Army Spotlight - Epirian Bot Army, Detachment Two
Posted on Monday Jul 24, 2017 at 05:00pm in Models
- by Iain Wilson
Last week, I shared part 1 of an Epirian Bot army that I've been putting together, which you can find here. This week, I'm fleshing it out with a second detachment, to bring the force up to the 120 point mark, suitable for small games.
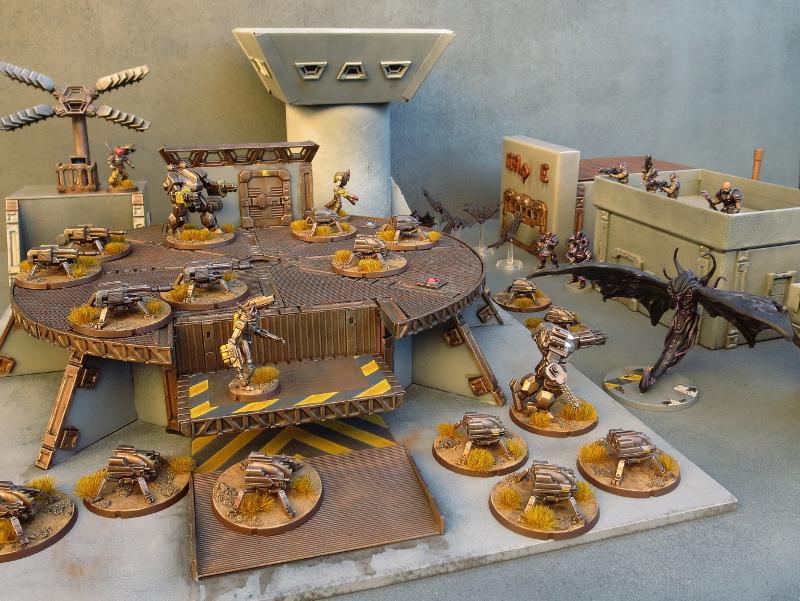
Unsurprisingly in a bot-themed force, the second detachment is comprosed of a whole bunch of extra robots!
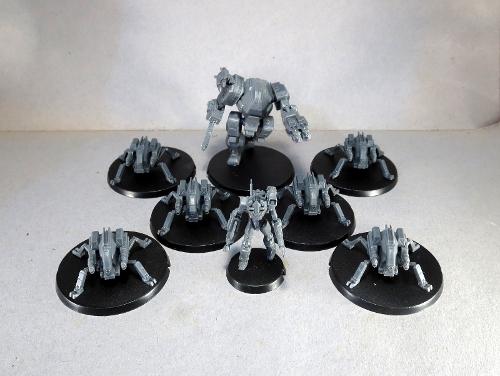
To keep with the bot theme, I wanted the second Command unit to be a Scarecrow rather than another Bot Handler.
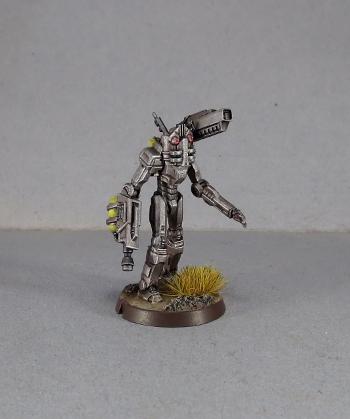
Scarecrows are shifted to a Command slot if you give them a Command Array. That's slightly problematic, since I've been using the Command Array part to put masks on my Scarecrows. I got around this by taking one of the aerials that had been cut off the array and gluing it onto the side of the Scarecrow's head, behind the mask.
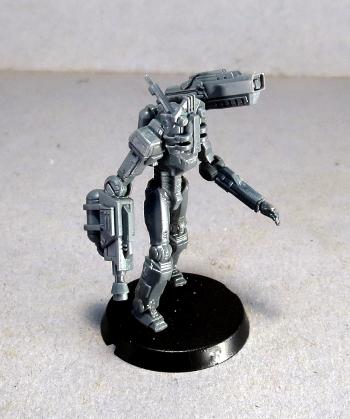
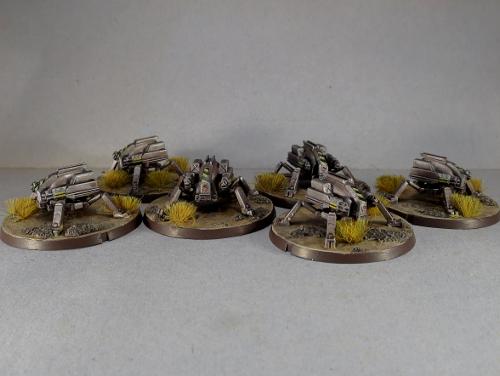
The Scarecrow commander is required to take at least two Core units, so I needed another two units of Spider drones. This time around, I went with Flakk Guns instead of the Cutters, for a bit of close-range supporting fire.
To round out the detachment, I selected another Hunter for my force.
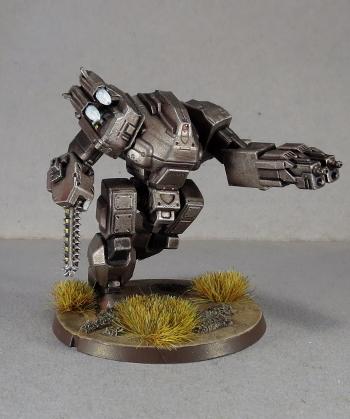
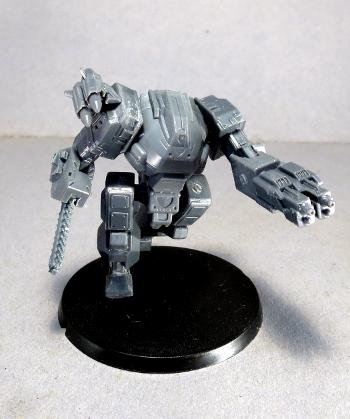
I had built this bot a while back, just to find out how the Hunter would look with a chainsaw in place of the Hydraulic Fist. The saw blade is taken from a Games Workshop Space Wolf kit. Rules-wise, it will still count as the fist.
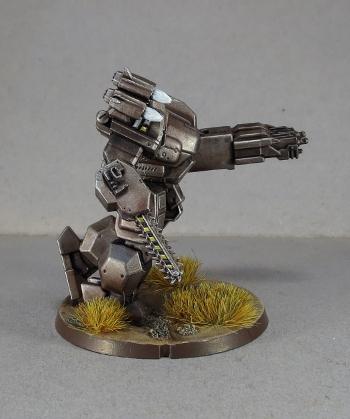
The bases on this detachment were a slight change from last week. I hadn't been entirely happy with the bases on the first detachment, and so I changed to a slightly darker colouring (Vallejo Heavy Brown, washed with Army Painter Strong Tone and then drybrushed with P3 Jack Bone) and added some grass tufts for a little extra pop. To keep things consistent, this obviously meant going back and redoing the bases on the first detachment as well...
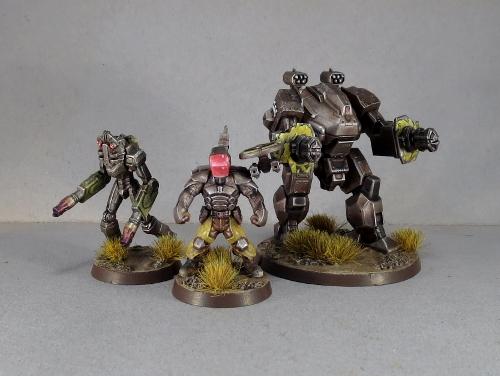
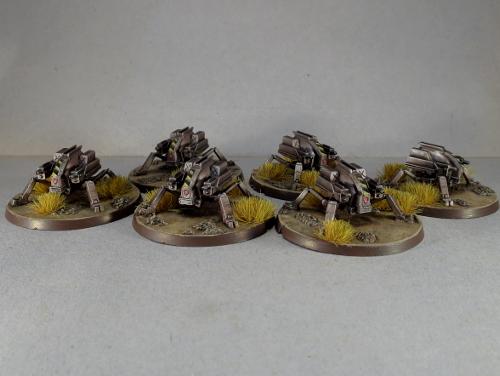
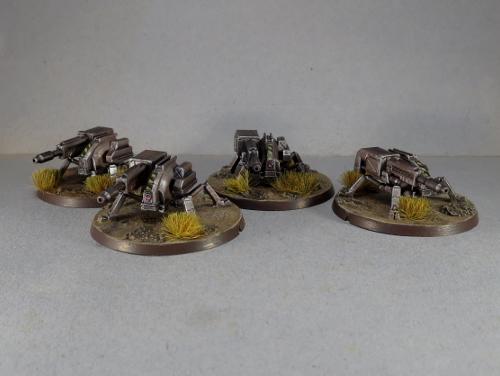
And so, the full force combined:
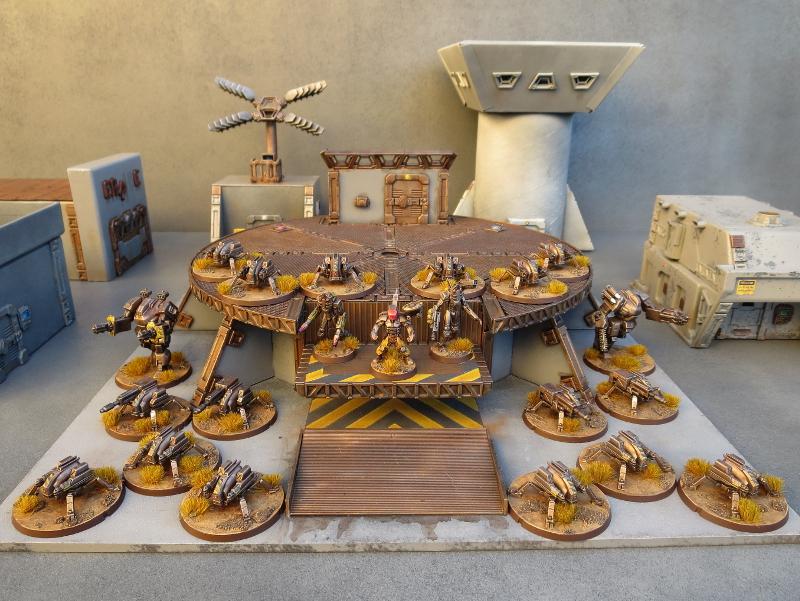
2nd Detachment:
Command: Scarecrow Sniper
- Command Array - 14 points
Core: Spider Drones
- Flakk Guns, replace Apprentice Bot Handler - 8 points
Core: Spider Drones
- Flakk Guns, replace Apprentice Bot Handler - 8 points
Anvil: Hunter-class Warmech
- Suppressor Dual Machine Gun, 2 Strike Missile Pods, Overdrive - 10 points
Total - 40 points.
Combined with Detachment 1: 120 points.
So, what's next for this force?
The obvious choice is to add some Fireflies, and I'll definitely be doing that as soon as I can. I'm also playing with some more homebrew rules, to create a spotter drone that would work in concert with heavy weapon-equipped robot units, possibly by being able to allocate a Command point to a friendly heavy unit within a certain radius that shares LOS to a selected target.
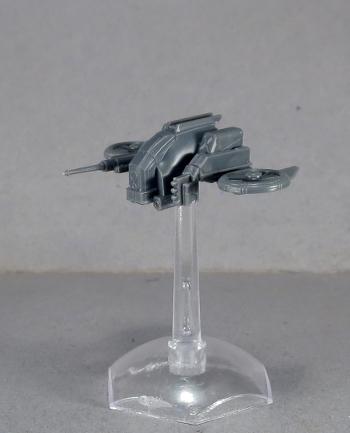
I also built a prototype for a Scarecrow spotlight article a while back, of a Scarecrow that replaces its legs with turbines from the Firefly kit. This was equipped with twin Clingfire sprayers, but I'm thinking that a unit of these equipped with twin Maglock Assault Rifles might be a fun option for encouraging enemy units to keep their heads down.
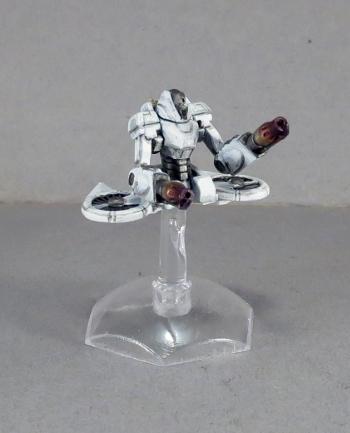
I'm picturing these guys as being able to move freely over obstacles, but being fairly slow moving and not particularly robust, due to the delicate balance required to keep such unwieldy creations airborne.
Stay tuned - I'll post another update on this force when I get these finished off!
If all of these robots are leaving you feeling inspired, you can pick up the full range of Maelstrom's Edge models from the webstore here. As always, feel free to share your creations on the Comm Guild Facebook page!
For other Maelstrom's Edge modeling articles, including tutorials and walkthroughs of a wide range of different building and miniature projects, check out the article roundup here.
Tags: bots conversion epirian modeling painting
Army Spotlight - Epirian Bot Army, Detachment One
Posted on Monday Jul 17, 2017 at 05:00pm in Models
- by Iain Wilson
The Epirian Foundation utilises a wide array of different bots on the battlefield, and the Maelstrom's Edge roster system allows you to create a force that makes the most use of them in place of human troops. And really, why wouldn't you? Robots!
I had a few assorted bots put together in a weathered metal colour scheme for a few previous articles, and so I decided this week that it would be fun to flesh them out into a usable force.
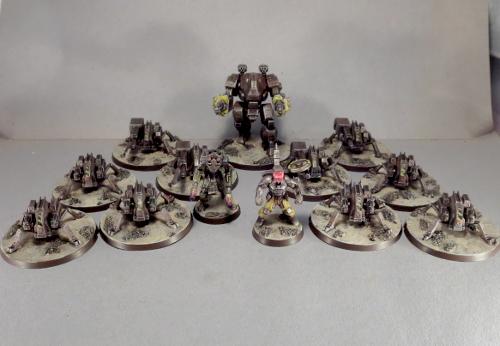
An army, of course, needs a leader. There are a couple of HQ options currently for Epirian forces, but I already had a Journeyman Bot Handler that I put together a while back and then never did anything with, so decided he would have the somewhat dubious honour of being the lone human in the force.
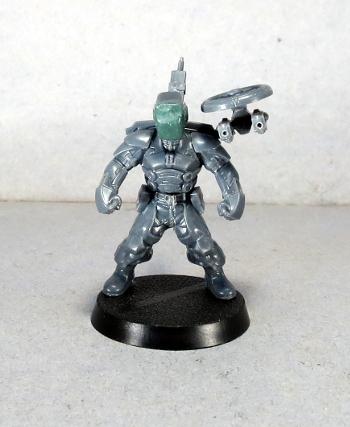
This guy was built from the Bot Handler sprue, with a few modifications.
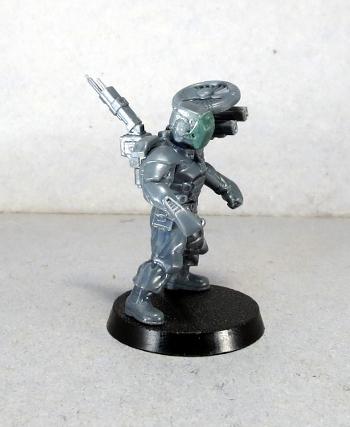
The head was taken from the Contractor sprue with a face shield added with some 'green stuff' putty.
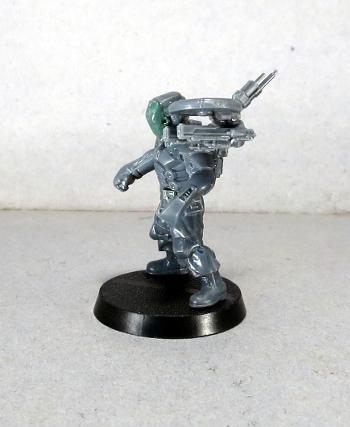
I gave him the spread-leg pose by taking both sets of legs from the handler sprue and cutting them apart vertically through the groin, and gluing the opposing halves with the matching straight legs together.
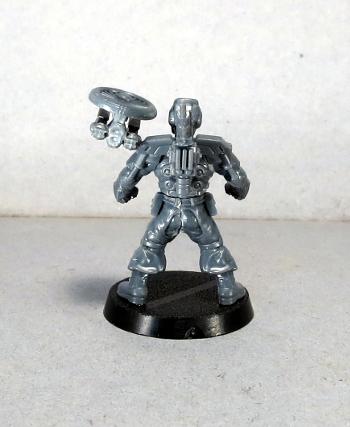
Rather than having him holding his pistols, I thought a mini gun-drone would be fun, so I mounted two pistols under a single turbine taken from a Firefly drone. This little drone is pinned to the Journeyman's shoulder, to give it the appearance of flight without needing a flight stand.
Painting was kept fairly simple, to match the bots that I had already built, and so used the weathered metal process that I've shown in several articles now - red undercoat, followed by a coat of brown, then a metal layer, and then a wash with Army Painter Strong Tone.
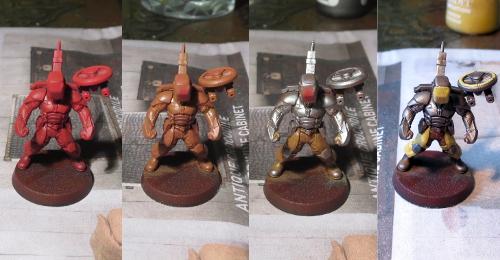
Yellow chaps and a shiny red faceplate tie in with the more subdued highlights used on the rest of the force while letting him stand out a little from the crowd of bots.
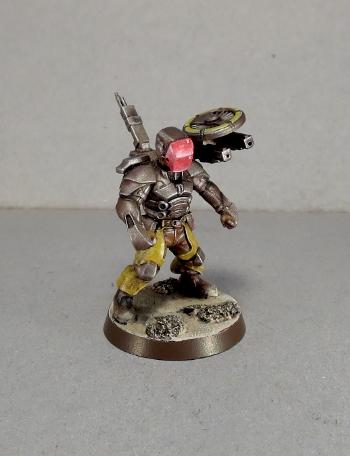
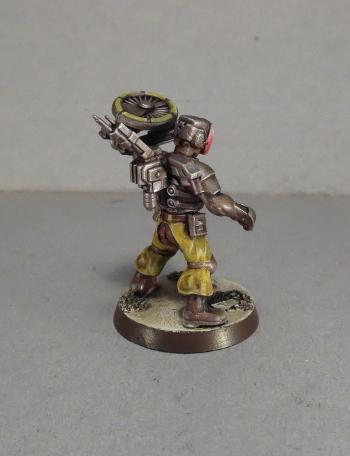
With paint in place, the Journeyman joins the Hunter mech that I originally painted up for the weathered metal tutorial, and a slightly modified Scarecrow that I built for a spotlight article on the lanky, elite units.
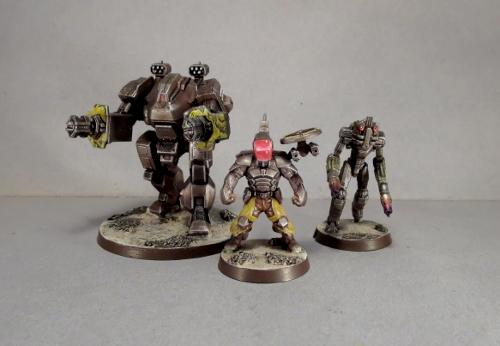
The army wasn't going to get far without troops, and so I grabbed a few Drone sprues and put together two units of Spider drones. To stick with the bot-theme, I made use of the upgrade option to replace the Apprentice handler who normally accompanies units of Spiders with a third drone instead.
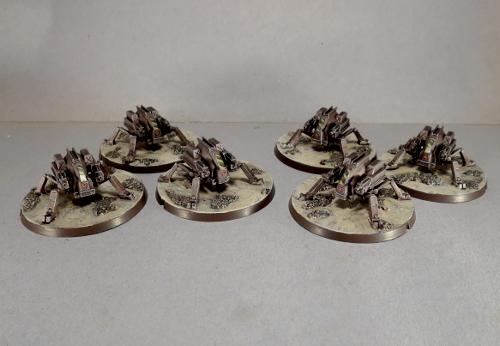
To round out this first detachment, I added some fire support from two units of Scorpion Drones. These are a home-brew unit that I created for an article a while back, rather than a standard Maelstrom's Edge unit - You can find their rules card and a tutorial for building them here.
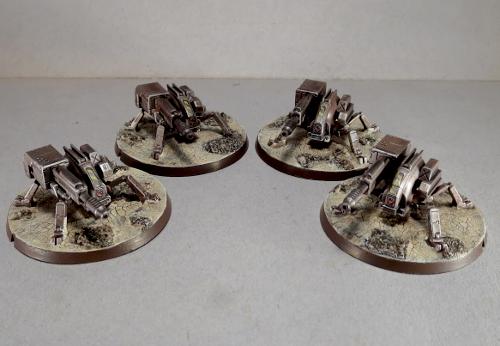
That rounds out the first detachment, which comprises around half of the planned force. Roster-wise, it looks like this:
Command: Journeyman Bot Handler
- second pistol, Command Booster - 17 points
Core: Spider Drones
- replace Apprentice Bot Handler - 9 points
Core: Spider Drones
- replace Apprentice Bot Handler - 9 points
Hammer: Scarecrow Sniper
- 2 linked clingfire sprayers, Overdrive - 5 points
Anvil: Hunter-class Warmech
- 2 flakk cannons, 2 cluster missile pods - 20 points
Anvil: Scorpion Drones - 10 points
- 2nd unit (Multi-unit selection) - 10 points
Total - 80 points.
Next week: Detachment 2.
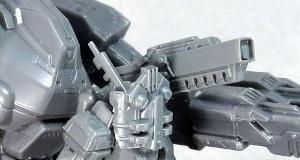
Spoiler: There will be robots!
If you would like to build your own robot army of doom, you can pick up the various Maelstrom's Edge kits from the webstore here. As always, feel free to share your creations on the Comm Guild Facebook page!
For other Maelstrom's Edge modeling articles, including tutorials and walkthroughs of a wide range of different building and miniature projects, check out the article roundup here.
Crafting Tales from the Edge
Posted on Thursday Jul 13, 2017 at 02:10pm in Fiction
In the summer of 2014 several members of the team had the opportunity to attend WorldCon in London and give a sneak-peek of Maelstrom's Edge to some of the world's best science-fiction authors. The aim? To showcase our universe and convince them to lend their awesome storytelling talents to our project. Presenting the backdrop, artwork, and prototype models, many of the authors we pitched to came away impressed with both our vision and our commitment to building a long-lasting IP. We came away from the London Excel centre having signed up a great mix of highly-acclaimed established voices and up-and-coming superstars to contribute to our project.

Tales from the Edge: Escalation is the result of that fruitful few days at science fiction’s biggest convention. The anthology brings together a wealth of talent contributing short fiction work to the Maelstrom's Edge universe:
Alastair Reynolds
With over a decade of experience as a professional astrophysicist to back up his writing chops, Alastair Reynolds is deservedly called the "reigning master of the intergalactic space opera", and brings a compelling edge of hard-SF to his unique brand of galaxy-spanning science fiction. Author of the Inhibitor trilogy that kicked off with the seismic Revelation Space and ended with the chilling Absolution Gap, Alastair's star has only risen over the last twenty years, and has been nominated for the prestigious Arthur C. Clarke Award three times.
http://www.alastairreynolds.com/
Here's what Alastair said about getting to play in the Maelstrom's Edge universe:
"Maelstrom's Edge is something different: an SF game universe put together with real originality and incorporating some genuinely clever and inventive thinking. There are enough worlds and stories waiting to be explored to last a lifetime..."
With his gritty blend of dark sci-fi, speculative science, and galaxy-spanning drama he is a perfect match for the Maelstrom's Edge universe and we're delighted to have him on board with our opening story, ‘Remainers’, in which a ship’s captain accepts a client’s dangerous request to return to a world doomed by the Maelstrom.
Rob Ziegler
Author of the spectacular Seed, which Paolo Bacigalupi described as "A hungry beast of a book, rippling with slaughter and sex, powerhouse action, surreal post-human horrors and bigger-than-life heroes", Rob's work combines kinetic action, bleak landscapes, and characters drawn from the grimy underbelly of society. As such we think he is perfect to help us flesh out some of the stories happening at the margins of the Maelstrom's Edge universe, particularly those involving the Broken, our very own faction of survivalists who mix the high-tech and the squalid together with the violent and the tender. ‘Little Bots’, Rob’s story in ‘Escalation’, is a terrific tale of a group of orphans, sneaking and tricking their way to survival.
http://zieglerstories.com/
Jaine Fenn
Described by SFX Magazine as "A major new talent" on the release of her debut novel, Consorts of Heaven, Jaine Fenn has proceeded to flesh out her Hidden Empire series, charting seven-thousand years of future history as humankind adventures among the stars. Known for writing tense and fast-paced stories set in vivid locales, we felt Jaine would create the kind of gripping fiction perfectly suited to the universe of Maelstrom's Edge. For her first story in our universe, Jaine set her sights on two of our future factions – telling the story of a noble Champion of the Artarian Remnant Fleet, amongst the ragtag flotilla of a Broken fleet, in the cracking short story ‘Over You’.
http://www.jainefenn.com/
Jeff Carlson
In the Plague Year trilogy Jeff Carlson unleashed a nanoplague on humanity that killed all warm-blooded life below 10,000 feet. In his Frozen Sky novels humankind discovered a deadly species in the icy waters of Jupiter's ice moon, Europa. Who better than this Philip K. Dick Award Finalist to help bring the Maelstrom's Edge universe to gripping life? When we told him about the Maelstrom's Edge universe and invited him to spread his fictional wings he had the following to say:
"These days I write sci fi and tech thrillers that, I hope, are chock full of monsters and chills and cutting edge science. When I heard about Maelstrom’s Edge, I begged its designers to let me play in their sandbox. An unstoppable wave of hellish energy. Civilizations destroyed. Terraforming corporations, mech, refugees, cults, strange planets. Man, that’s what I do!!!!"
Jeff’s story ‘The Spaces Between Us’ is something both beautiful and brutal, telling a tangled family tragedy on a world with something truly worth saving.
http://www.jverse.com/books/
Aliette de Bodard
Nominated for multiple Hugo, Nebula, and BSFA awards, and winner of the Nebula and Locus awards, Aliette de Bodard is a highly-acclaimed author who will bring brilliant prose allied to poignant characters to the Maelstrom's Edge universe. Subverting the usual tropes for original twists, and substituting by-the-numbers heroes for vivid individuals deeply entwined with familial and cultural shackles, we were really excited to see what Aliette did with the apocalyptic backdrop of Maelstrom's Edge, and her story, ‘Losses We Bear’ is a superb demonstration of her skills. http://aliettedebodard.com
Tomas L. Martin
Well, that’s me! Together with Stephen Gaskell, I’m one of the lead writers who helped develop the background to the Maelstrom’s Edge universe, as well as together writing the short stories that made up our first collection, ‘Tales from the Edge: Emergence’, and the two Maelstrom’s Edge novels, ‘Faith’ and ‘Sacrifice’. When not writing for Maelstrom’s Edge, I’m a lecturer in materials physics at the University of Bristol, as well as occasionally dabbling in other fiction endeavours! My story, ‘Fleet Champion’ is a little introduction to the tangled politics and heated contests of the Remnant Fleet and the power-suited Champions that compete for the honour and reputation of their noble houses.
http://www.tomaslmartin.com
Jonathan Cooper
Coming via Wolverhampton, Dublin and London, Jonathan Cooper is a novelist and occasional journalist now living in Amsterdam. He has written on film, TV and pop culture for the Mirror and the Independent and has short fiction published in the New London Review and Scrivener Creative Review. He is also the author of Lethbridge Stewart: The Showstoppers, a new novel featuring Doctor Who's very own Brigadier. In this anthology Jonathan gives us ‘The Daughter of Arin’, where a Comm Guild courier delivers a strange package that leads to an increasingly chaotic conspiracy.
Karin Lowachee
Winner of a boatload of awards including Warner Aspect First Novel, Prix Aurora Award 2006, and Spectrum Award 2006, not to mention twice being shortlisted for the Philip K. Dick Award, Karin Lowachee's Warchild Universe explores the experience of fictionalised child soldiers learning to survive in a war-torn galaxy. When we asked her to expand on what drew her to Maelstrom's Edge universe she had the following to say:
"In a genre that can literally explore anything the imagination envisions, the opportunity to sink my teeth into a doomsday event of galactic proportions was too good to pass. Everything about Maelstrom's Edge speaks to my creative inclinations: high stakes, complex characters, an expansive setting, and a sense of wonder. The possibilities for exploration both external and internal are endless, and my fascination with the human condition—our frailties as well as our strengths—is something I will explore. A psychological close-up of what a random band of survivors on a frontier planet are willing and able to do to reach their destination—and presumably their saving grace to get off-world ahead of the Maelstrom—will take an unflinching look at the nature of selfishness, exploitation, compassion and love."
Karin's tale ‘The Flesh of the World’ explores a lawless, frontier-type world that has been abandoned by the corporations, leaving the population alone to face the coming Maelstrom.
http://www.karinlowachee.com
Stephen Gaskell
The other half of the Maelstrom’s Edge lead writing team, Stephen is a prolific and talented writer both of fiction and for games. When not writing for Maelstrom’s Edge, Stephen works as a Senior Writer for Amplitude Studios, where he recently completed work on the popular 4X strategy title, Endless Space 2. His fiction has appeared in Clarkesworld, Interzone, Years Best Military SF, and elsewhere, and he is currently seeking representation for his debut novel, The Unborn World, a dystopian eco-thriller set in Lagos, Nigeria. An alumnus of University College, Oxford, he holds degrees in physics and artificial intelligence. Stephen’s contribution to the anthology is the fantastic ‘A Keeper’s Duty’, which explores the moral dilemma of a convert to the Karist Faith, growing up to become one of the Keepers who looks after the otherworldly alien creatures known as Angels.
http://www.stephengaskell.com
Liz Williams
With degrees in philosophy and artificial intelligence, a mother who was a gothic novelist, and a father who was a part-time conjurer, it is no exaggeration to say that Liz William's is one of the most original voices working in science fiction today. Short-listed for the Philip K. Dick Award for her novels no less than four times, Liz is also a master of the short form with her work appearing in many Year's Best anthologies. Writing dark and strange yet utterly compelling fiction, Liz's piece for our Maelstrom's Edge anthology is titled "’Moon Desert’ and is a fantastic read.
http://www.amazon.co.uk/Liz-Williams/e/B001HCXOL2
Maelstrom's Edge has a comprehensive long term fiction plan which we give as much attention as the game itself. From day one we've been trying to develop a universe which will grab the interest of anybody who has even a passing interest in Science Fiction, and with some of the best sci-fi authors in the world committing stories into the anthology ‘Tales From The Edge: Escalation’, Maelstrom's Edge is going from strength to strength, with plenty more to come from us in future.
Terrain Spotlight: Experimental Cybel Gate
Posted on Monday Jul 10, 2017 at 05:00pm in Models
- by Iain Wilson
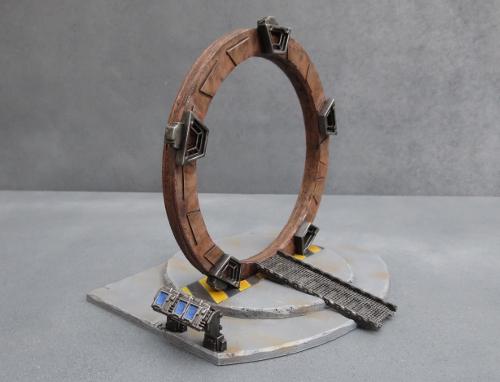
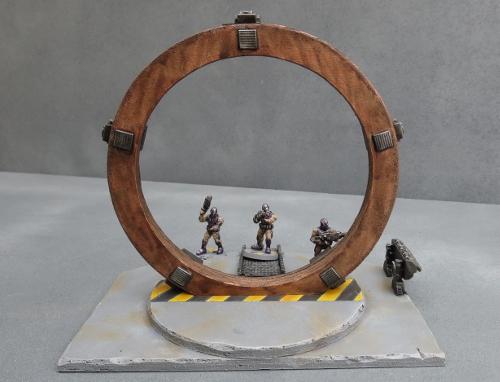
As the Maelstrom's apocalyptic conflagration closed in on the planet Devlin IV, rumours began to circulate amongst those still desperately trying to find passage off-world that scientists in a secret Epirian Foundation facility had been working on a new kind of Cybel gate that might prove to be their salvation. Whilst most Cybel gates are massive, space-borne affairs, this gate would supposedly operate from the planet's surface! While the rumour would ultimately lead to disappointment, as the project had been a dismal failure, it nevertheless gave temporary hope to many who had given up on escaping the Maelstrom's wrath and fueled a frantic search for this device.
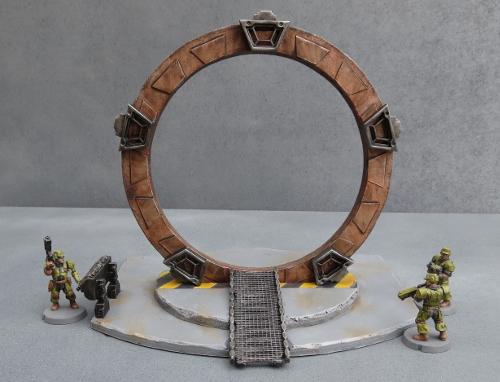
I had an idea a while back for a table themed around a Cybel gate research facility, where the experimental gate would form a centrepiece that would double as both a cool focal point and a potential objective for scenario-driven games. Capturing a resource such as this would, of course, be a worthy goal for any of the various forces encountered in Maelstrom's Edge, and there is all sorts of additional potential for thematic events when the gate is activated. Below is what I came up with, built from foamcore, cardboard, and components from the Maelstrom's Edge terrain sprue.
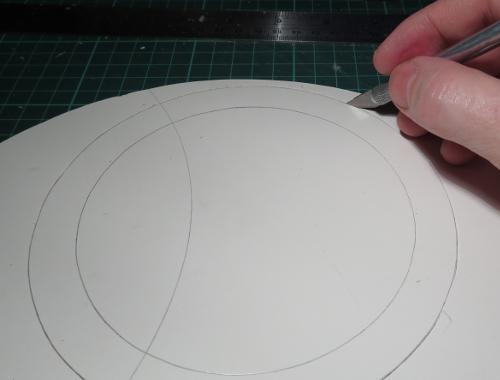
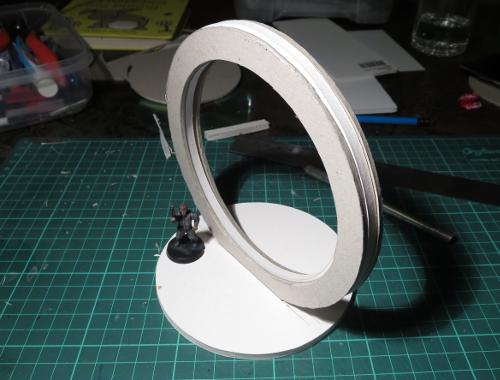
I started out creating the basic shape for the gate by tracing two concentric circles onto a sheet of 5mm foamcore and cutting the resultant ring out with a hobby knife.
I then used the foamcore ring as a template to make two more rings from thick card.

The circle cut from the inside of the foamcore ring was the perfect size to act as a base, with a channel cut down the middle for the ring to sit in.
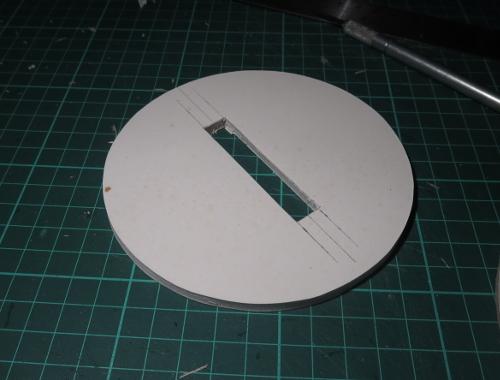
The three rings were glued together, and set in place to check the fit.
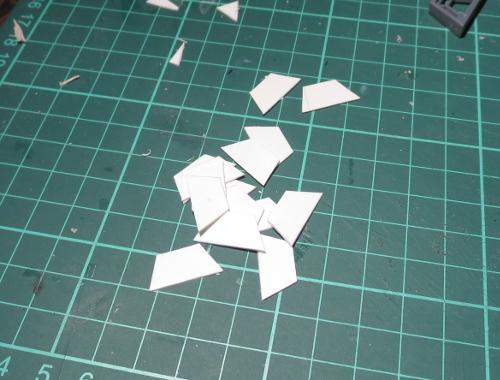
Next, I cut a bunch of trapezoid shapes from plasticard, sized to fit neatly inside the trapezoid window from the Maelstrom's Edge terrain sprue.
These were glued at intervals around one side of the ring.
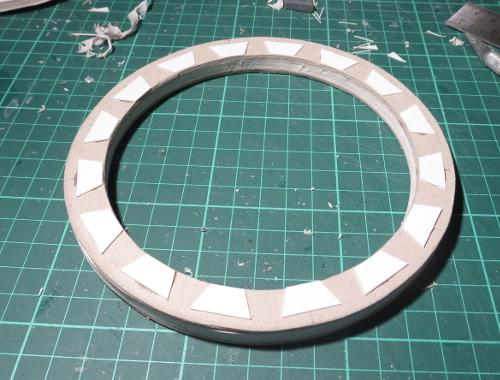
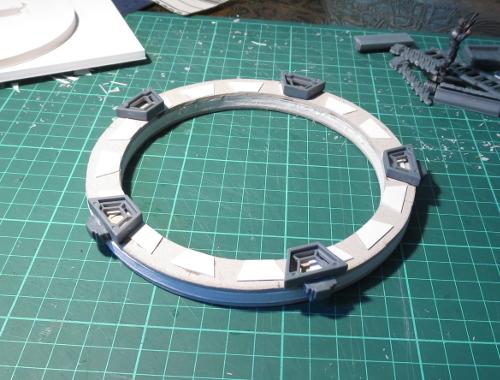
Over these, I glued 5 trapezoid windows, with power units cut from the bottom of the energy-fence posts glued around the outside of the ring.
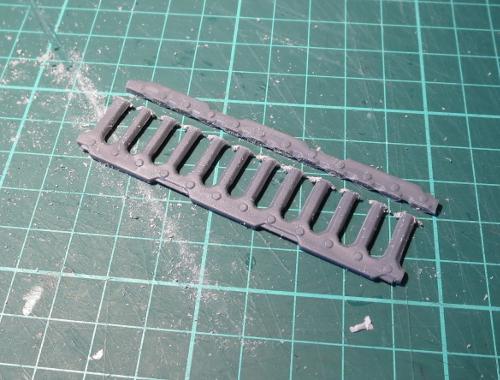
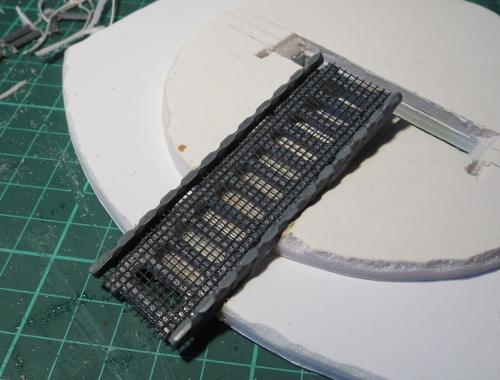
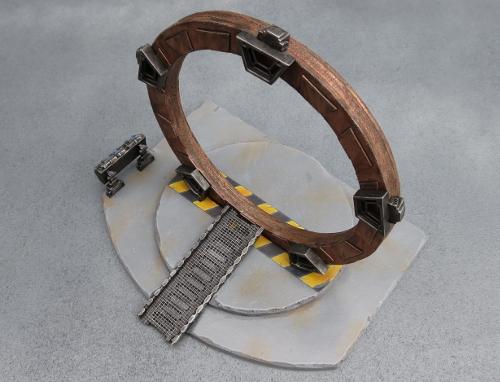
I took a ladder and cut the outside edges off with a razor saw.
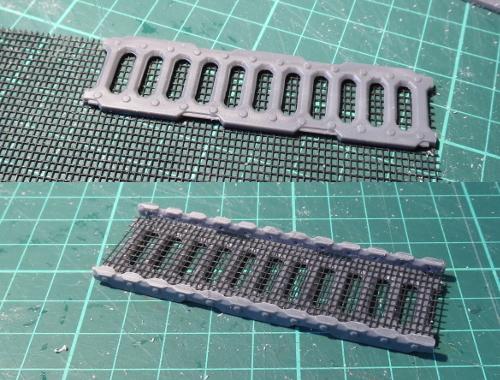
A second ladder was glued to a sheet of flyscreen, and then the flyscreen trimmed around the edges of the ladder and the cut pieces from the first ladder glued onto either side.
The base was bulked up a little with another layer of foamcore.
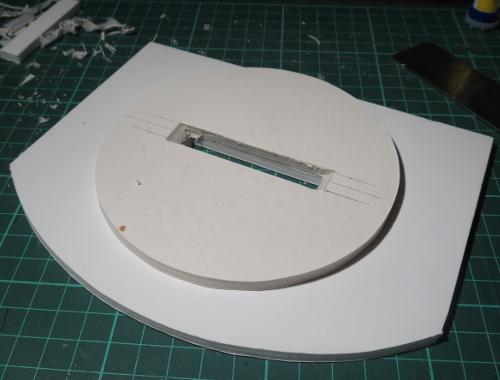
I then used a file to carve out an angled ramp down the front of the base.
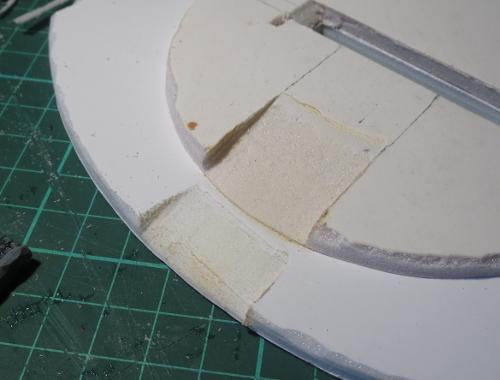
The ladder assembly slots neatly into the ramp recess.
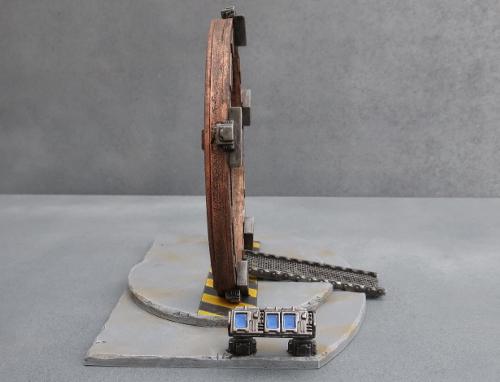
Finally, I put together a control panel using a light fixture and three trimmed computer panels.
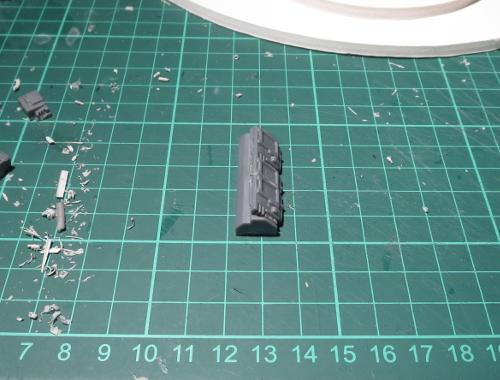
With the addition of some legs made from trimmed down energy-fence posts, the control panel was glued in place, and the gate was ready for painting.
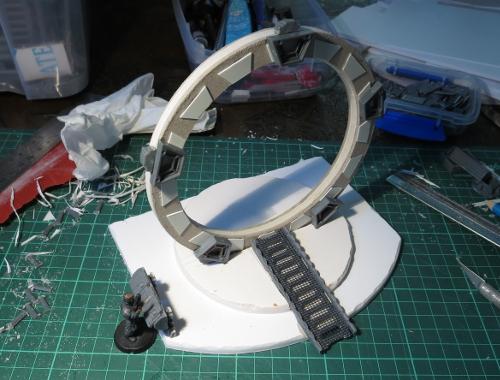
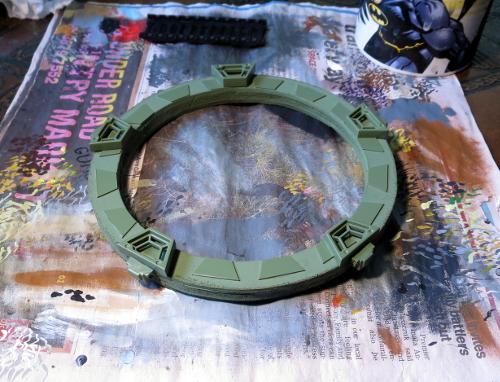
I wanted a bit of contrast in the gate assembly, so decided to go with a coppery ring and darkened steel details. To get started, I sprayed the ring with Army Painter Army Green, partly to give a nice base layer for the copper and partly because I didn't have a lot of time for painting this week, and the Army Painter sprays dry nice and quickly...
Over the green, I did a couple of coats of some old Citadel copper that I had laying around.

The base was sprayed with a medium grey colour.
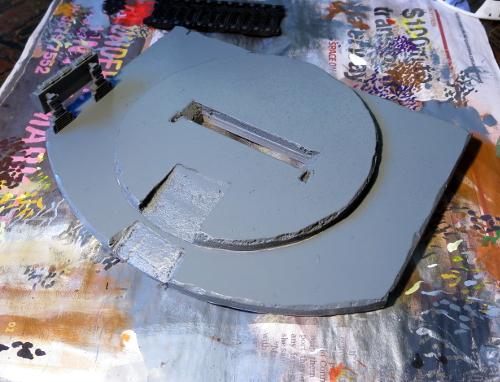
I then picked out the steel parts with black. It's a little hard to see in this lighting, but I also drybrushed the base with a light grey and added some dirt scuffing with some lightly drybrushed brown.
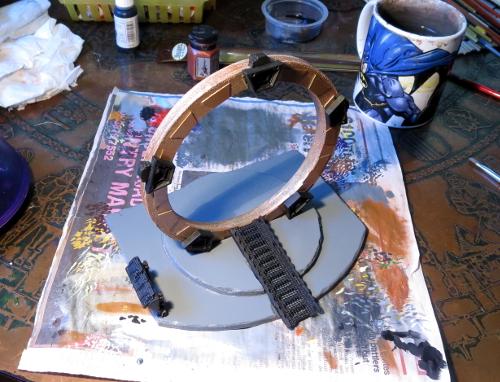
The ring was given a couple of coats of Army Painter Strong Tone, and the steel parts drybrushed with P3 Pig Iron and then washed with Army Painter Dark Tone.
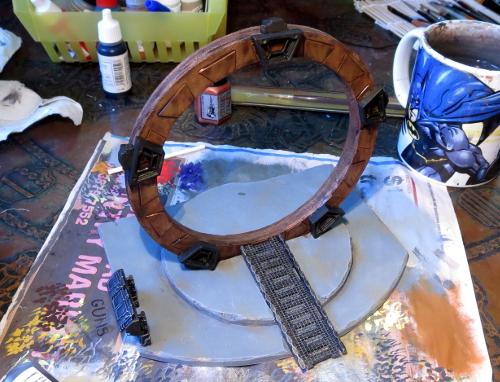
Finally, the control panel screens and some hazard lines were added, and the ring was given a light drybrush with silver to lift the edges a little.
If you would like to build your own experimental Cybel gate, you can pick up the Maelstrom's Edge terrain sprue from the webstore here. As always, feel free to share your creations on the Comm Guild Facebook page!
For other Maelstrom's Edge modeling articles, including tutorials and walkthroughs of a wide range of different building and miniature projects, check out the article roundup here.
Terrain Spotlight: Giftbox Garage
Posted on Monday Jul 03, 2017 at 05:00pm in Models
- by Iain Wilson
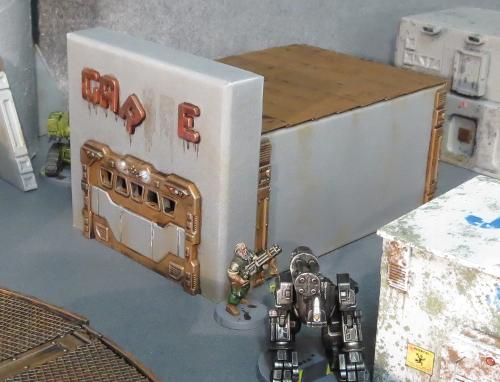
A while back, I shared a scifi western-themed building constructed from a Plast Craft Games plastic kit and the Maelstrom's Edge terrain sprue. This week, I wanted to have another try at that vaguely-western, raise-facade, scifi styling, but with more of a mass-produced, cheap colony building sort of vibe. Something a little more urban, but with a nod back to the frontier. This is what I came up with:
This is built from one of my favourite bases - the good old cardboard giftbox.
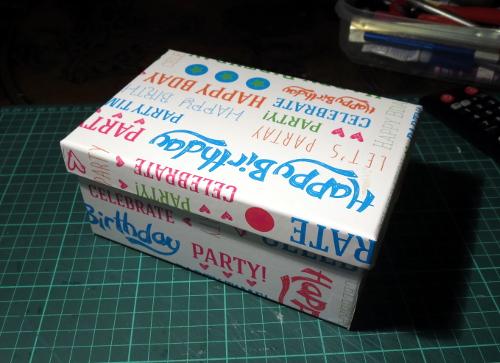
You can pick these up from just about anywhere that sells giftwares or from many craft shops, and they're generally fairly inexpensive. Craft shops will also often have raw cardboard versions without the printing on the outside, which does have the bonus of looking slightly less hideous while you're putting it together, but can have a rougher surface texture.
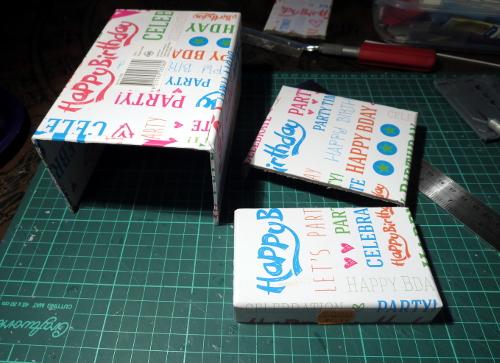
For my previous giftbox buildings, I used the lid upside down on top to form a walled-in roof area. This time, I used the lid for the facade. So the first step was to cut the lid to the height that I wanted the front of the building. I also cut away the end wall of the box, so that the hole for the front door only needed to go through the facade - The door inset is deeper than the width of the card, so would I otherwise have needed to cut a second door hole in the end of the box and hope that they lined up properly.
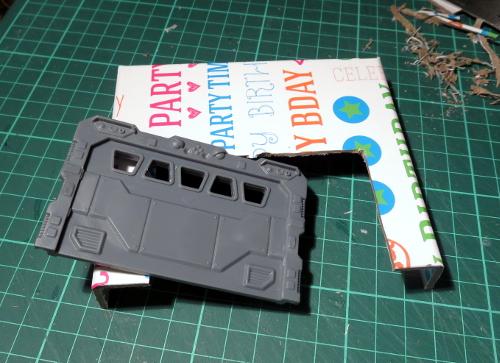
Speaking of a door hole: I took the garage door from the terrain sprue, sat it in place against the facade, and traced around the back of it before cutting out the resultant rectangle. The garage door was then glued in place.
The same process was used on the intact end of the box to add a small door and shutter window from the terrain sprue.
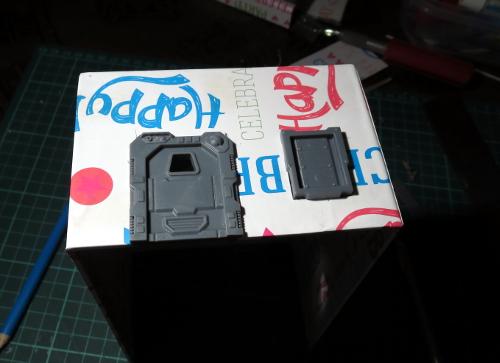
The facade was then glued in place.
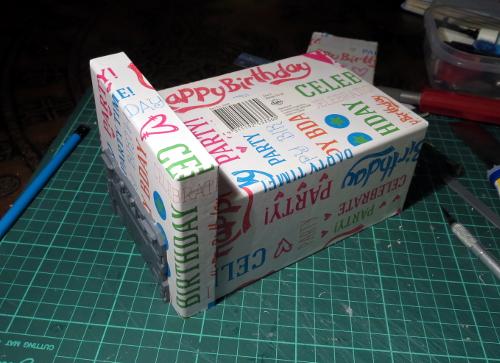
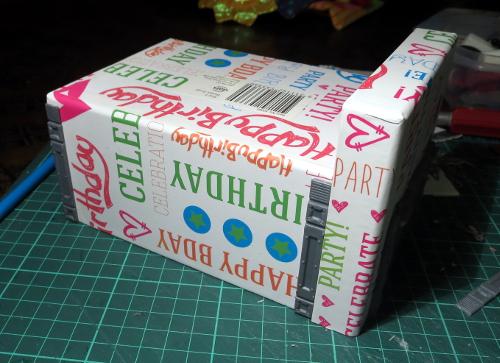
I glued a couple of support struts onto either side of the building, for a little texture.
A row of lintel pieces from the terrain sprue were glued onto the top edge of the back wall.
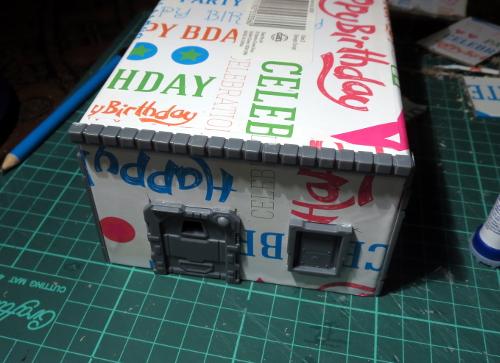
I then layered strips of plasticard along the roof, working up towards the front of the building.
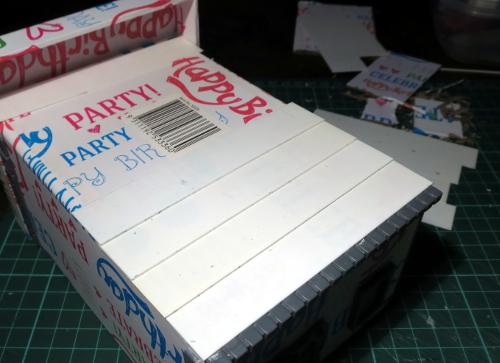
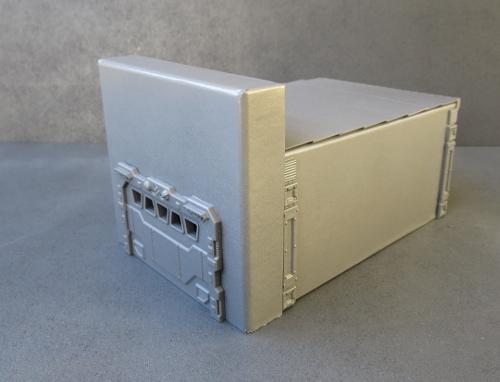
The final building, ready for painting:
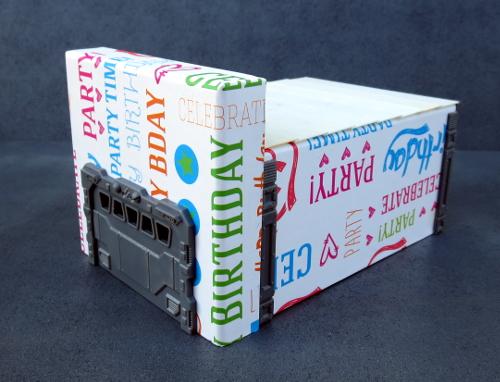
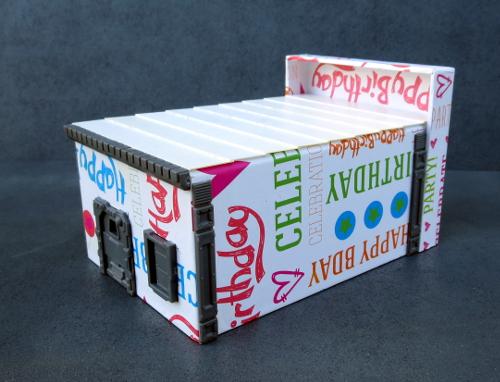
Quick and easy paintjob, that will be quite familiar for anyone who has been following these articles. I started with a black spray undercoat, to give a solid layer to cover over the printing.
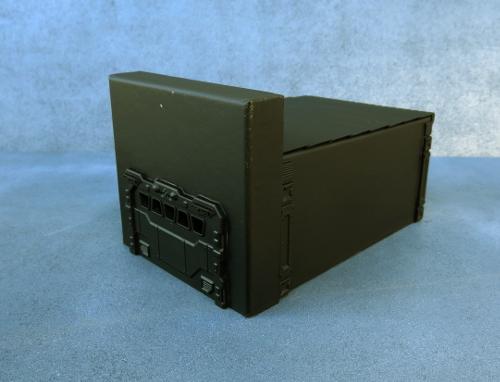
This was followed by a spray of flat grey, and while this was still wet I oversprayed this from above with a lighter grey to add a little bit of a natural highlight.
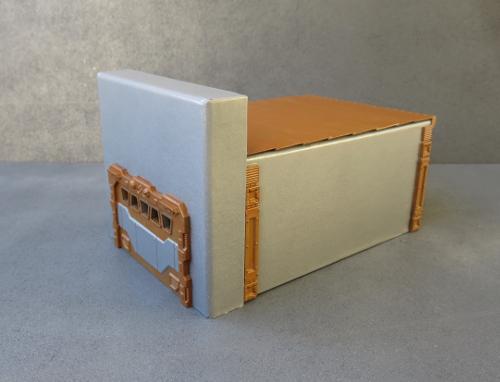
The metal parts were then picked out with Vallejo Beasty Brown.
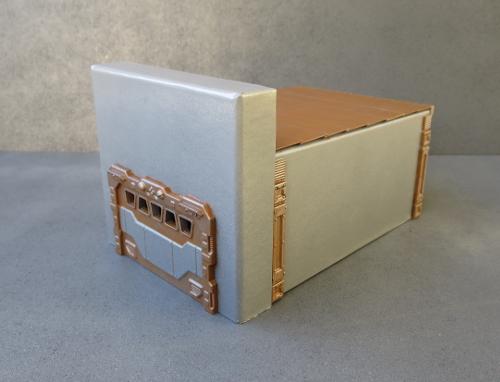
Then a drybrush of P3 Pig Iron.
Then a wash of the most useful paint on the planet: Army Painter Strong Tone.
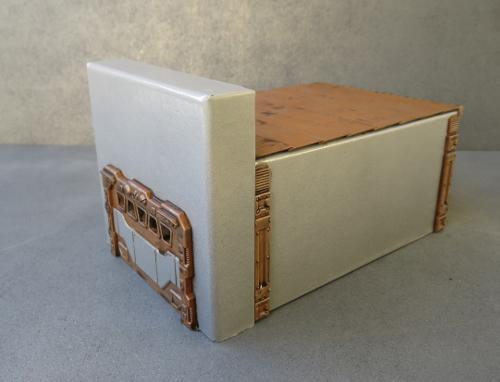
A final drybrush of silver over the metal bits and some detail work, and the newest addition to the table is ready to go.
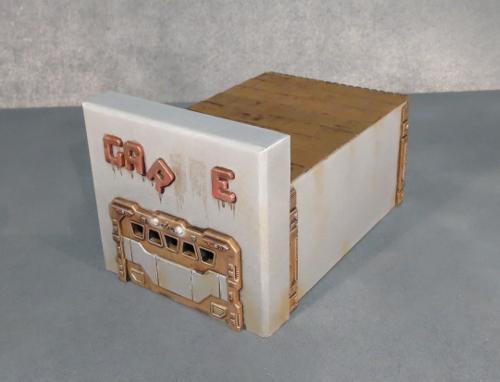
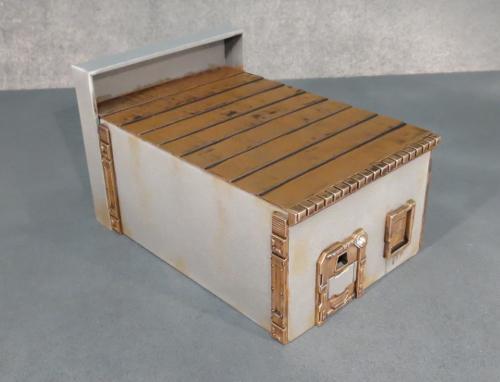
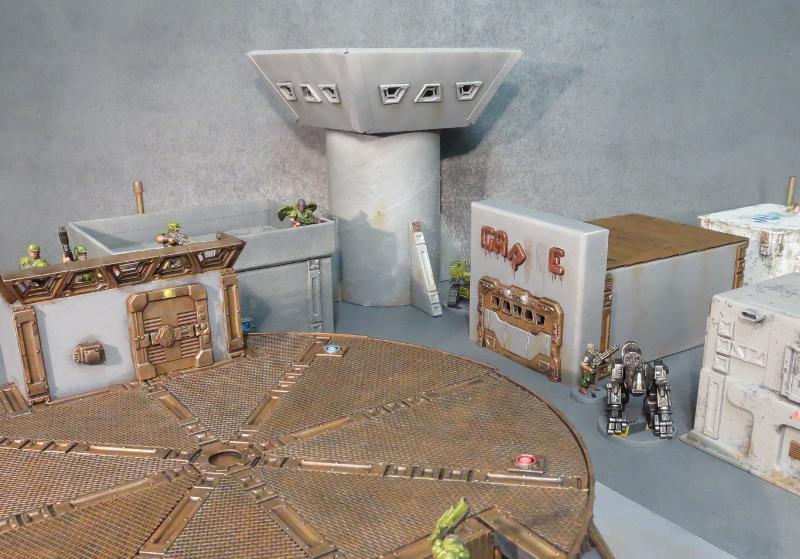
This design can be very easily tailored to different buildings through using different sized boxes and choosing different sprue components. If you would like to build your own, you can pick up the Maelstrom's Edge terrain sprue from the webstore here. As always, feel free to share your creations on the Comm Guild Facebook page!
For other Maelstrom's Edge modeling articles, including tutorials and walkthroughs of a wide range of different building and miniature projects, check out the article roundup here.
Tags: buildings conversion modeling spotlight terrain terrainsprue tutorial walkthrough
Conversion Spotlight: "Silverback" Mercenary Fire Support Mech
Posted on Monday Jun 26, 2017 at 05:00pm in Models
- by Iain Wilson
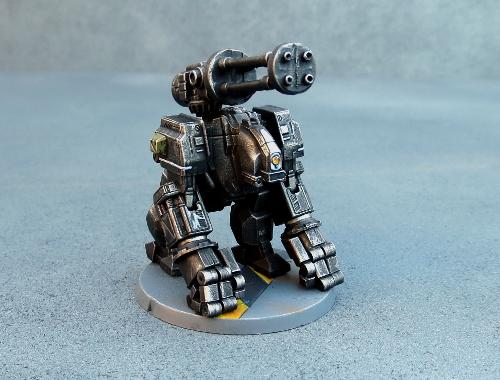
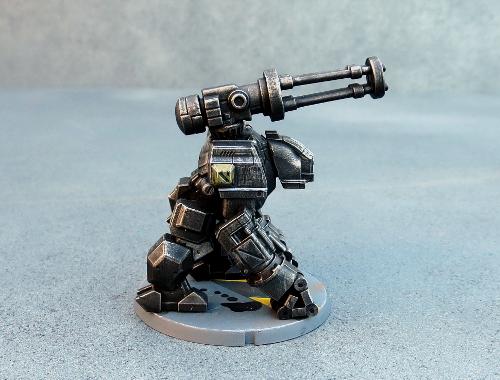
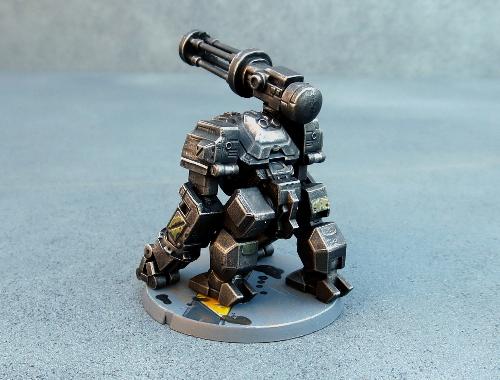
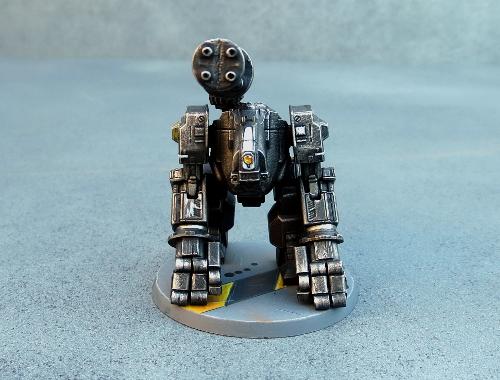
A variation on the Hunter War Mech chassis, the Silverback was an attempt by Epirian engineers to develop a mobile platform for heavy support weapons. Trading in speed for stability, initial deployments showed promising results, however over time the mech's ponderous movement began to be perceived as a liability. When this was compounded by some odd personality quirks that tended to develop in the experimental twinned bot cores used to give the Silverback increased tactical capability, the model was slowly phased out by Epirian forces. Some were sold to planetary security forces, while others found their way onto the black market, where they became a favourite of mercenaries who favoured a more blunt approach to martial engagement.
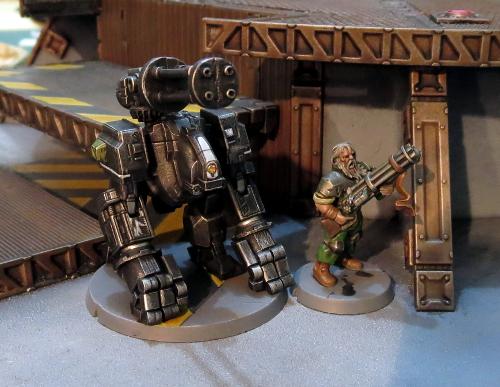
A mercenary bot handler and his Silverback charge.
The Epirian Hunter is a fantastic kit which presents some fun modeling possibilities straight out of the box. Sometimes, though, it's fun to do something a little more extreme, and it's from this that the Silverback was born. This wasn't made with any rules in mind, just something fun to build... although now of course I have some ideas percolating around for mercenary units, so this may be something I come back to in a future article.
To give the Silverback more gorilla-like proportions, I cut down the tops of the thighs level with the top of the protruding panel on the side. This also required slicing off the locating pin and reattaching it lower down. I also added a bit more of a bend to the left leg by slicing carefully through the top of the knee joint, cutting out a small wedge, and regluing the leg at the new angle.
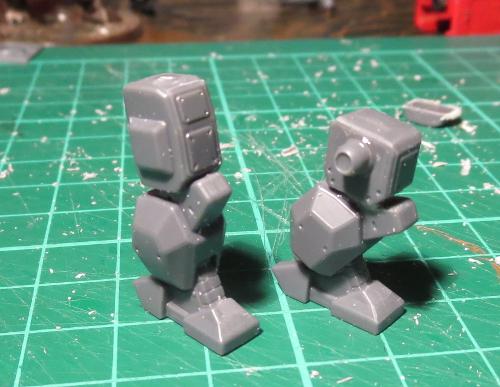
With the torso angled forwards, the top of the existing 'head' serves admirably as a neck. To add a new head, I used a razor saw to slice a drone chassis in half.
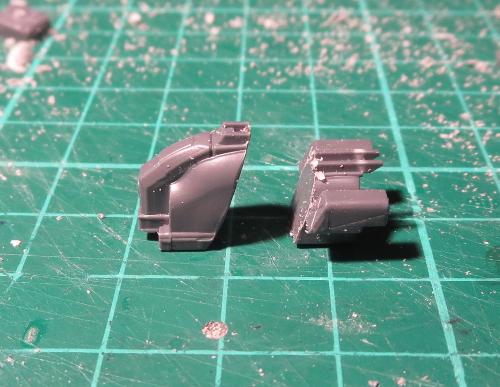
The front piece was then glued in place on the torso.

I wanted the arms a little straighter than is allowed by the hunter's elbow arrangement. So I trimmed away the back of the forearm piece, allowing more movement in the joint.
I then took some small pipe fittings from the Maelstrom's Edge terrain sprue and trimmed the square border off.
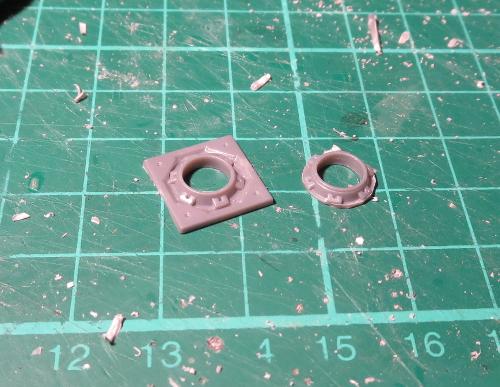
A small piece of plastic tube was then slipped into the fitting, and this glued in place against the 'hand' end of the forearm.
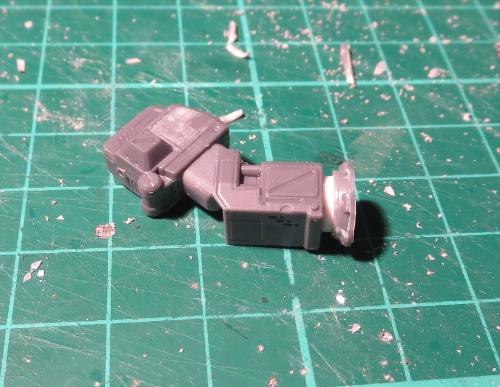
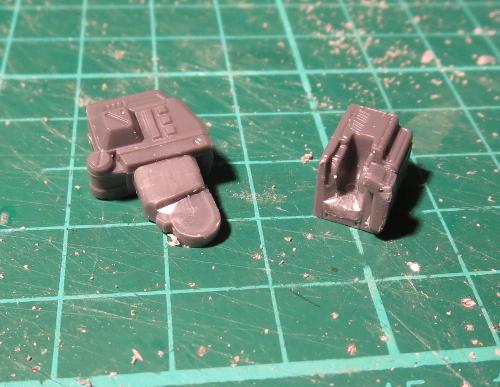
The hands were constructed from the back half of the drone chassis and small pieces cut from the drone's sprue (recycling for the win!).
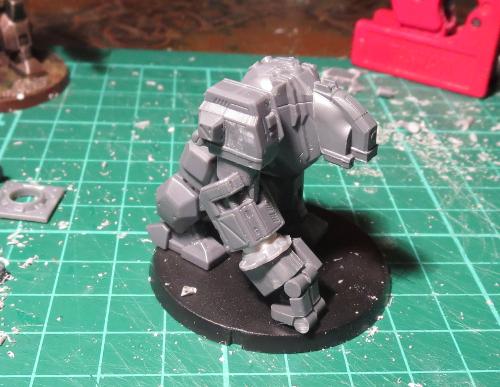
With everything glued together, the arm was glued in place.
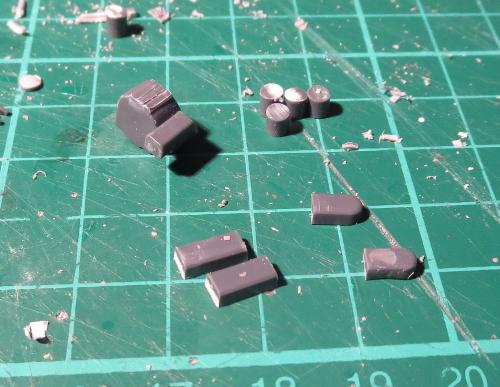
I initially only had two joints on each finger, but it just didn't look quite right, so I added an extra joint when I built the second arm, and then went back and did the same to the first one.
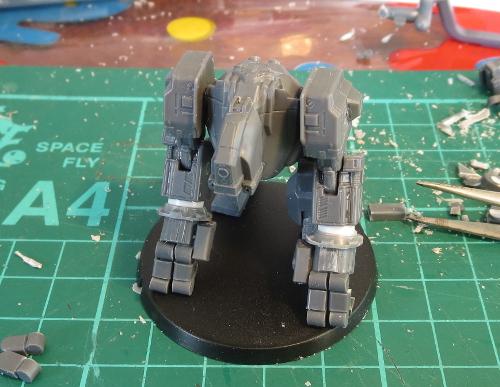
Another couple of small sprue pieces formed the ends of the thumbs, and I added a weapon purloined from a Games Workshop Tau battlesuit kit.
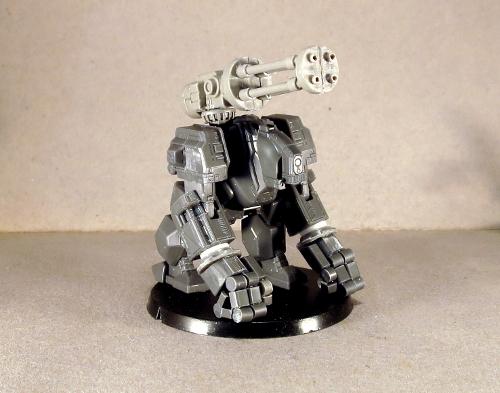
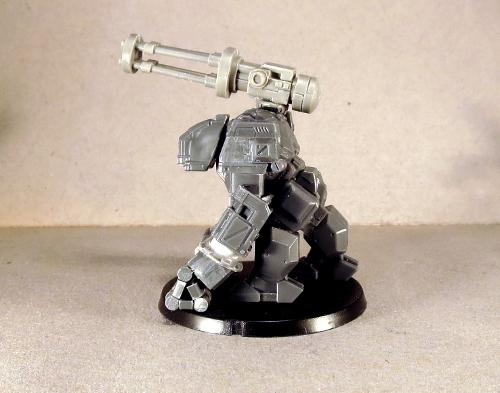
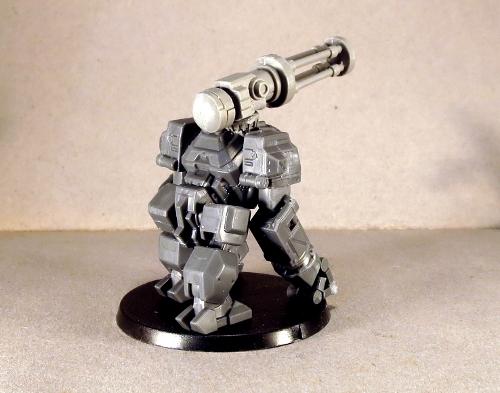
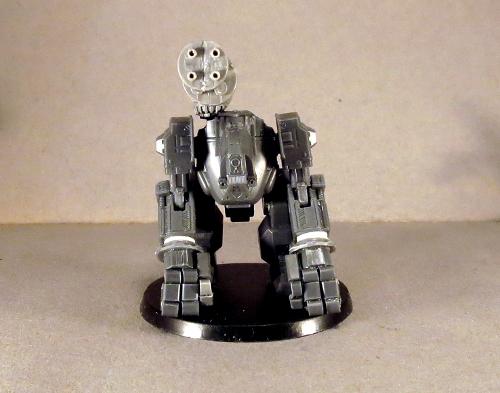
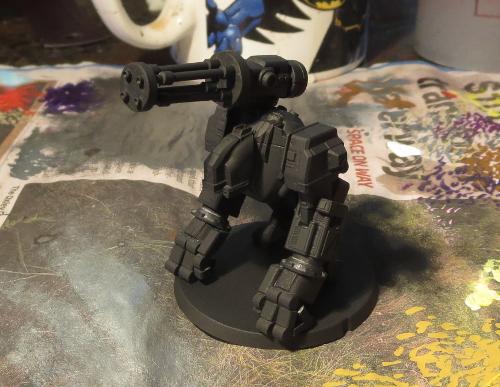
I wanted a dark, slightly sinister paintjob to emphasise the brutish nature of the mech, so started with a black undercoat.
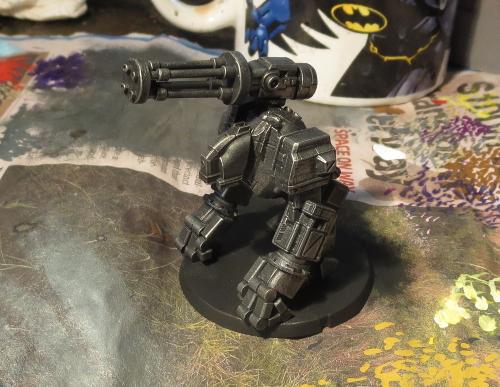
Over this I did a heavy drybrush of P3 Pig Iron.
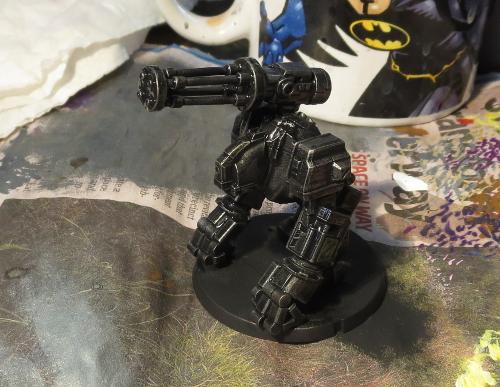
Then I washed the whole thing with a generous coat of Army Painter Dark Tone.
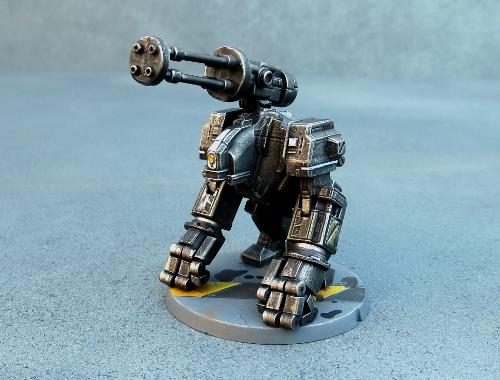
Once the wash dried, I lightly drybrushed all over with some more Pig Iron, and then did the detail work. A few panels here and there are picked out in different colours to give it a bit more of a ramshackle appearance, in keeping with its mercenary nature. It's not an award-winning paint-job, but is a nice, quick method for getting a table-ready model.
Feeling the urge to hack up a Hunter or two of your own? You can pick up the Hunter, Drone or terrain sprue from the Maelstrom's Edge webstore here. As always, feel free to share your creations on the Comm Guild Facebook page!
For other Maelstrom's Edge modeling articles, including tutorials and walkthroughs of a wide range of different building and miniature projects, check out the article roundup here.
Tags: conversion hunter modeling painting
Terrain Spotlight: Landing Pad
Posted on Monday Jun 19, 2017 at 05:00pm in Models
- by Iain Wilson
Terrain is a bit of a passion of mine. It can make such a difference to your games having a table full of nice-looking terrain pieces, and this is helped along with the addition of a shiny, impressive centre piece to dominate the battlefield.
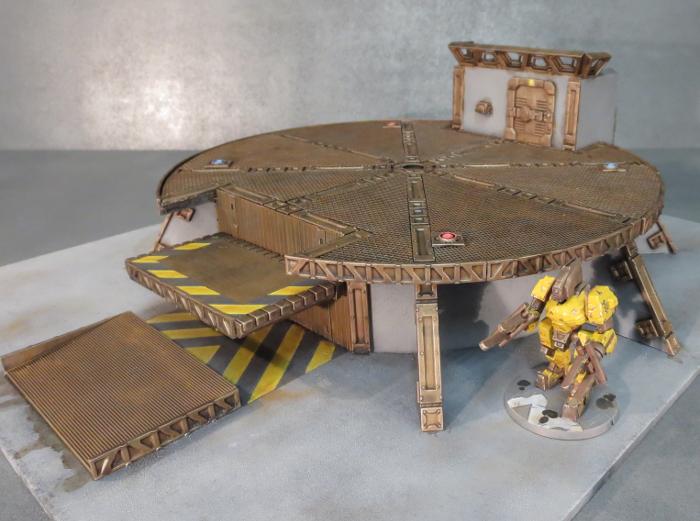
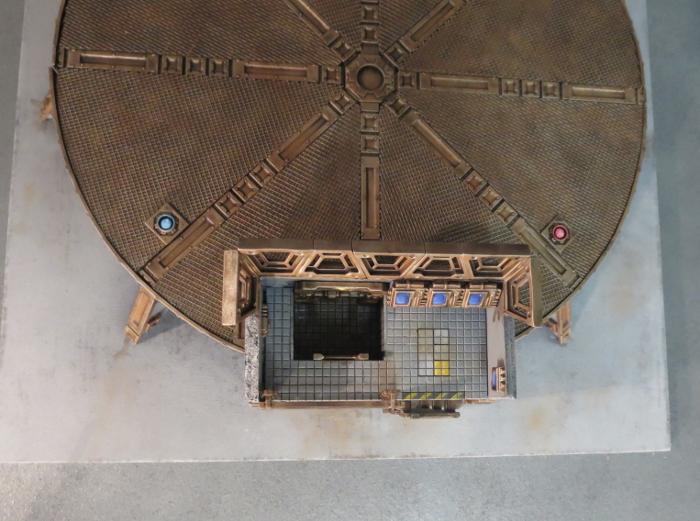
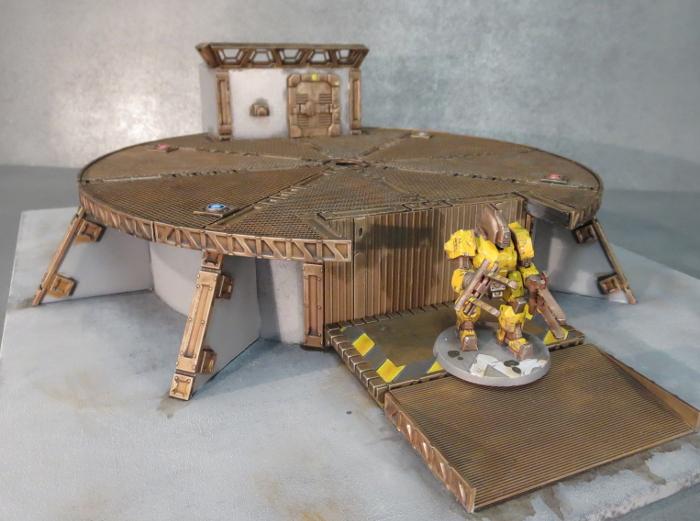
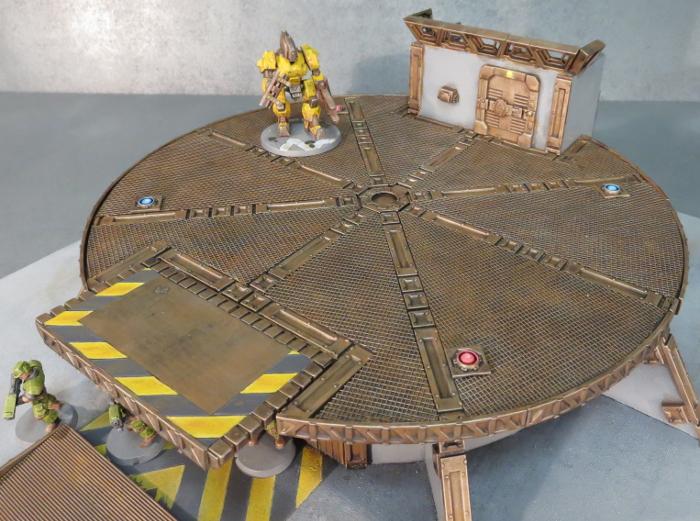
With that in mind, I set to work this week to build a landing pad for my table. Landing pads look great visually, can be easily tailored from game to game with the addition of some crates, landing craft or other small terrain features on top and make for nice line of sight blockers in the middle of the table.
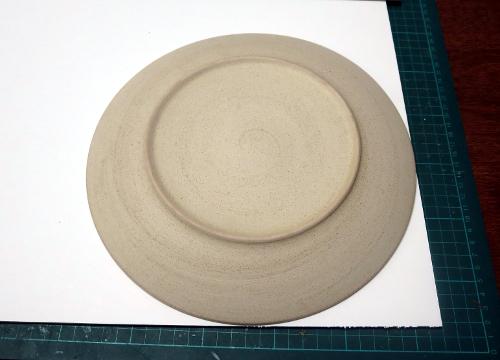
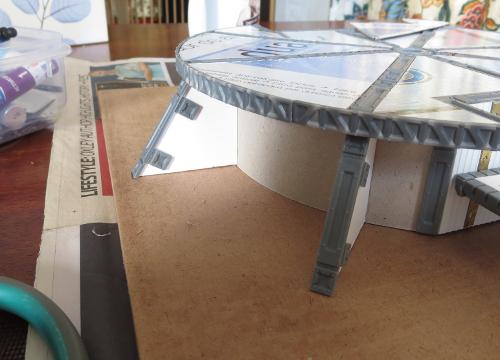
I started out, as so many of my projects do, with a few Maelstrom's Edge terrain sprues and a sheet of 5mm foamcore. A dinner plate served as a handy template for the pad itself.
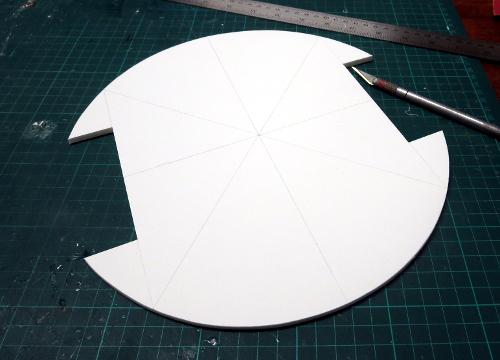
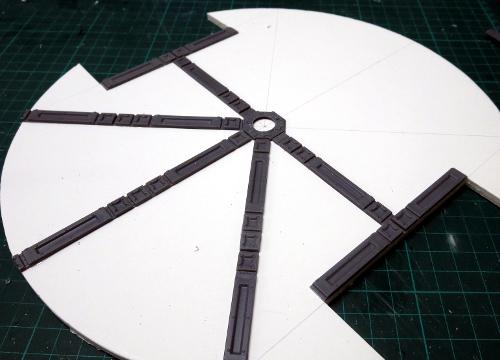
After tracing around the plate, I drew in an inset rectangle on opposing sides, to break up the circular shape a little in order to make the pad a little more visually interesting. The the shape was cut out with a hobby knife, and some guide lines drawn on for some detailing.
A round detail in the centre of the pad was created from the large pipe fitting, cut down to match the thickness of the support struts. I used a couple of spare struts as height gauges for a razor saw to cut through the pipe fitting sideways.
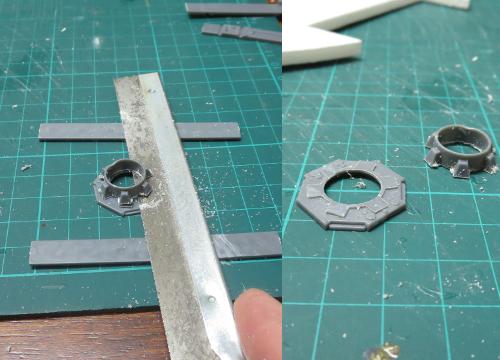
I then laid support struts out along the guide lines, cutting them to length so that they extended to the edges of the pad.
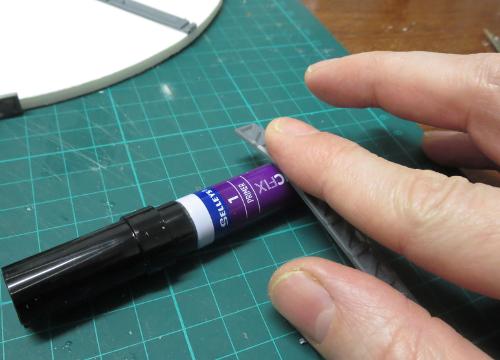
For some detail around the edge of the pad, I took some more support struts and rolled them carefully over a glue primer tube to give them a curve.
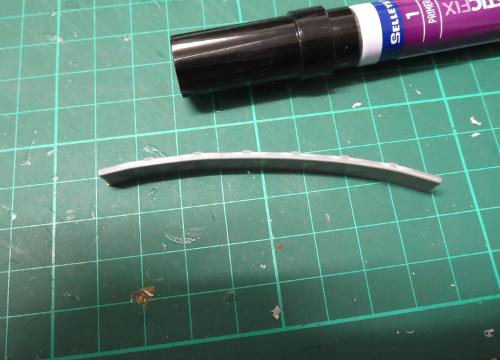
These were then glued around the edges of the pad, and held in place with some hat elastic until the glue set.
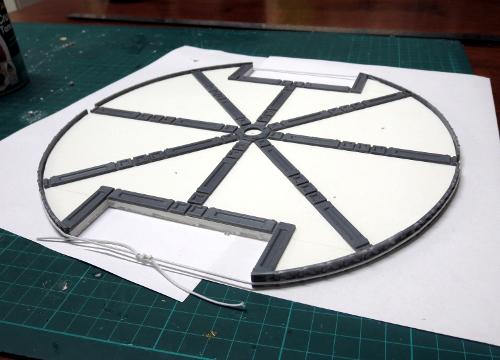
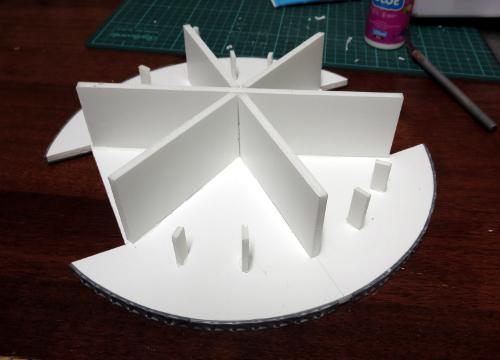
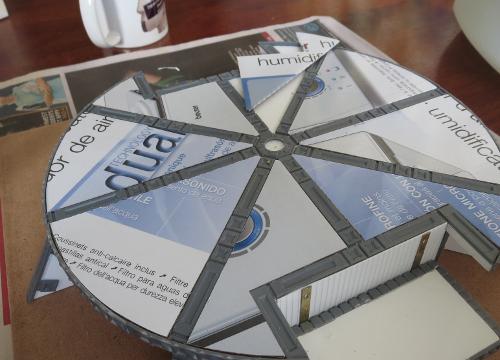
A landing pad on the ground is functional enough, but not much good for blocking line of sight, and certainly won't impress the neighbours. So I made a formwork from some more foamcore to go under the pad. In between each of the formwork supports, I spaced some off-cuts of foamcore to serve as guides for the outer wall.
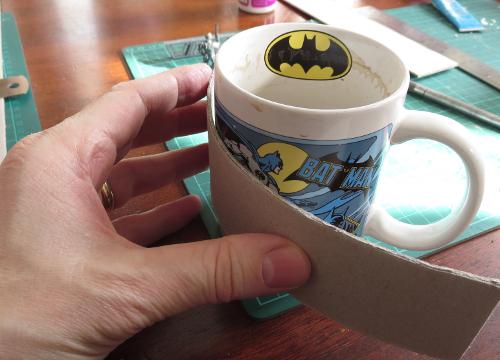
The outer wall was made from thick card, which was bent around the outside of a coffee mug.
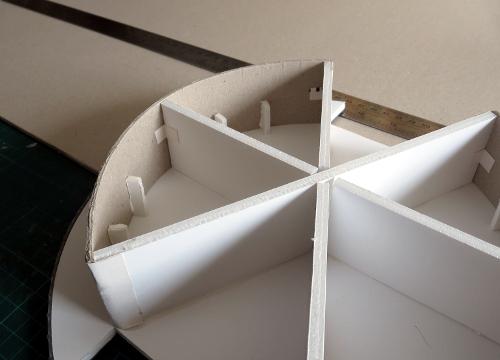
This was then glued in place around the outside of the support formwork, with the help of a few cardboard tabs to reinforce the joints.
A little more foamcore and some doors from the terrain sprue created the bare bones of a control tower.
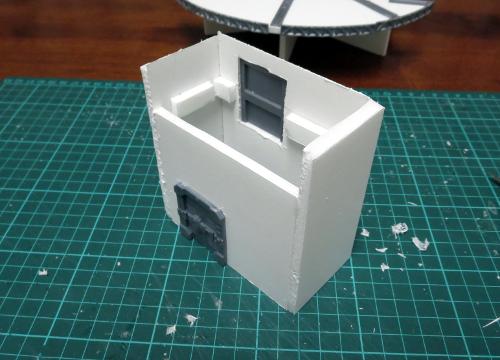
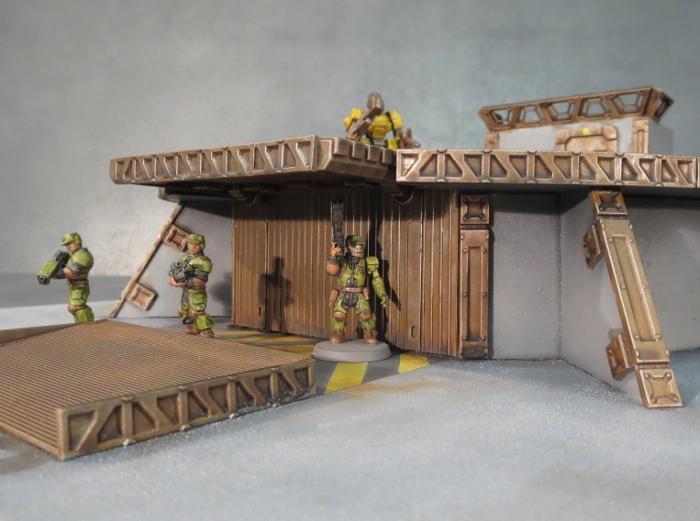
This will have multiple access points, through the lower door, a second door off the pad surface, and a ladder from the ground to the control platform. The ladder can be just glued directly to the wall, but this never looks quite right to me, as it would make climbing it a little problematic unless you cut recesses in behind it. In this case, I decided to space it out from the wall instead, using some off-cuts from the terrain sprue lintel piece.
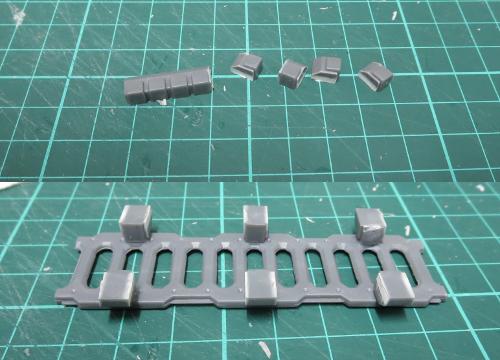
Because the inside of the upper door can be seen from the control platform, I used a second door on the inside wall. Two doors back to back are a little thick for 5mm foamcore walls, so I trimmed the inner door's back down flush so it would fit in neatly.
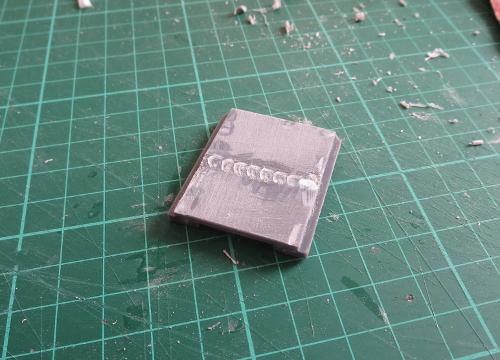
The floor of the platform was made from some tile-pattern plasticard, with a recess created for the inner door - this would have a short ladder up to the main platform.
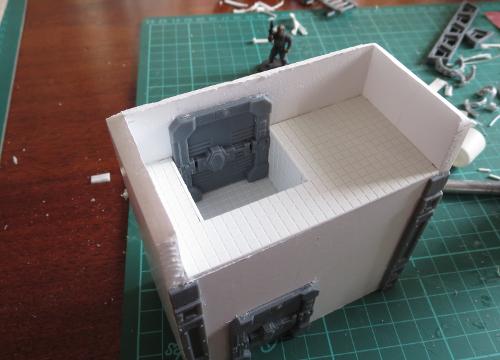
I also made some computer terminals using some computer panels and lintels.
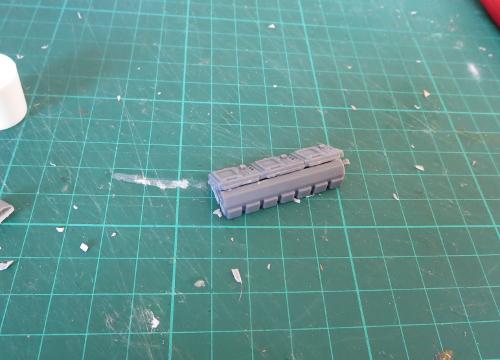
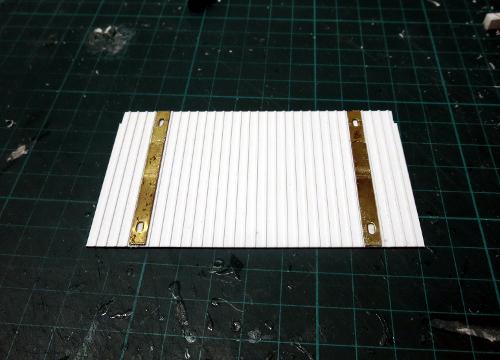
Opposite the control tower will be a lift. I wanted this to be functional, just for a little fun. So I made a wall section from some textured plasticard and glued on a couple of picture hooks that I had flattened out with some pliers and a hammer.
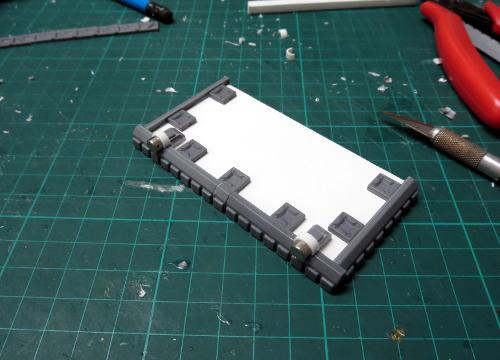
The lift platform was made from a rectangle of foamcore with detailing around the edges provided by some lintels and a support strut. On the bottom of one of the long sides I affixed some nice, strong, rare earth magnets. These allow the lift platform to be attached anywhere along the flattened picture hooks, and are strong enough to hold it up even with models standing on it.
The base of the platform still needed some more detail, so I made some buttresses to going around the perimeter. These are just a wedge of foamcore and some pieces cut from support struts. Normally I layer a piece of 5mm and a piece of 3mm foamcore to match the width of the support strut, but this time I decided to go for something a little more visually striking and just used a piece of 5mm foamcore with extra reinforcing pieces added on either side.
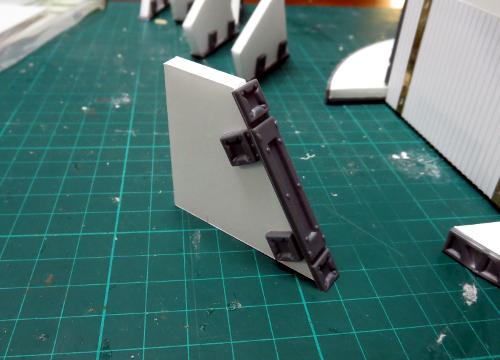
These buttresses were then glued around the base of the platform, lining up with the support struts on the platform top.
The top of the platform needed some more detail, and so I cut some wedges of card to slot in between the support struts.
These were sprayed black, and then painted with a coat of PVA glue and pressed onto some plastic flyscreen. I used a sharp hobby knife to cut around the edges.
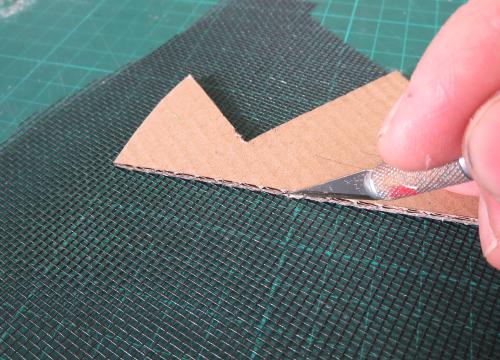
(Spraying them black before gluing the flyscreen on makes painting a little easier, as it can be tricky to cover all of the tiny little nooks and crannies in the flyscreen)
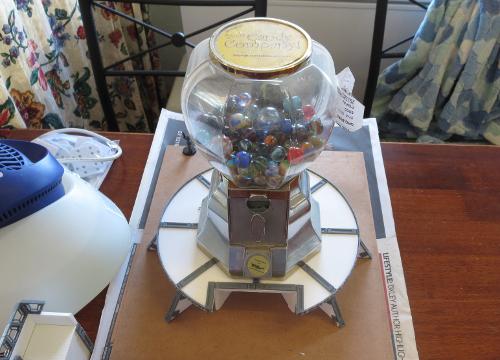
While the glue was setting on the flyscreen, I took the time to glue the landing pad down onto a base board of masonite. A handy, nearby gumball dispenser filled with marbles served as a weight to help the glue bond everything nice and tight.
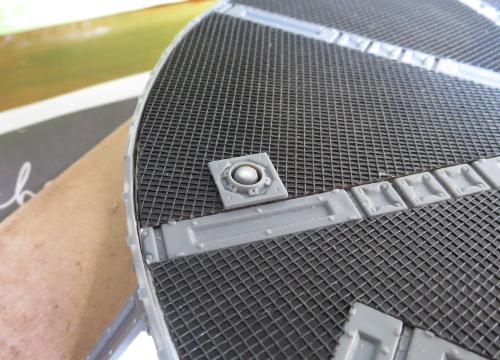
When everything was set, I glued the flyscreened wedges into place on the platform, and added some landing lights made from small pipe fittings and offcuts of sprue.
With the control tower then glued in place and a row of trapezoid windows added for controller protection, a ramp up to the lift built on the other side of the pad, and a few other little details here and there, construction was complete.
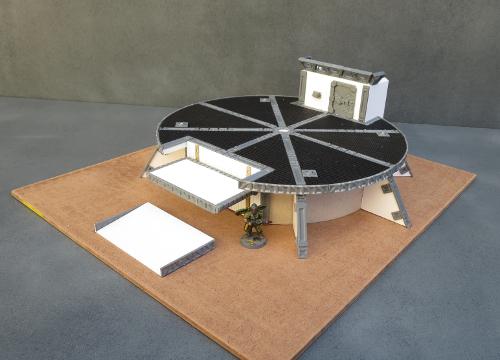
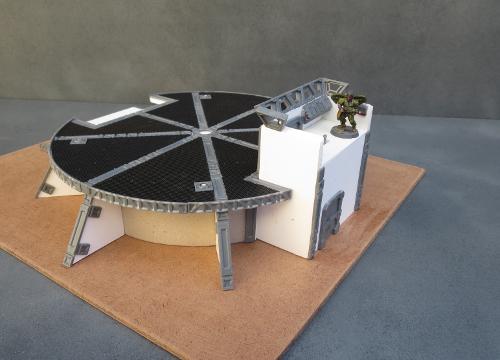
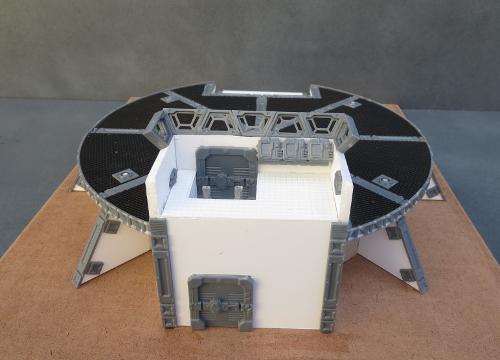
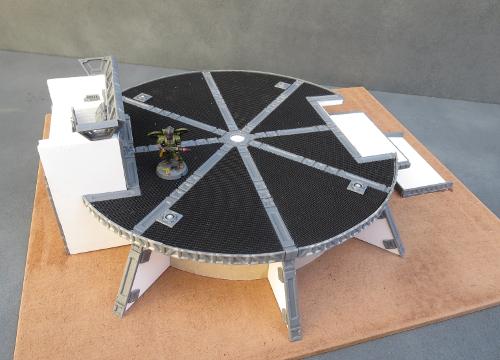
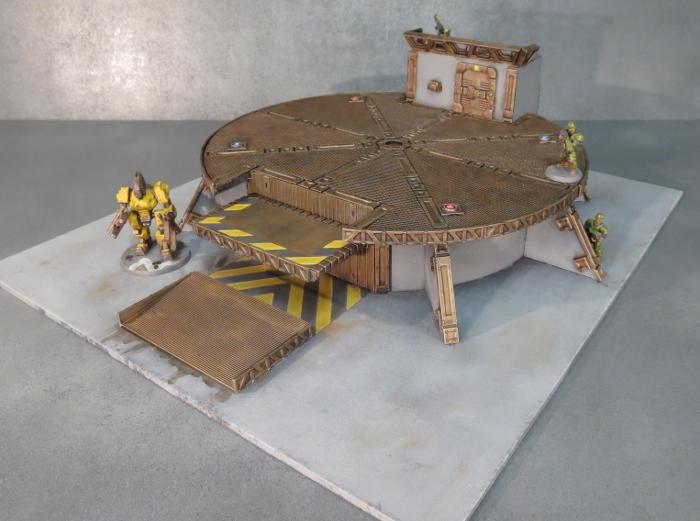
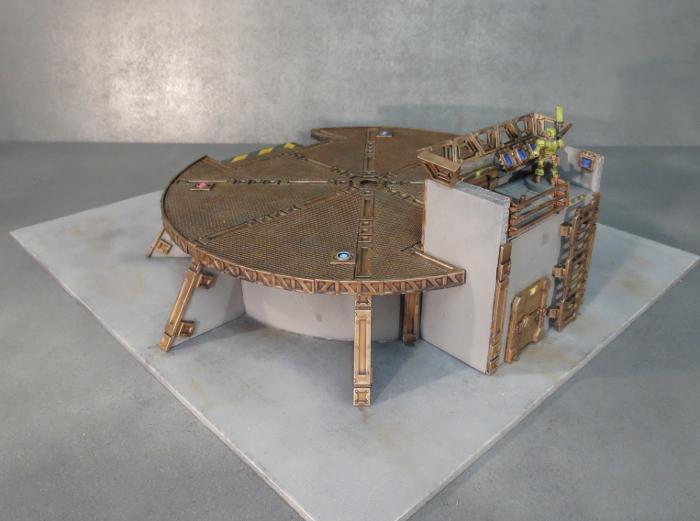
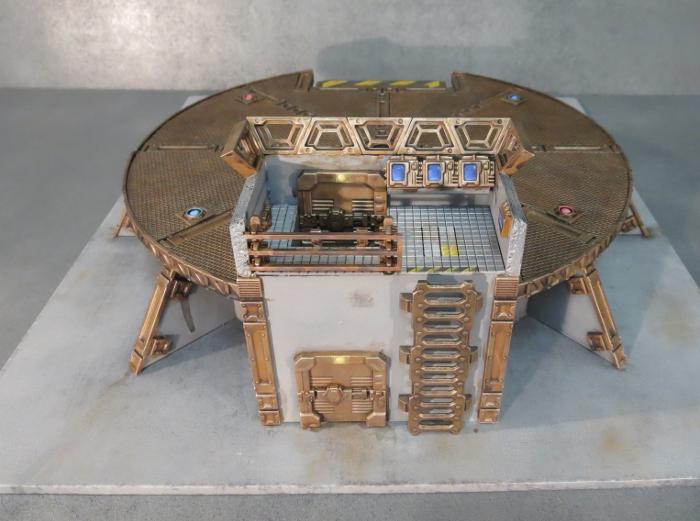
Painting was kept fairly simple: I basecoated with black spray, and then added a coat of grey for the base and walls. The metal parts were then painted using my weathered metal method shown here. Add in the details (including the obligatory hazard striping) and the job's done!
For other Maelstrom's Edge modeling articles, including tutorials and walkthroughs of a wide range of different building and miniature projects, check out the article roundup here.
Conversion Spotlight - Kaddar Nova Mini-Diorama
Posted on Monday Jun 12, 2017 at 05:00pm in Models
- by Iain Wilson
Sometimes it's nice to take a break from putting together armies and just paint something for fun. There's nothing better than taking some plastic and doing something new and shiny with it for getting some creative juices going, and it's a great way to explore the rich background of the game.
When I first got my hands on the plastic Kaddar Nova kit, I had an image of him standing in some imposing fashion unleashing a minnow like a trained hunting bird. I built the bare bones of this little diorama some time ago, but only just found the time to get it finished off and painted.
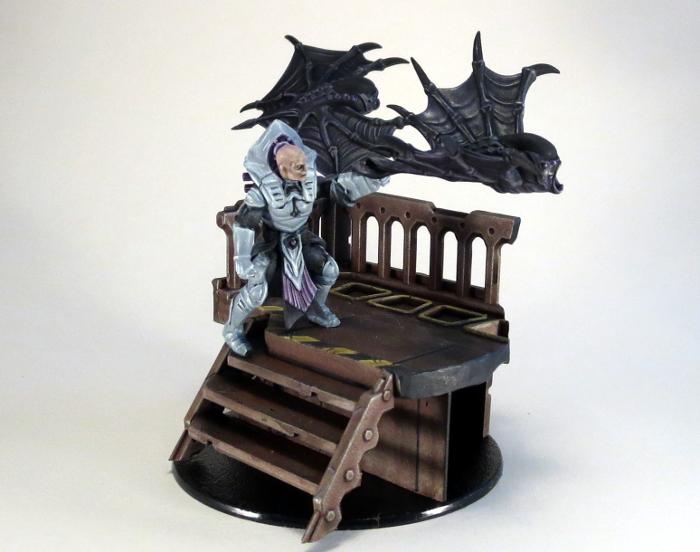
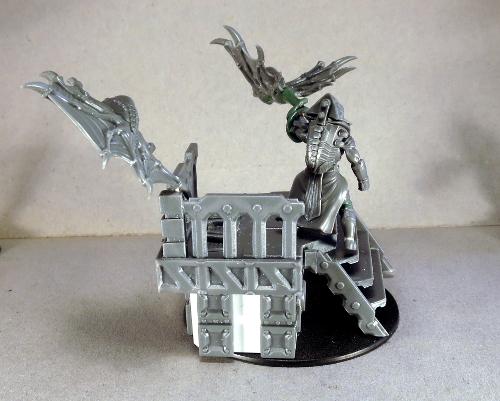
This piece was assembled from 3 different kits. The balcony was assembled almost entirely from components from the Maelstrom's Edge terrain sprue, with a little plasticard to fill in around the sides. The balcony floor is cut from a garage door, with the windows filled in with the gratings from the support struts cut into a trapezoid shape. The railing is made from a ladder, with one side trimmed off. The trimmed off side served for the sides of the staircase, with the stairs themselves made from lengths of support strut glued in detail-side down.
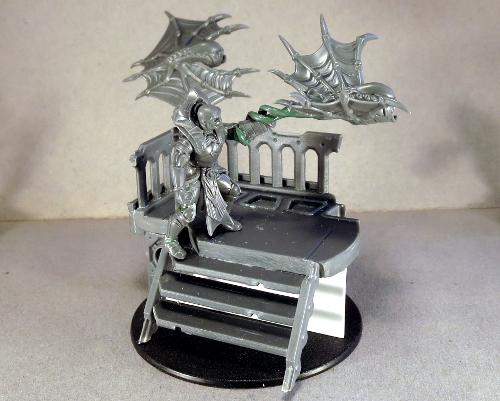
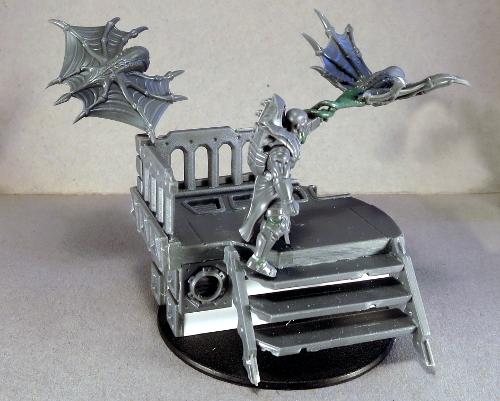
The Kaddar Nova is largely stock, although there was some small alteration of the legs (narrowing the groin area to bring his legs closer together and bending out the right foot so that his toe-tip would touch the lower stair).
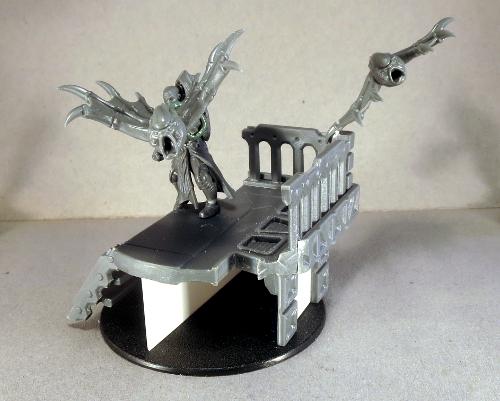
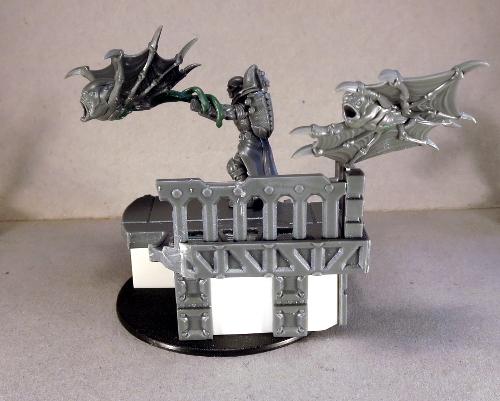
Likewise, the Minnows are assembled as normal, with the one launching off the Nova's hand losing his original tail and a new one made with a length of wire and some green stuff. The wire is glued into a small hole drilled in the Nova's forearm, which is covered up by the putty.
When painting something unusual, I like to try pushing my boundaries a little as a change from the repetitiveness of painting gaming forces. For this piece, I decided to go for a nice, bright, white armour, as I generally tend towards darker colour schemes. The trick with white, oddly enough, is to not make it white. Most white things aren't actually white to look at. Shadows add layers of grey, and reflections add other shades to the mix. (This goes for black, as well!) I wasn't about to try painting reflective armour this time around, but I did use Vallejo Light Grey blended into the white to shade the armour. The end result is possibly a little more grey than white, but I'm still pretty happy with how it turned out.
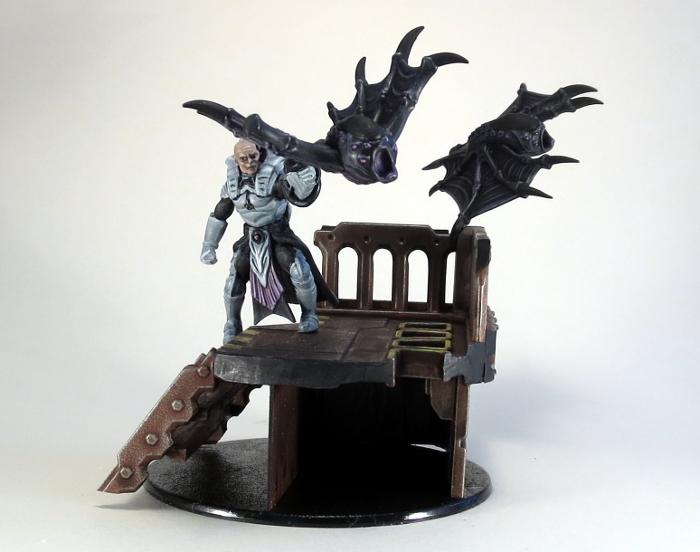
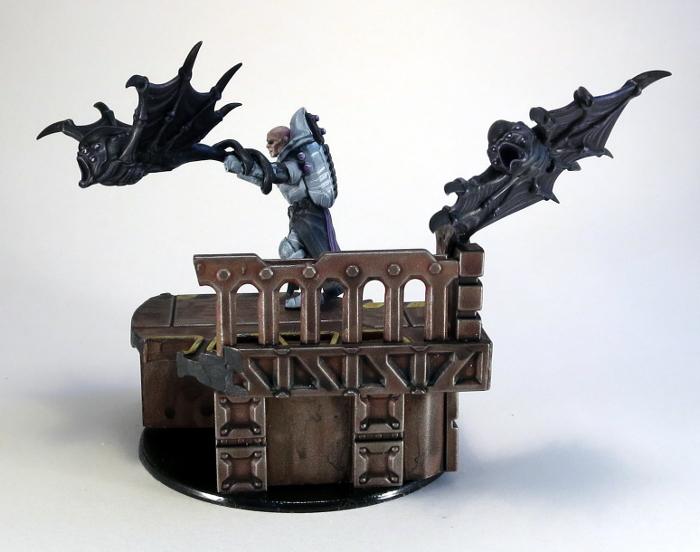
The Minnows were painted using a slight variation of the scheme I used for my winged Mature Angel a couple of weeks back. They were undercoated black, and then drybrushed with dark grey (Vallejo Heavy Charcoal, in this case) and then with purple (some old Citadel Warlock Purple and Tentacle Pink mixed together). This was then washed with some Army Painter Dark Tone to smooth out the drybrushing.
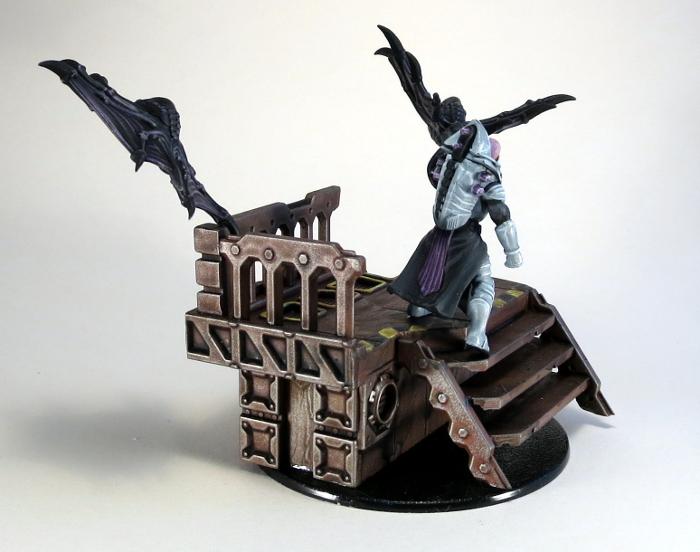
The balcony was painted using the weathered metal recipe shown in the article here, with the addition of some scratches, hazard stripes and yellow detail around the window/vents to break up the expanse of rusty metal a little.
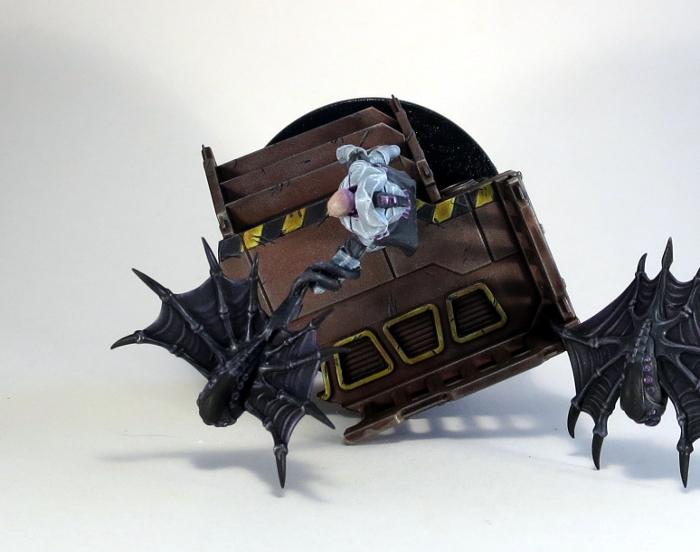
The end result is a simple little scene that I think is nicely evocative of the Maelstrom's Edge setting. If you want to try something similar, you can pick up the components used here from the Maelstrom's Edge webstore. As always, feel free to share your creations on the Comm Guild Facebook page!
For other Maelstrom's Edge modeling articles, including tutorials and walkthroughs of a wide range of different building and miniature projects, check out the article roundup here.
Tags: conversion diorama kaddar karist modeling nova painting
Terrain Spotlight: Comm Tower
Posted on Monday Jun 05, 2017 at 05:00pm in Models
- by Iain Wilson
One of the things I really enjoy about working with the Maelstrom's Edge terrain sprue is that with a little imagination and a sharp knife, there are so many potential uses for most of the parts. I think I've used the ladders, energy fences and pipe fittings far more as other things than I have for their original purposes.
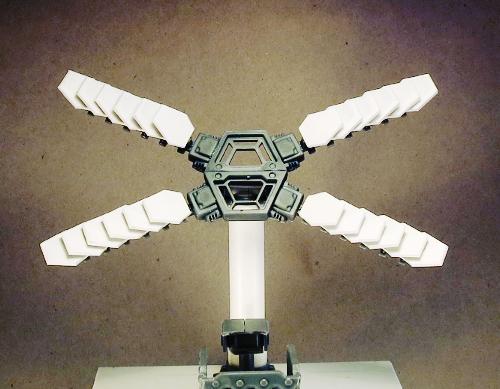
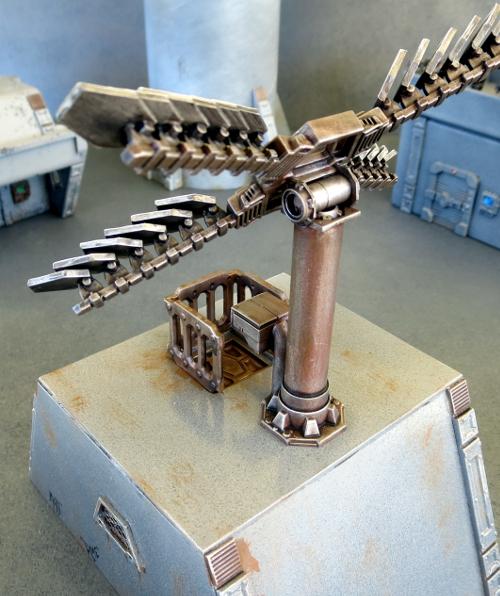
This week's build is no exception, as I had a bit of a brain-flash as I was looking at the energy fence posts and decided to build a communications array!
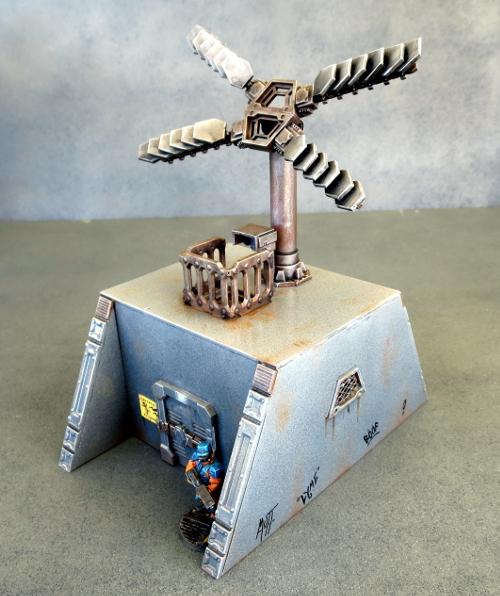
The main focus of this terrain piece is, of course, the cross-shaped array on the roof. The transceiver panels on this array are each built from a fence post and a series of hexagonal shapes cut from a sheet of plasticard. I cut a few test panels from cardboard to get the size and shape right, and then used one of those cardboard testers as a template to mark out the plasticard.
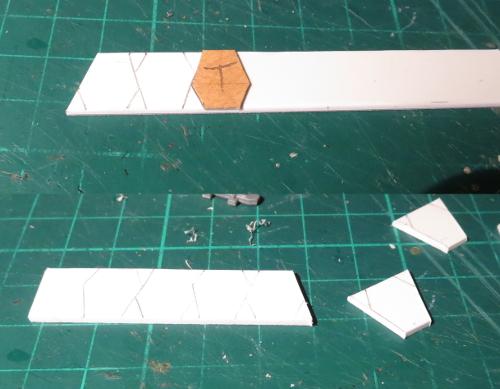
Once cut and cleaned up, the panels had a small length of plastic rod glued to the back, and then glued in place onto the fence post.
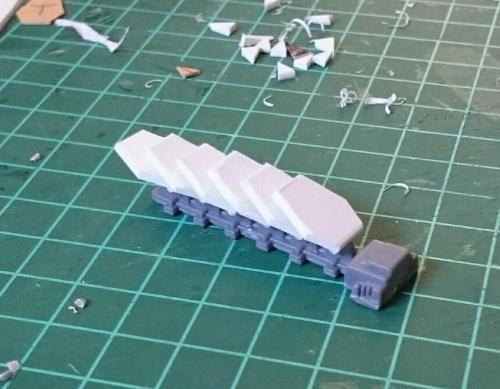
The four resultant transceiver arms were glued onto a pair of trapezoid windows to form the array. I sat this on a post made from plastic tubing and some pipe fittings, with a control panel mounted on the front for servicing and fine-tuning - because as any sci-fi buff would tell you, intergalactic regulations require any piece of important equipment to have a control interface positioned somewhere accessible from outside, but exposed to enemy shooting.
The array obviously needed something to stand on, so I made a basic building frame out of foamcore.
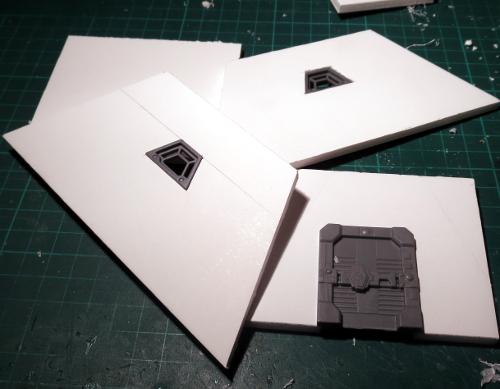
I set a hatch into the roof, and surrounded this with a railing made from a cut-up ladder - because while the control panel needs to be exposed, the Epirian Foundation still (on paper, at least) follows strict OH&S standards.
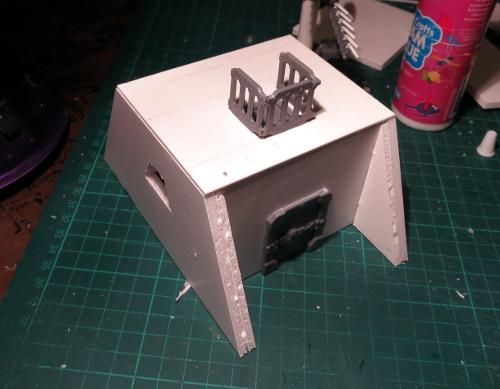
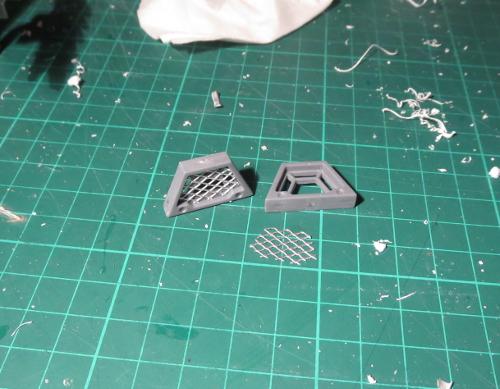
I wanted to use trapezoid windows in the sides of the building, to tie back to the shapes in the array, but they needed to look different to the array centre to reduce the number of people looking at the building and asking why it had windows on its aerial. So I cut some pieces of aluminium mesh to fit snugly inside the window frames.
With everything glued in place, the comm building looks like this:
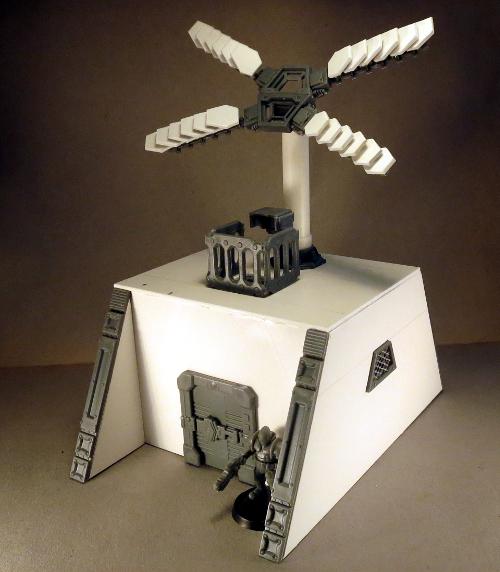
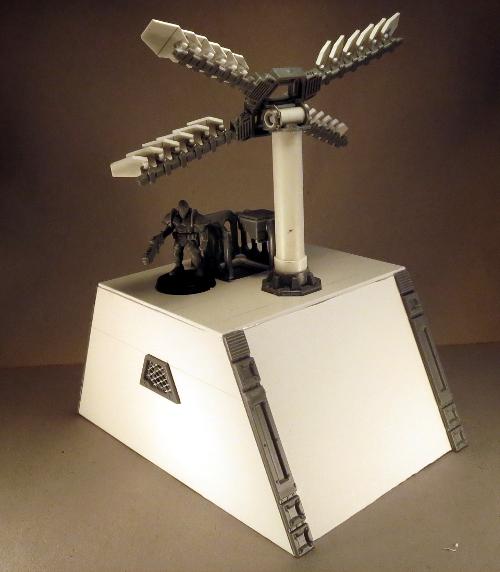
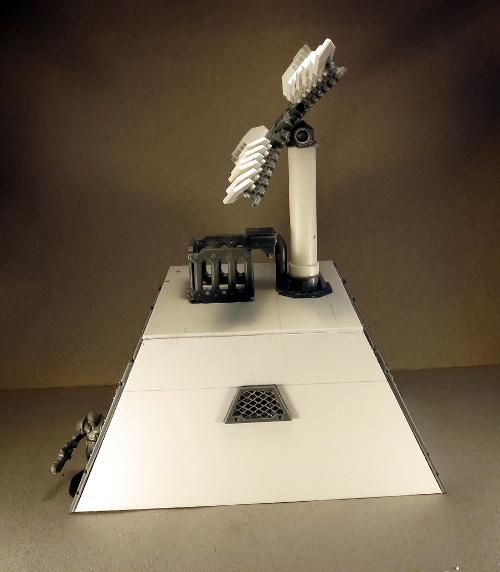
I kept the painting on this one a fairly simple grey, to match some other terrain from previous articles. The building section was sprayed with a medium grey undercoat, and the array sprayed red on the less important parts and black on the transceiver plates and 'moving' parts.
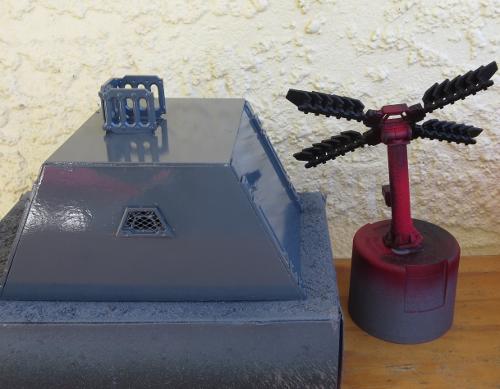
The building then had a light spray with a lighter grey, pitched from above so that the darker grey would stay in the indentations and form some natural shadows. The array and the metal parts on the building were painted using the weathered metal recipe from the article here. Then I finished up with weathering added with drybrushed brown, the door light and control panel screen painted in blue, and then added a couple of printed signs and some fineliner graffiti on the side and back walls.
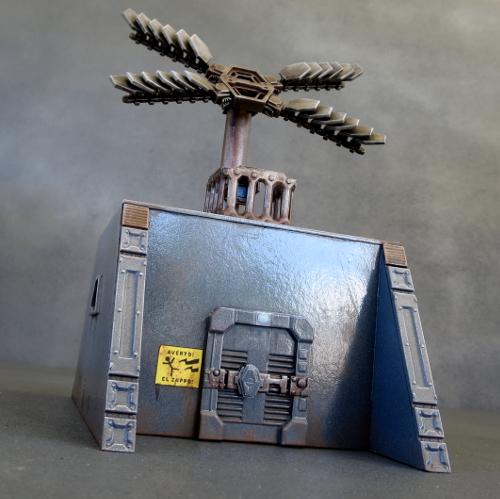
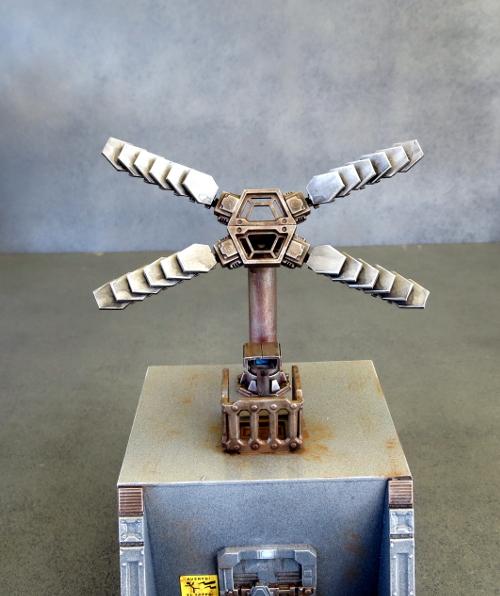
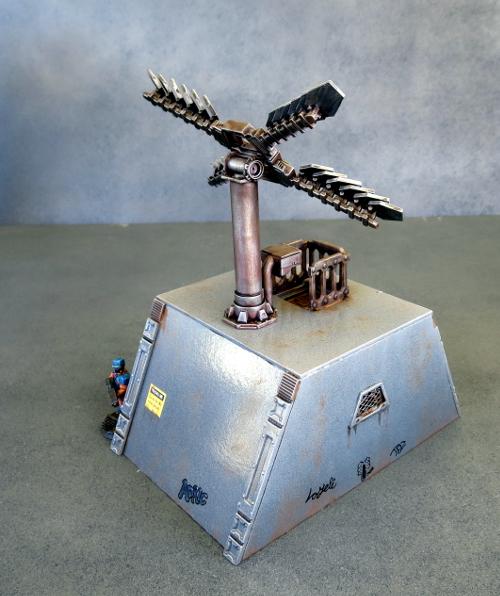
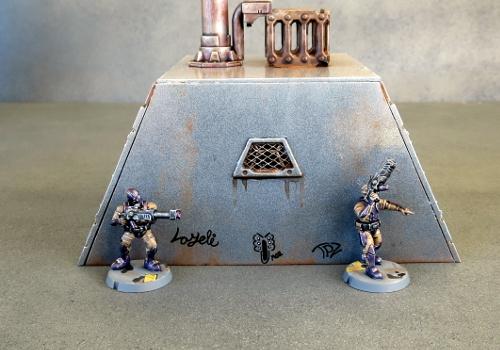
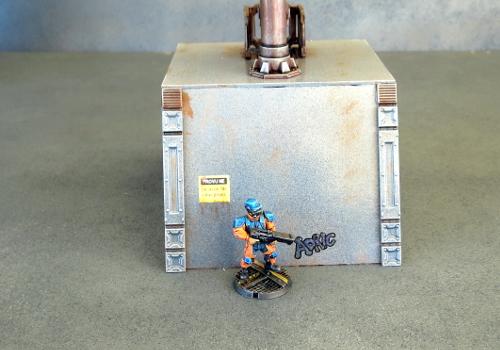
A cheery, grey city in progress...
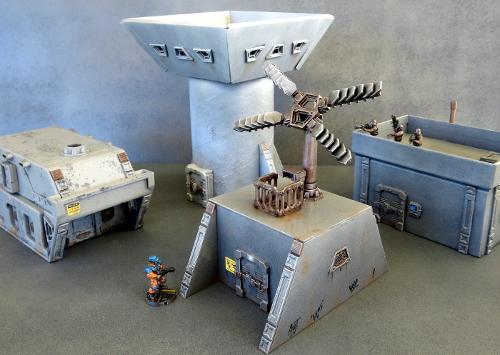
If you would like to build your own communications array, you can pick up the Maelstrom's Edge terrain sprue from the webstore here. As always, feel free to share your creations on the Comm Guild Facebook page!
For other Maelstrom's Edge modeling articles, including tutorials and walkthroughs of a wide range of different building and miniature projects, check out the article roundup here.
Tags: buildings modeling models spotlight terrain terrainsprue walkthrough
Modeling Spotlight: Winged Angel
Posted on Monday May 29, 2017 at 05:00pm in Models
![]() - by Iain Wilson
- by Iain Wilson
‘Nobody knows what the hell they’re even made of, never mind what they’re thinking.’
- - Gladius Belaru, survivor of the Angel attack on Morningstar Station, Thusia system
The fully mature Angel is a truly terrifying creature to encounter in the flesh, and their otherworldly scream is a harbinger of nightmares across the Spiral Arm. Dwarfing even the tallest of humans, the Angel is a tapering mass of writhing tentacles, gelatinous membranes, and bristled claws, smelling of sulphur and ozone.
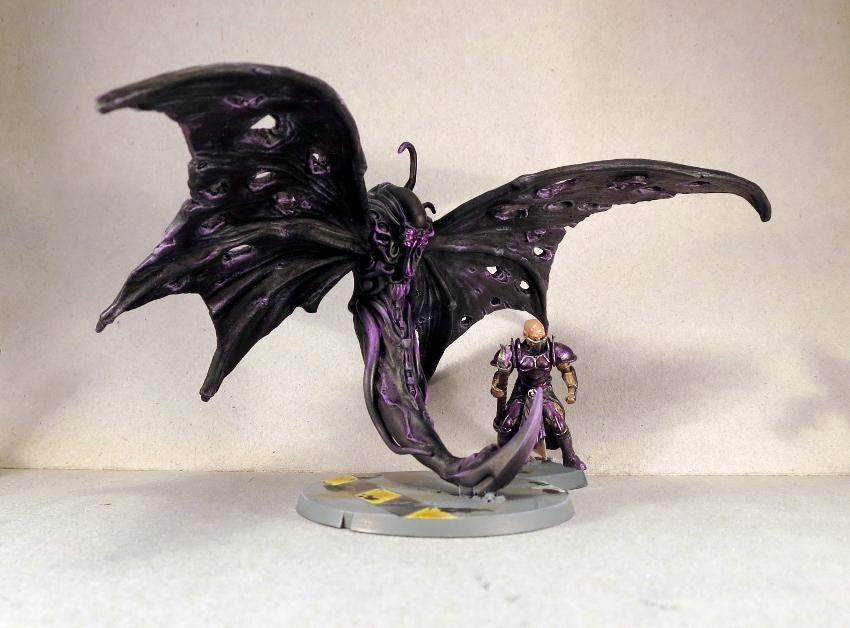
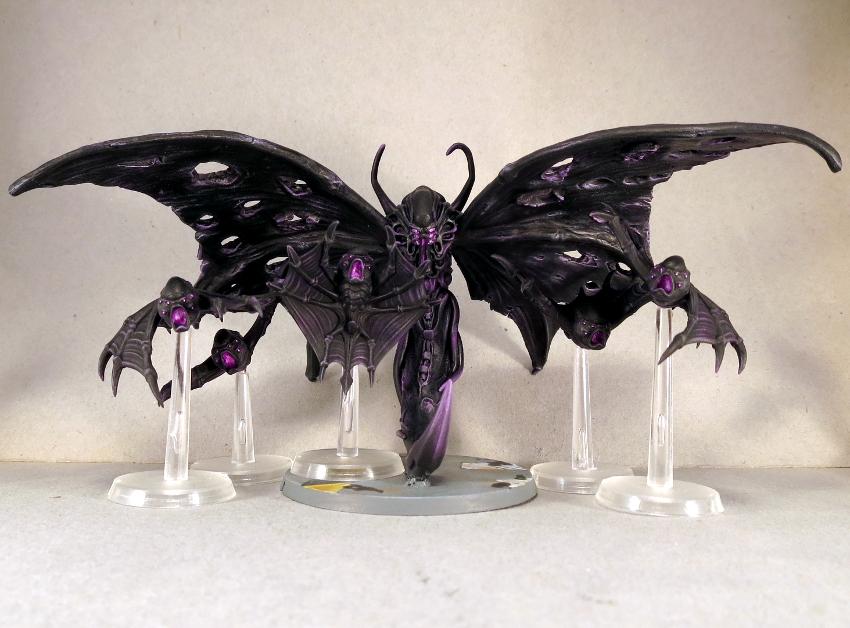
The plastic Mature Angel kit allows players to build angels in their combat form, which is one of the three common forms favoured by these bizarre creatures. While there is no particular need to model the angel's other forms, where would we be if we just went around assembling kits to spec? So this week, I'm building a Mature Angel in its flying form.
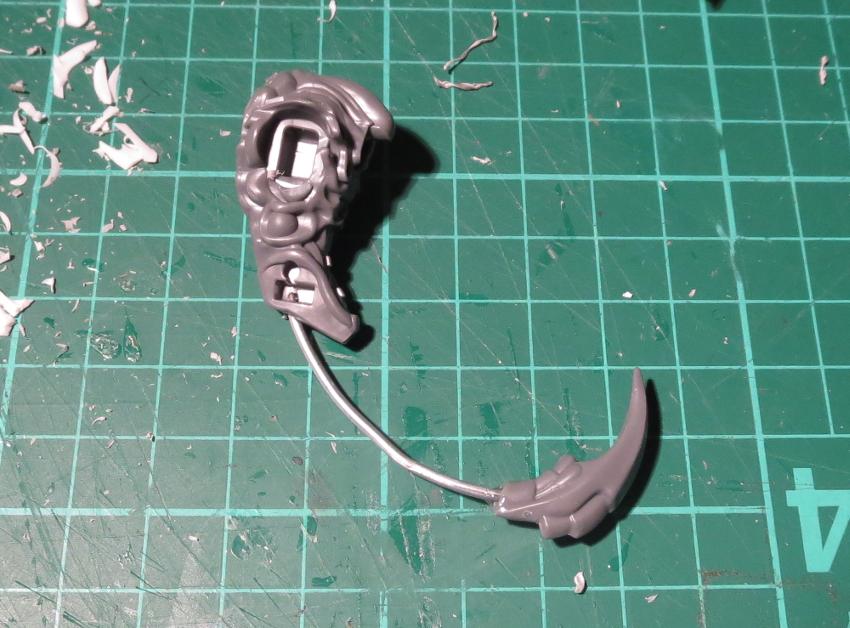
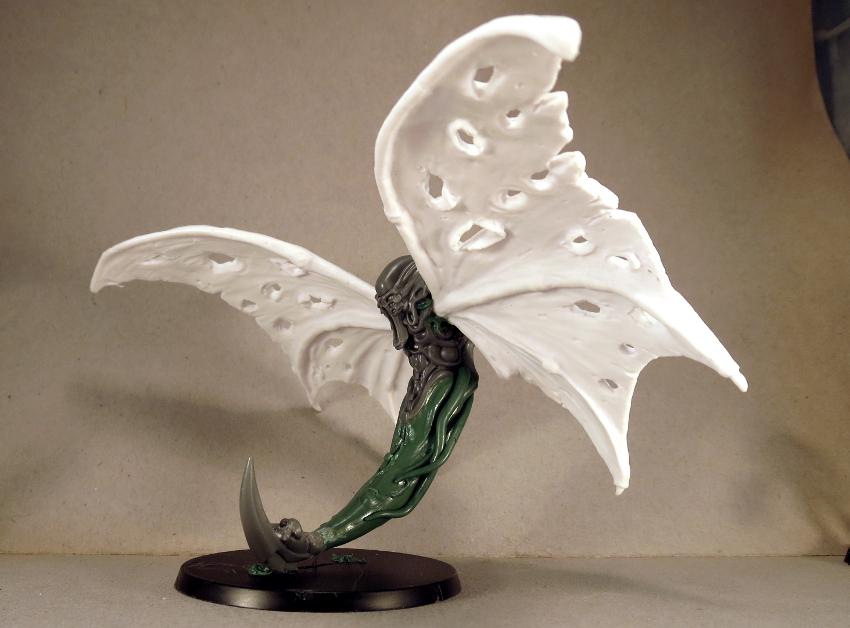
I started out with a length of wire glued into a hole drilled up into the bottom of the angel's torso. This was curved around to the front, with a spike cut from one of the angel's claws glued onto the other end.
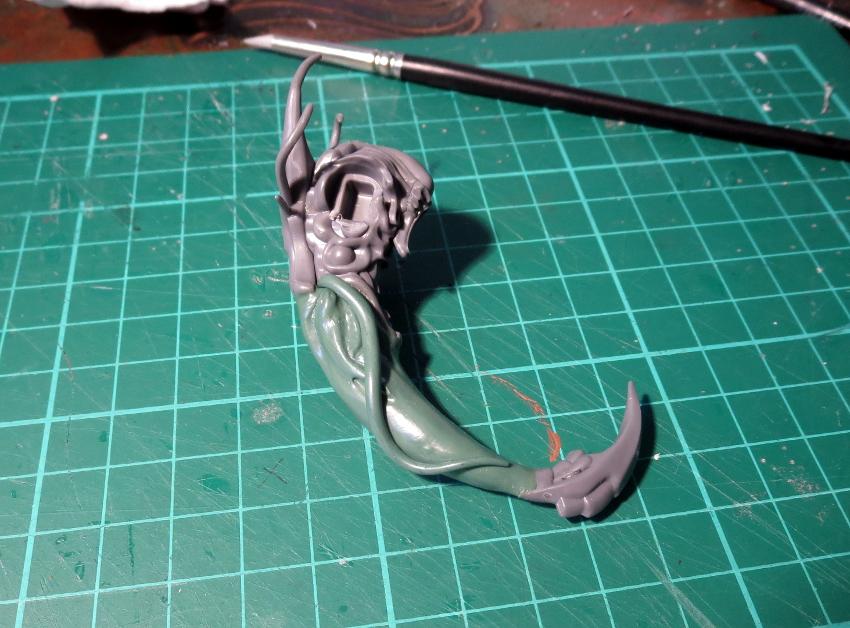
 Over the wire, I sculpted a tail from 'green stuff' putty, and added some tentacles down the side to make it a little more visually striking and to help represent the angel's fluid nature.
Wings can be sculpted over a similar wire armature, but to save a little time and effort here, I decided to purloin some from another model instead. The donor was a fire demon from Reaper's Bones range.
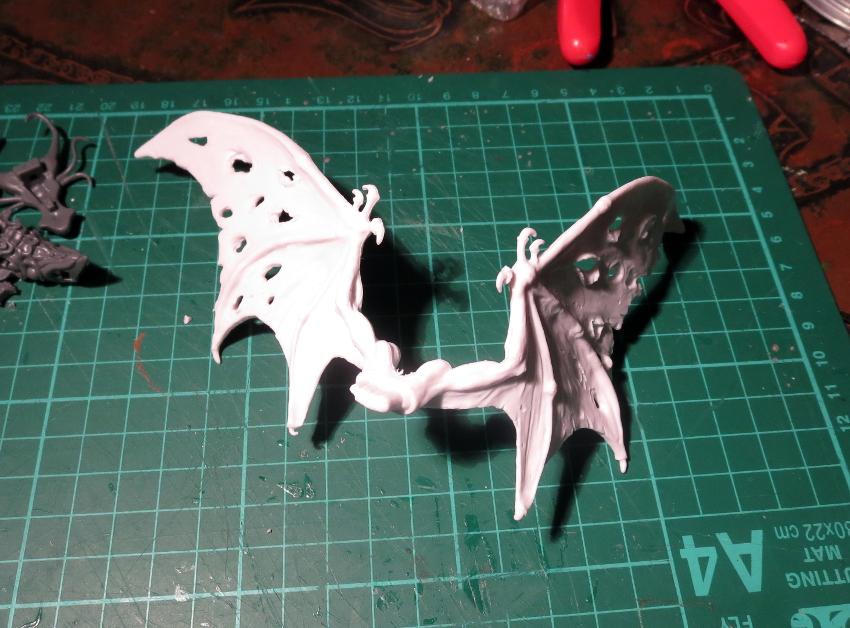
I cut the wings at the elbows, trimmed off the 'fingers' and glued the wings in place in the angel's arm sockets. A little more green stuff filled in the gaps.
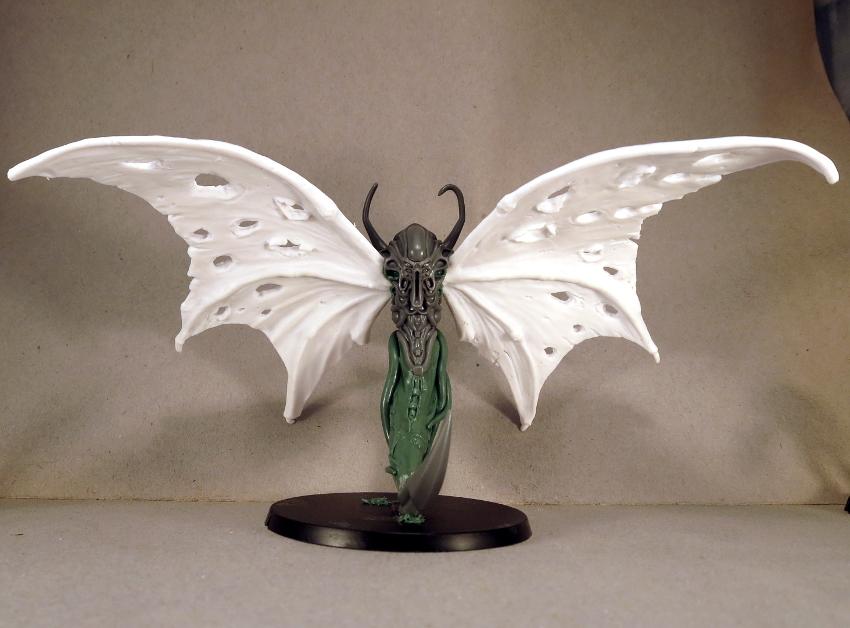
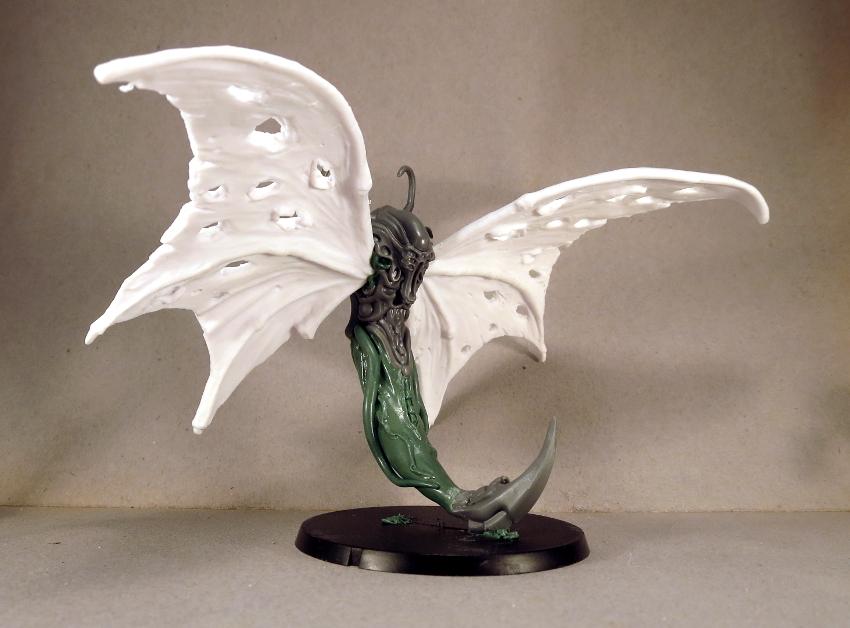
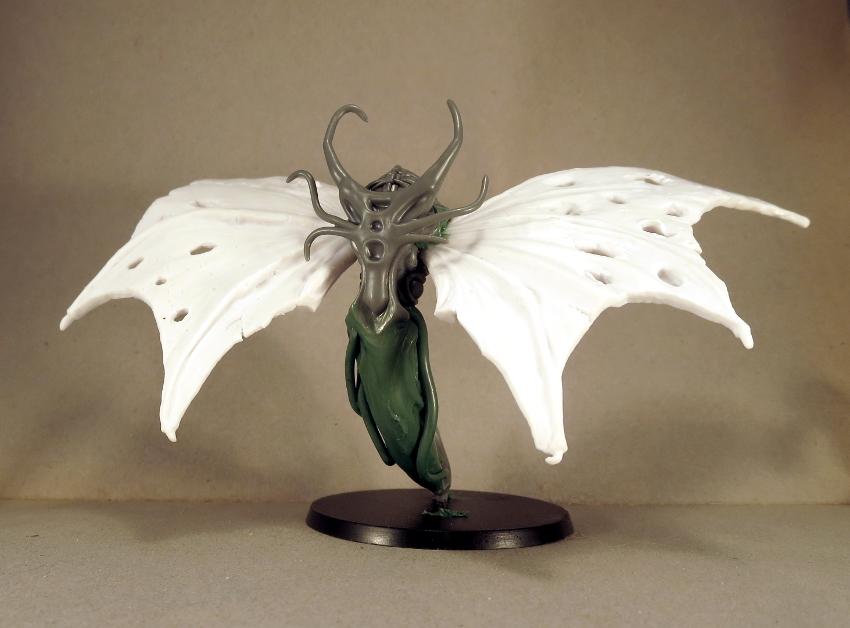
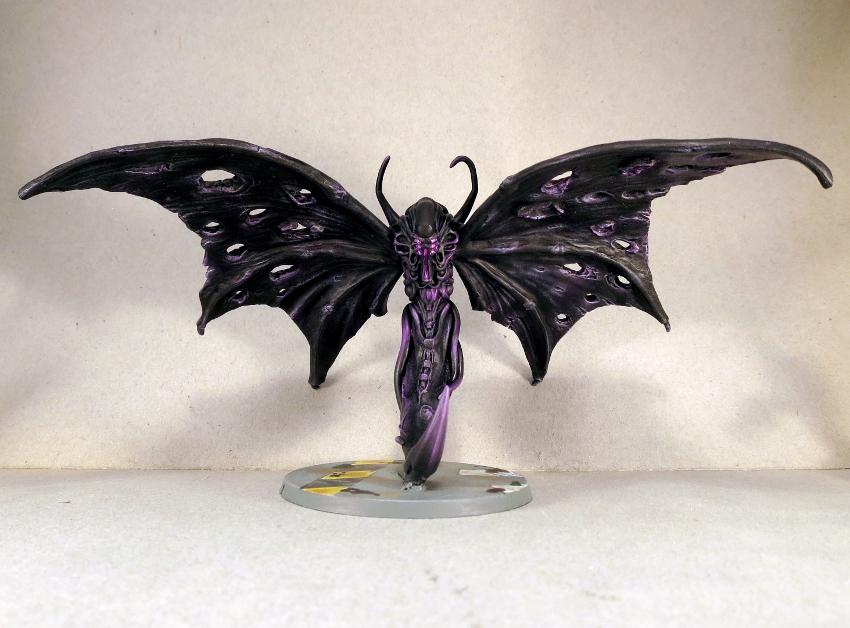
Painting - I kept the colour-scheme fairly simple, as angels are basically just black. Visually, just going with plain black isn't very interesting, though, so I tried to represent the angel's internal cybel energy by adding some purple highlights wherever seemed appropriate. The eyes and mouth were similarly painted purple, but highlighted up closer to white, to help them to stand out.
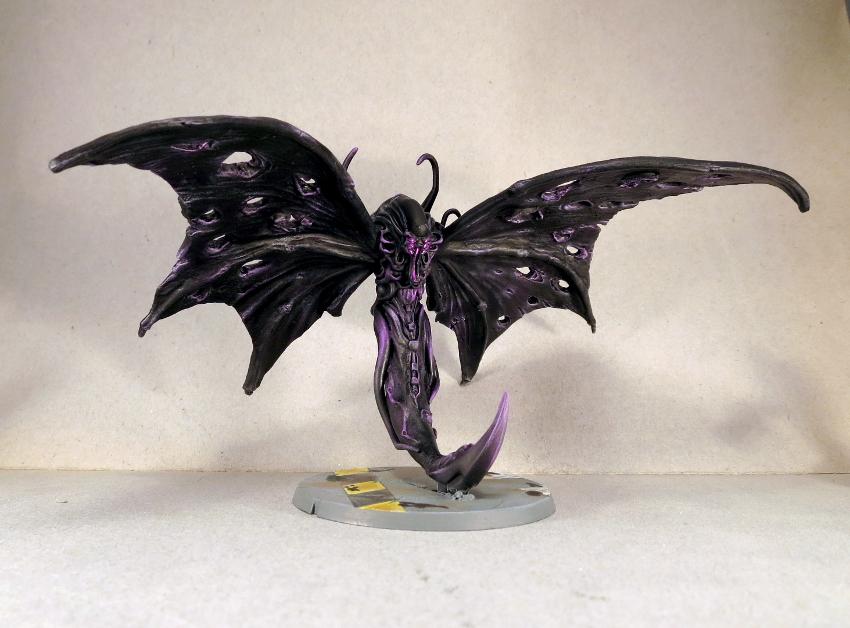
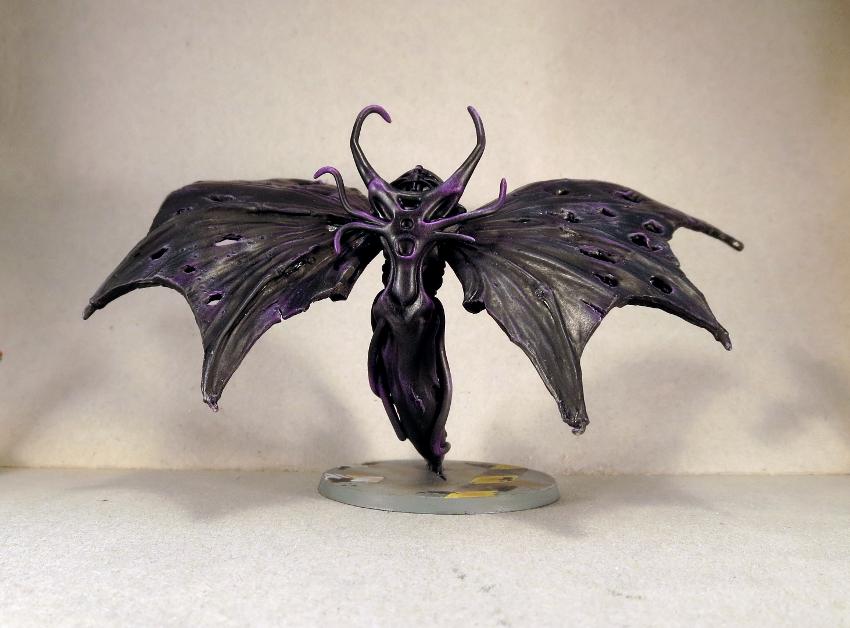
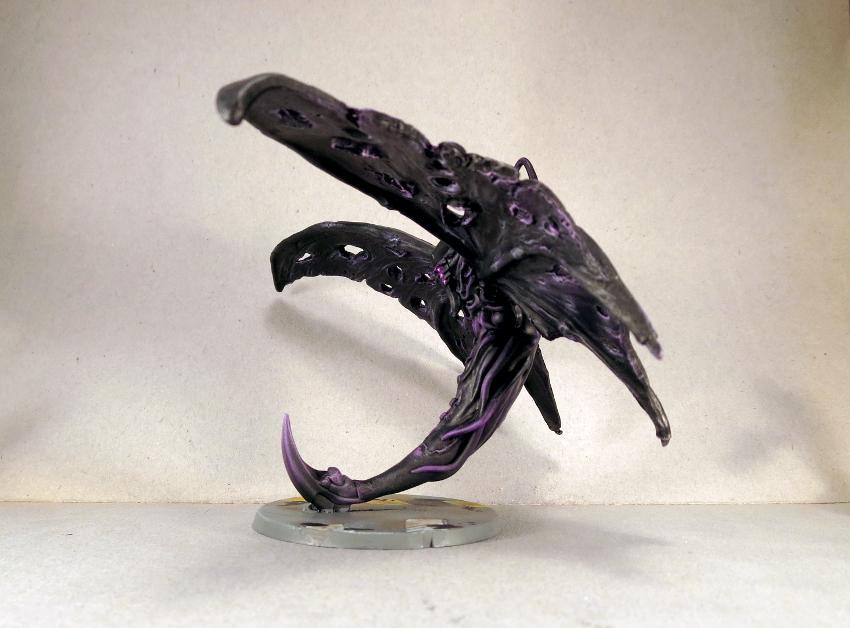
'Family' shot, with some minnows for company:
If you would like to build your own hideous flying spectre of doom, you can pick up the Mature Angel kit from the Maelstrom's Edge webstore here. As always, feel free to share your creations on the Comm Guild Facebook page!
For other Maelstrom's Edge modeling articles, including tutorials and walkthroughs of a wide range of different building and miniature projects, check out the article roundup here.
Terrain Spotlight: Catwalks
Posted on Monday May 22, 2017 at 05:00pm in Models
![]() - by Iain Wilson
- by Iain Wilson
As the Maelstrom creeps inexorably across the galaxy bringing Armageddon to world after world, many wars are fought in the shadow of once great cities. Where once were towering beacons of hope, the shining pinnacle of human endeavour, now lies ruin - seething hives of scum and villainy where only the strong survive.
For those inclined to less flowery prose: I thought it might be fun to explore what could be done to create multi-level terrain using the Maelstrom's Edge terrain sprue, for games set within the gloomy nether regions of gigantic cities on those worlds where everything has just gone a little bit wrong. Within these cities would be various tall structures linked by ladders and catwalks - essential if you want to get around without having to leap onto the roof of a passing taxi!
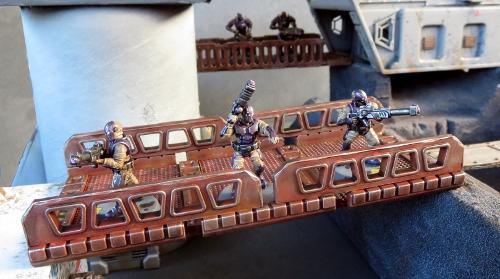
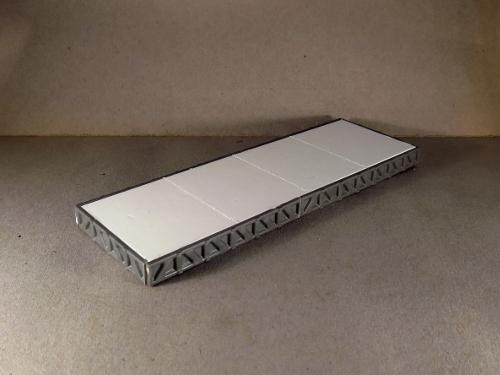
So this week, I'll be presenting a few ideas for different ways to construct catwalks to link your buildings together. Starting with the bare bones, Evil-Overlord-thinks-minions-don't-deserve-handrails version:
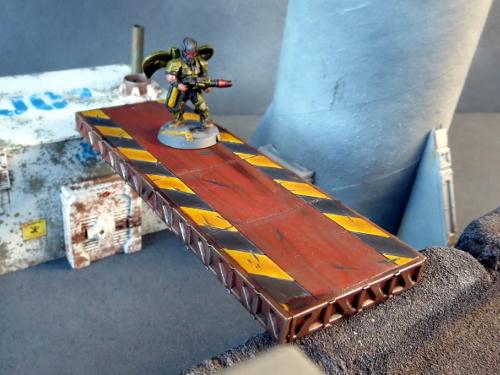
This is simply a strip of 5mm foamcore cut to an appropriate length, with some panel lines scored across at intervals with a razor saw (you could do the same with a hobby knife, but the saw helps to keep a consistent width and depth). The edges are covered up with reinforcing struts from the Maelstrom's Edge terrain sprue.
For the slightly more OH&S-conscious city builder, here's example 2:
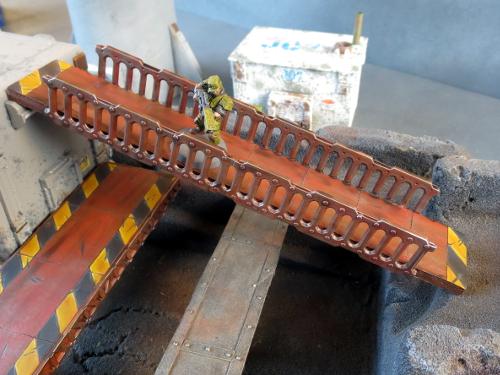
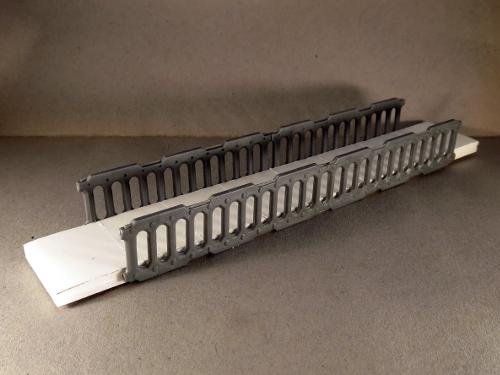
This is another strip of 5mm foamcore, but this time I've used ladders from the terrain sprue glued sideways along the edges to create handrails.
This catwalk is also a little narrower than the first. Varying the width of your catwalks allows for some visual variety, and also mixes up how the catwalk will function in-game, by changing what can fit on it, and whether or not troops will be able to easily block off enemy advances along it.
For something with a little more texture, example 3:
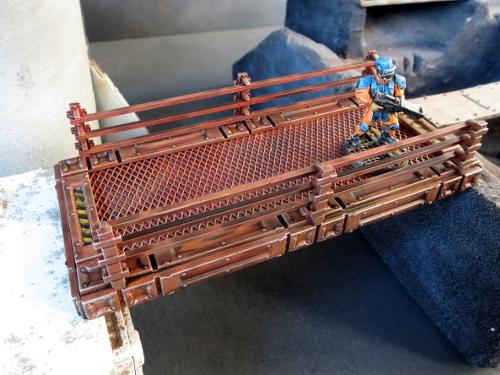
This one starts with another strip of foamcore, but this time I have glued a sheet of aluminium mesh to the top. Support struts from the terrain sprue are cut to size and glued around the perimeter of the top to hold the mesh down and cover the cut edges, and more support struts run around the outside edge of the foamcore to pretty things up.
The handrails are made using the top halves of half a dozen energy fence poles, with the railings cut from lengths of 1.5mm x 2mm plastic rod.
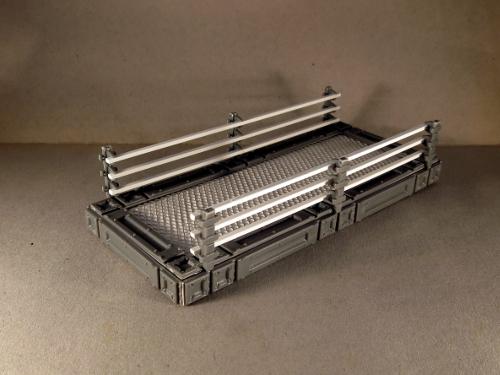
For a break from foamcore, the base of the catwalk can be made from plasticard or sturdy cardboard:
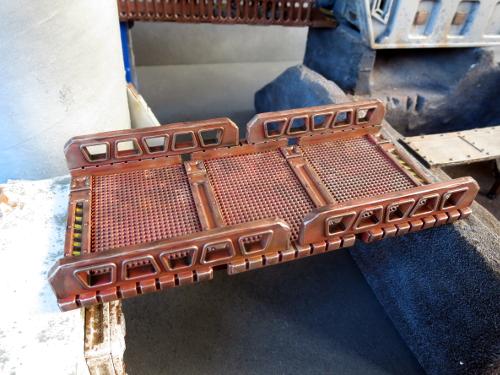
This catwalk uses 1.2mm plasticard, with some embroidery mesh cut to size and glued on top to add some texture, interspersed with support struts from the terrain sprue. The handrails are made from lintel pieces from the terrain sprue topped with leftover window strips cut from doors I used a few weeks back for barriers in my scatter terrain article.
And finally, the freestanding version:
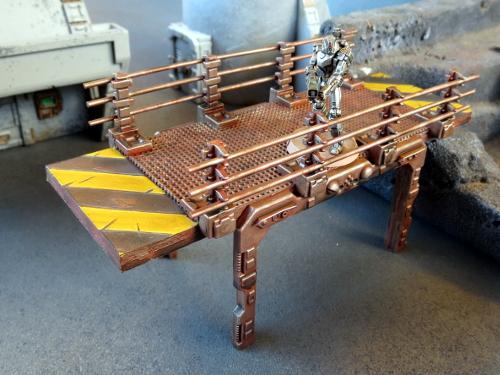
Back to the foamcore for this one, with the embroidery mesh once again providing some detail on the top. The handrails use the bottom halves of the fence posts used for the 3rd catwalk, with railings made from 1.6mm round plastic rod. The legs are door frames that were also left over from the scatter terrain article.
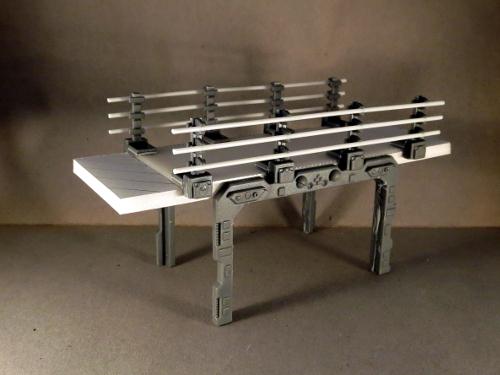
These are obviously just scratching the surface. You can easily mix up these designs by changing the dimensions or detailing. Replacing the foamcore with sturdy mesh gives you a more open, industrial style. You could even build some junction pieces and lay out catwalks on the table for a space corridor bug-fight!
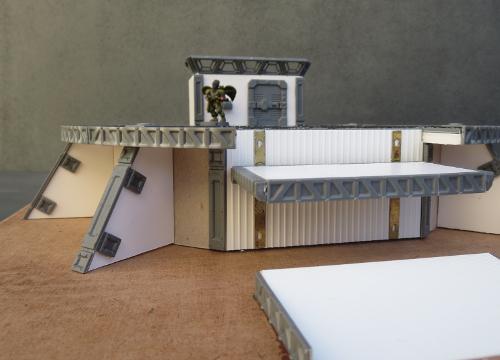
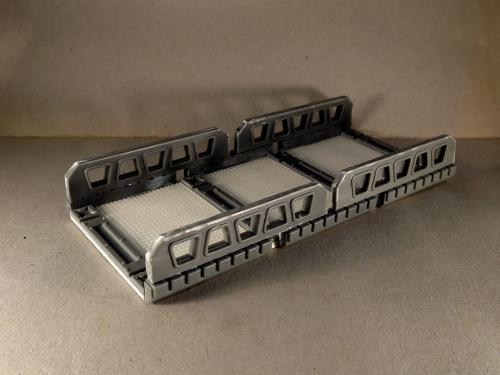
Where to from here? One of my next projects will be to create some matching buildings to hang these off, based around modular bulkheads like this:
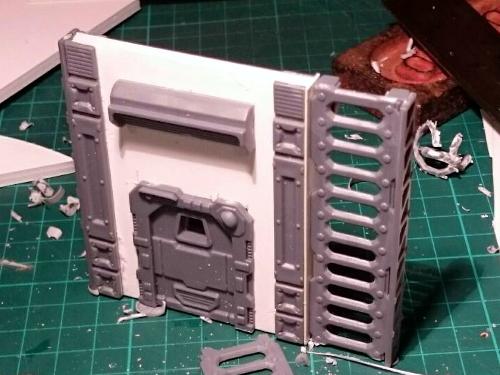
If you're feeling inspired and need more catwalks in your life, you can pick up the Maelstrom's Edge terrain sprue from the webstore here. As always, feel free to share your creations on the Comm Guild Facebook page!
For other Maelstrom's Edge modeling articles, including tutorials and walkthroughs of a wide range of different building and miniature projects, check out the article roundup here.
Tags: buildings conversion modeling spotlight terrain terrainsprue walkthrough
Karist Reaper Cadre - Card Correction
Posted on Tuesday May 16, 2017 at 10:43am in Tutorials
![]() - by Iain Wilson
- by Iain Wilson
It would appear that the unit card for the Karist Reaper Cadre in this week's article contained a couple of errors that needed to be corrected - The card incorrectly listed the unit as Core instead of Vanguard, and (sadly) the Pulse Lances weren't supposed to be free!
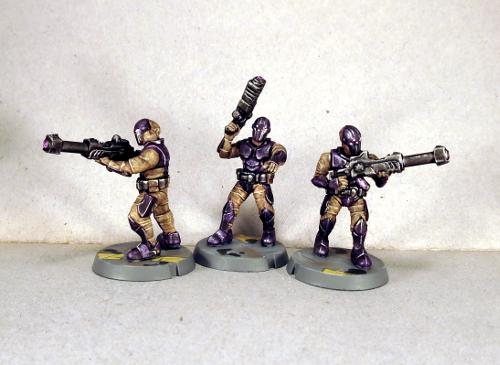
An updated version of the card has now been uploaded, and can be found here.
Those responsible for the error (me) have been severely castigated by, uh, me... and have promised to not do it again.
Karist Reaper Cadre Conversion Tutorial & Unit Card
Posted on Monday May 15, 2017 at 05:00pm in Tutorials
![]() - by Iain Wilson
- by Iain Wilson
Following on from the conversion article and rules card for the Epirian Scorpion Drone a little while ago, it seemed fitting to show the Karists a little love as well. Sneaky, sneaky love, in the form of the Karist Reaper Cadre. Armed with a sniper variant of the Karist Pulse Carbine, Reapers arrive in advance of the main force and are tasked with removing problematic opponents before the regular troopers have to deal with them.
Here, you'll find instructions for building the Reapers' fearsome Pulse Lance, and unofficial rules for running this unit in your games.
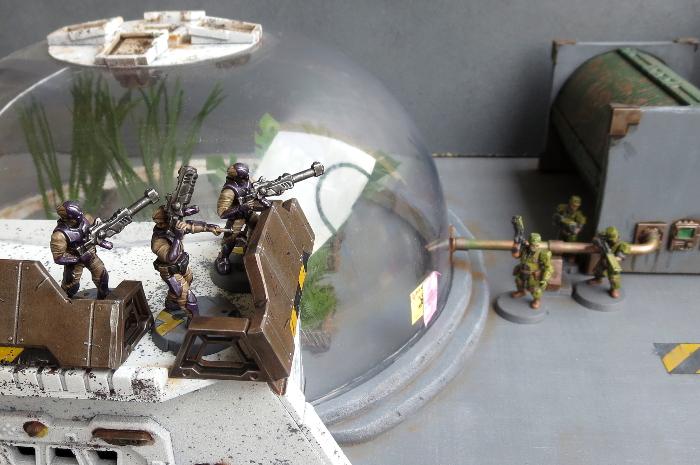
I've based the Reapers on the Karist Trooper, with the shoulder pads left off and the collar trimmed down to represent their lighter armour.

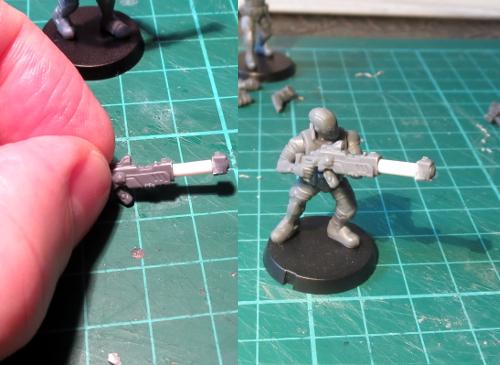
The unit comes with Pulse Carbines by default, but up to two models can be upgraded to have Pulse Lances. To build each lance, you will need two Pulse Carbines. You will also need some 1mm plastic rod (plastruct or similar) and some 2.5mm plastic tube.
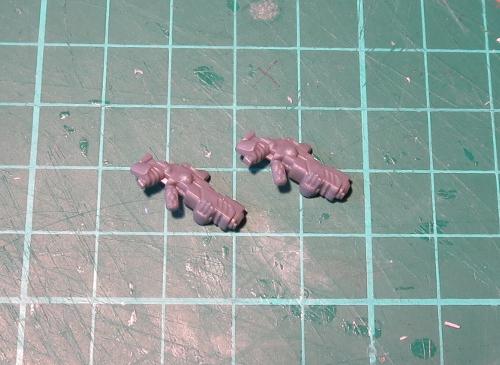
Start by cleaning off any mould lines, and then you will need to drill a 1mm hole into the barrel of one of the pulse carbines. Use a sharp knife to prick a guide hole into the centre of the barrel, and then drill in 3-5mm with a 1mm drill bit.
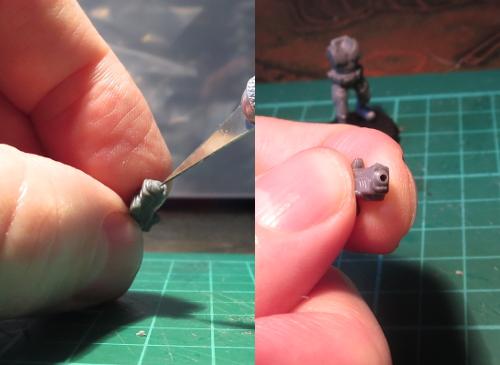
Then use a sharp knife or a file to remove the barrel completely, so the front of the weapon is flat. You do this after drilling, as it's easier to find the right position for the drill while the barrel is still there.
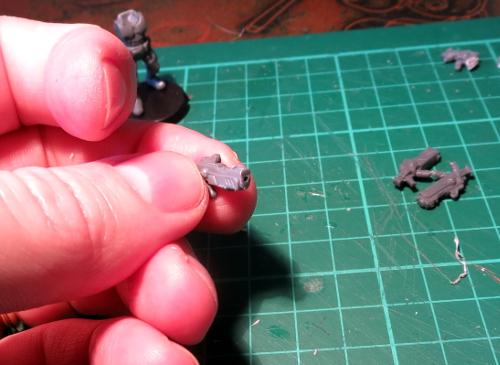
Take the other carbine and cut the front end off just behind the front sight, where there is a groove running across the top of the weapon.
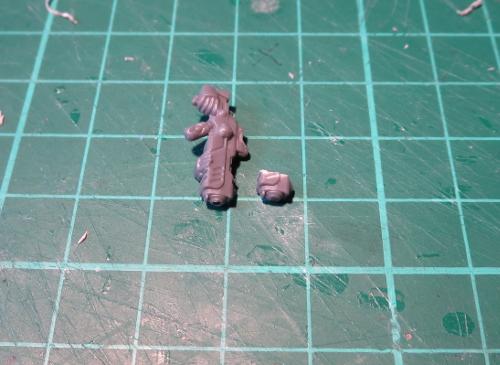
Drill a 1mm hole into the back of this piece, in line with the centre of the barrel. If you drill out your pulse weapon barrels, you can just drill all the way through.
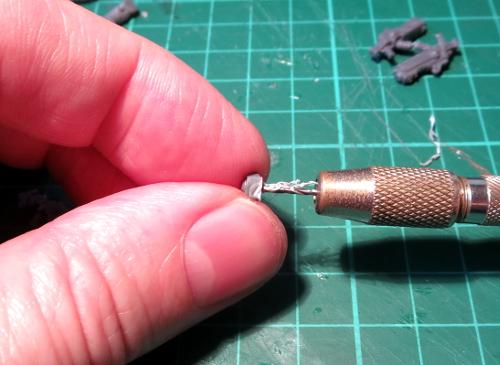
Trim off the leftover pieces of stock around the bottom and sides.
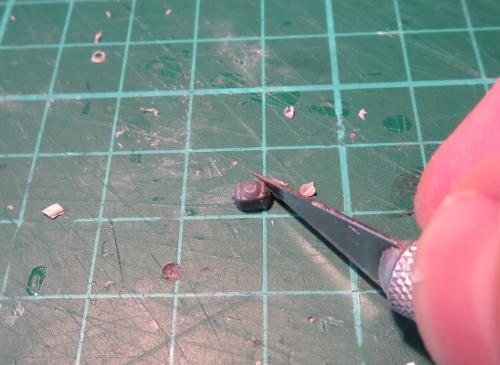
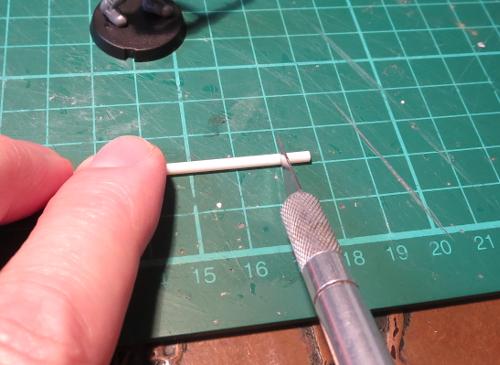
Cut a piece of the 2.5mm tubing around 7mm long - the exact length isn't important, so long as you're consistent with it on all of your lances. There are specialist tools out there for cutting plastic rod and tubing square, but here's the quick and easy method: Grab a cutting mat with a grid pattern on it. Lay the plastic tube along on of the grid lines. Line up where you want to cut with one of the perpendicular lines, and sit the knife blade on top, also lined up with the grid. Now, gently press down with the knife as you use your other hand to roll the tube forwards across the mat. Don't stress if the knife doesn't go through in one go, just roll the tube backwards and forwards a couple of times if necessary without lifting up the knife off the tube. The rolling motion causes the blade to scribe a neat ring around the tube, and when the knife makes it through to the centre your cut piece will pop off with a nice, square end.
Cut a piece of the 1mm rod that is 3-4mm or so longer than your piece of tube. Glue this into the barrel hole you drilled in the first carbine.
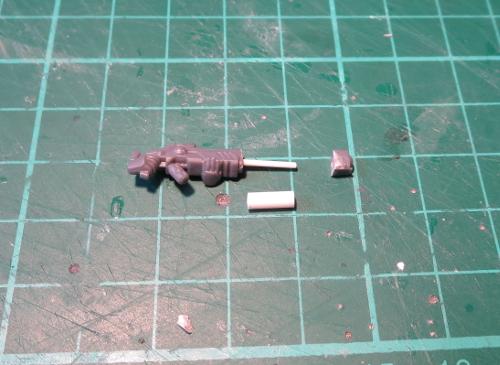
Check for length before gluing the rest in place - Slide the tubing over the 1mm rod, and then dry-fit the 2nd rifle barrel to make sure that it sits flush against the end of the tube. If necessary, either drill out the hole a little more or trim down the end of the rod so that everything sits snug, and then glue it all on place.
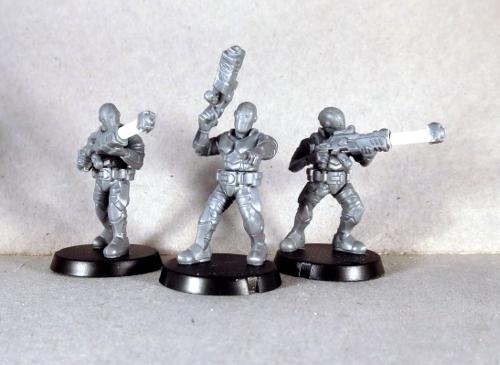
The finished unit, ready for painting:
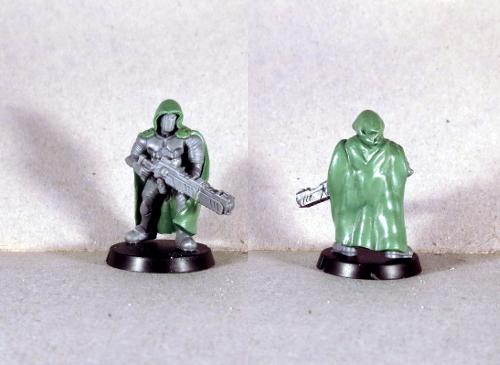
For an alternate take, I built the below version with a sculpted cloak and with a lance that uses one Pulse Carbine from the Trooper sprue, and a front half of a carbine from the Faction Expansion Sprue - that version of the carbine doesn't have hands modeled on, so is easier to use for this. This is a little less fiddly than the plastic tube version above, but doesn't stand out quite as much from the carbine.
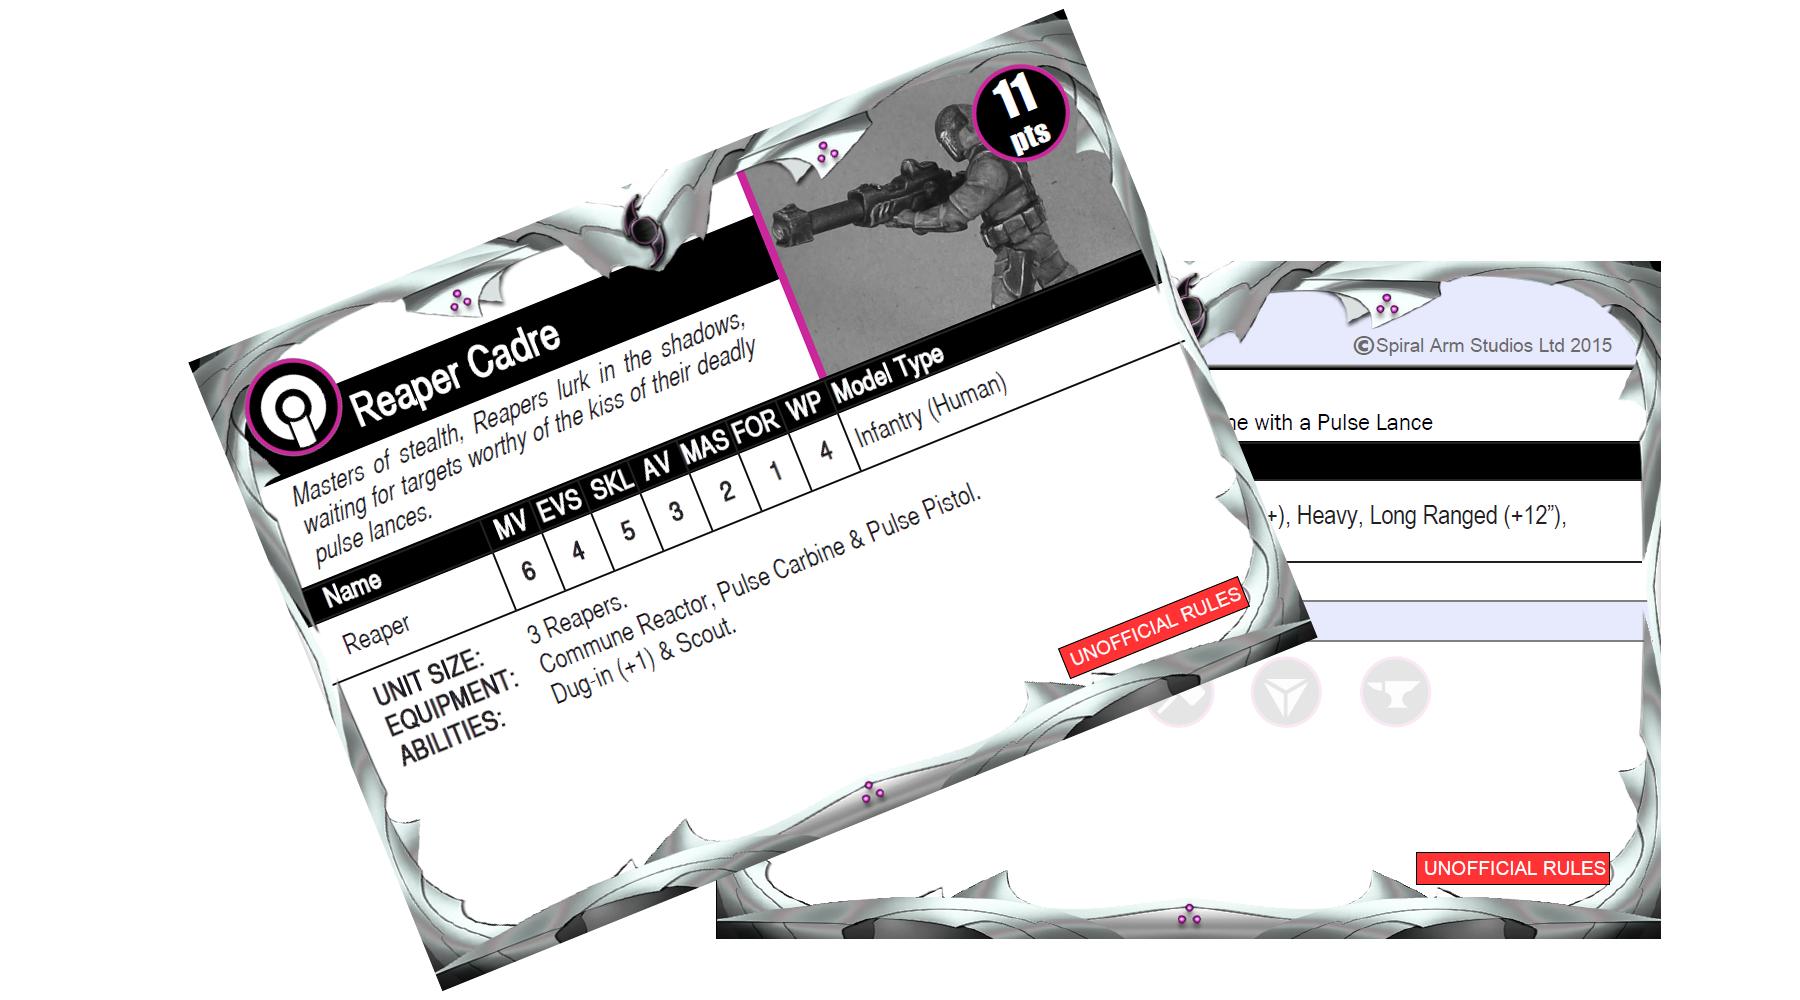
If you would like to use the Reaper Cadre in your own games, you can download an unofficial rules card here, and you can pick up the Karist Trooper kit needed to build it from the Maelstrom's Edge webstore here
As always, feel free to share your creations on the Comm Guild Facebook page!
For other Maelstrom's Edge modeling articles, including tutorials and walkthroughs of a wide range of different building and miniature projects, check out the article roundup here.
Tags: conversion karists modeling rules tutorial
Terrain Template and Tutorial - Bunker
Posted on Monday May 08, 2017 at 05:00pm in Tutorials
![]() - by Iain Wilson
- by Iain Wilson
A couple of weeks ago, I shared a template for building a small minehead structure from foamcore, cardboard and the Maelstrom's Edge terrain sprue. For something a little larger and more impressive-looking, I have put together a new template for a bunker. This builds on the basic design of the minehead to keep some design consistency on the table.

 You will need some 5mm or 6mm foamcore (either will work, although the roof piece will overhang the sides slightly with the thinner foamcore), some thin cardboard - around .5mm thick, PVA glue, and the Maelstrom's Edge terrain sprue. A sharp pencil, a steel ruler and a sharp craft knife will get you by for tools.
You will also need the building template, which can be downloaded from here: Bunker.pdf
From the terrain sprue, the following components are used: one of the small doors (either will do), three shutter windows*, two corner braces, the square hatch, and six of the long support struts.
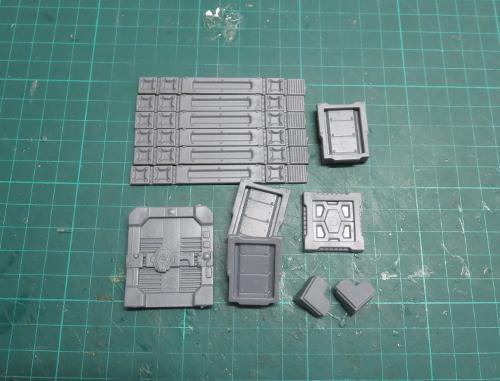
*There are only two shutter windows on a sprue, so you'll need to grab one of the windows from a second sprue. Alternatively, you can build the bunker without the rear window in order to stick to just a single sprue.
Print out the building template, and cut out the panels using steel ruler and knife.
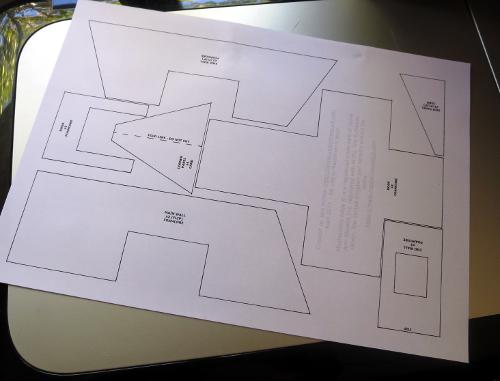
You can then lay the panels on top of the foamcore and card (the parts are labelled for which material they need) and draw around them with the pencil to transfer the outlines. The solid lines on the parts show where you need to cut.
You need multiples of some parts - the quantity required of each is listed on the part. Some parts also say '(flip)' after the quantity. For these, trace the panel once and then flip it over to trace the second. When cutting foamcore with a knife, the back of the piece can wind up a little rougher than the front, so flipping the template makes sure that you have two 'clean' surfaces for the outside of the building.
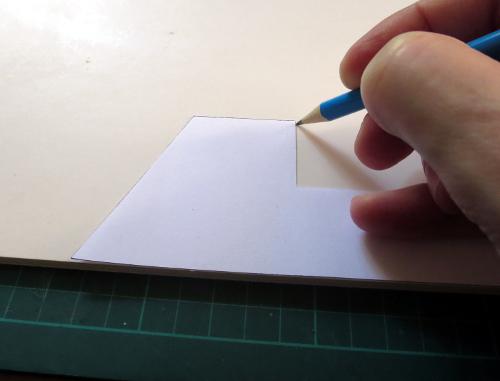
Once you have traced all of the parts onto the appropriate material, use the ruler and knife to cut them all out. If you have never cut foamcore before, don't try to cut through in one go. Lay the ruler along the line you want to cut, and then make several passes with the knife, working deeper as you go and being careful to keep the knife blade vertical so you don't wind up with a bevelled edge. If you're building the single-sprue version mentioned above, don't cut the rectangle out of the middle of one of the end wall pieces.
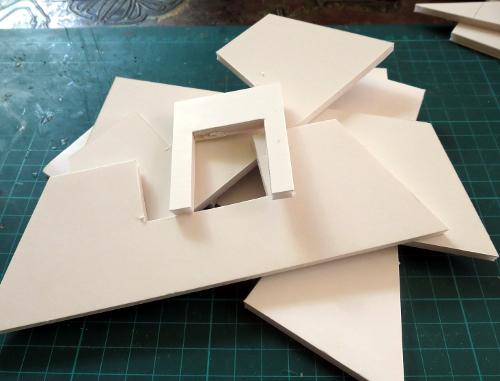
The end wall pieces lean inwards, so need to be bevelled at the bottom. Use a knife to cut an angled strip out of the back of the bottom of each of the wall parts.

There is a protrusion on the bottom of the shutter window that needs to be removed. Trim off with a knife or file it down on each of the windows so that the bottoms of the windows are flat. You can then glue the windows into the end walls. They sit angled out at the top, as below. The outer edge of the window frame sits flush with the wall at the bottom, while the back edge of the window should sit against the outside edge of the hole at the top.

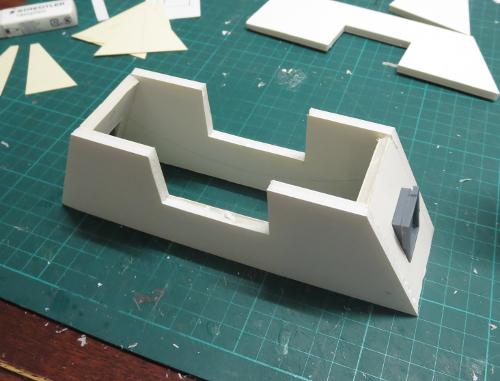
Take the two side wall pieces and two of the end walls and glue then together. The end walls sit inside the side walls, as shown below:
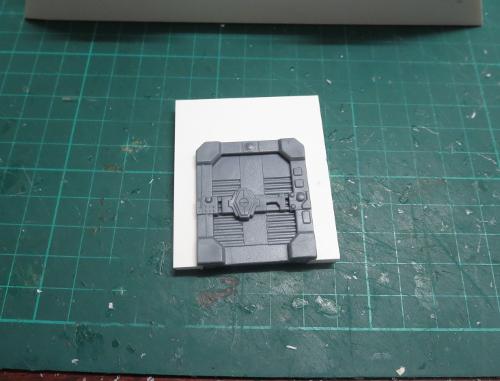
Glue the door into the door section.
Then take the door section, the third end wall and the two main walls and glue them together. The end wall sits inside the main wall sections, while the door goes across the other end, outside the main wall as below:
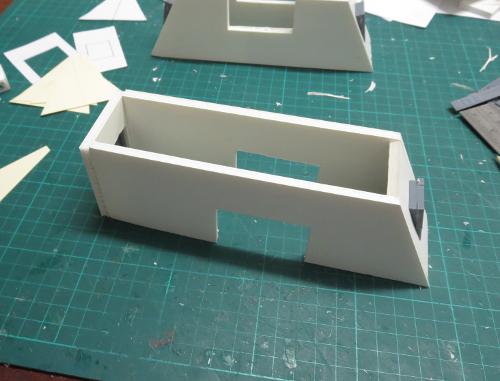
The two sections then slot together, and can be glued in place to form a t-shape.

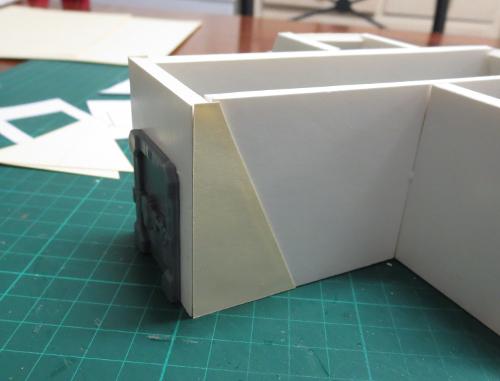
Glue on the side panels. These sit flush with the front of the door panel, to cover over the cut edge of the foamcore and to reinforce the joint.
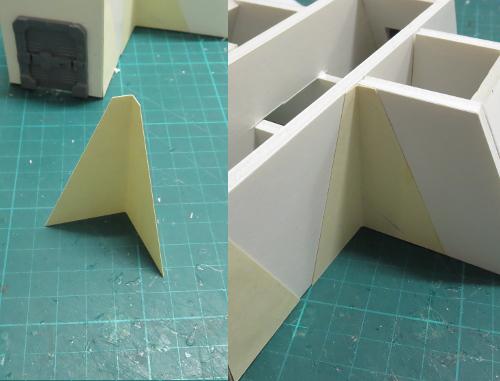
Fold the corner panels along the middle fold line, so that they form a 90-degree angle. These can then be glued in place into each of the inner corners of the 't'. You can use superglue for this step to speed things up a little, as there is no exposed foam to worry about. This helps to give the structure some rigidity while the PVA glue sets, and also covers over any messiness or gaps where the walls join.
The roof can now be glued in place.
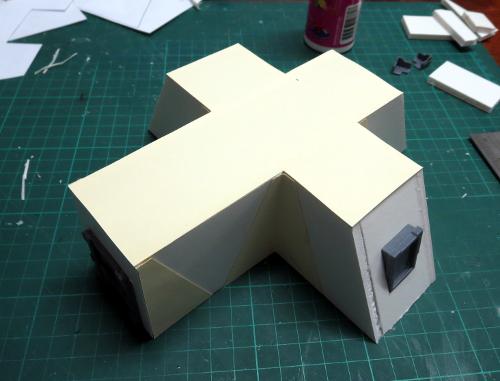
Glue the two corner braces in place on the roof corners above the door.

Take the support struts and cut off the vent and rivet strip from the end with a knife.
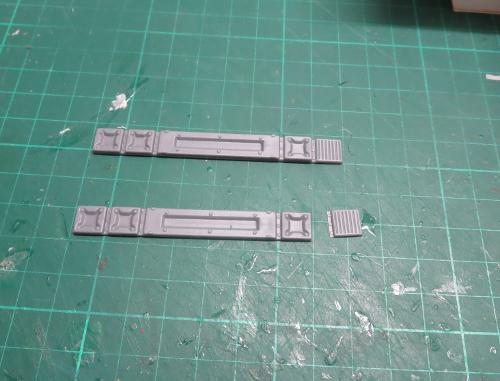
These are then glued onto the end walls, covering over the cut ends of the foamcore. The vent piece goes on the roof, with the rivet strip butting up against the top of the support strut.

Finally, glue the square hatch onto the roof, in the middle of the 't', and your bunker is complete.

Let the glue set, and it's ready for painting.

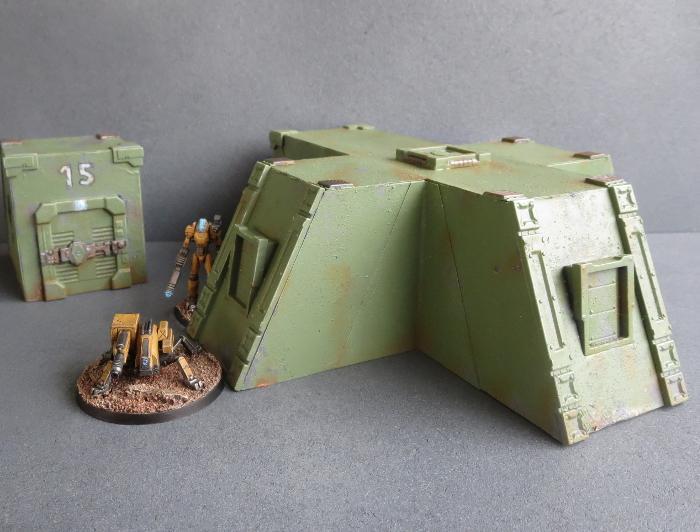
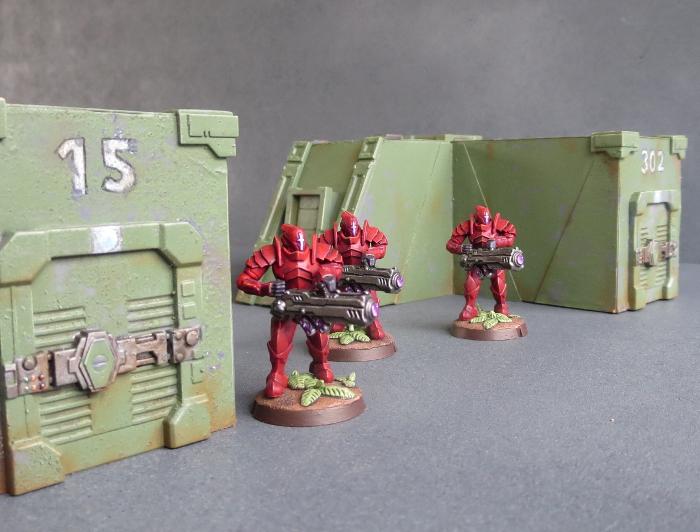
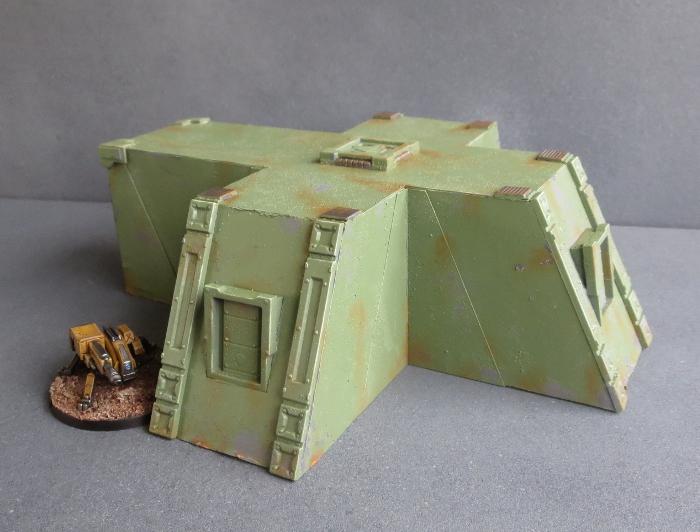
For variation, you could replace the door section with another angled end wall, leaving access through the roof or underground, for more of a fortified pillbox. Or you could stack the small minehead building on top, making a balcony above the door section for troops to stand on.
If you want to try it for yourself, you can grab the template from here and the Maelstrom's Edge terrain sprue from the webstore here. I'd love to see what others can come up with to do with the design, so as always please feel free to share your creations on the Comm Guild Facebook page!
For other Maelstrom's Edge modeling articles, including tutorials and walkthroughs of a wide range of different building and miniature projects, check out the article roundup here.
Epirian Scorpion Drone Conversion Tutorial and Unit Card
Posted on Monday May 01, 2017 at 05:00pm in Tutorials
![]() - by Iain Wilson
- by Iain Wilson
The humble Epirian Drone is a robot of many guises. It was designed as a modular core unit that could have an array of different weapons or motive devices in order to create specialised roles as required. So far in the game we have two of these variants: the Spider and the Firefly. I've had a lot of fun, however, thinking about ways to modify the kit to create other variants, and of the potential things that bored or desperate engineers on frontier worlds might come up with to make their drones fit new roles.
This week, I'm presenting one of the variants that I created: the Scorpion Drone.
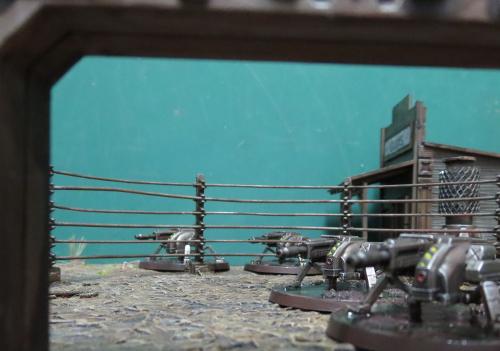
Armed with a hefty maglock chaingun, the Scorpion fills a heavy support role when there are no Hunters around to do the job.
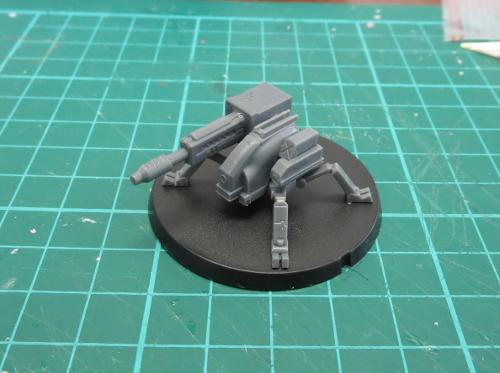
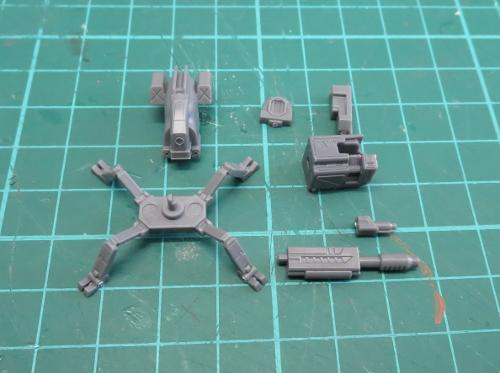
This is a fairly simple conversion, using most of a Drone (legs, chassis, left-side nacelle, rear plate, base) and a chaingun and left-side magazine unit from a Hunter - You could use the right side, but I've used the left as it is a leftover part if you build the Hunter with his hydraulic fist.
Using a sharp knife, cut the rectangular pod off the right side of the drone chassis.
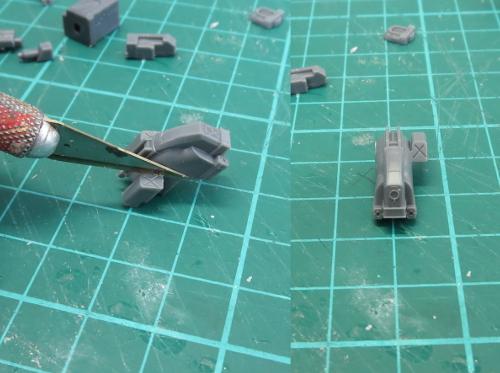
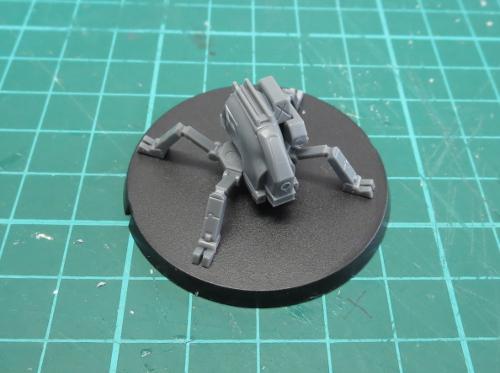
Assemble the drone parts as normal.
Assemble the chaingun with the magazine unit upside-down. This helps to conceal the elbow joint cavity, and means that the side glued to the drone chassis is the side with no detail on it.
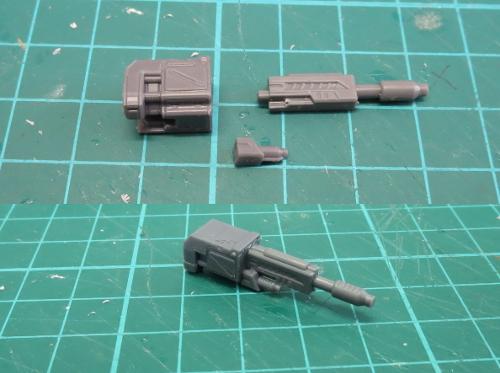
Glue the chaingun onto the chassis. It should sit with the rear of the magazine unit a couple of millimetres back from the rear of the drone, and the top of the magazine unit more-or-less level with the top of the rails on the chassis. The ejection port will line up with the rear left knee.
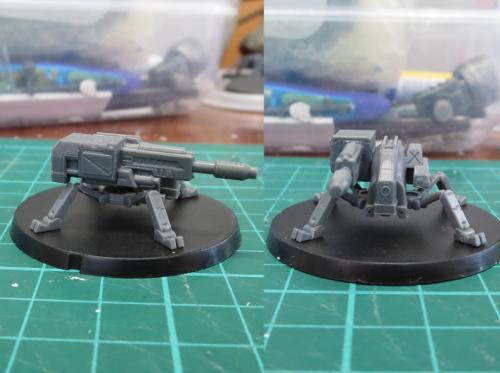
And that's it - job's done!

A couple of painted shots of the Scorpion in all its over-sized-weaponish glory:
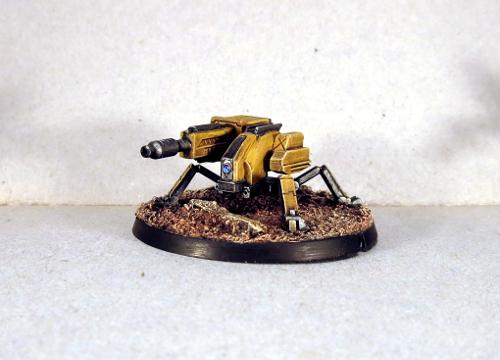
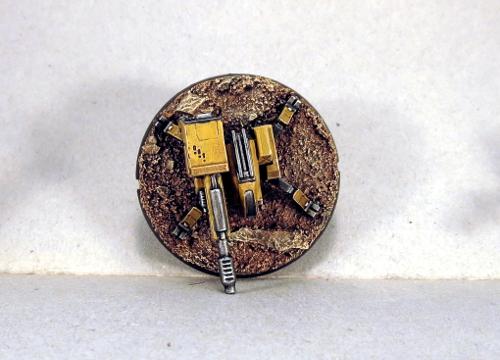
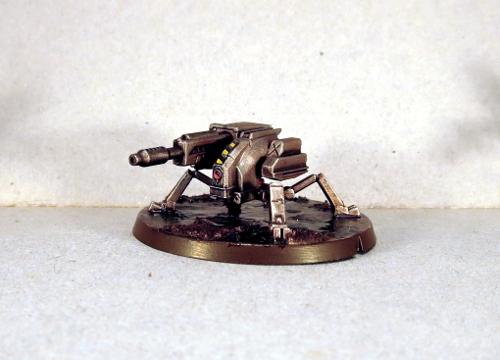
This was actually the second version of the Scorpion that I came up with. The first looked like this:
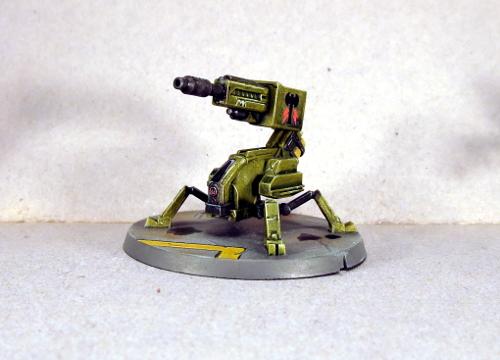
This version uses the chemtek sprayer from the Scarecrow kit to create more of a scorpion's tail for the weapon.
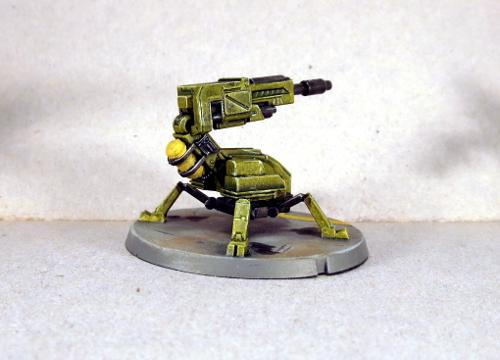
I decided to go with the second variant partly to make it an easier conversion, and partly because I thought the weapon mounted on the side looked a little more in keeping with the Maelstrom's Edge aesthetic. The tail is fun, but a little impractical.
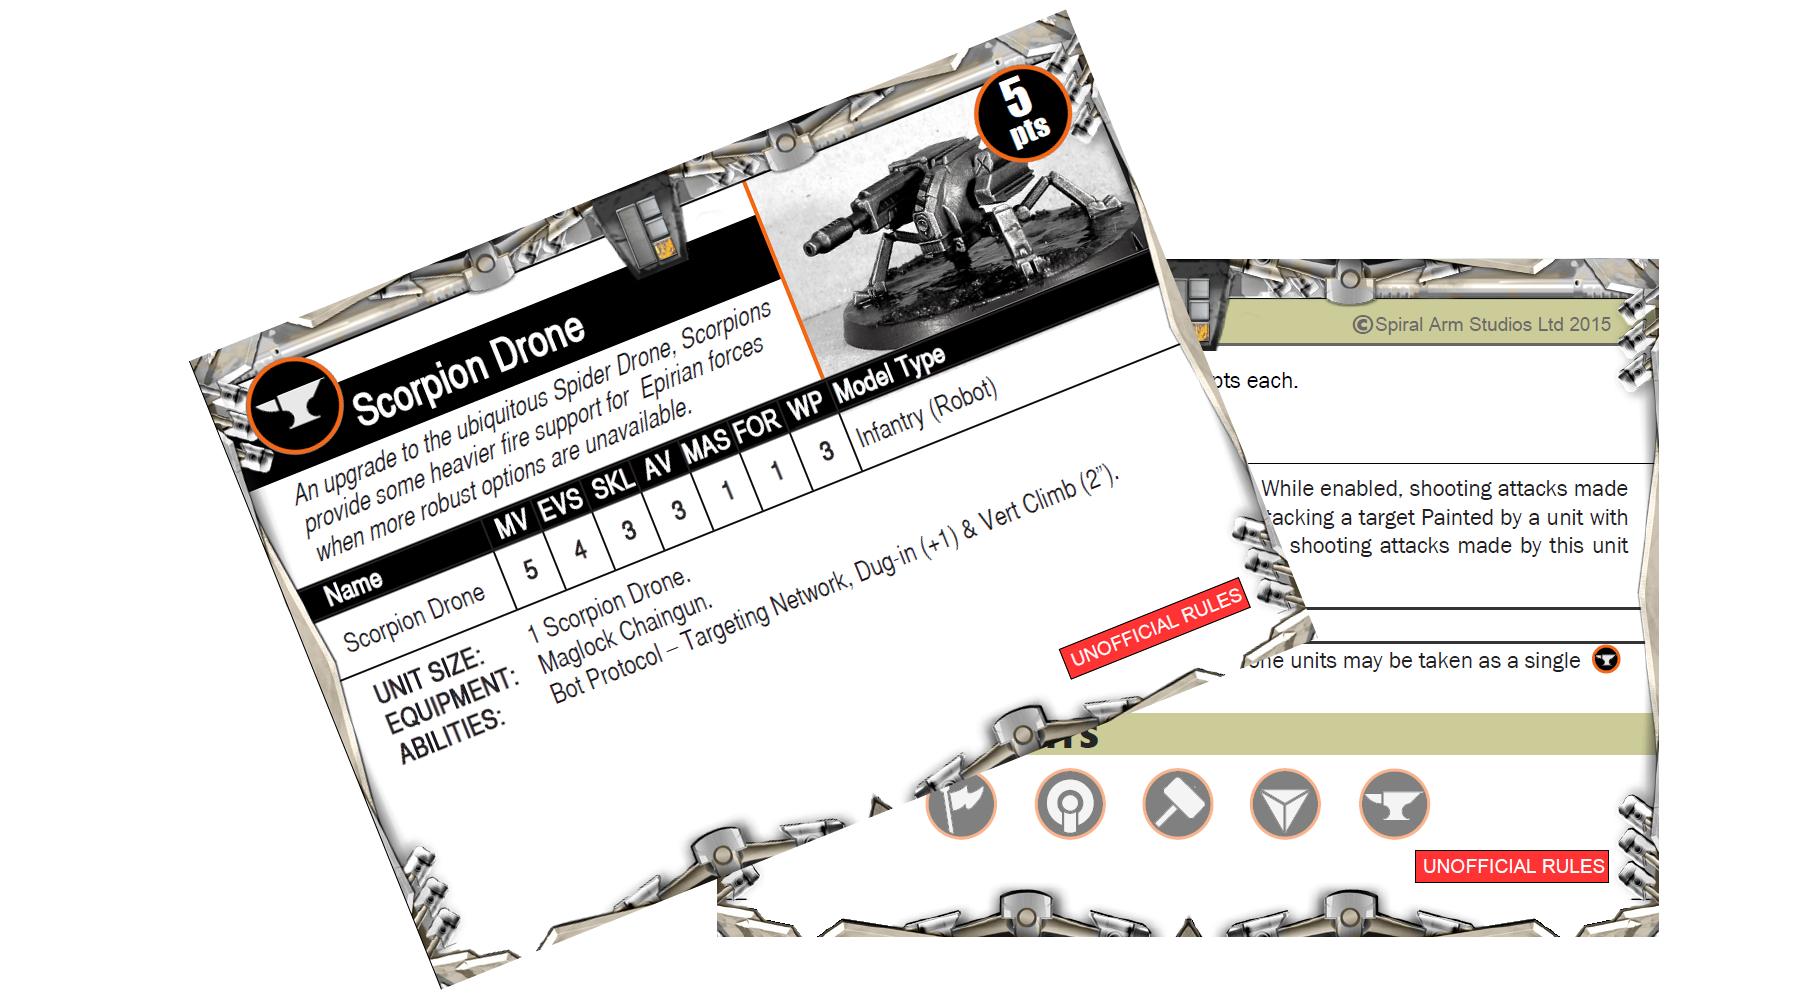
If you would like to use the Scorpion in your own games, you can download an unofficial rules card here, and you can pick up the Drone and Hunter kits needed to build it from the Maelstrom's Edge webstore here
As always, feel free to share your creations on the Comm Guild Facebook page!
For other Maelstrom's Edge modeling articles, including tutorials and walkthroughs of a wide range of different building and miniature projects, check out the article roundup here.
Tags: conversion drone epirian rules tutorial
