Entries tagged [model]
Maelstrom's Edge V2 - Updated Thunderbolt Sentry Drone
Posted on Friday Oct 21, 2022 at 05:00pm in The Epirian Foundation
 - by Iain Wilson
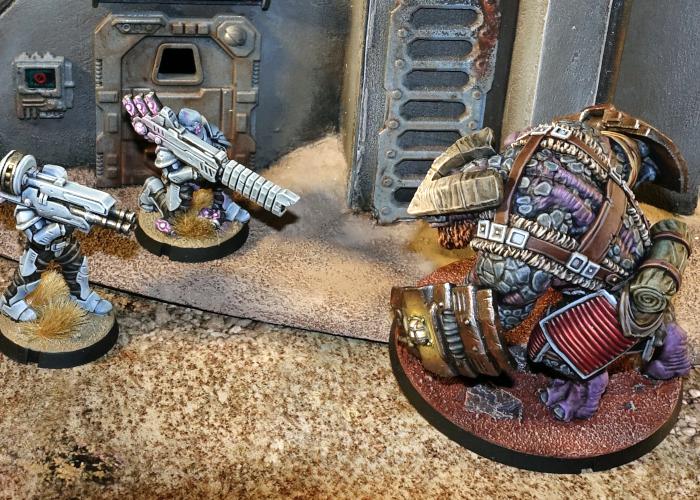
Alongside the slowly expanding Maelstrom's Edge model range and associated rules, we have from time to time released additional unofficial rules to accompany conversions or kitbashes of models borrowed from other ranges. When we tracked down the PDC Gaming gun carriage and added it to the webstore, we also released some rules to use it in your Epirian force as a Thunderbolt Sentry Drone. This week, we have updated the Thunderbolt rules for use in Maelstrom's Edge V2!
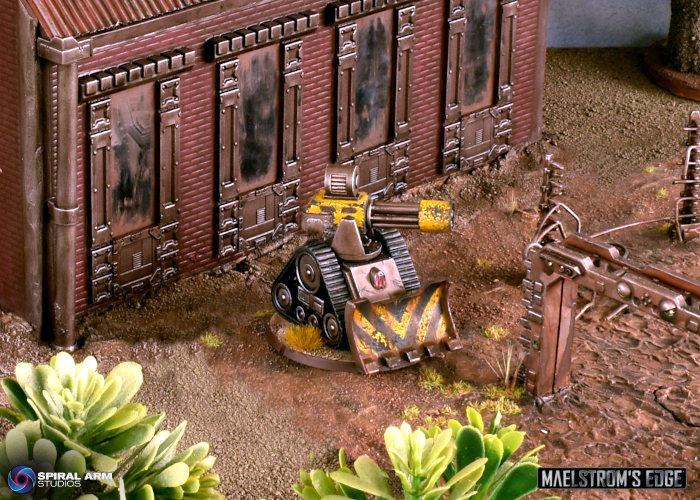
Thunderbolt Sentry Drones add some heavy firepower to Epirian forces, trundling around the battlefield and laying waste to enemy units with a range of different heavy weapons.
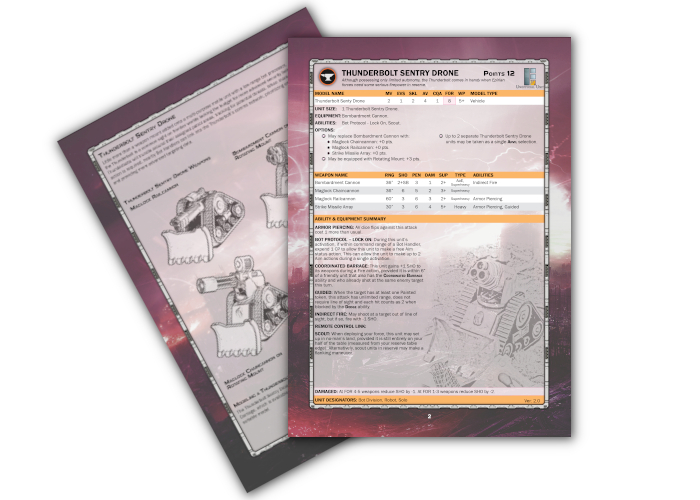
You can download the updated rules page for the Thunderbolt Sentry Drone along with the Maelstroms' Edge V2 Beta rules from the website here!
The Thunderbolt is a vehicle, and follows the rules for Large Models. Note that the section on page 27 of the Beta Rules entitled 'DIRECTIONAL MOVEMENT' has been removed from the final version of the V2 rules, so this section should be ignored.

To pick up your own gun carriage of superheavy doom, head over to the Maelstrom's Edge webstore here! You will find the gun carriage in the 'Terrain & Accessories' section.
What are you working on? We would love to see your models and terrain in the Comm Guild Facebook group!
For other building ideas, modeling tutorials, army spotlights and conversion walkthroughs, check out the Hobby section of the Maelstrom's Edge website here.
Model Spotlight: The Epirian Scarecrow
Posted on Tuesday Aug 23, 2022 at 05:00pm in Models
- by Iain Wilson
This week, we're taking a look at the multi-part, poseable plastic kit for the Epirian Foundation's feared security bot.
Scarecrows are area patrol units, designed to provide security to various types of property ranging from industrial perimeters to agricultural and terraforming facilities. Equipped with an advanced suite of thermal and motion tracking sensors, the Scarecrow is designed to detect and deter any non-authorized biological or technological intrusion into its designated patrol area.
The Scarecrow kit is designed to build a couple of different variants of this farming-bot-turned-military-asset, which lets you field the regular Scarecrow Sniper in a Hammer slot, or the Command Array-equipped Command Scarecrow leading an all-bot force. These can be armed with a shoulder mounted railrifle, and either a clingfire sprayer or chemtek sprayer on one arm.
If you 'borrow' a second clingfire sprayer (leftover from building a chemtek variant, obviously!) you can also build the twin-flaming Subjugator variant that often accompanies Contractor Suppression Teams.
The best part of the Scarecrow kit is its extreme flexibility. With separate ankle, knee, elbow and shoulder joints, the Scarecrow is our most poseable kit, and being plastic is a fantastic base for adding alternate parts and mixing things up even further.
To build your own implacable robot of avian-frightening Doom, pick up the plastic Scarecrows in a pack of two from the Maelstrom's Edge webstore!
While you're there, you can download the Maelstrom's Edge V2 rules from the Trial Rules section of the website here. The Beta rules documents contain all of the rules for playing V2 games, but keep in mind that these are just 'preview' documents - some rules may be revised based on feedback, and the final layout including background material for the factions and the Maelstrom's Edge universe, artwork and other 'flavor' material is missing.
For other modeling ideas, tutorials, army spotlights and conversion walkthroughs, check out the Hobby section of the Maelstrom's Edge website here.
What are you working on? We would love to see your models and terrain in the Comm Guild Facebook group!
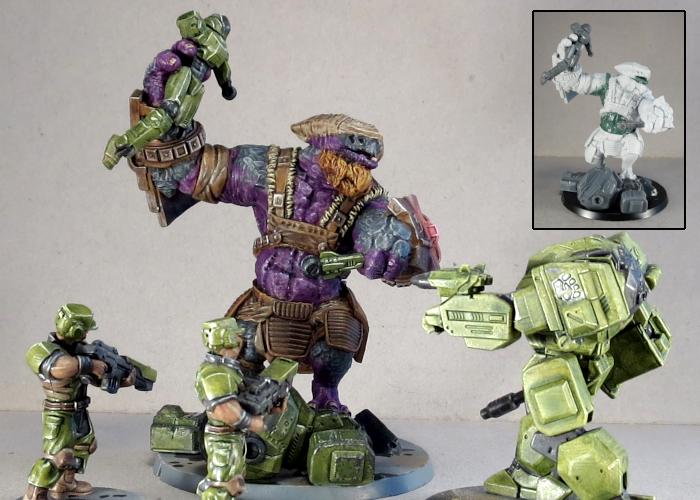
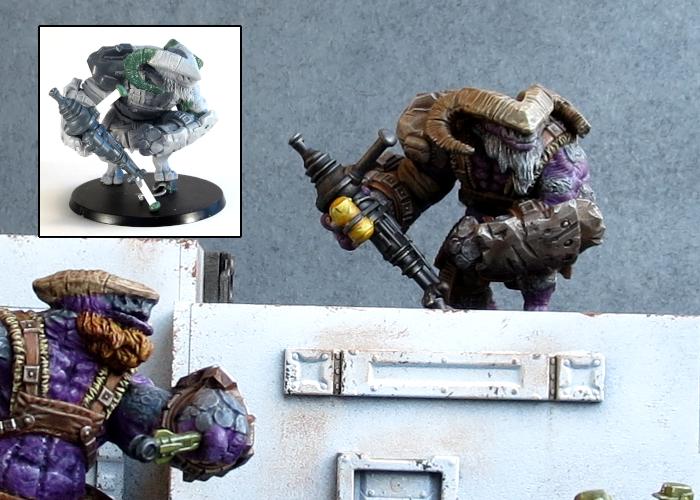
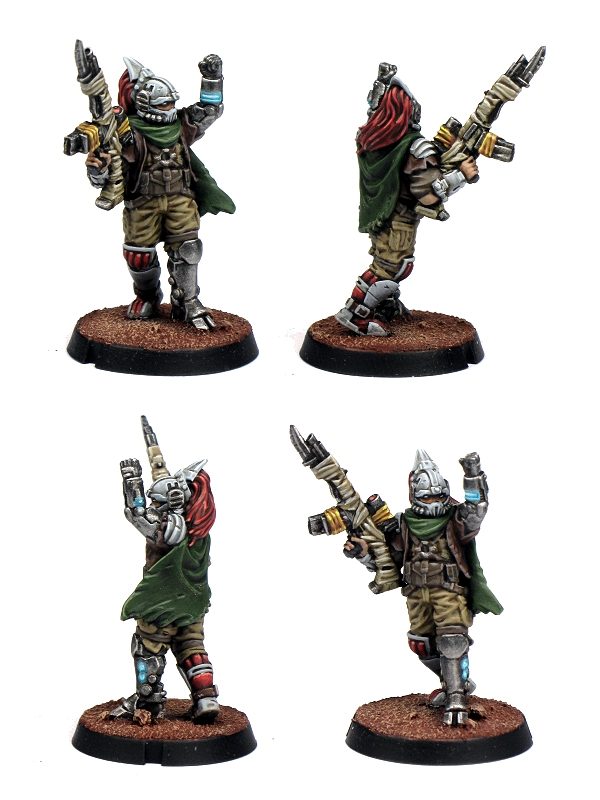
Model Spotlight: The Broken Gnolti
Posted on Tuesday Oct 05, 2021 at 06:00pm in Models
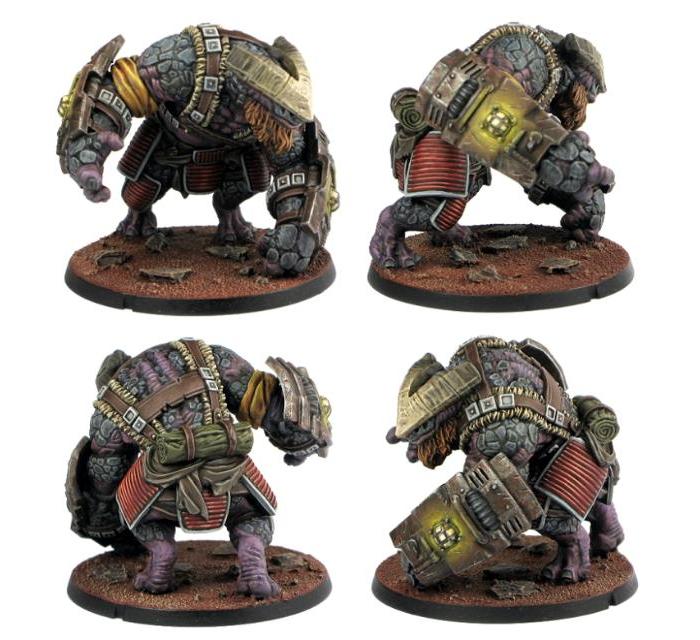
With its horned visage towering over the rest of its force, the Gnolti cuts an imposing presence on the battlefield. The resin Gnolti kit is one of our most popular, and makes for a fantastic centerpiece for any Broken force. Let's take a look at it!

Originally hired and transported to systems requiring extreme manual labour or exposure to elements lethal to humans, their normally calm, thoughtful temperament made Gnolti easy to integrate into human society. Gnolti are extremely loyal to those who treat them well, gladly risking themselves to protect their friends. Despite being incredibly useful, Gnolti are often denied berths on planetary evacuation ships due to their extreme size. Gnoltis have few opportunities to escape the Maelstrom, and stranded Gnolti are a common recruit into the ragtag warbands of the Broken, where their physical power can be a huge asset.
The studio Gnolti model, painted by Winterdyne Commission Modelling
The Gnolti's impressive physique is clad in makeshift harness and armour, its forearms covered by jury-rigged protective shields that it uses to protect nearby Broken units. The multi-part kit was sculpted for us by the resin techno-wizards at Anvil Industry, and cast in high quality resin.
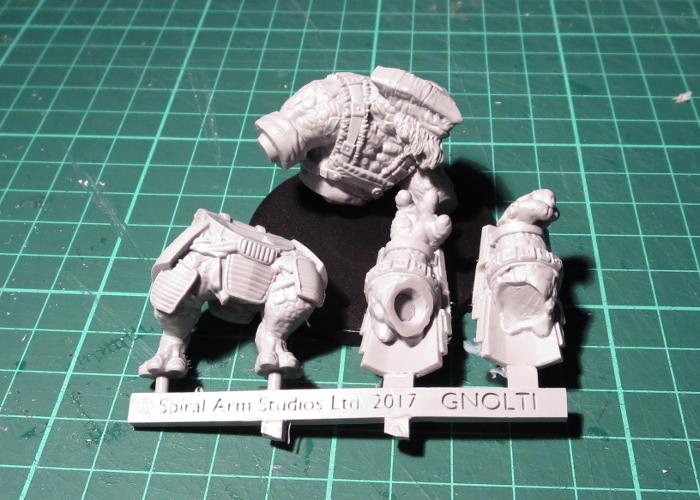
While the Gnolti kit is easy to assemble and impressive on the table, the resin is also easy to convert, which led to a few conversions that we've featured in previous articles:
Raging Gnolti
Gnolti Longhorn
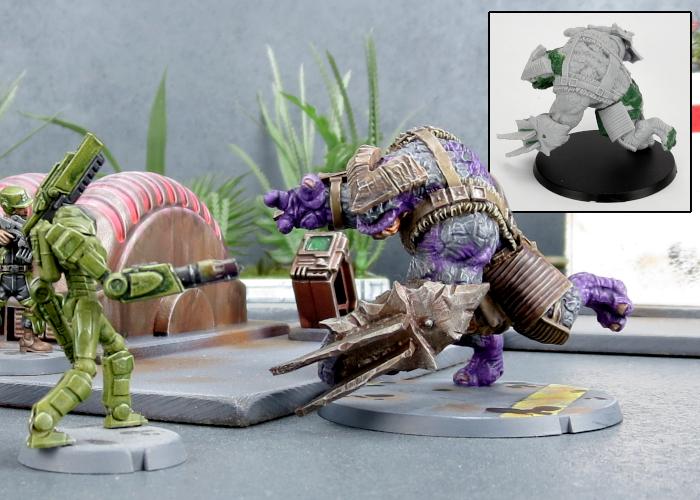
Gnolti Berserker
Pick up your own towering behemoth of muscly doom along with the rest of the Maelstrom's Edge range from the webstore here.
What are you working on? We would love to see your models and terrain in the Comm Guild Facebook group!
For other building ideas, modeling tutorials, army spotlights and conversion walkthroughs, check out the Hobby section of the Maelstrom's Edge website here.
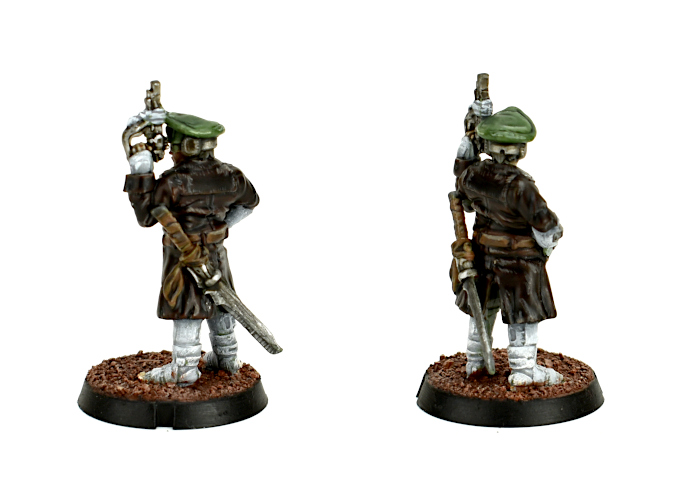
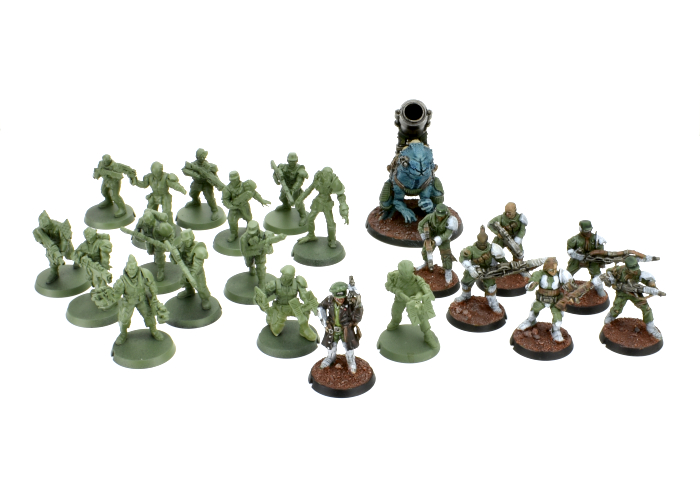
Painting Spotlight: Converted Broken Revolutionary Captain
Posted on Monday Aug 16, 2021 at 06:00pm in Tutorials
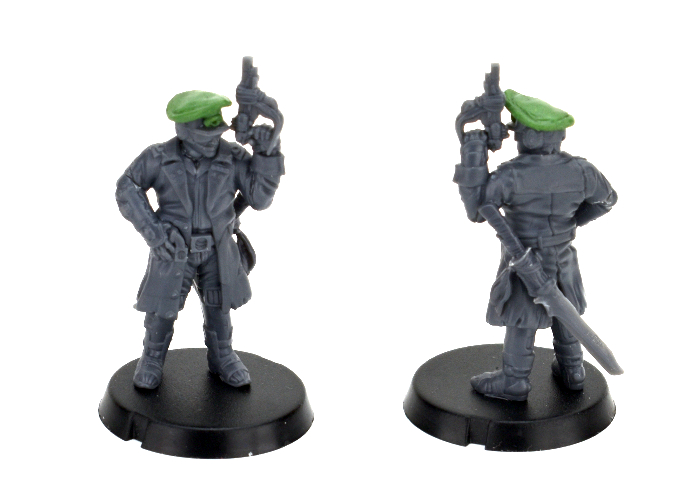
With the release of the Revolutionary Captain and Sniper models for the Broken, I couldn't resist the lure of that new army smell, and so I've been working away to put together a SARA force to sit alongside my existing Forsaken collection. The model I chose to lead the force was one that I showed back in the Conversion Spotlight article when the Revolutionary Captain was released, but this week I finally got some paint on him!
For those who haven't checked out the article linked above, this model was a conversion of the plastic SARA Captain model. The head was taken from an Epirian Contractor, with a hat added using 'green stuff' putty. I also gave him a sword built from a couple of chopped up weapons from the Broken Rabble sprue and a slightly reshaped Karist sword blade taken from the Faction Expansion sprue.

For this force, I chose to go with a colour scheme fairly similar to the Maelstrom's Edge studio model, using a lot of Army Green with white 'techy' bits. To make the Captain stand out a little more from the horde, though, I swapped out the studio model's green coat for a dark brown leather one. This was painted with Scalecolor Bosh Chestnut and several layers of Army Painter Dark Tone, before highlighting with Army Painter Leather Brown with a little Skeleton Bone mixed in.
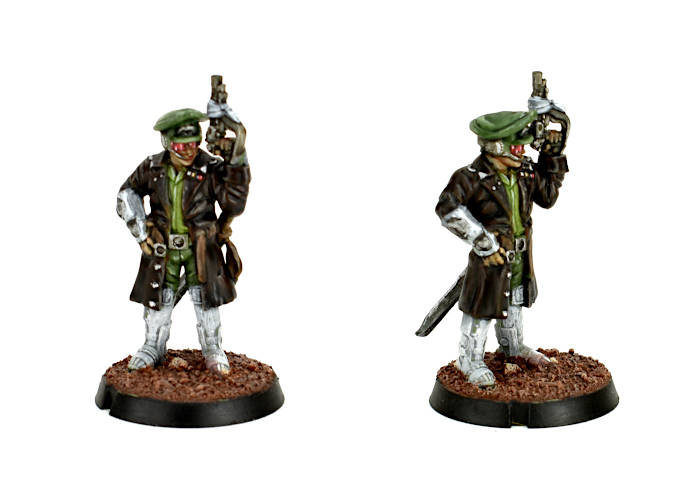
The rest of his uniform is Army Painter Army Green for the pants and hat, and Army Green mixed with Coat D'Arms Putrid Green for the shirt. These were washed with Army Painter Military Shader, and then the hat given two coats of Green Tone, before it was all highlighted with some more Putrid Green and Army Green mix. The metal was painted with Army Painter Plate Mail Metal and washed with Dark Tone and Strong Tone, with a Shining Silver highlight, while the white parts were given a coat of Army Painter Uniform Grey and then a heavy drybrush of white. It's a little rough up close, but quick and easy and looks suitably beaten up on the table!
The next job is to finish up the painting on the rest of his detachment, and then start on a second detachment so that I can work in a sniper or two!
To build your own army of revolutionary doom, you can pick up the Revolutionary Captain along with the rest of the Maelstrom's Edge range from the webstore here.
What are you working on? We would love to see your models and terrain in the Comm Guild Facebook group!
For other building ideas, modeling tutorials, army spotlights and conversion walkthroughs, check out the Hobby section of the Maelstrom's Edge website here.
Tags: broken conversion model painting sara
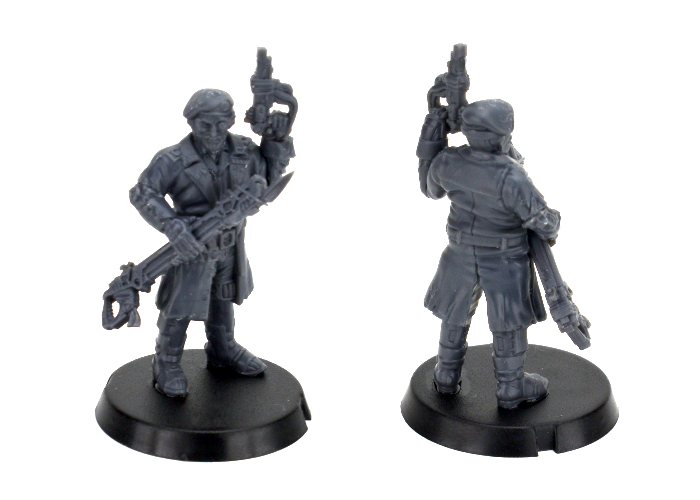
Model Spotlight: Revolutionary Captain!
Posted on Tuesday Jun 15, 2021 at 11:41pm in Tutorials
With the release of the Revolutionary Captain ushering the SARA subfaction into Maelstrom's Edge games, a range of new tactical options opens up for the Broken. I'll be sharing my fledgling SARA force in an upcoming army, but to kick things off I thought it would be fun to have a look at some modeling options for the fantastic Revolutionary Captain model!
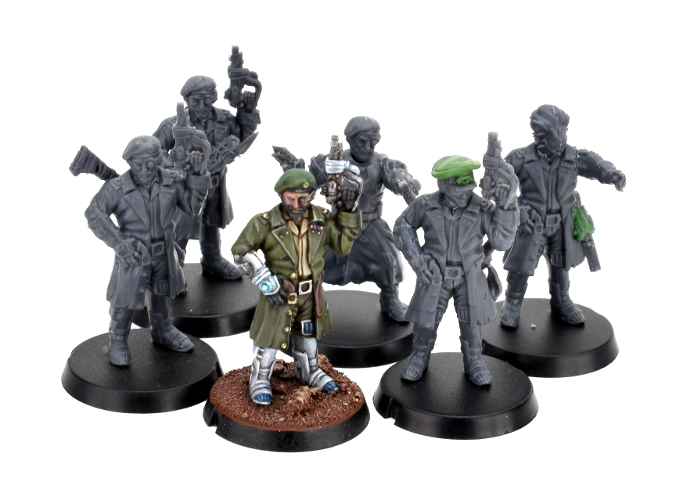
The Revolutionary Captain is a multipart, plastic model. He's not as modular as most of the Maelstrom's Edge model range, as the sculpt was in this case aiming for a specific character look. Being plastic, however, it's still relatively easy to give the model a more customised look if you feel so inclined, and I'll explore some different ideas for that below.
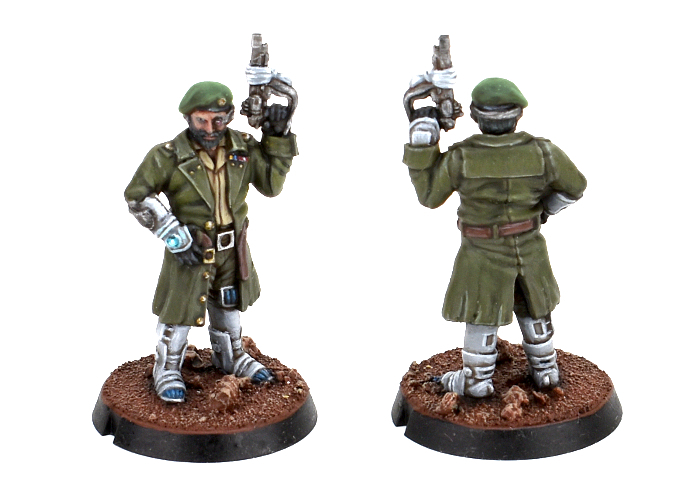
The studio model, painted by Winterdyne.
Built straight off the sprue, the Revolutionary Captain is equipped with his SARA Officer's Pistol. His rules card, which can be found here, gives him the option to take one of a number of different secondary weapons, which can mostly be sourced from the Broken Rabble kit. To equip a Beam Blastgun or Slug Rifle, the easy option is to just stick the weapon on his back. You could model a rifle strap from modeling putty, or just assume the weapon is held in place with a magnetic lock built into the back of his coat.
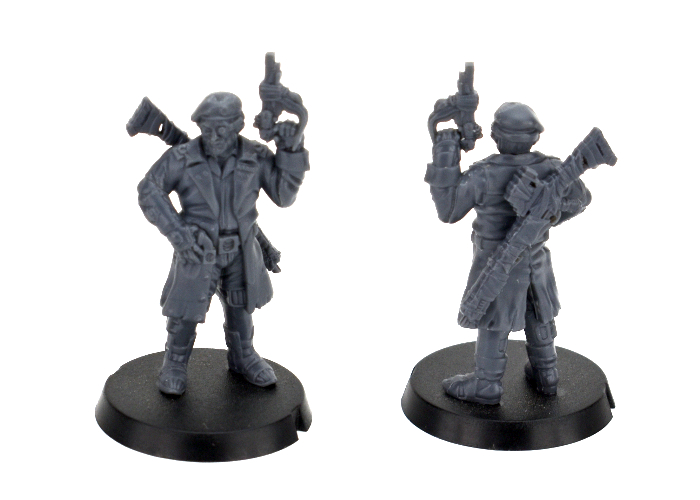
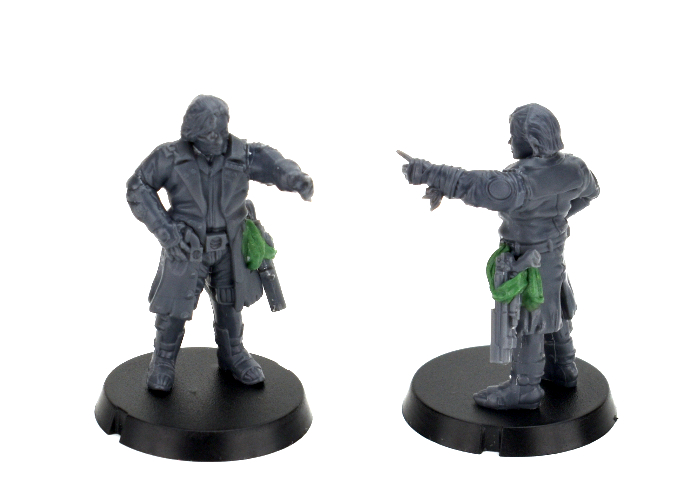
To take a more hands-on approach, for this version I sliced off his right hand, and used a forearm snipped from a Rabble sprue arm to hold the blastgun. As it still sits against his waist, there's no need to try to resculpt the coat belt where the hand was removed, as you can't see it anyway.
Of course, everyone knows that battlefield commanders spend a good amount of their time pointing at things. If your commander isn't either pointing at something, or standing with one foot on something, people might not even recognise them! By slicing off the Revolutionary Captain's left arm at the coat's shoulder seam, I was able to glue a pointing arm from the Rabble sprue in its place. I also replaced the head with a regular Rabble head by drilling out the neck a little with a 2mm drill bit, and glued a maglock pistol from the Epirian Contractor kit onto her hip with some strapping made from 'Green Stuff' putty to replace the officer's pistol. The putty isn't strictly necessary - you could easily just glue any of the Captain's pistol options to the belt, but the addition of the putty strap does make it look a little nicer on the model.
Of course, there's no reason for only humans to be revolting! With the neck drilled out as above, you can use any of the alien heads from the weapons sprue in the Rabble kit to create a xeno force commander.
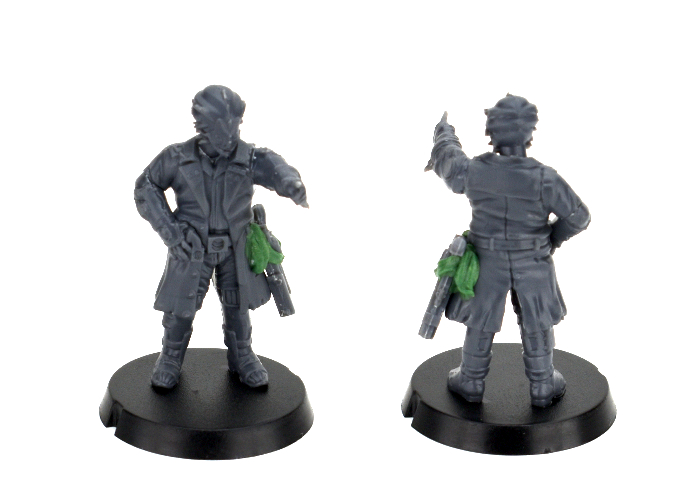
While we're replacing heads, some Captains like a nice, sensible cap in place of a beret, so for this one I used an Epirian Contractor head (mostly for the sunglasses!) and built the cap up into an officer's hat using Green Stuff. I also added a melee weapon on his belt using part of a Karist sword from the Faction Expansion Sprue and bits from a couple of weapons on the Rabble sprue. This could easily represent either the Poisoned Blade or Trophy Melee Weapon. For a slightly easier option, you could just use the Karist sword or knife from the Faction Expansion sprue. The resin Forsaken Chieftain also comes with both of these melee options, so if you have that model you could use whichever one you didn't use on her for the Revolutionary Captain.
Of course, if you're hacking up your Revolutionary Captain model to replace heads and weapons, this leaves you with some useful parts to build another Captain to lead a second Detachment! For the below model, I used some parts from the Rabble kit (legs, arms and beam pistol), the left hand and head from the Revolutionary Captain, and a torso from the Epirian SecDef kit just to help him to stand out a little more from the Broken horde.
To build your own army of revolutionary doom, you can pick up the Revolutionary Captain along with the rest of the Maelstrom's Edge range from the webstore here.
What are you working on? We would love to see your models and terrain in the Comm Guild Facebook group!
For other building ideas, modeling tutorials, army spotlights and conversion walkthroughs, check out the Hobby section of the Maelstrom's Edge website here.
Tags: broken conversion model modeling sara spotlight tutorials
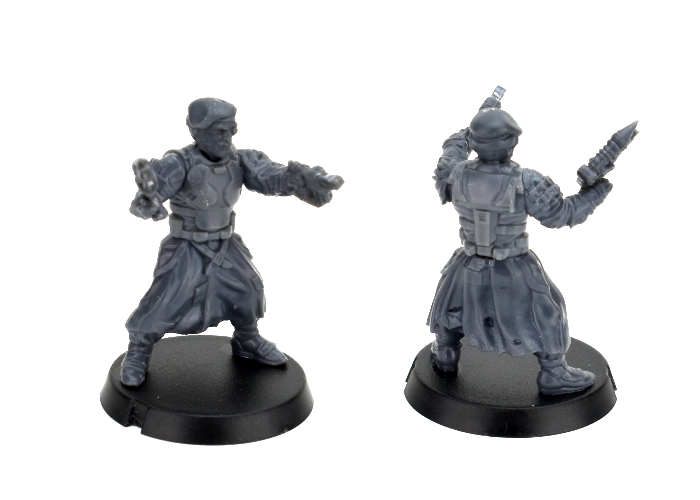
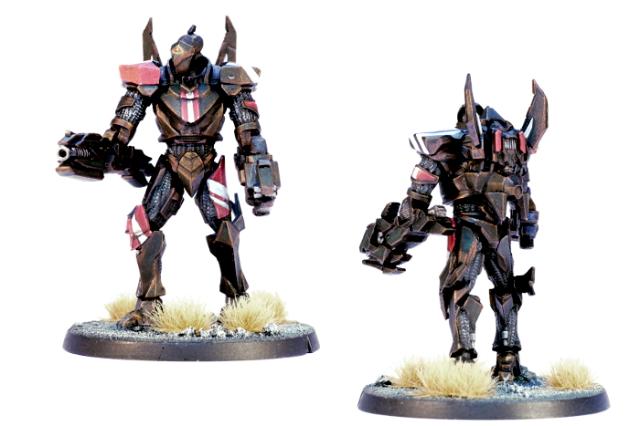
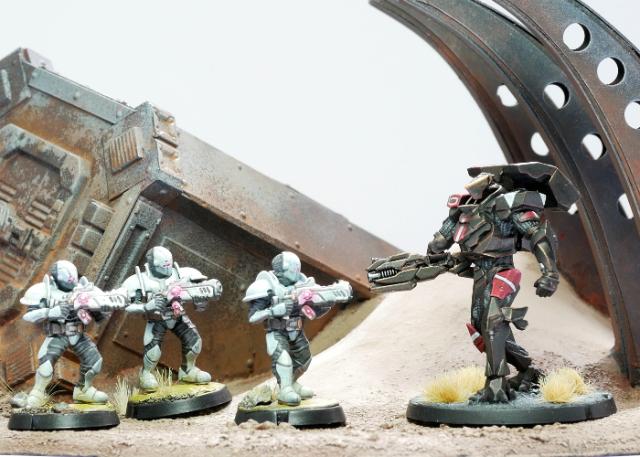
New resin release: Epirian SecDef Lieutenant
Posted on Friday May 24, 2019 at 05:00pm in The Epirian Foundation
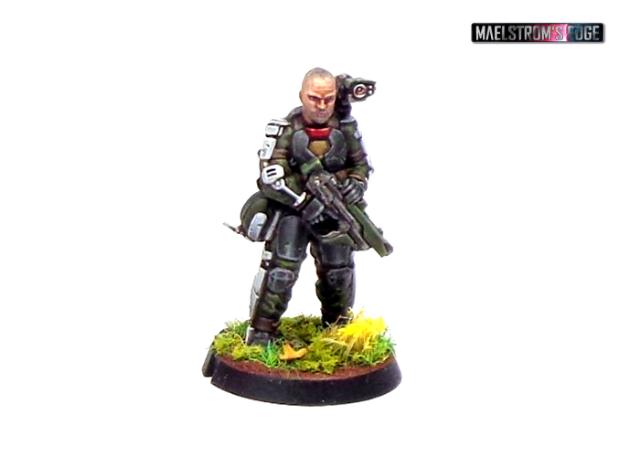
Anyone underestimating a SecDef lieutenant is about to pay dearly for his mistake. Promoted from amongst the most capable veteran sergeants, SecDef lieutenants are level-headed combat experts on both a tactical and strategic level with extensive financial and material resources to hand. Often taking on the most difficult (and therefore highest paying) missions with their platoons, the aim of most lieutenants is to accrue enough backpay to purchase a field commander commission, and the heavy combat rig that goes with that position.
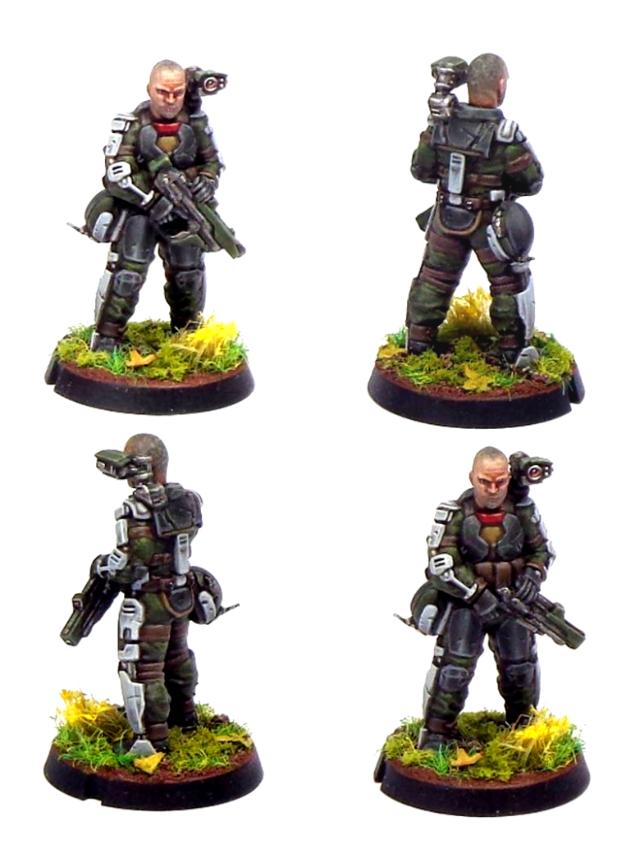
While technically tasked with safeguarding the same corporate goals as every other Epirian division, issues can arise when SecDef units are forced to cooperate with Bot Handler commanders in the field. Their philosophy, character and approach are almost diametrically opposed to that of the average Handler. The SecDef's innate distaste for bots results in them having little faith in the abilities of their robotic allies, having seen them fail once too many in their long careers where they believe proper SecDef infantry would have got the job done. Nevertheless, they are professional enough to let the deadly Hunter Warmechs profit from their shoulder-mounted target designator. Many a foe has perished under a hail of strike missiles shortly after a SecDef lieutenant is inserted into enemy lines, quickly identifying and painting the largest threat.
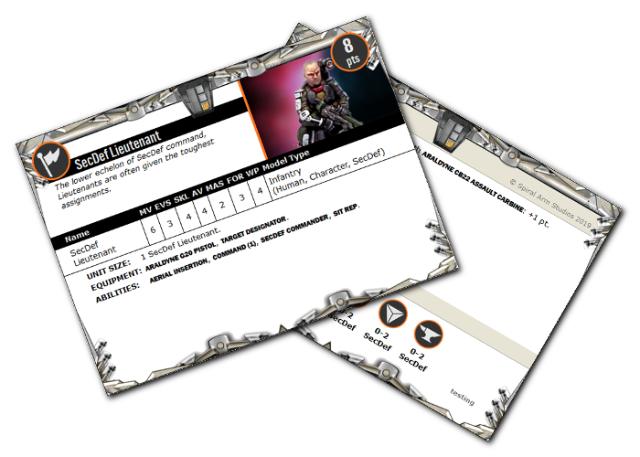
SecDef Lieutenant Rules Card
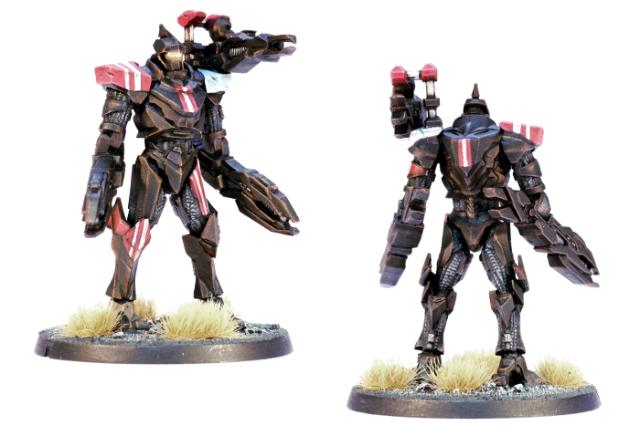
Modeling Spotlight: Remnant Militus Battlesuit
Posted on Monday Apr 15, 2019 at 05:00pm in Tutorials
- by Iain Wilson
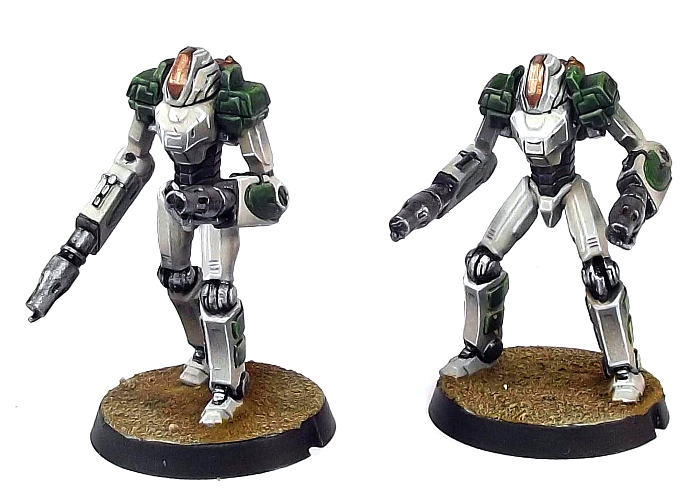
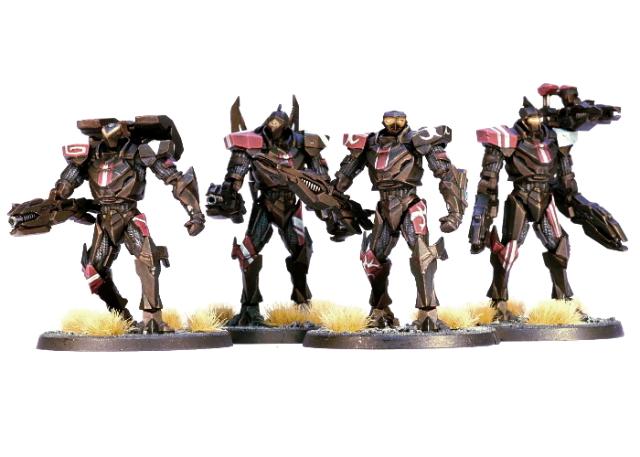
This month saw the release of a new faction, and a fantastic new multi-part, plastic kit for Maelstrom's Edge, in the form of the Artarian Remnant's Militus battlesuit. For this week's modeling article, I thought I would take a closer look at this kit and see what I could make with it.
The Militus kit comes with a single plastic frame, which includes one battlesuit, two each of the different ranged weapon options, fist and reflex shield options, two different shoulder pad options, two different backpack options, and more heads than you can poke a shock baton at, to allow for some very easy customisation between your different suits.
The Militus is fully articulated, with ball joints at ankles, knees, hips, elbows and shoulders, which allows for a wide range of posing options. The ranged weapons also have a multi-part gimble arrangement which allows both arm-mounted and shoulder-rig weapons to be positioned just how you want them.
As an alternative to the standard shoulder rig, you can leave the vertical arm off and flip the weapon over, attaching the gimbal directly to the shoulder pad.
As a handy extra, the connection point for the weapons onto the gimbal is a very snug fit, which actually allows you to leave the weapon unglued and just push them into place, so that you can switch between weapons as desired between games. Likewise, while the forearm-and-hand option uses a different upper arm to the ranged weapons, the shoulder joint is a tightly fitting ball and socket joint, so if you glue the shoulder pad on to the torso without gluing the arm, you can carefully wiggle the arms in and out of the shoulder socket to swap them.
The saw blades on the above suit are not from this kit, but came from a Warhammer 40000 ork vehicle, used here just because I thought it looked awesome!
The backpack options (a field generator and a jump pack) also slot on, fitting neatly over the suit's back. These aren't quite as snug as the shoulders, but you could easily leave them unglued and attach them when you want them with a little blue-tac or similar poster adhesive.
The fantastic thing about plastic, of course, is that it is simple to modify. So if the already wide range of posing available to the suit doesn't quite get it where you want it, it's an easy job to trim the joints a little to push them out even further. The below suit was posed by removing the top edges of the thigh armour plates, trimming the edges of the hip socket and leaving off the triangular piece that fits into the back of the shin.
Lorican Champions are highly individual souls, and love to customise their suits. For this reason, the frame includes a bunch of different heads, and we will be releasing a resin upgrade pack to add some extra options in the near future. You can also look at other 28mm resin add-ons for more distinctive customisation - the heads on the suits are more or less human-sized, although you may need to fill the neck socket with some putty. The below suit was customised with an assortment of resin parts I had laying around from an old grab bag. His weapon drone (representing a shoulder mounted weapo, rules-wise) was made from a chopped up jump pack.
Finally, you're likely to wind up with a bunch of extra heads after you have finished building your suits. As mentioned above, these are human-sized, so that opens up all sorts of potential for customising your troops from other factions!
What do you have planned for your Militus suits? Feel free to pop along and share your work, or ask any Maelstrom's Edge- or hobby-related questions on the Comm Guild Facebook page!
You can pick up the Militus suit along with the rest of the Maelstrom's Edge model range from the webstore here.
For other Maelstrom's Edge modeling articles, including tutorials and walkthroughs of a wide range of different building and miniature projects, check out the Hobby section of the Maelstrom's Edge website here.
Tags: conversion militus model modeling remnant spotlight tutorial walkthrough
New Faction & Plastic Release: The Artarian Remnant!
Posted on Sunday Apr 07, 2019 at 12:00am in The Remnant
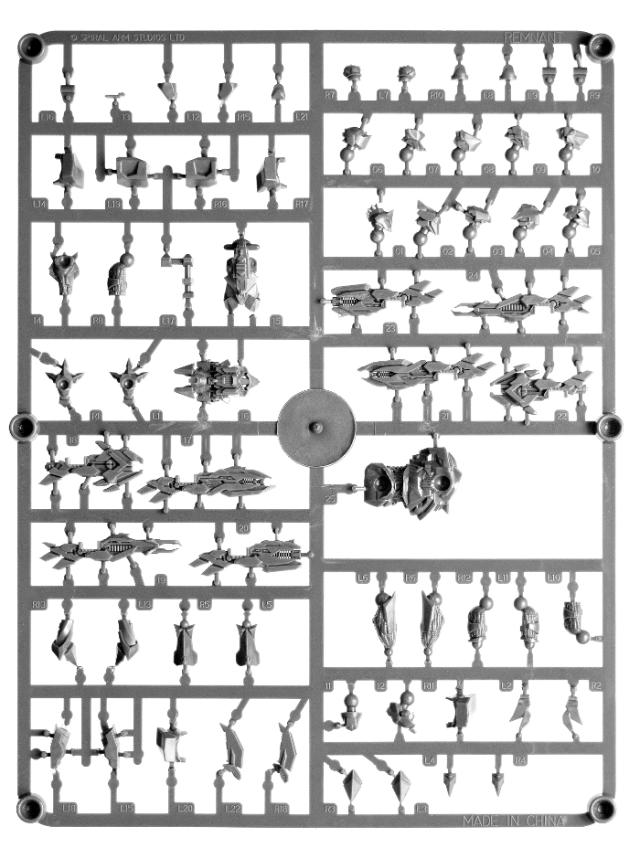
Spiral Arm Studios are thrilled to present our latest plastic kit: The Remnant Militus Battlesuit! This is the first kit for the Artarian Remnant, the newest faction to join the fray at the Maelstrom's Edge.
Lorican Combat Suits are the pinnacle of Artarian engineering, allowing a House Champion to have the utility and fighting prowess of many soldiers or workers. Each suit wearer is virtually a one man army, equipped with light but incredibly strong alloyed armour plating that is adapted from the same technology that is used in Remnant ship hull plating. It can absorb heat based weapons and even use it to recharge the suit's systems. The armour is quite capable of deflecting even heavy calibre ammunition, and is fully adapted to work in vacuum or underwater.

Each suit is assisted by sophisticated motion predicting micro-servo motors to give them unparalleled strength and mobility, moving with ease through dense terrain and being able to punch holes through conventional armour. Every suit also boasts a wealth of sensors including friend or foe recognition, communications frequencies, target acquisition and capability calculation, capable of identifying weak points on the target and providing suggestions as to what weapon to attack it with. All suits are slaved with targeting and intelligence information from the insertion ships in orbit, providing a strategic overview, co-ordination between strike teams and immunity to ambush.
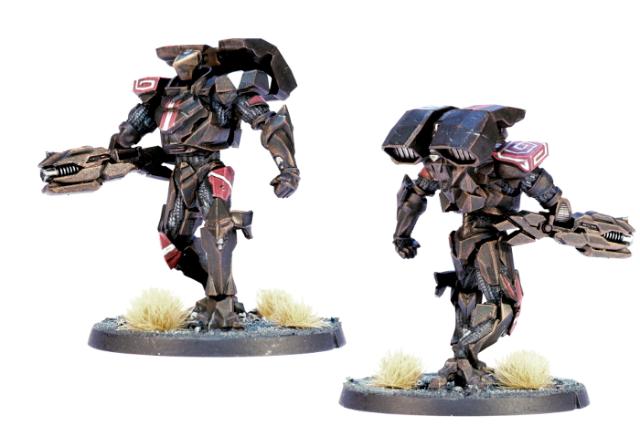
The suits are powered by a miniature tritium energy cell, and are good for several months without recharging. This powers all suit subsystems including medical diagnostic systems which will seal over wounds including resorting to removal of limbs if necessary, and supply painkillers, stimulants and medication as required. The armour will also recycle bodily waste and their occupants can survive for weeks without resupply, although the experience would not be particularly pleasant.
The standard 'Militus' class suit forms the core of most Artarian fire teams. They can be equipped with a range of different, high-powered weapon options and are also often fitted with protective field generators or jump packs for extra mobilty.
This kit contains a single, mulitpart Militus suit on one plastic sprue, along with a 45mm plastic base.
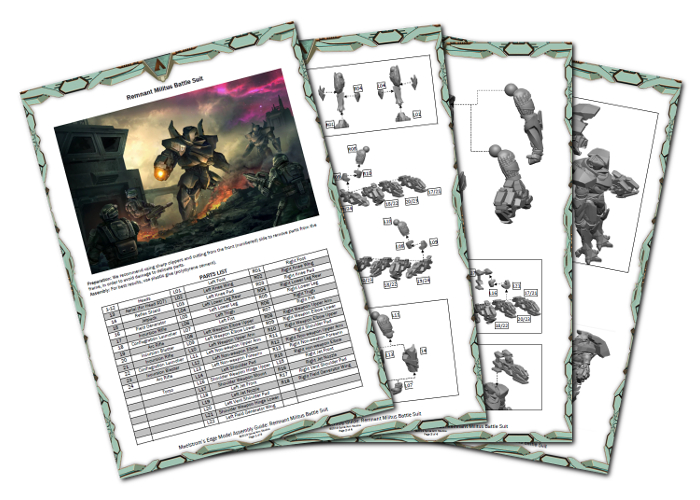
To get you building, you can find assembly instructions in PDF format here.
The Militus kit is available now from the Maelstrom's Edge webstore. Faction rules are still being finalised, as the other models for the Remnant are still being developed, but will be added to the website as soon as they are ready to go!
New Forsaken Tech Chieftain now available!
Posted on Thursday Aug 02, 2018 at 05:05am in The Broken
The Forsaken are commonly dismissed as simple, degenerate pirates, but the truth is that they usually attack only out of necessity. Piracy is many times the only way their community can survive a hostile galaxy: stealing food, fuel, ammunition and anything else of value they can get their hands on. The Forsaken rarely send out their forces en masse, knowing that a single crushing defeat could mean the end of their entire tribe's existence. Instead, they strike in small patrols, typically led by a Chieftain.
Though a Chieftain is granted his or her position of authority by The Assembly, they must first earn the respect of their fellow Forsaken to even be nominated. A Chieftain must be equal parts fighter, diplomat and cunning tactician. Knowing that their forces can never win a stand-up fight against a prepared opponent, a Chieftain leads his warriors to strike unseen from the shadows, quickly fading away before the enemy can root them out and respond in kind. Many an opposing force has underestimated the ingenuity of a Broken force led by a Chieftain, only realizing too late their folly, as improvised booby traps decimate their defensive positions and Broken secretly approach from their rear.
The appearance of a Chieftain can vary wildly both based upon the culture of their original homeworld, but also from that of the Broken Freeport they are now a part of. Chieftains tend to have slightly nicer clothing and equipment than standard Broken rabble, and many see it as almost their duty to show that even amongst the ranks of the Broken, an individual can still rise up and carry themselves with dignity and class. When the Broken do manage to defeat an enemy officer with particularly fancy clothing or an heirloom weapon, a Chieftain will confiscate these valuable items. A Chieftain wears these purloined treasures into battle, as both a reminder of their past victory, and to display their status as an iconic Broken leader.
This high detail monopose resin model comes with two different weapon options for the right hand - a customised slug rifle or a customised beam blastgun, and is available now from the webstore here! You can also find the updated rules for this model in the Force Builder section here.
Assembly Guide - Epirian Secdef
Posted on Wednesday Jul 04, 2018 at 05:00pm in Tutorials
We are very proud to announce the immediate availability of our latest plastics - the Epirian SecDef. These guys have exo-augmented armour, allowing them to be a much more powerful and effective fighting force than their contractor allies.
Available now at https://www.maelstromsedge.com/store/41/3x%20Epirian%20Secdef%20Infantry, along with details of their history and background.
Below, you can find instructions for assembling these great new models!
Assembling Epirian Secdef
General Notes
Polystyrene cement - only use superglue if you want to go insane! All of our models are designed to be assembled with polystyrene cement as it gives some time to re-pose while gluing, fuses the models together and prevents brittle joins like other glues do. Make sure you have polystyrene cement in your toolkit before you begin!
We want you to experiment! We've broken our models up into lots of parts and given a fair few spare parts so that you can push yourself out of your comfort zone, learn new skills and create some really unique models. We've tried to price things so that it won't break the bank if you make a mistake, so please cut stuff up and have some fun. Start simple with a slice here and a re-pose there, and watch your confidence and skills increase until you are a master modeler!
Basing - Always make sure you glue your model to its base with an eye on the arc markers on the sides of the base. The arc marker indents should be at the halfway point between the front and back of the model to show the front and back halves of the model when gaming. See the Maelstrom's Edge rulebook for more detailed notes on this.
Dry fit before gluing! - There are lots of pose options possible, but that means there is also the freedom to screw up and make some bad poses! Sticking the parts together and seeing how things look will usually lead to a model that is fairly static and repetitive. You should consider knee, hip, torso, and arm positions when gluing and ensure that you have a pose in mind before you start gluing things together. If in doubt or insecure about your talents in the posing area, we recommend you try to copy the poses from some of our studio models found here in the gallery.
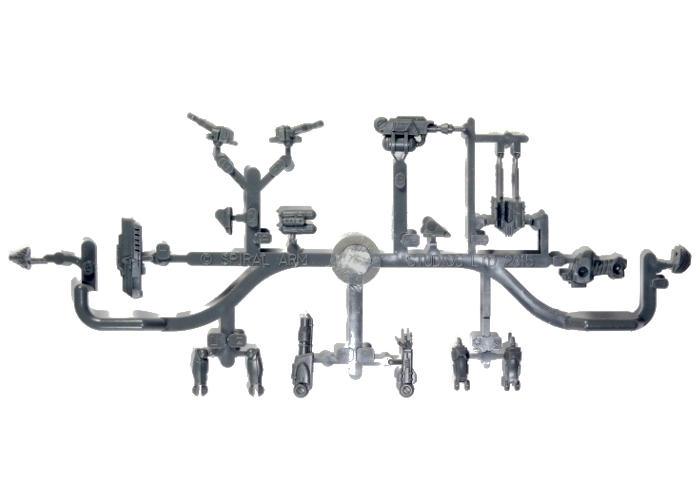
Epirian Secdef Assembly Notes
Three Secdef models can be made from one sprue. The sprue includes the following weapons: 2 x AR60 Assault Rifle, 1 x SR40 Sniper Rifle, 1 x CG100 Chaingun and 1 x LM14 Machine Gun.
Legs have three different poses and are paired, left and right, with differently-sized locator pins to keep them straight. Leg 5 goes with leg 7, 8 with 4 and 6 with 9.
The three torsos have two different designs (two with chest pouches and a backpack, one without), but the chestplate is identical for each, and any of the three torsos fit with any of the legs.
There are five 'sets' of arms, including two that have right hands with fingers together, and three with the fingers more splayed and the trigger finger separate. The closed-finger version works best for the Machine Gun or Chaingun, while the more open fingers work best for the Assault Rifles or Sniper Rifle. These are more-or-less matched with the extended left arms for the rifles and the left arms with more bent elbows for the heavier weapons. The pointing left arm obviously works with whichever right arm you choose, although there is one rifle arm that has the weapon held out to the side rather than across the body.
There are two small parts labelled as part 24 on the sprue. These are optional, and can be glued in between the belt and the heavier weapons as a support strut.
Finally, the three heads all fit with either of the two torso variants.
For some more ideas for building your Secdef models or to share your own creations, head on over to the Comm Guild Facebook page.
You can pick up the Secdef sprue, and the rest of the Maelstrom's Edge miniature range, from the webstore here.
For other Maelstrom's Edge modeling articles, including tutorials and walkthroughs of a wide range of different building and miniature projects, check out the article roundup here.
New Forsaken Chieftain for the Broken, now available!
Posted on Thursday May 31, 2018 at 12:01pm in The Broken
The Forsaken are commonly dismissed as simple, degenerate pirates, but the truth is that they usually attack only out of necessity. Piracy is many times the only way their community can survive a hostile galaxy: stealing food, fuel, ammunition and anything else of value they can get their hands on. The Forsaken rarely send out their forces en masse, knowing that a single crushing defeat could mean the end of their entire tribe's existence. Instead, they strike in small patrols, typically led by a Chieftain.

Though a Chieftain is granted his or her position of authority by The Assembly, they must first earn the respect of their fellow Forsaken to even be nominated. A Chieftain must be equal parts fighter, diplomat and cunning tactician. Knowing that their forces can never win a stand-up fight against a prepared opponent, a Chieftain leads his warriors to strike unseen from the shadows, quickly fading away before the enemy can root them out and respond in kind. Many an opposing force has underestimated the ingenuity of a Broken force led by a Chieftain, only realizing too late their folly, as improvised booby traps decimate their defensive positions and Broken secretly approach from their rear.
The appearance of a Chieftain can vary wildly both based upon the culture of their original homeworld, but also from that of the Broken Freeport they are now a part of. Chieftains tend to have slightly nicer clothing and equipment than standard Broken rabble, and many see it as almost their duty to show that even amongst the ranks of the Broken, an individual can still rise up and carry themselves with dignity and class. When the Broken do manage to defeat an enemy officer with particularly fancy clothing or an heirloom weapon, a Chieftain will confiscate these valuable items. A Chieftain wears these purloined treasures into battle, as both a reminder of their past victory, and to display their status as an iconic Broken leader.
This high detail resin model contains two alternate weapons for the left hand and a xeno spotter in the right hand, and is available now from the webstore here! You can also find the rules for this model in the Force Builder section here.
Painting Tutorial - Konstantin Moor, Veteran Bot Handler
Posted on Monday May 21, 2018 at 05:00pm in Tutorials
- by Iain Wilson
Last week, I ran through a conversion tutorial for a veteran Master Bot Handler who I'm calling Konstantin Moor, a nasty, multi-weaponed individual built, along with his faithful drone companions, from the new Epirian Master Bot Handler kit (If you missed last week's article, you can find it here).
Well, now it's time to get some paint on him!
Before I start, a quick note on paints: I tend to use paints from a few different ranges, as I collect whichever paints I like rather than sticking to a single brand. If you're looking to match any of the paints I use, you might find this Paint Compatibility Chart somewhat handy!
I'm painting Konstantin for gaming rather than display, so this is a fairly quick and easy paintjob, with nothing too complicated or fancy going on. I started out by basecoating all three models with Army Painter Army Green spray.
Next, I painted armour sections and the drone chassis with Vallejo Yellow Green, and metal sections with Vallejo Heavy Charcoal. I also gave Konstantin some Vallejo Neutral Grey pants, and a base layer of skin using Citadel Scorched Brown.
Once that was done, I went over the yellow green with a light wash of Army Painter Green Tone, and the metal, grey and skin with Army Painter Dark Tone.
When the washes had dried, I went back over the green sections with a fine brush and a little more green wash, applying very thin layers onto downward-facing surfaces to give them a little more shading. Then I applied a light highlight to raised edges using Coat D'Arms Putrid Green. The metal areas were given a similar highlight with P3 Pig Iron, and I used Vallejo Light Grey on Konstantin's pants. For his skin, I highlighted by lightly drybrushing with Citadel Tallarn Flesh.
Finally, the models were all transplanted to fresh bases, painted up in my urban scheme. I added some light grey onto Konstantin's eyebrows, and painted the lenses on his Neural Nodes with Army Painter Pure Red before giving them a spot of white in the centre. For the laser tips and the shield generator on the firefly drone (Cassio), I painted on a layer of Citadel Ultramarine Blue before drybrushing with Citadel Ice Blue and finishing with white. A few other details, like the red eye lenses on the drones (Pure Red, shaded with the red mixed with a little black and then a highlight spot of white), the Epirian badge on Konstantin's chest (Pig Iron, with a spot of P3 Cygnus Yellow), and picking out the missile tips on the spider drone (Iago), and the trio were ready for the table!
Group shot:
Stay tuned for an unofficial rules card to use Konstantin in your own games, coming later this week to the Force Listing section of the Maelstrom's Edge website!
What have you done with your Master Bot Handlers? We would love to see your creations on the Comm Guild Facebook page!
To pick up this or any of the rest of the Maelstrom's Edge model range, visit the webstore here.
For other Maelstrom's Edge modeling articles, including tutorials and walkthroughs of a wide range of different building and miniature projects, check out the article roundup here.
Modeling Spotlight: The Epirian Master Bot Handler
Posted on Monday May 07, 2018 at 05:00pm in Models
- by Iain Wilson
The Epirian Master Bot Handler is the latest plastic kit to be added to the Maelstrom's Edge range. Striding about the battlefield in his powered exoskeleton, he has the ability to lay down impressive amounts of firepower from a wide array of weapons, or finely co-ordinate his forces through networked neural nodes. Here, we'll have a look at some of the modeling options available with this fantastic model.
Built straight off the sprue, the Master Handler has multiple weapon options available - Repair Claws, Cutter Light Machine Guns, Drone Class Laser Systems and Flakk Guns can all be chosen for the arm mounted weapons in any combination, and the rectangular sockets on his backpack allow you to place Cluster Missile pods for even more punch, or Neural Nodes for throwing command points around with wild abandon.
You can find the Assembly Guide for the Master Handler here.
The Master Handler also brings some other impressive 'guns' to the table, with sleeveless and rather buff arms. If you prefer a more covered look on your models, the arms can be fairly easily replaced with the armoured arms from the regular Bot Handler kit. For the below model, on the sides of the torso I removed the protruding arc of plastic that sits just above the Master Handler's shoulders, and added a small locator pin made from a piece of plastic rod to the backs of the regular Handler's forearms. The arms were glued on to the torso with the tops of the shoulder pads sitting about where the original locator arc was, and the weapons slotted onto the locator pins on the arms as they do with the normal Master Handler arms.
The sprue comes with two sets of legs, one in an upright stance and the other in a knees-bent, braced stance. To mix up the posing a little, you can cut through the groin with a razor saw or sharp hobby knife and switch legs between the two sets to create a stance with one straight leg and one slightly bent. You might need a little gap filling with putty if the cut leaves the waist with a gap. On the below model, I have also extended the right arm out by cutting the top of the shoulder off square, gluing it to the torso and filling in the armpit with some 'green stuff' putty. The left arm has also been slightly repositioned below the elbow, and I have used a head from the Epirian Contractor sprue in place of the Master Handler's helmet.
The leftover legs from the above model were used below, with a similar reposing of the right arm as well.
I thought it might be handy to have a repair claw that was independent of the Handler's arms, so cut down one side of a backpack and drilled out a socket to attach one of the weapon support arms. I used two repair claws clamped over the ball joint on the end of the support arm to create a beefier, four-fingered repair claw. I also took the two Neural Nodes and cut them in half so that they would both fit on the other side of the backpack, and used a helmet from the regular Bot Handler sprue.
The neck joint on the Master Handler torso is compatible with any of the different plastic Epirian heads, and also works with most of the heads from the Broken Infantry pack, which is handy if you want to create an alien Handler for your force. For the below model, I aso left the weapon support arms off entirely, and built the Drone Class Laser System directly into the backpack by trimming off the backs of the weapons at an angle to match the backpack panels.
Because the Master Handler comes with two sets of legs and torsos, you're going to wind up with some spare parts. It seemed a shame to waste these, so I used a leftover helmet from the regular Handler sprue, and some Clingfire Sprayers and a command module from the Epirian Scarecrow kit to create a twin-flamethrower-equipped model that I'm calling an 'Eradicator'. The fuel hoses on the backs of the weapons are made from guitar string.
I thought it might also be fun to add some of that shiny, missile-pod goodness to a drone unit, and so I took a Master Handler backpack, trimmed off the bottom and stuck it onto the back end of a Spider Drone. I don't have a name for this friendly little fellow yet... I think I'll have to revisit that in a later article!
What have you done with your Master Bot Handlers? We would love to see your creations on the Comm Guild Facebook page!
To pick up this or any of the rest of the Maelstrom's Edge model range, visit the webstore here.
For other Maelstrom's Edge modeling articles, including tutorials and walkthroughs of a wide range of different building and miniature projects, check out the article roundup here.
Tags: conversion epirian handler model modeling