Terrain Spotlight: Drone Substation Quick-paint.
Posted on Friday Sept 05, 2025 at 05:00pm in Tutorials
 - by Iain Wilson
I was rummaging through some storage boxes the other day and came across a building that I had assembled a very long time ago and never got around to finishing. And since it has once again been a little while since I played with terrain, that seemed like as good a reason as any to take some time to get some paint on it!
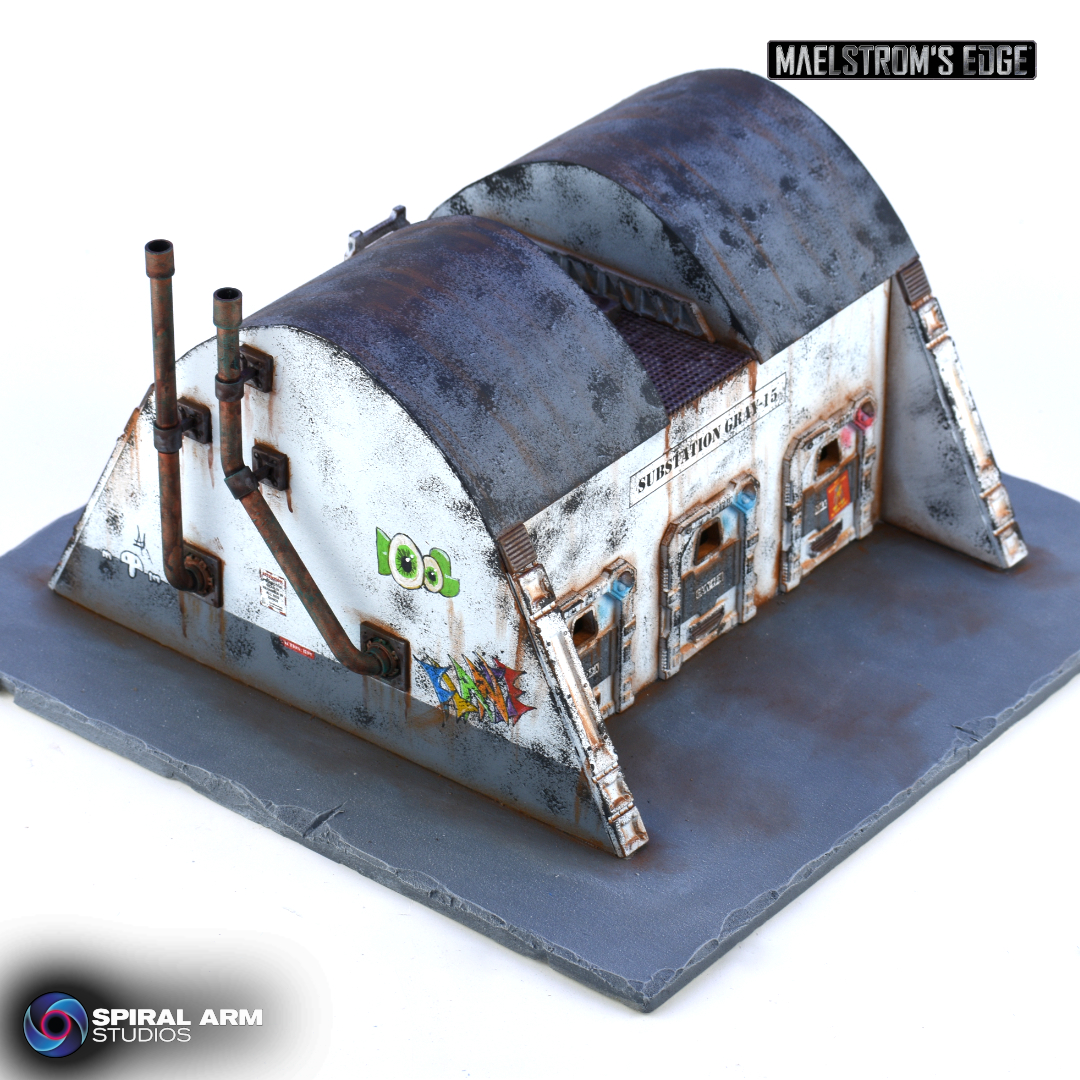
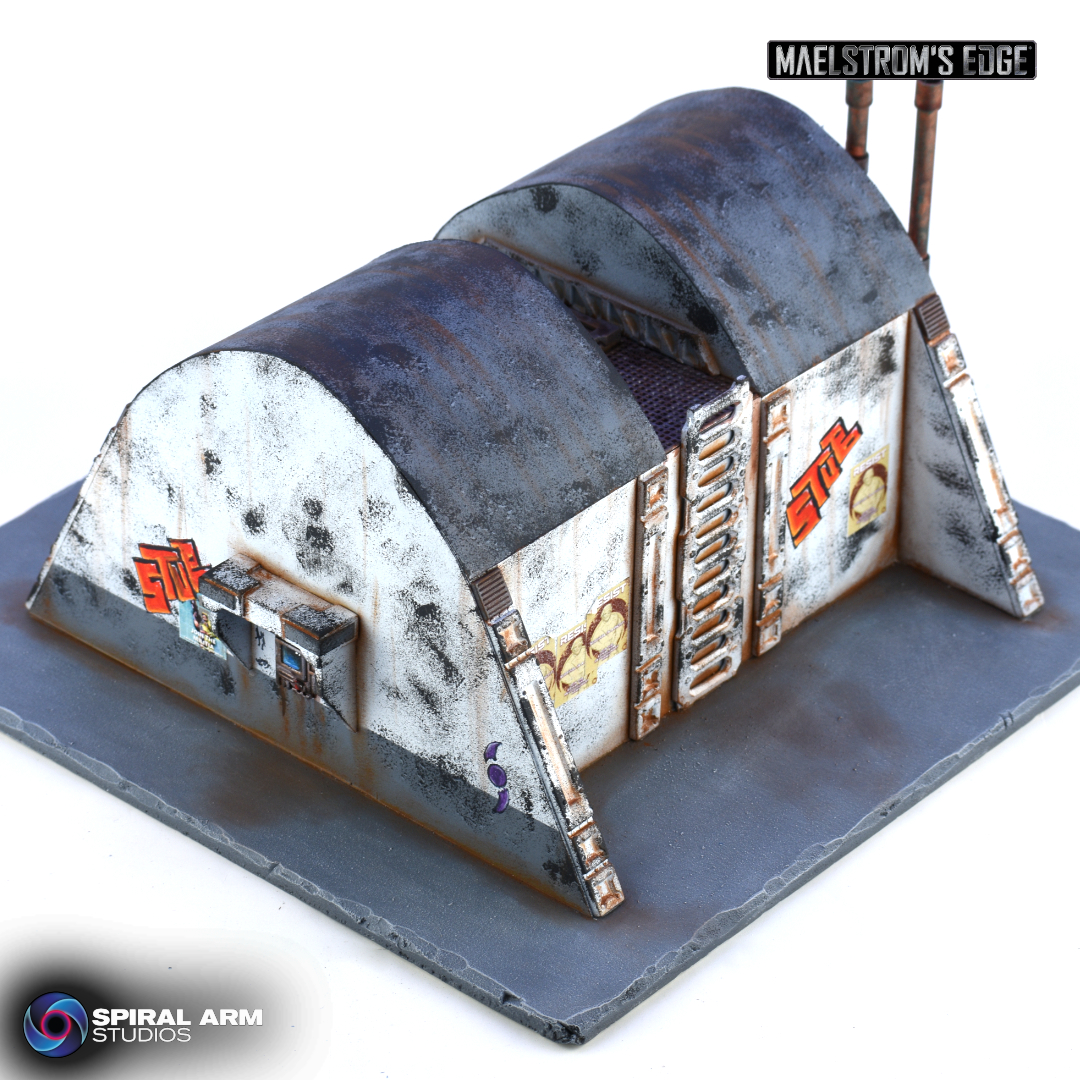
The building in question was built from foamcore, thin card, and bits from the first Maelstrom's Edge terrain detail sprue, and was made to be somewhat ambiguous as I hadn't decided when I built it what it was actually going to be. For some reason, I had (badly) sprayed it with a slightly watery pale green paint. I obviously had a plan for this when I did it, but I couldn't for the life of me remember what it might have been.
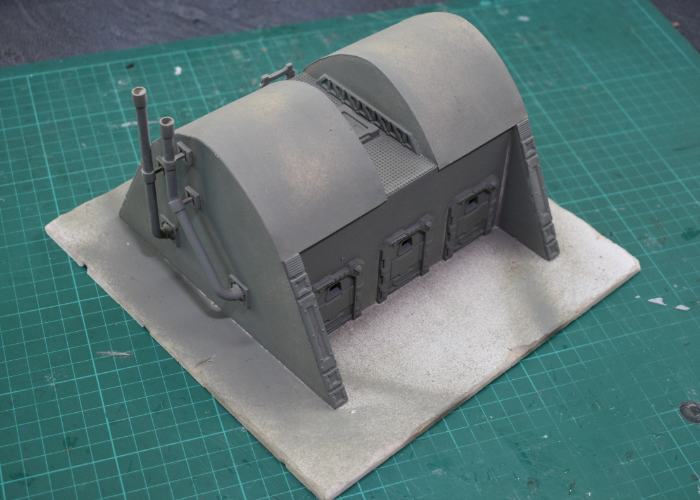
The first step, obviously, was to do something about that dodgy basecoat, so I gave the whole building a good spray with some Army Painter Uniform Grey.
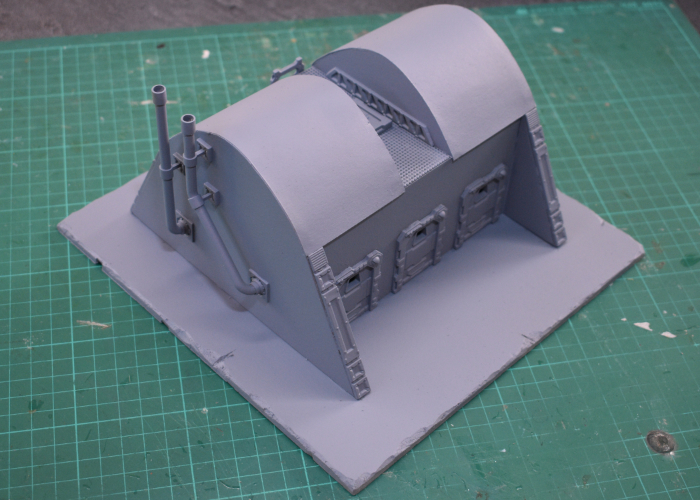
I wanted the building to be white (ish) but solid white buildings are a little boring. So to give it some detail, I broke out some masking tape and masked a strip along the bottom of each end wall before spraying with a coat of white. This was somewhat risky, as my masking tape has been sitting in my toolbox for about 15 years, and doesn't look quite right... There was a certain air of 'will it come off again?' in this operation. Luckily, though, it came off just fine.
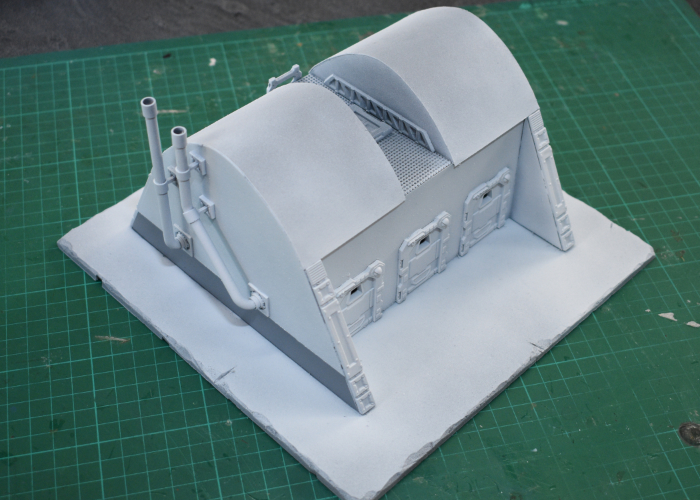
Now it was time to start painting the things that weren't going to be white. I gave the chimney pipes (made from cut off pieces of sprue and plastic tubing) a coat of VMC Emerald, and the other bare metal areas a layer of Beasty Brown. The roof and armour strips on the doors received a coat of uniform grey to match the side walls. I could have done this with masking, but that seemed too fiddly given the state of my masking tape, and these areas were easy enough to paint over neatly.
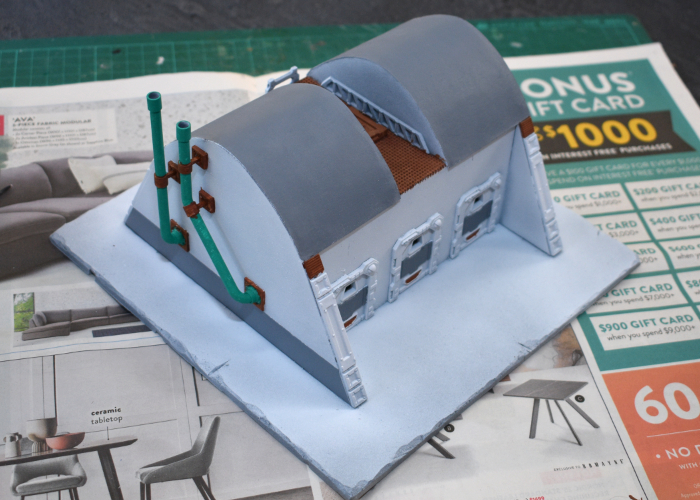
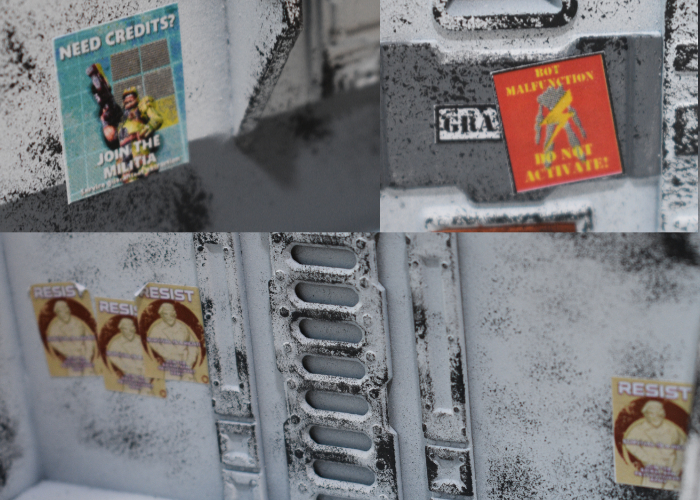
I wanted some signs here and there that looked like they had been there a while, so these needed to go on before any weathering. I printed off some appropriate signage, and glued them in place with some PVA glue.

Then it was time for aforementioned weathering. I broke out a sponge and some Game Color Heavy Charcoal, and went to work, concentrating most heavily on edges and top surfaces. This is the first part of the process where I usually start wondering if I've ruined it, but it usually comes together as it goes along...
With the initial weathering in place, I added some additional signage.
Then on with the detailing. The chimneys were painted with some old Citadel Copper, and the rest of the metal with a coat of Speedpaint Broadsword Silver. I also painted the base with a coat of Vallejo Neutral Grey.
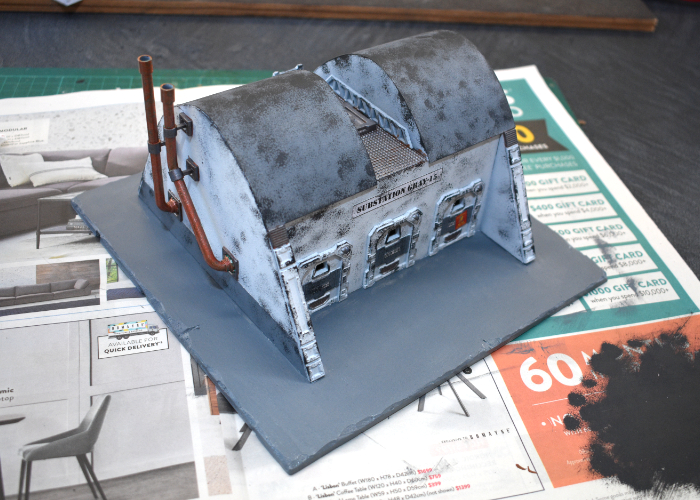
On sponged areas that aren't white, I like to go over and add some highlights on the larger chip marks. This isn't essential, but does help to give it some more texture and looks better at table height.

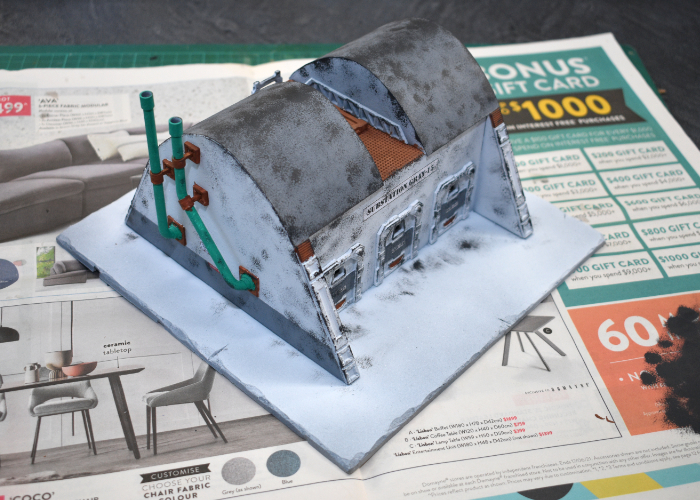
Then it was time for final detailing and weathering. I gave all of the exposed metal a coat of Army Painter Mid Brown ink, added some graffiti, and then got stuck into my favourite part - drybrushing on some dirt! I used Beasty Brown, working it into all of the creases and raised surfaces, and added some streaking here and there where it seemed appropriate.
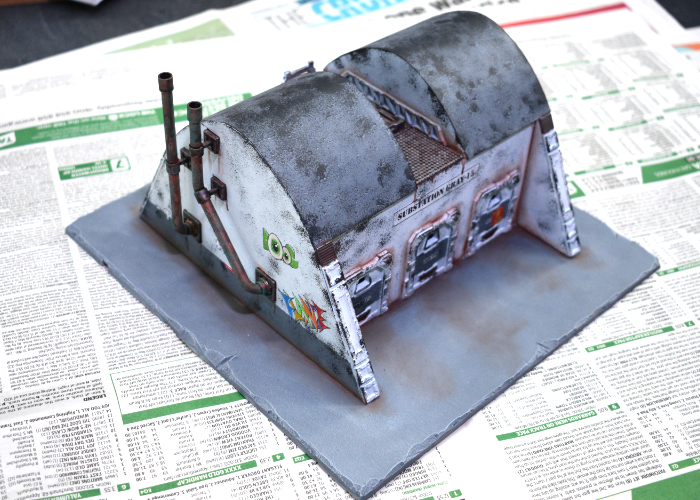
And with dirt in place, the building was ready for the table!
(Click for bigger pics!)
To build your own building of maintenance-neglected doom, grab the Maelstrom's Edge terrain sprues from the webstore here!
What are you working on? We would love to see your models and terrain in the Comm Guild Facebook group!
For other building ideas, modeling tutorials, army spotlights and conversion walkthroughs, check out the Hobby section of the Maelstrom's Edge website here. And while you're there, grab a copy of the Maelstrom's Edge V2 Beta rules!
Tags: modeling painting terrain terrainsprue
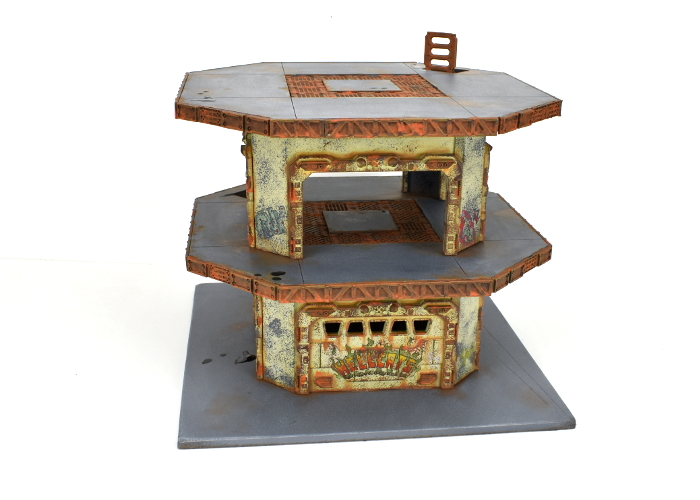
Terrain Spotlight: Juice Bottle Advertising Hub
Posted on Friday Dec 22, 2023 at 05:00pm in Tutorials
- by Iain Wilson
It's been way too long since I made some terrain, so I thought I would squeeze in one last article before Christmas!
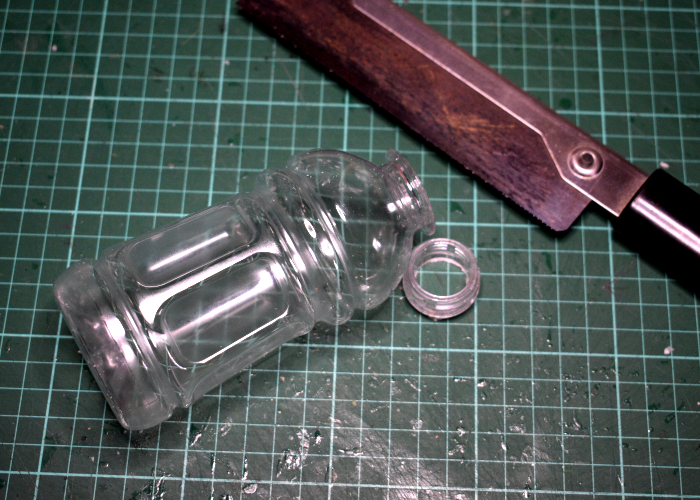
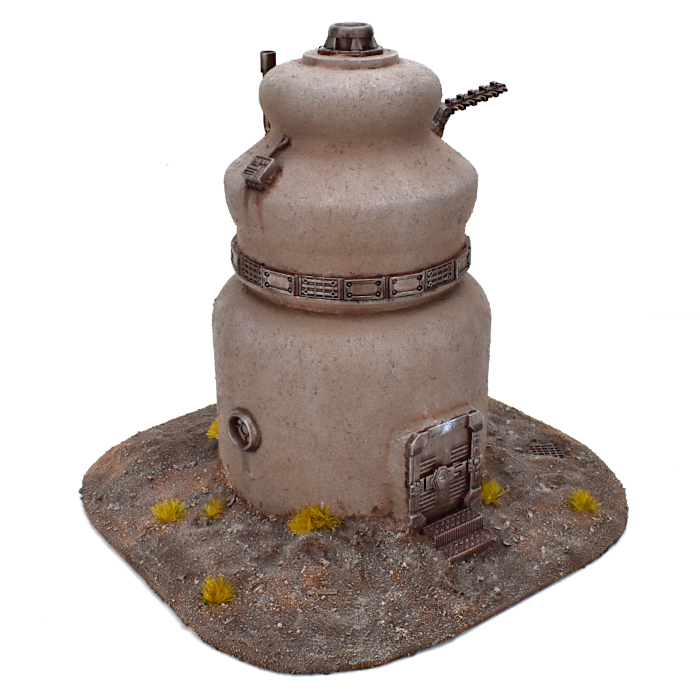
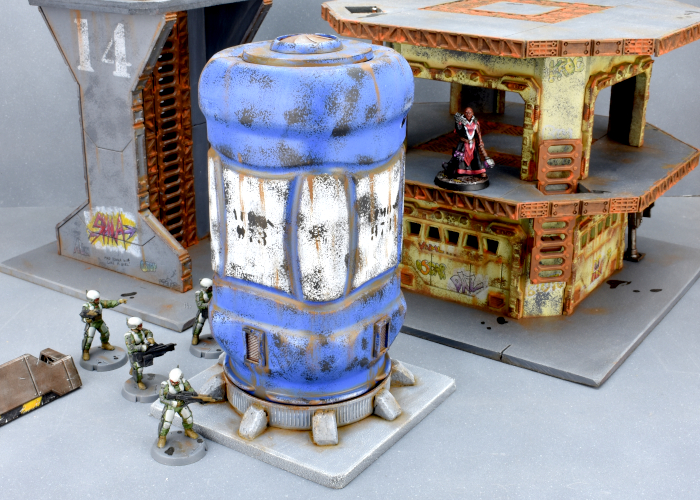
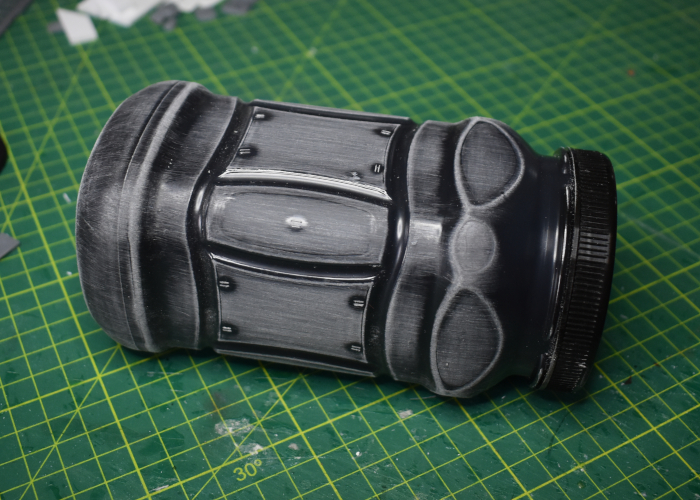
My kids had some juice in a takeaway meal the other day that came in an interestingly shaped bottle that I thought was worth having a play with. After giving the empty bottles a wash, I set to with tools and terrain sprue bits and came up with this little advertising hub.
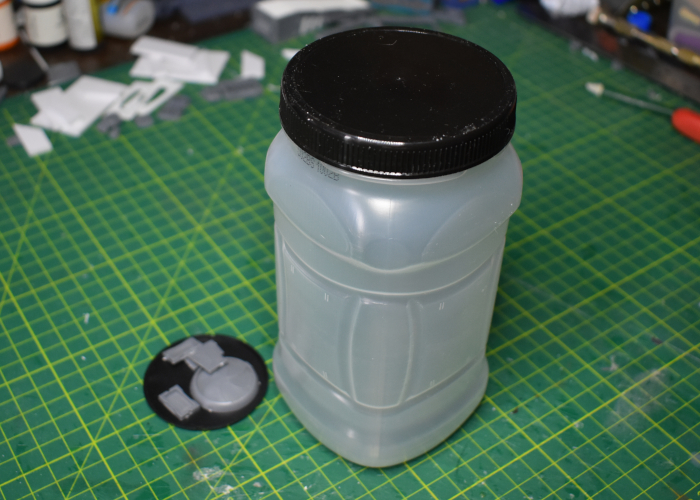
The first step, as mentioned above, was to wash the bottle and remove the label.
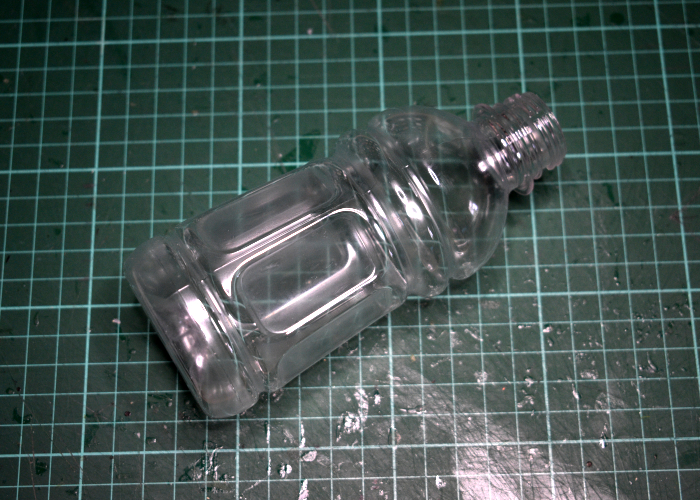
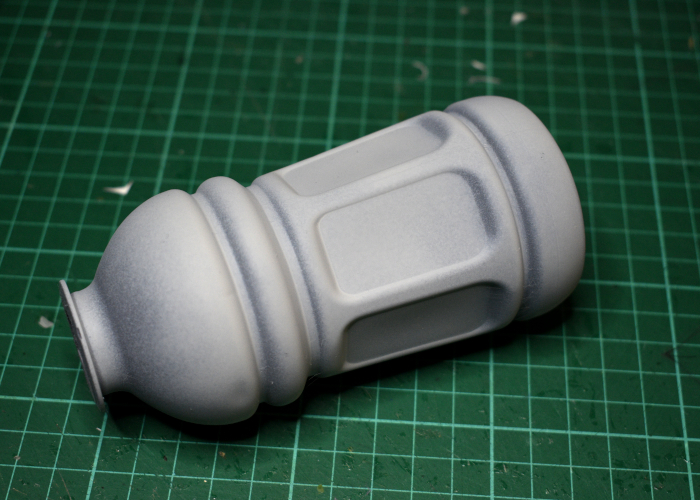
I used a razor saw to remove the screw thread part of the neck, and then gave the cut end a bit of a sand to smooth it down.
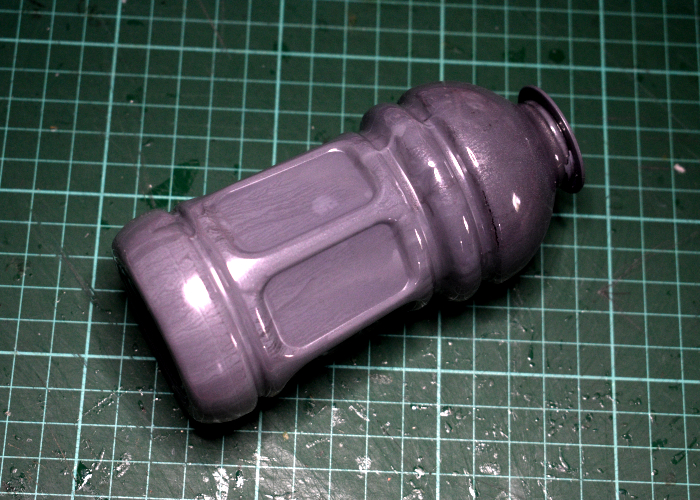
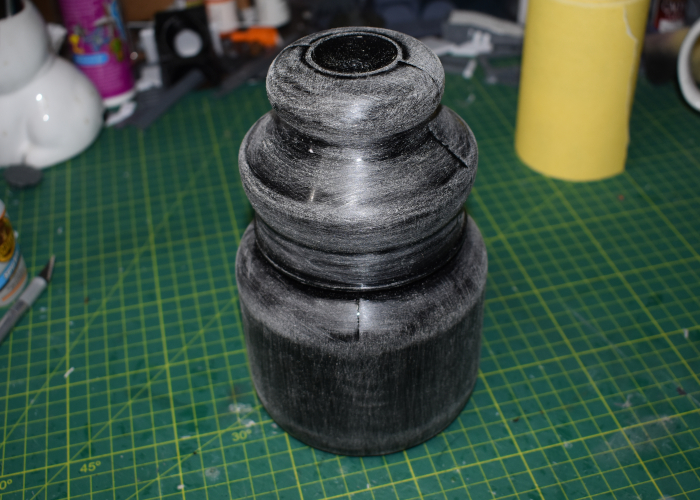
Then I sprayed inside the bottle with some grey paint. This isn't an essential step, but it does help to make the finished piece a little more opaque, particularly if the exterior paintwork gets scratched on the table later on.
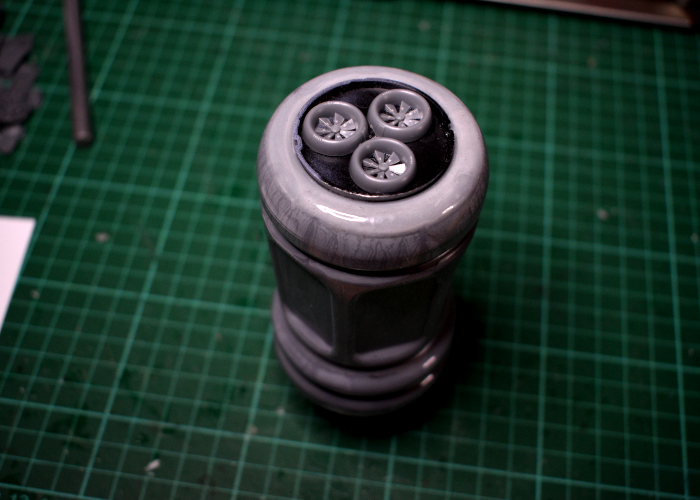
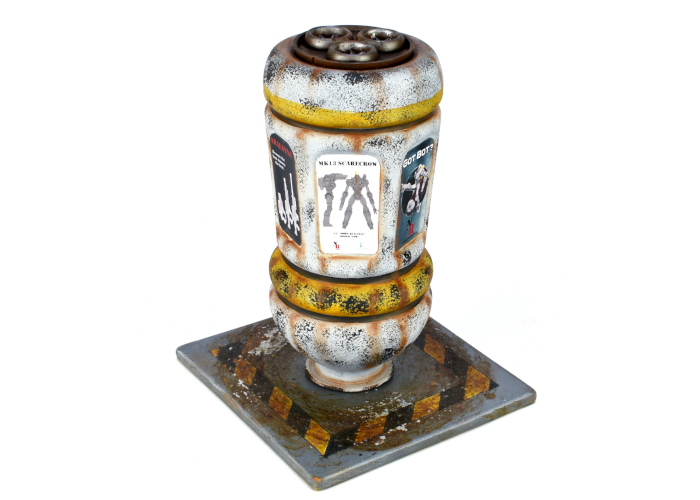
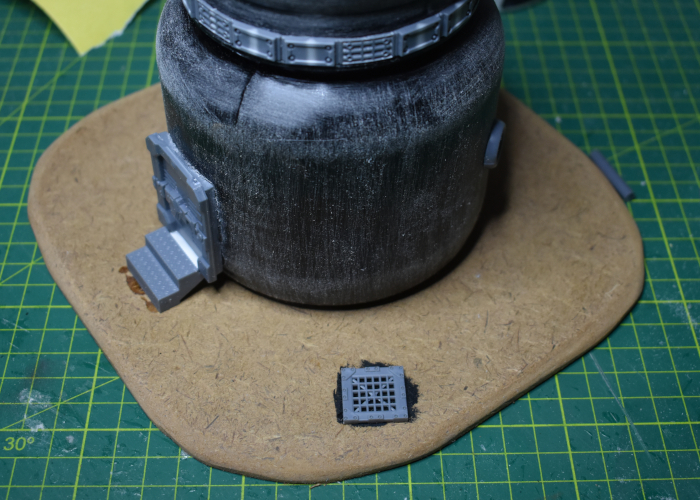
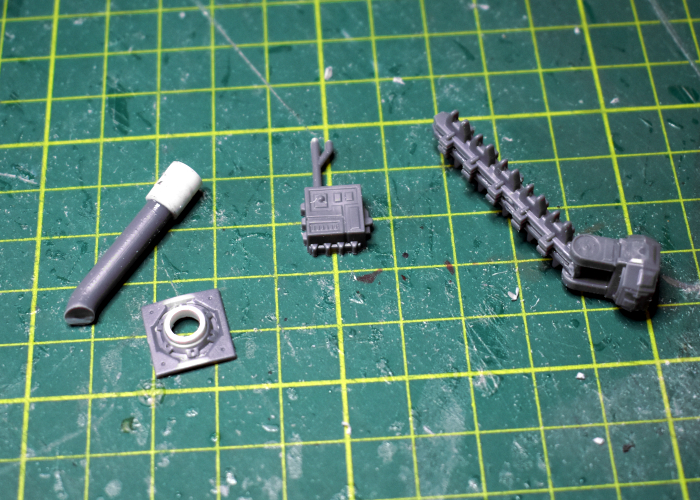
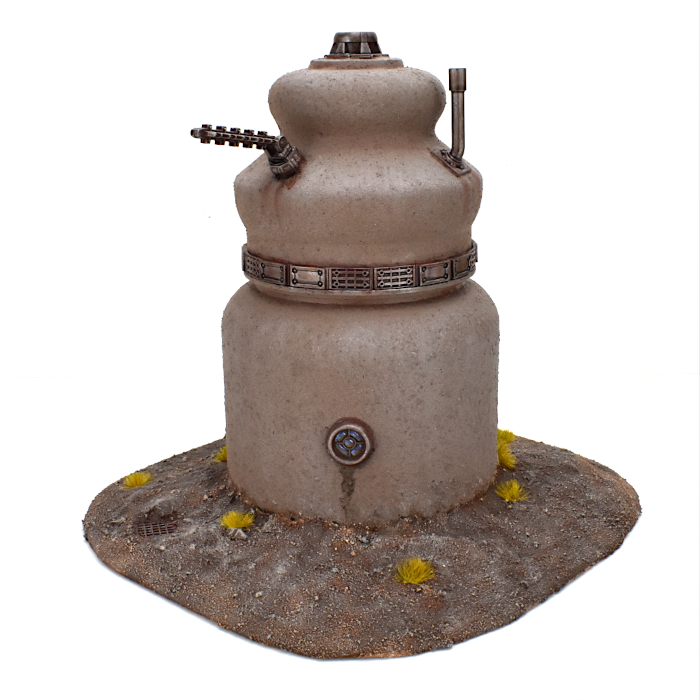
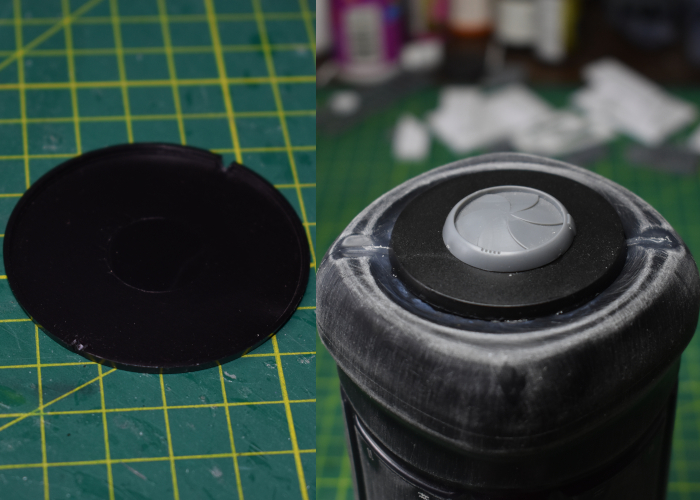
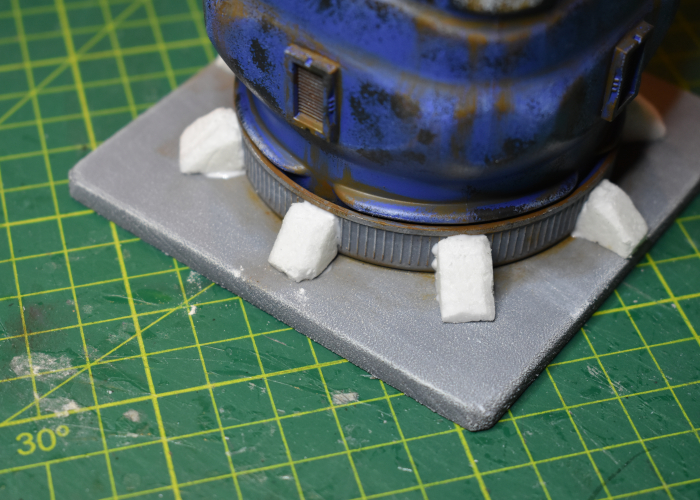
To disguise the bottle's bottom, I grabbed an appropriately sized miniature base and a trio of fans from the second Maelstrom's Edge Terrain Sprue and glued them in place with some Oily Glue.
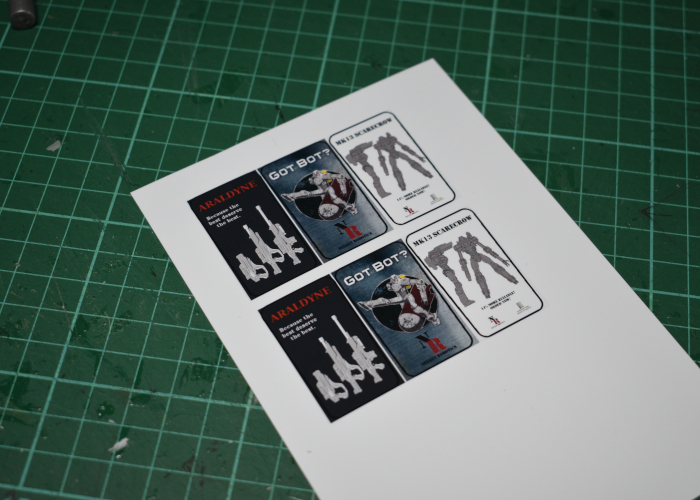
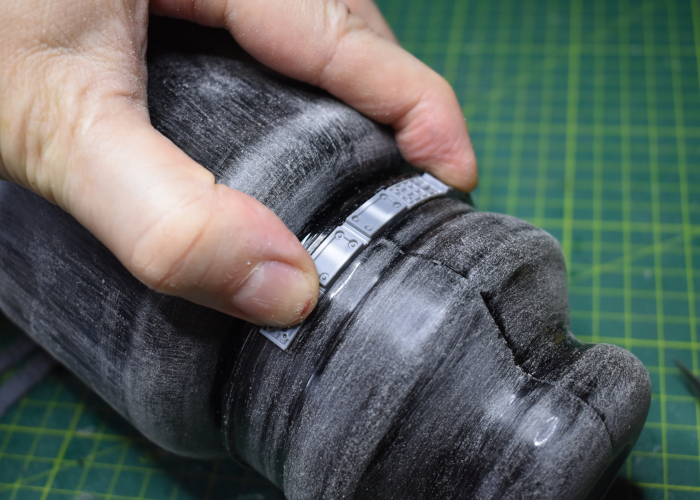
For the advertising part of the build, I whipped up some signs to fit into the recesses around the bottle, printing them out on photo paper so that they were nice and glossy and bright.
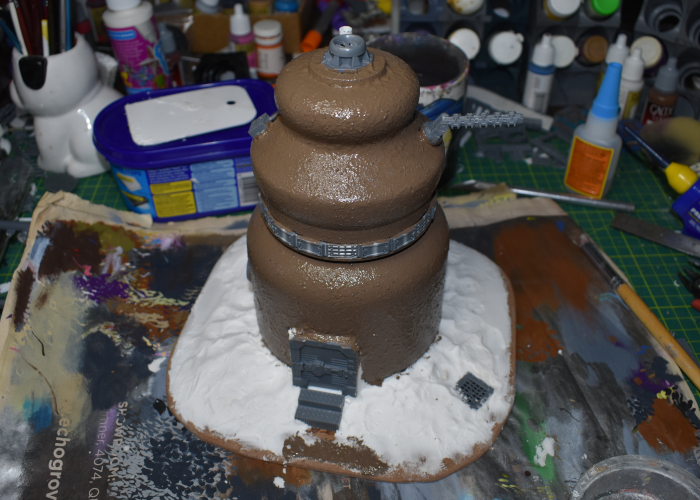
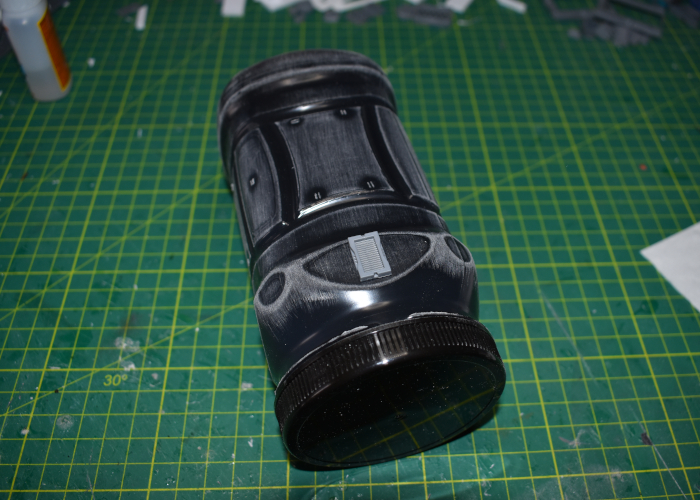
On to painting! I sprayed the bottle with a medium grey primer, and then a zenithal layer (sprayed from an angle above, to leave the darker grey underneath) of a very pale grey. This went straight over the shiny plastic, as the Rustoleum primer that I use generally sticks fairly well. If you're wanting to make your paint more durable and stick better, you can give the outside of the bottle a light sand with some fine sandpaper to break the gloss.
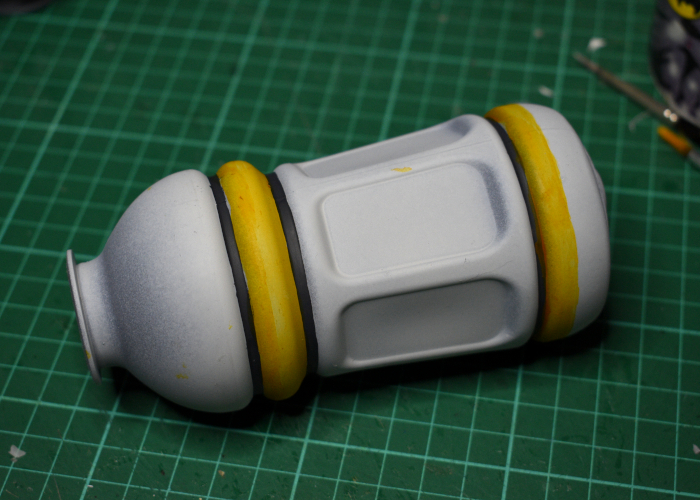
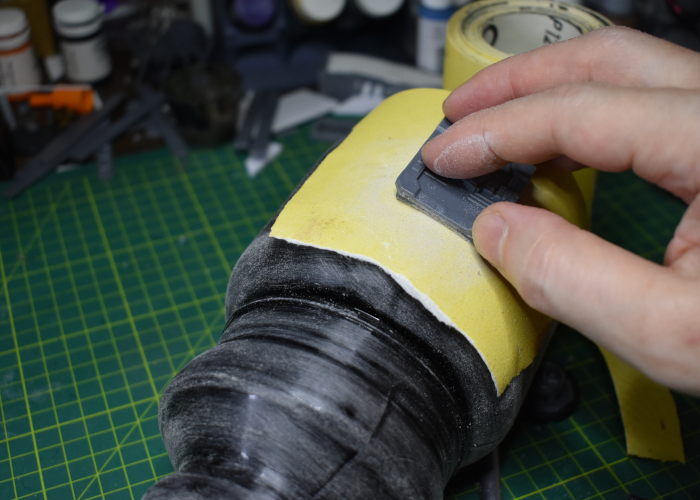
I added in some dark grey (Vallejo Heavy Charcoal) into the deep creases, and added a couple of strips of yellow using Vallejo Nuclear Yellow.
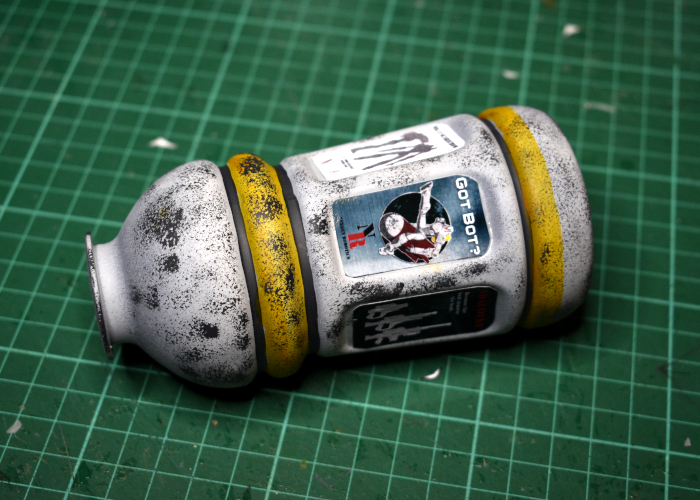
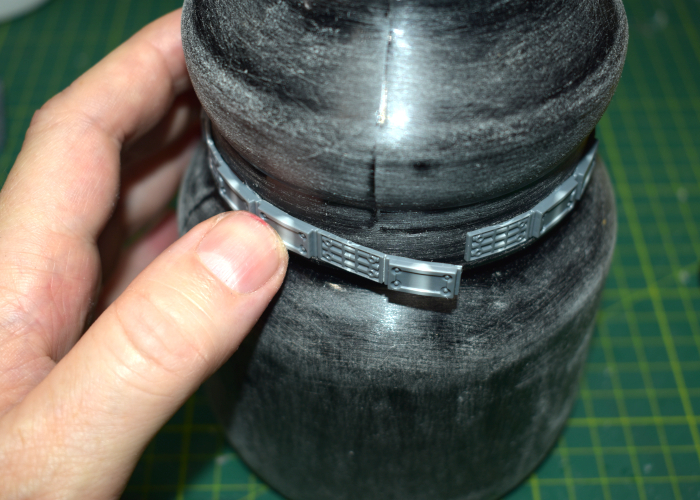
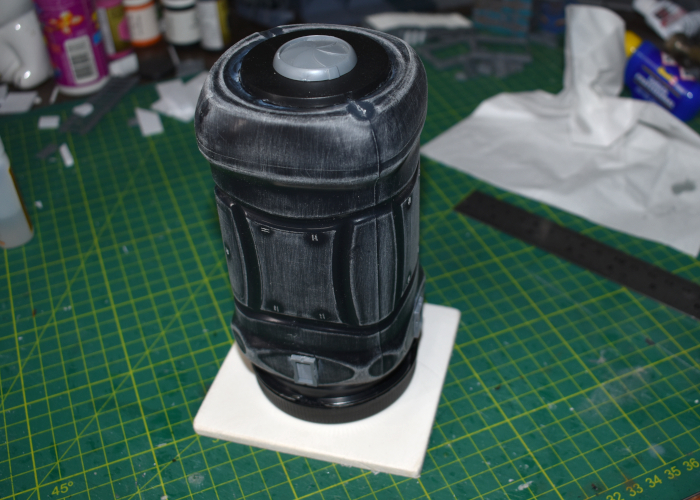
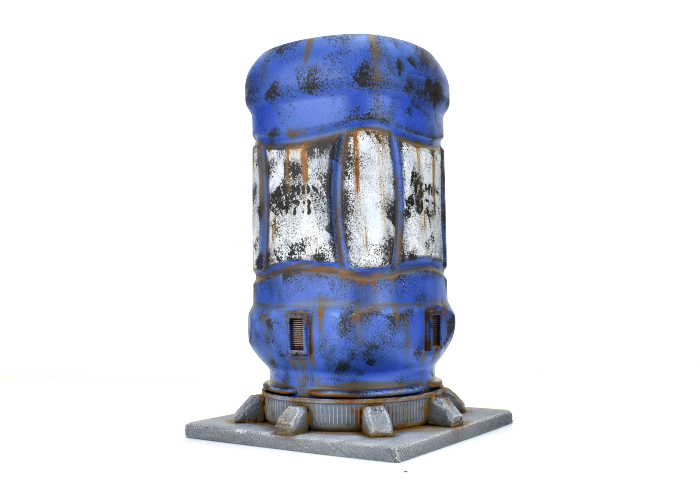
Next up came some weathering with a sponge and some more Heavy Charcoal, before gluing the signs in place.
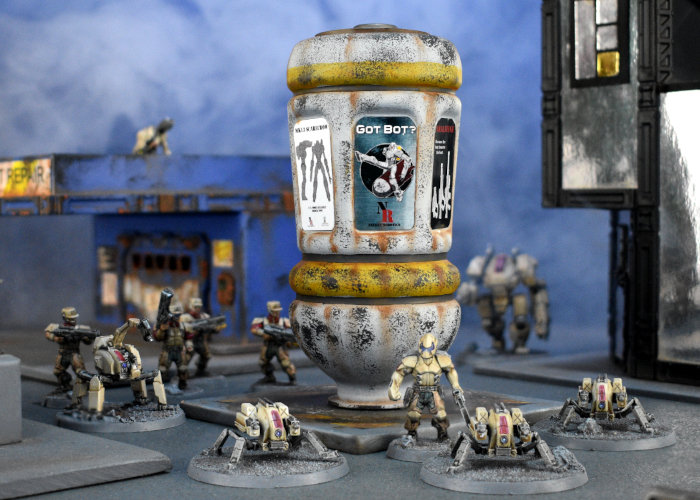
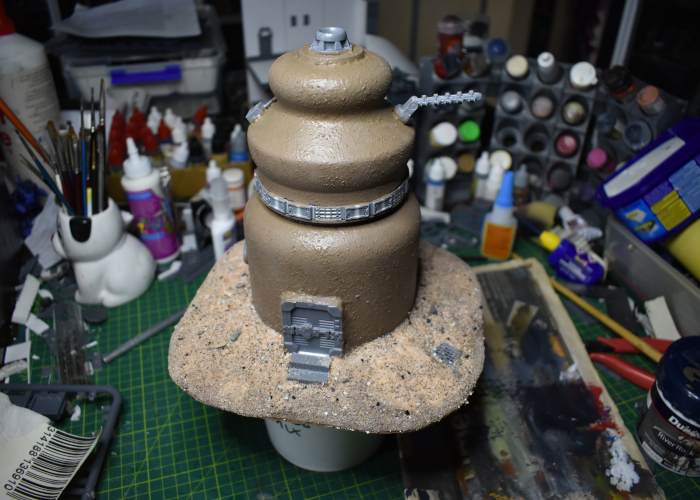
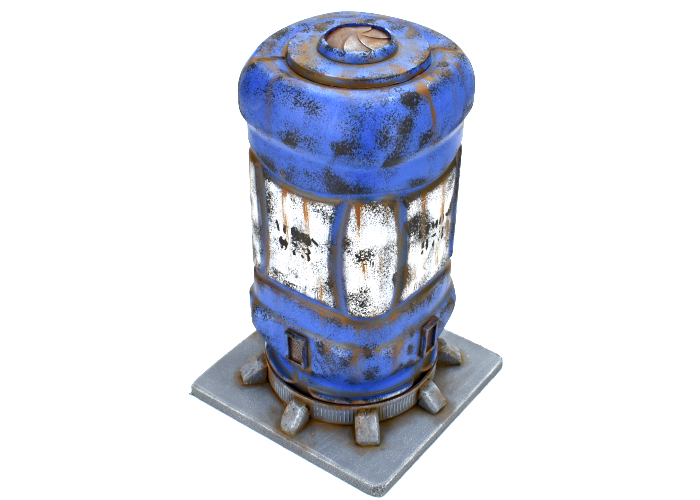
Finally, I painted up the fans on top with some a Vallejo Beasty Brown basecoat, a drybrush of Citadel Chainmail and a wash of Army Painter Strong Tone, and then dirtied everything up with a drybrush of some more Beasty Brown into the creases and forming some drip marks down the sides. Then I dropped it onto an old base I had prepared a while back, and it was ready for the table!
If you wanted to break up the original bottle shape some more, you could easily add some supporting buttresses around the bottom, or add some lights above the signs.
To build your own pillar of commercial doom, grab the Maelstrom's Edge terrain sprues from the webstore here!
What are you working on? We would love to see your models and terrain in the Comm Guild Facebook group!
For other building ideas, modeling tutorials, army spotlights and conversion walkthroughs, check out the Hobby section of the Maelstrom's Edge website here. And while you're there, grab a copy of the Maelstrom's Edge V2 Beta rules!
Terrain Tutorial: Alien Plants from Seedpods and Hot Glue!
Posted on Saturday May 06, 2023 at 05:00pm in Tutorials
- by Iain Wilson
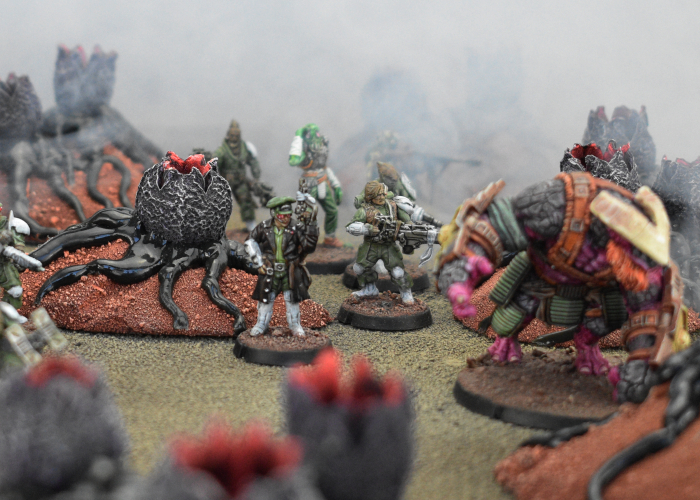
Anyone who scratchbuilds terrain knows that the best part of the process is finding new things to turn into terrain! I recently wound up with a whole box full of black hot glue sticks, and had been looking for a good project to use some of them up. Then my wife came home with a bag of seed pods she had collected from a tree she saw somewhere, and an idea was born. Read on to see how these alien ... er... plants? Yes, that'll do... came to life!
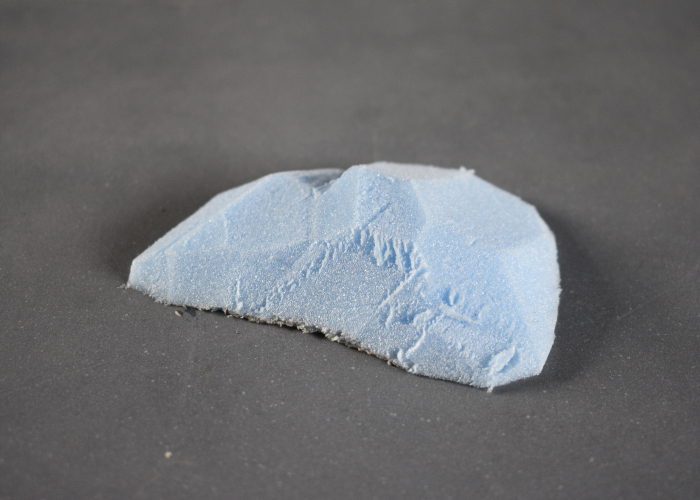
I started out with some blue insulation foam. If you haven't used this stuff before, it's a very firm expanded polystyrene sheet that some people use for insulating walls or somesuch boring thing, and sensible people use for making terrain as it's more solid and durable, and easy to work with than the more common white foam sheet.
Using a sharp knife, I cut the foam sheet into a low, hilly shape. You can use a hobby knife for this, although I used an old kitchen knife. (Don't use your good knives, as cutting foam will dull the blade!)
After painting a generous coat of PVA glue over the foam, I sprinkled on a couple of different types of sand, to create some varying texture over the whole thing.
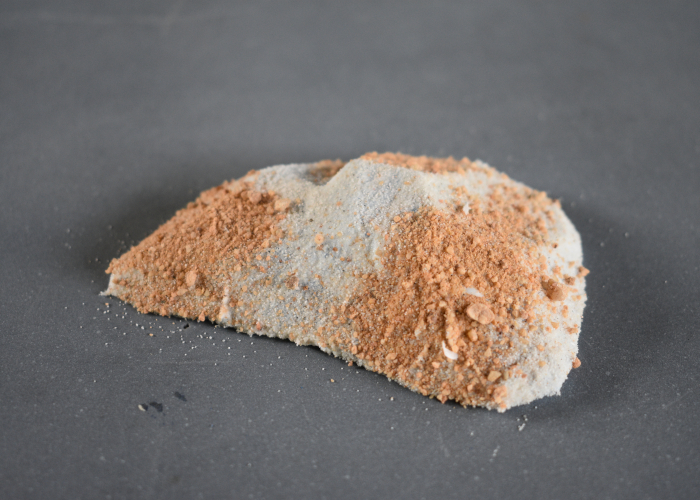
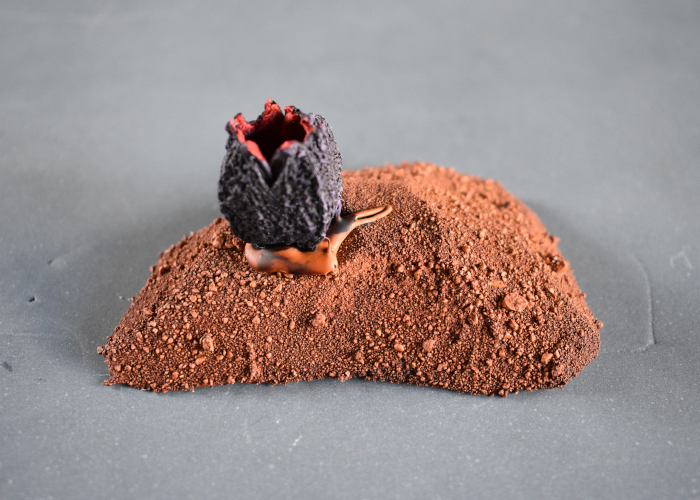
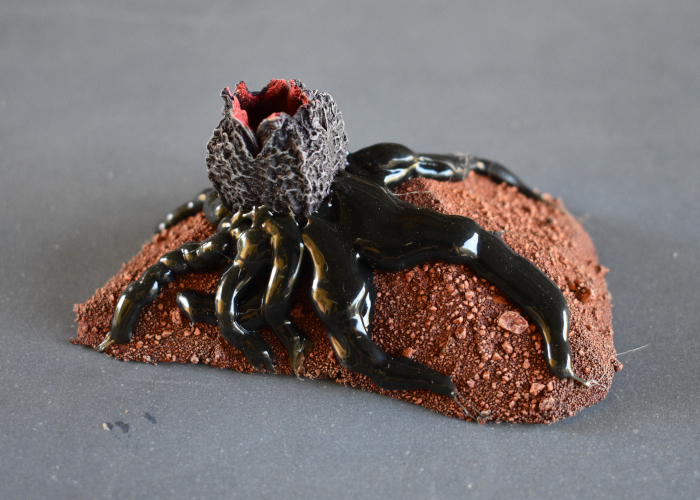
Once the PVA had time to dry, I used a blob of hot glue to stick a seedpod in place. (For multiple pieces, making the base pieces different sizes and using different numbers of seedpods on each will help avoid them all looking too similar on the table!)
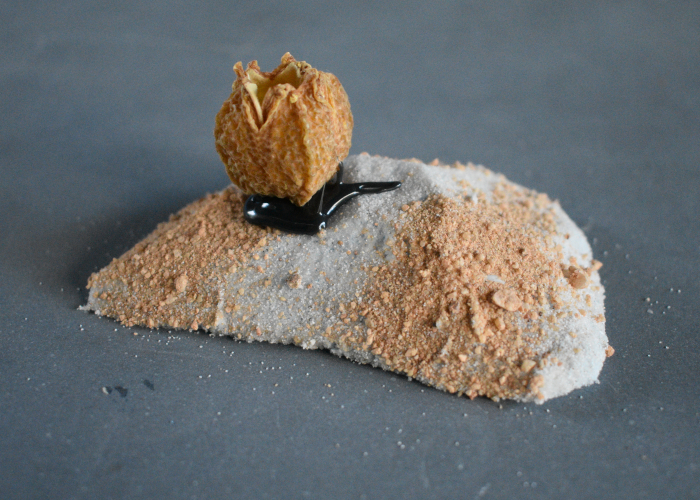
At this point, as I wasn't intending to paint over the hot glue parts of the plants, it was time to get some paint on, starting with a spray of matte white.
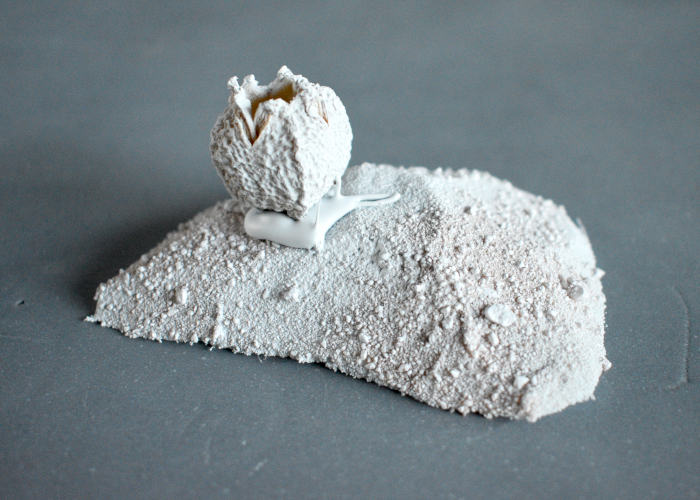
I then added some colour using Army Painter Speedpaints - Blood Red on the inside of the pod, Hive Dweller Purple on the outside, and a generous coat of Hardened Leather over the sand. A coat of matte sealer can also be a good idea here, to make sure that the seedpod is not exposed to the air so it will be preserved.
After giving the paint plenty of time to dry, it was time to go to town with the glue. Using a hot glue gun, I placed tentacle-like trails of glue outward from the seedpod, working around the pod to completely enclose the bottom of it.
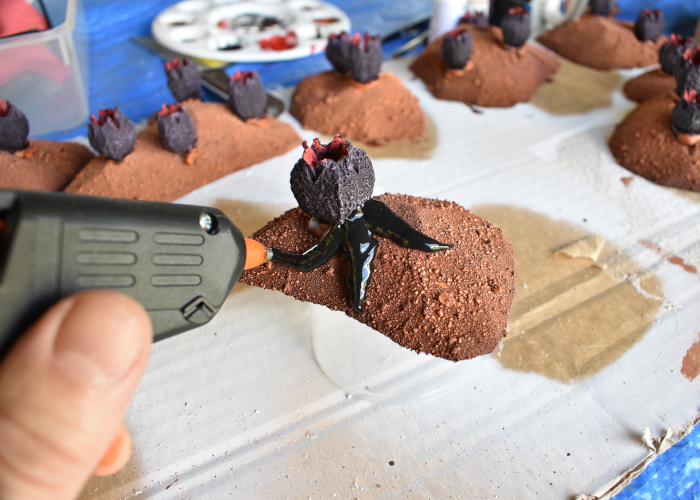
A couple of tips here:
- Allowing a minute for the previous tentacle to cool before doing the next one helps to avoid them sinking into each other. If you're working on a piece with multiple pods, then doing one at a time on each pod is a handy way to go.
- Depending on how good your glue gun is, it may build up more heat (making the glue runnier) the longer it is on. This can make it harder to keep good, defined tentacle shapes, so taking a break and turning the gun off for a while can help if you're having trouble making good shapes. Although just working faster can also help, as the glue stays firmer if it is not sitting in the gun for as lone - by varying the speed you push the glue through, you can make the tentacles gloopier looking or more defined, to suit your preference.
The tentacles all in place:
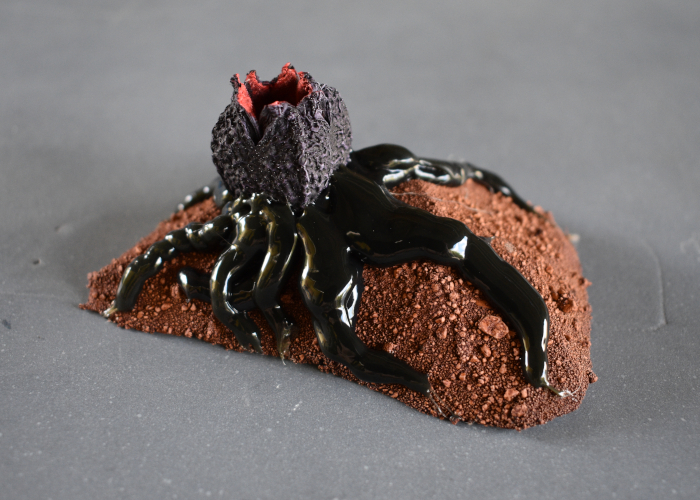
(A couple of these are a little gloopier than I wanted, due to me taking a bit longer to place them while I was trying to get pics of the process, but they'll look fine in the overall terrain patch!)
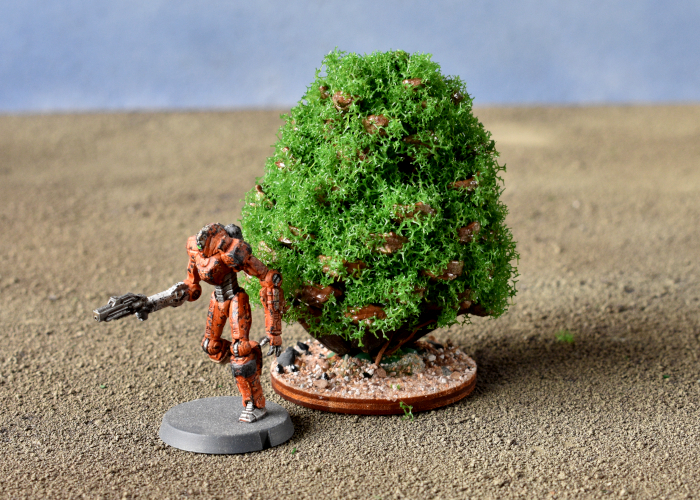
To finish up, I added a light drybrush of Game Color Bonewhite over the exposed sand areas, and a mix of the Bonewhite and White over the outside of the seedpod to pick up some of the texture.
A gaggle of pod pieces all ready for the table:
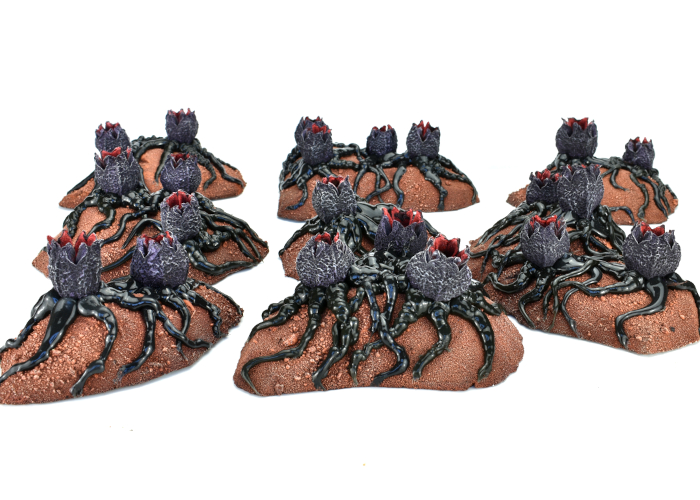
You could easily vary this to suit your own table by using different coloured glue sticks, and obviously you'll get very different results depending on the type of seedpods you use!
Once you have your vast plain of sinister biological doom, head on over to the Maelstrom's Edge webstore here, to pick up an army to run around in it!
What are you working on? We would love to see your models and terrain in the Comm Guild Facebook group!
For other building ideas, modeling tutorials, army spotlights and conversion walkthroughs, check out the Hobby section of the Maelstrom's Edge website here. And while you're there, grab a copy of the Maelstrom's Edge V2 Beta rules!
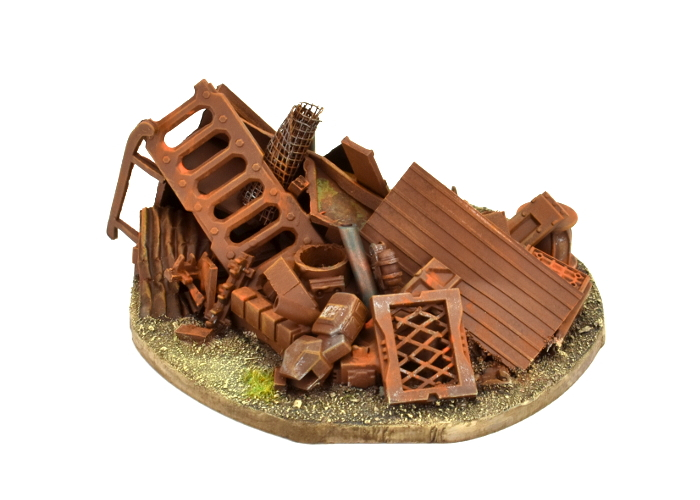
Painting Tutorial: Quick & Easy Rust!
Posted on Wednesday Nov 23, 2022 at 05:00pm in Tutorials
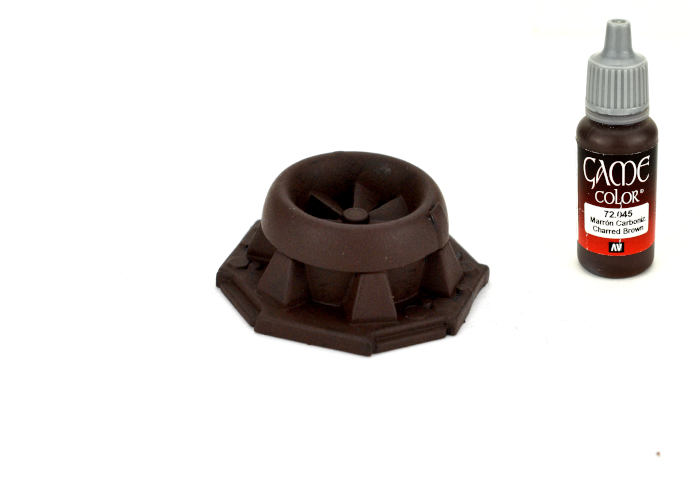
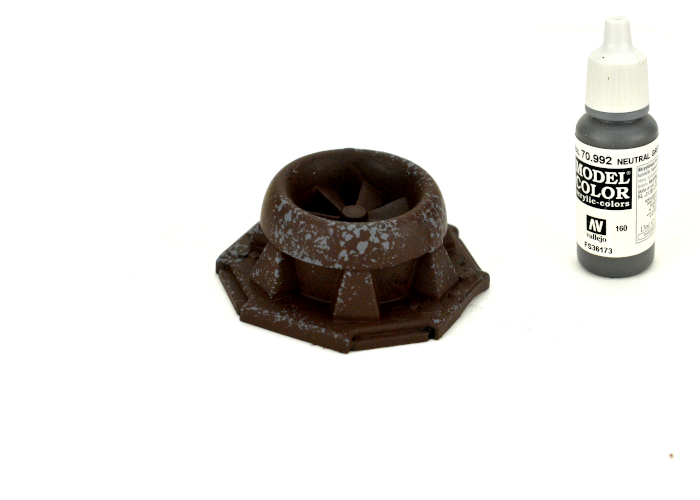
I'm using a fan assembly from the Maelstrom's Edge terrain sprues here (the fan from Sprue #2, and the large pipe fitting from Sprue #1).
Start with an undercoat of a mid to dark brown.
Note: The actual colour isn't too important - and that goes for the rest of this tutorial as well - as rust comes in a wide range of shades and textures depending on the surface and the level of corrosion. I have shown the specific colours I used for this tutorial in the images, but you should feel free to experiment with different shades to get an effect that you like!
Using a sponge, dab on some patches of mid to dark grey. This is an optional step, to keep some areas where the original metal is still showing through. If you are looking for a more solid level of corrosion, skip this step.
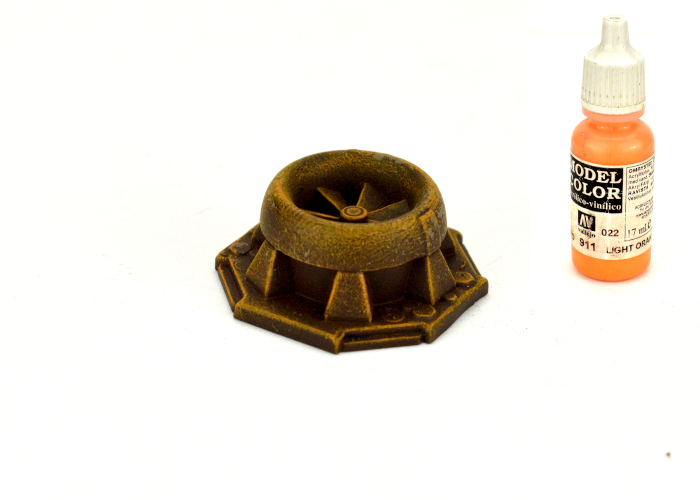
Drybrush with orange. As above, use whatever actual shade you choose, the goal is just to add some contrast on the brown. You can build up some different patches of corrossion if you want by using a couple of different oranges or reds here, but avoid using anything too bright.
Finally, use an old brush to dab on some rust effect paint. I use Army Painter Dry Rust, but there are variations on this same style of paint in quite a few different paint ranges. This is a very matte orange paint that is also quite thin, so once you dab it around it dries with a lighter tint over the areas where less of it is applied, while building up a more solid rust look where the paint is heavier. Don't try to smooth it out - just blob it on there. If you're bothered by the technical aspect of metal weathering, try to apply the rust paint more heavily on those areas where it would naturally be more exposed and so corrode more - Looking at pictures of rusted metal objects can help here - otherwise, just dab it on there wherever it looks right to you. Gaming models don't have to be strictly real-world accurate unless you want them to be!
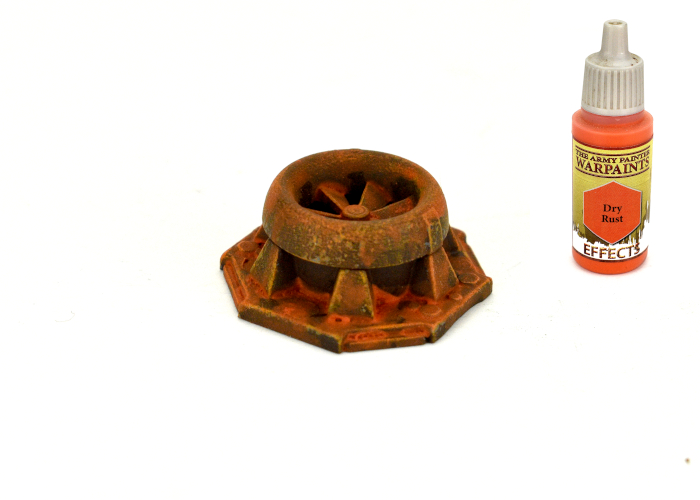
And that's it. Once the rust paint has dried, it's good to go. You can use this technique wherever you want some rusted surfaces, varying the colours and application to suit whatever you are painting at the time!

To get started on your own city of corroded doom, pick up the Maelstrom's Edge terrain sprues along with the rest of the range from the webstore here.
What are you working on? We would love to see your models and terrain in the Comm Guild Facebook group!
Remember to also grab a copy of the Maelstrom's Edge V2 Beta rules so you can get into the action!
Tags: painting rust tutorial walkthrough
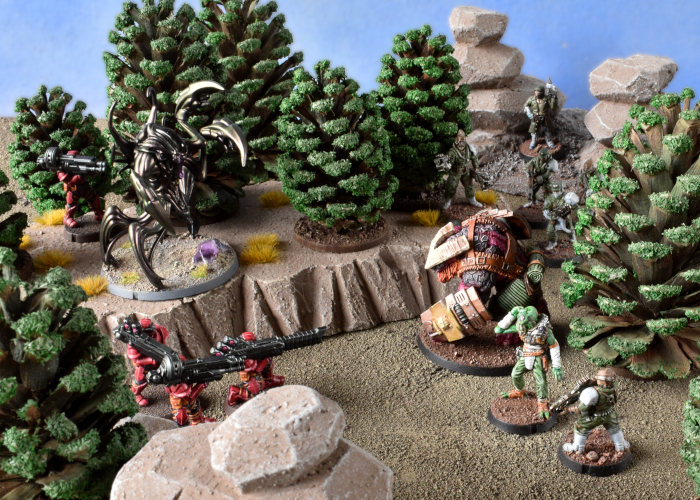
Terrain Tutorial: Cheap Trees from Pine Cones!
Posted on Friday Oct 14, 2022 at 05:00pm in Tutorials
- by Iain Wilson
A good collection of trees is handy for fleshing out your battlefields, but commercially-made trees made specifically for scale modeling can be expensive. I've shared a few different ideas in the past for making your own foliage, including using aquarium plants, expanding foam, and Christmas baubles covered in hot glue.
Over the years, one of the more common budget tree ideas I've come across is to use pine cones painted green. They have the advantage of being vaguely tree-shaped and inexpensive if you have pine trees nearby, but tend to wind up just looking like pine cones painted green. I thought I would see if I could come up with an easy and cheap way of improving on this idea a little, with this result:
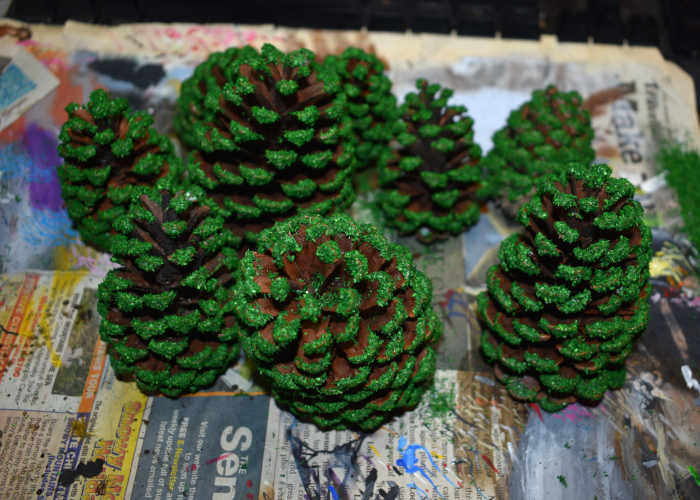
To get started, I collected a bunch of pine cones in assorted sizes, preferably as close to fully opened up as possible.
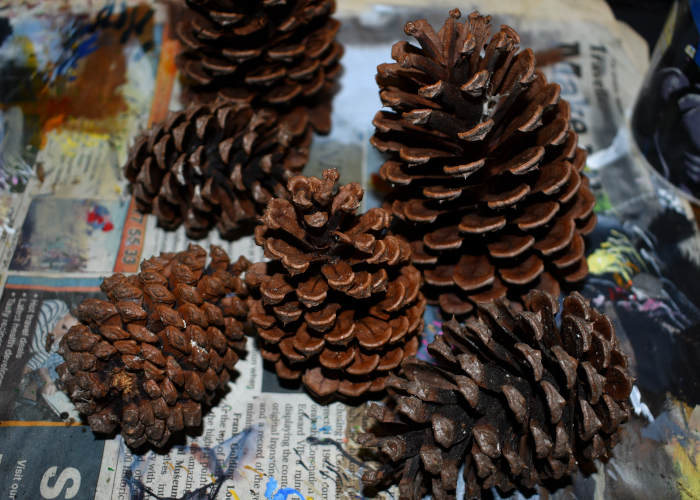
I took an old, large paintbrush and painted the outside of each pine cone with a generous layer of PVA glue.
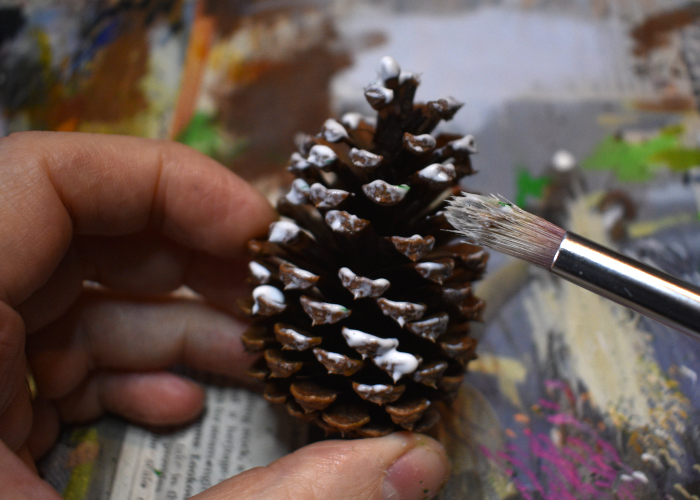
Then while the glue was still nice and wet, I dipped the cones in a tub of green flock, rolling them around to get the flock covering all of the glued areas.
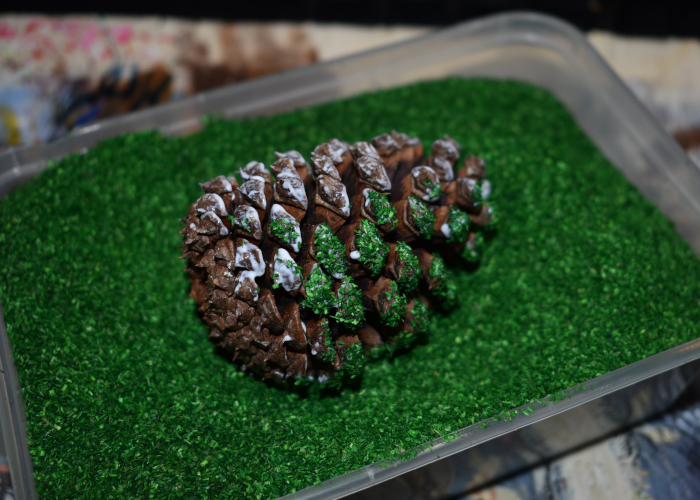
I don't normally use sawdust flock for modeling, as for its primary use (for grassed areas) I don't like how it looks, although I have used a finer flock in the past for making hedges. But I had a big tub of this stuff that someone gave to me years ago, and this seemed like a good use for it.
The flocked pine cones:
To finish up, I gave the trees a light spray from above using Army Painter Army Green. This dulled down the bright green of the flock and gave it some depth. I then used hot glue to attach the trees to some circular plywood bases. At this point, they can be put on the table as single trees, placed on top of a shaped terrain piece to make a forest base, or fitted to a textured base board. For the latter, you can glue the trees directly to the base board instead of using the circles, or texture around the circles so that the trees are removable, making for easier storage or the ability to remove trees when they are in the way for model movement.
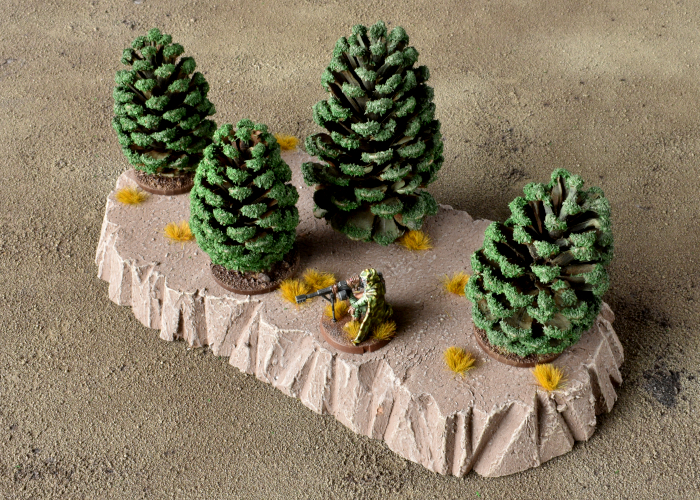
The end result, to be honest, still looks somewhat like pine cones painted green, although the illusion works a little better from above at normal playing height. For a little more work, you can also prune away the pieces from the base of the pine cone to create a trunk protruding from the bottom, like this:
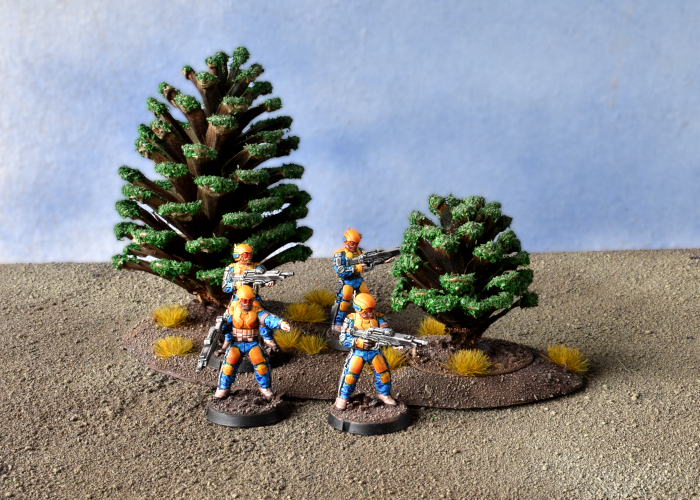
Or, to get even further away from the pine cone look, you can use a slightly more liberal coat of glue and cover the whole thing in landscaping foliage, like this:
Once you have your forest of pine-scented doom, head on over to the Maelstrom's Edge webstore here, to pick up an army to run around in it!
What are you working on? We would love to see your models and terrain in the Comm Guild Facebook group!
For other building ideas, modeling tutorials, army spotlights and conversion walkthroughs, check out the Hobby section of the Maelstrom's Edge website here. And while you're there, grab a copy of the Maelstrom's Edge V2 Beta rules!
Terrain Spotlight: Levitating Generator Platform!
Posted on Friday Sept 16, 2022 at 05:00pm in Tutorials
- by Iain Wilson
I've been fascinated for a while now by the various designs floating around for coffee tables and the like that 'float' with some clever cable design making it look like they have no actual support. In a moment of whimsy this week, I thought it might be fun to recreate this sort of design for the gaming table. And so... this happened:
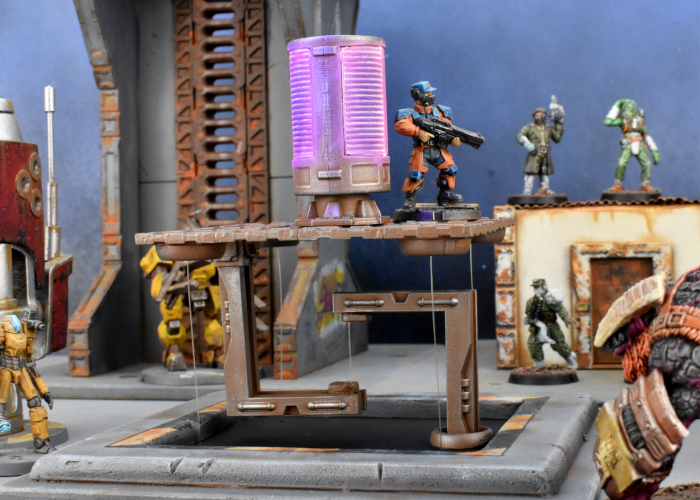
The main part of the structure is made from various bits and pieces from the Maelstrom's Edge terrain sprues. The circular windows on the bottom of the platform have a piece of thin plasticard behind them with a hole drilled through the centre. This allowed me to feed some clear fishing line through the holes and glue it onto the back of the plasticard. Once everything was painted and assembled, this would (I hoped!) securely hold the fishing line in place.
The base for the piece was made from a sheet of 2mm foamed PVC and some 6mm foamcore, with a few more bits from the terrain sprues for the support piece. I drilled holes in the base piece matching up to the holes on the platform corners, and made an indent beside each hole on the bottom of the base. This would allow the fishing line, when glued in place, to sit in the indents leaving the bottom of the base nice and flat.
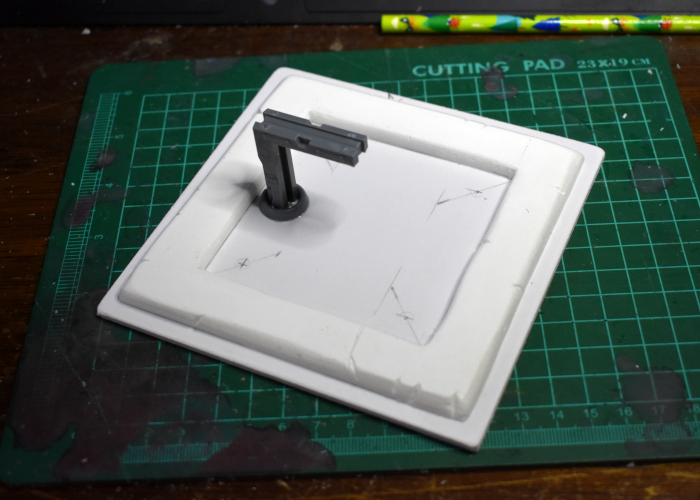
Everything needed to be painted before final assembly, to avoid getting paint on the fishing line - I wanted the line to remain as unobtrusive as possible.
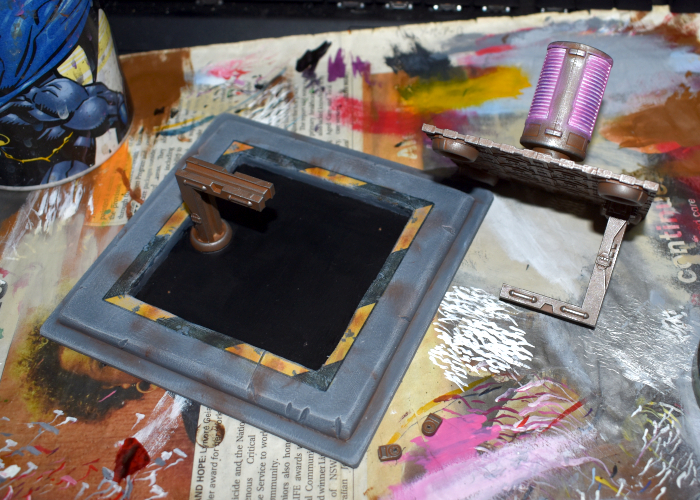
I glued the fishing line into the window ports and glued those in place on the bottom of the platform, and then glued the central support line in place. The it was just a matter of pulling the corner lines through the base holes until everything was sitting square and secure, and gluing the ends of the lines in place on the bottom of the base. There was a bit of breath-holding when I turned it over, and much rejoicing when it turned out to work as intended!
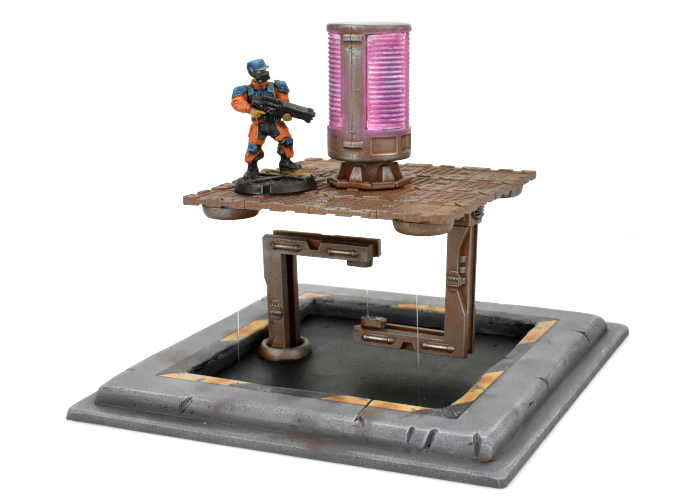
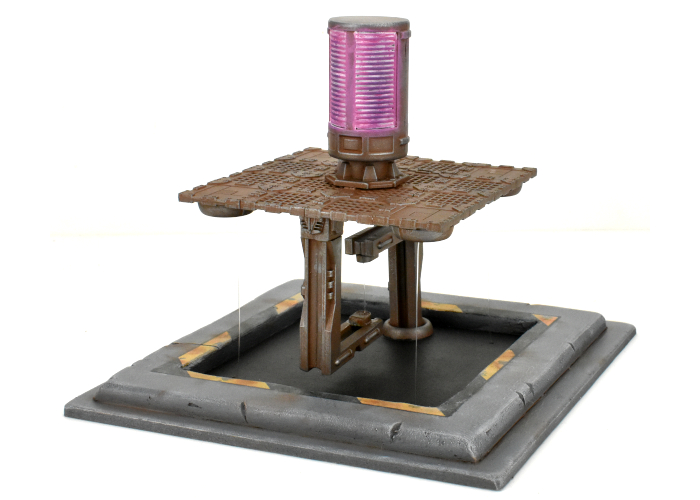

It's a bit of an odd piece for gaming terrain, but sometimes it's fun to make something just to find out if you can!
To build your own generator platform of floating doom, you can pick up the terrain sprues along with the rest of the Maelstrom's Edge range from the webstore here.
What are you working on? We would love to see your models and terrain in the Comm Guild Facebook group!
For other building ideas, modeling tutorials, army spotlights and conversion walkthroughs, check out the Hobby section of the Maelstrom's Edge website here. And while you're there, grab a copy of the Maelstrom's Edge V2 Beta rules!
Tags: modeling spotlight terrain terrainsprue
Terrain Tutorial: Quick and Easy Fences!
Posted on Friday Sept 09, 2022 at 05:00pm in Tutorials
- by Iain Wilson
Fences can provide an interesting extra dimension to miniature battlefields, as they block movement without necessarily also blocking line of site. This can force some tactical decisions around model placement and movement around the table. In this week's article, I'm sharing a quick and easy way to make some fences for your table.
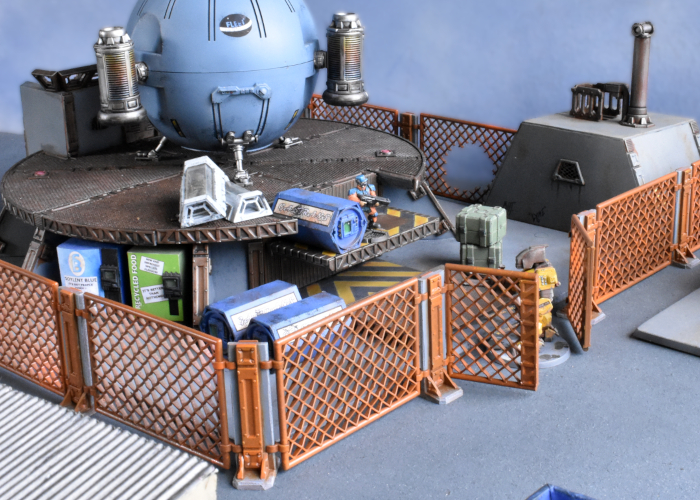
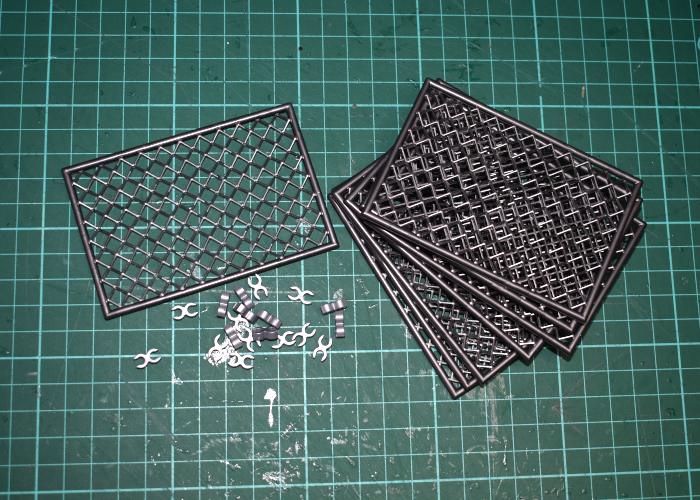
I came across these Lego-compatible fence pieces on AliExpress completely by accident, and thought they seemed ideal for gaming. They come as a pack of fence sections, and join together with separate clip pieces, and they're a nice, dark metallic grey colour. So for the really quick and easy version, you could just take these, clip a bunch of them together and plonk them on the table as-is and call the job a good-un.
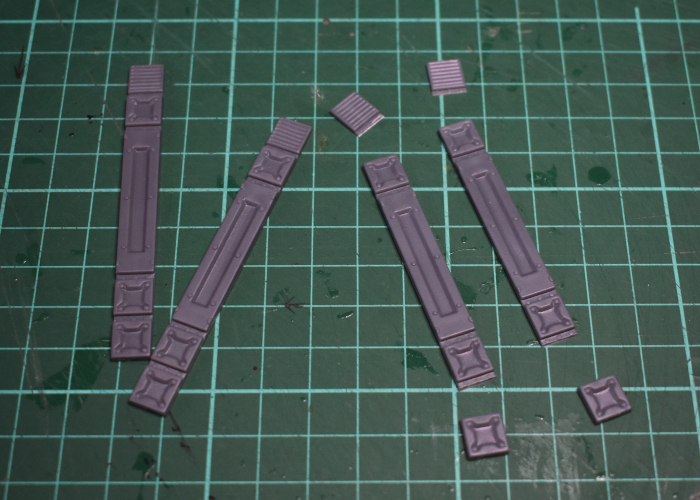
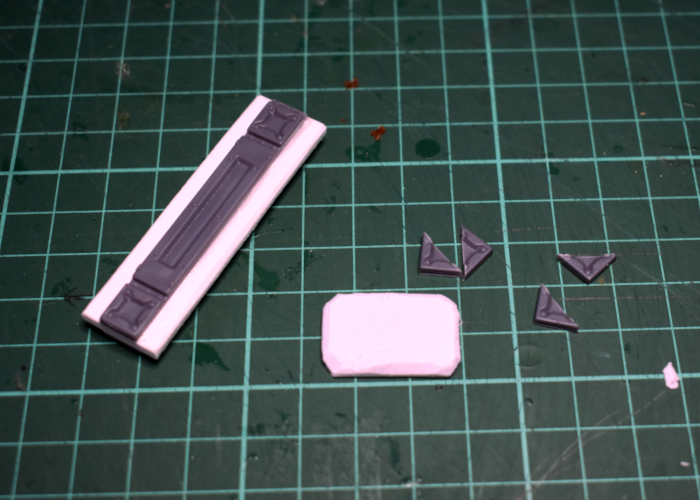
I wanted to fit them in with my existing terrain a little better, though, so I grabbed a couple of Maelstrom's Edge terrain sprues and set to work. I started by trimming up some reinforcing struts to about the same height as the fence panels by cutting off the top and bottom segments.
Then I took some 3mm foamed PVC and cut strips the same height as the struts, with about 4mm extra width either side - as a happy coincidence, this was the same width as two of the struts, so laying the struts side-by-side on the PVC served as a handy cutting guide.
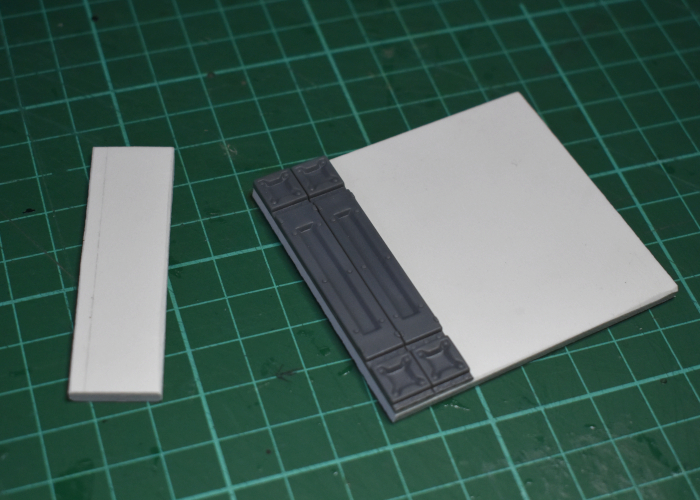
I glued the struts in place on either side of the PVC strips to form reinforced fence posts, and then cut some shorter strips to serve as bases for the posts. The bottom segment removed from the struts, cut in half diagonally, made some perfect supports to strengthen the attachment between post and base.
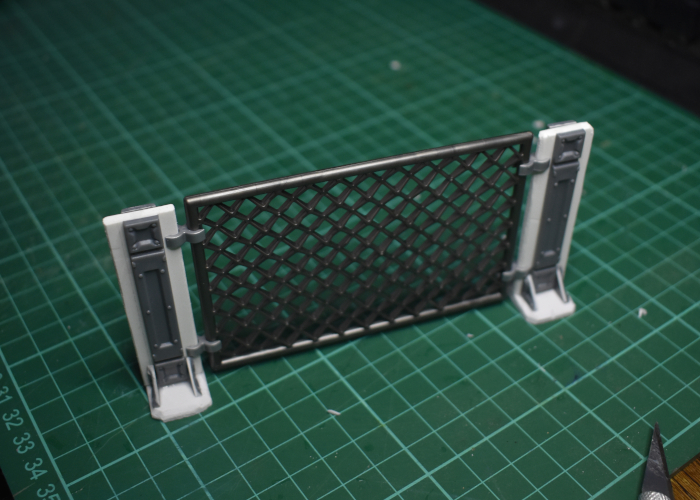
With everything glued together, the clips for the fence pieces slot snugly onto the PVC and it all stands up nicely.
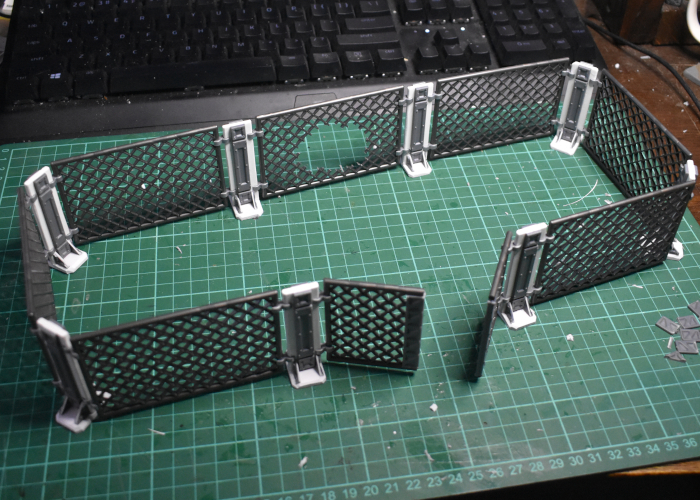
I made a bunch of posts, and for good measure cut one of the fence segments in half and attached some more reinforcing struts on the inner sections to make a two-part gate. The whole thing slots together and by twisting the holding clips can go around corners into whatever configuration is needed.
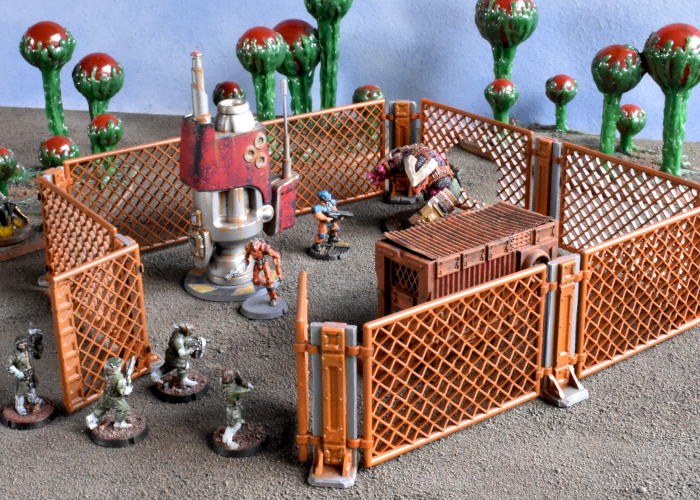
With a quick coat of rusty paint (Vallejo Beasty Brown spray with some splotchy spray of Tamiya Pure Orange and a light drybrush with Army Painter Fire Lizard) and some grey for the PVC parts (Army Painter Uniform Grey with a drybrush of white and some Vallejo Beasty Brown drybrushed into the creases) the fence is ready for the table!
To build your own fence of chainlinked doom, you can pick up the terrain sprues along with the rest of the Maelstrom's Edge range from the webstore here.
What are you working on? We would love to see your models and terrain in the Comm Guild Facebook group!
For other building ideas, modeling tutorials, army spotlights and conversion walkthroughs, check out the Hobby section of the Maelstrom's Edge website here. And while you're there, grab a copy of the Maelstrom's Edge V2 Beta rules!
Painting Tutorial: Quick & Easy Horns!
Posted on Wednesday Jul 13, 2022 at 05:00pm in Tutorials
- by Iain Wilson
With the release of the STL files for the Broken Gnolti last week, I found myself painting up another couple of these wee beasties, and along the way I found a quick and easy way to paint their horns that I thought was worth sharing. This would work for any model with ridged or otherwise rough-textured horns.
For this tutorial, I used Army Painter paints. You could substitute any similar acrylic colours for a similar result.

Start out with a white basecoat.
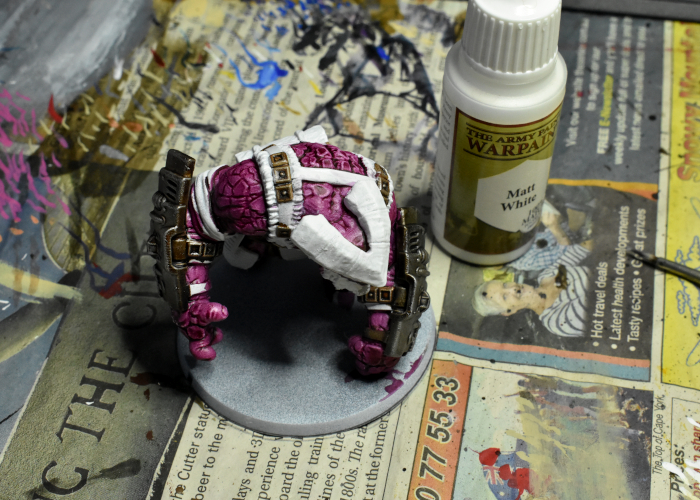
Add a coat of Skeleton Bone over the whole bone area.
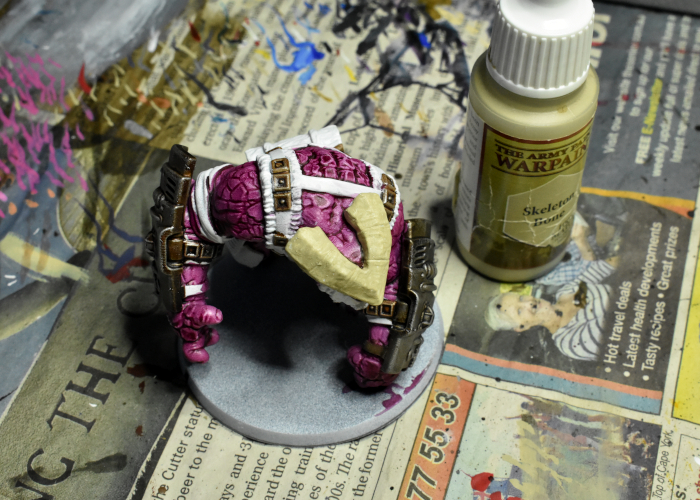
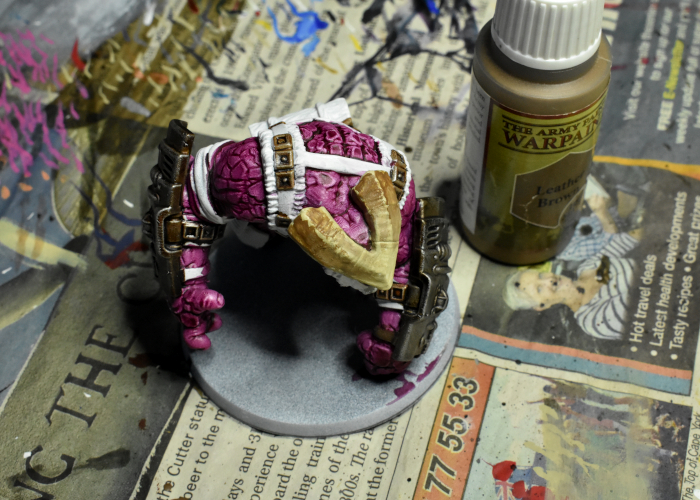
Starting with one face of the horn at a time, paint on some Leather Brown, around half to two-thirds of the way down to the base of the horn, depending on how dark overall you want the final result to be.
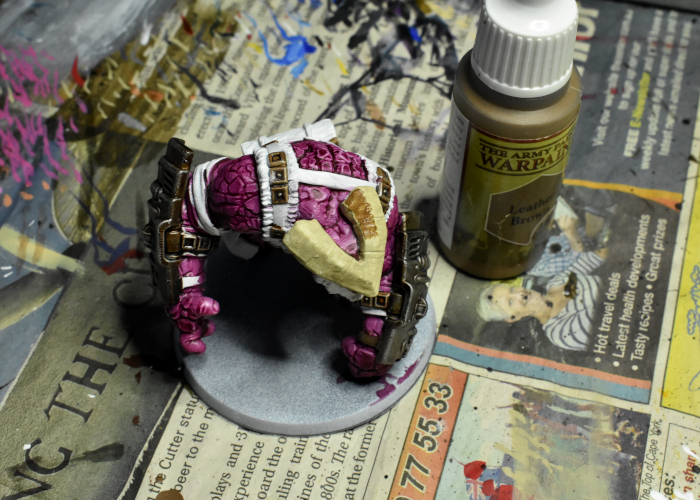
While the Leather Brown is still wet, go back over with some more Skeleton Bone, blending the two colours together to create a gradient. This doesn't have to be perfectly smooth, as the final step will tie it all back together.
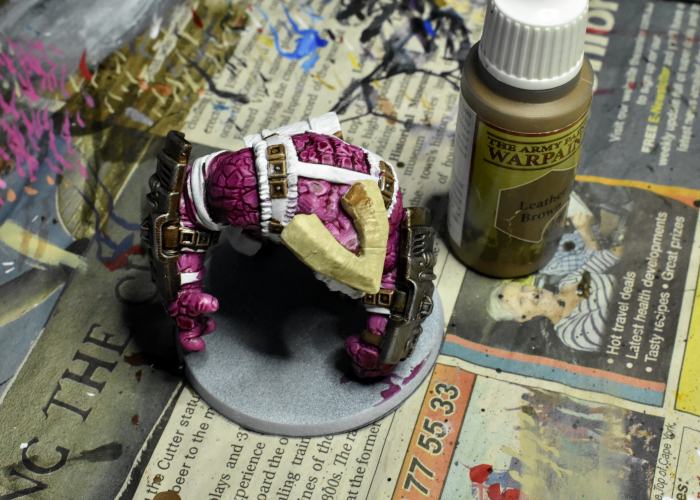
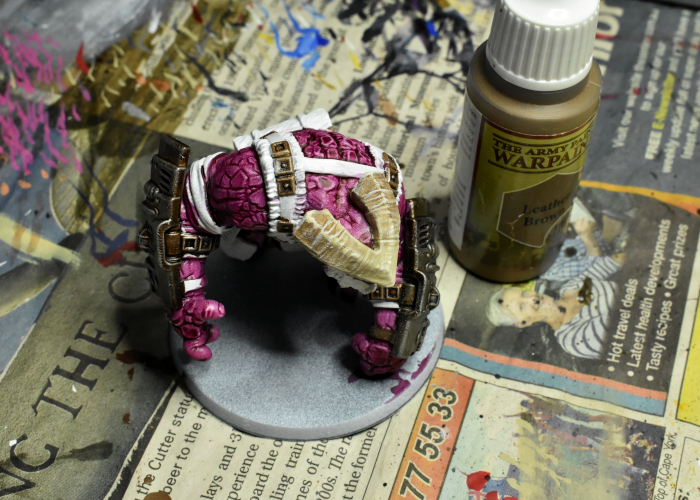
Repeat the above two steps for each face of the horns.
Finally, go over the whole thing with a light drybrush of white, or white mixed with a little bone.
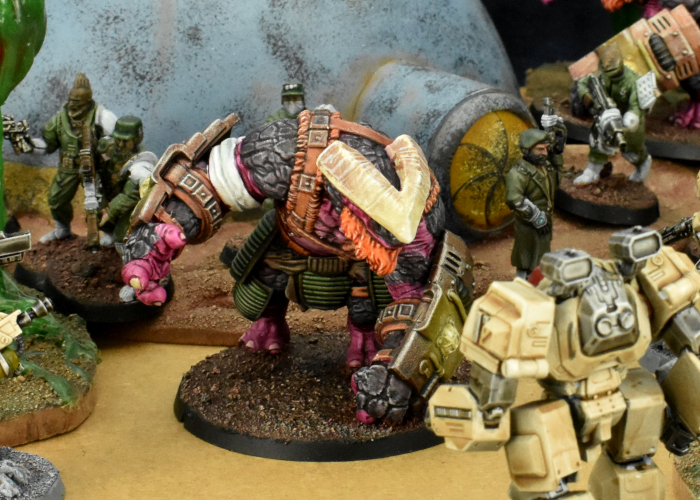
The finished Gnolti, ready to rampage!
Paint up your own Behemoth of Horned Doom by grabbing the Gnolti from the Maelstrom's Edge webstore!
While you're there, you can download the Maelstrom's Edge V2 rules from the Trial Rules section of the website here. The Beta rules documents contain all of the rules for playing V2 games, but keep in mind that these are just 'preview' documents - some rules may be revised based on feedback, and the final layout including background material for the factions and the Maelstrom's Edge universe, artwork and other 'flavor' material is missing.
If you have any feedbacks on the new rules, our model range, or the tutorial above, pop on over to the Comm Guild Facebook group and share your thoughts!
Modeling Spotlight: Speedpaint SecDef
Posted on Wednesday May 18, 2022 at 05:00pm in Tutorials
- by Iain Wilson
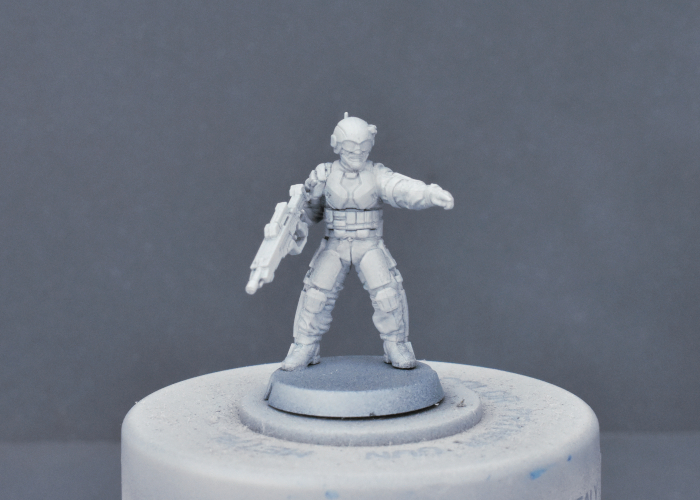
My long-awaited Army Painter Speedpaint Starter Set finally arrived last week, and I was impatient to give them a test run. I've had a bunch of plastic SecDef models assembled for a while, for a little side-project, and figured they would be perfect for the job. So I grabbed the first squad of models out of the hobby box and set to work!
I started off with a basecoat of Army Painter Matt White spray. I did experiment on a couple of initial test models with a plain white basecoat and a zenithal base using white and purple, but decided that the zenithal basecoat didn't make enough of a difference to the end result to be worth the effort.
(A zenithal basecoat is where two layers of colour are used - a darker colour in the recesses/undersides of the mode, and a lighter layer sprayed down from above. This can be handy when combined with certain painting methods, particularly using thinner 'glazing' paints to accentuate shading and highlights.)
For the uniform, I went with Highlord Blue, applying to any visible cloth areas and trying to avoid too much spillover onto the armour plates. I also added the blue to the raised surround on the helmet.
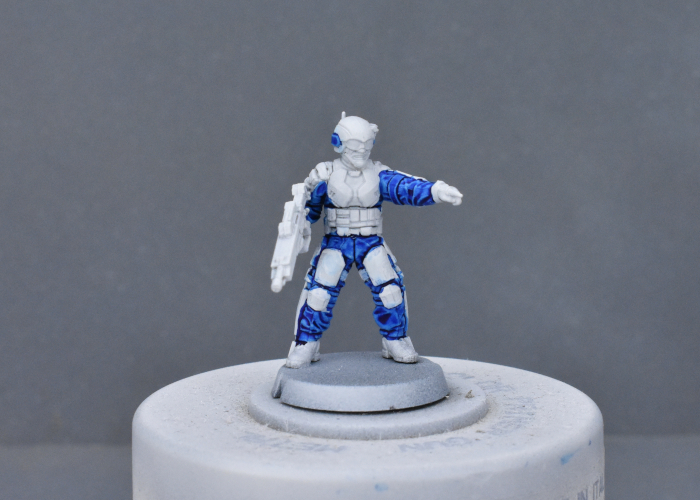
After a quick touchup where necessary with some Matt White, I painted a layer of Hardened Leather over pouches, straps, boots, gloves and face, and then went back over the face with Crusader Skin. The double layer on the skin was to give a darker skin colour - my initial test showed the Crusader Skin to be a bit more washed out than I wanted, but layering it over the Leather gave a nice, dark tone.
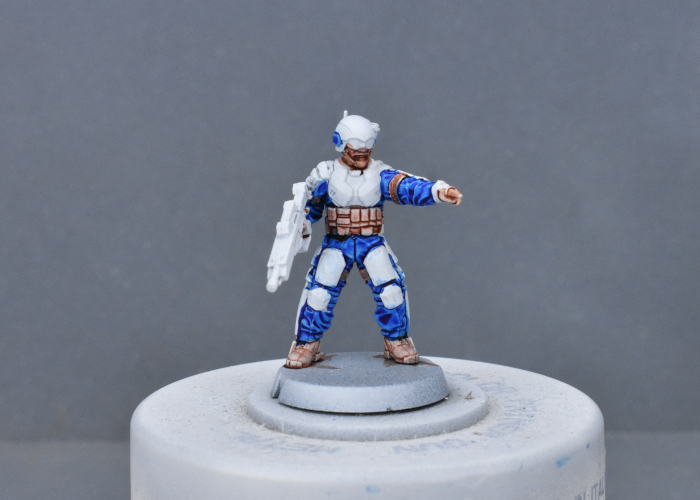
Next up, I painted over the weapon, belt, exoskeleton, and helmet commlink, targeter and chinstrap with Gravelord Grey.
For the armour plates and helmet, I went with a coat of Zealot Yellow. This settled nicely on the lower areas of the plates, providing a lovely contrast against the blue uniform.
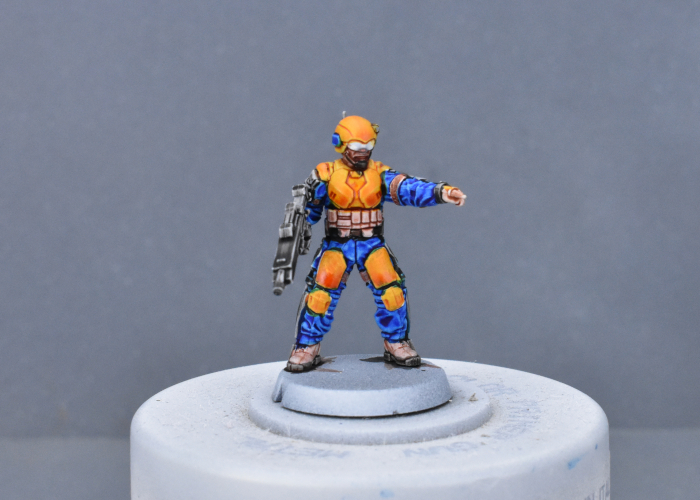
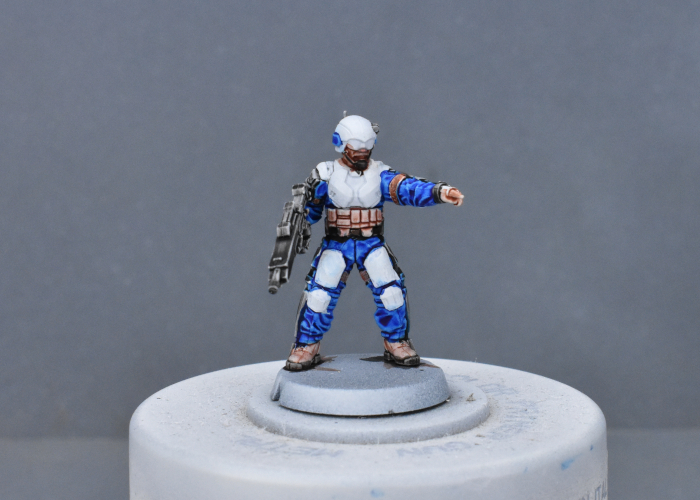
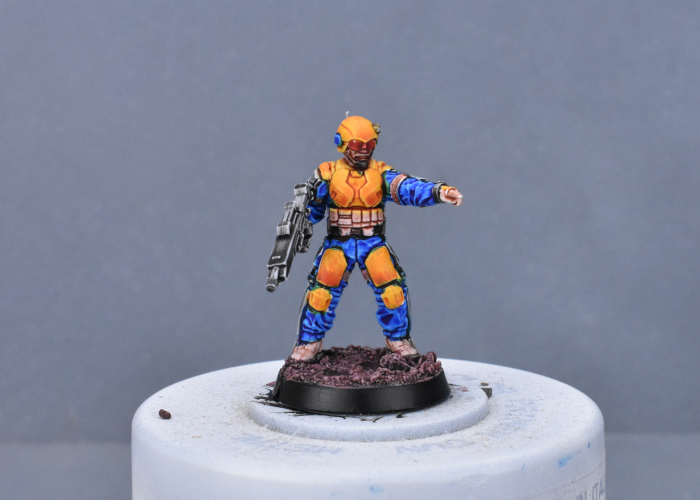
To finish up, I added some Blood Red over the goggles, and while that was drying added some gravel mix to the base. Without a dark brown in the starter set, I used a 1:1:1 mix of Hardened Leather, Blood Red and Hive Dweller Purple over the gravel, giving it a drybrush of Tanned Flesh and Ash Grey (regular acrylic paints) when it dried. With a quick run of Matt Black around the base rim and some white specular highlights on the goggles, he was ready for the table.
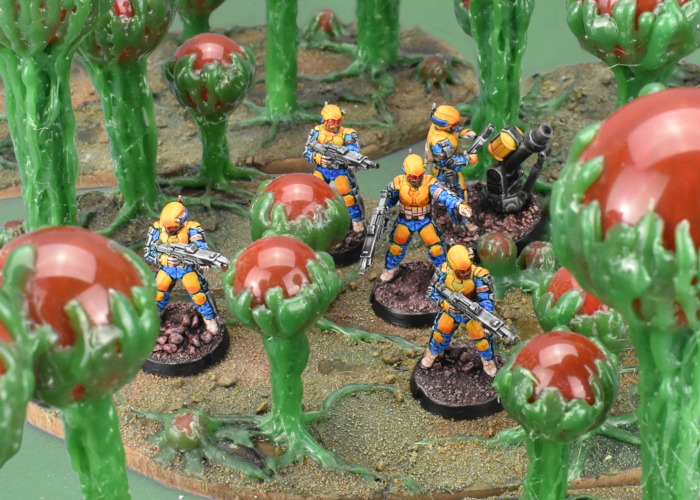
The unit assembled - regular SecDef models, with a custom made energy mortar using some plastic tubing and parts from the 2nd Maelstrom's Edge terrain sprue.
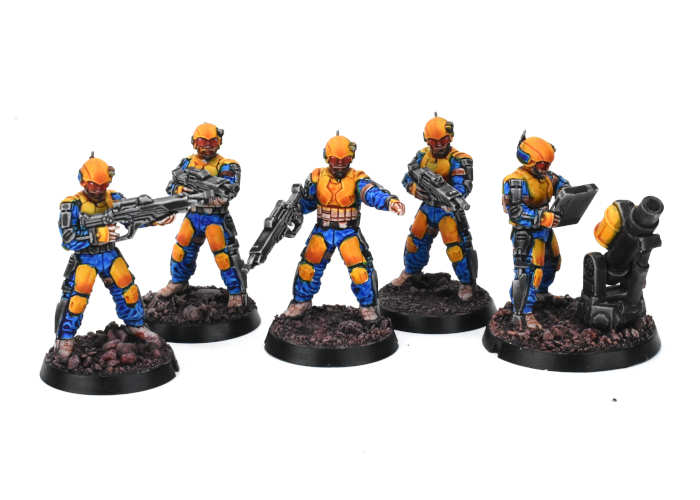
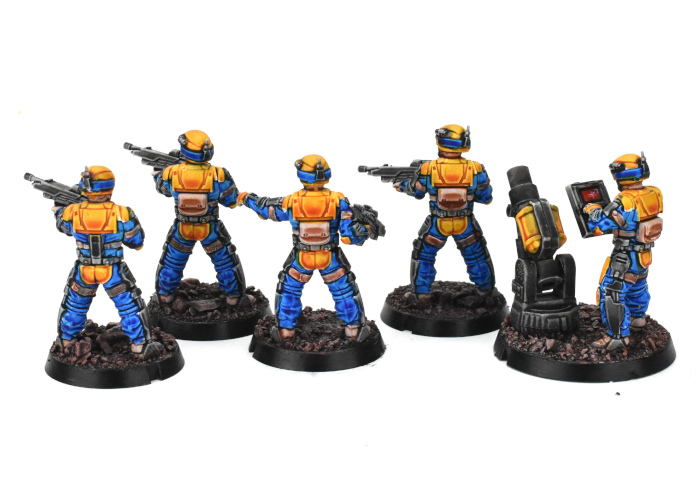
They're not perfectly neat, but for a quick, table-ready paintjob these paints are fantastic, giving some perfectly acceptable shading and highlights with a single coat. I'm looking forward to getting the rest of this force painted up!
To have a go yourself, pick up the plastic, multi-part SecDef kit from the Maelstrom's Edge webstore!
While you're there, you can download the V2 rules from the Trial Rules section of the Maelstrom's Edge website here. The Beta rules documents contain all of the rules for playing V2 games, but keep in mind that these are just 'preview' documents - some rules may be revised based on feedback, and the final layout including background material for the factions and the Maelstrom's Edge universe, artwork and other 'flavor' material is missing.
For other modeling ideas, tutorials, army spotlights and conversion walkthroughs, check out the Hobby section of the Maelstrom's Edge website here.
What are you working on? We would love to see your models and terrain in the Comm Guild Facebook group!
Terrain Spotlight: Terrain from 'Found' Objects
Posted on Tuesday May 03, 2022 at 05:00pm in Tutorials
- by Iain Wilson
One of my favourite parts of this hobby is building terrain from things that were originally intended for very different purposes. To this end, I tend to keep an eye out when I'm walking around a store or sending things to the recycle bin for anything that has an interesting shape. You can find quite a few of the resultant terrain projects in the Hobby section of the Maelstrom's Edge website, but here's a few highlights from the last couple of years.
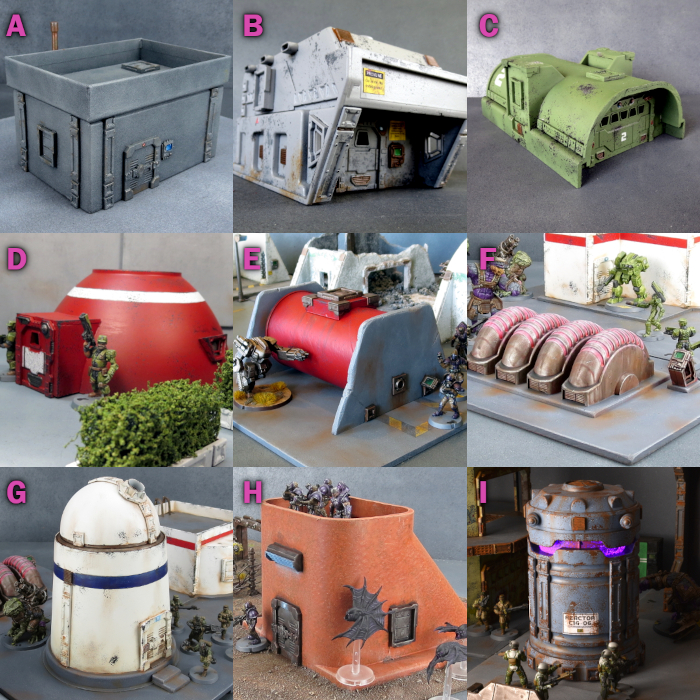
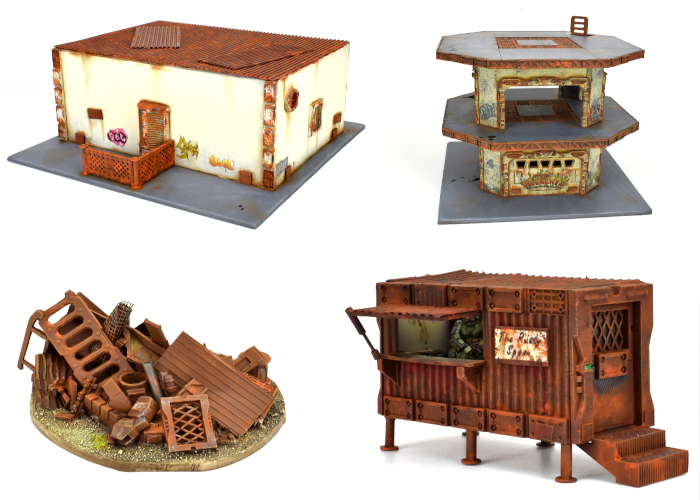
All of these make use of various assorted detail pieces from the Maelstrom's Edge terrain sprues. Click on the Walkthrough links to see how they were put together.
A - Basic building made from a cardboard gift box. Walkthrough
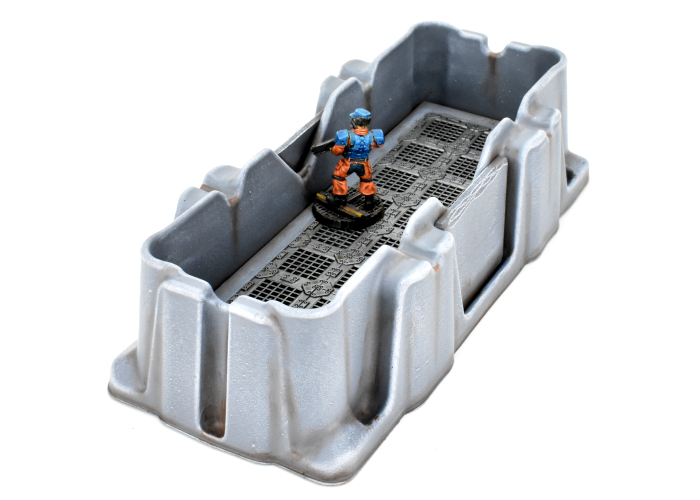
B - Portable building made from a plastic storage tray. Walkthrough
C - Military building made from a plastic stormwater drain. Walkthrough
D - Small Hab Dome made from a plastic bowl. Walkthrough
E - Storage Tank made from a Pringles tube. Walkthrough
F - Generator made from bubble gum tape canisters. Walkthrough
G - Observatory made from a yoghurt tub and a Christmas bauble. Walkthrough
H - Bunker made from a plastic air conditioning duct piece. Walkthrough
I - Generator made from a collapsible LED lamp. Walkthrough
To build your own battlefield terrain of recycled doom, you can pick up the terrain sprues along with the rest of the Maelstrom's Edge range from the webstore here.
What are you working on? We would love to see your models and terrain in the Comm Guild Facebook group!
For other building ideas, modeling tutorials, army spotlights and conversion walkthroughs, check out the Hobby section of the Maelstrom's Edge website here.
Tags: spotlight terrain terrainsprue
Terrain Spotlight: Plastic Packaging Firepoint
Posted on Wednesday Apr 20, 2022 at 05:00pm in Tutorials
- by Iain Wilson
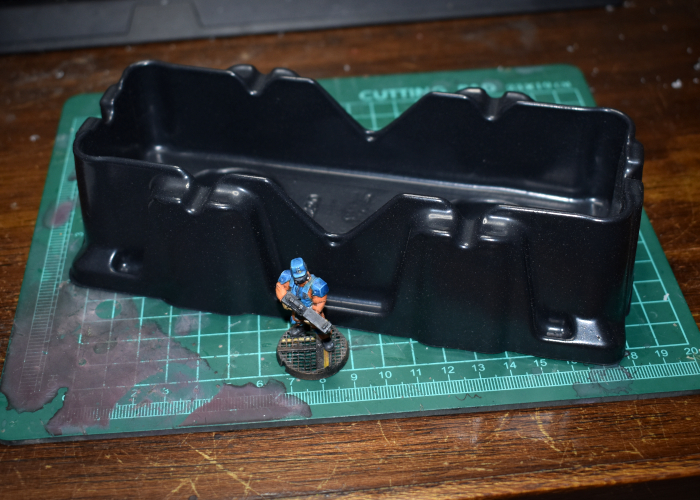
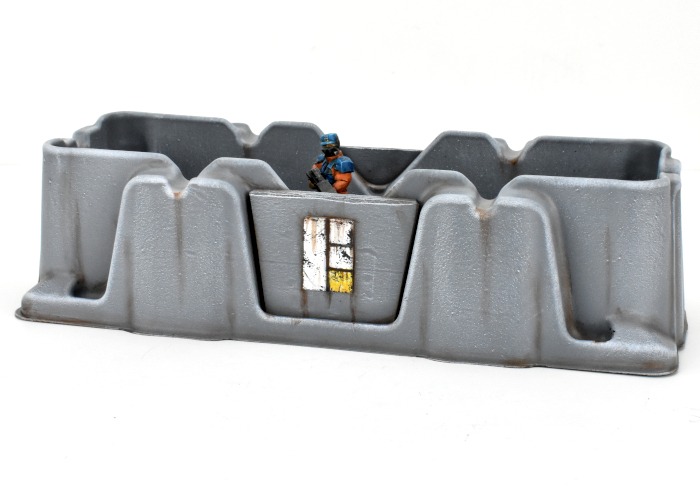
As you may have seen if you've been following the blog for a while, I make a lot of my terrain out of various bits and pieces that I come across here and there. This week I upgraded my external hard drive, and the new one came with some nifty plastic packaging pieces that I thought would be just perfect to turn into some small firepoint terrain pieces. And so I set to with some foamed PVC, superglue, and a couple of Maelstrom's Edge terrain sprues!
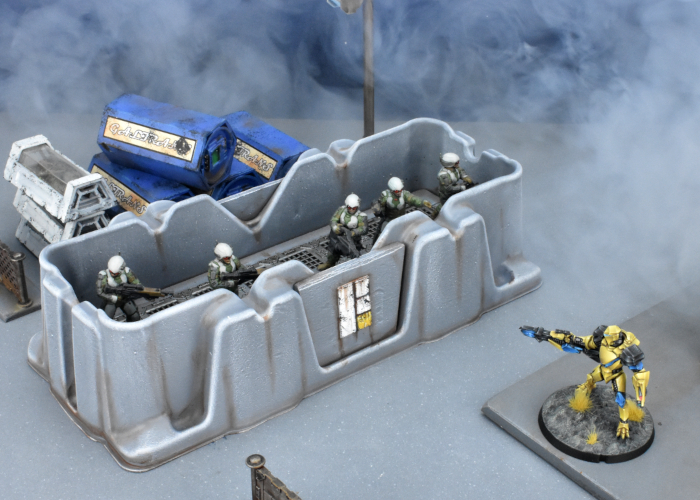
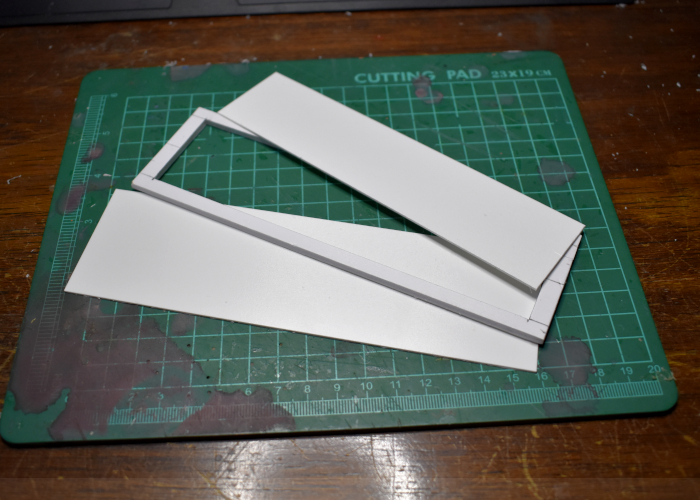
The 'floor' on the inside of the packaging piece was a fraction too low to allow models to see comfortably over the sides, and wasn't flat. Aside from that, I figured the contouring on the sides would give it some nice visual distinctiveness without the need for a lot of embellishment.
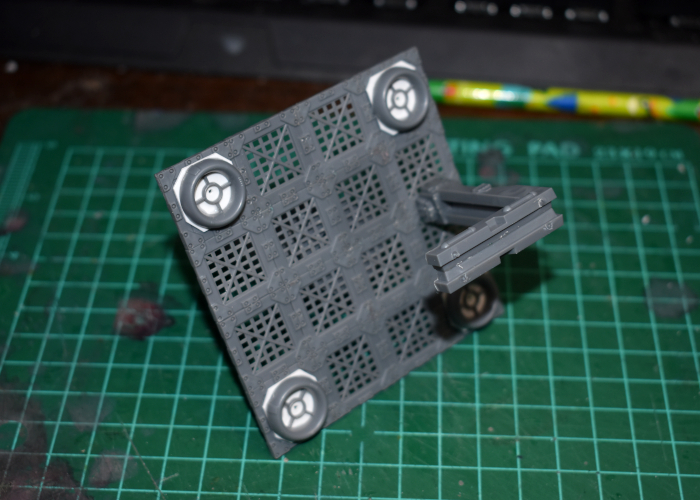
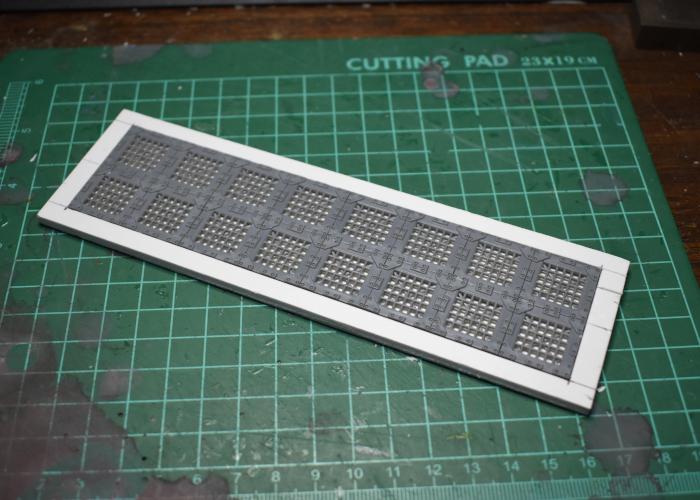
I started out by measuring up the inside dimensions, and putting together as many floor grating pieces from the 2nd Maelstrom's Edge terrain sprue as would fit in there.
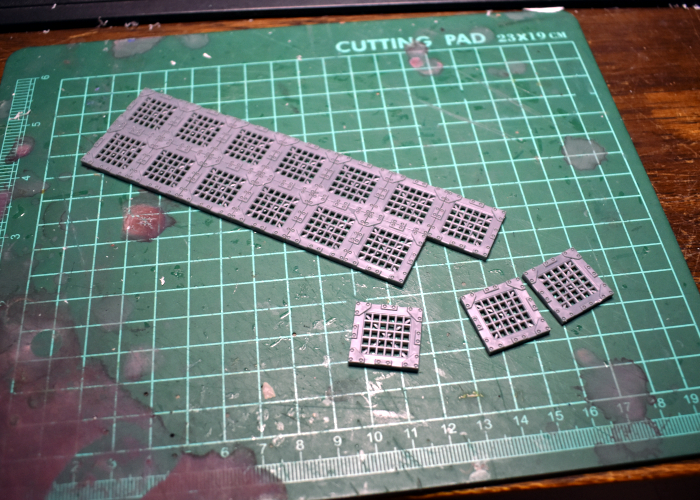
The grating left a small space around the edges, so to finish off the floor I cut a surround from 3mm foamed PVC to fit snug against the walls of the packaging, with a rectangle of 1mm PVC to sit underneath the grating to bring it up to the same height as the surround. Then I added a larger piece of 1mm PVC under the whole thing for rigidity and just that tiny bit of extra height.
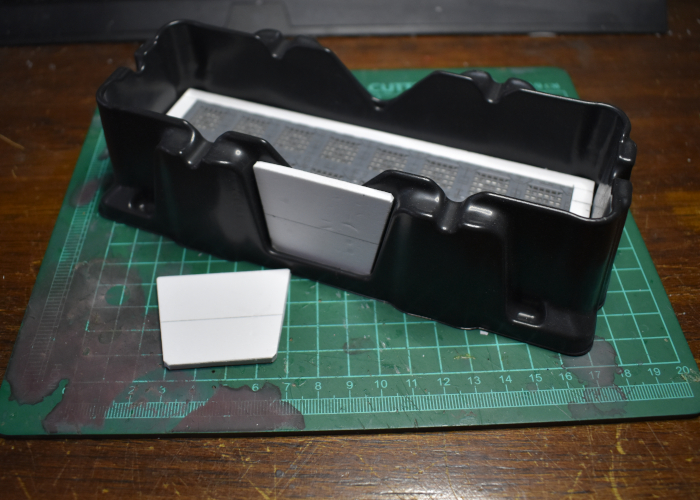
I used an all-plastic primer and superglue to fix the floor in place in the packaging piece. This left the walls a nice height for models to be mostly obscured while still being able to shoot over the walls, except for the middle section of the long walls, where it dipped down lower. I fixed this by cutting some trapezoid pieces of foamed PVC to glue over the gap.
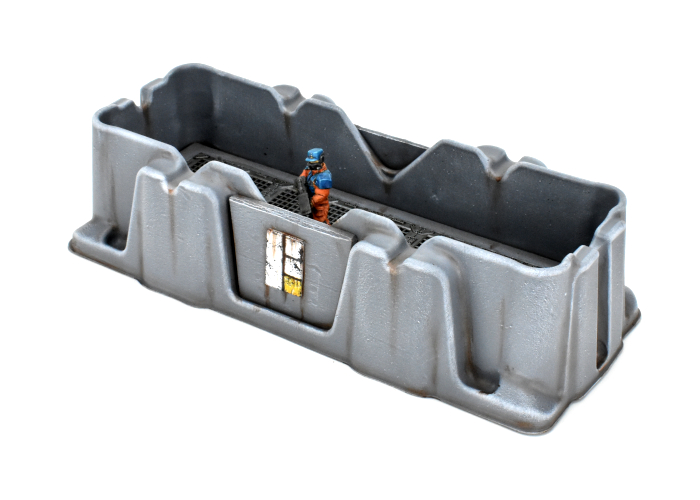
I kept the painting relatively simple, starting with an Army Painter Uniform Grey basecoat and then a drybrush of AP Gorgon Hide, with some AP Dirt Spatter in the creases for some easy weathering. The metal grating was painted with AK Interactive Gun Metal and then washed with AP Strong Tone. Finally, I added an Epirian symbol cut from 1mm foamed PVC to the front, painted with Gorgon Hide and White, and Citadel Iyanden Darksun and AP Daemonic Yellow for the yellow bit. I used a light sponge of Vallejo Heavy Charcoal for chipping, and then finished up with some more dirt spatter weathering.
To build your own bunker of recycled doom, you can pick up the terrain sprues along with the rest of the Maelstrom's Edge range from the webstore here.
What are you working on? We would love to see your models and terrain in the Comm Guild Facebook group!
For other building ideas, modeling tutorials, army spotlights and conversion walkthroughs, check out the Hobby section of the Maelstrom's Edge website here. And while you're there, grab a copy of the Maelstrom's Edge V2 Beta rules!
Terrain Spotlight: Candy Jar Desert Building
Posted on Tuesday Jan 11, 2022 at 06:00pm in Tutorials
- by Iain Wilson
As a wise man once said, "With great Christmas comes a great big bunch of junk food!"
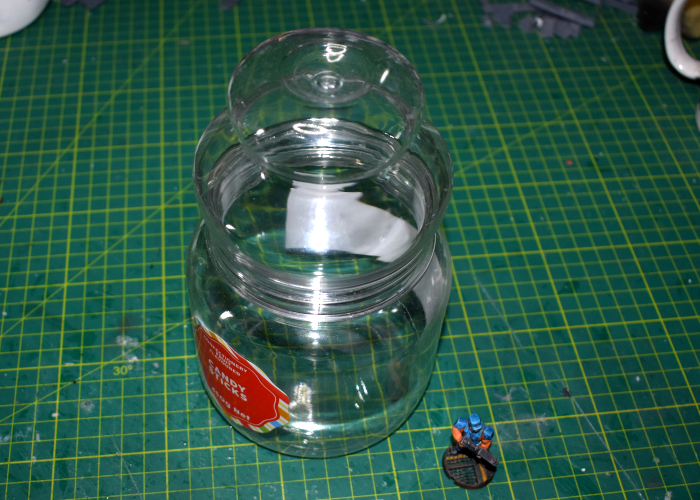
Amongst my family's collection of sugary delights this year was a plastic jar full of candy sticks, bought for my daughters to stuff into Christmas cards. Once empty, though, the jar itself was just too interesting a shape to toss it away. So, there was nothing else for it but to build something!
The jar in question, blissfully unaware that it was about to enter a whole different plane of existence.
After removing the labels and cleaning off the glue residue with some isopropyl alcohol, I sprayed the inside of the jar with some matt black spray. I do this whenever I'm using something clear as a terrain base, as it prevents stray light bleeding through the paint, and also stops things looking weird if the paint on the outside gets scratched.
I also gave the outside a scrub with some sandpaper to break up the glossy surface. This gives a better surface for the glue and paint to adhere to.
To fit doors and windows from the terrain sprue to the curved surface of the jar, rather than building a framework to square things up I decided to fit them to the curve. I laid a piece of sandpaper over the jar and used this as a curved sanding block to shape the back of the parts.
Adding the support struts around the rim of the lid was a little easier - I just bent them around the curve and glued them in place with superglue and a plastic primer.
In a happy coincidence, the spacing worked out almost perfect. I used three full struts, and cut the last one down to three sections, needing to trim only a fraction off the end to make it fit perfectly.
I glued the door and windows into place, adding some steps and gluing the jar down to a piece of hardboard. I also added a grating piece onto a bare patch of the board just for some extra visual interest, painting underneath it with some black as this was easier than doing it later.
To dress up the top of the building, I grabbed a few assorted pieces from the terrain sprues, whipping together an aerial array, a control box and a chimney using a piece of the sprue and some plastic tube.
With these parts glued in place, I finished off the roof with a fan and large pipe fitting glued onto a base that fit just perfectly over the cavity in the top of the jar lid.

The jar needed some texture, so I added a coat of textured paint and while that was drying I built up the base with some filling plaster.
Finally, I added a layer of sand and gravel mix over the filling plaster, fixing it in place with some PVA glue.
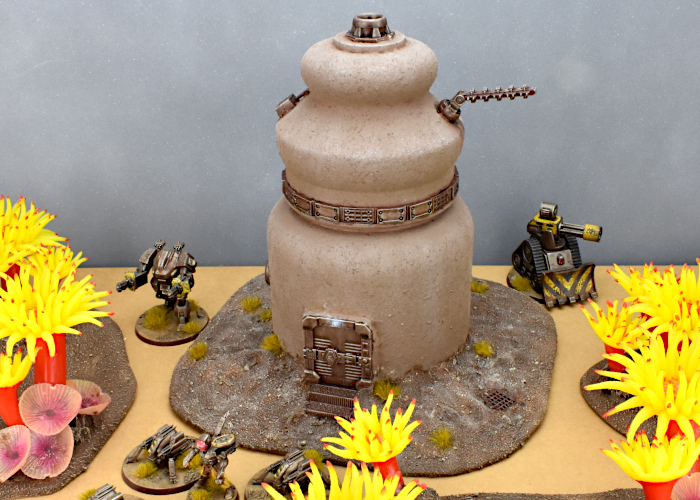
After a quick bit of paint work, the new building was looking totally sweet and ready for the table!
To build your own desert habitat of sugary doom, you can pick up the terrain sprues along with the rest of the Maelstrom's Edge range from the webstore here.
What are you working on? We would love to see your models and terrain in the Comm Guild Facebook group!
For other building ideas, modeling tutorials, army spotlights and conversion walkthroughs, check out the Hobby section of the Maelstrom's Edge website here.
Tags: buildings scratchbuild spotlight terrain terrainsprue tutorial
Maelstrom's Edge 2021 Christmas Special!
Posted on Saturday Dec 25, 2021 at 06:00pm in Tutorials
 - by Iain Wilson
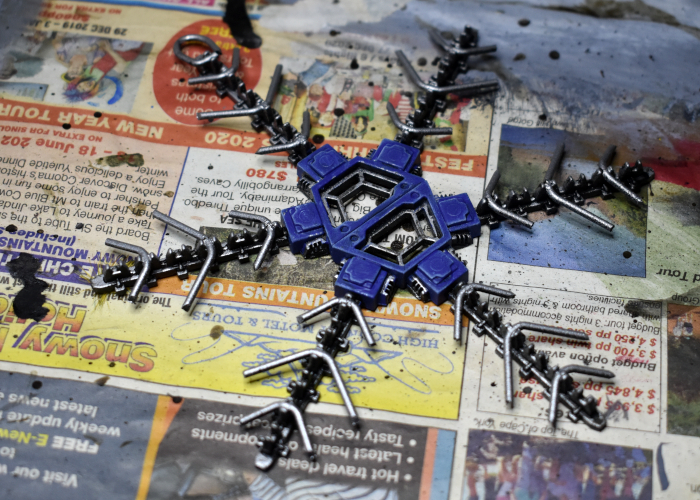
It's become a bit of a tradition around this time of year for me to grab some leftover sprues and throw together a sci-fi Christmas tree ornament. For this year's trinket, I grabbed some parts from the original Maelstrom's Edge terrain sprue and made myself a somewhat technological snowflake!

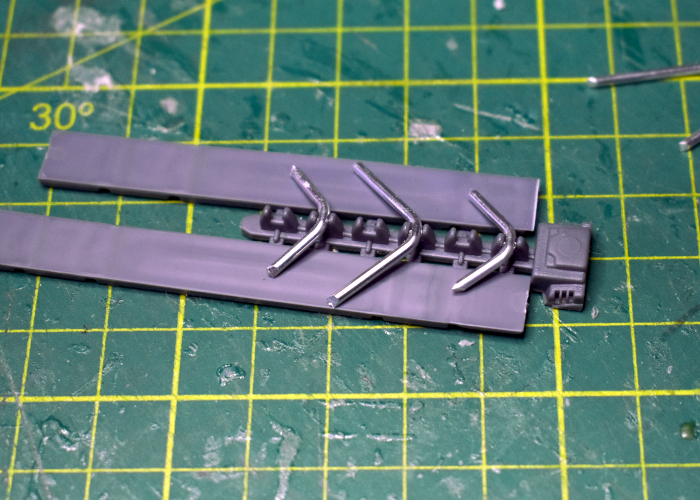
The build for this one was pretty simple. I started out with two trapezoid windows and half a dozen energy fence pylons.
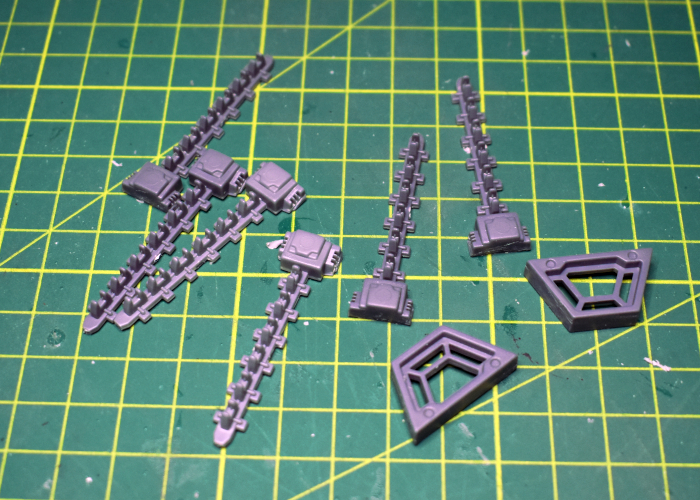
To make the branching parts of the snowflake 'arms', I grabbed some 1.5mm aluminium rod, cut it into 20mm and 30mm lengths, and bent them in the middle.
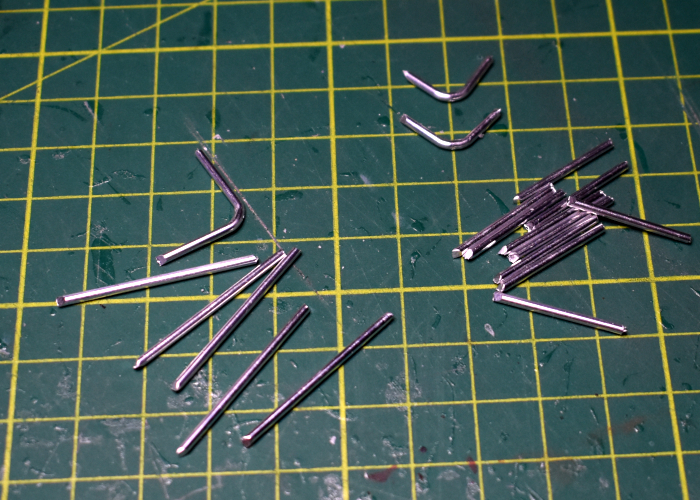
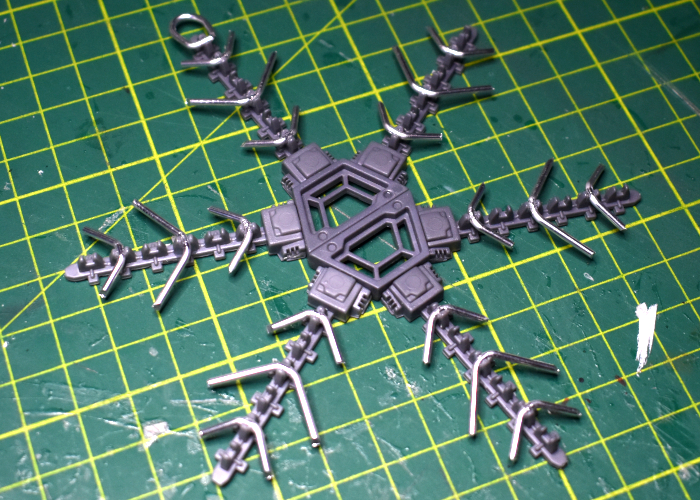
I made a simple formwork to glue the rod pieces in place, by laying a pair of struts from the terrain sprue on either side of the fence posts, adding a drop of glue into the grabby port on the post, and then sitting the bent rod in place. Another dollop of glue on top sealed the rods in place. I also added another piece of rod bent into a loop on the end of the 'top' fence post, to serve as a hanging loop.
Once the frankly horrific amount of glue I had used here had time to set, I used plastic cement to glue the windows together, and the bottoms of the fence posts to the window frames.
On to painting! I sprayed the whole thing with Army Painter Matt Black, and then with a layer of Plate Metal.
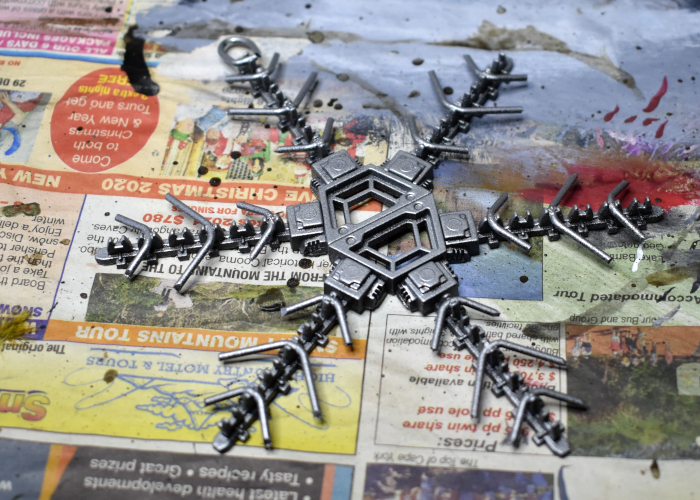
I then went over the window frams and fence posts with some Secret Weapon Soft Body Black wash that I had sitting around from an Adepticon goodie bag a few years back.
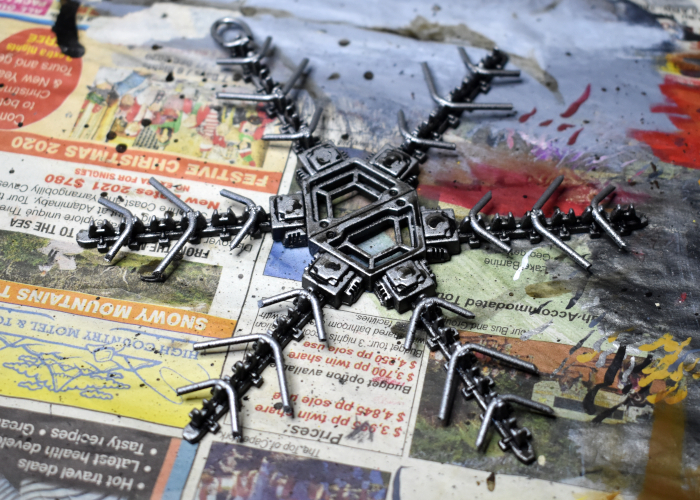
On the fence post bases and the window frames, I added a coat of Citadel Macragge Blue, with a highlight around the edges of Army Painter Ice Storm.
Then, because I apparently can't go for more than a week without weathering something, I took a sponge and some Vallejo Heavy Charcoal and added some chipping to the blue areas, highlighting with some more Ice Storm. As a final touch, I used some Army Painter blue tone to add a blue tint in the creases of the 'arm' attachments, for a little extra colour. And then on to the tree it went!
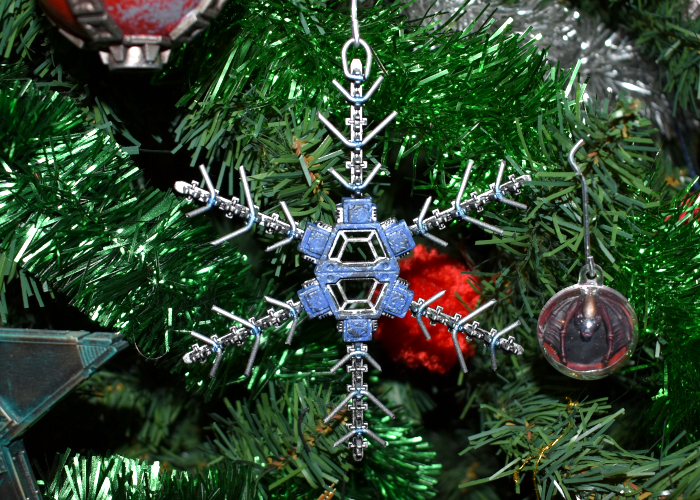
Here's wishing everyone a safe and happy time for whatever holidays you happen to celebrate around this time of year!
Build your own ornament of celebratory doom by picking up the Maelstrom's Edge terrain sprues along with the rest of the Maelstrom's Edge range from the webstore here.
What are you working on? We would love to see your models and terrain in the Comm Guild Facebook group!
For other building ideas, modeling tutorials, army spotlights and conversion walkthroughs, check out the Hobby section of the Maelstrom's Edge website here.
Terrain Spotlight: Fruit Jar Air Purifier!
Posted on Wednesday Dec 08, 2021 at 01:03am in Tutorials
- by Iain Wilson
Time for a super-quick terrain build! In the grand tradition of painting things instead of throwing them into the recycling bin, this week I built an air purifier station out of a plastic fruit jar, with some help from the Maelstrom's Edge terrain sprue!
The bulk of this terrain piece uses the aforementioned plastic jar, which I think originally had plums in it. The plums weren't much good for modeling, but the jar itself was an interesting shape, so I figured it was worth hanging onto it.
I started out by spraying the inside of the jar with some black paint. This helps to avoid things looking weird if the outer layer of paint gets scratched with use, and also blocks light from showing through if the outer paint layer is thin in places. I also gave the outside a light sand to help the glue and paint to stick better.
To cover over the embossed logos on the bottom of the jar, I took a large base and cut some indents into the bottom to sit over the mould line on the jar. I glued this in place using some all-plastic glue (a superglue with a primer pen that helps give a secure bond on different types of plastics). In the middle of the base I added an iris portal from the second Maelstrom's Edge terrain sprue.
I went light on additional details as I thought the shape of the jar was interesting enough by itself, but I added a vent on each side - the iris on top would be opened to suck in contaminated or otherwise unsuitable air, and the cleaned/chemically altered/now fit for breathing air would be pumped out through the vents, with all of the 'working gubbins' sealed away inside the unit.
Finally (or so I thought) I added a small base cut from a piece of 5mm foamed PVC.
While I was painting the purifier unit, I decided that it still looked a little too much like a jar turned upside down, largely because the lid is such a recognisable shape. So I broke it up a bit by adding some buttresses around it cut from a piece of polystyrene foam.
With some paint on, the air purifier wound up looking like this:
Build your own air purifier of respiratory doom by picking up the Maelstrom's Edge terrain sprues along with the rest of the Maelstrom's Edge range from the webstore here.
What are you working on? We would love to see your models and terrain in the Comm Guild Facebook group!
For other building ideas, modeling tutorials, army spotlights and conversion walkthroughs, check out the Hobby section of the Maelstrom's Edge website here.
Tags: spotlight terrain terrainsprue tutorial
Terrain Kitbash: Sector 16
Posted on Tuesday Nov 16, 2021 at 05:00pm in Tutorials
- by Iain Wilson
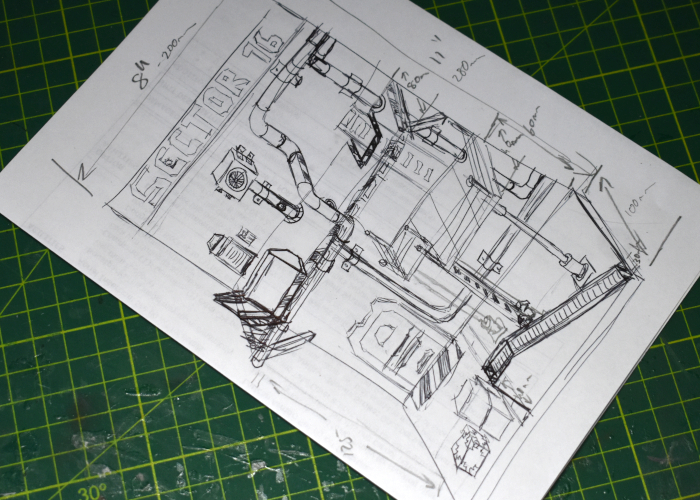
Sometimes I like to take a break from building things for the tabletop, and put something together just for the fun of it. That's what I had in mind this week, when I started work on a display backdrop piece that I'm calling 'Sector 16'
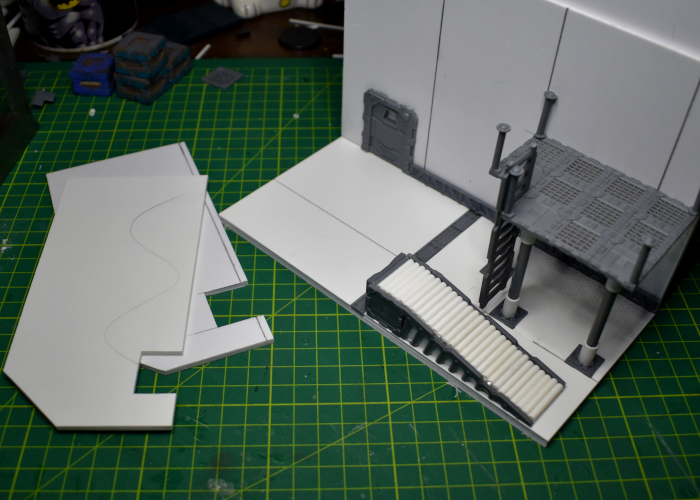
Most of the time, I get a rough idea of what I'm building in my head, and I just wing it from there. Some builds though require a little more planning to make sure everything will fit together correctly. My plan for Sector 16 wasn't particularly complicated, but with pipes running in multiple directions and platforms on several levels, I decided that a rough sketch would be a good idea. This still just serves as a starting point, and things tend to change along the way, but it helps to avoid those inadvertant 'oops' moments when something doesn't fit where it is supposed to.
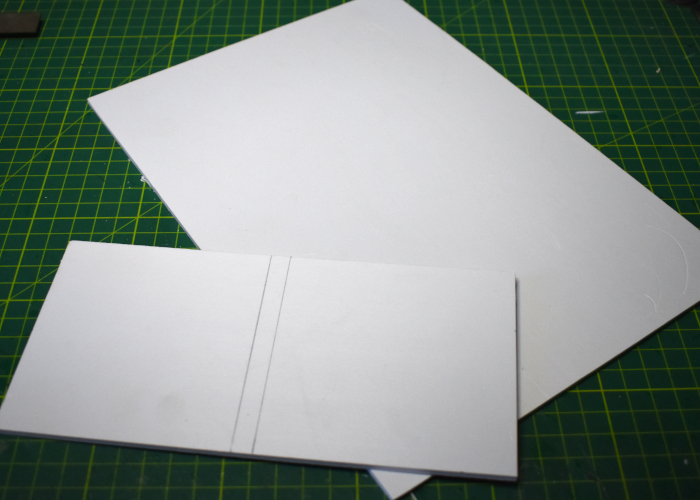
The bulk of the structure was made from foamed PVC sheet, cutting a base and back piece that would go together in an 'L' shape, with detail layered over the top.
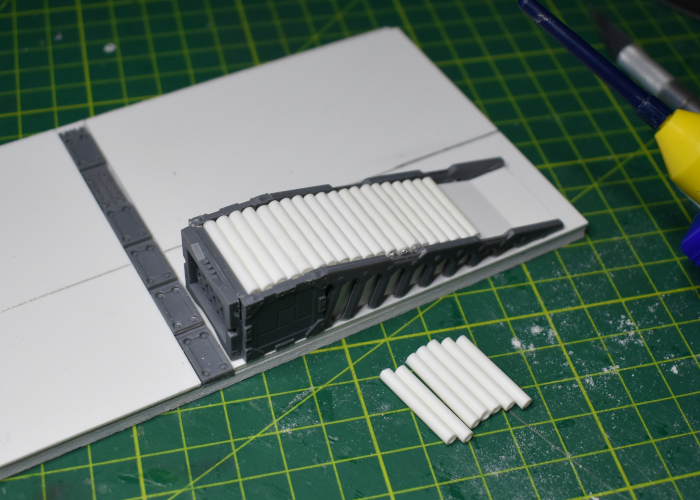
I thought that adding some detail along the front of the base would help to add depth, and when using it as a photo backdrop would be useful for disguising its relatively shallow depth. To this end, I constructed a conveyor assembly using parts from the Maelstrom's Edge terrain sprues, some 1mm foamed PVC and plastic tubing.
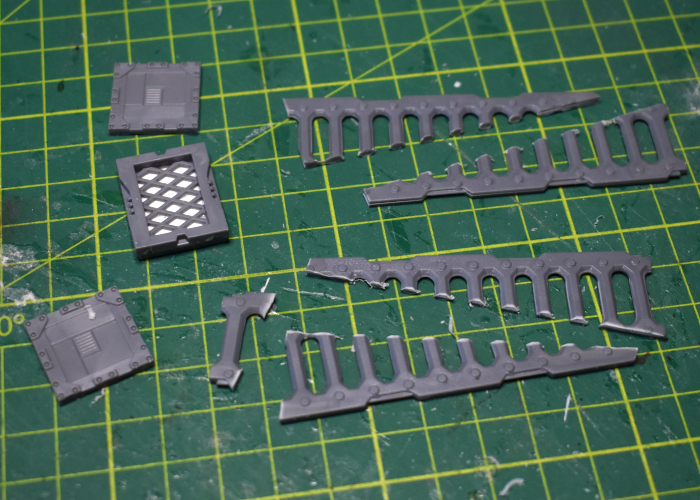
In the interests of mixing things up visually, I wanted the multiple level platforms to be constructed differently. The upper level was to be concrete, but for the lower level I used floor grating pieces from the second Maelstrom's Edge terrain sprue, with support poles cut from the sprue itself of the original terrain sprue.

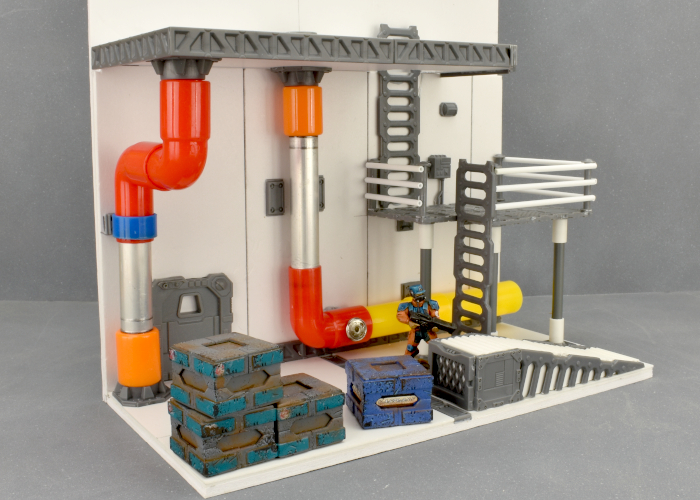
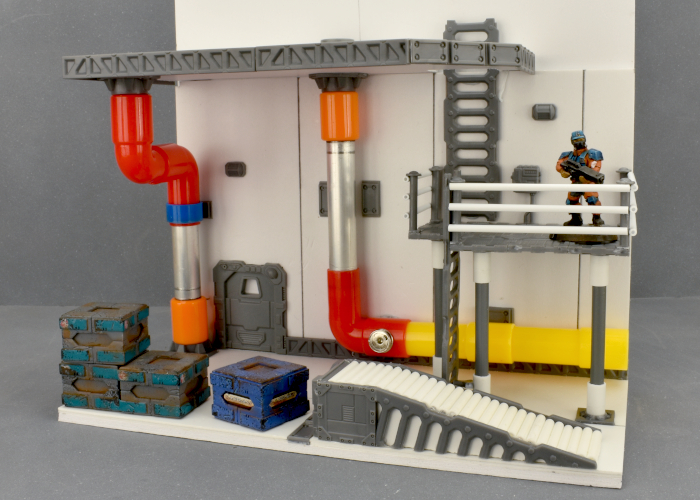
To finish up the lower section, I put together some pipes made using pieces from a kid's toy pipe construction set (which looks a little technicolour right now, but should be a little less cartoony when they have some paint on!) and some 12mm aluminium tubing, and added some additional details like lights, edging and pipe support straps using more pieces from the terrain sprues.
Tune in next time, as I get to work on the upper level!
To build your own sector of unspecified doom, you can pick up the terrain sprues along with the rest of the Maelstrom's Edge range from the webstore here.
What are you working on? We would love to see your models and terrain in the Comm Guild Facebook group!
For other building ideas, modeling tutorials, army spotlights and conversion walkthroughs, check out the Hobby section of the Maelstrom's Edge website here.
