Entries tagged [trees]
Terrain Tutorial: Cheap Trees from Pine Cones!
Posted on Friday Oct 14, 2022 at 05:00pm in Tutorials
 - by Iain Wilson
A good collection of trees is handy for fleshing out your battlefields, but commercially-made trees made specifically for scale modeling can be expensive. I've shared a few different ideas in the past for making your own foliage, including using aquarium plants, expanding foam, and Christmas baubles covered in hot glue.
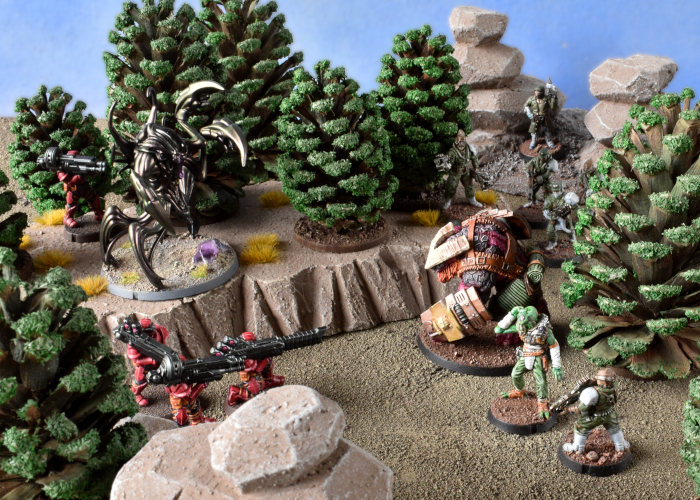
Over the years, one of the more common budget tree ideas I've come across is to use pine cones painted green. They have the advantage of being vaguely tree-shaped and inexpensive if you have pine trees nearby, but tend to wind up just looking like pine cones painted green. I thought I would see if I could come up with an easy and cheap way of improving on this idea a little, with this result:
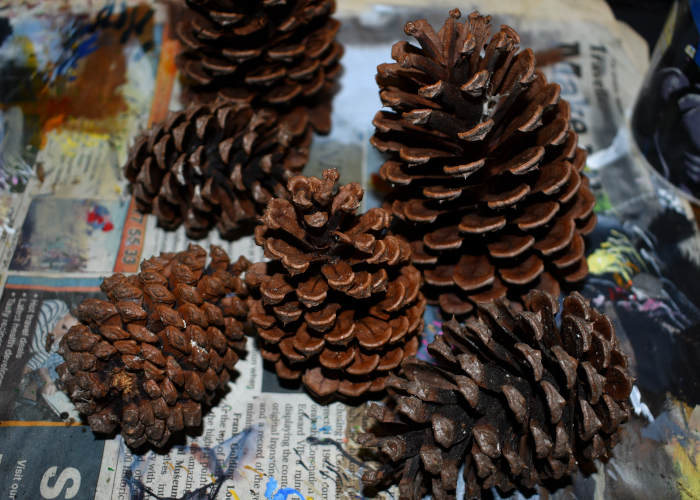
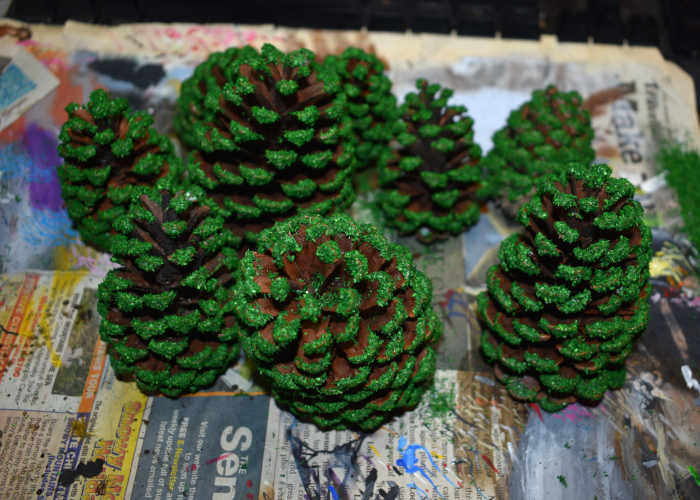
To get started, I collected a bunch of pine cones in assorted sizes, preferably as close to fully opened up as possible.
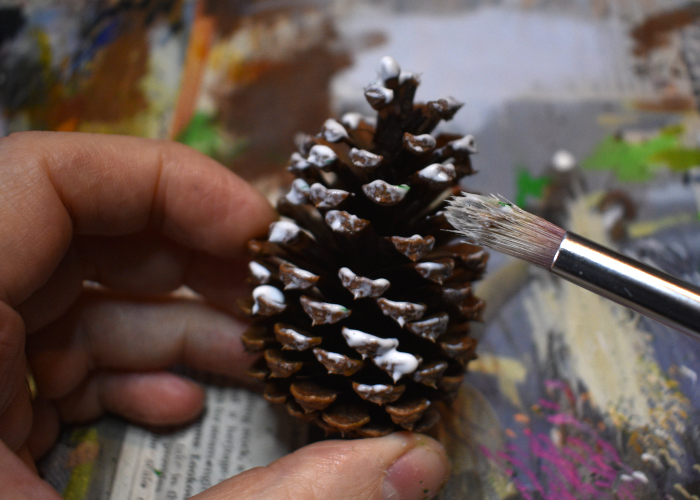
I took an old, large paintbrush and painted the outside of each pine cone with a generous layer of PVA glue.
Then while the glue was still nice and wet, I dipped the cones in a tub of green flock, rolling them around to get the flock covering all of the glued areas.
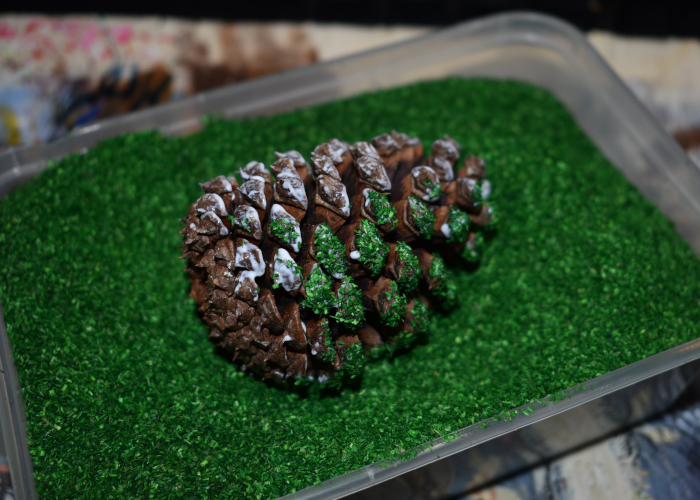
I don't normally use sawdust flock for modeling, as for its primary use (for grassed areas) I don't like how it looks, although I have used a finer flock in the past for making hedges. But I had a big tub of this stuff that someone gave to me years ago, and this seemed like a good use for it.
The flocked pine cones:
To finish up, I gave the trees a light spray from above using Army Painter Army Green. This dulled down the bright green of the flock and gave it some depth. I then used hot glue to attach the trees to some circular plywood bases. At this point, they can be put on the table as single trees, placed on top of a shaped terrain piece to make a forest base, or fitted to a textured base board. For the latter, you can glue the trees directly to the base board instead of using the circles, or texture around the circles so that the trees are removable, making for easier storage or the ability to remove trees when they are in the way for model movement.
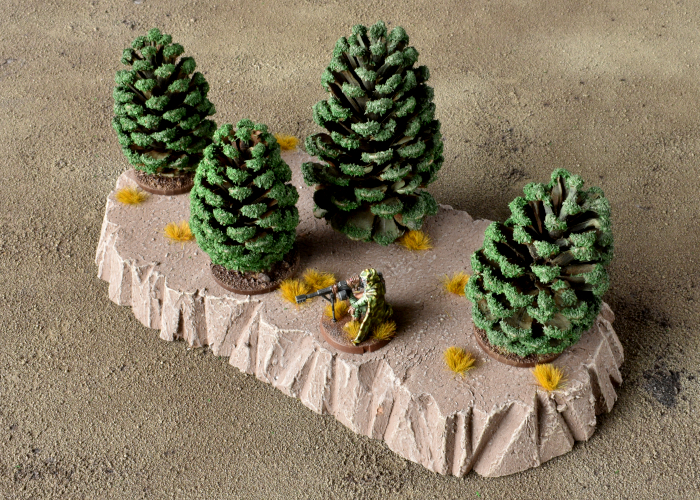
The end result, to be honest, still looks somewhat like pine cones painted green, although the illusion works a little better from above at normal playing height. For a little more work, you can also prune away the pieces from the base of the pine cone to create a trunk protruding from the bottom, like this:
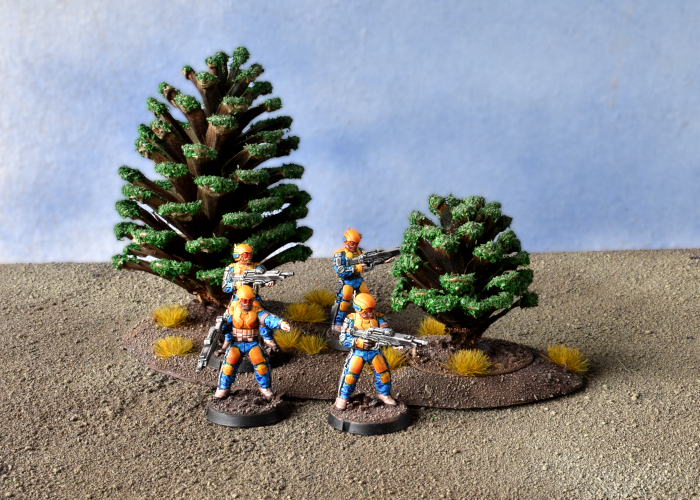
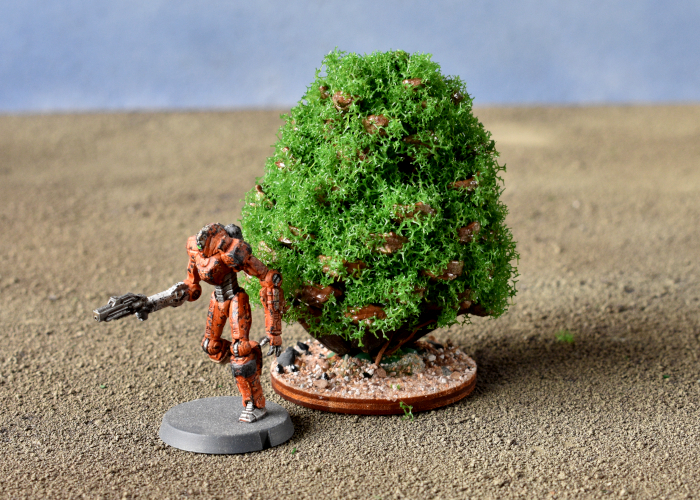
Or, to get even further away from the pine cone look, you can use a slightly more liberal coat of glue and cover the whole thing in landscaping foliage, like this:
Once you have your forest of pine-scented doom, head on over to the Maelstrom's Edge webstore here, to pick up an army to run around in it!
What are you working on? We would love to see your models and terrain in the Comm Guild Facebook group!
For other building ideas, modeling tutorials, army spotlights and conversion walkthroughs, check out the Hobby section of the Maelstrom's Edge website here. And while you're there, grab a copy of the Maelstrom's Edge V2 Beta rules!
Terrain Spotlight: Hot Glue & Christmas Bauble Alien Trees!
Posted on Monday Nov 02, 2020 at 05:00pm in Tutorials
I've been having a lot of fun lately coming up with different ways to make trees that look like they belong on alien worlds. You might have seen my previous articles with silicon aquarium plant trees, or my boab-inspired expanding foam trees. This week, I drew some inspiration from the Titan AE animated movie, working up some forest bases made from Christmas baubles and coloured hot glue!
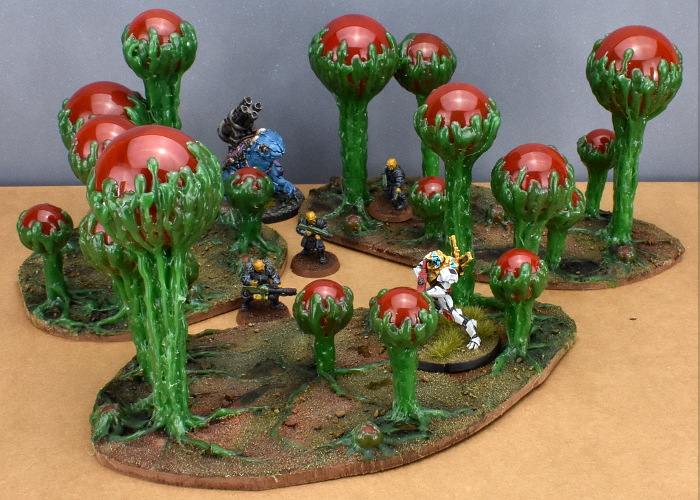
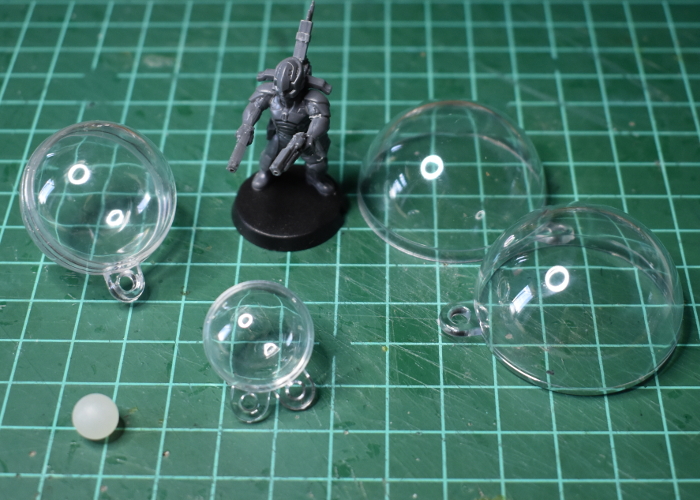
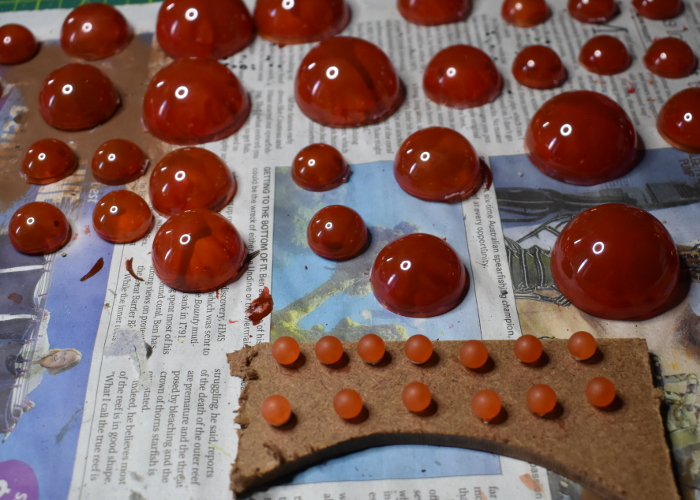
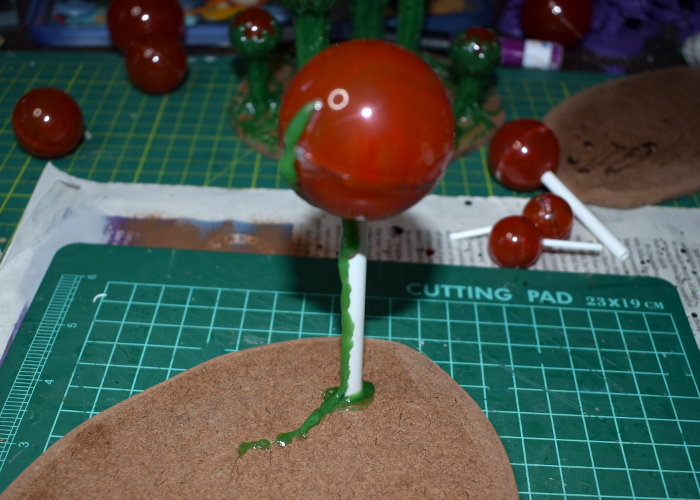
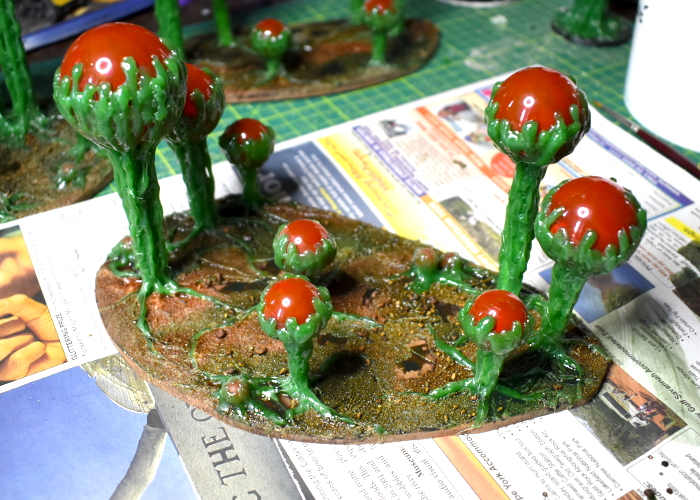
The basic idea with these is a plant that has a ball-shaped sac, filled with lighter-than-air gas of some kind (the cartoon plants they're based on are highly explosive!). To make these, I sourced a bunch of clear, plastic Christmas bauble shells in a range of sizes from Ali Express. These didn't go down as small as I wanted, so for the smallest size I wound up with some 8mm solid plastic balls.
To create the gaseous effect, I wanted the sacs to be mostly opaque, with swirling colour and just a hint of translucency. So, after trimming off the hanging tabs, I painted the insides of the baubles with Citadel Gryph-Hound Orange Contrast, and then dabbed in some blobs of Mig Blood Red, letting this run wherever it liked through the orange. For the solid balls, I just painted on a coat of the orange Contrast.
Once the baubles were dry, I fitted the halves together, and then used some superglue to stock different length stems onto them, making sure the joint lines on the baubles were running more or less horizontally. For the most part, the larger the bauble, the longer the stem it got, although I did mix this up a little here and there to keep things a little chaotic and organic.
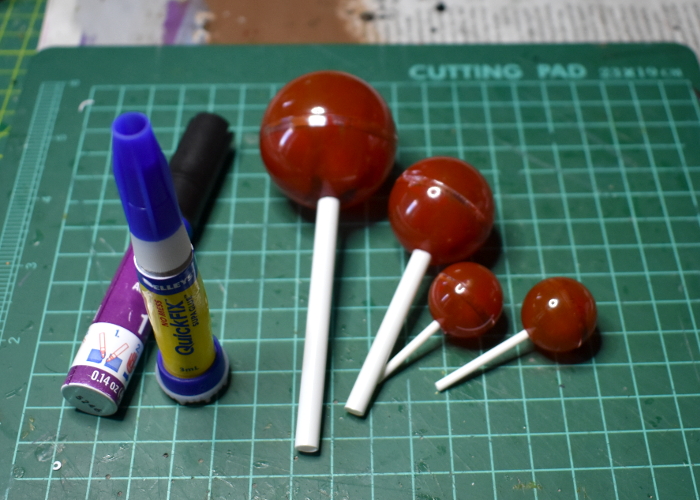
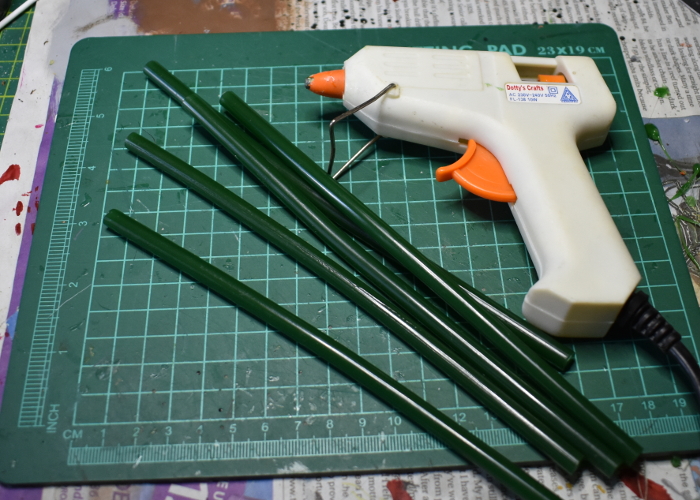
For adding the trunks, I used some green hot glue, also from Ali Express, although as with the baubles you might be able to find this in local craft stores, depending on where you are in the world.
A note on safety: If you plan on having a go at this, I feel compelled to point out the obvious: Hot glue is hot! Be careful to keep fingers away from the melty end of the glue gun, and avoid getting drips of glue onto your skin, as it can burn. Also, use in a well-ventilated area!
After gluing the stem to a hardwood base, I ran a line of glue from about two-thirds of the way up the bauble, all the way down, and then outwards to form a root shape along the top of the base.
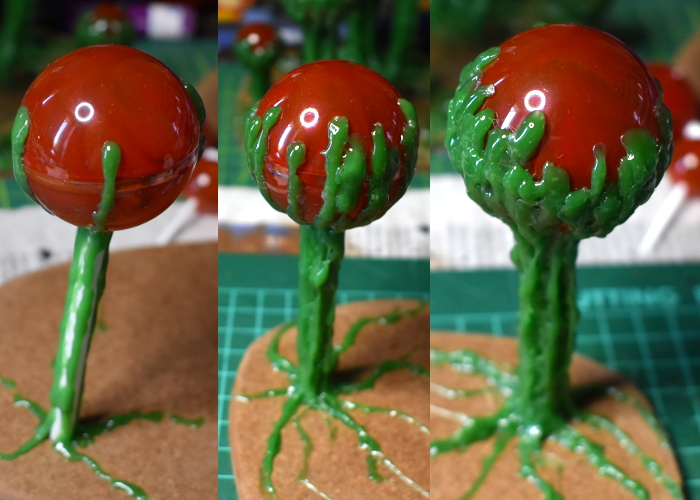
From there, I added successive strips down the length of the tree, keeping some space between each new strip and the immediately preceding one, to give them time to cool and set. The aim was to coat all of the outside of the stem, and most of the lower two-thirds of the bauble. Some parts of the lower half of the bauble show through the glue for effect, and to help light shine through the finished tree top, but the glue completely covers the joint line to hide it.
Here's a video of the gluing in process!
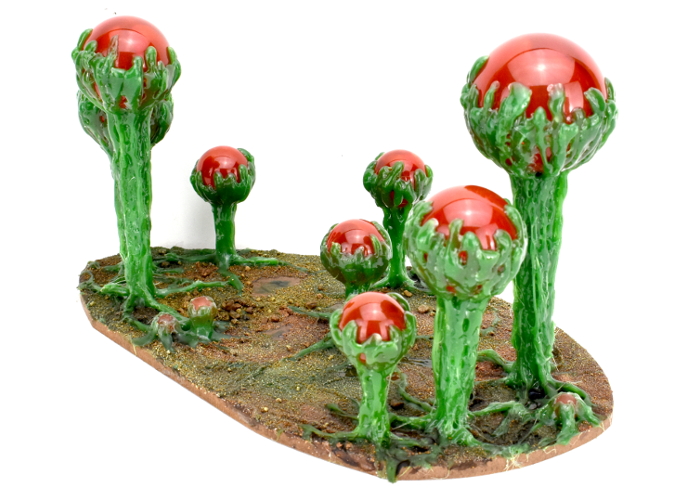
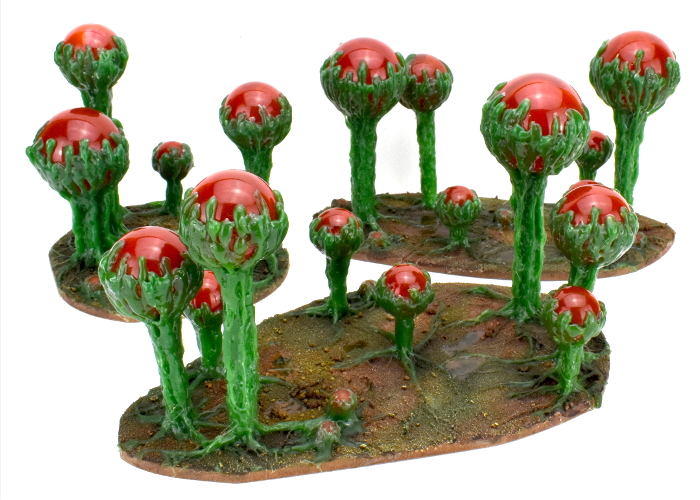
With the first tree done, I glued the next stem to the base, and repeated the process, continuing until I had a good number of trees on the base. There's a balance between having enough on there to be convincing as a 'forest' base, while still leaving enough room to position models. When in doubt, always err on the side of playability, as this is supposed to be gaming terrain, after all!
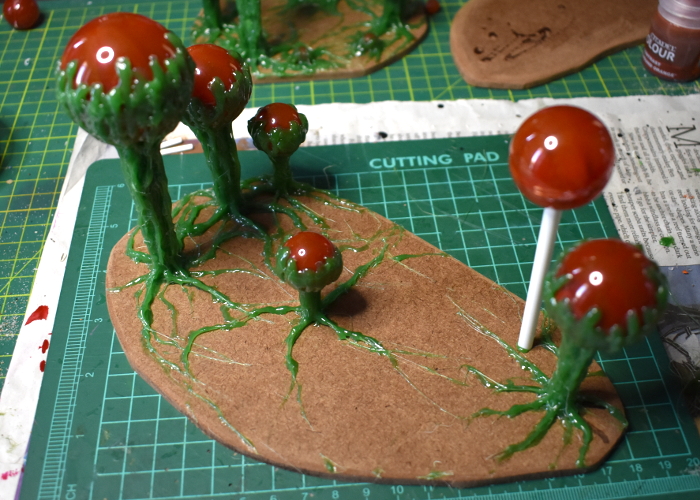
The small balls were used to create new growth without much height to it. For these, I glued the ball directly to the base, and then added blobs of glue around the circumference.

I decided on a boggy base to go with these trees, so started out by gluing some fine sand on with PVA glue, leaving the tree roots exposed. I also left some patches of the hardwood exposed, to make a few open puddles.

With the PVA dry, I painted over the sand with a mix of Army Painter Mid Brown and Green Tone Quickshades. You could paint the tree trunks to cover over the glue if you want, but I decided I liked the shiny green on them, so left them as is.
Finally, I added a light drybrush of Coat D'Arms Putrid Green over the sand, and painted some gloss varnish onto the 'puddle' areas. The end result looked something like this:

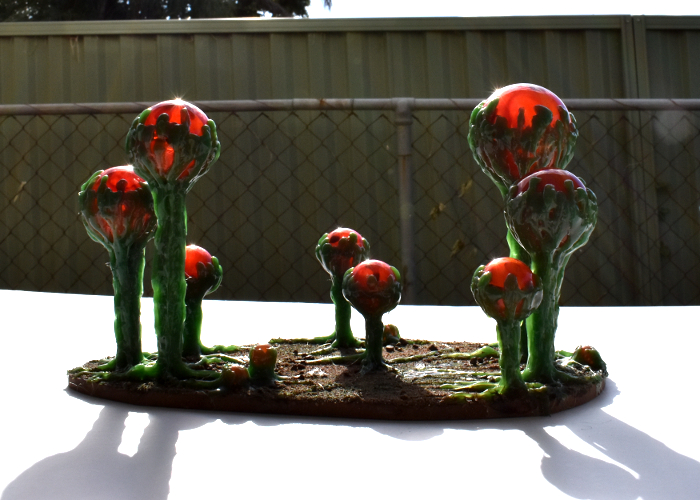
And a shot out in the sun, to show the light shining through the gas sacs!
Feel like giving some alien trees a go? Be sure to share what you come up with on the Comm Guild Facebook group!
Pop on over to the Maelstrom's Edge webstore here to find our plastic and resin model range, including the ever-popular Maelstrom's Edge terrain sprues.
And for other building ideas, modeling tutorials, army spotlights and conversion walkthroughs, check out the Hobby section of the Maelstrom's Edge website here!
Tags: scratchbuilding spotlight terrain trees tutorial walkthrough
Terrain Spotlight: Expanding Foam Trees!
Posted on Friday Aug 28, 2020 at 05:00pm in Tutorials
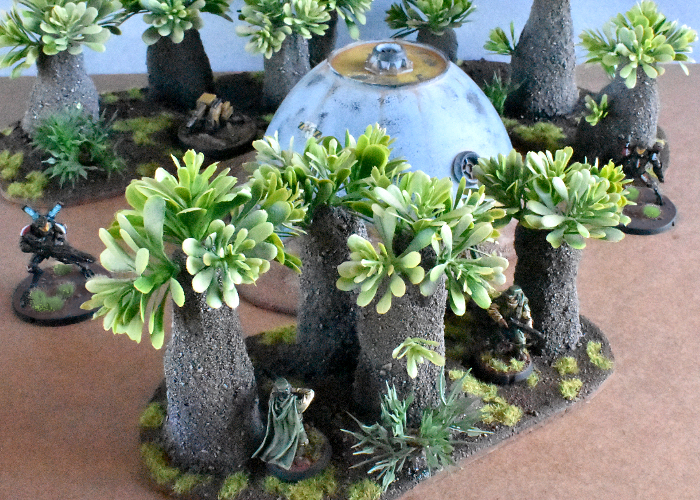
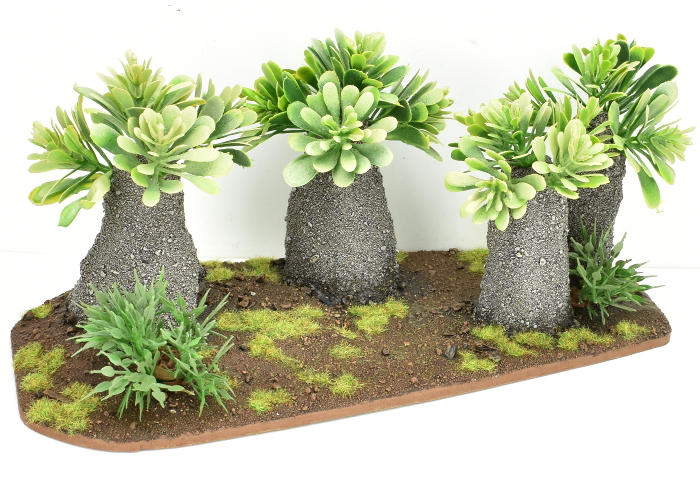
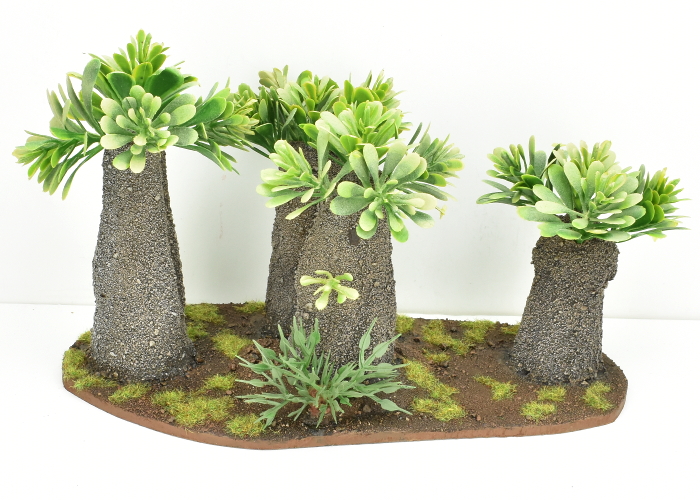
Most of my terrain building focuses on buildings and other urban-styled features, because tinkering with plastic terrain sprues is just too much fun. Sometimes, though, I like to venture outside the urban sprawl and into the forest. Previously, I've dabbled with old-school, polystyrene ball cacti and alien forest bases made from silicon aquarium plants. This week, I'm working on some boab-inspired trees made from expanding foam!
There are various tutorials floating around for expanding foam trees, but all of those that I found were using twigs or plastic tree trunks with the foam used for filling in foliage. I wanted to turn that idea upside down, using plastic plants for foliage, and the foam used for the trunk. (For the uninitiated, expanding foam is sold in hardware stores for filling holes in walls and the like. It comes in an aerosol can, and when you spray it out it expands to around 300% of its original volume, setting into a lightweight, hard-shelled foam)
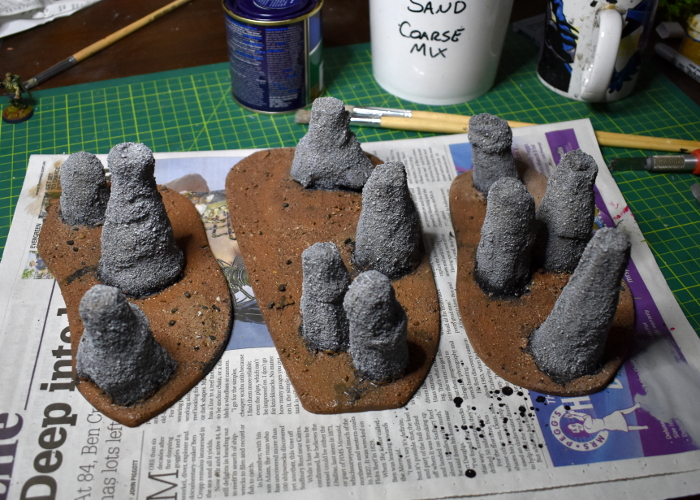
My first attempt used large bases with a piece of sprue stuck vertically on them as a support, with the foam sprayed around it, but this wasn't overly successful - they just settled into giant blobs of foam. So instead, I hit on the idea of using a mould for them. I took a screwdriver and used its handle to make a number of vaguely-conical holes in some damp playsand, and then sprayed the foam into these holes, leaving it to set.
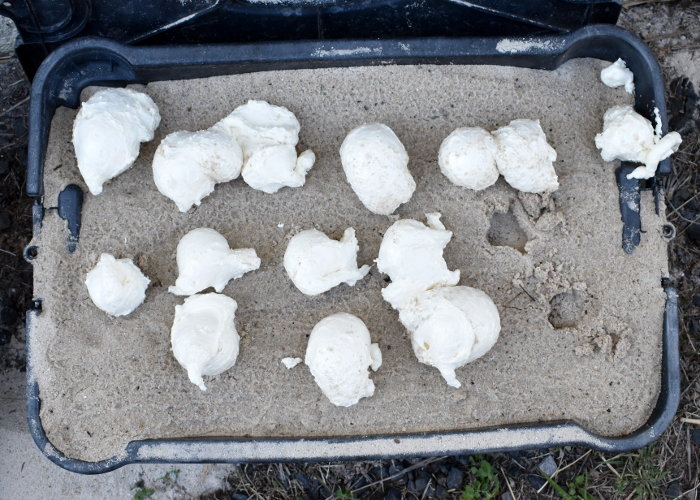
Once the foam was set, I pulled the pieces out of the holes, brushing off any loose sand. Because the foam is quite sticky when it is setting, they wound up with a layer of sand quite firmly glued to the outside, which made a nice texture on the trunks.
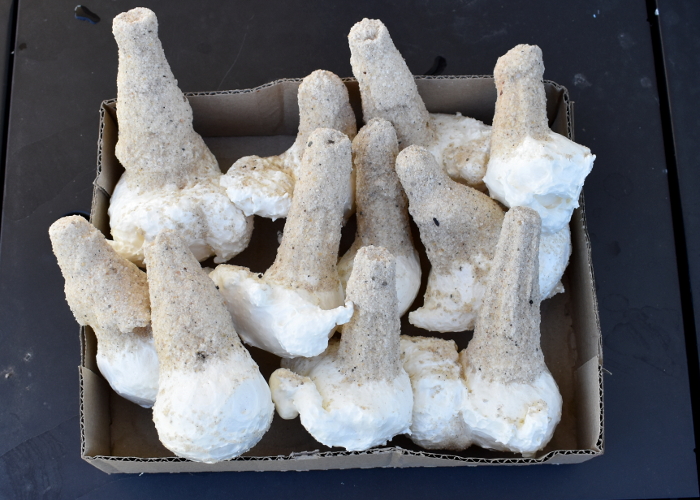
I used a mitre saw to cut the blobby excess bits off the bottom of the trunks, and then glued them down to some hardboard. A knife probably would have done this job, as the foam is quite easy to cut, but the deep-bladed saw made it easy to get a nice, flat cut.
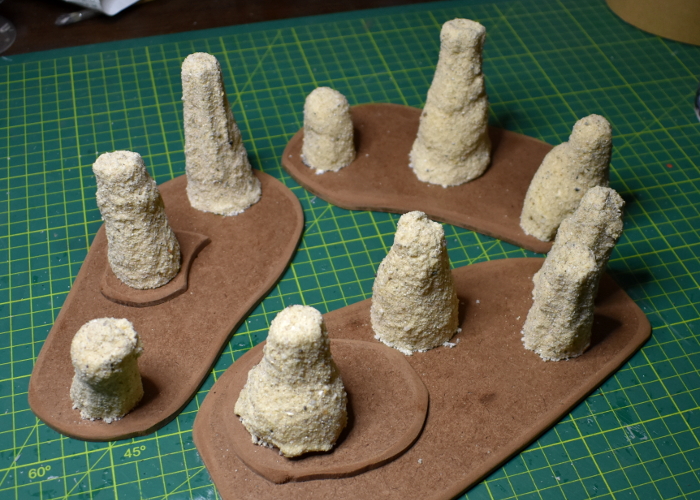
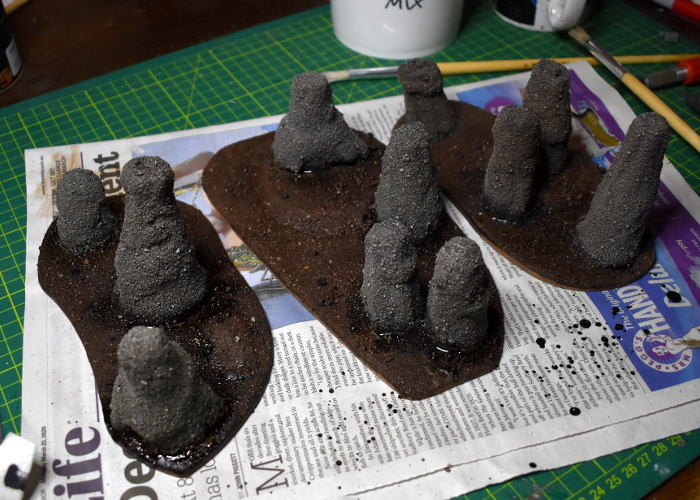
After texturing the bases with some light gravel and sand mix, I tried painting the trunks with a coat of the same charcoal wood stain that I used for last week's wood stain painting tutorial. While it worked great on the models, here it just tinted the sand but left the lighter, yellowy foam peeking through, so I painted over the top with a coat of Army Painter Ash Grey, and also basecoated the base with some Army Painter Leather Brown.
I then went over the whole lot with a generous coat of Army Painter Strong Tone.
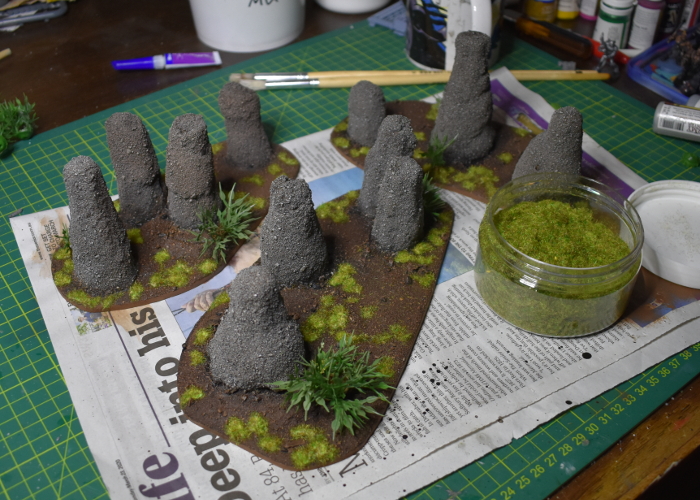
To finish up the painting, I gave the bases a light drybrush with some more Leather Brown, also painting the edges with the same colour. Then I glued on some patches of static grass, and a few bushes made from plastic indoor decorating plants - these come from large sheets of plants that are sold for making artificial garden walls.
At this point, these terrain pieces could easily pass for rocky outcrops or some sort of giant insect mounds, but I decided to go the final step and foliage them up. Using some more decorative plastic sheet plants, I pierced around the top of the trunks with a spike, and then glued clumps of plants on to form a canopy.
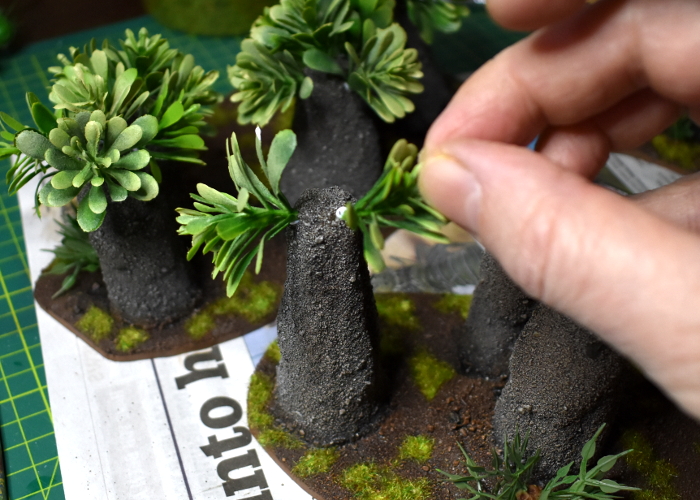
The end result:
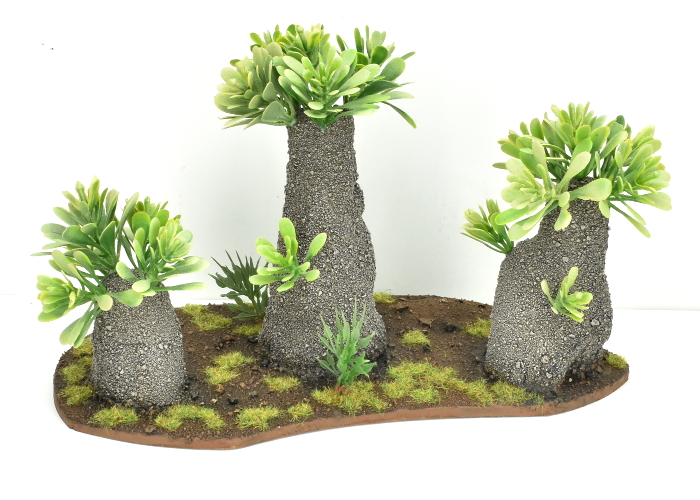
And the forest cluster, all together:
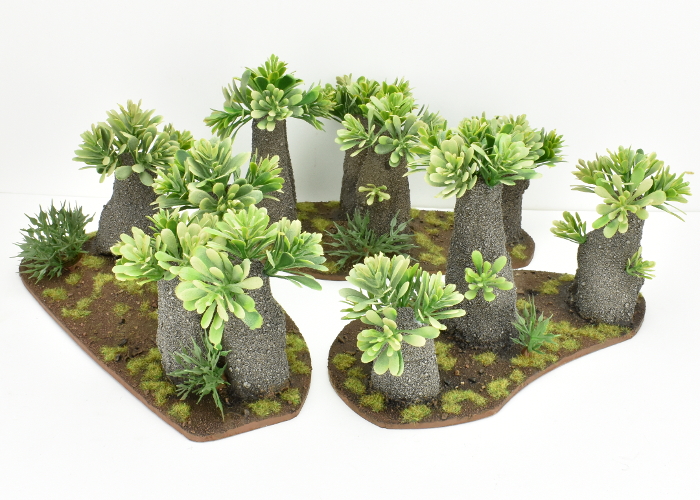
The texture on the trunks winds up a little unusual for bark, but given that they're intended for a sci-fi table it could easily be something other than wood as we know it - maybe some sort of calcium deposit, or a silicon-based extrusion on which the plants grow. It might also give an interesting bark effect to paint over the sand with some crackling, desert-earth texture paint.
If you feel like building your own alien forest of water-retaining doom, be sure to show your results in the Comm Guild Facebook group!
Meanwhile, don't forget that you can pick up the entire Maelstrom's Edge model range from the webstore here.
For other building ideas, modeling tutorials, army spotlights and conversion walkthroughs, check out the Hobby section of the Maelstrom's Edge website here.