Entries tagged [painting]
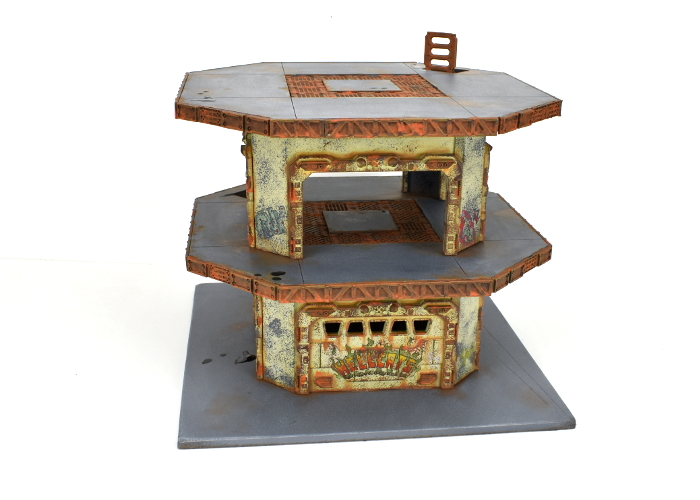
Terrain Spotlight: Drone Substation Quick-paint.
Posted on Friday Sept 05, 2025 at 05:00pm in Tutorials
 - by Iain Wilson
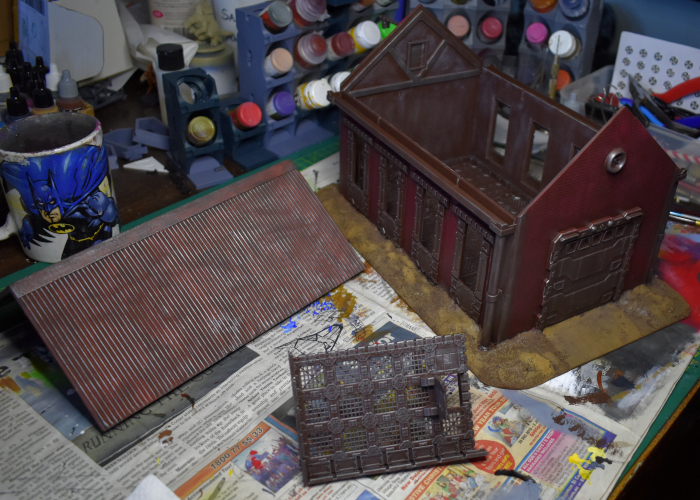
I was rummaging through some storage boxes the other day and came across a building that I had assembled a very long time ago and never got around to finishing. And since it has once again been a little while since I played with terrain, that seemed like as good a reason as any to take some time to get some paint on it!
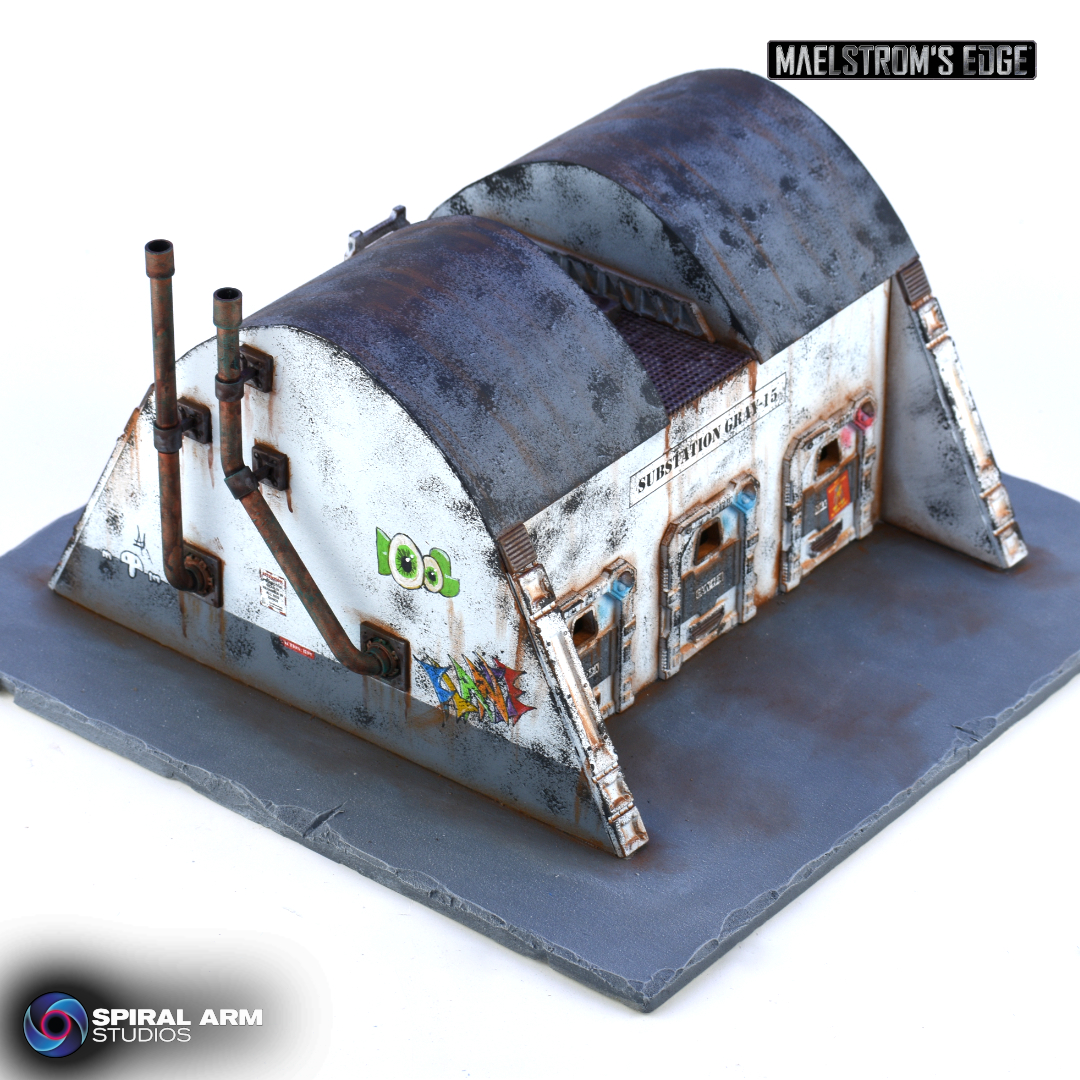
The building in question was built from foamcore, thin card, and bits from the first Maelstrom's Edge terrain detail sprue, and was made to be somewhat ambiguous as I hadn't decided when I built it what it was actually going to be. For some reason, I had (badly) sprayed it with a slightly watery pale green paint. I obviously had a plan for this when I did it, but I couldn't for the life of me remember what it might have been.
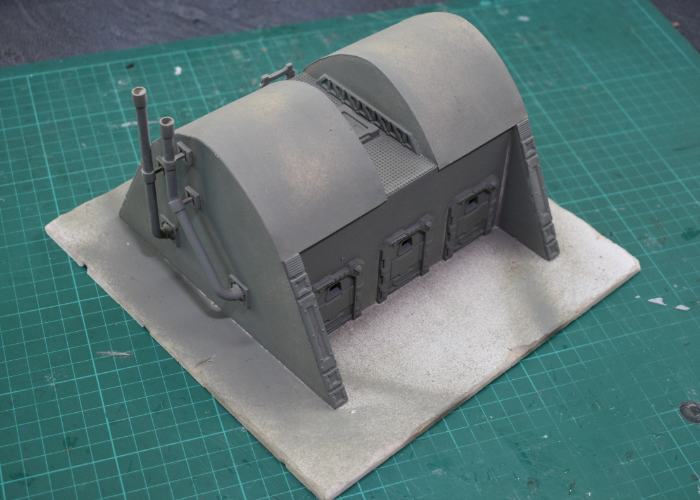
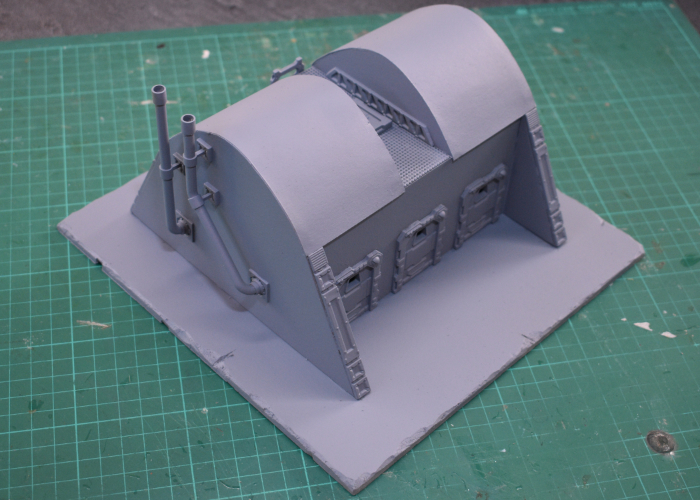
The first step, obviously, was to do something about that dodgy basecoat, so I gave the whole building a good spray with some Army Painter Uniform Grey.
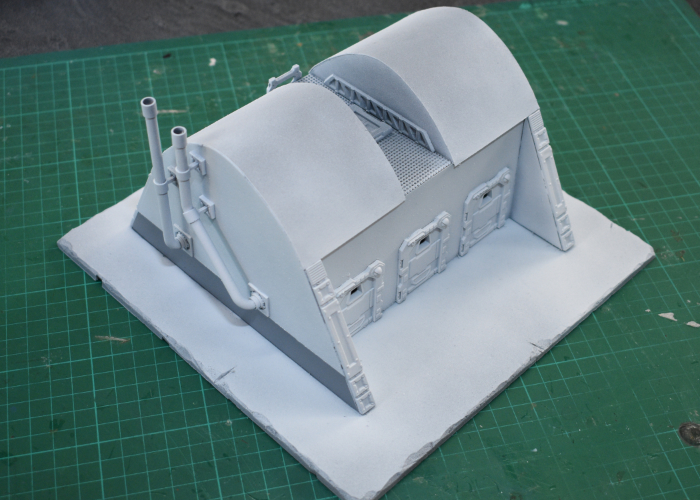
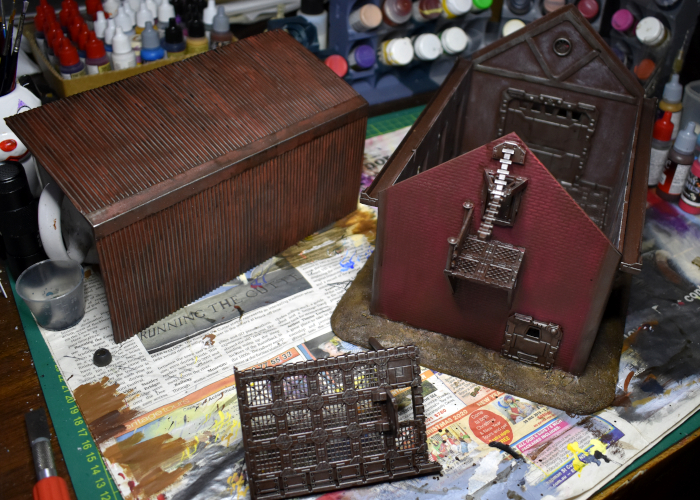
I wanted the building to be white (ish) but solid white buildings are a little boring. So to give it some detail, I broke out some masking tape and masked a strip along the bottom of each end wall before spraying with a coat of white. This was somewhat risky, as my masking tape has been sitting in my toolbox for about 15 years, and doesn't look quite right... There was a certain air of 'will it come off again?' in this operation. Luckily, though, it came off just fine.
Now it was time to start painting the things that weren't going to be white. I gave the chimney pipes (made from cut off pieces of sprue and plastic tubing) a coat of VMC Emerald, and the other bare metal areas a layer of Beasty Brown. The roof and armour strips on the doors received a coat of uniform grey to match the side walls. I could have done this with masking, but that seemed too fiddly given the state of my masking tape, and these areas were easy enough to paint over neatly.
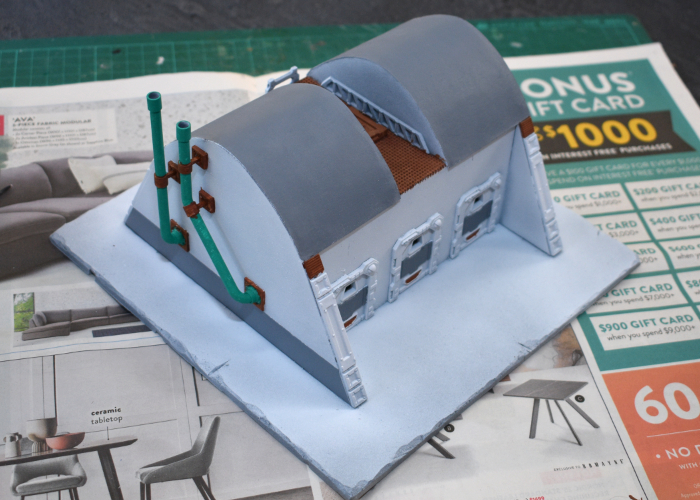
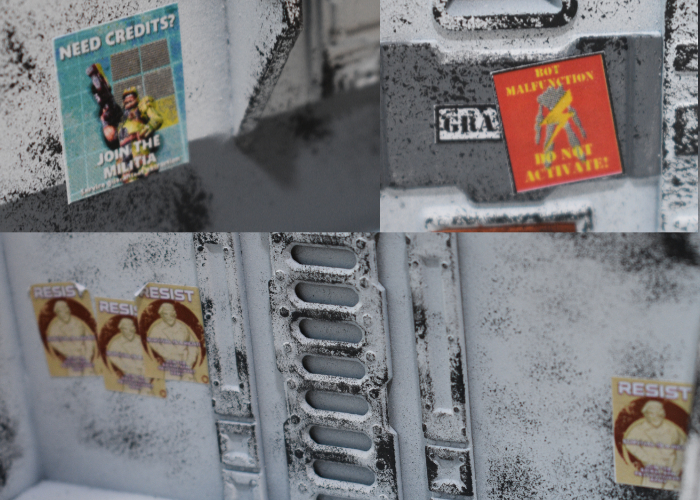
I wanted some signs here and there that looked like they had been there a while, so these needed to go on before any weathering. I printed off some appropriate signage, and glued them in place with some PVA glue.

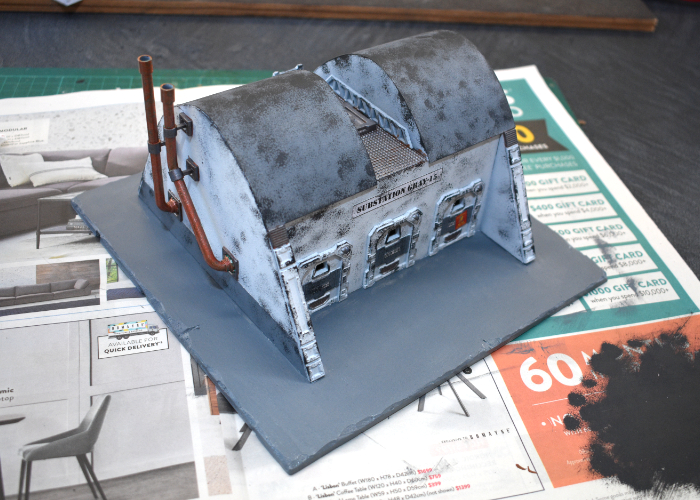
Then it was time for aforementioned weathering. I broke out a sponge and some Game Color Heavy Charcoal, and went to work, concentrating most heavily on edges and top surfaces. This is the first part of the process where I usually start wondering if I've ruined it, but it usually comes together as it goes along...
With the initial weathering in place, I added some additional signage.
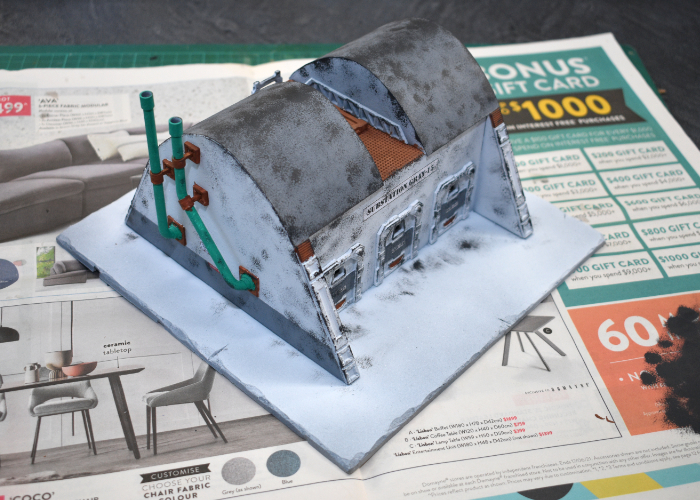
Then on with the detailing. The chimneys were painted with some old Citadel Copper, and the rest of the metal with a coat of Speedpaint Broadsword Silver. I also painted the base with a coat of Vallejo Neutral Grey.
On sponged areas that aren't white, I like to go over and add some highlights on the larger chip marks. This isn't essential, but does help to give it some more texture and looks better at table height.

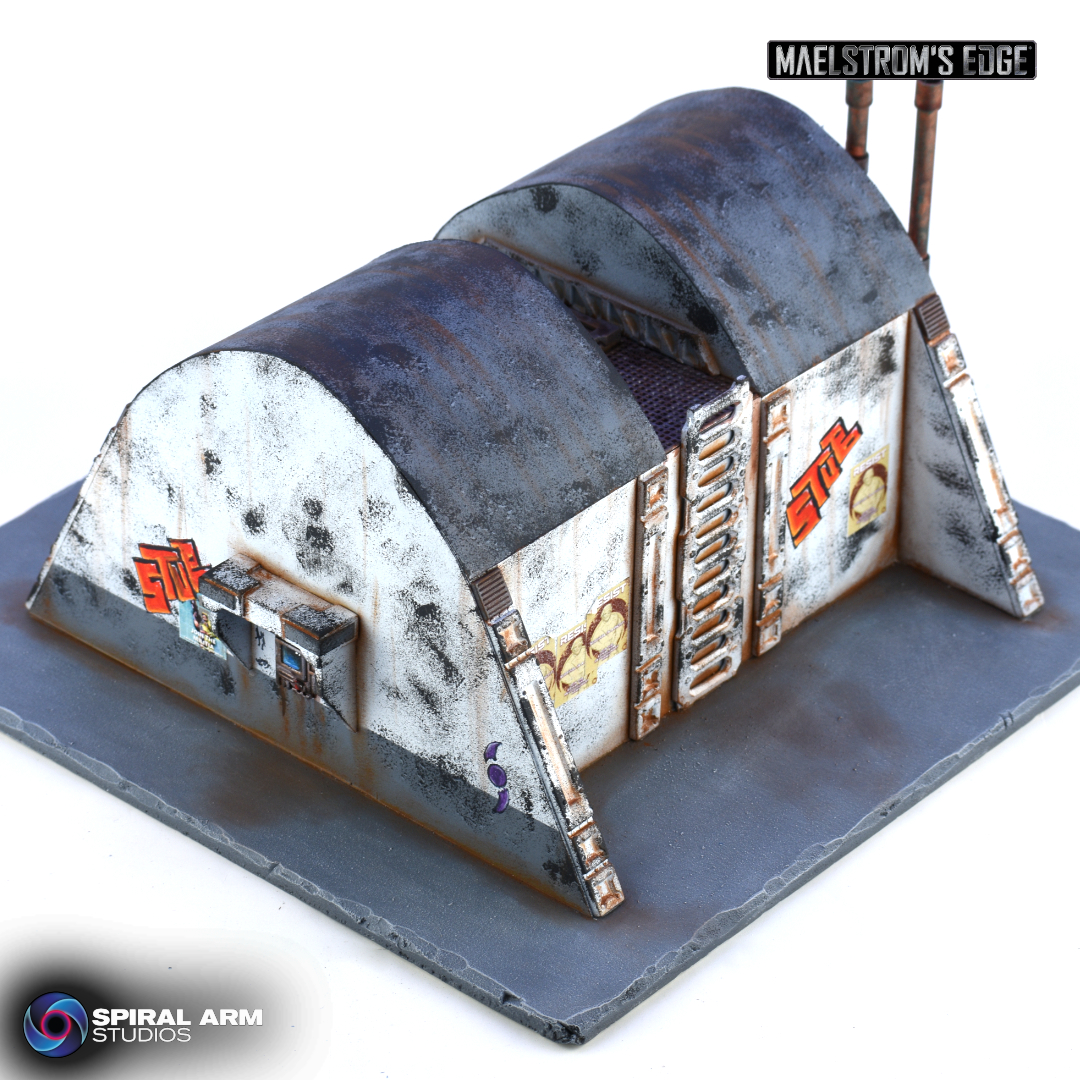
Then it was time for final detailing and weathering. I gave all of the exposed metal a coat of Army Painter Mid Brown ink, added some graffiti, and then got stuck into my favourite part - drybrushing on some dirt! I used Beasty Brown, working it into all of the creases and raised surfaces, and added some streaking here and there where it seemed appropriate.
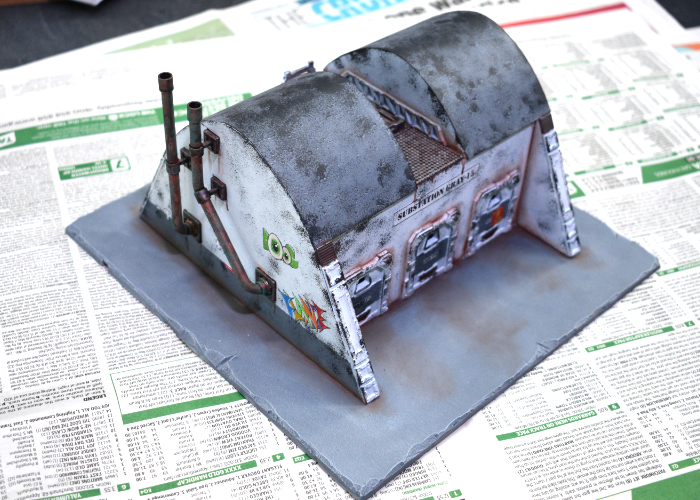
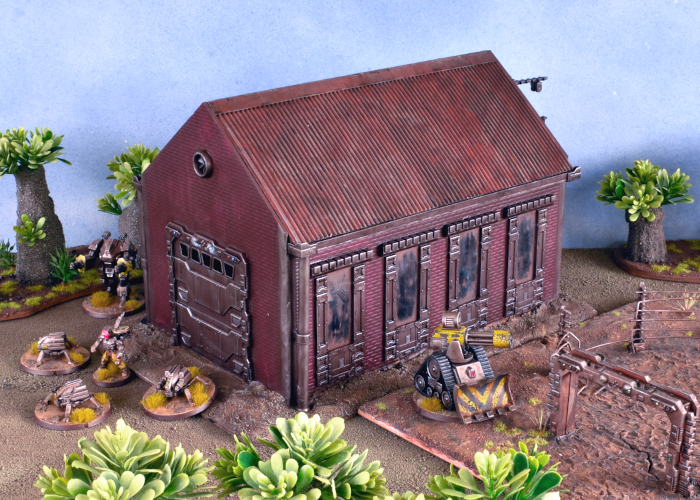
And with dirt in place, the building was ready for the table!
(Click for bigger pics!)
To build your own building of maintenance-neglected doom, grab the Maelstrom's Edge terrain sprues from the webstore here!
What are you working on? We would love to see your models and terrain in the Comm Guild Facebook group!
For other building ideas, modeling tutorials, army spotlights and conversion walkthroughs, check out the Hobby section of the Maelstrom's Edge website here. And while you're there, grab a copy of the Maelstrom's Edge V2 Beta rules!
Tags: modeling painting terrain terrainsprue
Modeling Spotlight: 'Lightyear' Hyperspeed Truck Repaint!
Posted on Thursday Mar 16, 2023 at 05:00pm in Models
- by Iain Wilson
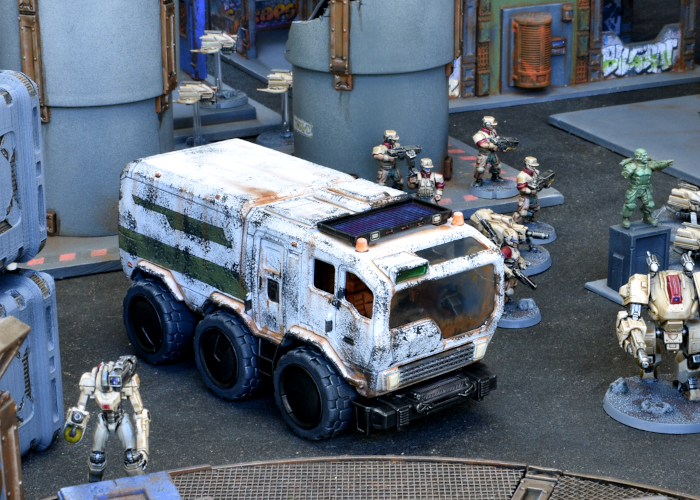
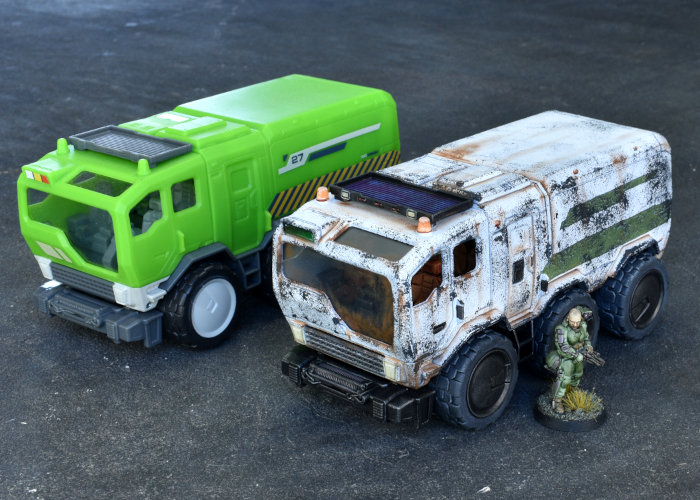
The 'Lightyear' movie from Pixar was accompanied by a 'Hyperspeed' range of rather cool vehicle and ship toys. While the 1" figures are too small to be useful, some of the vehicles actually wind up looking just about perfect alongside gaming miniatures. The truck, in particular, was just too good to not put on the table. So after grabbing some on special from a local department store, I pulled one apart and painted it up, to see how it would look!
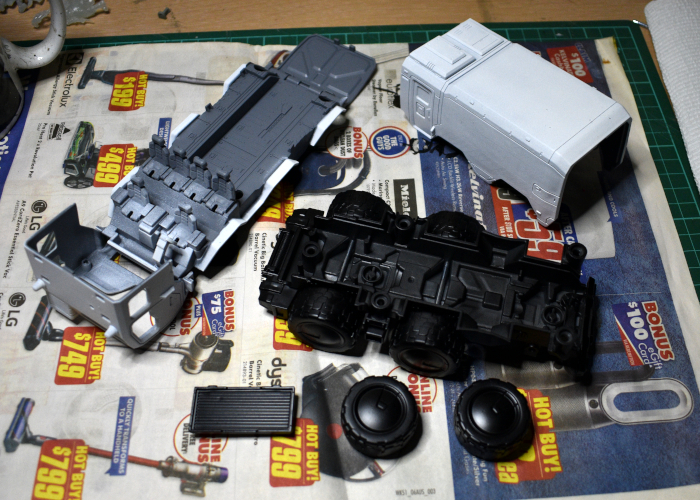
The truck is reasonably well detailed, and so to get the best results I decided to take it apart rather than trying to paint the fully assembled model. This turned out to be more difficult than expected, as two of the screws holding the back of the truck together are hidden behind the rear wheels, and the axles have textured ends that don't just pull out of the wheels - I wound up having to cut them and make a new rear axle. If I do any more of these, I'll probably just go the easy route and paint them assembled.
The truck in question before any modification:

I sprayed the chassis and wheels with Army Painter Matte Black, and the rest of the truck with Uniform Grey and then a zenithal spray of Matte White, so the grey stayed in the creases.
I didn't sand the vehicle before painting, as I was feeling lazy. The paint stuck fine to the plastic, although the printing on the sides of the truck back is slightly raised, which left a noticable shape under the paint. So I decided to just use that existing shape as a template for my own coloured decoration.
I kept the painting fairly simple, painting the seats with Army Painter Hardened Leather Speedpaint, and drybrushing the chassis with Citadel Boltgun Metal. The tyres were painted with Army Painter Uniform Grey, and then the chassis and wheels given a coat of Speedpaint Gravelord Grey. I wanted the truck to look a bit used, so after reassembling everything I weathered the white with some Vallejo Heavy Charcoal applied with a sponge, and drybrushed on some Vallejo Beasty Brown in the crevasses. The various lights were picked out with white and then various appropriate Speedpaints.
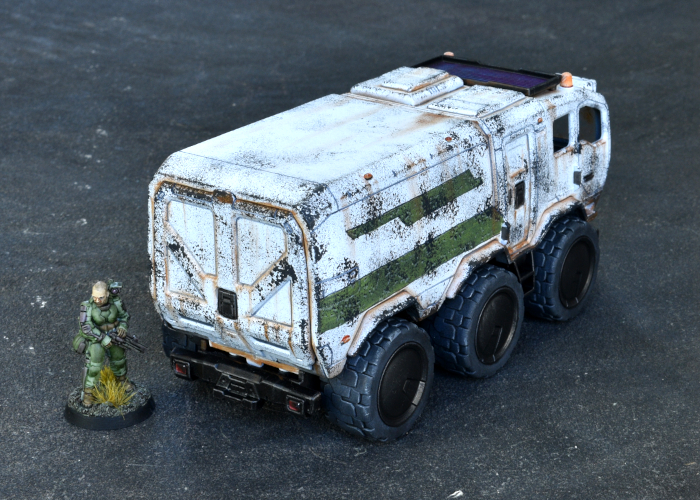
The finished truck, with the original for comparison:
I'm calling it the 'ParSec 12 Medium Transport'. You'll get there in a ParSec!
Once you've built your own fleet of cargo-carrying doom, head to the Maelstrom's Edge webstore here, to pick up some miniatures to attack it with!
We would love to see your models and terrain in the Comm Guild Facebook group. Pop in over there and share what you're working on!
For other building ideas, modeling tutorials, army spotlights and conversion walkthroughs, check out the Hobby section of the Maelstrom's Edge website here. And while you're there, grab a copy of the Maelstrom's Edge V2 Beta rules!
Painting Tutorial: Quick & Easy Rust!
Posted on Wednesday Nov 23, 2022 at 05:00pm in Tutorials
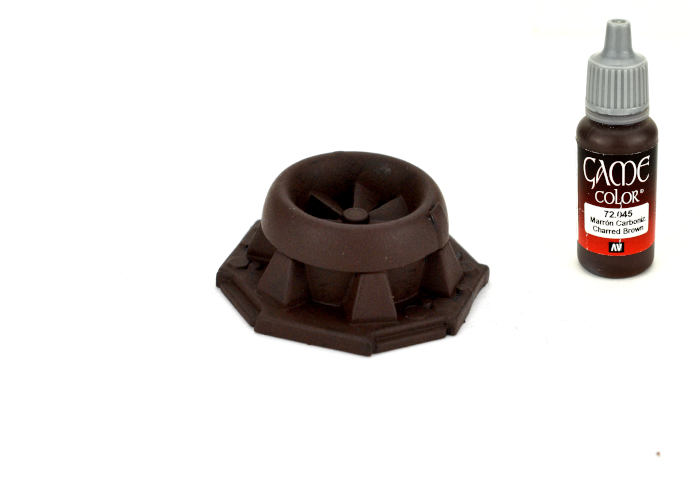
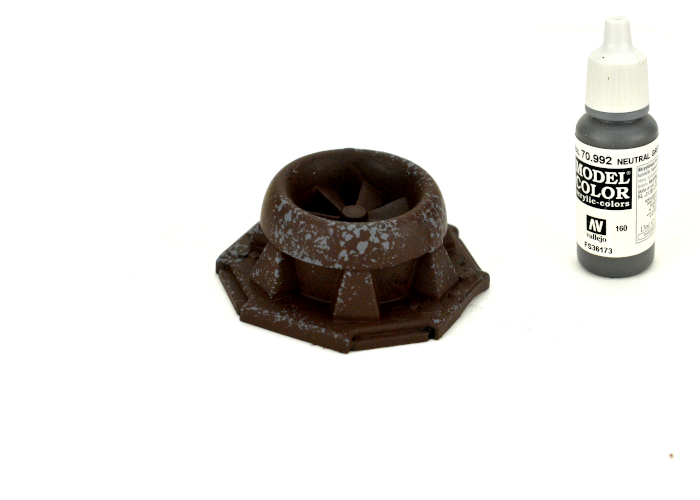
I'm using a fan assembly from the Maelstrom's Edge terrain sprues here (the fan from Sprue #2, and the large pipe fitting from Sprue #1).
Start with an undercoat of a mid to dark brown.
Note: The actual colour isn't too important - and that goes for the rest of this tutorial as well - as rust comes in a wide range of shades and textures depending on the surface and the level of corrosion. I have shown the specific colours I used for this tutorial in the images, but you should feel free to experiment with different shades to get an effect that you like!
Using a sponge, dab on some patches of mid to dark grey. This is an optional step, to keep some areas where the original metal is still showing through. If you are looking for a more solid level of corrosion, skip this step.
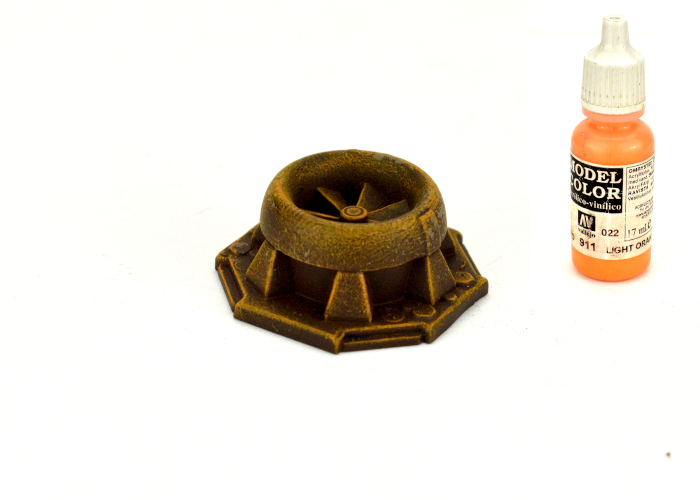
Drybrush with orange. As above, use whatever actual shade you choose, the goal is just to add some contrast on the brown. You can build up some different patches of corrossion if you want by using a couple of different oranges or reds here, but avoid using anything too bright.
Finally, use an old brush to dab on some rust effect paint. I use Army Painter Dry Rust, but there are variations on this same style of paint in quite a few different paint ranges. This is a very matte orange paint that is also quite thin, so once you dab it around it dries with a lighter tint over the areas where less of it is applied, while building up a more solid rust look where the paint is heavier. Don't try to smooth it out - just blob it on there. If you're bothered by the technical aspect of metal weathering, try to apply the rust paint more heavily on those areas where it would naturally be more exposed and so corrode more - Looking at pictures of rusted metal objects can help here - otherwise, just dab it on there wherever it looks right to you. Gaming models don't have to be strictly real-world accurate unless you want them to be!
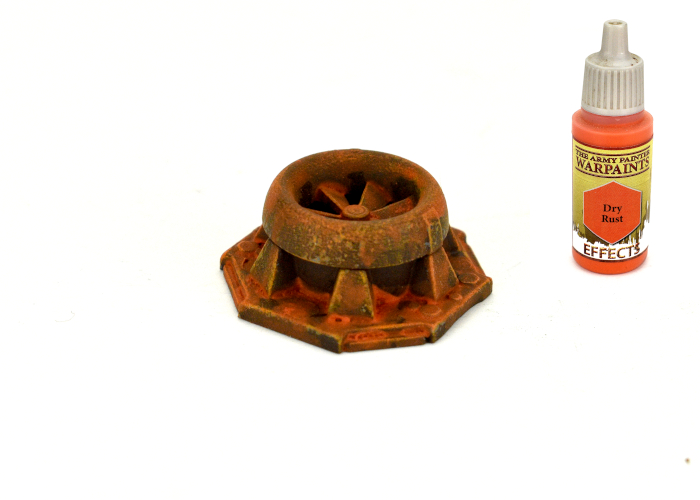
And that's it. Once the rust paint has dried, it's good to go. You can use this technique wherever you want some rusted surfaces, varying the colours and application to suit whatever you are painting at the time!

To get started on your own city of corroded doom, pick up the Maelstrom's Edge terrain sprues along with the rest of the range from the webstore here.
What are you working on? We would love to see your models and terrain in the Comm Guild Facebook group!
Remember to also grab a copy of the Maelstrom's Edge V2 Beta rules so you can get into the action!
Tags: painting rust tutorial walkthrough
Painting Tutorial: Quick & Easy Horns!
Posted on Wednesday Jul 13, 2022 at 05:00pm in Tutorials
- by Iain Wilson
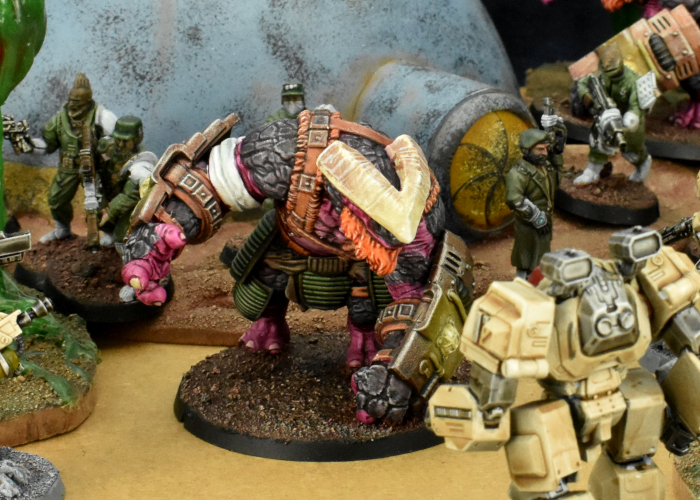
With the release of the STL files for the Broken Gnolti last week, I found myself painting up another couple of these wee beasties, and along the way I found a quick and easy way to paint their horns that I thought was worth sharing. This would work for any model with ridged or otherwise rough-textured horns.
For this tutorial, I used Army Painter paints. You could substitute any similar acrylic colours for a similar result.

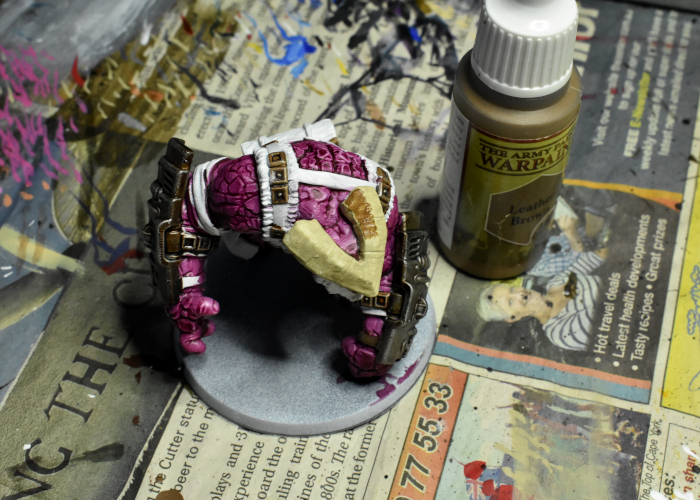
Start out with a white basecoat.
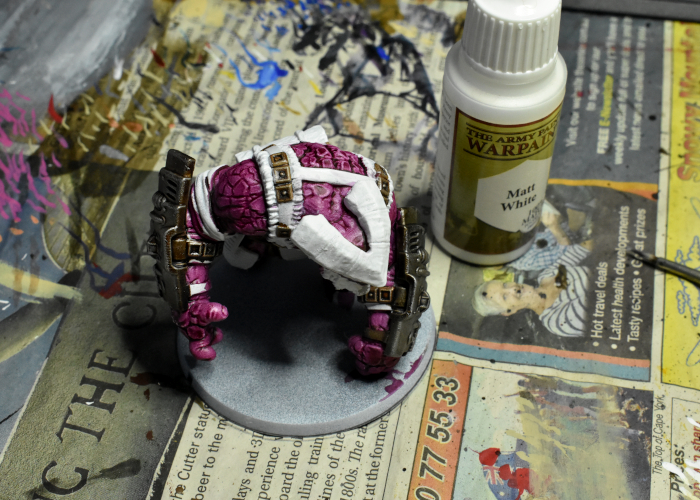
Add a coat of Skeleton Bone over the whole bone area.
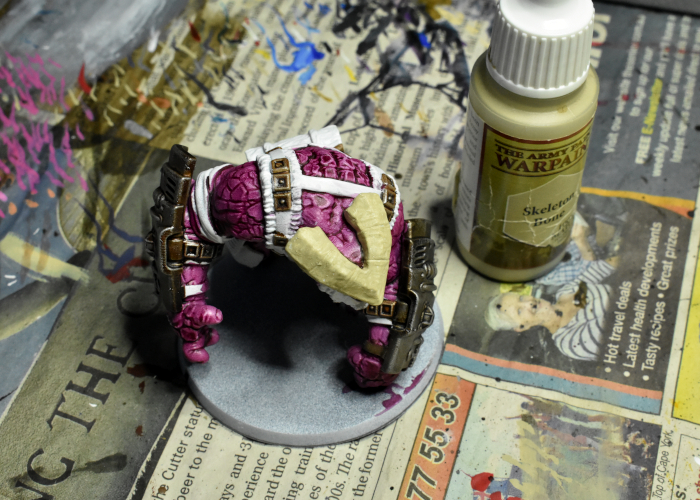
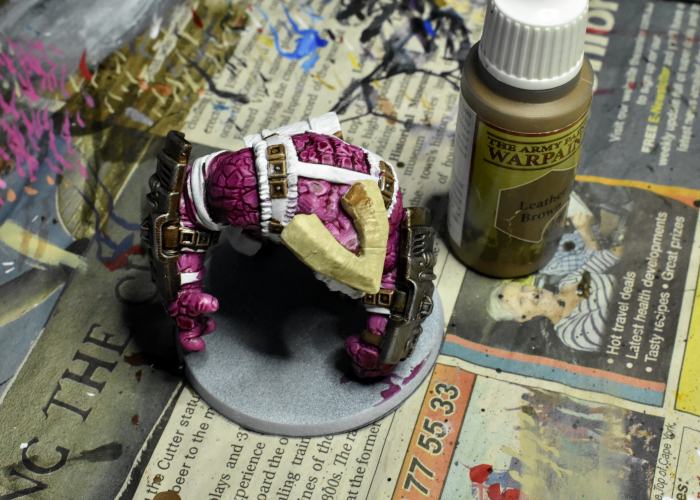
Starting with one face of the horn at a time, paint on some Leather Brown, around half to two-thirds of the way down to the base of the horn, depending on how dark overall you want the final result to be.
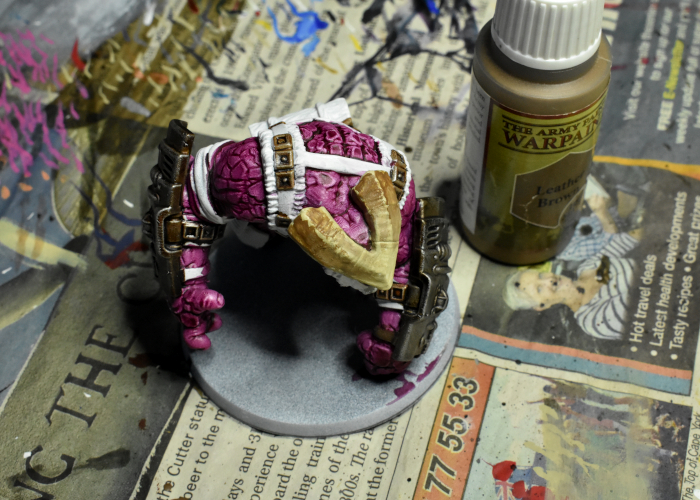
While the Leather Brown is still wet, go back over with some more Skeleton Bone, blending the two colours together to create a gradient. This doesn't have to be perfectly smooth, as the final step will tie it all back together.
Repeat the above two steps for each face of the horns.
Finally, go over the whole thing with a light drybrush of white, or white mixed with a little bone.
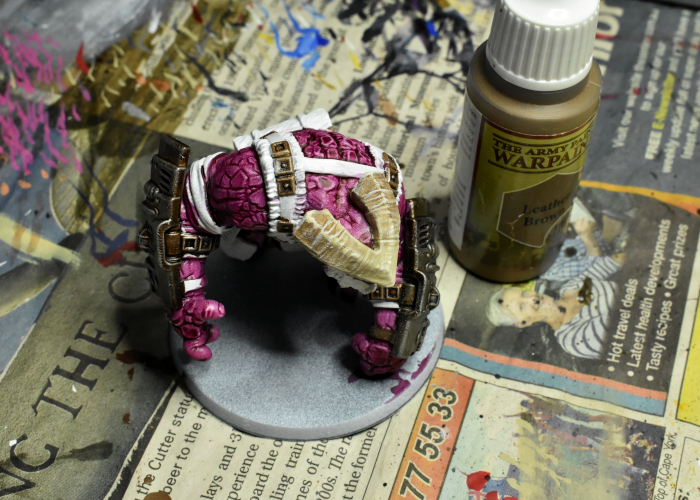
The finished Gnolti, ready to rampage!
Paint up your own Behemoth of Horned Doom by grabbing the Gnolti from the Maelstrom's Edge webstore!
While you're there, you can download the Maelstrom's Edge V2 rules from the Trial Rules section of the website here. The Beta rules documents contain all of the rules for playing V2 games, but keep in mind that these are just 'preview' documents - some rules may be revised based on feedback, and the final layout including background material for the factions and the Maelstrom's Edge universe, artwork and other 'flavor' material is missing.
If you have any feedbacks on the new rules, our model range, or the tutorial above, pop on over to the Comm Guild Facebook group and share your thoughts!
Modeling Spotlight: Speedpaint Kaddar Nova!
Posted on Wednesday Jun 22, 2022 at 05:00pm in The Karist Enclave
- by Iain Wilson
My adventures with Army Painter Speedpaints continued this week, as I'm slowly piecing together a force from various miniatures to run as an Imperial Guard army in 2nd edition Warhammmer 40000. This week's addition was a plastic (and slightly converted) Karist Kaddar Nova!
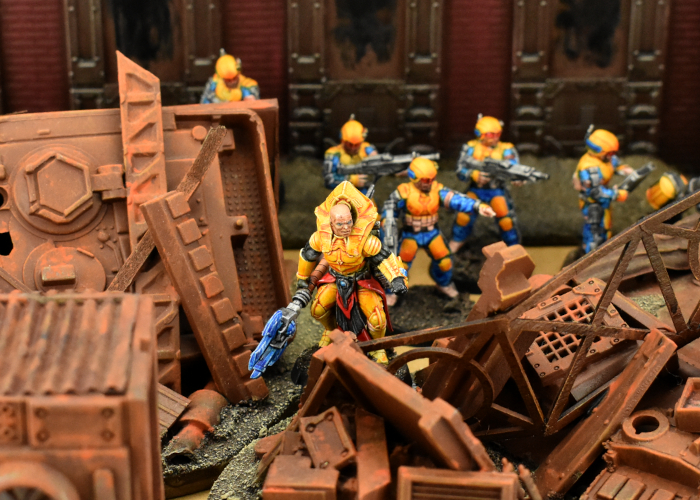
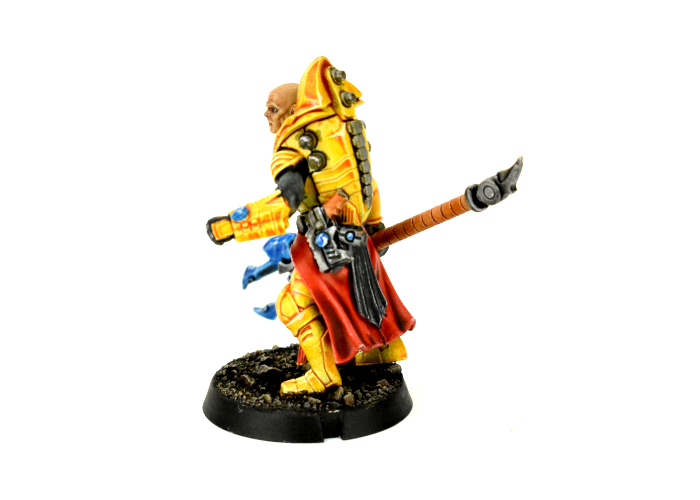
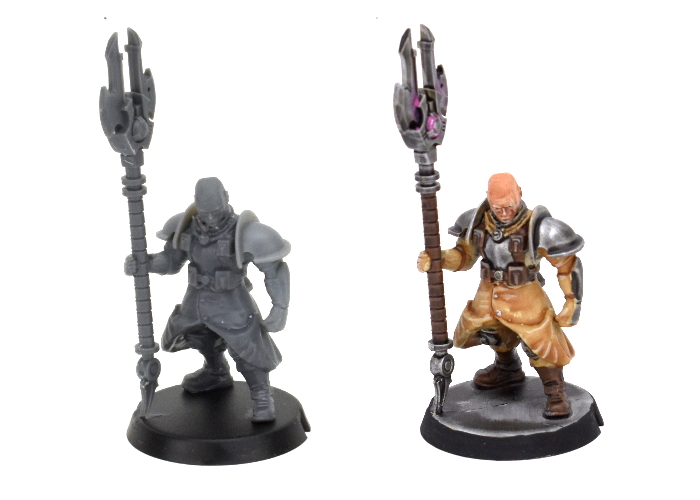
This model uses mostly the standard Kaddar Nova parts, although I added in a right hand, glaive and pistol from the Faction Expansion sprue, as this chap will be fielded as an Inquisitor Lord armed with a force rod and hand flamer.
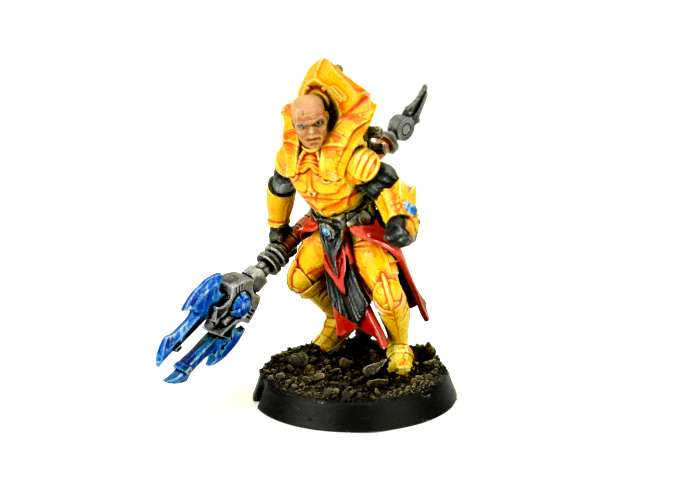
As per normal for Speedpaint work, I started with a white spray basecoat. The armour is Zealot Yellow, hung upside down to dry so that the paint would pool into upper recesses. For the skin, my initial tests with Crusader Skin straight over white were not what I wanted, so this time around I tried an experiment. Starting with a coat of Skeleton Bone, I applied a very light drybrush of Matt White and then the Crusader Skin, and was quite happy with the result. The eyes are a thin strip of white with some black dots in the middle, and then any mess around the edges cleaned up with some more Skeleton Bone and Crusader Skin.
Proper curing time is still something of a mystery with Speedpaint, and in certain conditions the paint can reactivate when painted over if it is not completely cured, so I have taken to applying a light coat of Anti-Shine varnish over the first, main colour and then applying any white touchups and subsequent Speedpaint colours over that, and this seems to do the trick.
I used Grim Black for the black parts on his tabard and arms, and Gravelord Grey for exposed metal parts. The grey gives a good metal stand-in without actually being metallic, and there's enough of a contrast between the grey and black for the two to wind up looking sufficiently different.
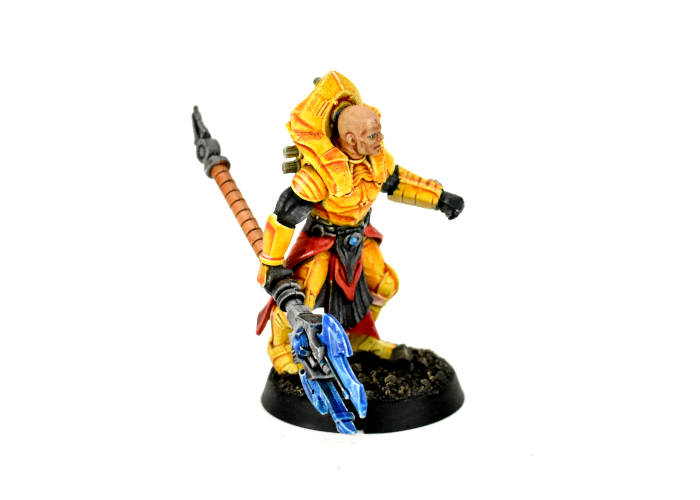
The blades on the glaive and the various glowy blue bits were painted with Highlord Blue with accents of Matt White, while the handle of the glaive is Hardened Leather.
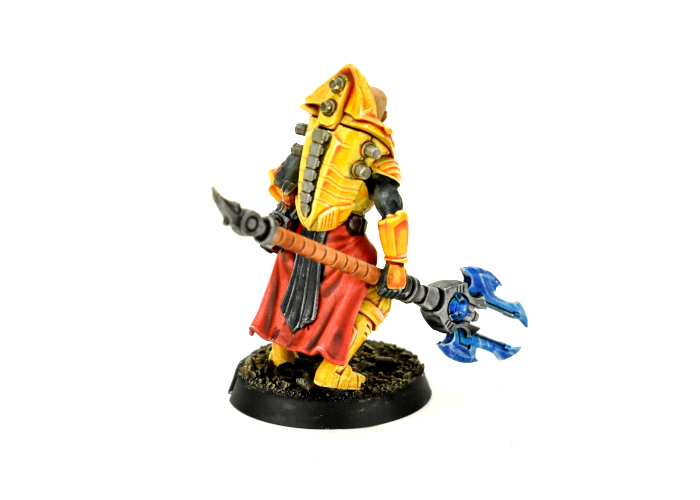
The tabard is Blood Red, applied in two layers - one for the initial colour, and then after that dried, some additional red dabbed into the deeper creases for some extra shading. Then, with all of the colours in place, I added some highlights wherever seemed appropriate on the model with a little Matt White.
Finally, I painted the base with a coat of Dark Wood, drybrushing when it was dry with a little Skeleton Bone, and then added Matt Black around the rim.
So, that's one squad and a character down, and the rest of the force in progress.

Stay tuned for more!
To build your own Psychic Lord of Proxied Doom, pick up the plastic Kaddar Nova kit from the Maelstrom's Edge webstore!
While you're there, you can download the V2 rules from the Trial Rules section of the Maelstrom's Edge website here. The Beta rules documents contain all of the rules for playing V2 games, but keep in mind that these are just 'preview' documents - some rules may be revised based on feedback, and the final layout including background material for the factions and the Maelstrom's Edge universe, artwork and other 'flavor' material is missing.
For other modeling ideas, tutorials, army spotlights and conversion walkthroughs, check out the Hobby section of the Maelstrom's Edge website here.
What are you working on? We would love to see your models and terrain in the Comm Guild Facebook group!
Tags: kaddar karist nova painting speedpaint spotlight walkthrough
Painting Tutorial: Quick & Easy Camouflage using Speedpaint!
Posted on Tuesday Jun 14, 2022 at 05:00pm in General
- by Iain Wilson
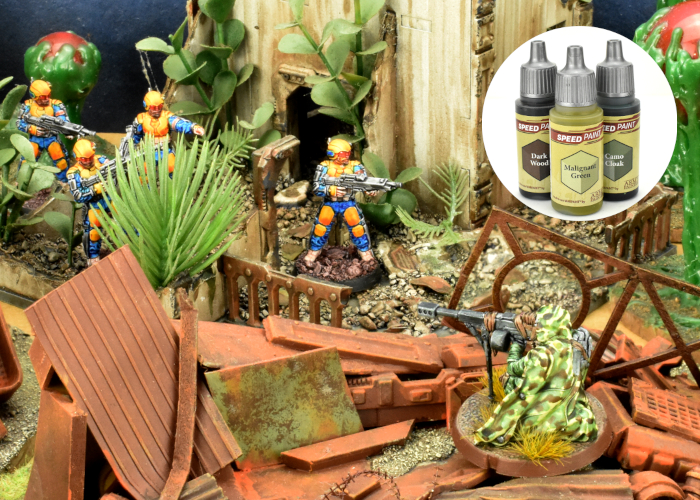
I've been having some fun experimenting with Army Painter's Speedpaints, to see what can be done with them. This week, I'd like to share this simple method that I stumbled upon for painting a camouflage pattern using just a trio of Speedpaints!
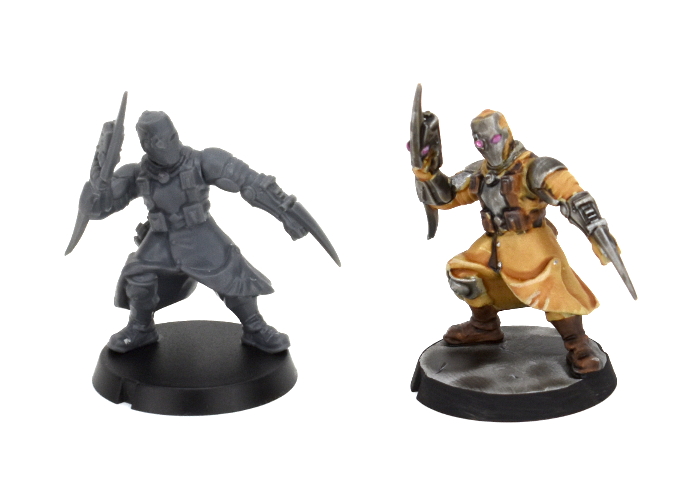
Step 1 - Basecoat the model with white spray.
Step 2 - Go over the camouflage area with a generous coat of Malignant Green.
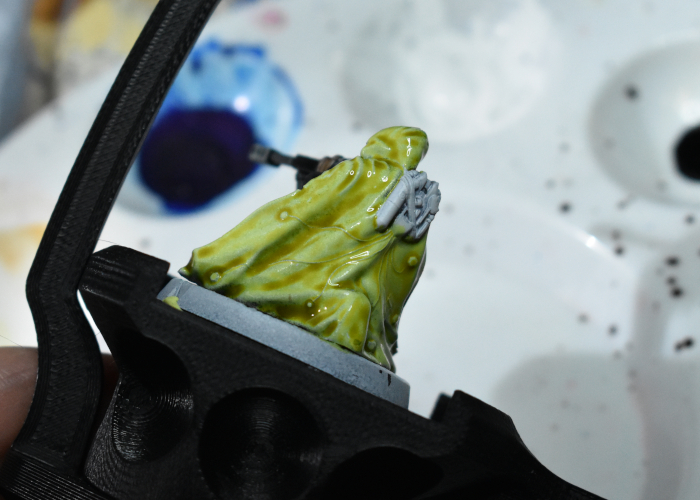
Step 3 - While the Malignant Green is still wet, dab on dots of Camo Cloak. Make these dots about half the size you want them, as they will spread out. Try to mix up the spacing of the dots as you go, so they don't wind up forming a regular pattern. Doing this while the first green is still wet allows the second colour to spread organically, creating irregular, random shapes.
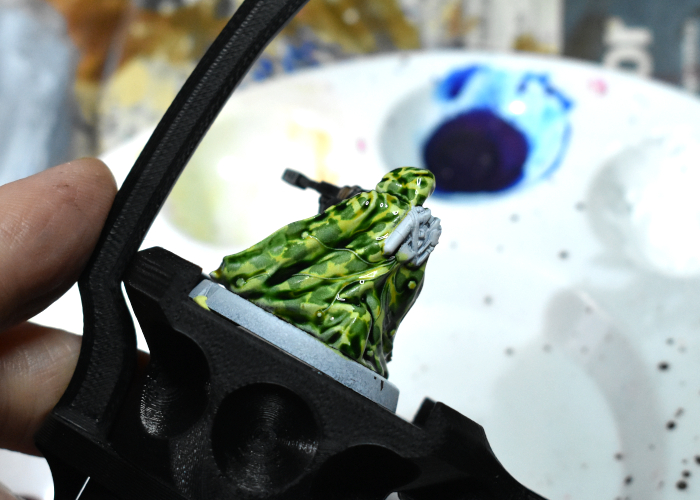
Step 4 - While those first two colours are still wet, go back over with slightly smaller dots of Dark Wood. This will spread across and through the other two colours, creating the layered camo effect.
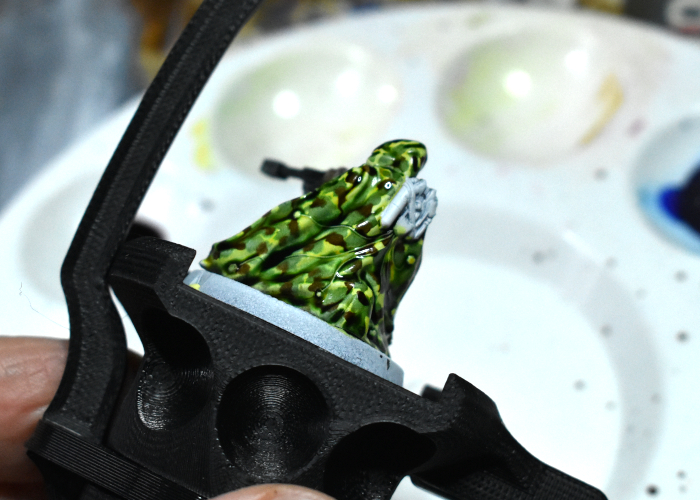
Step 5 - Let it all dry. It can help if you can lay the camouflage surface as flat as possible, to avoid the wet colours from running downwards.
The completed model - the rest of the model was also painted with Speedpaint, mostly Camo Cloak, Dark Wood and Grim Black.
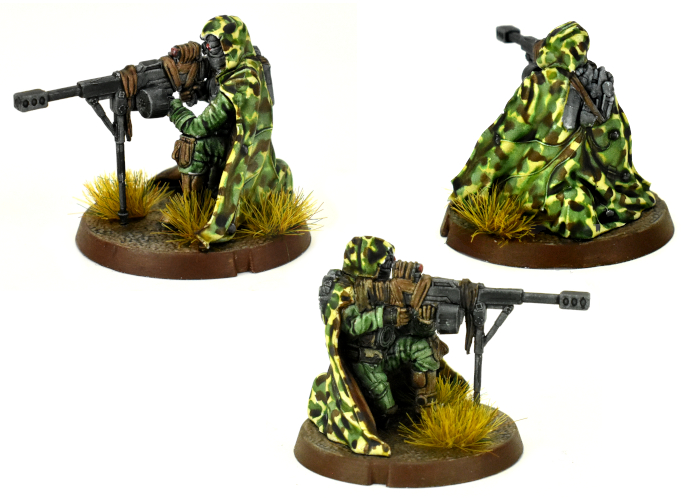
To have a go yourself, pick up the plastic Broken Sniper kit from the Maelstrom's Edge webstore!
While you're there, you can download the V2 rules from the Trial Rules section of the Maelstrom's Edge website here. The Beta rules documents contain all of the rules for playing V2 games, but keep in mind that these are just 'preview' documents - some rules may be revised based on feedback, and the final layout including background material for the factions and the Maelstrom's Edge universe, artwork and other 'flavor' material is missing.
For other modeling ideas, tutorials, army spotlights and conversion walkthroughs, check out the Hobby section of the Maelstrom's Edge website here.
What are you working on? We would love to see your models and terrain in the Comm Guild Facebook group!
Tags: broken painting tutorial walkthrough
Modeling Spotlight: Speedpaint SecDef
Posted on Wednesday May 18, 2022 at 05:00pm in Tutorials
- by Iain Wilson
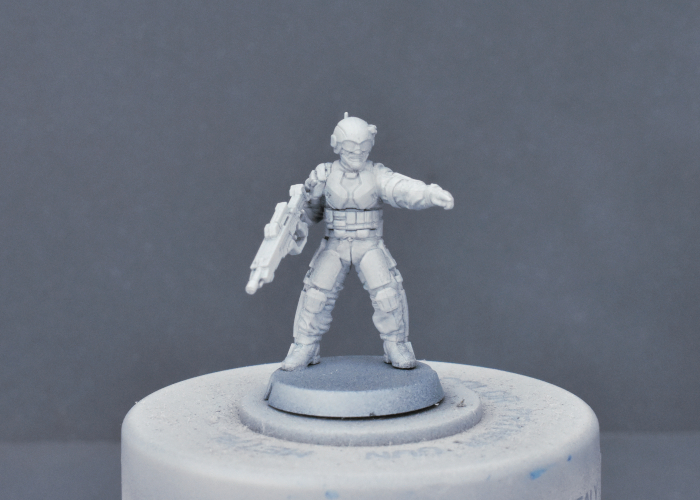
My long-awaited Army Painter Speedpaint Starter Set finally arrived last week, and I was impatient to give them a test run. I've had a bunch of plastic SecDef models assembled for a while, for a little side-project, and figured they would be perfect for the job. So I grabbed the first squad of models out of the hobby box and set to work!
I started off with a basecoat of Army Painter Matt White spray. I did experiment on a couple of initial test models with a plain white basecoat and a zenithal base using white and purple, but decided that the zenithal basecoat didn't make enough of a difference to the end result to be worth the effort.
(A zenithal basecoat is where two layers of colour are used - a darker colour in the recesses/undersides of the mode, and a lighter layer sprayed down from above. This can be handy when combined with certain painting methods, particularly using thinner 'glazing' paints to accentuate shading and highlights.)
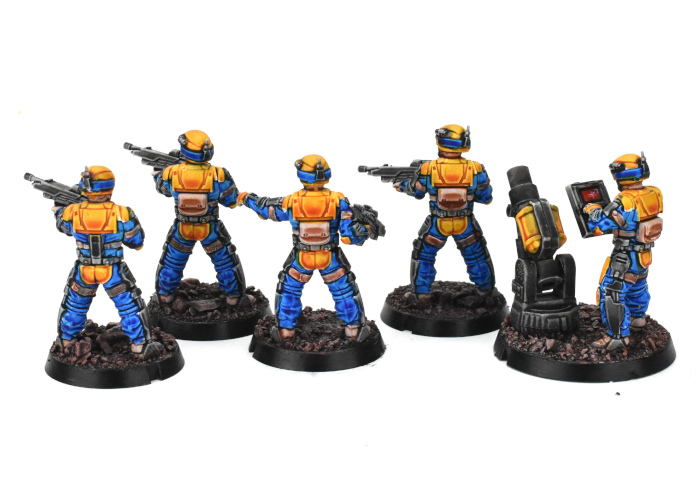
For the uniform, I went with Highlord Blue, applying to any visible cloth areas and trying to avoid too much spillover onto the armour plates. I also added the blue to the raised surround on the helmet.
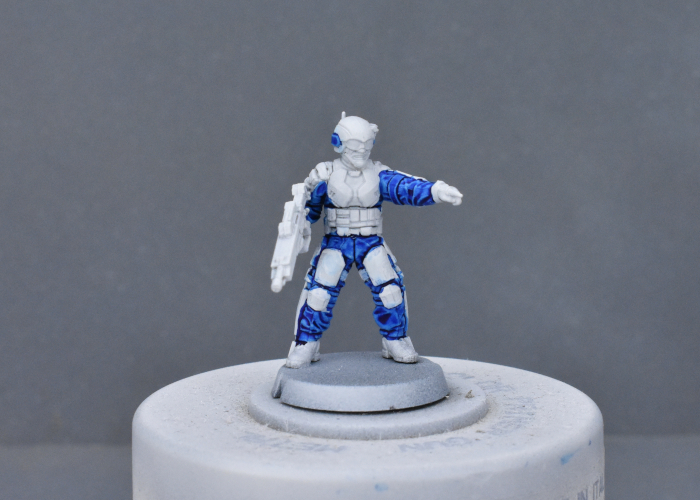
After a quick touchup where necessary with some Matt White, I painted a layer of Hardened Leather over pouches, straps, boots, gloves and face, and then went back over the face with Crusader Skin. The double layer on the skin was to give a darker skin colour - my initial test showed the Crusader Skin to be a bit more washed out than I wanted, but layering it over the Leather gave a nice, dark tone.
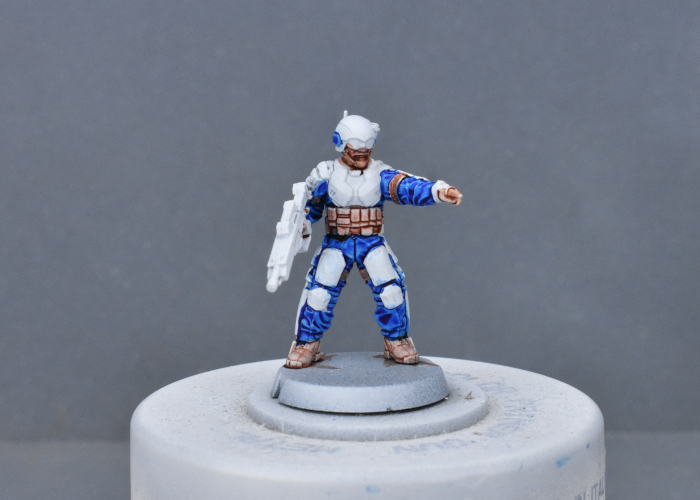
Next up, I painted over the weapon, belt, exoskeleton, and helmet commlink, targeter and chinstrap with Gravelord Grey.
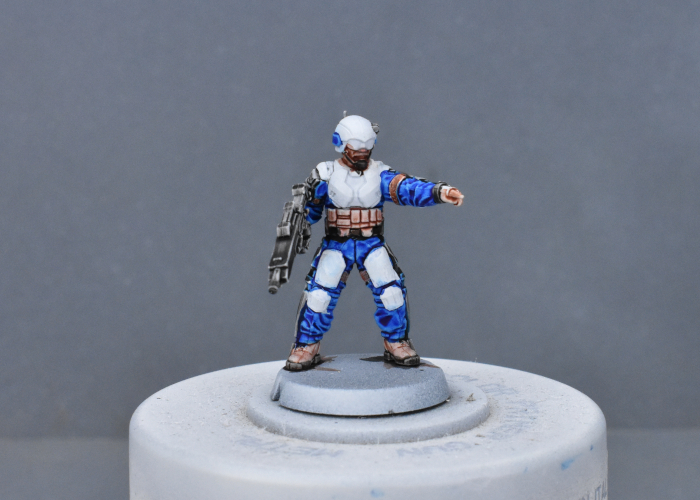
For the armour plates and helmet, I went with a coat of Zealot Yellow. This settled nicely on the lower areas of the plates, providing a lovely contrast against the blue uniform.
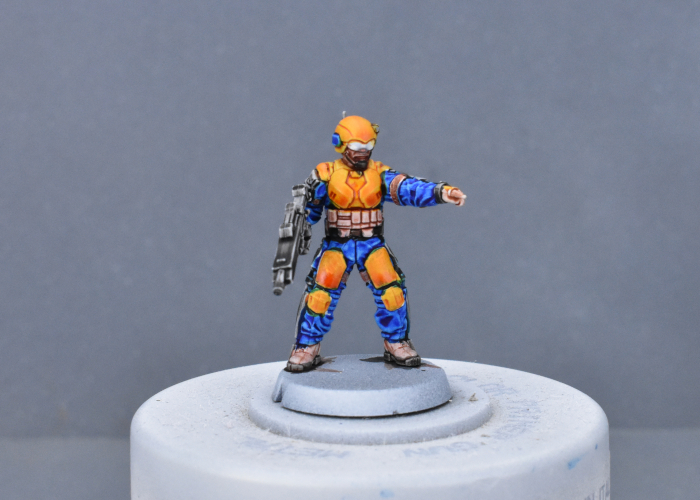
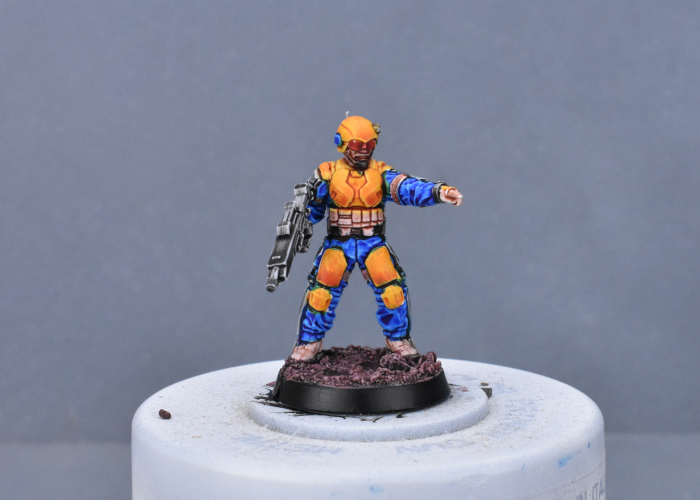
To finish up, I added some Blood Red over the goggles, and while that was drying added some gravel mix to the base. Without a dark brown in the starter set, I used a 1:1:1 mix of Hardened Leather, Blood Red and Hive Dweller Purple over the gravel, giving it a drybrush of Tanned Flesh and Ash Grey (regular acrylic paints) when it dried. With a quick run of Matt Black around the base rim and some white specular highlights on the goggles, he was ready for the table.
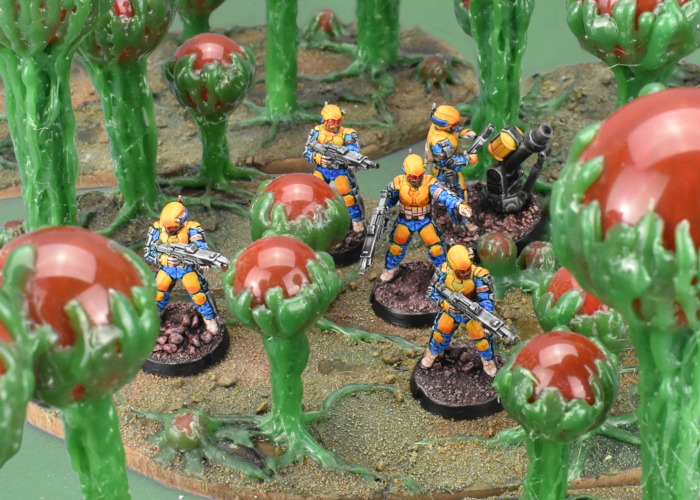
The unit assembled - regular SecDef models, with a custom made energy mortar using some plastic tubing and parts from the 2nd Maelstrom's Edge terrain sprue.
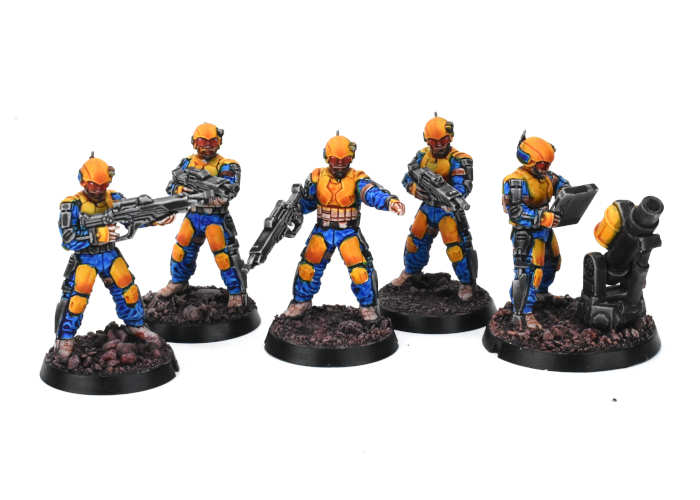
They're not perfectly neat, but for a quick, table-ready paintjob these paints are fantastic, giving some perfectly acceptable shading and highlights with a single coat. I'm looking forward to getting the rest of this force painted up!
To have a go yourself, pick up the plastic, multi-part SecDef kit from the Maelstrom's Edge webstore!
While you're there, you can download the V2 rules from the Trial Rules section of the Maelstrom's Edge website here. The Beta rules documents contain all of the rules for playing V2 games, but keep in mind that these are just 'preview' documents - some rules may be revised based on feedback, and the final layout including background material for the factions and the Maelstrom's Edge universe, artwork and other 'flavor' material is missing.
For other modeling ideas, tutorials, army spotlights and conversion walkthroughs, check out the Hobby section of the Maelstrom's Edge website here.
What are you working on? We would love to see your models and terrain in the Comm Guild Facebook group!
Force Spotlight: Quick Painted Epirians!
Posted on Tuesday Apr 12, 2022 at 05:00pm in The Epirian Foundation
- by Iain Wilson
A few weeks back, we published some sample force lists for the V2 Maelstrom's Edge rules. These got me a little inspired to put together a new force for myself, and so I dove into the unbuilt model pile and put together 120 points based on the Epirian sample list.
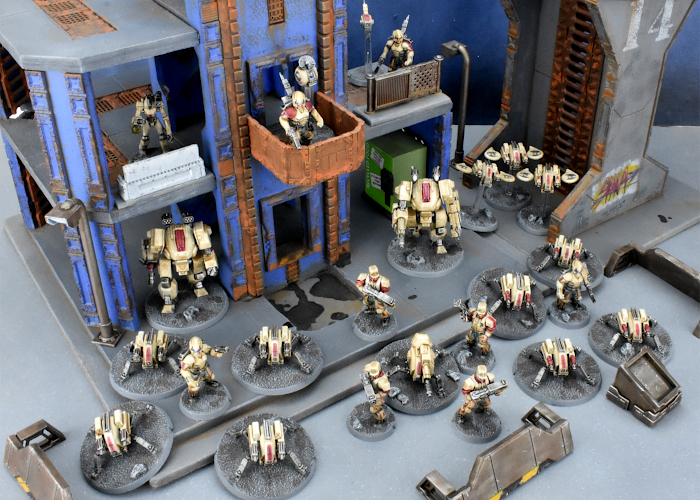
The force roster is almost identical to the sample list. I found myself short by one Firefly drone, so I dropped those to a unit of three, and gave the Contractor Defenders a Chaingun drone and one of the Journeymen a second Dominator pistol to make up the difference.
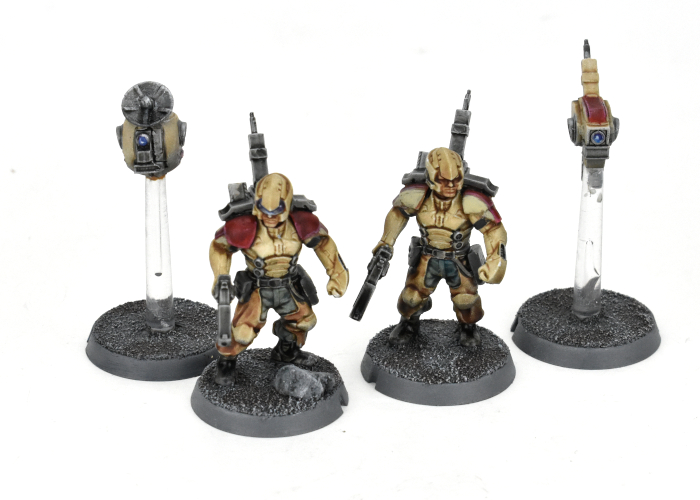
Journeyman Bot Handlers with micro drones (the drones are 3D printed test models - the finished models will be coming in plastic soon!)
I wanted a colour scheme that was quick and easy to paint, and also visually distinct from my existing forces. Starting out with a basecoat of Army Painter Uniform Grey spray, I then added a 'zenithal' highlight by spraying down from above the models with white spray. Over that, I applied a wash of Army Painter Soft Tone. Metal parts were picked out with AK Gunmetal and then washed with Army Painter Dark Tone - two coats for the weapons.
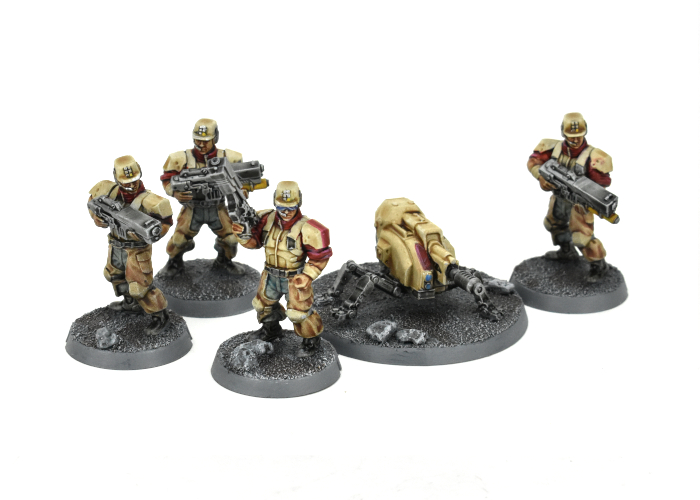
Contractor Defenders.
The pants on the Contractors were painted with a layer of Army Painter Blue Tone to give them a denim look, while the chaps were given a coat of Army Painter Mid Brown wash. I painted the skin with a coat of Army Painter Flesh Wash, and then as it still looked a bit pale added a layer of Mid Brown as well.
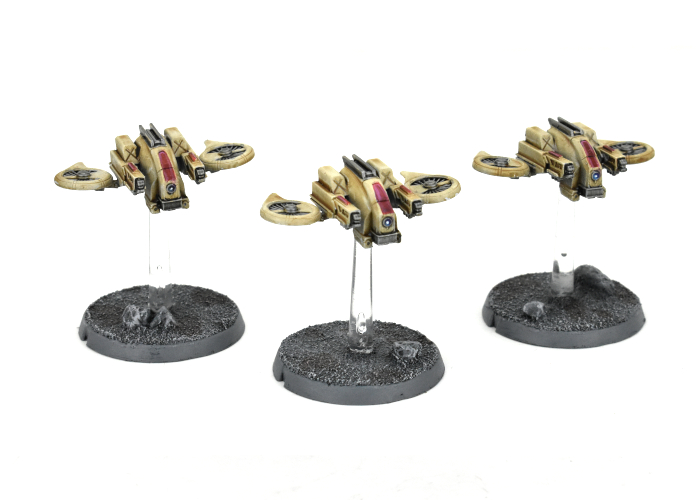
Firefly Drones.
For the red details, I painted on a coat of Citadel Blood Angels Red Contrast. This didn't look quite the right tone with the sandy coloured armour, so I added a layer of Army Painter Purple Tone over the top, before highlighting with Army Painter Pixie Pink.
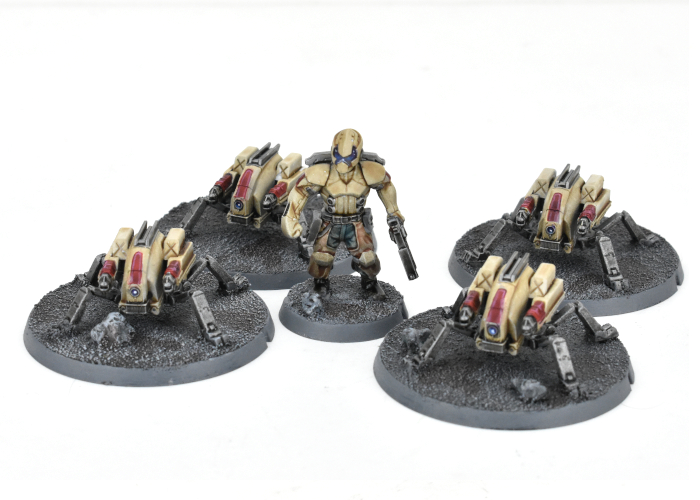
Spider Drones with flakk guns.
I had found with my previous Epirian Bot Force that the weapons on Spider Drones can be a little hard to differentiate from across the table, so I made sure I painted them differently, leaving the machine guns bare metal and adding a red casing on the flakk guns.
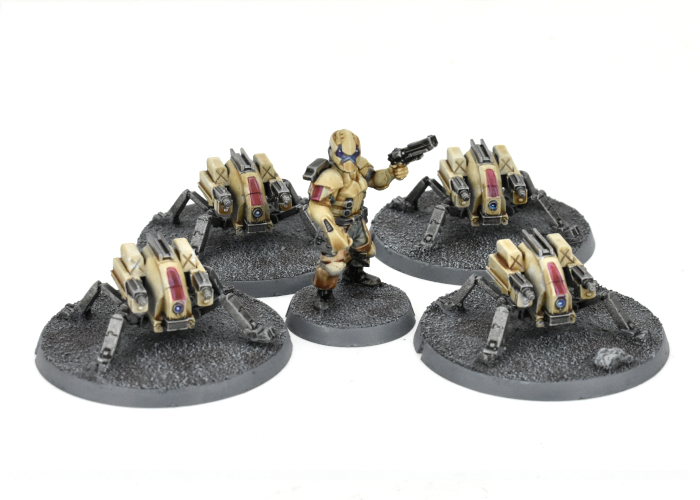
Spider Drones with machine guns.
I used Army Painter Ultramarine Blue for lenses and sensors, shading with Purple Tone and highlighting with Army Painter Gorgon Hide.
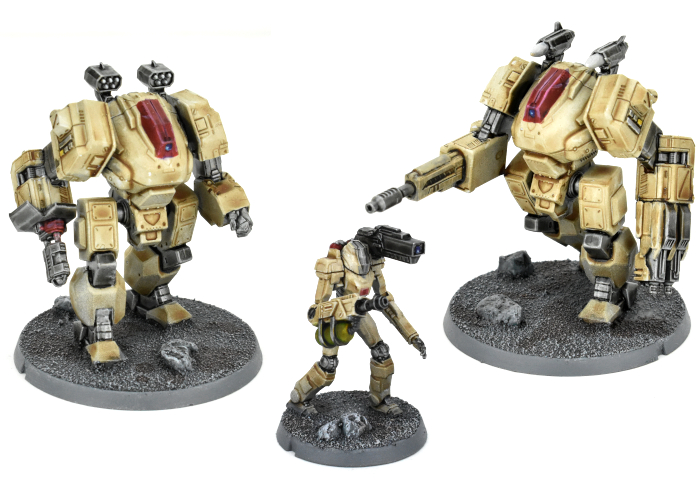
Hunter mechs and Scarecrow bot.
To finish up, after gluing on some fine sand and a few pebbles for detail, I painted the bases with Uniform Grey, washed over the top with Army Painter Dark Tone, and then drybrushed with Vallejo Light Grey and White before adding some splotches of Mid Brown here and there to break up all of that grey.
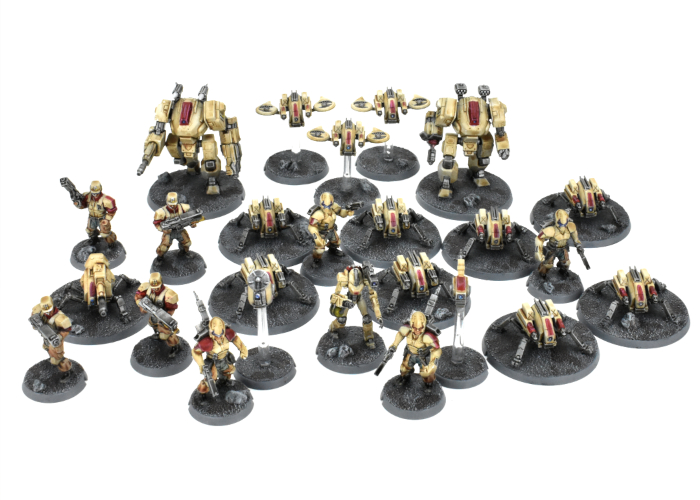
The full force deployed.
Get started on your own V2 force by heading over to the Maelstrom's Edge webstore!
While you're there, you can download the V2 rules from the Trial Rules section of the Maelstrom's Edge website here. The Beta rules documents contain all of the rules for playing V2 games, but keep in mind that these are just 'preview' documents - some rules may be revised based on feedback, and the final layout including background material for the factions and the Maelstrom's Edge universe, artwork and other 'flavor' material is missing.
If you have any thoughts on the new rules, pop on over to the Comm Guild Facebook group, or start up a thread in the Maelstrom's Edge section on the Dakka Dakka forums. We welcome any feedback, and would love to hear how everyone's forces stack up in the new rules!
Terrain Kitbash: Sci-Fi Barn pt3
Posted on Monday Oct 25, 2021 at 06:00pm in Tutorials
- by Iain Wilson
Sci Fi Barn, episode 3: Now in Epirocolor!
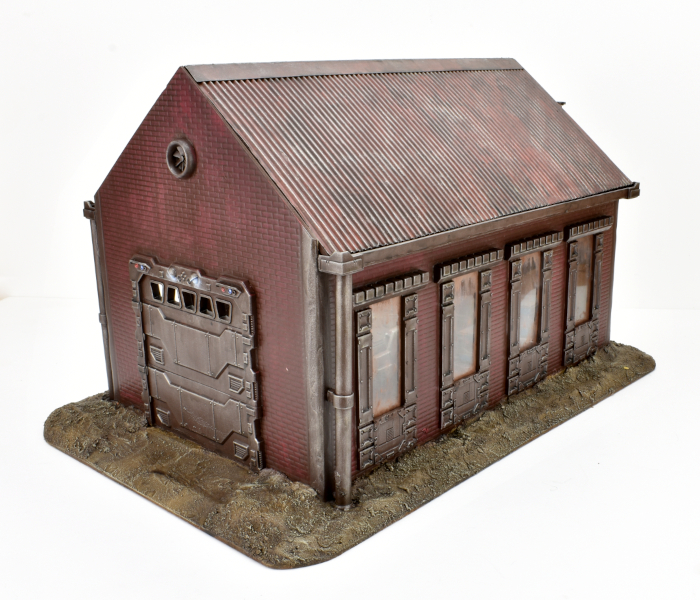
In this latest installment, I finally get some paint on this barn build. If you're wandering in here wondering what it's all about, this was a kitbash of a Plast Craft Games warehouse with parts from the Maelstrom's Edge terrain sprues to build the a sci fi barn (you can find the first part here).
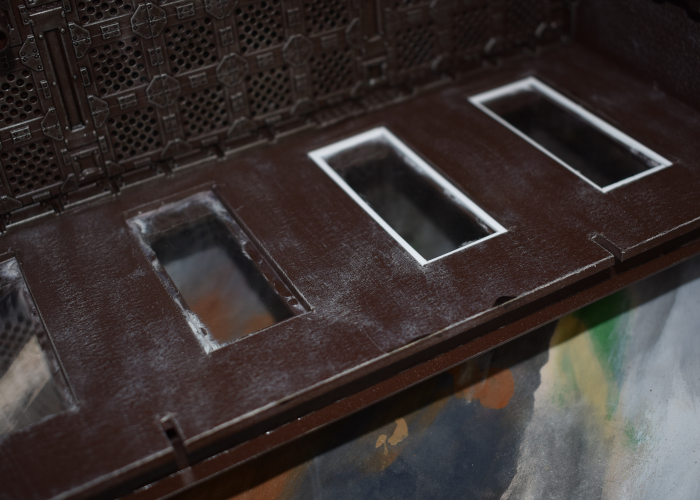
With assembly completed, I kicked off the painting by spraying the whole thing with a coat of a mediumish-dark brown satin spray paint that I had sitting on the shelf. Or, I would have, but it ran out on me. So I wound up spraying the top of the roof with some old Rustoleum flat red that I sometimes use as a base for rusty metal.

I went back over the red roof with some Vallejo Charred Brown before drybrushing over all of the metal parts with some Citadel Boltgun metal (Leadbelcher, for the newcomers). The non-metal parts of the interior walls were drybrushed with some Army Painter Skeleton Bone to pick up the texture on the foamed PVC, and the exterior bricks were given a heavy drybrush of Scalecolor Baal Crimson. Then before putting the drybrushes away, I gave the dirt on the base a layer of Vallejo Heavy Brown.
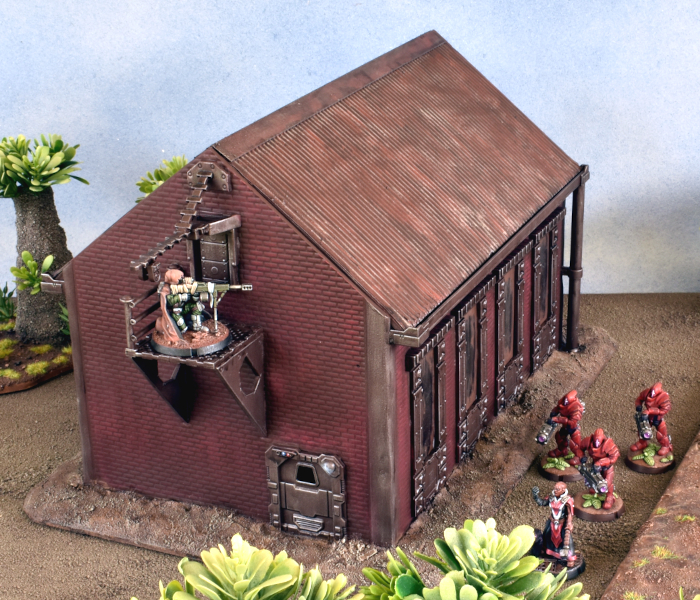
I was aiming for a weathered but not overly rusty metal look for this piece, as it's intended for a fairly arid 'western' themed table set. So over all of the metal parts and the base I added a generous coat of Army Painter Strong Tone and set it aside to dry.
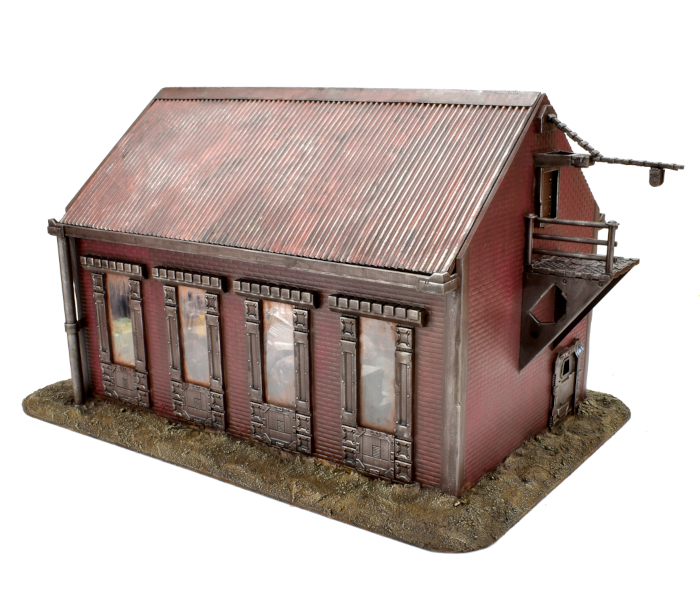
At this point it was time to fit the window panes. The warehouse set came with painted clear plastic pieces that looked fine in the original warehouse, but turned out to not look right here. So instead, I used them as a template to cut some clear plastic sheet to size as a replacement.
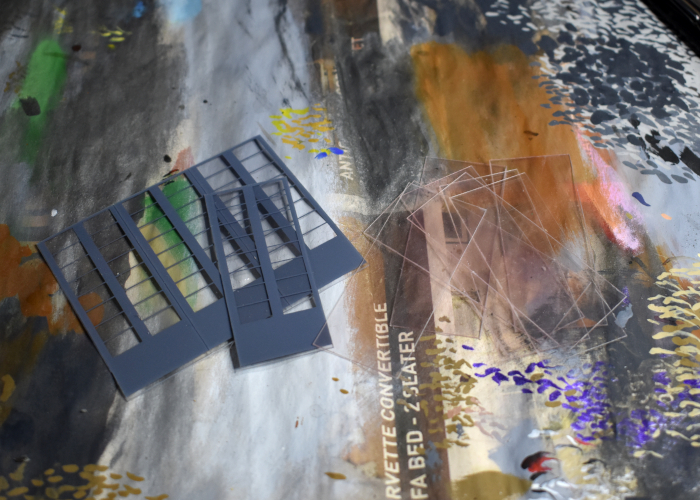
I hadn't originally planned to add internal window frames, but with the panes in place the glue around the edges was very obvious , so I added some thin frames using some thin PVC.
After painting these new internal frames brown, all that was left was to add final detailing. I drybrushed the base dirt with some Army Painter Skeleton Bone and all of the metal parts with a light layer of Army Painter Shining Silver. Lights and sensors on the door frames were painted in with red and blue.
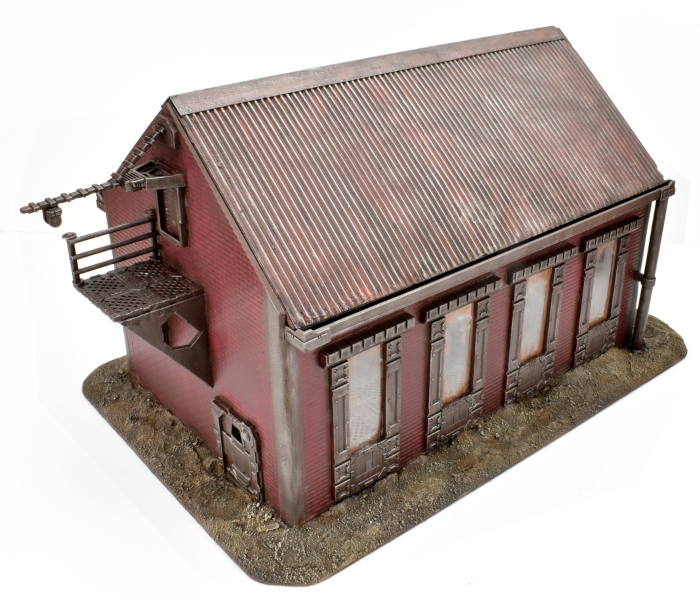
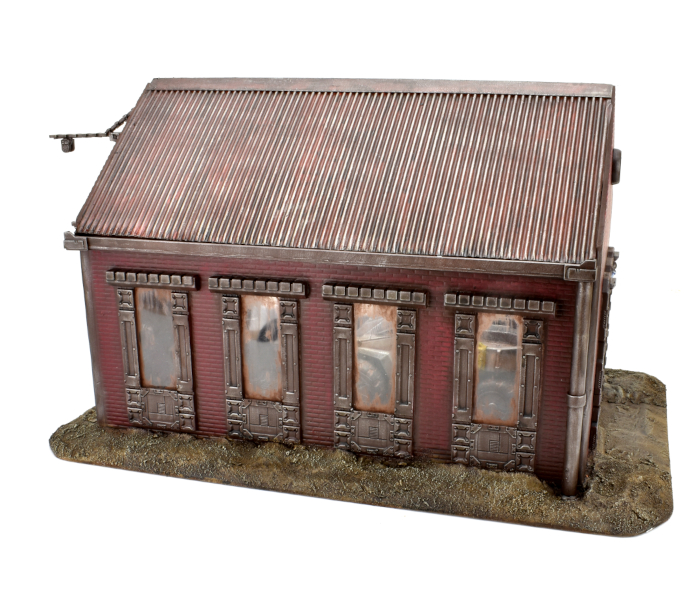
With the metal parts being quite dark, I didn't add a lot of dirt weathering, other than over the tops of the doorframes where it served to conceal a few messy over-brushes of red from the bricks. I did add some brown dirt smearing around the edges of the window panes, partly to give them a more weathered appearance, and partly to conceal any fogging from the glue.
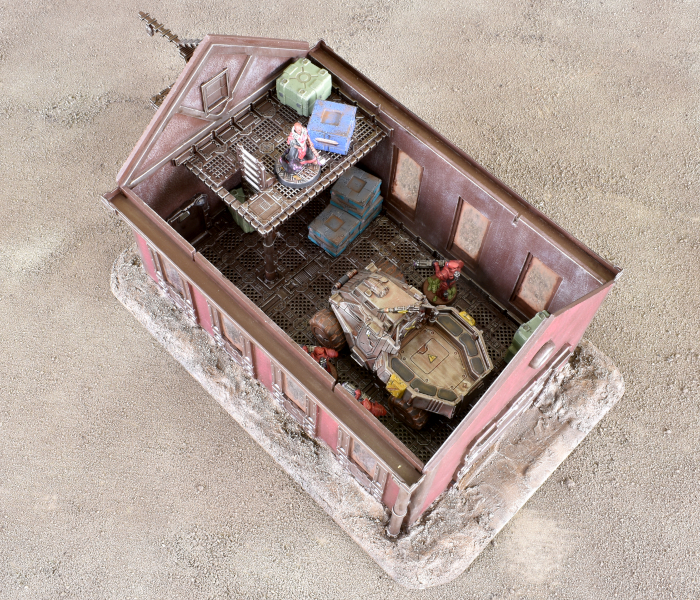
With some crates and an old vehicle thrown in for colour, when the roof is lifted off the interior winds up looking like this:
To build your own outbuilding of rural doom, you can pick up the terrain sprues along with the rest of the Maelstrom's Edge range from the webstore here.
What are you working on? We would love to see your models and terrain in the Comm Guild Facebook group!
For other building ideas, modeling tutorials, army spotlights and conversion walkthroughs, check out the Hobby section of the Maelstrom's Edge website here.
Tags: buildings conversion kitbash painting spotlight terrain terrainsprue tutorial
Painting Spotlight: Metallic Angel
Posted on Monday Sept 06, 2021 at 06:00pm in Tutorials
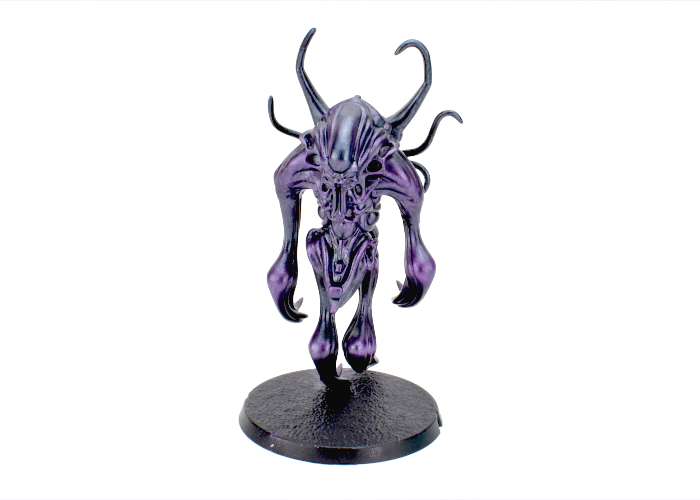
A while ago, I picked up a set of the Army Painter coloured metallic paints, and decided this week it was time to take them for a spin. The paint set includes some lovely purples that were just screaming out for a friendly little angel to bring to life. And so that's what I did.
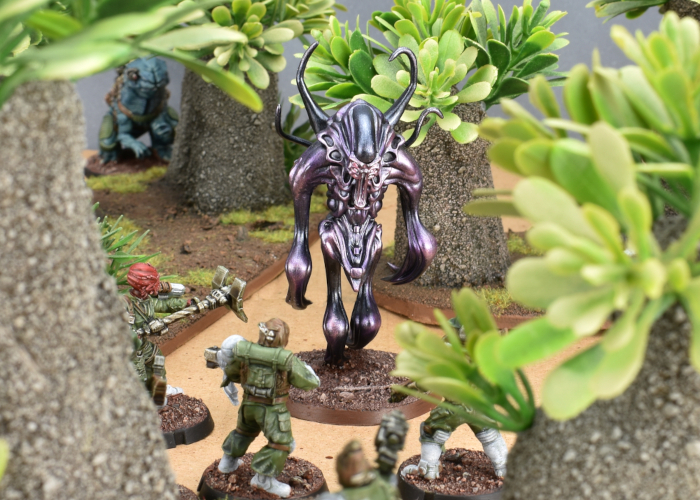
The model I chose to use for this was a conversion that I put together some time ago while playing around with the Mature Angel kit. The end result is a slightly sinister-looking, floaty juvenile angel.
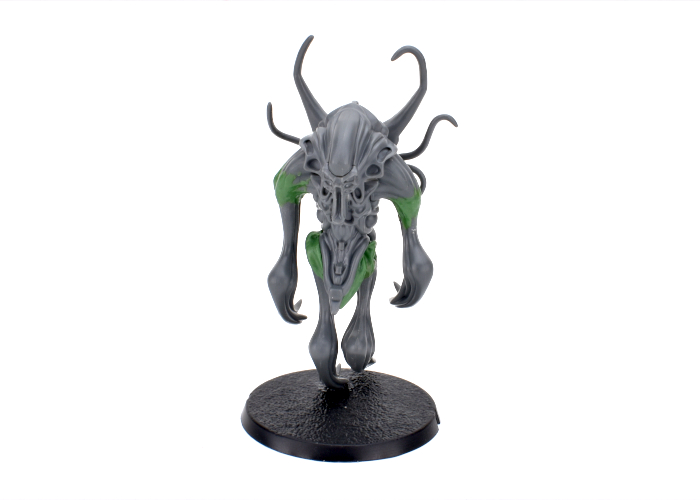
Metallic paint generally goes best over a dark basecoat, so I started out by spraying the model with some Army Painter black.
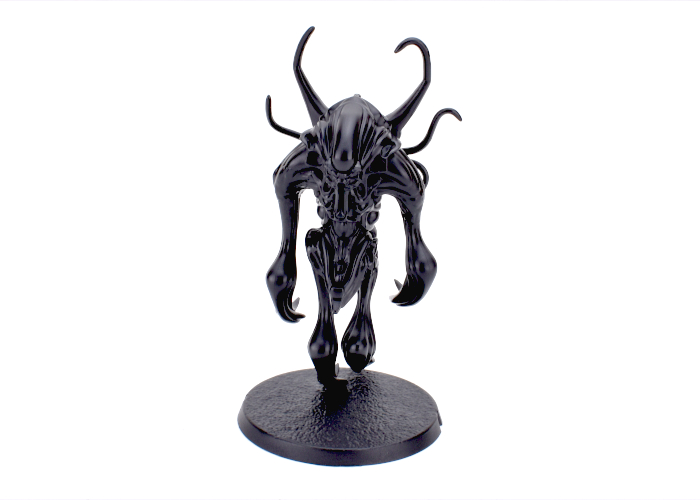
I then gave the whole model a coat of Night Scales, a metallic black from the Army Painter set. This has a slight bluey-purple tint to it that is just perfect for the angel. I was tempted to just leave it like this and call the job a good'un.
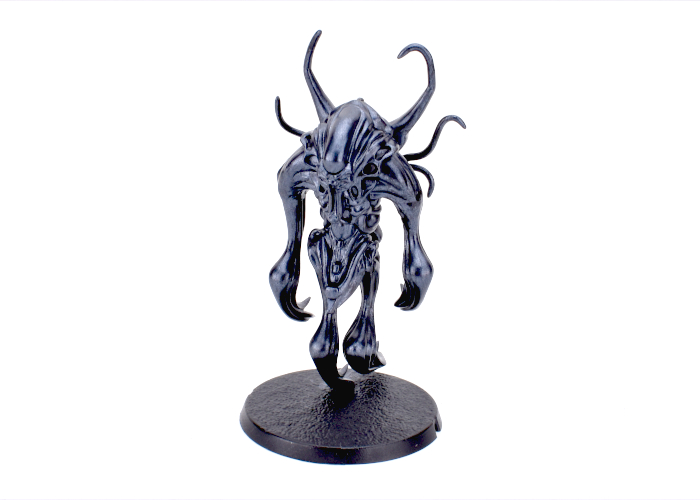
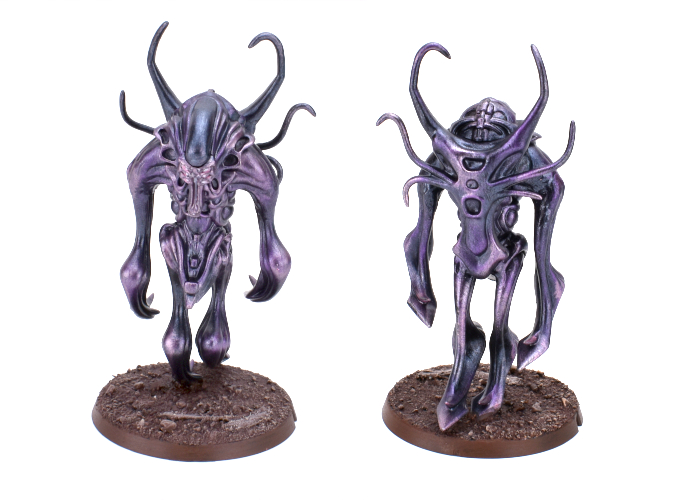
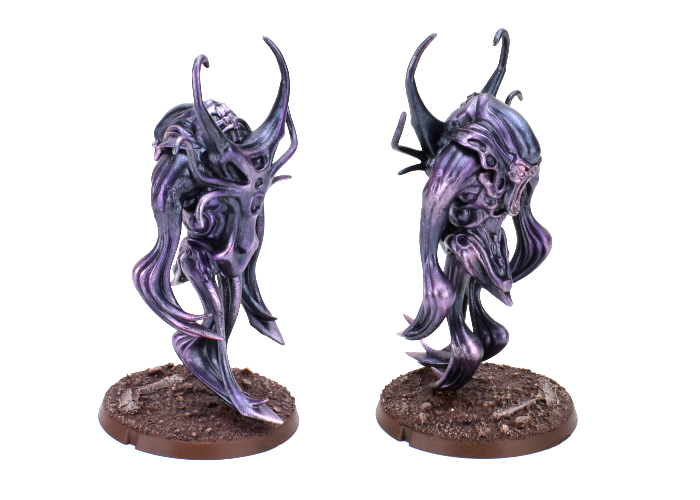
Deciding to go for a little more 'wow', though, I grabbed the bottle of Royal Purple, a midrange purple metal colour, and drybrushed the angel with it, building up more colour on raised areas and tentacle tips.
I used a light drybrush of Zephyr Pink to add some extra highlights wherever it seemed appropriate. I also went back over the top of the head with some more Night Scales, and picked out the eye sockets with Zephyr Pink before adding some white over on the eyeballs and inside the mouth. Finally, I added some coarse sand mix to the base with PVA glue, and then painted with Army Painter Dirt Spatter, then a wash of Mid Brown ink, and finally a drybrush with Kobold Skin, also picking out the base edge with more Dirt Spatter.
To build your own angel of floaty, screamy doom, you can pick up the Mature Angel kit along with the rest of the Maelstrom's Edge range from the webstore here.
What are you working on? We would love to see your models and terrain in the Comm Guild Facebook group!
For other building ideas, modeling tutorials, army spotlights and conversion walkthroughs, check out the Hobby section of the Maelstrom's Edge website here.
Army Spotlight: Broken SARA Detachment
Posted on Monday Aug 23, 2021 at 09:06pm in The Broken
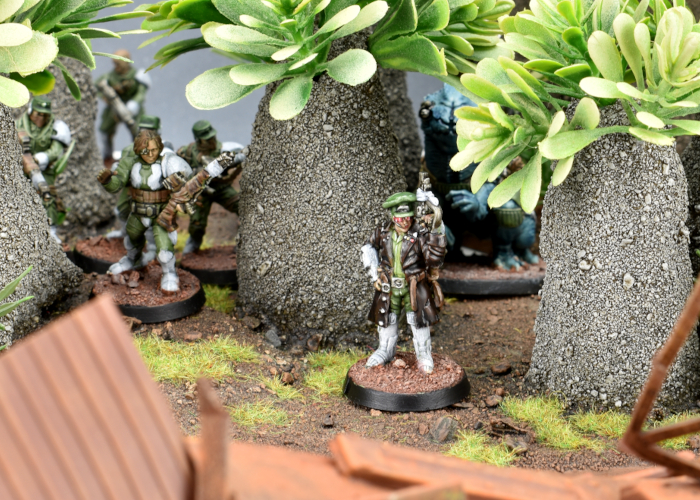
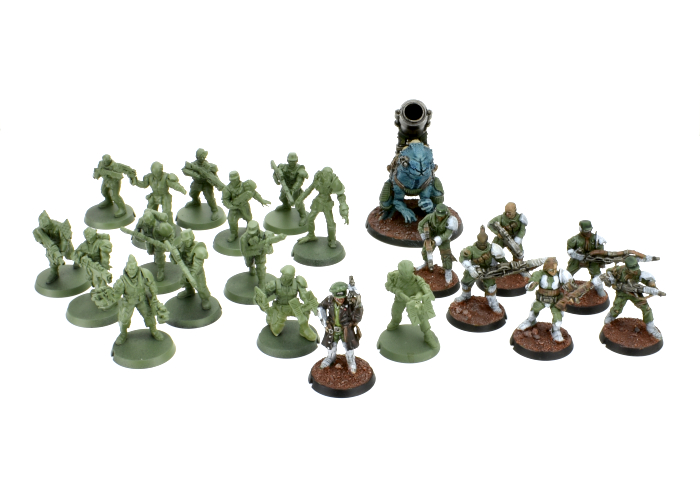
Last week, I shared a Revolutionary Captain conversion that I had painted up to lead a new SARA force for my army collection. This week, I completed work on the rest of his detachment!
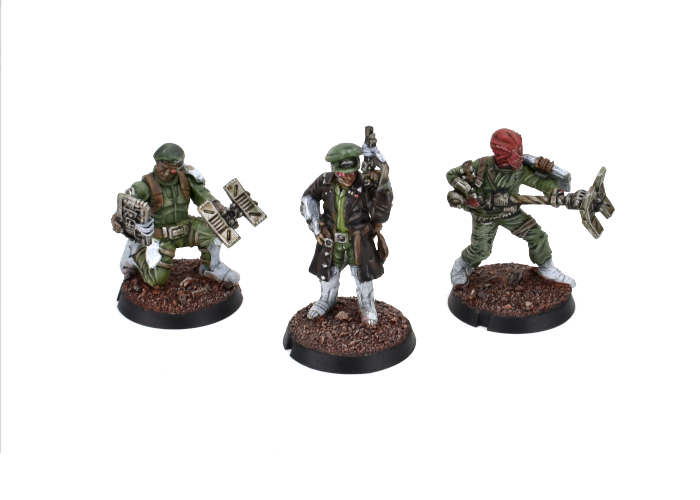
The leader for the detachment is obviously the aforementioned Revolutionary Captain, equipped with his signature pistol and an added trophy melee weapon. To accompany him into battle, I filled out a Vanguard slot with a pair of Sig Jammers, on using the regular resin model, and another converted up using a bunch of assorted parts, including the beret head that I didn't use on the Captain. Sig Jammers provide support to Broken forces by interfering with enemy Fields and forcing additional Suppression Points onto enemy units with their Tech Disruptors.
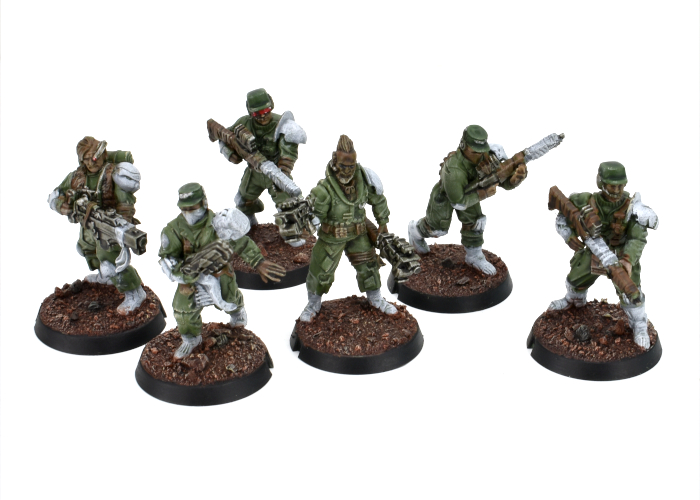
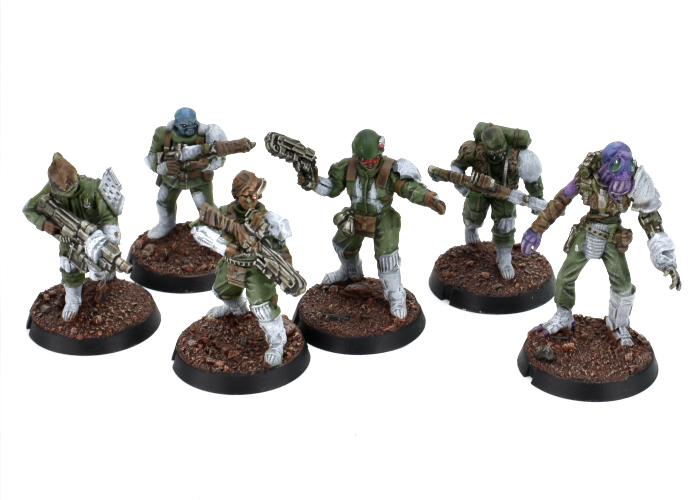
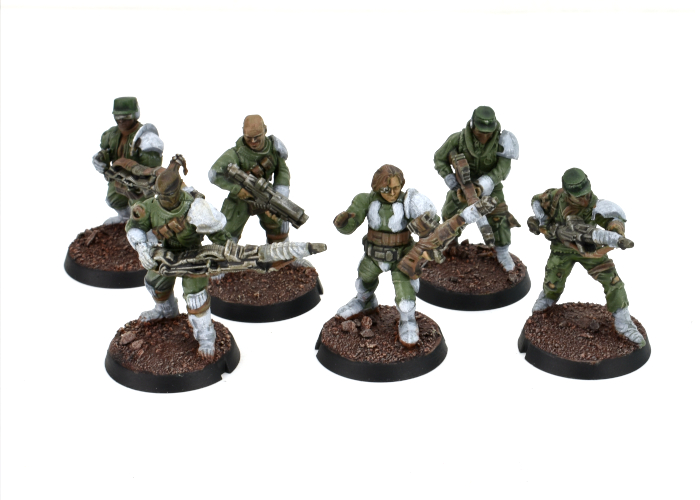
Rabble units make up the core of any Broken force. For my SARA, I wanted to give them a more military look than my Forsaken force, so I mostly stayed away from long coats and robes, and borrowed some extra armour parts from Epirian and Karist kits, and also a few bits and pieces from some Stargrave plastic models for a little extra variet. I also gave all of the models a shoulder pad on their left shoulder, as something to help unify the various assorted models... although in true Broken fashion, these pads are also sourced from a range of different places.
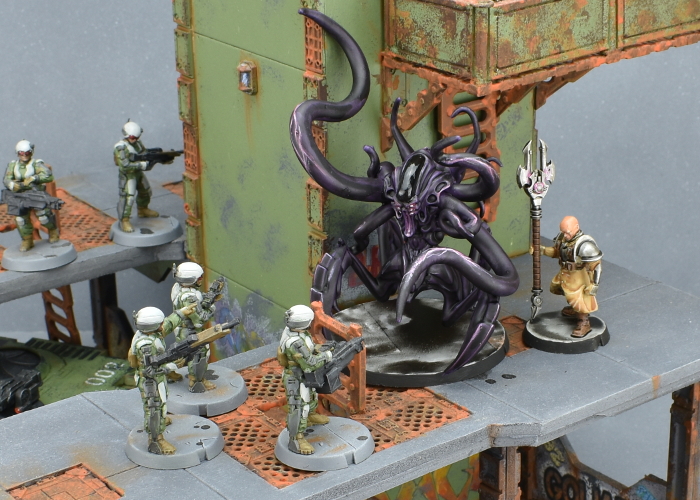
The second Rabble unit is accompanied by a Marsayan Hypnotist, to provide some tentacle-faced disruption to enemy shooting. Units accampanied by a Marsayan are difficult to hit, always counting as a Fleeting target and gaining a dodge against close range attacks.
For a bit of long range coverage, I added a Rabble Fire Support unit with beam longrifles to fill one of my Anvil slots.
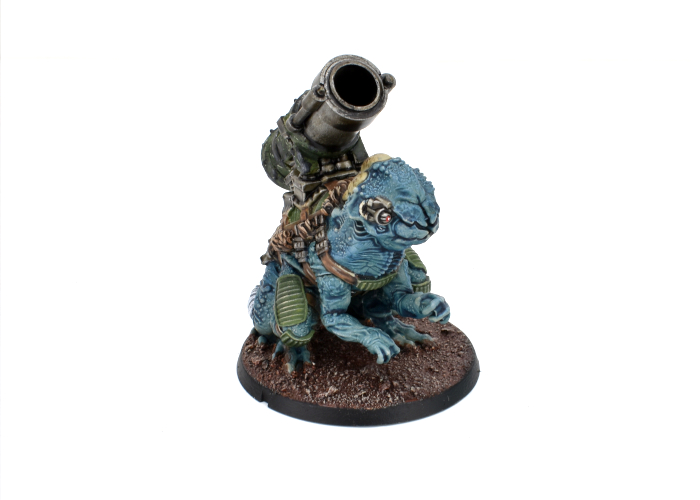
To round things out, I took a Pa'ku for the other Anvil slot, because how can you go past a giant toad with a cannon. The model I've used here is one I converted up for the spotlight article some time ago to count as a 'heavy EMP mortar' instead of the usual quad mortar... but could still be used as just a variant version of the usual gun if I want to keep things official. The Pa'ku's EMP mortar is great for dropping large blasts on enemy formations, although it works best in concert with other Pa'ku due to their Coordinated Barrage rule. So I'll probably look at painting up a second Pa'ku with the second detachment, potentially retrofitting it back into this detachment with the Multi-Unit Selection rule allowing both of them to count as a single Anvil choice.
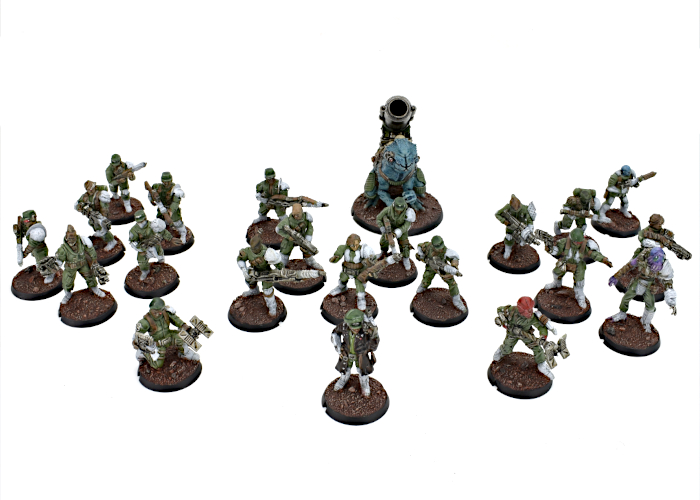
All up, this detachment currently comes in at 67 points, so is just under half of a 'standard' 150 point force. I'll be working on the second detachment as I have time, putting in another Revolutionary Captain, some snipers, and an assault unit featuring a couple of Hakoyu for some up-close-and-personal, pointy doom. In the meantime, I can always use these as a detachment alongside my Forsaken force.
More to come - stay tuned!
To build your own army of revolutionary doom, you can pick up the Broken along with the rest of the Maelstrom's Edge range from the webstore here.
What are you working on? We would love to see your models and terrain in the Comm Guild Facebook group!
For other building ideas, modeling tutorials, army spotlights and conversion walkthroughs, check out the Hobby section of the Maelstrom's Edge website here.
Tags: broken conversion modeling painting sara
Painting Spotlight: Converted Broken Revolutionary Captain
Posted on Monday Aug 16, 2021 at 06:00pm in Tutorials
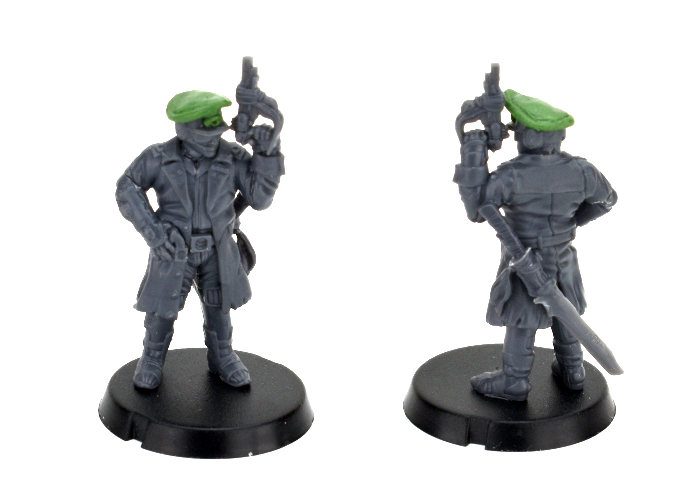
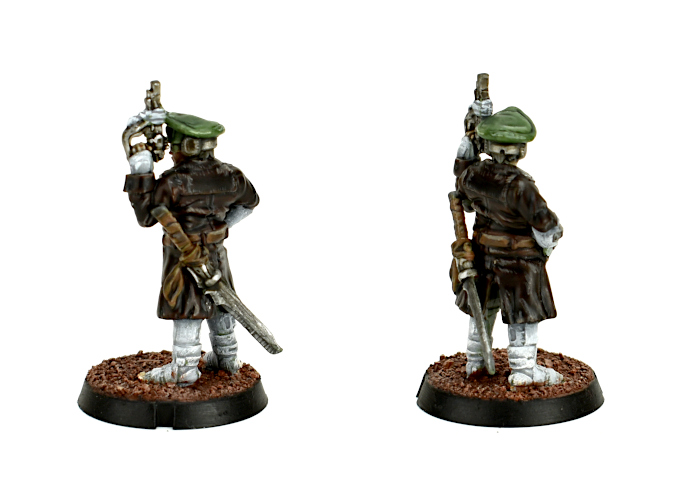
With the release of the Revolutionary Captain and Sniper models for the Broken, I couldn't resist the lure of that new army smell, and so I've been working away to put together a SARA force to sit alongside my existing Forsaken collection. The model I chose to lead the force was one that I showed back in the Conversion Spotlight article when the Revolutionary Captain was released, but this week I finally got some paint on him!
For those who haven't checked out the article linked above, this model was a conversion of the plastic SARA Captain model. The head was taken from an Epirian Contractor, with a hat added using 'green stuff' putty. I also gave him a sword built from a couple of chopped up weapons from the Broken Rabble sprue and a slightly reshaped Karist sword blade taken from the Faction Expansion sprue.
For this force, I chose to go with a colour scheme fairly similar to the Maelstrom's Edge studio model, using a lot of Army Green with white 'techy' bits. To make the Captain stand out a little more from the horde, though, I swapped out the studio model's green coat for a dark brown leather one. This was painted with Scalecolor Bosh Chestnut and several layers of Army Painter Dark Tone, before highlighting with Army Painter Leather Brown with a little Skeleton Bone mixed in.
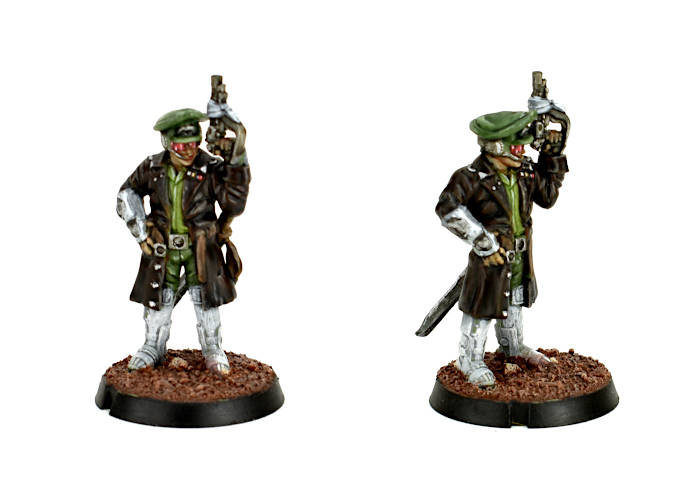
The rest of his uniform is Army Painter Army Green for the pants and hat, and Army Green mixed with Coat D'Arms Putrid Green for the shirt. These were washed with Army Painter Military Shader, and then the hat given two coats of Green Tone, before it was all highlighted with some more Putrid Green and Army Green mix. The metal was painted with Army Painter Plate Mail Metal and washed with Dark Tone and Strong Tone, with a Shining Silver highlight, while the white parts were given a coat of Army Painter Uniform Grey and then a heavy drybrush of white. It's a little rough up close, but quick and easy and looks suitably beaten up on the table!
The next job is to finish up the painting on the rest of his detachment, and then start on a second detachment so that I can work in a sniper or two!
To build your own army of revolutionary doom, you can pick up the Revolutionary Captain along with the rest of the Maelstrom's Edge range from the webstore here.
What are you working on? We would love to see your models and terrain in the Comm Guild Facebook group!
For other building ideas, modeling tutorials, army spotlights and conversion walkthroughs, check out the Hobby section of the Maelstrom's Edge website here.
Tags: broken conversion model painting sara
Painting Spotlight: Mature Angel Conversion
Posted on Monday Nov 23, 2020 at 05:00pm in Tutorials
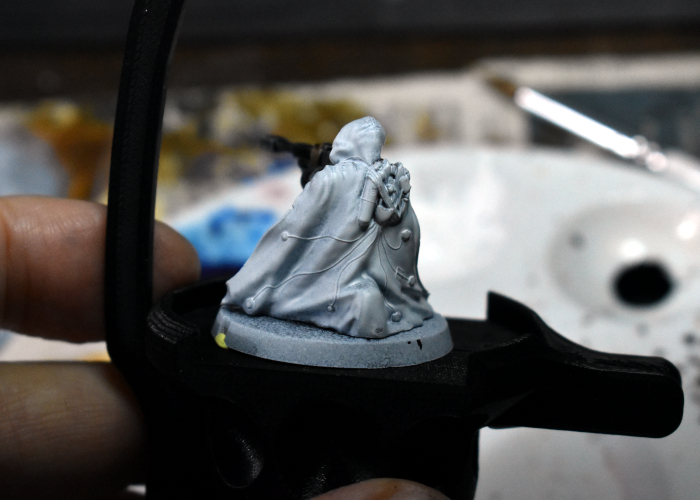
Last week, I added another Hobby Basics article to the Maelstrom's Edge website, covering some general information and quick tips for working with modeling putty. As part of that article, I wound up converting up a Karist Angel with more tentacles than is generally considered safe, and I couldn't resist taking the time this week to slap some paint on it. I've painted up a few different angels in the past, playing with different techniques each time to create a suitably inky-black and cybel-purple alien appearance for them. For this one, I decided to try something new once again, and broke out the Army Painter paints for a quick experiment. Here's a quick walkthrough of the painting process!
Before we get the paint on, here's a proper look at the converted model. It's based on the plastic Mature Angel kit, but with the claw arms modified slightly to form crab-like legs, and lots of tentacles added with 'green stuff' modeling putty.
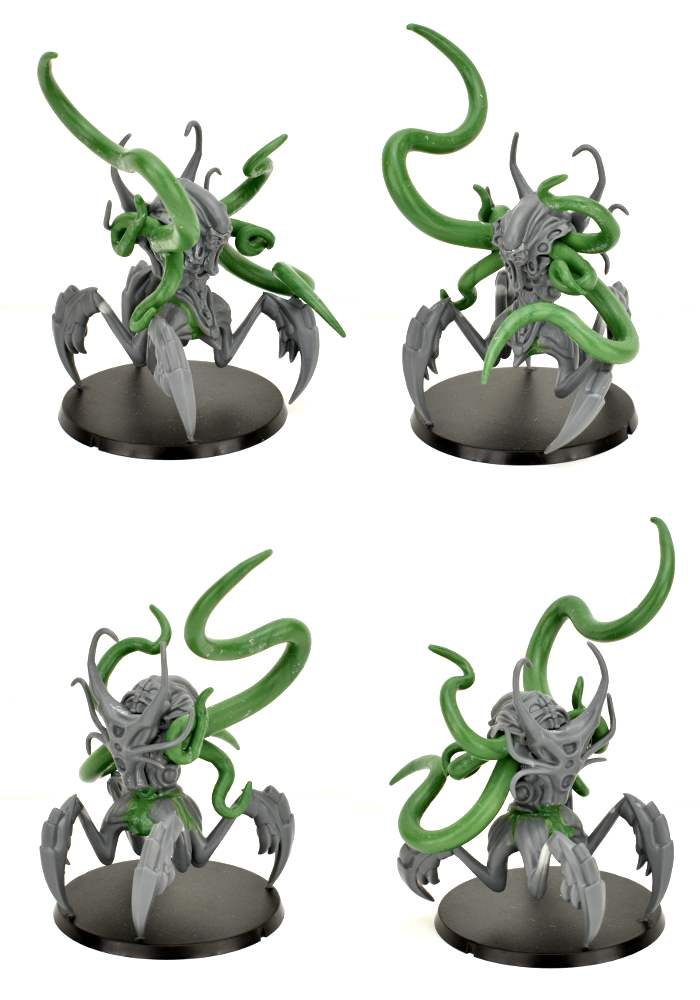
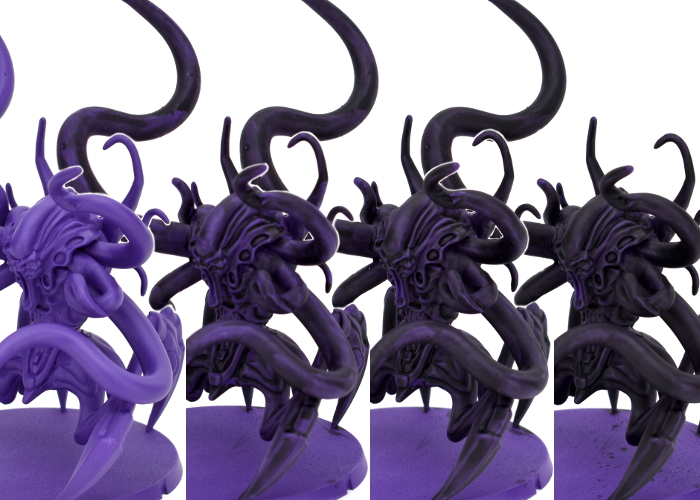
I gave the model an initial basecoat with white, to get a consistent colour for the next steps. Over that, I used Army Painter Alien Purple. Then, grabbing a nice, big brush, I painted three coats of Dark Tone over the entire model, leaving it to dry between each. This darkened everything up to an almost-black, while leaving hints of purple showing through.
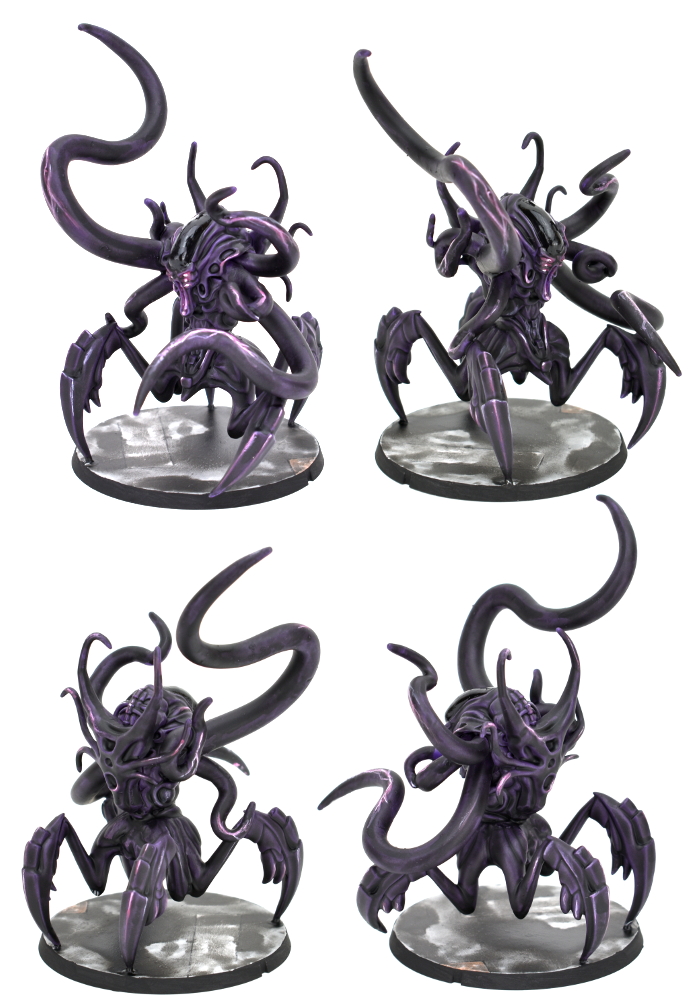
I then used a mix of Wasteland Soil, Warlock Purple and white to add highlights. I didn't highlight everywhere, as I didn't want to brighten the model up too much, and wanted the details to be slightly shadowy to accentuate the fluid nature of the Angel's body. I just added the highlights in places where they would add a little 'snap' to the model, accentuating specific features. I also painted in some lightning-like effects on the larger flat areas, to show the cybel energy coursing through the Angel's void gel, and painted the smooth top of the angel's head with black, and then a coat of gloss varnish. The base was painted similarly to my Greatcoat Karist Trooper kitbash, using Ash Grey and a generous layer of Dark Tone.
To paint up your own squidgy alien of tentacled doom, you can pick up the Mature Angel kit along with the rest of the Maelstrom's Edge range from the webstore here.
What are you working on? We would love to see your models and terrain in the Comm Guild Facebook group!
For other building ideas, modeling tutorials, army spotlights and conversion walkthroughs, check out the Hobby section of the Maelstrom's Edge website here.
Kitbash Spotlight: Greatcoat Karists!
Posted on Monday Nov 09, 2020 at 05:00pm in Tutorials
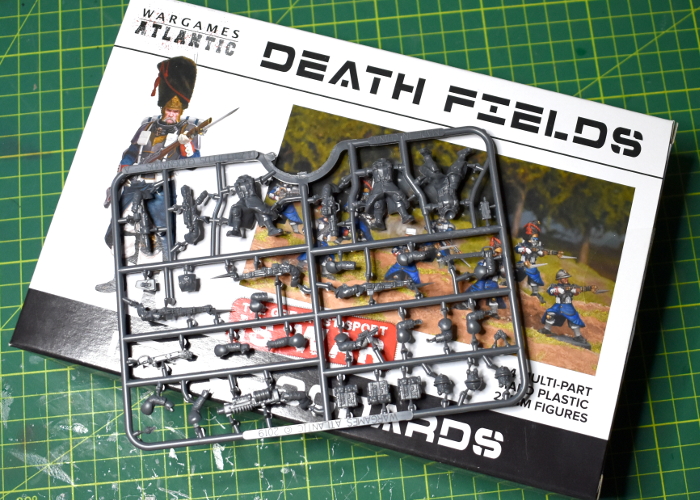
A couple of weeks ago, I shared a kitbash of some Trogyl Scouts - alien hunters based on the Wargames Atlantic 'Einherjar' (space dwarves) kit with alien heads from the Maelstrom's Edge Broken plastics. Well, this week I threw together another unholy fusion of Wargames Atlantic and MEdge kits, to create some Karist troopers in greatcoats!
When I bought the Einherjar kit, I couldn't resist also picking up a box of 'Les Grognards'. This is a plastic kit that comes with a slew of different heads to allow you to create a number of different, laser-gun-toting, sci-fi soldier regiments. It also includes the aforementioned laser guns, and a range of heavy weapons, but I wasn't really interested in those here.
As with the Trogyl, assembly was fairly straightforward, using bodies from Les Grognards, and heads and arms from the Maelstrom's Edge Karist Trooper kit. The heads for the Grognards only have short, stubby neck attachments, so I used a drill to enlarge the neck cavities to accommodate the Karist heads.
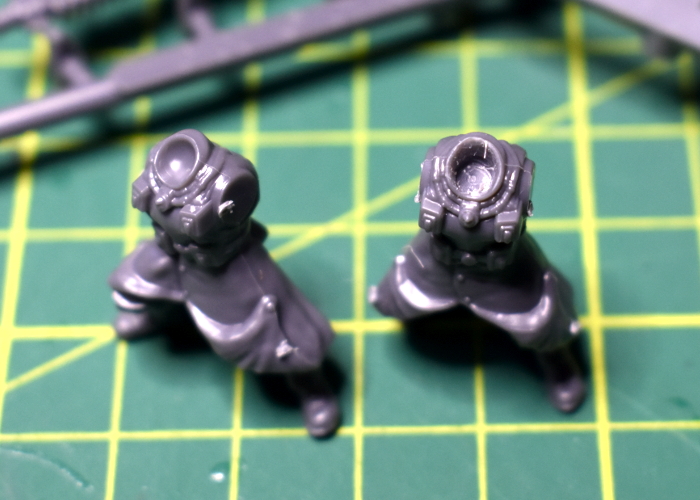
From there, it was just a matter of gluing everything in place. The torsos match Karist Trooper bodies in width, so the arms went on with no argument.
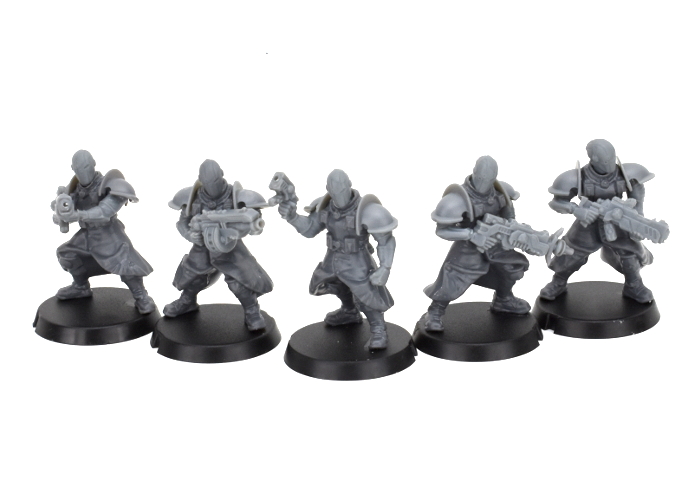
Regular readers of my articles will no doubt have noticed that I tend to use whatever paints I have on hand, but just for something different I thought I'd try sticking to a single brand, and painted these up using Army Painter paints exclusively. I started with a basecoat of Skeleton Bone spray, and then went over the armour plates and weapons with Plate Mail Metal, and the boots, belts and webbing with Leather Brown. Over that, I applied a wash of Light Tone to the bone areas, and Dark Tone everywhere else.
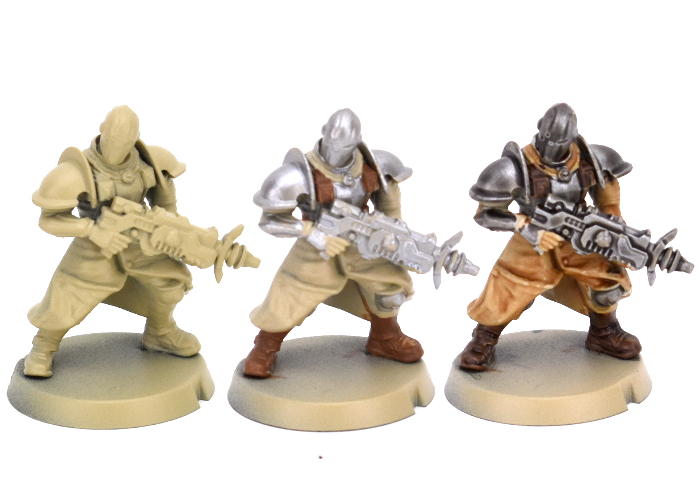
To finish up, I added some highlights to the coat and leather using some more Skeleton Bone, and picked out eye lenses and weapon energy blisters using Warlock Purple and white. The bases were painted with Ash Grey, and then given a generous wash of Dark Tone before I painted the edges with black.

Not content with basic troopers, I also had a tinker with the Faction Expansion sprue to make a greatcoat-clad Praetorian, and also plundered a Shadow Walker sprue to add in some teleporty, assassiny backup!
Now I'll have to see about expanding this little starter force into something table-ready!
Put together your own Karist force of zealoty doom by picking up the plastic Trooper kit, along with the rest of the Maelstrom's Edge range from the webstore here.
Then pop on over to the Comm Guild Facebook group to show us what you're working on!
For other building ideas, modeling tutorials, army spotlights and conversion walkthroughs, check out the Hobby section of the Maelstrom's Edge website here.
Tags: conversion karists kitbash modeling painting spotlight walkthrough
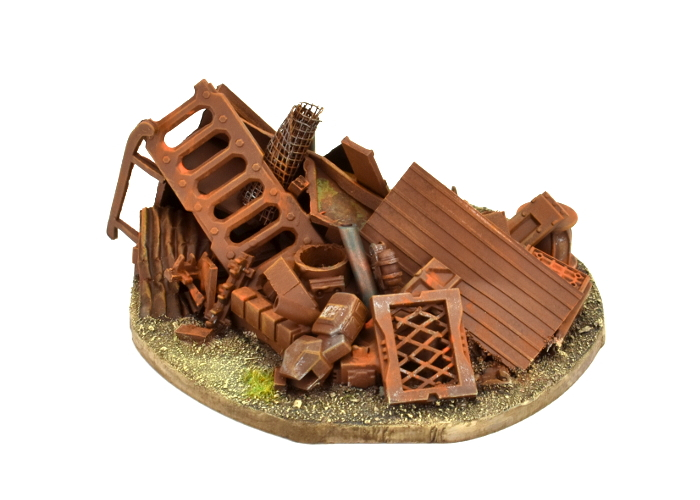
Terrain Spotlight: Junkyard!
Posted on Monday Oct 19, 2020 at 05:00pm in Tutorials
When you do a lot of conversion work on models or terrain, you tend to accumulate an ever-growing collection of discarded remnants - model or terrain components that have been cut up to use specific parts or them, leftover parts from different kits, random off-cuts of plasticard or cardboard, and other odd bits and pieces collected because they were interesting. Unless you have bottomless storage, it's handy to clean these out from time to time. Since I hate throwing anything away, however, I wanted a way to make use of these parts that I otherwise might not have an immediate project for. And so, I decided to make some junkyard terrain!
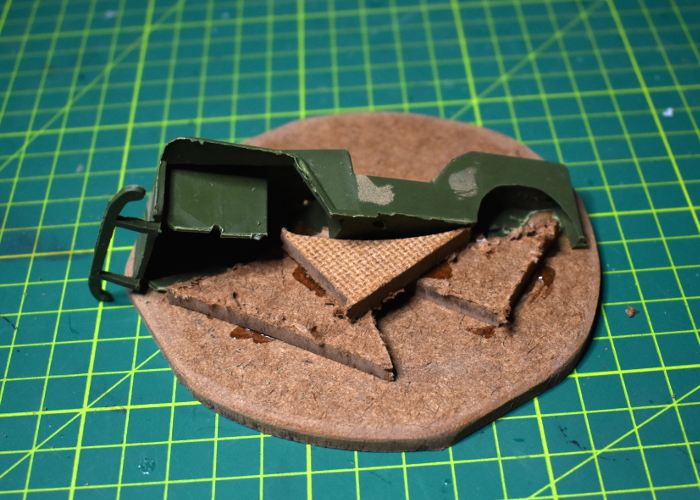
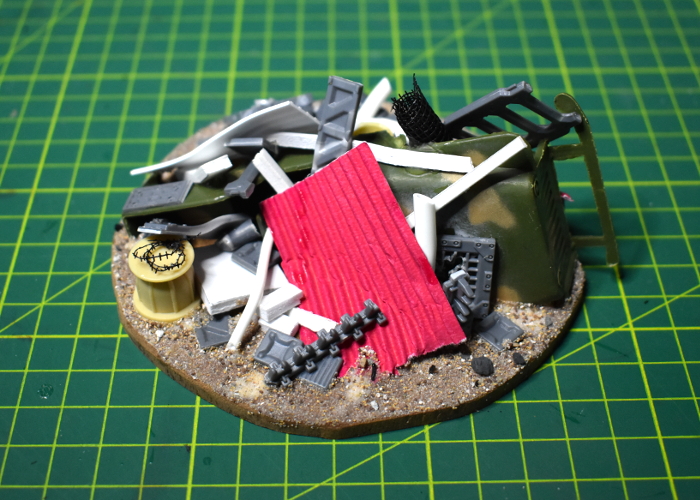
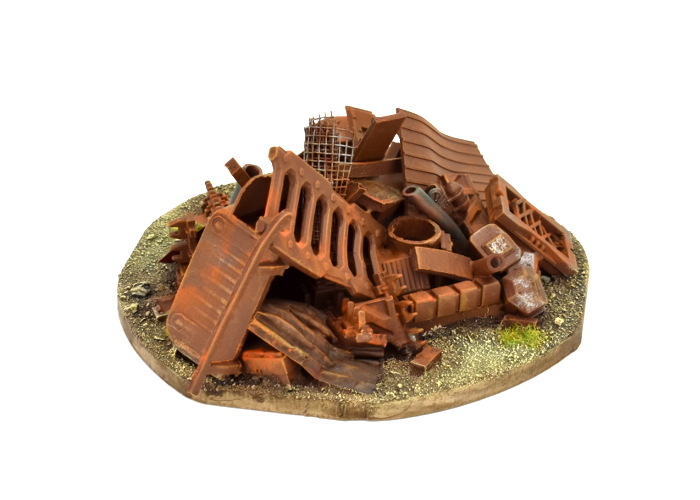
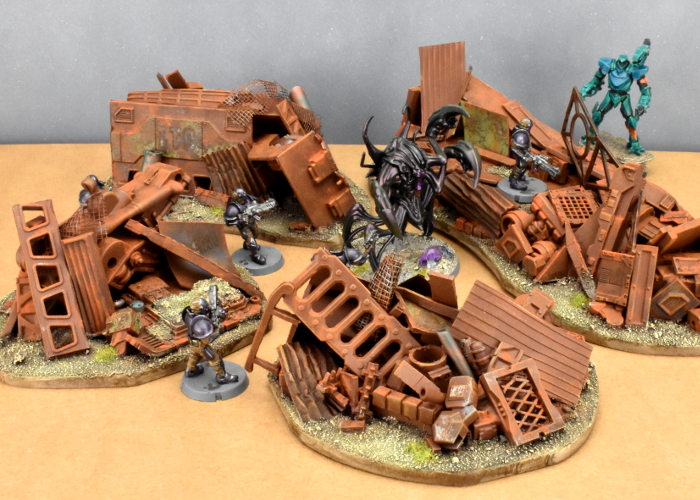
I wanted junk piles that would, at least in part, completely obscure human-sized models, so needed a bit of bulk to get started. For this purpose, I used some military vehicles from my daughters' toy soldier collection that had broken parts that couldn't be easily fixed. Cutting these more or less in half diagonally provided some interesting shapes to build on, and also doubled the number of terrain pieces I could potentially make from them!
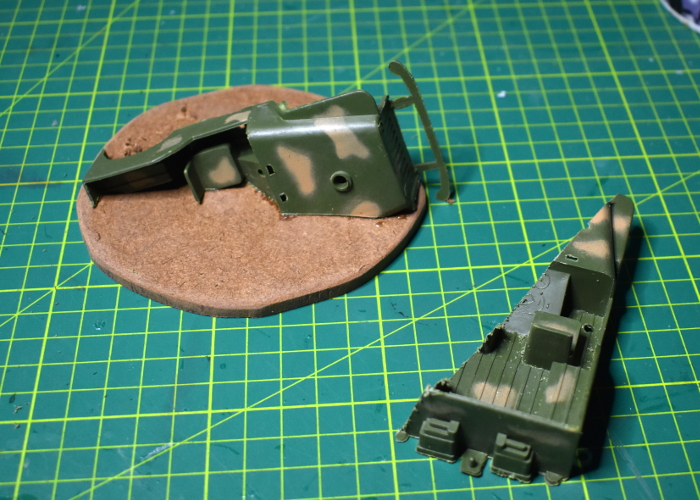
The vehicle parts were glued down onto some irregular pieces of hardboard, using Power Grip (a 'glue anything to anything else' sort of glue). I used some small hardboard off-cuts to add a little more bulk as well.
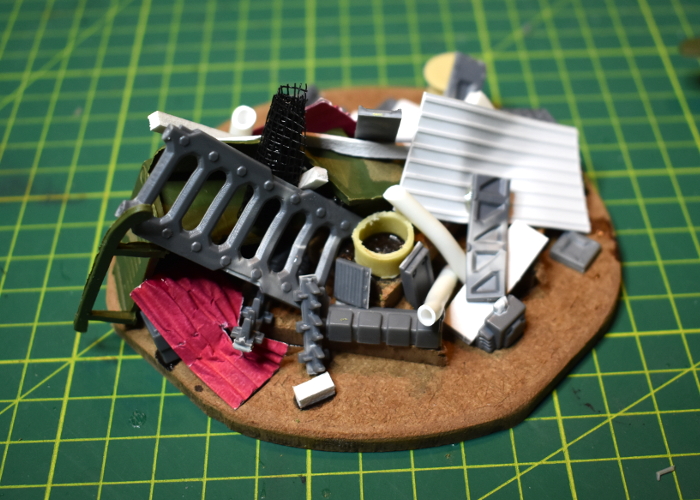
From there, it was simply a matter of grabbing interesting bits of this and that and gluing them on wherever seemed appropriate. As mentioned above, this included model and terrain parts, in some case chopped up a bit, bent, or otherwise cut or dented up in places to make them look more junk-worthy, and also whatever other scraps of building materials I had to hand, including plasticard, foamed PVC, plastic tubing, corrugated cardboard, flyscreen, and a few other odds and ends.
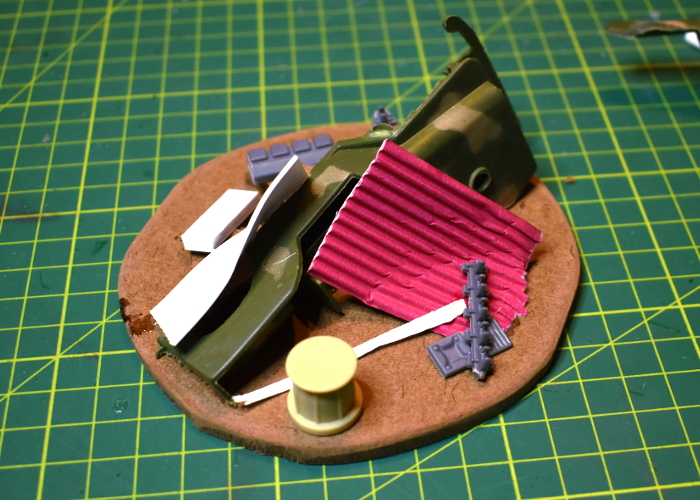
I kept piling up bits until I was happy with the amount of detail and cover on the base.

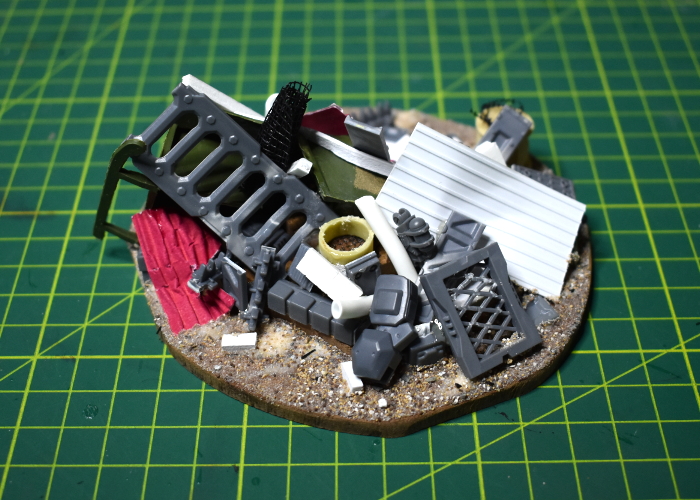
To finish up, I glued on some light gravel and sand mix anywhere on the hardboard where there was empty space.
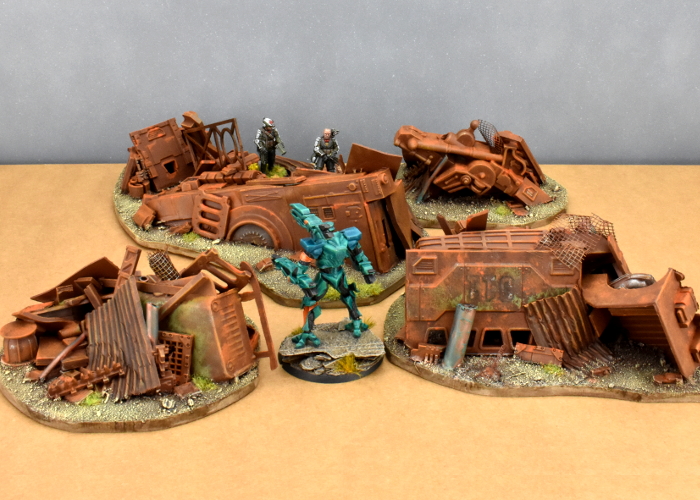
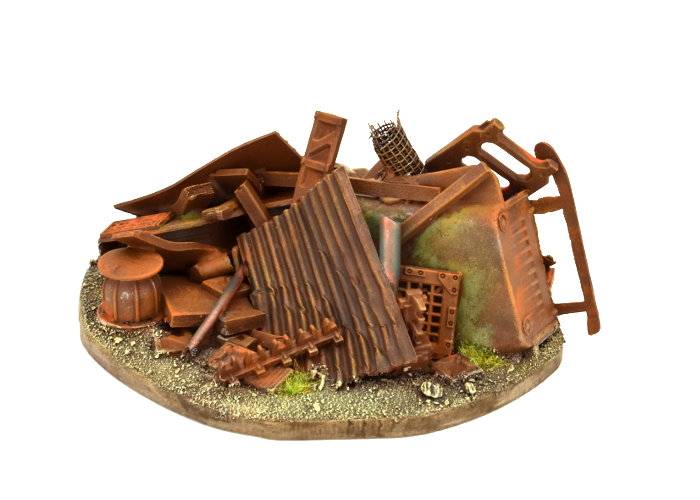
That just left painting. There were a few different potential ways to go here: painting everything up as heavily rusted and old, making it a newer junkyard with lots of shinier metal and painted parts, or something in between. To help disguise the mix of different building materials used, I decided on the first option.
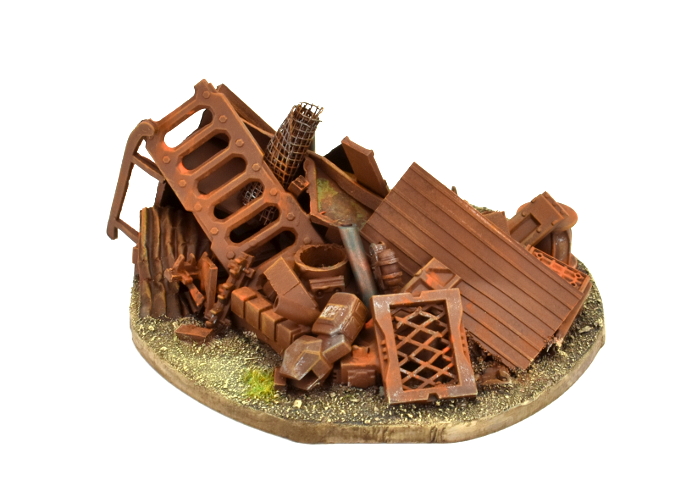
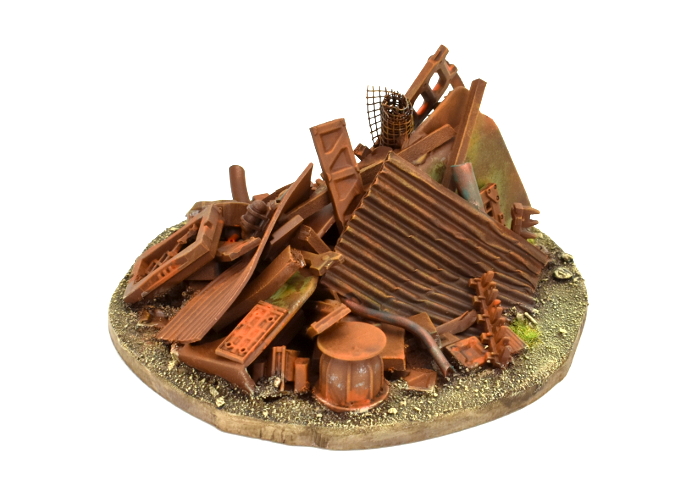
For the most part, I used the same rusted metal technique as for my shanty buildings and elsewhere. Some panels have some weathered paintwork still showing, and I couldn't resist adding in some aged copper pipes for a little extra colour, using the same method as in my copper tutorial. The gravel around the junk was painted in the same style as I used for my crystal outcrops, to provide some contrast to the rusty metal.
To get in some terrain action of your own, you can pick up the Maelstrom's Edge terrain sprues along with the rest of the model range from the webstore here.
For other building ideas, modeling tutorials, army spotlights and conversion walkthroughs, check out the Hobby section of the Maelstrom's Edge website here.
What are you working on? We would love to see your models and terrain in the Comm Guild Facebook group!
Tags: conversion modeling painting spotlight terrain terrainsprue tutorial walkthrough