Entries tagged [modeling]
Model Spotlight - The Kaigus Pact Troops Sprue!
Posted on Wednesday Oct 15, 2025 at 05:00pm in The Kaigus Pact
 - by Iain Wilson
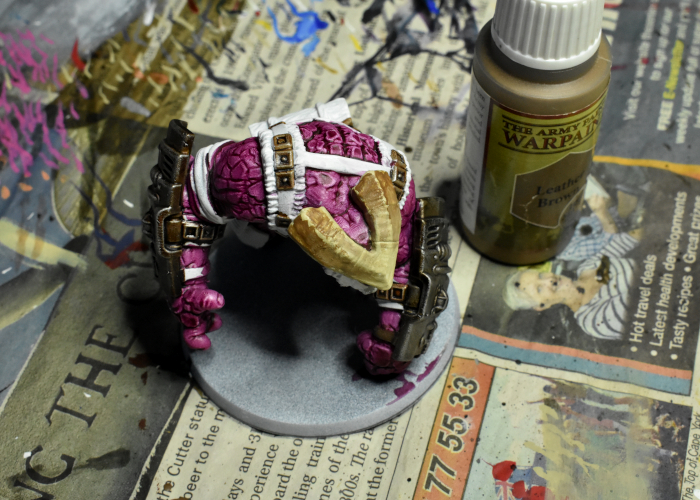
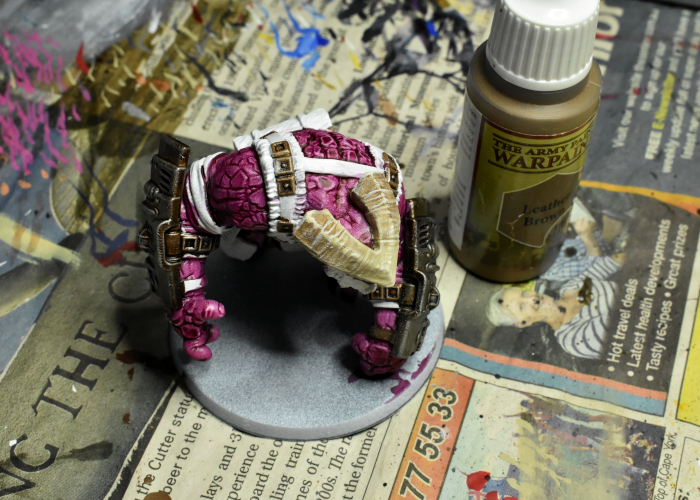
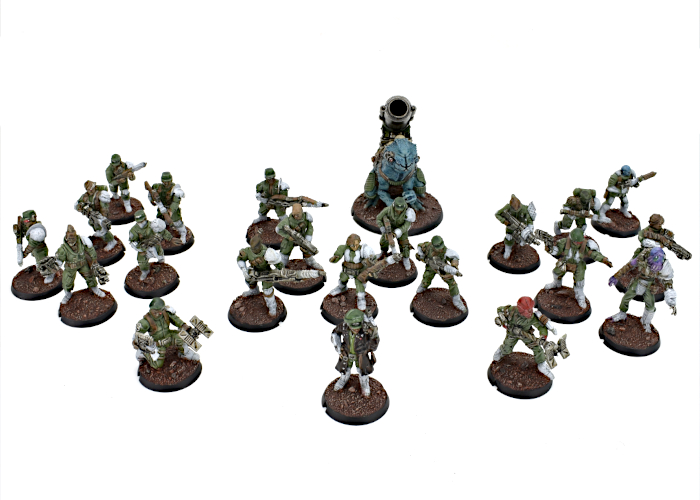
The arrival of the Maelstrom's Edge V2 rulebook was accompanied by the addition of an all new faction to the game - the Kaigus Pact! We're all very excited about them as the Kaigus Pact are very different to the other models we've released so far, with their alien appearance and organic approach to technology. This week, I thought I'd take a closer look at one of the new plastic kits - the Kaigus Pact Troops sprue.
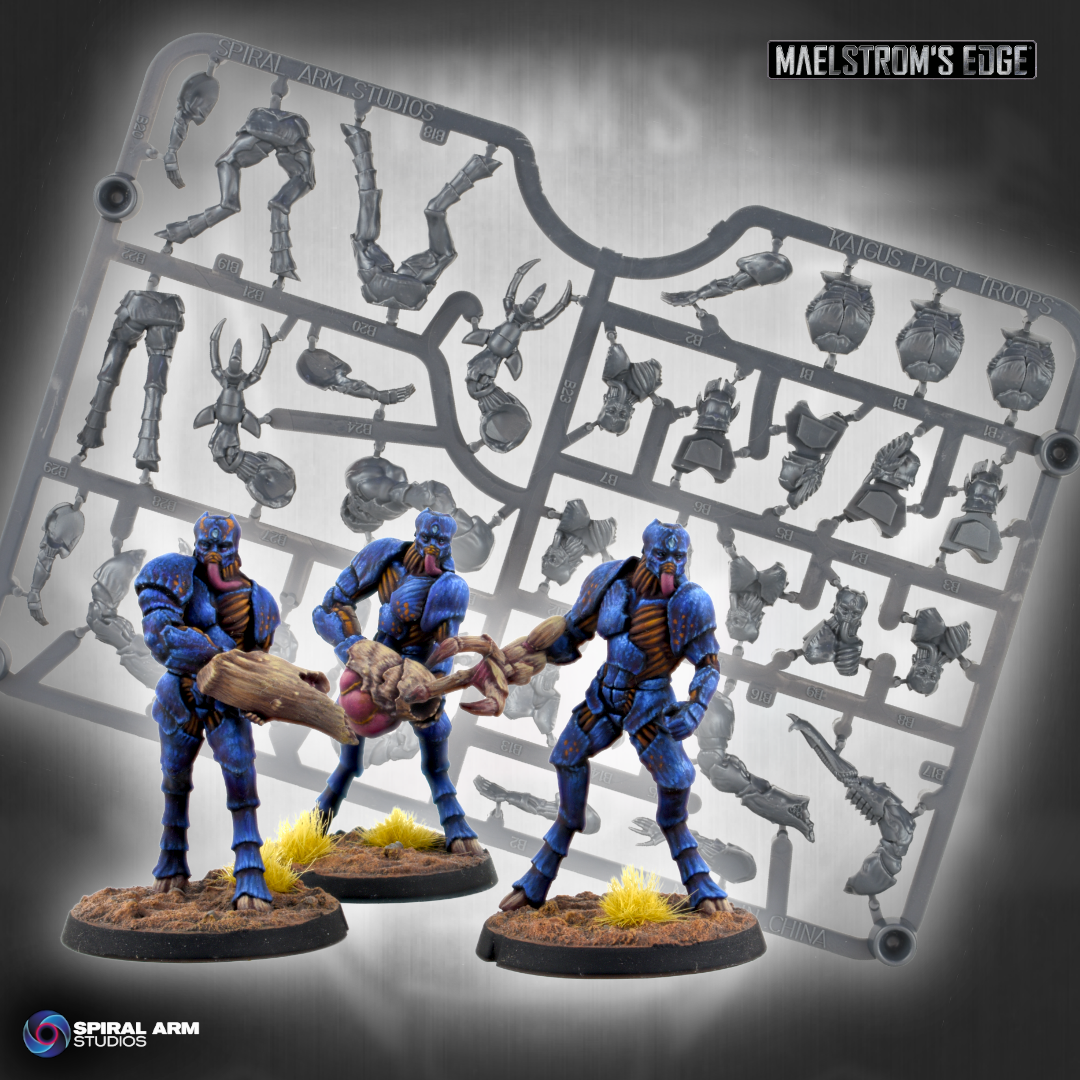
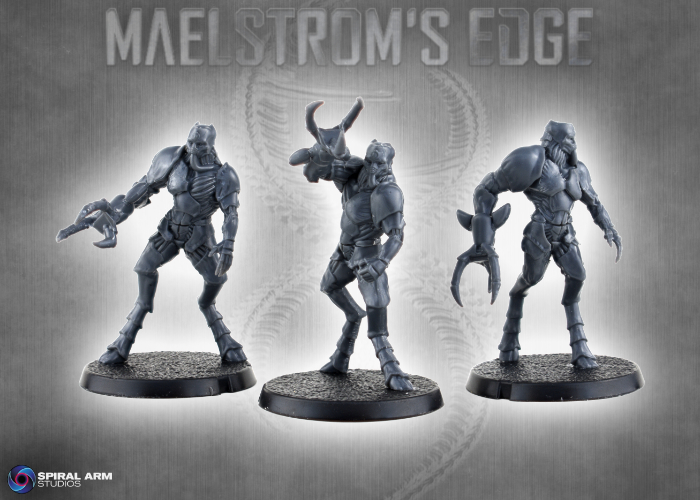
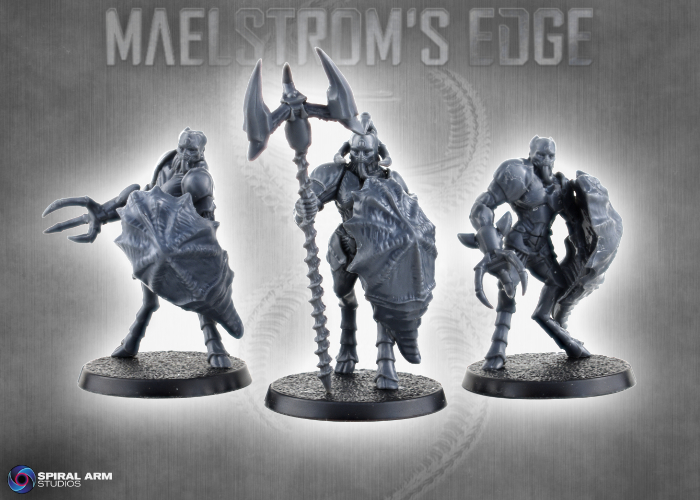
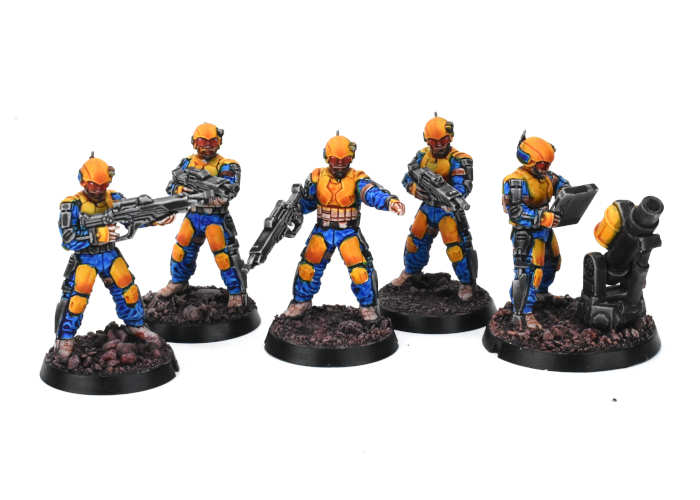
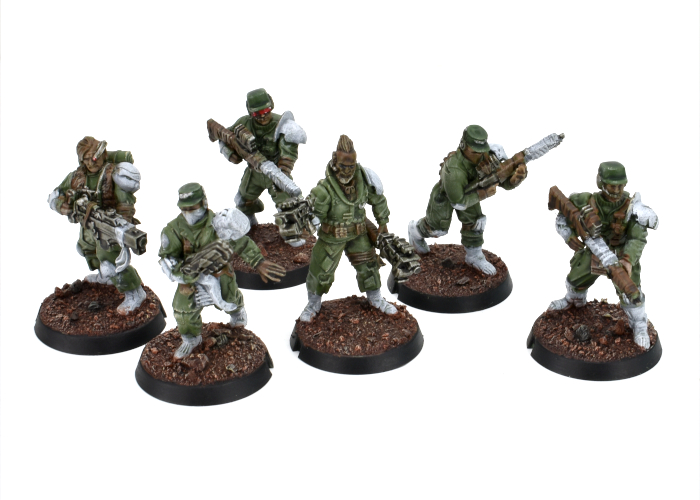
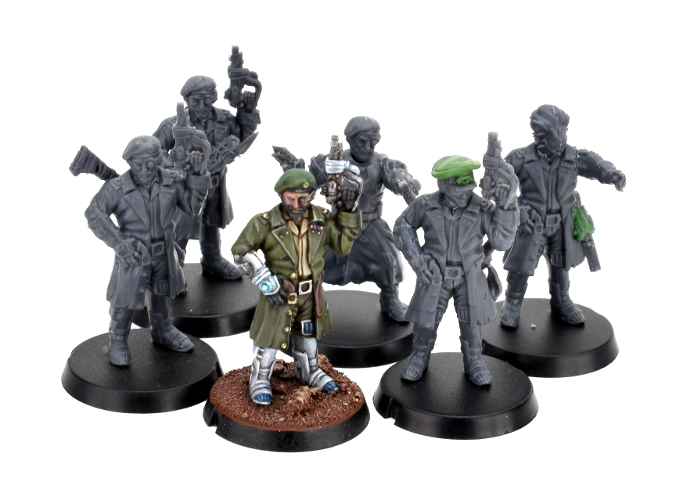
The troops sprue is one of a number of plastic sprues that we created for the Kaigus Pact launch, building three bioengineered warriors.

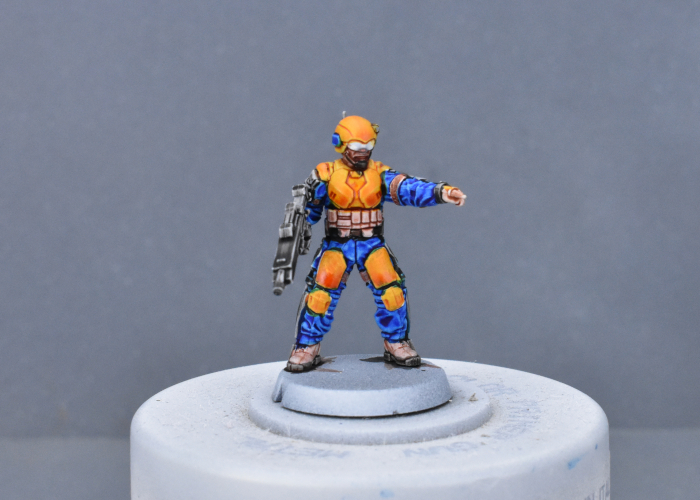
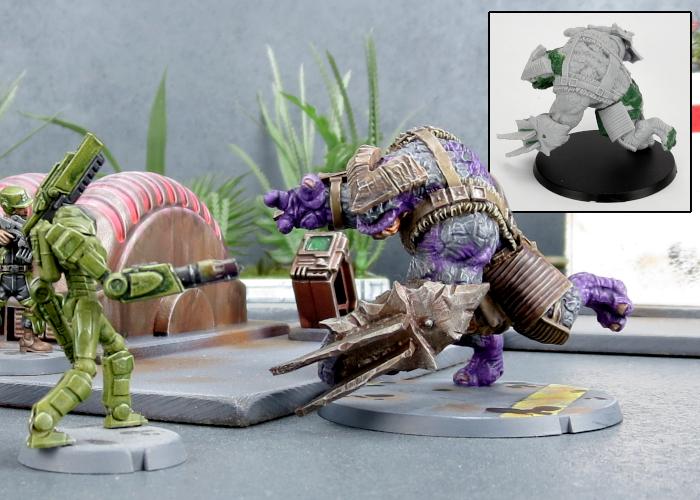
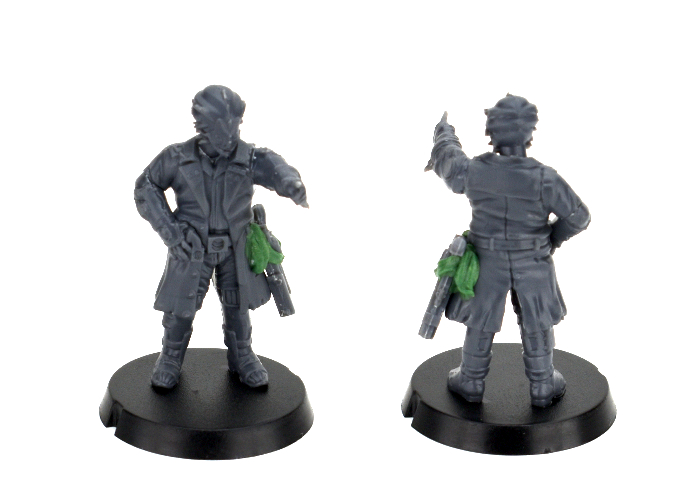
The Kaigus Pact Troops sprue, sculpted by Kevin Johnson.
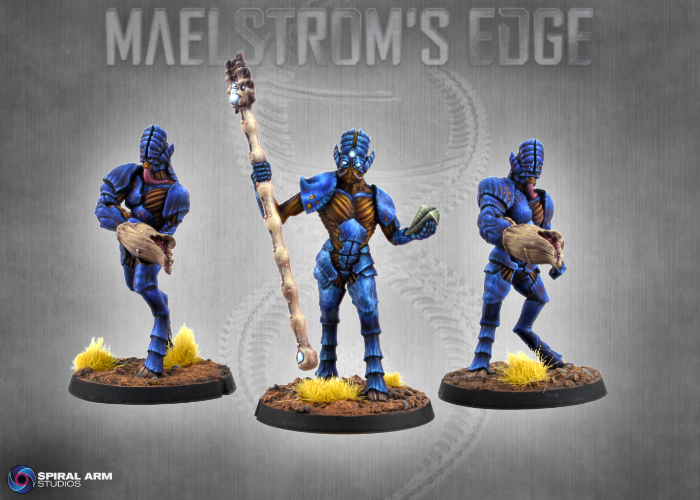
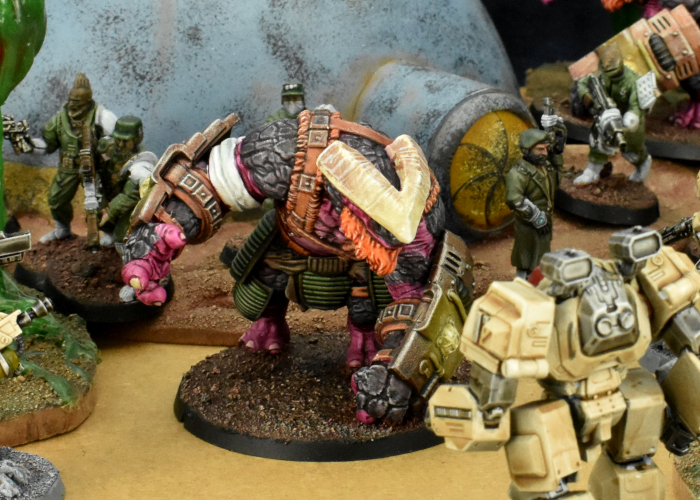
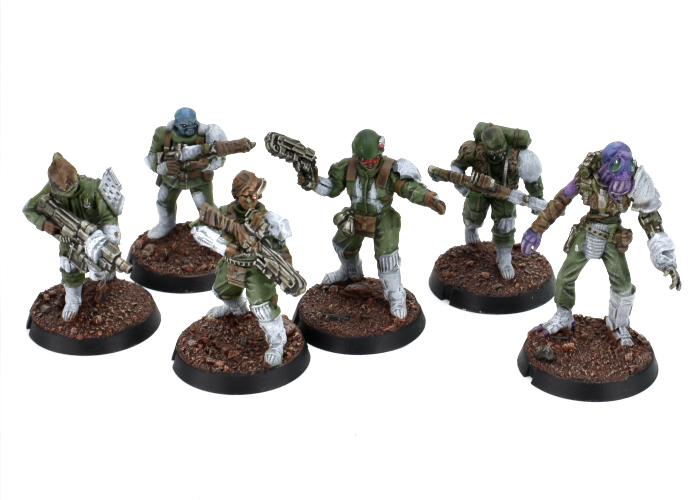
Kaigus Pact soldiers, known as Muharis, generally take to the field armed with organic weapons called Dart Hosts. These are bioengineered crustacean-like organisms that clamp over the Muharis' weapon arm and, as their name suggests, spit lethal darts with the same force as a more normal firearm. More at home in space, the massive forms of the Muharis are gangly and awkward looking on the ground, their asymmetrical torsos and giant, carapace-clad forms a stark contrast from their human forbears.
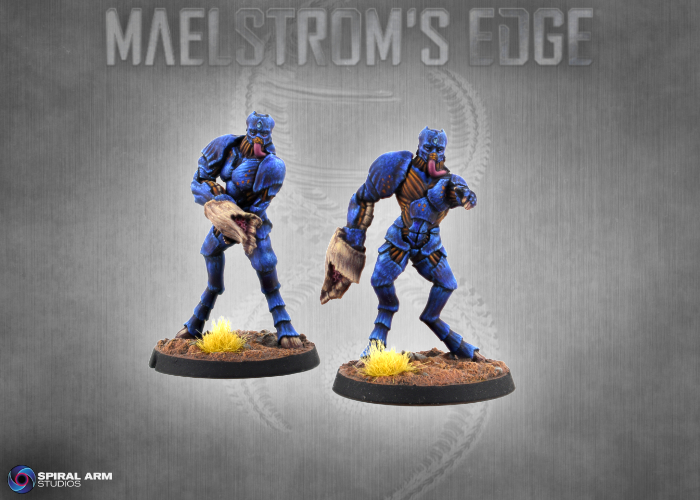
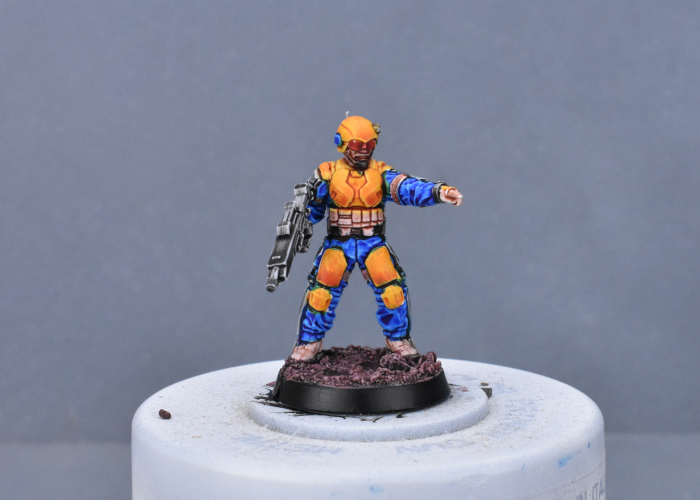
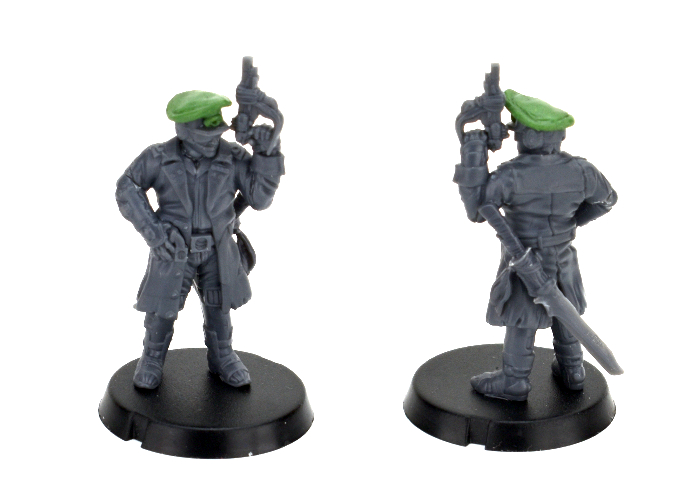
Kaigus Pact Muharis with Dart Hosts, painted by Todd McNeal.
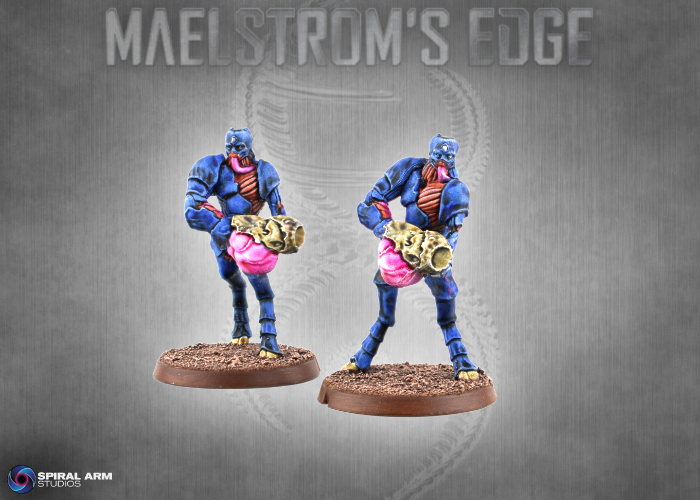
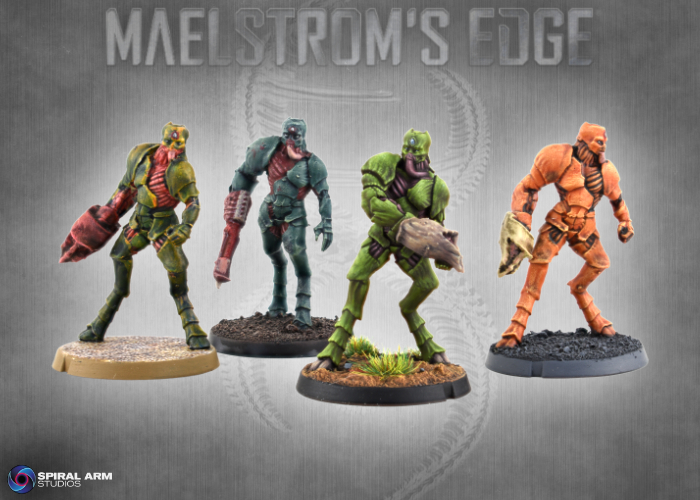
Muharis have access to a number of other lethal weapon symbiotes, including a heavier version of the standard Dart Host, the armor-piercing Spike Rifle and explosive-lobbing Brood Host. When more close-range assaults are called for, Muharis make use of the giant taloned Ripper Claw.
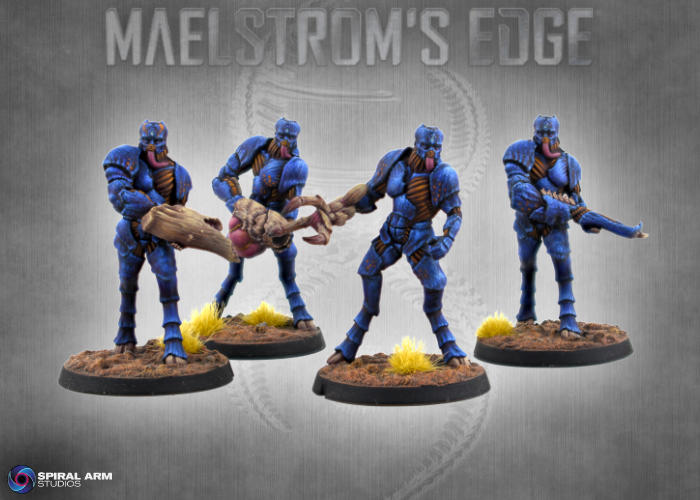
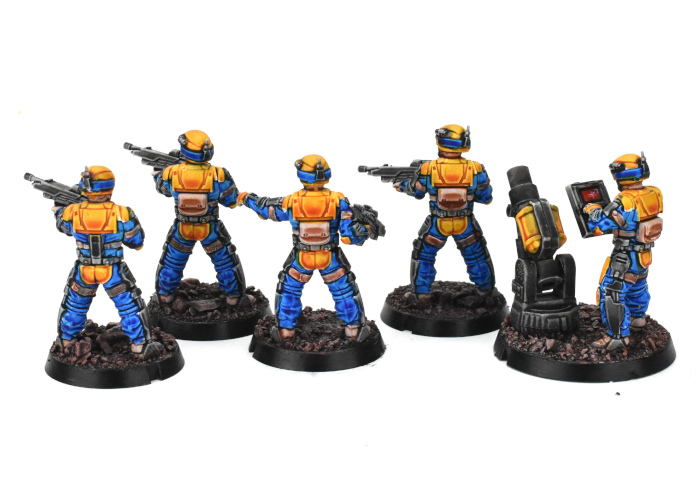
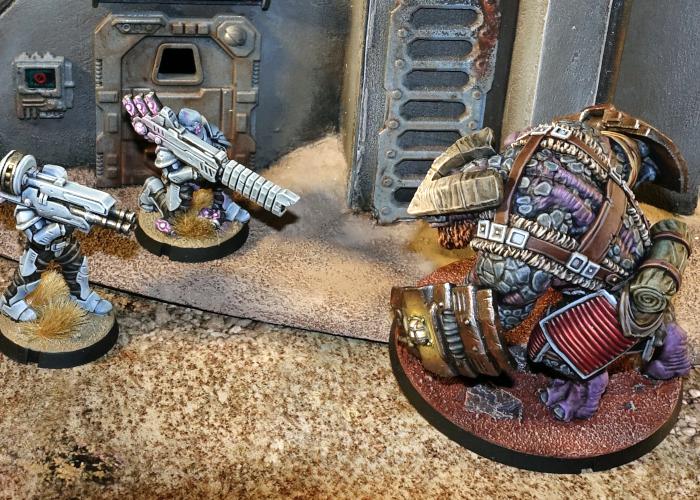
(Left to right) Heavy Dart Host, Brood Launcher, Ripper Claw & Spike Rifle, painted by Todd McNeal.
Regular Muharis Sentinel units have more limited access to these, while Sentinel Strongpoint units provide battlefield support with access to multiple heavier weapons.
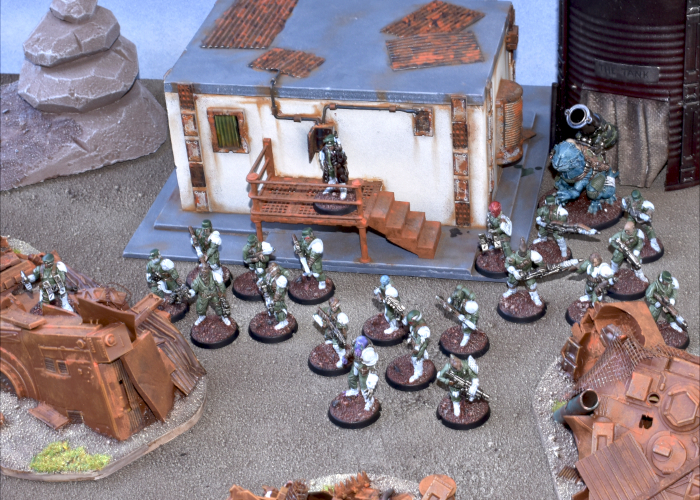
Sentinel Strongpoint unit with Brood Launchers, painted by Iain Wilson.
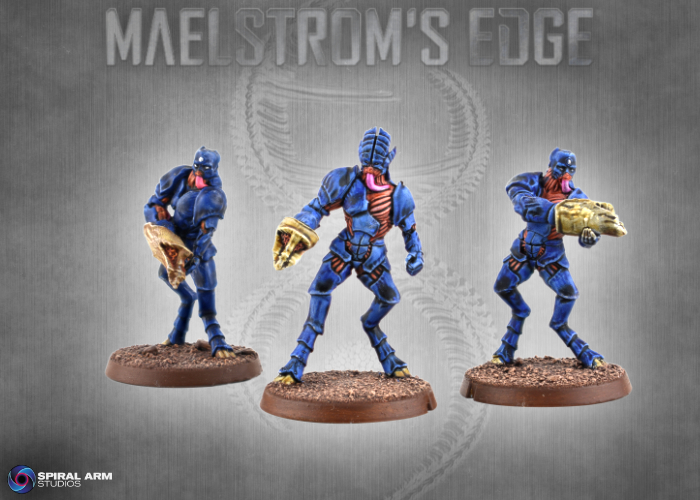
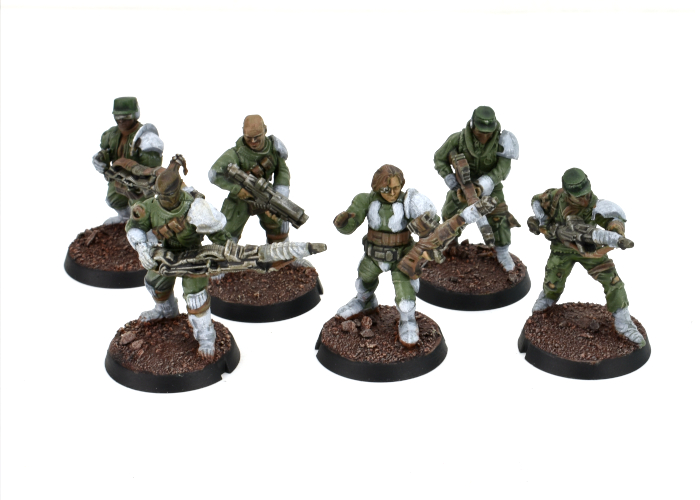
The troops sprue also allows you to build Biologis troops. more specialised than the Muharis soldiers, Biologis Attendants carry a shorter ranged but poisoned version of the Dart Host. The parts from the troops sprue can also be combined with the Proctat Upgrade sprue to build a Biologis Proctat, a Genostaff-equipped squad leader upgrade for Attendant units.
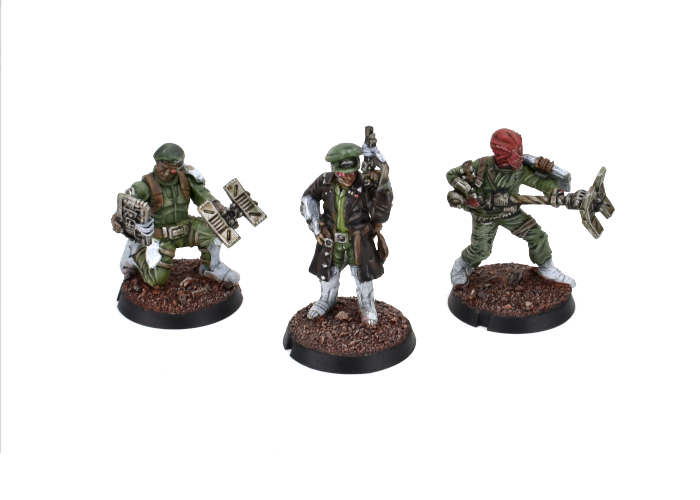
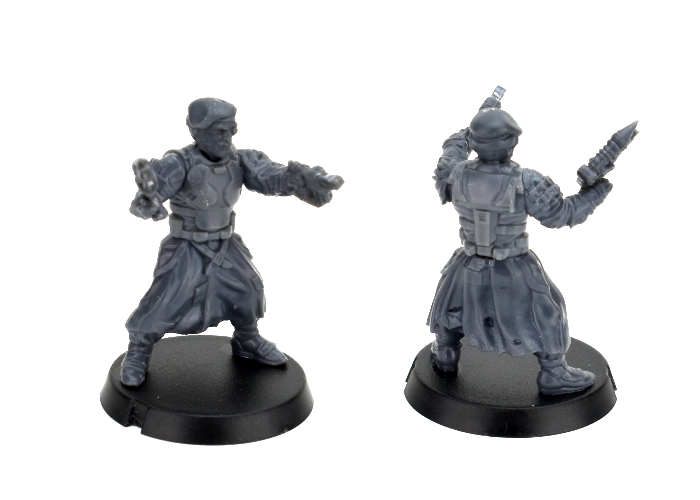
A Biologis Attendant unit, painted by Todd McNeal.
Biologis Adepts also serve as leaders in some Muharis Sentinel units, providing them the ability to spawn Thrall units on the battlefield.
A Muharis Sentinel unit with attached Biologis Adept, painted by Iain Wilson.
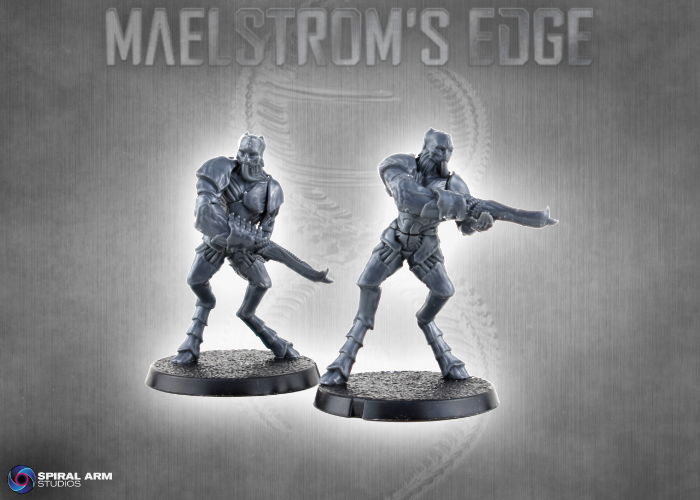
Because of the unique design of their armour and equipment, the Kaigus Pact troops are not quite as modular as some of our other plastic kits. The most notable difference is in the heads, which we couldn't separate at the neck as we usually do. Instead, the sprue provides a number of different torso fronts, so you still get a wide range of posing options by combining different legs and torso fronts.
Muharis with Ripper Claws.
Being plastic, the models are of course easy to chop and change to suit yourself! While weapons are fixes to the arms, again due to their unique design structure and the limitations of plastic tooling, it's easy enough to slice weapons off and switch arms to give yourself some different posing options.
Muharis with Spike Rifles. the model on the left is the standard arm configuration, while the model on the right has had the weapon switched to a different arm, and a left arm from the Proctat Upgrade sprue.
And, of course, if you're like me and enjoy wandering outside the bounds of the 'official' game units, there's nothing stopping you from going to town with these kits and creating your own units!
A unit I'm calling a 'Sentinel Bulwark', equipped with shields taken from the soon-to-be-released Orakan Shield Thrall, and a polearm made from a Proctat staff and Orakan legs!
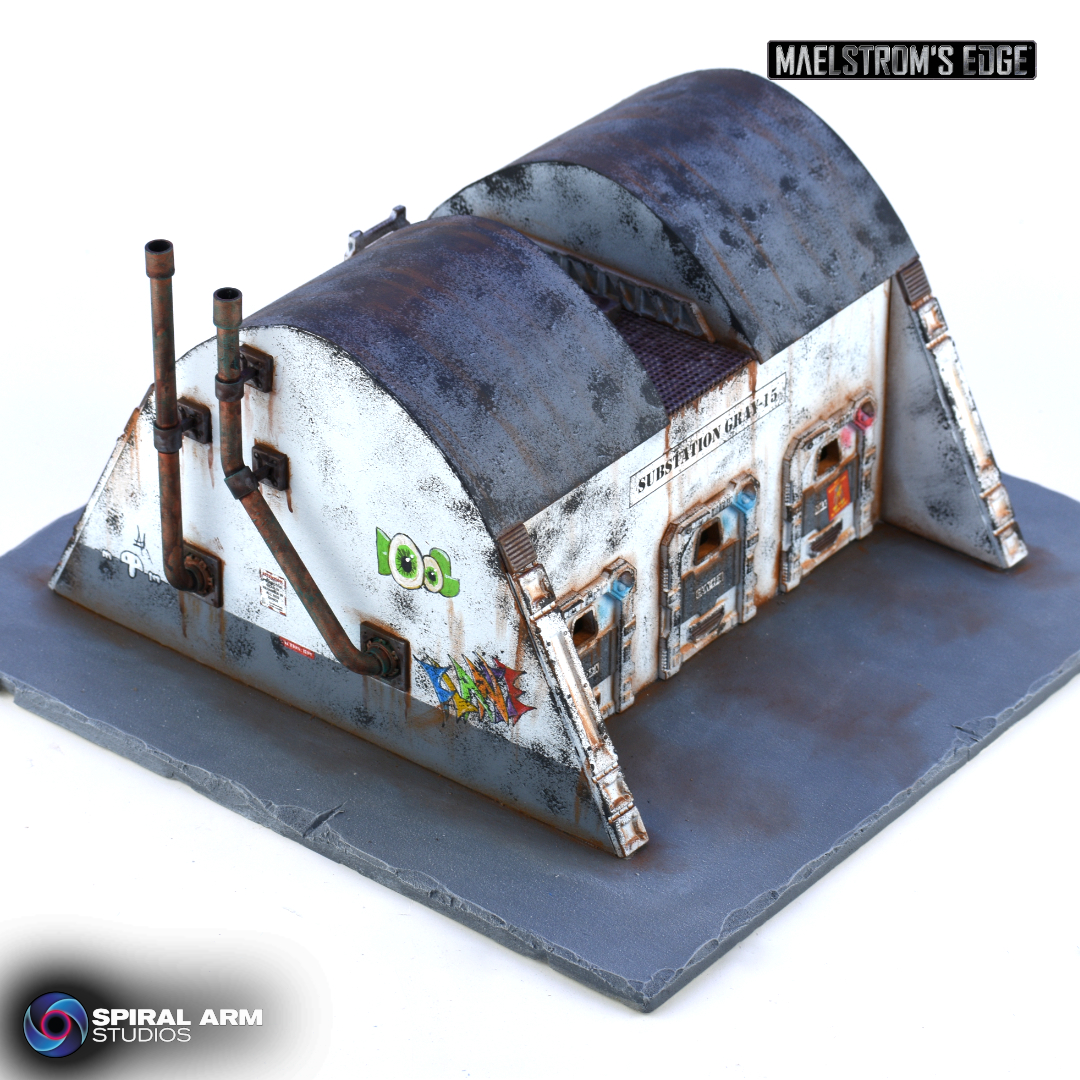
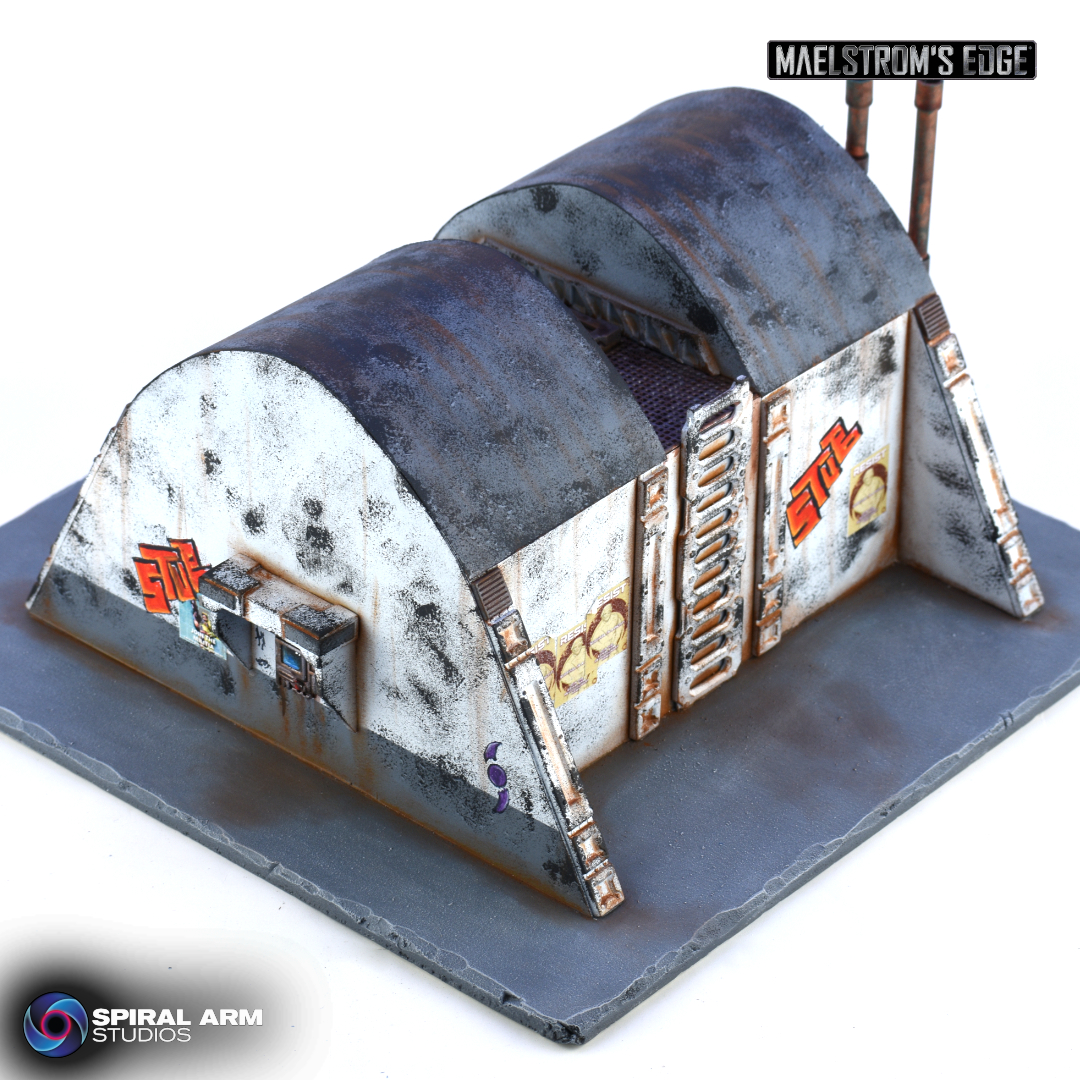
The painted models shown here (both Todd's fantastic studio models and my more table-level versions) are representative of the Koritanii moot, found active in Zycanthus space. The Kaigus Pact models lend themselves to a wide range of organic color-schemes - we recommend looking to sea-dwelling crustaceans for inspiration!
Some alternate Kaigus Pact color schemes.
The Kaigus Pact Troops box is available to buy soon, but in the meantime you can nab the sprue in the Kaigus Pact Starter Force box available now from the Maelstrom's Edge webstore here!
What are you working on? We would love to see your models and terrain in the Comm Guild Facebook group!
For other building ideas, modeling tutorials, army spotlights and conversion walkthroughs, check out the Hobby section of the Maelstrom's Edge website here. And while you're there, grab a copy of the Maelstrom's Edge V2 Beta rules!
Terrain Spotlight: Drone Substation Quick-paint.
Posted on Friday Sept 05, 2025 at 05:00pm in Tutorials
- by Iain Wilson
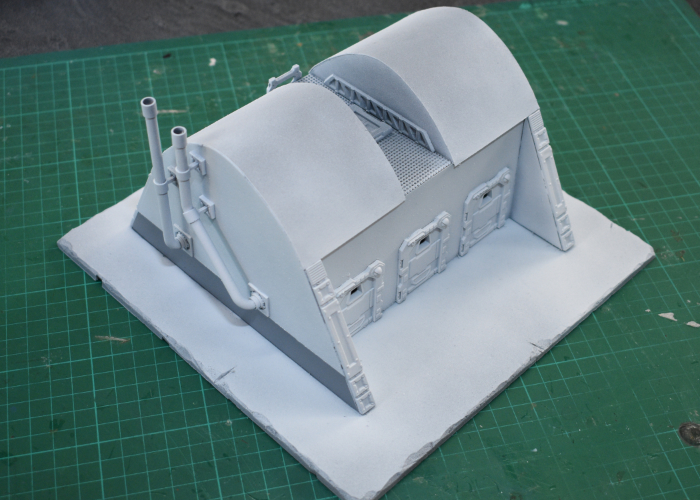
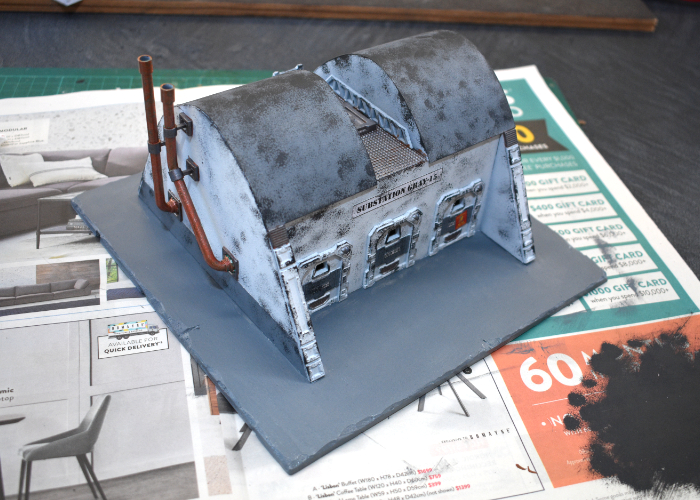
I was rummaging through some storage boxes the other day and came across a building that I had assembled a very long time ago and never got around to finishing. And since it has once again been a little while since I played with terrain, that seemed like as good a reason as any to take some time to get some paint on it!
The building in question was built from foamcore, thin card, and bits from the first Maelstrom's Edge terrain detail sprue, and was made to be somewhat ambiguous as I hadn't decided when I built it what it was actually going to be. For some reason, I had (badly) sprayed it with a slightly watery pale green paint. I obviously had a plan for this when I did it, but I couldn't for the life of me remember what it might have been.
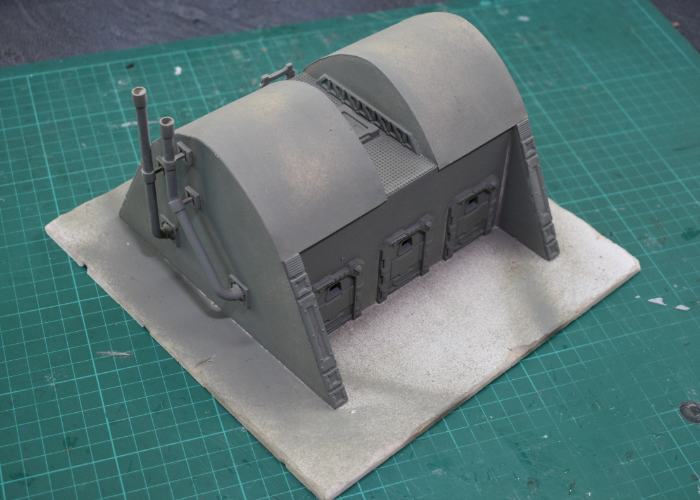
The first step, obviously, was to do something about that dodgy basecoat, so I gave the whole building a good spray with some Army Painter Uniform Grey.
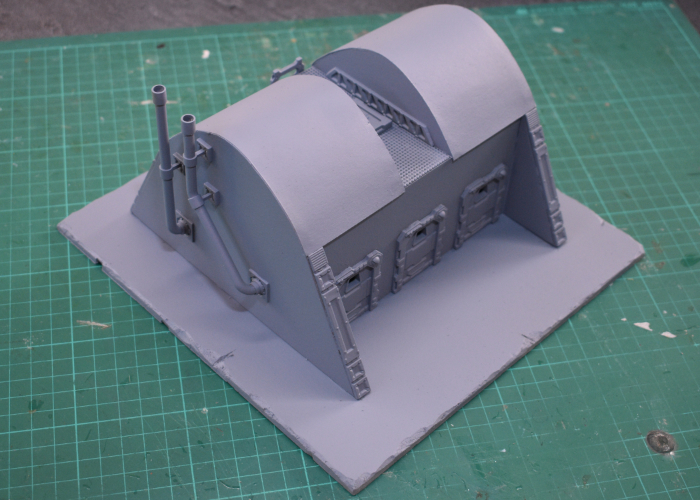
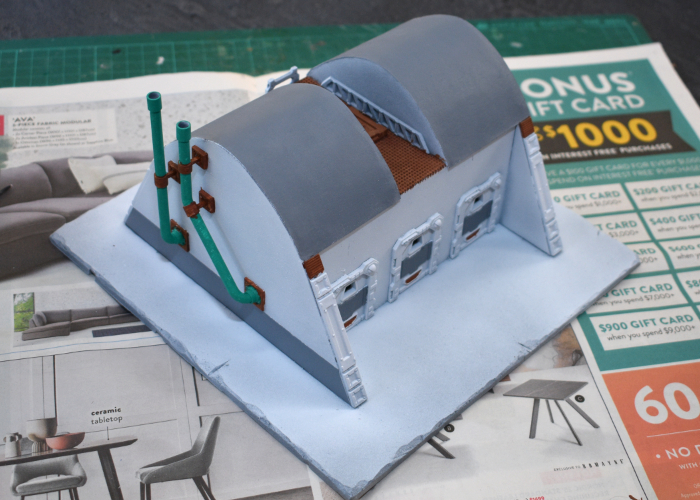
I wanted the building to be white (ish) but solid white buildings are a little boring. So to give it some detail, I broke out some masking tape and masked a strip along the bottom of each end wall before spraying with a coat of white. This was somewhat risky, as my masking tape has been sitting in my toolbox for about 15 years, and doesn't look quite right... There was a certain air of 'will it come off again?' in this operation. Luckily, though, it came off just fine.
Now it was time to start painting the things that weren't going to be white. I gave the chimney pipes (made from cut off pieces of sprue and plastic tubing) a coat of VMC Emerald, and the other bare metal areas a layer of Beasty Brown. The roof and armour strips on the doors received a coat of uniform grey to match the side walls. I could have done this with masking, but that seemed too fiddly given the state of my masking tape, and these areas were easy enough to paint over neatly.
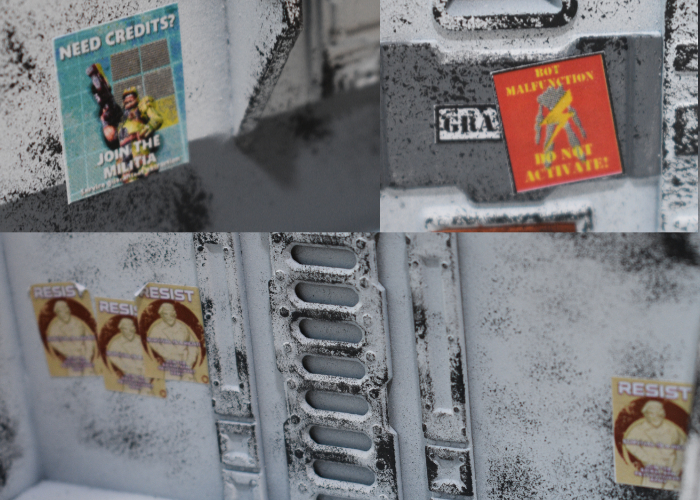
I wanted some signs here and there that looked like they had been there a while, so these needed to go on before any weathering. I printed off some appropriate signage, and glued them in place with some PVA glue.

Then it was time for aforementioned weathering. I broke out a sponge and some Game Color Heavy Charcoal, and went to work, concentrating most heavily on edges and top surfaces. This is the first part of the process where I usually start wondering if I've ruined it, but it usually comes together as it goes along...
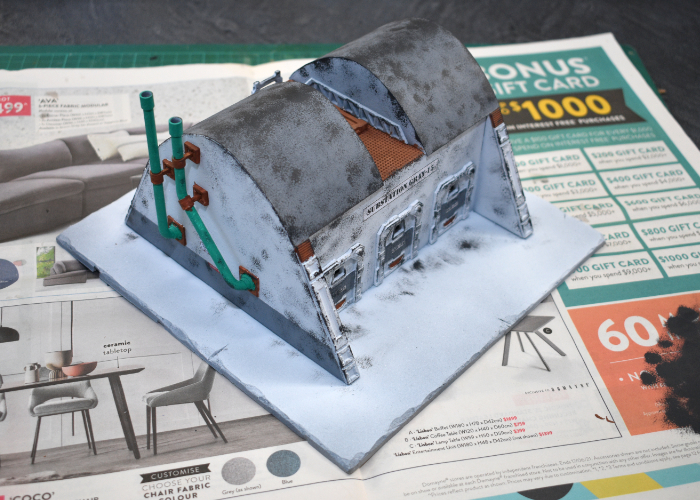
With the initial weathering in place, I added some additional signage.
Then on with the detailing. The chimneys were painted with some old Citadel Copper, and the rest of the metal with a coat of Speedpaint Broadsword Silver. I also painted the base with a coat of Vallejo Neutral Grey.
On sponged areas that aren't white, I like to go over and add some highlights on the larger chip marks. This isn't essential, but does help to give it some more texture and looks better at table height.

Then it was time for final detailing and weathering. I gave all of the exposed metal a coat of Army Painter Mid Brown ink, added some graffiti, and then got stuck into my favourite part - drybrushing on some dirt! I used Beasty Brown, working it into all of the creases and raised surfaces, and added some streaking here and there where it seemed appropriate.
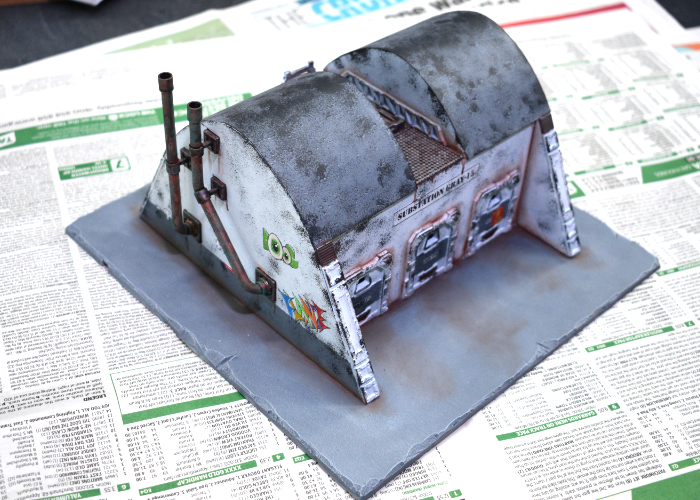
And with dirt in place, the building was ready for the table!
(Click for bigger pics!)
To build your own building of maintenance-neglected doom, grab the Maelstrom's Edge terrain sprues from the webstore here!
What are you working on? We would love to see your models and terrain in the Comm Guild Facebook group!
For other building ideas, modeling tutorials, army spotlights and conversion walkthroughs, check out the Hobby section of the Maelstrom's Edge website here. And while you're there, grab a copy of the Maelstrom's Edge V2 Beta rules!
Tags: modeling painting terrain terrainsprue
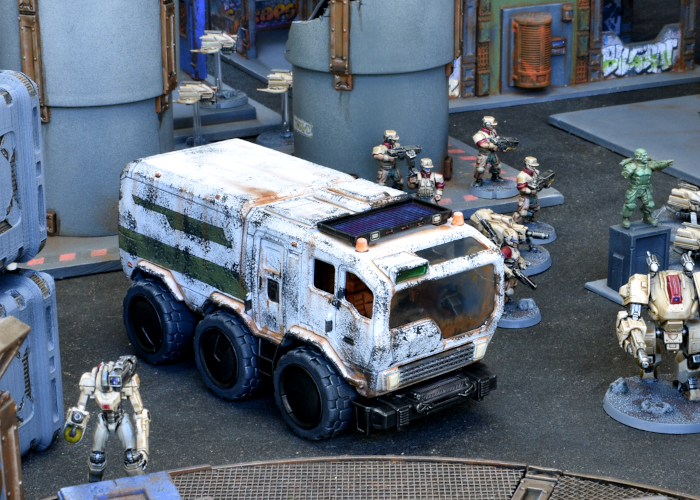
Modeling Spotlight: 'Lightyear' Hyperspeed Truck Repaint!
Posted on Thursday Mar 16, 2023 at 05:00pm in Models
- by Iain Wilson
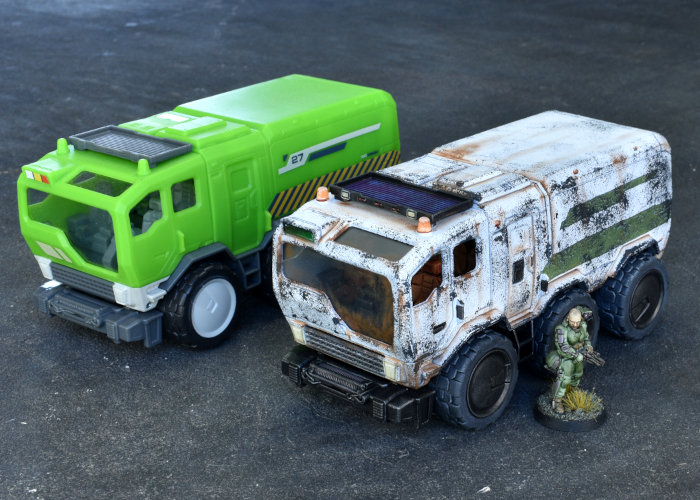
The 'Lightyear' movie from Pixar was accompanied by a 'Hyperspeed' range of rather cool vehicle and ship toys. While the 1" figures are too small to be useful, some of the vehicles actually wind up looking just about perfect alongside gaming miniatures. The truck, in particular, was just too good to not put on the table. So after grabbing some on special from a local department store, I pulled one apart and painted it up, to see how it would look!
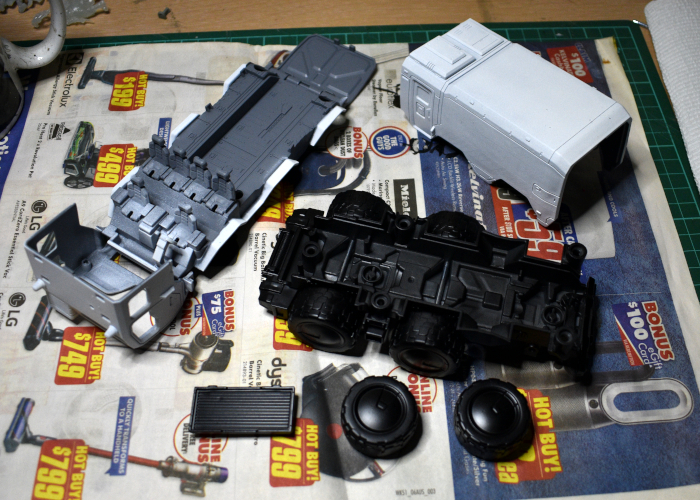
The truck is reasonably well detailed, and so to get the best results I decided to take it apart rather than trying to paint the fully assembled model. This turned out to be more difficult than expected, as two of the screws holding the back of the truck together are hidden behind the rear wheels, and the axles have textured ends that don't just pull out of the wheels - I wound up having to cut them and make a new rear axle. If I do any more of these, I'll probably just go the easy route and paint them assembled.
The truck in question before any modification:

I sprayed the chassis and wheels with Army Painter Matte Black, and the rest of the truck with Uniform Grey and then a zenithal spray of Matte White, so the grey stayed in the creases.
I didn't sand the vehicle before painting, as I was feeling lazy. The paint stuck fine to the plastic, although the printing on the sides of the truck back is slightly raised, which left a noticable shape under the paint. So I decided to just use that existing shape as a template for my own coloured decoration.
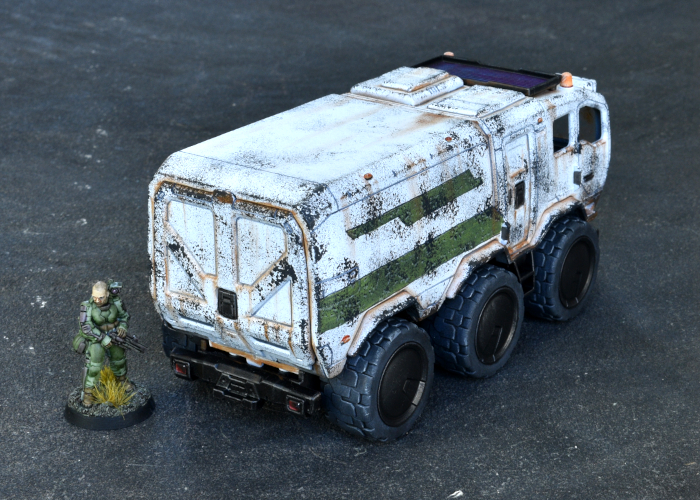
I kept the painting fairly simple, painting the seats with Army Painter Hardened Leather Speedpaint, and drybrushing the chassis with Citadel Boltgun Metal. The tyres were painted with Army Painter Uniform Grey, and then the chassis and wheels given a coat of Speedpaint Gravelord Grey. I wanted the truck to look a bit used, so after reassembling everything I weathered the white with some Vallejo Heavy Charcoal applied with a sponge, and drybrushed on some Vallejo Beasty Brown in the crevasses. The various lights were picked out with white and then various appropriate Speedpaints.
The finished truck, with the original for comparison:
I'm calling it the 'ParSec 12 Medium Transport'. You'll get there in a ParSec!
Once you've built your own fleet of cargo-carrying doom, head to the Maelstrom's Edge webstore here, to pick up some miniatures to attack it with!
We would love to see your models and terrain in the Comm Guild Facebook group. Pop in over there and share what you're working on!
For other building ideas, modeling tutorials, army spotlights and conversion walkthroughs, check out the Hobby section of the Maelstrom's Edge website here. And while you're there, grab a copy of the Maelstrom's Edge V2 Beta rules!
Maelstrom's Edge V2 - Updated Thunderbolt Sentry Drone
Posted on Friday Oct 21, 2022 at 05:00pm in The Epirian Foundation
- by Iain Wilson
Alongside the slowly expanding Maelstrom's Edge model range and associated rules, we have from time to time released additional unofficial rules to accompany conversions or kitbashes of models borrowed from other ranges. When we tracked down the PDC Gaming gun carriage and added it to the webstore, we also released some rules to use it in your Epirian force as a Thunderbolt Sentry Drone. This week, we have updated the Thunderbolt rules for use in Maelstrom's Edge V2!
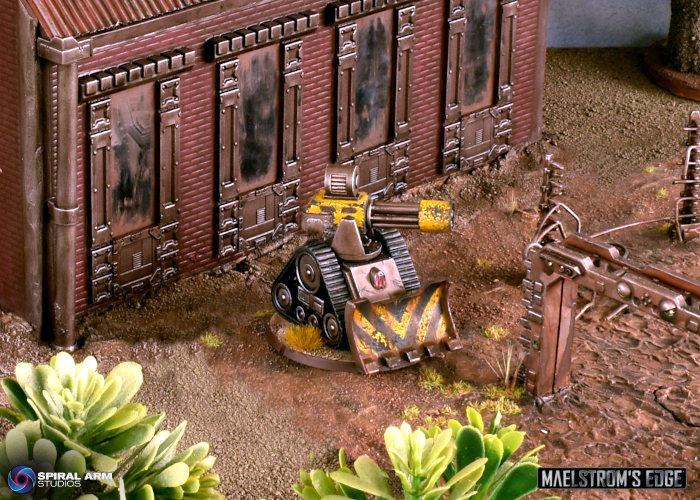
Thunderbolt Sentry Drones add some heavy firepower to Epirian forces, trundling around the battlefield and laying waste to enemy units with a range of different heavy weapons.
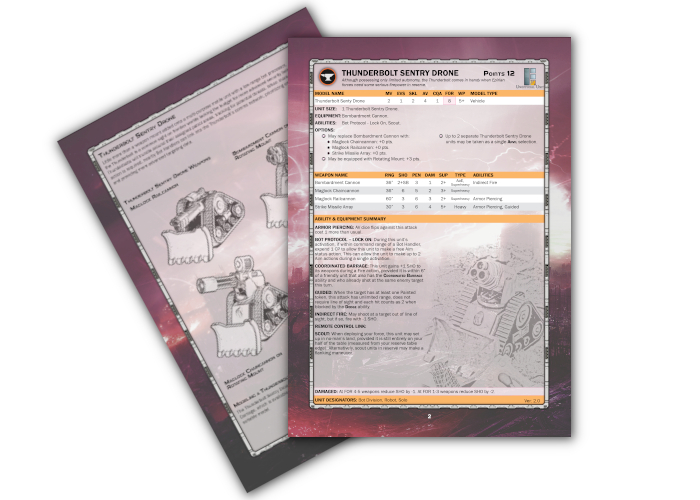
You can download the updated rules page for the Thunderbolt Sentry Drone along with the Maelstroms' Edge V2 Beta rules from the website here!
The Thunderbolt is a vehicle, and follows the rules for Large Models. Note that the section on page 27 of the Beta Rules entitled 'DIRECTIONAL MOVEMENT' has been removed from the final version of the V2 rules, so this section should be ignored.

To pick up your own gun carriage of superheavy doom, head over to the Maelstrom's Edge webstore here! You will find the gun carriage in the 'Terrain & Accessories' section.
What are you working on? We would love to see your models and terrain in the Comm Guild Facebook group!
For other building ideas, modeling tutorials, army spotlights and conversion walkthroughs, check out the Hobby section of the Maelstrom's Edge website here.
Terrain Tutorial: Cheap Trees from Pine Cones!
Posted on Friday Oct 14, 2022 at 05:00pm in Tutorials
- by Iain Wilson
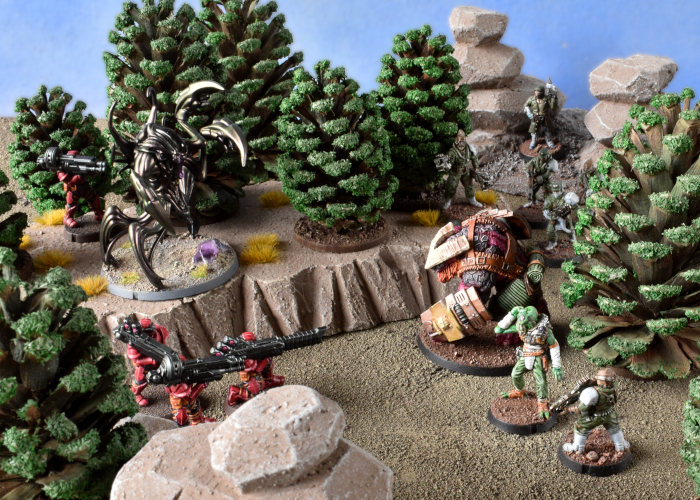
A good collection of trees is handy for fleshing out your battlefields, but commercially-made trees made specifically for scale modeling can be expensive. I've shared a few different ideas in the past for making your own foliage, including using aquarium plants, expanding foam, and Christmas baubles covered in hot glue.
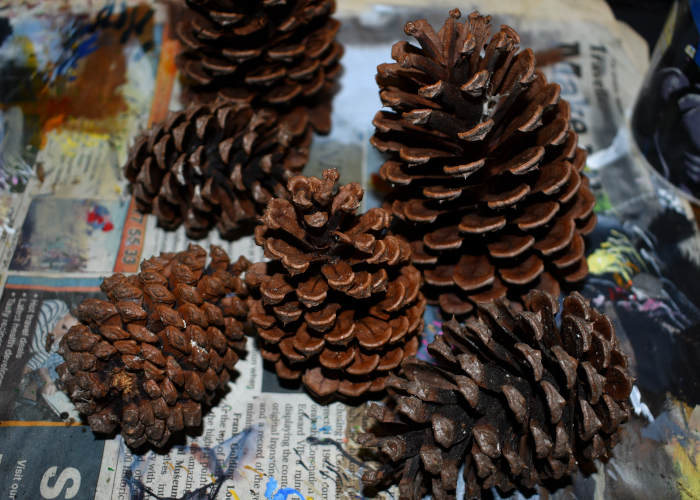
Over the years, one of the more common budget tree ideas I've come across is to use pine cones painted green. They have the advantage of being vaguely tree-shaped and inexpensive if you have pine trees nearby, but tend to wind up just looking like pine cones painted green. I thought I would see if I could come up with an easy and cheap way of improving on this idea a little, with this result:
To get started, I collected a bunch of pine cones in assorted sizes, preferably as close to fully opened up as possible.
I took an old, large paintbrush and painted the outside of each pine cone with a generous layer of PVA glue.
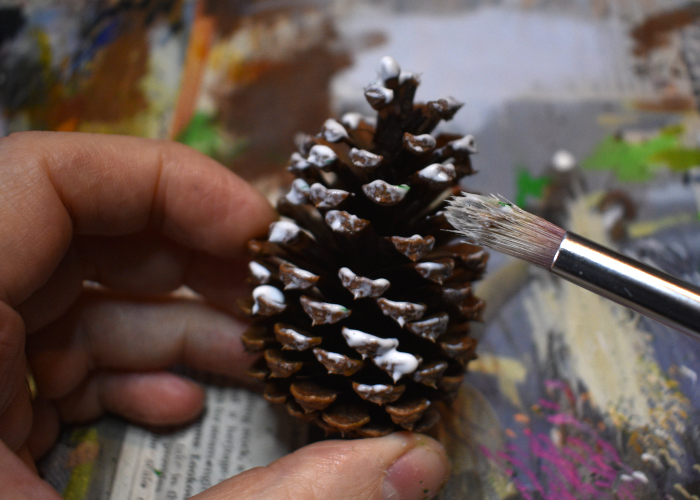
Then while the glue was still nice and wet, I dipped the cones in a tub of green flock, rolling them around to get the flock covering all of the glued areas.
I don't normally use sawdust flock for modeling, as for its primary use (for grassed areas) I don't like how it looks, although I have used a finer flock in the past for making hedges. But I had a big tub of this stuff that someone gave to me years ago, and this seemed like a good use for it.
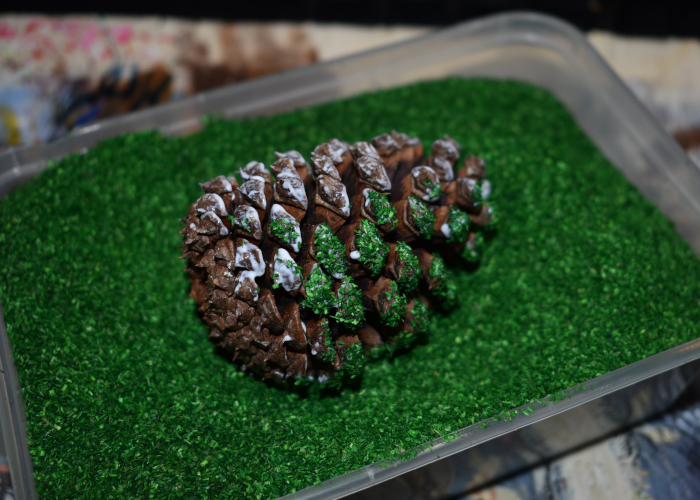
The flocked pine cones:
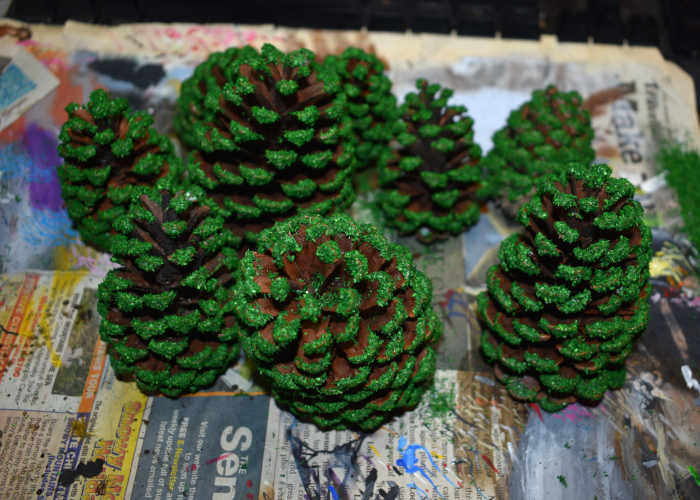
To finish up, I gave the trees a light spray from above using Army Painter Army Green. This dulled down the bright green of the flock and gave it some depth. I then used hot glue to attach the trees to some circular plywood bases. At this point, they can be put on the table as single trees, placed on top of a shaped terrain piece to make a forest base, or fitted to a textured base board. For the latter, you can glue the trees directly to the base board instead of using the circles, or texture around the circles so that the trees are removable, making for easier storage or the ability to remove trees when they are in the way for model movement.
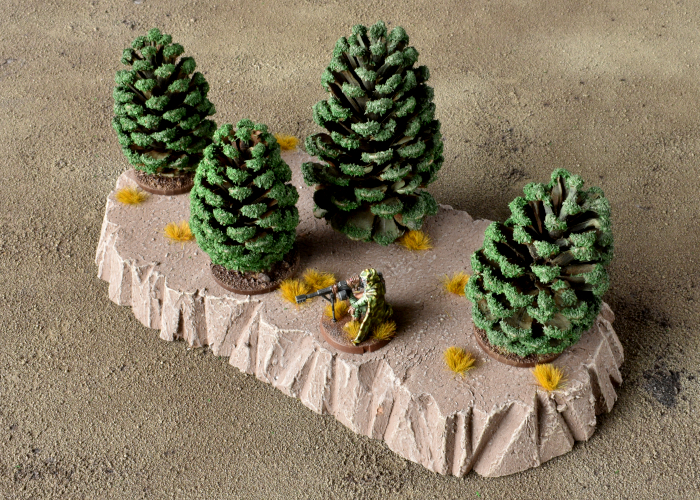
The end result, to be honest, still looks somewhat like pine cones painted green, although the illusion works a little better from above at normal playing height. For a little more work, you can also prune away the pieces from the base of the pine cone to create a trunk protruding from the bottom, like this:
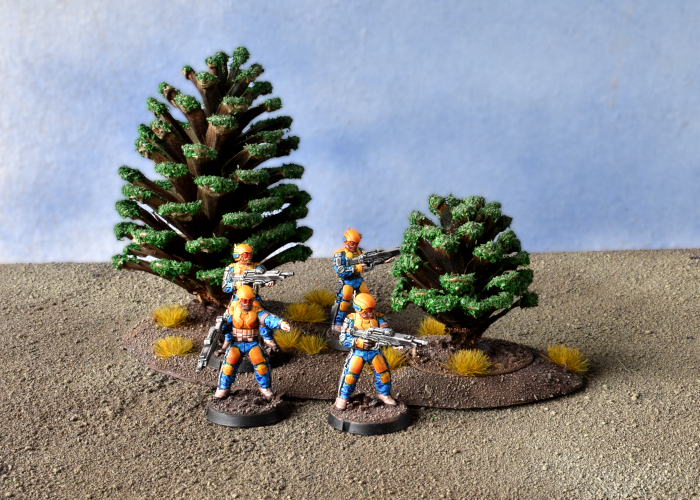
Or, to get even further away from the pine cone look, you can use a slightly more liberal coat of glue and cover the whole thing in landscaping foliage, like this:
Once you have your forest of pine-scented doom, head on over to the Maelstrom's Edge webstore here, to pick up an army to run around in it!
What are you working on? We would love to see your models and terrain in the Comm Guild Facebook group!
For other building ideas, modeling tutorials, army spotlights and conversion walkthroughs, check out the Hobby section of the Maelstrom's Edge website here. And while you're there, grab a copy of the Maelstrom's Edge V2 Beta rules!
Terrain Spotlight: Levitating Generator Platform!
Posted on Friday Sept 16, 2022 at 05:00pm in Tutorials
- by Iain Wilson
I've been fascinated for a while now by the various designs floating around for coffee tables and the like that 'float' with some clever cable design making it look like they have no actual support. In a moment of whimsy this week, I thought it might be fun to recreate this sort of design for the gaming table. And so... this happened:
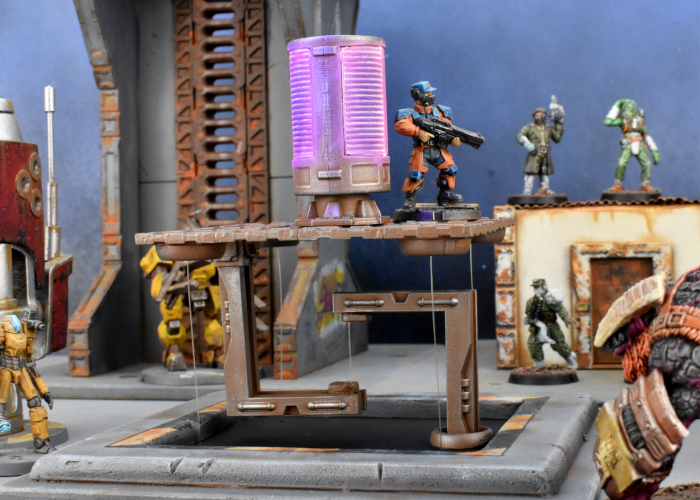
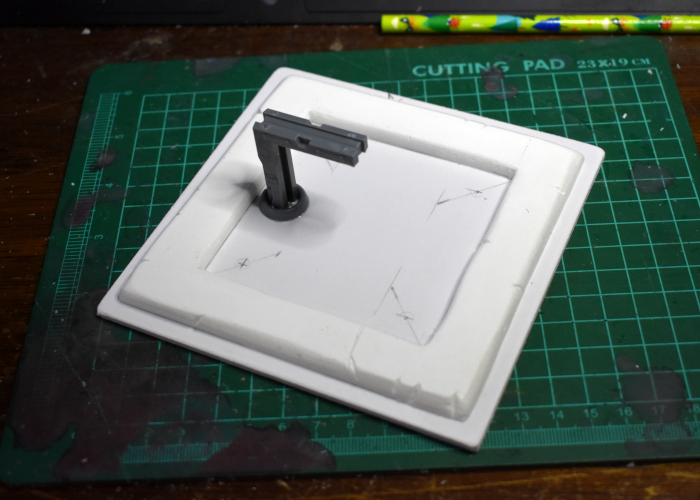
The main part of the structure is made from various bits and pieces from the Maelstrom's Edge terrain sprues. The circular windows on the bottom of the platform have a piece of thin plasticard behind them with a hole drilled through the centre. This allowed me to feed some clear fishing line through the holes and glue it onto the back of the plasticard. Once everything was painted and assembled, this would (I hoped!) securely hold the fishing line in place.
The base for the piece was made from a sheet of 2mm foamed PVC and some 6mm foamcore, with a few more bits from the terrain sprues for the support piece. I drilled holes in the base piece matching up to the holes on the platform corners, and made an indent beside each hole on the bottom of the base. This would allow the fishing line, when glued in place, to sit in the indents leaving the bottom of the base nice and flat.
Everything needed to be painted before final assembly, to avoid getting paint on the fishing line - I wanted the line to remain as unobtrusive as possible.
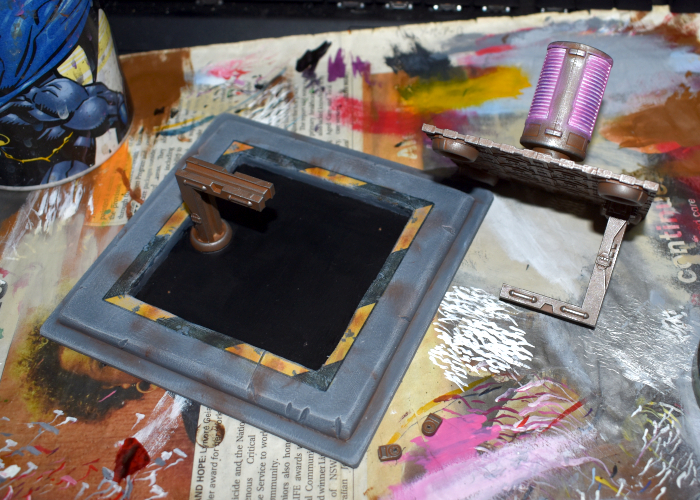
I glued the fishing line into the window ports and glued those in place on the bottom of the platform, and then glued the central support line in place. The it was just a matter of pulling the corner lines through the base holes until everything was sitting square and secure, and gluing the ends of the lines in place on the bottom of the base. There was a bit of breath-holding when I turned it over, and much rejoicing when it turned out to work as intended!
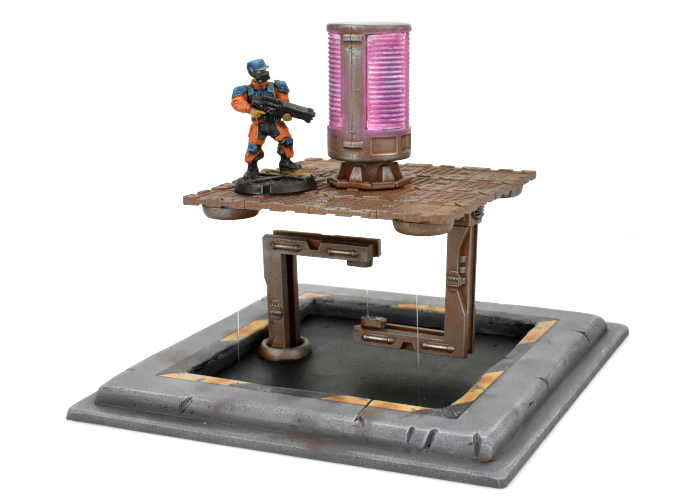
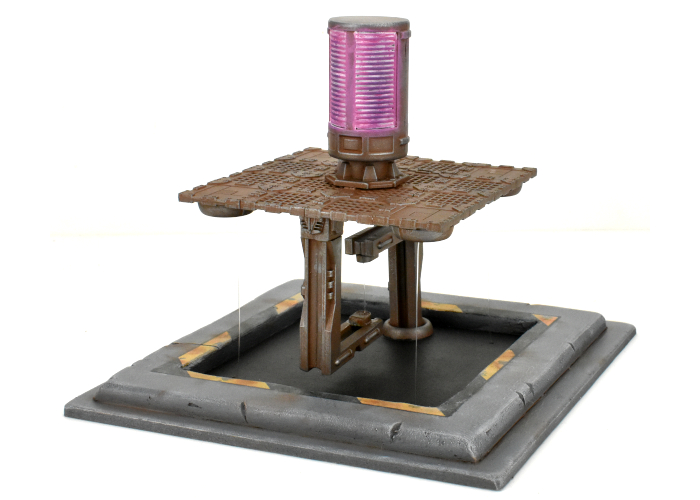

It's a bit of an odd piece for gaming terrain, but sometimes it's fun to make something just to find out if you can!
To build your own generator platform of floating doom, you can pick up the terrain sprues along with the rest of the Maelstrom's Edge range from the webstore here.
What are you working on? We would love to see your models and terrain in the Comm Guild Facebook group!
For other building ideas, modeling tutorials, army spotlights and conversion walkthroughs, check out the Hobby section of the Maelstrom's Edge website here. And while you're there, grab a copy of the Maelstrom's Edge V2 Beta rules!
Tags: modeling spotlight terrain terrainsprue
Terrain Tutorial: Quick and Easy Fences!
Posted on Friday Sept 09, 2022 at 05:00pm in Tutorials
- by Iain Wilson
Fences can provide an interesting extra dimension to miniature battlefields, as they block movement without necessarily also blocking line of site. This can force some tactical decisions around model placement and movement around the table. In this week's article, I'm sharing a quick and easy way to make some fences for your table.
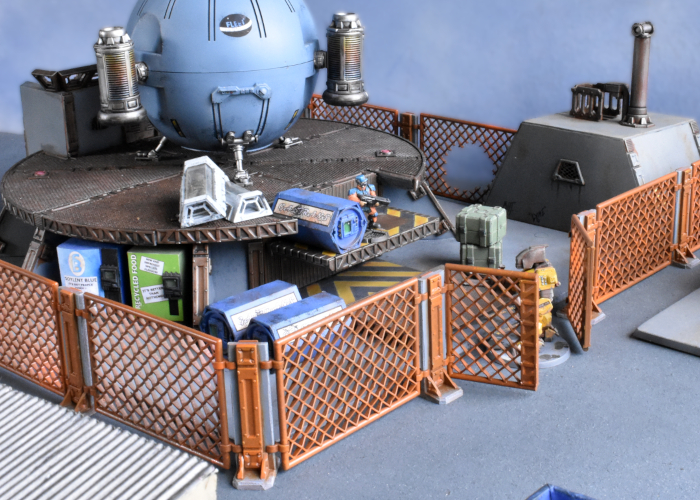
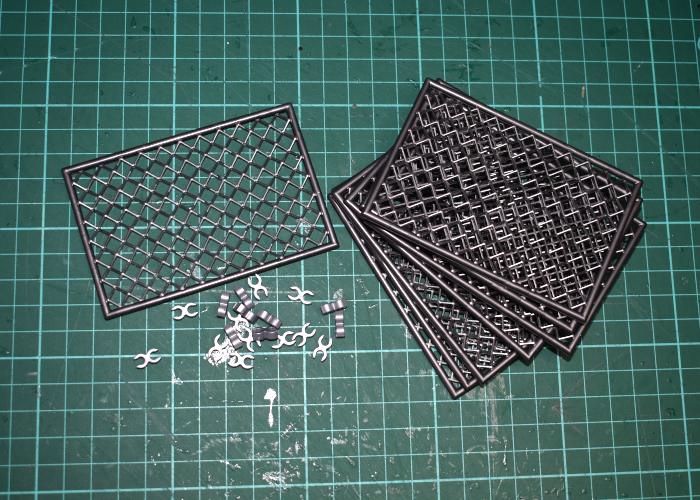
I came across these Lego-compatible fence pieces on AliExpress completely by accident, and thought they seemed ideal for gaming. They come as a pack of fence sections, and join together with separate clip pieces, and they're a nice, dark metallic grey colour. So for the really quick and easy version, you could just take these, clip a bunch of them together and plonk them on the table as-is and call the job a good-un.
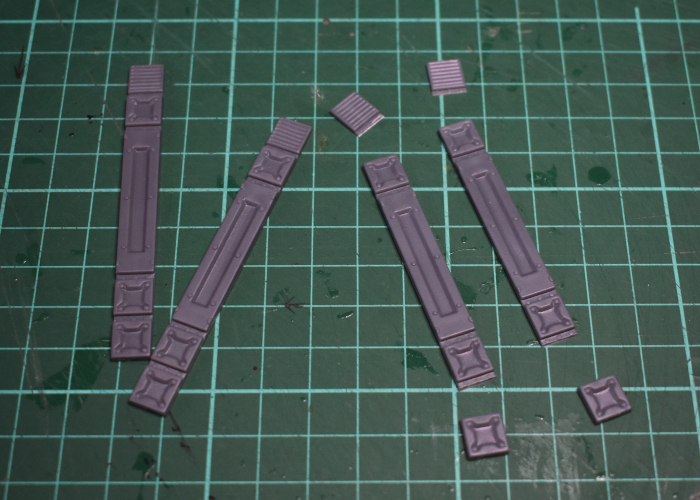
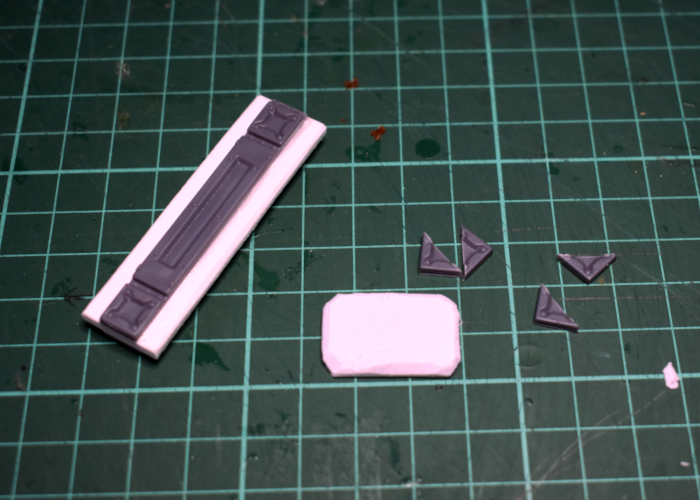
I wanted to fit them in with my existing terrain a little better, though, so I grabbed a couple of Maelstrom's Edge terrain sprues and set to work. I started by trimming up some reinforcing struts to about the same height as the fence panels by cutting off the top and bottom segments.
Then I took some 3mm foamed PVC and cut strips the same height as the struts, with about 4mm extra width either side - as a happy coincidence, this was the same width as two of the struts, so laying the struts side-by-side on the PVC served as a handy cutting guide.
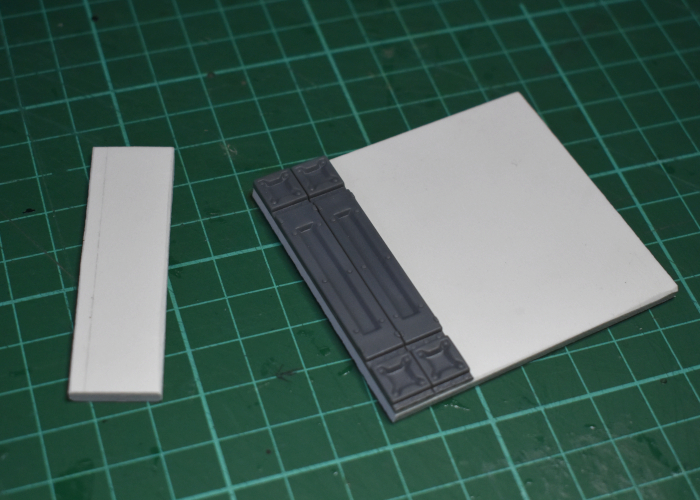
I glued the struts in place on either side of the PVC strips to form reinforced fence posts, and then cut some shorter strips to serve as bases for the posts. The bottom segment removed from the struts, cut in half diagonally, made some perfect supports to strengthen the attachment between post and base.
With everything glued together, the clips for the fence pieces slot snugly onto the PVC and it all stands up nicely.
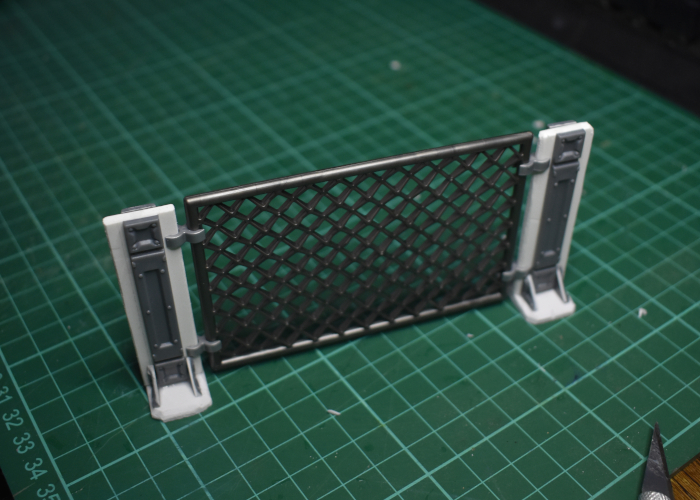
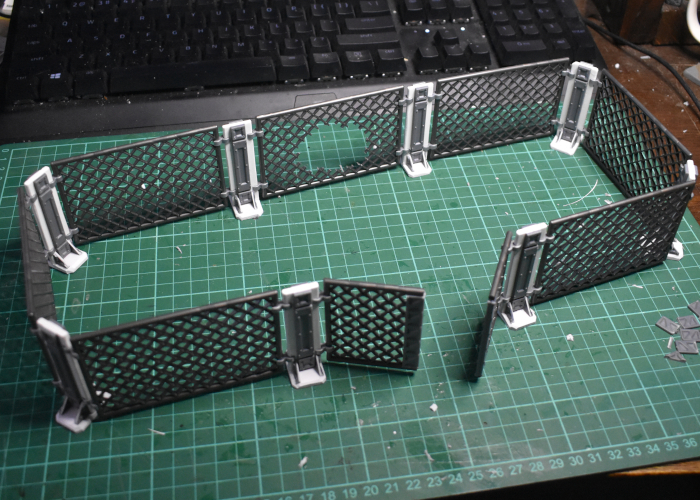
I made a bunch of posts, and for good measure cut one of the fence segments in half and attached some more reinforcing struts on the inner sections to make a two-part gate. The whole thing slots together and by twisting the holding clips can go around corners into whatever configuration is needed.
With a quick coat of rusty paint (Vallejo Beasty Brown spray with some splotchy spray of Tamiya Pure Orange and a light drybrush with Army Painter Fire Lizard) and some grey for the PVC parts (Army Painter Uniform Grey with a drybrush of white and some Vallejo Beasty Brown drybrushed into the creases) the fence is ready for the table!
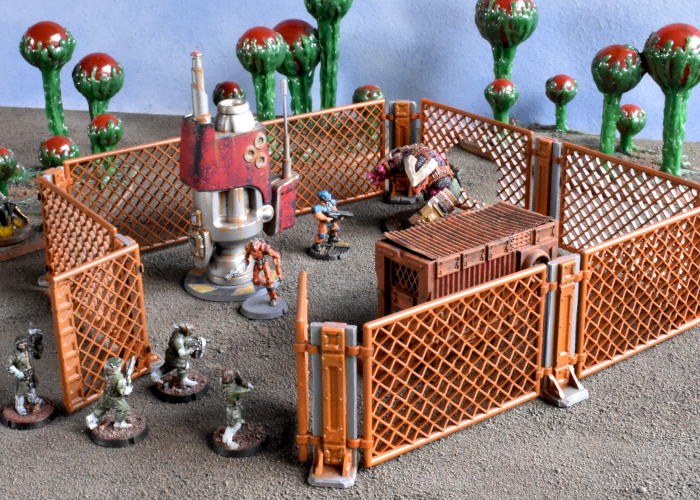
To build your own fence of chainlinked doom, you can pick up the terrain sprues along with the rest of the Maelstrom's Edge range from the webstore here.
What are you working on? We would love to see your models and terrain in the Comm Guild Facebook group!
For other building ideas, modeling tutorials, army spotlights and conversion walkthroughs, check out the Hobby section of the Maelstrom's Edge website here. And while you're there, grab a copy of the Maelstrom's Edge V2 Beta rules!
Painting Tutorial: Quick & Easy Horns!
Posted on Wednesday Jul 13, 2022 at 05:00pm in Tutorials
- by Iain Wilson
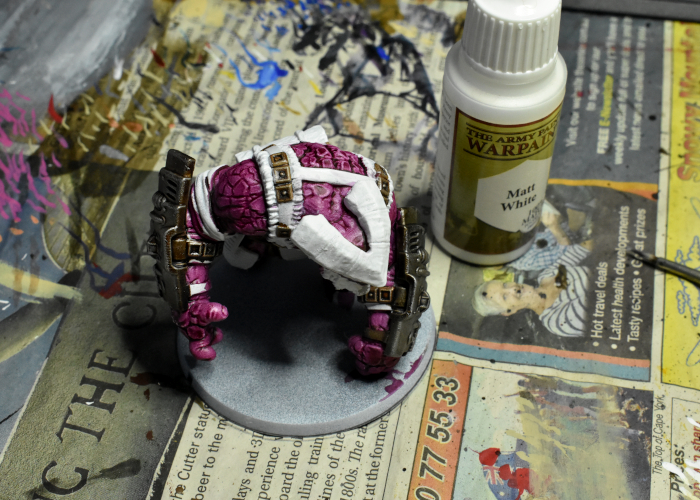
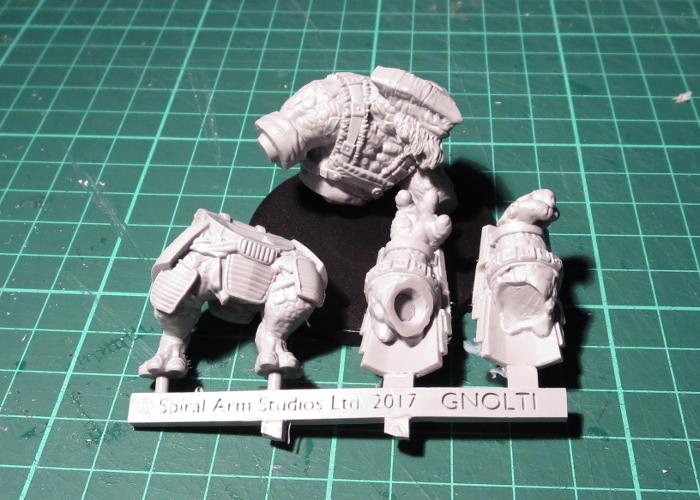
With the release of the STL files for the Broken Gnolti last week, I found myself painting up another couple of these wee beasties, and along the way I found a quick and easy way to paint their horns that I thought was worth sharing. This would work for any model with ridged or otherwise rough-textured horns.
For this tutorial, I used Army Painter paints. You could substitute any similar acrylic colours for a similar result.

Start out with a white basecoat.
Add a coat of Skeleton Bone over the whole bone area.
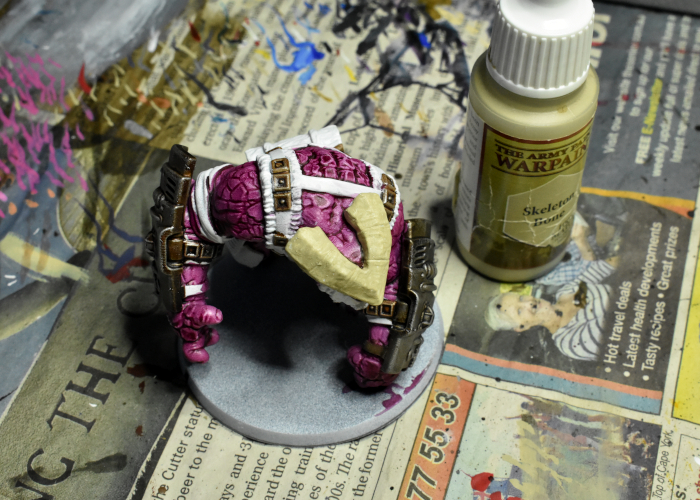
Starting with one face of the horn at a time, paint on some Leather Brown, around half to two-thirds of the way down to the base of the horn, depending on how dark overall you want the final result to be.
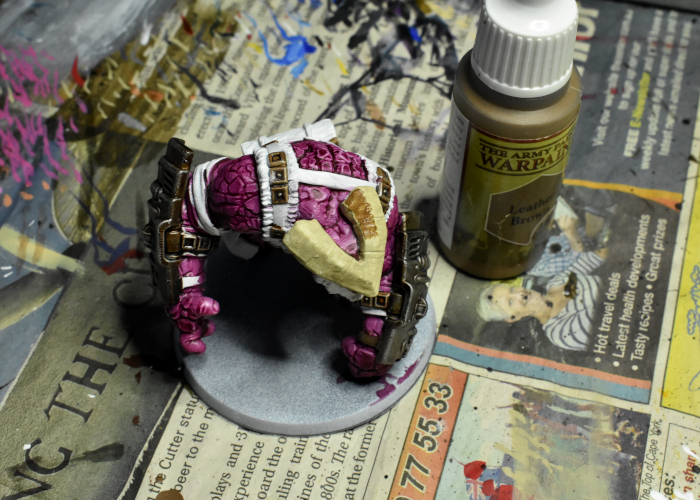
While the Leather Brown is still wet, go back over with some more Skeleton Bone, blending the two colours together to create a gradient. This doesn't have to be perfectly smooth, as the final step will tie it all back together.
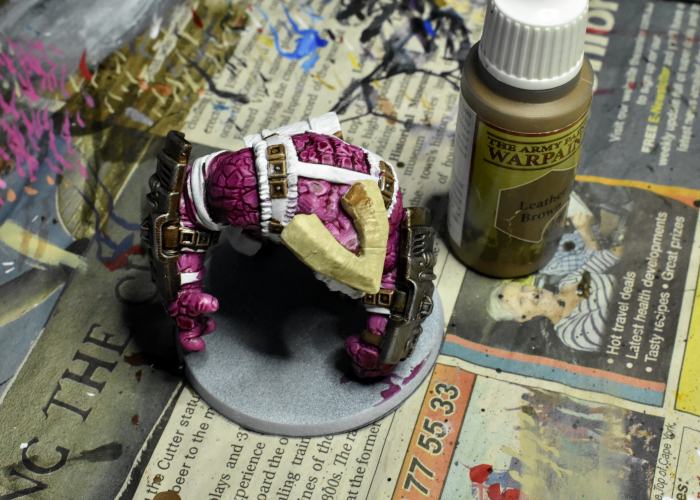
Repeat the above two steps for each face of the horns.
Finally, go over the whole thing with a light drybrush of white, or white mixed with a little bone.
The finished Gnolti, ready to rampage!
Paint up your own Behemoth of Horned Doom by grabbing the Gnolti from the Maelstrom's Edge webstore!
While you're there, you can download the Maelstrom's Edge V2 rules from the Trial Rules section of the website here. The Beta rules documents contain all of the rules for playing V2 games, but keep in mind that these are just 'preview' documents - some rules may be revised based on feedback, and the final layout including background material for the factions and the Maelstrom's Edge universe, artwork and other 'flavor' material is missing.
If you have any feedbacks on the new rules, our model range, or the tutorial above, pop on over to the Comm Guild Facebook group and share your thoughts!
Modeling Spotlight: Speedpaint SecDef
Posted on Wednesday May 18, 2022 at 05:00pm in Tutorials
- by Iain Wilson
My long-awaited Army Painter Speedpaint Starter Set finally arrived last week, and I was impatient to give them a test run. I've had a bunch of plastic SecDef models assembled for a while, for a little side-project, and figured they would be perfect for the job. So I grabbed the first squad of models out of the hobby box and set to work!
I started off with a basecoat of Army Painter Matt White spray. I did experiment on a couple of initial test models with a plain white basecoat and a zenithal base using white and purple, but decided that the zenithal basecoat didn't make enough of a difference to the end result to be worth the effort.
(A zenithal basecoat is where two layers of colour are used - a darker colour in the recesses/undersides of the mode, and a lighter layer sprayed down from above. This can be handy when combined with certain painting methods, particularly using thinner 'glazing' paints to accentuate shading and highlights.)
For the uniform, I went with Highlord Blue, applying to any visible cloth areas and trying to avoid too much spillover onto the armour plates. I also added the blue to the raised surround on the helmet.
After a quick touchup where necessary with some Matt White, I painted a layer of Hardened Leather over pouches, straps, boots, gloves and face, and then went back over the face with Crusader Skin. The double layer on the skin was to give a darker skin colour - my initial test showed the Crusader Skin to be a bit more washed out than I wanted, but layering it over the Leather gave a nice, dark tone.
Next up, I painted over the weapon, belt, exoskeleton, and helmet commlink, targeter and chinstrap with Gravelord Grey.
For the armour plates and helmet, I went with a coat of Zealot Yellow. This settled nicely on the lower areas of the plates, providing a lovely contrast against the blue uniform.
To finish up, I added some Blood Red over the goggles, and while that was drying added some gravel mix to the base. Without a dark brown in the starter set, I used a 1:1:1 mix of Hardened Leather, Blood Red and Hive Dweller Purple over the gravel, giving it a drybrush of Tanned Flesh and Ash Grey (regular acrylic paints) when it dried. With a quick run of Matt Black around the base rim and some white specular highlights on the goggles, he was ready for the table.
The unit assembled - regular SecDef models, with a custom made energy mortar using some plastic tubing and parts from the 2nd Maelstrom's Edge terrain sprue.
They're not perfectly neat, but for a quick, table-ready paintjob these paints are fantastic, giving some perfectly acceptable shading and highlights with a single coat. I'm looking forward to getting the rest of this force painted up!
To have a go yourself, pick up the plastic, multi-part SecDef kit from the Maelstrom's Edge webstore!
While you're there, you can download the V2 rules from the Trial Rules section of the Maelstrom's Edge website here. The Beta rules documents contain all of the rules for playing V2 games, but keep in mind that these are just 'preview' documents - some rules may be revised based on feedback, and the final layout including background material for the factions and the Maelstrom's Edge universe, artwork and other 'flavor' material is missing.
For other modeling ideas, tutorials, army spotlights and conversion walkthroughs, check out the Hobby section of the Maelstrom's Edge website here.
What are you working on? We would love to see your models and terrain in the Comm Guild Facebook group!
Model Spotlight: The Broken Gnolti
Posted on Tuesday Oct 05, 2021 at 06:00pm in Models
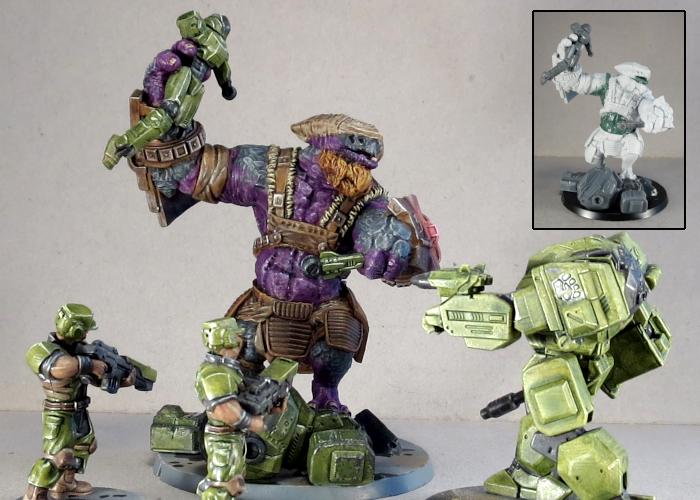
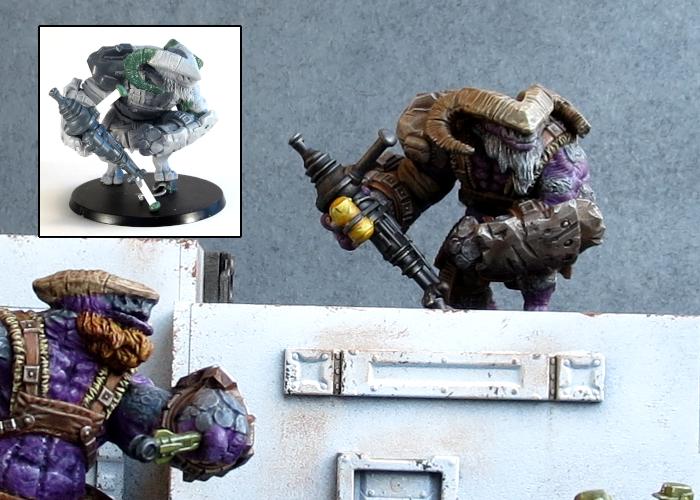
With its horned visage towering over the rest of its force, the Gnolti cuts an imposing presence on the battlefield. The resin Gnolti kit is one of our most popular, and makes for a fantastic centerpiece for any Broken force. Let's take a look at it!

Originally hired and transported to systems requiring extreme manual labour or exposure to elements lethal to humans, their normally calm, thoughtful temperament made Gnolti easy to integrate into human society. Gnolti are extremely loyal to those who treat them well, gladly risking themselves to protect their friends. Despite being incredibly useful, Gnolti are often denied berths on planetary evacuation ships due to their extreme size. Gnoltis have few opportunities to escape the Maelstrom, and stranded Gnolti are a common recruit into the ragtag warbands of the Broken, where their physical power can be a huge asset.
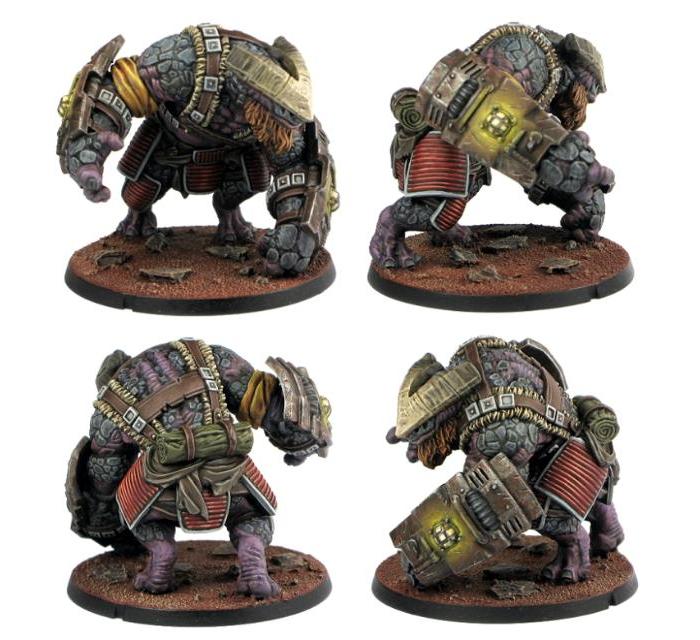
The studio Gnolti model, painted by Winterdyne Commission Modelling
The Gnolti's impressive physique is clad in makeshift harness and armour, its forearms covered by jury-rigged protective shields that it uses to protect nearby Broken units. The multi-part kit was sculpted for us by the resin techno-wizards at Anvil Industry, and cast in high quality resin.
While the Gnolti kit is easy to assemble and impressive on the table, the resin is also easy to convert, which led to a few conversions that we've featured in previous articles:
Raging Gnolti
Gnolti Longhorn
Gnolti Berserker
Pick up your own towering behemoth of muscly doom along with the rest of the Maelstrom's Edge range from the webstore here.
What are you working on? We would love to see your models and terrain in the Comm Guild Facebook group!
For other building ideas, modeling tutorials, army spotlights and conversion walkthroughs, check out the Hobby section of the Maelstrom's Edge website here.
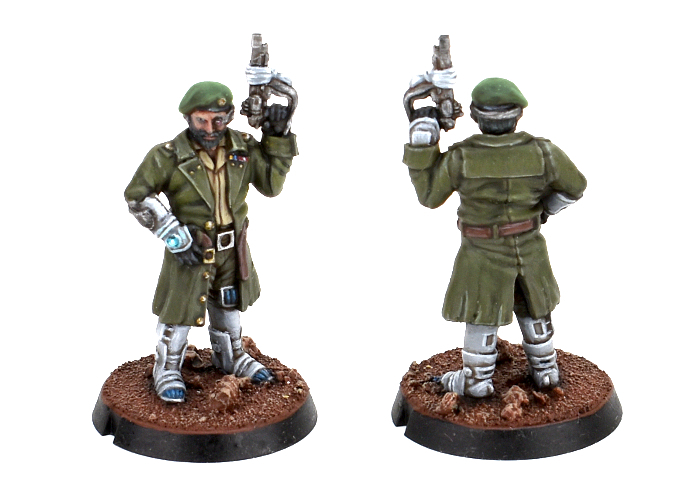
Army Spotlight: Broken SARA Detachment
Posted on Monday Aug 23, 2021 at 09:06pm in The Broken
Last week, I shared a Revolutionary Captain conversion that I had painted up to lead a new SARA force for my army collection. This week, I completed work on the rest of his detachment!
The leader for the detachment is obviously the aforementioned Revolutionary Captain, equipped with his signature pistol and an added trophy melee weapon. To accompany him into battle, I filled out a Vanguard slot with a pair of Sig Jammers, on using the regular resin model, and another converted up using a bunch of assorted parts, including the beret head that I didn't use on the Captain. Sig Jammers provide support to Broken forces by interfering with enemy Fields and forcing additional Suppression Points onto enemy units with their Tech Disruptors.
Rabble units make up the core of any Broken force. For my SARA, I wanted to give them a more military look than my Forsaken force, so I mostly stayed away from long coats and robes, and borrowed some extra armour parts from Epirian and Karist kits, and also a few bits and pieces from some Stargrave plastic models for a little extra variet. I also gave all of the models a shoulder pad on their left shoulder, as something to help unify the various assorted models... although in true Broken fashion, these pads are also sourced from a range of different places.
The second Rabble unit is accompanied by a Marsayan Hypnotist, to provide some tentacle-faced disruption to enemy shooting. Units accampanied by a Marsayan are difficult to hit, always counting as a Fleeting target and gaining a dodge against close range attacks.
For a bit of long range coverage, I added a Rabble Fire Support unit with beam longrifles to fill one of my Anvil slots.
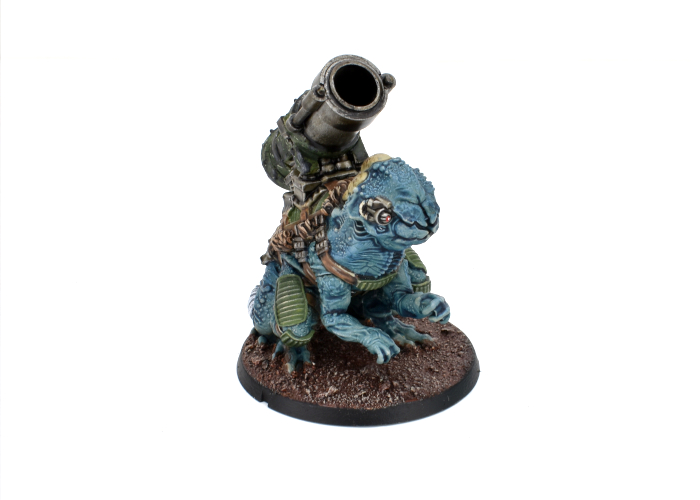
To round things out, I took a Pa'ku for the other Anvil slot, because how can you go past a giant toad with a cannon. The model I've used here is one I converted up for the spotlight article some time ago to count as a 'heavy EMP mortar' instead of the usual quad mortar... but could still be used as just a variant version of the usual gun if I want to keep things official. The Pa'ku's EMP mortar is great for dropping large blasts on enemy formations, although it works best in concert with other Pa'ku due to their Coordinated Barrage rule. So I'll probably look at painting up a second Pa'ku with the second detachment, potentially retrofitting it back into this detachment with the Multi-Unit Selection rule allowing both of them to count as a single Anvil choice.
All up, this detachment currently comes in at 67 points, so is just under half of a 'standard' 150 point force. I'll be working on the second detachment as I have time, putting in another Revolutionary Captain, some snipers, and an assault unit featuring a couple of Hakoyu for some up-close-and-personal, pointy doom. In the meantime, I can always use these as a detachment alongside my Forsaken force.
More to come - stay tuned!
To build your own army of revolutionary doom, you can pick up the Broken along with the rest of the Maelstrom's Edge range from the webstore here.
What are you working on? We would love to see your models and terrain in the Comm Guild Facebook group!
For other building ideas, modeling tutorials, army spotlights and conversion walkthroughs, check out the Hobby section of the Maelstrom's Edge website here.
Tags: broken conversion modeling painting sara
Modeling Tip: UV Resin Windows!
Posted on Monday Aug 09, 2021 at 06:00pm in Tutorials
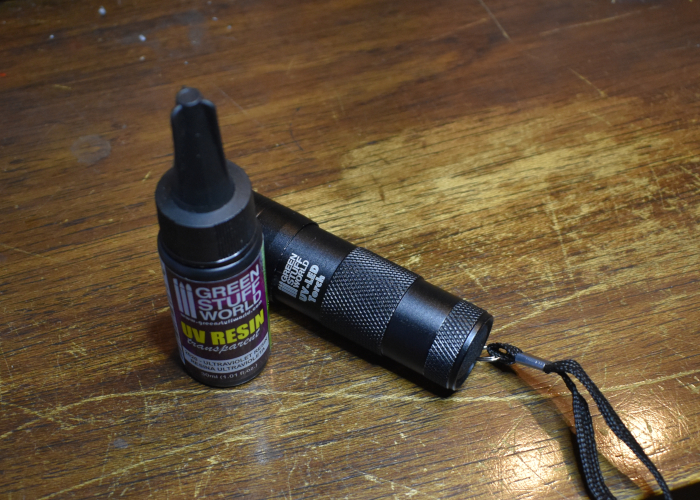
There are a few different options out there for filling in open windows on terrain. In the past, I've used clear plastic or aluminium mesh cut to shape and glued in. I recently picked up some Ultraviolet Resin intended for creating water effects, and it occurred to me that this might be a fun alternate way of adding panes to some windows.
The resin I'm working with is sold by Green Stuff World. It's a super-clear gel that you squeeze from the bottle and then set with a UV light, or by leaving it out in the sun. They also sell a UV torch, which I couldn't resist picking up.
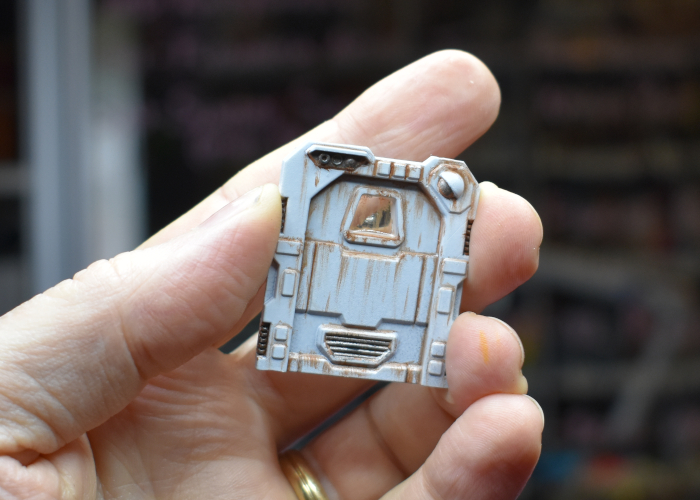
To create a window pane, I took a painted door from the Maelstrom's Edge terrain sprue and laid it down on some aluminium foil, with a small piece of thin plasticard in behind to push the foil snug against the back of the window frame.
(I used a painted door as it was going to be impossible to paint the inside of the window frame once the resin was in place.)
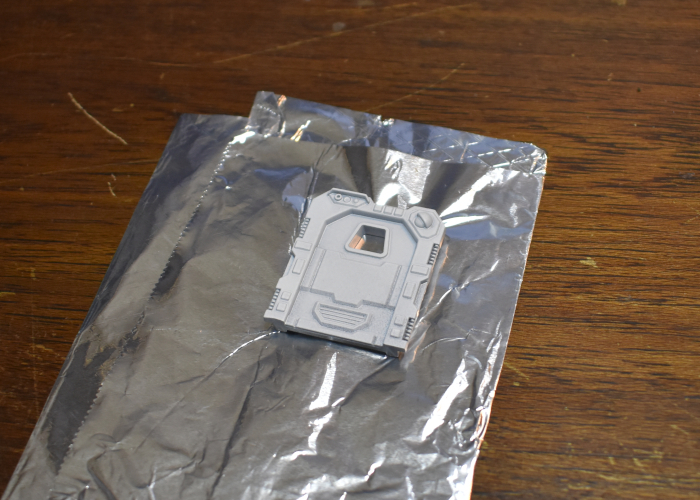
I then added a drop of resin into the middle of the window, leaving it a minute or so to settle out to the edges of the frame. There were very few airbubbles in the resin, but I used a pin to gently poke the few that were there to make them go away.
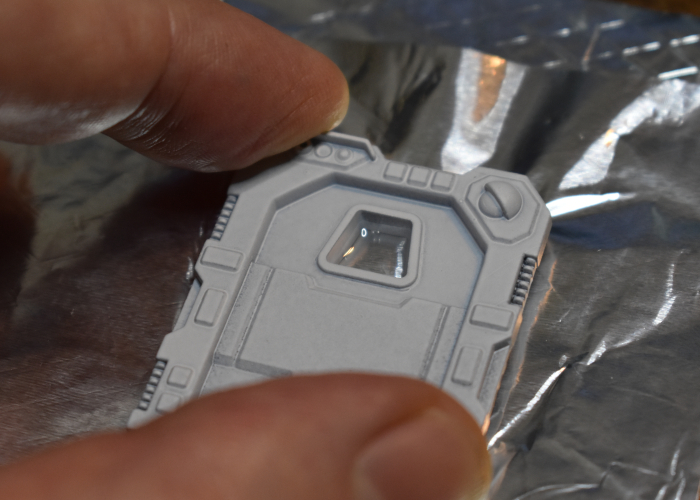
To set the resin, I sat the UV torch on top of the doorframe pointing directly at the window, and left it for a couple of minutes to let it do its thing. From further experimentation later, the resin starts to cure within a few seconds, but I wanted to leave it long enough to make sure.
From there, the door was ready to be glued into a piece of terrain and detailed.
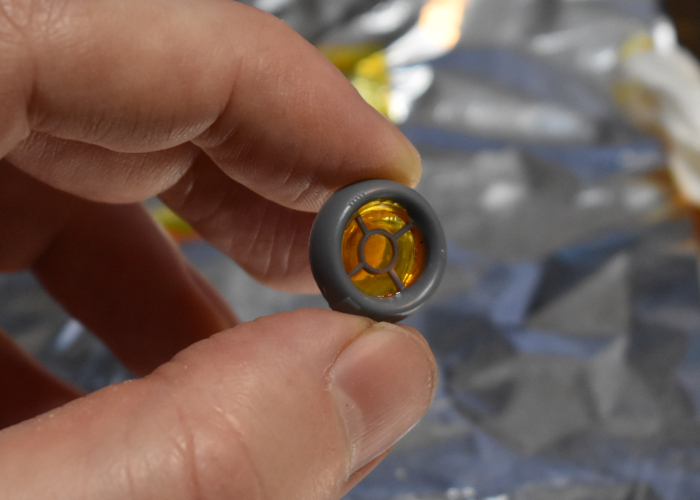
For coloured window glass, transparent paint gives a nice tint. This porthole was filled with resin in the centre, and then once set I painted the back of the resin with two coats of Tamiya Clear Orange.
To make your own windows of transparent doom, you can pick up the Maelstrom's Edge terrain sprues along with the rest of the Maelstrom's Edge range from the webstore here.
What are you working on? We would love to see your models and terrain in the Comm Guild Facebook group!
For other building ideas, modeling tutorials, army spotlights and conversion walkthroughs, check out the Hobby section of the Maelstrom's Edge website here.
Tags: modeling terrain terrainsprue tutorial
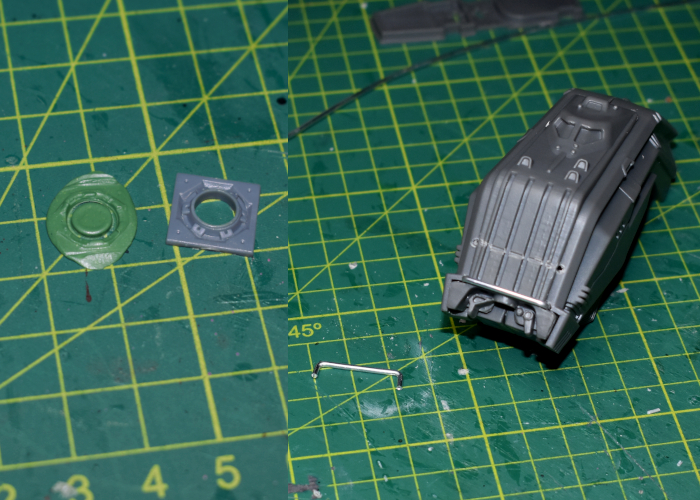
Modeling Spotlight: Kitbashed Pegasus Heavy Cargo Drone
Posted on Tuesday Jul 20, 2021 at 06:00pm in Tutorials
Time to hack something up, just because we can! I've had my eye on the Hornet dropship from Mantic's Warpath game for some time, as its general shape feels similar to the Epirian Firefly drone, just scaled up. So, I decided to take one and turn it into a heavy cargo drone to support Epirian forces behind the lines! Read on to see how it was built.
With its design already including wing-mounted turbines, the main alteration required was to make the front of the Hornet look like a standard Epirian drone. I used a small pipe fitting from the first Maelstrom's Edge terrain sprue for a sensor lens housing. For the lens itself, I rolled out some 'Green Stuff' putty into a thin sheet and used the pipe fitting as a stamp to cut out a circle. I also took a couple of pieces of aluminium rod and bent them to fit across the front section on the Hornet, to form the rectangular grill that Firefly and Spider drones have under their sensor lens.
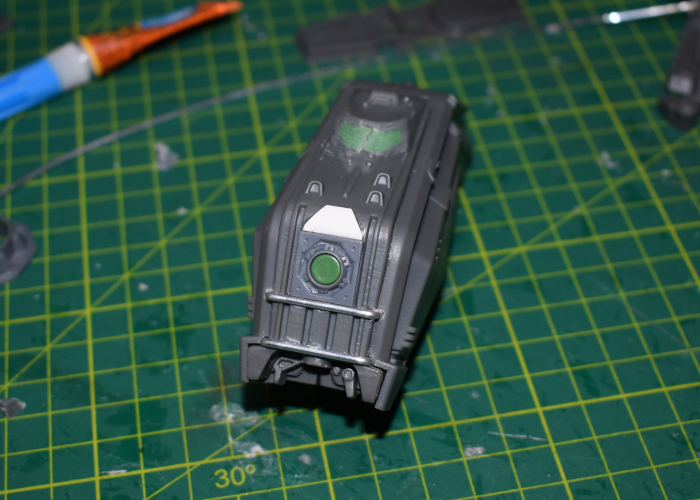
Once the Green Stuff was fully cured, I trimmed away the excess, and glued everything into place on the front of the Hornet. The Hornet's protruded above the lens housing, so I covered over it with a thin piece of plasticard. I had originally intended to cut off the cockpit bulge and seal over it with plasticard, but decided it would be easier to use some putty to fill in the windscreen recesses.
As this drone was intended as a scenery piece rather than for gaming, I decided to keep the cargo container as a separate piece. There is a doorway on one end with no door, as this normally sits up against the door on the back of the Hornet cockpit section. I took a door from the terrain sprue and trimmed it down to fit into the opening, adding a piece of plasticard to fill in the window. I also wanted to add some detail to the top of the container. Taking a fan from terrain sprue #2, I trimmed it down to fit inside the large pipe fitting from terrain sprue #1.
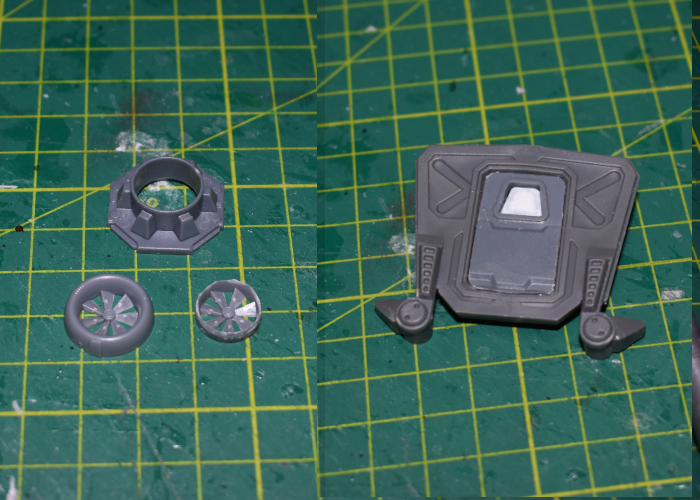
I glued the fan assembly onto the top of the container to line up with the circular vent on the underside of the Hornet's fuselage, and added some plasticard shaped to match the fuselage's trapezoid hatch.
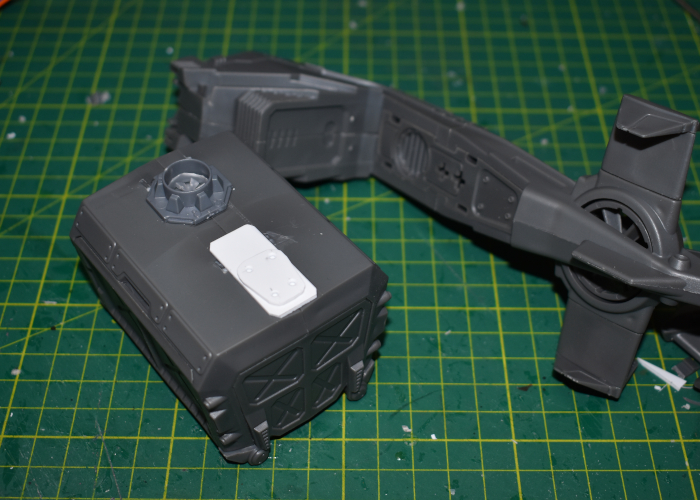
With everything else just assembled as normal, the new drone was ready for paint!
And the finished Pegasus Heavy Cargo Drone, ready to haul some heavy cargo:
To turn your own Hornet into a heavy drone of logistical doom, you can pick up the Maelstrom's Edge terrain sprues along with the rest of the Maelstrom's Edge range from the webstore here.
What are you working on? We would love to see your models and terrain in the Comm Guild Facebook group!
For other building ideas, modeling tutorials, army spotlights and conversion walkthroughs, check out the Hobby section of the Maelstrom's Edge website here.
Tags: conversion drone kitbash modeling spotlight
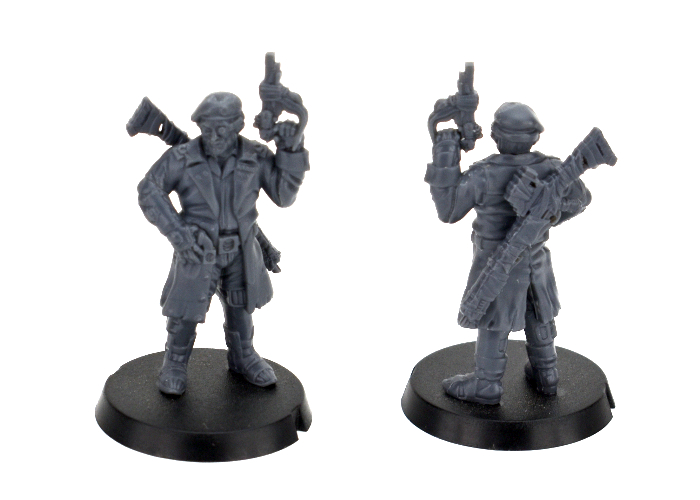
Model Spotlight: Revolutionary Captain!
Posted on Tuesday Jun 15, 2021 at 11:41pm in Tutorials
With the release of the Revolutionary Captain ushering the SARA subfaction into Maelstrom's Edge games, a range of new tactical options opens up for the Broken. I'll be sharing my fledgling SARA force in an upcoming army, but to kick things off I thought it would be fun to have a look at some modeling options for the fantastic Revolutionary Captain model!
The Revolutionary Captain is a multipart, plastic model. He's not as modular as most of the Maelstrom's Edge model range, as the sculpt was in this case aiming for a specific character look. Being plastic, however, it's still relatively easy to give the model a more customised look if you feel so inclined, and I'll explore some different ideas for that below.
The studio model, painted by Winterdyne.
Built straight off the sprue, the Revolutionary Captain is equipped with his SARA Officer's Pistol. His rules card, which can be found here, gives him the option to take one of a number of different secondary weapons, which can mostly be sourced from the Broken Rabble kit. To equip a Beam Blastgun or Slug Rifle, the easy option is to just stick the weapon on his back. You could model a rifle strap from modeling putty, or just assume the weapon is held in place with a magnetic lock built into the back of his coat.
To take a more hands-on approach, for this version I sliced off his right hand, and used a forearm snipped from a Rabble sprue arm to hold the blastgun. As it still sits against his waist, there's no need to try to resculpt the coat belt where the hand was removed, as you can't see it anyway.
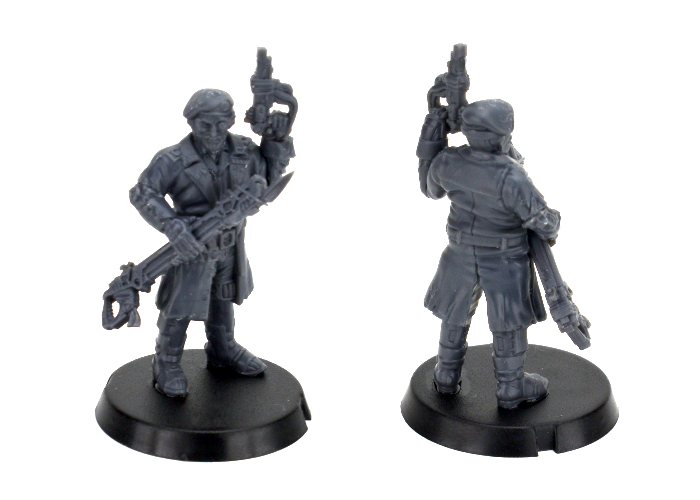
Of course, everyone knows that battlefield commanders spend a good amount of their time pointing at things. If your commander isn't either pointing at something, or standing with one foot on something, people might not even recognise them! By slicing off the Revolutionary Captain's left arm at the coat's shoulder seam, I was able to glue a pointing arm from the Rabble sprue in its place. I also replaced the head with a regular Rabble head by drilling out the neck a little with a 2mm drill bit, and glued a maglock pistol from the Epirian Contractor kit onto her hip with some strapping made from 'Green Stuff' putty to replace the officer's pistol. The putty isn't strictly necessary - you could easily just glue any of the Captain's pistol options to the belt, but the addition of the putty strap does make it look a little nicer on the model.
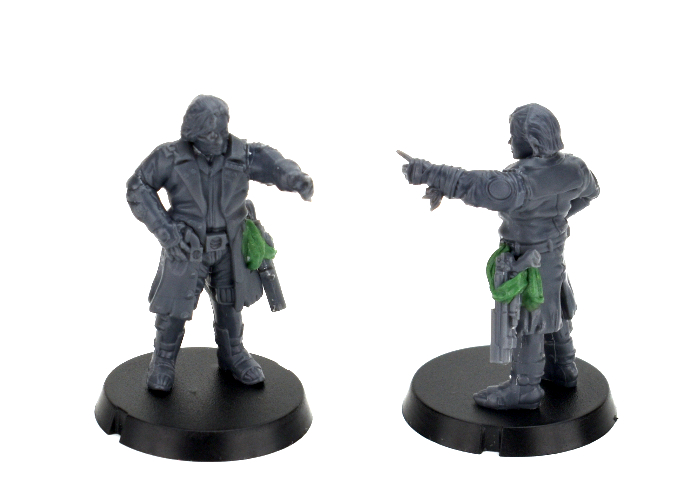
Of course, there's no reason for only humans to be revolting! With the neck drilled out as above, you can use any of the alien heads from the weapons sprue in the Rabble kit to create a xeno force commander.
While we're replacing heads, some Captains like a nice, sensible cap in place of a beret, so for this one I used an Epirian Contractor head (mostly for the sunglasses!) and built the cap up into an officer's hat using Green Stuff. I also added a melee weapon on his belt using part of a Karist sword from the Faction Expansion Sprue and bits from a couple of weapons on the Rabble sprue. This could easily represent either the Poisoned Blade or Trophy Melee Weapon. For a slightly easier option, you could just use the Karist sword or knife from the Faction Expansion sprue. The resin Forsaken Chieftain also comes with both of these melee options, so if you have that model you could use whichever one you didn't use on her for the Revolutionary Captain.
Of course, if you're hacking up your Revolutionary Captain model to replace heads and weapons, this leaves you with some useful parts to build another Captain to lead a second Detachment! For the below model, I used some parts from the Rabble kit (legs, arms and beam pistol), the left hand and head from the Revolutionary Captain, and a torso from the Epirian SecDef kit just to help him to stand out a little more from the Broken horde.
To build your own army of revolutionary doom, you can pick up the Revolutionary Captain along with the rest of the Maelstrom's Edge range from the webstore here.
What are you working on? We would love to see your models and terrain in the Comm Guild Facebook group!
For other building ideas, modeling tutorials, army spotlights and conversion walkthroughs, check out the Hobby section of the Maelstrom's Edge website here.
Tags: broken conversion model modeling sara spotlight tutorials
Terrain Spotlight: Pop-up Lamp Reactor!
Posted on Monday May 17, 2021 at 05:00pm in Tutorials
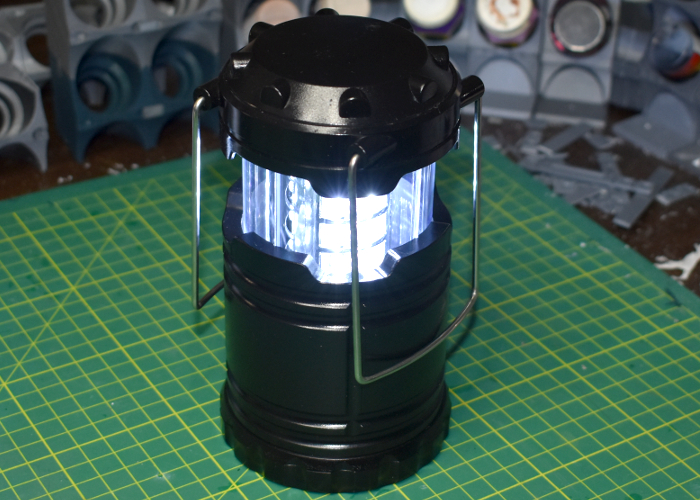
I came across this idea a little while ago in a Facebook group, and thought it was too good to not give it a go. Turns out, there are a bunch of pop-up LED lanterns currently floating about that are just perfect for turning into fantastic light-up reactors!
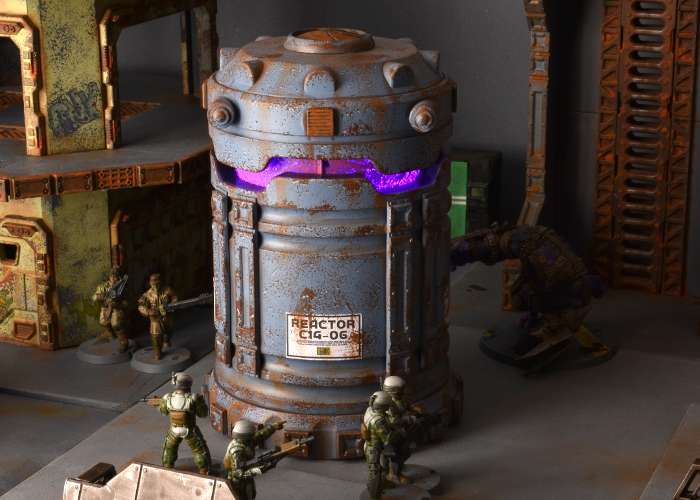
So, the foundation for this build is a pop-up lantern that I found on Amazon. There are variations available all over the place, all with a very similar design. The light comes on automatically when you lift the top of the lantern, and goes off when you push it closed.
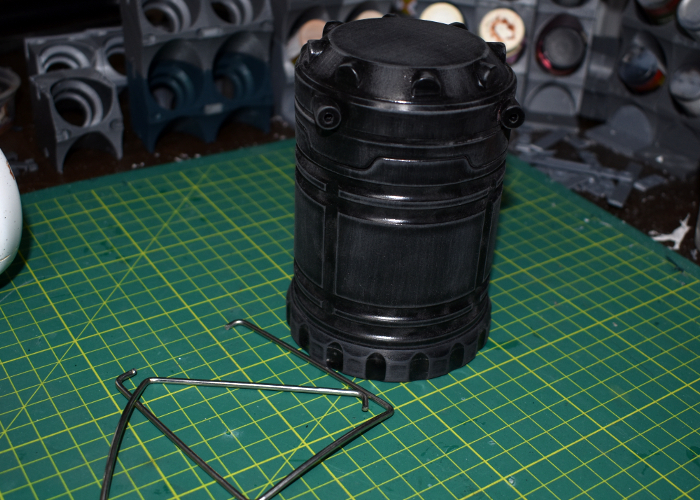
These look pretty amazing just painted up as-is, but I couldn't resist tweaking a little. The handles are spring steel wire, pushed into holes in the top of the lamp, so I removed these and put them aside. Then I gave the outside of the lamp a light sand with fine sandpaper. This part isn't essential, but I like to do it with unfamiliar plastic as it can help the glue and paint stick better.
From there, I took the Maelstrom's Edge terrain sprues and added some details. I cut down some support struts from the first terrain sprue to make some bracing for the sides, and added the square end pieces from the struts onto the small protrusions spaced around the base of the lamp. I also cut the tops from some railing posts from the second terrain sprue to cover over the handle holes, and added an iris portal to the top as a heat vent.
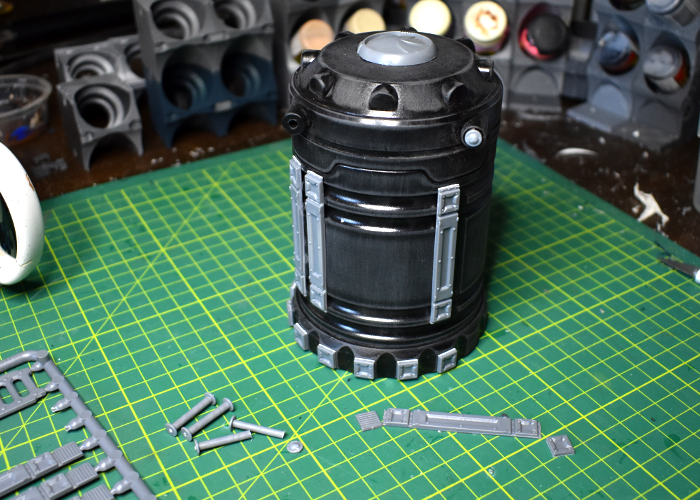
It looked like it needs just one last thing, so I used the vent pieces from the support struts to add a little more detail around the top of the lamp, and then it was ready for paint.
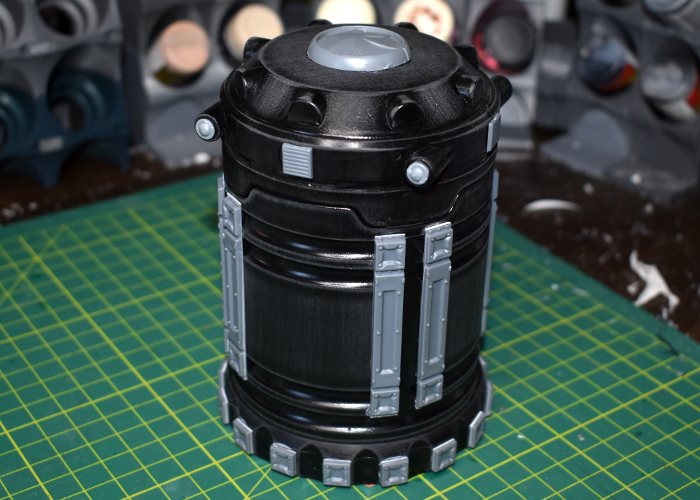
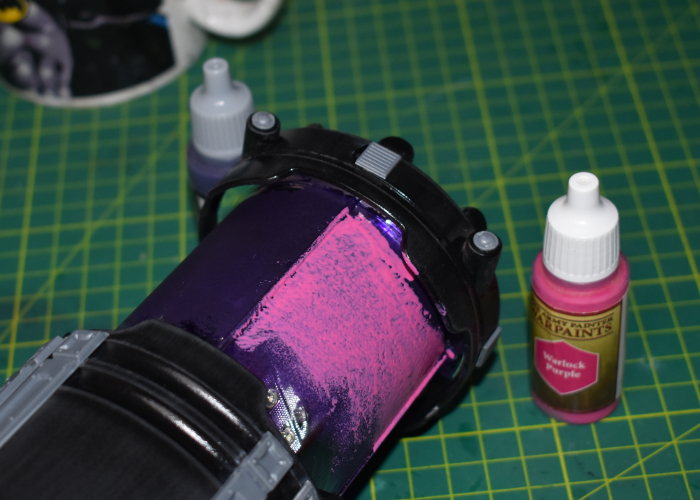
To paint up the reactor, I started with the clear plastic light cover. I used a sponge to apply a rough layer of Scalecolor Elandil Violet (a dark purple) and then when that was dry, a layer of Army Painter Warlock Purple. Normally I would do this on the inside of the clear plastic, to protect the paint, but it proved impossible to disassemble the lamp without breaking parts, so it went on the outside, and then I sealed it with a coat of Testor's Dull Coat.
To paint the rest, I started with a basecoat of Army Painter Wolf Grey, drybrushing white onto the upper edges. After gluing on some printed signs worked up in Gimp, I then sponged on some weathering using Army Painter Dirt Spatter, adding scattered white highlights on some of the broken grey. The metal grills and iris were given a coat of Dirt Spatter, a sponge of Vallejo Heavy Charcoal, a light drybrush with P3 Ember Orange, and finally a touch of Army Painter Dry Rust. To finish up, I drybrushed some more Dirt Spatter and Vallejo Beasty Brown into the creases.
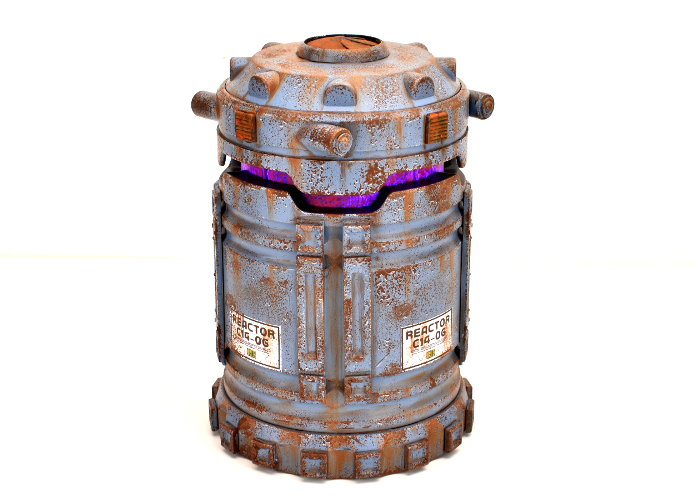
Because the fit of the light tube is rather tight, it does run the risk of rubbing the paint off by lifting or lowering it, so I've settled for turning it on and off by just taking the batteries out, instead. But other than that, I think it turned out quite well. The light is not as bright as it was originally, but it still gives a noticeable glow, even with the lights on!
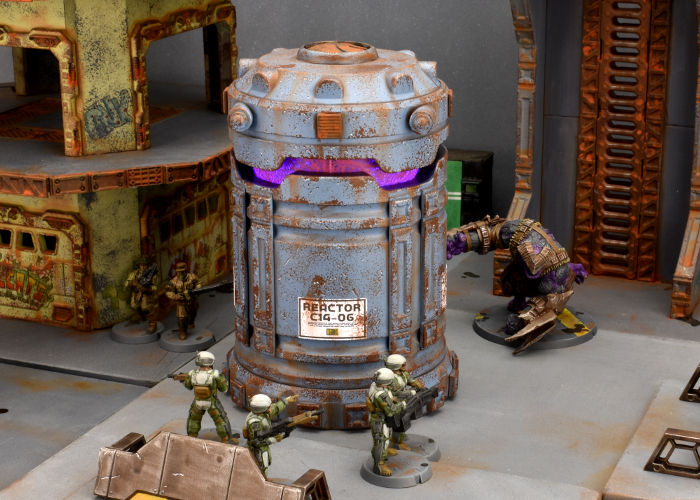
Put together your own evil reactor of purple-powered doom by picking up the terrain sprues, along with the rest of the Maelstrom's Edge range from the webstore here.
Then pop on over to the Comm Guild Facebook group to show us what you're working on!
For other building ideas, modeling tutorials, army spotlights and conversion walkthroughs, check out the Hobby section of the Maelstrom's Edge website here.
Tags: buildings kitbash modeling scratchbuild terrain terrainsprue