Entries tagged [drone]
Modeling Spotlight: Kitbashed Pegasus Heavy Cargo Drone
Posted on Tuesday Jul 20, 2021 at 06:00pm in Tutorials
Time to hack something up, just because we can! I've had my eye on the Hornet dropship from Mantic's Warpath game for some time, as its general shape feels similar to the Epirian Firefly drone, just scaled up. So, I decided to take one and turn it into a heavy cargo drone to support Epirian forces behind the lines! Read on to see how it was built.
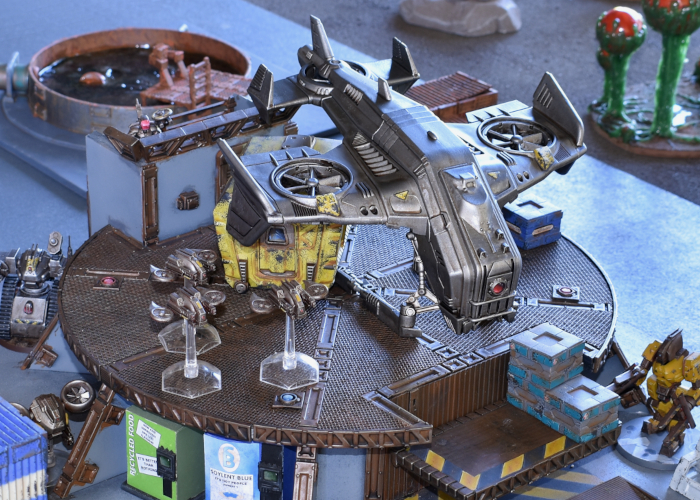
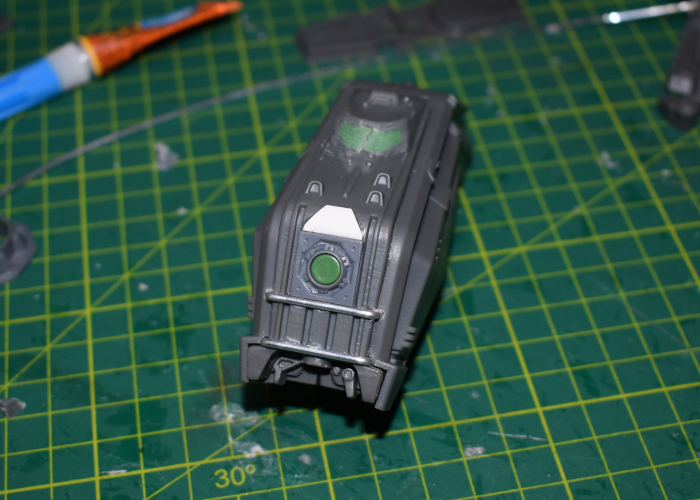
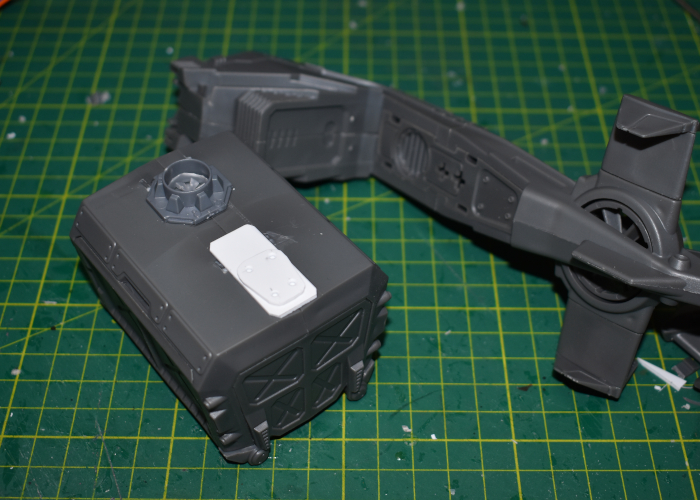
With its design already including wing-mounted turbines, the main alteration required was to make the front of the Hornet look like a standard Epirian drone. I used a small pipe fitting from the first Maelstrom's Edge terrain sprue for a sensor lens housing. For the lens itself, I rolled out some 'Green Stuff' putty into a thin sheet and used the pipe fitting as a stamp to cut out a circle. I also took a couple of pieces of aluminium rod and bent them to fit across the front section on the Hornet, to form the rectangular grill that Firefly and Spider drones have under their sensor lens.
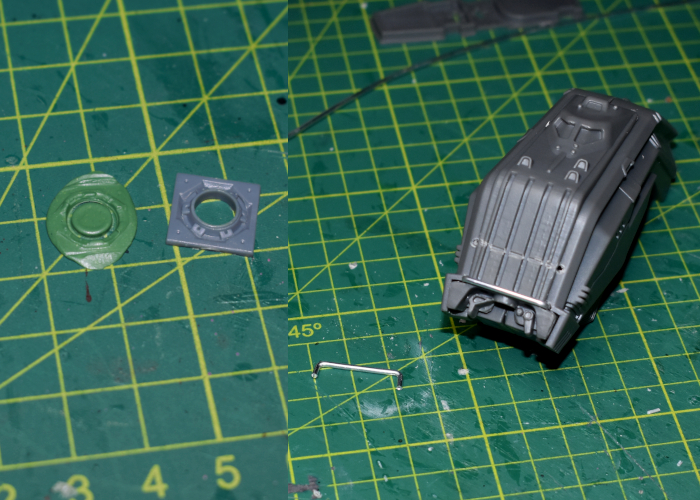
Once the Green Stuff was fully cured, I trimmed away the excess, and glued everything into place on the front of the Hornet. The Hornet's protruded above the lens housing, so I covered over it with a thin piece of plasticard. I had originally intended to cut off the cockpit bulge and seal over it with plasticard, but decided it would be easier to use some putty to fill in the windscreen recesses.
As this drone was intended as a scenery piece rather than for gaming, I decided to keep the cargo container as a separate piece. There is a doorway on one end with no door, as this normally sits up against the door on the back of the Hornet cockpit section. I took a door from the terrain sprue and trimmed it down to fit into the opening, adding a piece of plasticard to fill in the window. I also wanted to add some detail to the top of the container. Taking a fan from terrain sprue #2, I trimmed it down to fit inside the large pipe fitting from terrain sprue #1.
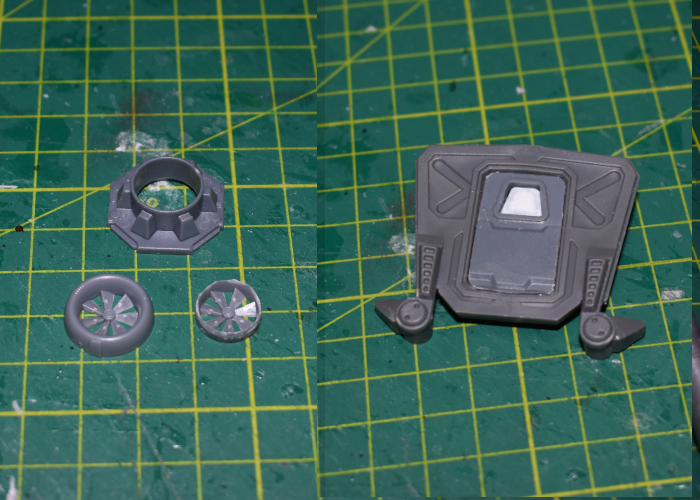
I glued the fan assembly onto the top of the container to line up with the circular vent on the underside of the Hornet's fuselage, and added some plasticard shaped to match the fuselage's trapezoid hatch.
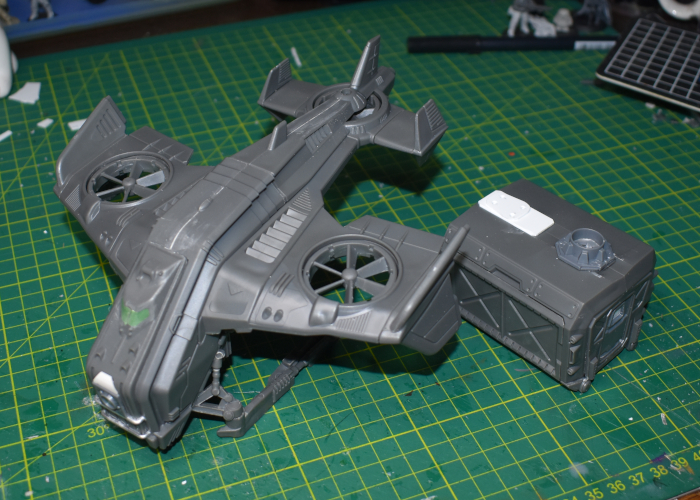
With everything else just assembled as normal, the new drone was ready for paint!
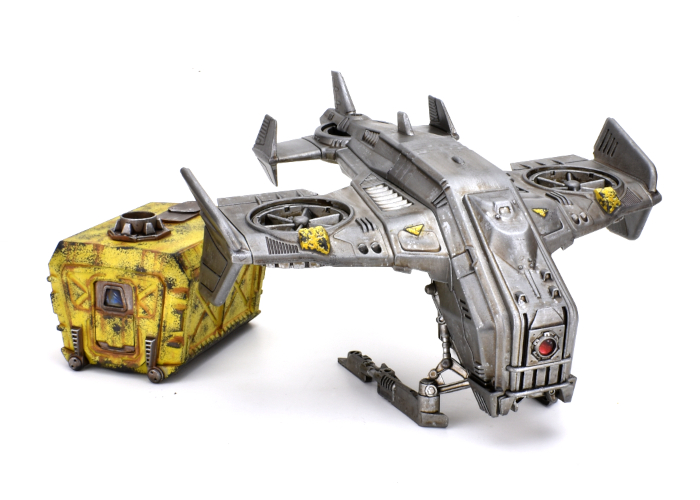
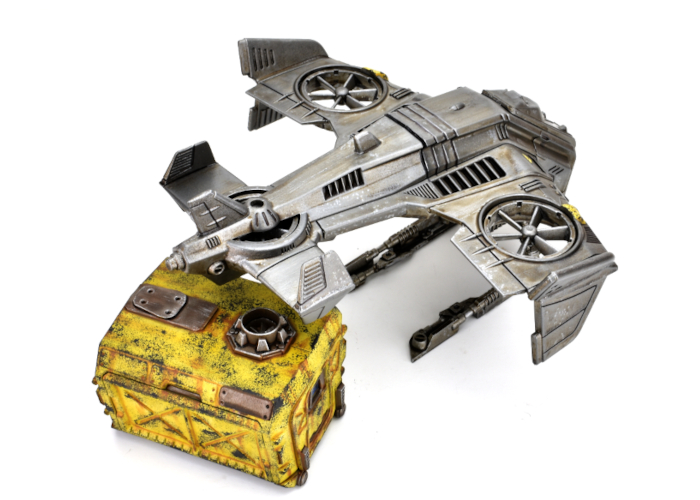
And the finished Pegasus Heavy Cargo Drone, ready to haul some heavy cargo:
To turn your own Hornet into a heavy drone of logistical doom, you can pick up the Maelstrom's Edge terrain sprues along with the rest of the Maelstrom's Edge range from the webstore here.
What are you working on? We would love to see your models and terrain in the Comm Guild Facebook group!
For other building ideas, modeling tutorials, army spotlights and conversion walkthroughs, check out the Hobby section of the Maelstrom's Edge website here.
Tags: conversion drone kitbash modeling spotlight
Modeling Spotlight: Epirian Light Carrier Drone
Posted on Monday Mar 12, 2018 at 05:00pm in Tutorials
- by Iain Wilson
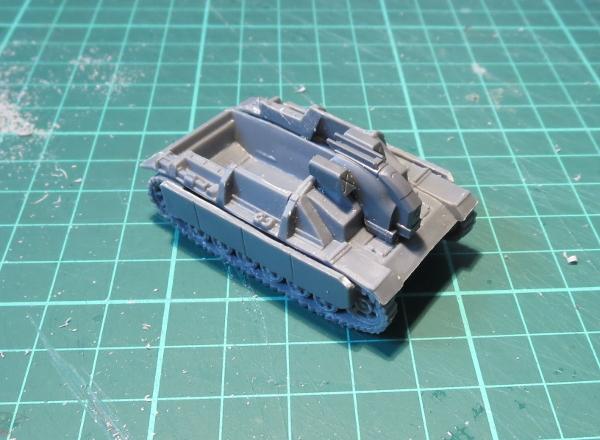
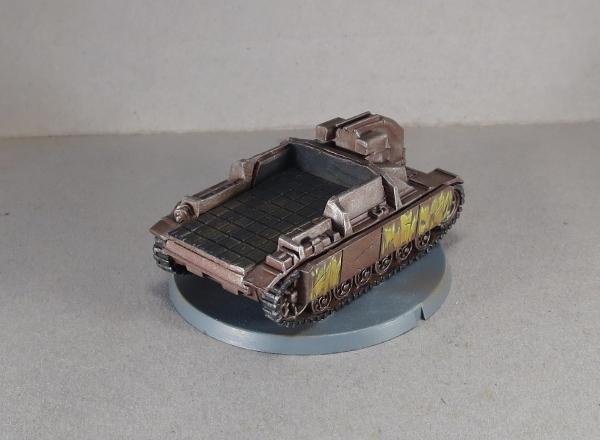
A few weeks ago, I published a spotlight article on the Epirian Drone, showing a few different ways the kit can be assembled or converted. One of the conversions shown was a Light Carrier Drone, made up from a drone chassis and the hull of a 15mm plastic tank from Flames of War, that I think came out of an Adepticon swag bag. This week, I'm going to run through how it was made, using the tank (I think it's some kind of Stug, but I'm no tank expert and so it didn't really matter beyond looking perfect for what I wanted to do) and the chassis piece from an Epirian Drone.
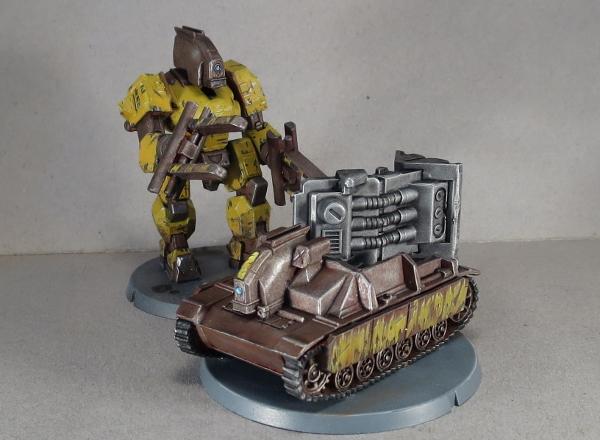
Like the bipedal 'Mule' cargo drone shown above (for which you can find an assembly article here) there are no rules for using this drone in the game - it will most likely just be used to add some flavour to the table. But I find that sometimes venturing off the beaten track and building something different just for the fun of it can really help to keep the creative juices churning over.
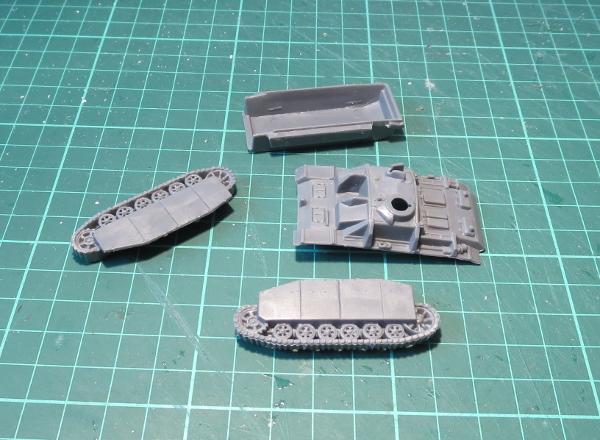
SO, I started by grabbing the main assembly parts of the tank - top and bottom of the hull, and the two track pieces.
I used a razor saw to cut most of the top of the hull away, leaving just the gun mount and the front armour.
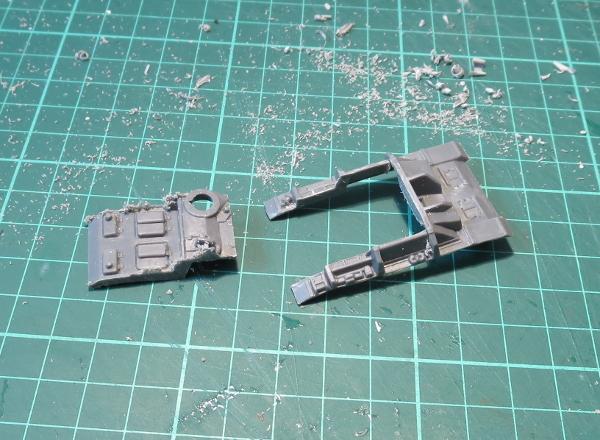
The tracks had some armour plating that extended up over the sides of the tank. I wanted these to be a little more low-profile, so I sawed them off level with the track guards.
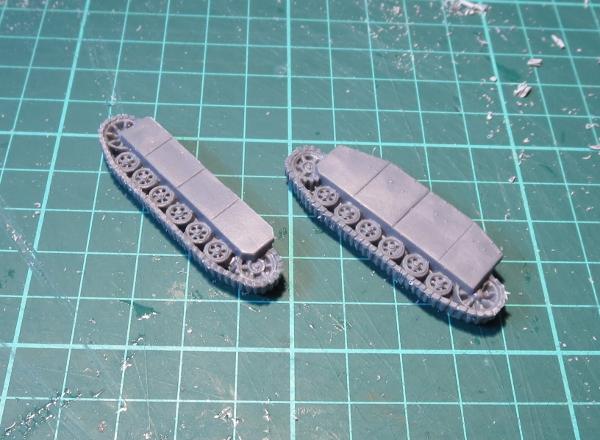
Then I assembled the hull and tracks as per normal, just with a newly-formed great, gaping hole in the rear.
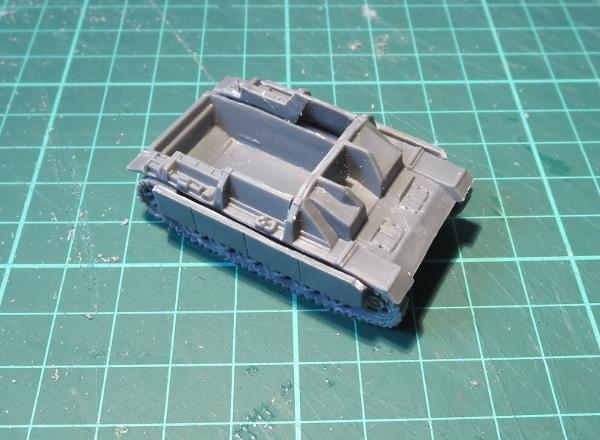
With a slight bevel added to the underside, the drone chassis slotted nicely into the gun mount.
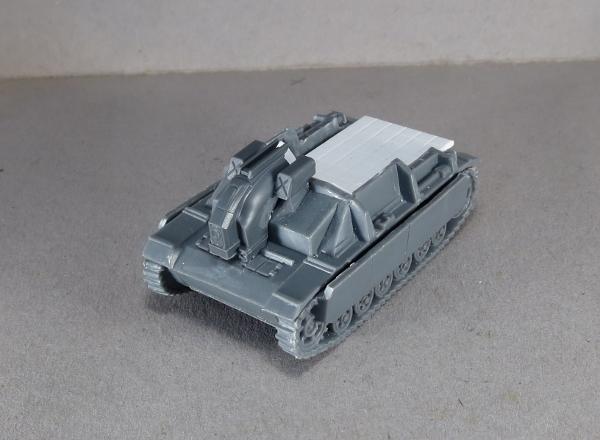
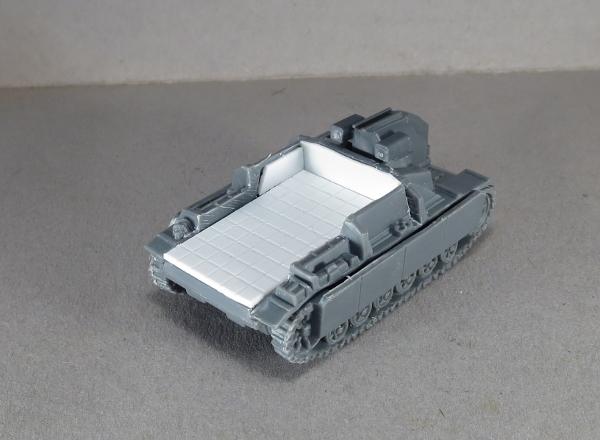
Finally, I filled in the back with some plasticard to create a cargo deck.
To paint it up, I turned once more to the technique shown in my weathered metal tutorial. I kept the palette fairly limited, to emphasise the bare-bones industrial nature of this machine, and made the yellow panels on the sides worn and battered to show a history of hard use.

What have you done with your Drones? We would love to see your creations on the Comm Guild Facebook page!
To pick up the Drone kit, or any of the rest of the Maelstrom's Edge model range, visit the webstore here.
For other Maelstrom's Edge modeling articles, including tutorials and walkthroughs of a wide range of different building and miniature projects, check out the article roundup here.
Tags: conversion drone epirian modeling robot spotlight tutorial walkthrough
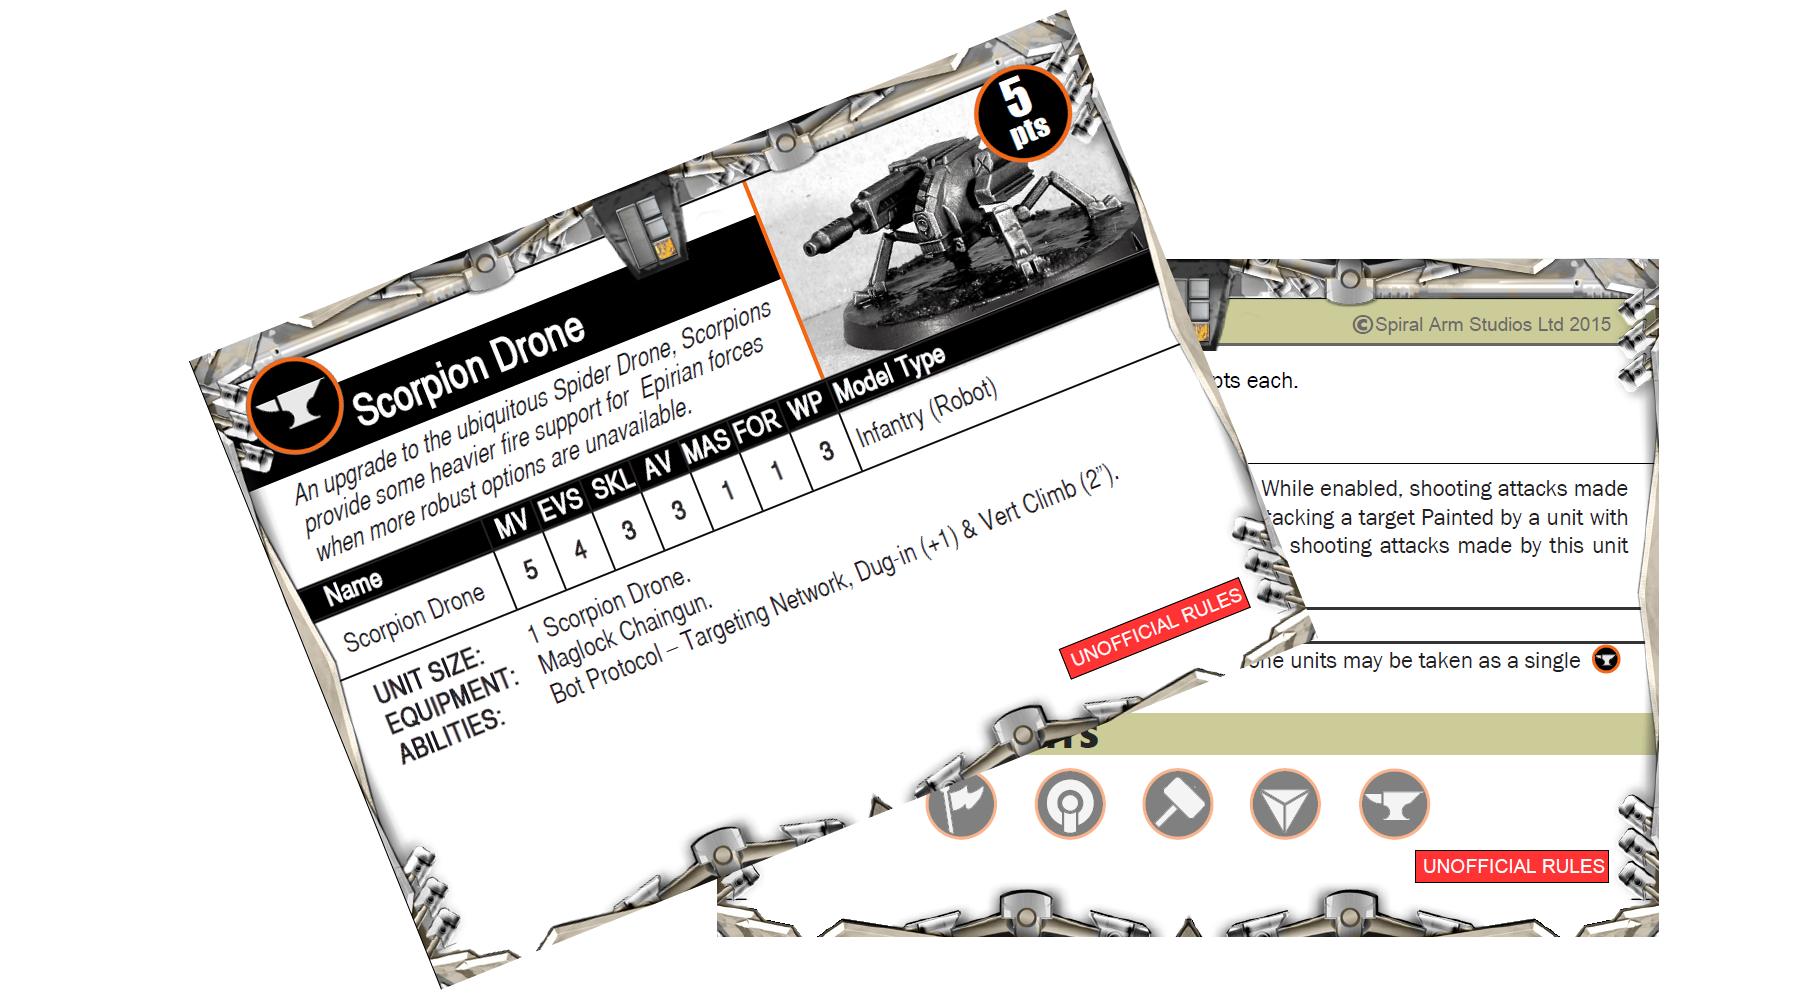
Epirian Scorpion Drone Conversion Tutorial and Unit Card
Posted on Monday May 01, 2017 at 05:00pm in Tutorials
 - by Iain Wilson
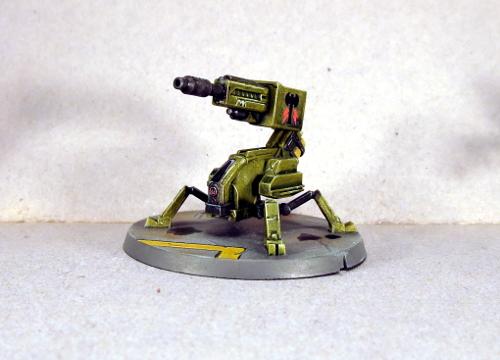
The humble Epirian Drone is a robot of many guises. It was designed as a modular core unit that could have an array of different weapons or motive devices in order to create specialised roles as required. So far in the game we have two of these variants: the Spider and the Firefly. I've had a lot of fun, however, thinking about ways to modify the kit to create other variants, and of the potential things that bored or desperate engineers on frontier worlds might come up with to make their drones fit new roles.
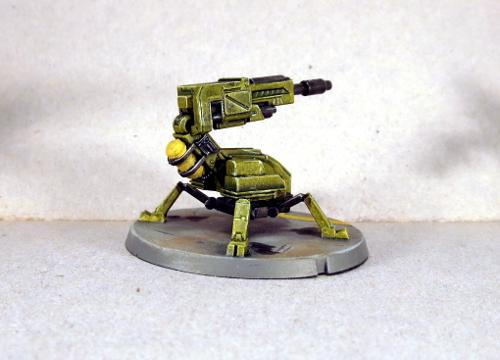
This week, I'm presenting one of the variants that I created: the Scorpion Drone.
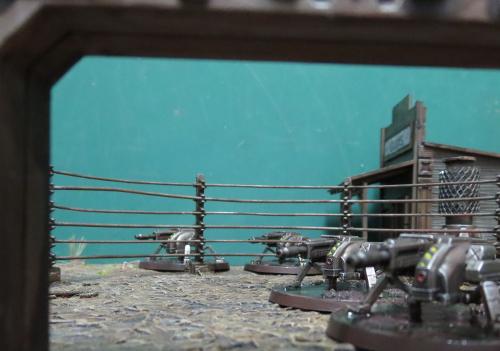
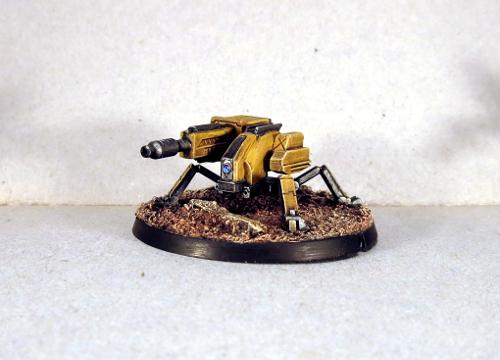
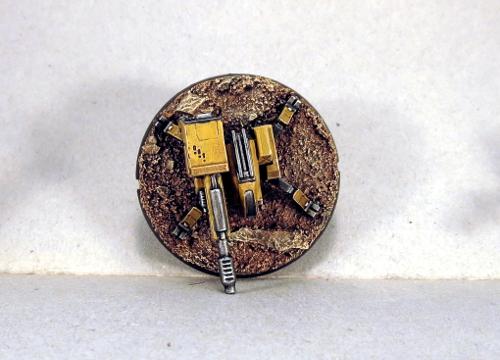
Armed with a hefty maglock chaingun, the Scorpion fills a heavy support role when there are no Hunters around to do the job.
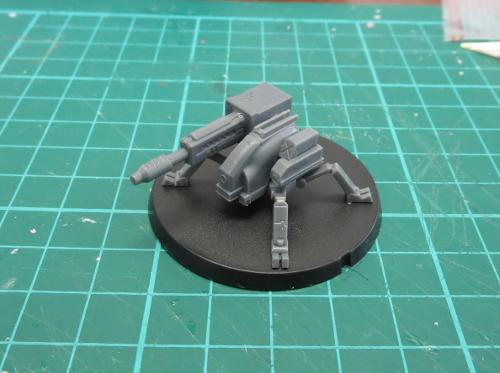
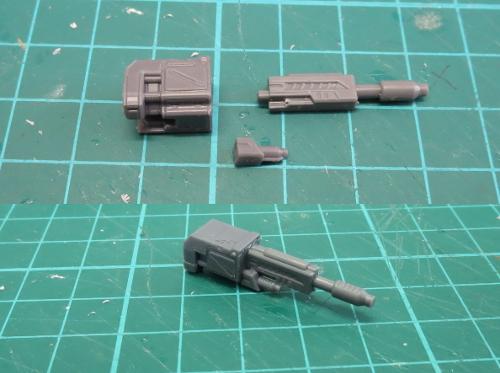
This is a fairly simple conversion, using most of a Drone (legs, chassis, left-side nacelle, rear plate, base) and a chaingun and left-side magazine unit from a Hunter - You could use the right side, but I've used the left as it is a leftover part if you build the Hunter with his hydraulic fist.
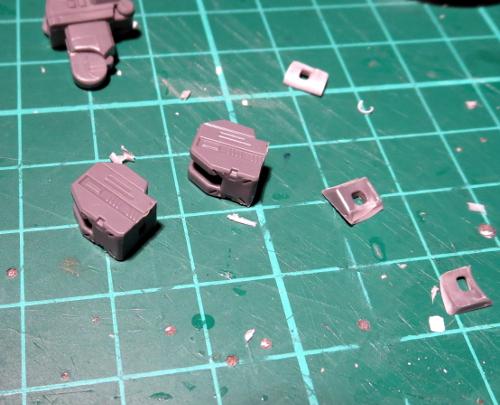
Using a sharp knife, cut the rectangular pod off the right side of the drone chassis.
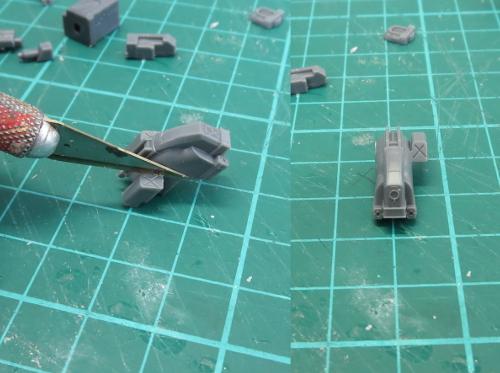
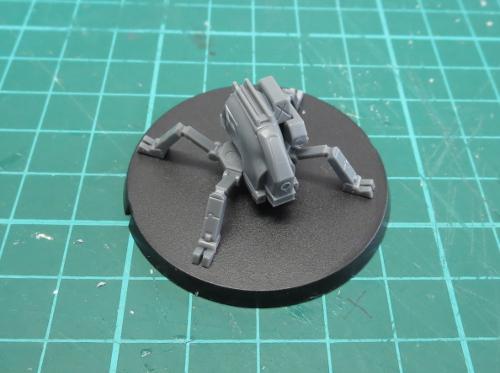
Assemble the drone parts as normal.
Assemble the chaingun with the magazine unit upside-down. This helps to conceal the elbow joint cavity, and means that the side glued to the drone chassis is the side with no detail on it.
Glue the chaingun onto the chassis. It should sit with the rear of the magazine unit a couple of millimetres back from the rear of the drone, and the top of the magazine unit more-or-less level with the top of the rails on the chassis. The ejection port will line up with the rear left knee.
And that's it - job's done!
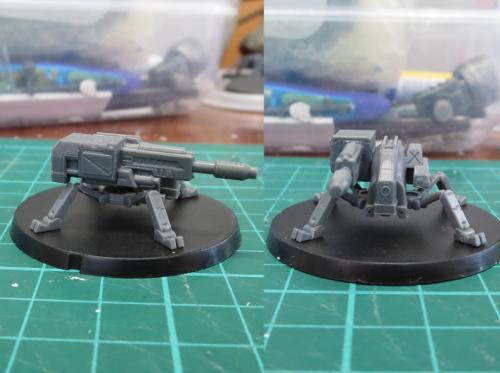
A couple of painted shots of the Scorpion in all its over-sized-weaponish glory:
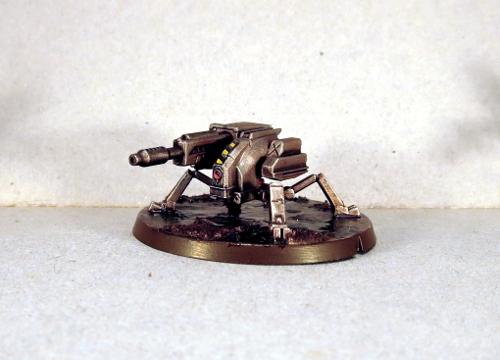
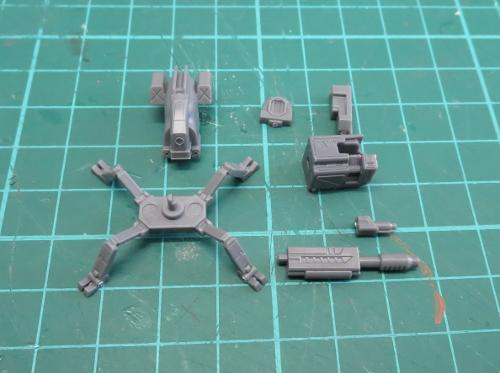
This was actually the second version of the Scorpion that I came up with. The first looked like this:
This version uses the chemtek sprayer from the Scarecrow kit to create more of a scorpion's tail for the weapon.
I decided to go with the second variant partly to make it an easier conversion, and partly because I thought the weapon mounted on the side looked a little more in keeping with the Maelstrom's Edge aesthetic. The tail is fun, but a little impractical.
If you would like to use the Scorpion in your own games, you can download an unofficial rules card here, and you can pick up the Drone and Hunter kits needed to build it from the Maelstrom's Edge webstore here
As always, feel free to share your creations on the Comm Guild Facebook page!
For other Maelstrom's Edge modeling articles, including tutorials and walkthroughs of a wide range of different building and miniature projects, check out the article roundup here.
Tags: conversion drone epirian rules tutorial
Conversion Spotlight: Epirian Mule Cargo Drone
Posted on Monday Jan 23, 2017 at 05:00pm in Models
- by Iain Wilson
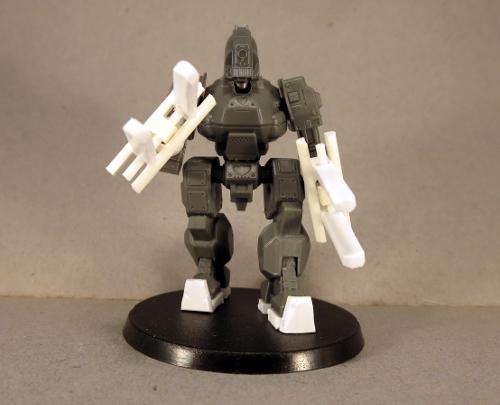
A lot of Epirian tech was originally developed for industrial or agricultural purposes and later modified and adapted for a military role. The Hunter warmech, however, was specifically designed for warfare. I thought it would be fun to see what might happen if the Hunter chassis was retrofitted back to more benign uses, and from that the Mule cargo drone was born.
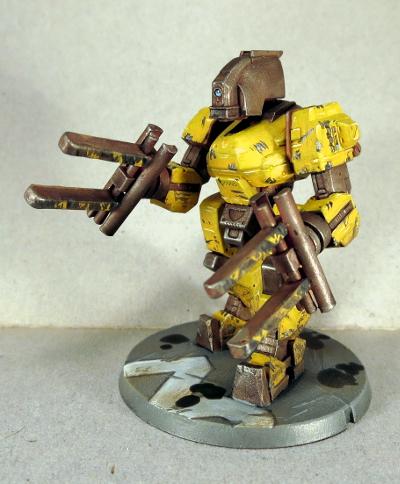
One of the obvious changes is the removal of the integrated processor unit and replacement with a head formed from the core unit of a standard drone. This was intended to reflect the civilian adaptation of the robot, with the more advanced processor unit swapped out for a less robust, less advanced (and likely much cheaper) alternative. I envisage the Mule as being much less autonomous than the Hunter and more limited in function.
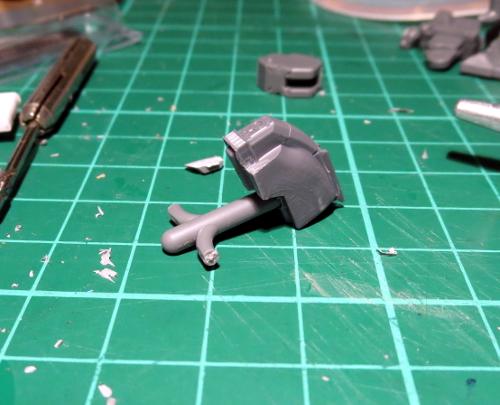
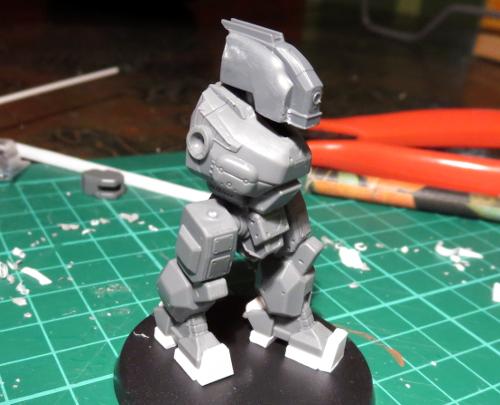
Adding a head ran the risk of making the rest of the robot look a little stumpy by comparison to the regular Hunter, and so I started out by bulking up the feet to give the legs the appearance of extra length.
This was done by adding some platforms under the heel and toe of each foot, and adding a kickplate on the front to help tie these into the shape of the foot. I also added some spikes to the heels, which I imagine being rammed into the ground and used to stabilise the robot when it is lifting something tricky.
For the head, I carefully removed the Hunter's original head unit with an exacto knife.
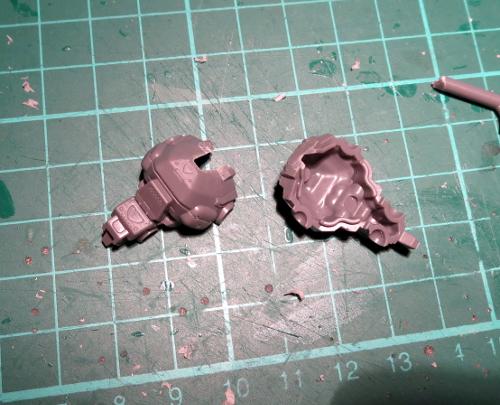
I then trimmed up a T-shaped piece cut from one of the Hunter's sprues to form the neck. This sits nicely inside the front of the torso.
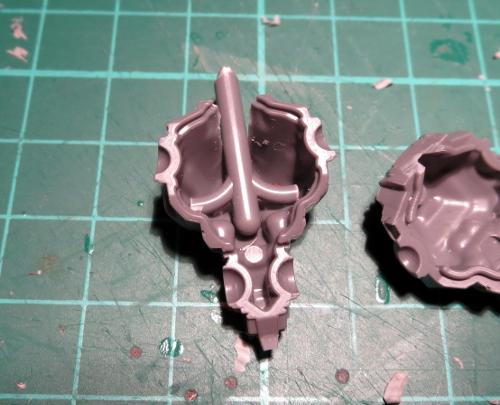
Taking a drone, I cut off all of the extraneous bits, leaving just the central unit. The hole in the bottom for the Firefly flight stem was widened to the width of the neck shaft, and this was then glued in place.
At this point, the legs and torso were all assembled as normal.
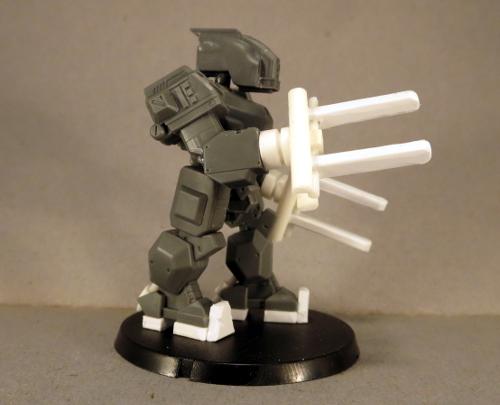
A cargo drone needs lifty arms (yes, that's the offical terminology), and so I took two forearm pieces and cut them off flat on the 'wrist' ends.
Note: You only get one of these forearm pieces on the Hunter sprue. If you have built another Hunter with a ranged weapon on the left arm instead of the hand, you'll have a forearm piece left over just waiting to be used for something like this.
The parts for the forks were then cut from plasticard and glued together.
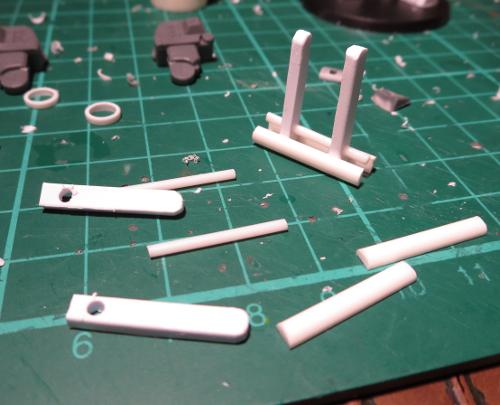
Once the glue on the forks was set they were attached to the forearms with plastic tubing, to create an assembly that looks capable of rotating, for fine control when toting those bales.

With the arms then glued in place, the Mule looks something like this:
All that's left to do then, of course, is to paint it.
A nice, bright, construction-site yellow was the only possible choice for painting my walking forklift. Metal parts were painted to be battered and weathered, and I added generous amounts of chipping and scratches to the yellow to show that this is a piece of hard-working machinery.
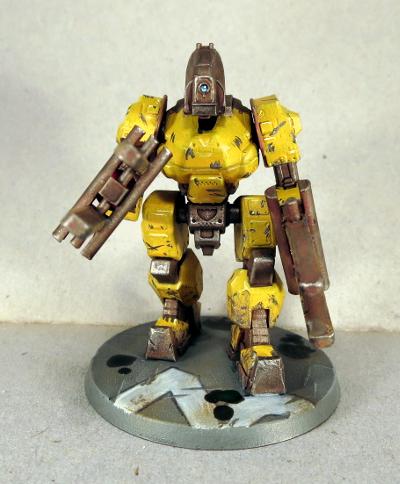
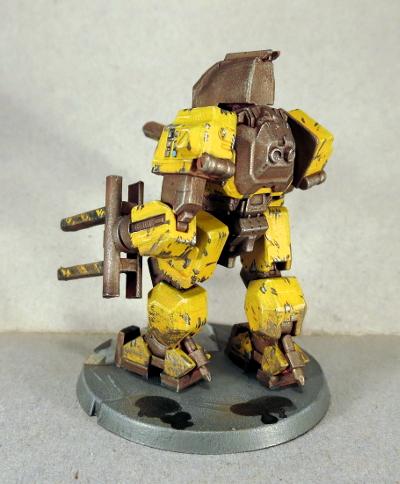
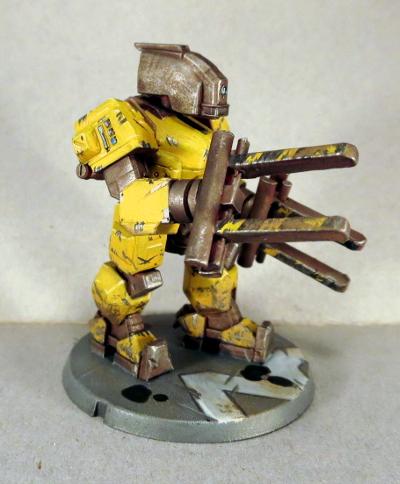
Game-wise, I picture this robot as an upgrade to a Spider drone unit, with minimal combat functionality but the ability to strip Victory Points from objectives at a more rapid rate than normal. It would also be fun to develop the design further and come up with other variants - perhaps a mining drone, an emergency response drone, or a construction unit.
Do you have ideas for your own drone variants? Grab some robot sprues from the Maelstrom's Edge webstore and see what you can come up with! And as always, feel free to share your creations on the Comm Guild Facebook page!
Tags: conversion drone epirian hunter