Entries tagged [epirian]
New digital options for Epirian Bot Handlers fly into the webstore!
Posted on Monday Jun 29, 2026 at 05:00pm in Models
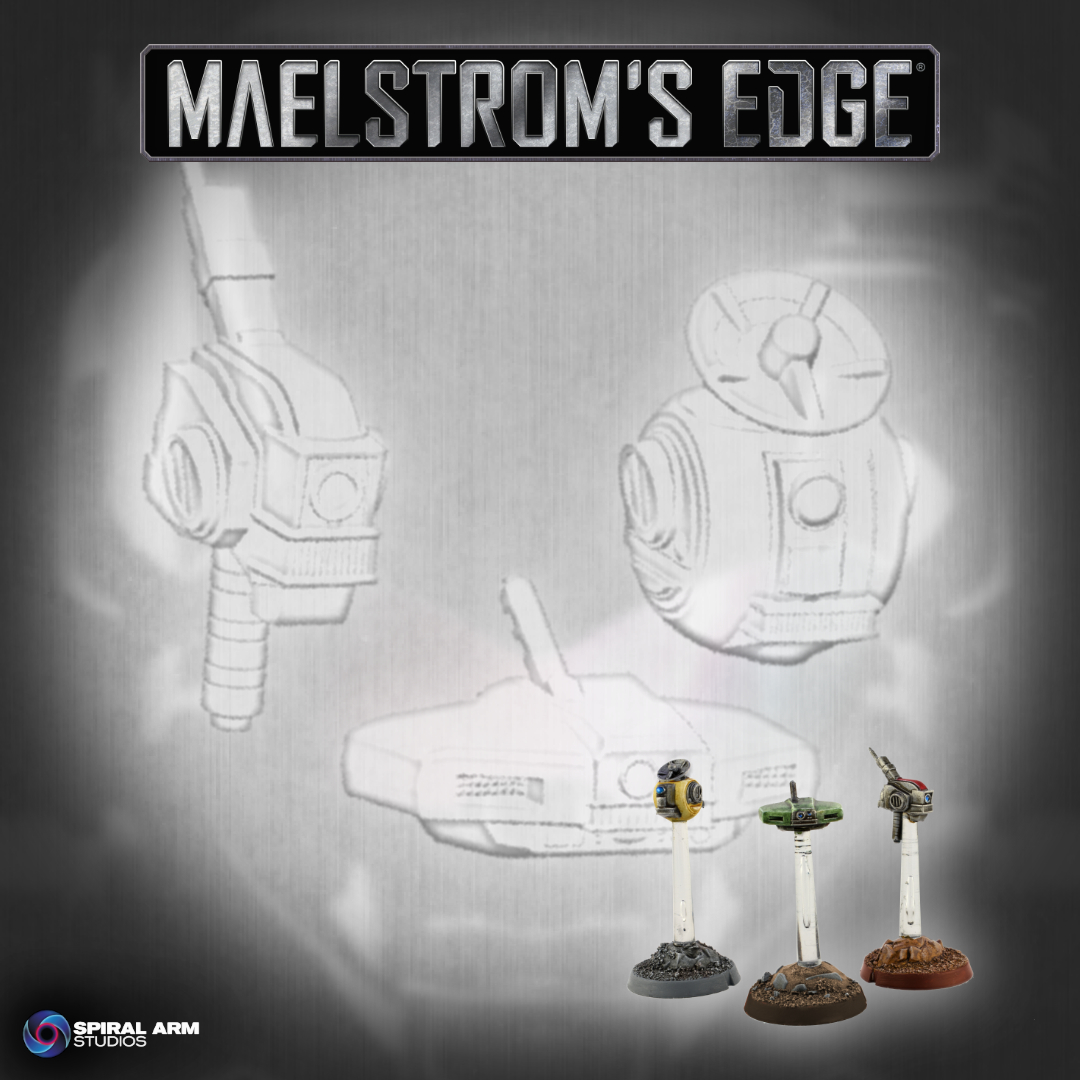
This STL model release includes Aerial Uplink, Spotter and Command Booster drones for Epirian Bot Handlers, along with bases and flight stems. Also included are some bonus parts that can be combined with the plastic Bot Handler sprue to create a female Apprentice or Journeyman Bot Handler. These are available now through the Maelstrom's Edge webstore here.
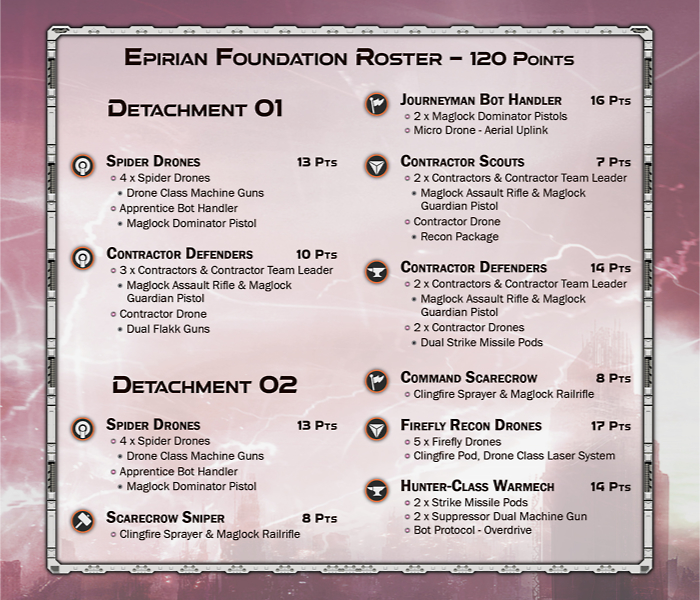
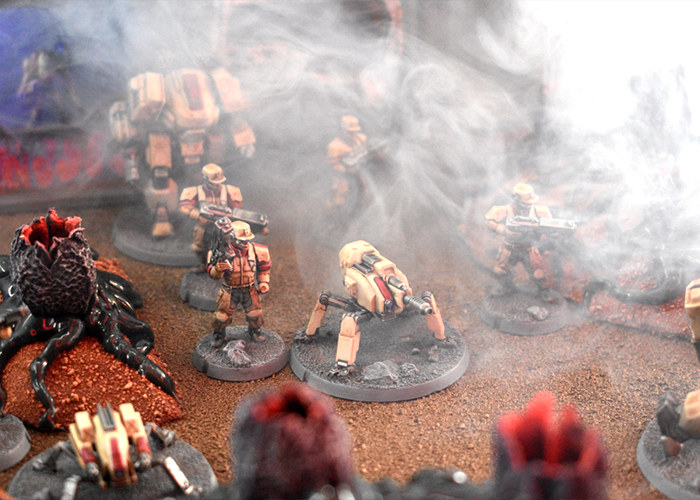
Enter, The Pact - 120 point Battle Report
Posted on Tuesday Oct 07, 2025 at 05:00pm in Gaming
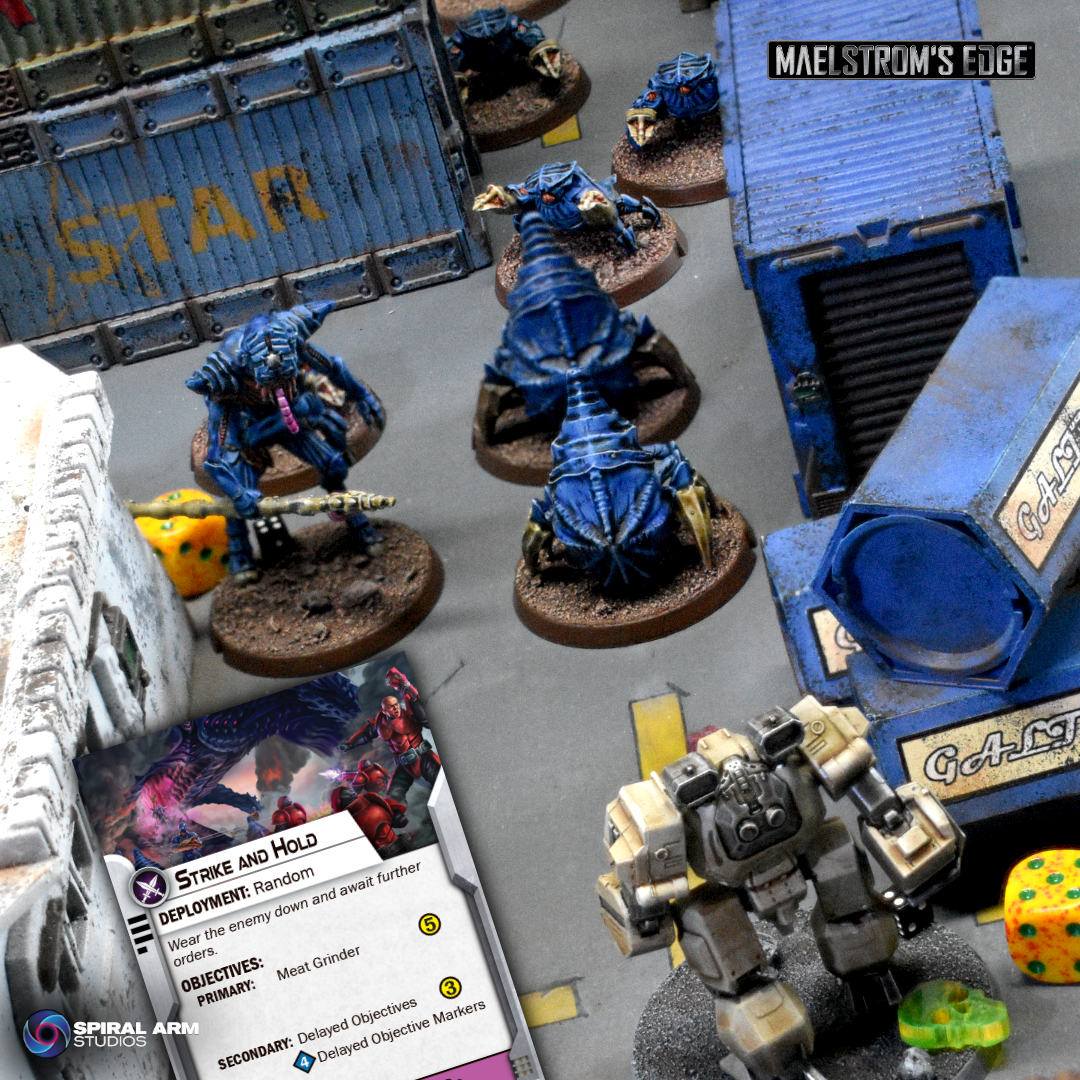
A new Maelstrom's Edge V2 battle report, featuring 120 points of Epirian Foundation militia taking on a Kaigus Pact assault in a Strike & Hold mission! Check it out here!
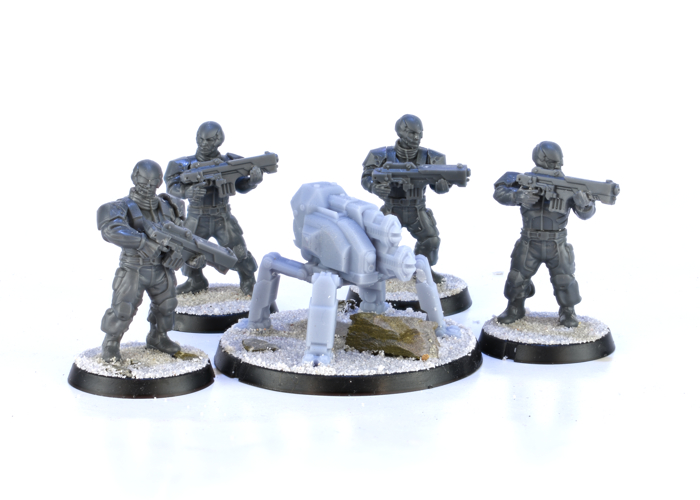
New Plastic Contractor Drones for the Epirian Foundation!
Posted on Monday Sept 01, 2025 at 05:00pm in The Epirian Foundation
Contractor Drones fill an essential role within militia units, allowing Contractors to focus on their objectives without the need to lug around heavy gear and weaponry on their own. More specialized drones even assist Engineer and Medical units, improving their odds of patching up their respective mechanical and biological patients.
We originally released a gun drone kits in resin way back in 2018, and followed it up with a support drone kit (also resin) in 2021. Along the way, though, we decided that this original design didn't quite fit the brief - from a gameplay perspective, they were too low to the ground, and looked too much like a spider drone with a weapon stuck on. So we've taken this opportunity to redesign the drones a little. The main difference is their height - with taller, bulkier legs, the weapon variants now hold their aim at around the same level as if the weapon was being held by a Contractor, which we felt was important to the unit's profile on the table.
We've also made it a little more modular - the support options slot into the same body piece as the guns now, rather than needing a completely separate model, and the guns can all be left unglued so that you can switch them out between battles. And, finally, we've included two more weapon options - the dual strike missile launcher that was an option that wasn't modeled in the first run, and a dual machine gun option that's new for V2!
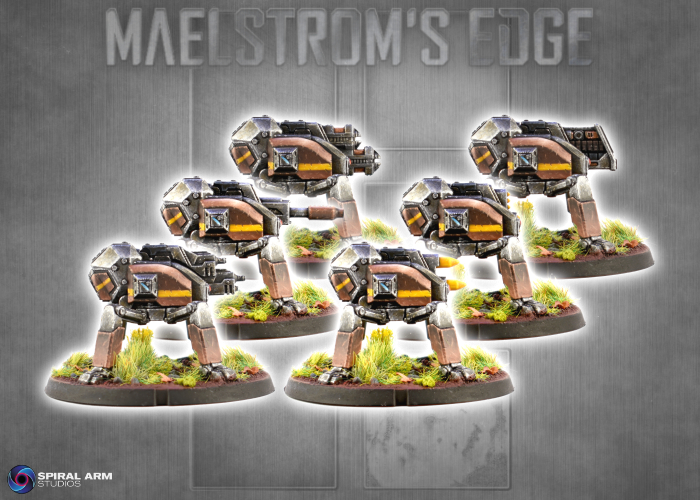
Get to work reinforcing your Epirian forces by grabbing the Contractor Drone kit, including two drone sprues, from the Maelstrom's Edge webstore here!

Our studio drones were painted by the very talented Todd McNeal at Toad Painting!
Tags: contractor drones epirian foundation
Special Issue - New weapons for Epirian SecDef!
Posted on Wednesday Aug 13, 2025 at 05:00pm in Models
Along with the original SecDef sprues, SecDef Infantry boxes now include an additional plastic sprue that includes 2 each of the new weapons options - GL2 Grenade Launcher, LC42 Laser Carbine and ML9 Assault Launcher, giving you plenty of options for building .
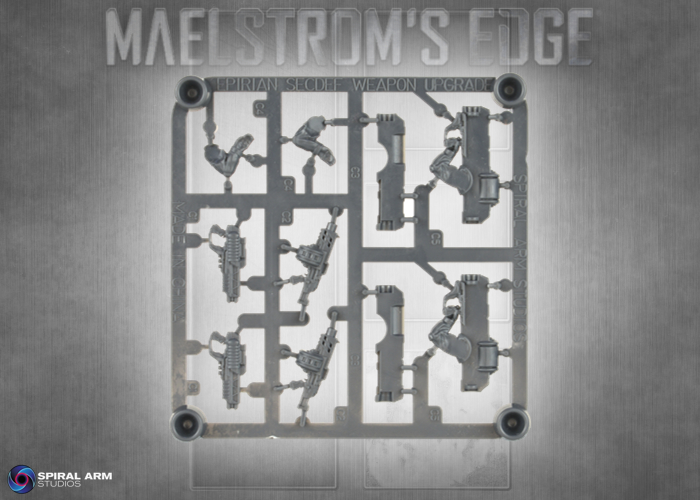
Get started on your elite force by grabbing the SecDef Infantry kit from the Maelstrom's Edge webstore here!
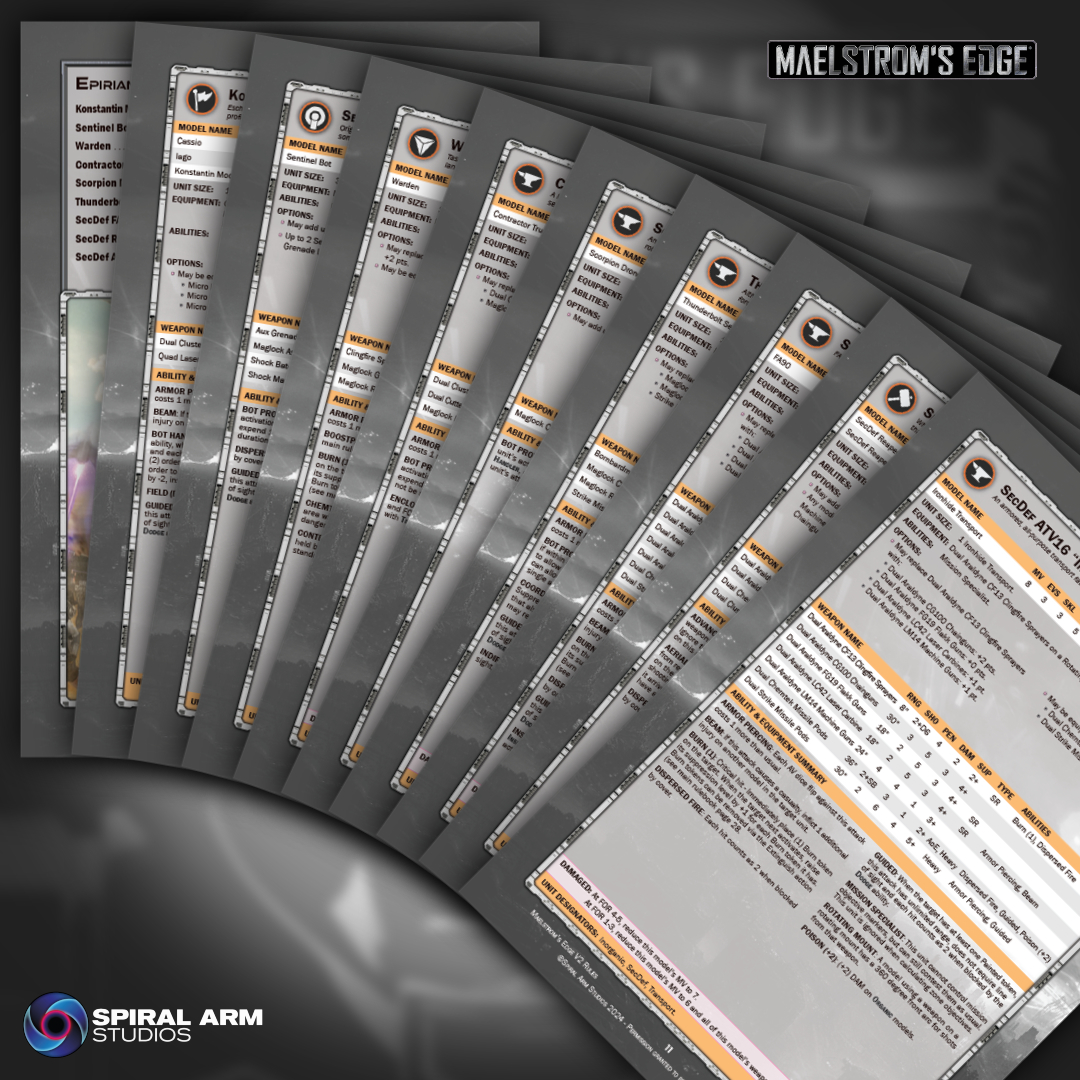
Updated Homebrew Epirian Unit Rules
Posted on Thursday Sept 12, 2024 at 05:00pm in Gaming
 - by Iain Wilson
With the release of the updated Beta seeing the V2 rules in their more or less final state, this seemed like a good time to get caught up with my assorted homebrew units created originally for the V1 ruleset. To begin with, I have worked through my Epirian creations, compiling them into a PDF for easy reference.
These units are all converted from assorted Maelstrom's Edge parts, or modified models from other games. To duplicate them, you can find the original modeling articles by following the links below, or you can choose to use whichever other appropriate models you have to hand. Note that as these are unofficial rules, you should ensure that you discuss it with your opponent before using them, to make sure they're familiar with and ok with them!
Konstantin Moor, Veteran Bot Handler - a unique Commander accompanied by two custom drones.
Sentinel Bot Unit - a robotic replacement for the standard Contractor unit.
Warden - a boostpack-equipped Epirian solo character.
Contractor Truck - a light transport vehicle for moving your Contractors about.
Scorpion Drone - a modified Spider Drone with a nastier bite.
Thunderbolt Sentry Drone - an automated weapon drone built from the PDC Gaming gun carriage model.
SecDef FA90 Reconnaissance Walker - a scout vehicle adding firepower and advance intel for SecDef forces.
SecDef Reaper Team - Originally just called the SecDef Heavy Team, updated with a better name and more options.
SecDef ATV16 “Ironhide” Transport - an armored SecDef transport converted from a Miniature Scenery Tactical Response Vehicle.
The Thunderbolt Sentry Drone and Warden already had V2 Beta rules published. This document updates them to V2.1, adding a Micro Drone equipment option to the Warden and including the rules entry for the Thunderbolt's Rotating Mount, which was left off the original page.
Download the PDF here!
To build your own force of kit-bashed doom, grab some Epirian models from the Maelstrom's Edge webstore here!
What are you working on? We would love to see your models and terrain in the Comm Guild Facebook group!
For other building ideas, modeling tutorials, army spotlights and conversion walkthroughs, check out the Hobby section of the Maelstrom's Edge website here. And while you're there, grab a copy of the Maelstrom's Edge V2 Beta rules!
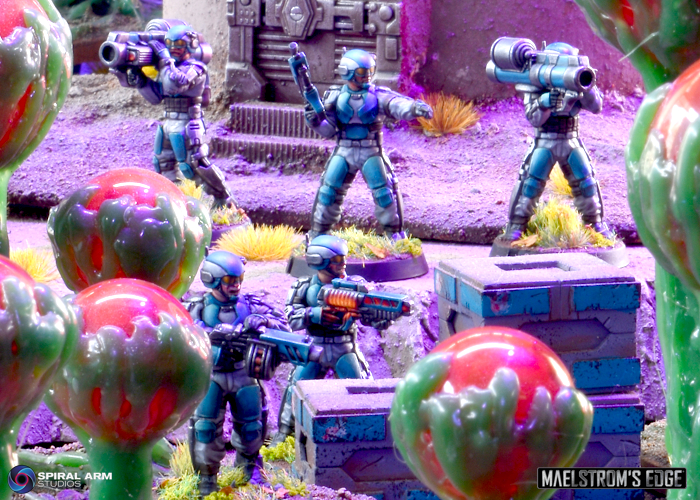
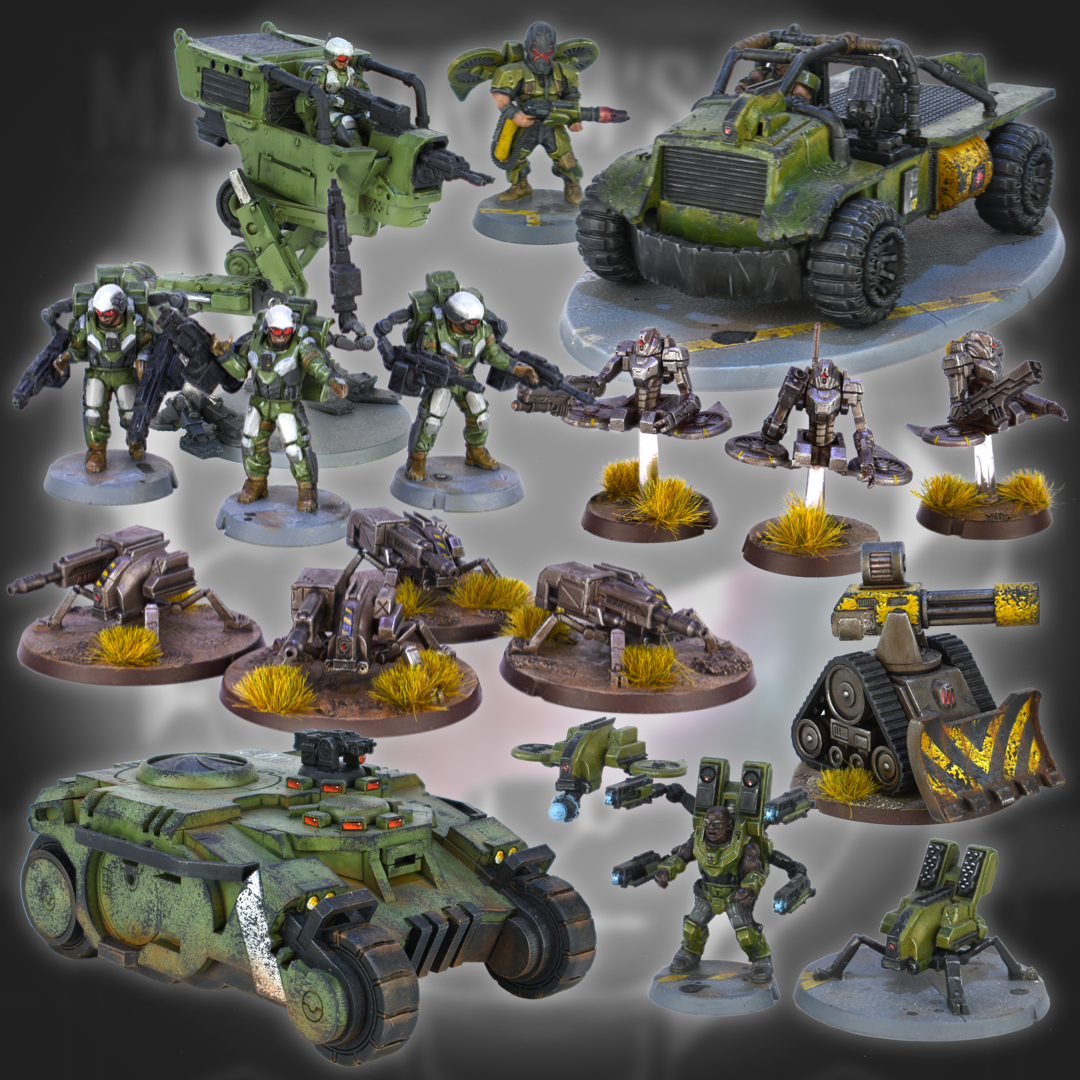
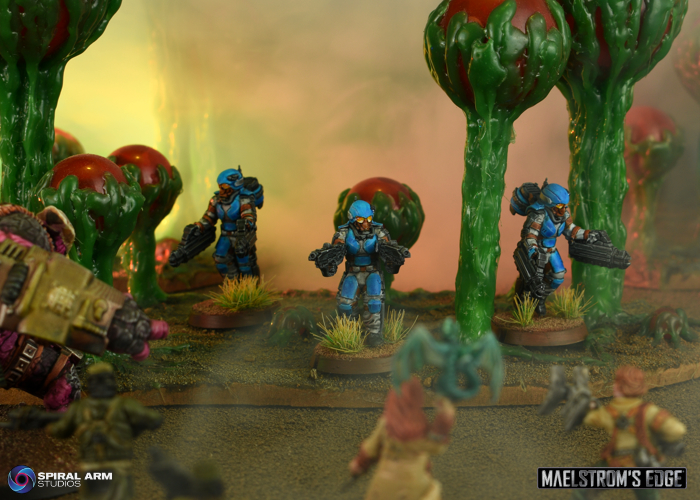
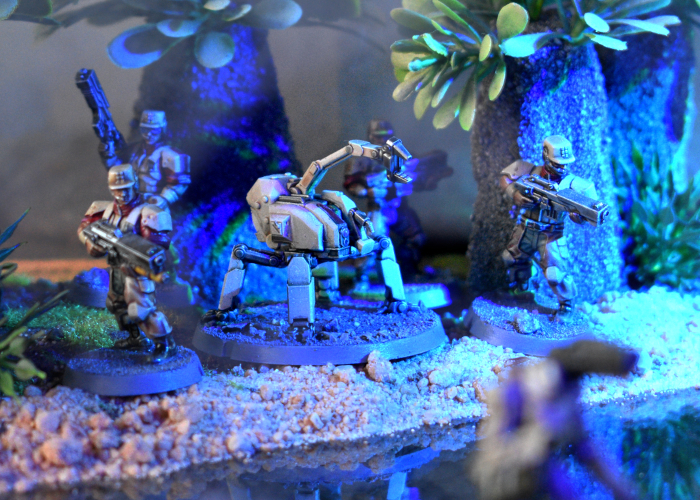
V2 Sample Force - Epirian Foundation
Posted on Thursday Aug 08, 2024 at 05:00pm in The Epirian Foundation
- by Iain Wilson
Maelstrom's Edge V2 is on the way, so this seems like the perfect time to build some new armies! The upcoming V2 Rulebook includes sample lists for each faction, and I thought it would be fun to build them all so that I can use them for some battle reports. I decided to start with the Epirians, because, well, robots are cool.
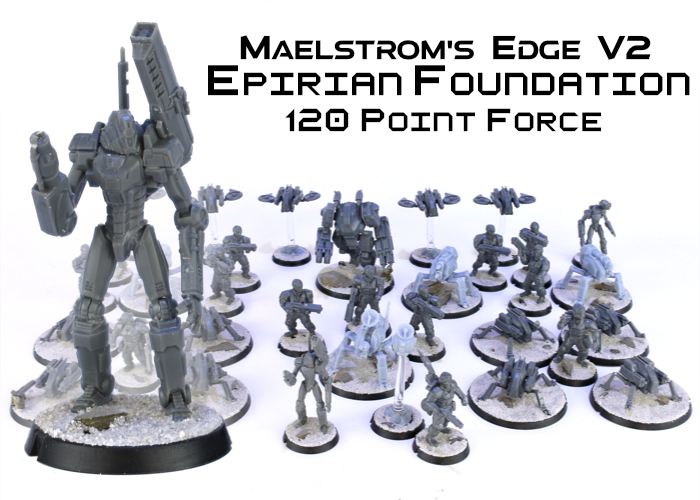
The force list for this project is focused around bots, although has a few Contractor units in there as well for variety. For simplicity, the rulebook sample list is built as a single detachment led by a Journeyman Handler and includes two Scarecrow Snipers. I decided to tweak things slightly by making one of the Scarecrows a Command unit and splitting some of the bots into a second detachment, but otherwise this force is the same as will appear in the book.
In a force led by a Handler, bots are the main focus. The Journeyman’s Bot Handler ability, improved by the Aerial Uplink, allows them to keep suppression under control for the force’s bots, while their Push the Machines ability allows you to reactivate an already activated bot unit, doubling the effectiveness of the Hunter or a Scarecrow each turn. By including the Command Scarecrow, the force gains an additional command point each turn, and having the second command model allows the force to be more spread out while remaining in a command radius bubble for orders and bot protocols.

These Command models are largely built stock, although I repositioned the head and weapon on the Command Scarecrow, and used a Broken head (with the helmet hung on the belt) for the Journeyman. The Aerial Uplink drone is a 3D print of an upcoming model.
The presence of the Apprentice Handlers in the Spider Drone units gives them the freedom to move out of the Scarecrow or Journeyman’s command radius without losing the benefit of orders and bot protocols.
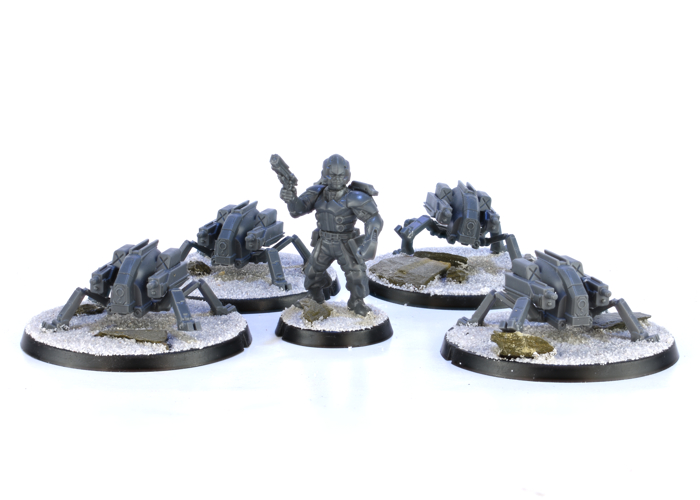

I used another Broken head for one of the Apprentices, and repositioned some of the Spider Drones' legs to add a little variety in their posing.
The inclusion of a few Contractor units helps provide some additional firepower in the force. The Recon Package in the Scout unit can paint enemy units for the attention of the Strike missiles on the Defender's weapon drones and the Hunter mech.
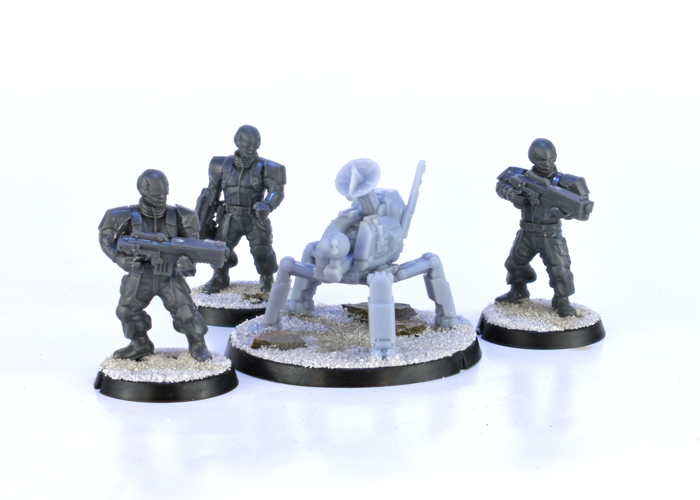
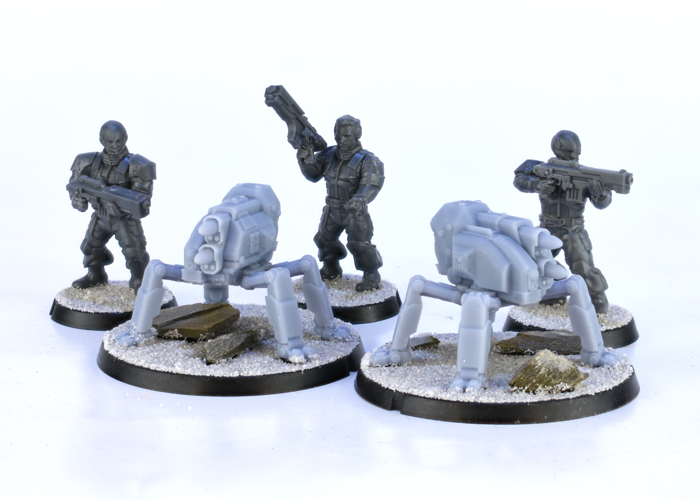
I used the arms and helmets from the Faction Expansion Sprue on the Contractors, as I wanted this force to have that better armoured look. The drones in these units are 3D prints, and these models are currently available as printable STLs, although a plastic kit is currently in development, for release as soon as possible!
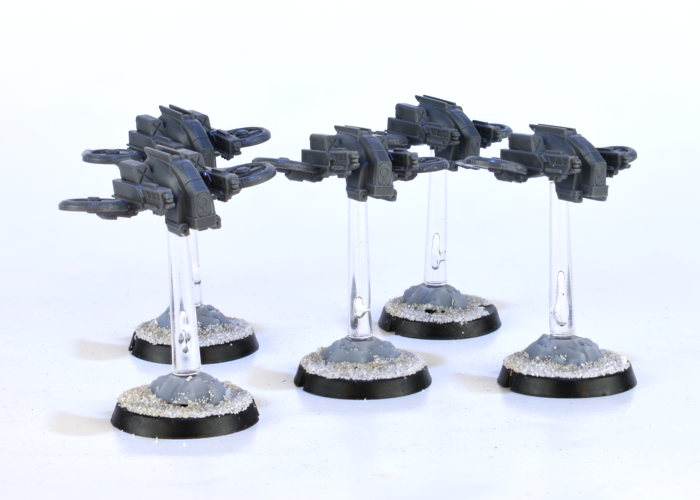
To round out the force, the Firefly drones provide some fast-moving harassment and paint enemies for the Strike missile units, while the Scarecrow and Hunter serve as mobile fire support and focus on taking out enemies too tough for the Contractors or Spiders to deal with. In addition, selecting the Master of Machines faction objective potentially gives the force an additional free bot protocol activation each turn, allowing the Hunter to move more quickly around the battlefield, the Scarecrows to pump out additional firepower, and the Fireflies to more effectively dodge enemy fire.
 With everything built and based, I'm looking forward to getting some paint on! I'm going with a blue and black scheme, as I don't have anything already in those colours, making it a nice opportunity to do something different.
Stay tuned for part 2!
To build your own force of remote controlled robotic doom, grab some Epirian models from the Maelstrom's Edge webstore here!
What are you working on? We would love to see your models and terrain in the Comm Guild Facebook group!
For other building ideas, modeling tutorials, army spotlights and conversion walkthroughs, check out the Hobby section of the Maelstrom's Edge website here. And while you're there, grab a copy of the Maelstrom's Edge V2 Beta rules!
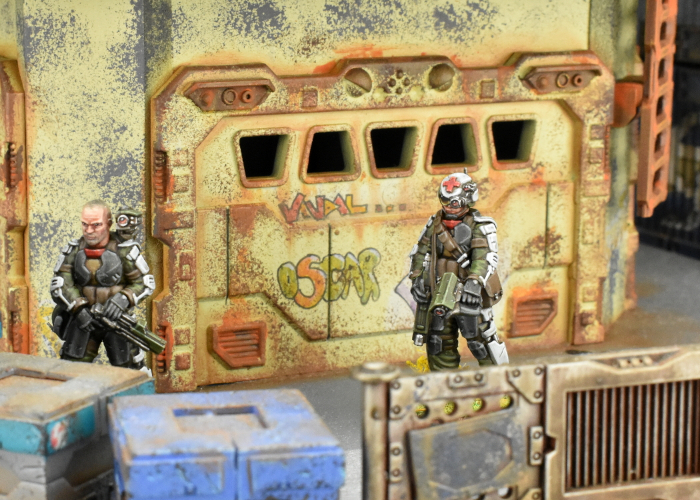
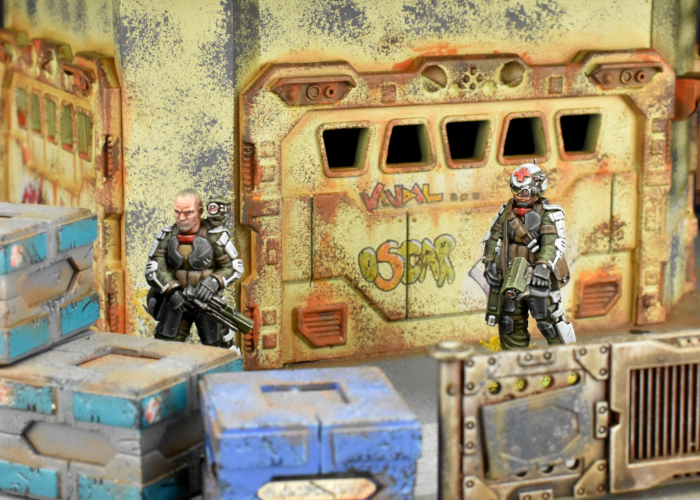
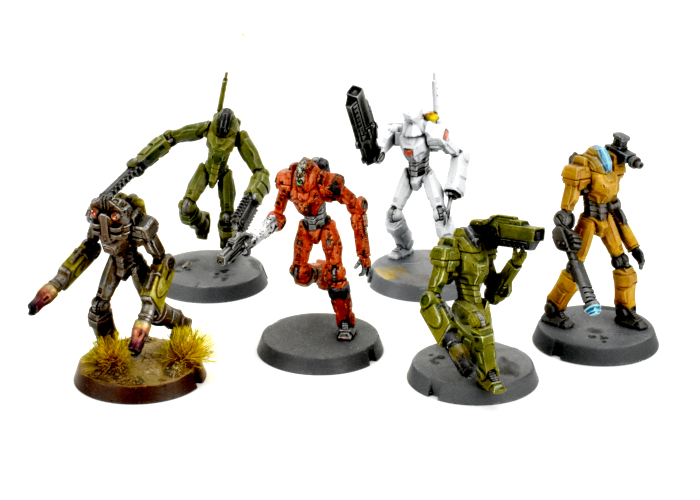
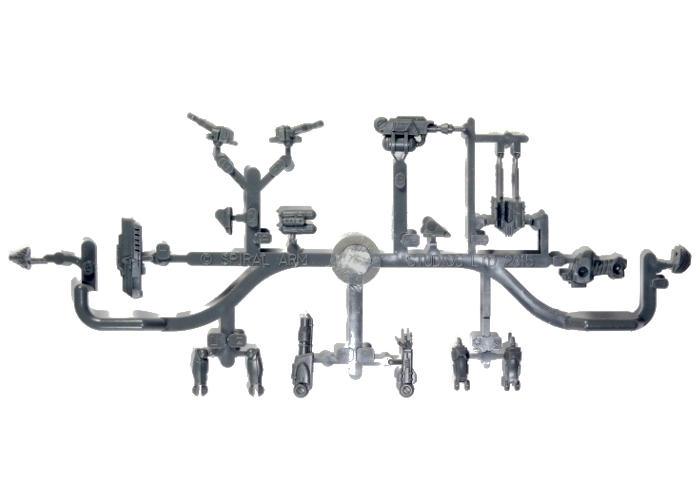
New Epirian STL Release - SecDef Boostpack Troops!
Posted on Thursday Jul 11, 2024 at 05:32am in The Epirian Foundation
A SecDef Rapid Intervention Team from the Forthrast Reconnaissance Division assaults a patrol of Broken insurgents.
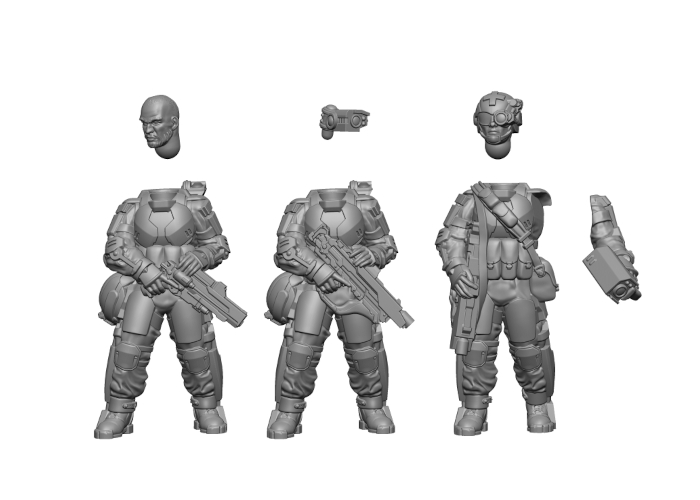
This digital model pack contains STL files for 5 Epirian SecDef Boostpack Troops, used in Epirian forces as Rapid Intervention Teams. Includes both supported and unsupported versions, and multiple equipment options.
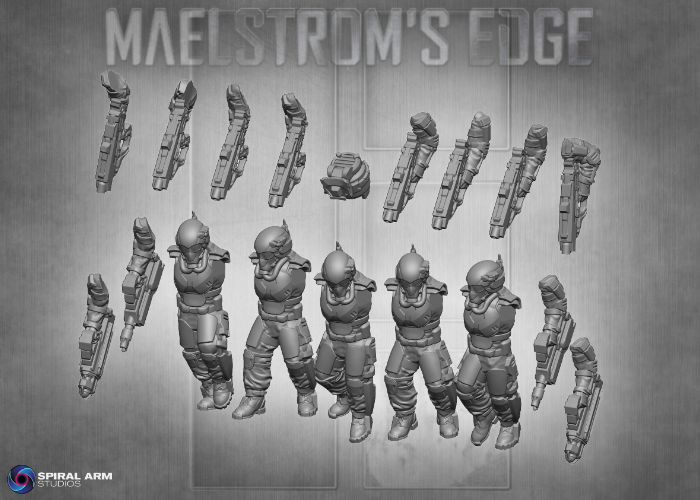
The included components.
You can find the rules for using SecDef Rapid Intervention Teams in your Epirian force in the downloads section of the Maelstrom's Edge website here.
Start building your elite army of defensively secure doom by grabbing your troopers from the webstore here!
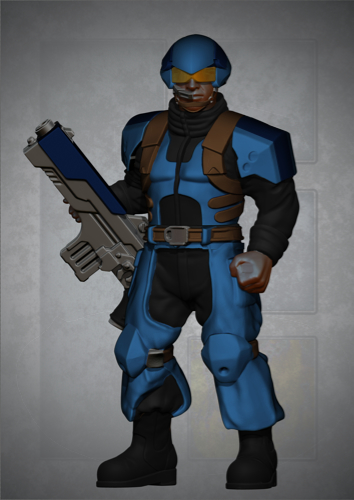
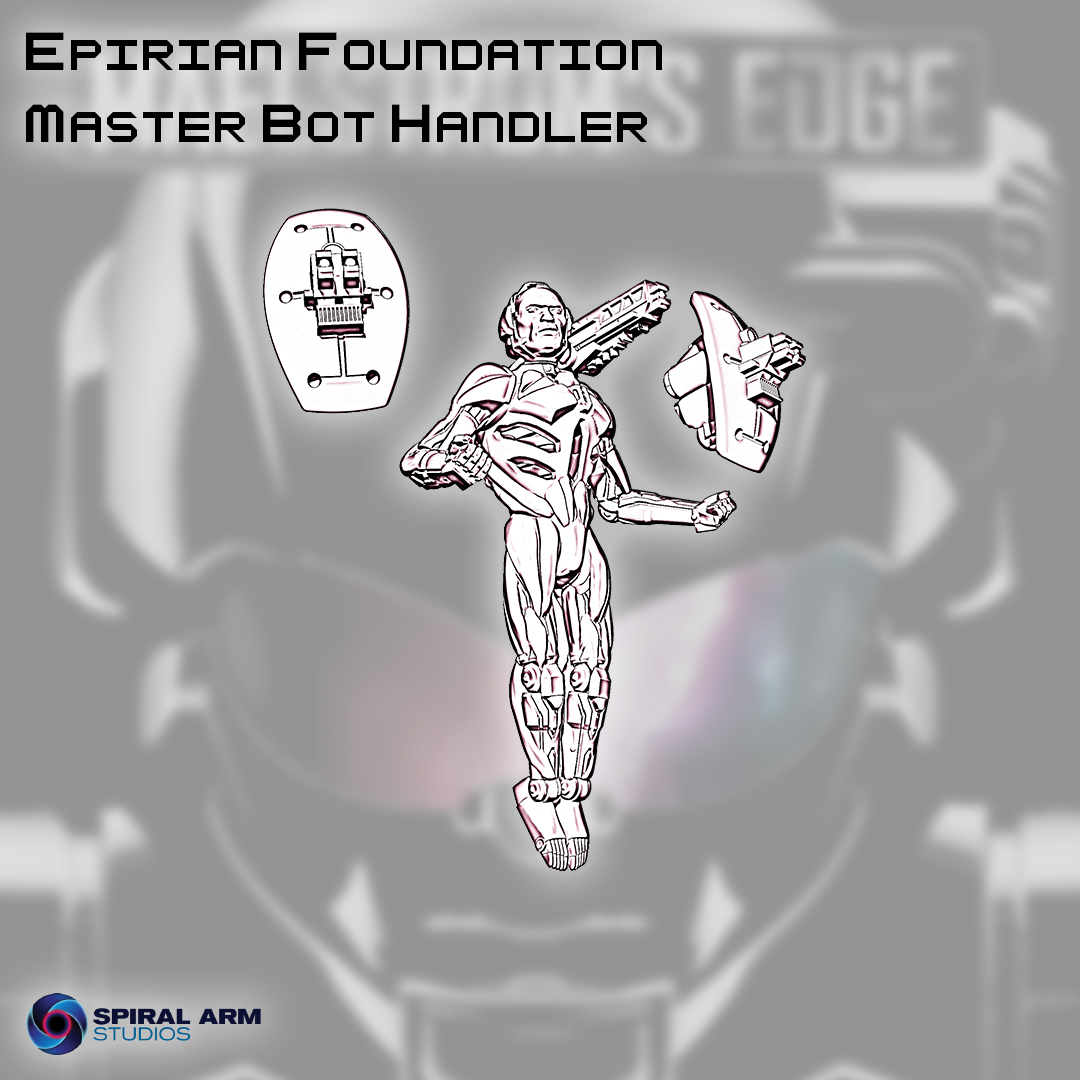
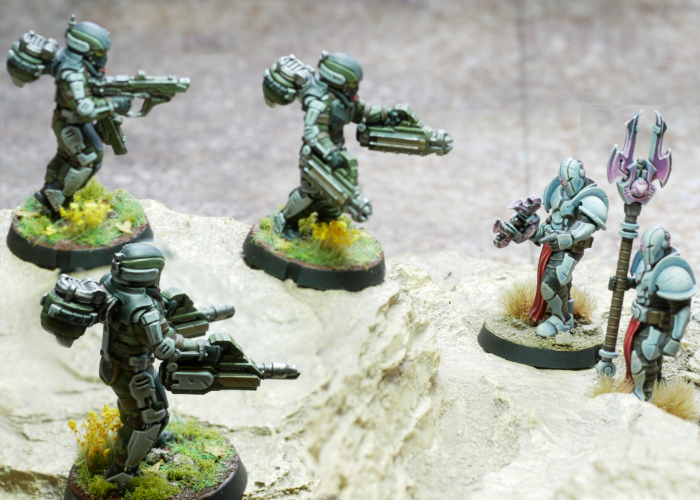
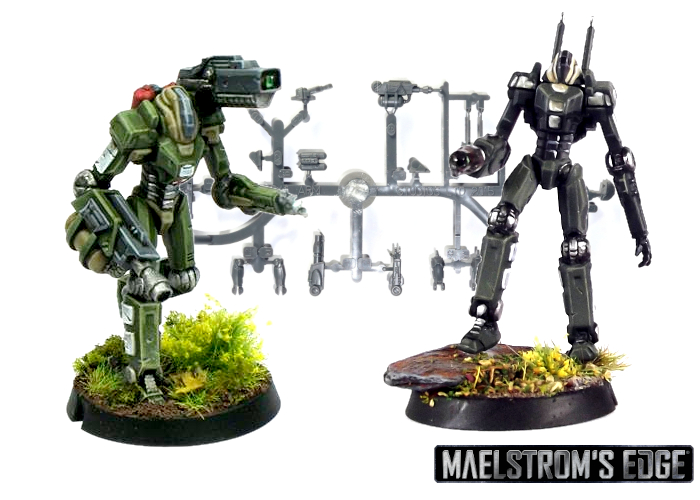
Sneaky Spotlight: The Epirian Master Bot Handler
Posted on Wednesday Oct 25, 2023 at 09:46pm in The Epirian Foundation
Click for larger image
Exceptionally wealthy Master Handlers are often accompanied by Defender Drones, armed with high intensity lasers and packed with proprietary technology not made available to anyone outside of the Foundation elite. Defenders hover noiselessly around their Handler emitting a cascading protective energy field, a visible reminder of the wealth and power of the Foundation.
Stay tuned for more sneak peeks! In the meantime, try out the V2 Beta rules by grabbing the PDFs from the Trial Rules section of the Maelstrom's Edge website here, and grab your models from the Maelstrom's Edge webstore here! Free shipping applies to qualifying orders - check your cart for details.
You can also find a series of articles looking at different aspects of the V2 game here.
If you have any questions on the V2 rules, the model range, or any other aspect of the Maelstrom's Edge game, feel free to pop in to the Comm Guild Facebook group here.
Droning on in support - New Epirian Digital Model!
Posted on Monday Sept 04, 2023 at 08:55pm in Models
A Contractor Engineer unit advances cautiously along a waterline.
This kit is comprised of a Support Drone chassis, and optional parts to equip it to join any of three different Contractor unit types. The Recon Package is the standard gear for support drones utilised by Contractor Scout units. Contractor Engineers make use of tool-equipped drones to effect repairs on other damaged bots, while medical drones in Contractor Medic units patch up the force's less hardy human elements. The digital model pack contains STL files for both supported and unsupported versions of the Support Drone, with multiple equipment options. The model has been slightly updated from the original resin release, featuring taller legs to boost the overall size of the drone.
Support Drone Render
You can find the rules for all of these Epirian unit in the downloads section of the Maelstrom's Edge website here.
Start building your army of shooty robotic doom by grabbing your Support Drone from the webstore here!
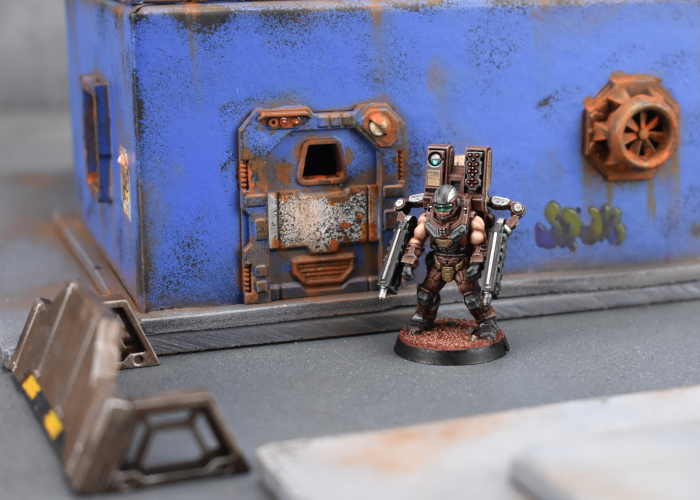
New Epirian STL release - Contractor Drone!
Posted on Monday Aug 07, 2023 at 05:00pm in Models
A Contractor Defender unit holds the line.
This digital model pack contains STL files for both supported and unsupported versions of the Contractor Drone, with multiple equipment options. The model has been slightly updated from the original resin release, with taller legs and the addition of the linked Strike Missile option. A 3D printed resin version will also be added to the webstore in the near future.
Contractor Drone Render
These drones are added to Contractor Defender or Contractor Scout units. You can find the rules for these units in the downloads section of the Maelstrom's Edge website here.
Start building your army of shooty robotic doom by grabbing your Contractor Drone from the webstore here!
New Release: Epirian SecDef Character Model STLs!
Posted on Thursday Dec 01, 2022 at 05:00pm in Models
SecDef Medics are combat veterans who have received additional training and equipment to administer first aid in the field. Known for being level-headed under fire, medics accompany SecDef tactical teams in the field, where they need to be equally competent at using their carbines or treating wounded squadmates.
Originally released in resin, these two SecDef character models are now available to purchase as STL files for 3D printing, from the Maelstrom's Edge store here!
This digital pack includes both supported and unsupported files, and two different weapon options for the Lieutenant.
The included parts.
You can find the rules for fielding these models in the downloads section of the Maelstrom's Edge website here.
3D printed examples, painted to a tabletop-ready standard - printed on an Anycubic Photon using Siraya Tech Fast resin at 50μm using Lychee slicer.
Printing results will vary depending on your printer, resin and settings.
Start building your elite force of corporate doom by grabbing some SecDef models from the Maelstrom's Edge webstore here!
Tags: epirian lieutenant medic secdef stl
Maelstrom's Edge V2 - Updated Epirian Warden rules sheet
Posted on Tuesday Nov 15, 2022 at 05:00pm in The Epirian Foundation
- by Iain Wilson
Back in 2016, I converted up a model using some spare parts that came to be called an 'Epirian Warden' - a clingfire-toting, flightpack-equipped veteran of the frontier. I also created an unofficial rules card to go with him, for use in V1. Well, following on from the Thunderbolt Sentry Drone a few weeks ago, I have now updated the Warden's rules to suit V2!
You can check out the original Warden conversion article here for ideas on how to build your own, although as an unofficial model you should feel free to build yours however you think appropriate.
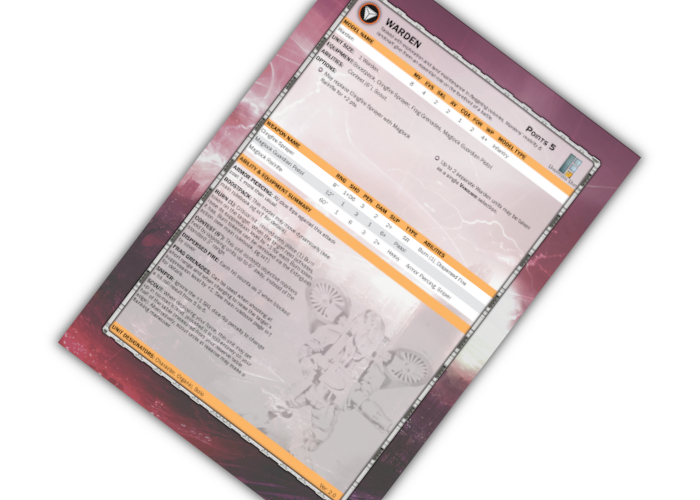
You can download the updated rules page for the Epirian Warden along with the Maelstroms' Edge V2 Beta rules from the website here!
To build your own soldier of trailblazing doom, grab some conversion fodder from the Maelstrom's Edge webstore here!
What are you working on? We would love to see your models and terrain in the Comm Guild Facebook group!
For other building ideas, modeling tutorials, army spotlights and conversion walkthroughs, check out the Hobby section of the Maelstrom's Edge website here.
Faction Spotlight: The Epirian SecDef
Posted on Friday Oct 28, 2022 at 05:00pm in The Epirian Foundation
A SecDef unit moves in on a Broken battle line.
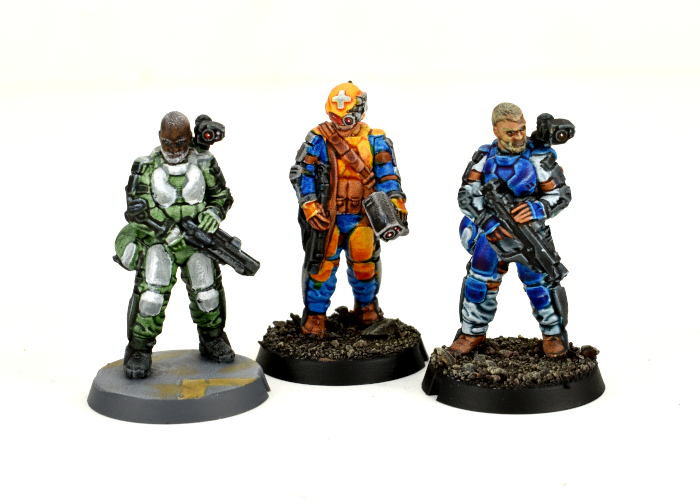
SecDef soldiers wear augmented power-assisted exoskeletons, with servo motors boosting the power of their arms and legs. As well as enabling antigrav aerial insertions from high altitude, the exoskeleton also allows them to wear thick ballistic armour without losing full mobility or movement. Their helmets are equipped with state-of-the art targeting and threat-identification heads-up displays, which when coupled with their years of advanced training and experience gives them an unparalleled instinct for tactical action on the battlefield. SecDef infantry sport the most advanced maglock weaponry produced by Araldyne Systems. The superior craftsmanship and state-of-the-art materials in an Araldyne AR60 assault rifle or G20 pistol makes it lighter to hold and more precise, with targeting optics linked into their helmets and a more expensive deadlier armour-piercing round made from rare earth metals. A squad can be supplemented with sniper or machine-gun armed specialists for specific combat roles, whilst the SecDef Annihilator team, armed with two Araldyne CG100 Chainguns, is capable of taking on even the most heavily emplaced fortifications. The combination of intense training, advanced exoskeletons and cutting-edge weaponry makes the SecDef the finest fighting forces in the Epirian Foundation - or for those with the resources to purchase their services.
A SecDef Lieutenant (left) and Medic, holding a strategic location
Promoted from amongst the most capable veteran sergeants, SecDef lieutenants are level-headed combat experts on both a tactical and strategic level with extensive financial and material resources to hand. Often taking on the most difficult (and therefore highest paying) missions with their platoons, the aim of most lieutenants is to accrue enough backpay to purchase a field commander commission, and the heavy combat rig that goes with that position.
SecDef Medics are combat veterans who have received additional training and equipment to administer first aid in the field. Known for being level-headed under fire, medics accompany SecDef tactical teams in the field, where they need to be equally competent at using their carbines or treating wounded squadmates. Equipped with an advanced diagnostics and treatment device and requiring weeks of additional training, medics represent a not-insubstantial investment for SecDef Commanders. While most still attribute significant cost savings to a medic's ability to save the lives of expensive SecDef troopers, the return on investment tends to be carefully monitored by SecDef administration. It's not uncommon for units to be refused additional medics where higher-than-normal attrition rates suggest that high recruitment costs would not be sufficiently reduced by the presence of medical personnel.
SecDef Rapid Intervention units are experts at speedy assaults.
SecDef forces excel at rapid insertions and mobile strikes against enemy positions. Sometimes though, even these elite troops run up against opposition that is too well entrenched for a normal assault. Against these targets, boostpack-equipped Rapid Intervention Teams are brought to bear. Selected from amongst the most skilled SecDef veterans and armed with twin Araldyne CB22 Assault Carbines, Rapid Intervention Teams use the greater mobility afforded by their boostpacks to outflank and surprise enemy defenses, quickly overwhelming them with a hail of deadly short-ranged firepower. Where an extra punch is required, Rapid Intervention Teams are equipped with Araldyne CF13 Clingfire Sprayers or FG19 Flakk Guns: more effective and streamlined versions of these ubiquitous weapons, typical of the improvements Araldyne is able to create.
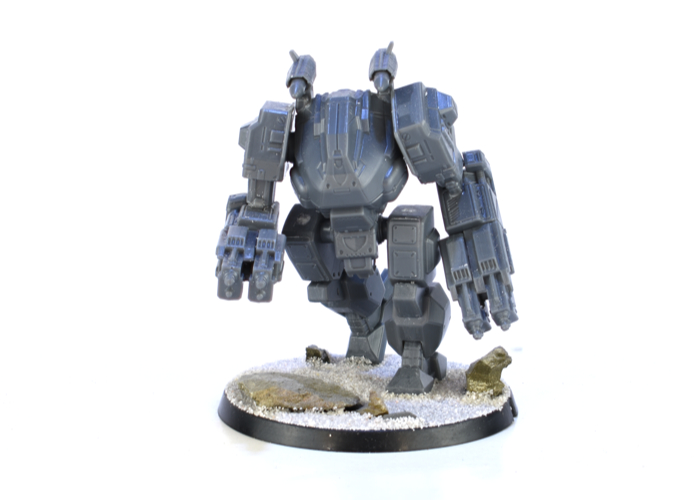
SecDef Field Commanders are a one-man army.
The SecDef value nothing more than completing the job they're assigned to in a timely manner, regardless of what it takes to do so. SecDef Field Commanders are the ultimate representation of that mantra. With prototype machine-assisted armor with the strength of several men, firepower equal to a whole squad and advanced targeting and comm systems allowing them to monitor several different feeds simultaneously in real-time, Force Commanders have all of the tools necessary to decimate the enemy.
As with all SecDef units, Field Commanders tend to carry high-end sophisticated Araldyne weaponry, but in their case, these weapons are mounted onto advanced machine-assisted arms, allowing multiple weapons to be fired simultaneously with ease. Each Field Commander is given complete leeway to choose their own weapons load-out to best support their particular fighting style: Hydraulic Fists to rip the enemy apart at close quarters, Araldyne FG19 Flakk Guns obliterate targets at short range, Araldyne LM14 Machine Guns to mow down foes by the dozen and Araldyne LS99 High-Intensity Lasers to melt through even the toughest armor. Not to mention the option to take either back-mounted cluster missile pods or advanced targeting systems.
Dominate the battlefield with your own SecDef force! You can pick up the SecDef model range from the Maelstrom's Edge webstore!
While you're there, you can download the V2 rules from the Trial Rules section of the Maelstrom's Edge website here. The Beta rules documents contain all of the rules for playing V2 games, but keep in mind that these are just 'preview' documents - some rules may be revised based on feedback, and the final layout including background material for the factions and the Maelstrom's Edge universe, artwork and other 'flavor' material is missing.
If you have any thoughts on the new rules, pop on over to the Comm Guild Facebook group, or start up a thread in the Maelstrom's Edge section on the Dakka Dakka forums. We welcome any feedback, and would love to hear how everyone's forces stack up in the new rules!
Maelstrom's Edge V2 - Updated Thunderbolt Sentry Drone
Posted on Friday Oct 21, 2022 at 05:00pm in The Epirian Foundation
- by Iain Wilson
Alongside the slowly expanding Maelstrom's Edge model range and associated rules, we have from time to time released additional unofficial rules to accompany conversions or kitbashes of models borrowed from other ranges. When we tracked down the PDC Gaming gun carriage and added it to the webstore, we also released some rules to use it in your Epirian force as a Thunderbolt Sentry Drone. This week, we have updated the Thunderbolt rules for use in Maelstrom's Edge V2!
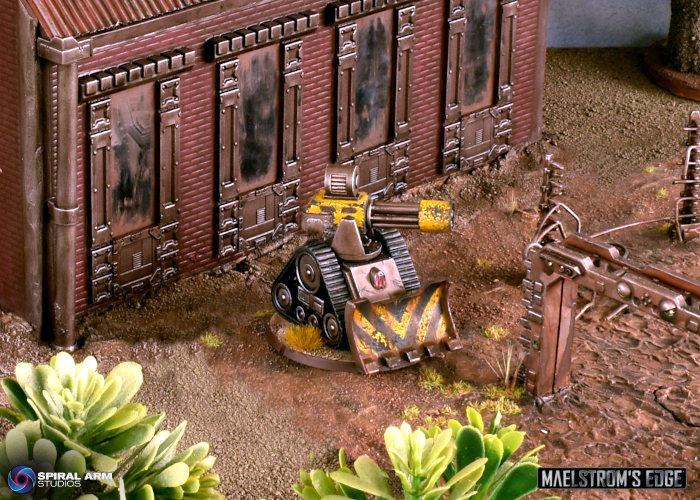
Thunderbolt Sentry Drones add some heavy firepower to Epirian forces, trundling around the battlefield and laying waste to enemy units with a range of different heavy weapons.
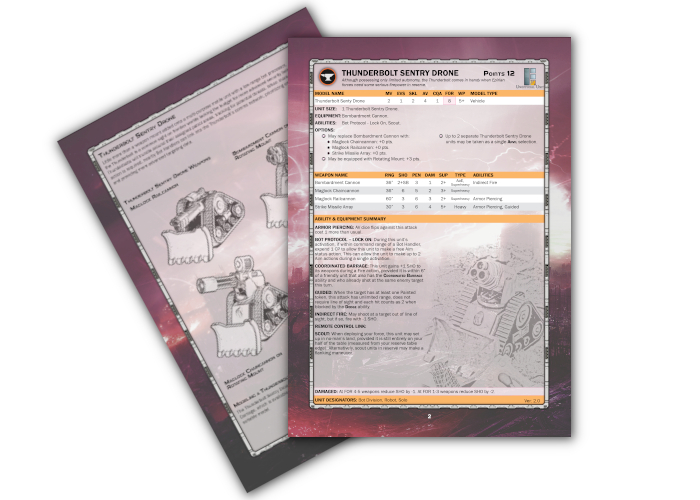
You can download the updated rules page for the Thunderbolt Sentry Drone along with the Maelstroms' Edge V2 Beta rules from the website here!
The Thunderbolt is a vehicle, and follows the rules for Large Models. Note that the section on page 27 of the Beta Rules entitled 'DIRECTIONAL MOVEMENT' has been removed from the final version of the V2 rules, so this section should be ignored.

To pick up your own gun carriage of superheavy doom, head over to the Maelstrom's Edge webstore here! You will find the gun carriage in the 'Terrain & Accessories' section.
What are you working on? We would love to see your models and terrain in the Comm Guild Facebook group!
For other building ideas, modeling tutorials, army spotlights and conversion walkthroughs, check out the Hobby section of the Maelstrom's Edge website here.
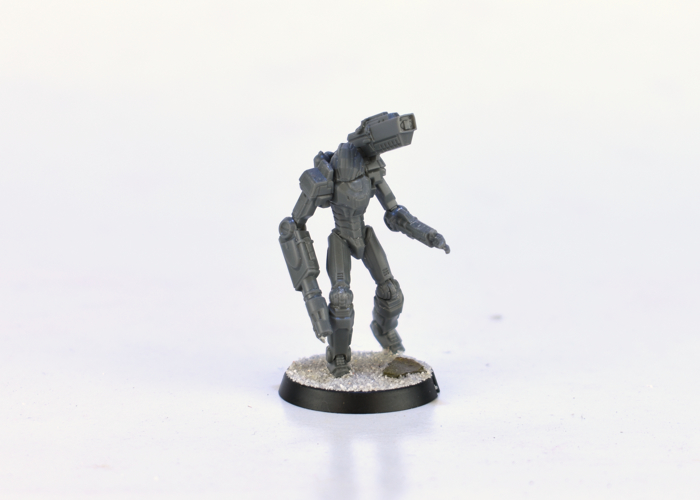
Model Spotlight: The Epirian Scarecrow
Posted on Tuesday Aug 23, 2022 at 05:00pm in Models
- by Iain Wilson
This week, we're taking a look at the multi-part, poseable plastic kit for the Epirian Foundation's feared security bot.
Scarecrows are area patrol units, designed to provide security to various types of property ranging from industrial perimeters to agricultural and terraforming facilities. Equipped with an advanced suite of thermal and motion tracking sensors, the Scarecrow is designed to detect and deter any non-authorized biological or technological intrusion into its designated patrol area.
The Scarecrow kit is designed to build a couple of different variants of this farming-bot-turned-military-asset, which lets you field the regular Scarecrow Sniper in a Hammer slot, or the Command Array-equipped Command Scarecrow leading an all-bot force. These can be armed with a shoulder mounted railrifle, and either a clingfire sprayer or chemtek sprayer on one arm.
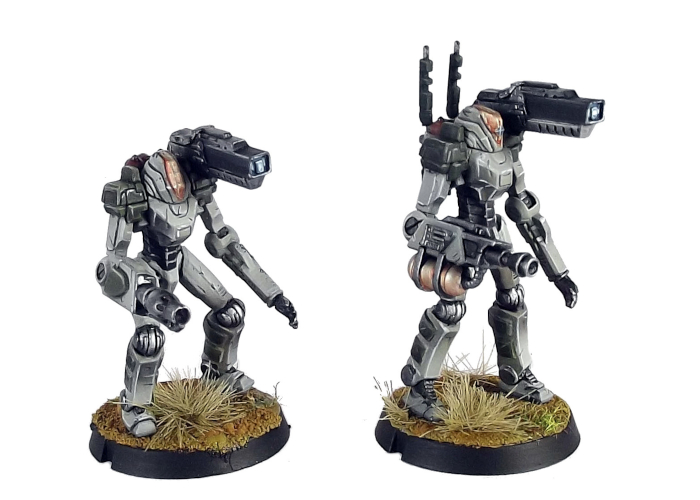
If you 'borrow' a second clingfire sprayer (leftover from building a chemtek variant, obviously!) you can also build the twin-flaming Subjugator variant that often accompanies Contractor Suppression Teams.
The best part of the Scarecrow kit is its extreme flexibility. With separate ankle, knee, elbow and shoulder joints, the Scarecrow is our most poseable kit, and being plastic is a fantastic base for adding alternate parts and mixing things up even further.
To build your own implacable robot of avian-frightening Doom, pick up the plastic Scarecrows in a pack of two from the Maelstrom's Edge webstore!
While you're there, you can download the Maelstrom's Edge V2 rules from the Trial Rules section of the website here. The Beta rules documents contain all of the rules for playing V2 games, but keep in mind that these are just 'preview' documents - some rules may be revised based on feedback, and the final layout including background material for the factions and the Maelstrom's Edge universe, artwork and other 'flavor' material is missing.
For other modeling ideas, tutorials, army spotlights and conversion walkthroughs, check out the Hobby section of the Maelstrom's Edge website here.
What are you working on? We would love to see your models and terrain in the Comm Guild Facebook group!