Entries tagged [robot]
Converting a Robot Stargrave Crew
Posted on Monday Sept 13, 2021 at 09:52pm in Tutorials
When Stargrave arrived on the gaming scene, bringing the popular Frostgrave rules into a sci-fi setting, it sparked all sorts of interesting ideas amongst gamers for building crews. While there is an official model range for the game, it also encourages players to use whatever miniatures they like, which is a perfect excuse to break out some models and get creative! I was particularly interested in the rule allowing any crew members to be robots, and set to work building up a crew using (mostly) the Maelstrom's Edge Epirian Scarecrow plastic kit!
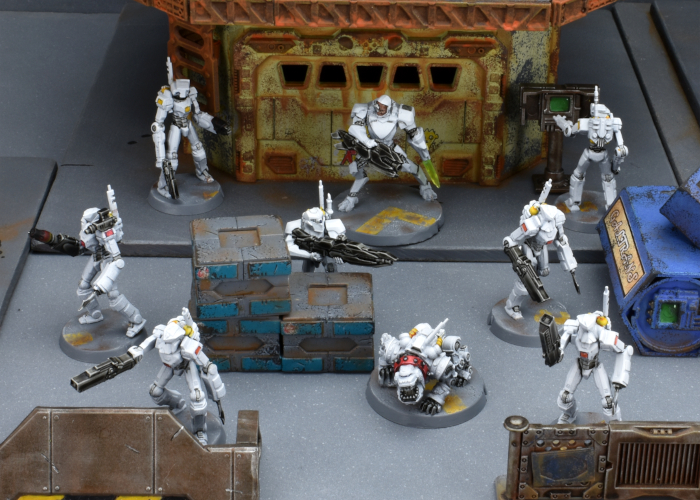
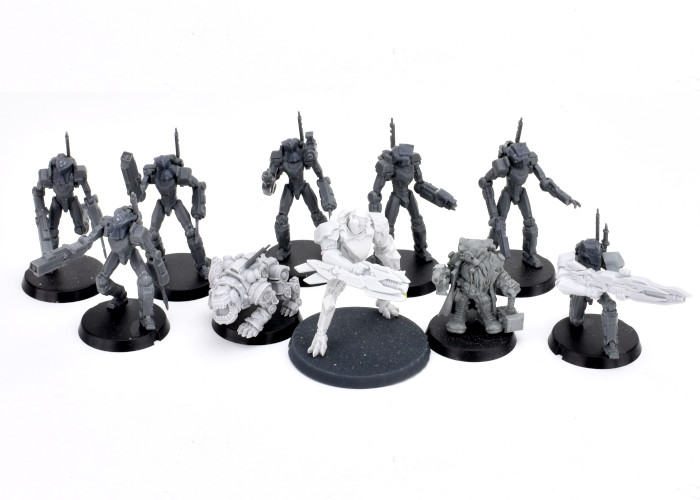
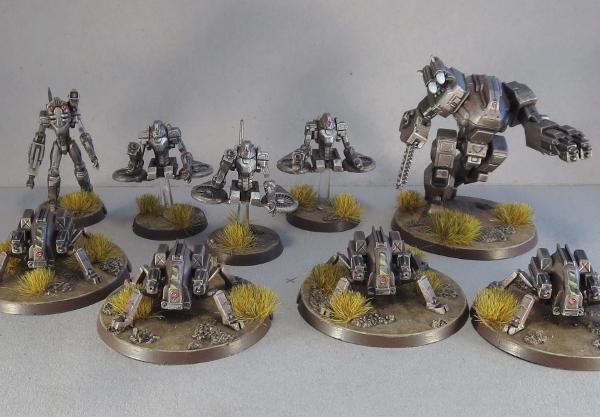
The bulk of the crew was made up of very slightly converted Scarecrows with different heads taken from the Remnant Militus battlesuit kit to denote different 'classes' of robot. Thanks to how wonderfully poseable the Scarecrow kit is, it's really easy to get a range of different looking models out of it! I also used a resin robo-dog from Artel W for a guard dog, added a (still to be painted) space dwarf from Victoria Miniatures as a first mate, and a converted Remnant Nimbus battlesuit for the Captain.
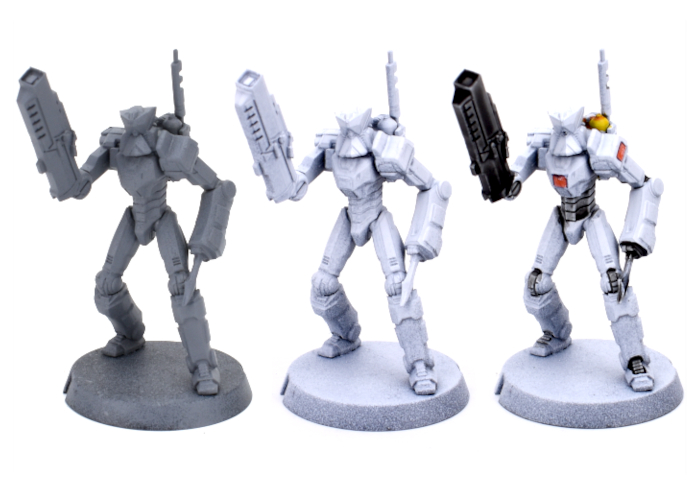
I wanted an easy paint scheme that I could get done quickly, and used Army Painter paints for the bulk of it. I started with a base coat of Uniform Grey spray, followed by a top-down (or 'zenithal') spray of white, so that the grey would stay visible in the creases and underneath surfaces to provide some shading. I then went over the joints and other exposed metal parts with a coat of Dark Tone, and gave the weapons three generous coats of the same. The final details were done with Citadel Contrast - Iyanden Yellow for the tanks on the robot's backs and Leviadon Blue highlighted with Army Painter Ice Storm and white for the eye lenses. The different classes of robot also received some shaded panels to tell them apart - yellow for techs, orange for soldiers and red for specialists.
I'm still deciding how to paint up the first mate, and how closely he will mimic the colour scheme, but here's the rest of the the crew all assembled:
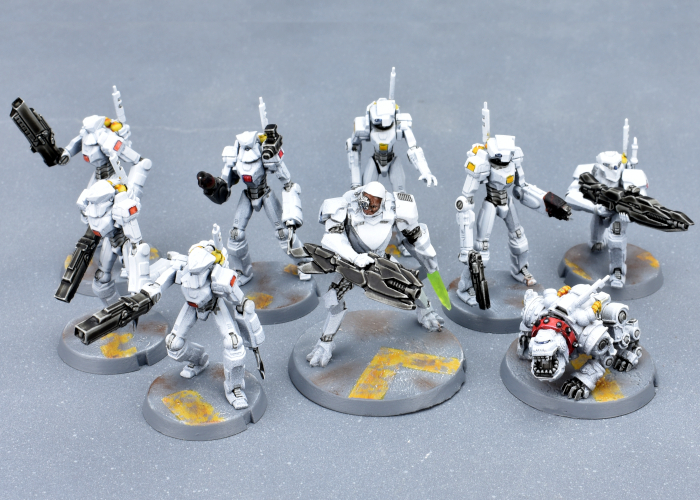
Captain and Guard Dog:
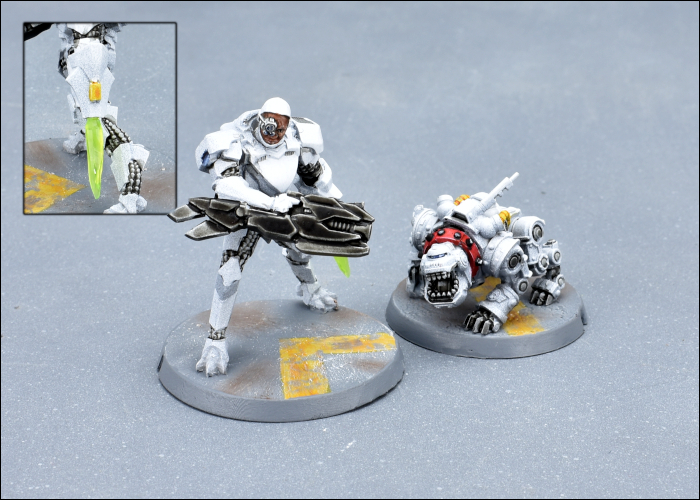
The Captain was built from a Nimbus battlesuit with the head taken from the Karist Heavy Weapons kit. The energy blade is part of a trimmed down lightsaber from a Star Wars figure, left over from an old project. He represents a cyborg in combat armour.
Tech crew - Hacker and Chiseler:
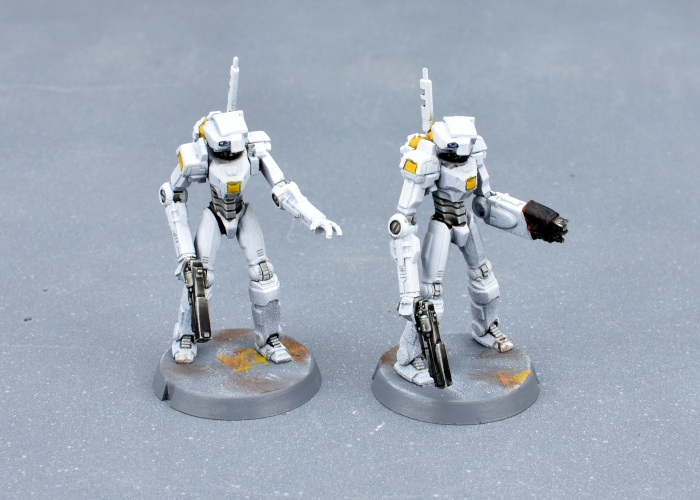
Chiselers are normally equipped with lockpicks. I decided to go a more direct route and gave him a cutting torch using part of a weapon from the Broken Rabble kit.
Troopers

I gave the troopers bulkier left arms to house their combat knives using spare Scarecrow shin pieces. The knives are taken from the Faction Expansion Sprue.
Specialists - Burner and Sniper:
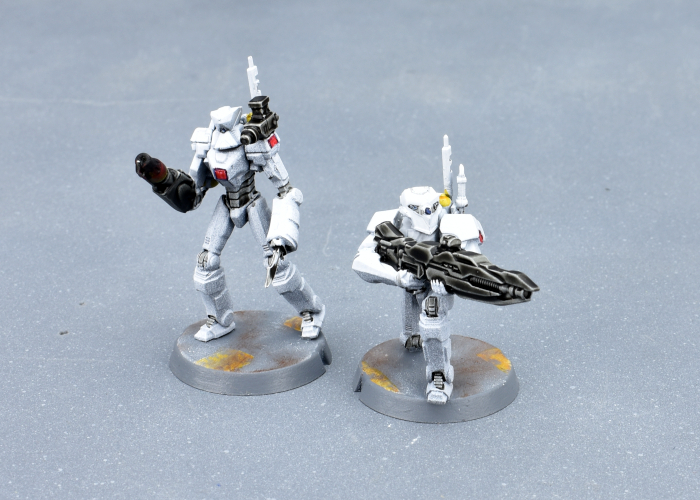
The Burner has a pistol and knife as well as the flamethrower, so I gave him the same knife arm as the regular troopers and mounted a mini grenade launcher taken from the Epirian Handler kit to his shoulder to represent the pistol. The sniper has a different head to the regular troopers, and his sniper rifle was a handy way to make use of the second set of arms that come with the Captain's Nimbus suit.
Time to get that mate painted up and send these bots out on into the black!
To build your own robot crew of clanking doom, you can pick up the Scarecrow kit along with the rest of the Maelstrom's Edge range from the webstore here.
What are you working on? We would love to see your models and terrain in the Comm Guild Facebook group!
For other building ideas, modeling tutorials, army spotlights and conversion walkthroughs, check out the Hobby section of the Maelstrom's Edge website here.
Tags: conversion epirian robot scarecrow spotlight stargrave
Epirian Sentinel Bot Conversion Tutorial & Unit Card
Posted on Monday Apr 09, 2018 at 05:00pm in Tutorials
- by Iain Wilson
The Epirian faction in Maelstrom's Edge includes a number of fantastic robot options, and with some careful planning it's even possible to field an all-robot force. I went for an almost all-robot force with my starter force, including a lone Journeyman to lead them. I thought it might be fun to add some robot 'not-contractors' to the army for some extra firepower, and so turned to a conversion that I put together for a spotlight on the Scarecrow kit some time ago, which I dubbed a Sentinel bot.
The Sentinel uses parts from the Scarecrow, Drone and Contractor kits.
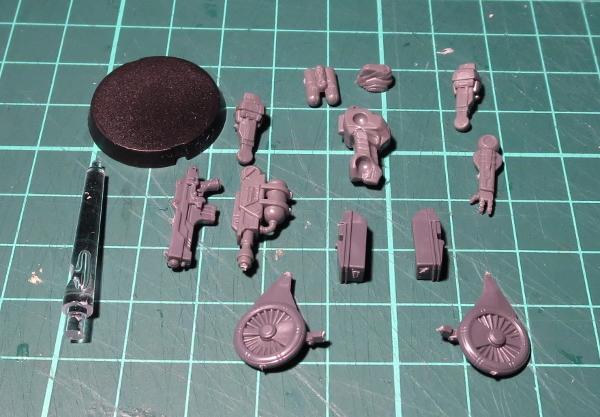
From the Scarecrow:
- Head
- Torso
- Left Arm
- Left Shoulder
- Right Shoulder
- Fuel Tanks
- Chemtech Sprayer
- Base
From the Drone kit:
- Turbines
- Turbine-mount side pieces
- Flight Stem
From the Contractor kit:
- Maglock Assault Rifle
Start by gluing the two Drone side pieces together and attaching the turbines, as below. There is a small ridge of plastic on the inside faces of the side pieces that needs to be shaved or filed down so that they sit flat against each other. A couple of pieces of spare sprue serve nicely to hold the turbines in place while the glue sets.

Take the Scarecrow torso and cut through it just below the top of the hips.
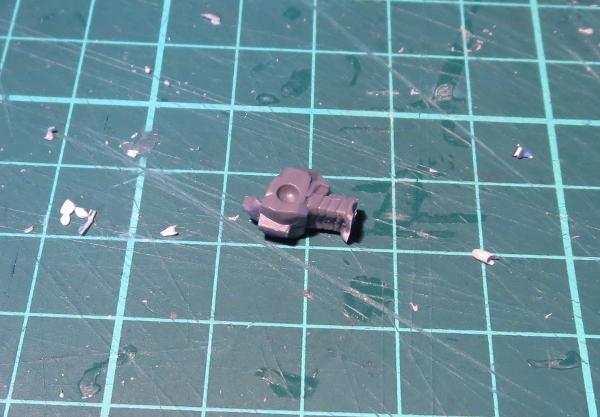
The torso then glues neatly into the middle cavity created by the two side pieces.
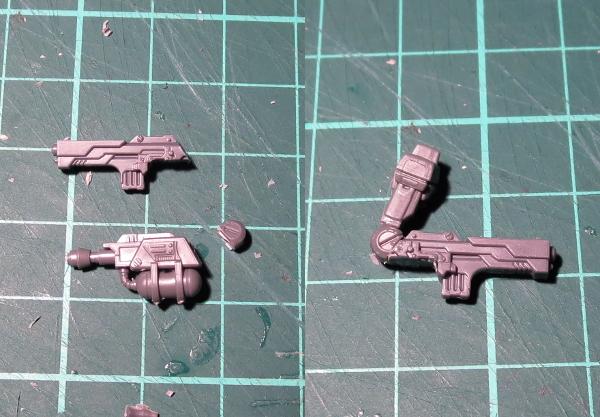
The left arm is assembled as normal. For the right, cut the pistol grip off the maglock rifle, and also cut the back of the rifle at an angle matching the ridge along the top, as shown below. The take the chemtech sprayer and cut the elbow joint off the back. This is glued onto the back of the maglock rifle, and then the weapon be glued to the upper arm.
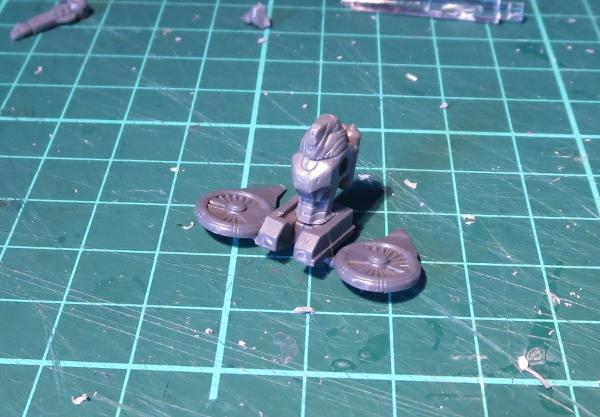
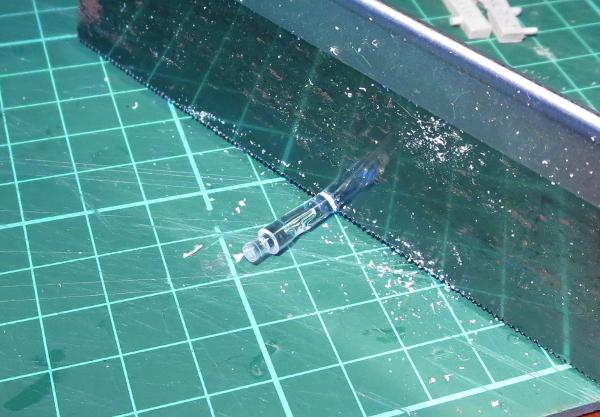
To keep the unit with a similar silhouette to the contractors they are replacing, take the flight stem and cut it a little above halfway up.
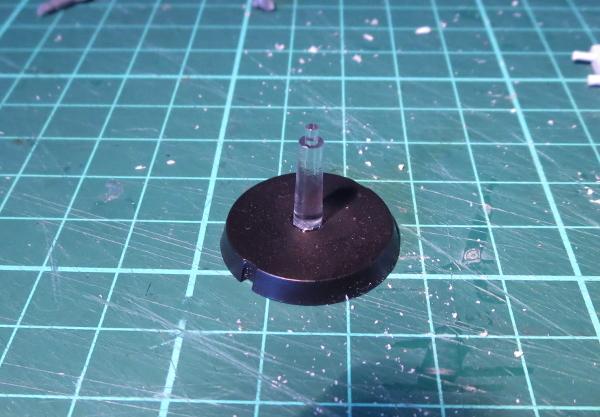
This is then glued to the middle of the base. You will need to drill a corresponding hole in the bottom of the turbine assembly for the peg on the top of the flight stem.
With head, tanks and arms glued in place, the bot can be glued onto the flight stem (or left separate if you're planning on spraying a basecoat, or just if you're a messy painter!) ready for paint.

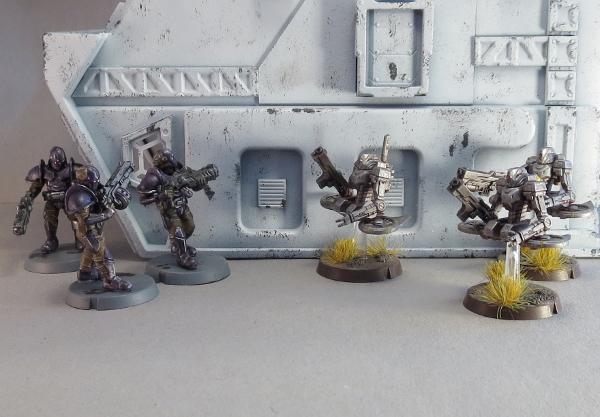
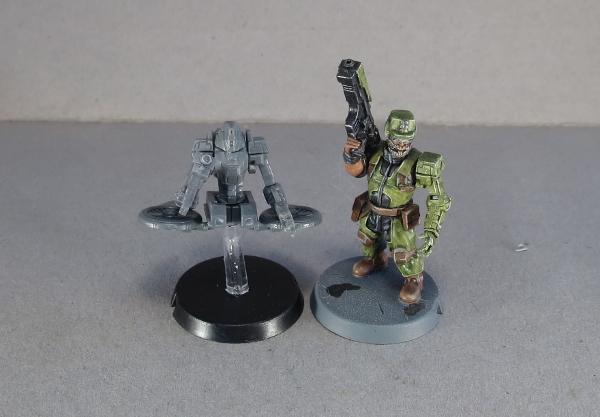
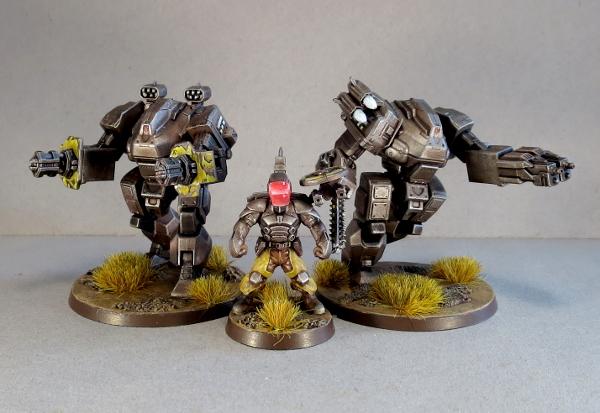
Scale shot with a Contractor:
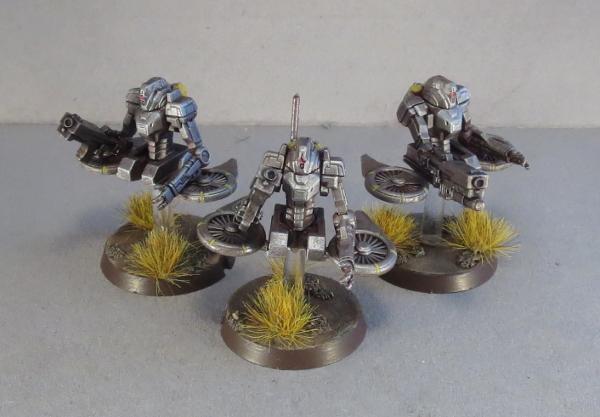
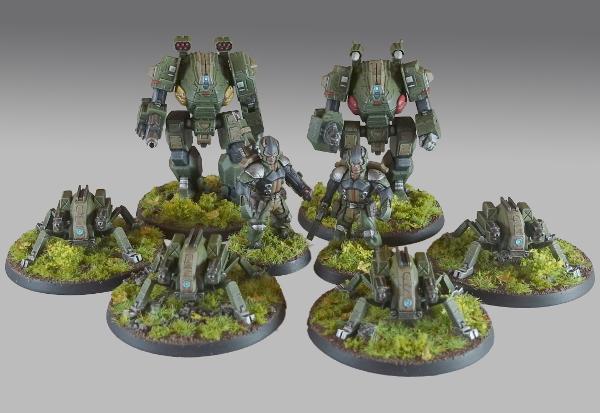
Painted up, the Sentinels are ready to take to the field. I have added a command unit to one model to create a unit leader, and equipped the third with the auxilliary grenade launcher version of the Maglock Rifle.
You can find an (unofficial) rules card for fielding Sentinel units in the Force Builder section of the Maelstrom's Edge website here. Alternatively, you could just field them as Contractors.
To pick up kits you'll need to create your own Sentinel unit, visit the Maelstrom's Edge webstore here.
We love to see what people are doing with their models, so be sure to also visit the Comm Guild Facebook page!
For other Maelstrom's Edge modeling articles, including tutorials and walkthroughs of a wide range of different building and miniature projects, check out the article roundup here.
Modeling Spotlight: Epirian Light Carrier Drone
Posted on Monday Mar 12, 2018 at 05:00pm in Tutorials
- by Iain Wilson
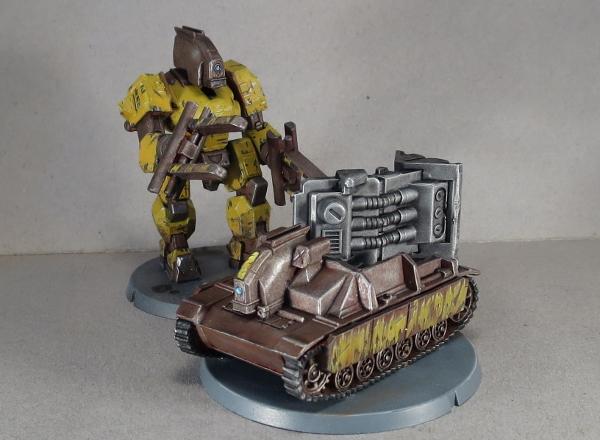
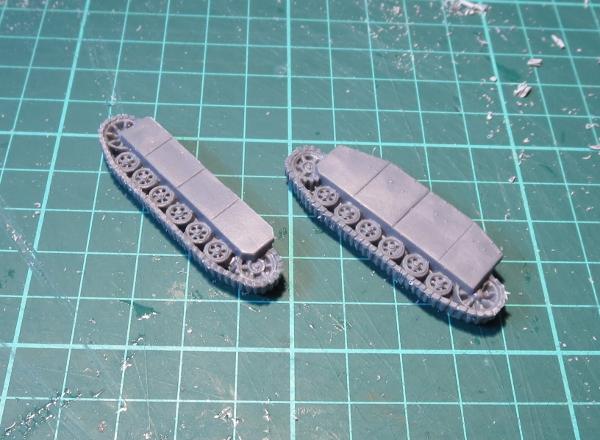
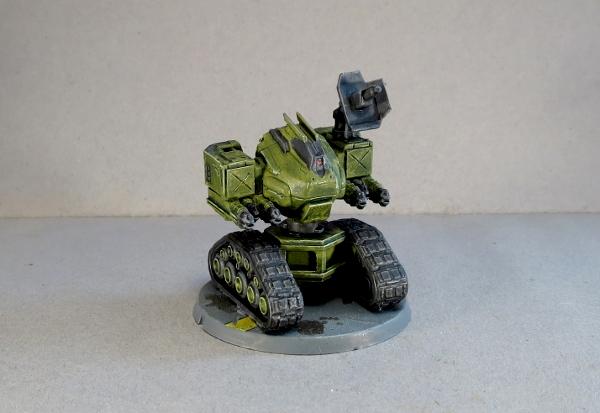
A few weeks ago, I published a spotlight article on the Epirian Drone, showing a few different ways the kit can be assembled or converted. One of the conversions shown was a Light Carrier Drone, made up from a drone chassis and the hull of a 15mm plastic tank from Flames of War, that I think came out of an Adepticon swag bag. This week, I'm going to run through how it was made, using the tank (I think it's some kind of Stug, but I'm no tank expert and so it didn't really matter beyond looking perfect for what I wanted to do) and the chassis piece from an Epirian Drone.
Like the bipedal 'Mule' cargo drone shown above (for which you can find an assembly article here) there are no rules for using this drone in the game - it will most likely just be used to add some flavour to the table. But I find that sometimes venturing off the beaten track and building something different just for the fun of it can really help to keep the creative juices churning over.
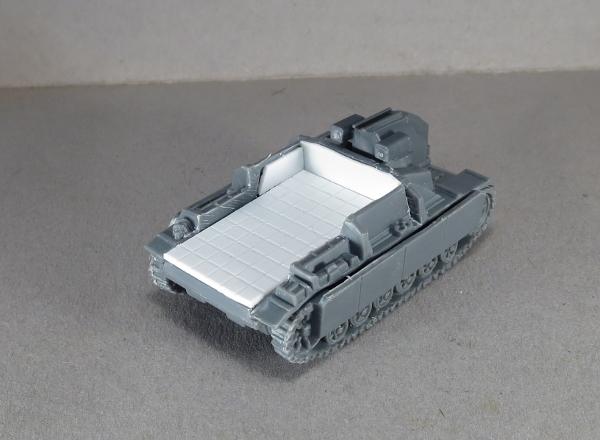
SO, I started by grabbing the main assembly parts of the tank - top and bottom of the hull, and the two track pieces.
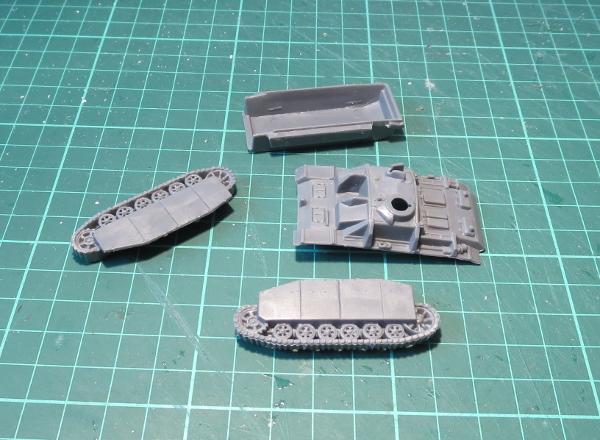
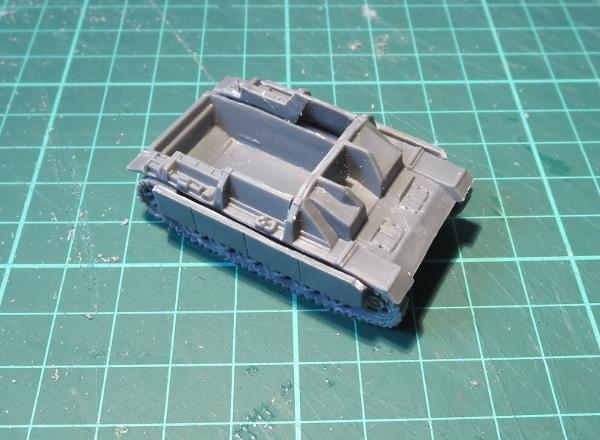
I used a razor saw to cut most of the top of the hull away, leaving just the gun mount and the front armour.
The tracks had some armour plating that extended up over the sides of the tank. I wanted these to be a little more low-profile, so I sawed them off level with the track guards.
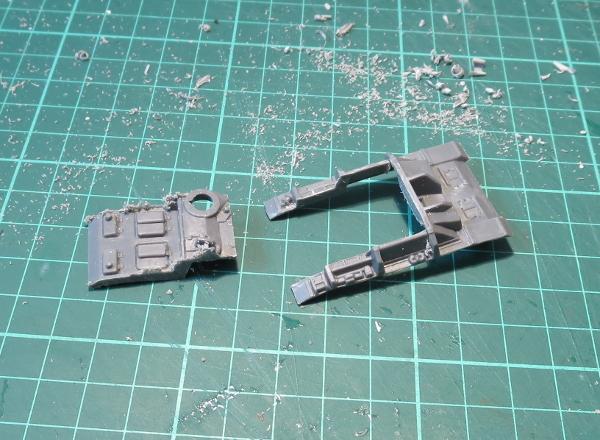
Then I assembled the hull and tracks as per normal, just with a newly-formed great, gaping hole in the rear.
With a slight bevel added to the underside, the drone chassis slotted nicely into the gun mount.
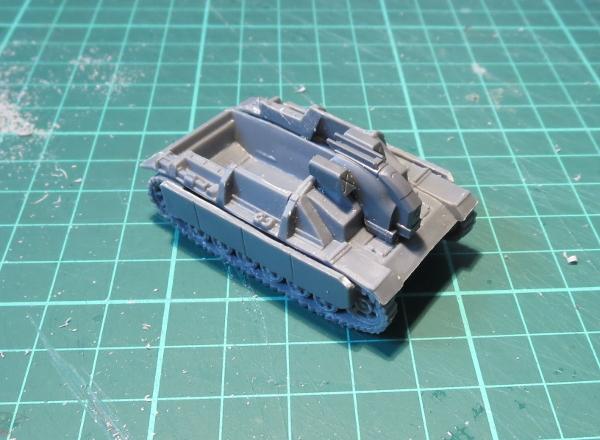
Finally, I filled in the back with some plasticard to create a cargo deck.
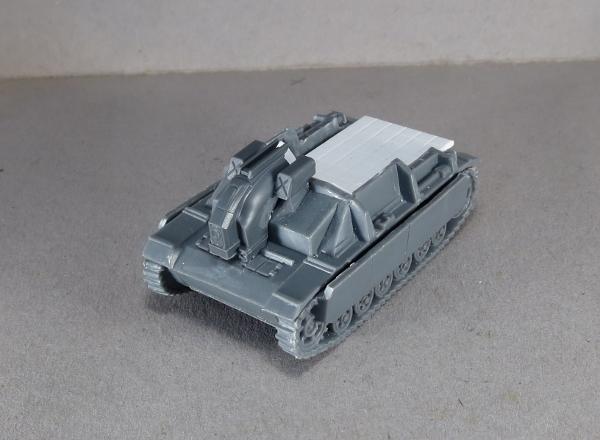
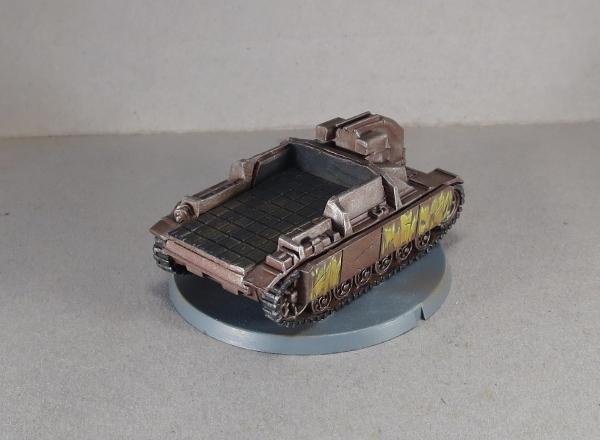
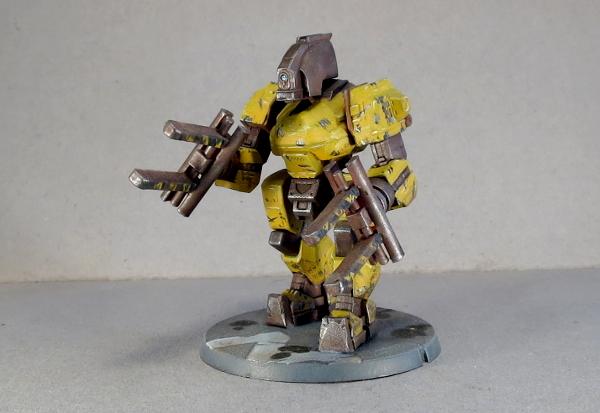
To paint it up, I turned once more to the technique shown in my weathered metal tutorial. I kept the palette fairly limited, to emphasise the bare-bones industrial nature of this machine, and made the yellow panels on the sides worn and battered to show a history of hard use.

What have you done with your Drones? We would love to see your creations on the Comm Guild Facebook page!
To pick up the Drone kit, or any of the rest of the Maelstrom's Edge model range, visit the webstore here.
For other Maelstrom's Edge modeling articles, including tutorials and walkthroughs of a wide range of different building and miniature projects, check out the article roundup here.
Tags: conversion drone epirian modeling robot spotlight tutorial walkthrough
Model Spotlight: Epirian Hunter Warmech
Posted on Monday Dec 11, 2017 at 05:00pm in Models
- by Iain Wilson
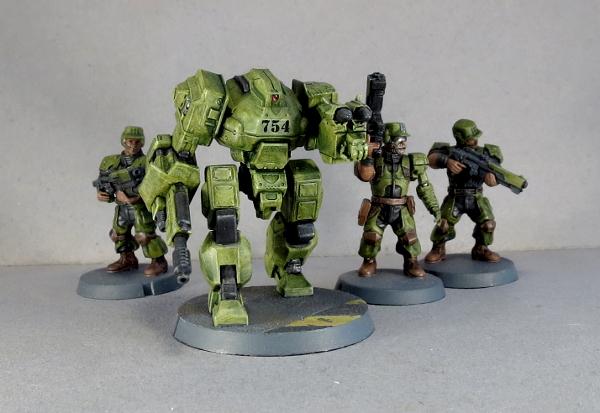
For this week's article, I thought it might be fun to pause and take a closer look back at one of the models from the initial Maelstrom's Edge release - the Epirian Hunter Warmech!
Designed through an arcane mix of clever sculpting, sliding-core moulding and witch-craft, the Hunter kit is beautifully detailed while going together with surprisingly few parts. Arms and legs are solid parts, removing the need for unsightly seams, while boasting articulated shoulders, elbows, ankles and hips to give enough poseability to keep things interesting.
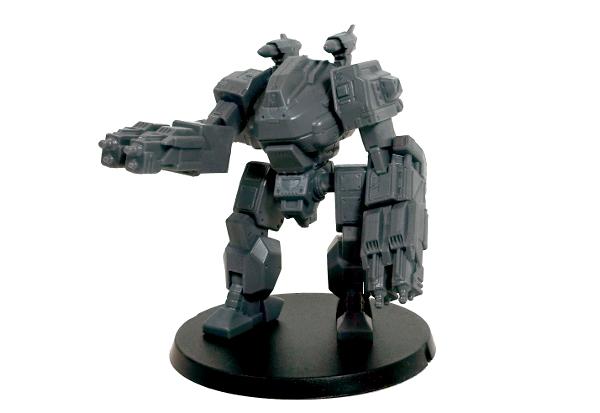
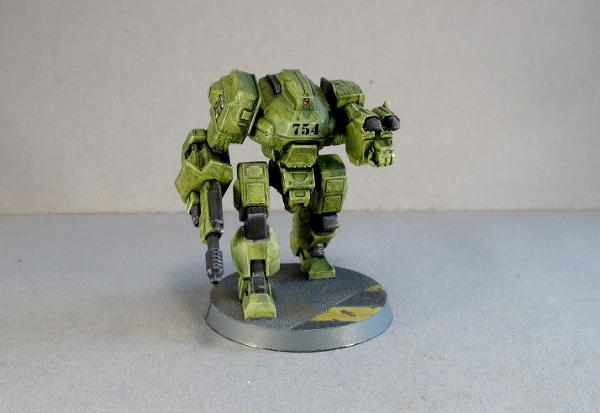
Towering above mere human soldiers, the Hunter is the second-largest model currently on the Maelstrom's Edge battlefield, beaten in size only by the Karist Angel (for now!)
The kit comes with a nice array of weapons - a maglock chain gun, a flakk cannon, two suppressor twin machine guns, two each of the different rocket pods, and a hydraulic fist.
Being plastic, 'borrowing' a second weapon from another kit and modifying it to go on the opposite arm is a breeze. Below, the shield for the flakk cannon has been flipped over to go on the right arm, with the top and bottom beveled parts reshaped slightly to keep the symmetry between the left and right.
The rocket pods are designed to mount behind the head, but it's too much fun to not play around with them and find other places to fit them!
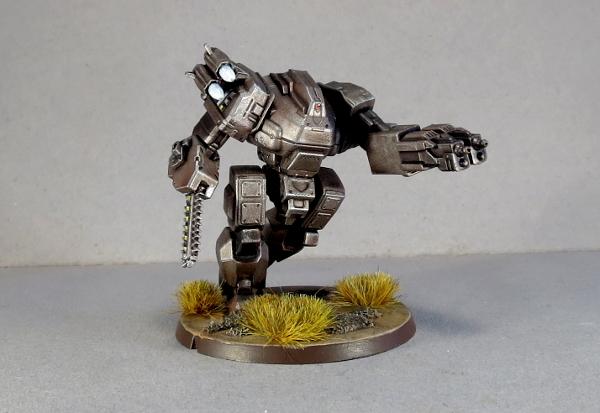
The legs have a slight bend in the knee, which allows for a surprising range of motion combined with the pivoting ankle joints. For a little more speed, the knee joint can be sliced through and reattached into more of a running pose.

If pounding away with a big, metal fist isn't your thing, the hydraulic fist can be easily replaced with a chainsaw blade or other suitably brutal melee weapon of your choosing. The Hunter below has a chainsaw taken from a Games Workshop plastic kit for some extra rippy fun.
If converting is more your thing, let your imagination run wild! Below is an Epirian Uplink Drone, built from a Hunter torso, some bits from the Spider drone kit, and some tracks from a Counterblast robot model. You can see how it was built in the article here.
Venturing a little further off the beaten track, this 'Mule' cargo drone was built from a Hunter chassis with a head made from a Spider drone and some lifter hands scratch-built from plasticard. You can check it out in the build article here.
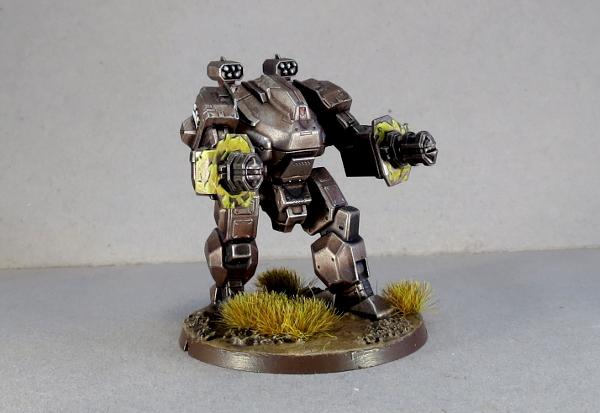
If big guns are more your thing, then the 'Silverback' fire support mech is going to be right up your alley. This was built from a reposed Hunter with hands made from drone parts and sprue, a drone chassis head, and a gun taken from a Games Workshop Tau kit. To find out how to build your own, check out the article here.

To build your own robot army of mechanical Doom, you can pick up the Hunter kit, along with the rest of the Maelstrom's Edge model range, from the webstore here. As always, we would love to see your creations on the Comm Guild Facebook page!
For other Maelstrom's Edge modeling articles, including tutorials and walkthroughs of a wide range of different building and miniature projects, check out the article roundup here.hun