Entries tagged [terrainsprue]
Terrain Spotlight: Drone Substation Quick-paint.
Posted on Friday Sept 05, 2025 at 05:00pm in Tutorials
 - by Iain Wilson
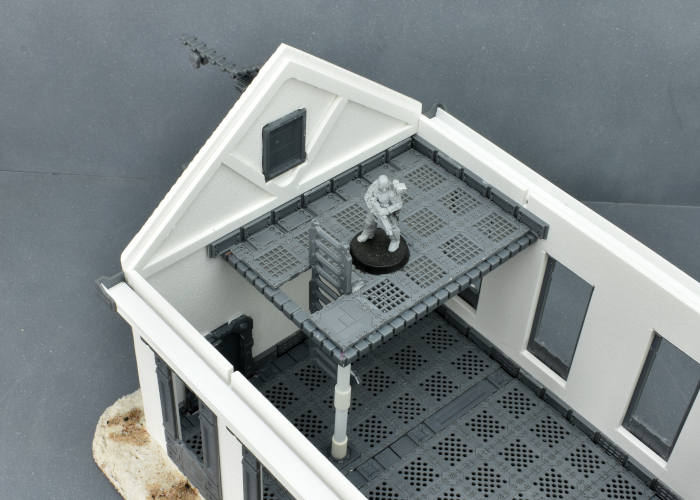
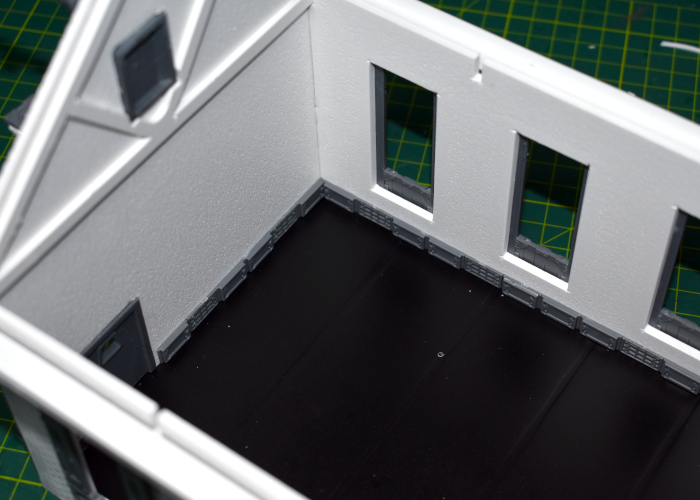
I was rummaging through some storage boxes the other day and came across a building that I had assembled a very long time ago and never got around to finishing. And since it has once again been a little while since I played with terrain, that seemed like as good a reason as any to take some time to get some paint on it!
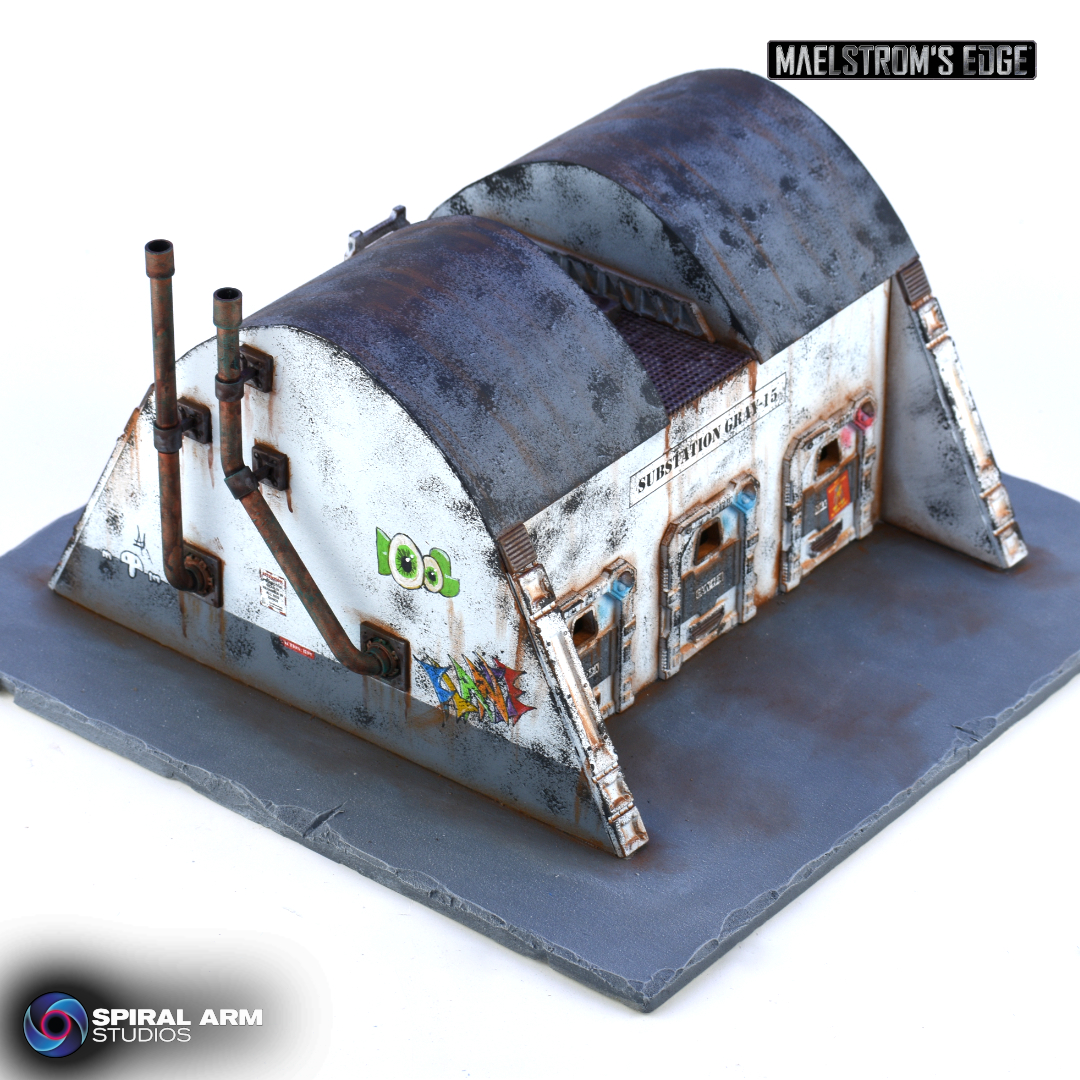
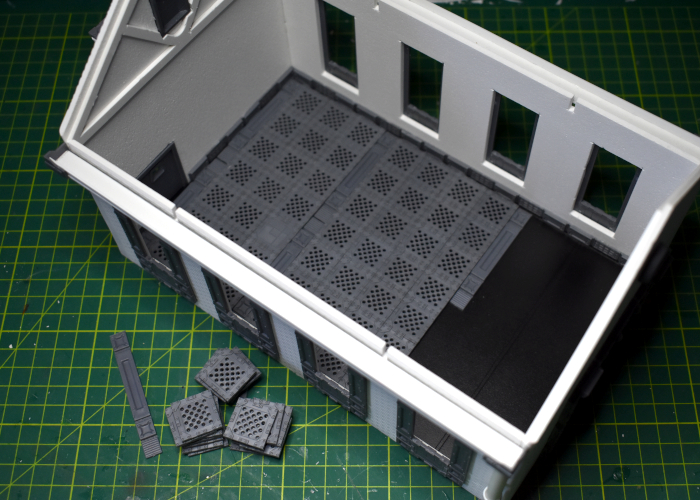
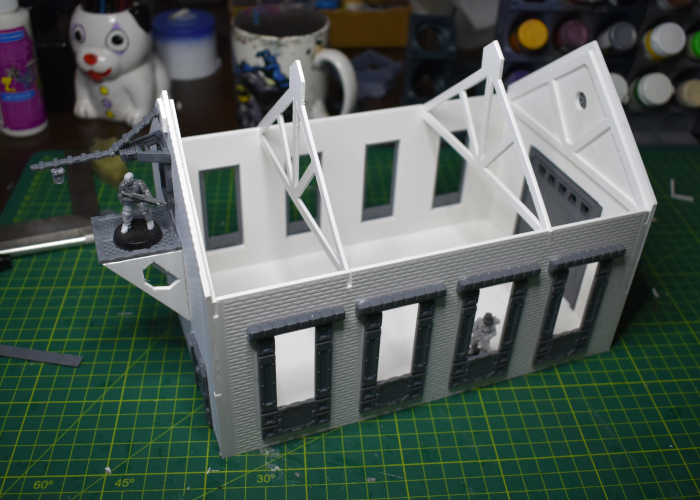
The building in question was built from foamcore, thin card, and bits from the first Maelstrom's Edge terrain detail sprue, and was made to be somewhat ambiguous as I hadn't decided when I built it what it was actually going to be. For some reason, I had (badly) sprayed it with a slightly watery pale green paint. I obviously had a plan for this when I did it, but I couldn't for the life of me remember what it might have been.
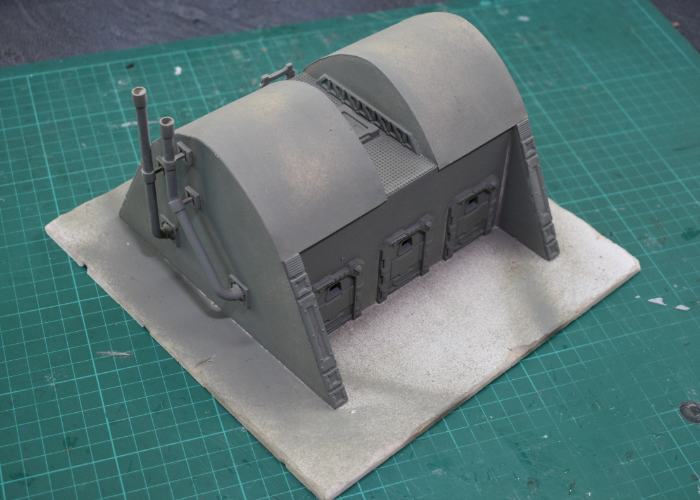
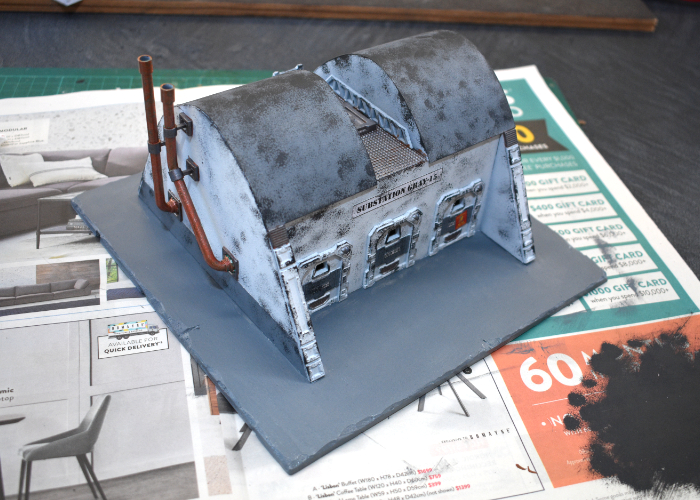
The first step, obviously, was to do something about that dodgy basecoat, so I gave the whole building a good spray with some Army Painter Uniform Grey.
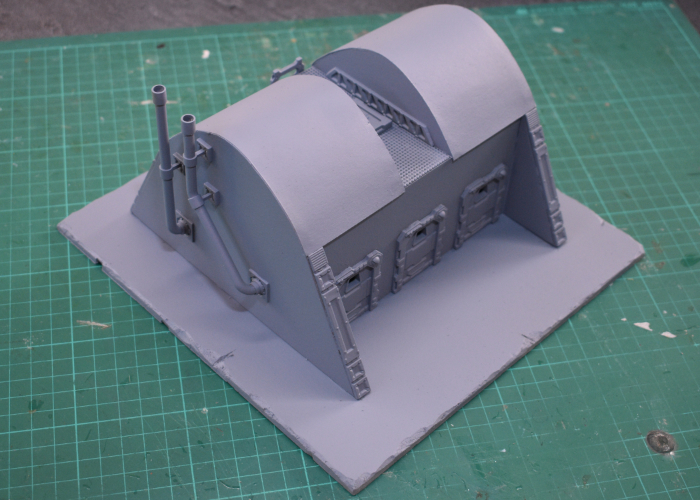
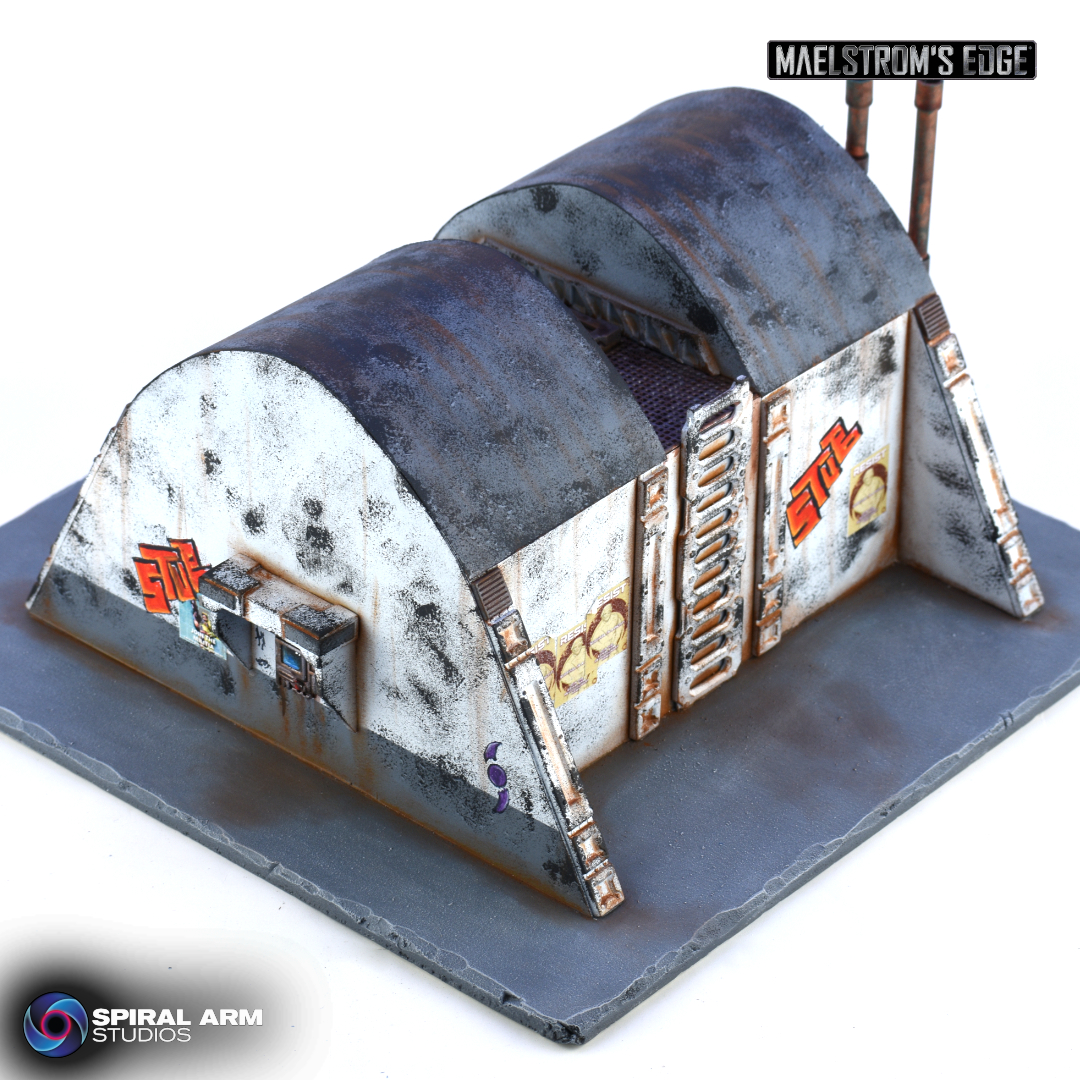
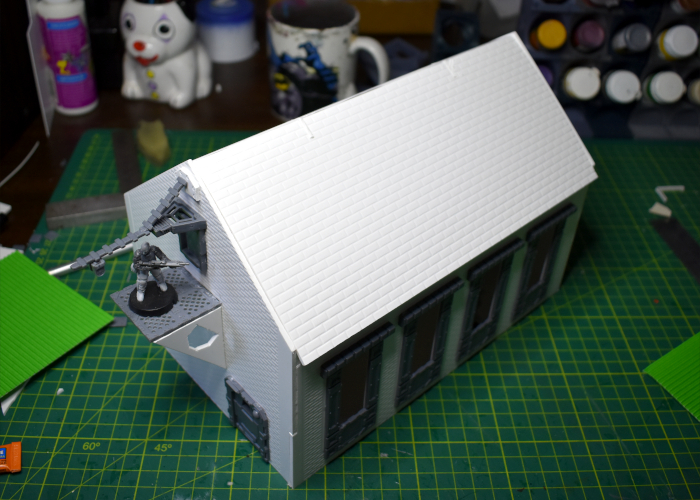
I wanted the building to be white (ish) but solid white buildings are a little boring. So to give it some detail, I broke out some masking tape and masked a strip along the bottom of each end wall before spraying with a coat of white. This was somewhat risky, as my masking tape has been sitting in my toolbox for about 15 years, and doesn't look quite right... There was a certain air of 'will it come off again?' in this operation. Luckily, though, it came off just fine.
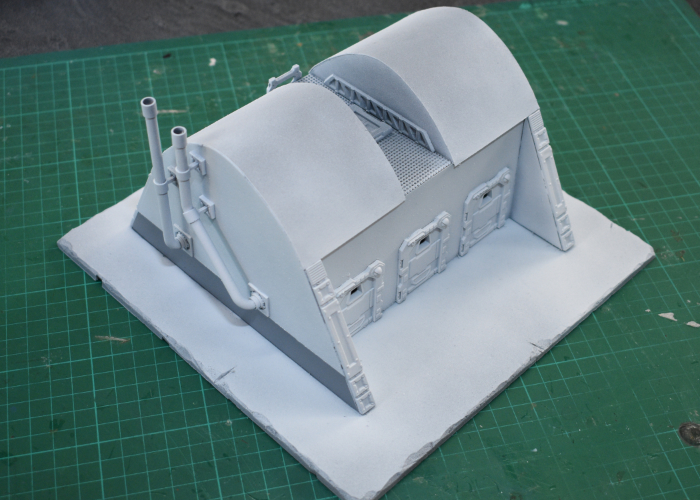
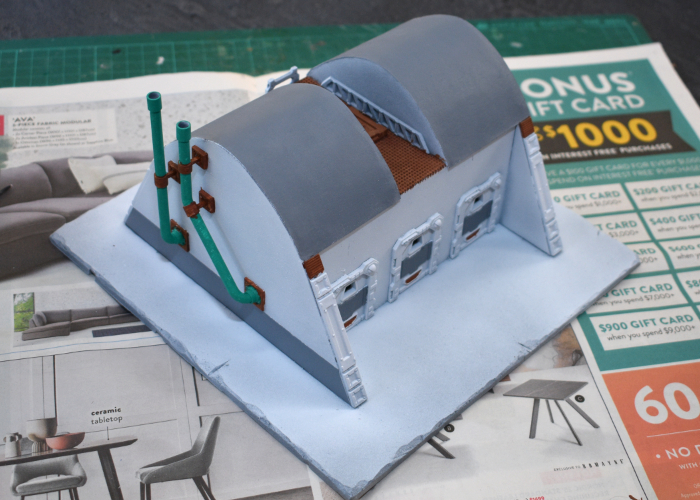
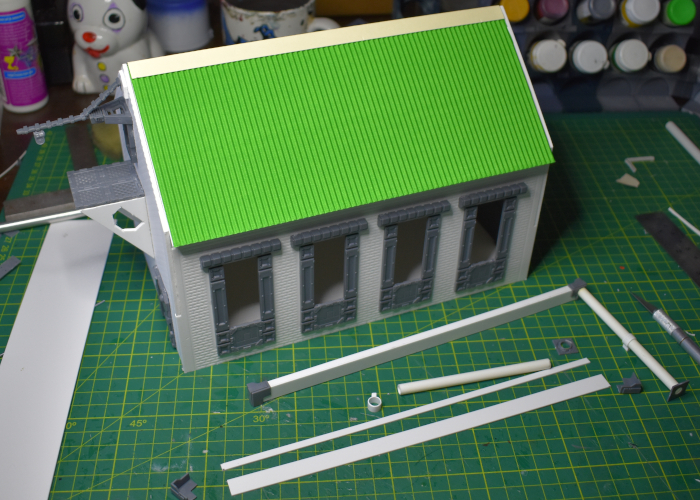
Now it was time to start painting the things that weren't going to be white. I gave the chimney pipes (made from cut off pieces of sprue and plastic tubing) a coat of VMC Emerald, and the other bare metal areas a layer of Beasty Brown. The roof and armour strips on the doors received a coat of uniform grey to match the side walls. I could have done this with masking, but that seemed too fiddly given the state of my masking tape, and these areas were easy enough to paint over neatly.
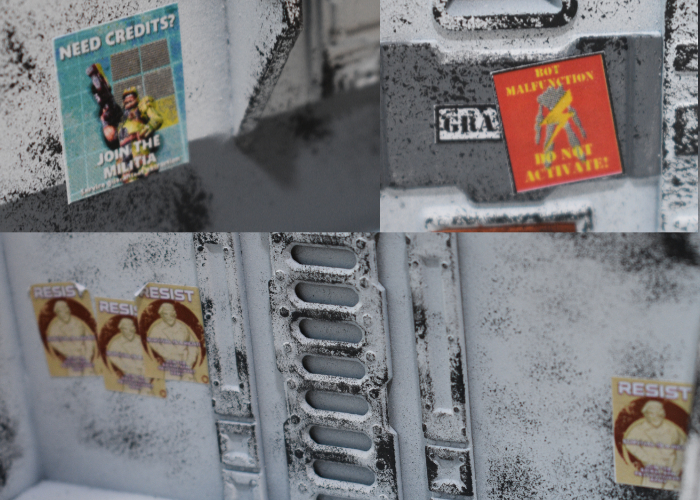
I wanted some signs here and there that looked like they had been there a while, so these needed to go on before any weathering. I printed off some appropriate signage, and glued them in place with some PVA glue.

Then it was time for aforementioned weathering. I broke out a sponge and some Game Color Heavy Charcoal, and went to work, concentrating most heavily on edges and top surfaces. This is the first part of the process where I usually start wondering if I've ruined it, but it usually comes together as it goes along...
With the initial weathering in place, I added some additional signage.
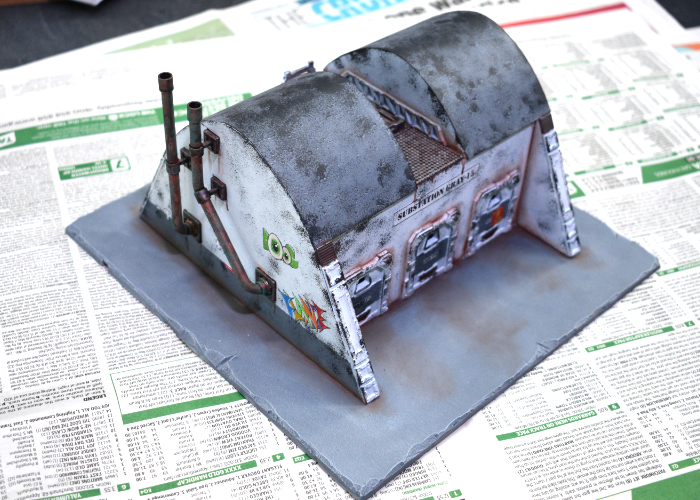
Then on with the detailing. The chimneys were painted with some old Citadel Copper, and the rest of the metal with a coat of Speedpaint Broadsword Silver. I also painted the base with a coat of Vallejo Neutral Grey.
On sponged areas that aren't white, I like to go over and add some highlights on the larger chip marks. This isn't essential, but does help to give it some more texture and looks better at table height.

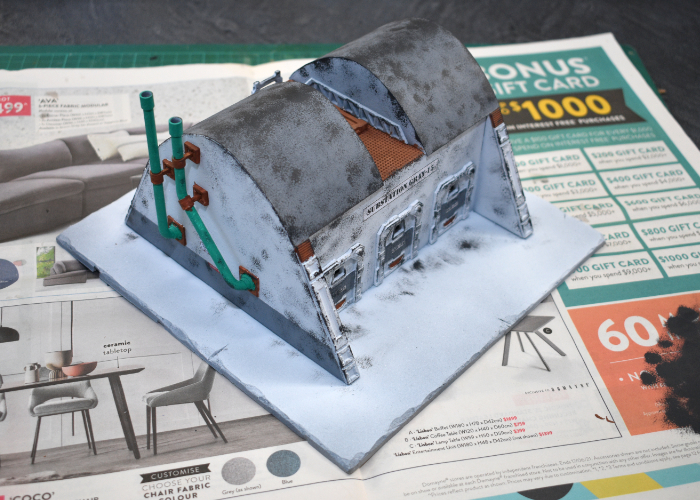
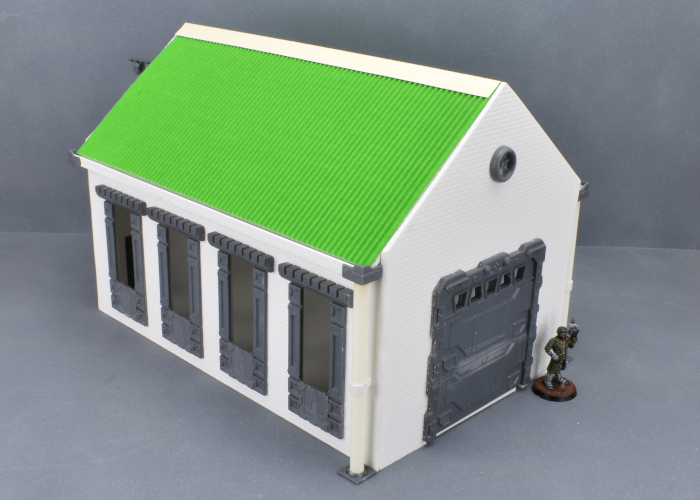
Then it was time for final detailing and weathering. I gave all of the exposed metal a coat of Army Painter Mid Brown ink, added some graffiti, and then got stuck into my favourite part - drybrushing on some dirt! I used Beasty Brown, working it into all of the creases and raised surfaces, and added some streaking here and there where it seemed appropriate.
And with dirt in place, the building was ready for the table!
(Click for bigger pics!)
To build your own building of maintenance-neglected doom, grab the Maelstrom's Edge terrain sprues from the webstore here!
What are you working on? We would love to see your models and terrain in the Comm Guild Facebook group!
For other building ideas, modeling tutorials, army spotlights and conversion walkthroughs, check out the Hobby section of the Maelstrom's Edge website here. And while you're there, grab a copy of the Maelstrom's Edge V2 Beta rules!
Tags: modeling painting terrain terrainsprue
Terrain Spotlight: Juice Bottle Advertising Hub
Posted on Friday Dec 22, 2023 at 05:00pm in Tutorials
- by Iain Wilson
It's been way too long since I made some terrain, so I thought I would squeeze in one last article before Christmas!
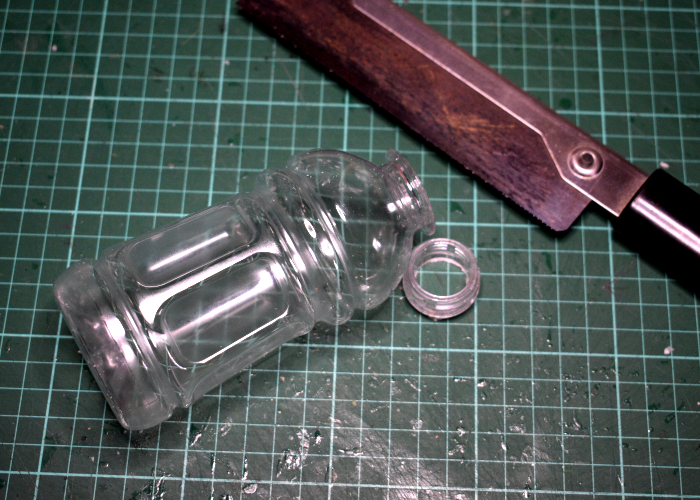
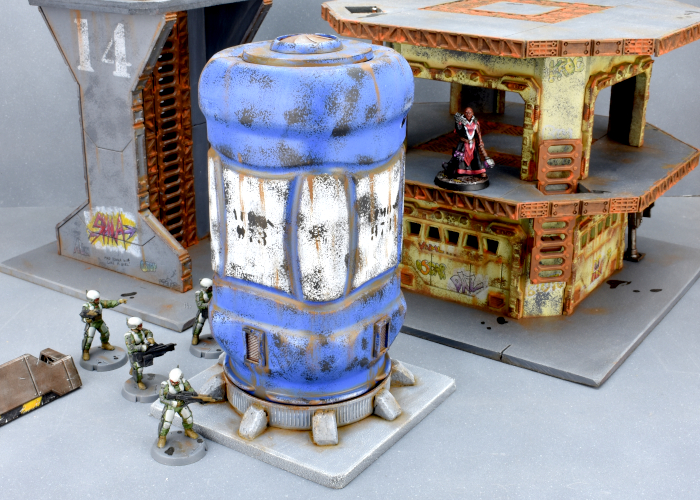
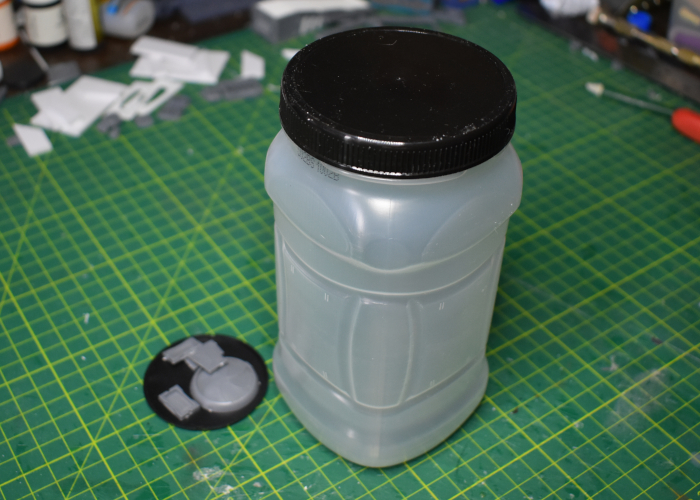
My kids had some juice in a takeaway meal the other day that came in an interestingly shaped bottle that I thought was worth having a play with. After giving the empty bottles a wash, I set to with tools and terrain sprue bits and came up with this little advertising hub.
The first step, as mentioned above, was to wash the bottle and remove the label.
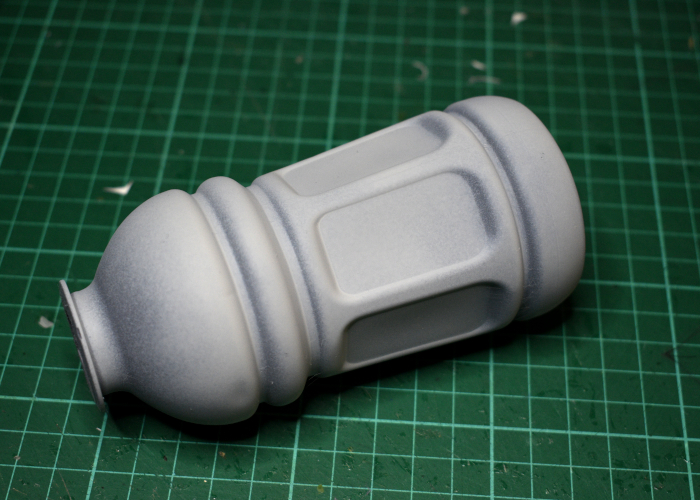
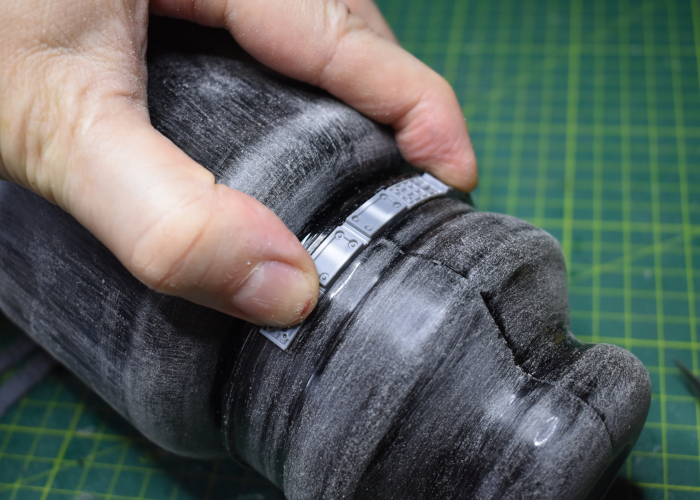
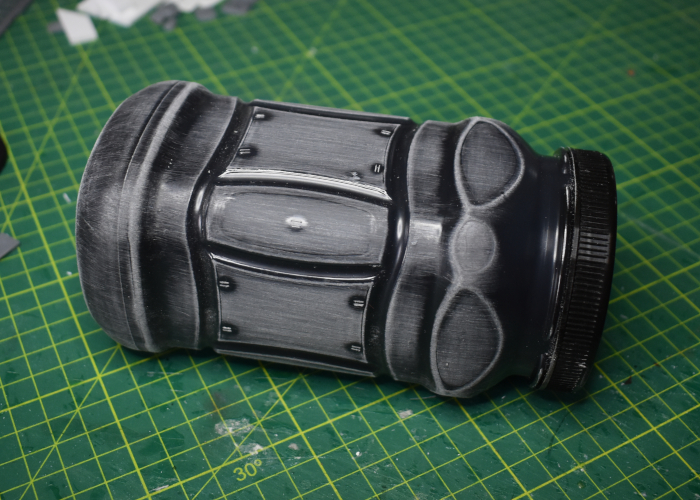
I used a razor saw to remove the screw thread part of the neck, and then gave the cut end a bit of a sand to smooth it down.
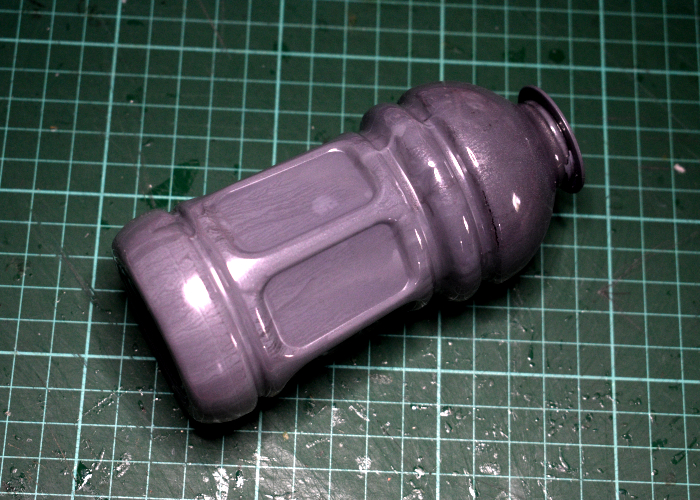
Then I sprayed inside the bottle with some grey paint. This isn't an essential step, but it does help to make the finished piece a little more opaque, particularly if the exterior paintwork gets scratched on the table later on.
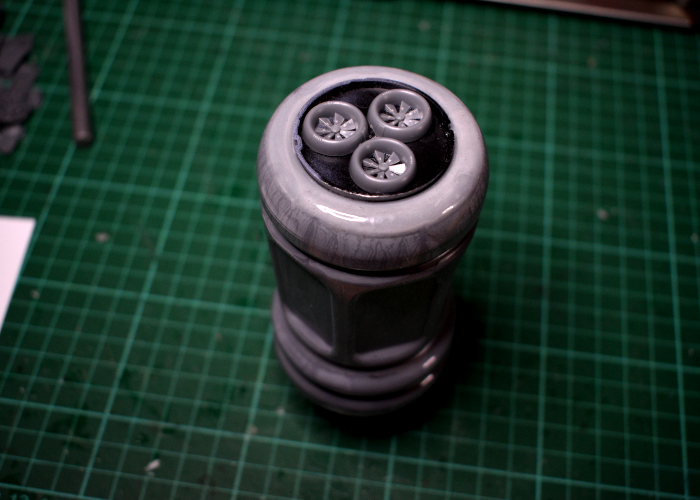
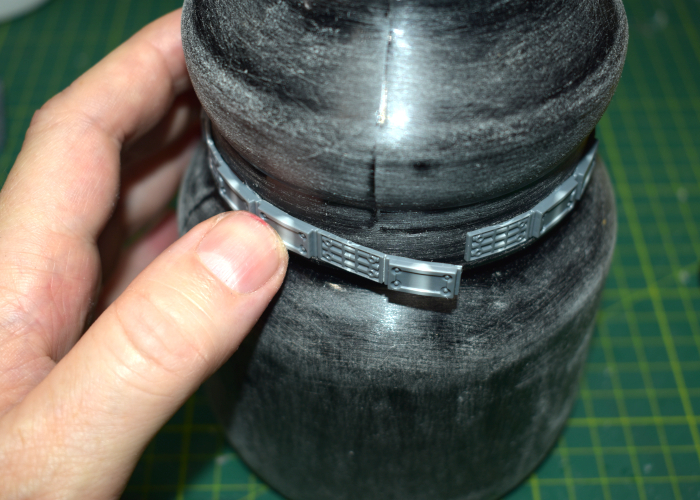
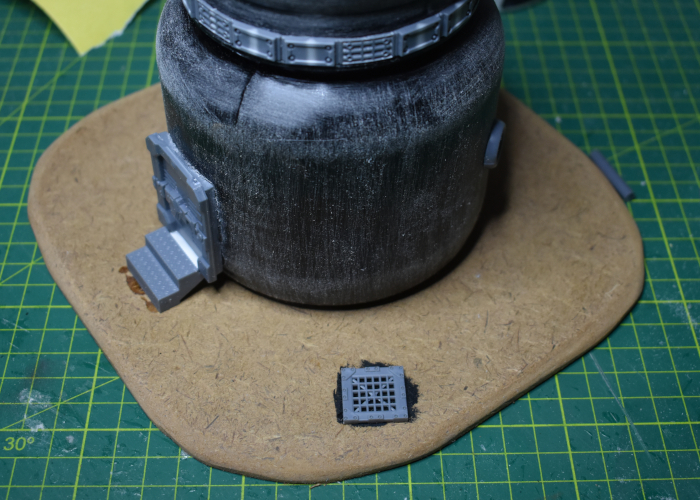
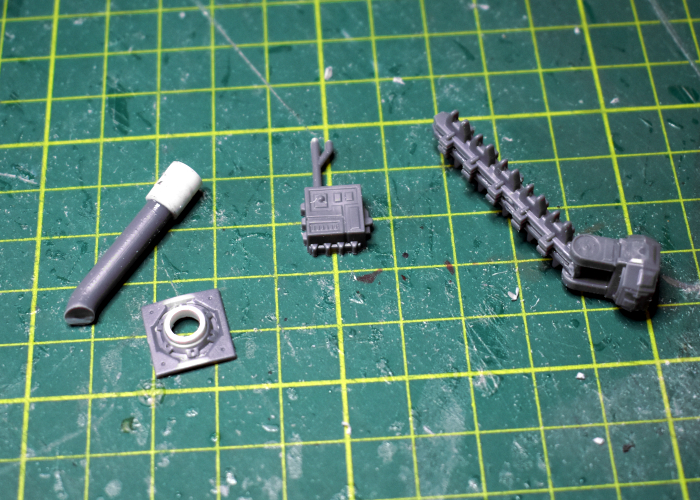
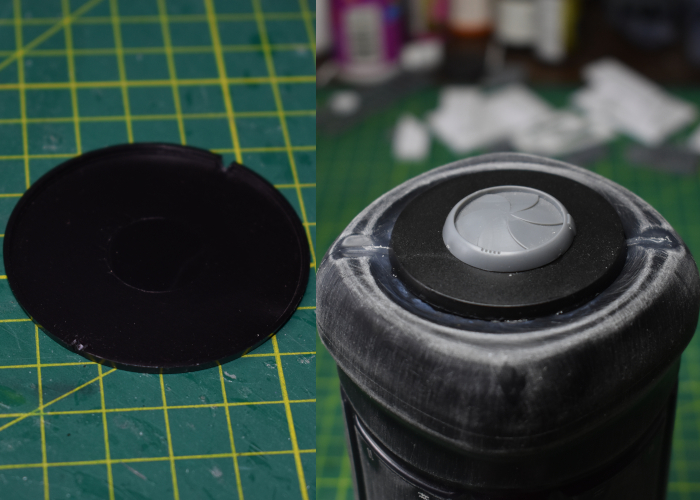
To disguise the bottle's bottom, I grabbed an appropriately sized miniature base and a trio of fans from the second Maelstrom's Edge Terrain Sprue and glued them in place with some Oily Glue.
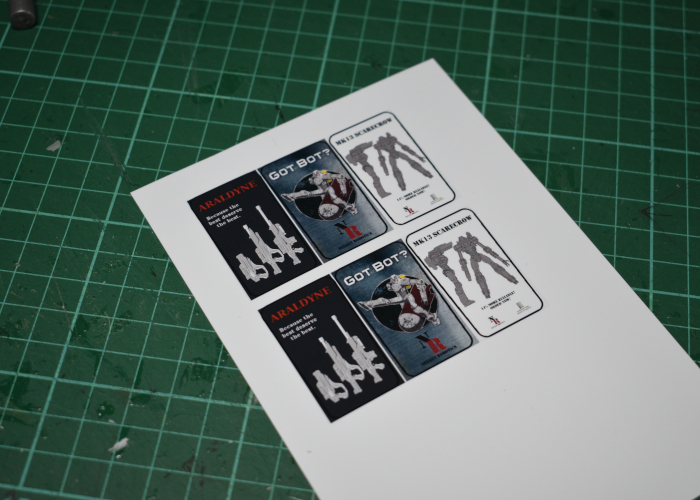
For the advertising part of the build, I whipped up some signs to fit into the recesses around the bottle, printing them out on photo paper so that they were nice and glossy and bright.
On to painting! I sprayed the bottle with a medium grey primer, and then a zenithal layer (sprayed from an angle above, to leave the darker grey underneath) of a very pale grey. This went straight over the shiny plastic, as the Rustoleum primer that I use generally sticks fairly well. If you're wanting to make your paint more durable and stick better, you can give the outside of the bottle a light sand with some fine sandpaper to break the gloss.
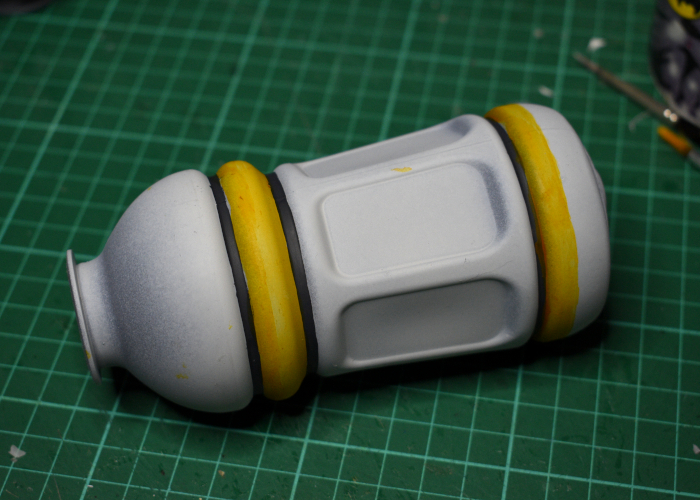
I added in some dark grey (Vallejo Heavy Charcoal) into the deep creases, and added a couple of strips of yellow using Vallejo Nuclear Yellow.
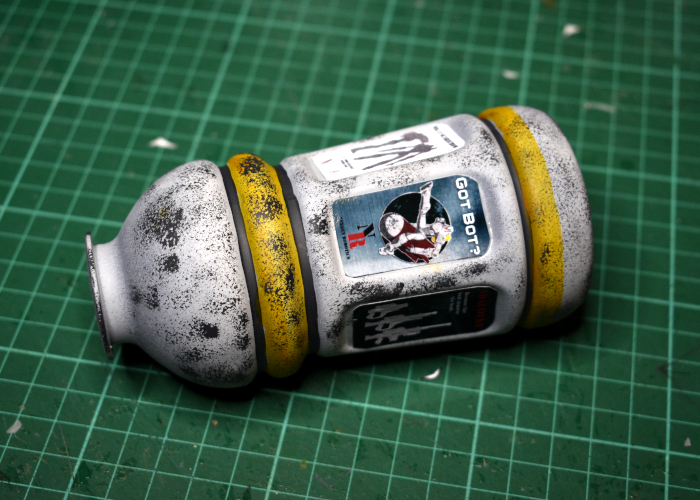
Next up came some weathering with a sponge and some more Heavy Charcoal, before gluing the signs in place.
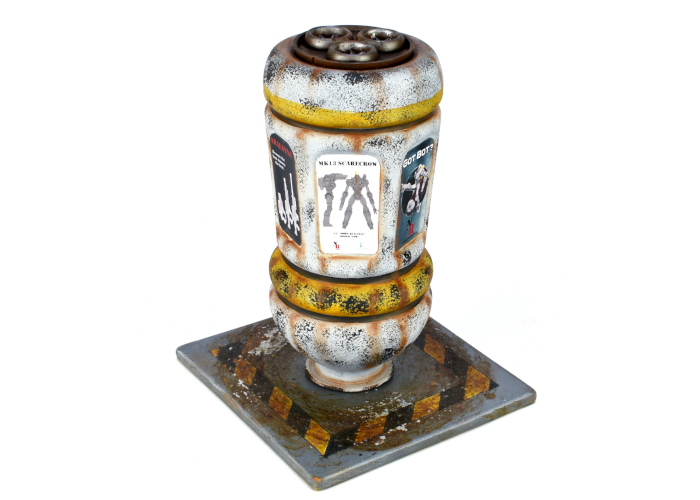
Finally, I painted up the fans on top with some a Vallejo Beasty Brown basecoat, a drybrush of Citadel Chainmail and a wash of Army Painter Strong Tone, and then dirtied everything up with a drybrush of some more Beasty Brown into the creases and forming some drip marks down the sides. Then I dropped it onto an old base I had prepared a while back, and it was ready for the table!
If you wanted to break up the original bottle shape some more, you could easily add some supporting buttresses around the bottom, or add some lights above the signs.
To build your own pillar of commercial doom, grab the Maelstrom's Edge terrain sprues from the webstore here!
What are you working on? We would love to see your models and terrain in the Comm Guild Facebook group!
For other building ideas, modeling tutorials, army spotlights and conversion walkthroughs, check out the Hobby section of the Maelstrom's Edge website here. And while you're there, grab a copy of the Maelstrom's Edge V2 Beta rules!
Terrain Spotlight: Levitating Generator Platform!
Posted on Friday Sept 16, 2022 at 05:00pm in Tutorials
- by Iain Wilson
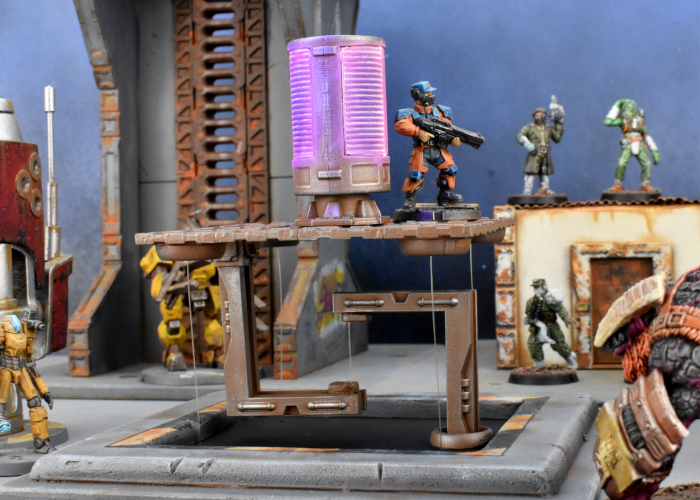
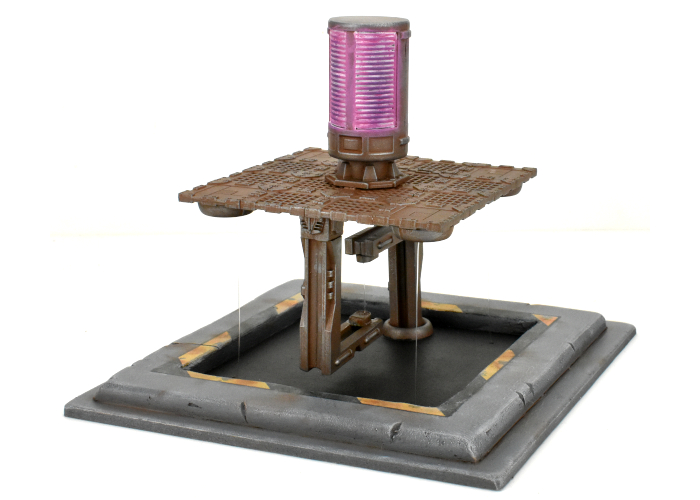
I've been fascinated for a while now by the various designs floating around for coffee tables and the like that 'float' with some clever cable design making it look like they have no actual support. In a moment of whimsy this week, I thought it might be fun to recreate this sort of design for the gaming table. And so... this happened:
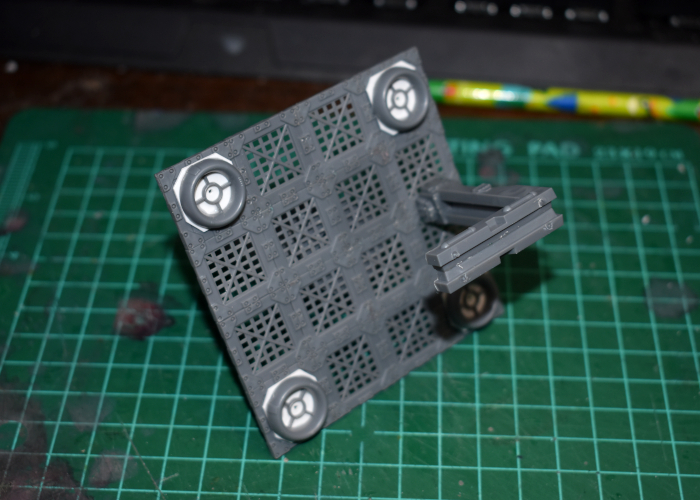
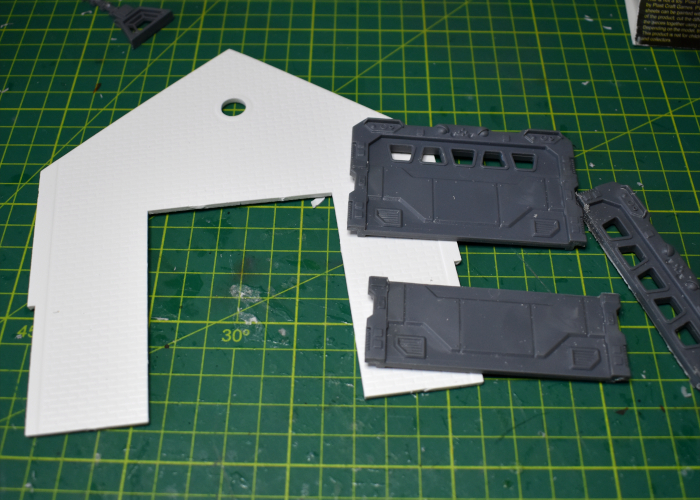
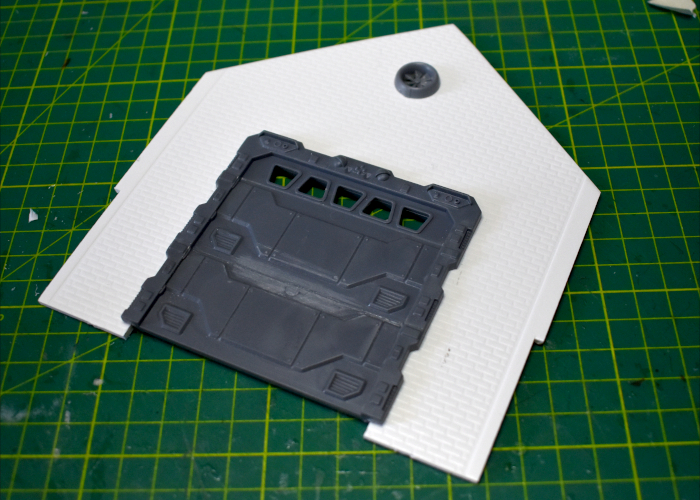
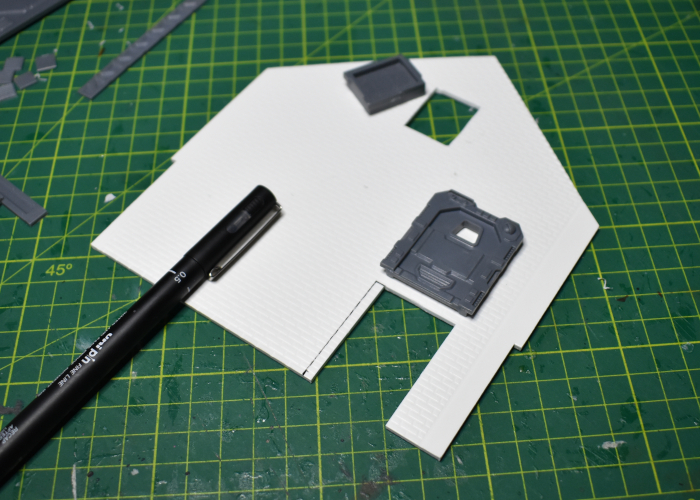
The main part of the structure is made from various bits and pieces from the Maelstrom's Edge terrain sprues. The circular windows on the bottom of the platform have a piece of thin plasticard behind them with a hole drilled through the centre. This allowed me to feed some clear fishing line through the holes and glue it onto the back of the plasticard. Once everything was painted and assembled, this would (I hoped!) securely hold the fishing line in place.
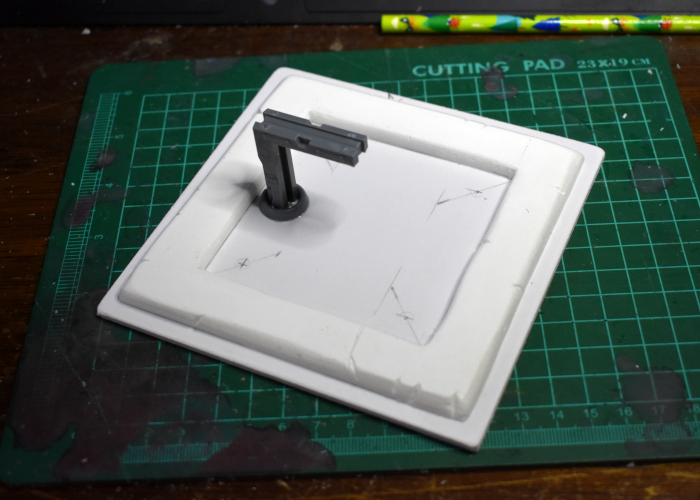
The base for the piece was made from a sheet of 2mm foamed PVC and some 6mm foamcore, with a few more bits from the terrain sprues for the support piece. I drilled holes in the base piece matching up to the holes on the platform corners, and made an indent beside each hole on the bottom of the base. This would allow the fishing line, when glued in place, to sit in the indents leaving the bottom of the base nice and flat.
Everything needed to be painted before final assembly, to avoid getting paint on the fishing line - I wanted the line to remain as unobtrusive as possible.
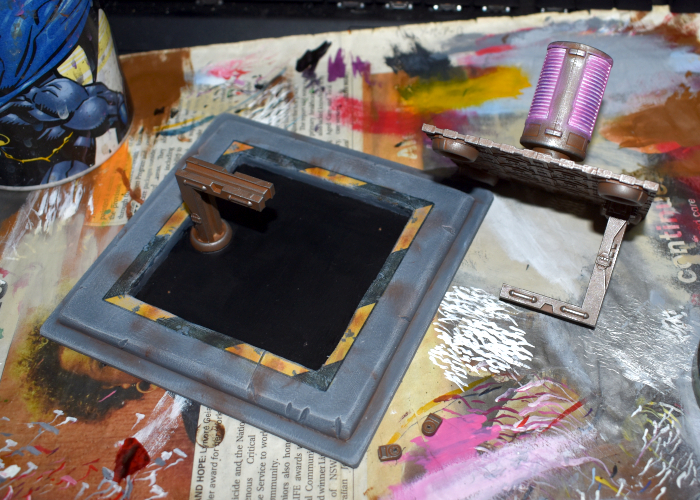
I glued the fishing line into the window ports and glued those in place on the bottom of the platform, and then glued the central support line in place. The it was just a matter of pulling the corner lines through the base holes until everything was sitting square and secure, and gluing the ends of the lines in place on the bottom of the base. There was a bit of breath-holding when I turned it over, and much rejoicing when it turned out to work as intended!
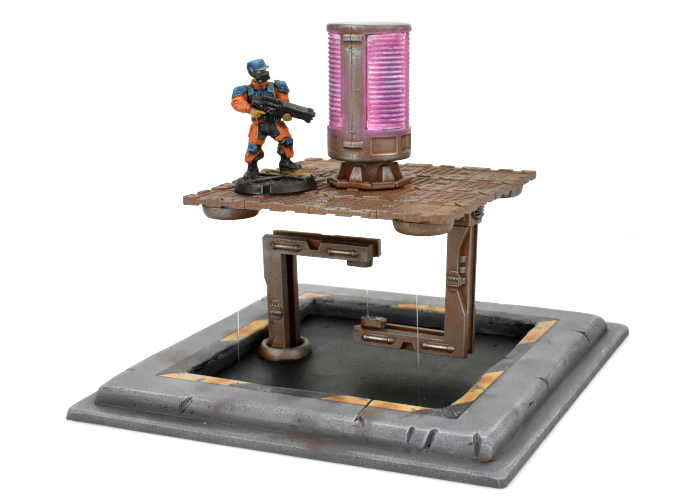

It's a bit of an odd piece for gaming terrain, but sometimes it's fun to make something just to find out if you can!
To build your own generator platform of floating doom, you can pick up the terrain sprues along with the rest of the Maelstrom's Edge range from the webstore here.
What are you working on? We would love to see your models and terrain in the Comm Guild Facebook group!
For other building ideas, modeling tutorials, army spotlights and conversion walkthroughs, check out the Hobby section of the Maelstrom's Edge website here. And while you're there, grab a copy of the Maelstrom's Edge V2 Beta rules!
Tags: modeling spotlight terrain terrainsprue
Terrain Tutorial: Quick and Easy Fences!
Posted on Friday Sept 09, 2022 at 05:00pm in Tutorials
- by Iain Wilson
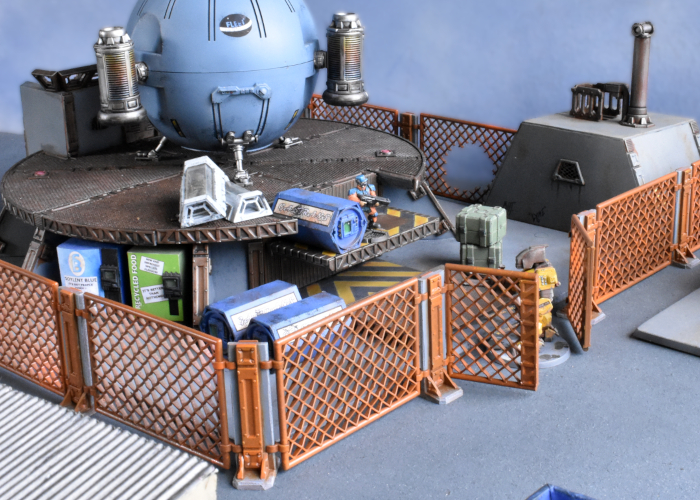
Fences can provide an interesting extra dimension to miniature battlefields, as they block movement without necessarily also blocking line of site. This can force some tactical decisions around model placement and movement around the table. In this week's article, I'm sharing a quick and easy way to make some fences for your table.
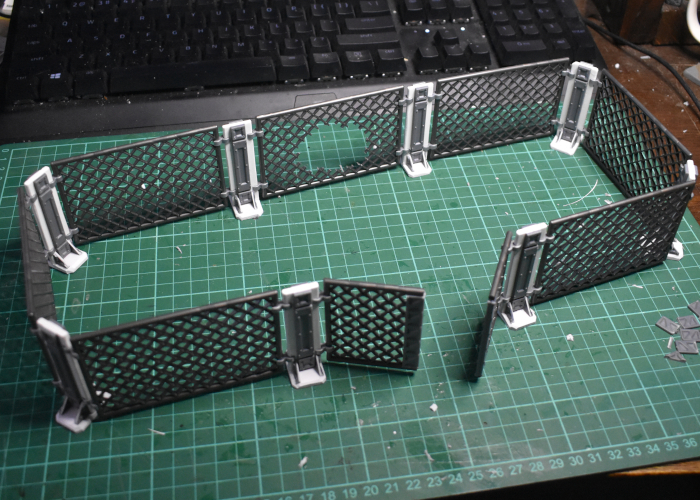
I came across these Lego-compatible fence pieces on AliExpress completely by accident, and thought they seemed ideal for gaming. They come as a pack of fence sections, and join together with separate clip pieces, and they're a nice, dark metallic grey colour. So for the really quick and easy version, you could just take these, clip a bunch of them together and plonk them on the table as-is and call the job a good-un.
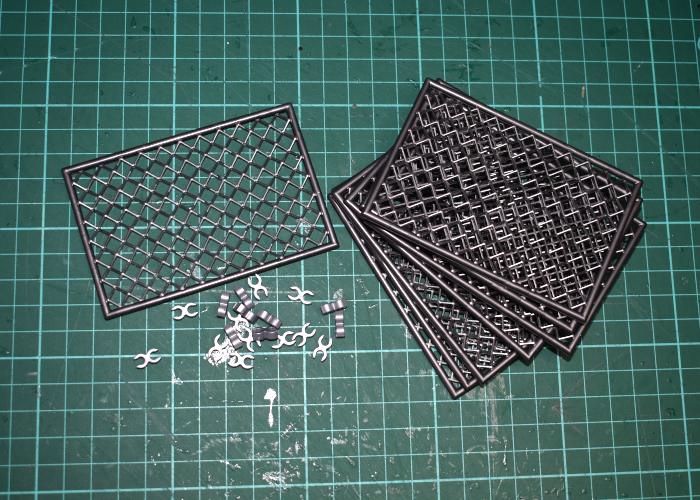
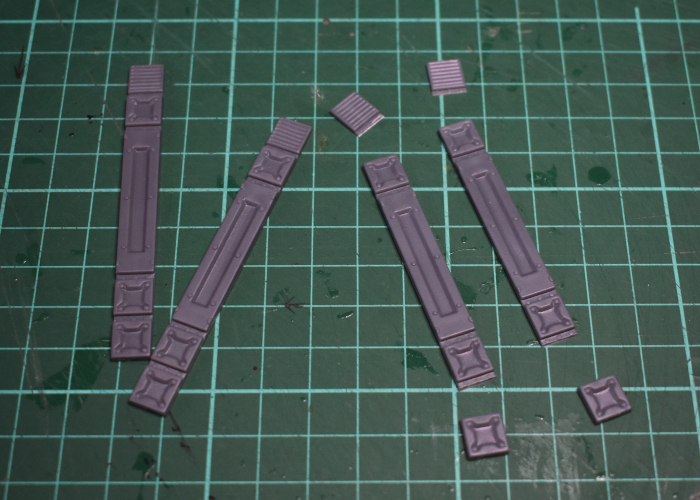
I wanted to fit them in with my existing terrain a little better, though, so I grabbed a couple of Maelstrom's Edge terrain sprues and set to work. I started by trimming up some reinforcing struts to about the same height as the fence panels by cutting off the top and bottom segments.
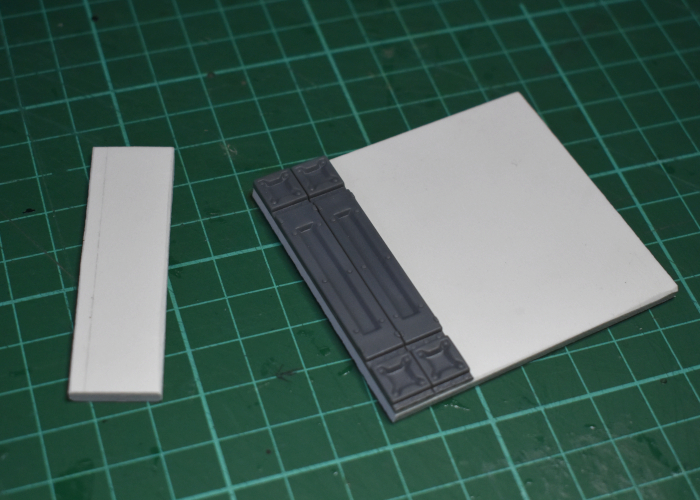
Then I took some 3mm foamed PVC and cut strips the same height as the struts, with about 4mm extra width either side - as a happy coincidence, this was the same width as two of the struts, so laying the struts side-by-side on the PVC served as a handy cutting guide.
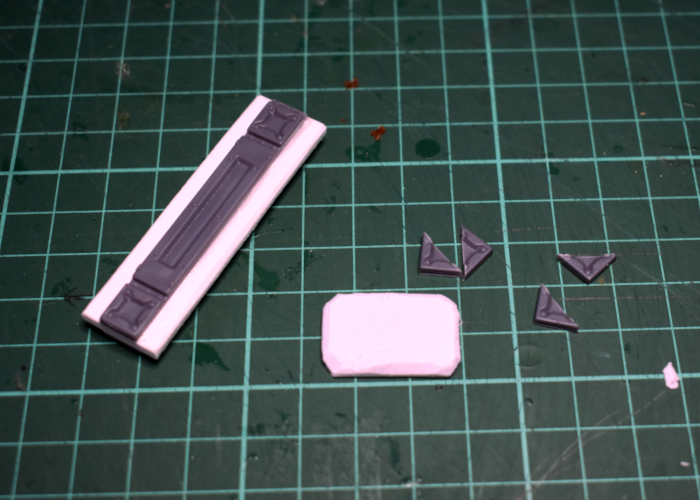
I glued the struts in place on either side of the PVC strips to form reinforced fence posts, and then cut some shorter strips to serve as bases for the posts. The bottom segment removed from the struts, cut in half diagonally, made some perfect supports to strengthen the attachment between post and base.
With everything glued together, the clips for the fence pieces slot snugly onto the PVC and it all stands up nicely.
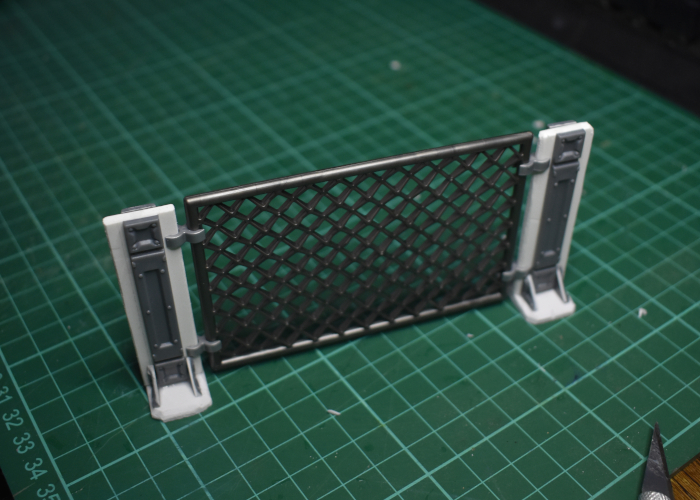
I made a bunch of posts, and for good measure cut one of the fence segments in half and attached some more reinforcing struts on the inner sections to make a two-part gate. The whole thing slots together and by twisting the holding clips can go around corners into whatever configuration is needed.
With a quick coat of rusty paint (Vallejo Beasty Brown spray with some splotchy spray of Tamiya Pure Orange and a light drybrush with Army Painter Fire Lizard) and some grey for the PVC parts (Army Painter Uniform Grey with a drybrush of white and some Vallejo Beasty Brown drybrushed into the creases) the fence is ready for the table!
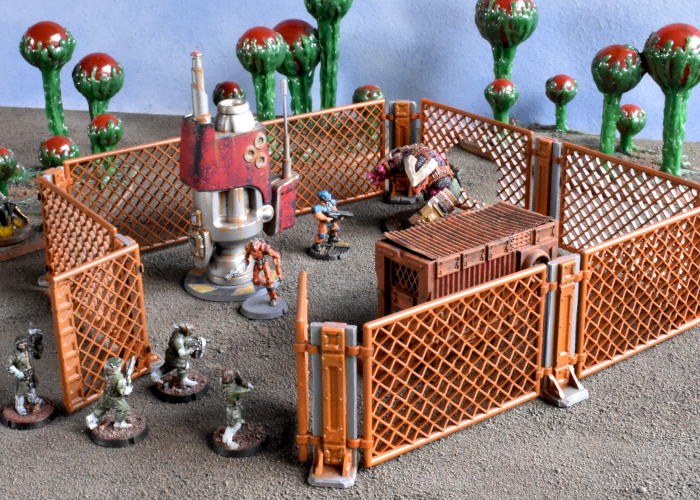
To build your own fence of chainlinked doom, you can pick up the terrain sprues along with the rest of the Maelstrom's Edge range from the webstore here.
What are you working on? We would love to see your models and terrain in the Comm Guild Facebook group!
For other building ideas, modeling tutorials, army spotlights and conversion walkthroughs, check out the Hobby section of the Maelstrom's Edge website here. And while you're there, grab a copy of the Maelstrom's Edge V2 Beta rules!
Terrain Spotlight: Terrain from 'Found' Objects
Posted on Tuesday May 03, 2022 at 05:00pm in Tutorials
- by Iain Wilson
One of my favourite parts of this hobby is building terrain from things that were originally intended for very different purposes. To this end, I tend to keep an eye out when I'm walking around a store or sending things to the recycle bin for anything that has an interesting shape. You can find quite a few of the resultant terrain projects in the Hobby section of the Maelstrom's Edge website, but here's a few highlights from the last couple of years.
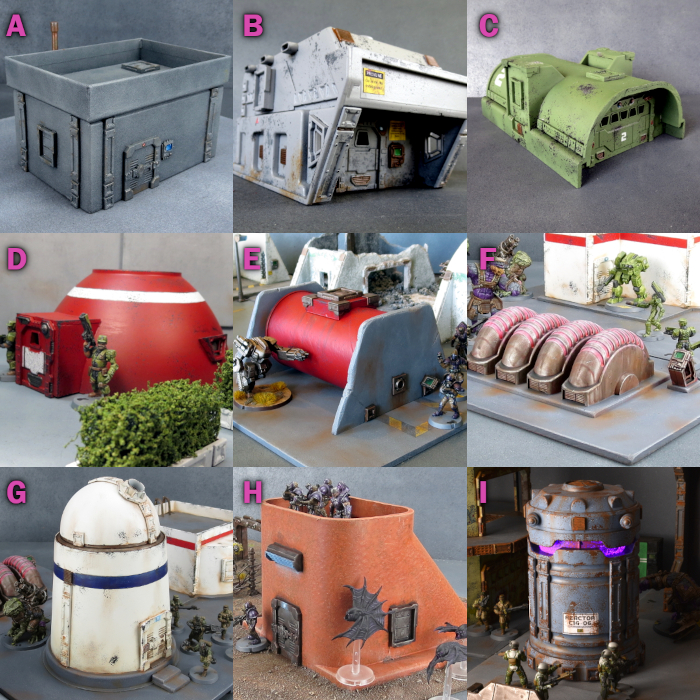
All of these make use of various assorted detail pieces from the Maelstrom's Edge terrain sprues. Click on the Walkthrough links to see how they were put together.
A - Basic building made from a cardboard gift box. Walkthrough
B - Portable building made from a plastic storage tray. Walkthrough
C - Military building made from a plastic stormwater drain. Walkthrough
D - Small Hab Dome made from a plastic bowl. Walkthrough
E - Storage Tank made from a Pringles tube. Walkthrough
F - Generator made from bubble gum tape canisters. Walkthrough
G - Observatory made from a yoghurt tub and a Christmas bauble. Walkthrough
H - Bunker made from a plastic air conditioning duct piece. Walkthrough
I - Generator made from a collapsible LED lamp. Walkthrough
To build your own battlefield terrain of recycled doom, you can pick up the terrain sprues along with the rest of the Maelstrom's Edge range from the webstore here.
What are you working on? We would love to see your models and terrain in the Comm Guild Facebook group!
For other building ideas, modeling tutorials, army spotlights and conversion walkthroughs, check out the Hobby section of the Maelstrom's Edge website here.
Tags: spotlight terrain terrainsprue
Terrain Spotlight: Plastic Packaging Firepoint
Posted on Wednesday Apr 20, 2022 at 05:00pm in Tutorials
- by Iain Wilson
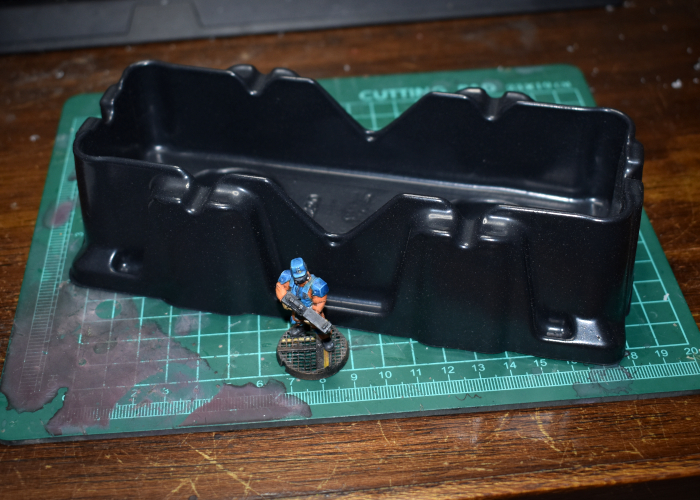
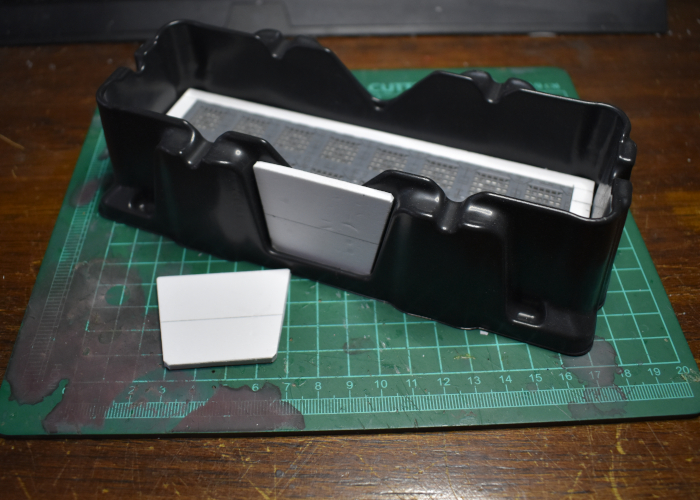
As you may have seen if you've been following the blog for a while, I make a lot of my terrain out of various bits and pieces that I come across here and there. This week I upgraded my external hard drive, and the new one came with some nifty plastic packaging pieces that I thought would be just perfect to turn into some small firepoint terrain pieces. And so I set to with some foamed PVC, superglue, and a couple of Maelstrom's Edge terrain sprues!
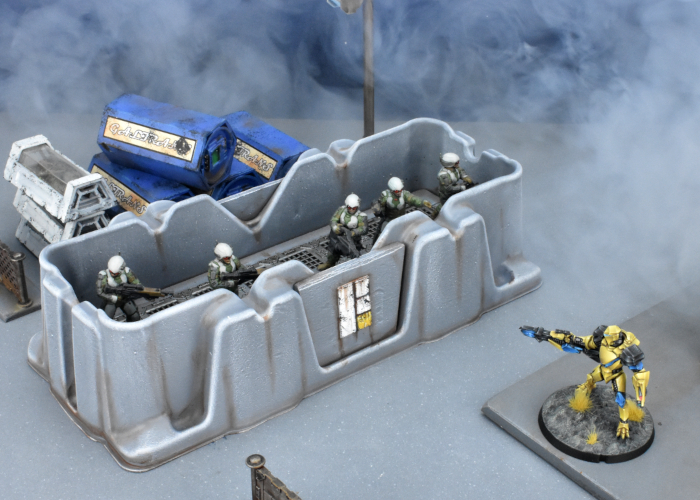
The 'floor' on the inside of the packaging piece was a fraction too low to allow models to see comfortably over the sides, and wasn't flat. Aside from that, I figured the contouring on the sides would give it some nice visual distinctiveness without the need for a lot of embellishment.
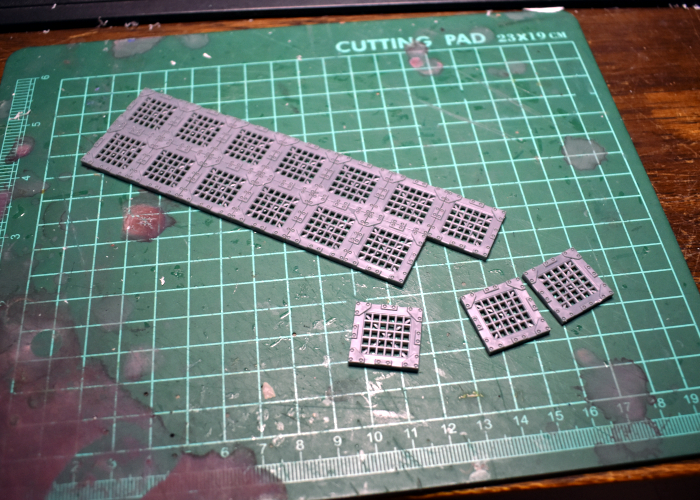
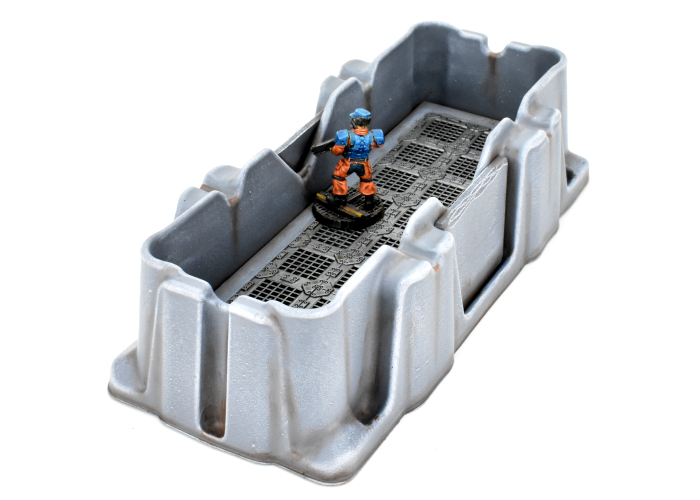
I started out by measuring up the inside dimensions, and putting together as many floor grating pieces from the 2nd Maelstrom's Edge terrain sprue as would fit in there.
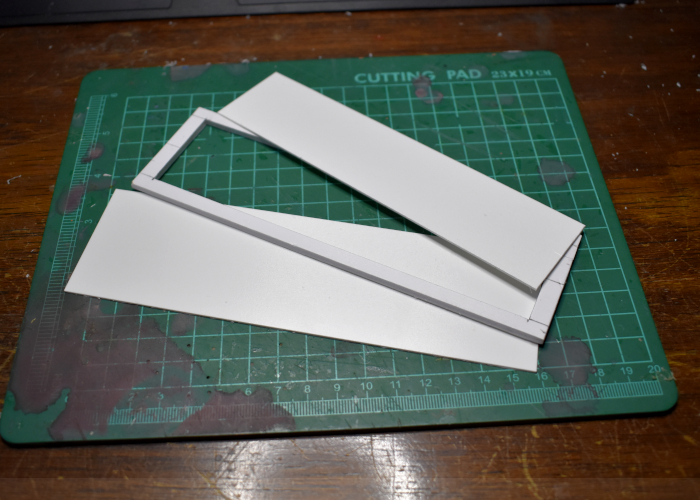
The grating left a small space around the edges, so to finish off the floor I cut a surround from 3mm foamed PVC to fit snug against the walls of the packaging, with a rectangle of 1mm PVC to sit underneath the grating to bring it up to the same height as the surround. Then I added a larger piece of 1mm PVC under the whole thing for rigidity and just that tiny bit of extra height.
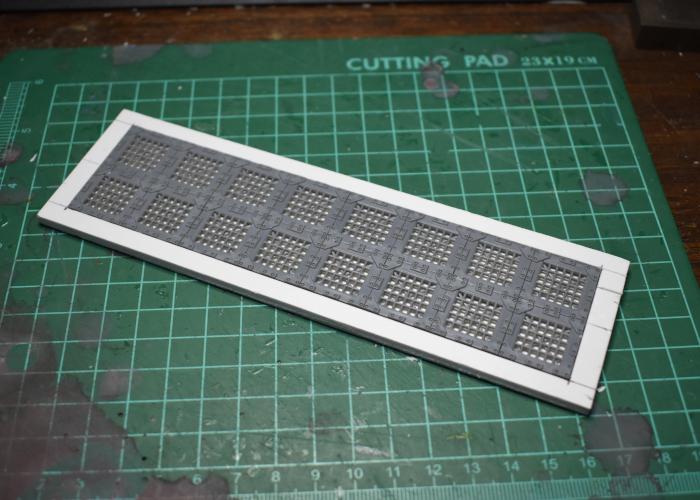
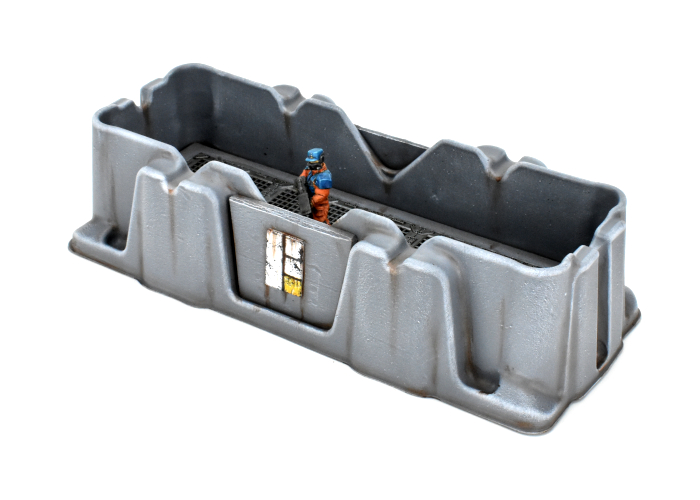
I used an all-plastic primer and superglue to fix the floor in place in the packaging piece. This left the walls a nice height for models to be mostly obscured while still being able to shoot over the walls, except for the middle section of the long walls, where it dipped down lower. I fixed this by cutting some trapezoid pieces of foamed PVC to glue over the gap.
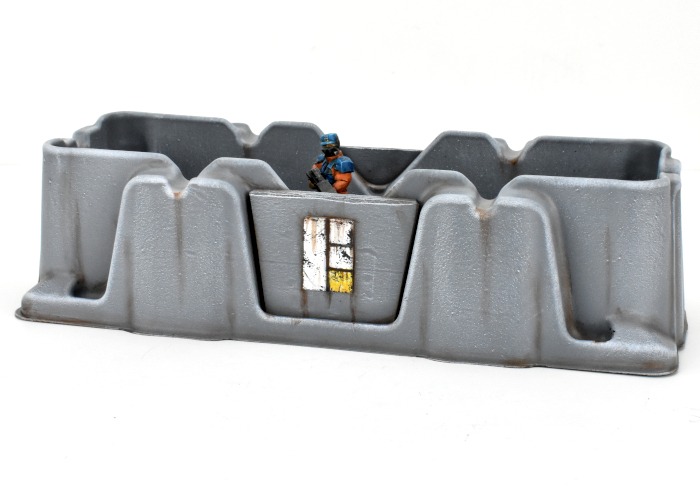
I kept the painting relatively simple, starting with an Army Painter Uniform Grey basecoat and then a drybrush of AP Gorgon Hide, with some AP Dirt Spatter in the creases for some easy weathering. The metal grating was painted with AK Interactive Gun Metal and then washed with AP Strong Tone. Finally, I added an Epirian symbol cut from 1mm foamed PVC to the front, painted with Gorgon Hide and White, and Citadel Iyanden Darksun and AP Daemonic Yellow for the yellow bit. I used a light sponge of Vallejo Heavy Charcoal for chipping, and then finished up with some more dirt spatter weathering.
To build your own bunker of recycled doom, you can pick up the terrain sprues along with the rest of the Maelstrom's Edge range from the webstore here.
What are you working on? We would love to see your models and terrain in the Comm Guild Facebook group!
For other building ideas, modeling tutorials, army spotlights and conversion walkthroughs, check out the Hobby section of the Maelstrom's Edge website here. And while you're there, grab a copy of the Maelstrom's Edge V2 Beta rules!
Terrain Spotlight: Candy Jar Desert Building
Posted on Tuesday Jan 11, 2022 at 06:00pm in Tutorials
- by Iain Wilson
As a wise man once said, "With great Christmas comes a great big bunch of junk food!"
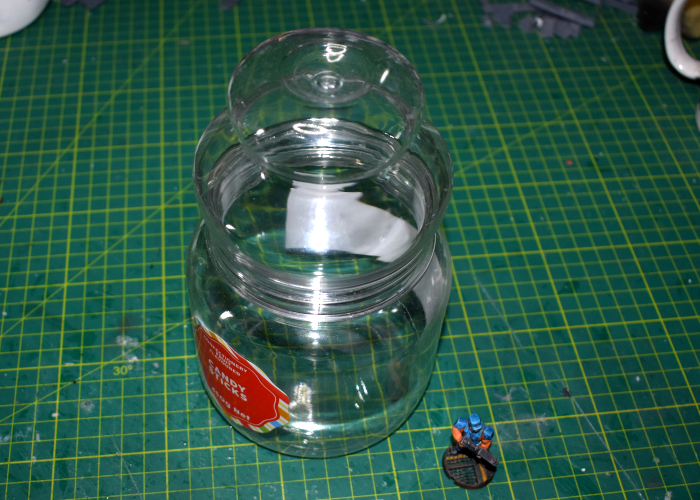
Amongst my family's collection of sugary delights this year was a plastic jar full of candy sticks, bought for my daughters to stuff into Christmas cards. Once empty, though, the jar itself was just too interesting a shape to toss it away. So, there was nothing else for it but to build something!
The jar in question, blissfully unaware that it was about to enter a whole different plane of existence.
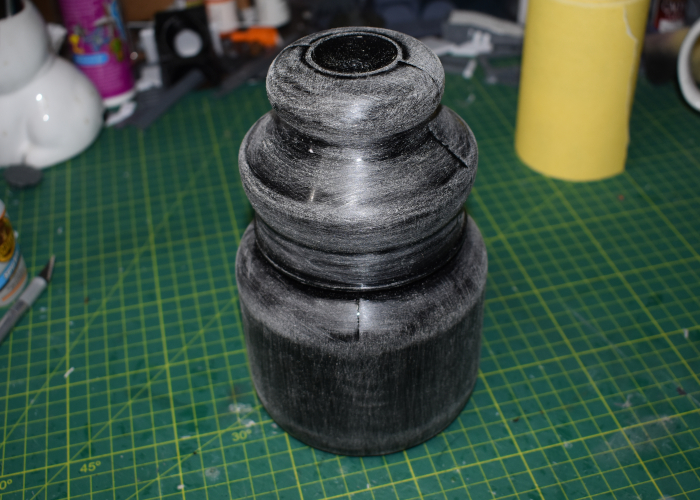
After removing the labels and cleaning off the glue residue with some isopropyl alcohol, I sprayed the inside of the jar with some matt black spray. I do this whenever I'm using something clear as a terrain base, as it prevents stray light bleeding through the paint, and also stops things looking weird if the paint on the outside gets scratched.
I also gave the outside a scrub with some sandpaper to break up the glossy surface. This gives a better surface for the glue and paint to adhere to.
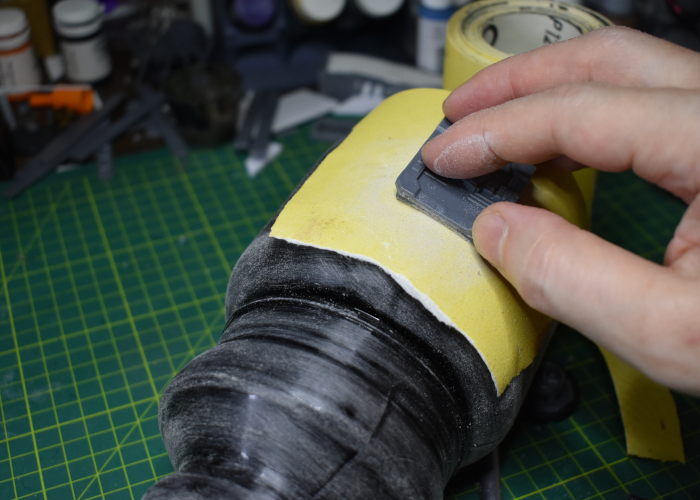
To fit doors and windows from the terrain sprue to the curved surface of the jar, rather than building a framework to square things up I decided to fit them to the curve. I laid a piece of sandpaper over the jar and used this as a curved sanding block to shape the back of the parts.
Adding the support struts around the rim of the lid was a little easier - I just bent them around the curve and glued them in place with superglue and a plastic primer.
In a happy coincidence, the spacing worked out almost perfect. I used three full struts, and cut the last one down to three sections, needing to trim only a fraction off the end to make it fit perfectly.
I glued the door and windows into place, adding some steps and gluing the jar down to a piece of hardboard. I also added a grating piece onto a bare patch of the board just for some extra visual interest, painting underneath it with some black as this was easier than doing it later.
To dress up the top of the building, I grabbed a few assorted pieces from the terrain sprues, whipping together an aerial array, a control box and a chimney using a piece of the sprue and some plastic tube.
With these parts glued in place, I finished off the roof with a fan and large pipe fitting glued onto a base that fit just perfectly over the cavity in the top of the jar lid.

The jar needed some texture, so I added a coat of textured paint and while that was drying I built up the base with some filling plaster.
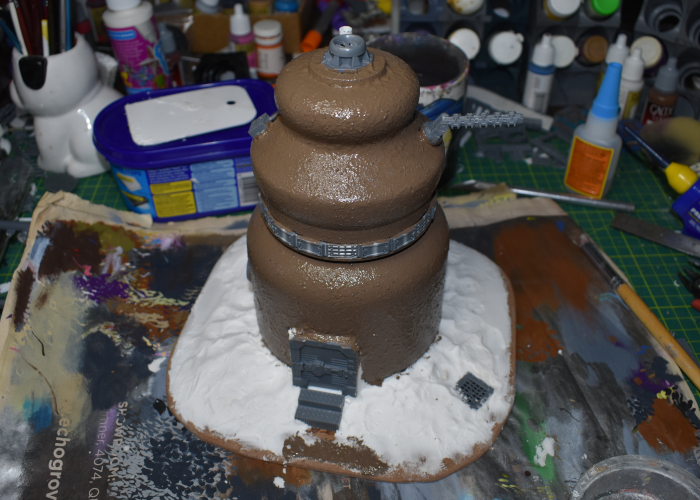
Finally, I added a layer of sand and gravel mix over the filling plaster, fixing it in place with some PVA glue.
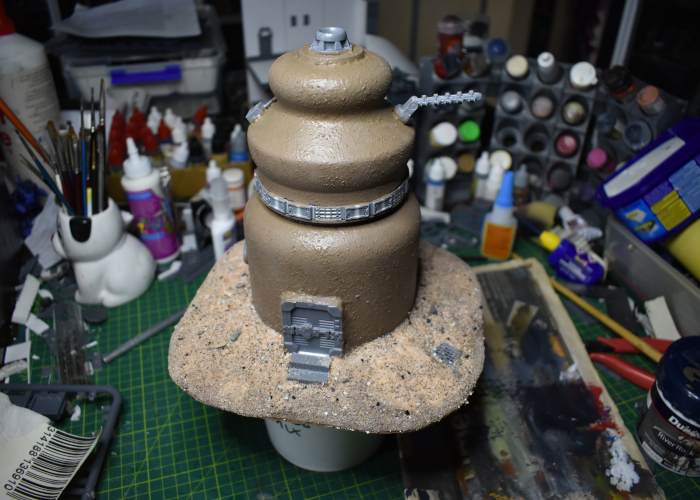
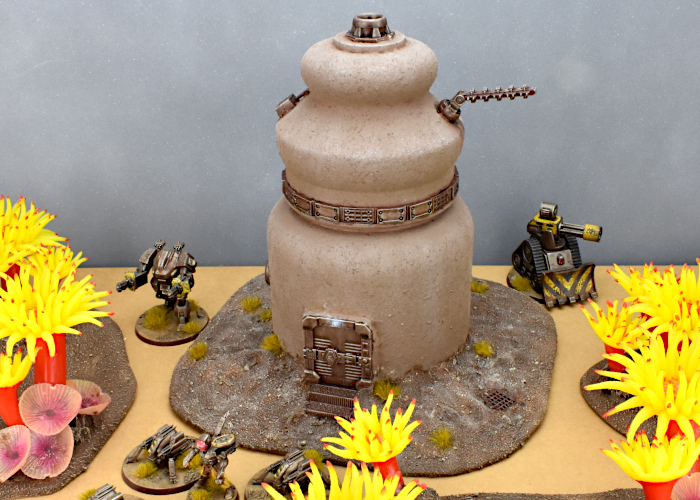
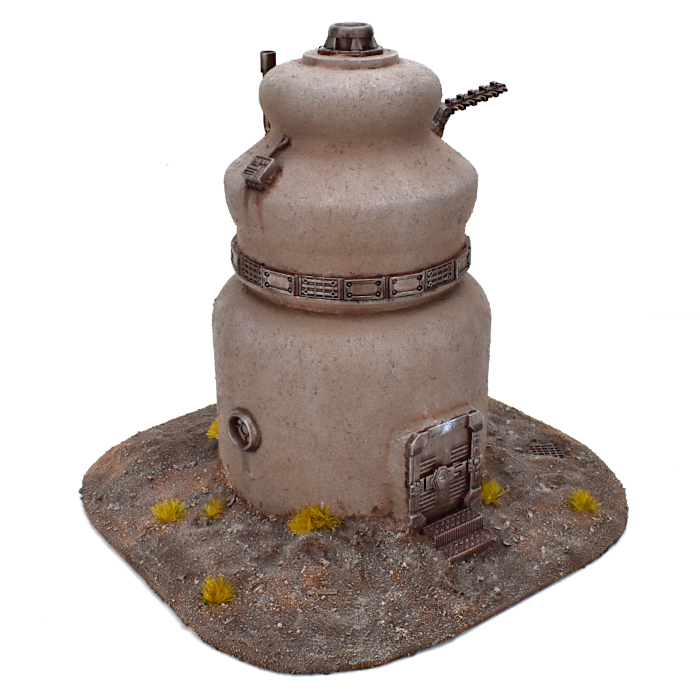
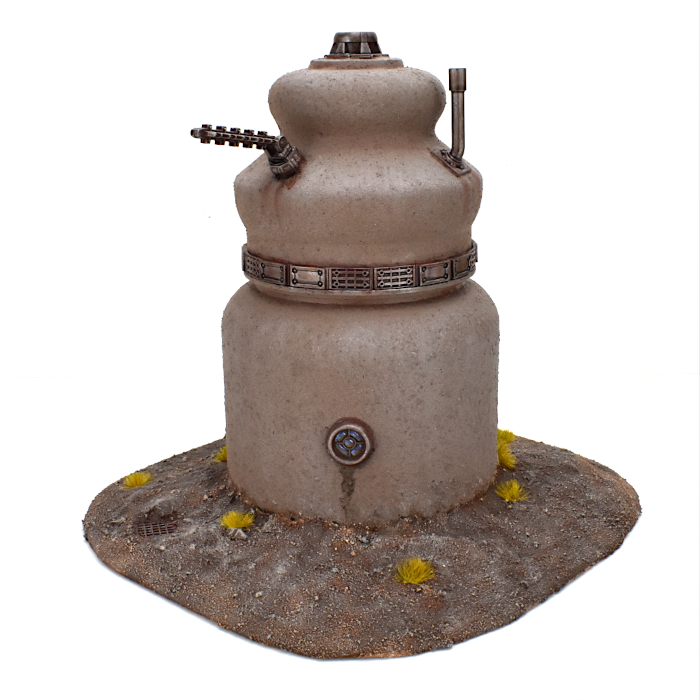
After a quick bit of paint work, the new building was looking totally sweet and ready for the table!
To build your own desert habitat of sugary doom, you can pick up the terrain sprues along with the rest of the Maelstrom's Edge range from the webstore here.
What are you working on? We would love to see your models and terrain in the Comm Guild Facebook group!
For other building ideas, modeling tutorials, army spotlights and conversion walkthroughs, check out the Hobby section of the Maelstrom's Edge website here.
Tags: buildings scratchbuild spotlight terrain terrainsprue tutorial
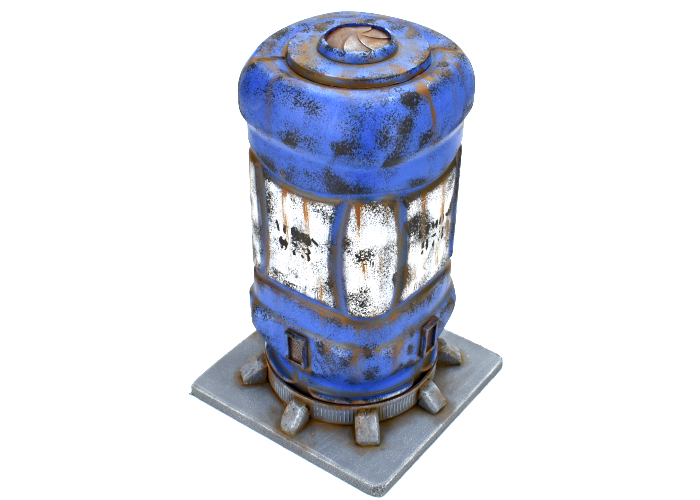
Terrain Spotlight: Fruit Jar Air Purifier!
Posted on Wednesday Dec 08, 2021 at 01:03am in Tutorials
- by Iain Wilson
Time for a super-quick terrain build! In the grand tradition of painting things instead of throwing them into the recycling bin, this week I built an air purifier station out of a plastic fruit jar, with some help from the Maelstrom's Edge terrain sprue!
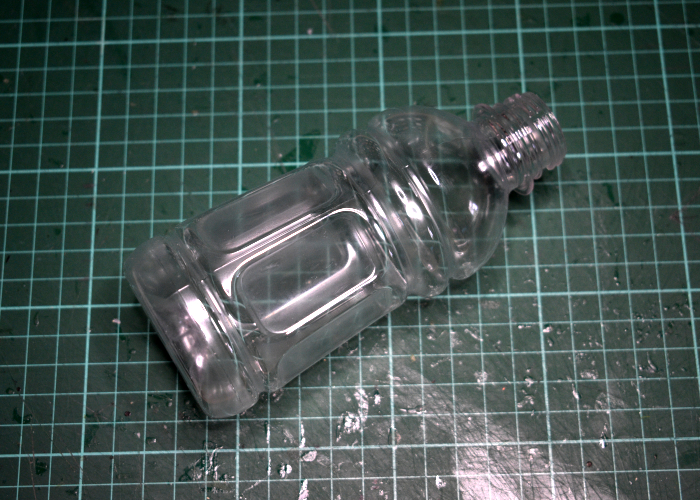
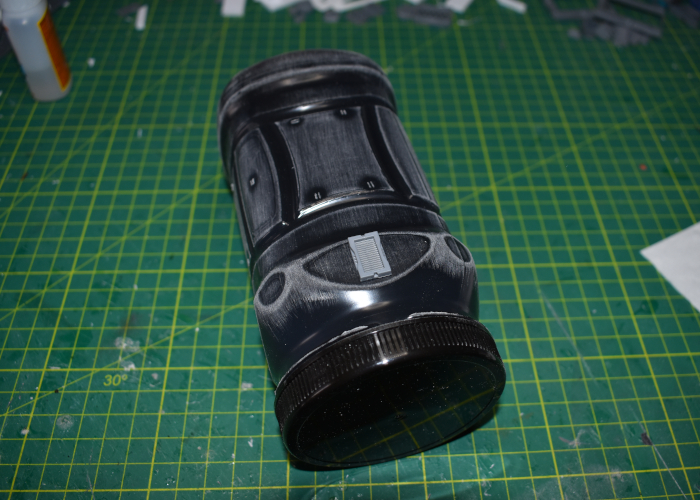
The bulk of this terrain piece uses the aforementioned plastic jar, which I think originally had plums in it. The plums weren't much good for modeling, but the jar itself was an interesting shape, so I figured it was worth hanging onto it.
I started out by spraying the inside of the jar with some black paint. This helps to avoid things looking weird if the outer layer of paint gets scratched with use, and also blocks light from showing through if the outer paint layer is thin in places. I also gave the outside a light sand to help the glue and paint to stick better.
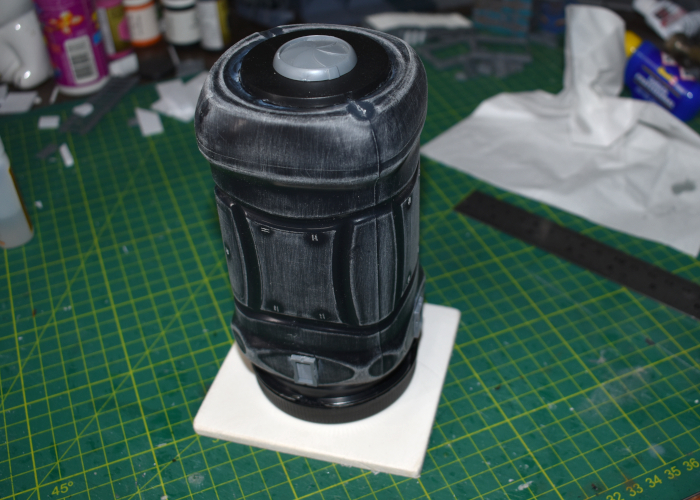
To cover over the embossed logos on the bottom of the jar, I took a large base and cut some indents into the bottom to sit over the mould line on the jar. I glued this in place using some all-plastic glue (a superglue with a primer pen that helps give a secure bond on different types of plastics). In the middle of the base I added an iris portal from the second Maelstrom's Edge terrain sprue.
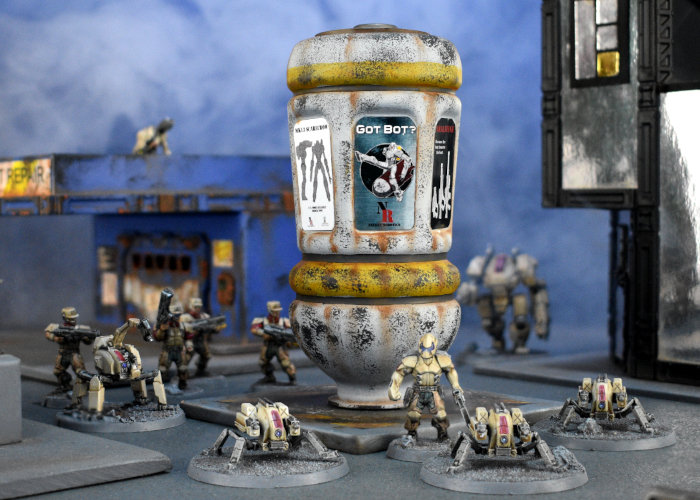
I went light on additional details as I thought the shape of the jar was interesting enough by itself, but I added a vent on each side - the iris on top would be opened to suck in contaminated or otherwise unsuitable air, and the cleaned/chemically altered/now fit for breathing air would be pumped out through the vents, with all of the 'working gubbins' sealed away inside the unit.
Finally (or so I thought) I added a small base cut from a piece of 5mm foamed PVC.
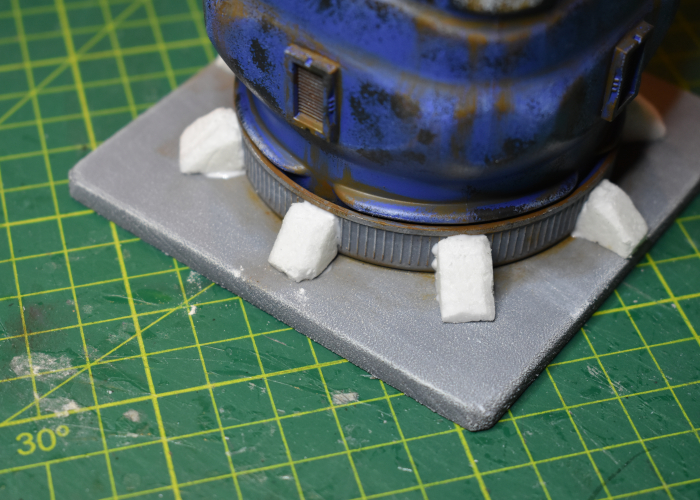
While I was painting the purifier unit, I decided that it still looked a little too much like a jar turned upside down, largely because the lid is such a recognisable shape. So I broke it up a bit by adding some buttresses around it cut from a piece of polystyrene foam.
With some paint on, the air purifier wound up looking like this:
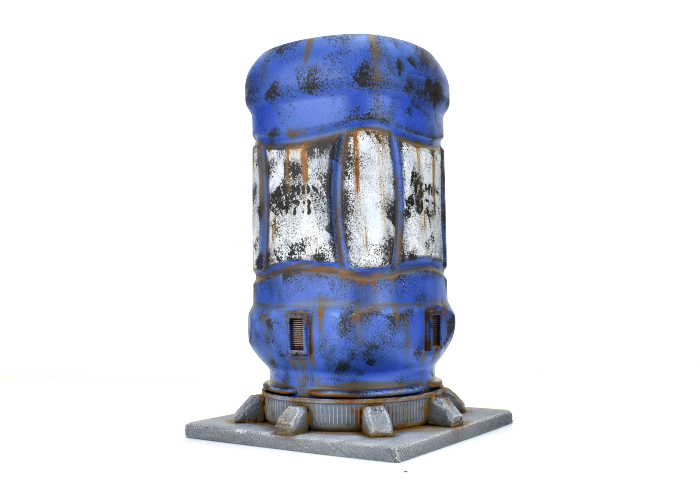
Build your own air purifier of respiratory doom by picking up the Maelstrom's Edge terrain sprues along with the rest of the Maelstrom's Edge range from the webstore here.
What are you working on? We would love to see your models and terrain in the Comm Guild Facebook group!
For other building ideas, modeling tutorials, army spotlights and conversion walkthroughs, check out the Hobby section of the Maelstrom's Edge website here.
Tags: spotlight terrain terrainsprue tutorial
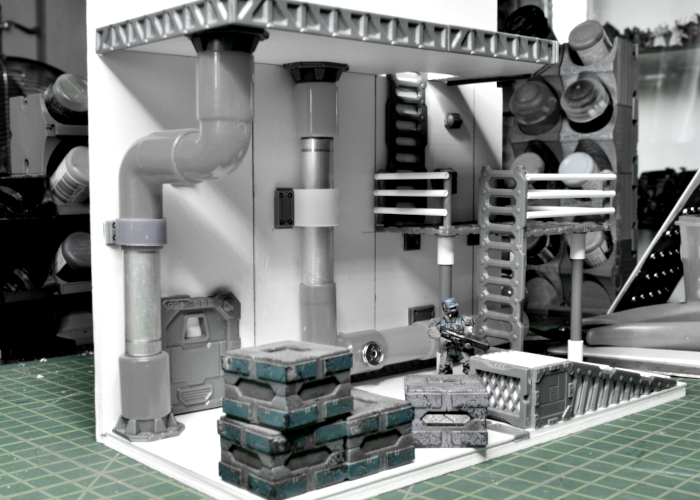
Terrain Kitbash: Sector 16
Posted on Tuesday Nov 16, 2021 at 05:00pm in Tutorials
- by Iain Wilson
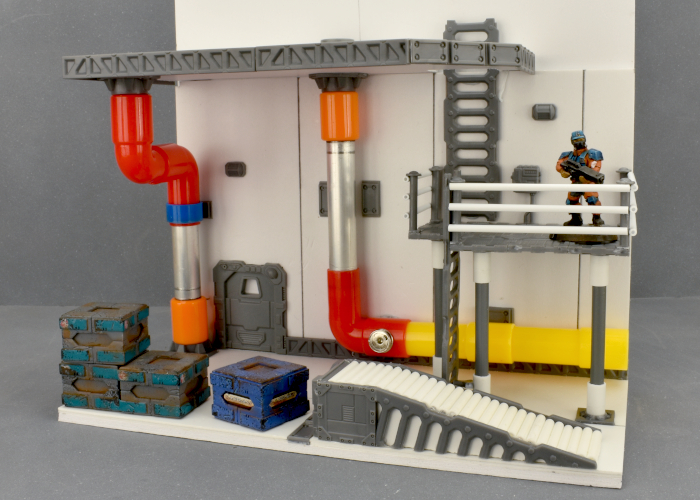
Sometimes I like to take a break from building things for the tabletop, and put something together just for the fun of it. That's what I had in mind this week, when I started work on a display backdrop piece that I'm calling 'Sector 16'
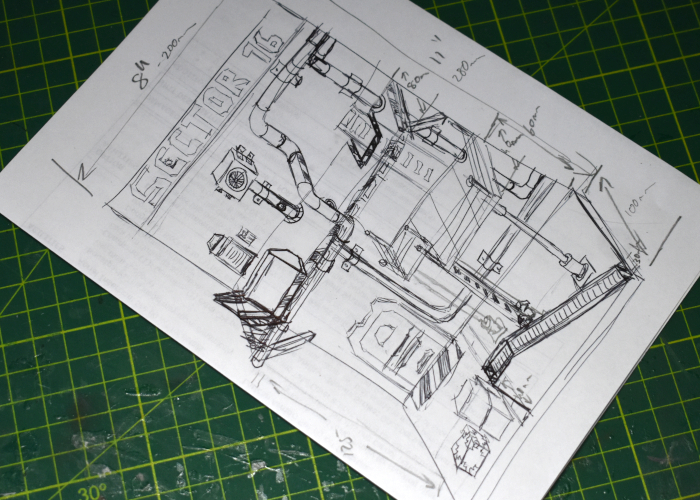
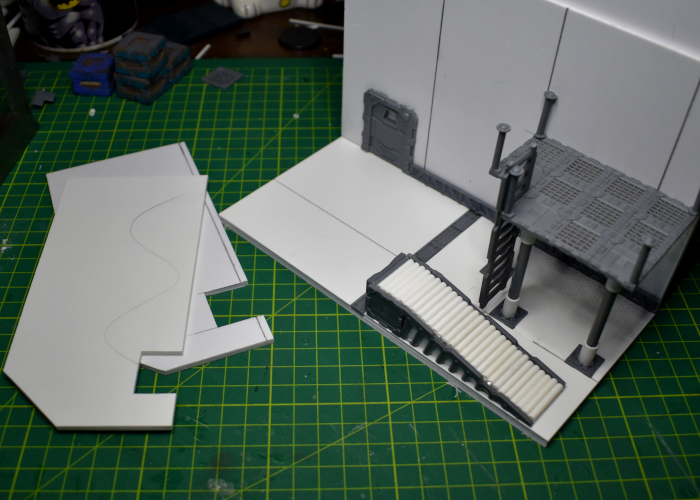
Most of the time, I get a rough idea of what I'm building in my head, and I just wing it from there. Some builds though require a little more planning to make sure everything will fit together correctly. My plan for Sector 16 wasn't particularly complicated, but with pipes running in multiple directions and platforms on several levels, I decided that a rough sketch would be a good idea. This still just serves as a starting point, and things tend to change along the way, but it helps to avoid those inadvertant 'oops' moments when something doesn't fit where it is supposed to.
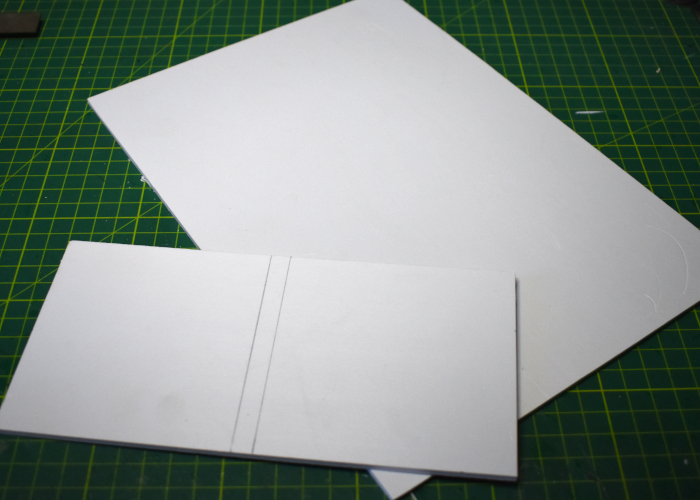
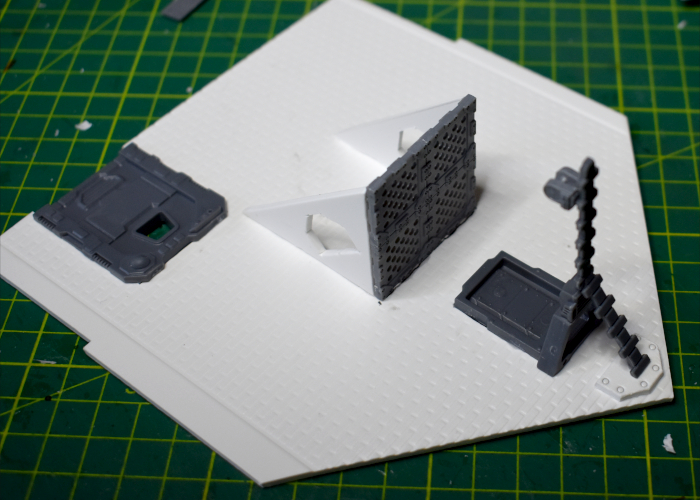
The bulk of the structure was made from foamed PVC sheet, cutting a base and back piece that would go together in an 'L' shape, with detail layered over the top.
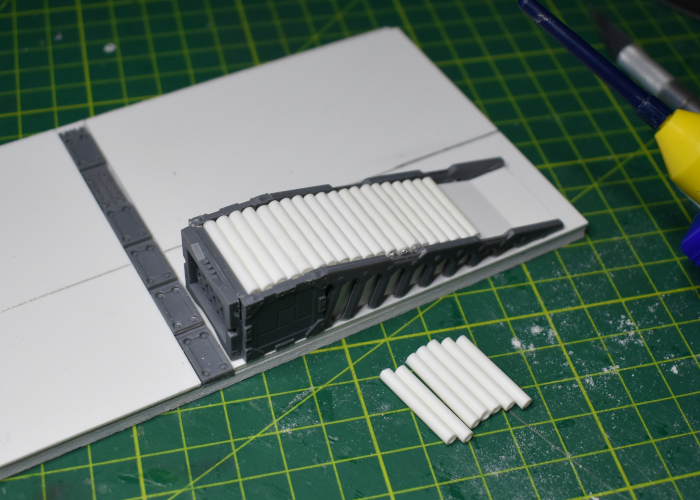
I thought that adding some detail along the front of the base would help to add depth, and when using it as a photo backdrop would be useful for disguising its relatively shallow depth. To this end, I constructed a conveyor assembly using parts from the Maelstrom's Edge terrain sprues, some 1mm foamed PVC and plastic tubing.
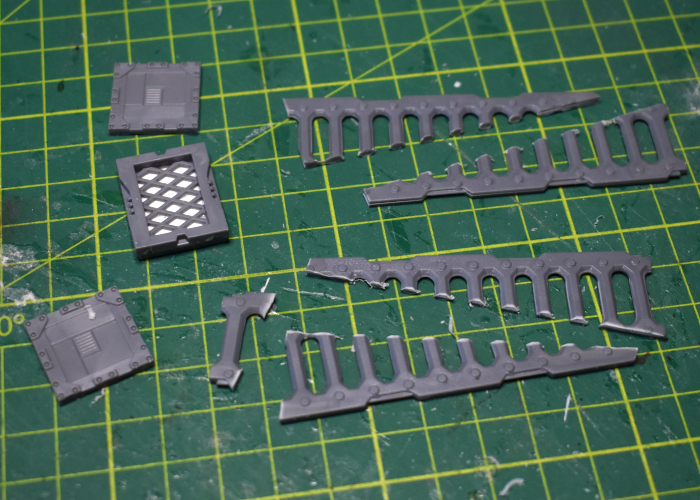
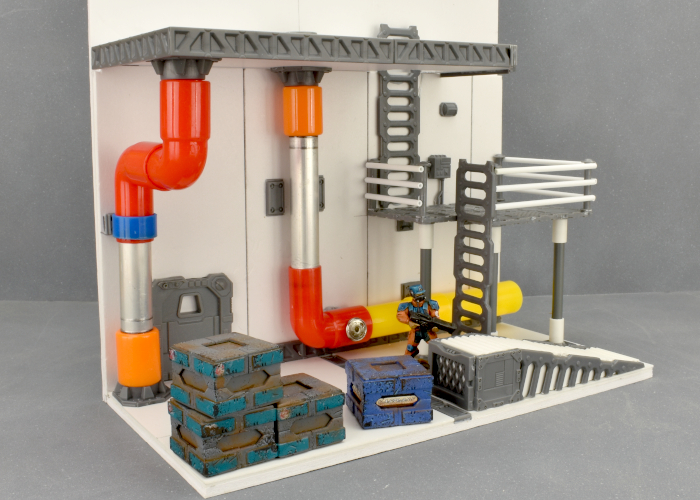
In the interests of mixing things up visually, I wanted the multiple level platforms to be constructed differently. The upper level was to be concrete, but for the lower level I used floor grating pieces from the second Maelstrom's Edge terrain sprue, with support poles cut from the sprue itself of the original terrain sprue.

To finish up the lower section, I put together some pipes made using pieces from a kid's toy pipe construction set (which looks a little technicolour right now, but should be a little less cartoony when they have some paint on!) and some 12mm aluminium tubing, and added some additional details like lights, edging and pipe support straps using more pieces from the terrain sprues.
Tune in next time, as I get to work on the upper level!
To build your own sector of unspecified doom, you can pick up the terrain sprues along with the rest of the Maelstrom's Edge range from the webstore here.
What are you working on? We would love to see your models and terrain in the Comm Guild Facebook group!
For other building ideas, modeling tutorials, army spotlights and conversion walkthroughs, check out the Hobby section of the Maelstrom's Edge website here.
Terrain Kitbash: Sci-Fi Barn pt3
Posted on Monday Oct 25, 2021 at 06:00pm in Tutorials
- by Iain Wilson
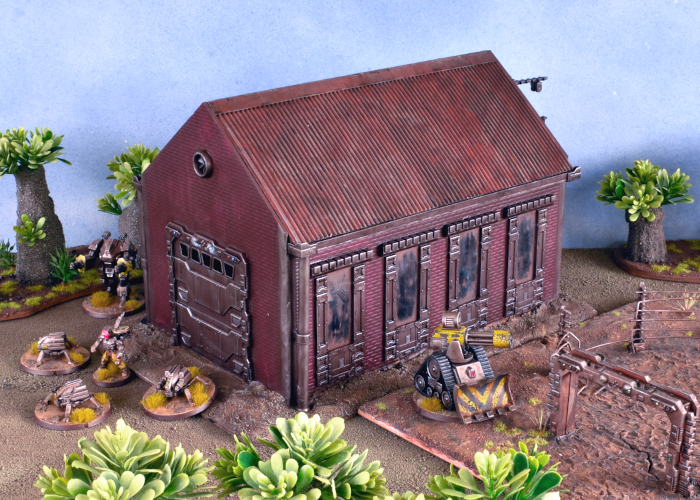
Sci Fi Barn, episode 3: Now in Epirocolor!
In this latest installment, I finally get some paint on this barn build. If you're wandering in here wondering what it's all about, this was a kitbash of a Plast Craft Games warehouse with parts from the Maelstrom's Edge terrain sprues to build the a sci fi barn (you can find the first part here).
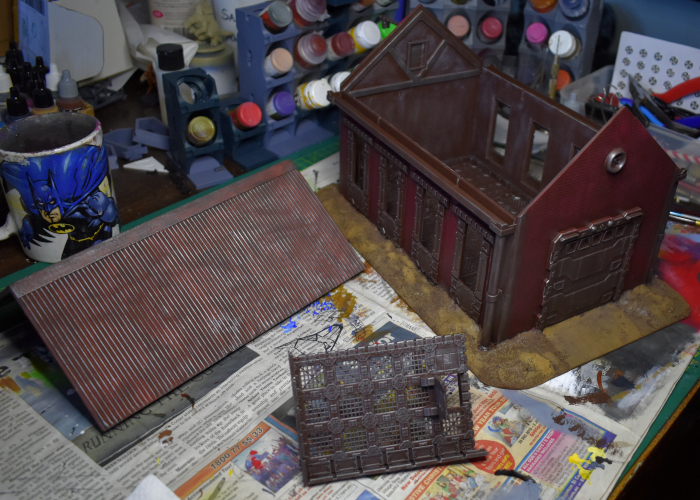
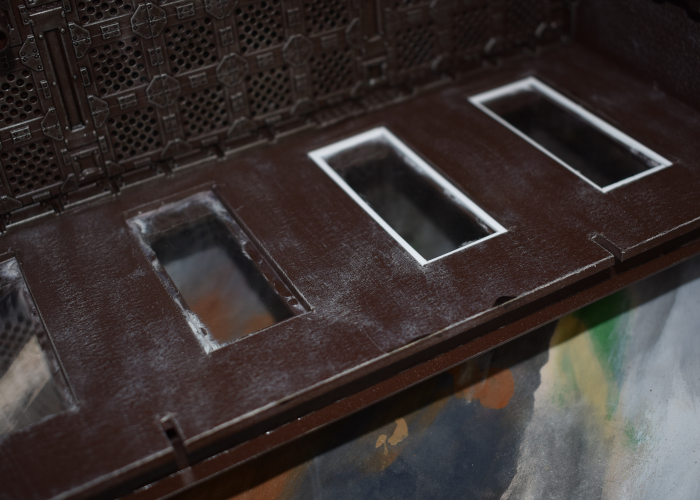
With assembly completed, I kicked off the painting by spraying the whole thing with a coat of a mediumish-dark brown satin spray paint that I had sitting on the shelf. Or, I would have, but it ran out on me. So I wound up spraying the top of the roof with some old Rustoleum flat red that I sometimes use as a base for rusty metal.

I went back over the red roof with some Vallejo Charred Brown before drybrushing over all of the metal parts with some Citadel Boltgun metal (Leadbelcher, for the newcomers). The non-metal parts of the interior walls were drybrushed with some Army Painter Skeleton Bone to pick up the texture on the foamed PVC, and the exterior bricks were given a heavy drybrush of Scalecolor Baal Crimson. Then before putting the drybrushes away, I gave the dirt on the base a layer of Vallejo Heavy Brown.
I was aiming for a weathered but not overly rusty metal look for this piece, as it's intended for a fairly arid 'western' themed table set. So over all of the metal parts and the base I added a generous coat of Army Painter Strong Tone and set it aside to dry.
At this point it was time to fit the window panes. The warehouse set came with painted clear plastic pieces that looked fine in the original warehouse, but turned out to not look right here. So instead, I used them as a template to cut some clear plastic sheet to size as a replacement.
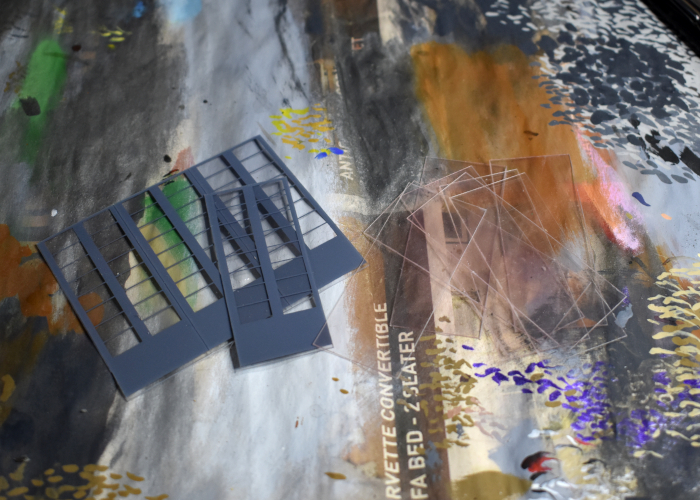
I hadn't originally planned to add internal window frames, but with the panes in place the glue around the edges was very obvious , so I added some thin frames using some thin PVC.
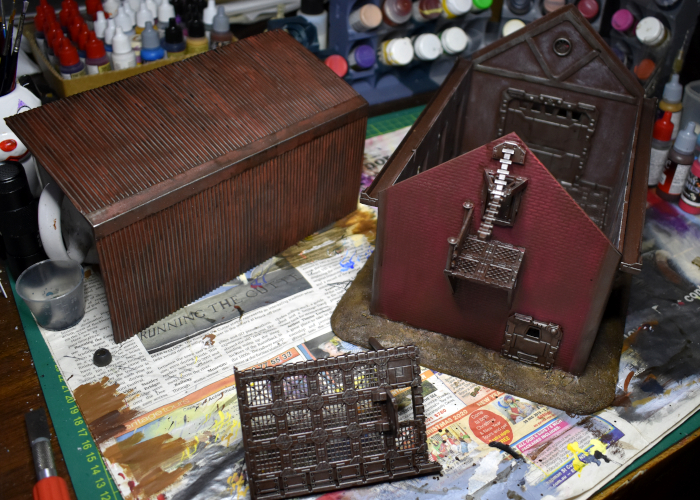
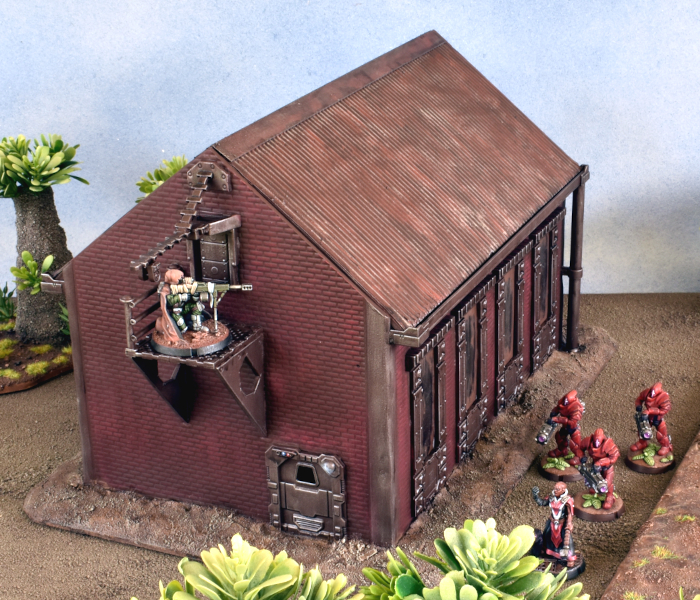
After painting these new internal frames brown, all that was left was to add final detailing. I drybrushed the base dirt with some Army Painter Skeleton Bone and all of the metal parts with a light layer of Army Painter Shining Silver. Lights and sensors on the door frames were painted in with red and blue.
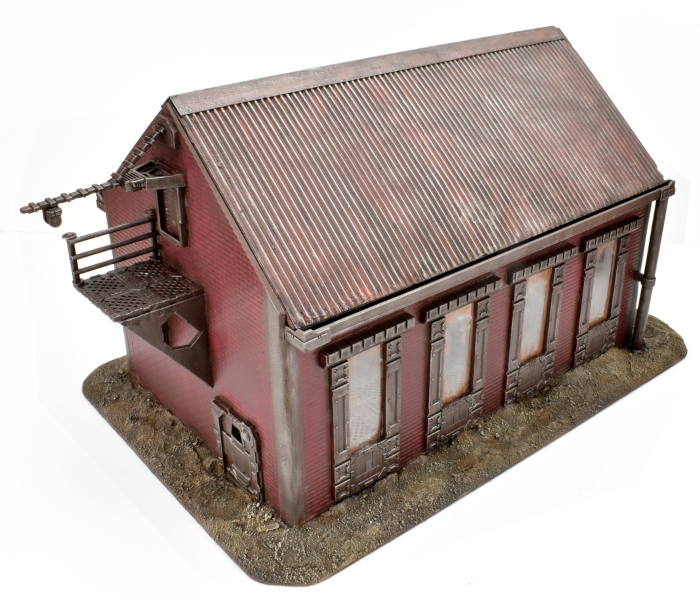
With the metal parts being quite dark, I didn't add a lot of dirt weathering, other than over the tops of the doorframes where it served to conceal a few messy over-brushes of red from the bricks. I did add some brown dirt smearing around the edges of the window panes, partly to give them a more weathered appearance, and partly to conceal any fogging from the glue.
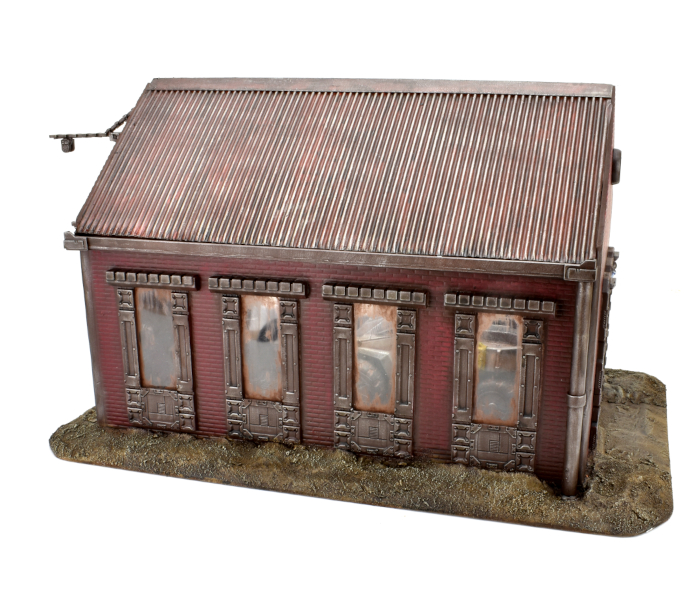
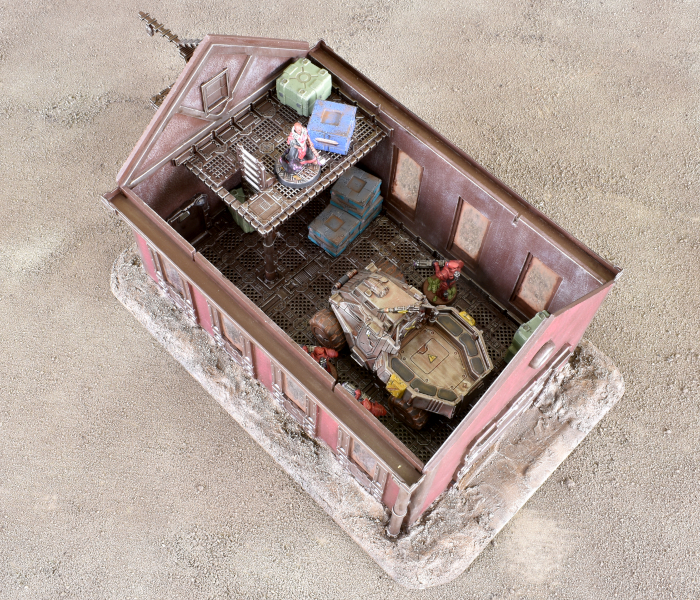
With some crates and an old vehicle thrown in for colour, when the roof is lifted off the interior winds up looking like this:
To build your own outbuilding of rural doom, you can pick up the terrain sprues along with the rest of the Maelstrom's Edge range from the webstore here.
What are you working on? We would love to see your models and terrain in the Comm Guild Facebook group!
For other building ideas, modeling tutorials, army spotlights and conversion walkthroughs, check out the Hobby section of the Maelstrom's Edge website here.
Tags: buildings conversion kitbash painting spotlight terrain terrainsprue tutorial
Terrain Kitbash: Sci-Fi Barn pt2
Posted on Monday Oct 11, 2021 at 06:00pm in Tutorials
- by Iain Wilson
Back in the barn!
I recently shared the first part of this build, combining a Plast Craft Games warehouse with parts from the Maelstrom's Edge terrain sprues to build the shell of a sci fi barn (part one is here). This week, I broke out some more terrain sprues and set to work on the interior!
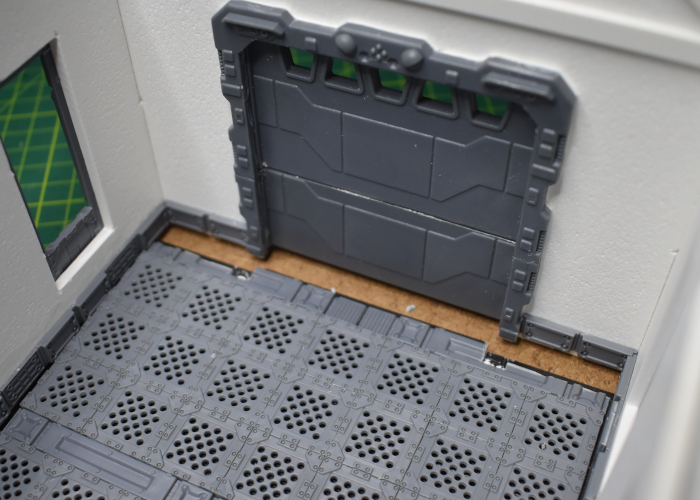
When I built the outside, I left the floor unglued, to get easier access for fitting parts. So I started by taking the floor piece back out and spraying it matte black, so that it wouldn't show underneath the grating pieces I was planning to use for a new floor layer on top. After measuring out the width of the floor against the floor grate pieces from the terrain sprue, I found there was going to be a slight gap around the edges, so I added some skirting using the reinforcing struts from terrain sprue #2.
Then I tiled the floor with one of the floor grates from terrain sprue #2, spacing them out with struts from terrain sprue #1 to cover the full length of the barn.
I wanted a small balcony on the end with the smaller door, which would provide access to the platform and crane on the outside of the wall. I used another of the floor grate pieces with some more reinforcing struts and lintel pieces top build the balcony, and some plastic tube with two of the small pipe fittings from terrain sprue #1 to hold it up on the protruding corner. Finally, a ladder from terrain sprue #1 provides access up to the balcony.
To add some detail to the inside of the doors, I grabbed some extra doors and cut the frames off the outside using a razor saw and scalpel.

The rectangular inside frame of the existing doors protrudes through the wall about a millimetre, so I cut some 1mm plasticard to form a spacer behind the new interior frames, trimming it up to match the contours of the outside of the frames and then gluing it all into place. I also added the outside ring from a porthole from terrain sprue #2 to finish off the hole for the exhaust fan on the outside wall.
I considered adding some interior detail around the windows, but this would complicate painting as I needed to get the clear plastic panes in at the end. I also thought about building some animal enclosures, but decided to keep the floor space open so that, in the event the building is being used with the interior accessible, I can just drop in a vehicle or some crates and other obstacles to suit the situation.
So that just left putting the barn onto a base. I cut a piece of 5mm hardboard to size, sanding down the edges to bevel them off and then glued the floor piece of the barn into the middle of it. When I went to glue the rest of the barn over the top, it immediately became apparent that I hadn't accounted for the raised floor tiles when I added the interior door frames, so I had to cut out some inserts for them to slot into.
Finally, I mixed up a batch of filling plaster with some PVA glue and fine sand for texture, and slathered it around the outside of the building to cover up the hardboard. This mixture didn't immediately stick particularly well to the hardboard, although it would once the glue dries, so this process involved poking it into place with fingers and an old paintbrush, and a certain amount of cursing. In the end, though, I got the plaster laid down all around the exterior, with a smoother ramp of pure filling plaster leading up to the larger door. Then I finished up by adding some small patches of sand and gravel mix here and there, glued into place with some more PVA glue.
Next up: Getting some paint on. Click here!
To build your own outbuilding of rural doom, you can pick up the terrain sprues along with the rest of the Maelstrom's Edge range from the webstore here.
What are you working on? We would love to see your models and terrain in the Comm Guild Facebook group!
For other building ideas, modeling tutorials, army spotlights and conversion walkthroughs, check out the Hobby section of the Maelstrom's Edge website here.
Tags: buildings conversion kitbash spotlight terrain terrainsprue tutorial
Terrain Kitbash: Sci-Fi Barn
Posted on Monday Sept 20, 2021 at 06:00pm in Tutorials
Time to get some terrain on!
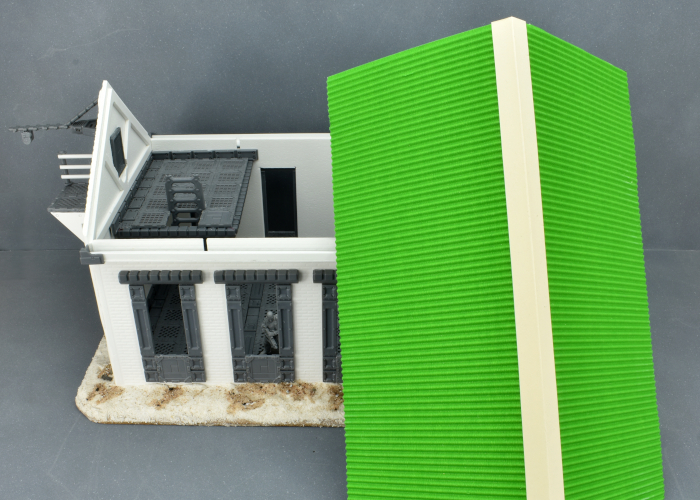
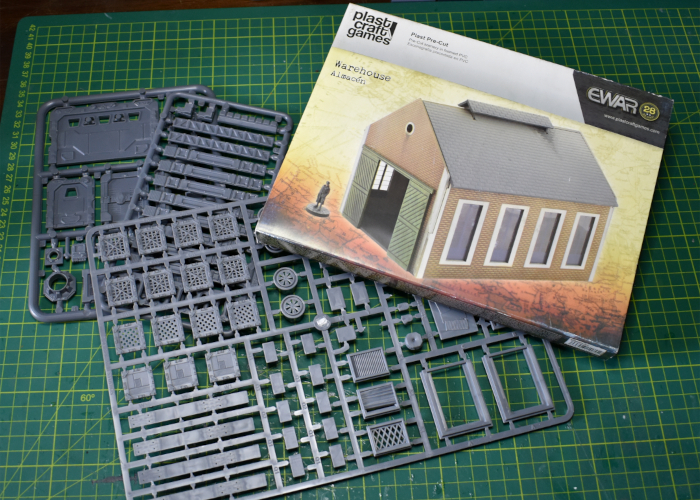
Back in 2017, I put together a sci-fi 'western' gunshop, using the Maelstrom's Edge terrain sprue and a foamed PVC western shop kit from Plast Craft Games. Plast Craft sadly appear to have gone out of business, but I picked up a few building kits on clearance from a local retailer to start fleshing out a themed table. The first (and probably largest) off the rank is an appopriately upgraded barn!
Along with the Maelstrom's Edge terrain sprues, the kit I used for this build is an urban warehouse. If you want to build something similar yourself, while you may not be able to still track down this specific kit, there are other similar buildings available in MDF from other manufacturers, or you could use foamed PVC or foamcore to build your own from scratch.
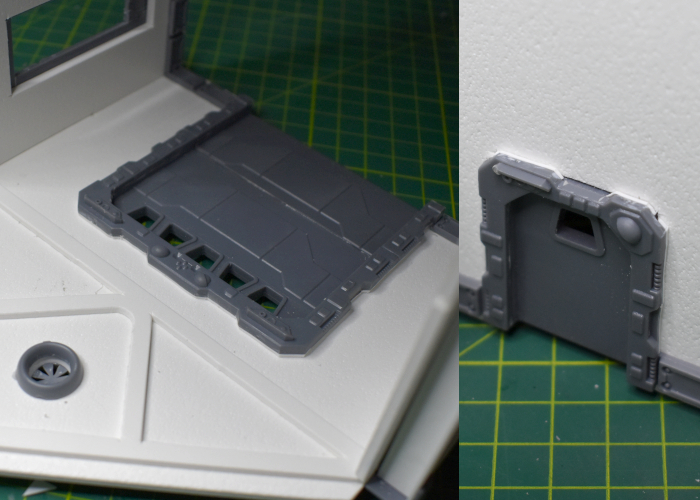
I started out by adding some tech details to the windows, bulking out the frames using support struts and lintel pieces from terrain sprue #1, and floor panels from terrain sprue #2.
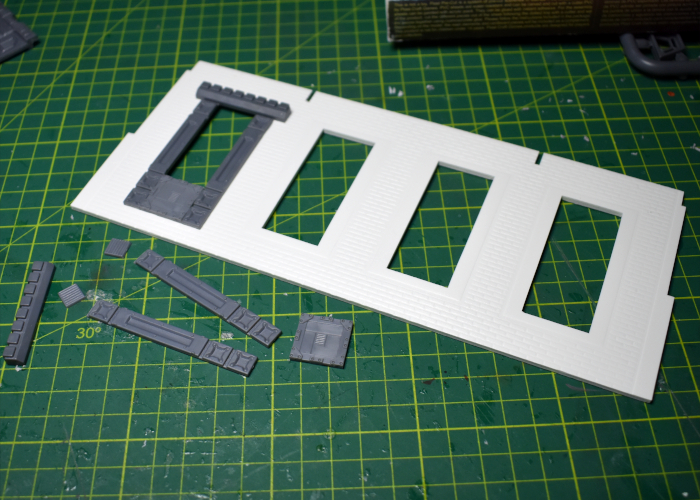
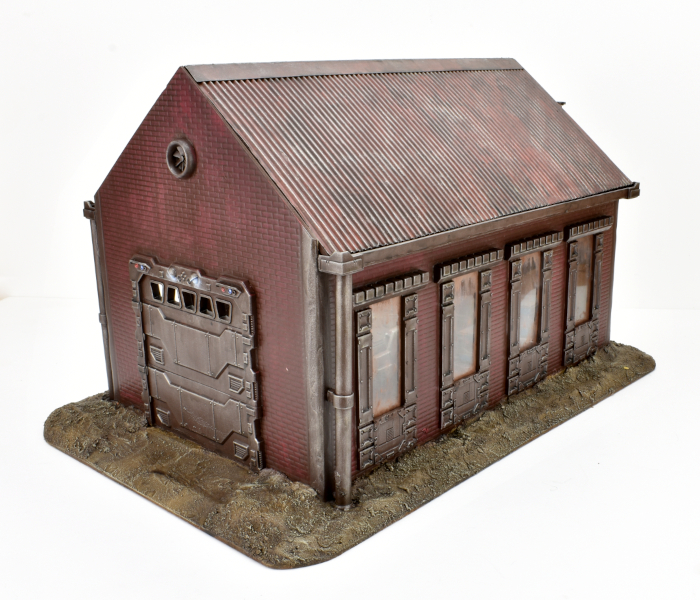
On the front of the building, I replaced the sliding wooden doors with a garage door from terrain sprue #1. To make up the extra height, I cut off the top of a second garage door with a razor saw and glued the two together.
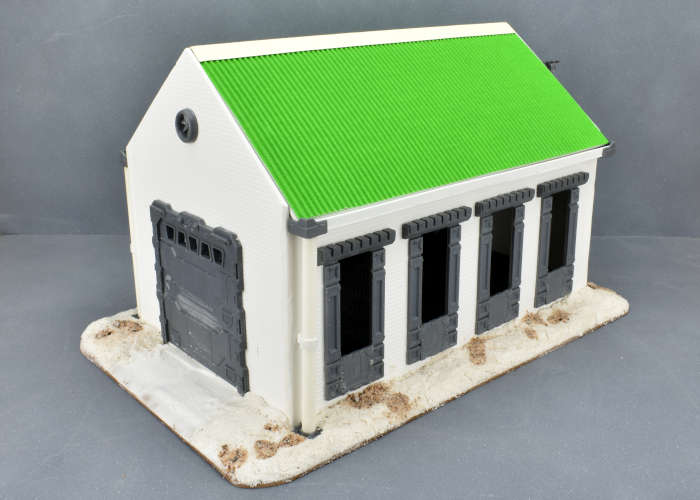
The resultant door was the right height, but too wide, so I also widened the door cavity in the wall with an exacto knife before gluing the door in place. The round window at the top of the wall turned out to be exactly the right size for the exhaust fan from sprue #2..
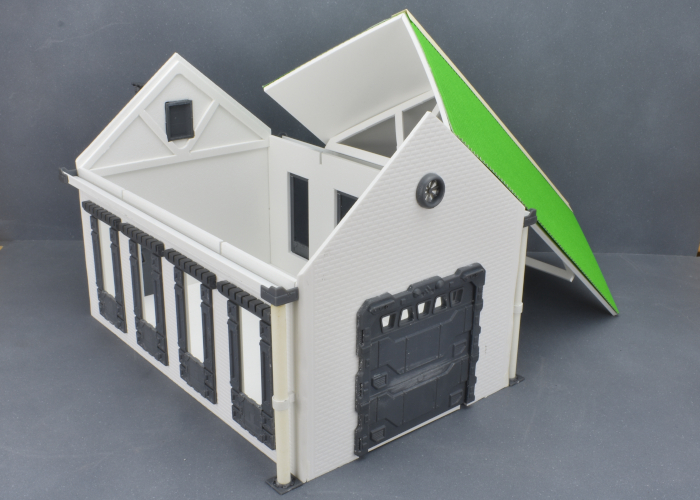
The other end of the building has a smaller door and a rectangular window up high. I enlarged the cavities slightly and glued in a shutter window and door from sprue #1.
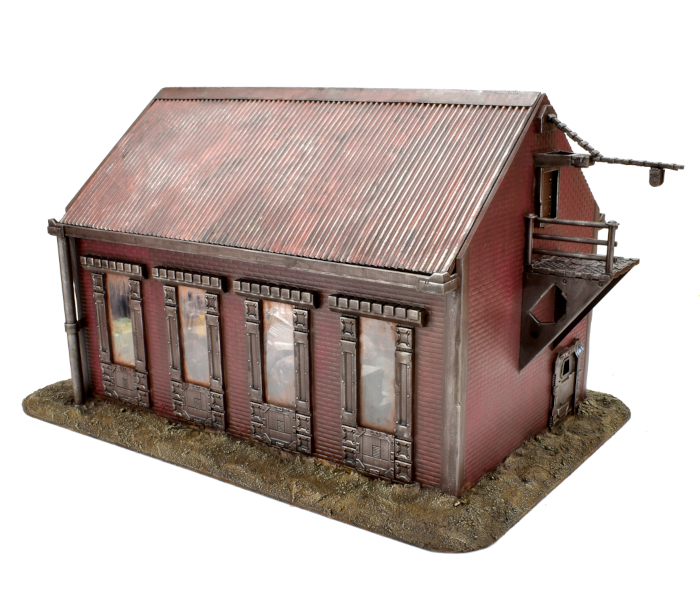
To avoid the building from just winding up looking like a plain box, I built a small platform and crane onto the wall, turning the small window into an access point for small freight. The platform was constructed from sprue #2 floor grates and some scrap pieces from the warehouse kit's roof trusses. The crane used a trapezoid window and a couple of energy fence pieces from sprue #1, the upright supports from the gun unit on sprue #2 and another scrap piece of PVC. I'll need to find some string or fine chain for it to finish up.
At that point, it was time to start slotting everything together.
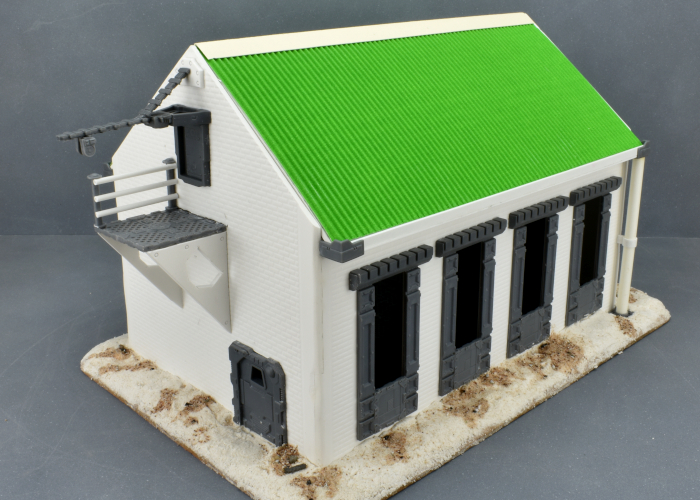
The warehouse kit has a tiled roof, but I wanted to go with corrugated iron instead, for a better contrast from the brick walls. With the top ventilation struts trimmed off, the assembled roof provides a solid base for the iron roof. I've left the middle two roof trusses and the roof itself unglued, so that the roof can be removed and the building interior used during a game.
Over the original roof, I glued two sheets of corrugated cardboard, adding a strip of thin, folded card for the ridge capping. That didn't look quite right as-is, so I decided to also add some rain guttering, using some plasticard and a few more components from terrain sprue #1.
The windows are still missing their 'glass' - some thin, translucent plastic that comes with the warehouse kit. This will be glued in place after I've painted the barn. Otherwise, the finished exterior:
As a final touch, I decided the small platform needed a hand rail, so I whipped one up using a pair of posts from terrain sprue #2 and some thin plastic rod.
Coming up in part 2: I'll add some detail to the interior of the building before painting. Find it here!
To build your own outbuilding of rural doom, you can pick up the terrain sprues along with the rest of the Maelstrom's Edge range from the webstore here.

What are you working on? We would love to see your models and terrain in the Comm Guild Facebook group!
For other building ideas, modeling tutorials, army spotlights and conversion walkthroughs, check out the Hobby section of the Maelstrom's Edge website here.
Tags: buildings conversion kitbash spotlight terrain terrainsprue tutorial
Terrain Kitbash: Communications Hub
Posted on Monday Aug 30, 2021 at 06:00pm in Tutorials
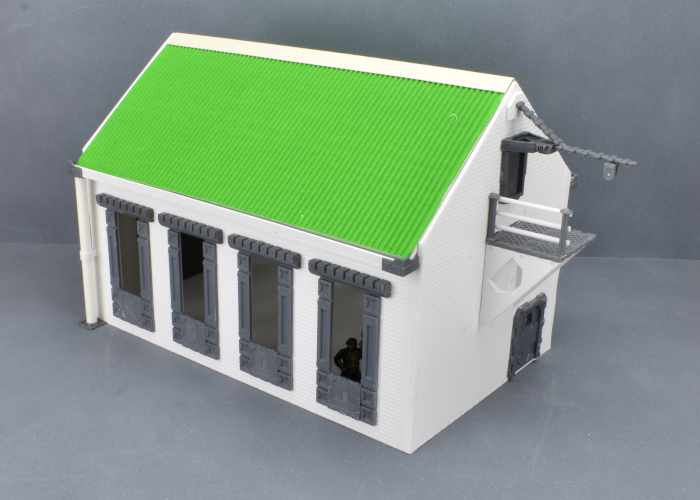
Regular readers would know by now that I have a habit of grabbing odd things from around the place that have interesting shapes and turning them into terrain. In the past, I've built terrain from various bits of building hardware, storage containers, food packaging, and Christmas tree decorations, amongst other things. This week, I ransacked Amazon's toy department to put together a communications hub!
The base for this model was a small light up laser gun toy that I found while browsing Amazon. This particular toy came in a set of 4 - three of this same design in different colours, and another blockier design that I'll find a different use for later.
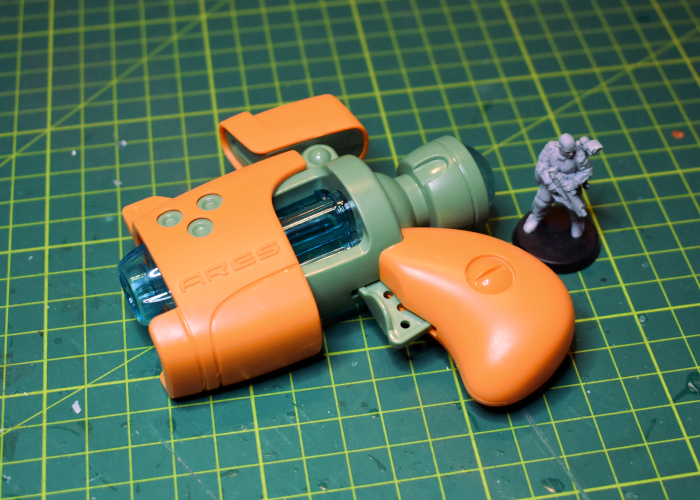
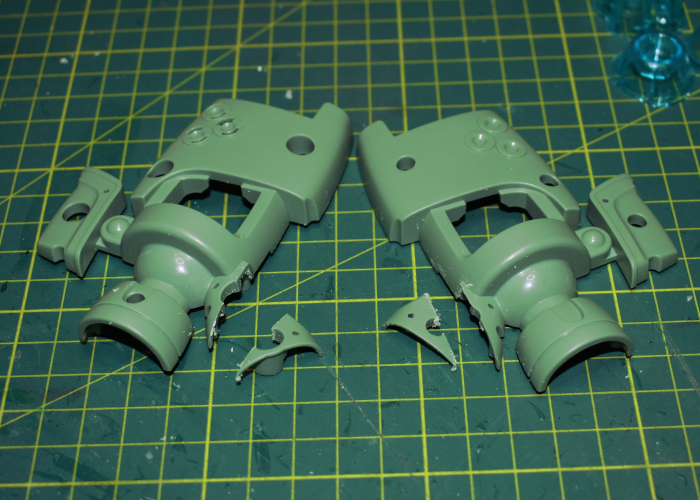
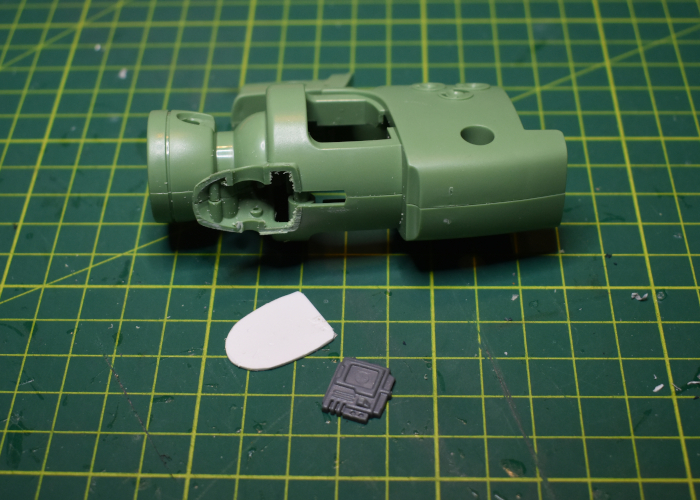
The first step was to take the gun apart so that I could remove the pistol grip and any other un-needed parts. The cowling from the front will likely wind up as a building entry at some point in the future, and I saved the light and speaker just on the off-chance that I want something to light up and make pew-pew noises.

The main part of the gun was almost perfect as is, although I trimmed down the protrusion that the pistol grip originally clipped onto with a razor saw.
I then cut a piece of plasticard to fit neatly over the opening, and grabbed a computer panel from the first Maelstrom's Edge terrain sprue to add to this plate.
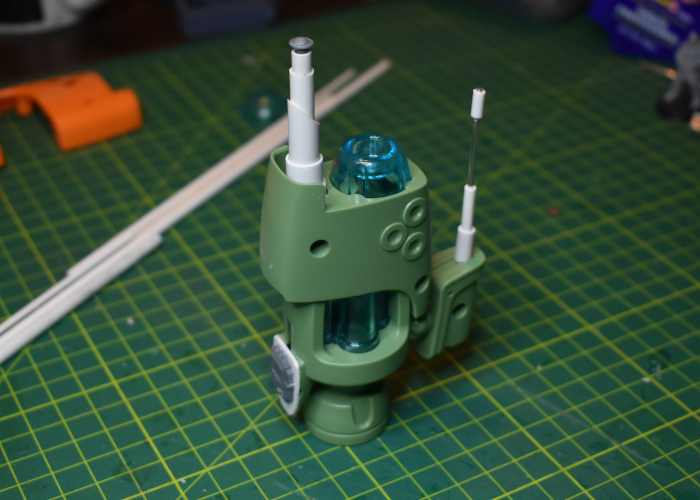
I reassembled the body of the gun, and added a couple of aerials made from plastic tubing, aluminium rod and a post piece from the second Maelstrom's Edge terrain sprue.
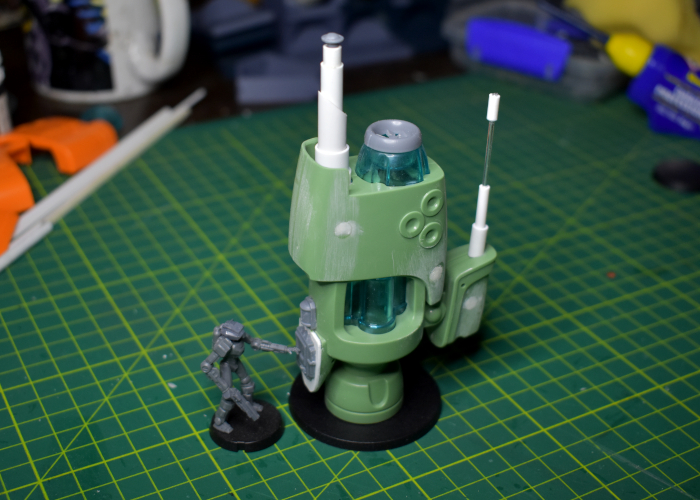
Finally, I added a base to make it a bit more stable, glued an exhaust fan from the second terrain sprue over the muzzle piece, and puttied over the screw holes.
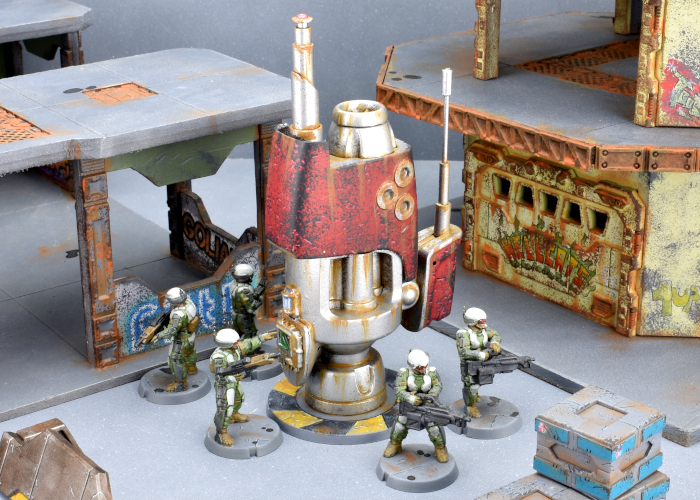
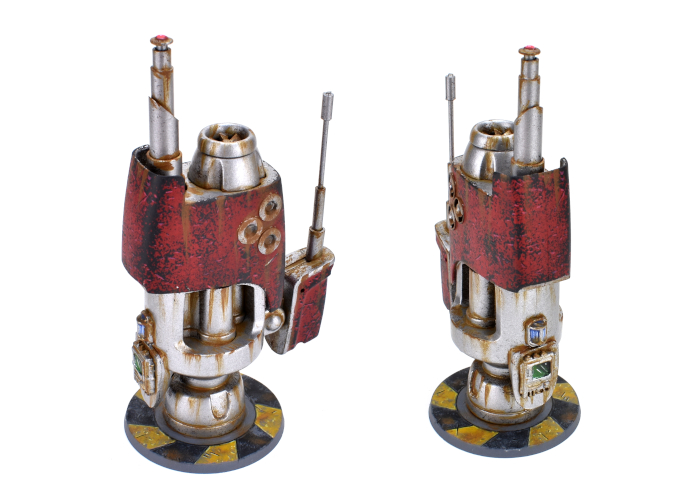
With some paint on, it wound up looking like this:
I considered leaving the blue central piece unpainted as a shiny, translucent feature, but decided against it as the three guns have different coloured pieces, so the translucent piece would be different on each comm hub... and that would offend me on a deeply spiritual level when I build the other two.
To build your own hub of communicative doom, you can pick up the Maelstrom's Edge terrain sprues along with the rest of the Maelstrom's Edge range from the webstore here.
What are you working on? We would love to see your models and terrain in the Comm Guild Facebook group!
For other building ideas, modeling tutorials, army spotlights and conversion walkthroughs, check out the Hobby section of the Maelstrom's Edge website here.
Modeling Tip: UV Resin Windows!
Posted on Monday Aug 09, 2021 at 06:00pm in Tutorials
There are a few different options out there for filling in open windows on terrain. In the past, I've used clear plastic or aluminium mesh cut to shape and glued in. I recently picked up some Ultraviolet Resin intended for creating water effects, and it occurred to me that this might be a fun alternate way of adding panes to some windows.
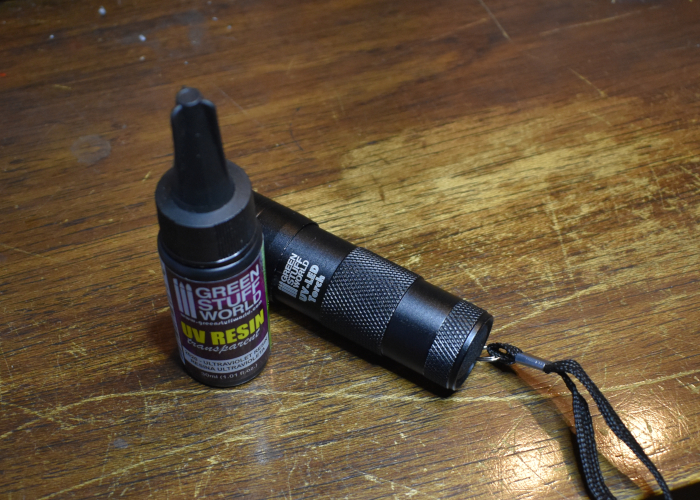
The resin I'm working with is sold by Green Stuff World. It's a super-clear gel that you squeeze from the bottle and then set with a UV light, or by leaving it out in the sun. They also sell a UV torch, which I couldn't resist picking up.
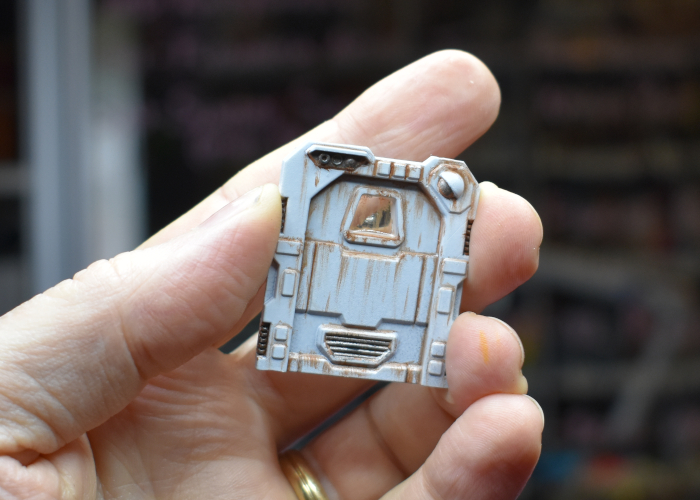
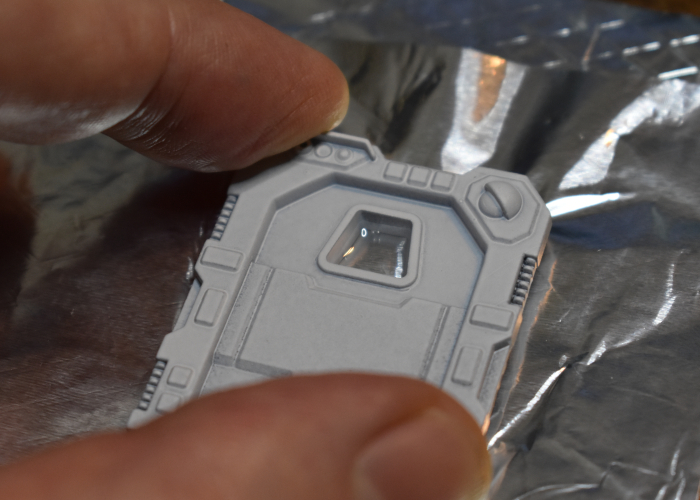
To create a window pane, I took a painted door from the Maelstrom's Edge terrain sprue and laid it down on some aluminium foil, with a small piece of thin plasticard in behind to push the foil snug against the back of the window frame.
(I used a painted door as it was going to be impossible to paint the inside of the window frame once the resin was in place.)
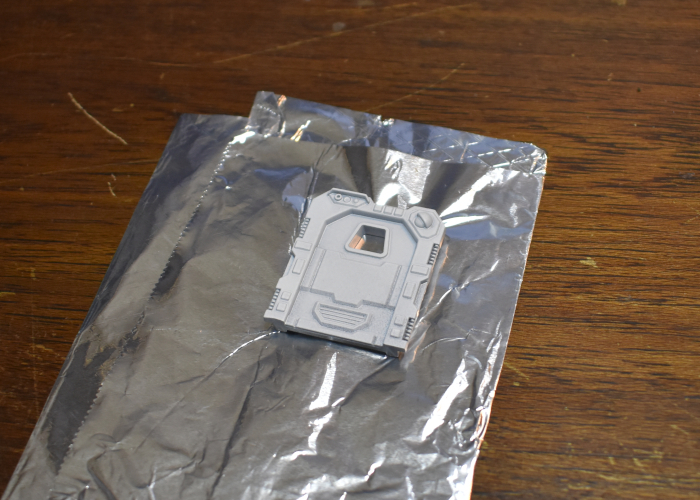
I then added a drop of resin into the middle of the window, leaving it a minute or so to settle out to the edges of the frame. There were very few airbubbles in the resin, but I used a pin to gently poke the few that were there to make them go away.
To set the resin, I sat the UV torch on top of the doorframe pointing directly at the window, and left it for a couple of minutes to let it do its thing. From further experimentation later, the resin starts to cure within a few seconds, but I wanted to leave it long enough to make sure.
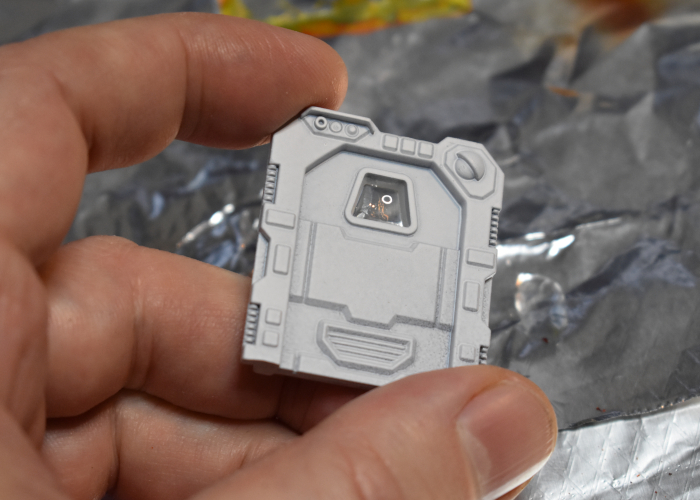
From there, the door was ready to be glued into a piece of terrain and detailed.
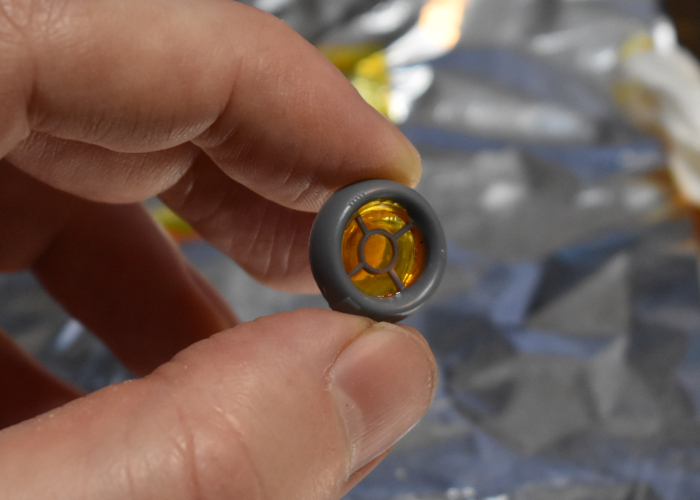
For coloured window glass, transparent paint gives a nice tint. This porthole was filled with resin in the centre, and then once set I painted the back of the resin with two coats of Tamiya Clear Orange.
To make your own windows of transparent doom, you can pick up the Maelstrom's Edge terrain sprues along with the rest of the Maelstrom's Edge range from the webstore here.
What are you working on? We would love to see your models and terrain in the Comm Guild Facebook group!
For other building ideas, modeling tutorials, army spotlights and conversion walkthroughs, check out the Hobby section of the Maelstrom's Edge website here.
Tags: modeling terrain terrainsprue tutorial
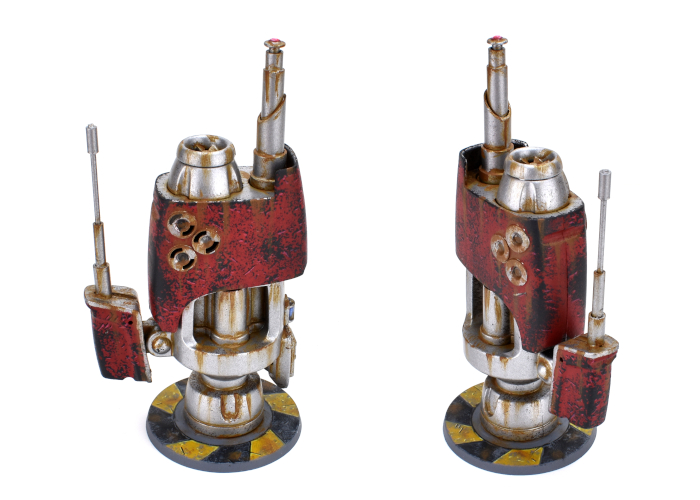
Terrain Spotlight: Pop-up Lamp Reactor!
Posted on Monday May 17, 2021 at 05:00pm in Tutorials
I came across this idea a little while ago in a Facebook group, and thought it was too good to not give it a go. Turns out, there are a bunch of pop-up LED lanterns currently floating about that are just perfect for turning into fantastic light-up reactors!
So, the foundation for this build is a pop-up lantern that I found on Amazon. There are variations available all over the place, all with a very similar design. The light comes on automatically when you lift the top of the lantern, and goes off when you push it closed.
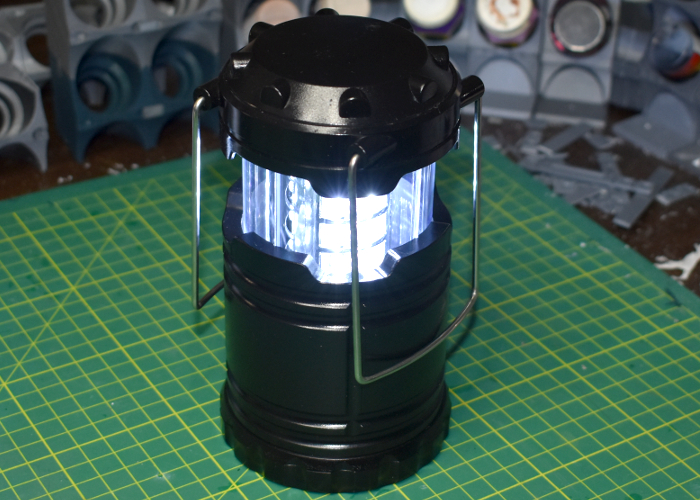
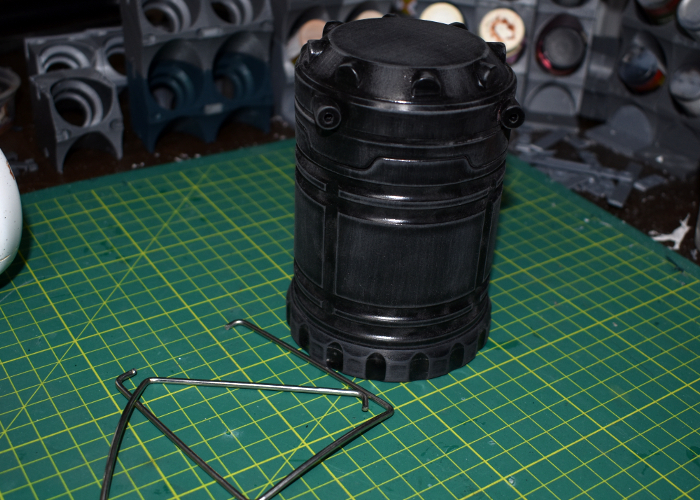
These look pretty amazing just painted up as-is, but I couldn't resist tweaking a little. The handles are spring steel wire, pushed into holes in the top of the lamp, so I removed these and put them aside. Then I gave the outside of the lamp a light sand with fine sandpaper. This part isn't essential, but I like to do it with unfamiliar plastic as it can help the glue and paint stick better.
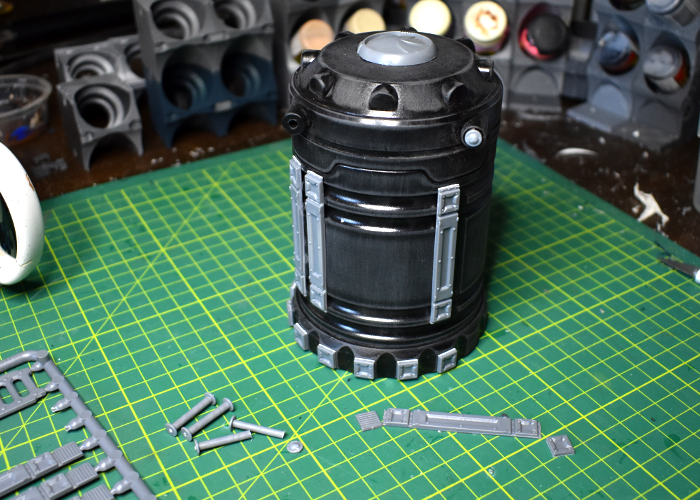
From there, I took the Maelstrom's Edge terrain sprues and added some details. I cut down some support struts from the first terrain sprue to make some bracing for the sides, and added the square end pieces from the struts onto the small protrusions spaced around the base of the lamp. I also cut the tops from some railing posts from the second terrain sprue to cover over the handle holes, and added an iris portal to the top as a heat vent.
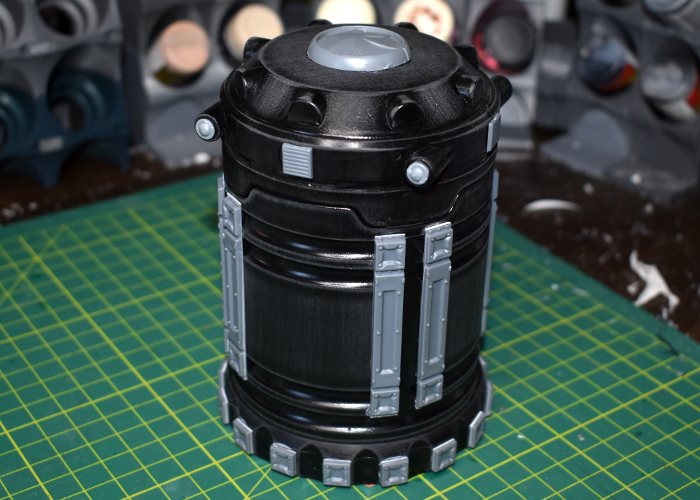
It looked like it needs just one last thing, so I used the vent pieces from the support struts to add a little more detail around the top of the lamp, and then it was ready for paint.
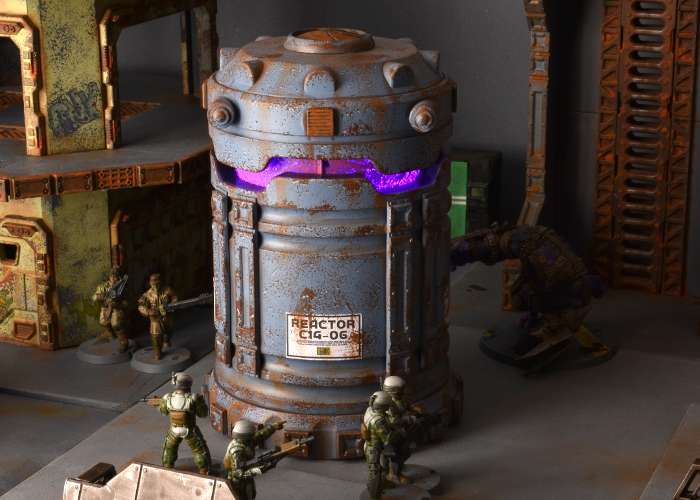
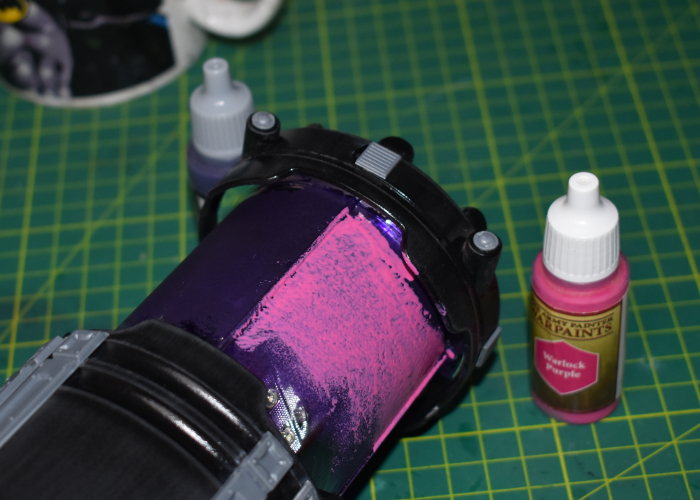
To paint up the reactor, I started with the clear plastic light cover. I used a sponge to apply a rough layer of Scalecolor Elandil Violet (a dark purple) and then when that was dry, a layer of Army Painter Warlock Purple. Normally I would do this on the inside of the clear plastic, to protect the paint, but it proved impossible to disassemble the lamp without breaking parts, so it went on the outside, and then I sealed it with a coat of Testor's Dull Coat.
To paint the rest, I started with a basecoat of Army Painter Wolf Grey, drybrushing white onto the upper edges. After gluing on some printed signs worked up in Gimp, I then sponged on some weathering using Army Painter Dirt Spatter, adding scattered white highlights on some of the broken grey. The metal grills and iris were given a coat of Dirt Spatter, a sponge of Vallejo Heavy Charcoal, a light drybrush with P3 Ember Orange, and finally a touch of Army Painter Dry Rust. To finish up, I drybrushed some more Dirt Spatter and Vallejo Beasty Brown into the creases.
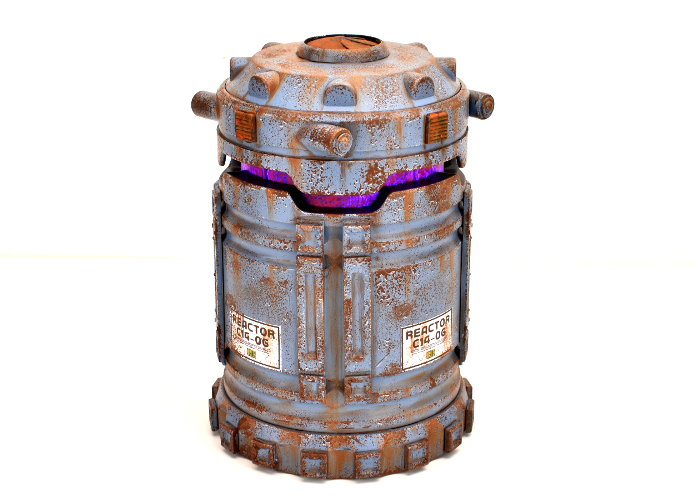
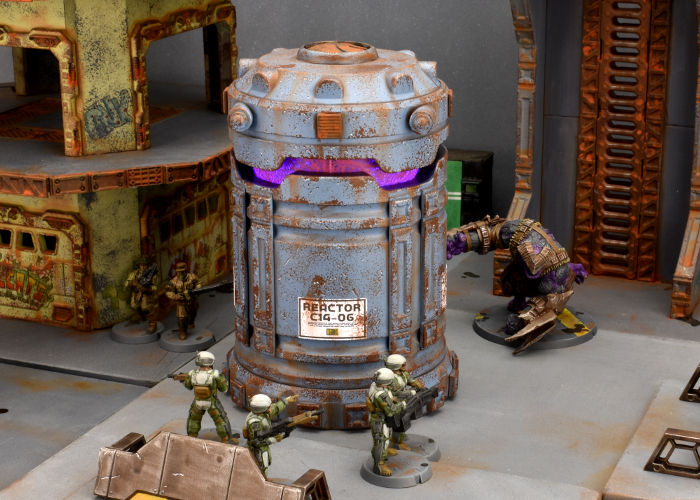
Because the fit of the light tube is rather tight, it does run the risk of rubbing the paint off by lifting or lowering it, so I've settled for turning it on and off by just taking the batteries out, instead. But other than that, I think it turned out quite well. The light is not as bright as it was originally, but it still gives a noticeable glow, even with the lights on!
Put together your own evil reactor of purple-powered doom by picking up the terrain sprues, along with the rest of the Maelstrom's Edge range from the webstore here.
Then pop on over to the Comm Guild Facebook group to show us what you're working on!
For other building ideas, modeling tutorials, army spotlights and conversion walkthroughs, check out the Hobby section of the Maelstrom's Edge website here.
Tags: buildings kitbash modeling scratchbuild terrain terrainsprue