Entries tagged [building]
Terrain Spotlight: Plastic Packaging Firepoint
Posted on Wednesday Apr 20, 2022 at 05:00pm in Tutorials
 - by Iain Wilson
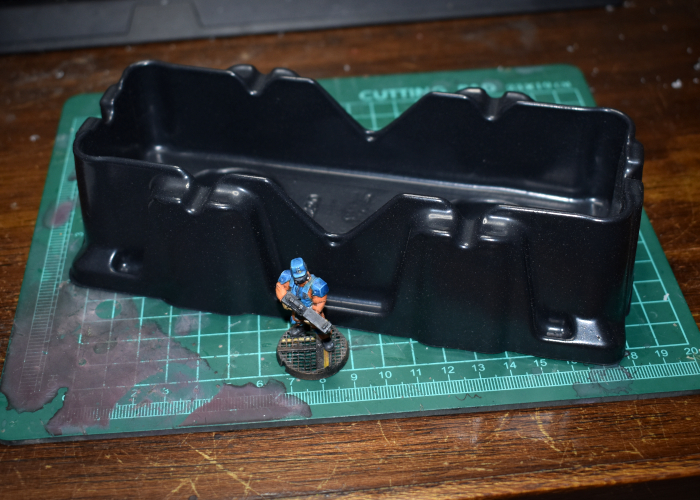
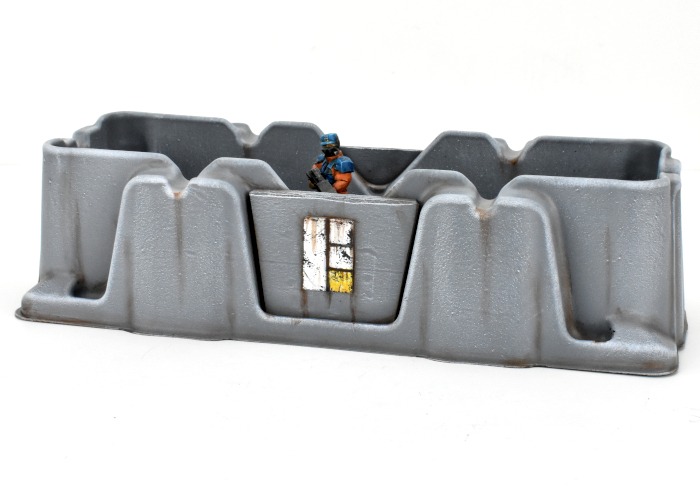
As you may have seen if you've been following the blog for a while, I make a lot of my terrain out of various bits and pieces that I come across here and there. This week I upgraded my external hard drive, and the new one came with some nifty plastic packaging pieces that I thought would be just perfect to turn into some small firepoint terrain pieces. And so I set to with some foamed PVC, superglue, and a couple of Maelstrom's Edge terrain sprues!
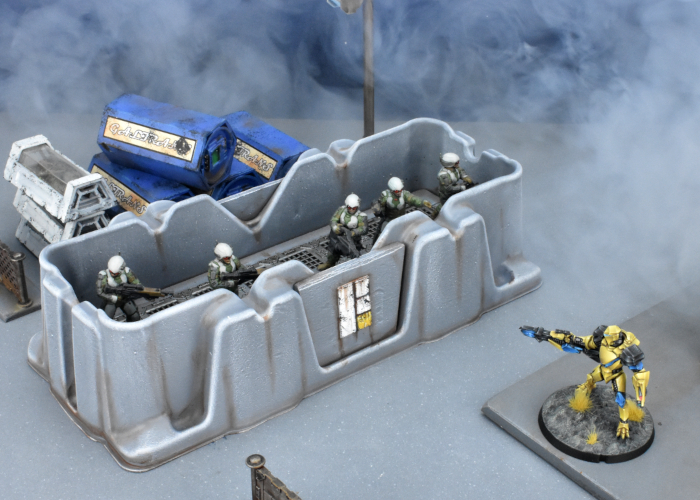
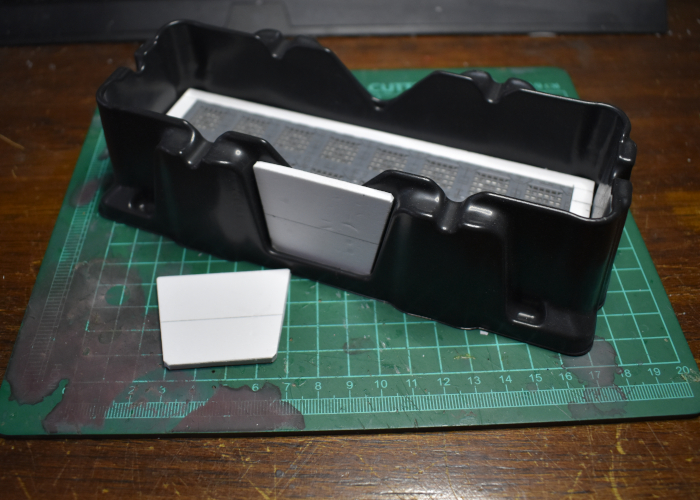
The 'floor' on the inside of the packaging piece was a fraction too low to allow models to see comfortably over the sides, and wasn't flat. Aside from that, I figured the contouring on the sides would give it some nice visual distinctiveness without the need for a lot of embellishment.
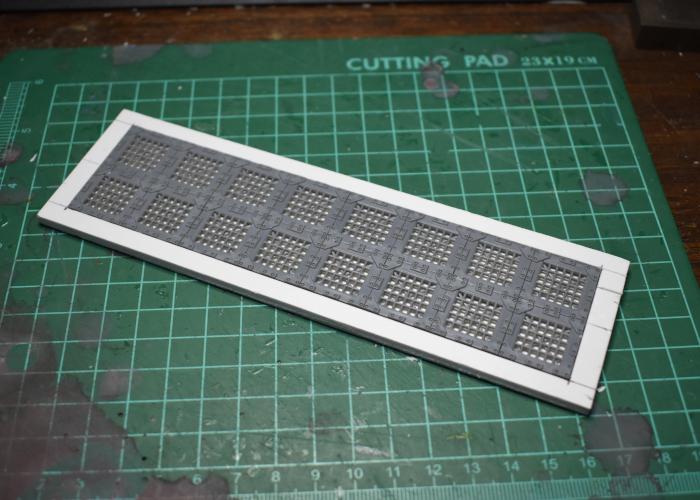
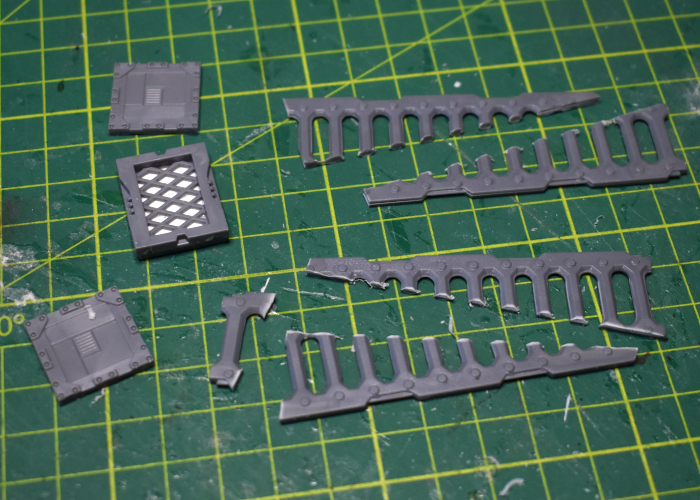
I started out by measuring up the inside dimensions, and putting together as many floor grating pieces from the 2nd Maelstrom's Edge terrain sprue as would fit in there.
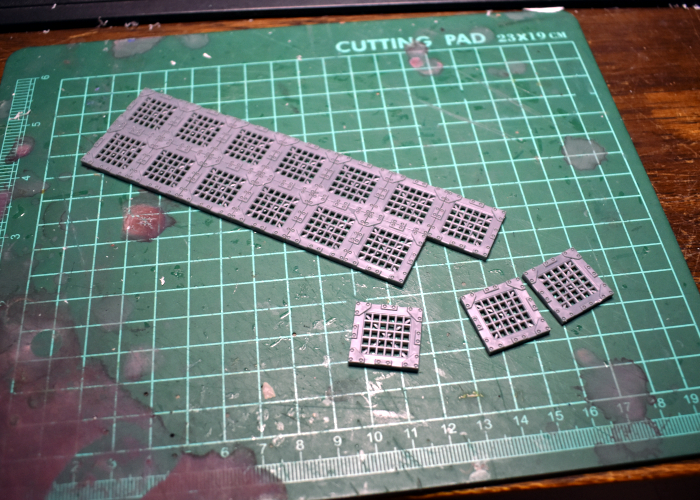
The grating left a small space around the edges, so to finish off the floor I cut a surround from 3mm foamed PVC to fit snug against the walls of the packaging, with a rectangle of 1mm PVC to sit underneath the grating to bring it up to the same height as the surround. Then I added a larger piece of 1mm PVC under the whole thing for rigidity and just that tiny bit of extra height.
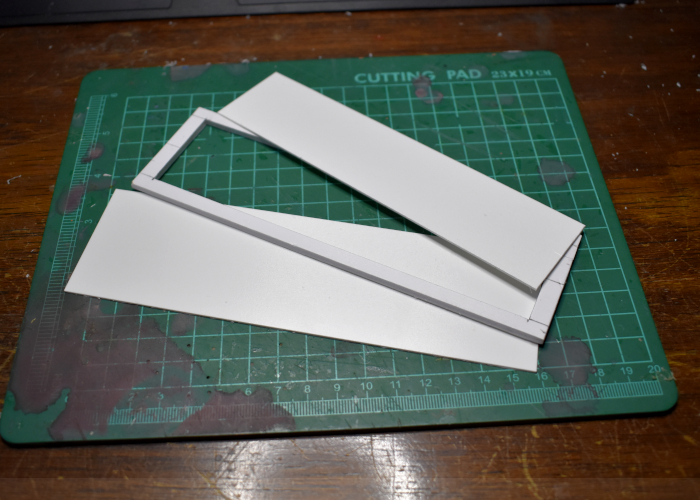
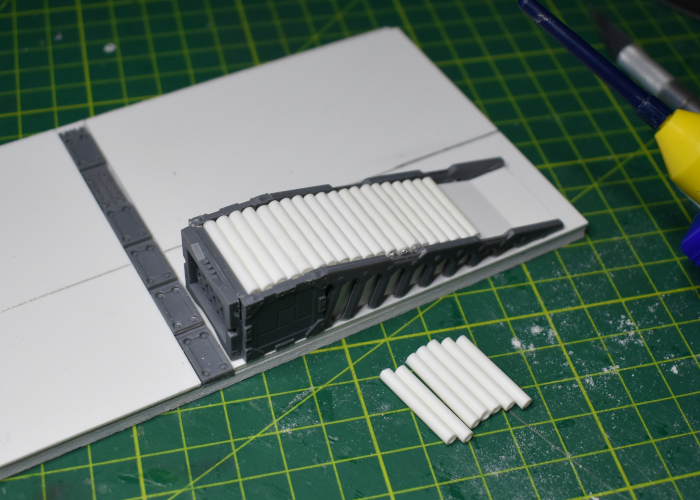
I used an all-plastic primer and superglue to fix the floor in place in the packaging piece. This left the walls a nice height for models to be mostly obscured while still being able to shoot over the walls, except for the middle section of the long walls, where it dipped down lower. I fixed this by cutting some trapezoid pieces of foamed PVC to glue over the gap.
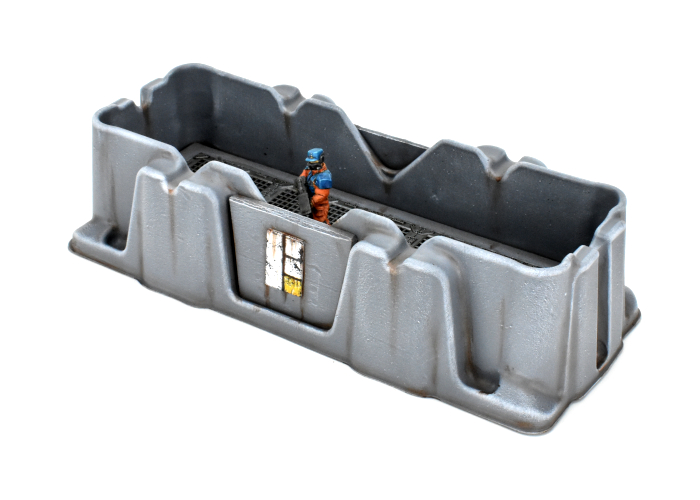
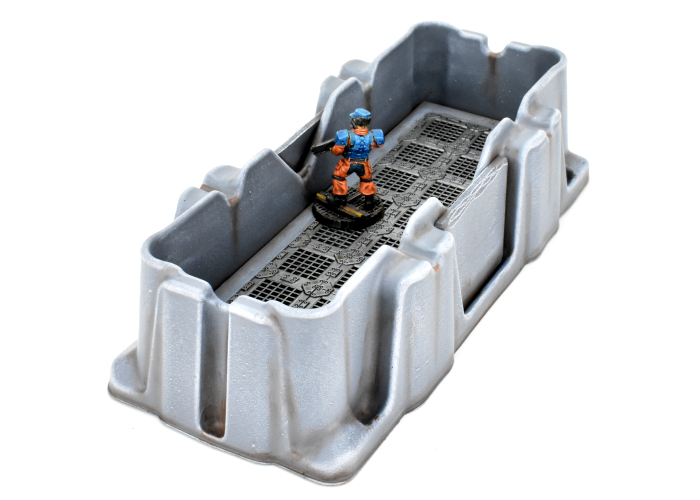
I kept the painting relatively simple, starting with an Army Painter Uniform Grey basecoat and then a drybrush of AP Gorgon Hide, with some AP Dirt Spatter in the creases for some easy weathering. The metal grating was painted with AK Interactive Gun Metal and then washed with AP Strong Tone. Finally, I added an Epirian symbol cut from 1mm foamed PVC to the front, painted with Gorgon Hide and White, and Citadel Iyanden Darksun and AP Daemonic Yellow for the yellow bit. I used a light sponge of Vallejo Heavy Charcoal for chipping, and then finished up with some more dirt spatter weathering.
To build your own bunker of recycled doom, you can pick up the terrain sprues along with the rest of the Maelstrom's Edge range from the webstore here.
What are you working on? We would love to see your models and terrain in the Comm Guild Facebook group!
For other building ideas, modeling tutorials, army spotlights and conversion walkthroughs, check out the Hobby section of the Maelstrom's Edge website here. And while you're there, grab a copy of the Maelstrom's Edge V2 Beta rules!
Terrain Kitbash: Sector 16
Posted on Tuesday Nov 16, 2021 at 05:00pm in Tutorials
- by Iain Wilson
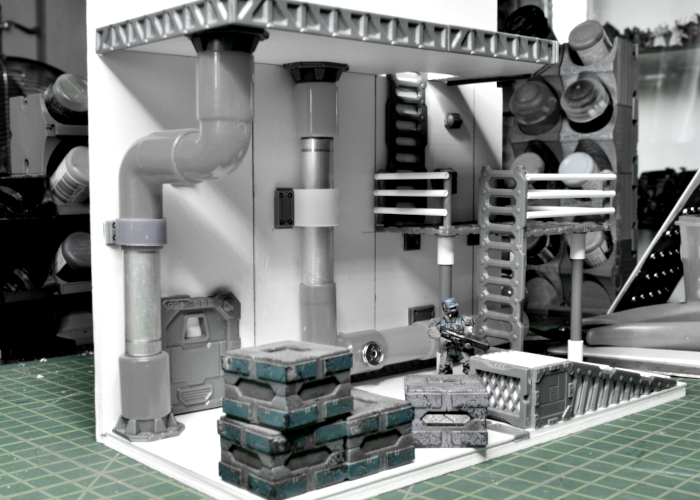
Sometimes I like to take a break from building things for the tabletop, and put something together just for the fun of it. That's what I had in mind this week, when I started work on a display backdrop piece that I'm calling 'Sector 16'
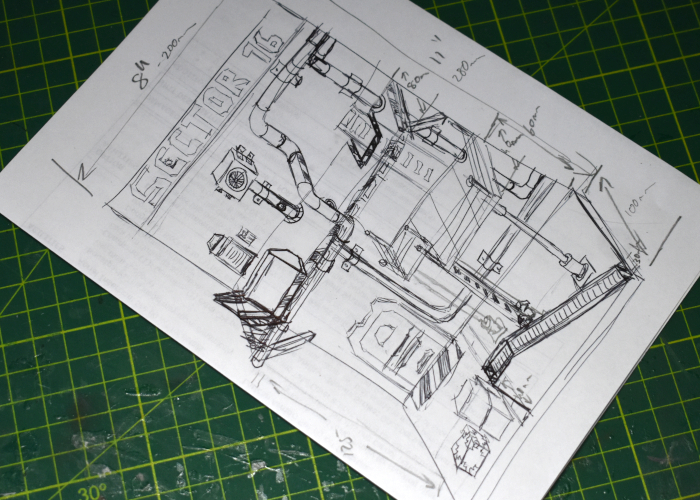
Most of the time, I get a rough idea of what I'm building in my head, and I just wing it from there. Some builds though require a little more planning to make sure everything will fit together correctly. My plan for Sector 16 wasn't particularly complicated, but with pipes running in multiple directions and platforms on several levels, I decided that a rough sketch would be a good idea. This still just serves as a starting point, and things tend to change along the way, but it helps to avoid those inadvertant 'oops' moments when something doesn't fit where it is supposed to.
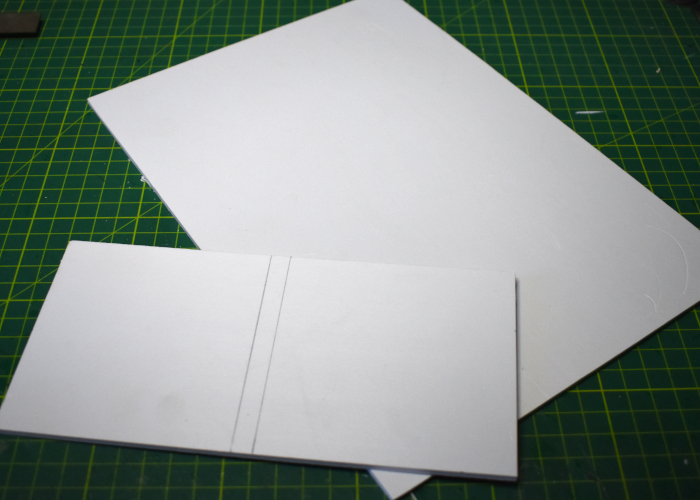
The bulk of the structure was made from foamed PVC sheet, cutting a base and back piece that would go together in an 'L' shape, with detail layered over the top.
I thought that adding some detail along the front of the base would help to add depth, and when using it as a photo backdrop would be useful for disguising its relatively shallow depth. To this end, I constructed a conveyor assembly using parts from the Maelstrom's Edge terrain sprues, some 1mm foamed PVC and plastic tubing.
In the interests of mixing things up visually, I wanted the multiple level platforms to be constructed differently. The upper level was to be concrete, but for the lower level I used floor grating pieces from the second Maelstrom's Edge terrain sprue, with support poles cut from the sprue itself of the original terrain sprue.

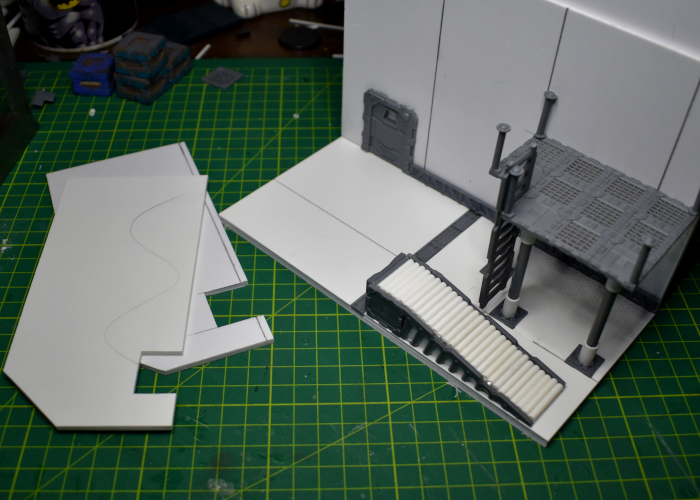
To finish up the lower section, I put together some pipes made using pieces from a kid's toy pipe construction set (which looks a little technicolour right now, but should be a little less cartoony when they have some paint on!) and some 12mm aluminium tubing, and added some additional details like lights, edging and pipe support straps using more pieces from the terrain sprues.
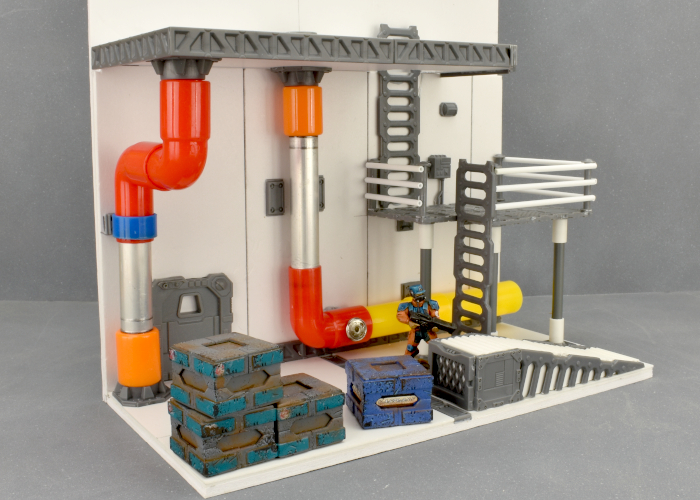
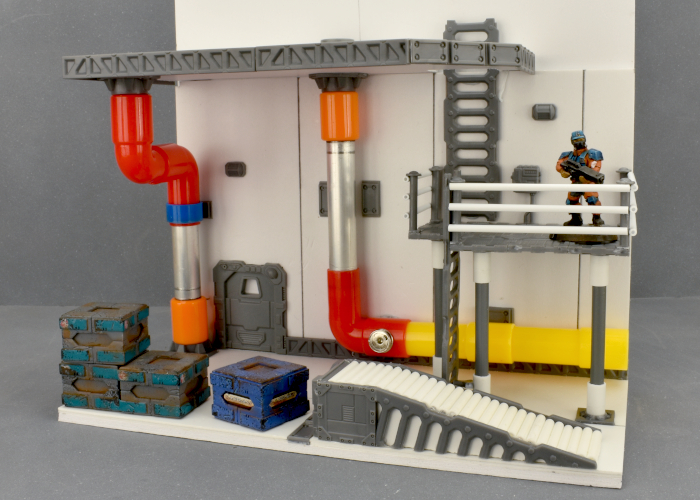
Tune in next time, as I get to work on the upper level!
To build your own sector of unspecified doom, you can pick up the terrain sprues along with the rest of the Maelstrom's Edge range from the webstore here.
What are you working on? We would love to see your models and terrain in the Comm Guild Facebook group!
For other building ideas, modeling tutorials, army spotlights and conversion walkthroughs, check out the Hobby section of the Maelstrom's Edge website here.
Terrain Spotlight: Cardboard Gift Box Ruin
Posted on Monday Jun 11, 2018 at 05:00pm in Tutorials
- by Iain Wilson
If you've been following my hobby articles for any length of time, you may have noticed that I'm rather fond of using cardboard gift boxes to make buildings (If you're new here, you can see examples here, here, or here). But while intact buildings are all well and good, a balanced battlefield should include a mix of line of sight blocking terrain and area terrain, and so this week I'm breaking out the old gift boxes and the Maelstrom's Edge terrain sprue for some good, old-fashioned ruins.
The structure for this build comes from two cardboard gift boxes, bought from a local discount store.
The lids were flipped over to create a walled roof, and I removed a corner of the smaller box with a sharp hobby knife so that it nestled in neatly against the larger box.
I used a door and a shutter window from the terrain sprue to mark out positions for doors and windows, by sitting them in place and tracing around them with a pencil.
Then I used the hobby knife to cut the door and window holes out, and marked out a rough plan for the building damage - the line around the building shows where the walls would be cut down, leaving more raised areas on corners, where the structure would be stronger.
The hobby knife was put to use again, as I cut along the ruin line all the way around the building.
Once done, the cardboard structure went together like this:
As a handy side-effect, the pieces removed from the tops of the walls can be saved and used to create other ruins later...
Because the ruin line wound up around the bottom of all of the window frames, I just left them bare. For the doorways, though, I chopped the door panel out from the surrounding doorframe, and cut the frame into shorter pieces to match the height of the ruined walls.
The doorframe pieces were then glued in place, and I also added some support struts on the corners of the walls, also suitably cut down to height and with the cut ends messed up a little with some clippers to simulate explosive damage. With these all in place, I glued the whole building structure to a base board of masonite.
If you're just after a quick and easy ruin, this is the point where you can call the job a good'un and go and slap some paint onto it. For some extra detailing, though, I chose to glue some chopped up card from the gift boxes and some leftovers from the cut terrain sprue bits around the building, and then using a generous amount of PVA glue added some gravel and sand.
After leaving the glue to dry, it was time for paint!
I started with a basecoat of grey spray, and then a light spray with white around the walls and the bigger rubble patches.
The exposed sections of the baseboard and the building floors was then re-based in Vallejo Neutral Grey, and then drybrushed with Vallejo Light Grey.
Everything was then dirtied up with some Neutral Grey sponge-weathering and spots of drybrushed Vallejo Beasty Brown.
I added a couple of extra details for colour - the number on the roof railing by dabbing through a number stencil with a large brush and some red paint, and a little graffiti on the back wall painted with yellow and some blue ink straight over the grey wall to give it a faded appearance.
The final step was a quick blast of black spray into the interior of the building to create some contrast.
And that's it - one ruin, ready for the table!
If you're keen to try this for yourself, you can pick up the giftboxes from gift stores all over the place, or online with a quick Google search, and the Maelstrom's Edge terrain sprue along with the rest of the Maelstrom's Edge model range from the webstore here.
For other Maelstrom's Edge modeling articles, including tutorials and walkthroughs of a wide range of different building and miniature projects, check out the article roundup here, or for help or advice, or just to share your work, feel free to visit the Comm Guild Facebook page!
Tags: building modeling spotlight terrain terrainsprue tutorial walkthrough
Terrain Spotlight: Knights of Dice Desert Residence meets the Maelstrom's Edge Terrain Sprue!
Posted on Monday May 28, 2018 at 05:00pm in Tutorials
- by Iain Wilson
A few weeks ago, I showcased a dice tower made from a Knights of Dice MDF blank and some bits from the Maelstrom's Edge terrain sprue. This week, I'm giving a similar treatment to a desert building from the KoD 'Tabula Rasa' range.
The Tabula Rasa terrain range is specifically designed to be fairly basic, both as a cost-effective way of filling your table and to serve as a base for people to add their own detail... which obviously makes these buildings a perfect match for the Maelstrom's Edge terrain sprue!
The building I've started with is the 'Desert Residence 1', which when assembled straight out of the pack looks something like this:
Before gluing the building together, there were a few modifications to make. To begins with, the doorways are a little small for the Maelstrom's Edge doors to fit in. So I sat the door over the doorway, traced around it with a pencil and then carefully cut the resultant enlarged doorway out with a sharp exacto knife. MDF cuts fairly easily, so this isn't too onerous, but if you would rather avoid it you could alternatively build a boxwork around the door, as I did on my watch tower) and just glue it over the existing doorway.
There are two differently-sized windows scattered around the building. The larger of them, like the doorways, is a little small for the shuttered windows from the terrain sprue, so I repeated the door process, using the top corner of the window hole to line up the plastic part, and then tracing and cutting a larger hole. Again, if you would prefer to avoid cutting MDF, the shutter windows work quite well just glued straight to the wall.
For the smaller window holes, I covered over two of them using the cast-off MDF pieces from the larger windows, and to this I attached part of the energy fence pylon from the terrain sprue to make some sort of mechanical gubbin (I have to admit, it looks a little like a high-tech toilet cystern to me).
For the third small window, I took the large pipe fitting from the terrain sprue, and glued a small circle of plastic mesh into the back of it. This was then glued over the window hole to make a covered vent.
As a nice little touch, all of the Knights of Dice kits come with a little crowbar-sort-of-thing in the top corner of the MDF sheet, which can be used for prying parts out for assembly, or pulling removable roofs off. With a little bit of trimming up, they also serve quite well as upright bars for attaching ladders. I trimmed the ladder from the terrain sprue off so that it was short enough to work on either of the two building sections - the hooks on the top allow it to be hung from any free stretch of roof railing without needing to glue it in place.
With the leftover piece of ladder and a couple of MDF cast-offs, I made a smaller access ladder to hang between the roof sections.
The final touch was to add some support strut sections from the terrain sprue to cover over the joint holes where the roof supports attach to the walls. I could also have removed the other joint gaps by filling with some filling plaster or putty and sanding it down smooth, but I actually like the wall joints for creating a pre-fabricated slab-assembly look.
With some paint and weathering, the final building winds up looking like this:
Some Karist troopers, taking up station:
To tech up some buildings of your own, you can pick up the Maelstrom's Edge terrain sprue, or any of the rest of the Maelstrom's Edge model range, from the webstore here. As always, be sure to share to see your creations, or pop in with any hobby questions to the Comm Guild Facebook page!
For other Maelstrom's Edge modeling articles, including tutorials and walkthroughs of a wide range of different building and miniature projects, check out the article roundup here.
Tags: building modeling spotlight terrain terrainsprue tutorial walkthrough