Entries tagged [buildings]
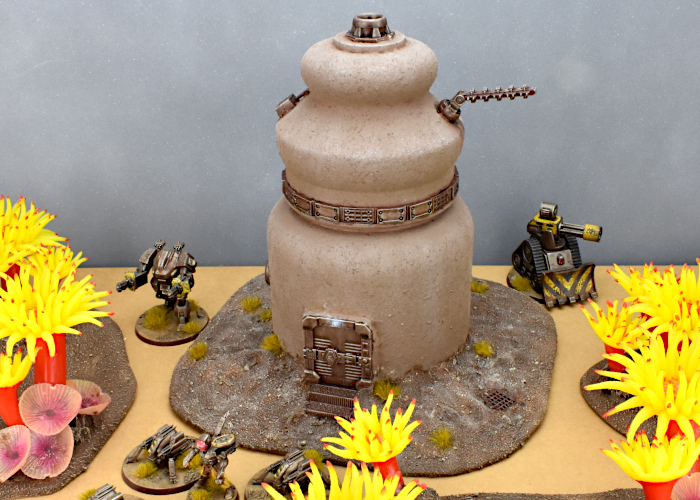
Terrain Spotlight: Candy Jar Desert Building
Posted on Tuesday Jan 11, 2022 at 06:00pm in Tutorials
 - by Iain Wilson
As a wise man once said, "With great Christmas comes a great big bunch of junk food!"
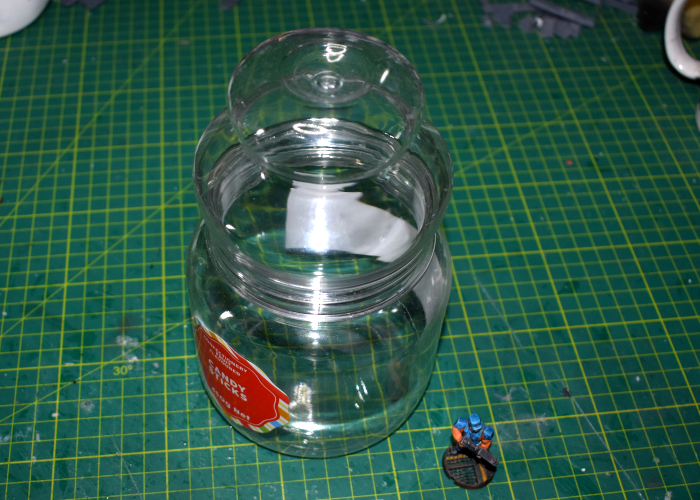
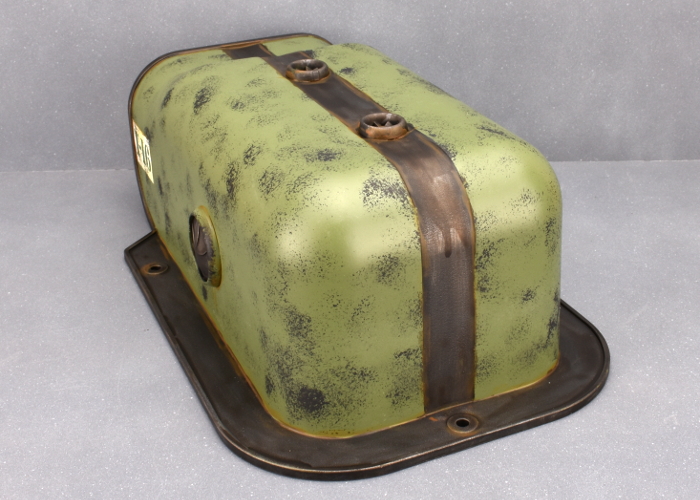
Amongst my family's collection of sugary delights this year was a plastic jar full of candy sticks, bought for my daughters to stuff into Christmas cards. Once empty, though, the jar itself was just too interesting a shape to toss it away. So, there was nothing else for it but to build something!
The jar in question, blissfully unaware that it was about to enter a whole different plane of existence.
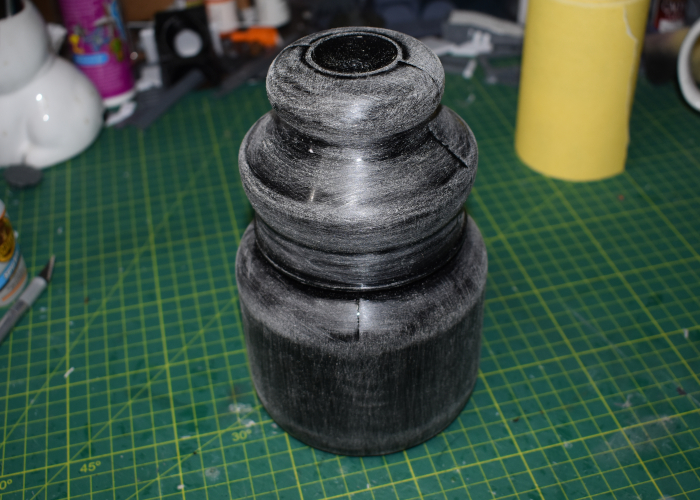
After removing the labels and cleaning off the glue residue with some isopropyl alcohol, I sprayed the inside of the jar with some matt black spray. I do this whenever I'm using something clear as a terrain base, as it prevents stray light bleeding through the paint, and also stops things looking weird if the paint on the outside gets scratched.
I also gave the outside a scrub with some sandpaper to break up the glossy surface. This gives a better surface for the glue and paint to adhere to.
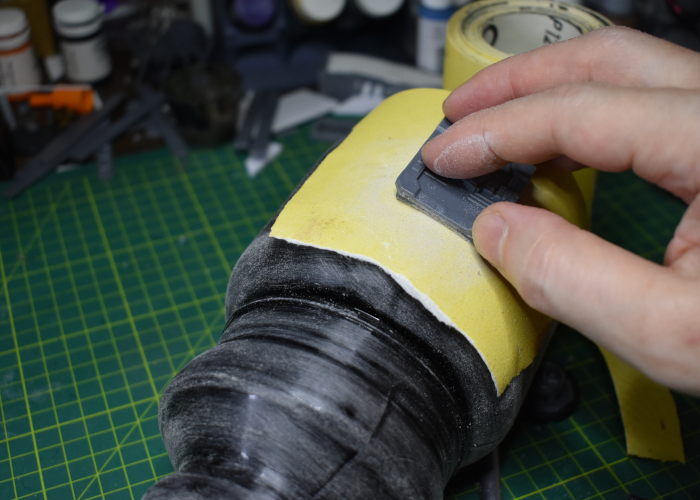
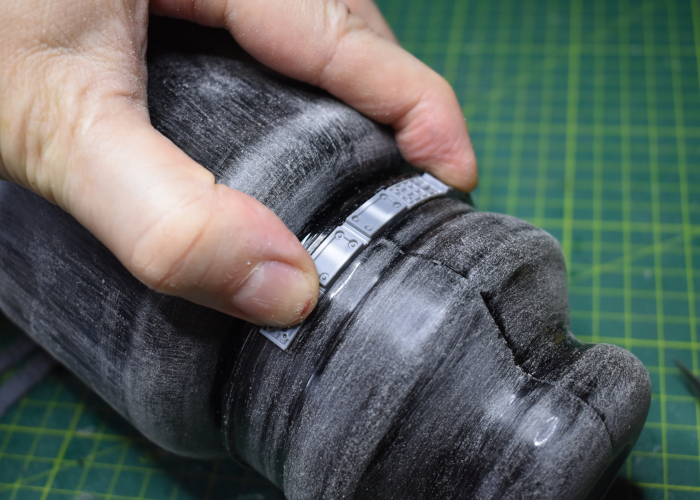
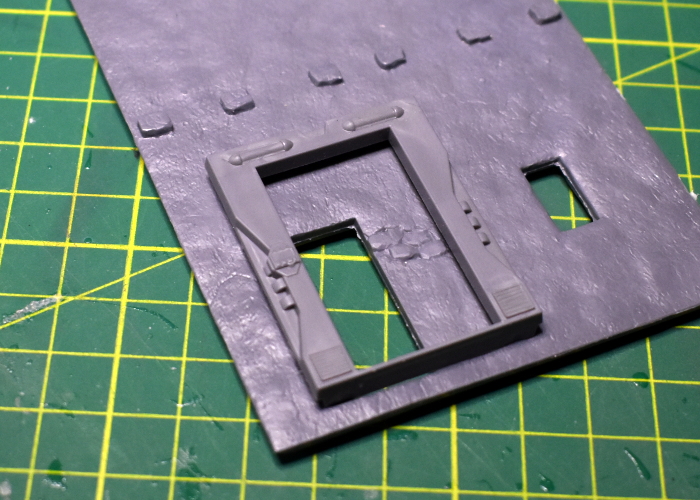
To fit doors and windows from the terrain sprue to the curved surface of the jar, rather than building a framework to square things up I decided to fit them to the curve. I laid a piece of sandpaper over the jar and used this as a curved sanding block to shape the back of the parts.
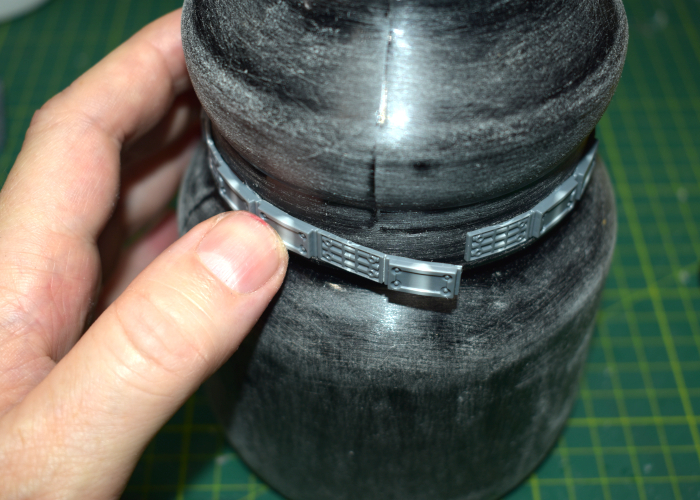
Adding the support struts around the rim of the lid was a little easier - I just bent them around the curve and glued them in place with superglue and a plastic primer.
In a happy coincidence, the spacing worked out almost perfect. I used three full struts, and cut the last one down to three sections, needing to trim only a fraction off the end to make it fit perfectly.
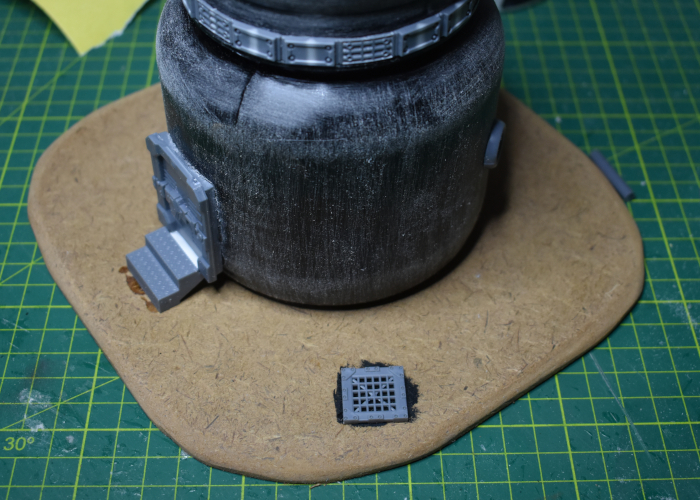
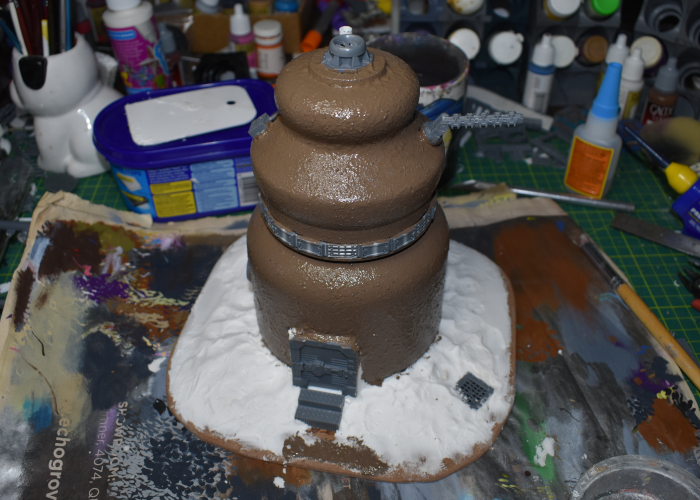
I glued the door and windows into place, adding some steps and gluing the jar down to a piece of hardboard. I also added a grating piece onto a bare patch of the board just for some extra visual interest, painting underneath it with some black as this was easier than doing it later.
To dress up the top of the building, I grabbed a few assorted pieces from the terrain sprues, whipping together an aerial array, a control box and a chimney using a piece of the sprue and some plastic tube.
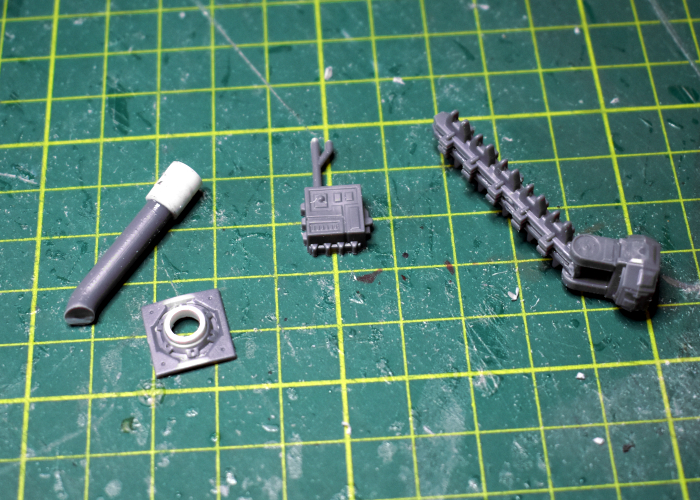
With these parts glued in place, I finished off the roof with a fan and large pipe fitting glued onto a base that fit just perfectly over the cavity in the top of the jar lid.

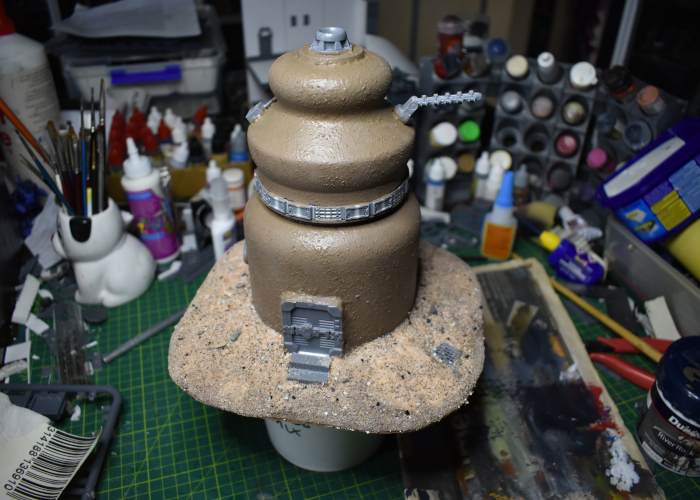
The jar needed some texture, so I added a coat of textured paint and while that was drying I built up the base with some filling plaster.
Finally, I added a layer of sand and gravel mix over the filling plaster, fixing it in place with some PVA glue.
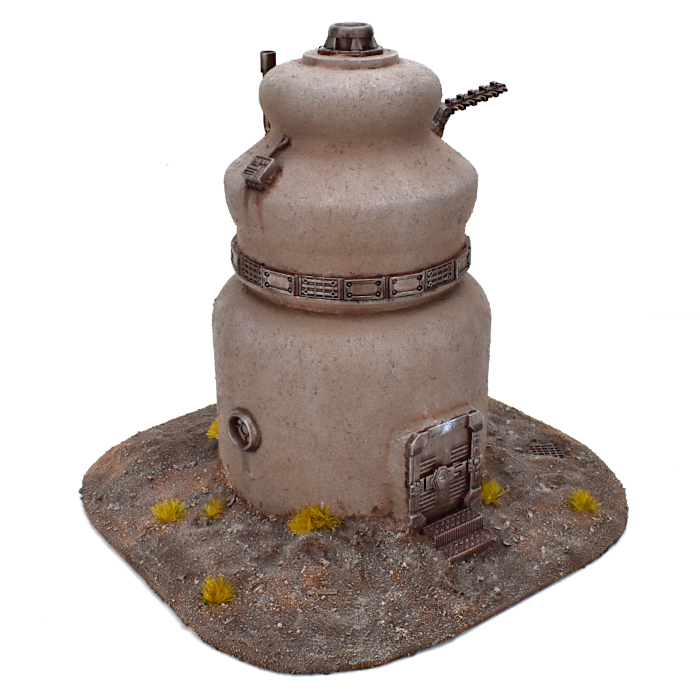
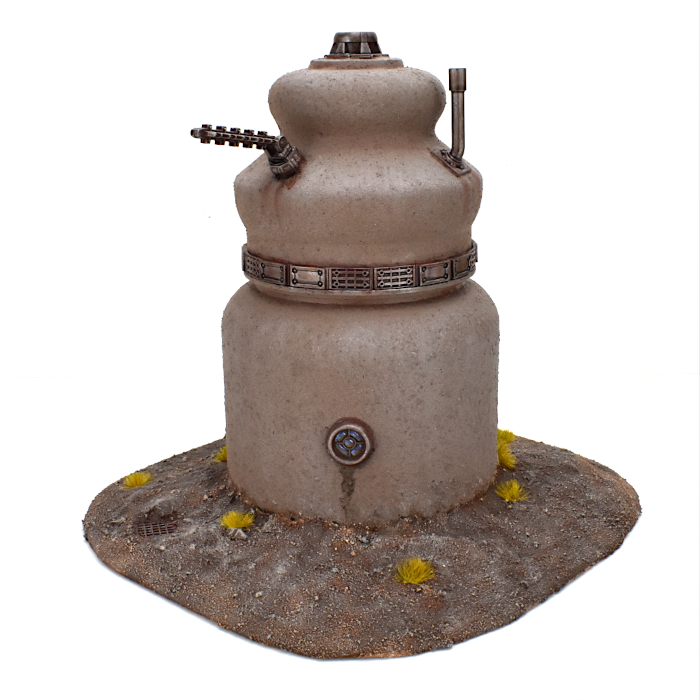
After a quick bit of paint work, the new building was looking totally sweet and ready for the table!
To build your own desert habitat of sugary doom, you can pick up the terrain sprues along with the rest of the Maelstrom's Edge range from the webstore here.
What are you working on? We would love to see your models and terrain in the Comm Guild Facebook group!
For other building ideas, modeling tutorials, army spotlights and conversion walkthroughs, check out the Hobby section of the Maelstrom's Edge website here.
Tags: buildings scratchbuild spotlight terrain terrainsprue tutorial
Terrain Kitbash: Sci-Fi Barn pt3
Posted on Monday Oct 25, 2021 at 06:00pm in Tutorials
- by Iain Wilson
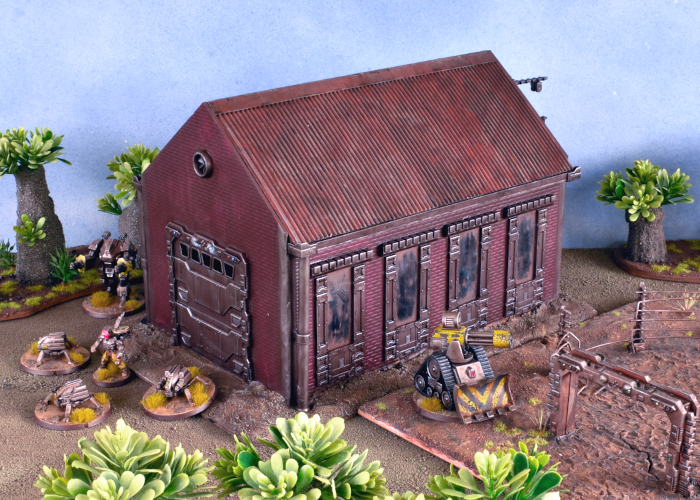
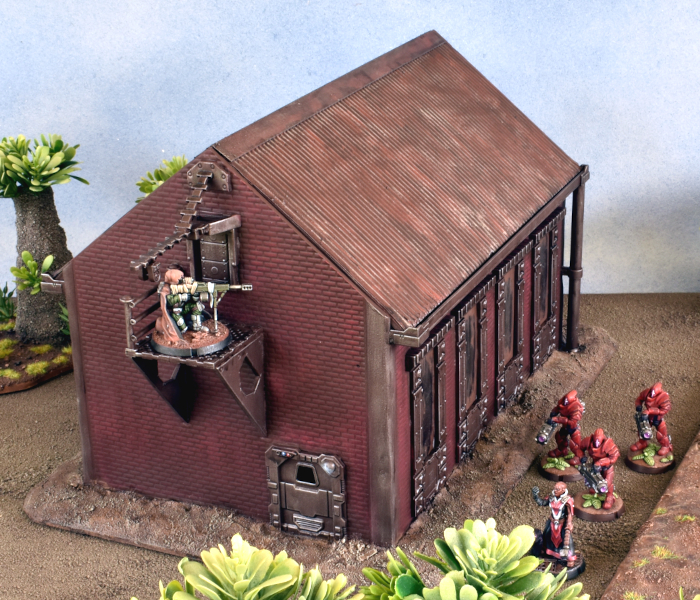
Sci Fi Barn, episode 3: Now in Epirocolor!
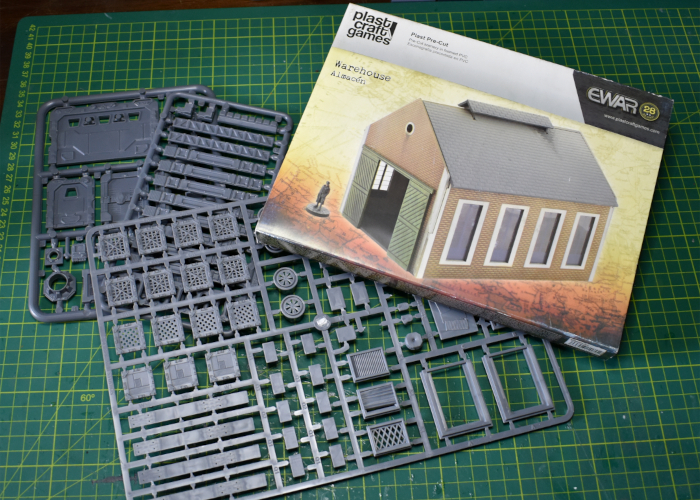
In this latest installment, I finally get some paint on this barn build. If you're wandering in here wondering what it's all about, this was a kitbash of a Plast Craft Games warehouse with parts from the Maelstrom's Edge terrain sprues to build the a sci fi barn (you can find the first part here).
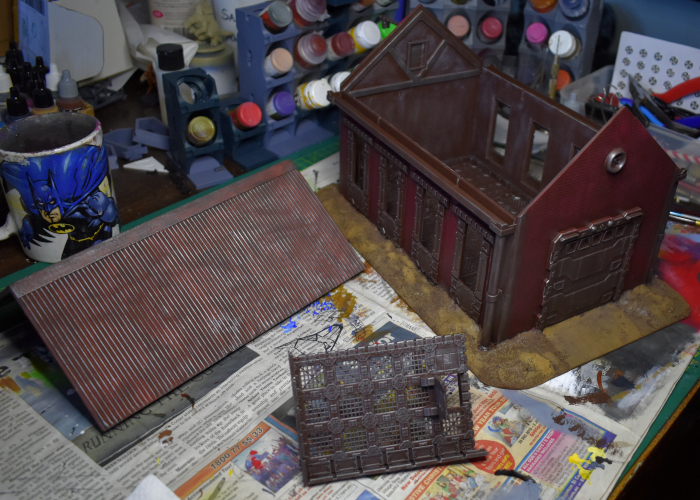
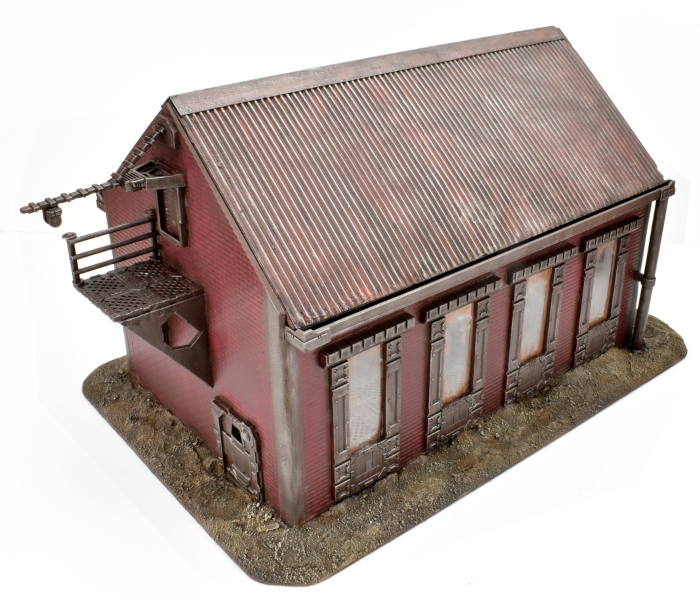
With assembly completed, I kicked off the painting by spraying the whole thing with a coat of a mediumish-dark brown satin spray paint that I had sitting on the shelf. Or, I would have, but it ran out on me. So I wound up spraying the top of the roof with some old Rustoleum flat red that I sometimes use as a base for rusty metal.

I went back over the red roof with some Vallejo Charred Brown before drybrushing over all of the metal parts with some Citadel Boltgun metal (Leadbelcher, for the newcomers). The non-metal parts of the interior walls were drybrushed with some Army Painter Skeleton Bone to pick up the texture on the foamed PVC, and the exterior bricks were given a heavy drybrush of Scalecolor Baal Crimson. Then before putting the drybrushes away, I gave the dirt on the base a layer of Vallejo Heavy Brown.
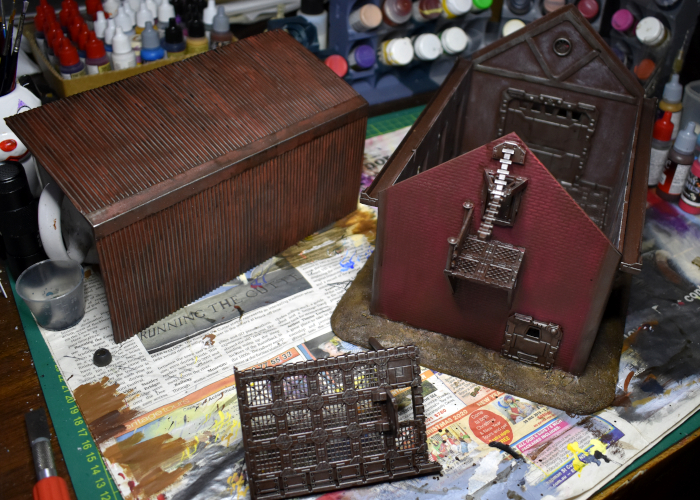
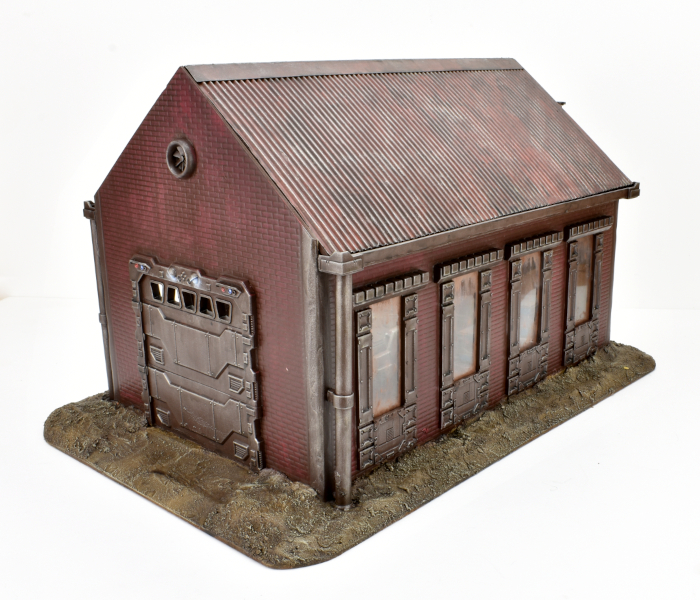
I was aiming for a weathered but not overly rusty metal look for this piece, as it's intended for a fairly arid 'western' themed table set. So over all of the metal parts and the base I added a generous coat of Army Painter Strong Tone and set it aside to dry.
At this point it was time to fit the window panes. The warehouse set came with painted clear plastic pieces that looked fine in the original warehouse, but turned out to not look right here. So instead, I used them as a template to cut some clear plastic sheet to size as a replacement.
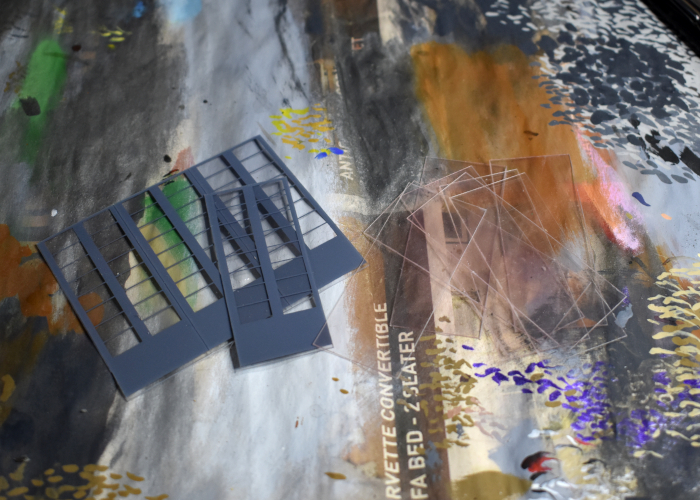
I hadn't originally planned to add internal window frames, but with the panes in place the glue around the edges was very obvious , so I added some thin frames using some thin PVC.
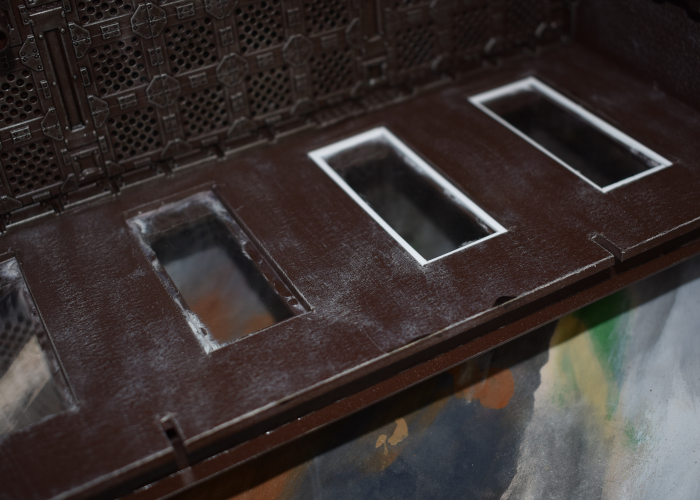
After painting these new internal frames brown, all that was left was to add final detailing. I drybrushed the base dirt with some Army Painter Skeleton Bone and all of the metal parts with a light layer of Army Painter Shining Silver. Lights and sensors on the door frames were painted in with red and blue.
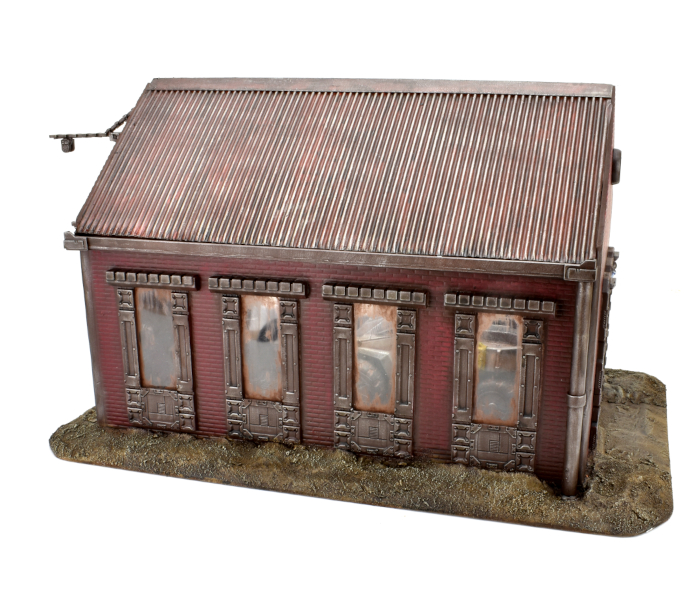
With the metal parts being quite dark, I didn't add a lot of dirt weathering, other than over the tops of the doorframes where it served to conceal a few messy over-brushes of red from the bricks. I did add some brown dirt smearing around the edges of the window panes, partly to give them a more weathered appearance, and partly to conceal any fogging from the glue.
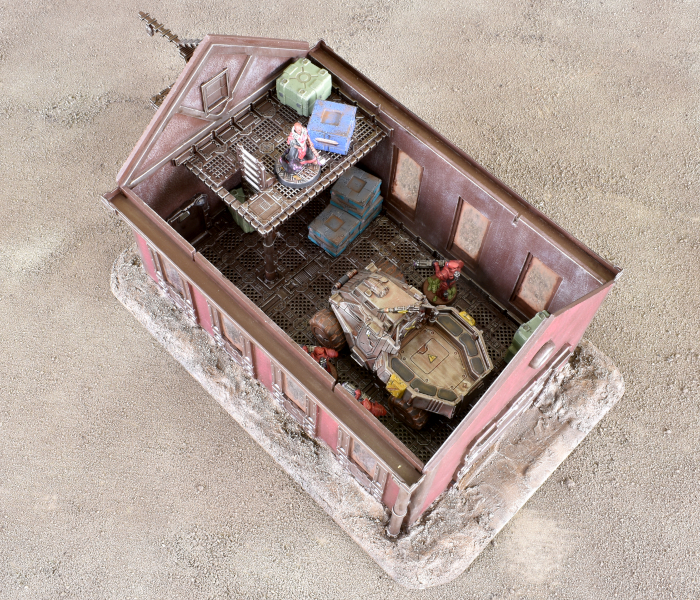
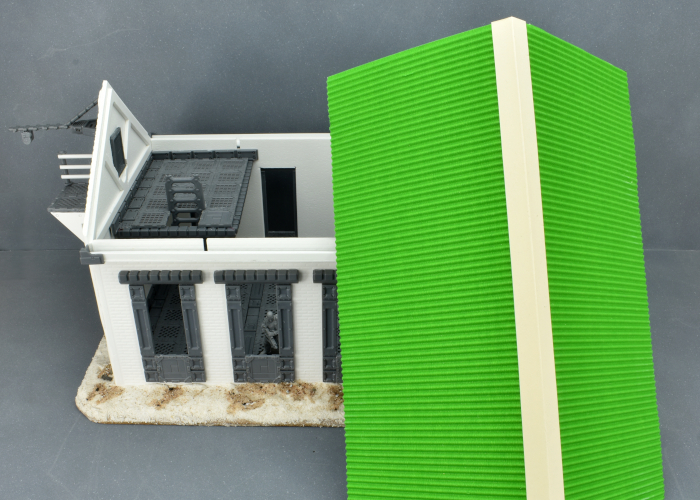
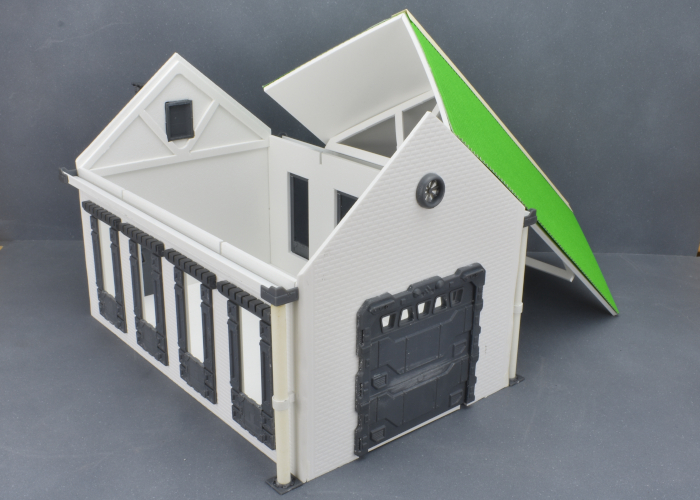
With some crates and an old vehicle thrown in for colour, when the roof is lifted off the interior winds up looking like this:
To build your own outbuilding of rural doom, you can pick up the terrain sprues along with the rest of the Maelstrom's Edge range from the webstore here.
What are you working on? We would love to see your models and terrain in the Comm Guild Facebook group!
For other building ideas, modeling tutorials, army spotlights and conversion walkthroughs, check out the Hobby section of the Maelstrom's Edge website here.
Tags: buildings conversion kitbash painting spotlight terrain terrainsprue tutorial
Terrain Kitbash: Sci-Fi Barn pt2
Posted on Monday Oct 11, 2021 at 06:00pm in Tutorials
- by Iain Wilson
Back in the barn!
I recently shared the first part of this build, combining a Plast Craft Games warehouse with parts from the Maelstrom's Edge terrain sprues to build the shell of a sci fi barn (part one is here). This week, I broke out some more terrain sprues and set to work on the interior!
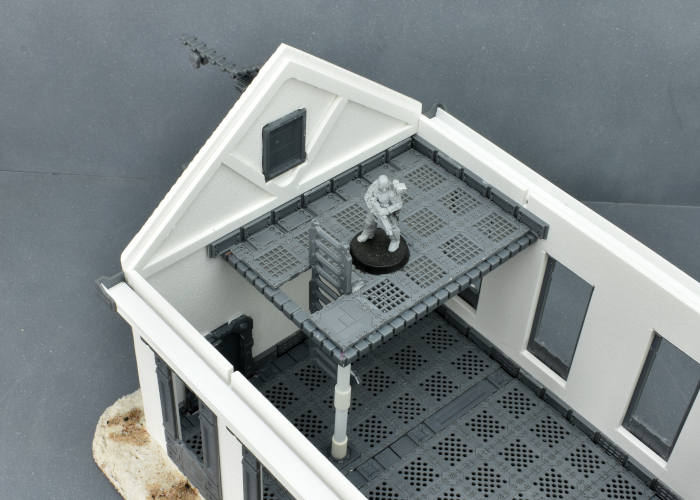
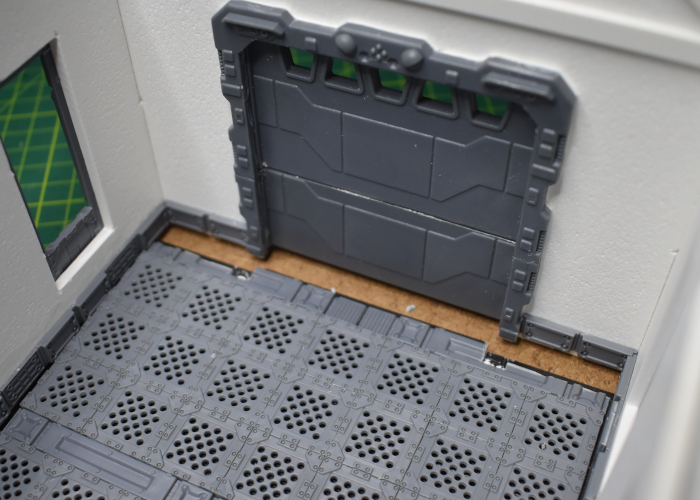
When I built the outside, I left the floor unglued, to get easier access for fitting parts. So I started by taking the floor piece back out and spraying it matte black, so that it wouldn't show underneath the grating pieces I was planning to use for a new floor layer on top. After measuring out the width of the floor against the floor grate pieces from the terrain sprue, I found there was going to be a slight gap around the edges, so I added some skirting using the reinforcing struts from terrain sprue #2.
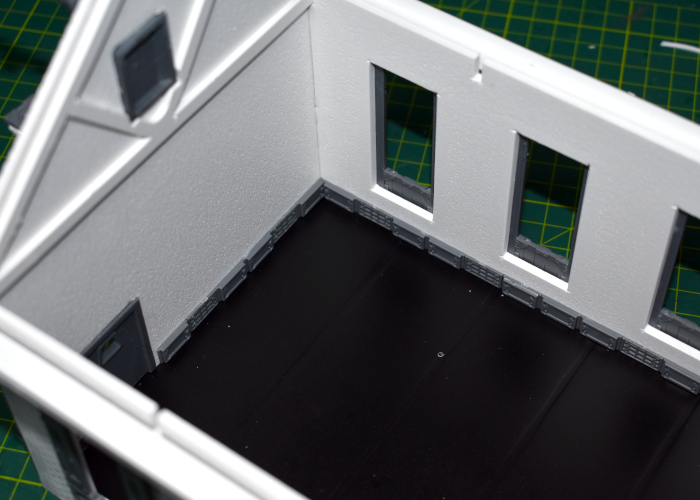
Then I tiled the floor with one of the floor grates from terrain sprue #2, spacing them out with struts from terrain sprue #1 to cover the full length of the barn.
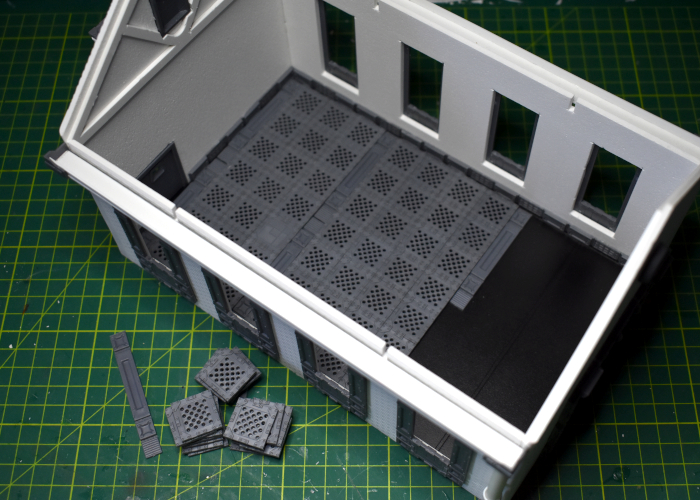
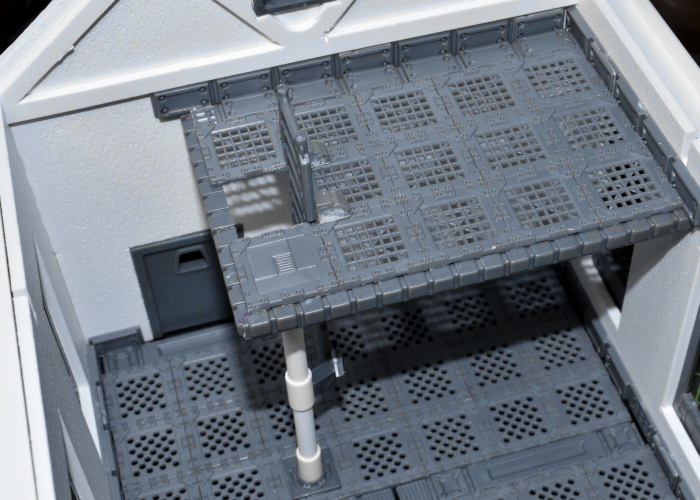
I wanted a small balcony on the end with the smaller door, which would provide access to the platform and crane on the outside of the wall. I used another of the floor grate pieces with some more reinforcing struts and lintel pieces top build the balcony, and some plastic tube with two of the small pipe fittings from terrain sprue #1 to hold it up on the protruding corner. Finally, a ladder from terrain sprue #1 provides access up to the balcony.
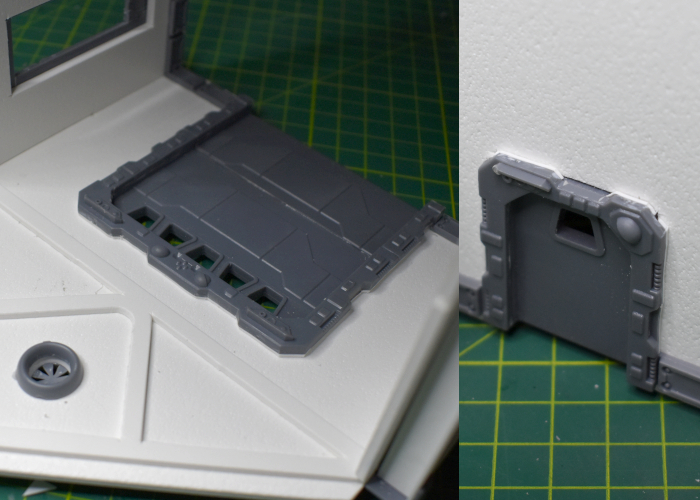
To add some detail to the inside of the doors, I grabbed some extra doors and cut the frames off the outside using a razor saw and scalpel.

The rectangular inside frame of the existing doors protrudes through the wall about a millimetre, so I cut some 1mm plasticard to form a spacer behind the new interior frames, trimming it up to match the contours of the outside of the frames and then gluing it all into place. I also added the outside ring from a porthole from terrain sprue #2 to finish off the hole for the exhaust fan on the outside wall.
I considered adding some interior detail around the windows, but this would complicate painting as I needed to get the clear plastic panes in at the end. I also thought about building some animal enclosures, but decided to keep the floor space open so that, in the event the building is being used with the interior accessible, I can just drop in a vehicle or some crates and other obstacles to suit the situation.
So that just left putting the barn onto a base. I cut a piece of 5mm hardboard to size, sanding down the edges to bevel them off and then glued the floor piece of the barn into the middle of it. When I went to glue the rest of the barn over the top, it immediately became apparent that I hadn't accounted for the raised floor tiles when I added the interior door frames, so I had to cut out some inserts for them to slot into.
Finally, I mixed up a batch of filling plaster with some PVA glue and fine sand for texture, and slathered it around the outside of the building to cover up the hardboard. This mixture didn't immediately stick particularly well to the hardboard, although it would once the glue dries, so this process involved poking it into place with fingers and an old paintbrush, and a certain amount of cursing. In the end, though, I got the plaster laid down all around the exterior, with a smoother ramp of pure filling plaster leading up to the larger door. Then I finished up by adding some small patches of sand and gravel mix here and there, glued into place with some more PVA glue.
Next up: Getting some paint on. Click here!
To build your own outbuilding of rural doom, you can pick up the terrain sprues along with the rest of the Maelstrom's Edge range from the webstore here.
What are you working on? We would love to see your models and terrain in the Comm Guild Facebook group!
For other building ideas, modeling tutorials, army spotlights and conversion walkthroughs, check out the Hobby section of the Maelstrom's Edge website here.
Tags: buildings conversion kitbash spotlight terrain terrainsprue tutorial
Terrain Kitbash: Sci-Fi Barn
Posted on Monday Sept 20, 2021 at 06:00pm in Tutorials
Time to get some terrain on!
Back in 2017, I put together a sci-fi 'western' gunshop, using the Maelstrom's Edge terrain sprue and a foamed PVC western shop kit from Plast Craft Games. Plast Craft sadly appear to have gone out of business, but I picked up a few building kits on clearance from a local retailer to start fleshing out a themed table. The first (and probably largest) off the rank is an appopriately upgraded barn!
Along with the Maelstrom's Edge terrain sprues, the kit I used for this build is an urban warehouse. If you want to build something similar yourself, while you may not be able to still track down this specific kit, there are other similar buildings available in MDF from other manufacturers, or you could use foamed PVC or foamcore to build your own from scratch.
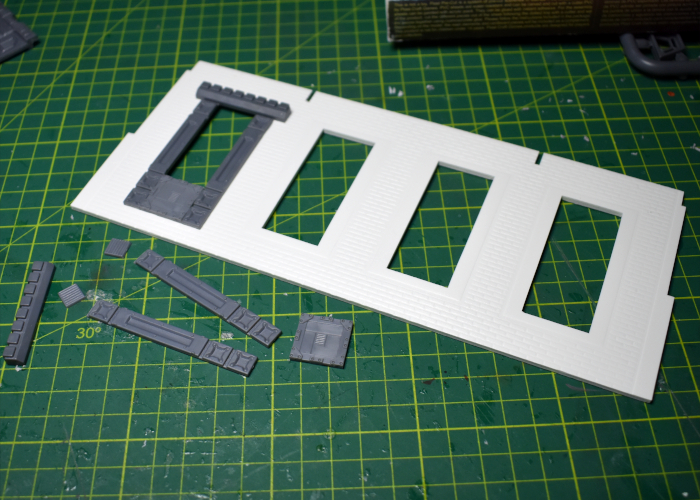
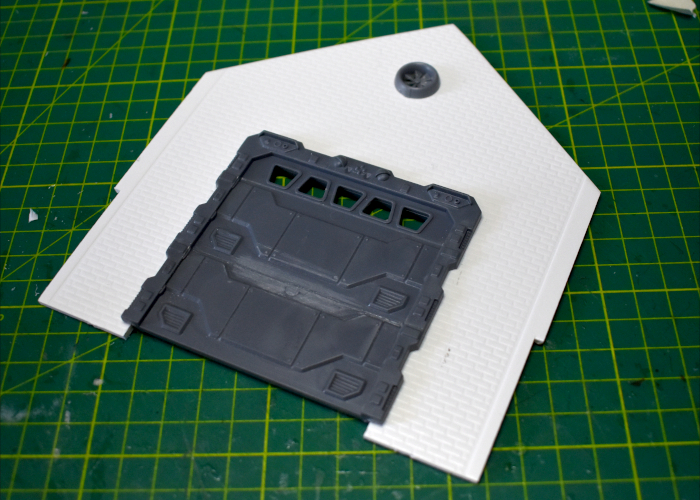
I started out by adding some tech details to the windows, bulking out the frames using support struts and lintel pieces from terrain sprue #1, and floor panels from terrain sprue #2.
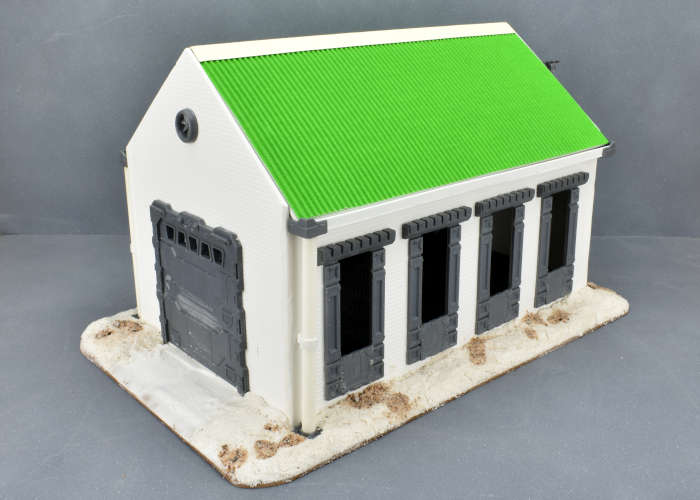
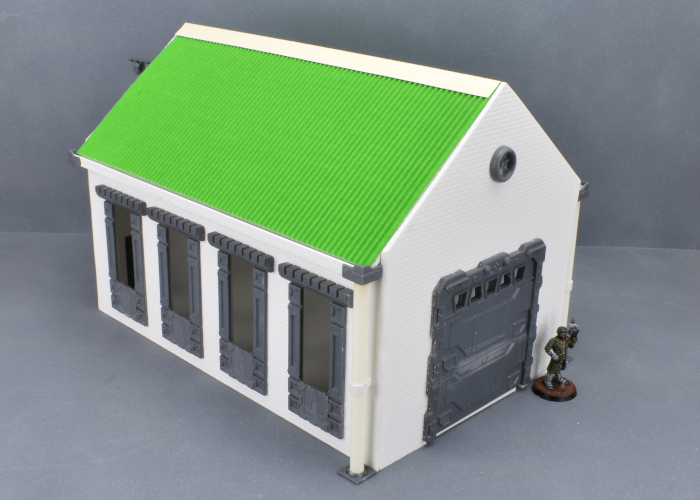
On the front of the building, I replaced the sliding wooden doors with a garage door from terrain sprue #1. To make up the extra height, I cut off the top of a second garage door with a razor saw and glued the two together.
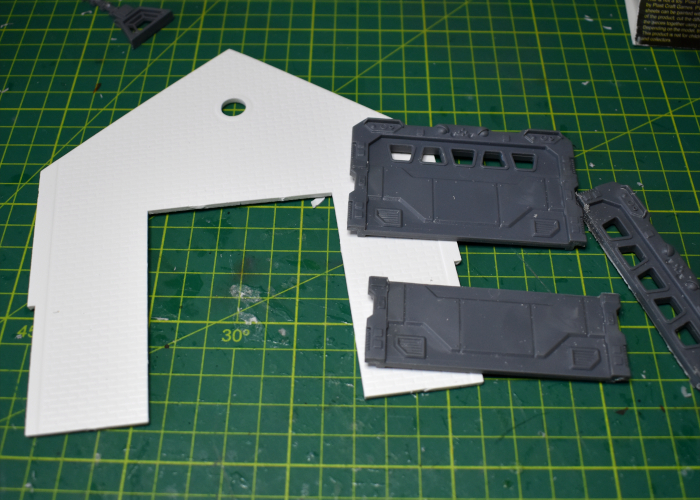
The resultant door was the right height, but too wide, so I also widened the door cavity in the wall with an exacto knife before gluing the door in place. The round window at the top of the wall turned out to be exactly the right size for the exhaust fan from sprue #2..
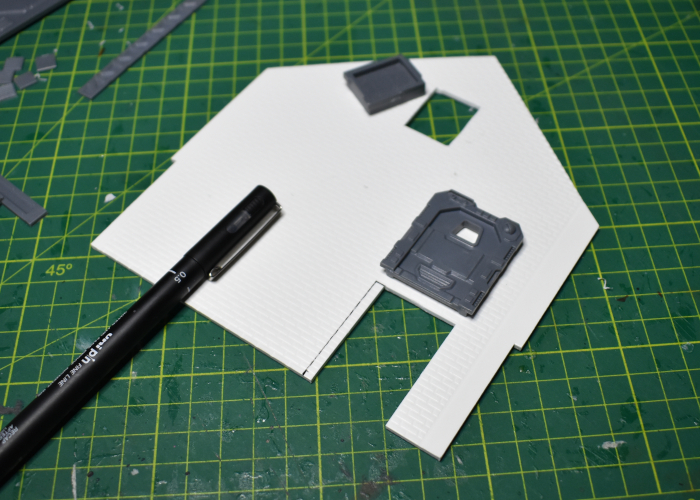
The other end of the building has a smaller door and a rectangular window up high. I enlarged the cavities slightly and glued in a shutter window and door from sprue #1.
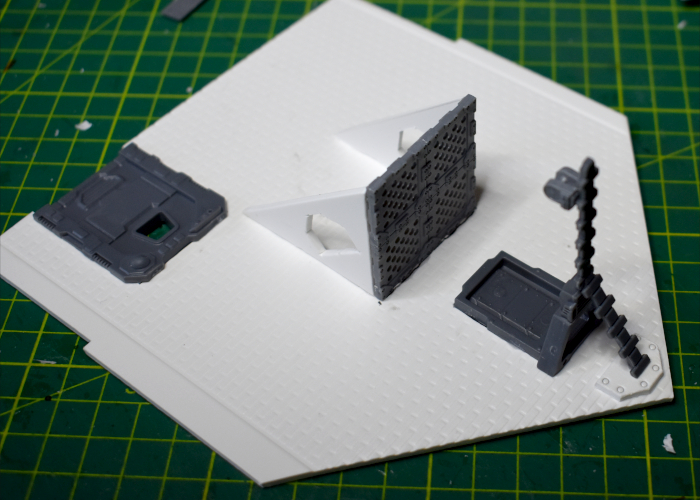
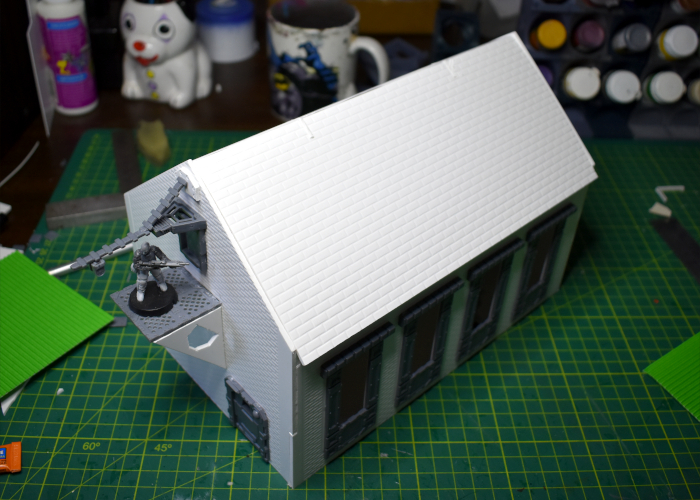
To avoid the building from just winding up looking like a plain box, I built a small platform and crane onto the wall, turning the small window into an access point for small freight. The platform was constructed from sprue #2 floor grates and some scrap pieces from the warehouse kit's roof trusses. The crane used a trapezoid window and a couple of energy fence pieces from sprue #1, the upright supports from the gun unit on sprue #2 and another scrap piece of PVC. I'll need to find some string or fine chain for it to finish up.
At that point, it was time to start slotting everything together.
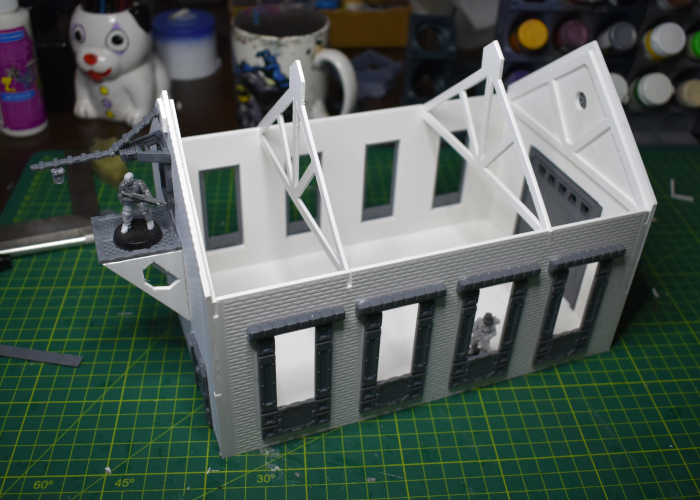
The warehouse kit has a tiled roof, but I wanted to go with corrugated iron instead, for a better contrast from the brick walls. With the top ventilation struts trimmed off, the assembled roof provides a solid base for the iron roof. I've left the middle two roof trusses and the roof itself unglued, so that the roof can be removed and the building interior used during a game.
Over the original roof, I glued two sheets of corrugated cardboard, adding a strip of thin, folded card for the ridge capping. That didn't look quite right as-is, so I decided to also add some rain guttering, using some plasticard and a few more components from terrain sprue #1.
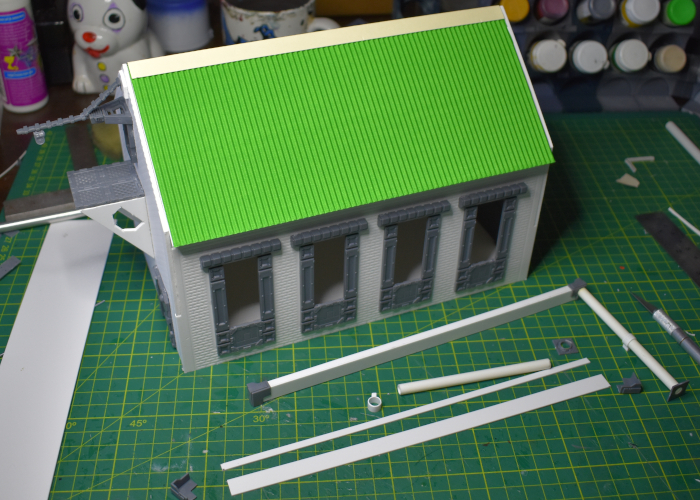
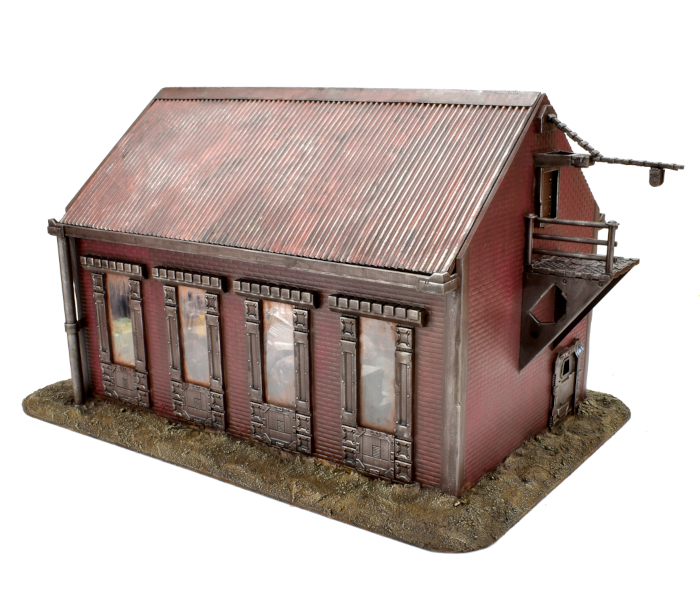
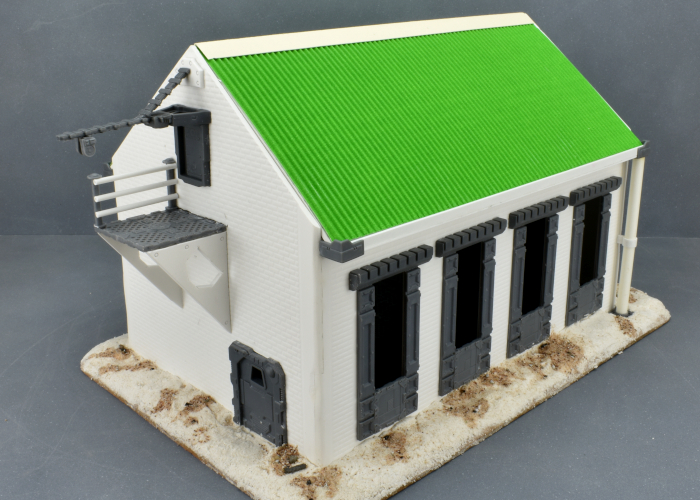
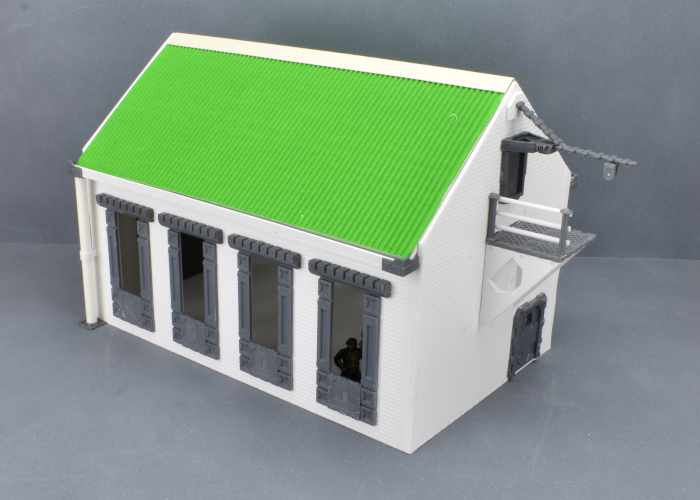
The windows are still missing their 'glass' - some thin, translucent plastic that comes with the warehouse kit. This will be glued in place after I've painted the barn. Otherwise, the finished exterior:
As a final touch, I decided the small platform needed a hand rail, so I whipped one up using a pair of posts from terrain sprue #2 and some thin plastic rod.
Coming up in part 2: I'll add some detail to the interior of the building before painting. Find it here!
To build your own outbuilding of rural doom, you can pick up the terrain sprues along with the rest of the Maelstrom's Edge range from the webstore here.

What are you working on? We would love to see your models and terrain in the Comm Guild Facebook group!
For other building ideas, modeling tutorials, army spotlights and conversion walkthroughs, check out the Hobby section of the Maelstrom's Edge website here.
Tags: buildings conversion kitbash spotlight terrain terrainsprue tutorial
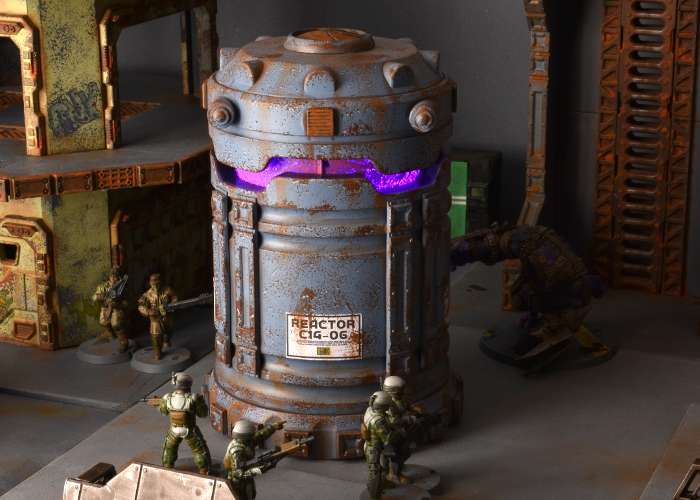
Terrain Spotlight: Pop-up Lamp Reactor!
Posted on Monday May 17, 2021 at 05:00pm in Tutorials
I came across this idea a little while ago in a Facebook group, and thought it was too good to not give it a go. Turns out, there are a bunch of pop-up LED lanterns currently floating about that are just perfect for turning into fantastic light-up reactors!
So, the foundation for this build is a pop-up lantern that I found on Amazon. There are variations available all over the place, all with a very similar design. The light comes on automatically when you lift the top of the lantern, and goes off when you push it closed.
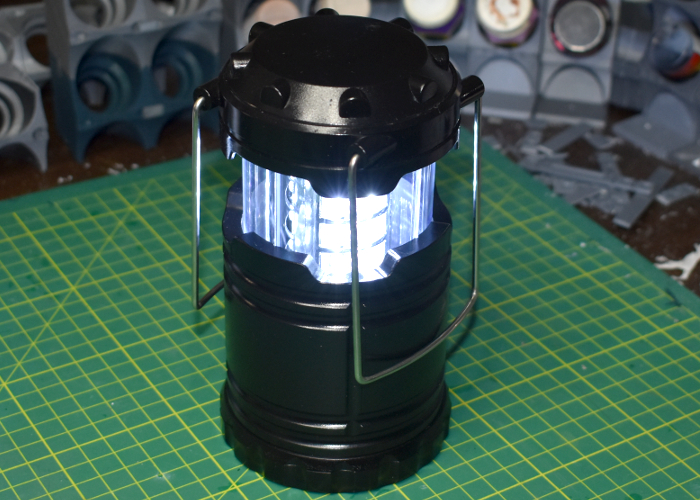
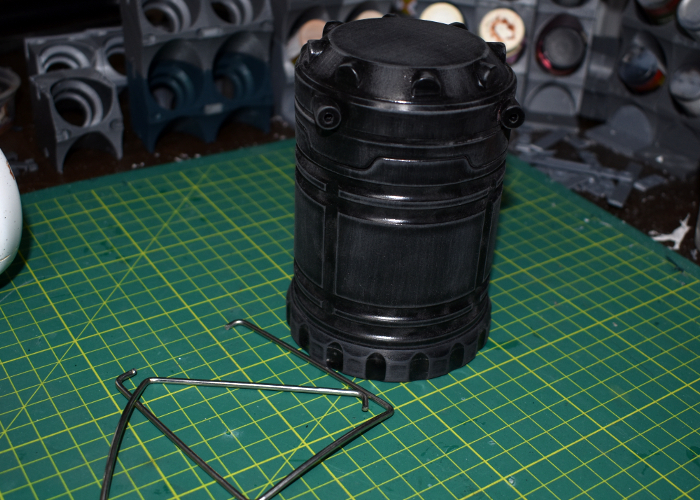
These look pretty amazing just painted up as-is, but I couldn't resist tweaking a little. The handles are spring steel wire, pushed into holes in the top of the lamp, so I removed these and put them aside. Then I gave the outside of the lamp a light sand with fine sandpaper. This part isn't essential, but I like to do it with unfamiliar plastic as it can help the glue and paint stick better.
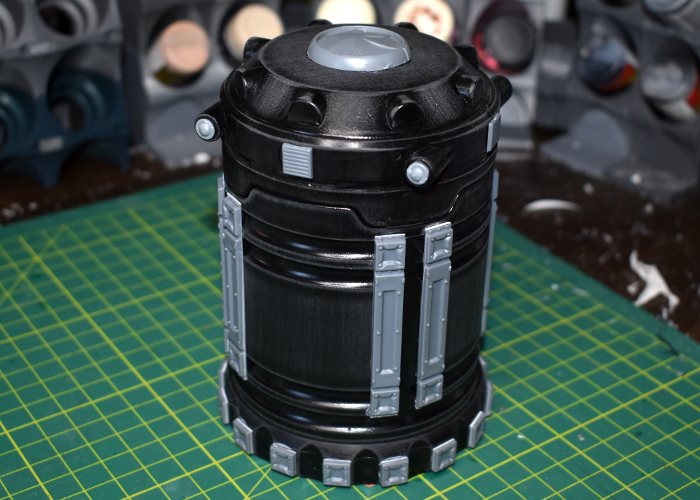
From there, I took the Maelstrom's Edge terrain sprues and added some details. I cut down some support struts from the first terrain sprue to make some bracing for the sides, and added the square end pieces from the struts onto the small protrusions spaced around the base of the lamp. I also cut the tops from some railing posts from the second terrain sprue to cover over the handle holes, and added an iris portal to the top as a heat vent.
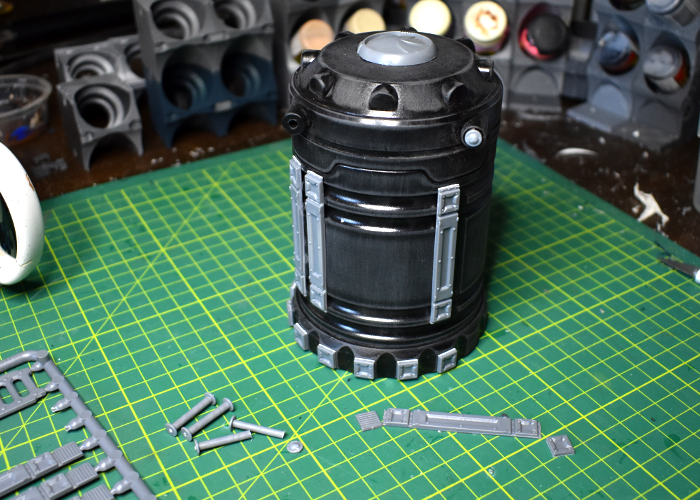
It looked like it needs just one last thing, so I used the vent pieces from the support struts to add a little more detail around the top of the lamp, and then it was ready for paint.
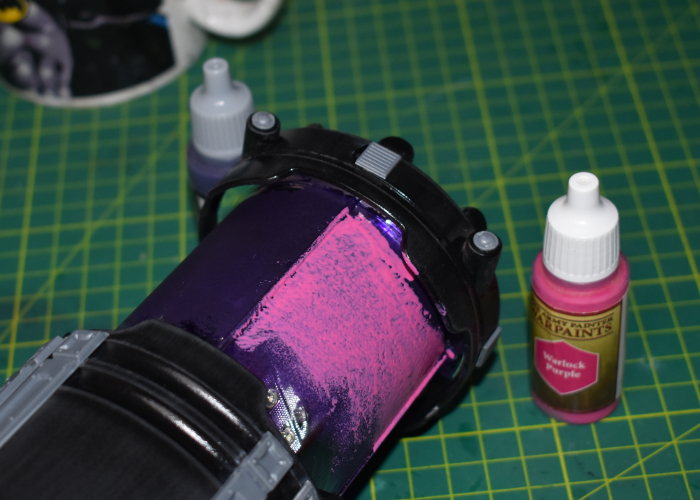
To paint up the reactor, I started with the clear plastic light cover. I used a sponge to apply a rough layer of Scalecolor Elandil Violet (a dark purple) and then when that was dry, a layer of Army Painter Warlock Purple. Normally I would do this on the inside of the clear plastic, to protect the paint, but it proved impossible to disassemble the lamp without breaking parts, so it went on the outside, and then I sealed it with a coat of Testor's Dull Coat.
To paint the rest, I started with a basecoat of Army Painter Wolf Grey, drybrushing white onto the upper edges. After gluing on some printed signs worked up in Gimp, I then sponged on some weathering using Army Painter Dirt Spatter, adding scattered white highlights on some of the broken grey. The metal grills and iris were given a coat of Dirt Spatter, a sponge of Vallejo Heavy Charcoal, a light drybrush with P3 Ember Orange, and finally a touch of Army Painter Dry Rust. To finish up, I drybrushed some more Dirt Spatter and Vallejo Beasty Brown into the creases.
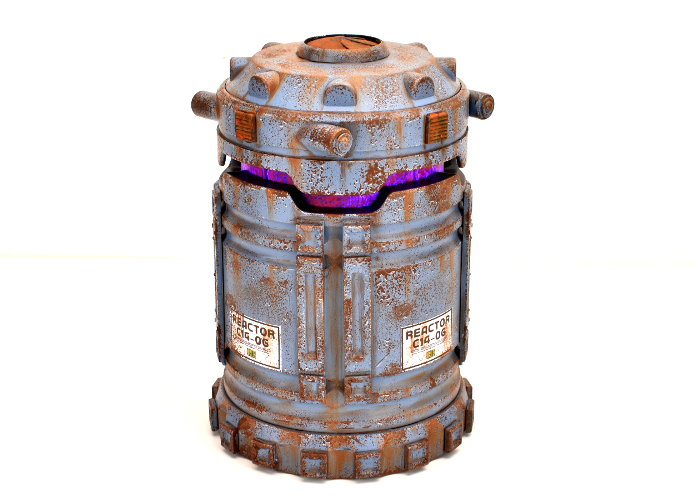
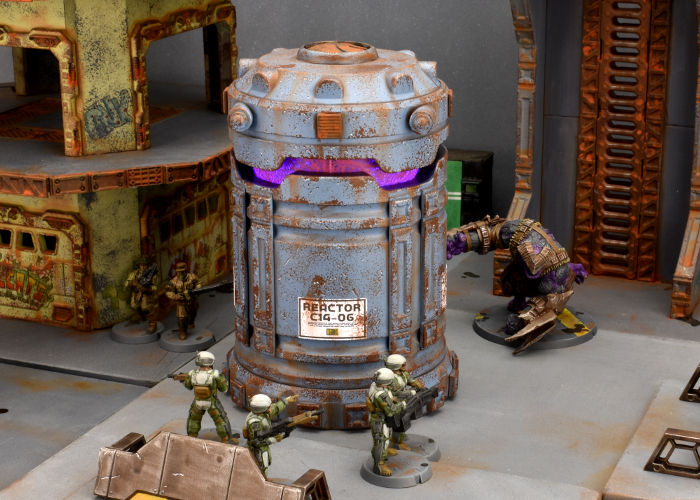
Because the fit of the light tube is rather tight, it does run the risk of rubbing the paint off by lifting or lowering it, so I've settled for turning it on and off by just taking the batteries out, instead. But other than that, I think it turned out quite well. The light is not as bright as it was originally, but it still gives a noticeable glow, even with the lights on!
Put together your own evil reactor of purple-powered doom by picking up the terrain sprues, along with the rest of the Maelstrom's Edge range from the webstore here.
Then pop on over to the Comm Guild Facebook group to show us what you're working on!
For other building ideas, modeling tutorials, army spotlights and conversion walkthroughs, check out the Hobby section of the Maelstrom's Edge website here.
Tags: buildings kitbash modeling scratchbuild terrain terrainsprue
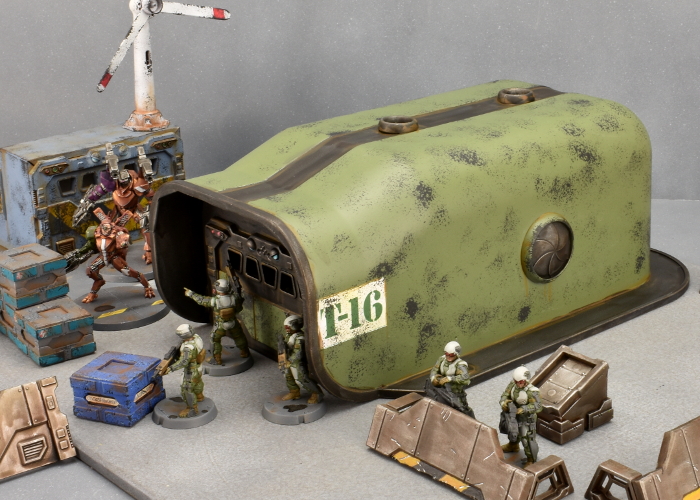
Terrain Spotlight: Aircon Ducting Barracks
Posted on Monday Jan 11, 2021 at 05:00pm in Tutorials
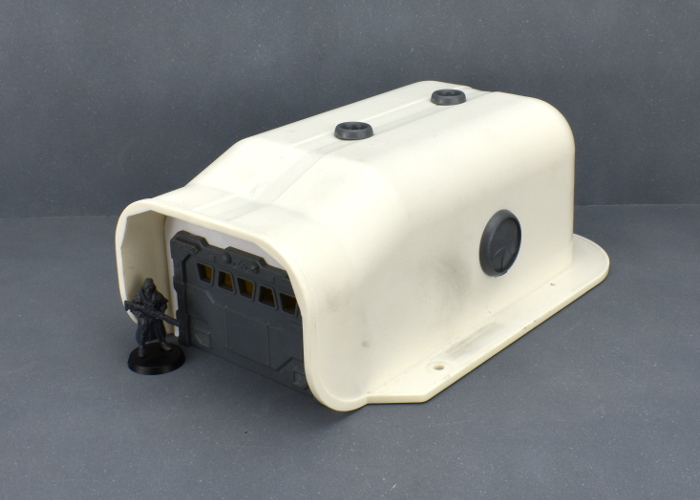
Over the Christmas break, I found myself in a local hardware store picking up some supplies for a few jobs around the house, and as so often happens I got a little distracted by random pieces of plastic. As a result, this week's modeling article is a sci fi barracks building made from components from the Maelstrom's Edge terrain sprues and a piece of plastic air conditioner ducting!
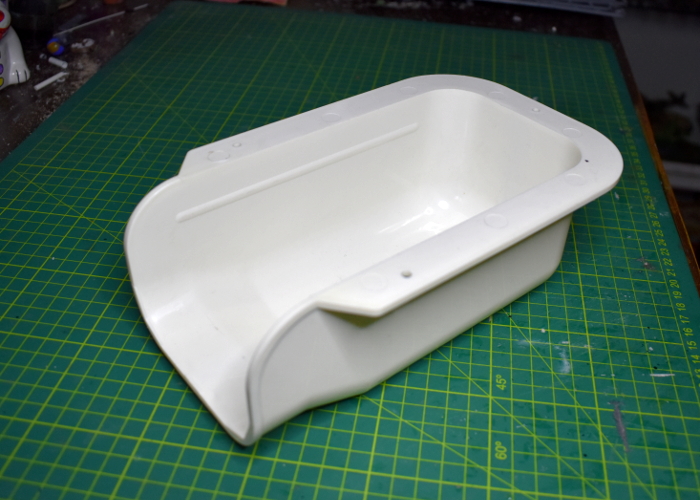
I have plundered the aircon ducting display before, resulting in a battlement-roofed bunker (which you can see here). This time around, I had picked up a longer piece that is usually used to cover over the spot where cables or drain hoses turn to go through a wall.
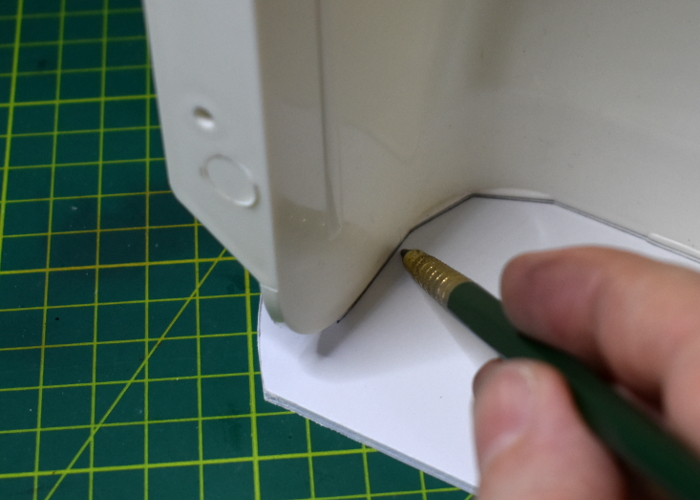
Because the shape was so perfect as is, there was very little that needed doing here, but it did need a front wall. For this, I used a piece of 3mm foamed PVC. Sitting the ducting end-on on top of the PVC, I traced around the inside with a pencil to get an accurate cutting pattern for the wall.
In the middle of the wall piece, I cut a rectangle to fit the garage door from Terrain Sprue #1.
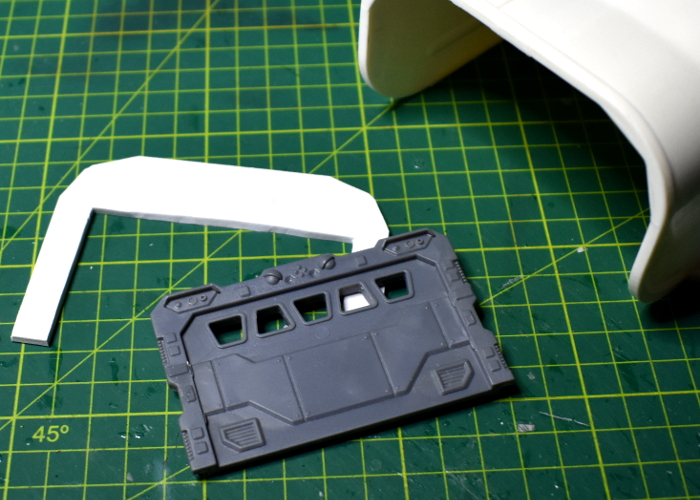
Before gluing everything in place, I gave the ducting a light sand all over. This breaks up the shiny outer surface of the plastic, allowing glue and paint to stick better. With that done, I glued the front wall in place inside the ducting, and added some iris windows and exhaust fans from Terrain Sprue #2 for some extra detail.
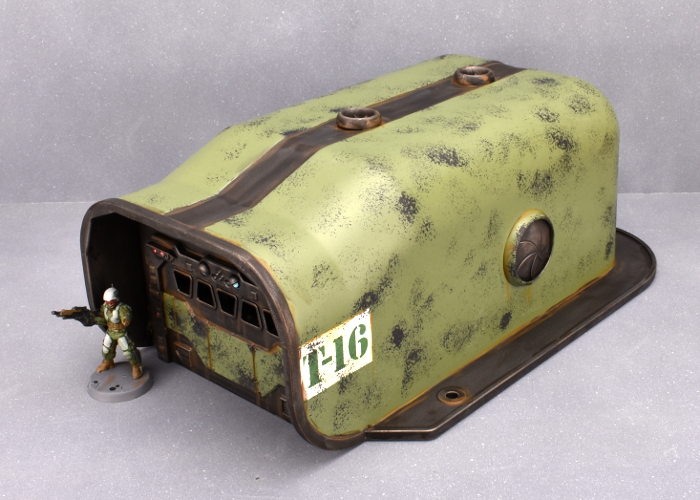
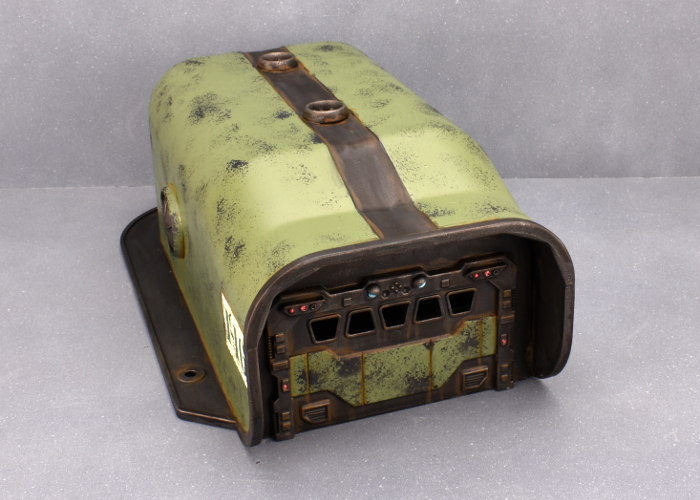
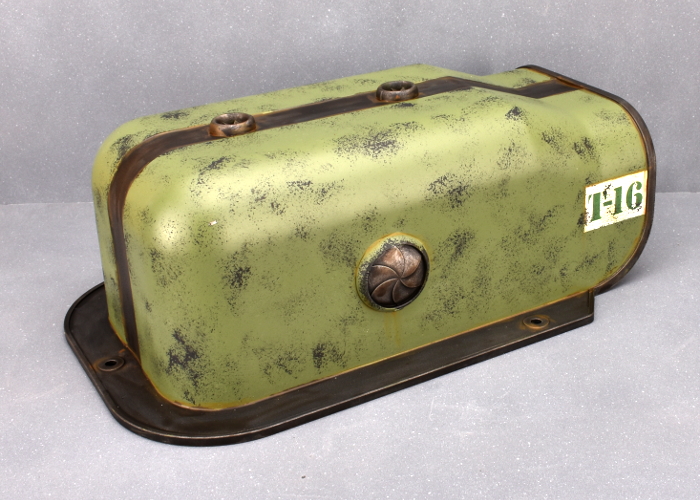
I decided against adding a base, as it didn't really seem necessary. The flange around the ducting makes it nice and stable on the tabletop, and this way it will fit in with whatever style of battlefield I choose to plonk it onto.
So, with some paint on, the barracks looks like this:
Put together your own sci fi barracks (of doom?) by picking up the plastic terrain sprues, along with the rest of the Maelstrom's Edge range from the webstore here.
Then pop on over to the Comm Guild Facebook group to show us what you're working on!
For other building ideas, modeling tutorials, army spotlights and conversion walkthroughs, check out the Hobby section of the Maelstrom's Edge website here.
Tags: buildings modeling terrain terrainsprue tutorial walkthrough
Terrain Spotlight: Converted Renedra Desert Buildings
Posted on Monday Dec 07, 2020 at 05:00pm in Tutorials
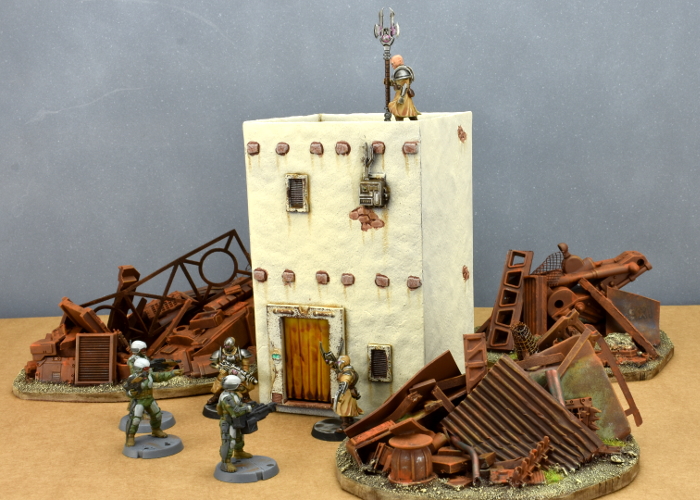
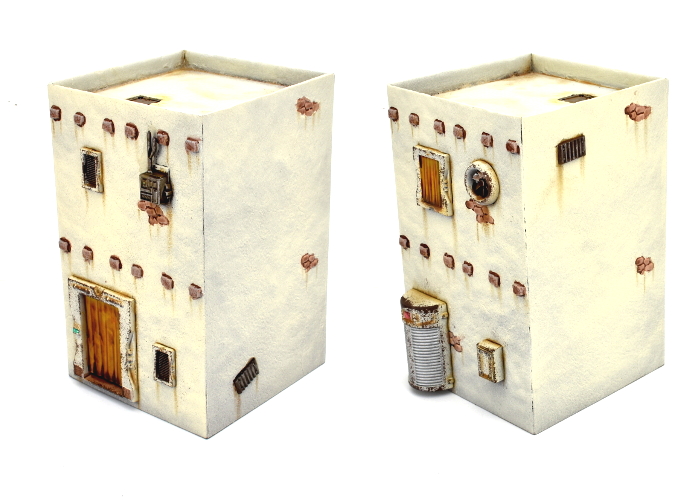
Browsing around online a few weeks back, my eye was caught by a neat looking new release from Renedra. They have a slowly-growing range of plastic historical building kits, and had just added to it with some two-story desert houses. While these are intended for historical settings, I thought it would be fun to see how they prettied up with the addition of some Maelstrom's Edge terrain sprue parts for a rustic sci-fi look. After a short and impatient wait for the post, I came up with this:
The pack I ordered includes parts for three houses. They all utilise the same floor and roof sprue, so are all the same width, just having different configurations of windows and doors, and differing overall heights. There are three sprues per building - the floor/roof sprue, and two identical wall sprues. To these, I added a Maelstrom's Edge terrain sprue.
The doorways on the buildings are quite small, and have timber doors that fit into them. That wasn't going to do here, though, so I took a doorway from the Maelstrom's Edge sprue and laid it over the existing doorway, using it as a guide to trace around with my hobby knife. Then, tracing gradually deeper cuts into that guideline, I carefully cut out the hole for the new doorway.
With the new door glued in place, I covered over the window cavities and the second doorway with various bits from the terrain sprue. As with the doorway, I used the curtained window as a guide to trace around in order to enlarge the original window hole.
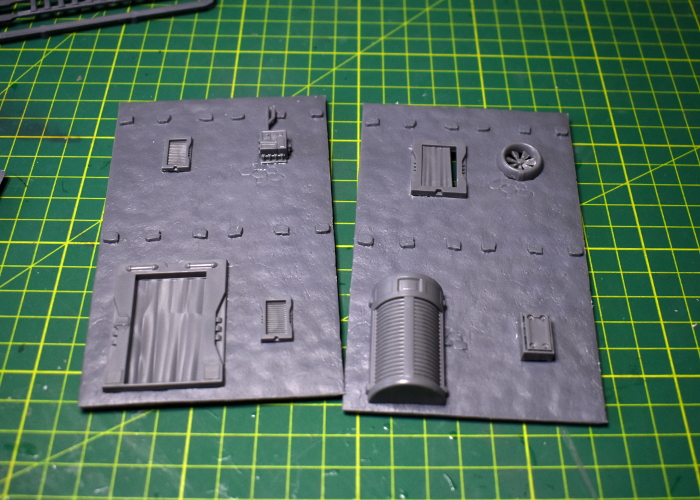
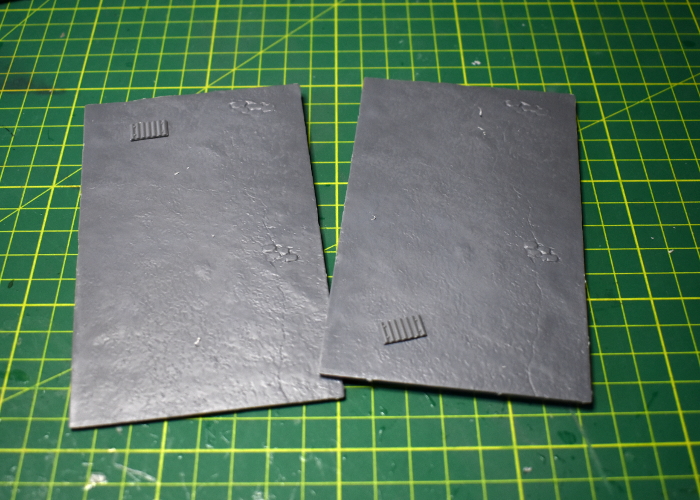
I left the side walls largely as is, adding just a couple of corrugated patches so they weren't identical.
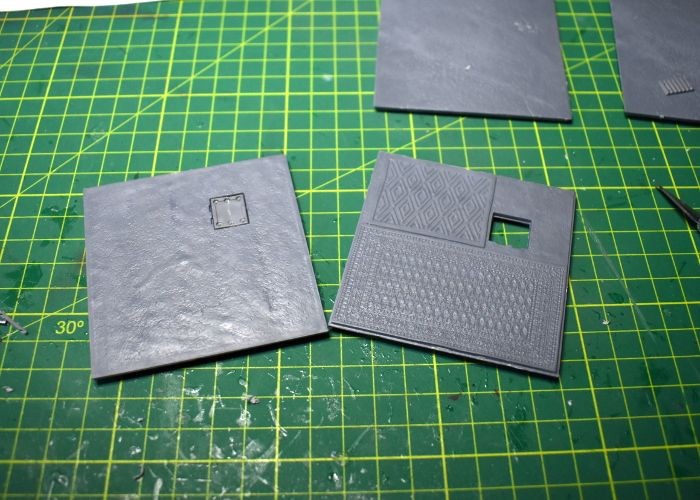
The floor/roof pieces were also left alone, although I replaced the wooden trapdoor in the roof with a metal one made from two strut panels trimmed to fit.
From there, I just had to glue everthing together. I also added a little filling putty along the corner seams and around the edge of the roof to neaten everything up a little.
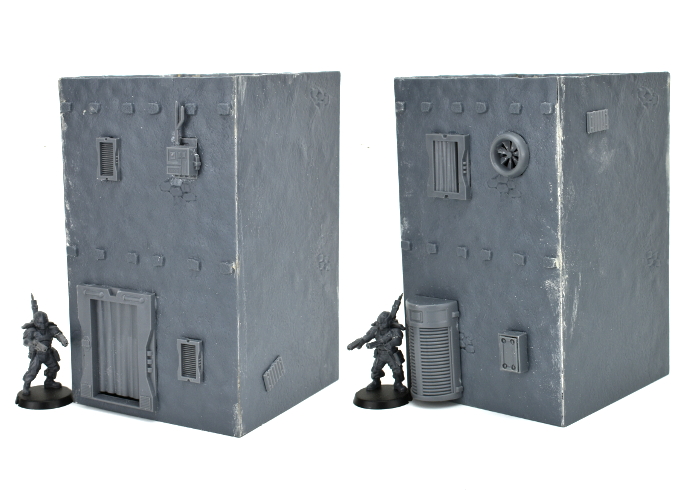
With a quick coat of paint, it wound up looking like this:
Now to get the other two finished off!
Why not give it a go? You can find the Maelstrom's Edge terrain sprues for your own terrain re-imaginings, along with the rest of the Maelstrom's Edge range from the webstore here.
What are you working on? We would love to see your models and terrain in the Comm Guild Facebook group!
For other building ideas, modeling tutorials, army spotlights and conversion walkthroughs, check out the Hobby section of the Maelstrom's Edge website here.
Tags: buildings conversion modeling spotlight terrain walkthrough
Terrain Spotlight: Tissue Box Building
Posted on Friday Jun 19, 2020 at 05:00pm in Tutorials
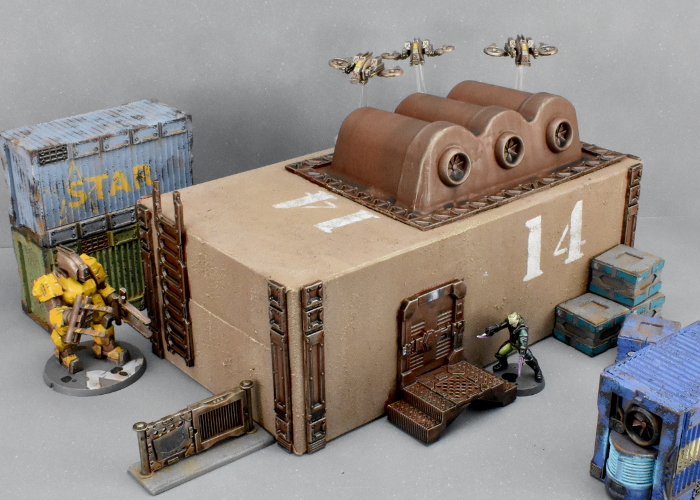
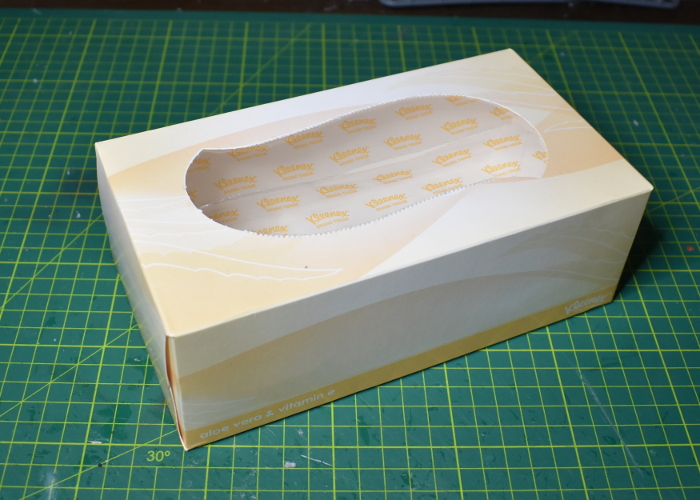
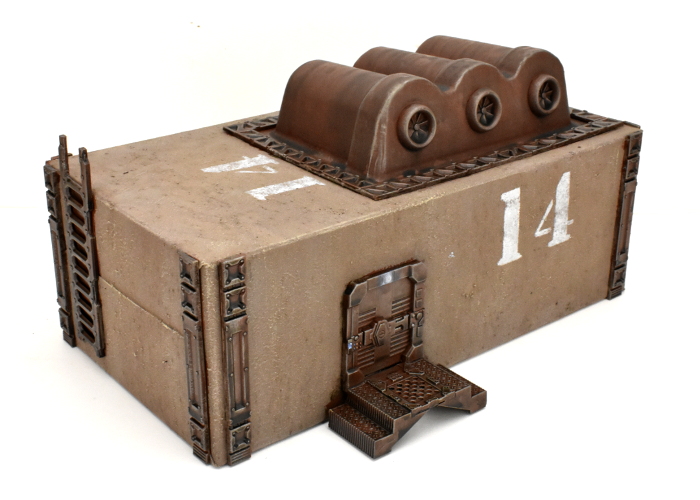
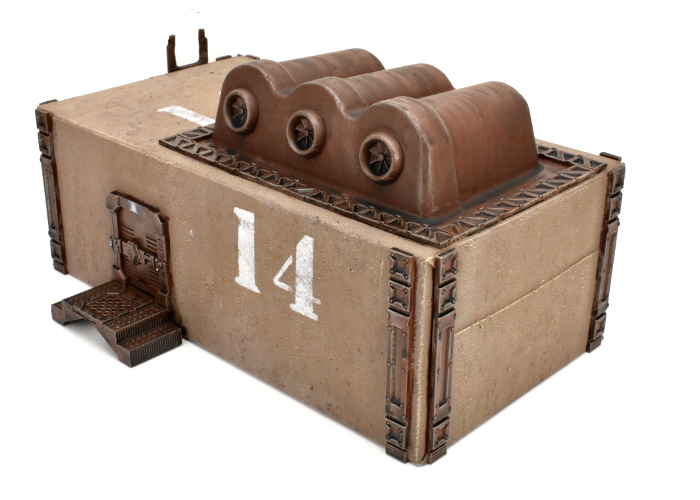
The big joy of the Maelstrom's Edge terrain sprue, for me, is that wandering around the house turns up an endless wealth of items just waiting to be turned into wargaming scenery by slapping some bits on it and painting it up. This week, I turned my attention to the recycling bin, where a humble tissue box was just calling out to be saved from the weekly rubbish collection. With a little cutting and gluing, and a lick of paint, I had Atmospheric Modification Plant #14 ready for the table!
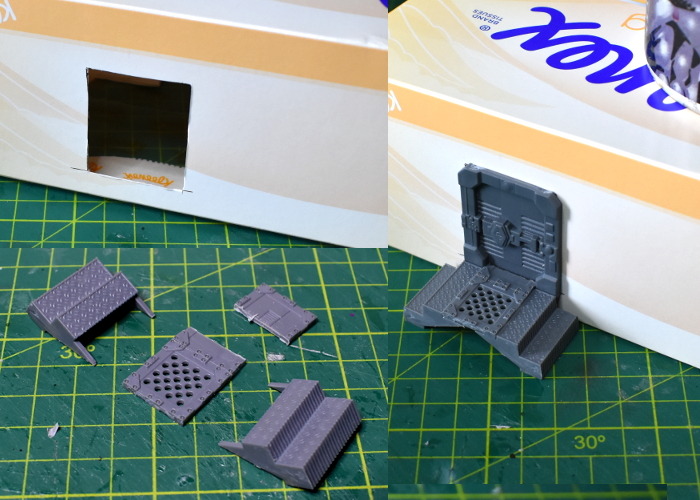
The base for this building, as mentioned above, was an empty tissue box. This isn't as robust a structure as some of my builds, but it does have the benefit of being inexpensive and with two small children in the house we have an endless supply of these to hand!
As I just intended this to be a quick and easy build, I didn't get too carried away with detailing. To be a functional building, however, it obviously needed a door. I used a door from Terrain Sprue #1 for this one, as the height of the doors on that sprue fit the box sides better than those on the newer sprue. I cut a hole for the door frame using an exacto knife, and also built a small landing using a couple of stair pieces and floor grates from Terrain Sprue #2, with a little trimming to make the solid floor piece fit neatly into the bottom of the doorway.
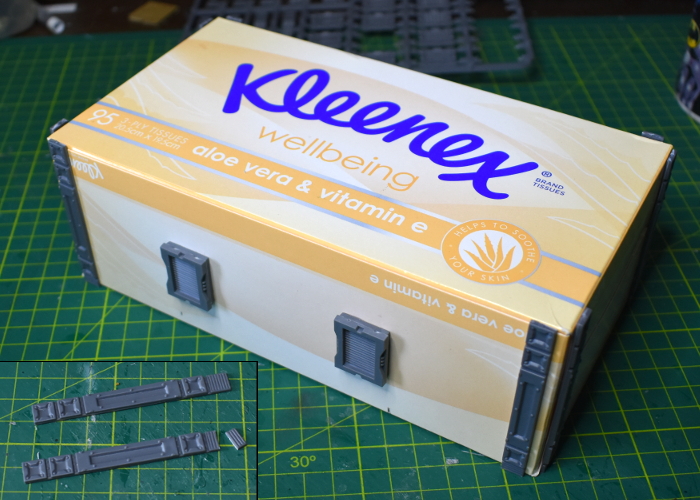
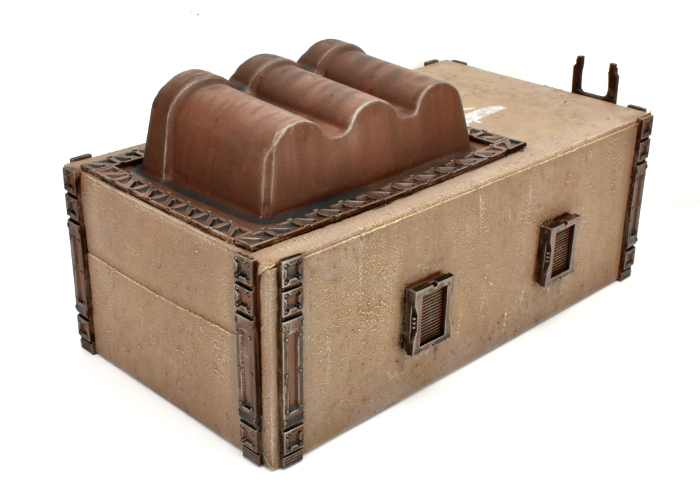
I added some reinforcing struts from Terrain Sprue #1 on the walls of the building, setting them in slightly from the corners. As well as adding some visual detail, this served to conceal the sides of the box flaps on the ends. The original sprue's struts were perfect for this as the vent pieces on the end could be easily trimmed down to make the strut the right height.
Spaced along the rear wall, I also added a pair of vent windows from Terrain Sprue #2. To avoid weakening the box structure any more than absolutely necessary, I just glued the windows directly onto the wall, rather than cutting holes and insetting the frames.
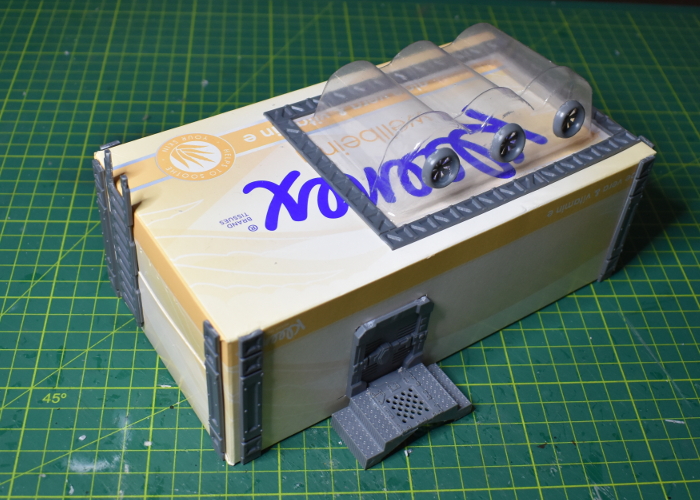
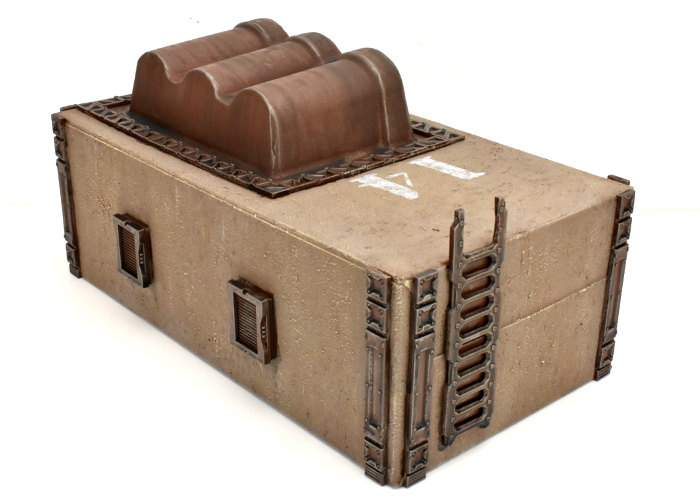
Plain box-shaped buildings are easy to build, but can be a little boring on the table, so I decided to add some raised detail on the roof to break it up a bit. Rummaging on my desk, I found a blister packet from some tubs of glitter that I picked up for a different project, that seemed like it would be an interesing shape with some paint on. So I glued it to the roof, added some industrial reinforcing struts from Terrain Sprue #1 around it to conceal the edges of the plastic, and also glued on some exhaust fans from Terrain Sprue #2.
Having cover on the roof is obviously not much use if models can't get up there, so I also added a ladder from sprue #1 on the end wall. I trimmed top couple of rungs off to make an extended handrail above the roof surface, to make that clamber onto the roof a little easier.
I could have also added some corrugated cardboard or textured plasticard to the remaining roof surface, but chose not to for this build. Instead, I painted the cardboard parts with some textured brown paint, drybrushing with a little bone. The metal parts were painted dark brown, drybrushed with Citadel Boltgun metal and then washed with Army Painter Strong Tone. With a little final detail work, the building looked like this:
To build your own tissuebox building, you can pick up the terrain sprues along with the rest of the Maelstrom's Edge model range from the webstore here.
For other building ideas, modeling tutorials, army spotlights and conversion walkthroughs, check out the Hobby section of the Maelstrom's Edge website here.
What are you working on? We would love to see what your models and terrain in the Comm Guild Facebook group!
Tags: buildings modeling spotlight terrain terrainsprue walkthrough
Terrain Spotlight: Painting the Underhive, part 5
Posted on Thursday Feb 27, 2020 at 05:00pm in Tutorials
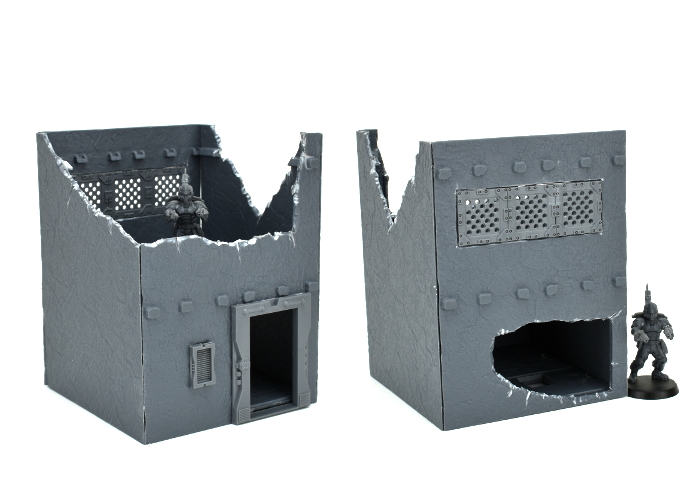
This week sees the conclusion (for now!) of my ongoing Underhive terrain project! Previously, I have painted up the watch tower, generator tower, junction tower and the all-important lift tower. That just left the trash processing unit sitting follornly on the desk in nothing but its undercoat - a situation that set out to remedy, with the below results!
This one was slightly more complicated with the base coat layer than the other buildings, as I wanted the wall panels to be green, but everything else to be grey or rusted metal. I sprayed the tower with Army Painter Army Green, and the first level platform and base with Wolf Grey, and then went back over the metal parts brown rust base, a brushed-on mix of Vallejo Charred Brown and AK Red Brown Leather.
I won't go through the whole process here, because aside from being green it's identical to how the previous structures were painted. The one difference, though, was the graffiti for the lower level. I wanted it to be fairly extensive, but realised that painting it in there by hand was going to be awfully tricky. Instead, I pulled up a couple of handy, online graffiti generators and used them to create some overlay pieces that could be printed out on paper, weathered with grey, cut out, and then glued in place over the lower walls.
Other than that, everything went together the same as for the previous structures. Once I had everything but the final weathering and detailing done, I glued it all together and applied those final touches.
The one thing left to do at this point was to assemble a table and see how it all looked together! With the addition of a couple of other appropriate buildings to fill in the excess space, and some catwalks and barricades put together for different articles some time back, it all wound up looking like this:
The only thing missing now is a couple of blood-crazed gangs running riot over it. Time for some gaming!
To build your own underhive metropolis, you can pick up the Maelstrom's Edge terrain sprues along with the rest of the Maelstrom's Edge range, from the webstore here.
As always, feel free to share your models and terrain, or ask any Maelstrom's Edge- or hobby-related questions on the Comm Guild Facebook page!
For other Maelstrom's Edge modeling articles, including tutorials and walkthroughs of a wide range of different building and miniature projects, check out the Hobby section of the Maelstrom's Edge website here.
Tags: buildings painting scratchbuild spotlight terrain terrainsprue walkthrough
Terrain Spotlight: Painting the Underhive, part 4
Posted on Thursday Feb 13, 2020 at 05:00pm in Tutorials
The underhive continues to come to life! Previously, I have painted up the watch tower, generator tower, and junction tower. That left me with the trash processing unit and the lift tower to do, and while I'm excited to get some paint on both of these, the lift tower won out this week!
This structure was initially base coated with Army Painter Ultramarine Bluw spray. From there, the process is more or less the same as on the previous structures, and so I started by going back over the exposed metal areas with my brown rust base (a mix of Vallejo Charred Brown and AK Red Brown Leather).
Over the blue, vertical surfaces, I applied light streaking using very watered down light grey. There's a little bit of a trick to getting this the perfect consistency, as if it's not watered down quite enough it can either go on too heavy or bead up on the base layer.
I'm carrying my heavy graffiti theme across to all of the structures wherever possible, and this building was no exception. As before, I sketched in the designs with a fineliner pen, and then coloured them in with assorted paints and inks.
I haven't been getting too carried away with hazard striping so far, but thought this building warranted some on the lift doors. I printed out some appropriately sized strips and glued them into place on the bottoms of the door frames.
Time for weathering! I sponged Vallejo Basalt Grey over the wall panels, and dark brown over the blue-painted metal sections. The grey is much more subtle against the blue than on the previous structure, but it still does the job - if nothing else, it helps to fade the blue down a bit so it's not so eye-catchingly bright. I also drybrushed light grey over the floor sections, and light orange over the rusted metal parts.
From there, I pulled out the Beasty Brown to drybrush some dirt into the nooks and crannies and raised sections.
I stopped at this point to grab some pics of the graffiti, with weathering in place.
Then it was on to the final rust layer. I applied a generous layer of Army Painter Dry Rust to the rusted metal areas by dabbing it on roughly with an old brush.
From there, I just had to glue the floors in place and apply a few final details like the generator coils and the lift control panels, and the job was done.
Next week: The Trash Processing Unit!
To build your own underhive metropolis, you can pick up the Maelstrom's Edge terrain sprues along with the rest of the Maelstrom's Edge range, from the webstore here.
As always, feel free to share your models and terrain, or ask any Maelstrom's Edge- or hobby-related questions on the Comm Guild Facebook page!
For other Maelstrom's Edge modeling articles, including tutorials and walkthroughs of a wide range of different building and miniature projects, check out the Hobby section of the Maelstrom's Edge website here.
Tags: buildings painting scratchbuild spotlight terrain terrainsprue walkthrough
Terrain Spotlight: Painting the Underhive, part 3
Posted on Thursday Feb 06, 2020 at 05:00pm in Tutorials
This week, I'm continuing right on with my underhive project. So far, I have painted up the watch tower and generator tower, and so I needed to paint something with a little more colour to it. So I decided to have a crack at my twin level junction tower.
When I base sprayed all of the structures, I hit this one with a coat of Army Painter Necrotic Flesh on the walls, and some medium grey on the floor/roof areas. I then went over with a brush and picked out all of the exposed metal areas with dark brown.
Most of the painting process here will be looking fairly familiar by now to anyone who has been following these articles. As with the sides of the watch tower, I added some streaking to the walls using very watered down pale grey with a flat brush.
I wanted this building to have some more extensive graffiti coverage, but as with the others I wanted it to be weathered and old, so this needed to go on before the weathering layer. I sketched out the designs with a fineliner pen and some pale grey paint, and then filled in the colour using Army Painter inks and Citadel Contrast in various colours.
To apply the weathering, I used a sponge to apply grey over the wall panels, and dark brown over the doors and doorframes. I also drybrushed the floors with pale grey, and the brown metal areas with pale orange.
I glued the ladders on at this point, and then went over the whole structure adding some dirt into creases and wherever else seemed appropriate with a drybrush of brown. I also glued the bottom layer down to the base board, although I left the top layer unglued so that they can be split and used as two single-level structures.
For the final touch, I dabbed Army Painter Dry Rust over the metal sections, working downwards onto the raised surfaces and stippling lightly all over to avoid hard edges on the rust sections. This gave a much smoother finish than on the previous structure, where the rust had wound up a bit stark in places.
So that's one more done. Stay tuned for part 4 - although I'm undecided as to whether to do the trash unit or the lift building first. I'm a bit excited about getting either of them done!
To build your own underhive metropolis, you can pick up the Maelstrom's Edge terrain sprues along with the rest of the Maelstrom's Edge range, from the webstore here.
As always, feel free to share your models and terrain, or ask any Maelstrom's Edge- or hobby-related questions on the Comm Guild Facebook page!
For other Maelstrom's Edge modeling articles, including tutorials and walkthroughs of a wide range of different building and miniature projects, check out the Hobby section of the Maelstrom's Edge website here.
Tags: buildings painting scratchbuild spotlight terrain terrainsprue walkthrough
Terrain Spotlight: Painting the Underhive, part 2
Posted on Thursday Jan 30, 2020 at 05:00pm in Tutorials
Last week, I started painting the underhive terrain that I've been building over the last few months, based very loosely on the designs of the terrain from the original Necromunda starter set. For anyone who missed the previous article, I started out by basecoating everything, and then finishing off the watch tower. This week, I'm carrying right along with the painting, on the generator tower!
For the basecoat on this one, I had sprayed the base with grey, and the upright sections of the building with a brown rust base colour. So before going any further, I needed to base the floors with grey, and just touch up with brown anywhere the spray had missed.
As another bare cement and rusty metal structure, painting from here was fairly similar to the tower. I gave the metal sections a drybrush with a light orange, and the cement a heavy drybrush with light grey.
I wanted to include some hazard stripes on this one to give it a bit more colour. To save time, instead of painting them by hand I worked up some circles in Gimp, printed them out, and then hit them with some sponge weathering with grey paint. Then it was simply a matter of cutting them out, painting the backs with a coat of PVA glue and sitting them in place.
I made up some larger circles to go around the central pit, and some smaller semicircles for the ladder access holes. I also whipped up a couple of quick signs to go on the upright pillars. While putting these all in place, I also went over the panel lines in the floors with a black fine point pen,and added some graffit around the upright pillars, just for colour.
Once the glue had set, I went over the cement areas with a patchy drybrush of brown to dirty things up, and then added some dry rust effect paint to the metal sections. The rust just gets blobbed on wherever seems appropriate, and it can be tricky to tell if you have got it right until it dries. It's come out a little too heavy and patchy in places here, so I'll probably go back and touch it up later.
That just left some final details - painting the keyboard and screen on the computer panel on the roof, painting the pipes in the core with an aged copper finish (you can find the tutorial for that here!), and adding some drops of black and brown ink around the place for assorted liquid stains.
Stay tuned for part 3, which promises to be a little more colourful!
To build your own underhive metropolis, you can pick up the Maelstrom's Edge terrain sprues along with the rest of the Maelstrom's Edge range, from the webstore here.
As always, feel free to share your models and terrain, or ask any Maelstrom's Edge- or hobby-related questions on the Comm Guild Facebook page!
For other Maelstrom's Edge modeling articles, including tutorials and walkthroughs of a wide range of different building and miniature projects, check out the Hobby section of the Maelstrom's Edge website here.
Tags: buildings painting scratchbuild spotlight terrain terrainsprue walkthrough
Terrain Spotlight: Painting the Underhive, part 1
Posted on Thursday Jan 23, 2020 at 05:00pm in Tutorials
Over the past couple of months, I've been slowly putting together an underhive table, based very loosely on the designs of the terrain from the original Necromunda starter set. With the first half a dozen buildings assembled, the time has finally come to get some paint on them!
To get things started, I pulled a bunch of spray paints out from the store room, and sprayed on the bulk undercoats, for the most part just going with whatever colour was going to make up the majority of the structure.
On most of the buildings, during construction I tried to leave parts unglued where painting with them assembled would be problematic, although they still promised to have some tricky parts left over here and there.
Once the sprays had time to dry properly, I took everything upstairs and set to work blocking in the rest of the base colours. Walls were all either coloured or grey for bare cement, floors were likewise filled in with grey, and bare metal sections were undercoated with a dark brown to form a rust base layer.
Painting structures of this size, production-lining it only really gets you so far before it starts feeling counter-productive. I also wanted to try out a couple of new ideas before hitting the whole collection with them, so at this point pushed the other buildings aside and focused in on the watch tower. I wanted a streaky, weathered look to the walls, which on this tower were going to be bare cement. So I took a wide, flat and wet brush and some very watered down pale grey paint, and applied light streaks by just passing the brush gently down the wall, dipping the brush in some water and going back over it if the grey lines came out too intense.
I wanted these buildings to look nicely 'lived in', with wear and tear and graffiti all over the place to add colour. To give the grafitti more of an aged appearance, I decided to paint it on before doing the rest of the weathering. I also added a large building number (or possibly a sector number... haven't decided yet!) to either side of the tower with a stencil whipped up on the PC. The graffit was all painted in freehand - I drew in an outline with a fineliner pen, and then painted in the colours using inks. Any messy bits or errors would be covered up (more or less) by the weathering!
I then sponged some darker grey liberally all over the walls.
Carrying right on with the weathering, I sponged dark brown over the support struts running up the edges of the walls, and then drybrushed over all of the metal parts with a light orange. I also glued the base on, and blacklined in the panel lines on the walls with a fineliner.
To finish up, I applied some Dry Rust effects paint liberally over the metal sections, and added some dirt and dust into the creases with a drybrush of brown. With a few extra nicks and scratches and some stains on the base using drops of ink, the tower was complete!
Stay tuned for part 2!
To build your own underhive metropolis, you can pick up the Maelstrom's Edge terrain sprues along with the rest of the Maelstrom's Edge range, from the webstore here.
As always, feel free to share your models and terrain, or ask any Maelstrom's Edge- or hobby-related questions on the Comm Guild Facebook page!
For other Maelstrom's Edge modeling articles, including tutorials and walkthroughs of a wide range of different building and miniature projects, check out the Hobby section of the Maelstrom's Edge website here.
Tags: buildings painting scratchbuild spotlight terrain terrainsprue walkthrough
Terrain Spotlight: Adjustable Angled Catwalk
Posted on Thursday Jan 16, 2020 at 05:00pm in Tutorials
The various buildings that I've been putting together for my underhive rebuild have been deliberately inconsistent in their heights. I didn't want a table full of terrain that had every structure with floors exactly 3" apart. This does, however, cause some potential problems with laying catwalks between the structures. Where the height difference is only minimal, the catwalks sit fine, but where there is a larger mis-match things can get a little precarious. In the middle of painting my first batch of buildings, though, I had an idea for a catwalk setup that could be adjusted to fit between floors at a range of different heights - and this is the end result!
The majority of this catwalk is built from parts taken from Maelstrom's Edge terrain sprue #2. For the top surface, I used the grid-shaped floor grates from two sprues, glued into a strip two grates wide.
Underneath the grates, I added some support structure cut from foamed PVC sheet. To get the depth I wanted, I used a piece of 3mm and a piece of 1mm thick sheet, as that's what I had to hand.
For the ends of the catwalk, I took a pair of stair pieces, two sets of uprights from the weapon tripod and a couple of pieces of 1.5mm aluminium rod. I trimmed the back end of the stair pieces off and drilled a 1.5mm hole through each side, just underneath the top stair. Then I drilled matching holes through the centre of the circular parts on the tripod uprights, and trimmed off their locator tabs.
The aluminium rod then slotted in through the holes in the stair sides, with the tripod uprights on either side. I then glued this assembly onto underside ends of the catwalk by gluing the bottoms of the tripod uprights to the grates, leaving the stair piece free to swivel on the rod. I also added a bracket made from a cut up solid grate piece, to act as a brace to hold the catwalk in place, and glued support struts around the outside of the catwalk to pretty up the edges.
With everything glued in place, the stair pieces on each end can sit flat on floors on different levels with the catwalk at an angle, and with the bracing pieces stopping it from sliding off.
With some paint on, it winds up looking something like this:
To build your own catwalks (or anything else you can think of!), you can pick up the Maelstrom's Edge terrain sprues along with the rest of the Maelstrom's Edge range, from the webstore here.
As always, feel free to share your models and terrain, or ask any Maelstrom's Edge- or hobby-related questions on the Comm Guild Facebook page!
For other Maelstrom's Edge modeling articles, including tutorials and walkthroughs of a wide range of different building and miniature projects, check out the Hobby section of the Maelstrom's Edge website here.
Tags: buildings scratchbuild spotlight terrain terrainsprue walkthrough
Terrain Spotlight: Lift Building
Posted on Thursday Jan 09, 2020 at 05:00pm in Tutorials
I'm rolling into the new year with another building for my ongoing underhive table project. The Necromunda Outlanders supplement came with a nifty tower that had a (more or less) functional lift on it, for speedy access between floors. The original cardboard lift piece clipped into the side of the bulkheads that made up the side of the building. For this build, I decided to make use of the magic of magnets instead!
As I've done for most of these buildings, I started with a rough sketch, to get an idea of what I was aiming for. The final structure actually wound up a mirror-image of the sketch, but the basic idea was there.
The lift tower would be three levels, with doorways onto each level. I wanted to use a doorframe on both sides of the wall to keep things looking pretty, so used a strip of 3mm foamed PVC sheet for the main bulk of the wall, and padded it slightly with some 1mm sheet to make the doorframe holes deep enough to accomodate the inset flanges from both door pieces. The doorway pieces were taken from Maelstrom's Edge terrain sprue #2.
I cut the other walls of the tower from some more 3mm foamed PVC, and added some detailing to the back wall using some more of the 1mm sheet and some plastic offcuts from previous projects.
Under each doorframe, on the outer facing of the wall, I cut recess for the magnetic lift attachment. Into these recesses, I glued a piece cut from the terrain sprue #2 support struts, with two neodymium magnets superglued to the back. The magnets are facing opposite ways so the poles don't interfere with each other while sitting side by side.
The lift was made from grating pieces from the terrain sprue, with a PVC support beam on the bottom. Into the end of the support beam, I drilled two 6mm holes and glued in another pair of magnets, making sure to get them the right way around to match the wall magnets!
With the tower walls all glued together, I added some strips up the front edges of the lift wall using support struts and lintels taken from Maelstrom's Edge terrain sprue #1. These had been carefully factored into the wall dimensions so that the lift fit snugly in between them.
For the floors, as with most of the previous structures, I used double thicknesses of 3mm foamed PVC for rigidity, adding some strips of floor grates from terrain sprue #2 down the middle to break up the flat expanses.
To support the outer corners of the floors, I cut some 30mm strips of PVC and added support struts from terrain sprue #1 up the edges of each facing.
A couple of windows from terrain sprue #2 added to a square of PVC made for a nice cover-generating wall on the other side of the building, to support the small 1st floor platform.
The lift doors wound up slightly above the floor on each level, in order to avoid having to lift the bottom floor up far enough to accomodate the magnetic strut on the underside of the lift. A set of stairs from terrain sprue #2 glued in under the interior doorframe on each level sorted out the step.
The roof was looking a little sparse, so I took a generator from terrain sprue #2, glued it to a rectangle of PVC for just a touch of extra height, and stuck that along the lift side of the roof to provide some low cover.
There's obviously not much point having cover on the roof if there is no way up there, so I took a ladder from terrain sprue #1, some posts from terrain sprue #2, and some offcut support strut pieces and added a ladder access from the top lift floor.
Finally, I cut a square of hardboard to sit under the whole thing for strength. At this stage, the floors are still unglued, for ease of painting.
The whole collection so far, with some catwalks made for a previous article a while back:
Looking at it all together, I think it might be time to get some paint on this lot, and then work on expanding out to a full table from there. Stay tuned!
To build your own hive structures, you can pick up the Maelstrom's Edge terrain sprues, along with the rest of the Maelstrom's Edge range, from the webstore here.
As always, feel free to share your models and terrain, or ask any Maelstrom's Edge- or hobby-related questions on the Comm Guild Facebook page!
For other Maelstrom's Edge modeling articles, including tutorials and walkthroughs of a wide range of different building and miniature projects, check out the Hobby section of the Maelstrom's Edge website here.
Tags: buildings scratchbuild spotlight terrain terrainsprue walkthrough