Entries tagged [buildings]
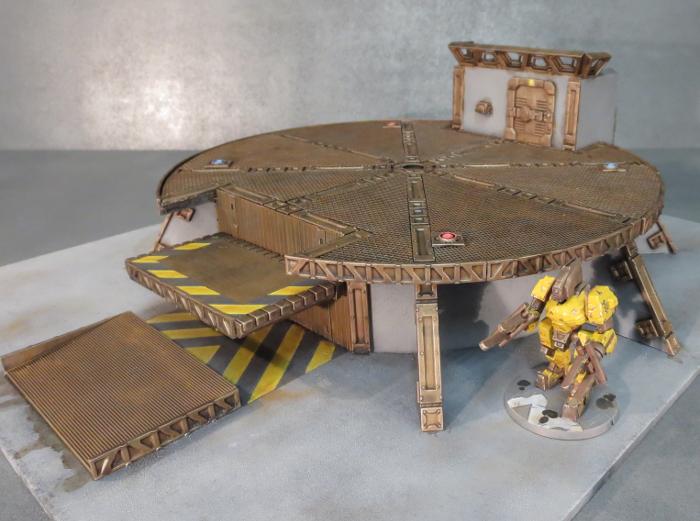
Terrain Spotlight: Junction Platform
Posted on Friday Dec 13, 2019 at 05:00pm in Tutorials
The underhive construction drive continues! So far, I've put together a watch tower, a trash processing unit and a generator tower, and this week I'm adding a junction platform to the collection.
This construction is based (very) loosely on the bare, square platform from the old Necromunda terrain collection, with scatter terrain can be placed on top, or it can be used as a junction point for multiple walkways. I decided to build two of them in the end, so that I can use them individually, or stack them up for multi-level shenanigans.
The bulk of the wall structure is taken care of using the wide doors from the Maelstrom's Edge terrain sprue #1. I used four of them, taking to them with a sharp exacto knife to remove the doors from the frames.
I joined the four resultant archways together using pieces of 3mm foamed PVC with 45 degree bevels on the vertical edges.
Some more strips of PVC filled in the gaps above the door frames, bringing the walls all up to the same height (2.75", which with the roof will come up to around 3". All of the buildings so far have been working around 3" to a level, although I'm not keeping it exactly the same from building to building, in order to accentuate the hodge-podge nature of the terrain once it's all on the table together with catwalks added!)
For the roof/platform piece, I cut two octagons of foamed PVC, leaving a space in the middle for some floor gratings. I also cut a ladder hatchway to match up to one of the lower angled walls.
For the middle detail on the platform, I took a bunch of floor grating pieces from the Maelstrom's Edge terrain sprue #2 and glued them into a square shape.
With the two platform layers glued together, I then inserted the gratings, and filled in the central square with another piece of PVC. I also lined the edges of the platform with reinforcing struts from both terrain sprues, trimmed as necessary to fit neatly around the perimeter.
With the platform glued in place on top of the walls, the last things to do were to cut a base from hardboard, and add a ladder from terrain sprue #1, using a piece trimmed from the lintel piece from that same sprue as a spacer.
For the second platform, I followed the exact same process, but left the doors intact on this one for some solid line of sight blocking.
One or two more structures to go, I think, and then it will be time to get some paint on - Stay tuned!
To give it a go yourself, you can pick up the Maelstrom's Edge terrain sprues, along with the rest of the Maelstrom's Edge range, from the webstore here.
As always, feel free to share your models and terrain, or ask any Maelstrom's Edge- or hobby-related questions on the Comm Guild Facebook page!
For other Maelstrom's Edge modeling articles, including tutorials and walkthroughs of a wide range of different building and miniature projects, check out the Hobby section of the Maelstrom's Edge website here.
Tags: buildings scratchbuild spotlight terrain terrainsprue walkthrough
Terrain Spotlight: Generator Tower
Posted on Thursday Dec 05, 2019 at 05:00pm in Tutorials
My ongoing project to create updated versions of the classic Necromunda terrain continued this week, with a third structure - a generator tower, based on the hexagonal(ish) multi-level platform.
I started out once again with a rough sketch, to get a feel for what I was building. I wanted something similar to the original shape, but with the bulkhead on the narrow end rotated 90 degrees, and with something in the central hole rather than just having a big empty space.
Instead of building individual bulkheads, like the original Necromunda plastics, I built each support pillar as a single piece. I'm not intending these buildings to be reconfigurable, and doing it this way gives the structure some extra strength. I used foamed PVC for the core of the pillar, cutting out the basic shape of the bulkheads, and then added support struts from the Maelstrom's Edge terrain sprues up each edge on both sides. I also added some buttresses from off-cuts of foamed PVC to provide some cover zones for gangers to hide in.
Access between levels is via a ladder running up the short end of the platform, rather than building a ladder into each pillar. This makes the structure a little harder to get up and down on than the original, but can be made up for with catwalk placement when the table is set up in full.
For the floors, I used double sheets of 3mm foamed PVC. One layer probably would have been enough, but I went for the extra strength and visual bulk from the thicker platforms.
I took two generator coils from terrain sprue #2 and glued them together. The ends have a slight angle to them, so I sanded them down flat, and also sanded down an iris portal to fit over one end of the generator. The other iris portal fits back to back with the first.
To give the generator something to sit on, I took a couple of trapezoid windows from terrain sprue #1 and trimmed their long edges to fit inside the central hole in the middle platform. In between these, I glued an octagon of PVC, with a large pipe fitting glued to the underside.
Time to fit everything together! I took some offcut pieces from the support struts and glued them to the bulkheads to create supports for the floors.
With the floors glued in place on their supports, the last things to do were to add some pipes running up from another large pipe fitting to the underside of the generator, and a control panel on the top level made from another trapezoid window, a computer from terrain sprue #2, and some cutoff support strut pieces.
As with the previous builds, I'll hold off on painting this one until I have a few more ready to go and do them all at once.
Stay tuned for more!
To build your own hive structures, you can pick up the Maelstrom's Edge terrain sprues along with the rest of the Maelstrom's Edge range, from the webstore here.
As always, feel free to share your models and terrain, or ask any Maelstrom's Edge- or hobby-related questions on the Comm Guild Facebook page!
For other Maelstrom's Edge modeling articles, including tutorials and walkthroughs of a wide range of different building and miniature projects, check out the Hobby section of the Maelstrom's Edge website here.
Tags: buildings scratchbuild spotlight terrain terrainsprue walkthrough
Terrain Spotlight: Watch Tower
Posted on Thursday Nov 28, 2019 at 05:00pm in General
Last week, I shared a trash processing unit, the first of a series of terrain structures inspired by the classic Necromunda plastic/cardboard hybrid terrain. (If you missed it, you can find it here)
This week, I'm adding a watch tower to the set!
As with the previous building, I started out with a quick sketch. I don't always use a sketch, and when I do I don't always follow it precisely, but it can be a handy tool for visualising the process.
For this construction, I once again pulled out the 3mm foamed PVC, and a bunch of both of the Maelstrom's Edge terrain sprues. I started out by building the central pillar, which needed a ladder running up the center to the twin hatches on the platform up top. To give the pillar some depth, I decided to use two layers of PVC, with a ladder running up the outside of each face rather than just using one going up the middle. I wanted to be able to see through the ladder section, though, so cut out a strip up the middle of each pillar side just wider than the ladder rungs. The ladders themselves were taken from terrain sprue #1. I also engraved some panel lines into the PVC with a scriber.
I glued the ladders onto the PVC with superglue, two to a side, leaving just a small part of the ladder projecting above the top so it would reach to the top of the platform. I then ran a strip of support struts from terrain sprue #1 up each side of the ladders for some extra detail.
Because the gap between the ladders would be practically inaccessible once assembled, I sprayed the inside with some rust brown base before gluing the two halves of the pillar together.
For the platform, I made up the main part of the floor using grating pieces from terrain sprue #2, glued edge to edge and leaving two pieces out in the middle for the ladder access.
I then cut a surround from foamed PVC, with a second layer to give it some thickness, and to provide a support structure for the grating.
I designed the side pillars to give the structure some bulk while also providing some nice cover at ground level. As with the central pillar, these were made from two layers of PVC, cut to shape and with some panel lines scribed in on the outside pieces.
To give the side pillars some detail, I trimmed up some more support struts from terrain sprue one and glued them running up the edges of the pillars on both sides.
To finish up, I cut some waist-height (to scale, obviously!) walls for the platform, using some off-cuts of foamed PVC and some trimmed down corner brackets from terrain sprue #1. I then glued the structure together, and cut a base of hardboard for it to sit on.
And that's two structures completed! As with the previous one, painting will come later, once I have a few of these all ready to go.
Stay tuned!
To give it a go yourself, you can pick up the Maelstrom's Edge terrain sprues, along with the rest of the Maelstrom's Edge range, from the webstore here.
As always, feel free to share your models and terrain, or ask any Maelstrom's Edge- or hobby-related questions on the Comm Guild Facebook page!
For other Maelstrom's Edge modeling articles, including tutorials and walkthroughs of a wide range of different building and miniature projects, check out the Hobby section of the Maelstrom's Edge website here.
Tags: buildings scratchbuild spotlight terrain terrainsprue walkthrough
Terrain Spotlight: Trash Processing Unit
Posted on Thursday Nov 21, 2019 at 05:00pm in Tutorials
Way back in the day, the original version of Games Workshop's Necromunda game came with a small table's worth of industrial-styled terrain that was constructed from printed cardboard and held together with plastic bulkheads. Many battles were fought over my set of this terrain, and so when a friend and I started talking about revisiting the original Necromunda rules, I thought it would be fun to put together an updated set of terrain inspired by that original battlefield. This week I put together the first of the large platform structures.
I started this build by sketching up a rough design for the structure. The aim wasn't to duplicate the original version, but to create something similar to it, with an eye towards making the structures look a little more like actual structures with some sort of purpose rather than just random platforms.
3mm foamed PVC has become my go-to for buildings, as it's easy to work with and lightweight, but quite durable. So to kick things off, I grabbed out the PVC and some support struts from the first Maelstrom's Edge terrain sprue, and put together eight bulkheads. These were made from a single piece of PVC cut to shape, with two support struts running vertically up the sides of each face.
Four of the bulkheads were left as standalone pieces, while the other four were joined into corner pieces for the front of the structure.
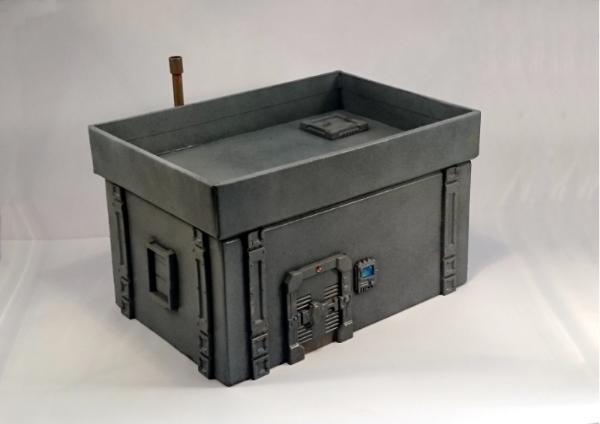
I used some more PVC to put together a box shape for the tower. The cutaway at the bottom of the front wall would be used to add a trash receptacle - my thought was for the tower to be some sort of trash processing unit.
The roof of the tower has four exhaust fans, taken from the second terrain sprue. I mounted these onto floor panel pieces, just shaving off a little around the bottom edge of the fan to make them fit neatly inside the bracing pieces on the panels.
The door for the trash unit was made from pieces of foamed PVC, cut to fit neatly into the opening to look like it's jammed open.
To conceal the joins on the tower walls, I ran a strip of support struts from terrain sprue #2 up each joint on the front and back, and then glued on the roof and a control panel for the trash unit.
For the floor of the first level, I used two layers of PVC, with some holes cut in to insert some floor mesh pieces from terrain sprue #2.
I glued the bulkheads onto the underside of the floor piece, and glued the plastic floor panel pieces into the holes. With a very minor bit of trimming, ladders from terrain sprue #1 fit neatly into the central hole in the grating sections, hanging down to about an inch above ground level - low enough for someone (or at least, someone with upper-body strength!) to grab the lower rungs and haul themselves up.
On the back of the tower, I added a generator piece from terrain sprue #2, bulked out with a little PVC to make it protrude enough to provide a neat little covered firing point.
For the upper level, I put together a catwalk using floor mesh pieces from terrain sprue #2.
The support braces for the catwalk were cut from the sides of a ladder. The ladder up to the catwalk has some of the rungs leftover from cutting the supports glued to the back, to space it out from the wall slightly.
High catwalks aren't very pleasant places to be in battle without some cover, so I added a balustrade using posts from terrain sprue #2 and some offcuts of PVC. A trimmed down ladder added some access to the roof level.
The other side wall needed some detail, so I grabbed the junction box from terrain sprue #2, and some aluminium rod and installed some exposed wiring. The clamp pieces were made from short sections of plastic rod and some sections cut from the support struts from terrain sprue #1. The lower end of the thinner cable will drape over the first level floor, having been severed from wherever it was originally attached to.
Finishing up by adding a light to the front wall and an access hatch to the bottom left wall of the tower, I also added a 10' square of PVC as a slab base for the structure. At the moment, the base, first level and tower are all separate pieces, and the ladders are all similarly unglued. I will glue the base onto the bottom of the bulkheads after painting the underside of the first level, and glue the tower and ladders in place once they are painted. I'll probably also add a larger piece of hardboard under the whole thing for some extra rigidity and also to give it some more weight on the table - better to prevent it sliding around.
Painting will come later - I'll get a few more structures made up over the coming weeks, and then go through painting everything together!
Stay tuned!
To give it a go yourself, you can pick up the Maelstrom's Edge terrain sprues, along with the rest of the Maelstrom's Edge range, from the webstore here.
As always, feel free to share your models and terrain, or ask any Maelstrom's Edge- or hobby-related questions on the Comm Guild Facebook page!
For other Maelstrom's Edge modeling articles, including tutorials and walkthroughs of a wide range of different building and miniature projects, check out the Hobby section of the Maelstrom's Edge website here.
Tags: buildings scratchbuild spotlight terrain terrainsprue walkthrough
Terrain Spotlight: Shipping Containers from Terrain Sprue 2
Posted on Thursday Oct 31, 2019 at 05:00pm in Tutorials
As one of my very first articles for Maelstrom's Edge, I put together some shipping containers/cages made from parts from the first terrain sprue and a little foamcore. With the recent release of the second terrain sprue, it seemed fitting to revisit the idea with the shiny, new parts available!
As with the original containers, I used doors to form the front and back of the container, with the rectangular doorframes from the new terrain sprue being perfect for the job. For the back of the container, I shaved off the control panelt and the gubbins up on top, as I planned to have the back as a wall. You could obviously just leave it alone and have a door at each end.
I linked the two doorframes together with the support struts from the terrain sprue, and glued in a floor cut from 3mm foamed PVC.
Inside the struts, I glued rectangles of 1mm foamed PVC, running up to about 1mm short of the top edge of the upper struts. This gives the container some strength, and provides something solid for the walls to glue onto and a ledge for the roof panel to sit on.
I glued another rectangle of PVC into the rear doorframe.
Onto the outer faces of the walls, I glued rectangles of corrugated cardboard, cut to fit flush against the edges of the doorframe and the struts with the corrugations running vertically. (There's no special significance to it being blue - it's just from a multicoloured pack of card I picked up a while back!)
Into the front doorframe, I added a piece of corrugated plasticard, cut with the corrugations running horizontally to simulate a roller door. Most modern-day shipping containers have hinged double doors, but since this doorframe is a little narrower I thought a roller seemed more appropriate. I used plasticard rather than more cardboard as the corrugations are slightly smaller, which helps to make it not look like just another wall.
With the door in place, I stuck another piece of corrugated cardboard into the top of the container for the roof.
The finished container, ready for paint:
And with some paint on:
To mix up the design, you could use plasticard with different textures in place of the corrugated cardboard.
You can also use other real-world container designs for inspiration, adding side doors, changing the length, or as below, using a trimmed down generator, a fan and a couple of other bits from the terrain sprue in place of the back wall to creat a refrigerated container.
And, of course, the discerning stellargee knows that nothing beats an old shipping container for knocking together your own little shanty cabin or business shack!
To give it a go yourself, you can grab the new terrain sprue, along with the rest of the Maelstrom's Edge range, from the Maelstrom's Edge webstore.
As always, feel free to share your models and terrain, or ask any Maelstrom's Edge- or hobby-related questions on the Comm Guild Facebook page!
For other Maelstrom's Edge modeling articles, including tutorials and walkthroughs of a wide range of different building and miniature projects, check out the Hobby section of the Maelstrom's Edge website here.
Tags: buildings conversion modeling spotlight terrain terrainsprue walkthrough
Terrain Spotlight: Basic Sci Fi Quonset Hut
Posted on Thursday Oct 17, 2019 at 05:00pm in Tutorials
Time for another building!
I don't know why, but I've always loved the shape of the humble Quonset hut. Some time back, I built some vaguely-Quonset styled buildings from plastic drainage channel, but the new terrain sprue gave me an excuse to revisit the idea and build something closer to the original design.
The bulk of the structure is 3mm foamed PVC. For the front and back walls, I grabbed a handy round thing and used it to trace out a pair of semi-circles, which I then cut out with a sharp hobby knife.
I also cut a rectangular piece for the floor, and a bracing strut to connect the tops of the walls.
I took a pair of curtain windows and a curtain doorway from the new terrain sprue and sat them in place on the walls before tracing around them with a sharp pencil and cutting out the resultant rectangles with a hobby knife. Then I used some superglue to stick them in place.
Using some more superglue, I fit the walls, floor and support strut together.
The roof was constructed from corrugated cardboard. I cut three pieces, one for each side, and a third to run over the top. Bending these short pieces over the curve was easier than it would have been to do it with one single, long piece, and the sections create a layered joint to give the roof a little bit of detail.
I started by gluing the side pieces in place along the bottom edges.
After giving the glue time to set properly, I added more glue up along the wall tops and carefully pressed the roof sections down onto the curve.
I used a similar process for the top section, initially gluing the centre line in place along the support strut, and then gluing the sides of the section down overlapping the side pieces.
A few final details from the terrain sprue, and the hut was ready for painting:
For a quick and easy paintjob, I gave the hut a basecoat of AK Interactive Rust Basecoat. Over this, I sprayed a light and rough coat of Army Painter Plate Armour, and then added rust by dabbing on Army Painter Dry Rust. Some quick details like lights and curtains, and then a drybrush in the creases with Vallejo Beasty Brown finished it off.
To give it a go yourself, you can pick up the new terrain sprue, along with the rest of the Maelstrom's Edge range, from the Maelstrom's Edge webstore.
As always, feel free to share your models and terrain, or ask any Maelstrom's Edge- or hobby-related questions on the Comm Guild Facebook page!
For other Maelstrom's Edge modeling articles, including tutorials and walkthroughs of a wide range of different building and miniature projects, check out the Hobby section of the Maelstrom's Edge website here.
Tags: buildings modelling spotlight terrain terrainsprue walkthrough
The new Maelstrom's Edge Terrain Sprue is available now!
Posted on Monday Oct 07, 2019 at 05:00pm in Models
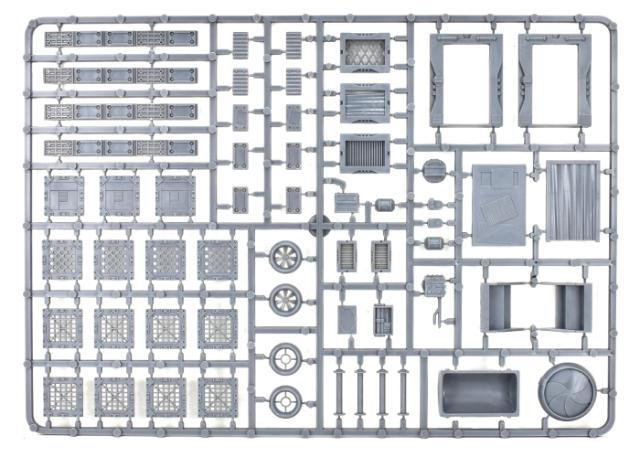
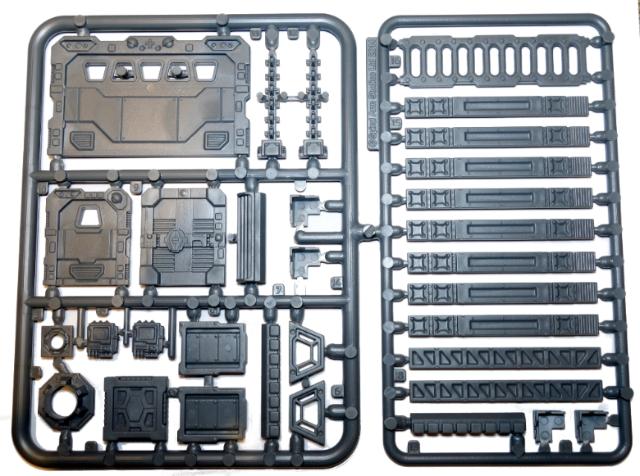
Sprue Front
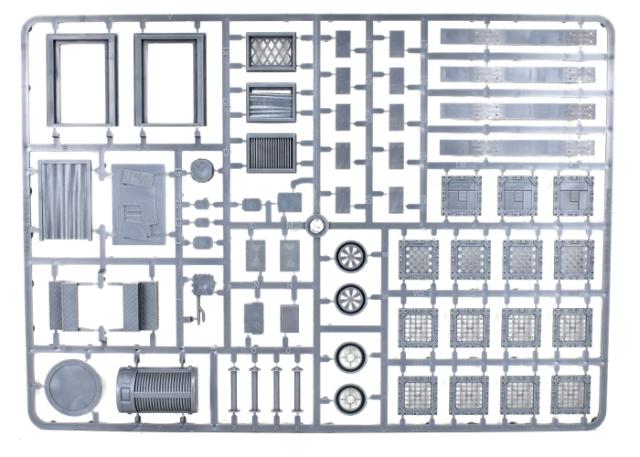
Sprue Back
Each sprue contains a range of terrain elements, including customisable doors, stairs, windows and parts for creating catwalks or low walls and barricades.
Round detail pieces for an exhaust fan or porthole can fit onto the end of the large pipe fitting from terrain sprue #1, or attach flush to walls or roofs.
The sprue also includes customisable struts for reinforcing walls, and a host of smaller details like a computer terminal, small vents, a generator coil, a junction/control box, lights, an antenna, and parts to combine with our plastic Broken Infantry weapons to build an automated sentry turret!
This pack includes two sprues - 118 components in total!
Get yours from the Maelstrom's Edge Webstore now!
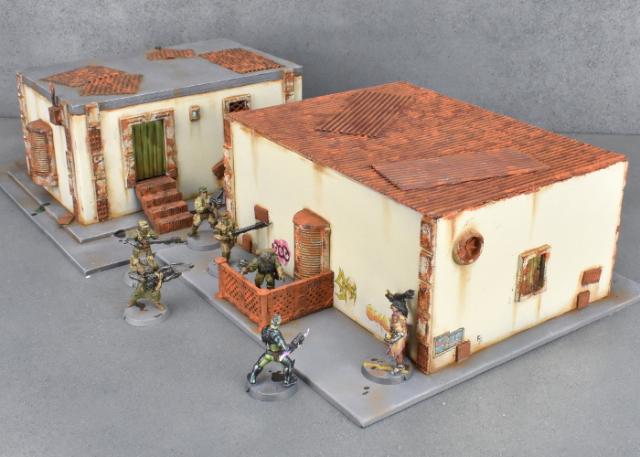
Terrain Spotlight: Raised Building using gift boxes and the new terrain sprue!
Posted on Thursday Oct 03, 2019 at 05:00pm in Tutorials
I've spent the last couple of weeks happily playing with the new Maelstrom's Edge terrain sprue and building up a nice collection of delapidated buildings for my Broken force to defend - or loot, as the mood may strike them! This week, however, I thought I might take a break from painting rust and see how something a little better maintained might look with the new components to hand.
I have turned to the ever-useful discount store cardboard gift box for this build. These boxes are perfect for creating buildings, as they come in a wide range of different sizes, are inexpensive, and are quite solid.
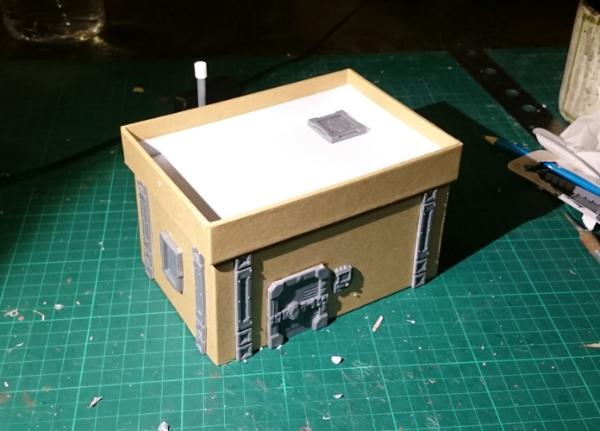
I started by flipping the box upside down, and cutting a hole in the side for the door frame from the terrain sprue by tracing around the back of the frame and then cutting with a sharp hobby knife. For the door itself, since I wanted something that wasn't all patched up, I went with a shutter-style door made from pieces cut from the support struts from the original terrain sprue.
My previous giftbox buildings have generally had flat roofs, so I decided to make this one angled, just for something different. I took the lid of the box and cut the sides away at a diagonal along the short edges.
I glued the lid upside down onto the bottom of the box (the top of the building, since the box is upside down!), glued the cut-off pieces of the short edges into the middle for reinforcing, and then stuck a piece of corrugated cardboard on top. I also added the vent windows on two walls, tracing and cutting as with the door frame.
To make this building stand out some more, I wanted to put it on a raised slab. For this, I used the lid of a larger giftbox.
On the so-far blank short wall, I gave the building some independent power using the generator from the new terrain sprue and linking it to the control box using some plastic tube and aluminium rod.
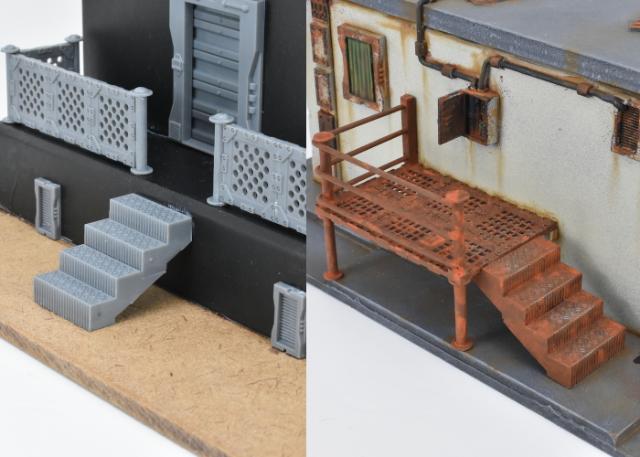
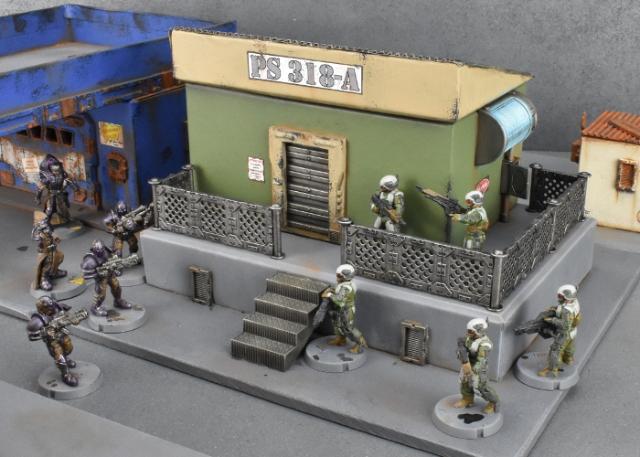
To finish up, I glued the base slab to a piece of hardboard, and added some stairs and small vents from the terrain sprue. I also fenced in the top of the slab using the upright posts and grating pieces, which fit nicely around the edge.
With some paint on, the finished building looks like this:
The new terrain sprue will be available from the Maelstrom's Edge webstore here from October 7th!
In the meantime, feel free to share your models and terrain, or ask any Maelstrom's Edge- or hobby-related questions on the Comm Guild Facebook page!
For other Maelstrom's Edge modeling articles, including tutorials and walkthroughs of a wide range of different building and miniature projects, check out the Hobby section of the Maelstrom's Edge website here.
Tags: buildings modeling spotlight terrain terrainsprue tutorial walkthrough
Painting Tutorial: Rusted Shanty Buildings
Posted on Thursday Sept 05, 2019 at 05:00pm in Tutorials
Our new, upcoming terrain sprue is themed around Broken terrain - delapidated, cobbled-together structures either repaired from abandoned ruins or cobbled together from salvage. I've been putting together a series of run-down shanty buildings and thought I would share my method for painting them up and making them all grubby and rusty!
The building I'm painting up here is the one shown in the walkthrough in the first preview article here.
The first step is a basecoat of dark brown. The exact colour doesn't matter too much, but here, I'm using an AK Interactive Rust Basecoat.
Over the brown goes a spray of cream, sprayed downwards at an angle to let the brown form some natural shading. I'm using a Dulux Chalky Finish cream spray, as it gives a fantastic, non-glossy surface finish.
Over the areas of exposed metal, re-undercoat with a dark brown. For painted metal areas, like the reinforcing struts, apply the dark brown with a sponge. (You can find a tutorial on sponge weathering here). The exact shade of brown doesn't matter too much, as rust comes in a wide range of shades dependong on age and exposure, but I've used AK Interactive Shadow Rust here.
For areas of lighter rust, apply a sponge of dark gray over the brown. This will give the effect of old but unrusted metal showing through the rust in places. Where you want heavier rust, like on the roof, leave this off. For this building, I used Vallejo Heavy Charcoal for this step. I have also painted the base with Vallejo Neutral Grey at this stage.
On the larger rusted surfaces, like the roof and door, apply a rough drybrush of orange. This doesn't need to be particularly even - you're aiming to create a rough highlight to accentuate the patchiness of the rust.
Now the magic part! The final coat of rust is applies with Vallejo Dry Rust. This is a worryingly bright orange paint that goes on gloopy and dries down to a very flat finish. Applied over the brown, the orange is dulled down to a perfect rust finish. Use an old brush and just dab it on, working downwards so that the rust collects most strongly on upper surfaces. As with the drybrush layer, the aim isn't to evenly coat everything, but to create a blotchy effect with the rust heavier on raised, exposed areas and lighter on undersides.
Around this time, drybrush the base with Valljeo Light Grey or similar.
Once the rust has dried, it's time to add some dirt. But first, paint in any remaining details - lights, control panels, grafitti or other markings on the walls, are all best added in now, so that the weathering goes over the top and they don't look out of place with the rest of the structure.
Then, use a medium brown (Vallejo Beasty Brown here) and drybrush around the bottom edges of the walls, in any vertical raised recesses, along the edge of the roof under the corrugated card, and along the tops of doors and windows. This is also a good time to drybrush some dirty patches on the base.
Finally, use a small drybrush to add some more brown along any remaining upper surfaces, like the tops of each segment on the reinforcing struts, the rim of the light fitting and anywhere else that dirt and dust would collect. I also like to add some oil (or other fluid) stains around the base by applying small drops of Army Painter Quickshade wash and leaving them to dry.
The new terrain sprue will be available soon. In the meantime, you can still pick up the original terrain sprue along with the rest of the Maelstrom's Edge model range in the webstore here.
As always, feel free to pop along and share your creations, or ask any Maelstrom's Edge- or hobby-related questions on the Comm Guild Facebook page!
For other Maelstrom's Edge modeling articles, including tutorials and walkthroughs of a wide range of different building and miniature projects, check out the Hobby section of the Maelstrom's Edge website here.
Tags: buildings modeling painting terrain terrainsprue tutorial
Terrain Spotlight: Firepoint Emplacement
Posted on Thursday Aug 29, 2019 at 05:00pm in Tutorials
As I mentioned in last week's article, we have a new terrain sprue coming!
Because new terrain gets me as excited as a very excited thing on a special day to be excited, I'm currently locked in my office, figuring out the best ways to make use of the new bits and pieces on the sprue and putting together new buildings for the ever-expanding terrain collection. One of the new pieces I put together this week was a small firepoint, just perfect for holding the line against incursions of lawless rabble!
The bulk of this structure is made up of floor grates from the new terrain sprue, and a combination of 3mm foamed PVC and 6mm foamcore for the walls.
I started out by laying out a floorplan, and gluing the grates together edge to edge. Then I cut the PVC and foamcore into sections to fit neatly around the three straight edges of the floor.
The sprue includes some posts which can be used to make low walls. For this build, I'm using a couple of them as floor supports, so trimmed off the rounded top.
Some stairs were needed to get up to the floor level in the firepoint. The stairs on the new sprue are designed to stack up on top of each other, and two stair pieces stacked come to almost exactly the same height as the floor grates sitting on the posts.
With the wall pieces glued together, the lower PVC sections form a support rail, on which the floor grates will sit.
To cover over the exposed ends of the foamcore, I took some support struts from the original terrain sprue and cut them to the same height as the walls. Four of these attach to the corners, neatly sealing over the foam.
The short, leftover pieces of the support struts were a nice length to form some bracing for the walls. I cut some small triangles of PVC and foamcore, which when glued together are exactly the same width as the struts.
That just left the top edges of the wall exposed. To seal that over, I cut a piece of foamed PVC in a lopsided 'U' shape to match the path of the wall, making it wide enough to overlap slightly on both sides, just to look prettier.
With the structure complete, I glued the firepoint down to a piece of hardboard. I wanted the firepoint to have some dirt piled up against the front, so I cut some expanded polystyrene to form the bulk of the dirt pile, and glued that in place around the front and the sides.
Finally, I gave the expanded polystyrene and the remaining exposed hardboard a generous coat of PVA glue and sprinkled a sand/gravel mix over it.
Ready for paint!
With some paint on, the finished firepoint looks like this:
The exact release date for the new terrain sprue is still to be confirmed based on production scheduling, but should be in the next few months. I'll be showing off some more previews in coming weeks to reveal other components included on the sprue.
In the meantime, you can still pick up the original terrain sprue along with the rest of the Maelstrom's Edge model range in the webstore here.
As always, feel free to pop along and share your creations, or ask any Maelstrom's Edge- or hobby-related questions on the Comm Guild Facebook page!
For other Maelstrom's Edge modeling articles, including tutorials and walkthroughs of a wide range of different building and miniature projects, check out the Hobby section of the Maelstrom's Edge website here.
Tags: buildings modeling spotlight terrain terrainsprue walkthrough
Terrain Spotlight: New Terrain Sprue Sneak Peek!
Posted on Thursday Aug 22, 2019 at 05:00pm in Tutorials
In the time since the release of the Maelstrom's Edge terrain sprue a couple of years ago, this useful little frame of detail parts has consistently been one of our most popular plastic kits. As good as it is, though, it was always intended to be just the start of a range of different terrain component kits. So over the last 18 months or so, we've been hard at work designing and sculpting a new sprue to add a whole slew of new building options!
This new kit will be out very soon, but to whet everyone's appetites, I thought I would take the opportunity to throw together a quick building walkthrough to show off some of the great new details!
To keep things simple for this build, I turned once more to my humble favourite: the cardboard gift box!
As with the first terrain sprue, the doors and windows are designed to slot into holes cut into the walls of the structure - although this time around, the doorframes and doors are separate components, so that you can model them open or closed!
To fit them into place, I started by flipping the box upside down, and drawing a guide line 12mm up from the bottom of one of the long walls. Then I held a door frame in place a third of the way along the wall and traced around the inset back of the frame with a sharp pencil. As I wanted two doors on this wall, representing a pair of joined habitation units, I repeated this a third of the way in from the other end of the wall as well.
To cut out the doorway holes, I used a sharp exacto blade, following the pencil line and making several passes rather than trying to cut right through in one go.
I then glued the doors in place with superglue, and cut and glued a window in each end wall using a similar process.
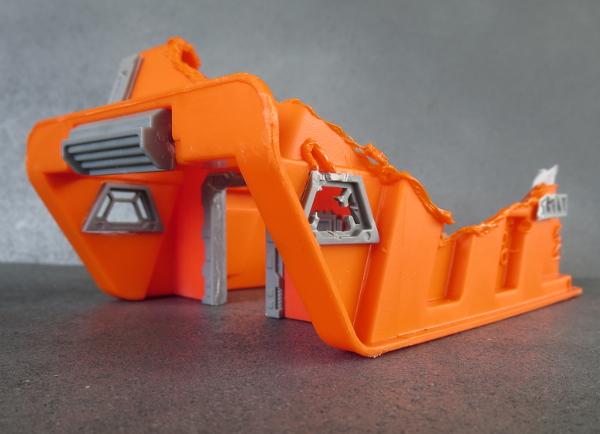
To reinforce the walls of your structures, the sprue includes a number of bolted struts like the first terrain sprue. These struts have some missing panels on them, with optional, separate panel pieces that can be glued on to vary the look of the struts a little.
One of my favourite details, the sprue also comes with two stair pieces, designed to be used individually or stacked up for a taller set of stairs. For this build, I was just using them individually, and also wanted to butt them right up against the wall, so I cut off the triangular support pieces from the backs of them with my exacto knife.
I glued the struts upright on the ends of each of the long walls of the building, and the stairs nestled in under each of the doors. I also glued an exhaust fan onto each end of the building for some extra ventilation.
To finish up, I covered over the rather boring top of the building with some corrugated cardboard, and build an awning using another piece of cardboard, some plastic tubing, and a couple of posts from the terrain sprue. I also added a base of foamed PVC, and some underfloor ventilation using vent pieces cut from the reinforcing struts on the original terrain sprue.
On the rear of the building, I glued a generator in the middle to service both hab units, and built a small fence to protect it and provide some low cover on the table, using some grating pieces and a couple more posts. I also added a couple of corrugated patches on the walls for some low-tech, DIY repair.
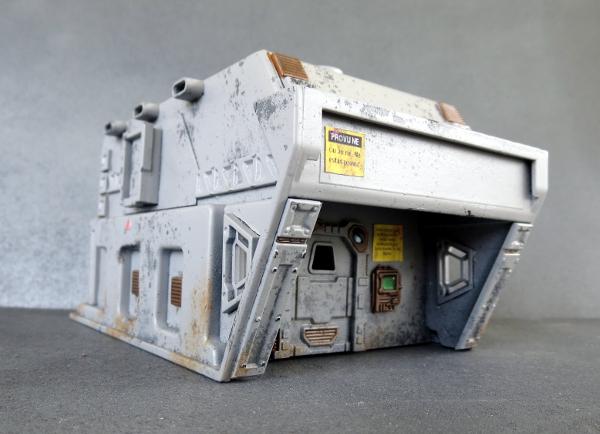
With some paint on (which I'll cover in a future article very soon!) the hab block was ready for the table!
The exact release date for these sprues is still to be confirmed based on production scheduling, but should be in the next few months. I'll be showing off some more previews in coming weeks to reveal other components included on the sprue.
In the meantime, you can still pick up the original terrain sprue along with the rest of the Maelstrom's Edge model range in the webstore here.
As always, feel free to pop along and share your creations, or ask any Maelstrom's Edge- or hobby-related questions on the Comm Guild Facebook page!
For other Maelstrom's Edge modeling articles, including tutorials and walkthroughs of a wide range of different building and miniature projects, check out the Hobby section of the Maelstrom's Edge website here.
Tags: buildings modeling spotlight terrain terrainsprue tutorial walkthrough
Terrain Spotlight: Giftbox Building with Removable Roof!
Posted on Thursday Jul 25, 2019 at 05:00pm in Tutorials
There are two common ways to create buildings for use in wargames - making them solid and either treating them as impassable structures or using abstract rules to represent models being inside where appropriate, or using buildings with removable roofs so that models can actually be placed inside and positioned accurately when required. I generally prefer to go the former route, as it makes buildings a lot simpler to put together, and is less fiddly during a game than having to take a roof off - particularly if there are models on it!
Sometimes, though, it's handy to be able to go that extra distance, so I thought I would show a quick and easy way to create a building with a removable roof from a cardboard giftbox, with a little help from the Maelstrom's Edge terrain sprue.
For the core of this building, I used a plain black cardboard giftbox, purchased from a local discount store.
Usually when I'm building terrain, I just go from the idea in my head and hope for the best. In this case, though, I sketched out a quick plan to make sure that the interior all fit into place as intended. The plan changed slightly along the way, but it provided a handy reference as I was putting everything together.
I started out by drawing around the base of the box on a piece of 2mm foamed PVC and cutting out a hole for the box to sit in. This serves to conceal the bottom edge of the box, which has a slightly rounded edge.
Next, I took a large door from the terrain sprue, sat it in place on one of the short edges of the box, traced around it with a pencil and then cut out the resultant rectangle to create a door cavity.
I did the same on one of the long edges of the box with a small door from the terrain sprue. This door is largely featureless on the back (as it wasn't really designed for use where you would see both sides of it), so I cut a piece of thin cardboard to duplicate the raised panelling from the front.
For the interior walls, I used more foamed PVC, with doorways cut in using the small door frame as a template. I checked that these walls fit where I wanted them, but didn't glue them in at this point so that I could get at the interior easier to add more detail.
The building needed some windows. I tend to default to the shutter windows on my builds and use the trapezoid windows for more interesting things, but for this building I had another plan for the shutters. So I spaced out some of the trapezoid windows on the long sides, cut holes by tracing around them with an exacto knife and then glued them in place. Using the knife instead of a pencil to trace gives a tighter fit, which is useful since the trapezoid windows don't have a flange to conceal a loose fit like the doors do.
I kitted out the interior with some bits and pieces made from an assortment of terrain sprue parts. All of this was glued in place, except for the ladder. I left that separate to make it easier to paint behind it.
And now, the important part! I took the lid of the box and glued four corner braces from the terrain sprue upside down around the corners of the lid top. These were spaced to fit neatly inside the box, so that the lid could be sat in place upside-down to create a walled roof.
Of course, this could also be done much more easily by just sitting the lid on the way it normally goes, but I like having a lot of buildings with walled roofs to allow for models to have some cover up there.
I finished up with a few extra detail pieces here and there, and another sheet of PVC on the bottom to form a base.
To paint, I gave the inside a spray with a Rustoleum dark brown primer, and then a light coat of Dulux chalky beige. The outside received a coat of Army Painter Army Green.
I gave the doorframes and windows a coat of Vallejo Heavy Brown, and then a layer of P3 Jack Bone. The base and roof are my usual urban mix of Vallejo Basalt Grey with a drybrush of Vallejo Light Grey.
As I wanted the weathering to be heavier on the outside then in, I gave the exterior metal parts a base coat of Citadel Scorched Brown, a very light drybrush of P3 Pig Iron, and then a generous dabbing of Army Painter Dry Rust. The interior metal parts got the same base coat, a heavier layer of Pig Iron, and then a wash with Army Painter Strong Tone.
Everything was dirtied up with a sponge of Vallejo Heavy Charcoal and a drybrush of Vallejo Beasty Brown into all the crevasses and corners, again going heavier on the outside of the building.
With some final detailing and a few printed posters, the building was ready for the table!
To build your own rooftop of removable doom, you can pick up the Maelstrom's Edge terrain sprue, along with the rest of the Maelstrom's Edge model range in the webstore here.
As always, feel free to pop along and share your creations, or ask any Maelstrom's Edge- or hobby-related questions on the Comm Guild Facebook page!
For other Maelstrom's Edge modeling articles, including tutorials and walkthroughs of a wide range of different building and miniature projects, check out the Hobby section of the Maelstrom's Edge website here.
Tags: buildings modeling spotlight terrain terrainsprue tutorial walkthrough
Terrain Spotlight: Oily Joe's Bot Repair
Posted on Thursday Jul 11, 2019 at 05:00pm in Tutorials
I'm venturing back inside the box this week, with a new building variant based on a couple of cardboard gift boxes, with some detailing help from the Maelstrom's Edge terrain sprue as usual.
Need your bot repaired, pronto? Want to pick up some spare power converters to get those units in the north quadrant back up and running? Well, don't bother heading down to Oily Joe's, because he's closed down and scarpered, to try to get a berth offworld before the Maelstrom hits.
The base structure of this building uses two differently sized cardboard gift boxes, sourced from one of the local discount stores. The smaller box forms the walls, while the lid of the larger box, which is just a fraction narrower than the small box is long, is used for the awning roof.
I started out by flipping the small box upside down, and using it as a template to mark out a surround of 2mm thick foamed PVC, which I cut out with an exacto knife and a steel ruler.
Then I grabbed a large door from the terrain sprue, and held that in place on one of the long walls (remembering to account for the 2mm surround at the bottom) to draw around it, and then cut out the door hole with the exacto knife.
I glued the door in place with some superglue.
I did the same with a small door on the other long wall, and shutter windows on either short wall. I also added a large pipe fitting one the side with the smaller door.
Next up, I slathered superglue generously over the top of the upside down box, and sat the roof in place.
To help disguise the the roof isn't quite as wide as the building itself, I added a strip of reinforcing struts from the terrain sprue around the lower edge, cutting them to fit neatly. I also added a square hatch on the roof to provide access.
Finally, I glued a comm panel on the wall beside the large door, and glued everything down onto an 8" x 8" piece of masonite. I also added a fan attachment to the end of the pipe fitting - this one is a plastic bit from an upcoming kit (Shhh, don't tell anyone - it's a secret!) but you can also create a fan blade using some cardboard or plasticard, as per the tutorial here.
With that, it was time to paint!
I gave the whole thing a light coat of flat black spray, and when that was dry added a layer of Army Painter Ultramarine Blue. On the doors, I added a white strip with Army Painter Ash Grey and white, and then weathered the whole thing with a sponge and some Vallejo Heavy Charcoal. (See the tutorial on sponge weathering here!) The base and roof were painted with Vallejo Basalt Grey and drybrushed with Light Grey.
For the rusted metal bits, I started with a base layer of old Citadel Scorched Brown, lightly drybrushed with P3 Pig Iron and Ember Orange, and then applied liberal dabs of Army Painter Dry Rust.
For a bit of extra colour, I printed off the sign for the front and a few smaller signs to scatter around the place after drawing them up in Gimp. These were stuck on with PVA glue, and then a dirtied everything up with a drybrush of Vallejo Beasty Brown in the corners and wherever else seemed appropriate. A few finishing details like the comm screen, lights, and some graffiti on the walls, and Oily Joe's was ready for the table!
To build your own retail champion of the future, you can pick up the Maelstrom's Edge terrain sprue, along with the rest of the Maelstrom's Edge model range in the webstore here.
As always, feel free to pop along and share your creations, or ask any Maelstrom's Edge- or hobby-related questions on the Comm Guild Facebook page!
For other Maelstrom's Edge modeling articles, including tutorials and walkthroughs of a wide range of different building and miniature projects, check out the Hobby section of the Maelstrom's Edge website here.
Tags: buildings spotlight terrain terrainsprue tutorial walkthrough
Terrain Spotlight: Building Ideas Roundup
Posted on Thursday Jul 04, 2019 at 05:00pm in Tutorials
The Maelstrom's Edge terrain sprue comes with a whole slew of assorted bits and pieces that can be added to basic building shapes to pretty them up for the gaming table. Over the past couple of years, I've shared quite a few different ideas for base structures for those buildings, and I thought it might be useful to do a bit of a round-up to compile them all in one handy reference.
One of my favourite options, that I've gone back to many times over the years, is the cardboard gift box.
With minimal effort, these can be quickly turned into table-ready terrain with the addition of some detail bits and some paint.
For a few ideas, here's some previous build articles:
For a slightly more detailed, but still mostly pre-made option, go for a wander through your local hardware store and look for interesting plastic shapes. Plastic storage trays, storm drain sections and various assorted plumbing fittings can all make great bases for buildings with a little imagination and some added detail.
You can find some tutorials and walkthroughs for putting these together here:
On a sort-of related note, you can find all sorts of handy bits and pieces around the kitchen as well - Never throw anything out!
Some handy articles:
If you feel are happy with building from scratch, you can of course work up whatever building shapes you want using standard modeling materials. Foamcore (AKA foamboard), plasticard, sturdy cardboard and foamed PVC can all be useful for creating more freeform shapes to suit yourself.
Some scratch-built building ideas:
Finally, there are a whole host of premade and often inexpensive buildings out there on the market these days, made from MDF, cardboard or PVC which can be spruced up into something special with a few extra details here and there.
Check out these examples of kits given a little extra love:
Do you have any clever building ideas that we haven't covered here? We'd love to see them in the Comm Guild Facebook group!
To get started on your own terrain adventure, you can pick up the Maelstrom's Edge terrain sprue, along with the rest of the Maelstrom's Edge model range in the webstore here.
For other Maelstrom's Edge modeling articles, including tutorials and walkthroughs of a wide range of different building and miniature projects, check out the Hobby section of the Maelstrom's Edge website here.
Tags: buildings modeling roundup terrainsprue tutorials walkthrough
Terrain Spotlight: MDF Sensor Dish
Posted on Monday May 27, 2019 at 05:00pm in Tutorials
I somehow managed to get through Salute this year without bankrupting myself on shiny, new models, but I did come home with a few fun-looking odds and ends. There were quite a few vendors selling laser-cut MDF kits, some of which I had seen before and some that were new, at least to me. One of the latter was Uncertain Scenery, who had an amazing industrial catwalk setup topped with a very cool sensor dish that I couldn't resist picking up.
This week, I decided the time had come to crack it open and see what I could do with it!
I have to start by saying that this was a fantastic kit to put together! It uses a mix of 3mm and 1.5mm MDF, and the design is really clever at making use of those two sheet thicknesses to create detail. Parts are cut with only a single attachment point to the surrounding sheet, so removal is easy and there's only that one point to trim up.
Because I can't resist the urge to tinker, I did make a few minor changes. As with a lot of MDF kits, the doors on the base of the structure were just a single panel with the door shapes etched into them. To give a little more detail, and to better fit in with the rest of my terrain collection, I decided to replace the existing doors with a door from the Maelstrom's Edge terrain sprue. It turned out the base structure was just a fraction shorter than the plastic door, so I added some spacers cut from 0.5mm plastic strip to the tops of the interior walls. This lifts the roof piece up just enough for the plastic door to slot in place. Rather than cutting into the walls to slot the door in, I cut a strip of leftover MDF from one of the parts sheets to run up either side of the rear of the door frame, and then just glued the door onto the outside face of the interior wall.
I also decided to replace the blocky, MDF ladder with a plastic ladder from the terrain sprue, cut to an appropriate length. The original ladder used a 3mm thick ladder piece, and guardrails up either side assembled from three pieces of 1.5mm sheet. As luck would have it, the ladder and the innermost guardrail sections together turned out to be exactly the same width as the plastic ladder, so leaving out these inner sections allowed my adjusted ladder to just slot into place as if it was meant to be there.
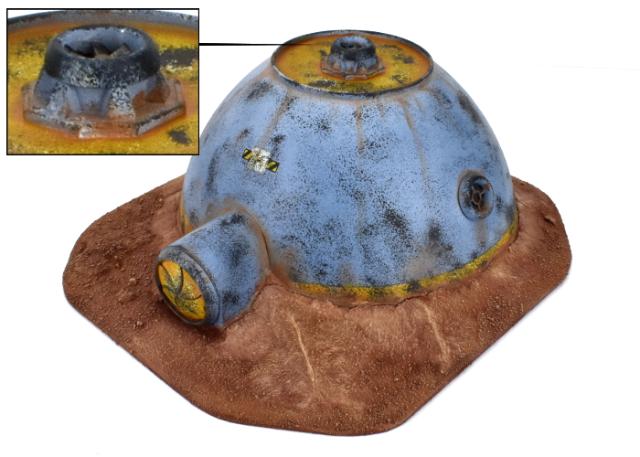
The base section originally had doors on two opposing walls, but I decided to just go with the one, and have a pipe running in where the other should have gone. I glued the door piece on backwards, with a new panel line etched in with a panel scriber so it wasn't just a featureless expanse, and added a pipe made from a couple of large pipe fittings from the terrain sprue, a piece of a 13mm drip irrigation elbow, and half of a press-stud for a valve.
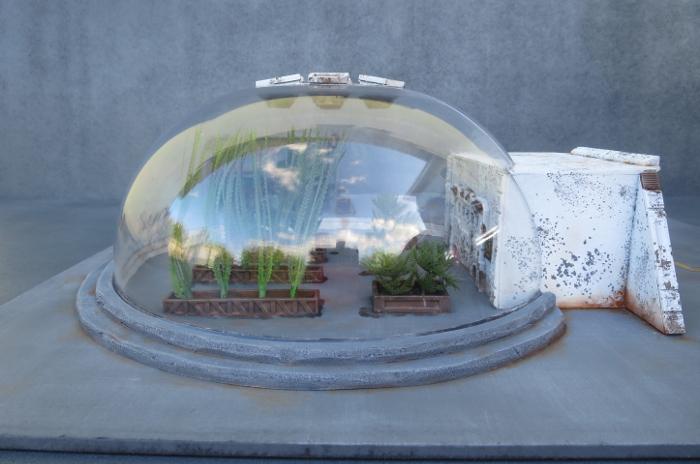
Everything else was assembled as per the nicely comprehensive instructions, although I left the dish panels off for spraying to make life a little easier, gluing them on once everything was mostly painted.
To paint, I started by giving the whole kit a coat of matte sealer, to help prevent the basecoat from soaking into the MDF as much. The base structure and dish panels were sprayed with a beige primer, and then given a rough coat of flat white.
For the rest of the assembly, I sprayed a generous basecoat of AK Interactive Rust spray, and then a light spray of Army Painter Platemetal. The bare metal parts on the base structure were given a coat of some old Citadel Scorched Brown, and then a drybrush with P3 Pig Iron.
I added weathering to the white by sponging on Vallejo heavy charcoal, and then dirtied everything up wherever seemed appropriate with a drybrush of Vallejo Beasty Brown.
And that's it, ready (for now) for the table. I've left it unbased for now, as I have some plans in that direction which will likely wind up in a future article...
To spruce up your own MDF kits, you can pick up the Maelstrom's Edge terrain sprue, along with the rest of the Maelstrom's Edge model range in the webstore here.
As always, feel free to pop along and share your creations, or ask any Maelstrom's Edge- or hobby-related questions on the Comm Guild Facebook page!
For other Maelstrom's Edge modeling articles, including tutorials and walkthroughs of a wide range of different building and miniature projects, check out the Hobby section of the Maelstrom's Edge website here.
Tags: buildings conversion modeling spotlight terrain terrainsprue walkthrough