Entries tagged [karist]
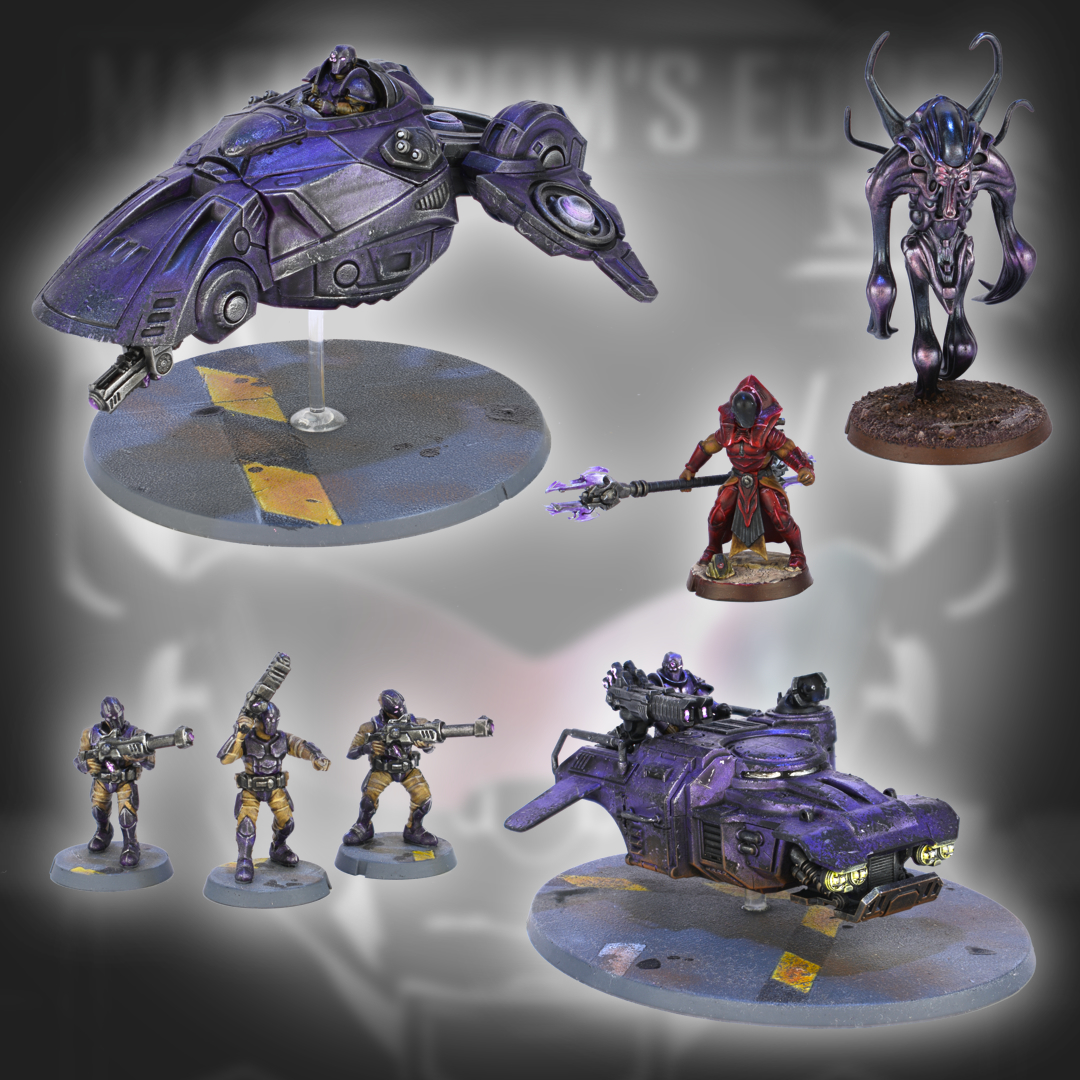
Force Spotlight - 50 point Karist Enclave Starter Force
Posted on Friday Nov 28, 2025 at 05:00pm in Models
First Encounter - a 50pt Starter Force Battle Report.
Posted on Wednesday Nov 12, 2025 at 05:00pm in Gaming
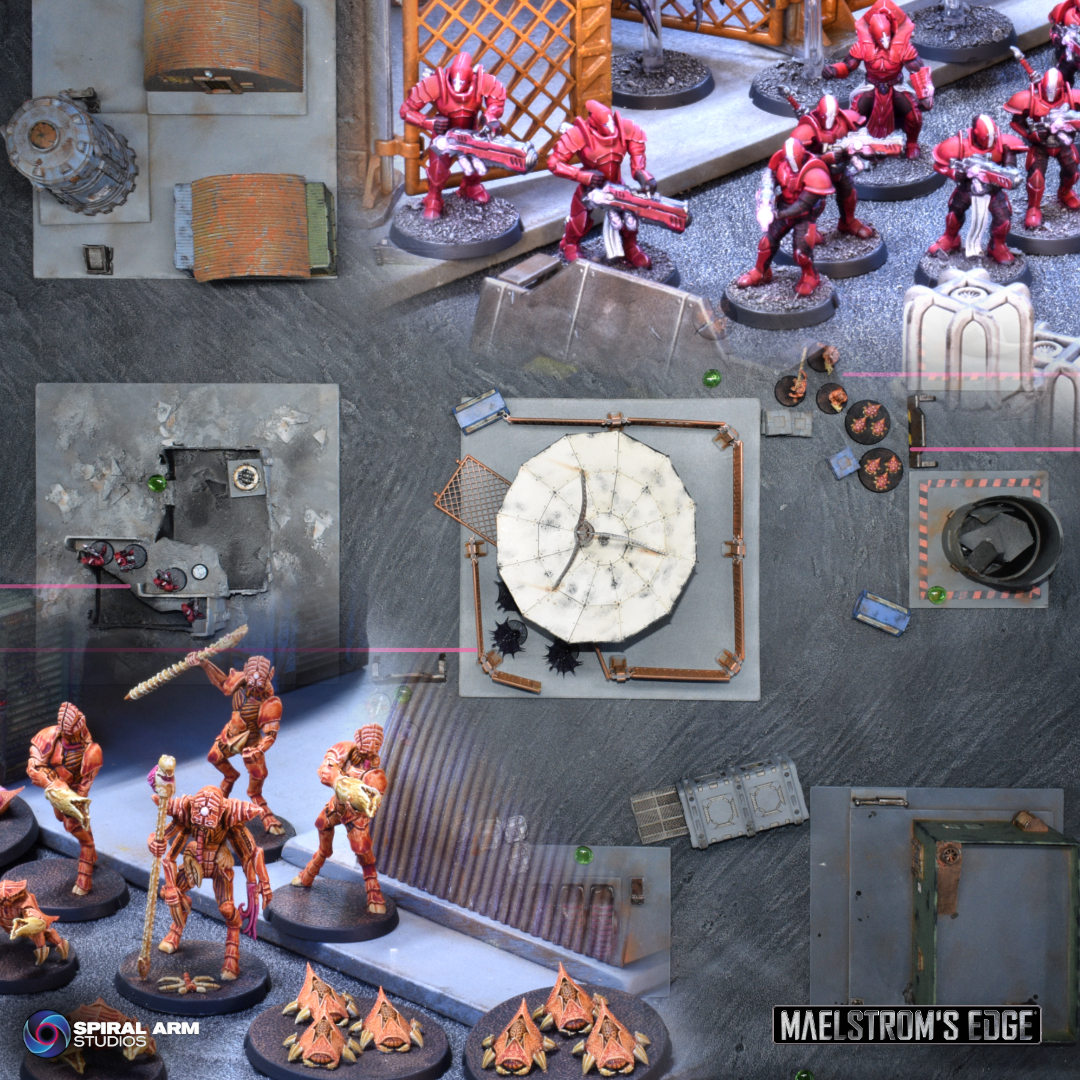
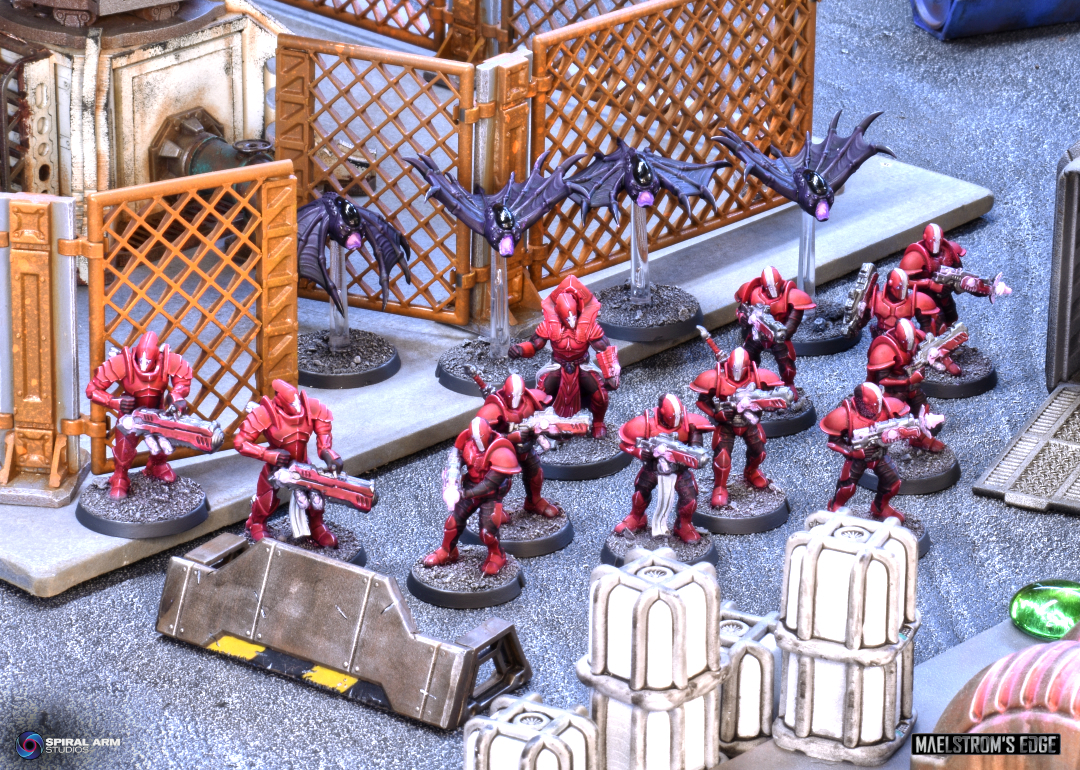
A new Maelstrom's Edge V2 battle report, using the Kaigus Pact and Karist Enclave Faction Starter Sets in a 50 point Forward Unto Victory mission! Check it out here!
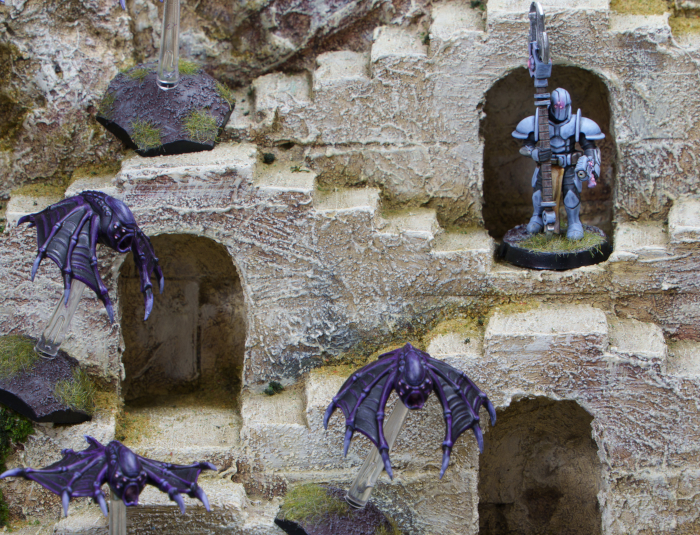
The final resin-to-digital conversion release arrives - Karist Angel Keepers!
Posted on Thursday Oct 03, 2024 at 09:18pm in Models
An Angel Keeper leads their alien charges into battle.
A strange and isolated offshoot of the Karist priesthood, Angel Keepers train enslaved Angels using regimented doses of cybel energy, and marshal these alien creatures on the battlefield.
This release required a bit of resculpting as the original model sculpt was lost, and so it had to be reconstructed from a partial sculpt. The resin original was also only designed to have one of the Keeper's two main weapons, with separate hand options holding the cybel goad and grenade launcher. The STL version now has the cybel goad in hand and the grenade launcher slung and ready when the Keeper needs it. The model also comes with two pose variants, an optional holstered pistol, and a male and female head - although the differences in appearance are minor due to the Keeper's mask!
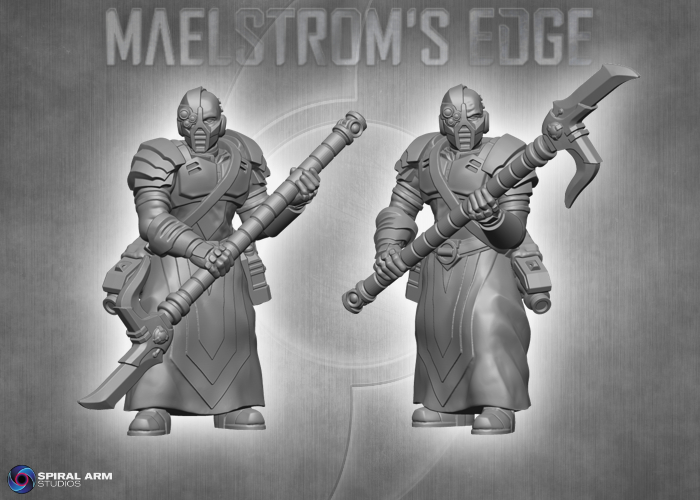
The digital file includes supported and unsupported versions of the Angel Keeper.
You can find the rules for using Angel Keepers in your Karist Enclave force in the downloads section of the Maelstrom's Edge website here.
Start building your elite army of shapeshifting doom by grabbing your Angel Keeper from the webstore here!
Revised Homebrew Karist Unit rules - and some Epirian Tweaks!
Posted on Thursday Sept 19, 2024 at 05:00pm in Gaming
 - by Iain Wilson
Following on from my Epirian Foundation update last week, I have now also revised my homebrew Karists from V1. This was a much smaller job, as I hadn't actually created as many Karist units, and that's clearly a terrible oversight that needs to be rectified! As such, along with updating the existing units, I have also added in a couple of extras from conversions that I had made that I hadn't created rules for yet.
As with the Epirians, these units are all converted from assorted Maelstrom's Edge parts, or modified models from other games. To duplicate them, you can find the original modeling articles by following the links below, or you can choose to use whichever other appropriate models you have to hand. Note that as these are unofficial rules, you should ensure that you discuss it with your opponent before using them, to make sure they're familiar with and ok with them!
Kaddar Militant - a variation on the usual Kaddar Nova, with a more warlike focus.
Reaper Cadre - stealthy Karist Troopers equipped with a longrifle variant of the pulse carbine.
Predator Attack Vehicle - an anti-grav support vehicle based on a Warhammer 40K Genestealer cult buggy.
Raptor Assault Skimmer - a transport vehicle based on a Gates of Antares Freeborn skimmer.
Angel Gloomstalker - a Juvenile Angel variant converted from the plastic Mature Angel kit.
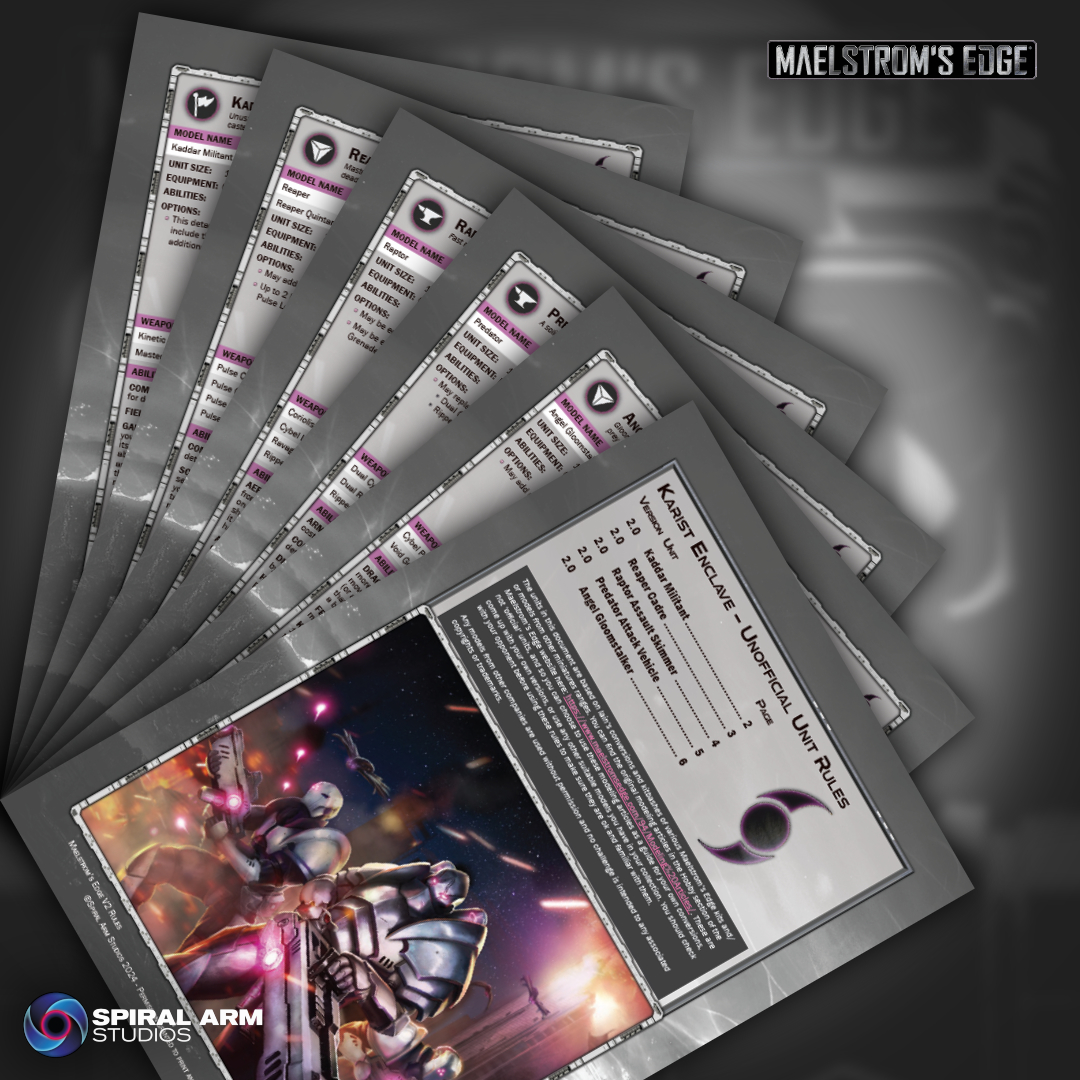
Download the rules PDF from the V2 Trial Rules page here!
I've also made a couple of tweaks to the Epirian rules posted last week. The SecDef Ironhide has had its Inorganic designator swapped to Armored, Sentinel bots can now all take Shock weapons, and I realised as I was working on the Karists that I already had a unit named 'Reapers', so the newly christened 'SecDef Reaper Team' has now been re-re-named the 'SecDef Wrecker Team'. You can grab the revised rules pages on the V2 Trial Rules page linked above.
To build your own force of over-zealous, kit-bashed doom, grab some Karist models from the Maelstrom's Edge webstore here!
What are you working on? We would love to see your models and terrain in the Comm Guild Facebook group!
For other building ideas, modeling tutorials, army spotlights and conversion walkthroughs, check out the Hobby section of the Maelstrom's Edge website here. And while you're there, grab a copy of the Maelstrom's Edge V2 Beta rules!
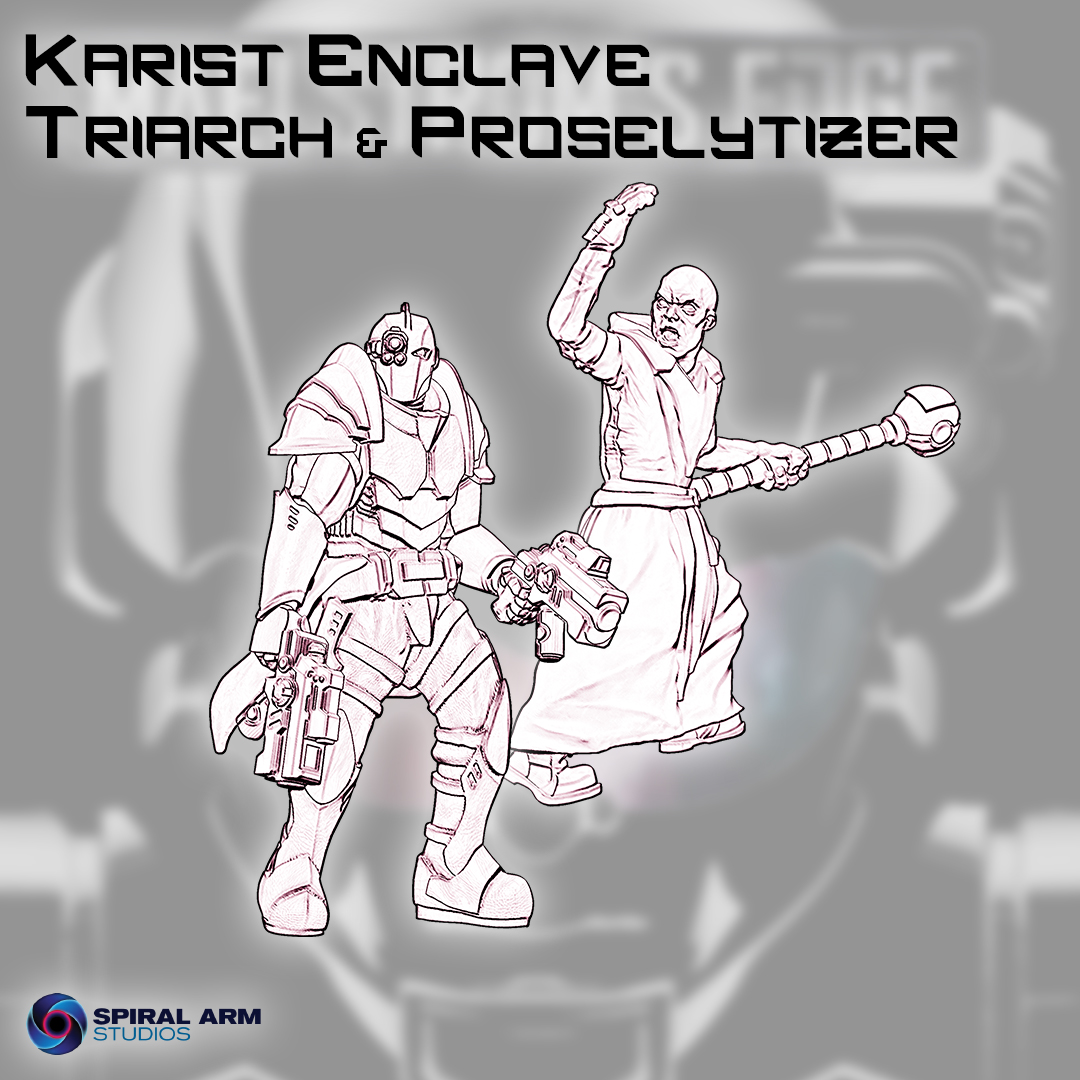
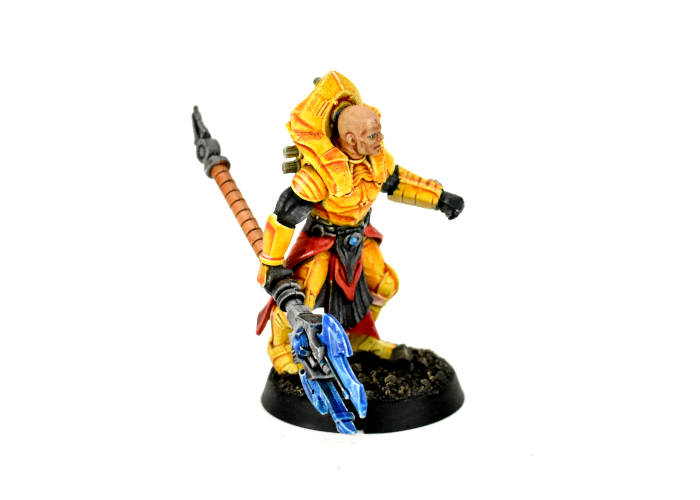
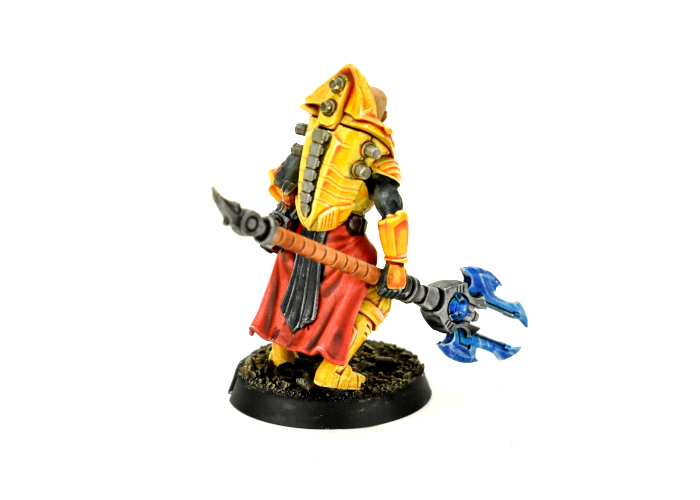
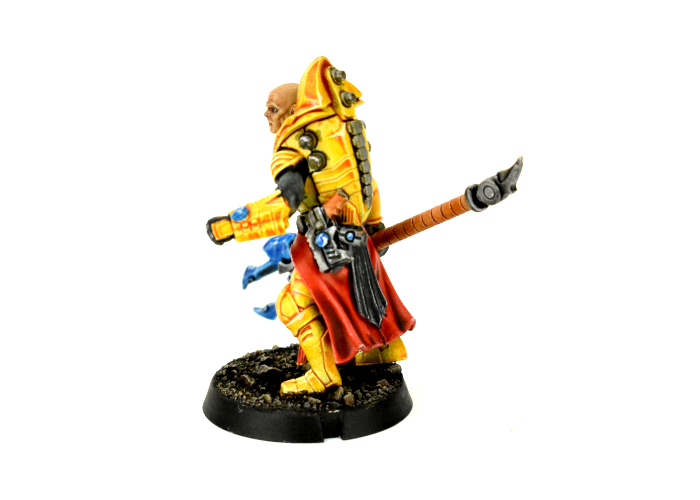
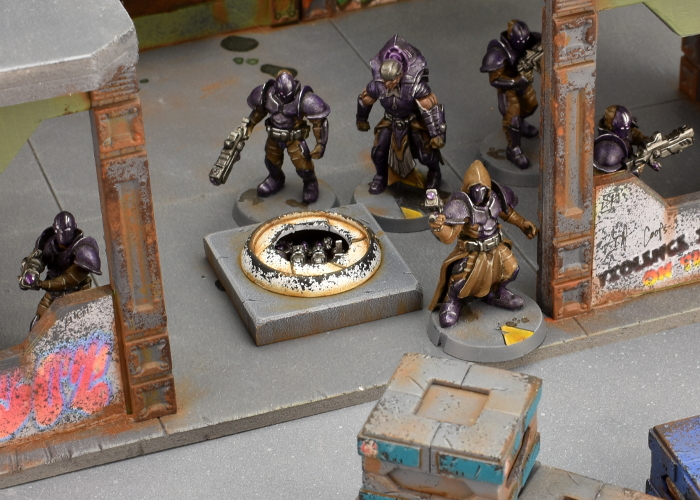
Sneaky Spotlight: Karist Enclave Triarch and Proselytizer
Posted on Friday Nov 17, 2023 at 06:00am in The Karist Enclave
Click for larger image
The lowest rank of ordained priest amongst the Kaddar, Proselytizers have yet to develop the oratory skills to sway whole crowds, or lead a large military offensive. As missionaries, Proselytizers work quietly amongst a planet’s population, gathering small groups of believers and setting the stage for their more experienced brethren to expand the movement into something greater. When combat is called for, Proselytizers are embedded within military units, where they inspire the troops to greater efforts, or use vocal tricks and the message of their faith to weaken the combat zeal of nearby enemy troops.
Stay tuned for more sneak peeks! In the meantime, try out the V2 Beta rules by grabbing the PDFs from the Trial Rules section of the Maelstrom's Edge website here, and grab your models from the Maelstrom's Edge webstore here! Free shipping applies to qualifying orders - check your cart for details.
You can also find a series of articles looking at different aspects of the V2 game here.
If you have any questions on the V2 rules, the model range, or any other aspect of the Maelstrom's Edge game, feel free to pop in to the Comm Guild Facebook group here.
New Karist STL Release - The Angel Hellblaster!
Posted on Wednesday Nov 01, 2023 at 05:00pm in Models
Karist forces advance behind a unit of Hellblasters.
This digital model pack contains STL files for both supported and unsupported versions of the Hellblaster in two different poses.
Angel Hellblaster Render
You can find the rules for using Angel Hellblasters in your Karist force in the downloads section of the Maelstrom's Edge website here.
Start building your army of eldritch alien doom by grabbing your Hellblasters from the webstore here!
Karist Enclave Colours - Maelstrom's Edge V2 Rulebook Preview
Posted on Friday Feb 24, 2023 at 01:20am in The Karist Enclave
(Click the image for a larger version!)
To get started on your own army of over-zealous doom, pick up the Karist models, or any of the rest of the range from the webstore here.
What are you working on? We would love to see your models and terrain in the Comm Guild Facebook group!
Remember to also grab a copy of the Maelstrom's Edge V2 Beta rules so you can get into the action!
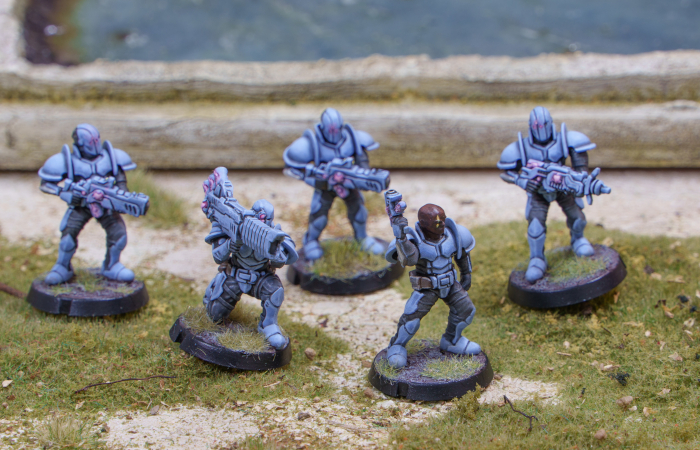
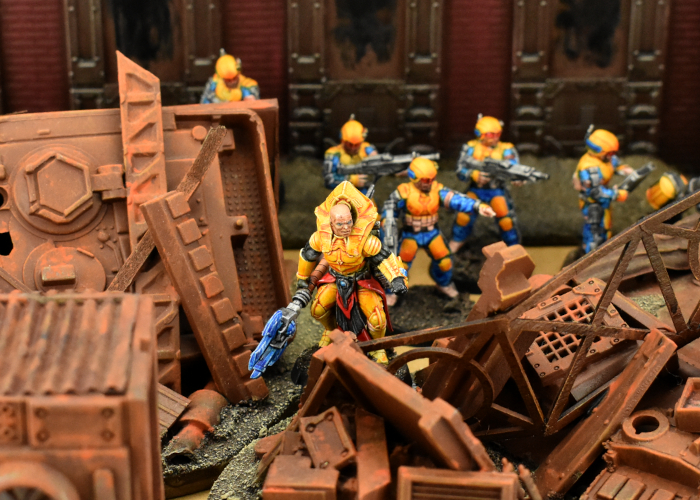
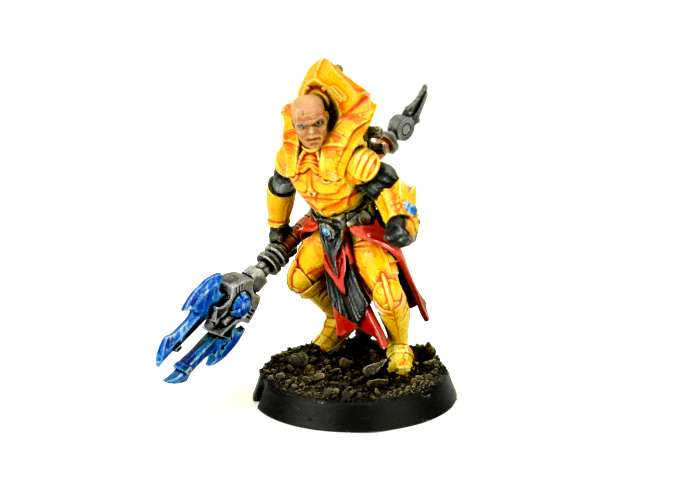
Army Spotlight: Marten's 90 point Karists
Posted on Tuesday Feb 14, 2023 at 05:00pm in The Karist Enclave
About his force, Marten says: "This is my 90pt Karist force. It's fairly small, which I find convenient for trying out new rules at first. I'm a fan of 'regular guys' in my forces. Hence there is no mature Angel, but two full sized squads of troopers, four Tempest Elites carrying the force's big guns and two Praetorians because they're cool. A Shadow Walker and a full complement of Minnows make up the fast element of the force, led by a Kaddar Nova.
The colour scheme was inspired by the painted examples on the Maelstrom's Edge kickstarter of 2015, combined with then new-to-me Warcolours paints which had a nice 5 tone 'blue grey' set.
The Kaddar Nova overlooks his force, accompanied by his Praetorian escort.
Karist Troopers, including a Heavy Trooper equipped with a devastating Cybel Lance.
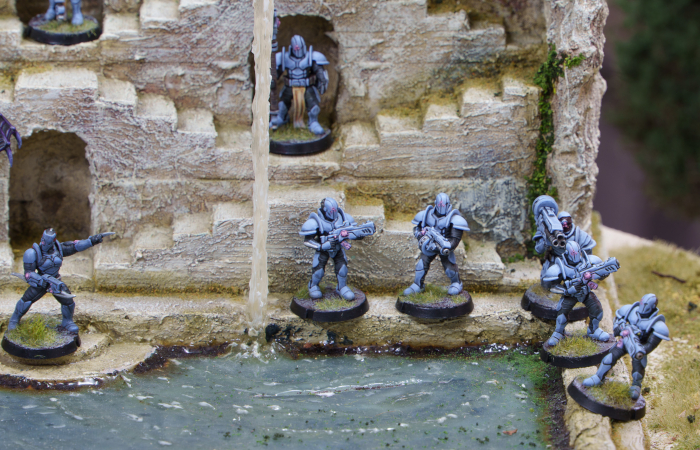
The second unit of Troopers, with a Ripper Heavy Grenade Launcher, and the deadly, teleporting Shadow Walker.
Tempest Elites are implacable fire support for Karist forces.
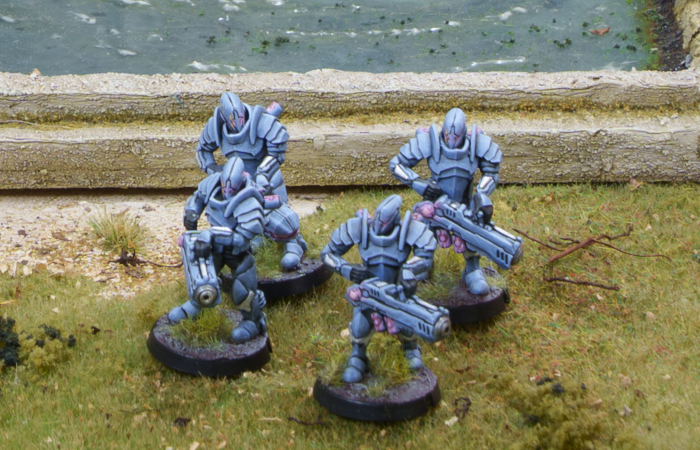
Though comparatively small, Minnows are no less ferocious than older Angels.
To get started on your own army of over-zealous doom, pick up the Karist models, or any of the rest of the range from the webstore here.
What are you working on? We would love to see your models and terrain in the Comm Guild Facebook group!
Remember to also grab a copy of the Maelstrom's Edge V2 Beta rules so you can get into the action!
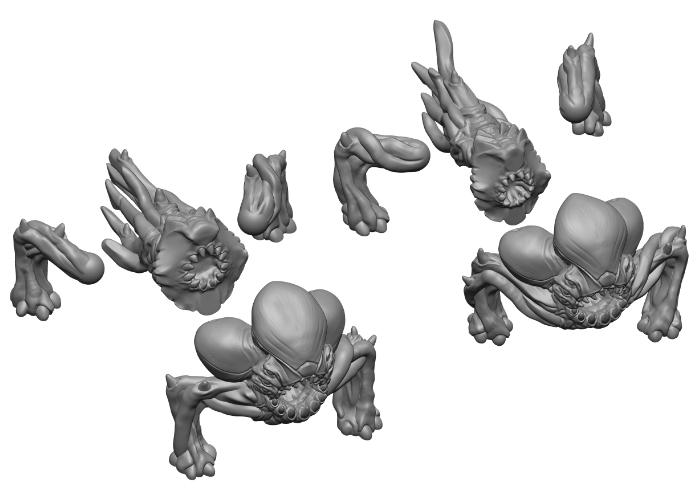
New Release: Karist Heavy Troopers - 3D Printable STL Files
Posted on Thursday Oct 06, 2022 at 05:00pm in Models
Originally released in resin, Karist Heavy Troopers are now available to purchase as STL files for 3D printing.

The Heavy Weapon Trooper digital pack includes both a supported and unsupported set of files, with Cybel Lance, Ripper Heavy Grenade Launcher and Ravager Pulse Cannon options to equip your troopers.
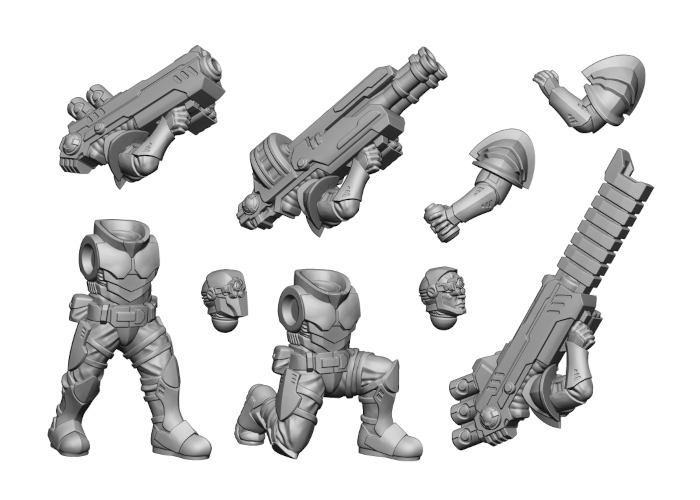
The included parts.
In Maelstrom's Edge games, the Karist Heavy Troopers are fielded on 25mm bases, available here, and can accompany Karist Trooper squads or form Karist Trooper Heavy squads.
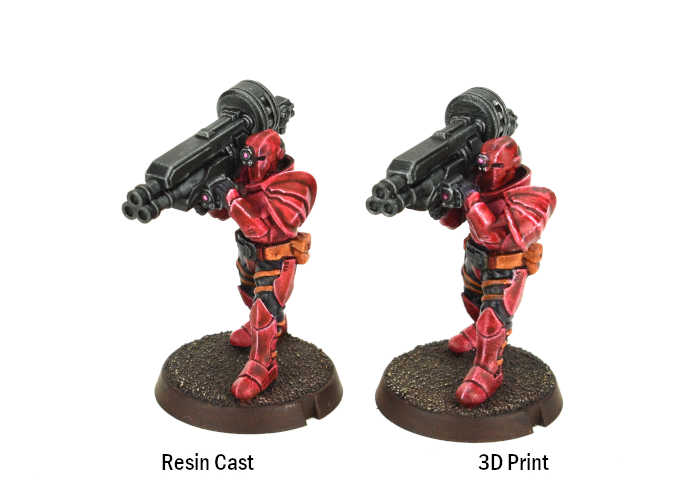
Resin production model and a 3D printed example, painted to a tabletop-ready standard - printed on an Anycubic Photon using Siraya Tech Fast resin at 50μm using Lychee slicer.
Printing results will vary depending on your printer, resin and settings.
Start building your secretive cult of digital doom by grabbing the Karist Heavy Troopers from the Maelstrom's Edge webstore here - or if you would prefer the resin version, you can find it in the store here!
Modeling Spotlight: Speedpaint Kaddar Nova!
Posted on Wednesday Jun 22, 2022 at 05:00pm in The Karist Enclave
- by Iain Wilson
My adventures with Army Painter Speedpaints continued this week, as I'm slowly piecing together a force from various miniatures to run as an Imperial Guard army in 2nd edition Warhammmer 40000. This week's addition was a plastic (and slightly converted) Karist Kaddar Nova!
This model uses mostly the standard Kaddar Nova parts, although I added in a right hand, glaive and pistol from the Faction Expansion sprue, as this chap will be fielded as an Inquisitor Lord armed with a force rod and hand flamer.
As per normal for Speedpaint work, I started with a white spray basecoat. The armour is Zealot Yellow, hung upside down to dry so that the paint would pool into upper recesses. For the skin, my initial tests with Crusader Skin straight over white were not what I wanted, so this time around I tried an experiment. Starting with a coat of Skeleton Bone, I applied a very light drybrush of Matt White and then the Crusader Skin, and was quite happy with the result. The eyes are a thin strip of white with some black dots in the middle, and then any mess around the edges cleaned up with some more Skeleton Bone and Crusader Skin.
Proper curing time is still something of a mystery with Speedpaint, and in certain conditions the paint can reactivate when painted over if it is not completely cured, so I have taken to applying a light coat of Anti-Shine varnish over the first, main colour and then applying any white touchups and subsequent Speedpaint colours over that, and this seems to do the trick.
I used Grim Black for the black parts on his tabard and arms, and Gravelord Grey for exposed metal parts. The grey gives a good metal stand-in without actually being metallic, and there's enough of a contrast between the grey and black for the two to wind up looking sufficiently different.
The blades on the glaive and the various glowy blue bits were painted with Highlord Blue with accents of Matt White, while the handle of the glaive is Hardened Leather.
The tabard is Blood Red, applied in two layers - one for the initial colour, and then after that dried, some additional red dabbed into the deeper creases for some extra shading. Then, with all of the colours in place, I added some highlights wherever seemed appropriate on the model with a little Matt White.
Finally, I painted the base with a coat of Dark Wood, drybrushing when it was dry with a little Skeleton Bone, and then added Matt Black around the rim.
So, that's one squad and a character down, and the rest of the force in progress.

Stay tuned for more!
To build your own Psychic Lord of Proxied Doom, pick up the plastic Kaddar Nova kit from the Maelstrom's Edge webstore!
While you're there, you can download the V2 rules from the Trial Rules section of the Maelstrom's Edge website here. The Beta rules documents contain all of the rules for playing V2 games, but keep in mind that these are just 'preview' documents - some rules may be revised based on feedback, and the final layout including background material for the factions and the Maelstrom's Edge universe, artwork and other 'flavor' material is missing.
For other modeling ideas, tutorials, army spotlights and conversion walkthroughs, check out the Hobby section of the Maelstrom's Edge website here.
What are you working on? We would love to see your models and terrain in the Comm Guild Facebook group!
Tags: kaddar karist nova painting speedpaint spotlight walkthrough
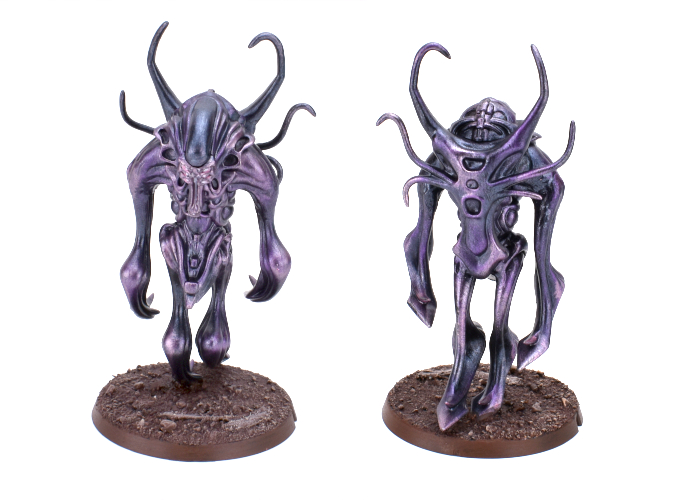
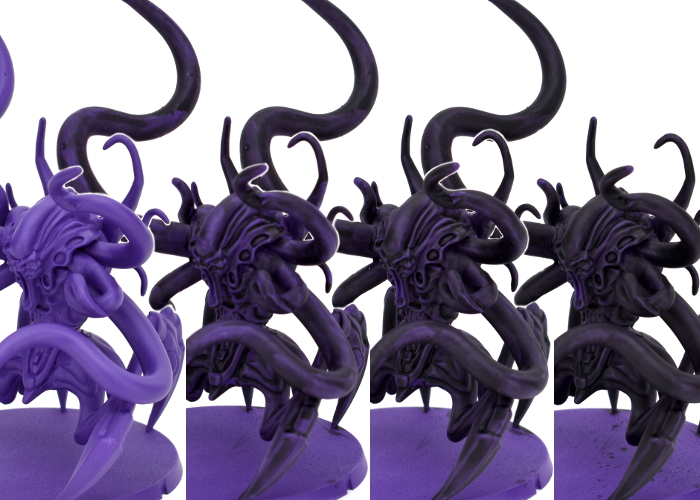
Painting Spotlight: Metallic Angel
Posted on Monday Sept 06, 2021 at 06:00pm in Tutorials
A while ago, I picked up a set of the Army Painter coloured metallic paints, and decided this week it was time to take them for a spin. The paint set includes some lovely purples that were just screaming out for a friendly little angel to bring to life. And so that's what I did.
The model I chose to use for this was a conversion that I put together some time ago while playing around with the Mature Angel kit. The end result is a slightly sinister-looking, floaty juvenile angel.
Metallic paint generally goes best over a dark basecoat, so I started out by spraying the model with some Army Painter black.
I then gave the whole model a coat of Night Scales, a metallic black from the Army Painter set. This has a slight bluey-purple tint to it that is just perfect for the angel. I was tempted to just leave it like this and call the job a good'un.
Deciding to go for a little more 'wow', though, I grabbed the bottle of Royal Purple, a midrange purple metal colour, and drybrushed the angel with it, building up more colour on raised areas and tentacle tips.
I used a light drybrush of Zephyr Pink to add some extra highlights wherever it seemed appropriate. I also went back over the top of the head with some more Night Scales, and picked out the eye sockets with Zephyr Pink before adding some white over on the eyeballs and inside the mouth. Finally, I added some coarse sand mix to the base with PVA glue, and then painted with Army Painter Dirt Spatter, then a wash of Mid Brown ink, and finally a drybrush with Kobold Skin, also picking out the base edge with more Dirt Spatter.
To build your own angel of floaty, screamy doom, you can pick up the Mature Angel kit along with the rest of the Maelstrom's Edge range from the webstore here.
What are you working on? We would love to see your models and terrain in the Comm Guild Facebook group!
For other building ideas, modeling tutorials, army spotlights and conversion walkthroughs, check out the Hobby section of the Maelstrom's Edge website here.
Karist Secret Cache Objective Marker Kitbash
Posted on Monday Jan 18, 2021 at 05:00pm in Tutorials
In games of Maelstrom's Edge, along with whatever objectives apply to the mission being played, each faction has an additional themed objective of their own. For the factions in the Battle for Zycanthus box, there are cardboard counters to use as faction objective markers, but it's always nice to have physical models to represent them instead. I shared a conversion some time ago for a kitbash of the Epirian's Automated Uplink Relay Drone (with a new, all-plastic version of this build coming up in a future article very soon!), and this seemed like a good time to balance things out with a Secret Cache marker for the Karist Enclave!
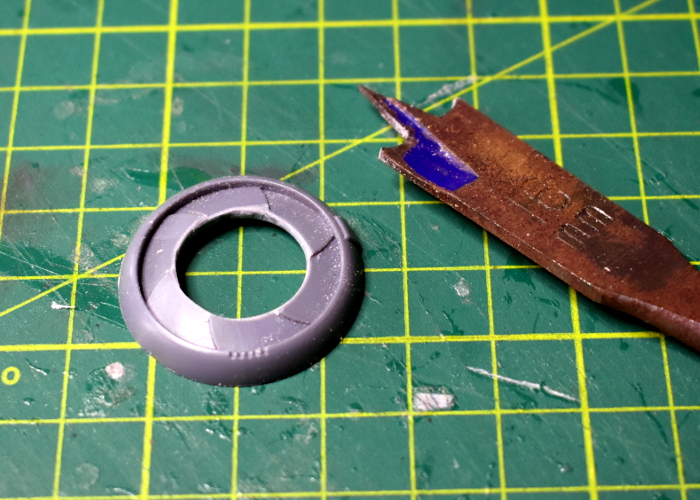
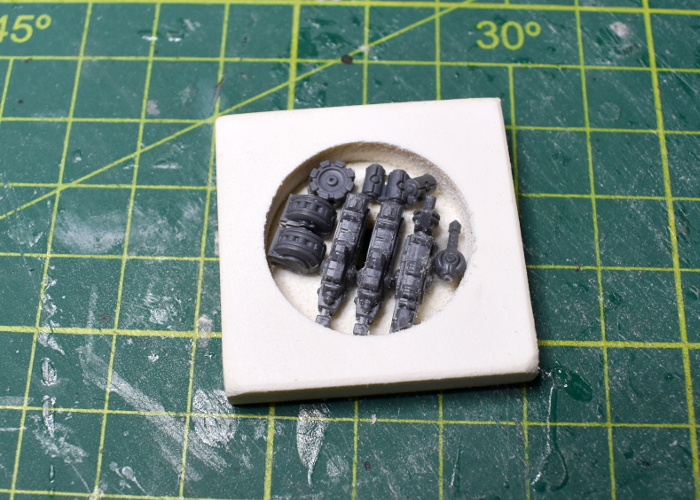
I was looking at the Maelstrom's Edge terrain sprue for a completely different project when it occurred to me that the iris hatch was a nearly perfect size for the Karist objective. The Secret Cache is a small objective, which means a model to represent it goes on a 25mm base, and as it happens, the iris is 25mm in diameter. So as an incredibly quick and easy option, you could just use the iris portal as-is. To keep things accurate, you can measure to the iris, ignoring the surround, or if your opponent agrees you could just measure to the outer edge of the portal, making it a 30mm objective marker instead of 25.
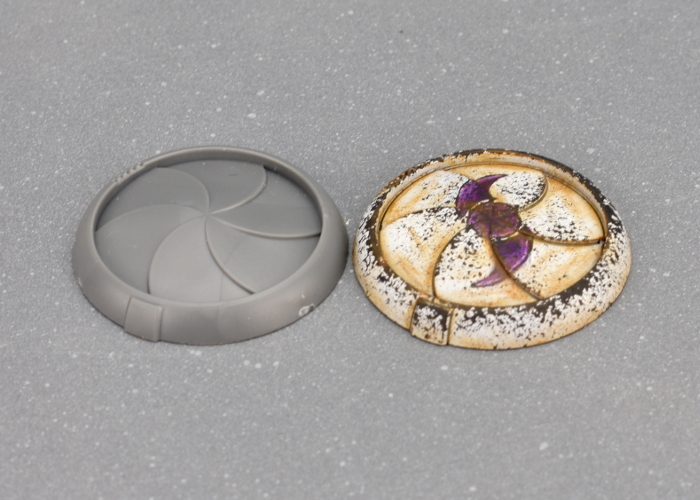
For a slightly more elaborate version, I took a portal and used a 16mm spade bit to drill out the middle of the iris.
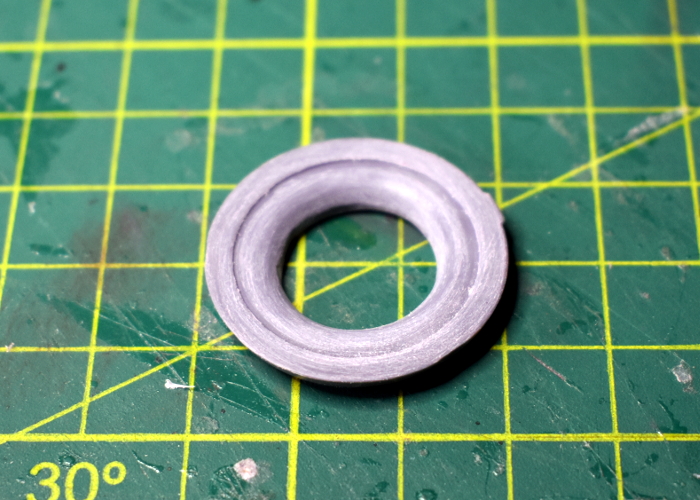
Wrapping a small piece of sandpaper around my index finger, I flipped the portal over and sanded around the underside to make it concave.
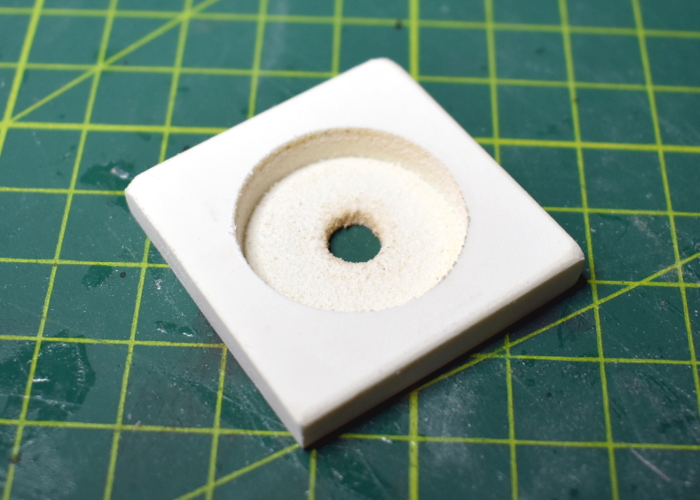
To make the base of the cache piece, I cut a small square of 6mm foamed PVC, and then drilled most of the way through the middle of it with a 25mm spade bit, before giving it a light sand.
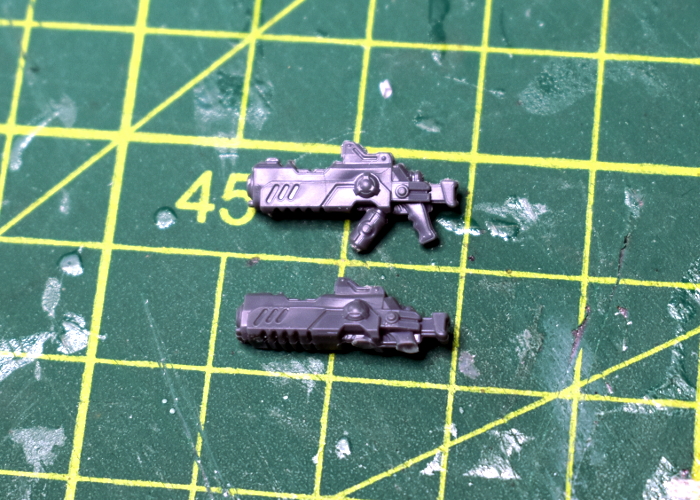
To fill the cache, I took a bunch of assorted Karist weapons from the Faction Expansion Sprue. I trimmed the bottom of the rifles down flat, sanding the bottom so that they fit neatly inside the cache cavity. If you don't have the expansion sprue handy, you could also just use spare weapons from the Karist Trooper sprue, cutting the hands off the bottom - either way, the bottoms of the weapons won't be visible once the cache is sealed up, so either way works just fine.
I glued the rifles in place, and then filled the space around them with grenades and a couple of ammo drums cut from grenade launchers. I also glued a small circle of plasticard into the drill bit guide hole in the bottom of the cache.
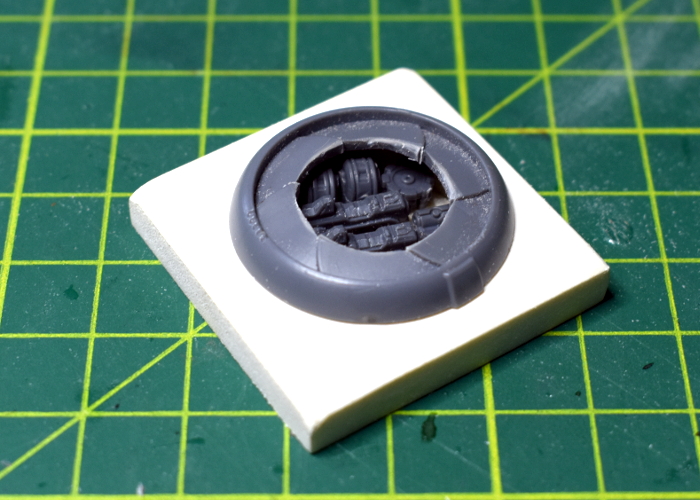
The final step before painted was to check that the portal fit neatly on top. At this point, I also used a hobby knife to cut some vertical lines into the inside of the hole in the iris, to delineate the tips of each petal. I left the portal separate for painting, gluing it in place at the end.
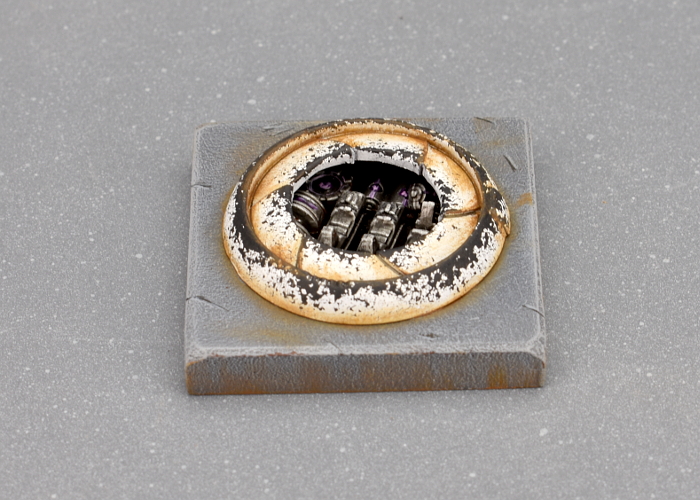
And speaking of painting, with some colour on the portal wound up looking like this:
Put together your own secret cache of pre-prepared doom by picking up the plastic terrain sprue, along with the rest of the Maelstrom's Edge range from the webstore here.
Then pop on over to the Comm Guild Facebook group to show us what you're working on!
For other building ideas, modeling tutorials, army spotlights and conversion walkthroughs, check out the Hobby section of the Maelstrom's Edge website here.
Tags: conversion karist modeling objective terrain terrainsprue tutorial walkthrough
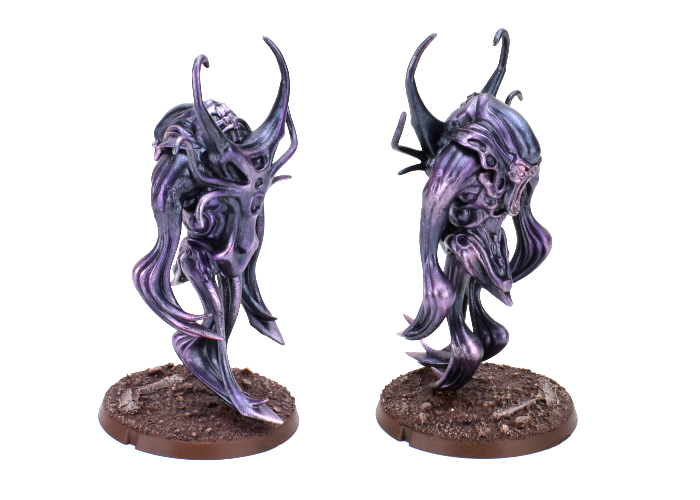
Painting Spotlight: Mature Angel Conversion
Posted on Monday Nov 23, 2020 at 05:00pm in Tutorials
Last week, I added another Hobby Basics article to the Maelstrom's Edge website, covering some general information and quick tips for working with modeling putty. As part of that article, I wound up converting up a Karist Angel with more tentacles than is generally considered safe, and I couldn't resist taking the time this week to slap some paint on it. I've painted up a few different angels in the past, playing with different techniques each time to create a suitably inky-black and cybel-purple alien appearance for them. For this one, I decided to try something new once again, and broke out the Army Painter paints for a quick experiment. Here's a quick walkthrough of the painting process!
Before we get the paint on, here's a proper look at the converted model. It's based on the plastic Mature Angel kit, but with the claw arms modified slightly to form crab-like legs, and lots of tentacles added with 'green stuff' modeling putty.
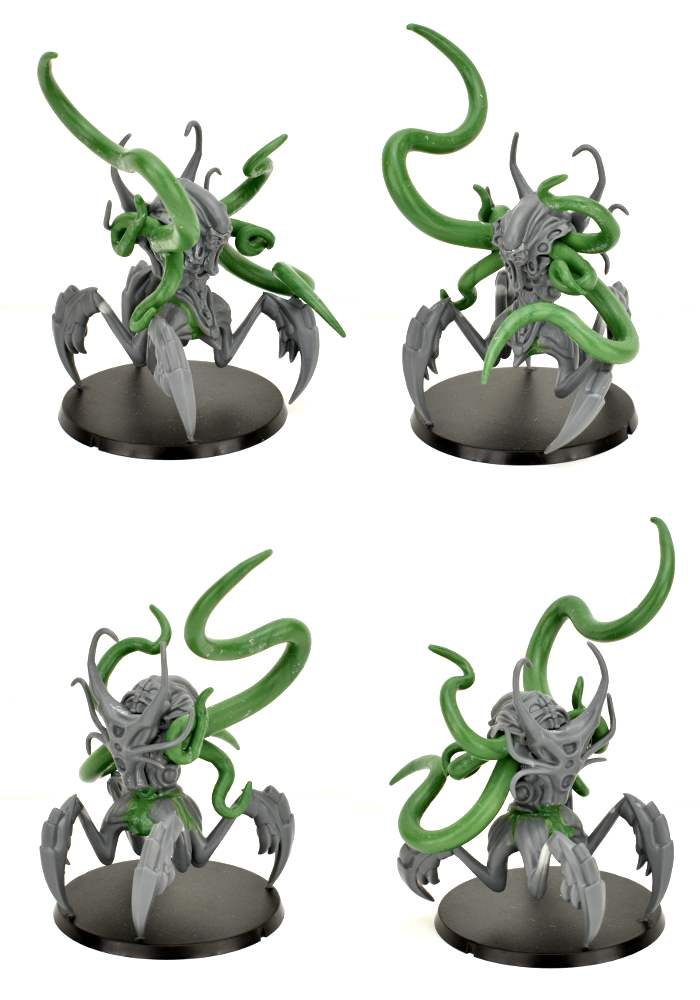
I gave the model an initial basecoat with white, to get a consistent colour for the next steps. Over that, I used Army Painter Alien Purple. Then, grabbing a nice, big brush, I painted three coats of Dark Tone over the entire model, leaving it to dry between each. This darkened everything up to an almost-black, while leaving hints of purple showing through.
I then used a mix of Wasteland Soil, Warlock Purple and white to add highlights. I didn't highlight everywhere, as I didn't want to brighten the model up too much, and wanted the details to be slightly shadowy to accentuate the fluid nature of the Angel's body. I just added the highlights in places where they would add a little 'snap' to the model, accentuating specific features. I also painted in some lightning-like effects on the larger flat areas, to show the cybel energy coursing through the Angel's void gel, and painted the smooth top of the angel's head with black, and then a coat of gloss varnish. The base was painted similarly to my Greatcoat Karist Trooper kitbash, using Ash Grey and a generous layer of Dark Tone.
To paint up your own squidgy alien of tentacled doom, you can pick up the Mature Angel kit along with the rest of the Maelstrom's Edge range from the webstore here.
What are you working on? We would love to see your models and terrain in the Comm Guild Facebook group!
For other building ideas, modeling tutorials, army spotlights and conversion walkthroughs, check out the Hobby section of the Maelstrom's Edge website here.
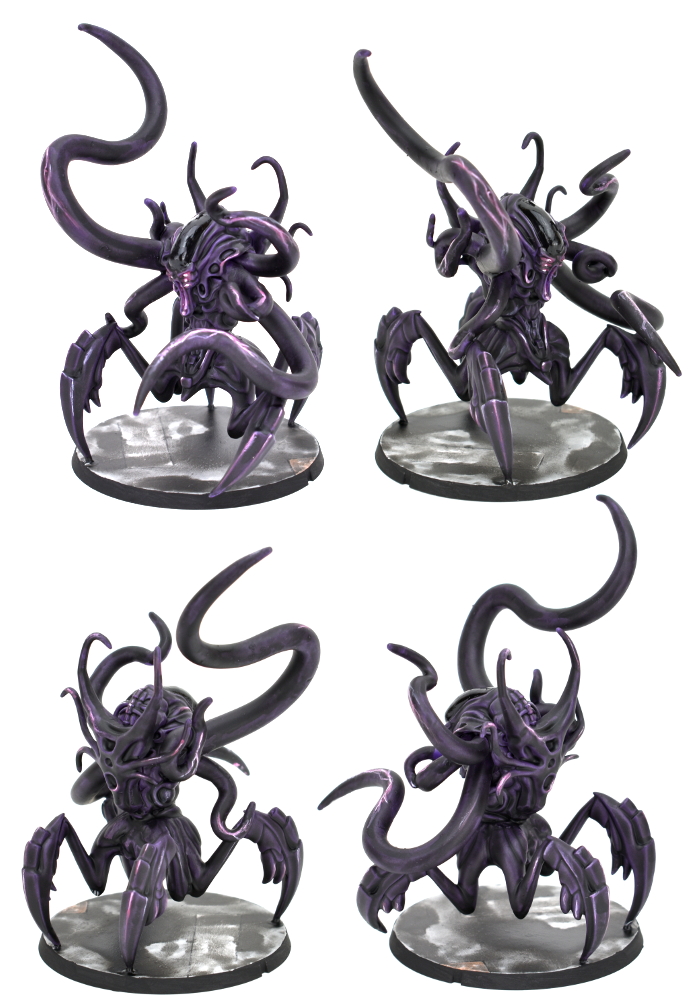
Painting Spotlight: Colorshift Shadow Walker
Posted on Thursday Jun 04, 2020 at 05:00pm in Tutorials
A few articles back, I painted up a Mature Angel using Colorshift paints, as a bit of an experiment. That was actually the second model I attempted with these paints, but I hadn't been entirely happy with the first one. This week, I had a little inspiration though, and so I dug him out and, with a final tweak to his face, wound up with a shiny green/blue Shadow Walker!
The model I painted here is a stock-standard Karist Shadow Walker (No conversion - I know, I'm as surprised as you!). As with the Angel, the armour was painted with Colorshift paints from Green Stuff World. These work best over a gloss black base, so that's where I started, with a quick spray.
Over the armour, I started painting thin layers of 'Emerald Getaway' Colorshift, slowly building up the colour. For the undersuit, I wanted a lighter green, so started with a basecoat of Vallejo Heavy Brown to work down gradually from the black.
I went over the brown with Coat D'Arms Putrid Green, and the belt and weapons with Vallejo Basalt Grey, while continuing to add layers to the Colorshift - It takes a lot of thin layers!
Once I had built up sufficient colour with the Colorshift, I added just a touch of silver on the edges of the armour plates, and some black into the creases, to try to lift them a little, as the shiny Colorshift tends to wash out the detail a bit. I also used some Army Painter Green Tone in multiple, thin layers to shade the undersuit, added a wash of Dark Tone over the weapons and belt, and picked out the helmet lenses and weapon blades with white.
To finish up, I painted the base, added some Basalt Grey highlights to the belt and weapons, and used Army Painter Purple Tone to add an energy shimmer effect to the blades (you can find a tutorial for that here) and shade the lenses.
This was the point where I put the model aside to begin with. While the Colorshift paint was quite effective, if slightly subtle and almost impossible to photograph, on the Angel, on the smaller armour plates on the Shadow Walker it was far more subdued, looking more like really dark shading in weird places rather than a color shift, and making the whole model a bit featureless and dark. I had the idea, though, that picking out the faceplate in a different colour might help to give the model some character. It was fine for the rest of the armour to be a bit dark on the sneaky, teleporty assassin, but I thought this would give him a nice focal point. So I whipped out some more Heavy Brown to re-basecoat over the green, and then used Army Painter Skeleton Bone and white to give him a nice, bone-coloured faceplate!
To give it a go yourself, you can pick up the plastic Shadow Walker kit, along with the rest of the Maelstrom's Edge model range from the webstore here.
What are you working on? We would love to see what your models and terrain in the Comm Guild Facebook group!
For other Maelstrom's Edge modeling articles, including tutorials and walkthroughs of a wide range of different building and miniature projects, check out the Hobby section of the Maelstrom's Edge website here.
Tags: karist painting shadow spotlight tutorial walker walkthrough
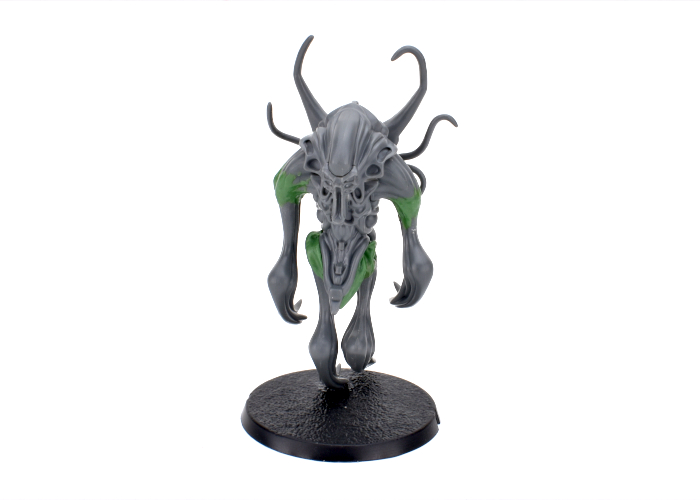
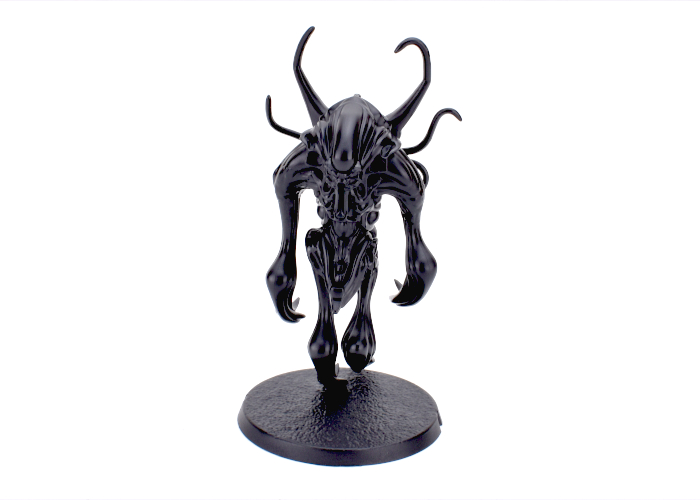
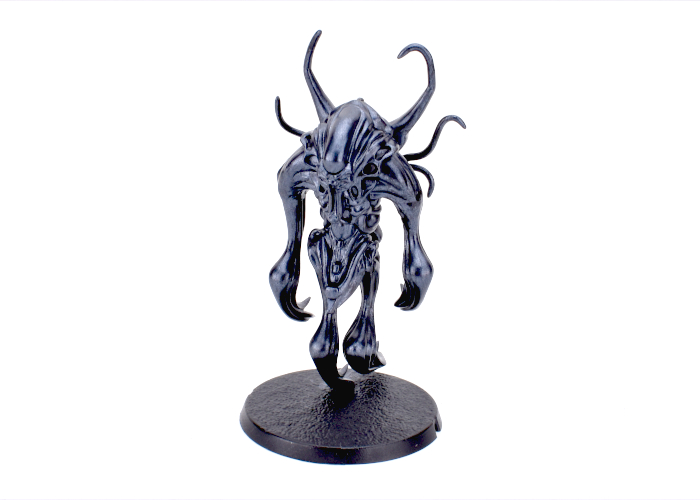
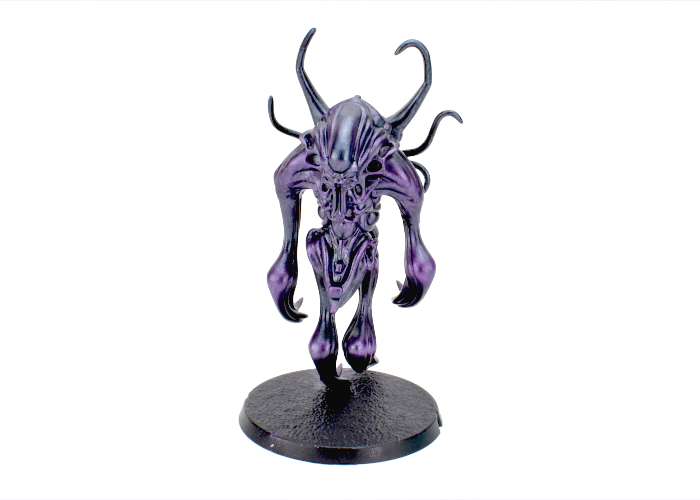
Painting Spotlight: Colorshift Angel
Posted on Friday May 01, 2020 at 02:36am in Tutorials
Time to build something!
For this week's article, I decided to have a go at a project that I've had percolating in the back of my brain for a while now. I bought some Colorshift paints from Green Stuff World some time ago, because they looked to pretty to not try them out on something, and I thought that they would be just perfect for conveying the otherworldly nature of the Karist Angel. So, I dug out an Angel that I had built way back when the Battle for Zycanthus box was first released and got some paint on it, with this result:
So, the first thing to mention here is that the Colorshift paint gives a really neat, subtle colour effect that is frustratingly difficult to photograph! There's a video at the end of this article that shows the transition effect a bit better than the pics fo, although the purple still looks more subdued than it does in the 'flesh'.
Back to the model! The Angel that I used here was built from the regular plastic kit, with some reposing of the legs and a second claw added on the left, just because I thought it would look cool.
As per the directions for the Colorshift paint, I started out with a coat of gloss black. I don't have an aurbrush, so this was just from a spraycan.
Once the black was dry, I started painting light layers of 'Evil Forest', taking care to leave the forehead so that it would stay a nice, shiny black. Evil Forest is shown on the bottle as a red to green transition, but the red actually comes out a deep purple over the black, which is exactly what I was looking for. I painted it on in light coats using a large, flat brush and brushing downwards to leave the black in the crevasses - traditional highlighting and shading tends to kill the shifting effect, so I was trying for whatever shading I could get.
Once I had built up sufficient colour with the Evil Forest, I added some highlights on raised edges and surfaces using 'Emerald Getaway'. This is a pale greeny-blue to blue shift, so over the Evil Forest it helped to accentuate the green shift a little, although that really doesn't show well in these pics.
To finish up, I painted the base, and painted in the eyes and mouth using some old Citadel Liche Purple, Tentacle Pink and white.
And the aforementioned video rotation:
You can pick up the plastic Mature Angel, along with the rest of the Maelstrom's Edge model range from the webstore here.
What are you working on? We would love to see what your models and terrain in the Comm Guild Facebook group!
For other Maelstrom's Edge modeling articles, including tutorials and walkthroughs of a wide range of different building and miniature projects, check out the Hobby section of the Maelstrom's Edge website here.
Tags: angel karist painting spotlight walkthrough