Entries tagged [conversion]
Terrain Kitbash: Sci-Fi Barn pt3
Posted on Monday Oct 25, 2021 at 06:00pm in Tutorials
 - by Iain Wilson
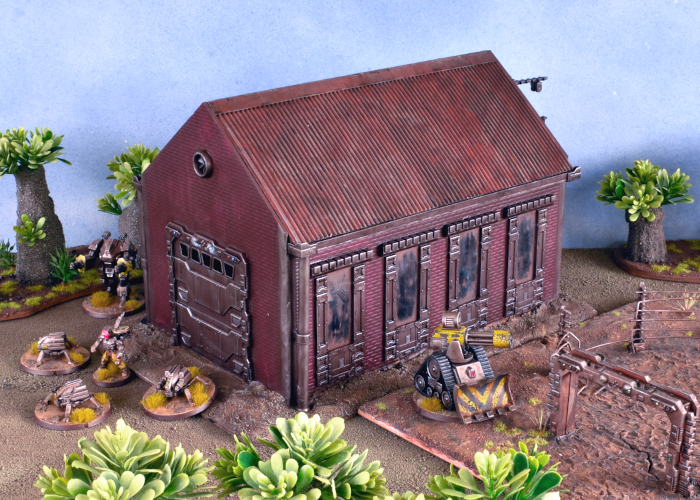
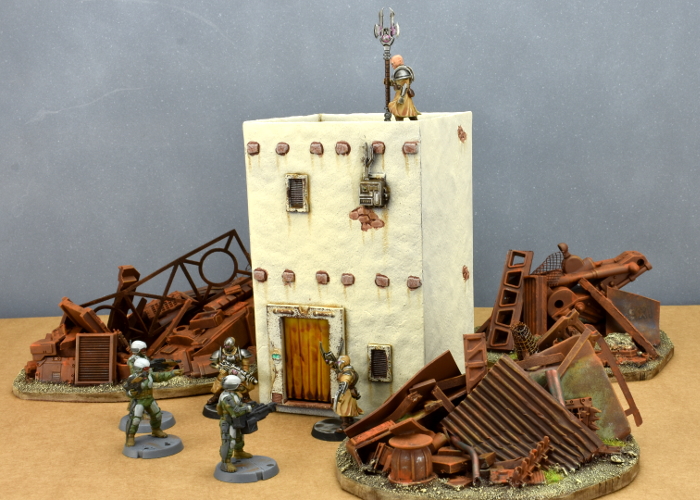
Sci Fi Barn, episode 3: Now in Epirocolor!
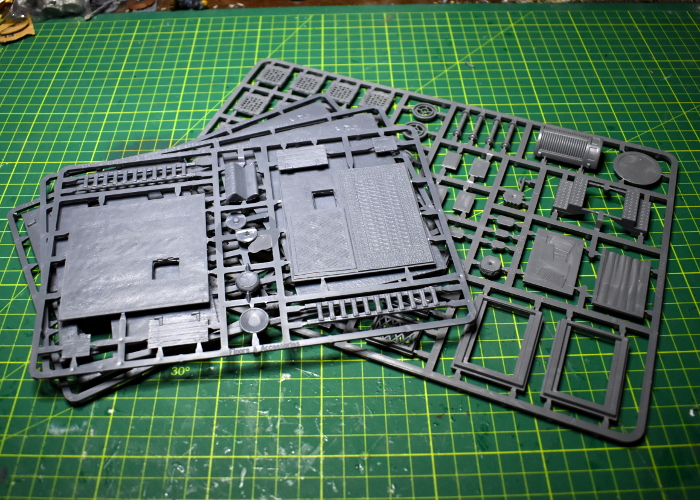
In this latest installment, I finally get some paint on this barn build. If you're wandering in here wondering what it's all about, this was a kitbash of a Plast Craft Games warehouse with parts from the Maelstrom's Edge terrain sprues to build the a sci fi barn (you can find the first part here).
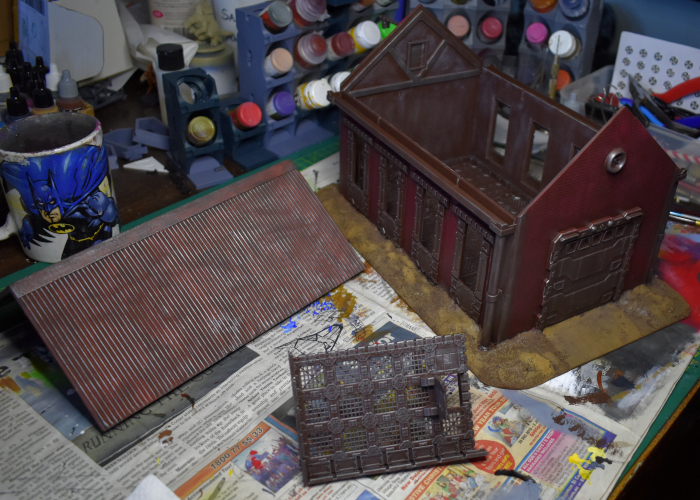
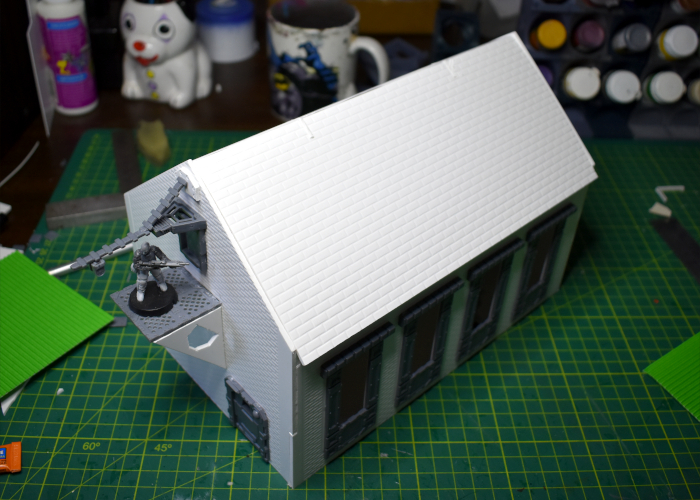
With assembly completed, I kicked off the painting by spraying the whole thing with a coat of a mediumish-dark brown satin spray paint that I had sitting on the shelf. Or, I would have, but it ran out on me. So I wound up spraying the top of the roof with some old Rustoleum flat red that I sometimes use as a base for rusty metal.

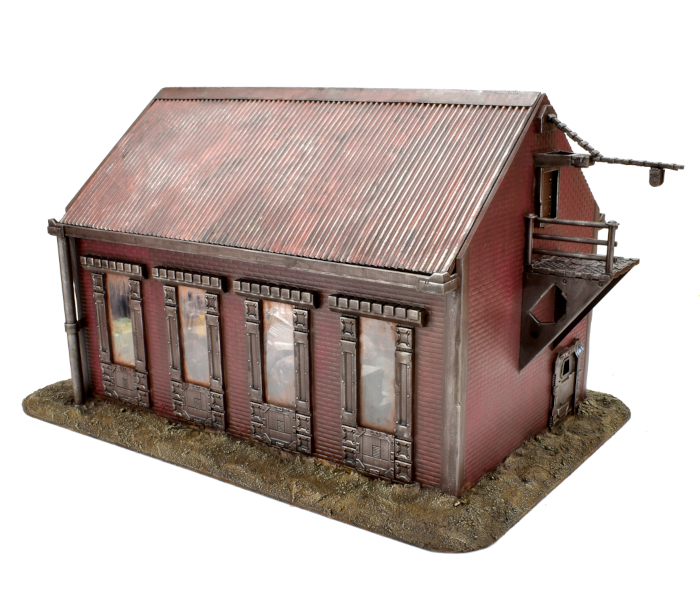
I went back over the red roof with some Vallejo Charred Brown before drybrushing over all of the metal parts with some Citadel Boltgun metal (Leadbelcher, for the newcomers). The non-metal parts of the interior walls were drybrushed with some Army Painter Skeleton Bone to pick up the texture on the foamed PVC, and the exterior bricks were given a heavy drybrush of Scalecolor Baal Crimson. Then before putting the drybrushes away, I gave the dirt on the base a layer of Vallejo Heavy Brown.
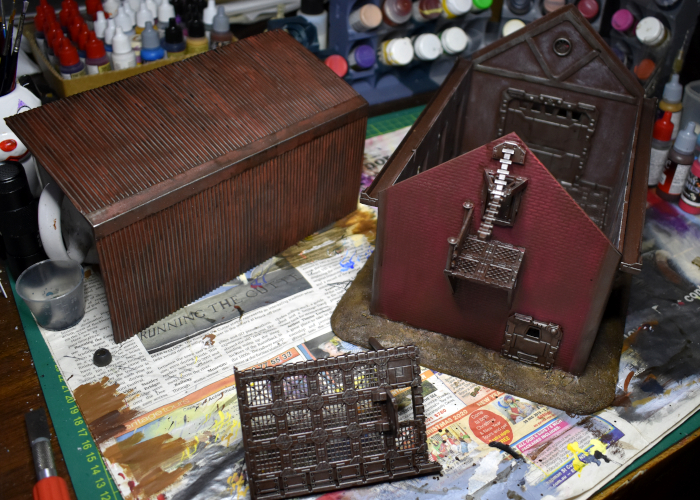
I was aiming for a weathered but not overly rusty metal look for this piece, as it's intended for a fairly arid 'western' themed table set. So over all of the metal parts and the base I added a generous coat of Army Painter Strong Tone and set it aside to dry.
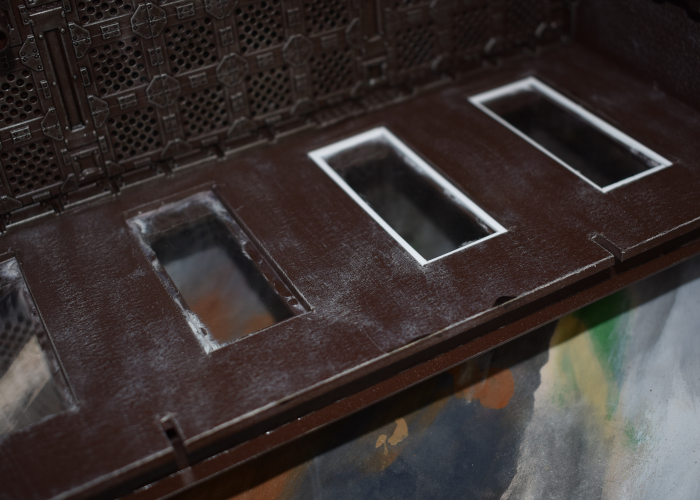
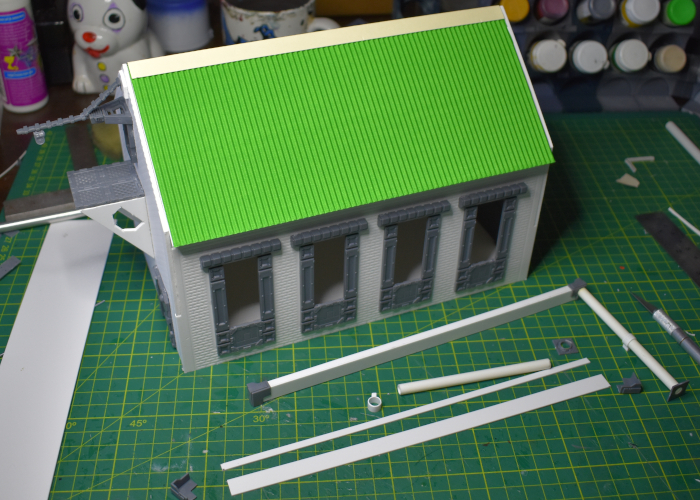
At this point it was time to fit the window panes. The warehouse set came with painted clear plastic pieces that looked fine in the original warehouse, but turned out to not look right here. So instead, I used them as a template to cut some clear plastic sheet to size as a replacement.
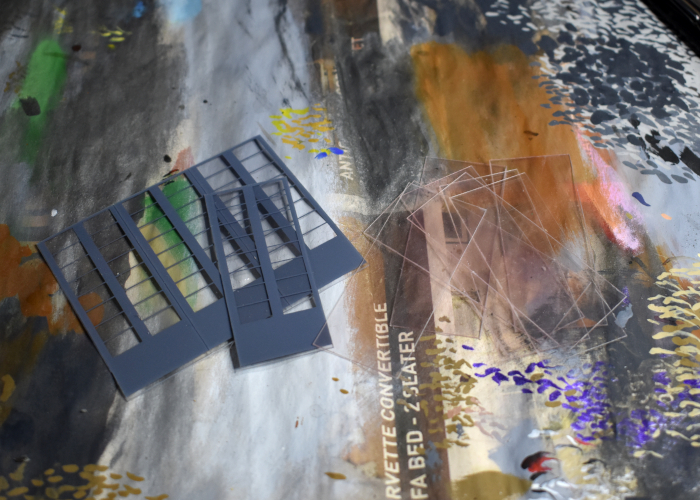
I hadn't originally planned to add internal window frames, but with the panes in place the glue around the edges was very obvious , so I added some thin frames using some thin PVC.
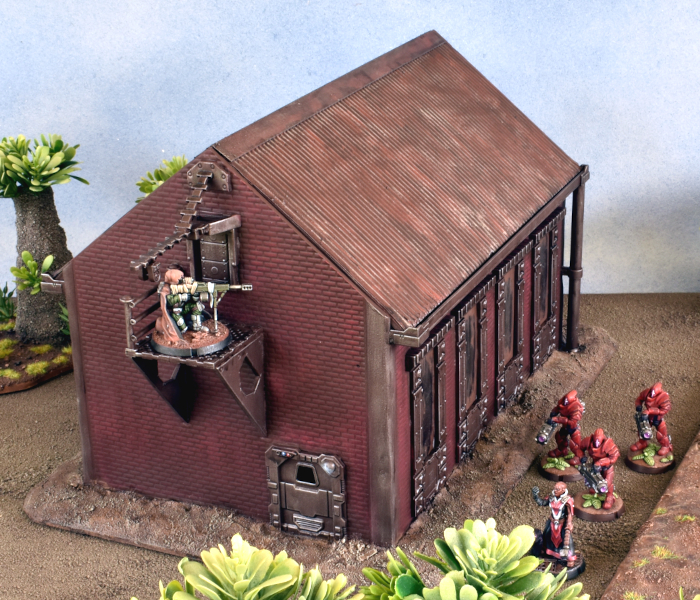
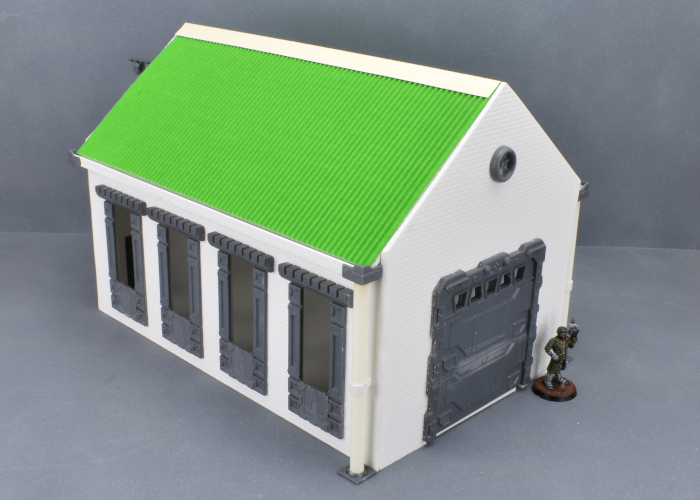
After painting these new internal frames brown, all that was left was to add final detailing. I drybrushed the base dirt with some Army Painter Skeleton Bone and all of the metal parts with a light layer of Army Painter Shining Silver. Lights and sensors on the door frames were painted in with red and blue.
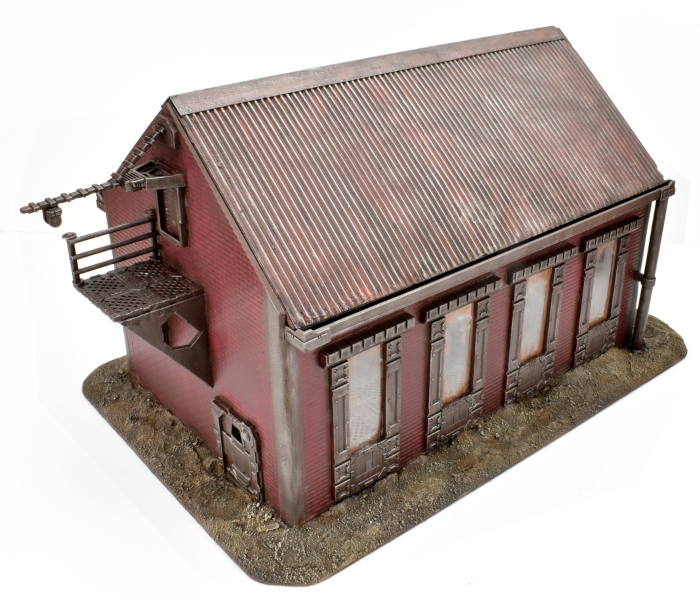
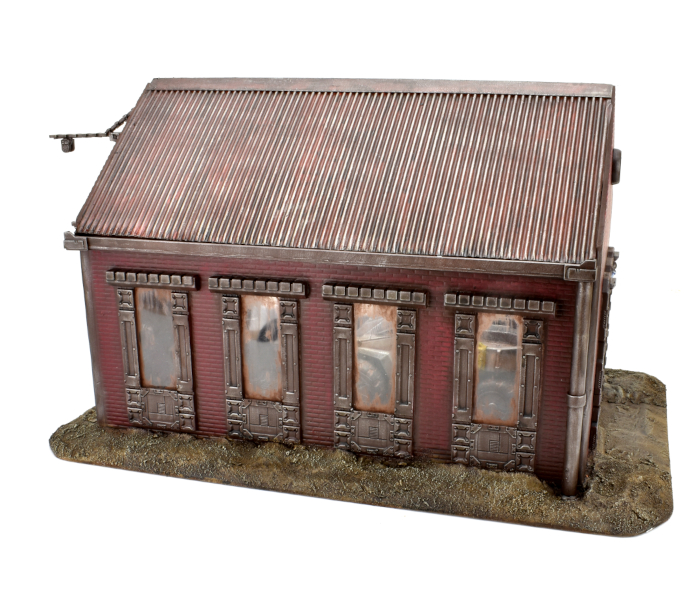
With the metal parts being quite dark, I didn't add a lot of dirt weathering, other than over the tops of the doorframes where it served to conceal a few messy over-brushes of red from the bricks. I did add some brown dirt smearing around the edges of the window panes, partly to give them a more weathered appearance, and partly to conceal any fogging from the glue.
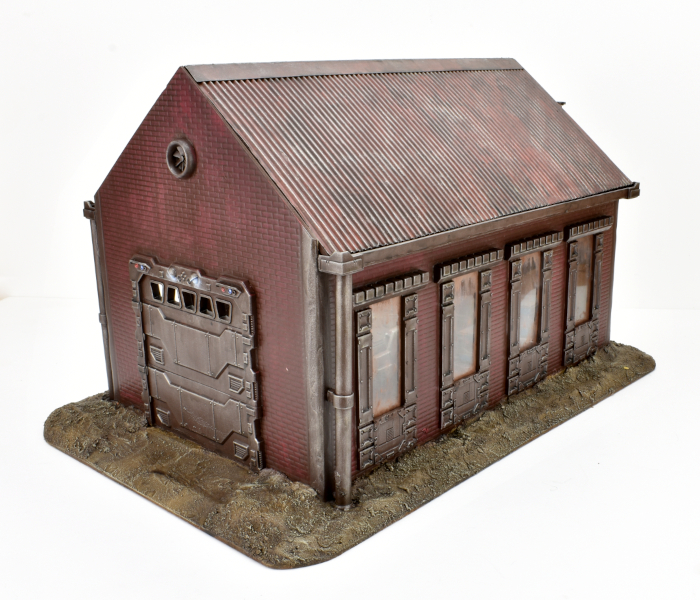
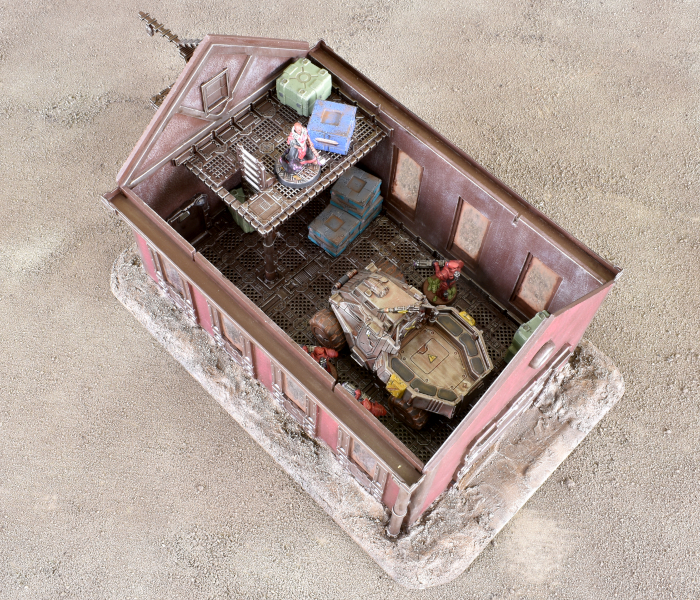
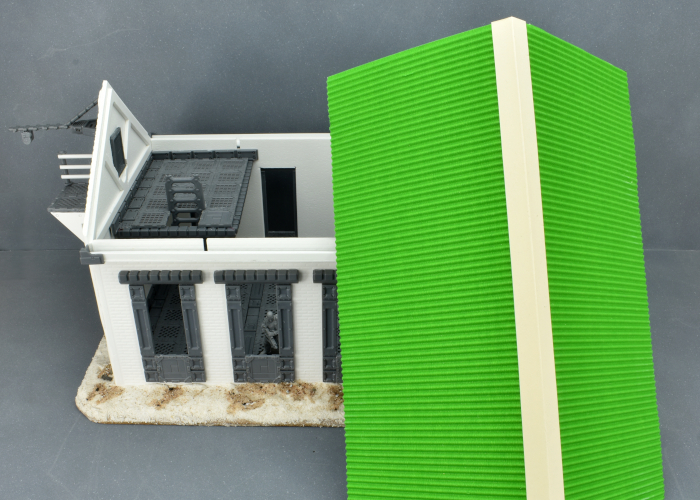
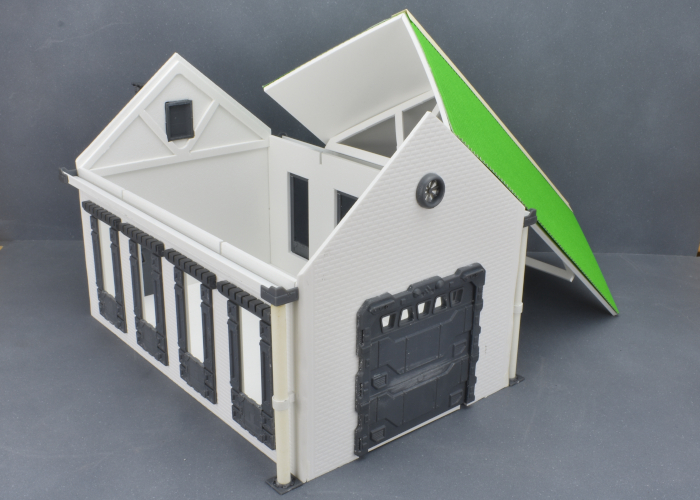
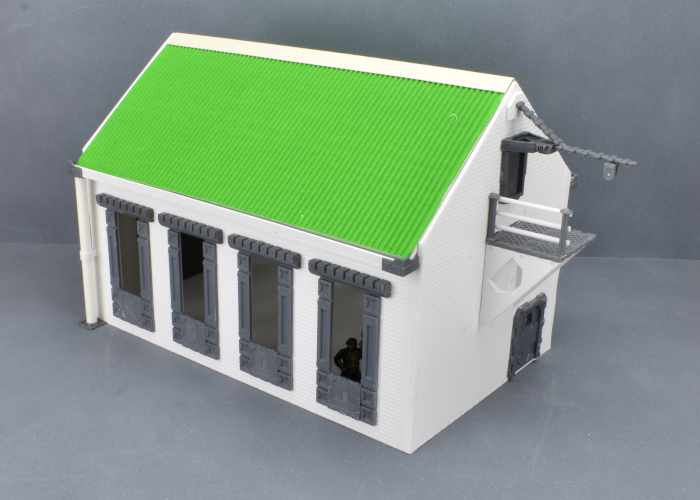
With some crates and an old vehicle thrown in for colour, when the roof is lifted off the interior winds up looking like this:
To build your own outbuilding of rural doom, you can pick up the terrain sprues along with the rest of the Maelstrom's Edge range from the webstore here.
What are you working on? We would love to see your models and terrain in the Comm Guild Facebook group!
For other building ideas, modeling tutorials, army spotlights and conversion walkthroughs, check out the Hobby section of the Maelstrom's Edge website here.
Tags: buildings conversion kitbash painting spotlight terrain terrainsprue tutorial
Terrain Kitbash: Sci-Fi Barn pt2
Posted on Monday Oct 11, 2021 at 06:00pm in Tutorials
- by Iain Wilson
Back in the barn!
I recently shared the first part of this build, combining a Plast Craft Games warehouse with parts from the Maelstrom's Edge terrain sprues to build the shell of a sci fi barn (part one is here). This week, I broke out some more terrain sprues and set to work on the interior!
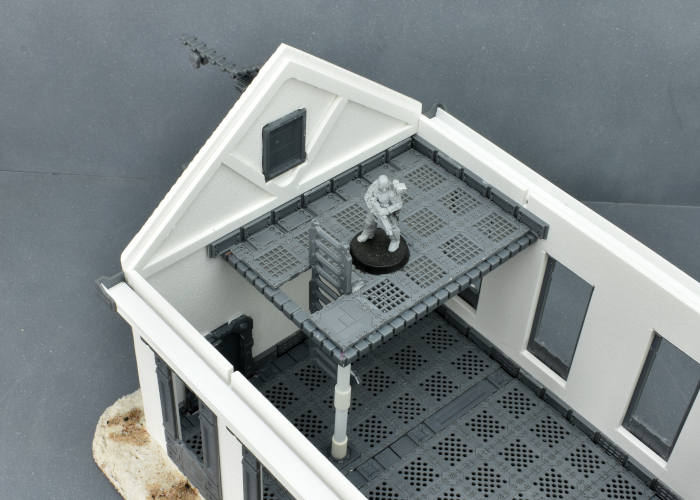
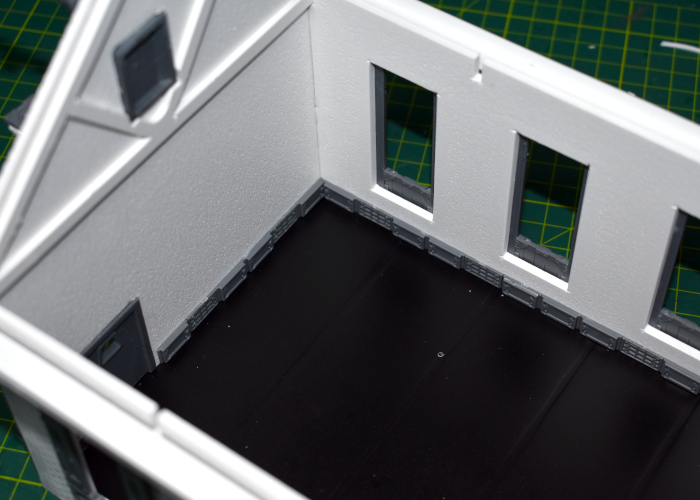
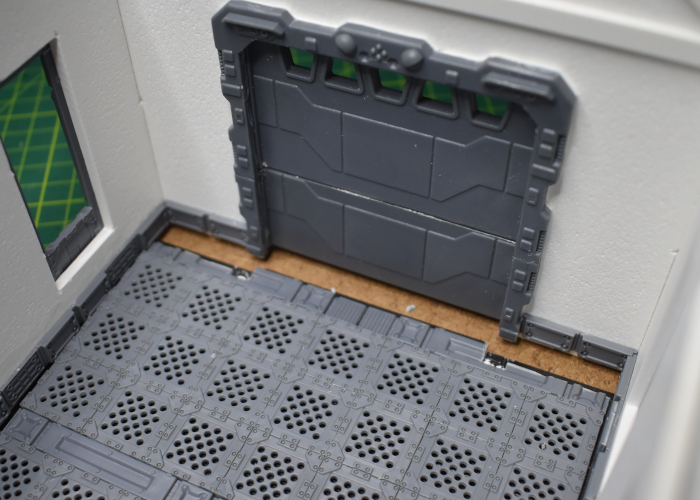
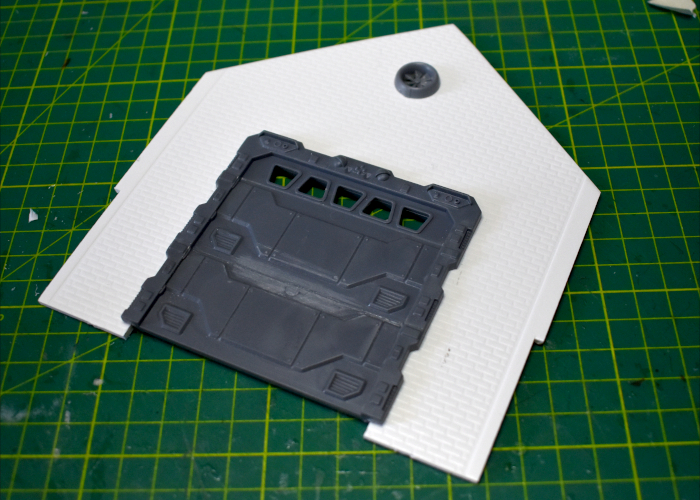
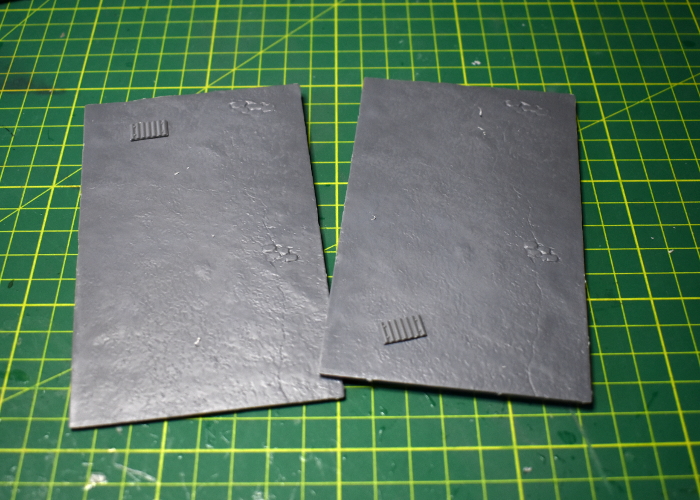
When I built the outside, I left the floor unglued, to get easier access for fitting parts. So I started by taking the floor piece back out and spraying it matte black, so that it wouldn't show underneath the grating pieces I was planning to use for a new floor layer on top. After measuring out the width of the floor against the floor grate pieces from the terrain sprue, I found there was going to be a slight gap around the edges, so I added some skirting using the reinforcing struts from terrain sprue #2.
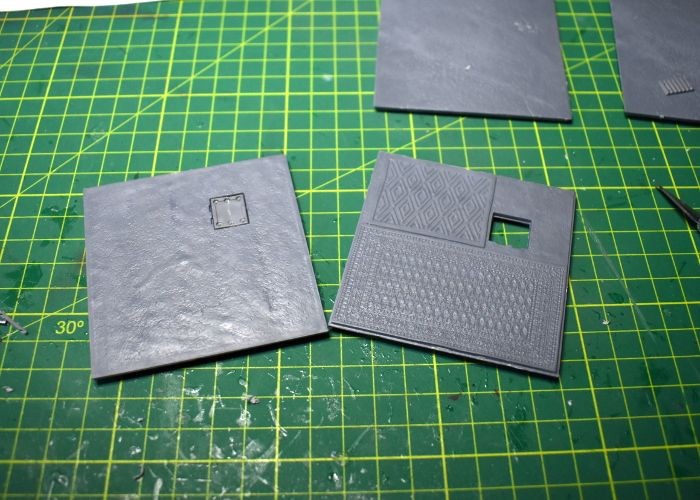
Then I tiled the floor with one of the floor grates from terrain sprue #2, spacing them out with struts from terrain sprue #1 to cover the full length of the barn.
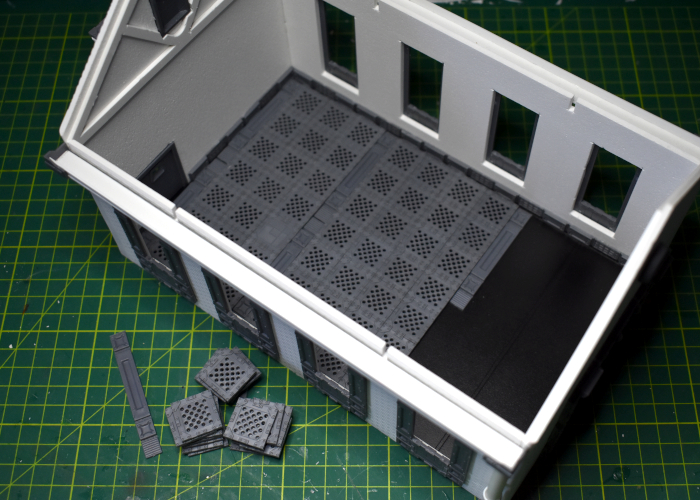
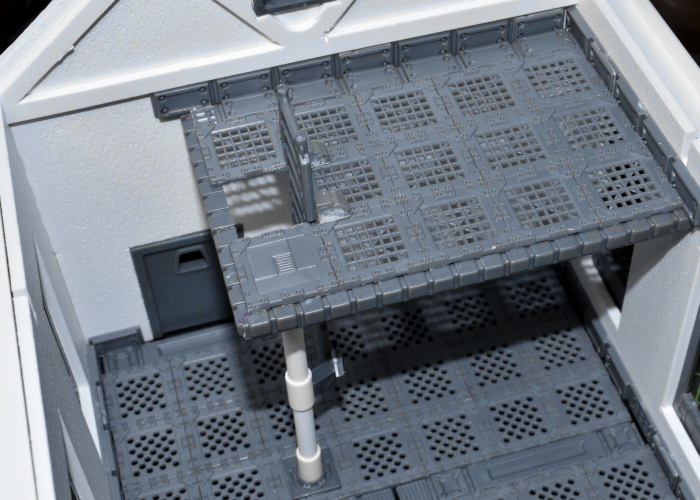
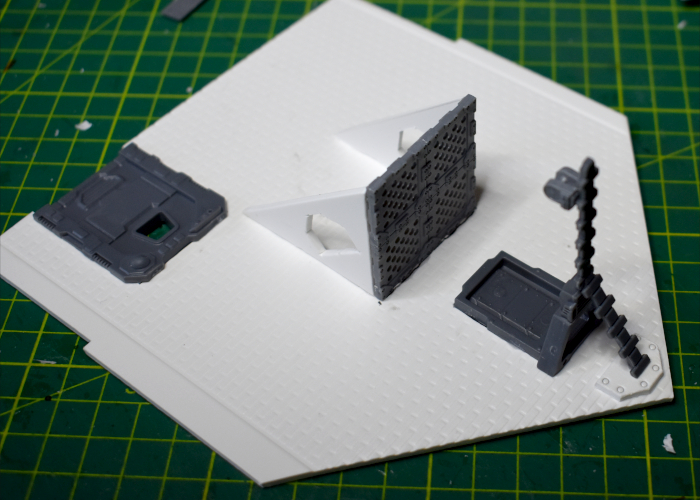
I wanted a small balcony on the end with the smaller door, which would provide access to the platform and crane on the outside of the wall. I used another of the floor grate pieces with some more reinforcing struts and lintel pieces top build the balcony, and some plastic tube with two of the small pipe fittings from terrain sprue #1 to hold it up on the protruding corner. Finally, a ladder from terrain sprue #1 provides access up to the balcony.
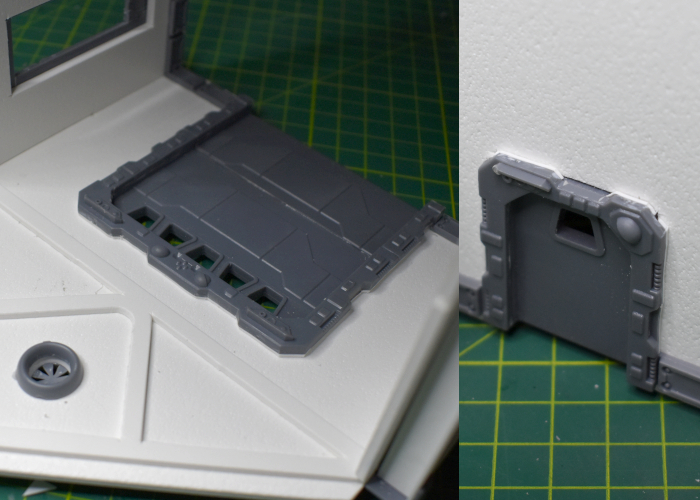
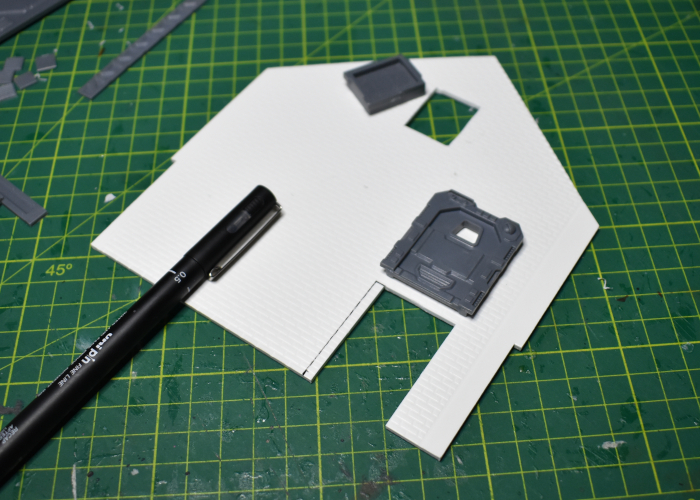
To add some detail to the inside of the doors, I grabbed some extra doors and cut the frames off the outside using a razor saw and scalpel.

The rectangular inside frame of the existing doors protrudes through the wall about a millimetre, so I cut some 1mm plasticard to form a spacer behind the new interior frames, trimming it up to match the contours of the outside of the frames and then gluing it all into place. I also added the outside ring from a porthole from terrain sprue #2 to finish off the hole for the exhaust fan on the outside wall.
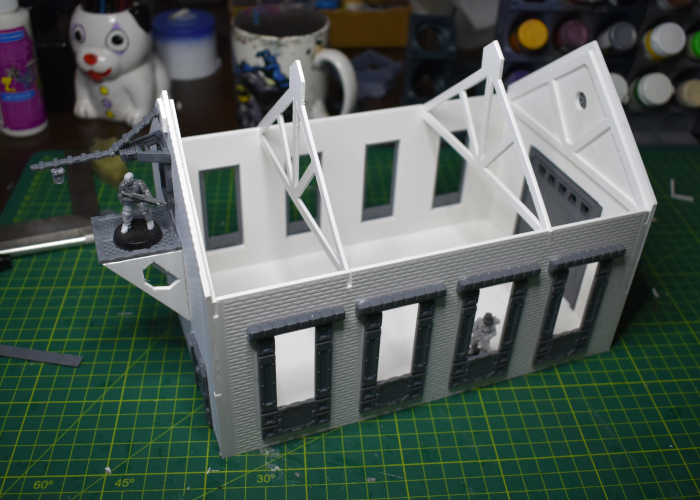
I considered adding some interior detail around the windows, but this would complicate painting as I needed to get the clear plastic panes in at the end. I also thought about building some animal enclosures, but decided to keep the floor space open so that, in the event the building is being used with the interior accessible, I can just drop in a vehicle or some crates and other obstacles to suit the situation.
So that just left putting the barn onto a base. I cut a piece of 5mm hardboard to size, sanding down the edges to bevel them off and then glued the floor piece of the barn into the middle of it. When I went to glue the rest of the barn over the top, it immediately became apparent that I hadn't accounted for the raised floor tiles when I added the interior door frames, so I had to cut out some inserts for them to slot into.
Finally, I mixed up a batch of filling plaster with some PVA glue and fine sand for texture, and slathered it around the outside of the building to cover up the hardboard. This mixture didn't immediately stick particularly well to the hardboard, although it would once the glue dries, so this process involved poking it into place with fingers and an old paintbrush, and a certain amount of cursing. In the end, though, I got the plaster laid down all around the exterior, with a smoother ramp of pure filling plaster leading up to the larger door. Then I finished up by adding some small patches of sand and gravel mix here and there, glued into place with some more PVA glue.
Next up: Getting some paint on. Click here!
To build your own outbuilding of rural doom, you can pick up the terrain sprues along with the rest of the Maelstrom's Edge range from the webstore here.
What are you working on? We would love to see your models and terrain in the Comm Guild Facebook group!
For other building ideas, modeling tutorials, army spotlights and conversion walkthroughs, check out the Hobby section of the Maelstrom's Edge website here.
Tags: buildings conversion kitbash spotlight terrain terrainsprue tutorial
Terrain Kitbash: Sci-Fi Barn
Posted on Monday Sept 20, 2021 at 06:00pm in Tutorials
Time to get some terrain on!
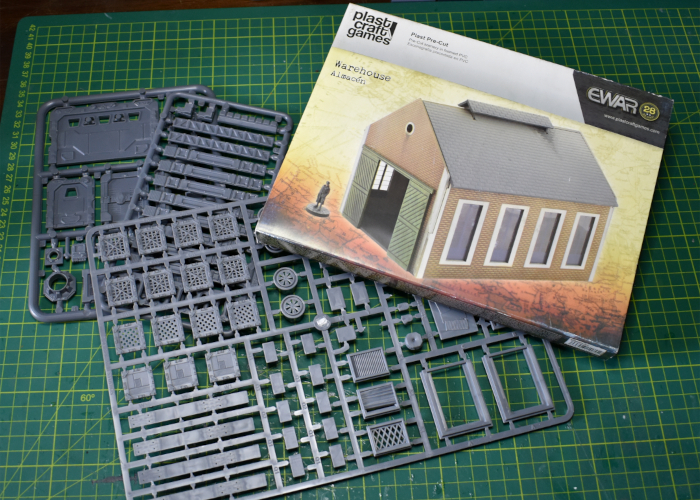
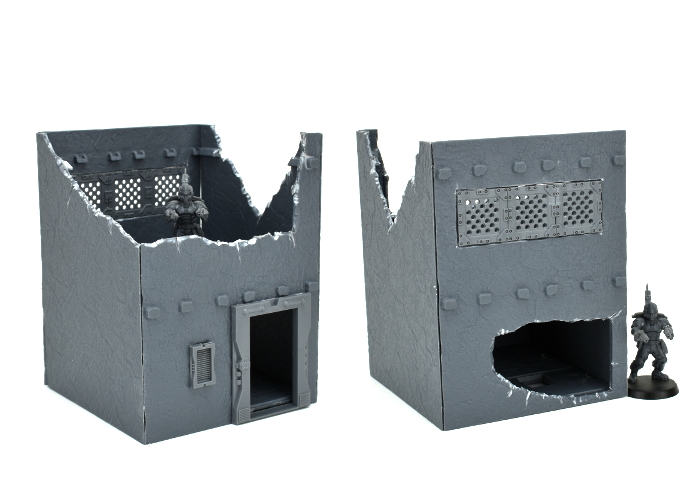
Back in 2017, I put together a sci-fi 'western' gunshop, using the Maelstrom's Edge terrain sprue and a foamed PVC western shop kit from Plast Craft Games. Plast Craft sadly appear to have gone out of business, but I picked up a few building kits on clearance from a local retailer to start fleshing out a themed table. The first (and probably largest) off the rank is an appopriately upgraded barn!
Along with the Maelstrom's Edge terrain sprues, the kit I used for this build is an urban warehouse. If you want to build something similar yourself, while you may not be able to still track down this specific kit, there are other similar buildings available in MDF from other manufacturers, or you could use foamed PVC or foamcore to build your own from scratch.
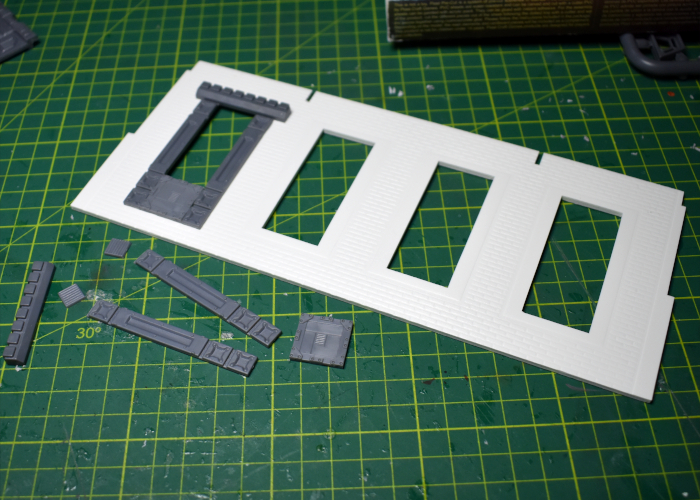
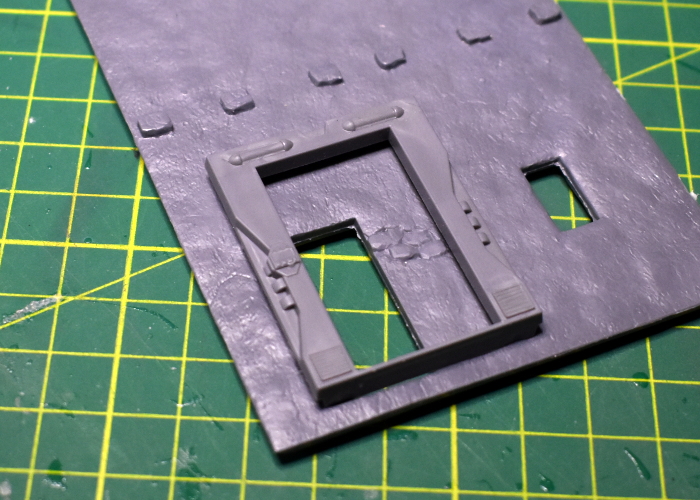
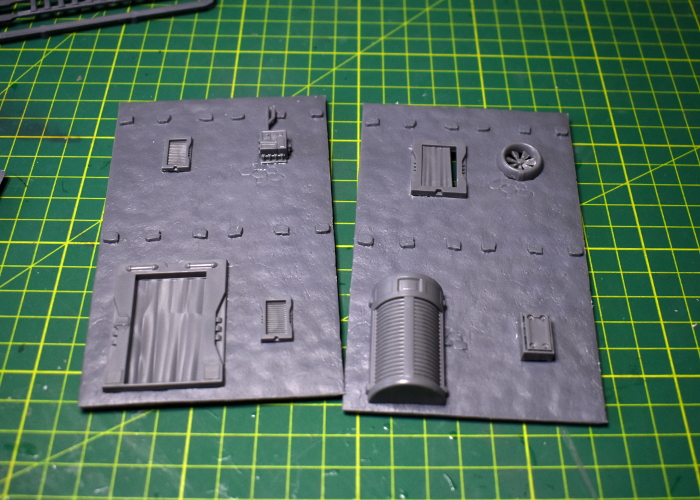
I started out by adding some tech details to the windows, bulking out the frames using support struts and lintel pieces from terrain sprue #1, and floor panels from terrain sprue #2.
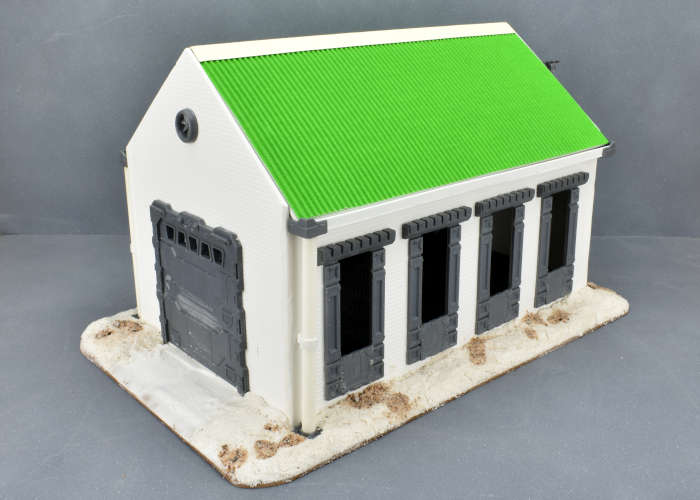
On the front of the building, I replaced the sliding wooden doors with a garage door from terrain sprue #1. To make up the extra height, I cut off the top of a second garage door with a razor saw and glued the two together.
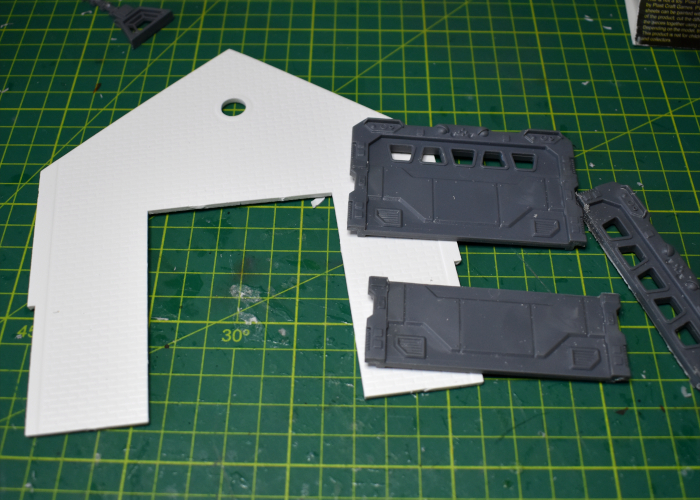
The resultant door was the right height, but too wide, so I also widened the door cavity in the wall with an exacto knife before gluing the door in place. The round window at the top of the wall turned out to be exactly the right size for the exhaust fan from sprue #2..
The other end of the building has a smaller door and a rectangular window up high. I enlarged the cavities slightly and glued in a shutter window and door from sprue #1.
To avoid the building from just winding up looking like a plain box, I built a small platform and crane onto the wall, turning the small window into an access point for small freight. The platform was constructed from sprue #2 floor grates and some scrap pieces from the warehouse kit's roof trusses. The crane used a trapezoid window and a couple of energy fence pieces from sprue #1, the upright supports from the gun unit on sprue #2 and another scrap piece of PVC. I'll need to find some string or fine chain for it to finish up.
At that point, it was time to start slotting everything together.
The warehouse kit has a tiled roof, but I wanted to go with corrugated iron instead, for a better contrast from the brick walls. With the top ventilation struts trimmed off, the assembled roof provides a solid base for the iron roof. I've left the middle two roof trusses and the roof itself unglued, so that the roof can be removed and the building interior used during a game.
Over the original roof, I glued two sheets of corrugated cardboard, adding a strip of thin, folded card for the ridge capping. That didn't look quite right as-is, so I decided to also add some rain guttering, using some plasticard and a few more components from terrain sprue #1.
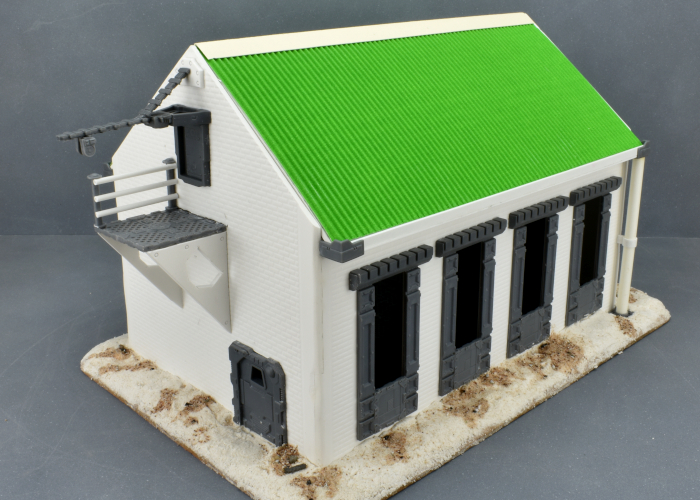
The windows are still missing their 'glass' - some thin, translucent plastic that comes with the warehouse kit. This will be glued in place after I've painted the barn. Otherwise, the finished exterior:
As a final touch, I decided the small platform needed a hand rail, so I whipped one up using a pair of posts from terrain sprue #2 and some thin plastic rod.
Coming up in part 2: I'll add some detail to the interior of the building before painting. Find it here!
To build your own outbuilding of rural doom, you can pick up the terrain sprues along with the rest of the Maelstrom's Edge range from the webstore here.

What are you working on? We would love to see your models and terrain in the Comm Guild Facebook group!
For other building ideas, modeling tutorials, army spotlights and conversion walkthroughs, check out the Hobby section of the Maelstrom's Edge website here.
Tags: buildings conversion kitbash spotlight terrain terrainsprue tutorial
Converting a Robot Stargrave Crew
Posted on Monday Sept 13, 2021 at 09:52pm in Tutorials
When Stargrave arrived on the gaming scene, bringing the popular Frostgrave rules into a sci-fi setting, it sparked all sorts of interesting ideas amongst gamers for building crews. While there is an official model range for the game, it also encourages players to use whatever miniatures they like, which is a perfect excuse to break out some models and get creative! I was particularly interested in the rule allowing any crew members to be robots, and set to work building up a crew using (mostly) the Maelstrom's Edge Epirian Scarecrow plastic kit!
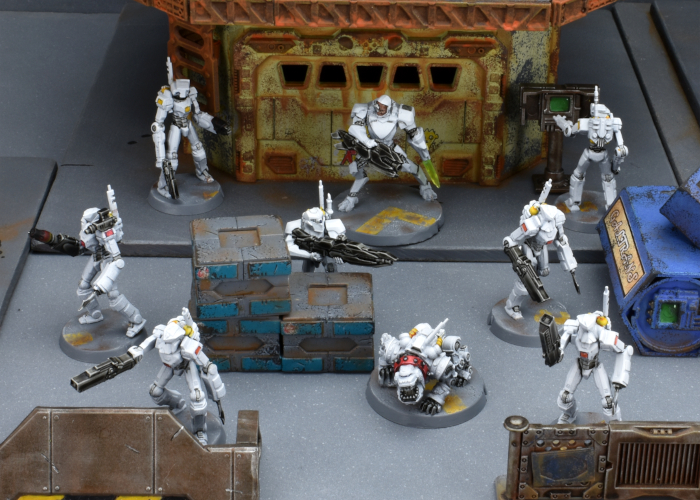
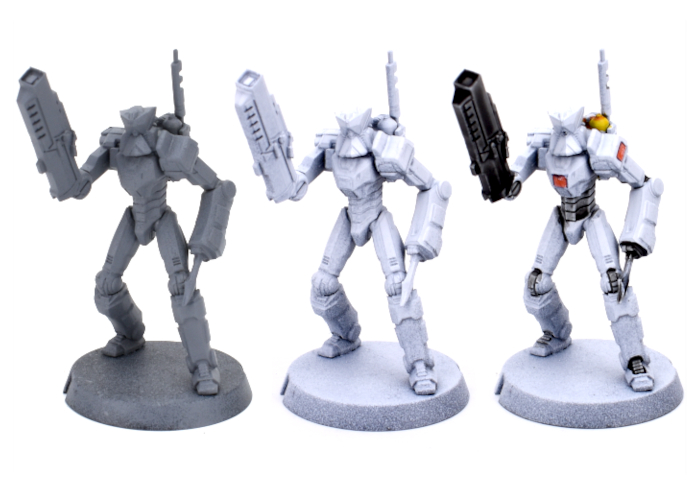
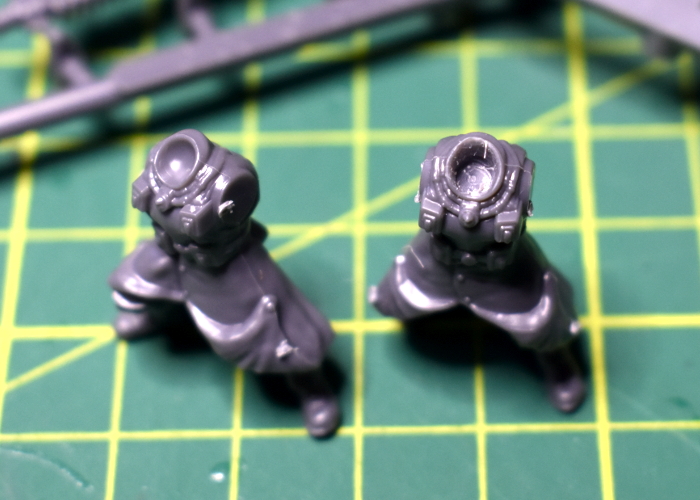
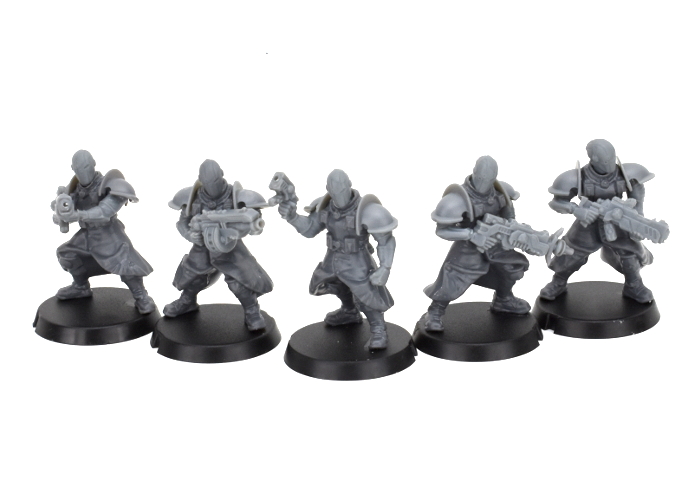
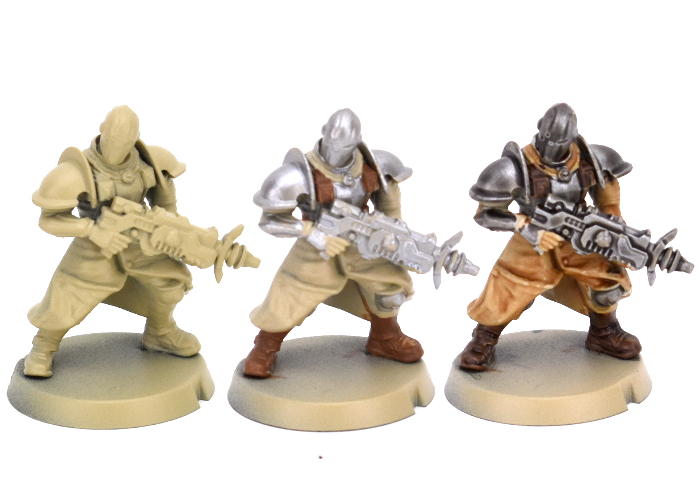
The bulk of the crew was made up of very slightly converted Scarecrows with different heads taken from the Remnant Militus battlesuit kit to denote different 'classes' of robot. Thanks to how wonderfully poseable the Scarecrow kit is, it's really easy to get a range of different looking models out of it! I also used a resin robo-dog from Artel W for a guard dog, added a (still to be painted) space dwarf from Victoria Miniatures as a first mate, and a converted Remnant Nimbus battlesuit for the Captain.
I wanted an easy paint scheme that I could get done quickly, and used Army Painter paints for the bulk of it. I started with a base coat of Uniform Grey spray, followed by a top-down (or 'zenithal') spray of white, so that the grey would stay visible in the creases and underneath surfaces to provide some shading. I then went over the joints and other exposed metal parts with a coat of Dark Tone, and gave the weapons three generous coats of the same. The final details were done with Citadel Contrast - Iyanden Yellow for the tanks on the robot's backs and Leviadon Blue highlighted with Army Painter Ice Storm and white for the eye lenses. The different classes of robot also received some shaded panels to tell them apart - yellow for techs, orange for soldiers and red for specialists.
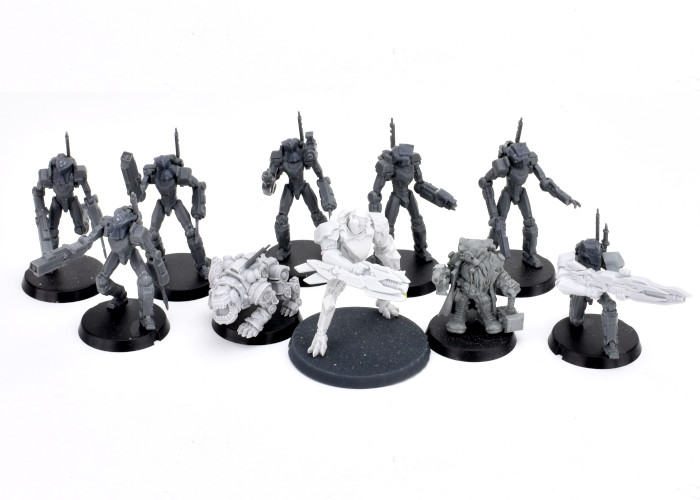
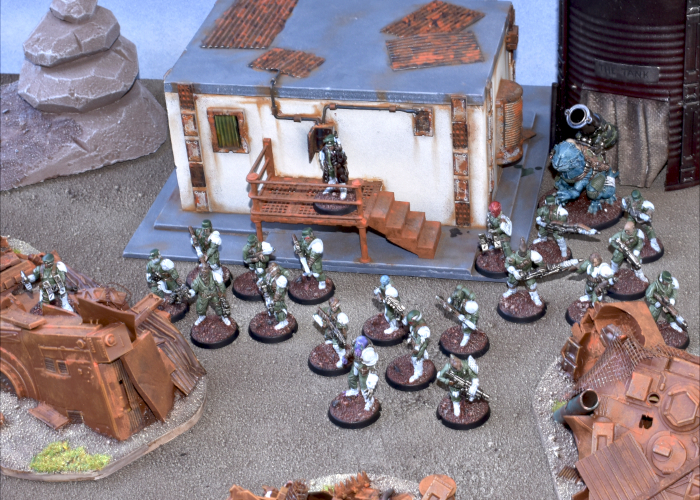
I'm still deciding how to paint up the first mate, and how closely he will mimic the colour scheme, but here's the rest of the the crew all assembled:
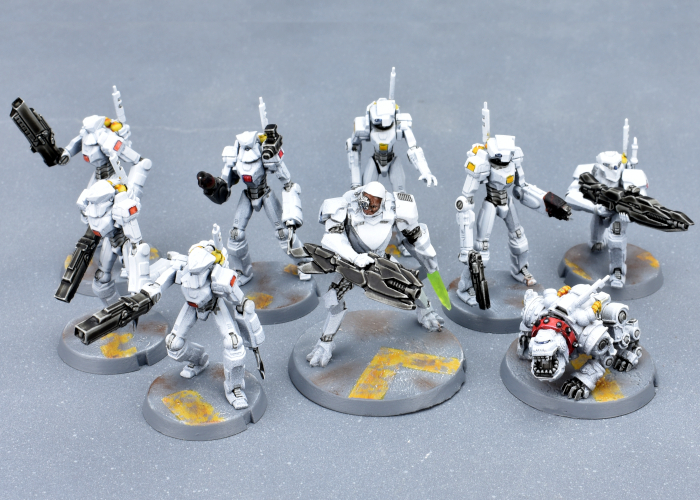
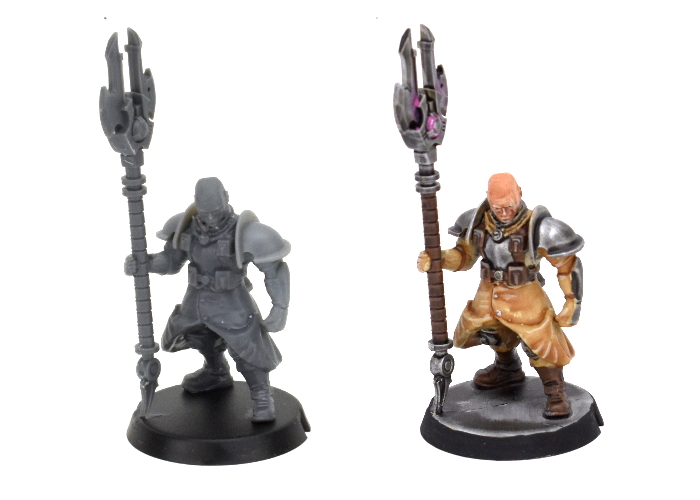
Captain and Guard Dog:
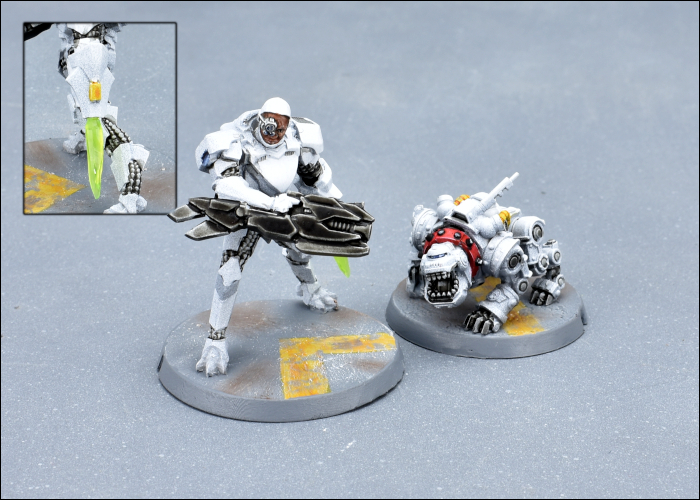
The Captain was built from a Nimbus battlesuit with the head taken from the Karist Heavy Weapons kit. The energy blade is part of a trimmed down lightsaber from a Star Wars figure, left over from an old project. He represents a cyborg in combat armour.
Tech crew - Hacker and Chiseler:
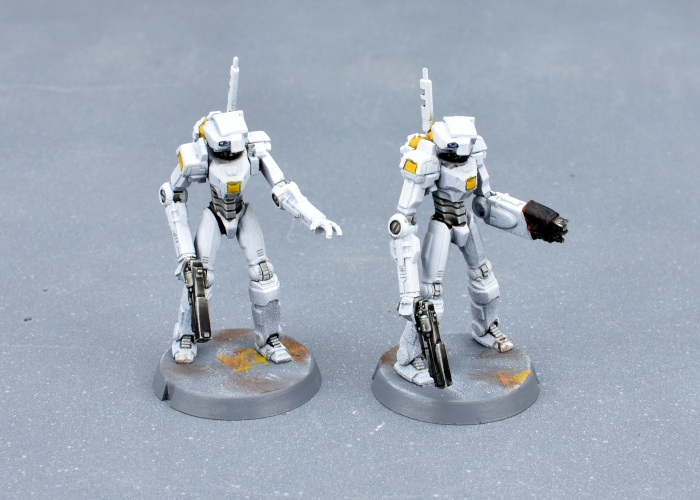
Chiselers are normally equipped with lockpicks. I decided to go a more direct route and gave him a cutting torch using part of a weapon from the Broken Rabble kit.
Troopers

I gave the troopers bulkier left arms to house their combat knives using spare Scarecrow shin pieces. The knives are taken from the Faction Expansion Sprue.
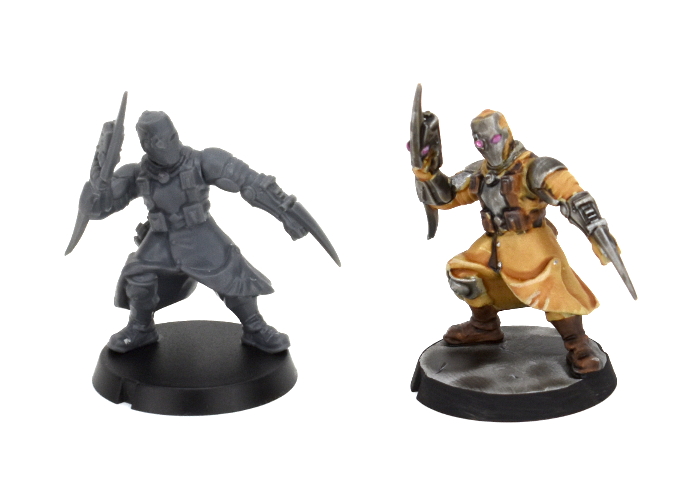
Specialists - Burner and Sniper:
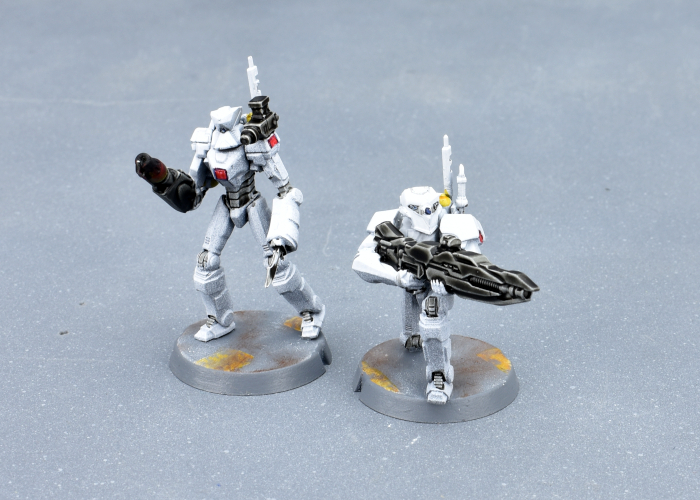
The Burner has a pistol and knife as well as the flamethrower, so I gave him the same knife arm as the regular troopers and mounted a mini grenade launcher taken from the Epirian Handler kit to his shoulder to represent the pistol. The sniper has a different head to the regular troopers, and his sniper rifle was a handy way to make use of the second set of arms that come with the Captain's Nimbus suit.
Time to get that mate painted up and send these bots out on into the black!
To build your own robot crew of clanking doom, you can pick up the Scarecrow kit along with the rest of the Maelstrom's Edge range from the webstore here.
What are you working on? We would love to see your models and terrain in the Comm Guild Facebook group!
For other building ideas, modeling tutorials, army spotlights and conversion walkthroughs, check out the Hobby section of the Maelstrom's Edge website here.
Tags: conversion epirian robot scarecrow spotlight stargrave
Army Spotlight: Broken SARA Detachment
Posted on Monday Aug 23, 2021 at 09:06pm in The Broken
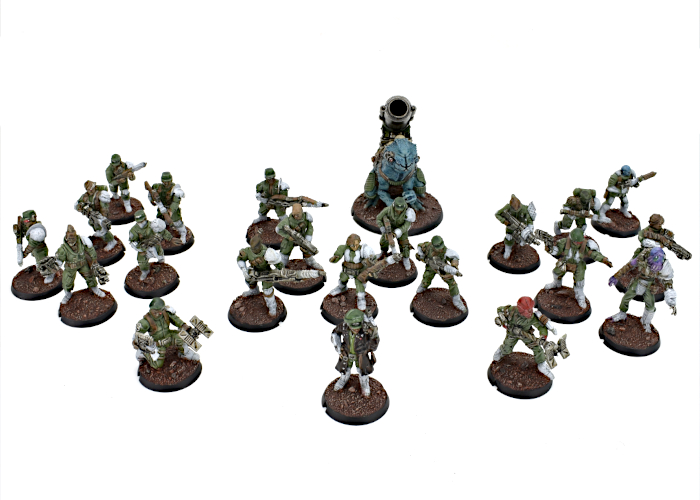
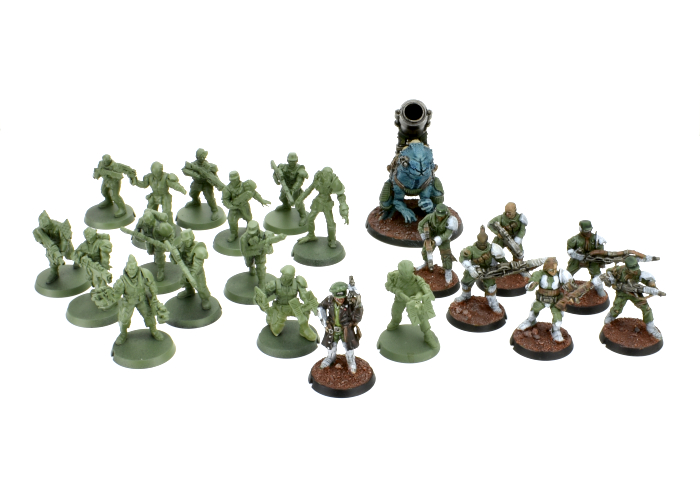
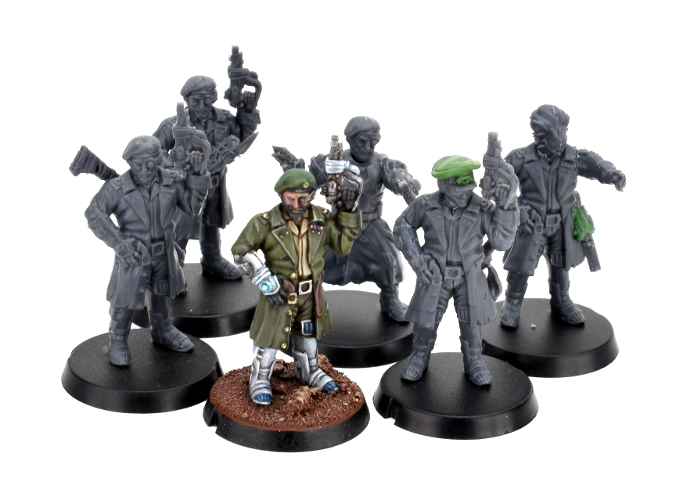
Last week, I shared a Revolutionary Captain conversion that I had painted up to lead a new SARA force for my army collection. This week, I completed work on the rest of his detachment!
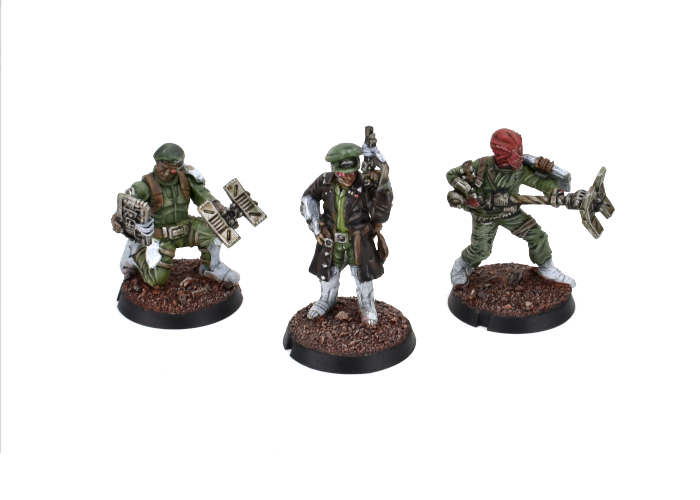
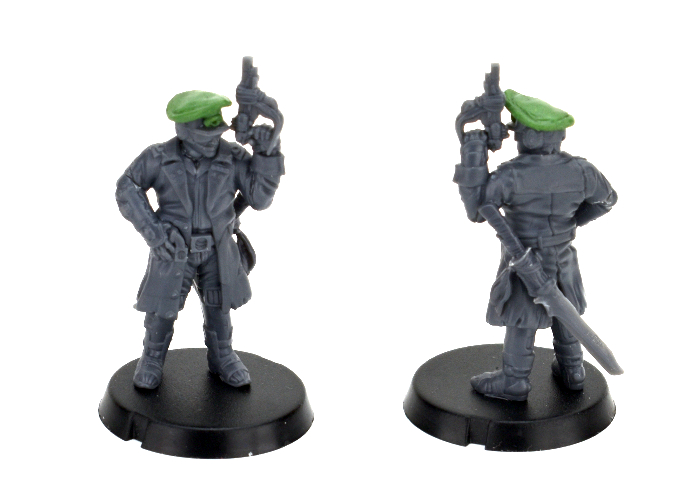
The leader for the detachment is obviously the aforementioned Revolutionary Captain, equipped with his signature pistol and an added trophy melee weapon. To accompany him into battle, I filled out a Vanguard slot with a pair of Sig Jammers, on using the regular resin model, and another converted up using a bunch of assorted parts, including the beret head that I didn't use on the Captain. Sig Jammers provide support to Broken forces by interfering with enemy Fields and forcing additional Suppression Points onto enemy units with their Tech Disruptors.
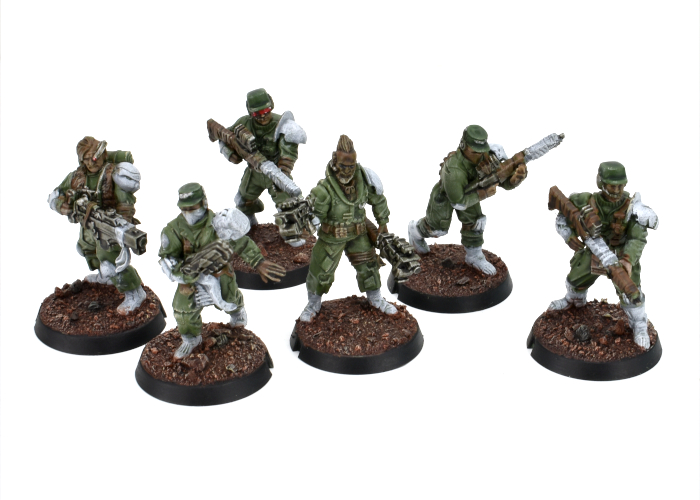
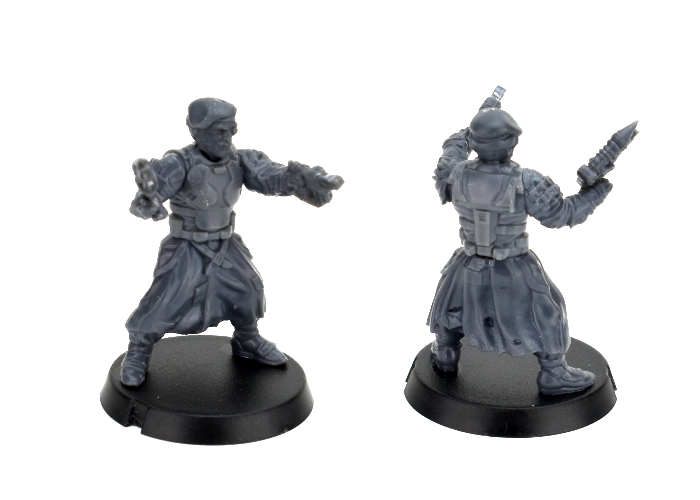
Rabble units make up the core of any Broken force. For my SARA, I wanted to give them a more military look than my Forsaken force, so I mostly stayed away from long coats and robes, and borrowed some extra armour parts from Epirian and Karist kits, and also a few bits and pieces from some Stargrave plastic models for a little extra variet. I also gave all of the models a shoulder pad on their left shoulder, as something to help unify the various assorted models... although in true Broken fashion, these pads are also sourced from a range of different places.
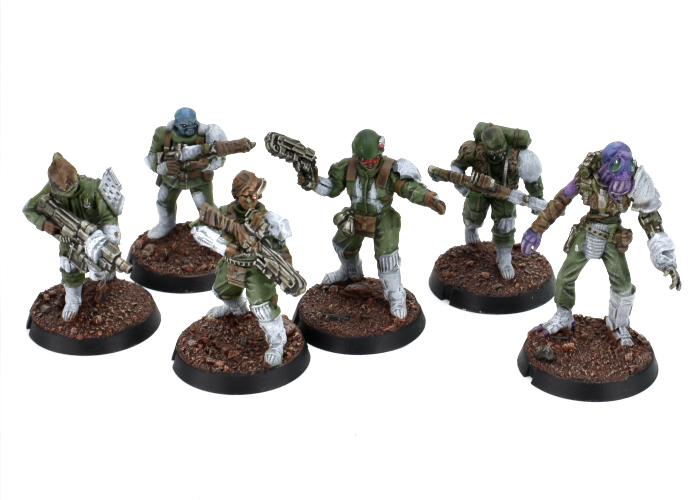
The second Rabble unit is accompanied by a Marsayan Hypnotist, to provide some tentacle-faced disruption to enemy shooting. Units accampanied by a Marsayan are difficult to hit, always counting as a Fleeting target and gaining a dodge against close range attacks.
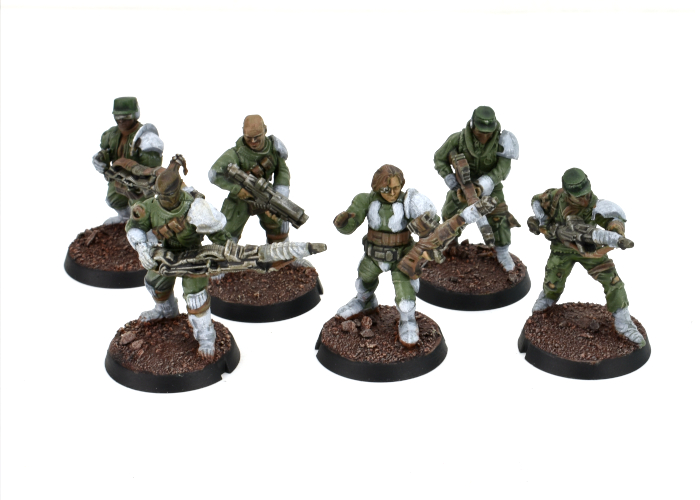
For a bit of long range coverage, I added a Rabble Fire Support unit with beam longrifles to fill one of my Anvil slots.
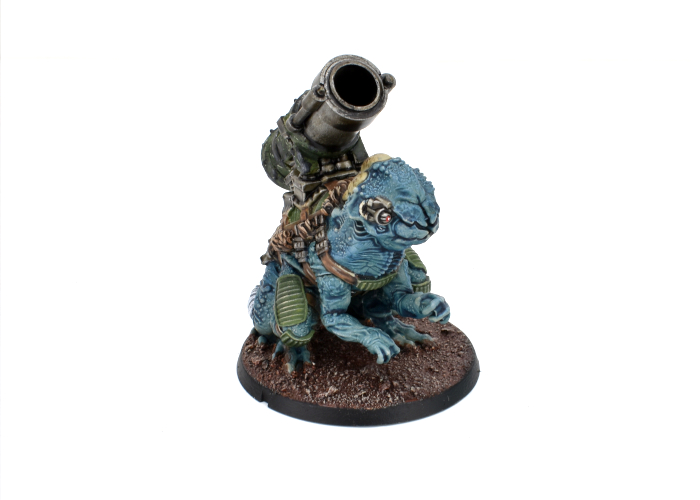
To round things out, I took a Pa'ku for the other Anvil slot, because how can you go past a giant toad with a cannon. The model I've used here is one I converted up for the spotlight article some time ago to count as a 'heavy EMP mortar' instead of the usual quad mortar... but could still be used as just a variant version of the usual gun if I want to keep things official. The Pa'ku's EMP mortar is great for dropping large blasts on enemy formations, although it works best in concert with other Pa'ku due to their Coordinated Barrage rule. So I'll probably look at painting up a second Pa'ku with the second detachment, potentially retrofitting it back into this detachment with the Multi-Unit Selection rule allowing both of them to count as a single Anvil choice.
All up, this detachment currently comes in at 67 points, so is just under half of a 'standard' 150 point force. I'll be working on the second detachment as I have time, putting in another Revolutionary Captain, some snipers, and an assault unit featuring a couple of Hakoyu for some up-close-and-personal, pointy doom. In the meantime, I can always use these as a detachment alongside my Forsaken force.
More to come - stay tuned!
To build your own army of revolutionary doom, you can pick up the Broken along with the rest of the Maelstrom's Edge range from the webstore here.
What are you working on? We would love to see your models and terrain in the Comm Guild Facebook group!
For other building ideas, modeling tutorials, army spotlights and conversion walkthroughs, check out the Hobby section of the Maelstrom's Edge website here.
Tags: broken conversion modeling painting sara
Painting Spotlight: Converted Broken Revolutionary Captain
Posted on Monday Aug 16, 2021 at 06:00pm in Tutorials
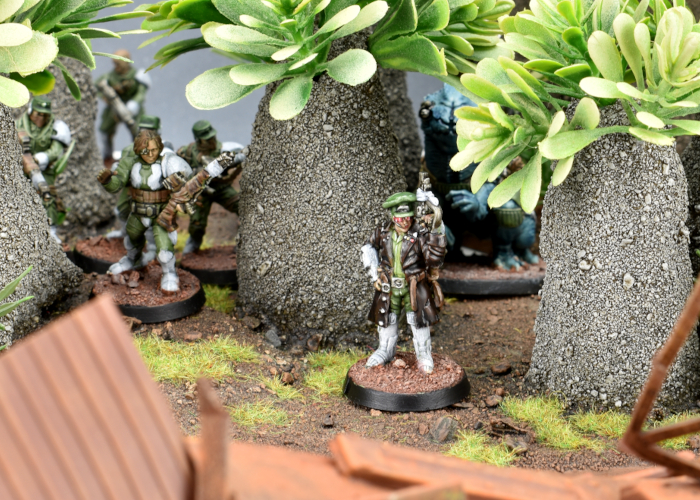
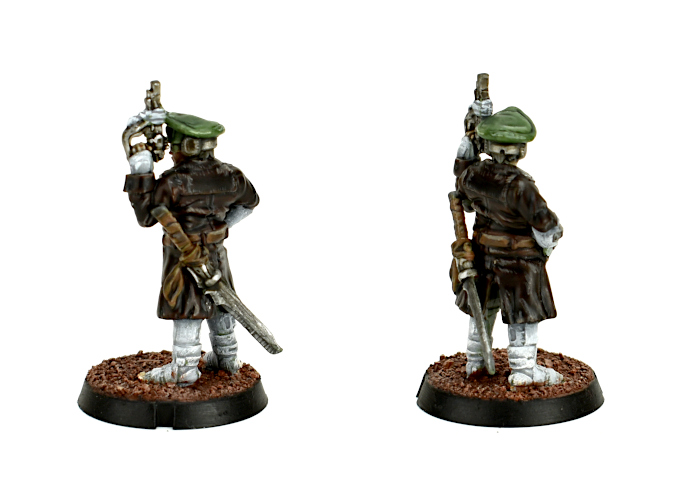
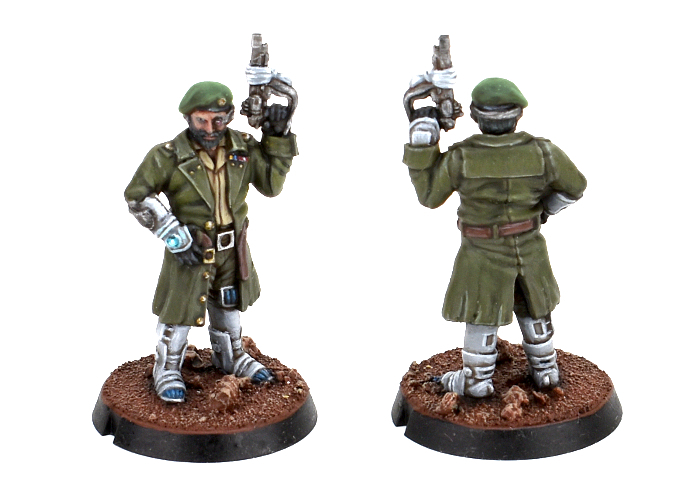
With the release of the Revolutionary Captain and Sniper models for the Broken, I couldn't resist the lure of that new army smell, and so I've been working away to put together a SARA force to sit alongside my existing Forsaken collection. The model I chose to lead the force was one that I showed back in the Conversion Spotlight article when the Revolutionary Captain was released, but this week I finally got some paint on him!
For those who haven't checked out the article linked above, this model was a conversion of the plastic SARA Captain model. The head was taken from an Epirian Contractor, with a hat added using 'green stuff' putty. I also gave him a sword built from a couple of chopped up weapons from the Broken Rabble sprue and a slightly reshaped Karist sword blade taken from the Faction Expansion sprue.

For this force, I chose to go with a colour scheme fairly similar to the Maelstrom's Edge studio model, using a lot of Army Green with white 'techy' bits. To make the Captain stand out a little more from the horde, though, I swapped out the studio model's green coat for a dark brown leather one. This was painted with Scalecolor Bosh Chestnut and several layers of Army Painter Dark Tone, before highlighting with Army Painter Leather Brown with a little Skeleton Bone mixed in.
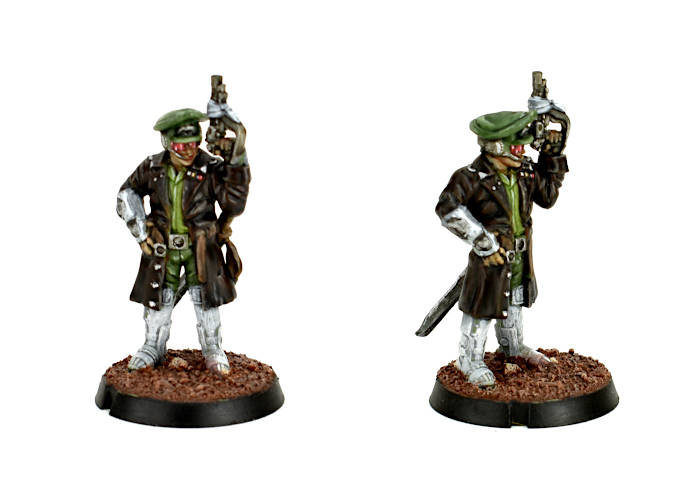
The rest of his uniform is Army Painter Army Green for the pants and hat, and Army Green mixed with Coat D'Arms Putrid Green for the shirt. These were washed with Army Painter Military Shader, and then the hat given two coats of Green Tone, before it was all highlighted with some more Putrid Green and Army Green mix. The metal was painted with Army Painter Plate Mail Metal and washed with Dark Tone and Strong Tone, with a Shining Silver highlight, while the white parts were given a coat of Army Painter Uniform Grey and then a heavy drybrush of white. It's a little rough up close, but quick and easy and looks suitably beaten up on the table!
The next job is to finish up the painting on the rest of his detachment, and then start on a second detachment so that I can work in a sniper or two!
To build your own army of revolutionary doom, you can pick up the Revolutionary Captain along with the rest of the Maelstrom's Edge range from the webstore here.
What are you working on? We would love to see your models and terrain in the Comm Guild Facebook group!
For other building ideas, modeling tutorials, army spotlights and conversion walkthroughs, check out the Hobby section of the Maelstrom's Edge website here.
Tags: broken conversion model painting sara
Modeling Spotlight: Kitbashed Pegasus Heavy Cargo Drone
Posted on Tuesday Jul 20, 2021 at 06:00pm in Tutorials
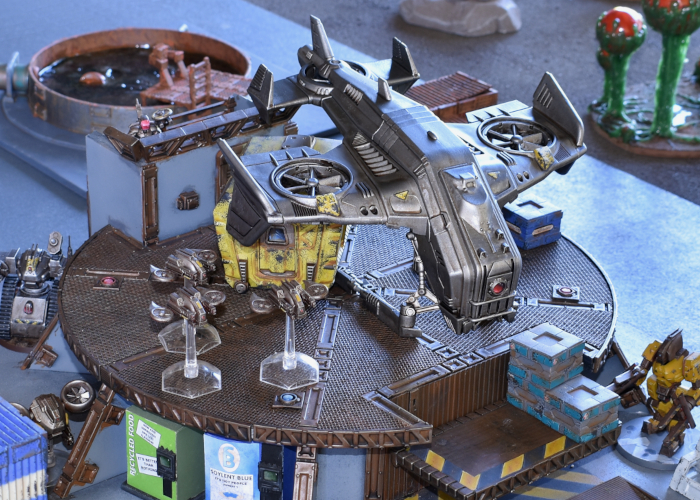
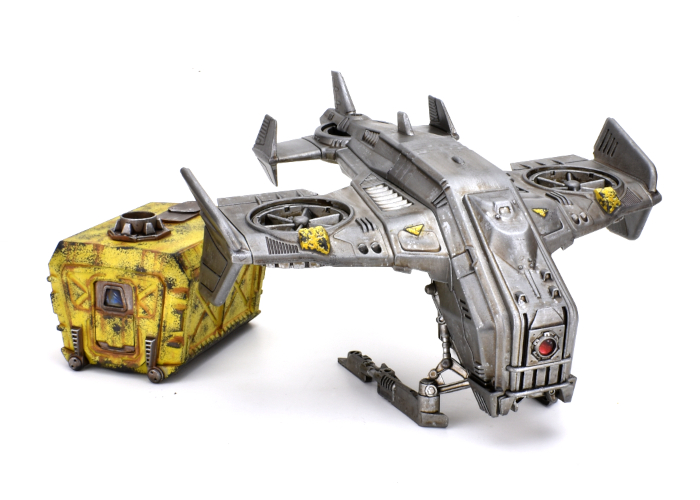
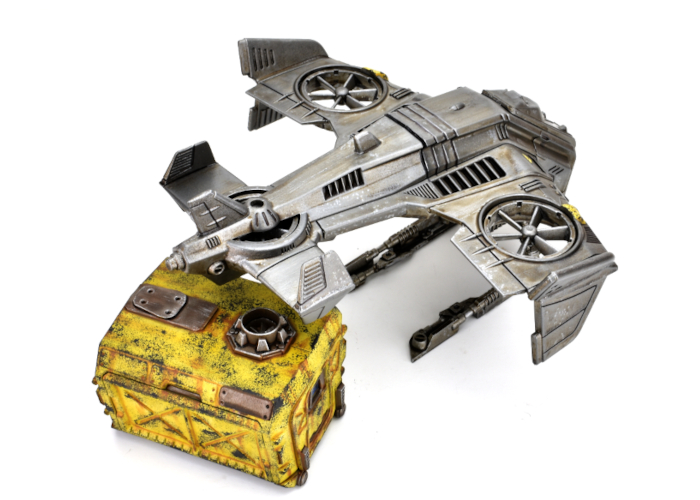
Time to hack something up, just because we can! I've had my eye on the Hornet dropship from Mantic's Warpath game for some time, as its general shape feels similar to the Epirian Firefly drone, just scaled up. So, I decided to take one and turn it into a heavy cargo drone to support Epirian forces behind the lines! Read on to see how it was built.
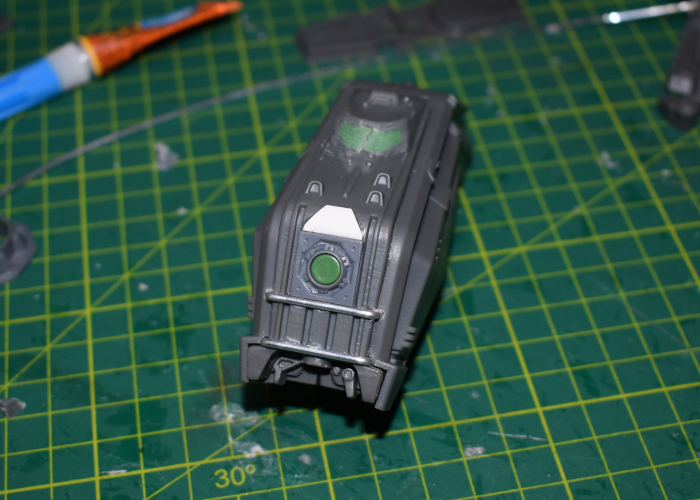
With its design already including wing-mounted turbines, the main alteration required was to make the front of the Hornet look like a standard Epirian drone. I used a small pipe fitting from the first Maelstrom's Edge terrain sprue for a sensor lens housing. For the lens itself, I rolled out some 'Green Stuff' putty into a thin sheet and used the pipe fitting as a stamp to cut out a circle. I also took a couple of pieces of aluminium rod and bent them to fit across the front section on the Hornet, to form the rectangular grill that Firefly and Spider drones have under their sensor lens.
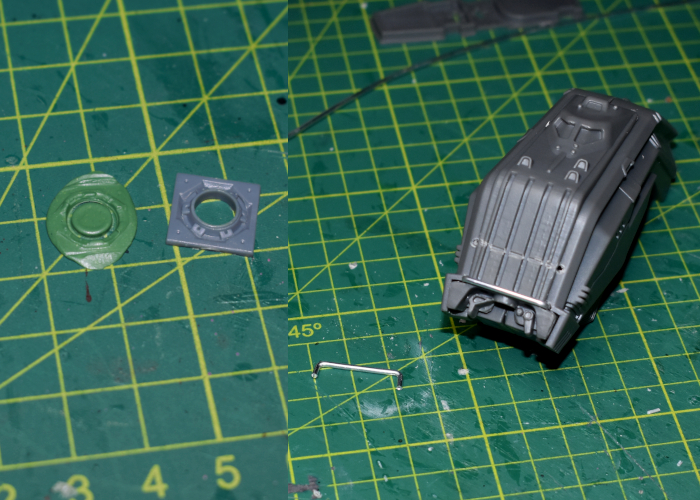
Once the Green Stuff was fully cured, I trimmed away the excess, and glued everything into place on the front of the Hornet. The Hornet's protruded above the lens housing, so I covered over it with a thin piece of plasticard. I had originally intended to cut off the cockpit bulge and seal over it with plasticard, but decided it would be easier to use some putty to fill in the windscreen recesses.
As this drone was intended as a scenery piece rather than for gaming, I decided to keep the cargo container as a separate piece. There is a doorway on one end with no door, as this normally sits up against the door on the back of the Hornet cockpit section. I took a door from the terrain sprue and trimmed it down to fit into the opening, adding a piece of plasticard to fill in the window. I also wanted to add some detail to the top of the container. Taking a fan from terrain sprue #2, I trimmed it down to fit inside the large pipe fitting from terrain sprue #1.
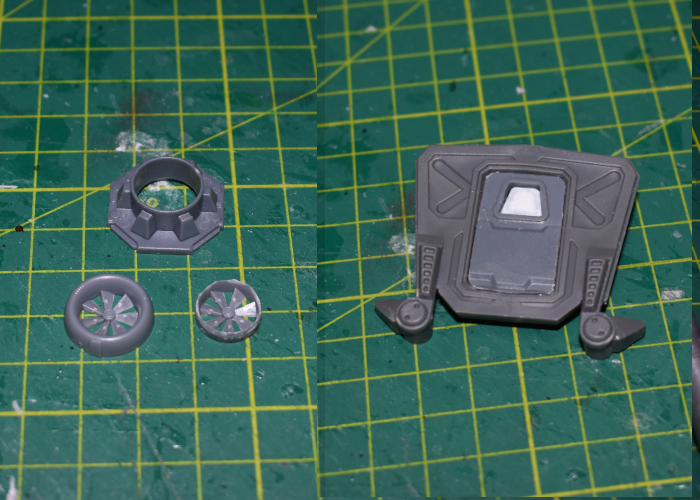
I glued the fan assembly onto the top of the container to line up with the circular vent on the underside of the Hornet's fuselage, and added some plasticard shaped to match the fuselage's trapezoid hatch.
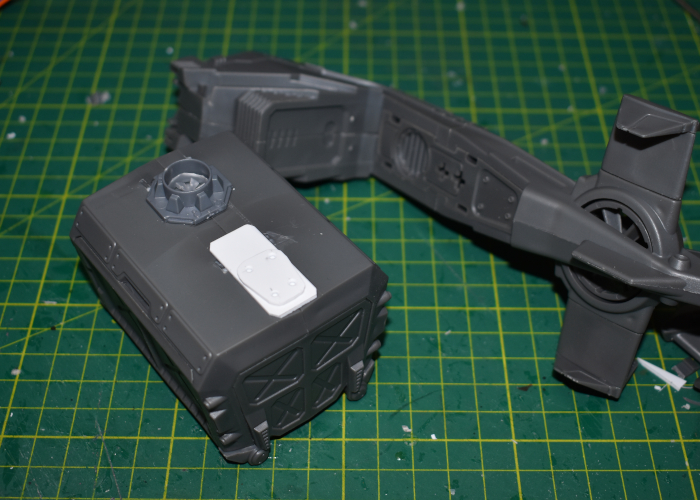
With everything else just assembled as normal, the new drone was ready for paint!
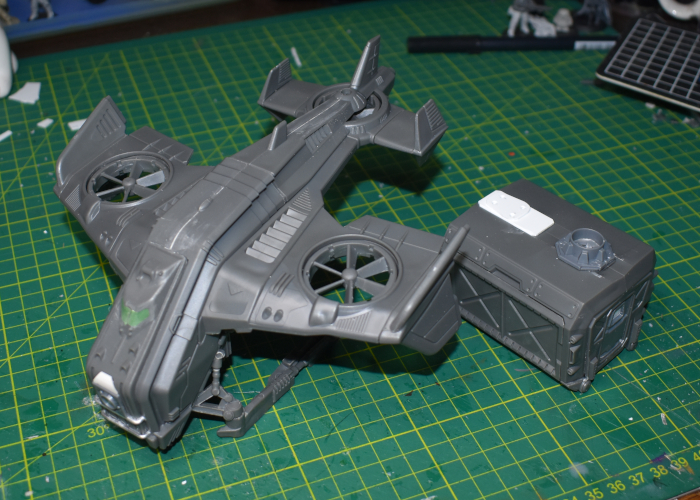
And the finished Pegasus Heavy Cargo Drone, ready to haul some heavy cargo:
To turn your own Hornet into a heavy drone of logistical doom, you can pick up the Maelstrom's Edge terrain sprues along with the rest of the Maelstrom's Edge range from the webstore here.
What are you working on? We would love to see your models and terrain in the Comm Guild Facebook group!
For other building ideas, modeling tutorials, army spotlights and conversion walkthroughs, check out the Hobby section of the Maelstrom's Edge website here.
Tags: conversion drone kitbash modeling spotlight
Model Spotlight: Revolutionary Captain!
Posted on Tuesday Jun 15, 2021 at 11:41pm in Tutorials
With the release of the Revolutionary Captain ushering the SARA subfaction into Maelstrom's Edge games, a range of new tactical options opens up for the Broken. I'll be sharing my fledgling SARA force in an upcoming army, but to kick things off I thought it would be fun to have a look at some modeling options for the fantastic Revolutionary Captain model!
The Revolutionary Captain is a multipart, plastic model. He's not as modular as most of the Maelstrom's Edge model range, as the sculpt was in this case aiming for a specific character look. Being plastic, however, it's still relatively easy to give the model a more customised look if you feel so inclined, and I'll explore some different ideas for that below.
The studio model, painted by Winterdyne.
Built straight off the sprue, the Revolutionary Captain is equipped with his SARA Officer's Pistol. His rules card, which can be found here, gives him the option to take one of a number of different secondary weapons, which can mostly be sourced from the Broken Rabble kit. To equip a Beam Blastgun or Slug Rifle, the easy option is to just stick the weapon on his back. You could model a rifle strap from modeling putty, or just assume the weapon is held in place with a magnetic lock built into the back of his coat.
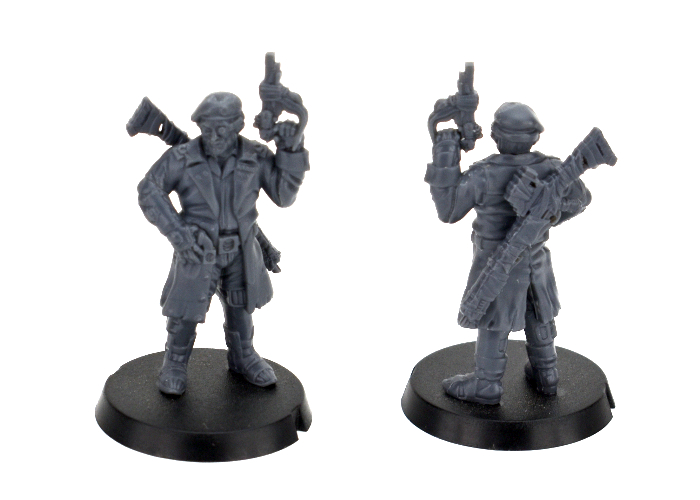
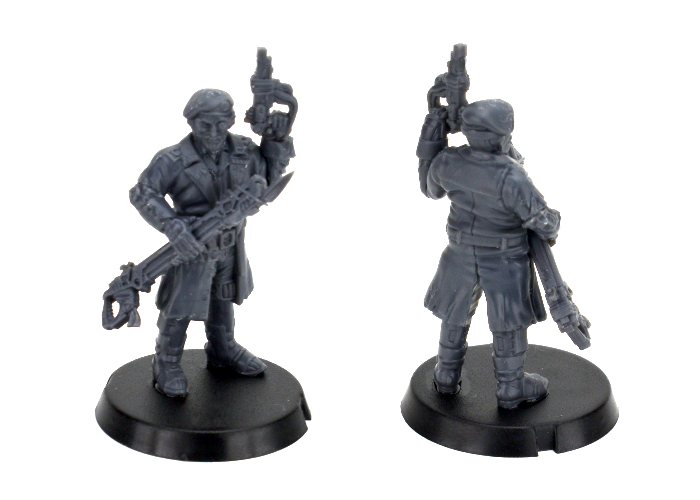
To take a more hands-on approach, for this version I sliced off his right hand, and used a forearm snipped from a Rabble sprue arm to hold the blastgun. As it still sits against his waist, there's no need to try to resculpt the coat belt where the hand was removed, as you can't see it anyway.
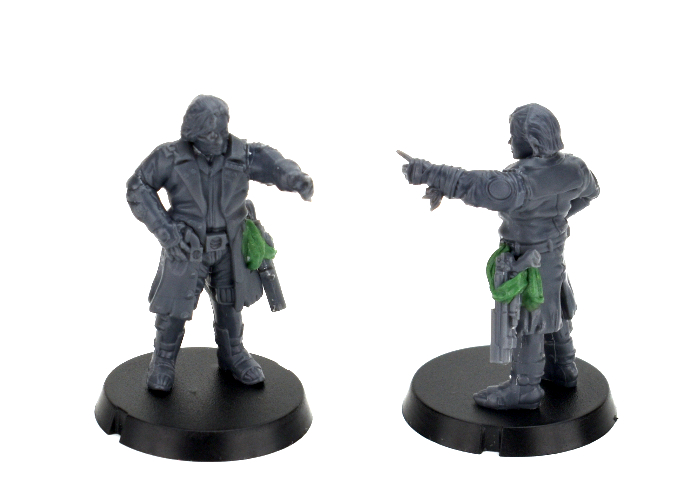
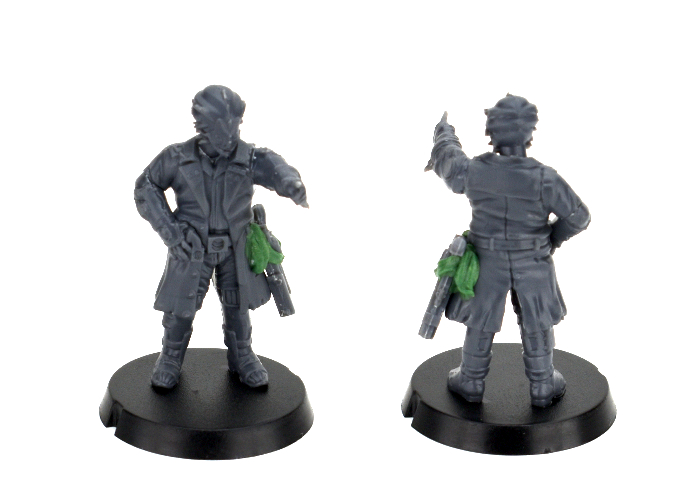
Of course, everyone knows that battlefield commanders spend a good amount of their time pointing at things. If your commander isn't either pointing at something, or standing with one foot on something, people might not even recognise them! By slicing off the Revolutionary Captain's left arm at the coat's shoulder seam, I was able to glue a pointing arm from the Rabble sprue in its place. I also replaced the head with a regular Rabble head by drilling out the neck a little with a 2mm drill bit, and glued a maglock pistol from the Epirian Contractor kit onto her hip with some strapping made from 'Green Stuff' putty to replace the officer's pistol. The putty isn't strictly necessary - you could easily just glue any of the Captain's pistol options to the belt, but the addition of the putty strap does make it look a little nicer on the model.
Of course, there's no reason for only humans to be revolting! With the neck drilled out as above, you can use any of the alien heads from the weapons sprue in the Rabble kit to create a xeno force commander.
While we're replacing heads, some Captains like a nice, sensible cap in place of a beret, so for this one I used an Epirian Contractor head (mostly for the sunglasses!) and built the cap up into an officer's hat using Green Stuff. I also added a melee weapon on his belt using part of a Karist sword from the Faction Expansion Sprue and bits from a couple of weapons on the Rabble sprue. This could easily represent either the Poisoned Blade or Trophy Melee Weapon. For a slightly easier option, you could just use the Karist sword or knife from the Faction Expansion sprue. The resin Forsaken Chieftain also comes with both of these melee options, so if you have that model you could use whichever one you didn't use on her for the Revolutionary Captain.
Of course, if you're hacking up your Revolutionary Captain model to replace heads and weapons, this leaves you with some useful parts to build another Captain to lead a second Detachment! For the below model, I used some parts from the Rabble kit (legs, arms and beam pistol), the left hand and head from the Revolutionary Captain, and a torso from the Epirian SecDef kit just to help him to stand out a little more from the Broken horde.
To build your own army of revolutionary doom, you can pick up the Revolutionary Captain along with the rest of the Maelstrom's Edge range from the webstore here.
What are you working on? We would love to see your models and terrain in the Comm Guild Facebook group!
For other building ideas, modeling tutorials, army spotlights and conversion walkthroughs, check out the Hobby section of the Maelstrom's Edge website here.
Tags: broken conversion model modeling sara spotlight tutorials
Conversion Spotlight: Automated Uplink Relay, MkII
Posted on Monday Mar 08, 2021 at 05:00pm in Tutorials
When pursuing conflicts outside of its zone of control, the Epirian Foundation makes use of portable uplink drones that link to orbital satelites and airborne recon to provide battlefield intelligence and allow Bot Handlers to remotely interface with Epirian assets on the ground. The Battle for Zycanthus box includes a cardboard marker for the Automated Uplink Relay, but for those wanting a more 'solid' version, I shared a kitbash idea some time ago using parts from various Epirian plastic kits and metal tracks from a Bombshell Miniatures model. The arrival of the PDC Gun Carriage gave me an idea for an alternative, all-plastic version!
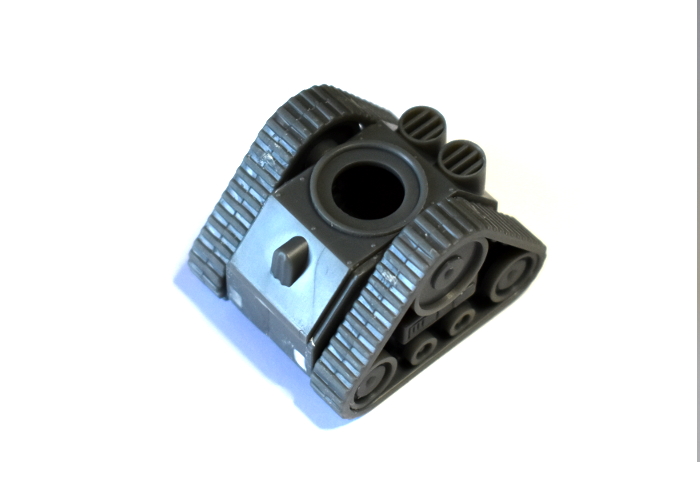
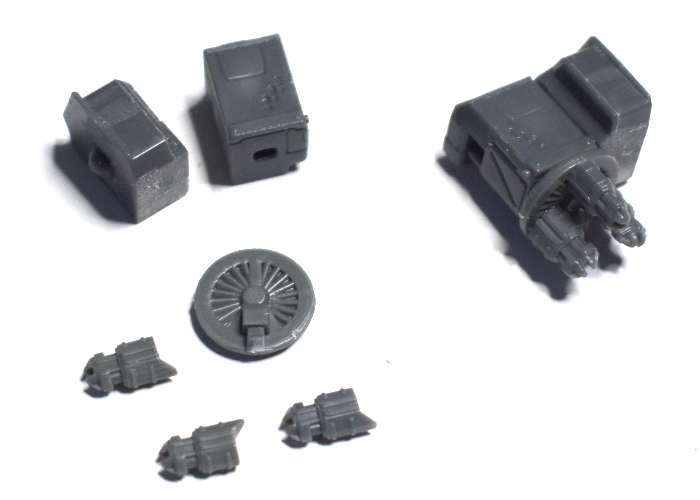
I made a few changes to the drone design this time around, with the most obvious one being the tracks. I built the track unit from the gun carriage as normal, although I trimmed off the lugs on the front that hold the dozer blade.
As with the original version, I used the body of an Epirian Hunter war mech, cutting apart at the waist with a razor saw.
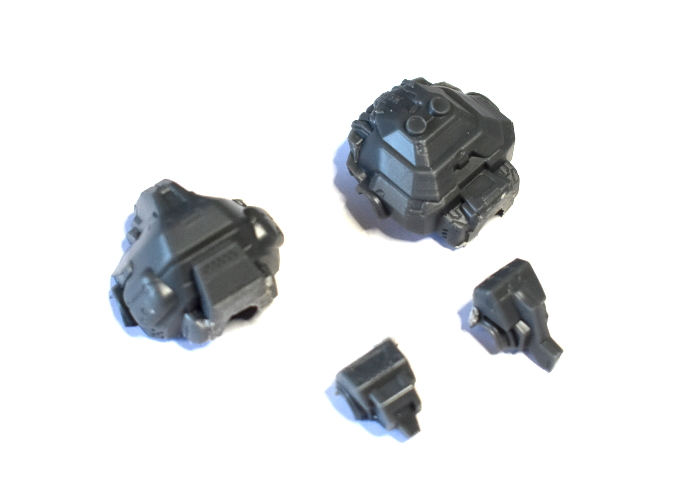
I gave the waist a rotating cuff by gluing on the round grill piece from the gun carriage, and added vanes on the head trimmed from a piece of thin plasticard.
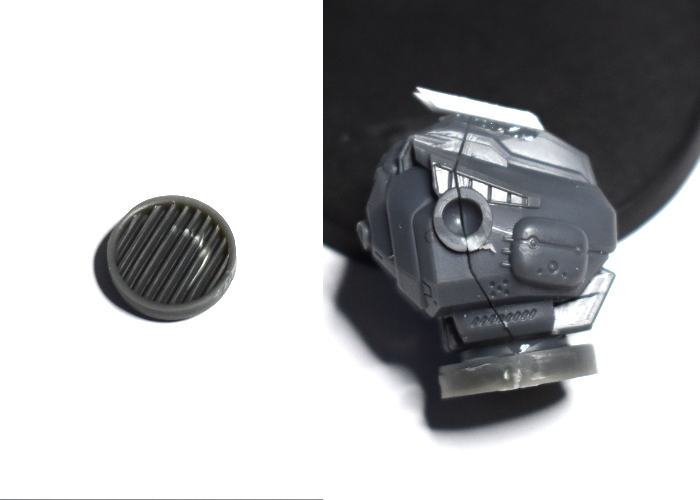
For the arms, I used the shoulders from the Hunter, with the upper arms trimmed off. I needed to glue a new piece for the weapon assembly onto the outer surface of the shoulder, so I sanded this down flat.
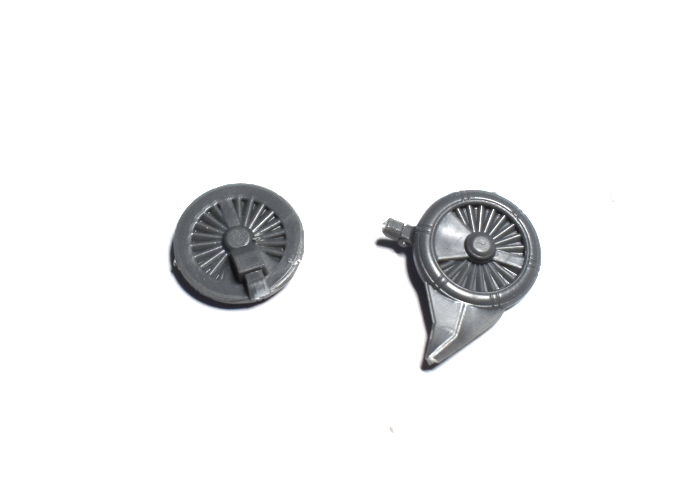
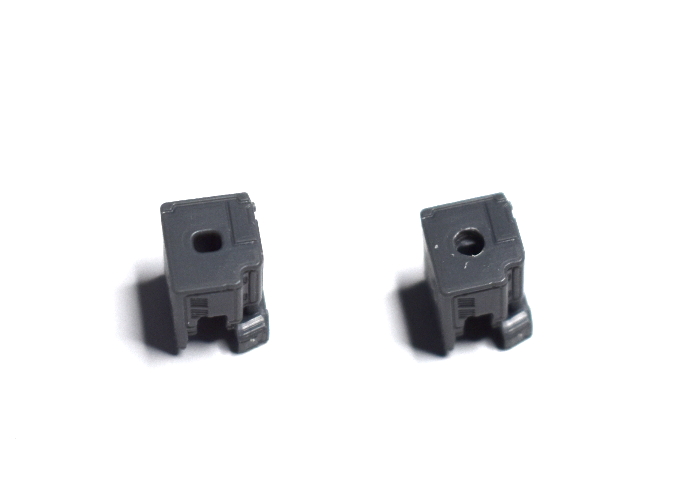
To make rotating cylinders for the tri-barreled Flakk Defense Battery, I used a couple of turbines leftover from the Epirian Spider/Firefly Drone kit. Because the kit makes either drone variant, if you have built any spiders, you'll have some of these laying around. I trimmed off the attachment peg and the wing.
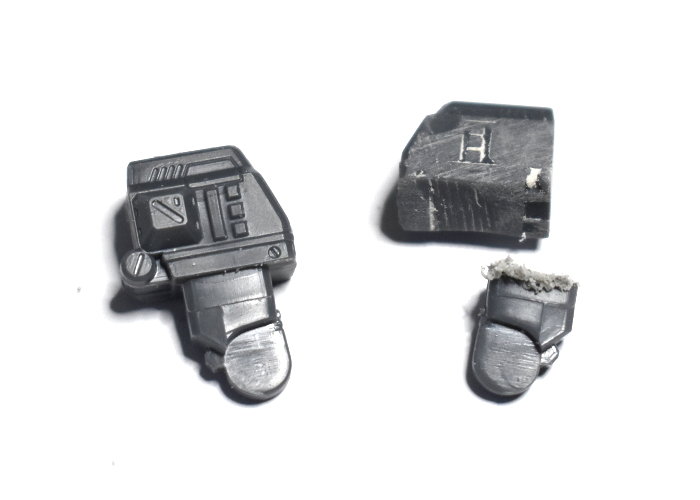
I used the Hunter's weapon casing forearms for the bulk of the flakk weapon casing, drilling out the attachment hole a little larger to accommodate the central hub on the drone turbine.
From there, I glued the weapon casings onto the outside of the shoulders, and the turbines onto the front of the casings. The barrells of the flakk weapon came from the drone kit, with the rear surface trimmed down flat and glued to the front of the turbine.
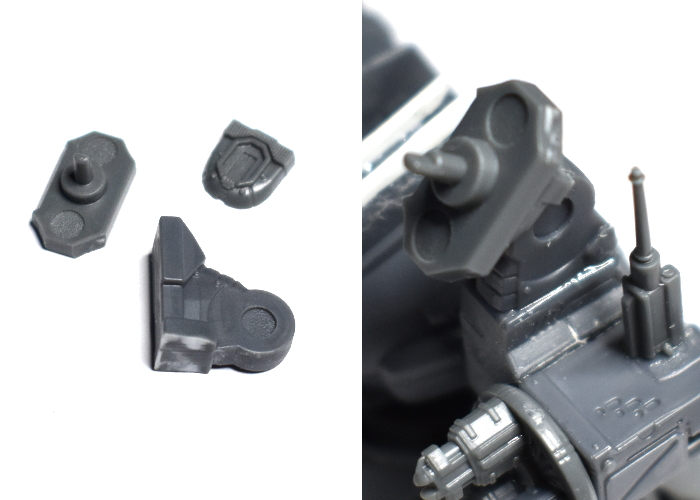
The last thing the Uplink Relay needed was the communications array. I used the 'spare' piece from the drone kit as a fixed arial, glued onto the top of the weapon casing on the left arm. I also assembled a signal dish using a trimmed Hunter foot and the back chassis piece from the drone kit. For the dish itself, I used the leg piece from the drone kit, with the legs themselves removed at the 'hip' pivot.
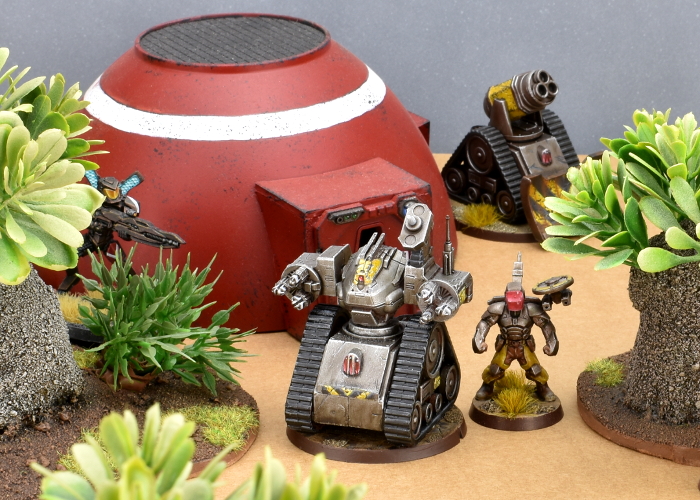
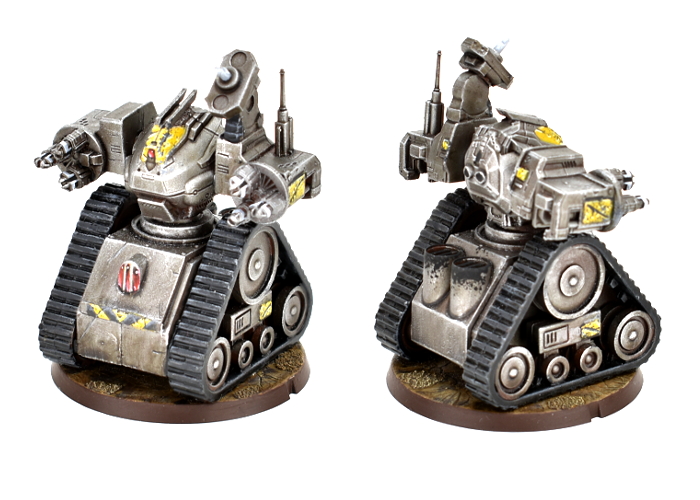
The assembled Automated Uplink Relay, ready for paint:
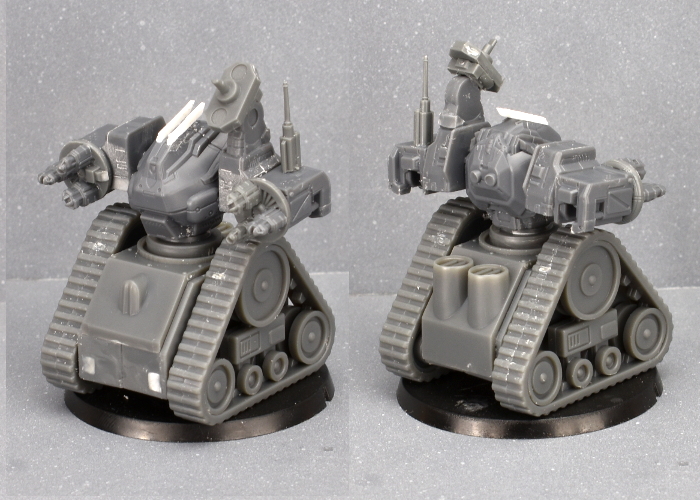
And the finished Relay, ready for the table:
Put together your own Automated Relay of Uplinky doom by picking up the plastic Hunter, Drone and Gun Carriage kits, along with the rest of the Maelstrom's Edge range from the webstore here.
Then pop on over to the Comm Guild Facebook group to show us what you're working on!
For a host of building ideas, modeling tutorials, army spotlights and conversion walkthroughs, check out the Hobby section of the Maelstrom's Edge website here.
Tags: conversion epirian kitbash modeling spotlight tutorial
Model Release - The PDC Gaming Gun Carriage!
Posted on Monday Mar 01, 2021 at 05:00pm in Models
This fantastic gun carriage model was made by PDC Gaming for a Kickstarter campaign some years ago. It's a multipart plastic kit, that comes with options for a turreted or fixed-mount weapon, and a range of different weapons that slot into place on either variant.
Although not being sold as a part of the core Maelstrom's Edge range, this kit is useful for those looking for a plastic track unit for conversions, or wanting to add some heavier firepower to their games. For the latter, you can find an unofficial rules card for the Epirian 'Thunderbolt' sentry drone in our Force Lists section here, or included in the PDF download in the Rules section here.
The gun carriage is available from the Maelstrom's Edge webstore now!
And stay tuned for an upcoming conversion article from Iain, using one of these carriages and parts from the Epirian Hunter war mech to build an all-plastic Epirian Automated Uplink Relay.
Tags: conversion models releases
Karist Secret Cache Objective Marker Kitbash
Posted on Monday Jan 18, 2021 at 05:00pm in Tutorials
In games of Maelstrom's Edge, along with whatever objectives apply to the mission being played, each faction has an additional themed objective of their own. For the factions in the Battle for Zycanthus box, there are cardboard counters to use as faction objective markers, but it's always nice to have physical models to represent them instead. I shared a conversion some time ago for a kitbash of the Epirian's Automated Uplink Relay Drone (with a new, all-plastic version of this build coming up in a future article very soon!), and this seemed like a good time to balance things out with a Secret Cache marker for the Karist Enclave!
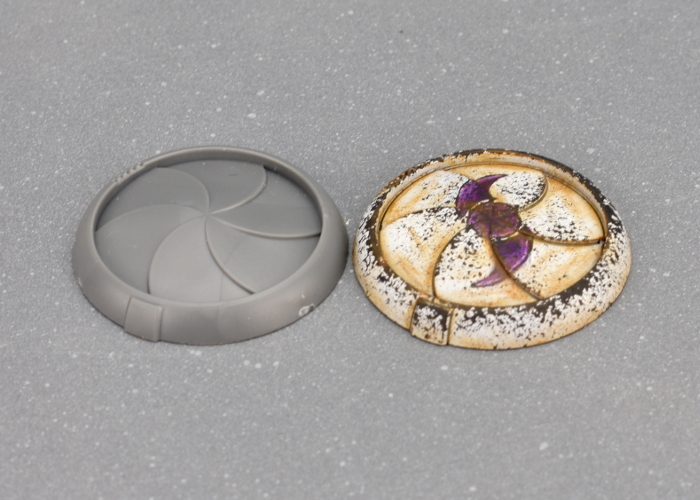
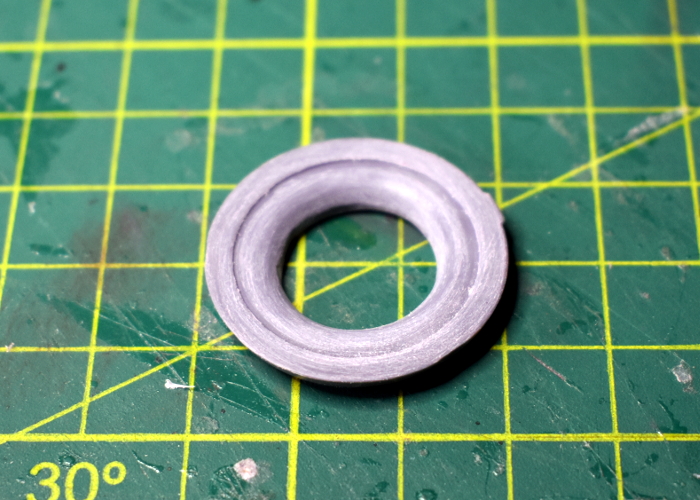
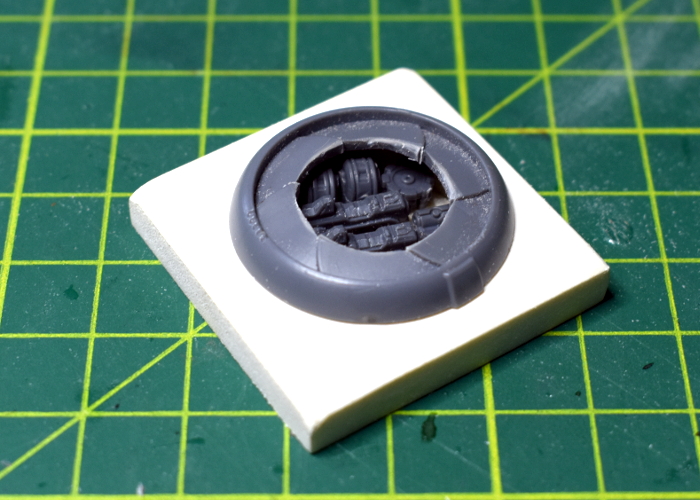
I was looking at the Maelstrom's Edge terrain sprue for a completely different project when it occurred to me that the iris hatch was a nearly perfect size for the Karist objective. The Secret Cache is a small objective, which means a model to represent it goes on a 25mm base, and as it happens, the iris is 25mm in diameter. So as an incredibly quick and easy option, you could just use the iris portal as-is. To keep things accurate, you can measure to the iris, ignoring the surround, or if your opponent agrees you could just measure to the outer edge of the portal, making it a 30mm objective marker instead of 25.
For a slightly more elaborate version, I took a portal and used a 16mm spade bit to drill out the middle of the iris.
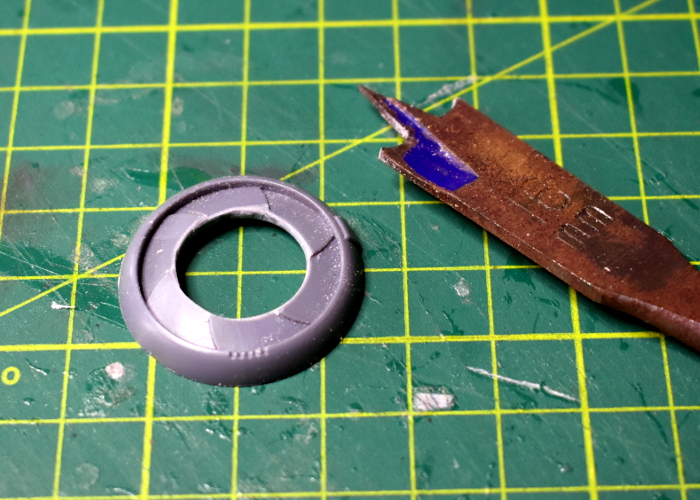
Wrapping a small piece of sandpaper around my index finger, I flipped the portal over and sanded around the underside to make it concave.
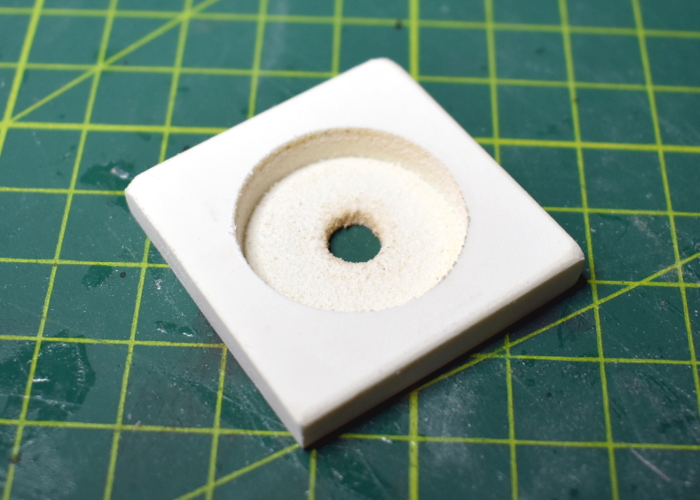
To make the base of the cache piece, I cut a small square of 6mm foamed PVC, and then drilled most of the way through the middle of it with a 25mm spade bit, before giving it a light sand.
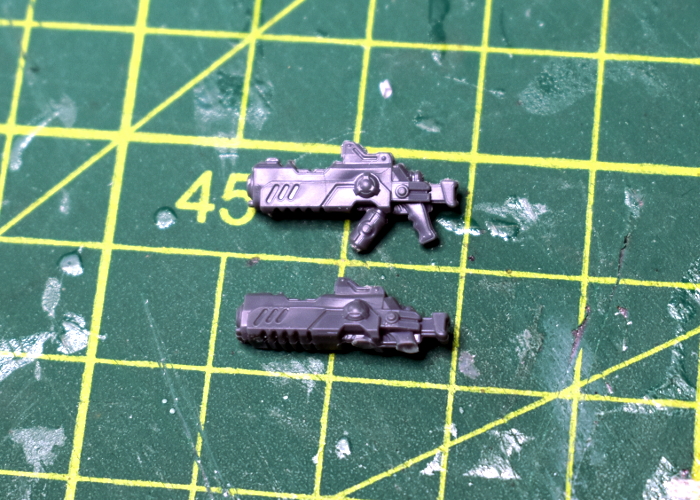
To fill the cache, I took a bunch of assorted Karist weapons from the Faction Expansion Sprue. I trimmed the bottom of the rifles down flat, sanding the bottom so that they fit neatly inside the cache cavity. If you don't have the expansion sprue handy, you could also just use spare weapons from the Karist Trooper sprue, cutting the hands off the bottom - either way, the bottoms of the weapons won't be visible once the cache is sealed up, so either way works just fine.
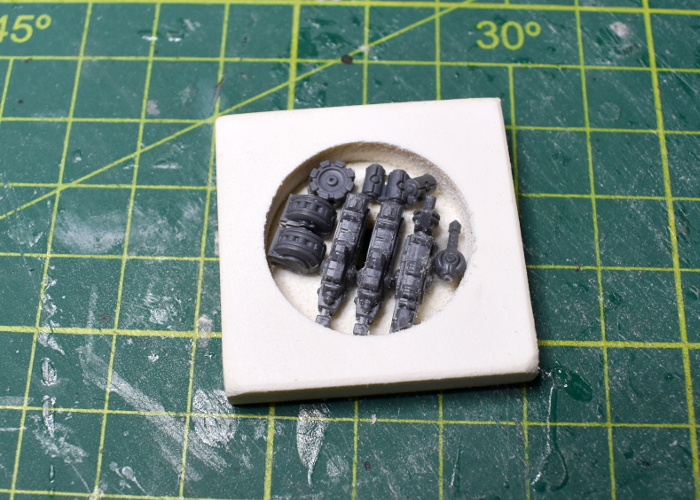
I glued the rifles in place, and then filled the space around them with grenades and a couple of ammo drums cut from grenade launchers. I also glued a small circle of plasticard into the drill bit guide hole in the bottom of the cache.
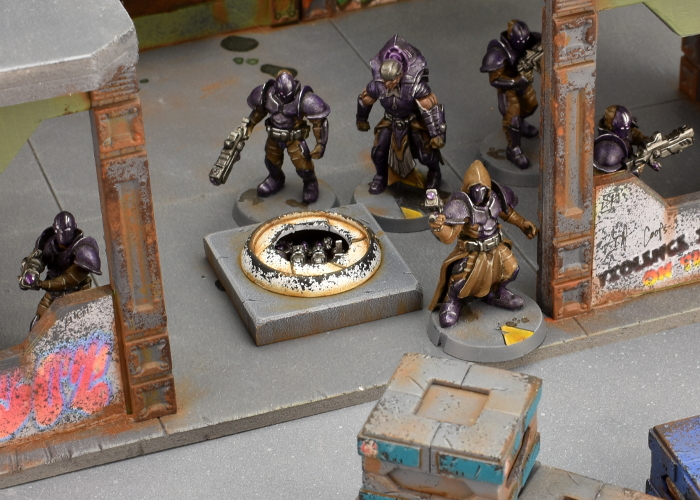
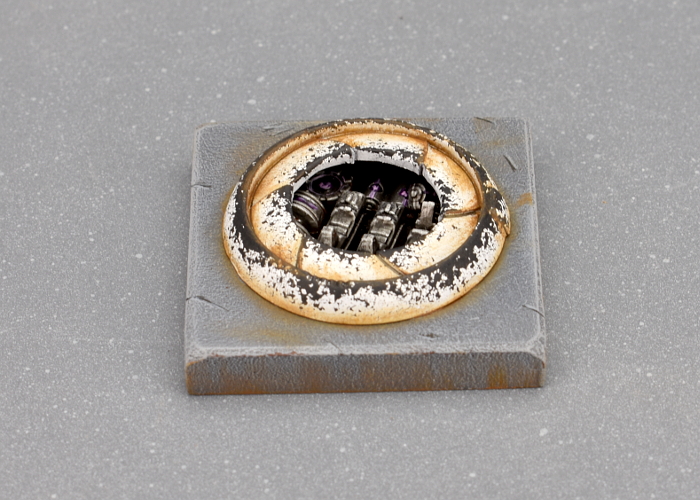
The final step before painted was to check that the portal fit neatly on top. At this point, I also used a hobby knife to cut some vertical lines into the inside of the hole in the iris, to delineate the tips of each petal. I left the portal separate for painting, gluing it in place at the end.
And speaking of painting, with some colour on the portal wound up looking like this:
Put together your own secret cache of pre-prepared doom by picking up the plastic terrain sprue, along with the rest of the Maelstrom's Edge range from the webstore here.
Then pop on over to the Comm Guild Facebook group to show us what you're working on!
For other building ideas, modeling tutorials, army spotlights and conversion walkthroughs, check out the Hobby section of the Maelstrom's Edge website here.
Tags: conversion karist modeling objective terrain terrainsprue tutorial walkthrough
Modeling Spotlight: The 2020 Annual Christmas Special!
Posted on Monday Dec 21, 2020 at 05:00pm in Tutorials
Christmas is fast approaching, and around this time each year I like to grab some bits and put together a tree decoration, just for the fun of building something different.
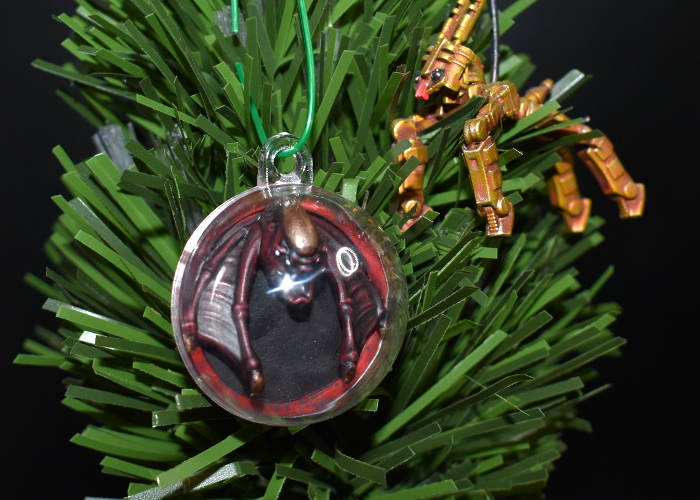
This year's decoration uses half of a plastic DIY bauble, an iris hatch from Terrain Sprue #2, and a Karist Minnow.
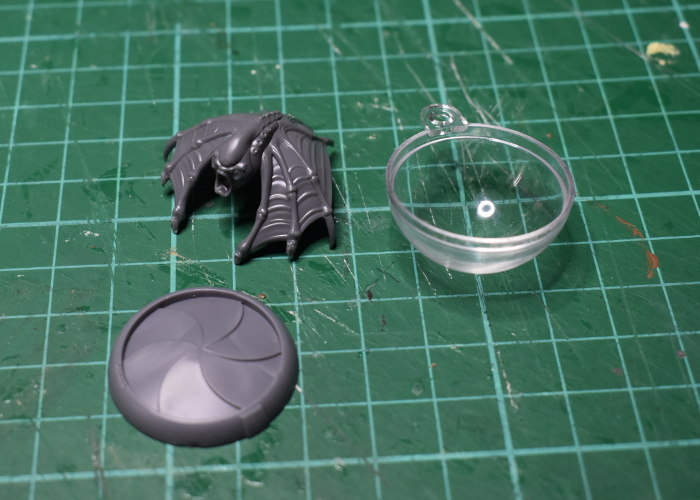
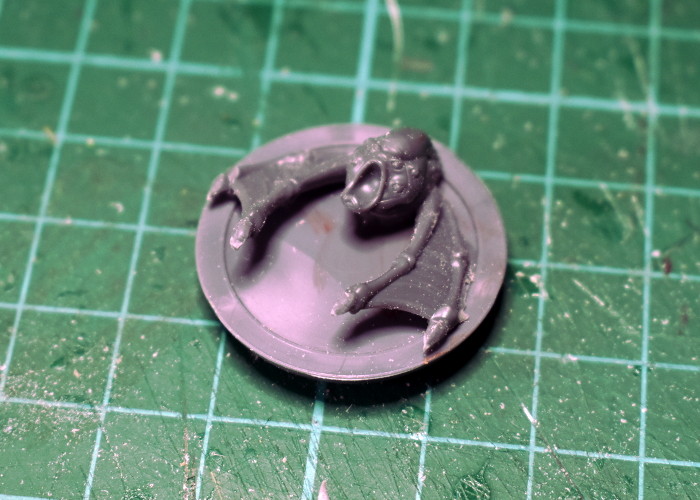
To get the minnow to fit inside the bauble half, I needed to remove a chunk of the body and wings. After trimming down the claws a little, I sat the front of the minnow inside the bauble and used a black paint pen to mark around the outside edge. Then I cut through the minnow along that line using a razor saw.
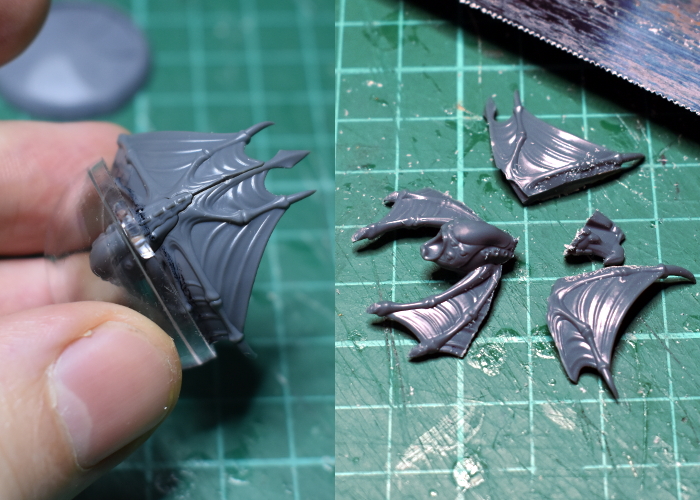
After a light sand to smooth down the cut, I glued the minnow onto the back of the iris.
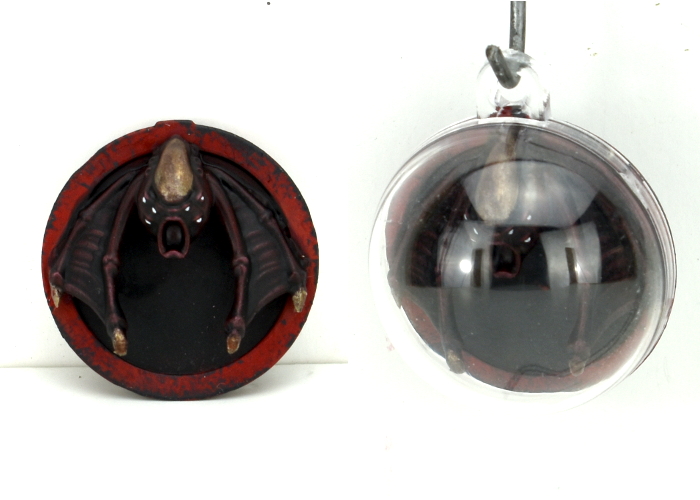
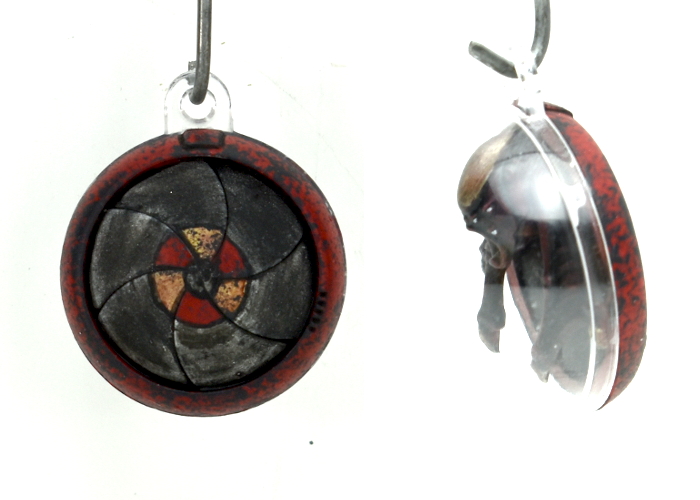
For painting, I went with a suitably Christmassy red and gold, rather than the usual black and purple for the minnow. The whole thing (less the bauble half) was sprayed with Army Painter Dragon Red, and then the Minnow given several generous coats of Dark Tone. The back of the iris piece was painted black, and the isis petals with Plate Mail Metal and washed with Dark Tone. The red parts of the iris were sponge weathered using Vallejo Heavy Charcoal, and the gold painted with Coat D'Arms Bright Gold and washed with Army Painter Mid Brown. Once everything was painted, I glued the bauble half in place, and the decoration was ready to go.
Put together your own Christmas Bauble of Doom by picking up any of our plastic or resin kits from the Maelstrom's Edge webstore here.
Then pop on over to the Comm Guild Facebook group to show us what you're working on!
For other building ideas, modeling tutorials, army spotlights and conversion walkthroughs, check out the Hobby section of the Maelstrom's Edge website here.
You can also find the previous Christmas kitbashes here, here, and here.
Wishing you all a Merry Christmas, and health and happiness for whichever holidays you observe at this time of year!
Tags: christmas conversion modeling
Kitbash Spotlight: Greatcoat Contractors
Posted on Monday Dec 14, 2020 at 05:00pm in Tutorials
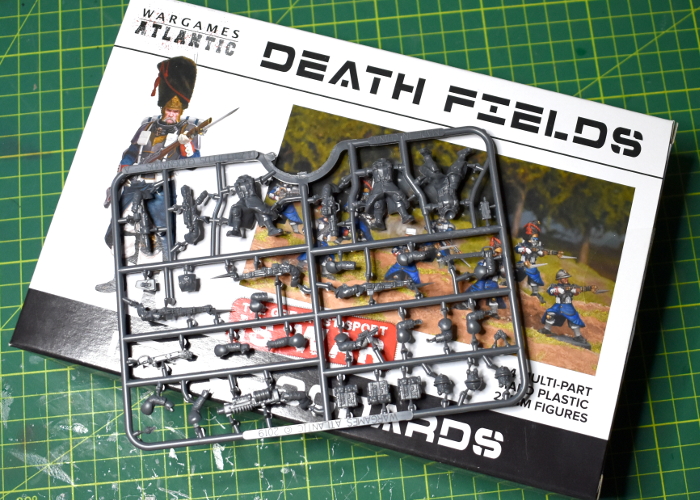
I'm continuing my stroll through the Wargames Atlantic model range. So far, I've made some short, alien scouts using Einherjar and heads from the Broken infantry sprue, and greatcoat-wearing Karist Troopers by combining Les Grognards and Karist parts. This week, I gave some Epirian Contractors the cold weather treatment, using the Raumjager Infantry box.
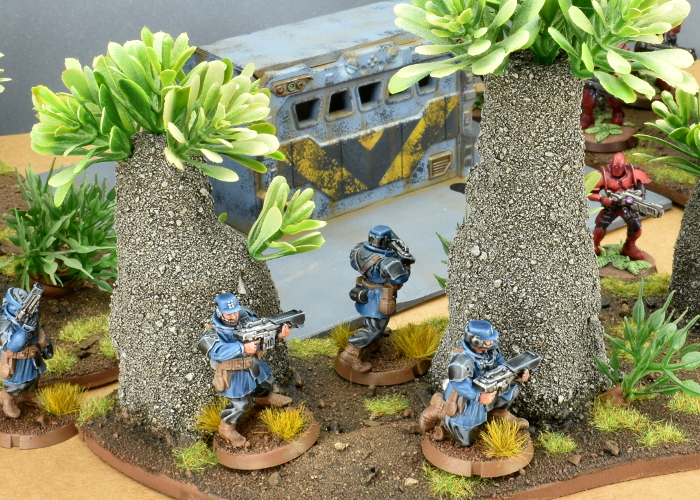
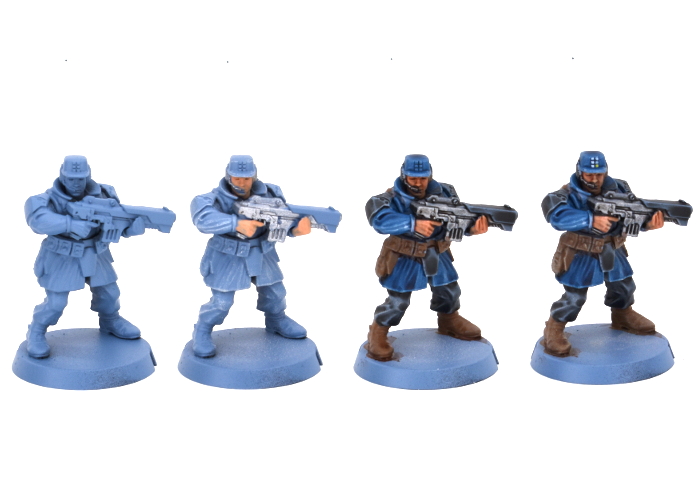
As with all of Wargames Atlantics' kits, the Raumjager are multipart, plastic models. To build my greatcoat Contractors, I used Raumjager bodies, and heads and weapons from the Epirian Contractor kit. The Contractors have rolled up sleeves, which didn't seem ideal with long coats, so I used the sleeved versions from the Faction Expansion Sprue instead.
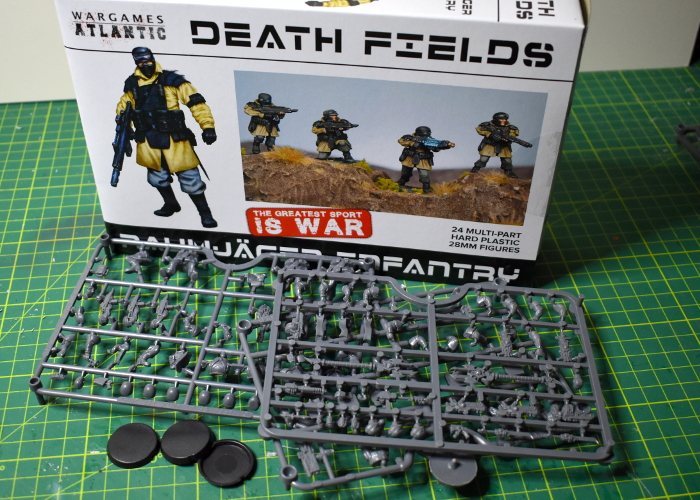
As with the previous kitbashes, the one difficulty is with the Wargames Atlantic models having shorter neck attachments than the Maelstrom's Edge models. This is easily fixed by drilling out the neck slightly with a 2mm drill bit.
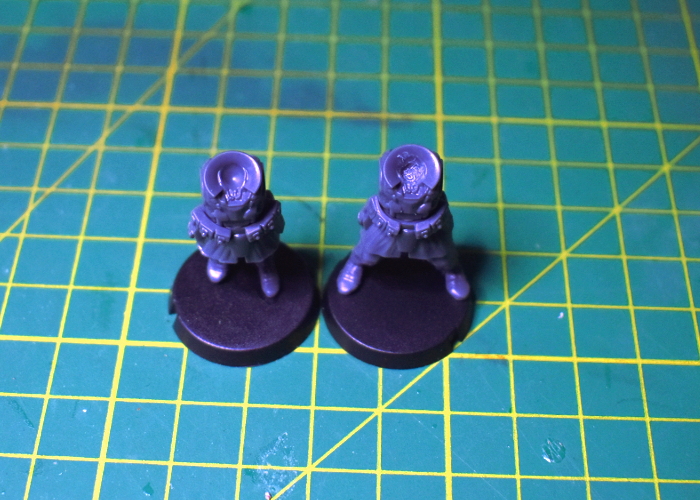
The Raumjager torsos are slightly wider than the Epirians but are close enough that everything still fits in place once arms and weapons are glued on.
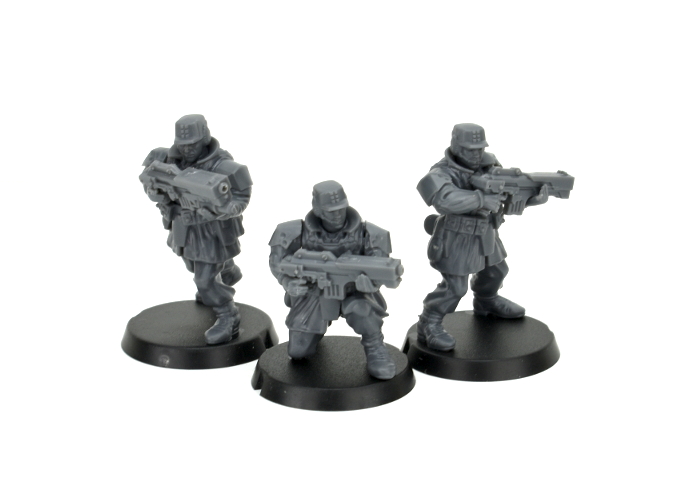
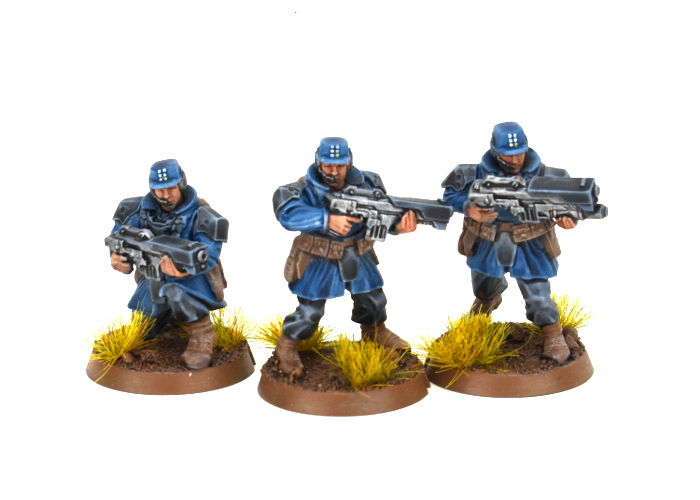
I painted these using Army Painter paints, starting out with a base coat of Wolf Gray spray. I picked out the face and hands with Barbarian Flesh and metal parts with Plate Mail Metal. I added a layer of Dark Tone over the weapons, pants and armour, and Blue Tone over the coats and hats. I also went over the skin and leather parts with Mid Brown but, while this worked ok over the skin, didn't tint the leather parts as well as I wanted. So after this dried, I went back over it with Leather Brown. Finally, I highlighted the leather and skin with Skeleton Bone, and picked out the Epirian badge on the hats with white and yellow.
With basing done, the unit was ready for the table.
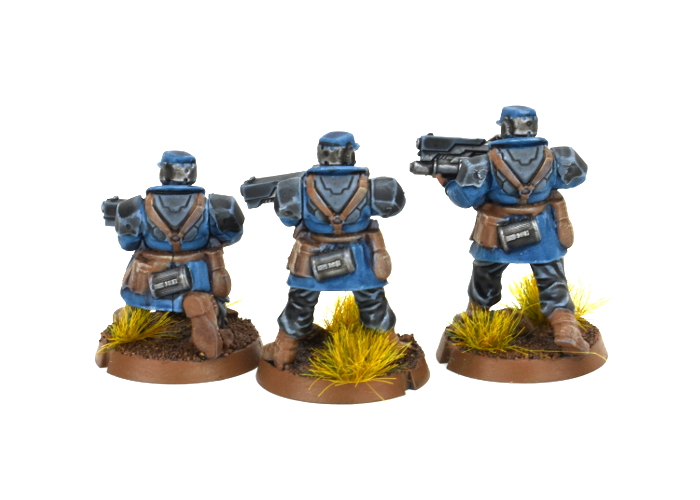
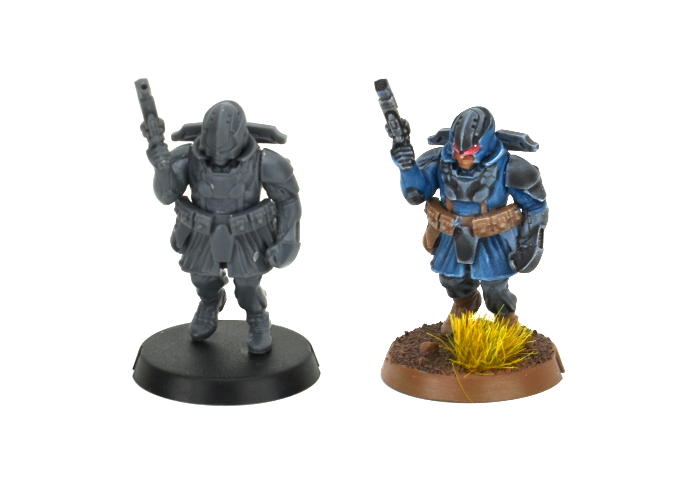
To lead them into battle, I also threw together a Bot Handler, using another Raumjager body and arms, head and uplink bar from the Epirian Handler kit.
Put together your own Epirian force of fashionably warm doom by picking up the plastic Contractor kit, along with the rest of the Maelstrom's Edge range from the webstore here.
Then pop on over to the Comm Guild Facebook group to show us what you're working on!
For other building ideas, modeling tutorials, army spotlights and conversion walkthroughs, check out the Hobby section of the Maelstrom's Edge website here.
Tags: contractors conversion epirian kitbash modeling spotlight
Terrain Spotlight: Converted Renedra Desert Buildings
Posted on Monday Dec 07, 2020 at 05:00pm in Tutorials
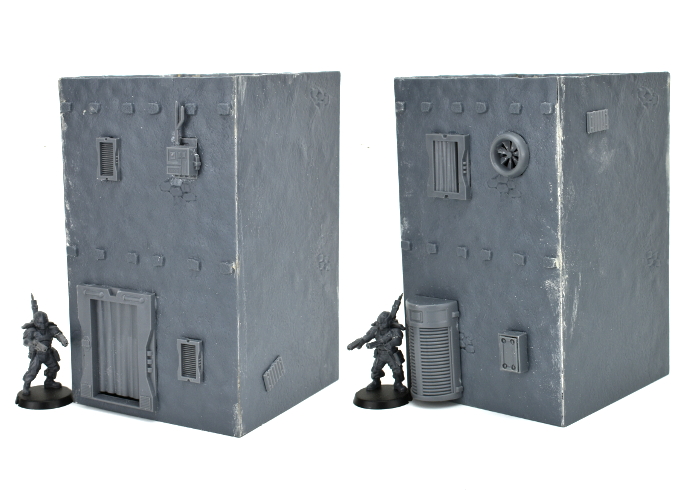
Browsing around online a few weeks back, my eye was caught by a neat looking new release from Renedra. They have a slowly-growing range of plastic historical building kits, and had just added to it with some two-story desert houses. While these are intended for historical settings, I thought it would be fun to see how they prettied up with the addition of some Maelstrom's Edge terrain sprue parts for a rustic sci-fi look. After a short and impatient wait for the post, I came up with this:
The pack I ordered includes parts for three houses. They all utilise the same floor and roof sprue, so are all the same width, just having different configurations of windows and doors, and differing overall heights. There are three sprues per building - the floor/roof sprue, and two identical wall sprues. To these, I added a Maelstrom's Edge terrain sprue.
The doorways on the buildings are quite small, and have timber doors that fit into them. That wasn't going to do here, though, so I took a doorway from the Maelstrom's Edge sprue and laid it over the existing doorway, using it as a guide to trace around with my hobby knife. Then, tracing gradually deeper cuts into that guideline, I carefully cut out the hole for the new doorway.
With the new door glued in place, I covered over the window cavities and the second doorway with various bits from the terrain sprue. As with the doorway, I used the curtained window as a guide to trace around in order to enlarge the original window hole.
I left the side walls largely as is, adding just a couple of corrugated patches so they weren't identical.
The floor/roof pieces were also left alone, although I replaced the wooden trapdoor in the roof with a metal one made from two strut panels trimmed to fit.
From there, I just had to glue everthing together. I also added a little filling putty along the corner seams and around the edge of the roof to neaten everything up a little.
With a quick coat of paint, it wound up looking like this:
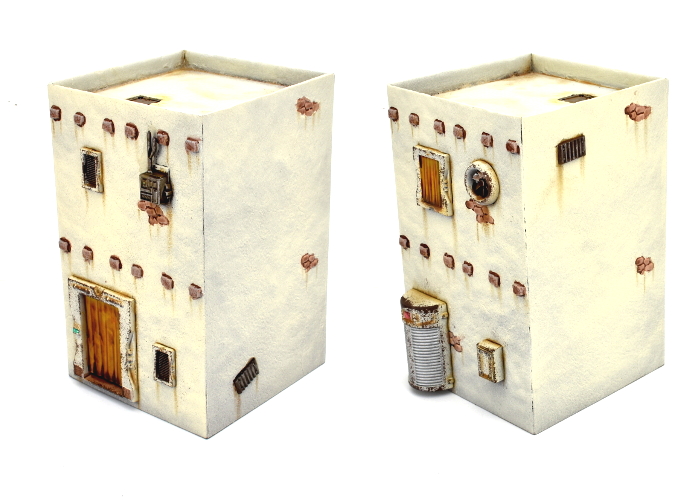
Now to get the other two finished off!
Why not give it a go? You can find the Maelstrom's Edge terrain sprues for your own terrain re-imaginings, along with the rest of the Maelstrom's Edge range from the webstore here.
What are you working on? We would love to see your models and terrain in the Comm Guild Facebook group!
For other building ideas, modeling tutorials, army spotlights and conversion walkthroughs, check out the Hobby section of the Maelstrom's Edge website here.
Tags: buildings conversion modeling spotlight terrain walkthrough
Kitbash Spotlight: Greatcoat Karists!
Posted on Monday Nov 09, 2020 at 05:00pm in Tutorials
A couple of weeks ago, I shared a kitbash of some Trogyl Scouts - alien hunters based on the Wargames Atlantic 'Einherjar' (space dwarves) kit with alien heads from the Maelstrom's Edge Broken plastics. Well, this week I threw together another unholy fusion of Wargames Atlantic and MEdge kits, to create some Karist troopers in greatcoats!
When I bought the Einherjar kit, I couldn't resist also picking up a box of 'Les Grognards'. This is a plastic kit that comes with a slew of different heads to allow you to create a number of different, laser-gun-toting, sci-fi soldier regiments. It also includes the aforementioned laser guns, and a range of heavy weapons, but I wasn't really interested in those here.
As with the Trogyl, assembly was fairly straightforward, using bodies from Les Grognards, and heads and arms from the Maelstrom's Edge Karist Trooper kit. The heads for the Grognards only have short, stubby neck attachments, so I used a drill to enlarge the neck cavities to accommodate the Karist heads.
From there, it was just a matter of gluing everything in place. The torsos match Karist Trooper bodies in width, so the arms went on with no argument.
Regular readers of my articles will no doubt have noticed that I tend to use whatever paints I have on hand, but just for something different I thought I'd try sticking to a single brand, and painted these up using Army Painter paints exclusively. I started with a basecoat of Skeleton Bone spray, and then went over the armour plates and weapons with Plate Mail Metal, and the boots, belts and webbing with Leather Brown. Over that, I applied a wash of Light Tone to the bone areas, and Dark Tone everywhere else.
To finish up, I added some highlights to the coat and leather using some more Skeleton Bone, and picked out eye lenses and weapon energy blisters using Warlock Purple and white. The bases were painted with Ash Grey, and then given a generous wash of Dark Tone before I painted the edges with black.

Not content with basic troopers, I also had a tinker with the Faction Expansion sprue to make a greatcoat-clad Praetorian, and also plundered a Shadow Walker sprue to add in some teleporty, assassiny backup!
Now I'll have to see about expanding this little starter force into something table-ready!
Put together your own Karist force of zealoty doom by picking up the plastic Trooper kit, along with the rest of the Maelstrom's Edge range from the webstore here.
Then pop on over to the Comm Guild Facebook group to show us what you're working on!
For other building ideas, modeling tutorials, army spotlights and conversion walkthroughs, check out the Hobby section of the Maelstrom's Edge website here.
Tags: conversion karists kitbash modeling painting spotlight walkthrough