Entries tagged [conversion]
Kitbash Spotlight: Trogyl Scouts!
Posted on Monday Oct 26, 2020 at 05:00pm in Tutorials
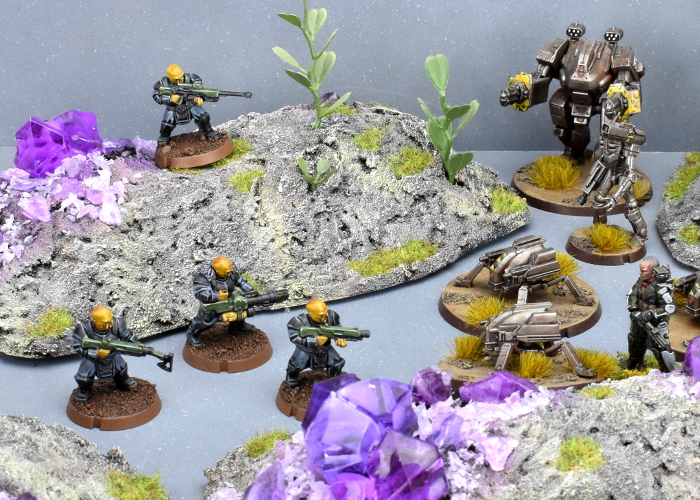
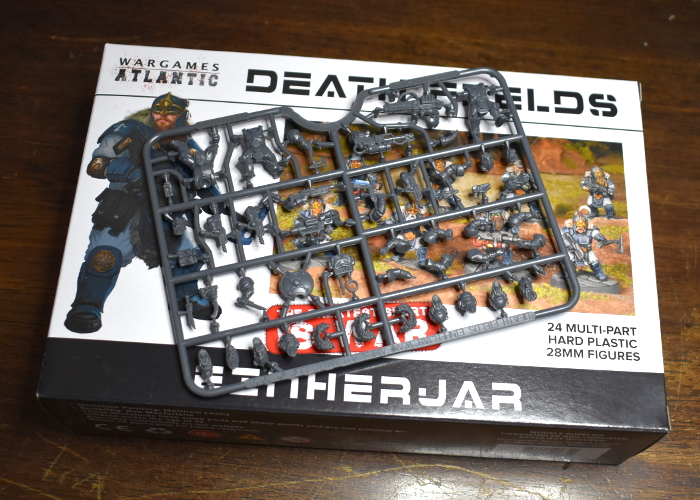
Wargames Atlantic have been releasing a steady stream of assorted plastic miniature kits over the last little while, and amongst their recent releases was a box of 'Einherjar' - space dwarves! I couldn't resist picking up a box to have a tinker with, and while most of them will probably be built as intended just because they're great models, I thought it would be fun to build something from them that fit in a little better on the Edge, and so came up with these: Trogyl Scouts!
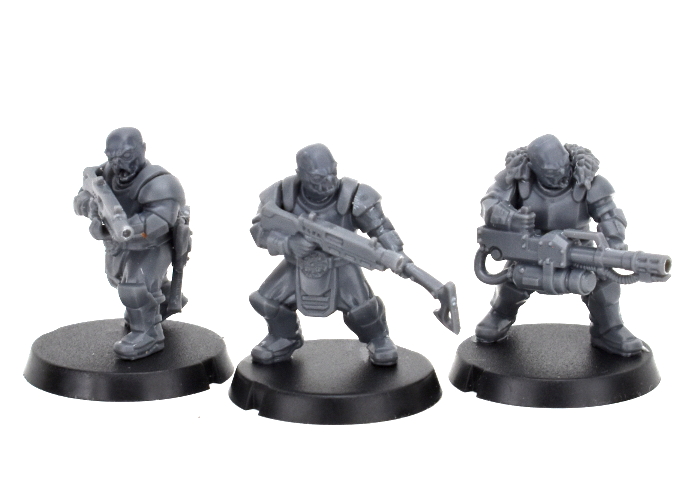
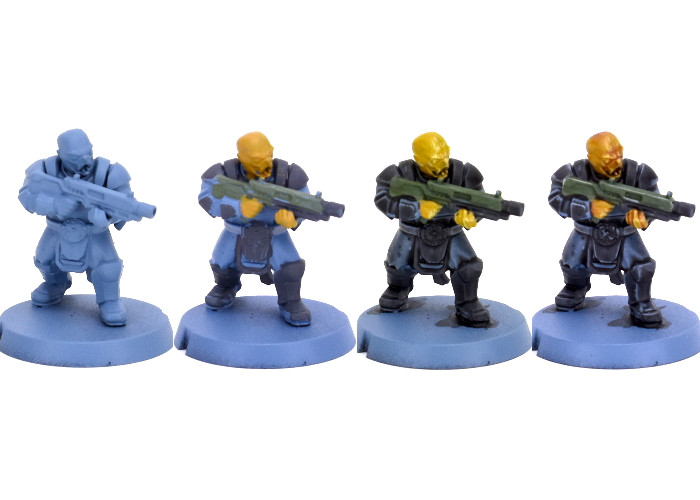
As mentioned above, the base for this conversion was the Einherjar kit. The kit comes with several weapon options, and different (suitably Dwarfy) head designs, but I wanted something alien, instead. Turning to the Maelstrom's Edge Broken kit, I chose the fanged head, which has an open and closed mouth variant, so they don't all wind up identical.
I didn't bother documenting the assembly, as it was pretty straightforward: Everything except the head was assembled as normal. The necks on the Broken models have a longer ball joint and a deeper socket on the torso for it, so I had the choice of either trimming down the necks on the alien heads, or drilling out the necks on the Einherjar torsos. I went with the latter, using a 2mm drill bit to make a deep enough hole for the alien heads to slot in neatly.
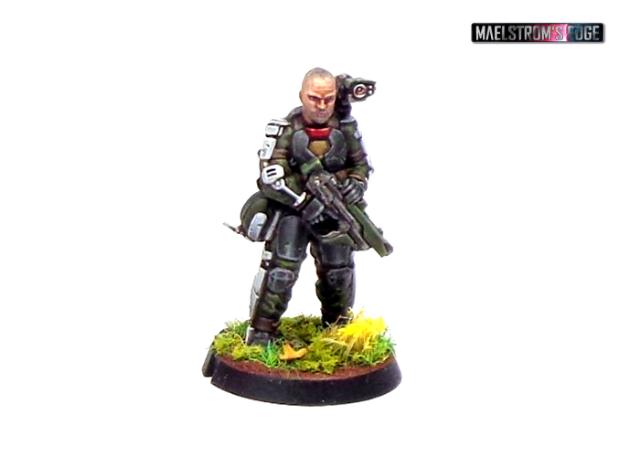
For comparison, here's a scale shot with Drinky McStagger of the Broken, and Trooper Anonymicus of the Epirian SecDef:
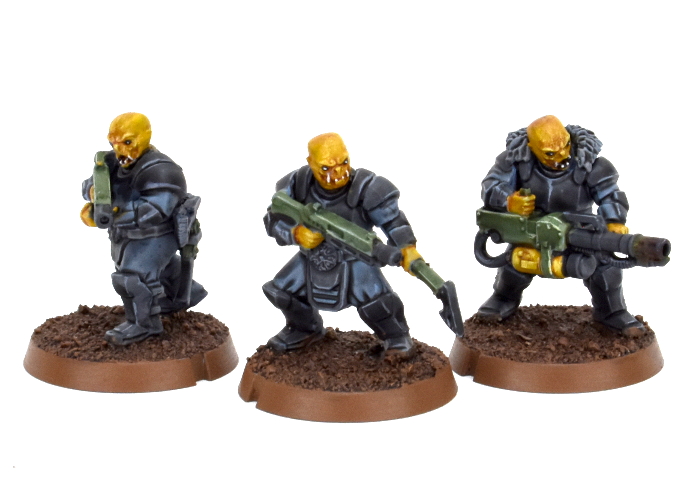
I envisaged this unit as being fairly stealthy, so wanted their uniforms to be nondescript. I started out with a basecoat of Army Painter Wolf Grey, then went over the exposed skin with Citadel Iyanden Darksun, weapon casings and pouches with Army Painter Army Green and armour plates and other metal areas with Vallejo Basalt Grey. The green was then washed with Army Painter Military Shader, and the grey areas with Army Painter Dark Tone. Over the yellow, I added a coat of P3 Cygnus Yellow, and then added a light drybrush of the yellow mixed with some white over the face and knuckles, before adding a layer of Army Painter Flesh Wash. The armour plates then received a light highlight with Vallejo Light Grey on upper edges, and the green areas a similar treatment with Coat D'Arms Putrid Green.
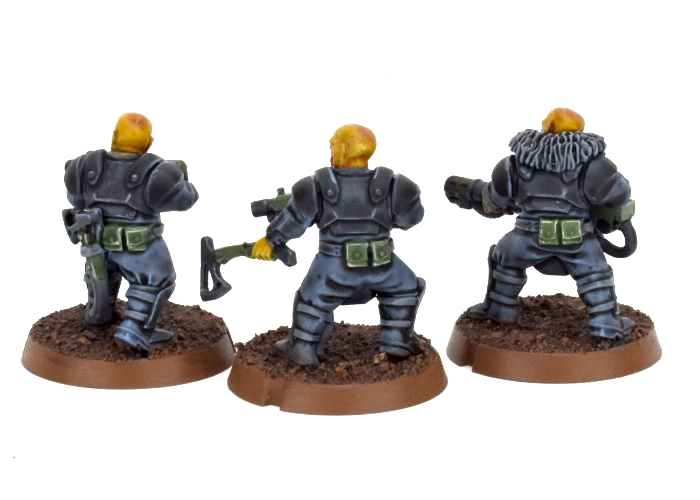
The final steps were to add in eyes with black and a tiny dot of white, and teeth with some more white, and then detail the base. I glued on a layer of sand, painted with Army Painter Leather Brown, washed with Army Painter Strong Tone, and then gave it a final drybrush with some more Leather Brown.
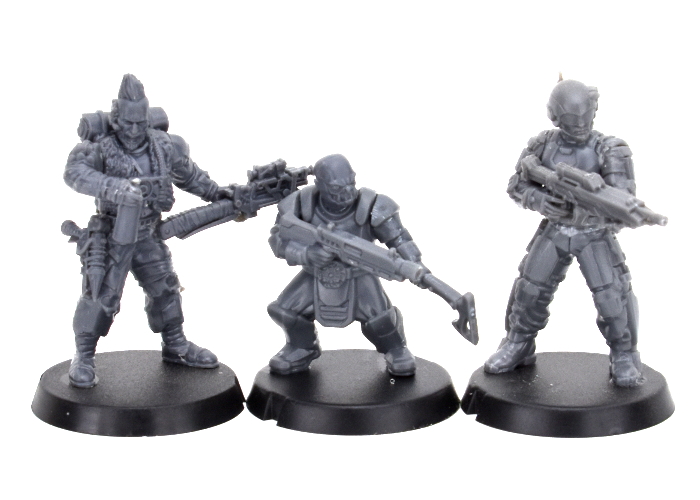
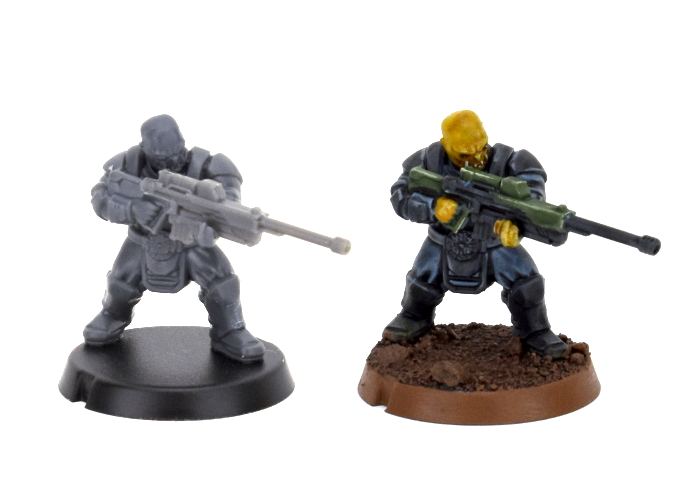
Since they're intended to be a scout unit, I couldn't resist adding in a sniper option as well, either to replace the flamethrower or as a unit-wide upgrade (I haven't decided yet!). I used a rifle from the Epirian SecDef kit, trimming off the shoulder stock and gluing it onto one of the Einherjar rifle arms with the weapon trimmed off just in front of the stock.
The next step will be to work up some (unofficial, obviously!) rules for these chaps. I'm thinking of a Mercenary-type faction, that can be 'hired' by any of the other factions, possibly using up two non-Core slots for the privilege. More on this once I can get something written up and tested on the table a little!
What are you working on? We would love to see your models and terrain in the Comm Guild Facebook group!
If you're running short on plastic fodder, you can pick up the full Maelstrom's Edge range from the webstore here.
For other building ideas, modeling tutorials, army spotlights and conversion walkthroughs, check out the Hobby section of the Maelstrom's Edge website here.
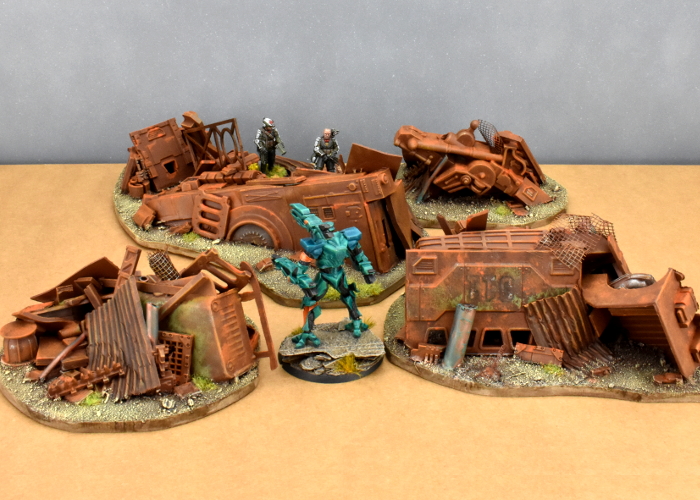
Terrain Spotlight: Junkyard!
Posted on Monday Oct 19, 2020 at 05:00pm in Tutorials
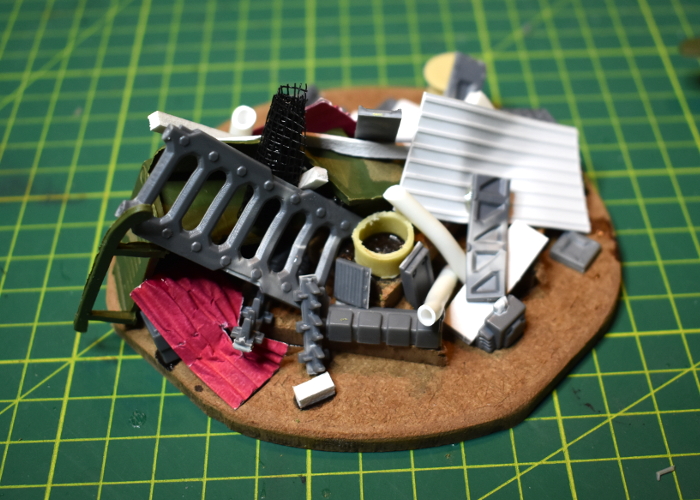
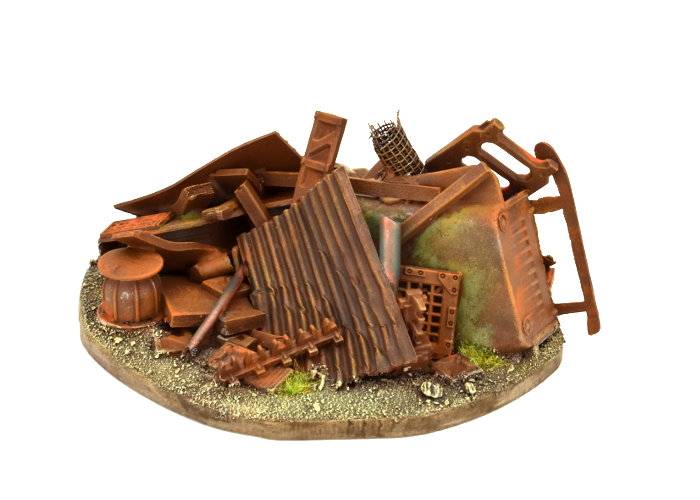
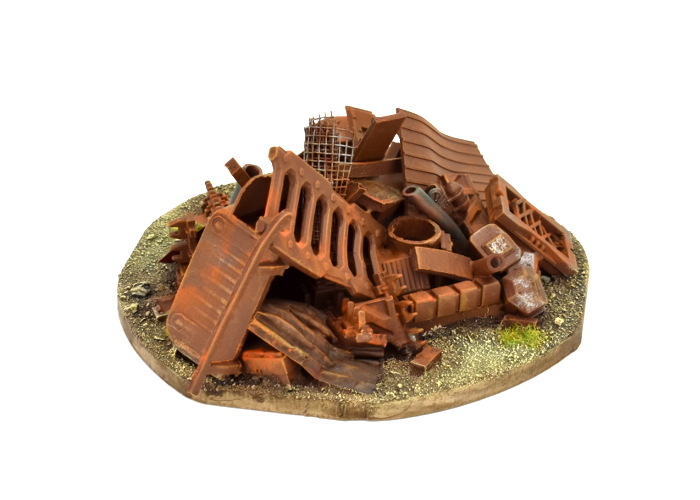
When you do a lot of conversion work on models or terrain, you tend to accumulate an ever-growing collection of discarded remnants - model or terrain components that have been cut up to use specific parts or them, leftover parts from different kits, random off-cuts of plasticard or cardboard, and other odd bits and pieces collected because they were interesting. Unless you have bottomless storage, it's handy to clean these out from time to time. Since I hate throwing anything away, however, I wanted a way to make use of these parts that I otherwise might not have an immediate project for. And so, I decided to make some junkyard terrain!
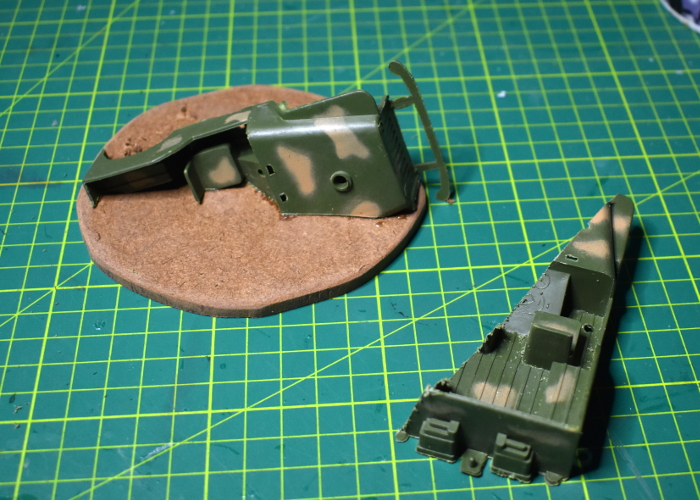
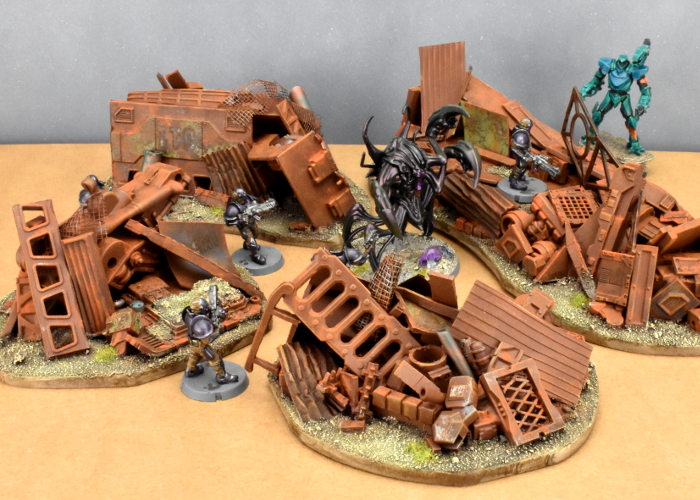
I wanted junk piles that would, at least in part, completely obscure human-sized models, so needed a bit of bulk to get started. For this purpose, I used some military vehicles from my daughters' toy soldier collection that had broken parts that couldn't be easily fixed. Cutting these more or less in half diagonally provided some interesting shapes to build on, and also doubled the number of terrain pieces I could potentially make from them!
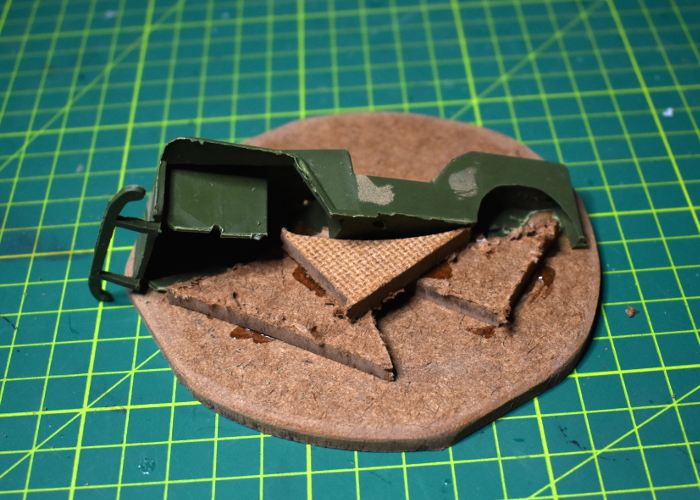
The vehicle parts were glued down onto some irregular pieces of hardboard, using Power Grip (a 'glue anything to anything else' sort of glue). I used some small hardboard off-cuts to add a little more bulk as well.
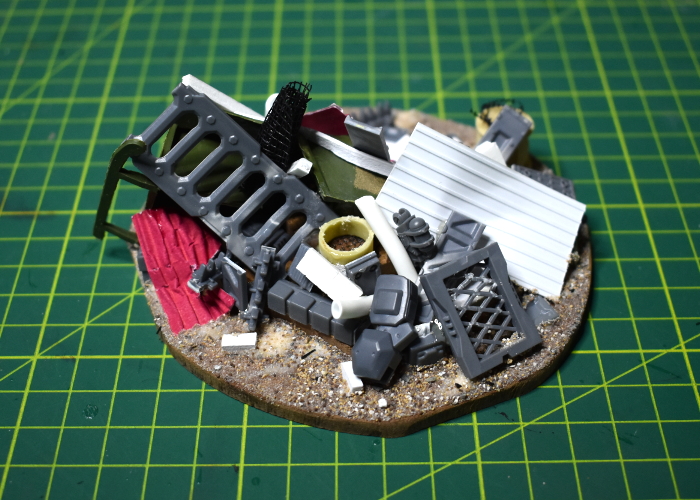
From there, it was simply a matter of grabbing interesting bits of this and that and gluing them on wherever seemed appropriate. As mentioned above, this included model and terrain parts, in some case chopped up a bit, bent, or otherwise cut or dented up in places to make them look more junk-worthy, and also whatever other scraps of building materials I had to hand, including plasticard, foamed PVC, plastic tubing, corrugated cardboard, flyscreen, and a few other odds and ends.
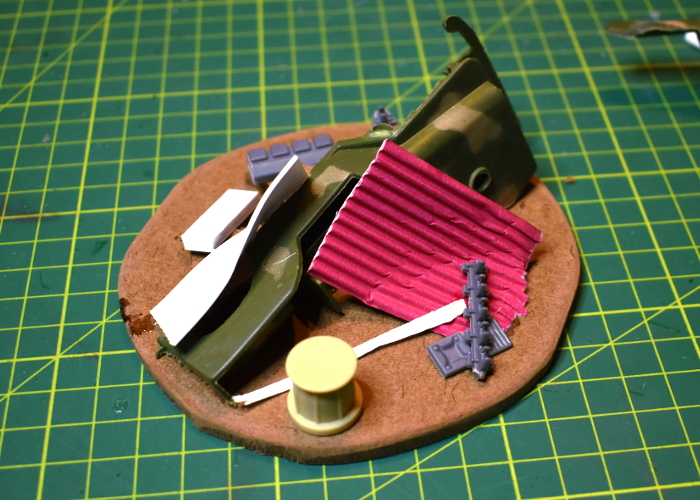
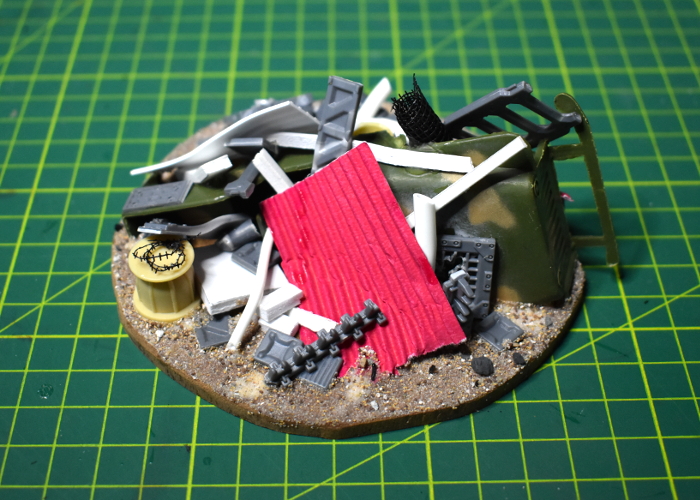
I kept piling up bits until I was happy with the amount of detail and cover on the base.

To finish up, I glued on some light gravel and sand mix anywhere on the hardboard where there was empty space.
That just left painting. There were a few different potential ways to go here: painting everything up as heavily rusted and old, making it a newer junkyard with lots of shinier metal and painted parts, or something in between. To help disguise the mix of different building materials used, I decided on the first option.
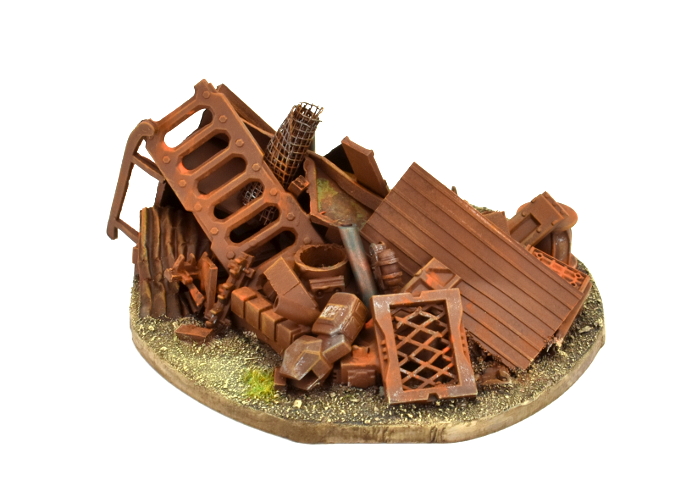
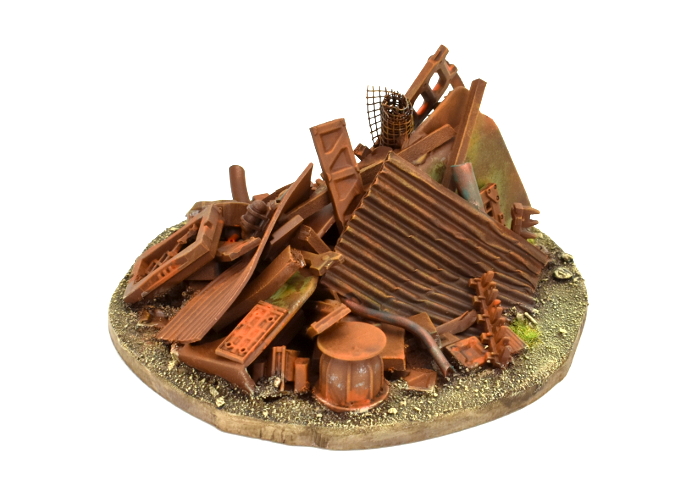
For the most part, I used the same rusted metal technique as for my shanty buildings and elsewhere. Some panels have some weathered paintwork still showing, and I couldn't resist adding in some aged copper pipes for a little extra colour, using the same method as in my copper tutorial. The gravel around the junk was painted in the same style as I used for my crystal outcrops, to provide some contrast to the rusty metal.
To get in some terrain action of your own, you can pick up the Maelstrom's Edge terrain sprues along with the rest of the model range from the webstore here.
For other building ideas, modeling tutorials, army spotlights and conversion walkthroughs, check out the Hobby section of the Maelstrom's Edge website here.
What are you working on? We would love to see your models and terrain in the Comm Guild Facebook group!
Tags: conversion modeling painting spotlight terrain terrainsprue tutorial walkthrough
Terrain Sprue Kitbash: Escape Pod
Posted on Friday May 08, 2020 at 02:11am in Tutorials
It probably won't surprise anyone who has been following my articles for any length of time that I spend a lot of time looking at sprues and figuring out different ways to fit parts together in new and interesting ways. This week, the power generators on Terrain Sprue #2 caught my eye, and I decided it was time to get away from it all, with a compact escape pod!
The main hull of the pod was built from two generators, and two reinforcing struts split into two and three segment pieces.
I glued the longer strut pieces, detail-side in, along the long edges of the back of the generator, and then trimmed the short pieces to fit neatly along the short edges, before fitting the second generator onto the other side.
For the jet nozzle on the rear of the pod, I used two large pipe fittings from Terrain Sprue #1, glued back-to-back. The inside piece needed some slight trimming on the flat edges to fit neatly between the protruding ends of the struts.
The viewport on the front of the pod was built from more parts from Terrain Sprue #2: a light, a round window and the base of the weapon mount with the sliderail trimmed down.
As a final step, I added some extra detail over the flat strut backs, using the energy fence posts from Terrain Sprue #1 with the bases cut off. For the bottom of the pod, I clipped off the energy projectors and sanded the post face down flat, gluing it with the back of the of the post facing out. On the top, I wanted a couple of clamps to hang the pod with, so I cut the top and bottom energy projector segments off the post, and then just trimmed, sanded and flipped the middle section.
That just left painting. I used a basecoat of Army Painter Necrotic Flesh, and then a wash of Citadel Iyanden Yellow Contrast, followed with a sponge of Vallejo Heavy Charcoal to weather it. For the metal sections, I used Citadel Boltgun Metal with a wash of Army Painter Strong Tone, followed by a light drybrush of Army Painter Shining Silver, and AK Interactive Pure Black over the jet exhaust. The viewport was painted with a mix of Army Painter Matt White, Ice Storm and Ultramarine Blue, and the lights on the rear panels with white, Army Painter Pure Red and AK Pure Black.
To build your own escape pod, you can pick up the terrain sprues, along with the rest of the Maelstrom's Edge model range from the webstore here.
What are you working on? We would love to see what your models and terrain in the Comm Guild Facebook group!
For other Maelstrom's Edge modeling articles, including tutorials and walkthroughs of a wide range of different building and miniature projects, check out the Hobby section of the Maelstrom's Edge website here.
Tags: conversion kitbash modeling spotlight terrain terrainsprue tutorial walkthrough
Modeling Spotlight: Epirian Aurochs Automated Transport Kitbash
Posted on Thursday Apr 23, 2020 at 05:00pm in Tutorials
Time to build something!
This week, I had a tinker with the Mule, from Mantic's Warpath game. I love the styling of this vehicle, and thought it would fit nicely into an Epirian force for Maelstrom's Edge with just a few minor tweaks. This was the end result:
The front end of the Mule is rather evocative of the torso of the Epirian Hunter Mech. This inspired me to turn the mule in to a bot-driven vehicle, rather than just another standard transport vehicle. My thinking is that this would be a general purpose vehicle, under the control of a bot handler, which could be used a cargo or troop transport, routine patrols or crowd control tasks.
To carry across the visual link to the Hunter, I took a Hunter torso and cut away the head piece from the top. On the Mule cab, I trimmed the hatch off the roof, and glued the Hunter head in place on the front of the roof.
The Mule comes with two different weapons, that slot into a socket on the back edge of the roof. I took one of these, sliced it off just in front of the mount, and attached a clingfire sprayer from the Epirian Scarecrow kit.
To give some potential variety, I took the second weapon, cut off the barrel and glued on the barrel from the Hunter's chaingun. The rest of the Mule was assembled as normal. I considered filling in or covering the windows and windscreen, but they're actually not super-well defined in the rather soft plastic used for this kit, so I figured with everything painted up they would just look like recessed detail panels.
Well, almost as normal. Just before painting, I decided to also add some cluster missiles. These were taken from the Hunter kit as well, with the mounting pegs cut off, and glued directly to the sides of the cab.
The assembled vehicle before painting:
To paint, I used the weathered metal process from my tutorial here.
And with final details in place, the Epirian 'Aurochs' automated transport vehicle is ready to go!
You can pick up the various Epirian robots, along with the rest of the Maelstrom's Edge model range from the webstore here.
What are you working on? We would love to see what your models and terrain in the Comm Guild Facebook group!
For other Maelstrom's Edge modeling articles, including tutorials and walkthroughs of a wide range of different building and miniature projects, check out the Hobby section of the Maelstrom's Edge website here.
Painting Spotlight: Helmeted Marsayan Hypnotist
Posted on Thursday Apr 02, 2020 at 05:00pm in Tutorials
Marsayan Hypnotists stand out amongst the forces of the Broken, with their gangly limbs and tentacled face. For this week's model, I decided to accentuate the alien-ness of the Marsayan a little more by adding a hazardous environment helmet from Bombshell Miniatures' Counterblast range. This model was actually put together a while back for a Spotlight article on the Marsayan, but this week I decided the time had come to get some paint on it!
There was a little conversion work involved in getting the helmet onto the model. I repositioned the arms and head, and shaved down the tops of the shoulders to provide a reasonably close fit for the bottom of the helmet ring.
I started out the painting by spraying the model with Army Painter Necrotic Flesh.
Over the clothing, I painted a layer of Citadel Gryph-Hound Orange Contrast. I also painted the wrappings and straps with Army Painter Mid Brown ink, and the fur and helmet ring with Army Painter Dark Tone.
For the skin, I added a layer of Army Painter Blue Tone over the Necrotic Flesh. I also painted the armour pads and eyes with Citadel Liche Purple, the helmet ring with Army Painter Ash Grey, and the fur and air tubes with Vallejo Heavy Charcoal.
I added a highlight to the orange with some Vallejo Light Orange mixed with white. I used some more white to highlight the helmet ring and bindings, and to apply a very light drybrush to the tubes and fur. Using some Army Painter Warlock Purple and white, I painted in the mouth tentacles and added a highlight to the purple armour sections. For the metal device on his hip and the cannister on his back, I painted on a coat of P3 Pig Iron, and then a wash of Dark Tone. Finally, I used some black and white to add shading and highlights to the eyes.
To finish up, I painted the base using the same urban scheme as the rest of my Broken force, and then glued the helmet in place.
What have you done with your Broken? We would love to see them on the Comm Guild Facebook page!
You can pick up the Marsayan Hypnotist, along with the rest of the Maelstrom's Edge model range from the webstore here.
For other Maelstrom's Edge modeling articles, including tutorials and walkthroughs of a wide range of different building and miniature projects, check out the Hobby section of the Maelstrom's Edge website here.
Modeling Spotlight: Biker Bot Handler Conversion
Posted on Thursday Mar 26, 2020 at 05:00pm in Tutorials
Some time ago, I put together a biker conversion for a Bot Handler Spotlight article, which has been sitting in the cabinet ever since, staring at me accusingly when I walk past. Unable to take the abuse any longer, I decided the time had come to get some paint on him, and this was the result:
The model was put together from an Epirian Bot Handler, the chassis from an Epirian Drone, and most of a Citadel Space Marine bike from Warhammer 40000. I carved out the inside of the handler's legs and bent them outwards to fit around the bike seat.
To paint, I started out with a basecoat of Army Painter Wolf Grey spray.
I then blocked in the main colours - P3 Pig Iron for the metal parts, Vallejo Stormy Blue for the bike panels and Handler's uniform, and Vallejo Heavy Charcoal for everything else.
Next, I painted a generous layer of Army Painter Dark Tone over the top of everything, and put it aside to dry.
For final detailing, I highlighted the blue using a mix of Army Painter Ultramarine Blue and white. Over the black, I added a highlight of Vallejo Light Grey, and Army Painter Shining Silver finished off the metal parts. To brighten things up a little, I added some gold using Coat D'Arms Bright Gold washed with Army Painter Medium Brown. For the face, I painted on a coat of Army Painter Barbarian Flesh with some more MEdium Brown, and finally added the red parts with Army Painter Pure Red, shaded with black and highlighted with white.
And that's one biker bot handler, ready to cruise the backroads of the Edge!
You can pick up the Epirian Bot Handler, along with the rest of the Maelstrom's Edge model range from the webstore here.
As always, feel free to share your models and terrain, or ask any Maelstrom's Edge- or hobby-related questions on the Comm Guild Facebook page!
For other Maelstrom's Edge modeling articles, including tutorials and walkthroughs of a wide range of different building and miniature projects, check out the Hobby section of the Maelstrom's Edge website here.
Tags: conversion epirian modeling painting spotlight walkthough
Model Spotlight: Remnant Nimbus Suits.
Posted on Thursday Mar 19, 2020 at 05:00pm in Tutorials
This week, I'm taking a break from terrain and having a closer look at the fantastic resin kit for the Nimbus battlesuit for the Artarian Remnant!
A smaller suit than the more common Militus, the Nimbus comes in a few less pieces as a result of being resin rather than plastic. The kit includes options for both the Longshot's sniper rifle, and the Pathfinder's Incursion Blaster and pinpoint scanner, as well as the thermal tracker and hologram projector for the shoulders and a cloak generator backpack.
While there is only a single head includedin the kit, the neck joint is the same size as on the Militus. This allows you to use plastic heads in place of the regular Nimbus head.
While they may not fit as neatly without some tweaking, you can also borrow heads from other factions for a bare head option. The model below has the head from a Karist heavy weapon trooper kit.
For faster-moving Nimbus variants, you can use a boostpack from the Militus kit. If you're building a boostpacking Pathfinder, be sure to glue the boostpack in place before the weapon arm, as the back of the blaster overlaps the bottom of the boostpack.
Alternatively, you can make a removable boostpack by trimming off the triangular pieces on the bottom, and then sitting it in place with a little bluetack.
Including multiple shoulder pads would have made the kit a little too fiddly, so the pads were sculpted with the venting systems in place. If you're using any other shoulder mounted equipment, it just glues over the top of the vents, but if you not, and if you don't want the vents either, they can be easily covered over with a little putty. Just push the putty in place in the vent and smooth it down flush with the flat of a knife. If necessary, let it set and then give it a little sand to finish flattening it out.
The arms mount at the shoulders with square locator pegs. These are there to make it easier to get the sniper rifle arms to fit together. You can reposition the arms by just slicing off the peg, so that the inside of the shoulder is flat, and then gluing it on however suits you.
For some more extreme repositioning, resin is easy to cut through with a sharp knife or razor saw, and then reattach with superglue.
What have you done with your Remnant suits? We would love to see them on the Comm Guild Facebook page!
You can pick up the Nimbus suit, along with the rest of the Maelstrom's Edge model range from the webstore here.
For other Maelstrom's Edge modeling articles, including tutorials and walkthroughs of a wide range of different building and miniature projects, check out the Hobby section of the Maelstrom's Edge website here.
Tags: conversion modeling nimbus remnant spotlight
Modeling Spotlight: Adding Arc Markers to 3rd Party bases.
Posted on Thursday Feb 20, 2020 at 05:00pm in Tutorials
Someone on the DakkaDakka forums recently asked how they could go about adding arc markings to non-Maelstrom's Edge bases, for miniatures that they're using from other ranges. This prompted me to exclaim, "How have I not made an article about that yet?!?"
So this week, while I'm finishing off my last underhive building, I thought I would put that article together - and here it is!
In Maelstrom's Edge, certain things have a different effect when a unit is approached from the front or the rear. To facilitate these rules, our bases have markers on the sides, breaking the base into a front and rear arc. If you're using different bases for your models, you can make do without them by using the model's shoulders or face as a reference, but it can be a lot easier to have that visual reference on the base.
There are a couple of different ways to go about this, but in either case the first step is to find the middle line of the base. I've found the easiest way to do that is to use a gridded cutting mat. Sit the base neatly in between the gridlines - Depending on the size of the base, it obviously won't always run from line to line. 25mm bases, for example, would just be centered with 2.5mm either side. Eyeballing this is usually accurate enough, but you can always measure it, or use a piece of 1mm gridded graph paper instead of the cutting mat if you prefer more precision.
When you have the base lined up, count in halfway on the grid, and use a pencil to make a mark on either side.
For 30mm bases, or other 'odd number' sizes, where the middle point would fall halfway between the grid lines, you might find it easier to mark on the diagonal rather than estimating halfway along the grid.
Once you have your marks, the quickest and easiest way to finish up is to draw or paint a solid line over the marks. For some extra razzle-dazzle, you can add the illusion of a cut-in by highlighting down either side.
If you would prefer to have cut-ins on the bases to match the normal Maelstrom's Edge bases, you can use a small file to etch the line into the side of the base. Try to keep the file perpendicular to the base's top surface, and stop just before you cut right through the base edge.
Do this on both sides, and you wind up with something like this:
Note that if you do accidentally file through the inner wall of the base edge, you can stick a small strip of plastic or paper over the inside of the gap to close it over again.
With some paint on, the filed divot gives you an etched arc marker that looks right at home alongside your regular Maelstrom's Edge bases!
That's it for this week. Stay tuned next week for the completion of my first batch of underhive buildings!
Pick up the Maelstrom's Edge model range from the webstore here.
As always, feel free to share your models and terrain, or ask any Maelstrom's Edge- or hobby-related questions on the Comm Guild Facebook page!
For other Maelstrom's Edge modeling articles, including tutorials and walkthroughs of a wide range of different building and miniature projects, check out the Hobby section of the Maelstrom's Edge website here.
Modeling Spotlight: The 2019 Annual Christmas Special!
Posted on Thursday Dec 19, 2019 at 05:00pm in Tutorials
With Christmas fast approaching, I took a break this week from my ongoing underhive building project to put together my now traditional, annual Christmas ornament build. In previous years, I've built a bauble and a hanging star, and so this time around I thought I'd try something a little different, and build a robot reindeer!
This construct used most of an Epirian Scarecrow, including both head pieces, and the lower legs and feet from a second.
I trimmed the toes off the feet to give them a stubbier look. I wasn't aiming for a direct representation of a reindeer here, just something that gave the general impression.
The torso, oriented horizontally, needed a suitably bulky neck to mount the head on, so I trimmed the tank mounting ridge off the Sacrecrow's back and glued both heads on as below.
I then assembled the legs. For the forelegs, I used the Scarecrow's upper arms, and attached the knee disks from the second set of shin pieces onto the insides of the elbow disks. I also drilled a 1mm hole in the back of the torso and glued in a piece of wire for hanging the ornament.
I then glued the command array onto the new neck for a head, and added a tail cut from the muzzle of a chemtech sprayer.
To paint, I gave it a base spray with Army Painter Plate Metal. I followed this up with a coat of Citadel Iyanden Yellow Contrast paint, and then a layer of Army Painter Light Tone. When this was dry, I finished up with a light drybrush of Vallejo Silver and then painted in the eyes and nose with black and red. I also gave the wire a couple of coats of black, to keep it looking neat.
With that, it was ready to join the previous years' decorations on the tree. It's a little goofy looking, but was a lot of fun to put together!
Merry Christmas from all of the team here at Spiral Arm studios, and have a safe and happy time with whichever celebrations you happen to find yourself a part of at this time of year!
To build your own Scarecrowdeer, you can pick up the Epirian Scarecrow kit, along with the rest of the Maelstrom's Edge range, from the webstore here.
As always, feel free to share your models and terrain, or ask any Maelstrom's Edge- or hobby-related questions on the Comm Guild Facebook page!
For other Maelstrom's Edge modeling articles, including tutorials and walkthroughs of a wide range of different building and miniature projects, check out the Hobby section of the Maelstrom's Edge website here.
Tags: christmas conversion modeling
Conversion Spotlight: Epirian Pathfinders
Posted on Thursday Nov 14, 2019 at 05:00pm in Tutorials
I received a grab bag of all sorts of awesome resin parts from Victoria Miniatures this week, so decided it was time to take a break from terrain building and have a bit of a tinker with some infantry. I had thought a while back that Epirian Contractors were just crying out for shotguns, and so with some handy resin additions, I created a new unit of scouty Contractors, which I'm calling 'Pathfinders'.
There's very little converting required here - I just assembled the Contractors without arms. Although I couldn't resist a little bit of cutting things up, so I gave the squad leader a cap on his belt, by cutting off the top of a spare Contractor head.
Victoria's resin cloaks are designed to slot over the shoulders, and fit snugly around the Contractors' collars. These were glued in place with superglue. The shotgun arms needed just a little trimming at the shoulders to fit neatly, as the Victoria Miniatures torsos are slightly narrower than those of the Contractors.
Painting was a quick and easy 'paint in base colours and then give it a wash' job. It's not the prettiest, but it gets a unit on the table quickly. The green areas were painted with Army Painter Army Green, and Vallejo Yellow Green, and washed with Army Painter Military Shader. The metal parts were base coated with Vallejo Heavy Charcoal, given a light drybrush of P3 Pig Iron and washed with Dark Tone. For the shirt, I used Army Painter Barbarian Flesh, Vallejo Heavy Brown for the leather parts, and Coat D'Arms Bone for the shirt. These were washed with Army Painter Strong Tone - This is a fairly heavy contrast with the bone, so creates a bit of a dirty, muddy look. If you are looking for a softer shading effect, you could use Mid Brown or Soft Tone instead of the Strong Tone.
To finish things up, I highlighted the green areas with Coat D'Arms Putrid Green, gave the skin, shirt and leather a highlight of bone, and painted the eyeshades with Heavy Brown, P3 Cygnus Yellow and some white highlights. The bases were basecoated with AK Red Brown Leather and washed with Army Painter Mid Brown.
To build your own Pathfinder unit, you can pick up the plastic Contractor kit, along with the rest of the Maelstrom's Edge range, from the Maelstrom's Edge webstore.
As always, feel free to share your models and terrain, or ask any Maelstrom's Edge- or hobby-related questions on the Comm Guild Facebook page!
For other Maelstrom's Edge modeling articles, including tutorials and walkthroughs of a wide range of different building and miniature projects, check out the Hobby section of the Maelstrom's Edge website here.
Tags: contractor conversion epirian modeling spotlight walkthrough
Terrain Spotlight: Shipping Containers from Terrain Sprue 2
Posted on Thursday Oct 31, 2019 at 05:00pm in Tutorials
As one of my very first articles for Maelstrom's Edge, I put together some shipping containers/cages made from parts from the first terrain sprue and a little foamcore. With the recent release of the second terrain sprue, it seemed fitting to revisit the idea with the shiny, new parts available!
As with the original containers, I used doors to form the front and back of the container, with the rectangular doorframes from the new terrain sprue being perfect for the job. For the back of the container, I shaved off the control panelt and the gubbins up on top, as I planned to have the back as a wall. You could obviously just leave it alone and have a door at each end.
I linked the two doorframes together with the support struts from the terrain sprue, and glued in a floor cut from 3mm foamed PVC.
Inside the struts, I glued rectangles of 1mm foamed PVC, running up to about 1mm short of the top edge of the upper struts. This gives the container some strength, and provides something solid for the walls to glue onto and a ledge for the roof panel to sit on.
I glued another rectangle of PVC into the rear doorframe.
Onto the outer faces of the walls, I glued rectangles of corrugated cardboard, cut to fit flush against the edges of the doorframe and the struts with the corrugations running vertically. (There's no special significance to it being blue - it's just from a multicoloured pack of card I picked up a while back!)
Into the front doorframe, I added a piece of corrugated plasticard, cut with the corrugations running horizontally to simulate a roller door. Most modern-day shipping containers have hinged double doors, but since this doorframe is a little narrower I thought a roller seemed more appropriate. I used plasticard rather than more cardboard as the corrugations are slightly smaller, which helps to make it not look like just another wall.
With the door in place, I stuck another piece of corrugated cardboard into the top of the container for the roof.
The finished container, ready for paint:
And with some paint on:
To mix up the design, you could use plasticard with different textures in place of the corrugated cardboard.
You can also use other real-world container designs for inspiration, adding side doors, changing the length, or as below, using a trimmed down generator, a fan and a couple of other bits from the terrain sprue in place of the back wall to creat a refrigerated container.
And, of course, the discerning stellargee knows that nothing beats an old shipping container for knocking together your own little shanty cabin or business shack!
To give it a go yourself, you can grab the new terrain sprue, along with the rest of the Maelstrom's Edge range, from the Maelstrom's Edge webstore.
As always, feel free to share your models and terrain, or ask any Maelstrom's Edge- or hobby-related questions on the Comm Guild Facebook page!
For other Maelstrom's Edge modeling articles, including tutorials and walkthroughs of a wide range of different building and miniature projects, check out the Hobby section of the Maelstrom's Edge website here.
Tags: buildings conversion modeling spotlight terrain terrainsprue walkthrough
Conversion Spotlight: Karist Raptor Assault Skimmer Kitbash
Posted on Thursday Oct 24, 2019 at 05:00pm in Tutorials
This week, I'm continuing on my quest to add transport vehicles to all of my Maelstrom's Edge forces, with the probably exception of the Remnant (who really don't need them!). A while back, I shared a kitbashed Karist anti-grav buggy converted from a Games Workshop Genestealer Cult vehicle. This week, I'm revisiting the Karist Enclave to build them a transport vehicle from a Beyond the Gates of Antares skimmer.
The kit that I used was a Freeborn Solar Command Skimmer. This is a hybrid kit with metal and resin bits that go onto a basic plastic skimmer chassis. I went with this variant rather than the basic version because the resin add-ons make the cabin space look a little more practical for carrying troops.
The general styling of the vehicle was pretty much exactly what I wanted, and matches up quite well with the Genestealer buggy aesthetically, so I didn't actually make a lot of changes. I needed to swap out the crew for Karists, and chose to just replace the pilot and putty over the gunner's seat with 'green stuff' putty. The pilot was built using the top half of a plastic Karist trooper, with a head from the resin Karist heavy weapon trooper set.
The main weapons would also be replaced, but I kept the metal launchers for the sides of the cabin, as they'll do well enough to represent Karist grenade launchers.
The main gun on the Antares skimmer is fixed in place in the middle of the nose. I decided that something with a little more free movement was called for, so grabbed a sentry turret from the new Maelstrom's Edge terrain sprue and added a Ravager Pulse Cannon nabbed from the Tempest Elite kit.
The gun turret fit in nicely underneath the front of the skimmer, and with everything else glued in place it wound up looking like this:
I kept the original flight base on there for painting, but then switched it to a spare Games Workshop vehicle base that I had laying around, attaching the skimmer to it with one of the drone flight stems from the Antares kit.
Painting followed the same scheme as my Karist Strike Force, and the later anti-grav vehicle, after which it looked like this:
Stay tuned next week for some trial Transport Vehicle rules, and (unofficial) rules cards for this assault skimmer as well as some Epirian and Broken transport vehicles!
To build your own Raptor, you can pick up the Freeborn Skimmer from Warlord Games, and the new Maelstrom's Edge terrain sprue and other Maelstrom's Edge kits from the Maelstrom's Edge webstore.
As always, feel free to share your models and terrain, or ask any Maelstrom's Edge- or hobby-related questions on the Comm Guild Facebook page!
For other Maelstrom's Edge modeling articles, including tutorials and walkthroughs of a wide range of different building and miniature projects, check out the Hobby section of the Maelstrom's Edge website here.
Conversion Spotlight: Epirian Hornet Drone
Posted on Thursday Oct 10, 2019 at 05:00pm in Tutorials
One of the best parts of this hobby, for me, is when you find yourself looking at some bits and get a little flash of inspiration on how to turn them into something completely different to what they were intended to be. I had one of those moments this week, while cutting some parts off the new Maelstrom's Edge terrain sprue, when on impulse I put a couple of the fan pieces together back-to-back. One thing led to another, and the Epirian Hornet Drone was born!
This is actually a really simple conversion, using parts from the Epirian Hunter Warmech, and four fans from the new terrain sprue.
The first step is to take the Hunter torso and use a sharp hobby knife or razor saw to cut through the waist joint.
With the two halves of the remaining torso glued together, there's a large hole in the bottom, into which a flight stem fits quite neatly. Fill the front half of the hole with green stuff or similar putty.
The Hunter's Cutter machine guns are in two pieces, one of which has a wide flap that covers the underside of the weapon once assembled. Don't use that one. Take the other halves of the two cutters, and glue them to the underside of the Hunter torso. They sit in quite neatly, nestled in under the bulge of the chestplate.
Next, take the four fans from the terrain sprue and glue them together in pairs, lining up the fan blades, to make a pair of turbines.
Glue the turbines onto the Hunter's shoulder sockets.
One drone, ready for painting!
With some paint on, it winds up looking something like this:
You can pick up both the Hunter kit and the new terrain sprue, along with the rest of the Maelstrom's Edge range, from the Maelstrom's Edge webstore.
As always, feel free to share your models and terrain, or ask any Maelstrom's Edge- or hobby-related questions on the Comm Guild Facebook page!
For other Maelstrom's Edge modeling articles, including tutorials and walkthroughs of a wide range of different building and miniature projects, check out the Hobby section of the Maelstrom's Edge website here.
Tags: conversion epirian hunter modeling spotlight terrain terrainsprue tutorial
Conversion Spotlight: Building the Militus Dominator.
Posted on Thursday Aug 01, 2019 at 05:00pm in Tutorials
With the Remnant rules released this week, players now have a range of different options for building their Militus suits. Four of the currently available suit classes are buildable straight off the sprue, but the Dominator class does require a very small (and very easy!) conversion to give it a second shoulder-mounted weapon.
The plastic militus kit only comes with a single shoulder-mounted weapon, which hangs on a rig that only fits on the left shoulder. To build the Dominator, you need two weapons. The easiest way to do this is to leave off the shoulder rig, and borrow a second mounting joint (parts L16 and L21 on the sprue) from a second Militus kit.
If you have built a suit or two with combat gauntlets, you will also have some leftover elbow mounts, which you can use instead.
Simply assemble the mounting joint on the weapon as normal, then flip it upside down and glue it directly to the top of the shoulder pad.
The rest of the suit can be assembled as normal.
With a coat of paint, the new Dominator is ready for the table!
Of course, that's just the easy way to do it. Being plastic, the Militus kit offers all sort of other conversion options if you want to get creative with clippers and glue!
Build up your own crusading force of indomitable firepower by picking up the Militus kit from the Maelstrom's Edge webstore here.
As always, feel free to pop along and share your creations, or ask any Maelstrom's Edge- or hobby-related questions on the Comm Guild Facebook page!
For other Maelstrom's Edge modeling articles, including tutorials and walkthroughs of a wide range of different building and miniature projects, check out the Hobby section of the Maelstrom's Edge website here.
Tags: conversion militus modeling remnant tutorial
Modeling Spotlight: Epirian SecDef Lieutenant
Posted on Monday Jun 10, 2019 at 05:00pm in Tutorials
The Epirian SecDef received a boost right in the Command slot last month with the release of a resin Lieutenant model. This fleshes the SecDef out into a fieldable Epirian sub-faction in their own right, as you can now build a detachment solely from SecDef units. This week, I'm taking a closer look at this fantastic model, and some of the modeling options available to it.
The SecDef Lieutenant comes in five pieces (ok, six, if you count the base!) - body, head, targeter, and two different hand options equipped with maglock pistol or carbine.
The head and targeter both have ball joints for full movement range, so you can position the targeter lined up with whichever way the Lieutenant is facing.
The head is also compatible with the SecDef plastics, so you can use a regular helmeted head for a slightly more safety-conscious leader. On the below model, I've used a regular SecDef Tactical head, and also clipped the helmet off his belt and glued on a plastic pouch from the Epirian Handler sprue to cover over the clipped detail.
You can also easily swap in alternate heads from elsewhere in the range. Here's a commander with a little more facial hair, for example, with a head lifted from the Broken Infantry sprue.
Carefully sawing through the waist with a razor saw allows you to swap in alternate legs to switch up the posing. Here, I've used a set of legs removed from a SecDef Boostpack Infantry model, and also given him a capped head from the Epirian Contractor sprue.
Of course, the compatible heads work both ways, so you can also swap in the Lieutenant's venerable pate for a regular SecDef Sergeant.
To get some of your own super-soldier action happening, you can pick up the SecDef Lieutenant, along with the rest of the Maelstrom's Edge model range in the webstore here.
As always, feel free to pop along and share your creations, or ask any Maelstrom's Edge- or hobby-related questions on the Comm Guild Facebook page!
For other Maelstrom's Edge modeling articles, including tutorials and walkthroughs of a wide range of different building and miniature projects, check out the Hobby section of the Maelstrom's Edge website here.
Tags: conversion epirian modeling secdef spotlight