Entries tagged [scratchbuilding]
Terrain Tutorial: Cheap Trees from Pine Cones!
Posted on Friday Oct 14, 2022 at 05:00pm in Tutorials
 - by Iain Wilson
A good collection of trees is handy for fleshing out your battlefields, but commercially-made trees made specifically for scale modeling can be expensive. I've shared a few different ideas in the past for making your own foliage, including using aquarium plants, expanding foam, and Christmas baubles covered in hot glue.
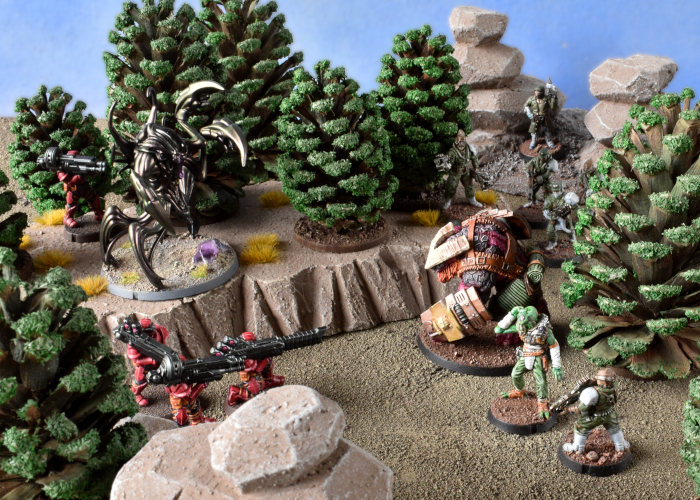
Over the years, one of the more common budget tree ideas I've come across is to use pine cones painted green. They have the advantage of being vaguely tree-shaped and inexpensive if you have pine trees nearby, but tend to wind up just looking like pine cones painted green. I thought I would see if I could come up with an easy and cheap way of improving on this idea a little, with this result:
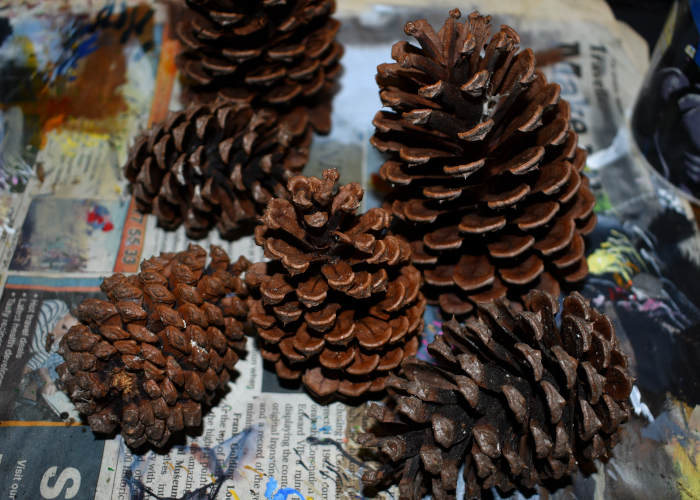
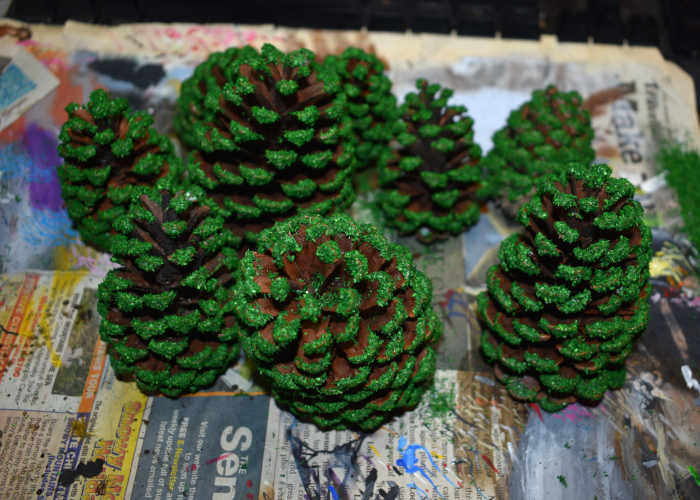
To get started, I collected a bunch of pine cones in assorted sizes, preferably as close to fully opened up as possible.
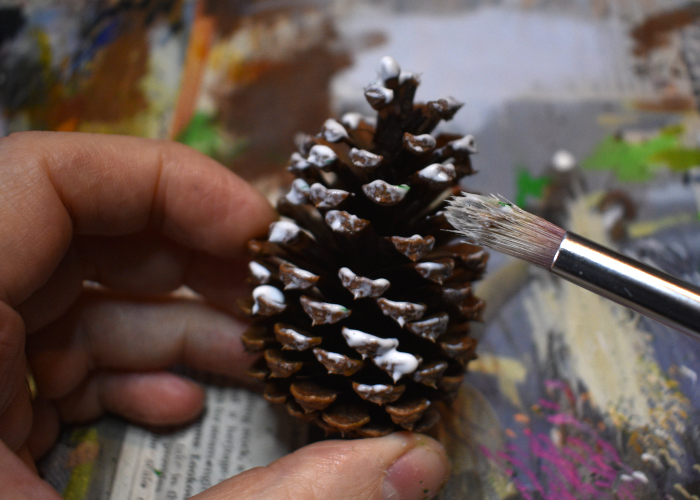
I took an old, large paintbrush and painted the outside of each pine cone with a generous layer of PVA glue.
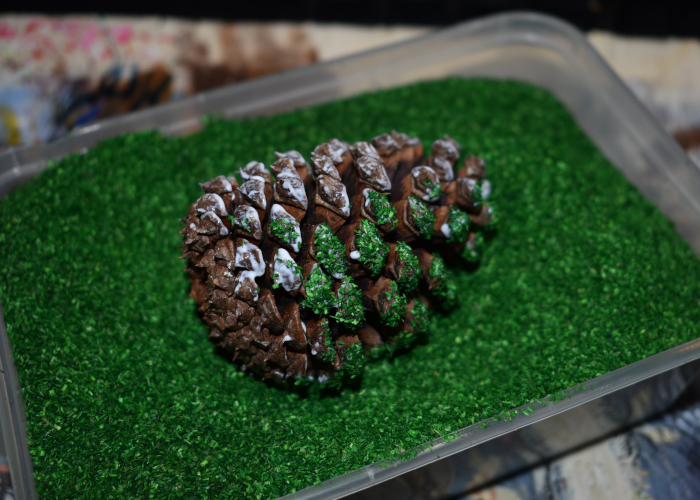
Then while the glue was still nice and wet, I dipped the cones in a tub of green flock, rolling them around to get the flock covering all of the glued areas.
I don't normally use sawdust flock for modeling, as for its primary use (for grassed areas) I don't like how it looks, although I have used a finer flock in the past for making hedges. But I had a big tub of this stuff that someone gave to me years ago, and this seemed like a good use for it.
The flocked pine cones:
To finish up, I gave the trees a light spray from above using Army Painter Army Green. This dulled down the bright green of the flock and gave it some depth. I then used hot glue to attach the trees to some circular plywood bases. At this point, they can be put on the table as single trees, placed on top of a shaped terrain piece to make a forest base, or fitted to a textured base board. For the latter, you can glue the trees directly to the base board instead of using the circles, or texture around the circles so that the trees are removable, making for easier storage or the ability to remove trees when they are in the way for model movement.
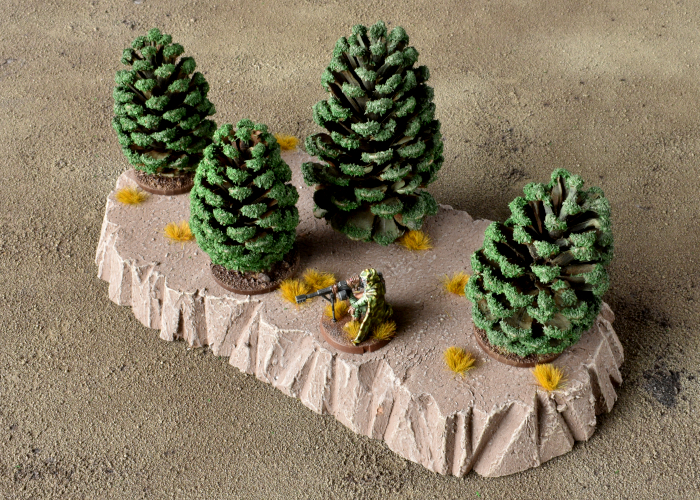
The end result, to be honest, still looks somewhat like pine cones painted green, although the illusion works a little better from above at normal playing height. For a little more work, you can also prune away the pieces from the base of the pine cone to create a trunk protruding from the bottom, like this:
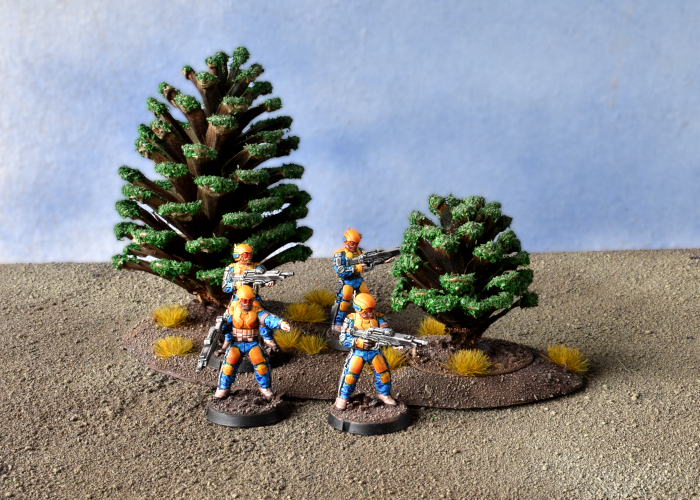
Or, to get even further away from the pine cone look, you can use a slightly more liberal coat of glue and cover the whole thing in landscaping foliage, like this:
Once you have your forest of pine-scented doom, head on over to the Maelstrom's Edge webstore here, to pick up an army to run around in it!
What are you working on? We would love to see your models and terrain in the Comm Guild Facebook group!
For other building ideas, modeling tutorials, army spotlights and conversion walkthroughs, check out the Hobby section of the Maelstrom's Edge website here. And while you're there, grab a copy of the Maelstrom's Edge V2 Beta rules!
Terrain Spotlight: Hot Glue & Christmas Bauble Alien Trees!
Posted on Monday Nov 02, 2020 at 05:00pm in Tutorials
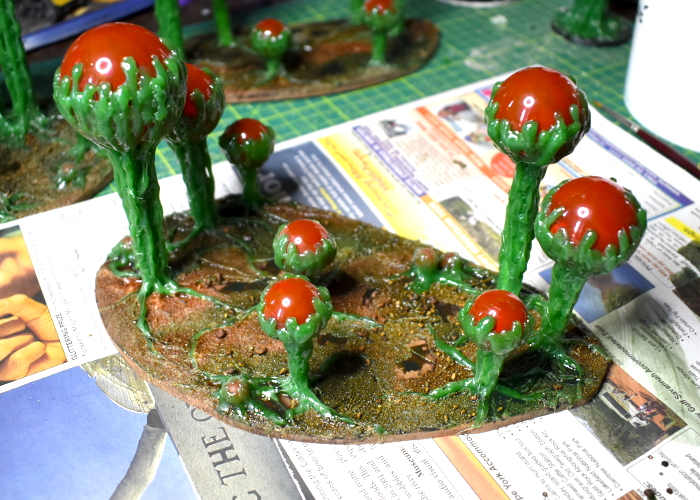
I've been having a lot of fun lately coming up with different ways to make trees that look like they belong on alien worlds. You might have seen my previous articles with silicon aquarium plant trees, or my boab-inspired expanding foam trees. This week, I drew some inspiration from the Titan AE animated movie, working up some forest bases made from Christmas baubles and coloured hot glue!
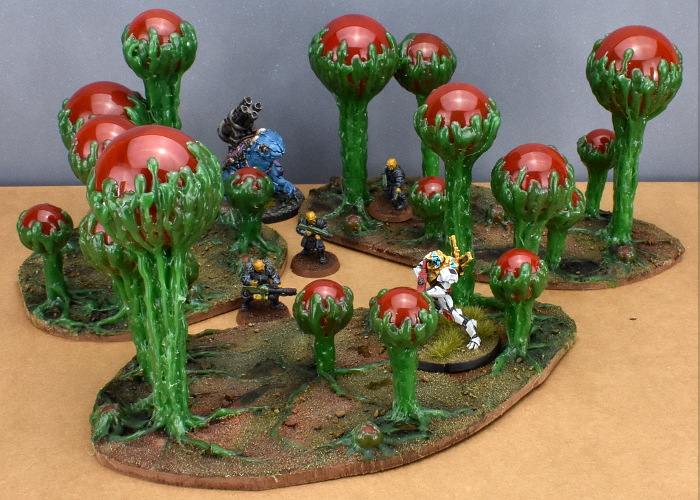
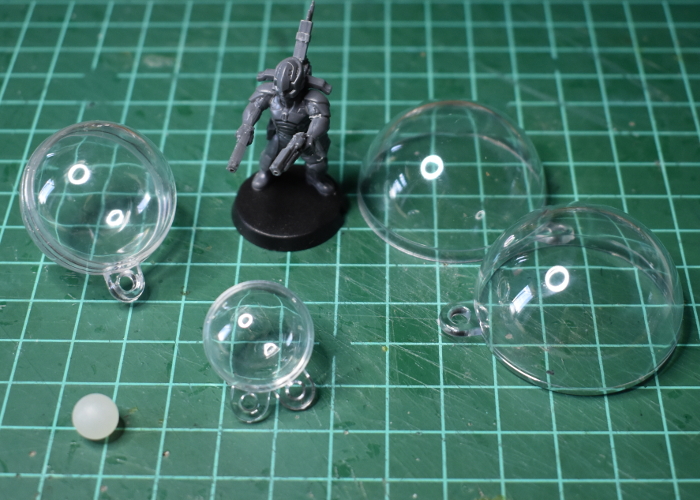
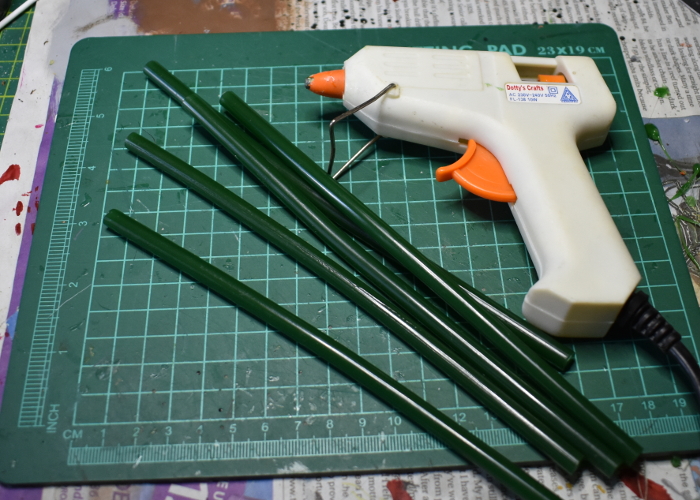
The basic idea with these is a plant that has a ball-shaped sac, filled with lighter-than-air gas of some kind (the cartoon plants they're based on are highly explosive!). To make these, I sourced a bunch of clear, plastic Christmas bauble shells in a range of sizes from Ali Express. These didn't go down as small as I wanted, so for the smallest size I wound up with some 8mm solid plastic balls.
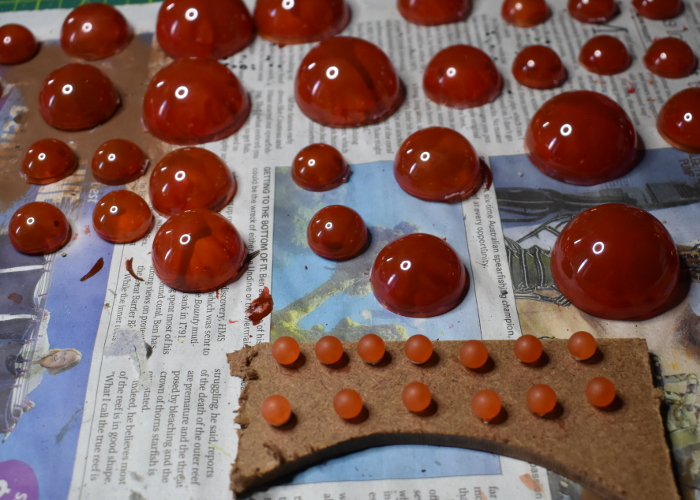
To create the gaseous effect, I wanted the sacs to be mostly opaque, with swirling colour and just a hint of translucency. So, after trimming off the hanging tabs, I painted the insides of the baubles with Citadel Gryph-Hound Orange Contrast, and then dabbed in some blobs of Mig Blood Red, letting this run wherever it liked through the orange. For the solid balls, I just painted on a coat of the orange Contrast.
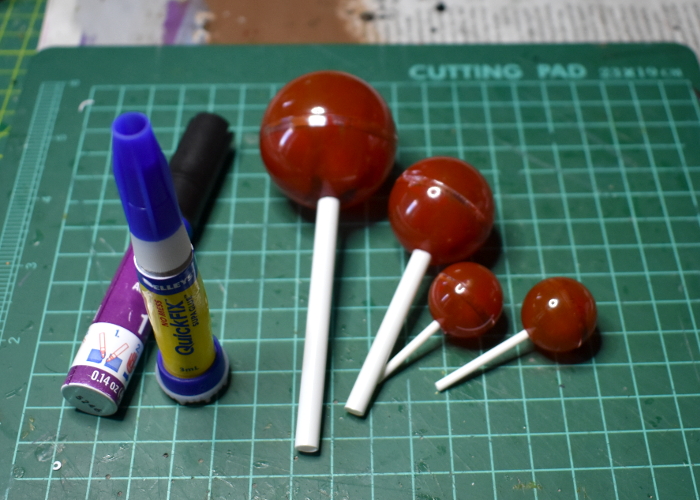
Once the baubles were dry, I fitted the halves together, and then used some superglue to stock different length stems onto them, making sure the joint lines on the baubles were running more or less horizontally. For the most part, the larger the bauble, the longer the stem it got, although I did mix this up a little here and there to keep things a little chaotic and organic.
For adding the trunks, I used some green hot glue, also from Ali Express, although as with the baubles you might be able to find this in local craft stores, depending on where you are in the world.
A note on safety: If you plan on having a go at this, I feel compelled to point out the obvious: Hot glue is hot! Be careful to keep fingers away from the melty end of the glue gun, and avoid getting drips of glue onto your skin, as it can burn. Also, use in a well-ventilated area!
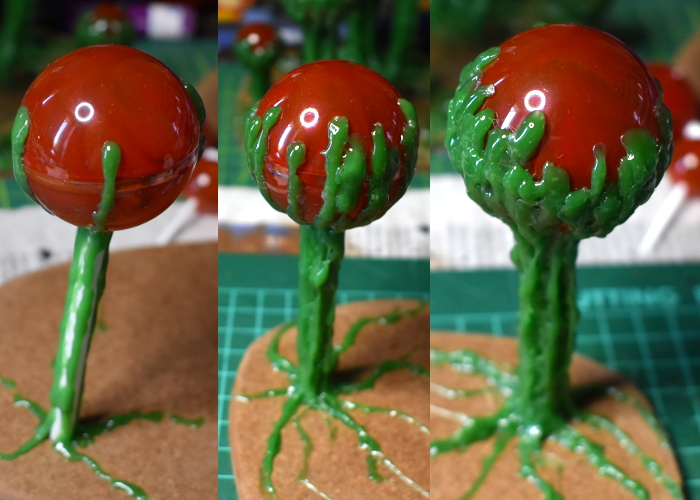
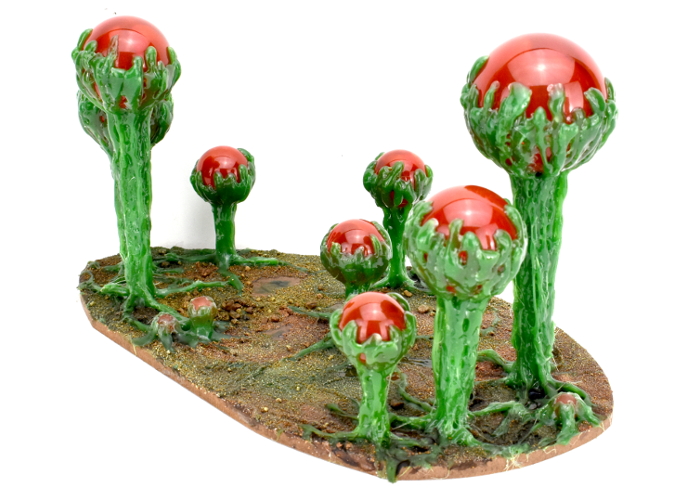
After gluing the stem to a hardwood base, I ran a line of glue from about two-thirds of the way up the bauble, all the way down, and then outwards to form a root shape along the top of the base.
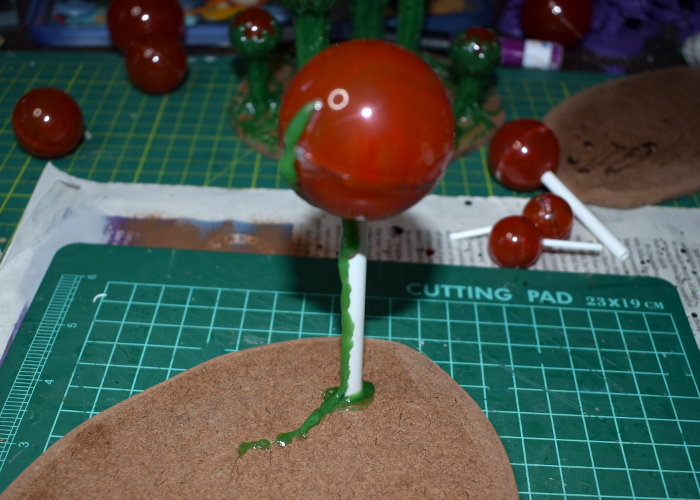
From there, I added successive strips down the length of the tree, keeping some space between each new strip and the immediately preceding one, to give them time to cool and set. The aim was to coat all of the outside of the stem, and most of the lower two-thirds of the bauble. Some parts of the lower half of the bauble show through the glue for effect, and to help light shine through the finished tree top, but the glue completely covers the joint line to hide it.
Here's a video of the gluing in process!
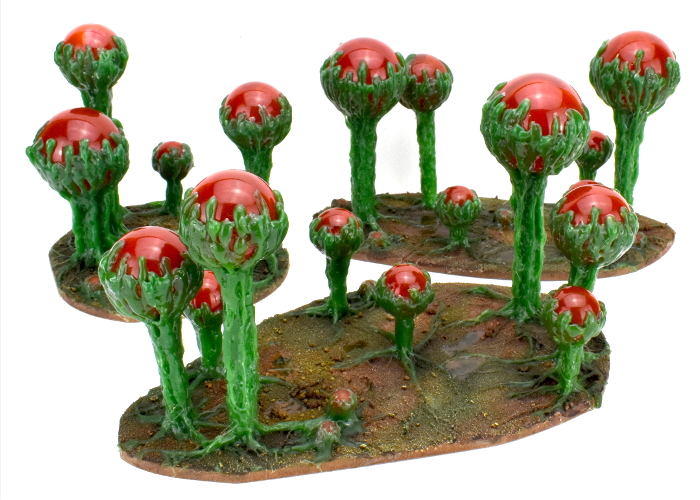
With the first tree done, I glued the next stem to the base, and repeated the process, continuing until I had a good number of trees on the base. There's a balance between having enough on there to be convincing as a 'forest' base, while still leaving enough room to position models. When in doubt, always err on the side of playability, as this is supposed to be gaming terrain, after all!
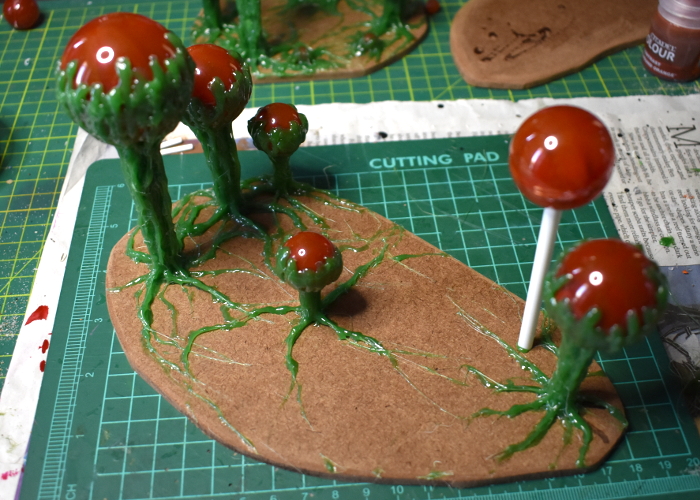
The small balls were used to create new growth without much height to it. For these, I glued the ball directly to the base, and then added blobs of glue around the circumference.

I decided on a boggy base to go with these trees, so started out by gluing some fine sand on with PVA glue, leaving the tree roots exposed. I also left some patches of the hardwood exposed, to make a few open puddles.

With the PVA dry, I painted over the sand with a mix of Army Painter Mid Brown and Green Tone Quickshades. You could paint the tree trunks to cover over the glue if you want, but I decided I liked the shiny green on them, so left them as is.
Finally, I added a light drybrush of Coat D'Arms Putrid Green over the sand, and painted some gloss varnish onto the 'puddle' areas. The end result looked something like this:

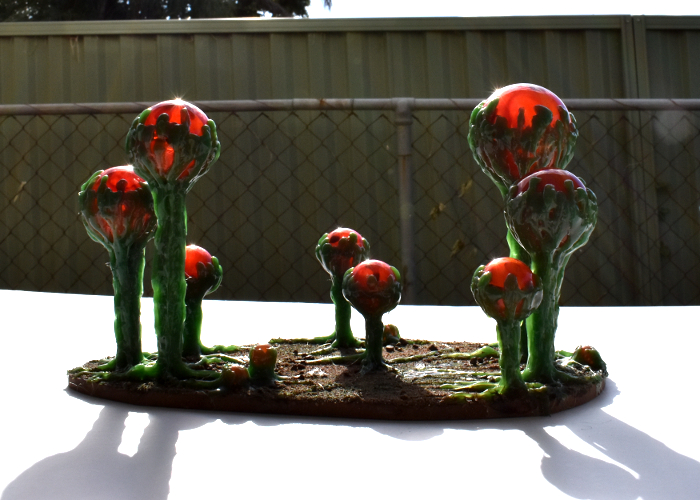
And a shot out in the sun, to show the light shining through the gas sacs!
Feel like giving some alien trees a go? Be sure to share what you come up with on the Comm Guild Facebook group!
Pop on over to the Maelstrom's Edge webstore here to find our plastic and resin model range, including the ever-popular Maelstrom's Edge terrain sprues.
And for other building ideas, modeling tutorials, army spotlights and conversion walkthroughs, check out the Hobby section of the Maelstrom's Edge website here!
Tags: scratchbuilding spotlight terrain trees tutorial walkthrough
Terrain Spotlight: Landing Pad 16, part 2
Posted on Monday Feb 04, 2019 at 05:00pm in Tutorials
- by Iain Wilson
Time to check back in on my landing pad display board build! (If you missed part one, you can find it here)
In the first instalment, I ran through the construction of the 'back' side of the display, so this time around I'm working on the landing pad area.
When I cut the foamed PVC for the floor, I left out a curved area that would form the main section of the actual landing pad itself. To fill this in, I cut a piece of 2mm thick cardboard.
On the top surface of the card, I painted a layer of superglue, and then laid a piece of fibreglass flyscreen flat over the card. Once the glue set, I trimmed the screen around the edges.
I wanted a section of the pad to have visible pipes under the mesh, and had cut a cavity into the cardboard for this purpose. Painting this with everything glued in place would be problematic, so I cut the screen neatly down one edge of the cavity so that it can be lifted up out of the way to paint the pipes. The pipes were made from sections of an assortment of plastic rods. Once the pipes and the rest of the pad are painted, I'll glue the screen back down and add a little trim over the top to disguise the joint.
As detailed last week, I built up the walls using foamed PVC. I left a recess around the top of the landing pad wall, along with the pad's retractable roof would slide.
I added support struts from the Maelstrom's Edge terrain sprue along the top and bottom of the walls, with an extra row of reinforcing
As I had pipes running into the wall from the back side of the board, I needed something on the pad side to match up to them. The first became a heat vent, using a trimmed down large pipe fitting from the terrain sprue and a pipe end from a 13mm drip irrigation setup. I shortened the pipe fitting by cutting across it with a razor saw.
For the second large pipe, I built a fuel storage tank using another drip irrigation piece, a piece of plastic packaging that I think came from a laser printer component, and a clear plastic cap - I don't recall exactly where this piece came from, but I think it was some piece of toddler-feeding paraphernalia. I added some connection ports to the front using the small pipe fitting from the terrain sprue and some plasticard.
For the smaller pipe, I ran a matching piece of pipe cut from the side of the terrain sprue, and fed this into an air conditioning unit built from foamed PVC and an assortment of gubbinz from the terrain sprue.
To the left of the pipe I had added a square hatch, just for a little detail, with the intention of this turning into a conveyor feeding into the pad area from elsewhere. For the conveyor belt, I glued in a bunch of plastic tubes to create rollers.
I broke up the vast expanse of flyscreen on the pad with a couple of strips of plasticard, and added a curved strip around the edges to conceal the join between the screen section and the solid floor.
The rectangle cut into the pad floor was intended to turn into a cargo lift. I built the lift platform using a piece of PVC, some support struts from the terrain sprue and a piece of chequer plate plasticard.
To allow for some variation in the display, I wanted to be able to reposition the lift. To this end, I built a hydraulic lift to go under the middle of the platform using some pieces of plastic tube and a couple of pipe fittings. Thanks to the magic of magnets, this all slots together when needed. Alternatively it can be left out, allowing the lift to sit on the floor.
Ships need to recharge as well as refuel. I built a charging port using a shutter window with most of the shutters cut out. Into the resultant opening, I glued a piece of plasticard and some assorted bits and pieces. The charging cable was made from a couple of pieces of plastic tube and the chain from a fob watch I had sitting in my bits box.
At the other end of the board, I wanted some stairs and decking platforms to create some vertical detail. I cut the shape of the platforms out of 1mm plasticard, and glued on some aluminium mesh cut to the same size.
On the bottom of the mesh, I glued matching pieces of plasticard, and then added some diagonal supports using I-beam plastic rod.
The supports for the platforms we made from foamed PVC, doubled-up to give it some extra thickness.
With the legs in place, I added some extra supports for staircases, cut from more PVC. I used strips of textured plasticard for the stair treads. For the moment, I left the platforms and the treads on the lower staircase unglued, to make it a little easier to paint underneath them.
I added some more support struts around the edges of the platforms and on the ends of the legs. I also glued on some posts for handrails, cut from the energy fence piece on the terrain sprue.
Some final small details:
- I added a spray gun (for vermin control) onto the wall using a chemtech sprayer from the Epirian Scarecrow kit with a pistol grip from a Guardian pistol added. For the mounting clips, I used a couple of leftover sections from the energy fence posts.
- I pillaged a clingfire sprayer and a leg from the Scarecrow kit, and a trimmed down Spider Drone head to create a security remote.
- And I made a billboard screen using sections cut from a garage door.
And with that, assembly is more or less complete!
The handrails are just a placeholder for the moment - I'm planning on using 1.6mm aluminium rods for these, so that they can be bent to shape to go down the stairs, but these won't be glued in until the platforms are painted.
Stay tuned for part three, where we get some paint on this little construction!
You can pick up the Maelstrom's Edge terrain sprue, along with the rest of the Maelstrom's Edge model range from the webstore here.
As always, feel free to pop along and share your work, or ask any Maelstrom's Edge- or hobby-related questions on the Comm Guild Facebook page!
For other Maelstrom's Edge modeling articles, including tutorials and walkthroughs of a wide range of different building and miniature projects, check out the article roundup here.
Tags: modeling scratchbuilding spotlight terrain terrainsprue walkthrough
Terrain Spotlight: Landing Pad 16, part 1
Posted on Monday Jan 21, 2019 at 05:00pm in Tutorials
- by Iain Wilson
This week, I'm kicking off something a little different for the new year. It's a bigger project than normal, so I'll be spacing it out over a couple of articles, with the aim being to build a detailed display board to use as a backdrop for photographing miniatures. I wanted something that would have plenty of open areas for placing miniatures, and a few different contrasting areas to allow some variety in backdrops with just the one piece. And so 'Landing Pad 16' was born:
Normally when I'm building terrain, I have a rough idea in my head of what I'm going to build, and I just wing it from that. Because this one was a little more complicated, I started by sketching out a rough design, and then translated that into a 1:1 plan on a sheet of cardboard.
For the bulk of the structure, I chose to use foamed PVC sheet. This is a lightweight, but strong plastic material that is easy to cut and shape, and takes extremely well to superglue, which allows it to be used to build solid, detailed structures.
I took my plan and drew up a neater version on the PVC, and then used an exacto knife and steel ruler to cut it out.
I had a slight measuring mishap when scribing some panel lines on the floor piece. Rather than starting over, I just flipped the floor over, making the build a mirror image of my original design. The floor was layered, to allow for some depth in the detailing. With the floor marking out the basic shape for the structure, I could start adding the walls, shaping the PVC to the outline of the building.
The foamed PVC is quite flexible, but I added a curve to the landing pad wall by heating the PVC in boiling water, curving it around a biscuit tin and letting it cool. This wasn't super-effective, but gave it enough of a lasting curve to let it bend more easily to the required shape. Having the natural bend in there means that the PVC isn't trying to spring back as hard against the glue line, giving a more solid joint.
As with all of my Maelstrom's Edge buildings so far, detailing on this one is added courtesy of the Maelstrom's Edge terrain sprue. I created two hexagonal windows for the landing bay freight access corridor by gluing together pairs of trapezoid windows along their long edges.
As I built up the structure, the plan changed a little from the original sketch. I added extra access between the two sides of the board, and brought the detail on the 'reverse' side down from the roof to a first-level courtyard.
The courtyard needed some depth to allow for some staggered model positioning, so I added a couple of descending platforms on the rear, using layers of PVC to create the steps between levels.
I had planned for a groove to run around the top of the landing pad wall, which would theoretically serve as a runner for a retractable roof - I'm not building the roof, but wanted it to be implied for completeness. For the roof groove to have depth, this needed to protrude into the back facing of the wall, so I built up a box structure using layers of PVC.
The doors on the terrain sprue have detail on both sides, but as they're intended to be used on external structures they only have the framework on the one side. I created a double sided doorway by removing the frame from the rest of the door using a razor saw. On a second door, I cut the door itself out leaving the frame intact, so I could have an open doorway for the freight access.
However carefully you cut and glue, you wind up with some gaps and rough edges. I used some putty to fill in wherever necessary, and once set used some fine sandpaper to smooth it down.
To give the walls some structural detail, I built up a recurring pattern using the support struts from the terrain sprue, and glued this on along the top and bottom of each wall. For curved walls, I carefully bent the strut to shape before gluing it in place.
Rather than having bare cement floors everywhere, I added tiles to the courtyard area using textured plasticard. By cutting out squares of tiles in a regular pattern, I inserted some decorative areas of smaller tiles - these will be painted up with the Epirian Foundation logo.
Using ladders from the terrain sprue, and posts cut from sections of the sprue itself, I added a handrail around the courtyard.
I left the handrail open in a couple of places, to allow some avenues for displaying models and show where the terrain would theoretically continue past the confines of the display board. I did extend the rail part of the way down the stairs, by cutting a piece of 2mm plasticard in a pattern matching the rungs of the ladder.
Down the other end of the board, behind the landing pad, I built some nice, hefty pipes using the large pipe fitting from the terrain sprue and some 13mm garden drip irrigation fittings.
I scattered some smaller pipes around the place using the small pipe fitting, some plastic tubing, and some more scrap sprue from the terrain sprue.
With all of that done, this side of the board is more or less done. There is still a little more gap filling and sanding to be done, and probably some more small details to add here and there. I'll need to add some sort of trim around the bottom edge to neaten everything up, but that will wait until the other side is finished so I can make it consistent.
Stay tuned for part two, detailing the landing pad side of the board!
You can pick up the Maelstrom's Edge terrain sprue, along with the rest of the Maelstrom's Edge model range from the webstore here.
As always, feel free to pop along and share your work, or ask any Maelstrom's Edge- or hobby-related questions on the Comm Guild Facebook page!
For other Maelstrom's Edge modeling articles, including tutorials and walkthroughs of a wide range of different building and miniature projects, check out the article roundup here.
Tags: modeling scratchbuilding spotlight terrain terrainsprue walkthrough
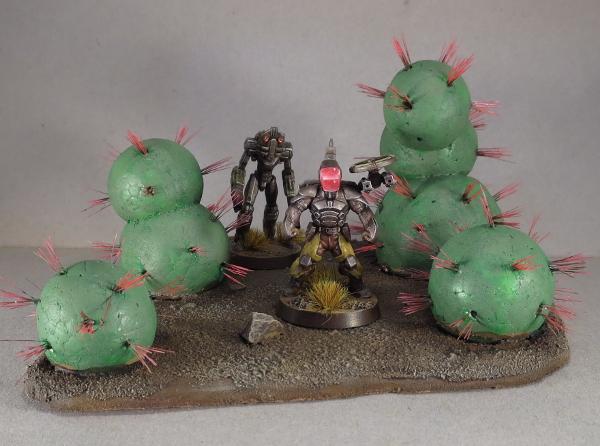
Terrain Tutorial: The Foam Ball Cactus!
Posted on Monday Feb 12, 2018 at 05:00pm in Tutorials
- by Iain Wilson
You may have noticed by now that I make a lot of buildings. Sometimes, though, it's nice to get away from the urban sprawl, and venture out into the untamed countryside where enemy troops may wind up being less scary than the native flora and fauna.
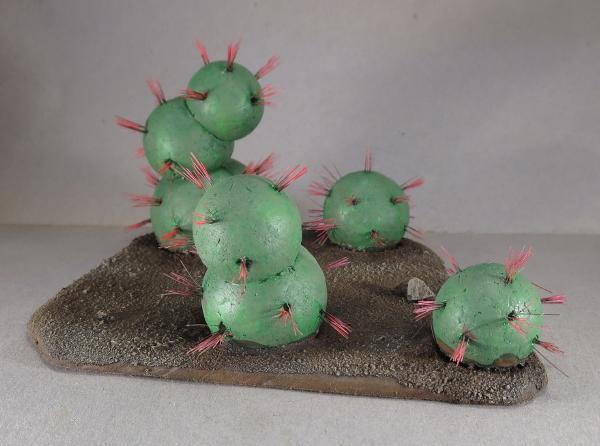
If you were gaming back in the '90s, you might be familiar with some of the scratch-built terrain that was featured in White Dwarf magazine back then. One of my favourites, and a staple on many a scifi gaming table back then, was the foam ball and toothpick-spine cactus. It was a little goofy, but also really easy to make and looked rather effective on the table in place of all those mass-produced train set trees. So I thought it might be fun to revisit the idea, and see what I could do to modernise it a little and maybe remove some of the danger of taking out an eyeball while checking line of sight. And so I came up with this:
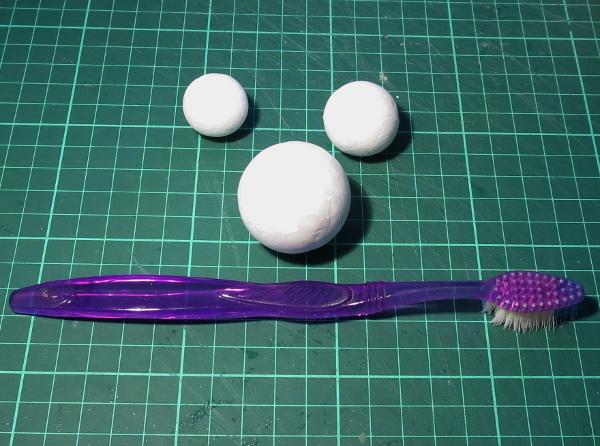
Staying true to the original, I found a bunch of different sized expanded polystyrene balls at a local discount store. To replace the old-school toothpick spines, I dug out an old toothbrush.
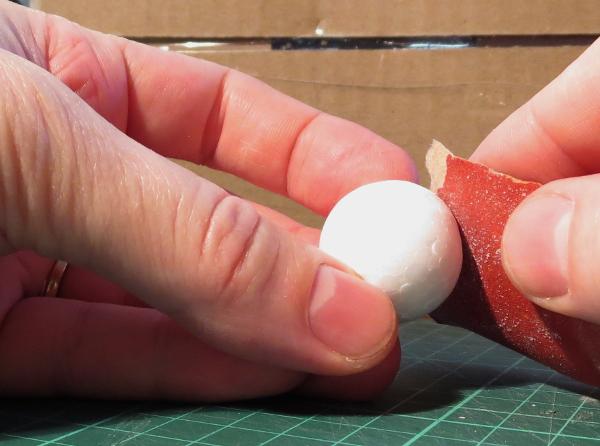
The first step is to give the foam balls a little touch-up with some fine sandpaper. This removes the mould line around the middle of the ball, and roughs up the outer surface a little to help the paint stick.
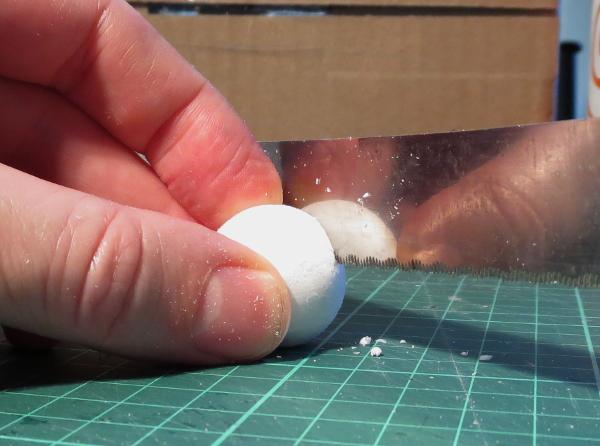
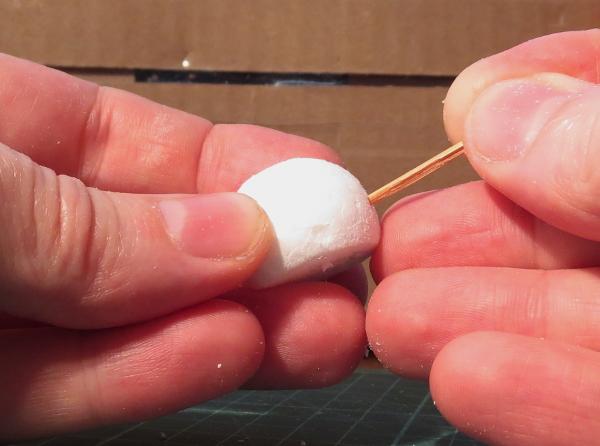
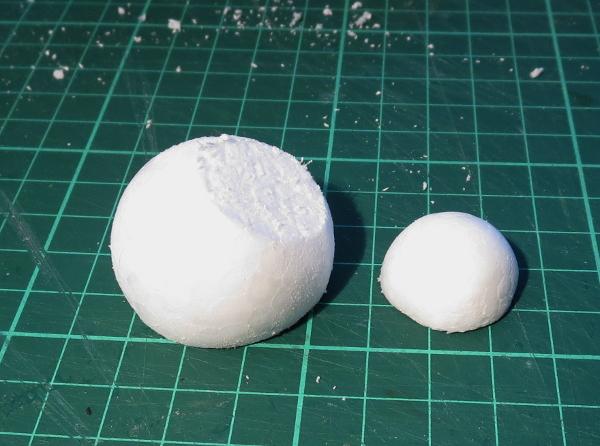
To make the ball easier to stick down to a base board, use a fine-tooth breadknife or other sharp knife to cut a slice off, making a flat surface for the bottom of the cactus.
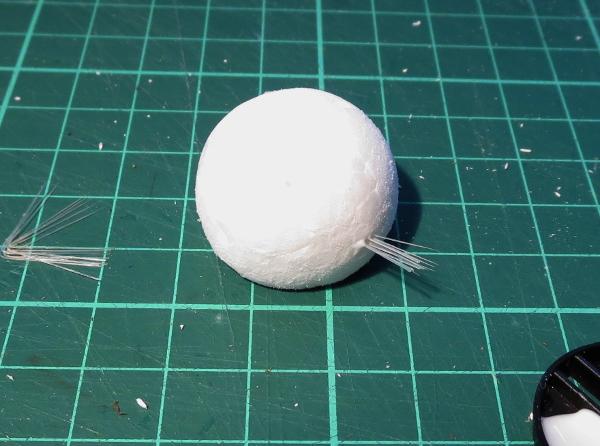
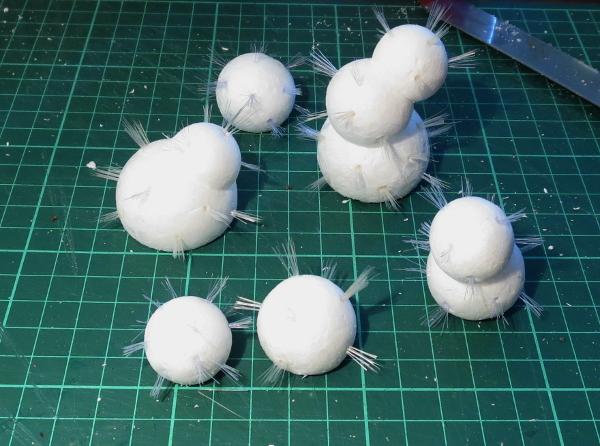
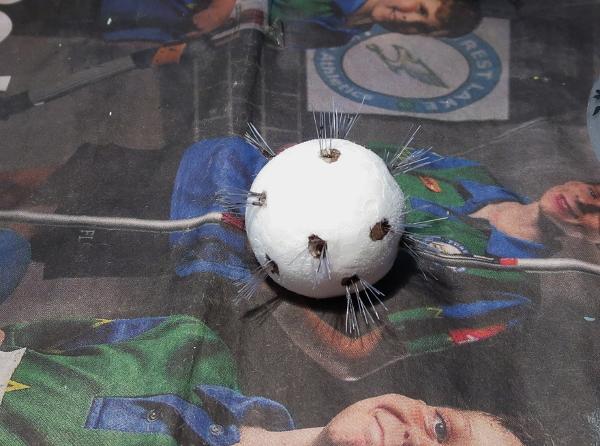
Next we need to pike some holes in the ball to add the spines. Serendipitously, I used a toothpick, but anything pointy will do the job. Make the holes at least 5mm deep, although it doesn't hurt if they go in further. They're spaced around the ball in rough layers, without being too neat about it - slightly haphazard spacing adds to the organic look.
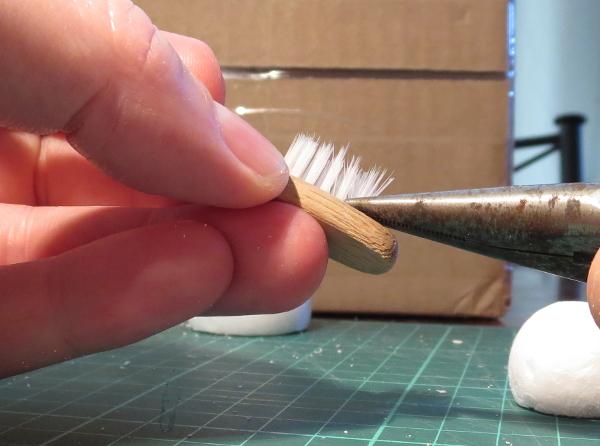
Toothbrush time! Take your toothbrush and, using a pair of pointy pliers, rip out a bunch of bristles. Try to hold them together - they tend to scatter if you're not careful when you let go.
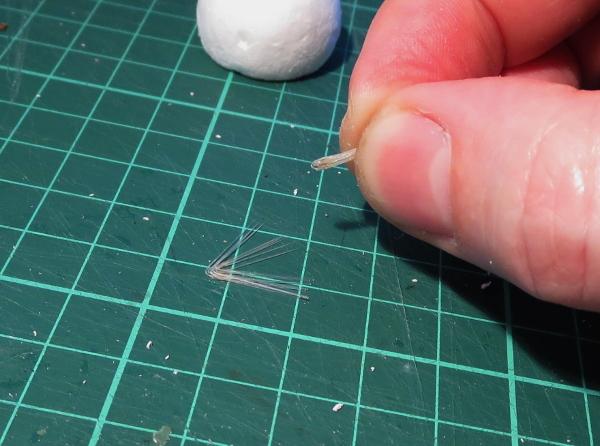
Depending on how many bristles are in a clump, you might want to split the clump into halves or thirds, or use the whole thing as a single clump of spines. It's entirely up to the look you want.
In most toothbrushes, there is a small piece of metal in the fold at the base of the bristles that anchors them into the brush. Tease this out and discard it, and then separate the bristles into the size clump you want, being careful to put the extras down so that they stay together for later.
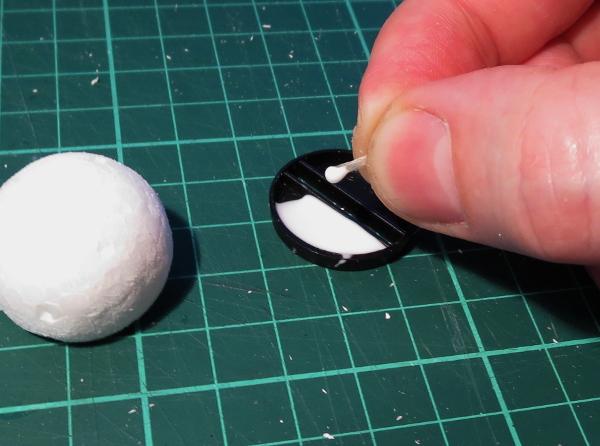
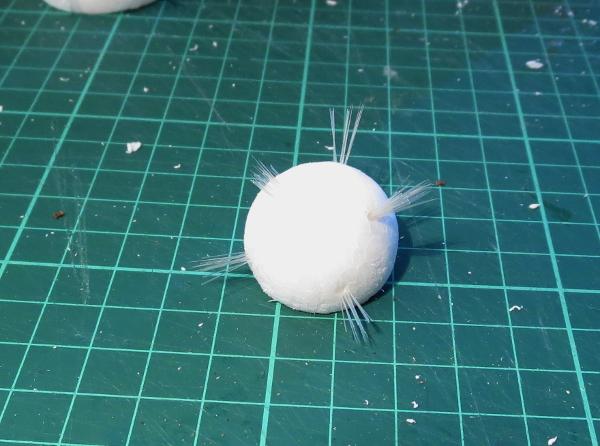
Dip the base of the bristle clump in some PVA glue, and then insert it into one of the holes in the foam ball. Mine have about half of the bristle inside the ball, to give them a good anchor and to stop them from splaying out too much.
Repeat until you have all of the holes filled with bristles.
For an older cactus, you can add extra nodules by slicing off a section on the top of the first ball and gluing the flat bottom of another ball into place on top. Reinforce with a toothpick glued in the middle, if you want a little extra strength. When that's set, poke in the holes and add bristles as above.
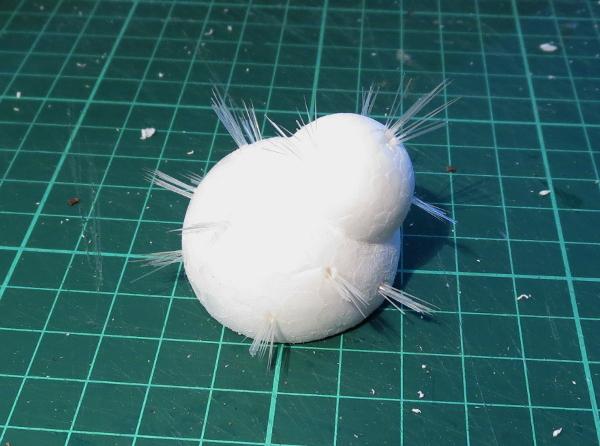
Mixing in some different configurations and different sized balls will help create a nice, varied look on the terrain piece.
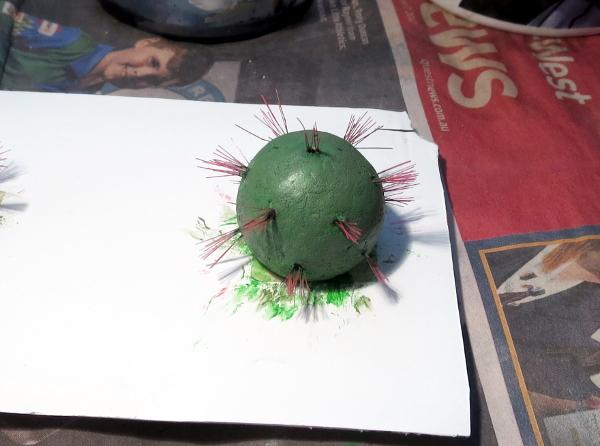
To paint, first work around the holes with a pointy brush and a dab of brown wash or thinned brown or green paint to mask the white interior of the holes. (If you're more forward-thinking than me, you could alternatively do this before you glue the bristles in, which might be a bit easier!)
Then paint the rest. I've gone for standard green cacti, with red spines for some contrasting colour, but for alien flora you could obviously use whatever colours you please.
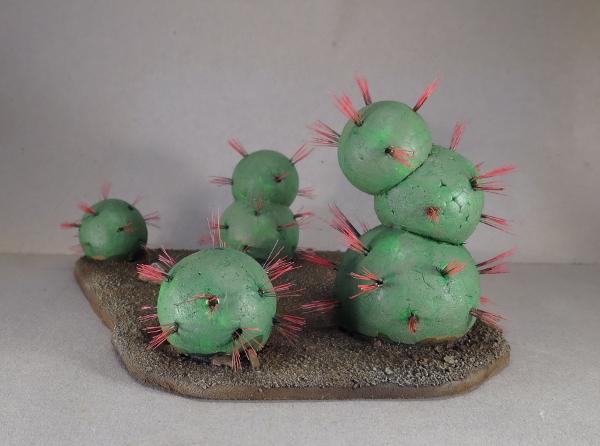
From there, glue your painted cacti onto a base board, and your cactus grove is ready for the table!
Do you have ideas for your own alien area terrain? We'd love to see them! Come along and share on the Comm Guild Facebook page.
For other Maelstrom's Edge modeling articles, including tutorials and walkthroughs of a wide range of different building and miniature projects, check out the article roundup here, and you can find the Maelstrom's Edge model range and boxed game in the webstore here.
Tags: scratchbuilding terrain tutorial
Modeling Spotlight: Epirian Victory Point Tracker
Posted on Tuesday Jan 23, 2018 at 11:19am in General
- by Iain Wilson
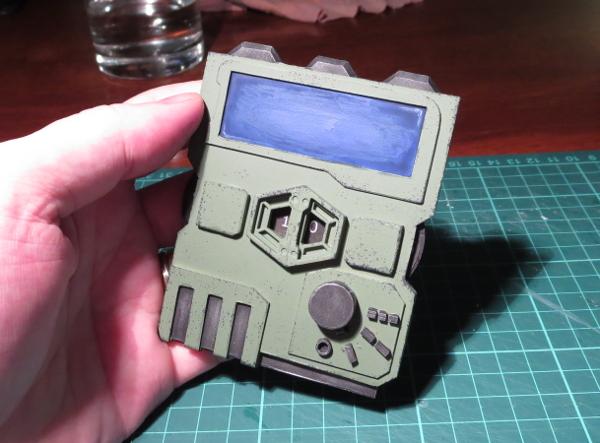
Victory. The elusive mistress that haunts our gaming hours. How do we capture her? Well, in Maelstrom's Edge, we do it by counting up Victory Points, and hopefully winding up with more of them than our opponents. The Battle for Zycanthus box includes Victory Point trackers along with the plethora of tokens and markers found within, but I decided that I wanted something with a little more spectacle, and so I built myself a VP tracker for my Epirian force.
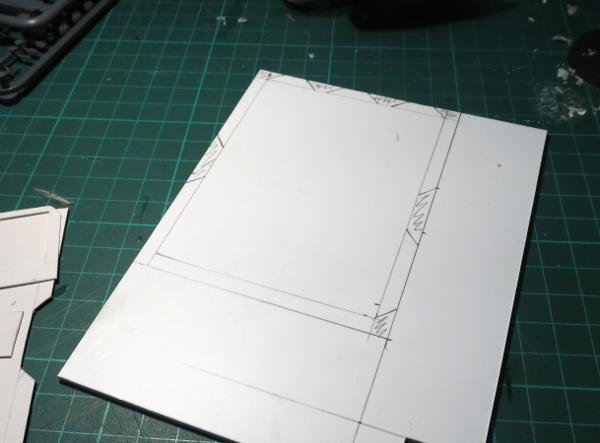
This all started with a rough concept sketch, to get an idea of how things should fit together.
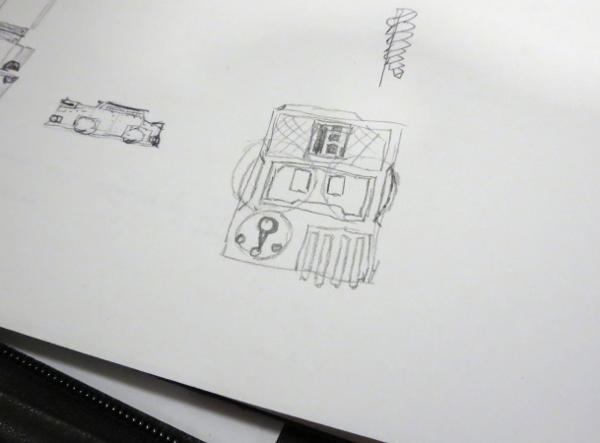
I then made a quick mockup in cardboard, as a sort of proof of concept, and to get a better feel for the size it needed to be.
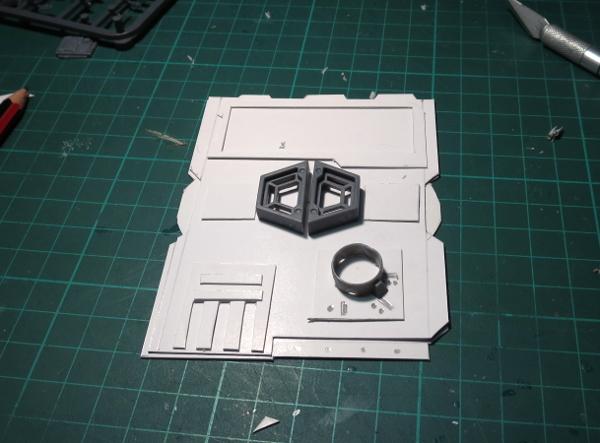
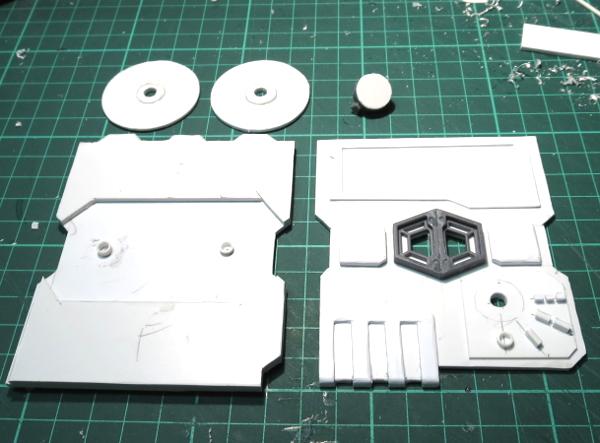
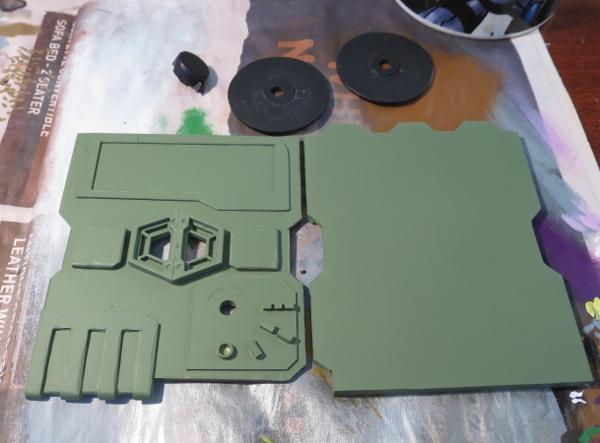
The main body of the tracker is made from layers of 2mm thick plasticard. Each layer was marked out in pencil and then cut out and the edges smoothed down.
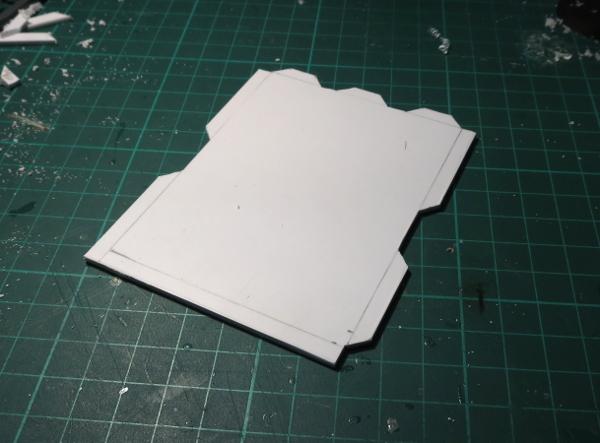

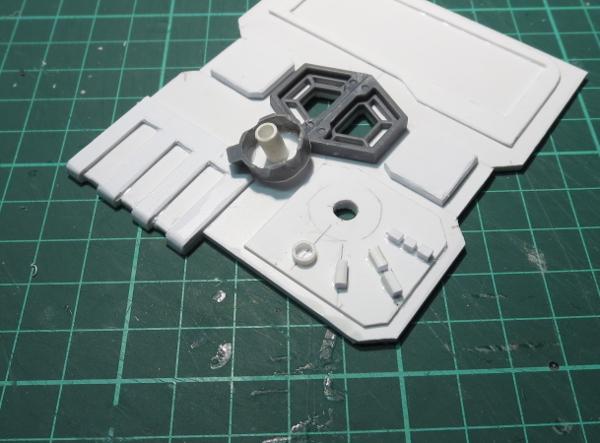
To show the current VP total, there are two dials with the numbers 0-9 marked around the edge. These are cut from thinner plasticard, with a spacer added on the top surface so that the face with the numbers on it doesn't rub against the inside of the tracker's front.
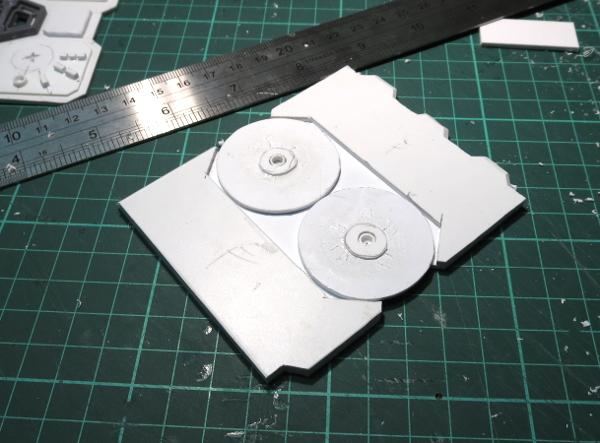
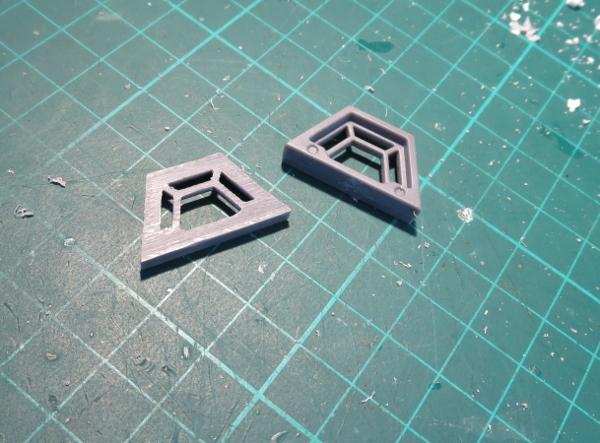
The windows for the VP display are made from a couple of trapezoid windows from the Maelstrom's Edge terrain sprue. I used a razor saw to slice through the windows just behind the interior bracing, to make them a little thinner and so that the bracing would sit flush against the front plate of the tracker.
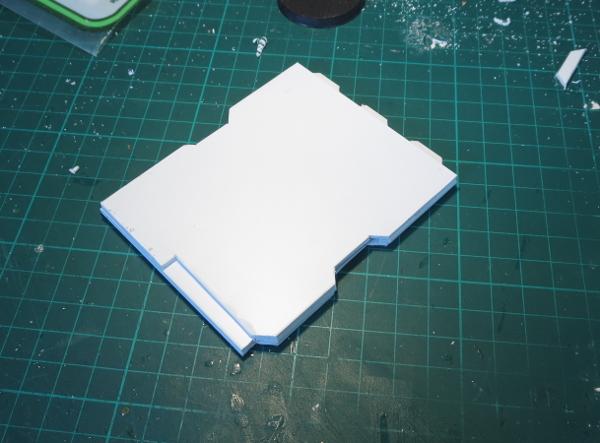
From there, I cut a couple of trapezoid holes in the front plate to match up to the large openings in the windows, and then added a bunch of detail with various pieces of plasticard.
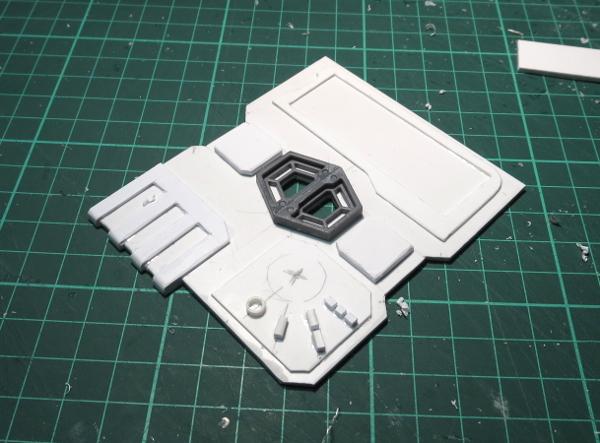
In the bottom corner, I added a rotary switch for tracking how many times the special faction objective has been tapped.
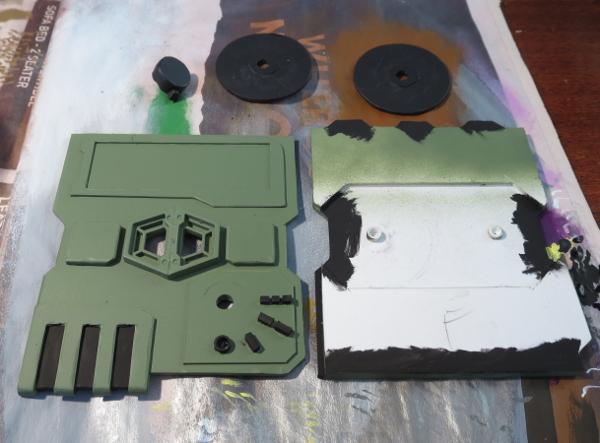
With detailing complete, it was time to paint!
I basecoated the tracker with Army Painter Army Green spray, and used some flat black spray on the VP dials and the rotary switch.
I wanted some metal detail on the tracker to break up the colour a little, so re-basecoated some appropriate spots with some black. I also added a little black inside the side openings for the dials, just to avoid having the white plastic showing through when it was assembled.
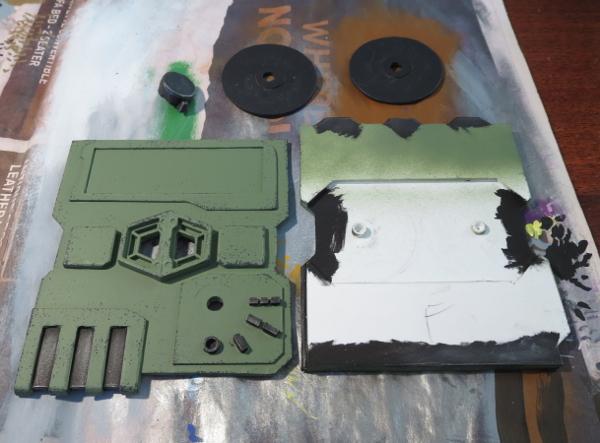
The metal parts then received a drybrush of P3 Pig Iron, and some weathering added with Vallejo Heavy Charcoal applied lightly with a sponge.

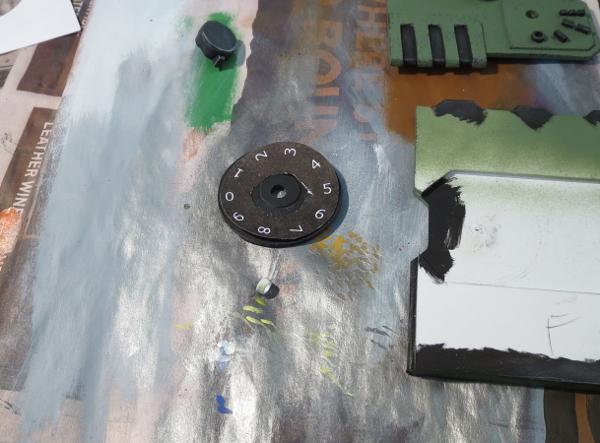
The numbers for the VP dials were drawn up on black circles in Gimp and then printed out, cut to shape and glued onto the plastic dials.
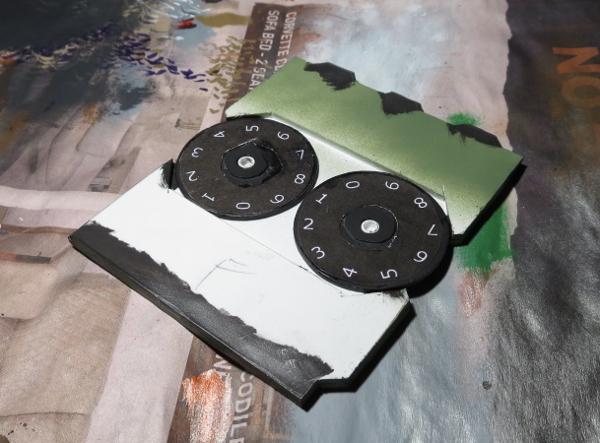
Finally, the front plate was glued in place, and the screen painted with some Ultramarine Blue and shaded with Army Painter Blue Tone.
My plan is to make up some smaller versions of the mission cards to sit in the screen cavity.
And then, of course, the next step will be to make some similarly themed trackers for my Karists and Broken!
Have you built anything unusual for your Maelstrom's Edge games? We would love to see your creations on the Comm Guild Facebook page!
You can find the entire Maelstrom's Edge range in the webstore here.
For other Maelstrom's Edge modeling articles, including tutorials and walkthroughs of a wide range of different building and miniature projects, check out the article roundup here.
Tags: conversion epirian gaming modeling scratchbuilding spotlight tutorial walkthrough