Assembly Guide - Broken Rabble
Posted on Monday Oct 02, 2017 at 05:00pm in Tutorials
Assembling Broken Rabble Units
General Notes
Polystyrene cement - only use superglue if you want to go insane! All of our models are designed to be assembled with polystyrene cement as it gives some time to re-pose while gluing, fuses the models together and prevents brittle joins like other glues do. Make sure you have polystyrene cement in your toolkit before you begin!
We want you to experiment! We've broken our models up into lots of parts and given a fair few spare parts so that you can push yourself out of your comfort zone, learn new skills and create some really unique models. We've tried to price things so that it won't break the bank if you make a mistake, so please cut stuff up and have some fun. Start simple with a slice here and a re-pose there, and watch your confidence and skills increase until you are a master modeler!
Basing - Always make sure you glue your model to its base with an eye on the arc markers on the sides of the base. The arc marker indents should be at the halfway point between the front and back of the model to show the front and back halves of the model when gaming. See the Maelstrom's Edge rulebook for more detailed notes on this.
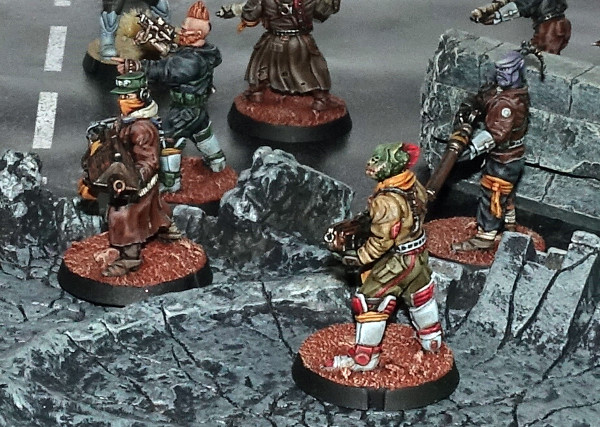
Dry fit before gluing! - There are lots of pose options possible, but that means there is also the freedom to screw up and make some bad poses! Sticking the parts together and seeing how things look will usually lead to a model that is fairly static and repetitive. You should consider knee, hip, torso, and arm positions when gluing and ensure that you have a pose in mind before you start gluing things together. If in doubt or insecure about your talents in the posing area, we recommend you try to copy the poses from some of our studio models found here in the gallery.
Broken Rabble Assembly Notes
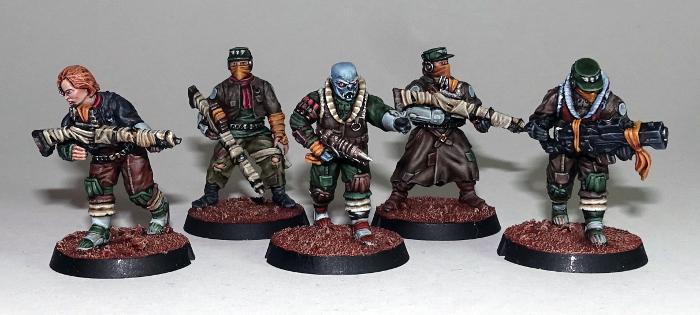
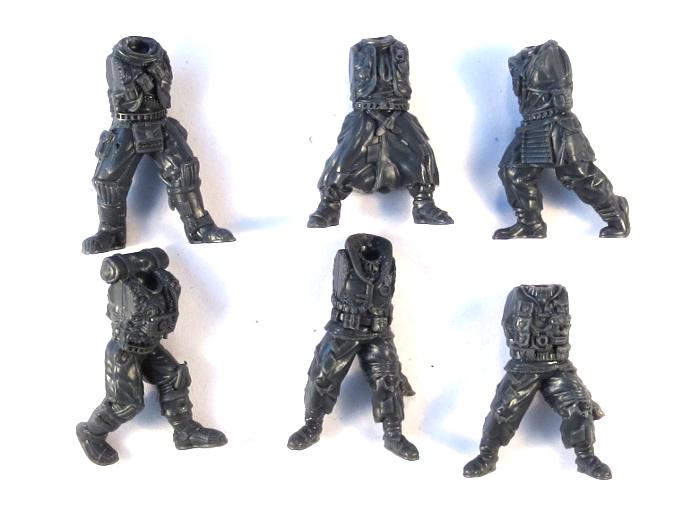
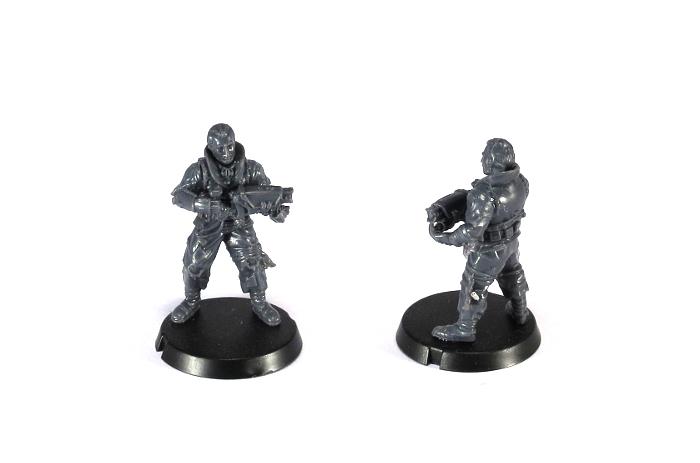
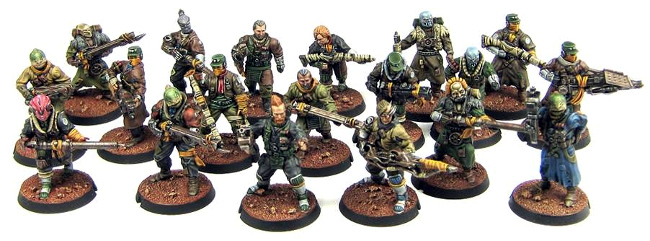
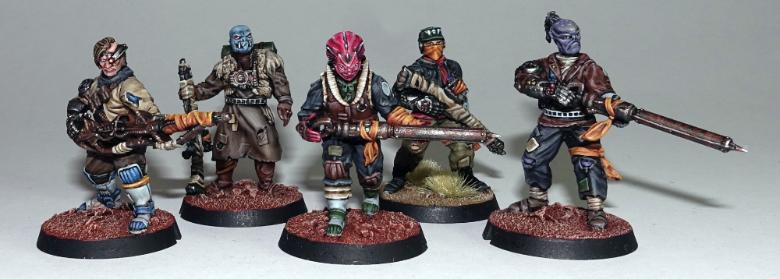
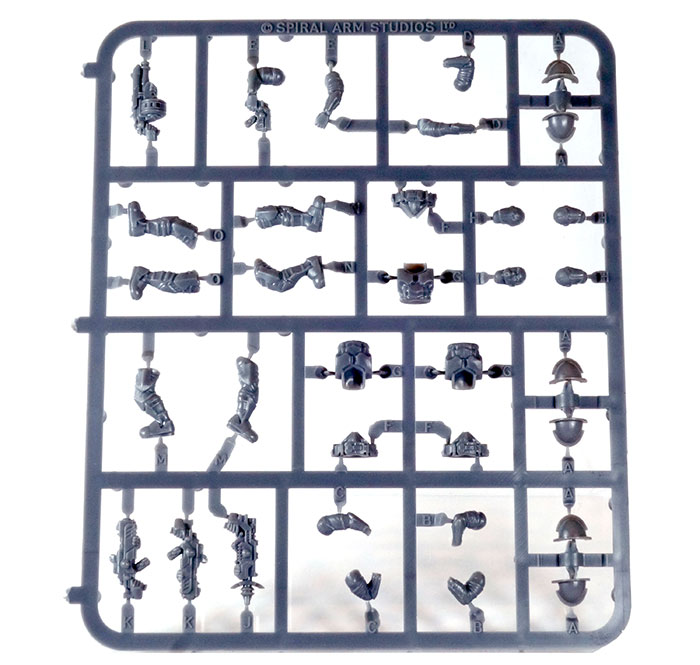
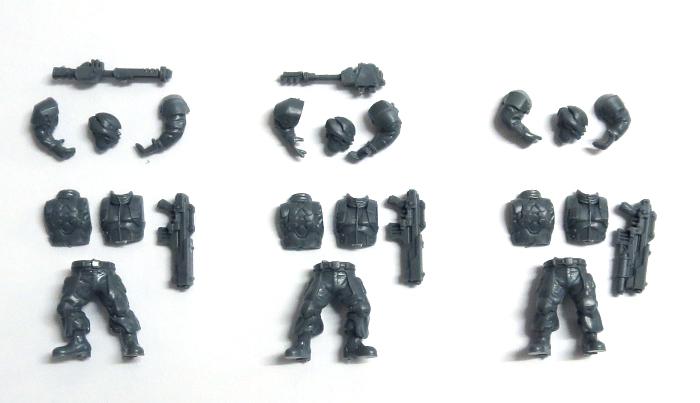
Six Broken models can be made from one set of the Broken Infantry sprues:
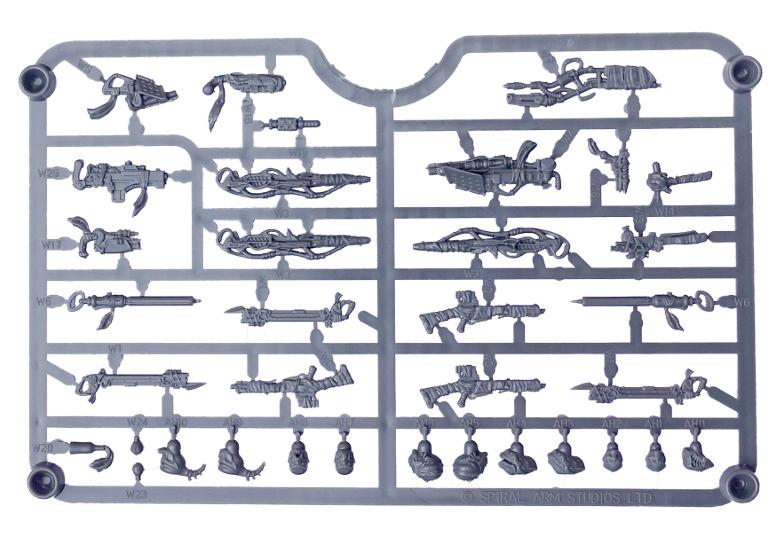
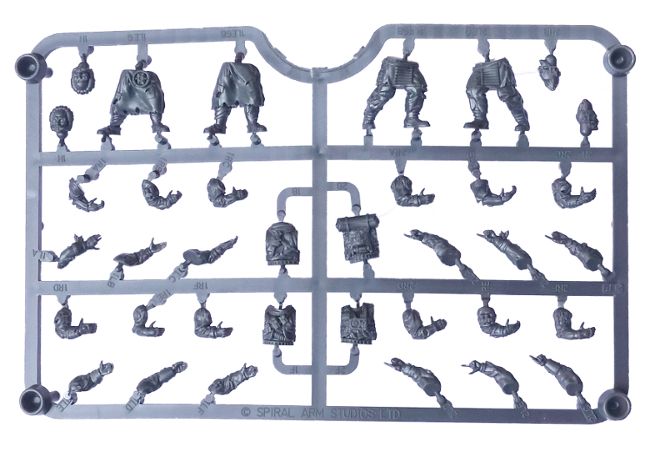
Assembly is fairly straightforward, with everything fitting together where you would expect. There are six different torsos, each with a unique front and back.
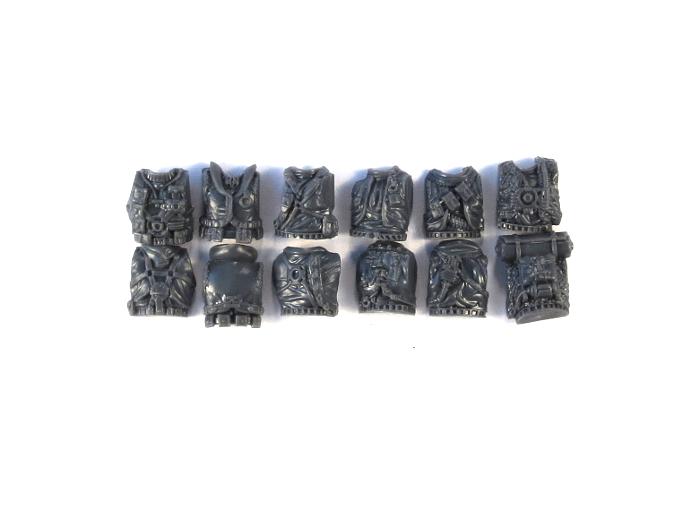
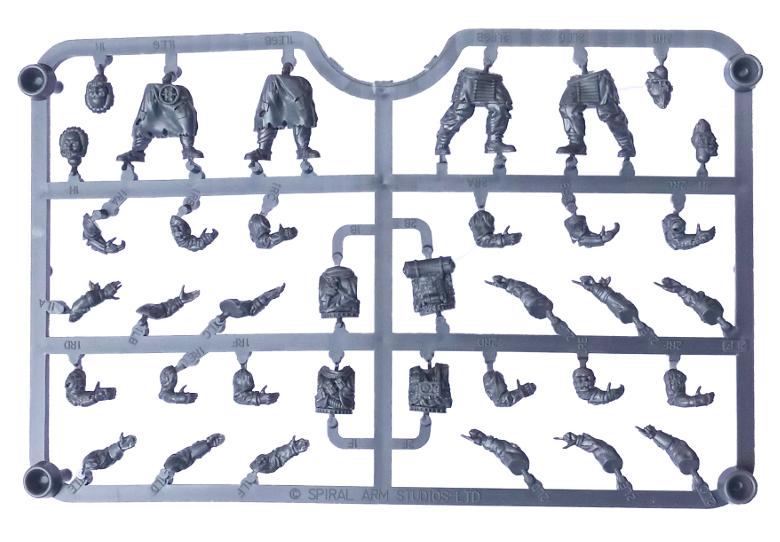
You can save yourself some aggravation if you keep the matching parts together when you cut them off the sprue. If they do get mixed up it will help that the fittings are different on each pair, so each front and back will only go together with its correct partner.
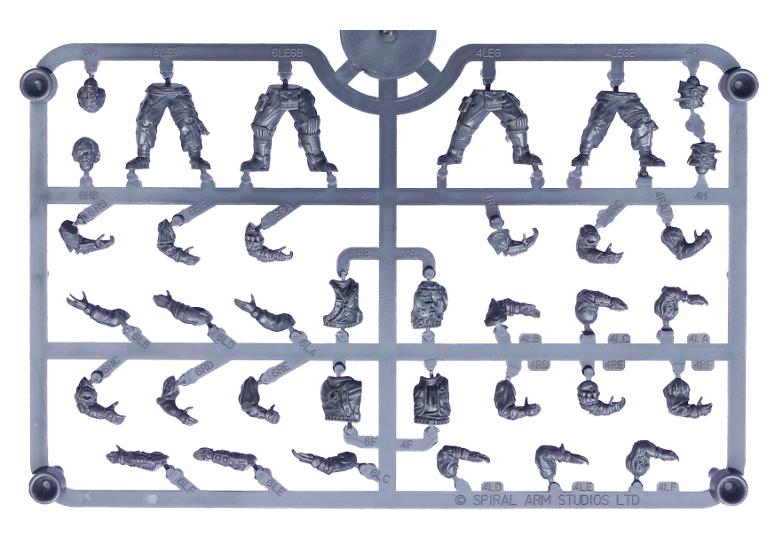
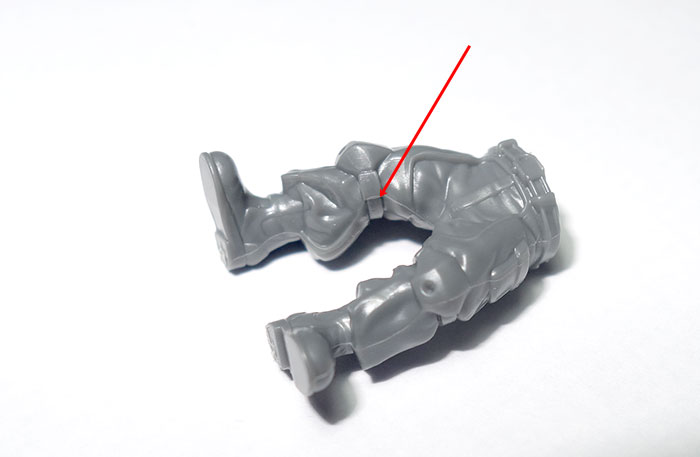
The twelve different sets of legs give you a whole slew of options for posing, as with one exception any of the torsos will work with any of the legs. The exception is torso 3 (parts 3B and 3F) which has pouches hanging from the belt. This torso fits with the legs labelled 3LEG and 6LEG, and slightly less flush with 3LEGB, although the pouches hide any slight gap you wind up with on that last set. You can also make this torso fit with some of the other legs if you trim up the bottom of some of the pouches a little.
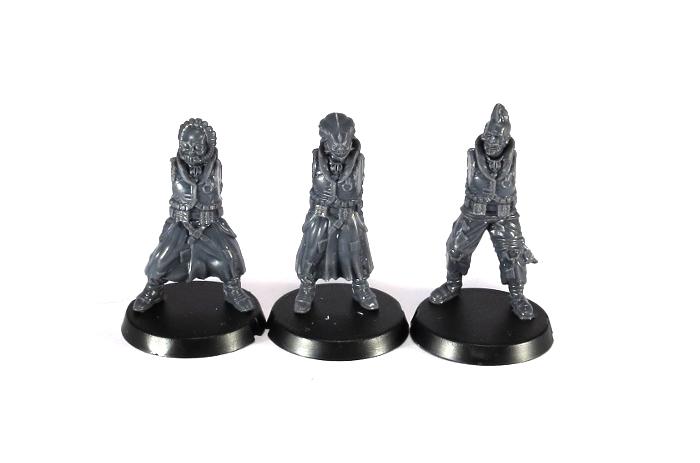
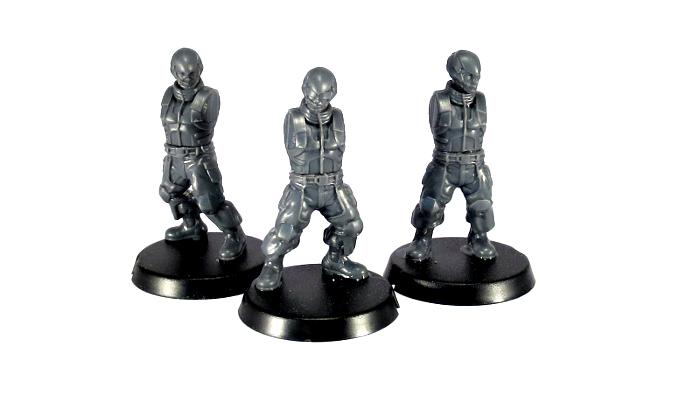
With the torsos glued in place, you might notice that there is a reasonable amount of height variation between the models, which makes for a much more ragtag look to the unit than the usual identically-sized military units.
As with the torso/leg pairing, most of the huge range of heads on the sprues will work with any of the torsos. Torso 2 (2B and 2F) has a rolled cloak across the shoulders and torso 3 (3B and 3F) has a high collar, both of which may get in the way for heads 3H, 4H, 6H, 6HB and AH11.
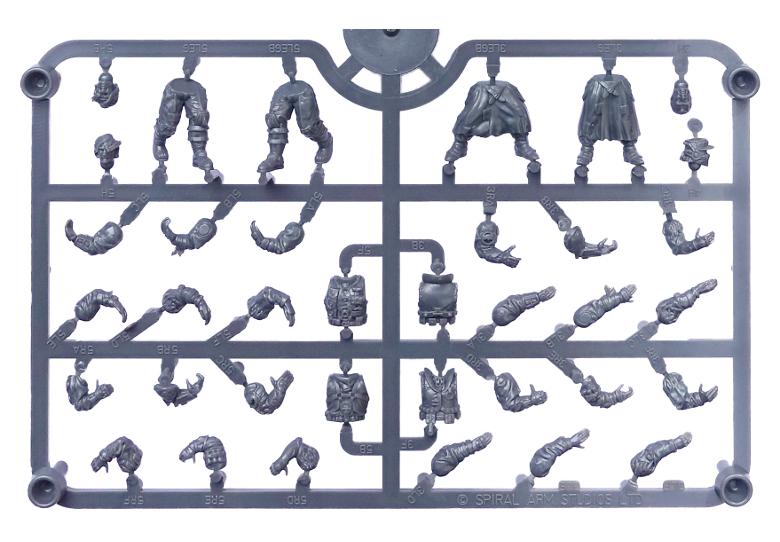
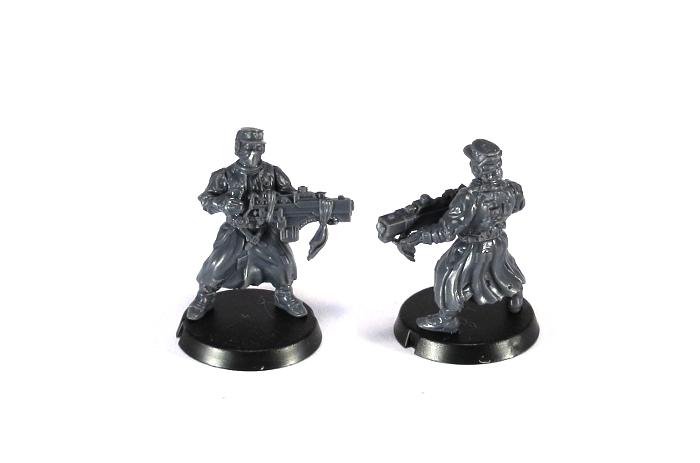
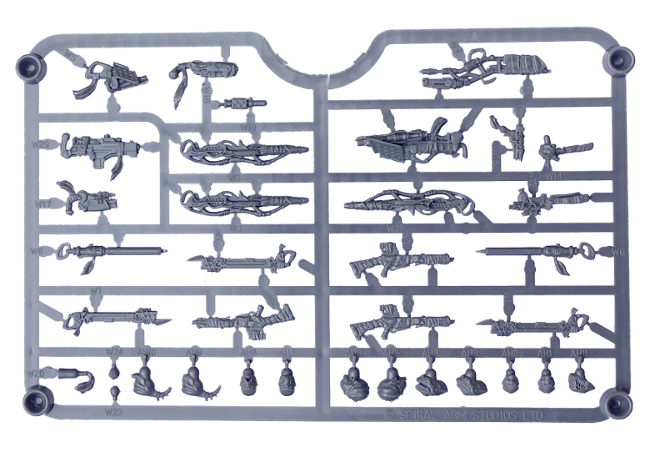
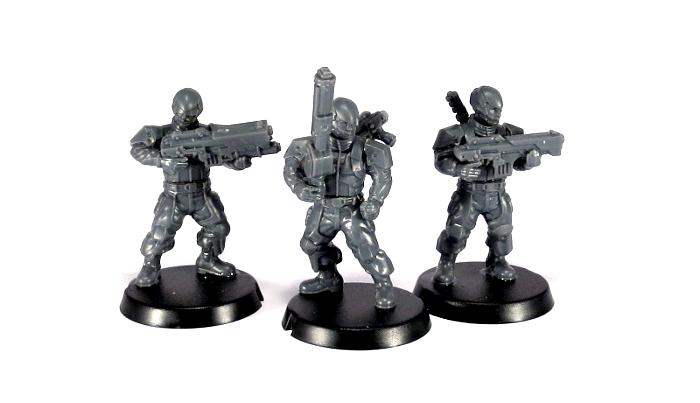
With the massive range of arms available to choose from, a little experimenting may be required to get just the look you want. Because of the different grips and sizes of the various weapons, some weapon hands have a more open grip and others are more closed, so this needs to be kept in mind when fitting them onto your models. In some cases the 'matching' left arm will work, but for some weapon/arm combinations you may want to tack the right arm and weapon together and then find a left arm that fits best.
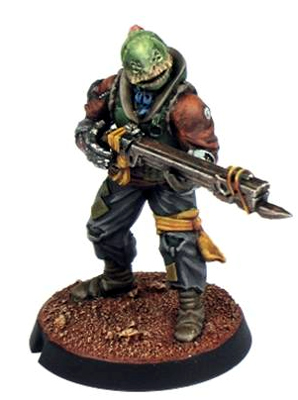
The Slug Rifle is the basic weapon of Broken Rabble units. It works best with a more open right hand, as does the Chem Launcher.
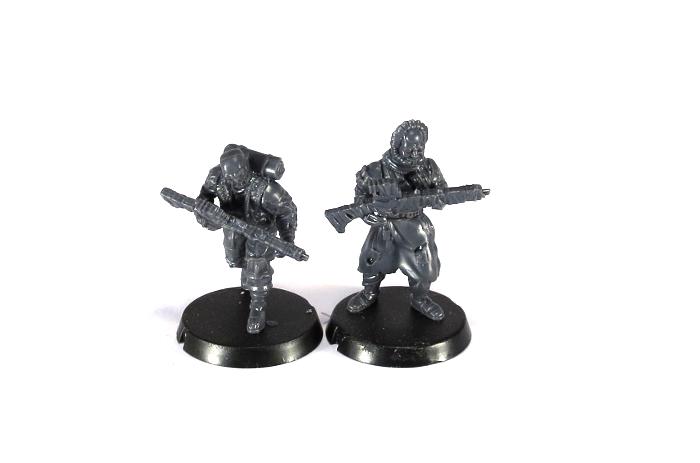
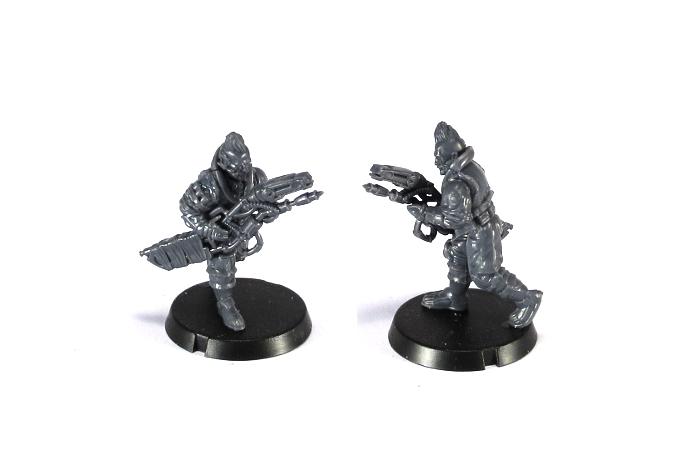
The Auto Slugger and Glue Carbine also work with a more open right hand, but work best with hands 1RC, 3RA, 4RC, 5RB or 6RC.
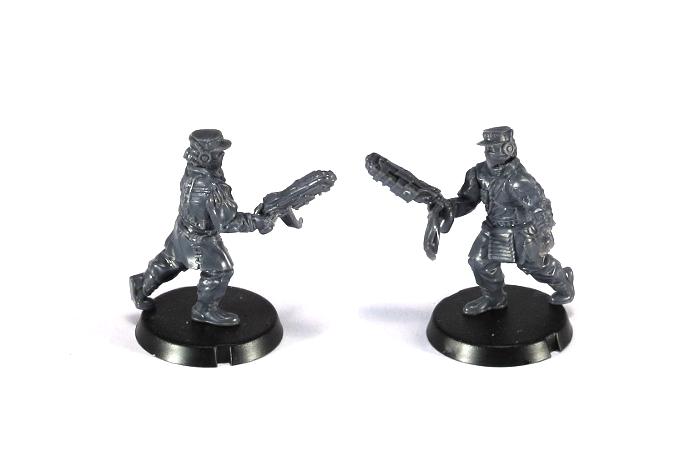
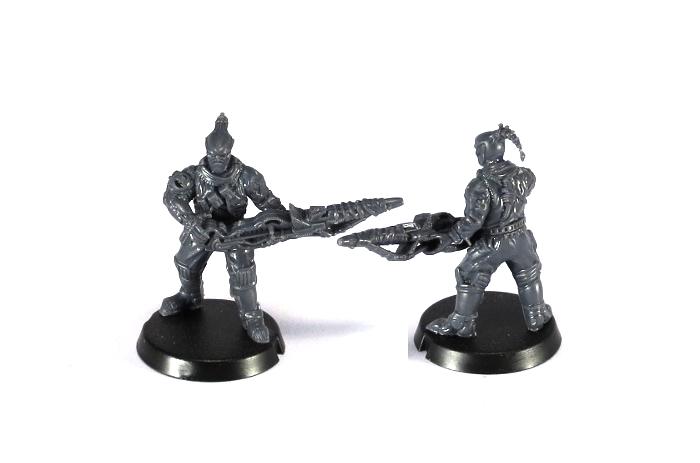
The Longbeam Rifle and EMP Harpoon can use a more closed hand to latch onto their rear grips, or you can use an open hand for a more relaxed grip.

Likewise, the Glue Rifle can potentially work with either grip style. It's such an unusually-shaped weapon, and can work held a few different ways, so have a play with it and see what you like best!
For some more ideas for building your Broken models or to share your own creations, head on over to the Comm Guild Facebook page.
You can pick up the Broken Infantry Pack, and the rest of the Maelstrom's Edge miniature range, from the webstore here.
For other Maelstrom's Edge modeling articles, including tutorials and walkthroughs of a wide range of different building and miniature projects, check out the article roundup here.
The Broken - Plastic Ragtag Civilian Models Now Available!
Posted on Friday Sept 29, 2017 at 12:00pm in The Broken
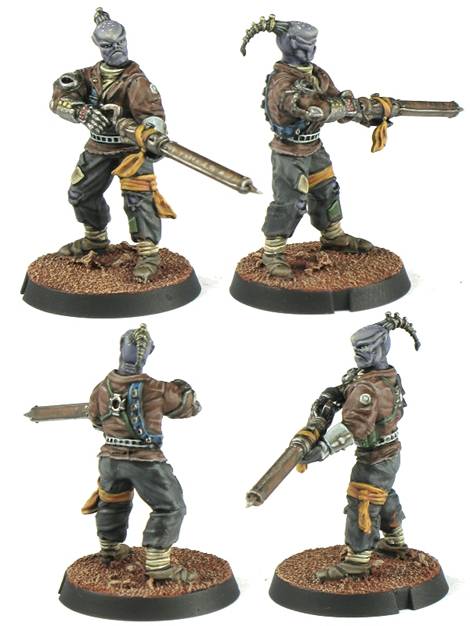
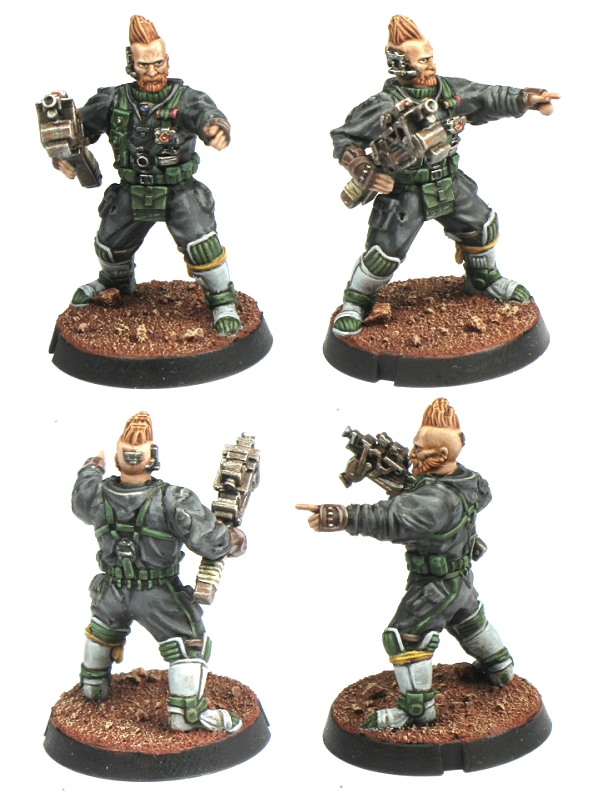
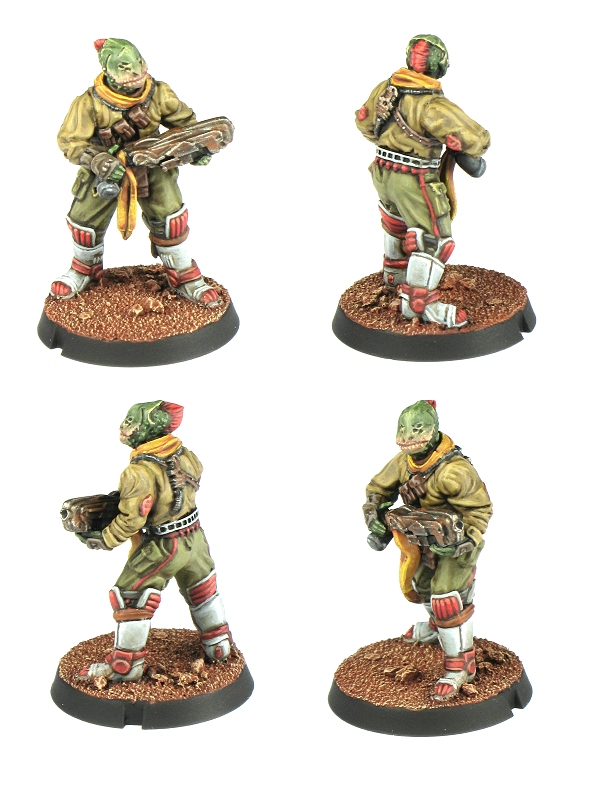
We are proud to announce that the third Maelstrom's Edge faction has now launched, with a range of plastic models. We present to you... The Broken!
From the factories and the slums, the mining complexes and the farms of the galaxy come the Broken, a growing movement of citizenry angered by the lack of opportunity to escape the Maelstrom. They are a diverse mix of workers, aliens, and rogues left on doomed worlds by the ruling parties.
These survivors take matters into their own hands after being left behind. They pool their resources and knowledge in a communal effort to escape the Edge. Derelict ships are repaired. Affluent people’s ships are stolen. Government ships are commandeered. Any ship available is pressed into service for the Broken. They are a group unlike any ever seen in the galaxy. Fear, hate, anger, need fused them, these abandoned people, into an unstoppable force with one goal - escape the Edge. The Broken is a term used to unify all such desperate people across the Edge. Their motivation, methods, and sanity vary wildly from fervent revolutionaries to callous pirates to the few who have stared into the maw of the Maelstrom only to come away unhinged.
The Broken are available for purchase now at the Maelstrom's Edge webstore. You can also check out the unit cards and faction rules at our brand new online force listing section.
Half a dozen models can be built from a single set of sprues, with enough options for all of your sci-fi civilian modeling desires to be fulfilled. Suitable as proxy models, conversion fodder, and part swaps for other ranges, there are plenty of uses beyond Maelstrom's Edge, so those spare parts you have left over when building a Broken force will have plenty of uses.
The kit is extremely versatile, with every arm, torso, legs and head a distinct part and combination. No hands are built in to the weapons so they are easily switchable with other models, and the entire kit is almost fully parts compatible with our Karist and Epirian lines, allowing for rogue Karist and Epirian forces to represented, as well as converts and captured equipment.
The kit also has unprecedented diversity for a plastic sci-fi civilian range, featuring plenty of female heads and gender agnostic heads, as well as large mixture of alien heads with variant poses to ensure you can build a force themed around a specific alien type if you so desire.
Keep your eyes on this website for assembly instructions and more articles featuring The Broken in the near future.
We are also pleased to report that this release kicks off the start of our increased release schedule, with a release planned every month. Make sure you follow us on facebook to see all of our releases as they are revealed!
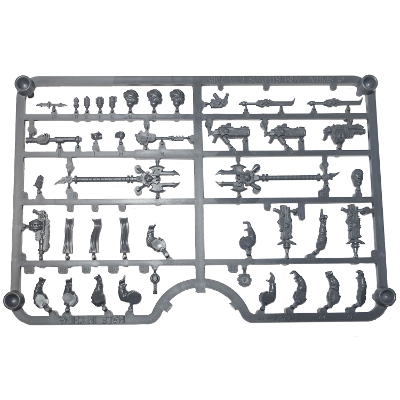
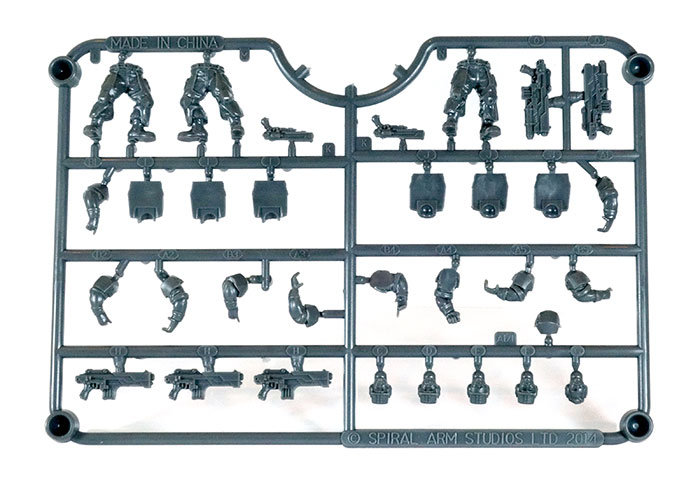
The Broken Infantry Sprues
Posted on Tuesday Sept 26, 2017 at 09:00am in Models
Only 4 days until the first models from our new faction - The Broken - are available for purchase!
We'll be sharing more information each day until release, starting with the most important of all - detailed pictures of the sprues!
A common question we've had so far is just how many sprues are needed for each unit to be built? Additionally, how many sprues will be needed for a full force of Broken?
As you can see above, six models can be made with a huge array of options from each set of sprues. Units will be made up of 4-6 models each, with 1 HQ model as well, so a single set of sprues can make up a full squad of 6, with most options. Three sets of sprues will be enough to make full squads of all three unit types. Going with two 6 man squads and one 5 man squad will also allow an HQ model to be built, giving a full complement. The Broken are made up of inexperienced and easily available forces so have a very low points cost compared to some of our factions, so while 3 squads will cover all basic options, if you want to build a full force (100-150 points), you'll be doing some careful list building first!
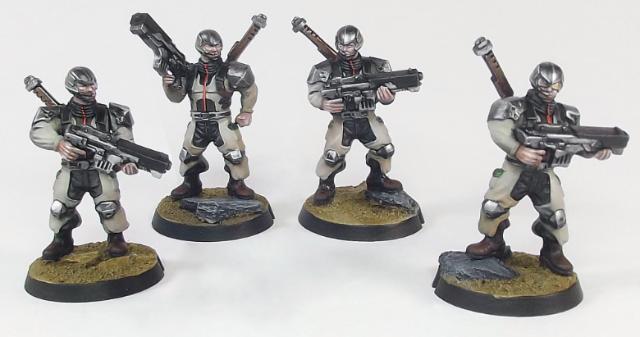
Painting Tutorial: Hazard Stripes
Posted on Monday Sept 25, 2017 at 05:00pm in Tutorials
- by Iain Wilson
Battlefields are a dangerous place, but that's no reason not to follow reasonable occupational health and safety protocols. So here's a quick and easy tutorial for painting hazard stripes on your terrain, to make sure that your settlement's managing body doesn't find themselves with unexpected compensation claims on top of their post-battle repair bills!
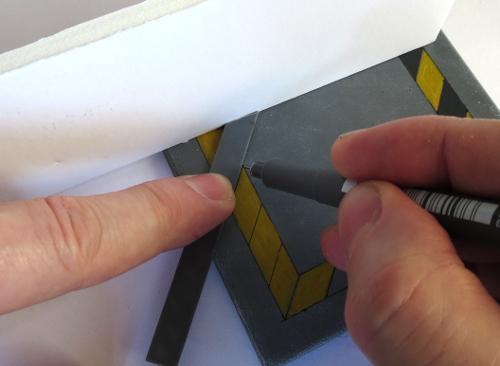
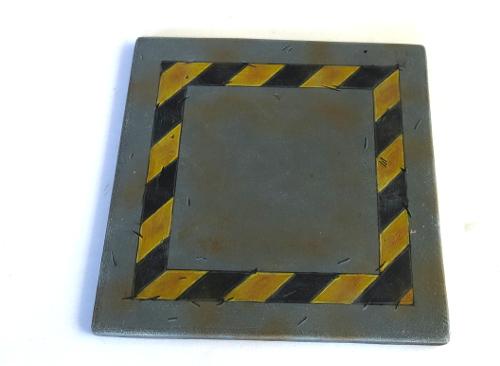
Start by marking out the area that you want to draw attention to with a ruler and a fine line black pen - I'm using a Staedtler 0.05 'Pigment Liner' here.
You can use a ruler to mark out the width that you want for the striped area, but I find it quicker and easier to just grab an appropriately-sized strip of plasticard or (as shown here) a spare support strut from the Maelstrom's Edge terrain sprue and use it as a guide.
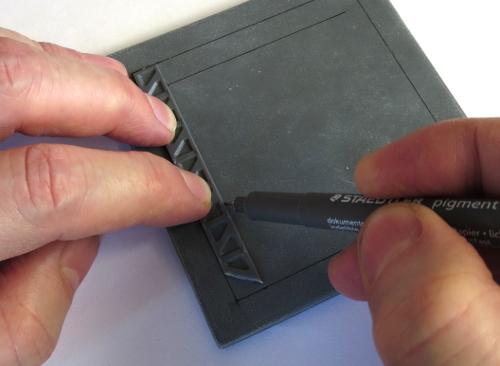
Once you have marked out the area to be striped, it's time to start adding in the lines for the striping itself. I generally use something around about a 45-degree angle, but the precise angle doesn't really matter. Place your guide strip where you want the first stripe (I started at the corner here, because it seemed like the obvious place) and draw a line either side of the strip. If you're working to the right, move the strip to line up the left hand edge with the right hand stripe, and draw a new line along the right of the strip. Repeat all the way along.
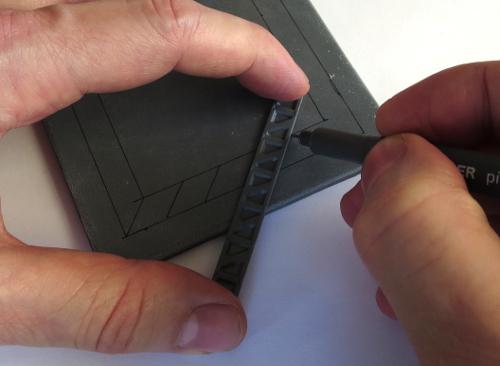
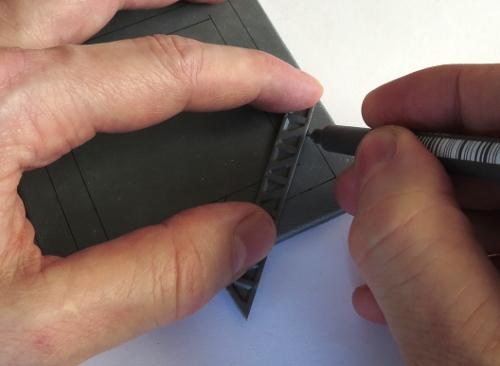
If your hazardous area has corners, there are a couple of ways to approach them. The easiest way is to just run your stripes past the corner, so that the angle of the stripes reverses around the corner.
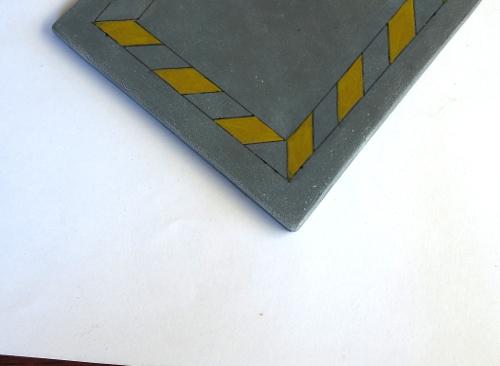
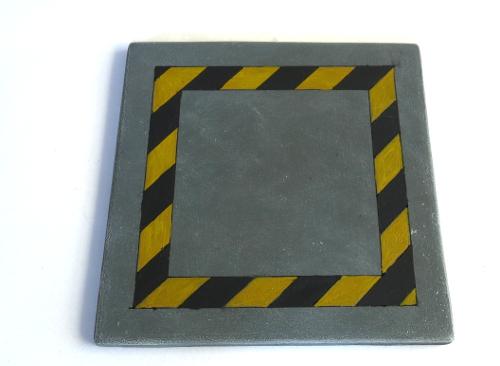
Once you're all marked out, it's a good idea to either set the piece aside for a couple of hours to let the pigment from the pen set properly, or hit it with a coat of fixative spray (which you should be able to get in the sealer section of any decent craft store) to avoid it smudging. Then it's time to fill in every second stripe with yellow. Here, I've used a basecoat of Iyanden Darksun followed by a coat of P3 Cygnus Yellow. It doesn't matter if it's a little patchy, unless you're going for a new and pristine look to your terrain.

The above shows how the stripes 'flip' when they go around the corner. Alternatively, you can run the stripes to the corner, and then start another run of stripes in the new direction. This can be fiddly for odd angles, but works fairly well for 90-degree corners.
It's also worth mentioning that if you are worried about painting neatly in the lines, you can minimise the need to do so a little by painting the whole area yellow before marking the stripes in. That way, you only have to be neat with the black, which is a little more forgiving since messy bits that run over the lines can just be turned into weathering anyway.

Extra tip - If your striped area runs up to a wall, cutting the end of your template strip at an angle lets you get it
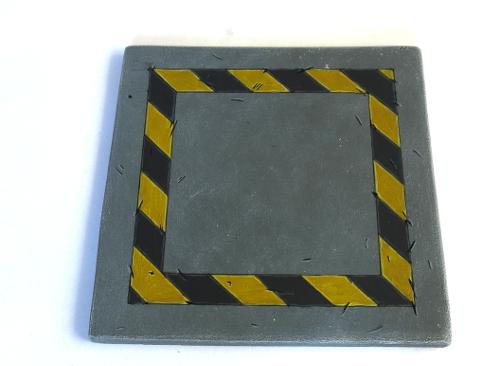
Next, fill in the 'black' areas. I prefer to use a dark grey rather than a black, as it looks a little more natural. Here, I'm using Vallejo Heavy Charcoal, from their Game Colour 'Extra Opaque' range.
If you're in a hurry, you can leave it there and it will look quite presentable. Or carry on for a little more detail...
Add some chips and scratches with your pen, wherever seems appropriate. This is a great way to conceal any spots where your paint wasn't completely inside the lines, and also adds some extra detail to the finished piece.

Then highlight the edges of the hazard stripes and the scratches with lighter yellow and grey - I just mix a little white into whichever yellow I used for the stripes, and some Vallejo Basalt Grey for the 'black' sections. I have also used some Vallejo Light Grey to highlight the scratches on the surrounding cement area.
You can 'fade' the stripes, to give them a more worn appearance, by drybrushing with a little of the same colour as the area around them. My cement on this piece is Vallejo Basalt Grey drybrushed with Light Grey, so I've drybrushed over the stripes with some more light grey. The heavier you go with the drybrush, the more faded the end result.
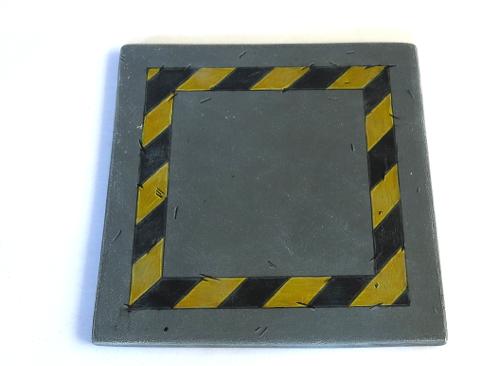
Finally, a bit of brown drybrushed into the middle of the yellow stripes gives them some more depth, with some more brown (Vallejo Beasty Brown here) drybrushed around to dirty things up.
And that's about it. Go forth and hazard up your terrain wherever seems appropriate.
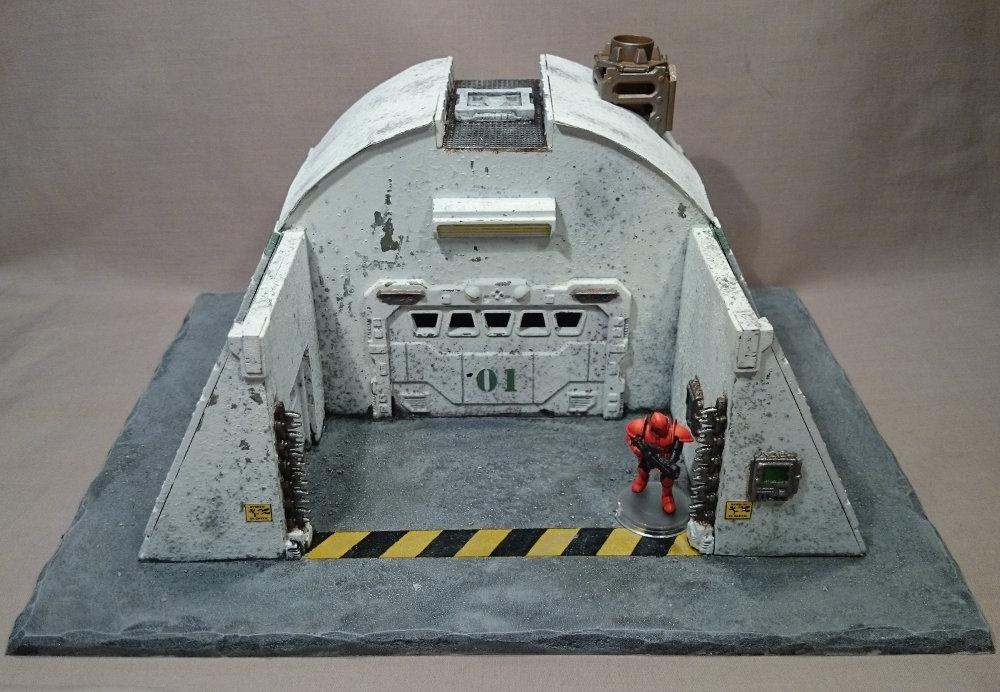
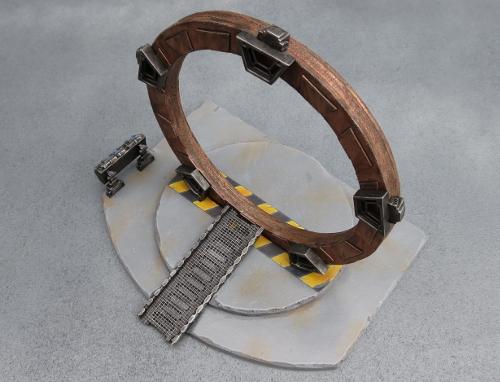
Gateways, energy fences, holes, hatchways, heat vents, and anything else that could conceivably crush, spindle or make your day unpleasant is a good candidate for some serious warning stripes.
To build your own hazardous terrain, you can pick up the Maelstrom's Edge terrain sprue from the webstore here. As always, feel free to share your creations on the Comm Guild Facebook page!
For other Maelstrom's Edge modeling articles, including tutorials and walkthroughs of a wide range of different building and miniature projects, check out the article roundup here.
Painting Tutorial: Heat Stress
Posted on Monday Sept 18, 2017 at 05:00pm in Tutorials
- by Iain Wilson
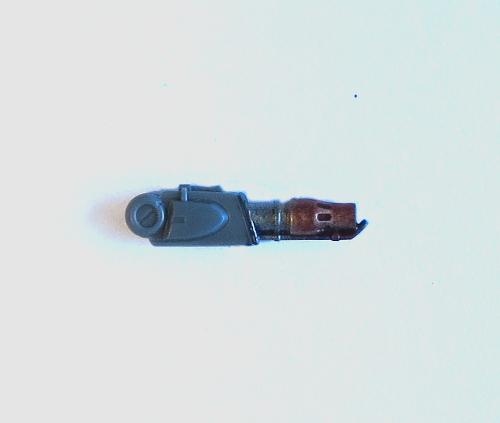
If you're tired of painting your weapon barrels silver and calling the job a good'un, this week's tutorial is for you! Here, we're going to run through how to paint a heat stress effect using Army Painter inks, perfect for Clingfire sprayers or Maglock Chainguns to make them really pop on your models.
Start with a basecoat of metal. Here, I've used P3 Pig Iron, equivalent to Citadel Leadbelcher (Boltgun Metal, for the old-timers).
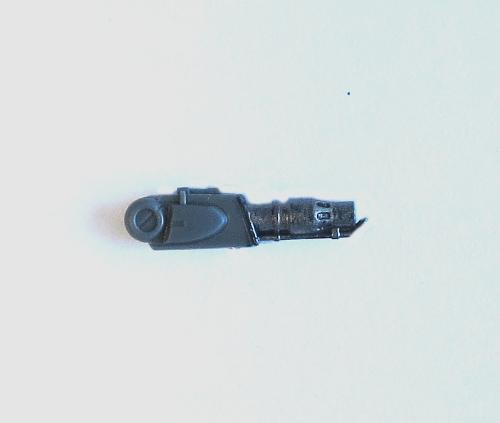
Paint the part that you want to be heatstressed with gold. I've used Coat D'arms Bright Gold here, but any gold will do.
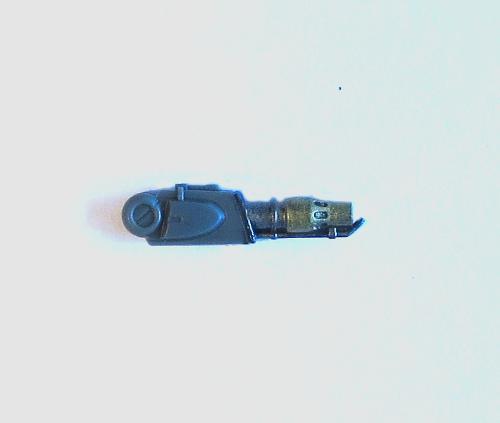
Next, leaving a thin strip of gold at the end furthest from the weapon muzzle, paint the gold area with several thin coats of Army Painter Red Tone. Avoid trying to rush it by slopping the coats on too heavy, as that can cause the colour to go all blotchy. Keep the coats thin and let them dry thoroughly in between (which doesn't take long if you're keeping them thin!), and start each coat just a little bit further away from the start of the gold section, so that you build a natural transition from the gold to the red. Don't be concerned if the first coat or two doesn't look like it's actually doing much - it's a cumulative effect and the colour will build up as you keep going over it.
(in case you're wondering, we're doing this with inks rather than normal paints because the ink lets the metallic sheen show through.)
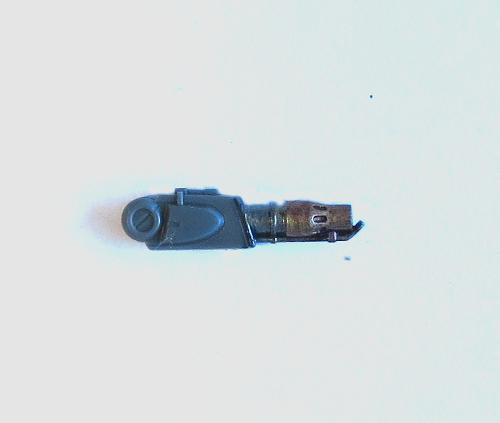
Once you have built up the red to a level you're happy with, switch to Purple Tone. Leave a section of red, and then build up a few layers of purple, starting each layer a little closer to the muzzle of the weapon to build up the transition from red to purple. As before, use thin coats and let each one dry thoroughly before starting the next.
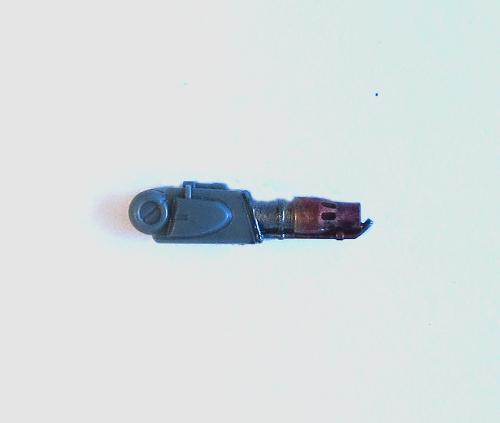
You can also stretch it out a little on longer barrels by using some Blue Tone in between the red and the purple, to give a more gradual transition from red to lighter bluish-purple to darker purple.
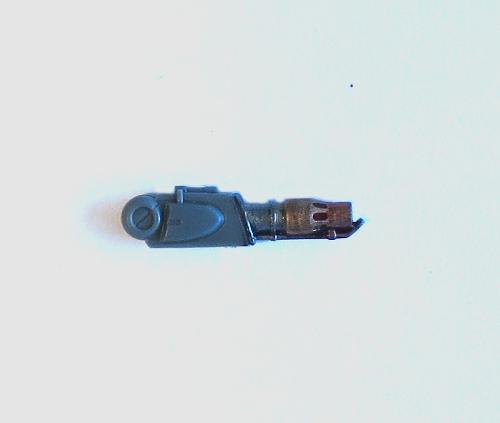
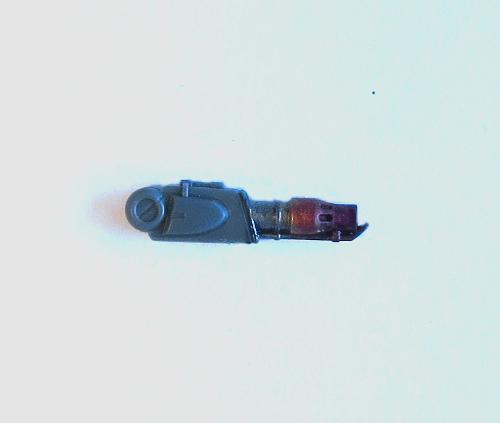
Finally, paint the muzzle of the weapon black. Thin the paint a little and work it back into the purple slightly, giving a sooty appearance to the muzzle area.
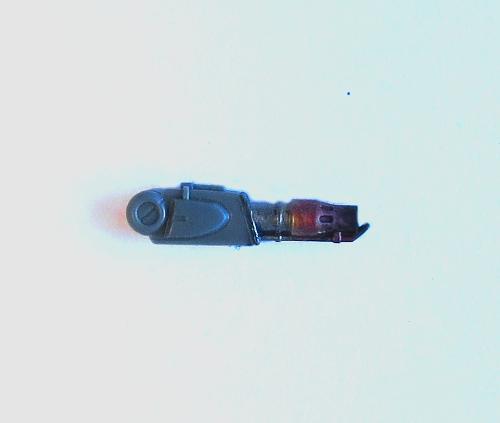
If you like your weapons looking a little cleaner, you can leave off that last step and just finish with the purple.
To build your own army of scorchy, melty doom, you can pick up the full range of Maelstrom's Edge miniatures and terrain accessories from the webstore here. As always, feel free to share your creations on the Comm Guild Facebook page!
For other Maelstrom's Edge modeling articles, including tutorials and walkthroughs of a wide range of different building and miniature projects, check out the article roundup here.
Tags: modeling painting tutorial walkthrough
Terrain Tutorial: Streetlights
Posted on Monday Sept 11, 2017 at 05:00pm in Tutorials
- by Iain Wilson
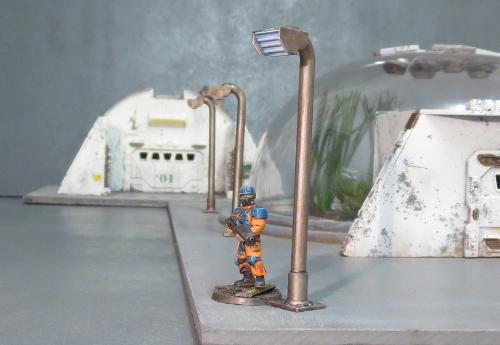
When you're putting together an urban table, little 'real' details can help immensely to bring it all to life. With that in mind, we shared a tutorial a little while back for creating simple hedges made from kitchen scourers and flock. This week we're adding to the urban chaos, and using up some of that leftover sprue, with some quick and easy streetlights.
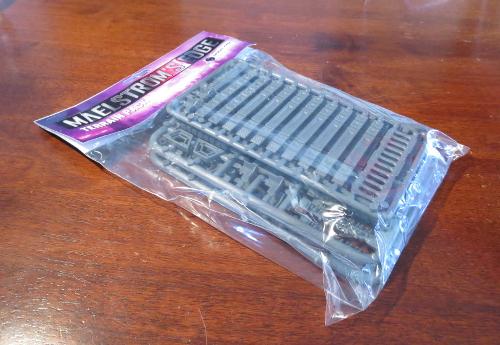
The Maelstrom's Edge terrain sprue has a whole slew of useful components on it, but it also has a nice, rounded frame that is itself rather handy for making pipes, railings or, in this case, streetlight poles. I'm using three emptied sprues (the smaller side of the two frames that make up the terrain sprue), three small pipe fittings, a striplight, some 6mm plastic tubing and some .75mm plasticard.

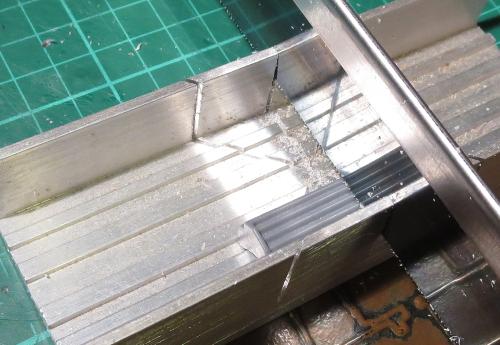
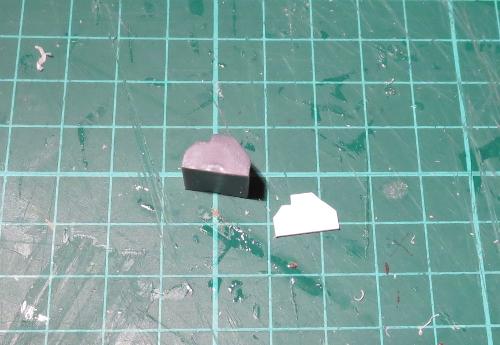
The first step is to take the striplight and cut it into 3 sections. You can do this with a sharp hobby knife if you're patient and not too attached to your thumbs, but a razor saw and hobby mitre box makes the job a lot easier.
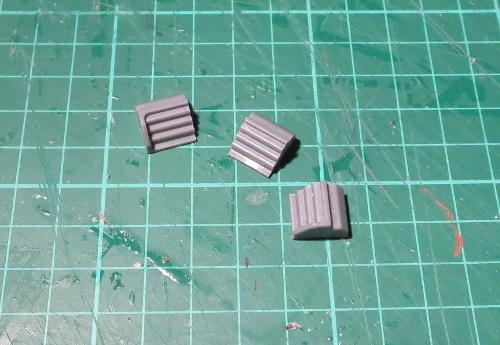
Trace around one of the end sections of the cut striplight to transfer the shape of the light's side panel to the plasticard, and then cut out four panels - 1 each for the light sections from either end, and two for the middle section.
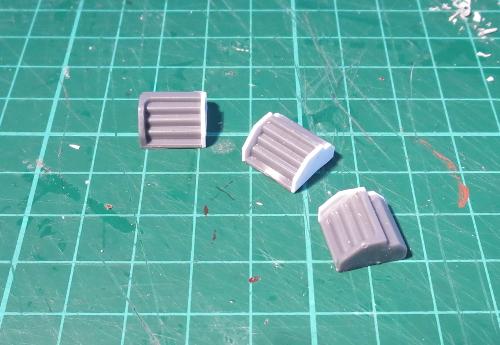
Glue these panels in place. Once the glue is dry, you can shave or file the edges of the panels down so that they are flush with the shape of the light.
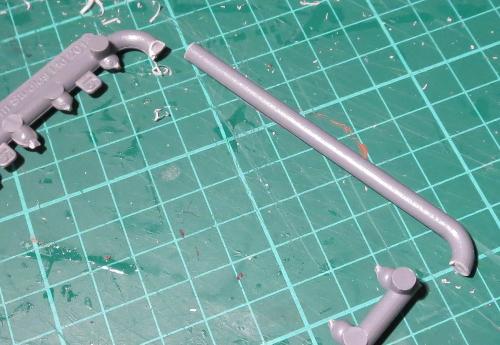
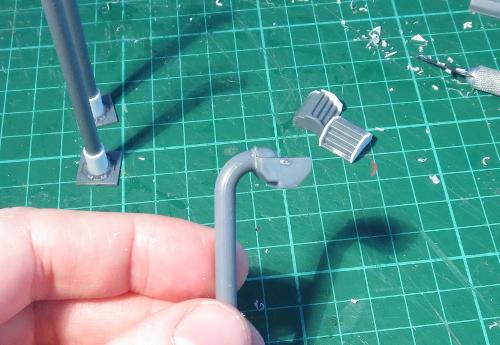
The sprue frame has one end that has no connection tabs on it. This end will form the pole for the light. Cut three of them as below:
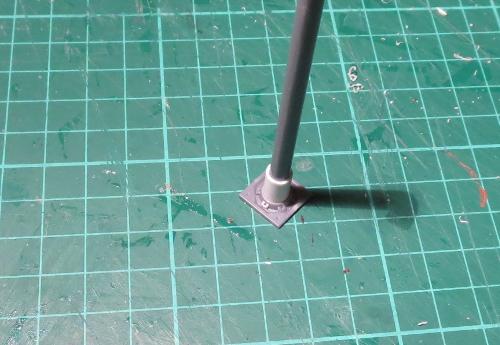
On the straight end of each of the poles, add a short piece of the plastic tube - I've used a 10mm section, but the exact length isn't important so long as it's consistent on all of your lights.
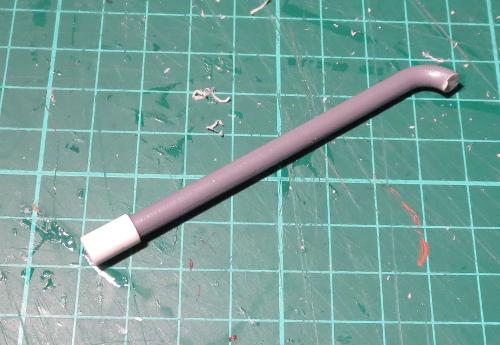
The tube then goes into the pipe fitting.
From the leftover sprue, cut three identical connection tabs.
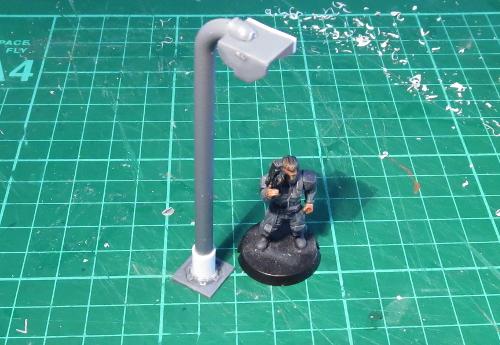
The light is glued in place on the bent end of the pole, and the connection tab is glued on top to add a little detail and bulk up the joint to match the end of the pole.
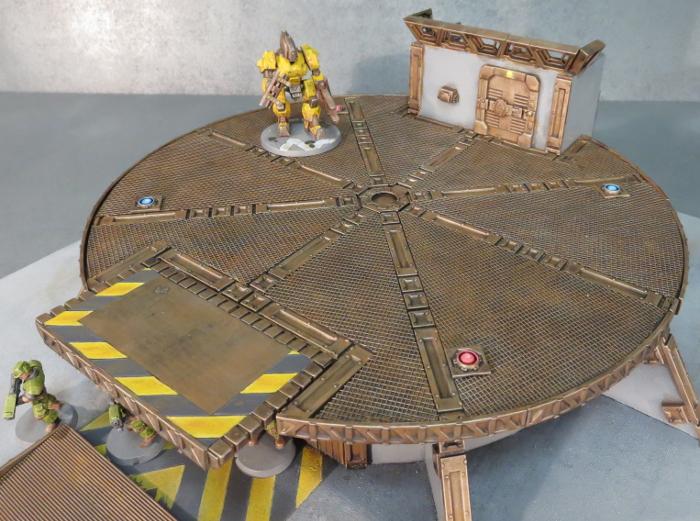
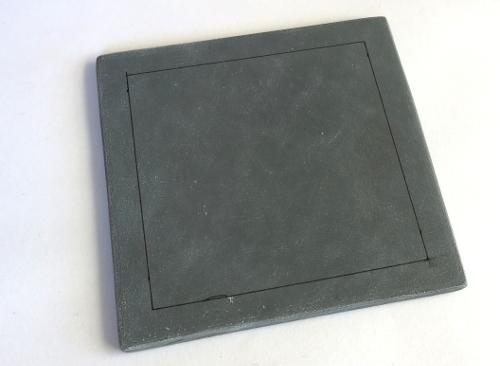
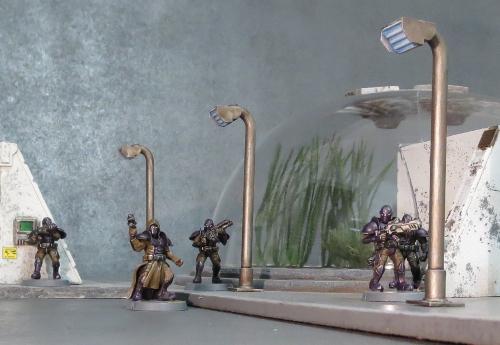
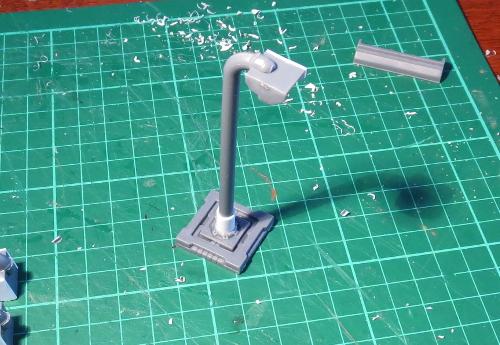
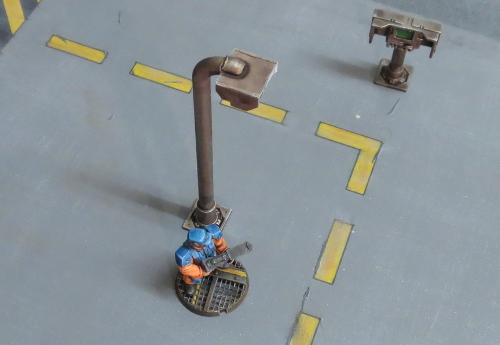
If you're intending to glue the lights onto your terrain, then you're done (aside from painting, obviously). If you want to be able to use the streetlights as scatter terrain, then you might want to glue them to a slightly larger base to make them more stable. You could use a small circle of MDF or plasticard, a spare miniature base, or alternatively the square hatch from the terrain sprue serves for a more high-tech solution.
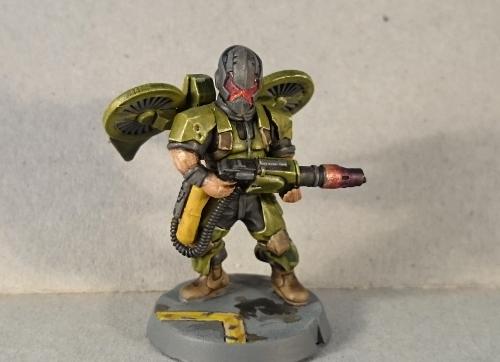
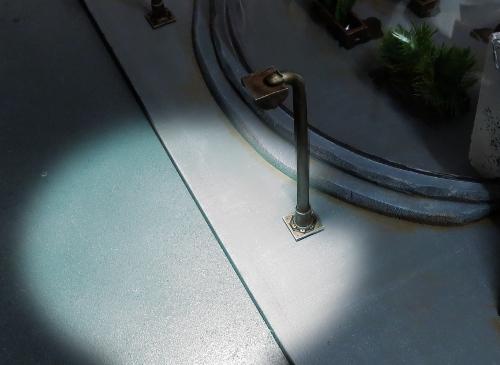
From there, it's all down to painting. The lights shown here have been painting using the weathered metal formula that features in so many of my articles - You can find the tutorial here.
And that brings us to a close once more. Time to pop the chairs up on the tables, grab our umbrellas and saunter off into the gathering dusk...
To put together your own scifi urban utopia, you can pick up the Maelstrom's Edge terrain sprue in a handy two-pack from the webstore here.
As always, feel free to share your creations on the Comm Guild Facebook page!
For other Maelstrom's Edge modeling articles, including tutorials and walkthroughs of a wide range of different building and miniature projects, check out the article roundup here.
Conversion Spotlight: Kaddar Militant
Posted on Monday Sept 04, 2017 at 05:00pm in Models
- by Iain Wilson
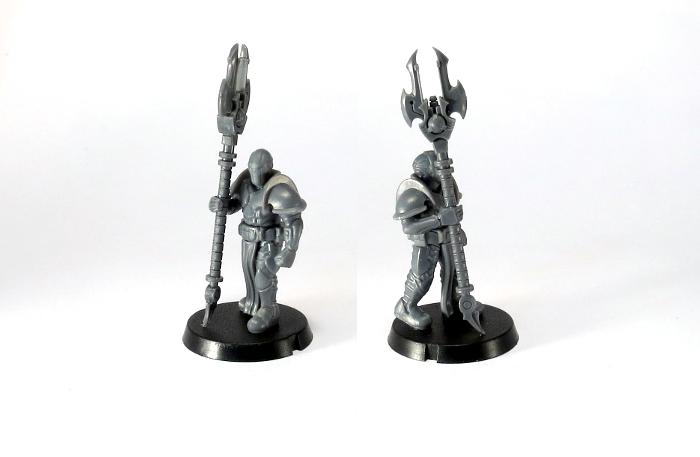
The range of plastic miniatures available for Maelstrom's Edge covers all of the units and options currently available in the game. There's a lot of fun to be had by taking those miniatures and exploring other options beyond the current limits of the game, whether to field with home-brew rules or just for one-off display pieces to flex the creative muscles. This week, we're looking at a model from the latter category, built just for fun, because it never hurts to have a bigger stick.
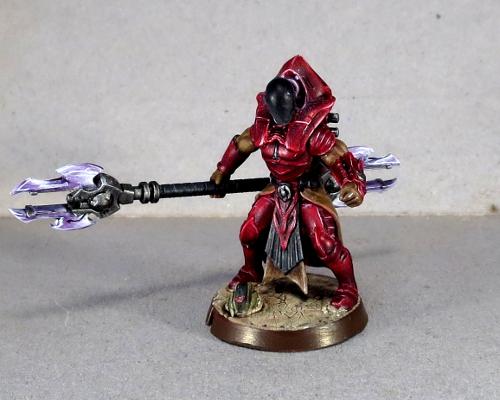
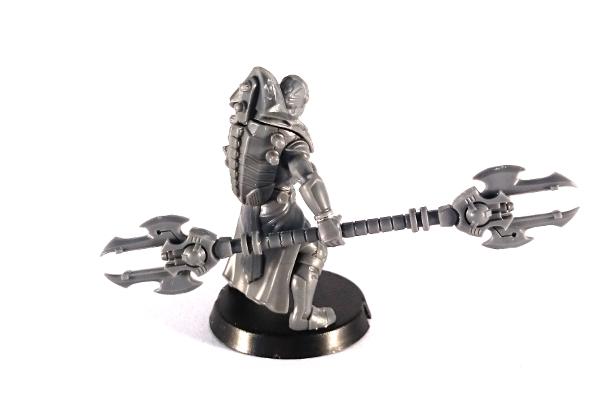
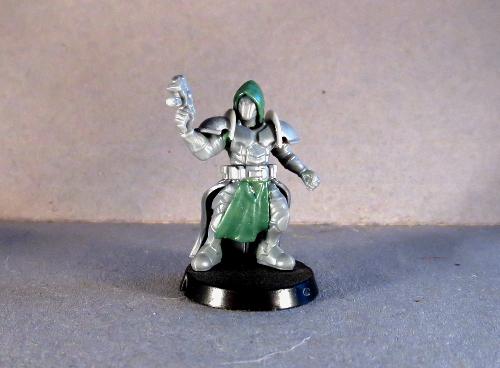
When the Faction Expansion Sprue was released, I took one look at the awesome cybel glaive on the sprue and couldn't resist the urge to create a double-ended version by sticking the head of one glaive onto the bottom end of the shaft of a second. The resultant, admittedly slightly over-the-top, marvel of blades and energy emitters needed a suitably awe-inspiring model to carry it, so I turned to the ever-imposing Kaddar Nova kit.

The head is taken from the Karist Trooper kit, with the front sanded down smooth.
Painting started out with a basecoat of Army Painter Dragon Red. From there, I built up shadows using thin, multiple layers of Army Painter Purple Tone, before higlighting the edges with white and then a final wash of Army Painter Red Tone over the top to mesh everything together.
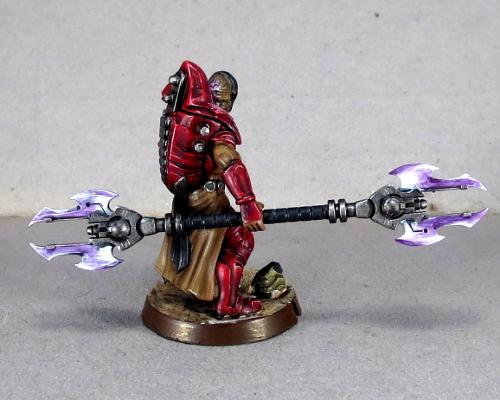
The cloth parts were painted with Vallejo Heavy Brown, and then shaded with layers of Army Painter Strong Tone. Similarly, the black parts were painted with Vallejo Heavy Grey, highlighted with some Vallejo Neutral Grey and then shaded with Army Painter Dark Tone.
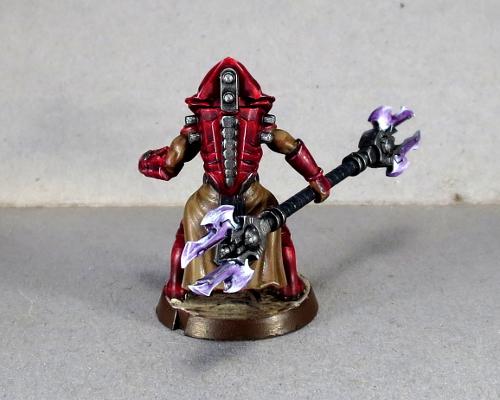
Metal parts started with some more Heavy Grey, and then a coat of P3 Pig Iron, and finally a wash with Dark Tone to give it some depth. Finally, the glaive blades were painted white and then worked up to the purple with layers of Purple Tone. The panel behind his head was given some purple light with a layer of Citadel Warlock Purple, drybrushed with a little Citadel Tentacle Pink and then a final drybrush of white.
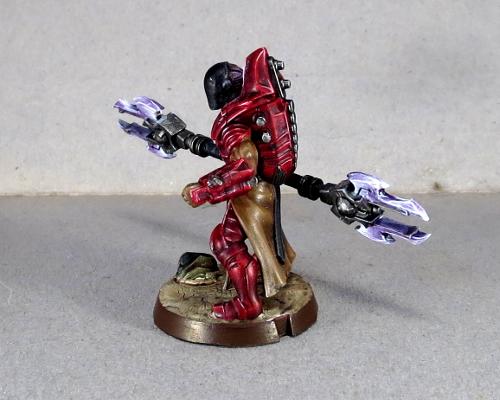
The end result is a spiky, sinister-looking character who will probably wind up spawning yet another Karist force in my collection. I'm thinking of this guy as a 'Kaddar Militant' - a subsect of the Kaddar Priest class, who lean a little more towards brutal subjugation to get their way than is the norm for Karist forces. Stay tuned - there may well wind up being a rules card at some point in the not too distant future, tweaking the standard Kaddar Nova rules to allow for the double-ended Glaive and some revision to the normal unit selection matrix.
If this has inspired you to get creative with some plastic, you can pick up the Maelstrom's Edge terrain sprue from the webstore here. As always, feel free to share your creations on the Comm Guild Facebook page!
For other Maelstrom's Edge modeling articles, including tutorials and walkthroughs of a wide range of different building and miniature projects, check out the article roundup here.
Tags: conversion kaddar karist modeling painting
Previewing the Broken
Posted on Wednesday Aug 30, 2017 at 06:27pm in The Broken
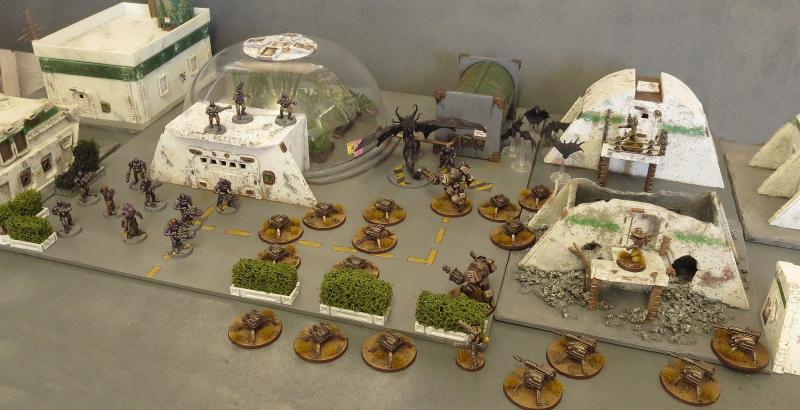
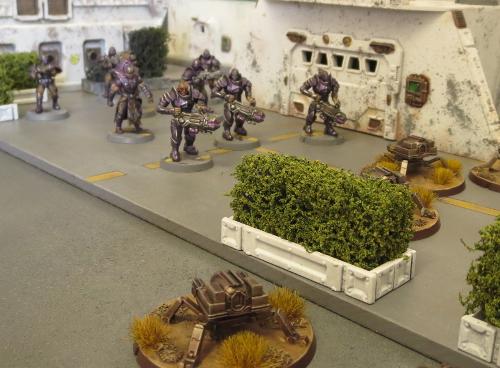
As the release of The Broken gathers speed, it is time to share some more photos of the upcoming models with you. All of these can be built using our plastic kit. The kit will allow three different units or an HQ model to be assembled from it, so the 4 sprues that make up the kit will be a solid foundation of any Broken force.
Keep your eyes on the comm guild blog, our facebook page, or make sure your email address is registered at http://www.maelstromsedge.com to be notified when the Broken go on sale in Sep 2017.
Army Spotlight - Karist Strike Force
Posted on Monday Aug 28, 2017 at 12:00am in Models
- by Iain Wilson
A little while ago I shared an Epirian bot army that I had been assembling, which you can find here if you missed it the first time. It didn't seem like the done thing to let all of those blasphemous machines hog the limelight, and so this week it's time for the pure and wholesome forces of the Karist Enclave to shine.
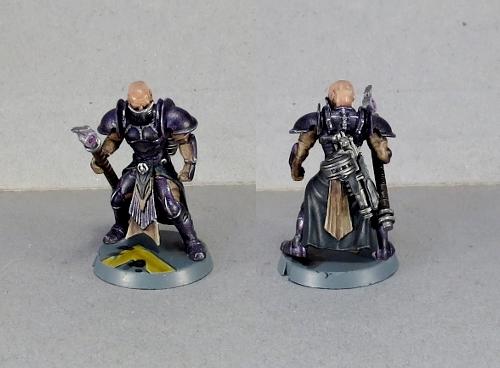
I wanted a Karist leader with a bit of presence - the sort of no-nonsense character who would stride about the battlefield secure in the rightness of his cause and confidence in his inevitable victory. So I took the Kaddar Nova kit and modified the legs slightly to give him a walking pose.
The conversion involved cutting some plastic away from the groin where the two leg pieces join, to bring the legs in for a more upright pose. One leg was angled slightly back by rotating at the waist joint, and the ankles were carefully twisted to straighten them out. The end result is a walking but slightly bow-legged pose, which helps to show the weight that the Nova is carrying around with that backpack!
The painting on this force is quite simple, as I wanted something quick and easy that I could expand on later as I add more models to the roster. The purple is an old Citadel metallic purple washed with Army Painter Dark Tone. The brown cloth sections painted with Vallejo Heavy Brown and washed with Army Painter Strong Tone form a nice contrast to the purple, and the weapons are painted in a no-nonsense metal scheme using P3 Pig Iron washed with Dark Tone.
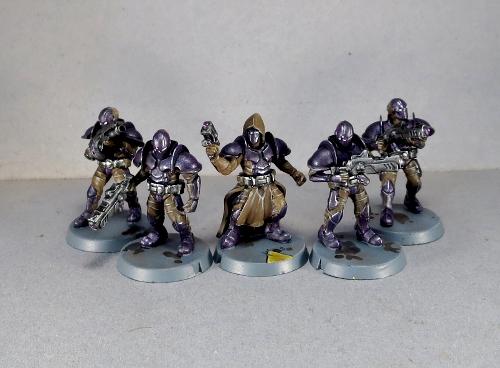
While I was aiming for a fairly small, elite force this time around, I still needed a unit of Troopers to fill in the required Core slot. I decided to go for a 5-man unit, to help them stand out from the more compact specialist units I was going to include and to give help them last a little longer once they get in range of all those Epirian guns.
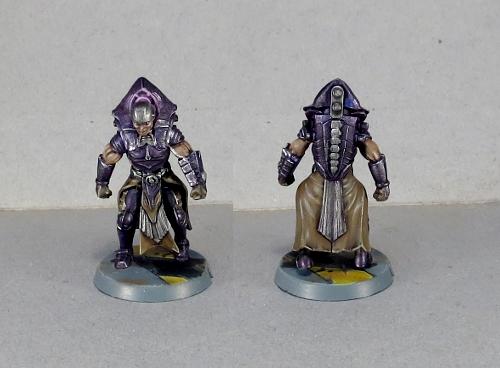
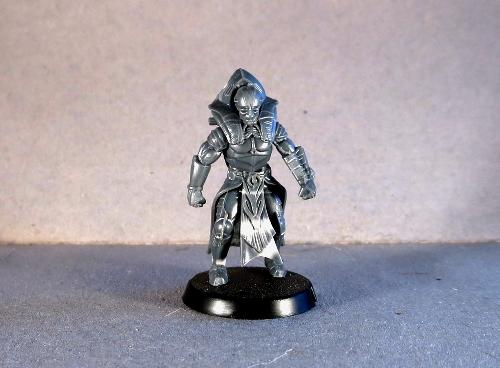
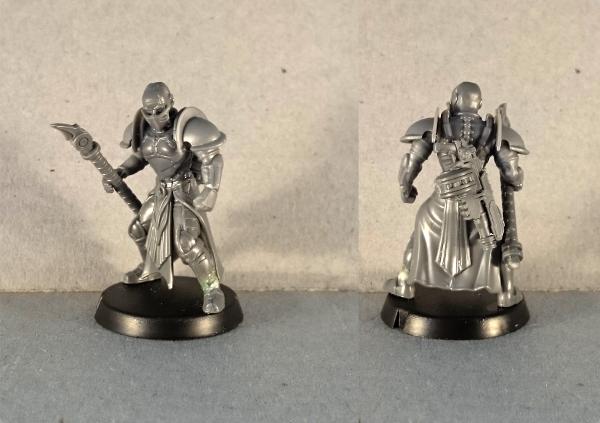
The Quintarch for this unit was based loosely on an early piece of Maelstrom's Edge artwork, with robes made from a leftover Kaddar Nova robe and some green stuff putty.
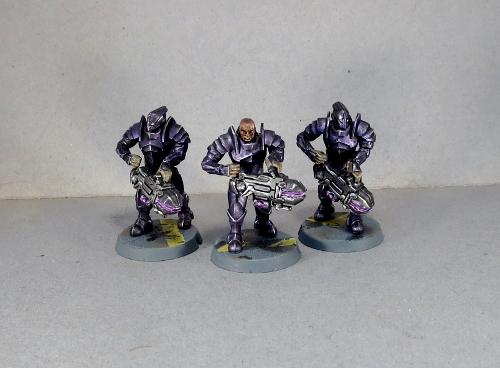
A unit of Tempest Elites provide some fire support, with their fearsome Hellstorm Energy Mortars.
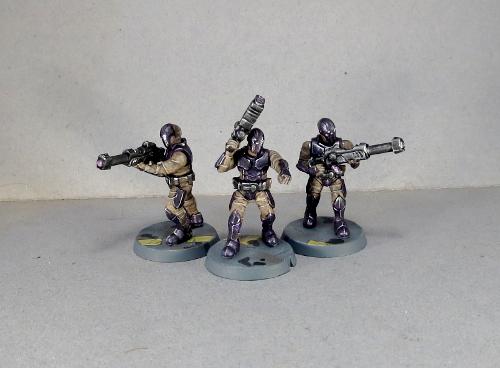
For some extra firepower where it counts, I included a Reaper Cadre. This is a homebrew unit that I put together for an article a while back. They're basically elite troopers armed with a long rifle version of the Pulse Carbine. You can find the conversion article and a rules card here.
I obviously needed to include some angel units, and to keep them in line I also took along an Angel Keeper. He forms the HQ option for a second detachment.
The Keeper is a playtest unit offered up some time ago for those who wanted some extra angel-related shenanigans in their forces. The model is a conversion using parts from a few different kits, as there is no official model (yet!) for it - you can find the conversion tutorial and rules card here.
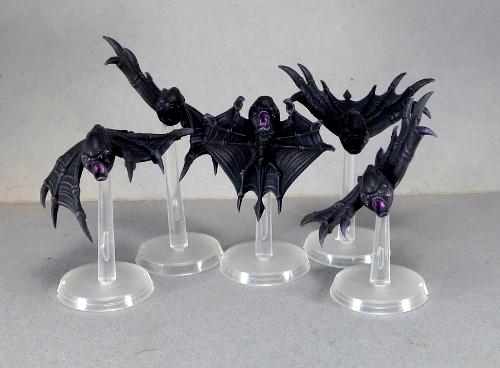
In the Keeper's charge are a unit of Minnows. These were converted to add some extra motion to their poses, by mixing up the pairing of the wing parts and filling in any resultant gaps with a little green stuff.
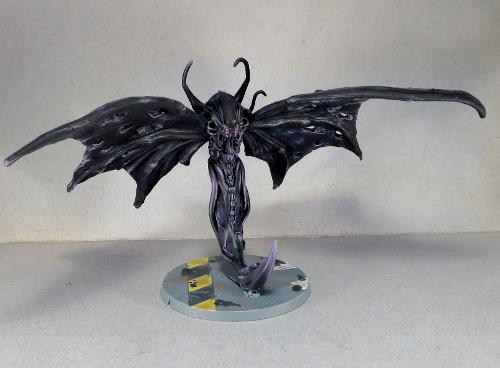
The Minnows' big brother rounds out the second detachment for now. I put together a model of a Mature Angel in its flight form a while ago, and so he had to go into this force. This model was built using the body from the Mature Angel kit, a tail made from green stuff and some wings from a demon model from the Reaper Bones range. You can find a walkthrough of the conversion here
The force all together:
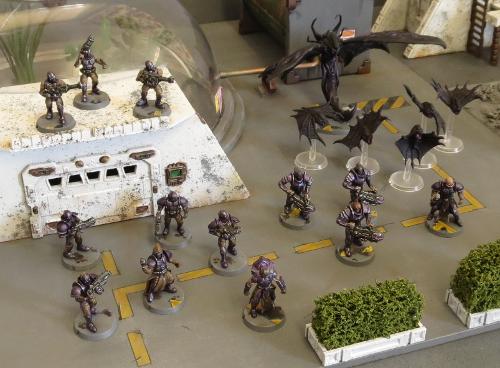
This leaves me with a roster that looks something like this:
Detachment 1
Command: Kaddar Nova - 15 points
Core: Karist Troopers
- Ripper Grenade Launcher - 18 points
Hammer: Tempest Elites
- Hellstorm Energy Mortars - 25 points
Vanguard: Reaper Cadre
- 2 Pulse Lances - 15 points
Detachment 2
Command: Angel Keeper
- Ripper Grenades - 10 points
Core: Angel Minnow Pack - 10 points
Anvil: Mature Angel - 23 points
Total - 116 points.
If you would like to put together your own Karist strike force, you can pick up the various Maelstrom's Edge kits from the webstore here. As always, feel free to share your creations on the Comm Guild Facebook page!
For other Maelstrom's Edge modeling articles, including tutorials and walkthroughs of a wide range of different building and miniature projects, check out the article roundup here.
The Maelstrom's Edge Fiction Creative Process
Posted on Thursday Aug 24, 2017 at 07:18pm in Fiction
by Tomas L. Martin
When I joined the team designing Maelstrom’s Edge in 2011, it was a small team with a great vision. We wanted to create not just a fun and challenging wargame with a bunch of cool-looking multipart plastic models to go with it, but to also design a new science fiction universe that the game and models would fit into. We wanted to bring a broad and complex world to life, somewhere deep and exciting where the tabletop battles would feel like a natural extension to the stories we told in the background fluff and fiction.
Stephen Gaskell and I signed on as lead writers to write the kind of fun space opera stories we loved reading and watching ourselves. Together with the rest of the design team, we would throw around influences that got us excited. The classic settings of Star Wars, Dune and Alien were all mentioned, as they are for many science fiction creations across the years. But it was the dark, morally grey confrontations of the remade Battlestar Galactica TV show that made the most frequent appearance in those discussions, as well as the wise-cracking, fast-paced action of Firefly.
We loved the idea of a universe where it made sense for there to be the kind of skirmishes and battles that the tabletop game depicted. Somewhere right on the bleeding edge of civilisation, where every day was a fight to survive and get the resources you needed, and where characters would be forced to make hard, morally complex choices, where the readers of our work could see both sides of the coin, and be genuinely torn as to what the right choice would be.
It wasn’t just the science fiction settings and heroes of the screen that inspired us. We also took a lot of inspiration from the great works of science fiction written on the page in the last few decades. Amazing writers like Peter Hamilton, Iain M. Banks, Neal Asher and Alastair Reynolds, who would tell big sweeping stories of interstellar conspiracies and wars, whilst keeping a certain balance between gritty action and scientific realism. Vibrant new writers like Aliette de Bodard, Tobias Buckell, Karin Lowachee and James S.A. Corey, who combined vibrant language and unusual characters with deep and interesting worldbuilding.
Stephen and I took inspiration from many of these great writers when we wrote the first set of short stories to cultivate the universe of Maelstrom’s Edge, stories that later were collected into the short story anthology ‘Tales from the Edge: Emergence’. We kept thinking of the fantastic peers we had in the science fiction realm when we co-wrote what would become the first two Maelstrom’s Edge novels, Faith and Sacrifice. And we continue to think of these influences today as we move forward to design the stories and background of future Maelstrom’s Edge releases.
Which is why it’s an incredible honour that such a large number of the authors we admire greatly agreed to contribute short stories set in the Maelstrom’s Edge anthology, Escalation, which is out now on the Kindle Store. Having the expertise of writers like Nebula and Hugo award winning Aliette de Bodard, or the Philip K. Dick award-nominated Karin Lowachee and Liz Williams, was a huge coup for us and we’re delighted with the stories that they have given us for the anthology. Likewise to have such influential authors as Jeff Carlson and Alastair Reynolds writing in the Maelstrom’s Edge universe has been an incredible pleasure, and we hope that you enjoy their adventures in our creation just as much as we have.
Tags: creativeprocess fiction
Terrain Spotlight: The Galactic Wanderer
Posted on Monday Aug 21, 2017 at 05:00pm in Models
- by Iain Wilson
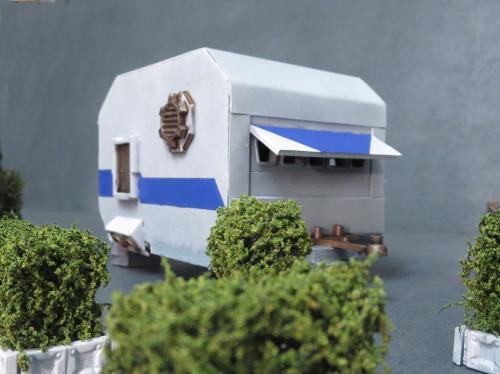
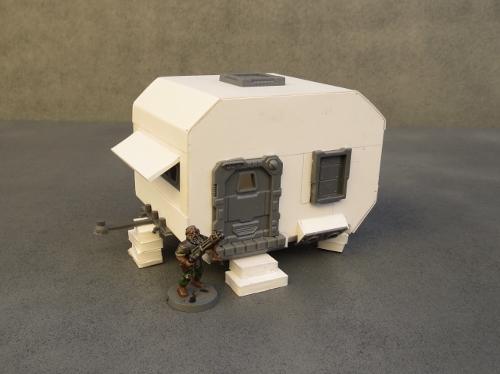
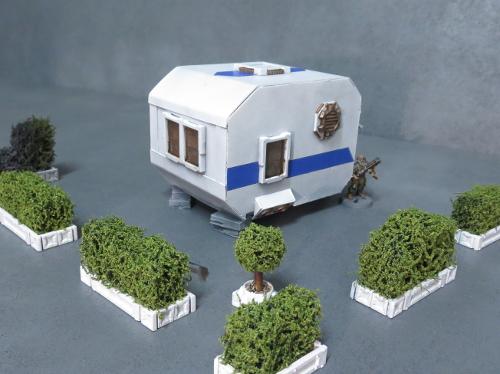
When I shared my Hedge Tutorial a few weeks ago, there was a comment made that they looked like they would be right at home in some sort of scifi trailer park. Well, I'm not one to let a challenge like that go unanswered, and so... the Galactic Wanderer was born.
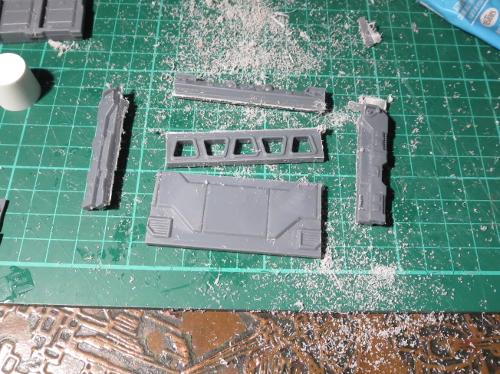
Like many of my terrain builds, this all started with some foam core and a bunch of parts from the Maelstrom's Edge terrain sprue.
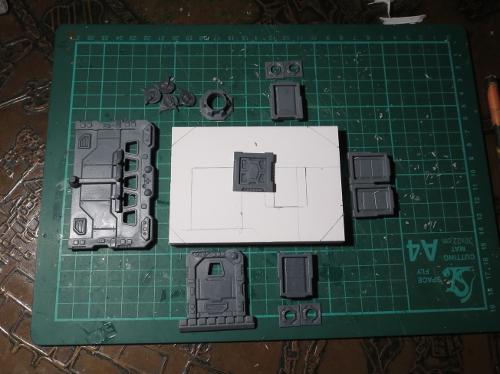
I cut a fairly basic, old-school caravan shape from the foamcore, and cut holes for a door and some windows.
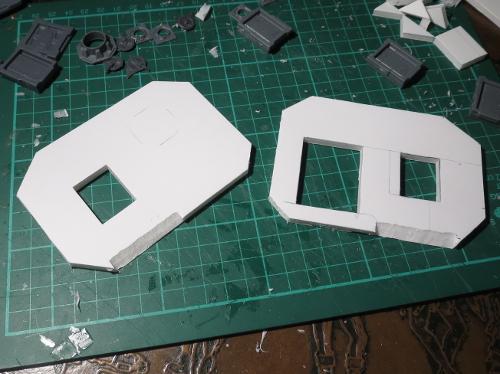
The body of the caravan was glued together with foam glue (a white glue that I picked up a while back. It may well just be overpriced PVA glue, but it does a good job of gluing foam and grabs a little faster than a lot of PVA glues that I have tried) and the door and windows glued in place.
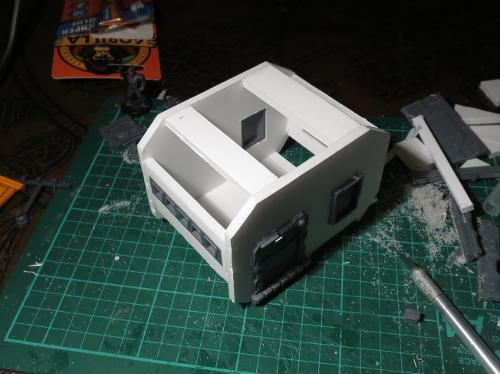
A strip of windows cut from a garage door fit quite nicely along the front wall.
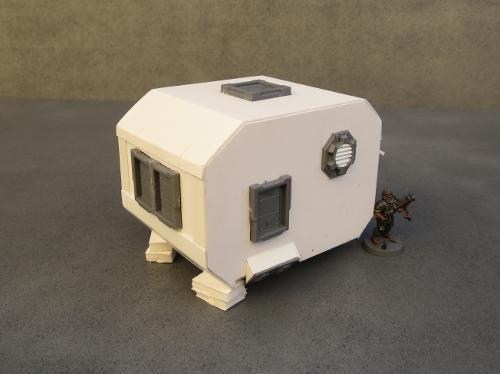
An awning cut from a piece of 2mm plasticard provides a nice break in the regular shape of the caravan, and is totally there for aesthetic reasons and not at all to help conceal the fact that the strip of windows actually wound up just a little bit wonky. I also added a towbar made from a section of old sprue, a hatch in the roof, and rested the construction on some 'bricks' cut from discarded pieces of foamcore.
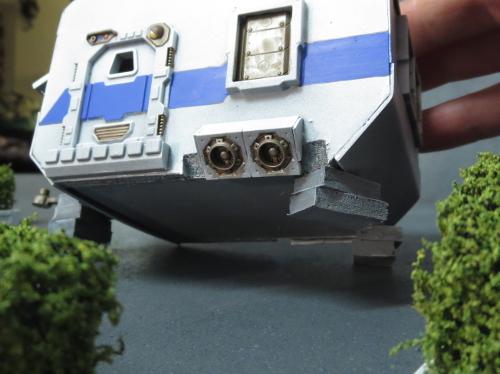
To help with the scifi vibe, unstead of wheels this caravan has some turbines made from the small pipe fitting from the terrain sprue with some turbines from the Epirian Drone sprue behind them. And finally, a large pipe fitting, trimmed off with a razor saw and with some strips of plasticard glued inside provides some ventilation.
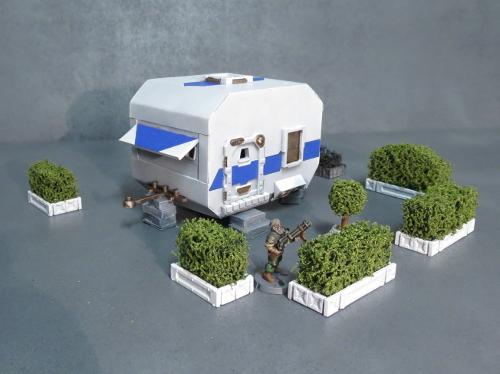
A quick spray and some striping later, and the compact, budget-conscious home of the future is ready for housing stellar refugees or indulging the wanderlust of the more well-to-do.
A better look at the caravan's 'wheels':
To build your own holiday villa or mobile refugee camp of the future, you can pick up the Maelstrom's Edge terrain sprue from the webstore here. As always, feel free to share your creations on the Comm Guild Facebook page!
For other Maelstrom's Edge modeling articles, including tutorials and walkthroughs of a wide range of different building and miniature projects, check out the article roundup here.
Tags: buildings modeling spotlight terrain terrainsprue walkthrough
Assembly Guide - Karist Praetorians
Posted on Monday Aug 14, 2017 at 05:00pm in Tutorials
The assembly guides on the Maelstrom's Edge website are missing the new units added by the Faction Expansion Sprue. Last week, we went over the assembly of the Epirian Suppression Team, and so this time around we'll look at the other unit created from the sprue, the Karist Praetorians.
Karist Praetorian Assembly Guide

General Notes
Polystyrene cement - only use superglue if you want to go insane! All of our models are designed to be assembled with polystyrene cement as it gives some time to re-pose while gluing, fuses the models together and prevents brittle joins like other glues do. Make sure you have polystyrene cement in your toolkit before you begin!
We want you to experiment! We've broken our models up into lots of parts and given a fair few spare parts so that you can push yourself out of your comfort zone, learn new skills and create some really unique models. We've tried to price things so that it won't break the bank if you make a mistake, so please cut stuff up and have some fun. Start simple with a slice here and a re-pose there, and watch your confidence and skills increase until you are a master modeler!
Basing - Always make sure you glue your model to its base with an eye on the arc markers on the sides of the base. The arc marker indents should be at the halfway point between the front and back of the model to show the front and back halves of the model when gaming. See the Maelstrom's Edge rulebook for more detailed notes on this.
Dry fit before gluing! - There are lots of pose options possible, but that means there is also the freedom to screw up and make some bad poses! Sticking the parts together and seeing how things look will usually lead to a model that is fairly static and repetitive. You should consider knee, hip, torso, and arm positions when gluing and ensure that you have a pose in mind before you start gluing things together. If in doubt or insecure about your talents in the posing area, we recommend you try to copy the poses from some of our studio models found here in the gallery.
Karist Praetorian Assembly Notes
Karist Praetorians are fairly straightforward to assemble, being just a modification of the basic Karist Trooper. Three models can be assembled using the following sprues:
Karist Trooper Sprue:
Faction Expansion Sprue
You will need the below parts from those sprue. We've used one rifle and one pistol just to show how they go together, but you could of course choose to use all rifles or all pistols when you assemble your own unit.
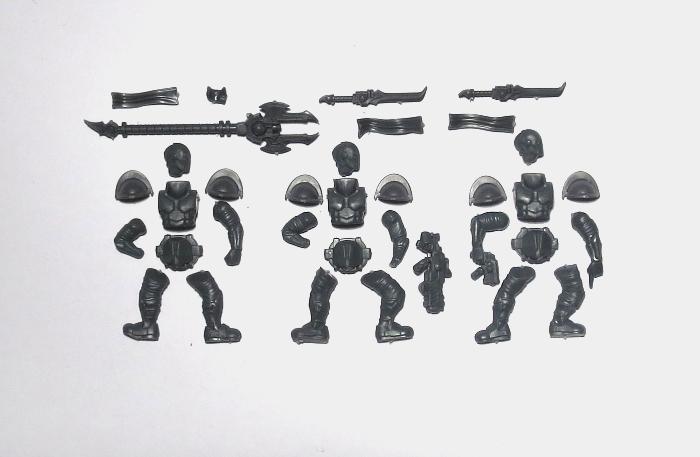
One design decision that might seem a little odd is the splitting of the legs from the lower torso/crotch piece. This had to be done because the upper leg armour is not possible to mould in injection moulded plastic without having to make some ugly tweaks to it that would have really reduced sharpness beyond what we were willing to tolerate. We decided to split the legs at the top instead, allowing ease of conversions and sustaining the crisp armour plates.
All three lower torsos (part F) are identical, as are all three torsos (G). Legs are paired with the same letter (eg; part M is both the left and right leg of the same pose). We recommend the first step in your Karist Trooper assembly should be sticking the legs on the lower torsos.
Add the loincloths next, as this is easiest before there are other parts to get in the way. There is a recess on the inside top of each loincloth that fits neatly over the groin armour. All three loincloths work with all three leg poses, but as usual it's a good idea to do a quick dry-fit before gluing to check that they look how you want them.

The most complex part of the build is the arm / weapon assembly. This is because three points need to be glued at the same time - the arms to the torso and the hands to the arms. If you are using polystyrene cement, you'll get a minute or two of re-posing time which can make this a lot easier. Arms are paired by code as well (eg; part C is both a left and right arm that go together). Mixing up your paired arms will mean some odd posing!
The shoulderpads (part A) are designed to be optional if you are so inclined - underarm detail is sculpted on the upper arms. We've not made any models without them though as we enjoy the distinctive profile the shoulderpads gives to the Karists. If you postion the arms so that the shoulders are just below the top of the armour, the shoulder pads will butt up neatly against the sides of the torso.

From the Karist Trooper sprue, Part K is the Karist Pulse Carbine. Part J is the Radwave Emitter and part L is the Grenade Launcher.
There is no Karist hand that holds the cybel blade neatly, although with a little conversion you can make the closed fist work. The easiest approach though is to glue the sword to the model's back, where it would presumably be held in place with a magnetic lock.

The cybel glaive does have a hand on the expansion sprue to hold it. You can use any of the right arms from the Karist Trooper sprue for this. Some of the rifle arms have a small wedge of wrist attached to angle the rifle correctly across the body. While not essential, it will look a little better if you cut this wedge off along the front edge of the forearm armour.

Once the hand is attached, you can glue the arm onto the torso, and then the glaive into the hand.
As with most models with poseable heads, we recommend building the whole model and then putting the head in place last of all.

For some more ideas for building or converting your models, check out the Karist Praetorian Spotlight article here.
You can pick up your Contractor and Expansion sprues from the Maelstrom's Edge webstore here. As always, feel free to share your creations on the Comm Guild Facebook page!
For other Maelstrom's Edge modeling articles, including tutorials and walkthroughs of a wide range of different building and miniature projects, check out the article roundup here.
Tags: karist modeling praetorians tutorial
Assembly Guide - Epirian Suppression Team
Posted on Monday Aug 07, 2017 at 05:00pm in Tutorials
The assembly guides on the Maelstrom's Edge website are missing the new units added by the Faction Expansion Sprue. So this week, we're going back to basics and running through assembly of the Epirian Suppression Team.
Assembling Epirian Contractor Suppression Teams
General Notes
Polystyrene cement - only use superglue if you want to go insane! All of our models are designed to be assembled with polystyrene cement as it gives some time to re-pose while gluing, fuses the models together and prevents brittle joins like other glues do. Make sure you have polystyrene cement in your toolkit before you begin!
We want you to experiment! We've broken our models up into lots of parts and given a fair few spare parts so that you can push yourself out of your comfort zone, learn new skills and create some really unique models. We've tried to price things so that it won't break the bank if you make a mistake, so please cut stuff up and have some fun. Start simple with a slice here and a re-pose there, and watch your confidence and skills increase until you are a master modeler!
Basing - Always make sure you glue your model to its base with an eye on the arc markers on the sides of the base. The arc marker indents should be at the halfway point between the front and back of the model to show the front and back halves of the model when gaming. See the Maelstrom's Edge rulebook for more detailed notes on this.
Dry fit before gluing! - There are lots of pose options possible, but that means there is also the freedom to screw up and make some bad poses! Sticking the parts together and seeing how things look will usually lead to a model that is fairly static and repetitive. You should consider knee, hip, torso, and arm positions when gluing and ensure that you have a pose in mind before you start gluing things together. If in doubt or insecure about your talents in the posing area, we recommend you try to copy the poses from some of our studio models found here in the gallery.
Epirian Contractor Suppression Team Assembly Notes
Three Epirian Suppression Team Contractors can be made from the following sprues:
Epirian Contractor Engineer Sprue
Faction Expansion Sprue
Assembly is straightforward and the two above sprues will make up three models with the following parts. Please note that arms are paired, so do not mix them up or you'll have a really hard time putting them in pairs again! Pairing is done by number, so A1/B1 are a pair, as are A5/B5, etc. You can choose between the rolled-sleeve versions on the Contractor sprue, or the sleeves-down arms on the Expansion sprue.
The main build considerations with the Epirian Contractors are that some of the arm poses do not work well with some of the leg poses due to the angles involved, so as always, be certain you dry fit things first. If in doubt, try to copy our studio assemblies for good effect.
As with our Epirian Handler model, the torso has a slight lean to it, and because of that, if you place one foot higher than the other when basing your models, you'll open up much more posing flexibility. This can be done easily by bulking up your basing texture underfoot, adding a pebble or slope to the base, or a multitude of other options.
Cleanup and assembly is fairly easy with the Epirians, with everything going where it should. One point of note is this little mould line on the kneepad strapping:
That raised mould line between the front and rear halves of the part looks a lot better if it is shaved down but as it is a little bit deeper than our usual near non-existent mould lines, it can be missed when trimming. Please note that in the photo above we've used a pre-production prototype piece with mould lines that are much worse than our finished products so that you can see more clearly.
Legs, torso and heads go together as you would expect.
Suppression Team members magnetically lock their 'spare' weapon to their backplate when not in use. So if you choose to have rifles in hand, you can glue the shock weapons to the model's back. Alternatively, you can glue the rifle to their back or sling a pistol off their belt, and put the shock weapon in hand. Use the rifle arms that have the index finger on the trigger, rather than the extended-finger hands - the fingers are close enough together that they still look fairly natural gripping a handle instead of a pistol-grip. The Shock Baton does have a chunkier grip than the Maul, so if you're having trouble getting it to fit, you can shave down the sides of the grip a little.
For some more ideas for building your Suppression Team models, check out the Epirian Suppression Team Spotlight article here.
You can pick up your Contractor and Expansion sprues from the Maelstrom's Edge webstore here. As always, feel free to share your creations on the Comm Guild Facebook page!
For other Maelstrom's Edge modeling articles, including tutorials and walkthroughs of a wide range of different building and miniature projects, check out the article roundup here.
Developing Stories for Maelstrom's Edge
Posted on Friday Aug 04, 2017 at 10:00am in Fiction
One of the things we were most passionate about when we started working on Maelstrom’s Edge was making a new world. We love games where there are lots of stories and background material to get people excited about the context surrounding the game itself - where are the battles taking place, who is fighting and why is there a conflict between them?
As part of the initial universe design, our lead writers Stephen Gaskell and Tomas L. Martin wrote a number of short stories exploring different parts of the setting. These first insights into the Maelstrom’s Edge universe were released in our first short story collection, ‘Tales from the Edge: Emergence’. In addition, during the runup to the Kickstarter for the Maelstrom’s Edge game, we approached a number of other professional writers to provide their take on our world, including exploring new factions, planets and ideas. Now, a second anthology, ‘Tales from the Edge: Escalation’ has been released, containing a wealth of fantastic new short fiction from award-winning and bestselling authors such as Alastair Reynolds, Aliette de Bodard, Jeff Carlson and Jaine Fenn.

From the beginning we also knew we wanted to launch with a set of stories telling the backstory of our first set, the Battle for Zycanthus, and so following on from those initial short stories, Tomas and Stephen wrote the fiction that would become our first two novels, Faith and Sacrifice, set on the planet of Zycanthus.
Zycanthus is a frontier planet a few light years from the Maelstrom’s Edge, halfway through terraforming by the Epirian Foundation and their robots. In the boxed game, there is a conflict between Foundation and the shadowy religious group known as the Karist Enclave, who wish to convert the people of Zycanthus to their beliefs about ascension in the presence of the Maelstrom.
To set up the battles that people were going to be playing with their miniatures, our team of writers set out to tell the story of what happened on Zycanthus just before the events portrayed in the box set, when the Karist Enclave first revealed itself and the fighting began.
Initially, the task of telling this story was split into two – Stephen Gaskell wrote a series of stories set from the viewpoint of Zafah, one of the Karist missionaries who lands in secret on Zycanthus, whilst Tomas L. Martin wrote the opposing view of the Epirian Foundation, where a backwater Sheriff called Kyle Wynn uncovers the Enclave’s secret invasion.
We wanted to publish the books ourselves to have the freedom of getting it to our players in whatever format worked best, but printing a book of that size is challenging and would have meant needing to charge more than we felt was appropriate, so we made the decision to split the story into two smaller novels, Maelstrom's Edge: Faith and Maelstrom's Edge: Sacrifice. You can find them in the Kindle store right now.
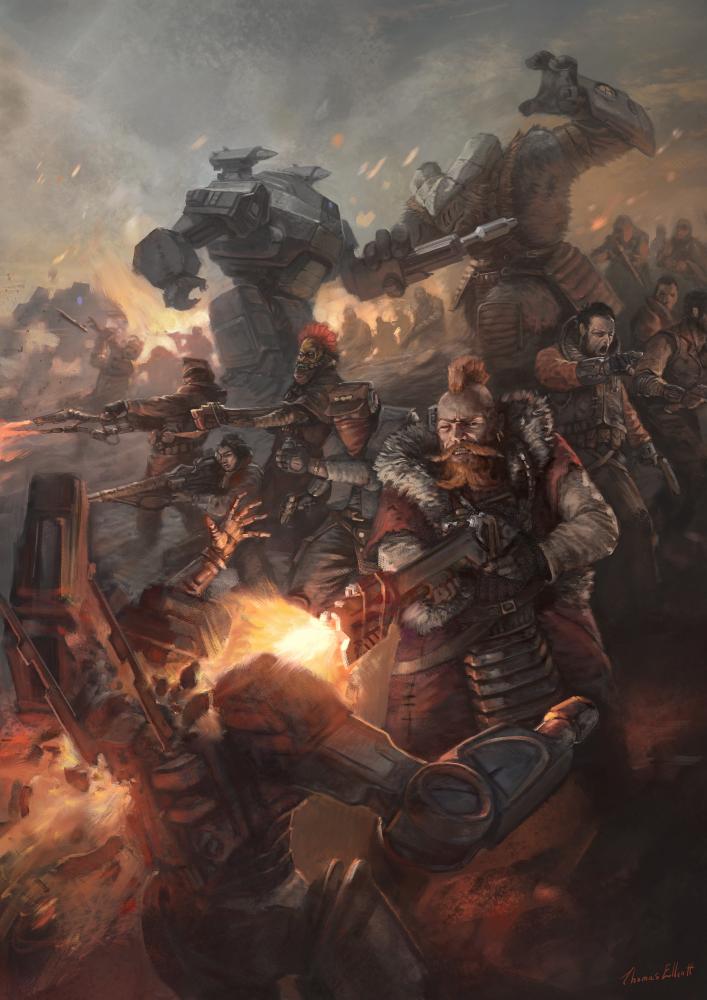
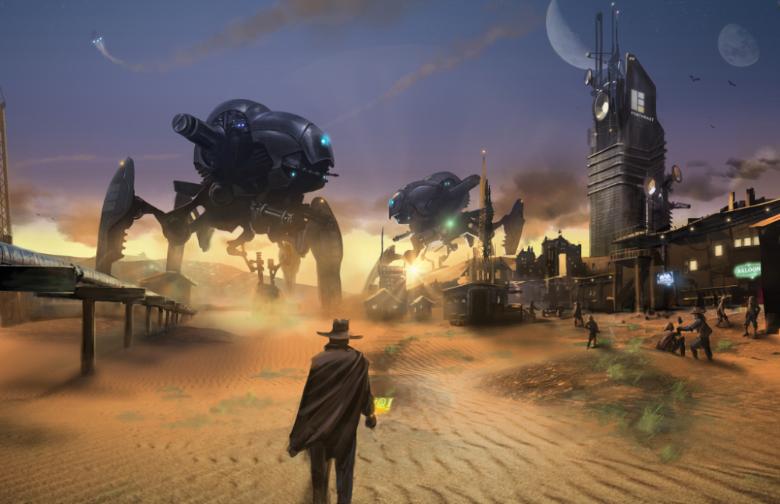
What follows is an excerpt from Chapter Five of the first book, Maelstrom's Edge: Faith, where a pair of Epirian lawmakers encounter the Karist Enclave, including a monstrous alien Angel, for the first time.
Kyle Wynn is an Epirian Sheriff keeping the peace in the small desert town of Venusai on the planet of Zycanthus. When he and his partner Randall get reports of terraforming robots disappearing in the desert, they head out to investigate. When they find a set of footprints and strange markings in the sand, they follow them, never expecting the dangers they are heading into...
Maelstrom's Edge: Faith, Excerpt from Chapter Five
Wynn and Randall tracked the footprints for several hours. They sent the drones a few klicks ahead of the prowler, set them crisscrossing the trail with infrared cameras. The evening had really started to set in now, and only the dull purple glow of the Maelstrom in the east gave any illumination. It cast cruel shadows in its sickly half-light.
“I hate that thing,” Randall said, staring up at the bruised sky. “Just staring down at us like that, so you never forget that it’s coming.”
Wynn wondered if the Maelstrom was all that was coming to Zycanthus. When he had been a prospector, he’d heard stories from worlds close to the Edge. Before their destruction, there had been reports of strange creatures attacking isolated outposts, shadowy coups, riots and public executions. These stories seemed to get more and more intense and confused as the Maelstrom got closer, ending in tales of destruction that Wynn had always written off as a product of the panic that set in as the planets fell apart.
Now he wasn’t so sure. The footprints continued to march across the sand for klicks, rarely breaking out of their steady pattern. Wynn thought he could spot at least five different tracks, but he also occasionally saw the imprint of something larger, but always indistinct, as if the thing making the impression was hardly touching the ground at all.
They were nearly at the location of the third terraforming drudge when the signal of one of the patrol drones winked out.
“Huh?” Randall tapped a monitor, on which the drone’s sensor feeds had been replaced by static. “Where did it go?”
Wynn said nothing. He was watching the other patrol drone’s feed. It was hovering above a ravine. In the rocks at the bottom, he could see five figures, clad in frost-white armour. Heavy carbines dangled from their shoulders, and canisters filled with purple energy were strung around their waists. They were the most dangerous looking people Wynn had ever seen on Zycanthus, and they were staring straight back at him.
“Randall,” he said, “We have company!”
Wynn flicked a switch and sent the video feed to Randall’s station. Hidden in a hollow, the group of armoured figures stood, checking heavy looking weapons. From the looks of it, they were military, but Wynn didn’t recognise their markings, two scythe like points either side of a circle, deep black against their white armour.
“Who the hell?” Randall said. “Those are not a bunch of kids. When exactly did we get invaded?”
“Apparently a few days ago,” Wynn murmured, studying the footage. The soldiers held themselves bolt upright, with the discipline of many years of training. Their armour was wickedly curved at the edges, and their helmets had only one eye, with a trio of small lenses where the other eye should have been. “They can see the probe,” Wynn said. “Why aren’t they shooting it down?”
Something flashed across the drone’s camera, blocking the view to the soldiers. Something big. Wynn took in a dark blue body, with a gaping maw above glassy, alien eyes. Below the tortured face, the structure faded away into an amorphous mass of tendrils. Wynn and Randall had one more look at its face before a lithe limb snaked out and snapped into the drone, and the video feed cut out.
“Call for backup,” Wynn said, staring at the screen. “Call for backup right fucking now."
“I’m trying!” Randall said. “There’s no satellite coverage out here, I can’t get a signal.”
“Well, keep trying!” Wynn said. He grimaced as he imagined what that creature would do to the prowler. The vehicle was tough, but it definitely hadn’t been designed to be alien-proof.
“What the fuck was that thing, Kyle?” Randall reached over and locked the prowler’s door. “What did they bring here?”
“I think they called them Angels,” Wynn said slowly, thinking back to the stories he’d heard out in the black. “I heard some spacers talk once about how they show up as the Maelstrom approaches. How the hell did it get here?”
“Sheriff,” Randall said. “How far away was that drone?”
Wynn looked up. In the gloom of the Maelstrom-tinged sky, he could see in the distance the raised silhouette of a pair of recessed cliffs, below which a ravine fell down to the dry riverbed.
“They’re less than a mile away,” Wynn said.
“Who are these people?” Randall said. “And what the hell do they want with us?”
Wynn killed the engine, and reached for his rifle.
“I don’t know,” he said, turning the headlamps and the lights of the cab off. “But I think if we don’t kill them, we’re not going to make it back to Venusai alive.”
“Wait,” Randall said. “Sheriff, what are you doing? Why aren’t we getting out of here?”
Wynn turned and pushed his deputy against his seat, his face close.
“You saw that thing, Randall. That Angel, or whatever you want to call it. Whatever it was, that thing was flying. Do you really think we’d get far?”
Randall fell silent. Wynn reached over the seats and grabbed Randall’s shotgun and ammo pack, and shoved them into his deputy’s arms.
“The course they’ve taken,” Wynn told him. “It leads right back to Venusai.”
“What?” Randall’s eyes bulged wildly. Wynn had seen men taken by panic before during the hairier moments of prospecting new worlds. They couldn’t afford for that to happen today. Not if they wanted to get out of here alive.
“Now,” Wynn said as calmly as he could manage, “I don’t intend for that to happen. I intend to stop them before they can go home to Rania, Maggie and the rest of the town. So I’m going to get out of this truck as quietly as I can, move to a defendable position, and take them down. I can’t do it by myself, so I need you to calm down and move with me. Can you do that?”
Randall thrashed about for a second, his eyes darting to every possible escape route. Then his body seemed to relax, and he nodded.
“Ok,” he said. “All right. I’m not going to let whoever they are get to Maggie.”
“Then let’s go before they get here,” Wynn said. He pulled his rifle onto his shoulder and cracked open the driver’s door of the prowler.”
“Sheriff, wait.”
Wynn’s heart sunk. If he couldn’t get Randall to overcome his fear, they’d be sitting ducks in the cab of the prowler. But to his surprise, his deputy wasn't cowering. He was clambering over the back seat into the control centre jabbing a finger at the controls. He passed Wynn a headset with a bud microphone curling down from its strap, and then put one on himself.
“We need all the help we can get,” Randall said. “I’m activating all the remaining drones. Even the unarmed ones can provide a distraction.”
“You can’t stay here,” Wynn insisted, pulling on the headset. “You saw what that thing did to the terraformers, we’d be carved apart.”
“I’ll stay long enough to get all the drones moving,” Randall said, stabbing at the control panel, “and then I’ll take the remote headset and move to higher ground. But it’ll take a few minutes to get them all activated, so you should get somewhere you have good line of sight, and I’ll join you later.”
Wynn hesitated for a moment, then nodded and clambered out of the cab. Randall’s plan was about the best they could hope for, and it would do neither of them any good to waste any more time.
He dropped the last few rungs of the ladder to the ground, and set off on a crouching run towards a series of escarpments leading up to a rocky bluff to the right of the prowler. As he left the vehicle he heard the whine of several drones starting up, and a couple sprung up from the rack and began buzzing about the sky, as he pulled himself up onto a prominent cluster of boulders.
Wynn dropped to a prone position and unfolded the stock of his rifle, resting it against the edge of the rock, looking down at the prowler some twenty metres away. His rifle, an Ednotech maglock weapon, had been with him since his prospecting days, although he’d upgraded pretty much every component over the years. He cocked the rifle, pulled the butt in against his shoulder and settled his eye at the scope. Just like old times.
For several minutes, nothing happened, except the occasional flash of movement as a drone left the prowler’s rack. Wynn began to hope that maybe the intruders had not heard the prowler, had assumed the drones were on their own and carried on walking. But then he saw a flash of off-white armour plating at the foot of the valley and all thought of getting out without a fight vanished.
“I see them,” Wynn told Randall through the headset. "At the foot of the valley. Try and keep the drones hidden until I can get a shot off.”
“Gotcha,” Randall replied. “Three more to launch.”
Wynn tapped the microphone in reply, and settled into his position. He watched the soldiers advance, using the cover of the boulders that lined the valley, moving in pairs. There was no hope of Wynn getting all of them in one go, they were too well trained for that. His first shot had to work.
One of the soldiers peeled off the main group and crouched, aiming his weapon at the prowler. It was a larger gun than the others, with a belt that fed canisters of what looked like cybel energy into the magazine. Cybel energy, harvested from the cybel network that linked the stars, was incredibly potent and powered many of the ships and industries of the galaxy, but the stuff was so volatile that only the most foolhardy or brave would use it as a weapon.
The soldier barked a command at the other three and fired a round off. The ball of purple-white energy looped up in the air like a mortar shot, splashing into the ground with a sound like thunder. A crater exploded into being in the sand beside the prowler, rocking the vehicle and spraying it with debris but not harming it. With his range sighted, the soldier shifted position for another shot.
He would not get another try. Wynn squeezed the trigger of his rifle, sending a bullet straight down the line of the valley. The shot splintered the soldier’s helmet just below the three lenses that covered the soldier’s eye, spraying most of his head onto the rock behind him. The soldier collapsed to the ground, lifeless.
The others span and aimed their carbines in Wynn’s direction, trying to work out where the shot had come from. Wynn reached forward slowly and capped the lens of his scope, hoping to stay hidden for just a bit longer.
“Ok,” he said quietly into the mic, “They know I’m here. Go crazy with the drones, and then get to cover.”
“You got it,” Randall said. A phalanx of patrol drones rose from the stones, pinging laser shots at the soldiers, sending them diving for cover. While they were distracted, Wynn risked another shot, but the soldier in his sights moved at the last moment and the bullet impacted harmlessly into the sand.
One of the drones found its mark, burning a dark hole in the back of one of the soldiers’ armour, sending him sprawling. The remaining intruders sprayed shots at the drones, sending two robots crashing to earth. Then the soldiers hunkered down out of sight and called out to someone behind them.
A tortured sound filled the air, like the squeal of metal on metal. The desert breeze carried the smell of ozone, reminding him of the workshop’s smell when Rania used her plasma cutter. Then the monster emerged from behind the shadow of the escarpment.
The creature was massive, as tall as the prowler. Its features were squid-like in some ways, and bat-like in others, but attempting to compare it to an animal could only vaguely approximate its strangeness. Its body was an elongated smooth surface, with a number of limbs stabbing out from it. Two of these furled back against its body, thin membranes hanging between them as wings. More indistinct limbs propelled the beast along the ground, while at least four more tendrils dangled in front of it, their tips armed with sharp spikes or pseudopods. It was a deep dark purple, almost but not quite black, that seemed to be eaten up by the Maelstrom-tinged shadows of the escarpment.
Behind the creature was a much smaller figure, a crooked, thin man in a hooded robe, carrying an awkwardly large satchel across his back. He had a large staff held in both hands, a large flask of purple cybel energy at its base. The man used the other end to stroke the skin of the creature, and prod it forward towards the prowler. The creature opened the maw at the centre of its body and screamed that tortured metallic sound, like two spaceships colliding.
“Skyfire,” Randall swore. “Are you seeing this thing, Kyle? Is that really there?”
“An Angel,” Wynn muttered. “It’s real all right. You better get out of there.”
“Are you kidding me?” Randall said. “Against that thing? I think I’d rather take my chances in the prowler. Let’s see how it likes a bit of the Foundation’s finest.”
Randall’s surviving drones rejoined their formation, hovering in one place to let the last few launch from the prowler. Then he sent the five robots flying at the new appearance, buzzing the creature with the lasers and light machine guns mounted on their wings and cupolas.
The Angel screeched and flinched at the impacts on its body. Through the rifle’s scope Wynn could see most of the bullets passing harmlessly through the creature’s body, the holes they made closing behind the slug’s passing like it hadn’t even been hit, as if the drones were firing through water. Then with a sudden movement, the Angel leapt forward, its wings unfolding and tendrils leaping out from its body, further than their original length appeared to allow, the creature’s flesh changing in mid-action. Within seconds the drones had been smashed to the floor, strewing mechanical parts across the sand.
“Well,” Randall said in a breathless voice, “Storms. That could have gone a bit better.”
###
I hope you enjoyed this excerpt from the first novel in the Maelstrom’s Edge universe. You can read more in Maelstrom's Edge: Faith by Tomas L. Martin and Stephen Gaskell - on Kindle now!
Terrain Tutorial - Hedges
Posted on Monday Jul 31, 2017 at 05:00pm in Tutorials
- by Iain Wilson
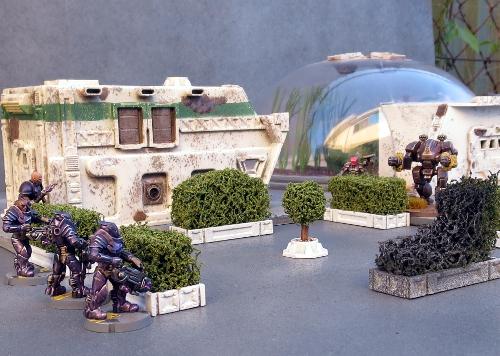
Stands of forest or jungle trees are staples of most of our gaming collections. Sometimes, though, you want your greenery to suit a more civilised warzone, and for that, you just can't go past the humble hedge. So this week, we're looking at a quick and easy way to churn out some shrubby scatter terrain.
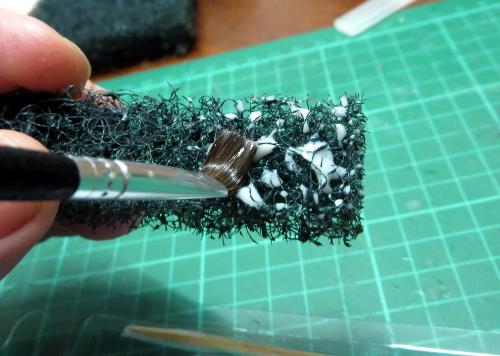
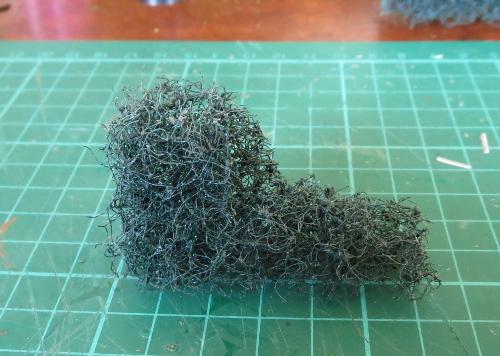
We start with a thick kitchen scourer. For a standard green hedge, you would ideally want a dark green or black scourer, although you could easily use other colours to make alien hedges. The scourer I'm using here is about 20mm thick, and has a really coarse texture. You could use thinner scourers by gluing a couple together, but that may wind up with a visible seam line.

Cut the scourer into strips using a sharp knife or a fine saw. The width of the strips is up to you, depending on how tall you want to make your hedges.

Next, paint the strips of scourer with some PVA glue. Work the glue into the weave of the scourer a little, but try to not leave any big lumps of glue right on the surface, as that may make the outside of your hedge a little blobby.
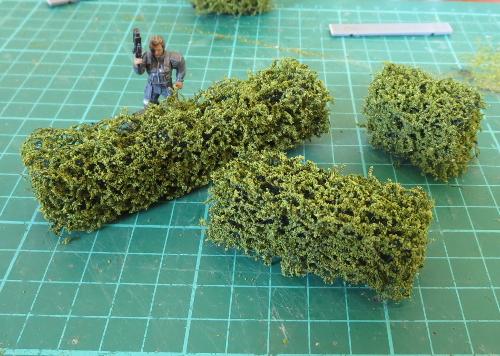
Finally, scatter flock over the glue. You'll get the best results here with a fine grade flock, which you should be able to find in most gaming stores' modeling supply sections or anywhere that sells model trains. Don't use the chunkier, dyed-sawdust stuff - it will just wind up looking like dyed sawdust stuck to a sponge.
Let the glue dry, and you could easily use your hedges as is to stick onto terrain pieces or scatter around a table. For a slightly more urban look, you can add some boxwork to them using strips of plasticard or the support struts from the Maelstrom's Edge terrain sprue. For the below, I've used a strip of 5mm masonite as a base, which will help to give the hedge section a little more weight.
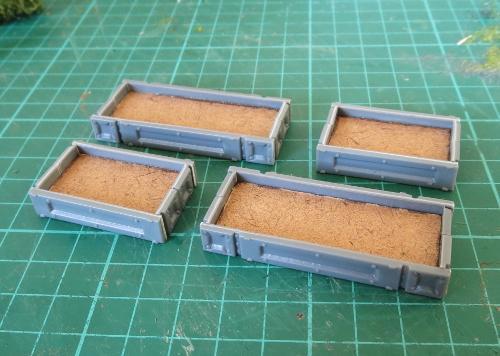
Paint the boxwork up however suits your terrain collection, and then glue the hedges in place with some superglue or PVA glue.
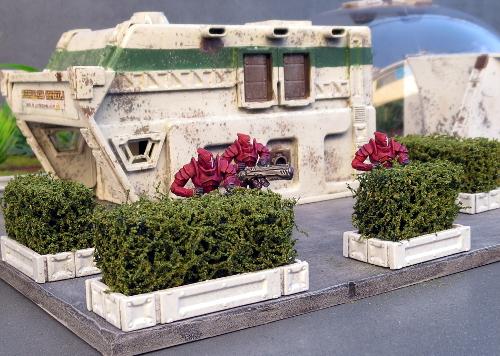
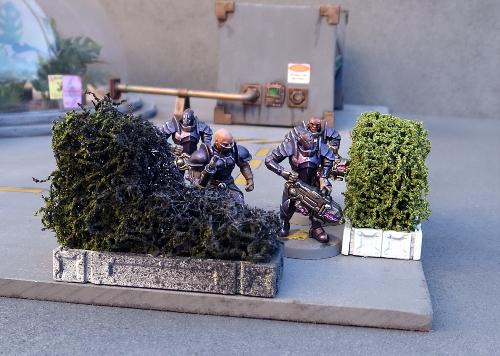
You can mix things up a little by making sections in different heights, to create some lower cover and some full line-of-sight-blocking barriers. Battle damage can be added by cutting or tearing away pieces of the scourer before adding the flock.
To create a burnt effect, I left the flock a bit patchy around the damaged part of the hedge, and once the glue was dry gave it a quick spray with some flat black, followed by a light dusting of flat grey.
If you want to get really carried away, you can also shape the scourer using a knife or some sturdy scissors and create some topiary features.
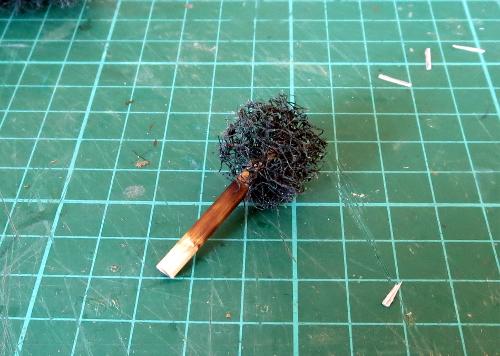
The trunk of this ball topiary was made from a short piece of a wooden skewer, dyed with a little brown ink and then glued into the scourer ball with superglue.
If this all has your green thumb itching, grab yourself some scourers and hedge away! As always, feel free to share your creations on the Comm Guild Facebook page - first one to post a miniature garden maze for their gaming table wins a cookie! (Or possibly just the adulation of the masses and fleeting fame...)
You can find the full range of Maelstrom's Edge models, including the ever-useful terrain sprue, in the Maelstrom's Edge webstore here, and a collection of modeling articles, tutorials and walkthroughs of a wide range of different building and miniature projects in the article roundup here.
