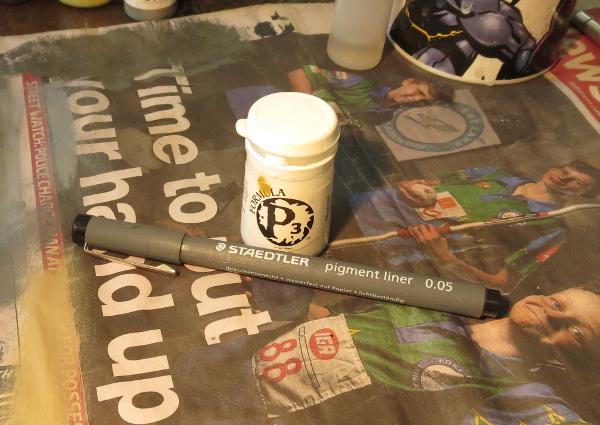
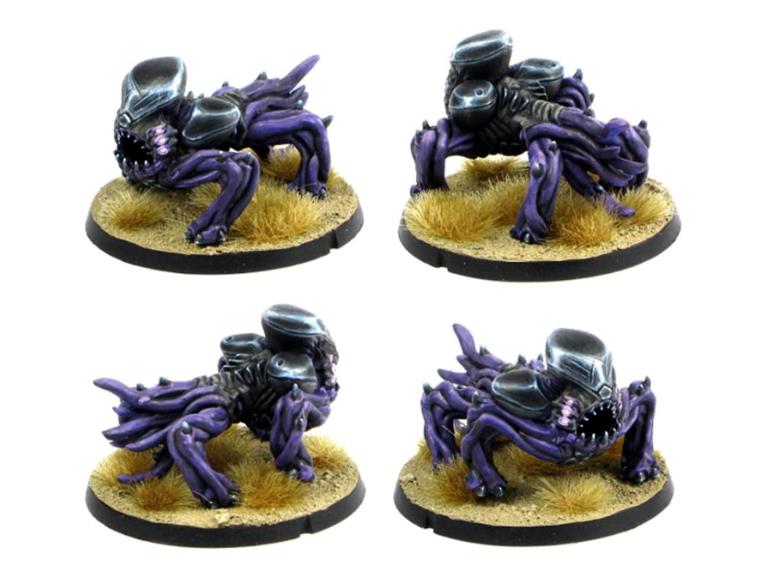
Karist Heavy Weapons - Available Now
Posted on Thursday Nov 30, 2017 at 10:00am in The Karist Enclave
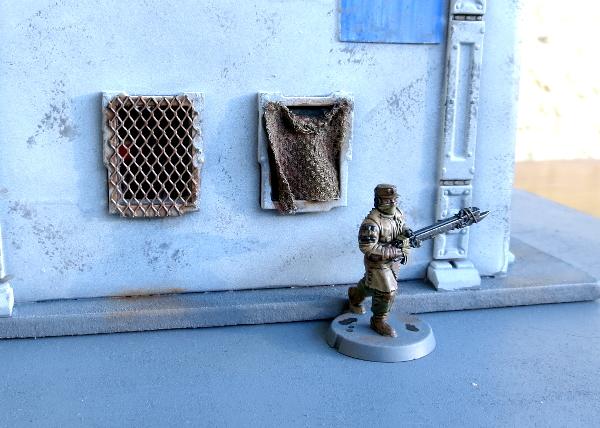
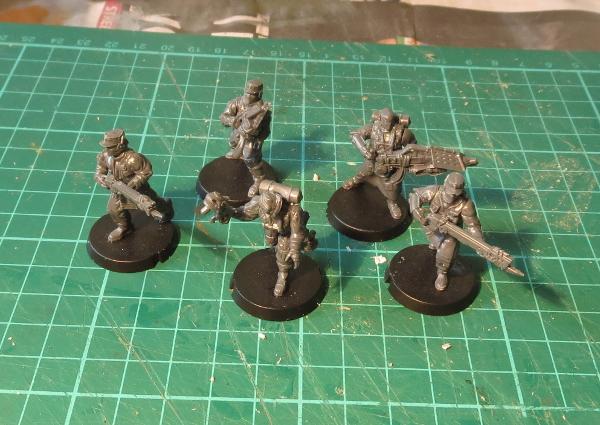
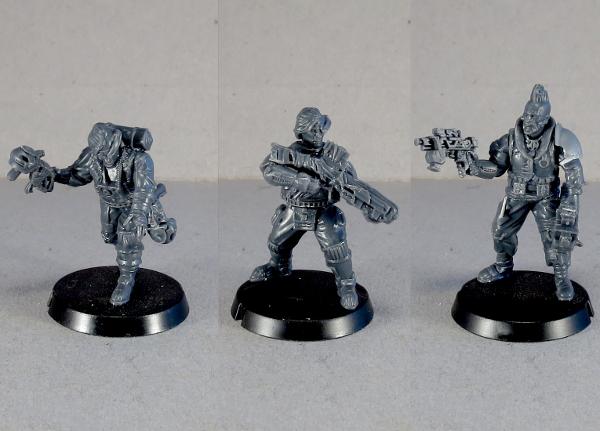
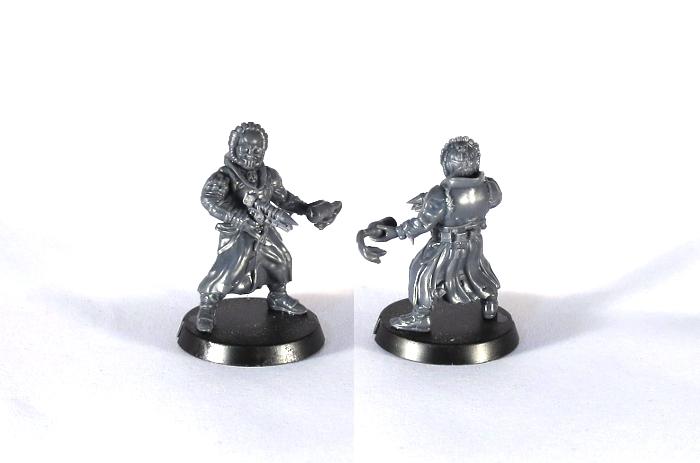
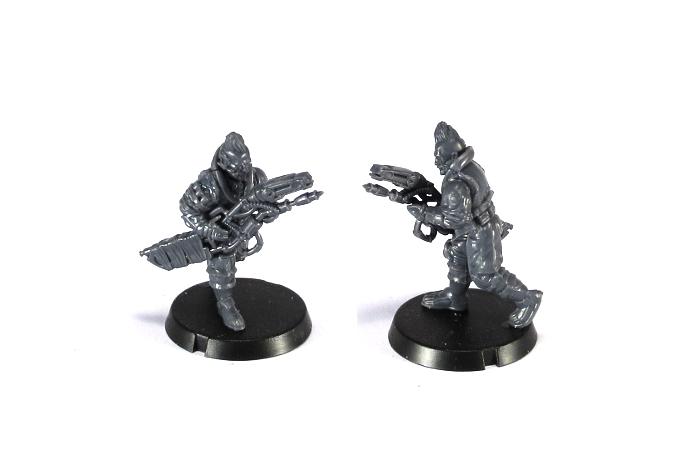
Spiral Arm Studios are proud to present our latest release in our continuing one release per month cycle - Karist Heavy Weapons.
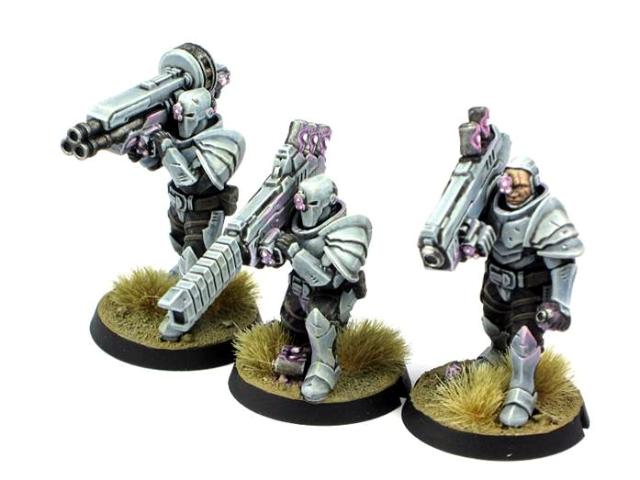
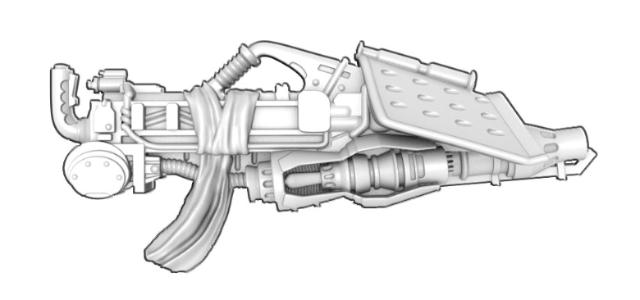
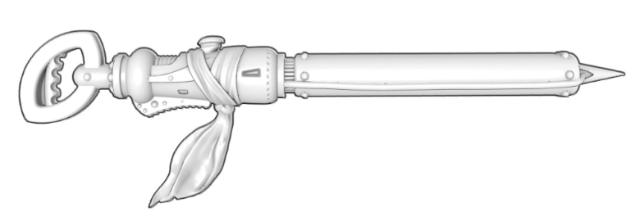
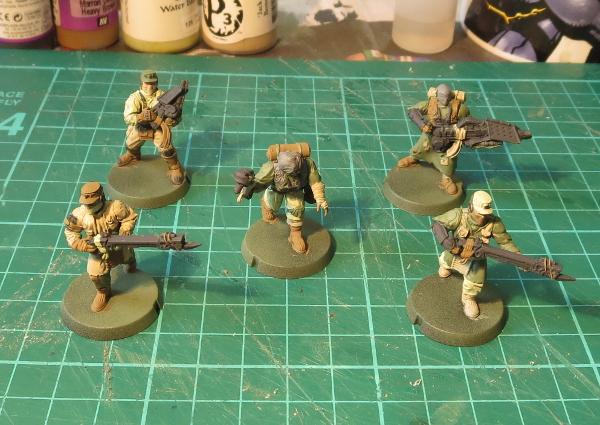
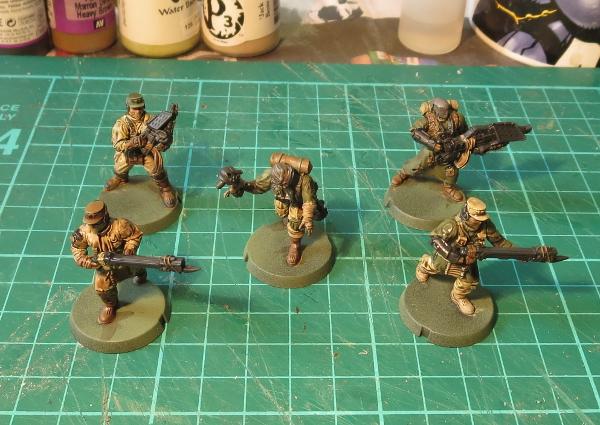
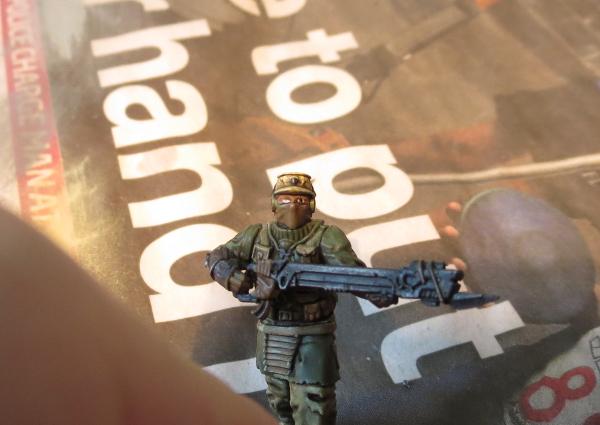
These weapons are resin, with slightly up-armoured Karist troopers carrying and operating them. One of the weapons can now be added to your basic Karist Trooper squads for +1 to +2 points, or you can build an entirely new Anvil unit with two heavy weapons - the Karist Trooper Heavy Squad.
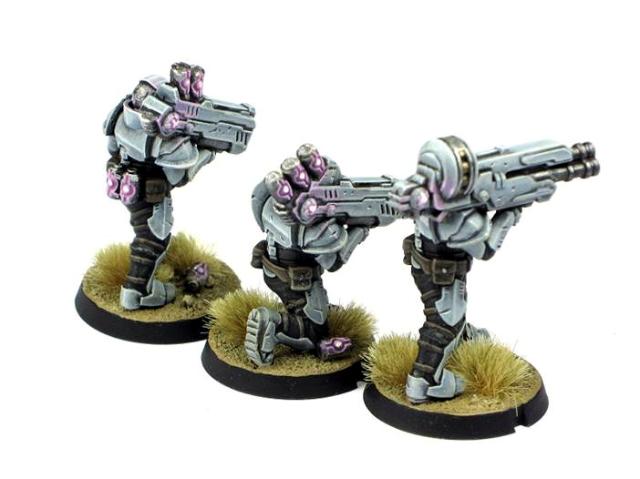
Weapon and unit rules are available on the Karist online unit cards section of the Maelstrom's Edge website.
The models are available for purchase right now at the Maelstrom's Edge store.
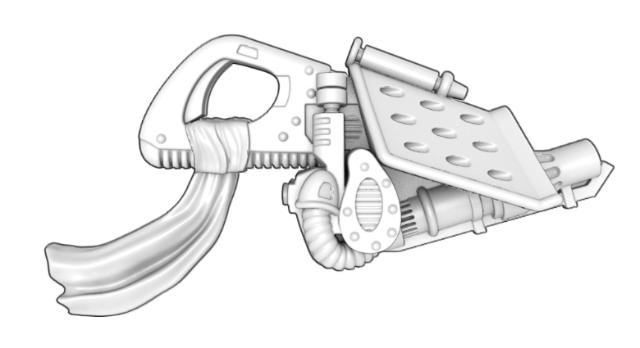
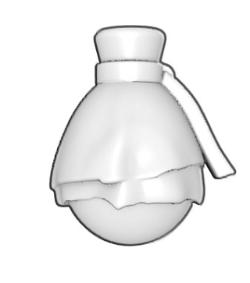
You'll also notice that the kit comes with a Karist trooper head which has the mask removed, revealing the human underneath.
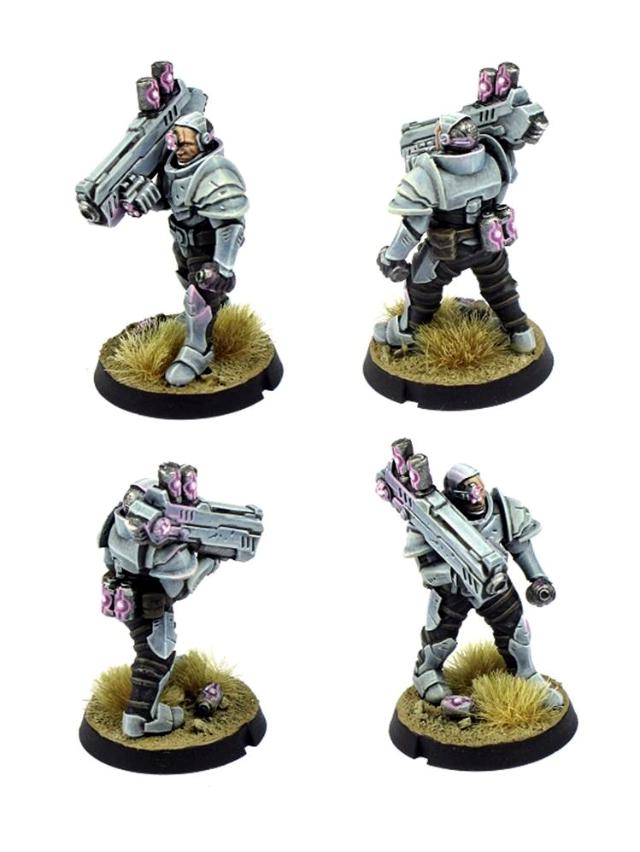
The above model is also demonstrating the alternate arm option, holding a cybel ammo cannister. Parts are broadly interchangeable with the rest of the Karist range, opening up further options and conversion possibilities!
Tags: heavyweapons karist models resin
Terrain Tutorial: Blanket Door Coverings
Posted on Monday Nov 27, 2017 at 05:00pm in Tutorials
- by Iain Wilson
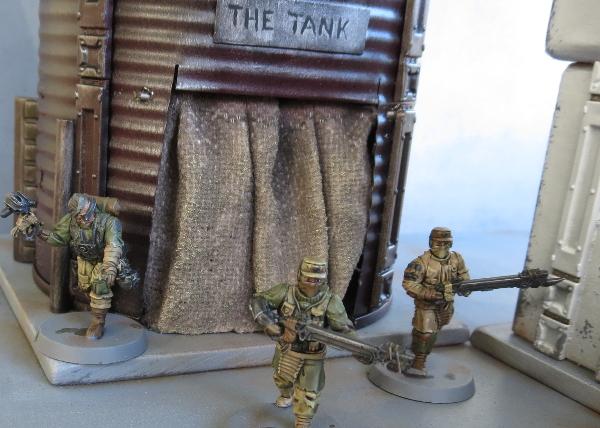
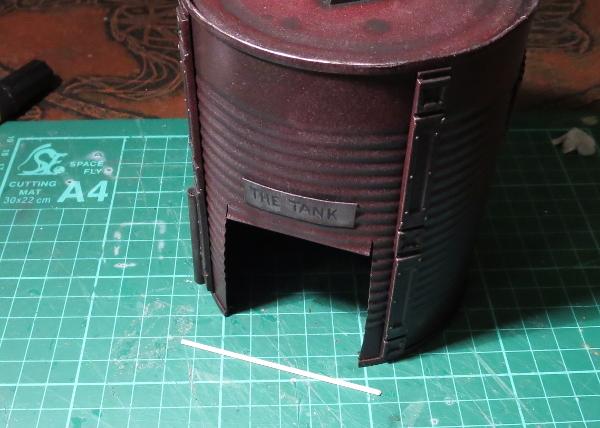
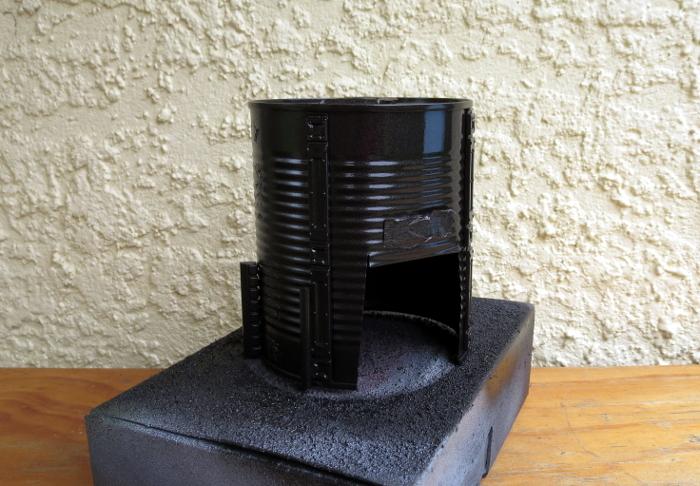
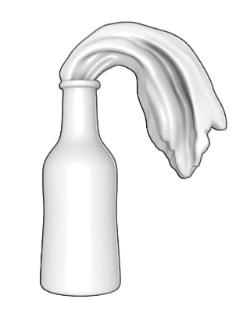
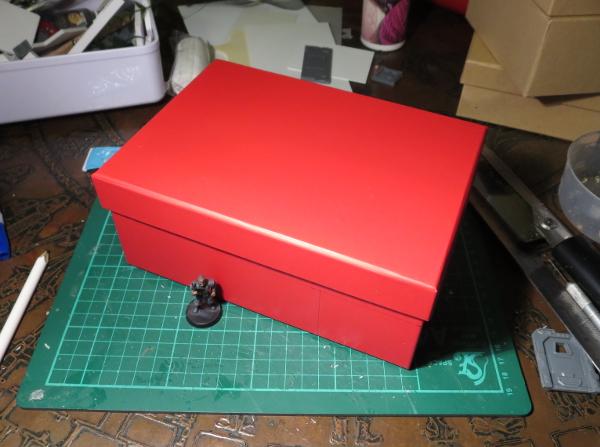
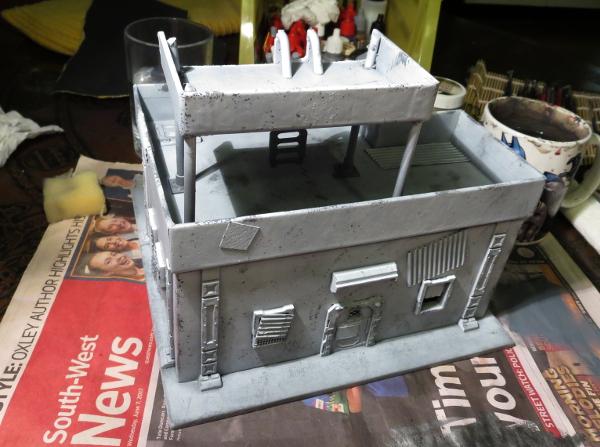
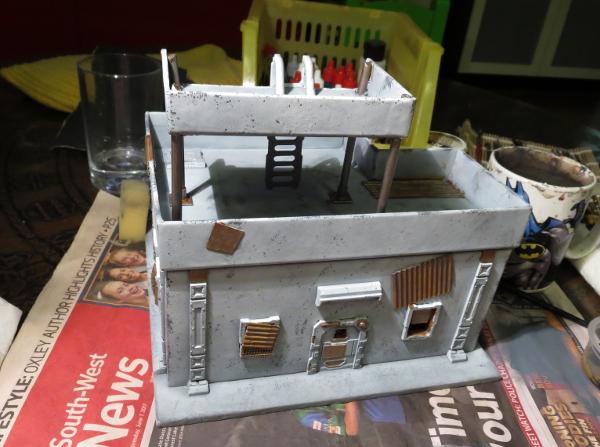
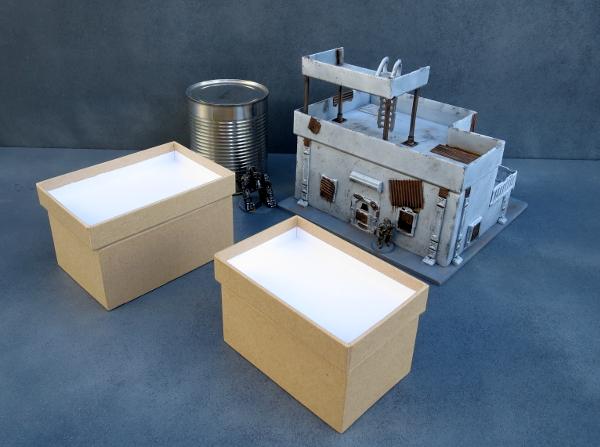
Last week I put together the second part of my Broken settlement, with some buildings made from a cardboard gift box and an old fruit tin. The fruit tin still needed a door covering, and I wanted something that looked sufficiently rough and ready. I decided to go with an old blanket to serve as a makeshift door, which wound up looking like this:
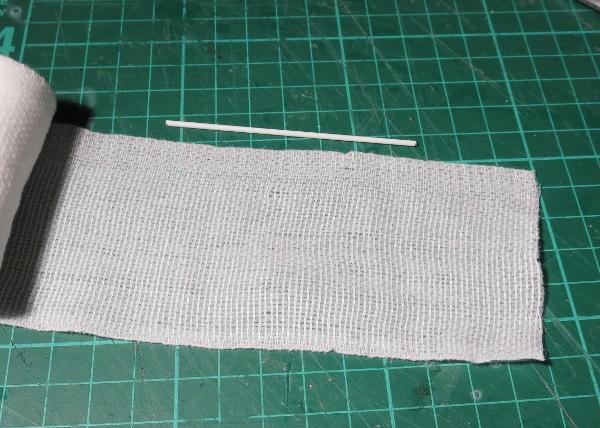
To start with, I took a length of plastic rod and cut it to run across the doorway with a little overhang on either side. This would eventually sit in place at the top of the doorframe, poked through a couple of holes drilled into the tin on either side.
I then grabbed some crepe bandage and cut a piece a little longer than the rod, to allow it to bunch up. Bunched curtains look more interested than a flat sheet, unless you want to paint a design on, in which case a flatter surface is going to be easier to deal with.
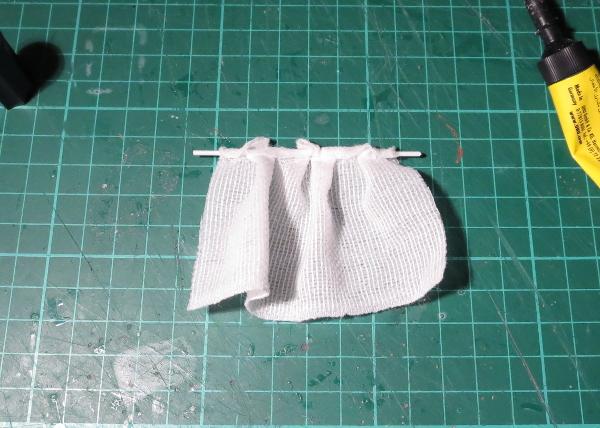
Next I glued the bandage over the rod with some superglue, bunching it up so that the ends of the rod were sticking out, and folded over the rod far enough so that the bottom of the blanket would just touch the ground when hung in place.
Now comes the messy part - I mixed up some PVA glue with a little water. The exact amount of water is going to depend on how runny your PVA glue is, but you're aiming for around the consistency of pouring cream.
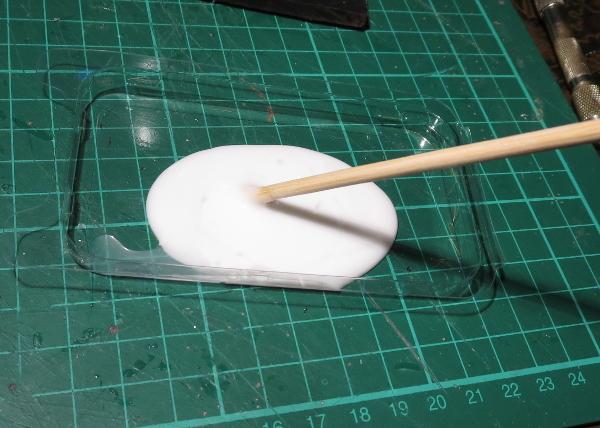
Then I dropped the bandage blanket in the glue and let it soak right in. When the glue dries, it will stiffen up the cloth, so you want it good and soaked through. If the glue is too thick, it doesn't soak in as well and you wind up with some parts of the blanket that are still soft and floppy, and others a goopy mess.
Once the bandage was nice and gluey, I hung it in place and arranged the folds to look as natural as possible, and then left it sit for two days to give it plenty of time to dry. Once dry, it will be stiff, but still slightly flexible. If it's too soft and doesn't hold its shape, you can stiffen it up a little more by painting on some additional glue, but try not to put it on too thick and fill up the weave of the fabric. If you have a brush-on superglue, you could also paint some of that onto the back of the blanket if it is accessible, but again, be sparing so you don't soak it into the weave and destroy the blanket look.
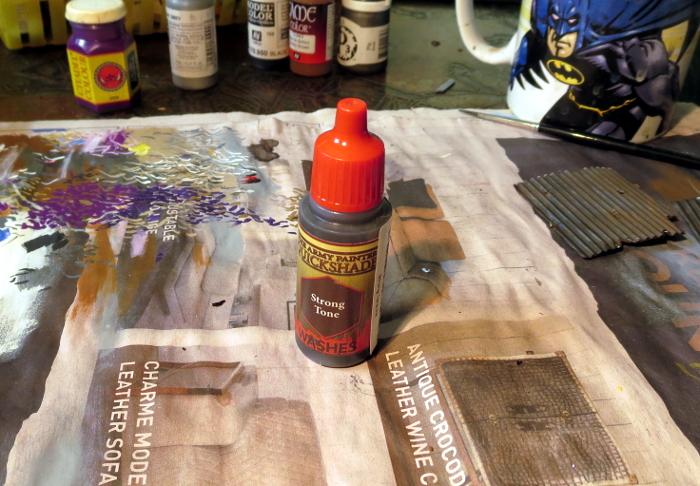
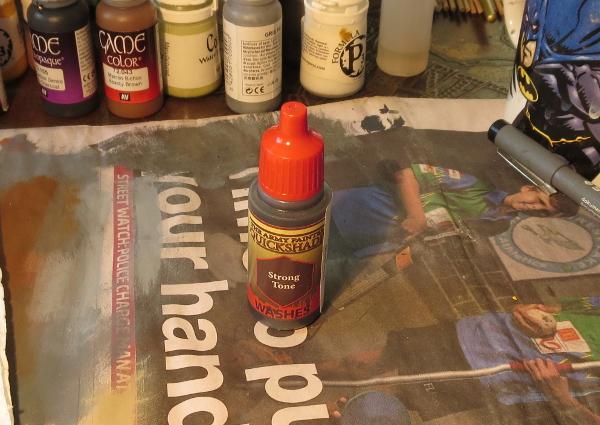
When the glue is properly dried, it's time to paint. I started out with a layer of Army Painter Strong Tone, but you could use whatever colour fits your terrain. If you use a wash or ink, make sure you give it plenty of time to dry, as the watery paint can cause the PVA glue to soften up again.
Once the wash was dry, I carefully drybrushed with some bone and white to highlight the raised parts of the blanket, and added a little more wash into the deeper creases for some extra shading.

And that's a job done!
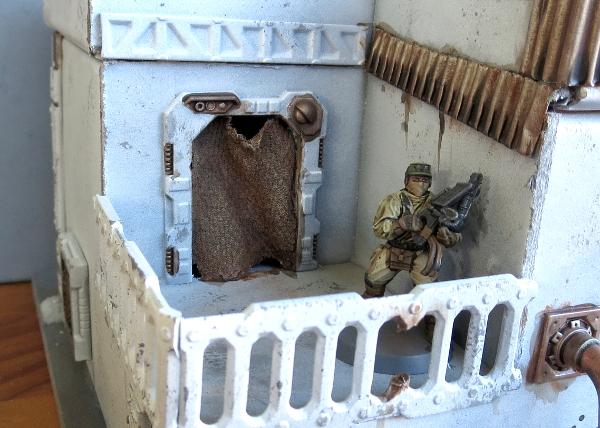
You can also use a similar technique to hang blanket coverings over windows. On this one, the blanket is tacked onto the outside of the window frame. To attach the soaked bandage to the window, I added a drop of superglue to the top corners, let that set, and then carefully teased the wet blanket into the shape I wanted it:
The same was done here to hang a blanket inside this door frame. This is a door piece off the Maelstrom's Edge terrain sprue with the door cut out of the frame. The blanket is superglued in place at the top corners and down the sides of the door frame and then shaped and left to dry.
On my next terrain project, I'll also be using this to add some canvas roof coverings to a building that's seen better days... Stay tuned!
To build your own stellar refugee settlement, you can pick up the Maelstrom's Edge terrain sprue along with the rest of the Maelstrom's Edge miniature range from the webstore here. As always, feel free to share your creations on the Comm Guild Facebook page!
For other Maelstrom's Edge modeling articles, including tutorials and walkthroughs of a wide range of different building and miniature projects, check out the article roundup here.
Building a Karist temple: how not to
Posted on Saturday Nov 25, 2017 at 05:33pm in Tutorials
Originally posted on Dakkadakka by Sgt.Oddball.
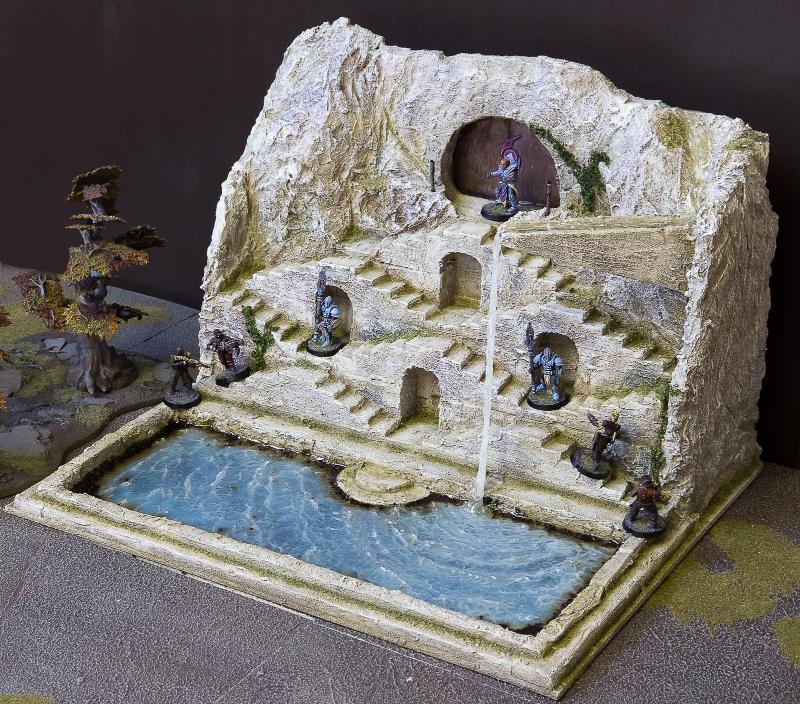
What follows is a brief overview of how I built this Karist temple, inspired by the stepwells seen most commonly in India. A couple mostly water-related things did not work out at first, so here’s how to avoid those things.
1. I took the lid from one of those boxes they put wine bottles in, measured things, and glued my foam stairs to the lid. The steps are sized to accommodate normal 25mm based dudes without them tipping over. At the back: I just used scraps of foam to hold everything up. I then used foam again to make the basin.
2. I then stacked bits of foam to create the rock around the stairs and the temple entrance.
3. With fingers, a hobby knife, a serrated knife and a hot soldering iron I shaped the foam to look like rock.

4. I then undercoated the whole thing with white textured wall paint. Next, I used a hobby paint mixture to make everything rocky a yellow-sandish colour. The inside of the basin was painted a bright blue. The rock was then washed in diluted brown paint and the water area highlighted with progressively lighter shades of blue-green (lighter towards edges). The rock was highlighted with probably the base colour again and then adding in a sandy colour and white. I also used various coloured washes (reds, greens, browns) to give the rock colour some variation. All highlighting is simple drybrushing/overbrushing. In the last picture, I’ve poured Woodland Scenics E-Z water in the basin and in the water source on top, which is a resin you melt before pouring. This is the first thing you should not do. This stuff was just not suitable for this purpose. It shrunk and cracked as it cured and had a yellowish tint.
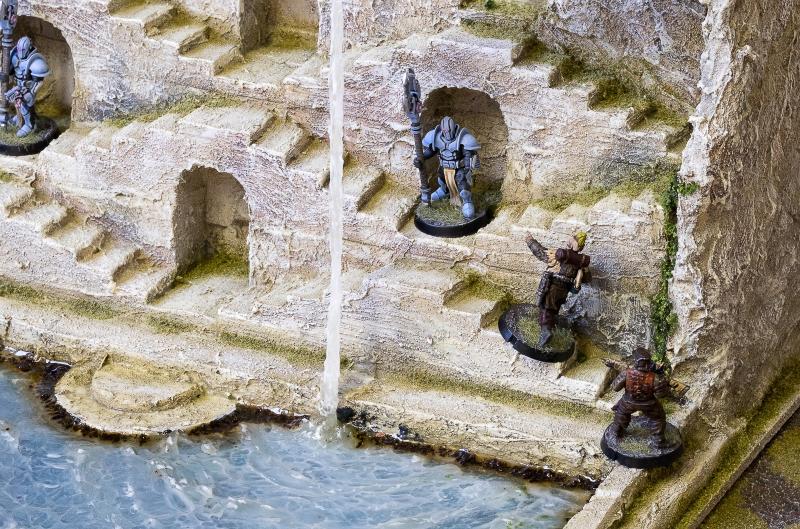
5. It’s not at all easy to remove E-Z water once it’s set, especially if you want to keep the surrounding terrain in one piece. Getting rid of it involved trying all sorts of methods, eventually a chisel was most effective. I then tried a more familiar (to me) product, which is Woodland Scenics Realistic water. This is awesome stuff and gave me a very nice pool. For the water drop and a little ripple effect I used Woodland Scenics Water effects, which is also nice.
Then I did the second thing you should not do. I figured I could add some white to the water by mixing white paint into the Water effects stuff and applying it where appropriate. However, Water effects itself is white until it cures, hence I couldn’t see how much the white paint coloured the Water effects. Of course, I didn’t bother to test my batch (all this water stuff takes forever to cure and I have no patience). Turns out I used too much white paint and all my water now looked ridiculous (basically like that picture of the uncured Water effects). The thing is, it’s impossible to get rid of. I think I tried painting over the whole thing? Not sure. Anyway, in the end I decided it was time to once again dig out the whole basin.
This time was worse, as the Realistic water isn’t as easily chiselled as the E-Z Water. It stays a little soft. After much perseverance I got everything out, but I destroyed some of the paint job and actual foam bits around the basin. I had to redo all that and also build new steps into the water (round steps this time). Now that I knew what not to do, again using Realistic water and Water effects got me the desired result (still room for improvement, but I’ll leave that for another project).
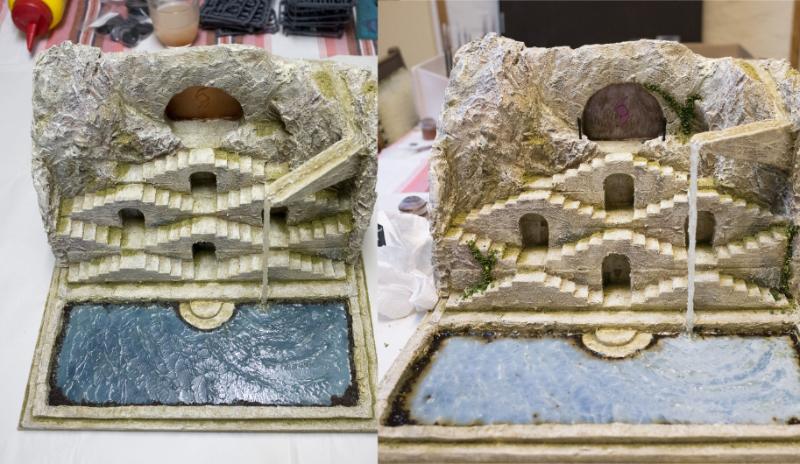
6. The final steps were making temple doors with the Karist logo out of plasticard, and detailing. The Maelstrom's Edge terrain sprue supplied a control panel. The doors were painted brown, then bronze, then drybrushed pewter and silver. The logo got various purple paints, washes and highlights. I used green weathering powder to colour the rock a bit in the crevices and then sprinkled on fine blended green turf for some moss, and the dried contents of some teabags around the edges of the basin to represent fallen leaves and such muck accumulating there. This muck, of, course, didn’t appear wet so I added a final coat of Realistic water (this is the white sheen you see in the last image). The colour from the tea bled a bit more than I’d like, so this is probably another thing I’d find a better procedure for next time. To finish up I glued some coarser, darker green turf to the rock to represent vines, washed that with a brown wash and then highlighted with an olive colour. I then broke a skewer in two and wrapped the ends in narrow masking tape to make two torches and planted these near the entrance, painted brown and metallic.
And that’s basically it! Apart from messing around with the water a lot (this cost me so much time, it ain’t funny), it’s a fairly simple project.
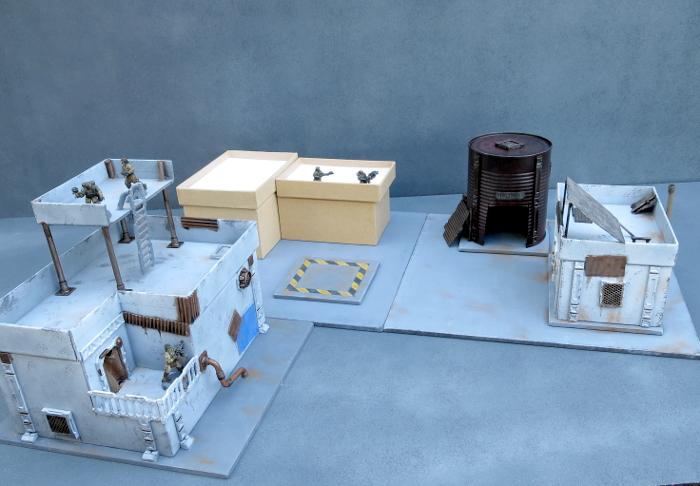
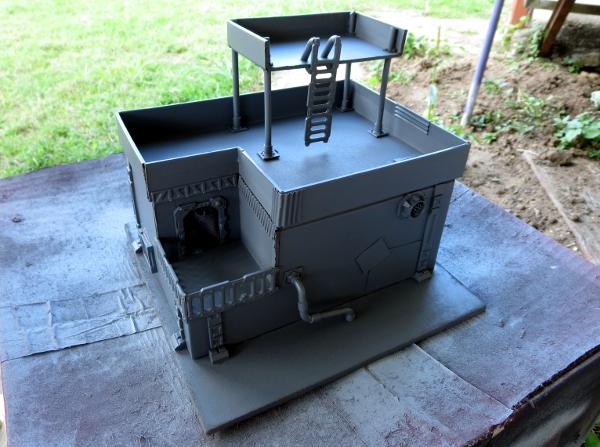
Terrain Spotlight: Broken Settlement, part 2
Posted on Monday Nov 20, 2017 at 05:00pm in Tutorials
- by Iain Wilson
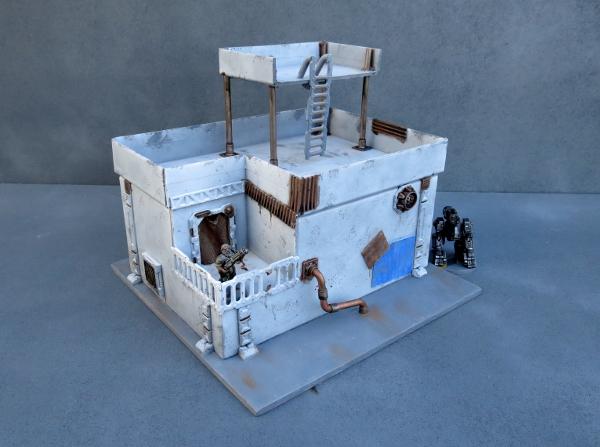
This week, I'm continuing on with the construction of the Broken settlement that I started a few weeks back, which you can find round about here, by adding in another 'renovated' building and a converted water tank shelter.
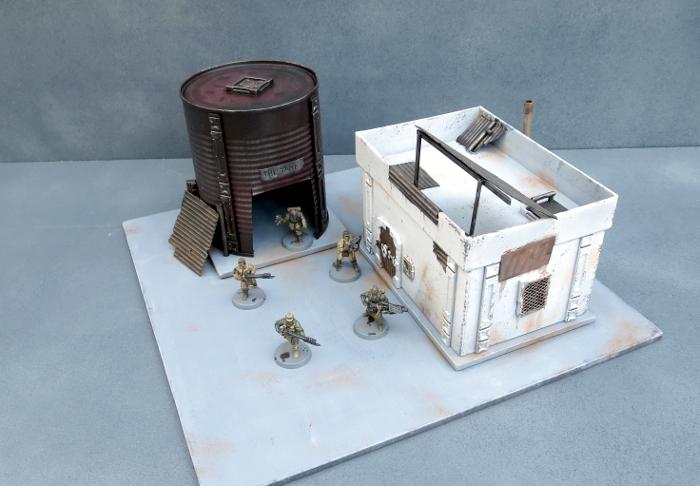
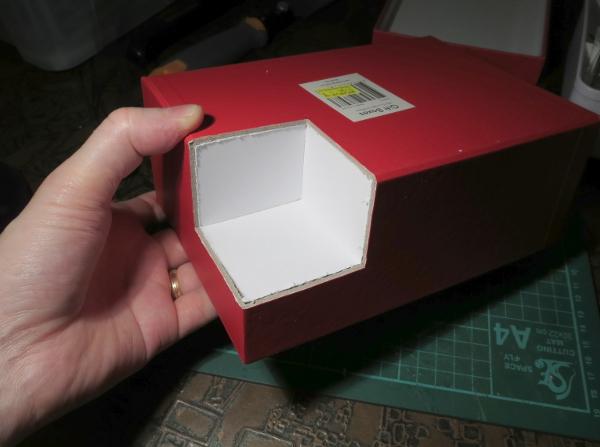
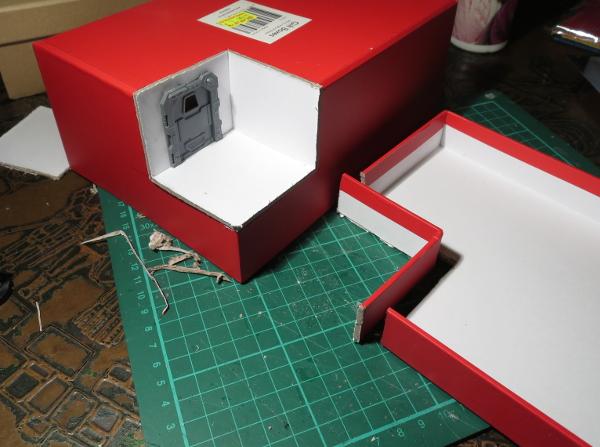
I fast-forwarded a little on construction by grabbing a small building that I made some time ago for a video showing how to make a building from a cardboard gift box and the Maelstrom's Edge terrain sprue (which you can find on Youtube here). This was partly painted as a test run for the sponge-weathering that I used on the first building for this settlement.
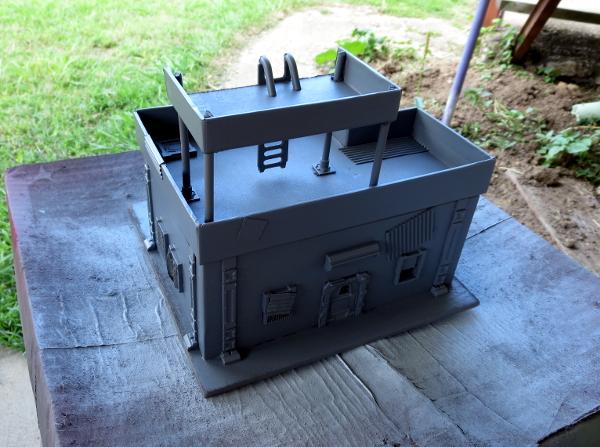
Clearly, this building was still far too pretty looking to fit into a Broken settlement, so I added a bunch of patch-plating using plasticard and corrugated cardboard, and added some mesh over the windows on the sides. I also built a framework on the roof to create a makeshift shelter or sentry point.

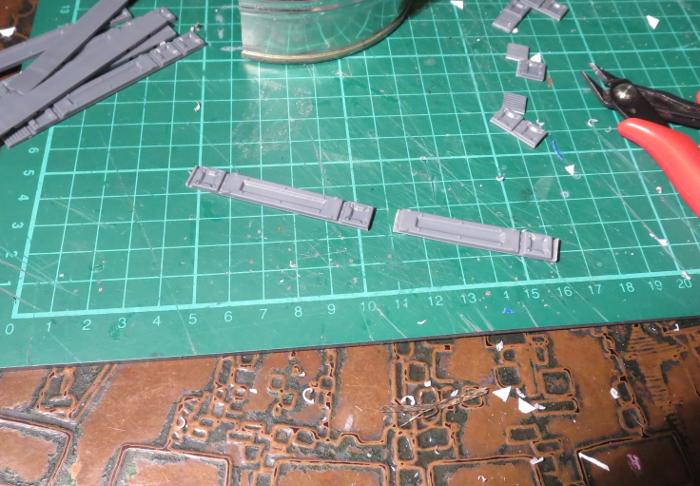
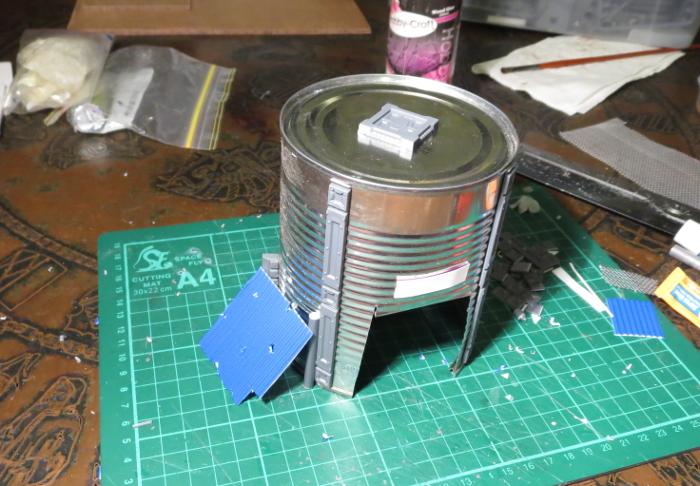
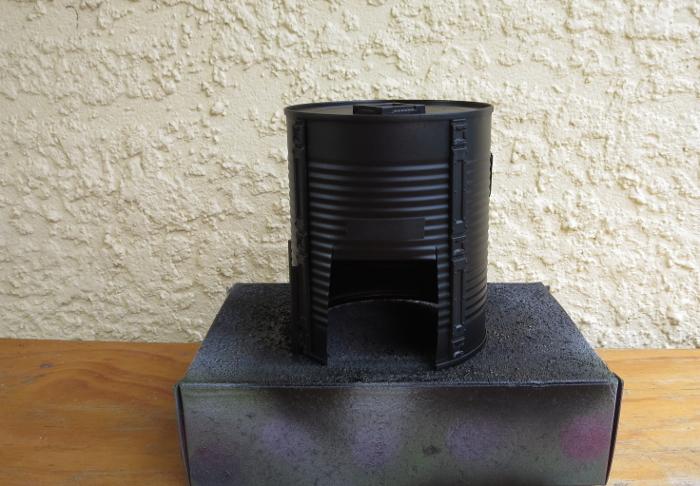
The companion building for the gift box one is made from an old fruit tin. This received a good wash and had the label removed, and then I cut a squarish hole in the side to serve as a doorway.
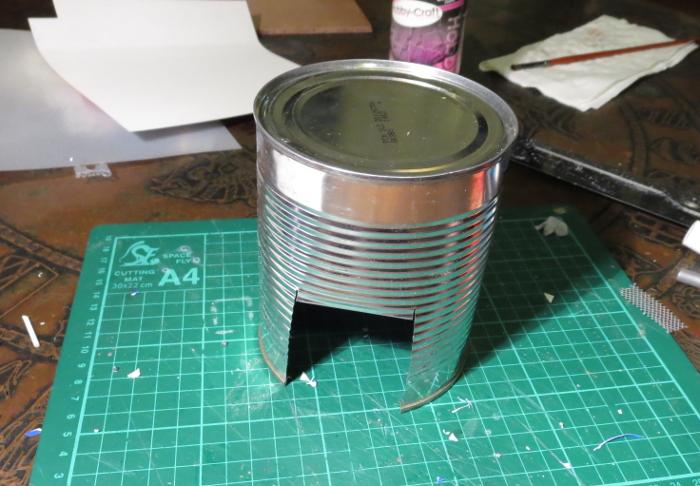
I cut a bunch of reinforcing struts from the terrain sprue to fit neatly down the sides of the tin.
With the addition of some patches, a hatch on the roof and a lean-to on the side, the old tank was ready for painting.
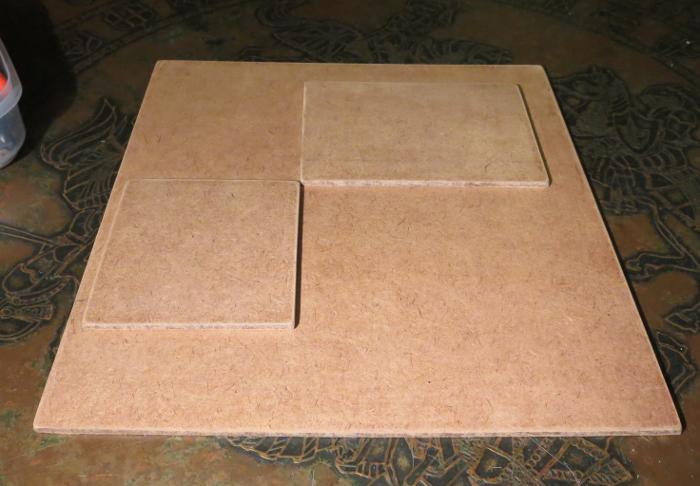
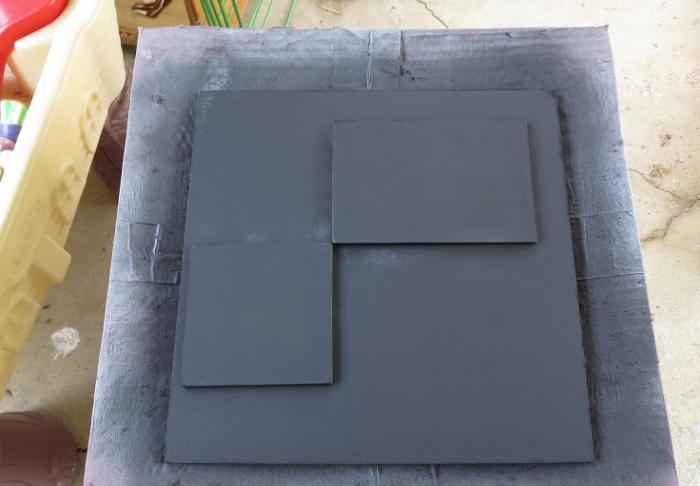
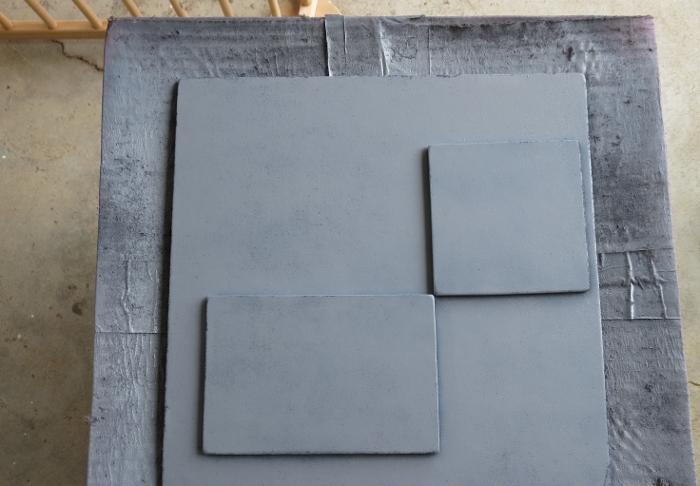
To sit the buildings on, I cut a 12" square of masonite, with a couple of smaller pieces glued on top - a rectangle for the gift box building and a square for the tank. These were cut to size and then sanded around the edges to smooth down the burrs. I then gave the top surface a light sand to break up the shine and give it some texture for drybrushing later, and then glued the building foundation pads on with PVA glue.
Everything in place, ready for painting:
Because the gift box building was already mostly painted, I could skip straight to the detail work. To check how the main bit was done, check out the first article linked back up at the start of this one.
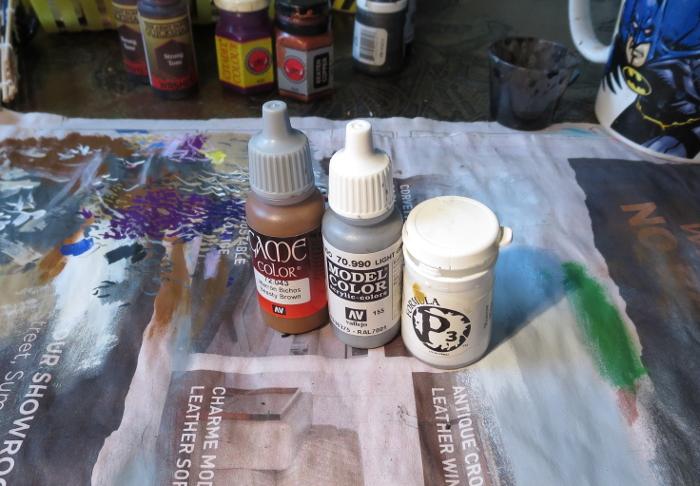
The various metal patches were given a coat of a rough mix of Vallejo Beasty Brown and black.
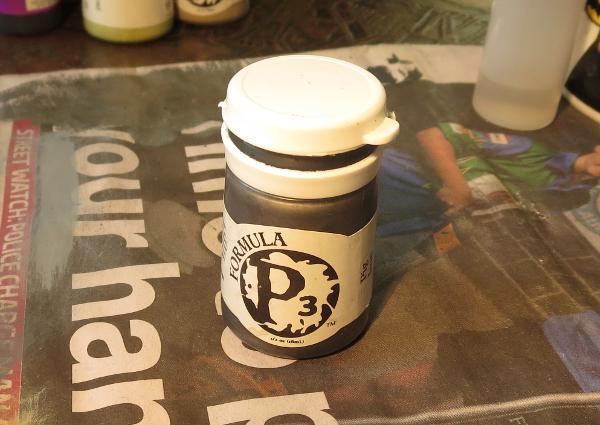
Over this went a light drybrush of P3 Pig Iron.
This was followed by a generous coat of Army Painter Strong Tone.
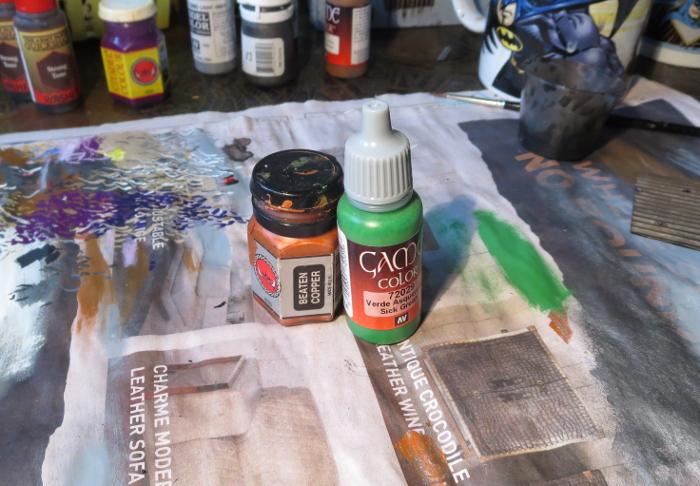
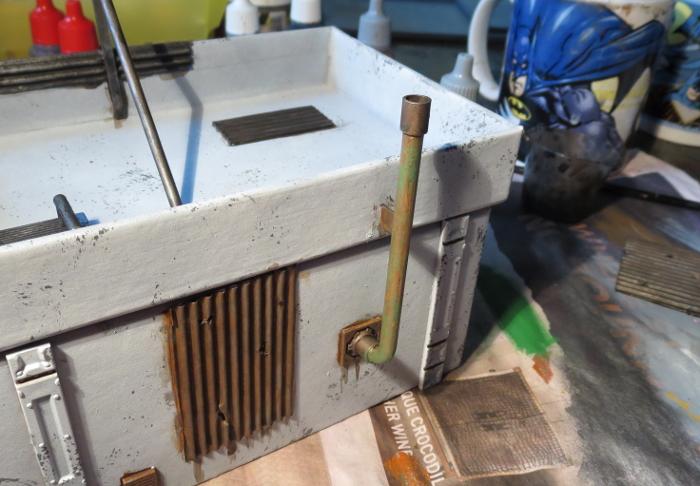
The pipe on the back wall was painted with a coat of Citadel Beaten Copper, and then given a light drybrush of Vallejo Sick Green.
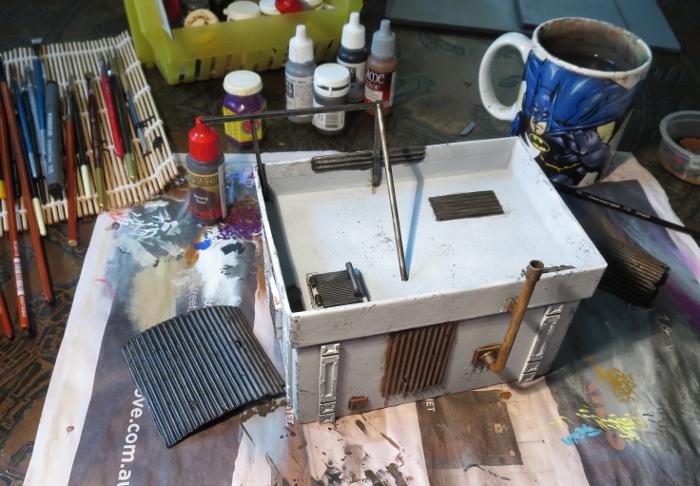
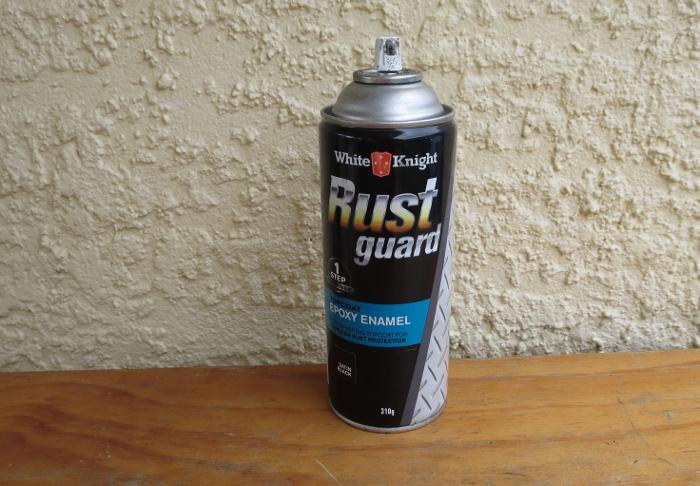
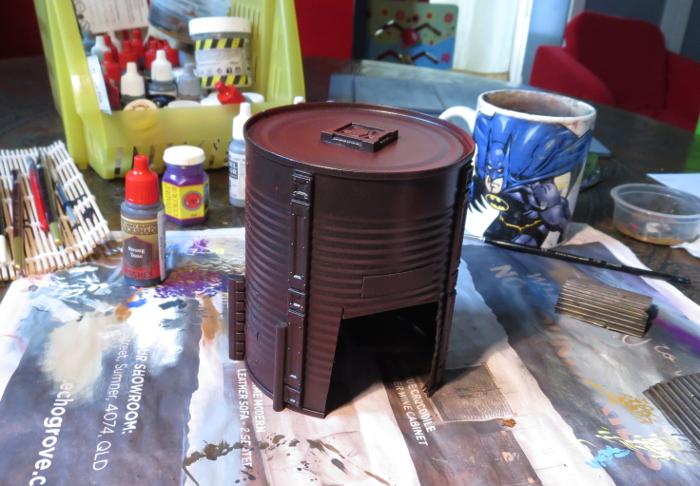
Meanwhile, the tank was given a spray inside and out with black Rustguard, to prevent it from rusting through the paint down the track.
I then masked off the detail parts of the tank building with some masking tape.
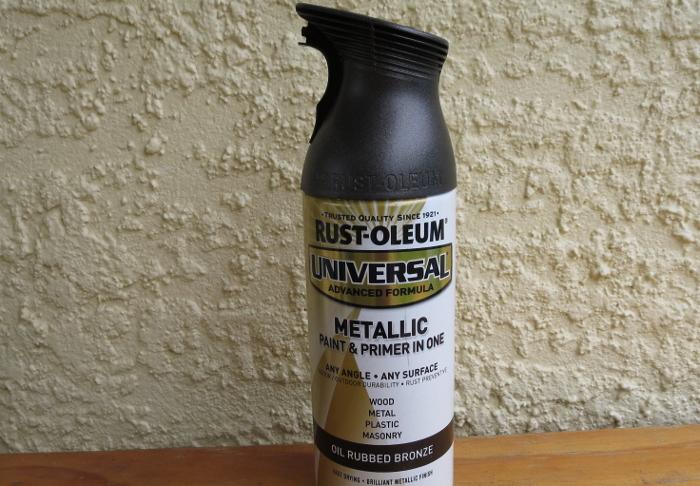
The came a coat of Rust-oleum Oil Washed Bronze. This is a rust-preventing primer like the black, so could have actually gone straight over the bare tin without the layer of black, but I wanted to make sure it was good and dark. The black base helps this without having to spray the bronze on too heavy, as it gets a bit goopy and rough.
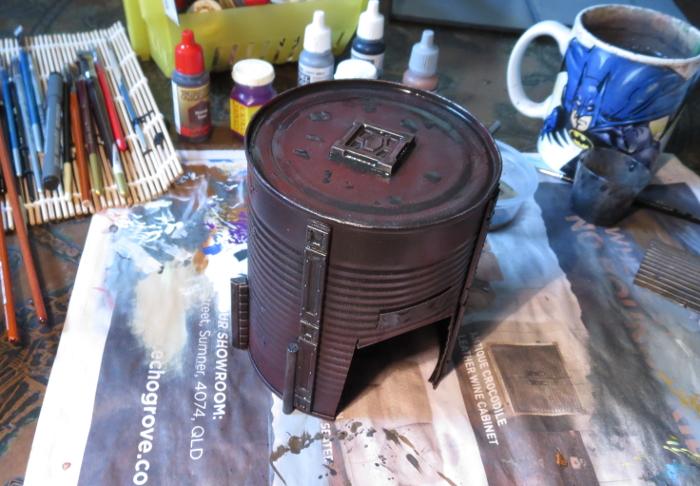
When the bronze was dry, I sprayed lightly over the top surface of the tank with some Army Painter Dragon Red, and then flipped the tank upside down and sprayed lightly around it so that the red caught in the undersides of the tin's corrugations without coating the whole thing in red.
I then drybrushed the whole thing lightly with Pig Iron, going a little heavier on the detail parts to make them stand out a little from the darker tank. The detail parts were then washed with some Strong Tone, and a few puddles of Strong Tone scattered around on the top surface.
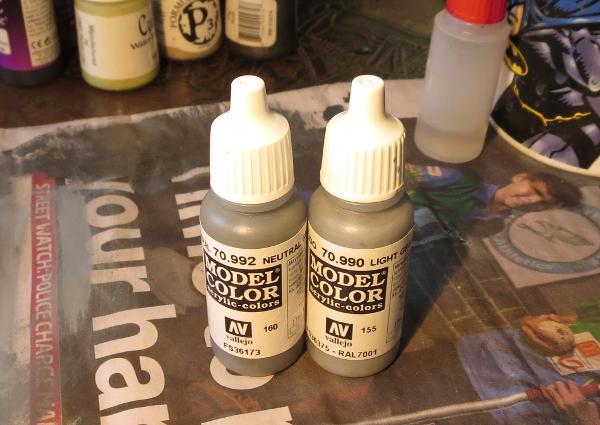
While all of this was going on, I undercoated the based board with some flat black, and then gave it a coat of a flat medium grey. I deliberately use a range of different greys to basecoat my 'concrete' terrain bases, to help reduce the uniformity of the vast expanse of concrete on the table. If you look around in a city that has a lot of concrete structures, the colours vary considerably depending on the age of the concrete and the specific mix used, so it creates a better sense of realism on the gaming table if you carry this across in your painting.
To finish off the base, it was given a drybrush of Vallejo Light Grey mixed roughly with white, and then some patches of worn grime were added with a light drybrush of Beasty Brown, on both the base and the gift box building.
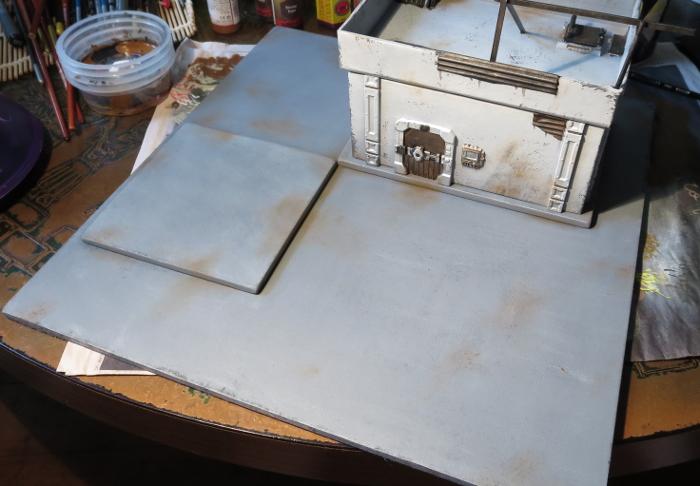
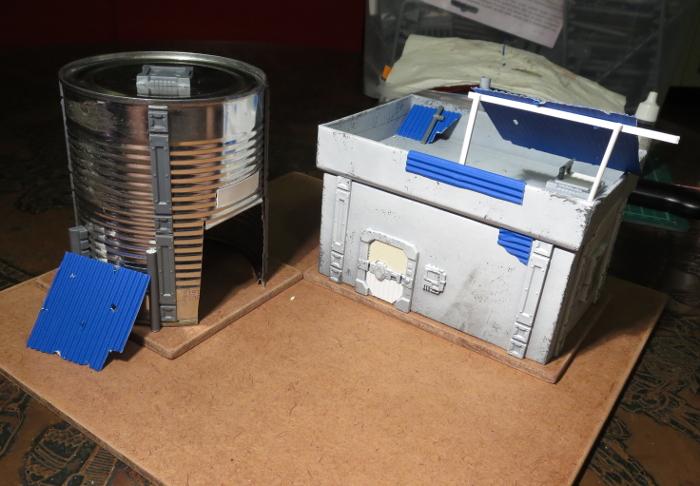
With the addition of a couple of final details (some lettering above the tank's doorway, the light above the door and the comm panel screen), this little building cluster is about done for now.
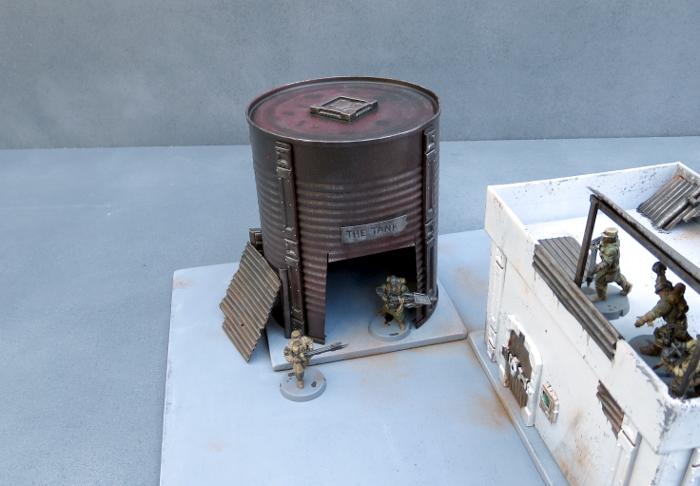
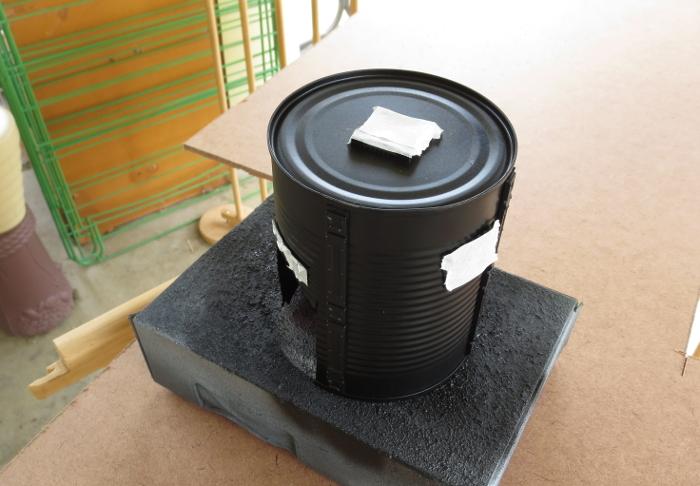
The tank still needs a blanket door covering, which I'll be going through in an upcoming tutorial, and I will go back over all of the buildings in the settlement to add some more characterful detailing once I have some more of the bulking out done, but it's at a point where it's not going to look out of place on the table as-is.

So what's next?
Aside from the door covering for the tank, I'll be moving on to another building section that will have some challenges in the roofing department and some sort of interesting detail in the courtyard.
Stay tuned for more!
To build your own stellar refugee settlement, you can pick up the Maelstrom's Edge terrain sprue from the webstore here. As always, feel free to share your creations on the Comm Guild Facebook page!
For other Maelstrom's Edge modeling articles, including tutorials and walkthroughs of a wide range of different building and miniature projects, check out the article roundup here.
Tags: broken buildings modeling models spotlight terrain terrainsprue walkthrough
Modeling Spotlight: The Angel Hellblaster (or 'Fun with Resin!')
Posted on Monday Nov 13, 2017 at 05:00pm in Tutorials
- by Iain Wilson
The Karist Hellblaster is the first of a range of resin models for Maelstrom's Edge, to help flesh out the factions with some more fun and freaky options. This week, I'm having a look at some modeling options with this great little kit.
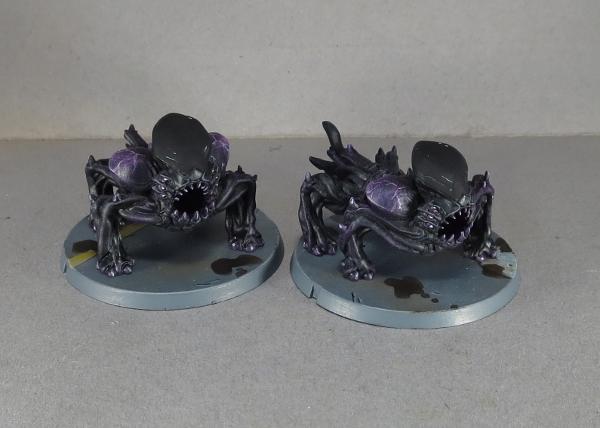
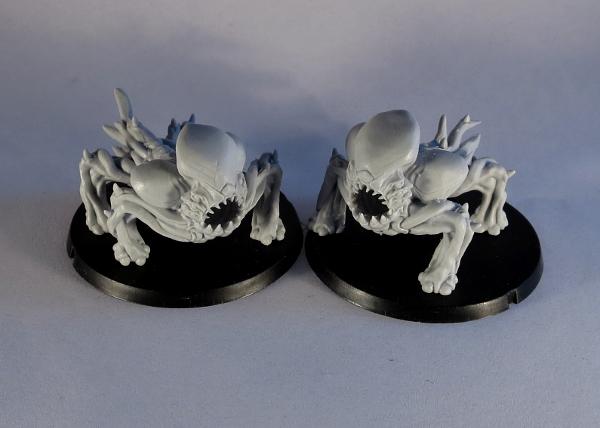
The Hellblaster comes in a pack of two variants, with slightly different posing and tail tentacles.
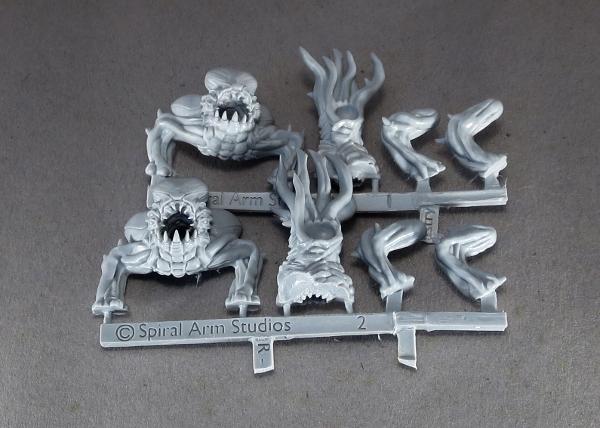
Assembly is really easy - It's always a good idea to wash resin models in warm, soapy water before assembly, to clean off any mould release residue (this may affect paint adhesion, otherwise), then cut off the sprue and trim off any mould lines, glue the head piece to the front of the torso, and the rear legs into their sockets. There's a little posability in the rear legs, as the sockets allow for some movement.
If you want to branch out a little from stock poses, one of the really fun aspects of resin models is that they can be easily reshaped. Drop the part you want to reshape into some hot water for a minute or so. When the part has had time to warm through, fish it out and quickly bend it into the shape you want. Then pop it into some cold water to set it in that shape.
Obligitary safety warning: It's always a good idea to avoid breathing in fumes from heated resin or plastic, so boil your miniatures somewhere with good ventilation. And use an appropriate tool (tweezers, long-nose pliers, etc) to fish the resin pieces out of the hot water and handle hot parts with care.
Using this method, you can add a bit of a bend to the Hellblaster's torso, to give it more of a sinuous, in-motion appearance.

You can also reposition legs and tentacles to suit. It helps that angels don't have a fixed skeletal structure - tentacles are fairly forgiving when it comes to finding appropriate poses!
Note that as an alternative to the hot water technique above, you can achieve a similar result using a hair dryer to heat smaller parts. As above, through, handle with care to avoid damage to both the parts and yourself.
With a little more work, you can carefuly cut through in between the cheek sacs and the tops of the forelimbs, to allow for more movement. In the below example, I have stretched the legs out to raise the head and shoulders up higher, and added a slight forwards arch to the angel's back.
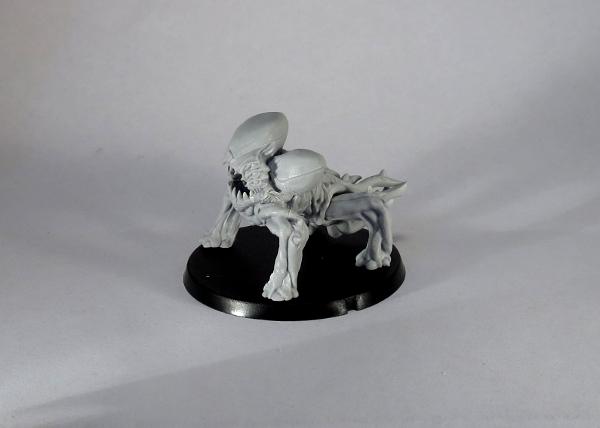
Painted up in an appropriate colour scheme, the Hellblaster fits in nicely with the Mature Angels and Minnows to add a bit more variation to an angel force.
But where to from here?
There's no reason to stop with basic reposing! Angels love nothing more than experimenting with different forms, and while the Hellblaster is a form forced on them by Karist Keepers, it also makes a good base for some different angel types, like the (very work-in-progress) examples below:
Snake-angel, converted using the front of a Hellblaster, the wings from a Minnow and a wire armature covered in 'green stuff' putty.
The snake body will be smoothed out with another layer of putty, and some exterior tentacles added for some detail.
Shrike-angel, converted using a Hellblaster body with the forelimbs and energy sacs cut off, and the wings from a Minnow.
The body of the Hellblaster is considerably bigger than a Minnow's, so this guy has a much smaller wing to body ratio, but I think it's still close enough to work, particularly given angels fly using gravitic manipulation and the wings are largely just for show anyway. As with the snake, this model still needs some putty work to join the wings properly to the torso and fill in the flat spots where the legs and sacs were removed. I may also trim down the crest a little, to something more closely resembling the head of the Minnow.
Or, for something completely different, how about angel cavalry?
(Ok, this one's stretching the background a little - chances are that anyone trying to ride an angel wouldn't be riding it for very long... But it was too fun an idea to not have a play with it!)
To build your own shape-changing army of alien doom, you can pick up the Hellblaster along with the rest of the Maelstrom's Edge range from the webstore here. As always, feel free to share your creations on the Comm Guild Facebook page!
For other Maelstrom's Edge modeling articles, including tutorials and walkthroughs of a wide range of different building and miniature projects, check out the article roundup here.
Tags: angel conversion converting hellblaster modeling spotlight tutorial walkthrough
'The Broken' Rules - Part 4: Broken Weaponry
Posted on Friday Nov 10, 2017 at 11:00am in Gaming
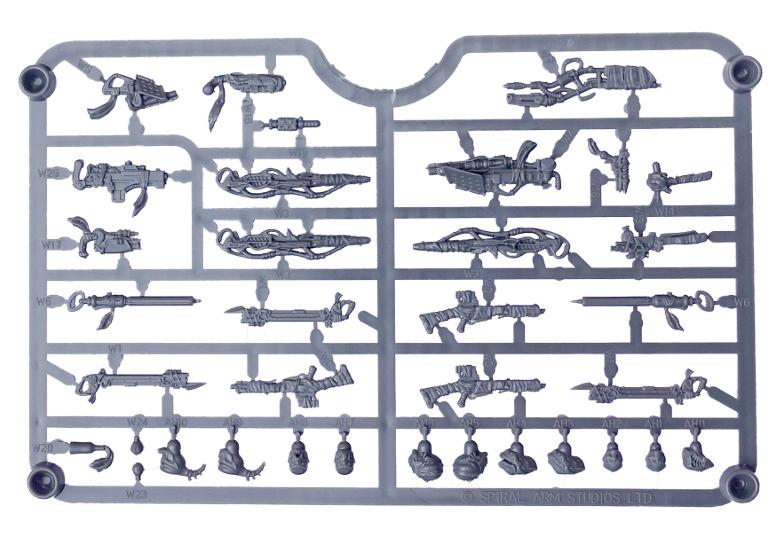
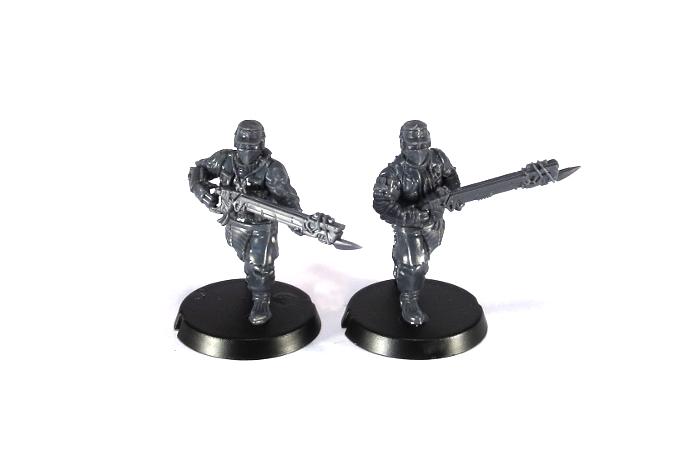
In a previous article, we talked a bit about the weaponry the Broken favor, namely that they like to customize and overcharge their weapons to make them deadlier, even when doing so means that they have a tendency to break down, overheat or even explode! Today we're going to take a closer look at the different classes of weapons that you'll find on the Broken Rabble sprue.
SLUG WEAPONS
The most commonly found type of ranged weapon throughout the spiral arm, slug weapons are cheap to produce and easy to maintain, making them the workhorse of the Broken armory. Broken tend to favor slug weapons with a high rate of fire, even though their ability to penetrate armor isn’t very good.
An Auto Slugger starts life as a 'liberated' Epirian Foundation Maglock Assault Rifle. However, as the Broken can't easily replicate the Foundation's caseless Maglock ammunition, their weaponsmiths instead convert its chassis to fire a smaller, jacketed round. This conversion creates a weapon that has a much higher rate of fire but unfortunately a lot more recoil.
BEAM WEAPONS
The Broken have a long history of weaponizing lasers, converting them from a wide-range of industrial applications. Invariably, Broken weaponsmiths set the damage output for these weapons at their absolute maximum, firing short, but incredibly powerful beams capable of melting through even the toughest enemy armor. However, this also makes the weapon highly unstable: prone to overheating, shorting out and on occasion, bursting into flames.

Beam Blastguns are sturdy and incorporate a blade at the tip of their barrel, making them double as perfect melee weapons for close-quarters fighting.
TORCH WEAPONS
Combustible liquids are quite easy to find and manufacture, providing the Broken with weaponry even when supplies of more traditional ammunition are running low. Torch weapons are also the perfect fit for short-ranged firefights, precisely how the Broken prefer to face their foes.
CHEM WEAPONS
Many cultures in the spiral arm refuse to utilize chemical weapons, deeming them morally repugnant or abiding by longstanding, often totally outdated, treaties that ban their use outright. The Broken have no such qualms, and the relative ease with which the components to concoct chemical weapons can be found amongst the black markets makes them a popular choice. Chem Launchers hurl a small pellet, smashing open upon impact and spraying the area with a lethal combination of liquid acid and a potent airborne poison. However, as most Broken aren't equipped with any kind breathing protection, these poisons are designed to disperse incredibly quickly, affecting only a small targeted area.


EXOTIC WEAPONS
Broken weaponsmiths are renowned for making weapons out of junk that other factions would never dream of using. One example is the EMP Harpoon, which utilises gas-powered harpoons, each with a ‘liberated’ Epirian Foundation EMP charge housed inside, perfect for penetrating fields and pulling the enemy out from cover.
Plastex is an incredibly sticky industrial adhesive used in construction by the Foundation. The Broken use this substance to make their glue weapons, which can completely incapacitate their targets in a messy goo. Unfortunately, Plastex is not designed to be deployed so rapidly, meaning glue weapons often jam or misfire, splattering their operator or those Broken unfortunate to be around them.

BROKEN GRENADES
The Broken favor simple weapons that are easy to procure, and their choice of grenades is no different. Cluster grenades are the most common anti-personnel grenade in the spiral arm and any military shipment or installation the Broken manage to raid invariably provides them with crates of cluster grenades.
Molotov bombs are handmade explosives created simply by filling a common container full of combustible liquid.
Overcharged powercells are standard-issue batteries used throughout the spiral arm for portable power, but which are set to dangerous levels, causing them to detonate with frightening power.
Quick-painting the Broken
Posted on Monday Nov 06, 2017 at 05:00pm in Tutorials
- by Iain Wilson
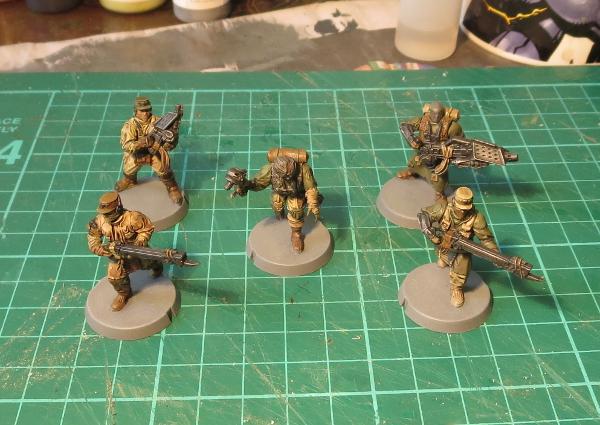
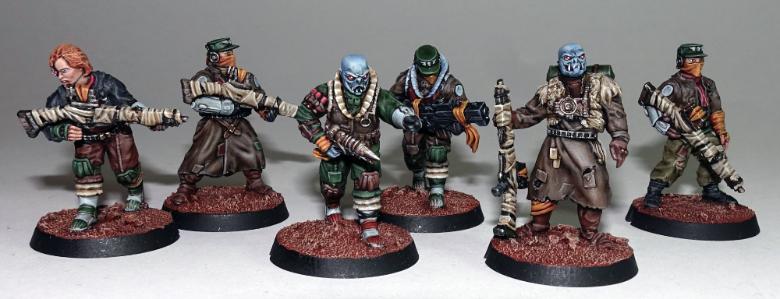
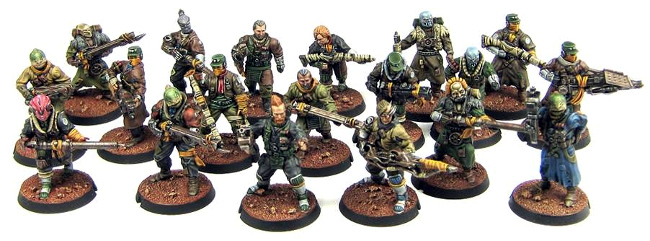
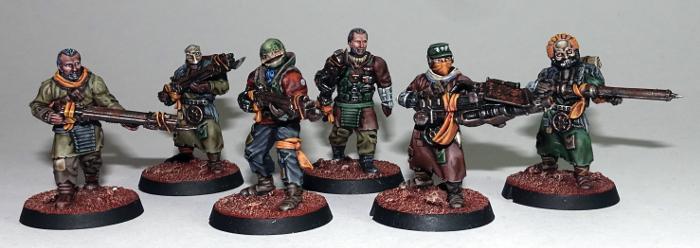
The arrival of the Broken into Maelstrom's Edge adds a new element to the game: Vast, raggedy hordes of cheap troops swarming all over the battlefield shooting stuff and stealing all the good boots. Which, of course, means lots of shiny new models to paint! You might be happy taking your time with this, but for those a little more time-poor, or who just want to get their new models on the table as quickly as possible, here's a guide to quick-painting your Broken recruits.
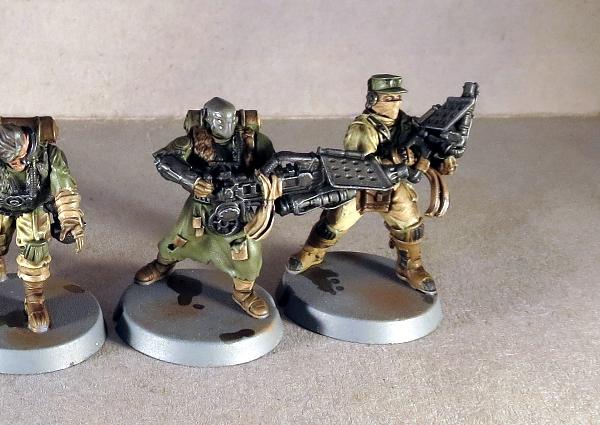
I'm painting up an Assault squad that I have assembled and ready to go, but obviously this could just as easily work for any of the Broken units.
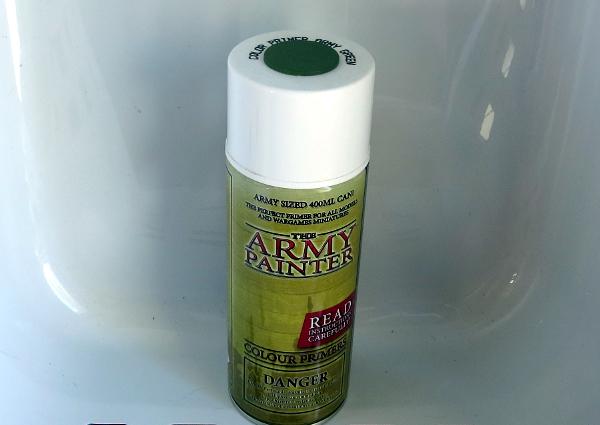
I started out with a basecoat of Army Painter Army Green primer.
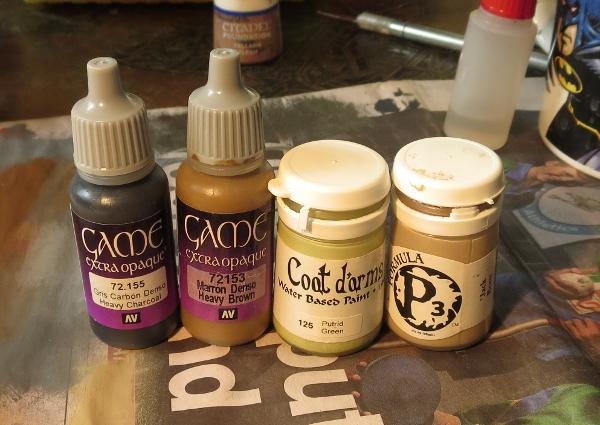
To get a suitably rag-tag look, I used a range of brown and grey tones, but the specific colours you choose aren't particularly important. The idea is to create a random distribution of different coloured clothing, while keeping to a limited colour palette to maintain some cohesiveness throughout the force. Weapons were painted with Vallejo Heavy Charcoal, and skin with Citadel Tallarn Flesh.
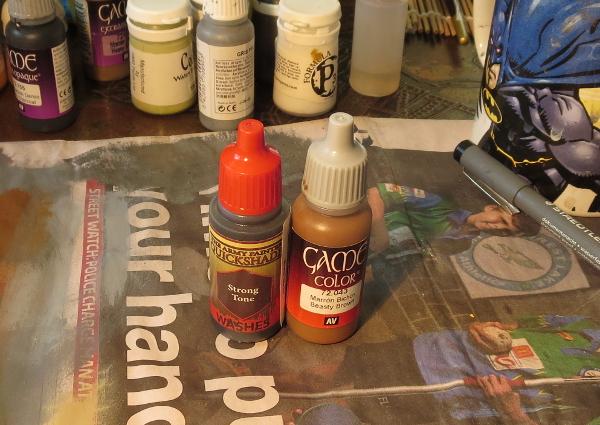
Everybody then got a wash coat of Army Painter Strong Tone. This settles nicely into the creases to add shading, and 'dirties' everything up a little.
Once the wash was set, I gave the weapons and other metal parts a light drybrush with P3 Pig Iron.

At this point, you could also give the clothing a light drybrush or a little edge highlighting with the original colours - This will lighten them up slightly if the wash was too heavy and has left them too muddy and homogenous, but otherwise isn't really necessary.
Bases were done to match my urban board set-up. This was done with a coat of Vallejo Neutral Grey, drybrushed with Light Grey.
To finish up the bases, I added some patches of drybrushed Vallejo Beasty Brown and some puddles of Strong Tone.
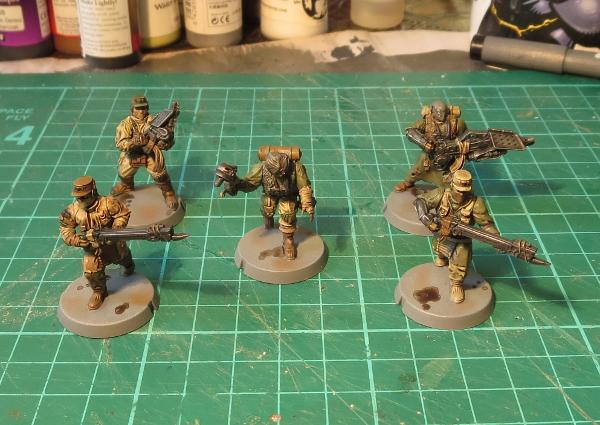
At this point, you could easily plonk these on the table and have at it, but I always like to add eyes wherever possible to finish off my models. This is done with a fine detail brush and some white paint for the whites of the eyes, with a dot of black added either with the same fine brush or with a fineliner pen.
The black should cover most of the white, and touch both the top and bottom of the eye to avoid a wide-eyed, crazy look. Unless, obviously, you want a wide-eyed, crazy look.
And with that, the squad is ready for action!
To paint up your own vast, screaming horde of rabble, you can pick up the Maelstrom's Edge Broken Infantry pack from the webstore here. As always, feel free to share your creations on the Comm Guild Facebook page!
For other Maelstrom's Edge modeling articles, including tutorials and walkthroughs of a wide range of different building and miniature projects, check out the article roundup here.
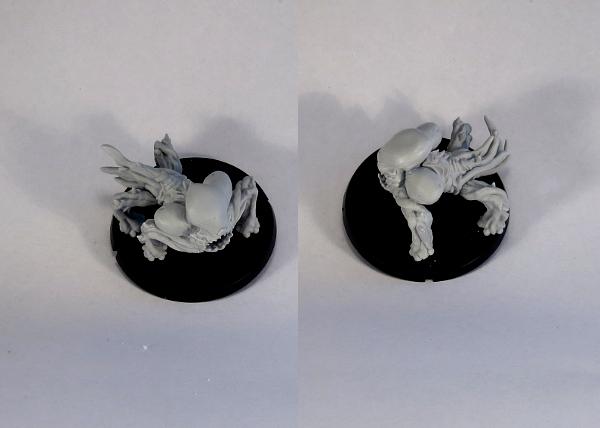
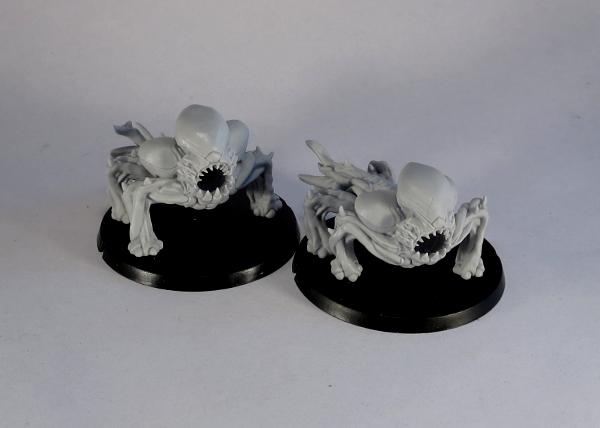
The Karist Angel Hellblaster - Available Now!
Posted on Tuesday Oct 31, 2017 at 03:00pm in Models
We at Spiral Arm Studios are proud to announce the immediate release of the Karist Angel Hellblaster unit. A valuable addition to any Karist force and our first ever resin model! It seems fitting to release a monstrous creature on Halloween!
The Angel Hellblaster is a juvenile form of an Angel. Larger than a minnow but smaller than a mature Angel, juvenile angels can take many forms, but Karist Keepers try to goad certain Minnows into a Hellblaster form for the many tactical advantages the Hellblaster type offers.
First and foremost, the Cybel Blast ability sets these guys apart from the rest of the Karist forces. Using a powerful template blast, they can really hold their own.
Cybel Blast: Range 24", SHO 2+SB, PEN 4, DAM 1, Special: AoE (SB), Explosive (6+).
The full Angel Hellblaster profile and force builder elements can be found on the Force Lists section of the Maelstrom's Edge website.
Two distinct models are available in a single pack:
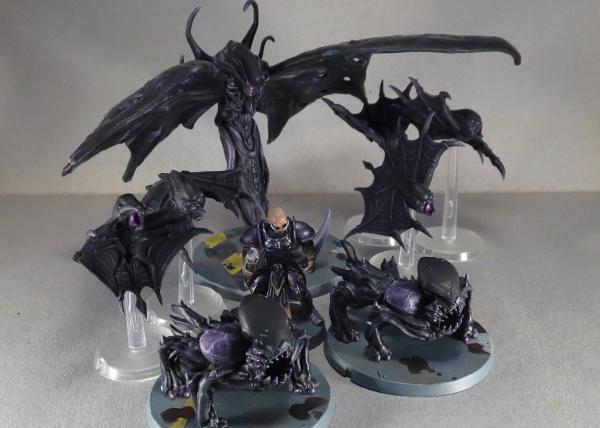
The Hellblaster sits on a 44mm base, the same as the Epirian Spider Drones and Hunter Warmechs. Here's what the Angel range looks like now:
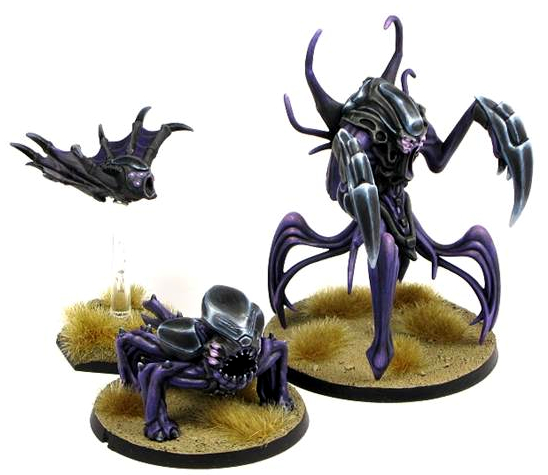
If you have wanted to build an all-Angel army, we are just one model away from it being completely viable, and the Angel Hellblaster will be the Hammer of your force.
The Angel Hellblaster is available now in the Maelstrom's Edge webstore.
Tags: angel hellblaster karist model resin
Terrain Spotlight: Broken Settlement, part 1
Posted on Monday Oct 30, 2017 at 05:00pm in Tutorials
- by Iain Wilson
With the release of the Broken adding a long-awaited third faction to the Maelstrom's Edge universe, it seemed fitting to take a break from tinkering with the shiny new models to add some appropriate terrain to the table. So this week, I broke out some gift boxes that I had waiting for an opportune moment, grabbed some terrain sprues and got to work!
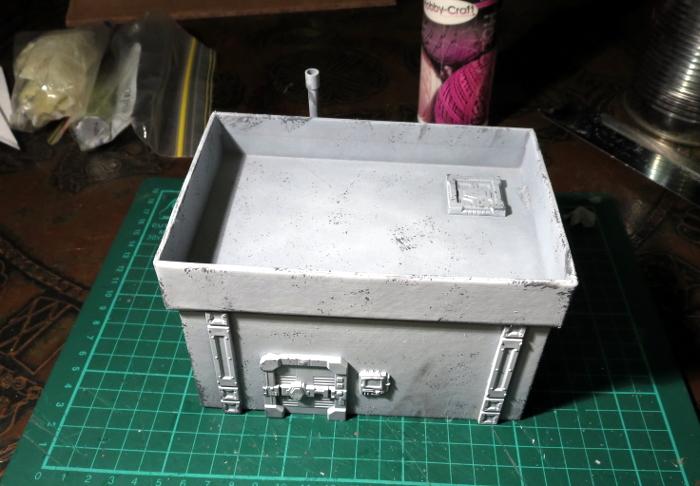
The core of the first building for my new Broken settlement is a 20cm x 15cm cardboard gift box. The plan was to more or less follow the style of my earlier gift box buildings, but with the addition of some faction-appropriate wear and tear and rough repair work.
I started by cutting out holes in the box for windows and doors, using a sharp hobby knife.
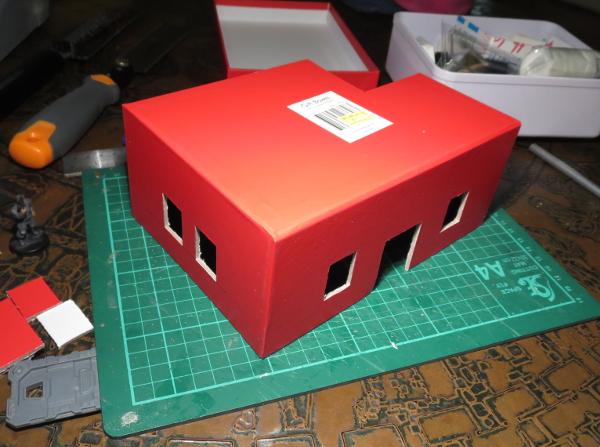
To break up the box shape a little, I cut away one corner of the box, 6cm along each side. Flipped over, this corner piece fits back in place as a recessed balcony.
I cut a hole in one wall of the balcony to add a door, and cut a matching corner off the box lid, which would form the walled roof of the building.
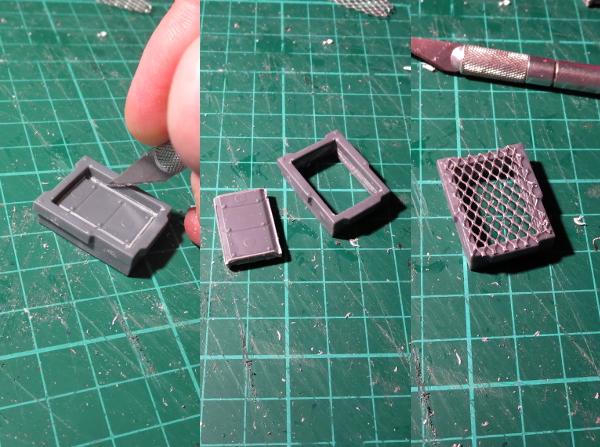
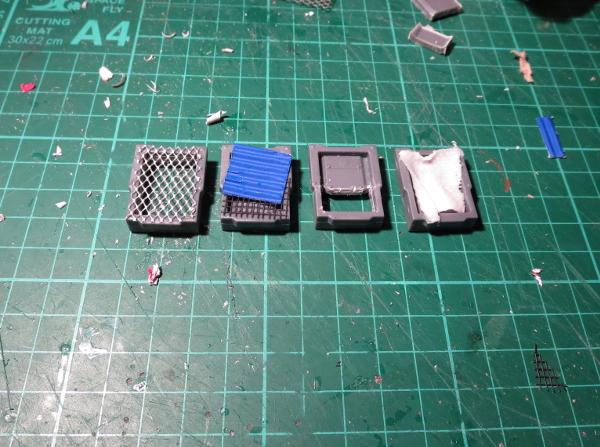
From there, it was time to glue the box onto a square of masonite, and start detailing. To make the building look like it had been through some rough times, I modified the rectangular shutter windows from the terrain sprue. For the first one, I carefully cut out the shutter using a hobby knife, and then glued some aluminium mesh over the front of the window frame.
Rather than making all of the windows the same, I made different modifications to the other windows. On one, I glued some plastic flyscreen and a square of corrugated cardboard over the front of the frame, another had the shutter replaced with a piece of crepe bandage soaked in watered-down PVA glue, and on the last one I cut away just the lowest section of the shutter.
The terrain sprue parts were glued in place with superglue, and then I added some patches cut from thin plasticard and corrugated cardboard to the walls of the building.
The door on the balcony received a blanket in place of the original door with another piece of glue-soaked bandage, and a couple of ladders were used to create a railing. A pipe made from pieces of sprue joined with some plastic tubing and a vent made from a large pipe fitting with some aluminium mesh glued inside finished off the detailing on the back.
The building was still looking a little boxy, so I decided to break up the silhouette a bit more with the addition of a watchtower on the roof. This was constructed from a piece of gift box lid left over from a previous project, and some pieces cut from the ends of the terrain sprue. The ladder was glued in place with another couple of sprue pieces forming the hand grips at the top.
With construction complete, it was time to break out the paint. I started with a base coat of flat grey.
Over that went a thin layer of flat white. I didn't want this to be perfectly smooth and pristine, shining white, so kept the coat thin enough for the grey to show through a little. Once the spray was dry, some weathering was added with a sponge and some Vallejo Neutral Grey.
The metal patches and any other parts that I wanted bare metal were painted with a coat of Vallejo Beasty Brown, and then given a rough coat of P3 Pig Iron.
The base was painted with a coat of Vallejo Neutral Grey, and then a drybrush of Vallejo Light Grey, with some patches of Beasty Brown added to dirty things up a little. A splash of Army Painter Strong Tone over the metal bits and blankets, and a rough coat of Citadel Ultramarines Blue over a couple of the metal patches, and the building was pretty much table-ready.
There is still a little detail work to go, but some of that will wait until I get some more of the settlement completed so that I can match details across the different buildings to tie everything together.
So what's next?
I will be adding a couple of smaller gift box buildings with some varying levels of damage and delapidation, and I have some plans for a large peach tin that was rather conveniently opened the other day. The outsides of the buildings will gain some awnings and banners and the like, and I'll scatter some scrap around to add some flavour (and also some handy cover).
Stay tuned for more!
To build your own stellar refuge settlement, you can pick up the Maelstrom's Edge terrain sprue from the webstore here. As always, feel free to share your creations on the Comm Guild Facebook page!
For other Maelstrom's Edge modeling articles, including tutorials and walkthroughs of a wide range of different building and miniature projects, check out the article roundup here.
Tags: broken buildings modeling models spotlight terrain terrainsprue walkthrough
'The Broken' Rules - Part 3: Sub-factions of The Broken
Posted on Thursday Oct 26, 2017 at 11:10am in Gaming
Every group of survivors that manage to band together to escape the Maelstrom eventually forms a distinct Broken community with its own goals and moral codes. However, there are some broad classifications of the different Broken societies that they tend to fall within:
- The Forsaken - The most common type of Broken, these are the general bunch of rag-tag survivors who turn to piracy throughout the Maelstrom's Edge simply as a means to survive. The Forsaken have a strong moral code, and see themselves as better than the rest of the spiral arm that has cast them out, therefore they attack only out of necessity. Of the different Broken sub-factions, the Forsaken tend to have a slightly higher level of technology, as their societies provide a good refuge for outcast Weaponsmiths looking to ply their trade.
- Jackals - Bands of despots and marauders, who look only to further their own interests in a galaxy gone mad. Believing that might is always right, Jackals will attack anyone and take everything they can manage to steal. Jackals live for the glory of combat, and usually go to war hopped up on a potent cocktail of combat drugs that makes them all but impervious to minor flesh wounds. Sociopaths and criminals filter in from across the spiral arm towards the Maelstrom's Edge in order to join some of the more famous Jackal hordes.
- Spiral Arm Revolutionary Army - The SARA are Broken who have banded together to overthrow those they see as corrupt regimes and corporations who have failed the common man by leaving billions behind to die by the Maelstrom. SARA is more regimented and militaristic than other Broken societies, usually founded by former military who rebelled and fled when they discovered that their government didn't actually have any plans to save them from the Maelstrom. Despite being labeled as terrorists, SARA cells receive funding and equipment from secret benefactors sympathetic to their cause. SARA regularly utilizes counterinsurgency and propaganda as weapons, and like the Jackals, they get a steady stream of recruits from throughout the spiral arm who believe that humanity should be doing more to save itself from the plight of the Maelstrom.
So how will these sub-factions actually work in the game? You'll essentially choose which sub-faction you're fielding based on which command unit(s) you decide to take in your force. So if you chose to take Forsaken command units, then you'd have a Forsaken force and you wouldn't be able to include any Jackal or SARA command units as part of the same force. Naturally, dependent on which sub-faction you use, you'll get different abilities and bonuses for your units. But beyond the command units that are dedicated to a particular sub-faction, all of the other Broken units we make will be playable in any type of Broken force.
As you may have already pieced together, so far we've only released rules for the Forsaken sub-faction, in the form of the Forsaken Chieftain. More than the other Broken sub-factions, the tactics of the Forsaken rely on cunning and misdirection to win the day, and the two unique abilities the Chieftain has, highlight this. First, let's take a look at 'Booby Traps':
During its main action, this model may expend one of its allocated command points to trigger a booby trap, up to a maximum of (X) times per turn. When a booby trap is triggered, select an enemy unit which is both taking cover and visible to the model triggering it. That unit gains D3+1 STs. A single enemy unit cannot be affected by more than one booby trap per turn.This ability is great because it can be used exactly when and where it will be most helpful to you. Got an enemy unit that is teetering on the edge of being shell-shocked? Hit them with a booby trap. Got an enemy unit that's got absolutely no suppression on it? Nail them with a booby trap to at least force them to take a discipline check when activating. Sure, it costs a command point to trigger a booby trap, but its the kind of ability that can change the course of a battle when used smartly.
The other ability the Chieftain has is 'Shadow Master':
For each model with this ability, one additional friendly unit can utilize the Shadow StrIke ability in each end phase (instead of just 1 unit) and during deployment, an additional friendly unit in reserve can be declared as arriving via Shadow Strike (instead of just 1 unit). In addition, a friendly unit within 18” of a model with this ability automatically passes its shadow strike discipline check, unless the unit is shell-shocked.This really is the defining ability of the Forsaken, as it allows them to utilize Shadow Strike on multiple units per turn. So if you have 2 Chieftains in your force, that means you could use Shadow Strike on 3 of your units per turn. That opens up all kinds of tactical options unavailable to other factions, such as being able to suddenly put several of your units right into the enemy's vulnerable rear arcs, or to redeploy several of your units onto objective markers that are on the far side of the table.
The last piece of the Forsaken puzzle is their faction objective 'Now You See Me':
Partial: (each end phase) This turn, if at least one of your units was put into reserve via shadow strike and the now you don’t ability was not utilized at all, gain 1 VP.This objective at its base level just rewards a Forsaken force with Victory Points for using Shadow Strike on at least 1 of its units per turn. But if you don't really need to gain a Victory Point on a particular turn, you can instead cash that Victory Point in for two really amazing options: either removing 3D3 suppression from a unit, or returning a model killed previously in the battle back into the unit. So say your opponent has spent the entire turn pounding on one of your key units, building up a ton of suppression on it. In the end phase of that turn, if the unit is within 18" of a Chieftain, you can automatically remove it from the table (without having to take a discipline check thanks to the Chieftain's Shadow Master ability), get rid of 3D3 suppression and then next turn you'll be able to put that unit back anywhere on the table that is in cover and more than 12" from the enemy...not too shabby!
Full: (end of game) If at least one of your models on the table has the Forsaken designator, gain all of this objective’s remaining VPs.
Now You Don’t: Once per turn, when you remove one of your units from the table via shadow strike, you may either immediately remove 3D3 STs from it, or return 1 model back to the unit that had previously been removed as a casualty.
When the time comes for us to release Jackal and SARA command units, we'll talk more about how those forces from those sub-factions will fight. Until then, if the imagery/theme of the Jackals/SARA sub-faction appeals to you right off the bat, you should feel free to paint/convert your models into those themes, as all you'll need to do to change your force from one sub-faction to another is to take a different command unit.
Modeling Spotlight: Easy Broken Rabble Conversions
Posted on Monday Oct 23, 2017 at 05:00pm in Tutorials
- by Iain Wilson
The new, plastic Broken Infantry kit has been out for a few weeks now, and I've been having a ball exploring the modeling options available from these sprues. With build articles now up showing how to put together your Chieftains, Rabble squads (which also serves for the Fire Support unit) and Assault units, it seemed like a good time to look at some easy ways to customise your Broken models a little.
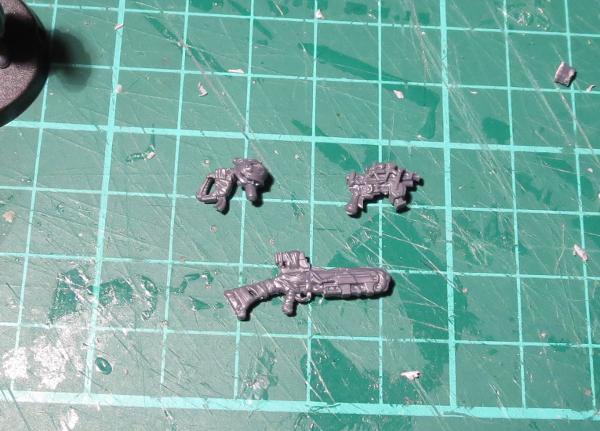
Let's kick things off with guns. Broken have a lot of different weapons, and they're all cobbled together from whatever parts they can scrounge. You can accentuate this a little by swapping grips between the different weapons. Below I have swapped the Chem Pistol grip out in favour or the firing grip from a Beam Blastgun, given a Slug Pistol the pistol grip from a Beam Pistol, and replaced the curved handle on the Chem Launcher with the back half of a Slug Rifle.
With Broken forces being made up of refugees from all walks of life, and equipped with whatever gear they can beg, borrow or steal, the other Maelstrom's Edge plastic kits are a great resource for personalising your forces. A trimmed down Karist Trooper shoulder pad is a great way to single out your unit Bosses from their otherwise equally-scruffy charges.
Karist Trooper and Epirian Contractor arms and heads can also be used to add some extra variety when scattered through with the Broken parts. The necks may be a little tight on some of the Broken torsos, but you can shave them down with a sharp hobby knife or a modeling file to make them fit.
The model on the left below also has Contractor legs. The Broken torsos and legs have multiple belts and straps, but the thicker belt on the Contractor leg pieces can make this look a little strange and results in the model being very tall, so in this case I have removed the belt from the bottom of the torso with a sharp knife before attaching to the legs.
To venture a little out of the box, the below Chieftain model has been given a melee weapon (just for show) made from a cut-down EMP Harpoon with a blade from a knife taken from the Faction Expansion Sprue.
A gunslinger Chieftain can be made using the pistol arms from the Epirian Bot Handler sprue. You can cut the pistols off just above the tops of the hands and attach Broken weapons instead, but in this case I liked the look of the Epirian pistols so left them there, where they will probably sub as Slug Pistols for now. I also added a long coat and lifted the collar with 'green stuff' putty.
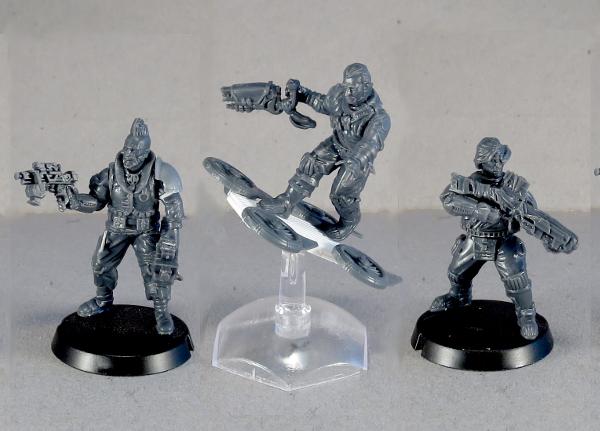
Last, but not least, the more speed-happy Broken may want a better way across the battlefield than walking like everyone else, and what better way to travel than a custom-made skyboard?
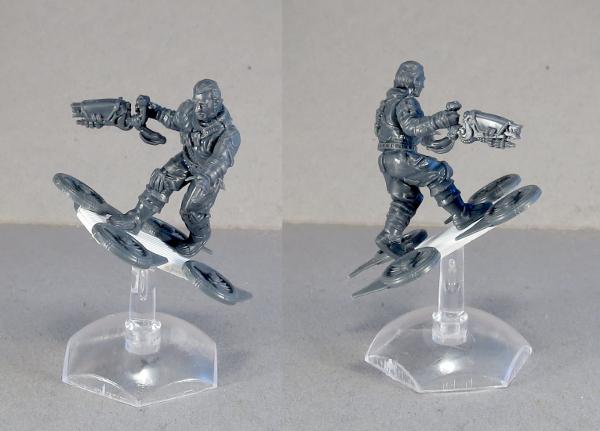
The board was made from a strip of plasticard, with some leftover turbines from Epirian Firefly Drones added onto the sides. Obviously, there are no rules for these, but the idea was too much fun to not put it together, so I'm planning to put together a unit of these guys and work up some homebrew rules for them. Watch this space!
To get to work on your own Rabble horde, you can find the Broken Infanty kit in single, double or triple packs in the Maelstrom's Edge webstore here, along with the rest of the Maelstrom's Edge plastic model range. As always, feel free to share your creations on the Comm Guild Facebook page!
For other Maelstrom's Edge modeling articles, including tutorials and walkthroughs of a wide range of different building and miniature projects, check out the article roundup here.
Assembly Guide - Broken Forsaken Chieftains & Unit Bosses
Posted on Monday Oct 16, 2017 at 05:00pm in Tutorials
Assembling Broken Forsaken Chieftains & Unit Bosses

Note: The bulk of this article is the same as for the Broken Rabble Assembly Guide and the Broken Rabble Assault Unit Guide, as the only real difference between the different units model-wise is the choice of weapons. So if you have already worked through those, this guide will look rather familiar and you may want to just skip down to the part with the weapons.
This guide will cover assembling Forsaken Chieftain and Boss models with the various pistol options from the infantry sprue. The two-handed weapon options are all covered in the Rabble and Rabble Assault unit articles linked above. You can also use this guide for assembling standard Assault Unit models with pistols.
General Notes
Polystyrene cement - only use superglue if you want to go insane! All of our models are designed to be assembled with polystyrene cement as it gives some time to re-pose while gluing, fuses the models together and prevents brittle joins like other glues do. Make sure you have polystyrene cement in your toolkit before you begin!
We want you to experiment! We've broken our models up into lots of parts and given a fair few spare parts so that you can push yourself out of your comfort zone, learn new skills and create some really unique models. We've tried to price things so that it won't break the bank if you make a mistake, so please cut stuff up and have some fun. Start simple with a slice here and a re-pose there, and watch your confidence and skills increase until you are a master modeler!
Basing - Always make sure you glue your model to its base with an eye on the arc markers on the sides of the base. The arc marker indents should be at the halfway point between the front and back of the model to show the front and back halves of the model when gaming. See the Maelstrom's Edge rulebook for more detailed notes on this.
Dry fit before gluing! - There are lots of pose options possible, but that means there is also the freedom to screw up and make some bad poses! Sticking the parts together and seeing how things look will usually lead to a model that is fairly static and repetitive. You should consider knee, hip, torso, and arm positions when gluing and ensure that you have a pose in mind before you start gluing things together. If in doubt or insecure about your talents in the posing area, we recommend you try to copy the poses from some of our studio models found here in the gallery.
Broken Forsaken Chieftain & Unit Boss Assembly Notes
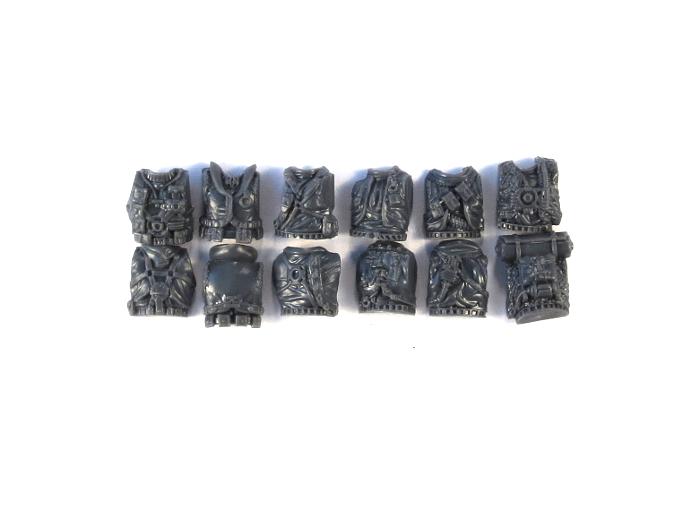
Six Broken models can be made from one set of the Broken Infantry sprues:
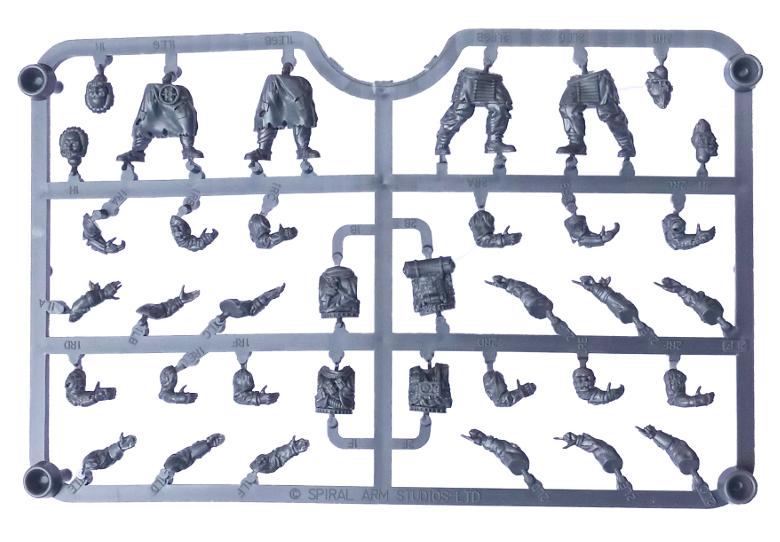
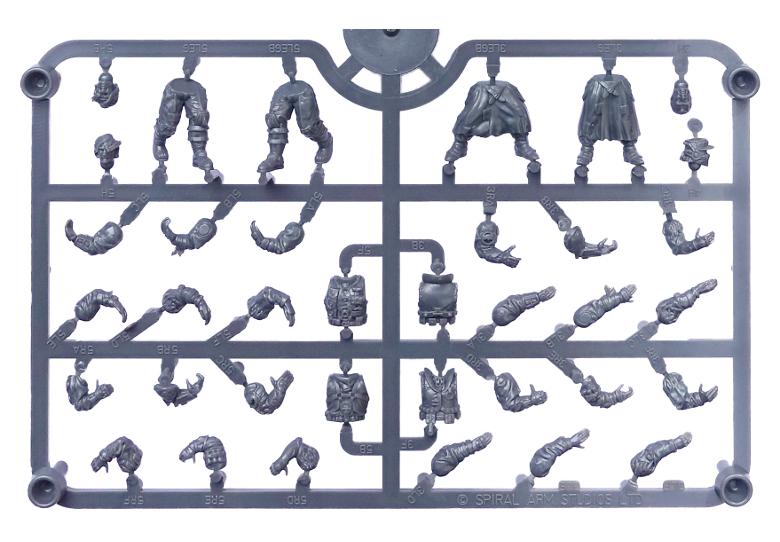
Assembly is fairly straightforward, with everything fitting together where you would expect. There are six different torsos, each with a unique front and back.
You can save yourself some aggravation if you keep the matching parts together when you cut them off the sprue. If they do get mixed up it will help that the fittings are different on each pair, so each front and back will only go together with its correct partner.
The twelve different sets of legs give you a whole slew of options for posing, as with one exception any of the torsos will work with any of the legs. The exception is torso 3 (parts 3B and 3F) which has pouches hanging from the belt. This torso fits with the legs labelled 3LEG and 6LEG, and slightly less flush with 3LEGB, although the pouches hide any slight gap you wind up with on that last set. You can also make this torso fit with some of the other legs if you trim up the bottom of some of the pouches a little.
With the torsos glued in place, you might notice that there is a reasonable amount of height variation between the models, which makes for a much more ragtag look to the unit than the usual identically-sized military units.
As with the torso/leg pairing, most of the huge range of heads on the sprues will work with any of the torsos. Torso 2 (2B and 2F) has a rolled cloak across the shoulders and torso 3 (3B and 3F) has a high collar, both of which may get in the way for heads 3H, 4H, 6H, 6HB and AH11.
With the massive range of arms available to choose from, a little experimenting may be required to get just the look you want. Because of the different grips and sizes of the various weapons, some weapon hands have a more open grip and others are more closed, so this needs to be kept in mind when fitting them onto your models. Models with two pistols can have the second pistol hanging from their belt or backpack, or in a resting pose using one of the various open hands. Open left hands can also be used to hold grenades.
The Slug Pistol needs a fairly open grip, as it has a fairly chunky handle on it. It works best with arms 1RC, 3RA, 4RC, 5RB, and 6RC.
You can also create a resting pose with it using one of the open left hands and balancing the pistol on the model's hip.
The Chem Pistol works with a more closed right hand, as the handgrip is a little thinner than on the slug pistol.
The Beam Pistol also works best with a more closed right hand, but work best with hands 3RA, 4RE, 5RB, 6RA or 6RE.
For some more ideas for building your Broken models or to share your own creations, head on over to the Comm Guild Facebook page.
You can pick up the Broken Infantry Pack, and the rest of the Maelstrom's Edge miniature range, from the webstore here.
For other Maelstrom's Edge modeling articles, including tutorials and walkthroughs of a wide range of different building and miniature projects, check out the article roundup here.
Tags: boss broken chieftain forsaken modeling models tutorial
'The Broken' Rules - Part 2: Fighting with The Broken
Posted on Thursday Oct 12, 2017 at 02:00pm in Gaming
For those who love our new Broken Rabble models but are curious as to how the faction performs on the tabletop, have no fear, we've got some answers for you today. The first thing you have to know is that the Broken individually aren't very good at all. They're the 'common man' of the spiral arm, and therefore they have terrible skill, terrible armor and a terrible willpower characteristic. But have heart! The Broken's true power lies in their sheer strength of numbers. There's a whole lot more Broken with nothing left to lose stranded near the Maelstrom's Edge then the troops from all the other factions put together! The Broken draw tremendous strength from the fact that they greatly outnumber their foes, and as a Broken player, you will definitely outnumber your opponent. Not only do basic Broken units cost the fewest points in the game by a pretty wide margin, but they also tend to have a maximum size of 6 models (while most other factions are limited to squads of 5 or less models). You'll probably want to go with the maximum number of models in each of your units, because the Broken's poor Skill characteristic means they miss with a lot of their shooting, so the more models you have firing, the more chance you'll be able to score some quality hits on the enemy. The other reason you'll want to max out your squad size is because of a little force-wide ability the Broken have called 'Mob Mentality':
MOB MENTALITY: This model’s WP characteristic is equal to the total number of models in the unit that share this ability, unless that number is lower than the model’s actual WP characteristic value. Models with the Mob Mentality ability have an asterisk listed with their WP characteristic value as a reminder of this ability.This ability makes full-sized Broken units into some of the most reliable units in the entire game, especially when you join a character to them, making a 7-man strong unit...it takes 21 suppression tokens on such a unit to shell shock it and guarantee that it will have to retreat! Of course as an opponent of the Broken, don't fret about this too much, because the Broken are some of the easiest models to kill in the game, meaning it doesn't take too much work to whittle down that 7-man unit to a much more manageable size.
The Broken know that their technology and weaponry can't normally match that of the other factions they fight against, so they are willing to modify their weapons to dangerous levels to put themselves on more of an even playing field. When looking across the characteristics of Broken weapons, at first glance it might seem like they are as good, if not better, than those fielded by other factions, and in many cases they are! But this potency comes with a price, and that's the 'Unstable' ability:
UNSTABLE: When a ‘1’ is rolled to hit with this attack, place a number of STs onto the firing unit equal to the current DAM value of the attack.Pretty much all of the really good weapons the Broken have are Unstable. While this ability doesn't actually kill Broken models, it can quickly start tacking tons of suppression onto Broken firing units. All this extra suppression is all well and fine while your units are at their maximum size, but as soon as the enemy starts killing a few of your models, the suppression generated by your own weapons will start to haunt you. So deciding whether or not to equip your Broken units with Unstable weapons plays a huge part in how your force will behave on the table. If you're a gambler, then pack in the Unstable weapons and hope to obliterate your foes before you drown in your own suppression!
The Broken know they cannot win in a straight-up fight against the other factions in the spiral arm, and so they have developed a method of fighting that relies on darting into and out of the shadows, confounding and frustrating their foes. This is represented by a faction-wide ability known as 'Shadow Strike':
SHADOW STRIKE In the end phase of each turn, before calculating VPs, a Broken player may select a single friendly infantry unit that is at least 12” away from the enemy and has every single one of its models in cover (from every enemy unit). The selected unit takes a shadow strike discipline check. If the check is successful, the unit is removed from the table and is put into reserve, keeping any STs it has.As you can see, this ability really gives the Broken a huge advantage of being able to put a unit pretty much anywhere on the table each turn (as long as the unit is put into cover). Of course, a unit that is placed onto the table via Shadow Strike is only able to fire wildly that turn (meaning they only hit on rolls of '6'), so you do sacrifice most of the unit's firepower to get this benefit, but its generally worth it to be able to control the table and capture objective markers when and where you need to. On top of that, the abilities of a Forsaken Chieftain make Shadow Strike even better, but we'll talk more about that in the next installment, where we'll be looking a bit closer at the different sub-factions of the Broken, including the Forsaken Chieftain.
In any future turn, a unit that was put into reserve via the Shadow Strike ability can either elect to arrive normally, or may instead deploy via the Shadow Strike main action. The Shadow Strike action allows the unit to be placed anywhere on the table that is both entirely in cover and at least 12” away from the enemy, and then, after being placed this way, the unit may fire a single round of wild shooting. A unit that is placed on the table via the Shadow Strike action counts as having moved.
When putting a Broken infantry unit into reserve before the game, its owning player may declare that the unit will arrive during the game via the Shadow Strike main action described above. Only a single Broken unit per side (including a joined character) may start the game this way.
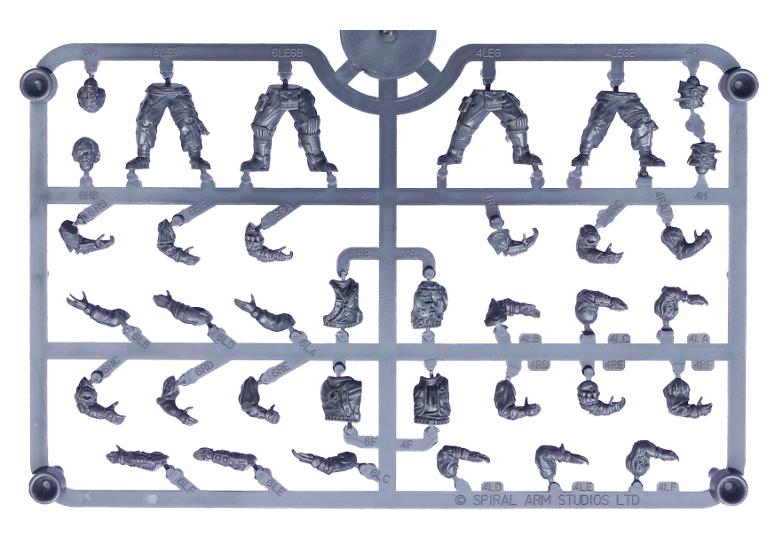
Assembly Guide - Broken Rabble Assault Unit
Posted on Monday Oct 09, 2017 at 05:00pm in Tutorials
Assembling Broken Rabble Assault Units
Note: The bulk of this article is the same as for the Broken Rabble Assembly Guide here, as the only real difference between the different units model-wise is the choice of weapons. So if you have already worked through that one, this guide will look rather familiar and you may want to just skip down to the part with the weapons.
This guide will cover assembling Assault models with the various two-handed weapons. The pistol options will all be covered in the upcoming Chieftain/Boss article very soon.
General Notes
Polystyrene cement - only use superglue if you want to go insane! All of our models are designed to be assembled with polystyrene cement as it gives some time to re-pose while gluing, fuses the models together and prevents brittle joins like other glues do. Make sure you have polystyrene cement in your toolkit before you begin!
We want you to experiment! We've broken our models up into lots of parts and given a fair few spare parts so that you can push yourself out of your comfort zone, learn new skills and create some really unique models. We've tried to price things so that it won't break the bank if you make a mistake, so please cut stuff up and have some fun. Start simple with a slice here and a re-pose there, and watch your confidence and skills increase until you are a master modeler!
Basing - Always make sure you glue your model to its base with an eye on the arc markers on the sides of the base. The arc marker indents should be at the halfway point between the front and back of the model to show the front and back halves of the model when gaming. See the Maelstrom's Edge rulebook for more detailed notes on this.
Dry fit before gluing! - There are lots of pose options possible, but that means there is also the freedom to screw up and make some bad poses! Sticking the parts together and seeing how things look will usually lead to a model that is fairly static and repetitive. You should consider knee, hip, torso, and arm positions when gluing and ensure that you have a pose in mind before you start gluing things together. If in doubt or insecure about your talents in the posing area, we recommend you try to copy the poses from some of our studio models found here in the gallery.
Rabble Assault Unit Assembly Notes
Six Broken models can be made from one set of the Broken Infantry sprues:
Assembly is fairly straightforward, with everything fitting together where you would expect. There are six different torsos, each with a unique front and back.
You can save yourself some aggravation if you keep the matching parts together when you cut them off the sprue. If they do get mixed up it will help that the fittings are different on each pair, so each front and back will only go together with its correct partner.
The twelve different sets of legs give you a whole slew of options for posing, as with one exception any of the torsos will work with any of the legs. The exception is torso 3 (parts 3B and 3F) which has pouches hanging from the belt. This torso fits with the legs labelled 3LEG and 6LEG, and slightly less flush with 3LEGB, although the pouches hide any slight gap you wind up with on that last set. You can also make this torso fit with some of the other legs if you trim up the bottom of some of the pouches a little.
With the torsos glued in place, you might notice that there is a reasonable amount of height variation between the models, which makes for a much more ragtag look to the unit than the usual identically-sized military units.
As with the torso/leg pairing, most of the huge range of heads on the sprues will work with any of the torsos. Torso 2 (2B and 2F) has a rolled cloak across the shoulders and torso 3 (3B and 3F) has a high collar, both of which may get in the way for heads 3H, 4H, 6H, 6HB and AH11.
With the massive range of arms available to choose from, a little experimenting may be required to get just the look you want. Because of the different grips and sizes of the various weapons, some weapon hands have a more open grip and others are more closed, so this needs to be kept in mind when fitting them onto your models. In some cases the 'matching' left arm will work, but for some weapon/arm combinations you may want to tack the right arm and weapon together and then find a left arm that fits best.
The signature weapon of the Rabble Assault unit is the Beam Blastgun. It works best with a more closed right hand, as do the Torch and the Massive Torch.
The Chem Launcher and Glue Carbine work with a more open right hand, but work best with hands 1RC, 3RA, 4RC, 5RB or 6RC.
The EMP Harpoon can use a more closed hand to latch onto its rear grip, or you can use an open hand for a more relaxed grip.

Likewise, the Glue Rifle can potentially work with either grip style. It's such an unusually-shaped weapon, and can work held a few different ways, so have a play with it and see what you like best!
For some more ideas for building your Broken models or to share your own creations, head on over to the Comm Guild Facebook page.
You can pick up the Broken Infantry Pack, and the rest of the Maelstrom's Edge miniature range, from the webstore here.
For other Maelstrom's Edge modeling articles, including tutorials and walkthroughs of a wide range of different building and miniature projects, check out the article roundup here.
Tags: broken modeling tutorial walkthrough
'The Broken' Rules - Part 1: What Else is Coming?
Posted on Friday Oct 06, 2017 at 11:43am in Gaming
If you haven't checked out the rules for our new Broken units yet, you can find them here. There's both unit cards and also a summary PDF that contains all the necessary info regarding the Broken's weapons, abilities and equipment.
The Broken represent a departure from how our previous two factions, the Epirian Foundation and the Karist Enclave, were developed. In the case of those two, upfront we had a solid road map of all of the units that were going to be included in the starter set, so we knew there was enough unit variety right out of the gate for a player to comfortably field an entire force. However, for the Broken, it become apparent that the basic Rabble infantry kit was going to be finished before any other models in the range, so the question then became: Do we sit on this infantry kit for several months in order to build up enough different types of Broken units to have more of a 'full faction' release, or do we instead release the kit as soon as we can, and just fill in the rest of the range as other models are finished being designed/sculpted? Once we saw how amazing the Broken Rabble kit turned out in its final form, the choice was easy. We knew both Maelstrom Edge players and general miniature game hobbyists everywhere were going to love it, so it just didn't make sense to hold its release back. Because of that, the Broken faction will continually evolve bit by bit, as we're able to add more models to the range. The good thing is that we're finally at a point where you'll be seeing much more regular model releases from us (the current target is once per month), which means that if you're a budding Broken player, you won't be waiting forever to get new reinforcements.
The next question we had to answer was: should we release rules for all the Broken units we plan on making in the future (even if there won't be models finished for those units for a while), or should we instead just put out rules piecemeal as we release new models? There are positive and negative aspects with either path, but ultimately the decision came down to the fact that the rules/options for a unit often need to be tweaked based upon how the sculptor turns out the final model(s), including how many optional bits they are able to fit onto the sprue. For example, if we were to put out rules for every Broken unit we plan to make in the future, invariably talented hobbyists would convert some of their existing models to create these 'future' units. But when the final production versions of those models are eventually finished, it might turn out that we needed to change the unit's rules and/or eliminate some equipment choices, thereby leaving those who took the time to make their own versions suddenly out in the cold. We ultimately decided to just release rules for the units that we currently have available, and we're exploring new ways to make publishing these rules both easy and convenient. We've just gotten an online unit card system up and running on our website, and we're pushing to get to a full force creation system integrated into this as well. Once we have a solid collection of Broken units available, we will be looking at avenues to create/publish a full faction book for the Broken, but for the time being, any rules we publish online are considered 'playtest' rules, and we absolutely welcome any feedback you guys might have. You can leave this feedback either in the Maelstrom's Edge forum on Dakka, or you can email us directly at rules-AT-spiralarmstudios-DOT-com.
One of the great things about the Broken is that the faction centres around a core of 'common man' infantry rabble units, that all pull from the same model kit. It's one of the big reasons that we made sure to include so many different options in the Rabble kit, because we knew that every Broken force will have quite a few Rabble units, and we wanted to make sure they all could be made to look quite different from each other. This one kit alone can be used to make 3 different types of Broken Rabble unit:
- The basic Broken Rabble unit - used to fill out the Core unit selections of your force.
- Rabble Assault - the close range specialist units, featuring more deadly short-ranged weaponry.
- Rabble Fire Support - able to take lots of the longer ranged specialized weaponry.
For those of you chomping at the bit to give the Broken a test drive right now might be wondering about Command units for the Broken (because you need at least one Command unit to field a legal force). To fill that void, we've released temporary rules for the Forsaken Chieftain, which you can build using any model in the Broken Rabble kit. We have plans to release actual Forsaken Chieftain models in the future that will be equipped with new and different gear/weapon options, but if you take the time to convert a Chieftain out of your Rabble kit right now, you can rest assured that any weapon options you pick will remain part of its final rules.
Thanks for reading, and in the next instalment we'll be looking at how the Broken actually fare on the table!
We'd also like to take a moment to point out the next video in our Video Rulebook series is now up on youtube and we'll be continuing to add these videos until the entire rulebook is covered, making it much easier to learn to play Maelstrom's Edge.
