Terrain Template & Tutorial - Minehead
Posted on Monday Apr 24, 2017 at 05:00pm in Tutorials
 - by Iain Wilson
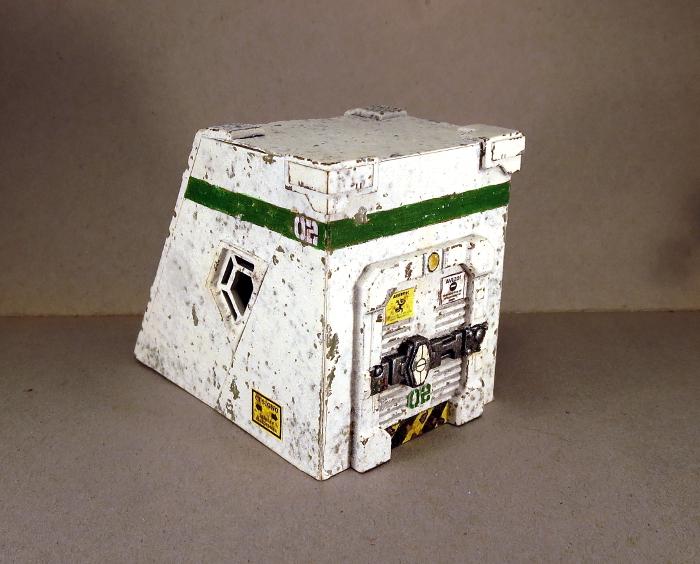
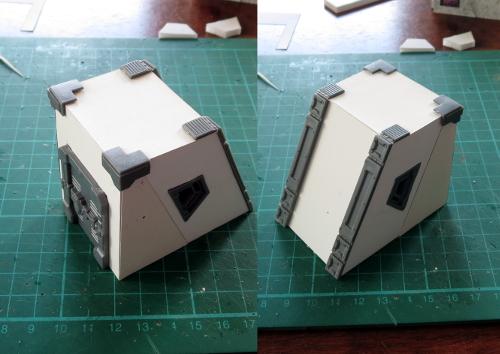
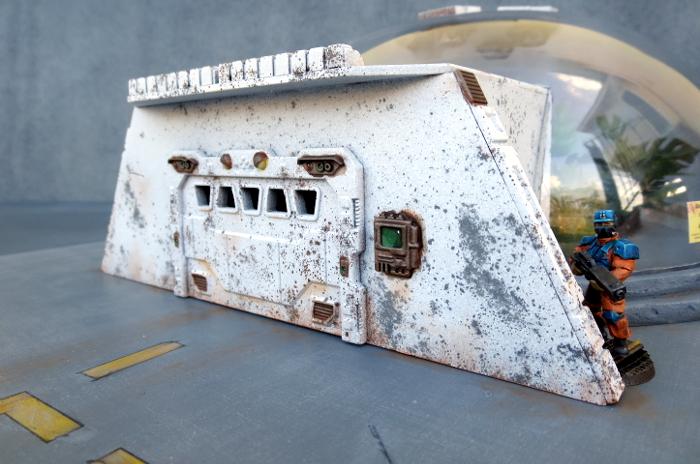
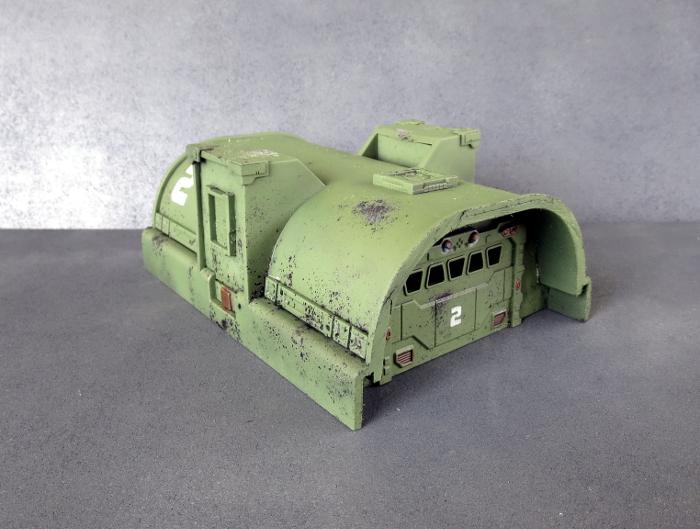
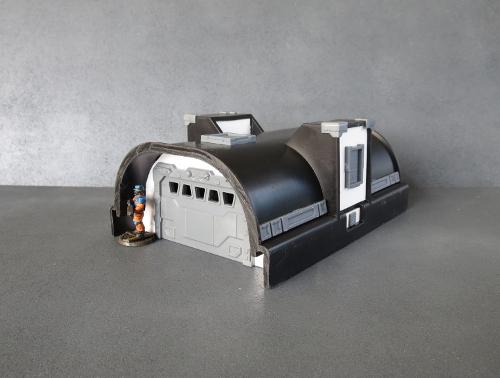
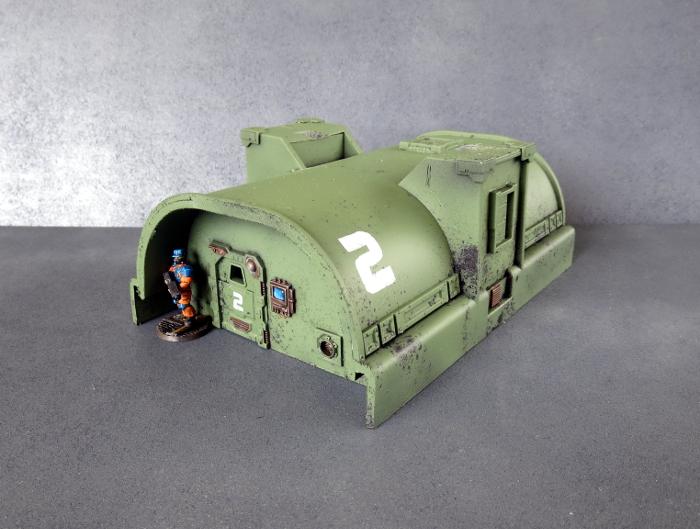
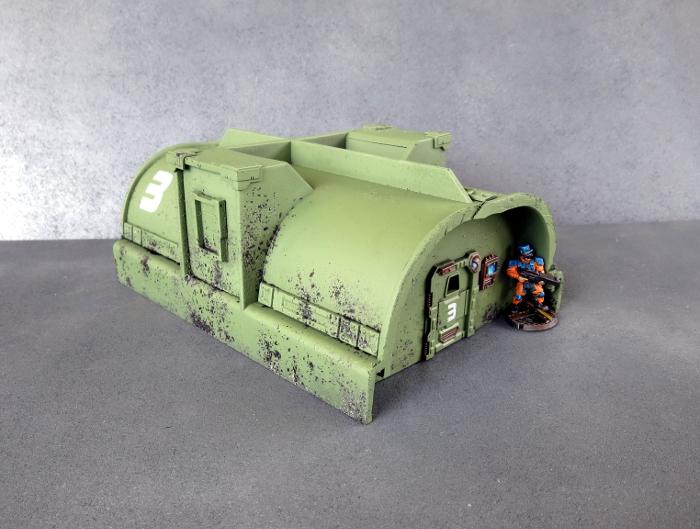
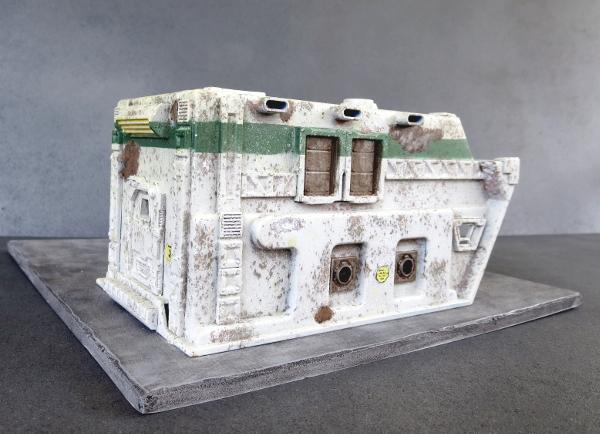
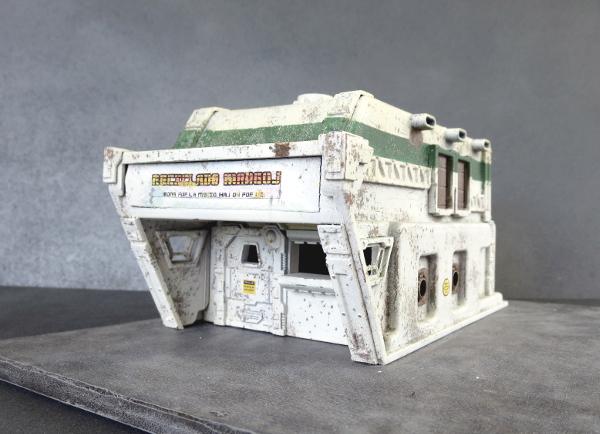
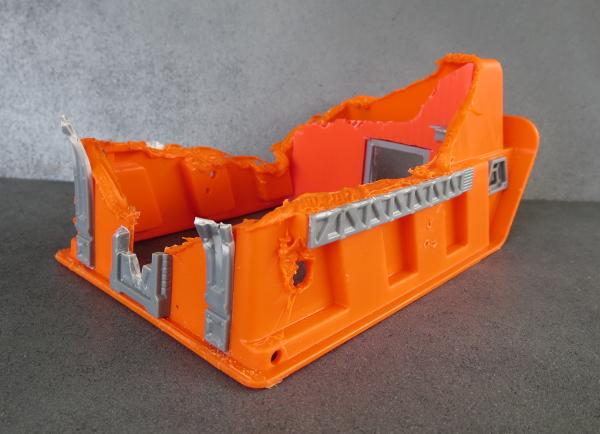
This week, we're sharing an easy building tutorial that would be perfect for those looking to dip a toe into the terrain scratch-building pool for the first time. The project is a small outbuilding, which I think of as an access to some sort of underground facility, although it could also double as a small utility or detention building.
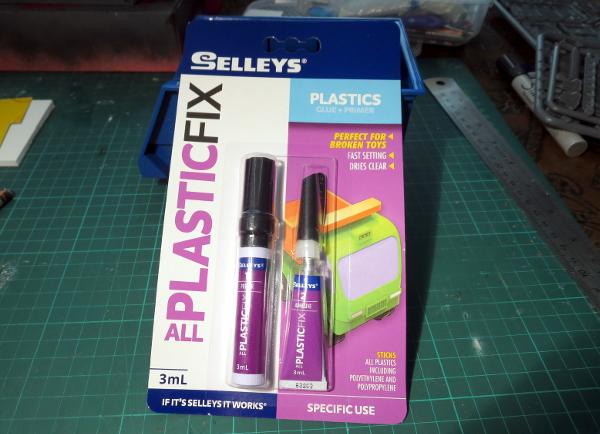
 You will need some 5mm or 6mm foamcore (either will work, although the roof piece will overhang the sides slightly with the thinner foamcore), some thin cardboard - around .5mm thick, PVA glue, and the Maelstrom's Edge terrain sprue. A sharp pencil, a steel ruler and a sharp craft knife will get you by for tools.
You will also need the building template, which can be downloaded from here: Minehead.pdf
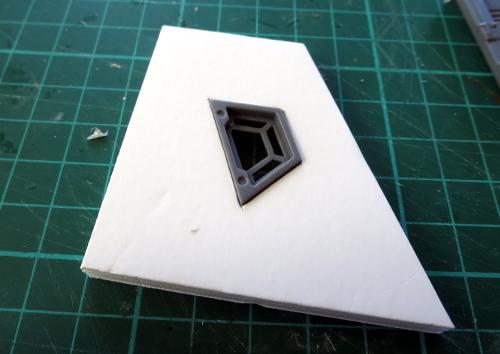
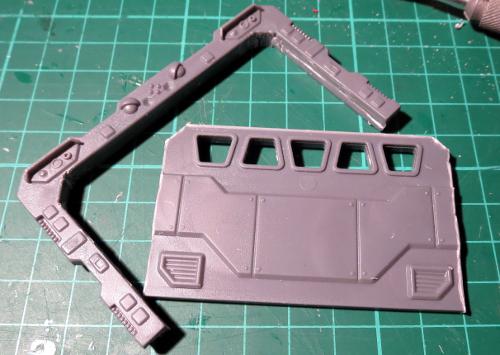
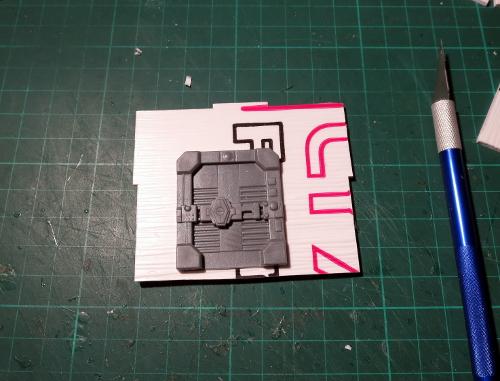
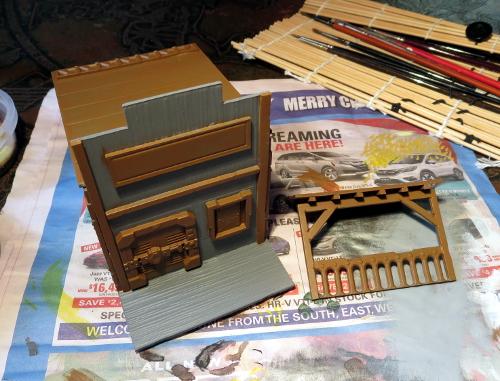
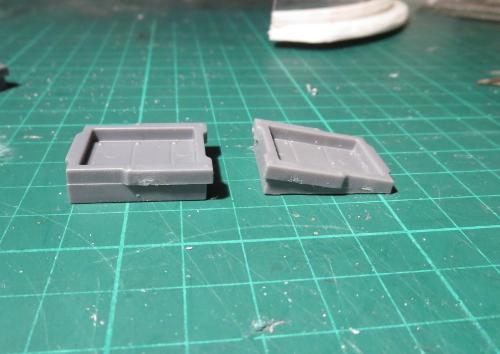
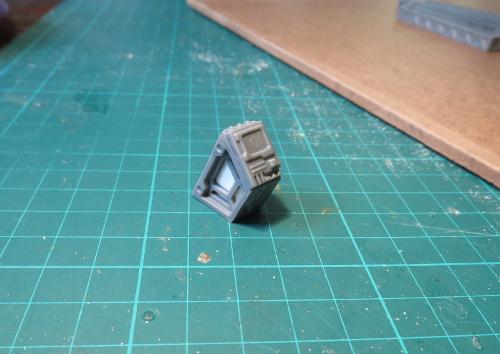
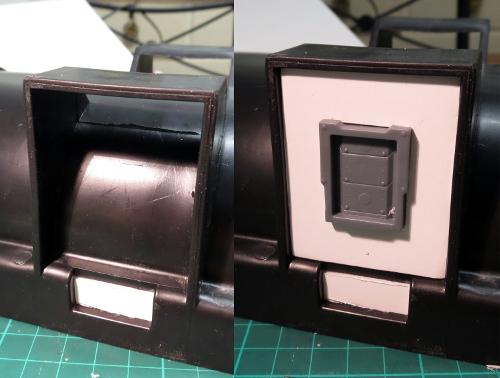
From the terrain sprue, the following components are used: one of the small doors (either will do), two trapezoid windows, two corner braces and two of the long support struts.

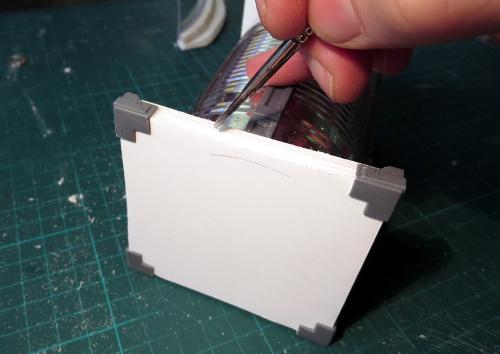
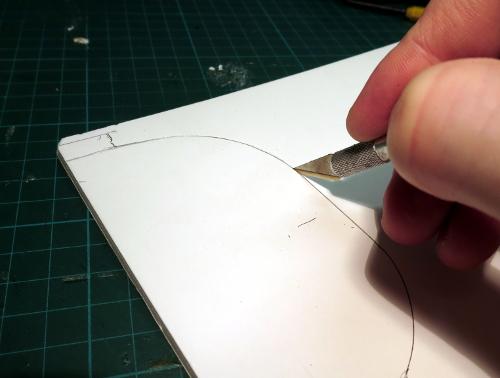
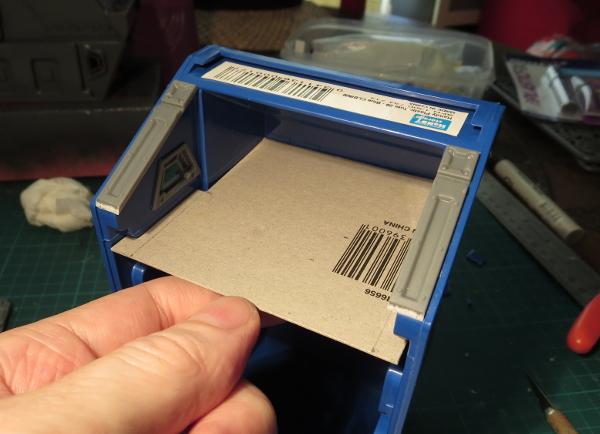
Print out the building template, and cut out the panels using steel ruler and knife.
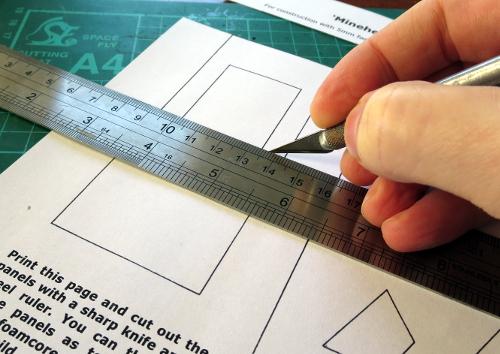
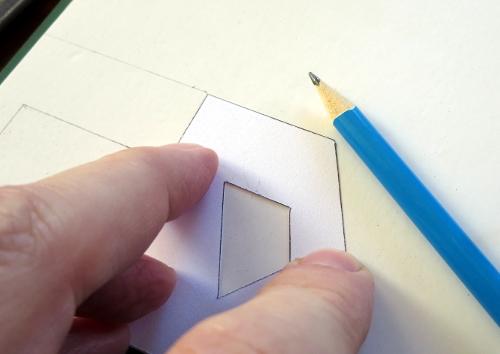
You can then lay the panels on top of the foamcore and card (the parts are labelled for which material they need) and draw around them with the pencil to transfer the outlines.
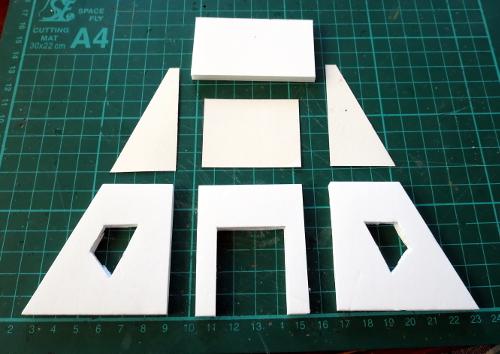
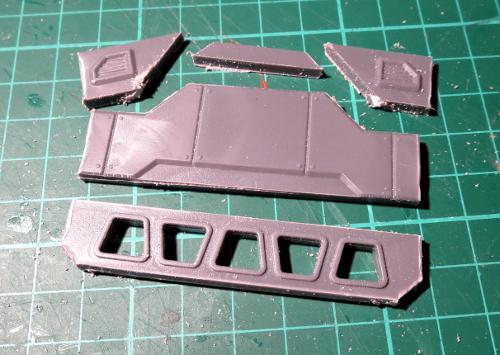
Once you have traced all of the parts onto the appropriate material, use the ruler and knife to cut them all out. If you have never cut foamcore before, don't try to cut through in one go. Lay the ruler along the line you want to cut, and then make several passes with the knife, working deeper as you go and being careful to keep the knife blade vertical so you don't wind up with a bevelled edge.
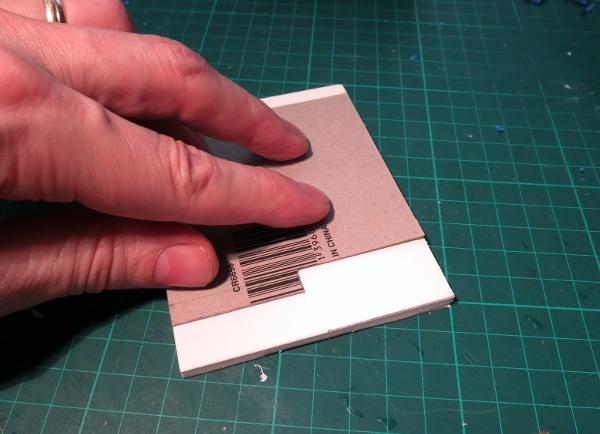
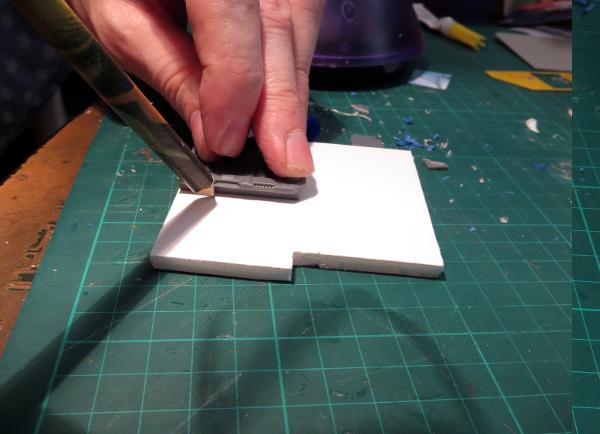
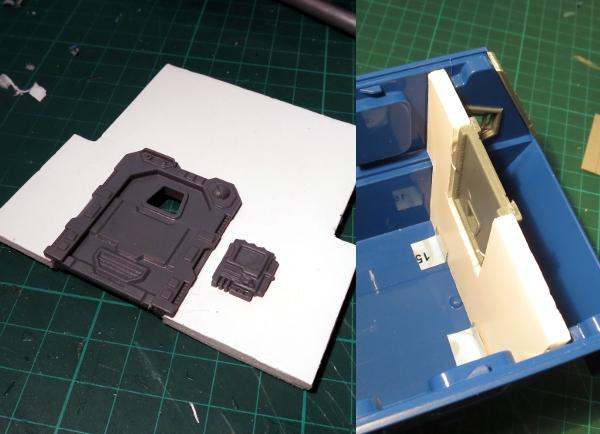
Check the fit on the holes for the trapezoid windows by pushing the windows into place. You can trim around the edges where necessary to make them fit nice and snug. If you have cut the window holes too large, you can pad them back out by gluing a strip of cardboard onto whichever cut edge has a gap. Once you're happy with the fit, run some glue around the edge of the window hole and then push the window into place.
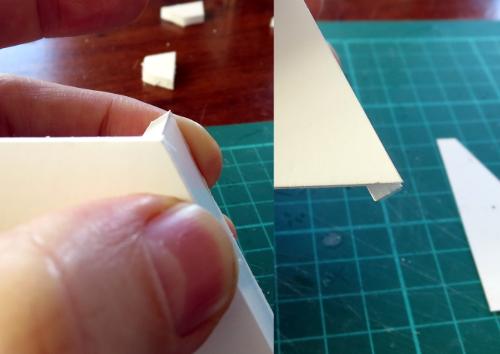
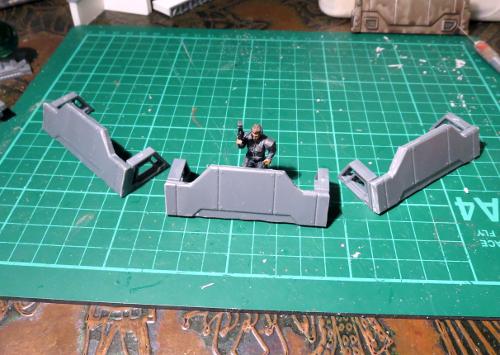
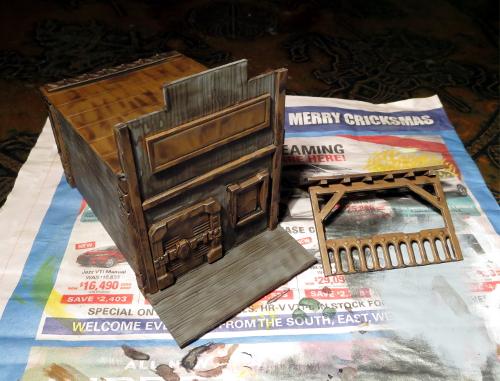
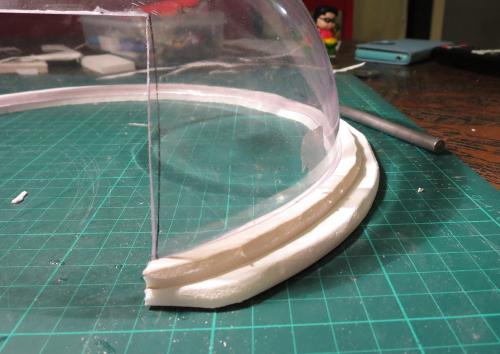
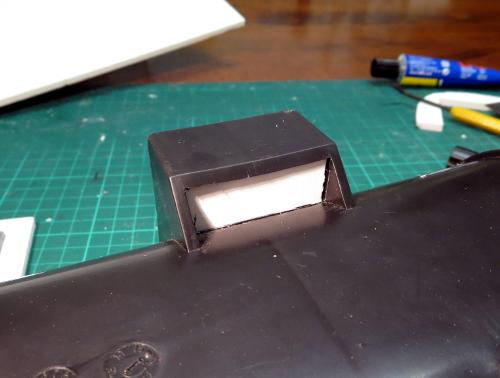
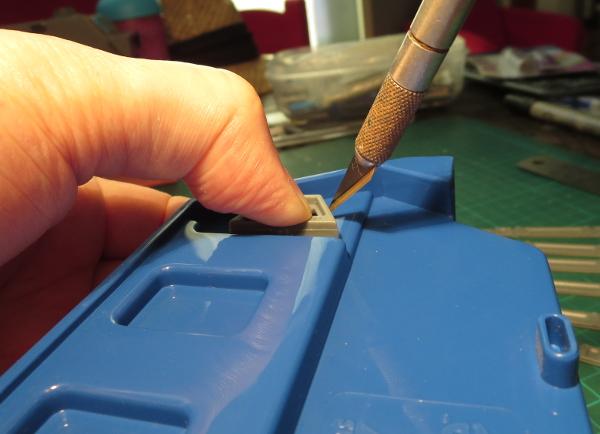
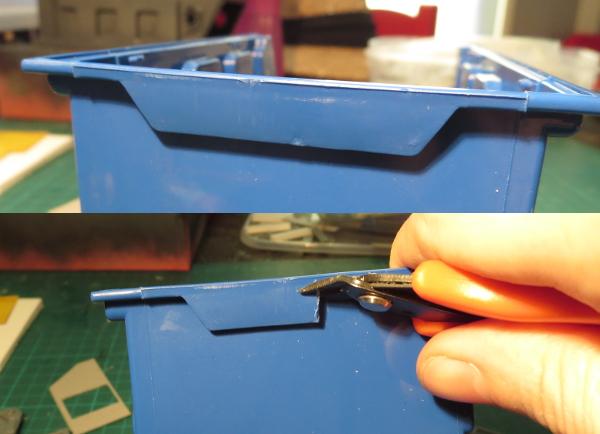
Next up we need to glue the walls together. Because of the angle on the back wall, the bottom of the wall will protrude past the bottom of the building, so will need a little trimming. If you hold the back wall against the side as below, so that the top edge of the back wall sits level with the top of the side wall (left-hand image) you can see the triangular part that needs trimming off (right-hand image) - trim this off with the knife, or sand it down, so that the bottom of the back wall sits flat on the table.
From there, glue the side walls to the rear side of the front wall. The run a little glue down either side of the back wall section. Spread the side walls out slightly, hold the back wall in place, and squeeze the side walls back in against it. Give the glue 30 seconds or so to start to grab, and then sit the building down on the table. You can look down from above here and nudge the walls around as necessary to square everything up. A cutting mat with a printed grid is a big help for this step, as you can line the walls up with the grid.
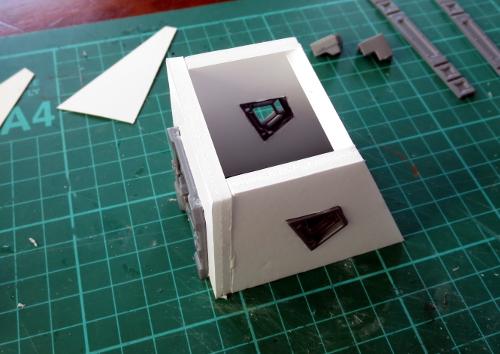
The cardboard side panels can then be glued one onto the front of each of the side walls, so that they cover over the exposed polystyrene edges of the front wall. The roof panel goes (surprisingly...) on top - run a little glue around the top edges of each wall, and sit the roof on top.

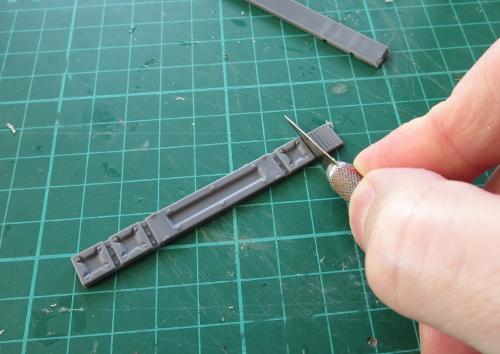
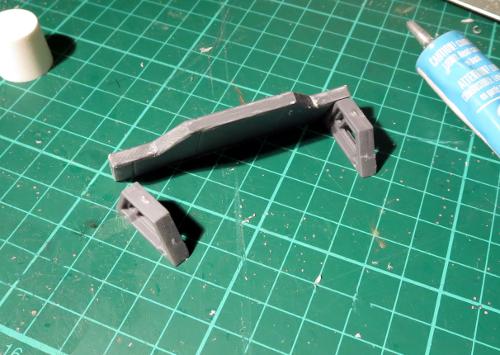
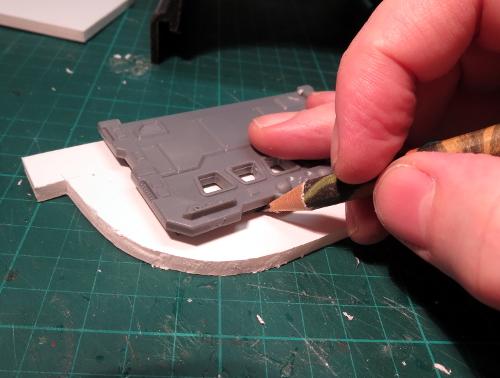
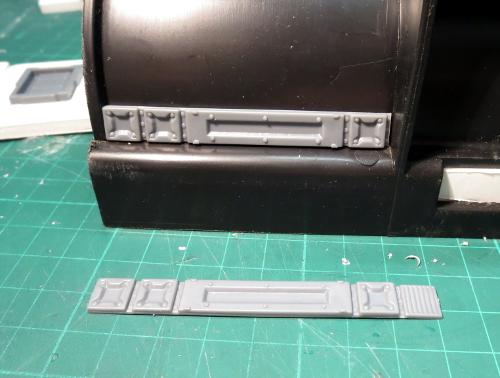
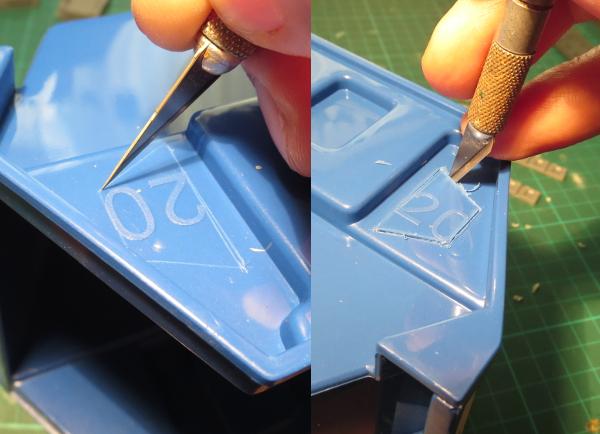
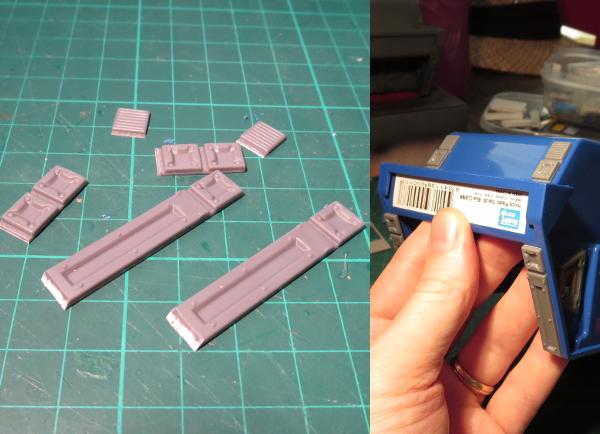
Take the two support struts and slice off the grill piece as below, leaving the recessed rivet strip attached to the grill.
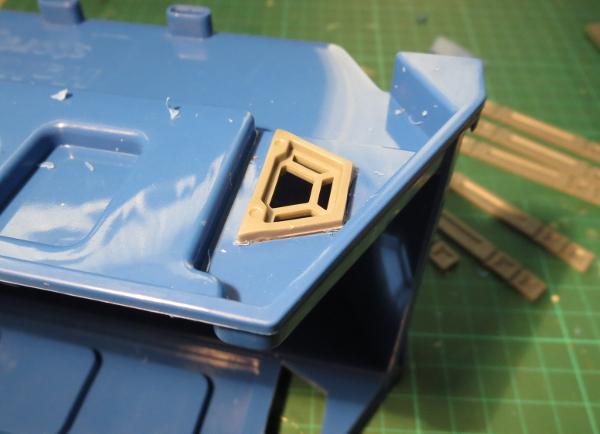
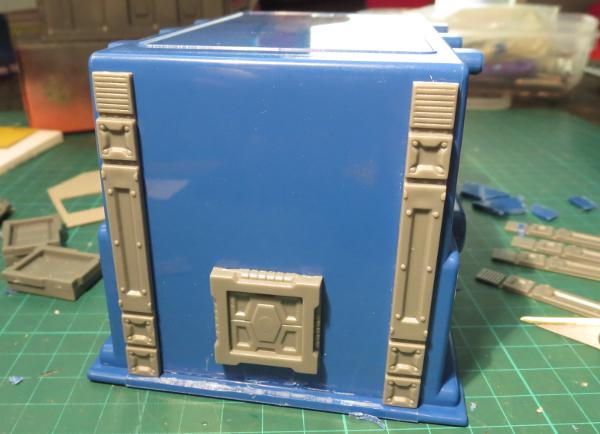
The grills are glued onto the back edge of the roof, one at each corner with the rivet strip to the edge. The remaining sections of the support struts are then glued running up the sides of the back wall, covering over the exposed polystyrene edges of the side walls. Check for fit first - if they protrude past the bottom of the building when lined up with the roof at the top, bevel off the bottom of the strut with your knife before gluing in place.

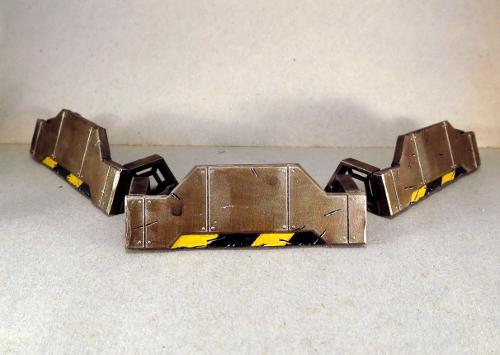
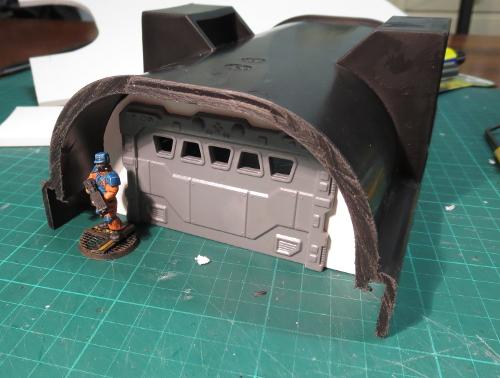
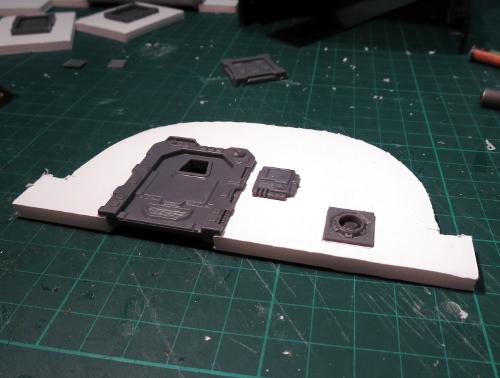
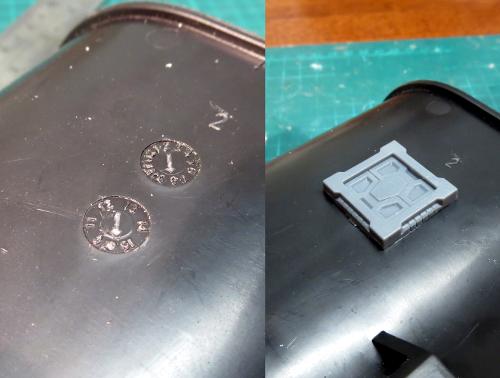
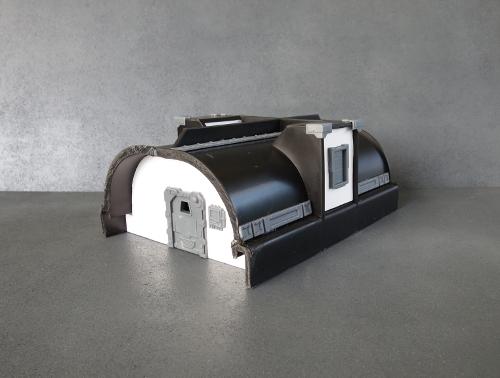
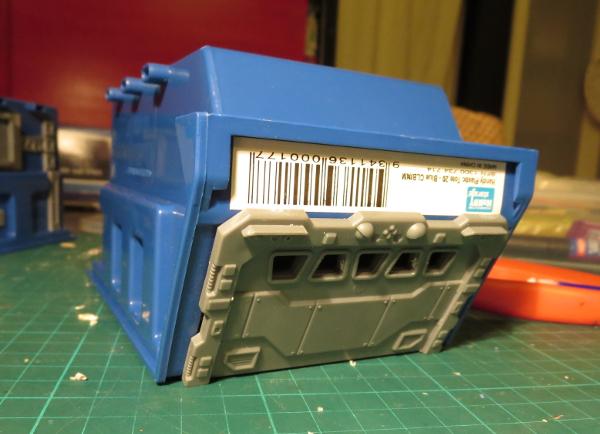
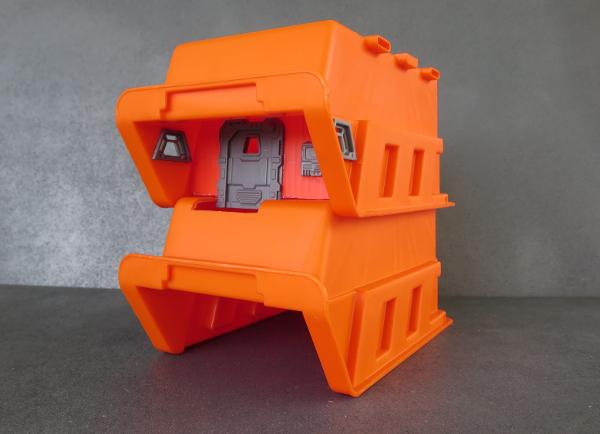
Finally, take the two corner pieces and glue them to the front corners of the roof. What you wind up with should look something like this:
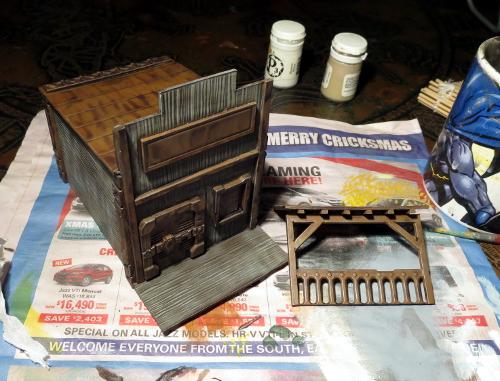
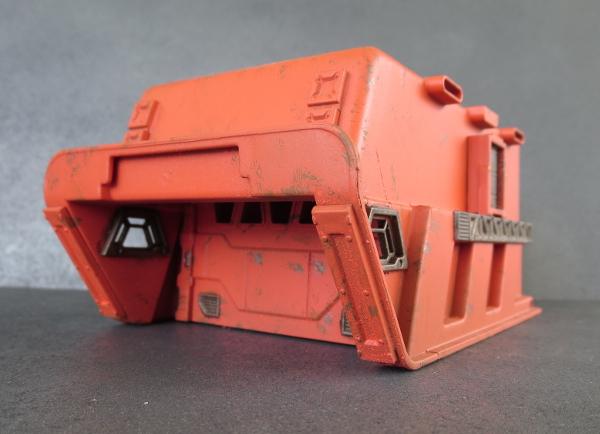
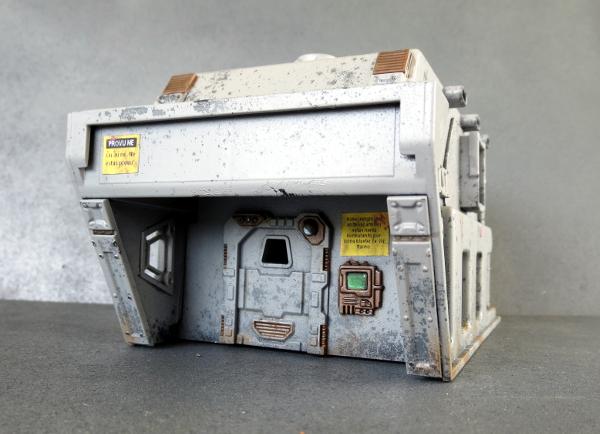
All that remains is painting, once the glue has set. Paint the building up in whatever colours suit your table or preferences. I like to weather my buildings, but it's not necessary - a simple spray with grey, white or a muted (not pastel, but not too bright) primary colour with the details picked out where appropriate works quite well with these as well.
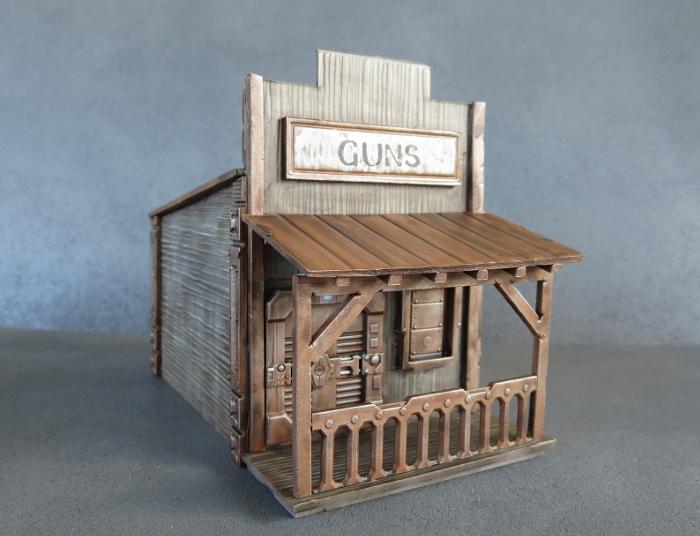
Here's my prototype version painted up, with some added salt weathering and some paper signs created in Gimp and printed out on paper for gluing on wherever they seem appropriate.
The graffiti on the back wall was made in an online graffiti creator (google it, you'll turn up a few different ones with different functions and fonts), printed and glued in place. You can see the edges of the paper if you look closely, but from game-playing distance it does the job. The numbers on the green strips and door were done the same way.
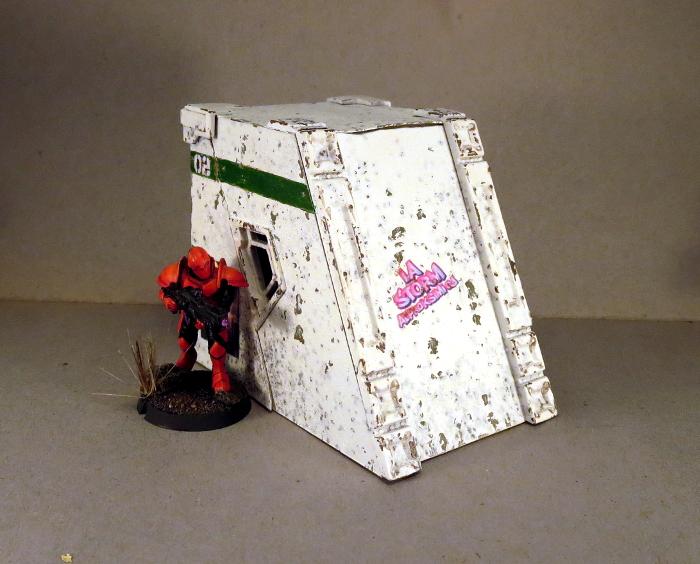
(Note that the windows in the painted example above are in a slightly different position to the template. This was a design change between the prototype and the template creation, as I think it looks better with the slight gap between the window and the raised side panel.)
And there you have it - one mine access/detention cell/utility closet/bike garage/whatever else you can think of to use it for.
If you want to try it for yourself, you can grab the template from here and the Maelstrom's Edge terrain sprue from the webstore here. I'd love to see what others can come up with to do with the design, so as always please feel free to share your creations on the Comm Guild Facebook page!
For other Maelstrom's Edge modeling articles, including tutorials and walkthroughs of a wide range of different building and miniature projects, check out the article roundup here.
Tutorial and Spotlight Article Roundup
Posted on Monday Apr 17, 2017 at 05:00pm in Tutorials
The full list of articles is getting a little unwieldy for a single page, so rather than keep updating an increasingly confusing list here, you can find the full collection of articles broken down by sections in the Hobby area of the Maelstrom's Edge website here!
If you've seen anything here that has lit that modeling flame, you can pick up the various plastic kits currently available in the Maelstrom's Edge range from the webstore here.
Maelstrom's Edge also has a Facebook group, known as 'the Comm Guild', where you can post any questions you have about the rules, the models, or upcoming releases, or share your modeling projects. The group can be found here. We love to see what people are working on, so whether you're a modeling veteran or a complete newcomer to the world of miniature wargaming, feel free to join in.
And in the meantime, stay tuned for the plethora of modeling content that we have still coming down the pipeline!
Tags: buildings conversion models painting terrainsprue tutorial
Terrain Tutorial: Blast Craters
Posted on Monday Apr 10, 2017 at 05:00pm in Tutorials
- by Iain Wilson
Last week, I went through some options for building a few different types of scatter terrain from components on the Maelstrom's Edge terrain sprue (if you missed it, you can find the article here). There is one other essential piece of scatter terrain that wasn't covered in that article, though: the humble blast crater.
Craters are a ubiquitous component of gaming tables from just about any genre (or at least any that deal with firearms of any kind) and along with those other staples of sci fi gaming - the soup-can storage tank and the spikey-polystyrene-ball cactus - you'll never be gifted the location of the secret lounge of the Terrain Builder's Guild if you don't have at least two or three in your terrain collection.
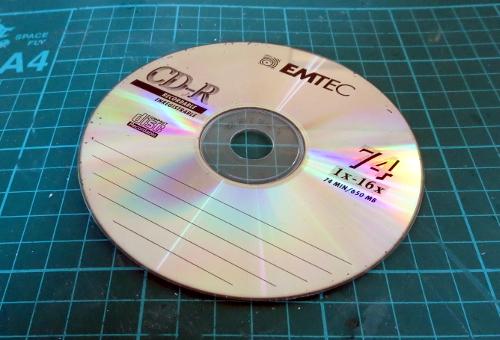
To get started, you'll want something round and flat to use as a base. Old CDs are perfect, as they're a good size without being too thick, and it saves them from going into landfill.
If you don't have any old CDs or DVDs kicking around, craftboard, cardboard or foamcore will also do the job, although cardboard or foamcore may bow slightly.
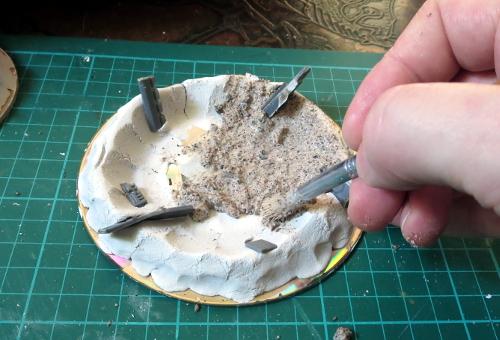
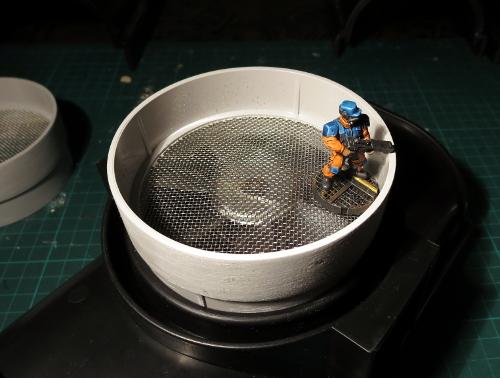
Take some air-drying clay (I'm using Jovi Air Dry Modeling Clay) and make a ring that's a little smaller in diameter than the base.
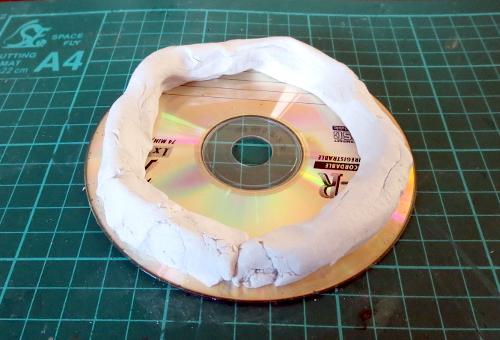
Smooth the clay down onto the base by pressing or rubbing it with your fingers, working around the ring on both the inside and outside and leaving a raised ridge. Don't make it too neat - you want a certain amount of irregularity to avoid the crater looking like a neatly-dug hole. There should be a steeper slope on the outside of the ridge than inside.
While the clay is still soft, add some chunky features. I'm using some leftover scraps from other terrain projects, from the Maelstrom's Edge terrain sprue. Just push them into the clay wherever seems appropriate. Longer pieces should be angled towards the outer edge, as if they've been pushed there by the explosion.
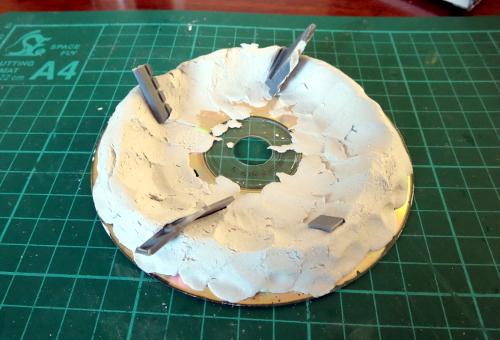
Air-drying clays aren't generally particularly adhesive, so the parts won't be held in there very firmly. The next step with stick them in place fairly comprehensively, but if you're concerned about them getting knocked around while you're working, you can add a little superglue on the part before pushing it into place.
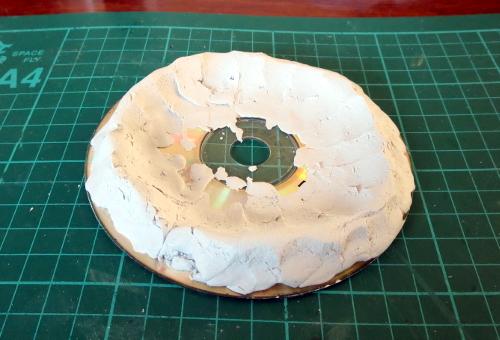
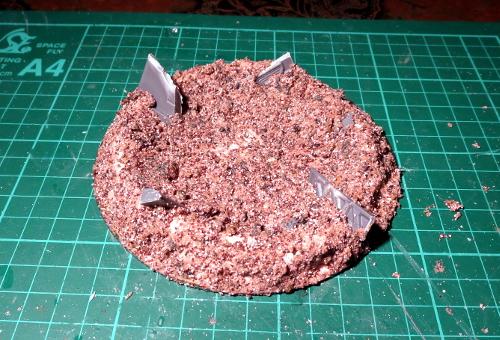
When the clay dries, it may contract a little and lift up around the edges. You can avoid that by pressing it back down periodically as it dries, but it's not really a big problem - Once the clay has set, you can just chip off any bits that are sticking up more than a couple of millimetres and ignore the rest. The edge will be obscured by the texturing that happens next.
Take some coarse sand/fine gravel mix. I have a pot that has a mix of silversand, sandpit sand, small chips of slate, fine gravel and a little model railway ballast for good measure. You want a bit if a mix of textures for best effect, but if you don't have access to all of that just some regular sand with a little railway ballast or fine gravel mixed in will do just fine.
Into this, mix a generous dollop of PVA glue (also known as Elmer's glue or wood glue) and a little water. You want the mix to be thoroughly wet through, but not runny.
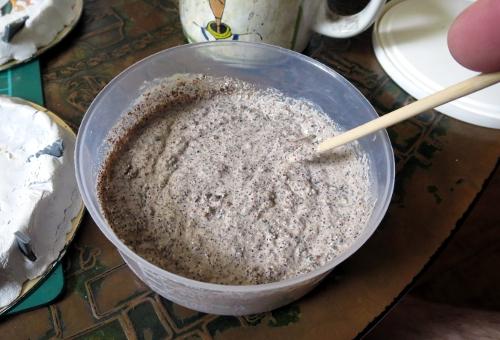
Using a large paintbrush that you're not emotionally attached to (because it's probably not coming back from this) spread a coat of the sand mix over the crater, starting from the middle and working up and over the ridge. That will naturally give you some radial detail running outwards from the blast area. You can accentuate that a little if you want by dragging a toothpick or wooden skewer gently outwards through the sand mix layer.
(If you haven't covered over the hole in the middle of the CD with clay, sticking on a small piece of masking tape before you apply the sand will take care of that.)
Don't worry if the detail looks a little soft at this point. As the glue dries, it will sink in and leave some nice, gritty texture.
Once the sand layer has completely dried, paint up in some suitable colours to match your table. Here, I've used a grey spray undercoat, a coat of Army Painter Strong Tone, and then a drybrush of Vallejo Basalt Grey, Light Grey and white, to match my urban terrain. A little brown drybrushed around in patches helps dirty things up a little, and the terrain sprue parts are painted with Vallejo Beasty Brown, drybrushed with Citadel Boltgun and then washed with Army Painter Strong Tone.
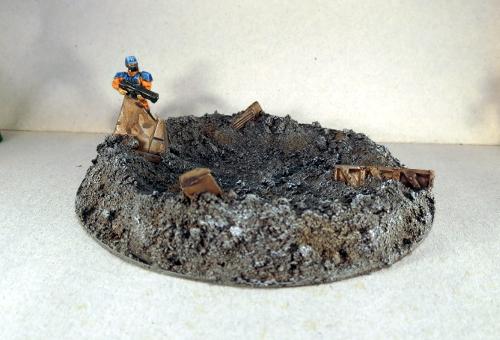
For some variety, use a mix of different base sizes to create different craters.
You can easily customise this basic design through using different sized bases, linking multiple craters together, or using larger or smaller rubble and terrain parts for detail.
And that's all there is to it! If you're feeling inspired, you can check out a bunch of other terrain-building articles by clicking here, or you can pick up the Maelstrom's Edge terrain sprue (in a handy 2-pack!) from the Maelstrom's Edge webstore here.
And as always, feel free to share your creations on the Comm Guild Facebook page!
Tags: terrain terrainsprue tutorial
Terrain Tutorial: Scatter Terrain
Posted on Monday Apr 03, 2017 at 05:00pm in Tutorials
- by Iain Wilson
The Maelstrom's Edge terrain sprue is a fantastic resource for detailing scifi buildings made from all sorts of things - You can find a bunch of different ideas and tutorials here. The terrain sprue components are also handy though for making smaller detail pieces to scatter around your gaming tables for a little extra cover. I have previously shared a tutorial for building small shipping containers from a couple of doors, some ladders and a little foamcore (you can find that tutorial here), and this week I thought I would run through a few more small scatter terrain ideas.
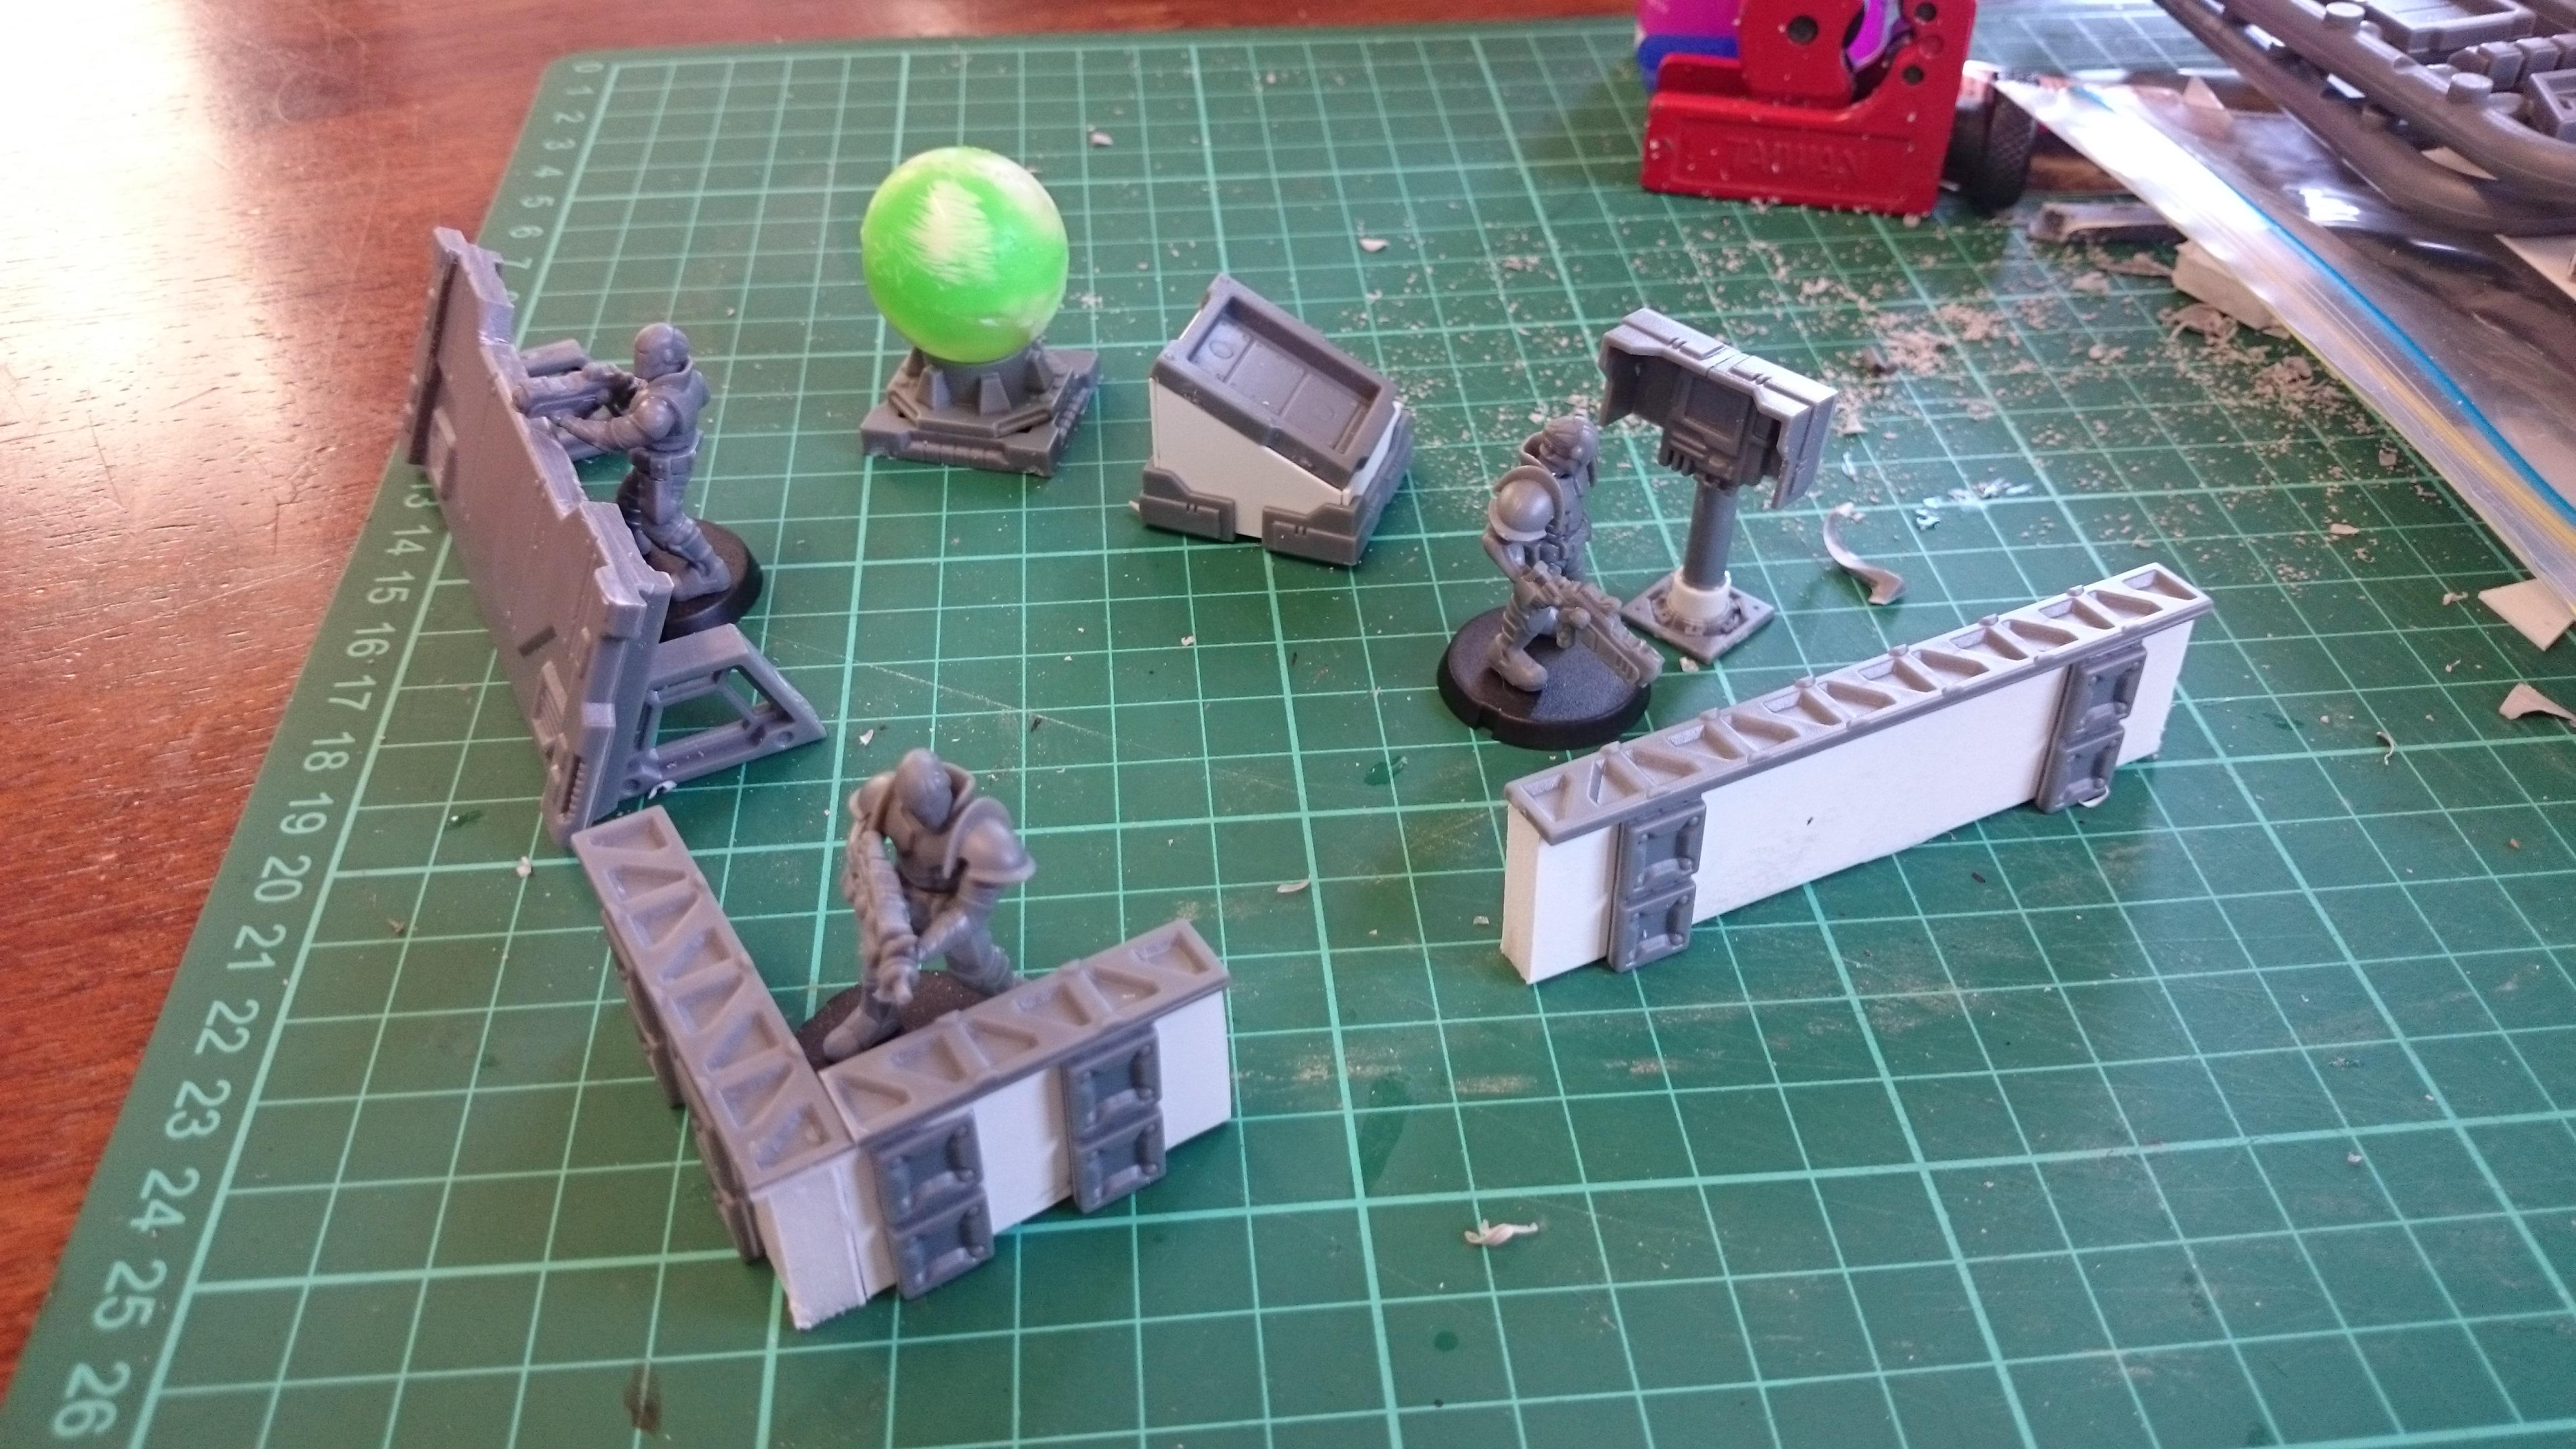
First up: Barricades
For this, you'll need one garage door, and two trapezoid windows.
Start by removing the door from the door frame. You can do this with a jeweller's saw or razor saw, or by running around the inside of the frame with a sharp hobby knife from both sides until the door pops out.
This gives you an open door frame that you can use on a building or ruin, and a handy detailed panel that can be cut up as below:
Throw the off-cuts into your bits box (they'll come in handy for a ruin or scrapheap down the track, and the strip of small windows is a nifty bit of detail for a building or other wall feature) and glue the trapezoid windows to the back of the lower section of the door.
Once the glue has set, you have some barriers just perfect for huddling behind and feeling all suppressed.
I've painted these up fairly plain, so that they will fit with whatever sort of table I throw them on. You can easily paint them to match your buildings, or paint on mis-matched panels for more of a ramshackle look.
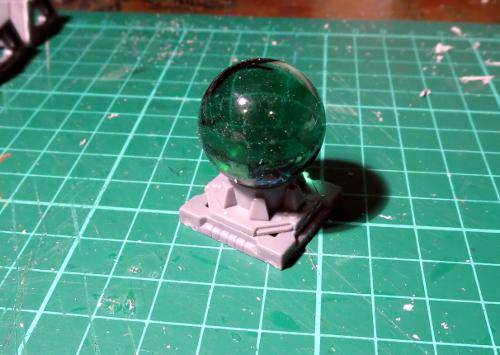
Next: The Orb!

I picture this device as a 3d map tank, so the ball on top would represent either a hologram or a glass ball with a projection inside.
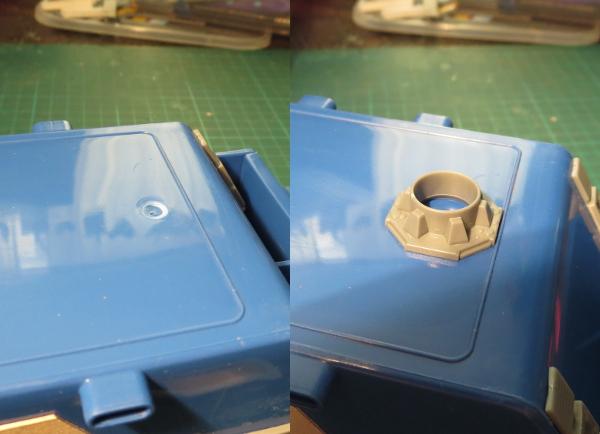
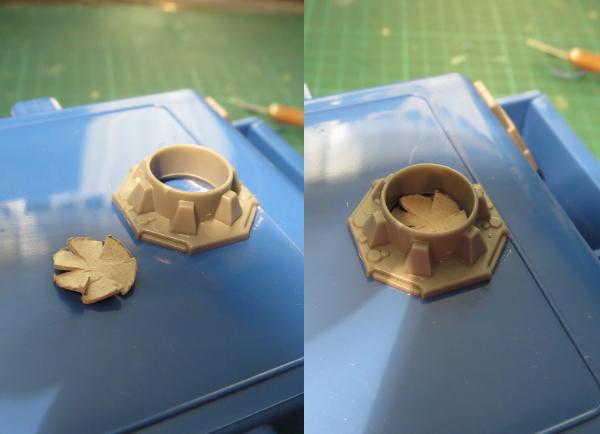
You will need a square hatch, a large pipe fitting, and a suitable-size marble (the one I've used is around 25mm (1") diameter).
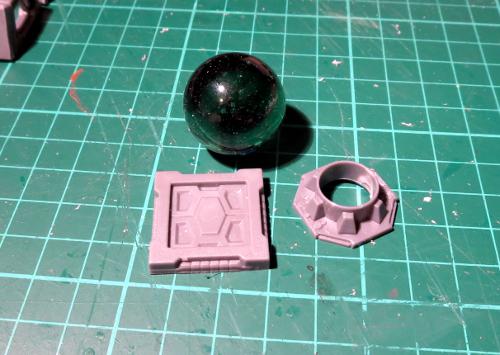
No cutting required on this one - Simply glue the pipe fitting to the top of the square hatch, and put the marble on top. If you hold off on gluing the marble in place until you have painted the base unit, you won't need to worry about cleaning stray paint splatters off the glass.
You could also paint the marble, or use a ball bearing or small plastic ball, to make it into a planetary globe sculpture or some other artistic installation.

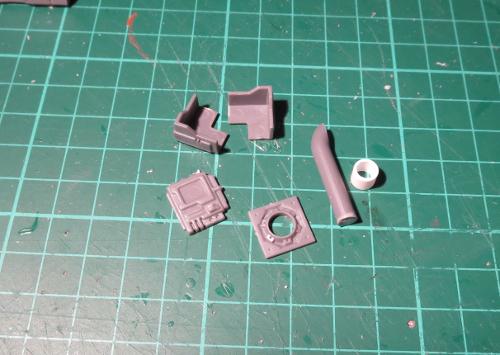
Next: Public Comm Unit
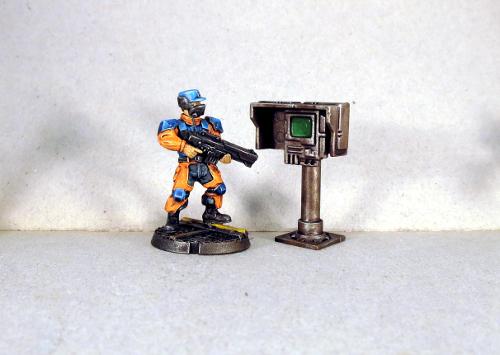
The little computer screen on the terrain sprue shows up all over the place on my terrain pieces. I picture it as a generic, multi-purpose unit that can be configured to display whatever information or controls are required for any given application. In this case, as a public access comm unit or data terminal.
To build this, you need the small pipe fitting, two corner braces, a computer screen, and a 5mm-long piece of 6mm (1/4") plastic tube. You also need a piece of sprue from the terrain sprue - The sprue has a thicker half and a thinner half. From the thinner sprue, cut a piece around 25mm (1") from a corner, with the corner cut off flush with the length of the sprue piece. The end result is a length of plastic rod with a rounded end that has one flat face, as pictured below.
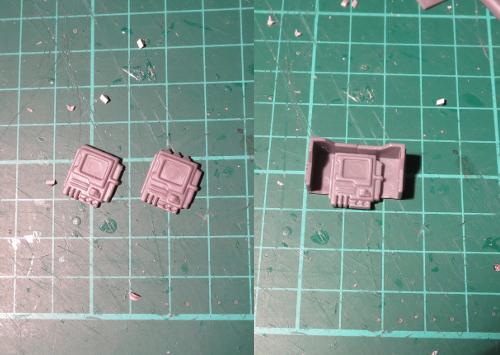
Take the screen and cut off the wedge-shaped protuberances running along the top. Then glue the corner braces together and the screen into the middle, inside the corners and butting up against the top, so that the corner braces form a shade around the screen.
Then glue the plastic tube into the pipe fitting, and the sprue piece inside that, with the rounded end at the top. Make sure the flat face is parallel to one of the edge of the pipe fitting. Then glue the back of the screen to the flat face of the sprue piece.
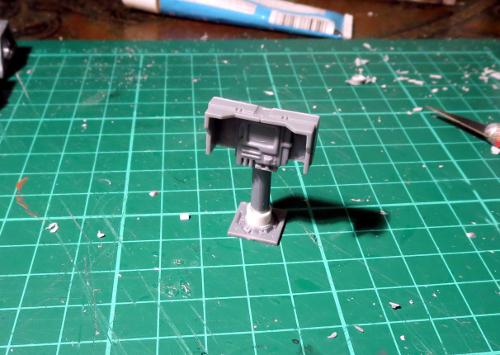
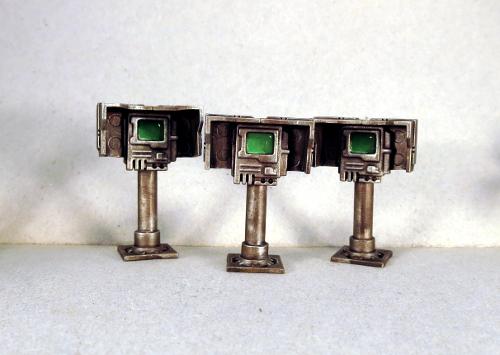
Once painted up, these can be glued onto your terrain pieces for a little extra detail. They also stand quite well on their own, or you could glue them to a base for a little extra stability, and then they can be scattered around as needed - they would make handy objective markers.
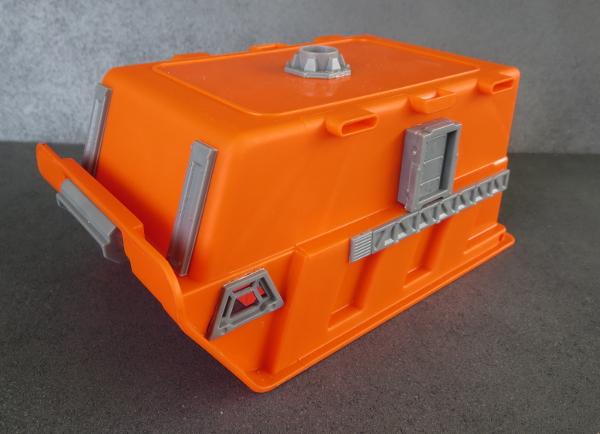
And finally: Thermal Vents
No self-respecting, quasi-military terraforming base is complete without some sort of underground installation. The problem with underground installations, though, is that they need some sort of ventilation shaft, otherwise nobody has any way to sneak in!
To build some suitable clandestine access, (or just some nice, blocky, solid cover for your solo models, depending on your point of view and the specific game objectives at hand) you will need a shutter window, four corner braces and some thin plasticard - I've used .5mm sheet here.
Take the shutter window and on the rear frame, cut or file down the top edge at around a 45-degree angle, as below, leaving the raised frame at the front intact.
Cut sections of plastcard to run around the window frame. The measurements I've used are below:
Rear section - 21mm wide x 20mm tall
Front section - 21mm wide x 9mm tall
Sides - 23mm wide x 20mm/9mm, to match the front and rear sections.
If you're using thicker or thinner plasticard, you will need to tweak the width of the front and rear sections by a matching amount. You can also change the angle of the window frame by making the side pieces longer or shorter.

Check your plasticard sections for fit, and then glue them in place around the window frame.

The corner braces are then glued around the base.

As with the barricades back at the start, you can paint these up to match whatever buildings you have, or put them in more generic colours to scatter around multiple tables.
That's the lot for this week - although it's just scratching the surface of what you can do with the terrain sprue components. If you like what you have seen here and want to try building some scatter pieces of your own, you can pick up the terrain sprue in a pack of two from the Maelstrom's Edge webstore here.
We love seeing what people create with the sprues, so as always, please feel free to share your work on the Comm Guild Facebook page!
Terrain Spotlight: Welcome to Hamilton!
Posted on Monday Mar 27, 2017 at 05:00pm in Models
- by Iain Wilson
The frontier world listed in the Epirian Foundation directory as PG-4215 [designation pending] is a barely-habitable planet on the outer fringe of populated space. At the time the Maelstrom approached the system, PG-4215 possessed a single official settlement, known as 'Research & Terraforming Implementation Facility Alpha' by the Foundation and as 'Hamilton' by those unfortunate enough to have been posted there.
With PG-4215's few small, equatorial landmasses being hot, dry, and generally unpleasant, Hamilton's small population very early on had committed themselves to paving over and urbanising as much of it as possible.
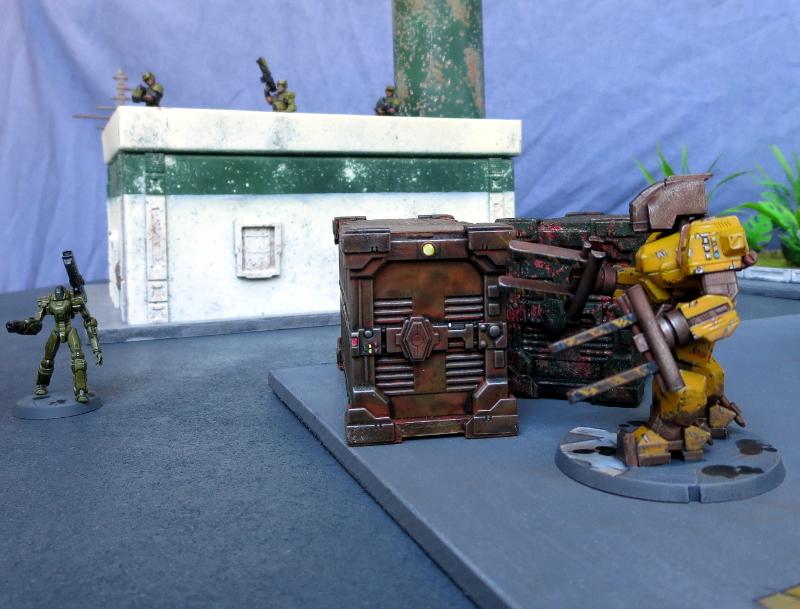
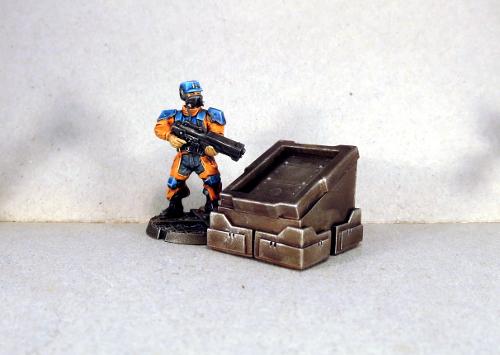
Oblivious to impending conflict, an Epirian cargo drone shunts shipping containers for unloading.
Hamilton is the first table setup that I've finished off so far for my own Maelstrom's Edge games. I've used it somewhat as a test-bed for trying out different ideas, with the end result being a bit of a hodge-podge of styles.
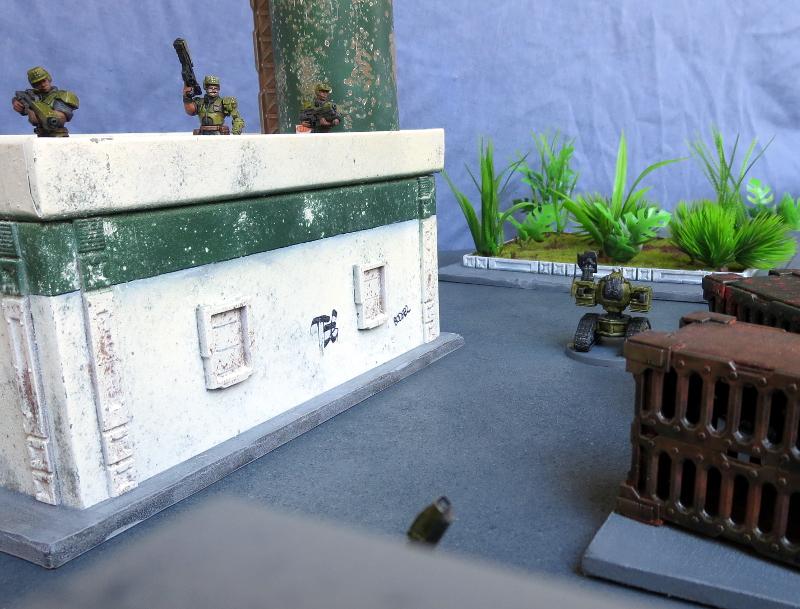
Taking up position on the roof of the refectory, the squad watches an automated uplink relay trundle down the laneway.
Buildings have been constructed from a range of different materials, with the components from the Maelstrom's Edge terrain sprue helping to tie it all together into a more-or-less coherent whole. The building above is made from a cardboard giftbox with the lid flipped upside down.
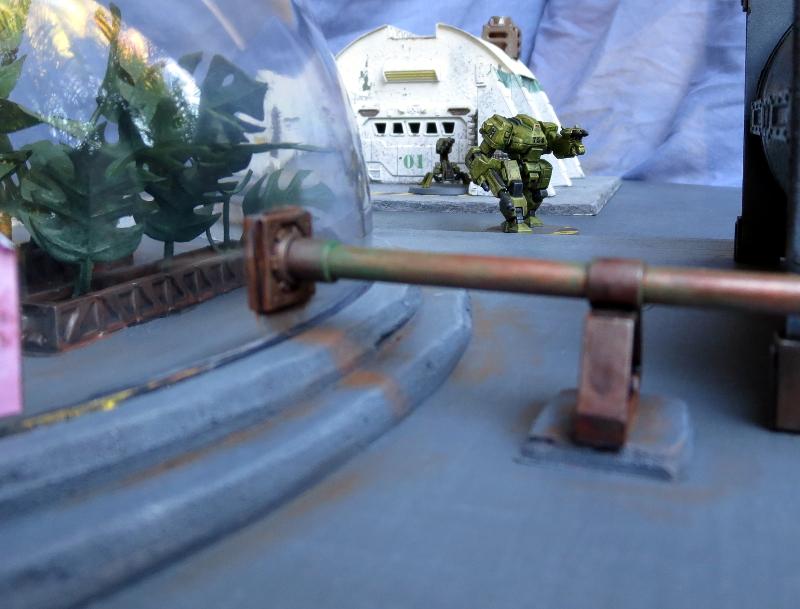
In the distance, past the plantation dome, a squad of heavy armoured Karists approaches, weapons at the ready.
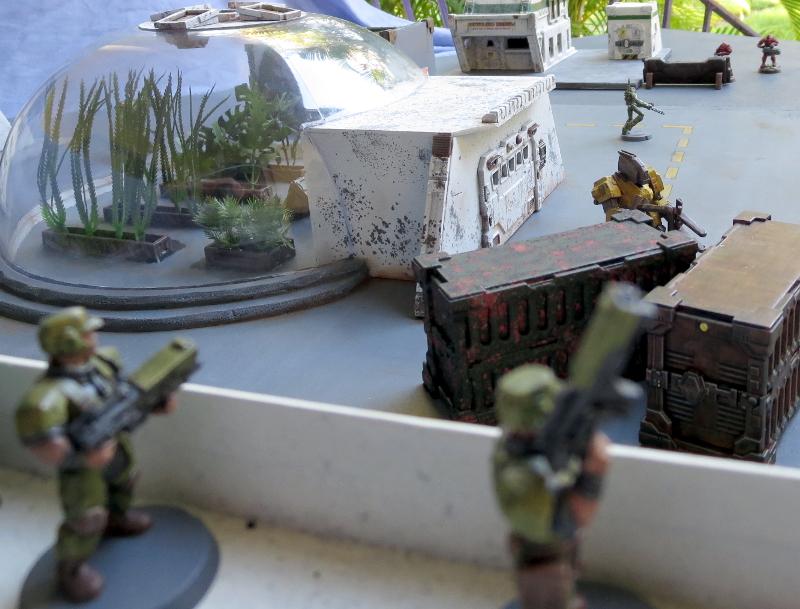
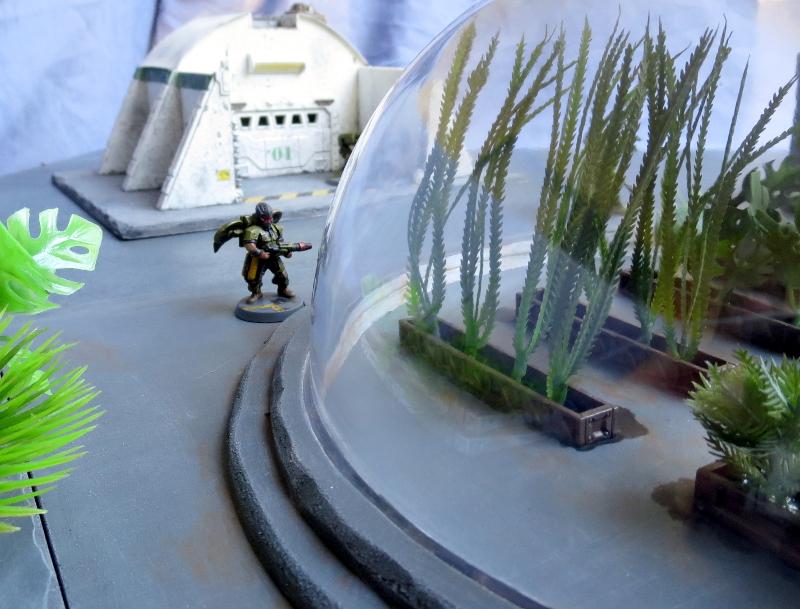
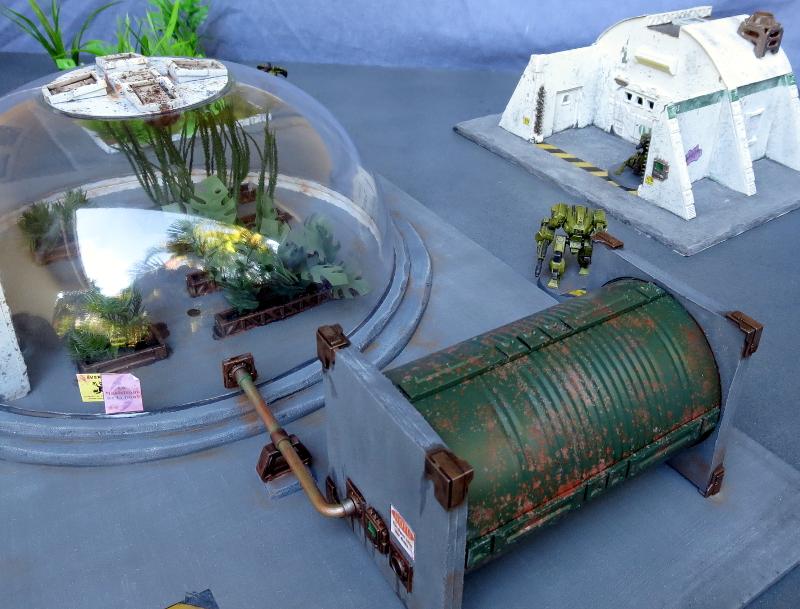
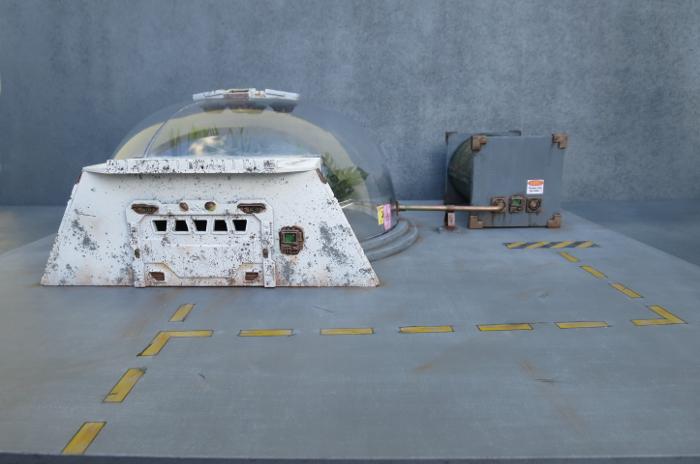
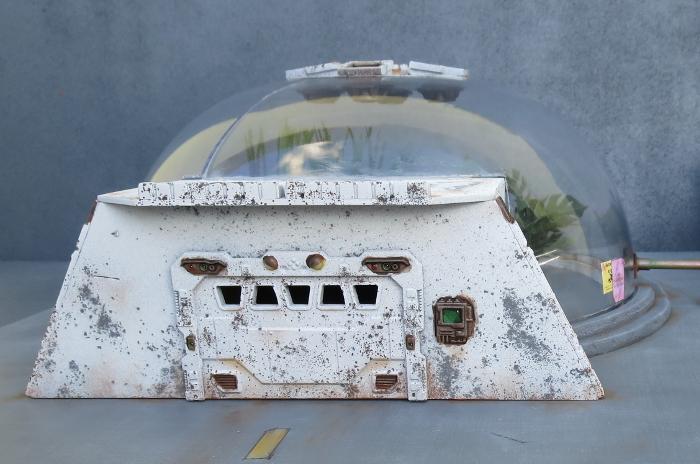
The plantation dome was constructed from a plastic salad bowl, with foamcore used for the enclosed area at the front. You can see how this was put together in the walkthrough here.
A Warden conducts a routine maintenance check on the exterior of the planation dome.
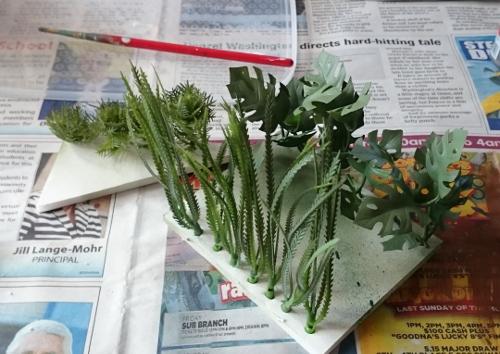
Trimmed-down and repainted aquarium plants were used for the plantation beds inside the dome. In the background is one of my first foamcore constructions.
A Hunter warmech on patrol.
Cover is extremely important in Maelstrom's Edge, so wherever possible I have tried to include protruding elements for models to potentially hide behind, as can be seen in the buttressing on the building behind the Hunter.
A Scorpion drone lurks in the courtyard, awaiting instructions from its Handler.
Of course, some details aren't particularly useful for cover, and are just there to look pretty.
On the other side of town, a Hunter on loan from the Swamp Research Team surveys the laneway.
Painting has mostly been kept fairly simple, with the buildings all painted white with some salt weathering to make them look like they've been exposed to the elements on an unfriendly world. I wanted a unified colour scheme to help tie the disparate buildings together, so they would look like the town was cobbled together from various sources, but would still look like it was purpose built for a single organisation.
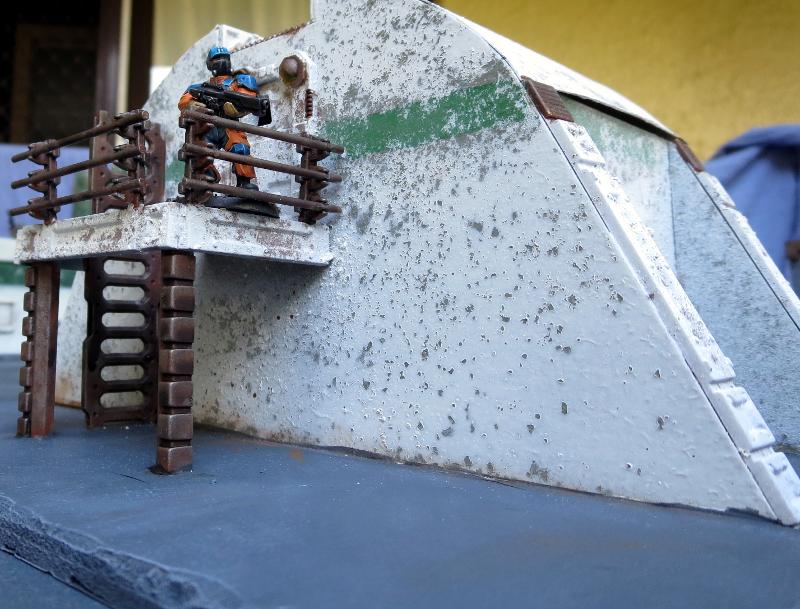
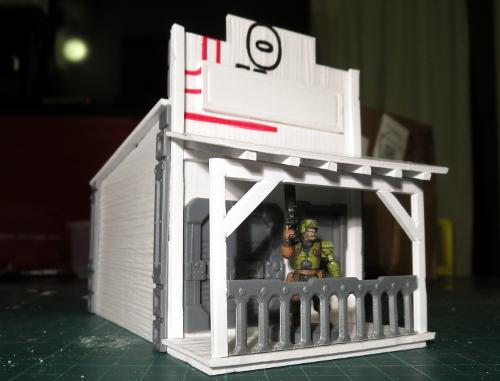
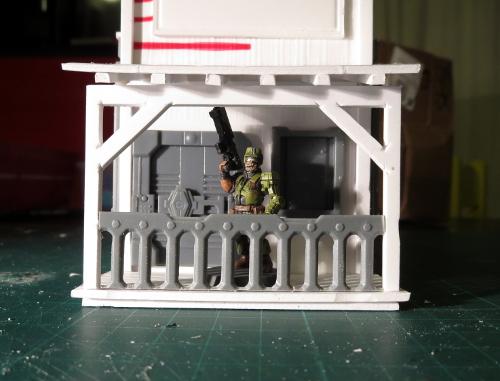
Lieutenant Bob takes up position on the balcony.
Variations on a basic design can help create a 'kit-home' look, with some different buildings that all clearly belong together. The above building was constructed using a similar template to the first foamcore structure, but with the courtyard removed and a balcony added. You can see the construction of this building in a short video here.
The Karists advance.
If you're aiming for an urban-themed board, it's a good idea to add in some area terrain elements rather than just having a table filled with solid buildings, as this mixes things up a bit for movement and cover. The same template used for Lieutenant Bob's balcony building was used to create a ruin, just by cutting off the roof, bashing things up a bit and adding some rubble on the base.
A lone Karist trooper lurks between the buildings.
In the background above you can see another building made from a plastic storage tray. Check out the build video here.
Scarecrows move to intercept the intruders.
Playing on a themed table is a great way to bring your games to life, as it helps to create the illusion of an actual battlefield, rather than just having a random assortment of different terrain.
Despite imminent conflict, Bob can't resist trying out his new camera drone...
Still to do: I have several more buildings still on the workbench for this board, including a bot storage building and some more small multi-purpose buildings. I'd also like to add some sort of water-treatment pond. This will help to expand out from 4'x4' to a more rounded 4'x6', which is better for standard games. It would also benefit from the addition of more scatter terrain to break up the firelanes a little, which will be my next terrain project:
All of the decorative elements on the buildings shown here are from the Maelstrom's Edge terrain sprue. You can find this in a handy two-pack in the Maelstrom's Edge online store here. You can share your terrain creations on the Comm Guild Facebook page!
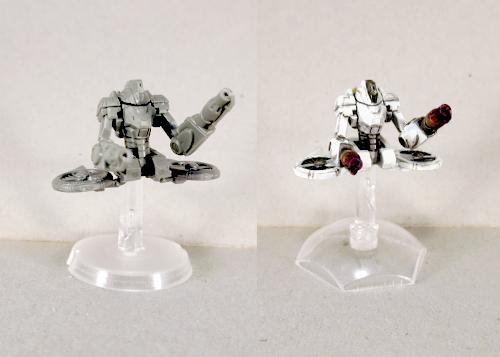
Conversion Spotlight: Epirian Automated Uplink Relay
Posted on Monday Mar 20, 2017 at 05:00pm in Models
- by Iain Wilson
The dependence on robotic units and information warfare means that the Epirian Foundation relies on
electronic communication to function as an effective fighting force. When pursuing conflicts outside of its zone of control, the Foundation uses portable uplinks that link to orbital satellites and airborne recon, providing battlefield intelligence about enemy positions and weaknesses and allowing Bot Handlers to remotely interface with Epirian drones on the ground.
The Maelstrom's Edge rules include an automated uplink relay as a faction-specific objective for the Epirian forces. The uplink itself is represented with a cardboard standee, as it represents a physical object that moves around the board, but I thought it might be nice to have an actual model to represent it. And so, I came up with this:
 My kitbash differs a bit from the artwork on the card - the artwork was done while the game was still in its early design stages, before the models were finalised. As a result, the drone chassis that forms the basis of the upper body of the uplink is really too small for the job. The card version also wound up with only a single gun, while the finished version of the uplink, ruleswise, is supposed to have two flakk batteries.
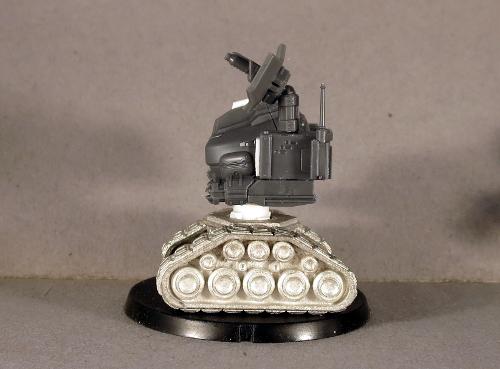
So after initially looking at various ideas using a drone chassis, I went with a Hunter torso instead.
The track unit was purloined from a Counterblast Mekkus Defender robot. Quick and easy to assemble - just two track units and a central hub to which they both attach.

I then took a Hunter torso and cut it off at the waist joint.
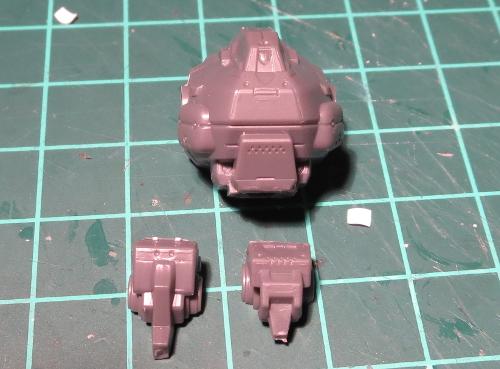
A new waist joint was constructed from plastic tubing, to slot neatly into the waiting cavity in the top of the track unit's central hub.

The flakk batteries were constructed from the flakk guns on the drone sprue. I took the two weapon mount parts and joined them together, glued a flakk gun onto each mount and added a third flakk gun, slightly shaved down on either side, inset between the other two. These were then attached to the forearm magazine piece from the hunter to create something reminiscent of the boxy 'shoulders' of the drone chassis from the original uplink artwork.
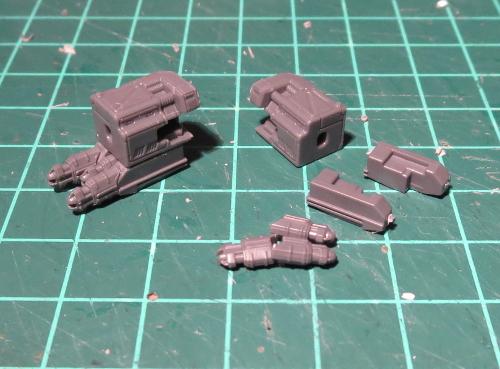
One of the big, obvious details in the artwork is the big satellite dish mounted on the uplink's left shoulder. I didn't have anything suitably rounded to hand, but in a flash of inspiration grabbed the flakk cannon from the Hunter sprue and chopped through the exposed parts of the cannon barrels. The shield section was then attached at a jaunty angle to the muzzle end of the cannon, and an antenna made from the coaxial barrel from the Hunter's chaingun.

The shoulder sockets were trimmed at an angle so that the weapon arms would sit horizontal. The weapon arms were then glued in place, and the satellite dish and an auxiliary antenna made from the 'spare' weapon on the drone sprue attached to the left shoulder. I also added a square of plasticard to the front of each shoulder to cover over the original weapon attachment sockets. These have an 'X' shape scribed into them to once again tie back to the drone shoulder design. As a final nod to the drone chassis (although this is a detail on the final drone model that is absent from the uplink illustration) I added a pair of rails running along the top of the head, cut from thin plasticard.


I decided to paint this one up to match my original Epirian colour scheme, using Vallejo Yellow Green with a wash of Army Painter Green Tone, and the metal parts painted Vallejo Basalt Grey with a couple of coats of Army Painter Dark Tone.
The tracks were given a light drybrush with Citadel Boltgun Metal (aka Leadbelcher) and then another wash, this time with Army Painter Strong Tone.
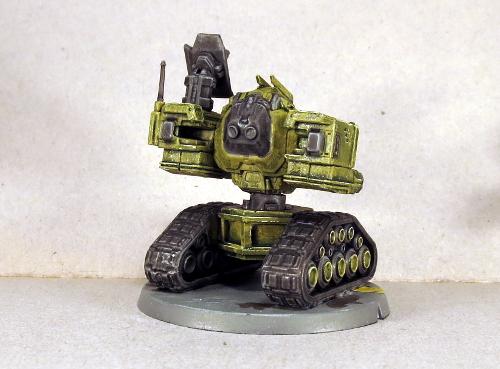
The base was urban-ised with a basecoat of Vallejo Neutral Grey and a drybrush of Vallejo Light Grey. Some oil stains splotched on with Army Painter Strong Tone, some chipping, and some yellow line markings complete the scene.
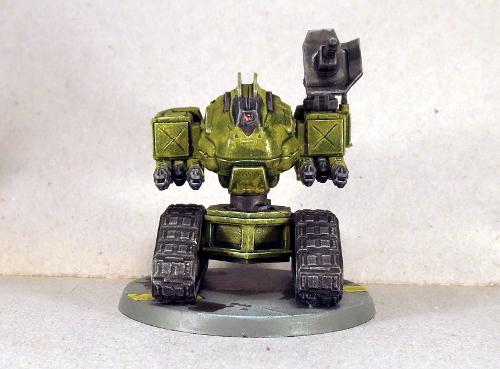
And so there it is: One Automated Uplink Relay. Size-wise, it comes in as a perfect match height=wise for the card version. A little more sideways bulk, but that suits it with the size of the base anyway.
It's not a perfect match for the artwork, but I think it's close enough to be recognisable for what it's supposed to be, and is a really easy conversion.
If you would like to have a go at this yourself, you'll need the track unit from Counterblast (or something else like it - there are a fair few options out there for small, tracked weapon units), and a Maelstrom's Edge Hunter (which will also give you the base for the uplink) and two Drone sprues - You'll have enough parts left over to still build complete drones from those sprues with the other weapon options. You can find the Maelstrom's Edge sprues in the online store here.
Be sure to share your version of the completed uplink relay on the Comm Guild Facebook page!
Terrain Walkthrough: Western-themed SciFi Building
Posted on Monday Mar 13, 2017 at 05:00pm in Models
- by Iain Wilson
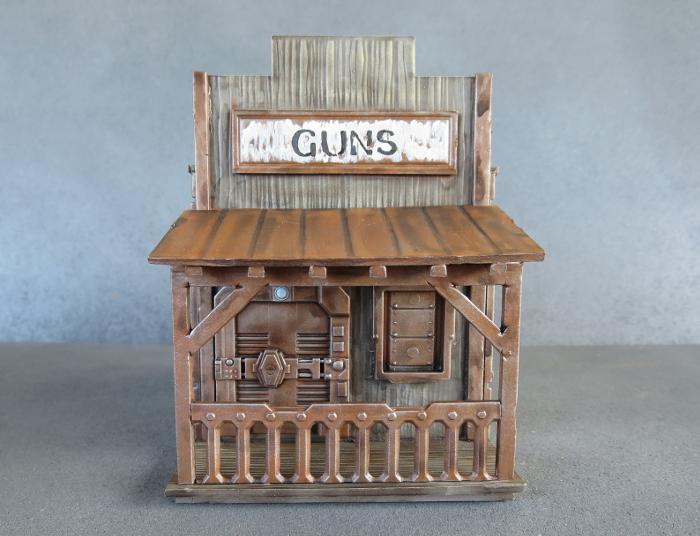
A few weeks back, I built an Epirian Stockyard, just to get an idea of how some more rustic styling would fit into the Maelstrom's Edge universe. So it was with a fairly large amount of delight that I stumbled this week upon some fantastic, inexpensive, western-styled building kits from a company called Plast Craft Games. These are made from die-cut PVC sheets, and make a perfect base for customisation - in this case, with the addition of some parts from the Maelstrom's Edge Terrain Sprue to make a scifi frontier-town building.
The original kit comes as a single PVC sheet, with the cut panels attached with a few lugs. The PVC is soft enough to cut easily, and while there was some warping of some of the panels (I'm assuming from the pressure of the cutting process) they bend back into shape readily enough. The fact that the woodgrain shown in the store pics of the kit was actually embossed onto the parts was a nice surprise - I had been assuming that was just painted detail.
So, the first step was to remove all of the panels from the sheet and clean off the attachment lugs. I was a little surprised to find printing on the outer facings of the building pieces - as I inadvertently discovered three-quarters of the way through assembly, this is actually a sheet of protective film that peels off, once you know about it... It's not mentioned in the mostly-pictorial assembly instructions.
The opening for the door on the front wall turned out to be exactly the right height for the terrain sprue door, although I had to widen it a little. This was the work of a moment with a steel ruler and an exacto knife, and then I did the same for the window, which needed to be widened just a fraction and lengthened a bit. These parts could then be glued in with superglue.
The back wall of the building doesn't have any openings, but I decided to add a second door for in-game versatility. This was done by tracing around the door frame and cutting out a hole for it with the exacto knife and ruler again.
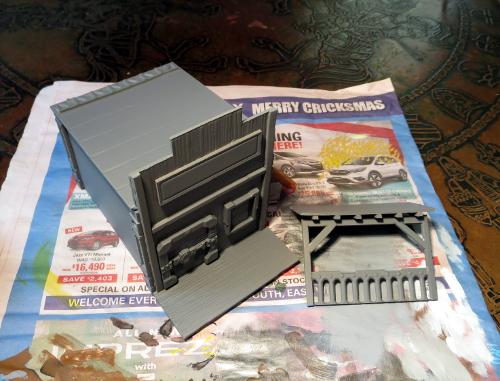
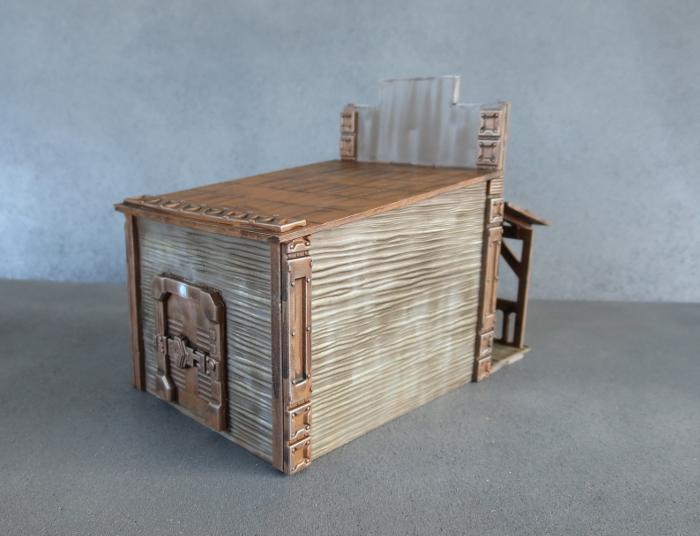
From there, the rest of the building could be assembled. There are some timber braces that run vertically up the edges of each all to disguise the panel joins. I left these on the front and back wall, but flipped them over to hide the woodgrain so that they could be painted as metal to match the terrain sprue parts. Then I added the terrain sprue reinforcing pieces on the side walls and roof, and added a railing to the front porch using a trimmed-down ladder.
(The porch roof and rails are still unglued at this point, to make painting the front of the building easier.)
Time to paint!
I started with a spray of grey undercoat all over.
Parts that I wanted to be metal were then given a coat of Vallejo Beasty Brown.
This was followed with a light drybrush of Citadel Boltgun Metal (Leadbelcher, for the newcomers)

Then the whole building was given a generous wash with Army Painter Strong Tone.
Once dry, the wash was cleaned up a little in a few places where it hadn't covered quite right, and then the wood areas were drybrushed with P3 Jack Bone, with some white mixed in for some lighter areas - this was intended to give the wood an uneven, weathered appearance. The metal parts were also given a light drybrush with the Boltgun Metal again.
At that point, all that was left was to paint up the lights on top of the doors (Citadel Ice Blue with a drybrush of white) and the green-orange-red lights on the door lock panels, give the moving parts of the door locks a coat of Boltgun Metal to make them stand out from the rest of the weathered metal parts, and to paint the sign on the front wall.

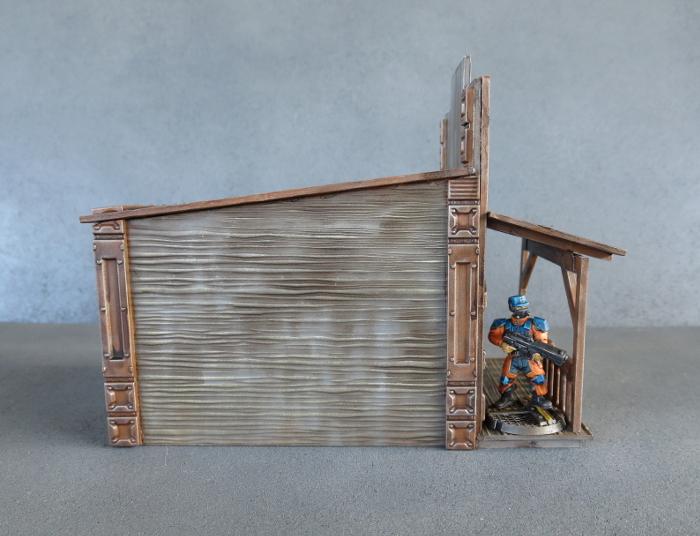
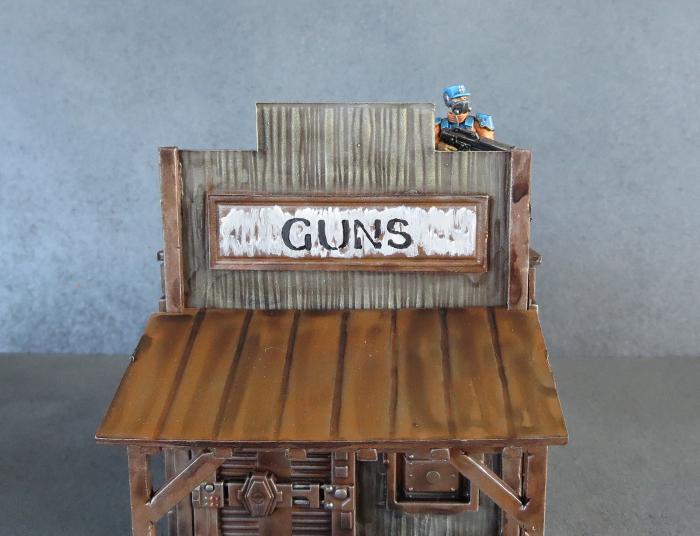
So while Lieutenant Bob there takes up his sniping position on the roof, and I go off to make up a town's-worth of these and track down some models for the Serenity crew, we mosey off into the sunset once more.
If you're feeling a similar urge to misbehave, you can find the Plast Craft Games range in various hobby stores and through their own webstore and you can pick up the Maelstrom's Edge terrain sprue 2-pack from the Maelstrom's Edge webstore here.
As always, we'd love to see what you come up with, so feel free to share your creations on the Comm Guild Facebook page!
Terrain Walkthrough: Plantation Dome
Posted on Monday Mar 06, 2017 at 05:00pm in Models
- by Iain Wilson
On many frontier worlds, terraforming is still underway when colonists move in and start trying to install some sort of civilisation on everything. Where conditions are less favourable, this can require mean that non-native vegetation can need a little help getting established.
One of my very early ideas when the Maelstrom's Edge Terrain Sprue was first released into my eager little hands was for a small bio-dome-style structure where food or other useful plants would be grown during the process of making the planet fully habitable. It's taken a while to get back to it, but this is what I eventually came up with:

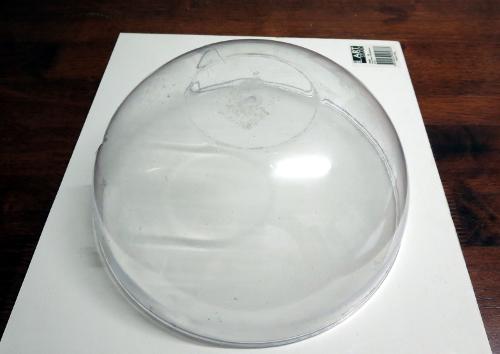
The foundation for this building was a plastic salad bowl, found at a local discount store.
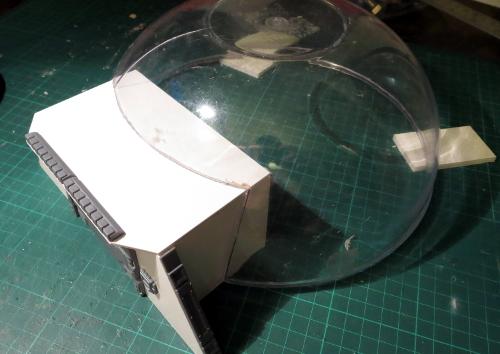
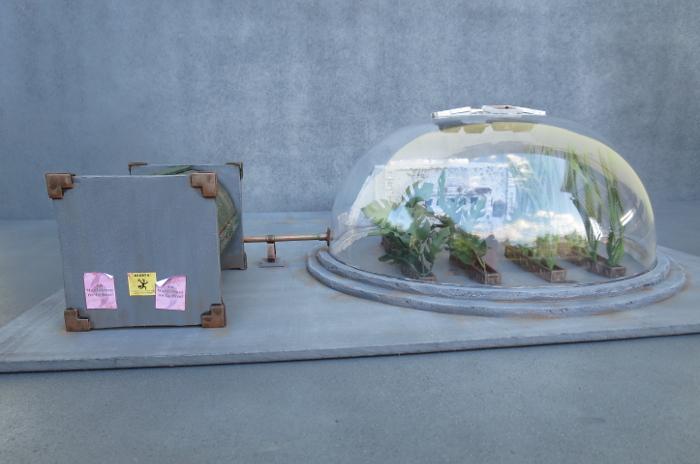
I built a 'gateway' building, to be installed into the side of the dome. This would form a sort of airlock, to allow for environment control inside the dome, and also function as a storeroom for whatever tools or drones were used to maintain the plantlife inside.
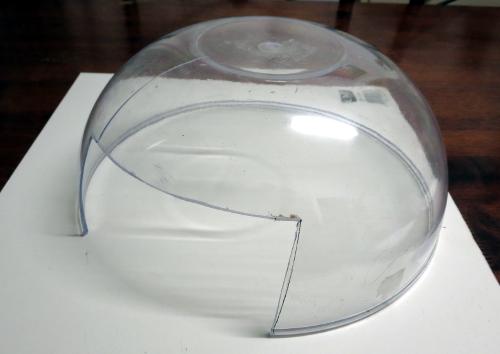
To install the airlock, I carefully cut a square hole into the side of the bowl. Apparently I wasn't quite careful enough, as the fairly brittle plastic cracked just as I was almost finished cutting. (Note for next time - use a razor saw rather than trying to get clever with an exacto knife!) I decided to go with it anyway, as a little damage on battlefield terrain obviously isn't the end of the world.
The gateway building was prettied up with doors, control panels and some reinforcing from the terrain sprue.
The hole in the side of the bowl is 5mm too short for the gateway. That allows me to add a foamcore rim around the base of the dome, with another ring of foamcore running on top, sealing in the edge of the bowl.
I wanted some detail for the top of the dome, to disguise the bowl's flat bottom. So I took some shutter windows and used a razor saw to cut the backs of the frames so that the windows sit on an angle.
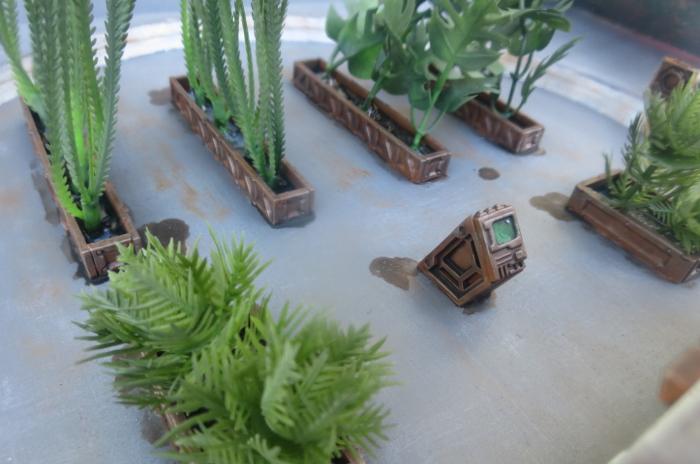
These were then glued to a circle of plasticard cut slightly smaller than the base of the bowl. A square hatch in the middle forms a hub, where I imagine the machinery that controls the shutters would be located.
On the inside of the bowl, I added some large pipe fittings, positioned to sit directly underneath each of the shutter windows. This forms a venting system, to allow the atmosphere inside the dome to be vented in an emergency, or to allow controlled amounts of the outside air into the dome.

A bunch of reinforcing strips from the terrain sprue were hacked up and glued into planter boxes to go inside the dome.
To these, I added a control unit using a control panel and two trapezoid windows glued together with a small piece of foamcore sandwiched between them. This would control the environment inside the dome, administer fertilisers or other chemicals to the plants, or activate the dome's resident drones.
After marking out the inside circumference of the dome on a sheet of masonite, the planters and control unit were glued in place.

For the plants themselves, I cut appropriately-sized pieces from a few different aquarium plants. These were lightly sprayed with a matt green paint to dull them down a little and make them look slightly less plastic. These would be glued into the planter boxes and the boxes then half-filled with clear craft glue (water effects would be better, but I was in a hurry and craft glue was what I had to hand).
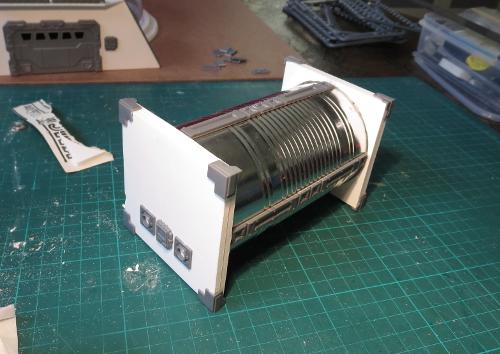
To add a little extra detail to the overall terrain piece, I built a water tank from some foamcore and a beverage mix tin. The ends of the tin are nested into circles cut into the inner sheets of foamcore, for extra strength.
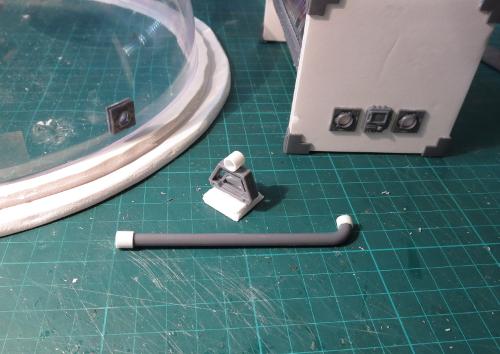
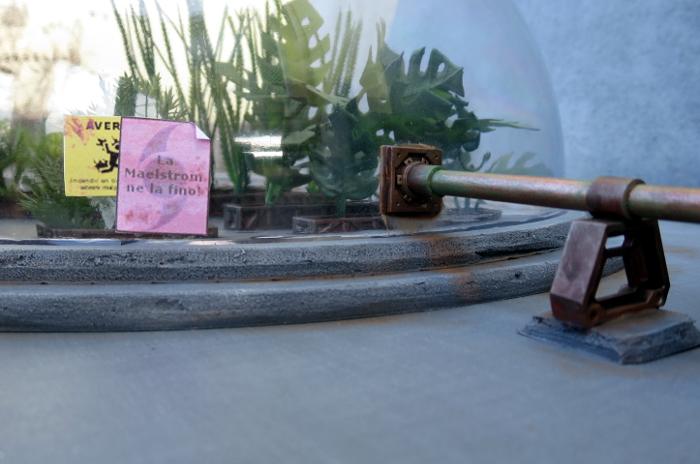
A pipe made from a piece of sprue cut from the terrain sprue and some plastic tube joins the water tank to the dome. I built a support for the pipe from a trapezoid window and another piece of tube, and added small pipe fittings from the terrain sprue to the inside and outside of the dome. The drone tasked with watering the plants would connect to the interior fitting and syphon off as much water as required.
The last thing to do then before painting and assembling everything was to paint any exposed edges of the foamcore with some PVA glue, to protect it from the spraypaint.
My original batch of buildings for Maelstrom's Edge were painted white with green detailing, and since the gateway building for this one was constructed in a similar style, I went with a matching colour scheme.
The gateway was sprayed with a grey undercoat, and then a spray of matt white, with salt weathering to give it a nicely aged appearance.
The water tank was painted brown, drybrushed with Citadel Boltgun Metal and washed with Army Painter Strong Tone before being sprayed with a coat of green.
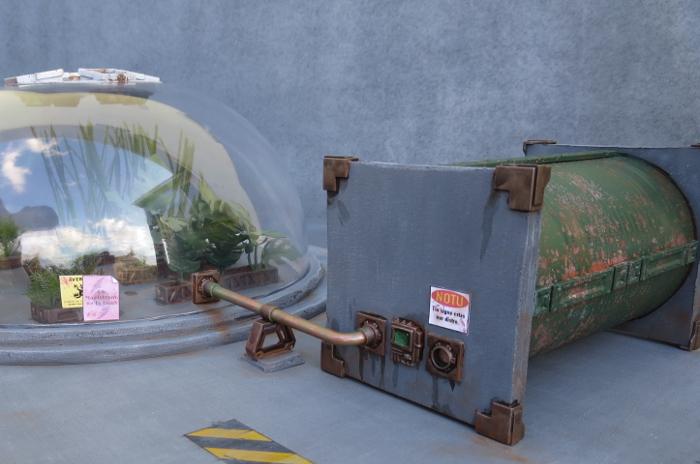
Again, salt weathering adds some age and experience. The end pieces, along with the base board and the dome rim, were painted with Vallejo Basalt Grey and then drybrushed with Vallejo Light Grey.
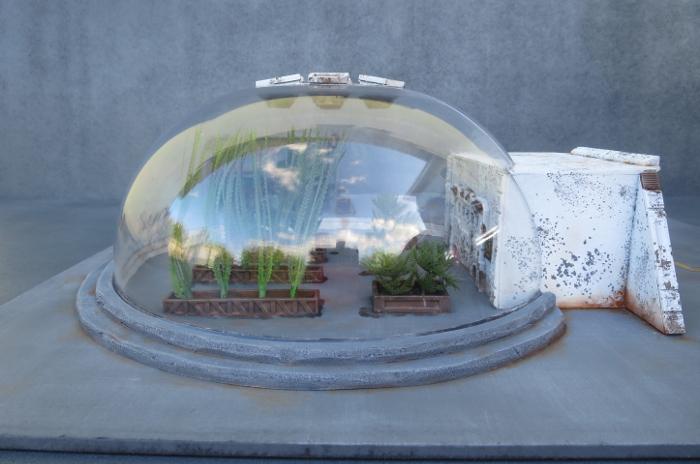
A few touches of Vallejo Beasty Brown add some dirt around the place, and some signs created in Gimp, printed out and glued in place add some character touches.
The interior needed to be all painted and the plants glued in place before the dome could be glued down.
I considered leaving the gateway unglued, so that it could be pulled out to put models inside the dome, but figured that as cool as that might look, there was little actual point in being able to do so in-game, so for a gaming terrain piece that was an unnecessary bit of fiddliness.
A yellow guideline adds a little extra detail to the broad expance of base. The base was deliberately large - the dome and water tank make for a fairly hefty line of sight blocker, so I wanted to leave plenty of free space around it. Where a little more cover is required, scatter terrain (barriers, crates, industrial bins, and the like) can easily be added to the open front corner.
And that's it - another terrain piece just waiting for a battle to spring up around it.
To build your own plantation dome, or a transport hub, or whatever other round thing strikes your fancy, you can pick up the Maelstrom's Edge terrain sprue from the online store (in a handy 2-pack!) here.
As always, please feel free to share your creations on the Comm Guild Facebook page!
Tags: buildings modeling terrain walkthrough
Painting Tutorial: Weathered Metal
Posted on Monday Feb 27, 2017 at 05:00pm in Tutorials
- by Iain Wilson
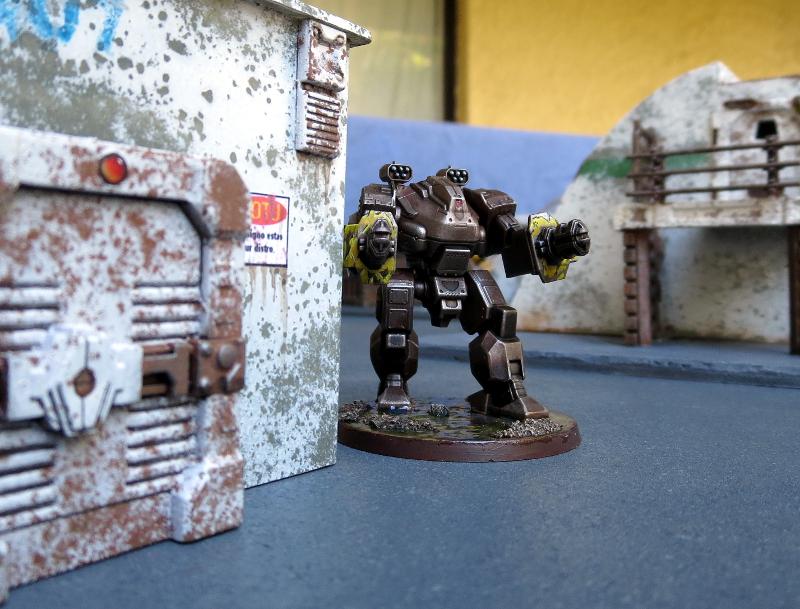
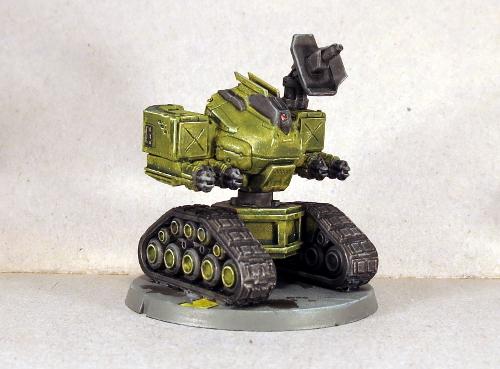
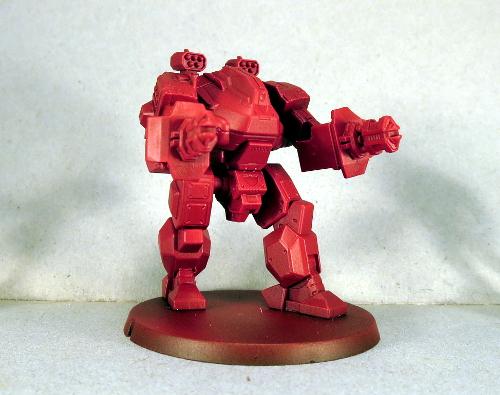
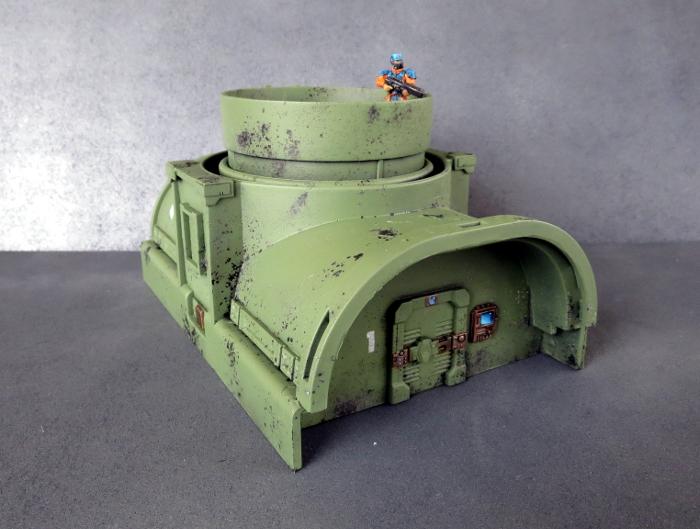
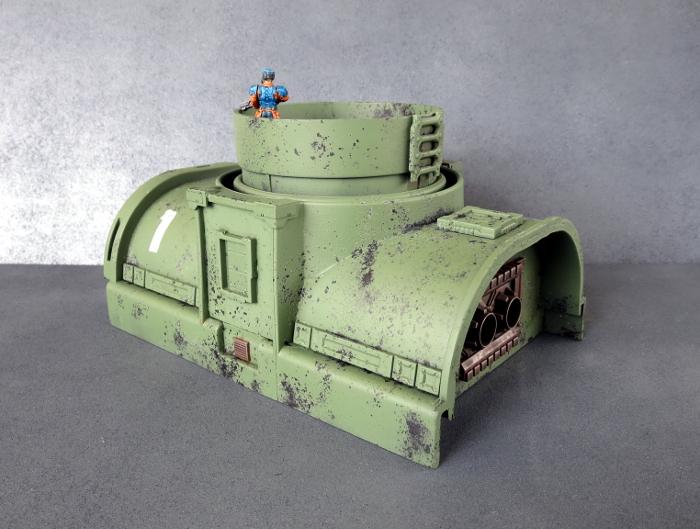
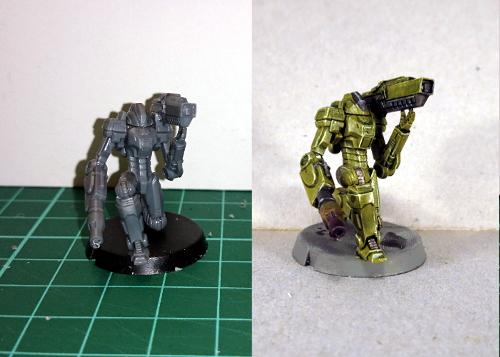
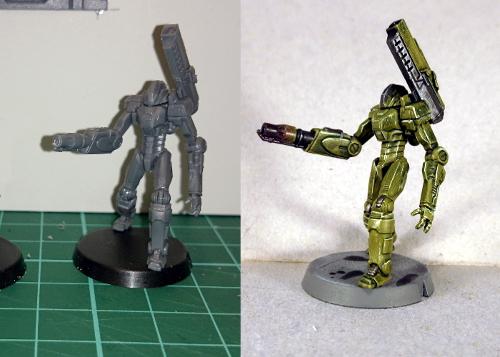
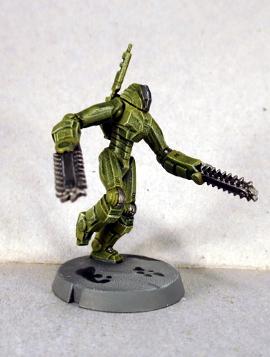
Terraforming planets is hard work, particularly on those worlds where conditions are less than favourable to begin with. Equipment has to contend with a huge range of different environments and, particularly once the Maelstrom come close, maintenance schedules can be somewhat less rigorously clung to than they might be on more 'civilised' worlds. This gives a bit of scope for painting terrain and models with a less polished finish, so this week, I thought I'd share an easy little method that I use to paint weathered metal. My guinea pig here is an Epirian Hunter Warmech.
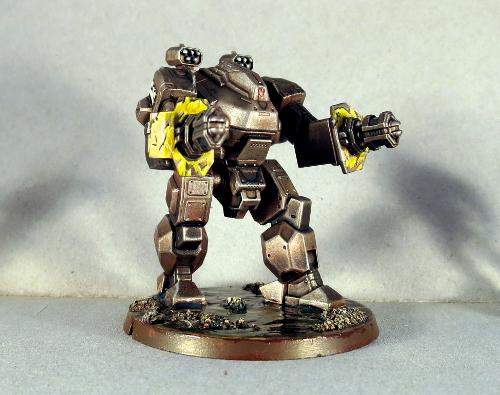
This all starts with a red undercoat - Here I've used Army Painter Pure Red. Just a light coat, as it doesn't have to be super-bright. Going straight over the grey plastic dulls the red down a little as well.
Over the red, paint a coat of a medium brown colour. I've used Vallejo Beasty Brown. This doesn't need to be perfectly even - If a bit of the red tint shows through, all the better. It will look a little odd to begin with, but it all pulls together at the end.
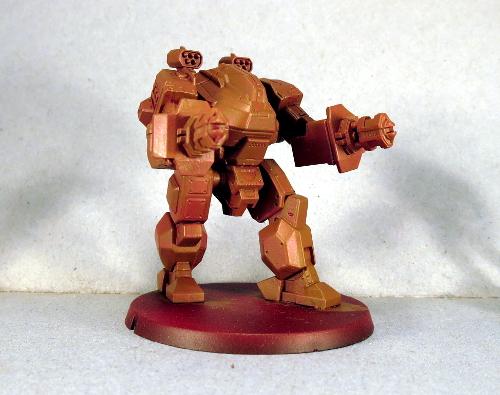
Next, paint a light coat of a medium metal tone. I've used P3 Pig Iron, which is roughly equivalent to the old Boltgun Metal/Leadbelcher. Again, you don't want to completely cover the brown. For a more rusted, dirty look, just lightly drybrush the metal on. For a more lightly weathered look, use a heavier coat of metal while leaving the brown in the creases. And as with the red, if a little brown tint shows through the coat of metal, that's excellent for our purposes here.

Now the magic step: Give the model a liberal coat of brown ink. The below is done with Army Painter Strong Tone, which is more or less identical to the old Citadel Devlan Mud. (Agrax Nightshade replaced this in the Citadel range. It's probably close enough for these purposes, but I haven't tried it.)
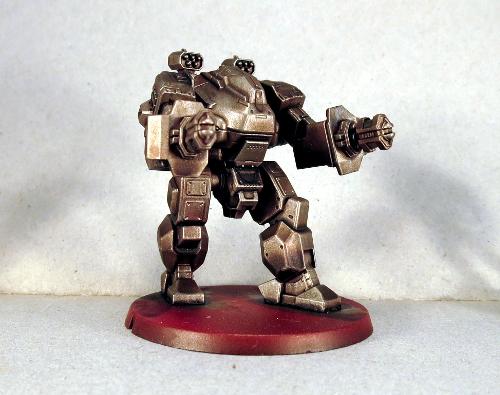
Once the ink is dry, it's time for final detailing. You can highlight with a little silver to pick out raised edges, just to brighten things up a little bit. I also like to go over weapons and working parts with a coat or two of black ink, to make them stand out a little more. You can also paint over the top with a patchy layer of colour to show worn paint with the metal showing through.
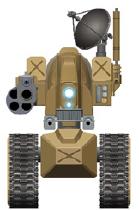
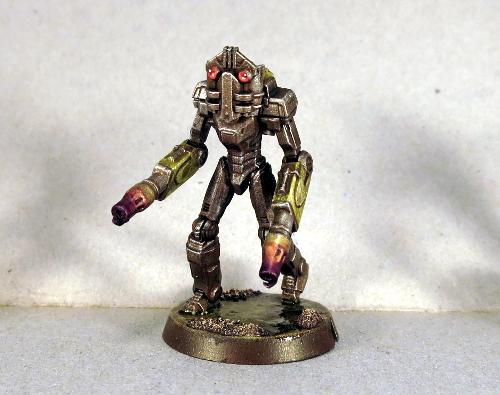
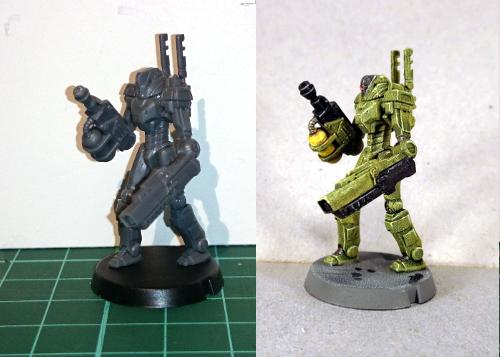
Here's the same technique on a different model, this time a slightly converted Epirian Scarecrow.
This is also a great way to pick out metal detail on buildings or ruins. Below is an example with a more dirty effect, achieved by just lightly drybrushing the metal over the brown before washing, as described above.
You can also add extra weathering by drybrushing brown or rusty red over the top, wherever looks like an appropriate place for rust or dirt to gather, or experiment with different coloured washes to create different metal effects.
You can pick up the models shown in this article from the Maelstrom's Edge webstore here. As always, we'd love to see what you're working on, so feel free to swing by the Comm Guild Facebook page!
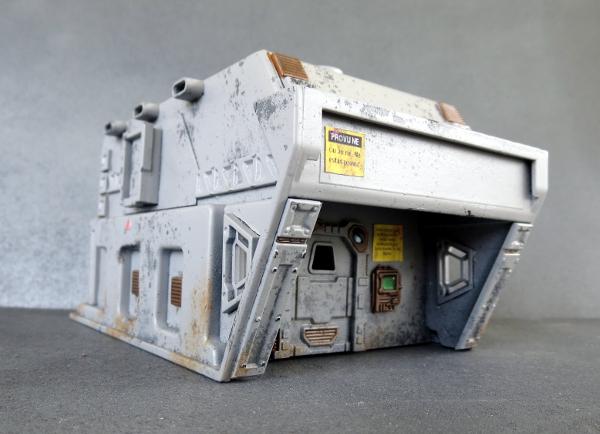
Terrain Tutorial: Drainage Channel Buildings
Posted on Monday Feb 20, 2017 at 05:00pm in Tutorials
- by Iain Wilson
In my continuing quest to turn every interesting thing I encounter into wargaming terrain, I often find myself wandering up and down the plumbing aisle of the local hardware store. The result of the latest meanderings, once combined with some foamcore and an assortment of parts from the Maelstrom's Edge Terrain Sprue, looks like this:
This started out life as a section of plastic drainage channel, that looks like this:
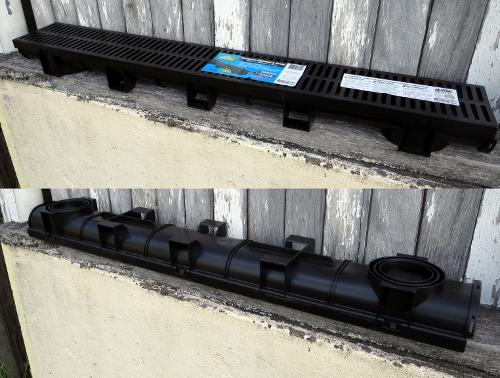
There are a whole bunch of variations on these, in different sizes and with different detailing on the undersides, which become the buildings' roofs. I chose this particular one through the arcane process of just buying the cheapest one (which was around AU$15).
Clearly having designed this product with wargamers in mind, the manufacturer has quite helpfully broken the length of channel into 5 sections.
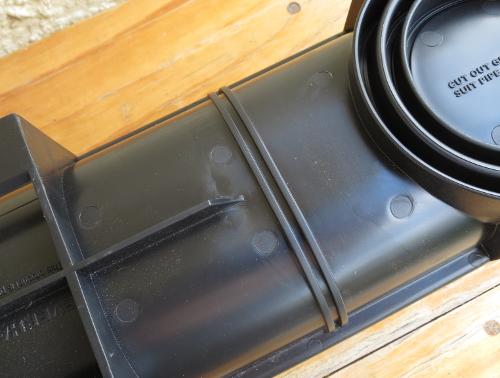
Taking to those dividing lines with a hacksaw results in 5 equal lengths, just the perfect size for a building.

Rough edges on the cut ends can be sanded or trimmed with a sharp knife.
To fill in the ends, I used foamcore. You could also use plasticard, cardboard or corrugated plastic signboard, but I like foamcore for its ease of use.
To get the shape right, sit the building shell end-wise on the foamcore, and trace around the inside with a pencil.
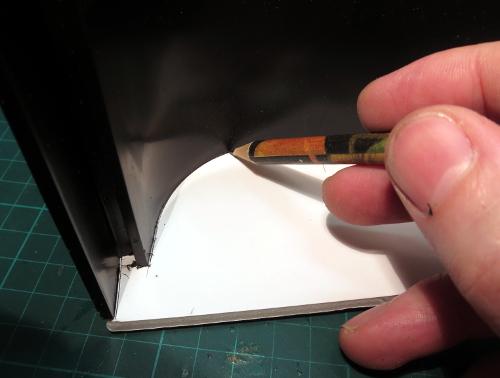
Cut out the resultant shape with a sharp knife.
Once your end piece is cut out, check the fit against the shell, and trim wherever necessary to get a neat fit. Then add details from the terrain sprue components. I'm starting with a garage door - these are designed to be inset, so cut out a hole for it by tracing around the frame and then cutting out. Check for fit, and then glue the door in place.
The end panel can then be glued in place in the end of the building shell. Recessing the wall a little, rather than having it flush with the end of the shell, will provide a nice little nook for models to take cover in.
A note on glue - Skip this part if you've read any of my previous articles on gluing things to random assorted plastic objects: Plastics used for plumbing fittings are not generally designed with gamers in mind, but you can usually get away with a good quality superglue. For gluing plastic to plastic, you can buy specialised 'all plastic' glues, some of which are a two-part system (a tube of superglue, and a 'primer' that helps the glue stick better) and some that are just really sticky glue. For foamcore, you can use superglue if you're just gluing onto the cardboard outer shell, but superglue will melt the interior foam, so for gluing to the edges of the foamcore you'll need a good PVA glue or a specialist Foam glue, which you should be able to get from any craft store.
Repeat for the other end, using whatever detail components seem appropriate.
Each section of this channel has a raised, rectangular detail midway down each side, which I believe is to help keep it in place in the ground, for those rare situations where you might feel inclined to buy these for their actual, intended purpose. These are turned into windows by adding a panel of foamcore with a shutter window inset into the middle. On this section, there is also a small hole below the window where the grating clipped in. This is also covered over with a little foamcore.
The back on some of the sections also needs filling in with a little more foamcore.
A couple of reinforcing struts from the terrain sprue add a little extra detail down the sides of the building shell.
On the roof, errant text or (in this case) batch symbols can be covered over with hatches or extra reinforcing.
With detailing complete, the building winds up looking something like this:
There are some differences between the separate sections of this channel. The above was from the middle section. The next section along is almost the same, but with a raised ridge down the middle.
The sections on either end have a circular detail in the middle, for attaching downpipes.

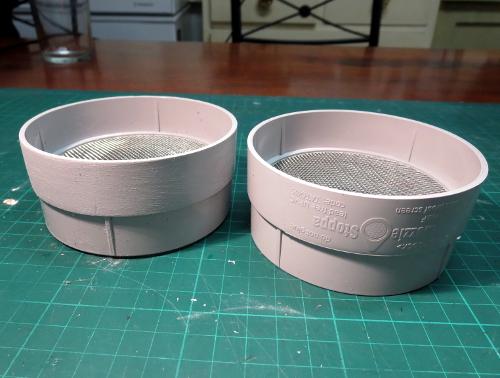
This turned out to be a perfect spot to place an old PC fan.
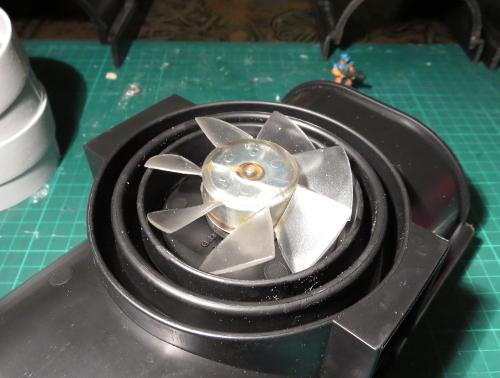
Over this, I added a section of mosquito barrier, intended for insertion into guttering downpipes. This had some text around the outside, which I removed with a bit of sanding.
Once clipped in place over the fan and with a section of ladder glued onto the outside for access, this creates a nice visual detail, and a functional watch platform.
So the resultant building looks like this:
Construction complete, the end result is three different buildings that all look similar enough to represent mass-produced structures with slight variations for specific roles.
Astute readers may realise that this leaves two sections of the original channel. The only logical thing to do with them was, of course, to combine them and make a two-story version:

On the upper story, I recessed the end walls even further in and added a floor from foamcore, to create a good-sized balcony on either end of the building. The railing was made from two ladders.
From there, all that's left is to paint them!
I used a Killrust Satin Black spray as a basecoat - a decent quality spray is a good idea, as cheaper sprays may not stick as well to the plastic used for these channels. This was followed up with a coat of Rustoleum 'Oil Rubbed Bronze', which I thought would make a nice, dark, weathered metal layer to show through for the weathering. A coat of sealer and a sprinkle of salt (there's a tutorial on salt-weathering coming in the very near future), and then a top coat with Army Painter 'Army Green', before scrubbing off the salt. Then some final detailing, and the buildings are ready for the table.
If you're feeling the urge to head on out to the hardware store to recreate these yourself, you can pick up a two-pack of the Maelstrom's Edge terrain sprues from the online store here. As always, feel free to share your creations on the Comm Guild Facebook page!
Spotlight: Epirian Scarecrow
Posted on Monday Feb 13, 2017 at 05:00pm in Models
- by Iain Wilson
Scarecrows are a mainstay of Foundation design, originally created to protect the wide-open swathes of agricultural assets on newly terraformed worlds, but since reimagined into a deadly military asset. Here, we take a look at the scarecrow kit, and some of the various ways that you can hack it up and get all creative on its shiny, robot posterior.
The Scarecrow sprue builds the regular Scarecrow, and also includes a variant head and command unit for the model's back to upgrade to the Scarecrow command variant, which lets you take an entire army of assorted Epirian robots.
Studio Scarecrow Models
This kit was designed specifically to allow as much poseability as possible, with joints at the elbows, knees and ankles.

This allows you to assemble the Scarecrow into anything from a stationary pose, to walking, running, or even kneeling down (for that extra sniper-y feeling!)
This model had some slight trimming done on the left elbow joint to allow it to bend a little further than normal, but the legs are completely unmodified
The maglock railrifle that makes up the Scarecrow's long-range firepower is designed to sit horizontally on the top of the shoulder pad. Thanks to the flat planes of the shoulder pad, however, it's easy to raise the railrifle up into a 'standby' position by simply gluing it onto the back of the pad instead of the top.
Alternatively, you can substitute the railrifle for the left forearm by cutting the elbow joint off the forearm and gluing it onto the back end of the railrifle.
For a slightly more complicated variant, the below model has the railrifle substituted in for the right arm weapon. The right shoulder was trimmed up slightly to allow the shoulder pad to swing around a little further than normal, the right elbow bent in slightly, and the left wrist sliced through and the hand rotated to support the rifle. The chemtech sprayer is on standby on the robot's back, where I would assume some handy mechanism allows him to swap out the two weapons as required.

A variant of the Scarecrow bot swaps out the railrifle in favour of two linked clingfire sprayers. Each sprue only comes with one of each weapon, so you'll need to steal the second from another Scarecrow sprue, but the weapons are designed to fit onto either arm.
This variant is also useable as a Subjugator bot, an assault mech used by Epirian Suppression squads. While there's no particular need to do anything to make a Subjugator visually different to a regular Scarecrow, why let that stop you?
The below model (which I'm calling a 'tiki-bot') is a stock standard Scarecrow with the command unit trimmed up a little and glued over the face.
If you prefer your crowd control to be more mobile, you can remove the legs entirely and replace them with a handy flight unit, made from scavenged turbines from a Firefly drone (which you'll have left over if you went with Spider drones instead).
For a slightly less out-of-the-box option, you can use a grenade launcher from the Bot Handler sprue and a force rod from the Faction Expansion sprue to make a closer-quarters version of the Subjugator.

And finally, the up-close-and-personal variant, made by swapping out the arms for legs taken from a second kit (this gives the shoulders a slightly wider range of movement) and adding some chainsaw blades taken from a Games Workshop Space Marine kit.
There are no rules for these last two options - I just thought they would be fun to build. I'd love to see what people come up with for them, though!
If you're feeling the urge to create some killer robots of your own, you can pick up the Scarecrow in a pack of two from the Maelstrom's Edge webstore here. And as always, feel free to share your creations on the Comm Guild Facebook page!
Tags: conversion epirian scarecrow
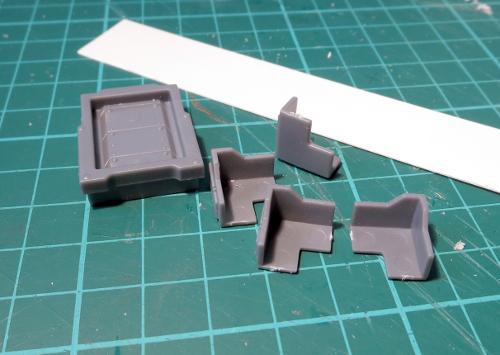
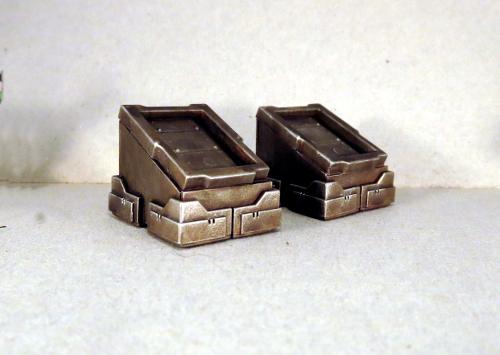
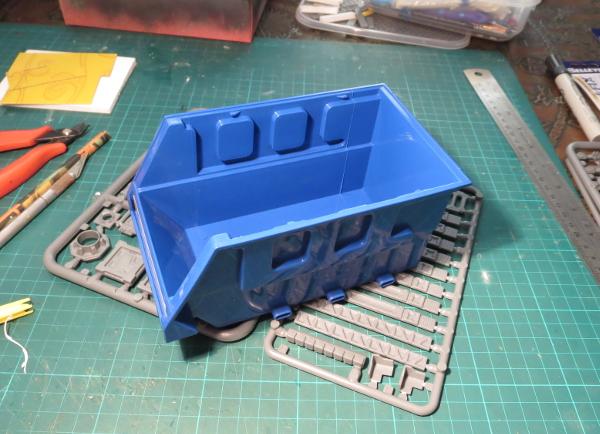
Terrain Tutorial: Plastic Storage Tray Buildings
Posted on Monday Feb 06, 2017 at 05:00pm in Tutorials
- by Iain Wilson
The Maelstrom's Edge Terrain Sprue contains a slew of assorted plastic bits and pieces that can be used to pretty up your home-made scifi terrain, including a bunch of essential elements like doors, windows and pipe fittings. A few months ago I posted a tutorial on using cardboard gift boxes to create quick and easy buildings, which you can still find here. This time around, I'm using plastic modular storage trays to create buildings like this:
These trays can be found at most hardware stores, or anywhere online that sells plastic storage - you can find a few different examples on Amazon, and they're generally pretty inexpensive and available in a bunch of different sizes.
Here's a glimpse of what we're going to do to it:
Before getting started, a quick note on glue.
Obviously, versatility for making wargaming terrain isn't a prime design consideration for the people making these trays, and so the plastics used for them can be a little variable to work with. Plastic (polystyrene) cement won't work on them, but for the most part I've found that superglue works just fine. If they have a waxy feel to the plastic, or if you try the superglue and it doesn't hold particularly well, there are specific glues out there for dealing with recalcitrant plastics that look something like this:
This is a two-part system that uses a primer to help the glue stick. Just apply the primer, then apply the glue, push the parts together, and they'll never come apart again. I don't use it all the time simply because it's more bother than a single tube of glue, but for those trickier jobs it works a treat.
Edit: It can also help when gluing this sort of shiny plastic product to give it a sand with some fine sandpaper. This breaks up the glossy surface, giving the glue a better purchase.
SO, onto the building!
There are a few parts on the terrain sprue that are designed to be inset into a wall. If you're using any of these, I recommend cutting the holes for them as the first job, to avoid accidentally popping glued parts off when the plastic flexes while you're trying to cut it.
I'm starting here with the trapezoid windows, which will go into the front sides of the tray. This adds a nice little detail at what will be the front of the building, and also serves in this case to get rid of some imprinted text on the sides of the tray. I vary the orientation of these depending on the exact shape of the tray that I use, as different trays will have different angles at the front. Go with whatever looks best with the trays you use - for this one, I'm putting the long edges vertical.
To cut out the hole for them, hold the window against the side of the tray and trace lightly around it with a sharp knife.
You can then drop the window and carefully cut along the traced lines. If you have a Dremel-style rotary tool with a saw or small router bit, that might save some effort here, but otherwise just going slowly and carefully with the knife and not trying to cut right through in one go does the job.
Once you have all for sides cut through, check the window for fit and neaten up as necessary. The mould line on the window serves as a handy guide to get the windows on both sides of the building pushed through their respective walls an even amount.
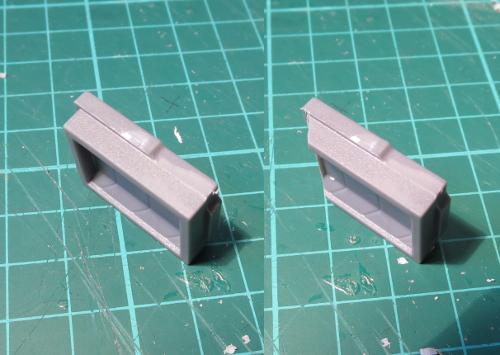
There is generally a small lip of plastic at the back of these trays that is used for clipping them onto racking. If you're feeling lazy you can just leave it there and work around it, but I find it looks better to remove it. A decent pair of clippers will get rid of the bulk of it and then you can just clean up with the knife.
The reinforcing strips off the terrain sprue are the real heroes of this build, as they do such a great job of making otherwise bare plastic look like a manufactured structure. They can be used intact where there is room, like this:
Alternatively, you can chop them up along the edges of the panels to fit them around the moulded shapes on the tray.
There will sometimes be writing imprinted onto the sides of the tray.
This can be removed by cutting it out and replacing with detail parts, as with the trapezoid windows back at the start, or the shutter windows on this building:
Alternatively, you can cover it over with a little cardboard, plasticard or foamcore cut to an appropriate shape. Here, I've used a small piece of thin cardboard to cover the bulk of the text, with a rectangle cut in the middle for a shutter window. These are designed so that they can be inset into the wall, but they look fine just stuck directly onto the surface as well, and that saves cutting more holes in the plastic.

There is also usually a small nub on the bottom of the tray (which is forming the building's roof) from the moulding process used to manufacture the tray. I like the cover these over with the large pipe fitting from the terrain sprue:
This can then have some plastic rod added to create a chimney, or a fan blade cut from a circle of cardboard to make an exhaust fan.
The exact layout of parts on the sides of the building is driven by the shape of the moulding, and by how detailed you want your building to be.
With the outside all detailed up, it's time to seal in the front. I generally use foamcore for this for ease of cutting and strength, but plasticard or cardboard would also do the job, as does corrugated plastic sign board. There can be a little trial and error getting a piece cut to fit just right with the shape of the tray - I start by fitting to the bottom of the tray (the widest part), pushing the cut piece into the tray up to the narrower point which is usually about halfway in, marking the foamcore with a pencil using the interior of the tray as a guide, and then cutting to match.
If you're making up a bunch of these buildings using identical trays, it's a big time-saver to make a template out of a piece of cardboard or plasticard and use that to mark out your wall pieces.
You can then trace around whichever door you are using.
Cut out the door hole and glue the door in (remember not to apply superglue directly to the foam interior of the foamcore, as it will melt). Once the door, control panel, and anything else you're putting on the wall is attached, just slide the wall into the tray and glue it in place.
On this building, I added a service counter using a trimmed down lintel piece.
As an alternative to the small doors, some trays fit the garage door quite well, although sometimes with a little trimming to shape required.
Alternatively, some trays are sized just right to glue the garage door directly to the outside front of the tray, which creates an interesting angled front, although loses you the nice little awning for models to hide in.
Once you have the building all detailed up, all that's left is to paint it.
These are a perfect canvas for weathering effects - I'll be looking to cover some different techniques for that in coming tutorials.
As with the glue, painting can be a slightly variable experience, depending on the specific plastic used. You can use an etching primer if you want to make sure it will stick, but I've been getting by with regular spray paint and sealer.
Unsealed, the paint can scratch off, although just how easily will depend on the plastic and the quality of your paint. If you're planning on using a rigorous weathering technique like salt weathering, I recommend applying a light coat of sealer over the base coat to make it a little more durable.
When you're done, a good spray of matte sealer over the top should keep everything where it belongs.
For a break from solid buildings, you can create ruins by chopping out the bottoms of the trays and applying suitably damaged terrain parts.
Or for something a little more ambitious, the modular nature of these trays makes it relatively easy to stack them up and make multi-story units. This one below will eventually have a little balcony off the front of the upper level, perfect for hiding sneaky sniper units.
You can quickly and easily assemble a table-full of modular terrain units using a bunch of identical trays, or mix-and-match different size or brand trays for more of a ramshackle, cobbled-together settlement, just perfect for a stellar refugee camp or a temporary staging base, and buildings can be easily customised to fit different roles in the settlement.
If this has inspired you to create your own modular settlement, grab yourself some terrain sprues from the Maelstrom Edge online store here, and as always be sure to share your creations on the Comm Guild Facebook page!
Tags: buildings terrain terrainsprue tutorial
Battle report: The final act?
Posted on Wednesday Feb 01, 2017 at 05:00pm in Gaming
Originally posted on DakkaDakka by Sgt. Oddball.
Fluff bits are in italics, game bits in plain text.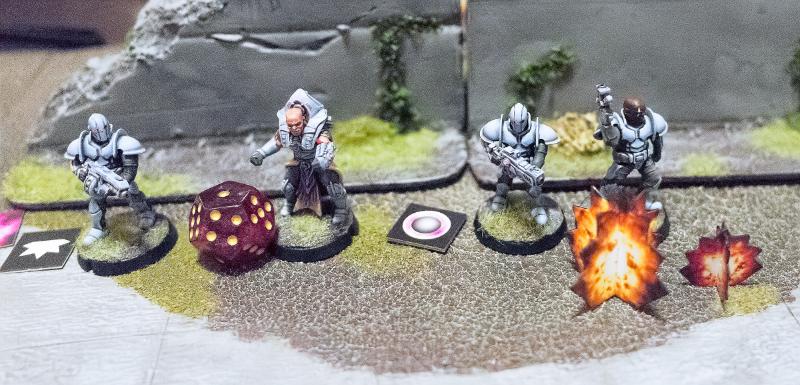
Introduction
Bacaro wasn’t quite sure if his last outing had been success or failure, really. Two things were now becoming clear to him though. First of all that this conflict would not be won or lost by military supremacy. The Karist Enclave, though they had struck a severe blow with their surprise offensive, were severely outnumbered by the Epirian forces on Asper and could not hope to hold out for all that long. This conflict would be decided by the people. The Karists clearly counted on both gaining enough support from the people themselves and also, perhaps more importantly, on the Broken causing major havoc. The Broken had already become more then an annoyance before the Karist assault, but they had taken this opportunity to increase their efforts to claim what they thought was theirs. The shock of the early Karist successes and the fear of being abandoned by the Foundation had already caused many to flock to the Broken cause. If order could not be restored quickly, Asper would be lost. Bacaro’s second epiphany concerned his own person. He’d always thought himself a Handler of status. The jobs he was assigned and the meagre forces supplied to him now showed that the head honchos did not in fact think of Bacaro very highly, or, indeed, at all. Take his current mission. He was to take and hold some backwater energy station that never did matter and never would, and he was to do it with a frankly depressing ‘ force’. “Well”, thought Bacaro, “this might be as good a time as any to start making my own plans” as he hopped out of his prowler.Mission and objectives
I’m trying to develop a sort of ‘introductory mission’, using small forces and a smaller play area. This mission uses the Territories and Decimation objectives (and the faction objectives).Terrain
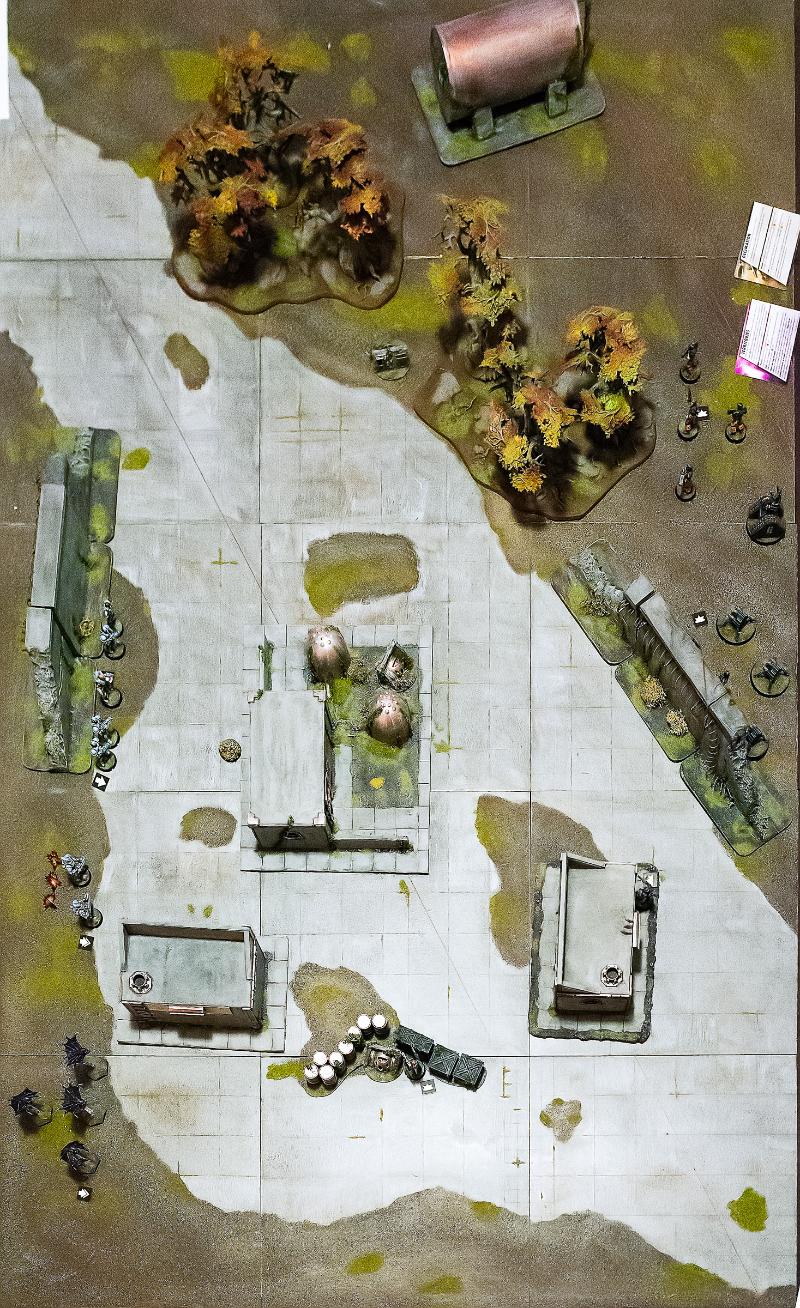
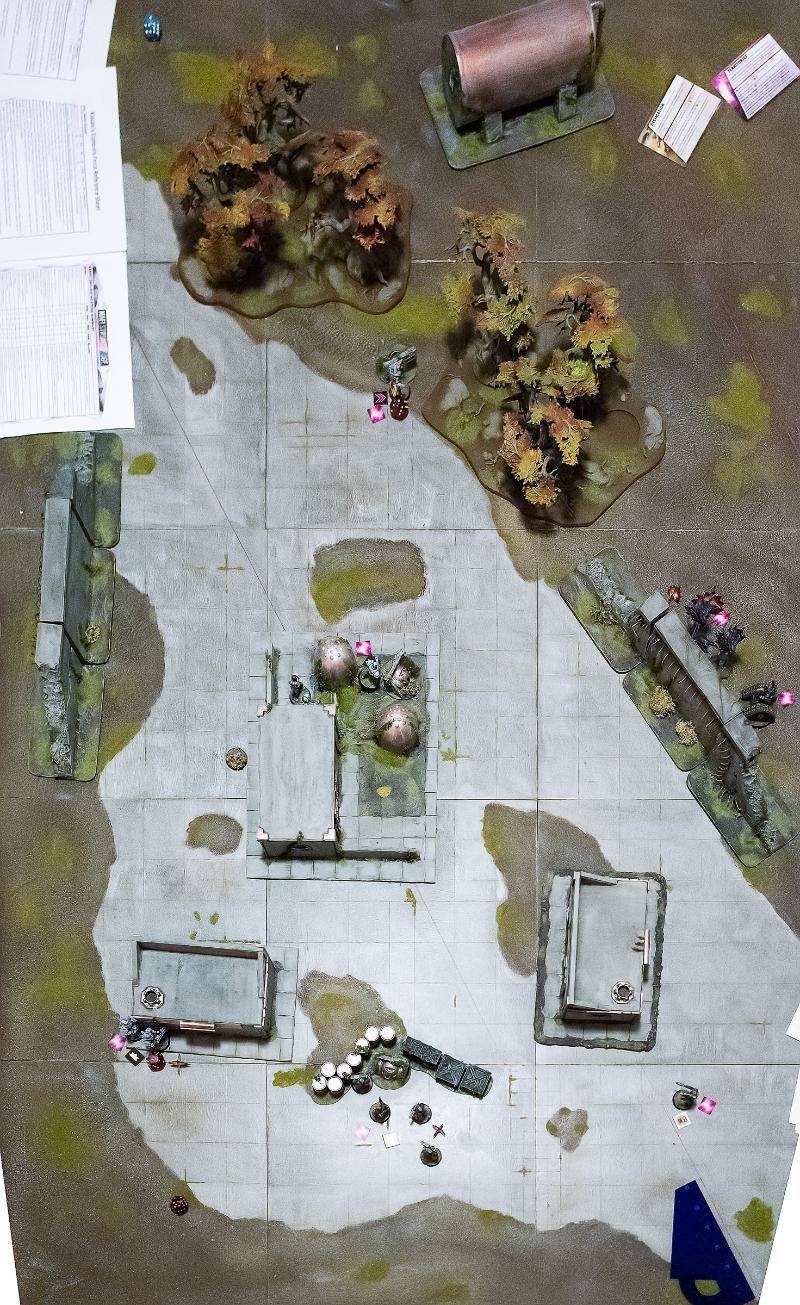
Backwater energy station.
The board is 3’ by 5’. All terrain was assigned cover value 2. The woods are area terrain, the buildings, crates & barrels and the walls are obstacles. We didn’t use the actual building rules, so units couldn’t enter.
Kaddar Nova Myro strongly felt the absence of Elyssa, the Shadow Walker. She’d always made sure there were no surprises, no open ends. Now, Myro felt he was going in blind-folded. The Enclave needed more Cybel energy though, desperately so, there was no holding back.
Deployment
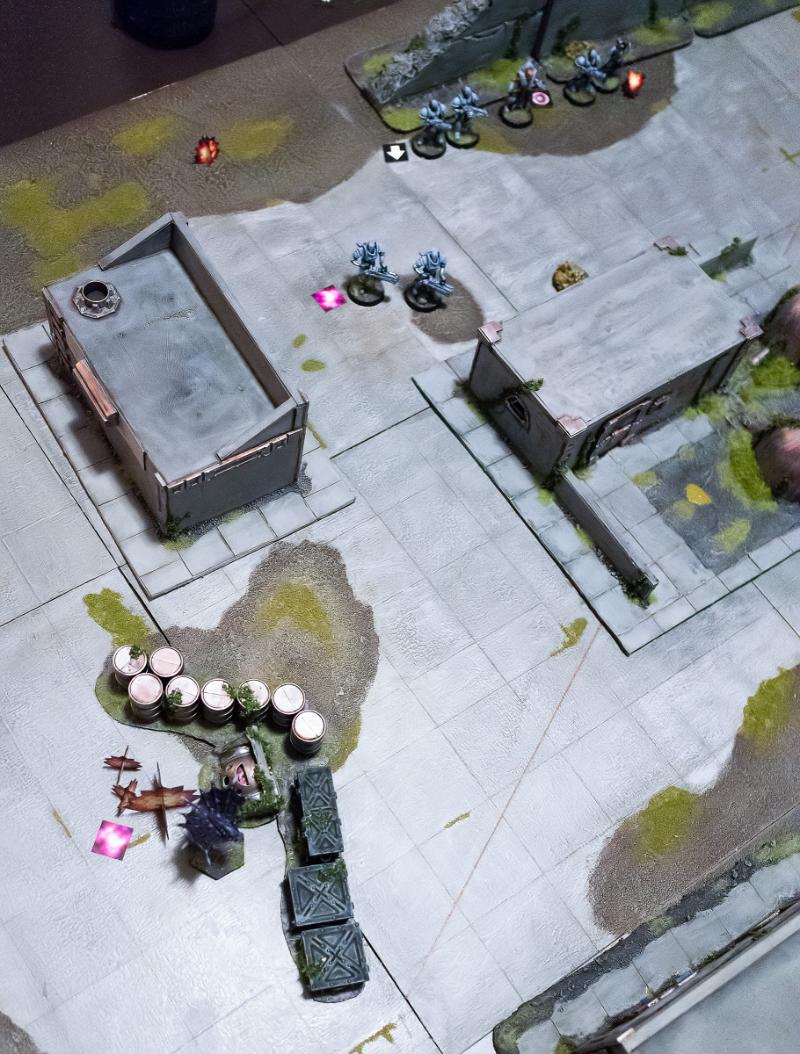
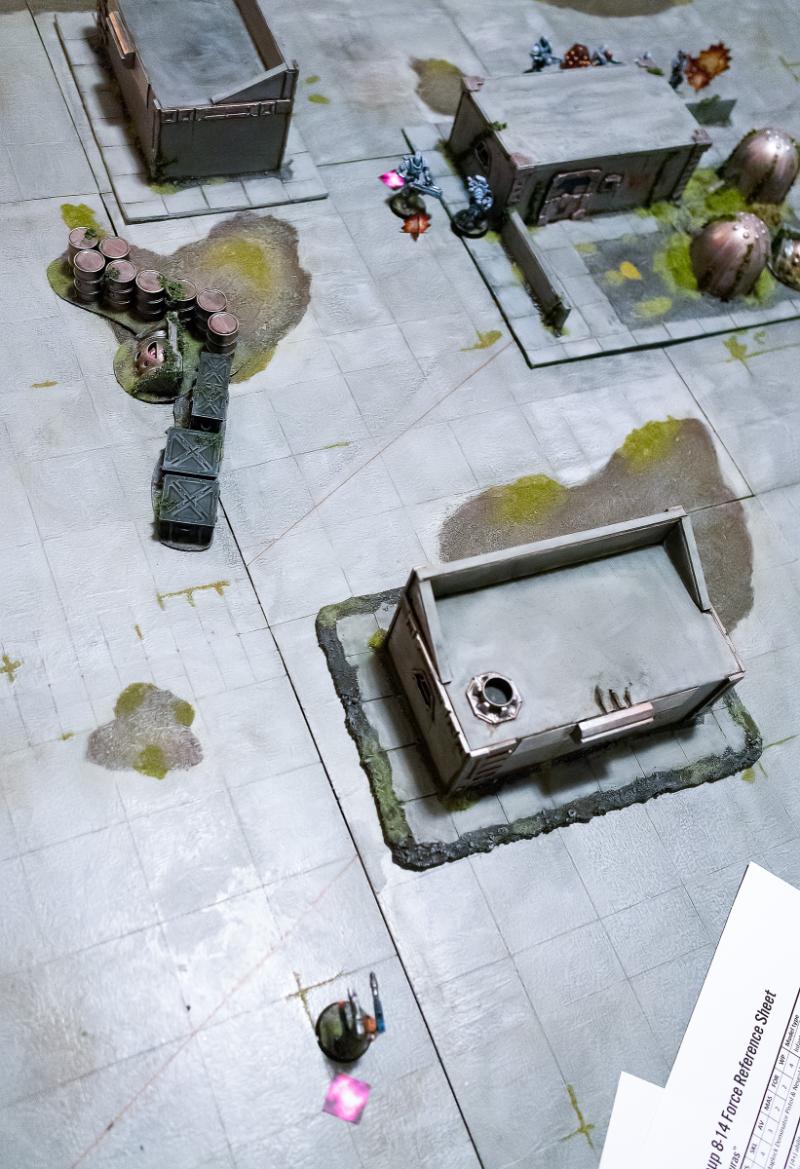
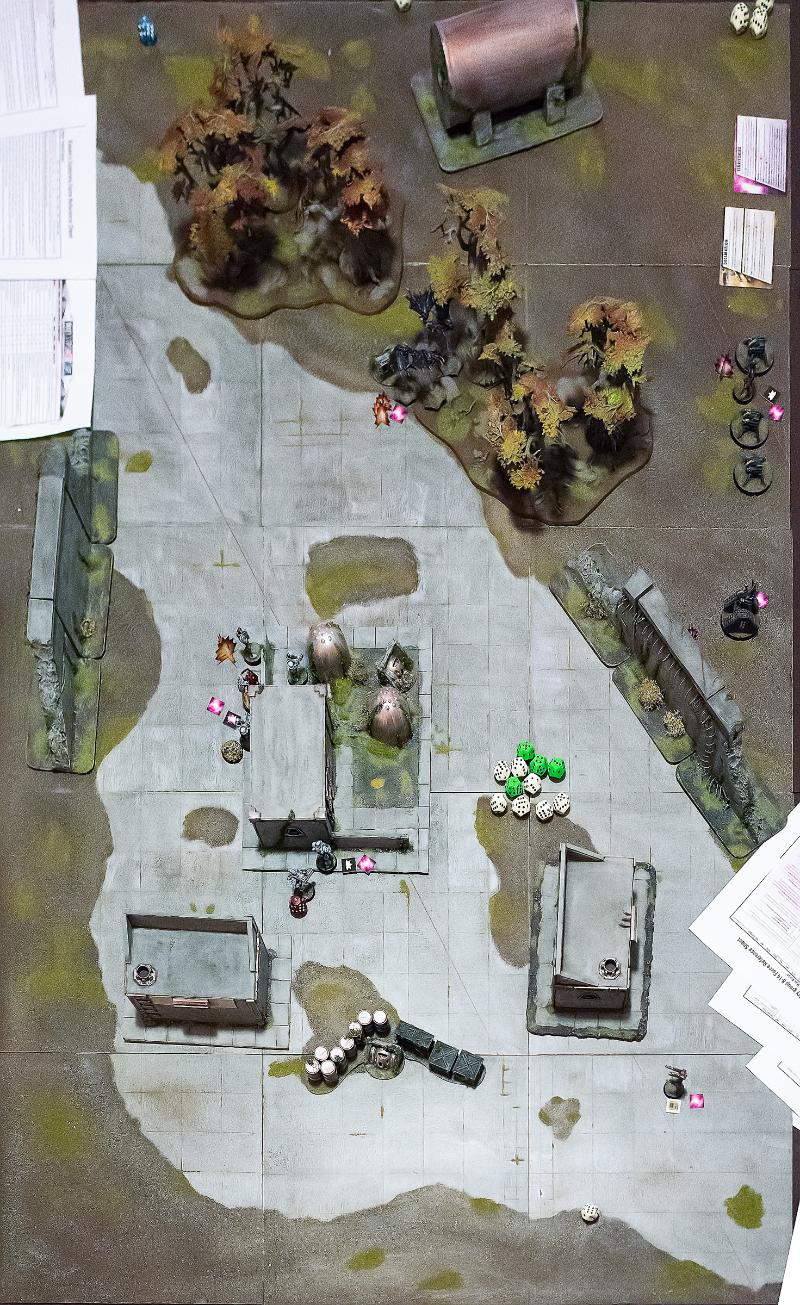
Pitched deployment was rolled for. The Karists bid 3STs to be attackers. Deployment is as shown.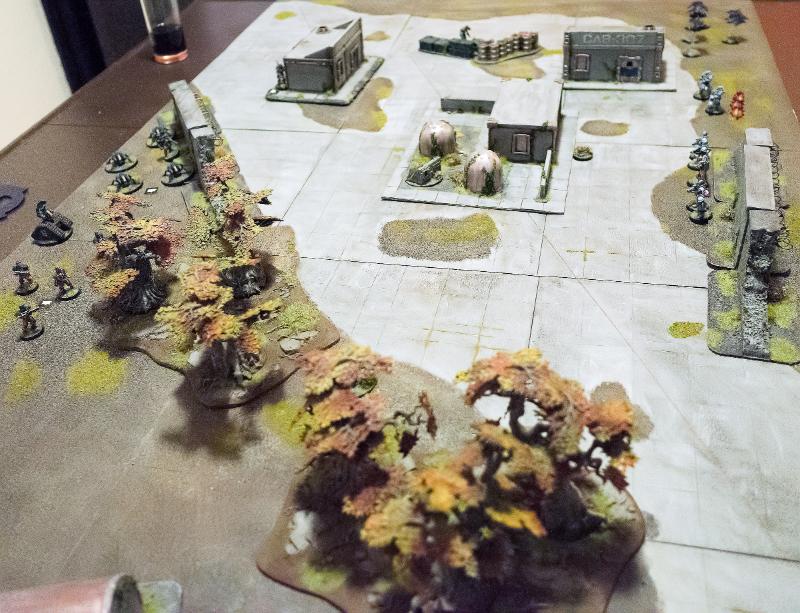
Epirian Deployment left, Karists right. The Territories objectives are three energy terminal markers spread in a line across the board. All Karists are deployed on the move, all Epirians are deployed pinned.
Karist force (49 pts)
- Kaddar Nova Myro;
- 4 Troopers with a Ripper Grenade Launcher;
- 2 Tempest Elites with Ravager Vulcan Pulse Cannons (with 3 deployment STs);
- 4 Angel Minnows.
Epirian force (90 pts)
- Journeyman Bot Handler Bacaro;
- 4 Contractors with 1 grenade launcher;
- 5 Firefly Drones;
- 4 Spider Drones with Cutter light machine guns and an apprentice handler;
- Scarecrow with Maglock Railrifle and Clingfire sprayer.
Turn 1
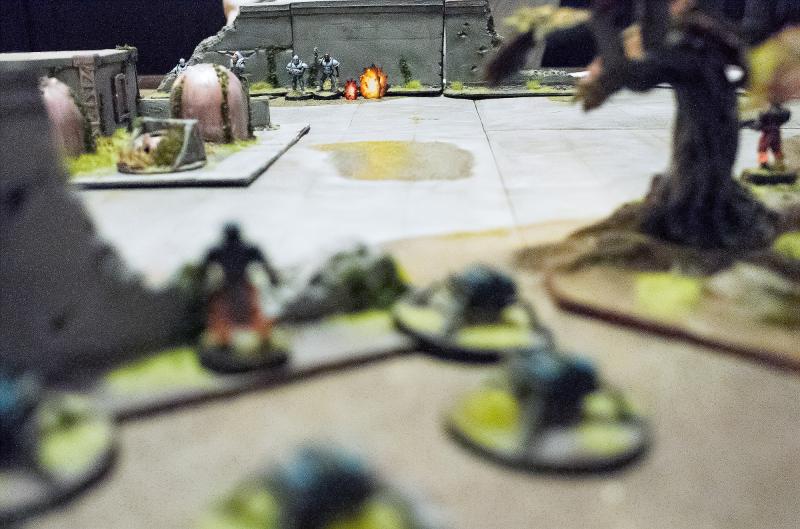
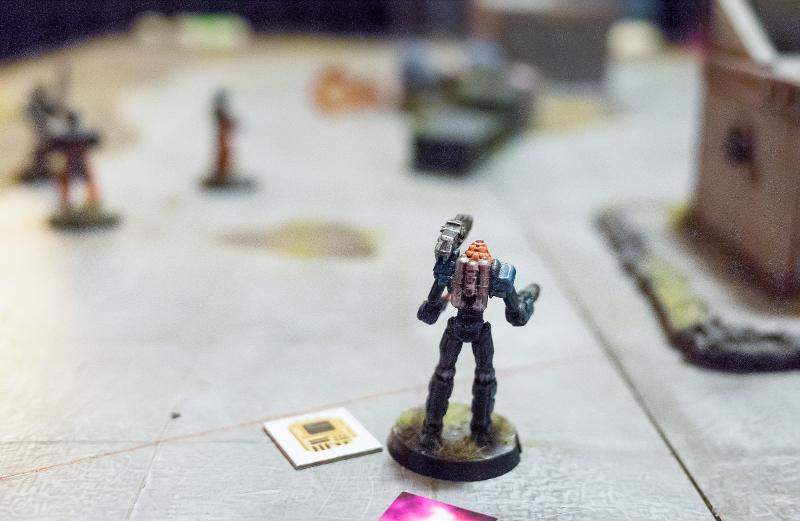
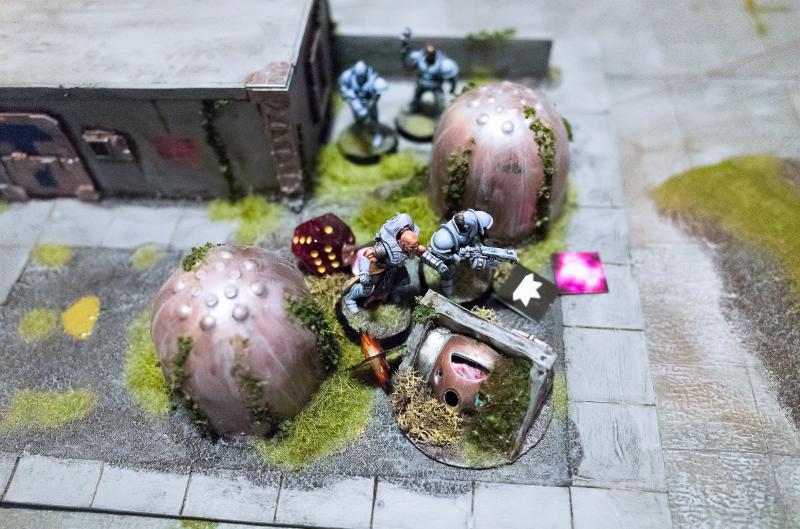
Note that I’ll be ignoring the Epirian Automated Uplink Relay activations: it contributed its victory point the first couple of turns and added some command points later on. Also, my flash trigger battery was empty so the pics are a bit sub par, and also I didn't take any notes so the report as a whole is a bit iffy.Myro wasn’t going to waste any time. “Fly, my pretties” he thought as he watched his flock of Minnows descend upon the Epirian unbelievers.
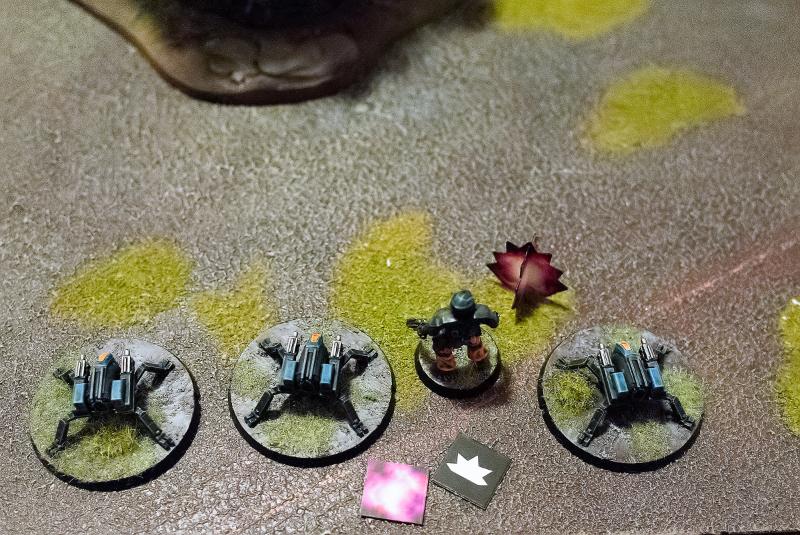
1st activation: The Minnows charge into the lone Scarecrow. After defensive fire, CQ fighting and reactive CQ fighting, the Minnows are 1 down and have gained a pile of STs, whilst the Scarecrow has suffered an injury and has also taken some STs.
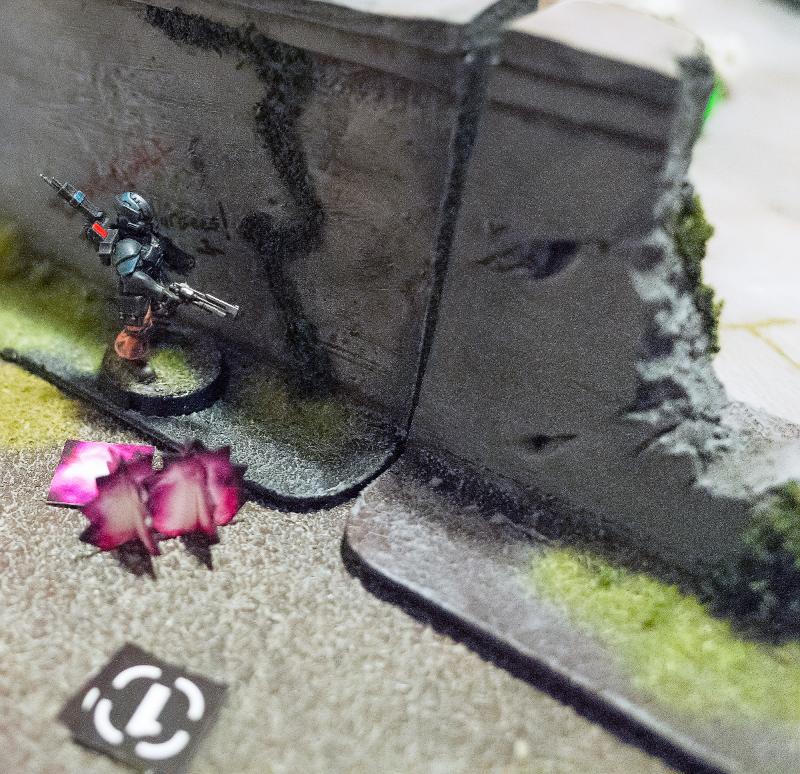
Always putting faith in his bots first, Bacaro had sent his Scarecrow ahead to oversee the field. Immediately he was flocked by aliens, but Bacaro linked his mind with the bot and doused them in clingfire.
2nd activation: The Scarecrow gets his bot protocols activated and moves away from the Minnows to get a clear shot with the clingfire sprayer. All but one Minnow go down.
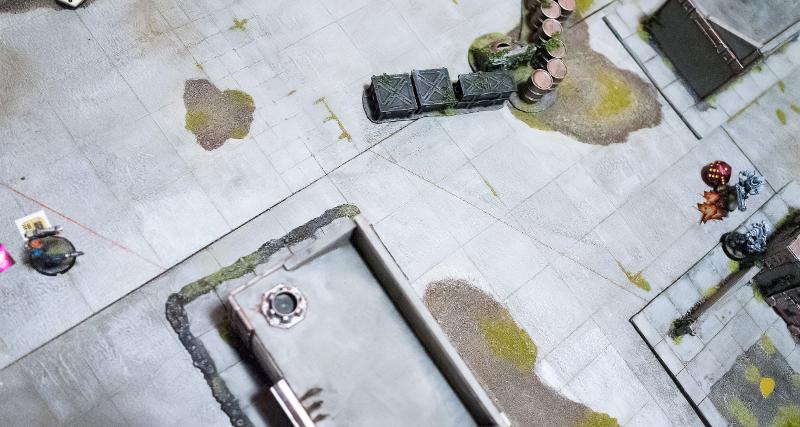
Having taken care of this first threat, Bacaro immediately had his Contractors take up position in the woods. Previous experiences had taught him to put these guys where they felt most secure, or else they’d probably run off at the first whiff of pink smoke.
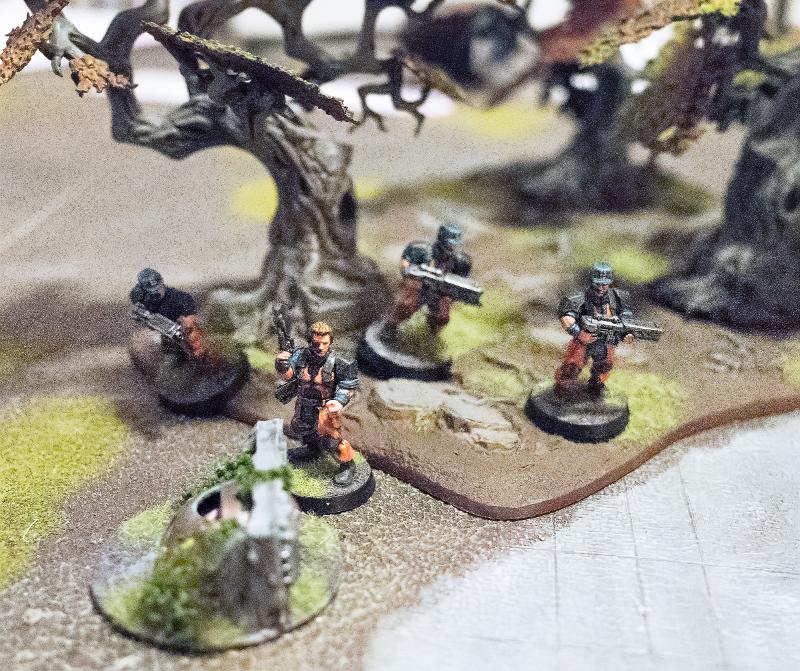
3rd activation: The Contractors take the objective near the woods and loose some shots at the Nova’s shielded unit.
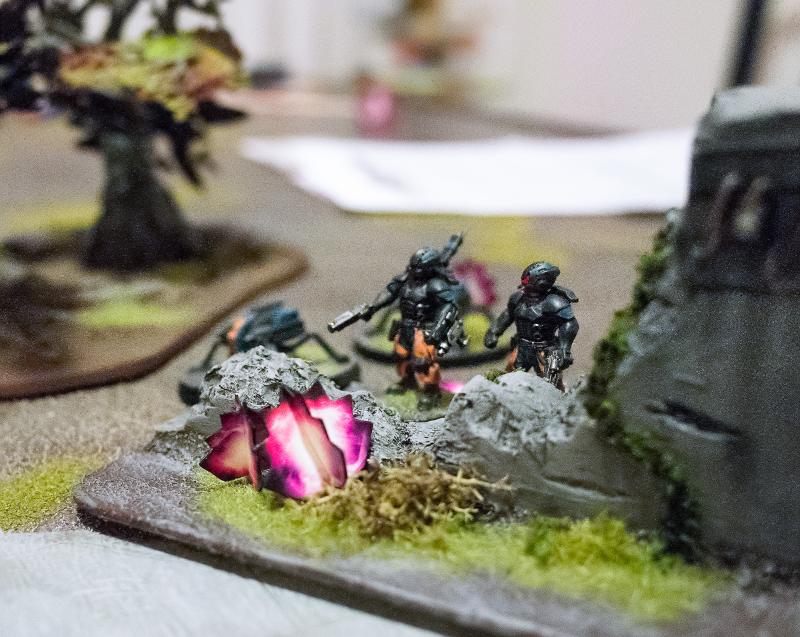
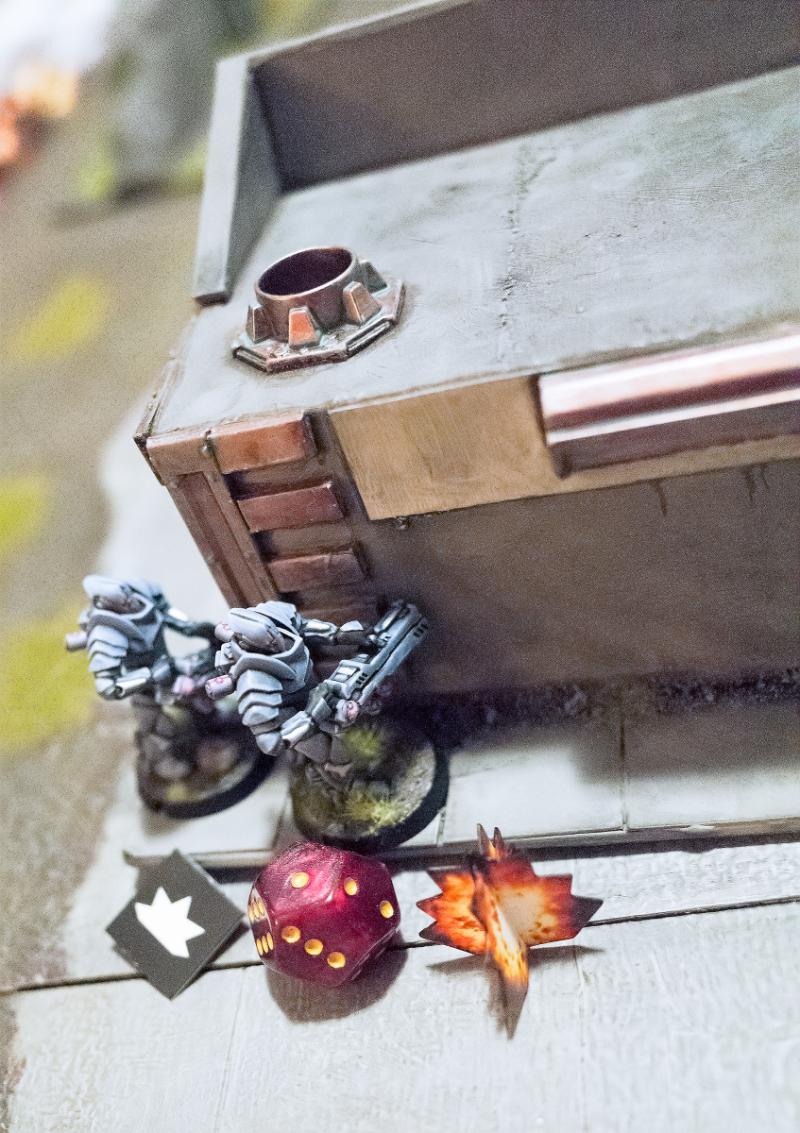
Myro observed coolly how the robot’s flamethrower engulfed his Minnows. Without the need to order them, he saw his Elites advance and utterly destroy the machine with Vulcan Pulse fire.
4th activation: The Tempests advance and fire at the Scarecrow, destroying it.
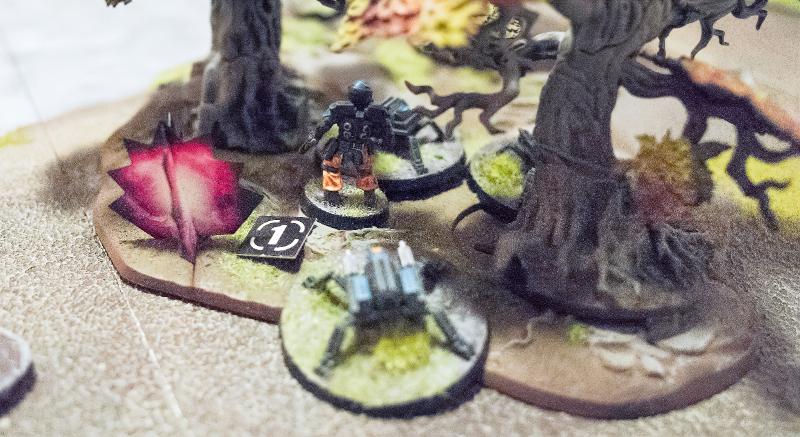
A Scarecrow against a flock of aliens, that’s a fair exchange, thought Bacaro. Meanwhile, his ever eager subordinate Kasero had advanced his Spider Drones up the center and was laying down a veritable rain of fire on the enemy position. Good.
5th activation: The Spider Drones Advance & Fire at the Nova unit. The dice are on fire, generating a bunch of extra hits through the Cutter machine gun’s burst ability. A Trooper snuffs it and the unit gets a pile of STs.
Bacaro figured he could end this here and now and called in the one favour Epirian Command still granted him: an aerial drone strike. Moments later the hated foe was peppered from above.
6th activation: The Journeyman launches his air strike at the Nova’s unit, to some but not too great effect: the Nova takes an injury. Myro cringed at the stabbing pain in his shoulder. He was surprised at the intensity of fire coming his way. If only Elyssa were here, he’d surely have had a better idea of what to expect from the opposition. His reactor shield kept his brothers mostly safe though, only Mai-Lo seemed like she’d better return to base. The rest of his squad he led up to the central building housing the refinery controls. The Cybel must flow.
7th activation: The Nova has enough willpower not to be too impressed by the pile of STs on his unit. He advances to the secret cache objective, switches his reactor to gauntlet overload and returns fire at the Contractors, taking one down. He then shakes off some of his suppression, whilst overload suppress sprinkles STs on the nearby Epirian units.
Turn 1 ends with 2 points for the Epirians, claiming one objective and utilising the uplink relay, and zero for the Karists. Note that this is the first time we used the Territories objective and we forgot that you keep getting points even after you move away from an objective. Not sure if this impacted the game much, but we’ll need to get it right next time . The Karist player destroyed the depleted Minnow unit.
Turn 2
The Epirians get priority and generate 4 command points, whilst the Karists generate 3 CPs. Both bring back a unit: the Minnows and the Scarecrow.Bacaro cursed the shimmering field protecting the enemy commander and ordered his men to keep pouring their fire into it. It wouldn’t hold forever.
1st activation: The depleted contractors lob a grenade shell at the Nova and fire their assault rifles, trying to render the unit ineffective through suppression.
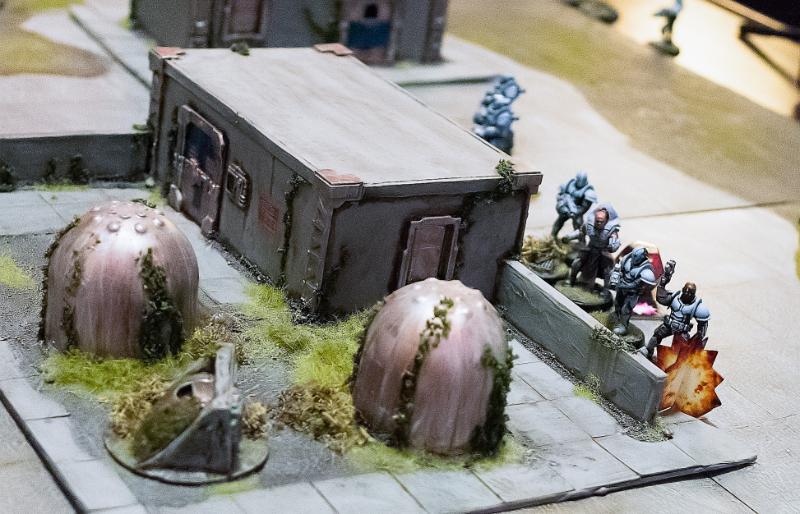
The Tempest Elites, recognising the greatest threat, walked up to the corner of the central building and unleashed their Ravagers at the location of the Spider Drones and the Epirian commander, only to see them hide effectively behind the remains of a thick wall.
2nd activation: the Tempests advance and fire at the Journeyman, who is lucky to escape without a scratch.
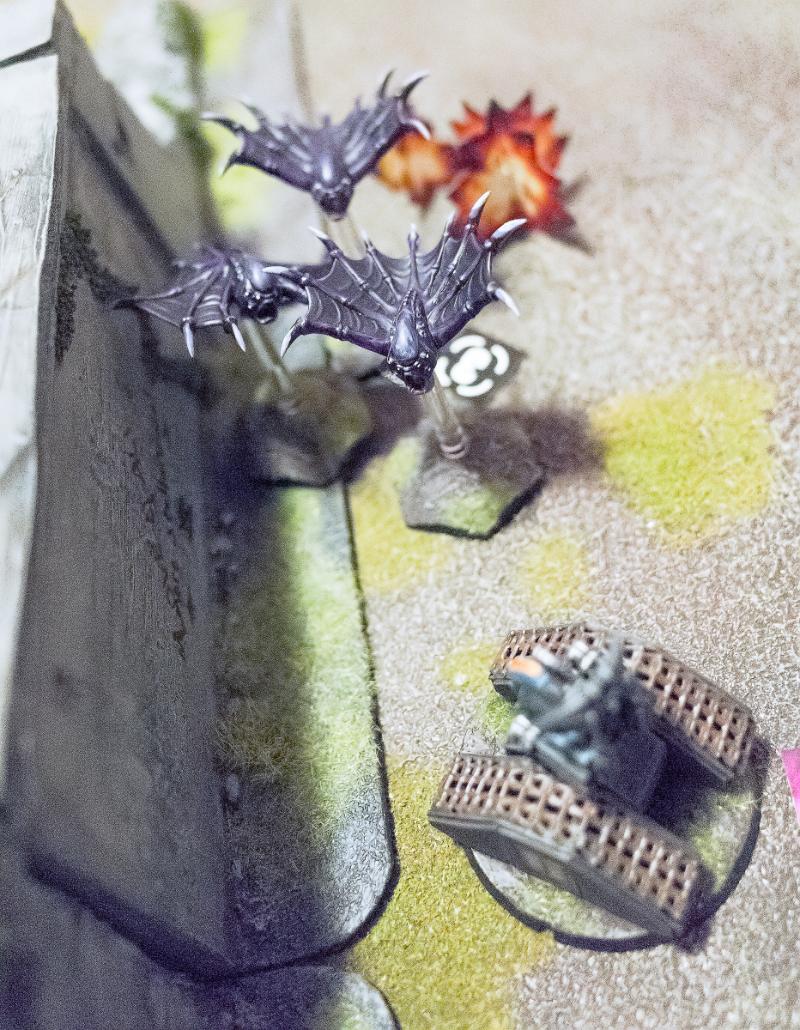
Sensing an opportunity to swing the battle as his Tempests were keeping down the soulless drones, Myro directed another flock of Minnows at the enemy’s position in the forest, hoping to drive them away from the refinery controls.
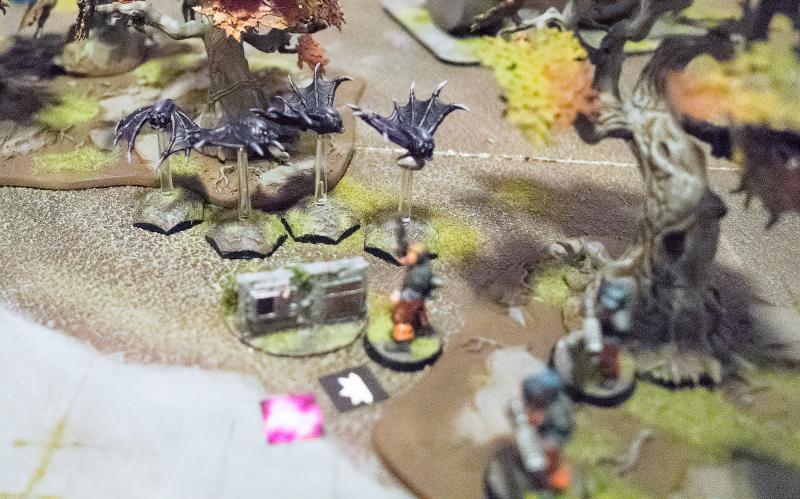
3rd activation: the Minnows Dash back in to contest the objective.
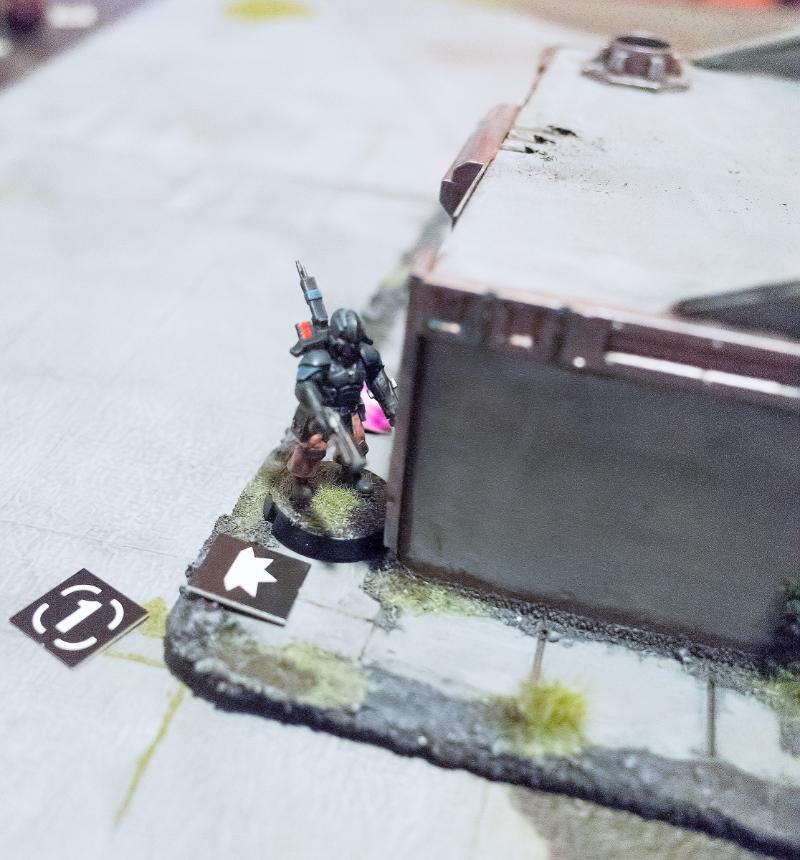
Bacaro immediately recognised that the enemy murder machines on the left flank had to be subdued if he was to take the field. Another Scarecrow bot was sent up the left flank to target the foe’s heavy armour.
4th activation: The new Scarecrow came on the board and fired at the Tempests to very little effect. Which is as well, because we forgot the Scarecrow had to fire wild due to the Railrifle’s ‘heavy’ ability.
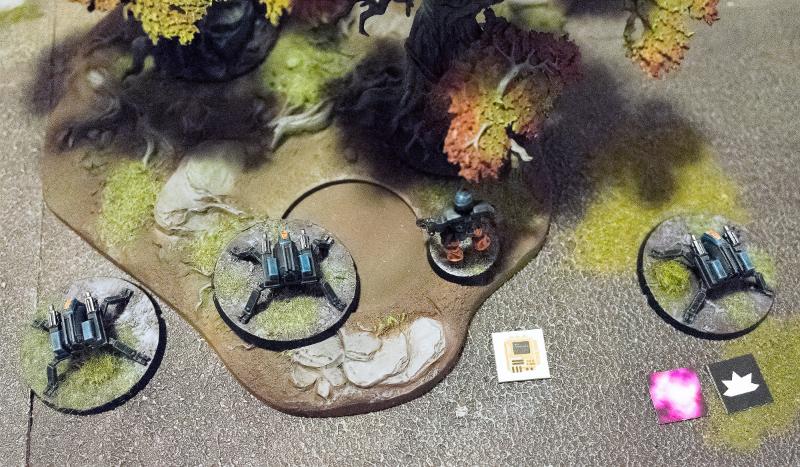
Again putting faith in his Drones over his people, Bacaro shouted to Kasero to advance into the woods and fix the alien situation before they scared off his Contractors.

5th activation: The Spider Drones take an order and dig in in the woods, shooting the Minnows as they go, piling on STs.
Bacaro then sought the security of the big wall. He was no coward, but there were limits to how much he was willing to risk for this dump.
6th activation: The Journeyman executes a tactical retreat to get into order range of the Scarecrow.
Somewhere in this turn the Nova unit probably shot some Epirians, I think the Drones?
At the end of turn 2 the Epirians take a point for their uplink relay and the Karists a point for their secret cache.
Turn 3
Epirians get priority.Again acting to get rid of the Tempest threat, Bacaro linked his mind with the next Scarecrow bot and found a kink in the enemy armour with the powerful Railrifle. Good, but was it too little, too late?
1st activation: the Scarecrow gets an order and with hold and fire manages to put an injury on one of the Tempests.
As his Tempests were now having issues, it was time to roll the Epirian flank. Myro again directed his fire at the forest, targeting the little Drones.
2nd activation: The Nova unit spreads out a bit and attacks the drones, piling on the STs. One Drone turns into scrap.
With the Minnows ahead and the enemy commander firing at his flank, apprentice Kasero thought it wise to reconsider his next move.
3rd activation: With a bunch of STs and the Minnows near, the Spiders are forced to retreat to the board edge.
As Myro forced the Drones to retreat, the Minnows went with their instincts and charged the Contractors in their now very uncomfortable position in the woods. Sure enough, they perished.
4th activation: The Minnows fail their discipline check, but due to ‘bloodthirsty’ they get to charge the Contractors, who die.
The Tempests and Journeyman obviously did something as well this turn which I can’t quite recall, probably fire into the Drones or Contractors and Minnows respectively.
At the end of turn 3 the Epirians take a point for their uplink relay and the Karists a point for their secret cache (the Minnows cannot score objectives due to their ‘kill mission’).
Turn 4
The Epirians bring back the Contractor unit as a reinforcement.Sensing victory, Kaddar Nova Myro orders his elites to advance and secure their flank, containing the last energy terminal in danger of being disabled by the Epirians.
1st activation: (this shot was taken later): Tempests dash to the objective and probably fired wild at the scarecrow. This was just as he expected, damn Contractors couldn’t even hold off a flock of angry baby angels and Kasero once again overstretched himself and then chickened out. No more of this, Bacaro thought. An angry shout to Kasero brought them back to the woods at least, pouring more fire into the stubborn Minnows.
2nd activation: The Spider Drones are given an order and their protocols are enabled, after which they dig in in the woods, firing wild at the minnows.
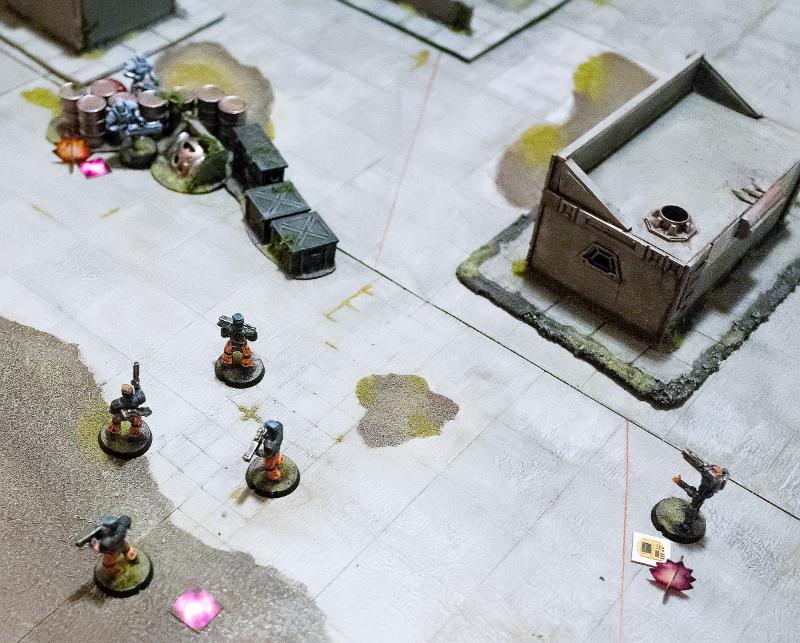
A second group of useless Contractors then finally arrived at the left flank, asking for orders. Resisting his urge to tell them to just take a hike, Bacaro ordered them to support his precious Scarecrow and keep the Tempests occupied.
3rd activation: Contractor reinforcements Dash ahead and put some STs on the Tempests.
Myro saw the bots return to the fray and wasted no time in jumping across the low wall, reaching the central terminal with a few strides. Lead from the front had always been his motto, that’s where you get the best view.
4th activation: The Kaddar Nova leaves his unit to claim an objective.
Once again linking with the Scarecrow, Bacaro put the heat on the Tempests at the terminal. With his Railrifle and the Contractors In support, he’d take this flank and then circle round. It was all or nothing now.
5th activation: The Scarecrow is ordered and puts more pressure on the Tempests.
A warning cry then pulled Bacaro’s attention away to the right. The Minnows were threatening Kasero. Bacaro loosed a few shots with his Dominator pistol, but the Minnows didn’t seem to care. He could then only watch…
6th activation: The Journeyman puts more STs on the minnows.
The Minnows’ rage ever increasing, they now descended on the little drones that had returned to the woods. They never had a chance.
7th activation: (same image) The Minnows get another charge in and destroy the remaining bots and Handler.
Myro became ever more confident. The more his little angels came under fire, the bigger a threat they became. He motioned to his unit to go and help out the Tempests on the other flank. The threat on this side was gone.
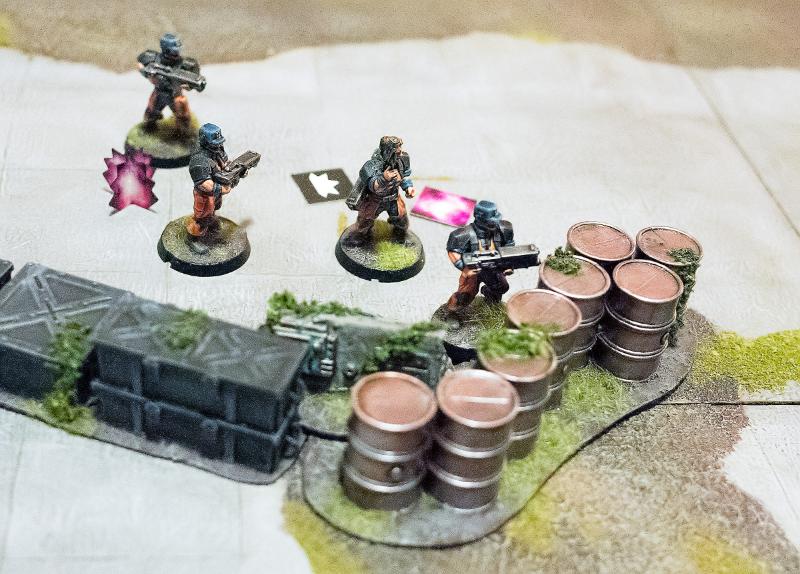
8th activation: The Troopers take position in order to fire at the Contractors. They are well dispersed and hidden beyond the crates, so the damage is limited.
At the end of turn 4 the Epirians score 0, whilst the Karists get three: two terminals and the secret cache.
Turn 5
The Epirians bid 6 command tokens to bring back the Spider Drones, but the Karists counter with 7. The Epirians are now really outnumbered.Bacaro weighed his options as he loosed another shot at the Tempests with his Scarecrow. This campaign had brought nothing but misery, and why? It was all pointless…
1st activation: The Scarecrow keeps shooting the Tempests, who are now properly suppressed. With the constant sniper fire from the distant bot and a full squad of Contractors advancing on their position, the Tempest Tetrarch decided to retreat and form a new front with the Troopers coming up on their rear. They’d retake the objective together.
2nd activation: The amount of STs and proximity of the Contractors now forces the Tempests to retreat.
The minnows are unstoppable. Myro watches as they move on from the broken bots and fly behind the wall, where he knows the Epirian commander is located. This battle would end now.
3rd activation: The minnows keep taking advantage of their bloodthirsty ability to attack new targets. This time, the Journeyman falls to their Cybel maws.
Team Leader Fiennes got nothing but static on his earpiece. He’d advanced up to the terminal as ordered and was awaiting new orders, but he got no response from commander Bacaro and had no line of sight to his position. Was he dead? Gone? A glance over his shoulder told him the Scarecrow was still around. Bacaro never showed any love for his human troops, but his bots… was he just too taken by guiding the bots? The Scarecrow didn’t move…
4th activation: The Contractors take an objective.
Myro surveyed the field. He felt the Minnows had done their job, what remained of the Epirians would soon be gone. A few quick orders put the Tempests on defense whilst his Troopers could start to enter the refinery building and gather what energy there was left to get here.
5th activation: The Troopers move to claim the center objective.
Myro switched his reactor to boost mode and ran off towards the far terminal himself to coordinate with his Troopers. He half expected to come under fire still, but nothing happened. Another sweet victory for the cause.
6th activation: The Nova Dashes to the objective. Final image.
The Karists get more points for having over half the territories at the end of the game and for having taken out one third of the Epirian forces, making them the clear winner. “What happened to Bacaro?!” barked command over the holo-link. “I’m not sure sir, our uplink was right near his position when we… moved out, it must have imagery of what happened.” Without another word, the holo shut down, leaving Fiennes in confusion. At the other end sat a pensive Epirian commander. They had seen the data from the uplink, but the last of it was weirdly scrambled and the thing itself was nowhere to be found. Destroyed by the Karists no doubt, but what had happened to that data…? Was Bacaro dead?
With a few modifications to the points given out by the objectives and a little more terrain I think this will do nicely for an intro mission. The forces are only small, but with the reinforcements mechanic the players need never be out of stuff to work with, and the game should about fit on a normal sized table.
I recall when I first read the rules how I worried Maelstrom’s Edge would give a limited gaming experience, given the max of 5 turns and smaller forces. I could not have been more wrong. Every game you immediately get into the thick of it and every activation is interesting. 5 turns is plenty. A handful of models is plenty. Just make sure you have enough terrain on the table.
Having played a couple games now and seen a few more, the rules are starting to click nicely. The big thing with this type of game is always the special unit and weapon abilities. To get a good idea in your head of what units can do just reading the rules is never enough, you need to see them work to really get that feel. In this game the Minnows’ bloodthirsty ability was a bit of an eye-opener. I never thought of it as a big thing, but it means they are a threat even when utterly suppressed because they keep coming at you and have a big charge range. Cool stuff.
Spotlight: Karist Tempest Elites
Posted on Monday Jan 30, 2017 at 05:00pm in Models
- by Iain Wilson
Although nobody doubts a Karist Trooper’s battlefield effectiveness, a Tempest Elite is a far more intimidating sight. Veterans of many campaigns of enlightenment, entrusted with the Enclave’s heaviest man-portable weaponry and advanced armoured suits, each one is a genuine hero of the Karist cause, capable of single-handedly devastating the enemy with staggering levels of firepower from their Ravager Pulse Cannons and Coriolis Energy Launchers. Here, we have a play with the models for these formiddable warriors.
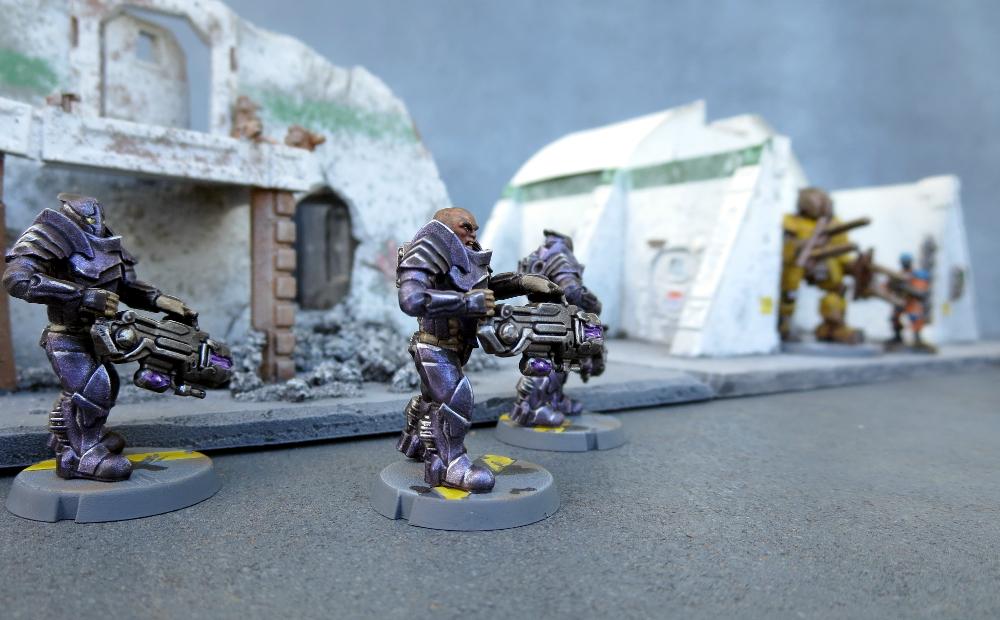
One of the first units designed for Maelstrom's Edge, Tempest Elites are a multi-part plastic kit, with each sprue building two troopers armed with either pulse cannon or energy launcher.
Tempest with pulse cannon.
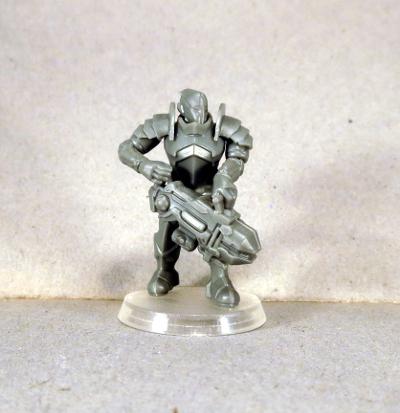
Tempest with energy launcher.
The energy launcher doubles for both the Corialis Energy Launcher and the rather more deadly Hellstorm Energy Mortar, with the difference being down to the way the Cybel charge is fired.
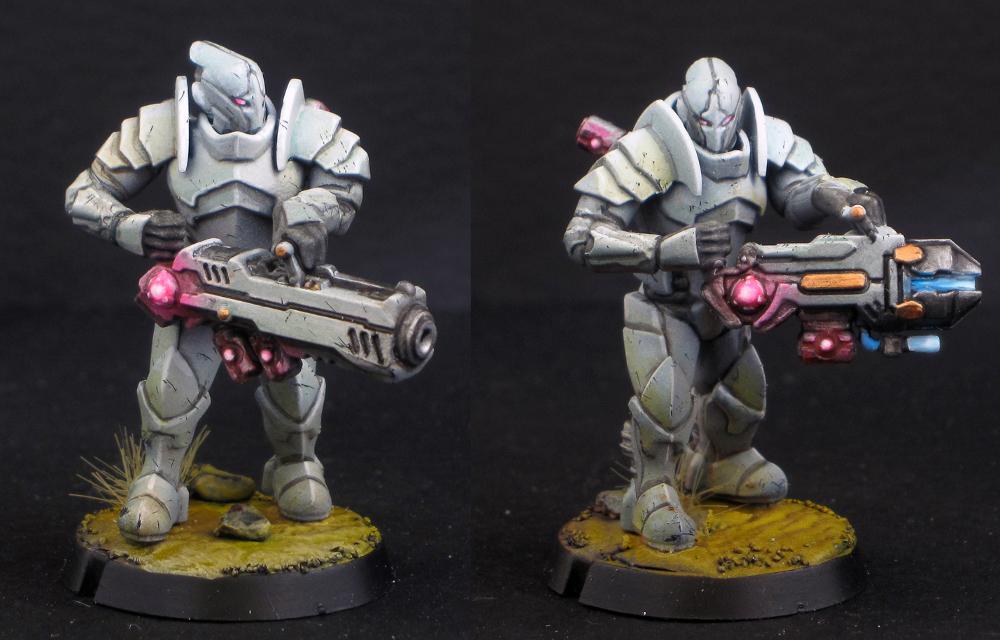
Studio Models
The two models on the sprue have different leg poses and arm positions, and thanks to the versatility of plastic, can be easily modified if you want to alter poses or equipment.
For a break from the standard weapon grip, this model was altered using regular Karist Trooper arms to carry the weapon over the shoulder:
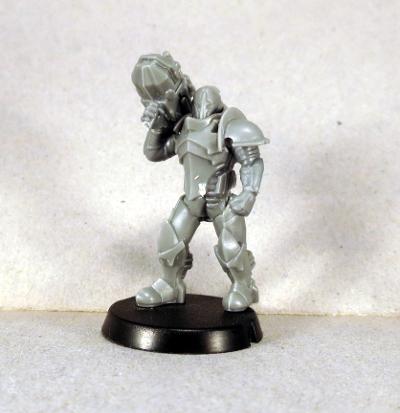
To fit onto the shoulder pad, the Tempest's hands were sliced off the weapon and a hollow cut into the back left of the weapons' frame. The trigger hand was attached onto the Trooper forearm, with the wrist trimmed at an angle so the top of the hand would sit flush against the bottom of the weapon.
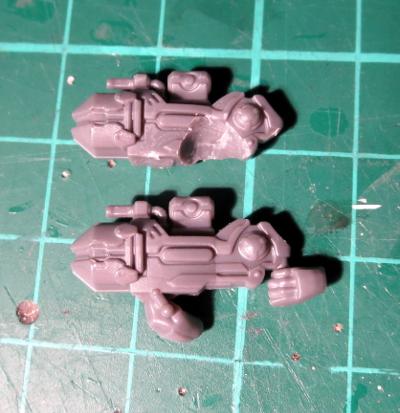
The same process works for the pulse cannon.
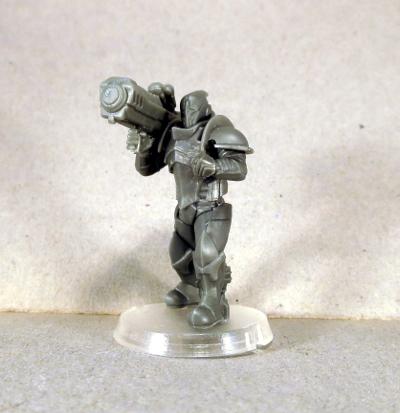
For something a little more off-the-beaten-track, this Tetrarch was equipped with a Cybel Glaive from the Faction Expansion Sprue. This isn't an option allowed by the rules, but looks so very pretty!
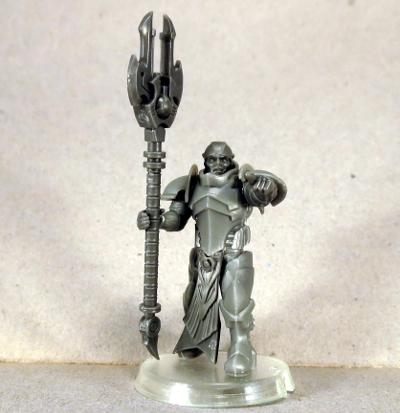
The head and loincloth were taken from the Kaddar Nova sprue (which comes with extras, just perfect for this sort of converting!) and the pointing arm also comes from the Faction Expansion Sprue.
And for those situations where having a great, big gun isn't quite enough, why not have two?
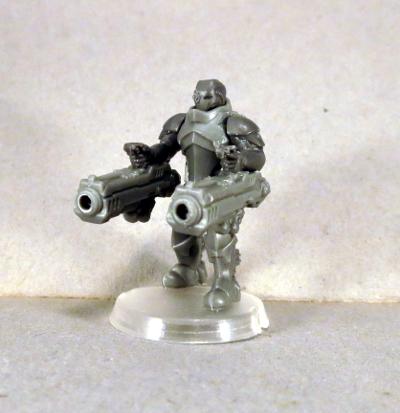
Assembled using arms liberated from the Epirian Handler sprue, and a head from the Shadow Walker sprue.
He probably won't spend a lot of time on the table... but it had to be done.
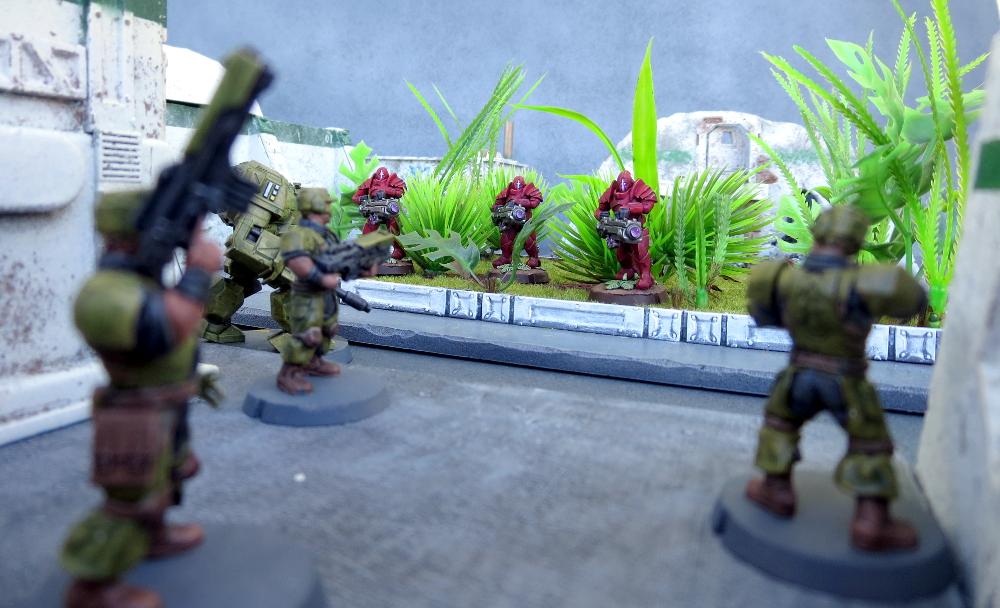
Tempest Elites are a veritable storm of nastiness on the table, and are the backbone of many a Karist force. If you're feeling the lure of heavy firepower, you can pick up the Tempest Elite sprue from the Maelstrom's Edge online store, and as always feel free to share your creations on the Comm Guild Facebook page!
Conversion Spotlight: Epirian Mule Cargo Drone
Posted on Monday Jan 23, 2017 at 05:00pm in Models
- by Iain Wilson
A lot of Epirian tech was originally developed for industrial or agricultural purposes and later modified and adapted for a military role. The Hunter warmech, however, was specifically designed for warfare. I thought it would be fun to see what might happen if the Hunter chassis was retrofitted back to more benign uses, and from that the Mule cargo drone was born.
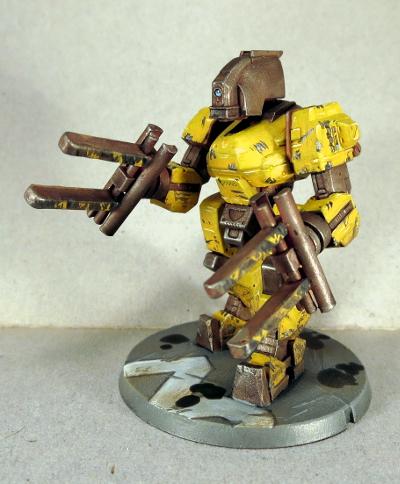
One of the obvious changes is the removal of the integrated processor unit and replacement with a head formed from the core unit of a standard drone. This was intended to reflect the civilian adaptation of the robot, with the more advanced processor unit swapped out for a less robust, less advanced (and likely much cheaper) alternative. I envisage the Mule as being much less autonomous than the Hunter and more limited in function.
Adding a head ran the risk of making the rest of the robot look a little stumpy by comparison to the regular Hunter, and so I started out by bulking up the feet to give the legs the appearance of extra length.
This was done by adding some platforms under the heel and toe of each foot, and adding a kickplate on the front to help tie these into the shape of the foot. I also added some spikes to the heels, which I imagine being rammed into the ground and used to stabilise the robot when it is lifting something tricky.
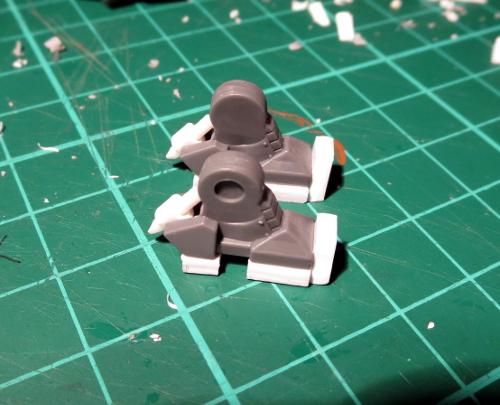
For the head, I carefully removed the Hunter's original head unit with an exacto knife.
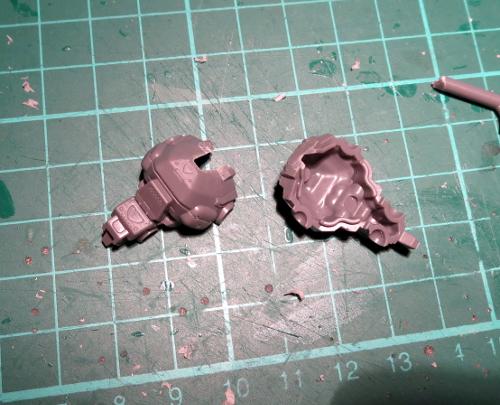
I then trimmed up a T-shaped piece cut from one of the Hunter's sprues to form the neck. This sits nicely inside the front of the torso.
Taking a drone, I cut off all of the extraneous bits, leaving just the central unit. The hole in the bottom for the Firefly flight stem was widened to the width of the neck shaft, and this was then glued in place.
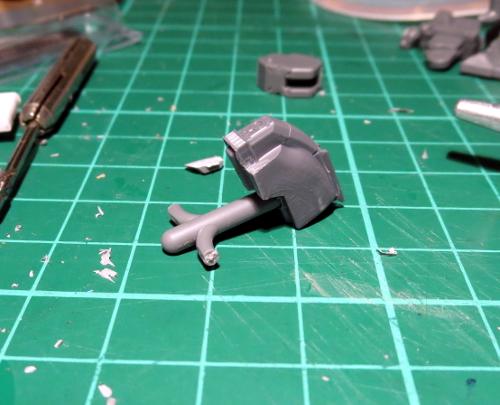
At this point, the legs and torso were all assembled as normal.
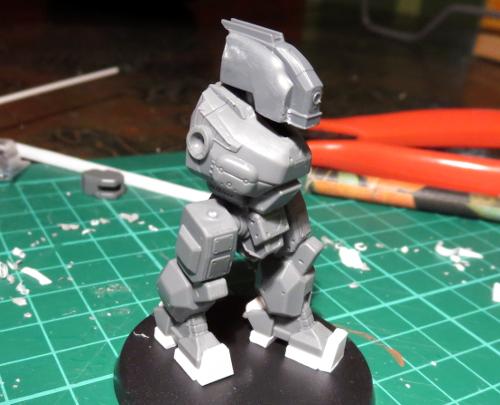
A cargo drone needs lifty arms (yes, that's the offical terminology), and so I took two forearm pieces and cut them off flat on the 'wrist' ends.
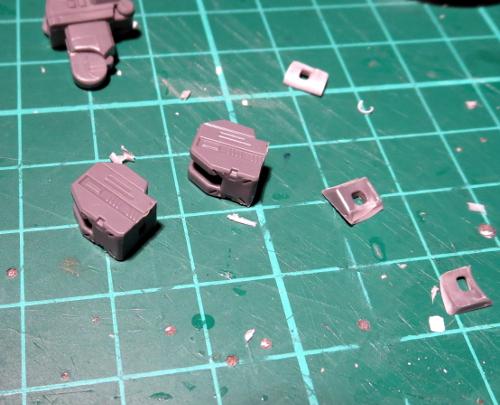
Note: You only get one of these forearm pieces on the Hunter sprue. If you have built another Hunter with a ranged weapon on the left arm instead of the hand, you'll have a forearm piece left over just waiting to be used for something like this.
The parts for the forks were then cut from plasticard and glued together.
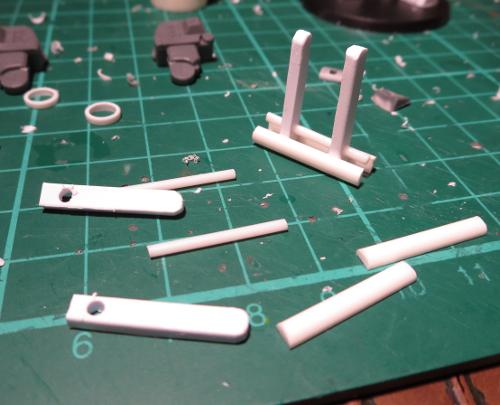
Once the glue on the forks was set they were attached to the forearms with plastic tubing, to create an assembly that looks capable of rotating, for fine control when toting those bales.

With the arms then glued in place, the Mule looks something like this:
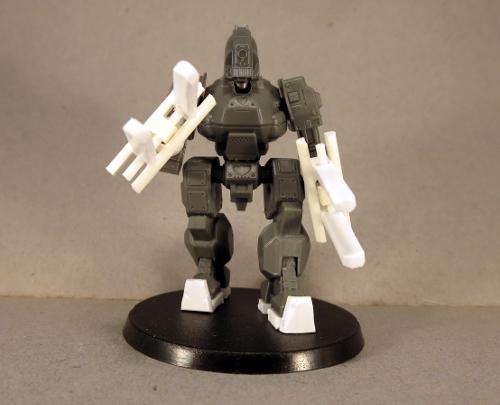
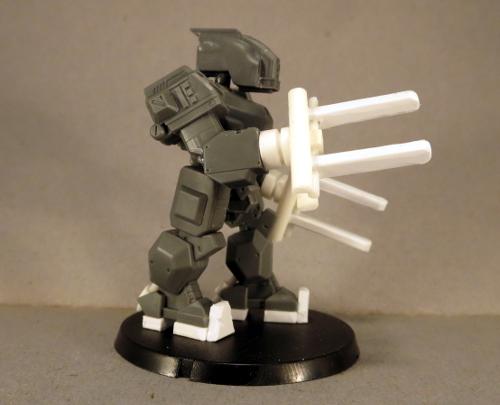
All that's left to do then, of course, is to paint it.
A nice, bright, construction-site yellow was the only possible choice for painting my walking forklift. Metal parts were painted to be battered and weathered, and I added generous amounts of chipping and scratches to the yellow to show that this is a piece of hard-working machinery.
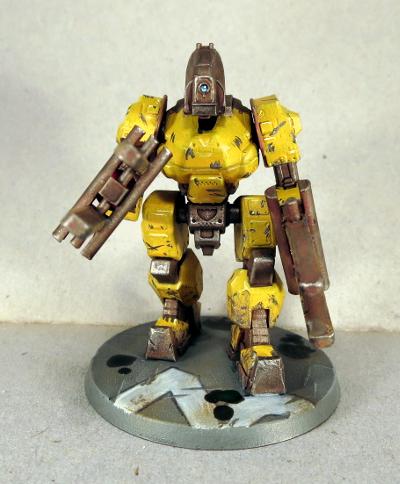
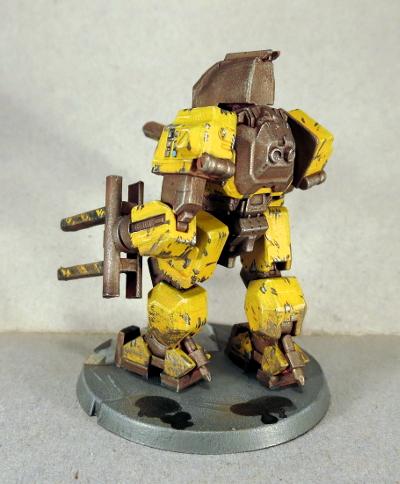
Game-wise, I picture this robot as an upgrade to a Spider drone unit, with minimal combat functionality but the ability to strip Victory Points from objectives at a more rapid rate than normal. It would also be fun to develop the design further and come up with other variants - perhaps a mining drone, an emergency response drone, or a construction unit.
Do you have ideas for your own drone variants? Grab some robot sprues from the Maelstrom's Edge webstore and see what you can come up with! And as always, feel free to share your creations on the Comm Guild Facebook page!
Tags: conversion drone epirian hunter
