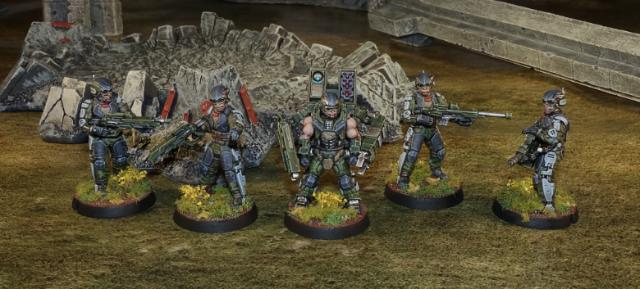
Spiral Arm Studios at Salute 2019
Posted on Friday Mar 22, 2019 at 08:23pm in General
Salute 2019 is on Saturday, April 6, 2019 at Excel London, run by the South London Warlords - If you're going along, come down to booth TK16 and say hello, and check out our shiny new plastic!
Tags: preview salute2019
Terrain Spotlight: Bunker from an Air Conditioner Fitting
Posted on Monday Mar 18, 2019 at 05:00pm in Tutorials
- by Iain Wilson
Apparently even when I'm looking for something else completely, the terrain bug is difficult to avoid. On a completely unrelated trip through the hardware store for a change, I came across a rack of plastic air conditioner ducting that included a bunch of pieces that immediately jumped out as potential building fodder. Before you could say 'Get to the bunker!' I was on my way home with fingers just itching to break out the tools. The end result was a brand new ground-level access for a bunker complex!
The piece that I chose started out life as a 100mm ceiling cap, which is apparently something to do with air conditioners - I'm taking the word of the label for that! I love the idea of buildings that serve as an entryway to larger complexes below ground, and the shape of this fitting looked perfect for an atrium bunker leading to a staircase or angled lift shaft.
As the type of plastic used was shiny and of indeterminate pedigree, I started out by removing the label and giving the whole thing a light sand with fine grade sandpaper to remove the glossy outer layer. This helps the glue and paint to stick later.
The fitting is made of two separate pieces that clip together along the sides, which made cutting window holes a little easier - I popped the pieces apart, and used a shutter window from the Maelstrom's Edge terrain sprue to trace around for the hole, with one vertical edge running along the seam. Then I cut along the top and bottom of the marked hole with a razor saw, and scored the other vertical side and snapped the resultant scrap piece out of the hole. This was repeated on the other side, and again on the front for a door hole, using the armoured door from the terrain sprue as a guide.
I glued the windows and door in place using an 'all plastic' glue combo (a two-part setup that includes a tube of superglue and a 'primer' pen that is used first to help the glue stick to unusual plastics). I also added a strip light above the door for a little extra visual detail, and to cover over the screw hole that was there.
To fill in the roof, I cut two pieces of 2mm foamed PVC to the right shape to fit in the cavity. In one of these I cut a square hole for the hatch from the terrain sprue. The two pieces of PVC were then superglued together, and the hatch glued into the hole.
The fitting has a couple of handy ridges running around in the top cavity at a perfect height to form a balcony once the PVC section was glued and dropped in to sit on them. At this point I also glued the structure down onto a piece of masonite cut to an appropriate size and shape, and filled in the seam on the fitting with a little putty.
To paint, I started out with a coat of Rustoleum brown primer.
I wanted some light texture over the non-metal parts of the bunker. For this, I used a terracotta paint found in the paint section at my hardware store. This is generally used on plastic plant pots to make them look like they're made of terracotta, and has a really fine grit mixed through it to give it a sandy feel. I used a large brush and dabbed this on rather than brushing, to avoid brushstrokes showing up when I drybrushed over it.
The terracotta coat was a little patchy when it dried, with the dark brown basecoat showing through a bit darker than I wanted, so I went over it with a coat of Burnt Sienna craft paint. While that was drying, I also went over the base with a generous layer of PVA glue and sprinkled on a coarse sand and gravel mix.
The bunker was then drybrushed with a mix of Burnt Sienna and a taupe colour (actually called 'Fawn' on the bottle). The metal parts were given a heavy drybrush with P3 Pig Iron and then a generous wash with Army Painter Dark Tone, and the base was painted with a dark brown (Burnt Umber) craft paint.
Finally, the base was drybrushed with some more Fawn, and the lights painted with Citadel Ultramarine Blue, drybrushed with Ice Blue and White.
I also added a building number on the back slope, using a stencil printed out on paper and cut out with a hobby knife. I dabbed on Vallejo Light Grey with a large brush, and then a layer of white, trying not to make it too neat so that it would look a little weather-worn.
A shot of the roof:
And that's it - ready for the table!
Build your own bunker by picking up the Maelstrom's Edge terrain sprue, along with the rest of the Maelstrom's Edge model range from the webstore here.
As always, feel free to pop along and share your work, or ask any Maelstrom's Edge- or hobby-related questions on the Comm Guild Facebook page!
For other Maelstrom's Edge modeling articles, including tutorials and walkthroughs of a wide range of different building and miniature projects, check out the Hobby section of the Maelstrom's Edge website here.
Tags: buildings bunker modeling spotlight terrain terrainsprue walkthrough
Painting Tutorial: Weathered Signs using Photo Paper Decals
Posted on Monday Mar 11, 2019 at 05:00pm in Tutorials
- by Iain Wilson
Marking your buildings and other urban features with signs, graffiti and other appropriate splashes of colour is a great way of adding some touches of realism to your wargaming terrain. This week, I thought I would share a simple technique for creating faded and worn signs and markings using decals made from photo paper!
This technique won't get you bright, new looking signs - for that, you can use regular decals, or print your sign out on paper and glue it in place. What we're aiming for here are signs that have been out in the elements for a while, and are battered, chipped and faded.
Start by drawing up the design you want to apply to the building in your drawing program of choice (I use Gimp). The final applied image will be duller than your original, so you may need to experiment a bit to find the right level at first - If you want a fairly bright and legible sign, use bright colours. Use more muted colours for a more faded effect.
You will also need to flip the image so it is a mirror-image. Then print onto gloss photo paper, and cut out the design using a sharp hobby knife or scissors. Leave a tab of extra paper on one side, and just score lightly along the edge of the image on the tab side.
Apply a thin layer of superglue to the surface of the image. You need to keep this thin enough that it won't squeeze outside the bounds of the image when you press it onto the terrain surface. Don't worry if you don't get the image covered perfectly, as this just creates some handy chipping on the final image.
Press the image face-first onto your painted surface and hold it in place until the glue has had a chance to set.
Grab the excess paper tab and gently peel the paper off. It should peel away leaving the ink and a very thin surface layer of the photo paper behind. Gently scrape the paper layer away with a finger nail to expose the coloured surface beneath.
For any remaining scraps of thin paper left behind, you can rub gently with a damp fingertip to clean then away. The moisture will make your image look brighter for a moment, and white parts may go transparent, but it will fade again as it dries.
If the end result is a little too faded, you can pick the colours up a little by painting on a thin layer of gloss varnish. It won't make a huge difference, but will brighten things up slightly.
From there, you can go ahead and add other detailing and weathering to your terrain as desired. See my guide to sponge weathering here, or the slightly more advanced salt weathering technique here.
As noted back at the start, while the end result is intended to be faded and weathered, you will get a brighter end result if you use stronger colours to begin with. Black shows through best of all, so you can add extra definition to the image by adding thin black borders around everything.
Give it a go! Feel free to share your efforts, or ask for help on the Comm Guild Facebook page!
You can pick up the entire Maelstrom's Edge model range, including the terrain sprue used for the terrain in this article, from the webstore here.
For other Maelstrom's Edge modeling articles, including tutorials and walkthroughs of a wide range of different building and miniature projects, check out the Hobby section of the Maelstrom's Edge website here.
New resin release: Epirian SecDef Boostpack Specialists!
Posted on Wednesday Mar 06, 2019 at 05:00pm in The Epirian Foundation
This week sees the addition of some heavier firepower to SecDef Rapid Intervention Teams, with the release of SecDef Boostpack Specialists!
-Click here for the full rules card-
Painting Spotlight: Broken Forsaken Chieftain
Posted on Monday Mar 04, 2019 at 05:00pm in Tutorials
- by Iain Wilson
Time to get some paint on!
Despite building a bunch of Forsaken Chieftains for a conversion article a while back (This one!), I hadn't had a chance to get any of them painted up yet, so my Broken force has been languishing without a properly-attired leader for all this time. This week I decided to remedy this situation!
The model painted here was one of the resin conversions featured in the article linked above, with the normal Xeno Spotter and melee weapon replaced with bionic arms holding a Beam Blastgun and a grenade.
My broken troops were painted with a very quick 'base colours and a wash of brown ink' affair, which was shown in the article way back here. As a force's leader is a bit of a centrepiece, I wanted a paintjob that was going to look like it fitted in with the troops, but was a little more polished. I started out by spraying the model with Army Painter Army Green, as I had with the troops.
I then picked out the base colours, leaving the army green on the pants and shirt, and painting straps, pouches, boots and armour pads with Vallejo Heavy Brown and Beasty Brown, the coat with P3 Jack Bone, her face with Citadel Tallarn Flesh, and everything else with Vallejo Heavy Charcoal.
The next step was to add some highlights. I used Coat D'Arms Putrid Green to highlight the creases in the shirt and pants, and followed up with some touches of Jack Bone on the darker brown areas and face, and P3 Morrow White on the coat and lighter brown parts.
The green was then shaded with a wash of Army Painter Green Tone, and the brown areas and face with Army Painter Strong Tone. While that was drying, I added some white highlights to the hair, and painted the metal areas - the weapon was just given a light drybrush with P3 Pig Iron, and the other metal areas given a flat coat of the same.
Next up, the metal parts were given a highlight with Army Painter Shining Silver. I also painted the edge detail on the coat with some old Citadel Tentacle Pink, and shaded the coat with multiple light coats of Army Painter Soft Tone painted into the creases and concealed areas.
I then gave the metal parts a wash of Army Painter Dark Tone, and shaded the coat edge detail with some light coats of Army Painter Purple Tone.
That just left some final detail work - The eye was painted white and a black dot added in the middle. The bionic eye was painted with Vallejo Red and Army Painter Pure Red, with a highlight of white. For the yellow on the grenade, I started with a coat of Citadel Iyanden Yellow, a top layer of P3 Cygnus Yellow, some shading underneath with Soft Tone and a highlight of yellow with a little white mixed in. The straps on the gun were painted with Heavy Brown and given a wash of Strong Tone, as were the cross-straps on the back of the coat. Also on the back of the coat, I picked out the studs with Heavy Charcoal and added a highlight with Shining Silver.
And, finally, the base was painted with the same urban scheme that I've been using for several of my Maelstrom's Edge forces - you can find a how-to here.
The finished model, leading a Broken force into battle!
Keen to try putting together your own Broken force? You can find the resin Chieftain model and plastic Broken Infantry used here, along with the rest of the Maelstrom's Edge model range in the webstore here.
As always, feel free to pop along and share your work, or ask any Maelstrom's Edge- or hobby-related questions on the Comm Guild Facebook page!
For other Maelstrom's Edge modeling articles, including tutorials and walkthroughs of a wide range of different building and miniature projects, check out the Hobby section of the Maelstrom's Edge website here.
Terrain Spotlight: Plant Pot Bunker
Posted on Monday Feb 25, 2019 at 05:00pm in Tutorials
- by Iain Wilson
One of the things that I enjoy most about this hobby is finding random things that can be turned into new terrain. This week's article is one of just those awesome little finds - a bunker made from a grocery-store plant pot!
The base for this build was one of a set of three plastic plant pots, found at my local supermarket.
As the plastic these are made of is really hard and shiny, I started out by lightly sanding the outside. This breaks up the shiny surface, and allows glue and paint to adhere better.
I decided to avoid cutting into the pot, as I expected the plastic to be quite brittle - brittle plastic breaks easily if you're not careful when cutting it, and it was easier to just not bother. As such, I took a door from the Maelstrom's Edge terrain sprue and built a small boxwork for it using foamed PVC. I used the side of the bunker as a tracing guide to get the correct angle on the back of the box, so that it would sit nice and flush.
The door was then glued in place using an 'all plastics' superglue (a two-part glue that has a tube of superglue and a 'primer' pen that makes it stick better to plastics that don't do so well with superglue alone), along with a square of foamed PVC cut to fit neatly around the bottom of the bunker.
I used reinforcing struts from the terrain sprue for the bunker's vision slits, shortened up by cutting the last section off each end.
To get the slits positioned right on each side, I marked out the correct horizontal position on a cork sanding block, and used that pushed up against the wall as a height guide.
To cover over the holes in the base of the pot, I cut a square of 1mm plasticard and glued it into the recess.
To finish up, I glued the bunker to a roughly-shaped piece of masonite, and trimmed up the base square of PVC to make it a less regular shape, adding some protrusions with cast-offs of PVC to break it up even further. I also added some buttresses on the three non-door sides of the bunker, to break up line of sight around the perimeter.
I painted over the PVC on the base with some Vallejo Heavy Brown before gluing some gravel mix down over the top with PVA glue - the paint layer helps to stop stray bits of white showing through once the base is painted.
The finished bunker, ready for paint:
And with some paint on:
Build your own bunker by picking up the Maelstrom's Edge terrain sprue, along with the rest of the Maelstrom's Edge model range from the webstore here.
As always, feel free to pop along and share your work, or ask any Maelstrom's Edge- or hobby-related questions on the Comm Guild Facebook page!
For other Maelstrom's Edge modeling articles, including tutorials and walkthroughs of a wide range of different building and miniature projects, check out the article roundup here.
Modeling Spotlight: Kitbashed Epirian Contractor Truck
Posted on Monday Feb 18, 2019 at 05:00pm in Tutorials
- by Iain Wilson
Running around is all well and good, but sometimes it's preferable to travel in style. So with that in mind this week I decided to add some extra mobility to my Epirian force in the form of a contractor truck, built from a somewhat neatened-up Games Workshop Ork Squigbuggy.
The basic truck chassis was perfect for the look that I wanted, with the main challenge being to remove anything overtly 'orky'. The ramshackle look is great, but not really in keeping with the Epirian aesthetic. And obviously, the ork crew themselves had to go. The only problem there was that the driver's feet are moulded to the pedals. So job number one was to remove those feet with a chisel-blade hobby knife.
Removing the metal 'teeth' on the front grill was more problematic, so I replaced the grill piece entirely with a new one cut from textured plasticard.
Likewise, there was just too much detail on the rear tray to be easily removed, so I built a new tray out of layered 1mm plasticard, with a centre detail piece cut from plastic mesh.
I considered trimming up the doors, but was on a roll with the plasticard by this point, so quickly knocked up two new door panels and added some Epirian badges using tile-texture plasticard.
The extra plating on the sides of the front cowling was considerably easier. I cut away anything that didn't belong, and gave the trimmed surfaces a light sand to make sure they were smooth.
Humans being somewhat smaller than orks, the driver needed a seat added to fit in properly, so I assembled one out of 1mm plasticard and some more of the tile. For the driver himself, I used an Epirian contractor with the legs cut and repositioned.
The proportions had worked out all wrong to use the original pedals, so the driver's feet both wound up resting on the middle pedal. I added some pieces of plasticard over the other two to cover up the holes left from cutting off the original driver's feet.
I've been making it a feature of my Epirian conversions to include a drone head, and the intake on the hood seemed like an obvious spot to put one, with a little trimming to make it sit as flush as possible.
Rather than trying to wedge a second seat into the asymmetrical cabin, I decided to make it a single-seater and add a drone-controlled weapon in the (ahem) shotgun spot. I built this using a few pieces pilfered from the Master Bot Handler and Scarecrow kits, with a base from a Spider Drone leg piece with the actual legs removed.
To give the weapon a clear fire arc, I cut apart the roll cage and shortened the crossbar so that it would only extend over the driver's seat.
At this point, it was time to putty up any gaps, notably around the base of the drone and the driver's repositioned legs. The roll cage was left unglued for now, and there would be a little more putty filling required once I was ready to put it in place, but this couldn't happen until after I had painted the driver and cabin. (In hindsight, I also should have left the driver separate, as it proved rather difficult to paint him in place!)
The final step was to add some arms for the driver - I needed some outstretched arms, so wound up using Master Handler arms with Contractor shoulder pads added, and the hands replaced with open contractor hands to grip the steering wheel. And with that, the truck was all set for painting.
Painting used the same scheme as I have used on my previous green Epirians - Vallejo Yellow Green washed with Army Painter Green Tone, although in this case I spent a little more time layering the ink to create neater shading and highlights.
I added damage to the paintwork by sponging with Vallejo Heavy Charcoal and then highlighting the lower edges of the paint chips with yellow green.
The metal parts were painted with Vallejo Basalt Grey, washed with a coat of Secret Weapon Soft Body Black, and then drybrushed with Vallejo Light Grey. I followed this up with a final wash of Army Painter Dark Tone.
The next step will be to work up a rules card for this thing, probably with some homebrew rules for transporting units to make use of that trayback!
What have you done to personalise your forces? As always feel free to pop along and share your work, or ask any Maelstrom's Edge- or hobby-related questions on the Comm Guild Facebook page!
You can pick them up the Epirian models used here, along with the rest of the Maelstrom's Edge model range from the webstore here.
For other Maelstrom's Edge modeling articles, including tutorials and walkthroughs of a wide range of different building and miniature projects, check out the Hobby section of the Maelstrom's Edge website here.
Tags: contractor conversion epirian modeling spotlight walkthrough
Terrain Tutorial: Corner Brace Shipping Crates
Posted on Monday Feb 11, 2019 at 05:00pm in Tutorials
- by Iain Wilson
Time for another quick and easy build!
The Maelstrom's Edge terrain sprue includes a nifty corner bracing piece, which would normally be used on the roof corners of flat-roof buildings to pretty them up a little. Because a lot of my buildings have angled buttresses or ballustraded roofs, I collect a lot of spares of this part. Looking for something easy and effective to do with them, I hit on the idea of turning them into shipping crates!
To replicate these, for each crate you will need some 1mm thick plasticard or cardboard - two pieces 21mm square, two pieces 21mm x 12mm, and two pieces 19mm by 12mm, and you will also need eight corner braces.
Start by placing the corner braces flat side down, and gluing them together in sets of four along the flat edges, as below:
Glue your large squares into the two resultant boxwork shapes. If you're using plasticard, you can use polystyrene cement for this. Use superglue if you have gone with cardboard.
Next, take the 21mm long strips, and glue them along the inside of one of the boxes, along opposite sides. It doesn't matter which two sides you go with, so long as they are opposite each other.
The 19mm strips should then fit neatly in on the other two sides. It's a good idea to check them for fit, and trim up if necessary before gluing them in. If you wind up with the corners of the strips not all meeting up exactly, it's not a problem, as they'll be hidden by the boxwork when you put the other side on.
Speaking of the other side, you can now glue this on by sliding it on over the strips, until it butts up neatly against the first side.
And that's it. They're really easy to put together, so (assuming you have enough corner braces knocking around) you can quickly assemble a few of them to stack up and scatter around the table for a bit of low cover.
They're fairly light, so while they sit neatly on top of each other, you may find it beneficial to glue the stacks together so that they don't get knocked awry mid-game. This also gives you less surface to paint, since you won't need to paint the faces that are touching other crates!
Keen to give it a go? You can pick up the Maelstrom's Edge terrain sprue, along with the rest of the Maelstrom's Edge model range from the webstore here.
As always, feel free to pop along and share your work, or ask any Maelstrom's Edge- or hobby-related questions on the Comm Guild Facebook page!
For other Maelstrom's Edge modeling articles, including tutorials and walkthroughs of a wide range of different building and miniature projects, check out the article roundup here.
Tags: terrain terrainsprue tutorial
Terrain Spotlight: Landing Pad 16, part 2
Posted on Monday Feb 04, 2019 at 05:00pm in Tutorials
- by Iain Wilson
Time to check back in on my landing pad display board build! (If you missed part one, you can find it here)
In the first instalment, I ran through the construction of the 'back' side of the display, so this time around I'm working on the landing pad area.
When I cut the foamed PVC for the floor, I left out a curved area that would form the main section of the actual landing pad itself. To fill this in, I cut a piece of 2mm thick cardboard.
On the top surface of the card, I painted a layer of superglue, and then laid a piece of fibreglass flyscreen flat over the card. Once the glue set, I trimmed the screen around the edges.
I wanted a section of the pad to have visible pipes under the mesh, and had cut a cavity into the cardboard for this purpose. Painting this with everything glued in place would be problematic, so I cut the screen neatly down one edge of the cavity so that it can be lifted up out of the way to paint the pipes. The pipes were made from sections of an assortment of plastic rods. Once the pipes and the rest of the pad are painted, I'll glue the screen back down and add a little trim over the top to disguise the joint.
As detailed last week, I built up the walls using foamed PVC. I left a recess around the top of the landing pad wall, along with the pad's retractable roof would slide.
I added support struts from the Maelstrom's Edge terrain sprue along the top and bottom of the walls, with an extra row of reinforcing
As I had pipes running into the wall from the back side of the board, I needed something on the pad side to match up to them. The first became a heat vent, using a trimmed down large pipe fitting from the terrain sprue and a pipe end from a 13mm drip irrigation setup. I shortened the pipe fitting by cutting across it with a razor saw.
For the second large pipe, I built a fuel storage tank using another drip irrigation piece, a piece of plastic packaging that I think came from a laser printer component, and a clear plastic cap - I don't recall exactly where this piece came from, but I think it was some piece of toddler-feeding paraphernalia. I added some connection ports to the front using the small pipe fitting from the terrain sprue and some plasticard.
For the smaller pipe, I ran a matching piece of pipe cut from the side of the terrain sprue, and fed this into an air conditioning unit built from foamed PVC and an assortment of gubbinz from the terrain sprue.
To the left of the pipe I had added a square hatch, just for a little detail, with the intention of this turning into a conveyor feeding into the pad area from elsewhere. For the conveyor belt, I glued in a bunch of plastic tubes to create rollers.
I broke up the vast expanse of flyscreen on the pad with a couple of strips of plasticard, and added a curved strip around the edges to conceal the join between the screen section and the solid floor.
The rectangle cut into the pad floor was intended to turn into a cargo lift. I built the lift platform using a piece of PVC, some support struts from the terrain sprue and a piece of chequer plate plasticard.
To allow for some variation in the display, I wanted to be able to reposition the lift. To this end, I built a hydraulic lift to go under the middle of the platform using some pieces of plastic tube and a couple of pipe fittings. Thanks to the magic of magnets, this all slots together when needed. Alternatively it can be left out, allowing the lift to sit on the floor.
Ships need to recharge as well as refuel. I built a charging port using a shutter window with most of the shutters cut out. Into the resultant opening, I glued a piece of plasticard and some assorted bits and pieces. The charging cable was made from a couple of pieces of plastic tube and the chain from a fob watch I had sitting in my bits box.
At the other end of the board, I wanted some stairs and decking platforms to create some vertical detail. I cut the shape of the platforms out of 1mm plasticard, and glued on some aluminium mesh cut to the same size.
On the bottom of the mesh, I glued matching pieces of plasticard, and then added some diagonal supports using I-beam plastic rod.
The supports for the platforms we made from foamed PVC, doubled-up to give it some extra thickness.
With the legs in place, I added some extra supports for staircases, cut from more PVC. I used strips of textured plasticard for the stair treads. For the moment, I left the platforms and the treads on the lower staircase unglued, to make it a little easier to paint underneath them.
I added some more support struts around the edges of the platforms and on the ends of the legs. I also glued on some posts for handrails, cut from the energy fence piece on the terrain sprue.
Some final small details:
- I added a spray gun (for vermin control) onto the wall using a chemtech sprayer from the Epirian Scarecrow kit with a pistol grip from a Guardian pistol added. For the mounting clips, I used a couple of leftover sections from the energy fence posts.
- I pillaged a clingfire sprayer and a leg from the Scarecrow kit, and a trimmed down Spider Drone head to create a security remote.
- And I made a billboard screen using sections cut from a garage door.
And with that, assembly is more or less complete!
The handrails are just a placeholder for the moment - I'm planning on using 1.6mm aluminium rods for these, so that they can be bent to shape to go down the stairs, but these won't be glued in until the platforms are painted.
Stay tuned for part three, where we get some paint on this little construction!
You can pick up the Maelstrom's Edge terrain sprue, along with the rest of the Maelstrom's Edge model range from the webstore here.
As always, feel free to pop along and share your work, or ask any Maelstrom's Edge- or hobby-related questions on the Comm Guild Facebook page!
For other Maelstrom's Edge modeling articles, including tutorials and walkthroughs of a wide range of different building and miniature projects, check out the article roundup here.
Tags: modeling scratchbuilding spotlight terrain terrainsprue walkthrough
Sculpting Tutorial: Quick and Easy Hoods
Posted on Monday Jan 28, 2019 at 05:00pm in Tutorials
- by Iain Wilson
It's been a while since I sculpted anything, so this seems like as good a time as any to throw in a quick and easy sculpting tutorial!
Hoods are a nice way of adding that extra sinister touch to your sneaky cultists, and they're actually really easy to make. There are a few different potential ways to go about it, but here I'll run through the way I've found results in the least amount of swearing.
What you will need:
- Some putty - I'm using 'Green Stuff (Kneadatite), but any fine-grain two-part epoxy (ProCreate, or the finer-grade Milliput, for example) will do the job.
- Sculpting tools - I use silicon colour shapers for most of my sculpting, with the bulk of the heavy lifting being done by a flat, square ended tool and a rounded pointy one.
- Baking Paper - not essential, but handy to use as a work surface to stop the putty sticking to the table.
- And obviously, a miniature to put the hood on...
Start by mixing a ball of putty around about the size of the model's head.
Pop the putty ball on top of the model's head, and then use your fingers to flatten the ball down either side.
Use a tool to finish smoothing down the sides, rolling or pulling the putty right down to the model's neck.
Pull the putty from either side to the middle at the back of the head, to close up the gap, then use a round tool to roll up along the resultant seam to smooth it out. This should leave a pointy peak at the top rear of the hood.
Carrying on with the rounded tool, roll along the top of the hood and down the sides to smooth out any remaining fingerprints, lumps or creases that shouldn't be there.
Use the flat tool to shape the front of the hood. You can work the tool in under the putty around the face to pull it outwards, and then smooth along the outside to remove any creases and pull the edge forwards.
Use the point of the rounded tool to poke into the putty at either side of the neck, to make it look like the hood flares out a little and then folds back in under at the collar.
Finally, use the rounded tool, or the edge of the flat tool, to create some creases wherever they look natural - I like to add some shape around the back, where the weight of the pointy rear of the hood would cause the fabric to sag a little.
And that's pretty much it - you can continue to work the putty to fine-tune the shape as necessary, and then let it set before painting!
A couple more examples.
If all of that was a little hard to follow, here's a run through in video form!
If that's all got you inspired to get some hoody action happening in your own cult forces, You can pick up a coven of alien-worshipping Karists, along with the rest of the Maelstrom's Edge range from the webstore here.
As always, feel free to pop along and share your work, or ask any Maelstrom's Edge- or hobby-related questions on the Comm Guild Facebook page!
For other Maelstrom's Edge modeling articles, including tutorials and walkthroughs of a wide range of different building and miniature projects, check out the article roundup here.
Terrain Spotlight: Landing Pad 16, part 1
Posted on Monday Jan 21, 2019 at 05:00pm in Tutorials
- by Iain Wilson
This week, I'm kicking off something a little different for the new year. It's a bigger project than normal, so I'll be spacing it out over a couple of articles, with the aim being to build a detailed display board to use as a backdrop for photographing miniatures. I wanted something that would have plenty of open areas for placing miniatures, and a few different contrasting areas to allow some variety in backdrops with just the one piece. And so 'Landing Pad 16' was born:
Normally when I'm building terrain, I have a rough idea in my head of what I'm going to build, and I just wing it from that. Because this one was a little more complicated, I started by sketching out a rough design, and then translated that into a 1:1 plan on a sheet of cardboard.
For the bulk of the structure, I chose to use foamed PVC sheet. This is a lightweight, but strong plastic material that is easy to cut and shape, and takes extremely well to superglue, which allows it to be used to build solid, detailed structures.
I took my plan and drew up a neater version on the PVC, and then used an exacto knife and steel ruler to cut it out.
I had a slight measuring mishap when scribing some panel lines on the floor piece. Rather than starting over, I just flipped the floor over, making the build a mirror image of my original design. The floor was layered, to allow for some depth in the detailing. With the floor marking out the basic shape for the structure, I could start adding the walls, shaping the PVC to the outline of the building.
The foamed PVC is quite flexible, but I added a curve to the landing pad wall by heating the PVC in boiling water, curving it around a biscuit tin and letting it cool. This wasn't super-effective, but gave it enough of a lasting curve to let it bend more easily to the required shape. Having the natural bend in there means that the PVC isn't trying to spring back as hard against the glue line, giving a more solid joint.
As with all of my Maelstrom's Edge buildings so far, detailing on this one is added courtesy of the Maelstrom's Edge terrain sprue. I created two hexagonal windows for the landing bay freight access corridor by gluing together pairs of trapezoid windows along their long edges.
As I built up the structure, the plan changed a little from the original sketch. I added extra access between the two sides of the board, and brought the detail on the 'reverse' side down from the roof to a first-level courtyard.
The courtyard needed some depth to allow for some staggered model positioning, so I added a couple of descending platforms on the rear, using layers of PVC to create the steps between levels.
I had planned for a groove to run around the top of the landing pad wall, which would theoretically serve as a runner for a retractable roof - I'm not building the roof, but wanted it to be implied for completeness. For the roof groove to have depth, this needed to protrude into the back facing of the wall, so I built up a box structure using layers of PVC.
The doors on the terrain sprue have detail on both sides, but as they're intended to be used on external structures they only have the framework on the one side. I created a double sided doorway by removing the frame from the rest of the door using a razor saw. On a second door, I cut the door itself out leaving the frame intact, so I could have an open doorway for the freight access.
However carefully you cut and glue, you wind up with some gaps and rough edges. I used some putty to fill in wherever necessary, and once set used some fine sandpaper to smooth it down.
To give the walls some structural detail, I built up a recurring pattern using the support struts from the terrain sprue, and glued this on along the top and bottom of each wall. For curved walls, I carefully bent the strut to shape before gluing it in place.
Rather than having bare cement floors everywhere, I added tiles to the courtyard area using textured plasticard. By cutting out squares of tiles in a regular pattern, I inserted some decorative areas of smaller tiles - these will be painted up with the Epirian Foundation logo.
Using ladders from the terrain sprue, and posts cut from sections of the sprue itself, I added a handrail around the courtyard.
I left the handrail open in a couple of places, to allow some avenues for displaying models and show where the terrain would theoretically continue past the confines of the display board. I did extend the rail part of the way down the stairs, by cutting a piece of 2mm plasticard in a pattern matching the rungs of the ladder.
Down the other end of the board, behind the landing pad, I built some nice, hefty pipes using the large pipe fitting from the terrain sprue and some 13mm garden drip irrigation fittings.
I scattered some smaller pipes around the place using the small pipe fitting, some plastic tubing, and some more scrap sprue from the terrain sprue.
With all of that done, this side of the board is more or less done. There is still a little more gap filling and sanding to be done, and probably some more small details to add here and there. I'll need to add some sort of trim around the bottom edge to neaten everything up, but that will wait until the other side is finished so I can make it consistent.
Stay tuned for part two, detailing the landing pad side of the board!
You can pick up the Maelstrom's Edge terrain sprue, along with the rest of the Maelstrom's Edge model range from the webstore here.
As always, feel free to pop along and share your work, or ask any Maelstrom's Edge- or hobby-related questions on the Comm Guild Facebook page!
For other Maelstrom's Edge modeling articles, including tutorials and walkthroughs of a wide range of different building and miniature projects, check out the article roundup here.
Tags: modeling scratchbuilding spotlight terrain terrainsprue walkthrough
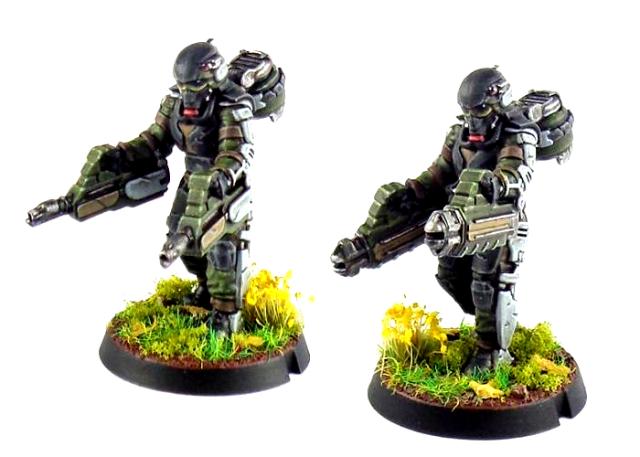
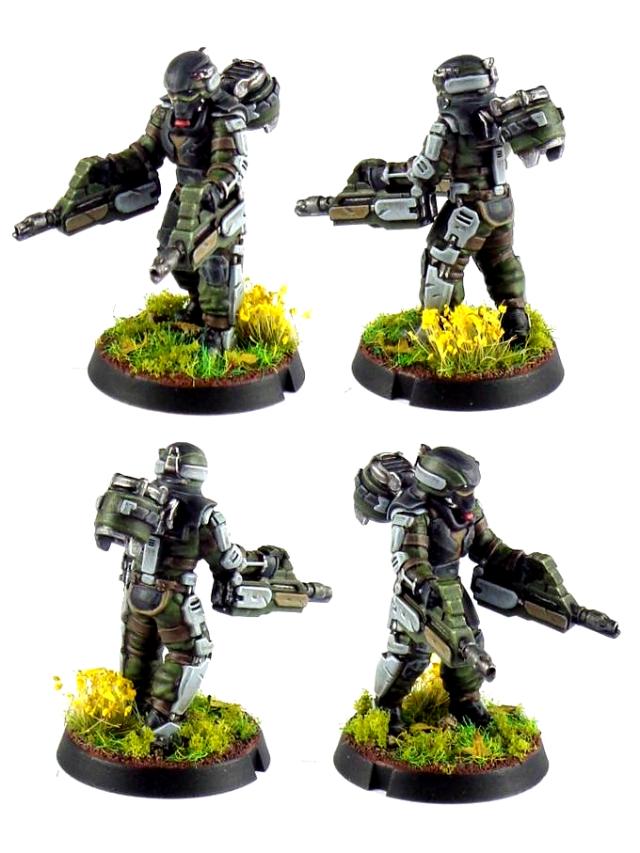
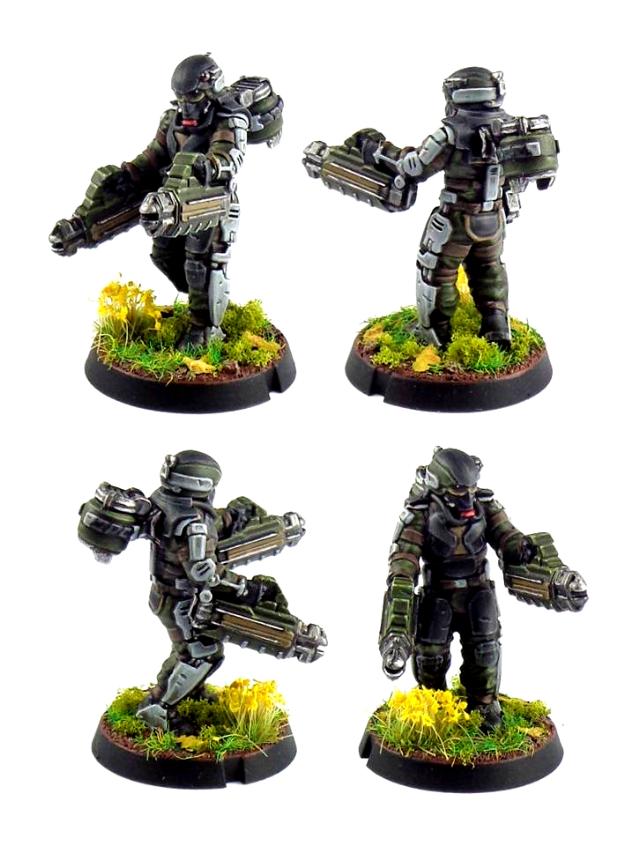
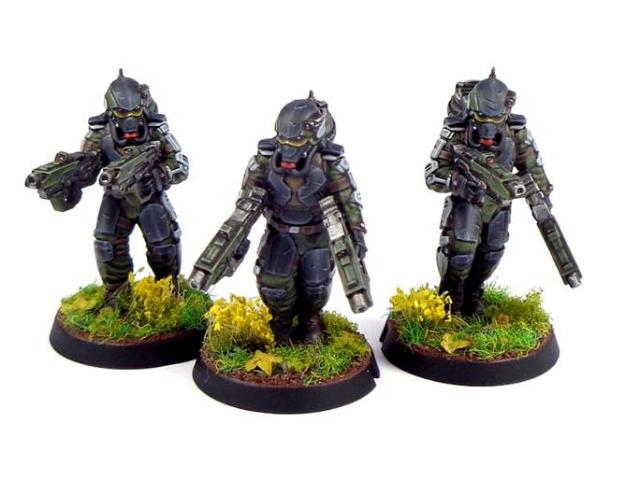
Modeling Spotlight: Epirian Boostpack Infantry
Posted on Monday Jan 14, 2019 at 05:00pm in Models
- by Iain Wilson
Following on from my improbably-mobile Pa'ku conversion, I'm continuing the jetpack theme this week with a bit of a closer look at the Epirian SecDef Boostpack Infantry models released last month.
Released in a pack of three models, Boostpack Infantry take to the table as a SecDef Rapid Intervention Team, where their boostpacks and twin carbines allow them to get in close to the enemy and lay down a withering hail of fire.
The high quality resin kit comes with the body and head as a single piece, with separate weapon arms, boostpacks and grenades. The unit's rules card also gives them access to a couple of special weapon options - these will be coming in a separate release very soon!
Assembly is really straightforward - the boostpack goes on the back, with a handy locator pin slotting into the model's backplate, and the arms go where you would expect, and are fully interchangeable between the three models.
There is no specific mounting point for the clingfire grenades - you can glue them to the belt, chestplate, thighs, or wherever else seems appropriate.
While the armour is the same as the regular plastic SecDef models (aside from the head!), the shoulders are slightly different to allow for the boostpack mounting plate extending up over them. You can sub in arms from the plastic sprue though by removing the small shoulder pad piece shown below in red.
With a little more work, you can create gasmask-equipped SecDef Tactical Teams, by using the plastic arms and filling in the boostpack mounting point with a little green stuff putty.
For a little more leg variety, you can use a sharp hobby knife or razor saw to cut through the bodies just below the belt. This allows you to glue on legs from the plastic SecDef to mix up your boostpack models, or use the resin legs on your regular SecDef teams to add some running models.
SecDef Sergeants have, from time to time, been known to requisition the best gear for themselves. This sergeant has given himself a bit of a boost with a twin-turbine boostpack, made by trimming off the locator pin on the pack and gluing two boostpacks side by side to the model's back.
Finally, why should SecDef have all of the fun? While boostpacks are notoriously unreliable and difficult to keep operational, it seems likely that some Broken chieftains or techs with the right technical knowledge would be unable to resist the lure of the extra speed afforded by a scavenged unit!
To add a Rapid Intervention Team to your Epirian force, you can pick them up along with the rest of the Maelstrom's Edge model range from the webstore here.
As always, feel free to pop along and share your work, or ask any Maelstrom's Edge- or hobby-related questions on the Comm Guild Facebook page!
For other Maelstrom's Edge modeling articles, including tutorials and walkthroughs of a wide range of different building and miniature projects, check out the article roundup here.
Tags: conversion epirian modeling secdef spotlight
Conversion Spotlight: Jet Pa'ku!
Posted on Monday Jan 07, 2019 at 06:00pm in Tutorials
- by Iain Wilson
Pa'ku are generally regarded as slow, deliberate creatures, rarely rushing into action and often waiting on the sidelines of a battle pondering the best course of action before deigning to lend their (once they get going) formidable skills to the fray. While playing with the resin model, though, I happened upon a conversion idea that was just too much fun to not do it - and so the Jet Pa'ku was born!
I originally put this guy together for a spotlight article on the Pa'ku model when it was released (which you can see here), and in his unpainted state he looked like this:
The conversion used most of one Pa'ku model, the main part of the gun from a second, two auto sluggers taken from the Broken Infantry sprue, and the bottom of an energy fence piece from the Maelstrom's Edge terrain sprue.
I had to make some changes to his pose, so repositioned his arms by soaking them for a minute in boiling water, bending them into the shape I wanted, and then dropping them in some ice water to 'set' them in that shape. To fit the hands onto the guns, I trimmed away some of the webbing between the fingers, widened the trigger space by cutting away a small piece at the back of the gun, and gently bent the fingers around the grips. I also cut a wedge out of the front of his neck with a razor saw, and bent the head forwards using the same hot/cold water treatment. The minor gap that was left behind was filled in with a little 'green stuff' putty.
The Pa'ku's feet are very flat on the bottoms, to attach to the base. That just wouldn't do here, so I used the above hot/cold water treatment to add a bit of a curl to the toes, and then sculpted some detail onto the bottom of the feet with more green stuff.
For the jetpack, I used the main sections of two quad mortars. I trimmed the fittings up so that they would attach sideways to the Pa'ku's backpack, added a turbine from the Epirian Firefly Drone on the front where the weapon barrels normally go, and filled in the gap in between the two new jets with the energy fence base, some green stuff, and a small piece of plasticard over the top to neaten it up.
With everything else assembled, the final detail was to add the smoke trails from the jetpack. For rigidity, I cut a couple of pieces of plastic sprue to the right length and glued them bases for ease of working. Then I covered these in a mix of shredded cardboard (made from small pieces of cardboard box run through a spice grinder) and PVA glue. This was a bit experimental, but looked the part once done, so I crossed my fingers and just hoped it would work out right when it was painted.
Speaking of which, painting started out with a basecoat of Army Painter Army Green spray.
I drybrushed over the skin with Coat D'Arms Putrid Green, and went over all of the metal and leather parts with Vallejo Beasty Brown. The leather straps then got a coat of Vallejo Heavy Brown.
I drybrushed the metal areas with P3 Pig Iron, and then washed the metal and leather parts with Army Painter Strong Tone. I also went over the skin with a generous coat of Army Painter Military Shader wash, and when this was dry, picked out the fur around the backpack, the weapons, claws, targeter and the smoke trail with Vallejo Heavy Charcoal.
Since making the smoke trail clearly wasn't getting experimental enough, I had also decided to try painting a flame effect into the smoke. I did this by picking out sunken areas near the jet nozzles with white, then painting in some yellow and red, leaving the brighter yellow deeper in and fading out to red closer to the surface. Then I drybrushed over the top with more Heavy Charcoal, and highlighted with Vallejo Light Grey and some white.
The weapons, claws, fur and targeter were given a light drybrush with Vallejo Neutral Grey and then a wash of Army Painter Dark Tone. I also added some Dark Tone patches on the jetpack to break up the metal tone a little, and painted the bumps on his back with some old Citadel Tentacle Pink, washed with a couple of coats of Army Painter Red Tone.
This just left some finishing touches - I gave the weapons a highlight with a very light drybrush of Pig Iron, picked up the cloth bindings with the old Citadel Liche Purple with a Tentacle Pink highlight, added some highlights and scratches to the metal bits with Army Painter Shining Silver, painted in the eyes with Citadel Iyanden Darksun, and finally popped some Army Painter Pure Red onto the targeter lens with a white highlight spot.
And there he is! There are no game rules for this monstrosity; it was purely an exercise in conversion for the sake of it. Sometimes it's fun to take a break from assembling game-ready forces to just build something cool!
To add a Pa'ku (or a Jet Pa'ku!) to your own Broken force, you can pick him up along with the rest of the Maelstrom's Edge model range from the webstore here.
As always, feel free to pop along and share your work, or ask any Maelstrom's Edge- or hobby-related questions on the Comm Guild Facebook page!
For other Maelstrom's Edge modeling articles, including tutorials and walkthroughs of a wide range of different building and miniature projects, check out the article roundup here.
Tags: broken conversion modeling spotlight
2018 Maelstrom's Edge Roundup!
Posted on Monday Dec 31, 2018 at 06:00pm in General
It's been a huge year for Maelstrom's Edge! As 2018 draws to a close, we thought it would be fun to take a moment to have a look back at what we have achieved over the last year.
Our biggest focus for this year has been to expand the model range, to give players more options for their games. We rolled this out with regular model releases in either plastic or resin.
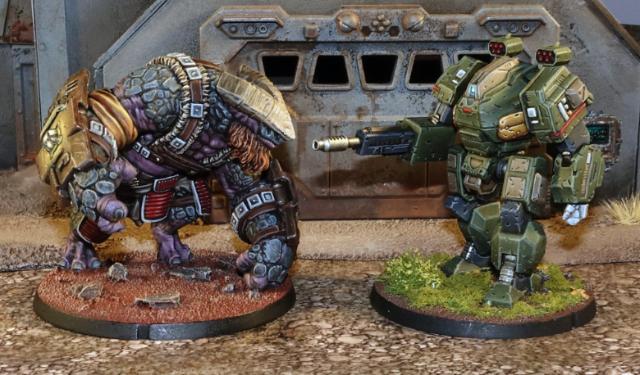
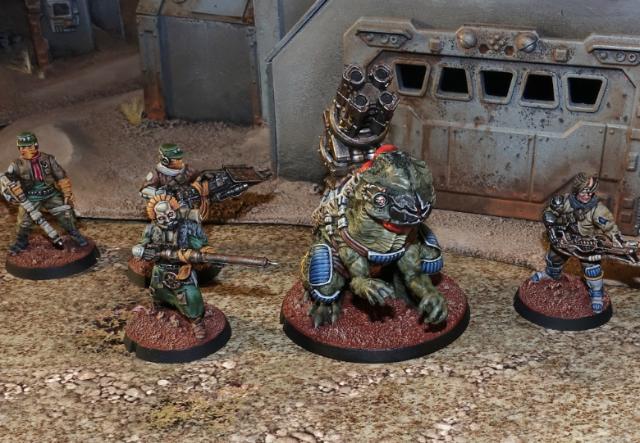
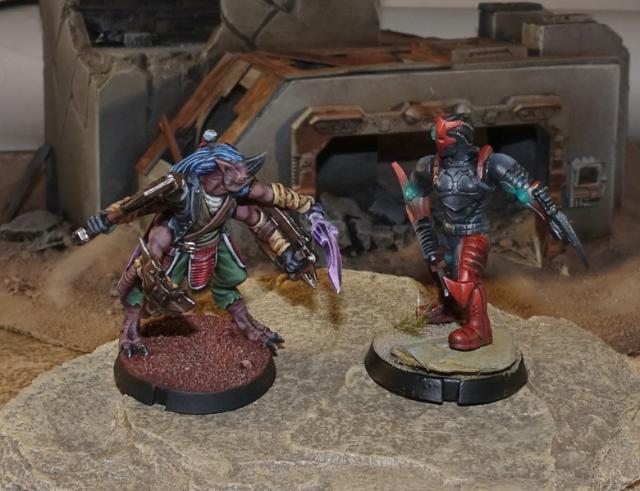
As the new kids on the block, the Broken received the lion's share of new models, with a slew of non-Core options to expand the force. These included two Chieftain variants - a Forsaken Chieftain with a Xeno spotter, and a Tech Chieftain variant with bionics and custom weapons, a Sig Jammer to mess with an opponent's technological capabilities, the ever-impressive Gnolti, our largest model to date, and the quad-mortar-carrying Pa'ku.
We also introduced a new category of unit to the game, with two 'Add-on' unit options joining the Broken ranks. The Marsayan Hypnotist and Hakoyu Grand Master can replace a normal squad member in regular Broken infantry units, adding different capabilities and tactical options to the unit.
The Epirian Foundation also received some reinforcements, with a resin Contractor Drone added to the mix, changing up how Contractor units are formed. The original Contractor unit was replaced with Contractor Defender and Contractor Scout units, with new battefield roles defined by the drones that accompany them.
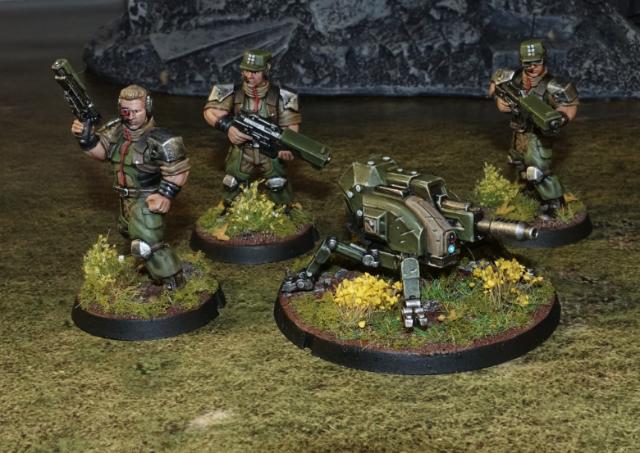
A new Command option also joined the fray, with the release of the plastic Master Bot Handler kit. This fantastic kit allows you to build a mech-suit enhanced commander with a wide array of different weapon configurations, and accompanied the release of a new sub-faction for the Foundation: The SecDef.
The SecDef are the elite troops of the Epirian Foundation, and take to the field with the best weapons and equipment money can buy. We kicked off this range with another plastic kit, SecDef Infantry, used to build SecDef Tactical Teams, and have added to this with our latest release, in the form of resin Boostpack Infantry for SecDef Rapid Intervention Teams.
Through the Comm Guild blog, we continued to release weekly modeling articles, covering a wide range of different hobby-related topics including painting techniques, conversion ideas and tutorials or spotlights on different terrain projects. There are too many to list them all here, but you can find them all in the Hobby section of the Maelstrom's Edge website.
There have also been some big changes to the Maelstrom's Edge website over the last few months, with the addition of more content and some rearranging to make things easier to find. We also added printable PDF versions of all of our rules cards in the Rules section, to supplement the online-viewable cards in the Force List viewer.
SO where to next?
We will be continuing with our regular release schedule, with new models coming over the next few months for the Epirian Foundation and the Karist Enclave. The usual onslaught of modeling content will continue through the Comm Guild, and we'll be looking to add more gaming material as well in the form of battle reports and tactics articles.
We will be attending Salute in April, so the start of the year will also be busy getting models ready, and all going well, we'll have a couple of big previews to show off over the Salute weekend...
Our thanks to everyone who has supported us through the past year. We're looking forward to sharing new and shiny things with you in the year to come!
Have questions about the Maelstrom's edge models or rules? Need help with a modeling project? Have conversions or painted models to share? Head on over to the Comm Guild Facebook page to discuss and share everything to do with Maelstrom's Edge!
Tags: roundup
It's Christmas - time to build something!
Posted on Monday Dec 24, 2018 at 06:00pm in Tutorials
- by Iain Wilson
Last year, just for something different, I made a Christmas ornament out of a plastic bauble and some components from the Maelstrom's Edge terrain sprue. I thought it might be fun to continue this each year, and so with that time of year upon us once more, I broke out the sprues and some foamed PVC, and came up with this:
For the main part of the star, I cut two stars out of 3mm foamed PVC - a single 6mm star would have been easier, but the 3mm was what I had to hand.
I glued the two stars together with superglue, and trimmed around the edges to make sure they lined up.
In the middle of the star I drilled a 13mm hole, and glued a marble in the middle.
To run around the outside of the star I took ten support struts from the terrain sprue and cut them down into segments.
The long segments were trimmed up to fit and then glued around the outside. I used the short segments to add internal bracing, and cut the vents into wedge pieces to fit into the points of the star. Finally, I added a large pipe fitting on either side to bracket the marble.
To paint, I started out with some Rustoleum Oiled Bronze spray.
Over that, I added a heavy drybrush of Coat D'Arms Bright Gold.
I used a drybrush of Vallejo Emerald to add verdigris wherever it looked appropriate.
The final step was to paint the marble. I went with red to keep the Christmas vibe going. I used a blend of Vallejo Red and Army Painter Pure Red, with a highlight of white and a little Army Painter Purple Tone to shade around the outside.
To build your own festive constructs of
As always, feel free to pop along and share your work, or ask any Maelstrom's Edge- or hobby-related questions on the Comm Guild Facebook page!
For other Maelstrom's Edge modeling articles, including tutorials and walkthroughs of a wide range of different building and miniature projects, check out the article roundup here.
Tags: christmas conversion modeling
