Modeling Spotlight: Hakoyu Grand Masters
Posted on Monday Dec 17, 2018 at 06:00pm in Tutorials
- by Iain Wilson
Hakoyu Grand Masters are masters of close quarters fighting, lending the experience of decades of training in combat skills and their exquisitely-crafted energy weapons to the Broken Federation's cause. This week, I'm taking a closer look at the model for this fearsome melee veteran.
The Hakoyu Grand Master is a multi-part resin model, with the body cast in one piece and all four arms joining at the elbows. Two of the forearms are equipped with the Hakoyu's shields, while the other two hold the Phase Weapons - a sword and an axe.
The elbow joint is a ball-and-socket affair, which allows for a decent range of posing, and also allows you to choose where to put each forearm.
Of course, that also means that you can mix and match arms between models - for the below model, I swapped out the shields in favour of doubling up the weapons. The second axe and sword were switched to the opposite side simply by slicking them off just above the hand and switching them, gluing each weapon onto the hand the other had been removed from.
Phase weapons take many forms, at the preference of the individual Grand Master. For this model, I replaced the sword and axe with a double-ended polearm - presumably this Grand Master would be skilled enough with this weapon for it to have the same effect as fighting with two separate blades! The hands were swapped out with plastic hands from the Broken Infantry sprue - as the Hakoyu only has three fingers, I resculpted the fingers on the left hand with a little 'green stuff' putty. The right hand is bionic, so I left it as is - ill-fitting bionics would be just one of the difficulties faced by alien races amongst the often poorly-equipped Broken.
Life on the Edge is hard, and emergency surgery and appropriate bionics are not always available when needed. It would be expected that this might take a toll on veteran Grand Masters, who spend so much of their time in the thick of the fighting. This Grand Master has at some point lost two of his hands, and rather than replacing them with bionics has had his Phase blades strapped directly to his wrists. I also put this model into a slightly more crouched pose, but cutting through the lower knee joint, bending the legs and then filling in the remaining gap with some putty.
Finally, while known primarily for their fearsome skills in melee, I would expect some Grand Masters to take pride in mastering all aspect of warfare. This Grand Master has eschewed the usual Phase weapons (aside from the one still strapped to his back - you can't turn away completely from tradition, after all!) in favour of a long rifle converted from two slug rifles from the Broken Infantry sprue. The forearm (another bionic) is also taken from the Infantry sprue. I also doubled up the larger of the two shields, but cutting the small shield off the right forearm, and the arm off the large shield, and then gluing them together.
What have you done with your Grand Master? Feel free to pop along and share your work, or ask any Maelstrom's Edge- or hobby-related questions on the Comm Guild Facebook page!
You can pick up the Hakoyu Grand Master along with the rest of the Maelstrom's Edge model range from the webstore here.
For other Maelstrom's Edge modeling articles, including tutorials and walkthroughs of a wide range of different building and miniature projects, check out the article roundup here.
Tags: broken conversion converting hakoyu modeling spotlight tutorial
New resin Epirian unit: SecDef Rapid Intervention Team
Posted on Thursday Dec 13, 2018 at 06:00pm in The Epirian Foundation
This week sees the release of some new, fast-moving reinforcements for the Epirian SecDef - the Rapid Intervention Team!

-Click here for the full rules card-
Modeling Spotlight: Epirian Contractor Drones
Posted on Monday Dec 10, 2018 at 06:00pm in Models
- by Iain Wilson
The addition of the Contractor Drone to Epirian Contractor units gave them some new tactical options, with heavy weapon options for the re-titled Contractor Defender units, and supply drone options for the new Contractor Scout unit. This week I'm looking at some modeling options for the multi-part, resin Contractor Drone model.
Building one of four different options, the Contractor Drone kit comes with three different weapon options - a maglock chaingun, twin cluster missile pods and twin flakk guns. It also includes the Resupply Package for the Contractor Scout unit.
While sharing a superficially similar configuration, the Contractor Drone is a distinctly different model from the Spider Drone, with a chassis that is bulkier and taller. It also has weapon mounts situated beside its off-centre sensor unit as opposed to the Spider's side-mounted set-up.
The drone's legs all fit into any of the four shoulder sockets, with a barrel pivot allowing them to be positioned through a wide range of movement.
The equipment options slot in with a large locator tab. If you want to keep your options open, you can use a small piece of blu tac or similar re-usable adhesive to temporarily fix them in place and swap them out as you want.
Since I have problems assembling things the way they're supposed to be, I couldn't resist taking a knife to the kit to see what I could do with it. For a taller profile, I repositioned the feet on the below drone by soaking the legs in hot water and then bending them. I also cut through the legs right beside the shoulder assembly and glued them back on at a shallower angle.
One of the weapon options - Strike Missile Pods - didn't make it into the kit for the initial release. There are a couple of fairly easy ways to get around this problem if you want Strike Missile-equipped drones. For this one, I took a pair of Strike Missile pods from the Hunter Warmech kit, trimmed them up a little to fit onto the Contractor Drone front and glued them together.
If you don't have a Hunter kit to hand, you can also take the Cluster Missile pods, trim the missiles flush with the front of the pods, glue a 1.5mm hole into the front of each pod and glue in two pieces of 1.5mm plastic rod trimmed to points.
For a closed version of the Resupply drone, I cut through the supply cache directly behind the front panel using a razor saw, and then glued the panel directly to the front of the drone.
Legs are all well and good, but sometimes a more stable platform is called for. On the below drone, I replaced the legs with a skirt made from sections cut from a lintel piece found on the Maelstrom's Edge terrain sprue. Under that, I added some tracks purloined from an old Mechwarrior tank model.
The Contractor Drone chassis also makes a nice, solid foundation for a remote turret assembly, to be installed on fortification walls or vehicle hulls. In place of the legs, I added a mounting column cut from a length of plastic tube, and inserted that into the small pipe fitting from the Maelstrom's Edge terrain sprue.
You can pick up the Contractor Drone along with the rest of the Maelstrom's Edge model range from the webstore here.
As always, feel free to pop along and share your work, or ask any Maelstrom's Edge- or hobby-related questions on the Comm Guild Facebook page!
For other Maelstrom's Edge modeling articles, including tutorials and walkthroughs of a wide range of different building and miniature projects, check out the article roundup here.
Terrain Spotlight: Yoghurt Tub Observatory
Posted on Monday Dec 03, 2018 at 06:00pm in Tutorials
- by Iain Wilson
A side effect of building a lot of scratch-built terrain is that you sooner or later find yourself eyeing off all of your rubbish, trying to decide whether to throw it out or put it in the 'terrain fodder' box. This week's article comes from seeing an empty yoghurt tub sitting upside-down on the sink and thinking 'Hmm... I could totally do something with that!'
With the addition of half of a plastic Christmas bauble, and some bits and pieces from the terrain sprue, I built an observatory:
This all started, as I said above, with a 700g yoghurt tub. I was undecided at first as to just what to do with it, but when I went fossicking around in my potential terrain bits collection, I came across half of a plastic bauble that my wife bought a couple of years ago with Christmas stamps or somesuch thing in it. It looked a perfect size to combine with the tub, and so an idea was born.
I decided to keep this one fairly light on extra detail, for a clean, functional-in-a-sciency-sort-of-way building. The first thing to do was add a door, so I grabbed one from the Maelstrom's Edge terrain sprue, traced around it on the side of the tub and then cut out the doorway rectangle carefully with a sharp hobby knife. After checking the fit and making some slight adjustments with the knife, the door was glued in place with an 'all plastics' glue (a two-part superglue that includes a 'primer' to help the glue grab to plastics that can otherwise be problematic for a strong glue bond).
I added three support struts spaced around the building, just gluing them in place where I wanted them.
For the dome, I took some more support struts and separated the small square sections with attached rivet strips by cutting through the strut with the knife. I gave these a slight curve by bending them carefully over the handle of the hobby knife. On the bauble, I drew a guideline through the middle and then glued the strut sections and a large pipe fitting along the line.
I then glued the bauble in place on top of the yoghurt tub, and added two more support strut pieces halfway around each side, to help reinforce the glue bond, as the edges of the bauble are fairly thin.
Finally, I cut an 8" square of masonite, and glued the tub in the middle of it. I also added a couple of steps cut from an off-cut of foamed PVA, and a little strip of plasticard to cover over the doorstep, where my doorway cut had been a little untidy.
A couple of coats of spray and a little detail work later, and the new observatory looked like this:
A quick tip on painting clear containers - it can be a really good idea, particularly if you are using lighter colours, to spray the inside of the container black or grey before gluing it in place and painting the outside. This helps to make the end result more opaque, as the painted building can otherwise go a slightly translucent or look a little glowy if there is a strong light behind it. It also helps keep the building looking good if the paint gets scratched on the outside.
To build your own yoghurt tub science building, you can pick up the Maelstrom's Edge terrain sprue along with the rest of the Maelstrom's Edge model range from the webstore here.
As always, feel free to pop along and share your work, or ask any Maelstrom's Edge- or hobby-related questions on the Comm Guild Facebook page!
For other Maelstrom's Edge modeling articles, including tutorials and walkthroughs of a wide range of different building and miniature projects, check out the article roundup here.
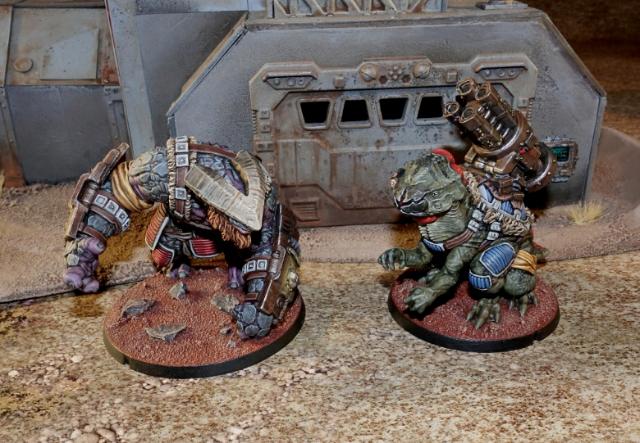
Modeling Spotlight: Pa'ku Artillery
Posted on Monday Nov 26, 2018 at 06:00pm in Tutorials
- by Iain Wilson
This past month saw the release of the Pa'ku for the Broken faction, taking to the field with their gigantic Quad EMP Cannon strapped to their rather large backs. This is another brilliant model in a slowly growing collection of characterful alien creatures for the faction, and so in my usual style, I figured it would be fun to take a hobby knife to it and see what happened!
The fantastic studio model below shows the Pa'ku in all his warty glory. He's big, he's ugly, but nobody's going to tell him that so long as he has that gigantic quad cannon pointed in their general direction!
The Pa'ku is a resin model, and comes in 6 pieces, along with a 45mm base. The arms are on ball joints that allow for a bit of posing movement, and the cannon barrels have a round locator piece, so can be swivelled around to whatever orientation you prefer.
The immediate, obvious conversion opportunity is to replace the quad cannon with a larger-bore, single cannon. On the below model, I added a ring of plastic tube over the rear tube assembly, and replaced the barrel section with a new, larger, single barrel made from layered plastic tubing, with some plastic rod struts on the sides to give it a little extra detail.
As an extra bonus, you can also put him on the table with the unofficial rules card in the Force List section of the Maelstrom's Edge website here. You could easily leave off the side detailing and just use a single piece of 10mm tubing for a less detailed but much easier conversion, or use a different gun entirely for other heavy weapon variants.
Venturing a little further outside the box, the slow moving, steady Pa'ku seemed like an ideal candidate for ferrying around notable Broken characters who prefer not to dirty their own boots any more than necessary. With that in mind, I took a Pa'ku and assembled it without the gun, and then added a platform onto the back with a little plasticard, and added a rider built from the Broken Infantry sprue. The handrail is cut from a ladder from the Maelstrom's Edge terrain sprue, and the sheath of extra harpoons is a piece of plastic tube filled with offcuts of 1mm rod, attached with a rivet piece from the previously-hacked-up ladder.
Of course, it's possible that not all Pa'ku are as slow and deliberate in their actions as the species is renowned for. What happens to those more headstrong, battle-hungry Pa'ku? I'd like to think they turn out something like this:
The jetpack was made from the main section of two quad guns, with help from a little putty, Epirian drone parts and plasticard. The head was repositioned by cutting and bending the neck, and the forearms twisted in hot water and guns added from the Broken Infantry sprue. I'll be sharing a more detailed build of this one in an upcoming article, once I get some paint on him!
To add some giant-cannon-goodness to your own Broken force, you can pick up the Pa'ku along with the rest of the Maelstrom's Edge model range from the webstore here.
As always, feel free to pop along and share your work, or ask any Maelstrom's Edge- or hobby-related questions on the Comm Guild Facebook page!
For other Maelstrom's Edge modeling articles, including tutorials and walkthroughs of a wide range of different building and miniature projects, check out the article roundup here.
Terrain Tutorial: Flight Base Shipping Crates
Posted on Monday Nov 19, 2018 at 05:00pm in Tutorials
- by Iain Wilson
This week's modeling article came about more or less by accident! I have a bunch of flight bases left over from the Epirian Drone kit, as it comes with both 45mm bases for Spider Drones, and flight bases for Firefly Drones. I discovered when sorting out some bases in a mixed box of bits that the 25mm round bases fit quite neatly inside the bottom of the flight base, creating a pretty neat little detail effect, and I thought: I need to do something with that!
And so I did - multi-purpose shipping crates:
This is a really quick and easy build. You'll need two flight base bottom pieces, two 25mm bases, some thin cardboard (I'm using part of a manilla folder here, but cereal packet or similar thin card or even some thin plasticard would do just fine) and a computer terminal from the Maelstrom's Edge terrain sprue. That last bit is optional, as the crates will still look perfectly functional without it, but it does help to finish it off and give it that definite sci-fi stamp!
First, cut the cardboard into a strip - the width of the cardboard is the length of the crate. I've gone with 50mm long crates, as that seemed like a good size, but you could make them longer or shorter (or even do a mix of sizes) if you choose. Mark out six 15mm increments along the strip and lightly score with a sharp hobby knife, and cut the cardboard off about 5 or 6mm past the last one. Cut the corners of that last, shorter increment off at 45 degrees, as below:
Fold along each score line to create a hexagonal tube.
Apply superglue to the inside of one end of the tube, and wrap it around one of the flight bases, with the base bottom facing out, so that the end of the tube lines up flush with the bottom of the base.
Repeat for the other end, and this time also glue the short tab on the end of the cardboard inside the corresponding edge of the tube.
Glue a 25mm base, bottom facing out, inside each of the flight bases. The arc markers on the 25mm base line up with two corners of the flight base. If you're not using Maelstrom's Edge bases for this, it still works, you just won't have the extra bit of detail from the arc markers. Some bases also have branding stamps on the bottom - you could use these the other way around, for a slightly different look.
Finally, glue the computer terminal in one end.
Add some paint, and your cargo crates are ready for the table!
Printing out some shipping company names and gluing them on the sides is a great way to add some extra detail and make them look authentic!
To build your own shipping crates, you can pick up the Maelstrom's Edge terrain sprue (and 25mm bases!) along with the rest of the Maelstrom's Edge model range from the webstore here.
As always, feel free to pop along and share your work, or ask any Maelstrom's Edge- or hobby-related questions on the Comm Guild Facebook page!
For other Maelstrom's Edge modeling articles, including tutorials and walkthroughs of a wide range of different building and miniature projects, check out the article roundup here.
Maelstrom's Edge Fiction
Posted on Monday Nov 19, 2018 at 12:00am in Fiction
When creating the Maelstrom's Edge game, we wanted a universe that felt real and 'lived in', and that people would want to revisit and build in their games. With that in mind, we set about creating a wealth of background material to guide the creation of the game, and then expanded on that by approaching various authors to flesh out the Maelstrom's Edge setting. The end result of that is a slowly growing collection of fiction that we're extremely proud of.
Our first releases were our novels, 'Faith' and 'Sacrifice', which tell the story of two of the factions battling it out for control of Zycanthus, a planet a few tens of lightyears from the Maelstrom's Edge. The corporate Epirian Foundation owners of the world are trying to extract what resources they can in the last few decades before Zycanthus is destroyed by the Maelstrom. The secretive religious extremists of the Karist Enclave however, have identified Zycanthus as a key world for conversion to their beliefs - that the Maelstrom is not the end of everything, but the beginning of a new age for mankind - that if they prepare their souls for the Maelstrom's embrace, they will ascend to a new plane of existence.
In the first novel, 'Faith', Epirian Sheriff Kyle Wynn is ambushed in the desert by a Karist landing party and left for dead. He begins to uncover just how deep and wide the Karist infiltration of Zycanthus goes - and how dangerous it might be. Meanwhile Karist priestess Zafah has travelled to the world to try and teach people of the salvation that Ascension can bring - but the reaction of the Epirian security forces to her missionary work forces her to consider more direct methods of teaching the people the Karist Way. With both sides adamant that their way is best, the stakes are raised for a cataclysmic battle for control of the Zycanthus star system in the second book, 'Sacrifice'.
Our short story compilations, 'Tales from the Edge: Emergence' and 'Tales from the Edge: Escalation' take a closer look at an assortment of different settings along the Edge.
'Emergence' includes eight short stories stories by Tomas Martin, Stephen Gaskell and Andrew Everett, which explore the conflict and intrigue amongst the stars near the Maelstrom's Edge.
Stephen Gaskell's novelette 'Transit' tells of a young boy discovering the Maelstrom is coming to his world, whilst 'The Kaddar Nova' depicts the devotion and fanaticism of the most dedicated of the Karist Enclave's apocalyptic priesthood.
Tomas L. Martin's stories 'The Shipyard', 'The Scarecrow' and 'The Hunter' delve into the background of the corporate Epirian Foundation and their robotic guardians.
'Scraps' by Andrew Everett, 'Crisis Point' by Stephen Gaskell and 'Static Prevails' by Thomas L.Martin explore the conflict and intrigue amongst the stars near the Maelstrom's Edge.
'Escalation' is the second short story collection, and goes even deeper into the chaos of the Edge with stories by Alastair Reynolds, Aliette de Bodard, Liz Williams, and other accomplished scif-fi authors.
'Remainers', by Alastair Reynolds follows the return of a starship captain to a world doomed by the Maelstrom on the behest of a mysterious client.
In Rob Ziegler's 'Little Bots', a group of orphans scheme and sneak their way into a plot to escape their dying world, whilst Jeff Carlson's 'The Spaces Between Us' looks at the challenge of the Maelstrom's approach from another direction - if a world is lost, do we have a duty to save what makes it unique?
Jaine Fenn's 'Over You' and Tomas L. Martin's 'Fleet Champion' explore the honour-bound existence of the Remnant Fleet's Champions. The Remnant is all that's left of the Artarian civilisation fleeing the destruction of their homeworlds by the Maelstrom, and rely on their exo-suited Champions to secure the resources they need to survive - by force if necessary.
Nebula, Locus and SFWA award-winning author Aliette de Bodard tells a tale of the aftermath of an attack by the Karist Enclave on an Epirian Foundation world in 'Losses We Bear'. The topic of the Karist Enclave is also explored in Stephen Gaskell's 'A Keeper's Duty', where a young apprentice must learn to control the power of the unpredictable aliens known as the Angels.
Jonathan Cooper's 'The Daughter of Arin' presents a challenge when a Comm Guild courier arrives with an unexpected package, whilst stories from Philip K. Dick Award nominated authors Karin Lowachee and Liz Williams explore the ragtag rebels of the Broken and the challenges confronted by those who have nothing but the clothes on their backs in 'The Flesh of the World' and 'Moon Desert'.
The stories within this volume explore the tangled and desperate politics of the civilisations on the Maelstrom's Edge, from passionate revolutionaries to devout missionaries. The array of bestselling and award-winning writing talent will take you on journeys to planets where every decision can be the difference between survival and destruction.
These four books are all available in print through the Maelstrom's Edge webstore here, or you can find eBook versions on Amazon here.
The Maelstrom's Edge webstore also has available Audiobook versions of a selection of the short stories from 'Tales from the Edge: Emergence', with two more chapters in the story started in 'Transit' to come in the near future.
With so much more of the Edge still to explore, we hope you enjoy diving into our galaxy as much as we did creating it!
Website Update - Printable Unit Cards!
Posted on Thursday Nov 15, 2018 at 07:08pm in Gaming
The Maelstrom's Edge website has an online unit card viewer (which you can find here), allowing you to see the stats, options and special rules for each uit in the game.
As part of our ongoing upgrade to the website, we have now also added printable PDF card compilations for each faction. You can find these in the Rules section, along with the summary sheets, samples force rosters and gameplay tutorials!
Conversion Spotlight & Rules: Gnolti Berserker!
Posted on Monday Nov 12, 2018 at 06:00pm in Tutorials
- by Iain Wilson
Big, burly, slow to anger but nigh on unstoppable when they get rolling, the Gnolti is an impressive sight on the table, and is one of my favourite models. A while back, I got to thinking about the different ways that the ongoing battles around the Maelstrom's Edge would affect these massive, generally peaceful aliens, and started exploring this with my 'Longhorn' conversion. At the other end of the scale from the implacable veteran, I thought it would be an interesting contrast to have a much younger Gnolti who handles the constant call to arms in a much more direct fashion - and so the Gnolti Berserker was born:
As with my previous Gnolti conversions, this was built from the standard Gnolti model.
I wanted to give him a charging pose, as this guy was definitely not the 'sit back and take a breather' type of fighter! So I started by cutting the left leg off with a razor saw, and then reattaching it with the leg pivoted to the rear.
In place of the Gnolti's normal field generating bucklers, I thought it would be fun to give the berserker an array of scavenged blades to fight with. Using a sharp exacto knife, I cut off the existing detail from the shields, added some cracks and dents, and glued on some blades cut from the resin casting tab that the parts came on. (Waste not, want not!) As the left hand's fingers are slightly flattened on the bottom where they normally sit on the base, I also reshaped these by carefully rounding them off with the knife and adding in some knuckle lines.
For my Longhorn, I had gone with the idea that the Gnolti's horns would grow as they age. Running that idea backwards, a younger Gnolti would therefore need shorter horns. I figured that reducing his beard would also be fitting, and so I cut away the back couple of sections of the horns, removed all of his beard, and also sliced open the mouth with a razor saw and, holding it under some hot water, carefully bent it open.
I used 'Green Stuff' putty to replace the missing detail around his neck where the horns and beard were originally, resculpted a smaller beard and added a layer over the lower lip to reshape it.
Similarly, I filled in the gap created by re-posing the leg, and also removed the blanket roll from the Gnolti's back just to create a little visual difference from the others, and sculpted in new draped cloth in its place.
Finally, I glued on the arms and did a little final gap-filling where the reposing of the arms caused them to not fit flush at the elbow joints.
Painting was largely the same as my original Gnolti conversion, although I used a very slightly darker grey on the scales and made his beard a brighter orange.
Conversions are only part of the fun, of course - What about getting the models on the table? You can find unofficial rules cards for the Gnolti Longhorn and Gnolti Berserker in the Force List section of the Maelstrom's Edge website here, or download a printable version in the 'Unofficial Cards' PDF compilation here.
If you want to give them a try but aren't as confident in your converting, you can very easily use the standard Gnolti model as a fill-in - for the Berserker, paint him without the light on the shields and maybe make him a bit dirtier, and for the Longhorn just glue on an appropriate gun in the right hand, and you're good to go!
Family Shot!
To put together your own mountain of xenos rage, you can pick up the Gnolti kit along with the rest of the Maelstrom's Edge model range from the webstore here.
As always, feel free to pop along and share your work, or ask any Maelstrom's Edge- or hobby-related questions on the Comm Guild Facebook page!
For other Maelstrom's Edge modeling articles, including tutorials and walkthroughs of a wide range of different building and miniature projects, check out the article roundup here.
Terrain Spotlight: Generator Made From Bubblegum Tape Dispensers!
Posted on Monday Nov 05, 2018 at 06:00pm in Tutorials
- by Iain Wilson
One of the most enjoyable aspects of terrain building for me is to find everyday things that, with a little bit of tinkering, suddenly turn into something that looks at home on the battlefield. This has resulted in me spending more time than is healthy wandering through hardware stores and discount shops looking for new fodder for the workbench - it's often a little surprising where that perfect next project piece will show up.
This week's build is based on an idea that I have come across in several different incarnations online, and thought it looked too cool to not try it out. So after a quick trip to the local grocery store, I found myself building a generator out of bubblegum tape dispensers!
I picked up two packs of grape-flavoured Hubba Bubba. Obviously, the flavour doesn't make any difference to the build, but if you're buying bubblegum anyway, is there any logical reason to buy any flavour other than grape?
The first step was to remove the bubblegum from the packs, and remove the labels. The labels mostly peeled off easily, but needed a little cleanup with some Tea Tree Oil to remove the sticky residue - If you don't have access to Tea Tree Oil, use whatever local equivalent you have for cleaning sticky residue off things.
Then I may have got momentarily distracted...
One side of the pack has an internal ridge running down each long side of the opening, and a pair of tongues that close over into the other half. These needed to be removed, which I did with a sharp exacto knife. They're made from a fairly soft plastic, so cut easily.
This left four almost-identical, semi-circular pieces.
To join the segments together, I took four 25mm bases and cut them in half with a razor saw. The arc markers on the Maelstrom's Edge bases serve as a handy guide for this, but if you are using different bases then some measuring and marking would be involved here.
I cut a piece of masonite to an appropriate size for a base, and then a smaller piece of foamed PVC for the generator to sit on. I could have used another piece of masonite here, but figured the plastic gum dispenser would glue better to the PVC. On the PVC, I marked out where the dispenser pieces would sit, and added a 25mm-wide centre strip to serve as a guide for gluing the base pieces on.
Then, I sat each dispenser piece in turn onto the marks and glued the base sections in position on both sides using an all-plastics glue.
(The 'all-plastics' glue that I use is a 2-part system that has a tube of superglue and a 'primer' pen. You prime the contact points on both parts to be glued before applying the glue, and it creates a super-fast and extremely strong bond with just about any type of plastic).
It was around about this time that I noticed that there were small recycling symbols embossed on two of the dispenser pieces, so I carefully shaved these off with the exacto knife and lightly sanded down the surface. Then I moved on to the ends. Due to the dispenser having that tongue that I cut off back at the start, one side was left with a flat plate, while the other had a hole where the tongue originally slotted in. I took the cut piece of tongue and glued it into this gap.
Then I took eight support struts from the Maelstrom's Edge terrain sprue, and cut off the vent sections on their ends. These were glued in pairs into the dispenser opening.
The four sections of dispenser were then glued down onto the base, with the 25mm base sections on each touching the matching section on the next.
I felt that the generator needed a control panel, so quickly threw one together using a console and two trapezoid windows from the terrain sprue, with a square of foamed PVC as a base.
With that glued in place onto the masonite base, the generator was ready for some paint!
I painted it up using my normal weathered metal technique (which you can find in the tutorial here).
To build your own generator, you should be able to find the bubblegum tape just about anywhere that sells bubblegum, and can pick up the Maelstrom's Edge terrain sprue along with the rest of the Maelstrom's Edge model range from the webstore here.
As always, feel free to pop along and share your work, or ask any Maelstrom's Edge- or hobby-related questions on the Comm Guild Facebook page!
For other Maelstrom's Edge modeling articles, including tutorials and walkthroughs of a wide range of different building and miniature projects, check out the article roundup here.
Tags: buildings conversion spotlight terrain terrainsprue tutorial
New Broken unit release: Pa'ku Artillery
Posted on Wednesday Oct 31, 2018 at 05:00pm in The Broken
This month sees the release of a new support unit for the Broken: Pa'ku Artillery, available now from the webstore here!
Behind the implacable visage of the Pa'ku resides a powerful, if often misunderstood intellect. Extremely logical creatures, when the Pa'ku are convinced a certain course of action will do more good than wrong, they will take lives without scruples if that is what it takes. Pa'ku artillery has been known to mercilessly bombard hospitals or civilian refugee groups when they have concluded that this was the most logical course of action. They do not make any decision lightly nor do they act carelessly. In fact, the Pa'ku sometimes drive their commanders crazy as they sit pondering the pros and cons of a proposed course of action and all the alternatives, and where the situation is particularly complex have been known to gather for private war councils with their own kind before they will consider responding to a call to arms. Despite their reputation for ruthlessness, when Pa'ku take lives it is because they believe there is no viable alternative. This does not however mean they are saints - all of a Pa'ku's deliberations are still ultimately guided by self-interest and a desire to survive the chaos of the Edge.

Despite their peculiarities, Pa'ku are especially desirable to the Broken. Their solid physiques make them extremely suited to carrying heavy loads, including the biggest artillery the Broken manage to cobble together. At close range, the Pa'ku can extend their very long tongue with enough force to cave in a man's skull. Pa'ku only speak to other species when necessary, and their language is difficult for most races to translate or speak. Combined with their large size, this generally results in them being overlooked by evacuation efforts, and so as with the even larger Gnolti, joining the Broken is often the only reasonable chance for a Pa'ku to escape the edge and find a new home.
Pa'ku are often found in the support lines of Broken forces with giant cannon and other esoteric weapons strapped to their broad shoulders. Linked with electronic targeting systems, these weapons can be slaved together to unleash devastating barrages of firepower onto enemy lines. Their favoured weapon is a multi-barrelled EMP mortar, which carpets the battlefield with explosive energy packets that can fry electronic systems and incinerate softer targets. You can find the rules for the Pa'ku Artillery unit in the Force Builder section of the Maelstrom's Edge website here.
This high detail, multi-part resin kit contains one Pa'ku armed with a Quad EMP Mortar, and is available now from the webstore here!
Terrain Spotlight: Abandoned Outpost
Posted on Monday Oct 29, 2018 at 06:00pm in Tutorials
- by Iain Wilson
As anyone who has been following these modeling articles may have noticed, I have all sorts of trouble looking at store-bought kits and not immediately coming up with various ways to hack them up and glue them back together again, and this week's article is no exception. There are a plethora of outstanding MDF building kits out in the market these days, which can be great options for inexpensive, easy to build terrain. Thanks to how easy it is to cut and glue, they can also form a great base for modification. I recently put together a basic desert building from Knights of Dice's Tabula Rasa range, with some extra detailing courtesy of the Maelstrom's Edge terrain sprue (If you missed it, you can find the article here), and this week, I'm taking a stab at a second building from this range. Intact buildings are just so pre-galaxy-spanning-apocalypse, however, so I'm taking the knife to this one and creating a small abandoned outpost:
The first step was to plan out exactly how I was going to destroy the building, so I popped the parts off their sheets and fitted the basic structure together with no glue. Then I took a pencil and drew a rough line around the outside where I wanted the walls to be damaged.
I cut the walls using a sharp exacto knife, by scoring through on the outside following the pencil line relatively closely, then scoring a roughly corresponding line on the inside of the wall piece (this wasn't an exact match, just eye-balled to be close enough) and then snapping the piece in two. The edge was then cleaned up using the knife to remove any fluffy or protruding parts.
When all of the cuts were completed, it was time to add some detail. The Tabula Rasa kits are deliberately plain, both to keep the cost down and to provide a generic structure for detail pieces to be added, and so they're a perfect base for the Maelstrom's Edge terrain sprue!
I took a door piece and used a razor saw to cut the door out of the frame, and broke the frame into several pieces. Some scarring was also added with the knife.
I widened both the exterior and interior doorways to match the terrain sprue door pieces. The door frame pieces were glued in place on the exterior doorway, and I added a second doorframe with the door also removed but the frame left intact into the inner doorway. Support struts cut to length were glued over the corner joints on the walls to hide them, and add a little more visual interest to the otherwise fairly plain, boxy building. On the first Tabula Rasa building I added detail over the window holes as well, but for this ruin it didn't seem necessary.
The courtyard has a low MDF wall that runs around it, but I wanted something a little more flashy, so I took a couple of ladders from the terrain sprue and cut off one side with a razor saw.
These were then cut to length and glue in place around the edges of the courtyard, after gluing the scrap pieces back into the locator holes for the original wall to fill them in.
To help turn this into an old, long-abandoned ruin that the jungle had started to reclaim, I built up some patches on the floor with air-drying clay.
I pressed a few castoffs pieces of MDF into the clay, and glued the distressed door down on the courtyard floor. Over this, I painted a thick layer of PVA glue and sprinkled on a generous layer of a gravel, sand and railway ballast mix that I like to use for building rubble as it has a lot of different textures in there.
When the PVA glue had dried, I tipped off the excess gravel mix, and then it was time to paint. I didn't have a brown spray to hand, so I undercoated with some flat black and, while it was still wet, followed up with a light coat of Army Painter Dragon Red.
Over this went a coat of a light cream colour, and then a highlight spray of white from above.
I went back over anything that I wanted to look like exposed metal and re-undercoated with Vallejo Beasty Brown, before drybrushing with P3 Pig Iron. The few bits of the original floor still peeking through the rubble were painted with Vallejo Basalt Grey and drybrushed with Vallejo Light Grey.
With that out of the way, I went to town with washes!
I gave the whole building a generous coat of Army Painter Strong Tone. The walls were painted with a medium-sized flat brush, using vertical strokes to create a streaky effect and allowing the wash to pool and run where it felt like it. When that first wash had dried, I went back over it, picking out small areas with extra dollops of Strong Tone and also adding some patches of Green Tone and Military Shader to give them a greenish, mossy tint.
Time to add some shrubbery!
I took a bunch of assorted fake plants. Most of these are cheap aquarium plants, although I also used a bunch of plastic greenery taken from a mat I found at a local hardware store for creating fake vertical gardens. It looks rubbish as an actual plant feature, but is a perfect resource for my purposes here.
Fake plants, particularly the cheaper kind, tend to be rather brightly coloured and slightly glossy, which just wouldn't do. I got around this by giving the plants a light spray with Army Painter Army Green - not enough to completely cover over the original colour, but enough to dull down the colour and shine. To add some extra colour differentiation, I very lightly misted the tips of some of the plants with white. The painted plants were then glued in place wherever seemed appropriate, but poking a hole through the rubble and into the underlying clay, applying some superglue to the plant stem and pushing it into the hole. I also cut some leaves off a few plants and glued them around on the ground.
The final step was to paint the fallen leaves with varying amounts of brown, and then a quick wash of Strong Tone. At this point, the ruin looked something like this:
To get all apocalyptic on your own building creations, you can pick up the Maelstrom's Edge terrain sprue along with the rest of the Maelstrom's Edge model range from the webstore here.
As always, feel free to pop along and share your work, or ask any Maelstrom's Edge- or hobby-related questions on the Comm Guild Facebook page!
For other Maelstrom's Edge modeling articles, including tutorials and walkthroughs of a wide range of different building and miniature projects, check out the article roundup here.
Tags: conversion modeling painting spotlight terrain terrainsprue tutorial walkthrough
Modeling Spotlight: Karist Kaddar Nova
Posted on Monday Oct 22, 2018 at 06:00pm in Models
- by Iain Wilson
This week, I'm having a play around with another of the original models released with the Battle for Zycanthus boxed set: The Kaddar Nova!
The Kaddar Nova is a member of the Karist Enclave priesthood, but they are often granted operational control on the battlefield due to their experience and the reverence paid to them by members of the Enclave. Equipped with an incredibly powerful cybel reactor that serves as both a power source and a weapon, the Kaddar Nova is a distinctive figure. Their bodies are enlarged and twisted by their constant exposure to cybel energy, and their ravaged faces cut a stark contrast to their powerful frames.
As the leader and figurehead of the Karist forces, the Kaddar Nova needed a suitably impressive model kit, and so the sprue comes with a nice array of parts to build them. But as always, of course, the sprue is only the starting point, and below I'll go through some quick and easy ways to further customise this fearsome individual.
Building your Kaddar Nova straight off the sprue lets you choose from three different sets of legs, two different arms for each side, two different heads, and an optional crown piece for the more formal-dressing Kaddar.
The indents in the crown mimic the extra eyes of the alien Angels that often accompany Karist forces. You can use this to make a more mysterious Kaddar Nova by taking the head with the scull-cap, trimming his nose down flat and gluing the crown piece on upside down over his face, so that the upper rim sits just below his eyes.
Headswaps are another easy way to mix things up on your models. The necks on the original Karist sets weren't all interchangeable (something that we've corrected in later Maelstrom's Edge models) but thanks to them being plastic that's easily fixed with a little cutting or filing. On the below model, I have used a head from the Tempest Elite set, with the helmet crust removed as it would hit up against the cybel reactor.
A more inscrutable look can be achieved using a Karist Trooper helmet with the neck trimmed down to fit, and the eye lenses sanded down to produce a blank faceplate. The staff on this model is a modified Cybel Glaive from the Faction Expansion sprue.
An advancing pose can be created with some careful cutting - trim a wedge out of the groin area where the legs join, so that they can be attached in a less spread position, and glue them so that one leg is to the rear slightly. Once the glue has set, cut or file the waist down flat and assemble the rest of the model - his robes largely hide the joint, but you can use a little modeling putty to fill any resulting gaps.
Alternatively, you can look for legs from elsewhere in the range. Trooper legs are too small, as they're not cybel-enhanced like the more elite Karist warriors, but by cutting through the waist of a Tempest Elite model with a razor saw, you can replace the Kaddar Nova's robed legs with walking, armoured legs instead.
Shadow Walker legs also work, although they're a fraction shorter. This Kaddar Nova is obviously just not quite as cybel-swollen as his compatriots yet.
The Kaddar Nova is only one aspect of the Kaddar priesthood, and others will be fleshed out eventually. In the meantime, though, it's fun to see where mashing bits together can lead you... The below model is a combination of Kaddar Nova and Shadow Walker parts, with some small tentacles taken from a couple of Mature Angel kits. I call him a 'Kaddar Noctis'.
Hopefully, this has given you some inspiration for your own Kaddar Nova builds! To get started, you can pick up the Kaddar Nova along with the rest of the Maelstrom's Edge model range from the webstore here.
As always, feel free to pop along and share your work, or ask any Maelstrom's Edge- or hobby-related questions on the Comm Guild Facebook page!
For other Maelstrom's Edge modeling articles, including tutorials and walkthroughs of a wide range of different building and miniature projects, check out the article roundup here.
Tags: conversion kaddar karist modeling nova spotlight tutorial
Background Fiction - The Prowler APV
Posted on Wednesday Oct 17, 2018 at 06:00pm in Fiction
Prowler APV
Prowler is the group term used to refer to the armoured personnel vehicles used by Epirian Contractors and security forces. Six or eight wheeled, the prowler is sturdy enough to clamber over rough terrain or suffer small arms fire, and its sealed compartments are large enough to house five to ten men. Prowlers are utilised for different functions, with some having an empty rear for transport of goods or men, whilst others have banks of computer interfaces to control drones or even act as a mobile command vehicle in battle. Prowlers are fitted with a drone rack allowing for rapid launch of airborne drones, and military vehicles sport a roof-mounted turret with a surface to air rocket battery or machine gun.
Tags: background epirian fiction
Terrain Tutorial: Hack the Terrain Sprue!
Posted on Monday Oct 15, 2018 at 06:00pm in Tutorials
- by Iain Wilson
The Maelstrom's Edge Terrain Sprue contains a slew of assorted plastic bits and pieces that can be used to pretty up your home-made scifi terrain, including a bunch of essential elements like doors, windows and pipe fittings. This week, I'd like to share a few tips and tricks for squeezing a little extra versatility out of the terrain sprue and adding some extra touches of detail to your buildings.
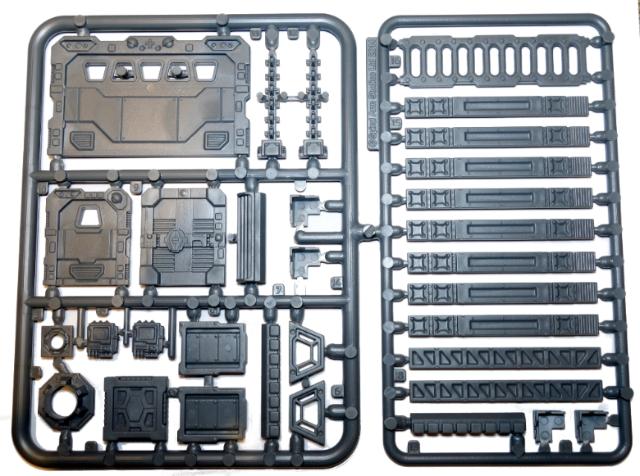
The terrain sprue in all its glory! While it's loaded with all sorts of interesting bits that can be clipped off and glued on to your buildings as-is, a little careful cutting and some extra materials will go a long way towards adding that extra detailing that helps to finish things off just right.
Handrails
An easy one to start with! The ladder from the sprue can be used for making railings for balconies or walkways, by cutting off one side along the red line shown below, with a razor saw or exacto knife. The lintel piece, cut down to length, is perfect for filling in the corners:
Alternatively, you can just glue the intact ladder sideways onto the outer edge of your walkway or platform, like this:
Ventilation Ducts
The large pipe fitting can be used for creating ventilation ducts with the addition of a fan blade made from plasticard or thin cardboard. Use the fitting itself as a template for the fan, by holding it upside-down against your plasticard or cardboard and drawing around the inside with a sharp pencil:
(In case you're wondering, you use the fitting upside-down for this because it flares out at the bottom. So if you draw around with the fitting right-way-up, your fan is going to wind up too wide to fit in)
Next, you can flip the fitting up the right way, and use the buttresses as a guide to make six marks around the circle:
The join the marks across the circle, and along each of the resultant radial lines make another mark 2mm out from the centre.
Then cut out the circle, and cut inwards along each radial line up to the inner marks. Dry-fit it inside the pipe fitting to make sure it goes in, and sand around the edge if necessary so that it goes in easily - you don't want a tight fit, as it will deform slightly in the next step.
Now gently twist each of the segments around the circle to create a fan shape. If you're using plasticard, go gently here to avoid snapping it - cardboard is a little more forgiving at this step. Obviously, you also need to make sure that you twist each segment the same way, otherwise your fan is going to run into some operational issues.
Your fan blade can now be glued in place inside the pipe fitting by applying a small amount of superglue around the edge and pushing it into place.
Once it's been glued into place on your building and painted, you ventilation duct can look something like this:
You can also create a more compact version using the smaller pipe fitting and a rotor assembly from an Epirian Firefly Drone. Simply trim off the mounting strut and fin from the rotor piece to make it circular, and glue it to the back of the pipe fitting, as below:
You'll need to cut a small hole in whatever surface you're mounting this on for the rotor assembly to sit in, so that the pipe fitting can sit flush.
Chimney Pipes
I always try to look out for ways to make use of all of the leftover sprue that builds up from all of those plastic projects. The round sprue used on this terrain set is particularly useful with just a little help from some plastic tubing. Take the small pipe fitting, an 'L'-shaped piece of the thinner side of the terrain sprue, a square cut from the bottom of one of the support struts, and a couple of short pieces of 7mm (1/4") plastic tubing (Plastruct, Woodland Scenics or the like).
The 7mm tubing fits nice and snugly into the small pipe fitting. In a happy coincidence, the thinner section of the terrain sprue fits just as neatly into the 7mm tubing. If you remove any extraneous casting gates and mouldlines from the sprue piece and fit it all together, you can do this:
This can be then glued in place wherever seems appropriate, and can be easily reconfigured to match your terrain using different combinations of sprue sections and/or extra bits of tubing or support strut sections.
Trouble-free Doors
Some people have been using various plastic containers, storage trays or home guttering sections in conjunction with the terrain sprue to create some interesting buildings for their MEdge tables. One of the big problems with some of these options, though, is that the doors need to be inset into the walls, and cutting some plastics easily and cleanly in order to do so can be problematic. So I came up with this solution:
Take a door, and three support struts.
Trim off the support struts along the red lines in the below diagram, keeping just the middle pieces. Note that the top piece in the below picture is slightly different to the other two, which have a rivet strip left on one end:
The glue them in place around the back of the door frame. The strut piece from the top of the diagram goes along the top, and the other two (which, unless something's gone horribly wrong, will be identical) go down either side with the rivet strip at the top.
This can then be glued in place on the wall of whatever you're using to make your building, with no cutting of the wall required.
These are just a few ideas that I've found useful when constructing terrain. One of the great things about a product like this is the more-or-less limitless possibilities opened up through the ease of working with plastic components and the open-ended nature of the construction allowed by it. It's always great to see people take the sprue and find new and unexpected ways to use the components on it. So why not give it a go? You can pick up the Maelstrom's Edge terrain sprue along with the rest of the Maelstrom's Edge model range from the webstore here.
As always, feel free to pop along and share your work, or ask any Maelstrom's Edge- or hobby-related questions on the Comm Guild Facebook page!
For other Maelstrom's Edge modeling articles, including tutorials and walkthroughs of a wide range of different building and miniature projects, check out the article roundup here.
Tags: buildings converting modeling terrain terrainsprue tutorial
