Entries tagged [converting]
Modeling Spotlight: Hakoyu Grand Masters
Posted on Monday Dec 17, 2018 at 06:00pm in Tutorials
- by Iain Wilson
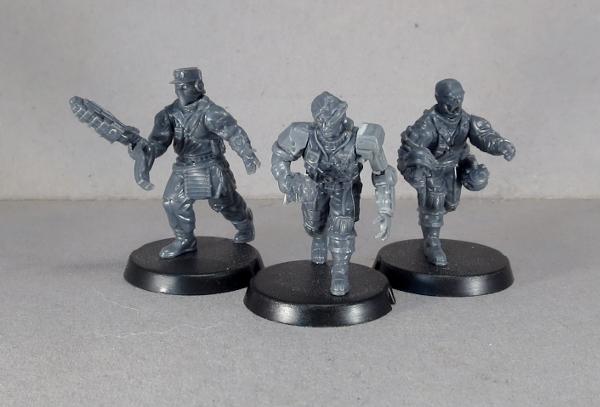
Hakoyu Grand Masters are masters of close quarters fighting, lending the experience of decades of training in combat skills and their exquisitely-crafted energy weapons to the Broken Federation's cause. This week, I'm taking a closer look at the model for this fearsome melee veteran.
The Hakoyu Grand Master is a multi-part resin model, with the body cast in one piece and all four arms joining at the elbows. Two of the forearms are equipped with the Hakoyu's shields, while the other two hold the Phase Weapons - a sword and an axe.
The elbow joint is a ball-and-socket affair, which allows for a decent range of posing, and also allows you to choose where to put each forearm.
Of course, that also means that you can mix and match arms between models - for the below model, I swapped out the shields in favour of doubling up the weapons. The second axe and sword were switched to the opposite side simply by slicking them off just above the hand and switching them, gluing each weapon onto the hand the other had been removed from.
Phase weapons take many forms, at the preference of the individual Grand Master. For this model, I replaced the sword and axe with a double-ended polearm - presumably this Grand Master would be skilled enough with this weapon for it to have the same effect as fighting with two separate blades! The hands were swapped out with plastic hands from the Broken Infantry sprue - as the Hakoyu only has three fingers, I resculpted the fingers on the left hand with a little 'green stuff' putty. The right hand is bionic, so I left it as is - ill-fitting bionics would be just one of the difficulties faced by alien races amongst the often poorly-equipped Broken.
Life on the Edge is hard, and emergency surgery and appropriate bionics are not always available when needed. It would be expected that this might take a toll on veteran Grand Masters, who spend so much of their time in the thick of the fighting. This Grand Master has at some point lost two of his hands, and rather than replacing them with bionics has had his Phase blades strapped directly to his wrists. I also put this model into a slightly more crouched pose, but cutting through the lower knee joint, bending the legs and then filling in the remaining gap with some putty.
Finally, while known primarily for their fearsome skills in melee, I would expect some Grand Masters to take pride in mastering all aspect of warfare. This Grand Master has eschewed the usual Phase weapons (aside from the one still strapped to his back - you can't turn away completely from tradition, after all!) in favour of a long rifle converted from two slug rifles from the Broken Infantry sprue. The forearm (another bionic) is also taken from the Infantry sprue. I also doubled up the larger of the two shields, but cutting the small shield off the right forearm, and the arm off the large shield, and then gluing them together.
What have you done with your Grand Master? Feel free to pop along and share your work, or ask any Maelstrom's Edge- or hobby-related questions on the Comm Guild Facebook page!
You can pick up the Hakoyu Grand Master along with the rest of the Maelstrom's Edge model range from the webstore here.
For other Maelstrom's Edge modeling articles, including tutorials and walkthroughs of a wide range of different building and miniature projects, check out the article roundup here.
Tags: broken conversion converting hakoyu modeling spotlight tutorial
Modeling Spotlight: Pa'ku Artillery
Posted on Monday Nov 26, 2018 at 06:00pm in Tutorials
- by Iain Wilson
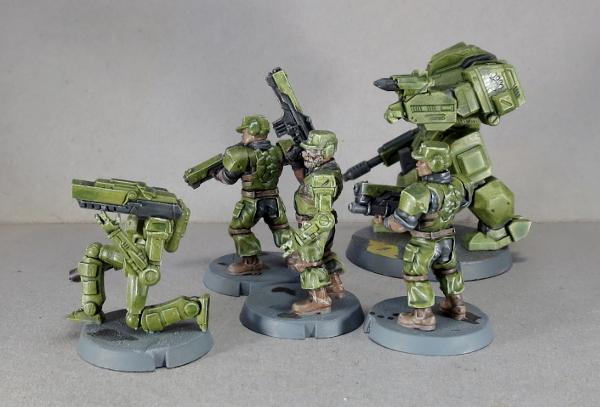
This past month saw the release of the Pa'ku for the Broken faction, taking to the field with their gigantic Quad EMP Cannon strapped to their rather large backs. This is another brilliant model in a slowly growing collection of characterful alien creatures for the faction, and so in my usual style, I figured it would be fun to take a hobby knife to it and see what happened!
The fantastic studio model below shows the Pa'ku in all his warty glory. He's big, he's ugly, but nobody's going to tell him that so long as he has that gigantic quad cannon pointed in their general direction!
The Pa'ku is a resin model, and comes in 6 pieces, along with a 45mm base. The arms are on ball joints that allow for a bit of posing movement, and the cannon barrels have a round locator piece, so can be swivelled around to whatever orientation you prefer.
The immediate, obvious conversion opportunity is to replace the quad cannon with a larger-bore, single cannon. On the below model, I added a ring of plastic tube over the rear tube assembly, and replaced the barrel section with a new, larger, single barrel made from layered plastic tubing, with some plastic rod struts on the sides to give it a little extra detail.
As an extra bonus, you can also put him on the table with the unofficial rules card in the Force List section of the Maelstrom's Edge website here. You could easily leave off the side detailing and just use a single piece of 10mm tubing for a less detailed but much easier conversion, or use a different gun entirely for other heavy weapon variants.
Venturing a little further outside the box, the slow moving, steady Pa'ku seemed like an ideal candidate for ferrying around notable Broken characters who prefer not to dirty their own boots any more than necessary. With that in mind, I took a Pa'ku and assembled it without the gun, and then added a platform onto the back with a little plasticard, and added a rider built from the Broken Infantry sprue. The handrail is cut from a ladder from the Maelstrom's Edge terrain sprue, and the sheath of extra harpoons is a piece of plastic tube filled with offcuts of 1mm rod, attached with a rivet piece from the previously-hacked-up ladder.
Of course, it's possible that not all Pa'ku are as slow and deliberate in their actions as the species is renowned for. What happens to those more headstrong, battle-hungry Pa'ku? I'd like to think they turn out something like this:
The jetpack was made from the main section of two quad guns, with help from a little putty, Epirian drone parts and plasticard. The head was repositioned by cutting and bending the neck, and the forearms twisted in hot water and guns added from the Broken Infantry sprue. I'll be sharing a more detailed build of this one in an upcoming article, once I get some paint on him!
To add some giant-cannon-goodness to your own Broken force, you can pick up the Pa'ku along with the rest of the Maelstrom's Edge model range from the webstore here.
As always, feel free to pop along and share your work, or ask any Maelstrom's Edge- or hobby-related questions on the Comm Guild Facebook page!
For other Maelstrom's Edge modeling articles, including tutorials and walkthroughs of a wide range of different building and miniature projects, check out the article roundup here.
Terrain Tutorial: Hack the Terrain Sprue!
Posted on Monday Oct 15, 2018 at 06:00pm in Tutorials
- by Iain Wilson
The Maelstrom's Edge Terrain Sprue contains a slew of assorted plastic bits and pieces that can be used to pretty up your home-made scifi terrain, including a bunch of essential elements like doors, windows and pipe fittings. This week, I'd like to share a few tips and tricks for squeezing a little extra versatility out of the terrain sprue and adding some extra touches of detail to your buildings.
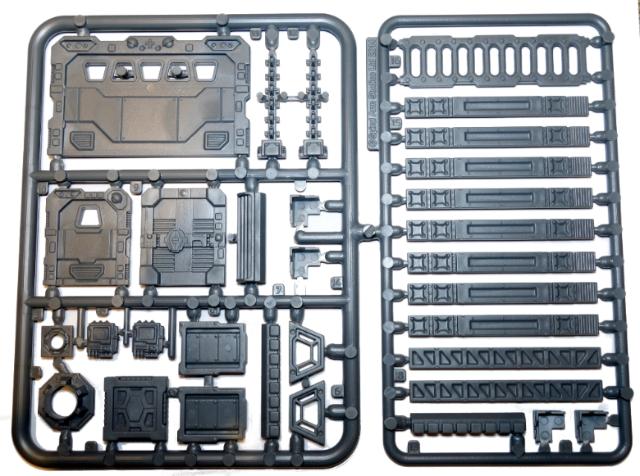
The terrain sprue in all its glory! While it's loaded with all sorts of interesting bits that can be clipped off and glued on to your buildings as-is, a little careful cutting and some extra materials will go a long way towards adding that extra detailing that helps to finish things off just right.
Handrails
An easy one to start with! The ladder from the sprue can be used for making railings for balconies or walkways, by cutting off one side along the red line shown below, with a razor saw or exacto knife. The lintel piece, cut down to length, is perfect for filling in the corners:
Alternatively, you can just glue the intact ladder sideways onto the outer edge of your walkway or platform, like this:
Ventilation Ducts
The large pipe fitting can be used for creating ventilation ducts with the addition of a fan blade made from plasticard or thin cardboard. Use the fitting itself as a template for the fan, by holding it upside-down against your plasticard or cardboard and drawing around the inside with a sharp pencil:
(In case you're wondering, you use the fitting upside-down for this because it flares out at the bottom. So if you draw around with the fitting right-way-up, your fan is going to wind up too wide to fit in)
Next, you can flip the fitting up the right way, and use the buttresses as a guide to make six marks around the circle:
The join the marks across the circle, and along each of the resultant radial lines make another mark 2mm out from the centre.
Then cut out the circle, and cut inwards along each radial line up to the inner marks. Dry-fit it inside the pipe fitting to make sure it goes in, and sand around the edge if necessary so that it goes in easily - you don't want a tight fit, as it will deform slightly in the next step.
Now gently twist each of the segments around the circle to create a fan shape. If you're using plasticard, go gently here to avoid snapping it - cardboard is a little more forgiving at this step. Obviously, you also need to make sure that you twist each segment the same way, otherwise your fan is going to run into some operational issues.
Your fan blade can now be glued in place inside the pipe fitting by applying a small amount of superglue around the edge and pushing it into place.
Once it's been glued into place on your building and painted, you ventilation duct can look something like this:
You can also create a more compact version using the smaller pipe fitting and a rotor assembly from an Epirian Firefly Drone. Simply trim off the mounting strut and fin from the rotor piece to make it circular, and glue it to the back of the pipe fitting, as below:
You'll need to cut a small hole in whatever surface you're mounting this on for the rotor assembly to sit in, so that the pipe fitting can sit flush.
Chimney Pipes
I always try to look out for ways to make use of all of the leftover sprue that builds up from all of those plastic projects. The round sprue used on this terrain set is particularly useful with just a little help from some plastic tubing. Take the small pipe fitting, an 'L'-shaped piece of the thinner side of the terrain sprue, a square cut from the bottom of one of the support struts, and a couple of short pieces of 7mm (1/4") plastic tubing (Plastruct, Woodland Scenics or the like).
The 7mm tubing fits nice and snugly into the small pipe fitting. In a happy coincidence, the thinner section of the terrain sprue fits just as neatly into the 7mm tubing. If you remove any extraneous casting gates and mouldlines from the sprue piece and fit it all together, you can do this:
This can be then glued in place wherever seems appropriate, and can be easily reconfigured to match your terrain using different combinations of sprue sections and/or extra bits of tubing or support strut sections.
Trouble-free Doors
Some people have been using various plastic containers, storage trays or home guttering sections in conjunction with the terrain sprue to create some interesting buildings for their MEdge tables. One of the big problems with some of these options, though, is that the doors need to be inset into the walls, and cutting some plastics easily and cleanly in order to do so can be problematic. So I came up with this solution:
Take a door, and three support struts.
Trim off the support struts along the red lines in the below diagram, keeping just the middle pieces. Note that the top piece in the below picture is slightly different to the other two, which have a rivet strip left on one end:
The glue them in place around the back of the door frame. The strut piece from the top of the diagram goes along the top, and the other two (which, unless something's gone horribly wrong, will be identical) go down either side with the rivet strip at the top.
This can then be glued in place on the wall of whatever you're using to make your building, with no cutting of the wall required.
These are just a few ideas that I've found useful when constructing terrain. One of the great things about a product like this is the more-or-less limitless possibilities opened up through the ease of working with plastic components and the open-ended nature of the construction allowed by it. It's always great to see people take the sprue and find new and unexpected ways to use the components on it. So why not give it a go? You can pick up the Maelstrom's Edge terrain sprue along with the rest of the Maelstrom's Edge model range from the webstore here.
As always, feel free to pop along and share your work, or ask any Maelstrom's Edge- or hobby-related questions on the Comm Guild Facebook page!
For other Maelstrom's Edge modeling articles, including tutorials and walkthroughs of a wide range of different building and miniature projects, check out the article roundup here.
Tags: buildings converting modeling terrain terrainsprue tutorial
Modeling Spotlight: Karist Shadow Walkers
Posted on Monday Aug 20, 2018 at 06:00pm in Tutorials
- by Iain Wilson
I'm taking a little break from new releases this week to have a look back at another of the original release units - The Karist Shadow Walker!
The Shadow Walker sprue contains two different torsos (twisted in different directions from the front) and two of each arm in different poses. This allows you to create two very different, dynamically posed models from those parts. You can find the general assembly guide on the Maelstrom's Edge website here.
Somewhere along the design process, the sprue went from being intended to create a single model to including parts for two full models with the lack of only a second head. Luckily, several other Karist kits come with extra heads, so it's not too difficult to purloin a leftover in order to build that second Walker. The right hand model below uses the bare head from the Karist Trooper sprue, and there's another bare head available on the Faction Expansion Sprue.
Alternatively, the resin Karist Heavy Weapons set comes with two troopers and three heads - two helmeted, and one bare. The helmeted heads are very similar in style to the Shadow Walker's, with a couple of extra eye lenses. The model below has also been reposed slightly, with the right arm extended and filled with 'green stuff' putty, and the right shin repositioned so that his front foot matches his line of fire.
While we're reposing our models, it is really easy to add a little more motion to the pose by cutting off the bent leg just below the knee and reattaching it at a sharper angle and off the ground, to create a 'lunging' pose. The below Shadow Walker has clearly just Rifted in and is charging into the action:
Borrowing parts from different kits does, of course, work both ways. The Karist Praetorians below were given Shadow Walker legs to help them stand out a little from regular troopers and to create a more dynamic pose than is possible from the Trooper legs. The added loincloths are from the Faction Expansion sprue.
As I was working through these models, I found myself wondering what it would look like if Shadow Walkers had their own specialised mini-factions. From there, I wound up with the 'Shadow Dancer', carrying a regular cybel blade on place of the usual Shadow Walker's wrist-mounted version, and with an added prehensile, mechanical topknot which, I expect, would whip around as the Dancer flips and whirls about his opponents, and shoot out toxic darts or hallucinogenic gas from the emitter on its tip. The cybel blade was taken from the faction expansion sprue, and the topknot made from a piece of guitar string and the muzzle from a Karist radwave emitter.
By contrast, the 'Shadow Stalker' eschews close range combat where possible, opting instead to carry out his work from afar with his nox rifle. This model has an assault rifle arm taken from the new Broken Forsaken Tech Chieftain model with the bayonet and muzzle removed and a silencer made from a length of plastic tube attached. The head is the bare head option from the Karist Heavy Weapons pack.
I don't have a name for this next one yet (feel free to leave suggestions in the comments!) but how about a Shadow Walker sect that has found an alternative to teleporting? Using arcane science to fuse Angel DNA to the human form, this Shadow Walker variant is equipped with void-gel wings!
Of course, if you're going to have bizarre sub-sects of the Karist Walker breed, it wouldn't be too surprising to have a clandestine offshoot of the regular Kaddar priesthood overseeing them. And so the Kaddar Noctis was born - like the flying Walker above, this model fuses Human and Angel DNA, with the traditional Shadow Walker cybel blade replaced with an Angel's void-gel tentacles. The legs and torso are from the Kaddar Nova sprue, with most of the Cybel reactor removed and replaced with a modified cybel glaive head from the Faction Expansion sprue. Arms and head are from the Shadow Walker sprue, with the small tentacle parts taken from a pair of Mature Angel models.
To add some sneaky, pointed 'negotiation' to your own Karist Force, you can pick up the Shadow Walker along with the rest of the Maelstrom's Edge model range from the webstore here.
As always, feel free to pop along and share your work, or ask any Maelstrom's Edge- or hobby-related questions on the Comm Guild Facebook page!
For other Maelstrom's Edge modeling articles, including tutorials and walkthroughs of a wide range of different building and miniature projects, check out the article roundup here.
Tags: conversion converting karist modeling models spotlight
Modeling Tutorial - Scarecrow-arm Bionics
Posted on Monday Dec 18, 2017 at 05:00pm in Tutorials
- by Iain Wilson
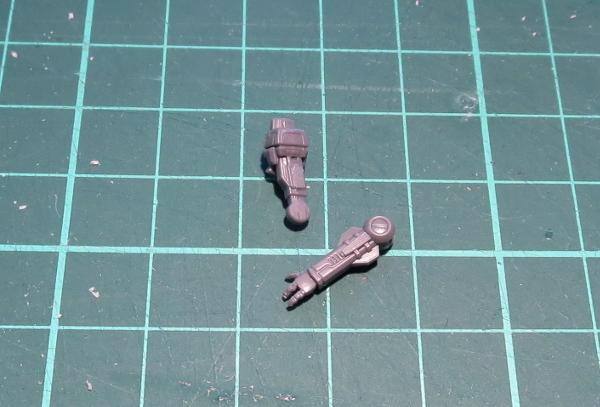
Amongst the veterans of the savage and bloody conflicts that rage along the Maelstrom's Edge, bionic limbs are commonplace. Many (at least those who can afford it) choose high-tech limb augmetics that are practically indistinguishable from the original. The less fortunate, or perhaps just the less vain, often wind up with more obvious mechanical assistance. You can find various examples of this amongst the plastic broken models, but here I'm going to share an easy bionic arm made from the left arm of an Epirian Scarecrow bot.
The arm comes in two pieces. Start by trimming or filing off any mould lines.
Take the upper arm piece and remove the round lug from the inside of the shoulder and the flange from the top of the shoulder with a sharp knife or razor saw, and cut off the arm just above the elbow pivot and just below the reinforcing struts.
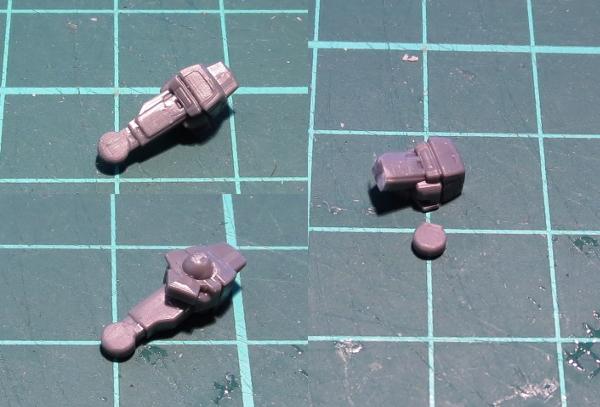
On the lower arm piece, cut the hand off just above the wrist, and the forearm just below the reinforcing struts, and then also remove the struts - leaving them on makes the forearm a little too bulky.
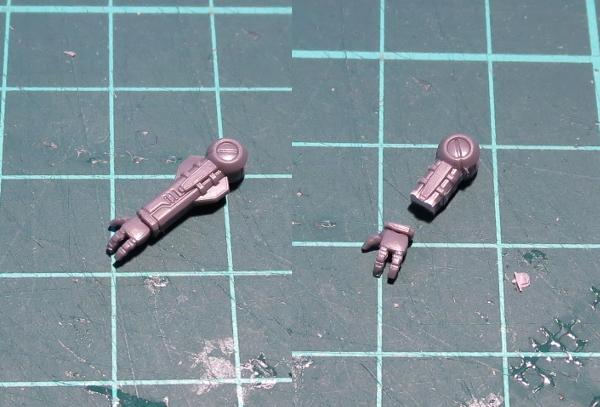
Assemble the arm by gluing the hand back onto the truncated lower arm, the elbow pivot onto the upper arm, and then gluing the elbow joint together.
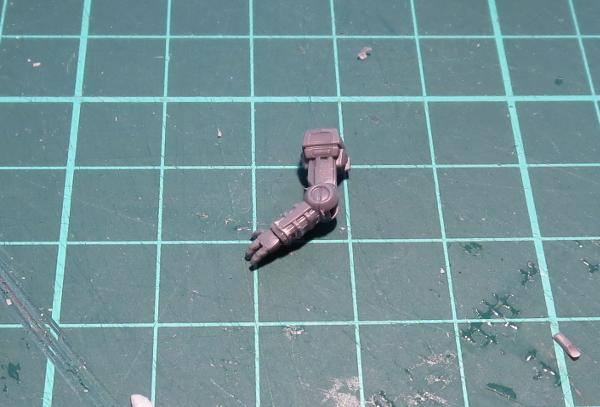
Glue onto your model of choice, and you're ready to paint and send them off to battle!
To rebuild your own warriors into an augmented force of renewed usefulness, you can pick up the Scarecrow bot along with the rest of the Maelstrom's Edge model range from the webstore here. As always, we would love to see your creations on the Comm Guild Facebook page!
For other Maelstrom's Edge modeling articles, including tutorials and walkthroughs of a wide range of different building and miniature projects, check out the article roundup here.
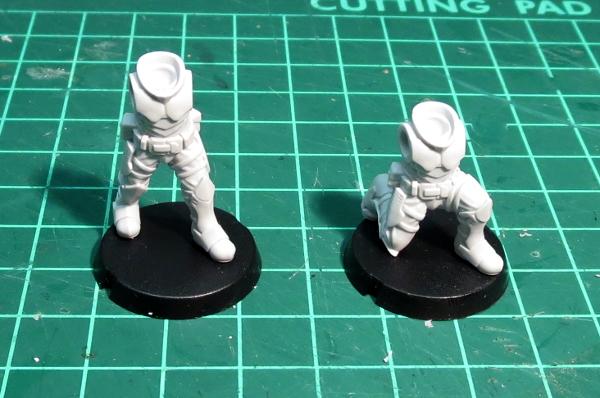
Modeling Spotlight: Assembling Karist Heavy Troopers
Posted on Monday Dec 04, 2017 at 05:00pm in Tutorials
- by Iain Wilson
This week saw the release of the next Maelstrom's Edge resin set into the wild, with the addition of heavy weapon troopers to the Karist Enclave lineup. Here, we're having a quick look at how to assemble these great new models!
The Karist heavy troopers come in a pack of two troopers, with three heavy weapons between them. They also include 3 optional heads - two with helmets and one open-face, an extra left arm with a spare cybel cannister, and a bunch of extra cybel cannisters to attach to their belts.
As always with resin models, it's a good idea to give them a quick wash in warm, soapy water to clear off any residual mould release, as this can affect paint adhesion. If any of the parts are a little bent, this is also the time to drop them in some hot water and then reshape them - although the casts I received of these models were all beautiful and straight, with extremely minimal mould lines, so very little clean-up work involved.
The two bodies are all one piece, and so once the frame lugs are trimmed off the bottom of the feet, can be glued straight onto your base. Because these are resin rather than polystyrene like the regular plastic kits, use a good quality superglue or fast-setting epoxy glue, rather than plastic cement.
The arms have nice, sturdy locator pins that fit snugly into the sockets in the shoulders.
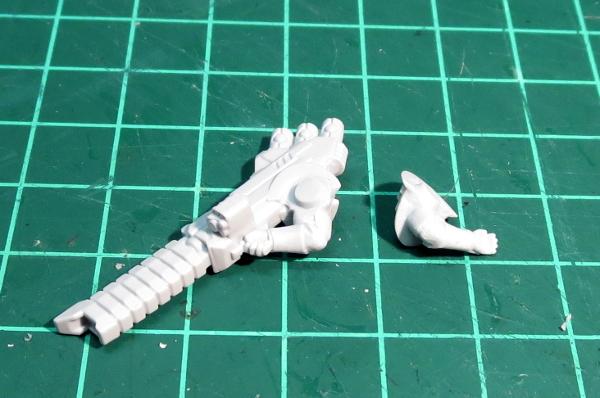
Dry-fit them first to get a feel for how they sit, and then I find the easiest way to ensure the arms fit together nicely is to put a drop of glue into each shoulder socket, a small drop on the left palm, and then sit everything into place and make any minor adjustment quickly before the glue grabs. You can glue one arm at a time if you prefer, but it can be trickier to get a perfect fit that way, depending on the angle of the arms.
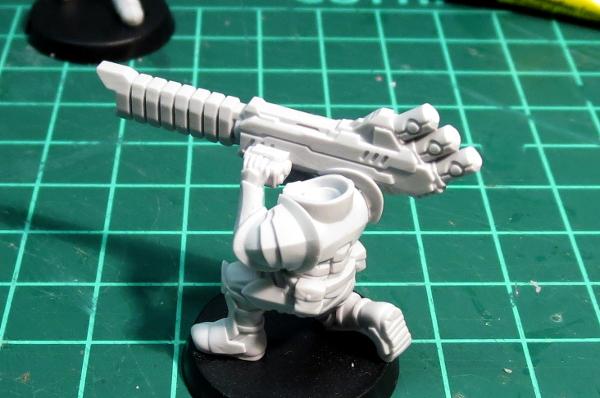
Finally, glue the heads in place, and you're ready for paint!
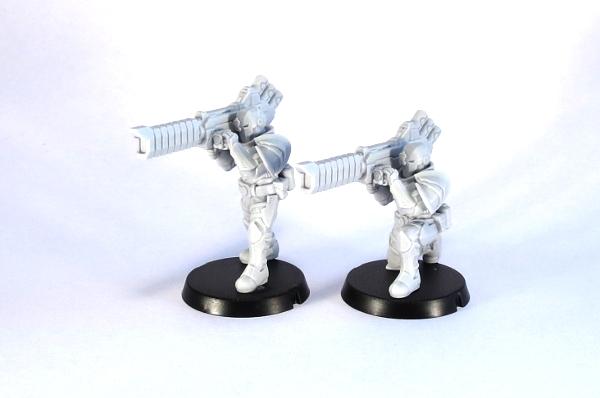
You can add a Quintarch to the unit using a regular Karist trooper, or you can add parts from the Trooper sprue and/or Faction Expansion Sprue to another heavy trooper body to keep with the heavier armour look for the whole unit.
You could also use weapons and arms from the Trooper sprue on the heavy trooper bodies to make special weapon troopers for your regular Karist units.
And for a final bit of fun, I made some conversions a while back of some Tempest Elites with shoulder-mounted weapons (from the Spotlight article here). That conversion becomes even easier with the pulse cannon and cannister arm from the heavy trooper set!

To build your own army of Maelstrom-worshipping, explody Doom, you can pick up the Karist Heavy Trooper set, along with the rest of the Maelstrom's Edge model range, from the webstore here. As always, we would love to see your creations on the Comm Guild Facebook page!
For other Maelstrom's Edge modeling articles, including tutorials and walkthroughs of a wide range of different building and miniature projects, check out the article roundup here.
Tags: conversion converting heavy karist modeling trooper tutorial walkthrough
Modeling Spotlight: The Angel Hellblaster (or 'Fun with Resin!')
Posted on Monday Nov 13, 2017 at 05:00pm in Tutorials
- by Iain Wilson
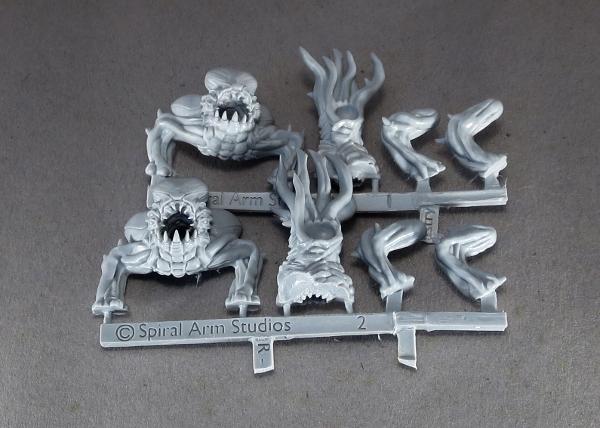
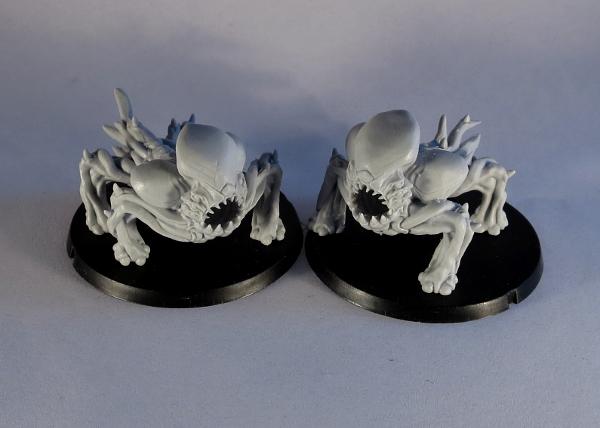
The Karist Hellblaster is the first of a range of resin models for Maelstrom's Edge, to help flesh out the factions with some more fun and freaky options. This week, I'm having a look at some modeling options with this great little kit.
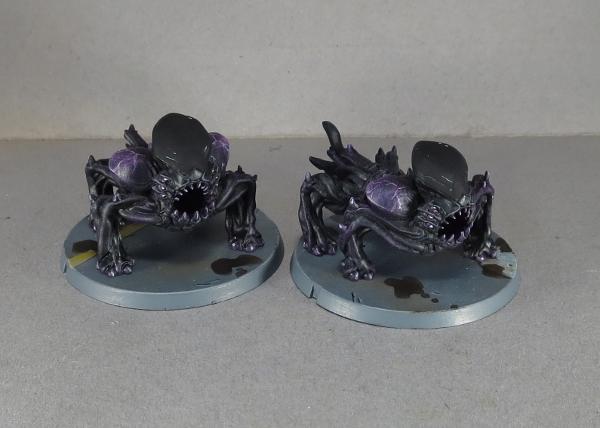
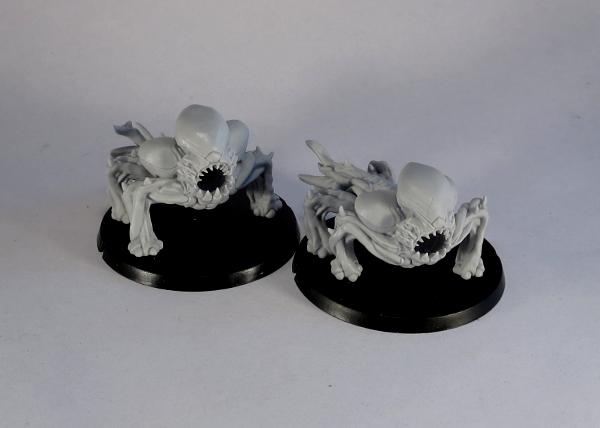
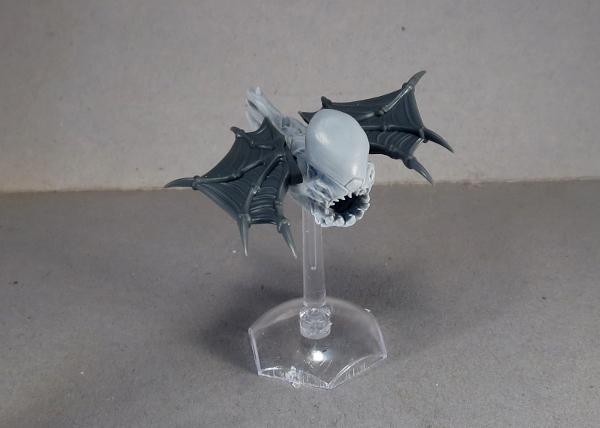
The Hellblaster comes in a pack of two variants, with slightly different posing and tail tentacles.
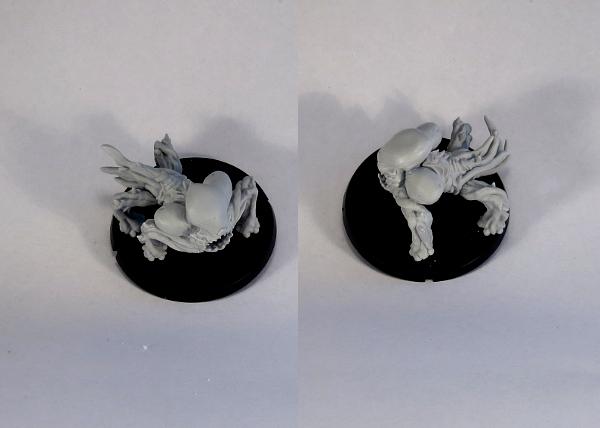
Assembly is really easy - It's always a good idea to wash resin models in warm, soapy water before assembly, to clean off any mould release residue (this may affect paint adhesion, otherwise), then cut off the sprue and trim off any mould lines, glue the head piece to the front of the torso, and the rear legs into their sockets. There's a little posability in the rear legs, as the sockets allow for some movement.
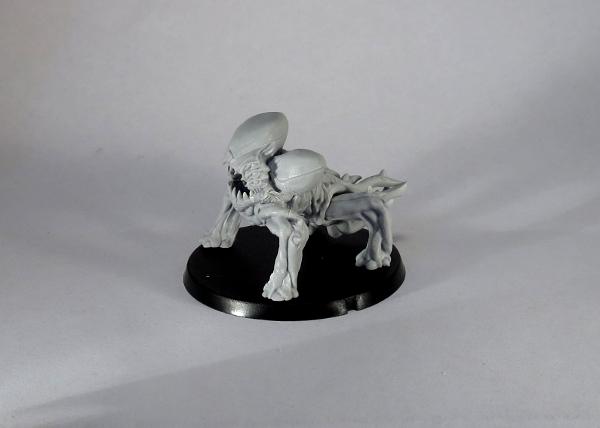
If you want to branch out a little from stock poses, one of the really fun aspects of resin models is that they can be easily reshaped. Drop the part you want to reshape into some hot water for a minute or so. When the part has had time to warm through, fish it out and quickly bend it into the shape you want. Then pop it into some cold water to set it in that shape.
Obligitary safety warning: It's always a good idea to avoid breathing in fumes from heated resin or plastic, so boil your miniatures somewhere with good ventilation. And use an appropriate tool (tweezers, long-nose pliers, etc) to fish the resin pieces out of the hot water and handle hot parts with care.
Using this method, you can add a bit of a bend to the Hellblaster's torso, to give it more of a sinuous, in-motion appearance.

You can also reposition legs and tentacles to suit. It helps that angels don't have a fixed skeletal structure - tentacles are fairly forgiving when it comes to finding appropriate poses!
Note that as an alternative to the hot water technique above, you can achieve a similar result using a hair dryer to heat smaller parts. As above, through, handle with care to avoid damage to both the parts and yourself.
With a little more work, you can carefuly cut through in between the cheek sacs and the tops of the forelimbs, to allow for more movement. In the below example, I have stretched the legs out to raise the head and shoulders up higher, and added a slight forwards arch to the angel's back.
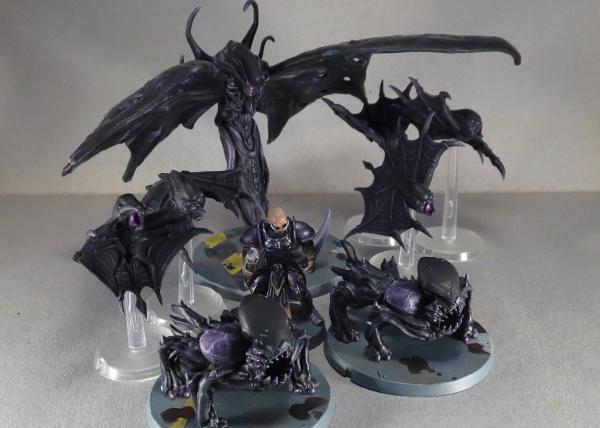
Painted up in an appropriate colour scheme, the Hellblaster fits in nicely with the Mature Angels and Minnows to add a bit more variation to an angel force.
But where to from here?
There's no reason to stop with basic reposing! Angels love nothing more than experimenting with different forms, and while the Hellblaster is a form forced on them by Karist Keepers, it also makes a good base for some different angel types, like the (very work-in-progress) examples below:
Snake-angel, converted using the front of a Hellblaster, the wings from a Minnow and a wire armature covered in 'green stuff' putty.
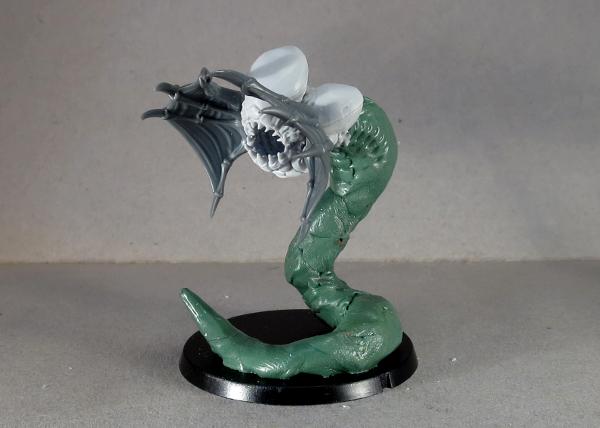
The snake body will be smoothed out with another layer of putty, and some exterior tentacles added for some detail.
Shrike-angel, converted using a Hellblaster body with the forelimbs and energy sacs cut off, and the wings from a Minnow.
The body of the Hellblaster is considerably bigger than a Minnow's, so this guy has a much smaller wing to body ratio, but I think it's still close enough to work, particularly given angels fly using gravitic manipulation and the wings are largely just for show anyway. As with the snake, this model still needs some putty work to join the wings properly to the torso and fill in the flat spots where the legs and sacs were removed. I may also trim down the crest a little, to something more closely resembling the head of the Minnow.
Or, for something completely different, how about angel cavalry?
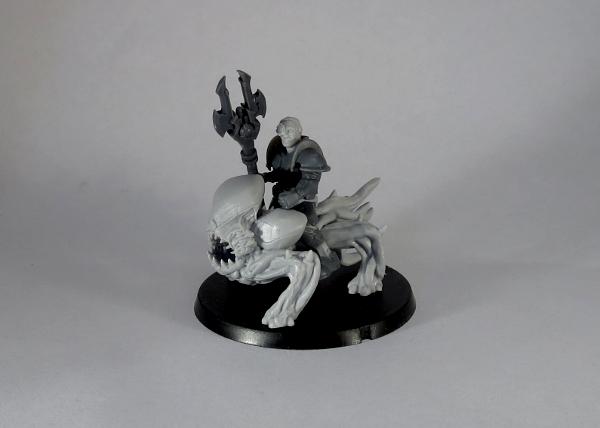
(Ok, this one's stretching the background a little - chances are that anyone trying to ride an angel wouldn't be riding it for very long... But it was too fun an idea to not have a play with it!)
To build your own shape-changing army of alien doom, you can pick up the Hellblaster along with the rest of the Maelstrom's Edge range from the webstore here. As always, feel free to share your creations on the Comm Guild Facebook page!
For other Maelstrom's Edge modeling articles, including tutorials and walkthroughs of a wide range of different building and miniature projects, check out the article roundup here.
Tags: angel conversion converting hellblaster modeling spotlight tutorial walkthrough