The New Maelstrom's Edge Terrain Sprue - Available October 7th!
Posted on Tuesday Oct 01, 2019 at 05:00pm in Models
Sprue Front
This new sprue is themed around the Broken faction, with detail pieces intended to help you build ruins and run-down structures, with a few extras to mix things up a bit.
Sprue Back
Unlike the solid doors on the first terrain sprue, this time around we've included a couple of empty door frames. These can be used as is, or you can fill them with an included solid door piece or a curtain, both of which are double sided so that you can mix up the facings for more variety.
Doors
The three windows on the sprue carry on the theme, with one covered with a curtain, one with metal mesh, and the third with a vent-style grill.
Windows
You can reinforce your walls with struts sized to match the similar struts on the first terrain sprue. This time around, though, the struts have missing panels which can be replaced (or not!) as you choose with several different patch pieces, included some that match the original panels. This lets you mix up the look of the struts to suit yourself. You can also use the extra panels to add patches to walls.
Windows
If you would rather get away from straight edges and corners, you can use the round porthole and iris portal to add some more rounded details. The iris can be used as a floor or roof hatch, or can also serve as a small access door. The porthole and a similarly-shaped fan piece can be glued straight onto a wall or roof, and are also designed to fit neatly onto the top of the large pipe fitting from the first terrain sprue.
Iris, Portholes and Fan (And a scifi shipping container from Laser Cut Card!)
Iris, Portholes and Fan
The first sprue included a ladder for getting up above ground level, but this time around we've included some stairs. The stair pieces are designed to stack up, so you can customise them to whatever height you want for your walkways or doors. The sprue also includes several different grating designs which can be used to make walkways and catwalks, or paired with the upright posts to make fences or barricades.
Stairs and Grates
Barricades
The rest of the sprue is filled up with technical details - a new computer terminal, light fittings, small vent pieces, an antenna, a generator coil and a junction/control box with a separate lid that can be attached open or closed, or used as a wall patch!
Barricades
And finally, we have also included the pieces to make a small, automated turret for securing your hard-won territory against rampaging gangs or bloodthirsty pirates. This is designed to work with the larger weapons from the Broken Infantry sprue, with the weapon mounting pieces attaching to a slide rail so they can be positioned as needed. This piece is just decorative for now, but we have some plans for ways to incorporate these into your games, to come later!
Barricades
The new sprue will be available from the Maelstrom's Edge webstore from the 7th of October. Like the previous terrain sprue, it will be sold as a two-pack, at the same price. Stay tuned for more terrain ideas featuring the new sprue!
Tags: release terrain terrainsprue
Terrain Spotlight - An experiment in eroded rocky outcrops from foamed PVC.
Posted on Thursday Sept 26, 2019 at 05:00pm in Tutorials
I came across a tutorial online a little while ago for making eroded rocky outcrops using stacks of corrugated cardboard coated in filling plaster, and then distressed with a wire brush. It was really effective, but I'm not a huge fan of using plaster on gaming terrain as it tends to chip easily. So I thought I'd have a go at making something similar, using foamed PVC.
From putting together buildings, I tend to wind up with a lot of small off-cuts of foamed PVC sheet. This would potentially work with any thickness of sheet, but the thicker the better. Here, I'm using 3mm sheet as that's what I had to hand.
I cut a series of roughly oval shapes from the sheet, slowly decreasing in size so that they would stack up to form the shape of the outcrop.
Using superglue, I glued the layers together, trying to not get glue right out to the edges of the PVC pieces as this would interfere with the texturing later on.
Next, I used a hobby knife to smooth down the layers, more or less. These didn't have to be perfectly blended, but enough to disguise the separate layers of PVC once the texturing was applied.
To apply the rock texture, I scraped horizontally around the edge of the outcrop with a wire brush. The aim here was to vary the depth and length of the scrapes to give a random, rock texture, without cutting in too deep and making it all too flimsy.
With a spray coat of black, and a drybrush of a mix of brown and grey paints, the outcrop was ready for the table.
It's not perfect - it could use some more defined layers running around the circumference, level with the flat areas. This would give it more of a stacked-rock effect and look less like a single lump. But it was an interesting experiment, and a fun way to use up some scraps. I'll have to tinker with the idea a little more and see where I can take it!
Do you have terrain creations you'd like to share? You can get feedback on your work, or ask any Maelstrom's Edge- or hobby-related questions on the Comm Guild Facebook page!
You can pick up the entire Maelstrom's Edge model range, including our plastic urban terrain detail sprue in the webstore here.
For other Maelstrom's Edge modeling articles, including tutorials and walkthroughs of a wide range of different building and miniature projects, check out the Hobby section of the Maelstrom's Edge website here.
Tags: modeling spotlight terrain walkthrough
Modeling Spotlight: SecDef 'Ironhide' Transport Vehicle Kitbash
Posted on Thursday Sept 19, 2019 at 05:00pm in General
While 'official' vehicles for Maelstrom's Edge are likely still a while in the future, the next edition of the game will include some expanded vehicle rules, in the interests of being forward-compatible. One of the things this will add in is the ability to transport troops in appropriate vehicles, and as I'm a fan of sending troops careening around the battlefield in small, metal boxes, I decided to get the jump on things and add some transport capabilities to my existing forces - just for show, for now. This week, I built some stylish wheels for my SecDef, using the Miniature Scenery Tactical Response Vehicle as a base.
Miniature Scenery are an Australian company, producing a range of terrain and vehicle kits in laser-cut MDF. Through some sort of wizardry that defies my comprehension, the vehicles in particular are very cleverly designed to look as little like MDF as possible once assembled, which makes them a great addition to the miniature collection!
Assembly was largely by-the-book. I did take some extra time to sand down the wheels, which are made from several layers of MDF sandwiched together. This is something that is shown in the example pics but not in the instructions, and does make the wheels look a little more polished.
While I considered replacing the lights with something more 3D, in the end the only modifications I made were to the top hatches. These are flat, being etched into the MDF surface, and while they look ok, I wanted something more detailed. So I replaced the rear turret with an iris hatch from the upcoming new Maelstrom's Edge terrain sprue. For the smaller front hatches, I used round windows from the same terrain sprue, filled in with 'green stuff' putty and sanded flat. On the middle hatch, I added a weapon turret using two SecDef machine guns and a couple of weapon brackets from the terrain sprue.
With everything glued in place, the vehicle looked something like this:
Given the vehicle's intended role, painting was (rather predictably) very similar to the process used for my 120 point SecDef force. I gave it some weathering to give it a battle-worn look (and to help disguise any minor assembly flaws!) but otherwise kept it fairly plain. Since the vehicle itself is fairly busy, I thought a more complicated colour scheme might just be too much. And in the end, the decision to not replace the lights turned out fine, as with some paint on the flat, engraved lights work just great.
And that's it - ready for the table! In coming weeks, I'll be looking to add some more 'unofficial' unit cards for some transports (including this one, obviously) to the Force Listing section of the Maelstrom's Edge website, to allow you to kick the wheels of the new rules a little if you're so inclined!
You can pick up the entire Maelstrom's Edge model range, including our current plastic urban terrain detail sprue in the webstore here.
Share your creations, or ask any Maelstrom's Edge- or hobby-related questions on the Comm Guild Facebook page!
For other Maelstrom's Edge modeling articles, including tutorials and walkthroughs of a wide range of different building and miniature projects, check out the Hobby section of the Maelstrom's Edge website here.
Terrain Tutorial: Rocky Outcrops.
Posted on Thursday Sept 12, 2019 at 05:00pm in Tutorials
Buildings are all well and good, but sometimes you want to get out of the urban sprawl, and wage apocalyptic war surrounded by nature! I've shared articles previously covering alien forest bases made from silicon aquarium plants and cactus clumps made from foam balls, but this week we're tackling the ever-popular stacked rock outcrops.
These rocky terrain features are made from sheets of expanded polystyrene. I've used pieces cut from an old foam vegetable box here, because that's what I had laying about. You can generally buy expanded polystyene by the sheet in various grades and thicknesses from hardware stores or foam specialty stores, but if you're more thrifty-minded it's worth asking your local fruit and vegetable retailer if they have any old boxes laying around, or you can save the packaging inserts from electrical equipment.
Expanded polystyrene is composed of loads of small balls of foam pressed together to form a sheet. For this sort of project, you want polystyrene composed of relatively small beads (under 2mm), as the larger sort is much harder to cut cleanly and is more prone to damage.
The first step is to cut a piece of foam to form the base of the outcrop. This can be whatever shape you like, just remember to leave one or more flat spots for the stacked rock spires. For cutting the foam, you can buy heated wire cutters specifically for the purpose, but generally a sharp knife will do the job - just don't use the good kitchen knives, as cutting foam does tend to blunt the knife fairly quickly.
Next, cut rocks for the stacks, starting larger and making each successive rock a little smaller, for however many you want to stack up. Rocks come in all sorts of different shapes and textures, so the actual shape here isn't too important, but I like to use largely flat cuts to create a faceted look. Avoid making really sharp edges on the foam, as these will be fragile. Make your rocks different thicknesses, and you can angle the tops a little to avoid the stack looking too artificial.
Once you have your rocks cut, glue the stacks in place with PVA glue. Don't use superglue or plastic cement, as these will melt the foam. For a little extra strength, you can push toothpicks or wooden skewers cut to an appropriate length down the centre of the rock spires. Push this in until it is sitting just below the surface of the topmost rock, and then glue a scrap piece of foam into the hole to plug it up.
Now we need to disguise the foam a little, as just painting over the foam with regular paint tends to look like, well, painted foam.
So instead, paint the outcrop with a textured paint. Again, the specific texture is more or less up to you depending on the look you want, but here I'm using a Dulux 'River Rock' textured paint. This is an acrylic, indoor house paint with a fine sand texture mixed through it. You can generally pick up sample pots of similar paint from hardware or paint stores, or check out their clearance bins for mis-tinted paving paint, which you can sometimes grab for cheap. If you can find a colour that you want to use as a base colour (as I've done here) that's great, but otherwise you can just paint over it, so the actual colour of the textured paint isn't too important. You can also just use regular paint and stir in some fine sand - silversand (sold in pet stores) is ideal for this.
Dab the paint on with an old brush, rather than brushing it. This avoids brushstrokes and helps to clump the texture. The paint I'm using takes two coats to build up the level of texture I wanted for this outcrop, but coverage will vary depending on the paint you use.
To add some visual interest, glue some sand and/or small gravel to the top surface of the base of the outcrop with PVA glue, and once the glue is dry, undercoat with a similar colour to your textured surface - a few shades darker or lighter is fine, once again just depending on the look you want.
Finally, choose a lighter colour and drybrush over the whole thing. Here, I've used Army Painter Ash Grey, as it's a nice, pale grey with a slight brownish tinge, so it ties into the textured basecoat nicely. If you're unfamiliar with drybrushing, you take a large brush, dip it in your paint, wipe it on some paper until there is hardly any colour still coming off, and then brush that over the surface to be painted. With so little paint on the brush, it just picks up the raised detail, leaving the base coat in the crevasses. You can slowly build up the colour in this way until you get the level of highlighting that you want. It's a great technique for painting rough surfaces like rocks or fur, or for getting worn metal effects.
The finished outcrop, ready for the table:
You can glue your outcrop down to a piece of hardboard to give it some extra weight if you wish - this can be a help in preventing it from sliding around the table!
Keen to give it a go? Be sure to share your creations, or ask any Maelstrom's Edge- or hobby-related questions on the Comm Guild Facebook page!
You can pick up the entire Maelstrom's Edge model range, including our plastic urban terrain detail sprue in the webstore here.
For other Maelstrom's Edge modeling articles, including tutorials and walkthroughs of a wide range of different building and miniature projects, check out the Hobby section of the Maelstrom's Edge website here.
Printable Mission & Objective cards now online!
Posted on Monday Sept 09, 2019 at 05:00pm in Gaming
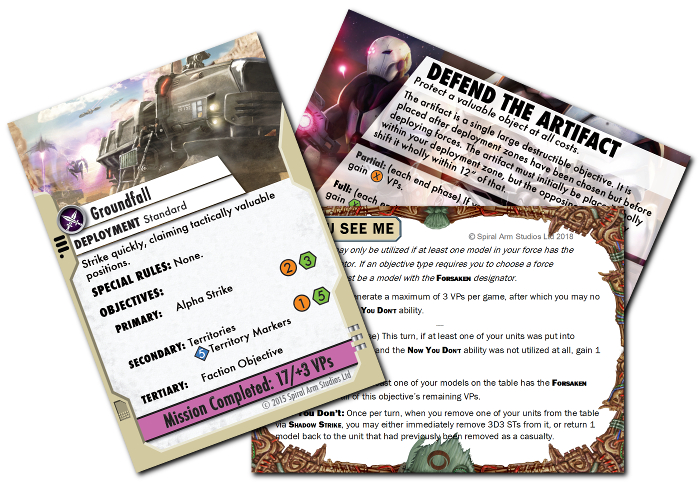
This PDF document includes all of the core Missions and Objectives, and all of the exclusive Faction Objectives for the Epirian, Karist and Broken factions. Watch this space for an update with Faction Objectives for the Artarian Remnant very soon!
Painting Tutorial: Rusted Shanty Buildings
Posted on Thursday Sept 05, 2019 at 05:00pm in Tutorials
Our new, upcoming terrain sprue is themed around Broken terrain - delapidated, cobbled-together structures either repaired from abandoned ruins or cobbled together from salvage. I've been putting together a series of run-down shanty buildings and thought I would share my method for painting them up and making them all grubby and rusty!
The building I'm painting up here is the one shown in the walkthrough in the first preview article here.
The first step is a basecoat of dark brown. The exact colour doesn't matter too much, but here, I'm using an AK Interactive Rust Basecoat.
Over the brown goes a spray of cream, sprayed downwards at an angle to let the brown form some natural shading. I'm using a Dulux Chalky Finish cream spray, as it gives a fantastic, non-glossy surface finish.
Over the areas of exposed metal, re-undercoat with a dark brown. For painted metal areas, like the reinforcing struts, apply the dark brown with a sponge. (You can find a tutorial on sponge weathering here). The exact shade of brown doesn't matter too much, as rust comes in a wide range of shades dependong on age and exposure, but I've used AK Interactive Shadow Rust here.
For areas of lighter rust, apply a sponge of dark gray over the brown. This will give the effect of old but unrusted metal showing through the rust in places. Where you want heavier rust, like on the roof, leave this off. For this building, I used Vallejo Heavy Charcoal for this step. I have also painted the base with Vallejo Neutral Grey at this stage.
On the larger rusted surfaces, like the roof and door, apply a rough drybrush of orange. This doesn't need to be particularly even - you're aiming to create a rough highlight to accentuate the patchiness of the rust.
Now the magic part! The final coat of rust is applies with Vallejo Dry Rust. This is a worryingly bright orange paint that goes on gloopy and dries down to a very flat finish. Applied over the brown, the orange is dulled down to a perfect rust finish. Use an old brush and just dab it on, working downwards so that the rust collects most strongly on upper surfaces. As with the drybrush layer, the aim isn't to evenly coat everything, but to create a blotchy effect with the rust heavier on raised, exposed areas and lighter on undersides.
Around this time, drybrush the base with Valljeo Light Grey or similar.
Once the rust has dried, it's time to add some dirt. But first, paint in any remaining details - lights, control panels, grafitti or other markings on the walls, are all best added in now, so that the weathering goes over the top and they don't look out of place with the rest of the structure.
Then, use a medium brown (Vallejo Beasty Brown here) and drybrush around the bottom edges of the walls, in any vertical raised recesses, along the edge of the roof under the corrugated card, and along the tops of doors and windows. This is also a good time to drybrush some dirty patches on the base.
Finally, use a small drybrush to add some more brown along any remaining upper surfaces, like the tops of each segment on the reinforcing struts, the rim of the light fitting and anywhere else that dirt and dust would collect. I also like to add some oil (or other fluid) stains around the base by applying small drops of Army Painter Quickshade wash and leaving them to dry.
The new terrain sprue will be available soon. In the meantime, you can still pick up the original terrain sprue along with the rest of the Maelstrom's Edge model range in the webstore here.
As always, feel free to pop along and share your creations, or ask any Maelstrom's Edge- or hobby-related questions on the Comm Guild Facebook page!
For other Maelstrom's Edge modeling articles, including tutorials and walkthroughs of a wide range of different building and miniature projects, check out the Hobby section of the Maelstrom's Edge website here.
Tags: buildings modeling painting terrain terrainsprue tutorial
Audiobook release: Bolt.
Posted on Monday Sept 02, 2019 at 05:00pm in Fiction
We're pleased to announce the release of a new audiobook, Bolt!
Bolt is the latest chapter in the story begun in Transit, about a young boy named Kelvin who discovers a frightening truth about the Maelstrom and what it means for his world. In the second installment, Fracture, Kelvin and his family start working on a plan to escape. And in this latest chapter, they head to a remote scrapyard to secure their transport, where things don't go quite to plan.
This hour long audiobook, written by Stephen Gaskell and narrated by Paul Ansdell, can be found along with the previous chapters in the Maelstrom's Edge webstore here.
Terrain Spotlight: Firepoint Emplacement
Posted on Thursday Aug 29, 2019 at 05:00pm in Tutorials
As I mentioned in last week's article, we have a new terrain sprue coming!
Because new terrain gets me as excited as a very excited thing on a special day to be excited, I'm currently locked in my office, figuring out the best ways to make use of the new bits and pieces on the sprue and putting together new buildings for the ever-expanding terrain collection. One of the new pieces I put together this week was a small firepoint, just perfect for holding the line against incursions of lawless rabble!
The bulk of this structure is made up of floor grates from the new terrain sprue, and a combination of 3mm foamed PVC and 6mm foamcore for the walls.
I started out by laying out a floorplan, and gluing the grates together edge to edge. Then I cut the PVC and foamcore into sections to fit neatly around the three straight edges of the floor.
The sprue includes some posts which can be used to make low walls. For this build, I'm using a couple of them as floor supports, so trimmed off the rounded top.
Some stairs were needed to get up to the floor level in the firepoint. The stairs on the new sprue are designed to stack up on top of each other, and two stair pieces stacked come to almost exactly the same height as the floor grates sitting on the posts.
With the wall pieces glued together, the lower PVC sections form a support rail, on which the floor grates will sit.
To cover over the exposed ends of the foamcore, I took some support struts from the original terrain sprue and cut them to the same height as the walls. Four of these attach to the corners, neatly sealing over the foam.
The short, leftover pieces of the support struts were a nice length to form some bracing for the walls. I cut some small triangles of PVC and foamcore, which when glued together are exactly the same width as the struts.
That just left the top edges of the wall exposed. To seal that over, I cut a piece of foamed PVC in a lopsided 'U' shape to match the path of the wall, making it wide enough to overlap slightly on both sides, just to look prettier.
With the structure complete, I glued the firepoint down to a piece of hardboard. I wanted the firepoint to have some dirt piled up against the front, so I cut some expanded polystyrene to form the bulk of the dirt pile, and glued that in place around the front and the sides.
Finally, I gave the expanded polystyrene and the remaining exposed hardboard a generous coat of PVA glue and sprinkled a sand/gravel mix over it.
Ready for paint!
With some paint on, the finished firepoint looks like this:
The exact release date for the new terrain sprue is still to be confirmed based on production scheduling, but should be in the next few months. I'll be showing off some more previews in coming weeks to reveal other components included on the sprue.
In the meantime, you can still pick up the original terrain sprue along with the rest of the Maelstrom's Edge model range in the webstore here.
As always, feel free to pop along and share your creations, or ask any Maelstrom's Edge- or hobby-related questions on the Comm Guild Facebook page!
For other Maelstrom's Edge modeling articles, including tutorials and walkthroughs of a wide range of different building and miniature projects, check out the Hobby section of the Maelstrom's Edge website here.
Tags: buildings modeling spotlight terrain terrainsprue walkthrough
Terrain Spotlight: New Terrain Sprue Sneak Peek!
Posted on Thursday Aug 22, 2019 at 05:00pm in Tutorials
In the time since the release of the Maelstrom's Edge terrain sprue a couple of years ago, this useful little frame of detail parts has consistently been one of our most popular plastic kits. As good as it is, though, it was always intended to be just the start of a range of different terrain component kits. So over the last 18 months or so, we've been hard at work designing and sculpting a new sprue to add a whole slew of new building options!
This new kit will be out very soon, but to whet everyone's appetites, I thought I would take the opportunity to throw together a quick building walkthrough to show off some of the great new details!
To keep things simple for this build, I turned once more to my humble favourite: the cardboard gift box!
As with the first terrain sprue, the doors and windows are designed to slot into holes cut into the walls of the structure - although this time around, the doorframes and doors are separate components, so that you can model them open or closed!
To fit them into place, I started by flipping the box upside down, and drawing a guide line 12mm up from the bottom of one of the long walls. Then I held a door frame in place a third of the way along the wall and traced around the inset back of the frame with a sharp pencil. As I wanted two doors on this wall, representing a pair of joined habitation units, I repeated this a third of the way in from the other end of the wall as well.
To cut out the doorway holes, I used a sharp exacto blade, following the pencil line and making several passes rather than trying to cut right through in one go.
I then glued the doors in place with superglue, and cut and glued a window in each end wall using a similar process.
To reinforce the walls of your structures, the sprue includes a number of bolted struts like the first terrain sprue. These struts have some missing panels on them, with optional, separate panel pieces that can be glued on to vary the look of the struts a little.
One of my favourite details, the sprue also comes with two stair pieces, designed to be used individually or stacked up for a taller set of stairs. For this build, I was just using them individually, and also wanted to butt them right up against the wall, so I cut off the triangular support pieces from the backs of them with my exacto knife.
I glued the struts upright on the ends of each of the long walls of the building, and the stairs nestled in under each of the doors. I also glued an exhaust fan onto each end of the building for some extra ventilation.
To finish up, I covered over the rather boring top of the building with some corrugated cardboard, and build an awning using another piece of cardboard, some plastic tubing, and a couple of posts from the terrain sprue. I also added a base of foamed PVC, and some underfloor ventilation using vent pieces cut from the reinforcing struts on the original terrain sprue.
On the rear of the building, I glued a generator in the middle to service both hab units, and built a small fence to protect it and provide some low cover on the table, using some grating pieces and a couple more posts. I also added a couple of corrugated patches on the walls for some low-tech, DIY repair.
With some paint on (which I'll cover in a future article very soon!) the hab block was ready for the table!
The exact release date for these sprues is still to be confirmed based on production scheduling, but should be in the next few months. I'll be showing off some more previews in coming weeks to reveal other components included on the sprue.
In the meantime, you can still pick up the original terrain sprue along with the rest of the Maelstrom's Edge model range in the webstore here.
As always, feel free to pop along and share your creations, or ask any Maelstrom's Edge- or hobby-related questions on the Comm Guild Facebook page!
For other Maelstrom's Edge modeling articles, including tutorials and walkthroughs of a wide range of different building and miniature projects, check out the Hobby section of the Maelstrom's Edge website here.
Tags: buildings modeling spotlight terrain terrainsprue tutorial walkthrough
The Aurum Blade - A 120 point Remnant Fire Team
Posted on Thursday Aug 15, 2019 at 05:00pm in The Remnant
As fun as it is to mess about with different colour schemes and builds, sooner or later you just have to throw some dice. I decided it was time to stop building random Remnant Militus suits, and put together an actual, playable fire team.
And so, after consulting the force lists and jotting down a quick list, and piecing together the remaining suits that I needed to make it work, the Aurum Blade was born!
This is a 120 point force, which is a good size for small, quick games. It also serves as a nice core for expansion later, as I intend to add some Nimbus and Brutus suits once those kits are ready to go.
The Aurum Blade - 120 point Artarian Remnant force
Command - Militus Warrior Prime - 34 points
- Arc Splitter
- Aruval Phase Blade
- Prime Array
- Vent System
- Defensive Countermeasures
Some of the gear that I wanted for this model isn't available yet (coming in an upgrade pack as soon as we can get it finished!), so I used a couple of fill-in parts. The Aruval Blade is taken from a Warhammer 40000 Space Wolf kit, the Defensive Countermeasures are trimmed off the Epirian Master Handler's missile pods, and the Prime Array is the back end of an Incursion Blaster, sliced off and flipped upside down.
***
Core - Militus Warrior - 17 points
- Combat Gauntlet
- Combat Gauntlet with Reflex Shield
- Lorican Field Generator
This model was a conversion I had to make after I wound up with some leftover parts from a Warhammer 40000 Ork Trukk that I kitbashed into an Epirian Contractor Truck. While the saws are big and showy, it made the most sense to just treat them as combat gauntlets, rules-wise. The saws are attached to trimmed-down reflex shield arms, but that's just represented as a single reflex shield due to there being no benefit to taking two of them!
Core - Militus Warrior - 21 points
- Conflagration Launcher
- Combat Gauntlet
- Incursion Blaster
This was one of the first models I painted up for the Remnant, and is still one of my favourites, so it was a fairly obvious idea to base a fire team around him.
Anvil - Militus Dominator - 30 points
- Conflagration Launcher x2
- Incursion Blaster x2
You might remember this suit from such articles as Building the Militus Dominator! He's just itching to lay down some firepower.
Vanguard - Militus Skyrunner Initiate - 18 points
- Incursion Blaster x2
- Mark of the Initiate
This last model was also assembled and painted for a previous article, showing how to paint the gold used on this fire team. The Mark of the Initiate means that he takes to the field with lower stats then the rest of the team, but also makes him five points cheaper, which meant that the fire team came in bang on the 120 points without having to sacrifice any gear.
As an initiate, I left his suit simpler than the rest of the fire team, with the only white decoration being the initiate shield on his left shoulder pad.
The team all assembled:
All that's left now is to test them out on the table! I'll make no promises on their performance there - I tend to build lists around the models that I want to I like the look of, with very little regard for what will be most effective in battle. Part of the challenge is in taking whatever you wind up with and finding ways to make it work!
More on that soon!
To put together your own Remnant fire team, pick up the Militus battlesuit from the webstore here.
As always, feel free to pop along and share your creations, or ask any Maelstrom's Edge- or hobby-related questions on the Comm Guild Facebook page!
For other Maelstrom's Edge modeling articles, including tutorials and walkthroughs of a wide range of different building and miniature projects, check out the Hobby section of the Maelstrom's Edge website here.
Painting Tutorial: Old Gold Armour
Posted on Thursday Aug 08, 2019 at 05:00pm in Tutorials
If you've been following this blog with even passing attention, you might have noticed that I've been on a bit of a Militus spree. In between the assorted conversions and random paint schemes that I've been trying out, I shared a suit in a dark gold scheme way back when the kit was released, and then revisited that colour scheme with the recent Dominator conversion article. With two suits now matching, it seemed like a good idea to keep going, so right now I'm putting together a 120-point force, which will feature in an upcoming article. In the meantime, I thought I would share the method I came up with for painting the gold, using Army Painter Warpaints and Quickshade.
I'm using a Militus suit here, but obviously this technique can be applied to whatever you want to put it on. I start out by spraying the suit with Army Painter Plate Armour. That's specifically for the Militus, as it lets me run Dark Tone wash over the mechanical underlayer and then move on to the armour. You could also use a grey basecoat for a similar effect, or use white or beige if you would like a slightly brighter end result.
Over the Plate Metal, I paint a coat of Wasteland Soil. This goes on horribly over the plate metal, and looks a bit streaky and patchy, but that's absolutely fine for this effect. If it bothers you, you can give it a second coat to smooth it out, but there's really no need - the purple is just there to give the gold some depth, and you won't see it in the end.
You could use a medium-tone brown instead, but I find that tends to give a more muddy-looking result.
Next up, I paint on two coats of Bright Gold over the purple. This results in a rather strange look - from some angles, the gold will look smooth, and from other angles the purple will show through. As with the previous step - don't worry, magic happens in a minute!
Over the gold, I lightly drybrush with Shining Silver to pick up the raised edges.
And finally, I apply a liberal coat of Mid Brown Quickshade wash. This does a couple of things - it deepens up the colour of the gold, and it adds a brown tint over the purple, turning it into shadow. It's a fairly common technique when wet blending or glazing to add purple into the colour you're shading as you work into the deeper creases. This is sort of the same thing, but in reverse.
After leaving the wash to dry, the model is ready to move on to detailing. If you think it needs it, you can accentuate the highlights with some more gold or silver on raised edges, but I like it as is.
The finished model:
Want to give it a go? You can pick up the Militus battlesuit, along with the rest of the Maelstrom's Edge model range in the webstore here.
As always, feel free to pop along and share your creations, or ask any Maelstrom's Edge- or hobby-related questions on the Comm Guild Facebook page!
For other Maelstrom's Edge modeling articles, including tutorials and walkthroughs of a wide range of different building and miniature projects, check out the Hobby section of the Maelstrom's Edge website here.
Colours of the Remnant
Posted on Monday Aug 05, 2019 at 08:14pm in The Remnant
Because competition between the houses is fierce, Lorican fire teams are most commonly made up of champions from a single house, although occasionally mixed-house teams will be fielded out of necessity or for a co-operative, all-star event. Each House has a colour scheme made up of a Primary colour which usually covers the majority of the suit, and a Secondary colour which is applied in a unique pattern to identify the individual Champions. A Tertiary colour is applied in matching patterns for the entire fire team.
In the below image, the three suits shown are all from the same House and fire team, with gold (primary) and white (secondary) for the House colours, and purple for the fire team marking.
Similarly, the three below colour schemes are all for the same House, with bronze (primary) and white (secondary) for the House colours. However, these suits are all from different fire teams.
There are many different Houses of varying importance throughout the Remnant fleets, with some Houses spread across multiple fleets, and some smaller Houses only found on one or two. As a result, variations in fire team markings are not uncommon even within a single House. Additionally, different Houses apply their colouring with varying degrees of rigidity - some allow considerable leeway for champions to customise their own suits, while others will adopt a more rigid, military-style colouration. In some rare cases, champions may even take to the field with no House markings at all, usually due to their House affiliation being severed due to poor achievement in the arena or the field.
How have you painted your Remnant suits? We'd love to see them! Pop along to the Comm Guild Facebook Group to share your work!
The Militus kit is available now, along with the rest of the Maelstrom's Edge model range in the webstore here.
You can find the rules for the Remnant in the online Force Listing section here, and you can also find a downloadable, printable version in the 'Rules' section of the website here!
Happy Gaming!
Conversion Spotlight: Building the Militus Dominator.
Posted on Thursday Aug 01, 2019 at 05:00pm in Tutorials
With the Remnant rules released this week, players now have a range of different options for building their Militus suits. Four of the currently available suit classes are buildable straight off the sprue, but the Dominator class does require a very small (and very easy!) conversion to give it a second shoulder-mounted weapon.
The plastic militus kit only comes with a single shoulder-mounted weapon, which hangs on a rig that only fits on the left shoulder. To build the Dominator, you need two weapons. The easiest way to do this is to leave off the shoulder rig, and borrow a second mounting joint (parts L16 and L21 on the sprue) from a second Militus kit.
If you have built a suit or two with combat gauntlets, you will also have some leftover elbow mounts, which you can use instead.
Simply assemble the mounting joint on the weapon as normal, then flip it upside down and glue it directly to the top of the shoulder pad.
The rest of the suit can be assembled as normal.
With a coat of paint, the new Dominator is ready for the table!
Of course, that's just the easy way to do it. Being plastic, the Militus kit offers all sort of other conversion options if you want to get creative with clippers and glue!
Build up your own crusading force of indomitable firepower by picking up the Militus kit from the Maelstrom's Edge webstore here.
As always, feel free to pop along and share your creations, or ask any Maelstrom's Edge- or hobby-related questions on the Comm Guild Facebook page!
For other Maelstrom's Edge modeling articles, including tutorials and walkthroughs of a wide range of different building and miniature projects, check out the Hobby section of the Maelstrom's Edge website here.
Tags: conversion militus modeling remnant tutorial
Rules for the Artarian Remnant are now online!
Posted on Tuesday Jul 30, 2019 at 05:00pm in Gaming
This month, the forces of the Artarian Remnant assemble to storm the battlefields of the Edge, with the release of rules cards for the Militus battlesuit!
With a wide array of different gear and weapons available to them, the Militus is the most widespread of the suit types in use by Remnant champions. The suit classes that can be built straight from the plastic Militus kit are represented on five rules cards - two different command options, and three different troop options, which you can now find in the Remnant section of the online Force List.
Faction Abilities
All Militus suit types have the 'Aerial Insertion' rule, to represent the fire team deploying from orbit. What makes them truly special compared to other armies, though, is the 'Crowd Favorites' rule. Combat is an extreme sport for Lorican Champions, and fire teams broadcast their exploits back to adoring fans on the vast ships of the Remnant Fleets, who in turn convey their support to their chosen Champions in the form of Favor.
While Remnant forces receive Command Points each turn for any Command models in play, they also gain an additional point for every 3 Lorican Champions currently on the table. This represents the Champions being boosted by the support of the watching crowds back in the fleet. These Command Points can then be used by the Champions to Overcharge their suits, allowing them to move faster, buff their weapons, or improve their defensive abilities, at the expense of generating heat. Heat is represented by additional Suppression, and can be dispersed through the use of Venting systems.
Militus Warrior
The most common Militus class is the Warrior. A Core choice in a Remnant detachment, the Militus Warrior wields powerful ranged or melee weapons on its arms. It can be equipped with a field generator backpack, and also has access to a third, shoulder-mounted weapon or an assortment of support equipment.
Note: We will be releasing a resin upgrade pack which will include all of the support equipment options, but we have included these options on the cards for now to let you try them out!
Militus Warrior Prime
Experienced Lorican champions may eventually wind up commanding fire teams in combat, and bear the rank of 'Prime' to show their status. The Warrior Prime's 'Counterattack' ability gives his units a boost when retaliating against enemy fire.
Militus Skyrunner
The Skyrunner eschews the protection of a field generator, or the extra firepower of a shoulder mounted weapon in favour of the mobility boost provided by a Lorican Boostpack. While more limited in options than other Militus classes, the Skyrunner serves as a handy Vanguard option for capturing territory and getting the drop on slower enemy units.
A Skyrunner Prime retains the mobility of their class, and can use their enhanced view of the battlefield to better co-ordinate the movement of their units with the 'Mobile Strike' ability.
Militus Dominator
A more specialised class like the Skyrunner, the Dominator trades in support options in favour of overwhelming firepower. While they lack the ability to take the heavier weaponry available to larger Brutus class suits, Dominators opt for twin ranged weapons on their shoulders to maximise their ability to rain punishing fire on their opponents.
So, What's Next?
Well, as we mentioned, there will be a resin upgrade pack coming, with an array of different support options and some special parts to customise your Primes.
Of course, the Militus isn't the only weapon in the Remnant arsenal, and many Lorican Champions take to the field in the heavier Brutus or super-light Nimbus suits. Both of these will be added to the force with resin models later this year.
In the meantime, though, the multiple variants of Militus suit give you plenty of options for building different forces and taking on the less-well-equipped and considerably squishier factions opposing them on the Maelstrom's Edge!
The Militus kit is available now, along with the rest of the Maelstrom's Edge model range in the webstore here.
You can see the unit cards in the online Force Listing section here, and you can also find a downloadable, printable version in the 'Rules' section of the website here!
Happy Gaming!
Terrain Spotlight: Giftbox Building with Removable Roof!
Posted on Thursday Jul 25, 2019 at 05:00pm in Tutorials
There are two common ways to create buildings for use in wargames - making them solid and either treating them as impassable structures or using abstract rules to represent models being inside where appropriate, or using buildings with removable roofs so that models can actually be placed inside and positioned accurately when required. I generally prefer to go the former route, as it makes buildings a lot simpler to put together, and is less fiddly during a game than having to take a roof off - particularly if there are models on it!
Sometimes, though, it's handy to be able to go that extra distance, so I thought I would show a quick and easy way to create a building with a removable roof from a cardboard giftbox, with a little help from the Maelstrom's Edge terrain sprue.
For the core of this building, I used a plain black cardboard giftbox, purchased from a local discount store.
Usually when I'm building terrain, I just go from the idea in my head and hope for the best. In this case, though, I sketched out a quick plan to make sure that the interior all fit into place as intended. The plan changed slightly along the way, but it provided a handy reference as I was putting everything together.
I started out by drawing around the base of the box on a piece of 2mm foamed PVC and cutting out a hole for the box to sit in. This serves to conceal the bottom edge of the box, which has a slightly rounded edge.
Next, I took a large door from the terrain sprue, sat it in place on one of the short edges of the box, traced around it with a pencil and then cut out the resultant rectangle to create a door cavity.
I did the same on one of the long edges of the box with a small door from the terrain sprue. This door is largely featureless on the back (as it wasn't really designed for use where you would see both sides of it), so I cut a piece of thin cardboard to duplicate the raised panelling from the front.
For the interior walls, I used more foamed PVC, with doorways cut in using the small door frame as a template. I checked that these walls fit where I wanted them, but didn't glue them in at this point so that I could get at the interior easier to add more detail.
The building needed some windows. I tend to default to the shutter windows on my builds and use the trapezoid windows for more interesting things, but for this building I had another plan for the shutters. So I spaced out some of the trapezoid windows on the long sides, cut holes by tracing around them with an exacto knife and then glued them in place. Using the knife instead of a pencil to trace gives a tighter fit, which is useful since the trapezoid windows don't have a flange to conceal a loose fit like the doors do.
I kitted out the interior with some bits and pieces made from an assortment of terrain sprue parts. All of this was glued in place, except for the ladder. I left that separate to make it easier to paint behind it.
And now, the important part! I took the lid of the box and glued four corner braces from the terrain sprue upside down around the corners of the lid top. These were spaced to fit neatly inside the box, so that the lid could be sat in place upside-down to create a walled roof.
Of course, this could also be done much more easily by just sitting the lid on the way it normally goes, but I like having a lot of buildings with walled roofs to allow for models to have some cover up there.
I finished up with a few extra detail pieces here and there, and another sheet of PVC on the bottom to form a base.
To paint, I gave the inside a spray with a Rustoleum dark brown primer, and then a light coat of Dulux chalky beige. The outside received a coat of Army Painter Army Green.
I gave the doorframes and windows a coat of Vallejo Heavy Brown, and then a layer of P3 Jack Bone. The base and roof are my usual urban mix of Vallejo Basalt Grey with a drybrush of Vallejo Light Grey.
As I wanted the weathering to be heavier on the outside then in, I gave the exterior metal parts a base coat of Citadel Scorched Brown, a very light drybrush of P3 Pig Iron, and then a generous dabbing of Army Painter Dry Rust. The interior metal parts got the same base coat, a heavier layer of Pig Iron, and then a wash with Army Painter Strong Tone.
Everything was dirtied up with a sponge of Vallejo Heavy Charcoal and a drybrush of Vallejo Beasty Brown into all the crevasses and corners, again going heavier on the outside of the building.
With some final detailing and a few printed posters, the building was ready for the table!
To build your own rooftop of removable doom, you can pick up the Maelstrom's Edge terrain sprue, along with the rest of the Maelstrom's Edge model range in the webstore here.
As always, feel free to pop along and share your creations, or ask any Maelstrom's Edge- or hobby-related questions on the Comm Guild Facebook page!
For other Maelstrom's Edge modeling articles, including tutorials and walkthroughs of a wide range of different building and miniature projects, check out the Hobby section of the Maelstrom's Edge website here.
Tags: buildings modeling spotlight terrain terrainsprue tutorial walkthrough
