Painting Spotlight: Militus Battlesuit painted with layered Contrast paint.
Posted on Thursday Jul 18, 2019 at 05:00pm in Tutorials
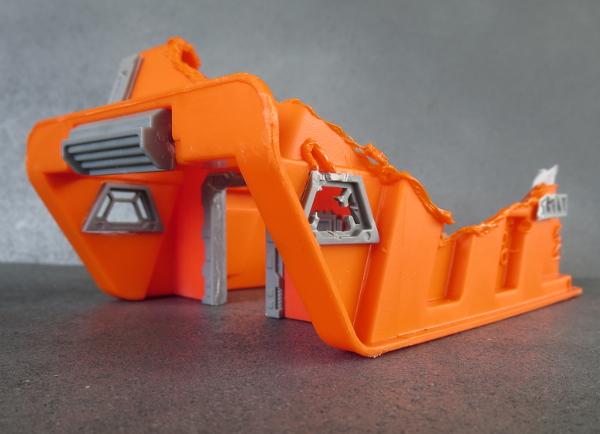
I picked up three of the new Citadel Contrast paints to have a play with when they were released - a yellow, orange and red. This was partly just from curiosity as to how they worked, and partly hoping to plug the colour gaps not filled by the other washes (mostly Army Painter) in my current paint collection. I showed off my initial dabblings a few weeks back, with a metallic red and yellow Militus battlesuit (here, if you missed it), using the Contrast as intended, but with the orange I wanted to see of these paints could be used for a thinner, layering style instead of just glopping it on and hoping for the best. So I broke out another Militus suit, and wound up with this:
The model I started with was a Militus suit that I had slightly converted by adding some spare knee wings to the shoulder pads and a flappy cape sort of thing hanging from his belt that was taken from the Karist Kaddar Nova kit.
As with the previous suit, I started out with a basecoat of Army Painter Plate Metal spray.
Over the mechanical undersuit parts and the arm-mounted conflagration launchers, I painted a layer of Army Painter Dark Tone.
When that was dry, I gave the rest of the armour a light coat of Gryph-Hound Orange, keeping it thin enough that it didn't pool. This looked a bit scrappy, but that's ok for now.
I then started building up the orange with successive, light layers. These layers slowly work back from raised edge, building up heavier colour in creases, lower edges of plates and other shaded areas. Once the orange was about as dark as I thought it was going to get, I used a little Blood Angels Red to add some extra shading.
Once I was finished with the Contrast layers, I painted the helmet crest and the cape with Citadel Macragge Blue, and the eyes, inner strip details on the cape and some detail on the sides of the guns with Army Painter Ash Grey. I also basecoated the base with Vallejo Basalt Grey.
To finish up, I gave the blue a light drybrush with some old Citadel Ice Blue to pick up the detail and then washed it with a generous coat of Army Painter Blue Tone. Over the Ash Grey I added a highlight of white, and then I went over the raised edges of the armour with some Coat D'Arms Fiery Orange, with a final spot highlight of white wherever it seemed appropriate. The base was finished off with a drybrush of Vallejo Light Grey and my usual 'urban' detailing.
Some final thoughts: Over the Plate Metal basecoat, the orange wound up more of a coppery brown. I don't dislike the colour, but a white or cream base would be needed for more of an 'orange' orange. I also found that the red faded considerably as it dried, so the final level of contrast on the armour plates isn't as high as I had intended. Some over-compensation would clearly be required when shading this way with the Contrast paints in this way.
Another minor issue is that the Contrast rubbed off on raised edges really easily with handling during painting. I had heard that the Contrast paints were a little more fragile than regular acrylics, and are best sealed for handling, and this would seem to be made worse by the thinner coats used here. A light coat of sealer between layers now and then would probably be a good idea for keeping the paint intact while working, although I'm not sure how the Contrast goes over sealer.
Overall, though, the process seems to work, it just needs some refining as the Contrast behaves quite differently to the Army Painter Quickshades that I usually use for this sort of method.
You can pick up the Militus battlesuit, along with the rest of the Maelstrom's Edge model range in the webstore here.
As always, feel free to pop along and share your creations, or ask any Maelstrom's Edge- or hobby-related questions on the Comm Guild Facebook page!
For other Maelstrom's Edge modeling articles, including tutorials and walkthroughs of a wide range of different building and miniature projects, check out the Hobby section of the Maelstrom's Edge website here.
Tags: militus modeling painting remnant spotlight tutorial walkthrough
Terrain Spotlight: Oily Joe's Bot Repair
Posted on Thursday Jul 11, 2019 at 05:00pm in Tutorials
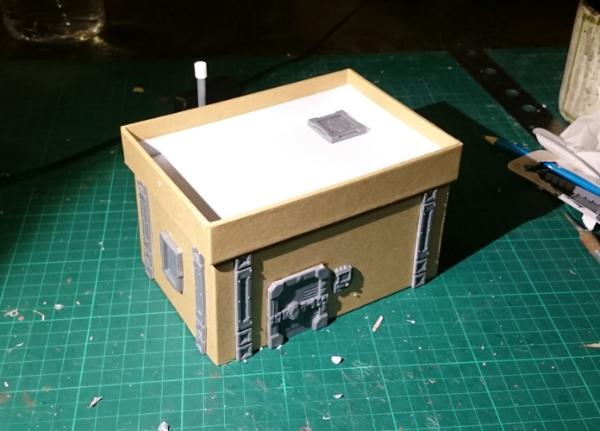
I'm venturing back inside the box this week, with a new building variant based on a couple of cardboard gift boxes, with some detailing help from the Maelstrom's Edge terrain sprue as usual.
Need your bot repaired, pronto? Want to pick up some spare power converters to get those units in the north quadrant back up and running? Well, don't bother heading down to Oily Joe's, because he's closed down and scarpered, to try to get a berth offworld before the Maelstrom hits.
The base structure of this building uses two differently sized cardboard gift boxes, sourced from one of the local discount stores. The smaller box forms the walls, while the lid of the larger box, which is just a fraction narrower than the small box is long, is used for the awning roof.
I started out by flipping the small box upside down, and using it as a template to mark out a surround of 2mm thick foamed PVC, which I cut out with an exacto knife and a steel ruler.
Then I grabbed a large door from the terrain sprue, and held that in place on one of the long walls (remembering to account for the 2mm surround at the bottom) to draw around it, and then cut out the door hole with the exacto knife.
I glued the door in place with some superglue.
I did the same with a small door on the other long wall, and shutter windows on either short wall. I also added a large pipe fitting one the side with the smaller door.
Next up, I slathered superglue generously over the top of the upside down box, and sat the roof in place.
To help disguise the the roof isn't quite as wide as the building itself, I added a strip of reinforcing struts from the terrain sprue around the lower edge, cutting them to fit neatly. I also added a square hatch on the roof to provide access.
Finally, I glued a comm panel on the wall beside the large door, and glued everything down onto an 8" x 8" piece of masonite. I also added a fan attachment to the end of the pipe fitting - this one is a plastic bit from an upcoming kit (Shhh, don't tell anyone - it's a secret!) but you can also create a fan blade using some cardboard or plasticard, as per the tutorial here.
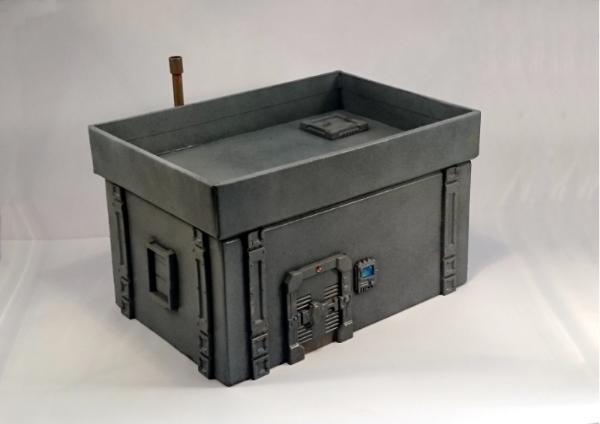
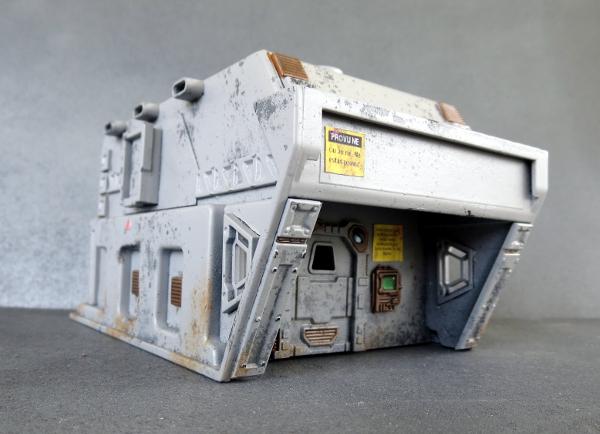
With that, it was time to paint!
I gave the whole thing a light coat of flat black spray, and when that was dry added a layer of Army Painter Ultramarine Blue. On the doors, I added a white strip with Army Painter Ash Grey and white, and then weathered the whole thing with a sponge and some Vallejo Heavy Charcoal. (See the tutorial on sponge weathering here!) The base and roof were painted with Vallejo Basalt Grey and drybrushed with Light Grey.
For the rusted metal bits, I started with a base layer of old Citadel Scorched Brown, lightly drybrushed with P3 Pig Iron and Ember Orange, and then applied liberal dabs of Army Painter Dry Rust.
For a bit of extra colour, I printed off the sign for the front and a few smaller signs to scatter around the place after drawing them up in Gimp. These were stuck on with PVA glue, and then a dirtied everything up with a drybrush of Vallejo Beasty Brown in the corners and wherever else seemed appropriate. A few finishing details like the comm screen, lights, and some graffiti on the walls, and Oily Joe's was ready for the table!
To build your own retail champion of the future, you can pick up the Maelstrom's Edge terrain sprue, along with the rest of the Maelstrom's Edge model range in the webstore here.
As always, feel free to pop along and share your creations, or ask any Maelstrom's Edge- or hobby-related questions on the Comm Guild Facebook page!
For other Maelstrom's Edge modeling articles, including tutorials and walkthroughs of a wide range of different building and miniature projects, check out the Hobby section of the Maelstrom's Edge website here.
Tags: buildings spotlight terrain terrainsprue tutorial walkthrough
Terrain Spotlight: Building Ideas Roundup
Posted on Thursday Jul 04, 2019 at 05:00pm in Tutorials
The Maelstrom's Edge terrain sprue comes with a whole slew of assorted bits and pieces that can be added to basic building shapes to pretty them up for the gaming table. Over the past couple of years, I've shared quite a few different ideas for base structures for those buildings, and I thought it might be useful to do a bit of a round-up to compile them all in one handy reference.
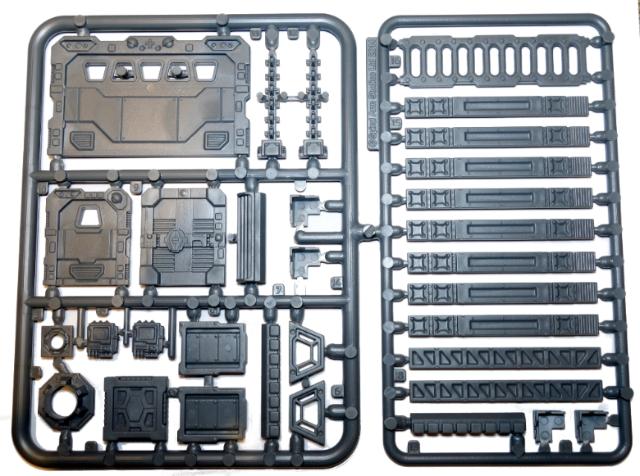
One of my favourite options, that I've gone back to many times over the years, is the cardboard gift box.
With minimal effort, these can be quickly turned into table-ready terrain with the addition of some detail bits and some paint.
For a few ideas, here's some previous build articles:
For a slightly more detailed, but still mostly pre-made option, go for a wander through your local hardware store and look for interesting plastic shapes. Plastic storage trays, storm drain sections and various assorted plumbing fittings can all make great bases for buildings with a little imagination and some added detail.
You can find some tutorials and walkthroughs for putting these together here:
On a sort-of related note, you can find all sorts of handy bits and pieces around the kitchen as well - Never throw anything out!
Some handy articles:
If you feel are happy with building from scratch, you can of course work up whatever building shapes you want using standard modeling materials. Foamcore (AKA foamboard), plasticard, sturdy cardboard and foamed PVC can all be useful for creating more freeform shapes to suit yourself.
Some scratch-built building ideas:
Finally, there are a whole host of premade and often inexpensive buildings out there on the market these days, made from MDF, cardboard or PVC which can be spruced up into something special with a few extra details here and there.
Check out these examples of kits given a little extra love:
Do you have any clever building ideas that we haven't covered here? We'd love to see them in the Comm Guild Facebook group!
To get started on your own terrain adventure, you can pick up the Maelstrom's Edge terrain sprue, along with the rest of the Maelstrom's Edge model range in the webstore here.
For other Maelstrom's Edge modeling articles, including tutorials and walkthroughs of a wide range of different building and miniature projects, check out the Hobby section of the Maelstrom's Edge website here.
Tags: buildings modeling roundup terrainsprue tutorials walkthrough
New resin release: Epirian SecDef Medic!
Posted on Monday Jul 01, 2019 at 05:00pm in The Epirian Foundation

SecDef Medics are combat veterans who have received additional training and equipment to administer first aid in the field. Known for being level-headed under fire, medics accompany SecDef tactical teams in the field, where they need to be equally competent at using their carbines or treating wounded squadmates.
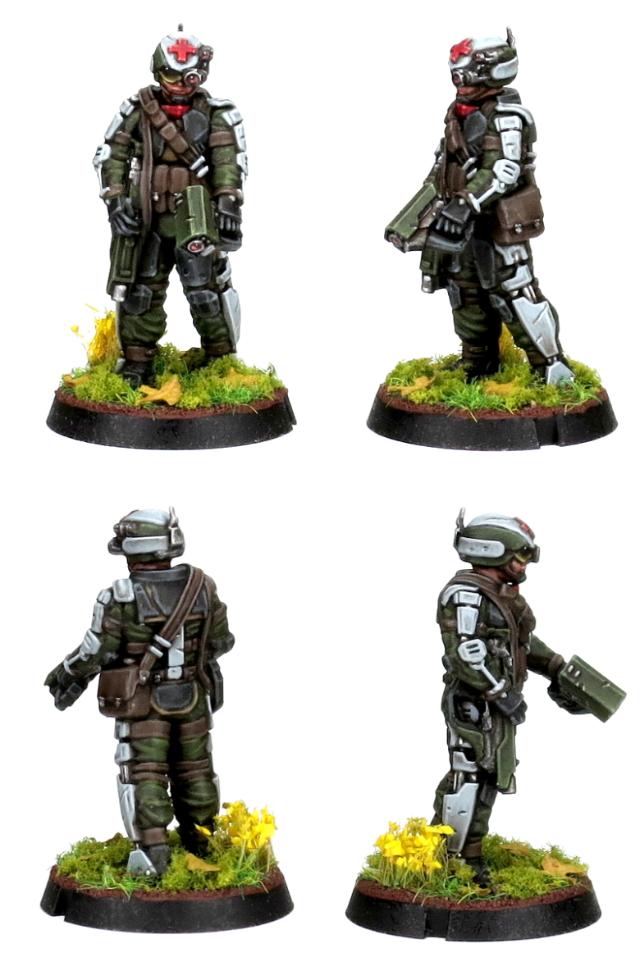
Equipped with an advanced diagnostics and treatment device and requiring weeks of additional training, medics represent a not-insubstantial investment for SecDef Commanders. While most still attribute significant cost savings to a medic's ability to save the lives of expensive SecDef troopers, the return on investment tends to be carefully monitored by SecDef administration. It's not uncommon for units to be refused additional medics where higher-than-normal attrition rates suggest that high recruitment costs would not be sufficiently reduced by the presence of medical personnel.
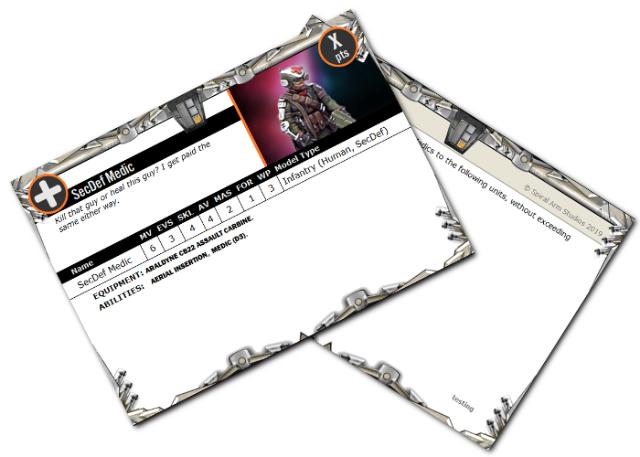
SecDef Medic Rules Card
Painting Spotlight: Remnant Militus Suit with Contrast Paints
Posted on Monday Jun 24, 2019 at 05:00pm in Tutorials
If you've been following my articles for any length of time, you may have noticed that I like using lots of ink washes in my painting. Washes are a great way of quickly adding shading to a model, and so are an invaluable tool if you want to get your models painted speedily and easily. So when the new Citadel Contrast paints came out this month, I couldn't resist taking them for a spin to see what they could do. I specifically wanted to try out a bright red and a yellow, as these are shades that weren't already covered well by my existing collection of washes, and so dug out a Militus Battlesuit from the to-be-painted pile that seemed like a good candidate for the experiment.
The model I chose to paint up was one of the conversions featured in the Militus conversion spotlight article from back in April. This is a mostly-stock model, with a little trimming on the leg joints to allow more of a crouched pose than is otherwise available to the kit.
There are a range of specific basecoat sprays available for the Contrast range, but working on the assumption that following instructions never got anyone anywhere interesting, I chose to use Army Painter Plate Metal spray as a base instead.
Red inks tend to give a richer colour over gold than silver, but that worked into the overall plan. I started out by giving the whole model a generous coat of Iyanden Yellow.
After leaving that to fully dry, I went back over the armour plating with Blood Angels Red, leaving the yellow on the suit's mechanical underlayer and a few other strategic spots.
And just like that, the model was 90% finished. I finished up by adding in some blue detailing on the weapon, chest, boostpack exhaust and helmet eye-lens, and some dark grey on the incursion rifle barrel. I also painted up the metal grating base structure with some Macragge Blue on the vertical panels, and then some Army Painter Strong Tone and Dry Rust over the whole thing. Finally, the base itself was painted with Vallejo Basalt Grey, drybrushed with Vallejo Light Grey and Beasy Brown, and given a few nicks and scratches with black and some more light grey.
As with any ink-painting technique, the end result is not perfectly neat, but what it lacks in accuracy it makes up for in speed. Although if you wanted to spend some more time on it, it should be possible to get neater shading by applying multiple, light coats - This won't be as subtle, or as suitable for paler colours as when done with Army Painter Quickshades, due to the Contrast paints being so much more heavily pigmented, but it should still work ok for darker shades. I'll be testing that theory in a later article.
If you're feeling inspired, you can pick up the Militus kit, along with the rest of the Maelstrom's Edge model range in the webstore here.
As always, feel free to pop along and share your creations, or ask any Maelstrom's Edge- or hobby-related questions on the Comm Guild Facebook page!
For other Maelstrom's Edge modeling articles, including tutorials and walkthroughs of a wide range of different building and miniature projects, check out the Hobby section of the Maelstrom's Edge website here.
Tags: militus painting remnant spotlight tutorial walkthrough
Painting Tutorial: Quick-Painting a SecDef Lieutenant
Posted on Monday Jun 17, 2019 at 05:00pm in Tutorials
I've been playing around with speed painting a lot lately (so much to paint, so little time!) and have been having a lot of fun experimenting with inks to achieve quick and easy shaded, table-top level results. This week I decided to see what I could do with some Army Painter Quickshades and the new SecDef Lieutenant model.
To start out, I basecoated the model with a flat, cream coloured spray.
I then gave everything except his head a coat of Military Shader.
Once that first layer of ink had dried, I went over the armour plates with a second coat of Military Shader, and boots, pouches and gloves with two generous coats of Mid Brown. On the pistol and the exo-skeleton on the arms and legs, I used Purple Tone, which over the green resulted in a nice, slightly bluish-tinged grey.
I decided that there wasn't quite enough contrast on the plates and exo-skeleton, so went over them with a coat of Dark Tone.
For his head, I painted on a generous coat of Flesh Wash.
To finish up, I painted in his eyes with fine, white horizontal lines, and small dots of black in the middle. For his beard and some characterful head-stubble, I added a thin coat of Dark Tone. I also went over the lens in the targeter and the helmet lenses with white, then a layer of Red Tone, and then a highlight dot of white. Finally, I added some fine gravel to the base, and painted it with Army Green, a coat of Strong Tone, and then a light drybrush of Ash Grey, with a couple of grass tufts added for colour.
To take the paint job that little bit further, he could use a light edge highlight on the armour plates and exoskeleton, but for a quick, rough and ready job he's all set for the tabletop.
To start your own SecDef muster, you can pick up the SecDef Lieutenant, along with the rest of the Maelstrom's Edge model range in the webstore here.
As always, feel free to pop along and share your creations, or ask any Maelstrom's Edge- or hobby-related questions on the Comm Guild Facebook page!
For other Maelstrom's Edge modeling articles, including tutorials and walkthroughs of a wide range of different building and miniature projects, check out the Hobby section of the Maelstrom's Edge website here.
Maelstrom's Edge V2 Rules - Help, I'm being suppressed!
Posted on Thursday Jun 13, 2019 at 03:27am in Gaming
In V2, suppression will have a much bigger impact on how your units perform on the table (more on that later!). As a side effect of that, being able to suppress enemy units becomes much more useful. We have allowed players to capitalise on this by intruducing a 'Suppression' (SUP) stat to the weapon profile.
You will now be able to choose between two different types of shooting attacks. You can fire normally, which applies suppression to the target unit if it is hit and/or damaged similarly to how it works in V1. Alternatively, you can choose to use 'Suppressive Fire', which doesn't cause direct damage like normal shooting, but allows you to roll against the weapon's SUP stat and increase the target's suppression for each successful roll. This represents your unit spraying the enemy with fire to force their heads down, rather than taking carefully aimed shots.
This gives you some tactical choices when you are electing to shoot with a unit, and also means that units armed with low powered weapons aren't necessarily completely useless against tougher opponents - you might not have much chance of wounding them with regular shooting, but you can potentially still use suppressive fire to soften them up for other units, and if their suppression goes high enough they start taking automatic damage!
If you want to know more, you can join in on the discussion of the new rules, and download a copy of the current draft rules for V2, in the development thread on the DakkaDakka forums here. You can also post any feedback in the Comm Guild Facebook group here.
If you haven't tried Maelstrom's Edge yet, and don't want to wait for V2, you can download the PDF version of the current Maelstrom's Edge rulebook from the website here!
Modeling Spotlight: Epirian SecDef Lieutenant
Posted on Monday Jun 10, 2019 at 05:00pm in Tutorials
The Epirian SecDef received a boost right in the Command slot last month with the release of a resin Lieutenant model. This fleshes the SecDef out into a fieldable Epirian sub-faction in their own right, as you can now build a detachment solely from SecDef units. This week, I'm taking a closer look at this fantastic model, and some of the modeling options available to it.
The SecDef Lieutenant comes in five pieces (ok, six, if you count the base!) - body, head, targeter, and two different hand options equipped with maglock pistol or carbine.
The head and targeter both have ball joints for full movement range, so you can position the targeter lined up with whichever way the Lieutenant is facing.
The head is also compatible with the SecDef plastics, so you can use a regular helmeted head for a slightly more safety-conscious leader. On the below model, I've used a regular SecDef Tactical head, and also clipped the helmet off his belt and glued on a plastic pouch from the Epirian Handler sprue to cover over the clipped detail.
You can also easily swap in alternate heads from elsewhere in the range. Here's a commander with a little more facial hair, for example, with a head lifted from the Broken Infantry sprue.
Carefully sawing through the waist with a razor saw allows you to swap in alternate legs to switch up the posing. Here, I've used a set of legs removed from a SecDef Boostpack Infantry model, and also given him a capped head from the Epirian Contractor sprue.
Of course, the compatible heads work both ways, so you can also swap in the Lieutenant's venerable pate for a regular SecDef Sergeant.
To get some of your own super-soldier action happening, you can pick up the SecDef Lieutenant, along with the rest of the Maelstrom's Edge model range in the webstore here.
As always, feel free to pop along and share your creations, or ask any Maelstrom's Edge- or hobby-related questions on the Comm Guild Facebook page!
For other Maelstrom's Edge modeling articles, including tutorials and walkthroughs of a wide range of different building and miniature projects, check out the Hobby section of the Maelstrom's Edge website here.
Tags: conversion epirian modeling secdef spotlight
Terrain Spotlight: Toothbrush Head Wind Turbine!
Posted on Monday Jun 03, 2019 at 05:00pm in Tutorials
While fusion reactors and other super-advanced energy generation is all well and good on worlds with bountiful resources, sometimes a more low tech solution is called for.
This week's article was spawned, as so many of them are, by my reluctance to throw stuff away. I found myself looking at an old electric toothbrush head and thinking, 'That would make an excellent base for a fan!' And so the wind farm of the future was begun.
I started out, as I said, with a perfectly ordinary electric toothbrush head.
The wider circle near the base of the stem turned out to be exactly the right size to fit into the large pipe fitting from the Maelstrom's Edge terrain sprue. So I started out by trimming a little length off the bottom of the stem with a razor saw, so that the raised circle would sit flush with the top of the fitting when it was seated in place.
The bristles needed to go, to make room for the fan blades, so I plucked them out using a pair of clippers.
For the fan blades, I cut three strips of thin plasticard, rounding off the ends.
I added a twist to the blades by holding one end with pliers and rotating the other end.
With the blades shaped appropriately, I glued them in place using an all-plastics glue (a two-part glue that uses a primer pen and a tube of superglue to securely bond all sorts of different plastics. Useful when you're using plastics that don't holding plain superglue well).
For the turbine's hub, I cut the end off a superglue tube cap with a razor saw.
Using the all-plastics glue again, I glued the cap piece into place in the middle of the brush head.
Finally, I glued the large pipe fitting into place on the bottom of the stem.
With a little paint on, the turbine is ready for the table, either as a standalone piece of scatter terrain, or to add to another terrain piece!
You can pick up the Maelstrom's Edge terrain sprue, along with the rest of the Maelstrom's Edge model range in the webstore here.
As always, feel free to pop along and share your creations, or ask any Maelstrom's Edge- or hobby-related questions on the Comm Guild Facebook page!
For other Maelstrom's Edge modeling articles, including tutorials and walkthroughs of a wide range of different building and miniature projects, check out the Hobby section of the Maelstrom's Edge website here.
Terrain Spotlight: MDF Sensor Dish
Posted on Monday May 27, 2019 at 05:00pm in Tutorials
I somehow managed to get through Salute this year without bankrupting myself on shiny, new models, but I did come home with a few fun-looking odds and ends. There were quite a few vendors selling laser-cut MDF kits, some of which I had seen before and some that were new, at least to me. One of the latter was Uncertain Scenery, who had an amazing industrial catwalk setup topped with a very cool sensor dish that I couldn't resist picking up.
This week, I decided the time had come to crack it open and see what I could do with it!
I have to start by saying that this was a fantastic kit to put together! It uses a mix of 3mm and 1.5mm MDF, and the design is really clever at making use of those two sheet thicknesses to create detail. Parts are cut with only a single attachment point to the surrounding sheet, so removal is easy and there's only that one point to trim up.
Because I can't resist the urge to tinker, I did make a few minor changes. As with a lot of MDF kits, the doors on the base of the structure were just a single panel with the door shapes etched into them. To give a little more detail, and to better fit in with the rest of my terrain collection, I decided to replace the existing doors with a door from the Maelstrom's Edge terrain sprue. It turned out the base structure was just a fraction shorter than the plastic door, so I added some spacers cut from 0.5mm plastic strip to the tops of the interior walls. This lifts the roof piece up just enough for the plastic door to slot in place. Rather than cutting into the walls to slot the door in, I cut a strip of leftover MDF from one of the parts sheets to run up either side of the rear of the door frame, and then just glued the door onto the outside face of the interior wall.
I also decided to replace the blocky, MDF ladder with a plastic ladder from the terrain sprue, cut to an appropriate length. The original ladder used a 3mm thick ladder piece, and guardrails up either side assembled from three pieces of 1.5mm sheet. As luck would have it, the ladder and the innermost guardrail sections together turned out to be exactly the same width as the plastic ladder, so leaving out these inner sections allowed my adjusted ladder to just slot into place as if it was meant to be there.
The base section originally had doors on two opposing walls, but I decided to just go with the one, and have a pipe running in where the other should have gone. I glued the door piece on backwards, with a new panel line etched in with a panel scriber so it wasn't just a featureless expanse, and added a pipe made from a couple of large pipe fittings from the terrain sprue, a piece of a 13mm drip irrigation elbow, and half of a press-stud for a valve.
Everything else was assembled as per the nicely comprehensive instructions, although I left the dish panels off for spraying to make life a little easier, gluing them on once everything was mostly painted.
To paint, I started by giving the whole kit a coat of matte sealer, to help prevent the basecoat from soaking into the MDF as much. The base structure and dish panels were sprayed with a beige primer, and then given a rough coat of flat white.
For the rest of the assembly, I sprayed a generous basecoat of AK Interactive Rust spray, and then a light spray of Army Painter Platemetal. The bare metal parts on the base structure were given a coat of some old Citadel Scorched Brown, and then a drybrush with P3 Pig Iron.
I added weathering to the white by sponging on Vallejo heavy charcoal, and then dirtied everything up wherever seemed appropriate with a drybrush of Vallejo Beasty Brown.
And that's it, ready (for now) for the table. I've left it unbased for now, as I have some plans in that direction which will likely wind up in a future article...
To spruce up your own MDF kits, you can pick up the Maelstrom's Edge terrain sprue, along with the rest of the Maelstrom's Edge model range in the webstore here.
As always, feel free to pop along and share your creations, or ask any Maelstrom's Edge- or hobby-related questions on the Comm Guild Facebook page!
For other Maelstrom's Edge modeling articles, including tutorials and walkthroughs of a wide range of different building and miniature projects, check out the Hobby section of the Maelstrom's Edge website here.
Tags: buildings conversion modeling spotlight terrain terrainsprue walkthrough
New resin release: Epirian SecDef Lieutenant
Posted on Friday May 24, 2019 at 05:00pm in The Epirian Foundation
Anyone underestimating a SecDef lieutenant is about to pay dearly for his mistake. Promoted from amongst the most capable veteran sergeants, SecDef lieutenants are level-headed combat experts on both a tactical and strategic level with extensive financial and material resources to hand. Often taking on the most difficult (and therefore highest paying) missions with their platoons, the aim of most lieutenants is to accrue enough backpay to purchase a field commander commission, and the heavy combat rig that goes with that position.
While technically tasked with safeguarding the same corporate goals as every other Epirian division, issues can arise when SecDef units are forced to cooperate with Bot Handler commanders in the field. Their philosophy, character and approach are almost diametrically opposed to that of the average Handler. The SecDef's innate distaste for bots results in them having little faith in the abilities of their robotic allies, having seen them fail once too many in their long careers where they believe proper SecDef infantry would have got the job done. Nevertheless, they are professional enough to let the deadly Hunter Warmechs profit from their shoulder-mounted target designator. Many a foe has perished under a hail of strike missiles shortly after a SecDef lieutenant is inserted into enemy lines, quickly identifying and painting the largest threat.
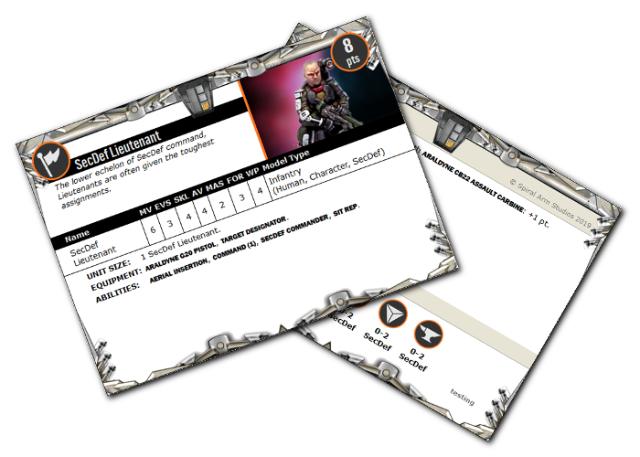
SecDef Lieutenant Rules Card
Terrain Spotlight: Mirrored Glass Building
Posted on Monday May 20, 2019 at 05:00pm in Tutorials
Metal and concrete buildings are all well and good, but I thought it might be fun to build something a little shinier for a change. Nothing says 'futuristic city' quite like mirrored-glass-wall buildings, after all!
I've had a play in the past with some clear plastic and mirror-effect sprays, without managing to achieve the effect I was after. Then I came across some lovely, shiny silver card in a discount store, and an idea was hatched.
The basic idea was to make a structure out of 5mm foamcore, using the support struts from the Maelstrom's Edge terrain sprue to form a framework to hold the cardboard. I started by plotting out a rough design using a bunch of struts trimmed to appropriate lengths, so I could get the foamcore dimensions correct.
After marking out the wall dimensions on the formcore, I cut them out using an exacto knife and a steel ruler.
I made a base for the structure from two stacked squares of 2mm foamed PVC. The upper, smaller square created a framework for the foamcore to sit up against, to ensure the building was square and give it some extra strength.
With the outer wall constructed, I added some reinforcement on the inside corners using some offcuts of PVC.
To create the framework for the card to slide into, I glued 5mm plasticard strips onto the walls, tracing the pattern of the support struts.
The strips are narrower than the struts, so with the strut centered on the strip a 1mm overhang was created on each side.
To help avoid the building just being a boring, square box, I left a cutaway to allow for an angled doorway. To fill this in, I cut a square of foamcore to fit across the opening, and cut a rectangle out for a door from the terrain sprue.
With the wall structure complete, I started building up the roof layers with some more PVC, cut to overhang the walls just slightly to close off the tops of the card slots. These weren't glued in place yet - that had to wait until the card was in place.
I joined the three roof levels together using angled pieces of PVC. This served the dual purpose of giving the roof an interesting shape, and also making the whole roof structure into a single piece that could be lifted on and off, which would be easier for painting than separate pieces.
At this point, it was time to paint! I decided to keep it fairly simple, as the main focus on this building was going to be the mirrored walls. I gave the whole exterior a base coat of AK Interactive Rust spray, and then a layer of a satin black spraypaint, leaving the rust in the crevasses for some natural weathering.
When the spray had dried, I cut strips of the silver card to fit into each of the wall slots.
Once all the strips were in place, I glued the roof on top.
For the final detailing, I painted the base with Vallejo Neutral Grey, drybrushed with Vallejo Light Grey. I also gave the black a light drybrush with the light grey, and then added some dirt weathering with Vallejo Beasty Brown. I also added some signage, with Epirian logos made from strips of the silver card and some gold card from the same pack for the 'yellow' lower squares. All ready for the table!
You can pick up the Maelstrom's Edge terrain sprue, along with the rest of the Maelstrom's Edge model range in the webstore here.
As always, feel free to pop along and share your creations, or ask any Maelstrom's Edge- or hobby-related questions on the Comm Guild Facebook page!
For other Maelstrom's Edge modeling articles, including tutorials and walkthroughs of a wide range of different building and miniature projects, check out the Hobby section of the Maelstrom's Edge website here.
Maelstrom's Edge V2 Rules - Getting up close and personal!
Posted on Thursday May 16, 2019 at 01:11am in Gaming
In the current Maelstrom's Edge rules, unless you have a melee weapon with a specified SHO value, the number of dice you roll for Close Quarters attacks is determined by a neat little formula that uses the model's EVS, MAS and FOR stats. While this provides some nice granularity, and allows for a large model's CQ ability to be reduced as it takes damage, it's also a little awkward to calculate on the fly. As a result, it's the one thing in the V1 rules that, going by player feedback, is almost universally disliked by players. We've taken that feedback on board for V2, and will be changing model statlines to include a shiny, new Close Quarters Attacks (CQA) characteristic!
This entirely replaces the current formula - No more algebra in the middle of the game, you just look at the CQA stat, and roll that many dice! This does mean that large models no longer lose shots as they are wounded, but this will be accounted for elsewhere, with their ability to use multiple weapons being affected instead.
You can join in on the discussion of the new rules, and download a copy of the current draft rules for V2, in the development thread on the DakkaDakka forums here. You can also post any feedback in the Comm Guild Facebook group here.
If you haven't tried Maelstrom's Edge yet, and don't want to wait for V2, you can download the PDF version of the current Maelstrom's Edge rulebook from the website here!
Painting Tutorial: Painting a Pa'ku using (almost) only Army Painter Quickshades!
Posted on Monday May 13, 2019 at 05:00pm in Tutorials
A beautifully painted army that someone has slaved over for more hours than is healthy can be a truly wonderful thing to behold. Sometimes, though, we just want to get some models on the table as quickly as possible. Way back when I first started writing these articles, I shared a tutorial on painting with washes, as it's a really simple technique for speed painting. (Don't look at it, the pictures are horrible and I really need to redo them...)
I thought I would revisit it this week, with a step-by-step walkthrough painting a Broken Pa'Ku (almost) entirely with Army Painter Quickshade washes.
A quick note before starting: Army Painter have two different product ranges under their 'Quickshade' banner. The first are dips, which come in a tin and are used precisely as the name implies - you essentially paint the model in basic colours, drop it in the dip, shake or wipe off the excess dip, and call the job a good 'un. These are good for quickly adding shading to a bunch of models, but can result in a rather muted overall effect due to everything being shaded the same colour. The second product is what we're using here. These are washes, sold in dropper bottles. Washes are thinner than regular acrylic paint, and are usually painted on over lighter colours, where they settle into the creases and darken everything up. Instead of doing that, I'm painting directly over a flat white spray undercoat.
My previous Pa'ku was painted green, so I decided to change it up a little and go blue this time. The first step, then, is to paint a generous coat of Blue Tone all over the Pa'ku's skin. Because the wash is quite watery, this isn't a precise operation. You're unlikely to win awards with models painted using this technique, as regardless of how careful you are, a little bit of wash running into places it doesn't belong as more or less unavoidable. If it gets too messy, you can wait until the first layer dries and then touch up the rest of the model with some white paint before proceeding.
Next up, I painted the straps and bindings with a coat of Mid Brown.
I wanted the large bumps on his back to contrast with the blue skin, so used Flesh Wash. Over the white, this created a light, weathered-bone sort of colour. This needed to go on quite heavily, and required a couple of touchups after it dried, as the flesh tone is very light. In hindsight, Soft Tone might have worked better.
For some brighter colour, I painted the armour pads with Purple Tone.
That left the gun and other metal parts, and the fur around his back pad. I painted these with Dark Tone. For the metal, I was aiming for a dark grey/black tone rather than a true metallic. If you want more of a metal tone, then painting the metal parts with Gun Metal before washing would have done the trick. Instead, I opted for a couple of coats of Dark Tone, with the below picture showing the first coat.
To finish up, I applied the second coat of Dark Tone to the metal parts, and ran a coat of Strong Tone over the fur to help differentiate it slightly from the metal. I also decided that the brown was paler than I wanted, so gave it a second coat of Mid Brown. The Quickshades lend themselves well to this sort of layering - they're heavily pigmented, but over the white the effect is light enough that you can get subtle colour effects with light coats, and a more vibrant colour with a heavy coat, or layer extra coats (or different coloured washes) over the top for a darker finish.
I also went over the targeter lens with some Red Tone, and added a little Dark Tone into the other three eyes, following up with a small dot of regular white paint (hence the 'almost' disclaimer!) in the center of each eye and the targeter when the washes dried.
The base was painted with Army Green, washed with Strong Tone, and then drybrushed with Ash Grey.
The end result is a fairly basic colour scheme - If I was so inclined, I could go back over and tidy up a few small areas of splash-over from the wash, and add a few extra details here and there like the cabling on the gun.
If you're looking for quick and easy, though, it's a really handy technique to play around with, and can easily be adapted to other colour schemes using different wash shades.
If you're keen to paint up your own big, blue, artillery frog, you can pick up the resin Pa'ku kit, along with the rest of the Maelstrom's Edge model range in the webstore here.
As always, feel free to pop along and share your creations, or ask any Maelstrom's Edge- or hobby-related questions on the Comm Guild Facebook page!
For other Maelstrom's Edge modeling articles, including tutorials and walkthroughs of a wide range of different building and miniature projects, check out the Hobby section of the Maelstrom's Edge website here.
Tags: broken pa'ku painting tutorial walkthrough
Another look at the converted Militus from this week's painting guide!
Posted on Friday May 10, 2019 at 05:49am in The Remnant
You can find the painting article here.
The Militus kit is available now from the Maelstrom's Edge webstore!
Tags: conversion militus modeling painting remnant
