Modeling Spotlight: The 2019 Annual Christmas Special!
Posted on Thursday Dec 19, 2019 at 05:00pm in Tutorials
With Christmas fast approaching, I took a break this week from my ongoing underhive building project to put together my now traditional, annual Christmas ornament build. In previous years, I've built a bauble and a hanging star, and so this time around I thought I'd try something a little different, and build a robot reindeer!
This construct used most of an Epirian Scarecrow, including both head pieces, and the lower legs and feet from a second.
I trimmed the toes off the feet to give them a stubbier look. I wasn't aiming for a direct representation of a reindeer here, just something that gave the general impression.
The torso, oriented horizontally, needed a suitably bulky neck to mount the head on, so I trimmed the tank mounting ridge off the Sacrecrow's back and glued both heads on as below.
I then assembled the legs. For the forelegs, I used the Scarecrow's upper arms, and attached the knee disks from the second set of shin pieces onto the insides of the elbow disks. I also drilled a 1mm hole in the back of the torso and glued in a piece of wire for hanging the ornament.
I then glued the command array onto the new neck for a head, and added a tail cut from the muzzle of a chemtech sprayer.
To paint, I gave it a base spray with Army Painter Plate Metal. I followed this up with a coat of Citadel Iyanden Yellow Contrast paint, and then a layer of Army Painter Light Tone. When this was dry, I finished up with a light drybrush of Vallejo Silver and then painted in the eyes and nose with black and red. I also gave the wire a couple of coats of black, to keep it looking neat.
With that, it was ready to join the previous years' decorations on the tree. It's a little goofy looking, but was a lot of fun to put together!
Merry Christmas from all of the team here at Spiral Arm studios, and have a safe and happy time with whichever celebrations you happen to find yourself a part of at this time of year!
To build your own Scarecrowdeer, you can pick up the Epirian Scarecrow kit, along with the rest of the Maelstrom's Edge range, from the webstore here.
As always, feel free to share your models and terrain, or ask any Maelstrom's Edge- or hobby-related questions on the Comm Guild Facebook page!
For other Maelstrom's Edge modeling articles, including tutorials and walkthroughs of a wide range of different building and miniature projects, check out the Hobby section of the Maelstrom's Edge website here.
Tags: christmas conversion modeling
Terrain Spotlight: Junction Platform
Posted on Friday Dec 13, 2019 at 05:00pm in Tutorials
The underhive construction drive continues! So far, I've put together a watch tower, a trash processing unit and a generator tower, and this week I'm adding a junction platform to the collection.
This construction is based (very) loosely on the bare, square platform from the old Necromunda terrain collection, with scatter terrain can be placed on top, or it can be used as a junction point for multiple walkways. I decided to build two of them in the end, so that I can use them individually, or stack them up for multi-level shenanigans.
The bulk of the wall structure is taken care of using the wide doors from the Maelstrom's Edge terrain sprue #1. I used four of them, taking to them with a sharp exacto knife to remove the doors from the frames.
I joined the four resultant archways together using pieces of 3mm foamed PVC with 45 degree bevels on the vertical edges.
Some more strips of PVC filled in the gaps above the door frames, bringing the walls all up to the same height (2.75", which with the roof will come up to around 3". All of the buildings so far have been working around 3" to a level, although I'm not keeping it exactly the same from building to building, in order to accentuate the hodge-podge nature of the terrain once it's all on the table together with catwalks added!)
For the roof/platform piece, I cut two octagons of foamed PVC, leaving a space in the middle for some floor gratings. I also cut a ladder hatchway to match up to one of the lower angled walls.
For the middle detail on the platform, I took a bunch of floor grating pieces from the Maelstrom's Edge terrain sprue #2 and glued them into a square shape.
With the two platform layers glued together, I then inserted the gratings, and filled in the central square with another piece of PVC. I also lined the edges of the platform with reinforcing struts from both terrain sprues, trimmed as necessary to fit neatly around the perimeter.
With the platform glued in place on top of the walls, the last things to do were to cut a base from hardboard, and add a ladder from terrain sprue #1, using a piece trimmed from the lintel piece from that same sprue as a spacer.
For the second platform, I followed the exact same process, but left the doors intact on this one for some solid line of sight blocking.
One or two more structures to go, I think, and then it will be time to get some paint on - Stay tuned!
To give it a go yourself, you can pick up the Maelstrom's Edge terrain sprues, along with the rest of the Maelstrom's Edge range, from the webstore here.
As always, feel free to share your models and terrain, or ask any Maelstrom's Edge- or hobby-related questions on the Comm Guild Facebook page!
For other Maelstrom's Edge modeling articles, including tutorials and walkthroughs of a wide range of different building and miniature projects, check out the Hobby section of the Maelstrom's Edge website here.
Tags: buildings scratchbuild spotlight terrain terrainsprue walkthrough
New Faction Objective Cards for the Artarian Remnant!
Posted on Tuesday Dec 10, 2019 at 05:00pm in Gaming
In keeping with the individual nature of Remnant fire teams, we've given you three different faction objectives to choose from!
When Remnant Champions go to war, their exploits are followed avidly back in their fleets by crowds of Artarians, all rooting for their favourite fire teams and champions. Crowd favour can be fickle, depending on successes or failure on the field, but the attention of the masses can provide a boost to a battling champion.
If you choose Favour of the Crowd as your faction objective, you can represent this attention through an extra command point bestowed upon the first suit you activate each turn. As champions can use command points to boost their suit systems through the Overcharge rule, this can come in very handy when a suit needs that little bit extra.
The attention of the crowds doesn't just convey approval (or lack of) to the fighting champions, but can also focus the fire team's efforts against particular enemy units at whim. The Great Hunt faction objective represents this by allowing you to nominate an enemy unit as your current Hunt target each turn. Successfully destroying this target will grant you VPs and additional command points. Even if you don't destroy your Hunt targets, though, nominating a unit as such can be a handy way of forcing your opponent to keep that unit away from the main action to avoid giving away VPs, allowing you to steer the battle where you want it to go!
Finally, the Epic Hero faction objective lets you take to the field with an accomplished hero of the Artarian Remnant. This hero's exploits have earned him fame and fortune amongst his own people, and the enmity of the enemies of the Remnant.
The Epic Hero gains you additional VPs for every enemy unit they destroy, but at the risk of also giving away a VP to your opponent if your hero is brought down!
To try these out for yourself, you can download the cards now from the Card Downloads section of the Maelstrom's Edge website. We would love to hear how they work out for you in your games, so be sure to pop over to the Comm Guild Facebook Group and share your war stories!
You can pick up the plastic Militus battlesuit model, used to create various suit variants for your Remnant fire teams, from the Maelstrom's Edge webstore here!
Terrain Spotlight: Generator Tower
Posted on Thursday Dec 05, 2019 at 05:00pm in Tutorials
My ongoing project to create updated versions of the classic Necromunda terrain continued this week, with a third structure - a generator tower, based on the hexagonal(ish) multi-level platform.
I started out once again with a rough sketch, to get a feel for what I was building. I wanted something similar to the original shape, but with the bulkhead on the narrow end rotated 90 degrees, and with something in the central hole rather than just having a big empty space.
Instead of building individual bulkheads, like the original Necromunda plastics, I built each support pillar as a single piece. I'm not intending these buildings to be reconfigurable, and doing it this way gives the structure some extra strength. I used foamed PVC for the core of the pillar, cutting out the basic shape of the bulkheads, and then added support struts from the Maelstrom's Edge terrain sprues up each edge on both sides. I also added some buttresses from off-cuts of foamed PVC to provide some cover zones for gangers to hide in.
Access between levels is via a ladder running up the short end of the platform, rather than building a ladder into each pillar. This makes the structure a little harder to get up and down on than the original, but can be made up for with catwalk placement when the table is set up in full.
For the floors, I used double sheets of 3mm foamed PVC. One layer probably would have been enough, but I went for the extra strength and visual bulk from the thicker platforms.
I took two generator coils from terrain sprue #2 and glued them together. The ends have a slight angle to them, so I sanded them down flat, and also sanded down an iris portal to fit over one end of the generator. The other iris portal fits back to back with the first.
To give the generator something to sit on, I took a couple of trapezoid windows from terrain sprue #1 and trimmed their long edges to fit inside the central hole in the middle platform. In between these, I glued an octagon of PVC, with a large pipe fitting glued to the underside.
Time to fit everything together! I took some offcut pieces from the support struts and glued them to the bulkheads to create supports for the floors.
With the floors glued in place on their supports, the last things to do were to add some pipes running up from another large pipe fitting to the underside of the generator, and a control panel on the top level made from another trapezoid window, a computer from terrain sprue #2, and some cutoff support strut pieces.
As with the previous builds, I'll hold off on painting this one until I have a few more ready to go and do them all at once.
Stay tuned for more!
To build your own hive structures, you can pick up the Maelstrom's Edge terrain sprues along with the rest of the Maelstrom's Edge range, from the webstore here.
As always, feel free to share your models and terrain, or ask any Maelstrom's Edge- or hobby-related questions on the Comm Guild Facebook page!
For other Maelstrom's Edge modeling articles, including tutorials and walkthroughs of a wide range of different building and miniature projects, check out the Hobby section of the Maelstrom's Edge website here.
Tags: buildings scratchbuild spotlight terrain terrainsprue walkthrough
Terrain Spotlight: Watch Tower
Posted on Thursday Nov 28, 2019 at 05:00pm in General
Last week, I shared a trash processing unit, the first of a series of terrain structures inspired by the classic Necromunda plastic/cardboard hybrid terrain. (If you missed it, you can find it here)
This week, I'm adding a watch tower to the set!
As with the previous building, I started out with a quick sketch. I don't always use a sketch, and when I do I don't always follow it precisely, but it can be a handy tool for visualising the process.
For this construction, I once again pulled out the 3mm foamed PVC, and a bunch of both of the Maelstrom's Edge terrain sprues. I started out by building the central pillar, which needed a ladder running up the center to the twin hatches on the platform up top. To give the pillar some depth, I decided to use two layers of PVC, with a ladder running up the outside of each face rather than just using one going up the middle. I wanted to be able to see through the ladder section, though, so cut out a strip up the middle of each pillar side just wider than the ladder rungs. The ladders themselves were taken from terrain sprue #1. I also engraved some panel lines into the PVC with a scriber.
I glued the ladders onto the PVC with superglue, two to a side, leaving just a small part of the ladder projecting above the top so it would reach to the top of the platform. I then ran a strip of support struts from terrain sprue #1 up each side of the ladders for some extra detail.
Because the gap between the ladders would be practically inaccessible once assembled, I sprayed the inside with some rust brown base before gluing the two halves of the pillar together.
For the platform, I made up the main part of the floor using grating pieces from terrain sprue #2, glued edge to edge and leaving two pieces out in the middle for the ladder access.
I then cut a surround from foamed PVC, with a second layer to give it some thickness, and to provide a support structure for the grating.
I designed the side pillars to give the structure some bulk while also providing some nice cover at ground level. As with the central pillar, these were made from two layers of PVC, cut to shape and with some panel lines scribed in on the outside pieces.
To give the side pillars some detail, I trimmed up some more support struts from terrain sprue one and glued them running up the edges of the pillars on both sides.
To finish up, I cut some waist-height (to scale, obviously!) walls for the platform, using some off-cuts of foamed PVC and some trimmed down corner brackets from terrain sprue #1. I then glued the structure together, and cut a base of hardboard for it to sit on.
And that's two structures completed! As with the previous one, painting will come later, once I have a few of these all ready to go.
Stay tuned!
To give it a go yourself, you can pick up the Maelstrom's Edge terrain sprues, along with the rest of the Maelstrom's Edge range, from the webstore here.
As always, feel free to share your models and terrain, or ask any Maelstrom's Edge- or hobby-related questions on the Comm Guild Facebook page!
For other Maelstrom's Edge modeling articles, including tutorials and walkthroughs of a wide range of different building and miniature projects, check out the Hobby section of the Maelstrom's Edge website here.
Tags: buildings scratchbuild spotlight terrain terrainsprue walkthrough
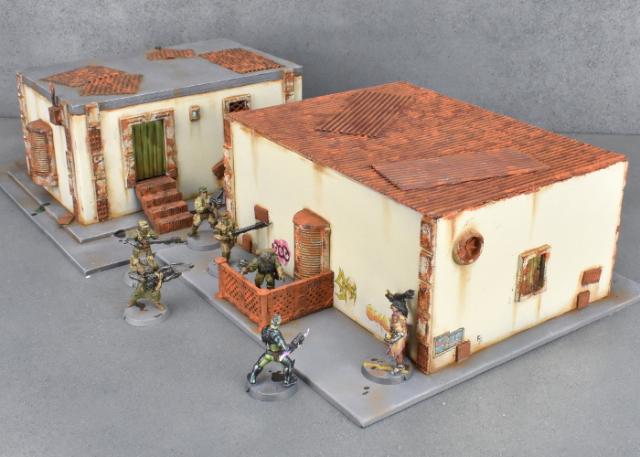
Terrain Spotlight: Trash Processing Unit
Posted on Thursday Nov 21, 2019 at 05:00pm in Tutorials
Way back in the day, the original version of Games Workshop's Necromunda game came with a small table's worth of industrial-styled terrain that was constructed from printed cardboard and held together with plastic bulkheads. Many battles were fought over my set of this terrain, and so when a friend and I started talking about revisiting the original Necromunda rules, I thought it would be fun to put together an updated set of terrain inspired by that original battlefield. This week I put together the first of the large platform structures.
I started this build by sketching up a rough design for the structure. The aim wasn't to duplicate the original version, but to create something similar to it, with an eye towards making the structures look a little more like actual structures with some sort of purpose rather than just random platforms.
3mm foamed PVC has become my go-to for buildings, as it's easy to work with and lightweight, but quite durable. So to kick things off, I grabbed out the PVC and some support struts from the first Maelstrom's Edge terrain sprue, and put together eight bulkheads. These were made from a single piece of PVC cut to shape, with two support struts running vertically up the sides of each face.
Four of the bulkheads were left as standalone pieces, while the other four were joined into corner pieces for the front of the structure.
I used some more PVC to put together a box shape for the tower. The cutaway at the bottom of the front wall would be used to add a trash receptacle - my thought was for the tower to be some sort of trash processing unit.
The roof of the tower has four exhaust fans, taken from the second terrain sprue. I mounted these onto floor panel pieces, just shaving off a little around the bottom edge of the fan to make them fit neatly inside the bracing pieces on the panels.
The door for the trash unit was made from pieces of foamed PVC, cut to fit neatly into the opening to look like it's jammed open.
To conceal the joins on the tower walls, I ran a strip of support struts from terrain sprue #2 up each joint on the front and back, and then glued on the roof and a control panel for the trash unit.
For the floor of the first level, I used two layers of PVC, with some holes cut in to insert some floor mesh pieces from terrain sprue #2.
I glued the bulkheads onto the underside of the floor piece, and glued the plastic floor panel pieces into the holes. With a very minor bit of trimming, ladders from terrain sprue #1 fit neatly into the central hole in the grating sections, hanging down to about an inch above ground level - low enough for someone (or at least, someone with upper-body strength!) to grab the lower rungs and haul themselves up.
On the back of the tower, I added a generator piece from terrain sprue #2, bulked out with a little PVC to make it protrude enough to provide a neat little covered firing point.
For the upper level, I put together a catwalk using floor mesh pieces from terrain sprue #2.
The support braces for the catwalk were cut from the sides of a ladder. The ladder up to the catwalk has some of the rungs leftover from cutting the supports glued to the back, to space it out from the wall slightly.
High catwalks aren't very pleasant places to be in battle without some cover, so I added a balustrade using posts from terrain sprue #2 and some offcuts of PVC. A trimmed down ladder added some access to the roof level.
The other side wall needed some detail, so I grabbed the junction box from terrain sprue #2, and some aluminium rod and installed some exposed wiring. The clamp pieces were made from short sections of plastic rod and some sections cut from the support struts from terrain sprue #1. The lower end of the thinner cable will drape over the first level floor, having been severed from wherever it was originally attached to.
Finishing up by adding a light to the front wall and an access hatch to the bottom left wall of the tower, I also added a 10' square of PVC as a slab base for the structure. At the moment, the base, first level and tower are all separate pieces, and the ladders are all similarly unglued. I will glue the base onto the bottom of the bulkheads after painting the underside of the first level, and glue the tower and ladders in place once they are painted. I'll probably also add a larger piece of hardboard under the whole thing for some extra rigidity and also to give it some more weight on the table - better to prevent it sliding around.
Painting will come later - I'll get a few more structures made up over the coming weeks, and then go through painting everything together!
Stay tuned!
To give it a go yourself, you can pick up the Maelstrom's Edge terrain sprues, along with the rest of the Maelstrom's Edge range, from the webstore here.
As always, feel free to share your models and terrain, or ask any Maelstrom's Edge- or hobby-related questions on the Comm Guild Facebook page!
For other Maelstrom's Edge modeling articles, including tutorials and walkthroughs of a wide range of different building and miniature projects, check out the Hobby section of the Maelstrom's Edge website here.
Tags: buildings scratchbuild spotlight terrain terrainsprue walkthrough
Conversion Spotlight: Epirian Pathfinders
Posted on Thursday Nov 14, 2019 at 05:00pm in Tutorials
I received a grab bag of all sorts of awesome resin parts from Victoria Miniatures this week, so decided it was time to take a break from terrain building and have a bit of a tinker with some infantry. I had thought a while back that Epirian Contractors were just crying out for shotguns, and so with some handy resin additions, I created a new unit of scouty Contractors, which I'm calling 'Pathfinders'.
There's very little converting required here - I just assembled the Contractors without arms. Although I couldn't resist a little bit of cutting things up, so I gave the squad leader a cap on his belt, by cutting off the top of a spare Contractor head.
Victoria's resin cloaks are designed to slot over the shoulders, and fit snugly around the Contractors' collars. These were glued in place with superglue. The shotgun arms needed just a little trimming at the shoulders to fit neatly, as the Victoria Miniatures torsos are slightly narrower than those of the Contractors.
Painting was a quick and easy 'paint in base colours and then give it a wash' job. It's not the prettiest, but it gets a unit on the table quickly. The green areas were painted with Army Painter Army Green, and Vallejo Yellow Green, and washed with Army Painter Military Shader. The metal parts were base coated with Vallejo Heavy Charcoal, given a light drybrush of P3 Pig Iron and washed with Dark Tone. For the shirt, I used Army Painter Barbarian Flesh, Vallejo Heavy Brown for the leather parts, and Coat D'Arms Bone for the shirt. These were washed with Army Painter Strong Tone - This is a fairly heavy contrast with the bone, so creates a bit of a dirty, muddy look. If you are looking for a softer shading effect, you could use Mid Brown or Soft Tone instead of the Strong Tone.
To finish things up, I highlighted the green areas with Coat D'Arms Putrid Green, gave the skin, shirt and leather a highlight of bone, and painted the eyeshades with Heavy Brown, P3 Cygnus Yellow and some white highlights. The bases were basecoated with AK Red Brown Leather and washed with Army Painter Mid Brown.
To build your own Pathfinder unit, you can pick up the plastic Contractor kit, along with the rest of the Maelstrom's Edge range, from the Maelstrom's Edge webstore.
As always, feel free to share your models and terrain, or ask any Maelstrom's Edge- or hobby-related questions on the Comm Guild Facebook page!
For other Maelstrom's Edge modeling articles, including tutorials and walkthroughs of a wide range of different building and miniature projects, check out the Hobby section of the Maelstrom's Edge website here.
Tags: contractor conversion epirian modeling spotlight walkthrough
Terrain Spotlight: Specimen Tank
Posted on Thursday Nov 07, 2019 at 05:00pm in Tutorials
The new Maelstrom's Edge terrain sprue introduced a whole lot of fun new bits and pieces to play with, and I've been having a blast coming up with different ways to make best use of them. This week, I'm using some iris portals in a slightly un-portal way, to create a laboratory-style specimen tank!
For the top and bottom of the tank, I used a pair of the irises from the terrain sprue.
The two irises are joined together using a piece of 1mm thick, transparent plasticard. I cut this into a rectangle 74.5mm long, to match the circumference of the iris' inner rim. I then curled the plasticard around into a cylinder, and used another thin strip of plasticard as a tab to glue the edges together.
The instrument panel mount serves both to hold the controls for the tank, and to disguise the join in the cylinder. I used a piece cut from the side of the terrain sprue itself for the upright strut, a computer panel and the base of the sentry turret to create a sliding mount for the panel.
Finally, it's not much of a specimen tank without a specimen to put in it! I took a mature angel torso, and filled in the arm, leg and back sockets with 'green stuff' putty, to create a 'resting' angel form with no void gel extrusions.
On to painting! This was mostly done with Army Painter paints. I gave the tank parts (aside from the cylinder) a basecoat with a spray of Plate Metal, and the angel with Wolf Grey.
I followed up with a wash of Dark Tone on the metal parts. I wanted a grimy, green ooze look to the cylinder without messing about with water effects, so I painted the inside of the cylinder with some brush-on gloss varnish with a couple of drops of Green Tone mixed in.
The angel received a couple of heavy coats of Dark Tone over the grey.
To suspend the angel in the tank, I attached it to the upper iris with a piece of copper wire glued into holes drilled into the top of the angel's head and the underside of the iris.
With a final drybrush of P3 Pig Iron over the metal parts, and some detailing on the computer panel, I then assembled the tank by gluing the cylinder into the top of the base iris, sliding the angel inside and gluing the upper iris on top, and then attaching the panel strip to the side.
To give it a go yourself, you can grab the new terrain sprue along with the rest of the Maelstrom's Edge range, from the Maelstrom's Edge webstore.
As always, feel free to share your models and terrain, or ask any Maelstrom's Edge- or hobby-related questions on the Comm Guild Facebook page!
For other Maelstrom's Edge modeling articles, including tutorials and walkthroughs of a wide range of different building and miniature projects, check out the Hobby section of the Maelstrom's Edge website here.
Terrain Spotlight: Shipping Containers from Terrain Sprue 2
Posted on Thursday Oct 31, 2019 at 05:00pm in Tutorials
As one of my very first articles for Maelstrom's Edge, I put together some shipping containers/cages made from parts from the first terrain sprue and a little foamcore. With the recent release of the second terrain sprue, it seemed fitting to revisit the idea with the shiny, new parts available!
As with the original containers, I used doors to form the front and back of the container, with the rectangular doorframes from the new terrain sprue being perfect for the job. For the back of the container, I shaved off the control panelt and the gubbins up on top, as I planned to have the back as a wall. You could obviously just leave it alone and have a door at each end.
I linked the two doorframes together with the support struts from the terrain sprue, and glued in a floor cut from 3mm foamed PVC.
Inside the struts, I glued rectangles of 1mm foamed PVC, running up to about 1mm short of the top edge of the upper struts. This gives the container some strength, and provides something solid for the walls to glue onto and a ledge for the roof panel to sit on.
I glued another rectangle of PVC into the rear doorframe.
Onto the outer faces of the walls, I glued rectangles of corrugated cardboard, cut to fit flush against the edges of the doorframe and the struts with the corrugations running vertically. (There's no special significance to it being blue - it's just from a multicoloured pack of card I picked up a while back!)
Into the front doorframe, I added a piece of corrugated plasticard, cut with the corrugations running horizontally to simulate a roller door. Most modern-day shipping containers have hinged double doors, but since this doorframe is a little narrower I thought a roller seemed more appropriate. I used plasticard rather than more cardboard as the corrugations are slightly smaller, which helps to make it not look like just another wall.
With the door in place, I stuck another piece of corrugated cardboard into the top of the container for the roof.
The finished container, ready for paint:
And with some paint on:
To mix up the design, you could use plasticard with different textures in place of the corrugated cardboard.
You can also use other real-world container designs for inspiration, adding side doors, changing the length, or as below, using a trimmed down generator, a fan and a couple of other bits from the terrain sprue in place of the back wall to creat a refrigerated container.
And, of course, the discerning stellargee knows that nothing beats an old shipping container for knocking together your own little shanty cabin or business shack!
To give it a go yourself, you can grab the new terrain sprue, along with the rest of the Maelstrom's Edge range, from the Maelstrom's Edge webstore.
As always, feel free to share your models and terrain, or ask any Maelstrom's Edge- or hobby-related questions on the Comm Guild Facebook page!
For other Maelstrom's Edge modeling articles, including tutorials and walkthroughs of a wide range of different building and miniature projects, check out the Hobby section of the Maelstrom's Edge website here.
Tags: buildings conversion modeling spotlight terrain terrainsprue walkthrough
Trial Transport Rules - Downloadable PDF
Posted on Monday Oct 28, 2019 at 05:00pm in Gaming
From time to time, we'll be offering a chance to test out new ideas in development. These trial rules will potentially change during development, but will give you an idea of where they're going, and let you try out something new.
You can now download some trial rules for fielding vehicles that can transport infantry units around the battlefield. A version of these rules will be included in the next edition of the Maelstrom's Edge rules, but this version, tailored to fit into the V1 ruleset, lets you kick some tyres a little earlier.
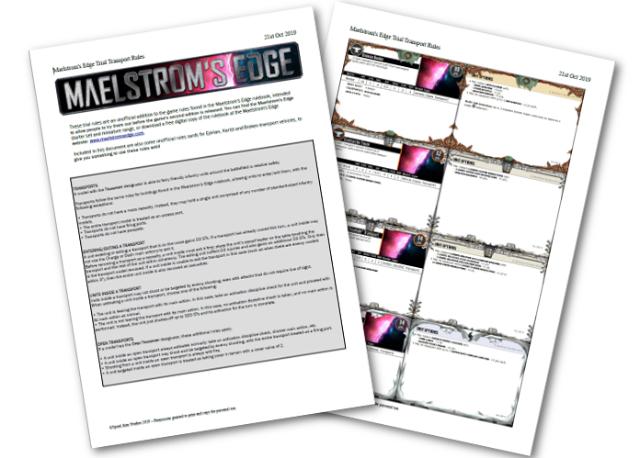
Also included in the download are some unofficial rules cards for Epirian, Karist and Broken transport vehicles, to give you something to test these rules with. Conversions to build some of these have been featured in previous Comm Guild modeling articles, and you can use these as inspiration for your own vehicles, or feel free to use whichever other appropriate vehicles you like.
You can download the trial transport rules from the Maelstrom's Edge website here.
We would love feedback on the rules, or to see your transport vehicle builds. Pop on in to the Comm Guild Facebook Group!
Conversion Spotlight: Karist Raptor Assault Skimmer Kitbash
Posted on Thursday Oct 24, 2019 at 05:00pm in Tutorials
This week, I'm continuing on my quest to add transport vehicles to all of my Maelstrom's Edge forces, with the probably exception of the Remnant (who really don't need them!). A while back, I shared a kitbashed Karist anti-grav buggy converted from a Games Workshop Genestealer Cult vehicle. This week, I'm revisiting the Karist Enclave to build them a transport vehicle from a Beyond the Gates of Antares skimmer.
The kit that I used was a Freeborn Solar Command Skimmer. This is a hybrid kit with metal and resin bits that go onto a basic plastic skimmer chassis. I went with this variant rather than the basic version because the resin add-ons make the cabin space look a little more practical for carrying troops.
The general styling of the vehicle was pretty much exactly what I wanted, and matches up quite well with the Genestealer buggy aesthetically, so I didn't actually make a lot of changes. I needed to swap out the crew for Karists, and chose to just replace the pilot and putty over the gunner's seat with 'green stuff' putty. The pilot was built using the top half of a plastic Karist trooper, with a head from the resin Karist heavy weapon trooper set.
The main weapons would also be replaced, but I kept the metal launchers for the sides of the cabin, as they'll do well enough to represent Karist grenade launchers.
The main gun on the Antares skimmer is fixed in place in the middle of the nose. I decided that something with a little more free movement was called for, so grabbed a sentry turret from the new Maelstrom's Edge terrain sprue and added a Ravager Pulse Cannon nabbed from the Tempest Elite kit.
The gun turret fit in nicely underneath the front of the skimmer, and with everything else glued in place it wound up looking like this:
I kept the original flight base on there for painting, but then switched it to a spare Games Workshop vehicle base that I had laying around, attaching the skimmer to it with one of the drone flight stems from the Antares kit.
Painting followed the same scheme as my Karist Strike Force, and the later anti-grav vehicle, after which it looked like this:
Stay tuned next week for some trial Transport Vehicle rules, and (unofficial) rules cards for this assault skimmer as well as some Epirian and Broken transport vehicles!
To build your own Raptor, you can pick up the Freeborn Skimmer from Warlord Games, and the new Maelstrom's Edge terrain sprue and other Maelstrom's Edge kits from the Maelstrom's Edge webstore.
As always, feel free to share your models and terrain, or ask any Maelstrom's Edge- or hobby-related questions on the Comm Guild Facebook page!
For other Maelstrom's Edge modeling articles, including tutorials and walkthroughs of a wide range of different building and miniature projects, check out the Hobby section of the Maelstrom's Edge website here.
Terrain Spotlight: Basic Sci Fi Quonset Hut
Posted on Thursday Oct 17, 2019 at 05:00pm in Tutorials
Time for another building!
I don't know why, but I've always loved the shape of the humble Quonset hut. Some time back, I built some vaguely-Quonset styled buildings from plastic drainage channel, but the new terrain sprue gave me an excuse to revisit the idea and build something closer to the original design.
The bulk of the structure is 3mm foamed PVC. For the front and back walls, I grabbed a handy round thing and used it to trace out a pair of semi-circles, which I then cut out with a sharp hobby knife.
I also cut a rectangular piece for the floor, and a bracing strut to connect the tops of the walls.
I took a pair of curtain windows and a curtain doorway from the new terrain sprue and sat them in place on the walls before tracing around them with a sharp pencil and cutting out the resultant rectangles with a hobby knife. Then I used some superglue to stick them in place.
Using some more superglue, I fit the walls, floor and support strut together.
The roof was constructed from corrugated cardboard. I cut three pieces, one for each side, and a third to run over the top. Bending these short pieces over the curve was easier than it would have been to do it with one single, long piece, and the sections create a layered joint to give the roof a little bit of detail.
I started by gluing the side pieces in place along the bottom edges.
After giving the glue time to set properly, I added more glue up along the wall tops and carefully pressed the roof sections down onto the curve.
I used a similar process for the top section, initially gluing the centre line in place along the support strut, and then gluing the sides of the section down overlapping the side pieces.
A few final details from the terrain sprue, and the hut was ready for painting:
For a quick and easy paintjob, I gave the hut a basecoat of AK Interactive Rust Basecoat. Over this, I sprayed a light and rough coat of Army Painter Plate Armour, and then added rust by dabbing on Army Painter Dry Rust. Some quick details like lights and curtains, and then a drybrush in the creases with Vallejo Beasty Brown finished it off.
To give it a go yourself, you can pick up the new terrain sprue, along with the rest of the Maelstrom's Edge range, from the Maelstrom's Edge webstore.
As always, feel free to share your models and terrain, or ask any Maelstrom's Edge- or hobby-related questions on the Comm Guild Facebook page!
For other Maelstrom's Edge modeling articles, including tutorials and walkthroughs of a wide range of different building and miniature projects, check out the Hobby section of the Maelstrom's Edge website here.
Tags: buildings modelling spotlight terrain terrainsprue walkthrough
Conversion Spotlight: Epirian Hornet Drone
Posted on Thursday Oct 10, 2019 at 05:00pm in Tutorials
One of the best parts of this hobby, for me, is when you find yourself looking at some bits and get a little flash of inspiration on how to turn them into something completely different to what they were intended to be. I had one of those moments this week, while cutting some parts off the new Maelstrom's Edge terrain sprue, when on impulse I put a couple of the fan pieces together back-to-back. One thing led to another, and the Epirian Hornet Drone was born!
This is actually a really simple conversion, using parts from the Epirian Hunter Warmech, and four fans from the new terrain sprue.
The first step is to take the Hunter torso and use a sharp hobby knife or razor saw to cut through the waist joint.
With the two halves of the remaining torso glued together, there's a large hole in the bottom, into which a flight stem fits quite neatly. Fill the front half of the hole with green stuff or similar putty.
The Hunter's Cutter machine guns are in two pieces, one of which has a wide flap that covers the underside of the weapon once assembled. Don't use that one. Take the other halves of the two cutters, and glue them to the underside of the Hunter torso. They sit in quite neatly, nestled in under the bulge of the chestplate.
Next, take the four fans from the terrain sprue and glue them together in pairs, lining up the fan blades, to make a pair of turbines.
Glue the turbines onto the Hunter's shoulder sockets.
One drone, ready for painting!
With some paint on, it winds up looking something like this:
You can pick up both the Hunter kit and the new terrain sprue, along with the rest of the Maelstrom's Edge range, from the Maelstrom's Edge webstore.
As always, feel free to share your models and terrain, or ask any Maelstrom's Edge- or hobby-related questions on the Comm Guild Facebook page!
For other Maelstrom's Edge modeling articles, including tutorials and walkthroughs of a wide range of different building and miniature projects, check out the Hobby section of the Maelstrom's Edge website here.
Tags: conversion epirian hunter modeling spotlight terrain terrainsprue tutorial
The new Maelstrom's Edge Terrain Sprue is available now!
Posted on Monday Oct 07, 2019 at 05:00pm in Models
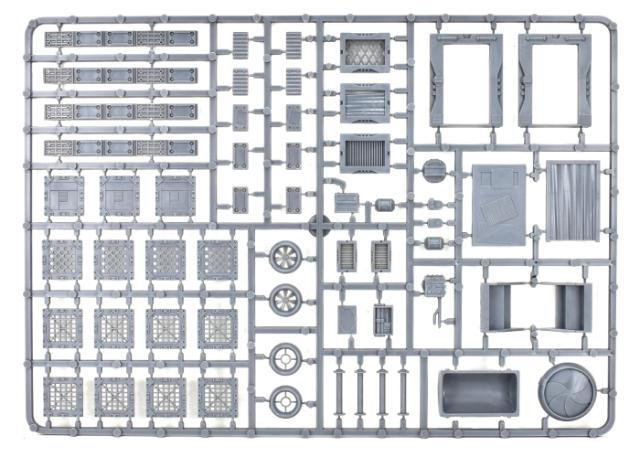
Sprue Front
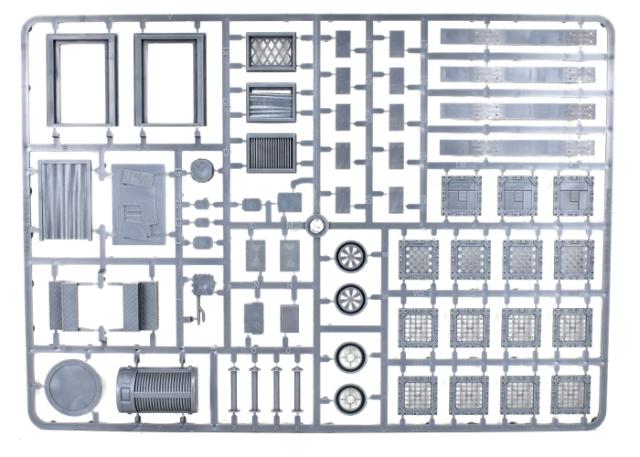
Sprue Back
Each sprue contains a range of terrain elements, including customisable doors, stairs, windows and parts for creating catwalks or low walls and barricades.
Round detail pieces for an exhaust fan or porthole can fit onto the end of the large pipe fitting from terrain sprue #1, or attach flush to walls or roofs.
The sprue also includes customisable struts for reinforcing walls, and a host of smaller details like a computer terminal, small vents, a generator coil, a junction/control box, lights, an antenna, and parts to combine with our plastic Broken Infantry weapons to build an automated sentry turret!
This pack includes two sprues - 118 components in total!
Get yours from the Maelstrom's Edge Webstore now!
Terrain Spotlight: Raised Building using gift boxes and the new terrain sprue!
Posted on Thursday Oct 03, 2019 at 05:00pm in Tutorials
I've spent the last couple of weeks happily playing with the new Maelstrom's Edge terrain sprue and building up a nice collection of delapidated buildings for my Broken force to defend - or loot, as the mood may strike them! This week, however, I thought I might take a break from painting rust and see how something a little better maintained might look with the new components to hand.
I have turned to the ever-useful discount store cardboard gift box for this build. These boxes are perfect for creating buildings, as they come in a wide range of different sizes, are inexpensive, and are quite solid.
I started by flipping the box upside down, and cutting a hole in the side for the door frame from the terrain sprue by tracing around the back of the frame and then cutting with a sharp hobby knife. For the door itself, since I wanted something that wasn't all patched up, I went with a shutter-style door made from pieces cut from the support struts from the original terrain sprue.
My previous giftbox buildings have generally had flat roofs, so I decided to make this one angled, just for something different. I took the lid of the box and cut the sides away at a diagonal along the short edges.
I glued the lid upside down onto the bottom of the box (the top of the building, since the box is upside down!), glued the cut-off pieces of the short edges into the middle for reinforcing, and then stuck a piece of corrugated cardboard on top. I also added the vent windows on two walls, tracing and cutting as with the door frame.
To make this building stand out some more, I wanted to put it on a raised slab. For this, I used the lid of a larger giftbox.
On the so-far blank short wall, I gave the building some independent power using the generator from the new terrain sprue and linking it to the control box using some plastic tube and aluminium rod.
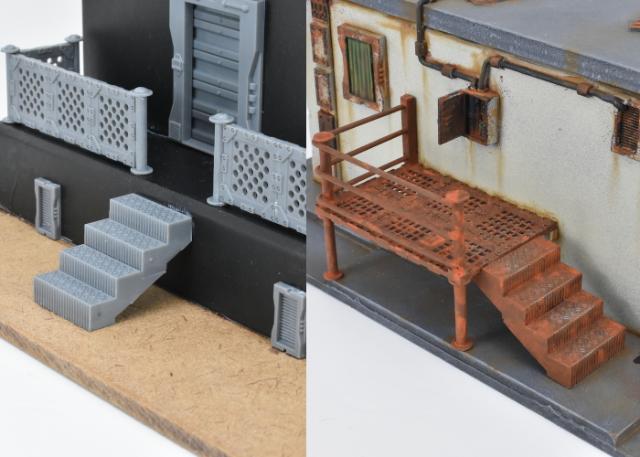
To finish up, I glued the base slab to a piece of hardboard, and added some stairs and small vents from the terrain sprue. I also fenced in the top of the slab using the upright posts and grating pieces, which fit nicely around the edge.
With some paint on, the finished building looks like this:
The new terrain sprue will be available from the Maelstrom's Edge webstore here from October 7th!
In the meantime, feel free to share your models and terrain, or ask any Maelstrom's Edge- or hobby-related questions on the Comm Guild Facebook page!
For other Maelstrom's Edge modeling articles, including tutorials and walkthroughs of a wide range of different building and miniature projects, check out the Hobby section of the Maelstrom's Edge website here.
Tags: buildings modeling spotlight terrain terrainsprue tutorial walkthrough
