Modeling Spotlight: Biker Bot Handler Conversion
Posted on Thursday Mar 26, 2020 at 05:00pm in Tutorials
Some time ago, I put together a biker conversion for a Bot Handler Spotlight article, which has been sitting in the cabinet ever since, staring at me accusingly when I walk past. Unable to take the abuse any longer, I decided the time had come to get some paint on him, and this was the result:
The model was put together from an Epirian Bot Handler, the chassis from an Epirian Drone, and most of a Citadel Space Marine bike from Warhammer 40000. I carved out the inside of the handler's legs and bent them outwards to fit around the bike seat.
To paint, I started out with a basecoat of Army Painter Wolf Grey spray.
I then blocked in the main colours - P3 Pig Iron for the metal parts, Vallejo Stormy Blue for the bike panels and Handler's uniform, and Vallejo Heavy Charcoal for everything else.
Next, I painted a generous layer of Army Painter Dark Tone over the top of everything, and put it aside to dry.
For final detailing, I highlighted the blue using a mix of Army Painter Ultramarine Blue and white. Over the black, I added a highlight of Vallejo Light Grey, and Army Painter Shining Silver finished off the metal parts. To brighten things up a little, I added some gold using Coat D'Arms Bright Gold washed with Army Painter Medium Brown. For the face, I painted on a coat of Army Painter Barbarian Flesh with some more MEdium Brown, and finally added the red parts with Army Painter Pure Red, shaded with black and highlighted with white.
And that's one biker bot handler, ready to cruise the backroads of the Edge!
You can pick up the Epirian Bot Handler, along with the rest of the Maelstrom's Edge model range from the webstore here.
As always, feel free to share your models and terrain, or ask any Maelstrom's Edge- or hobby-related questions on the Comm Guild Facebook page!
For other Maelstrom's Edge modeling articles, including tutorials and walkthroughs of a wide range of different building and miniature projects, check out the Hobby section of the Maelstrom's Edge website here.
Tags: conversion epirian modeling painting spotlight walkthough
Model Spotlight: Remnant Nimbus Suits.
Posted on Thursday Mar 19, 2020 at 05:00pm in Tutorials
This week, I'm taking a break from terrain and having a closer look at the fantastic resin kit for the Nimbus battlesuit for the Artarian Remnant!
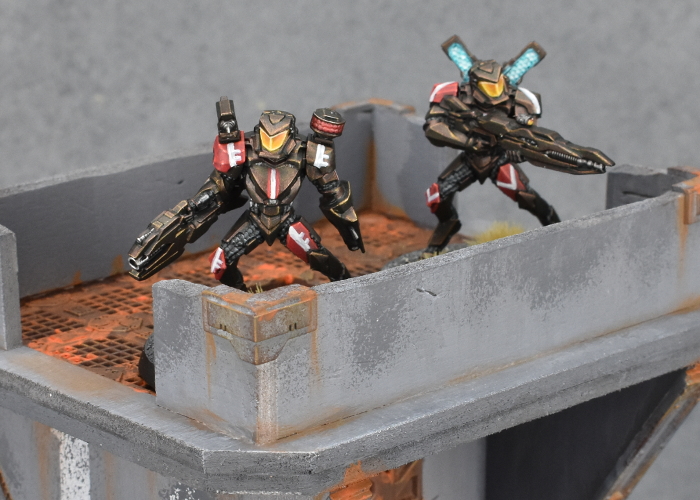
A smaller suit than the more common Militus, the Nimbus comes in a few less pieces as a result of being resin rather than plastic. The kit includes options for both the Longshot's sniper rifle, and the Pathfinder's Incursion Blaster and pinpoint scanner, as well as the thermal tracker and hologram projector for the shoulders and a cloak generator backpack.
While there is only a single head includedin the kit, the neck joint is the same size as on the Militus. This allows you to use plastic heads in place of the regular Nimbus head.
While they may not fit as neatly without some tweaking, you can also borrow heads from other factions for a bare head option. The model below has the head from a Karist heavy weapon trooper kit.
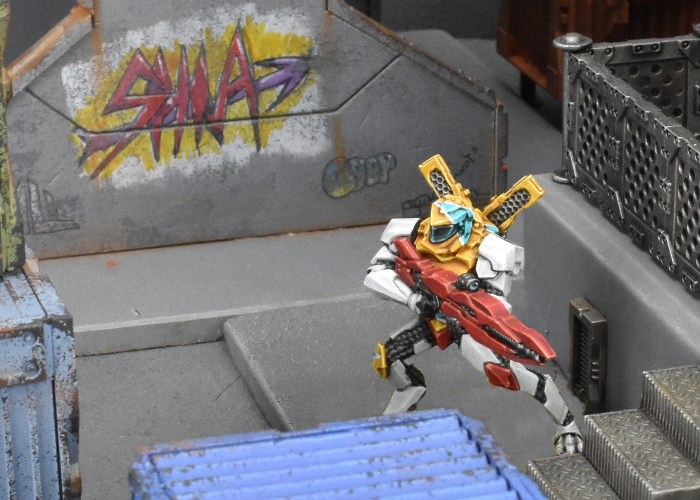
For faster-moving Nimbus variants, you can use a boostpack from the Militus kit. If you're building a boostpacking Pathfinder, be sure to glue the boostpack in place before the weapon arm, as the back of the blaster overlaps the bottom of the boostpack.
Alternatively, you can make a removable boostpack by trimming off the triangular pieces on the bottom, and then sitting it in place with a little bluetack.
Including multiple shoulder pads would have made the kit a little too fiddly, so the pads were sculpted with the venting systems in place. If you're using any other shoulder mounted equipment, it just glues over the top of the vents, but if you not, and if you don't want the vents either, they can be easily covered over with a little putty. Just push the putty in place in the vent and smooth it down flush with the flat of a knife. If necessary, let it set and then give it a little sand to finish flattening it out.
The arms mount at the shoulders with square locator pegs. These are there to make it easier to get the sniper rifle arms to fit together. You can reposition the arms by just slicing off the peg, so that the inside of the shoulder is flat, and then gluing it on however suits you.
For some more extreme repositioning, resin is easy to cut through with a sharp knife or razor saw, and then reattach with superglue.
What have you done with your Remnant suits? We would love to see them on the Comm Guild Facebook page!
You can pick up the Nimbus suit, along with the rest of the Maelstrom's Edge model range from the webstore here.
For other Maelstrom's Edge modeling articles, including tutorials and walkthroughs of a wide range of different building and miniature projects, check out the Hobby section of the Maelstrom's Edge website here.
Tags: conversion modeling nimbus remnant spotlight
Remnant Faction Summary now online!
Posted on Monday Mar 16, 2020 at 08:14pm in The Remnant
The Faction Summary for the Artarian Remnant is now online!
This summary lists all of the special rules, equipment and weapon profiiles used by the Remnant units released so far, and will be updated as future options are released. You can download the PDF here!
Terrain Spotlight: Crystal Outcrops!
Posted on Friday Mar 13, 2020 at 05:00pm in Tutorials
I recently picked up the fantastic Xenos Jungle terrain mat from Deep Cut Studio, as I really loved the unusual colouring. It shows an alien world covered in rocks, sinister looking ground mist or liquid, some yellowy-green plants, and large, shiny outcrops of purple crystals, and I was instantly in love when I saw it. The only problem with it was that I didn't have any suitable terrain to go with it, so I set out this week to rectify that problem, creating some crystal-encrusted rocky outcrops!
There are a large range of different ways to make crystals, or facsimiles thereof, for the table, but I decided to go the easiest route and just use something that already looked the part. After scouring the internet for a while, I found some acrylic 'ice crystals' on Amazon that looked like they would fit the bill. I wound up buying three packets from three different sellers, due to some unexpected one-per-customer rules on them, which netted me three packets of purple crystals that, while identical in shape, were all slightly different shades of purple. As this just winds up with a more natural overall effect, I couldn't have planned it better if I had tried!
As the crystals were all the same size, I glued some together using an all-plastics glue, and took some others and belted them with a hammer to break them down into smaller pieces (Wear eye protection if you want to try this!)
For the bulk of the outcrops, I decided to use expanded polystyrene, as it's quick and easy to cut to shape. I used an old kitchen knife to roughly cut the polystyrene to the shape I wanted, and then used small spots of PVA glue to glue it down to a piece of 3mm foamed PVC to give it a solid base. Using small amounts of PVA rather than covering the whole piece helps to avoid the base warping when the glue druies.
To cover the polystyrene, the common choice would be filling plaster. I'm not a fan of this, hoever, as it chips easily, so I decided to try something experimental. I ran a bunch of old cardboard boxes through a cross-cut paper shredder, to make a nice pile of tiny cardboard pieces.
I soaked the cardboard in water overnight in the hope of softening it up a bit, and then drained and squeezed out as much water as I could, before mixing it into a slurry with PVA glue, some cheap, black, acrylic paint and a little plaster to bind it all together. Then, I slopped the resultant mess over the polystyrene, smoothing it down as much as possible.
While the cardboard mess was wet, I took crystals and applied clear craft glue to the bottoms. These were then pushed them into the wet surface, so that they would be partially submerged. I then left it overnight for everything to set.
The cardboard slurry dried with a fairly obvious, rectangular texture, which was going to look a bit odd for a natural outcrop, so I painted over the whole thing with a generous layer of PVA glue and sprinkled a coarse sand mixture over it, leaving this to set.
After shaking off the excess sand the next day, I gave the rock surface a coat of black paint.
My intention was to drybrush it grey, to try to match the rock on the mat, but my test piece wound up far too dark and grey looking, so I wound up going back over it with a rough coat of a sandy brown craft paint.
Over this, I applied a generous layer of Army Painter Strong Tone.
When the wash had dried, I set to work with some Coat D'Arms Bone and Bilious Green, and some Vallejo Light Grey, drybrushing all over the rock. The colours don't show up well in the pic here, but the aim was to replicate somewhat the different tones found on the different areas of the mat, so that the terrain wouldn't look out of place wherever it was positioned. I finished up with a final highlight of white to tie everything together, and then added a purple blush around the crystals. This was again matching the style of the mat, and also hopefully adding some more colour under the small crystal pieces I was intending to add at the end.
Finally, I dabbed some more PVA glue around the crystal outcrops and sprinkled on some of the small crystal gravel that resulted from my earlier hammering efforts. I also added some statuic grass and some plants cut from plastic home-decorating sheets to break up some of the boring rock bits.
With a few bits together on the mat, it wound up looking like this:
It's not a perfect match for the terrain on the mat, but it's close enough to work! The next step will be to finish off the rest of the outcrops and a building that I have in progress (as soon as I finish panic-buying some more Strong Tone!), and then work up some sort of 'forest' bases to flesh out a full table.
Stay tuned for more!
In the meantime, you can pick up the Maelstrom's Edge terrain sprues, along with the rest of the Maelstrom's Edge range, from the webstore here.
As always, feel free to share your models and terrain, or ask any Maelstrom's Edge- or hobby-related questions on the Comm Guild Facebook page!
For other Maelstrom's Edge modeling articles, including tutorials and walkthroughs of a wide range of different building and miniature projects, check out the Hobby section of the Maelstrom's Edge website here.
Tags: modeling painting spotlight terrain tutorial walkthrough
Modeling Tutorial: Simple Marble Bases
Posted on Thursday Mar 05, 2020 at 05:00pm in Tutorials
While painted sand is quick and easy for finishing off your miniature bases, sometimes it's nice to go with something a little more unusual to set your force apart. This week, I'm sharing a handy tutorial for creating super-simple marble bases, with no painting required!
The marble texture comes from adhesive vinyl. This can be bought by the roll in a huge range of different patterns and colours, so you can find something to suit whatever colours you are painting your army.
The vinyl is made to stick to a wide range of different surfaces, and so you can just peel off the backing and stick it directly to the base. Over time, however, the adhesive around the edges can sometimes dry out, causing the edges of the vinyl to peel up. To avoid this, apply a thin circle of superglue around the perimeter of the base top.
Cut a piece of vinyl slightly larger then the base, and then peel off the backing paper from the vinyl, and press the base into place on the sticky side.
Remove the excess vinyl by cutting carefully around the edge of the base with a sharp knife.
If the cut vinyl winds up a little rough, you can smooth it out by sanding lightly around the edge with a fine grade sandpaper.
Finally, attach your model using superglue.
The final model, ready for the table. If you prefer a less clean look, you can also glue some gravel or other rubble on top of the vinyl, or drybrush on some brown to dirty things up a bit.
That's it for this week. Tune in next week for more modeling-related shenanigans!
You can pick up the Maelstrom's Edge model range from the webstore here.
As always, feel free to share your models and terrain, or ask any Maelstrom's Edge- or hobby-related questions on the Comm Guild Facebook page!
For other Maelstrom's Edge modeling articles, including tutorials and walkthroughs of a wide range of different building and miniature projects, check out the Hobby section of the Maelstrom's Edge website here.
Tags: bases modeling painting tutorial walkthrough
Terrain Spotlight: Painting the Underhive, part 5
Posted on Thursday Feb 27, 2020 at 05:00pm in Tutorials
This week sees the conclusion (for now!) of my ongoing Underhive terrain project! Previously, I have painted up the watch tower, generator tower, junction tower and the all-important lift tower. That just left the trash processing unit sitting follornly on the desk in nothing but its undercoat - a situation that set out to remedy, with the below results!
This one was slightly more complicated with the base coat layer than the other buildings, as I wanted the wall panels to be green, but everything else to be grey or rusted metal. I sprayed the tower with Army Painter Army Green, and the first level platform and base with Wolf Grey, and then went back over the metal parts brown rust base, a brushed-on mix of Vallejo Charred Brown and AK Red Brown Leather.
I won't go through the whole process here, because aside from being green it's identical to how the previous structures were painted. The one difference, though, was the graffiti for the lower level. I wanted it to be fairly extensive, but realised that painting it in there by hand was going to be awfully tricky. Instead, I pulled up a couple of handy, online graffiti generators and used them to create some overlay pieces that could be printed out on paper, weathered with grey, cut out, and then glued in place over the lower walls.
Other than that, everything went together the same as for the previous structures. Once I had everything but the final weathering and detailing done, I glued it all together and applied those final touches.
The one thing left to do at this point was to assemble a table and see how it all looked together! With the addition of a couple of other appropriate buildings to fill in the excess space, and some catwalks and barricades put together for different articles some time back, it all wound up looking like this:
The only thing missing now is a couple of blood-crazed gangs running riot over it. Time for some gaming!
To build your own underhive metropolis, you can pick up the Maelstrom's Edge terrain sprues along with the rest of the Maelstrom's Edge range, from the webstore here.
As always, feel free to share your models and terrain, or ask any Maelstrom's Edge- or hobby-related questions on the Comm Guild Facebook page!
For other Maelstrom's Edge modeling articles, including tutorials and walkthroughs of a wide range of different building and miniature projects, check out the Hobby section of the Maelstrom's Edge website here.
Tags: buildings painting scratchbuild spotlight terrain terrainsprue walkthrough
Modeling Spotlight: Adding Arc Markers to 3rd Party bases.
Posted on Thursday Feb 20, 2020 at 05:00pm in Tutorials
Someone on the DakkaDakka forums recently asked how they could go about adding arc markings to non-Maelstrom's Edge bases, for miniatures that they're using from other ranges. This prompted me to exclaim, "How have I not made an article about that yet?!?"
So this week, while I'm finishing off my last underhive building, I thought I would put that article together - and here it is!
In Maelstrom's Edge, certain things have a different effect when a unit is approached from the front or the rear. To facilitate these rules, our bases have markers on the sides, breaking the base into a front and rear arc. If you're using different bases for your models, you can make do without them by using the model's shoulders or face as a reference, but it can be a lot easier to have that visual reference on the base.
There are a couple of different ways to go about this, but in either case the first step is to find the middle line of the base. I've found the easiest way to do that is to use a gridded cutting mat. Sit the base neatly in between the gridlines - Depending on the size of the base, it obviously won't always run from line to line. 25mm bases, for example, would just be centered with 2.5mm either side. Eyeballing this is usually accurate enough, but you can always measure it, or use a piece of 1mm gridded graph paper instead of the cutting mat if you prefer more precision.
When you have the base lined up, count in halfway on the grid, and use a pencil to make a mark on either side.
For 30mm bases, or other 'odd number' sizes, where the middle point would fall halfway between the grid lines, you might find it easier to mark on the diagonal rather than estimating halfway along the grid.
Once you have your marks, the quickest and easiest way to finish up is to draw or paint a solid line over the marks. For some extra razzle-dazzle, you can add the illusion of a cut-in by highlighting down either side.
If you would prefer to have cut-ins on the bases to match the normal Maelstrom's Edge bases, you can use a small file to etch the line into the side of the base. Try to keep the file perpendicular to the base's top surface, and stop just before you cut right through the base edge.
Do this on both sides, and you wind up with something like this:
Note that if you do accidentally file through the inner wall of the base edge, you can stick a small strip of plastic or paper over the inside of the gap to close it over again.
With some paint on, the filed divot gives you an etched arc marker that looks right at home alongside your regular Maelstrom's Edge bases!
That's it for this week. Stay tuned next week for the completion of my first batch of underhive buildings!
Pick up the Maelstrom's Edge model range from the webstore here.
As always, feel free to share your models and terrain, or ask any Maelstrom's Edge- or hobby-related questions on the Comm Guild Facebook page!
For other Maelstrom's Edge modeling articles, including tutorials and walkthroughs of a wide range of different building and miniature projects, check out the Hobby section of the Maelstrom's Edge website here.
Terrain Spotlight: Painting the Underhive, part 4
Posted on Thursday Feb 13, 2020 at 05:00pm in Tutorials
The underhive continues to come to life! Previously, I have painted up the watch tower, generator tower, and junction tower. That left me with the trash processing unit and the lift tower to do, and while I'm excited to get some paint on both of these, the lift tower won out this week!
This structure was initially base coated with Army Painter Ultramarine Bluw spray. From there, the process is more or less the same as on the previous structures, and so I started by going back over the exposed metal areas with my brown rust base (a mix of Vallejo Charred Brown and AK Red Brown Leather).
Over the blue, vertical surfaces, I applied light streaking using very watered down light grey. There's a little bit of a trick to getting this the perfect consistency, as if it's not watered down quite enough it can either go on too heavy or bead up on the base layer.
I'm carrying my heavy graffiti theme across to all of the structures wherever possible, and this building was no exception. As before, I sketched in the designs with a fineliner pen, and then coloured them in with assorted paints and inks.
I haven't been getting too carried away with hazard striping so far, but thought this building warranted some on the lift doors. I printed out some appropriately sized strips and glued them into place on the bottoms of the door frames.
Time for weathering! I sponged Vallejo Basalt Grey over the wall panels, and dark brown over the blue-painted metal sections. The grey is much more subtle against the blue than on the previous structure, but it still does the job - if nothing else, it helps to fade the blue down a bit so it's not so eye-catchingly bright. I also drybrushed light grey over the floor sections, and light orange over the rusted metal parts.
From there, I pulled out the Beasty Brown to drybrush some dirt into the nooks and crannies and raised sections.
I stopped at this point to grab some pics of the graffiti, with weathering in place.
Then it was on to the final rust layer. I applied a generous layer of Army Painter Dry Rust to the rusted metal areas by dabbing it on roughly with an old brush.
From there, I just had to glue the floors in place and apply a few final details like the generator coils and the lift control panels, and the job was done.
Next week: The Trash Processing Unit!
To build your own underhive metropolis, you can pick up the Maelstrom's Edge terrain sprues along with the rest of the Maelstrom's Edge range, from the webstore here.
As always, feel free to share your models and terrain, or ask any Maelstrom's Edge- or hobby-related questions on the Comm Guild Facebook page!
For other Maelstrom's Edge modeling articles, including tutorials and walkthroughs of a wide range of different building and miniature projects, check out the Hobby section of the Maelstrom's Edge website here.
Tags: buildings painting scratchbuild spotlight terrain terrainsprue walkthrough
Terrain Spotlight: Painting the Underhive, part 3
Posted on Thursday Feb 06, 2020 at 05:00pm in Tutorials
This week, I'm continuing right on with my underhive project. So far, I have painted up the watch tower and generator tower, and so I needed to paint something with a little more colour to it. So I decided to have a crack at my twin level junction tower.
When I base sprayed all of the structures, I hit this one with a coat of Army Painter Necrotic Flesh on the walls, and some medium grey on the floor/roof areas. I then went over with a brush and picked out all of the exposed metal areas with dark brown.
Most of the painting process here will be looking fairly familiar by now to anyone who has been following these articles. As with the sides of the watch tower, I added some streaking to the walls using very watered down pale grey with a flat brush.
I wanted this building to have some more extensive graffiti coverage, but as with the others I wanted it to be weathered and old, so this needed to go on before the weathering layer. I sketched out the designs with a fineliner pen and some pale grey paint, and then filled in the colour using Army Painter inks and Citadel Contrast in various colours.
To apply the weathering, I used a sponge to apply grey over the wall panels, and dark brown over the doors and doorframes. I also drybrushed the floors with pale grey, and the brown metal areas with pale orange.
I glued the ladders on at this point, and then went over the whole structure adding some dirt into creases and wherever else seemed appropriate with a drybrush of brown. I also glued the bottom layer down to the base board, although I left the top layer unglued so that they can be split and used as two single-level structures.
For the final touch, I dabbed Army Painter Dry Rust over the metal sections, working downwards onto the raised surfaces and stippling lightly all over to avoid hard edges on the rust sections. This gave a much smoother finish than on the previous structure, where the rust had wound up a bit stark in places.
So that's one more done. Stay tuned for part 4 - although I'm undecided as to whether to do the trash unit or the lift building first. I'm a bit excited about getting either of them done!
To build your own underhive metropolis, you can pick up the Maelstrom's Edge terrain sprues along with the rest of the Maelstrom's Edge range, from the webstore here.
As always, feel free to share your models and terrain, or ask any Maelstrom's Edge- or hobby-related questions on the Comm Guild Facebook page!
For other Maelstrom's Edge modeling articles, including tutorials and walkthroughs of a wide range of different building and miniature projects, check out the Hobby section of the Maelstrom's Edge website here.
Tags: buildings painting scratchbuild spotlight terrain terrainsprue walkthrough
New Artarian Remnant model release: The Nimbus Battlesuit!
Posted on Monday Feb 03, 2020 at 05:00pm in The Remnant
Like its heavier Militus cousin, the Nimbus battlesuit is a marvel of Artarian engineering. Designed for sniper and scout roles, the Nimbus trades in the Militus' heavier armour in favour of speed and agility.
A specialised modification of the Incursion Rifle, the Nimbus Longshot's Torus Sniper Rifle fires a single, high-powered shot that can blast through enemy fields from across the battlefield.
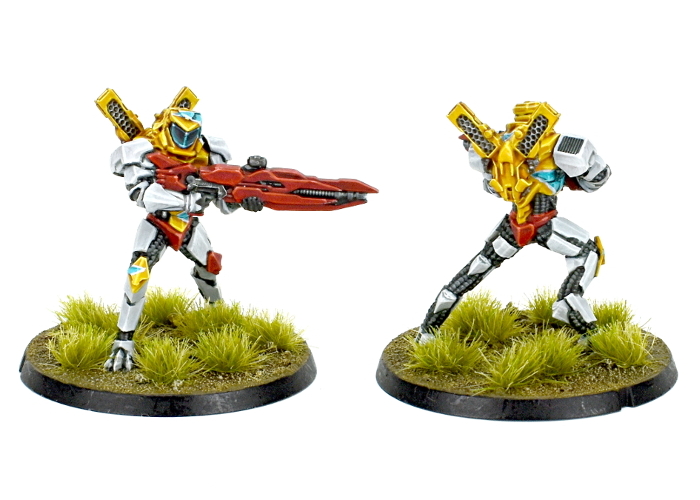
The Nimbus Pathfinder fills the scout role, armed with an Incursion Blaster and equipped with a Pinpoint Scanner that it uses to paint enemy units to draw down heavier Remnant firepower.
Both variants of the suit can be equipped with an array of additional equipment, including Hologram Projectors and Cloak Generators to confound enemy targeting, Vent Systems to assist with cooling, Thermal Trackers to enhance their already formidable shooting, and a Lorican Boostpack when additional speed is required.
This kit contains a single, resin Nimbus suit, along with a 45mm plastic base. This model can be built as any of the following units: Nimbus Pathfinder, Nimbus Pathfinder Prime, Nimbus Longshot, Nimbus Longshot Prime. The rules for these units can be found in the Force Lists section of the website, or in a downloadable, printable format in the rules section here.
You can find assembly instructions for this model in PDF format here.
And, of course, the Nimbus battlesuit is available now from the Maelstrom's Edge online store here!
Terrain Spotlight: Painting the Underhive, part 2
Posted on Thursday Jan 30, 2020 at 05:00pm in Tutorials
Last week, I started painting the underhive terrain that I've been building over the last few months, based very loosely on the designs of the terrain from the original Necromunda starter set. For anyone who missed the previous article, I started out by basecoating everything, and then finishing off the watch tower. This week, I'm carrying right along with the painting, on the generator tower!
For the basecoat on this one, I had sprayed the base with grey, and the upright sections of the building with a brown rust base colour. So before going any further, I needed to base the floors with grey, and just touch up with brown anywhere the spray had missed.
As another bare cement and rusty metal structure, painting from here was fairly similar to the tower. I gave the metal sections a drybrush with a light orange, and the cement a heavy drybrush with light grey.
I wanted to include some hazard stripes on this one to give it a bit more colour. To save time, instead of painting them by hand I worked up some circles in Gimp, printed them out, and then hit them with some sponge weathering with grey paint. Then it was simply a matter of cutting them out, painting the backs with a coat of PVA glue and sitting them in place.
I made up some larger circles to go around the central pit, and some smaller semicircles for the ladder access holes. I also whipped up a couple of quick signs to go on the upright pillars. While putting these all in place, I also went over the panel lines in the floors with a black fine point pen,and added some graffit around the upright pillars, just for colour.
Once the glue had set, I went over the cement areas with a patchy drybrush of brown to dirty things up, and then added some dry rust effect paint to the metal sections. The rust just gets blobbed on wherever seems appropriate, and it can be tricky to tell if you have got it right until it dries. It's come out a little too heavy and patchy in places here, so I'll probably go back and touch it up later.
That just left some final details - painting the keyboard and screen on the computer panel on the roof, painting the pipes in the core with an aged copper finish (you can find the tutorial for that here!), and adding some drops of black and brown ink around the place for assorted liquid stains.
Stay tuned for part 3, which promises to be a little more colourful!
To build your own underhive metropolis, you can pick up the Maelstrom's Edge terrain sprues along with the rest of the Maelstrom's Edge range, from the webstore here.
As always, feel free to share your models and terrain, or ask any Maelstrom's Edge- or hobby-related questions on the Comm Guild Facebook page!
For other Maelstrom's Edge modeling articles, including tutorials and walkthroughs of a wide range of different building and miniature projects, check out the Hobby section of the Maelstrom's Edge website here.
Tags: buildings painting scratchbuild spotlight terrain terrainsprue walkthrough
Terrain Spotlight: Painting the Underhive, part 1
Posted on Thursday Jan 23, 2020 at 05:00pm in Tutorials
Over the past couple of months, I've been slowly putting together an underhive table, based very loosely on the designs of the terrain from the original Necromunda starter set. With the first half a dozen buildings assembled, the time has finally come to get some paint on them!
To get things started, I pulled a bunch of spray paints out from the store room, and sprayed on the bulk undercoats, for the most part just going with whatever colour was going to make up the majority of the structure.
On most of the buildings, during construction I tried to leave parts unglued where painting with them assembled would be problematic, although they still promised to have some tricky parts left over here and there.
Once the sprays had time to dry properly, I took everything upstairs and set to work blocking in the rest of the base colours. Walls were all either coloured or grey for bare cement, floors were likewise filled in with grey, and bare metal sections were undercoated with a dark brown to form a rust base layer.
Painting structures of this size, production-lining it only really gets you so far before it starts feeling counter-productive. I also wanted to try out a couple of new ideas before hitting the whole collection with them, so at this point pushed the other buildings aside and focused in on the watch tower. I wanted a streaky, weathered look to the walls, which on this tower were going to be bare cement. So I took a wide, flat and wet brush and some very watered down pale grey paint, and applied light streaks by just passing the brush gently down the wall, dipping the brush in some water and going back over it if the grey lines came out too intense.
I wanted these buildings to look nicely 'lived in', with wear and tear and graffiti all over the place to add colour. To give the grafitti more of an aged appearance, I decided to paint it on before doing the rest of the weathering. I also added a large building number (or possibly a sector number... haven't decided yet!) to either side of the tower with a stencil whipped up on the PC. The graffit was all painted in freehand - I drew in an outline with a fineliner pen, and then painted in the colours using inks. Any messy bits or errors would be covered up (more or less) by the weathering!
I then sponged some darker grey liberally all over the walls.
Carrying right on with the weathering, I sponged dark brown over the support struts running up the edges of the walls, and then drybrushed over all of the metal parts with a light orange. I also glued the base on, and blacklined in the panel lines on the walls with a fineliner.
To finish up, I applied some Dry Rust effects paint liberally over the metal sections, and added some dirt and dust into the creases with a drybrush of brown. With a few extra nicks and scratches and some stains on the base using drops of ink, the tower was complete!
Stay tuned for part 2!
To build your own underhive metropolis, you can pick up the Maelstrom's Edge terrain sprues along with the rest of the Maelstrom's Edge range, from the webstore here.
As always, feel free to share your models and terrain, or ask any Maelstrom's Edge- or hobby-related questions on the Comm Guild Facebook page!
For other Maelstrom's Edge modeling articles, including tutorials and walkthroughs of a wide range of different building and miniature projects, check out the Hobby section of the Maelstrom's Edge website here.
Tags: buildings painting scratchbuild spotlight terrain terrainsprue walkthrough
Terrain Spotlight: Adjustable Angled Catwalk
Posted on Thursday Jan 16, 2020 at 05:00pm in Tutorials
The various buildings that I've been putting together for my underhive rebuild have been deliberately inconsistent in their heights. I didn't want a table full of terrain that had every structure with floors exactly 3" apart. This does, however, cause some potential problems with laying catwalks between the structures. Where the height difference is only minimal, the catwalks sit fine, but where there is a larger mis-match things can get a little precarious. In the middle of painting my first batch of buildings, though, I had an idea for a catwalk setup that could be adjusted to fit between floors at a range of different heights - and this is the end result!
The majority of this catwalk is built from parts taken from Maelstrom's Edge terrain sprue #2. For the top surface, I used the grid-shaped floor grates from two sprues, glued into a strip two grates wide.
Underneath the grates, I added some support structure cut from foamed PVC sheet. To get the depth I wanted, I used a piece of 3mm and a piece of 1mm thick sheet, as that's what I had to hand.
For the ends of the catwalk, I took a pair of stair pieces, two sets of uprights from the weapon tripod and a couple of pieces of 1.5mm aluminium rod. I trimmed the back end of the stair pieces off and drilled a 1.5mm hole through each side, just underneath the top stair. Then I drilled matching holes through the centre of the circular parts on the tripod uprights, and trimmed off their locator tabs.
The aluminium rod then slotted in through the holes in the stair sides, with the tripod uprights on either side. I then glued this assembly onto underside ends of the catwalk by gluing the bottoms of the tripod uprights to the grates, leaving the stair piece free to swivel on the rod. I also added a bracket made from a cut up solid grate piece, to act as a brace to hold the catwalk in place, and glued support struts around the outside of the catwalk to pretty up the edges.
With everything glued in place, the stair pieces on each end can sit flat on floors on different levels with the catwalk at an angle, and with the bracing pieces stopping it from sliding off.
With some paint on, it winds up looking something like this:
To build your own catwalks (or anything else you can think of!), you can pick up the Maelstrom's Edge terrain sprues along with the rest of the Maelstrom's Edge range, from the webstore here.
As always, feel free to share your models and terrain, or ask any Maelstrom's Edge- or hobby-related questions on the Comm Guild Facebook page!
For other Maelstrom's Edge modeling articles, including tutorials and walkthroughs of a wide range of different building and miniature projects, check out the Hobby section of the Maelstrom's Edge website here.
Tags: buildings scratchbuild spotlight terrain terrainsprue walkthrough
Terrain Spotlight: Lift Building
Posted on Thursday Jan 09, 2020 at 05:00pm in Tutorials
I'm rolling into the new year with another building for my ongoing underhive table project. The Necromunda Outlanders supplement came with a nifty tower that had a (more or less) functional lift on it, for speedy access between floors. The original cardboard lift piece clipped into the side of the bulkheads that made up the side of the building. For this build, I decided to make use of the magic of magnets instead!
As I've done for most of these buildings, I started with a rough sketch, to get an idea of what I was aiming for. The final structure actually wound up a mirror-image of the sketch, but the basic idea was there.
The lift tower would be three levels, with doorways onto each level. I wanted to use a doorframe on both sides of the wall to keep things looking pretty, so used a strip of 3mm foamed PVC sheet for the main bulk of the wall, and padded it slightly with some 1mm sheet to make the doorframe holes deep enough to accomodate the inset flanges from both door pieces. The doorway pieces were taken from Maelstrom's Edge terrain sprue #2.
I cut the other walls of the tower from some more 3mm foamed PVC, and added some detailing to the back wall using some more of the 1mm sheet and some plastic offcuts from previous projects.
Under each doorframe, on the outer facing of the wall, I cut recess for the magnetic lift attachment. Into these recesses, I glued a piece cut from the terrain sprue #2 support struts, with two neodymium magnets superglued to the back. The magnets are facing opposite ways so the poles don't interfere with each other while sitting side by side.
The lift was made from grating pieces from the terrain sprue, with a PVC support beam on the bottom. Into the end of the support beam, I drilled two 6mm holes and glued in another pair of magnets, making sure to get them the right way around to match the wall magnets!
With the tower walls all glued together, I added some strips up the front edges of the lift wall using support struts and lintels taken from Maelstrom's Edge terrain sprue #1. These had been carefully factored into the wall dimensions so that the lift fit snugly in between them.
For the floors, as with most of the previous structures, I used double thicknesses of 3mm foamed PVC for rigidity, adding some strips of floor grates from terrain sprue #2 down the middle to break up the flat expanses.
To support the outer corners of the floors, I cut some 30mm strips of PVC and added support struts from terrain sprue #1 up the edges of each facing.
A couple of windows from terrain sprue #2 added to a square of PVC made for a nice cover-generating wall on the other side of the building, to support the small 1st floor platform.
The lift doors wound up slightly above the floor on each level, in order to avoid having to lift the bottom floor up far enough to accomodate the magnetic strut on the underside of the lift. A set of stairs from terrain sprue #2 glued in under the interior doorframe on each level sorted out the step.
The roof was looking a little sparse, so I took a generator from terrain sprue #2, glued it to a rectangle of PVC for just a touch of extra height, and stuck that along the lift side of the roof to provide some low cover.
There's obviously not much point having cover on the roof if there is no way up there, so I took a ladder from terrain sprue #1, some posts from terrain sprue #2, and some offcut support strut pieces and added a ladder access from the top lift floor.
Finally, I cut a square of hardboard to sit under the whole thing for strength. At this stage, the floors are still unglued, for ease of painting.
The whole collection so far, with some catwalks made for a previous article a while back:
Looking at it all together, I think it might be time to get some paint on this lot, and then work on expanding out to a full table from there. Stay tuned!
To build your own hive structures, you can pick up the Maelstrom's Edge terrain sprues, along with the rest of the Maelstrom's Edge range, from the webstore here.
As always, feel free to share your models and terrain, or ask any Maelstrom's Edge- or hobby-related questions on the Comm Guild Facebook page!
For other Maelstrom's Edge modeling articles, including tutorials and walkthroughs of a wide range of different building and miniature projects, check out the Hobby section of the Maelstrom's Edge website here.
Tags: buildings scratchbuild spotlight terrain terrainsprue walkthrough
Maelstrom's Edge 2019 Round-up
Posted on Thursday Dec 26, 2019 at 05:00pm in General
This year saw two of our biggest releases ever! Back in April, we added a fourth faction to the game, with the release of the plastic Militus Battlesuit forming the start of the Artarian Remnant's presence on the battlefields of the Edge.
Rather than using conventional military forces, the Remnant fight with elite Champions in highly advanced combat suits. Practically one-man-armies, these superlative warriors needed a model that did them justice, so we produced a multi-part, plastic kit that lets you assemble and customise your suits with a range of different weapons and poses available.
The Militus release was followed in short order by the arrival of the second Maelstrom's Edge terrain sprue! Terrain is incredibly important for making the most of Maelstrom's Edge games, and we want players to have as many options as possible there. As such, rather than producing limited, specific terrain kits we have carried on the concept from the first terrain sprue, giving players a range of new detail parts to use to customise their own terrain constructions.
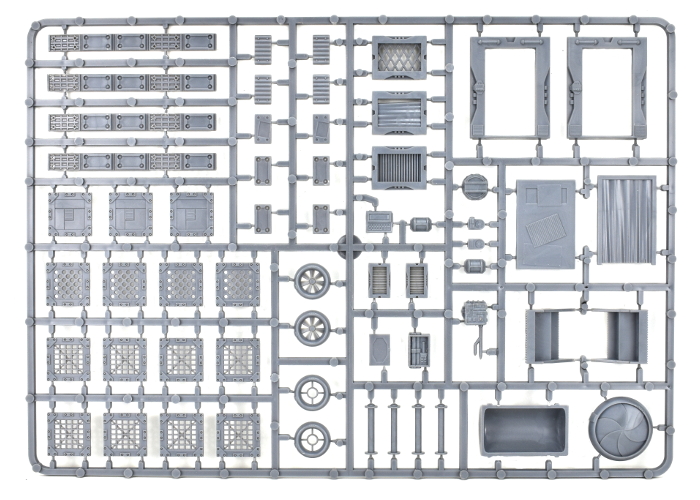
Loosely themed around Broken settlements, the new terrain sprue can be used by itself or combined with the original sprue to create a huge range of different buildings, ruins and urban or industrial features.
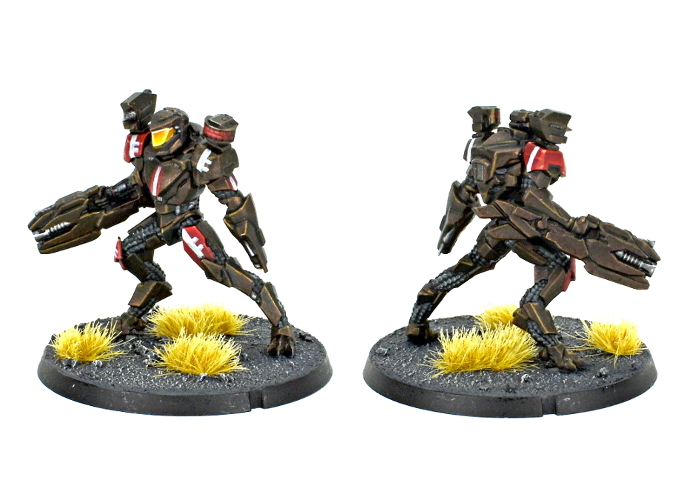
In other releases, things have been a little slower than usual this year due to some unavoidable delays in our production chain. We fleshed out our Epirian SecDef Rapid Insertion Teams with the addition of some weapon specialists. Equipped with dual clingfire throwers or flakk guns, these troopers add some punch to the fast-moving boostpack units.
We wanted players to have the option to take SecDef as a separate force to regular Epirians, so we added a resin SecDef Lieutenant to the range, and backed him up with a Medic to accompany Tactical Teams into battle and keep them on their feet.
On the rules front, we announced the ongoing development of a version 2 of the Maelstrom's Edge rules! Inevitably with something as complex as a miniatures wargame, there are things that wind up needing some tightening or adjusting, and as new units and factions are added to the game the core rules eventually need to evolve. Our aim is to keep the overall feeling the same, with a tactical and exciting game, while stripping out some uneccessary mechanics and tweaking some others to let the game flow better. To keep players involved in the process, there is a development thread on the DakkaDakka forums here where you can download a current playtest version of the V2 rules and provide feedback on the changes.
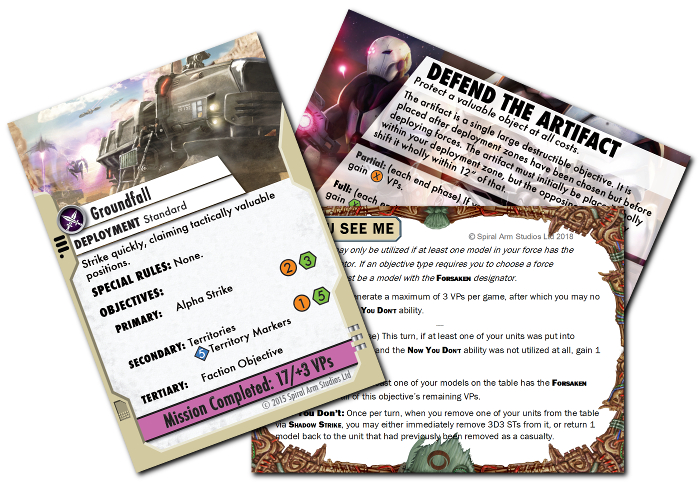
While we're all still on the current ruleset, however, we released the digitial version of the current rulebook for free download through the Maelstrom's Edge website. You can find this, along with downloadable versions of the Mission and Objective cards from the Battle For Zycanthus box, in the 'Rules' section of the website here.
Maelstrom's Edge V2 will be introducing rules for transport vehicles to the game. While vehicle models are likely to still be some way away, we thought there was no good reason to make players wait for these, so you can also find a set of trial transport rules for the current game here. This download includes some unofficial rules cards for transports for Epirian Contractors, SecDef, Broken and Karist forces, to use with whatever vehicles you decide to kitbash or repurpose - You can find some ideas on the Comm Guild blog, and in the modeling section of the Maelstrom's Edge website here!
SO - What next?
We have a lot planned for 2020! The primary aim will be to get the V2 rules finished, but along the way we have a slew of new model releases coming along. We'll be fleshing out the Remnant with new Nimbus scout suits and the massive Brutus support suit, adding more character options to Karist forces, and introducing more support options for Epirian and Broken forces.
And while all of that's happening, something else is stirring on the Edge...
Our thanks to all of those who have supported us as we have grown the game, from the initial Kickstarter through to where we are now. We're looking forward to sharing all sorts of new and shiny things with you in the years to come!
You can find the Maelstrom's Edge model range and the Battle For Zycanthus starter set in the webstore here.
As always, feel free to share your models and terrain, or ask any Maelstrom's Edge- or hobby-related questions on the Comm Guild Facebook page!
For Maelstrom's Edge modeling articles, including tutorials and walkthroughs of a wide range of different building and miniature projects, check out the Hobby section of the Maelstrom's Edge website here.
