Modeling Tutorial: Epirian Contractor Gas Masks
Posted on Monday Jan 02, 2017 at 05:00pm in Models
 - by Iain Wilson
In my continuing quest to find all of the fun and cool ways to customise the range of Maelstrom's Edge plastic models, this week I'm having a look at enhancing the humble Epirian Contractor, through the addition of a gas mask or rebreather to help him to stay upright and functional in some of those less human-friendly environments that they might come across on frontier worlds.
What You Need:
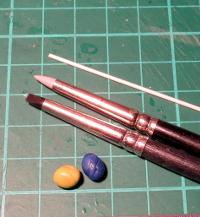
Aside from your contractors, you'll need a little green stuff, some sculpting tools (something flat, and something rounded - I like silicon clay shapers (also sometimes sold as 'color shapers' for painting), as they don't stick to the putty the way metal tools do), a little 1mm plastic rod and you may also find a hobby knife and some superglue useful.
You're best off working with the heads before they have been glued on the model, as you have a little more room to maneouvre that way. I find just working with the head on the sprue works well for this.
Note: For those new to putty work, 'green stuff' is the common name for a product called 'Kneadatite', which is a two-part epoxy putty. You have a blue component and a yellow component that you mix together until they go green, at which point they are pliable for sculpting for an hour or two, after which they set to a slightly-rubbery-plastic consistency.
What You Do:
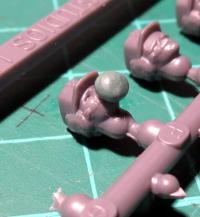
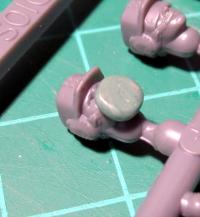
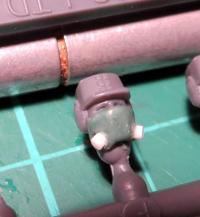
Roll a small ball of green stuff, and press it lightly onto the Contractor's lower face.
Tip: If you're trying to make a number of identical masks, roll out a long, thin sausage of green stuff, and cut off segments for each mask. This makes it much easier to get the same amount of putty for each mask.
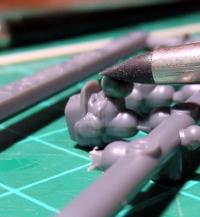
Using a flat sculpting tool, press the front of the ball down flat, angling down towards the chin.
Using a rounded or conical tool, roll the sides of the ball down to meet up with the Contractor's earpieces on either side.
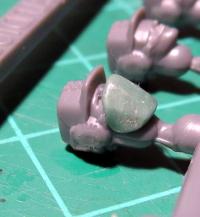
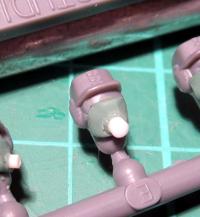
If necessary, use a sharp knife to cut the mask off just a fraction below the chin. If it juts down too far, you'll have problems getting the head to sit right without cutting off the front of the collar.
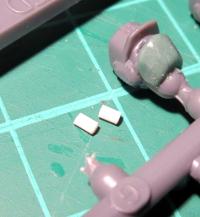
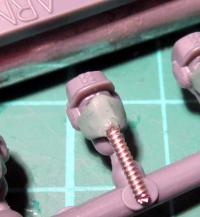
Then, cut yourself two 1-2mm lengths of plastic rod.
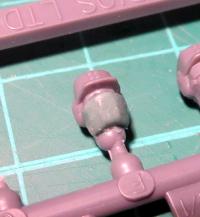
Press these into the 'cheeks' of the mask so that they protrude out diagonally downwards. It can help to add a small touch of superglue to the end of the rod that goes into the putty, to help it stick in place. Otherwise, they can work loose once the putty has set.
Leave for a couple of hours to let the putty set, and you're ready to glue the head in place and paint.
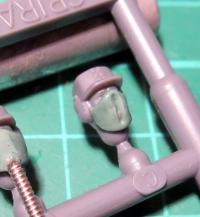
You can easily vary the design by modifying where you place the rebreather canister...
...using some guitar string instead if plastic rod, and running it down to a canister on the belt or armour harness...
...or leaving the canister off entirely and having an inset rebreather grill. This style also works well for converting a Karist Angel Keeper.
Working away at your own Contractor Squad? We'd love to see your work! Wander on over to the Comm Guild Facebook page to share your creations!
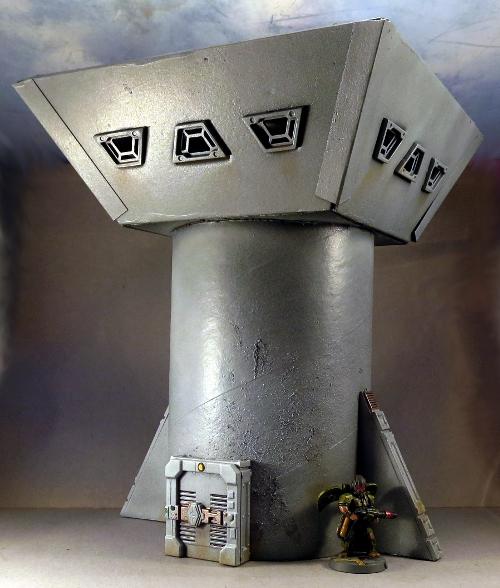
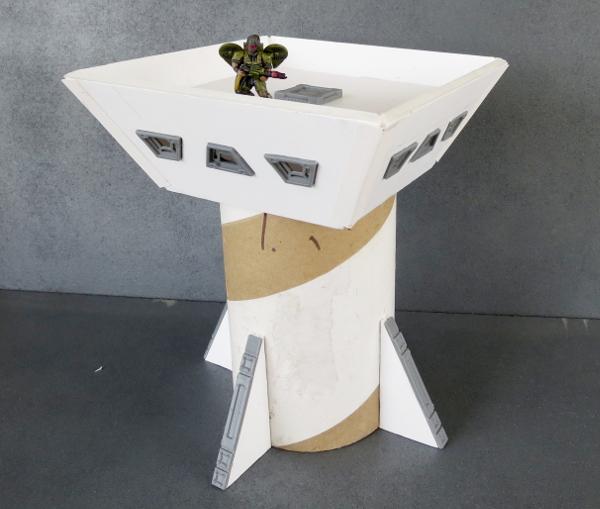
Terrain Spotlight: Watch Tower
Posted on Monday Dec 19, 2016 at 05:00pm in Models
- by Iain Wilson
It felt like far too long since I had built any terrain, and so this week I decided to throw something together out of some leftover scraps and odds and ends from some Maelstrom's Edge terrain sprues. And so, a watch tower was born!
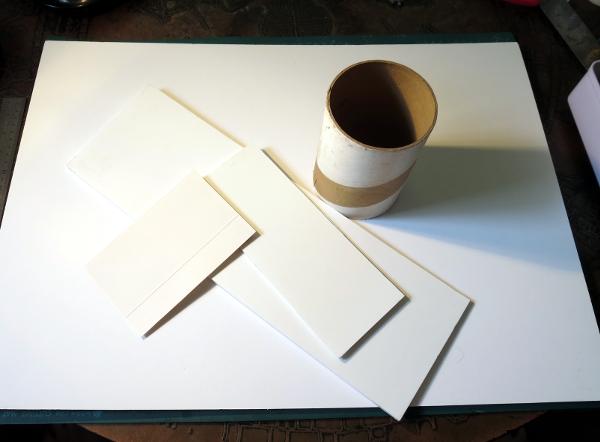
I started with just a vague idea of how this was going to turn out, and gathered up a bunch of useful materials: foam core, some thin cardboard, an offcut from an old postage tube, and of course the terrain sprues.
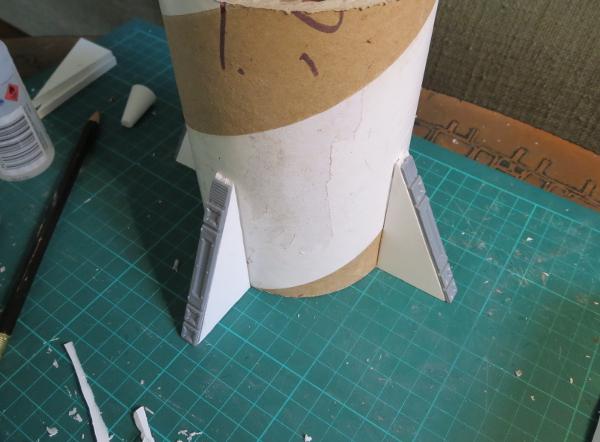
I also made use of a door assembly that I put together for a tutorial a little while ago and hadn't got around to sticking onto anything yet. This was build from one of the small doors off the terrain sprue, with boxing added around the back from a couple of the reinforcing detail strips.
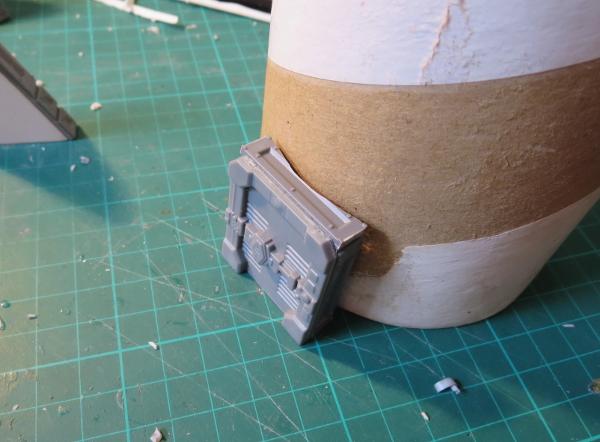
To fit the door to the curve of the tube, I rubed some chalk on the bottom of the tube, pressed the door against the tube with the top panel overhanging the chalked edge, and then rubbed it back and forth a couple of times to transfer the chalk to the inside of the panel. The it's just a matter of cutting away the chalked part of the panel with a sharp knife.
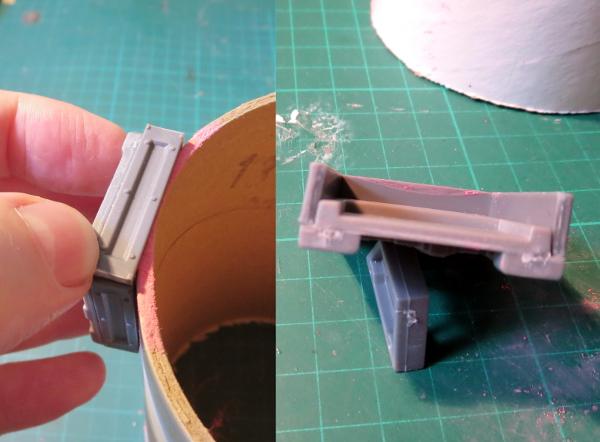
I wanted some buttresses spaced around the bottom of the tube. It's always a good idea when making gaming terrain to consider how the terrain piece will fit into the game. If you want your buildings to be more than just line of sight-blocking cubes, having some small protrusions around them that can be used for partial cover (buttresses, pipes, small balconies, etc) that models can lurk behind on their way across the battlefield is great for making them more useful on the table.
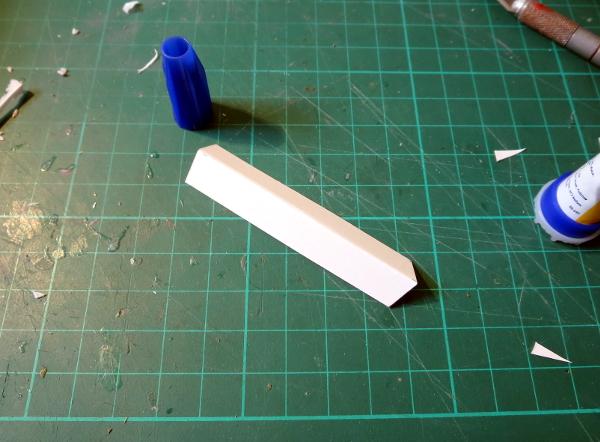
The buttresses were made from some 5mm and 3mm foamcore glued together, with reinforcing strips running up the angled outside edge.
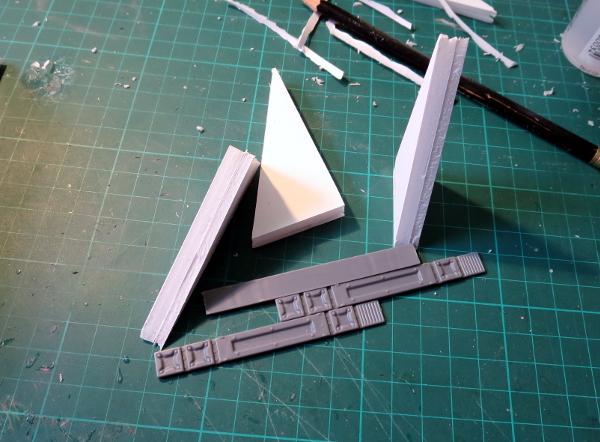
These were then glued in place at 90 degree spacings around the bottom of the tube.
Then it was time to build the watch chamber to go on top.
Taking some 5mm foamcore, I marked out the first wall.
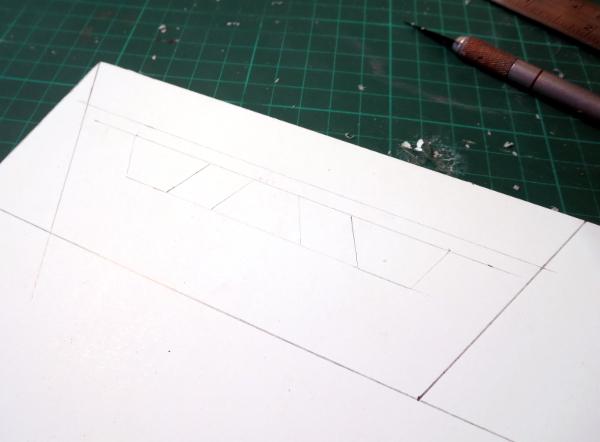
Using a sharp hobby knife, I carefully cut this out, and then used it as a template to make three more.

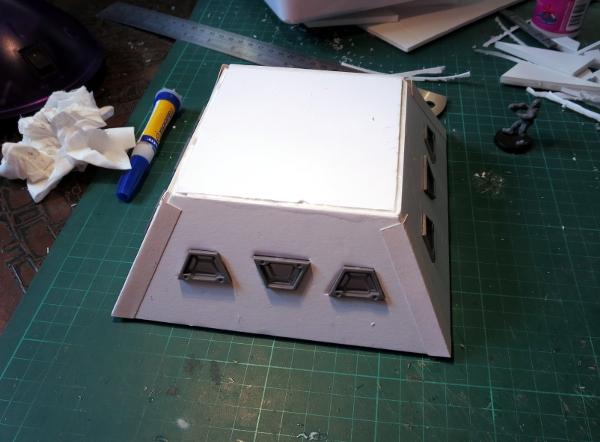
Trapezoid windows from the terrain sprue were glued into the window cavities, and then I chamfered off the back edges of the walls slightly to help them fit together for gluing. This wasn't particularly exact - that would have required far too much maths for a sunday afternoon, due to the angle of the walls. They'll be held together quite firmly by the glue and some cardboard reinforcing on the corners, so it doesn't matter too much if they don't meet up perfectly flush.
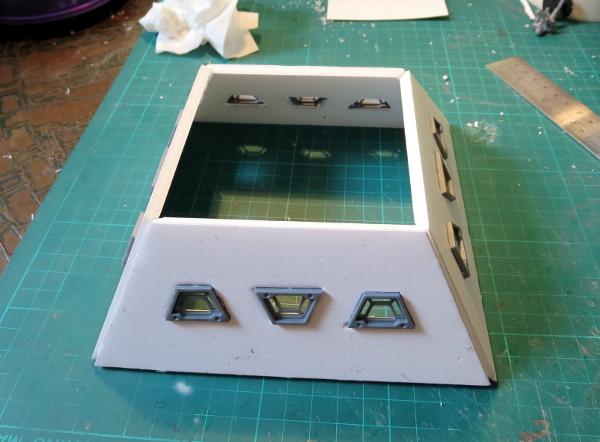
Speaking of cardboard reinforcing - these are just some 2cm-wide strips of thin card, cut with a bit of an angle at the top so that the outside corners don't stick up past the tops of the walls. Once superglued to the outsides of the corners, these add a bit of strength to the wall joints.
A square of foamcore with chamfered edges drops in to form the floor.
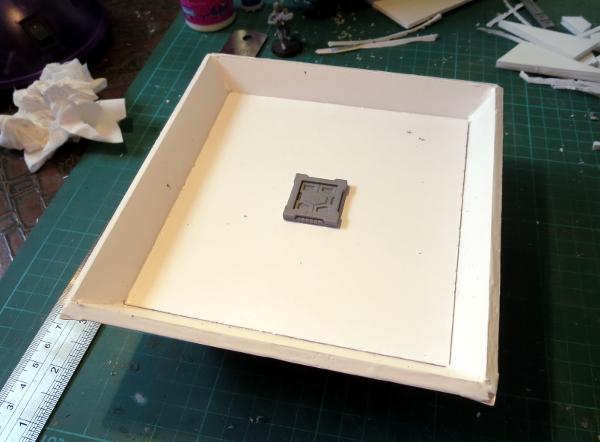
A similar but slightly larger square went in just above the windows, to create a roof with a nice little balcony. This comes back to the functionality aspect again - I like to have lots of buildings with game-friendly space on top. A hatch from the terrain sprue adds an access point from within the building.
(Note - if you care about having functional-looking and/or painted interiors in your buildings when they can be seen through the windows, remember to sort out the inside before gluing the roof on! Alternatively, painting the interior black before adding the roof makes it much less visible once everything is sealed up, or you could just glue small pieces of card over the insides of the windows so you can't see through them, and paint them up as opaque glass.)
Then all that remains is to glue the watch chamber to the top of the tube.
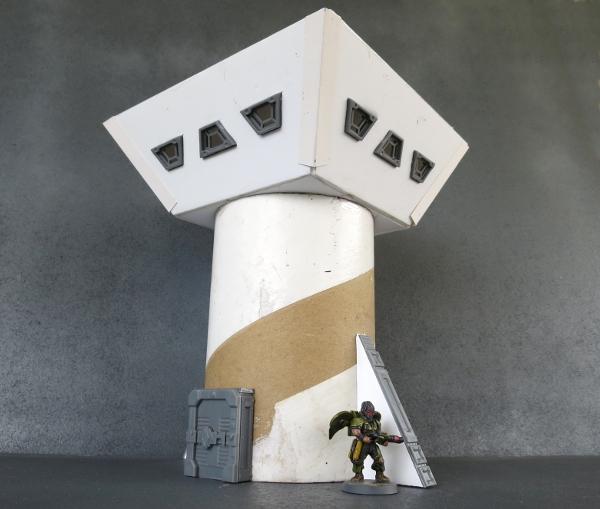
Once all of the glue is set, the watch tower is ready for painting and basing!
If you want to try your hand at building a watch tower of your own, or are feeling inspired to try something different, you can pick up the terrain sprue from the Maelstrom's Edge website here.
Be sure to share your creations on the Comm Guild Facebook page (https://www.facebook.com/groups/MaelstromsEdge)!
Tags: buildings terrain tutorial walkthrough
Epirian Warden Conversion Tutorial and Unit Card
Posted on Monday Dec 12, 2016 at 05:00pm in Models
- by Iain Wilson
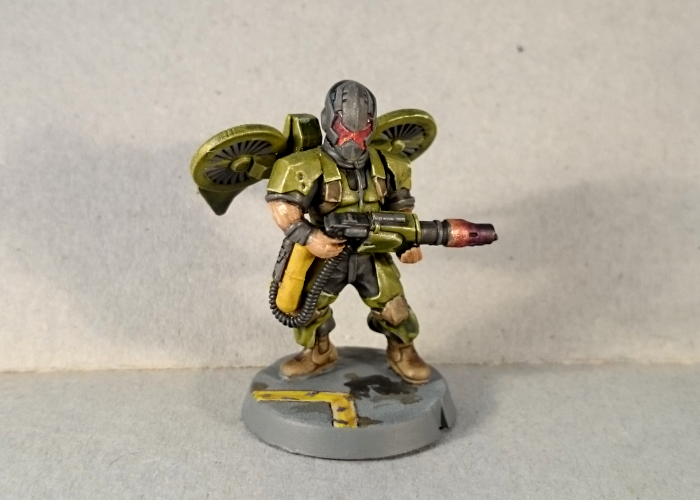
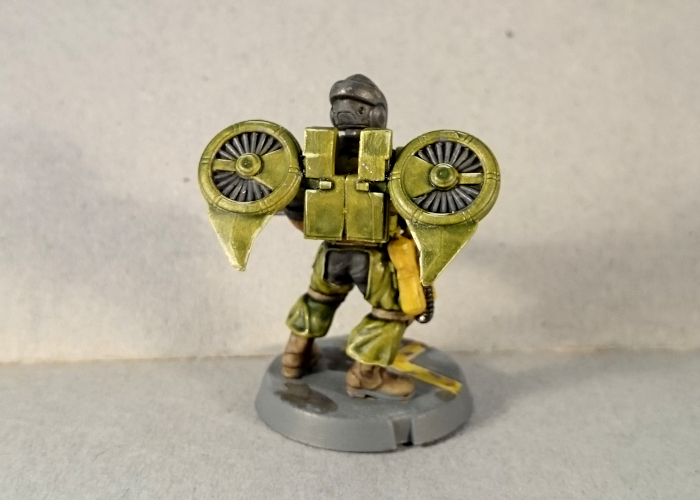
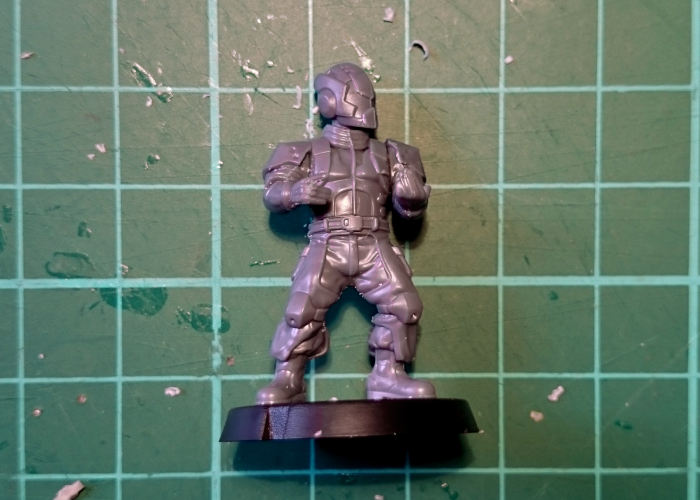
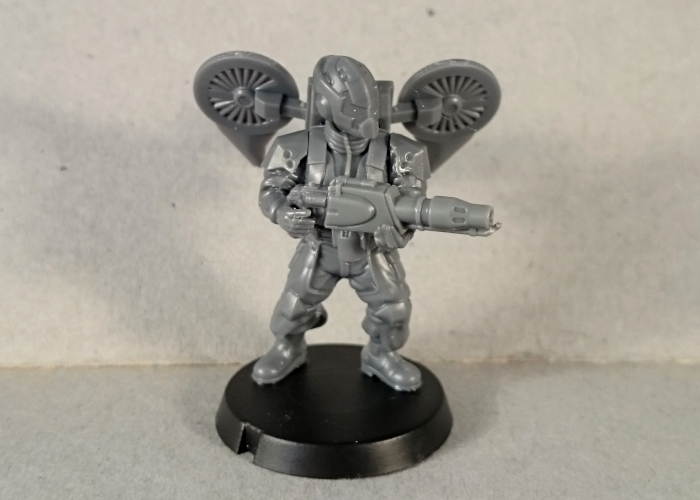
In amongst my early tinkering with the miniatures released for Maelstrom's Edge, I came up with a concept for an Epirian 'Warden' - a jump-pack-equipped solo character armed with a flame thrower, built rather handily using leftover parts from the Scarecrow and Drone sprues. He proved rather popular, so I've put together a tutorial showing how to build one for yourself.
The original conversion:
Building the Warden
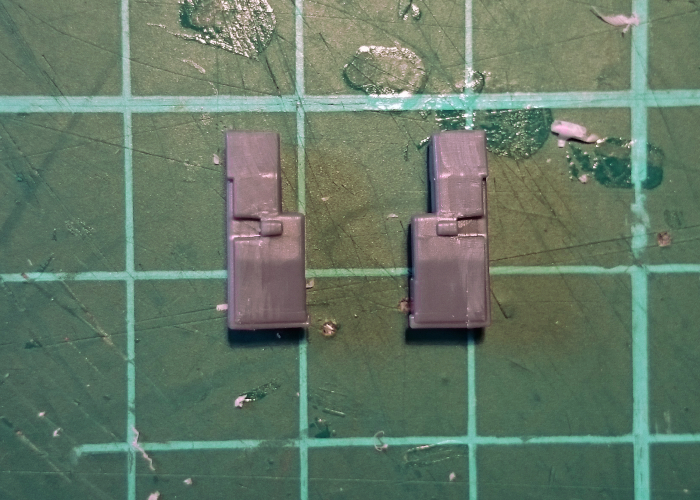
The original version requires a length of guitar string (or similar sized wire) for the flamethrower's fuel line and some pinning to hold the flight rotors in place. In order to keep things easier for beginners, I fine-tuned the design a little, replacing the separate tanks and fuel line with an integrated fuel canister, and slightly changing the way the jump pack goes together.
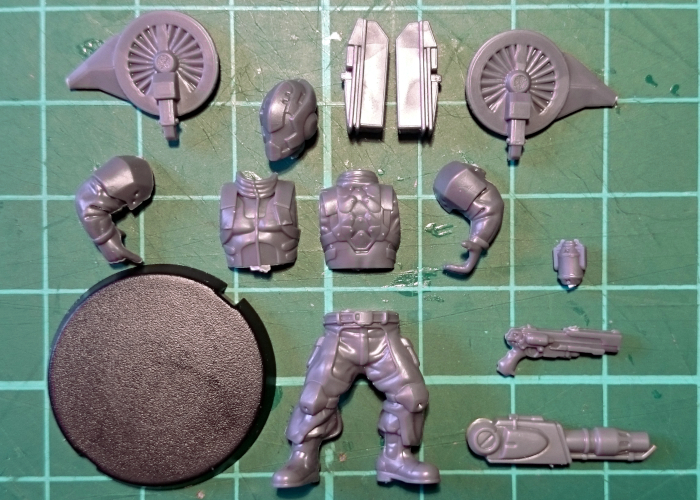
To build this version yourself, you'll need the following parts:
- A 25mm base
- Contractor or Bot Handler legs
- A Contractor torso and rifle arms (in this tutorial I have used the sleeved arms from the Faction Expansion sprue)
- A Bot Handler helmet
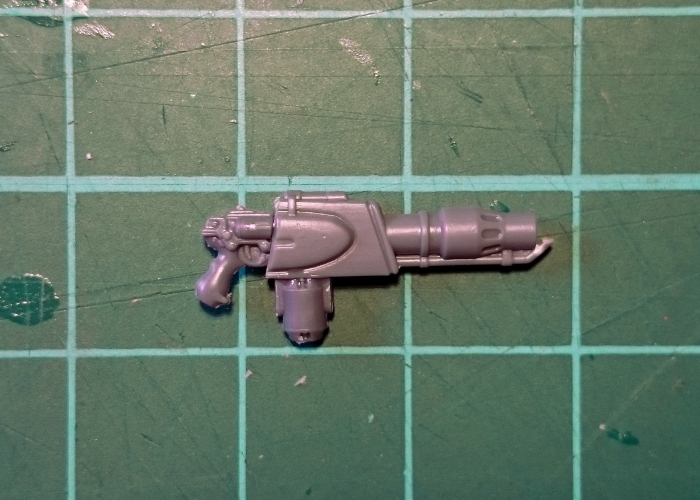
- A Maglock Pistol from the Contractor sprue
- A Clingfire Sprayer from the Scarecrow sprue
- A Choke Grenade (part F) from the Faction Expansion sprue
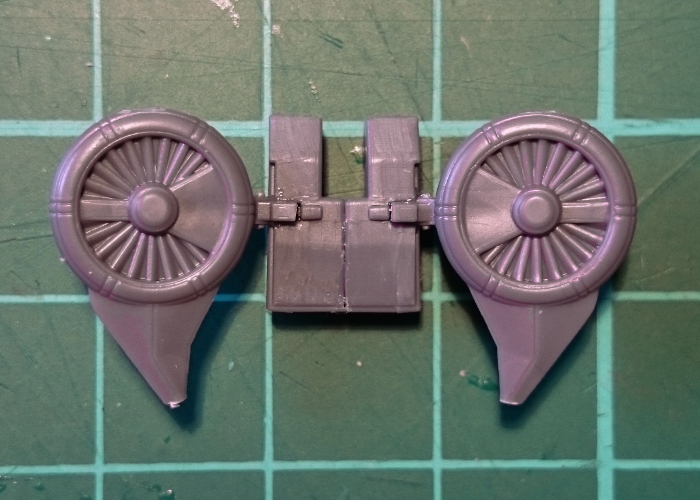
- Two rotors and the Drone side parts they connect to from the Drone sprue

You can pick up the parts you need to build your own Warden from the Maelstrom's Edge online store (www.maelstromsedge.com - You'll need the Epirian Contractor, Handler, Scarecrow, Drone and Faction Expansion Sprues, although if you already have those units (and went with Spider drones instead of Fireflies) you can probably build the Warden from your leftover parts.
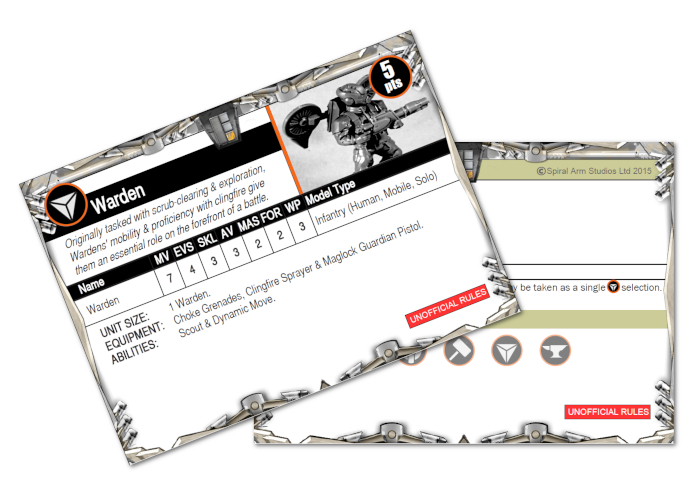
Updated 15th Nov 2022 - If you're interested in using the Warden in your games, you can find a rules page in the Maelstrom's Edge V2 Beta Rules section here, or a custom unit card for V1 in the 'Unofficial Cards - All Factions' document found here. This unit isn't an 'official' release for the game from the design studio, just something fun that I put together myself. So if you're planning on using him in your force, be sure to run it past your opponent first.
Tags: conversion epirian tutorial
Angel Keeper Conversion Tutorial and Rules
Posted on Tuesday Nov 15, 2016 at 05:00pm in Models
- by Iain Wilson
I've previously shown off a couple of conversions built to represent Karist Angel Keepers - a HQ unit that is currently in development and intended to offer a different way of playing Karist forces, by giving them access to an army potentially made entirely (other than the Keeper, of course) out of Angels. The conversions garnered a fair amount of interest, so I thought I should put together a brief run-down on how to do it. Of course, nice conversions are all well and good, but you also need rules to use them. So as an extra bonus, I snuck into the rules development vault and purloined an early playtest version of the Angel Keeper's unit card, which you can download as a PDF here.
Note: This card is now out of date. The current version of the Angel Keeper's rules can be found in the Karist Enclave file here.
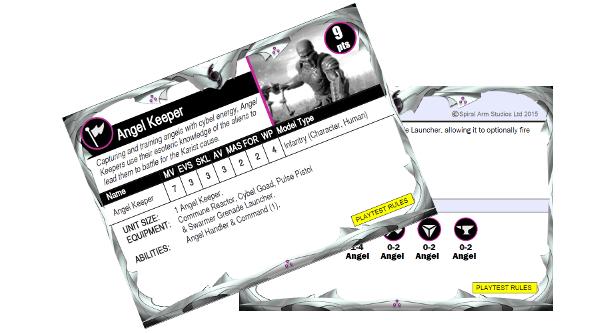
The PDF includes two cards: The Angel Keeper unit card, and a 'companion' card that includes new rules that apply to the Keeper. The rules on both of these cards are 'Playtest Rules', meaning that they're rules that are still being worked on, so you should ok it with your opponent before using the Angel Keeper in your games. Once the development process has been completed, the rules on the companion card will be rolled into the normal rulebooks and a final version of the unit card will be issued.
Obviously, the Keeper's force roster isn't yet as complete as it could be, because there are currently only the two angel kits - Minnows and the Mature Angel. Rest assured there will eventually be more unit options (and the associated model kits) to fill those other slots!
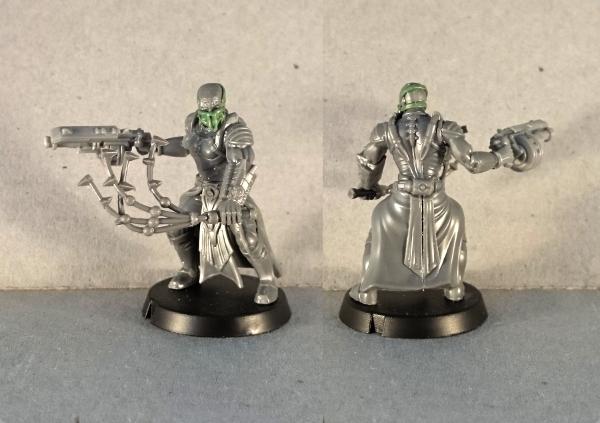
Building the Angel Keeper
My initial idea for the Angel Keeper included a sculpted mask and a flail lifted from a Games Workshop kit. He looked the part, but the sculpting required was going to be a turn-off for some players, so I worked up a second incarnation that used only MEdge parts, which looks like this:
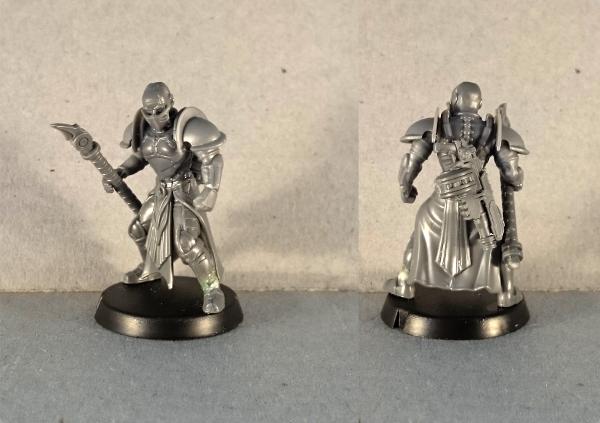
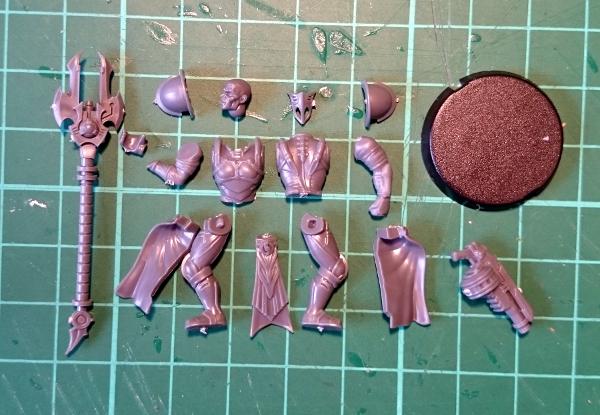
To build this version yourself, you'll need the following parts:
- A 25mm base
- Kaddar Nova legs and crown
- Shadow Walker Torso
- Karist Trooper arms and shoulder pads
- A bare head from the Kaddar Nova, Trooper or Expansion Sprue
- Ripper Grenade Launcher, Cybel Glaive and grabby hand* from the Expansion sprue
Assembly is mostly fairly straightforward: Build the legs as you normally would for the Kaddar Nova. You can create a slight visual break from the Nova by trimming off the bottom-most layer of the tabard, so it looks slightly less fancy than the Nova's if you like. Assemble and glue on the torso and the head.
One of the main identifiers for the Angel Keeper is the mask that they wear, which aids them in communicating with their angels. This mask covers the keeper's lower face, and is made by taking the Kaddar Nova crown and trimming away its peak, as below:

This is then glued in place with the former peak pointing downwards over the Keeper's nose and mouth. To give it a slightly better fit, slice off the Keeper's nose and if you're using a Kaddar Nova head (which is slightly more gaunt than the Trooper heads) it can help to make the mask a little more curved - hold it upright between your thumb and forefinger and give it a gentle squeeze to bend it very slightly, and then glue it in place.
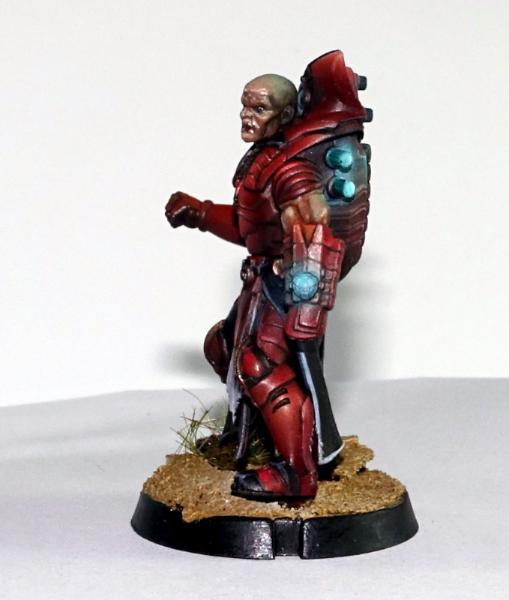
There is a small hollow in the small of the Nova's back, which is normally filled with the Nova's giant backpack. For the Angel Keeper, it's a handy place to glue the Ripper Grenade Launcher, hanging in reach on the Keeper's back for when it is needed and nicely disguising the hollow. If you're modeling your Keeper with the grenade launcher in hand, you can instead glue a grenade there, like on my first-generation keeper below:
The Angel Keeper is armed with a Cybel Goad, which he uses to encourage the angels in his charge to do as they're told, and also to whallop nearby enemies when the need arises. I envisaged the goad as potentially taking various forms depending on the preferences of the individual keeper - So some may use a staff or prod, others a whip or lash of some kind, or something else entirely. This opens up all sorts of modeling possibilities, but I'll show a couple of relatively easy options that I've come up with so far.
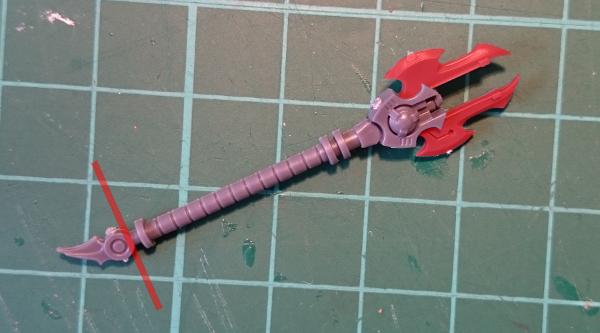
The easiest version of the goad uses just the shaft of the Cybel Glaive. Chop the head off just below the energy unit, along the red line shown below:

I picture this goad having a small cybel cannister in the round part behind the spike, which distributes a tiny jolt off cybel energy along the spike when it comes in contact with something.
Alternatively, you can trim the bottom spike and the blades off the glaive, as below:
This one is more of a taser-style unit, still requiring contact to use and administering a small cybel charge directly to the target rather than along a blade or spike.
Option number three is a little more complicated, using the handle from a Cybel Blade (from the Expansion sprue), the spike from the bottom of a Cybel Glaive and a short piece of metal guitar string to make a whip, as below:
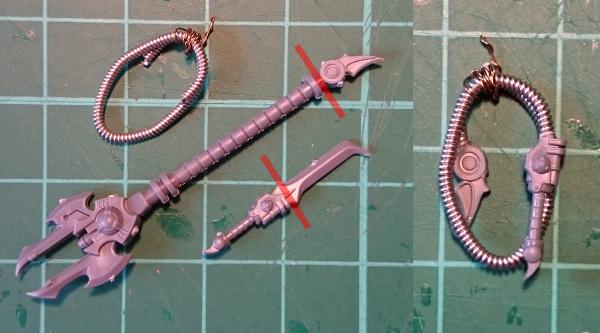
I have this one coiled up to hang on the Keeper's belt. The coiled guitar string is bound with a little fine copper wire to keep it together.
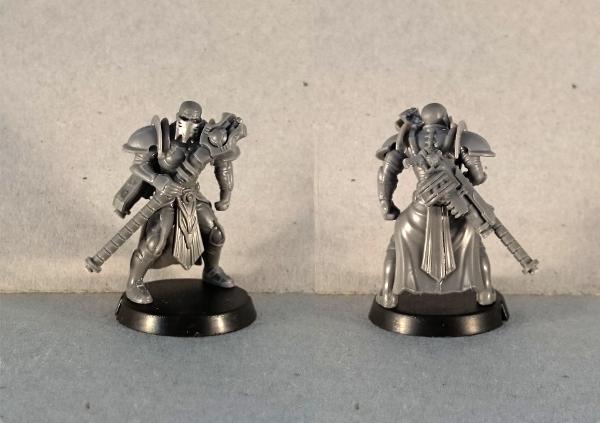
If you want your Keeper to have his grenade launcher in hand instead of his goad, the easiest option is to use the grenade launcher from the Trooper sprue instead of the Expansion sprue version, as it has the firing hand attached. For a single-handed grip, just slice or file off the support hand from the grenade launcher's stock. The pistol arm on the trooper sprue is nicely positioned out to the side for the grenade launcher - just cut off the pistol hand at the wrist, and glue the grenade launcher hand in its place.
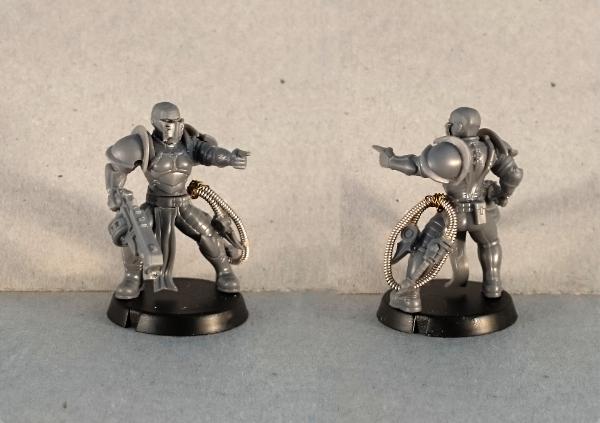
For the Keeper below, I have also used Shadow Walker legs with an Expansion sprue loincloth, instead of the Nova legs. This is an easy way to give your Keeper a slightly more dynamic pose or to make him slightly less austentatious.
You can pick up the parts you need to build your own Angel Keeper from the Maelstrom's Edge online store (www.maelstromsedge.com - You'll need the Kaddar Nova, Shadow Walker, Karist Trooper and Faction Expansion Sprue, which will build you an Angel Keeper and because of all of the extras on the sprues will still leave enough spare parts to still build a Kaddar Nova, a Shadow Walker and a unit of Karist Troopers or Praetorians.
We would love to hear any feedback you have on the Angel Keeper's rules, and see how everyone is building their own keepers, so please share your creations, questions or comments on the Comm Guild Facebook page (https://www.facebook.com/groups/MaelstromsEdge)!
Tags: conversion karist keeper pdf
Friday Photo - An Evil Looking Kaddar Nova
Posted on Friday Nov 04, 2016 at 05:00pm in Models
We've shared a few of our red Karist forces now, but this is the first showing of the very evil looking Kaddar Nova. The withered, blackened flesh lends itself well to a commander who has spent decades exposing themselves to deadly volumes of na-cybel radiation, ready for their ascendance. The colour scheme on this model just makes every little detail of the plastics pop so nicely in our opinion!
Forward Guidance: Individual Bases Now on Sale!
Posted on Sunday Oct 30, 2016 at 05:00pm in Models
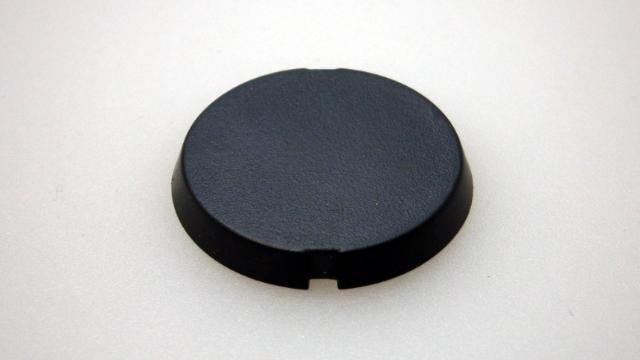
We are now selling bases individually for $0.50/£0.50 each, in packs of 5. Head over to the Maelstrom's Edge store to check them out. Please pass on the word to our friends in the Warmahordes community who might be interested in them too!
Friday Photo - Official Epirian Firefly Drone Colourscheme
Posted on Friday Oct 28, 2016 at 05:00pm in Models
This firefly shows our box art colourscheme in crisp, clear colour. Equipped with dual DCLS weapons, a squadron of firefly drones can really add some major tactical flexibility to your Epirian force.
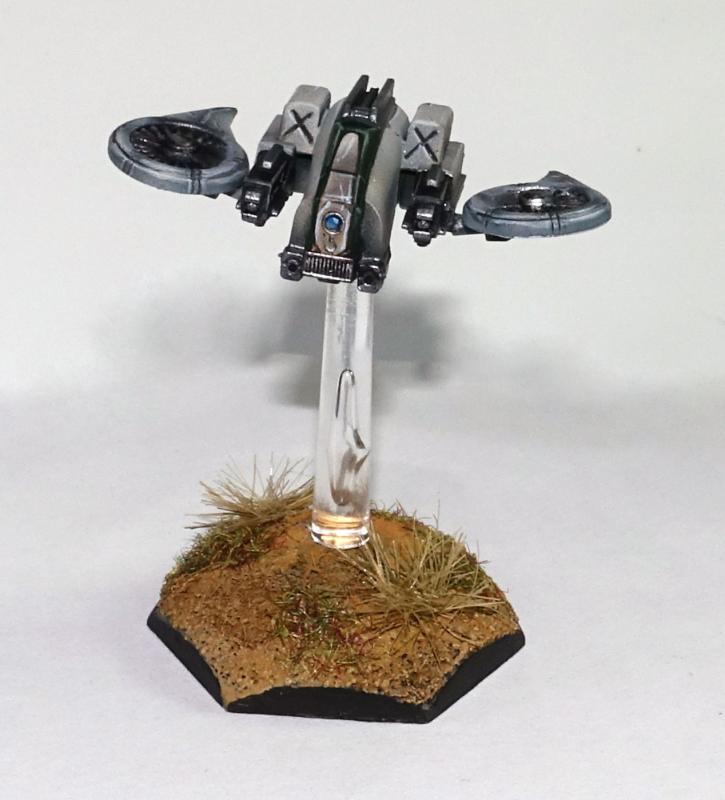
Friday Photo - Crazy Hunter Firepower
Posted on Friday Oct 21, 2016 at 05:00pm in Models

When you really need to put down some large Broken infantry units, few things are more effective than a Hunter equipped with two sets of suppressor dual machine guns and two cluster missile pods.
Tags: dualmachineguns epirian hunter painted
Forward Guidance: Individual Bases on Sale Soon!
Posted on Sunday Oct 16, 2016 at 05:00pm in Models
Starting in November, we'll be offering bases for sale in packs of 5, so you'll be able to purchase standard, medium or huge bases on their own with those lovely arc marker notches in the side. Suitable for any game with forward/rear arc requirements, we hope it will open up some nice conversion and hobby options for you!
Friday Photo - The Big Red Beast
Posted on Friday Oct 14, 2016 at 05:00pm in Models
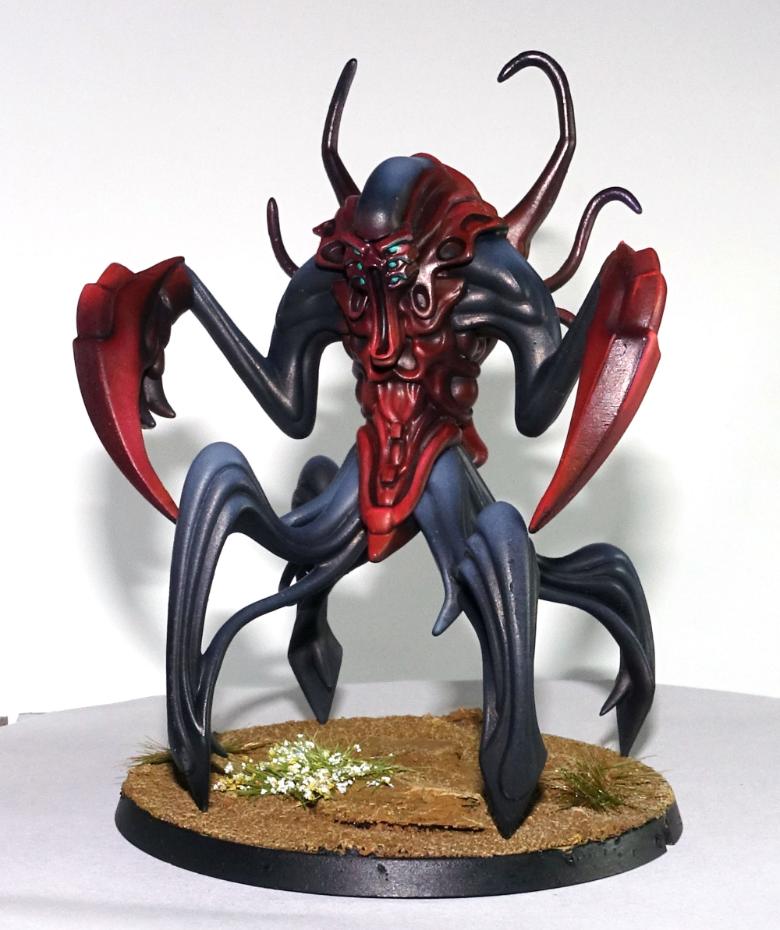
This striking Angel colourscheme is part of our red studio army by Lil'Legend Studios. The contrast makes it quite difficult to photograph effectively, but the sinister undertones can't be missed. Definitely not a creature you'd like to find tearing through the hull of your vehicle.
Friday Photo - Epirian Handler Looking Badass
Posted on Friday Oct 07, 2016 at 05:00pm in Models
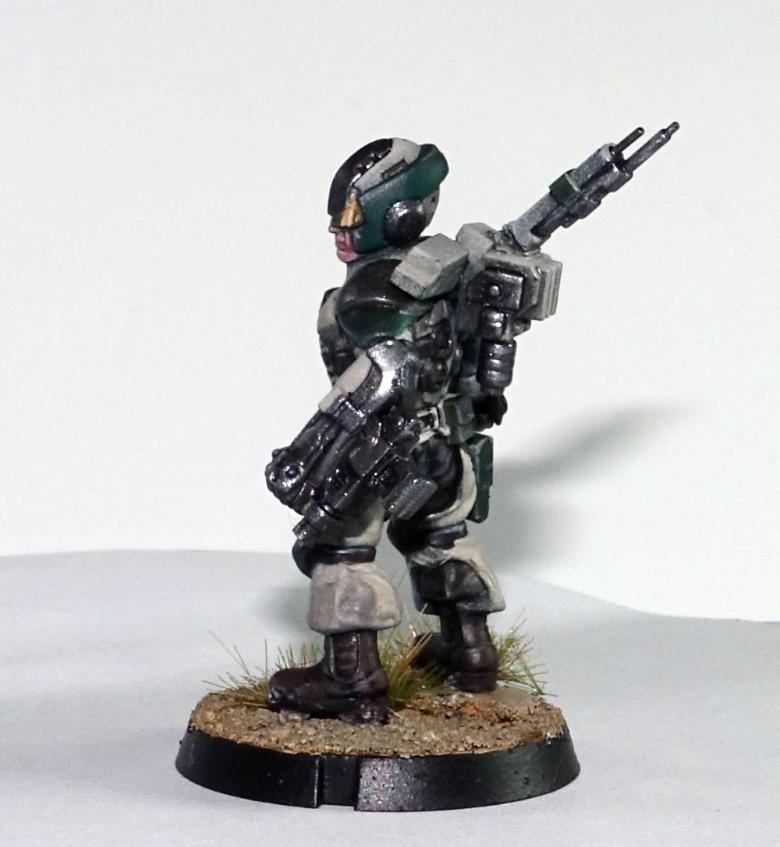
With most of our models generally shown from the front, it is easy to miss the crazy amounts of detail on all sides. This shot of one of our studio Epirian Handlers shows just how much detail these plastic models can have!
Gift Box Building with the Maelstrom's Edge Terrain Sprue
Posted on Thursday Oct 06, 2016 at 05:00pm in Models
- by Iain Wilson
The Maelstrom's Edge terrain sprue is a fantastic resource for enhancing your games. Packed as it is with different bits and pieces for crafting buildings and scifi accessories, it serves as a handy base to combine with foamcore, cardboard, plastic containers, the cat*, foam packaging inserts, plumbing supplies, or anything else you can think of to create distinctive and personalised battlefield terrain.
*Don't glue things to the cat. Seriously.
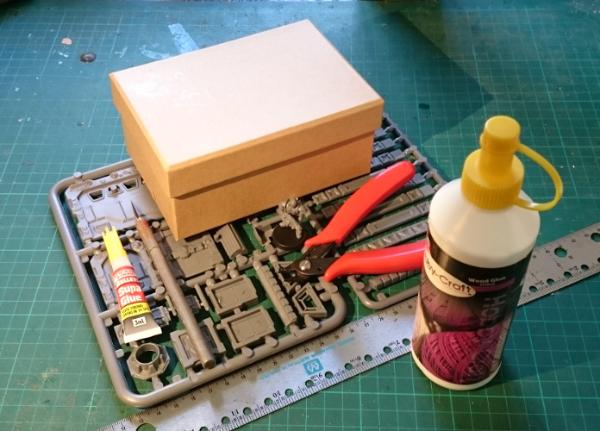
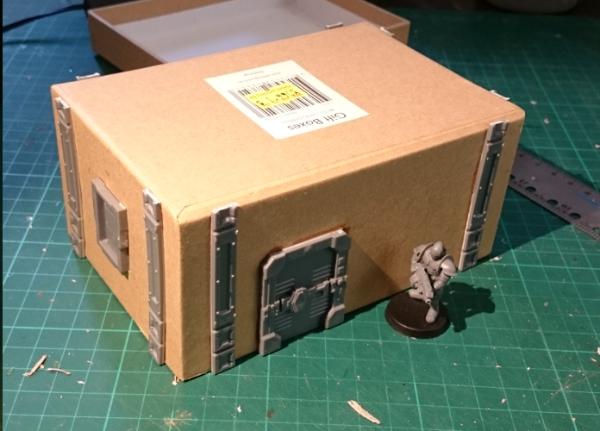
For now, I'd like to focus on one particular way to use the sprue, by crafting a basic building using a cardboard gift box.
These are fairly readily available all over the place, are generally made of a fairly sturdy cardboard, and are (best of all) cheap. You can also get them with all sorts of pretty patterns on them, but you'll probably want to paint them, so that’s less important, really.
Here’s a quick video showing the build process:
You will need: a giftbox, the terrain sprue, some glue (superglue for gluing the plastic parts on, PVA/wood glue for gluing the box lid on) clippers, a pencil, a sharp knife, and a ruler can be useful for marking out parts.
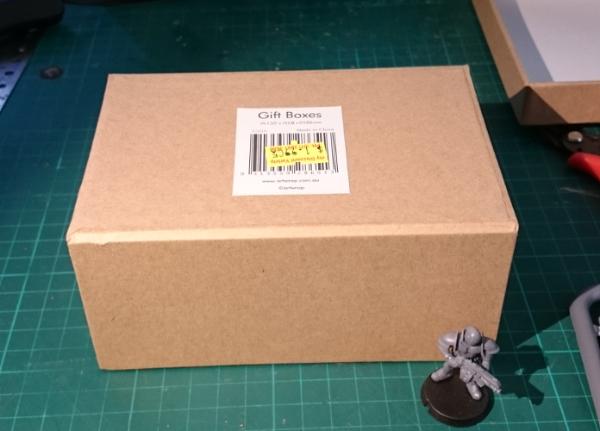
I want a building with a walled roof, as that gives some nice line of sight-blocking terrain while giving troops somewhere elevated to stand. So the box will be turned upside down, and the lid will eventually be glued on top, also upside down.
First step is to cut the parts you want to use off the sprue and clean up any mould lines.
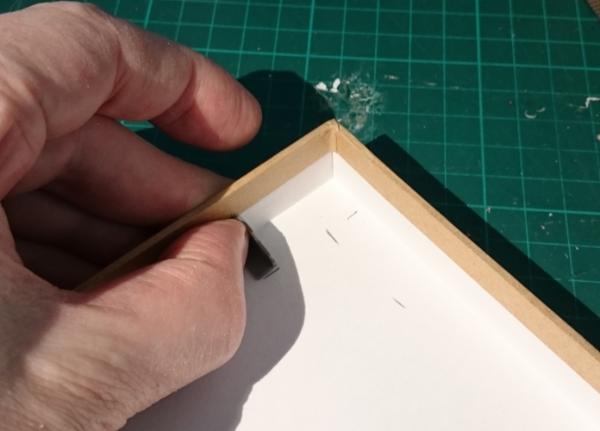
I'm using the long support pieces vertically on the walls of the building, so they need to be trimmed down to the height of the box. That's simply a case of taking the lid off, holding one of the supports against the box to mark where to cut it, and then cutting them all off at that point.
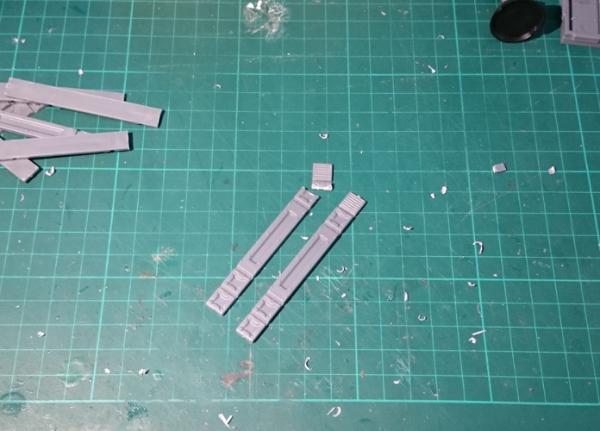
Put the leftover pieces aside - they'll come in handy for other projects.
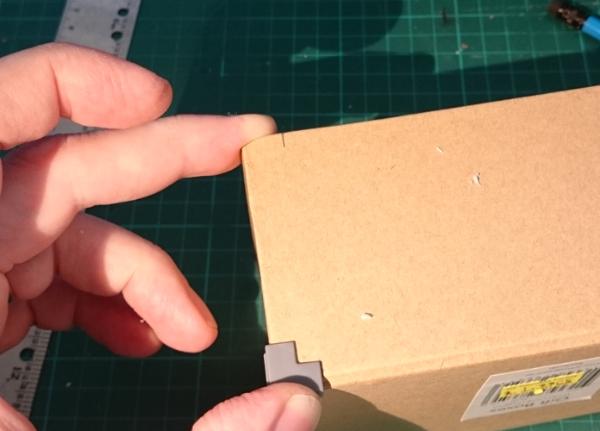
Next, measure out where the supports will go on the building. I tend to use them slightly in from the corners of my buildings, rather than as corner bracing - this looks neater, as they don't meet in a flush corner if you butt them up against each other right on the edge.
You can put them wherever you like, so long as it's consistently spaced around the building. Here, I've used a corner brace to mark out the spacing, by placing it up against the corner and marking against the side of it. Repeat top and bottom on both sides of each wall.
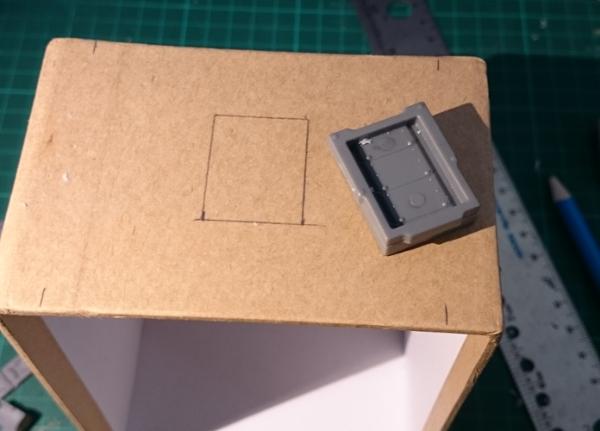
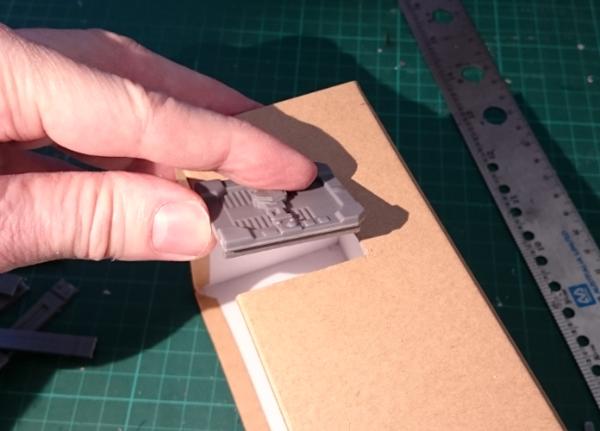
Next, work out where you want to put your door. Hold it in place against the building wall and draw around the back of the door frame with a pencil.
Do the same for the windows - I've gone for one on each end of the building.
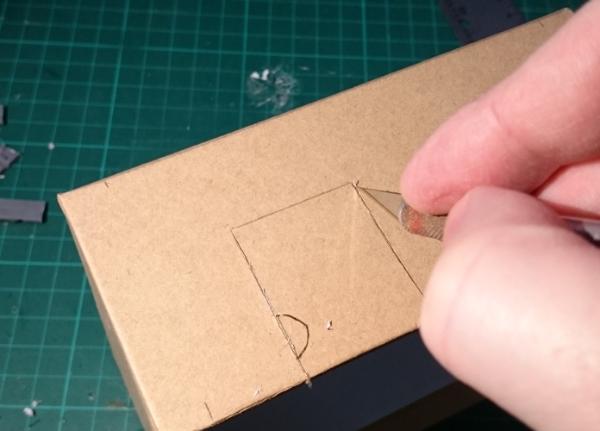
Then take your knife and carefully cut out the door and window holes. Note that the windows don't actually have to be inset into the walls - the box frame design means that they actually look pretty good just glued on the outside. So you can save yourself some cutting if you're in a hurry. I do prefer to inset them, though, as it looks a little more polished.
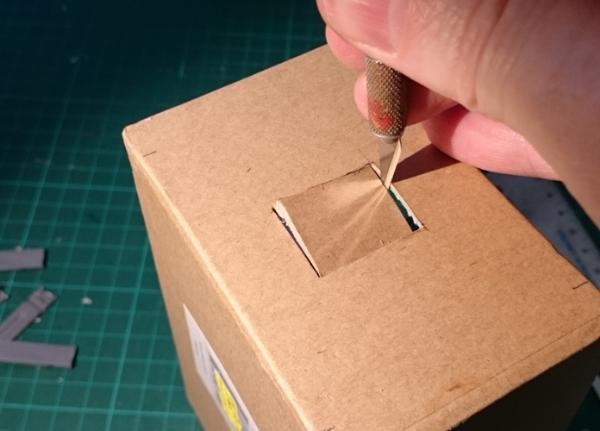
Once the holes are cut out, check that the parts fit in securely - trim up if necessary.
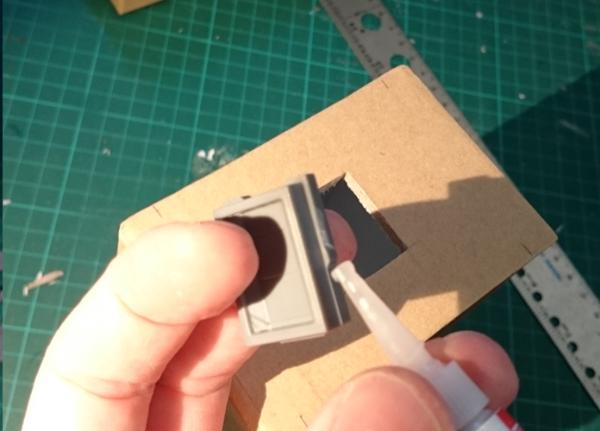
Then it's time to glue everything in place. Apply a small amount of glue around the door and window frames and push them into place. You can 'hide' the glue behind the protruding frame on the sides and bottom of the windows, so that you get less overflow onto the cardboard.
Run a line of glue down the back of the supports, and press them into place against your pencil marks on each wall.
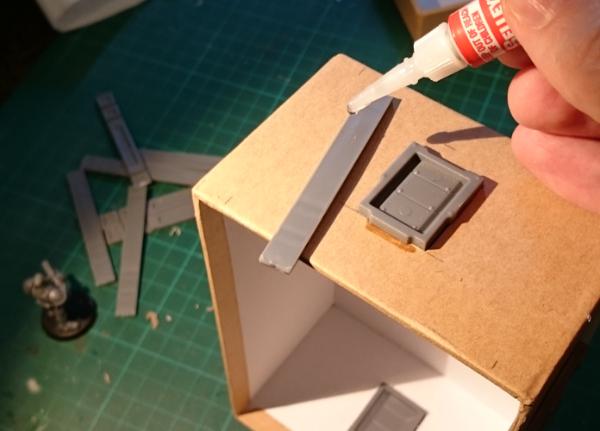
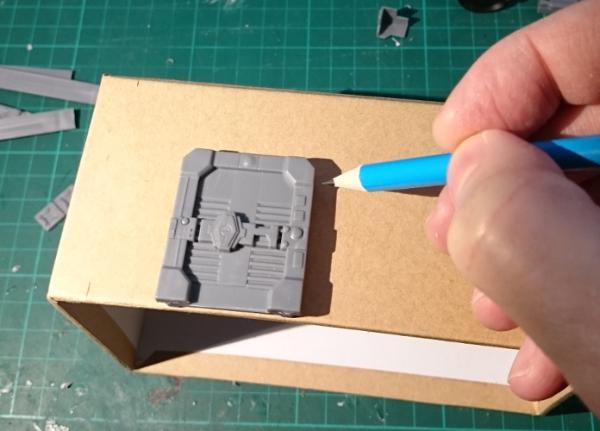
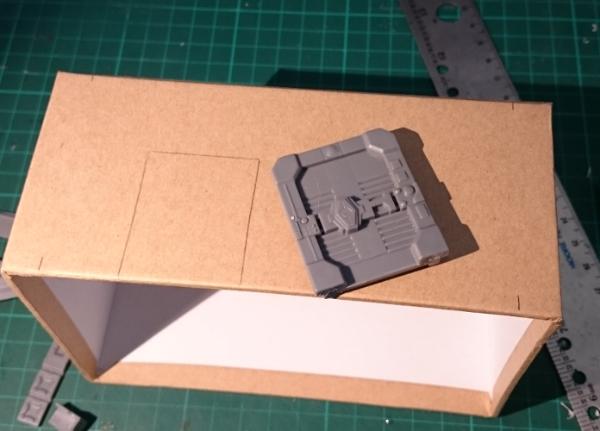
Next, grab your box lid, and on the inside mark out where you want the roof hatch to go. Once again I've used the corner brace to mark out an even distance from the sides of the box lid. Then glue the hatch in place.
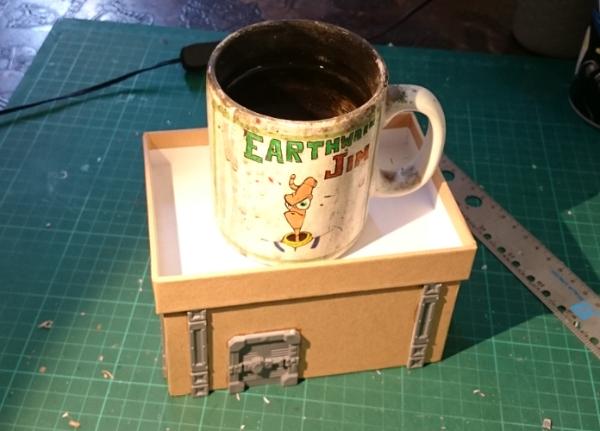
Now we can glue the roof on. Spread some PVA glue liberally over the top side of the building, press the lid on upside down, and sit something heavy on top to hold it snugly in place while the glue sets.

You could use superglue for this if you don't have any PVA or if you're in a hurry, but the PVA glue gives a better bond if there are irregularities in the cardboard that stop the two pieces from meeting perfectly flush.
While the roof is setting, we can hack the sprue a little to add some extra detail to the back of the building. Cut a corner piece off the narrower side of the sprue, as below. This will become the pipe for a small chimney or air vent.
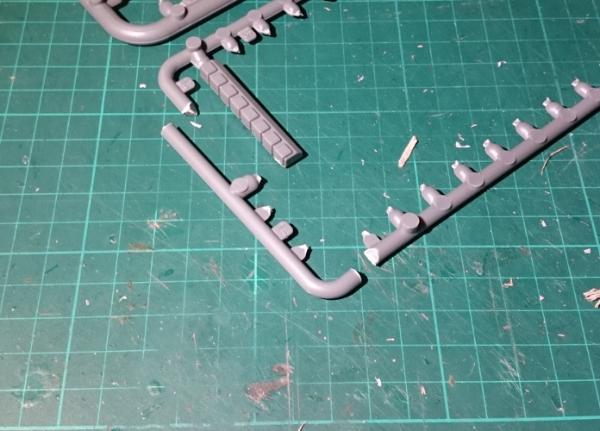
Clean off the extra tabs and the mould line, and grab the small pipe fitting off the sprue.
A handy feature of this part of the sprue is that it fits perfectly into a 1/4"(7mm) plasticard tube, which in turn fits snugly into the small pipe fitting. So cut yourself two short segments of tubing - one for each end of the 'pipe'. If you don't have any plasticard, you can also use a strip of thin cardboard (cereal packet or the like) wrapped around the sprue instead.
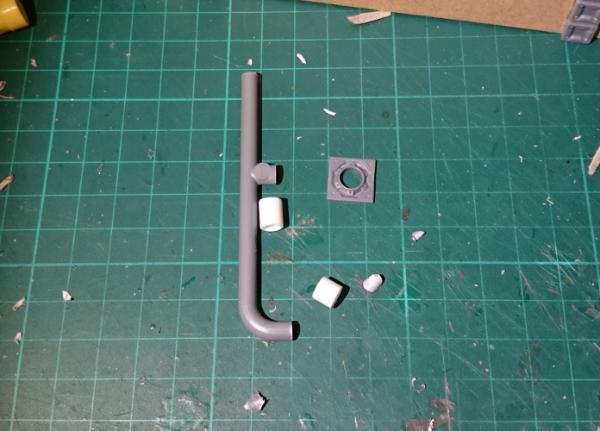
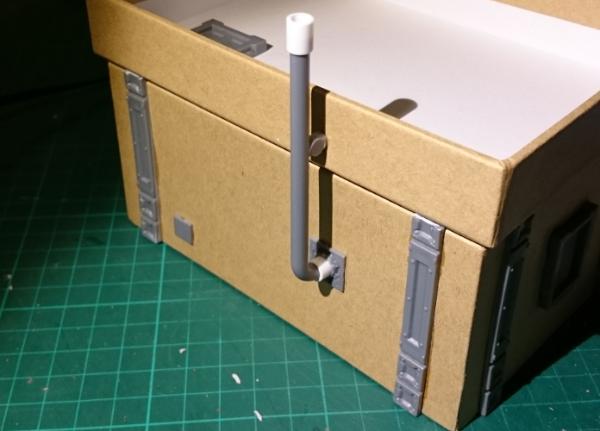
Glue the tubing (or cardboard strips) onto the 'pipe', glue the curved end into the pipe fitting, and check the fit against the back wall of the building. You can trim up the protruding sprue support as necessary to make sure the chimney sits vertically and the pipe fitting is flush against the wall. Then glue in place.
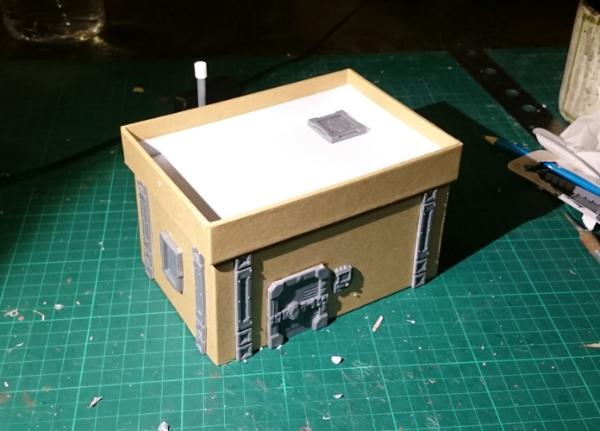
I have also added one of the small vent pieces that was trimmed off the wall supports right at the start, just for a little extra detail, and glued a comm panel onto the front wall beside the door.
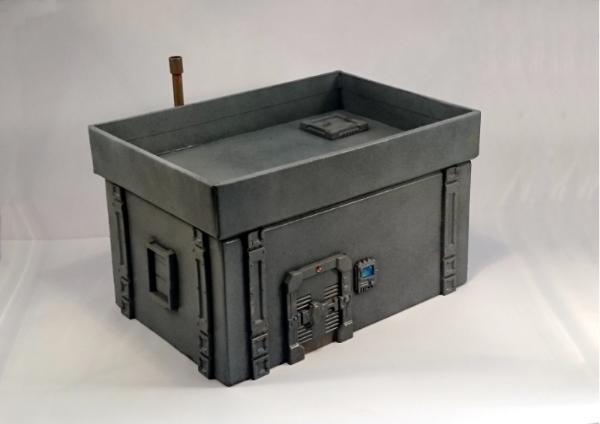
So the finished building looks something like this:
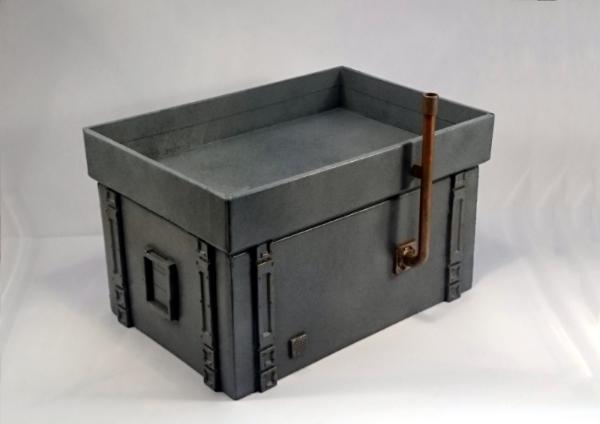
This can then be decorated however you like. I would recommend a good spray paint for the basecoat, particularly if the boxes you are using have a glossy finish. The building below was basecoated with black spray, and then given a spray coat of a medium grey, and a final highlight with a light grey spray from above, to leave the darker colour in the recesses and undercuts.
The 'chimney' pipe was painted in copper with a light drybrush of green to dirty it up, and some details like the comm panel screen and the light above the door picked out for a little extra colour. You could also add on building numbers, posters, warning signs, or anything else that you might find on a real building - we'll be covering some different ways to pretty up your battlefield terrain in a later article.
Pick up the terrain sprue from the Maelstrom's Edge online store here and give it a go! You can share your creations on the Comm Guild Facebook page here: https://www.facebook.com/groups/MaelstromsEdge
Terrain Thursday: Strategic Outpost
Posted on Thursday Sep 29, 2016 at 05:00pm in Models
We have quite a few pieces of terrain in our studio collection now. One of our absolute favourites is the strategic outpost.
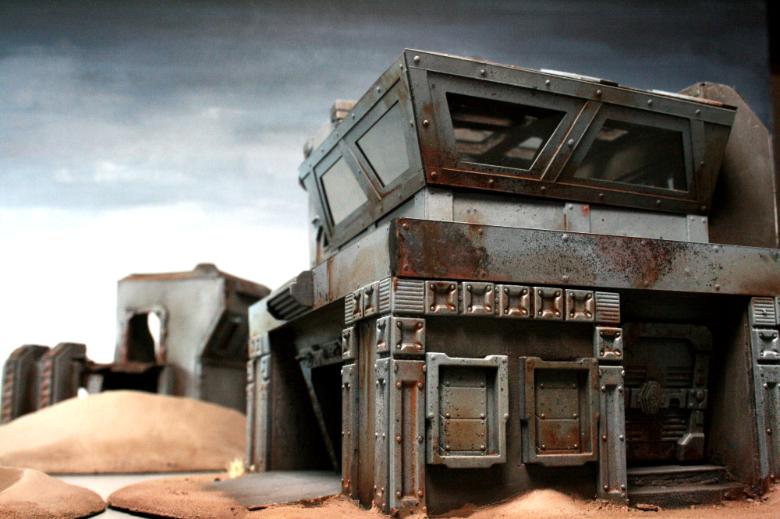
The upper floor's windows are transparent plastic, and not visible in the photos is a cool staircase leading to the upper floor.
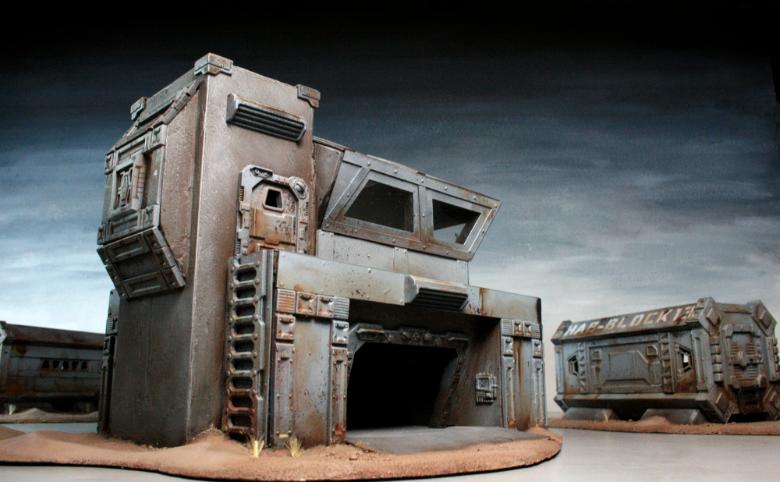
This building was primarily made out of foamcore, thin plasticard and normal card, and the Maelstrom's Edge terrain sprue.
Community Spotlight: Chris' Dig Site Objectives
Posted on Wednesday Sep 28, 2016 at 05:00pm in Models
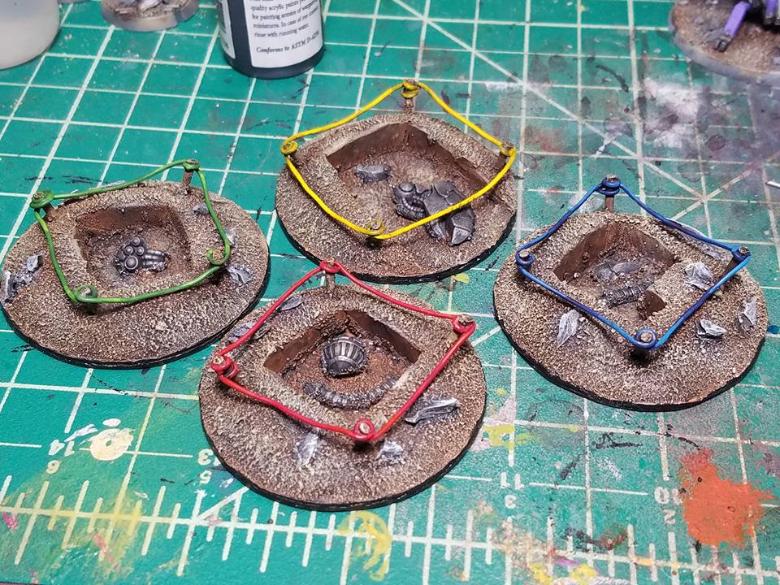
This morning on the Maelstrom's Edge: Comm Guild facebook community group, Christopher Wailes posted these fantastic dig site objectives. We wanted to share them widely, immediately as they are really good!
Tags: digsite modeling objectives painted
Friday Photo - Light Blue Epirian Scheme
Posted on Friday Sep 23, 2016 at 05:00pm in Models
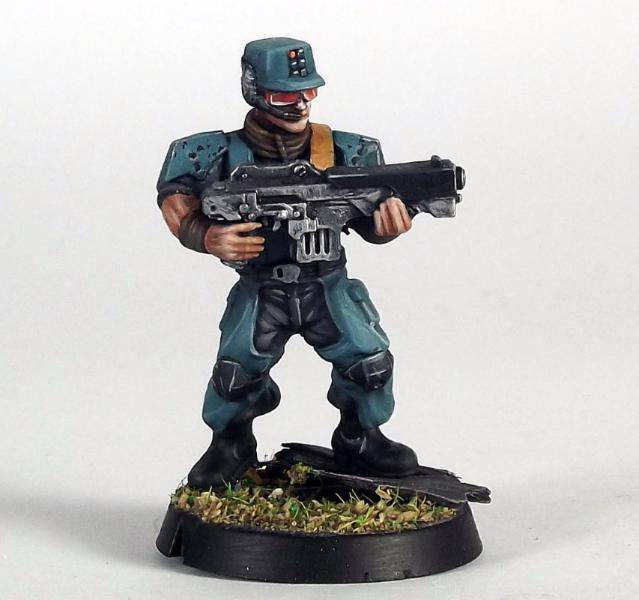
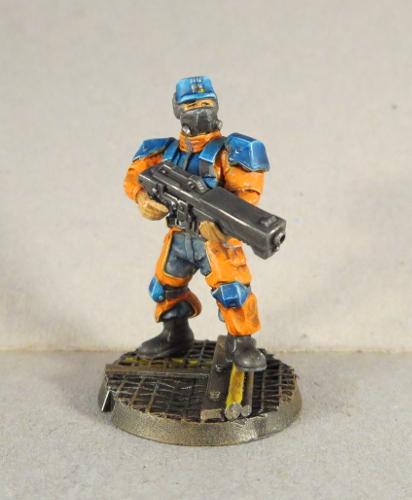
This week's photo is of a nice, light blue colourscheme for the Epirians. A lot brighter and less military drab than most of our other palettes, this scheme uses a classic blue/orange colour combo to good effect. The model has also been assembled with stuff underfoot, changing the default pose of the Epirian Contractor.
We don't have any robots painted up in this colourscheme yet, but would love to see some if anyone out there wants to have a go!
Tags: contractor epirian painted
