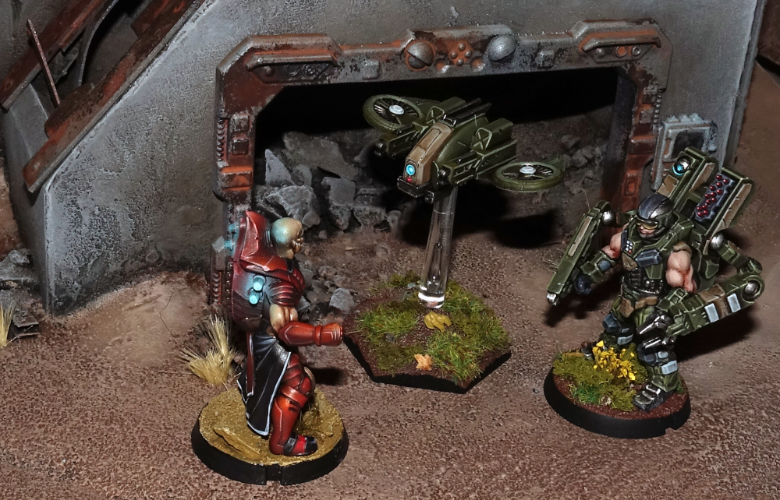
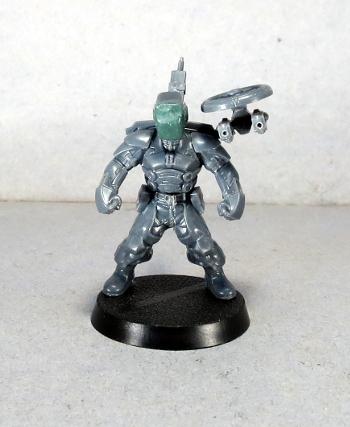
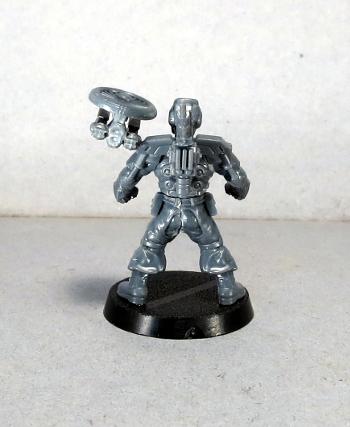
Modeling Spotlight: The Epirian Master Bot Handler
Posted on Monday May 07, 2018 at 05:00pm in Models
- by Iain Wilson
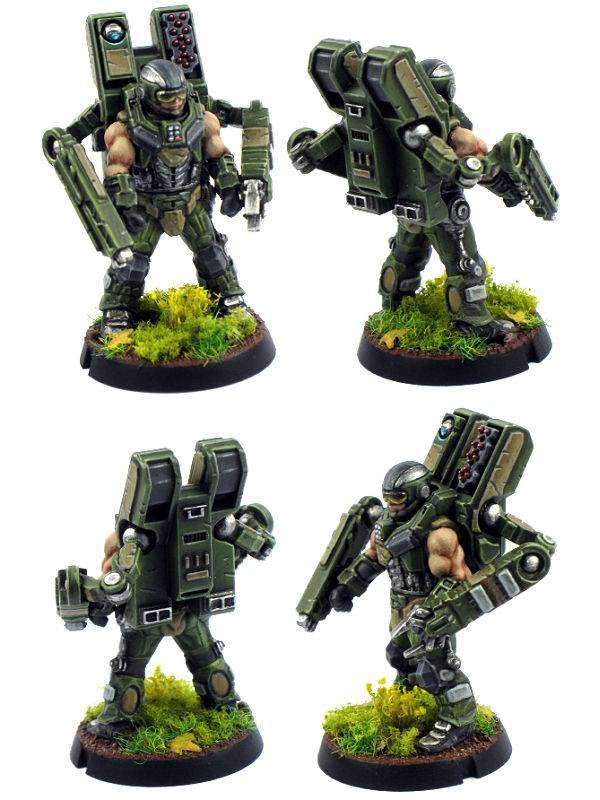
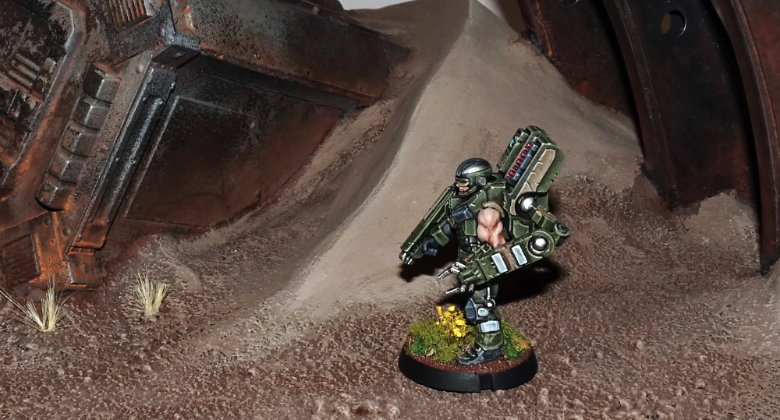
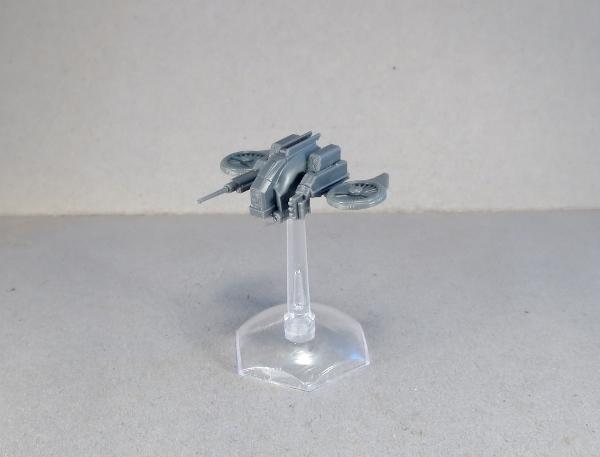
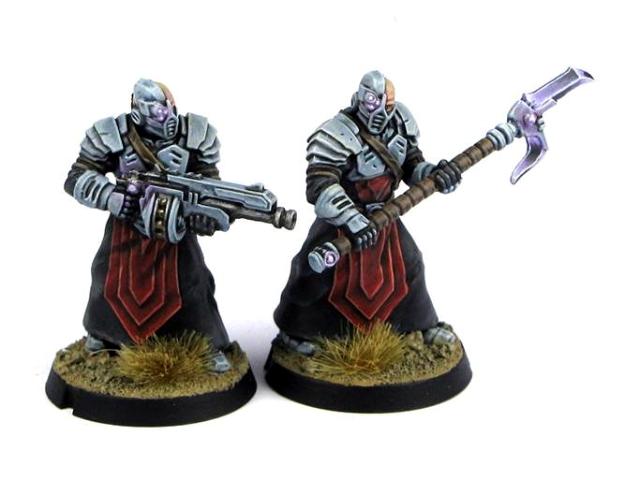
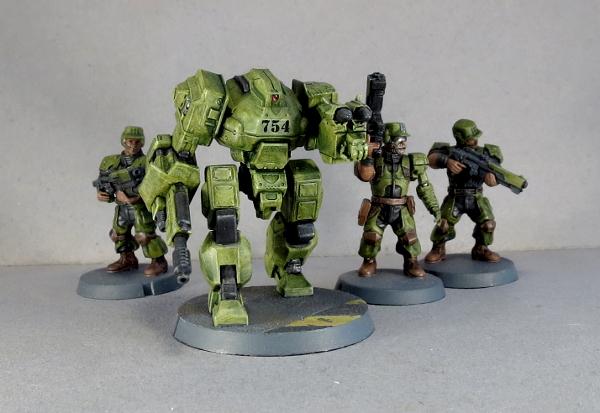
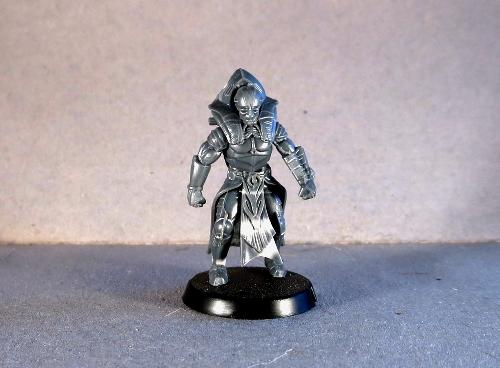
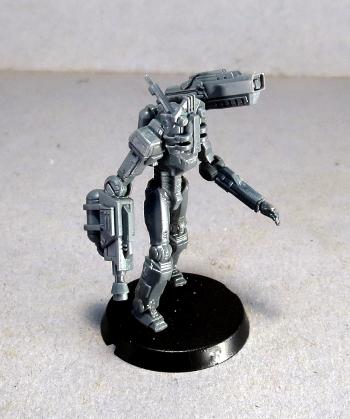
The Epirian Master Bot Handler is the latest plastic kit to be added to the Maelstrom's Edge range. Striding about the battlefield in his powered exoskeleton, he has the ability to lay down impressive amounts of firepower from a wide array of weapons, or finely co-ordinate his forces through networked neural nodes. Here, we'll have a look at some of the modeling options available with this fantastic model.
Built straight off the sprue, the Master Handler has multiple weapon options available - Repair Claws, Cutter Light Machine Guns, Drone Class Laser Systems and Flakk Guns can all be chosen for the arm mounted weapons in any combination, and the rectangular sockets on his backpack allow you to place Cluster Missile pods for even more punch, or Neural Nodes for throwing command points around with wild abandon.
You can find the Assembly Guide for the Master Handler here.
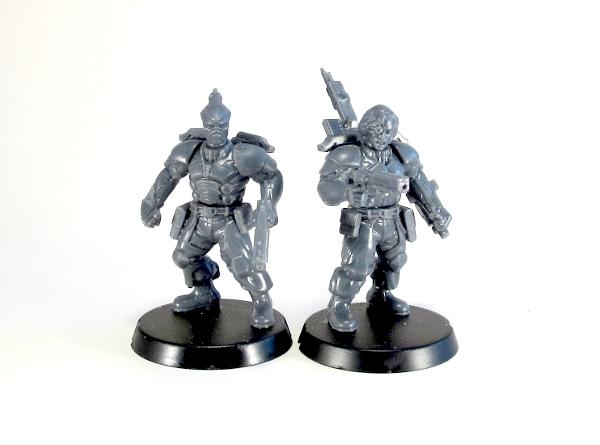
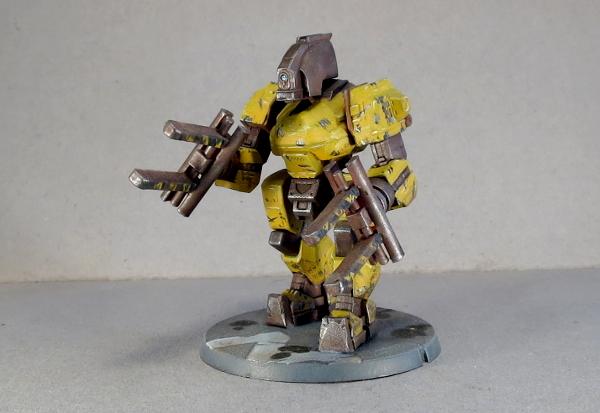
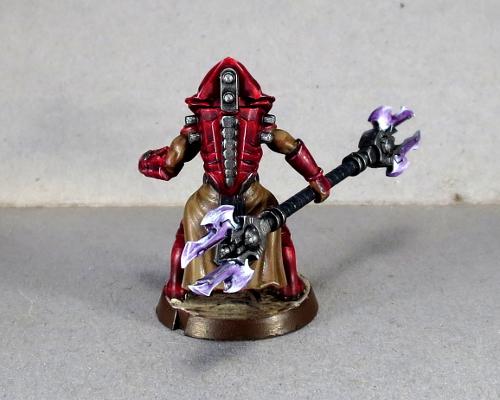
The Master Handler also brings some other impressive 'guns' to the table, with sleeveless and rather buff arms. If you prefer a more covered look on your models, the arms can be fairly easily replaced with the armoured arms from the regular Bot Handler kit. For the below model, on the sides of the torso I removed the protruding arc of plastic that sits just above the Master Handler's shoulders, and added a small locator pin made from a piece of plastic rod to the backs of the regular Handler's forearms. The arms were glued on to the torso with the tops of the shoulder pads sitting about where the original locator arc was, and the weapons slotted onto the locator pins on the arms as they do with the normal Master Handler arms.
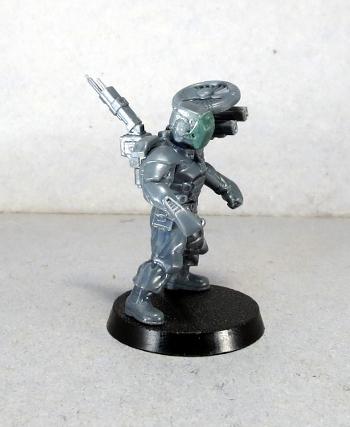
The sprue comes with two sets of legs, one in an upright stance and the other in a knees-bent, braced stance. To mix up the posing a little, you can cut through the groin with a razor saw or sharp hobby knife and switch legs between the two sets to create a stance with one straight leg and one slightly bent. You might need a little gap filling with putty if the cut leaves the waist with a gap. On the below model, I have also extended the right arm out by cutting the top of the shoulder off square, gluing it to the torso and filling in the armpit with some 'green stuff' putty. The left arm has also been slightly repositioned below the elbow, and I have used a head from the Epirian Contractor sprue in place of the Master Handler's helmet.
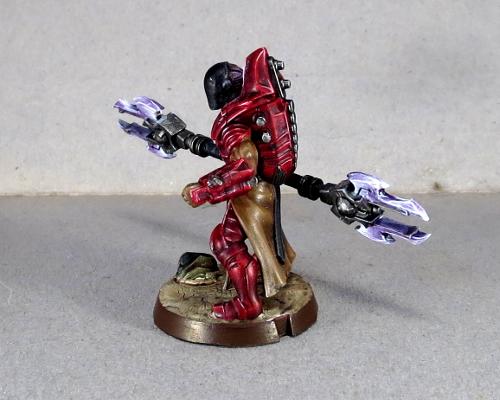
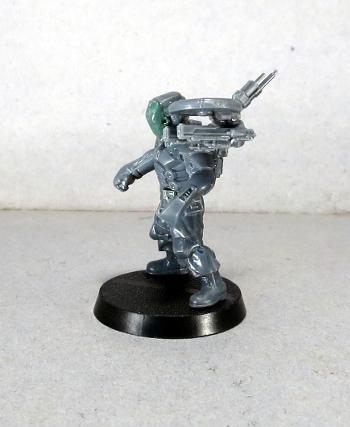
The leftover legs from the above model were used below, with a similar reposing of the right arm as well.
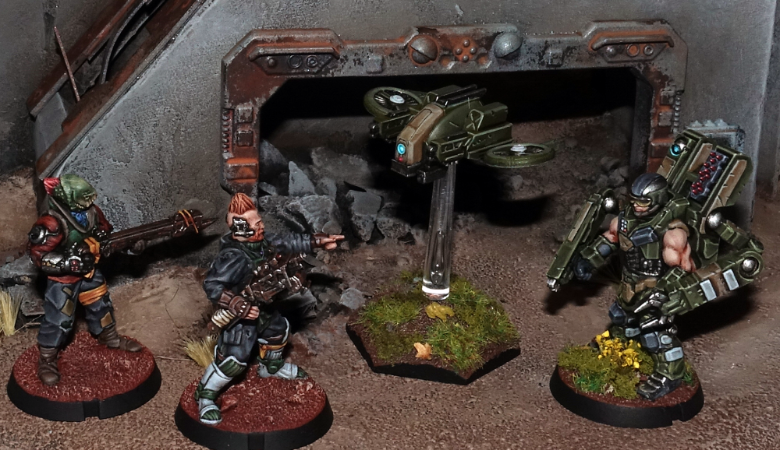
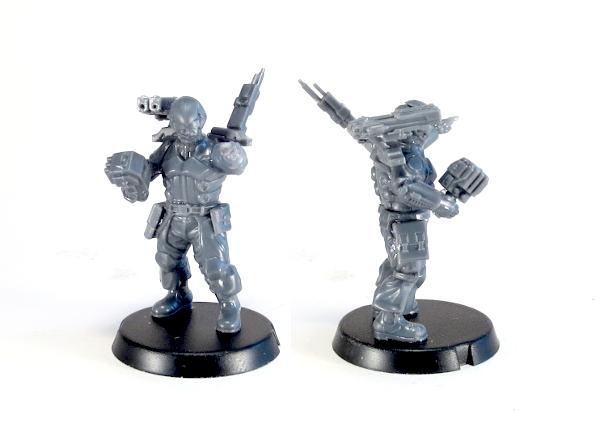
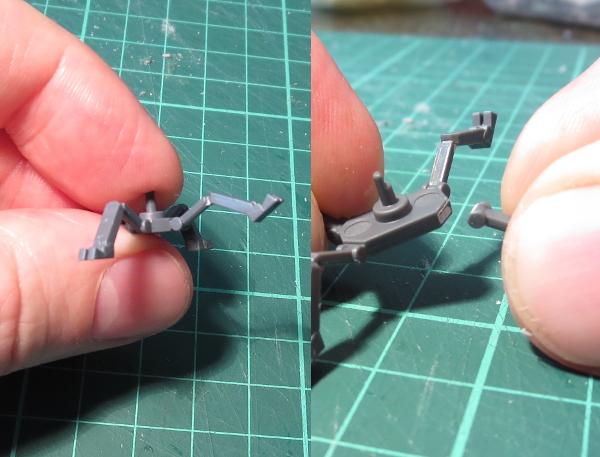
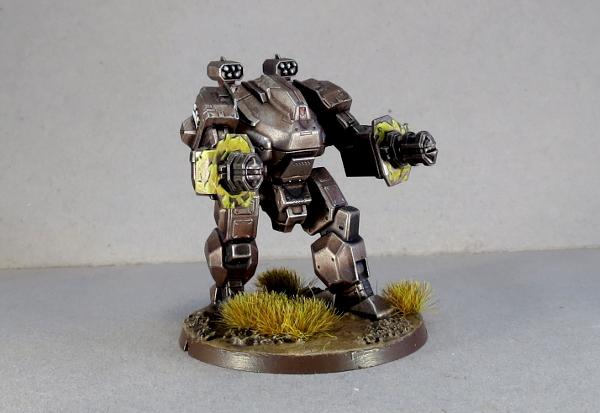
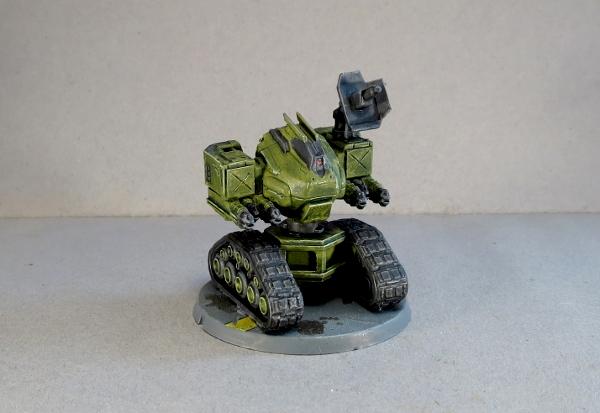
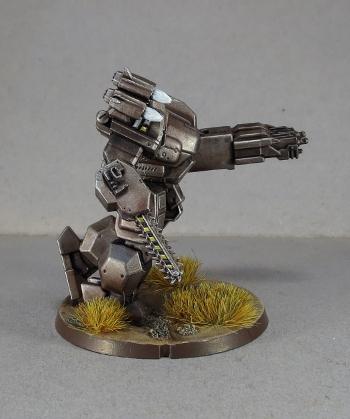
I thought it might be handy to have a repair claw that was independent of the Handler's arms, so cut down one side of a backpack and drilled out a socket to attach one of the weapon support arms. I used two repair claws clamped over the ball joint on the end of the support arm to create a beefier, four-fingered repair claw. I also took the two Neural Nodes and cut them in half so that they would both fit on the other side of the backpack, and used a helmet from the regular Bot Handler sprue.
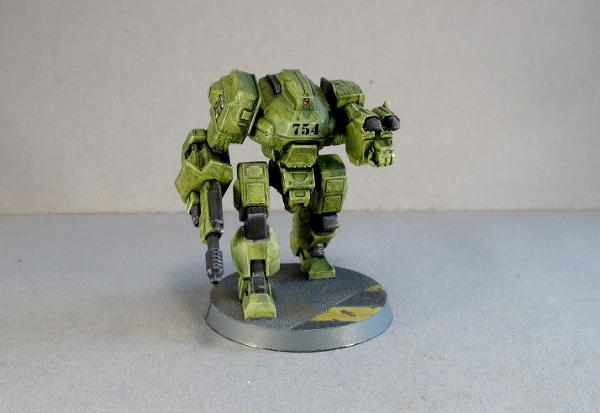
The neck joint on the Master Handler torso is compatible with any of the different plastic Epirian heads, and also works with most of the heads from the Broken Infantry pack, which is handy if you want to create an alien Handler for your force. For the below model, I aso left the weapon support arms off entirely, and built the Drone Class Laser System directly into the backpack by trimming off the backs of the weapons at an angle to match the backpack panels.
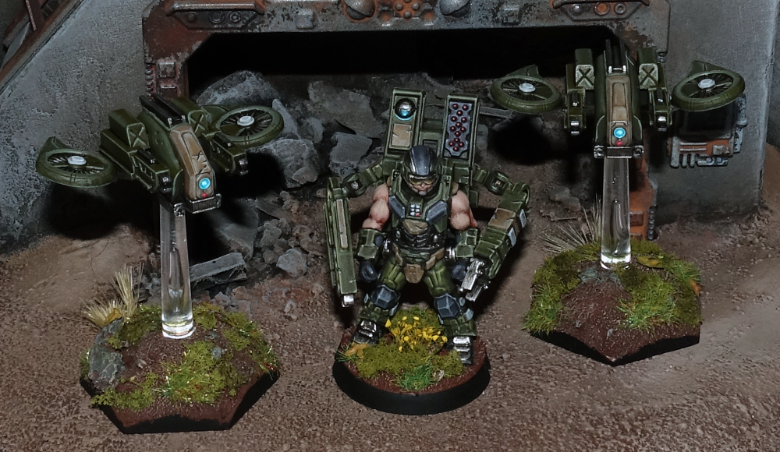
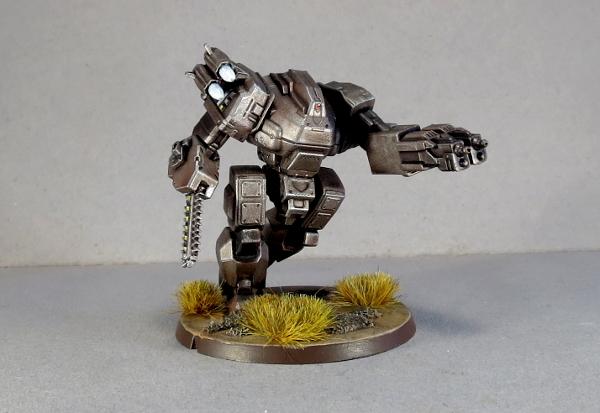
Because the Master Handler comes with two sets of legs and torsos, you're going to wind up with some spare parts. It seemed a shame to waste these, so I used a leftover helmet from the regular Handler sprue, and some Clingfire Sprayers and a command module from the Epirian Scarecrow kit to create a twin-flamethrower-equipped model that I'm calling an 'Eradicator'. The fuel hoses on the backs of the weapons are made from guitar string.
I thought it might also be fun to add some of that shiny, missile-pod goodness to a drone unit, and so I took a Master Handler backpack, trimmed off the bottom and stuck it onto the back end of a Spider Drone. I don't have a name for this friendly little fellow yet... I think I'll have to revisit that in a later article!
What have you done with your Master Bot Handlers? We would love to see your creations on the Comm Guild Facebook page!
To pick up this or any of the rest of the Maelstrom's Edge model range, visit the webstore here.
For other Maelstrom's Edge modeling articles, including tutorials and walkthroughs of a wide range of different building and miniature projects, check out the article roundup here.
Tags: conversion epirian handler model modeling
Our Latest Plastic Model - The Epirian Master Handler
Posted on Monday Apr 30, 2018 at 09:00pm in Models
We at Spiral Arm Studios are proud to present our latest model - the Epirian Master Handler. This alternate command model allows you to lead your robotic force with the ultimate robotic Handler. We previewed this model at Salute 2018 where it sold out very quickly, and now it is available on general release for everyone!
Rules are available immediately as normal on the Maelstrom's Edge website Force Lists section. As you can see there, a lot of interesting equipment is available.
The sprue contains enough parts to build any of the combinations in the rules, and has two variant bodies and legs for different posing. The real interesting bit is the backpack and supporting mech arm structure though, which is fully ball jointed, allowing a huge range of posing and angles. We originally wanted to make this kit in resin, but the complexity and detail of the mech arm parts demanded plastic and we are very glad we went that route!

The Epirian Foundation became one of the dominant forces in the Spiral Arm for two reasons: its terraforming technology allowed the Foundation to convert barren worlds into productive and verdant paradises, and its legions of robots and drones allowed it to harvest resources from inhabited planets and desolate asteroids alike. Both would be nothing, however, without Bot Handlers striding amongst their robotic charges, directing their actions and optimising their workflow. The limited AI of Epirian bots means that the true power lies in a Handler's control, and for many, training to become one of the Foundation's machine shepherds is the ultimate career to aspire to. By the time a Bot Handler reaches the hallowed status of Master, they are the Foundation's most valuable resource, guiding entire robotic divisions and piloting whole squadrons of starships on their own. They are so precious, in fact, that their corporate superiors overlook all manner of eccentricities and odd behaviors, both of which become increasingly common the longer a Handler plies their trade. As a Handler spends increased time with their consciousness projected into their robotic subjects, the more they become detached from humanity.
A Master Handler has spent decades diving into the electronic pathways of machines. Having to spend a few minutes conversing with another person is excruciating when one is used to simply thinking a command and have it be perfectly understood and followed. Master Handlers are often awkward and disdainful of other humans, which can unsettle those within their proximity. The elite human soldiers in the Foundation's SecDef division resent a Master Handler's lack of cohesion, despite the formidable abilities they bring to bear on the enemy. Master Handlers therefore refuse to serve embedded with any other Foundation unit, instead relying on custom built 'Defender' Drones to protect them. These modified Firefly drones have their clingfire payload replaced with state-of-the-art armour. Their vastly improved neural processors perform a 'swarm defense', continually scanning for potential threats, positioning themselves as a seemingly easy target, only to dart away once they have drawn enemy fire.
Master Handlers wear powerful machine-assisted armor normally reserved for elite SecDef forces, and wield an arsenal of weaponry that normal soldiers can only dream of. Some Master Handlers eschew additional weapons and instead utilize Neural Nodes: an incredibly expensive and controversial technology that combines a powerful machine neural processor with a tiny portion of the Master Handler's cognitive functions. The Neural Node acts as an independent, duplicated version of the Handler's consciousness for a brief moment, before safeguards purge its core memory. The Neural Node creates a powerful momentary electronic copy of the Master Handler's mind into the target drone, to assess the situation and provide the drones with a specific order. There are many voices both outside and within the Foundation that decry the use of Neural Nodes, claiming they are a form of A.I., which puts all of humanity at risk. The Foundation remains resolute that purging a Neural Nodes at regular intervals prevents any potential issues from arising. Master Handlers themselves ignore the controversy, relishing any opportunity to become closer to the robots under their control, to devastating effect amongst those that stand in their way.
As a brand new command model, you also get a new, different faction objective for the Epirians if you take this unit as the head of your detachment:
MASTER OF MACHINES
This objective may only be utilized if your force contains a Master Bot Handler. If utilized, a Master Bot Handler is automatically your force commander for any objective type that requires one.This objective type can generate a maximum of 3 VPs per game, after which you may no longer utilize the Bot Mastery ability.
-----
Partial: (each end phase) If at least one of your Master Bot Handlers is on the table and the Bot Mastery ability was not utilized that turn, gain 1 VP.
Full: (end of game) If at least one of your Master Bot Handlers is still on the table, gain all of this objective’s remaining VPs.
Bot Mastery: Once per turn, you may automatically enable one of your unit’s bot protocols when that unit is activated (regardless of whether its activation discipline check is successfully passed). You must have at least one Master Bot Handler on the table to utilize this ability.
Check out the Maelstrom's Edge store today to pick up your Master Handler for just $8.49/£5.99!
Tags: epirian handler masterhandler plastic sprues
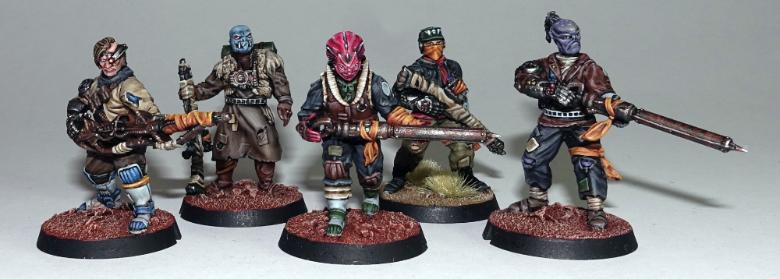
Modeling Spotlight: Epirian Bot Handlers
Posted on Monday Apr 23, 2018 at 05:00pm in Models
- by Iain Wilson
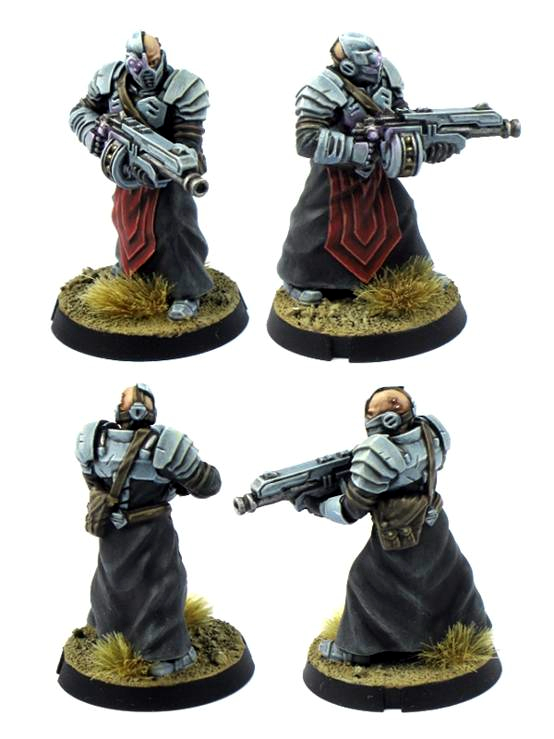
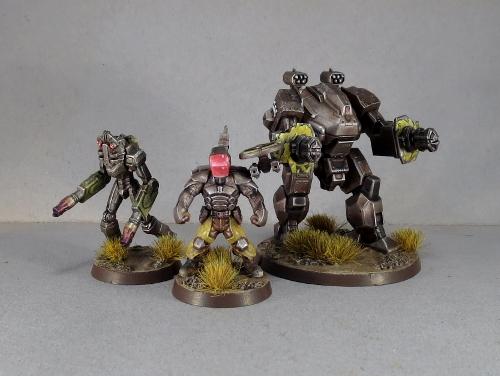
Bot Handlers serve as unit and force commanders amongst many Epirian forces, with their neural interfaces allowing them unparalleled access to tactical information and the ability to control bots at a distance. The Maelstrom's Edge Bot Handler sprue comes with parts to build two Bot Handlers, and this week we're having a bit of a look at just what you can do with them.
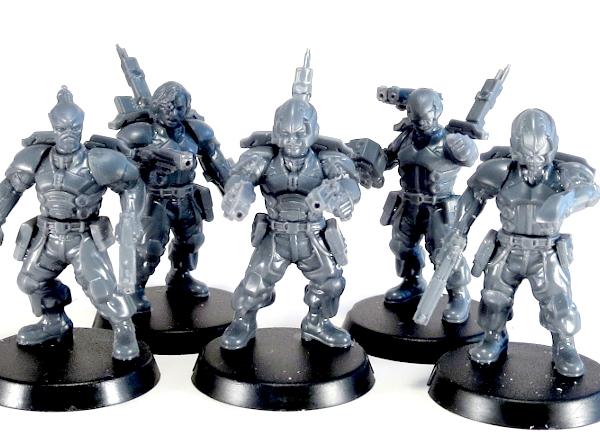
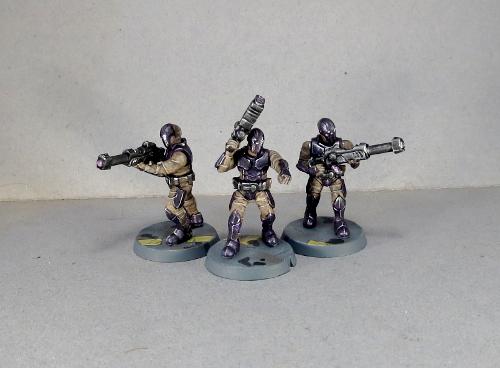
There are two different types of Bot Handlers in the game at the moment - The Apprentice Bot Handler, and the Journeyman Bot Handler. Apprentice Handlers lead units of Spider Drones in battle, while the more experienced Journeyman Handlers serve as low-level army commanders. These serve below the Master Handler, who will be added to the range soon with a new model and rules card.
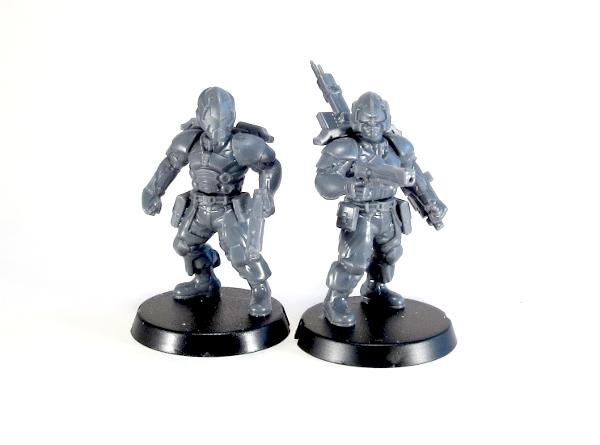
Apprentice Handler (left) and Journeyman Handler (right).
The Apprentice Handler is equipped with a Maglock Dominator Pistol (a more powerful version of the Maglock Guardian Pistol used by Epirian Contractors) and uses a Tactile Bot Interface on one arm to interface with the bots under his direct control.
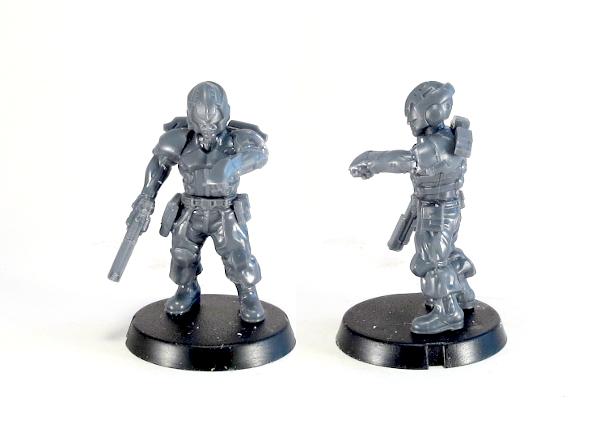
Apprentice Handler. The left arm has been slightly converted to look like he is motioning with the tactile interface gauntlet.
The Journeyman replaces the tactile interface with a more sofisticated Neural Interface, which frees up his hand to take a second pistol, or a forearm mounted grenade launcher.

Journeyman Bot Handlers (right).
Thanks to the modular nature of the Maelstrom's Edge kits, making small modifications to your models to personalise them a little is extremely easy. The standard Handler helmets can be swapped out for heads from other Epirian kits, or even from other factions.
Bot Handlers with heads from the Broken Infantry Pack.
Journeyman Handler with arms taken from the Broken Infantry Pack and the more streamlined helmet from the Faction Expansion Sprue.
Getting slightly more advanced, the below model was given a new pose by cutting two sets of legs apart at the groin and swapping halves to create a wide-legged, braced stance. A visor was added over a regular Contractor head with 'green stuff' putty, and the dual pistols were built onto a mini-drone made from a Firefly Drone turbine.

Converted Journeyman Bot Handler.
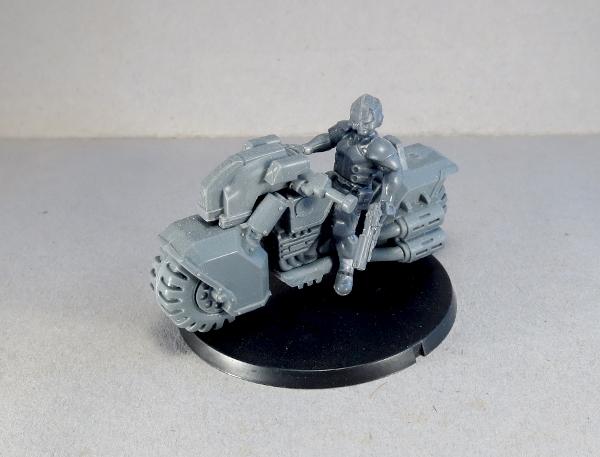
Or for something more outside the box, this Handler was reposed slightly by bending the legs outwards and replacing the right hand with an open Karist hand from the Faction Expansion Sprue, and was given a Drone Bike made from an Epirian Drone chassis and a Games Workshop bike.
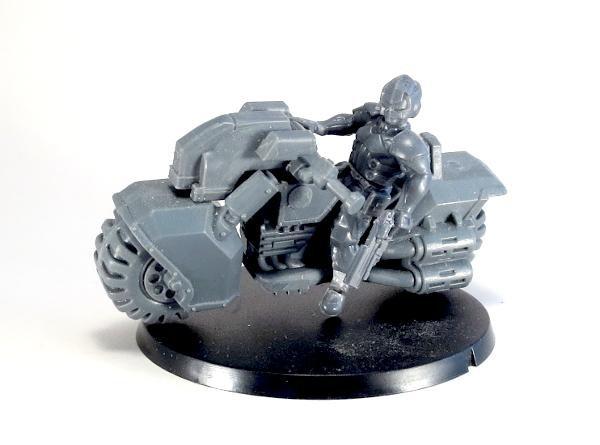
Born to ride.
To pick up the Epirian Bot Handler kit, or any of the rest of the Maelstrom's Edge model range, visit the webstore here. As always, we would love to see your creations on the Comm Guild Facebook page!
For other Maelstrom's Edge modeling articles, including tutorials and walkthroughs of a wide range of different building and miniature projects, check out the article roundup here.
Model Spotlight: Epirian Drones
Posted on Monday Feb 19, 2018 at 05:00pm in Models
- by Iain Wilson
Drones - the ubiquitous workhorse of the Epirian Foundation. Built around a standardised chassis that can be bolted onto a wide array of different locotion and weapon options, the humble drone can be found all over Foundation-settled worlds performing a wide range of tasks. Particularly valued by Contractor military units, the Drone's various weaponised configurations are found at the forefront of any engagement harrassing enemy units and getting into those hard to reach places. Here, we'll take a closer look at the options available on the plastic Drone sprue.
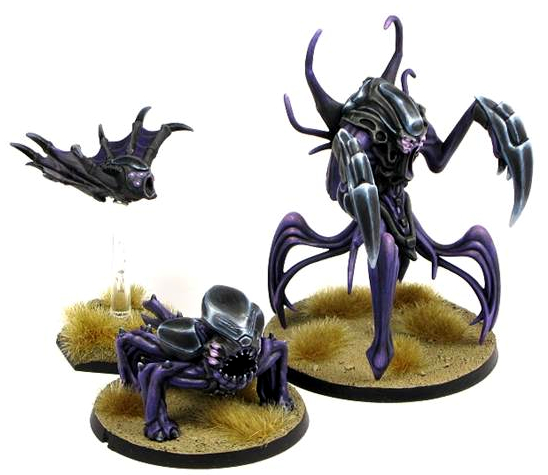
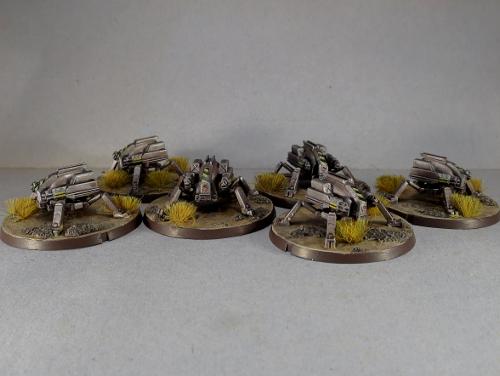
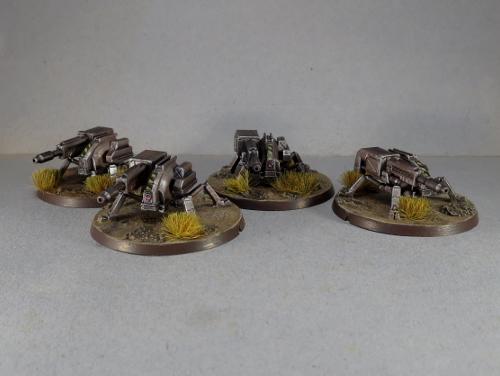
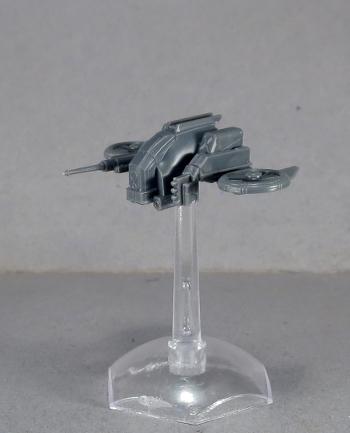
The Drone kit comes with parts to build either of two variants: the flying Firefly drone, or the agile, ground-hugging Spider drone.
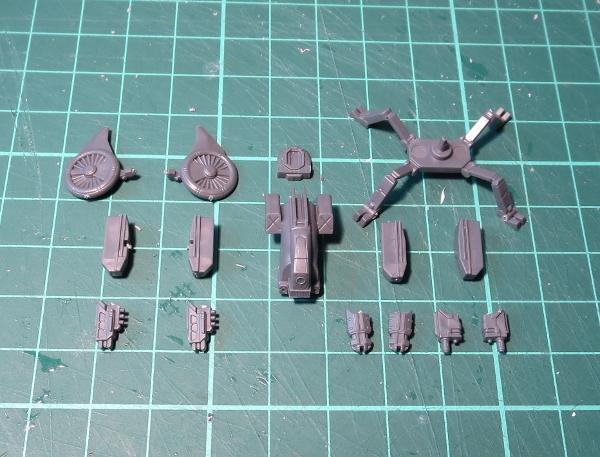
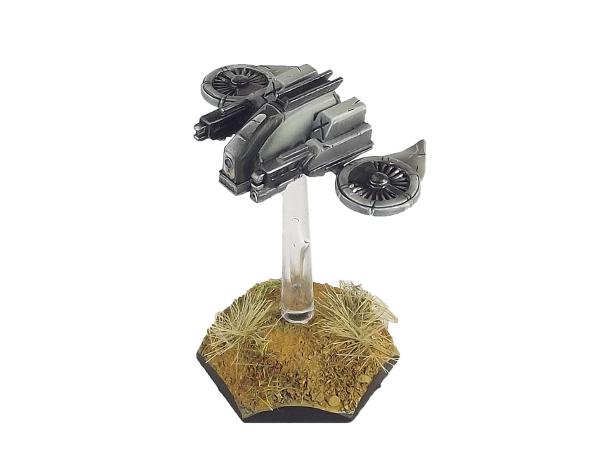
The Firefly is the fastest drone in the Foundation's arsenal, and the lightest armed. Held in the air by two dorsally mounted rotors, the Firefly is capable of vertical takeoff and landing (VTOL) and can travel up to 150 km/hr. Its primary purpose is as a forward scout, using its advanced sensor and communications suite to send information back about enemy positions. Its armour and weaponry is minimal and the Firefly can be easily taken out by even small arms fire - providing the shooter can hit its rapidly-moving frame. The Firefly is equipped with a Drone Class Laser System.
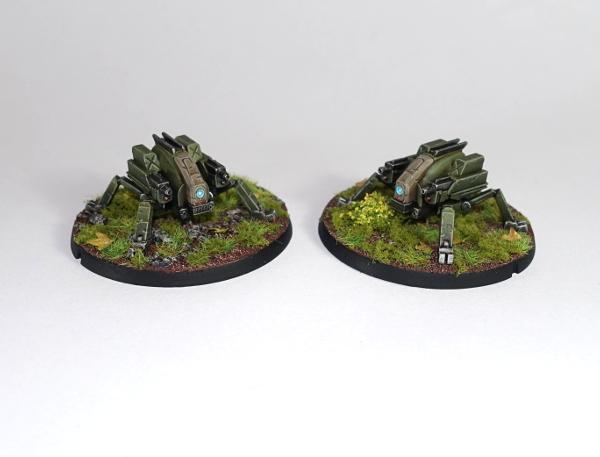
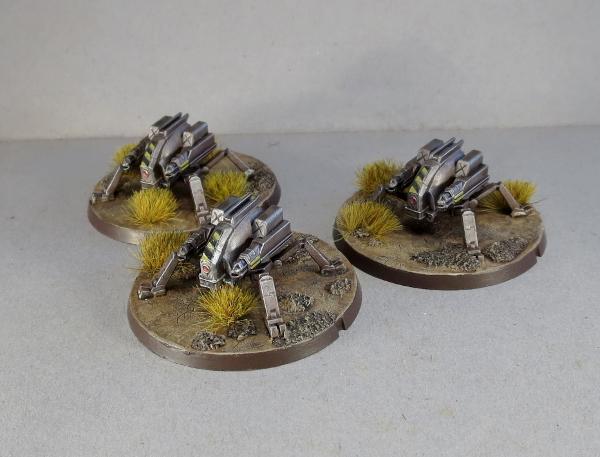
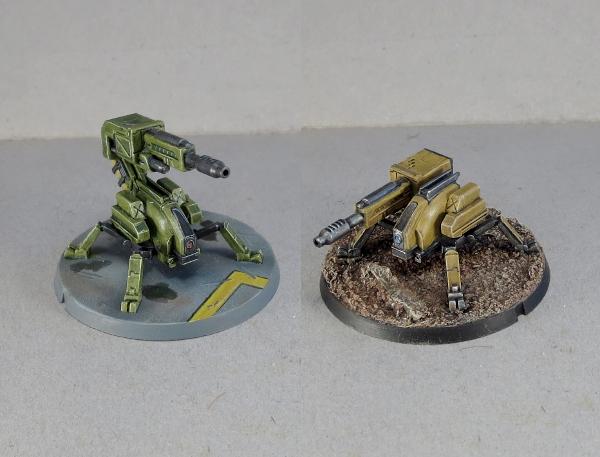
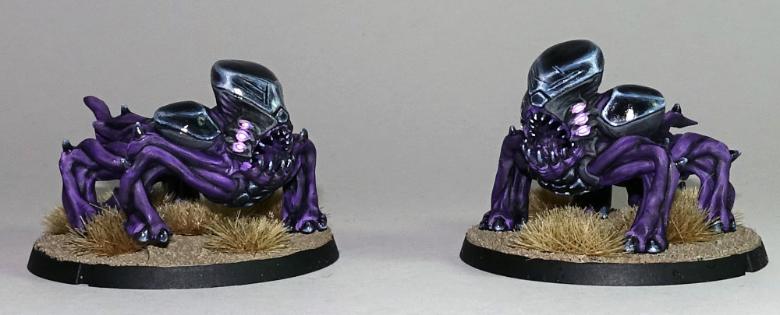
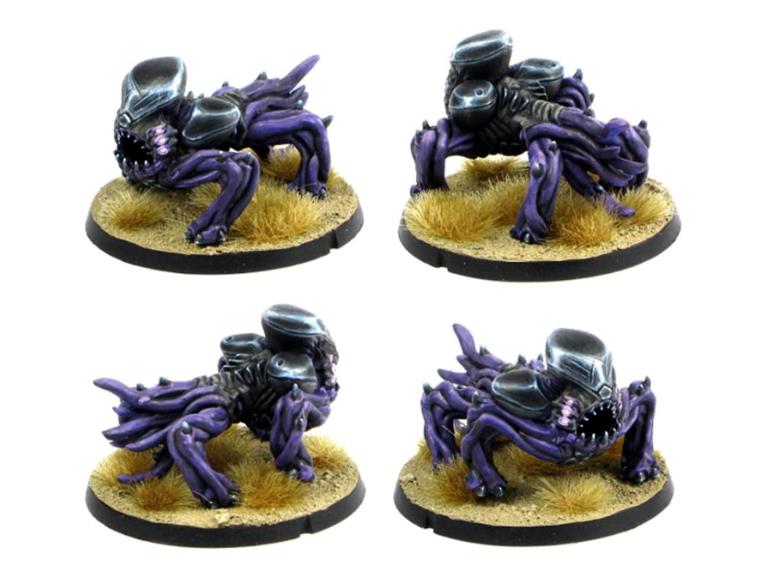
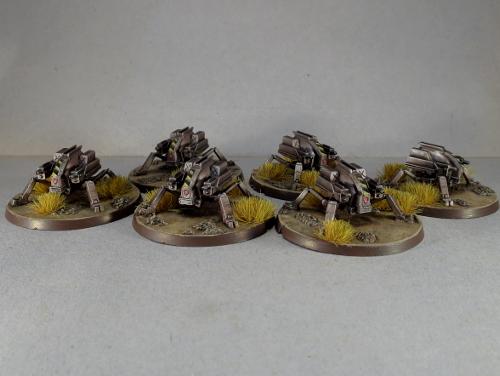
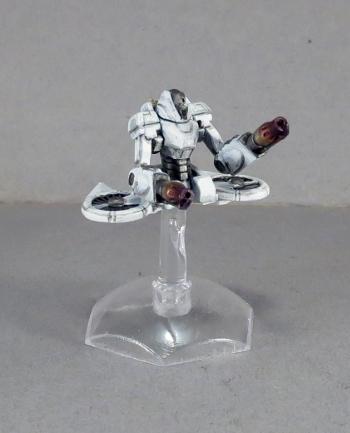
Slower than some of its drone counterparts but fitted with heavier weaponry, the Spider Drone is a popular choice for automated defences inside buildings where a Scarecrow's range is limited. Originally designed to operate within the rough terrain of mining tunnels, the Spider moves on multiple armoured legs, allowing it to keep its balance on the most unsteady of terrain.
The steadiness of its body allows more powerful guns with higher recoil to be added, and most combat Spider variants forgo the sensor suite used in Firefly, Rover and Stalker drones to accommodate more ammunition and heavier armour. Spiders can be equipped with Cutter Light Machine Guns or Flakk Guns.
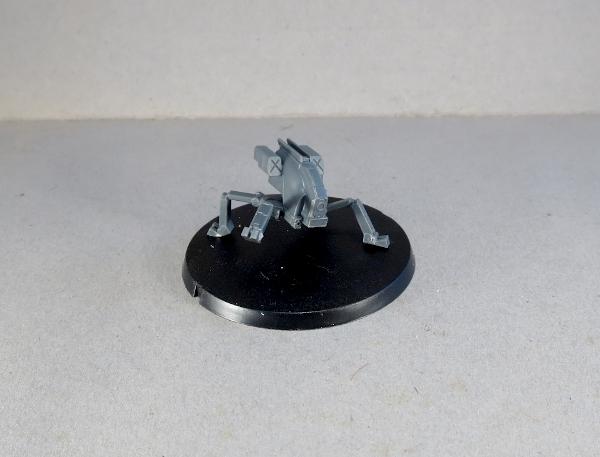
Because the sprue was developed before the rules were finalised, there wound up being a couple of extra parts on the sprue that were originally intended to be another weapon option, but which also serve nicely as antenae for identifying 'leader' models, or for converting your own different drone classes, like this Sensor Drone:
If you would like your drones to look a little more mobile, the thin legs of the Spider lend themselves well to conversions. You can easily repose them by either carefully bending at the joints, or by slicing through the joint and reattaching at a different angle.
For those wanting the Drones to pack a bit of punch on the battlefield, you could try out the reasonably simple Scorpion Drone conversion detailed here, which takes the Spider Drone and equips it with a Maglock Chaingun from the Hunter Mech kit.
Getting a little more adventurous with the converting, I like to think that the Drone chassis would find its way into all sorts of different applications where having some robotic assist might make a task easier or more efficient. Like this Light Carrier Drone, converted from a Drone chassis and a Battlefront 15mm plastic tank kit, with a little plasticard.
Or this (work-in-progress) Journeyman Patrol Bike, converted from a Games Workshop bike and an Epirian Bot Handler, with the Drone chassis up front for steer assist and targeting.
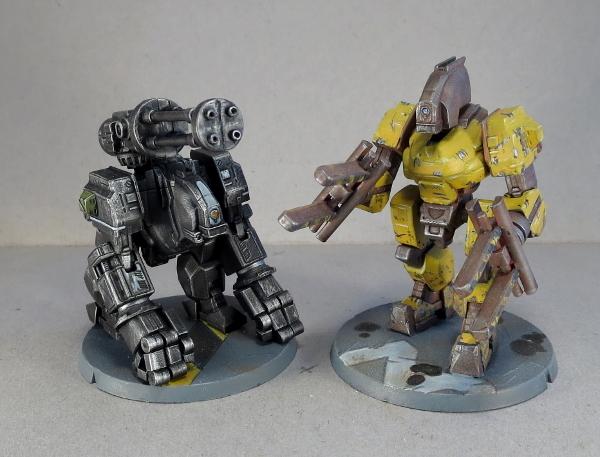
You can also use the Drone chassis as a head for larger bot constructs, like these 'Silverback' and 'Mule' Hunter Mech conversions.
All of that can, of course, leave you with a bunch of leftover flight turbines, which can be used to build a jump pack-equipped Epirian Warden, or some floating 'Sentinel' Drones, using the turbines and the top of a Scarecrow - tutorial coming soon for that one!
What have you done with your Drones? We would love to see your creations on the Comm Guild Facebook page!
To pick up the Drone kit, or any of the rest of the Maelstrom's Edge model range, visit the webstore here.
For other Maelstrom's Edge modeling articles, including tutorials and walkthroughs of a wide range of different building and miniature projects, check out the article roundup here.
Maelstrom's Edge Largest Ever Model - The Broken Gnolti
Posted on Friday Jan 26, 2018 at 10:30am in Models
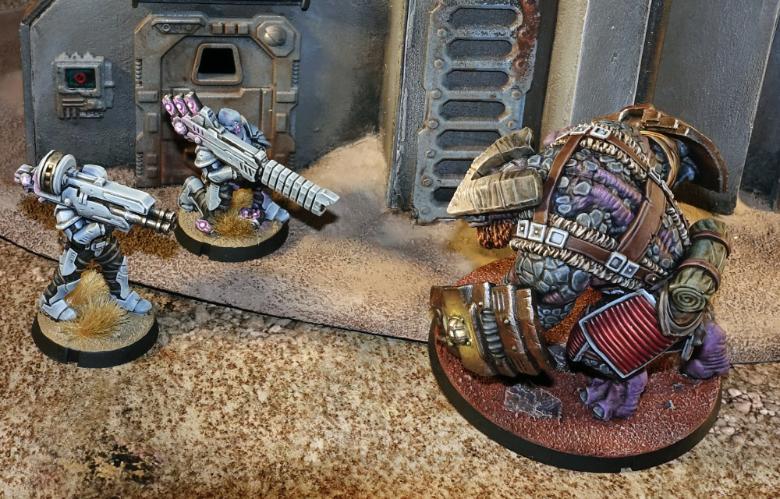
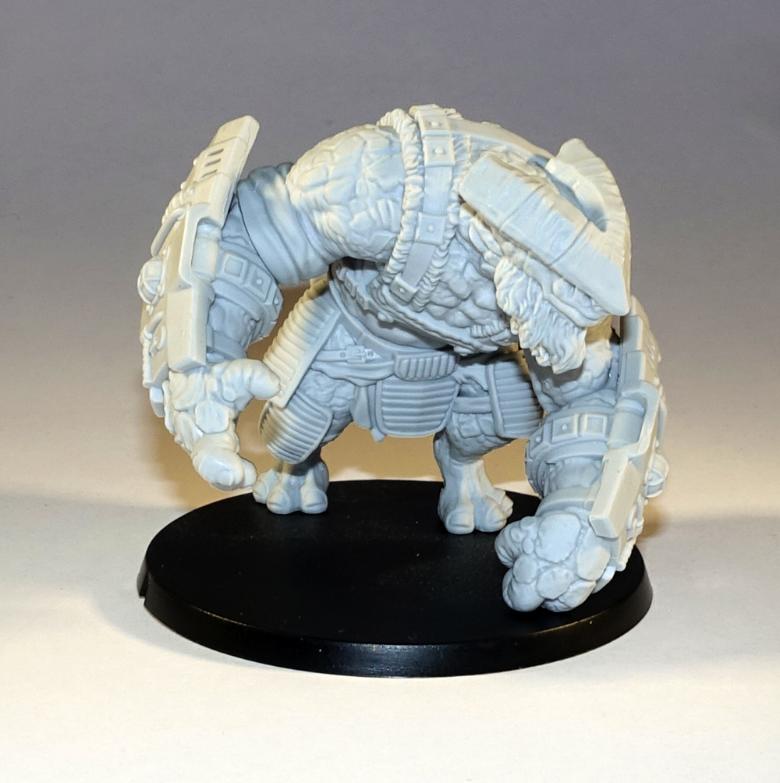
Spiral Arm Studios are proud to present their latest release - the Gnolti - a large, brutish alien which fights alongside the Broken. This four part resin model is the biggest we've ever made and is available now on the Maelstrom's Edge webstore.
The Gnolti are large, slow moving creatures with strength many times that of a human. Gnolti evolved on the high gravity moon orbiting the gas giant Encelasa, and were amongst the first alien species met by humanity. Many Gnolti remain on their homeworld, but some take up a nomadic life across the Spiral Arm, earning money with their bulky frames to send back home. Originally hired and transported to systems requiring extreme manual labour or exposure to elements lethal to humans, their normally calm, thoughtful temperament made Gnolti easy to integrate into human society. Gnolti are extremely loyal to those who treat them well, gladly risking themselves to protect their friends. Despite being incredibly useful, Gnolti are often denied berths on planetary evacuation ships due to their extreme size. Gnoltis have few opportunities to escape the Maelstrom, and stranded Gnolti are a common recruit into the ragtag warbands of the Broken, where their physical power can be a huge asset.
It takes an incredible amount of punishment to bring down a Gnolti in battle. Besides their massive strength and incredible toughness, Gnolti are blessed with an extreme regenerative trait that allows them to heal in just minutes massive wounds that would easily fell other species. Gnolti may be slow to anger, but once roused, their rage is hard to quench. A rampaging Gnolti is an image impossible to forget for those lucky enough to survive their attack. Frequently a Broken ringleader won't even arm their Gnolti comrades, as the spectacle of an enraged charging Gnolti can disrupt all but the most disciplined defensive lines. This near legendary reputation means that on the battlefield, Gnolti become a primary target of the enemy, regardless of whether they should be or not. The Broken gladly leverage this notion and use Gnolti as a screen for their more vulnerable units. The ferocity and size of a Gnolti is even used as a distraction tactic, drawing the fire of enemy troops so that other Broken can manoeuvre unhindered, to devastating effect. The Broken do not take the sacrifice of Gnolti lightly. At the end of each battle, Gnolti are given first pick of any loot that was captured, and every member of the warband stops by to wish thanks to the Gnolti they served with, or to pay homage to those Gnolti that didn't survive.
The Gnolti rules are available as always at the Maelstrom's Edge website, in the Force Listings section. Equipped with the ability to regenerate, and with massive fists to plow through enemy lines, this powerful model is a solid centrepiece for Broken detachments.
This is a four part resin model which has some posing flexibility at the forearms. Overall, the Gnolti has a mostly fixed pose designed to show the lumbering power of the model.
The Gnolti is available for purchase right now in the Maelstrom's Edge webstore.
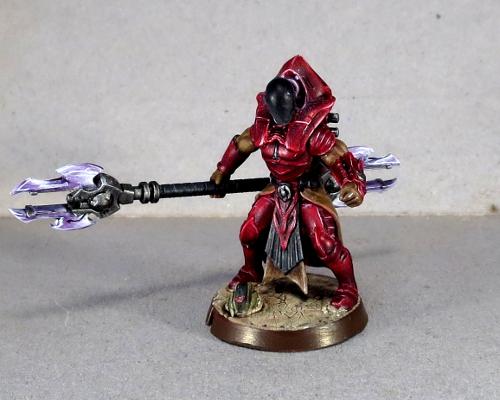
The Karist Angel Keeper - Available Now
Posted on Friday Dec 29, 2017 at 12:00pm in Models
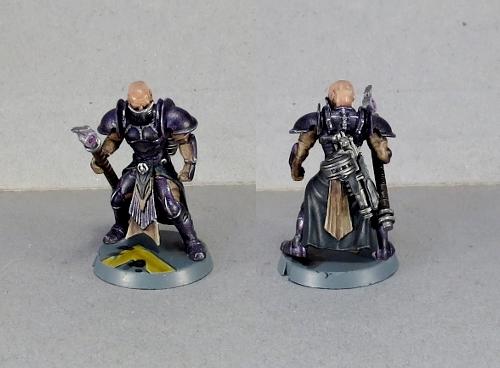
Spiral Arm Studios are proud to present our latest release in our continuing one release per month cycle - The Karist Keeper.
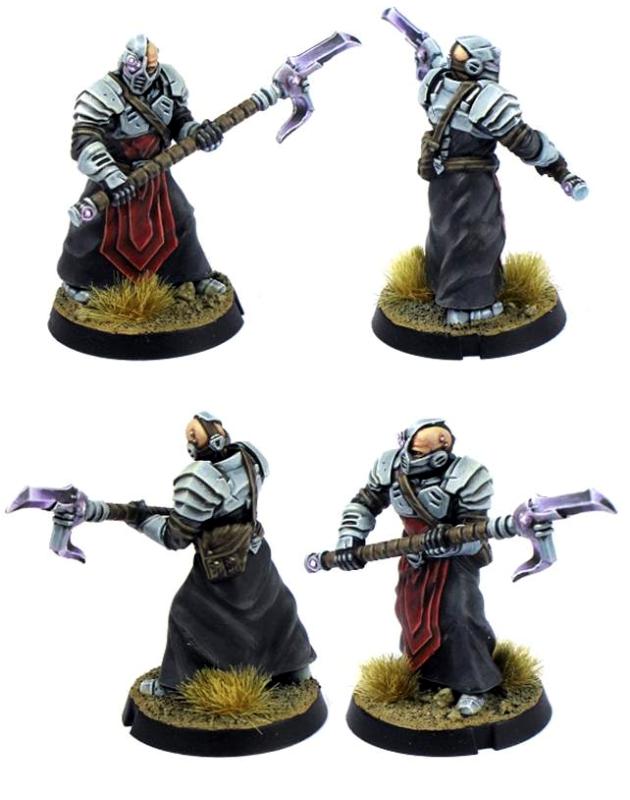
This high quality resin kit contains one Karist Angel Keeper model with two weapon options and a 25mm base. The cybel Goad can be assembled in a variety of angles for added dynamism. This Command model enables an all-Angel Karist army to be fielded, creating a very visually distinct force.
Angel Keepers are a strange, isolated offshoot within the Karist Priesthood. For hundreds of years, the Keepers of the Karist Enclave have enslaved the alien creatures known as Angels, keeping them docile using regimented doses of cybel energy. The Keepers experiment on their captives, using different forms of cybel energy and electromagnetically charged cages to shape the Angels, encouraging them to grow new limbs or shapes to match the Enclave's requirements. While all Karists are secretive, Keepers take this mantra to another level. Keeper Initiates hand-picked from amongst the ranks of Novitiate priests secretly study sacred texts from venerated Keepers on both the Karist faith and the complexities of caring for the Angel creatures. Some Initiates drop out when they witness the trapping of Angel Minnows with tainted cybel energy. But those who persevere with their training find Angels to be magnificent, transcendent beings, and pledge their lives to the cause. Junior Keepers undertake a vow of silence, abandoning common human pursuits to focus solely on the miraculous Angels. Keepers study Angels for many years, learning to train and even speak to them in a rudimentary, computer-assisted, language. Those that graduate to the full rank of Angel Keeper undergo surgery to replace their vocal cords with a cybernetic enhancement, effectively allowing them to 'speak' the language of the Angels.
Keepers are the least public of the Kaddar sect, having little to do with local populations, but fulfilling the critical role of Angel harvesting and training. On the battlefield, Keepers are tasked with marshalling Angel units to attack the enemy, an often tricky prospect. As the Angels feel the effects of mass and gravity far stronger than their other senses, Keepers can lead Angels around using the pulsed gravitic generator attached to their voicebox. The combination of sound and gravitic waves is irresistible to smaller Angels, but headstrong Mature Angels often ignore these orders if more tempting prey is available. Therefore, Keepers also utilise grenade launchers equipped with Swarmer rounds to douse enemy units with Na-Cybel. Not only do enemy units become incapacitated through temporary euphoria, but the Na-Cybel also draws the attention of any Angels nearby. When a Keeper and an Angel are in harmony, the consequences for their enemies can be devastating.
Weapon and model rules are available at the Karist online unit cards section of the Maelstrom's Edge website.
The Karist Keeper is available for purchase right now at the Maelstrom's Edge store.
Model Spotlight: Epirian Hunter Warmech
Posted on Monday Dec 11, 2017 at 05:00pm in Models
- by Iain Wilson
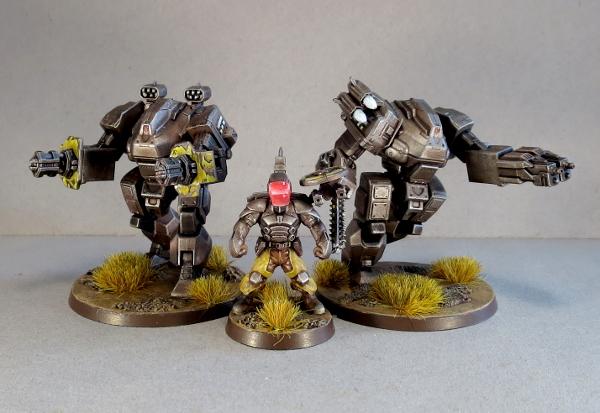
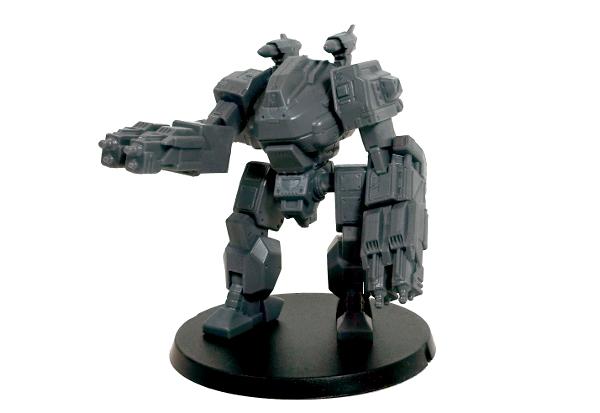
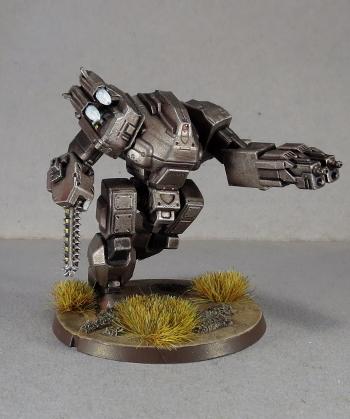
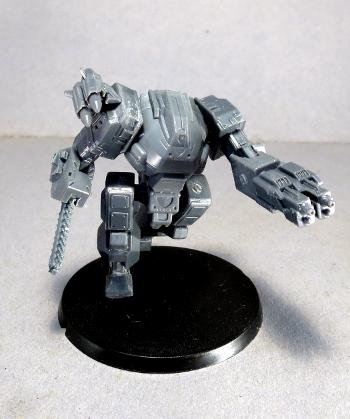
For this week's article, I thought it might be fun to pause and take a closer look back at one of the models from the initial Maelstrom's Edge release - the Epirian Hunter Warmech!
Designed through an arcane mix of clever sculpting, sliding-core moulding and witch-craft, the Hunter kit is beautifully detailed while going together with surprisingly few parts. Arms and legs are solid parts, removing the need for unsightly seams, while boasting articulated shoulders, elbows, ankles and hips to give enough poseability to keep things interesting.
Towering above mere human soldiers, the Hunter is the second-largest model currently on the Maelstrom's Edge battlefield, beaten in size only by the Karist Angel (for now!)
The kit comes with a nice array of weapons - a maglock chain gun, a flakk cannon, two suppressor twin machine guns, two each of the different rocket pods, and a hydraulic fist.
Being plastic, 'borrowing' a second weapon from another kit and modifying it to go on the opposite arm is a breeze. Below, the shield for the flakk cannon has been flipped over to go on the right arm, with the top and bottom beveled parts reshaped slightly to keep the symmetry between the left and right.
The rocket pods are designed to mount behind the head, but it's too much fun to not play around with them and find other places to fit them!
The legs have a slight bend in the knee, which allows for a surprising range of motion combined with the pivoting ankle joints. For a little more speed, the knee joint can be sliced through and reattached into more of a running pose.

If pounding away with a big, metal fist isn't your thing, the hydraulic fist can be easily replaced with a chainsaw blade or other suitably brutal melee weapon of your choosing. The Hunter below has a chainsaw taken from a Games Workshop plastic kit for some extra rippy fun.
If converting is more your thing, let your imagination run wild! Below is an Epirian Uplink Drone, built from a Hunter torso, some bits from the Spider drone kit, and some tracks from a Counterblast robot model. You can see how it was built in the article here.
Venturing a little further off the beaten track, this 'Mule' cargo drone was built from a Hunter chassis with a head made from a Spider drone and some lifter hands scratch-built from plasticard. You can check it out in the build article here.
If big guns are more your thing, then the 'Silverback' fire support mech is going to be right up your alley. This was built from a reposed Hunter with hands made from drone parts and sprue, a drone chassis head, and a gun taken from a Games Workshop Tau kit. To find out how to build your own, check out the article here.

To build your own robot army of mechanical Doom, you can pick up the Hunter kit, along with the rest of the Maelstrom's Edge model range, from the webstore here. As always, we would love to see your creations on the Comm Guild Facebook page!
For other Maelstrom's Edge modeling articles, including tutorials and walkthroughs of a wide range of different building and miniature projects, check out the article roundup here.hun
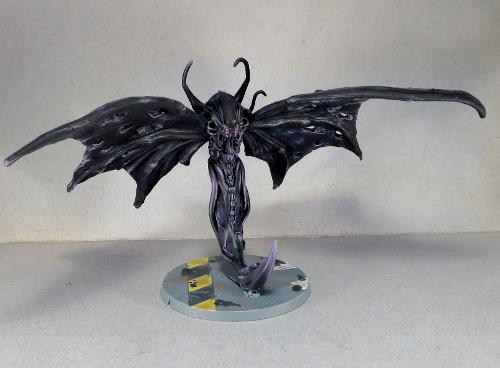
The Karist Angel Hellblaster - Available Now!
Posted on Tuesday Oct 31, 2017 at 03:00pm in Models
We at Spiral Arm Studios are proud to announce the immediate release of the Karist Angel Hellblaster unit. A valuable addition to any Karist force and our first ever resin model! It seems fitting to release a monstrous creature on Halloween!
The Angel Hellblaster is a juvenile form of an Angel. Larger than a minnow but smaller than a mature Angel, juvenile angels can take many forms, but Karist Keepers try to goad certain Minnows into a Hellblaster form for the many tactical advantages the Hellblaster type offers.
First and foremost, the Cybel Blast ability sets these guys apart from the rest of the Karist forces. Using a powerful template blast, they can really hold their own.
Cybel Blast: Range 24", SHO 2+SB, PEN 4, DAM 1, Special: AoE (SB), Explosive (6+).
The full Angel Hellblaster profile and force builder elements can be found on the Force Lists section of the Maelstrom's Edge website.
Two distinct models are available in a single pack:
The Hellblaster sits on a 44mm base, the same as the Epirian Spider Drones and Hunter Warmechs. Here's what the Angel range looks like now:
If you have wanted to build an all-Angel army, we are just one model away from it being completely viable, and the Angel Hellblaster will be the Hammer of your force.
The Angel Hellblaster is available now in the Maelstrom's Edge webstore.
Tags: angel hellblaster karist model resin
The Broken Infantry Sprues
Posted on Tuesday Sept 26, 2017 at 09:00am in Models
Only 4 days until the first models from our new faction - The Broken - are available for purchase!
We'll be sharing more information each day until release, starting with the most important of all - detailed pictures of the sprues!
A common question we've had so far is just how many sprues are needed for each unit to be built? Additionally, how many sprues will be needed for a full force of Broken?
As you can see above, six models can be made with a huge array of options from each set of sprues. Units will be made up of 4-6 models each, with 1 HQ model as well, so a single set of sprues can make up a full squad of 6, with most options. Three sets of sprues will be enough to make full squads of all three unit types. Going with two 6 man squads and one 5 man squad will also allow an HQ model to be built, giving a full complement. The Broken are made up of inexperienced and easily available forces so have a very low points cost compared to some of our factions, so while 3 squads will cover all basic options, if you want to build a full force (100-150 points), you'll be doing some careful list building first!
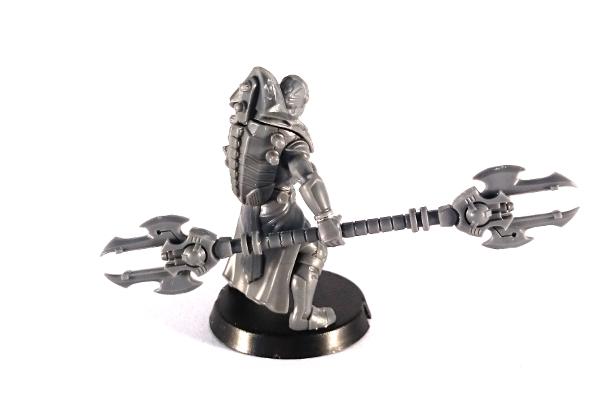
Conversion Spotlight: Kaddar Militant
Posted on Monday Sept 04, 2017 at 05:00pm in Models
- by Iain Wilson
The range of plastic miniatures available for Maelstrom's Edge covers all of the units and options currently available in the game. There's a lot of fun to be had by taking those miniatures and exploring other options beyond the current limits of the game, whether to field with home-brew rules or just for one-off display pieces to flex the creative muscles. This week, we're looking at a model from the latter category, built just for fun, because it never hurts to have a bigger stick.
When the Faction Expansion Sprue was released, I took one look at the awesome cybel glaive on the sprue and couldn't resist the urge to create a double-ended version by sticking the head of one glaive onto the bottom end of the shaft of a second. The resultant, admittedly slightly over-the-top, marvel of blades and energy emitters needed a suitably awe-inspiring model to carry it, so I turned to the ever-imposing Kaddar Nova kit.

The head is taken from the Karist Trooper kit, with the front sanded down smooth.
Painting started out with a basecoat of Army Painter Dragon Red. From there, I built up shadows using thin, multiple layers of Army Painter Purple Tone, before higlighting the edges with white and then a final wash of Army Painter Red Tone over the top to mesh everything together.
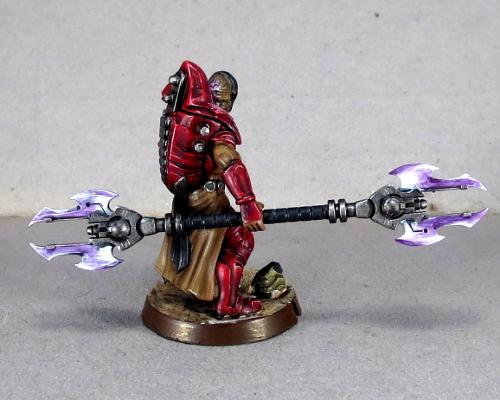
The cloth parts were painted with Vallejo Heavy Brown, and then shaded with layers of Army Painter Strong Tone. Similarly, the black parts were painted with Vallejo Heavy Grey, highlighted with some Vallejo Neutral Grey and then shaded with Army Painter Dark Tone.
Metal parts started with some more Heavy Grey, and then a coat of P3 Pig Iron, and finally a wash with Dark Tone to give it some depth. Finally, the glaive blades were painted white and then worked up to the purple with layers of Purple Tone. The panel behind his head was given some purple light with a layer of Citadel Warlock Purple, drybrushed with a little Citadel Tentacle Pink and then a final drybrush of white.
The end result is a spiky, sinister-looking character who will probably wind up spawning yet another Karist force in my collection. I'm thinking of this guy as a 'Kaddar Militant' - a subsect of the Kaddar Priest class, who lean a little more towards brutal subjugation to get their way than is the norm for Karist forces. Stay tuned - there may well wind up being a rules card at some point in the not too distant future, tweaking the standard Kaddar Nova rules to allow for the double-ended Glaive and some revision to the normal unit selection matrix.
If this has inspired you to get creative with some plastic, you can pick up the Maelstrom's Edge terrain sprue from the webstore here. As always, feel free to share your creations on the Comm Guild Facebook page!
For other Maelstrom's Edge modeling articles, including tutorials and walkthroughs of a wide range of different building and miniature projects, check out the article roundup here.
Tags: conversion kaddar karist modeling painting
Army Spotlight - Karist Strike Force
Posted on Monday Aug 28, 2017 at 12:00am in Models
- by Iain Wilson
A little while ago I shared an Epirian bot army that I had been assembling, which you can find here if you missed it the first time. It didn't seem like the done thing to let all of those blasphemous machines hog the limelight, and so this week it's time for the pure and wholesome forces of the Karist Enclave to shine.
I wanted a Karist leader with a bit of presence - the sort of no-nonsense character who would stride about the battlefield secure in the rightness of his cause and confidence in his inevitable victory. So I took the Kaddar Nova kit and modified the legs slightly to give him a walking pose.
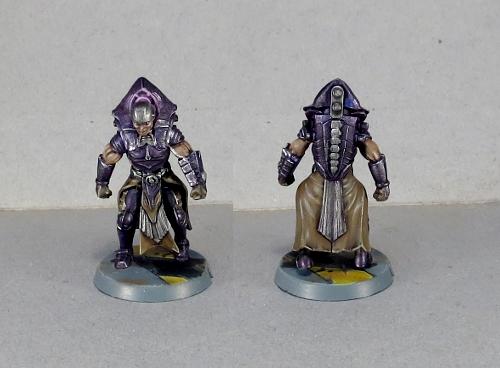
The conversion involved cutting some plastic away from the groin where the two leg pieces join, to bring the legs in for a more upright pose. One leg was angled slightly back by rotating at the waist joint, and the ankles were carefully twisted to straighten them out. The end result is a walking but slightly bow-legged pose, which helps to show the weight that the Nova is carrying around with that backpack!
The painting on this force is quite simple, as I wanted something quick and easy that I could expand on later as I add more models to the roster. The purple is an old Citadel metallic purple washed with Army Painter Dark Tone. The brown cloth sections painted with Vallejo Heavy Brown and washed with Army Painter Strong Tone form a nice contrast to the purple, and the weapons are painted in a no-nonsense metal scheme using P3 Pig Iron washed with Dark Tone.
While I was aiming for a fairly small, elite force this time around, I still needed a unit of Troopers to fill in the required Core slot. I decided to go for a 5-man unit, to help them stand out from the more compact specialist units I was going to include and to give help them last a little longer once they get in range of all those Epirian guns.
The Quintarch for this unit was based loosely on an early piece of Maelstrom's Edge artwork, with robes made from a leftover Kaddar Nova robe and some green stuff putty.
A unit of Tempest Elites provide some fire support, with their fearsome Hellstorm Energy Mortars.
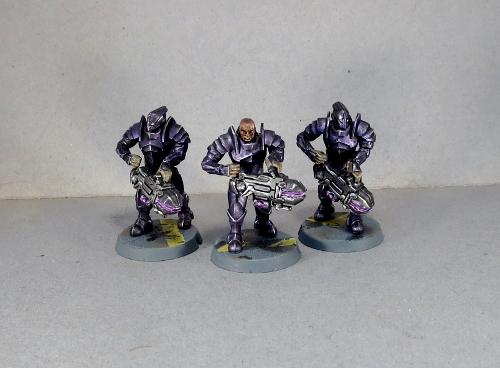
For some extra firepower where it counts, I included a Reaper Cadre. This is a homebrew unit that I put together for an article a while back. They're basically elite troopers armed with a long rifle version of the Pulse Carbine. You can find the conversion article and a rules card here.
I obviously needed to include some angel units, and to keep them in line I also took along an Angel Keeper. He forms the HQ option for a second detachment.
The Keeper is a playtest unit offered up some time ago for those who wanted some extra angel-related shenanigans in their forces. The model is a conversion using parts from a few different kits, as there is no official model (yet!) for it - you can find the conversion tutorial and rules card here.
In the Keeper's charge are a unit of Minnows. These were converted to add some extra motion to their poses, by mixing up the pairing of the wing parts and filling in any resultant gaps with a little green stuff.
The Minnows' big brother rounds out the second detachment for now. I put together a model of a Mature Angel in its flight form a while ago, and so he had to go into this force. This model was built using the body from the Mature Angel kit, a tail made from green stuff and some wings from a demon model from the Reaper Bones range. You can find a walkthrough of the conversion here
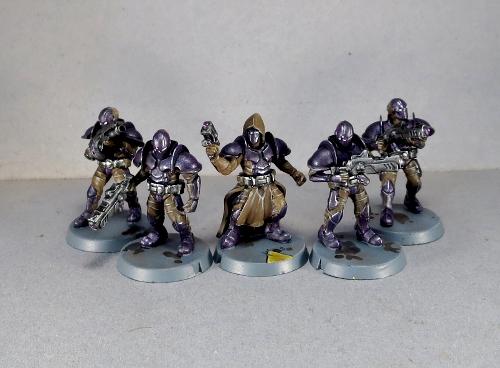
The force all together:
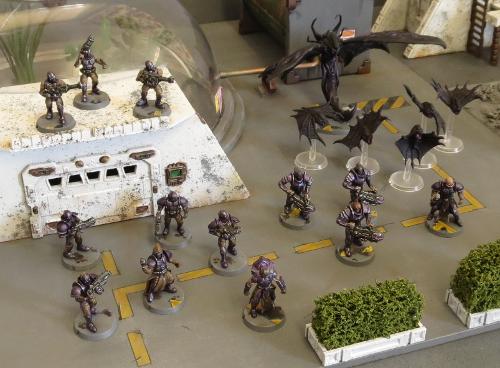
This leaves me with a roster that looks something like this:
Detachment 1
Command: Kaddar Nova - 15 points
Core: Karist Troopers
- Ripper Grenade Launcher - 18 points
Hammer: Tempest Elites
- Hellstorm Energy Mortars - 25 points
Vanguard: Reaper Cadre
- 2 Pulse Lances - 15 points
Detachment 2
Command: Angel Keeper
- Ripper Grenades - 10 points
Core: Angel Minnow Pack - 10 points
Anvil: Mature Angel - 23 points
Total - 116 points.
If you would like to put together your own Karist strike force, you can pick up the various Maelstrom's Edge kits from the webstore here. As always, feel free to share your creations on the Comm Guild Facebook page!
For other Maelstrom's Edge modeling articles, including tutorials and walkthroughs of a wide range of different building and miniature projects, check out the article roundup here.
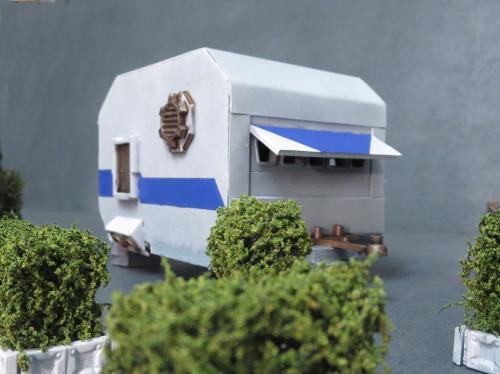
Terrain Spotlight: The Galactic Wanderer
Posted on Monday Aug 21, 2017 at 05:00pm in Models
- by Iain Wilson
When I shared my Hedge Tutorial a few weeks ago, there was a comment made that they looked like they would be right at home in some sort of scifi trailer park. Well, I'm not one to let a challenge like that go unanswered, and so... the Galactic Wanderer was born.
Like many of my terrain builds, this all started with some foam core and a bunch of parts from the Maelstrom's Edge terrain sprue.
I cut a fairly basic, old-school caravan shape from the foamcore, and cut holes for a door and some windows.
The body of the caravan was glued together with foam glue (a white glue that I picked up a while back. It may well just be overpriced PVA glue, but it does a good job of gluing foam and grabs a little faster than a lot of PVA glues that I have tried) and the door and windows glued in place.
A strip of windows cut from a garage door fit quite nicely along the front wall.
An awning cut from a piece of 2mm plasticard provides a nice break in the regular shape of the caravan, and is totally there for aesthetic reasons and not at all to help conceal the fact that the strip of windows actually wound up just a little bit wonky. I also added a towbar made from a section of old sprue, a hatch in the roof, and rested the construction on some 'bricks' cut from discarded pieces of foamcore.
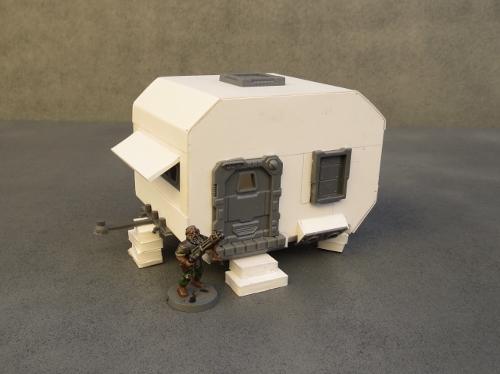
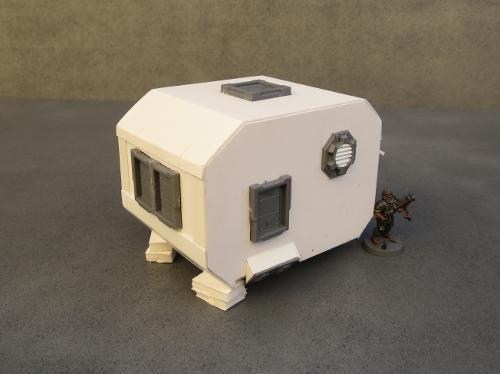
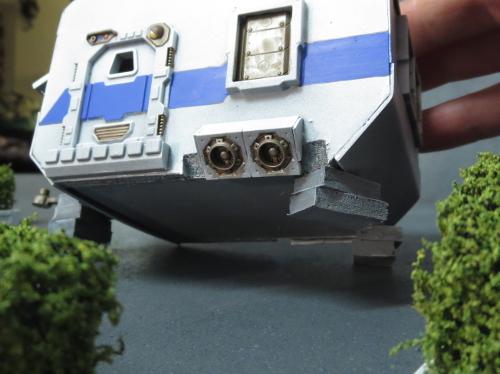
To help with the scifi vibe, unstead of wheels this caravan has some turbines made from the small pipe fitting from the terrain sprue with some turbines from the Epirian Drone sprue behind them. And finally, a large pipe fitting, trimmed off with a razor saw and with some strips of plasticard glued inside provides some ventilation.
A quick spray and some striping later, and the compact, budget-conscious home of the future is ready for housing stellar refugees or indulging the wanderlust of the more well-to-do.
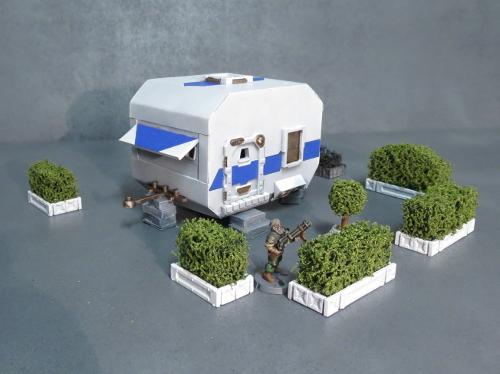
A better look at the caravan's 'wheels':
To build your own holiday villa or mobile refugee camp of the future, you can pick up the Maelstrom's Edge terrain sprue from the webstore here. As always, feel free to share your creations on the Comm Guild Facebook page!
For other Maelstrom's Edge modeling articles, including tutorials and walkthroughs of a wide range of different building and miniature projects, check out the article roundup here.
Tags: buildings modeling spotlight terrain terrainsprue walkthrough
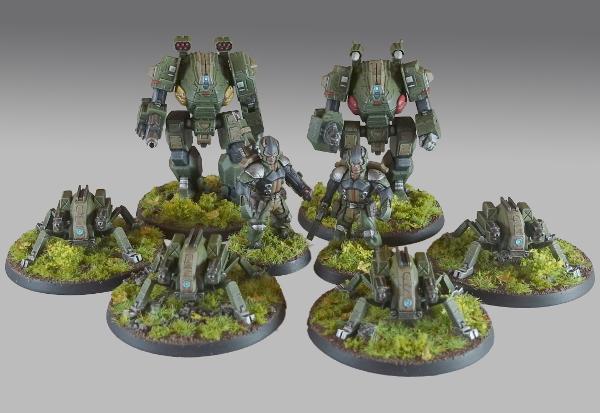
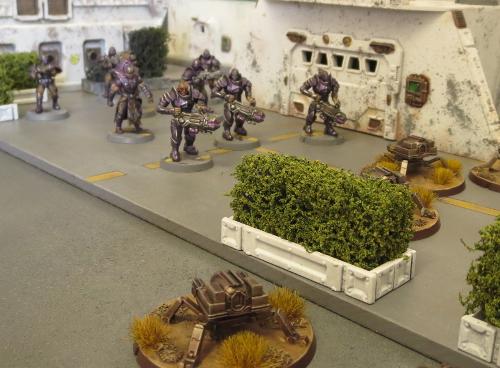
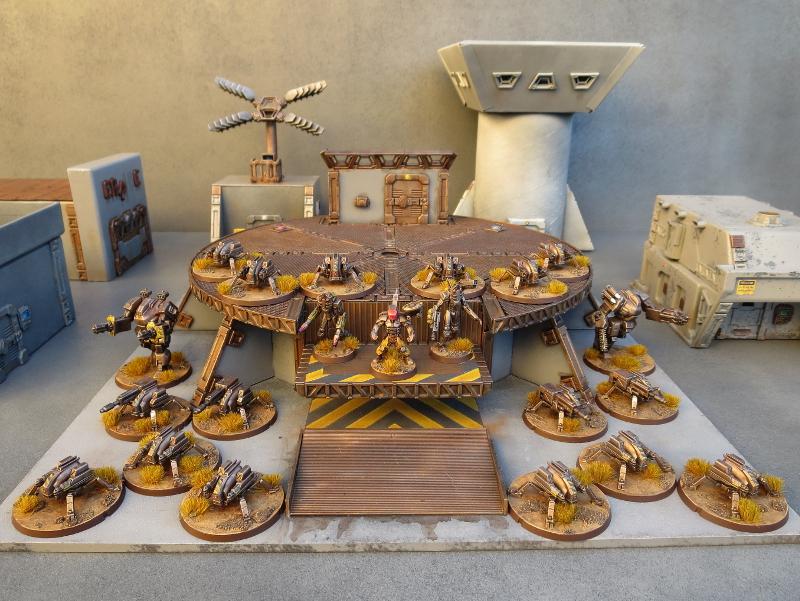
Army Spotlight - Epirian Bot Army, Detachment Two
Posted on Monday Jul 24, 2017 at 05:00pm in Models
- by Iain Wilson
Last week, I shared part 1 of an Epirian Bot army that I've been putting together, which you can find here. This week, I'm fleshing it out with a second detachment, to bring the force up to the 120 point mark, suitable for small games.
Unsurprisingly in a bot-themed force, the second detachment is comprosed of a whole bunch of extra robots!
To keep with the bot theme, I wanted the second Command unit to be a Scarecrow rather than another Bot Handler.
Scarecrows are shifted to a Command slot if you give them a Command Array. That's slightly problematic, since I've been using the Command Array part to put masks on my Scarecrows. I got around this by taking one of the aerials that had been cut off the array and gluing it onto the side of the Scarecrow's head, behind the mask.
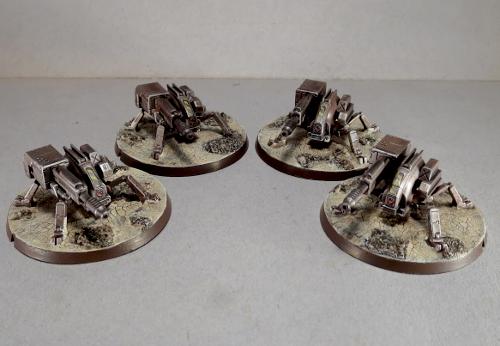
The Scarecrow commander is required to take at least two Core units, so I needed another two units of Spider drones. This time around, I went with Flakk Guns instead of the Cutters, for a bit of close-range supporting fire.
To round out the detachment, I selected another Hunter for my force.
I had built this bot a while back, just to find out how the Hunter would look with a chainsaw in place of the Hydraulic Fist. The saw blade is taken from a Games Workshop Space Wolf kit. Rules-wise, it will still count as the fist.
The bases on this detachment were a slight change from last week. I hadn't been entirely happy with the bases on the first detachment, and so I changed to a slightly darker colouring (Vallejo Heavy Brown, washed with Army Painter Strong Tone and then drybrushed with P3 Jack Bone) and added some grass tufts for a little extra pop. To keep things consistent, this obviously meant going back and redoing the bases on the first detachment as well...
And so, the full force combined:
2nd Detachment:
Command: Scarecrow Sniper
- Command Array - 14 points
Core: Spider Drones
- Flakk Guns, replace Apprentice Bot Handler - 8 points
Core: Spider Drones
- Flakk Guns, replace Apprentice Bot Handler - 8 points
Anvil: Hunter-class Warmech
- Suppressor Dual Machine Gun, 2 Strike Missile Pods, Overdrive - 10 points
Total - 40 points.
Combined with Detachment 1: 120 points.
So, what's next for this force?
The obvious choice is to add some Fireflies, and I'll definitely be doing that as soon as I can. I'm also playing with some more homebrew rules, to create a spotter drone that would work in concert with heavy weapon-equipped robot units, possibly by being able to allocate a Command point to a friendly heavy unit within a certain radius that shares LOS to a selected target.
I also built a prototype for a Scarecrow spotlight article a while back, of a Scarecrow that replaces its legs with turbines from the Firefly kit. This was equipped with twin Clingfire sprayers, but I'm thinking that a unit of these equipped with twin Maglock Assault Rifles might be a fun option for encouraging enemy units to keep their heads down.
I'm picturing these guys as being able to move freely over obstacles, but being fairly slow moving and not particularly robust, due to the delicate balance required to keep such unwieldy creations airborne.
Stay tuned - I'll post another update on this force when I get these finished off!
If all of these robots are leaving you feeling inspired, you can pick up the full range of Maelstrom's Edge models from the webstore here. As always, feel free to share your creations on the Comm Guild Facebook page!
For other Maelstrom's Edge modeling articles, including tutorials and walkthroughs of a wide range of different building and miniature projects, check out the article roundup here.
Tags: bots conversion epirian modeling painting
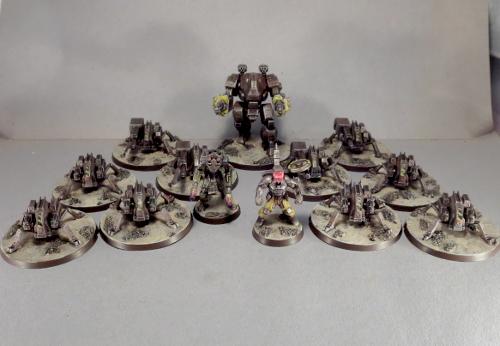
Army Spotlight - Epirian Bot Army, Detachment One
Posted on Monday Jul 17, 2017 at 05:00pm in Models
- by Iain Wilson
The Epirian Foundation utilises a wide array of different bots on the battlefield, and the Maelstrom's Edge roster system allows you to create a force that makes the most use of them in place of human troops. And really, why wouldn't you? Robots!
I had a few assorted bots put together in a weathered metal colour scheme for a few previous articles, and so I decided this week that it would be fun to flesh them out into a usable force.
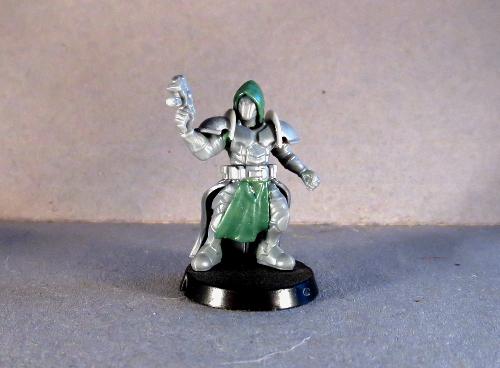
An army, of course, needs a leader. There are a couple of HQ options currently for Epirian forces, but I already had a Journeyman Bot Handler that I put together a while back and then never did anything with, so decided he would have the somewhat dubious honour of being the lone human in the force.
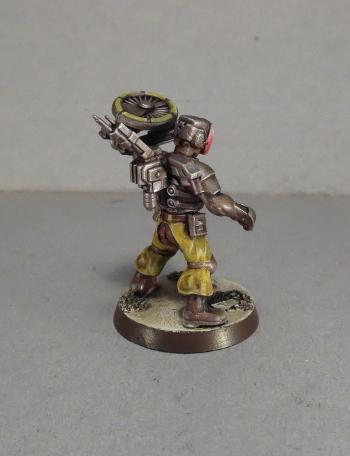
This guy was built from the Bot Handler sprue, with a few modifications.
The head was taken from the Contractor sprue with a face shield added with some 'green stuff' putty.
I gave him the spread-leg pose by taking both sets of legs from the handler sprue and cutting them apart vertically through the groin, and gluing the opposing halves with the matching straight legs together.
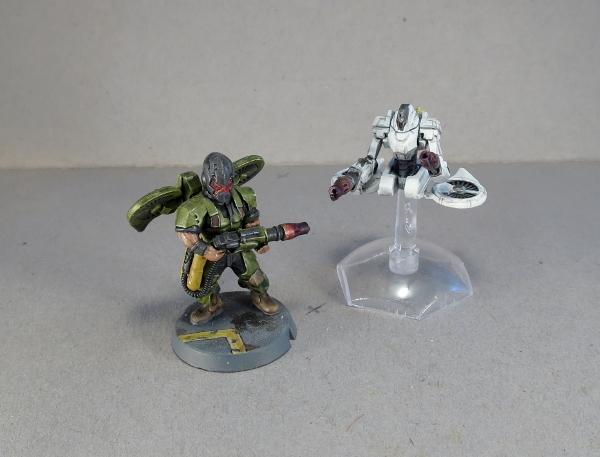
Rather than having him holding his pistols, I thought a mini gun-drone would be fun, so I mounted two pistols under a single turbine taken from a Firefly drone. This little drone is pinned to the Journeyman's shoulder, to give it the appearance of flight without needing a flight stand.
Painting was kept fairly simple, to match the bots that I had already built, and so used the weathered metal process that I've shown in several articles now - red undercoat, followed by a coat of brown, then a metal layer, and then a wash with Army Painter Strong Tone.
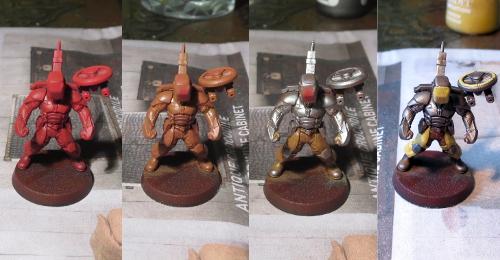
Yellow chaps and a shiny red faceplate tie in with the more subdued highlights used on the rest of the force while letting him stand out a little from the crowd of bots.

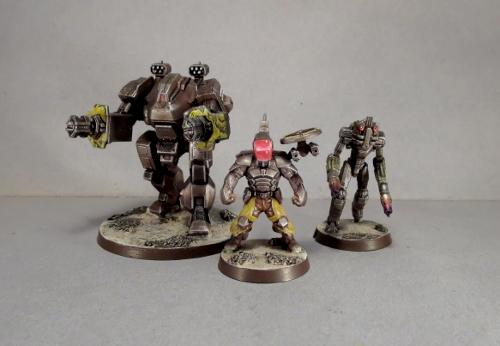
With paint in place, the Journeyman joins the Hunter mech that I originally painted up for the weathered metal tutorial, and a slightly modified Scarecrow that I built for a spotlight article on the lanky, elite units.
The army wasn't going to get far without troops, and so I grabbed a few Drone sprues and put together two units of Spider drones. To stick with the bot-theme, I made use of the upgrade option to replace the Apprentice handler who normally accompanies units of Spiders with a third drone instead.
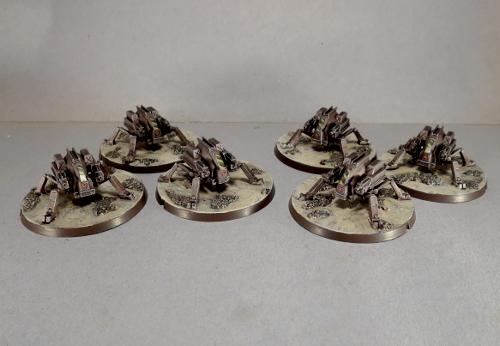
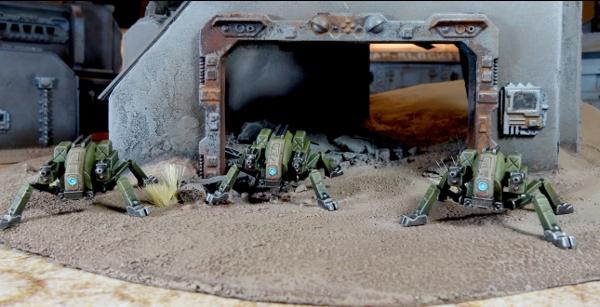
To round out this first detachment, I added some fire support from two units of Scorpion Drones. These are a home-brew unit that I created for an article a while back, rather than a standard Maelstrom's Edge unit - You can find their rules card and a tutorial for building them here.
That rounds out the first detachment, which comprises around half of the planned force. Roster-wise, it looks like this:
Command: Journeyman Bot Handler
- second pistol, Command Booster - 17 points
Core: Spider Drones
- replace Apprentice Bot Handler - 9 points
Core: Spider Drones
- replace Apprentice Bot Handler - 9 points
Hammer: Scarecrow Sniper
- 2 linked clingfire sprayers, Overdrive - 5 points
Anvil: Hunter-class Warmech
- 2 flakk cannons, 2 cluster missile pods - 20 points
Anvil: Scorpion Drones - 10 points
- 2nd unit (Multi-unit selection) - 10 points
Total - 80 points.
Next week: Detachment 2.
Spoiler: There will be robots!
If you would like to build your own robot army of doom, you can pick up the various Maelstrom's Edge kits from the webstore here. As always, feel free to share your creations on the Comm Guild Facebook page!
For other Maelstrom's Edge modeling articles, including tutorials and walkthroughs of a wide range of different building and miniature projects, check out the article roundup here.
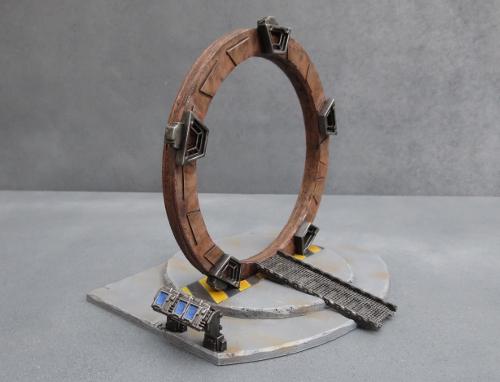
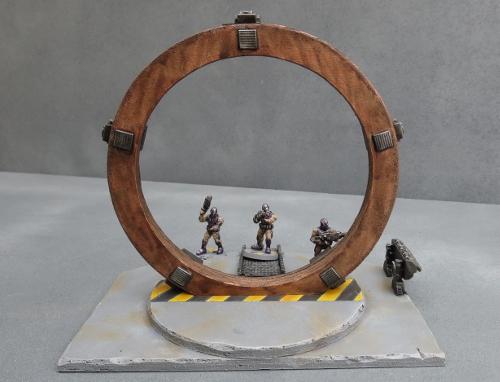
Terrain Spotlight: Experimental Cybel Gate
Posted on Monday Jul 10, 2017 at 05:00pm in Models
- by Iain Wilson
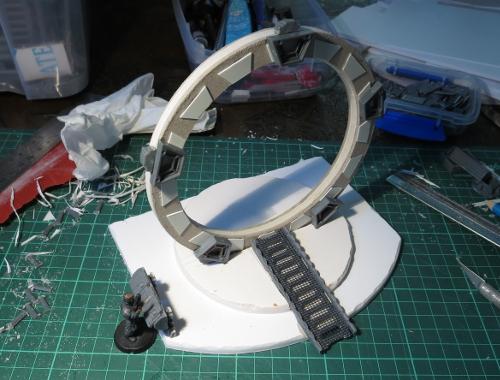
As the Maelstrom's apocalyptic conflagration closed in on the planet Devlin IV, rumours began to circulate amongst those still desperately trying to find passage off-world that scientists in a secret Epirian Foundation facility had been working on a new kind of Cybel gate that might prove to be their salvation. Whilst most Cybel gates are massive, space-borne affairs, this gate would supposedly operate from the planet's surface! While the rumour would ultimately lead to disappointment, as the project had been a dismal failure, it nevertheless gave temporary hope to many who had given up on escaping the Maelstrom's wrath and fueled a frantic search for this device.
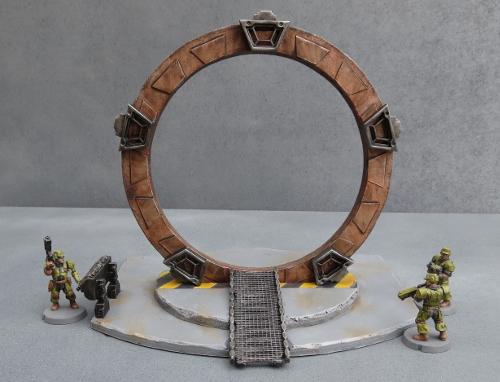
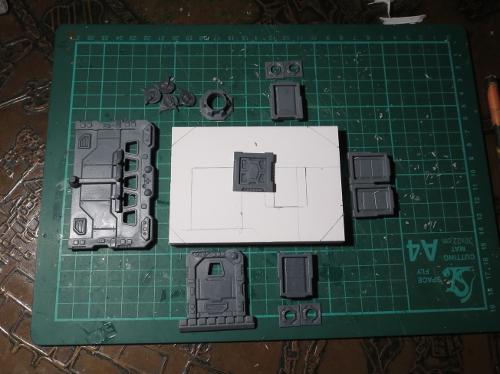
I had an idea a while back for a table themed around a Cybel gate research facility, where the experimental gate would form a centrepiece that would double as both a cool focal point and a potential objective for scenario-driven games. Capturing a resource such as this would, of course, be a worthy goal for any of the various forces encountered in Maelstrom's Edge, and there is all sorts of additional potential for thematic events when the gate is activated. Below is what I came up with, built from foamcore, cardboard, and components from the Maelstrom's Edge terrain sprue.
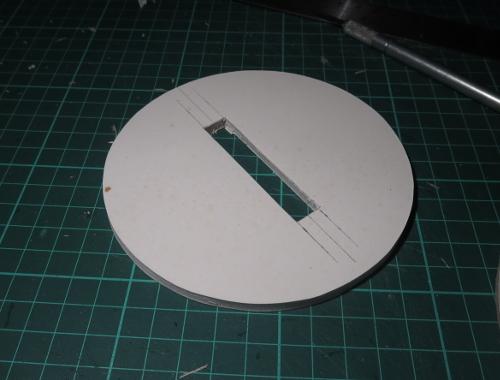
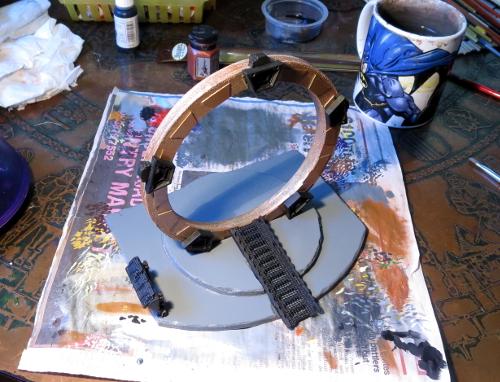
I started out creating the basic shape for the gate by tracing two concentric circles onto a sheet of 5mm foamcore and cutting the resultant ring out with a hobby knife.

I then used the foamcore ring as a template to make two more rings from thick card.

The circle cut from the inside of the foamcore ring was the perfect size to act as a base, with a channel cut down the middle for the ring to sit in.
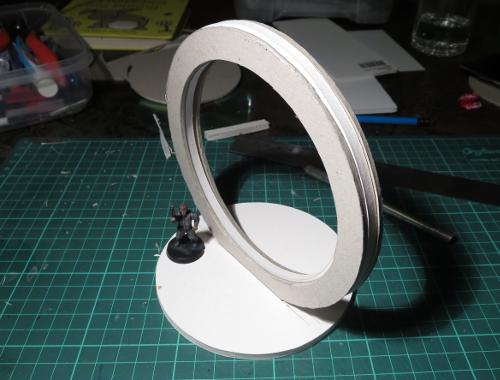
The three rings were glued together, and set in place to check the fit.
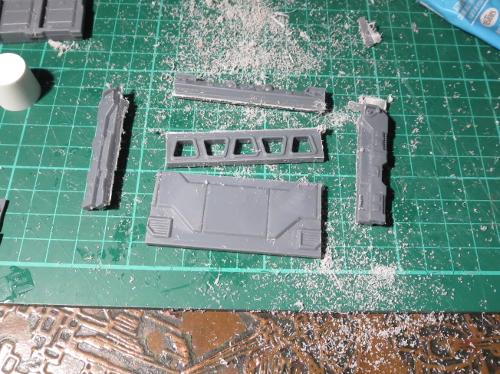
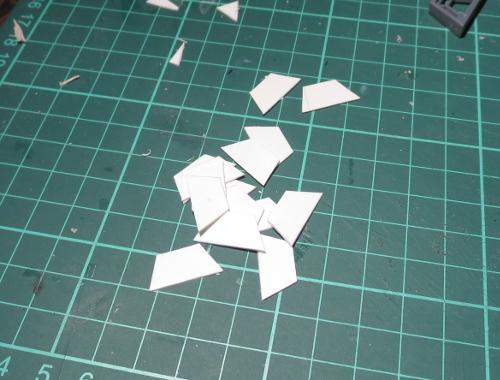
Next, I cut a bunch of trapezoid shapes from plasticard, sized to fit neatly inside the trapezoid window from the Maelstrom's Edge terrain sprue.
These were glued at intervals around one side of the ring.
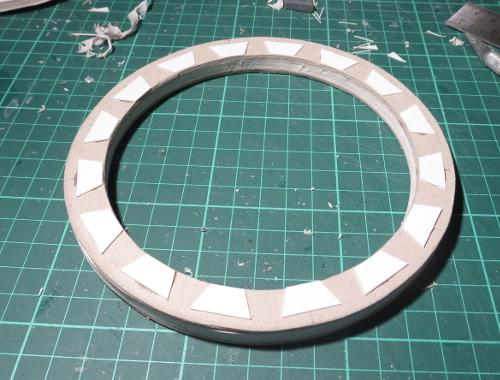
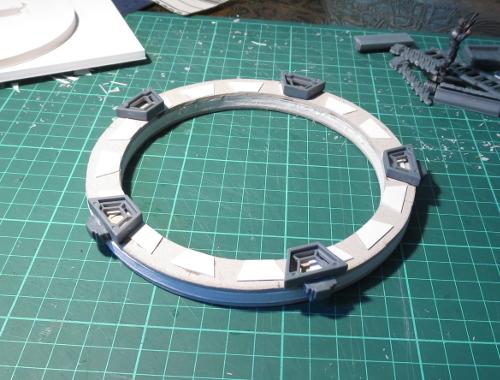
Over these, I glued 5 trapezoid windows, with power units cut from the bottom of the energy-fence posts glued around the outside of the ring.
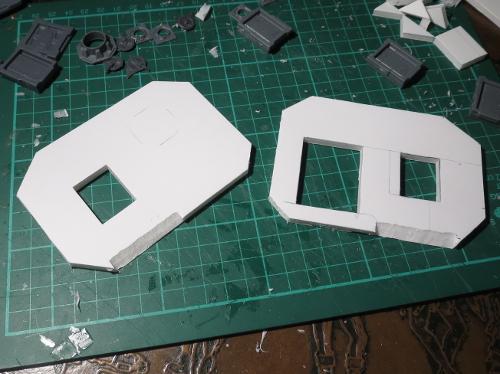
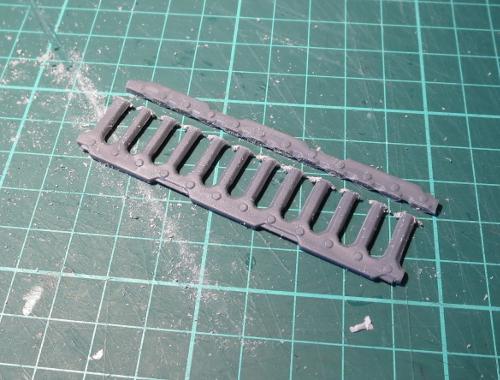
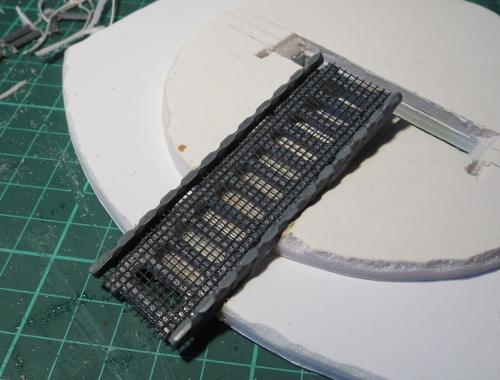
I took a ladder and cut the outside edges off with a razor saw.
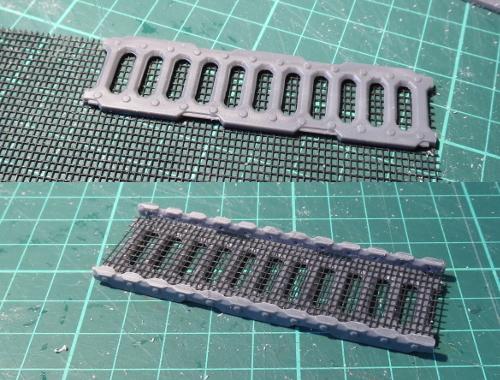
A second ladder was glued to a sheet of flyscreen, and then the flyscreen trimmed around the edges of the ladder and the cut pieces from the first ladder glued onto either side.
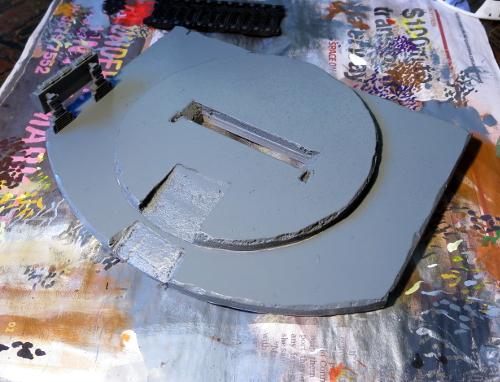
The base was bulked up a little with another layer of foamcore.
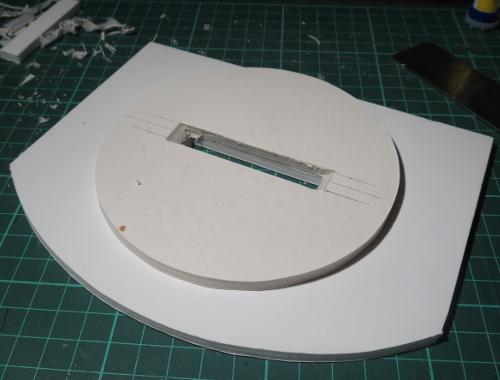
I then used a file to carve out an angled ramp down the front of the base.
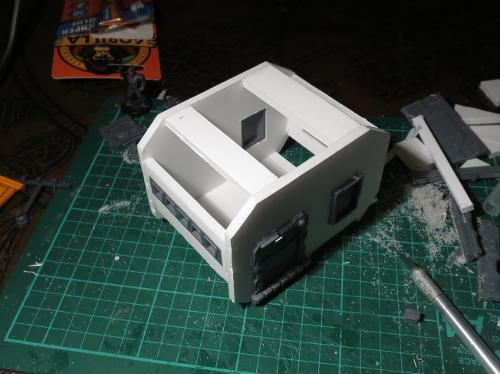
The ladder assembly slots neatly into the ramp recess.
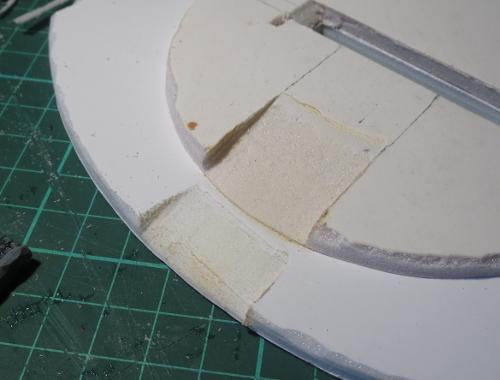
Finally, I put together a control panel using a light fixture and three trimmed computer panels.
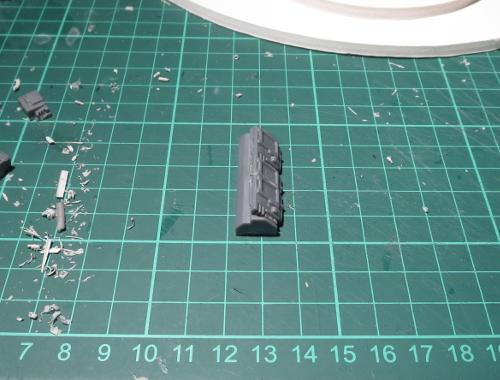
With the addition of some legs made from trimmed down energy-fence posts, the control panel was glued in place, and the gate was ready for painting.
I wanted a bit of contrast in the gate assembly, so decided to go with a coppery ring and darkened steel details. To get started, I sprayed the ring with Army Painter Army Green, partly to give a nice base layer for the copper and partly because I didn't have a lot of time for painting this week, and the Army Painter sprays dry nice and quickly...

Over the green, I did a couple of coats of some old Citadel copper that I had laying around.

The base was sprayed with a medium grey colour.
I then picked out the steel parts with black. It's a little hard to see in this lighting, but I also drybrushed the base with a light grey and added some dirt scuffing with some lightly drybrushed brown.
The ring was given a couple of coats of Army Painter Strong Tone, and the steel parts drybrushed with P3 Pig Iron and then washed with Army Painter Dark Tone.
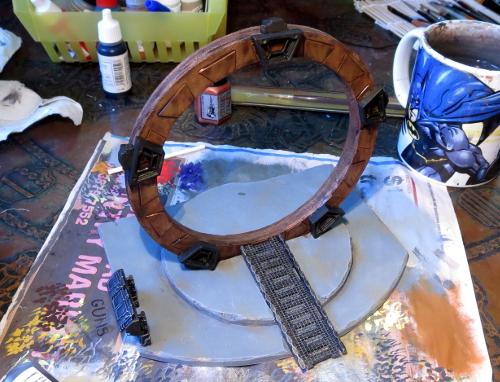
Finally, the control panel screens and some hazard lines were added, and the ring was given a light drybrush with silver to lift the edges a little.
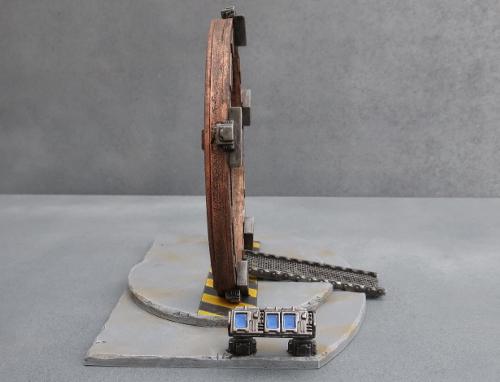
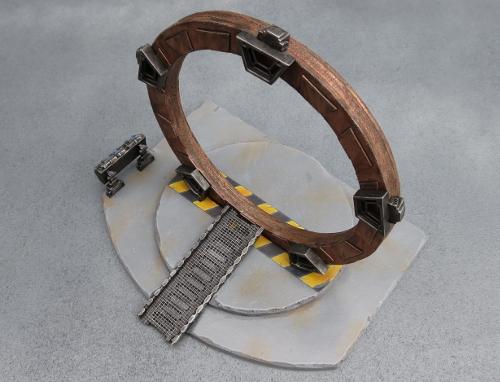
If you would like to build your own experimental Cybel gate, you can pick up the Maelstrom's Edge terrain sprue from the webstore here. As always, feel free to share your creations on the Comm Guild Facebook page!
For other Maelstrom's Edge modeling articles, including tutorials and walkthroughs of a wide range of different building and miniature projects, check out the article roundup here.
