Terrain Tutorial: Blanket Door Coverings
Posted on Monday Nov 27, 2017 at 05:00pm in Tutorials
- by Iain Wilson
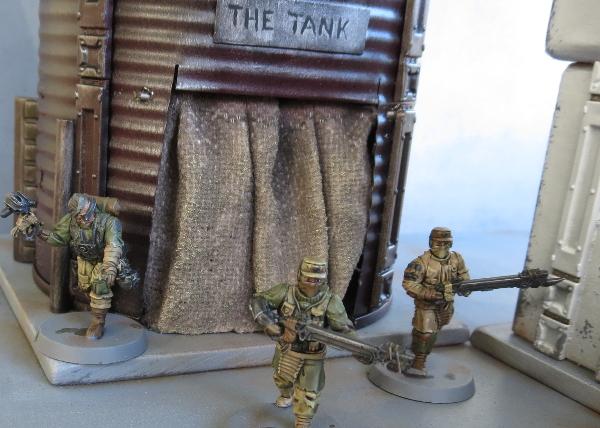
Last week I put together the second part of my Broken settlement, with some buildings made from a cardboard gift box and an old fruit tin. The fruit tin still needed a door covering, and I wanted something that looked sufficiently rough and ready. I decided to go with an old blanket to serve as a makeshift door, which wound up looking like this:
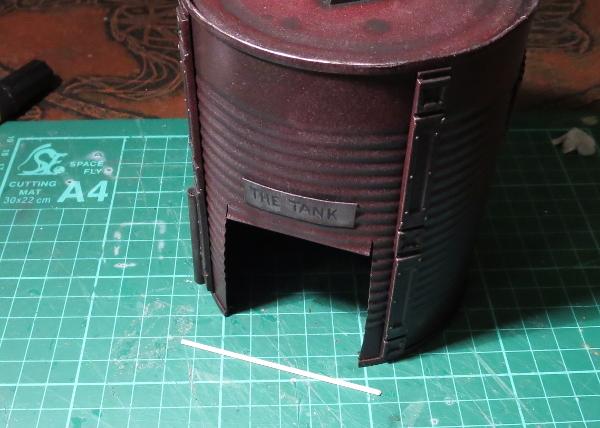
To start with, I took a length of plastic rod and cut it to run across the doorway with a little overhang on either side. This would eventually sit in place at the top of the doorframe, poked through a couple of holes drilled into the tin on either side.
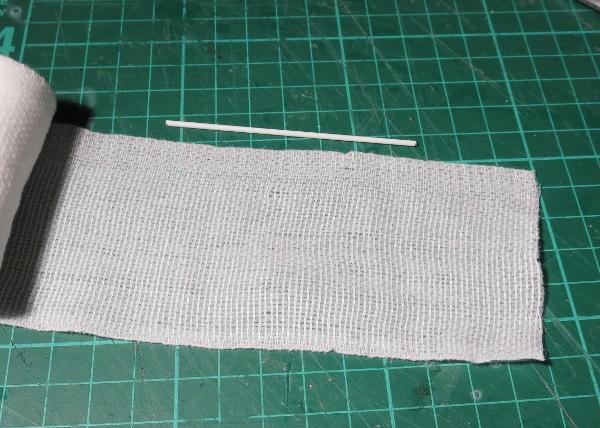
I then grabbed some crepe bandage and cut a piece a little longer than the rod, to allow it to bunch up. Bunched curtains look more interested than a flat sheet, unless you want to paint a design on, in which case a flatter surface is going to be easier to deal with.
Next I glued the bandage over the rod with some superglue, bunching it up so that the ends of the rod were sticking out, and folded over the rod far enough so that the bottom of the blanket would just touch the ground when hung in place.
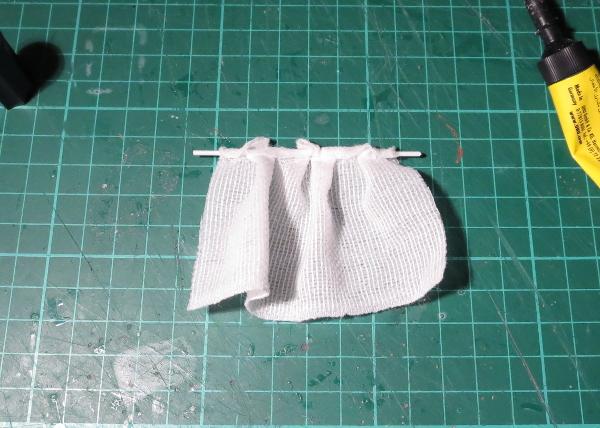
Now comes the messy part - I mixed up some PVA glue with a little water. The exact amount of water is going to depend on how runny your PVA glue is, but you're aiming for around the consistency of pouring cream.
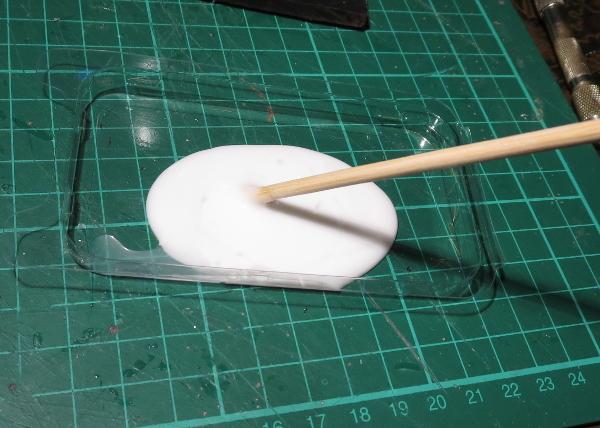
Then I dropped the bandage blanket in the glue and let it soak right in. When the glue dries, it will stiffen up the cloth, so you want it good and soaked through. If the glue is too thick, it doesn't soak in as well and you wind up with some parts of the blanket that are still soft and floppy, and others a goopy mess.
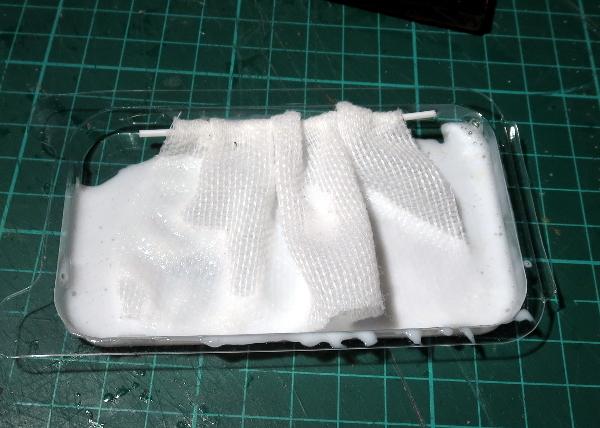
Once the bandage was nice and gluey, I hung it in place and arranged the folds to look as natural as possible, and then left it sit for two days to give it plenty of time to dry. Once dry, it will be stiff, but still slightly flexible. If it's too soft and doesn't hold its shape, you can stiffen it up a little more by painting on some additional glue, but try not to put it on too thick and fill up the weave of the fabric. If you have a brush-on superglue, you could also paint some of that onto the back of the blanket if it is accessible, but again, be sparing so you don't soak it into the weave and destroy the blanket look.
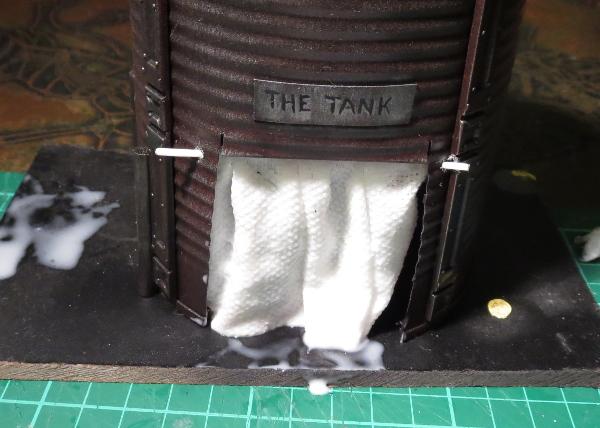
When the glue is properly dried, it's time to paint. I started out with a layer of Army Painter Strong Tone, but you could use whatever colour fits your terrain. If you use a wash or ink, make sure you give it plenty of time to dry, as the watery paint can cause the PVA glue to soften up again.
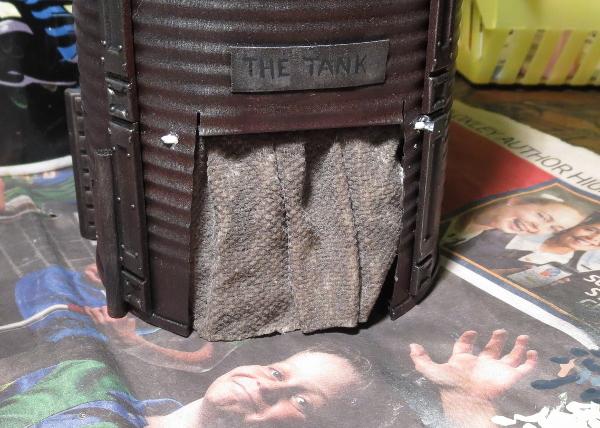
Once the wash was dry, I carefully drybrushed with some bone and white to highlight the raised parts of the blanket, and added a little more wash into the deeper creases for some extra shading.
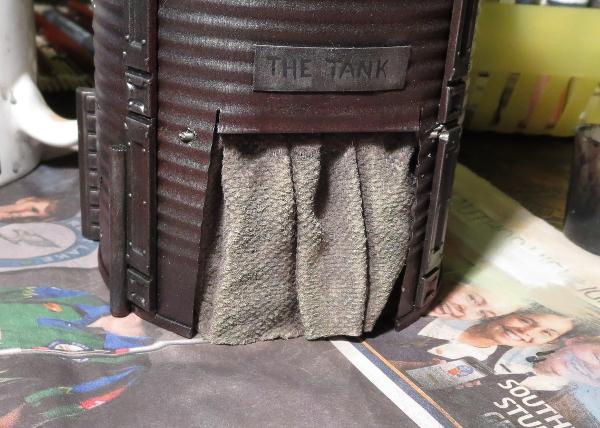
And that's a job done!
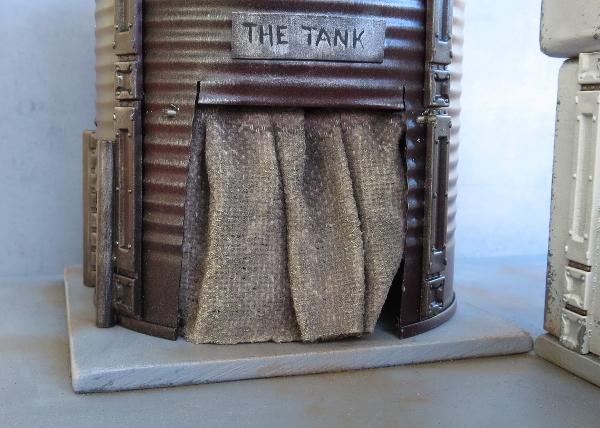
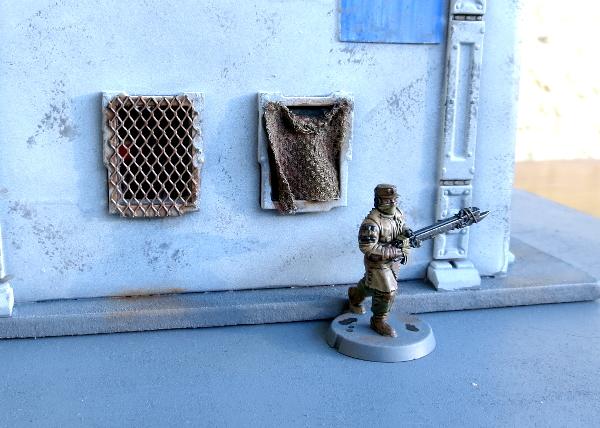
You can also use a similar technique to hang blanket coverings over windows. On this one, the blanket is tacked onto the outside of the window frame. To attach the soaked bandage to the window, I added a drop of superglue to the top corners, let that set, and then carefully teased the wet blanket into the shape I wanted it:
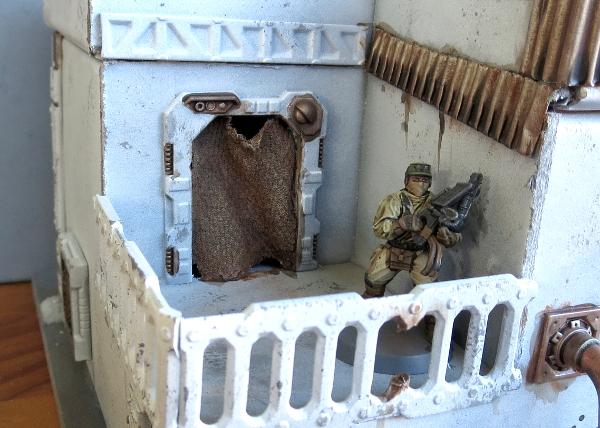
The same was done here to hang a blanket inside this door frame. This is a door piece off the Maelstrom's Edge terrain sprue with the door cut out of the frame. The blanket is superglued in place at the top corners and down the sides of the door frame and then shaped and left to dry.
On my next terrain project, I'll also be using this to add some canvas roof coverings to a building that's seen better days... Stay tuned!
To build your own stellar refugee settlement, you can pick up the Maelstrom's Edge terrain sprue along with the rest of the Maelstrom's Edge miniature range from the webstore here. As always, feel free to share your creations on the Comm Guild Facebook page!
For other Maelstrom's Edge modeling articles, including tutorials and walkthroughs of a wide range of different building and miniature projects, check out the article roundup here.
Building a Karist temple: how not to
Posted on Saturday Nov 25, 2017 at 05:33pm in Tutorials
Originally posted on Dakkadakka by Sgt.Oddball.
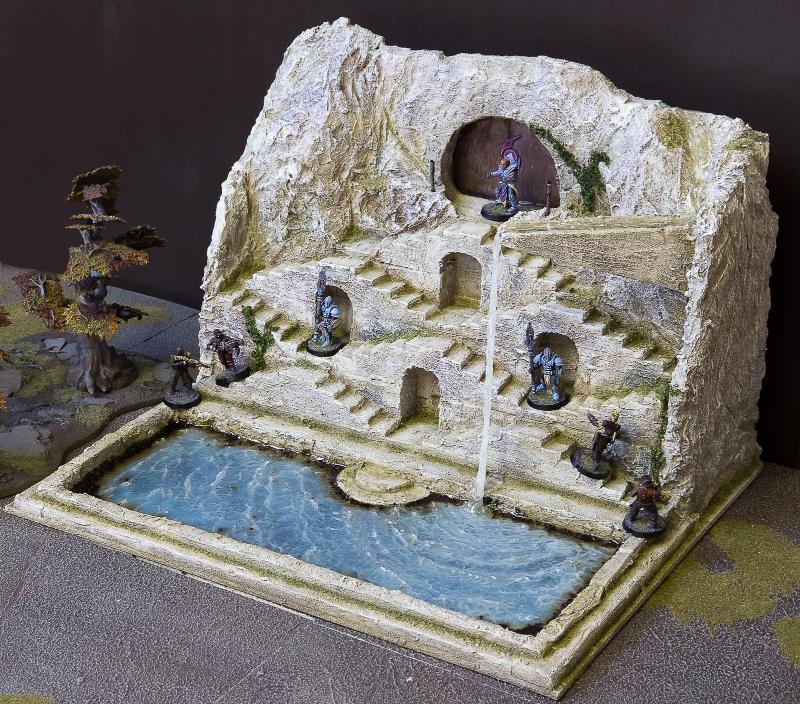
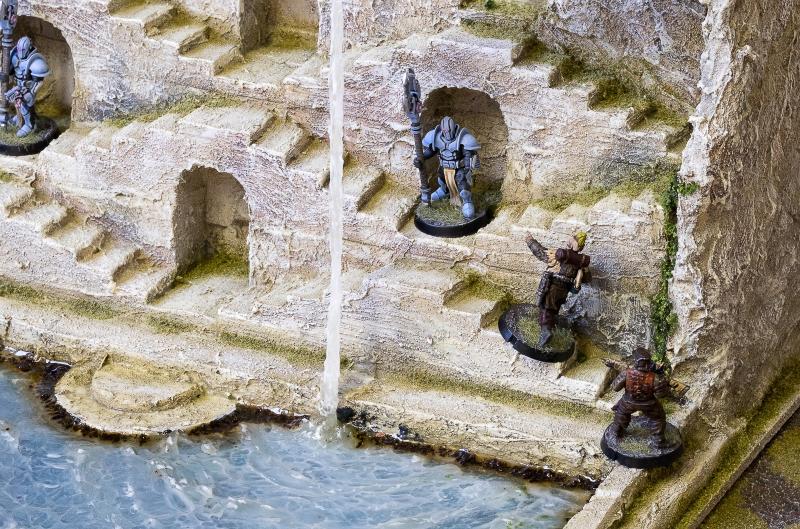
What follows is a brief overview of how I built this Karist temple, inspired by the stepwells seen most commonly in India. A couple mostly water-related things did not work out at first, so here’s how to avoid those things.

1. I took the lid from one of those boxes they put wine bottles in, measured things, and glued my foam stairs to the lid. The steps are sized to accommodate normal 25mm based dudes without them tipping over. At the back: I just used scraps of foam to hold everything up. I then used foam again to make the basin.
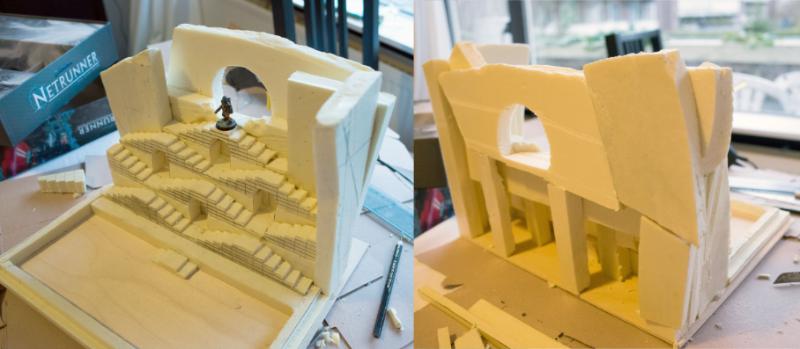
2. I then stacked bits of foam to create the rock around the stairs and the temple entrance.
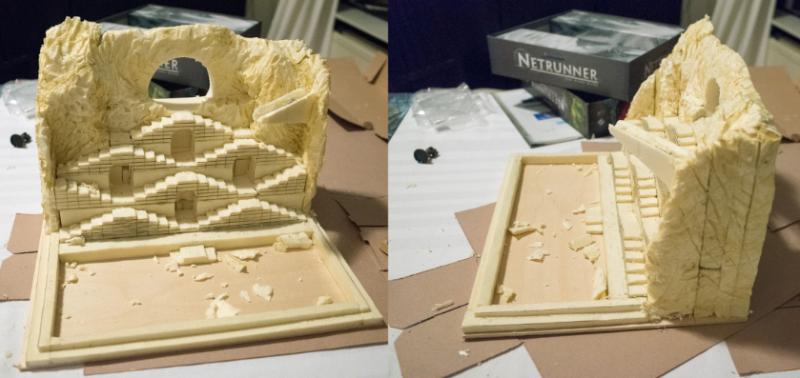
3. With fingers, a hobby knife, a serrated knife and a hot soldering iron I shaped the foam to look like rock.
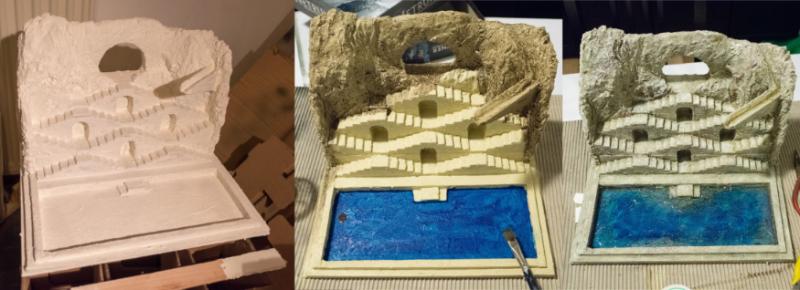
4. I then undercoated the whole thing with white textured wall paint. Next, I used a hobby paint mixture to make everything rocky a yellow-sandish colour. The inside of the basin was painted a bright blue. The rock was then washed in diluted brown paint and the water area highlighted with progressively lighter shades of blue-green (lighter towards edges). The rock was highlighted with probably the base colour again and then adding in a sandy colour and white. I also used various coloured washes (reds, greens, browns) to give the rock colour some variation. All highlighting is simple drybrushing/overbrushing. In the last picture, I’ve poured Woodland Scenics E-Z water in the basin and in the water source on top, which is a resin you melt before pouring. This is the first thing you should not do. This stuff was just not suitable for this purpose. It shrunk and cracked as it cured and had a yellowish tint.
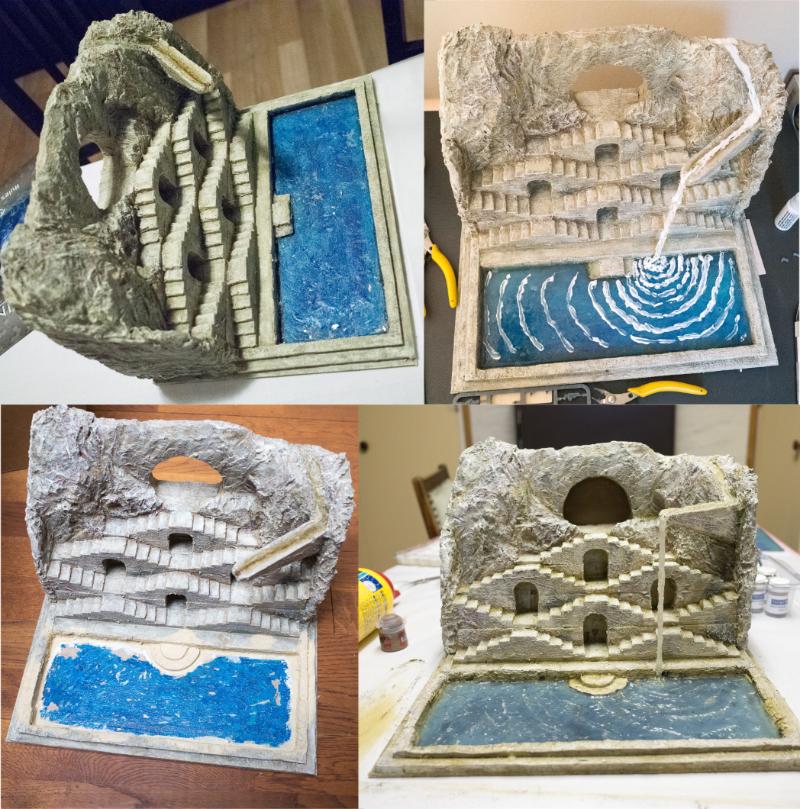
5. It’s not at all easy to remove E-Z water once it’s set, especially if you want to keep the surrounding terrain in one piece. Getting rid of it involved trying all sorts of methods, eventually a chisel was most effective. I then tried a more familiar (to me) product, which is Woodland Scenics Realistic water. This is awesome stuff and gave me a very nice pool. For the water drop and a little ripple effect I used Woodland Scenics Water effects, which is also nice.
Then I did the second thing you should not do. I figured I could add some white to the water by mixing white paint into the Water effects stuff and applying it where appropriate. However, Water effects itself is white until it cures, hence I couldn’t see how much the white paint coloured the Water effects. Of course, I didn’t bother to test my batch (all this water stuff takes forever to cure and I have no patience). Turns out I used too much white paint and all my water now looked ridiculous (basically like that picture of the uncured Water effects). The thing is, it’s impossible to get rid of. I think I tried painting over the whole thing? Not sure. Anyway, in the end I decided it was time to once again dig out the whole basin.
This time was worse, as the Realistic water isn’t as easily chiselled as the E-Z Water. It stays a little soft. After much perseverance I got everything out, but I destroyed some of the paint job and actual foam bits around the basin. I had to redo all that and also build new steps into the water (round steps this time). Now that I knew what not to do, again using Realistic water and Water effects got me the desired result (still room for improvement, but I’ll leave that for another project).
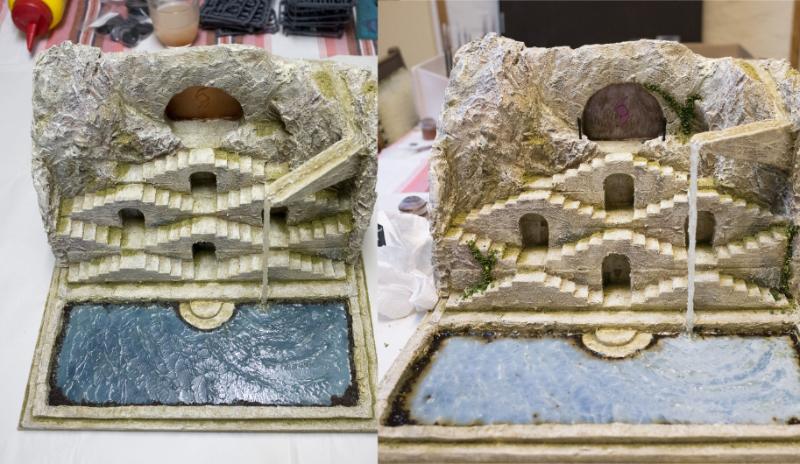
6. The final steps were making temple doors with the Karist logo out of plasticard, and detailing. The Maelstrom's Edge terrain sprue supplied a control panel. The doors were painted brown, then bronze, then drybrushed pewter and silver. The logo got various purple paints, washes and highlights. I used green weathering powder to colour the rock a bit in the crevices and then sprinkled on fine blended green turf for some moss, and the dried contents of some teabags around the edges of the basin to represent fallen leaves and such muck accumulating there. This muck, of, course, didn’t appear wet so I added a final coat of Realistic water (this is the white sheen you see in the last image). The colour from the tea bled a bit more than I’d like, so this is probably another thing I’d find a better procedure for next time. To finish up I glued some coarser, darker green turf to the rock to represent vines, washed that with a brown wash and then highlighted with an olive colour. I then broke a skewer in two and wrapped the ends in narrow masking tape to make two torches and planted these near the entrance, painted brown and metallic.
And that’s basically it! Apart from messing around with the water a lot (this cost me so much time, it ain’t funny), it’s a fairly simple project.
Terrain Spotlight: Broken Settlement, part 2
Posted on Monday Nov 20, 2017 at 05:00pm in Tutorials
- by Iain Wilson
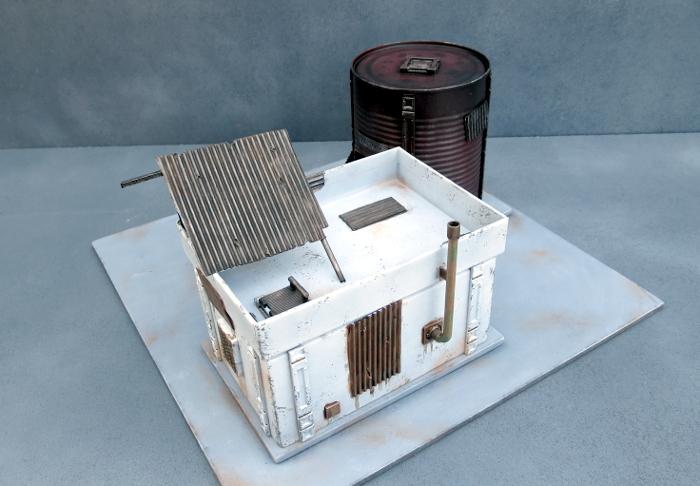
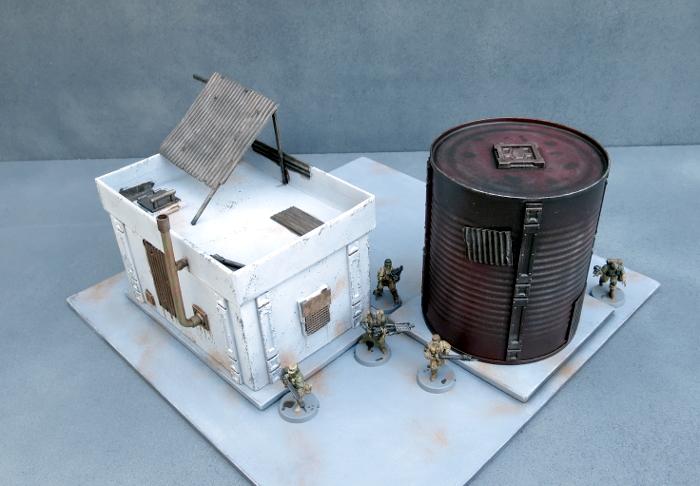
This week, I'm continuing on with the construction of the Broken settlement that I started a few weeks back, which you can find round about here, by adding in another 'renovated' building and a converted water tank shelter.
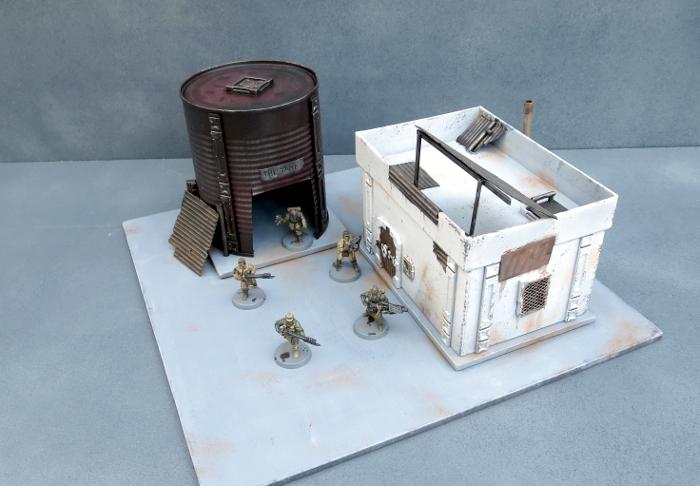
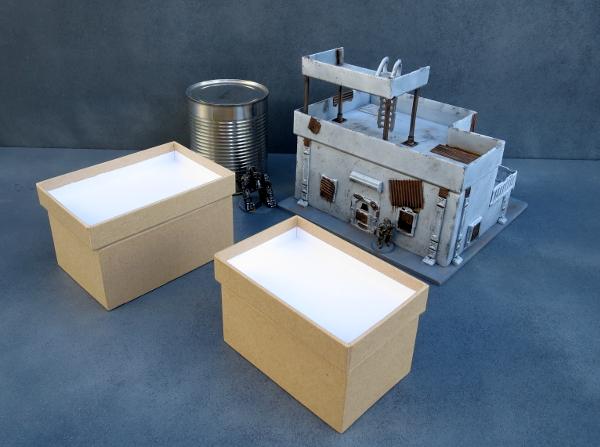
I fast-forwarded a little on construction by grabbing a small building that I made some time ago for a video showing how to make a building from a cardboard gift box and the Maelstrom's Edge terrain sprue (which you can find on Youtube here). This was partly painted as a test run for the sponge-weathering that I used on the first building for this settlement.
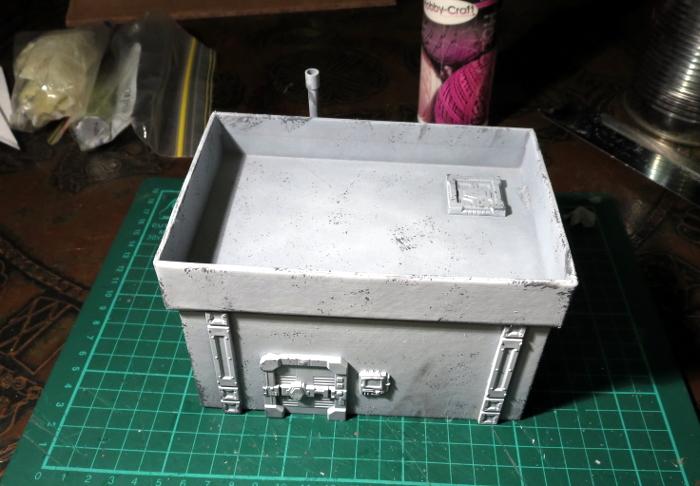
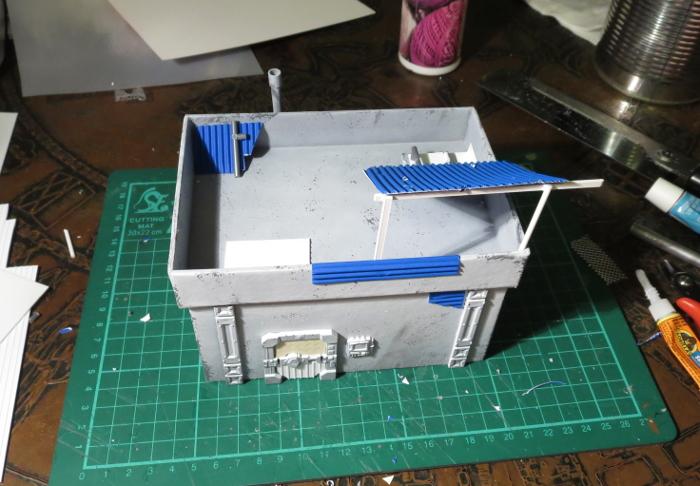
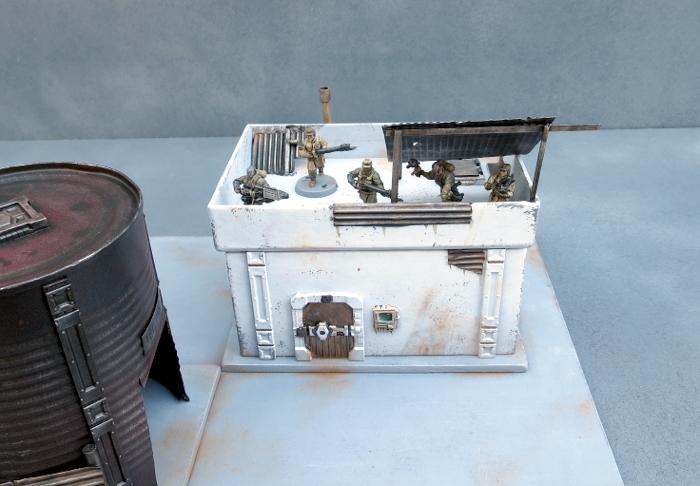
Clearly, this building was still far too pretty looking to fit into a Broken settlement, so I added a bunch of patch-plating using plasticard and corrugated cardboard, and added some mesh over the windows on the sides. I also built a framework on the roof to create a makeshift shelter or sentry point.
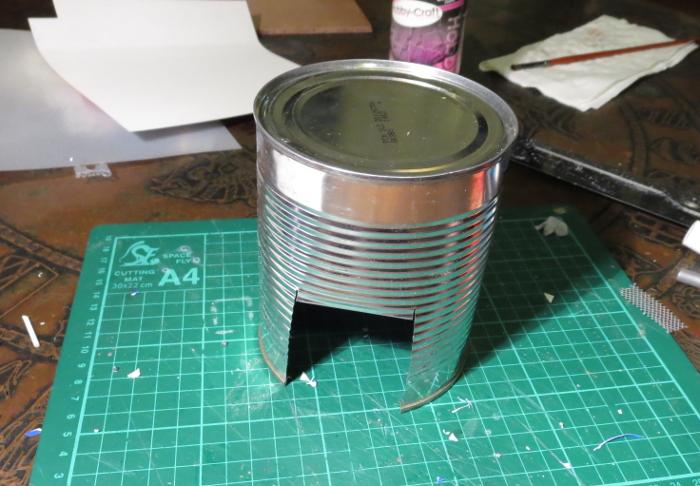
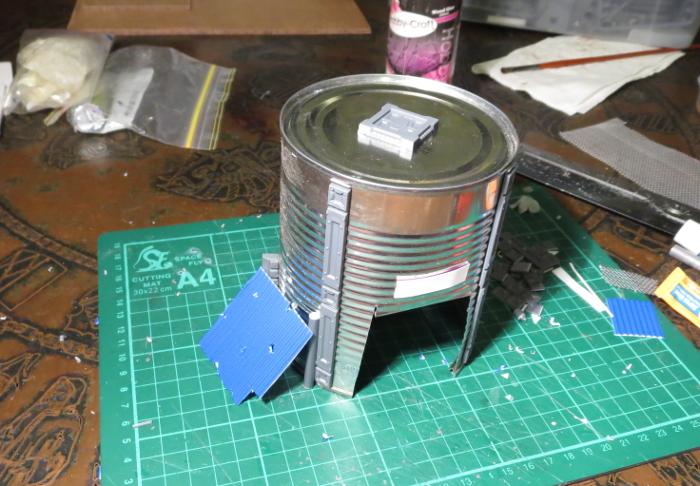
The companion building for the gift box one is made from an old fruit tin. This received a good wash and had the label removed, and then I cut a squarish hole in the side to serve as a doorway.
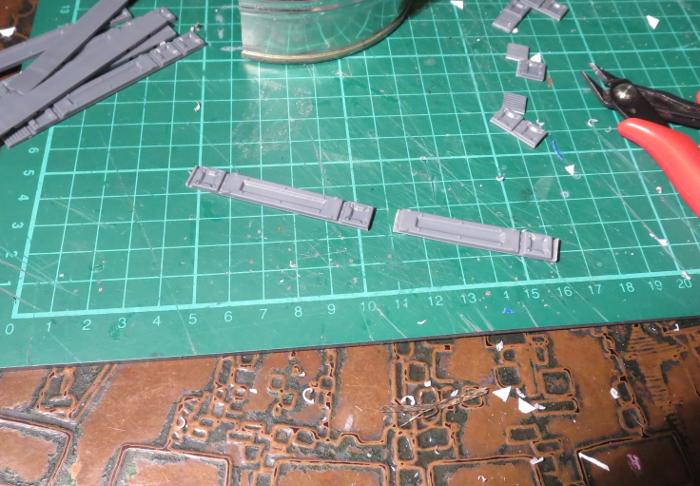
I cut a bunch of reinforcing struts from the terrain sprue to fit neatly down the sides of the tin.
With the addition of some patches, a hatch on the roof and a lean-to on the side, the old tank was ready for painting.
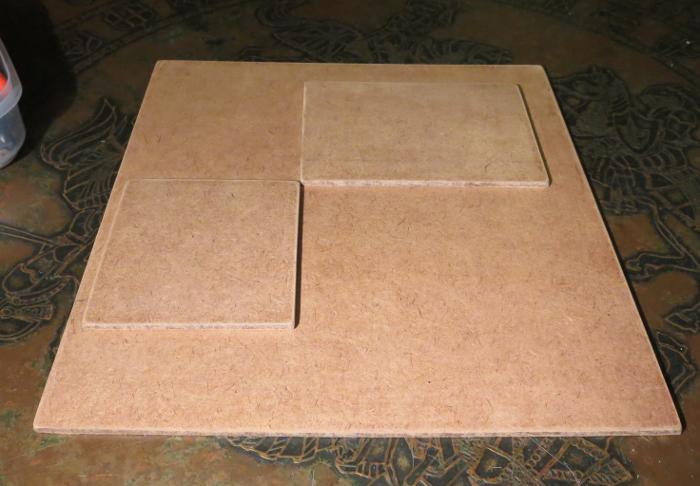
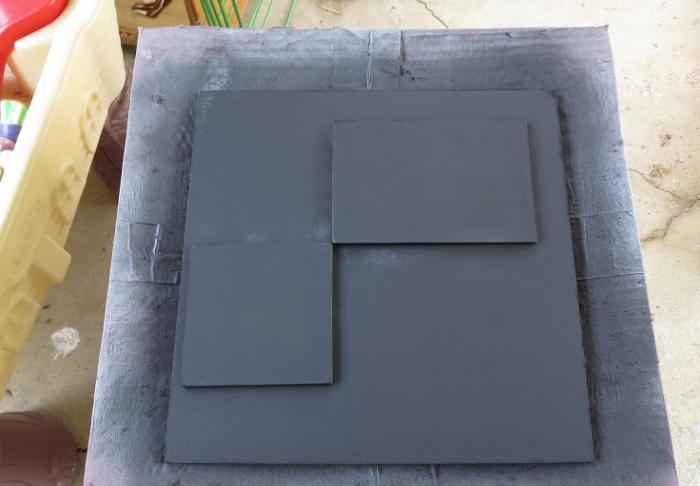
To sit the buildings on, I cut a 12" square of masonite, with a couple of smaller pieces glued on top - a rectangle for the gift box building and a square for the tank. These were cut to size and then sanded around the edges to smooth down the burrs. I then gave the top surface a light sand to break up the shine and give it some texture for drybrushing later, and then glued the building foundation pads on with PVA glue.
Everything in place, ready for painting:
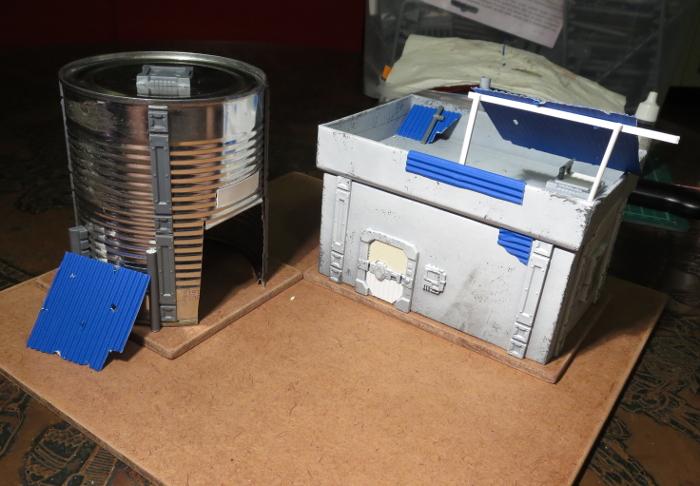
Because the gift box building was already mostly painted, I could skip straight to the detail work. To check how the main bit was done, check out the first article linked back up at the start of this one.
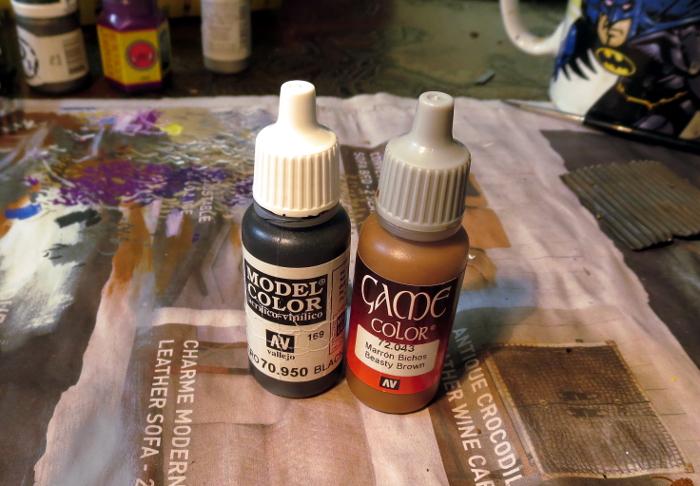
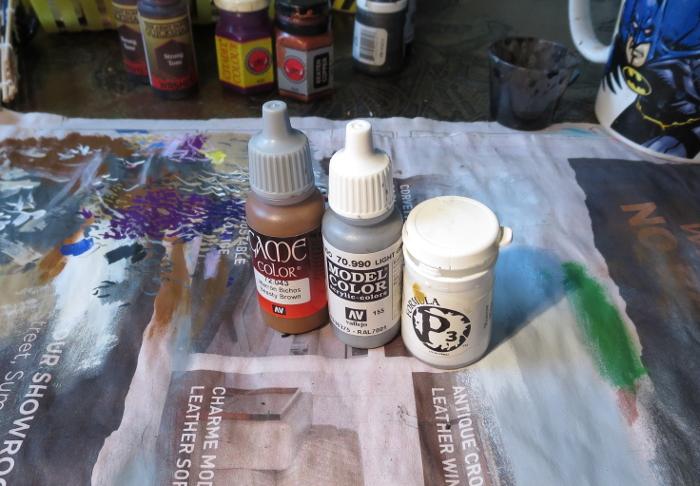
The various metal patches were given a coat of a rough mix of Vallejo Beasty Brown and black.
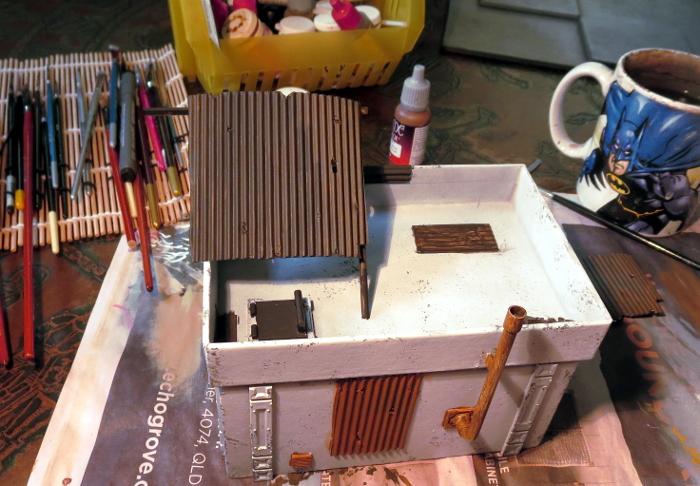
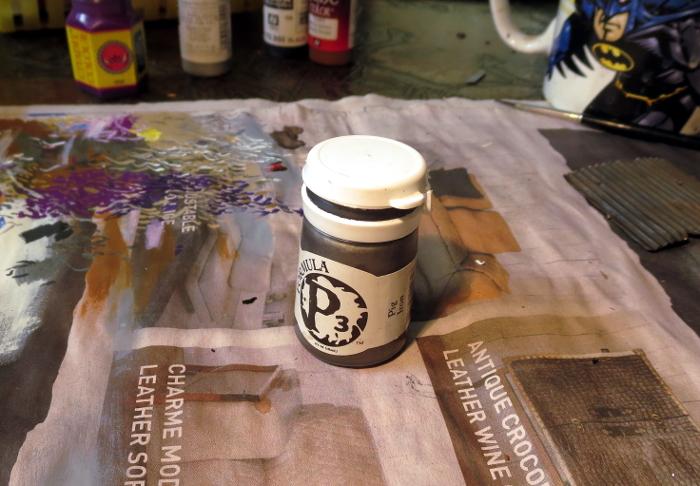
Over this went a light drybrush of P3 Pig Iron.
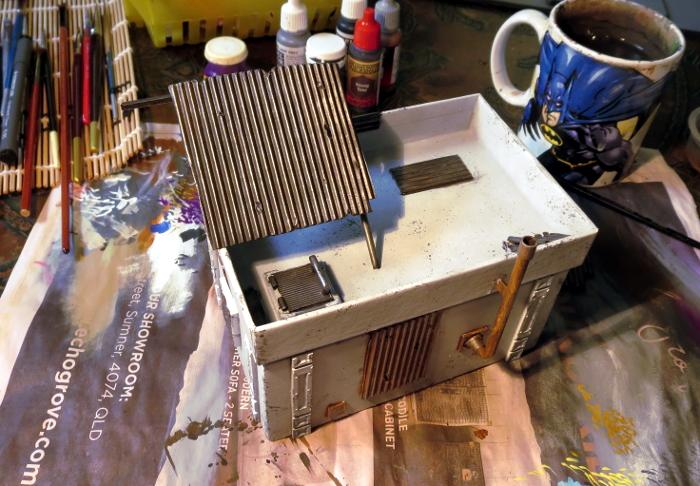
This was followed by a generous coat of Army Painter Strong Tone.
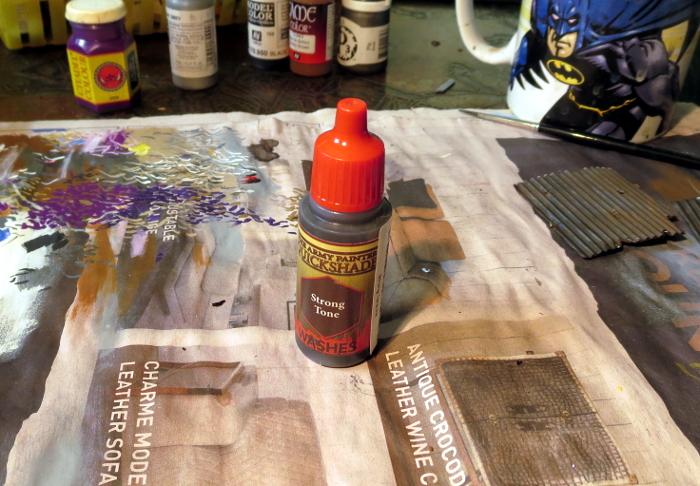
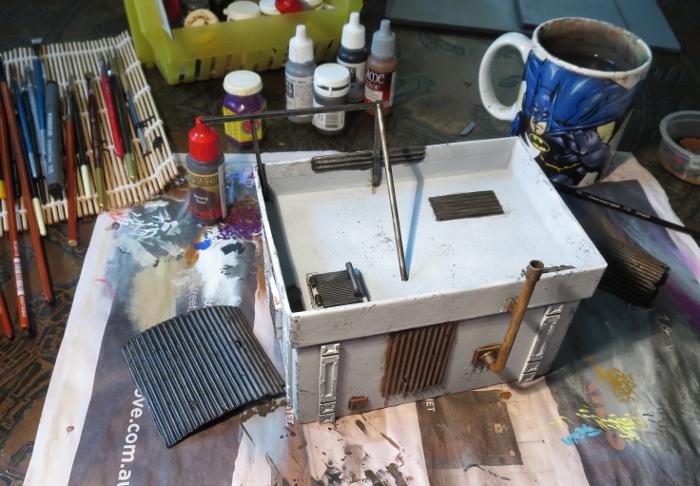
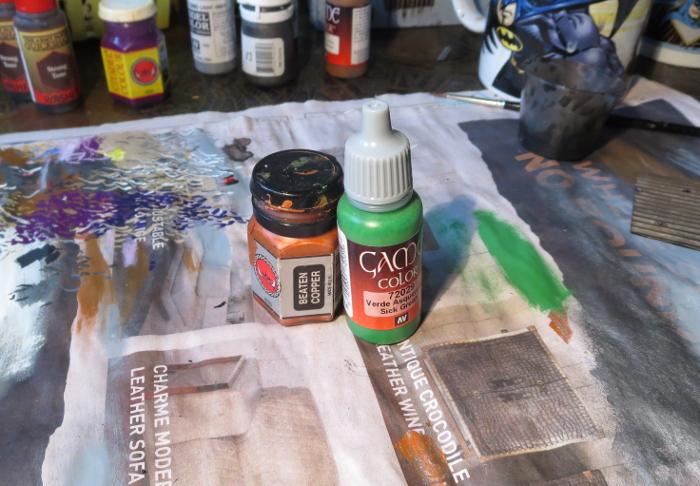
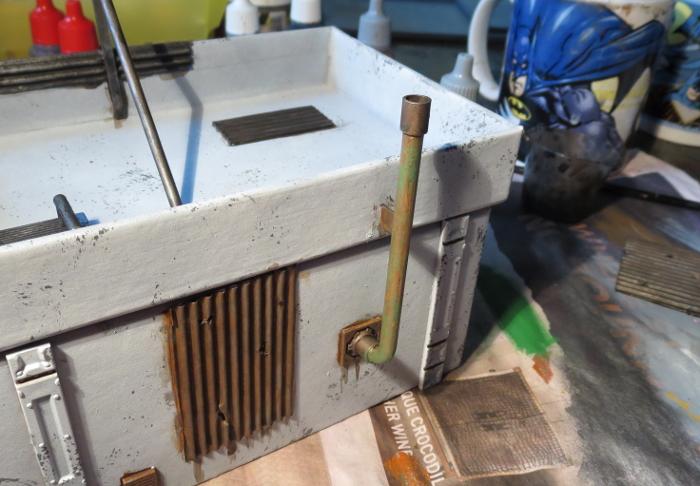
The pipe on the back wall was painted with a coat of Citadel Beaten Copper, and then given a light drybrush of Vallejo Sick Green.
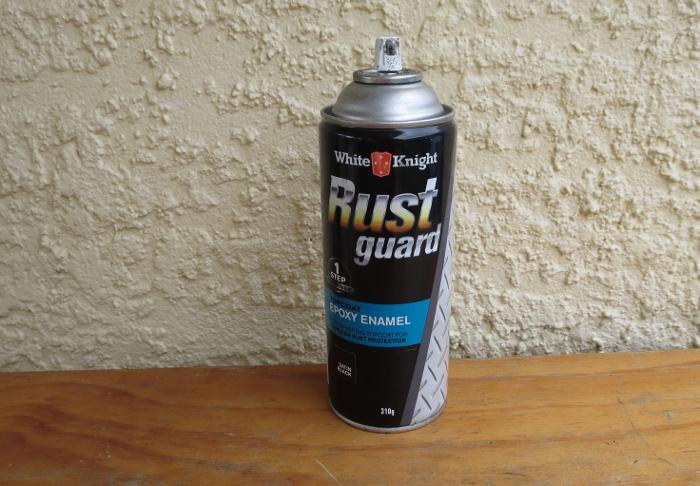
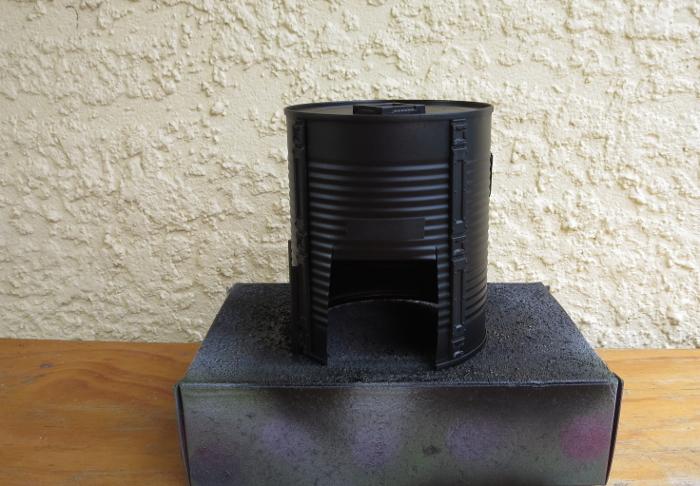
Meanwhile, the tank was given a spray inside and out with black Rustguard, to prevent it from rusting through the paint down the track.
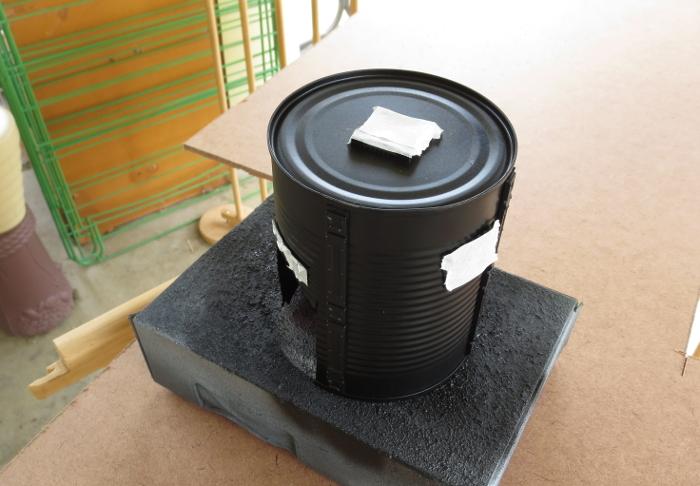
I then masked off the detail parts of the tank building with some masking tape.
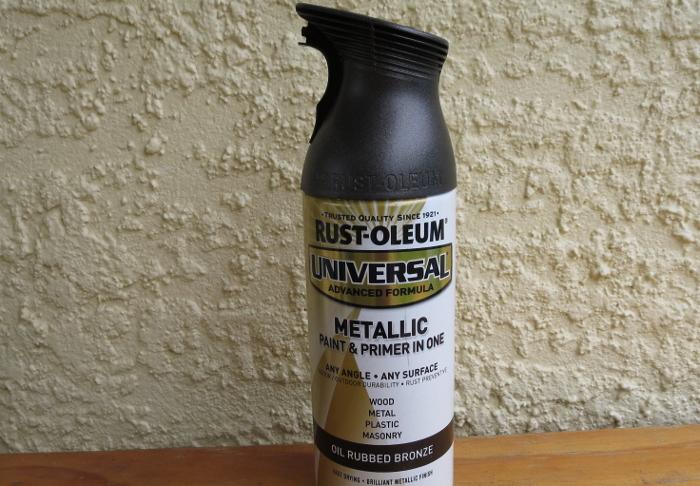
The came a coat of Rust-oleum Oil Washed Bronze. This is a rust-preventing primer like the black, so could have actually gone straight over the bare tin without the layer of black, but I wanted to make sure it was good and dark. The black base helps this without having to spray the bronze on too heavy, as it gets a bit goopy and rough.
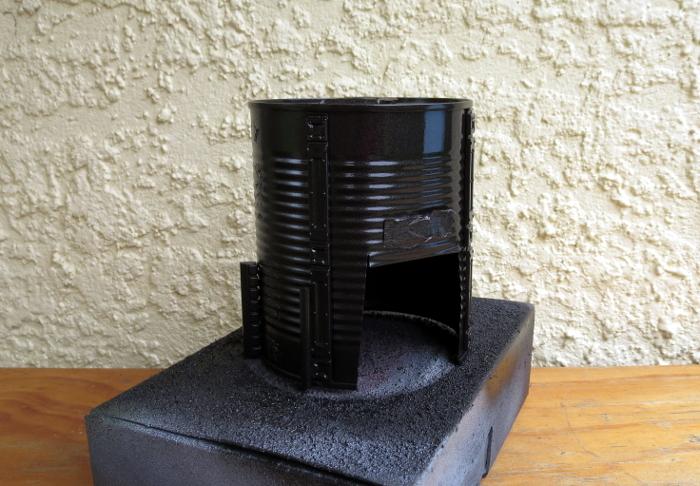
When the bronze was dry, I sprayed lightly over the top surface of the tank with some Army Painter Dragon Red, and then flipped the tank upside down and sprayed lightly around it so that the red caught in the undersides of the tin's corrugations without coating the whole thing in red.
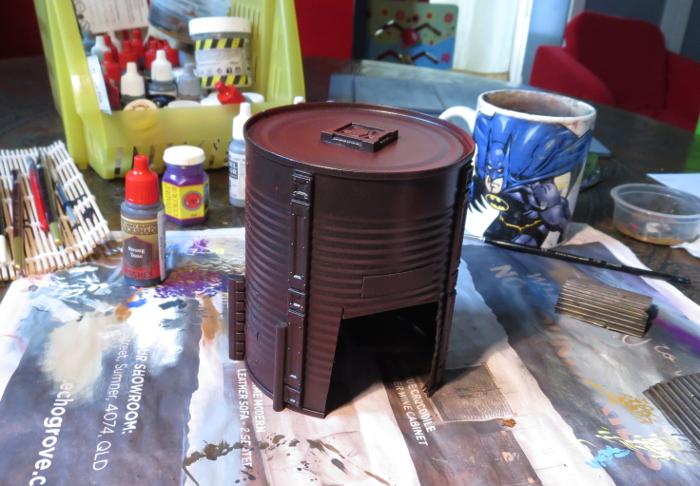
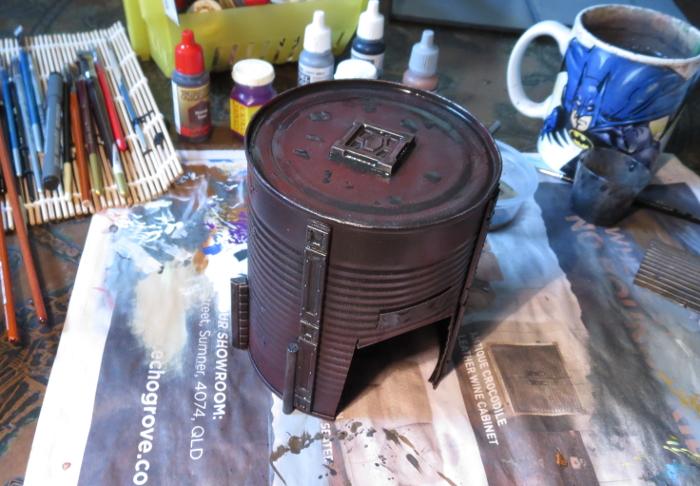
I then drybrushed the whole thing lightly with Pig Iron, going a little heavier on the detail parts to make them stand out a little from the darker tank. The detail parts were then washed with some Strong Tone, and a few puddles of Strong Tone scattered around on the top surface.
While all of this was going on, I undercoated the based board with some flat black, and then gave it a coat of a flat medium grey. I deliberately use a range of different greys to basecoat my 'concrete' terrain bases, to help reduce the uniformity of the vast expanse of concrete on the table. If you look around in a city that has a lot of concrete structures, the colours vary considerably depending on the age of the concrete and the specific mix used, so it creates a better sense of realism on the gaming table if you carry this across in your painting.
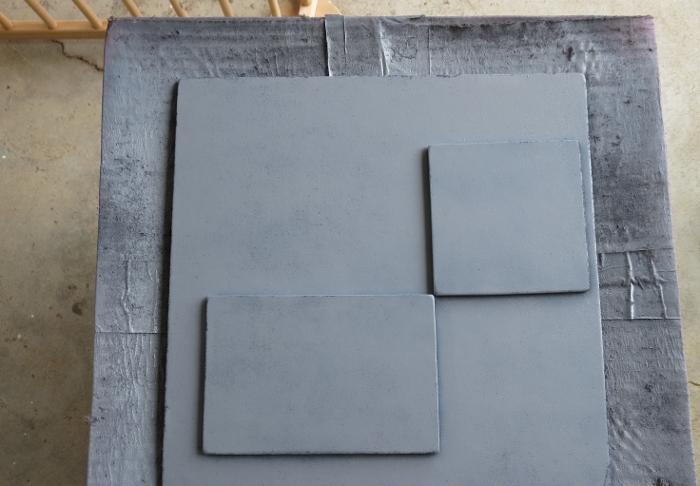
To finish off the base, it was given a drybrush of Vallejo Light Grey mixed roughly with white, and then some patches of worn grime were added with a light drybrush of Beasty Brown, on both the base and the gift box building.
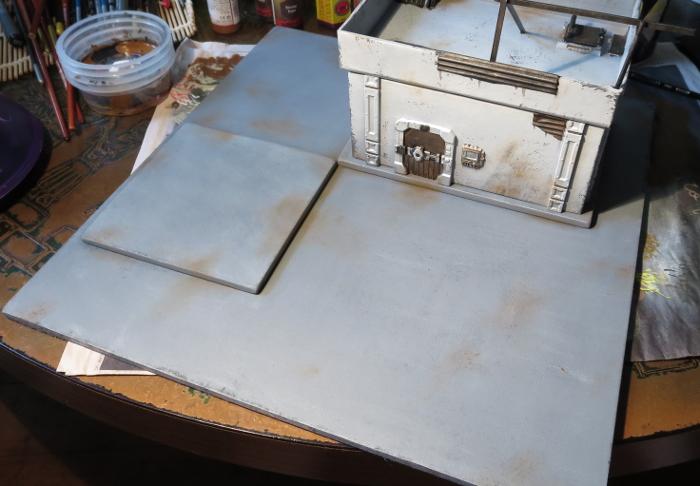
With the addition of a couple of final details (some lettering above the tank's doorway, the light above the door and the comm panel screen), this little building cluster is about done for now.
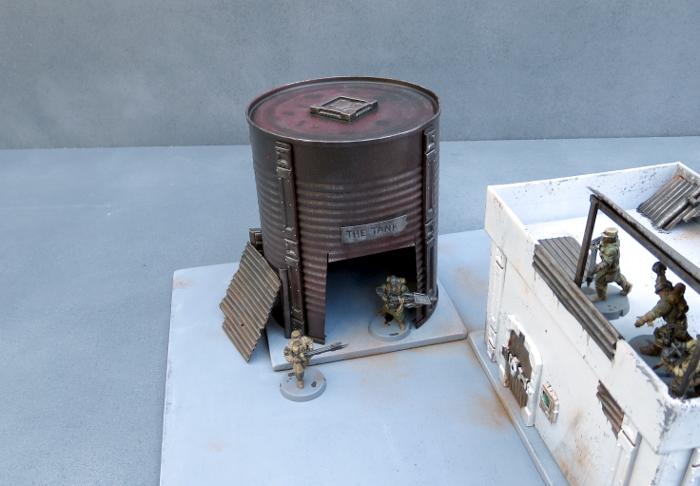
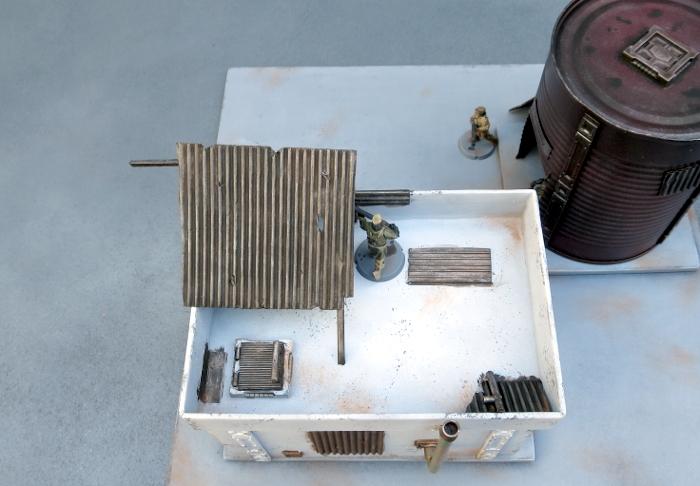
The tank still needs a blanket door covering, which I'll be going through in an upcoming tutorial, and I will go back over all of the buildings in the settlement to add some more characterful detailing once I have some more of the bulking out done, but it's at a point where it's not going to look out of place on the table as-is.

So what's next?
Aside from the door covering for the tank, I'll be moving on to another building section that will have some challenges in the roofing department and some sort of interesting detail in the courtyard.
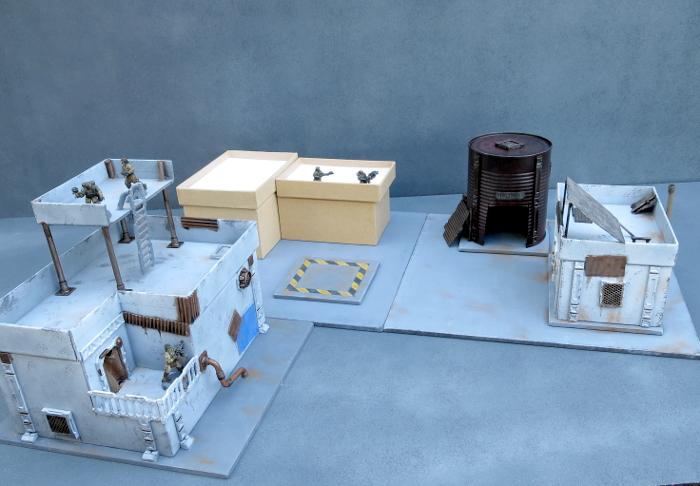
Stay tuned for more!
To build your own stellar refugee settlement, you can pick up the Maelstrom's Edge terrain sprue from the webstore here. As always, feel free to share your creations on the Comm Guild Facebook page!
For other Maelstrom's Edge modeling articles, including tutorials and walkthroughs of a wide range of different building and miniature projects, check out the article roundup here.
Tags: broken buildings modeling models spotlight terrain terrainsprue walkthrough
Modeling Spotlight: The Angel Hellblaster (or 'Fun with Resin!')
Posted on Monday Nov 13, 2017 at 05:00pm in Tutorials
- by Iain Wilson
The Karist Hellblaster is the first of a range of resin models for Maelstrom's Edge, to help flesh out the factions with some more fun and freaky options. This week, I'm having a look at some modeling options with this great little kit.
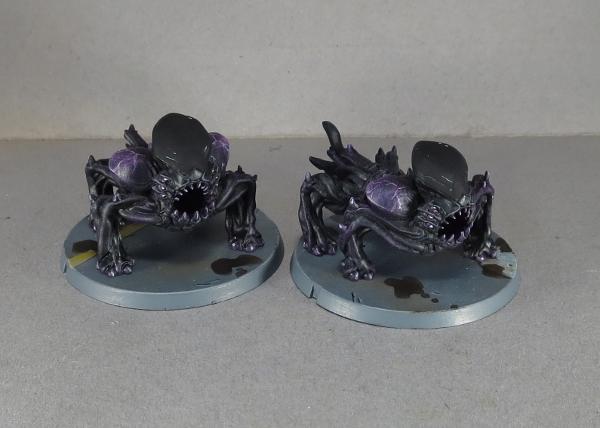
The Hellblaster comes in a pack of two variants, with slightly different posing and tail tentacles.
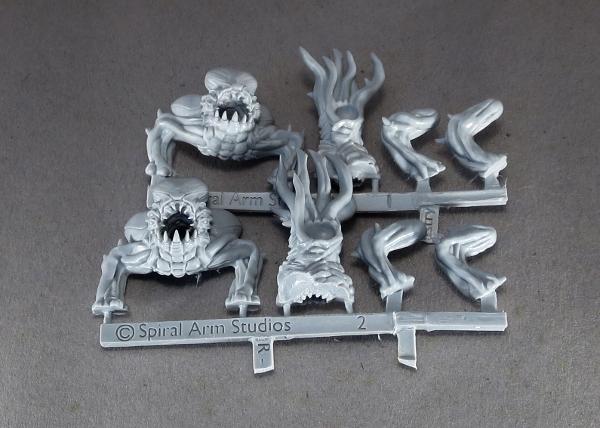
Assembly is really easy - It's always a good idea to wash resin models in warm, soapy water before assembly, to clean off any mould release residue (this may affect paint adhesion, otherwise), then cut off the sprue and trim off any mould lines, glue the head piece to the front of the torso, and the rear legs into their sockets. There's a little posability in the rear legs, as the sockets allow for some movement.
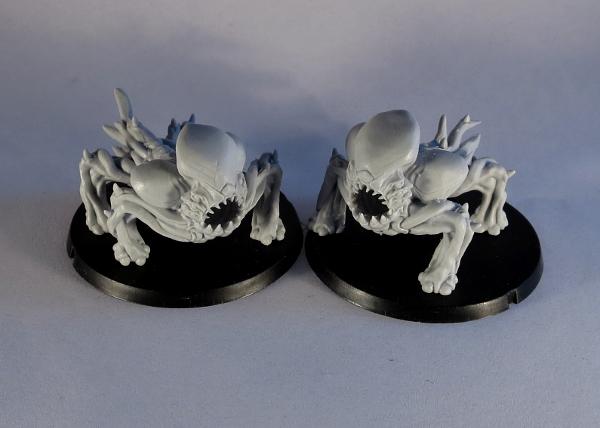
If you want to branch out a little from stock poses, one of the really fun aspects of resin models is that they can be easily reshaped. Drop the part you want to reshape into some hot water for a minute or so. When the part has had time to warm through, fish it out and quickly bend it into the shape you want. Then pop it into some cold water to set it in that shape.
Obligitary safety warning: It's always a good idea to avoid breathing in fumes from heated resin or plastic, so boil your miniatures somewhere with good ventilation. And use an appropriate tool (tweezers, long-nose pliers, etc) to fish the resin pieces out of the hot water and handle hot parts with care.
Using this method, you can add a bit of a bend to the Hellblaster's torso, to give it more of a sinuous, in-motion appearance.
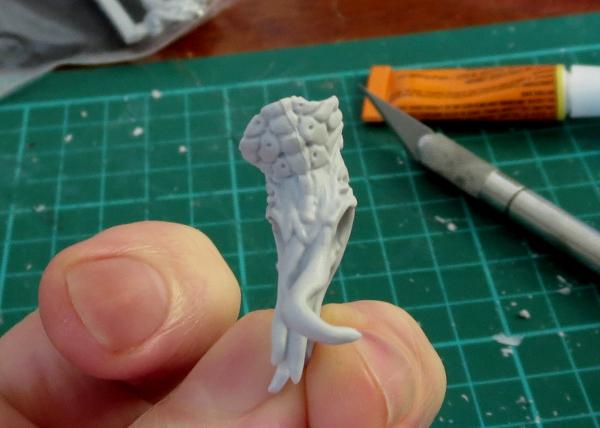
You can also reposition legs and tentacles to suit. It helps that angels don't have a fixed skeletal structure - tentacles are fairly forgiving when it comes to finding appropriate poses!
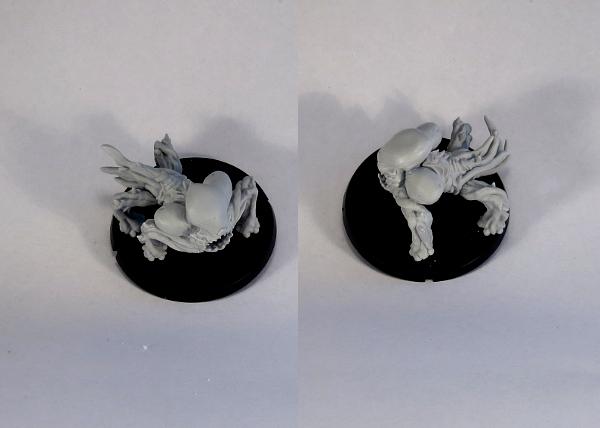
Note that as an alternative to the hot water technique above, you can achieve a similar result using a hair dryer to heat smaller parts. As above, through, handle with care to avoid damage to both the parts and yourself.
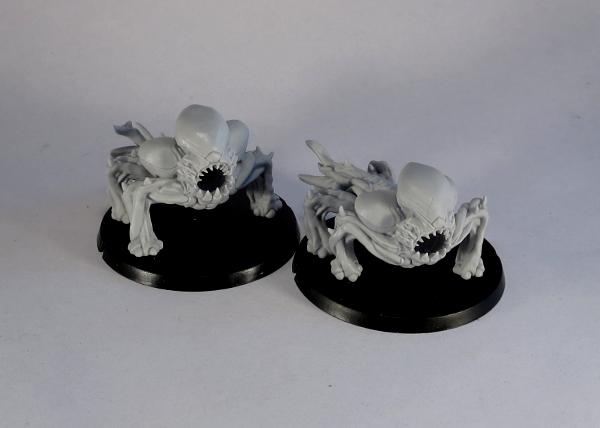
With a little more work, you can carefuly cut through in between the cheek sacs and the tops of the forelimbs, to allow for more movement. In the below example, I have stretched the legs out to raise the head and shoulders up higher, and added a slight forwards arch to the angel's back.
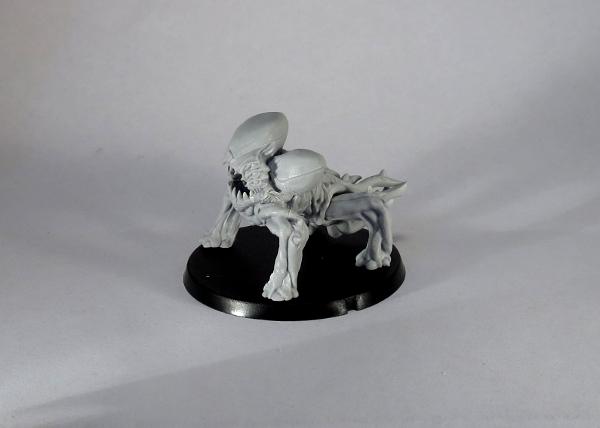
Painted up in an appropriate colour scheme, the Hellblaster fits in nicely with the Mature Angels and Minnows to add a bit more variation to an angel force.
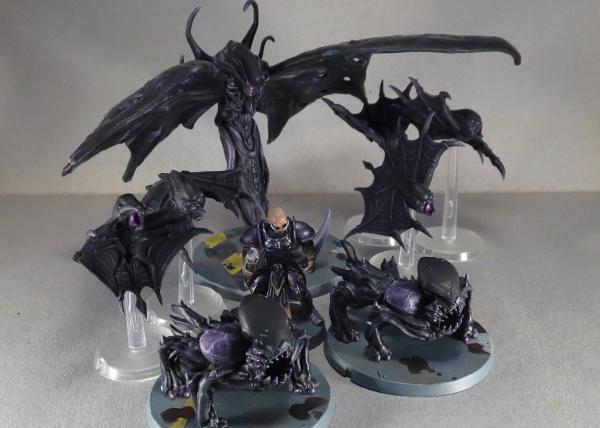
But where to from here?
There's no reason to stop with basic reposing! Angels love nothing more than experimenting with different forms, and while the Hellblaster is a form forced on them by Karist Keepers, it also makes a good base for some different angel types, like the (very work-in-progress) examples below:
Snake-angel, converted using the front of a Hellblaster, the wings from a Minnow and a wire armature covered in 'green stuff' putty.
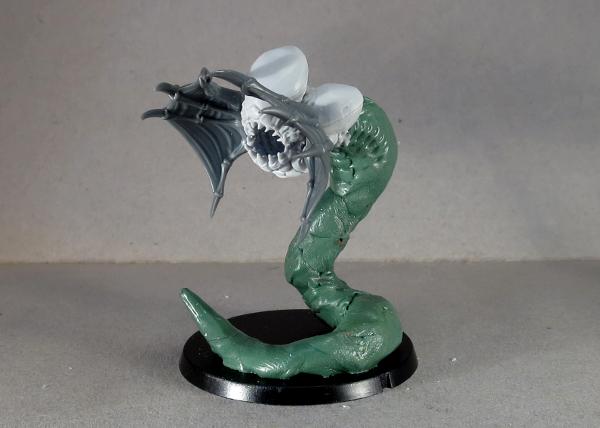
The snake body will be smoothed out with another layer of putty, and some exterior tentacles added for some detail.
Shrike-angel, converted using a Hellblaster body with the forelimbs and energy sacs cut off, and the wings from a Minnow.
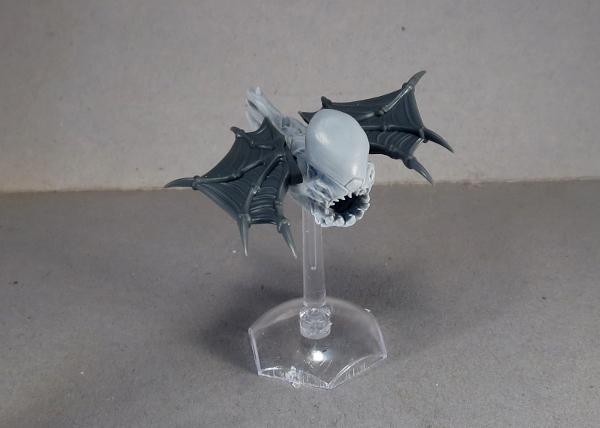
The body of the Hellblaster is considerably bigger than a Minnow's, so this guy has a much smaller wing to body ratio, but I think it's still close enough to work, particularly given angels fly using gravitic manipulation and the wings are largely just for show anyway. As with the snake, this model still needs some putty work to join the wings properly to the torso and fill in the flat spots where the legs and sacs were removed. I may also trim down the crest a little, to something more closely resembling the head of the Minnow.
Or, for something completely different, how about angel cavalry?
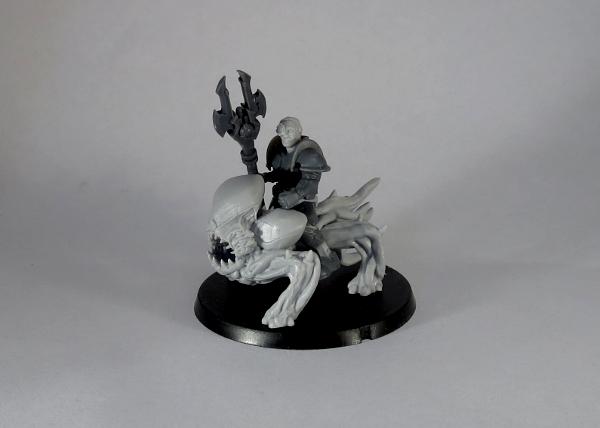
(Ok, this one's stretching the background a little - chances are that anyone trying to ride an angel wouldn't be riding it for very long... But it was too fun an idea to not have a play with it!)
To build your own shape-changing army of alien doom, you can pick up the Hellblaster along with the rest of the Maelstrom's Edge range from the webstore here. As always, feel free to share your creations on the Comm Guild Facebook page!
For other Maelstrom's Edge modeling articles, including tutorials and walkthroughs of a wide range of different building and miniature projects, check out the article roundup here.
Tags: angel conversion converting hellblaster modeling spotlight tutorial walkthrough
Quick-painting the Broken
Posted on Monday Nov 06, 2017 at 05:00pm in Tutorials
- by Iain Wilson
The arrival of the Broken into Maelstrom's Edge adds a new element to the game: Vast, raggedy hordes of cheap troops swarming all over the battlefield shooting stuff and stealing all the good boots. Which, of course, means lots of shiny new models to paint! You might be happy taking your time with this, but for those a little more time-poor, or who just want to get their new models on the table as quickly as possible, here's a guide to quick-painting your Broken recruits.
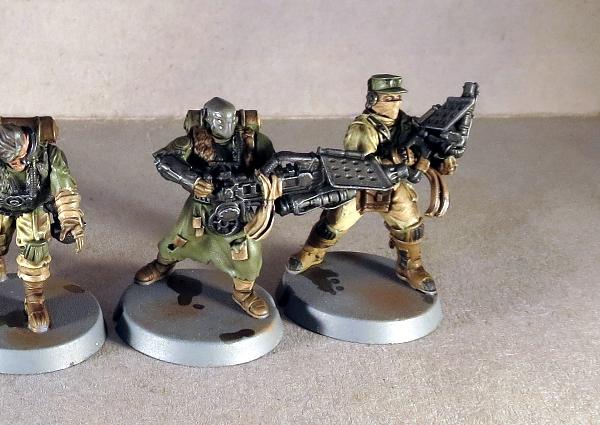
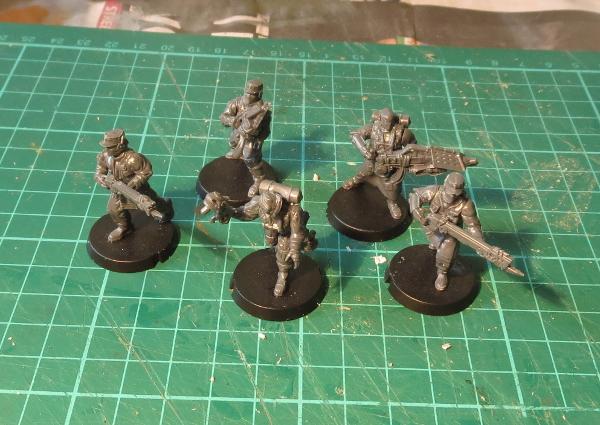
I'm painting up an Assault squad that I have assembled and ready to go, but obviously this could just as easily work for any of the Broken units.
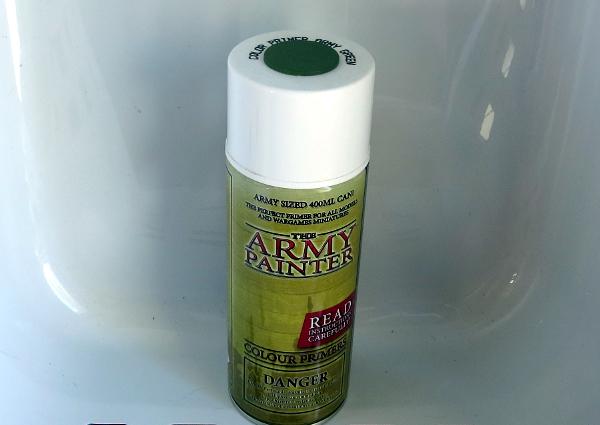
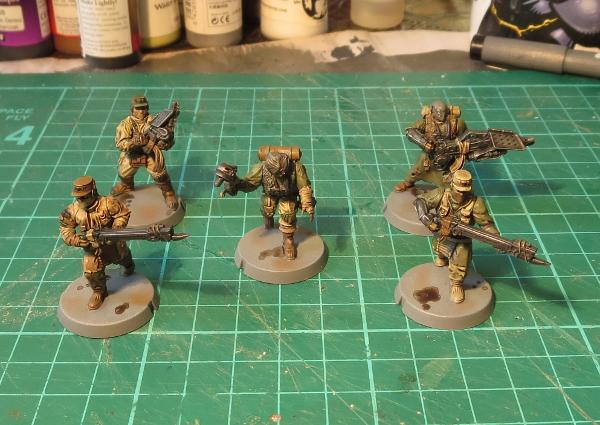
I started out with a basecoat of Army Painter Army Green primer.
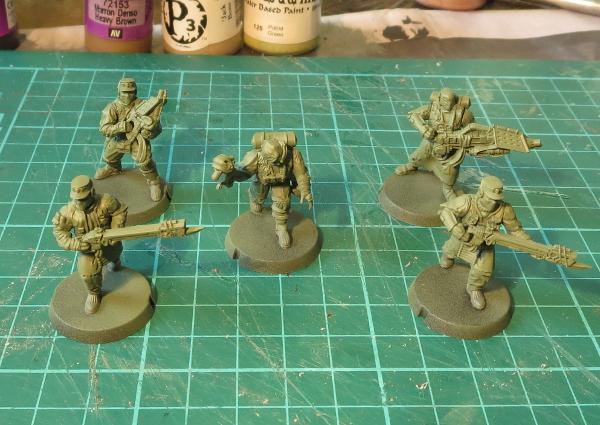
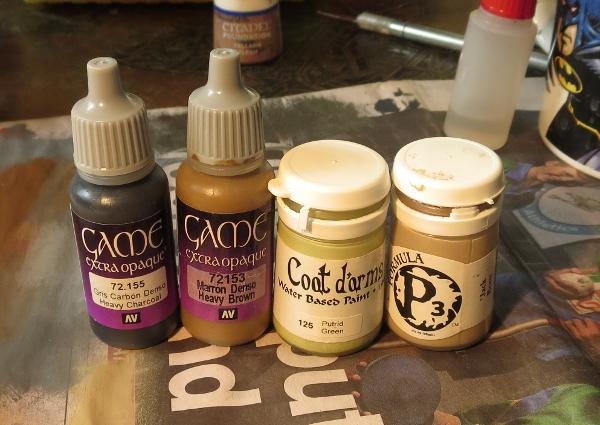
To get a suitably rag-tag look, I used a range of brown and grey tones, but the specific colours you choose aren't particularly important. The idea is to create a random distribution of different coloured clothing, while keeping to a limited colour palette to maintain some cohesiveness throughout the force. Weapons were painted with Vallejo Heavy Charcoal, and skin with Citadel Tallarn Flesh.
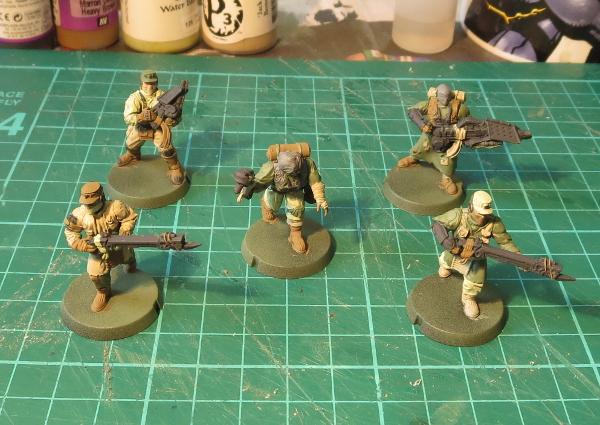
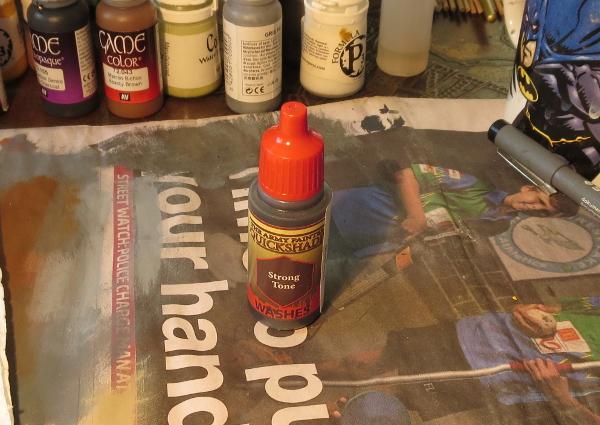
Everybody then got a wash coat of Army Painter Strong Tone. This settles nicely into the creases to add shading, and 'dirties' everything up a little.
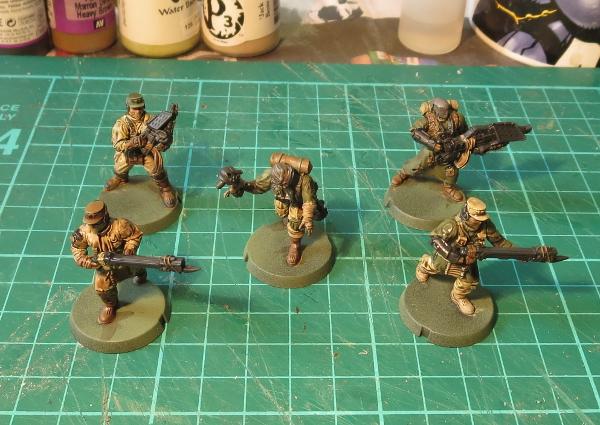
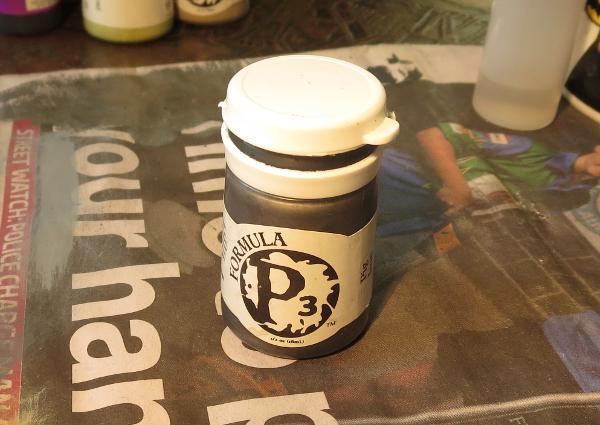
Once the wash was set, I gave the weapons and other metal parts a light drybrush with P3 Pig Iron.
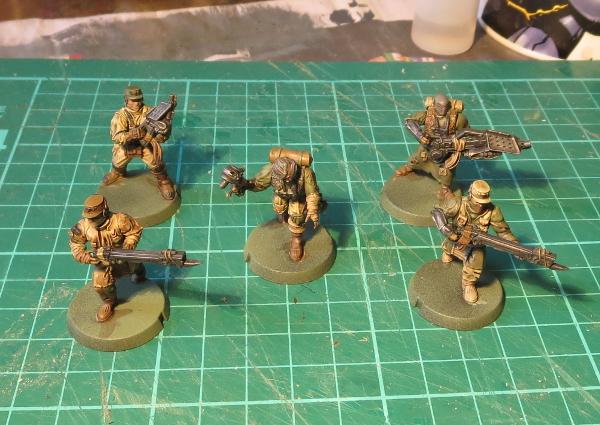
At this point, you could also give the clothing a light drybrush or a little edge highlighting with the original colours - This will lighten them up slightly if the wash was too heavy and has left them too muddy and homogenous, but otherwise isn't really necessary.
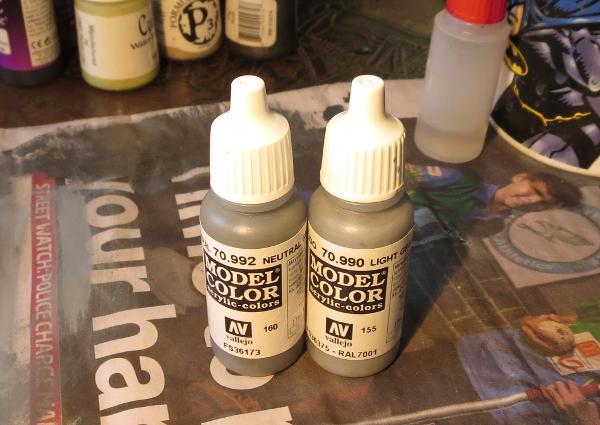
Bases were done to match my urban board set-up. This was done with a coat of Vallejo Neutral Grey, drybrushed with Light Grey.
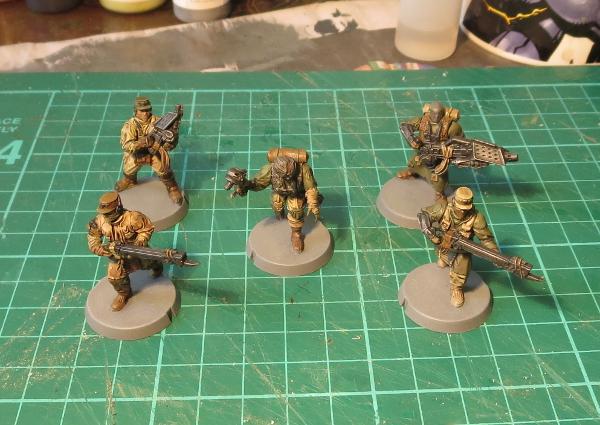
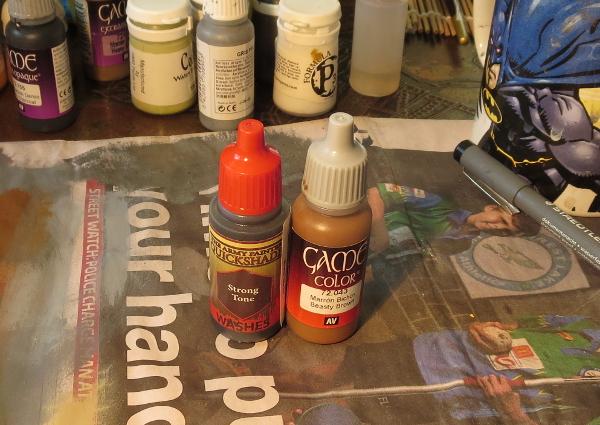
To finish up the bases, I added some patches of drybrushed Vallejo Beasty Brown and some puddles of Strong Tone.
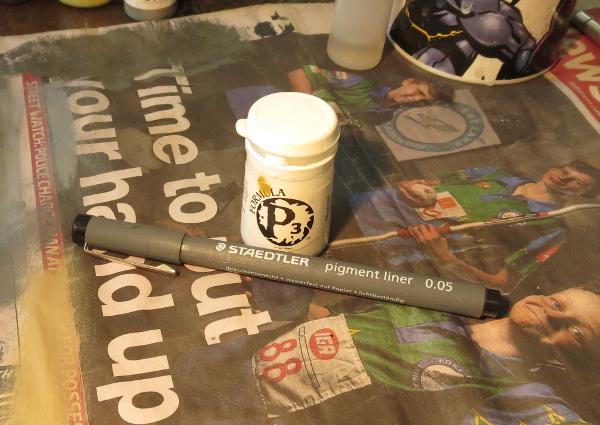
At this point, you could easily plonk these on the table and have at it, but I always like to add eyes wherever possible to finish off my models. This is done with a fine detail brush and some white paint for the whites of the eyes, with a dot of black added either with the same fine brush or with a fineliner pen.
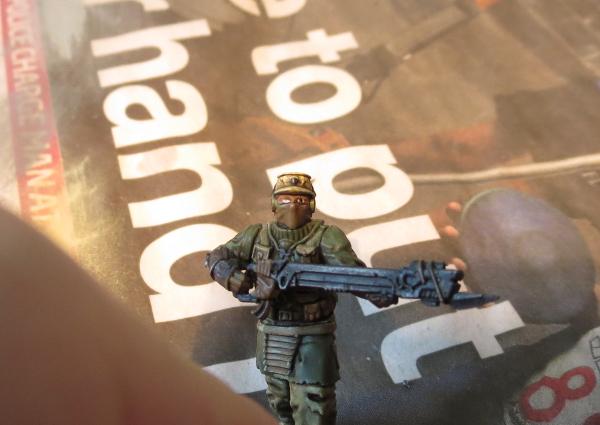
The black should cover most of the white, and touch both the top and bottom of the eye to avoid a wide-eyed, crazy look. Unless, obviously, you want a wide-eyed, crazy look.
And with that, the squad is ready for action!
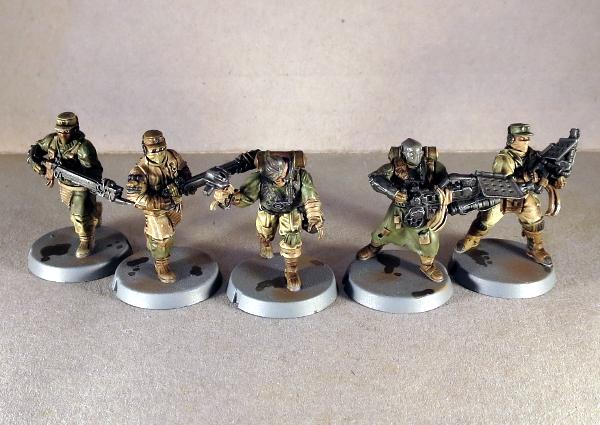
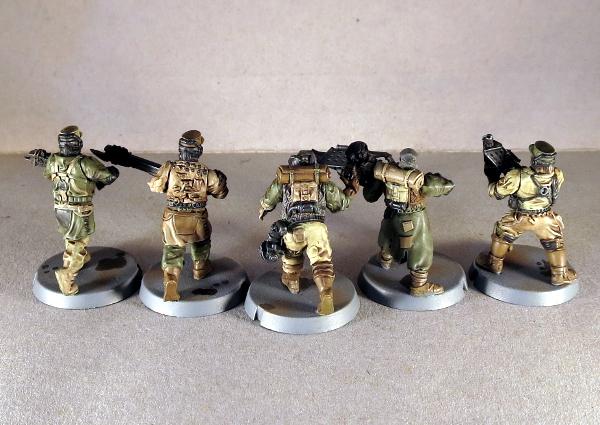
To paint up your own vast, screaming horde of rabble, you can pick up the Maelstrom's Edge Broken Infantry pack from the webstore here. As always, feel free to share your creations on the Comm Guild Facebook page!
For other Maelstrom's Edge modeling articles, including tutorials and walkthroughs of a wide range of different building and miniature projects, check out the article roundup here.
Terrain Spotlight: Broken Settlement, part 1
Posted on Monday Oct 30, 2017 at 05:00pm in Tutorials
- by Iain Wilson
With the release of the Broken adding a long-awaited third faction to the Maelstrom's Edge universe, it seemed fitting to take a break from tinkering with the shiny new models to add some appropriate terrain to the table. So this week, I broke out some gift boxes that I had waiting for an opportune moment, grabbed some terrain sprues and got to work!
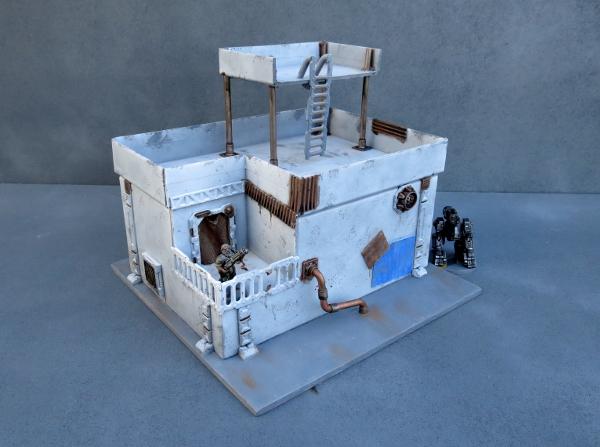
The core of the first building for my new Broken settlement is a 20cm x 15cm cardboard gift box. The plan was to more or less follow the style of my earlier gift box buildings, but with the addition of some faction-appropriate wear and tear and rough repair work.
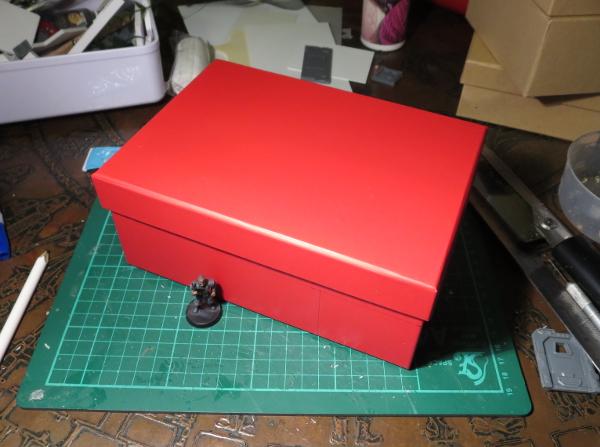
I started by cutting out holes in the box for windows and doors, using a sharp hobby knife.
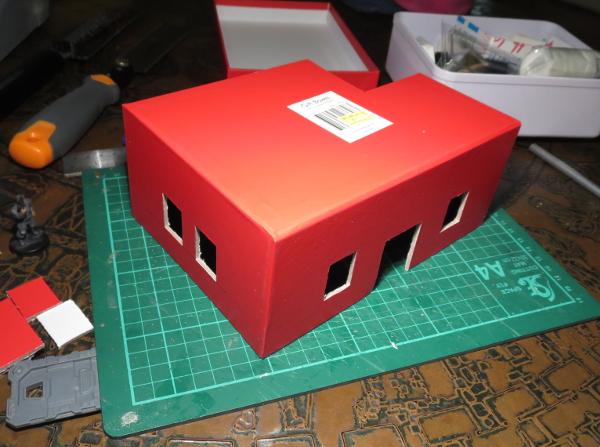
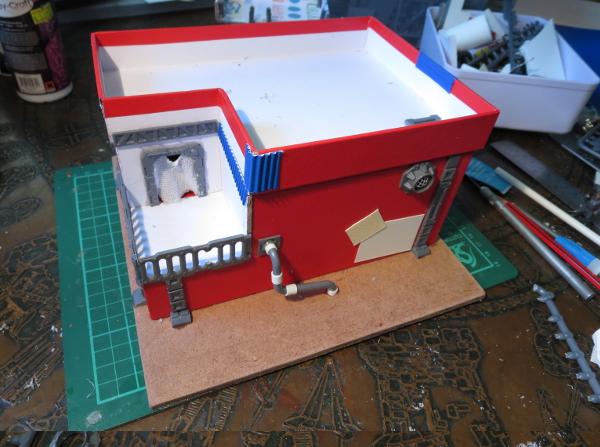
To break up the box shape a little, I cut away one corner of the box, 6cm along each side. Flipped over, this corner piece fits back in place as a recessed balcony.
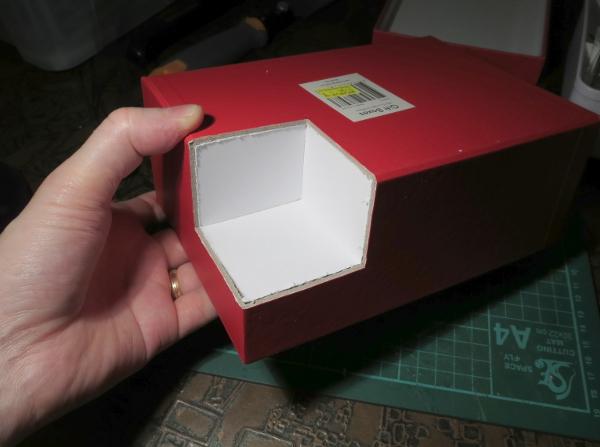
I cut a hole in one wall of the balcony to add a door, and cut a matching corner off the box lid, which would form the walled roof of the building.
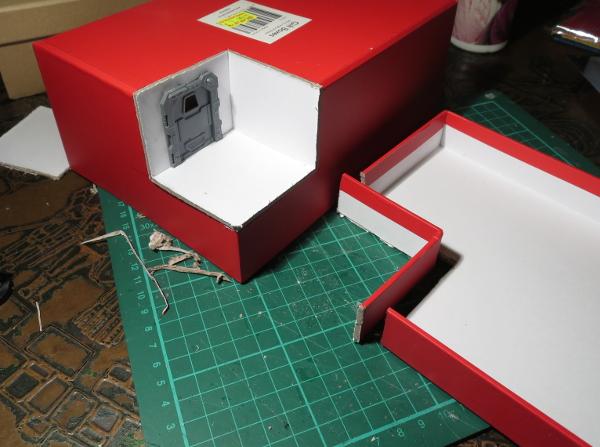
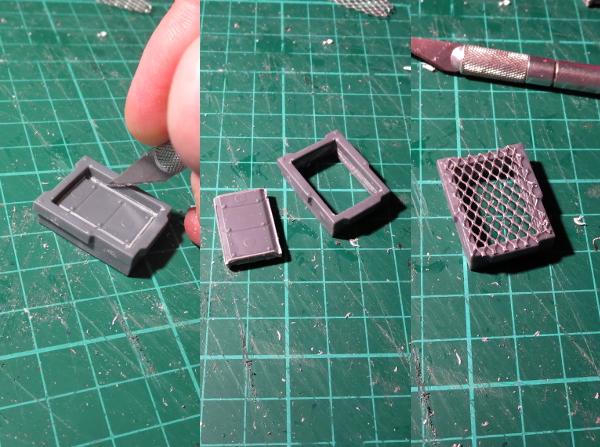
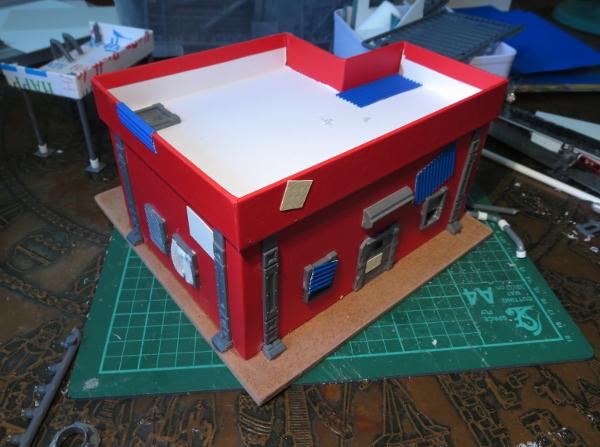
From there, it was time to glue the box onto a square of masonite, and start detailing. To make the building look like it had been through some rough times, I modified the rectangular shutter windows from the terrain sprue. For the first one, I carefully cut out the shutter using a hobby knife, and then glued some aluminium mesh over the front of the window frame.
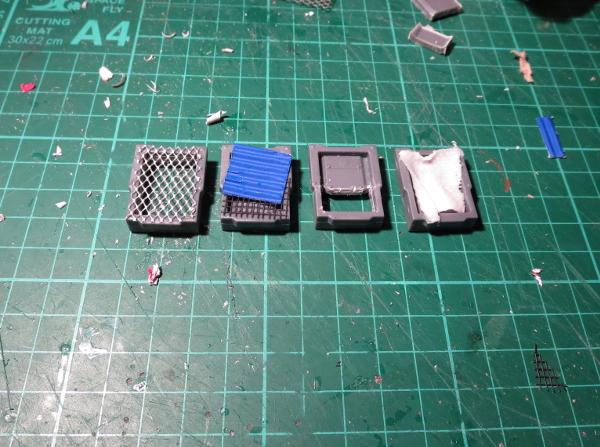
Rather than making all of the windows the same, I made different modifications to the other windows. On one, I glued some plastic flyscreen and a square of corrugated cardboard over the front of the frame, another had the shutter replaced with a piece of crepe bandage soaked in watered-down PVA glue, and on the last one I cut away just the lowest section of the shutter.
The terrain sprue parts were glued in place with superglue, and then I added some patches cut from thin plasticard and corrugated cardboard to the walls of the building.
The door on the balcony received a blanket in place of the original door with another piece of glue-soaked bandage, and a couple of ladders were used to create a railing. A pipe made from pieces of sprue joined with some plastic tubing and a vent made from a large pipe fitting with some aluminium mesh glued inside finished off the detailing on the back.
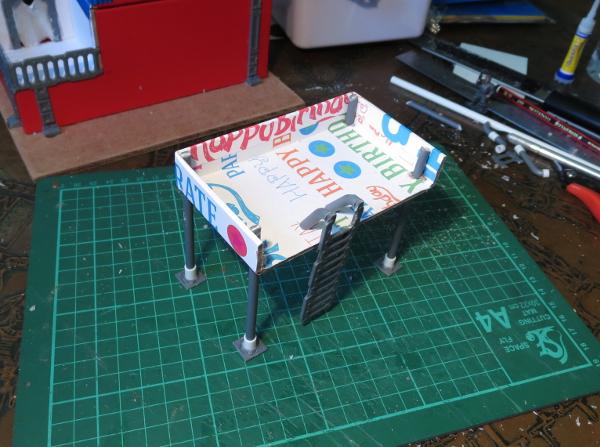
The building was still looking a little boxy, so I decided to break up the silhouette a bit more with the addition of a watchtower on the roof. This was constructed from a piece of gift box lid left over from a previous project, and some pieces cut from the ends of the terrain sprue. The ladder was glued in place with another couple of sprue pieces forming the hand grips at the top.
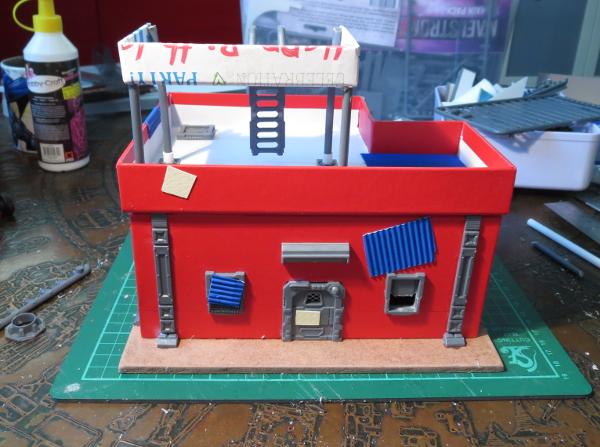
With construction complete, it was time to break out the paint. I started with a base coat of flat grey.
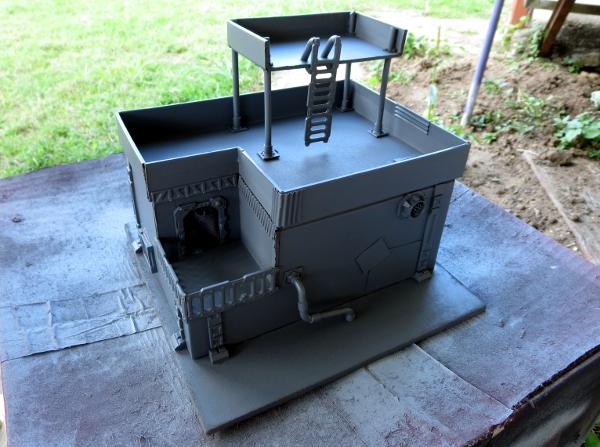
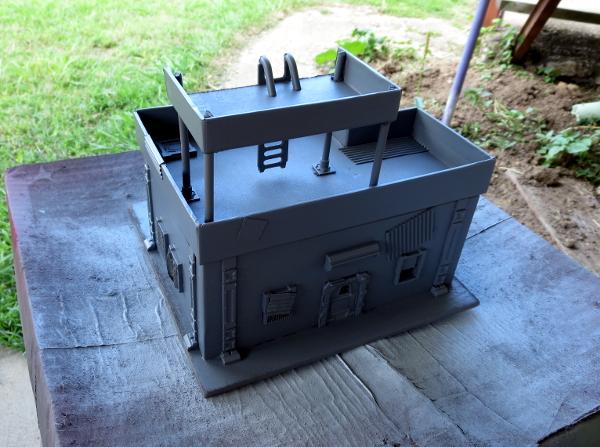
Over that went a thin layer of flat white. I didn't want this to be perfectly smooth and pristine, shining white, so kept the coat thin enough for the grey to show through a little. Once the spray was dry, some weathering was added with a sponge and some Vallejo Neutral Grey.
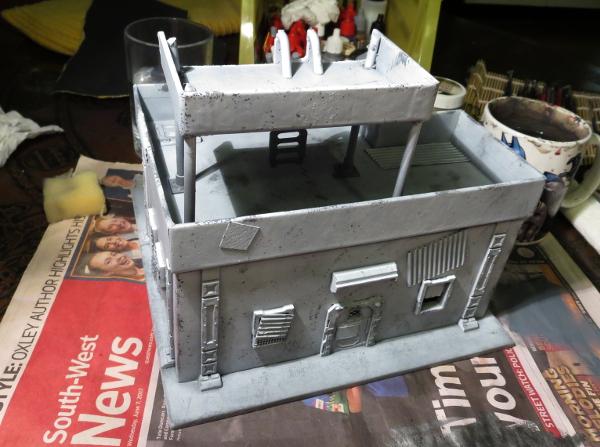
The metal patches and any other parts that I wanted bare metal were painted with a coat of Vallejo Beasty Brown, and then given a rough coat of P3 Pig Iron.
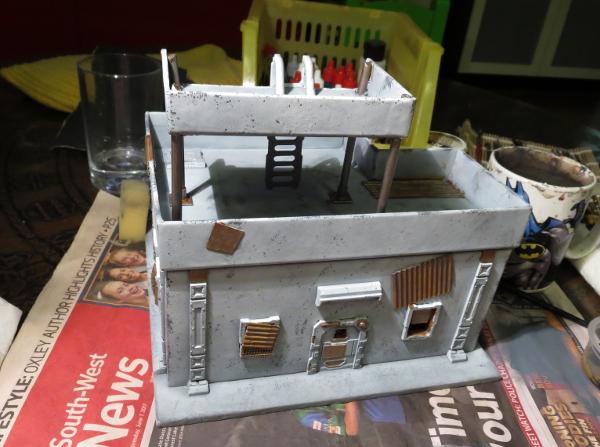
The base was painted with a coat of Vallejo Neutral Grey, and then a drybrush of Vallejo Light Grey, with some patches of Beasty Brown added to dirty things up a little. A splash of Army Painter Strong Tone over the metal bits and blankets, and a rough coat of Citadel Ultramarines Blue over a couple of the metal patches, and the building was pretty much table-ready.
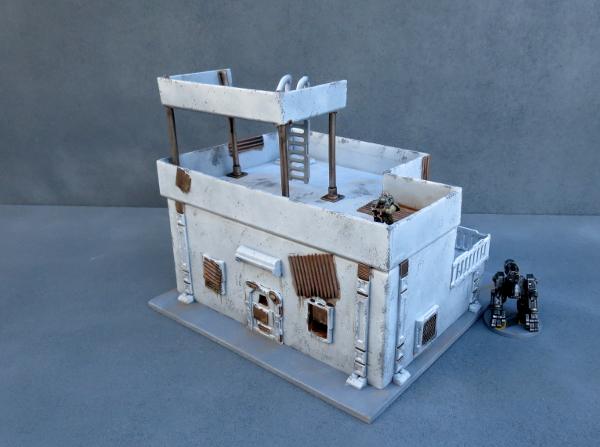
There is still a little detail work to go, but some of that will wait until I get some more of the settlement completed so that I can match details across the different buildings to tie everything together.
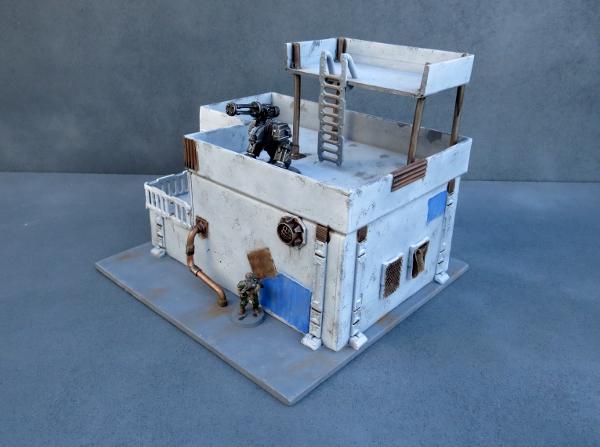
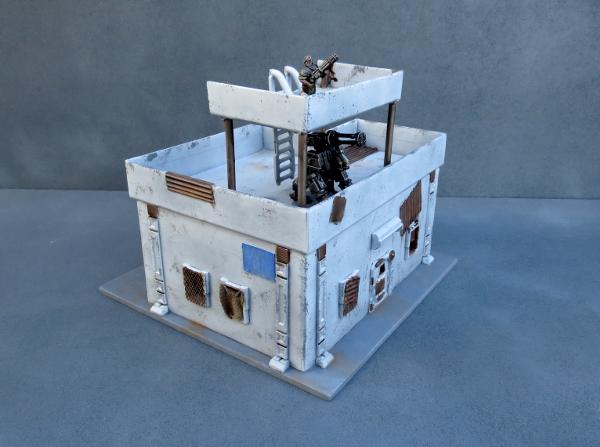
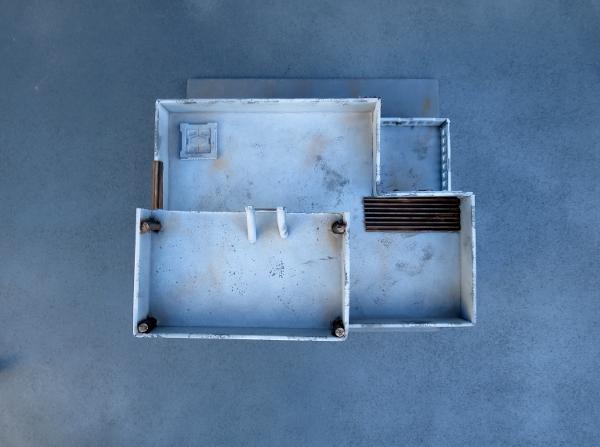
So what's next?
I will be adding a couple of smaller gift box buildings with some varying levels of damage and delapidation, and I have some plans for a large peach tin that was rather conveniently opened the other day. The outsides of the buildings will gain some awnings and banners and the like, and I'll scatter some scrap around to add some flavour (and also some handy cover).
Stay tuned for more!
To build your own stellar refuge settlement, you can pick up the Maelstrom's Edge terrain sprue from the webstore here. As always, feel free to share your creations on the Comm Guild Facebook page!
For other Maelstrom's Edge modeling articles, including tutorials and walkthroughs of a wide range of different building and miniature projects, check out the article roundup here.
Tags: broken buildings modeling models spotlight terrain terrainsprue walkthrough
Modeling Spotlight: Easy Broken Rabble Conversions
Posted on Monday Oct 23, 2017 at 05:00pm in Tutorials
- by Iain Wilson
The new, plastic Broken Infantry kit has been out for a few weeks now, and I've been having a ball exploring the modeling options available from these sprues. With build articles now up showing how to put together your Chieftains, Rabble squads (which also serves for the Fire Support unit) and Assault units, it seemed like a good time to look at some easy ways to customise your Broken models a little.
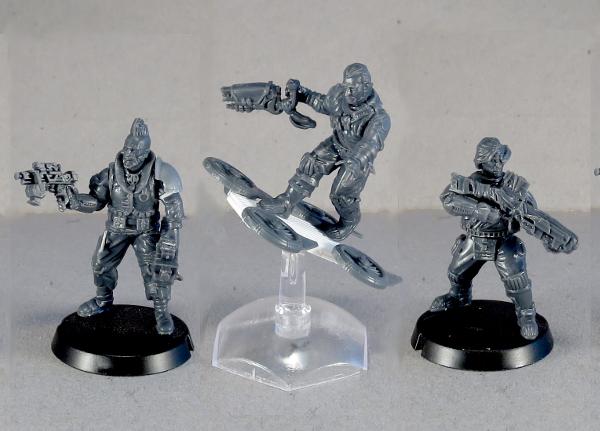
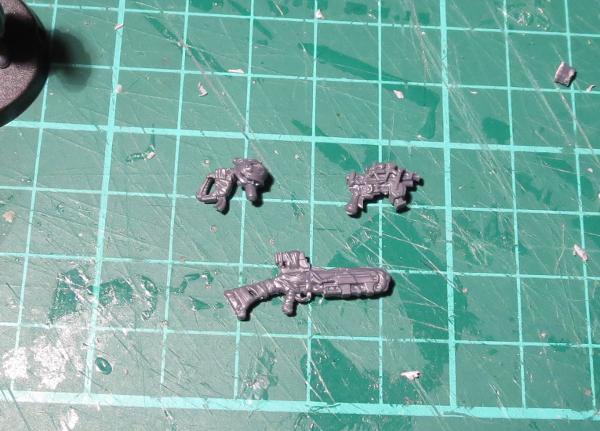
Let's kick things off with guns. Broken have a lot of different weapons, and they're all cobbled together from whatever parts they can scrounge. You can accentuate this a little by swapping grips between the different weapons. Below I have swapped the Chem Pistol grip out in favour or the firing grip from a Beam Blastgun, given a Slug Pistol the pistol grip from a Beam Pistol, and replaced the curved handle on the Chem Launcher with the back half of a Slug Rifle.
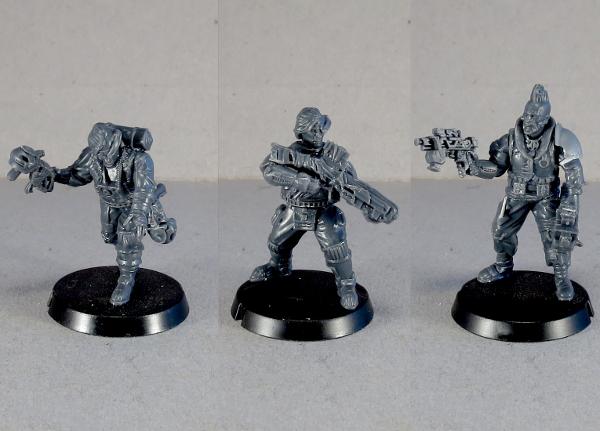
With Broken forces being made up of refugees from all walks of life, and equipped with whatever gear they can beg, borrow or steal, the other Maelstrom's Edge plastic kits are a great resource for personalising your forces. A trimmed down Karist Trooper shoulder pad is a great way to single out your unit Bosses from their otherwise equally-scruffy charges.
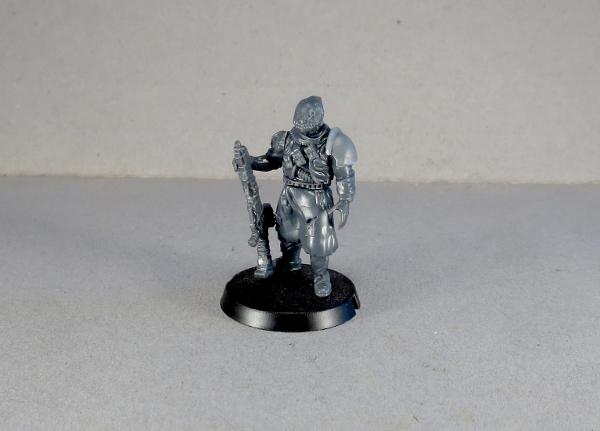
Karist Trooper and Epirian Contractor arms and heads can also be used to add some extra variety when scattered through with the Broken parts. The necks may be a little tight on some of the Broken torsos, but you can shave them down with a sharp hobby knife or a modeling file to make them fit.
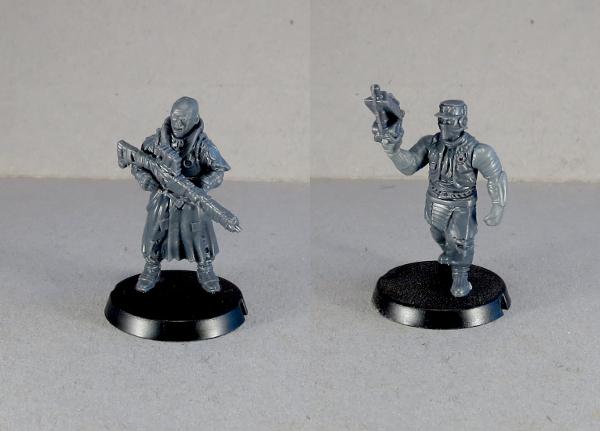
The model on the left below also has Contractor legs. The Broken torsos and legs have multiple belts and straps, but the thicker belt on the Contractor leg pieces can make this look a little strange and results in the model being very tall, so in this case I have removed the belt from the bottom of the torso with a sharp knife before attaching to the legs.
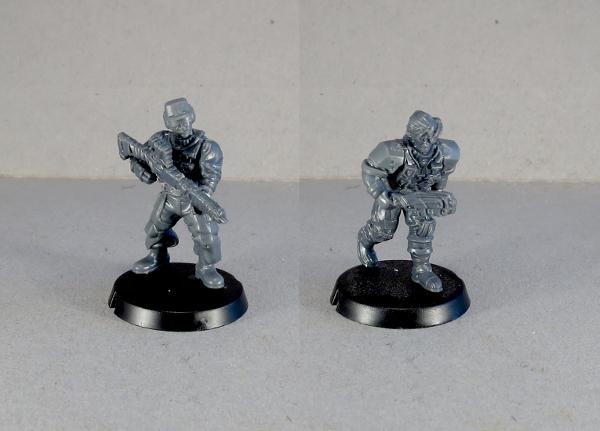
To venture a little out of the box, the below Chieftain model has been given a melee weapon (just for show) made from a cut-down EMP Harpoon with a blade from a knife taken from the Faction Expansion Sprue.
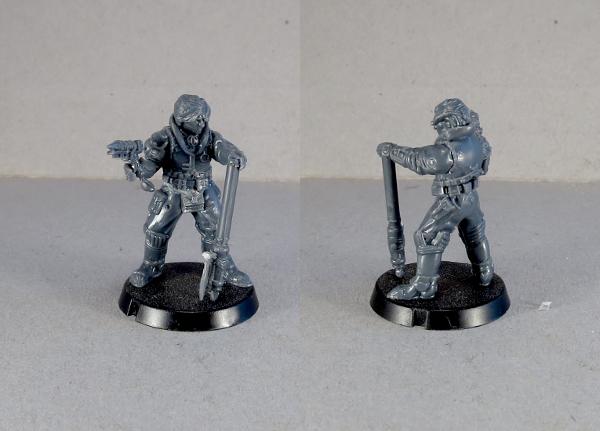
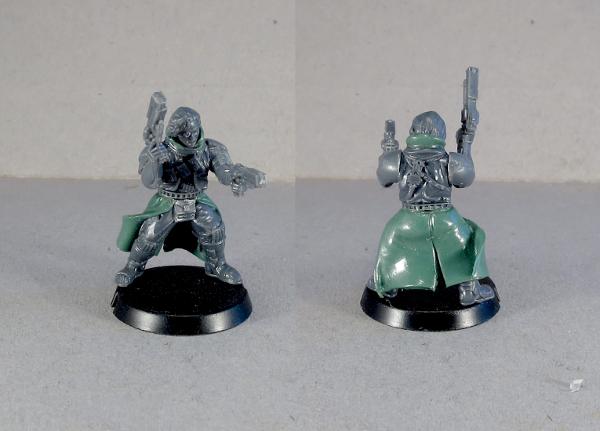
A gunslinger Chieftain can be made using the pistol arms from the Epirian Bot Handler sprue. You can cut the pistols off just above the tops of the hands and attach Broken weapons instead, but in this case I liked the look of the Epirian pistols so left them there, where they will probably sub as Slug Pistols for now. I also added a long coat and lifted the collar with 'green stuff' putty.
Last, but not least, the more speed-happy Broken may want a better way across the battlefield than walking like everyone else, and what better way to travel than a custom-made skyboard?
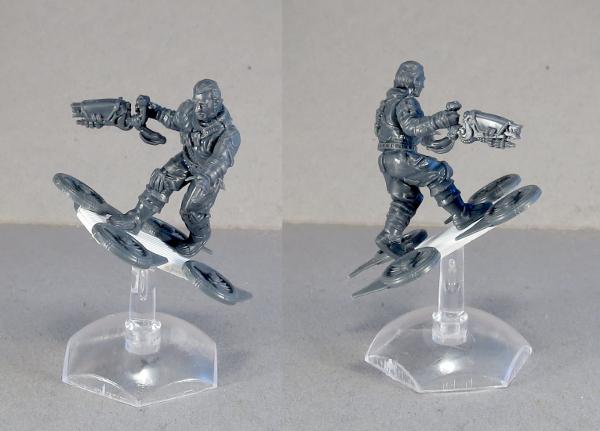
The board was made from a strip of plasticard, with some leftover turbines from Epirian Firefly Drones added onto the sides. Obviously, there are no rules for these, but the idea was too much fun to not put it together, so I'm planning to put together a unit of these guys and work up some homebrew rules for them. Watch this space!
To get to work on your own Rabble horde, you can find the Broken Infanty kit in single, double or triple packs in the Maelstrom's Edge webstore here, along with the rest of the Maelstrom's Edge plastic model range. As always, feel free to share your creations on the Comm Guild Facebook page!
For other Maelstrom's Edge modeling articles, including tutorials and walkthroughs of a wide range of different building and miniature projects, check out the article roundup here.
Assembly Guide - Broken Forsaken Chieftains & Unit Bosses
Posted on Monday Oct 16, 2017 at 05:00pm in Tutorials
Assembling Broken Forsaken Chieftains & Unit Bosses
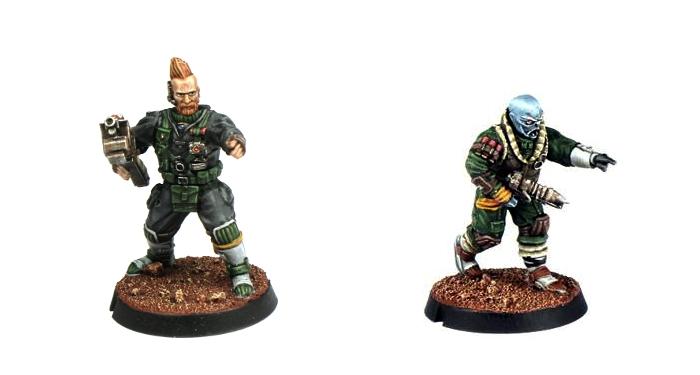
Note: The bulk of this article is the same as for the Broken Rabble Assembly Guide and the Broken Rabble Assault Unit Guide, as the only real difference between the different units model-wise is the choice of weapons. So if you have already worked through those, this guide will look rather familiar and you may want to just skip down to the part with the weapons.
This guide will cover assembling Forsaken Chieftain and Boss models with the various pistol options from the infantry sprue. The two-handed weapon options are all covered in the Rabble and Rabble Assault unit articles linked above. You can also use this guide for assembling standard Assault Unit models with pistols.
General Notes
Polystyrene cement - only use superglue if you want to go insane! All of our models are designed to be assembled with polystyrene cement as it gives some time to re-pose while gluing, fuses the models together and prevents brittle joins like other glues do. Make sure you have polystyrene cement in your toolkit before you begin!
We want you to experiment! We've broken our models up into lots of parts and given a fair few spare parts so that you can push yourself out of your comfort zone, learn new skills and create some really unique models. We've tried to price things so that it won't break the bank if you make a mistake, so please cut stuff up and have some fun. Start simple with a slice here and a re-pose there, and watch your confidence and skills increase until you are a master modeler!
Basing - Always make sure you glue your model to its base with an eye on the arc markers on the sides of the base. The arc marker indents should be at the halfway point between the front and back of the model to show the front and back halves of the model when gaming. See the Maelstrom's Edge rulebook for more detailed notes on this.
Dry fit before gluing! - There are lots of pose options possible, but that means there is also the freedom to screw up and make some bad poses! Sticking the parts together and seeing how things look will usually lead to a model that is fairly static and repetitive. You should consider knee, hip, torso, and arm positions when gluing and ensure that you have a pose in mind before you start gluing things together. If in doubt or insecure about your talents in the posing area, we recommend you try to copy the poses from some of our studio models found here in the gallery.
Broken Forsaken Chieftain & Unit Boss Assembly Notes
Six Broken models can be made from one set of the Broken Infantry sprues:
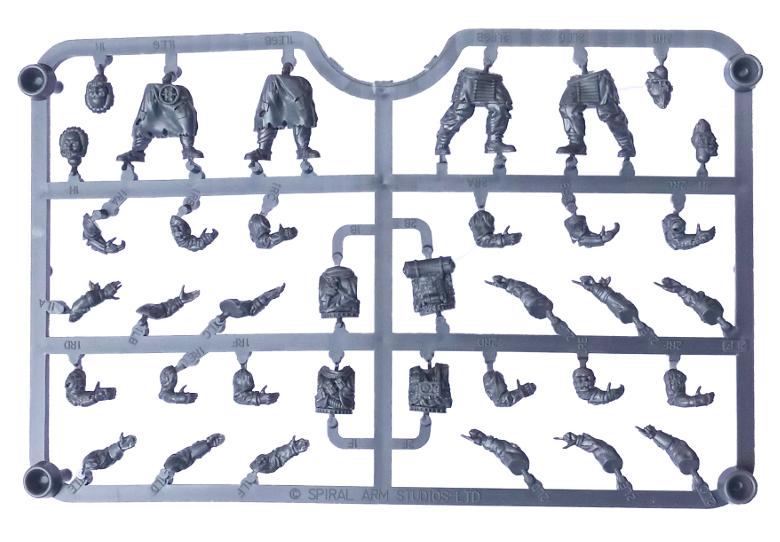
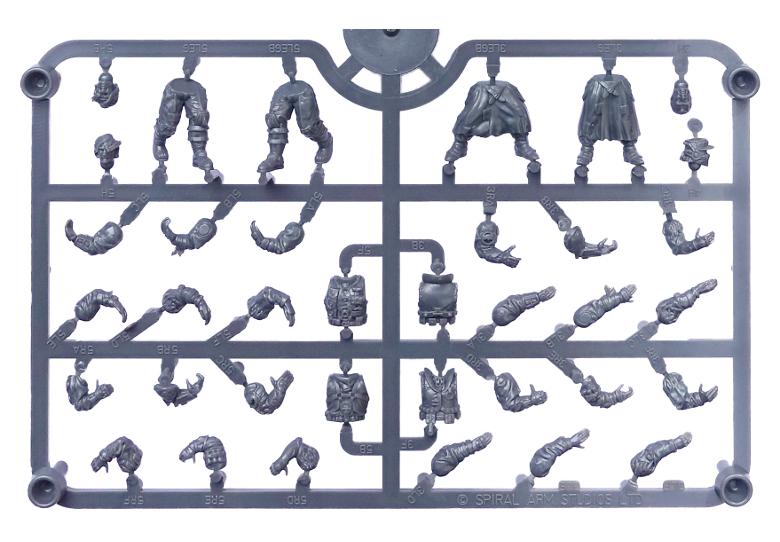
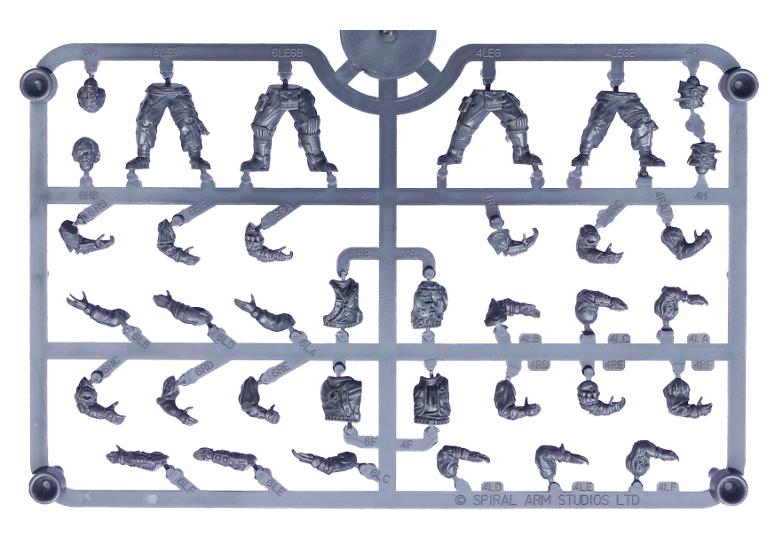
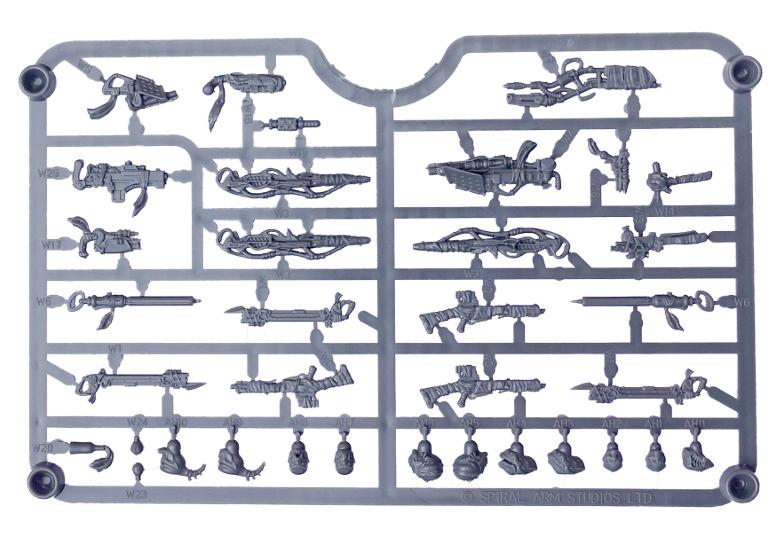
Assembly is fairly straightforward, with everything fitting together where you would expect. There are six different torsos, each with a unique front and back.
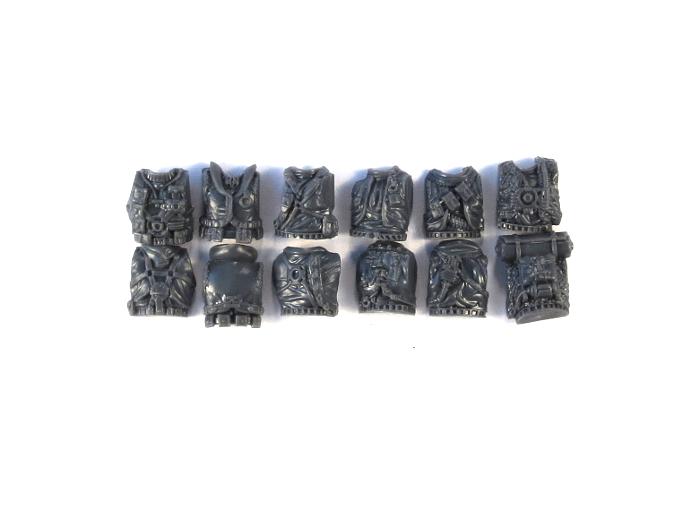
You can save yourself some aggravation if you keep the matching parts together when you cut them off the sprue. If they do get mixed up it will help that the fittings are different on each pair, so each front and back will only go together with its correct partner.
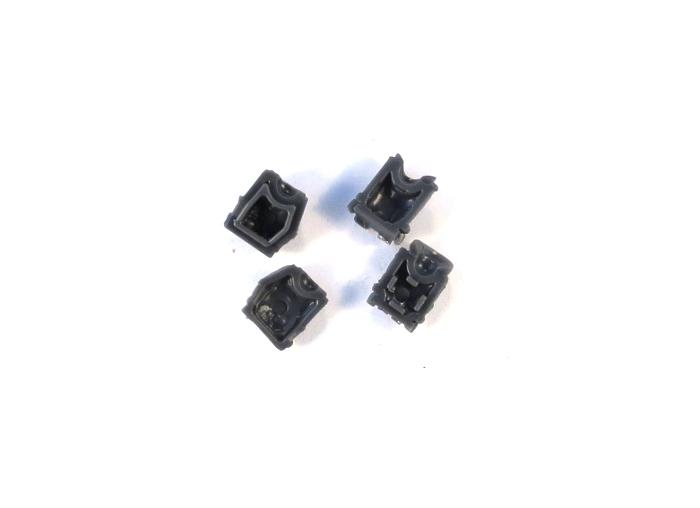
The twelve different sets of legs give you a whole slew of options for posing, as with one exception any of the torsos will work with any of the legs. The exception is torso 3 (parts 3B and 3F) which has pouches hanging from the belt. This torso fits with the legs labelled 3LEG and 6LEG, and slightly less flush with 3LEGB, although the pouches hide any slight gap you wind up with on that last set. You can also make this torso fit with some of the other legs if you trim up the bottom of some of the pouches a little.
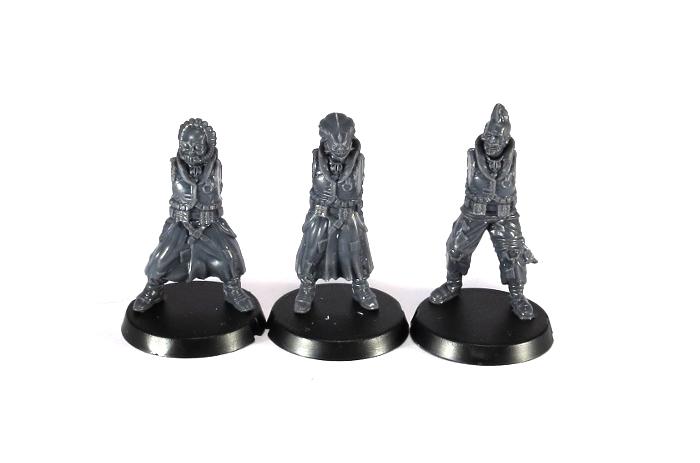
With the torsos glued in place, you might notice that there is a reasonable amount of height variation between the models, which makes for a much more ragtag look to the unit than the usual identically-sized military units.
As with the torso/leg pairing, most of the huge range of heads on the sprues will work with any of the torsos. Torso 2 (2B and 2F) has a rolled cloak across the shoulders and torso 3 (3B and 3F) has a high collar, both of which may get in the way for heads 3H, 4H, 6H, 6HB and AH11.
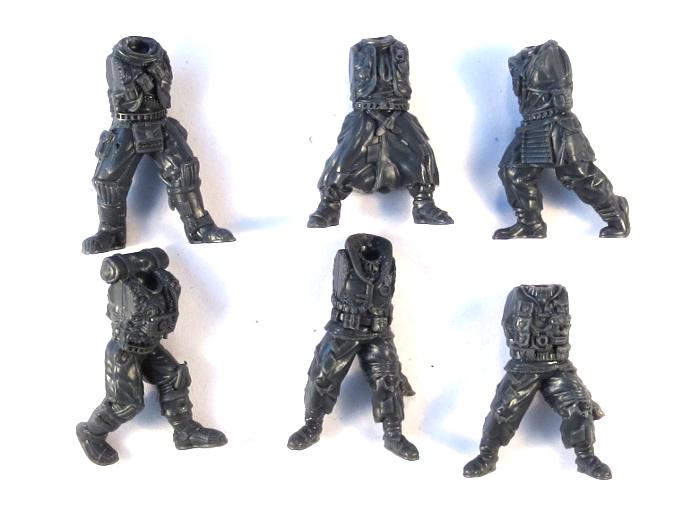
With the massive range of arms available to choose from, a little experimenting may be required to get just the look you want. Because of the different grips and sizes of the various weapons, some weapon hands have a more open grip and others are more closed, so this needs to be kept in mind when fitting them onto your models. Models with two pistols can have the second pistol hanging from their belt or backpack, or in a resting pose using one of the various open hands. Open left hands can also be used to hold grenades.
The Slug Pistol needs a fairly open grip, as it has a fairly chunky handle on it. It works best with arms 1RC, 3RA, 4RC, 5RB, and 6RC.
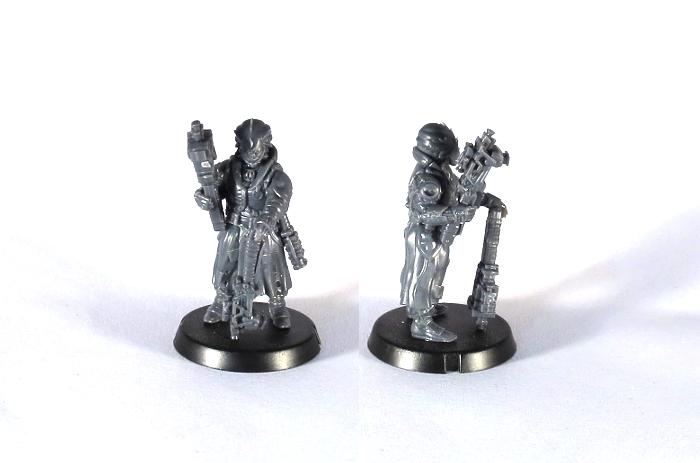
You can also create a resting pose with it using one of the open left hands and balancing the pistol on the model's hip.
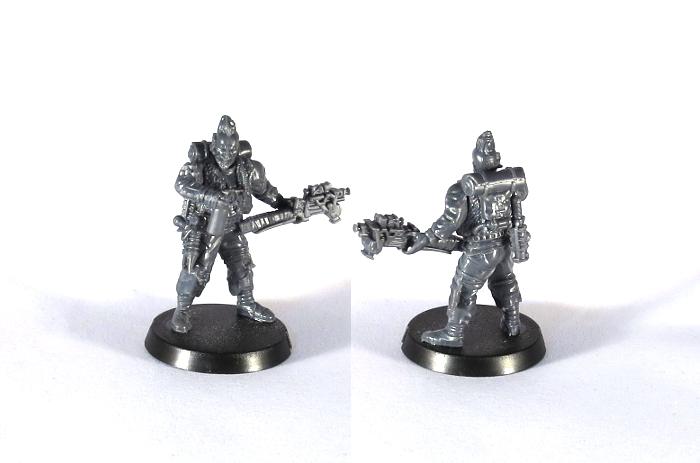
The Chem Pistol works with a more closed right hand, as the handgrip is a little thinner than on the slug pistol.
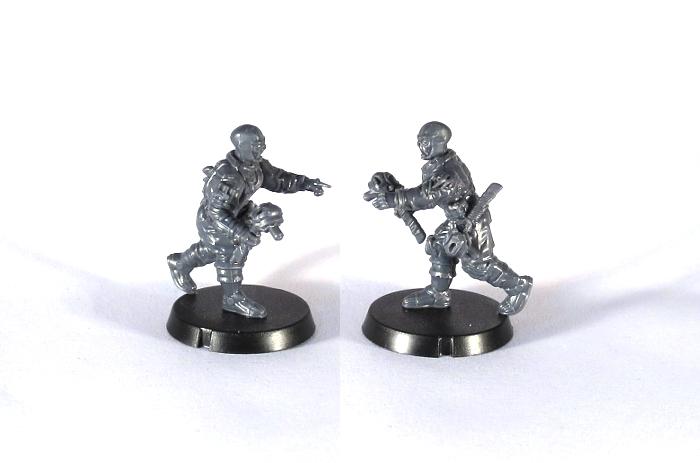
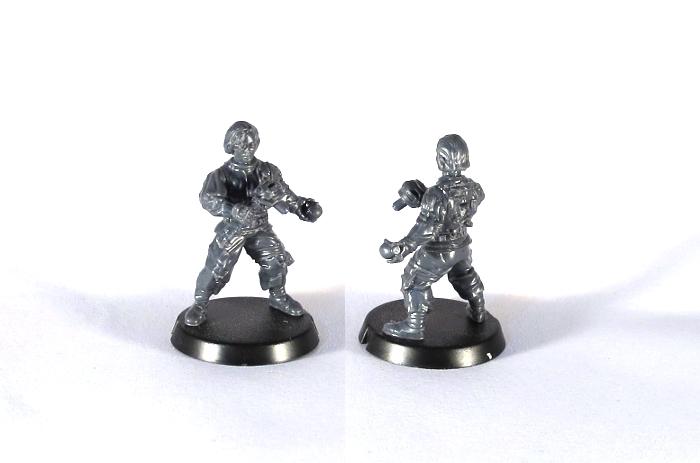
The Beam Pistol also works best with a more closed right hand, but work best with hands 3RA, 4RE, 5RB, 6RA or 6RE.
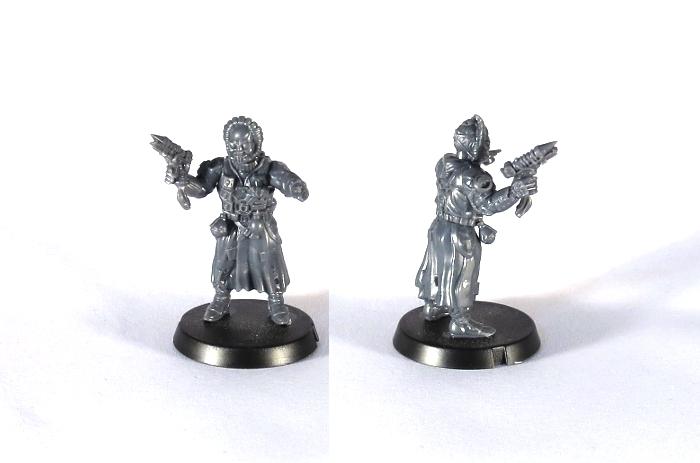
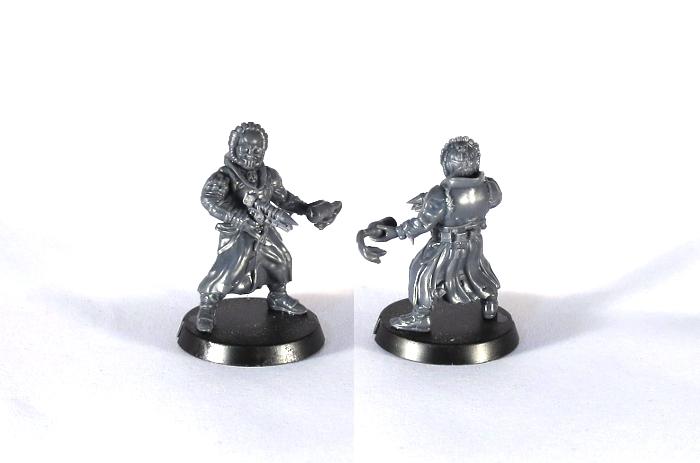
For some more ideas for building your Broken models or to share your own creations, head on over to the Comm Guild Facebook page.
You can pick up the Broken Infantry Pack, and the rest of the Maelstrom's Edge miniature range, from the webstore here.
For other Maelstrom's Edge modeling articles, including tutorials and walkthroughs of a wide range of different building and miniature projects, check out the article roundup here.
Tags: boss broken chieftain forsaken modeling models tutorial
Assembly Guide - Broken Rabble Assault Unit
Posted on Monday Oct 09, 2017 at 05:00pm in Tutorials
Assembling Broken Rabble Assault Units
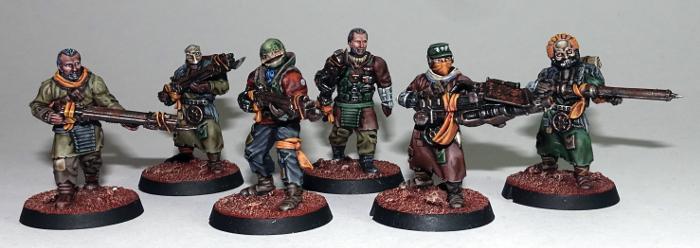
Note: The bulk of this article is the same as for the Broken Rabble Assembly Guide here, as the only real difference between the different units model-wise is the choice of weapons. So if you have already worked through that one, this guide will look rather familiar and you may want to just skip down to the part with the weapons.
This guide will cover assembling Assault models with the various two-handed weapons. The pistol options will all be covered in the upcoming Chieftain/Boss article very soon.
General Notes
Polystyrene cement - only use superglue if you want to go insane! All of our models are designed to be assembled with polystyrene cement as it gives some time to re-pose while gluing, fuses the models together and prevents brittle joins like other glues do. Make sure you have polystyrene cement in your toolkit before you begin!
We want you to experiment! We've broken our models up into lots of parts and given a fair few spare parts so that you can push yourself out of your comfort zone, learn new skills and create some really unique models. We've tried to price things so that it won't break the bank if you make a mistake, so please cut stuff up and have some fun. Start simple with a slice here and a re-pose there, and watch your confidence and skills increase until you are a master modeler!
Basing - Always make sure you glue your model to its base with an eye on the arc markers on the sides of the base. The arc marker indents should be at the halfway point between the front and back of the model to show the front and back halves of the model when gaming. See the Maelstrom's Edge rulebook for more detailed notes on this.
Dry fit before gluing! - There are lots of pose options possible, but that means there is also the freedom to screw up and make some bad poses! Sticking the parts together and seeing how things look will usually lead to a model that is fairly static and repetitive. You should consider knee, hip, torso, and arm positions when gluing and ensure that you have a pose in mind before you start gluing things together. If in doubt or insecure about your talents in the posing area, we recommend you try to copy the poses from some of our studio models found here in the gallery.
Rabble Assault Unit Assembly Notes
Six Broken models can be made from one set of the Broken Infantry sprues:


Assembly is fairly straightforward, with everything fitting together where you would expect. There are six different torsos, each with a unique front and back.

You can save yourself some aggravation if you keep the matching parts together when you cut them off the sprue. If they do get mixed up it will help that the fittings are different on each pair, so each front and back will only go together with its correct partner.

The twelve different sets of legs give you a whole slew of options for posing, as with one exception any of the torsos will work with any of the legs. The exception is torso 3 (parts 3B and 3F) which has pouches hanging from the belt. This torso fits with the legs labelled 3LEG and 6LEG, and slightly less flush with 3LEGB, although the pouches hide any slight gap you wind up with on that last set. You can also make this torso fit with some of the other legs if you trim up the bottom of some of the pouches a little.

With the torsos glued in place, you might notice that there is a reasonable amount of height variation between the models, which makes for a much more ragtag look to the unit than the usual identically-sized military units.
As with the torso/leg pairing, most of the huge range of heads on the sprues will work with any of the torsos. Torso 2 (2B and 2F) has a rolled cloak across the shoulders and torso 3 (3B and 3F) has a high collar, both of which may get in the way for heads 3H, 4H, 6H, 6HB and AH11.

With the massive range of arms available to choose from, a little experimenting may be required to get just the look you want. Because of the different grips and sizes of the various weapons, some weapon hands have a more open grip and others are more closed, so this needs to be kept in mind when fitting them onto your models. In some cases the 'matching' left arm will work, but for some weapon/arm combinations you may want to tack the right arm and weapon together and then find a left arm that fits best.
The signature weapon of the Rabble Assault unit is the Beam Blastgun. It works best with a more closed right hand, as do the Torch and the Massive Torch.
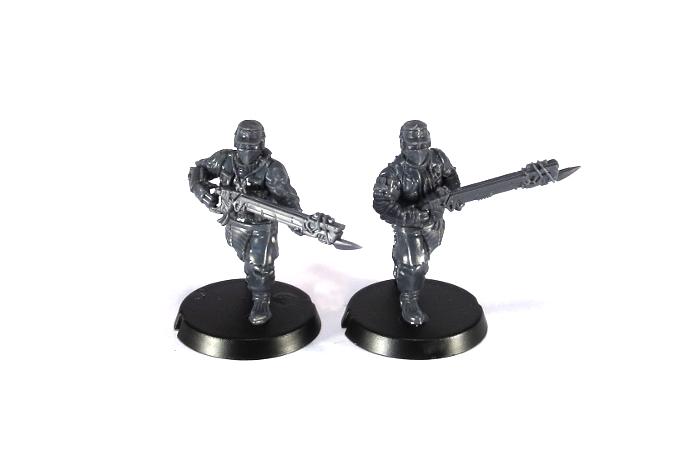
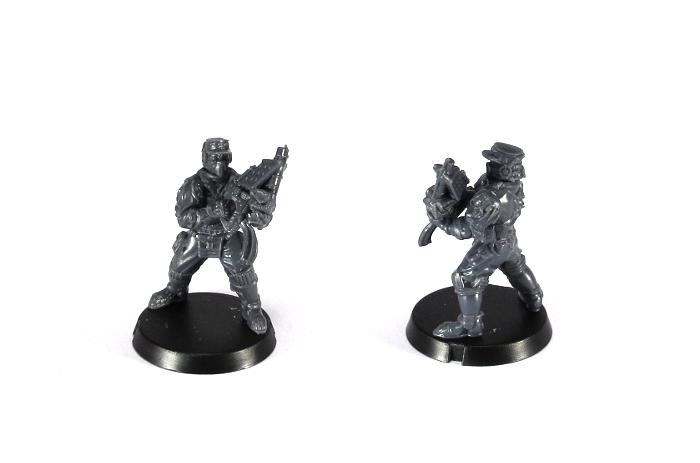
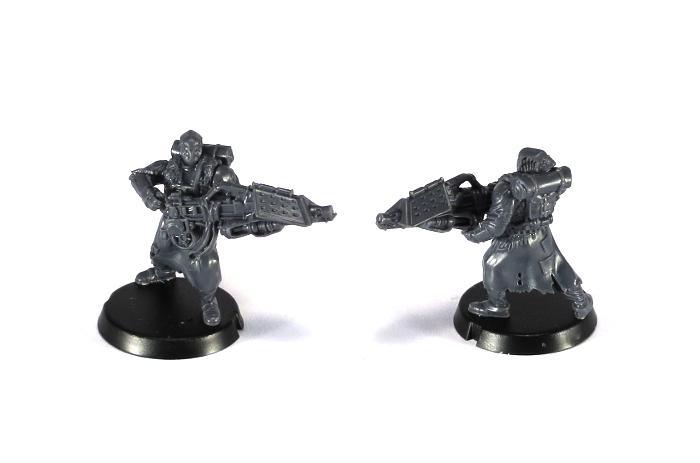
The Chem Launcher and Glue Carbine work with a more open right hand, but work best with hands 1RC, 3RA, 4RC, 5RB or 6RC.
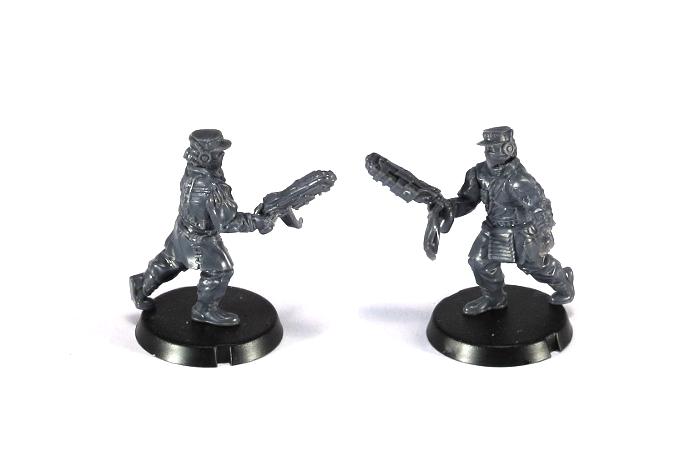
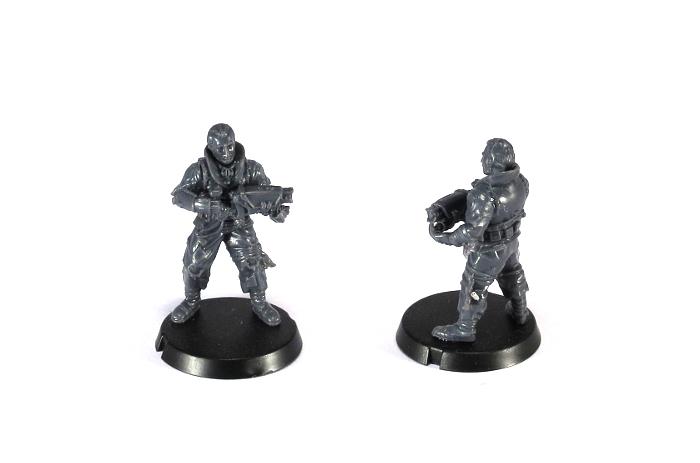
The EMP Harpoon can use a more closed hand to latch onto its rear grip, or you can use an open hand for a more relaxed grip.
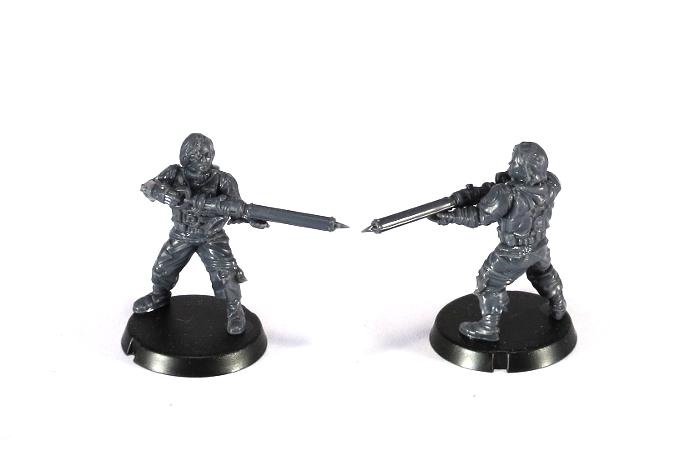
Likewise, the Glue Rifle can potentially work with either grip style. It's such an unusually-shaped weapon, and can work held a few different ways, so have a play with it and see what you like best!
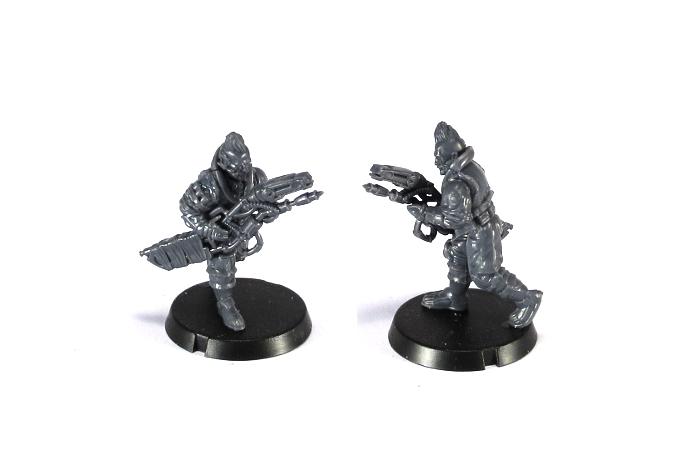
For some more ideas for building your Broken models or to share your own creations, head on over to the Comm Guild Facebook page.
You can pick up the Broken Infantry Pack, and the rest of the Maelstrom's Edge miniature range, from the webstore here.
For other Maelstrom's Edge modeling articles, including tutorials and walkthroughs of a wide range of different building and miniature projects, check out the article roundup here.
Tags: broken modeling tutorial walkthrough
Assembly Guide - Broken Rabble
Posted on Monday Oct 02, 2017 at 05:00pm in Tutorials
Assembling Broken Rabble Units
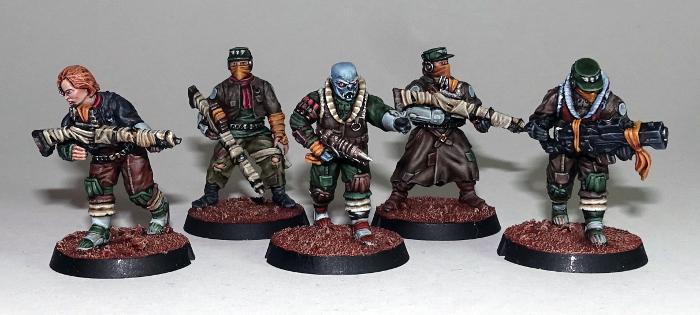
General Notes
Polystyrene cement - only use superglue if you want to go insane! All of our models are designed to be assembled with polystyrene cement as it gives some time to re-pose while gluing, fuses the models together and prevents brittle joins like other glues do. Make sure you have polystyrene cement in your toolkit before you begin!
We want you to experiment! We've broken our models up into lots of parts and given a fair few spare parts so that you can push yourself out of your comfort zone, learn new skills and create some really unique models. We've tried to price things so that it won't break the bank if you make a mistake, so please cut stuff up and have some fun. Start simple with a slice here and a re-pose there, and watch your confidence and skills increase until you are a master modeler!
Basing - Always make sure you glue your model to its base with an eye on the arc markers on the sides of the base. The arc marker indents should be at the halfway point between the front and back of the model to show the front and back halves of the model when gaming. See the Maelstrom's Edge rulebook for more detailed notes on this.
Dry fit before gluing! - There are lots of pose options possible, but that means there is also the freedom to screw up and make some bad poses! Sticking the parts together and seeing how things look will usually lead to a model that is fairly static and repetitive. You should consider knee, hip, torso, and arm positions when gluing and ensure that you have a pose in mind before you start gluing things together. If in doubt or insecure about your talents in the posing area, we recommend you try to copy the poses from some of our studio models found here in the gallery.
Broken Rabble Assembly Notes
Six Broken models can be made from one set of the Broken Infantry sprues:


Assembly is fairly straightforward, with everything fitting together where you would expect. There are six different torsos, each with a unique front and back.

You can save yourself some aggravation if you keep the matching parts together when you cut them off the sprue. If they do get mixed up it will help that the fittings are different on each pair, so each front and back will only go together with its correct partner.

The twelve different sets of legs give you a whole slew of options for posing, as with one exception any of the torsos will work with any of the legs. The exception is torso 3 (parts 3B and 3F) which has pouches hanging from the belt. This torso fits with the legs labelled 3LEG and 6LEG, and slightly less flush with 3LEGB, although the pouches hide any slight gap you wind up with on that last set. You can also make this torso fit with some of the other legs if you trim up the bottom of some of the pouches a little.

With the torsos glued in place, you might notice that there is a reasonable amount of height variation between the models, which makes for a much more ragtag look to the unit than the usual identically-sized military units.
As with the torso/leg pairing, most of the huge range of heads on the sprues will work with any of the torsos. Torso 2 (2B and 2F) has a rolled cloak across the shoulders and torso 3 (3B and 3F) has a high collar, both of which may get in the way for heads 3H, 4H, 6H, 6HB and AH11.

With the massive range of arms available to choose from, a little experimenting may be required to get just the look you want. Because of the different grips and sizes of the various weapons, some weapon hands have a more open grip and others are more closed, so this needs to be kept in mind when fitting them onto your models. In some cases the 'matching' left arm will work, but for some weapon/arm combinations you may want to tack the right arm and weapon together and then find a left arm that fits best.
The Slug Rifle is the basic weapon of Broken Rabble units. It works best with a more open right hand, as does the Chem Launcher.
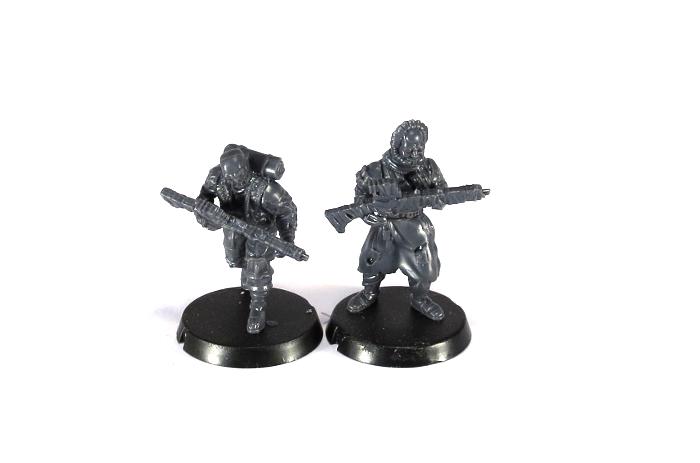

The Auto Slugger and Glue Carbine also work with a more open right hand, but work best with hands 1RC, 3RA, 4RC, 5RB or 6RC.
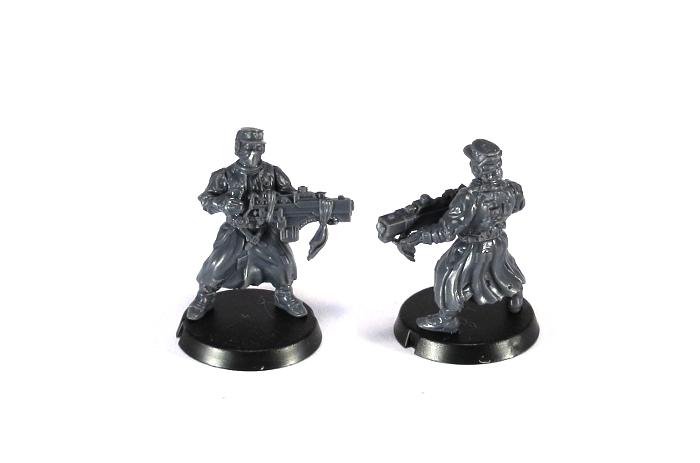

The Longbeam Rifle and EMP Harpoon can use a more closed hand to latch onto their rear grips, or you can use an open hand for a more relaxed grip.
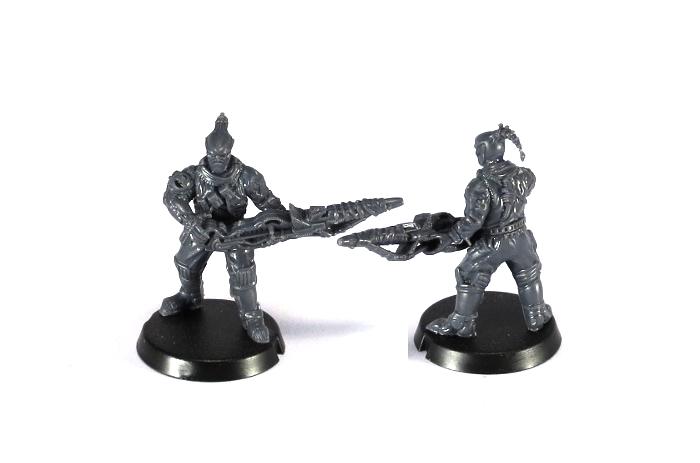

Likewise, the Glue Rifle can potentially work with either grip style. It's such an unusually-shaped weapon, and can work held a few different ways, so have a play with it and see what you like best!

For some more ideas for building your Broken models or to share your own creations, head on over to the Comm Guild Facebook page.
You can pick up the Broken Infantry Pack, and the rest of the Maelstrom's Edge miniature range, from the webstore here.
For other Maelstrom's Edge modeling articles, including tutorials and walkthroughs of a wide range of different building and miniature projects, check out the article roundup here.
Painting Tutorial: Hazard Stripes
Posted on Monday Sept 25, 2017 at 05:00pm in Tutorials
- by Iain Wilson
Battlefields are a dangerous place, but that's no reason not to follow reasonable occupational health and safety protocols. So here's a quick and easy tutorial for painting hazard stripes on your terrain, to make sure that your settlement's managing body doesn't find themselves with unexpected compensation claims on top of their post-battle repair bills!
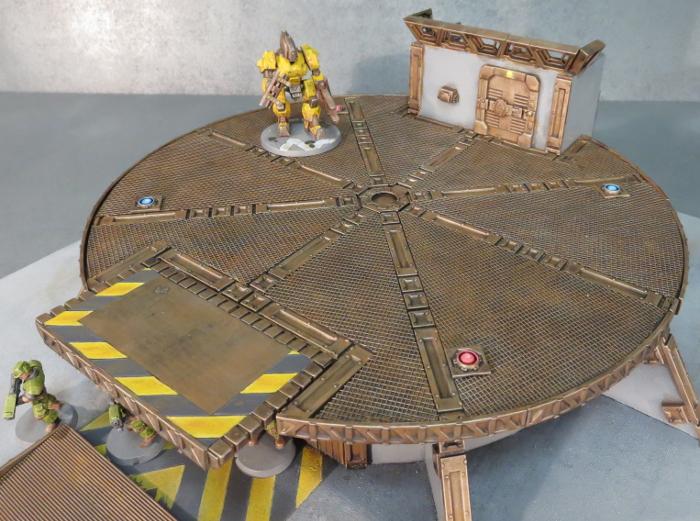
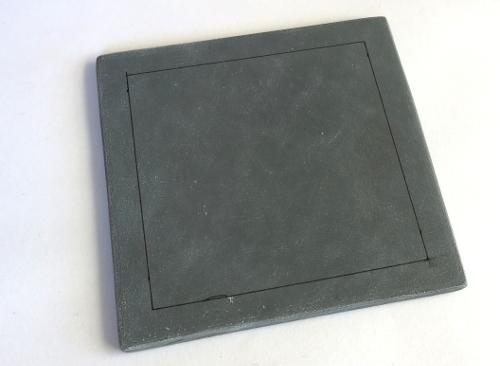
Start by marking out the area that you want to draw attention to with a ruler and a fine line black pen - I'm using a Staedtler 0.05 'Pigment Liner' here.
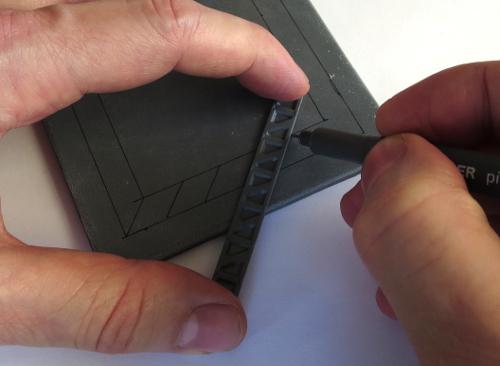
You can use a ruler to mark out the width that you want for the striped area, but I find it quicker and easier to just grab an appropriately-sized strip of plasticard or (as shown here) a spare support strut from the Maelstrom's Edge terrain sprue and use it as a guide.
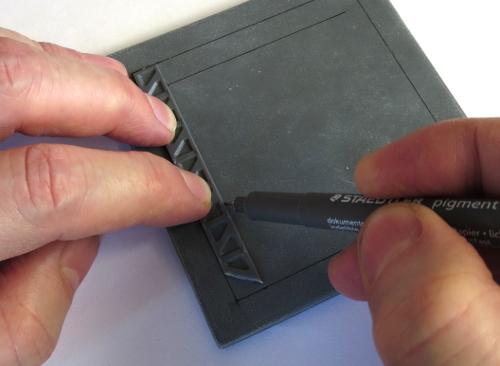
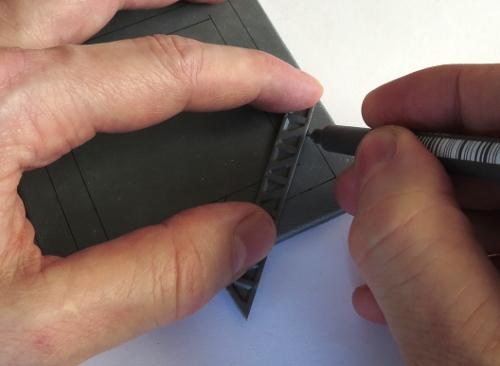
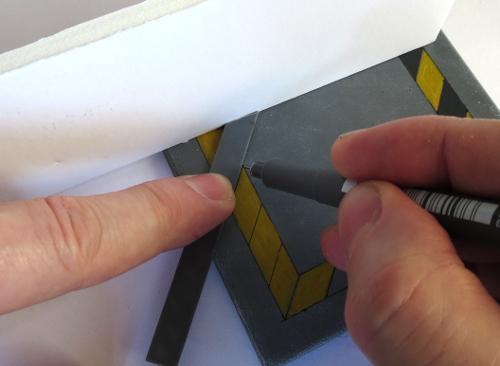
Once you have marked out the area to be striped, it's time to start adding in the lines for the striping itself. I generally use something around about a 45-degree angle, but the precise angle doesn't really matter. Place your guide strip where you want the first stripe (I started at the corner here, because it seemed like the obvious place) and draw a line either side of the strip. If you're working to the right, move the strip to line up the left hand edge with the right hand stripe, and draw a new line along the right of the strip. Repeat all the way along.
If your hazardous area has corners, there are a couple of ways to approach them. The easiest way is to just run your stripes past the corner, so that the angle of the stripes reverses around the corner.
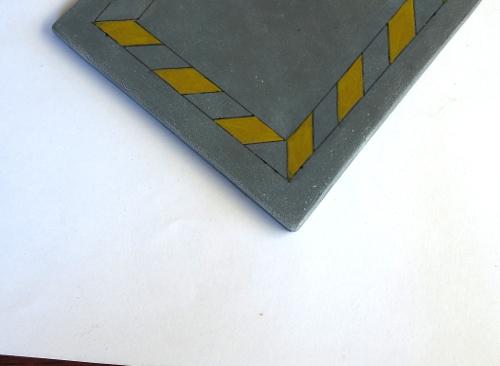
Once you're all marked out, it's a good idea to either set the piece aside for a couple of hours to let the pigment from the pen set properly, or hit it with a coat of fixative spray (which you should be able to get in the sealer section of any decent craft store) to avoid it smudging. Then it's time to fill in every second stripe with yellow. Here, I've used a basecoat of Iyanden Darksun followed by a coat of P3 Cygnus Yellow. It doesn't matter if it's a little patchy, unless you're going for a new and pristine look to your terrain.

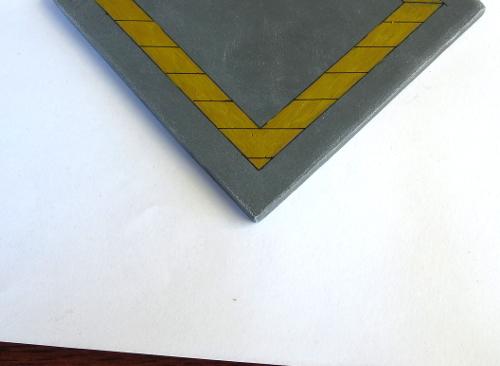
The above shows how the stripes 'flip' when they go around the corner. Alternatively, you can run the stripes to the corner, and then start another run of stripes in the new direction. This can be fiddly for odd angles, but works fairly well for 90-degree corners.
It's also worth mentioning that if you are worried about painting neatly in the lines, you can minimise the need to do so a little by painting the whole area yellow before marking the stripes in. That way, you only have to be neat with the black, which is a little more forgiving since messy bits that run over the lines can just be turned into weathering anyway.
Extra tip - If your striped area runs up to a wall, cutting the end of your template strip at an angle lets you get it
Next, fill in the 'black' areas. I prefer to use a dark grey rather than a black, as it looks a little more natural. Here, I'm using Vallejo Heavy Charcoal, from their Game Colour 'Extra Opaque' range.
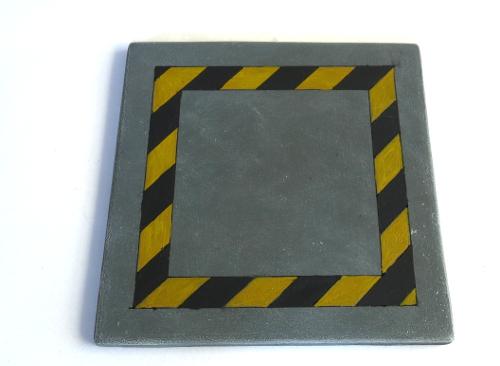
If you're in a hurry, you can leave it there and it will look quite presentable. Or carry on for a little more detail...
Add some chips and scratches with your pen, wherever seems appropriate. This is a great way to conceal any spots where your paint wasn't completely inside the lines, and also adds some extra detail to the finished piece.
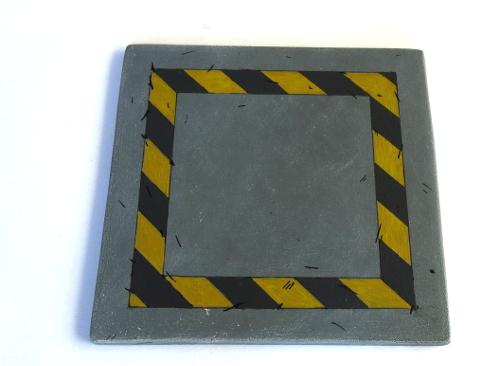
Then highlight the edges of the hazard stripes and the scratches with lighter yellow and grey - I just mix a little white into whichever yellow I used for the stripes, and some Vallejo Basalt Grey for the 'black' sections. I have also used some Vallejo Light Grey to highlight the scratches on the surrounding cement area.
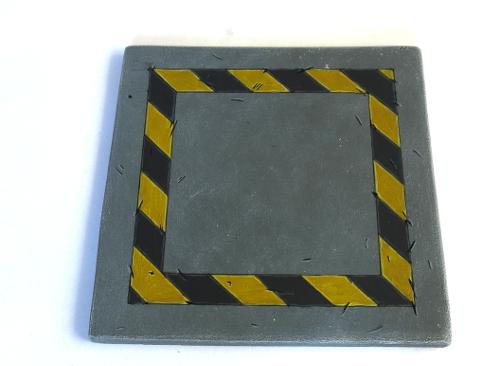
You can 'fade' the stripes, to give them a more worn appearance, by drybrushing with a little of the same colour as the area around them. My cement on this piece is Vallejo Basalt Grey drybrushed with Light Grey, so I've drybrushed over the stripes with some more light grey. The heavier you go with the drybrush, the more faded the end result.
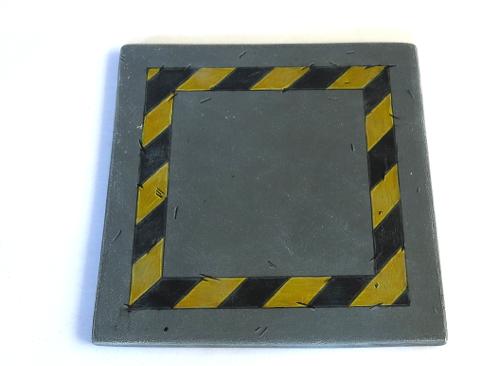
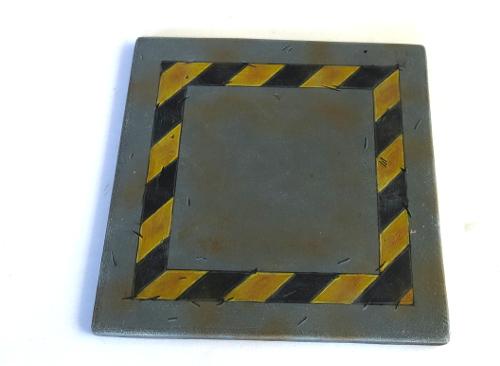
Finally, a bit of brown drybrushed into the middle of the yellow stripes gives them some more depth, with some more brown (Vallejo Beasty Brown here) drybrushed around to dirty things up.
And that's about it. Go forth and hazard up your terrain wherever seems appropriate.
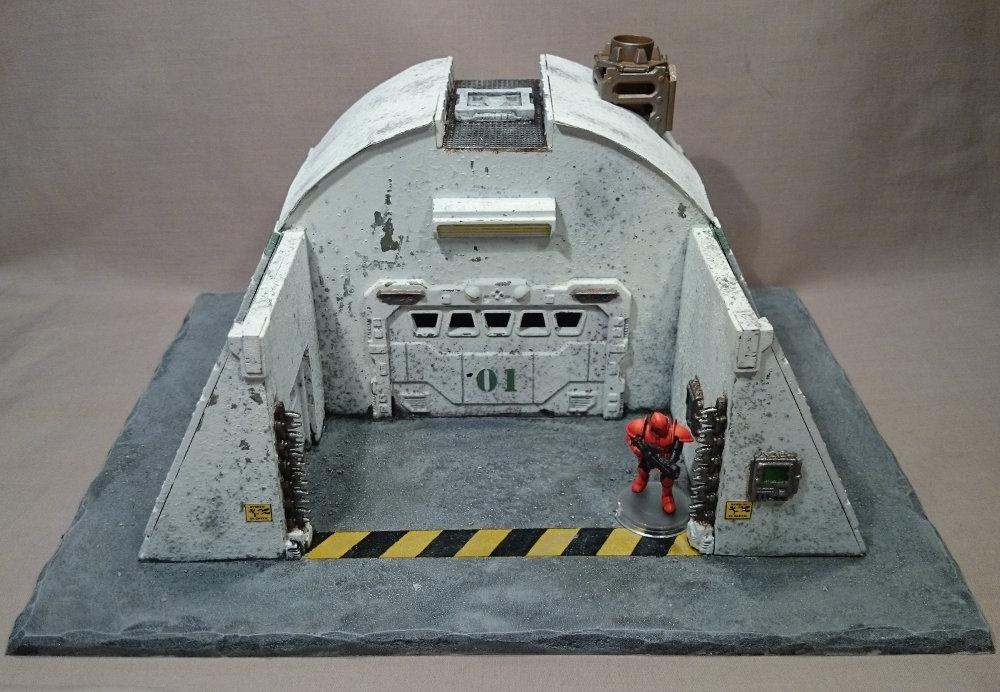
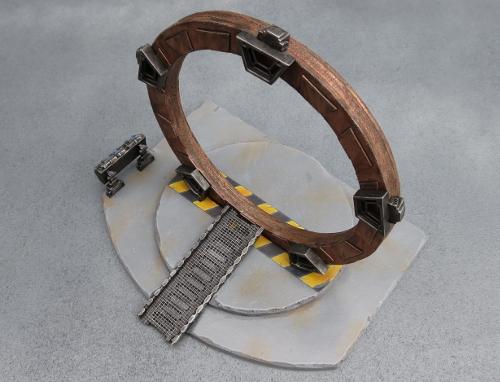
Gateways, energy fences, holes, hatchways, heat vents, and anything else that could conceivably crush, spindle or make your day unpleasant is a good candidate for some serious warning stripes.
To build your own hazardous terrain, you can pick up the Maelstrom's Edge terrain sprue from the webstore here. As always, feel free to share your creations on the Comm Guild Facebook page!
For other Maelstrom's Edge modeling articles, including tutorials and walkthroughs of a wide range of different building and miniature projects, check out the article roundup here.
Painting Tutorial: Heat Stress
Posted on Monday Sept 18, 2017 at 05:00pm in Tutorials
- by Iain Wilson
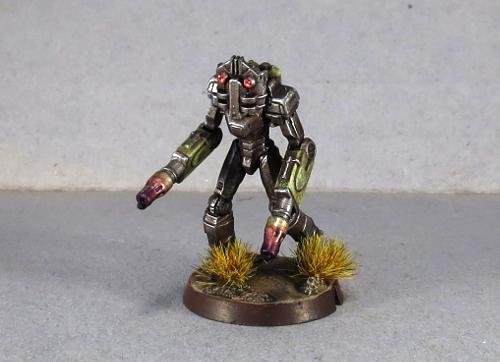
If you're tired of painting your weapon barrels silver and calling the job a good'un, this week's tutorial is for you! Here, we're going to run through how to paint a heat stress effect using Army Painter inks, perfect for Clingfire sprayers or Maglock Chainguns to make them really pop on your models.
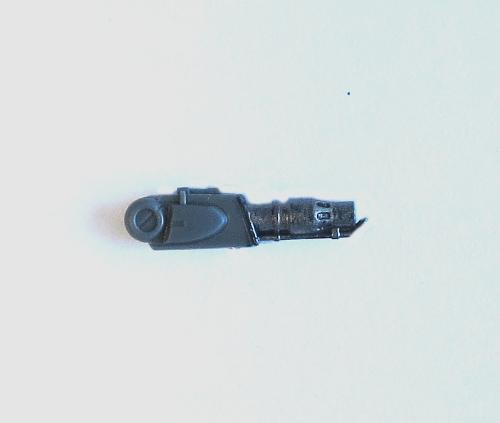
Start with a basecoat of metal. Here, I've used P3 Pig Iron, equivalent to Citadel Leadbelcher (Boltgun Metal, for the old-timers).
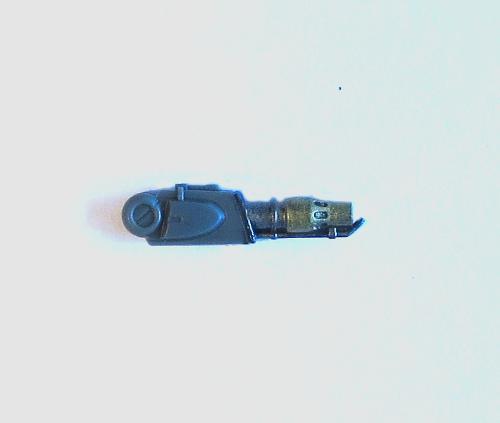
Paint the part that you want to be heatstressed with gold. I've used Coat D'arms Bright Gold here, but any gold will do.
Next, leaving a thin strip of gold at the end furthest from the weapon muzzle, paint the gold area with several thin coats of Army Painter Red Tone. Avoid trying to rush it by slopping the coats on too heavy, as that can cause the colour to go all blotchy. Keep the coats thin and let them dry thoroughly in between (which doesn't take long if you're keeping them thin!), and start each coat just a little bit further away from the start of the gold section, so that you build a natural transition from the gold to the red. Don't be concerned if the first coat or two doesn't look like it's actually doing much - it's a cumulative effect and the colour will build up as you keep going over it.
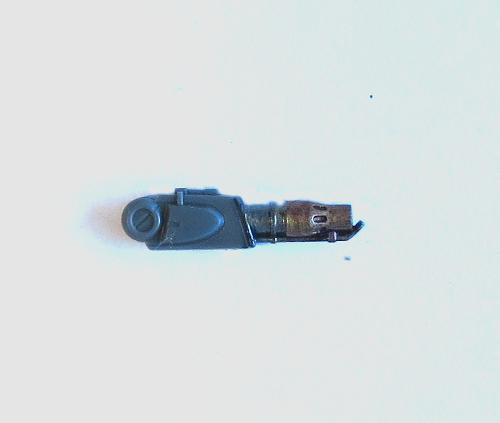
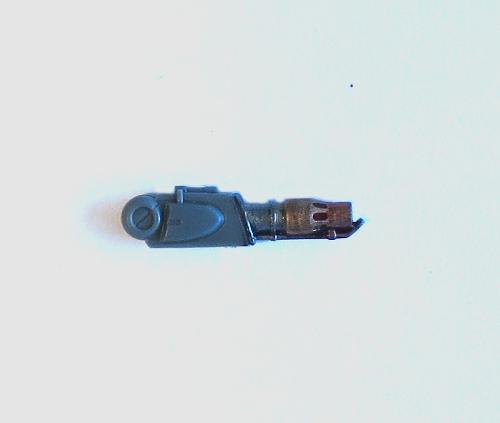
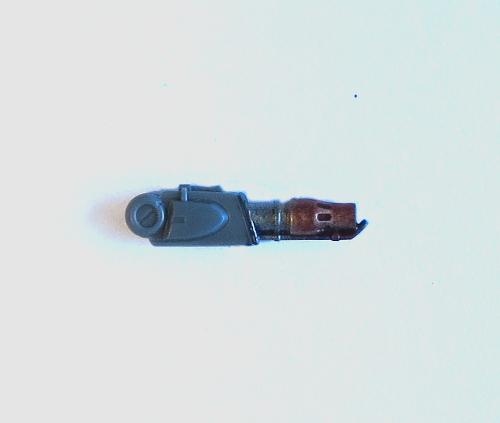
(in case you're wondering, we're doing this with inks rather than normal paints because the ink lets the metallic sheen show through.)
Once you have built up the red to a level you're happy with, switch to Purple Tone. Leave a section of red, and then build up a few layers of purple, starting each layer a little closer to the muzzle of the weapon to build up the transition from red to purple. As before, use thin coats and let each one dry thoroughly before starting the next.
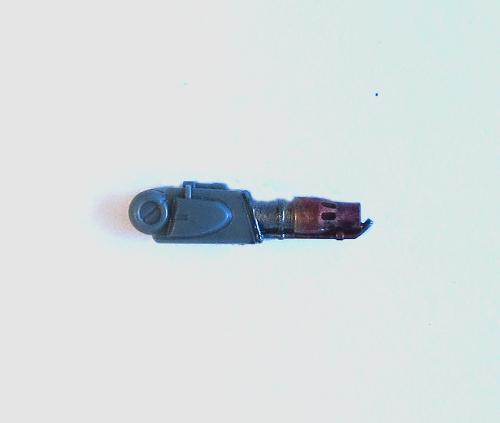
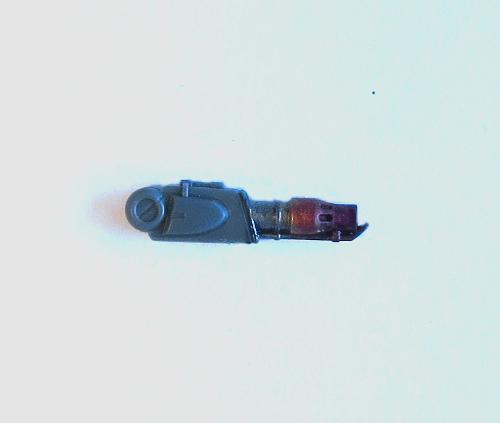
You can also stretch it out a little on longer barrels by using some Blue Tone in between the red and the purple, to give a more gradual transition from red to lighter bluish-purple to darker purple.
Finally, paint the muzzle of the weapon black. Thin the paint a little and work it back into the purple slightly, giving a sooty appearance to the muzzle area.
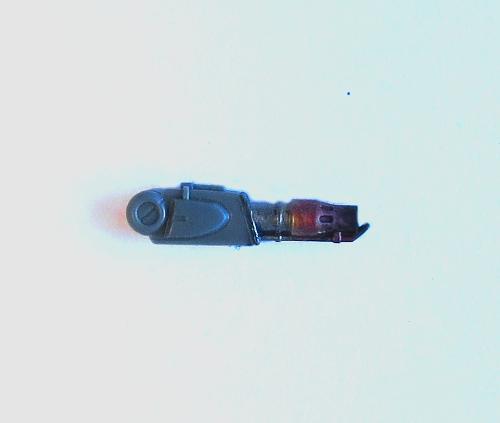
If you like your weapons looking a little cleaner, you can leave off that last step and just finish with the purple.
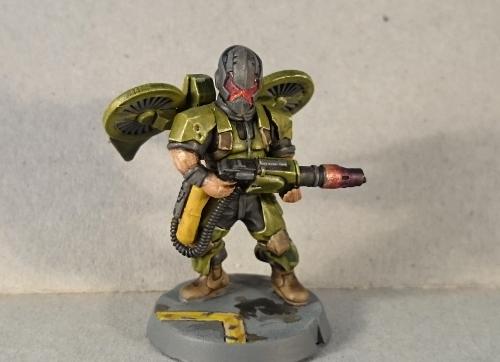
To build your own army of scorchy, melty doom, you can pick up the full range of Maelstrom's Edge miniatures and terrain accessories from the webstore here. As always, feel free to share your creations on the Comm Guild Facebook page!
For other Maelstrom's Edge modeling articles, including tutorials and walkthroughs of a wide range of different building and miniature projects, check out the article roundup here.
Tags: modeling painting tutorial walkthrough
Terrain Tutorial: Streetlights
Posted on Monday Sept 11, 2017 at 05:00pm in Tutorials
- by Iain Wilson
When you're putting together an urban table, little 'real' details can help immensely to bring it all to life. With that in mind, we shared a tutorial a little while back for creating simple hedges made from kitchen scourers and flock. This week we're adding to the urban chaos, and using up some of that leftover sprue, with some quick and easy streetlights.
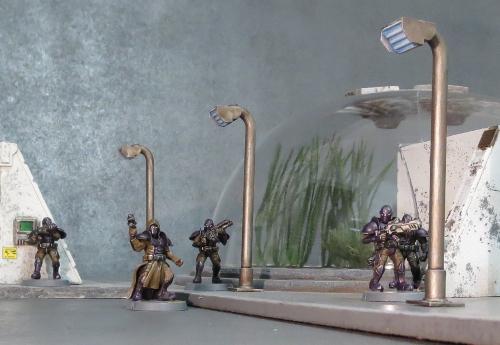
The Maelstrom's Edge terrain sprue has a whole slew of useful components on it, but it also has a nice, rounded frame that is itself rather handy for making pipes, railings or, in this case, streetlight poles. I'm using three emptied sprues (the smaller side of the two frames that make up the terrain sprue), three small pipe fittings, a striplight, some 6mm plastic tubing and some .75mm plasticard.
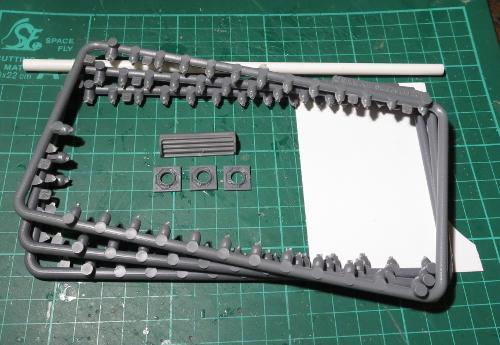
The first step is to take the striplight and cut it into 3 sections. You can do this with a sharp hobby knife if you're patient and not too attached to your thumbs, but a razor saw and hobby mitre box makes the job a lot easier.
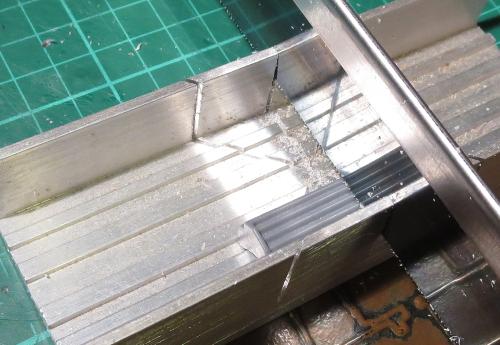
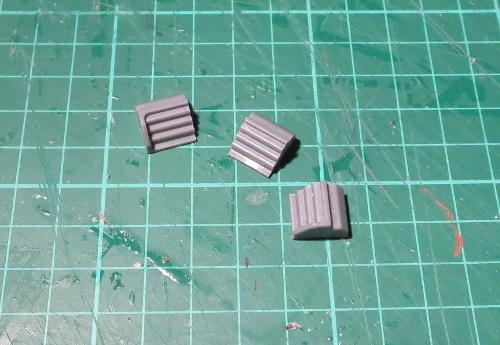
Trace around one of the end sections of the cut striplight to transfer the shape of the light's side panel to the plasticard, and then cut out four panels - 1 each for the light sections from either end, and two for the middle section.
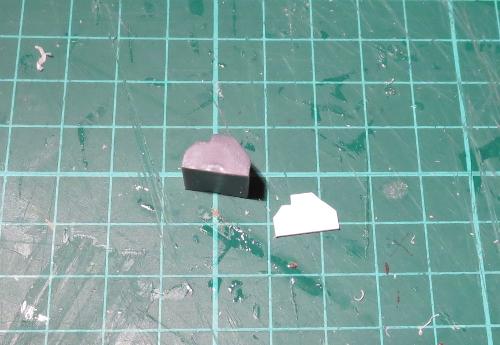
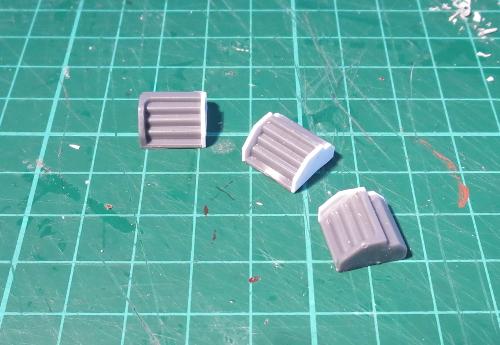
Glue these panels in place. Once the glue is dry, you can shave or file the edges of the panels down so that they are flush with the shape of the light.
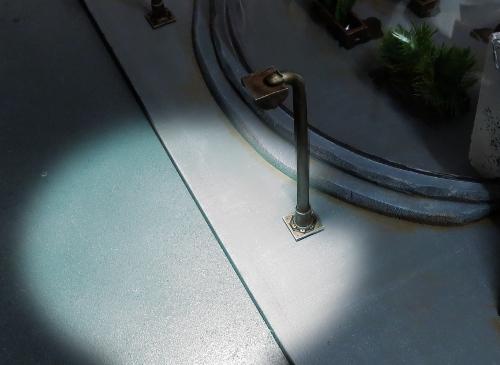
The sprue frame has one end that has no connection tabs on it. This end will form the pole for the light. Cut three of them as below:
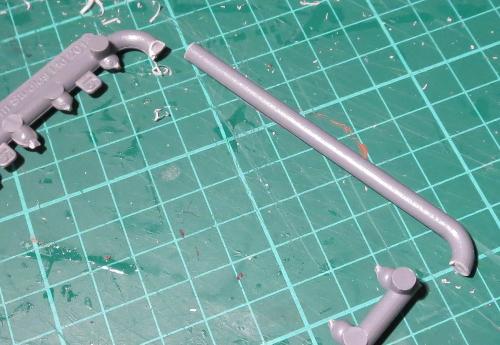
On the straight end of each of the poles, add a short piece of the plastic tube - I've used a 10mm section, but the exact length isn't important so long as it's consistent on all of your lights.
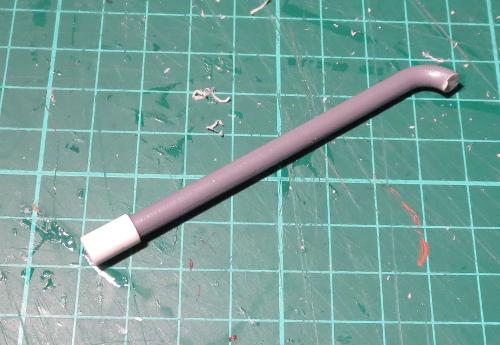
The tube then goes into the pipe fitting.
From the leftover sprue, cut three identical connection tabs.
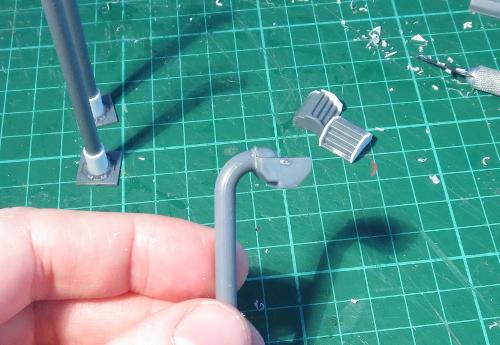
The light is glued in place on the bent end of the pole, and the connection tab is glued on top to add a little detail and bulk up the joint to match the end of the pole.
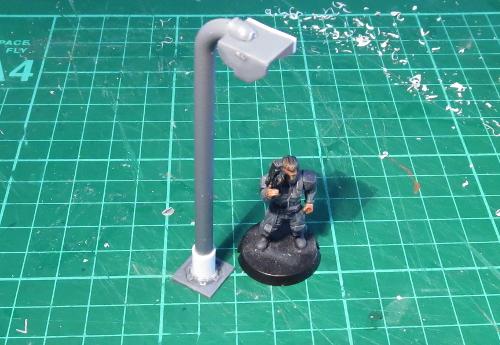
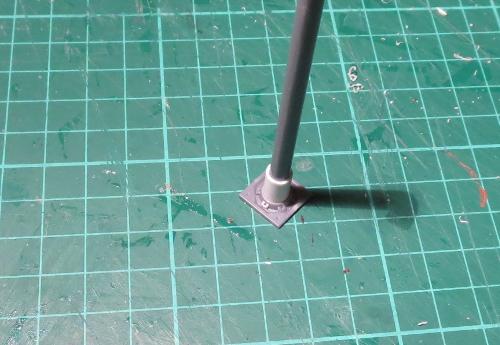
If you're intending to glue the lights onto your terrain, then you're done (aside from painting, obviously). If you want to be able to use the streetlights as scatter terrain, then you might want to glue them to a slightly larger base to make them more stable. You could use a small circle of MDF or plasticard, a spare miniature base, or alternatively the square hatch from the terrain sprue serves for a more high-tech solution.
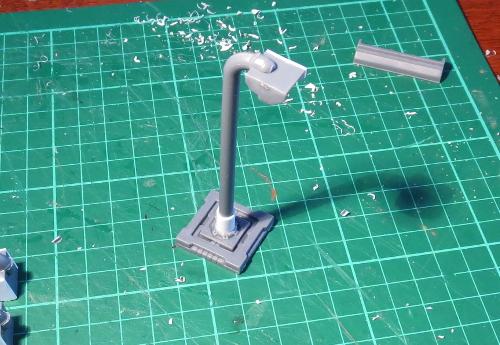
From there, it's all down to painting. The lights shown here have been painting using the weathered metal formula that features in so many of my articles - You can find the tutorial here.
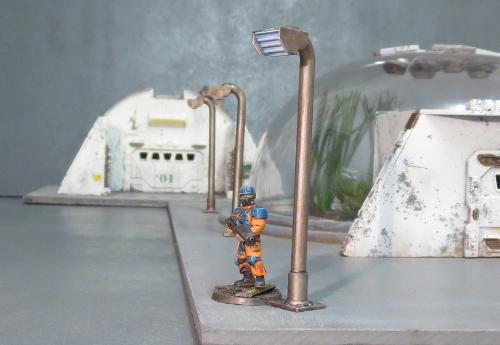
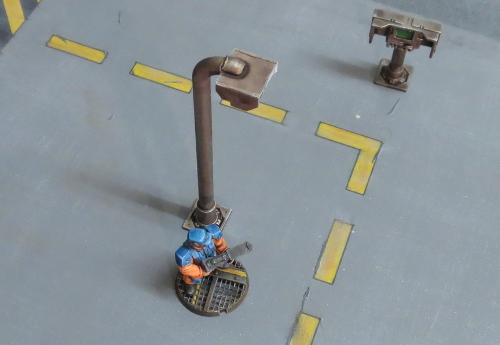
And that brings us to a close once more. Time to pop the chairs up on the tables, grab our umbrellas and saunter off into the gathering dusk...
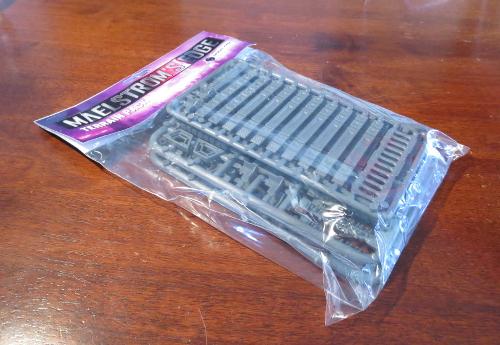
To put together your own scifi urban utopia, you can pick up the Maelstrom's Edge terrain sprue in a handy two-pack from the webstore here.
As always, feel free to share your creations on the Comm Guild Facebook page!
For other Maelstrom's Edge modeling articles, including tutorials and walkthroughs of a wide range of different building and miniature projects, check out the article roundup here.
Assembly Guide - Karist Praetorians
Posted on Monday Aug 14, 2017 at 05:00pm in Tutorials
The assembly guides on the Maelstrom's Edge website are missing the new units added by the Faction Expansion Sprue. Last week, we went over the assembly of the Epirian Suppression Team, and so this time around we'll look at the other unit created from the sprue, the Karist Praetorians.
Karist Praetorian Assembly Guide

General Notes
Polystyrene cement - only use superglue if you want to go insane! All of our models are designed to be assembled with polystyrene cement as it gives some time to re-pose while gluing, fuses the models together and prevents brittle joins like other glues do. Make sure you have polystyrene cement in your toolkit before you begin!
We want you to experiment! We've broken our models up into lots of parts and given a fair few spare parts so that you can push yourself out of your comfort zone, learn new skills and create some really unique models. We've tried to price things so that it won't break the bank if you make a mistake, so please cut stuff up and have some fun. Start simple with a slice here and a re-pose there, and watch your confidence and skills increase until you are a master modeler!
Basing - Always make sure you glue your model to its base with an eye on the arc markers on the sides of the base. The arc marker indents should be at the halfway point between the front and back of the model to show the front and back halves of the model when gaming. See the Maelstrom's Edge rulebook for more detailed notes on this.
Dry fit before gluing! - There are lots of pose options possible, but that means there is also the freedom to screw up and make some bad poses! Sticking the parts together and seeing how things look will usually lead to a model that is fairly static and repetitive. You should consider knee, hip, torso, and arm positions when gluing and ensure that you have a pose in mind before you start gluing things together. If in doubt or insecure about your talents in the posing area, we recommend you try to copy the poses from some of our studio models found here in the gallery.
Karist Praetorian Assembly Notes
Karist Praetorians are fairly straightforward to assemble, being just a modification of the basic Karist Trooper. Three models can be assembled using the following sprues:
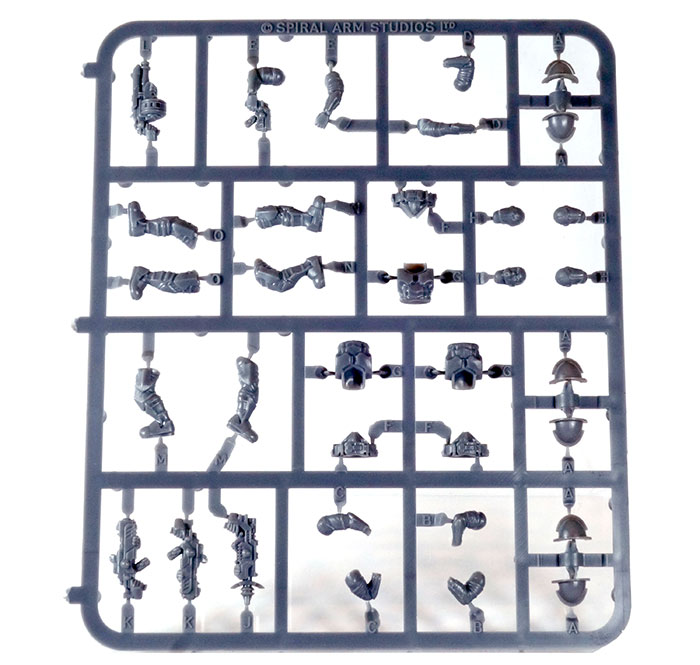
Karist Trooper Sprue:
Faction Expansion Sprue
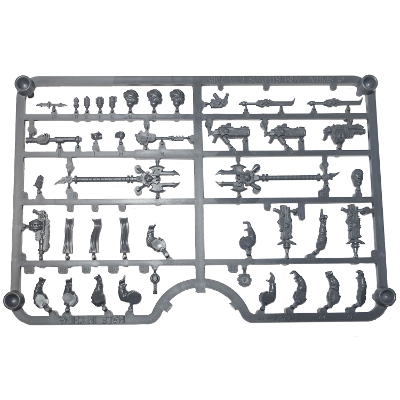
You will need the below parts from those sprue. We've used one rifle and one pistol just to show how they go together, but you could of course choose to use all rifles or all pistols when you assemble your own unit.
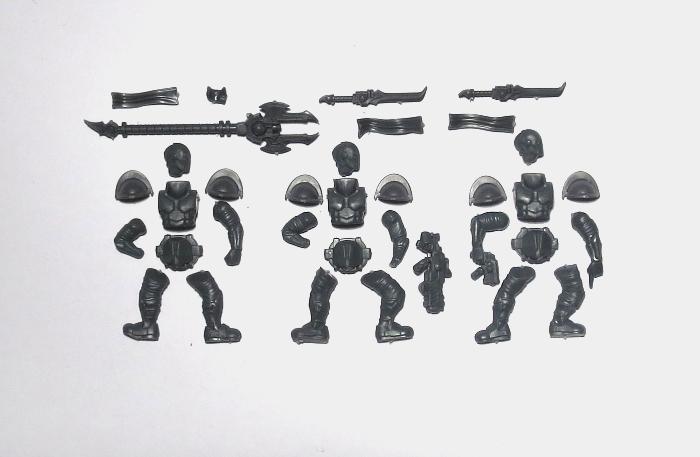
One design decision that might seem a little odd is the splitting of the legs from the lower torso/crotch piece. This had to be done because the upper leg armour is not possible to mould in injection moulded plastic without having to make some ugly tweaks to it that would have really reduced sharpness beyond what we were willing to tolerate. We decided to split the legs at the top instead, allowing ease of conversions and sustaining the crisp armour plates.
All three lower torsos (part F) are identical, as are all three torsos (G). Legs are paired with the same letter (eg; part M is both the left and right leg of the same pose). We recommend the first step in your Karist Trooper assembly should be sticking the legs on the lower torsos.
Add the loincloths next, as this is easiest before there are other parts to get in the way. There is a recess on the inside top of each loincloth that fits neatly over the groin armour. All three loincloths work with all three leg poses, but as usual it's a good idea to do a quick dry-fit before gluing to check that they look how you want them.

The most complex part of the build is the arm / weapon assembly. This is because three points need to be glued at the same time - the arms to the torso and the hands to the arms. If you are using polystyrene cement, you'll get a minute or two of re-posing time which can make this a lot easier. Arms are paired by code as well (eg; part C is both a left and right arm that go together). Mixing up your paired arms will mean some odd posing!
The shoulderpads (part A) are designed to be optional if you are so inclined - underarm detail is sculpted on the upper arms. We've not made any models without them though as we enjoy the distinctive profile the shoulderpads gives to the Karists. If you postion the arms so that the shoulders are just below the top of the armour, the shoulder pads will butt up neatly against the sides of the torso.

From the Karist Trooper sprue, Part K is the Karist Pulse Carbine. Part J is the Radwave Emitter and part L is the Grenade Launcher.
There is no Karist hand that holds the cybel blade neatly, although with a little conversion you can make the closed fist work. The easiest approach though is to glue the sword to the model's back, where it would presumably be held in place with a magnetic lock.

The cybel glaive does have a hand on the expansion sprue to hold it. You can use any of the right arms from the Karist Trooper sprue for this. Some of the rifle arms have a small wedge of wrist attached to angle the rifle correctly across the body. While not essential, it will look a little better if you cut this wedge off along the front edge of the forearm armour.

Once the hand is attached, you can glue the arm onto the torso, and then the glaive into the hand.
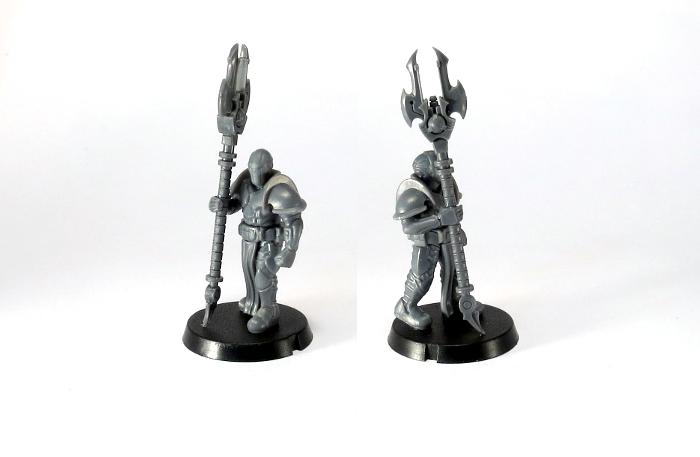
As with most models with poseable heads, we recommend building the whole model and then putting the head in place last of all.

For some more ideas for building or converting your models, check out the Karist Praetorian Spotlight article here.
You can pick up your Contractor and Expansion sprues from the Maelstrom's Edge webstore here. As always, feel free to share your creations on the Comm Guild Facebook page!
For other Maelstrom's Edge modeling articles, including tutorials and walkthroughs of a wide range of different building and miniature projects, check out the article roundup here.
Tags: karist modeling praetorians tutorial
Assembly Guide - Epirian Suppression Team
Posted on Monday Aug 07, 2017 at 05:00pm in Tutorials
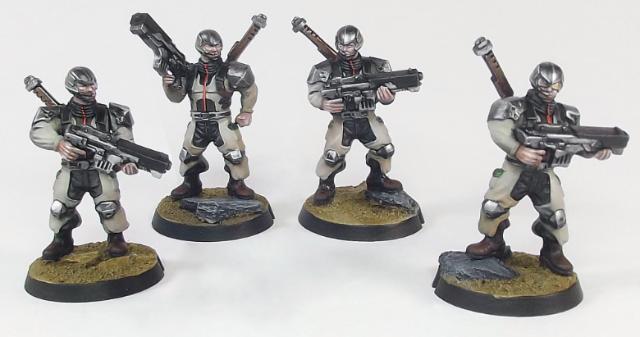
The assembly guides on the Maelstrom's Edge website are missing the new units added by the Faction Expansion Sprue. So this week, we're going back to basics and running through assembly of the Epirian Suppression Team.
Assembling Epirian Contractor Suppression Teams
General Notes
Polystyrene cement - only use superglue if you want to go insane! All of our models are designed to be assembled with polystyrene cement as it gives some time to re-pose while gluing, fuses the models together and prevents brittle joins like other glues do. Make sure you have polystyrene cement in your toolkit before you begin!
We want you to experiment! We've broken our models up into lots of parts and given a fair few spare parts so that you can push yourself out of your comfort zone, learn new skills and create some really unique models. We've tried to price things so that it won't break the bank if you make a mistake, so please cut stuff up and have some fun. Start simple with a slice here and a re-pose there, and watch your confidence and skills increase until you are a master modeler!
Basing - Always make sure you glue your model to its base with an eye on the arc markers on the sides of the base. The arc marker indents should be at the halfway point between the front and back of the model to show the front and back halves of the model when gaming. See the Maelstrom's Edge rulebook for more detailed notes on this.
Dry fit before gluing! - There are lots of pose options possible, but that means there is also the freedom to screw up and make some bad poses! Sticking the parts together and seeing how things look will usually lead to a model that is fairly static and repetitive. You should consider knee, hip, torso, and arm positions when gluing and ensure that you have a pose in mind before you start gluing things together. If in doubt or insecure about your talents in the posing area, we recommend you try to copy the poses from some of our studio models found here in the gallery.
Epirian Contractor Suppression Team Assembly Notes
Three Epirian Suppression Team Contractors can be made from the following sprues:
Epirian Contractor Engineer Sprue
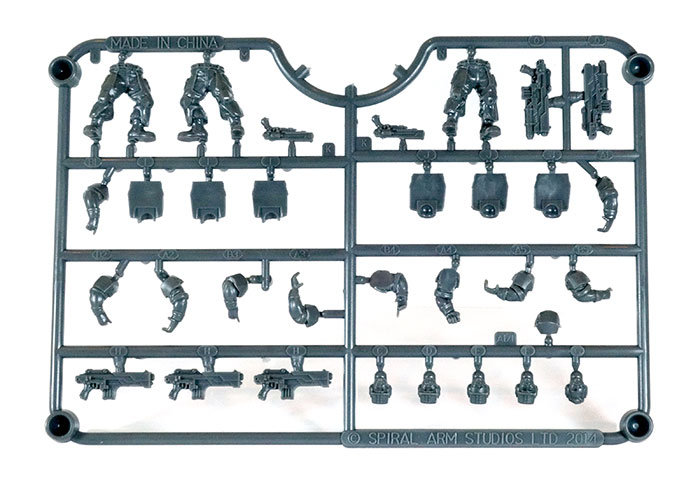
Faction Expansion Sprue

Assembly is straightforward and the two above sprues will make up three models with the following parts. Please note that arms are paired, so do not mix them up or you'll have a really hard time putting them in pairs again! Pairing is done by number, so A1/B1 are a pair, as are A5/B5, etc. You can choose between the rolled-sleeve versions on the Contractor sprue, or the sleeves-down arms on the Expansion sprue.
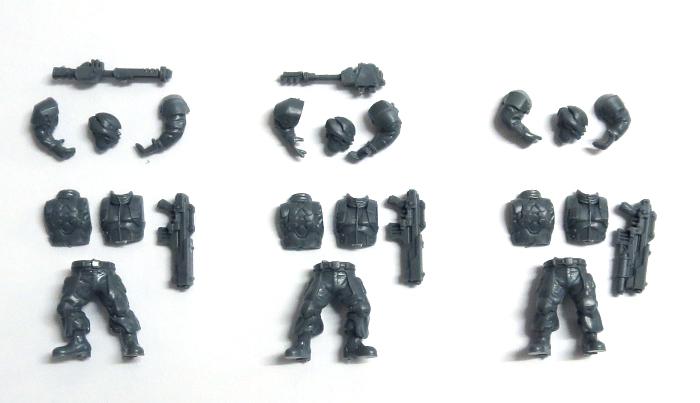
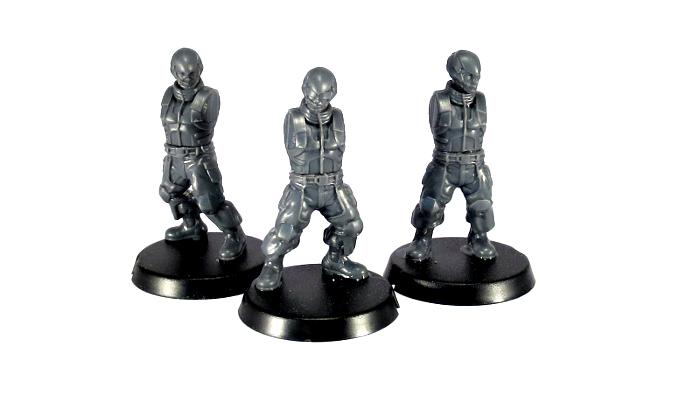
The main build considerations with the Epirian Contractors are that some of the arm poses do not work well with some of the leg poses due to the angles involved, so as always, be certain you dry fit things first. If in doubt, try to copy our studio assemblies for good effect.
As with our Epirian Handler model, the torso has a slight lean to it, and because of that, if you place one foot higher than the other when basing your models, you'll open up much more posing flexibility. This can be done easily by bulking up your basing texture underfoot, adding a pebble or slope to the base, or a multitude of other options.
Cleanup and assembly is fairly easy with the Epirians, with everything going where it should. One point of note is this little mould line on the kneepad strapping:
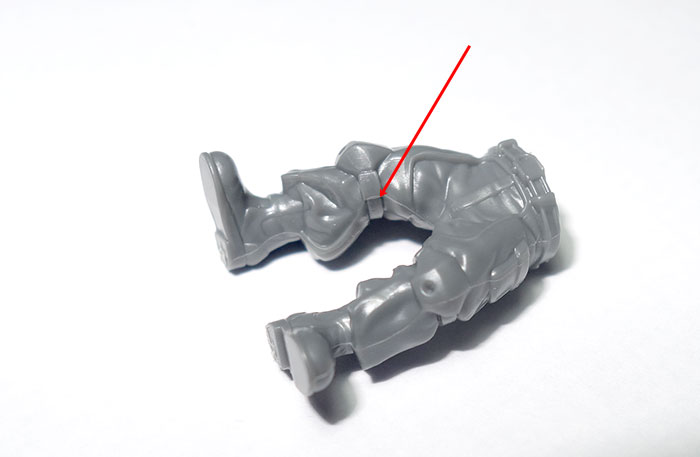
That raised mould line between the front and rear halves of the part looks a lot better if it is shaved down but as it is a little bit deeper than our usual near non-existent mould lines, it can be missed when trimming. Please note that in the photo above we've used a pre-production prototype piece with mould lines that are much worse than our finished products so that you can see more clearly.
Legs, torso and heads go together as you would expect.
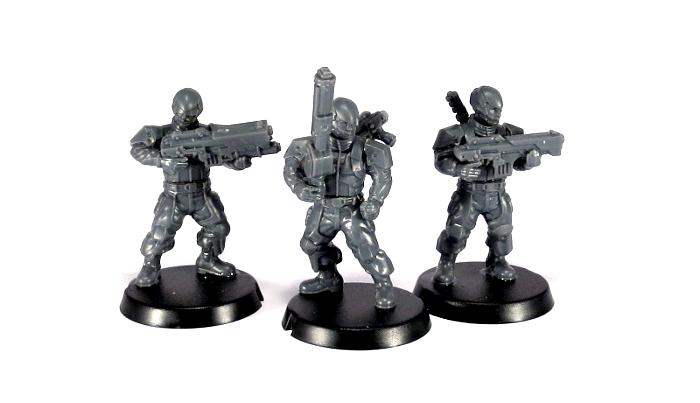
Suppression Team members magnetically lock their 'spare' weapon to their backplate when not in use. So if you choose to have rifles in hand, you can glue the shock weapons to the model's back. Alternatively, you can glue the rifle to their back or sling a pistol off their belt, and put the shock weapon in hand. Use the rifle arms that have the index finger on the trigger, rather than the extended-finger hands - the fingers are close enough together that they still look fairly natural gripping a handle instead of a pistol-grip. The Shock Baton does have a chunkier grip than the Maul, so if you're having trouble getting it to fit, you can shave down the sides of the grip a little.
For some more ideas for building your Suppression Team models, check out the Epirian Suppression Team Spotlight article here.
You can pick up your Contractor and Expansion sprues from the Maelstrom's Edge webstore here. As always, feel free to share your creations on the Comm Guild Facebook page!
For other Maelstrom's Edge modeling articles, including tutorials and walkthroughs of a wide range of different building and miniature projects, check out the article roundup here.
