Terrain Tutorial - Hedges
Posted on Monday Jul 31, 2017 at 05:00pm in Tutorials
- by Iain Wilson
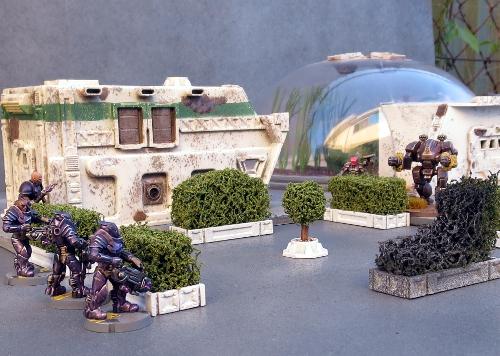
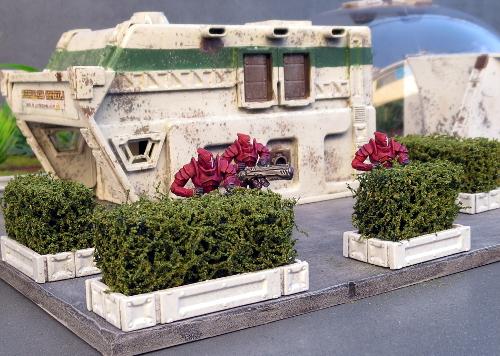
Stands of forest or jungle trees are staples of most of our gaming collections. Sometimes, though, you want your greenery to suit a more civilised warzone, and for that, you just can't go past the humble hedge. So this week, we're looking at a quick and easy way to churn out some shrubby scatter terrain.
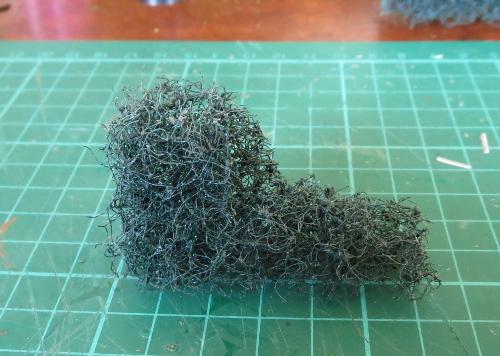
We start with a thick kitchen scourer. For a standard green hedge, you would ideally want a dark green or black scourer, although you could easily use other colours to make alien hedges. The scourer I'm using here is about 20mm thick, and has a really coarse texture. You could use thinner scourers by gluing a couple together, but that may wind up with a visible seam line.

Cut the scourer into strips using a sharp knife or a fine saw. The width of the strips is up to you, depending on how tall you want to make your hedges.

Next, paint the strips of scourer with some PVA glue. Work the glue into the weave of the scourer a little, but try to not leave any big lumps of glue right on the surface, as that may make the outside of your hedge a little blobby.
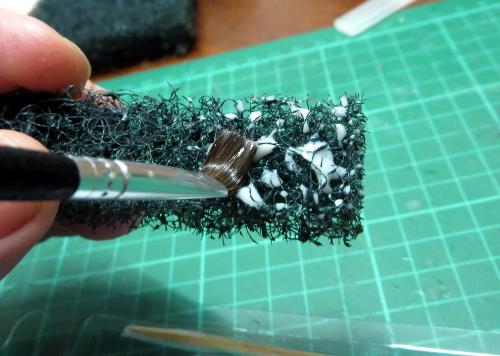
Finally, scatter flock over the glue. You'll get the best results here with a fine grade flock, which you should be able to find in most gaming stores' modeling supply sections or anywhere that sells model trains. Don't use the chunkier, dyed-sawdust stuff - it will just wind up looking like dyed sawdust stuck to a sponge.
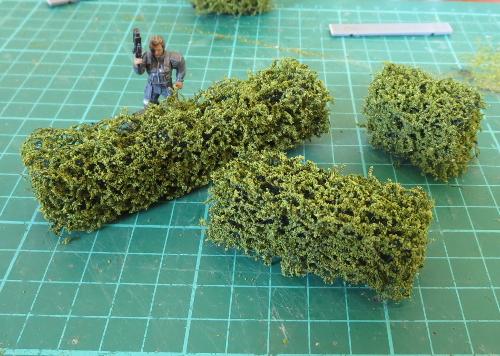
Let the glue dry, and you could easily use your hedges as is to stick onto terrain pieces or scatter around a table. For a slightly more urban look, you can add some boxwork to them using strips of plasticard or the support struts from the Maelstrom's Edge terrain sprue. For the below, I've used a strip of 5mm masonite as a base, which will help to give the hedge section a little more weight.
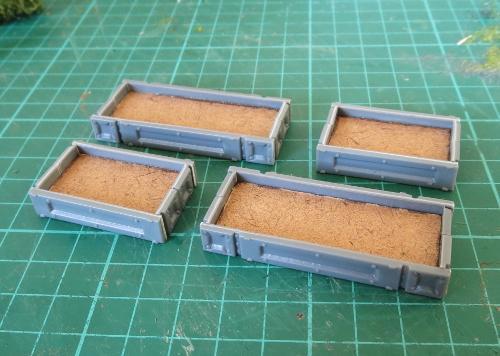
Paint the boxwork up however suits your terrain collection, and then glue the hedges in place with some superglue or PVA glue.
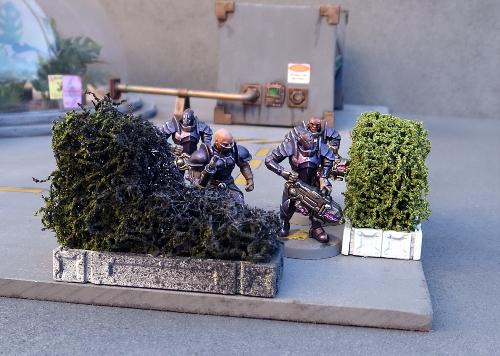
You can mix things up a little by making sections in different heights, to create some lower cover and some full line-of-sight-blocking barriers. Battle damage can be added by cutting or tearing away pieces of the scourer before adding the flock.
To create a burnt effect, I left the flock a bit patchy around the damaged part of the hedge, and once the glue was dry gave it a quick spray with some flat black, followed by a light dusting of flat grey.
If you want to get really carried away, you can also shape the scourer using a knife or some sturdy scissors and create some topiary features.
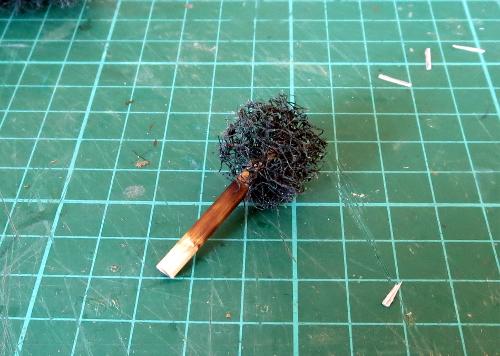
The trunk of this ball topiary was made from a short piece of a wooden skewer, dyed with a little brown ink and then glued into the scourer ball with superglue.
If this all has your green thumb itching, grab yourself some scourers and hedge away! As always, feel free to share your creations on the Comm Guild Facebook page - first one to post a miniature garden maze for their gaming table wins a cookie! (Or possibly just the adulation of the masses and fleeting fame...)
You can find the full range of Maelstrom's Edge models, including the ever-useful terrain sprue, in the Maelstrom's Edge webstore here, and a collection of modeling articles, tutorials and walkthroughs of a wide range of different building and miniature projects in the article roundup here.
Karist Reaper Cadre - Card Correction
Posted on Tuesday May 16, 2017 at 10:43am in Tutorials
 - by Iain Wilson
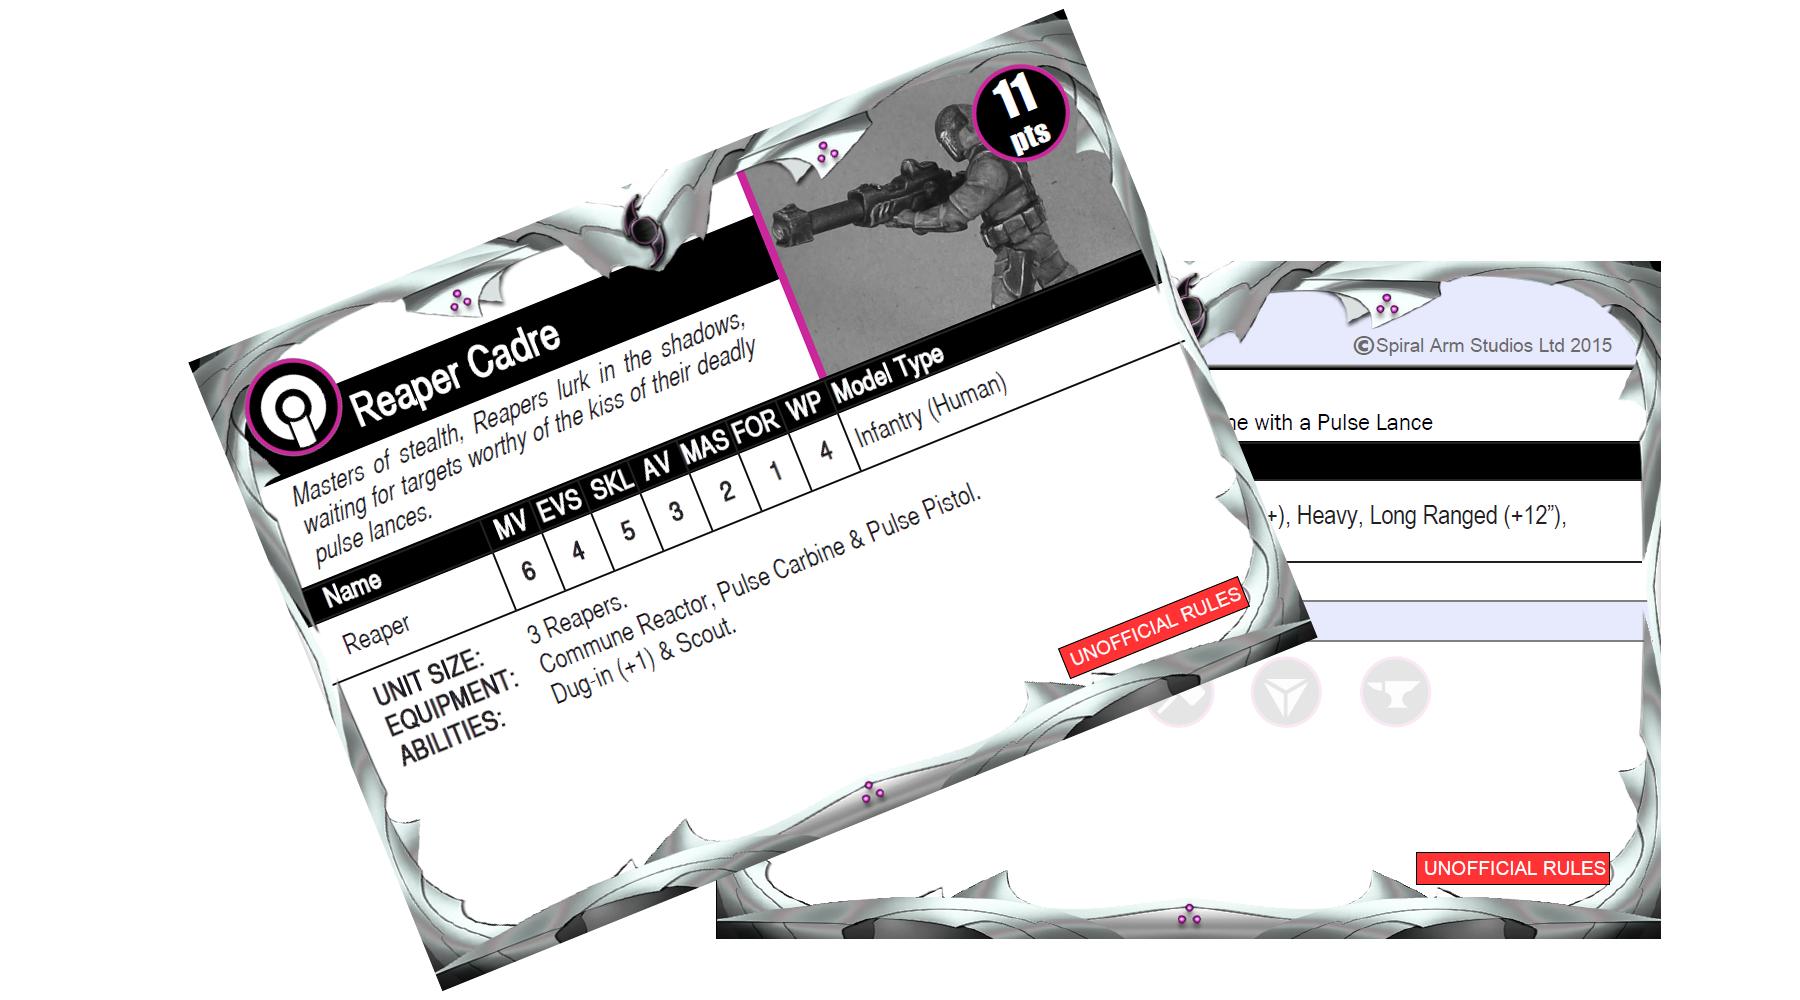
It would appear that the unit card for the Karist Reaper Cadre in this week's article contained a couple of errors that needed to be corrected - The card incorrectly listed the unit as Core instead of Vanguard, and (sadly) the Pulse Lances weren't supposed to be free!
An updated version of the card has now been uploaded, and can be found here.
Those responsible for the error (me) have been severely castigated by, uh, me... and have promised to not do it again.
Karist Reaper Cadre Conversion Tutorial & Unit Card
Posted on Monday May 15, 2017 at 05:00pm in Tutorials
- by Iain Wilson
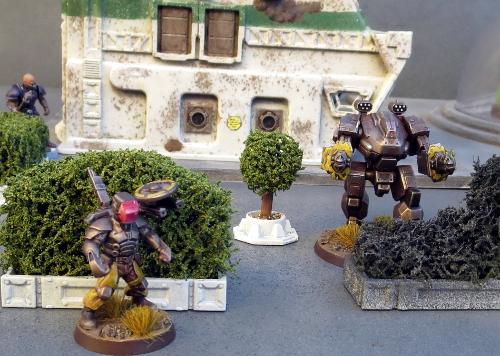
Following on from the conversion article and rules card for the Epirian Scorpion Drone a little while ago, it seemed fitting to show the Karists a little love as well. Sneaky, sneaky love, in the form of the Karist Reaper Cadre. Armed with a sniper variant of the Karist Pulse Carbine, Reapers arrive in advance of the main force and are tasked with removing problematic opponents before the regular troopers have to deal with them.
Here, you'll find instructions for building the Reapers' fearsome Pulse Lance, and unofficial rules for running this unit in your games.

I've based the Reapers on the Karist Trooper, with the shoulder pads left off and the collar trimmed down to represent their lighter armour.
The unit comes with Pulse Carbines by default, but up to two models can be upgraded to have Pulse Lances. To build each lance, you will need two Pulse Carbines. You will also need some 1mm plastic rod (plastruct or similar) and some 2.5mm plastic tube.
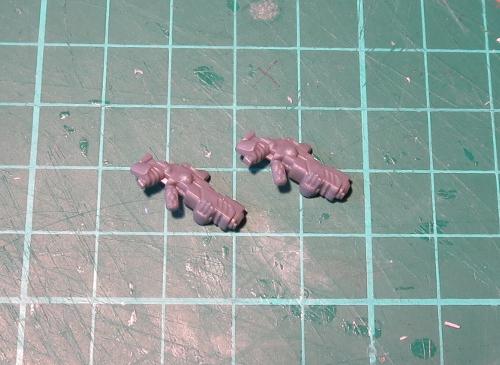
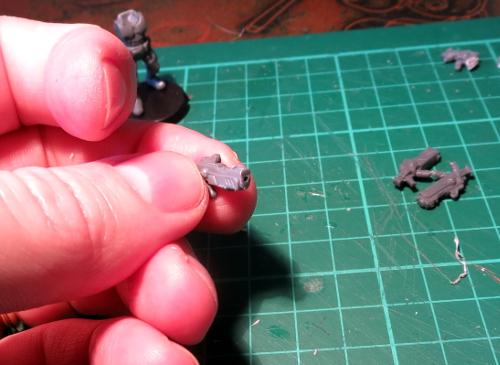
Start by cleaning off any mould lines, and then you will need to drill a 1mm hole into the barrel of one of the pulse carbines. Use a sharp knife to prick a guide hole into the centre of the barrel, and then drill in 3-5mm with a 1mm drill bit.
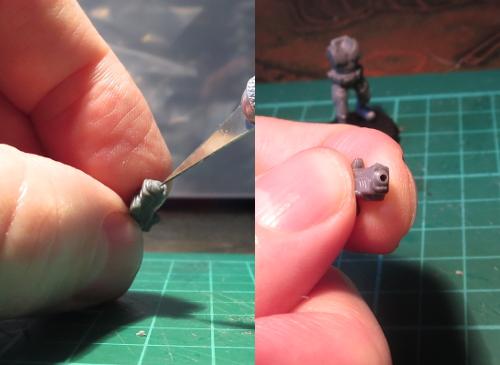
Then use a sharp knife or a file to remove the barrel completely, so the front of the weapon is flat. You do this after drilling, as it's easier to find the right position for the drill while the barrel is still there.
Take the other carbine and cut the front end off just behind the front sight, where there is a groove running across the top of the weapon.
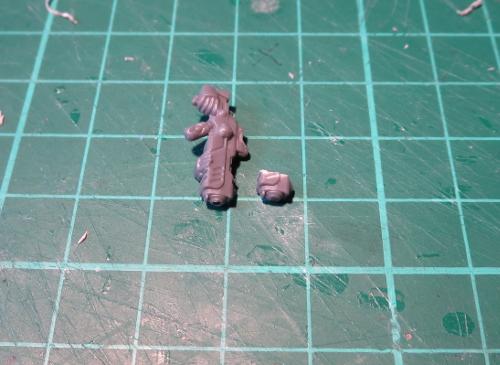
Drill a 1mm hole into the back of this piece, in line with the centre of the barrel. If you drill out your pulse weapon barrels, you can just drill all the way through.
Trim off the leftover pieces of stock around the bottom and sides.
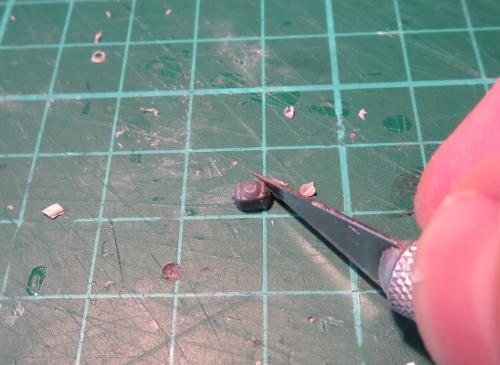
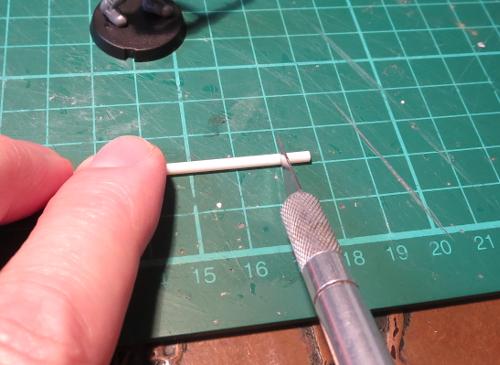
Cut a piece of the 2.5mm tubing around 7mm long - the exact length isn't important, so long as you're consistent with it on all of your lances. There are specialist tools out there for cutting plastic rod and tubing square, but here's the quick and easy method: Grab a cutting mat with a grid pattern on it. Lay the plastic tube along on of the grid lines. Line up where you want to cut with one of the perpendicular lines, and sit the knife blade on top, also lined up with the grid. Now, gently press down with the knife as you use your other hand to roll the tube forwards across the mat. Don't stress if the knife doesn't go through in one go, just roll the tube backwards and forwards a couple of times if necessary without lifting up the knife off the tube. The rolling motion causes the blade to scribe a neat ring around the tube, and when the knife makes it through to the centre your cut piece will pop off with a nice, square end.
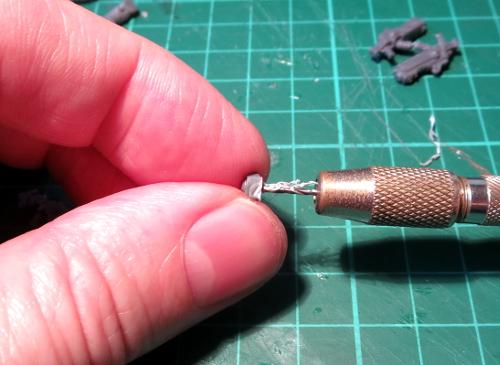
Cut a piece of the 1mm rod that is 3-4mm or so longer than your piece of tube. Glue this into the barrel hole you drilled in the first carbine.
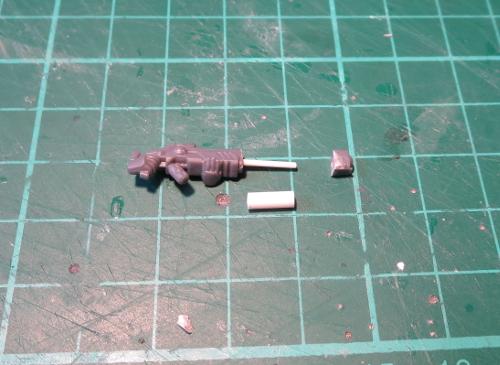
Check for length before gluing the rest in place - Slide the tubing over the 1mm rod, and then dry-fit the 2nd rifle barrel to make sure that it sits flush against the end of the tube. If necessary, either drill out the hole a little more or trim down the end of the rod so that everything sits snug, and then glue it all on place.

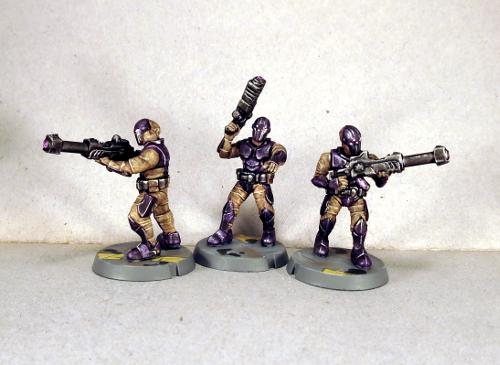
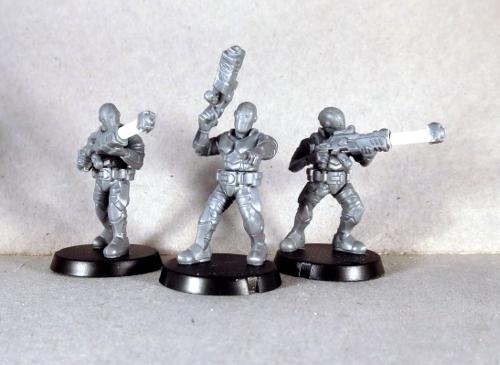
The finished unit, ready for painting:
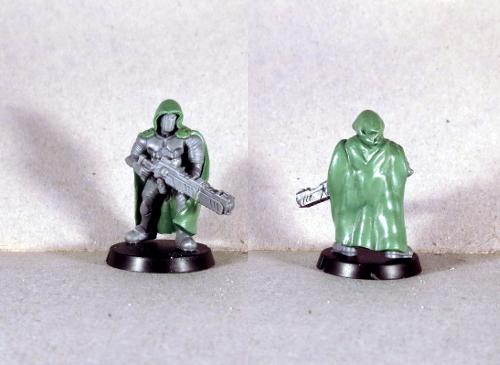
For an alternate take, I built the below version with a sculpted cloak and with a lance that uses one Pulse Carbine from the Trooper sprue, and a front half of a carbine from the Faction Expansion Sprue - that version of the carbine doesn't have hands modeled on, so is easier to use for this. This is a little less fiddly than the plastic tube version above, but doesn't stand out quite as much from the carbine.
If you would like to use the Reaper Cadre in your own games, you can download an unofficial rules card here, and you can pick up the Karist Trooper kit needed to build it from the Maelstrom's Edge webstore here
As always, feel free to share your creations on the Comm Guild Facebook page!
For other Maelstrom's Edge modeling articles, including tutorials and walkthroughs of a wide range of different building and miniature projects, check out the article roundup here.
Tags: conversion karists modeling rules tutorial
Terrain Template and Tutorial - Bunker
Posted on Monday May 08, 2017 at 05:00pm in Tutorials
- by Iain Wilson
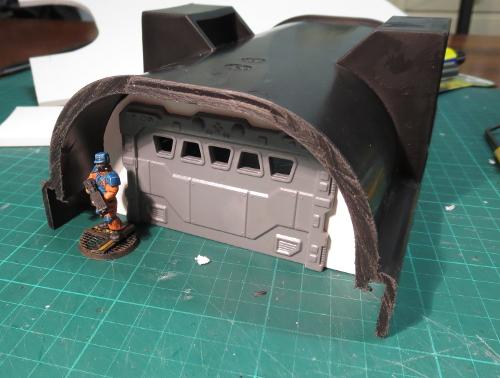
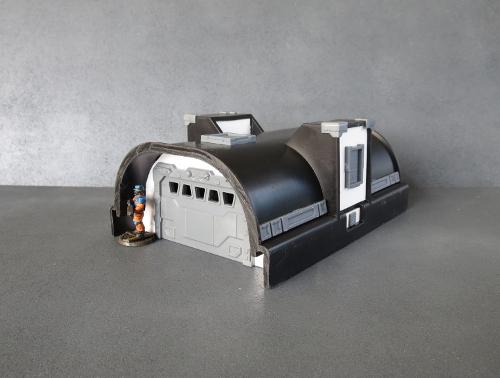
A couple of weeks ago, I shared a template for building a small minehead structure from foamcore, cardboard and the Maelstrom's Edge terrain sprue. For something a little larger and more impressive-looking, I have put together a new template for a bunker. This builds on the basic design of the minehead to keep some design consistency on the table.

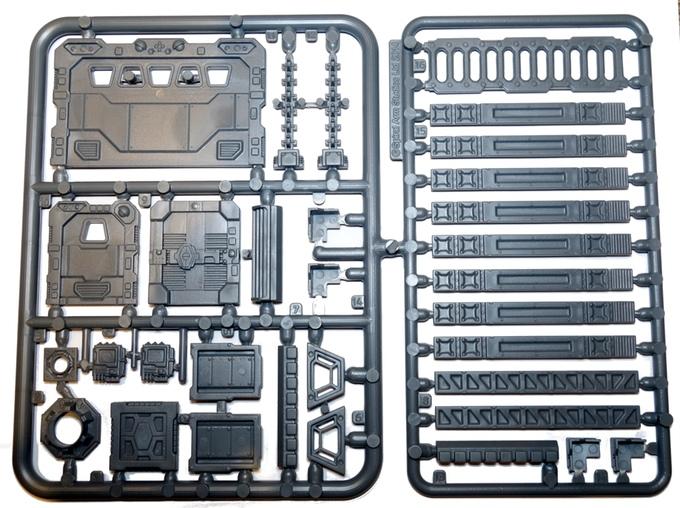
 You will need some 5mm or 6mm foamcore (either will work, although the roof piece will overhang the sides slightly with the thinner foamcore), some thin cardboard - around .5mm thick, PVA glue, and the Maelstrom's Edge terrain sprue. A sharp pencil, a steel ruler and a sharp craft knife will get you by for tools.
You will also need the building template, which can be downloaded from here: Bunker.pdf
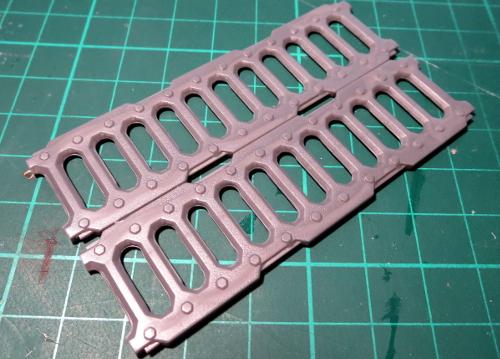
From the terrain sprue, the following components are used: one of the small doors (either will do), three shutter windows*, two corner braces, the square hatch, and six of the long support struts.
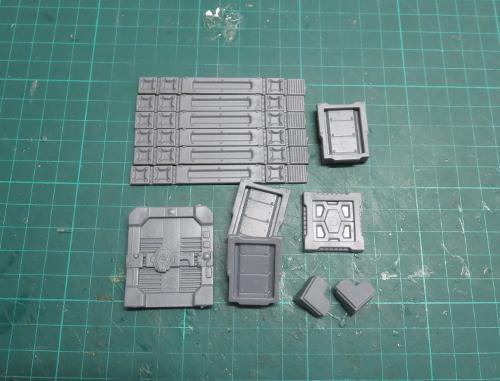
*There are only two shutter windows on a sprue, so you'll need to grab one of the windows from a second sprue. Alternatively, you can build the bunker without the rear window in order to stick to just a single sprue.
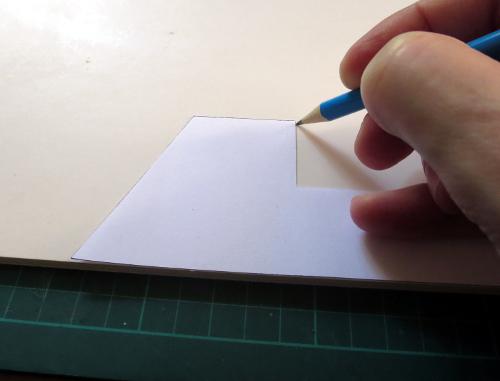
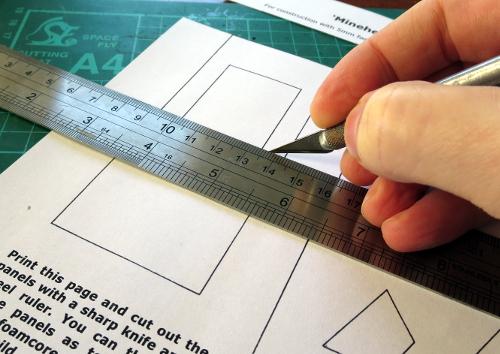
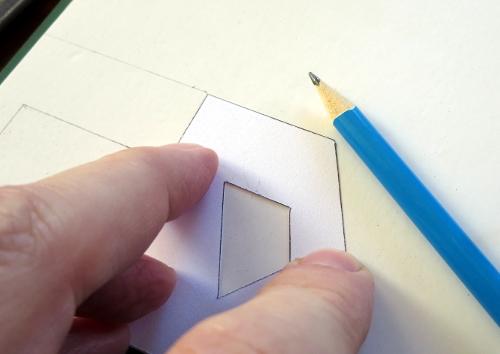
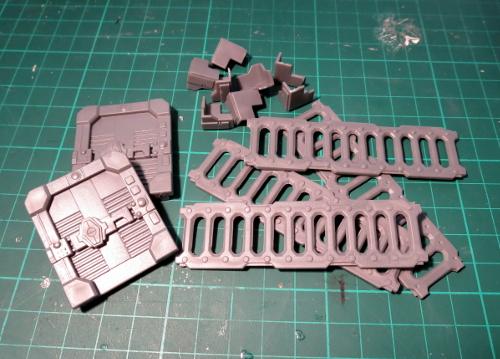
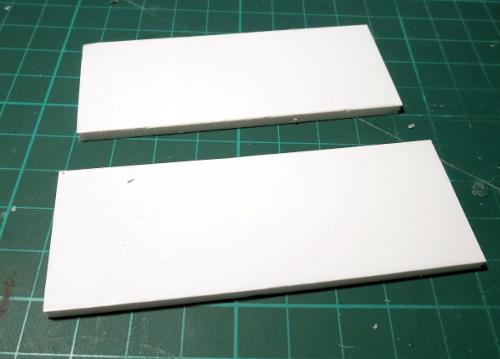
Print out the building template, and cut out the panels using steel ruler and knife.

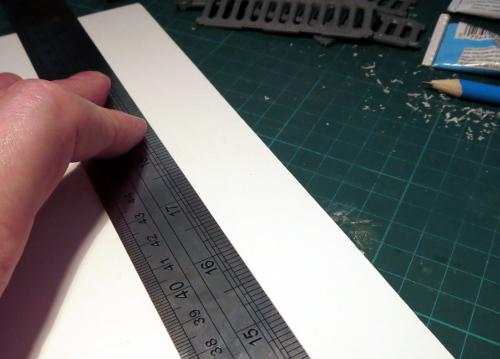
You can then lay the panels on top of the foamcore and card (the parts are labelled for which material they need) and draw around them with the pencil to transfer the outlines. The solid lines on the parts show where you need to cut.
You need multiples of some parts - the quantity required of each is listed on the part. Some parts also say '(flip)' after the quantity. For these, trace the panel once and then flip it over to trace the second. When cutting foamcore with a knife, the back of the piece can wind up a little rougher than the front, so flipping the template makes sure that you have two 'clean' surfaces for the outside of the building.
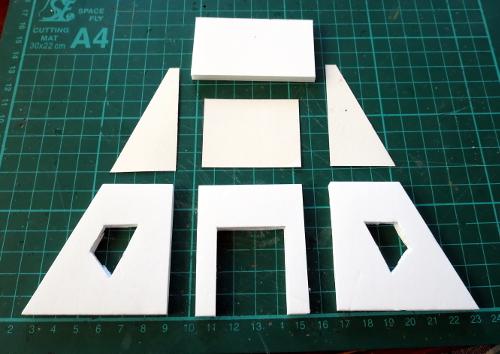
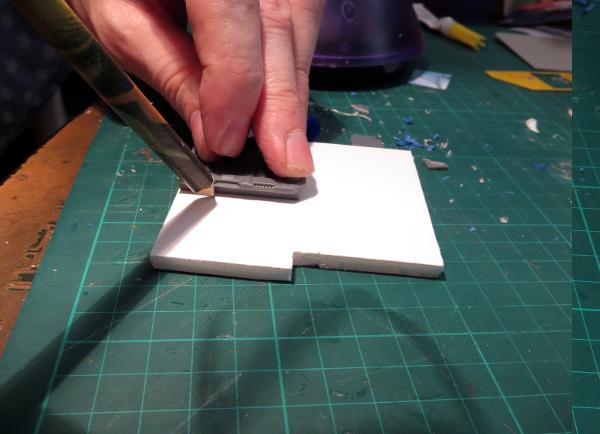
Once you have traced all of the parts onto the appropriate material, use the ruler and knife to cut them all out. If you have never cut foamcore before, don't try to cut through in one go. Lay the ruler along the line you want to cut, and then make several passes with the knife, working deeper as you go and being careful to keep the knife blade vertical so you don't wind up with a bevelled edge. If you're building the single-sprue version mentioned above, don't cut the rectangle out of the middle of one of the end wall pieces.
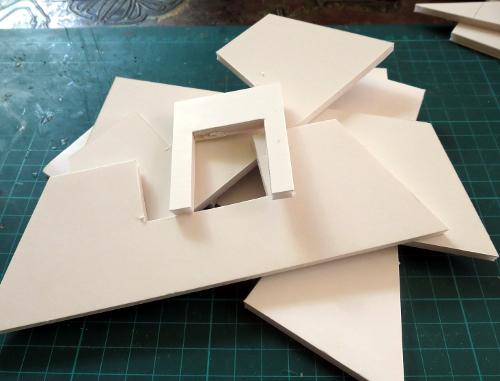
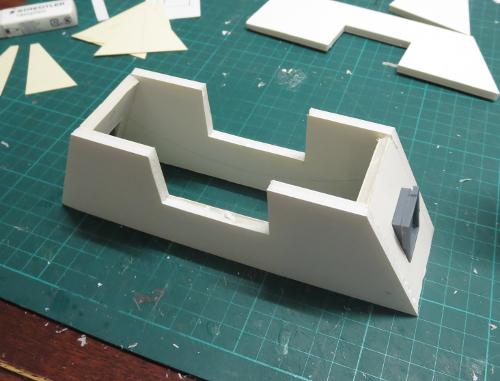
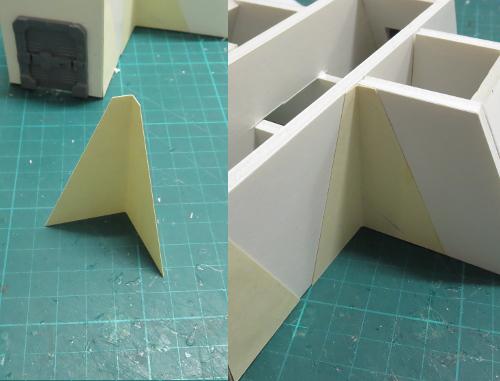
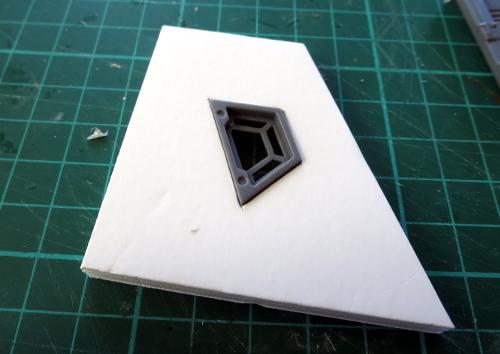
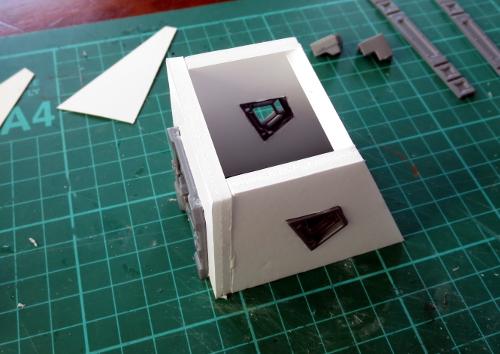
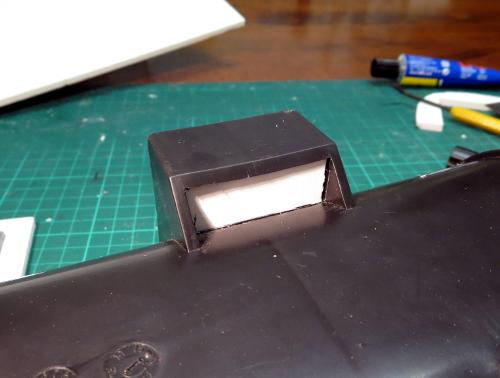
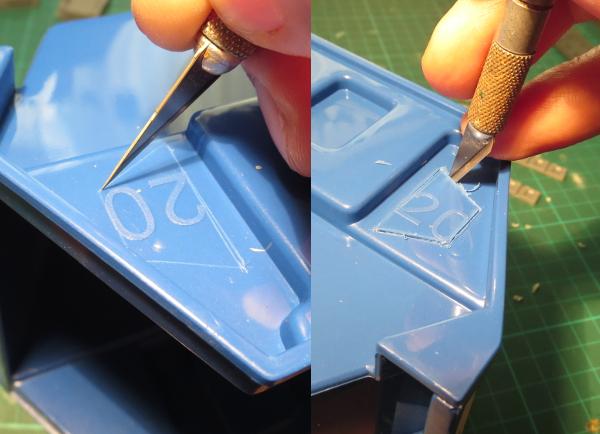
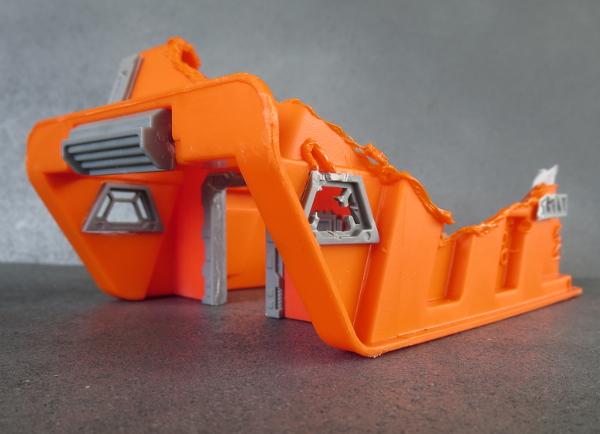
The end wall pieces lean inwards, so need to be bevelled at the bottom. Use a knife to cut an angled strip out of the back of the bottom of each of the wall parts.

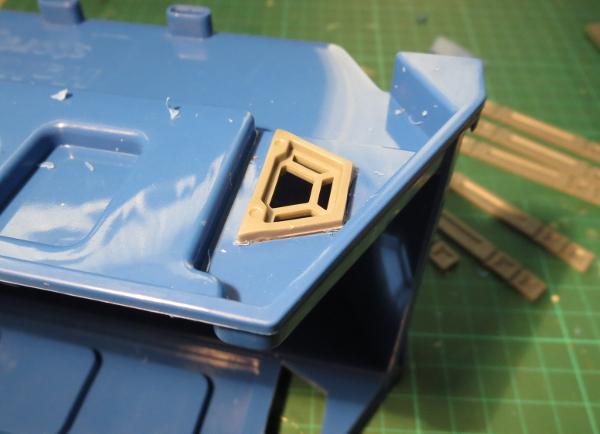
There is a protrusion on the bottom of the shutter window that needs to be removed. Trim off with a knife or file it down on each of the windows so that the bottoms of the windows are flat. You can then glue the windows into the end walls. They sit angled out at the top, as below. The outer edge of the window frame sits flush with the wall at the bottom, while the back edge of the window should sit against the outside edge of the hole at the top.

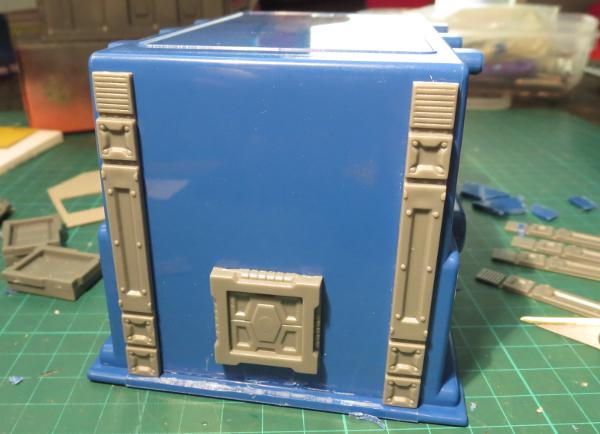
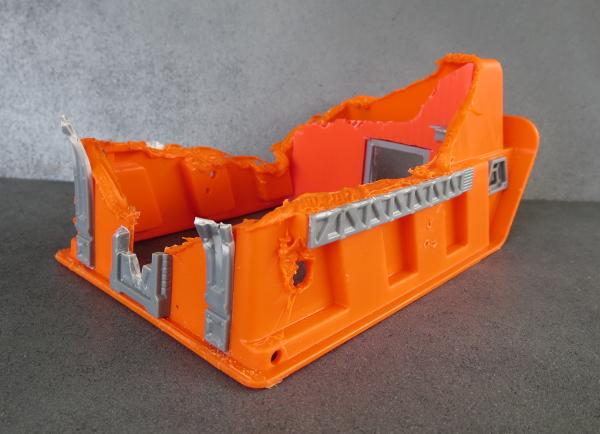
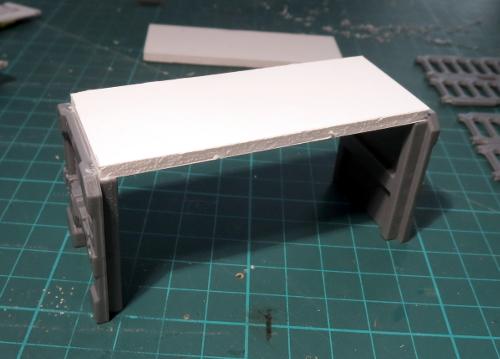
Take the two side wall pieces and two of the end walls and glue then together. The end walls sit inside the side walls, as shown below:
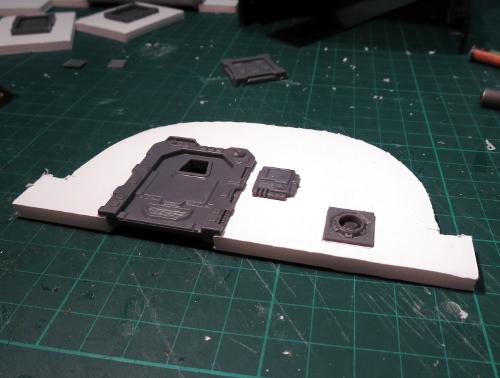
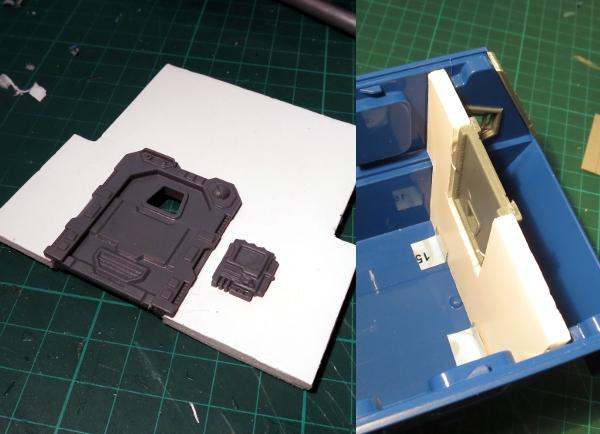
Glue the door into the door section.
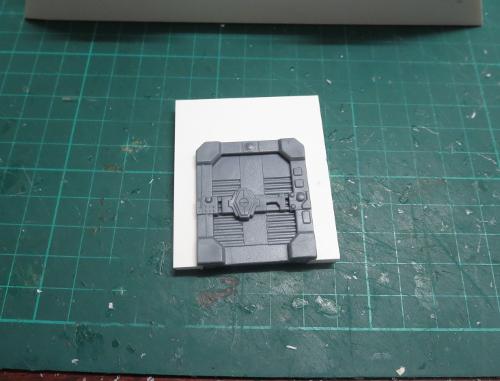
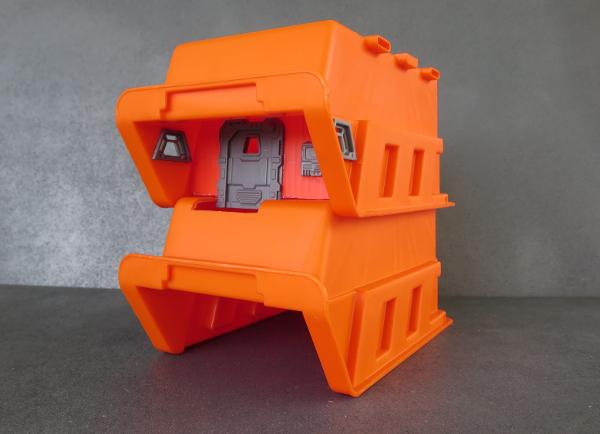
Then take the door section, the third end wall and the two main walls and glue them together. The end wall sits inside the main wall sections, while the door goes across the other end, outside the main wall as below:
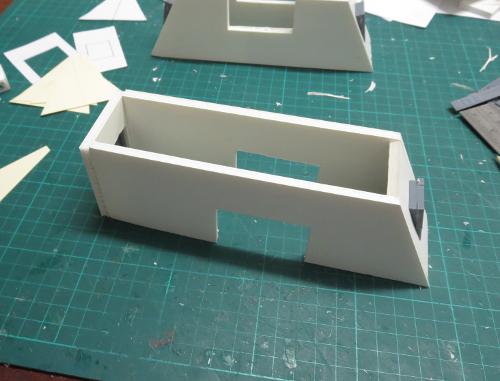
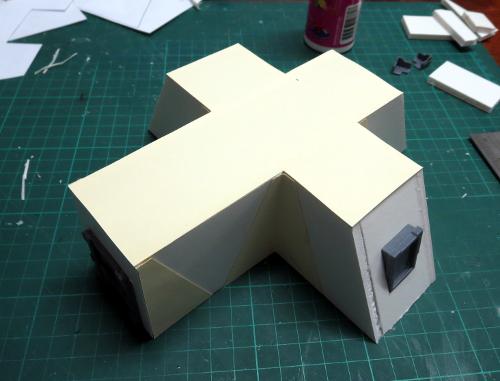
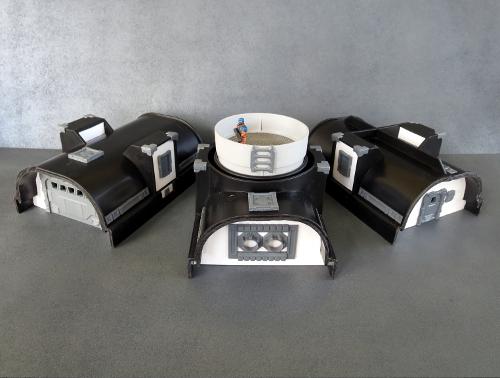
The two sections then slot together, and can be glued in place to form a t-shape.

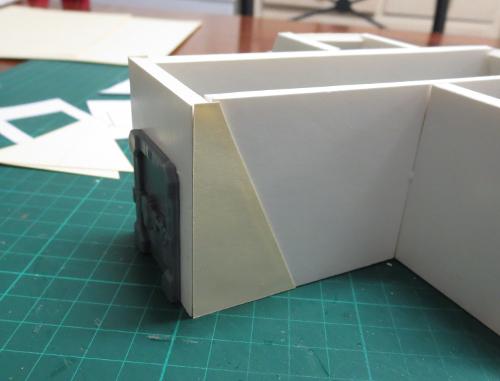
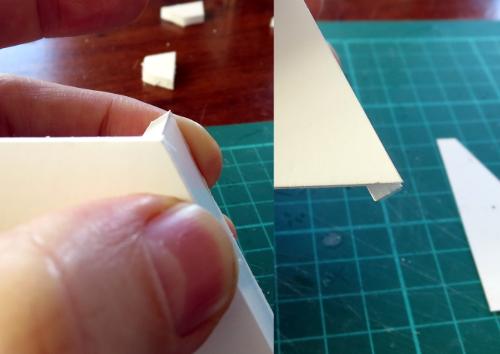
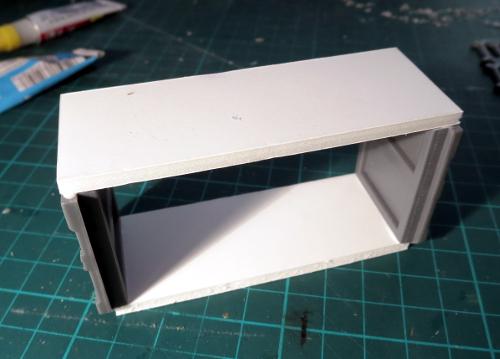
Glue on the side panels. These sit flush with the front of the door panel, to cover over the cut edge of the foamcore and to reinforce the joint.
Fold the corner panels along the middle fold line, so that they form a 90-degree angle. These can then be glued in place into each of the inner corners of the 't'. You can use superglue for this step to speed things up a little, as there is no exposed foam to worry about. This helps to give the structure some rigidity while the PVA glue sets, and also covers over any messiness or gaps where the walls join.
The roof can now be glued in place.
Glue the two corner braces in place on the roof corners above the door.

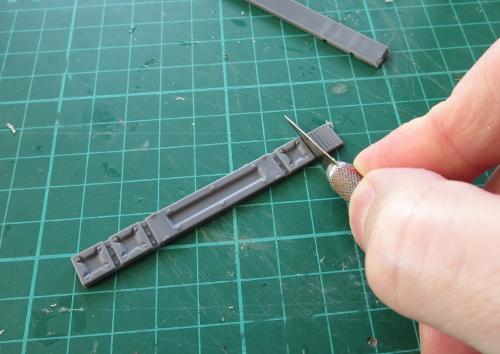
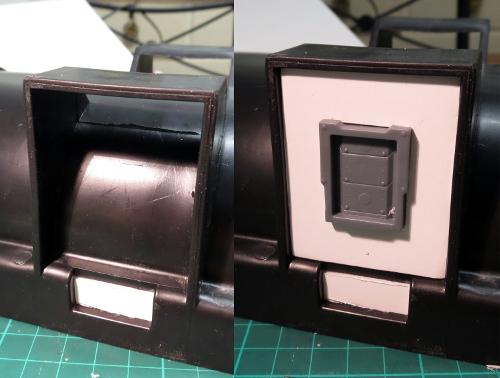
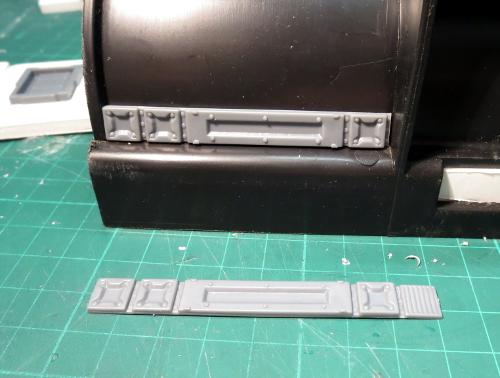
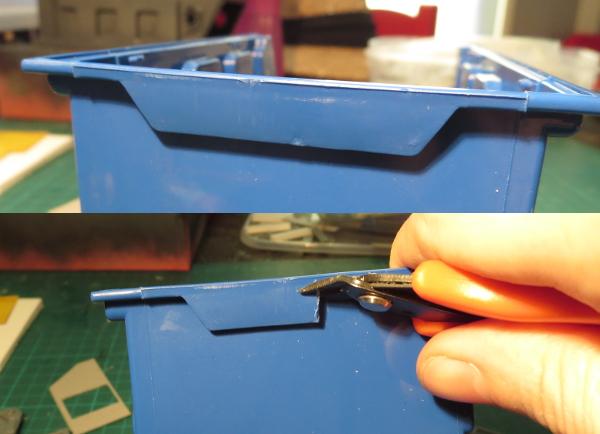
Take the support struts and cut off the vent and rivet strip from the end with a knife.
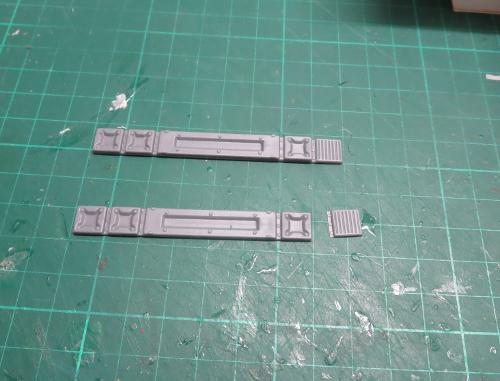
These are then glued onto the end walls, covering over the cut ends of the foamcore. The vent piece goes on the roof, with the rivet strip butting up against the top of the support strut.

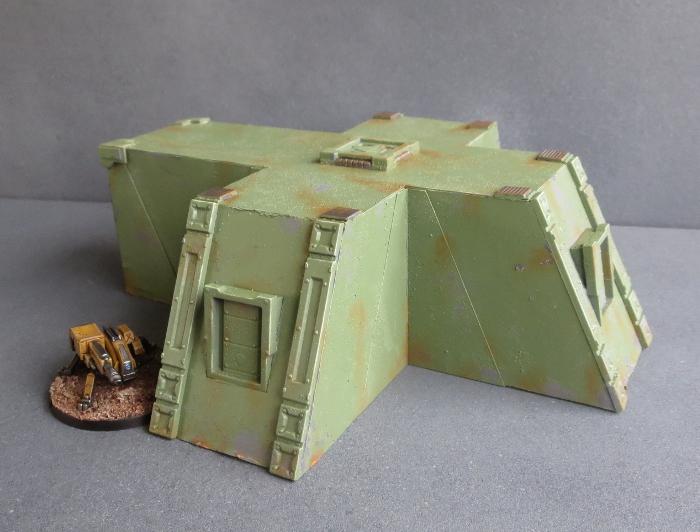
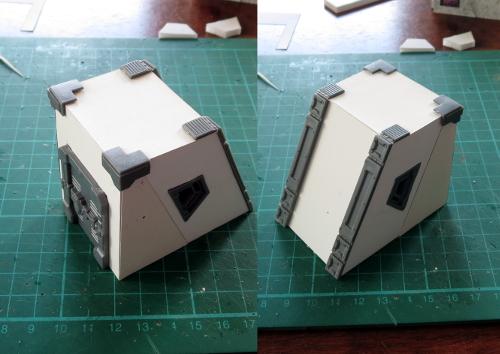
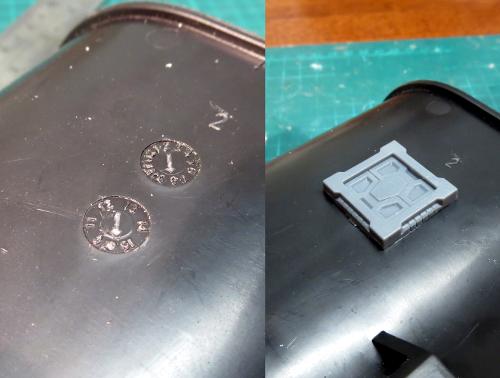
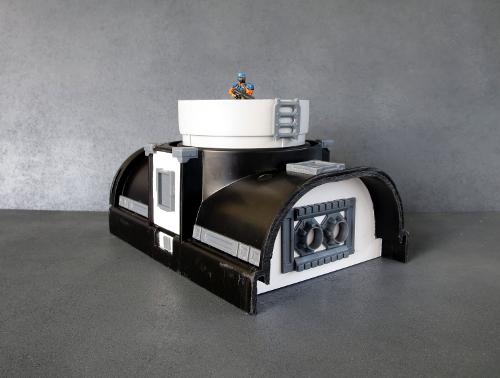
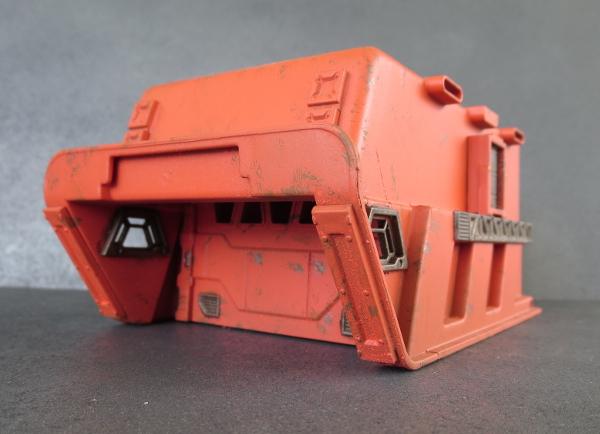
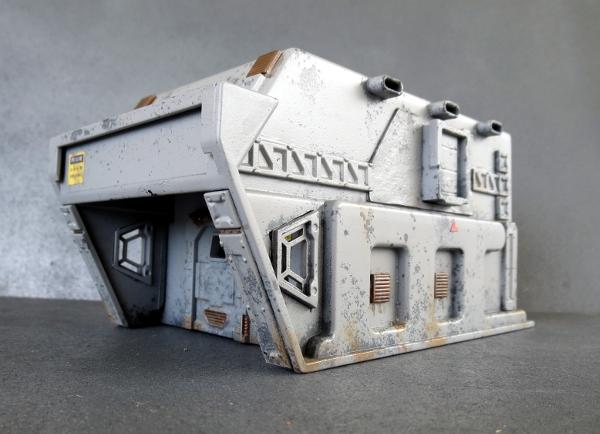
Finally, glue the square hatch onto the roof, in the middle of the 't', and your bunker is complete.

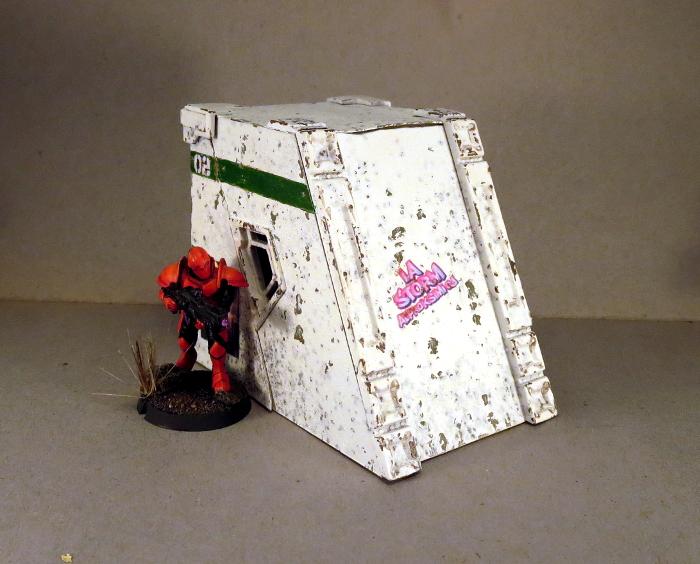
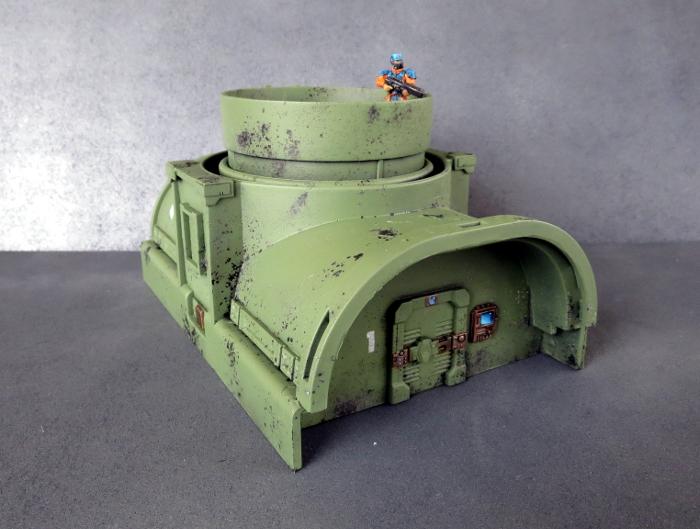
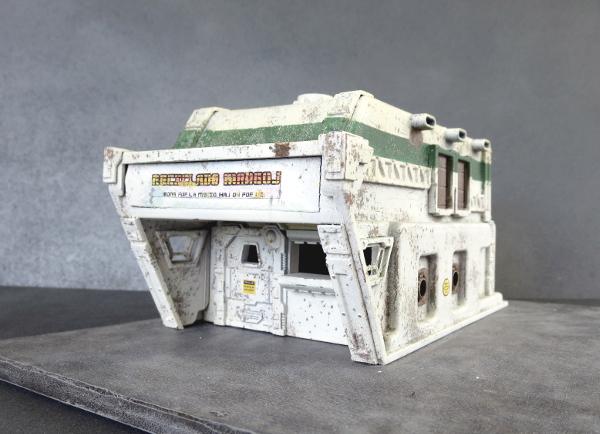
Let the glue set, and it's ready for painting.

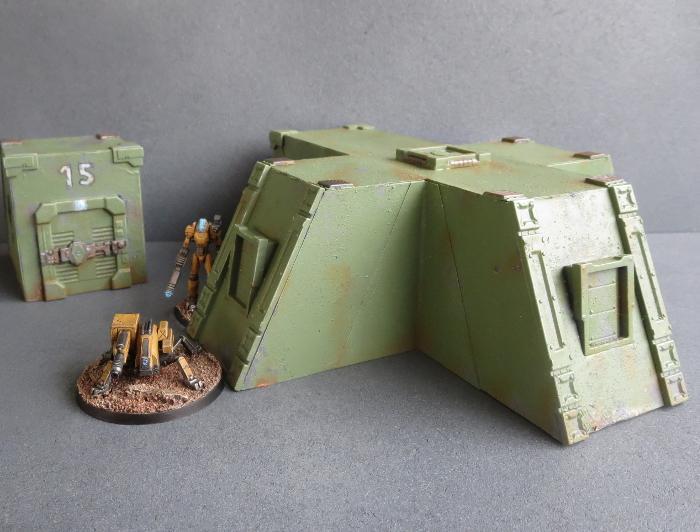
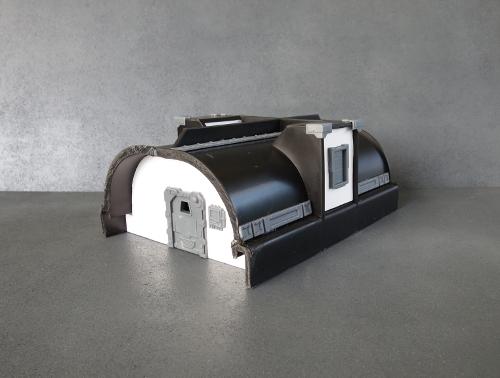
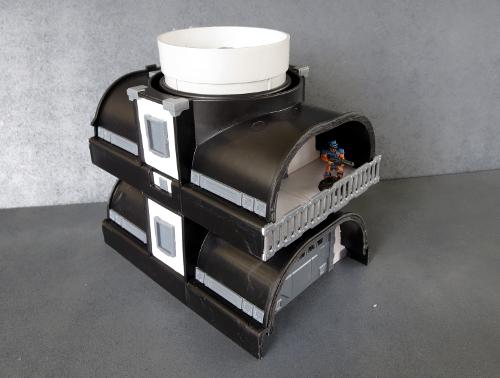
For variation, you could replace the door section with another angled end wall, leaving access through the roof or underground, for more of a fortified pillbox. Or you could stack the small minehead building on top, making a balcony above the door section for troops to stand on.
If you want to try it for yourself, you can grab the template from here and the Maelstrom's Edge terrain sprue from the webstore here. I'd love to see what others can come up with to do with the design, so as always please feel free to share your creations on the Comm Guild Facebook page!
For other Maelstrom's Edge modeling articles, including tutorials and walkthroughs of a wide range of different building and miniature projects, check out the article roundup here.
Epirian Scorpion Drone Conversion Tutorial and Unit Card
Posted on Monday May 01, 2017 at 05:00pm in Tutorials
- by Iain Wilson
The humble Epirian Drone is a robot of many guises. It was designed as a modular core unit that could have an array of different weapons or motive devices in order to create specialised roles as required. So far in the game we have two of these variants: the Spider and the Firefly. I've had a lot of fun, however, thinking about ways to modify the kit to create other variants, and of the potential things that bored or desperate engineers on frontier worlds might come up with to make their drones fit new roles.
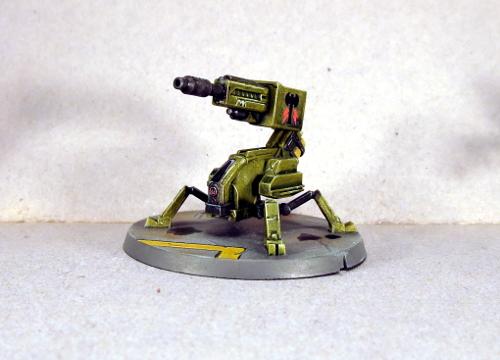
This week, I'm presenting one of the variants that I created: the Scorpion Drone.
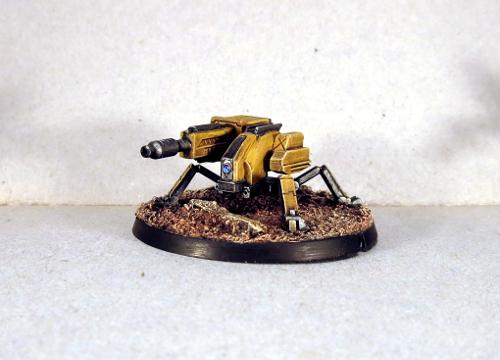
Armed with a hefty maglock chaingun, the Scorpion fills a heavy support role when there are no Hunters around to do the job.
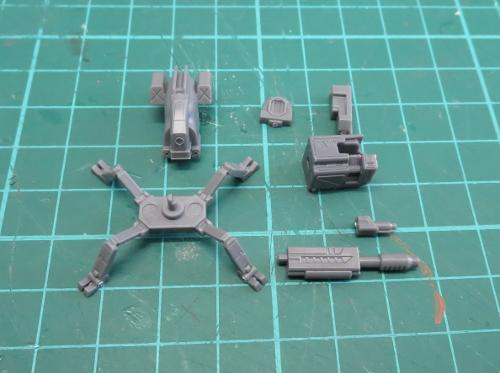
This is a fairly simple conversion, using most of a Drone (legs, chassis, left-side nacelle, rear plate, base) and a chaingun and left-side magazine unit from a Hunter - You could use the right side, but I've used the left as it is a leftover part if you build the Hunter with his hydraulic fist.
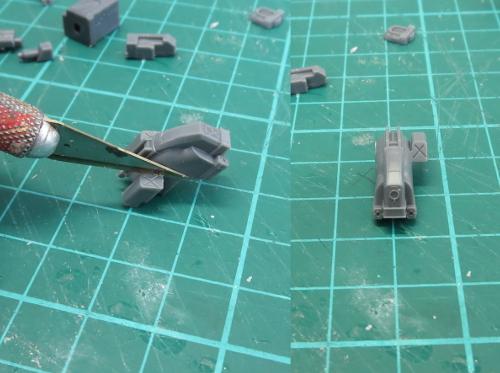
Using a sharp knife, cut the rectangular pod off the right side of the drone chassis.
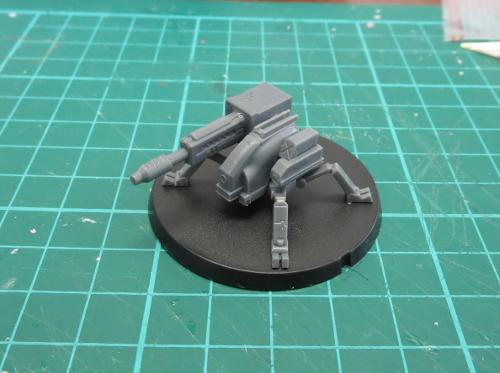
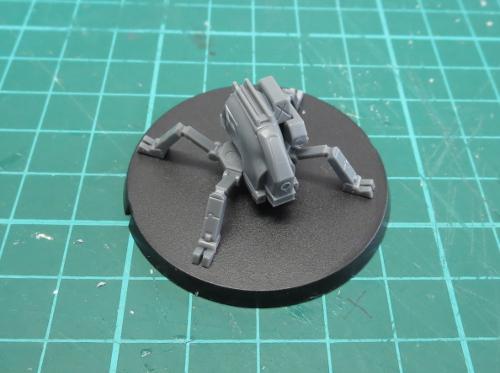
Assemble the drone parts as normal.
Assemble the chaingun with the magazine unit upside-down. This helps to conceal the elbow joint cavity, and means that the side glued to the drone chassis is the side with no detail on it.
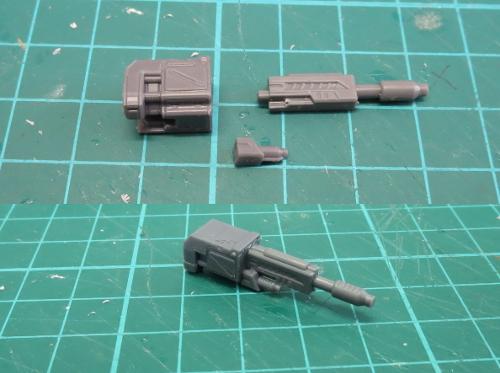
Glue the chaingun onto the chassis. It should sit with the rear of the magazine unit a couple of millimetres back from the rear of the drone, and the top of the magazine unit more-or-less level with the top of the rails on the chassis. The ejection port will line up with the rear left knee.
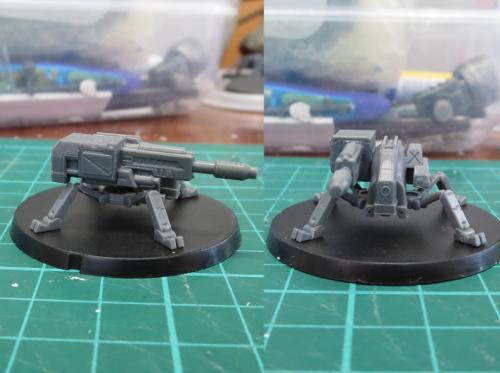
And that's it - job's done!
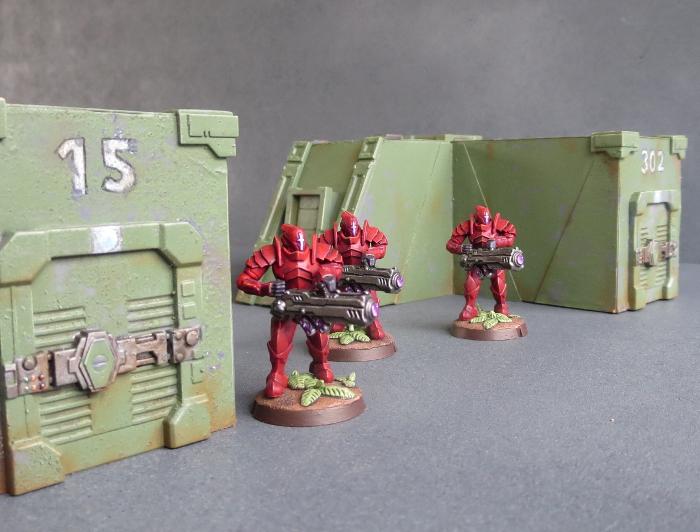
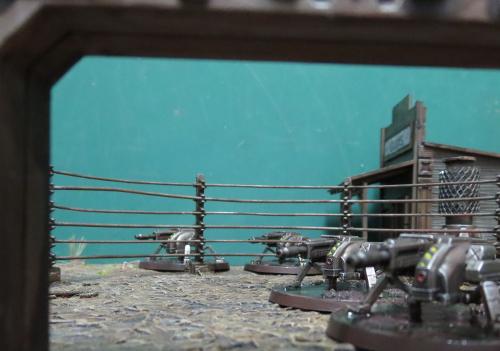
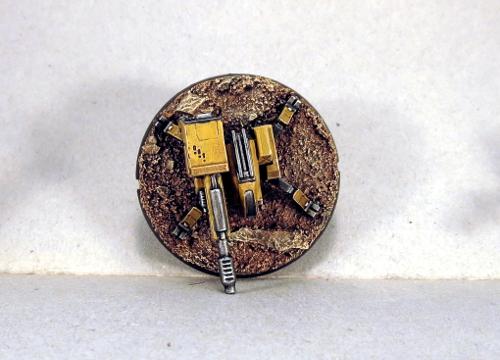
A couple of painted shots of the Scorpion in all its over-sized-weaponish glory:
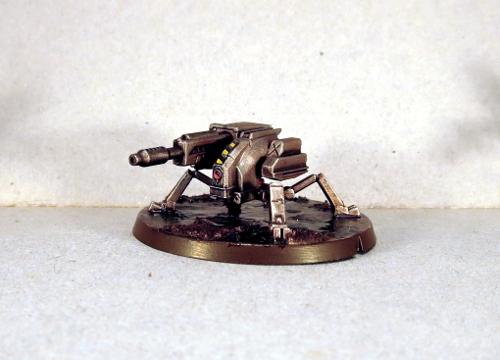
This was actually the second version of the Scorpion that I came up with. The first looked like this:
This version uses the chemtek sprayer from the Scarecrow kit to create more of a scorpion's tail for the weapon.
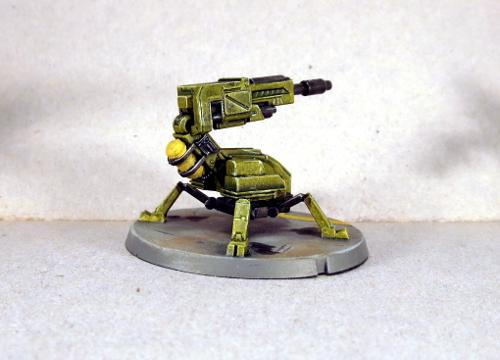
I decided to go with the second variant partly to make it an easier conversion, and partly because I thought the weapon mounted on the side looked a little more in keeping with the Maelstrom's Edge aesthetic. The tail is fun, but a little impractical.
If you would like to use the Scorpion in your own games, you can download an unofficial rules card here, and you can pick up the Drone and Hunter kits needed to build it from the Maelstrom's Edge webstore here

As always, feel free to share your creations on the Comm Guild Facebook page!
For other Maelstrom's Edge modeling articles, including tutorials and walkthroughs of a wide range of different building and miniature projects, check out the article roundup here.
Tags: conversion drone epirian rules tutorial
Terrain Template & Tutorial - Minehead
Posted on Monday Apr 24, 2017 at 05:00pm in Tutorials
- by Iain Wilson
This week, we're sharing an easy building tutorial that would be perfect for those looking to dip a toe into the terrain scratch-building pool for the first time. The project is a small outbuilding, which I think of as an access to some sort of underground facility, although it could also double as a small utility or detention building.
You will need some 5mm or 6mm foamcore (either will work, although the roof piece will overhang the sides slightly with the thinner foamcore), some thin cardboard - around .5mm thick, PVA glue, and the Maelstrom's Edge terrain sprue. A sharp pencil, a steel ruler and a sharp craft knife will get you by for tools.
You will also need the building template, which can be downloaded from here: Minehead.pdf
From the terrain sprue, the following components are used: one of the small doors (either will do), two trapezoid windows, two corner braces and two of the long support struts.

Print out the building template, and cut out the panels using steel ruler and knife.
You can then lay the panels on top of the foamcore and card (the parts are labelled for which material they need) and draw around them with the pencil to transfer the outlines.
Once you have traced all of the parts onto the appropriate material, use the ruler and knife to cut them all out. If you have never cut foamcore before, don't try to cut through in one go. Lay the ruler along the line you want to cut, and then make several passes with the knife, working deeper as you go and being careful to keep the knife blade vertical so you don't wind up with a bevelled edge.
Check the fit on the holes for the trapezoid windows by pushing the windows into place. You can trim around the edges where necessary to make them fit nice and snug. If you have cut the window holes too large, you can pad them back out by gluing a strip of cardboard onto whichever cut edge has a gap. Once you're happy with the fit, run some glue around the edge of the window hole and then push the window into place.
Next up we need to glue the walls together. Because of the angle on the back wall, the bottom of the wall will protrude past the bottom of the building, so will need a little trimming. If you hold the back wall against the side as below, so that the top edge of the back wall sits level with the top of the side wall (left-hand image) you can see the triangular part that needs trimming off (right-hand image) - trim this off with the knife, or sand it down, so that the bottom of the back wall sits flat on the table.
From there, glue the side walls to the rear side of the front wall. The run a little glue down either side of the back wall section. Spread the side walls out slightly, hold the back wall in place, and squeeze the side walls back in against it. Give the glue 30 seconds or so to start to grab, and then sit the building down on the table. You can look down from above here and nudge the walls around as necessary to square everything up. A cutting mat with a printed grid is a big help for this step, as you can line the walls up with the grid.
The cardboard side panels can then be glued one onto the front of each of the side walls, so that they cover over the exposed polystyrene edges of the front wall. The roof panel goes (surprisingly...) on top - run a little glue around the top edges of each wall, and sit the roof on top.

Take the two support struts and slice off the grill piece as below, leaving the recessed rivet strip attached to the grill.
The grills are glued onto the back edge of the roof, one at each corner with the rivet strip to the edge. The remaining sections of the support struts are then glued running up the sides of the back wall, covering over the exposed polystyrene edges of the side walls. Check for fit first - if they protrude past the bottom of the building when lined up with the roof at the top, bevel off the bottom of the strut with your knife before gluing in place.

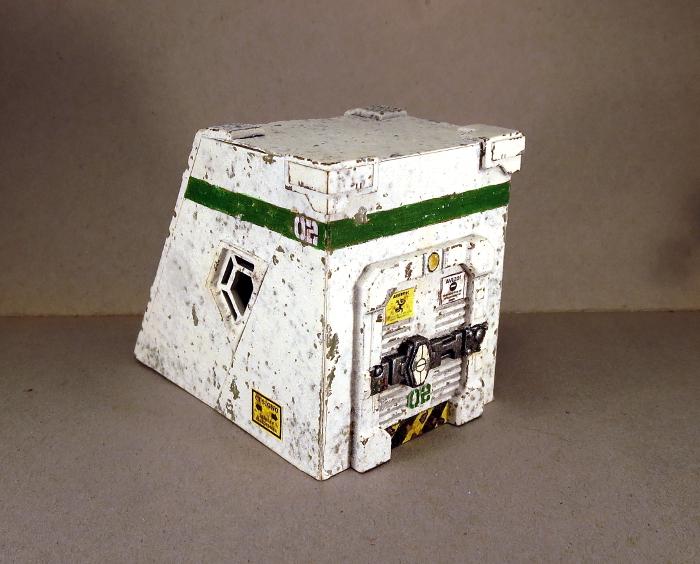
Finally, take the two corner pieces and glue them to the front corners of the roof. What you wind up with should look something like this:
All that remains is painting, once the glue has set. Paint the building up in whatever colours suit your table or preferences. I like to weather my buildings, but it's not necessary - a simple spray with grey, white or a muted (not pastel, but not too bright) primary colour with the details picked out where appropriate works quite well with these as well.
Here's my prototype version painted up, with some added salt weathering and some paper signs created in Gimp and printed out on paper for gluing on wherever they seem appropriate.
The graffiti on the back wall was made in an online graffiti creator (google it, you'll turn up a few different ones with different functions and fonts), printed and glued in place. You can see the edges of the paper if you look closely, but from game-playing distance it does the job. The numbers on the green strips and door were done the same way.
(Note that the windows in the painted example above are in a slightly different position to the template. This was a design change between the prototype and the template creation, as I think it looks better with the slight gap between the window and the raised side panel.)
And there you have it - one mine access/detention cell/utility closet/bike garage/whatever else you can think of to use it for.
If you want to try it for yourself, you can grab the template from here and the Maelstrom's Edge terrain sprue from the webstore here. I'd love to see what others can come up with to do with the design, so as always please feel free to share your creations on the Comm Guild Facebook page!
For other Maelstrom's Edge modeling articles, including tutorials and walkthroughs of a wide range of different building and miniature projects, check out the article roundup here.
Tutorial and Spotlight Article Roundup
Posted on Monday Apr 17, 2017 at 05:00pm in Tutorials

The full list of articles is getting a little unwieldy for a single page, so rather than keep updating an increasingly confusing list here, you can find the full collection of articles broken down by sections in the Hobby area of the Maelstrom's Edge website here!
If you've seen anything here that has lit that modeling flame, you can pick up the various plastic kits currently available in the Maelstrom's Edge range from the webstore here.
Maelstrom's Edge also has a Facebook group, known as 'the Comm Guild', where you can post any questions you have about the rules, the models, or upcoming releases, or share your modeling projects. The group can be found here. We love to see what people are working on, so whether you're a modeling veteran or a complete newcomer to the world of miniature wargaming, feel free to join in.
And in the meantime, stay tuned for the plethora of modeling content that we have still coming down the pipeline!
Tags: buildings conversion models painting terrainsprue tutorial
Terrain Tutorial: Blast Craters
Posted on Monday Apr 10, 2017 at 05:00pm in Tutorials
- by Iain Wilson
Last week, I went through some options for building a few different types of scatter terrain from components on the Maelstrom's Edge terrain sprue (if you missed it, you can find the article here). There is one other essential piece of scatter terrain that wasn't covered in that article, though: the humble blast crater.
Craters are a ubiquitous component of gaming tables from just about any genre (or at least any that deal with firearms of any kind) and along with those other staples of sci fi gaming - the soup-can storage tank and the spikey-polystyrene-ball cactus - you'll never be gifted the location of the secret lounge of the Terrain Builder's Guild if you don't have at least two or three in your terrain collection.
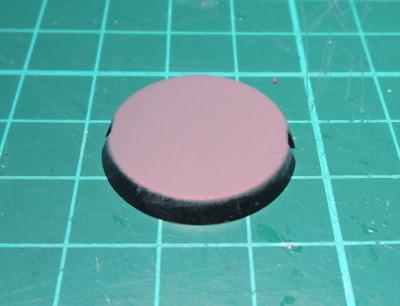
To get started, you'll want something round and flat to use as a base. Old CDs are perfect, as they're a good size without being too thick, and it saves them from going into landfill.

If you don't have any old CDs or DVDs kicking around, craftboard, cardboard or foamcore will also do the job, although cardboard or foamcore may bow slightly.
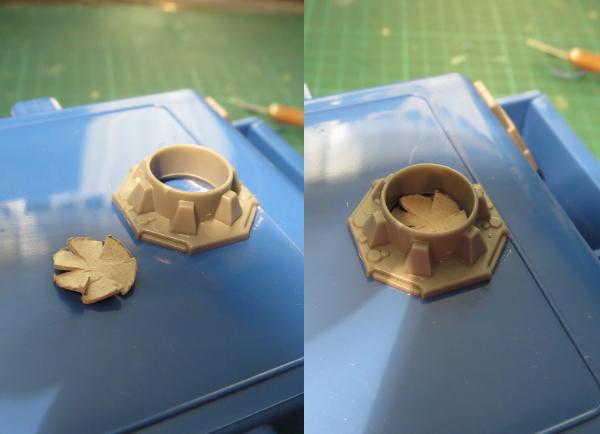
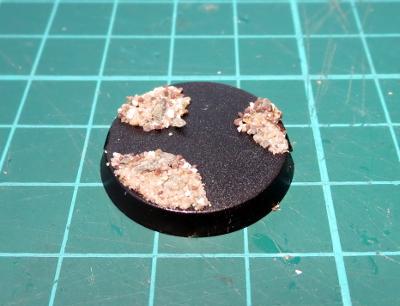
Take some air-drying clay (I'm using Jovi Air Dry Modeling Clay) and make a ring that's a little smaller in diameter than the base.
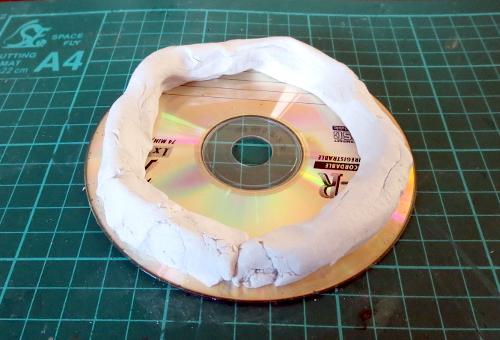
Smooth the clay down onto the base by pressing or rubbing it with your fingers, working around the ring on both the inside and outside and leaving a raised ridge. Don't make it too neat - you want a certain amount of irregularity to avoid the crater looking like a neatly-dug hole. There should be a steeper slope on the outside of the ridge than inside.
While the clay is still soft, add some chunky features. I'm using some leftover scraps from other terrain projects, from the Maelstrom's Edge terrain sprue. Just push them into the clay wherever seems appropriate. Longer pieces should be angled towards the outer edge, as if they've been pushed there by the explosion.
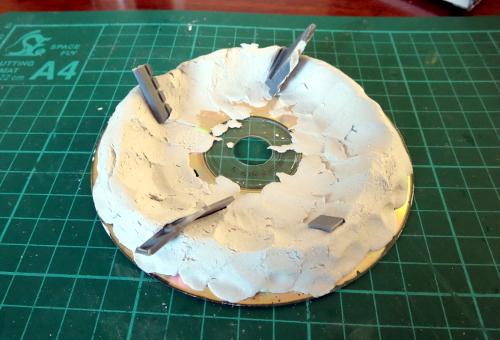
Air-drying clays aren't generally particularly adhesive, so the parts won't be held in there very firmly. The next step with stick them in place fairly comprehensively, but if you're concerned about them getting knocked around while you're working, you can add a little superglue on the part before pushing it into place.
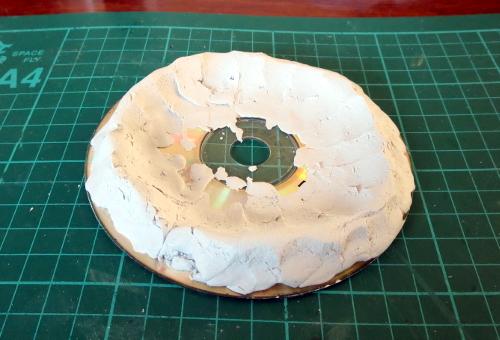
When the clay dries, it may contract a little and lift up around the edges. You can avoid that by pressing it back down periodically as it dries, but it's not really a big problem - Once the clay has set, you can just chip off any bits that are sticking up more than a couple of millimetres and ignore the rest. The edge will be obscured by the texturing that happens next.
Take some coarse sand/fine gravel mix. I have a pot that has a mix of silversand, sandpit sand, small chips of slate, fine gravel and a little model railway ballast for good measure. You want a bit if a mix of textures for best effect, but if you don't have access to all of that just some regular sand with a little railway ballast or fine gravel mixed in will do just fine.
Into this, mix a generous dollop of PVA glue (also known as Elmer's glue or wood glue) and a little water. You want the mix to be thoroughly wet through, but not runny.
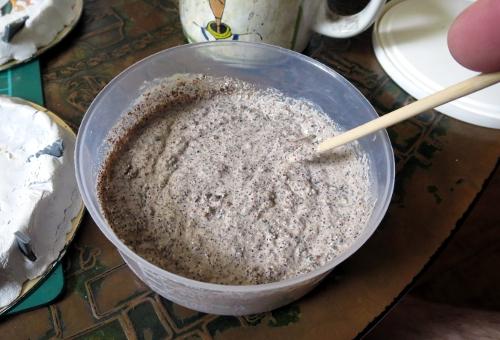
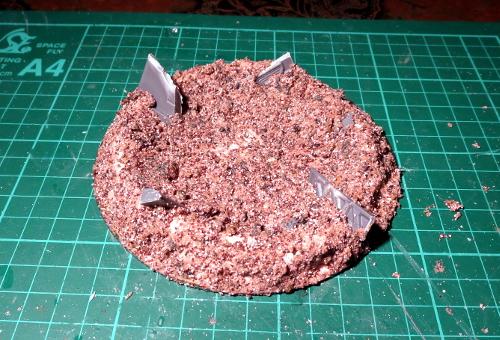
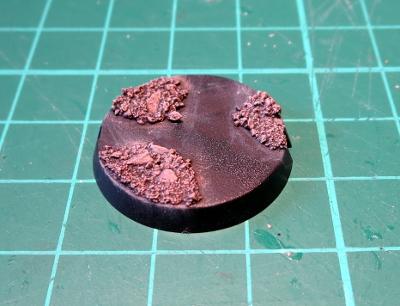
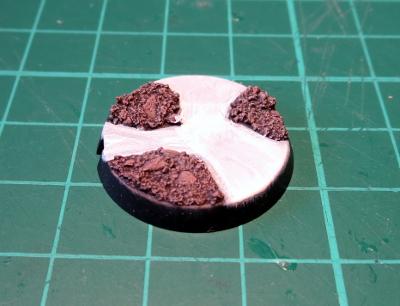
Using a large paintbrush that you're not emotionally attached to (because it's probably not coming back from this) spread a coat of the sand mix over the crater, starting from the middle and working up and over the ridge. That will naturally give you some radial detail running outwards from the blast area. You can accentuate that a little if you want by dragging a toothpick or wooden skewer gently outwards through the sand mix layer.
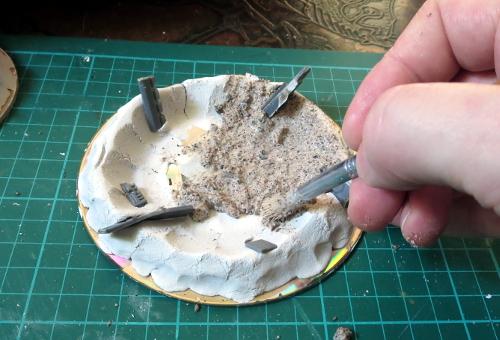
(If you haven't covered over the hole in the middle of the CD with clay, sticking on a small piece of masking tape before you apply the sand will take care of that.)
Don't worry if the detail looks a little soft at this point. As the glue dries, it will sink in and leave some nice, gritty texture.
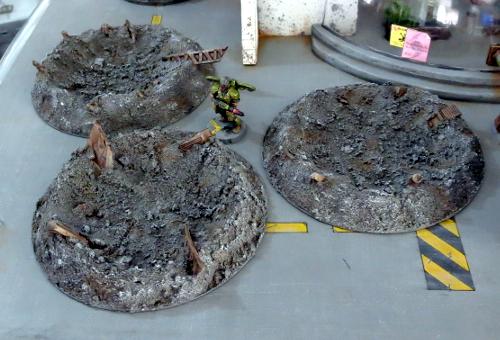
Once the sand layer has completely dried, paint up in some suitable colours to match your table. Here, I've used a grey spray undercoat, a coat of Army Painter Strong Tone, and then a drybrush of Vallejo Basalt Grey, Light Grey and white, to match my urban terrain. A little brown drybrushed around in patches helps dirty things up a little, and the terrain sprue parts are painted with Vallejo Beasty Brown, drybrushed with Citadel Boltgun and then washed with Army Painter Strong Tone.
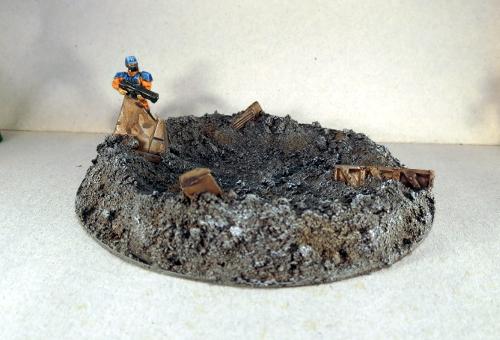
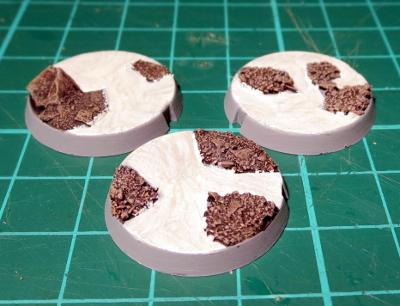
For some variety, use a mix of different base sizes to create different craters.
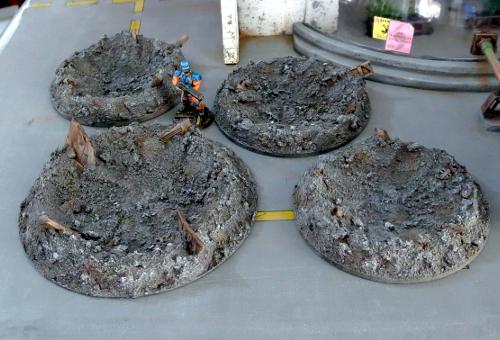
You can easily customise this basic design through using different sized bases, linking multiple craters together, or using larger or smaller rubble and terrain parts for detail.
And that's all there is to it! If you're feeling inspired, you can check out a bunch of other terrain-building articles by clicking here, or you can pick up the Maelstrom's Edge terrain sprue (in a handy 2-pack!) from the Maelstrom's Edge webstore here.
And as always, feel free to share your creations on the Comm Guild Facebook page!
Tags: terrain terrainsprue tutorial
Terrain Tutorial: Scatter Terrain
Posted on Monday Apr 03, 2017 at 05:00pm in Tutorials
- by Iain Wilson
The Maelstrom's Edge terrain sprue is a fantastic resource for detailing scifi buildings made from all sorts of things - You can find a bunch of different ideas and tutorials here. The terrain sprue components are also handy though for making smaller detail pieces to scatter around your gaming tables for a little extra cover. I have previously shared a tutorial for building small shipping containers from a couple of doors, some ladders and a little foamcore (you can find that tutorial here), and this week I thought I would run through a few more small scatter terrain ideas.
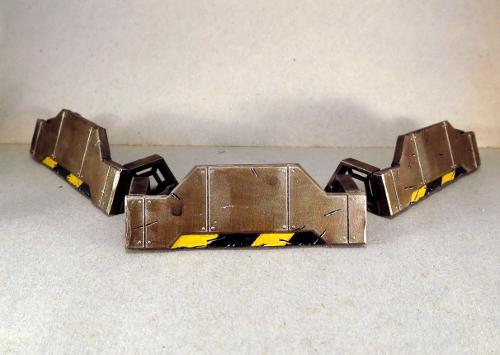
First up: Barricades
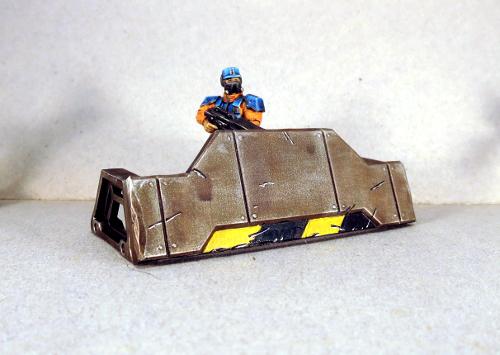
For this, you'll need one garage door, and two trapezoid windows.
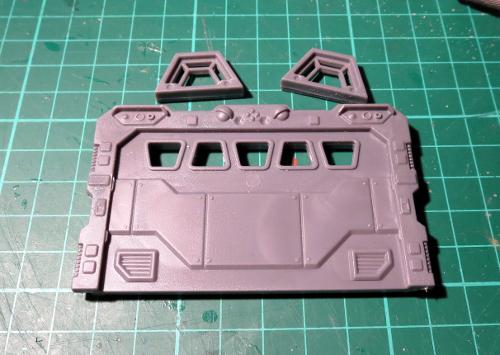
Start by removing the door from the door frame. You can do this with a jeweller's saw or razor saw, or by running around the inside of the frame with a sharp hobby knife from both sides until the door pops out.
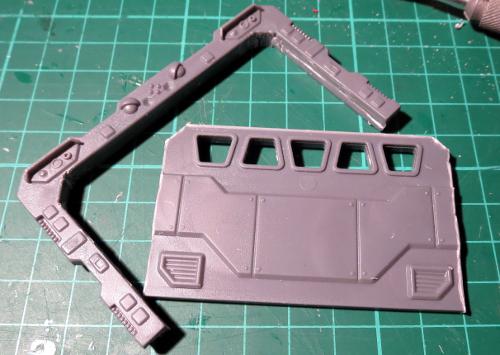
This gives you an open door frame that you can use on a building or ruin, and a handy detailed panel that can be cut up as below:
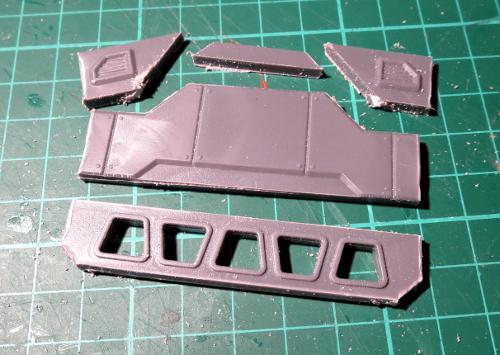
Throw the off-cuts into your bits box (they'll come in handy for a ruin or scrapheap down the track, and the strip of small windows is a nifty bit of detail for a building or other wall feature) and glue the trapezoid windows to the back of the lower section of the door.
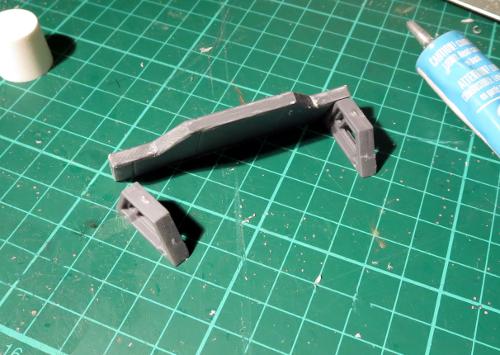
Once the glue has set, you have some barriers just perfect for huddling behind and feeling all suppressed.
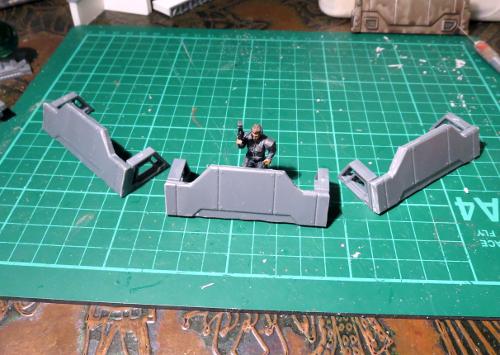
I've painted these up fairly plain, so that they will fit with whatever sort of table I throw them on. You can easily paint them to match your buildings, or paint on mis-matched panels for more of a ramshackle look.
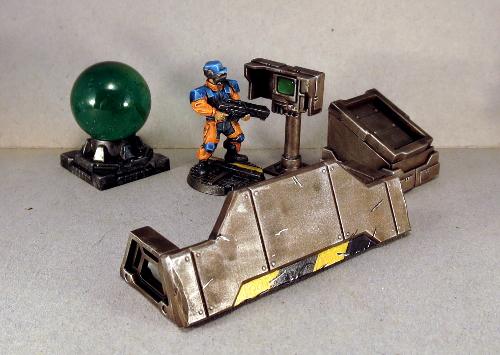
Next: The Orb!

I picture this device as a 3d map tank, so the ball on top would represent either a hologram or a glass ball with a projection inside.
You will need a square hatch, a large pipe fitting, and a suitable-size marble (the one I've used is around 25mm (1") diameter).
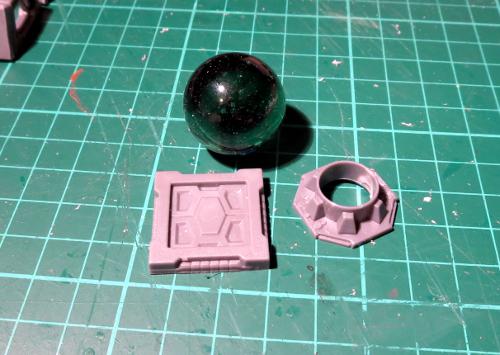
No cutting required on this one - Simply glue the pipe fitting to the top of the square hatch, and put the marble on top. If you hold off on gluing the marble in place until you have painted the base unit, you won't need to worry about cleaning stray paint splatters off the glass.
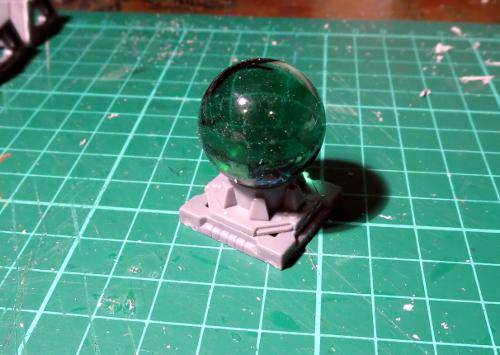
You could also paint the marble, or use a ball bearing or small plastic ball, to make it into a planetary globe sculpture or some other artistic installation.

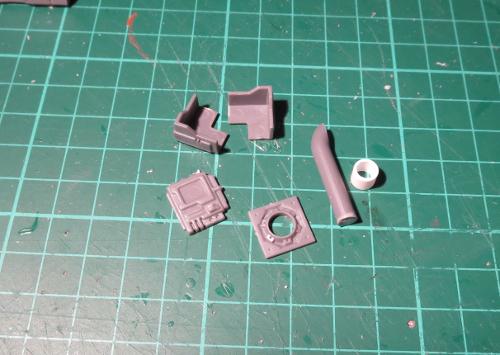
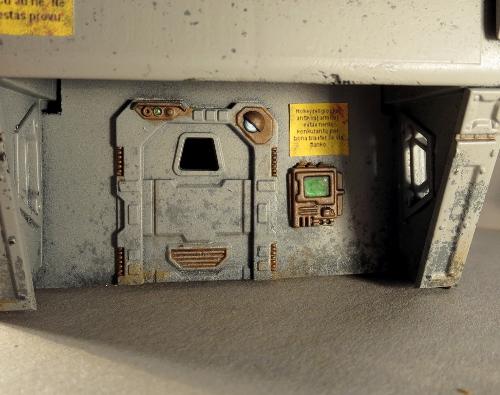
Next: Public Comm Unit
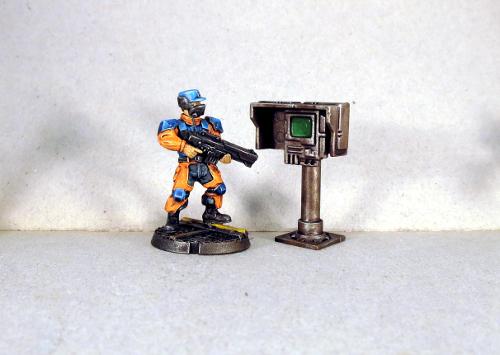
The little computer screen on the terrain sprue shows up all over the place on my terrain pieces. I picture it as a generic, multi-purpose unit that can be configured to display whatever information or controls are required for any given application. In this case, as a public access comm unit or data terminal.
To build this, you need the small pipe fitting, two corner braces, a computer screen, and a 5mm-long piece of 6mm (1/4") plastic tube. You also need a piece of sprue from the terrain sprue - The sprue has a thicker half and a thinner half. From the thinner sprue, cut a piece around 25mm (1") from a corner, with the corner cut off flush with the length of the sprue piece. The end result is a length of plastic rod with a rounded end that has one flat face, as pictured below.
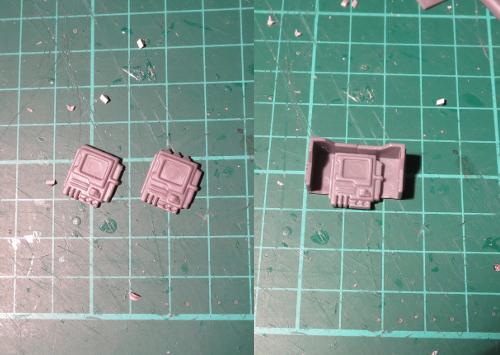
Take the screen and cut off the wedge-shaped protuberances running along the top. Then glue the corner braces together and the screen into the middle, inside the corners and butting up against the top, so that the corner braces form a shade around the screen.
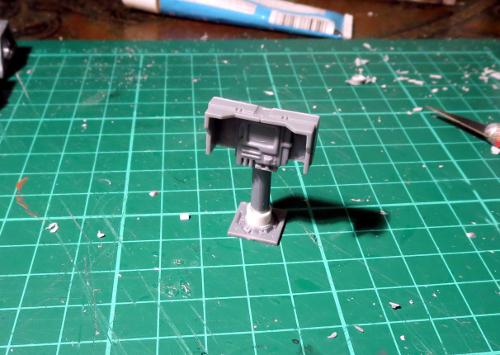
Then glue the plastic tube into the pipe fitting, and the sprue piece inside that, with the rounded end at the top. Make sure the flat face is parallel to one of the edge of the pipe fitting. Then glue the back of the screen to the flat face of the sprue piece.
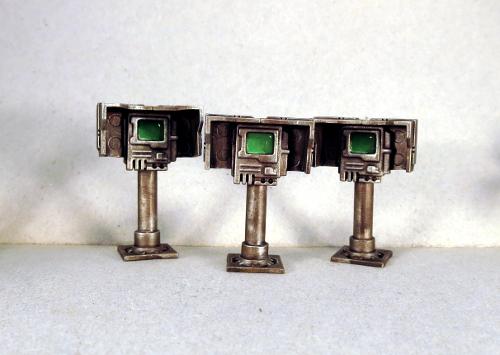
Once painted up, these can be glued onto your terrain pieces for a little extra detail. They also stand quite well on their own, or you could glue them to a base for a little extra stability, and then they can be scattered around as needed - they would make handy objective markers.
And finally: Thermal Vents
No self-respecting, quasi-military terraforming base is complete without some sort of underground installation. The problem with underground installations, though, is that they need some sort of ventilation shaft, otherwise nobody has any way to sneak in!
To build some suitable clandestine access, (or just some nice, blocky, solid cover for your solo models, depending on your point of view and the specific game objectives at hand) you will need a shutter window, four corner braces and some thin plasticard - I've used .5mm sheet here.
Take the shutter window and on the rear frame, cut or file down the top edge at around a 45-degree angle, as below, leaving the raised frame at the front intact.
Cut sections of plastcard to run around the window frame. The measurements I've used are below:
Rear section - 21mm wide x 20mm tall
Front section - 21mm wide x 9mm tall
Sides - 23mm wide x 20mm/9mm, to match the front and rear sections.
If you're using thicker or thinner plasticard, you will need to tweak the width of the front and rear sections by a matching amount. You can also change the angle of the window frame by making the side pieces longer or shorter.

Check your plasticard sections for fit, and then glue them in place around the window frame.

The corner braces are then glued around the base.

As with the barricades back at the start, you can paint these up to match whatever buildings you have, or put them in more generic colours to scatter around multiple tables.
That's the lot for this week - although it's just scratching the surface of what you can do with the terrain sprue components. If you like what you have seen here and want to try building some scatter pieces of your own, you can pick up the terrain sprue in a pack of two from the Maelstrom's Edge webstore here.
We love seeing what people create with the sprues, so as always, please feel free to share your work on the Comm Guild Facebook page!
Painting Tutorial: Weathered Metal
Posted on Monday Feb 27, 2017 at 05:00pm in Tutorials
- by Iain Wilson
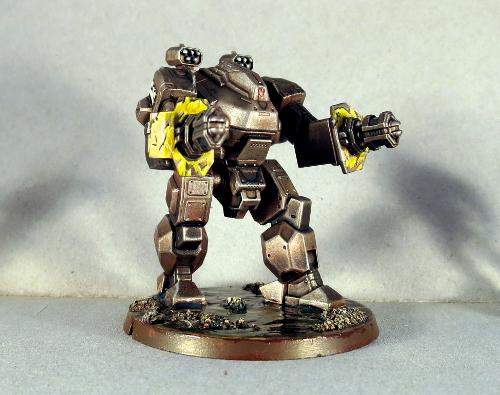
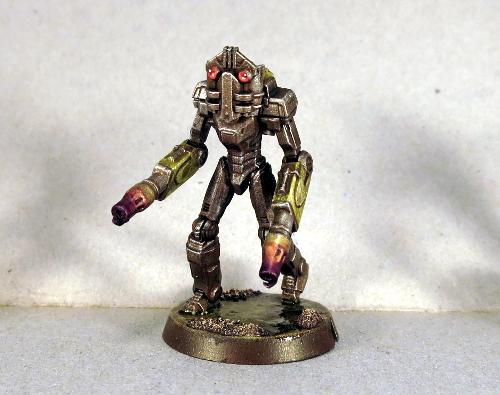
Terraforming planets is hard work, particularly on those worlds where conditions are less than favourable to begin with. Equipment has to contend with a huge range of different environments and, particularly once the Maelstrom come close, maintenance schedules can be somewhat less rigorously clung to than they might be on more 'civilised' worlds. This gives a bit of scope for painting terrain and models with a less polished finish, so this week, I thought I'd share an easy little method that I use to paint weathered metal. My guinea pig here is an Epirian Hunter Warmech.
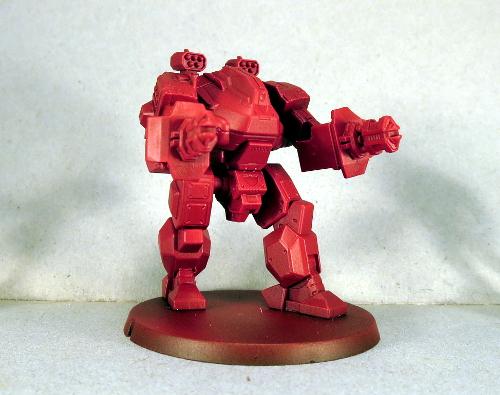
This all starts with a red undercoat - Here I've used Army Painter Pure Red. Just a light coat, as it doesn't have to be super-bright. Going straight over the grey plastic dulls the red down a little as well.
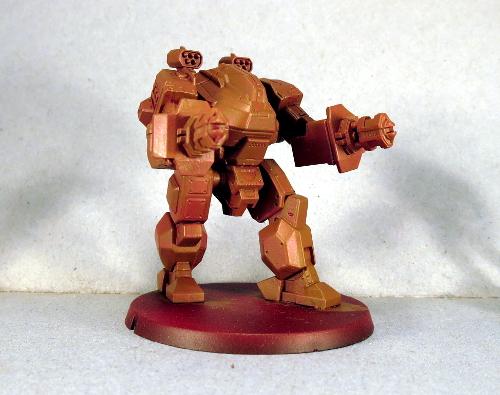
Over the red, paint a coat of a medium brown colour. I've used Vallejo Beasty Brown. This doesn't need to be perfectly even - If a bit of the red tint shows through, all the better. It will look a little odd to begin with, but it all pulls together at the end.
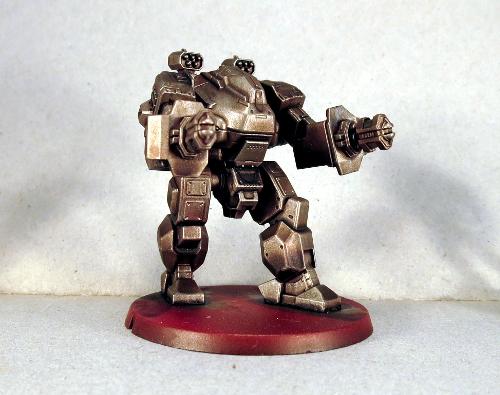
Next, paint a light coat of a medium metal tone. I've used P3 Pig Iron, which is roughly equivalent to the old Boltgun Metal/Leadbelcher. Again, you don't want to completely cover the brown. For a more rusted, dirty look, just lightly drybrush the metal on. For a more lightly weathered look, use a heavier coat of metal while leaving the brown in the creases. And as with the red, if a little brown tint shows through the coat of metal, that's excellent for our purposes here.

Now the magic step: Give the model a liberal coat of brown ink. The below is done with Army Painter Strong Tone, which is more or less identical to the old Citadel Devlan Mud. (Agrax Nightshade replaced this in the Citadel range. It's probably close enough for these purposes, but I haven't tried it.)
Once the ink is dry, it's time for final detailing. You can highlight with a little silver to pick out raised edges, just to brighten things up a little bit. I also like to go over weapons and working parts with a coat or two of black ink, to make them stand out a little more. You can also paint over the top with a patchy layer of colour to show worn paint with the metal showing through.
Here's the same technique on a different model, this time a slightly converted Epirian Scarecrow.
This is also a great way to pick out metal detail on buildings or ruins. Below is an example with a more dirty effect, achieved by just lightly drybrushing the metal over the brown before washing, as described above.
You can also add extra weathering by drybrushing brown or rusty red over the top, wherever looks like an appropriate place for rust or dirt to gather, or experiment with different coloured washes to create different metal effects.
You can pick up the models shown in this article from the Maelstrom's Edge webstore here. As always, we'd love to see what you're working on, so feel free to swing by the Comm Guild Facebook page!
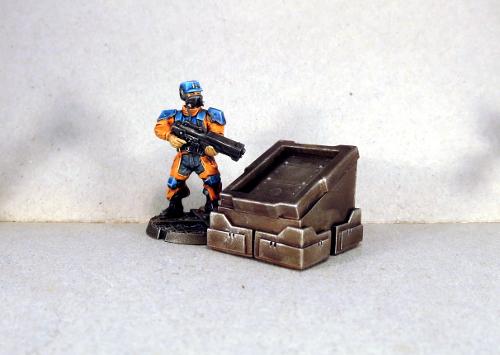
Terrain Tutorial: Drainage Channel Buildings
Posted on Monday Feb 20, 2017 at 05:00pm in Tutorials
- by Iain Wilson
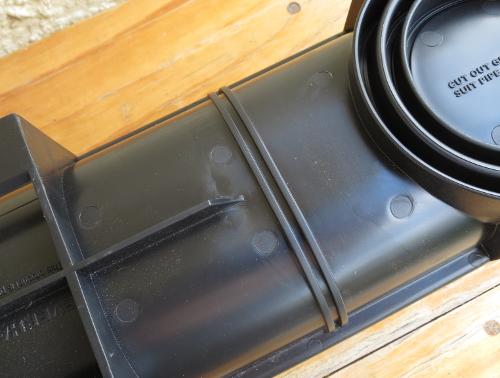
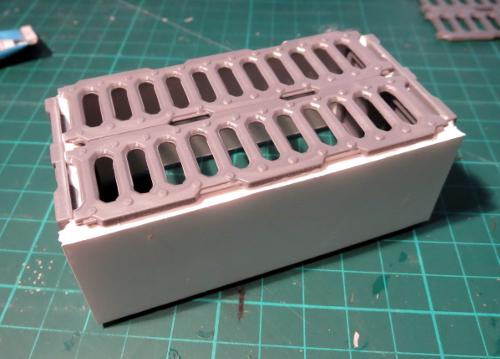
In my continuing quest to turn every interesting thing I encounter into wargaming terrain, I often find myself wandering up and down the plumbing aisle of the local hardware store. The result of the latest meanderings, once combined with some foamcore and an assortment of parts from the Maelstrom's Edge Terrain Sprue, looks like this:
This started out life as a section of plastic drainage channel, that looks like this:
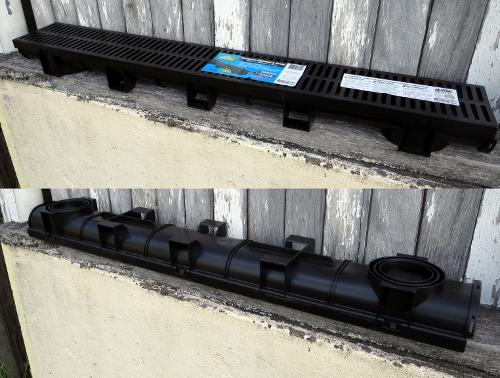
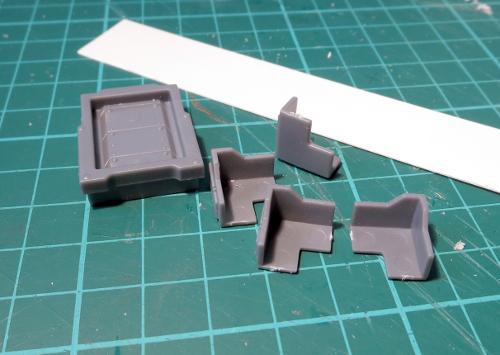
There are a whole bunch of variations on these, in different sizes and with different detailing on the undersides, which become the buildings' roofs. I chose this particular one through the arcane process of just buying the cheapest one (which was around AU$15).
Clearly having designed this product with wargamers in mind, the manufacturer has quite helpfully broken the length of channel into 5 sections.
Taking to those dividing lines with a hacksaw results in 5 equal lengths, just the perfect size for a building.

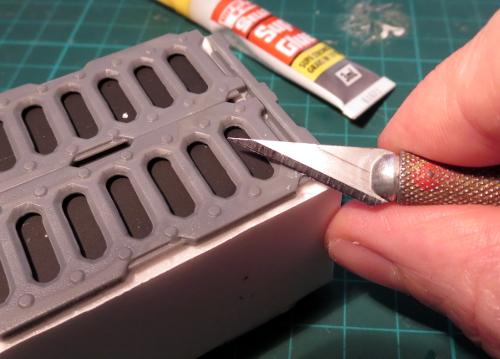
Rough edges on the cut ends can be sanded or trimmed with a sharp knife.
To fill in the ends, I used foamcore. You could also use plasticard, cardboard or corrugated plastic signboard, but I like foamcore for its ease of use.
To get the shape right, sit the building shell end-wise on the foamcore, and trace around the inside with a pencil.
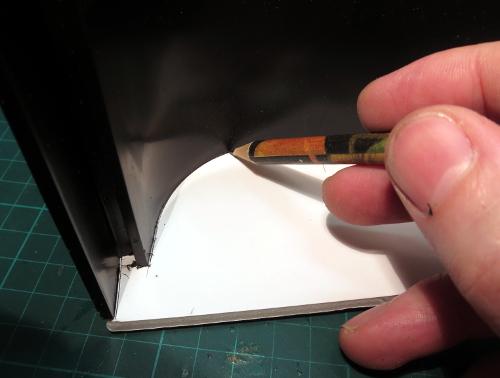
Cut out the resultant shape with a sharp knife.
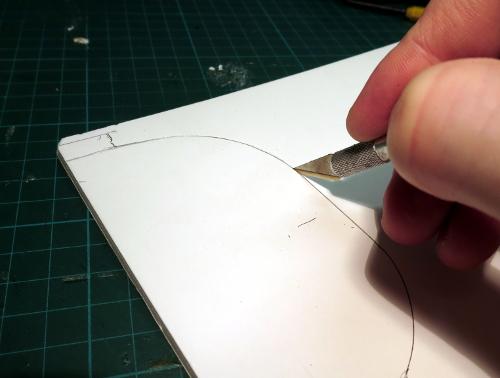
Once your end piece is cut out, check the fit against the shell, and trim wherever necessary to get a neat fit. Then add details from the terrain sprue components. I'm starting with a garage door - these are designed to be inset, so cut out a hole for it by tracing around the frame and then cutting out. Check for fit, and then glue the door in place.
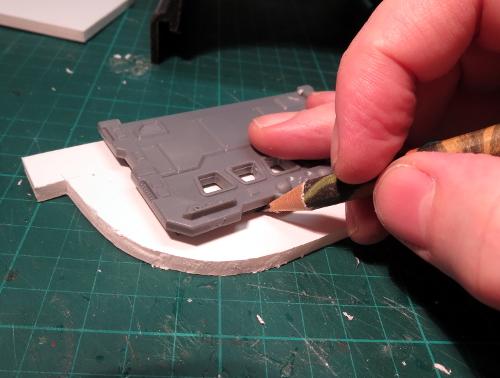
The end panel can then be glued in place in the end of the building shell. Recessing the wall a little, rather than having it flush with the end of the shell, will provide a nice little nook for models to take cover in.
A note on glue - Skip this part if you've read any of my previous articles on gluing things to random assorted plastic objects: Plastics used for plumbing fittings are not generally designed with gamers in mind, but you can usually get away with a good quality superglue. For gluing plastic to plastic, you can buy specialised 'all plastic' glues, some of which are a two-part system (a tube of superglue, and a 'primer' that helps the glue stick better) and some that are just really sticky glue. For foamcore, you can use superglue if you're just gluing onto the cardboard outer shell, but superglue will melt the interior foam, so for gluing to the edges of the foamcore you'll need a good PVA glue or a specialist Foam glue, which you should be able to get from any craft store.
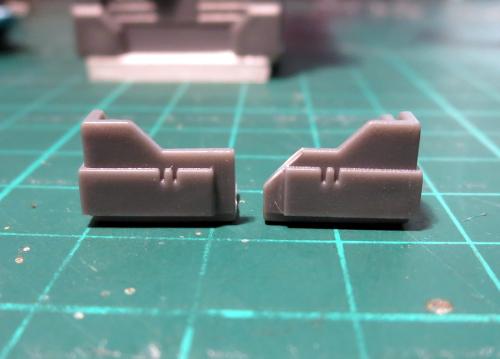
Repeat for the other end, using whatever detail components seem appropriate.
Each section of this channel has a raised, rectangular detail midway down each side, which I believe is to help keep it in place in the ground, for those rare situations where you might feel inclined to buy these for their actual, intended purpose. These are turned into windows by adding a panel of foamcore with a shutter window inset into the middle. On this section, there is also a small hole below the window where the grating clipped in. This is also covered over with a little foamcore.
The back on some of the sections also needs filling in with a little more foamcore.
A couple of reinforcing struts from the terrain sprue add a little extra detail down the sides of the building shell.
On the roof, errant text or (in this case) batch symbols can be covered over with hatches or extra reinforcing.
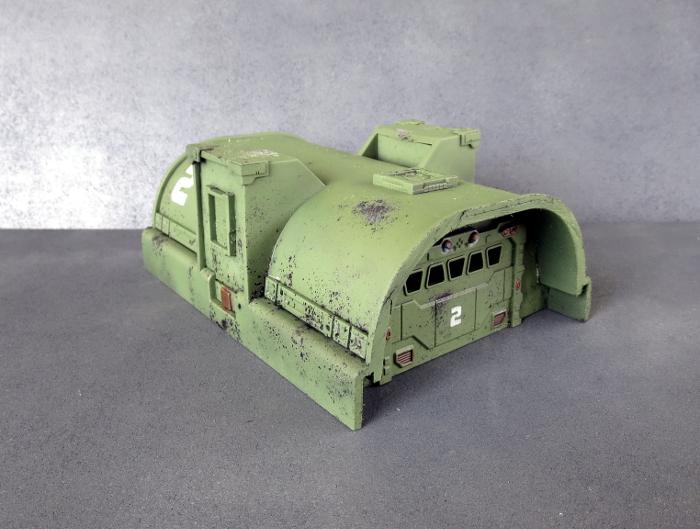
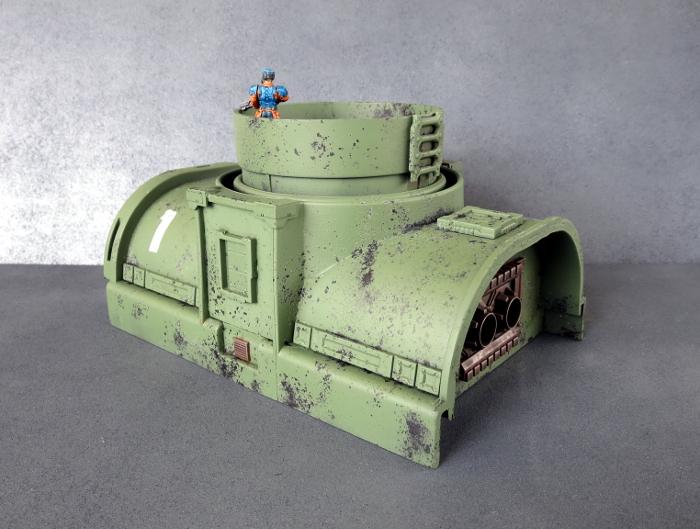
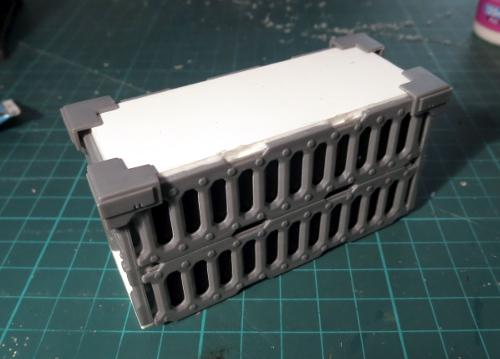
With detailing complete, the building winds up looking something like this:
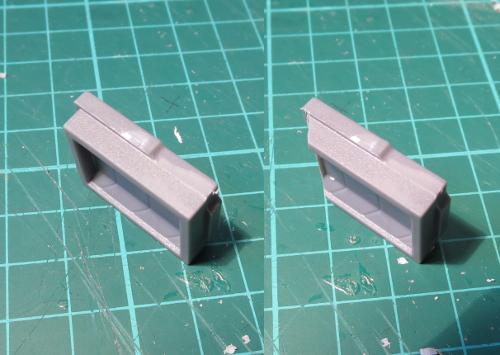
There are some differences between the separate sections of this channel. The above was from the middle section. The next section along is almost the same, but with a raised ridge down the middle.
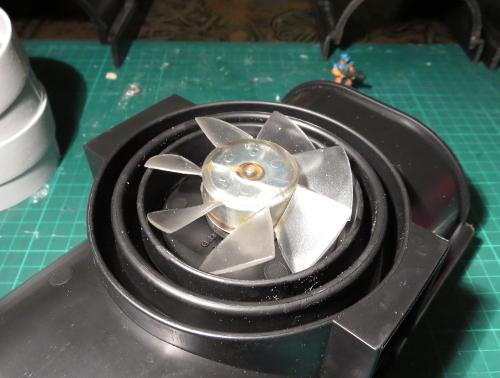
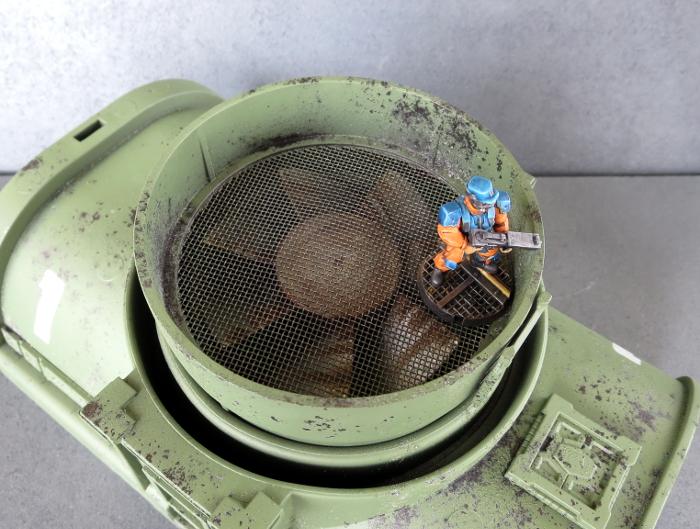
The sections on either end have a circular detail in the middle, for attaching downpipes.

This turned out to be a perfect spot to place an old PC fan.
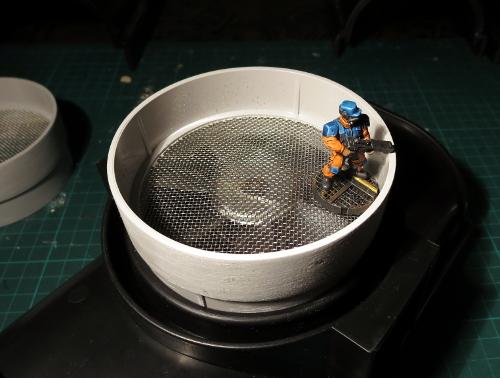
Over this, I added a section of mosquito barrier, intended for insertion into guttering downpipes. This had some text around the outside, which I removed with a bit of sanding.
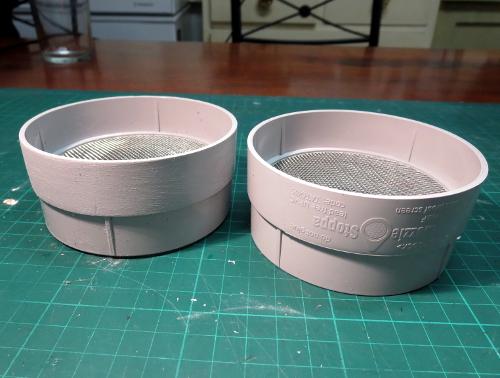
Once clipped in place over the fan and with a section of ladder glued onto the outside for access, this creates a nice visual detail, and a functional watch platform.
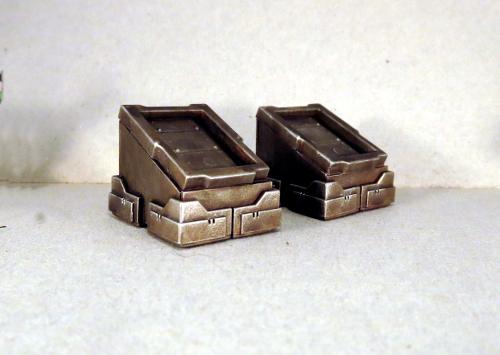
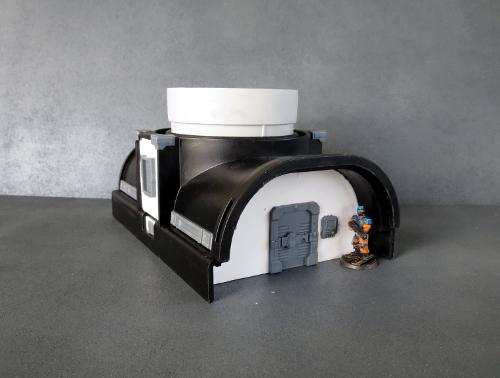
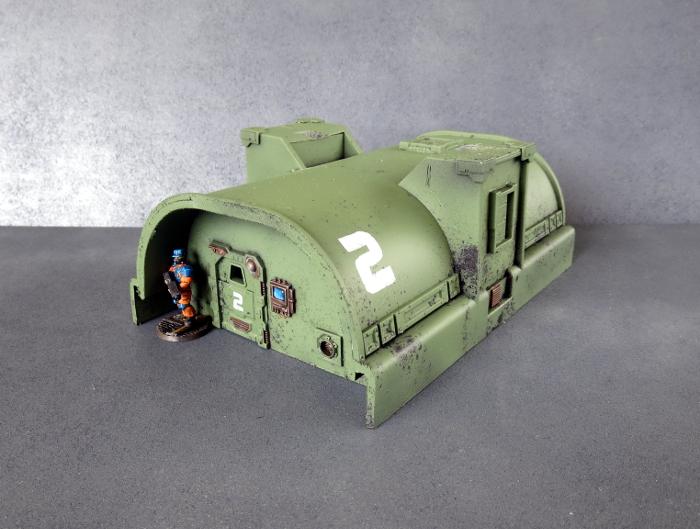
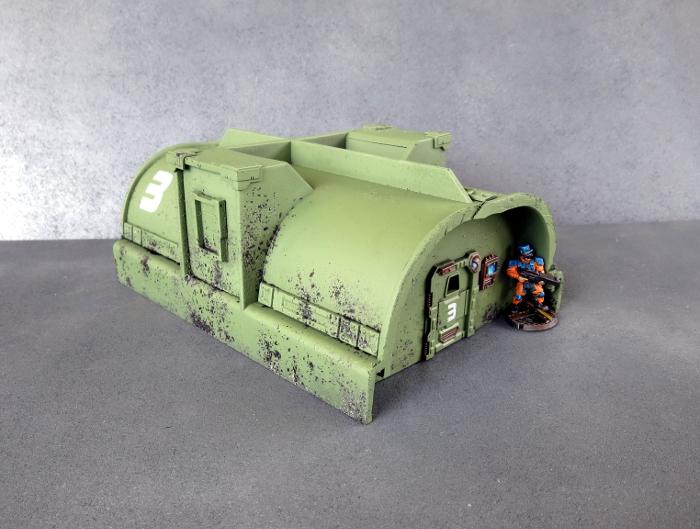
So the resultant building looks like this:
Construction complete, the end result is three different buildings that all look similar enough to represent mass-produced structures with slight variations for specific roles.
Astute readers may realise that this leaves two sections of the original channel. The only logical thing to do with them was, of course, to combine them and make a two-story version:

On the upper story, I recessed the end walls even further in and added a floor from foamcore, to create a good-sized balcony on either end of the building. The railing was made from two ladders.
From there, all that's left is to paint them!
I used a Killrust Satin Black spray as a basecoat - a decent quality spray is a good idea, as cheaper sprays may not stick as well to the plastic used for these channels. This was followed up with a coat of Rustoleum 'Oil Rubbed Bronze', which I thought would make a nice, dark, weathered metal layer to show through for the weathering. A coat of sealer and a sprinkle of salt (there's a tutorial on salt-weathering coming in the very near future), and then a top coat with Army Painter 'Army Green', before scrubbing off the salt. Then some final detailing, and the buildings are ready for the table.
If you're feeling the urge to head on out to the hardware store to recreate these yourself, you can pick up a two-pack of the Maelstrom's Edge terrain sprues from the online store here. As always, feel free to share your creations on the Comm Guild Facebook page!
Terrain Tutorial: Plastic Storage Tray Buildings
Posted on Monday Feb 06, 2017 at 05:00pm in Tutorials
- by Iain Wilson
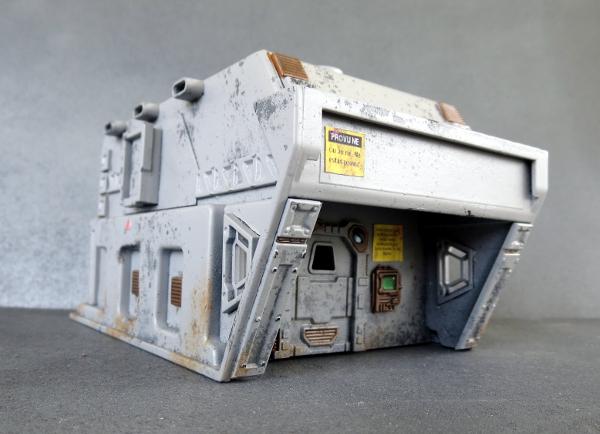
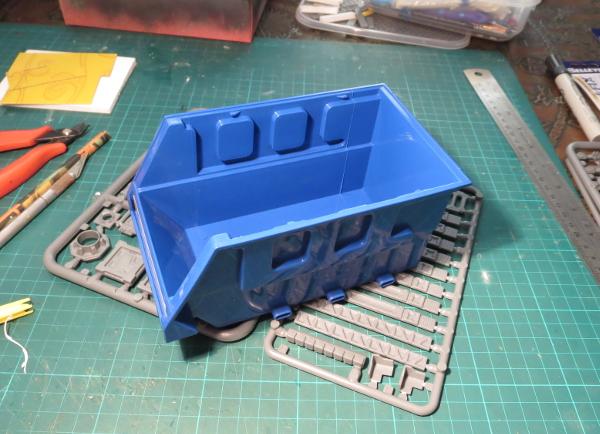
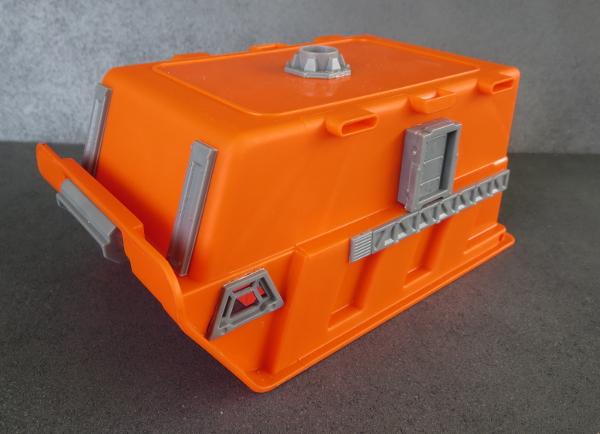
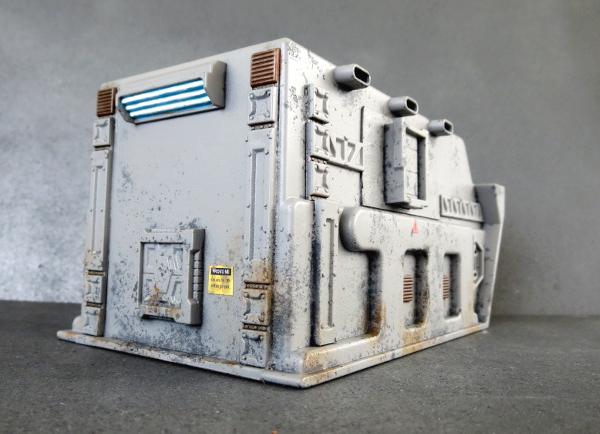
The Maelstrom's Edge Terrain Sprue contains a slew of assorted plastic bits and pieces that can be used to pretty up your home-made scifi terrain, including a bunch of essential elements like doors, windows and pipe fittings. A few months ago I posted a tutorial on using cardboard gift boxes to create quick and easy buildings, which you can still find here. This time around, I'm using plastic modular storage trays to create buildings like this:
These trays can be found at most hardware stores, or anywhere online that sells plastic storage - you can find a few different examples on Amazon, and they're generally pretty inexpensive and available in a bunch of different sizes.
Here's a glimpse of what we're going to do to it:
Before getting started, a quick note on glue.
Obviously, versatility for making wargaming terrain isn't a prime design consideration for the people making these trays, and so the plastics used for them can be a little variable to work with. Plastic (polystyrene) cement won't work on them, but for the most part I've found that superglue works just fine. If they have a waxy feel to the plastic, or if you try the superglue and it doesn't hold particularly well, there are specific glues out there for dealing with recalcitrant plastics that look something like this:
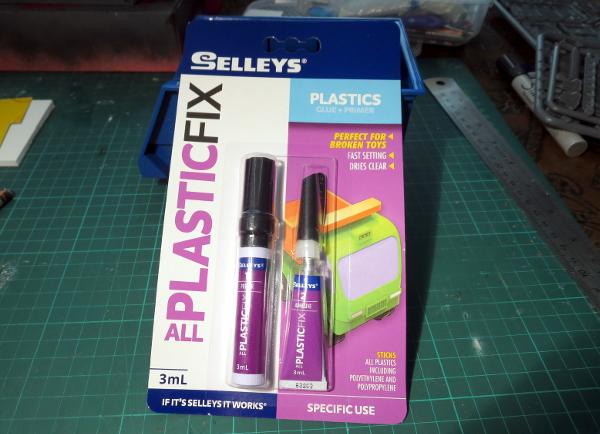
This is a two-part system that uses a primer to help the glue stick. Just apply the primer, then apply the glue, push the parts together, and they'll never come apart again. I don't use it all the time simply because it's more bother than a single tube of glue, but for those trickier jobs it works a treat.
Edit: It can also help when gluing this sort of shiny plastic product to give it a sand with some fine sandpaper. This breaks up the glossy surface, giving the glue a better purchase.
SO, onto the building!
There are a few parts on the terrain sprue that are designed to be inset into a wall. If you're using any of these, I recommend cutting the holes for them as the first job, to avoid accidentally popping glued parts off when the plastic flexes while you're trying to cut it.
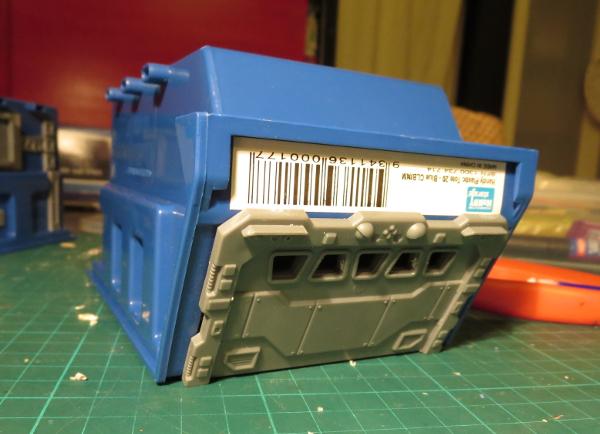
I'm starting here with the trapezoid windows, which will go into the front sides of the tray. This adds a nice little detail at what will be the front of the building, and also serves in this case to get rid of some imprinted text on the sides of the tray. I vary the orientation of these depending on the exact shape of the tray that I use, as different trays will have different angles at the front. Go with whatever looks best with the trays you use - for this one, I'm putting the long edges vertical.
To cut out the hole for them, hold the window against the side of the tray and trace lightly around it with a sharp knife.
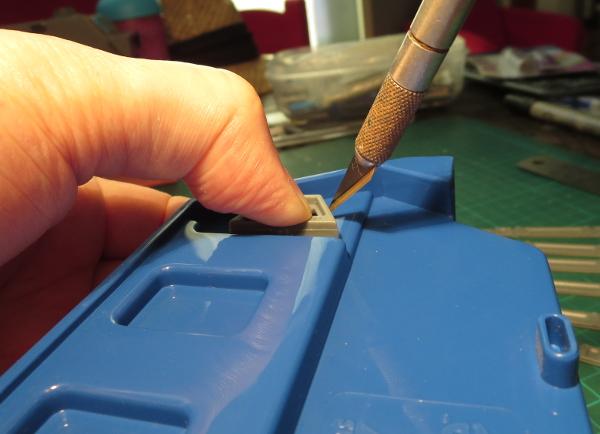
You can then drop the window and carefully cut along the traced lines. If you have a Dremel-style rotary tool with a saw or small router bit, that might save some effort here, but otherwise just going slowly and carefully with the knife and not trying to cut right through in one go does the job.
Once you have all for sides cut through, check the window for fit and neaten up as necessary. The mould line on the window serves as a handy guide to get the windows on both sides of the building pushed through their respective walls an even amount.
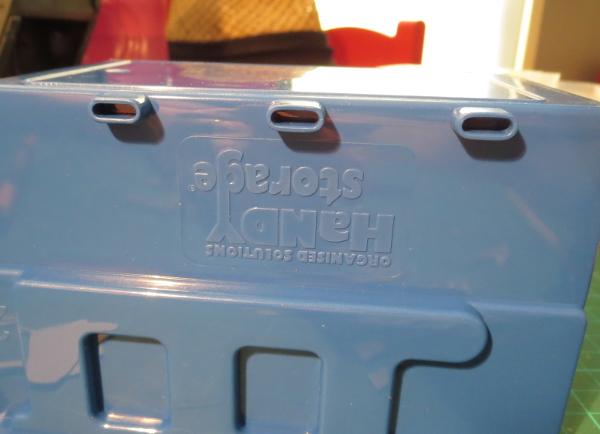
There is generally a small lip of plastic at the back of these trays that is used for clipping them onto racking. If you're feeling lazy you can just leave it there and work around it, but I find it looks better to remove it. A decent pair of clippers will get rid of the bulk of it and then you can just clean up with the knife.
The reinforcing strips off the terrain sprue are the real heroes of this build, as they do such a great job of making otherwise bare plastic look like a manufactured structure. They can be used intact where there is room, like this:
Alternatively, you can chop them up along the edges of the panels to fit them around the moulded shapes on the tray.
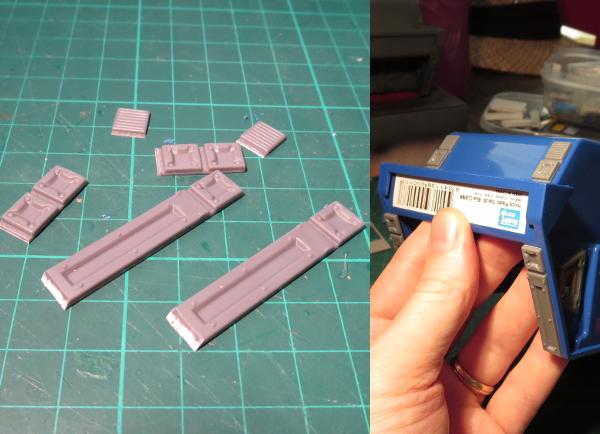
There will sometimes be writing imprinted onto the sides of the tray.
This can be removed by cutting it out and replacing with detail parts, as with the trapezoid windows back at the start, or the shutter windows on this building:
Alternatively, you can cover it over with a little cardboard, plasticard or foamcore cut to an appropriate shape. Here, I've used a small piece of thin cardboard to cover the bulk of the text, with a rectangle cut in the middle for a shutter window. These are designed so that they can be inset into the wall, but they look fine just stuck directly onto the surface as well, and that saves cutting more holes in the plastic.

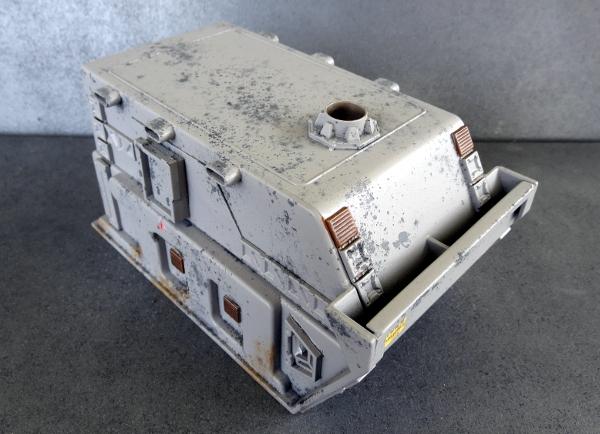
There is also usually a small nub on the bottom of the tray (which is forming the building's roof) from the moulding process used to manufacture the tray. I like the cover these over with the large pipe fitting from the terrain sprue:
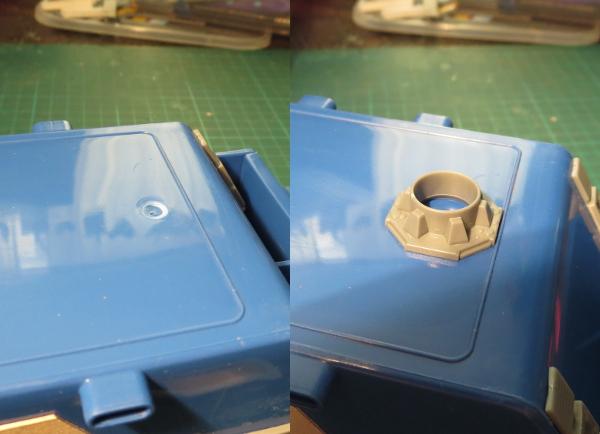
This can then have some plastic rod added to create a chimney, or a fan blade cut from a circle of cardboard to make an exhaust fan.
The exact layout of parts on the sides of the building is driven by the shape of the moulding, and by how detailed you want your building to be.
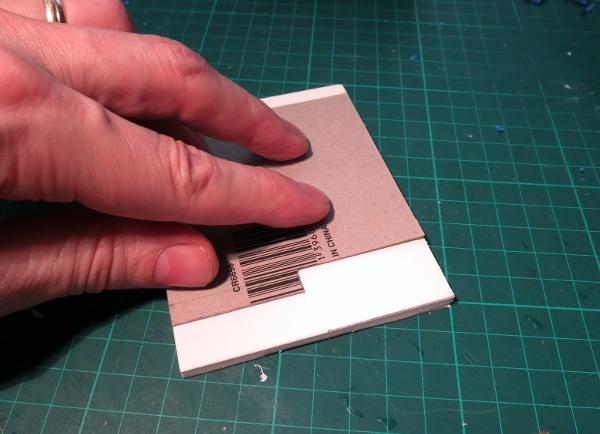
With the outside all detailed up, it's time to seal in the front. I generally use foamcore for this for ease of cutting and strength, but plasticard or cardboard would also do the job, as does corrugated plastic sign board. There can be a little trial and error getting a piece cut to fit just right with the shape of the tray - I start by fitting to the bottom of the tray (the widest part), pushing the cut piece into the tray up to the narrower point which is usually about halfway in, marking the foamcore with a pencil using the interior of the tray as a guide, and then cutting to match.
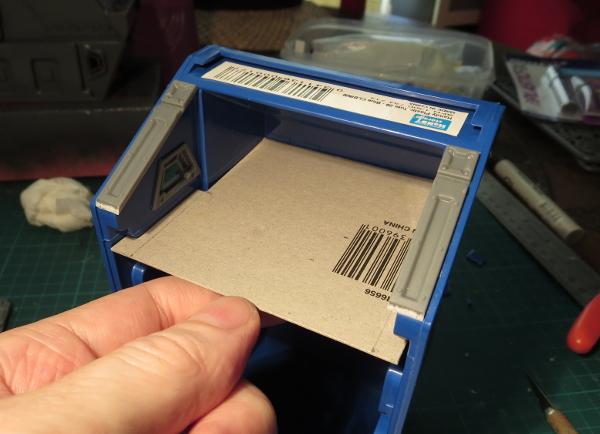
If you're making up a bunch of these buildings using identical trays, it's a big time-saver to make a template out of a piece of cardboard or plasticard and use that to mark out your wall pieces.
You can then trace around whichever door you are using.
Cut out the door hole and glue the door in (remember not to apply superglue directly to the foam interior of the foamcore, as it will melt). Once the door, control panel, and anything else you're putting on the wall is attached, just slide the wall into the tray and glue it in place.
On this building, I added a service counter using a trimmed down lintel piece.
As an alternative to the small doors, some trays fit the garage door quite well, although sometimes with a little trimming to shape required.
Alternatively, some trays are sized just right to glue the garage door directly to the outside front of the tray, which creates an interesting angled front, although loses you the nice little awning for models to hide in.
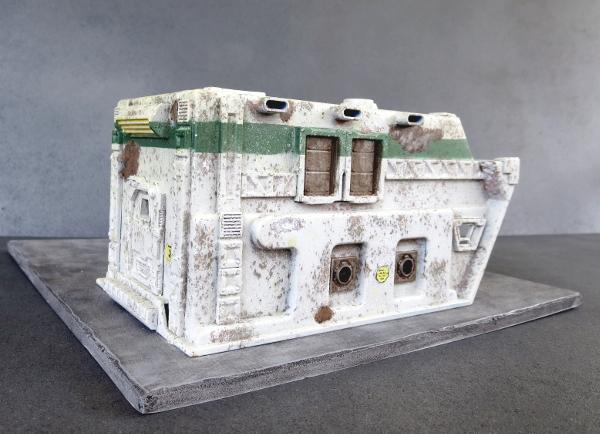
Once you have the building all detailed up, all that's left is to paint it.
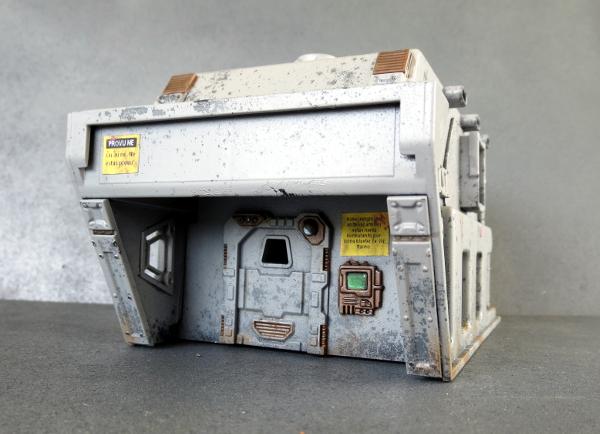
These are a perfect canvas for weathering effects - I'll be looking to cover some different techniques for that in coming tutorials.
As with the glue, painting can be a slightly variable experience, depending on the specific plastic used. You can use an etching primer if you want to make sure it will stick, but I've been getting by with regular spray paint and sealer.
Unsealed, the paint can scratch off, although just how easily will depend on the plastic and the quality of your paint. If you're planning on using a rigorous weathering technique like salt weathering, I recommend applying a light coat of sealer over the base coat to make it a little more durable.
When you're done, a good spray of matte sealer over the top should keep everything where it belongs.
For a break from solid buildings, you can create ruins by chopping out the bottoms of the trays and applying suitably damaged terrain parts.
Or for something a little more ambitious, the modular nature of these trays makes it relatively easy to stack them up and make multi-story units. This one below will eventually have a little balcony off the front of the upper level, perfect for hiding sneaky sniper units.
You can quickly and easily assemble a table-full of modular terrain units using a bunch of identical trays, or mix-and-match different size or brand trays for more of a ramshackle, cobbled-together settlement, just perfect for a stellar refugee camp or a temporary staging base, and buildings can be easily customised to fit different roles in the settlement.
If this has inspired you to create your own modular settlement, grab yourself some terrain sprues from the Maelstrom Edge online store here, and as always be sure to share your creations on the Comm Guild Facebook page!
Tags: buildings terrain terrainsprue tutorial
Terrain Tutorial: Shipping Container
Posted on Monday Jan 09, 2017 at 05:00pm in Tutorials
- by Iain Wilson
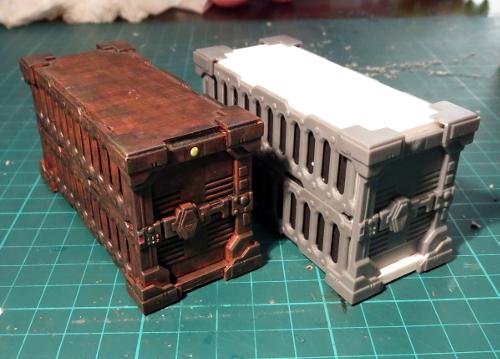
A while back, we showed off a shipping container made from components from the Maelstrom's Edge Terrain Sprue. This week, I'll be showing how to build it for yourself.

The terrain sprue is a fantastic source of interesting bits and pieces to spruce up your homemade terrain and, for the uninitiated, looks like this:
What you need:
You'll need four terrain sprues for this build, from which you will need:
- 4 x ladders
- 8 x corners
- 2 x heavy doors
 (I will be going through some ideas for using the other sprue components in the coming weeks.)
You will also need:
- 3mm foamcore
- A sharp hobby knife
- A steel ruler
- A pencil
- Superglue
- PVA glue or Foam glue (more or less the same as PVA, but slightly faster setting and formulated specifically for gluing foam)
What you do:
Clean the mould lines off the components. Then from your sheet of foamcore, measure out and cut a strip that is 31mm wide.
From this strip, cut one piece that is 81mm long, and another 87mm long.
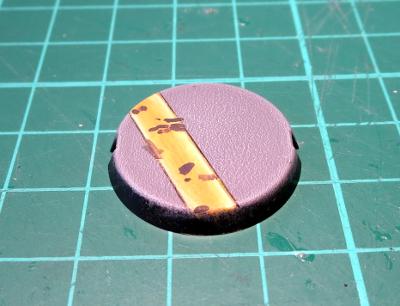
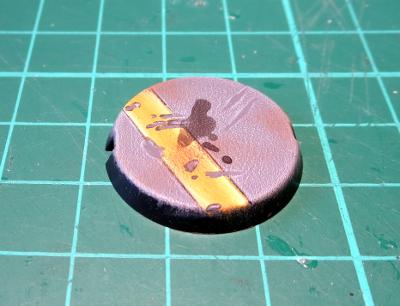
Using your PVA/foam glue, glue the 81mm strip bridging the tops of the two doors and sitting on top of the inset support that runs around the back of the door. The PVA is better than superglue for this initial assembly partly to avoid melting the edges of the foamcore (superglue melts expanded polystyrene) and partly to give some time to manipulate the structure as you build it, to ensure that it winds up square.
Once the glue has grabbed sufficiently to stop everything from falling apart when you move it, flip the structure over and glue the longer strip bridging the bottoms of the doors. The ends of the foamcore strip should be flush with the widest part of the bottom of the doors.
Using the superglue (or plastic glue if you prefer) glue two of the ladders together along their long edges. You can use the edge of the steel ruler to make sure that the ends are square. The do the same with the other two ladders.
Then, using the PVA/Foam glue again, glue the first pair of ladders into place along the side of the structure, with the raised-detail side outwards. You can lay the container on its side on a gridded cutting mat or use a set-square to make sure that the structure is all squared up at this point, and nudge it into shape off it doesn't all quite line up.
If you're building an open cage-style container like the one pictured at the start of the article, this is a good time to stop and let the glue set, and then paint the inside of the container - otherwise, it's going to be considerably harder to do once both sides are glued on.
Alternatively, you can cut a couple of pieces of foamcore or thin cardboard to glue to the inside of the ladder-walls to create an enclosed container.
Once you have painted the interior, or glued the interior panels in place, glue the second set of ladders on the other side. Then, using the hobby knife, trim off the bolts closest to the corners of the walls.
Take four of the corners, and glue them over the top corners of the container. Use superglue for this step, to give the structure some extra strength.
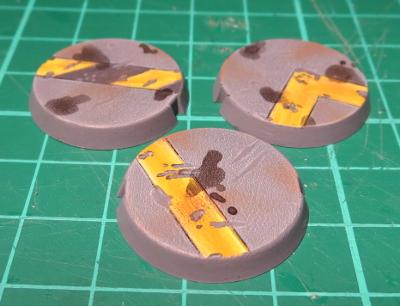
The other four corners will be going on the bottom. They need a little trimming so that they don't protrude over the bottom of the door - just bevel on corner off as below, and then opposing corner on the matching edge.
These can then be superglued in place around the bottom of the container. For this step, make sure you only get the superglue on the card side of the foamcore and on the plastic components where they touch - avoid getting glue on the foam edge of the base piece.
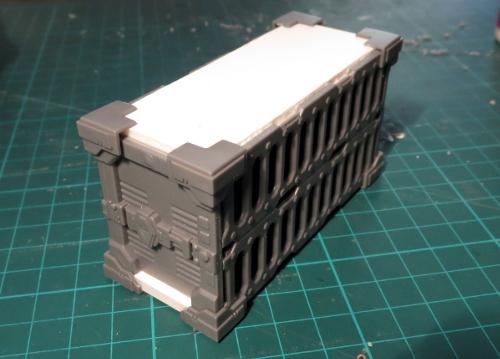
Once all your glue has set, the container is ready to paint! If you are intending to use spray paint, you will need to paint a thin layer of PVA or Foam glue over any remaining exposed edges of the foamcore first as, like superglue, most sprays will at least partially melt the polystyrene.
If you want to have a try at building your own containers, you can pick up the terrain sprue from the Maelstrom's Edge Online Store here. And as always, be sure to share your creations on the Comm Guild Facebook page (https://www.facebook.com/groups/MaelstromsEdge)!
All Your Base, Tutorial Part 2
Posted on Wednesday Dec 07, 2016 at 05:00pm in Tutorials
- by Iain Wilson
Last week, we looked at a few different ways to pretty up your bases, with industrial, rocky and snowy themes. This time around, I want to share a couple of my favourites - metal decking and ferns.
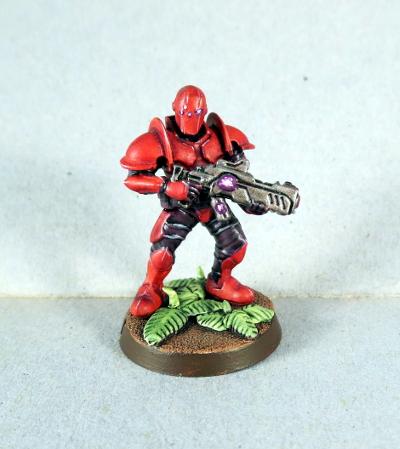
Ferns
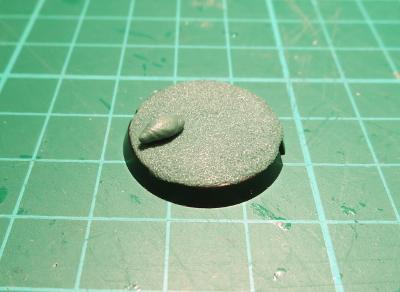
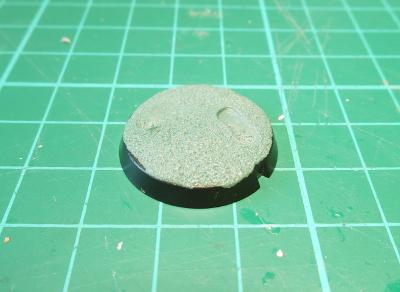
I start these off by building up some texture on the base, partly to look pretty and partly because the putty ferns that you're about to make will stick better to the layer of green stuff than to the plastic base.
Mix up some green stuff*, and press a 1-2mm thick layer all across the top of the base. Don't worry about fingerprints at this stage - they'll go away at the next step.
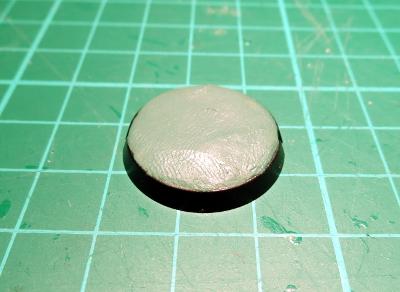
*For the uninitiated, 'green stuff' is the common name for a product called 'Kneadatite', which is a 2-part epoxy putty used for sculpting. I'll be putting together some basic green stuff tutorials in the near future.
Next up, take an old toothbrush and press the bristles into the green stuff to create a rough, pebbly texture all over the putty.
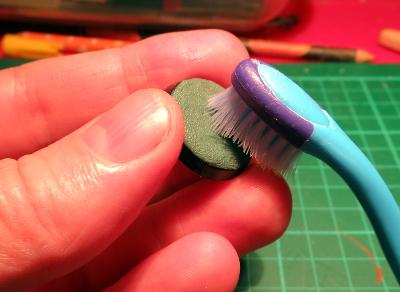
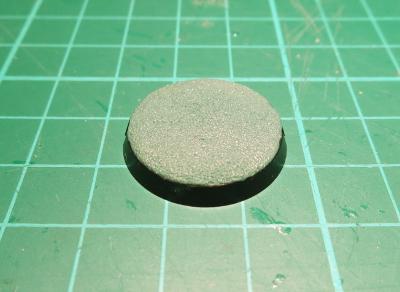
When you're done, it should look something like this:
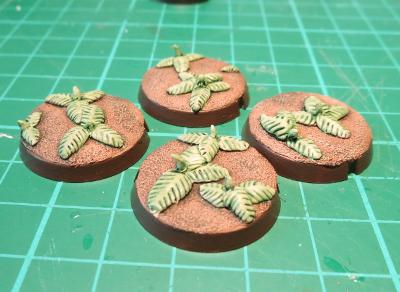
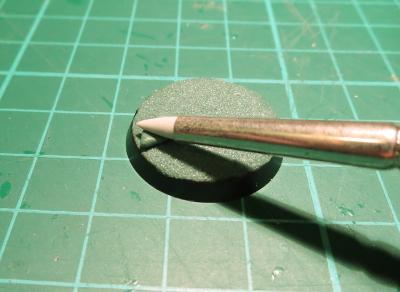
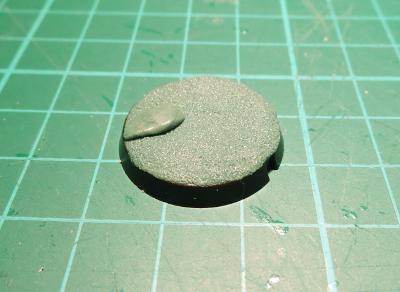
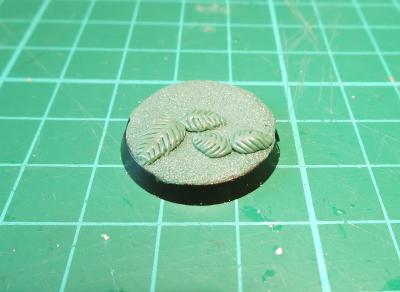
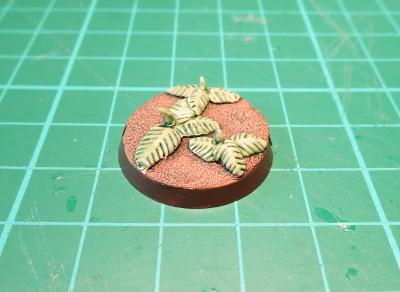
Once the putty is set, mix up a small amount and break off a 2-3mm ball. Roll this between your fingers into a teardrop shape, and press it onto the base just enough for it to stick there.
Using a round clay shaper, the back end of a hobby knife, or some other smooth, round tool, roll the teardrop out until it is mostly flat. For best effect, it should be flatter and thinner at each end than in the middle - this helps give the leaf some shape and make it look less like it's just laying flat on the ground.
Now take a hobby knife and score a series of parallel lines down each side of the leaf, running from about half a millimetre out from the centre line and angling slightly forwards out to the edges of the leaf.
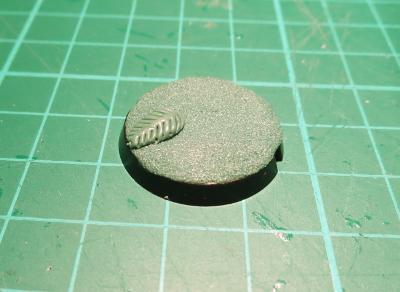
Repeat for a second leaf, butting the back end of the leaf up against the first and running it off in a different direction. Create other plants around the base using the same technique, remembering to leave room for the model's feet.
Note: If you're a little unsure about getting the placement right to fit a model on there, one easy way to give yourself a guide is to press the model's feet into the ground layer of putty before it sets.
Alternatively, you can draw around the model's feet with a micro pen, or dot with paint wherever the model's feet will go.
Once your first layer of leaves have set, you can build up your plants by adding extra layers on top, leaving each layer to set before moving on to the next.
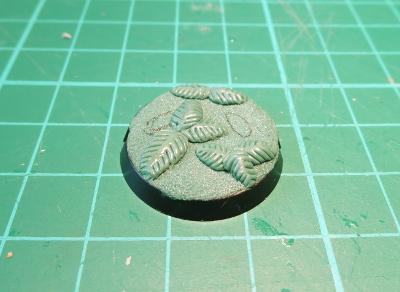
When you're happy with the buld-up of your ferns, roll out some small spikes of green stuff and press them in upright in the middle of each plant to represent a new, furled, leaf growth.
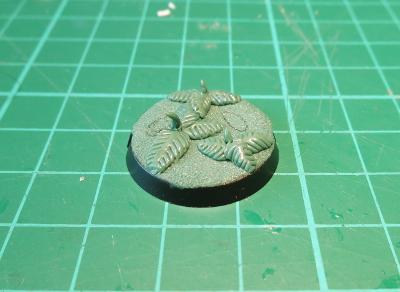
Leave to set, and then paint in appropriate colours. For the below, I've used Citadel Tallarn Flesh with a layer of Army Painter Strong Tone for the dirt, and Coat D'Arms Putrid Green with a wash of Army Painter Green Tone for the plants.
If you want a little more realism in the plants, add some tinges of brown to the lower leaves, as these are older leaves that will be starting to die off, and scatter some brown, discarded leaves around the base.
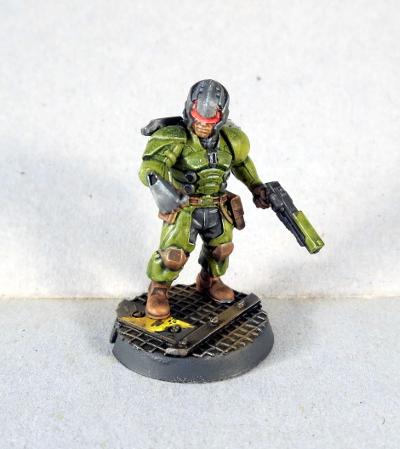
Metal Decking
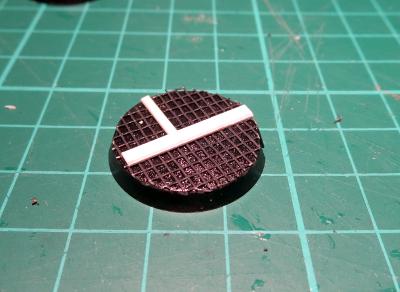
There are all sorts of options out there for buying textured plastic sheeting which can be cut to size and glued to your bases, but this can get expensive. For a cheaper option that still looks effective, I use plastic flyscreen.
Start by applying a thin coat of superglue all over the top of the base, and then glue down a small square of flyscreen.
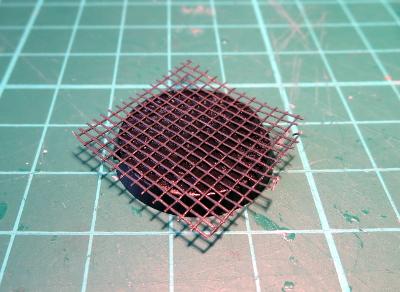
Once the glue has set, cut around the edge of the base with a sharp knife.
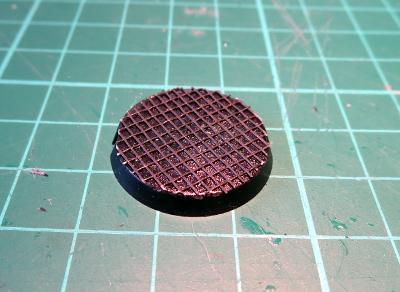
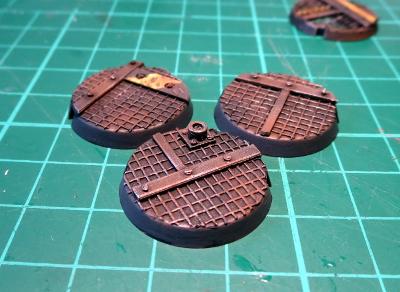
Now we can add some detail. Glue on small strips of plastic sheet or thin card to create panel reinforcing.
You can add rivets by drilling holes in the stripping with a 1mm drill bit (I recommend using a pin vice rather than a motorised tool for this, as it's really easy to gouge the holes out sideways with a motorised drill) and gluing in pieces of 1mm plastic rod, as below - I've shown the undercoated pic here, as it shows the detail better.
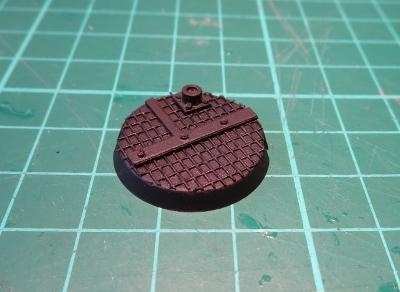
You can add whatever other detail seems appropriate. In the above pic, you can see a small pipe fitting or connection port made with a small square of plastic with a short length of tubing glued to it, with rivets added on the corners to hold it down.
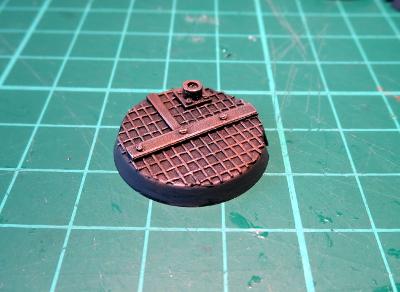
Once you're happy with the level of detail on the base (and you generally don't need much) it's time to paint. For the below, I've just used a black spray undercoat, followed by a heavy drybrush of Citadel Boltgun Metal followed by a wash of Army Painter Strong Tone. Once the wash is dry, I finished up with a light drybrush of Coat D'Arms Hairy Brown to dirty things up here and there, and a light highlight of Citadel Mithril Silver on the edges.
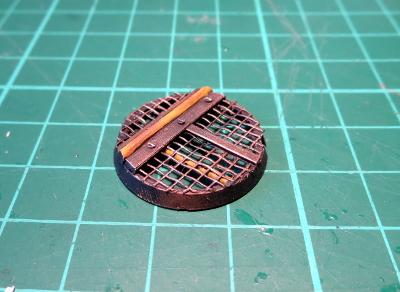
You can also add sections of hazard striping, coloured lines or deck numbers for some more colour.
As an alternative, if you're feeling brave, you can go for more of a mesh catwalk look by cutting the top off the base before applying the flyscreen and other detailing.
All of the ideas presented here and in the previous article are, of course, just starting points. You can add to or combine these different effects to create your own style, or look to real-world or movie set inspiration for something completely different.
Feeling inspired? Want to share how you have based your models? Jump into the Comm Guild Facebook page and show us what you have come up with!
All Your Base, Tutorial Part 1
Posted on Tuesday Nov 29, 2016 at 05:00pm in Tutorials
- by Iain Wilson
Once upon a time, there was an more-or-less universally accepted standard that gaming miniatures' bases would be either covered in flock (shudder) or covered in sand and painted light green. We've come a long way since then, with the common standard now to have sand painted brown with a couple of tufts of static grass to brighten things up a little.
If that's leaving you less than inspired, then this article might be for you! Over a couple of weeks, I'm going to run through a few different ways to pretty up your bases, ranging from easy to 'might need a little practice' in complexity.
First off the blocks: Industrial Grey
This style is intended to represent industrial or urban cement-paved areas, and can be as simple or as complex as you want it to be (or as your painting skills will allow!)
Start with a medium grey - I've used Vallejo Basalt Grey.
Then drybrush with a lighter grey - in this case, Vallejo Light Grey.
You could leave it there, but where's the fun in that?
You can use a ruler or a cast off piece of sprue to mark out lines on the cement, to represent part of the sorts of markings you might find on cement floors - hazard lines, lane markings, etc.
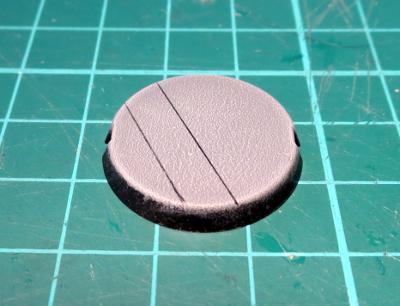
Paint in between the lines with an appropriate colour. Yellow is a great contrast against the grey, or white is good for a more subdued look.
Then you can add weathering, dirt and stains to your heart's content. For the chips, paint small splotches of your original medium grey and highlight around the edges with the light grey. Dirty things up by drybrushing with a little brown, and add drops of ink for oil or chemical stains.
Finally, paint around your base edges.
There are several schools of thought on base edges. Some painters like to go with a colour that complements whatever is on top of the base. Some prefer a contrasting colour, or different colours to denote different units, or even just good old black. There's no right or wrong - just go with whatever you think looks best.
Next: Let it snow!
There are various hobby 'snow' products on the market for creating wintery bases or terrain, but to me they never look quite right, as they're too grainy. Instead, I like to go with something like this:
Start by gluing a few small lumps of sand or fine gravel to your bases for a little texture. If you're doing this with the bases separate to the models, make sure you leave space in between the rocky clumps for the model's feet.
Once your glue has set, paint the rocks up. I've opted for a black wash to start out. This is followed by a heavy drybrush of brown (I used Citadel Tallarn Flesh here) and then a light drybrush of light grey (the Vallejo again). That's not a hard and fast formula - rocks come in all sorts of colours and textures, so use whatever colours will make for the nicest contrast with your miniatures.
Once that's done, the flat space in between becomes snow. If you want to (and I would recommend it on larger bases), you can break up the flatness by adding smooth bumps with Green Stuff or Milliput, or just leave them flat. Paint with white.
The last step is a little hard to photograph, so you'll have to take my word for it that it looks better in person. To get a nice, shiny snow look, I use a pearlescent paint. You can find a few variations on a similar theme in most craft shops - either a pearl white paint, a pearly gloss sealer, or a pearl medium which you add to your paint. Whichever you wind up with, paint a coat or two over your white, and then finish by painting the base edges.
Moving on: Rocky Wasteland
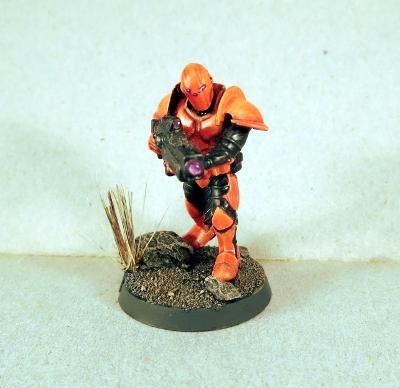
OK, so this one isn't actually too far removed from the standard sand-and-static-grass option, but without the static grass. Start by gluing some fine gravel mix - Mine is a mix of silver sand, regular sand and some crushed up slate. I like to add some bigger pieces of stone scattered around these bases as well to create a little bit of a feature.
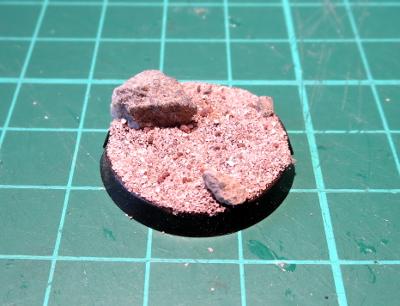
Paint: start with a black or brown wash to get into all the crevices.
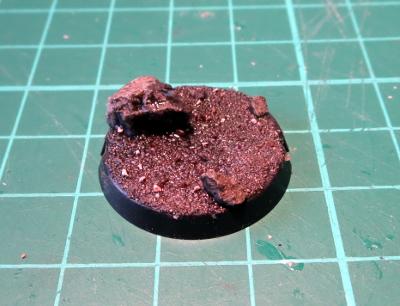
The drybrush with browns and/or greys (or whatever other colours you want your wasteland to be). I've used light grey and Coat D'Arms Hairy Brown here.
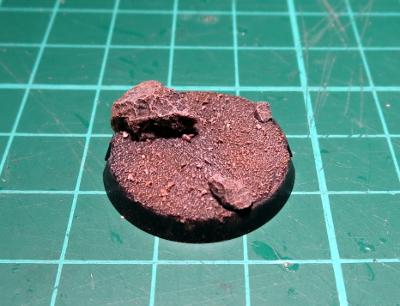
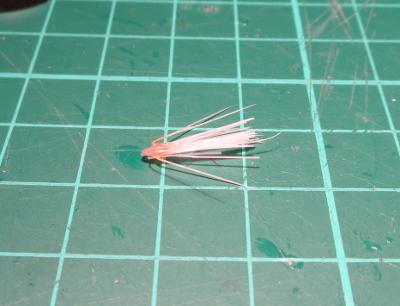
That's the boring part. Now to add some zing! Find yourself an old toothbrush, and pull out one of the clumps of bristles - use pointy pliers if they're reluctant to come out. There will sometimes be a small piece of metal in the fold at the bottom of the bristle that helps hold them in the toothbrush. If there is, discard that.
Before you let go, add a little superglue into the folded bottom of the bristle clump to hold it all together.
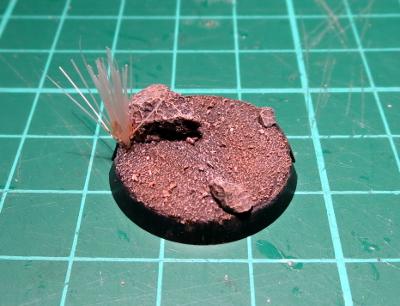
Then apply a small dollop of clear craft glue or superglue to the bottom of the bristles and press them into place on your base.
If you have a nice hollow to glue the bristles into, superglue will work fine. If they're sitting more on top of the gravel, the craft glue is better as it is thicker and will pool around the base of the bristles to give them a little stability.
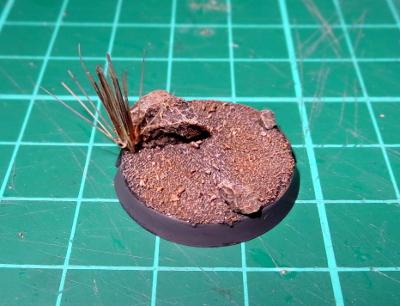
Once your glue is set, paint by washing with brown ink, and then drybrush a little bone or light green over the top to pick out the individual bristles again. Then paint your base edge.
As a final note on this one - If you're making up your base separately to the model, it's a good idea to either leave a couple of spots with no gravel for the model's feet to glue into, or pin the model to the base, as model feet don't tend to glue well to sand or gravel due to the lack of flat surface to grab onto.
In part two, we try to make your bases more riveting, and wander off in search of a shrubbery. Stay tuned!
Feeling inspired? Want to share how you have based your models? Jump into the Comm Guild Facebook page (https://www.facebook.com/groups/MaelstromsEdge)!
