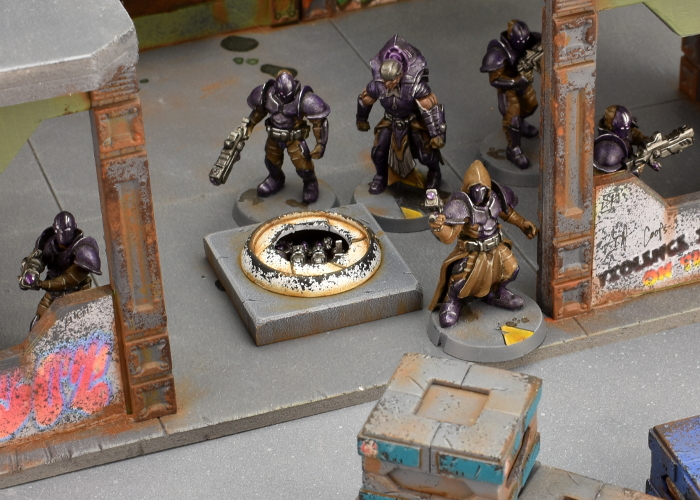
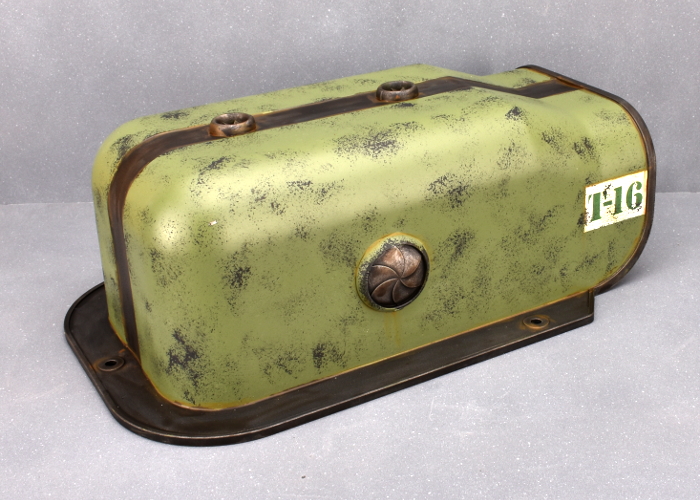
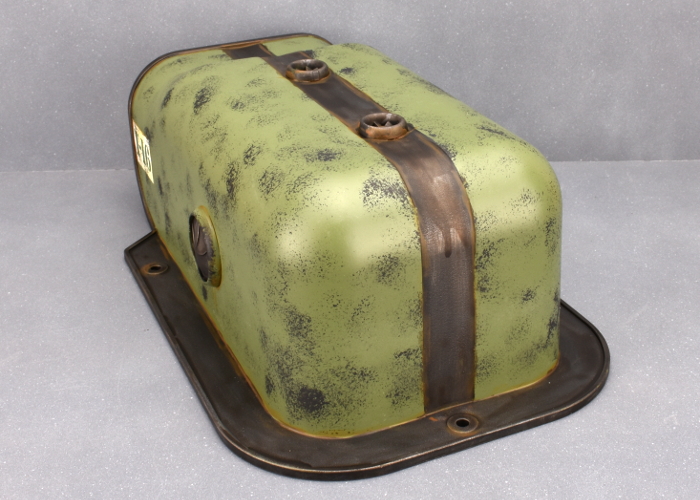
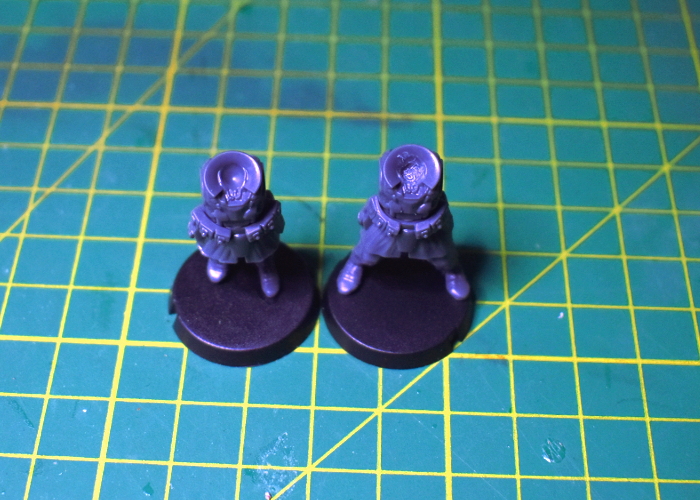
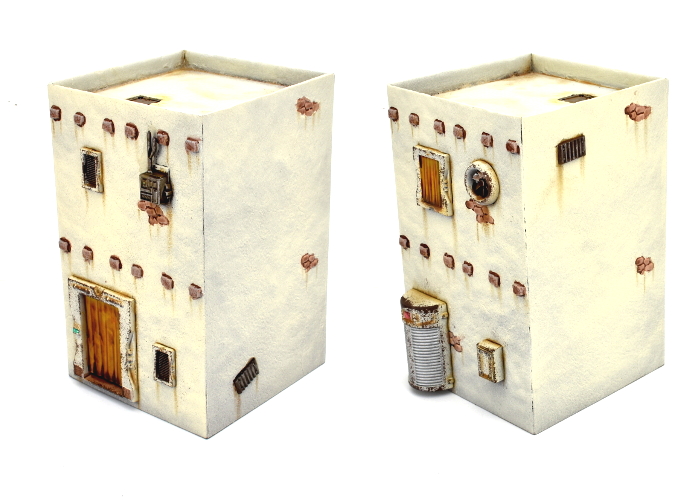
Edgepieces - Preview Feb 2021
Posted on Monday Feb 01, 2021 at 05:00pm in Models
After last year's disruptions to ... well, everything, we were all set to launch the new year with some of the backlog of models that we have been quietly working on in the background. Unfortunately, the new year actually started out with large chunks of the UK going back into lockdown, and everything sadly came once more to a screaming halt. So we have models, we just need to get them to where they need to be, and get some studio versions painted up, and this will happen as soon as we can make it so.
In the meantime, here's another sneak peek!
Stay tuned!
Hobby Basics: Basic Basing
Posted on Monday Jan 25, 2021 at 05:00pm in Tutorials
Time for some more hobby basics! In this latest addition to the article library, we're running through how to add and paint basic sand texture to your miniature bases. You can find the article here!
Stay tuned for more!
Karist Secret Cache Objective Marker Kitbash
Posted on Monday Jan 18, 2021 at 05:00pm in Tutorials
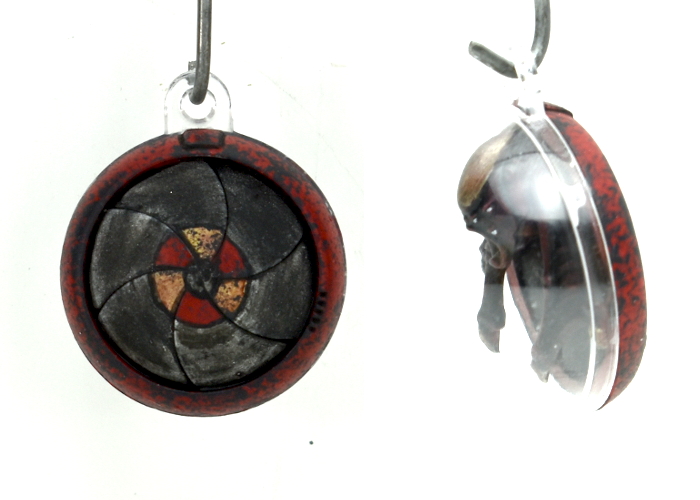
In games of Maelstrom's Edge, along with whatever objectives apply to the mission being played, each faction has an additional themed objective of their own. For the factions in the Battle for Zycanthus box, there are cardboard counters to use as faction objective markers, but it's always nice to have physical models to represent them instead. I shared a conversion some time ago for a kitbash of the Epirian's Automated Uplink Relay Drone (with a new, all-plastic version of this build coming up in a future article very soon!), and this seemed like a good time to balance things out with a Secret Cache marker for the Karist Enclave!
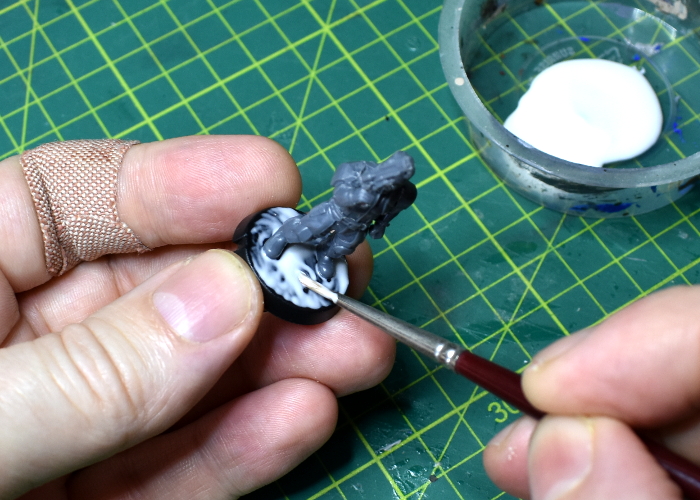
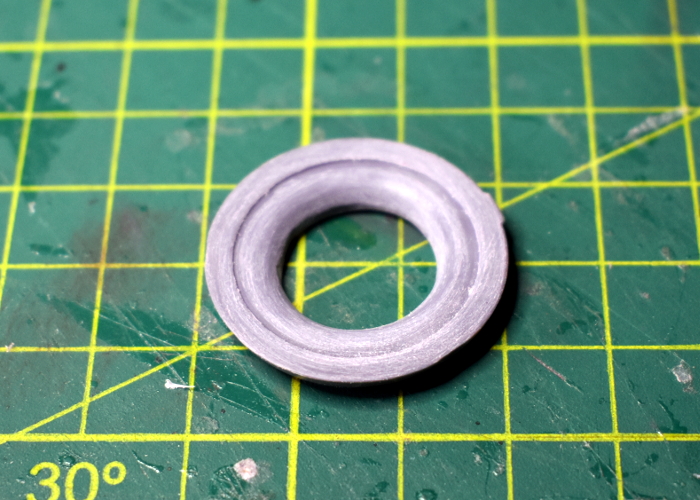
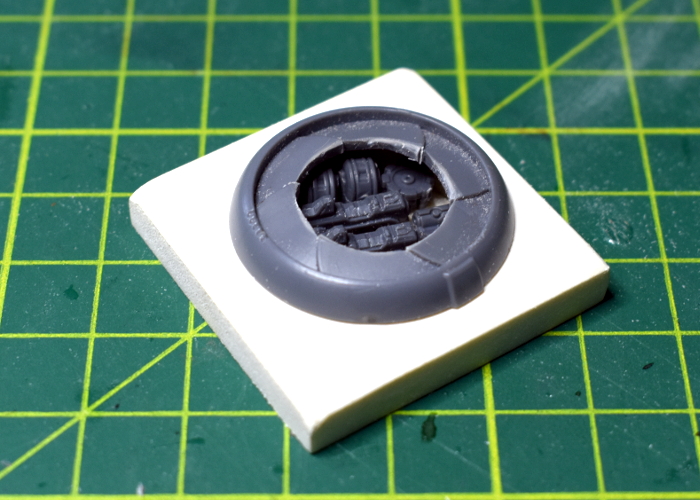
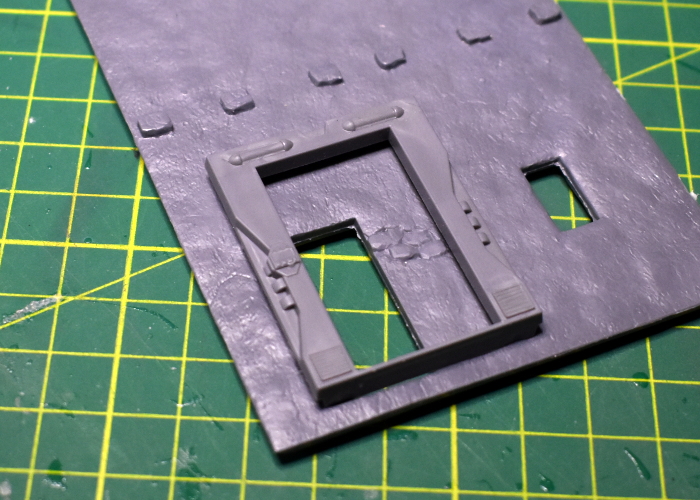
I was looking at the Maelstrom's Edge terrain sprue for a completely different project when it occurred to me that the iris hatch was a nearly perfect size for the Karist objective. The Secret Cache is a small objective, which means a model to represent it goes on a 25mm base, and as it happens, the iris is 25mm in diameter. So as an incredibly quick and easy option, you could just use the iris portal as-is. To keep things accurate, you can measure to the iris, ignoring the surround, or if your opponent agrees you could just measure to the outer edge of the portal, making it a 30mm objective marker instead of 25.
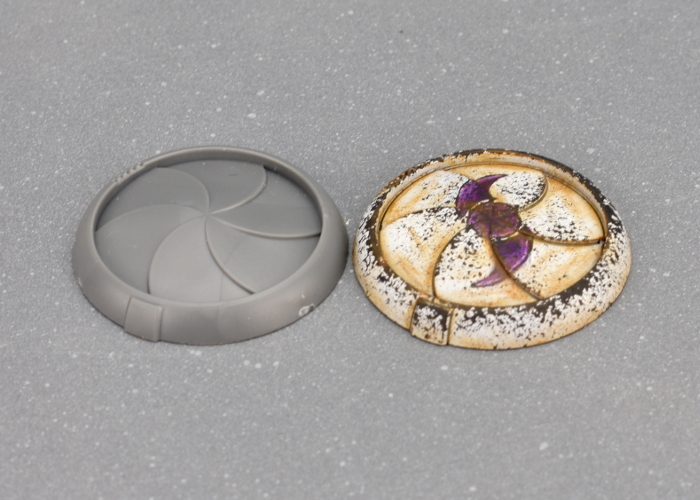
For a slightly more elaborate version, I took a portal and used a 16mm spade bit to drill out the middle of the iris.
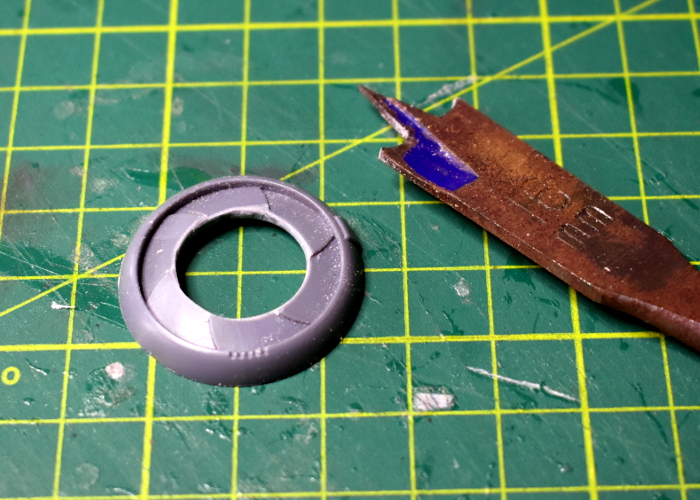
Wrapping a small piece of sandpaper around my index finger, I flipped the portal over and sanded around the underside to make it concave.
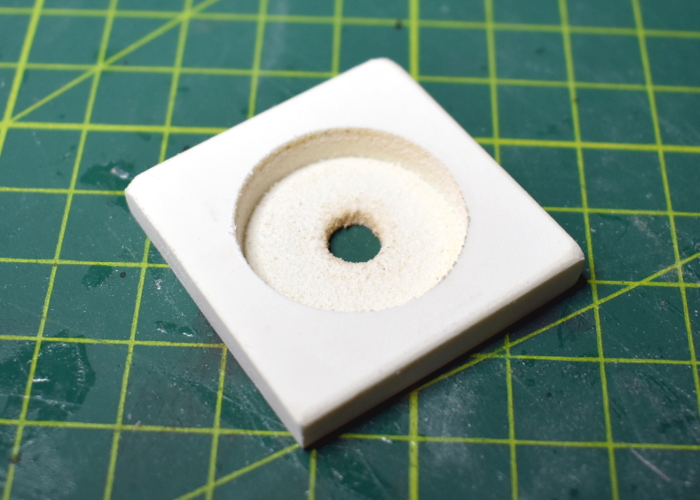
To make the base of the cache piece, I cut a small square of 6mm foamed PVC, and then drilled most of the way through the middle of it with a 25mm spade bit, before giving it a light sand.
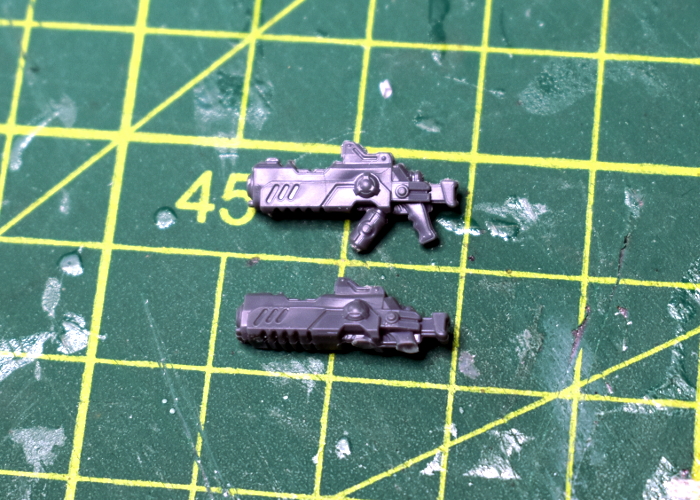
To fill the cache, I took a bunch of assorted Karist weapons from the Faction Expansion Sprue. I trimmed the bottom of the rifles down flat, sanding the bottom so that they fit neatly inside the cache cavity. If you don't have the expansion sprue handy, you could also just use spare weapons from the Karist Trooper sprue, cutting the hands off the bottom - either way, the bottoms of the weapons won't be visible once the cache is sealed up, so either way works just fine.
I glued the rifles in place, and then filled the space around them with grenades and a couple of ammo drums cut from grenade launchers. I also glued a small circle of plasticard into the drill bit guide hole in the bottom of the cache.
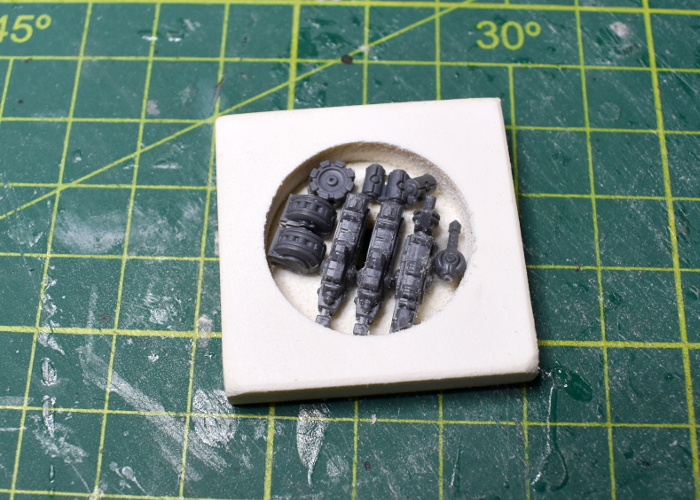
The final step before painted was to check that the portal fit neatly on top. At this point, I also used a hobby knife to cut some vertical lines into the inside of the hole in the iris, to delineate the tips of each petal. I left the portal separate for painting, gluing it in place at the end.
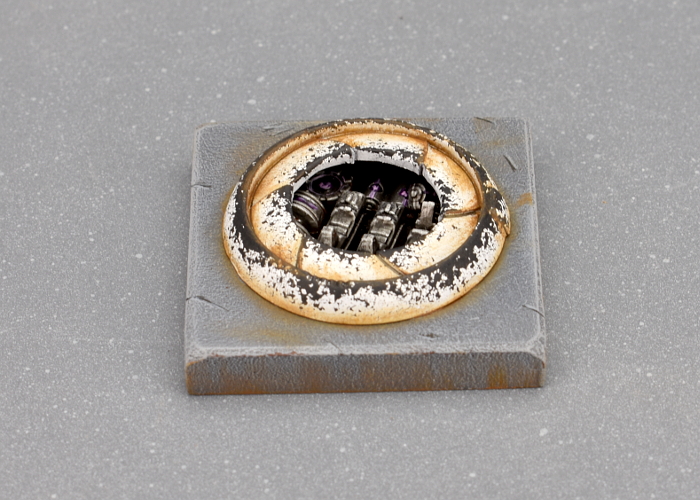
And speaking of painting, with some colour on the portal wound up looking like this:
Put together your own secret cache of pre-prepared doom by picking up the plastic terrain sprue, along with the rest of the Maelstrom's Edge range from the webstore here.
Then pop on over to the Comm Guild Facebook group to show us what you're working on!
For other building ideas, modeling tutorials, army spotlights and conversion walkthroughs, check out the Hobby section of the Maelstrom's Edge website here.
Tags: conversion karist modeling objective terrain terrainsprue tutorial walkthrough
Terrain Spotlight: Aircon Ducting Barracks
Posted on Monday Jan 11, 2021 at 05:00pm in Tutorials
Over the Christmas break, I found myself in a local hardware store picking up some supplies for a few jobs around the house, and as so often happens I got a little distracted by random pieces of plastic. As a result, this week's modeling article is a sci fi barracks building made from components from the Maelstrom's Edge terrain sprues and a piece of plastic air conditioner ducting!
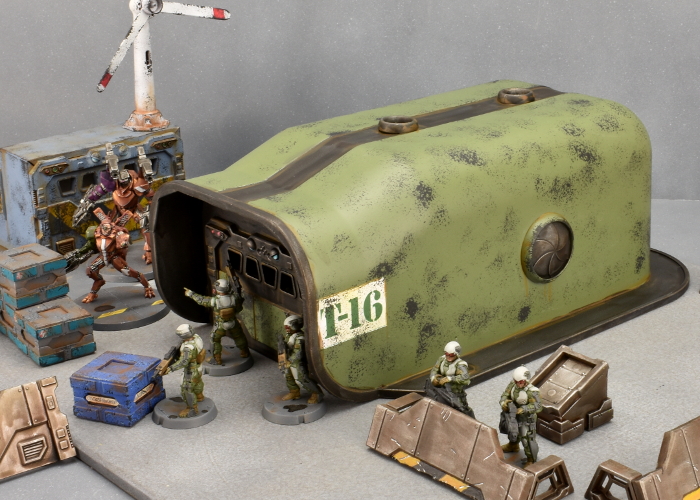
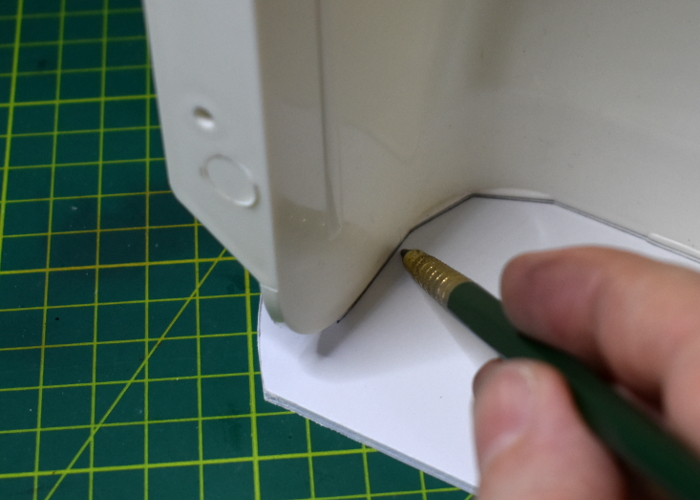
I have plundered the aircon ducting display before, resulting in a battlement-roofed bunker (which you can see here). This time around, I had picked up a longer piece that is usually used to cover over the spot where cables or drain hoses turn to go through a wall.
Because the shape was so perfect as is, there was very little that needed doing here, but it did need a front wall. For this, I used a piece of 3mm foamed PVC. Sitting the ducting end-on on top of the PVC, I traced around the inside with a pencil to get an accurate cutting pattern for the wall.
In the middle of the wall piece, I cut a rectangle to fit the garage door from Terrain Sprue #1.
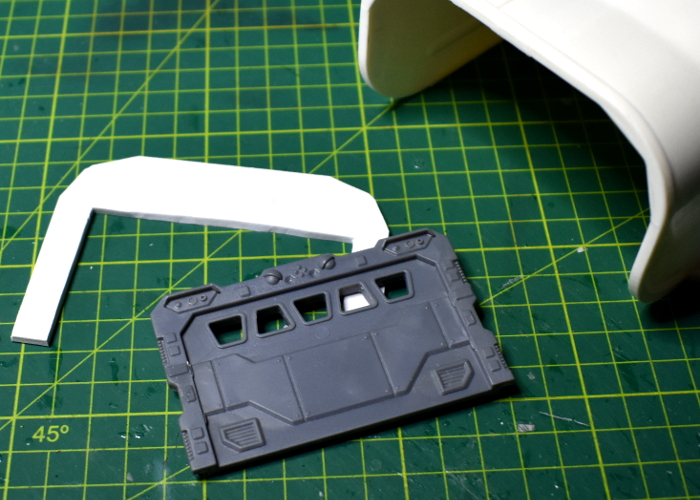
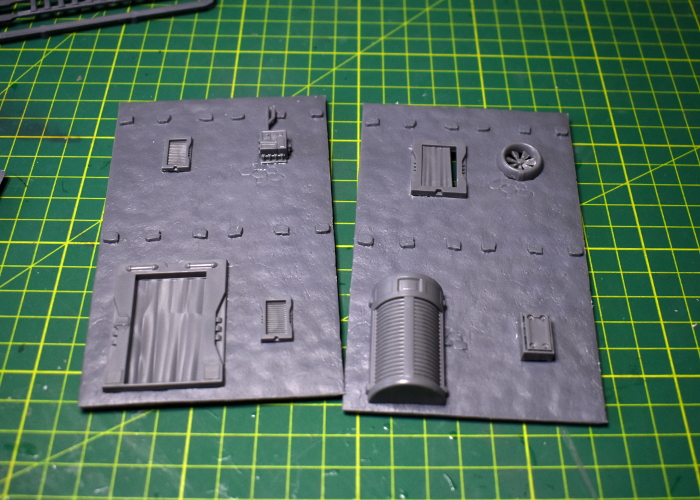
Before gluing everything in place, I gave the ducting a light sand all over. This breaks up the shiny outer surface of the plastic, allowing glue and paint to stick better. With that done, I glued the front wall in place inside the ducting, and added some iris windows and exhaust fans from Terrain Sprue #2 for some extra detail.
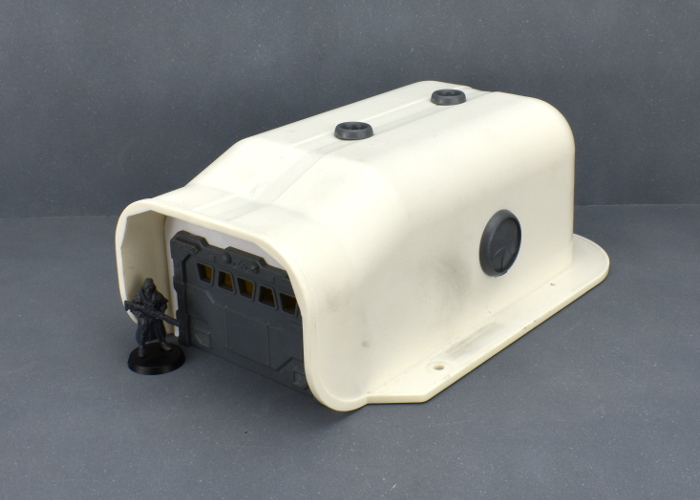
I decided against adding a base, as it didn't really seem necessary. The flange around the ducting makes it nice and stable on the tabletop, and this way it will fit in with whatever style of battlefield I choose to plonk it onto.
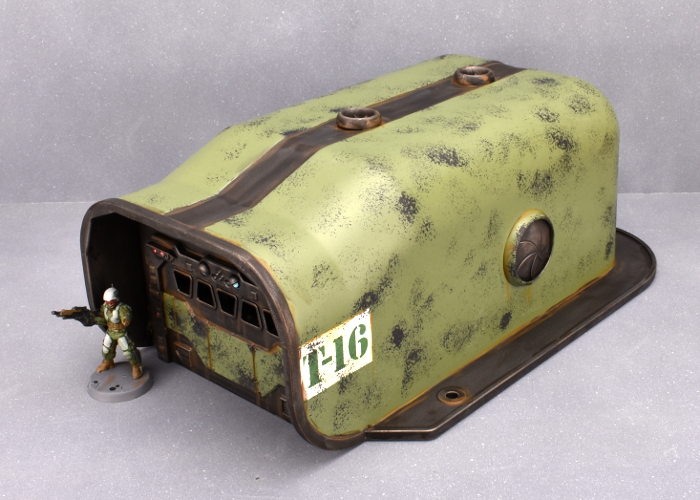
So, with some paint on, the barracks looks like this:
Put together your own sci fi barracks (of doom?) by picking up the plastic terrain sprues, along with the rest of the Maelstrom's Edge range from the webstore here.
Then pop on over to the Comm Guild Facebook group to show us what you're working on!
For other building ideas, modeling tutorials, army spotlights and conversion walkthroughs, check out the Hobby section of the Maelstrom's Edge website here.
Tags: buildings modeling terrain terrainsprue tutorial walkthrough
Maelstrom's Edge 2020 Roundup
Posted on Monday Dec 28, 2020 at 05:00pm in General
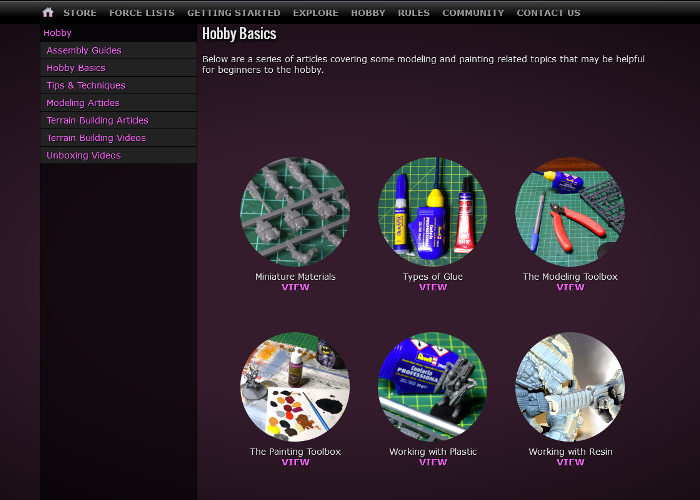
For the past several years, we've been sharing regular modeling articles on the blog, and this year was no exception. These have showcased different conversion ideas, kitbashes with other ranges, terrain projects, painting tips, and a new, ongoing series of hobby basics articles intended to help out beginners to the hobby. You can find all of our various modeling articles compiled in the hobby section of the Maelstrom's Edge website here.
With our usual monthly release schedule disrupted, we did still release a new model for the Artarian Remnant, inthe form of the Nimbus Battlesuit. We have plenty more in the pipeline, however, inluding the next round of reinforcements for each of the existing factions, and the first couple of units are underway for another new faction!
To give people some new modeling and tactical options to explore, Iain shared some homebrew rules for an Imperial Marine faction, introducing power-armoured super soldiers to the Edge, with downloadable rules cards in the Card Downloads section here, and a Summary of their weapons and special rules here.

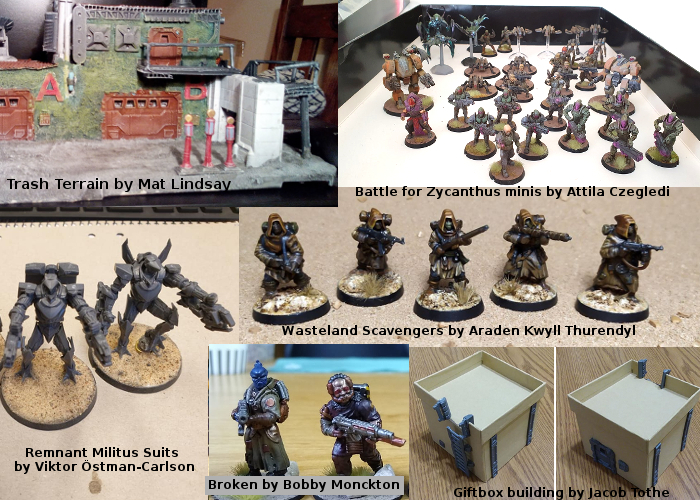
This year has also seen some great models shared by the community on the Comm Guild Facebook Group. The Group is a handy place to share your models, ask for hobby advice, or talk about the Maelstrom's Edge game. We would love to see more, so be sure to pop along and show us what you are working on!
So... what's next? The new year seems like as good a time as any to get things moving again. We have a whole host of new models in the pipeline, including new releases for all of the existing factions, and a brand new faction joining the chaos on the Edge!
Stay tuned!
For the full range of Maelstrom's Edge products, including the Battle for Zycanthus starter set, the plastic and resin model range, the ever-useful Maelstrom's Edge Terrain Sprues, novels and audiobooks, check out the webstore here.
For building ideas, modeling tutorials, army spotlights and conversion walkthroughs, have a look at the Hobby section of the Maelstrom's Edge website here.
Modeling Spotlight: The 2020 Annual Christmas Special!
Posted on Monday Dec 21, 2020 at 05:00pm in Tutorials
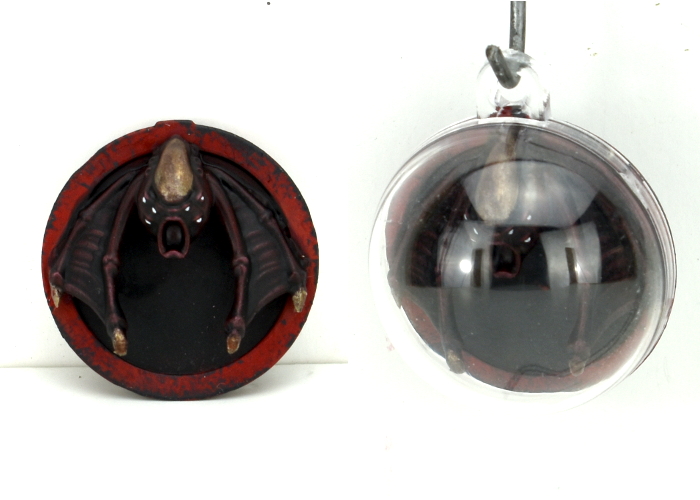
Christmas is fast approaching, and around this time each year I like to grab some bits and put together a tree decoration, just for the fun of building something different.
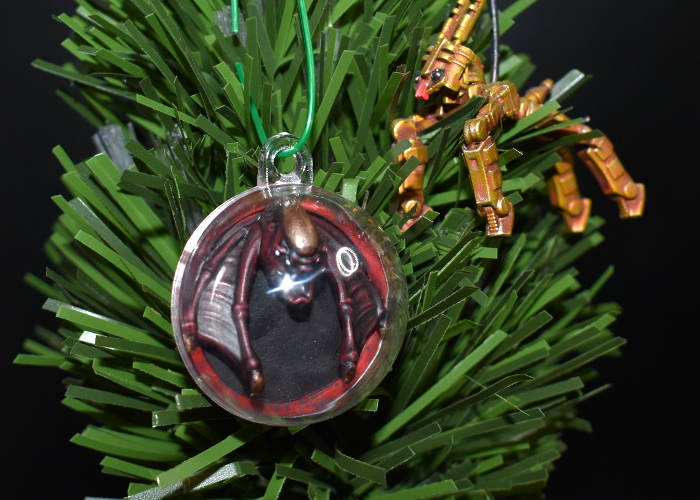
This year's decoration uses half of a plastic DIY bauble, an iris hatch from Terrain Sprue #2, and a Karist Minnow.
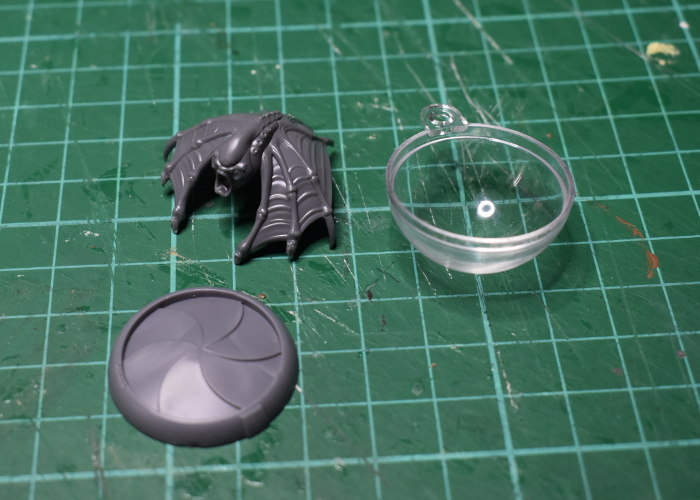
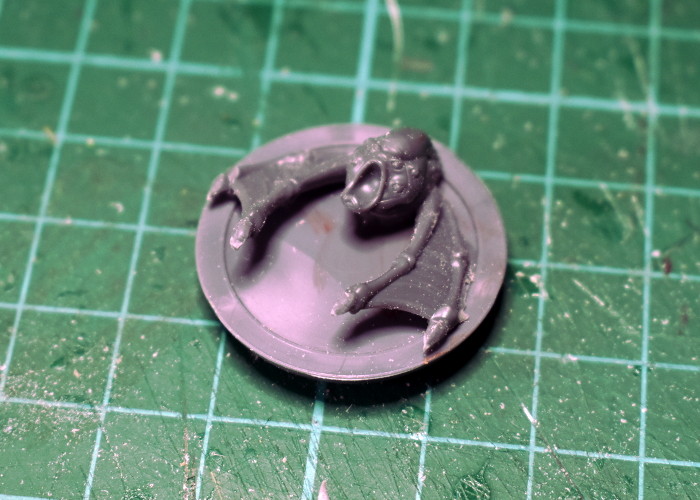
To get the minnow to fit inside the bauble half, I needed to remove a chunk of the body and wings. After trimming down the claws a little, I sat the front of the minnow inside the bauble and used a black paint pen to mark around the outside edge. Then I cut through the minnow along that line using a razor saw.
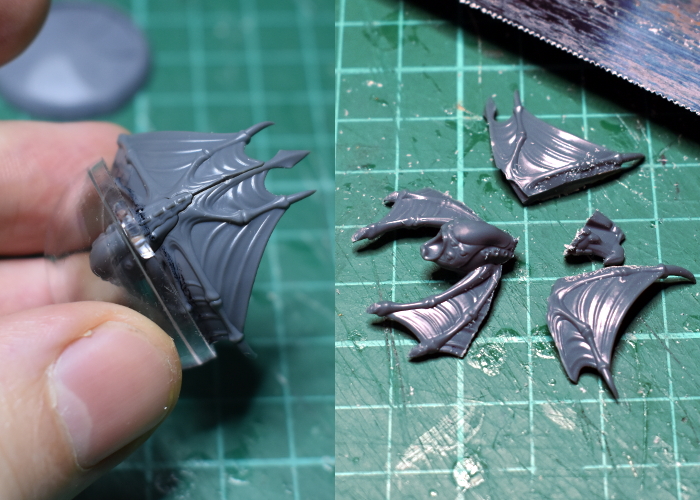
After a light sand to smooth down the cut, I glued the minnow onto the back of the iris.
For painting, I went with a suitably Christmassy red and gold, rather than the usual black and purple for the minnow. The whole thing (less the bauble half) was sprayed with Army Painter Dragon Red, and then the Minnow given several generous coats of Dark Tone. The back of the iris piece was painted black, and the isis petals with Plate Mail Metal and washed with Dark Tone. The red parts of the iris were sponge weathered using Vallejo Heavy Charcoal, and the gold painted with Coat D'Arms Bright Gold and washed with Army Painter Mid Brown. Once everything was painted, I glued the bauble half in place, and the decoration was ready to go.
Put together your own Christmas Bauble of Doom by picking up any of our plastic or resin kits from the Maelstrom's Edge webstore here.
Then pop on over to the Comm Guild Facebook group to show us what you're working on!
For other building ideas, modeling tutorials, army spotlights and conversion walkthroughs, check out the Hobby section of the Maelstrom's Edge website here.
You can also find the previous Christmas kitbashes here, here, and here.
Wishing you all a Merry Christmas, and health and happiness for whichever holidays you observe at this time of year!
Tags: christmas conversion modeling
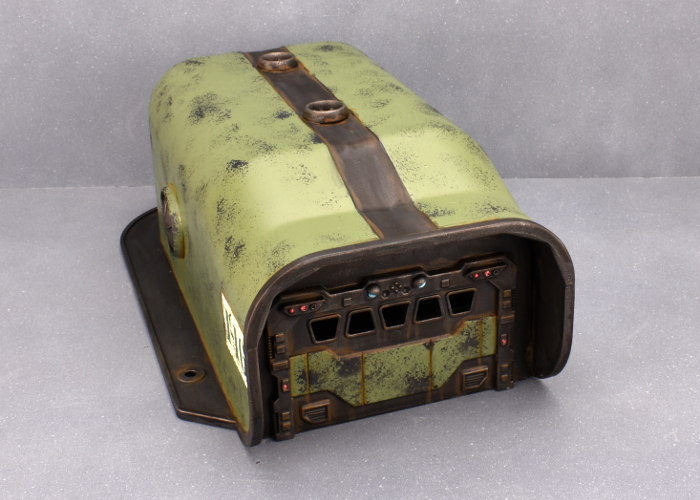
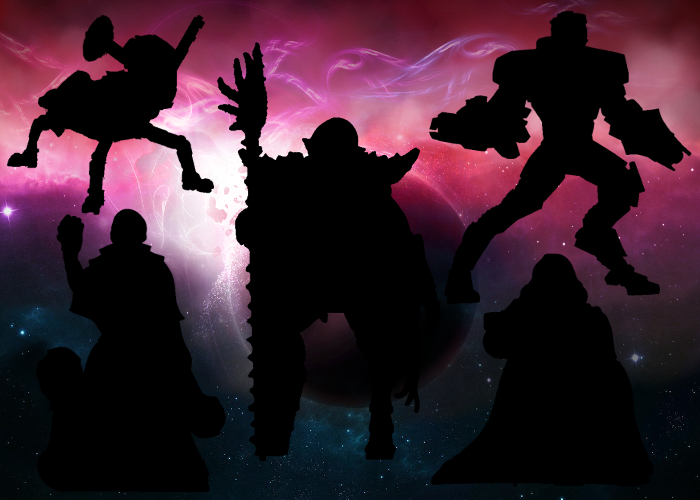
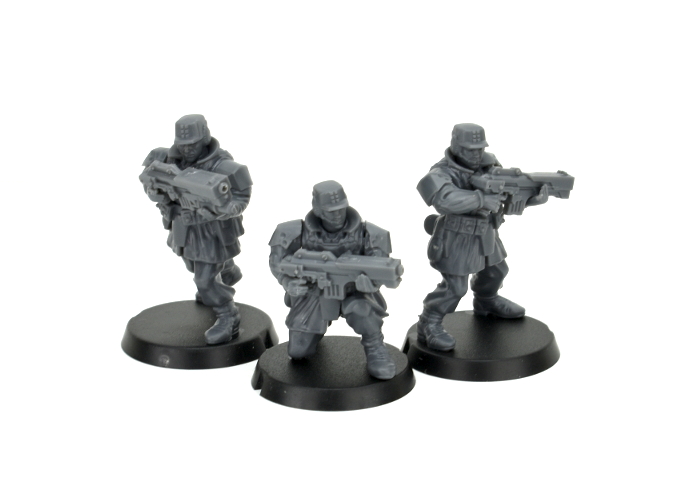
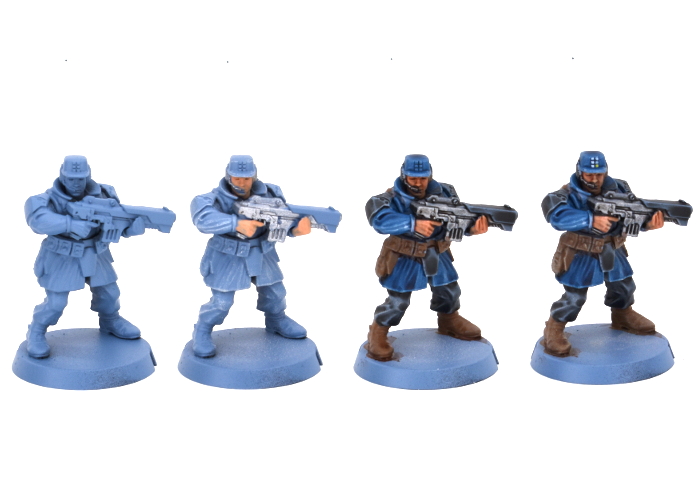
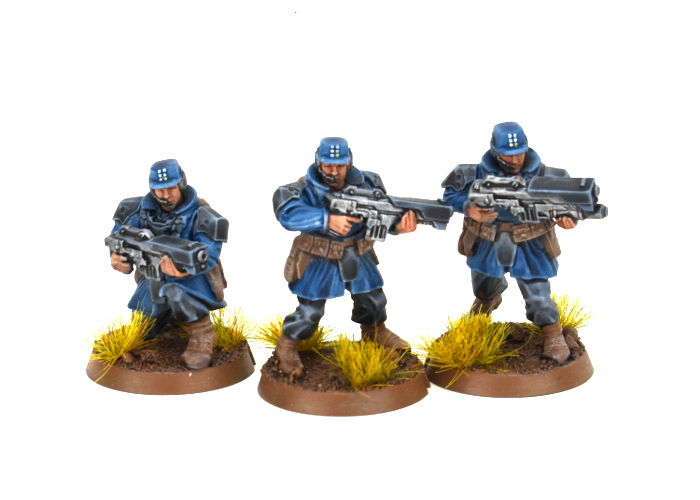
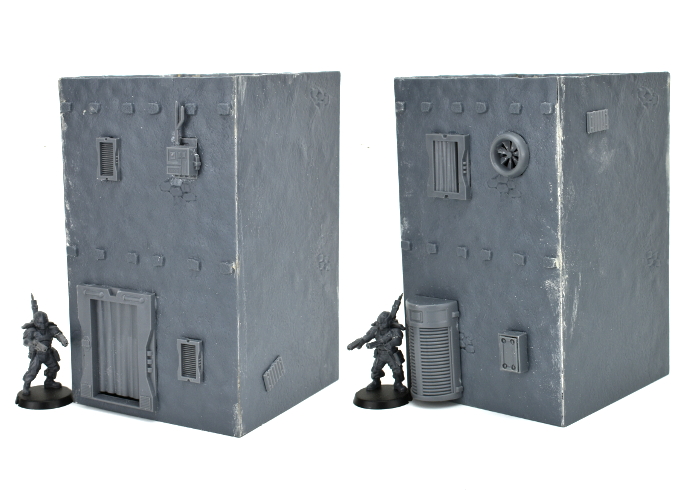
Edgepieces - a preview from the Maelstrom's Edge
Posted on Wednesday Dec 16, 2020 at 05:00pm in Models
Kitbash Spotlight: Greatcoat Contractors
Posted on Monday Dec 14, 2020 at 05:00pm in Tutorials
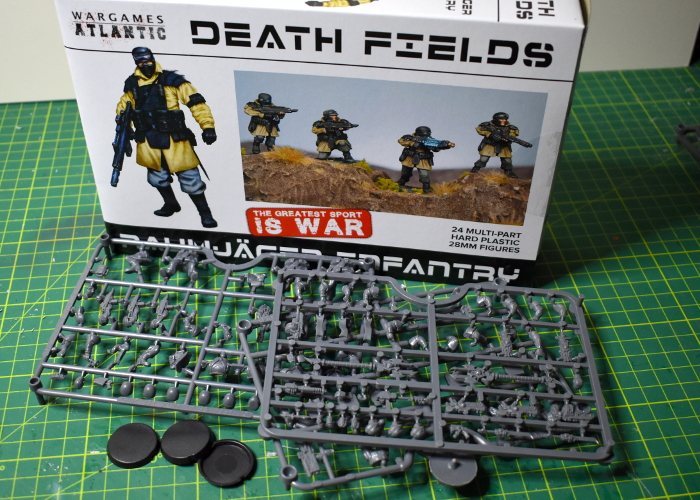
I'm continuing my stroll through the Wargames Atlantic model range. So far, I've made some short, alien scouts using Einherjar and heads from the Broken infantry sprue, and greatcoat-wearing Karist Troopers by combining Les Grognards and Karist parts. This week, I gave some Epirian Contractors the cold weather treatment, using the Raumjager Infantry box.
As with all of Wargames Atlantics' kits, the Raumjager are multipart, plastic models. To build my greatcoat Contractors, I used Raumjager bodies, and heads and weapons from the Epirian Contractor kit. The Contractors have rolled up sleeves, which didn't seem ideal with long coats, so I used the sleeved versions from the Faction Expansion Sprue instead.
As with the previous kitbashes, the one difficulty is with the Wargames Atlantic models having shorter neck attachments than the Maelstrom's Edge models. This is easily fixed by drilling out the neck slightly with a 2mm drill bit.
The Raumjager torsos are slightly wider than the Epirians but are close enough that everything still fits in place once arms and weapons are glued on.
I painted these using Army Painter paints, starting out with a base coat of Wolf Gray spray. I picked out the face and hands with Barbarian Flesh and metal parts with Plate Mail Metal. I added a layer of Dark Tone over the weapons, pants and armour, and Blue Tone over the coats and hats. I also went over the skin and leather parts with Mid Brown but, while this worked ok over the skin, didn't tint the leather parts as well as I wanted. So after this dried, I went back over it with Leather Brown. Finally, I highlighted the leather and skin with Skeleton Bone, and picked out the Epirian badge on the hats with white and yellow.
With basing done, the unit was ready for the table.
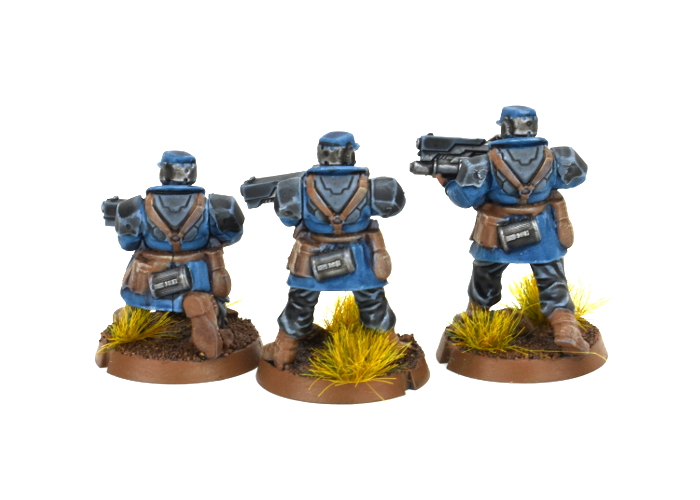
To lead them into battle, I also threw together a Bot Handler, using another Raumjager body and arms, head and uplink bar from the Epirian Handler kit.
Put together your own Epirian force of fashionably warm doom by picking up the plastic Contractor kit, along with the rest of the Maelstrom's Edge range from the webstore here.
Then pop on over to the Comm Guild Facebook group to show us what you're working on!
For other building ideas, modeling tutorials, army spotlights and conversion walkthroughs, check out the Hobby section of the Maelstrom's Edge website here.
Tags: contractors conversion epirian kitbash modeling spotlight
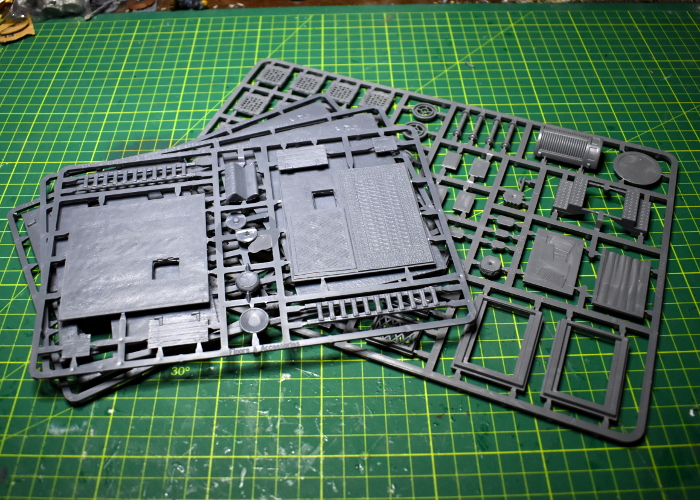
Terrain Spotlight: Converted Renedra Desert Buildings
Posted on Monday Dec 07, 2020 at 05:00pm in Tutorials
Browsing around online a few weeks back, my eye was caught by a neat looking new release from Renedra. They have a slowly-growing range of plastic historical building kits, and had just added to it with some two-story desert houses. While these are intended for historical settings, I thought it would be fun to see how they prettied up with the addition of some Maelstrom's Edge terrain sprue parts for a rustic sci-fi look. After a short and impatient wait for the post, I came up with this:
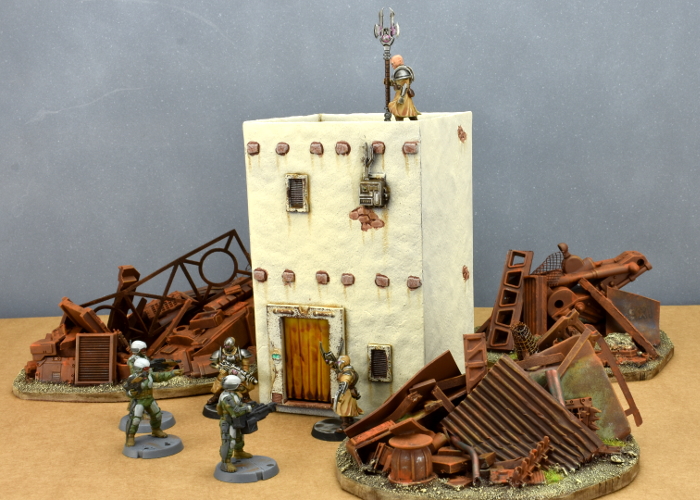
The pack I ordered includes parts for three houses. They all utilise the same floor and roof sprue, so are all the same width, just having different configurations of windows and doors, and differing overall heights. There are three sprues per building - the floor/roof sprue, and two identical wall sprues. To these, I added a Maelstrom's Edge terrain sprue.
The doorways on the buildings are quite small, and have timber doors that fit into them. That wasn't going to do here, though, so I took a doorway from the Maelstrom's Edge sprue and laid it over the existing doorway, using it as a guide to trace around with my hobby knife. Then, tracing gradually deeper cuts into that guideline, I carefully cut out the hole for the new doorway.
With the new door glued in place, I covered over the window cavities and the second doorway with various bits from the terrain sprue. As with the doorway, I used the curtained window as a guide to trace around in order to enlarge the original window hole.
I left the side walls largely as is, adding just a couple of corrugated patches so they weren't identical.
The floor/roof pieces were also left alone, although I replaced the wooden trapdoor in the roof with a metal one made from two strut panels trimmed to fit.
From there, I just had to glue everthing together. I also added a little filling putty along the corner seams and around the edge of the roof to neaten everything up a little.
With a quick coat of paint, it wound up looking like this:
Now to get the other two finished off!
Why not give it a go? You can find the Maelstrom's Edge terrain sprues for your own terrain re-imaginings, along with the rest of the Maelstrom's Edge range from the webstore here.
What are you working on? We would love to see your models and terrain in the Comm Guild Facebook group!
For other building ideas, modeling tutorials, army spotlights and conversion walkthroughs, check out the Hobby section of the Maelstrom's Edge website here.
Tags: buildings conversion modeling spotlight terrain walkthrough
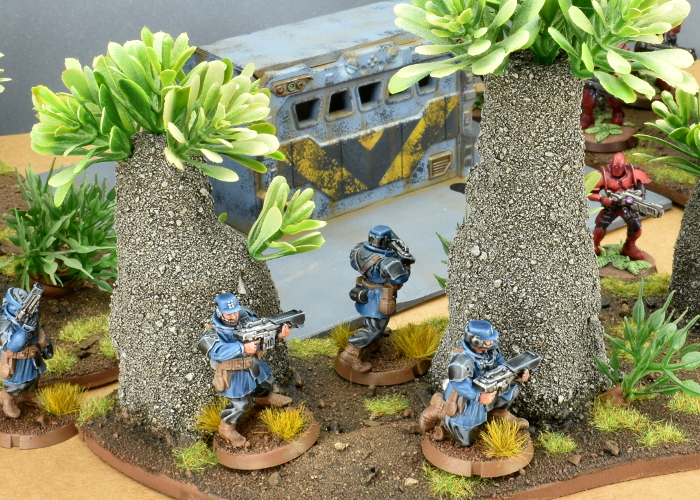
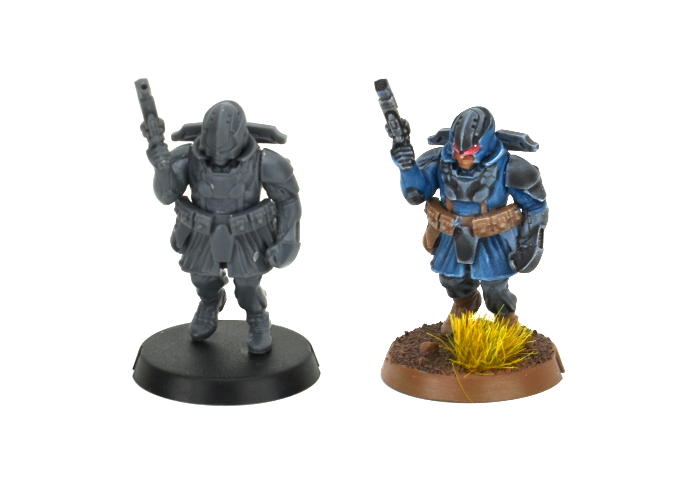
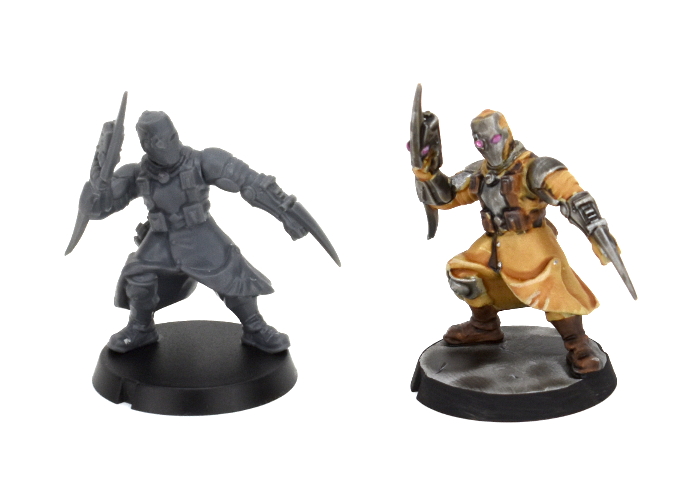
Unofficial Faction Rules - Trogyl Scouts
Posted on Monday Nov 30, 2020 at 05:00pm in Gaming
A few weeks ago, I shared a conversion article featuring some homebrew alien Trogyl Scouts, kitbashed from Wargames Atlantic Einherjar and Maelstrom's Edge Broken parts (find it here). While this was a fairly simple conversion, I was so happy with the results that it seemed a shame to leave them cooling their heels in the display case. So, I've worked up a rules card for them, adding them into a new (unofficial) 'Mercenary' faction!

Trogyl Scouts infiltrating a Karist encampment.
Mercenaries are an idea that I've been wanting to explore for a while now. As I've conceived them, rather than being a standalone faction in their own right, the Mercenary faction will allow the addition of less mainstream units that can be taken in a detachment drawn from another faction, although you will have to use up double the normal unit slots for the privilege. Need some more heavy firepower for your Broken force? Want something sneaky to back up you Epirians? Call in the mercs!
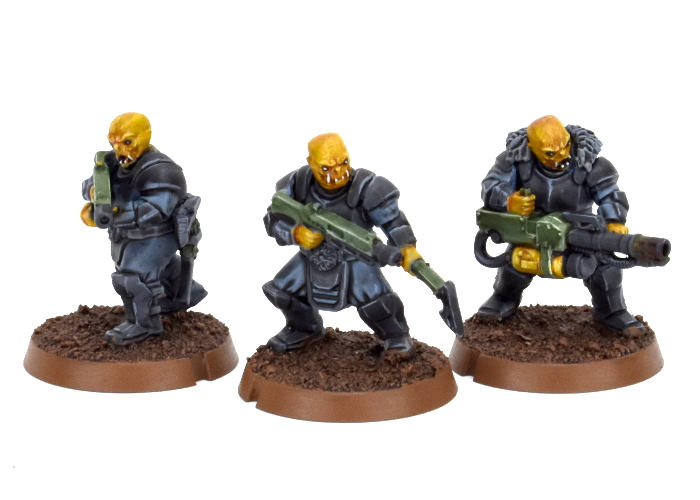
Trogyl Scouts.
The Trogyl are capable fighters, although lightly armed compared to some of the heavy hitters of the Edge. WIth their beam blastguns and ritual axes, they utilise their Scout ability to get in close to the enemy, while their Stealth rule allows them to make better use of available cover than most other troops. If a more long-ranged solution is called for, their blastguns can be swapped out for assault rifles or sniper rifles, and the unit also has the option to take a single heavier weapon, choosing from a grenade launcher, massive torch or plasma cannon.
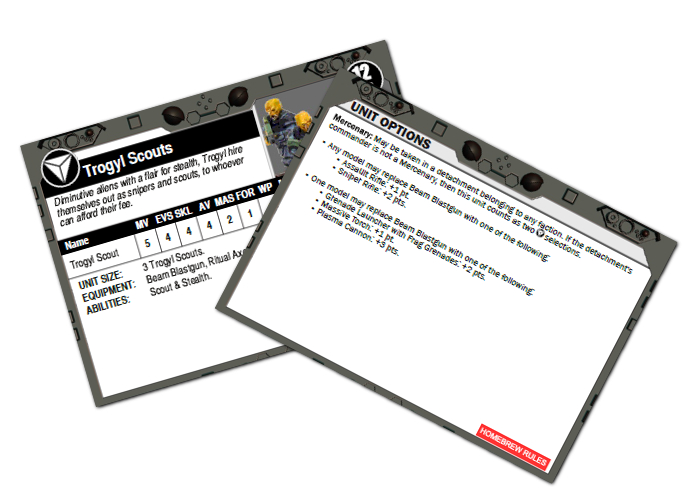
Trogyl Scouts rules card.
The unofficial rules card for the Trogyl can be downloaded here. The download also includes a summary card with the weapon and special rules that apply to the unit. This will be expanded out into a full summary page when other mercenary units join the fray, but for now that seemed excessive.
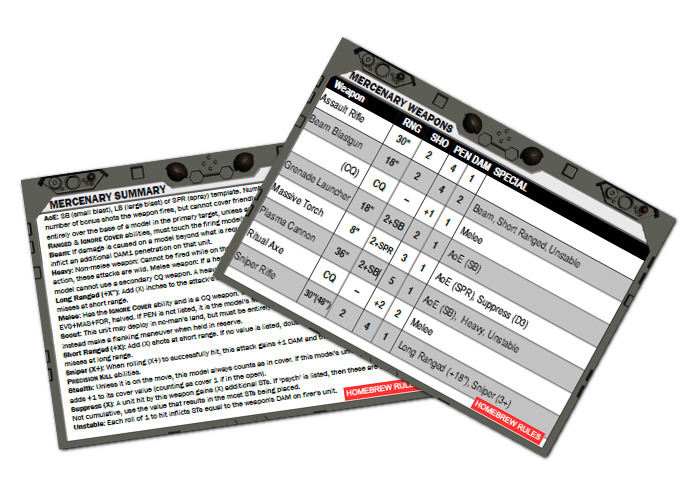
Trogyl Scouts Summary.
While your Trogyl are getting sneaky with it, you can share your battle reports, army building, or any feedback on these rules in the Comm Guild Facebook group!
If you're just getting started, or looking to expand your force, you can pick up the entire Maelstrom's Edge model range from the webstore here.
Happy Gaming!
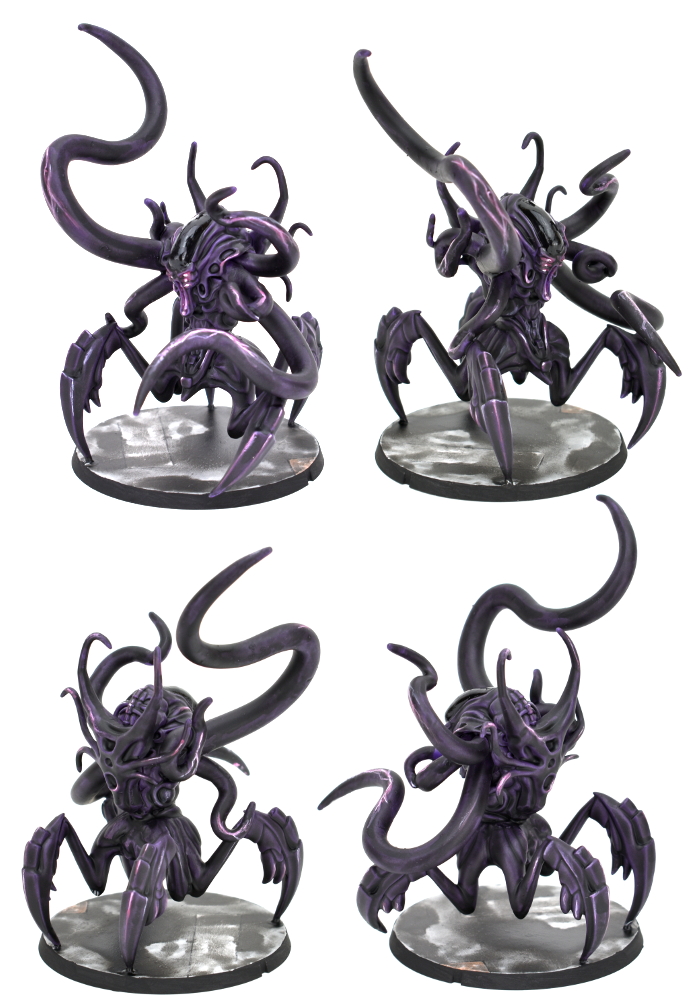
Painting Spotlight: Mature Angel Conversion
Posted on Monday Nov 23, 2020 at 05:00pm in Tutorials
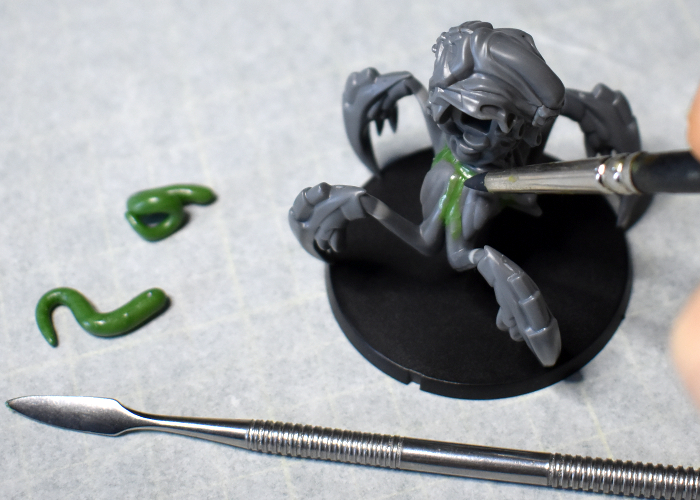
Last week, I added another Hobby Basics article to the Maelstrom's Edge website, covering some general information and quick tips for working with modeling putty. As part of that article, I wound up converting up a Karist Angel with more tentacles than is generally considered safe, and I couldn't resist taking the time this week to slap some paint on it. I've painted up a few different angels in the past, playing with different techniques each time to create a suitably inky-black and cybel-purple alien appearance for them. For this one, I decided to try something new once again, and broke out the Army Painter paints for a quick experiment. Here's a quick walkthrough of the painting process!
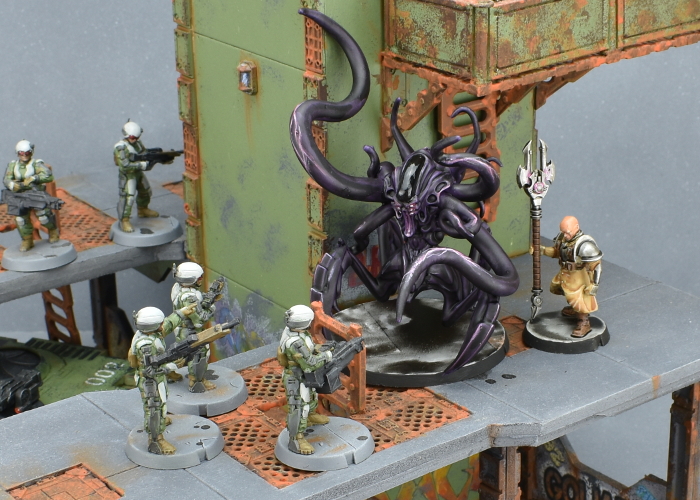
Before we get the paint on, here's a proper look at the converted model. It's based on the plastic Mature Angel kit, but with the claw arms modified slightly to form crab-like legs, and lots of tentacles added with 'green stuff' modeling putty.
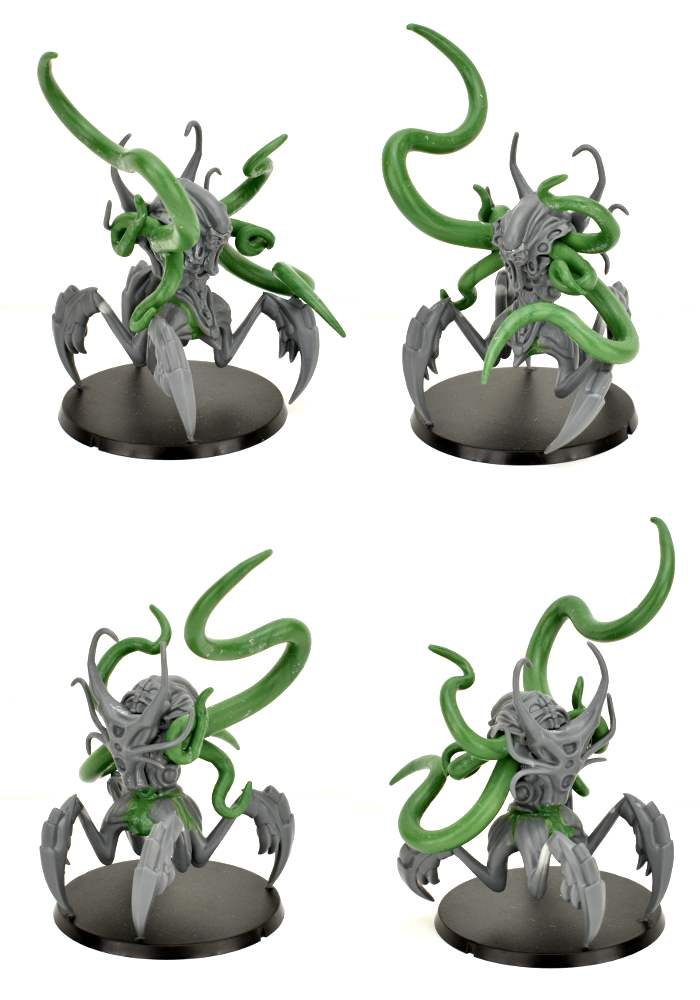
I gave the model an initial basecoat with white, to get a consistent colour for the next steps. Over that, I used Army Painter Alien Purple. Then, grabbing a nice, big brush, I painted three coats of Dark Tone over the entire model, leaving it to dry between each. This darkened everything up to an almost-black, while leaving hints of purple showing through.
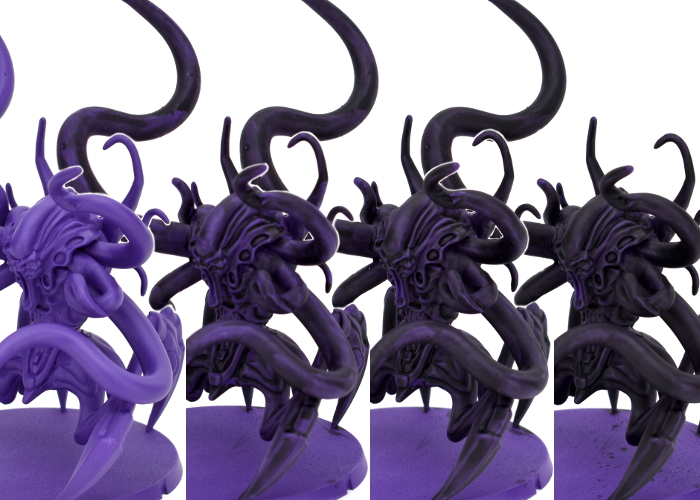
I then used a mix of Wasteland Soil, Warlock Purple and white to add highlights. I didn't highlight everywhere, as I didn't want to brighten the model up too much, and wanted the details to be slightly shadowy to accentuate the fluid nature of the Angel's body. I just added the highlights in places where they would add a little 'snap' to the model, accentuating specific features. I also painted in some lightning-like effects on the larger flat areas, to show the cybel energy coursing through the Angel's void gel, and painted the smooth top of the angel's head with black, and then a coat of gloss varnish. The base was painted similarly to my Greatcoat Karist Trooper kitbash, using Ash Grey and a generous layer of Dark Tone.
To paint up your own squidgy alien of tentacled doom, you can pick up the Mature Angel kit along with the rest of the Maelstrom's Edge range from the webstore here.
What are you working on? We would love to see your models and terrain in the Comm Guild Facebook group!
For other building ideas, modeling tutorials, army spotlights and conversion walkthroughs, check out the Hobby section of the Maelstrom's Edge website here.
Hobby Basics: Working with Putty
Posted on Monday Nov 16, 2020 at 05:00pm in Tutorials
Time for some more hobby basics! This week's modeling article takes a brief look at modeling putty - what it is, and what you can do with it. You can find the article here!
Stay tuned for more!
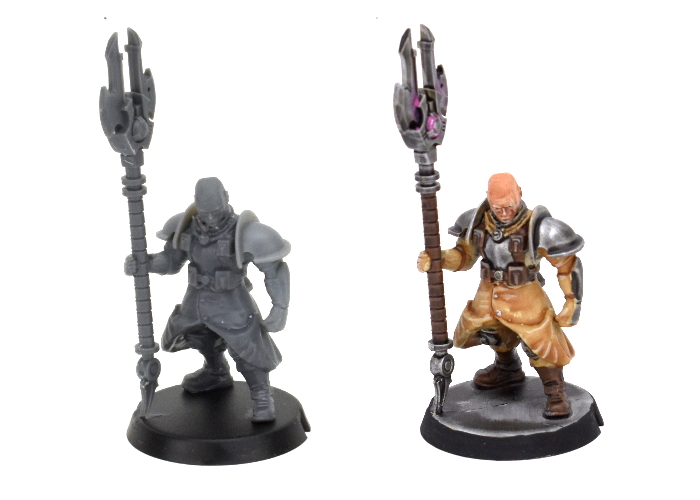
Kitbash Spotlight: Greatcoat Karists!
Posted on Monday Nov 09, 2020 at 05:00pm in Tutorials
A couple of weeks ago, I shared a kitbash of some Trogyl Scouts - alien hunters based on the Wargames Atlantic 'Einherjar' (space dwarves) kit with alien heads from the Maelstrom's Edge Broken plastics. Well, this week I threw together another unholy fusion of Wargames Atlantic and MEdge kits, to create some Karist troopers in greatcoats!
When I bought the Einherjar kit, I couldn't resist also picking up a box of 'Les Grognards'. This is a plastic kit that comes with a slew of different heads to allow you to create a number of different, laser-gun-toting, sci-fi soldier regiments. It also includes the aforementioned laser guns, and a range of heavy weapons, but I wasn't really interested in those here.
As with the Trogyl, assembly was fairly straightforward, using bodies from Les Grognards, and heads and arms from the Maelstrom's Edge Karist Trooper kit. The heads for the Grognards only have short, stubby neck attachments, so I used a drill to enlarge the neck cavities to accommodate the Karist heads.
From there, it was just a matter of gluing everything in place. The torsos match Karist Trooper bodies in width, so the arms went on with no argument.
Regular readers of my articles will no doubt have noticed that I tend to use whatever paints I have on hand, but just for something different I thought I'd try sticking to a single brand, and painted these up using Army Painter paints exclusively. I started with a basecoat of Skeleton Bone spray, and then went over the armour plates and weapons with Plate Mail Metal, and the boots, belts and webbing with Leather Brown. Over that, I applied a wash of Light Tone to the bone areas, and Dark Tone everywhere else.
To finish up, I added some highlights to the coat and leather using some more Skeleton Bone, and picked out eye lenses and weapon energy blisters using Warlock Purple and white. The bases were painted with Ash Grey, and then given a generous wash of Dark Tone before I painted the edges with black.

Not content with basic troopers, I also had a tinker with the Faction Expansion sprue to make a greatcoat-clad Praetorian, and also plundered a Shadow Walker sprue to add in some teleporty, assassiny backup!
Now I'll have to see about expanding this little starter force into something table-ready!
Put together your own Karist force of zealoty doom by picking up the plastic Trooper kit, along with the rest of the Maelstrom's Edge range from the webstore here.
Then pop on over to the Comm Guild Facebook group to show us what you're working on!
For other building ideas, modeling tutorials, army spotlights and conversion walkthroughs, check out the Hobby section of the Maelstrom's Edge website here.
Tags: conversion karists kitbash modeling painting spotlight walkthrough
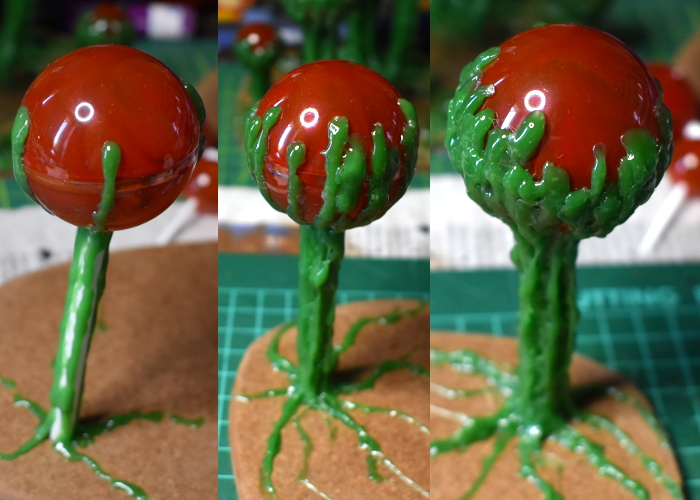
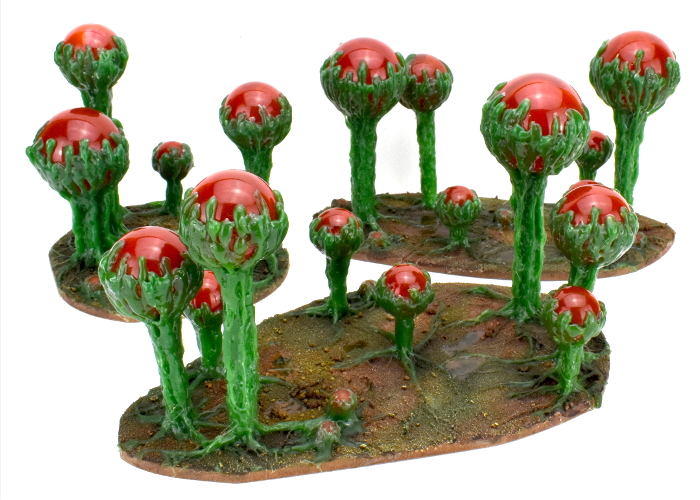
Terrain Spotlight: Hot Glue & Christmas Bauble Alien Trees!
Posted on Monday Nov 02, 2020 at 05:00pm in Tutorials
I've been having a lot of fun lately coming up with different ways to make trees that look like they belong on alien worlds. You might have seen my previous articles with silicon aquarium plant trees, or my boab-inspired expanding foam trees. This week, I drew some inspiration from the Titan AE animated movie, working up some forest bases made from Christmas baubles and coloured hot glue!
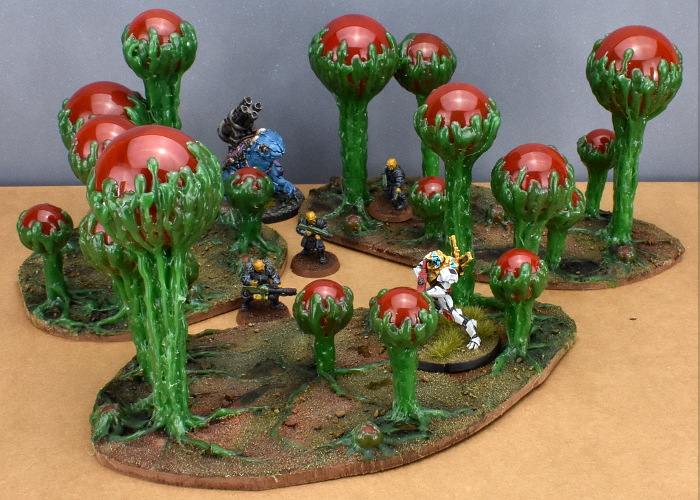
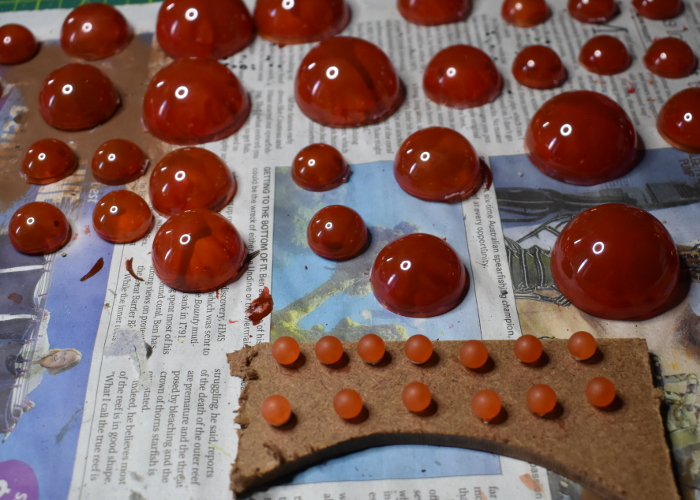
The basic idea with these is a plant that has a ball-shaped sac, filled with lighter-than-air gas of some kind (the cartoon plants they're based on are highly explosive!). To make these, I sourced a bunch of clear, plastic Christmas bauble shells in a range of sizes from Ali Express. These didn't go down as small as I wanted, so for the smallest size I wound up with some 8mm solid plastic balls.
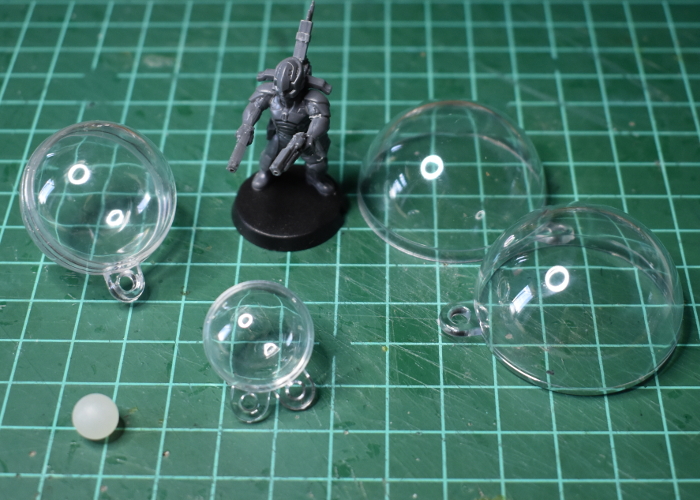
To create the gaseous effect, I wanted the sacs to be mostly opaque, with swirling colour and just a hint of translucency. So, after trimming off the hanging tabs, I painted the insides of the baubles with Citadel Gryph-Hound Orange Contrast, and then dabbed in some blobs of Mig Blood Red, letting this run wherever it liked through the orange. For the solid balls, I just painted on a coat of the orange Contrast.
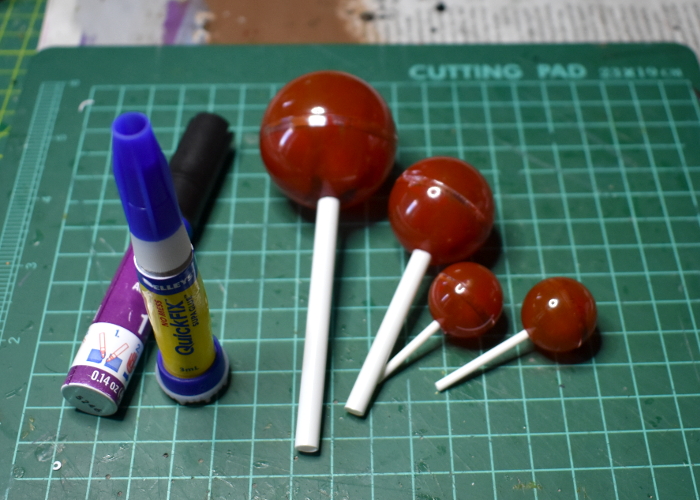
Once the baubles were dry, I fitted the halves together, and then used some superglue to stock different length stems onto them, making sure the joint lines on the baubles were running more or less horizontally. For the most part, the larger the bauble, the longer the stem it got, although I did mix this up a little here and there to keep things a little chaotic and organic.
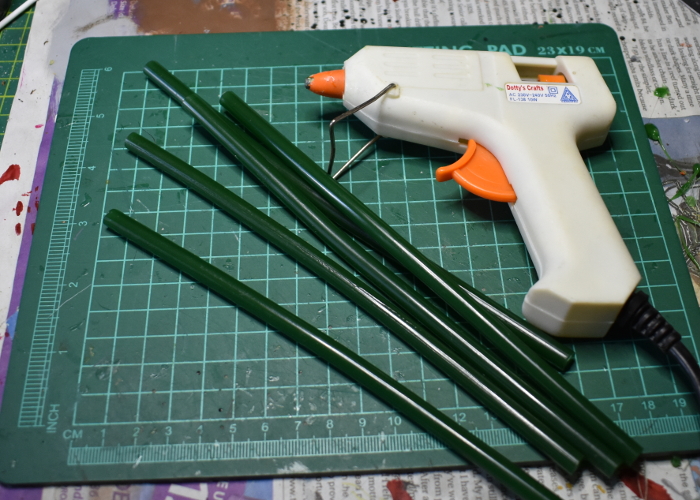
For adding the trunks, I used some green hot glue, also from Ali Express, although as with the baubles you might be able to find this in local craft stores, depending on where you are in the world.
A note on safety: If you plan on having a go at this, I feel compelled to point out the obvious: Hot glue is hot! Be careful to keep fingers away from the melty end of the glue gun, and avoid getting drips of glue onto your skin, as it can burn. Also, use in a well-ventilated area!
After gluing the stem to a hardwood base, I ran a line of glue from about two-thirds of the way up the bauble, all the way down, and then outwards to form a root shape along the top of the base.
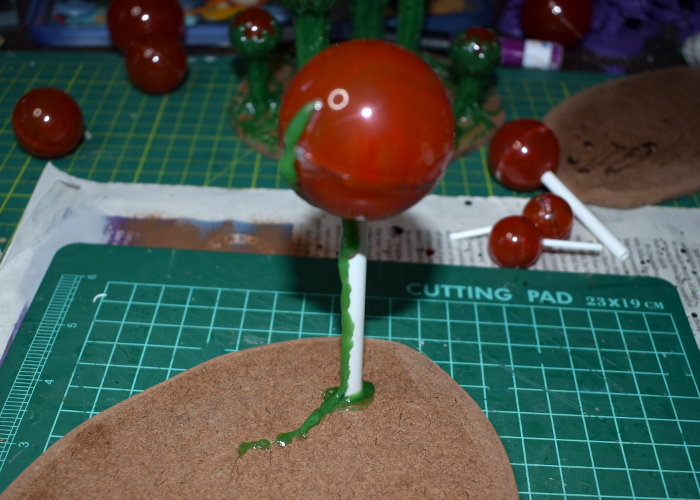
From there, I added successive strips down the length of the tree, keeping some space between each new strip and the immediately preceding one, to give them time to cool and set. The aim was to coat all of the outside of the stem, and most of the lower two-thirds of the bauble. Some parts of the lower half of the bauble show through the glue for effect, and to help light shine through the finished tree top, but the glue completely covers the joint line to hide it.
Here's a video of the gluing in process!
With the first tree done, I glued the next stem to the base, and repeated the process, continuing until I had a good number of trees on the base. There's a balance between having enough on there to be convincing as a 'forest' base, while still leaving enough room to position models. When in doubt, always err on the side of playability, as this is supposed to be gaming terrain, after all!
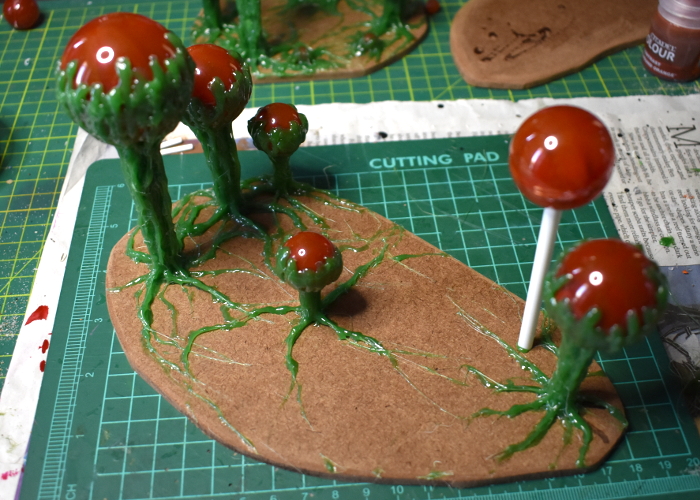
The small balls were used to create new growth without much height to it. For these, I glued the ball directly to the base, and then added blobs of glue around the circumference.

I decided on a boggy base to go with these trees, so started out by gluing some fine sand on with PVA glue, leaving the tree roots exposed. I also left some patches of the hardwood exposed, to make a few open puddles.

With the PVA dry, I painted over the sand with a mix of Army Painter Mid Brown and Green Tone Quickshades. You could paint the tree trunks to cover over the glue if you want, but I decided I liked the shiny green on them, so left them as is.
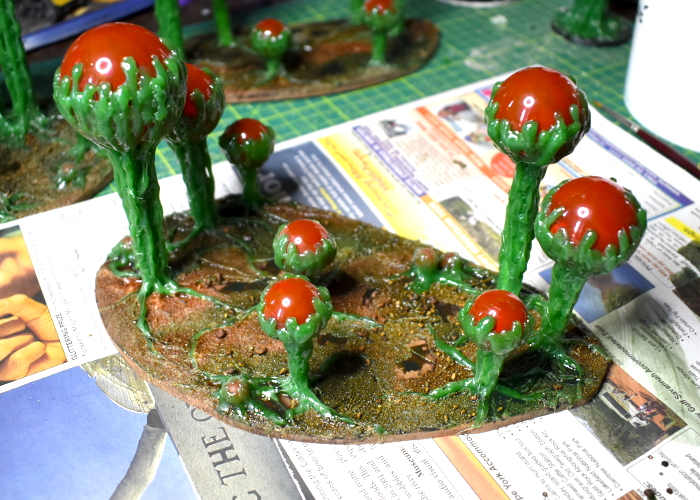
Finally, I added a light drybrush of Coat D'Arms Putrid Green over the sand, and painted some gloss varnish onto the 'puddle' areas. The end result looked something like this:
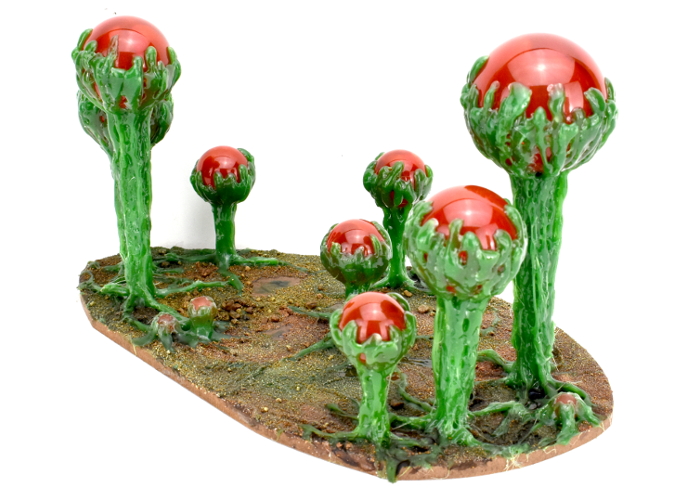

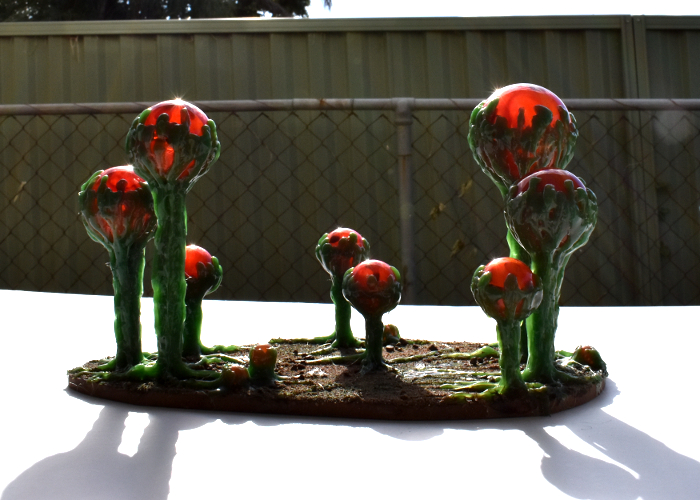
And a shot out in the sun, to show the light shining through the gas sacs!
Feel like giving some alien trees a go? Be sure to share what you come up with on the Comm Guild Facebook group!
Pop on over to the Maelstrom's Edge webstore here to find our plastic and resin model range, including the ever-popular Maelstrom's Edge terrain sprues.
And for other building ideas, modeling tutorials, army spotlights and conversion walkthroughs, check out the Hobby section of the Maelstrom's Edge website here!
Tags: scratchbuilding spotlight terrain trees tutorial walkthrough
