Game Primer: Narrative Missions
Posted on Thursday Jul 29, 2021 at 01:18am in Gaming
To create more of a level playing field, competitive missions require players to pick their forces without knowing what their mission will be and whether their force will end up being the attacker or defender. In truth, however, a force is almost always hand-picked and deployed to complete a specific mission. Narrative missions represent the perfect opportunity to recreate this dynamic more accurately, and in keeping with this idea, players select their forces [i]after[/i] choosing the mission, rather than before. This can be done to allow each player to select their own ideal force, or can be a co-operative exercise with players agreeing on the sort of forces that would be appropriate for the mission. The mission itself would usually be chosen by the players, although there's always the option to make it a random selection if you are not too attached to playing any specific type of battle.
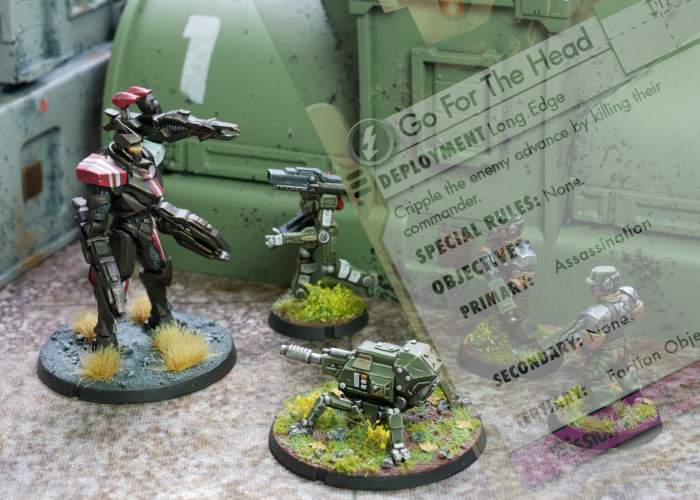
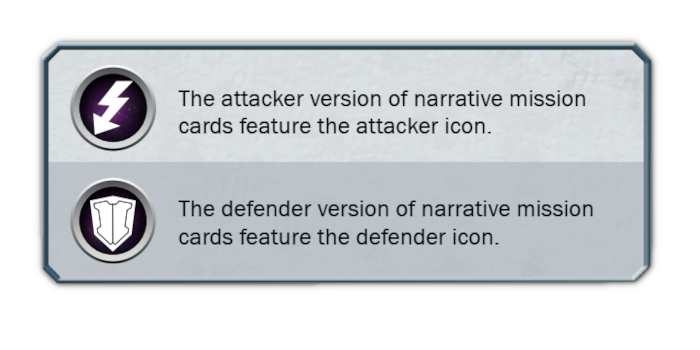
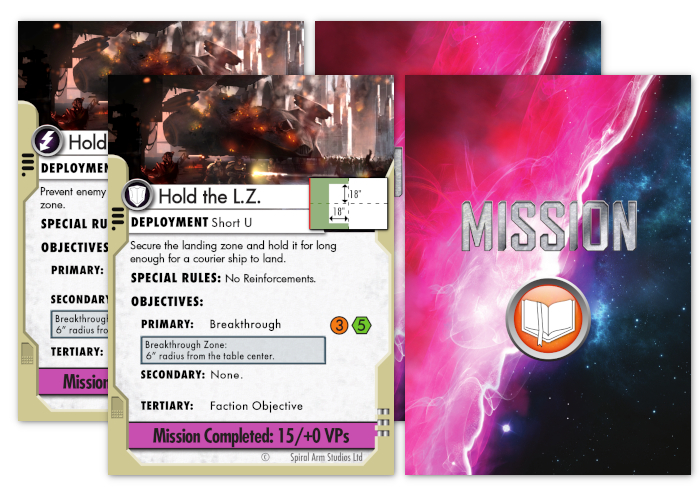
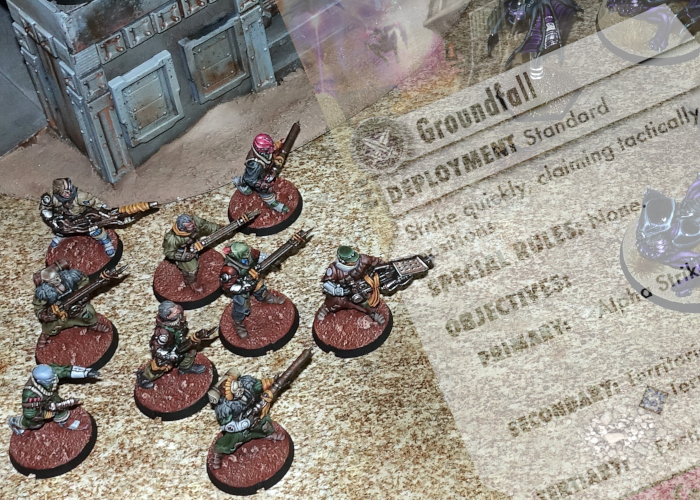
The Narrative mission cards are mostly the same as for Competitive missions, except that there are two cards for each mission - an Attacker card and a Defender card. The mission objectives listed on each card apply only to the player with that card. So one player's Primary Objective may be to assassinate the enemy commander, while the other player has to capture objectives around the board. There may or may not be Secondary missions in play, and the player's Faction objective will also always apply as a Tertiary objective.
Because Narrative missions often use non-standard deployment, the cards also include a diagram showing the shape and position of the deployment zone for each player. As with Competitive missions, the players roll off to see who chooses deployment zones with the winner choosing an appropriate zone and their opponent taking the corresponding zone from their card to suit. For example, if the deployment zone is 'Long Edge' for both players, the winner of the roll would choose either of the long board edges and their opponent would take the other.
As with Competitive Missions, there may be mission special rules that apply. These may restrict Reserves or Reinforcements, or impose other restrictions or bonuses on the force. In Narrative missions, however, these only apply to the player if they appear on their card. So one player may have the 'No Reserves' rule preventing them from keeping units off the table at the start of the game, while the other player may be free to reserve units if they wish.
Narrative missions excel for use in campaigns: where the result of one game has some bearing on which mission is used for the following game. There are a near infinite number of ways to implement a campaign system, though, and so while we intend to produce various campaigns for you to use in the future, players should feel free to let their imagination run wild coming up with custom campaign missions and different ways to link their games together.
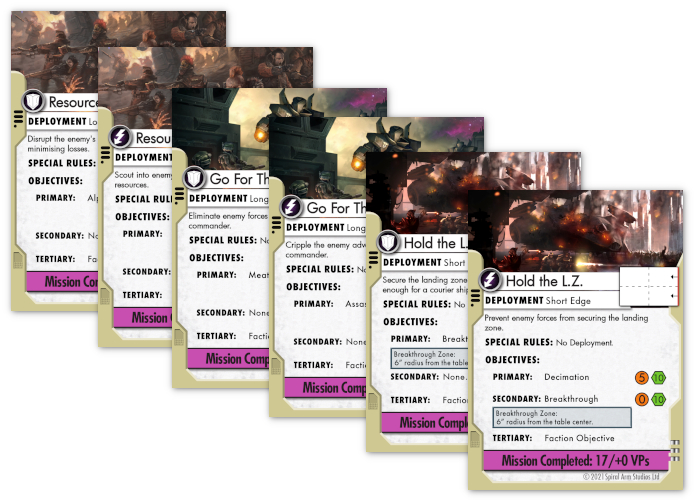
To get started with your Narrative journey, we've created three Narrative missions - "Hold the L.Z.", "Go For The Head" and "Resource Grab" - which you can download now from the 'Rules' section of the Maelstrom's Edge website here. Just download the PDF, print and cut out the cards, and you're good to go. We will release new narrative cards periodically, to give you something new to wage war over.
Note that you will also need the Objective and Faction Objective cards, which can also be downloaded in PDF form. The Objective cards are also included in the Battle for Zycanthus starter set.
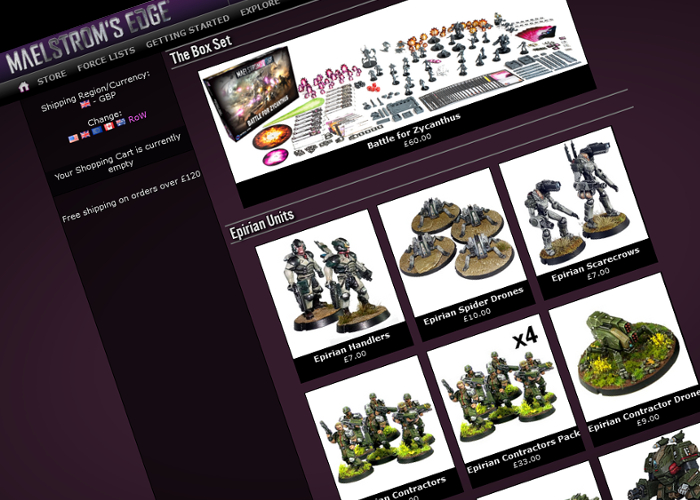
Get your tactical hat on and order the Battle for Zycanthus set, along with the rest of the Maelstrom's Edge range, from the webstore here! Free shipping applies to qualifying orders - check your cart for details.
If you have any questions on Narrative Missions, or any other aspect of Maelstrom's Edge gameplay, feel free to pop in to the Comm Guild Facebook group here.
2021 Mid(ish)year Roundup!
Posted on Monday Jul 26, 2021 at 06:00pm in General
Iain continued to smoosh things together in the workshop, working through a range of the usual sorts of modeling articles - kitbashes of kits, buildings made from bits and pieces and just generally getting paint all over everything in sight. You can find all of these modeling articles in the Hobby section of the Maelstrom's Edge website here.
On the new release front, we've given Epirian Contractor units some support with a new resin drone, and launched the Spiral Arm Revolutionary Army as a subfaction for the Broken, with the addition of plastic kits for a Revolutionary Captain and a cam-cloaked sniper. We also picked up the PDC Gaming heavy weapons carriage - a plastic kit that lets you build a range of different mobile weapons platforms, for those gamers looking for some heavier firepower. You can find all of these in the Maelstrom's Edge webstore.
Our biggest reveal for this year so far was, of course, the launch of the kickstarter for StackaRack - a plastic, customisable paint storage system! Our Kickstarter funded successfully, and we're currently hard at work finalising the design work so that we can get it sent off to our plastics production people. If you missed the Kickstarter, you can find out more information and follow our progress on the StackaRack Facebook page here.
So... what's next?
In the coming months, we have new plastic model releases for the Karists and Remnant, a couple of resin upgrades for the Remnant Militus kit, and a whole new range of bases to add to the webstore. There's also a new faction - our fifth! - to crawl forth from the destruction of the Edge. On top of that, we're still beavering away behind the scenes on version 2 of the Maelstrom's Edge rules. Our original target had to be pushed back significantly thanks to the pandemic, but we're aiming to have the Beta version of the rules out before the end of this year. If you want to get in early, you can find a very early draft of the new rules in the development thread on the DakkaDakka forums here.
So much great stuff still to come - Stay tuned!
For the full range of Maelstrom's Edge products, including the Battle for Zycanthus starter set, the plastic and resin model range, the ever-useful Maelstrom's Edge Terrain Sprues, novels and audiobooks, check out the webstore here.
For building ideas, modeling tutorials, army spotlights and conversion walkthroughs, have a look at the Hobby section of the Maelstrom's Edge website here.
What is the Maelstrom?
Posted on Wednesday Jul 21, 2021 at 06:00pm in Fiction

The Maelstrom was strongly attracted to large masses, consuming them swiftly and spreading along the large and stable cybel tunnel networks that linked them. The Maelstrom travels slowly as it expands through empty space, lacking anything to react with, but moves more rapidly as it reaches a star system and begins to react with the mass contained within. This gives the Edge a chaotic, churning appearance at large scales, reaching ahead in some places like a solar flare, and curving around empty areas far more slowly. Some worlds considered safe from the Maelstrom for centuries suddenly come under threat within decades, while other worlds left to fend for themselves in the wake of imminent destruction are given last minute reprieves as the Maelstrom curls around them towards a richer target, buying them a few more years, but cut off from any possibility of escape.
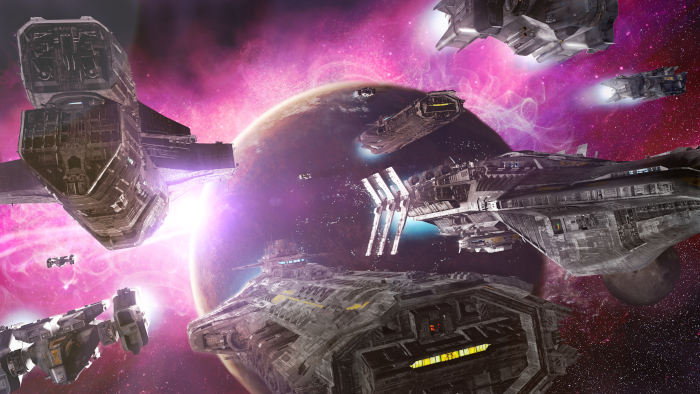
What remains of mankind is trapped between the Maelstrom’s Edge and the rim-ward tip of the Spiral Arm. With the gulf between galactic arms untraversable, the only direction to go is rim-wards, away from certain death into an uncertain future. There is some hope. Many worlds still hundreds of light years from the Edge are unaffected by the disaster. Further towards the rim of the galaxy, entire civilisations of alien and human cultures still trade, invent new technologies, terraform worlds, and live their lives as it used to be, but as stellargees fleeing the Maelstrom begin to arrive, the inhabitants of these worlds too begin to look over their shoulders at what’s to come.
You can find out more by downloading a free PDF version of the Maelstrom's Edge rulebook here. If a physical book is more to your taste, grab the Battle for Zycanthus starter set or any of our novels or audiobooks from the webstore here! Free shipping applies to qualifying orders - check your cart for details.
Meanwhile, if you have any questions on the Maelstrom's Edge background or gameplay, pop in to the Comm Guild Facebook group here.

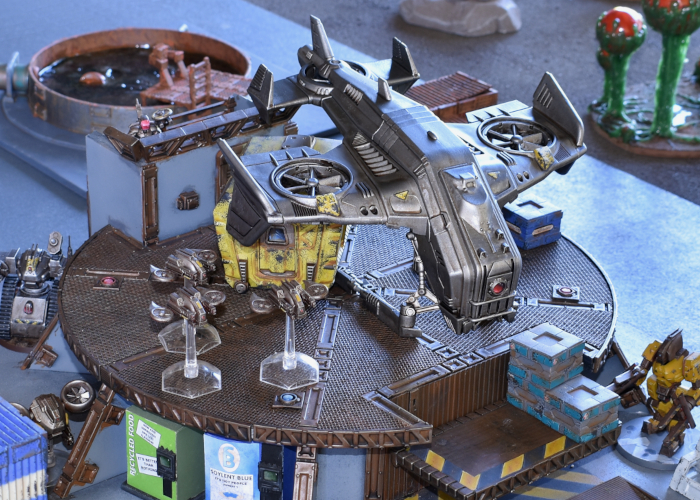
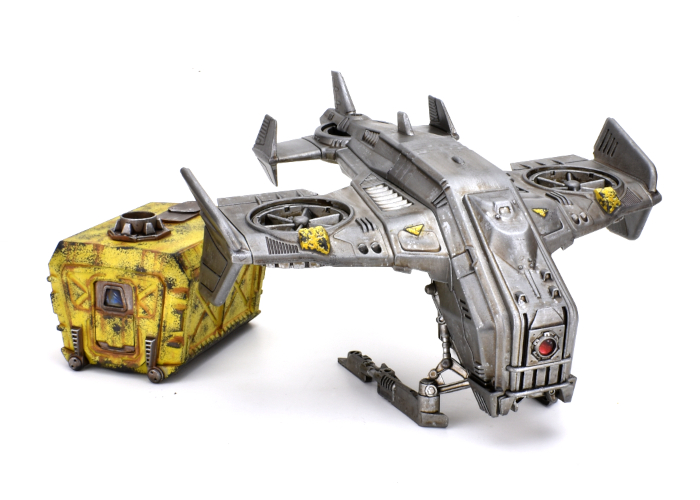
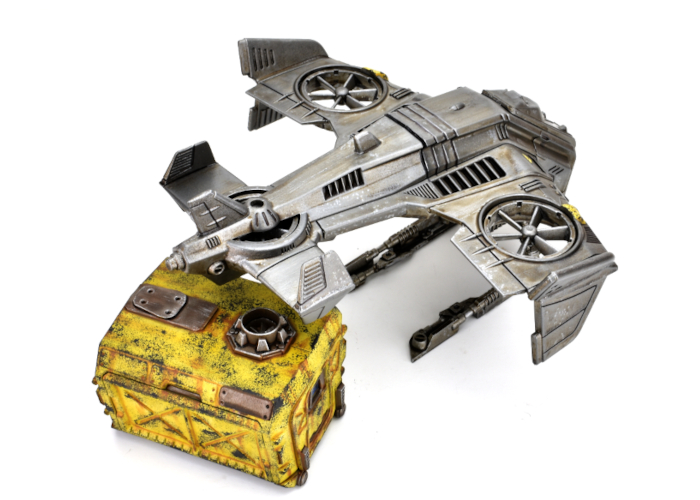
Modeling Spotlight: Kitbashed Pegasus Heavy Cargo Drone
Posted on Tuesday Jul 20, 2021 at 06:00pm in Tutorials
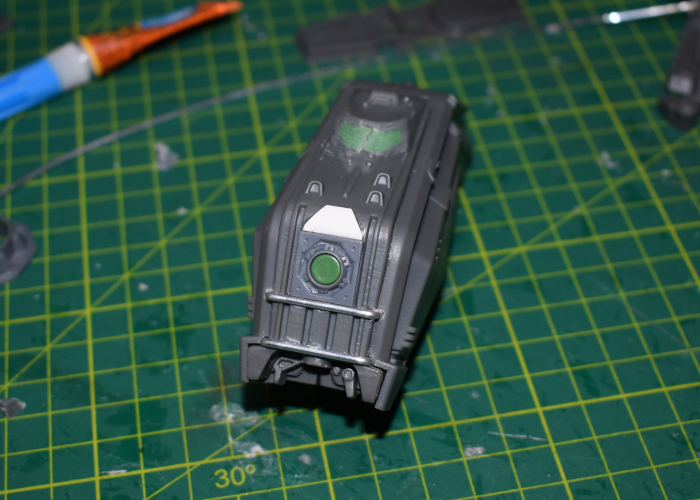
Time to hack something up, just because we can! I've had my eye on the Hornet dropship from Mantic's Warpath game for some time, as its general shape feels similar to the Epirian Firefly drone, just scaled up. So, I decided to take one and turn it into a heavy cargo drone to support Epirian forces behind the lines! Read on to see how it was built.
With its design already including wing-mounted turbines, the main alteration required was to make the front of the Hornet look like a standard Epirian drone. I used a small pipe fitting from the first Maelstrom's Edge terrain sprue for a sensor lens housing. For the lens itself, I rolled out some 'Green Stuff' putty into a thin sheet and used the pipe fitting as a stamp to cut out a circle. I also took a couple of pieces of aluminium rod and bent them to fit across the front section on the Hornet, to form the rectangular grill that Firefly and Spider drones have under their sensor lens.
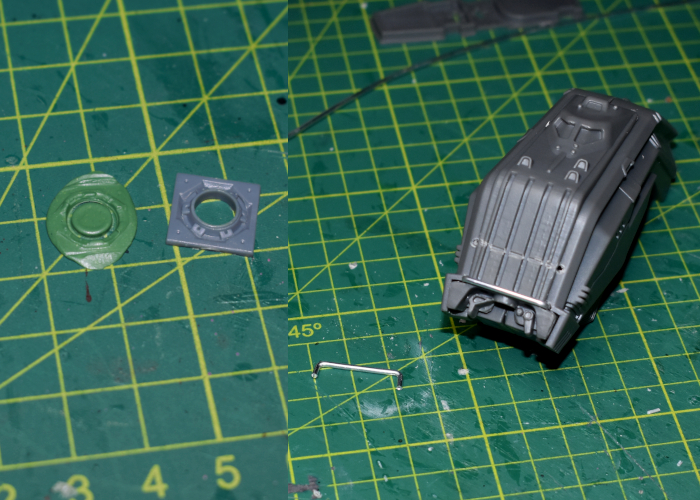
Once the Green Stuff was fully cured, I trimmed away the excess, and glued everything into place on the front of the Hornet. The Hornet's protruded above the lens housing, so I covered over it with a thin piece of plasticard. I had originally intended to cut off the cockpit bulge and seal over it with plasticard, but decided it would be easier to use some putty to fill in the windscreen recesses.
As this drone was intended as a scenery piece rather than for gaming, I decided to keep the cargo container as a separate piece. There is a doorway on one end with no door, as this normally sits up against the door on the back of the Hornet cockpit section. I took a door from the terrain sprue and trimmed it down to fit into the opening, adding a piece of plasticard to fill in the window. I also wanted to add some detail to the top of the container. Taking a fan from terrain sprue #2, I trimmed it down to fit inside the large pipe fitting from terrain sprue #1.
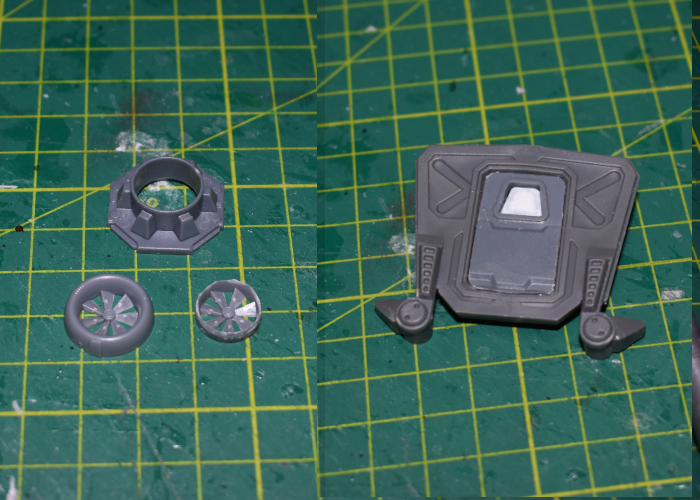
I glued the fan assembly onto the top of the container to line up with the circular vent on the underside of the Hornet's fuselage, and added some plasticard shaped to match the fuselage's trapezoid hatch.
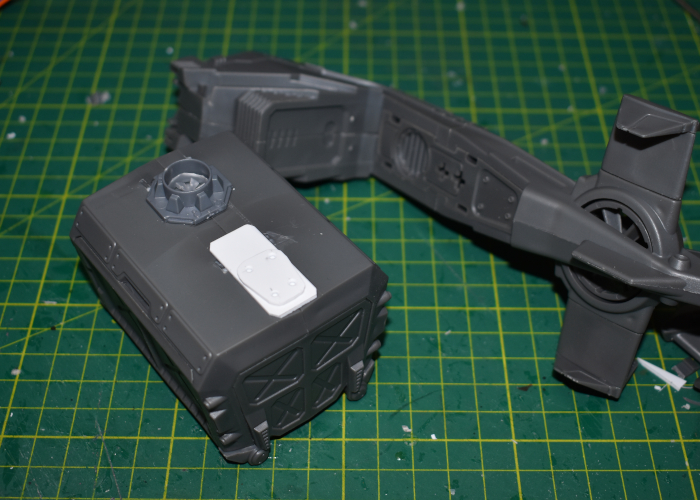
With everything else just assembled as normal, the new drone was ready for paint!
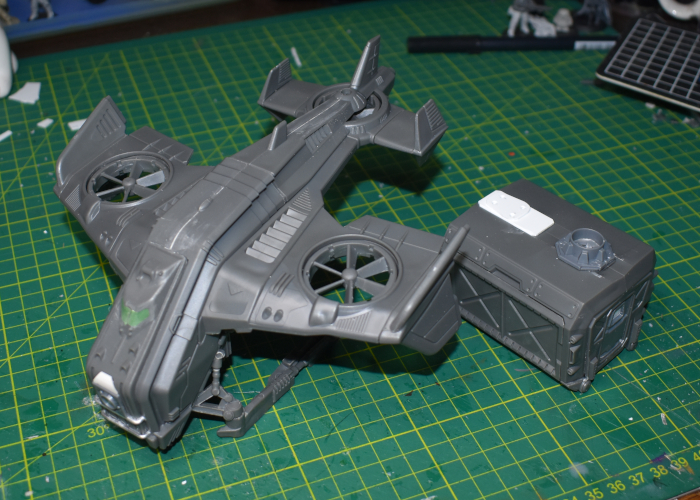
And the finished Pegasus Heavy Cargo Drone, ready to haul some heavy cargo:
To turn your own Hornet into a heavy drone of logistical doom, you can pick up the Maelstrom's Edge terrain sprues along with the rest of the Maelstrom's Edge range from the webstore here.
What are you working on? We would love to see your models and terrain in the Comm Guild Facebook group!
For other building ideas, modeling tutorials, army spotlights and conversion walkthroughs, check out the Hobby section of the Maelstrom's Edge website here.
Tags: conversion drone kitbash modeling spotlight
Game Primer: Missions & Objectives
Posted on Monday Jul 12, 2021 at 06:00pm in Gaming
The Maelstrom's Edge rules allow for two different mission types - 'Narrative' missions, where each player has their own objectives that support the narrative of the game, and 'Competive' missions which aim to provide a balanced competition through both players having the same objectives. The mission cards that come with the Battle for Zycanthus set (also available for download on the website here) are the latter type.
Each Maelstrom’s Edge mission features several objective types, giving players multiple paths towards victory. Victory Points (VPs) are tabulated at the end of each turn, and if you can manage to reach the total needed to complete the mission while also outpacing your opponent by a wide enough margin, then the game immediately ends with you as the victor! This makes accomplishing mission objectives as efficiently as possible of paramount importance to the game.
Missions are chosen at the start of the game, before deployment, by shuffling together the mission cards and drawing one at random. Each mission card contains a number of pieces of important information, including a list of any mission special rules that apply, and the objectives that players need to achieve in order to gain Victory Points. For easy reference, the objectives are all each printed on reference cards, although these can also be found in the Maelstrom's Edge Rulebook.
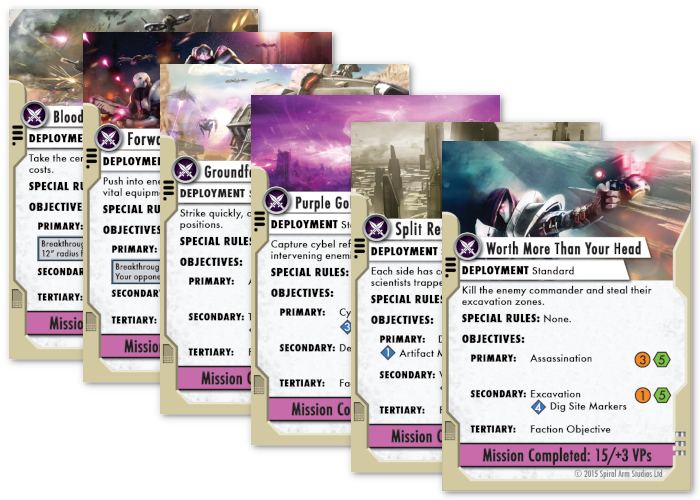
Objectives may call for players to destroy or control objective markers scattered around the board, eliminate specific enemy models, capture territory, and so on, with each objective granting Victory Points each turn, at the end of the game, and/or when specific conditions are met. For example, when playing the 'Purple Gold' mission, players gain 2 VPs in turns 1-3 for each refinery objective marker under their control, increasing to 4VPs each from turn 4 onwards. Then at the end of the game, an additional 5 VPs are awarded to the player who controls at least half of the refinery markers.
Purple Gold also has Decimation as a secondary objective, which grants VPs based on how much of the enemy force you have managed to destroy. Players should always be mindful of both Primary and Secondary objectives, as reaching the mission's VP cap with a sufficient 'margin of victory' immediately ends the game! For Purple Gold, this means scoring a total of at least 15 VPs, while also having scored at least 3 more VPs than your opponent. If neither player reaches the required VP goal earlier, standard games of Maelstrom's Edge last for 5 turns. At the end of Turn 5, VPs from any objectives with 'end of game' conditions are applied, and the player with the highest final VP total is the winner - so long as they have a sufficient margin of victory. If neither player manages this, then the game is considered a hard fought draw!
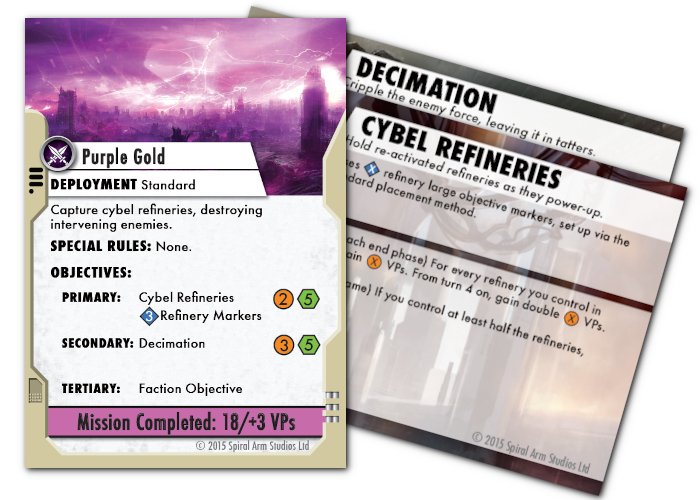
To add a little individuality to the missions, each of the game's different factions also has one or more 'Faction Objectives' which provide a tertiary path to collect VPs. These faction objectives provide themed VPs tailored to that specific force, with some being available to any force made up of that faction, and others being specific to forces that contain certain sub-faction units. For example, any Karist Enclave force can utilise the Secret Cache objective, while a force that includes an Angel Keeper may choose to use the First Contact objective card instead.
Faction objectives usually provide a limited number of VPs, and also grant a special bonus to the force until those limited VPs have been tapped out. The Karist Secret Cache, for example, allows a Karist player with a unit close enough to the cache objective marker to utilise the 'Cache Resupply' rule to re-roll any failed rolls to hit, or to gain an additional VP at the end of the turn. Once they have received 3 VPs from the cache, the objective marker is removed and Cache Resupply can no longer be used.
While all of that can seem a little complicated at first, in practice it creates a layered game experience where achieving a solid victory relies on making best use of the forces at hand, rather than just how quickly you can eliminate enemy units.
It's worth noting in closing that the above all relates specifically to 'Competitive' mission types. We'll explore the differences that Narrative play can bring to the game in a future article.
Get your tactical hat on and order the Battle for Zycanthus set, along with the rest of the Maelstrom's Edge range, from the webstore here! Free shipping applies to qualifying orders - check your cart for details.
If you have any questions on Missions, or any other aspect of Maelstrom's Edge gameplay, feel free to pop in to the Comm Guild Facebook group here.
New Broken Faction Objective and Summary Update
Posted on Tuesday Jul 06, 2021 at 06:00pm in Gaming
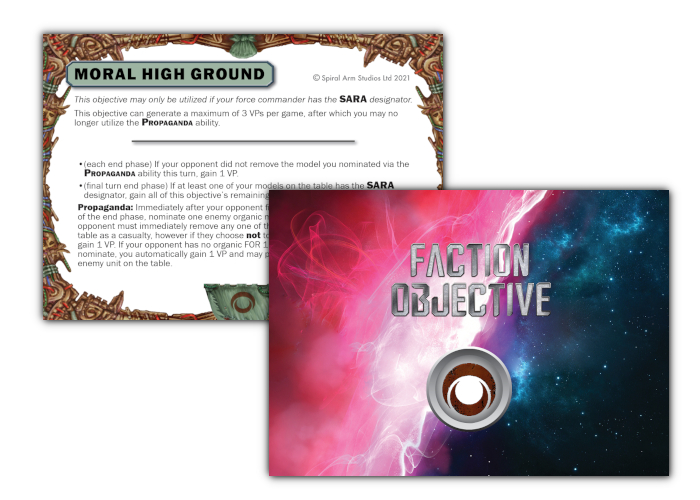
Along with their military might, SARA forces are deft at using propaganda to demoralise and destabilise enemy forces. This is represented through the Propaganda rule allowing a SARA player to force their opponent to sacrifice a model each turn.
Propaganda
Immediately after your opponent finishes their ‘Destroy Units’ portion of the end phase, nominate one enemy organic model on the table with FOR 1. Your opponent must immediately remove any one of their organic, FOR 1 models from the table as a casualty, however if they choose not to remove the model you nominated, gain 1 VP. If your opponent has no organic FOR 1 models on the table for you to nominate, you automatically gain 1 VP and may place +D3 psych STs on any one enemy unit on the table.
The Moral High Ground card has been added to both the Mission & Objective card pack and Faction Objective card pack, which can be found in the Card Downloads section of the Maelstrom's Edge website here!
The unit cards for the Revolutionary Captain and the Broken Sniper also both introduced some new special rules and equipment. These have now been added to the Broken Summary, which you can find in the Faction Summary Sheets section here.
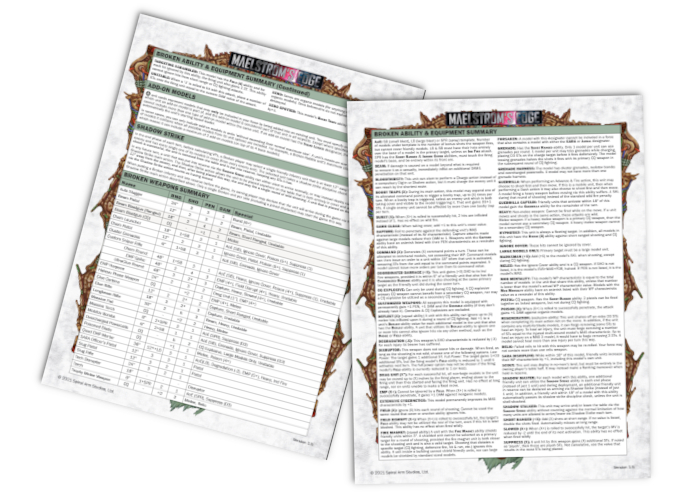
If you still need the unit cards for these two models, they can also be found in the Card Downloads section, in the Broken Unit Cards PDF.
Build your army of revolutionary doom by picking up these fantastic new models from the Maelstrom's Edge webstore now! Free shipping applies to qualifying orders - check your cart for details.
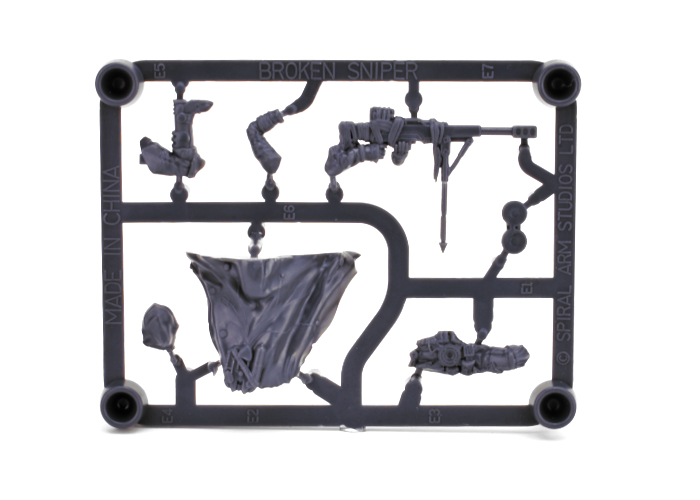
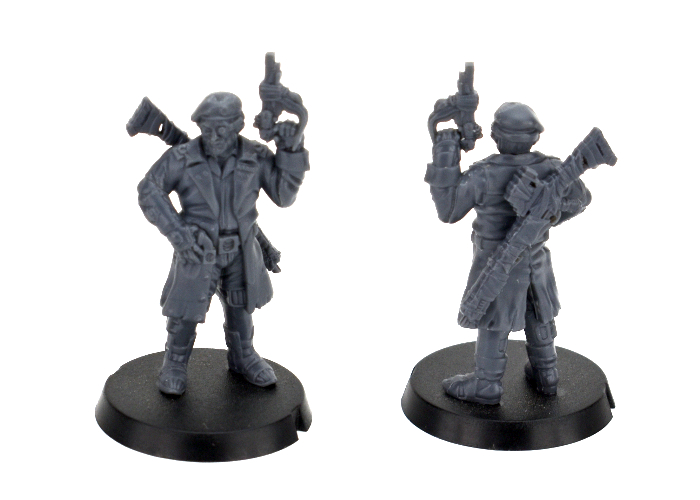
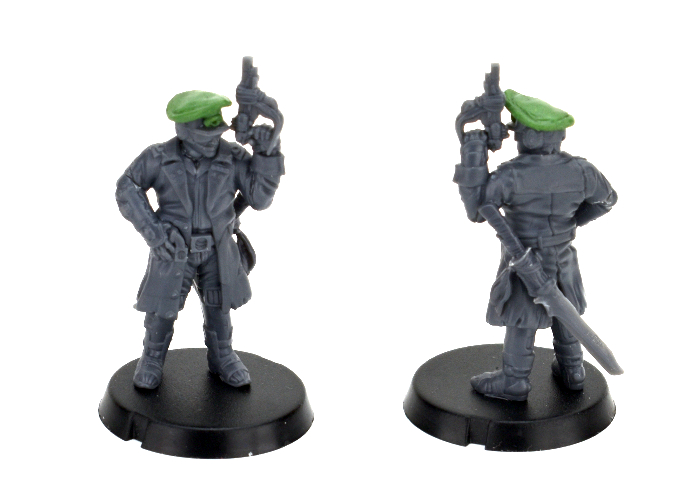
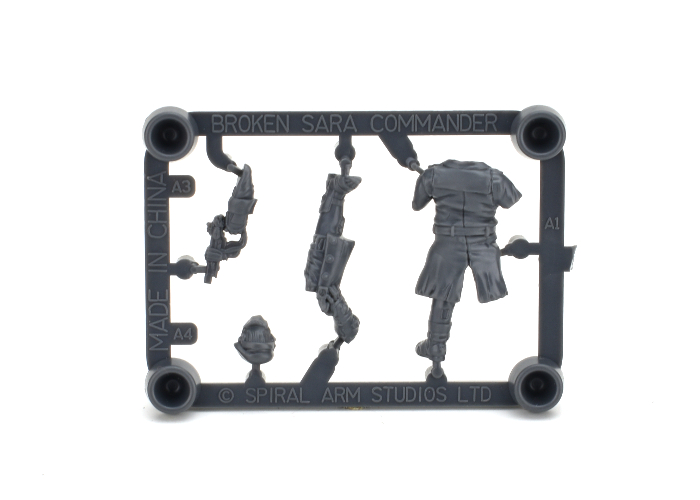
New Broken model release: The Sniper!
Posted on Monday Jun 28, 2021 at 06:00pm in Models
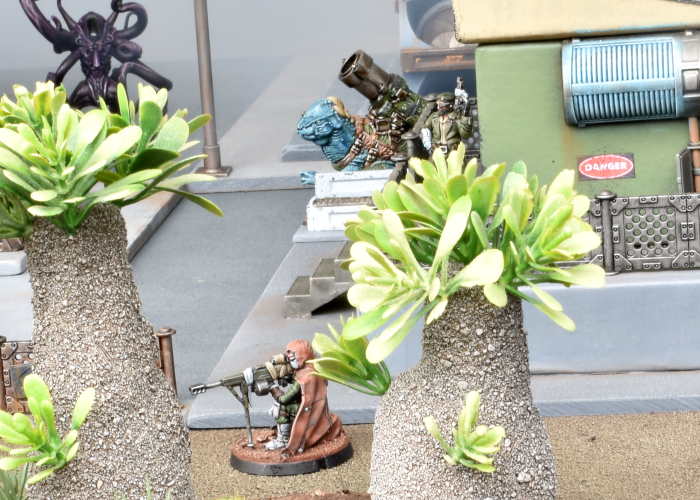
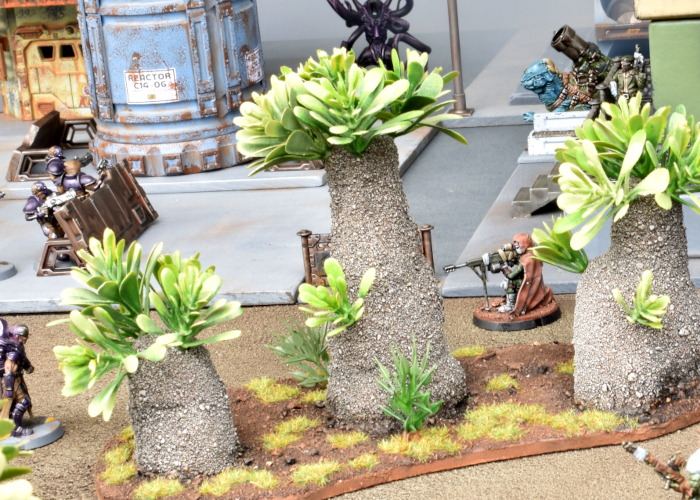
Broken Snipers originate either as marksmen from a planetary military that is displaced by the Maelstrom or pulled from within the ranks of the SARA and trained when it is noticed that they display a high level of accuracy with their rifle. Unfortunately, the Broken simply do not have the types of training facilities that other factions have access to, nor the manufacturing and technology in place to produce state of the art high-powered sniper rifles. All of which means that, one-on-one, Broken Snipers will never be a direct match with their foes. Therefore, the role of a Sniper focuses more on being a jack of all trades thorn in the enemy’s side.
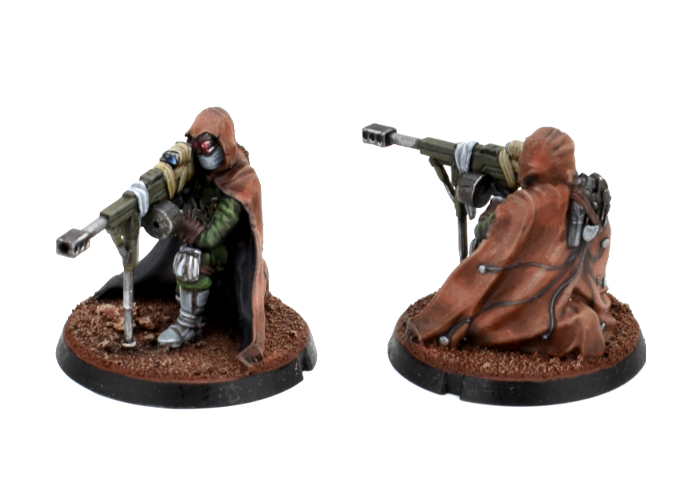
A Sniper amongst the Broken is an immensely valuable battlefield tool and therefore Broken commanders commission their weaponsmiths to produce custom, high-end weapons and tech for their Snipers, so as to give them a fighting chance on the battlefield. Though each Sniper has a slight variation in their kit, their basics usually entail a cloak with powered optical and anti-radar camouflage, along with a drum-fed sniper rifle, which is able to switch on the fly between several different custom-made specialty ammunition types.
As with all Broken, Snipers are the master of stealth, and their ability to pick the right ammunition type to most punish their target before disappearing into the mists before the enemy can return fire in earnest makes them one of the most loathed foes in the spiral arm.
The Broken Sniper is a plastic kit on a single sprue, and is supplied with a 32mm plastic base.
Grab your Sniper from the Maelstrom's Edge webstore now!
Maelstrom's Edge Webstore News
Posted on Tuesday Jun 22, 2021 at 06:00pm in General
We have also added a similar pack for the Maelstrom's Edge terrain sprues, including 4 sprues each of terrain sprue #1 and #2. This should give you plenty of bits and pieces to bulk up your sci fi terrain collection.
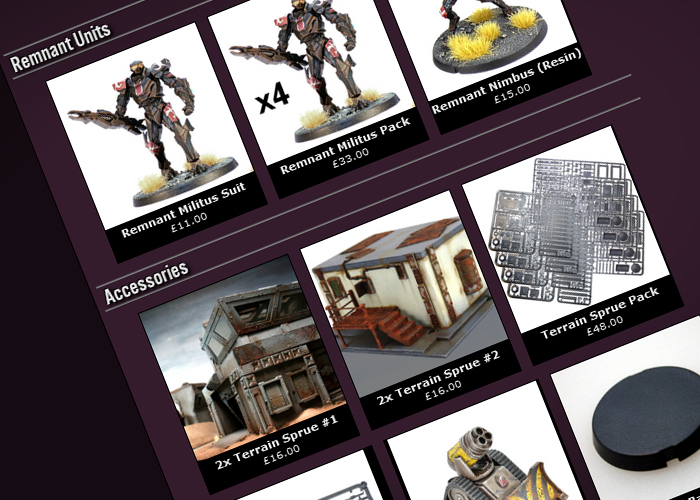
Pop in to the Maelstrom's Edge webstore here now! Free shipping applies to qualifying orders - check your cart for details.
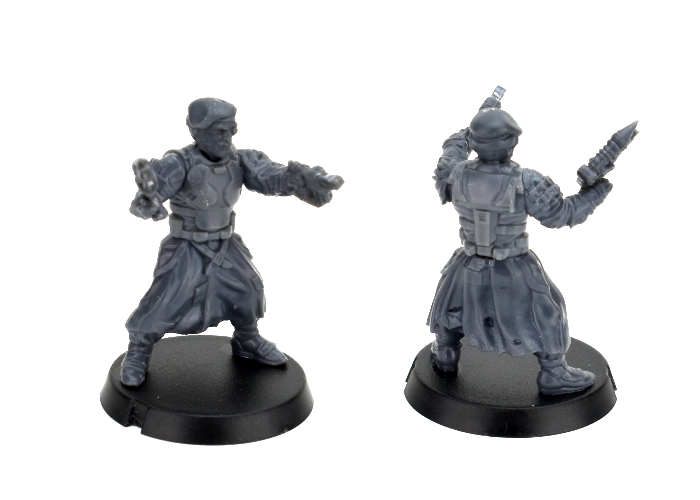
Model Spotlight: Revolutionary Captain!
Posted on Tuesday Jun 15, 2021 at 11:41pm in Tutorials
With the release of the Revolutionary Captain ushering the SARA subfaction into Maelstrom's Edge games, a range of new tactical options opens up for the Broken. I'll be sharing my fledgling SARA force in an upcoming army, but to kick things off I thought it would be fun to have a look at some modeling options for the fantastic Revolutionary Captain model!
The Revolutionary Captain is a multipart, plastic model. He's not as modular as most of the Maelstrom's Edge model range, as the sculpt was in this case aiming for a specific character look. Being plastic, however, it's still relatively easy to give the model a more customised look if you feel so inclined, and I'll explore some different ideas for that below.
The studio model, painted by Winterdyne.
Built straight off the sprue, the Revolutionary Captain is equipped with his SARA Officer's Pistol. His rules card, which can be found here, gives him the option to take one of a number of different secondary weapons, which can mostly be sourced from the Broken Rabble kit. To equip a Beam Blastgun or Slug Rifle, the easy option is to just stick the weapon on his back. You could model a rifle strap from modeling putty, or just assume the weapon is held in place with a magnetic lock built into the back of his coat.
To take a more hands-on approach, for this version I sliced off his right hand, and used a forearm snipped from a Rabble sprue arm to hold the blastgun. As it still sits against his waist, there's no need to try to resculpt the coat belt where the hand was removed, as you can't see it anyway.
Of course, everyone knows that battlefield commanders spend a good amount of their time pointing at things. If your commander isn't either pointing at something, or standing with one foot on something, people might not even recognise them! By slicing off the Revolutionary Captain's left arm at the coat's shoulder seam, I was able to glue a pointing arm from the Rabble sprue in its place. I also replaced the head with a regular Rabble head by drilling out the neck a little with a 2mm drill bit, and glued a maglock pistol from the Epirian Contractor kit onto her hip with some strapping made from 'Green Stuff' putty to replace the officer's pistol. The putty isn't strictly necessary - you could easily just glue any of the Captain's pistol options to the belt, but the addition of the putty strap does make it look a little nicer on the model.
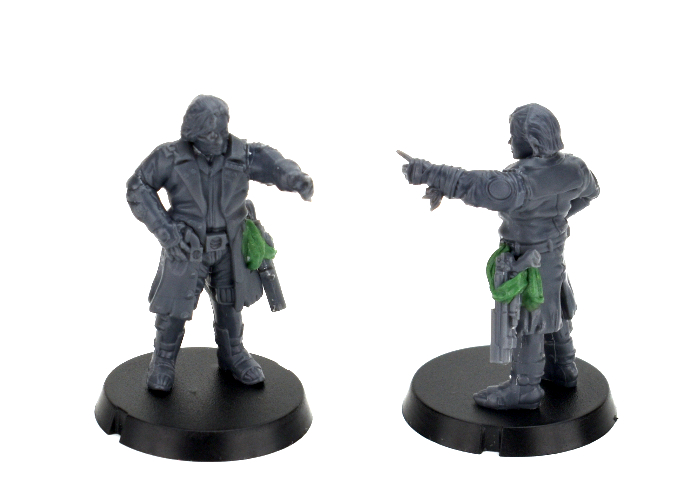
Of course, there's no reason for only humans to be revolting! With the neck drilled out as above, you can use any of the alien heads from the weapons sprue in the Rabble kit to create a xeno force commander.
While we're replacing heads, some Captains like a nice, sensible cap in place of a beret, so for this one I used an Epirian Contractor head (mostly for the sunglasses!) and built the cap up into an officer's hat using Green Stuff. I also added a melee weapon on his belt using part of a Karist sword from the Faction Expansion Sprue and bits from a couple of weapons on the Rabble sprue. This could easily represent either the Poisoned Blade or Trophy Melee Weapon. For a slightly easier option, you could just use the Karist sword or knife from the Faction Expansion sprue. The resin Forsaken Chieftain also comes with both of these melee options, so if you have that model you could use whichever one you didn't use on her for the Revolutionary Captain.
Of course, if you're hacking up your Revolutionary Captain model to replace heads and weapons, this leaves you with some useful parts to build another Captain to lead a second Detachment! For the below model, I used some parts from the Rabble kit (legs, arms and beam pistol), the left hand and head from the Revolutionary Captain, and a torso from the Epirian SecDef kit just to help him to stand out a little more from the Broken horde.
To build your own army of revolutionary doom, you can pick up the Revolutionary Captain along with the rest of the Maelstrom's Edge range from the webstore here.
What are you working on? We would love to see your models and terrain in the Comm Guild Facebook group!
For other building ideas, modeling tutorials, army spotlights and conversion walkthroughs, check out the Hobby section of the Maelstrom's Edge website here.
Tags: broken conversion model modeling sara spotlight tutorials
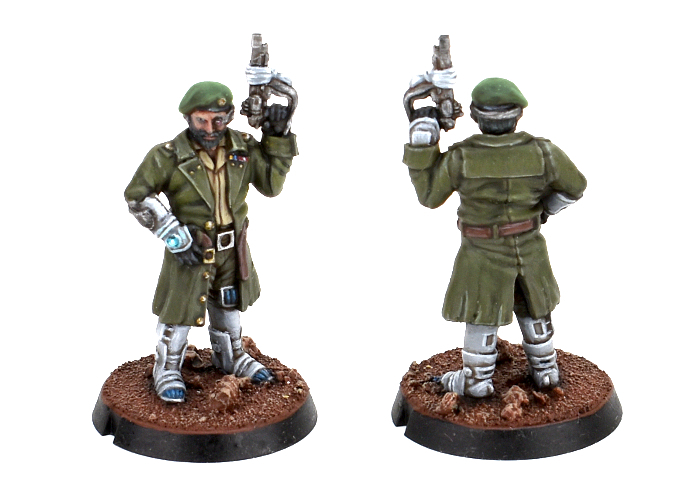
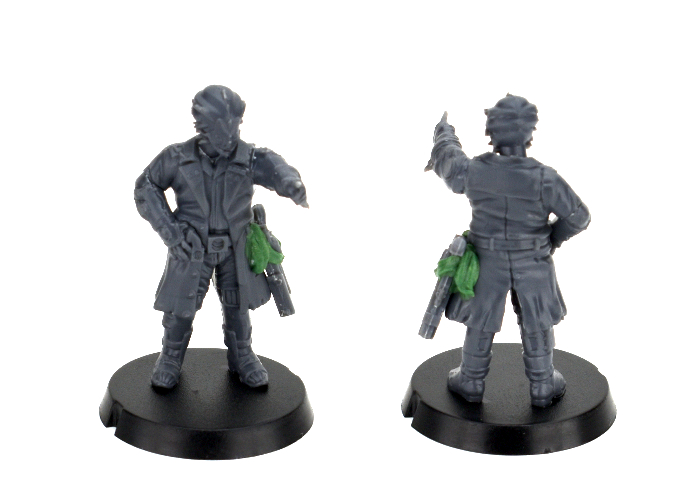
New model release: The SARA Revolutionary Captain!
Posted on Tuesday Jun 08, 2021 at 06:00pm in The Broken
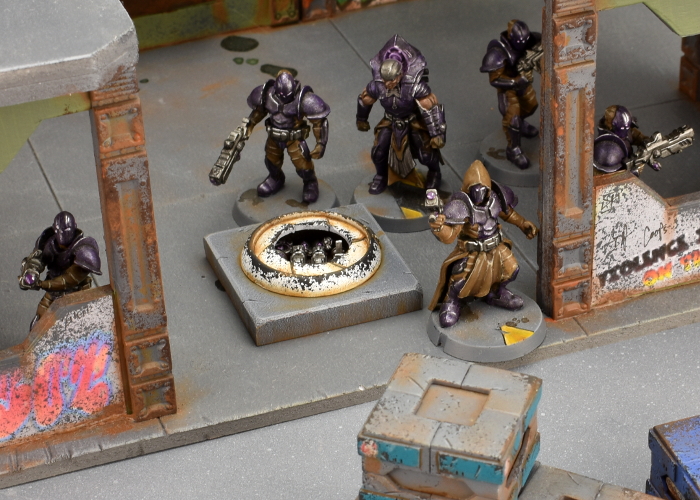
Revolutionary Captains lead companies of SARA troops on the battlefield. While SARA companies are comprised mostly of the same sorts of units as you would find in Forsaken or Jackal forces, their more military-focused structure results in better discipline and tactics on the battlefield.

On the table, the Revolutionary Captain's military experience grants your Broken force some new abilities. The SARA Discipline rule grants units in the Captain's command radius a boost to their WP. These units are also granted the new Guerilla rule, which allows a unit taking an Advance & Fire action to shoot before moving, allowing your units to to attack enemy positions and then fade away into cover.
The first of a series of smaller plastic kits that we are releasing, the Revolutionary Captain kit is a single sprue with a multipart, monopose model and is supplied with a 25mm base.
Grab your Revolutionary Captain from the Maelstrom's Edge webstore now!
What is SARA?
Posted on Monday May 31, 2021 at 06:00pm in Gaming
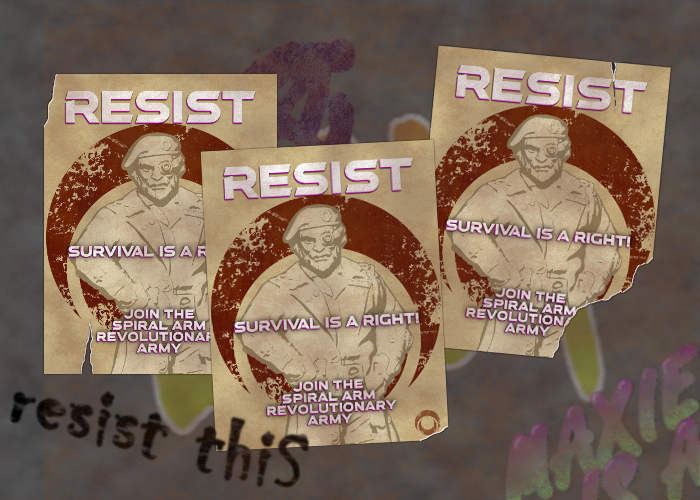
Tales of SARA have filtered throughout the spiral arm, so similar to the Jackals, there is a constant stream of people moving towards the Maelstrom’s Edge looking to join their cause. However, while SARA sees the Forsaken as potential allies and a pool for recruitment, they are vehemently opposed to Jackals, who they see as poisoning the otherwise good name of the Broken. SARA cells will often go out of their way to attack a Jackal stronghold when they discover its location.
With their well-equipped, fast-moving fleets, SARA does wage some military campaigns at worlds right at the Edge, mainly by attacking external forces that have laid siege to a planet so as to exploit its resources before the Maelstrom arrives. But even when they’re successful in these types of campaigns, the number of people they can actually rescue is often quite small, basically just those who can fit onto the ships they manage to liberate during the fighting. As a result, SARA instead prefers to target worlds that are still a few generations away from being threatened by the Maelstrom, but are downplaying the danger to their populace and secretly shuttling away the rich and powerful. These types of worlds almost always have secret cells of SARA already in operation, funded by secret donors who see SARA as either a philanthropic cause or just a way to guarantee their own escape from the Maelstrom. These cells seek to weaken local government and ferret out hidden Karist Enclave cells. Bolstered by reinforcements from out-system, SARA groups will spread their infiltration throughout the society to fuel full scale revolts. It isn’t entirely unknown for SARA to completely topple a government this way, and turn the planet’s full scale production towards producing ships to save as many people as possible.
SARA is very much a paramilitary organization and more often than not, the founders of a cell start as lower echelon military units on a dying world who realize their government is not going to save them. They spend years organizing rebellions, training civilians to fight, struggling to get as many people off-planet as possible. As SARA contains a higher percentage of military-trained individuals, it tends to be much more regimented and organized than most Broken forces, and has better discipline and morale. When the time comes for open conflict, SARA cells are organised into brigades, each led by a Revolutionary Colonel. Each brigade is comprised of a varying number of companies depending on the number of SARA units available, each led by a Revolutionary Captain. When SARA manages to rescue souls from a dying world or from ships that have no place to go, able-bodied adults are offered a place in a SARA company for a certain period of time - usually 5 to 10 years, depending on the particular cell. After their service time is up, they are free to leave and try to find their own way in the galaxy, though many choose to remain with the fleet. In this way, SARA fleets are constantly provided with a stream of new recruits.
While from outside SARA is commonly seen as a single entity, there is no true central leadership and each brigade acts autonomously. Some degree of communication between fleets does exist, through cells utilising fast courier vessels or infiltrating Comm Guild facilities and piggybacking support requests or warnings onto authorised Guild messages. This allows SARA fleets to converge when a larger response is required than each can handle alone, or to avoid systems where the danger from the Maelstrom’s unpredictable advance is too great to risk their valuable resources. Sharing similar goals does not always guarantee co-operation though, as fleet commanders may disagree on the value of specific objectives or the best allocation of resources, occasionally even leading to conflict between different SARA brigades.
SO... why are we telling you all this?
Next week sees the release of our new, plastic SARA commander model, which will open up new options for your Broken forces in Maelstrom's Edge. We will also have a showcase article to follow the commander, with a SARA force being put together by Iain - stay tuned!

Put together your own ill-equipped rabble of doom by picking up the plastic Broken infantry sprues, along with the rest of the Maelstrom's Edge range from the webstore here.
Then pop on over to the Comm Guild Facebook group to show us what you're working on!
For other building ideas, modeling tutorials, army spotlights and conversion walkthroughs, check out the Hobby section of the Maelstrom's Edge website here.
Model Spotlight: Remnant Nimbus Battlesuit.
Posted on Monday May 24, 2021 at 06:00pm in Models
You can find this fantastic resin miniature in the Maelstrom's Edge webstore here.
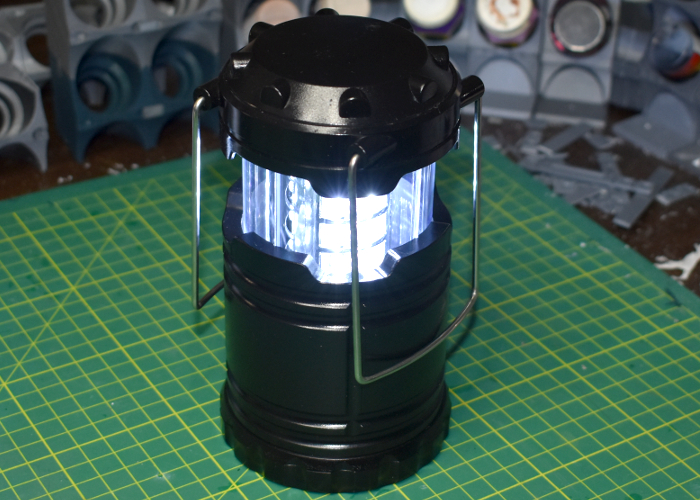
Terrain Spotlight: Pop-up Lamp Reactor!
Posted on Monday May 17, 2021 at 05:00pm in Tutorials
I came across this idea a little while ago in a Facebook group, and thought it was too good to not give it a go. Turns out, there are a bunch of pop-up LED lanterns currently floating about that are just perfect for turning into fantastic light-up reactors!
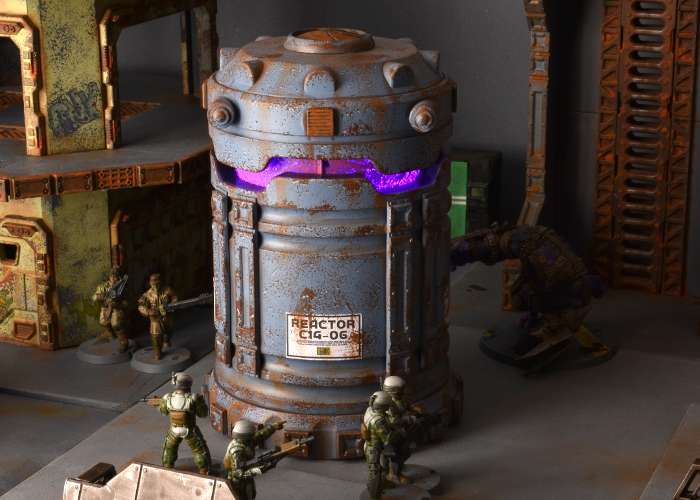
So, the foundation for this build is a pop-up lantern that I found on Amazon. There are variations available all over the place, all with a very similar design. The light comes on automatically when you lift the top of the lantern, and goes off when you push it closed.
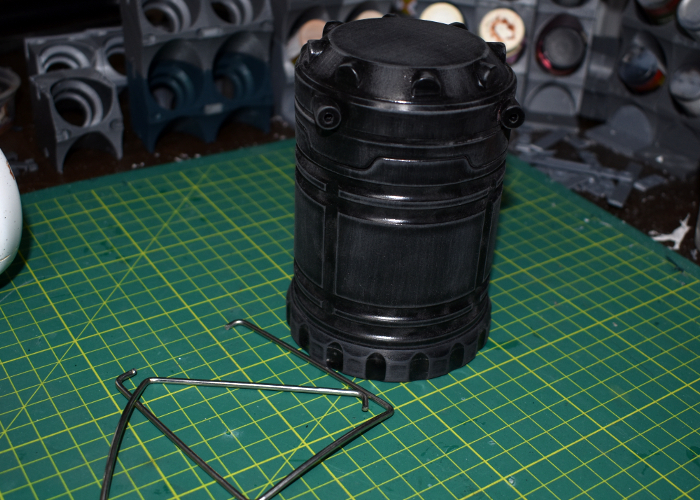
These look pretty amazing just painted up as-is, but I couldn't resist tweaking a little. The handles are spring steel wire, pushed into holes in the top of the lamp, so I removed these and put them aside. Then I gave the outside of the lamp a light sand with fine sandpaper. This part isn't essential, but I like to do it with unfamiliar plastic as it can help the glue and paint stick better.
From there, I took the Maelstrom's Edge terrain sprues and added some details. I cut down some support struts from the first terrain sprue to make some bracing for the sides, and added the square end pieces from the struts onto the small protrusions spaced around the base of the lamp. I also cut the tops from some railing posts from the second terrain sprue to cover over the handle holes, and added an iris portal to the top as a heat vent.
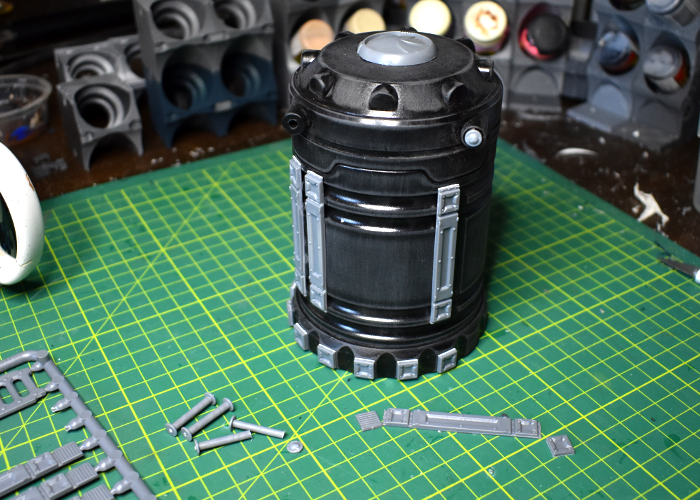
It looked like it needs just one last thing, so I used the vent pieces from the support struts to add a little more detail around the top of the lamp, and then it was ready for paint.
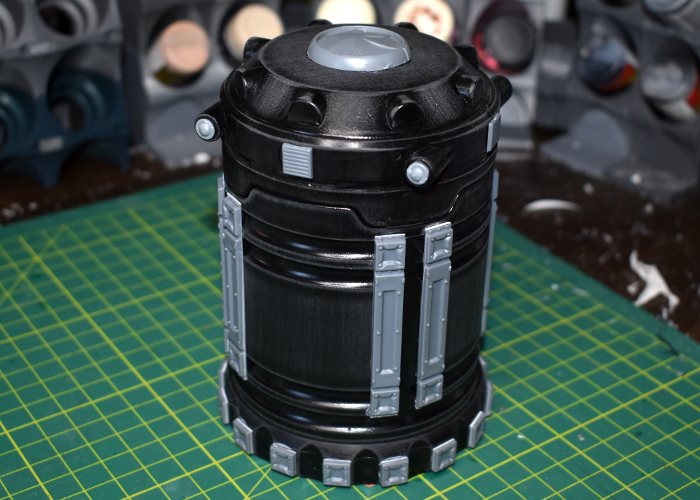
To paint up the reactor, I started with the clear plastic light cover. I used a sponge to apply a rough layer of Scalecolor Elandil Violet (a dark purple) and then when that was dry, a layer of Army Painter Warlock Purple. Normally I would do this on the inside of the clear plastic, to protect the paint, but it proved impossible to disassemble the lamp without breaking parts, so it went on the outside, and then I sealed it with a coat of Testor's Dull Coat.
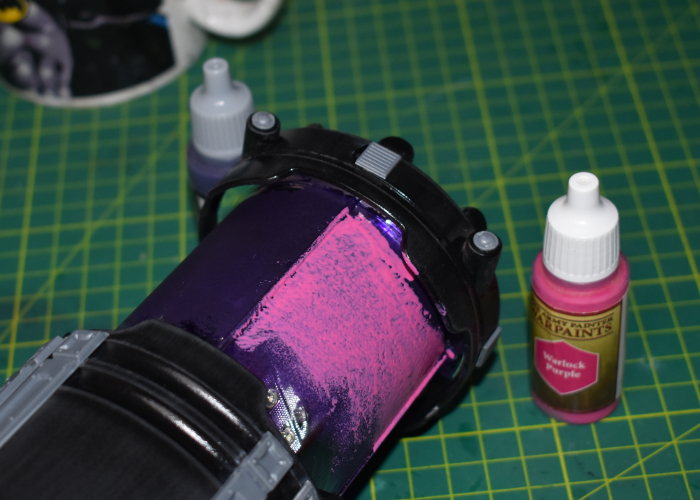
To paint the rest, I started with a basecoat of Army Painter Wolf Grey, drybrushing white onto the upper edges. After gluing on some printed signs worked up in Gimp, I then sponged on some weathering using Army Painter Dirt Spatter, adding scattered white highlights on some of the broken grey. The metal grills and iris were given a coat of Dirt Spatter, a sponge of Vallejo Heavy Charcoal, a light drybrush with P3 Ember Orange, and finally a touch of Army Painter Dry Rust. To finish up, I drybrushed some more Dirt Spatter and Vallejo Beasty Brown into the creases.
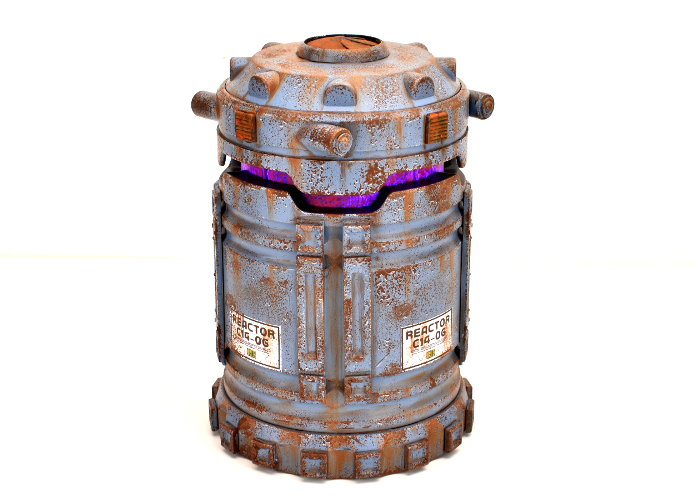
Because the fit of the light tube is rather tight, it does run the risk of rubbing the paint off by lifting or lowering it, so I've settled for turning it on and off by just taking the batteries out, instead. But other than that, I think it turned out quite well. The light is not as bright as it was originally, but it still gives a noticeable glow, even with the lights on!
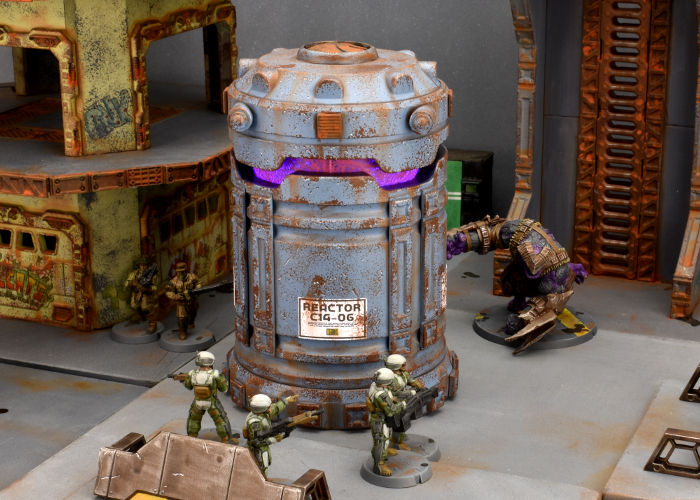
Put together your own evil reactor of purple-powered doom by picking up the terrain sprues, along with the rest of the Maelstrom's Edge range from the webstore here.
Then pop on over to the Comm Guild Facebook group to show us what you're working on!
For other building ideas, modeling tutorials, army spotlights and conversion walkthroughs, check out the Hobby section of the Maelstrom's Edge website here.
Tags: buildings kitbash modeling scratchbuild terrain terrainsprue
Model Spotlight: SecDef Lieutenant
Posted on Monday May 10, 2021 at 05:00pm in Models
You can find this fantastic resin miniature in the Maelstrom's Edge webstore here.
Almost there - so here's a bonus video!
Posted on Tuesday May 04, 2021 at 01:12pm in StackaRack
If you're Iain, you turn them into terrain, of course!
Get in on the Kickstarter before time runs out! Find StackaRack on Kickstarter now: https://www.kickstarter.com/projects/spiralarmstudios/stackarack
