Terrain Kitbash: Sci-Fi Barn
Posted on Monday Sept 20, 2021 at 06:00pm in Tutorials
Time to get some terrain on!
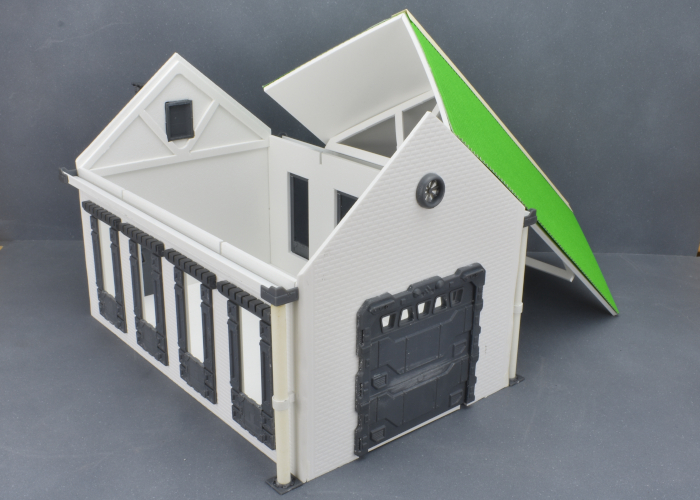
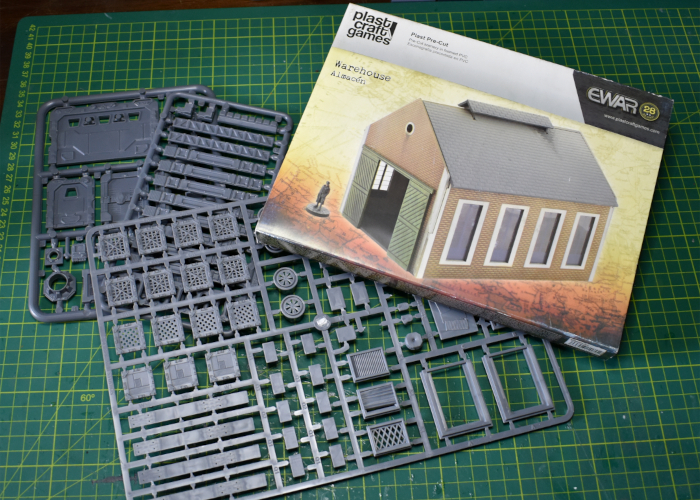
Back in 2017, I put together a sci-fi 'western' gunshop, using the Maelstrom's Edge terrain sprue and a foamed PVC western shop kit from Plast Craft Games. Plast Craft sadly appear to have gone out of business, but I picked up a few building kits on clearance from a local retailer to start fleshing out a themed table. The first (and probably largest) off the rank is an appopriately upgraded barn!
Along with the Maelstrom's Edge terrain sprues, the kit I used for this build is an urban warehouse. If you want to build something similar yourself, while you may not be able to still track down this specific kit, there are other similar buildings available in MDF from other manufacturers, or you could use foamed PVC or foamcore to build your own from scratch.
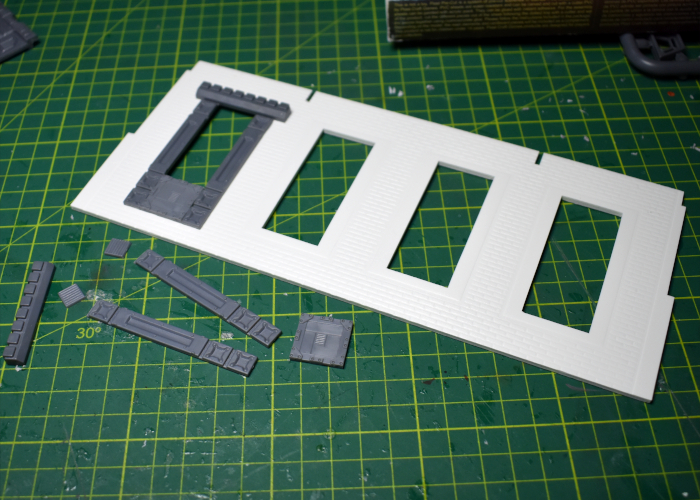
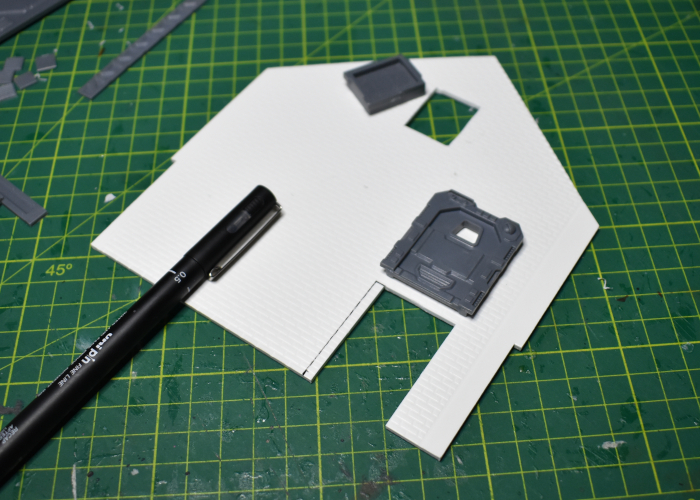
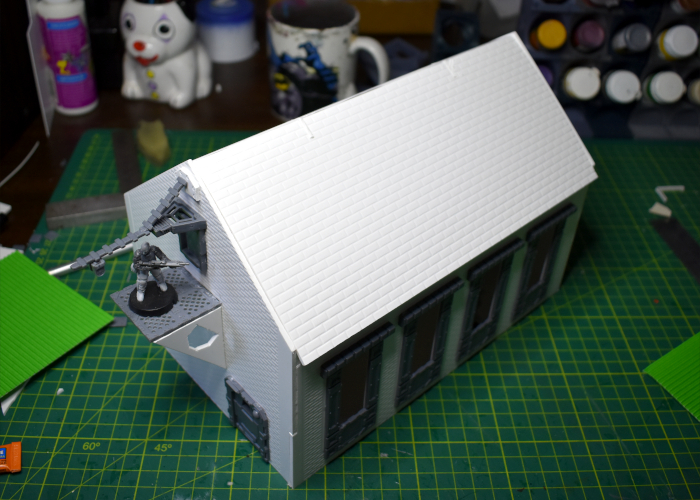
I started out by adding some tech details to the windows, bulking out the frames using support struts and lintel pieces from terrain sprue #1, and floor panels from terrain sprue #2.
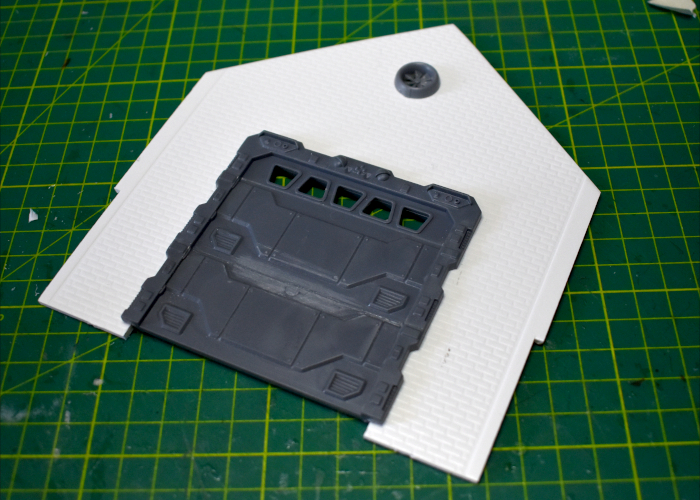
On the front of the building, I replaced the sliding wooden doors with a garage door from terrain sprue #1. To make up the extra height, I cut off the top of a second garage door with a razor saw and glued the two together.
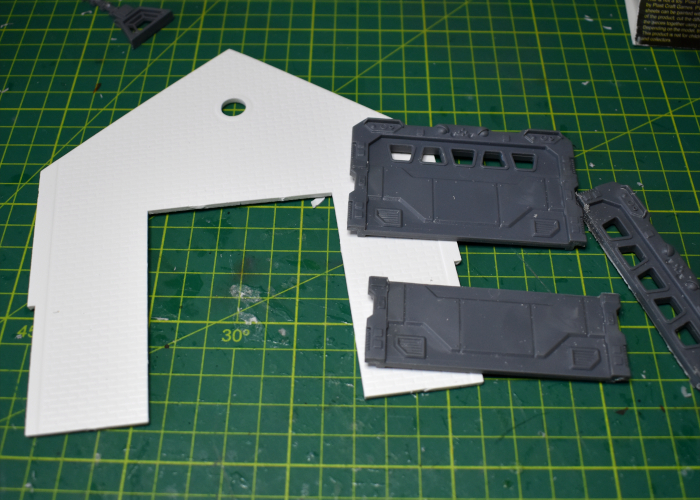
The resultant door was the right height, but too wide, so I also widened the door cavity in the wall with an exacto knife before gluing the door in place. The round window at the top of the wall turned out to be exactly the right size for the exhaust fan from sprue #2..
The other end of the building has a smaller door and a rectangular window up high. I enlarged the cavities slightly and glued in a shutter window and door from sprue #1.
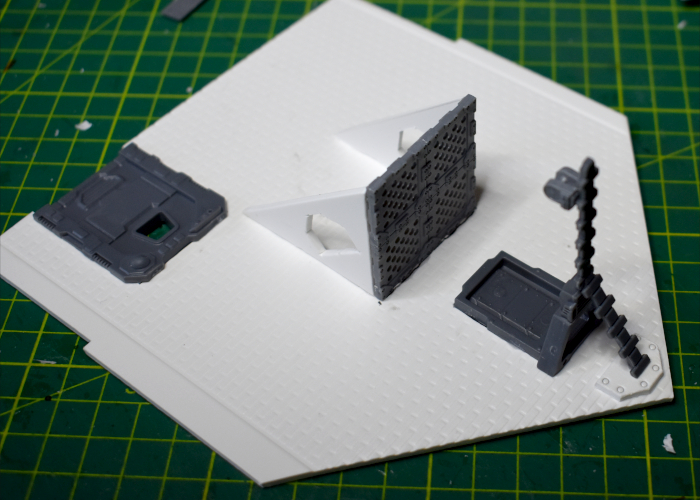
To avoid the building from just winding up looking like a plain box, I built a small platform and crane onto the wall, turning the small window into an access point for small freight. The platform was constructed from sprue #2 floor grates and some scrap pieces from the warehouse kit's roof trusses. The crane used a trapezoid window and a couple of energy fence pieces from sprue #1, the upright supports from the gun unit on sprue #2 and another scrap piece of PVC. I'll need to find some string or fine chain for it to finish up.
At that point, it was time to start slotting everything together.
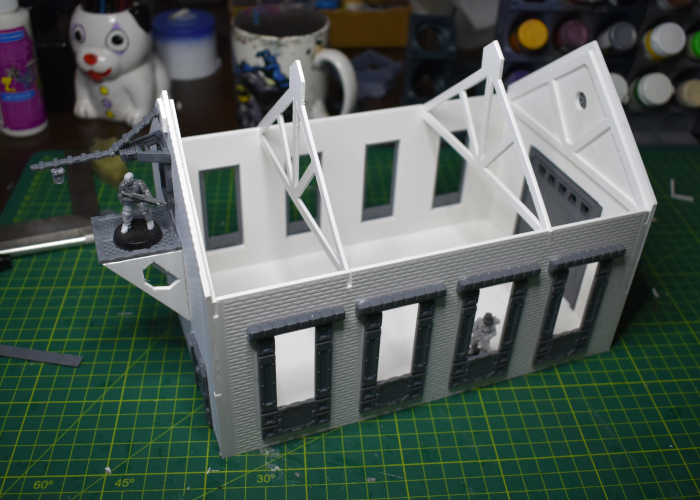
The warehouse kit has a tiled roof, but I wanted to go with corrugated iron instead, for a better contrast from the brick walls. With the top ventilation struts trimmed off, the assembled roof provides a solid base for the iron roof. I've left the middle two roof trusses and the roof itself unglued, so that the roof can be removed and the building interior used during a game.
Over the original roof, I glued two sheets of corrugated cardboard, adding a strip of thin, folded card for the ridge capping. That didn't look quite right as-is, so I decided to also add some rain guttering, using some plasticard and a few more components from terrain sprue #1.
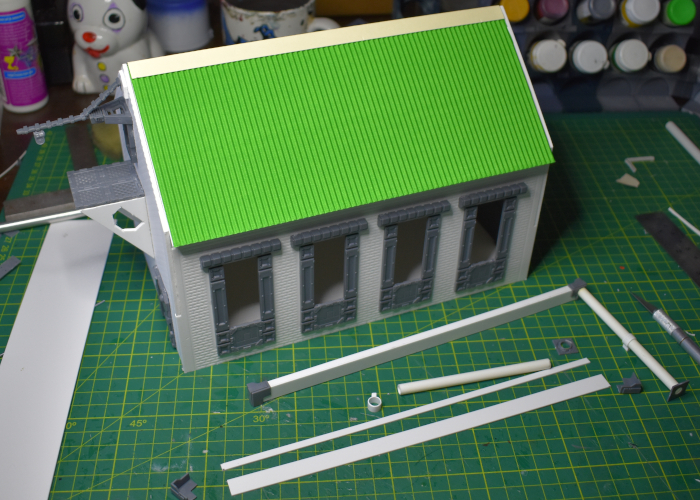
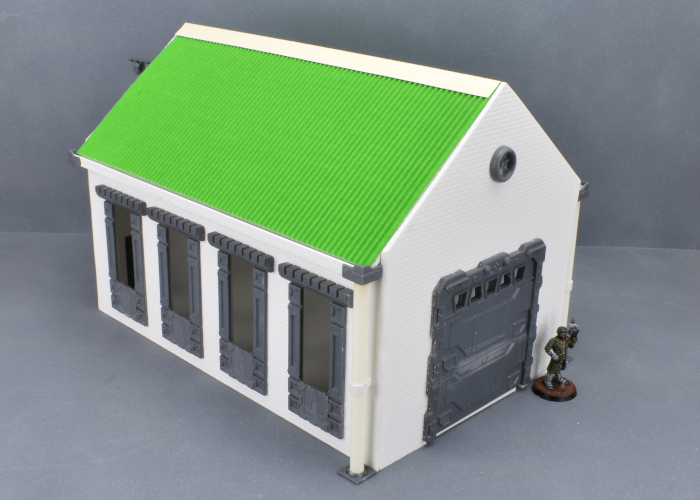
The windows are still missing their 'glass' - some thin, translucent plastic that comes with the warehouse kit. This will be glued in place after I've painted the barn. Otherwise, the finished exterior:
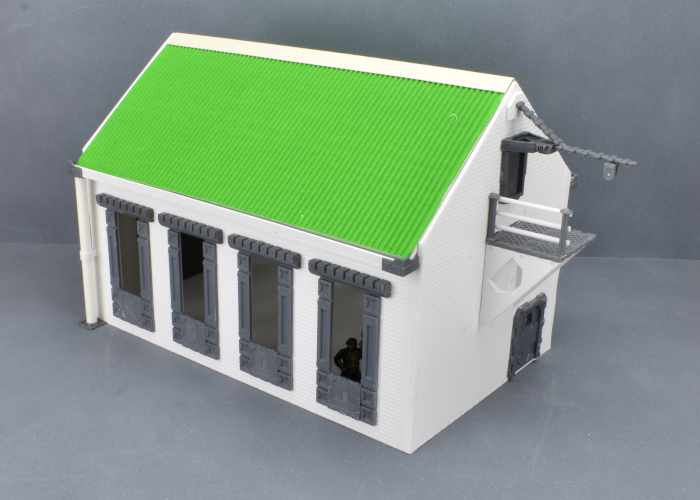
As a final touch, I decided the small platform needed a hand rail, so I whipped one up using a pair of posts from terrain sprue #2 and some thin plastic rod.
Coming up in part 2: I'll add some detail to the interior of the building before painting. Find it here!
To build your own outbuilding of rural doom, you can pick up the terrain sprues along with the rest of the Maelstrom's Edge range from the webstore here.

What are you working on? We would love to see your models and terrain in the Comm Guild Facebook group!
For other building ideas, modeling tutorials, army spotlights and conversion walkthroughs, check out the Hobby section of the Maelstrom's Edge website here.
Tags: buildings conversion kitbash spotlight terrain terrainsprue tutorial
What is the Artarian Remnant?
Posted on Wednesday Sept 15, 2021 at 06:00pm in The Remnant
Before the coming of the Maelstrom, the Artarian Republic was situated in a string of systems stretching out from the edge of the Capital Worlds of humanity towards the vast undiscovered reaches of the Spiral Arm. They enjoyed the close links to the old, well developed systems in the Capital Worlds, and room for expansion in the other direction. The Artarians harboured ambitions to accomplish what humanity had never managed to do – explore the other spiral arms of the galaxy. Their cybel gates and ships were more advanced than any other frontier empire, and their colonisation technology was the envy of the frontier. The Artarians wanted more room to expand, and saw no reason why the cybel network couldn’t route around the galactic core to link other spiral arms. It was never established whether the Artarians managed this feat – there was significant opposition in the Senate to proposals to forge new cybel links near the unstable galactic core as it had never been done before.
When the Maelstrom erupted, it completely obliterated the Capital Worlds of humanity - the oldest, most developed centres of civilisation. With alarming swiftness the Artarians and other societies were bordering on the edge of the coruscating purple-red cloud of energy, helplessly watching it consume untold trillions of lives. The Artarians were far too close to the Capital Worlds to have any hope of conducting any meaningful research into the tidal wave of energy before it swept over their planets. They could only determine that the energy release was apocalyptic – no attempt to measure its potential destructive power was successful. The Maelstrom’s epicentre was only a few hundred light-years away from the Republic, leaving the Artarians with only a few precious decades to prepare for evacuation before it inevitably destroyed their systems too.
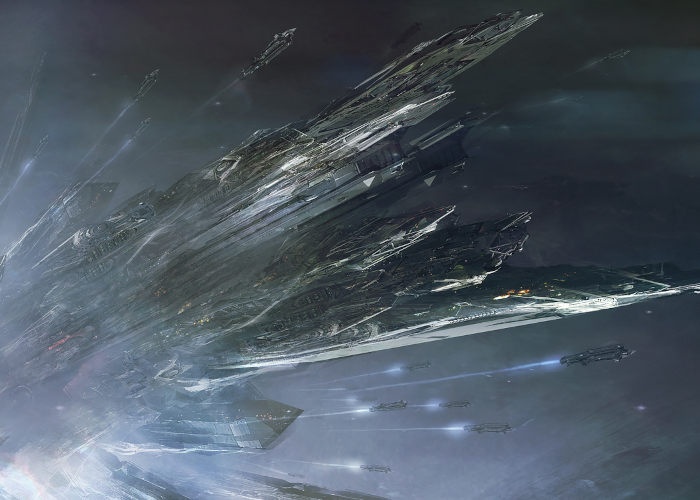
Their escape plan was ambitious: they would build ships that were entire countries – space-worthy versions of their arcologies and habitats, using their colonisation technology to move their entire society into space and away from the Maelstrom.
The Great Houses conduct gladiatorial duels or contests between Champions to settle disputes and conflicts. Each House spends considerable effort collecting a retinue of ritual champions in order to out-fight their rivals. This form of ‘polite warfare’ avoids risking damage to their limited ships and resources, and stops any dispute spiralling out of control into conventional warfare which would doom the Remnant. The resources that Great Houses spend on their individual Gladiatorial champions could fund an entire army in any other context and this, combined with their advanced technology makes the Champions one of the most powerful fighting forces in the galaxy. Lorican Fire Teams are equipped with such destructive weaponry and are so difficult to incapacitate, some worlds facing military action will surrender without much of a fight once they have witnessed them in combat. As the prospect of a few men fighting and beating hundreds is pretty cinematic, Artarian citizens thoroughly enjoy the heavily edited footage sent back of Fire Teams driving back large military forces on their own, often cheering on their favourite Champion.
The Remnant Fleet avoids conflict with outsiders as much as possible in order to protect their irreplaceable ships and resources. When they do fight, the Senate appoints a House which suits the task at hand, instructing them to deploy their Champions in a surgical strike, so that battles rarely escalate above a skirmish. In return, that House gains first rights on resources found after that planet is subdued, for example a House may be particularly interested in copper reserves on the planet and ask for rights to that resource.
In rare instances where a wider conflict is completely unavoidable, there are more conventional military units that can be deployed, such as the Fleetguard, drawn from the ranks of the population with high aptitude scores but not quite high enough for a Champion. In general though, Fire Teams will be deployed to crush resistance at a target site, crippling the planet’s military response long enough to either take apart their resistance piecemeal, or delay them long enough for the Remnant Fleets to harvest whatever resources they can and make their escape before the enemy can retaliate. Usually the fleet will not arrive at a planet until military resistance is subdued, in case of hidden orbital facilities or ground based defence weapons that could threaten the ships.
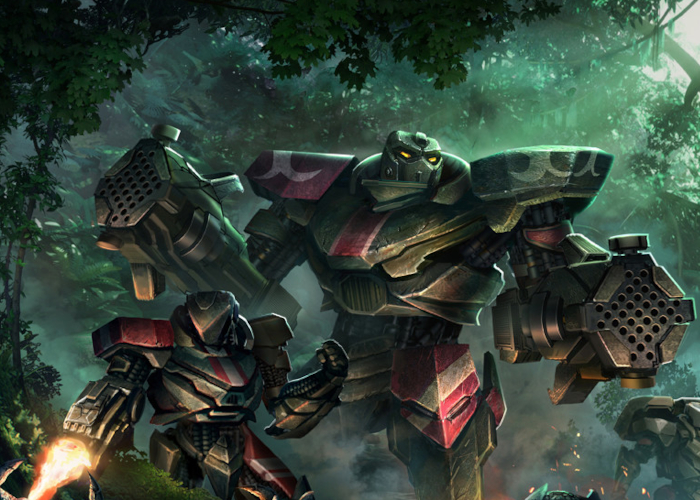
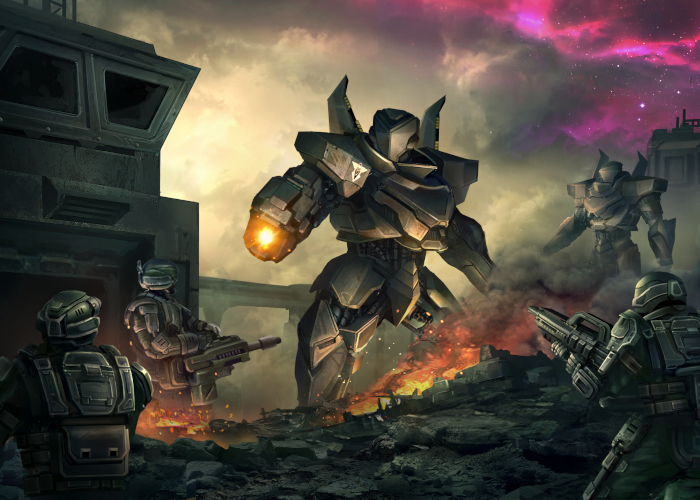
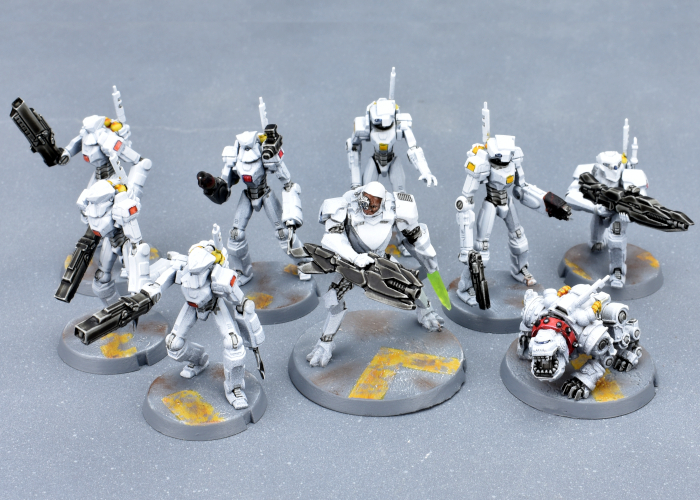
Lorican Combat Suits are the pinnacle of Artarian engineering, allowing a House Champion to have the utility and fighting prowess of many soldiers or workers. Each suit wearer is virtually a one man army, equipped with light but incredibly strong alloyed armour plating that is adapted from the same technology that is used in Remnant ship hull plating. It can absorb heat based weapons and even use it to recharge the suit's systems. The armour is quite capable of deflecting even heavy calibre ammunition, and is fully adapted to work in vacuum or underwater.
Each suit is assisted by sophisticated motion predicting micro-servo motors to give them unparalleled strength and mobility, moving with ease through dense terrain and being able to punch holes through conventional armour. Every suit also boasts a wealth of sensors including friend or foe recognition, communications frequencies, target acquisition and capability calculation, capable of identifying weak points on the target and providing suggestions as to what weapon to attack it with. All suits are slaved with targeting and intelligence information from the insertion ships in orbit, providing a strategic overview, co-ordination between strike teams and immunity to ambush.
Fire Teams make use of a variety of suits specialised to the preferences of their Champion pilot. From the lighter, fast moving Nimbus suits, the more common, versatile Militus suits, to the huge, hard-hitting Brutus, Lorican suits are rightly feared by those who encounter them on the battlefields on the Edge.
You can find out more about the Artarian Remnant on the Maelstrom's Edge website. While you're there, you can pick up any of the Broken models, along with the rest of the Maelstrom's Edge range, from the webstore. Free shipping applies to qualifying orders - check your cart for details.
Meanwhile, if you have any questions on the Maelstrom's Edge background or gameplay, pop in to the Comm Guild Facebook group here.
Converting a Robot Stargrave Crew
Posted on Monday Sept 13, 2021 at 09:52pm in Tutorials
When Stargrave arrived on the gaming scene, bringing the popular Frostgrave rules into a sci-fi setting, it sparked all sorts of interesting ideas amongst gamers for building crews. While there is an official model range for the game, it also encourages players to use whatever miniatures they like, which is a perfect excuse to break out some models and get creative! I was particularly interested in the rule allowing any crew members to be robots, and set to work building up a crew using (mostly) the Maelstrom's Edge Epirian Scarecrow plastic kit!
The bulk of the crew was made up of very slightly converted Scarecrows with different heads taken from the Remnant Militus battlesuit kit to denote different 'classes' of robot. Thanks to how wonderfully poseable the Scarecrow kit is, it's really easy to get a range of different looking models out of it! I also used a resin robo-dog from Artel W for a guard dog, added a (still to be painted) space dwarf from Victoria Miniatures as a first mate, and a converted Remnant Nimbus battlesuit for the Captain.
I wanted an easy paint scheme that I could get done quickly, and used Army Painter paints for the bulk of it. I started with a base coat of Uniform Grey spray, followed by a top-down (or 'zenithal') spray of white, so that the grey would stay visible in the creases and underneath surfaces to provide some shading. I then went over the joints and other exposed metal parts with a coat of Dark Tone, and gave the weapons three generous coats of the same. The final details were done with Citadel Contrast - Iyanden Yellow for the tanks on the robot's backs and Leviadon Blue highlighted with Army Painter Ice Storm and white for the eye lenses. The different classes of robot also received some shaded panels to tell them apart - yellow for techs, orange for soldiers and red for specialists.
I'm still deciding how to paint up the first mate, and how closely he will mimic the colour scheme, but here's the rest of the the crew all assembled:
Captain and Guard Dog:
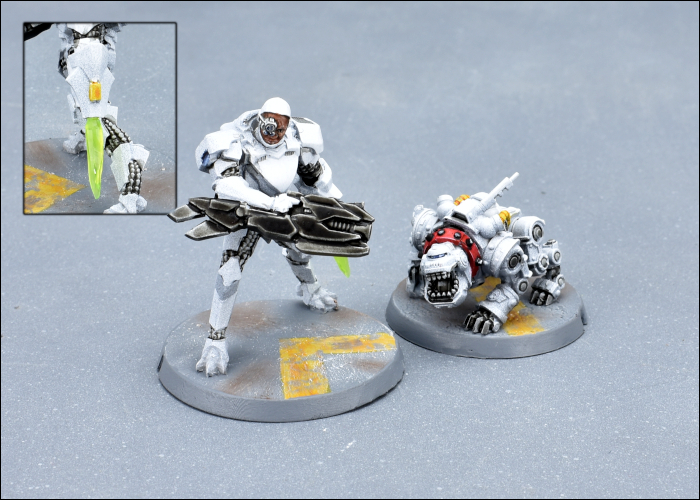
The Captain was built from a Nimbus battlesuit with the head taken from the Karist Heavy Weapons kit. The energy blade is part of a trimmed down lightsaber from a Star Wars figure, left over from an old project. He represents a cyborg in combat armour.
Tech crew - Hacker and Chiseler:
Chiselers are normally equipped with lockpicks. I decided to go a more direct route and gave him a cutting torch using part of a weapon from the Broken Rabble kit.
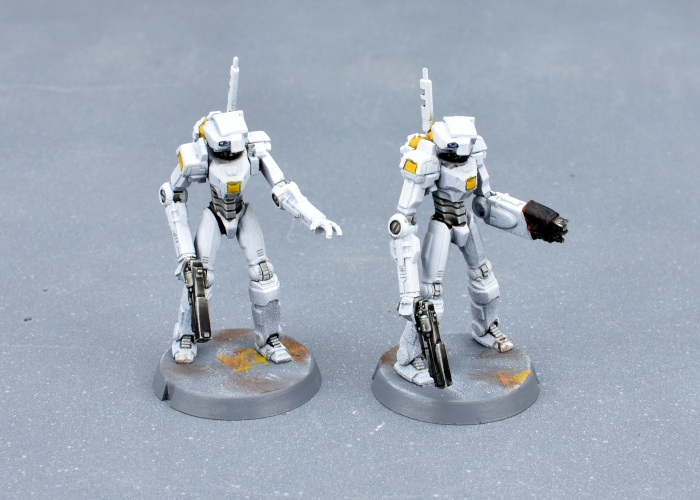
Troopers

I gave the troopers bulkier left arms to house their combat knives using spare Scarecrow shin pieces. The knives are taken from the Faction Expansion Sprue.
Specialists - Burner and Sniper:
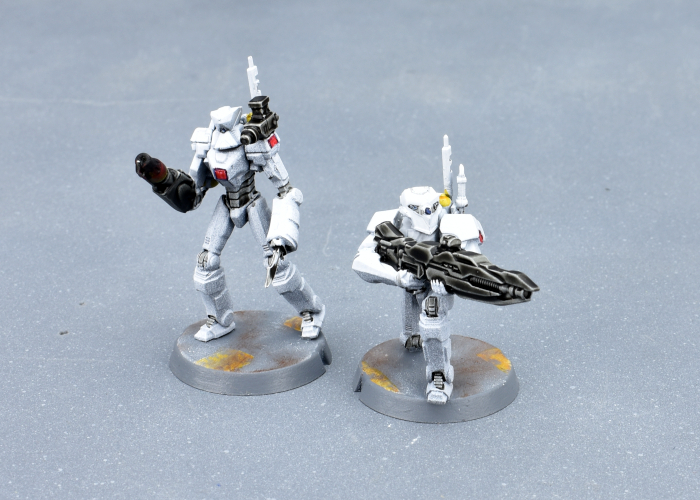
The Burner has a pistol and knife as well as the flamethrower, so I gave him the same knife arm as the regular troopers and mounted a mini grenade launcher taken from the Epirian Handler kit to his shoulder to represent the pistol. The sniper has a different head to the regular troopers, and his sniper rifle was a handy way to make use of the second set of arms that come with the Captain's Nimbus suit.
Time to get that mate painted up and send these bots out on into the black!
To build your own robot crew of clanking doom, you can pick up the Scarecrow kit along with the rest of the Maelstrom's Edge range from the webstore here.
What are you working on? We would love to see your models and terrain in the Comm Guild Facebook group!
For other building ideas, modeling tutorials, army spotlights and conversion walkthroughs, check out the Hobby section of the Maelstrom's Edge website here.
Tags: conversion epirian robot scarecrow spotlight stargrave
Karist anti-grav vehicle rules!
Posted on Wednesday Sept 08, 2021 at 06:00pm in Gaming
Along with the trial transport rules we released for players to try out a while back, we shared some 'unofficial' rules cards for several transport vehicles. This included a Karist Raptor, converted from a Beyond the Gates of Antares vehicle with some added Karist parts. The Raptor has now received a small update to its card, tweaking its rules a little, and also now has an escort vehicle to accompany it on the battlefield - The Scorpio.
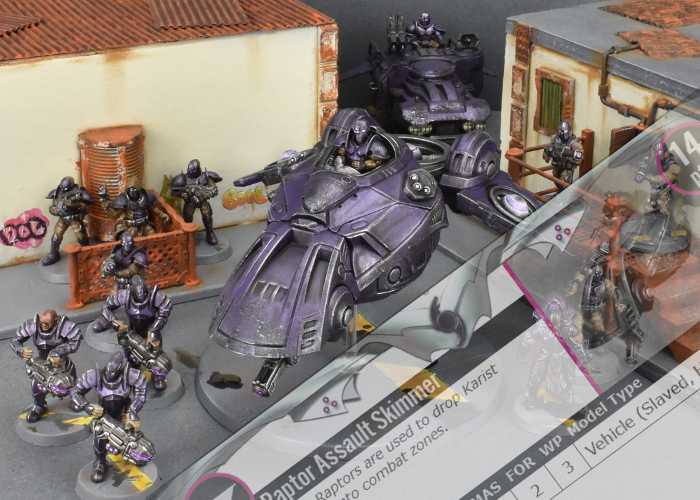
The Scorpio pictured below is built from a Warhammer 40,000 Genestealer Cult vehicle with some Karist parts and a little plasticard added. You can see how it was built here, and can also find the Raptor walkthrough here. You can find the rules cards for them in the 'Unofficial Cards - All Factions' document that you can download from the rules section of the Maelstrom's Edge website here.
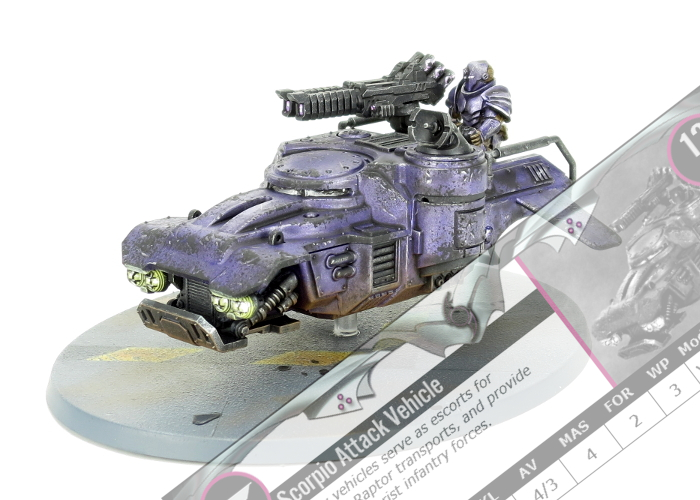
These are 'unofficial' cards, which is a label we put on units created from conversions and/or third-party models. As such, you should check with your opponent before using them, to make sure they're ok with it and to give them a chance to familiarise themselves with the rules. It also means that, while we have provided the above conversion ideas, you should also feel free to use any other suitable vehicle models that you may have to hand.
Battle for your ascension by grabbing a Karist force from the Maelstrom's Edge webstore here! Free shipping applies to qualifying orders - check your cart for details.
If you have any questions about using vehicles in Maelstrom's Edge, or any other aspect of Maelstrom's Edge gameplay, feel free to pop in to the Comm Guild Facebook group here.
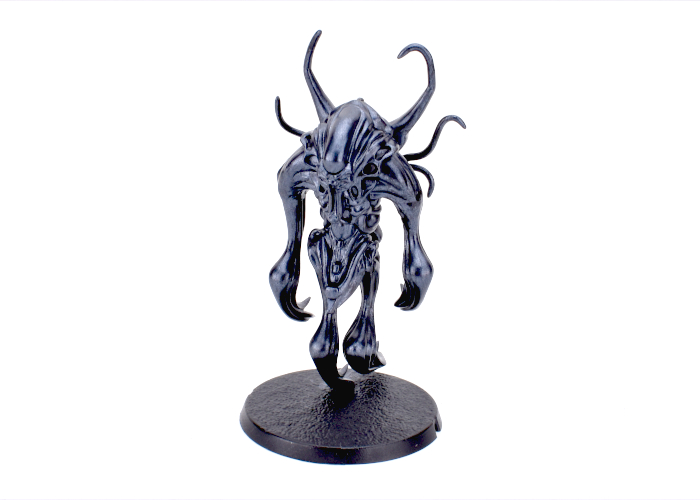
Painting Spotlight: Metallic Angel
Posted on Monday Sept 06, 2021 at 06:00pm in Tutorials
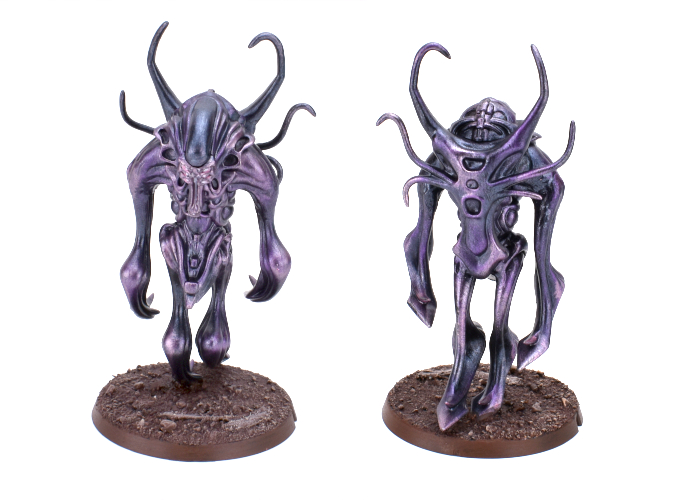
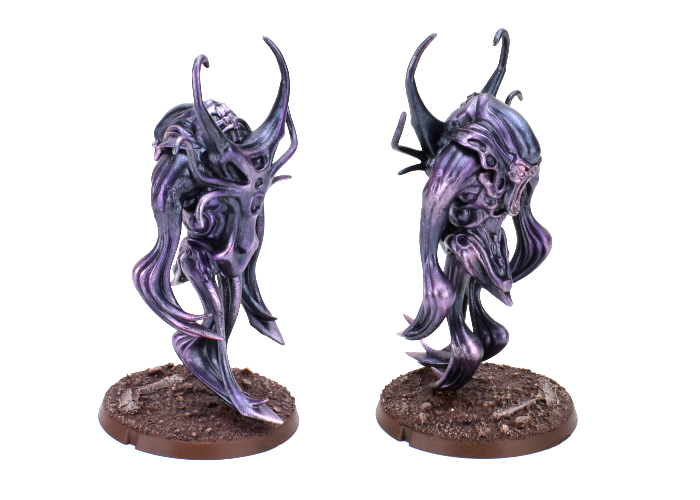
A while ago, I picked up a set of the Army Painter coloured metallic paints, and decided this week it was time to take them for a spin. The paint set includes some lovely purples that were just screaming out for a friendly little angel to bring to life. And so that's what I did.
The model I chose to use for this was a conversion that I put together some time ago while playing around with the Mature Angel kit. The end result is a slightly sinister-looking, floaty juvenile angel.
Metallic paint generally goes best over a dark basecoat, so I started out by spraying the model with some Army Painter black.
I then gave the whole model a coat of Night Scales, a metallic black from the Army Painter set. This has a slight bluey-purple tint to it that is just perfect for the angel. I was tempted to just leave it like this and call the job a good'un.
Deciding to go for a little more 'wow', though, I grabbed the bottle of Royal Purple, a midrange purple metal colour, and drybrushed the angel with it, building up more colour on raised areas and tentacle tips.
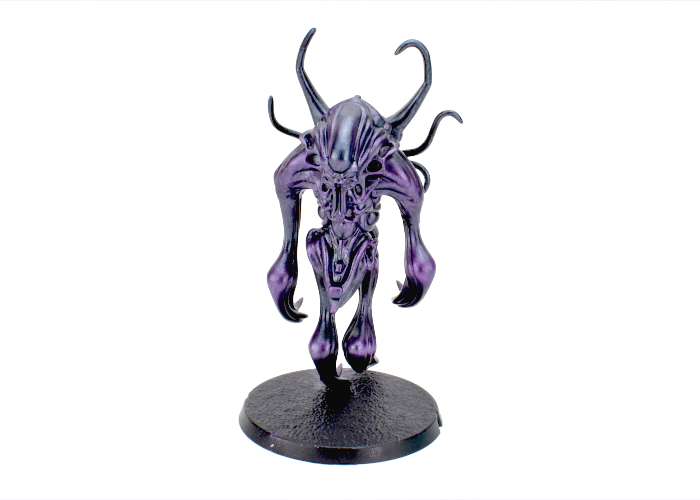
I used a light drybrush of Zephyr Pink to add some extra highlights wherever it seemed appropriate. I also went back over the top of the head with some more Night Scales, and picked out the eye sockets with Zephyr Pink before adding some white over on the eyeballs and inside the mouth. Finally, I added some coarse sand mix to the base with PVA glue, and then painted with Army Painter Dirt Spatter, then a wash of Mid Brown ink, and finally a drybrush with Kobold Skin, also picking out the base edge with more Dirt Spatter.
To build your own angel of floaty, screamy doom, you can pick up the Mature Angel kit along with the rest of the Maelstrom's Edge range from the webstore here.
What are you working on? We would love to see your models and terrain in the Comm Guild Facebook group!
For other building ideas, modeling tutorials, army spotlights and conversion walkthroughs, check out the Hobby section of the Maelstrom's Edge website here.
Who are the Broken?
Posted on Wednesday Sept 01, 2021 at 06:00pm in The Broken
These survivors take matters into their own hands after being left behind. They pool their resources and knowledge in a communal effort to escape the Edge. Derelict ships are repaired. Affluent people’s ships are stolen. Government ships are commandeered. Any ship available is pressed into service for the Broken. They are a group unlike any ever seen in the galaxy. Fear, hate, anger, need fused them, these abandoned people, into an unstoppable force with one goal - escape the Edge. The Broken is a term used to unify all such desperate people across the Edge. Their motivation, methods, and sanity vary wildly from fervent revolutionaries to callous pirates to the few who have stared into the maw of the Maelstrom only to come away unhinged.
When the Broken arrive to do combat, it is rarely for a pitched battle. The Broken fight for their freedom, for resources, ships and information, usually against a far better equipped and trained military force. In combat, the Broken rely on stealth, subterfuge, and sabotage, backed up by sheer weight of numbers to overwhelm their opposition. Although the average combatant from other factions may be disciplined and well equipped, they often also have a narrow mindset, moulded by strict training. The strength of the Broken lies in the sheer variety of fighters from all walks of life, each bringing their own unique skills with them, honed through desperation and the need to survive. This gives the Broken a large amount of flexibility in how they can approach any goal.
One of the greatest equalisers of the Broken method of combat is electronic warfare. Amongst the ranks of the warband will be a variety of ex-engineers, programmers, blueprint pirates and information merchants, all well versed in the electronic systems and technologies of their worlds. Warbands use these skills to foment dissent on worlds, steal technology and blueprints, and falsify documents. On the battlefield armed with a simple data link, one skilled individual can circumvent security systems, interrupt power grids, broadcast false intelligence, and create fake sensor data to confuse their opponents. Although enemy mechs and combat suits are hardened from direct attack, the barrage of denial of service attacks and unreliability of automated security systems in the face of a Broken attack levels the playing field considerably.
These electronic attacks are supplemented by the warband’s leader’s skill as they direct the fighters under their control. A Forsaken Chieftain with a small band will favour stealth and misdirection. A Jackal Warlord may throw drug-crazed berserkers at the enemy, or take the enemy up close and personal with short ranged blastguns. A more organised Revolutionary warband may employ combined arms, using fast vehicles and directed explosive weapons to achieve their goals.

You can find out more about the Broken on the Maelstrom's Edge website. While you're there, you can pick up any of the Broken models, along with the rest of the Maelstrom's Edge range, from the webstore. Free shipping applies to qualifying orders - check your cart for details.
Meanwhile, if you have any questions on the Maelstrom's Edge background or gameplay, pop in to the Comm Guild Facebook group here.
Terrain Kitbash: Communications Hub
Posted on Monday Aug 30, 2021 at 06:00pm in Tutorials
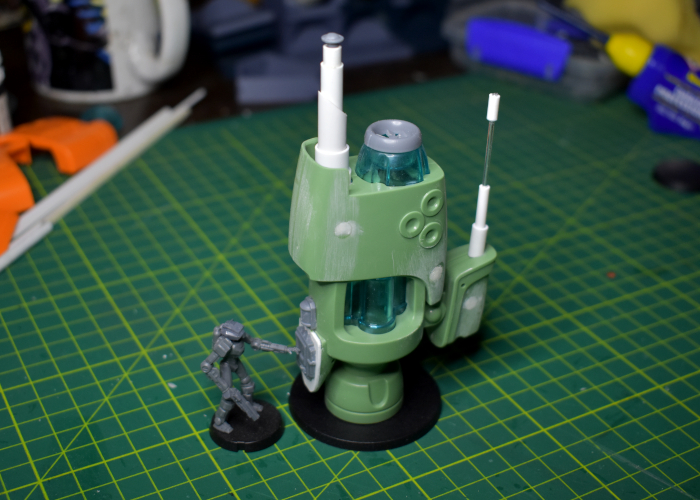
Regular readers would know by now that I have a habit of grabbing odd things from around the place that have interesting shapes and turning them into terrain. In the past, I've built terrain from various bits of building hardware, storage containers, food packaging, and Christmas tree decorations, amongst other things. This week, I ransacked Amazon's toy department to put together a communications hub!
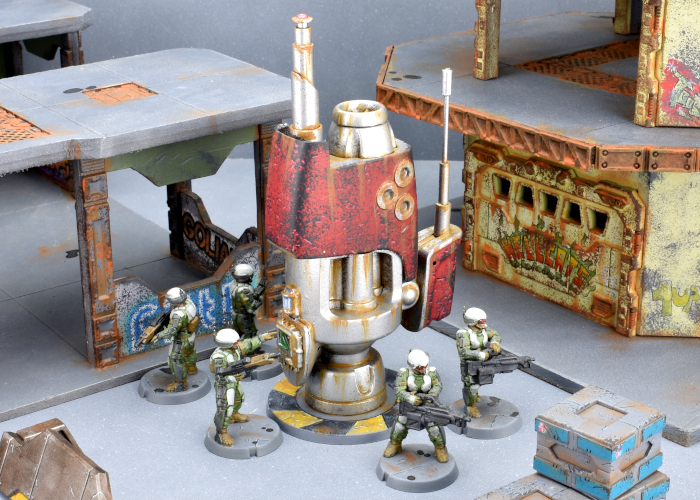
The base for this model was a small light up laser gun toy that I found while browsing Amazon. This particular toy came in a set of 4 - three of this same design in different colours, and another blockier design that I'll find a different use for later.
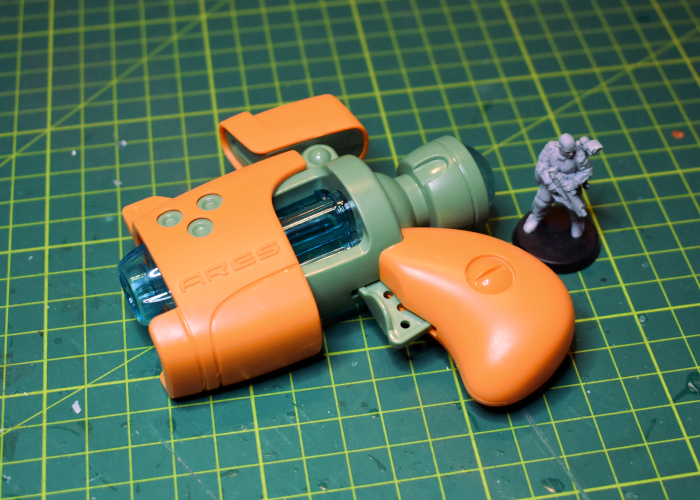
The first step was to take the gun apart so that I could remove the pistol grip and any other un-needed parts. The cowling from the front will likely wind up as a building entry at some point in the future, and I saved the light and speaker just on the off-chance that I want something to light up and make pew-pew noises.

The main part of the gun was almost perfect as is, although I trimmed down the protrusion that the pistol grip originally clipped onto with a razor saw.
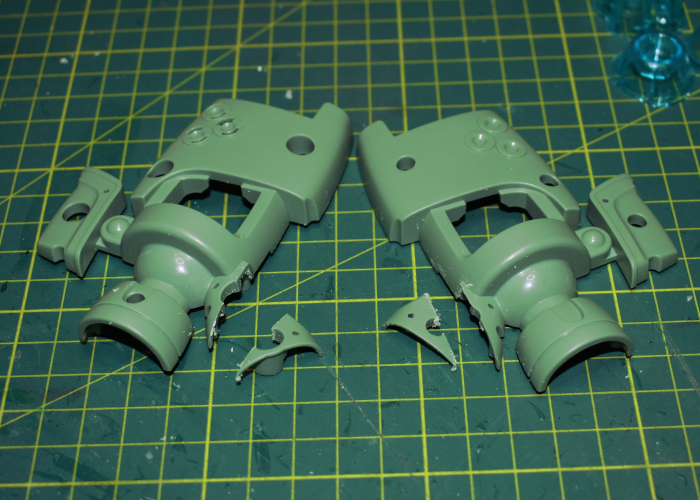
I then cut a piece of plasticard to fit neatly over the opening, and grabbed a computer panel from the first Maelstrom's Edge terrain sprue to add to this plate.
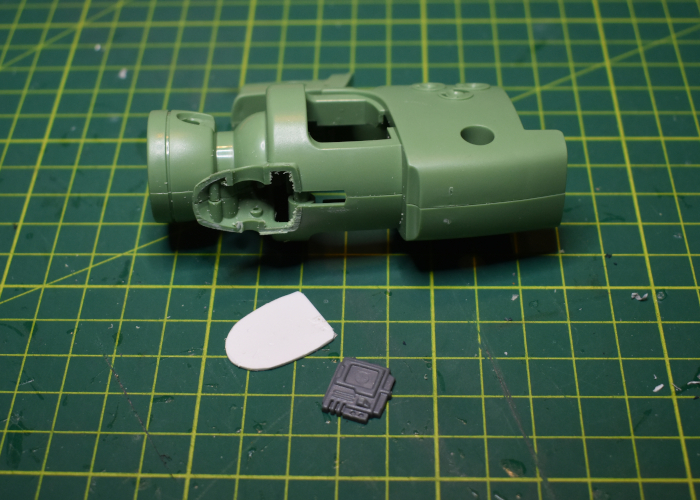
I reassembled the body of the gun, and added a couple of aerials made from plastic tubing, aluminium rod and a post piece from the second Maelstrom's Edge terrain sprue.
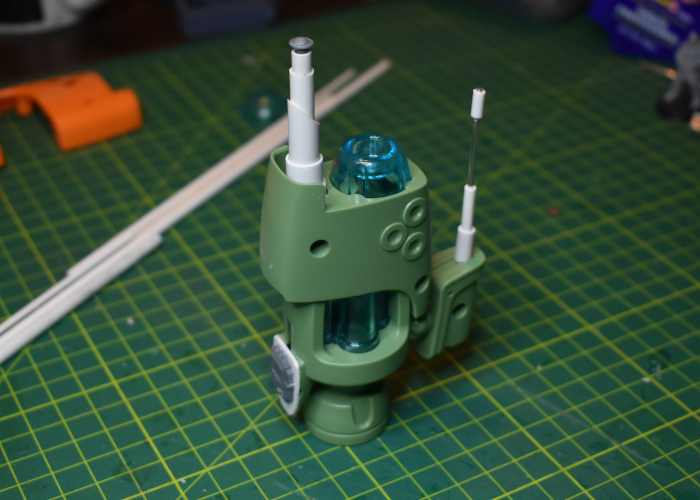
Finally, I added a base to make it a bit more stable, glued an exhaust fan from the second terrain sprue over the muzzle piece, and puttied over the screw holes.
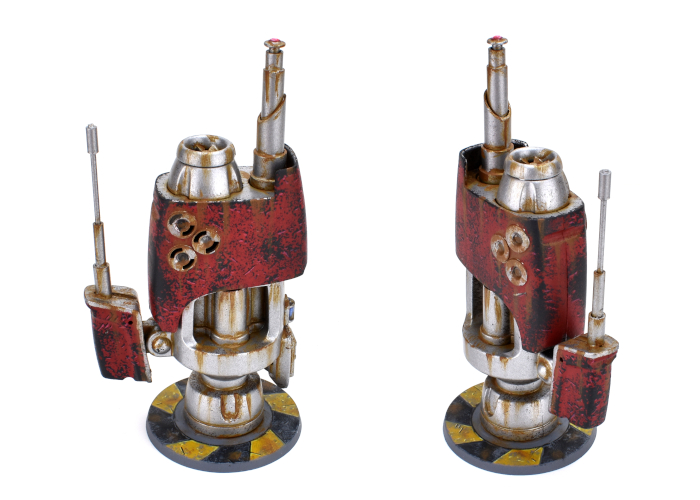
With some paint on, it wound up looking like this:
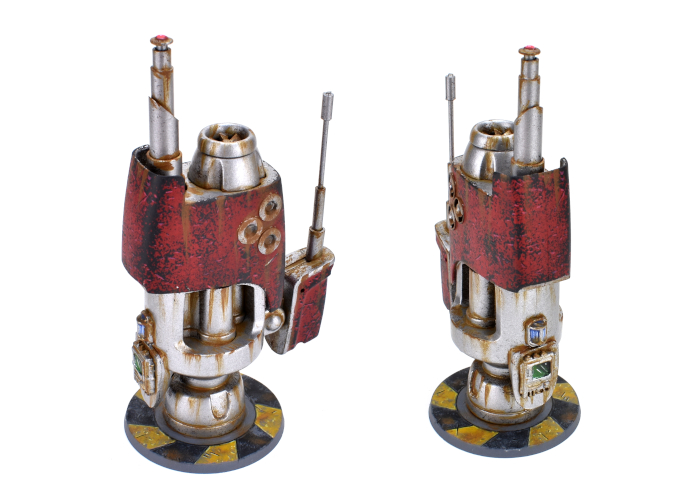
I considered leaving the blue central piece unpainted as a shiny, translucent feature, but decided against it as the three guns have different coloured pieces, so the translucent piece would be different on each comm hub... and that would offend me on a deeply spiritual level when I build the other two.
To build your own hub of communicative doom, you can pick up the Maelstrom's Edge terrain sprues along with the rest of the Maelstrom's Edge range from the webstore here.
What are you working on? We would love to see your models and terrain in the Comm Guild Facebook group!
For other building ideas, modeling tutorials, army spotlights and conversion walkthroughs, check out the Hobby section of the Maelstrom's Edge website here.
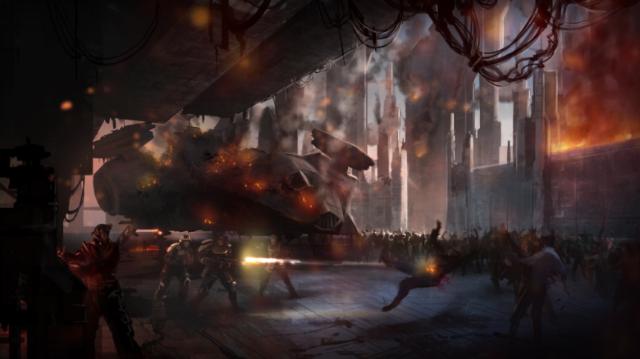
Remainers
Posted on Wednesday Aug 25, 2021 at 06:00pm in Fiction
What did any of us really know about our taciturn, black clad client? Not more than we ever needed to know. If they could pay a portion of the fee up front, I was generally satisfied. Sometimes the jobs were complicated, or of questionable legality. The fewer the questions asked, often the better.
The Boscile job had seemed simple enough. It might not be wise to go against the flow of the evacuation effort, going back to a world that had already been cleared out, but it certainly wasn't forbidden. If Garran Boscile was into some sort of extralegal activity – something akin to looting, maybe – then nothing about his demeanour fitted that picture. In the few conversations I'd had with him, I'd formed the idea that our client was closer to a scholar than a criminal. There was an obsessive, driven look in his eyes – the mad glint of a man looking for the final part in a puzzle that had consumed a lifetime, or a large part of it.
If the man wanted answers, and could pay, who was I to say no?
I stood up. I'd had enough of following progress on a screen, not after we'd come all this way. I worked my way back through the ship, bumping into one or two other members of the crew, until I was standing at the top of the ramp, one hand on a hydraulic ram.
Boscile was already at the base of the ramp, ready to step off. One hand was empty. The other clutched the handle of a large metal case, one that almost seemed too bulky – and presumably heavy – for the ease with which it was carried.
'I hope this is worth it,' I called down to him.
'You've done very well, Captain. In a little while you'll understand how vital this contract has been. You'll have assisted me in righting a great wrong.'
'Thing is, I'm not really in the wrong righting business.'
'You are now,' he answered.
Boscile moved to the edge of the deck. A short descending flight of steps connected it to the main part of the building. The roof of the main structure was a square, perfectly flat except for a low service building set in the middle. There was an open doorway in the side of that building, and a stairwell leading down into unlit darkness. There were no walls anywhere around the outside, so it had presumably been uncommon for visitors to come up here, unless they were using the landing deck.
Boscile walked to the edge of the building. He knelt down with the case on the ground, flipped its lid and took out a stubby cylinder. He did something to the end of the cylinder and it began to flare a bright pink, giving off billowing wafts of thick, chemically dyed smoke. Boscile waved the object over the side of the building, then set it down on the very edge, so that the flare's brightness would have been visible from the ground. He then took a second cylinder from the case, locked the case, and carried it and the cylinder back to the central stairwell. He activated the second flare and threw it into the stairwell.
Pink light flickered away down into unseen depths.
Boscile walked back to the base of the boarding ramp. 'I have summoned them,' he said. 'They will be here before too long.'
'Them?' I asked, barely having to raise my voice since the air was so still.
'Remainers. Groups of people who chose not to be evacuated. They have their reasons; ours is not to argue with them.'
'Karist crackpots, you mean.'
'Not all, Captain. Some remain out of a deep personal attachment to the soil they were born on. They would rather die here, than live somewhere else. You cannot blame them for that. Others remain purely as a point of principle: if the evacuation program forbids them from remaining, then they will do their utmost to disobey it. Near the end, on this world as on many others, it was not too difficult. It was hard enough coordinating the effort to evacuate the willing, let alone those who would rather stay behind.'
'No one stayed behind.'
'No one was officially left behind. That's not entirely the same thing. By my reckoning around a million souls remain on Calexis, organised into a dozen or so semi-independent communities. We would say that they were regressing to a hunter-gatherer lifestyle, except there'll never be time for that.'
'Fine,' I said, only slightly rattled by this information. 'If they've chosen to stay here, that's their stupid choice. What the hell do they want with you?'
'The basic human necessities, Captain.' He knelt down and opened another layer of the case. It folded out to reveal ranks of small glass vials, with colour-coded stoppers. 'Medical supplies have become scarce since the hospitals were abandoned. You'd think it would be the opposite, but the authorities were very careful to make sure the major stocks were destroyed or contaminated. Given that the drugs had already been paid for, it was an act of pure spite. They gained nothing by doing that, except to make life more difficult for those who stayed behind.'
'If life's difficult now, wait until the Maelstrom arrives.'
'The Remainers know that,' Boscile said curtly. 'Do you think them fools? To see out the Maelstrom is their choice. But they need not suffer needlessly until then.' He patted the case. 'It isn't much, not given how many people stayed behind. They will need to be sparing with their usage. But it was all I could afford on the open market, and if I had tried to bring in more, questions would have been asked.'
'You paid for the drugs yourself?'
He looked up sharply. 'Of course. Who else was going to do it?'
v
Against my instincts, I stepped off the ship and walked across the short connecting stairs between the pad and the main part of the building. The air was still breezeless, and the yellow sky made it feel oppressively still and lifeless. I stood next to Boscile and his case, hands on my hips as I looked down. 'What do they need with medicines, anyway? They're going to die!'
'Months or years from now. You know as well as I do that the advancement of the Maelstrom isn't predictable on a short timescale. It surges, slows … sometimes almost stops advancing completely. They may have decades … and you're saying they shouldn't be spared from the worst consequences of illness, age, pregnancy?' Boscile closed one layer of the case and opened another, containing just as many colour-coded vials 'It won't do much – I know that. But a tiny reduction in human misery is still a reduction. You see that, don't you?'
'I suppose.'
'Money would be useless to these people,' Boscile said. 'Which is just as well, as I have little enough to offer. My quest has made me a poor man, not a rich one. Between these drugs, the cost of your services, the expense of reaching the station where you were docked … well, never mind. I will soon have something that makes all such considerations moot.'
'This little trip is going to make you rich?'
'Far from it. In fact I expect it to make me deeply unpopular. But the truth must out, and there will be those willing to pay for it. If I can ensure the truth reaches the right hands, then I will consider that ample repayment for my efforts.' He closed the case, and stood up until he was level with me, his eyes swimming behind his spectacles. 'Terrible crimes have happened, Captain – worse than the abandonment of these people. Those misdeeds would not only go unpunished, all evidence of them would be lost.
But we are here now.'
'What crimes?' I asked.
'Captain!'
I turned around. It was Drago, calling down from the top of the boarding ramp.
I had a good view of the Grey Ghost now, since she was level with the surface of the landing pad. The deck was a delicate projection, and the ship squatting down on it, straining low on its own undercarriage, looked much too heavy for such a thing, like a fat book buckling a thin shelf.
'What?'
'You'd better come see.'
I nodded at Boscile. 'Give me a moment. I guess you're not going anywhere.'
'No,' he answered, reasonably enough. 'I do not suppose I am.'
Excerpt from the short story 'Remainers', by Alastair Reynolds.
Find the rest in 'Tales from the Edge: Escalation', available in paperback from the Maelstrom's Edge Webstore, or grab the digital version on Amazon.
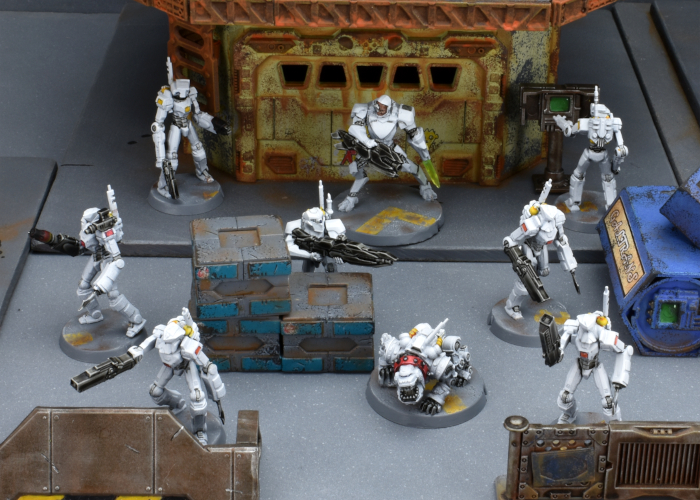
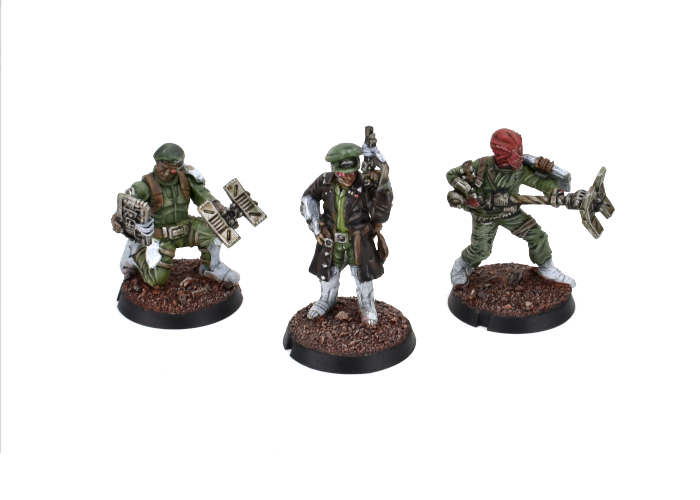
Army Spotlight: Broken SARA Detachment
Posted on Monday Aug 23, 2021 at 09:06pm in The Broken
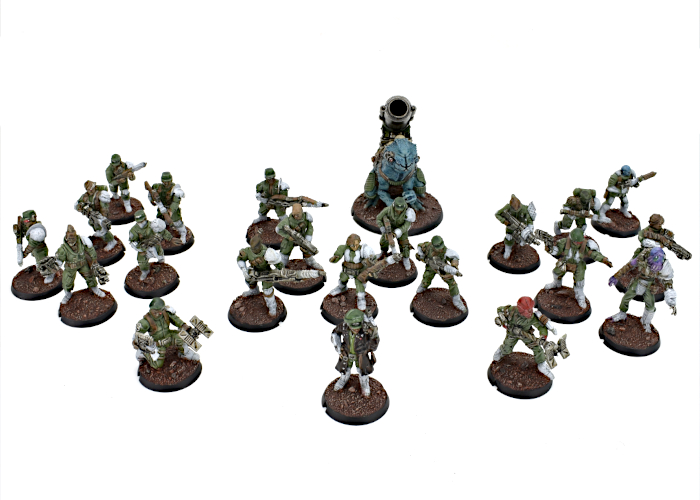
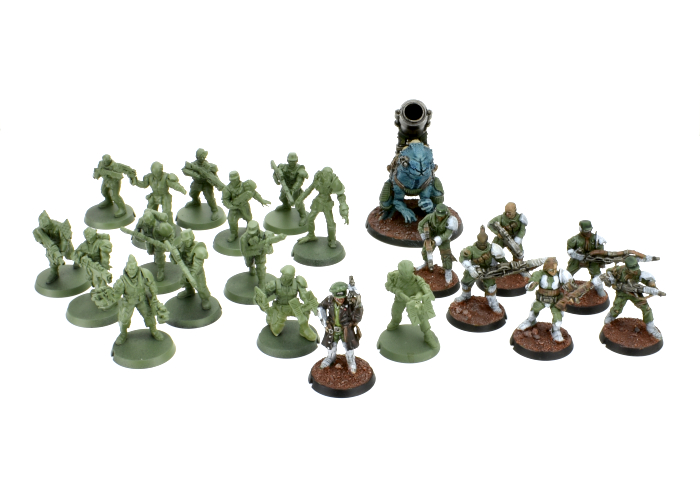
Last week, I shared a Revolutionary Captain conversion that I had painted up to lead a new SARA force for my army collection. This week, I completed work on the rest of his detachment!
The leader for the detachment is obviously the aforementioned Revolutionary Captain, equipped with his signature pistol and an added trophy melee weapon. To accompany him into battle, I filled out a Vanguard slot with a pair of Sig Jammers, on using the regular resin model, and another converted up using a bunch of assorted parts, including the beret head that I didn't use on the Captain. Sig Jammers provide support to Broken forces by interfering with enemy Fields and forcing additional Suppression Points onto enemy units with their Tech Disruptors.
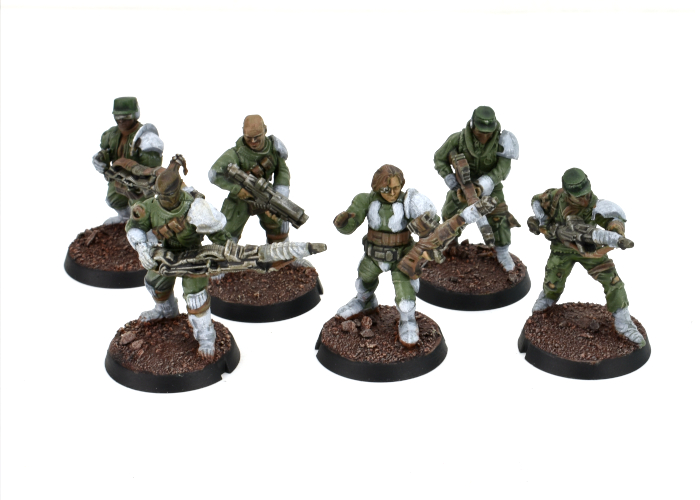
Rabble units make up the core of any Broken force. For my SARA, I wanted to give them a more military look than my Forsaken force, so I mostly stayed away from long coats and robes, and borrowed some extra armour parts from Epirian and Karist kits, and also a few bits and pieces from some Stargrave plastic models for a little extra variet. I also gave all of the models a shoulder pad on their left shoulder, as something to help unify the various assorted models... although in true Broken fashion, these pads are also sourced from a range of different places.
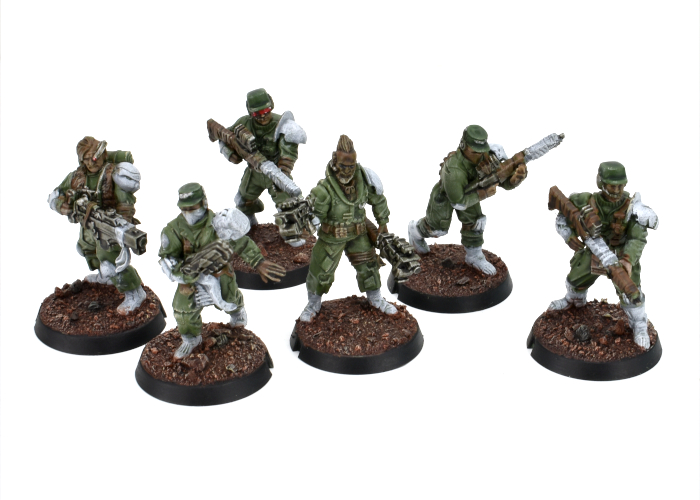
The second Rabble unit is accompanied by a Marsayan Hypnotist, to provide some tentacle-faced disruption to enemy shooting. Units accampanied by a Marsayan are difficult to hit, always counting as a Fleeting target and gaining a dodge against close range attacks.
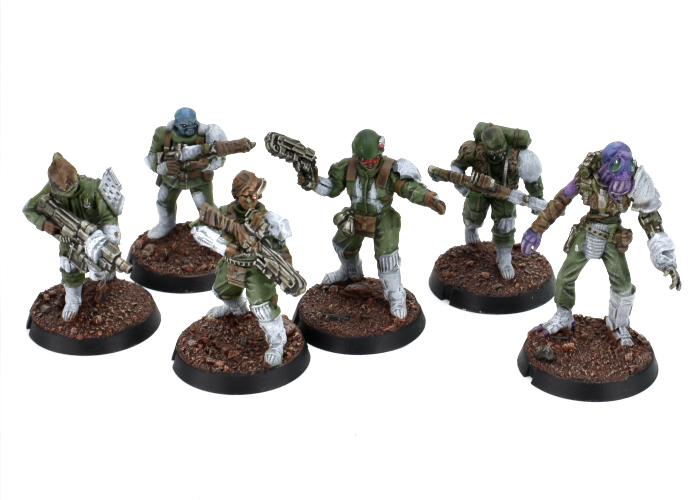
For a bit of long range coverage, I added a Rabble Fire Support unit with beam longrifles to fill one of my Anvil slots.
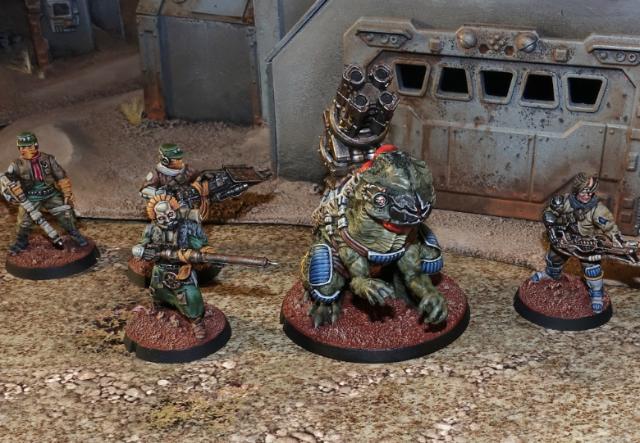
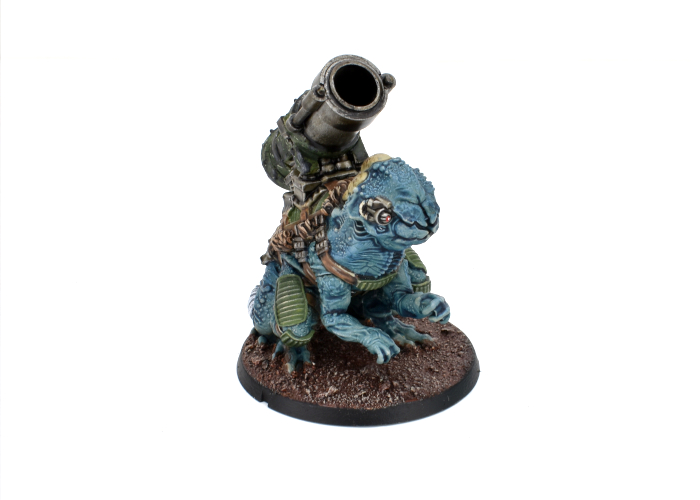
To round things out, I took a Pa'ku for the other Anvil slot, because how can you go past a giant toad with a cannon. The model I've used here is one I converted up for the spotlight article some time ago to count as a 'heavy EMP mortar' instead of the usual quad mortar... but could still be used as just a variant version of the usual gun if I want to keep things official. The Pa'ku's EMP mortar is great for dropping large blasts on enemy formations, although it works best in concert with other Pa'ku due to their Coordinated Barrage rule. So I'll probably look at painting up a second Pa'ku with the second detachment, potentially retrofitting it back into this detachment with the Multi-Unit Selection rule allowing both of them to count as a single Anvil choice.
All up, this detachment currently comes in at 67 points, so is just under half of a 'standard' 150 point force. I'll be working on the second detachment as I have time, putting in another Revolutionary Captain, some snipers, and an assault unit featuring a couple of Hakoyu for some up-close-and-personal, pointy doom. In the meantime, I can always use these as a detachment alongside my Forsaken force.
More to come - stay tuned!
To build your own army of revolutionary doom, you can pick up the Broken along with the rest of the Maelstrom's Edge range from the webstore here.
What are you working on? We would love to see your models and terrain in the Comm Guild Facebook group!
For other building ideas, modeling tutorials, army spotlights and conversion walkthroughs, check out the Hobby section of the Maelstrom's Edge website here.
Tags: broken conversion modeling painting sara
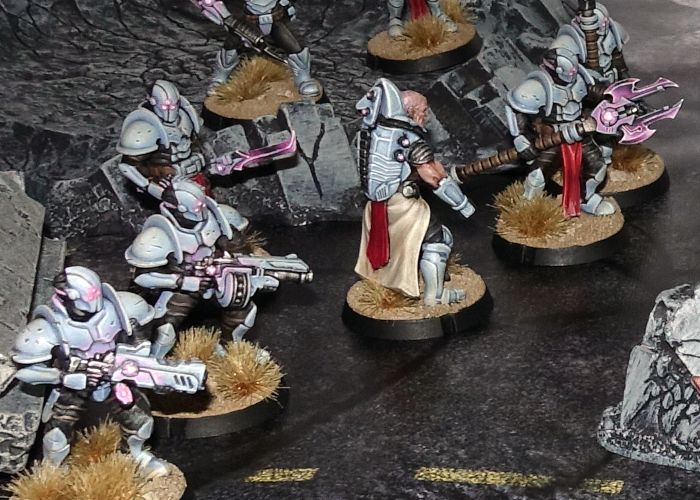
What is the Karist Enclave?
Posted on Wednesday Aug 18, 2021 at 06:00pm in Fiction
Karist society is focused around service to the Enclave, and all Karists are expected to give their time to the Enclave’s needs, whether that be a tour as a soldier or missionary, or the giving of time to perform communal tasks. In return for their services citizens are given an allocation on the Enclave’s nanoforges and are also allowed to partake in commune rituals, where Kaddar Priests touch their followers with small quantities of na-cybel energy, inspiring flashes of euphoria and visions that are said to be hints of what happens during ascension.
In battle, the Enclave’s forces are clad in distinctive scalloped armour, and armed with weaponry that fires pulses of cybel energy. Frequently, they are also accompanied by Angels, ethereal alien creatures that live off cybel energy, kept enslaved by their Keepers to inflict huge damage on the Enclave’s enemies. Shadow Walkers, acting as the hands of the Heirarchs, use their skills in stealth and deception to infiltrate the governments and armies of their foes.
Ascension drives all of the Enclave’s actions, from the missionaries who travel to doomed worlds to the soldiers who ‘liberate’ those planets viewed as essential by the Heirarchs. Whether that strategy is defined by the number of Karist believers on the planet who need to be saved or the resources that can be appropriated is a matter of some debate amongst critics of the Enclave’s operations. Whatever their motivations, the Karist Enclave is a growing force across many of the worlds threatened by the Maelstrom’s Edge.
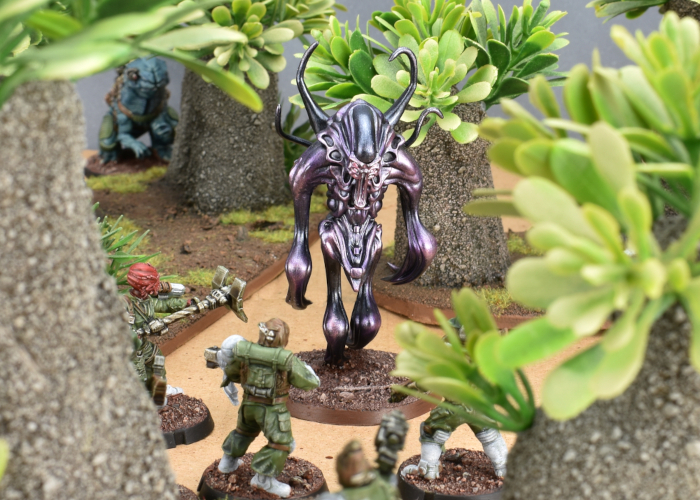
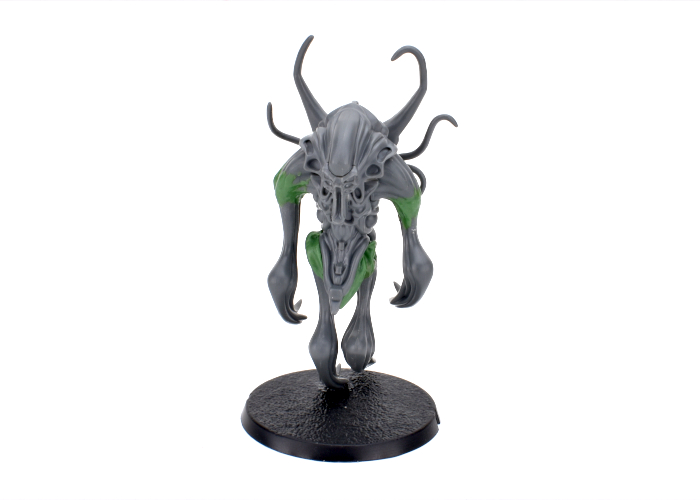
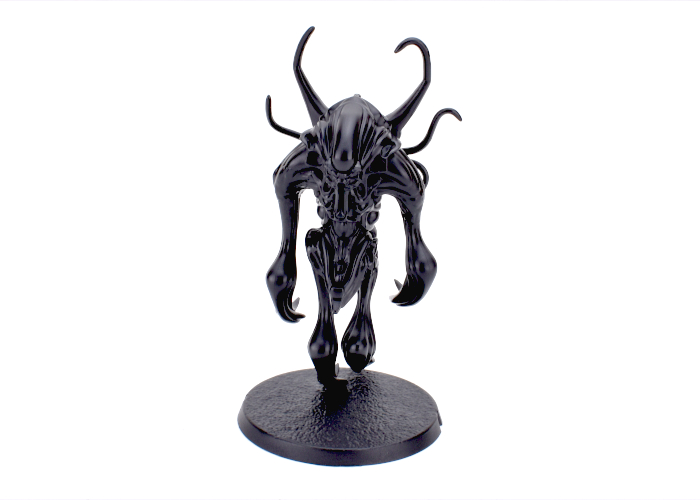
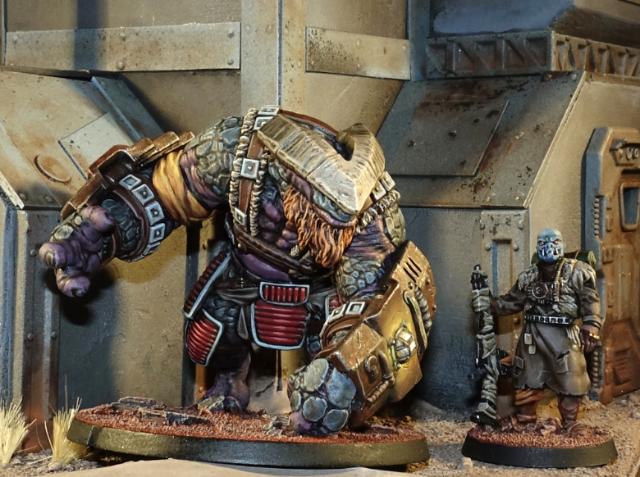
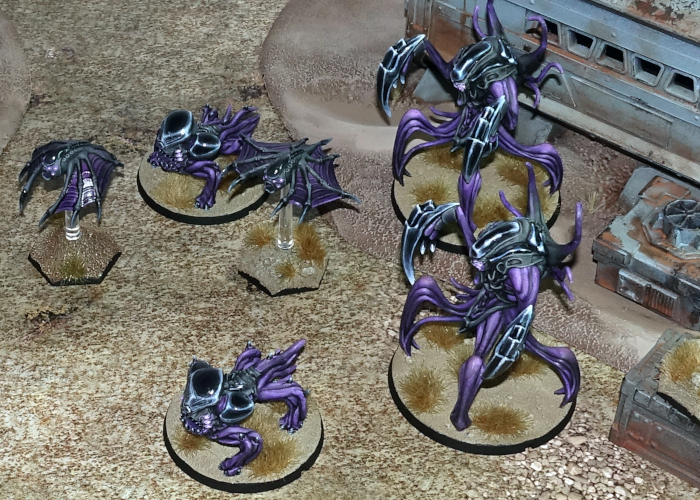
The aliens known as the Angels of the Maelstrom are many-limbed, amorphous creatures of deepest black. The creatures have long been the subject of legend around lonely spaceship mess decks, but until the Maelstrom had driven them from their deep space habitats they had rarely been seen. Angels can change form, with some resembling giant bipedal squid and others smaller, winged beasts. Although when they had been encountered in deep space the Angels are shy of human contact and relatively benign, the Maelstrom seems to drive them to insanity. Fleeing the Edge like savage beasts before a fire, the Angels are drawn to sources of cybel energy, and will descend upon ships, stations or worlds in their path with catastrophic fury. The Karist Enclave has come to use this hunger for cybel energy to enslave the alien creatures for their own ends. For hundreds of years, the Keepers of the Karist Enclave have enslaved Angels, keeping them docile using regimented doses of cybel energy. Keepers experiment on their captives, using different forms of cybel energy and electromagnetically charged cages to shape the Angels, encouraging them to grow new limbs or shapes to match the Enclave's requirements.
You can find out more about the Enclave by downloading a free PDF version of the Maelstrom's Edge rulebook here. If a physical book is more to your taste, grab the Battle for Zycanthus starter set, along with the rest of the Maelstrom's Edge range, from the webstore here! Free shipping applies to qualifying orders - check your cart for details.
Meanwhile, if you have any questions on the Maelstrom's Edge background or gameplay, pop in to the Comm Guild Facebook group here.
Painting Spotlight: Converted Broken Revolutionary Captain
Posted on Monday Aug 16, 2021 at 06:00pm in Tutorials
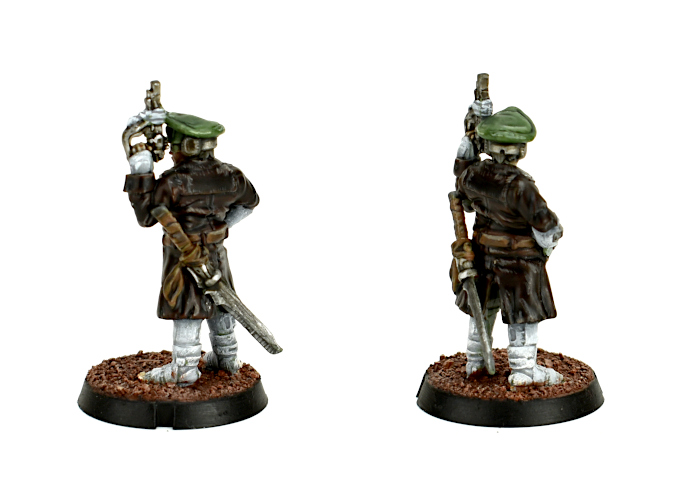
With the release of the Revolutionary Captain and Sniper models for the Broken, I couldn't resist the lure of that new army smell, and so I've been working away to put together a SARA force to sit alongside my existing Forsaken collection. The model I chose to lead the force was one that I showed back in the Conversion Spotlight article when the Revolutionary Captain was released, but this week I finally got some paint on him!
For those who haven't checked out the article linked above, this model was a conversion of the plastic SARA Captain model. The head was taken from an Epirian Contractor, with a hat added using 'green stuff' putty. I also gave him a sword built from a couple of chopped up weapons from the Broken Rabble sprue and a slightly reshaped Karist sword blade taken from the Faction Expansion sprue.
For this force, I chose to go with a colour scheme fairly similar to the Maelstrom's Edge studio model, using a lot of Army Green with white 'techy' bits. To make the Captain stand out a little more from the horde, though, I swapped out the studio model's green coat for a dark brown leather one. This was painted with Scalecolor Bosh Chestnut and several layers of Army Painter Dark Tone, before highlighting with Army Painter Leather Brown with a little Skeleton Bone mixed in.
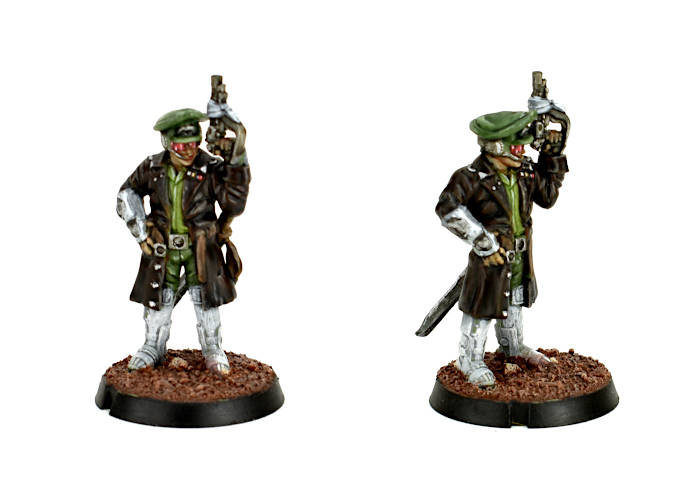
The rest of his uniform is Army Painter Army Green for the pants and hat, and Army Green mixed with Coat D'Arms Putrid Green for the shirt. These were washed with Army Painter Military Shader, and then the hat given two coats of Green Tone, before it was all highlighted with some more Putrid Green and Army Green mix. The metal was painted with Army Painter Plate Mail Metal and washed with Dark Tone and Strong Tone, with a Shining Silver highlight, while the white parts were given a coat of Army Painter Uniform Grey and then a heavy drybrush of white. It's a little rough up close, but quick and easy and looks suitably beaten up on the table!
The next job is to finish up the painting on the rest of his detachment, and then start on a second detachment so that I can work in a sniper or two!
To build your own army of revolutionary doom, you can pick up the Revolutionary Captain along with the rest of the Maelstrom's Edge range from the webstore here.
What are you working on? We would love to see your models and terrain in the Comm Guild Facebook group!
For other building ideas, modeling tutorials, army spotlights and conversion walkthroughs, check out the Hobby section of the Maelstrom's Edge website here.
Tags: broken conversion model painting sara
Game Primer: Assembling a Force
Posted on Wednesday Aug 11, 2021 at 06:00pm in Gaming
Each unit available to a force has a Unit card, which includes the unit's composition, equipment and special rules. These cards also contain all the information you need to select your force for a game, like the unit's points cost and unit type.
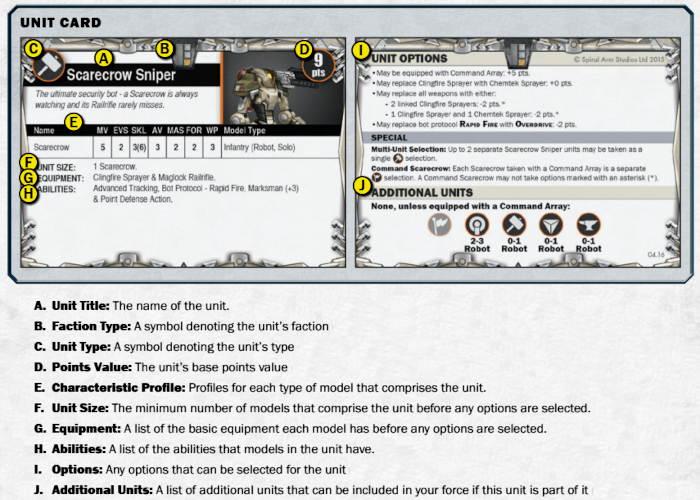
Games are typically played using a points limit that is agreed upon between both sides before forces are selected. You are always free to field a force whose point total is less than or equal to the agreed upon limit, but never one that exceeds it, not even by a single point! If you’re unsure about what points limit to use for your games, the following guidelines can help you decide. However, you should also feel free to experiment playing games with both higher or lower points limits than those suggested:
120 Points: This is a good limit if playing a game just using the contents of a single Battle for Zycanthus box set. This size game will typically last around 90 minutes to 2 hours once both players are familiar with the rules.
150 Points: This is the suggested points limit for Maelstrom’s Edge games to provide players with ample decisions when selecting their forces, while not taking too long to complete. This size game will typically last around 2-3 hours once both players are familiar with the rules.
Any units included in a force must be noted on a force roster, detailing the point total of each unit chosen and including any options selected for that unit.
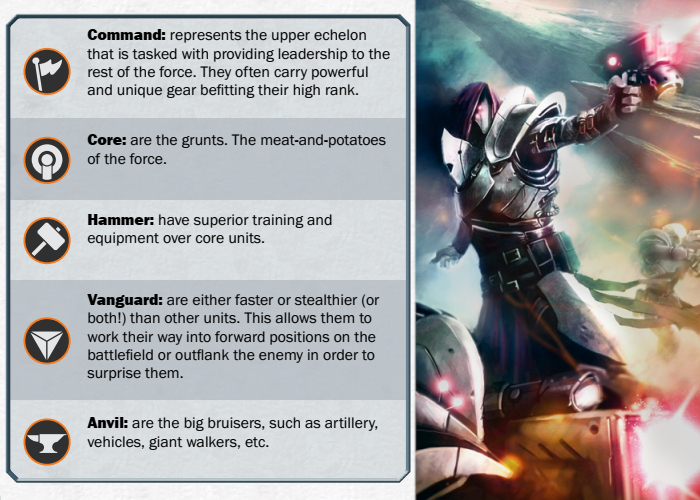
Your force is selected as one or more detachments, led by a Command model. Some units types are optional while others are mandatory, with a minimum number of those units you must select. For example, most commanders require you to take at least one Core unit selection in your force, while also allowing you the choice of a number of Vanguard, Hammer or Anvil units. Once you have satisfied any mandatory unit requirements, you can select other units up to the maximum allowed by that commander (or to the points limit for the game) or take another commander for a new detachment, following the same selection process.

A 150 point Karist Force
To get you started, we've created some sample rosters for different forces, which can be found on the website here!
Get your force together by grabbing the Battle for Zycanthus starter set, or any of the rest of the Maelstrom's Edge range, from the webstore here! Free shipping applies to qualifying orders - check your cart for details.
If you have any questions on force selection, or any other aspect of Maelstrom's Edge gameplay, feel free to pop in to the Comm Guild Facebook group here.
Modeling Tip: UV Resin Windows!
Posted on Monday Aug 09, 2021 at 06:00pm in Tutorials
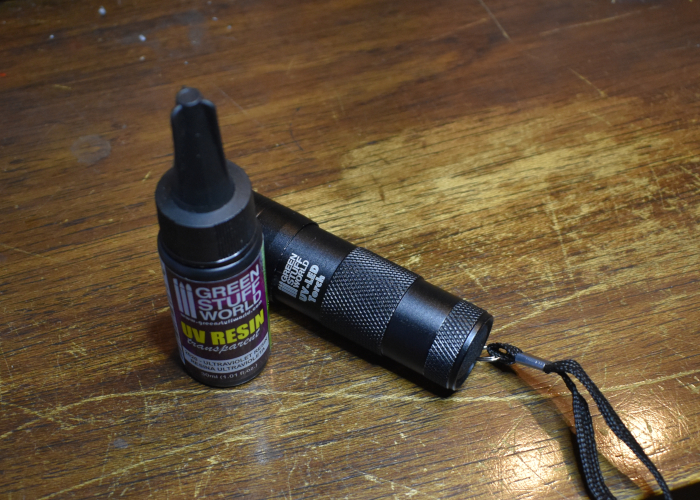
There are a few different options out there for filling in open windows on terrain. In the past, I've used clear plastic or aluminium mesh cut to shape and glued in. I recently picked up some Ultraviolet Resin intended for creating water effects, and it occurred to me that this might be a fun alternate way of adding panes to some windows.
The resin I'm working with is sold by Green Stuff World. It's a super-clear gel that you squeeze from the bottle and then set with a UV light, or by leaving it out in the sun. They also sell a UV torch, which I couldn't resist picking up.
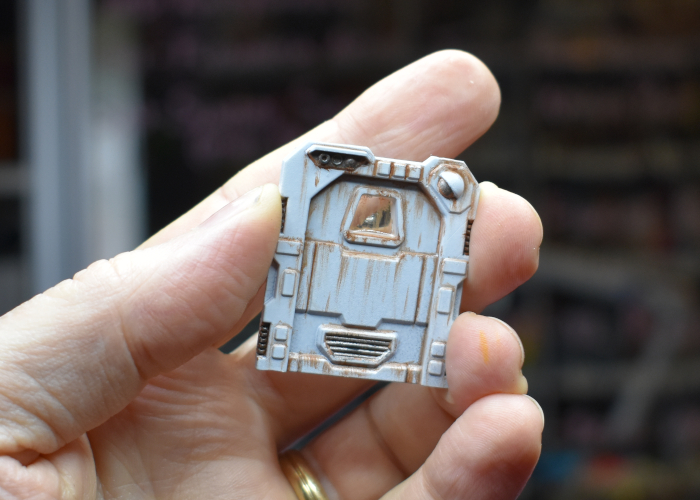
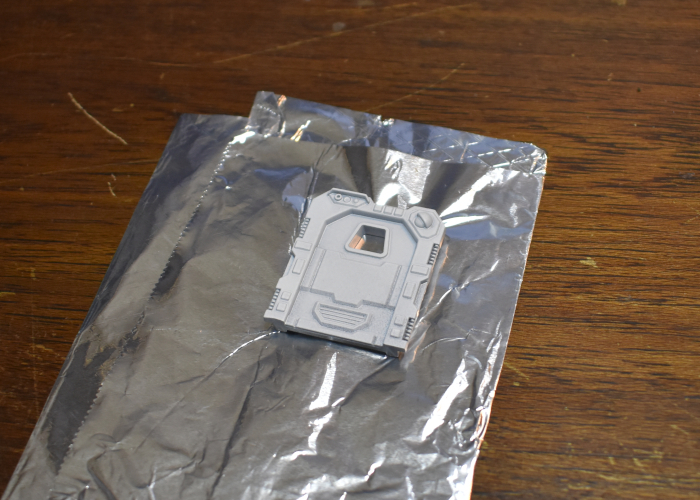
To create a window pane, I took a painted door from the Maelstrom's Edge terrain sprue and laid it down on some aluminium foil, with a small piece of thin plasticard in behind to push the foil snug against the back of the window frame.
(I used a painted door as it was going to be impossible to paint the inside of the window frame once the resin was in place.)
I then added a drop of resin into the middle of the window, leaving it a minute or so to settle out to the edges of the frame. There were very few airbubbles in the resin, but I used a pin to gently poke the few that were there to make them go away.
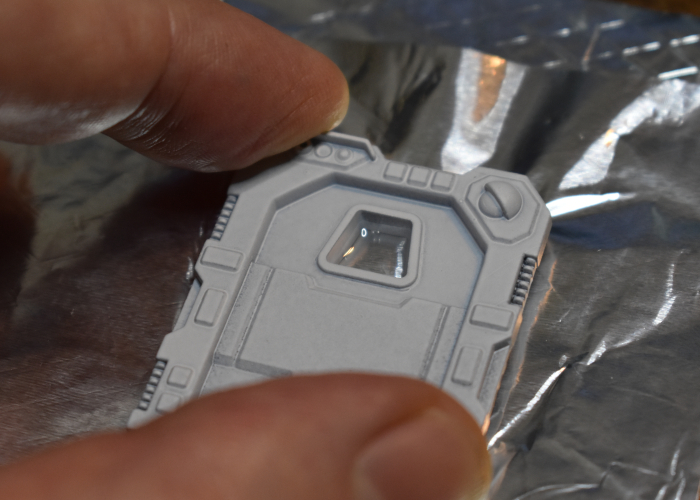
To set the resin, I sat the UV torch on top of the doorframe pointing directly at the window, and left it for a couple of minutes to let it do its thing. From further experimentation later, the resin starts to cure within a few seconds, but I wanted to leave it long enough to make sure.
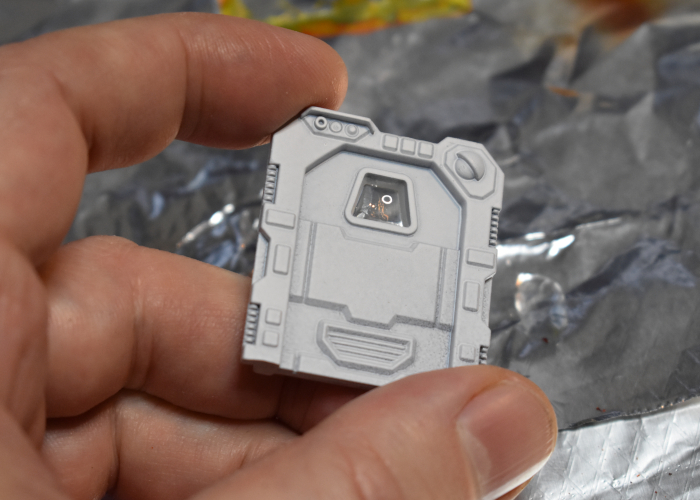
From there, the door was ready to be glued into a piece of terrain and detailed.
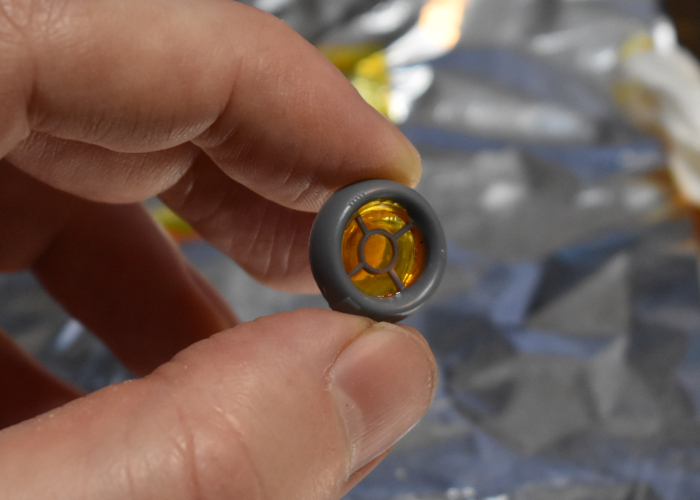
For coloured window glass, transparent paint gives a nice tint. This porthole was filled with resin in the centre, and then once set I painted the back of the resin with two coats of Tamiya Clear Orange.
To make your own windows of transparent doom, you can pick up the Maelstrom's Edge terrain sprues along with the rest of the Maelstrom's Edge range from the webstore here.
What are you working on? We would love to see your models and terrain in the Comm Guild Facebook group!
For other building ideas, modeling tutorials, army spotlights and conversion walkthroughs, check out the Hobby section of the Maelstrom's Edge website here.
Tags: modeling terrain terrainsprue tutorial
Game Primer: Updated Base Rules
Posted on Wednesday Aug 04, 2021 at 06:00pm in Gaming

The Maelstrom’s Edge rulebook includes various guidelines for customising your models without inadvertently breaking the rules by changing how that model functions on the tabletop, and a part of that covers appropriate basing. Originally, these rules only had to deal with four different bases (including the hex-shaped flying bases), but with that number expanded out to nine, we wanted to allow players some freedom for creative modelling without forcing anyone to rebase existing models. As such, the text from the ‘Custom Basing’ section on page 132 of the Maelstrom’s Edge rulebook should be replaced with the following:
CUSTOM BASING
Models are normally mounted on the base specified for them as part of their model kit.
Conversions will sometimes result in a model not fitting on the correct base. Some players also like to use larger, impressively-detailed bases to make their character models and other significant units stand out on the table. While using a different sized base has an impact on how the model functions on the table, particularly for things like movement and unit coherency, so long as the change is not too extreme this has minimal practical effect on the game. As such models may be mounted on a base one size smaller or larger than specified in their instructions. In units of more than one model, all models with the same original base size must be mounted on the same alternate size.
You can use custom bases, or bases from another manufacturer, but these must have appropriate arc markings modeled or painted on, and fit within the same size range as above. For example, if a model would normally have a 32mm base, then any alternate base would need to be within 28-36mm in diameter. If the alternate base has modeled elements on it that significantly raise the height of the model compared to a standard base, then this qualifies as the model being converted as detailed above.

As we update the build instructions for our kits, these will include the relevant base size for each model. In some cases the default base size for a model may change – for example, the Remnant Nimbus is being updated to use a new 40mm base instead of the original 46mm, although the kit will come with both for the moment – and in these cases both the original and the updated base size can be considered valid. We don’t want anyone to feel like they need to pull apart their carefully finished models to update them!
While you're playing with bases, check out the Hobby Basics and the Tips & Techniques pages in the Hobby section of the Maelstrom's Edge website for some tips and tutorials covering different basing methods. Find them here!
Get your game on by ordering the Battle for Zycanthus set, along with the rest of the Maelstrom's Edge range, from the webstore here! Free shipping applies to qualifying orders - check your cart for details.
If you have any questions on bases, model building, or any other aspect of Maelstrom's Edge gameplay, feel free to pop in to the Comm Guild Facebook group here.
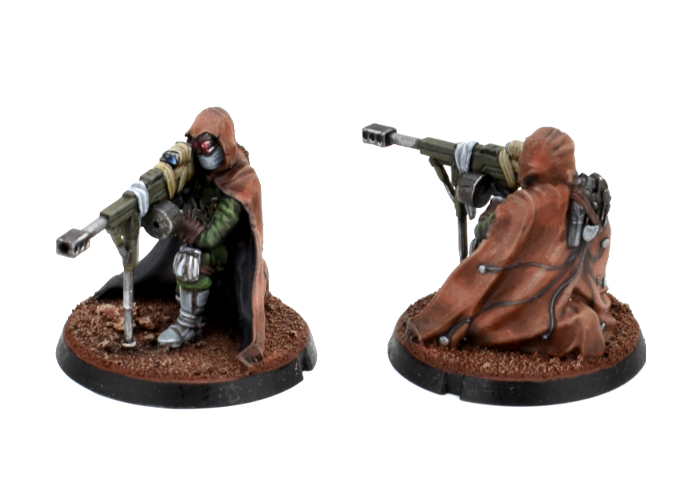
New Release: New base sizes!
Posted on Monday Aug 02, 2021 at 06:00pm in Models

Some of these have already snuck out into the wild, with the recently released Broken Sniper coming with the new 32mm base. Others will be appearing in coming months on other models waiting in the queue.
You can also pick up all of these bases separately from the Maelstrom's Edge webstore now!
