Hobby Basics: The Beginner Modeler Toolbox
Posted on Thursday Aug 06, 2020 at 05:00pm in Tutorials
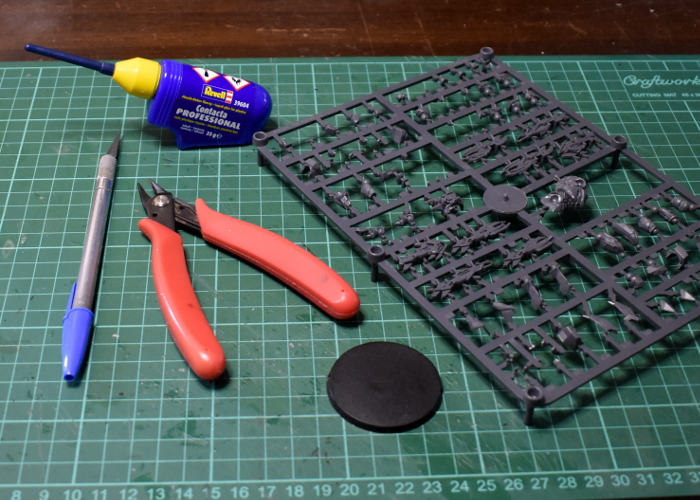
This week's article is the next installment in our series of basic hobby tutorials, taking a look at the tools that you need to get started building models. You can find the article here!
Stay tuned for more!
Terrain Spotlight: Derelict Water Tank
Posted on Thursday Jul 30, 2020 at 05:00pm in Tutorials
I've bought a couple of different materials for making water terrain features over the years, but other than using a tiny bit of Woodland Scenics' 'Realistic Water' in the watering trough in my Sci Fi Stockyard some time ago, I've never really done anything with it. So this week, I decided it was time to get my toes wet.
The main part of this water tank was originally the lid of a cylindrical gift box.
I flipped the lid upside down and used it as a template to cut a circle out of a sheet of foamed PVC for the lid to fit neatly into. A plastic plate served as a template for a larger circle around the tank. (Note: if you're using plates for circle templates, plastic is best. China or ceramic plates are often not perfectly circular!)
After gluing the tank and surround down to a square of hardboard, I started detailing. A thread spool that I had tucked away in my 'to be turned into terrain' pile looked like a perfect base for an overflow pipe, with additional detailing added from some more foamed PVC and a porthole and exhaust fan from the 2nd Maelstrom's Edge terrain sprue.
I also took a bunch of floor grates and pillars from Terrain Sprue #2, and half of a ladder from the Terrain Sprue #1 to make a platform. Onto this, I glued a control panel made from an antennae array from sprue #2 and a couple of trimmed down trapezoid windows from sprue #1, with a piece of plastic tube to finish it off. I made sure this would fit where I wanted it, but held off on gluing it in place until it was painted.
To add some detail around the outside of the tank, I took some loose strut panels from sprue #2 and curved them slightly over a marker pen before supergluing them in place at intervals around the tank.
Some small pipe fittings, a little plastic tubing and a piece of sprue cut from Terrain Sprue #1 served to make a smaller fill pipe. And finally, because it's against the law to make a water feature for a sci fi table and not have a barrel floating in it, I dug one out of the bits collection. After cutting through it at an angle with a razor saw, this gave me two barrels to glue in place inside the tank.
Painting consisted of spraying the whole thing with a brown 'Rust Basecoat', adding a coat of Army Painter Gun Metal around the outside, and then going to town with browns, oranges and Army Painter Dry Rust. On the inside of the tank I also added some swirls of green, before gluing the platform in place and filling the tank with several layers of Woodland EZ Water and Realistic Water, adding drops of Army Painter inks in between to provide some swirly patches of colour. This wasn't entirely successful, as the inks reacted with the Realistic Water and made it dry a bit lumpy - the key would seem to be to make sure that the inks are fully dry before adding the 'water'... or using Woodlands own pigments that are actually intended for this job!
To build your own water tank of icky, muddy doom, you can pick up the terrain sprues along with the rest of the Maelstrom's Edge model range from the webstore here.
For other building ideas, modeling tutorials, army spotlights and conversion walkthroughs, check out the Hobby section of the Maelstrom's Edge website here.
What are you working on? We would love to see your models and terrain in the Comm Guild Facebook group!
Terrain Spotlight: Paint Bottle Fuel Pylon
Posted on Friday Jul 17, 2020 at 05:00pm in Tutorials
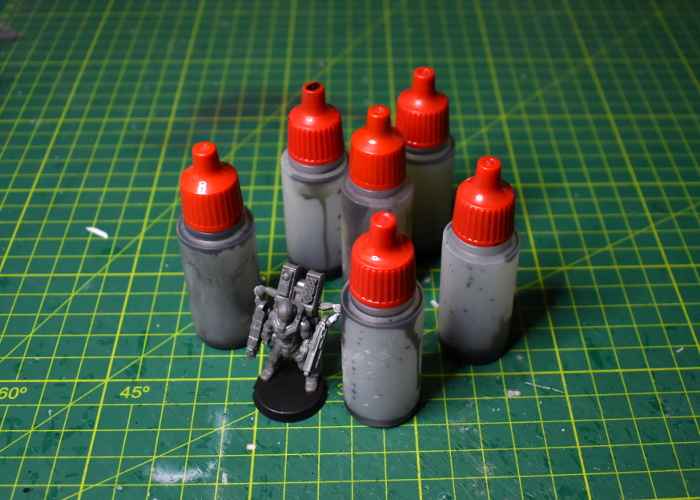
Building as much terrain as I do, I go through a lot of paint. Going through a lot of paint obviously results in a lot of empty paint bottles, and it always seems a shame to just throw them out. It's handy to hang onto a few for mixing colours. I also use an Army Painter dropper bottle for adding water to my palette, and another for dishwashing liquid for wet blending colours. This week, though, I thought I'd see what I could come up with for using up a few more of the bottles piling up in my 'I really should throw this lot out' box. This fuel storage pylon is the end result.
I use a lot of Army Painter Strong Tone in my painting, so had accrued a pile of empty dropper bottles. These, I decided, would be the bulk of the structure, as I love the shape of the tops.
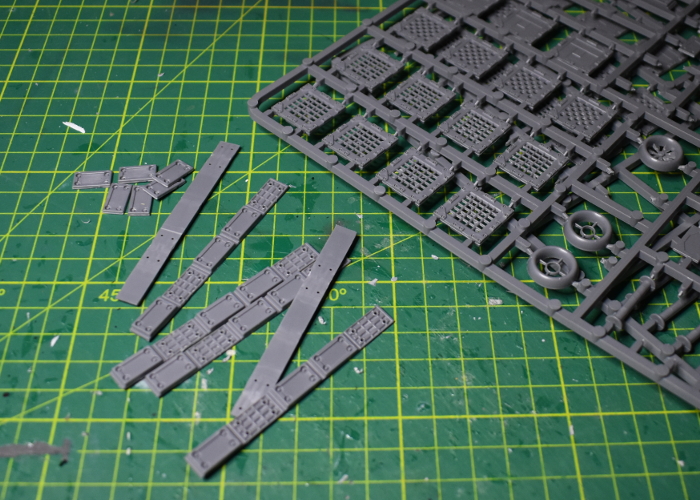
To jazz them up a little, I took a bunch of reinforcing struts from the 2nd Maelstrom's Edge terrain sprue. These, trimmed down to three sections each, fit perfectly up the sides of the bottles.
For the core of the pylon, I took an old P3 paint bottle, and a tub of glitter from a pack I bought a while back as I thought they were a useful shape. After emptying out the glitter and purging it with fire (the only sensible thing to do with glitter) I glued the two together with some 'Power Grip' glue, and also added an exhaust fan from terrain sprue #2 to the top. This created a tall pillar that I could glue the dropper bottles onto. I initially used the Power Grip to glue the dropper bottles onto the glitter tub, but found that the much softer plastic of the droppers didn't adhere well - they fell off if knocked at all. So I reglued them with superglue with an 'all-plastic' primer, which seemed to do the trick.
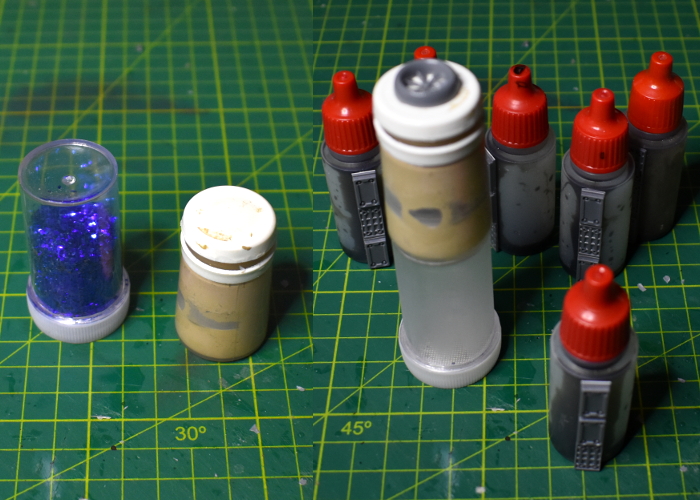
To finish up, I took a spare base and added a control panel using part of a reinforcing strut and a computer panel from terrain sprue #2, and a trapezoid window from terrain sprue #1. I also trimmed the tops off six posts from terrain sprue #2 to glue onto the tops of the dropper bottle lids.

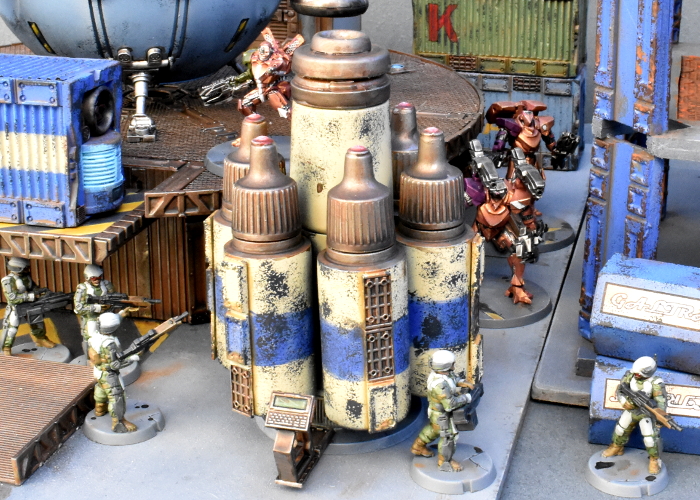
With some paint on, the pylon looked like this:
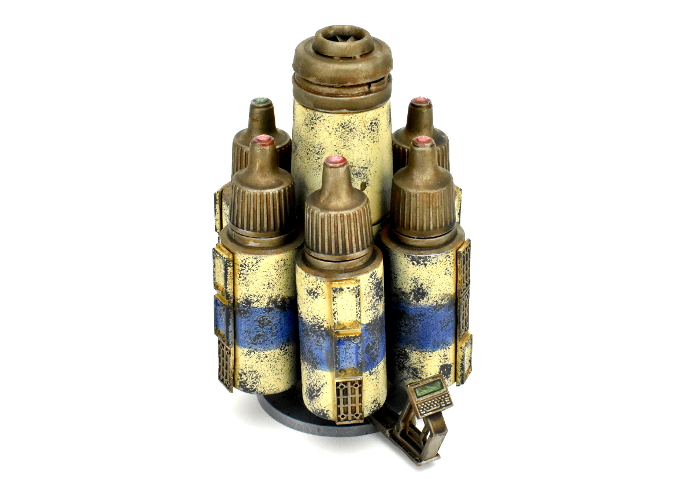
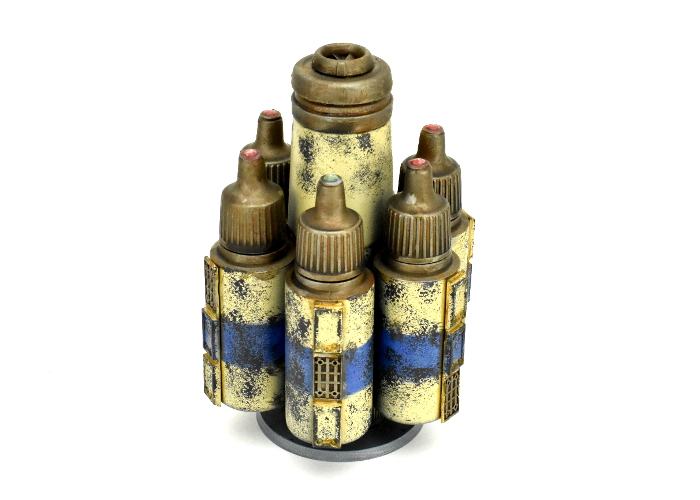
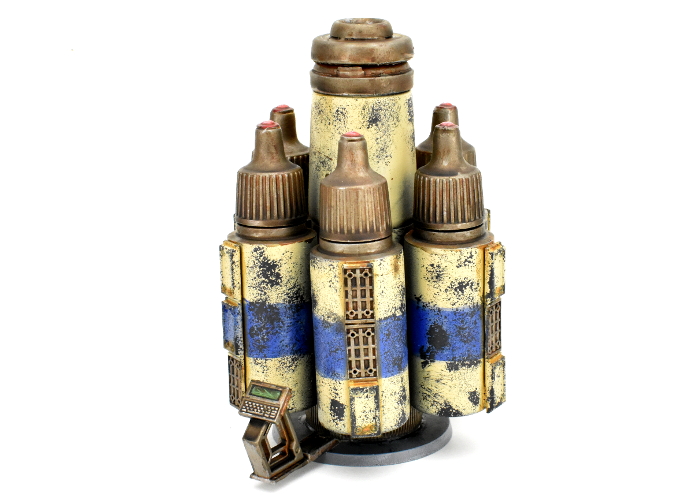
With the paint on, the origin of the parts is still rather obvious. That's not always a problem, particularly for those of us who started off our terrain collections back in the day by just spraypainting whatever interestingly-shaped junk we came across... I would possibly consider adding a ring of plasticard around the top of the dropper bottles, or some piping running from the bottles to the core, if I build any more of these.
To build your own paint bottle fuel pylon, you can pick up the terrain sprues along with the rest of the Maelstrom's Edge model range from the webstore here.
For other building ideas, modeling tutorials, army spotlights and conversion walkthroughs, check out the Hobby section of the Maelstrom's Edge website here.
What are you working on? We would love to see what your models and terrain in the Comm Guild Facebook group!
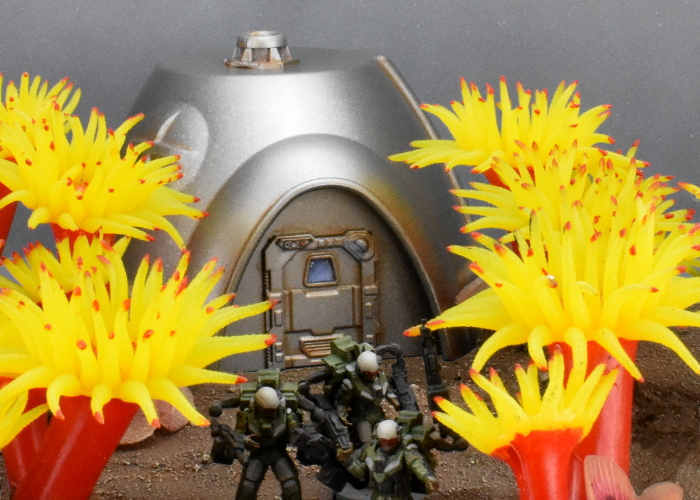
Terrain Spotlight: Hamster Igloo Environment Dome
Posted on Friday Jul 10, 2020 at 05:00pm in Tutorials
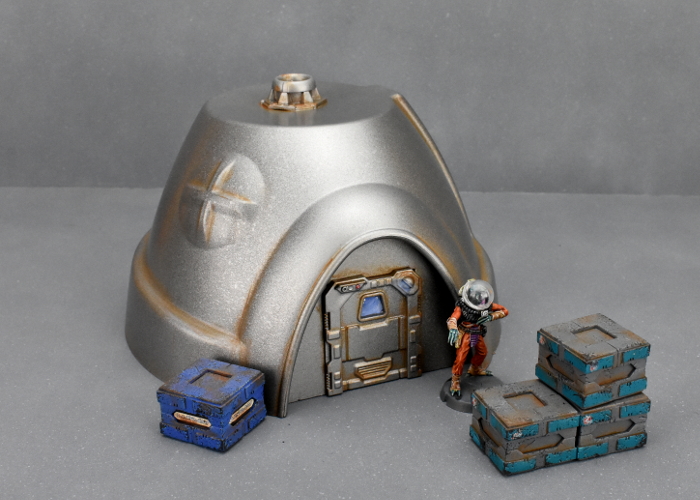
Pet supplies can be a fantastic source of supplies for terrain projects. Previously, I've shown some alien forest terrain made from silicon aquarium plants, and more recently a spherical space ship constructed from a plastic rodent ball with detailing from the Maelstrom's Edge terrain sprues. For this week's article, I came across a plastic hamster igloo on Amazon that looked just perfect for turning into a hazardous environment building.
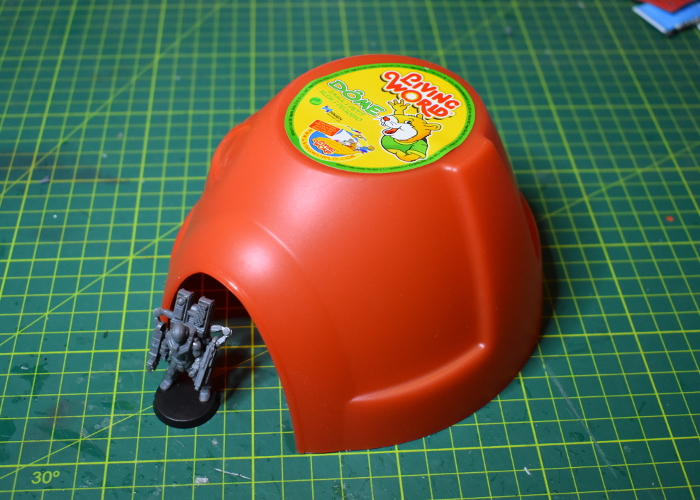
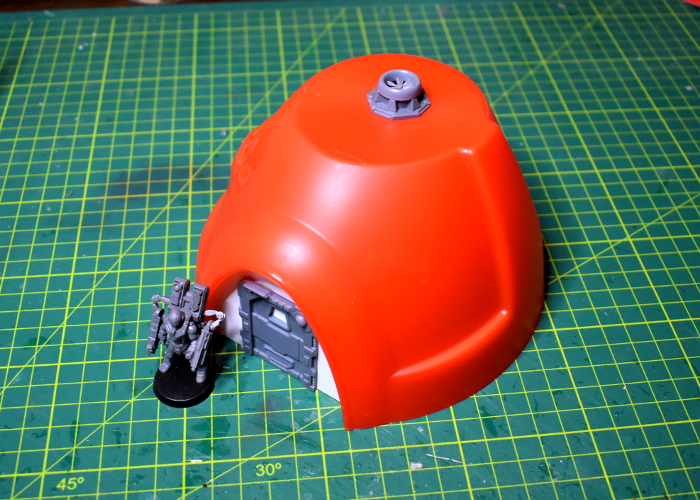
The igloo is a single piece of moulded plastic. They come in a few different sizes, but this one seemed like a good starting point for a small habitat building or utility building.
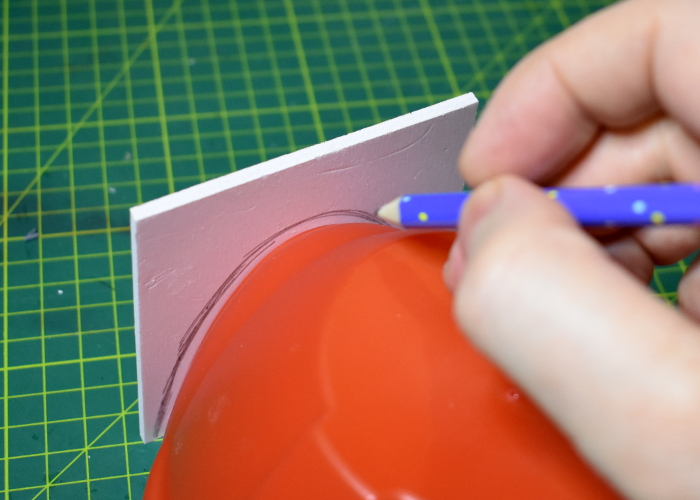
This build really didn't need a lot of detailing, but at the very least it needed a door. I took a piece of 3mm foamed PVC, and sat it against the doorway of the igloo. This formed a handy guide for me to trace around with a pencil, about 5mm out from the doorway.
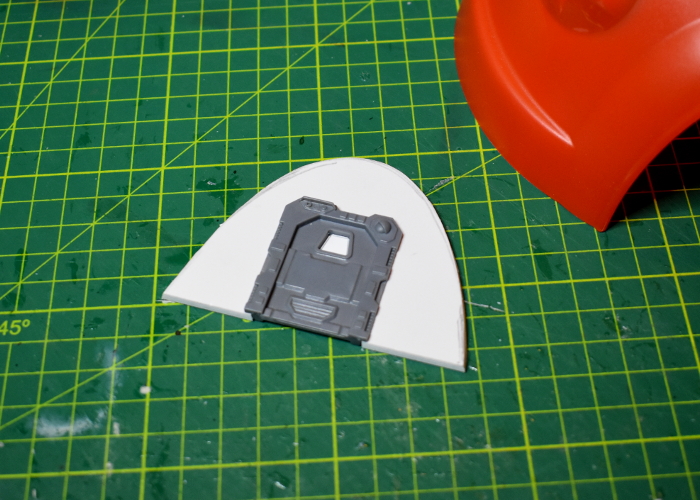
Using an exacto knife, I cut along the pencil line at an angle, so it would sit neatly inside the doorway section. Then I took a door from Terrain Sprue #1, used it as a guide to cut a rectangular hole for it in the middle of the PVC panel, and then glued the door in place. I also cut a small piece of plasticard to size and glued it into the window hole.
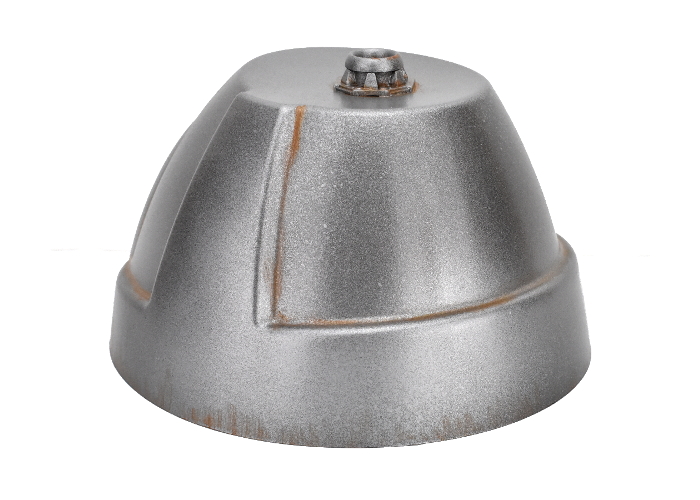
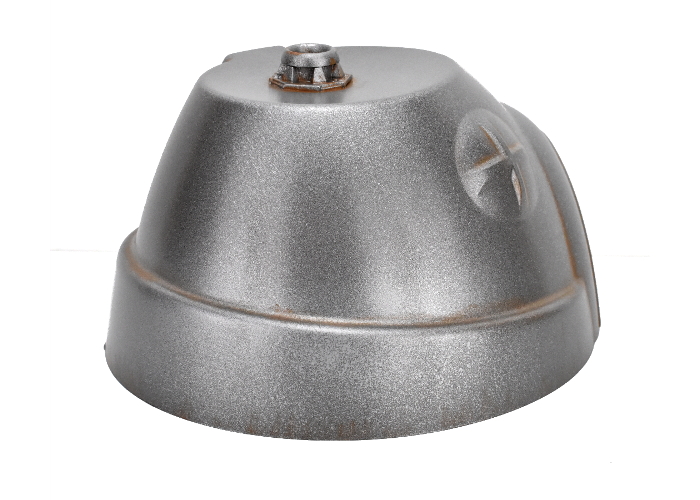
Using a heavy duty 'Power Grip' glue, I glued the door in place inside the igloo doorway. I left the rest of the structure as is, to keep things simple, aside from adding an exhaust fan on the roof to conceal the plastic injection point from the manufacturing process. This was made from the large pipe fitting from Terrain Sprue #1, and the fan from Terrain Sprue #2.
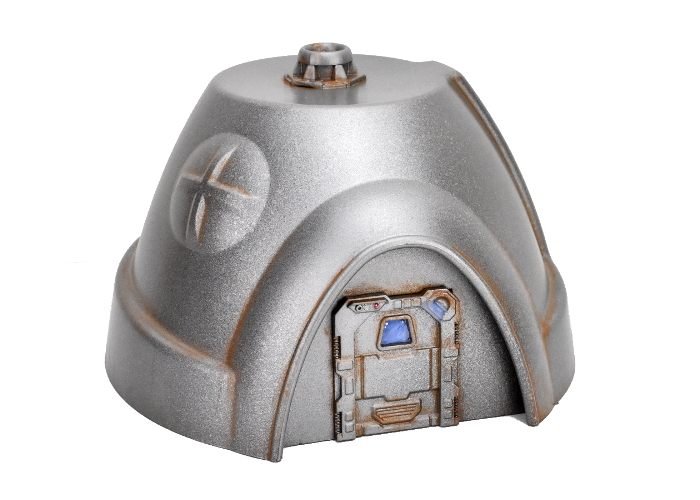
That just left painting. I sprayed the whole thing inside and out with AK Interactive Rust Basecoat. This gave a consistent colour base for the rest of the paint, and including the inside was intended to make sure the plastic igloo was fully opaque. I then sprayed with Army Painter Gun Metal, and then added a light coat of Army Painter Platemetal to highlight everything. While I wanted to keep things fairly shiny overall, I added a light drybrush of Vallejo Beasty Brown in to the creases to give things a little definition. With some blue and white for the window and door light, and a final red lens on the door sensor, the building was ready for the table.

To build your own environment building, you can pick up the terrain sprues along with the rest of the Maelstrom's Edge model range from the webstore here.
For other building ideas, modeling tutorials, army spotlights and conversion walkthroughs, check out the Hobby section of the Maelstrom's Edge website here.
What are you working on? We would love to see what your models and terrain in the Comm Guild Facebook group!
Modeling Spotlight: Christmas Bauble Ball Tank
Posted on Thursday Jul 02, 2020 at 05:00pm in Tutorials
Sometimes, it's fun to build something just for the sheer joy of building it. This week's modeling project is one of those. I have always loved the rather silly and impractical design of the ball tank, and it occurred to me while looking at some bits that it wouldn't be too difficult to make one. And so I did.
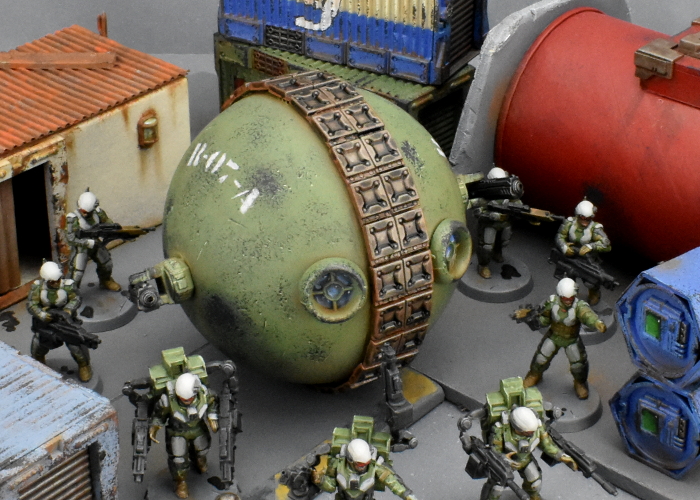
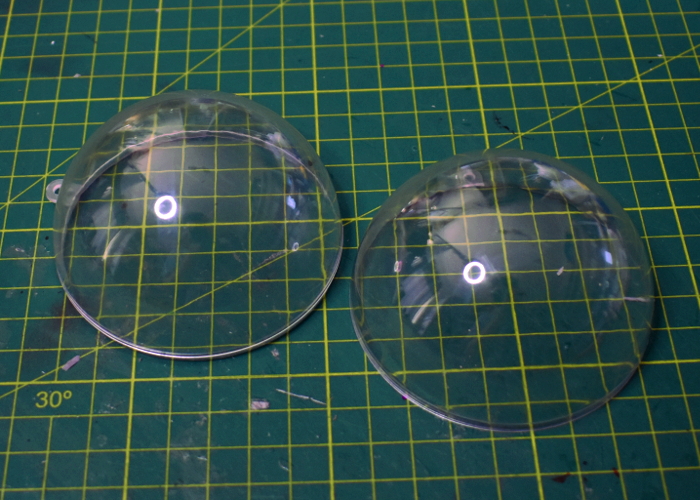
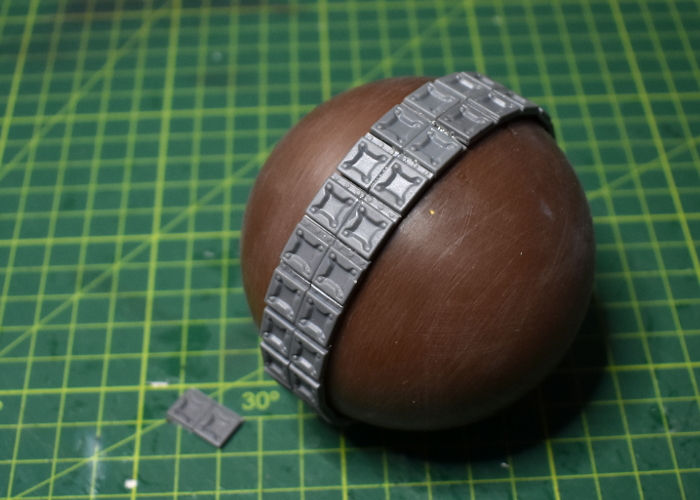
The core of a ball tank is, rather unsurprisingly, a ball. For this one, I used a DIY Christmas bauble that I picked up a while back.
For the tracks, I used a whole bunch of square segments cut from the support struts on Terrain Sprue #1.
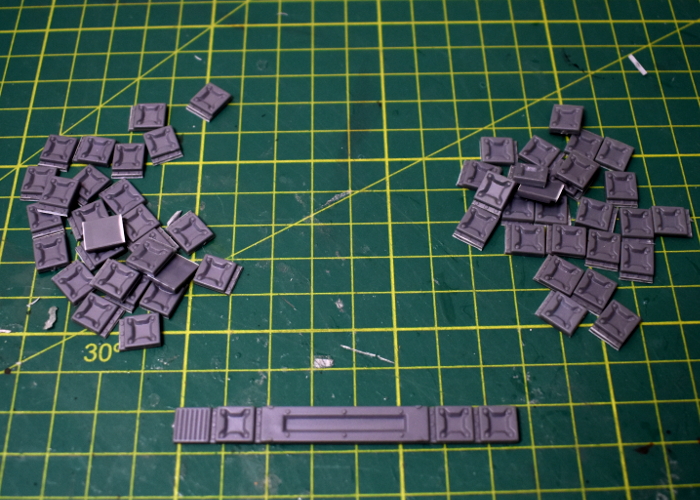
To help the paint and glue stick, I gave the outside of the ball a light sand, and then I sprayed the inside of the ball with primer. This helps to make it more opaque, and stops things from looking weird if the outside gets scratched. Then I glued the track segments in pairs around the join line.
A tank needs guns. I took two weapon mounts from Terrain Sprue #2, and added a couple of pulse cannons taken from the Karist Tempest Elite sprue.
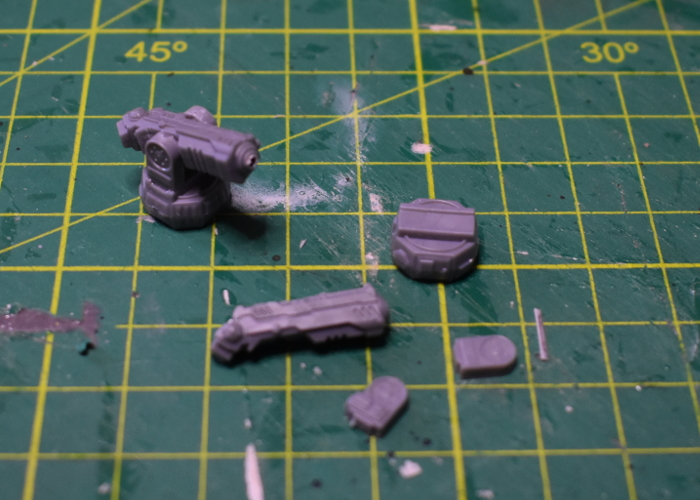
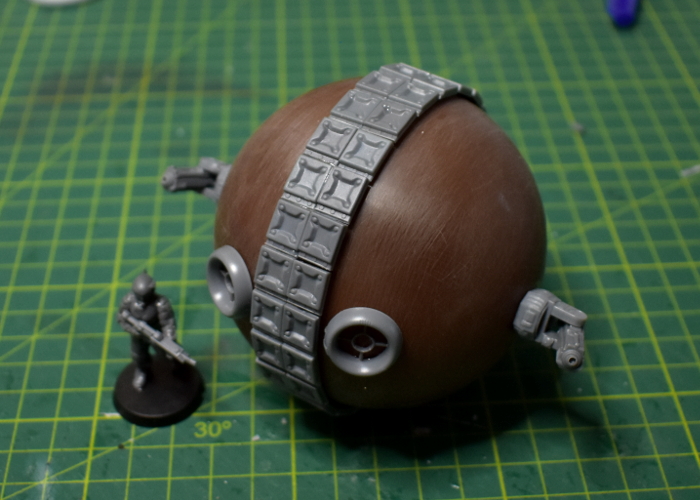
I wanted some obvious viewports on the front, so took a pair of portholes from Terrain Sprue #2 and pressed them down on the top of a paint pot to make the back concave.
With the portholes and weapon sponsons glued in place, the tank was ready for paint!
I painted the tank with Army Painter Army Green spray, adding weathering with a sponge of Vallejo Heavy Charcoal and highlights of Coat D'Arms Putrid Green. The tracks were basecoated with Vallejo Beasty Brown, drybrushed with Citadel Boltgun Metal and then washed with Army Painter Dark Tone.

The viewports were painted with a blend of Army Painter Ultramarine Blue and white.

The weapons were painted with Army Painter Heavy Charcoal, drybrushed with Boltgun Metal and washed with Dark Tone.
For the final details, I added the tank number on the side using a decal I printed and cut out, stippling over the stencil with Army Painter Ash Grey and white, and then added a light drybrush of Beasty Brown around the edges of the tracks and the sponsons.
To build your own ball tank, you can pick up the terrain sprues along with the rest of the Maelstrom's Edge model range from the webstore here.
For other kitbash ideas, modeling tutorials, army spotlights and conversion walkthroughs, check out the Hobby section of the Maelstrom's Edge website here.
What are you working on? We would love to see what your models and terrain in the Comm Guild Facebook group!
Tags: kitbash modeling spotlight terrainsprue vehicle walkthrough
Hobby Basics: Types of Glue
Posted on Friday Jun 26, 2020 at 05:00pm in Tutorials
Continuing on with our basic tutorial series, this week we're having a look at the common types of glue used in the hobby. This article explains what the different glues are like, and what you can and can't use them for. You can find the article here!
Stay tuned for more!
Terrain Spotlight: Tissue Box Building
Posted on Friday Jun 19, 2020 at 05:00pm in Tutorials
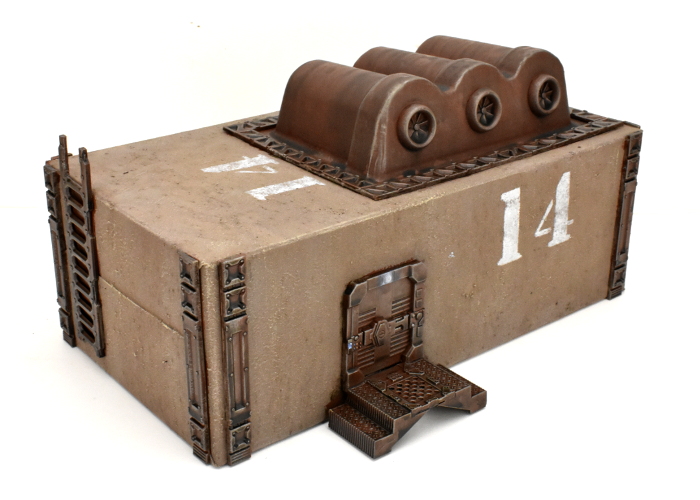
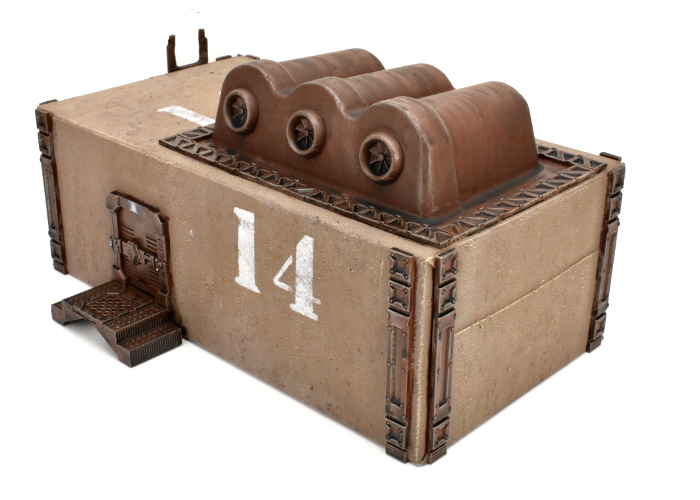
The big joy of the Maelstrom's Edge terrain sprue, for me, is that wandering around the house turns up an endless wealth of items just waiting to be turned into wargaming scenery by slapping some bits on it and painting it up. This week, I turned my attention to the recycling bin, where a humble tissue box was just calling out to be saved from the weekly rubbish collection. With a little cutting and gluing, and a lick of paint, I had Atmospheric Modification Plant #14 ready for the table!
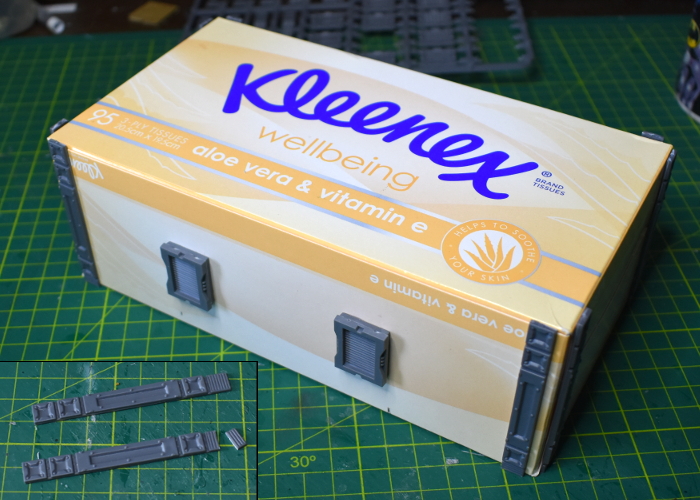
The base for this building, as mentioned above, was an empty tissue box. This isn't as robust a structure as some of my builds, but it does have the benefit of being inexpensive and with two small children in the house we have an endless supply of these to hand!
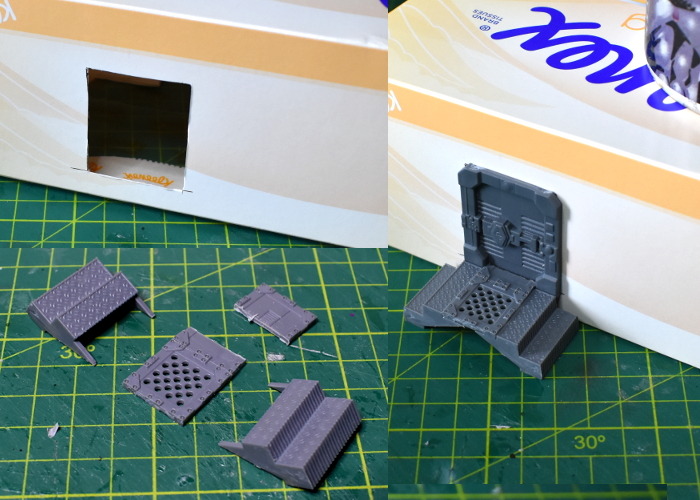
As I just intended this to be a quick and easy build, I didn't get too carried away with detailing. To be a functional building, however, it obviously needed a door. I used a door from Terrain Sprue #1 for this one, as the height of the doors on that sprue fit the box sides better than those on the newer sprue. I cut a hole for the door frame using an exacto knife, and also built a small landing using a couple of stair pieces and floor grates from Terrain Sprue #2, with a little trimming to make the solid floor piece fit neatly into the bottom of the doorway.
I added some reinforcing struts from Terrain Sprue #1 on the walls of the building, setting them in slightly from the corners. As well as adding some visual detail, this served to conceal the sides of the box flaps on the ends. The original sprue's struts were perfect for this as the vent pieces on the end could be easily trimmed down to make the strut the right height.
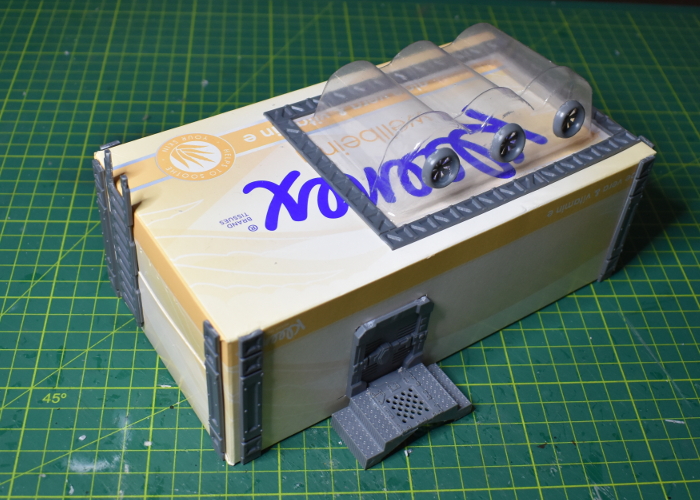
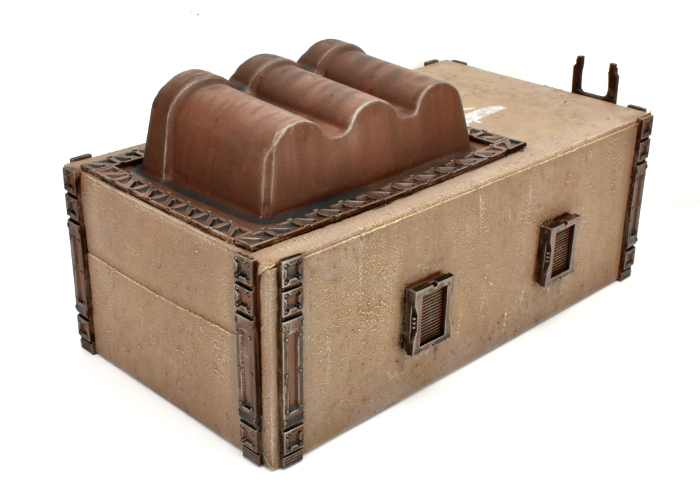
Spaced along the rear wall, I also added a pair of vent windows from Terrain Sprue #2. To avoid weakening the box structure any more than absolutely necessary, I just glued the windows directly onto the wall, rather than cutting holes and insetting the frames.
Plain box-shaped buildings are easy to build, but can be a little boring on the table, so I decided to add some raised detail on the roof to break it up a bit. Rummaging on my desk, I found a blister packet from some tubs of glitter that I picked up for a different project, that seemed like it would be an interesing shape with some paint on. So I glued it to the roof, added some industrial reinforcing struts from Terrain Sprue #1 around it to conceal the edges of the plastic, and also glued on some exhaust fans from Terrain Sprue #2.
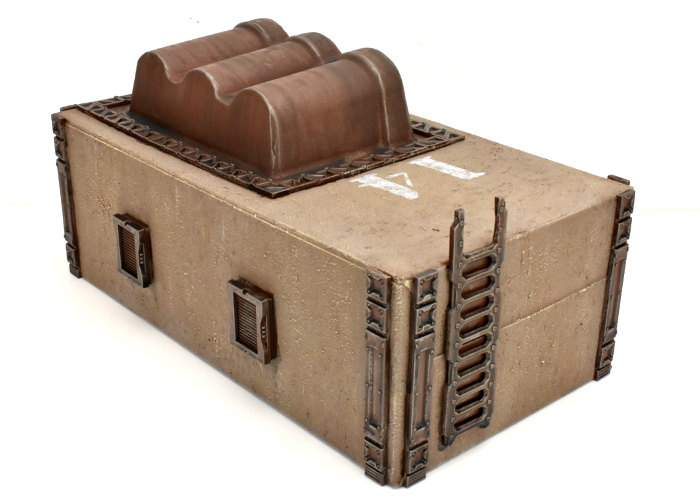
Having cover on the roof is obviously not much use if models can't get up there, so I also added a ladder from sprue #1 on the end wall. I trimmed top couple of rungs off to make an extended handrail above the roof surface, to make that clamber onto the roof a little easier.
I could have also added some corrugated cardboard or textured plasticard to the remaining roof surface, but chose not to for this build. Instead, I painted the cardboard parts with some textured brown paint, drybrushing with a little bone. The metal parts were painted dark brown, drybrushed with Citadel Boltgun metal and then washed with Army Painter Strong Tone. With a little final detail work, the building looked like this:
To build your own tissuebox building, you can pick up the terrain sprues along with the rest of the Maelstrom's Edge model range from the webstore here.
For other building ideas, modeling tutorials, army spotlights and conversion walkthroughs, check out the Hobby section of the Maelstrom's Edge website here.
What are you working on? We would love to see what your models and terrain in the Comm Guild Facebook group!
Tags: buildings modeling spotlight terrain terrainsprue walkthrough
Hobby Basics: Miniature Materials
Posted on Thursday Jun 11, 2020 at 05:00pm in Tutorials
I'm going back to basics this week! Bunging together structures from assorted odd and ends, and showcasing conversions is all well and good, but for those just getting into the hobby it can all be a lot to take in. So I'm launching a series of articles on the Maelstrom's Edge website aimed at beginners, covering a range of basic modeling and painting related topics. This week, I'm breaking down the different materials commonly used for making wargaming miniatures, and the differences between them. You can find the article here!
Stay tuned for more!
Painting Spotlight: Colorshift Shadow Walker
Posted on Thursday Jun 04, 2020 at 05:00pm in Tutorials
A few articles back, I painted up a Mature Angel using Colorshift paints, as a bit of an experiment. That was actually the second model I attempted with these paints, but I hadn't been entirely happy with the first one. This week, I had a little inspiration though, and so I dug him out and, with a final tweak to his face, wound up with a shiny green/blue Shadow Walker!
The model I painted here is a stock-standard Karist Shadow Walker (No conversion - I know, I'm as surprised as you!). As with the Angel, the armour was painted with Colorshift paints from Green Stuff World. These work best over a gloss black base, so that's where I started, with a quick spray.
Over the armour, I started painting thin layers of 'Emerald Getaway' Colorshift, slowly building up the colour. For the undersuit, I wanted a lighter green, so started with a basecoat of Vallejo Heavy Brown to work down gradually from the black.
I went over the brown with Coat D'Arms Putrid Green, and the belt and weapons with Vallejo Basalt Grey, while continuing to add layers to the Colorshift - It takes a lot of thin layers!
Once I had built up sufficient colour with the Colorshift, I added just a touch of silver on the edges of the armour plates, and some black into the creases, to try to lift them a little, as the shiny Colorshift tends to wash out the detail a bit. I also used some Army Painter Green Tone in multiple, thin layers to shade the undersuit, added a wash of Dark Tone over the weapons and belt, and picked out the helmet lenses and weapon blades with white.
To finish up, I painted the base, added some Basalt Grey highlights to the belt and weapons, and used Army Painter Purple Tone to add an energy shimmer effect to the blades (you can find a tutorial for that here) and shade the lenses.
This was the point where I put the model aside to begin with. While the Colorshift paint was quite effective, if slightly subtle and almost impossible to photograph, on the Angel, on the smaller armour plates on the Shadow Walker it was far more subdued, looking more like really dark shading in weird places rather than a color shift, and making the whole model a bit featureless and dark. I had the idea, though, that picking out the faceplate in a different colour might help to give the model some character. It was fine for the rest of the armour to be a bit dark on the sneaky, teleporty assassin, but I thought this would give him a nice focal point. So I whipped out some more Heavy Brown to re-basecoat over the green, and then used Army Painter Skeleton Bone and white to give him a nice, bone-coloured faceplate!
To give it a go yourself, you can pick up the plastic Shadow Walker kit, along with the rest of the Maelstrom's Edge model range from the webstore here.
What are you working on? We would love to see what your models and terrain in the Comm Guild Facebook group!
For other Maelstrom's Edge modeling articles, including tutorials and walkthroughs of a wide range of different building and miniature projects, check out the Hobby section of the Maelstrom's Edge website here.
Tags: karist painting shadow spotlight tutorial walker walkthrough
Modeling Spotlight: Rodent Ball Spaceship!
Posted on Thursday May 28, 2020 at 05:00pm in Tutorials
The Kaiser Industries OR-8 'Gaterunner' was originally designed as a small freighter. Sales were initially poor due to its limited cargo space compared to other ships in its class, combined with a lack of artificial gravity and other 'non-essential' crew-comfort systems in the interests of keeping the ship's mass as low as possible. Despite its ungainly appearance, the OR-8's speed and manoeuverability were excellent, however, resulting in the ship becoming popular with short-ranged couriers who used them primarily for 1- or 2-gate hops between systems. With the coming of the Maelstrom, many of these couriers were pressed into service as evacuation craft, with their non-pressurised cargo holds retrofitted to accomodate sleeper capsules.
This was a project spawned by a rodent ball habitat dome idea shared by Patrick Keith a while back on the Counterblast Facebook group. I had originally intended to do something similar, but when I received my ball it turned out to be a little smaller than I had pictured. While I was figuring out whether or not I needed another small hab dome alongside my salad bowl domes, I decided that the markings on the ball made for nice detailing for a cool ship design. And so the OR-8 was born!
As mentioned above, this all started with a plastic ball for exercising pet rodents.
I started out by giving the outside of the ball a light sand with fine sandpaper. This breaks the shiny outer surface of the hard plastic, giving glue and paint a better surface to which they can stick.
Next up, I sprayed the inside of the ball with a grey primer. This doesn't have to be a flawless coat, as it won't really ever been seen - it just provides a grey surface instead of a clear one, so if the paint on the outside gets scratched over time, things don't start to look a bit weird. Once this paint was dry, I also stuck strips of duct tape on the inside to cover over the vertical airhole strips.
From there, it was time to start detailing. I used some parts from the Maelstrom's Edge terrain sprues and a little plastic tubing to construct three telescoping legs, which I glued onto the ball just above the access hole. I also cut the top strip off a door and used a few more parts from terrain sprue #2, positioned above and below two of the longer airhole strips to make a closed access ramp.
Rather than trying to cut multiple holes in the ball for the trapezoid windows that would form the forward viewports on the ship, I decided to shape the windows to fit flush on the curved surface. I did this by laying a piece of sandpaper on the ball, and sanding the back of the window down to the height I wanted. This nicely replicated the curve of the ball onto the window. A piece of reinforcing strut from terrain sprue #1 served as a handy, bendable guide to mark out consistent spacing for the windows above the tops of the airholes.
I then carefully glued the windows in place, and added a round porthole from terrain sprue #2 in the middle.
Into the middle of the porthole, I built an antenna array using various pieces scavenged from the bits box.
For each of the engines, I took a pair of generators, a pair of iris doors, a fan and a weapon mount base from terrain sprue #2, and a large pipe fitting from terrain sprue #1. On the generators, I cut out the bottom to allow them to sit flat inside the iris door once glued back-to-back, and then sanded down the top surface to create a flat area for the pipe fitting to attach.
The weapon mounts have a naturally concave back surface, which sat quite neatly on the sides of the ball.
Finally, I glued the engines onto the weapon mounts, adding a pin of aluminium rod to help hold them in place securely.
With some paint on, the OR-8 was ready to fly!
To build your own orb ship of sphericalness, you can pick up the terrain sprues along with the rest of the Maelstrom's Edge model range from the webstore here.
What are you working on? We would love to see what your models and terrain in the Comm Guild Facebook group!
For other Maelstrom's Edge modeling articles, including tutorials and walkthroughs of a wide range of different building and miniature projects, check out the Hobby section of the Maelstrom's Edge website here.
Painting Spotlight: Escape Pod Diorama
Posted on Thursday May 21, 2020 at 05:00pm in Tutorials
There are a lot of examples out there in internet land of huge, sprawling, super-detailed dioramas that you can pore over for hours and dream of one day having the time (or the storage space!) to make something like that yourself... This is not one of those. Dioramas can also be just a quick, simple exercise in putting together something different to whatever else you're currently working on. I love putting together armies, but sometimes I just want to do something unrelated, or I'll have a little flash of inspiration for a mini scene, and letting that out and building whatever it leads to is a great way of flexing those creative 'muscles'.
That's sort of what happened here. When I put together my kitbashed escape pod a couple of weeks ago, I had the idea to throw together part of a launching bay for it, just to give it something to hang from for the photos. I hadn't originally even intended to paint this, but looking at it sitting on the table afterwards, I decided that it would make for a cute little mini-diorama. So, I broke out a few extra parts, slapped on some paint, and this was the end result:
To get started, I had to snap the escape pod off the hanging struts, as it had been glued in place to photograph it for the previous article. Luckily, I had used superglue here, and it snapped away cleanly without breaking anything. I then finished detailing around the door by adding a thin strip of foamed PVC into the gap between the door and the floor grating, and fleshing out the sides of the doorway with some more PVC and a couple of strut pieces from the terrain sprue to widen it out to match the floor.
A lot of my terrain tends to be rather worn and dirty-looking. I wanted this piece to be old and worn, but not as dirty, simulating a ship or station interior rather than a planet-based facility. To that end, I began painting with a base coat of Army Painter Wolf Grey spray, following by a downwards spray of white. This is sometimes called 'zenithal painting', and is used to allow the spray to natural add highlights and shading as the second spray catches raised areas while leaving the darker basecoat in the crevasses and undersides of detail pieces.
I used Citadel Boltgun Metal to pick out some exposed metal pieces, which I then washed with a layer of Army Painter Strong Tone. On the middle strip on the door, I applied a a coat of Vallejo Heavy Brown and then a couple of layers of Army Painter Pure Red. This was a little messy around the edges, due to the difficulty of painting around the protruding floor piece, so I had to clean up around the edges of the red with a little more grey and white.
At this point, it was time for detailing. I printed up a small sign for the middle of the door and stuck it in place with some PVA glue. On the upper edges of the red door strip, I added a highlight with some old Citadel Titillating Pink, and then applied some sponge weathering over the white and red areas with Army Painter Heavy Charcoal. I went back over the red on the door with some more pink to highlight the edges of the weathering, and blacklined around the white parts with a finepoint black pen to help pick out the details.
My initial intention was to have the floor painted the same as the walls, to accentuate that cleaner spaceship look, but in practice it just killed the detail on the floor grating and made the whole think look a bit bland. So I went back over the floor with some Army Painter Dark Tone, and then gave it a light drybrush with white.
While I wasn't intending to cram a whole heap of docking bay detail into this little diorama, I did want something other than the escape pod in there. I decided to throw in a service robot, assembled from most of an Epirian Scarecrow, with clamp-hands taken from the Master Handler kit and a head made from a trimmed down Firefly Drone turbine, with an eye lens cut from one of the Scarecrow heads.
The robot was painted with a spray of Army Painter Plate Metal, then a wash of Strong Tone. Over that, I gave it a light drybrush with some more Plate Metal, and then picked out some red bits using the same steps as the red on the door. Finally, I painted in the blue eye lens using some Vallejo Electric Blue, black and white. (You can find a handy tutorial on painting lenses here!)
The final detail before assembling everything was to print out a picture of the Maelstrom, to glue in behind the door to provide a nice view out the windows. I played around with various orientations of this for a bit to find what looked best, and then trimmed it to fit behind the door and glued it into place with some superglue. With the robot and pod glued in position, the diorama was done!
To build your own escape pod, you can pick up the terrain sprues, along with the rest of the Maelstrom's Edge model range from the webstore here.
What are you working on? We would love to see what your models and terrain in the Comm Guild Facebook group!
For other Maelstrom's Edge modeling articles, including tutorials and walkthroughs of a wide range of different building and miniature projects, check out the Hobby section of the Maelstrom's Edge website here.
Tags: diorama modeling painting spotlight terrain terrainsprue
Quick and Easy Painting with Washes, redux!
Posted on Thursday May 14, 2020 at 05:00pm in Tutorials
Not everyone has the time to spend paintstakingly blending, shading and detailing their models. Sometimes, you just want to get them on the table quickly, so I thought it might be useful to explore some options for fast and painless army painting.
My guinea pigs for this article are some Epirian Suppression Team models, painted exclusively with washes! This is a really easy technique to get to grips with, and while it won't get you an award-winning work of art, it does give you perfectly serviceable-looking models that look great on the table.
For those unfamiliar with them, washes are thin paints designed to sink into the model's crevices whilst leaving less colour on the raised detail (Also sometimes called 'inks' - Not to be confused with 'glazes' which are translucent paints that tint the surface they're painted onto evenly). So while it's a little less precise than blended highlighting or 'juicing' (applying super-thin coats of increasingly dark colour to build up shadow or colour transition), we can use washes over a pale base colour to highlight and shade a model all in one fell swoop. There are a wide range of different washes or inks available, but for this article I'm using Army Painter Quickshades.
I start by giving the model a base coat of white.
Now I'm going to start applying washes to build up the colours I want, leaving the model to fully dry between each. On this model, I've started with a coat of Soft Tone over everything except for the weapons. This is pale enough that other colours will go ok over the top - if you're using darker tones, it's best to try to keep them strictly on the areas where you want them, otherwise you'll need to touch up your basecoat to cover up the overspill before painting each part of the model. Apply a generous coat of wash and leave it to thoroughly dry before moving on to the next step.
Next, I've gone over the armour and chaps with Green Tone, and picked out the boots, belt, kneepads and weapons with Dark Tone. If the colour is lighter than you would like, you can let it dry and then add another coat, as I did with the Dark Tone - this isn't a particularly strong wash, so several coats were needed to get the weapons as dark as I wanted them. You can speed this process up by painting parts that you want to be really 'black' with a medium grey colour before using the wash, but for this article I just stuck with the wash by itself.
I left the tip and front facing of the Shock Baton free of the black wash, as once the black wash dried I applied a coat of Blue Tone to those, which gives a nice energy-glow effect over the white. I also went over the exposed skin areas with Flesh Tone. At this point, I also stuck some sand to the base with PVA glue, washing it with a coat of Strong Tone once the glue dried. Then, to finish up, a quick coat of black around the base edge - you could skip this step by masking off the base edge with tape before painting and then just peeling the tape off at the end.
You can vary the look of the washes by using different base coats. The model below was painted using the exact same process as above, but over a bone basecoat instead of the white.
If you prefer a little more detail, you can go over the washed model with regular paint, picking out features like eyes, belt buckles and the like, and of course you can use different wash colours to suit your preferred colour scheme.
Why not give it a go? As always, feel free to share efforts, or ask any Maelstrom's Edge- or hobby-related questions on the Comm Guild Facebook page!
You can pick up the Epirian Suppression Team, along with the rest of the Maelstrom's Edge model range from the webstore here.
For other Maelstrom's Edge modeling articles, including tutorials and walkthroughs of a wide range of different building and miniature projects, check out the Hobby section of the Maelstrom's Edge website here.
Tags: epirian painting tutorial walkthrough washes
Terrain Sprue Kitbash: Escape Pod
Posted on Friday May 08, 2020 at 02:11am in Tutorials
It probably won't surprise anyone who has been following my articles for any length of time that I spend a lot of time looking at sprues and figuring out different ways to fit parts together in new and interesting ways. This week, the power generators on Terrain Sprue #2 caught my eye, and I decided it was time to get away from it all, with a compact escape pod!
The main hull of the pod was built from two generators, and two reinforcing struts split into two and three segment pieces.
I glued the longer strut pieces, detail-side in, along the long edges of the back of the generator, and then trimmed the short pieces to fit neatly along the short edges, before fitting the second generator onto the other side.
For the jet nozzle on the rear of the pod, I used two large pipe fittings from Terrain Sprue #1, glued back-to-back. The inside piece needed some slight trimming on the flat edges to fit neatly between the protruding ends of the struts.
The viewport on the front of the pod was built from more parts from Terrain Sprue #2: a light, a round window and the base of the weapon mount with the sliderail trimmed down.
As a final step, I added some extra detail over the flat strut backs, using the energy fence posts from Terrain Sprue #1 with the bases cut off. For the bottom of the pod, I clipped off the energy projectors and sanded the post face down flat, gluing it with the back of the of the post facing out. On the top, I wanted a couple of clamps to hang the pod with, so I cut the top and bottom energy projector segments off the post, and then just trimmed, sanded and flipped the middle section.
That just left painting. I used a basecoat of Army Painter Necrotic Flesh, and then a wash of Citadel Iyanden Yellow Contrast, followed with a sponge of Vallejo Heavy Charcoal to weather it. For the metal sections, I used Citadel Boltgun Metal with a wash of Army Painter Strong Tone, followed by a light drybrush of Army Painter Shining Silver, and AK Interactive Pure Black over the jet exhaust. The viewport was painted with a mix of Army Painter Matt White, Ice Storm and Ultramarine Blue, and the lights on the rear panels with white, Army Painter Pure Red and AK Pure Black.
To build your own escape pod, you can pick up the terrain sprues, along with the rest of the Maelstrom's Edge model range from the webstore here.
What are you working on? We would love to see what your models and terrain in the Comm Guild Facebook group!
For other Maelstrom's Edge modeling articles, including tutorials and walkthroughs of a wide range of different building and miniature projects, check out the Hobby section of the Maelstrom's Edge website here.
Tags: conversion kitbash modeling spotlight terrain terrainsprue tutorial walkthrough
Painting Spotlight: Colorshift Angel
Posted on Friday May 01, 2020 at 02:36am in Tutorials
Time to build something!
For this week's article, I decided to have a go at a project that I've had percolating in the back of my brain for a while now. I bought some Colorshift paints from Green Stuff World some time ago, because they looked to pretty to not try them out on something, and I thought that they would be just perfect for conveying the otherworldly nature of the Karist Angel. So, I dug out an Angel that I had built way back when the Battle for Zycanthus box was first released and got some paint on it, with this result:
So, the first thing to mention here is that the Colorshift paint gives a really neat, subtle colour effect that is frustratingly difficult to photograph! There's a video at the end of this article that shows the transition effect a bit better than the pics fo, although the purple still looks more subdued than it does in the 'flesh'.
Back to the model! The Angel that I used here was built from the regular plastic kit, with some reposing of the legs and a second claw added on the left, just because I thought it would look cool.
As per the directions for the Colorshift paint, I started out with a coat of gloss black. I don't have an aurbrush, so this was just from a spraycan.
Once the black was dry, I started painting light layers of 'Evil Forest', taking care to leave the forehead so that it would stay a nice, shiny black. Evil Forest is shown on the bottle as a red to green transition, but the red actually comes out a deep purple over the black, which is exactly what I was looking for. I painted it on in light coats using a large, flat brush and brushing downwards to leave the black in the crevasses - traditional highlighting and shading tends to kill the shifting effect, so I was trying for whatever shading I could get.
Once I had built up sufficient colour with the Evil Forest, I added some highlights on raised edges and surfaces using 'Emerald Getaway'. This is a pale greeny-blue to blue shift, so over the Evil Forest it helped to accentuate the green shift a little, although that really doesn't show well in these pics.
To finish up, I painted the base, and painted in the eyes and mouth using some old Citadel Liche Purple, Tentacle Pink and white.
And the aforementioned video rotation:
You can pick up the plastic Mature Angel, along with the rest of the Maelstrom's Edge model range from the webstore here.
What are you working on? We would love to see what your models and terrain in the Comm Guild Facebook group!
For other Maelstrom's Edge modeling articles, including tutorials and walkthroughs of a wide range of different building and miniature projects, check out the Hobby section of the Maelstrom's Edge website here.
Tags: angel karist painting spotlight walkthrough
Modeling Spotlight: Epirian Aurochs Automated Transport Kitbash
Posted on Thursday Apr 23, 2020 at 05:00pm in Tutorials
Time to build something!
This week, I had a tinker with the Mule, from Mantic's Warpath game. I love the styling of this vehicle, and thought it would fit nicely into an Epirian force for Maelstrom's Edge with just a few minor tweaks. This was the end result:
The front end of the Mule is rather evocative of the torso of the Epirian Hunter Mech. This inspired me to turn the mule in to a bot-driven vehicle, rather than just another standard transport vehicle. My thinking is that this would be a general purpose vehicle, under the control of a bot handler, which could be used a cargo or troop transport, routine patrols or crowd control tasks.
To carry across the visual link to the Hunter, I took a Hunter torso and cut away the head piece from the top. On the Mule cab, I trimmed the hatch off the roof, and glued the Hunter head in place on the front of the roof.
The Mule comes with two different weapons, that slot into a socket on the back edge of the roof. I took one of these, sliced it off just in front of the mount, and attached a clingfire sprayer from the Epirian Scarecrow kit.
To give some potential variety, I took the second weapon, cut off the barrel and glued on the barrel from the Hunter's chaingun. The rest of the Mule was assembled as normal. I considered filling in or covering the windows and windscreen, but they're actually not super-well defined in the rather soft plastic used for this kit, so I figured with everything painted up they would just look like recessed detail panels.
Well, almost as normal. Just before painting, I decided to also add some cluster missiles. These were taken from the Hunter kit as well, with the mounting pegs cut off, and glued directly to the sides of the cab.
The assembled vehicle before painting:
To paint, I used the weathered metal process from my tutorial here.
And with final details in place, the Epirian 'Aurochs' automated transport vehicle is ready to go!
You can pick up the various Epirian robots, along with the rest of the Maelstrom's Edge model range from the webstore here.
What are you working on? We would love to see what your models and terrain in the Comm Guild Facebook group!
For other Maelstrom's Edge modeling articles, including tutorials and walkthroughs of a wide range of different building and miniature projects, check out the Hobby section of the Maelstrom's Edge website here.
