Tactics: Equipping the Epirian Master Bot Handler
Posted on Saturday May 12, 2018 at 09:30pm in Gaming
EQUIPPING A MASTER BOT HANDLER
A Master Bot Handler is one of the most powerful figures in the Foundation, able to command legions of robotic minions and carry a vast array of weaponry that common soldiers can only dream of. However, this dizzying amount of options can also make deciding exactly how to equip your own Master Handler a bit daunting. Have no fear though! Once you finish with this article, you’ll have all the insider information of what Master Handlers are capable of and know how you’ll want to equip yours.
TACTICAL ROLES OF A MASTER HANDLER
There are three main roles you can equip your Master Handler to fulfill:
- Bot Commander.
- Gun Heavy.
- Support/Melee.
BOT COMMANDER
No matter how you choose to equip your Master Handler, you’ll want to be aware that, above all else, they are a force multiplier for Foundation robotic units. So if you’re looking to field a force that has a preponderance of Contractor or SecDef (coming soon!) units, then you might want to instead just stick with taking regular Journeyman Bot Handlers as the Command Model for your detachments.
With a Master Handler, while you pay a premium in points to take them, you get a heck of a lot of value by way of improving all the robotic units in your force. With his Neural Interface, a Master Handler effectively has the Command (3) ability, which means he’s able to issue orders to up to 3 friendly units within 18” per turn. Anytime a Bot Handler (of any level) issues an order to a Bot unit, that unit gets to enable its Bot Protocols for the turn, which makes them perform much better: Hunter Warmechs get to move and shoot more effectively, Scarecrows get to fire more shots, Firefly Drones dodge incoming fire better and Spider Drones make better use of cover they’re hiding in. If you’re looking to make the absolute most out of this ability to buff nearby robotic units in this way, then there are a few options for the Master Handler that are pretty much mandatory:
Neural Nodes - Master Handlers are able to take up to 2 Neural Nodes. Each one allows them to issue an order to 1 more unit then they normally would be able to. A Master Handler has a WP of 5, which means, especially later in the game when you have a lot of Command Points available, you can put 5 Command Points onto the Master Handler and with the help of a couple Neural Nodes, be able to issue orders to 5 nearby robotic units (thereby enabling Bot Protocols on all of them).
Command Booster Micro Drone - Being able to issue orders to 5 nearby bot units is great, but with a command range of only 18”, you’ll have to keep all those units pretty well clustered around your Master Handler, which is less than ideal. However, Master Handlers are able to take a Command Booster Micro Drone, which increases their command range up to 24”. If you’re looking to make your Master Handler into a true bot commander, then taking a Command Booster allows you to keep your Master Handler back out of harms way while still issuing orders to your bot units that need them.
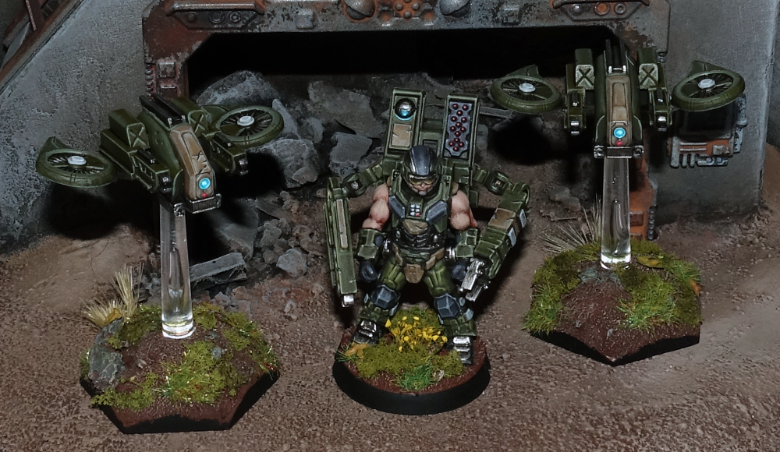
Firefly Defender Drones - In order to get the most out of your Master Handler as a bot commander you’ll want to keep them roughly in the center of your force, within command range of as many of your bot units as possible. Unfortunately, a Master Handler's prickly superior attitude prevents them from joining friendly units, so to keep your Master Handler safe, a great tactic can be to keep him hidden behind a big obstacle or piece of area terrain so that the enemy can't even spot him. However, a canny opponent might try to counter this by outflanking that terrain in order to get some wide open shots on your Handler. While the Master Handler’s impressive MAS 3 can protect him from a small amount of enemy fire, if the opponent does get a decent-sized unit with open shots on your Master Handler, you're probably going to lose the linchpin of your entire force, and along with it, the game. Therefore taking 1-2 Firefly Defender Drones can be a solid idea to help protect your Handler. As long as you enable their Bot Protocols, Firefly Defender Drones grant their unit (including the Master Handler) the Dodge ability equal to the number of Defender Drones in the unit (so 2 Defender Drones means the unit gets the Dodge (2) ability).
Cheap Weapons - As your goal will be to keep your bot commander Master Handler hidden from the enemy behind terrain, it doesn't make sense to spend extra points on weapons that will probably never be used. As such, sticking with the 0 point weapons (like a Flakk Gun and/or Repair Claw) is the smart choice for a Master Handler acting as a bot commander.
Master of Machines faction objective - Finally, if you want to get the absolute most out of your Master Handler as a bot commander, then taking the Master of Machines as your faction objective is pretty much a must, as it potentially allows you to enable Bot Protocols on a 6th friendly bot unit, and better yet, one that’s beyond your Master Handler’s command range:
MASTER OF MACHINES This objective may only be utilized if your force contains a Master Bot Handler. If utilized, a Master Bot Handler is automatically your force commander for any objective type that requires one. This objective type can generate a maximum of 3 VPs per game, after which you may no longer utilize the Bot Mastery ability. ----- Partial: (each end phase) If at least one of your Master Bot Handlers is on the table and the Bot Mastery ability was not utilized that turn, gain 1 VP. Full: (end of game) If at least one of your Master Bot Handlers is still on the table, gain all of this objective’s remaining VPs. Bot Mastery: Once per turn, you may automatically enable one of your unit’s bot protocols when that unit is activated (regardless of whether its activation discipline check is successfully passed). You must have at least one Master Bot Handler on the table to utilize this ability.
SAMPLE ‘BOT COMMANDER’ MASTER HANDLER
- Master Bot Handler - 16 pts.
- 1 Firefly Defender Drone - 3 pts.
- 2 Neural Nodes - 2 pts.
- 2 Flakk Guns - 0 pts.
- Command Booster Micro Drone - 3 pts.
- TOTAL - 24 pts.
GUN HEAVY
The next major role a Master Handler can fill is one of straight-up shooty death to the enemy. The Master Handler’s powerful exo-skeleton allows them to carry more and heavier guns than any other Foundation infantry model released to date. That means when equipped properly, a Master Handler’s unit can be one the most devastating shooting units in your arsenal. But be warned, this is also the most expensive configuration for a Master Handler.
Fire Assist - One very important limitation to be aware of is that, while Master Handlers have the Fire Assist (+1) ability, this only allows them to fire a maximum of 2 weapons during each round of shooting. That means the only reason you’d want to equip your Master Handler with more than 2 weapons is to give you the tactical flexibility to choose the best 2 weapons to fire in any given situation.
Cluster Missile Pods - If you’re looking to get maximum firepower out of your Master Handler, then taking 2 linked Cluster Missile Pods is definitely the way to go. Linked weapons add +1 to the number of shots the weapon normally is able to fire (and also only count as a single weapon being fired). So if you can manage to find a target where you're able to cover 3 models with the Cluster Missile Pod's AoE template, then you’re looking at getting to fire 5 shots, plus any 6’s you manage to roll count as 2 hits instead of 1!
Arm-mounted Weapons- For a gun heavy Master Handler, you really can’t go wrong with any of the arm-mounted ranged weapon options. However, you do want to pick weapons whose range and weapon profile are a good match to be fired alongside the linked Cluster Missile Pods. The Cutter Light Machine Gun is the obvious choice. A Flakk Gun can be a great choice for your second arm-mounted weapon because it is 0 points and is useful to fire instead of the Cutter when your Master Handler happens to find themselves in an up close and personal situation with the enemy. The Drone Class Laser System (DCLS) is a fine choice to take instead of a Cutter if you desire, providing your Handler with the absolute maximum number of shots possible (albeit with a PEN of only 1), that pair nicely with the shooting of the Firefly Defender Drones that are part of the unit.
Firefly Defender Drones - While Defender Drones are great at keeping the Master Handler protected from enemy fire, they are also all equipped with a DCLS as well, which means when you take a full squad of 4 of them and combine their firepower with that of the Master Handler, you can obliterate almost any enemy light infantry unit right off the table, regardless of whether they’re in cover or not!
Aerial Drone Strike - One thing that should never be forgotten is that the Master Handler also has an Aerial Drone Strike: a one-time use, incredibly powerful area effect weapon. Best of all, using an Aerial Drone Strike just counts as firing a single weapon, which means the Master Handler can fire the Aerial Drone Strike and also fire another weapon at the same time (including his linked Cluster Missile Pods, for example), and all of this gets combined with the shooting of his Defender Drones as well!
Aerial Uplink & Targeting Micro Drones - There are two great Micro Drone options for your gun heavy Master Handler. The Aerial Uplink Drone allows the Master Handler to fire his Aerial Drone Strike two times during the game, instead of just once, which is great for obvious reasons. An even better fit is the Targeting Drone. This gives the Master Handler and all of his Defender Drones +3 SKL when shooting (except during close quarters fighting), which unsurprisingly ups the deadliness of their combined firepower to near obscene levels.
SAMPLE ‘GUN HEAVY’ MASTER HANDLER
- Master Bot Handler - 16 pts.
- 4 Firefly Defender Drones - 12 pts.
- 2 linked Cluster Missile Pods - 4 pts.
- 1 Cutter Light Machine Gun & 1 Flakk Gun - 1 pt.
- Targeting Micro Drone - 2 pts.
- TOTAL - 35 pts.
SUPPORT/MELEE
While the bot commander and gun heavy roles for the Master Handler are fairly straightforward and easy to define, you can also mix and match different aspects of these roles a bit to create something unique for your Master Handler. In addition, the inclusion of a Repair Claw allows a Master Handler to perform yet another role: that of helping to remove suppression from nearby bot units.
Repair Claw - Giving your Master Handler a Repair Claw can be a great choice, not only because it is 0 points, but also because it gives the Handler the Bot Repairs (2D3) ability. This means that whenever the Handler finishes an Advance & Fire or Dash action within 6” of another friendly bot unit, he can remove 2D3 suppression tokens (STs) from them, turning him into an excellent support unit (Note that you cannot use this ability on the Bot Handler’s own unit though). Considering that you'll be keeping your Handler near your bot units to help enable their Bot Protocols, you will often find him within range to perform these types of repairs. You can also consider giving your Handler 2 Repair Claws. While this doesn’t allow him to remove any additional STs from friendly units, it does turn him into quite the close quarters (CQ) powerhouse. Since the Handler is able to fire 2 weapons per round of shooting (which includes CQ fighting), this allows him to use both of his Repair Claws to their full effect. That’s a total of 8, PEN 4 shots during CQ fighting (on top of any shots generated by his Defender Drones) which ain’t too shabby! Be warned that the Master Handler is a pretty slow mover so it can be a bit tough to get him into CQ fighting, but once there, he’ll certainly be able to cause some significant damage.
Firefly Defender Drones - Whether you’re running your Master Handler next to your bot units to remove STs from them, or trying to charge into CQ fighting, either way you’ll definitely need to protect your Handler with at least 2, it not the max of 4 Defender Drones to dissuade the enemy from picking him off and to soak up the inevitable defensive fire he takes from the enemy.
Flakk Gun - If you’re taking 1 repair claw on your support Handler, then the obvious weapon to pair with that is the Flakk Gun, which excels at short range shooting. Since a support/melee Handler will often find himself near the enemy (when removing STs from your bot units and/or running around trying to get into CQ fighting) having a powerful short ranged weapon is a great choice.
Aerial Uplink & Defense Micro Drones - While there isn’t one Micro Drone choice that really excels for a Master Handler in a support role, the Aerial Uplink Drone is a solid pick. Because you likely won’t have the great firepower of a gun heavy build, being able to unleash an Aerial Drone Strike twice during the game can be quite useful. On the other hand, the Defense Drone is perfect for the Handler that is trying to get into CQ fighting. Sure it's a one-use item, but it’s 0 points, and for the turn it's used the Handler gets the Field (2) ability (great for when his Defender Drones have been destroyed) and makes him an absolute melee monster. Plus, because the Handler can fire 2 weapons, he’s able to use the Defender Drones melee profile as well as one Repair Claw in CQ fighting!
SAMPLE ‘SUPPORT’ MASTER HANDLER
- Master Bot Handler - 16 pts.
- 2 Firefly Defender Drones - 6 pts.
- 1 Cluster Missile Pod & 1 Neural Node - 4 pts.
- 1 Flakk Gun & 1 Repair Claw - 0 pts.
- Aerial Uplink Micro Drone - 2 pts.
- TOTAL - 28 pts.
SAMPLE ‘MELEE’ MASTER HANDLER
- Master Bot Handler - 16 pts.
- 4 Firefly Defender Drones - 12 pts.
- 2 Neural Nodes - 2 pts.
- 2 Repair Claws - 0 pts.
- Defense Micro Drone - 0 pts.
- TOTAL - 30 pts.
How will you use your Master Handlers? To share your tactics or modeling ideas, or to discuss the loadouts described above or any other aspect of the Maelstrom's Edge game, visit the Comm Guild Facebook page.
You can find the Epirian Master Bot Handler, along with the rest of the Maelstrom's Edge model range, in the webstore here!
Modeling Spotlight: The Epirian Master Bot Handler
Posted on Monday May 07, 2018 at 05:00pm in Models
- by Iain Wilson
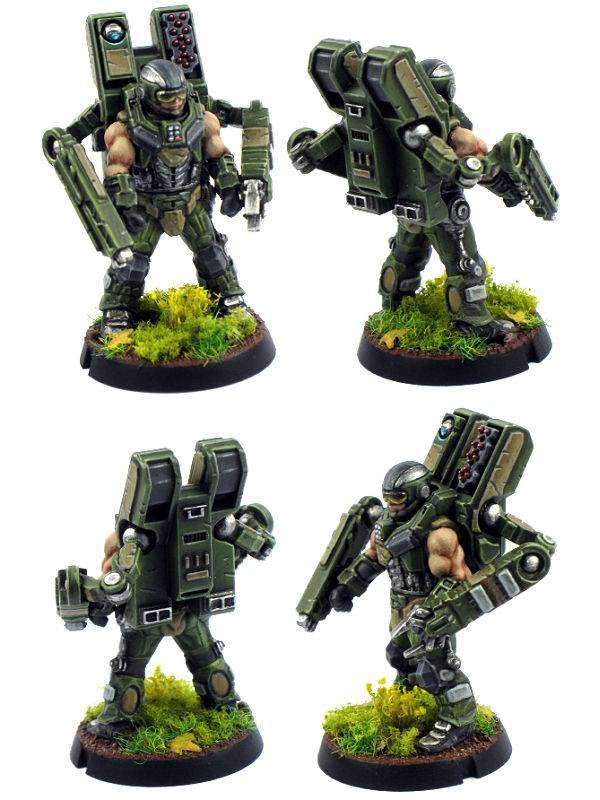
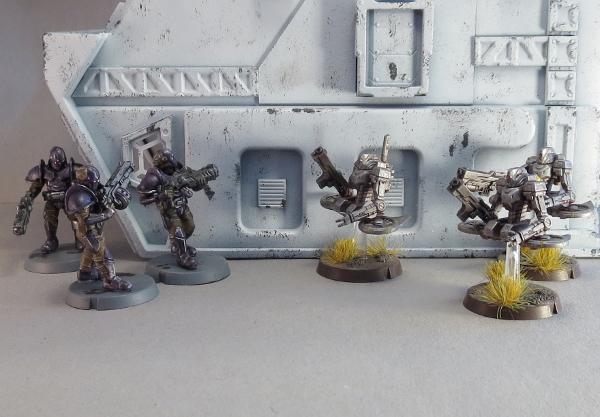
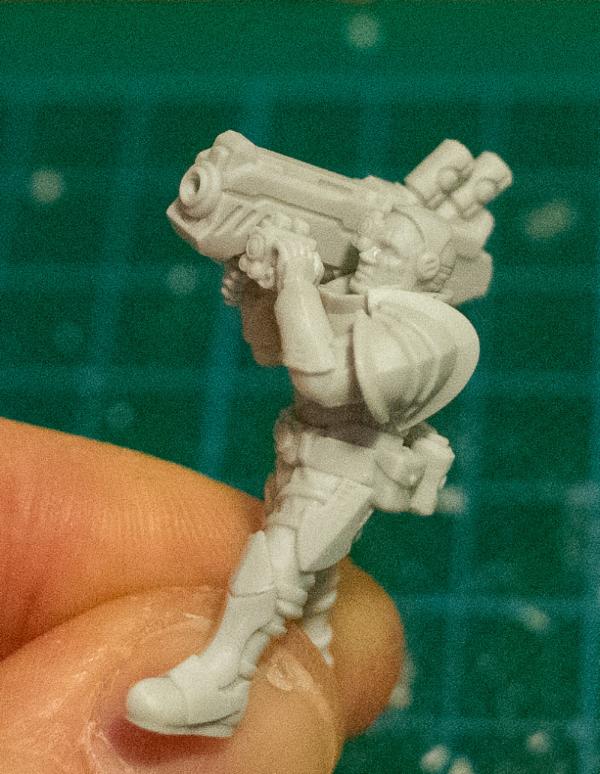
The Epirian Master Bot Handler is the latest plastic kit to be added to the Maelstrom's Edge range. Striding about the battlefield in his powered exoskeleton, he has the ability to lay down impressive amounts of firepower from a wide array of weapons, or finely co-ordinate his forces through networked neural nodes. Here, we'll have a look at some of the modeling options available with this fantastic model.
Built straight off the sprue, the Master Handler has multiple weapon options available - Repair Claws, Cutter Light Machine Guns, Drone Class Laser Systems and Flakk Guns can all be chosen for the arm mounted weapons in any combination, and the rectangular sockets on his backpack allow you to place Cluster Missile pods for even more punch, or Neural Nodes for throwing command points around with wild abandon.
You can find the Assembly Guide for the Master Handler here.
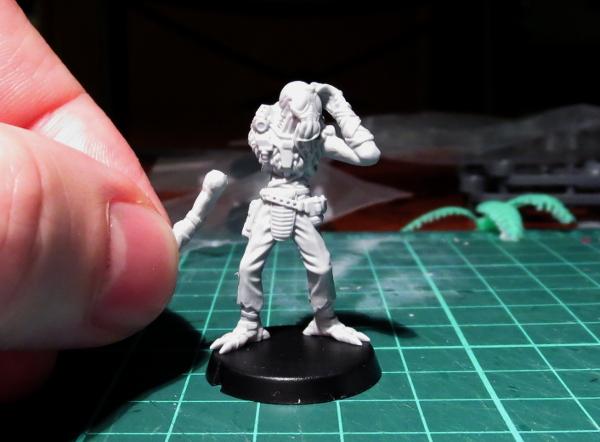
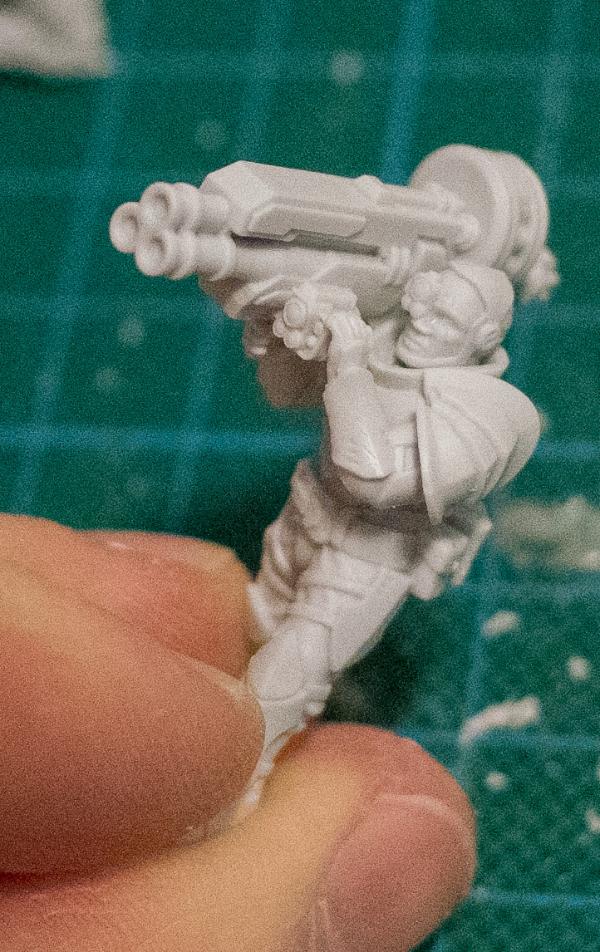
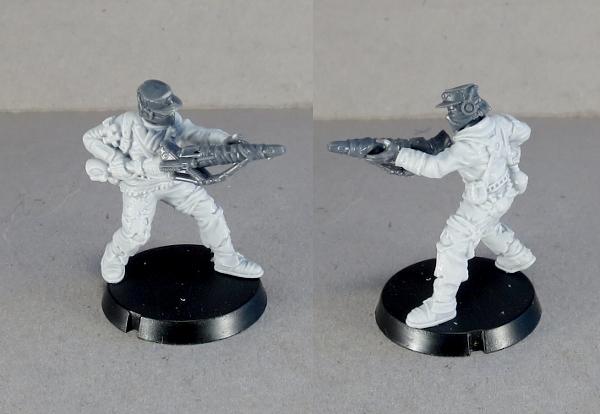
The Master Handler also brings some other impressive 'guns' to the table, with sleeveless and rather buff arms. If you prefer a more covered look on your models, the arms can be fairly easily replaced with the armoured arms from the regular Bot Handler kit. For the below model, on the sides of the torso I removed the protruding arc of plastic that sits just above the Master Handler's shoulders, and added a small locator pin made from a piece of plastic rod to the backs of the regular Handler's forearms. The arms were glued on to the torso with the tops of the shoulder pads sitting about where the original locator arc was, and the weapons slotted onto the locator pins on the arms as they do with the normal Master Handler arms.
The sprue comes with two sets of legs, one in an upright stance and the other in a knees-bent, braced stance. To mix up the posing a little, you can cut through the groin with a razor saw or sharp hobby knife and switch legs between the two sets to create a stance with one straight leg and one slightly bent. You might need a little gap filling with putty if the cut leaves the waist with a gap. On the below model, I have also extended the right arm out by cutting the top of the shoulder off square, gluing it to the torso and filling in the armpit with some 'green stuff' putty. The left arm has also been slightly repositioned below the elbow, and I have used a head from the Epirian Contractor sprue in place of the Master Handler's helmet.
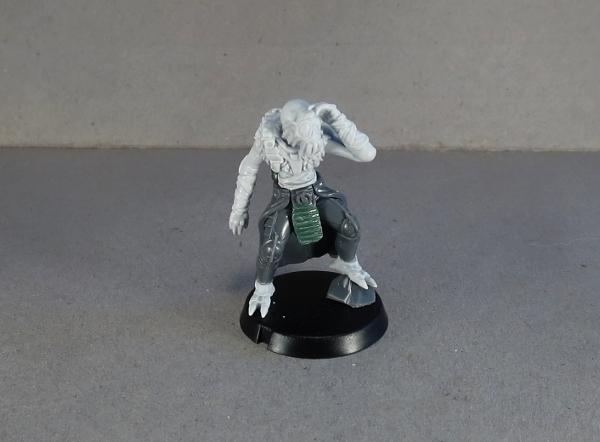
The leftover legs from the above model were used below, with a similar reposing of the right arm as well.
I thought it might be handy to have a repair claw that was independent of the Handler's arms, so cut down one side of a backpack and drilled out a socket to attach one of the weapon support arms. I used two repair claws clamped over the ball joint on the end of the support arm to create a beefier, four-fingered repair claw. I also took the two Neural Nodes and cut them in half so that they would both fit on the other side of the backpack, and used a helmet from the regular Bot Handler sprue.
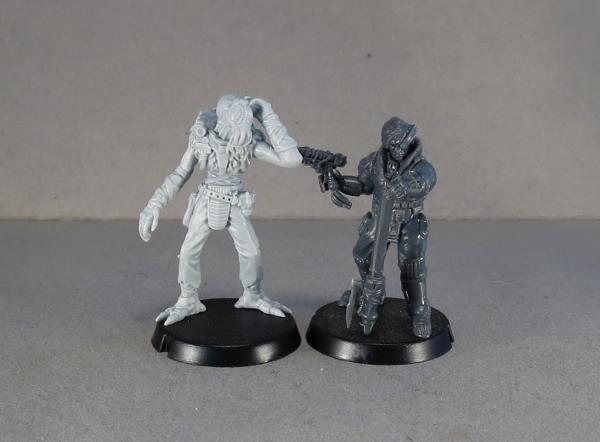
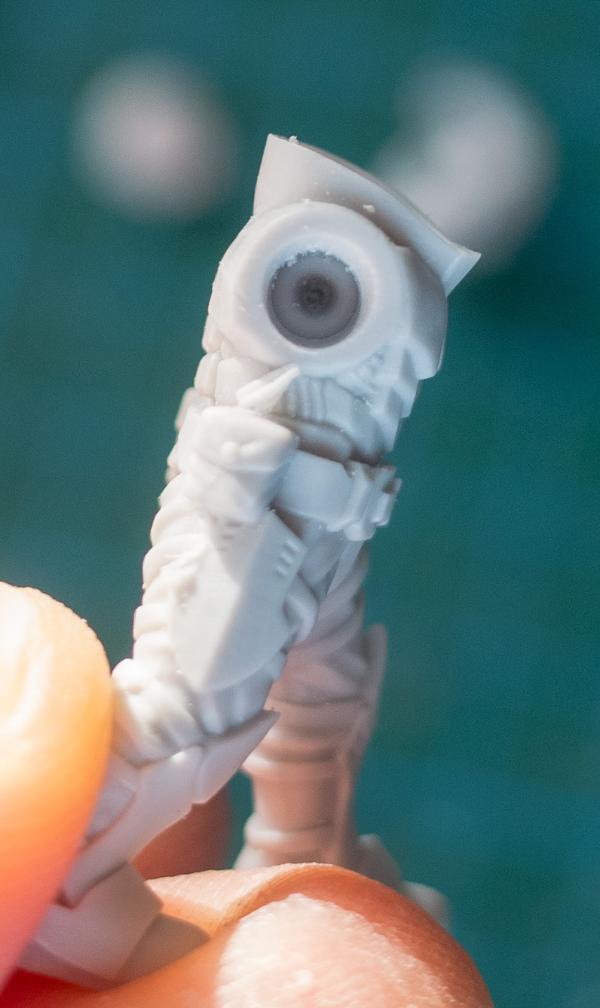
The neck joint on the Master Handler torso is compatible with any of the different plastic Epirian heads, and also works with most of the heads from the Broken Infantry pack, which is handy if you want to create an alien Handler for your force. For the below model, I aso left the weapon support arms off entirely, and built the Drone Class Laser System directly into the backpack by trimming off the backs of the weapons at an angle to match the backpack panels.
Because the Master Handler comes with two sets of legs and torsos, you're going to wind up with some spare parts. It seemed a shame to waste these, so I used a leftover helmet from the regular Handler sprue, and some Clingfire Sprayers and a command module from the Epirian Scarecrow kit to create a twin-flamethrower-equipped model that I'm calling an 'Eradicator'. The fuel hoses on the backs of the weapons are made from guitar string.
I thought it might also be fun to add some of that shiny, missile-pod goodness to a drone unit, and so I took a Master Handler backpack, trimmed off the bottom and stuck it onto the back end of a Spider Drone. I don't have a name for this friendly little fellow yet... I think I'll have to revisit that in a later article!
What have you done with your Master Bot Handlers? We would love to see your creations on the Comm Guild Facebook page!
To pick up this or any of the rest of the Maelstrom's Edge model range, visit the webstore here.
For other Maelstrom's Edge modeling articles, including tutorials and walkthroughs of a wide range of different building and miniature projects, check out the article roundup here.
Tags: conversion epirian handler model modeling
Assembly Guide - Epirian Master Bot Handler
Posted on Monday Apr 30, 2018 at 11:00pm in Tutorials
Assembling the Epirian Master Bot Handler
General Notes
Polystyrene cement - only use superglue if you want to go insane! All of our models are designed to be assembled with polystyrene cement as it gives some time to re-pose while gluing, fuses the models together and prevents brittle joins like other glues do. Make sure you have polystyrene cement in your toolkit before you begin.
We want you to experiment! We've broken our models up into lots of parts and given a fair few spare parts so that you can push yourself out of your comfort zone, learn new skills and create some really unique models. We've tried to price things so that it won't break the bank if you make a mistake, so please cut stuff up and have some fun. Start simple with a slice here and a re-pose there, and watch your confidence and skills increase until you are a master modeler!
Basing - Always make sure you glue your model to its base with an eye on the arc markers on the sides of the base. The arc marker indents should be at the halfway point between the front and back of the model to show the front and back halves of the model when gaming. See the Maelstrom's Edge rulebook for more detailed notes on this.
Dry fit before gluing! - There are lots of pose options possible, but that means there is also the freedom to screw up and make some bad poses! Sticking the parts together and seeing how things look will usually lead to a model that is fairly static and repetitive. You should consider the parts available and ensure that you have a pose in mind before you start gluing things together. If in doubt or insecure about your talents in the posing area, we recommend you try to copy the poses from some of our studio models found here in the gallery.
Master Bot Handler Assembly Notes
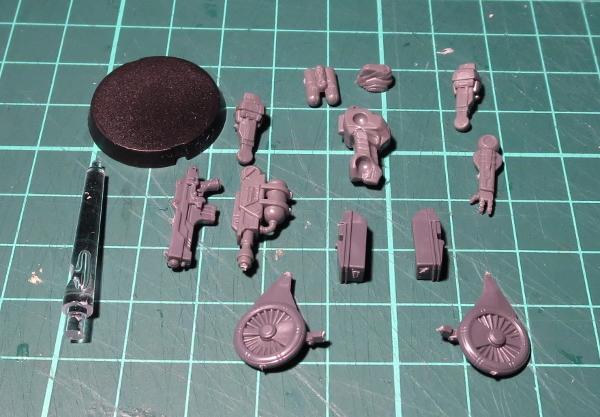
The sprue comes with parts to assemble one model, with two different body options, two each of four different arm weapons and two each of the backpack equipment options:
You can find the rules and options for the Master Bot Handler's equipment in the Force Builder section of the Maelstrom's Edge website. It's worth noting that rules-wise, if you go all out on ranged weapons you'll wind up with one more weapon than the Master can actually fire in a turn, so while that can be handy for versatility if you have the points available, it's worth considering how you will use him on the table before you start gluing bits on!
The body options provide two different poses, with the torso paired with the legs to create a crouched, braced-for-firing pose, or a more upright stance. Torso parts 1 & 2 go with legs part 5, and torso parts 3 & 4 go with legs part 6, although the torsos do fit on either pair of legs if you want to play around with the posing.
The neural nodes (part 16) cluster missiles (part 17) fit into the rectangular recesses on the top of the backpack, and can be paired or taken as one of each.
Note: Due to a well-intentioned but mistaken last minute change by the sculptor before the sprue went for tooling, the neural nodes and cluster missiles have differently-sized locator bars on their backs that slot into matching recesses on the backpack. As the bar on the neural node is slightly longer than that on the cluster missile pod, this means that if you want to use a dual-node configuration (or just want to put a single neural node on the left instead of the right) you need to trim off the ends of the bar to allow it to fit into the missile pod's slot.
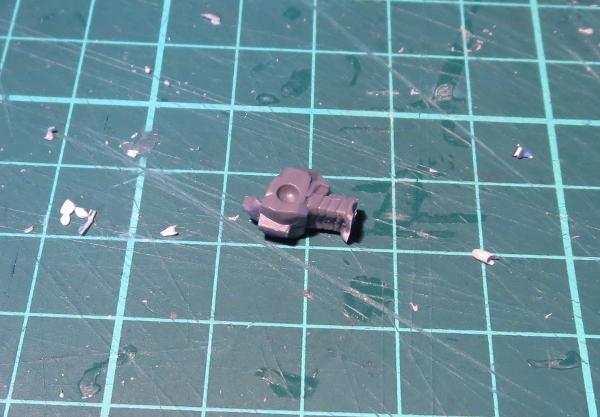
Backpack, head and arms can be glued in place to set up the basic posing.
Assembling the weapon arms all in one go is a little fiddly, so it's best to glue your chosen weapons onto the arms first. The sprue comes with the following weapons:
- 2 x Repair Claw (part 10)
- 2 x Cutter Machine Gun (parts 13 & 14)
- 2 x Drone Class Laser System (parts 19 & 20)
- 2 x Flakk Gun (parts 11 & 12)
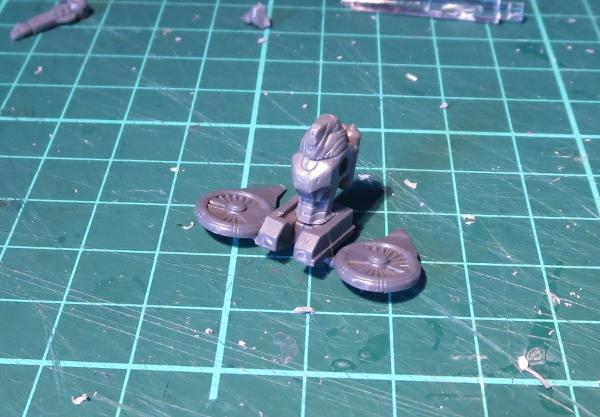
The support arms for the weapons are made up of parts 21 and 22, and two of part 18.
The flat disc on part 18 slots into the middle of the two matching discs on parts 21/22. If the fit is a little too snug, you can file or shave down the sides of the disc a little. Don't get too carried away, or you'll make it fit too loosely.
The two parts joined at whatever angle fits the posing of the arms and weapons. The best bet is to glue the join with a touch of plastic glue and then dry fit the support arm against the model to get the right angle on the joint, ensuring that the larger ball fits neatly into the recess on the backpack, and the smaller ball sits into the outside of the ring on the weapon. Once you're happy with the angle of the joint, glue the ends in place.
From there, your model is ready for painting!
For modeling help, to discuss how best to use the Master Bot Handler in your games, or to share your models, head on over to the Comm Guild Facebook page.
You can pick up the Master Bot Handler, his accompanying Firefly Drones, and the rest of the Maelstrom's Edge miniature range, from the webstore here.
For other Maelstrom's Edge modeling articles, including tutorials and walkthroughs of a wide range of different building and miniature projects, check out the article roundup here.
Our Latest Plastic Model - The Epirian Master Handler
Posted on Monday Apr 30, 2018 at 09:00pm in Models
We at Spiral Arm Studios are proud to present our latest model - the Epirian Master Handler. This alternate command model allows you to lead your robotic force with the ultimate robotic Handler. We previewed this model at Salute 2018 where it sold out very quickly, and now it is available on general release for everyone!
Rules are available immediately as normal on the Maelstrom's Edge website Force Lists section. As you can see there, a lot of interesting equipment is available.
The sprue contains enough parts to build any of the combinations in the rules, and has two variant bodies and legs for different posing. The real interesting bit is the backpack and supporting mech arm structure though, which is fully ball jointed, allowing a huge range of posing and angles. We originally wanted to make this kit in resin, but the complexity and detail of the mech arm parts demanded plastic and we are very glad we went that route!

The Epirian Foundation became one of the dominant forces in the Spiral Arm for two reasons: its terraforming technology allowed the Foundation to convert barren worlds into productive and verdant paradises, and its legions of robots and drones allowed it to harvest resources from inhabited planets and desolate asteroids alike. Both would be nothing, however, without Bot Handlers striding amongst their robotic charges, directing their actions and optimising their workflow. The limited AI of Epirian bots means that the true power lies in a Handler's control, and for many, training to become one of the Foundation's machine shepherds is the ultimate career to aspire to. By the time a Bot Handler reaches the hallowed status of Master, they are the Foundation's most valuable resource, guiding entire robotic divisions and piloting whole squadrons of starships on their own. They are so precious, in fact, that their corporate superiors overlook all manner of eccentricities and odd behaviors, both of which become increasingly common the longer a Handler plies their trade. As a Handler spends increased time with their consciousness projected into their robotic subjects, the more they become detached from humanity.
A Master Handler has spent decades diving into the electronic pathways of machines. Having to spend a few minutes conversing with another person is excruciating when one is used to simply thinking a command and have it be perfectly understood and followed. Master Handlers are often awkward and disdainful of other humans, which can unsettle those within their proximity. The elite human soldiers in the Foundation's SecDef division resent a Master Handler's lack of cohesion, despite the formidable abilities they bring to bear on the enemy. Master Handlers therefore refuse to serve embedded with any other Foundation unit, instead relying on custom built 'Defender' Drones to protect them. These modified Firefly drones have their clingfire payload replaced with state-of-the-art armour. Their vastly improved neural processors perform a 'swarm defense', continually scanning for potential threats, positioning themselves as a seemingly easy target, only to dart away once they have drawn enemy fire.
Master Handlers wear powerful machine-assisted armor normally reserved for elite SecDef forces, and wield an arsenal of weaponry that normal soldiers can only dream of. Some Master Handlers eschew additional weapons and instead utilize Neural Nodes: an incredibly expensive and controversial technology that combines a powerful machine neural processor with a tiny portion of the Master Handler's cognitive functions. The Neural Node acts as an independent, duplicated version of the Handler's consciousness for a brief moment, before safeguards purge its core memory. The Neural Node creates a powerful momentary electronic copy of the Master Handler's mind into the target drone, to assess the situation and provide the drones with a specific order. There are many voices both outside and within the Foundation that decry the use of Neural Nodes, claiming they are a form of A.I., which puts all of humanity at risk. The Foundation remains resolute that purging a Neural Nodes at regular intervals prevents any potential issues from arising. Master Handlers themselves ignore the controversy, relishing any opportunity to become closer to the robots under their control, to devastating effect amongst those that stand in their way.
As a brand new command model, you also get a new, different faction objective for the Epirians if you take this unit as the head of your detachment:
MASTER OF MACHINES
This objective may only be utilized if your force contains a Master Bot Handler. If utilized, a Master Bot Handler is automatically your force commander for any objective type that requires one.This objective type can generate a maximum of 3 VPs per game, after which you may no longer utilize the Bot Mastery ability.
-----
Partial: (each end phase) If at least one of your Master Bot Handlers is on the table and the Bot Mastery ability was not utilized that turn, gain 1 VP.
Full: (end of game) If at least one of your Master Bot Handlers is still on the table, gain all of this objective’s remaining VPs.
Bot Mastery: Once per turn, you may automatically enable one of your unit’s bot protocols when that unit is activated (regardless of whether its activation discipline check is successfully passed). You must have at least one Master Bot Handler on the table to utilize this ability.
Check out the Maelstrom's Edge store today to pick up your Master Handler for just $8.49/£5.99!
Tags: epirian handler masterhandler plastic sprues
Modeling Spotlight: Epirian Bot Handlers
Posted on Monday Apr 23, 2018 at 05:00pm in Models
- by Iain Wilson
Bot Handlers serve as unit and force commanders amongst many Epirian forces, with their neural interfaces allowing them unparalleled access to tactical information and the ability to control bots at a distance. The Maelstrom's Edge Bot Handler sprue comes with parts to build two Bot Handlers, and this week we're having a bit of a look at just what you can do with them.
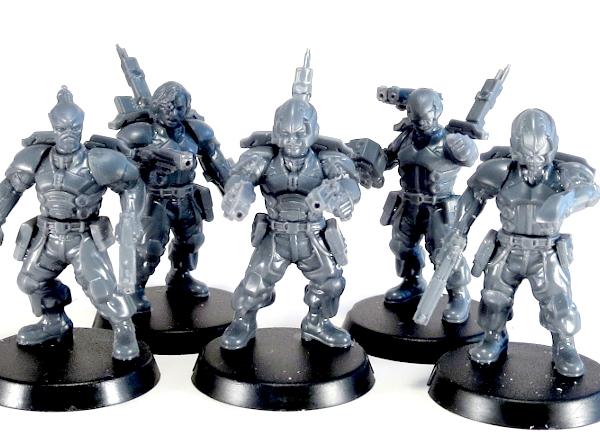
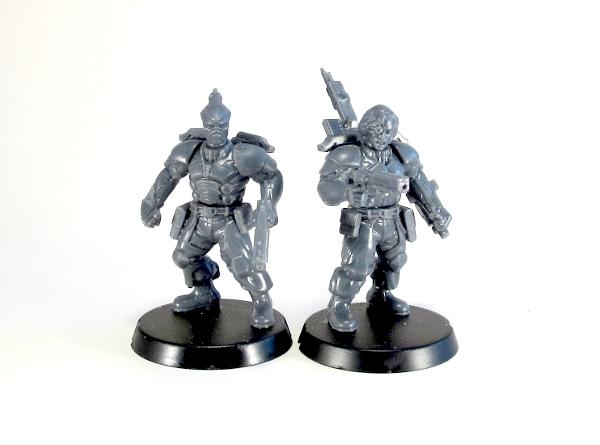
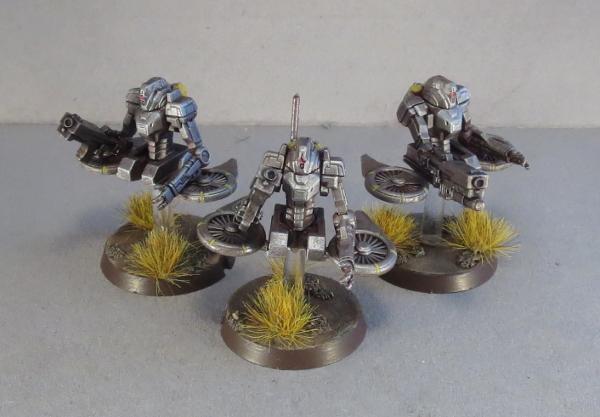
There are two different types of Bot Handlers in the game at the moment - The Apprentice Bot Handler, and the Journeyman Bot Handler. Apprentice Handlers lead units of Spider Drones in battle, while the more experienced Journeyman Handlers serve as low-level army commanders. These serve below the Master Handler, who will be added to the range soon with a new model and rules card.
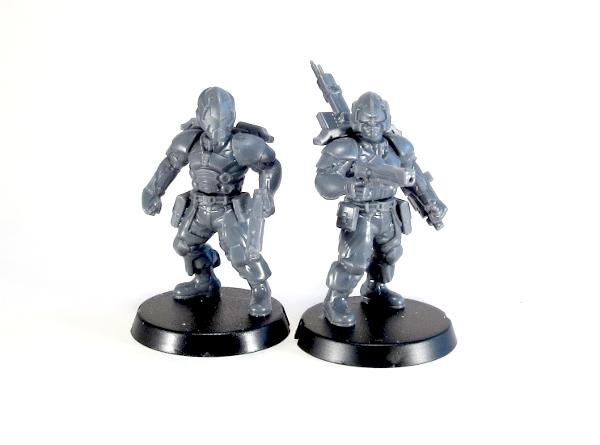
Apprentice Handler (left) and Journeyman Handler (right).
The Apprentice Handler is equipped with a Maglock Dominator Pistol (a more powerful version of the Maglock Guardian Pistol used by Epirian Contractors) and uses a Tactile Bot Interface on one arm to interface with the bots under his direct control.
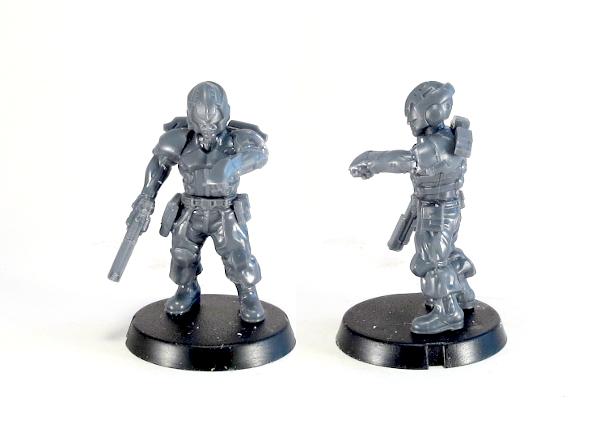
Apprentice Handler. The left arm has been slightly converted to look like he is motioning with the tactile interface gauntlet.
The Journeyman replaces the tactile interface with a more sofisticated Neural Interface, which frees up his hand to take a second pistol, or a forearm mounted grenade launcher.

Journeyman Bot Handlers (right).
Thanks to the modular nature of the Maelstrom's Edge kits, making small modifications to your models to personalise them a little is extremely easy. The standard Handler helmets can be swapped out for heads from other Epirian kits, or even from other factions.
Bot Handlers with heads from the Broken Infantry Pack.
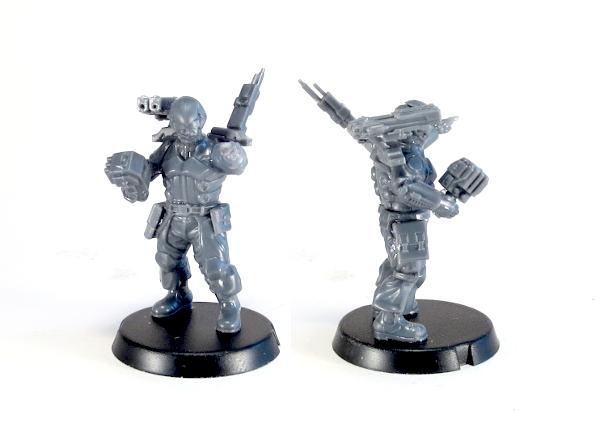
Journeyman Handler with arms taken from the Broken Infantry Pack and the more streamlined helmet from the Faction Expansion Sprue.
Getting slightly more advanced, the below model was given a new pose by cutting two sets of legs apart at the groin and swapping halves to create a wide-legged, braced stance. A visor was added over a regular Contractor head with 'green stuff' putty, and the dual pistols were built onto a mini-drone made from a Firefly Drone turbine.

Converted Journeyman Bot Handler.
Or for something more outside the box, this Handler was reposed slightly by bending the legs outwards and replacing the right hand with an open Karist hand from the Faction Expansion Sprue, and was given a Drone Bike made from an Epirian Drone chassis and a Games Workshop bike.
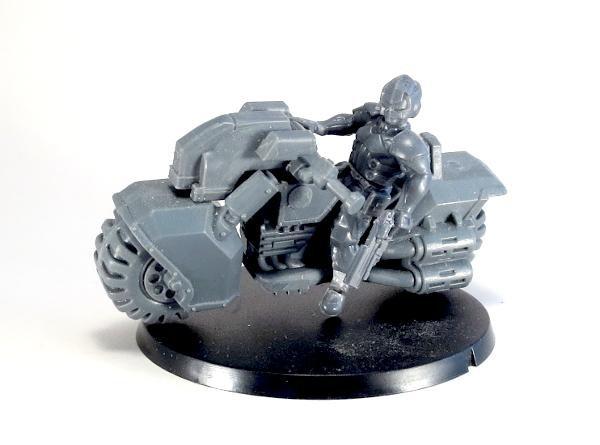
Born to ride.
To pick up the Epirian Bot Handler kit, or any of the rest of the Maelstrom's Edge model range, visit the webstore here. As always, we would love to see your creations on the Comm Guild Facebook page!
For other Maelstrom's Edge modeling articles, including tutorials and walkthroughs of a wide range of different building and miniature projects, check out the article roundup here.
Terrain Spotlight: Epirian-themed Dice Tower
Posted on Monday Apr 16, 2018 at 05:00pm in Tutorials
- by Iain Wilson
There's nothing worse than throwing a bucketload of dice on the table and having a stray ricochet take out that carefully-painted model sitting perched on the edge of a piece of terrain, or having to launch an expedition under the table when the dice decide to go on an adventure. There are a few common solutions to this problem - dice trays, rolling on another table, never painting anything, ever - but this week, I decided to build a dice tower from a Knights of Dice blank and some bits from the Maelstrom's Edge terrain sprue.

For the uninitiated, a dice tower is a box or tube that has some angled ledges inside. Instead of flinging your dice all over the table like some sort of uncultured barbarian, you drop them into the top of the tower where they roll down from ledge to ledge, eventually rolling out into the tray at the base of the tower where their predilection for wanton destruction is safely contained.
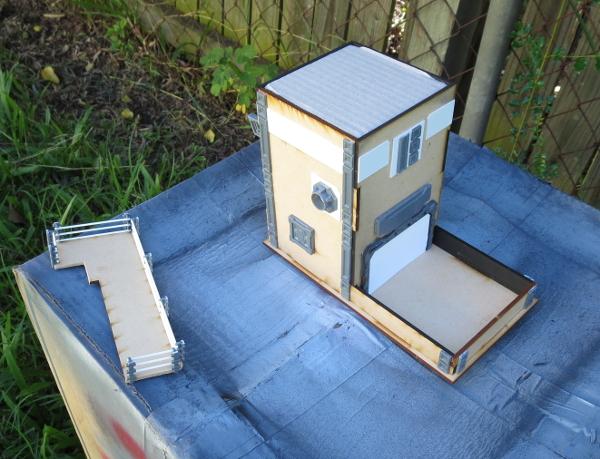
The KoD tower that I used as a base for the build is a plain, laser-cut MDF affair, that when assembled as standard looks like this:
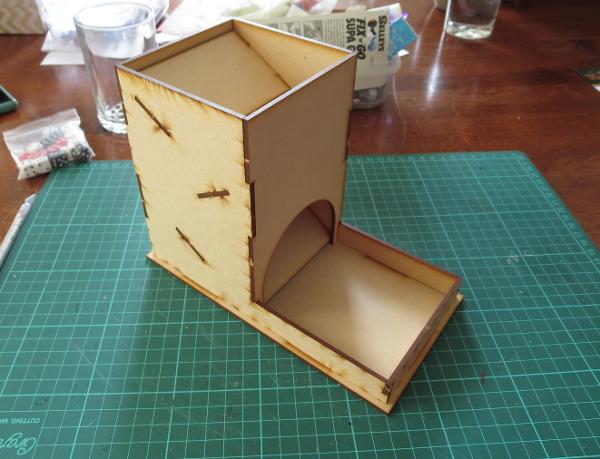
I wanted something that would look like it belonged on the table, and so dug out some terrain sprues and tools, and went to work.
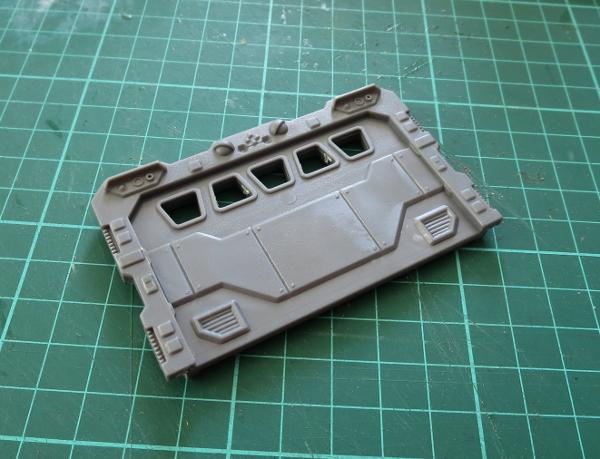
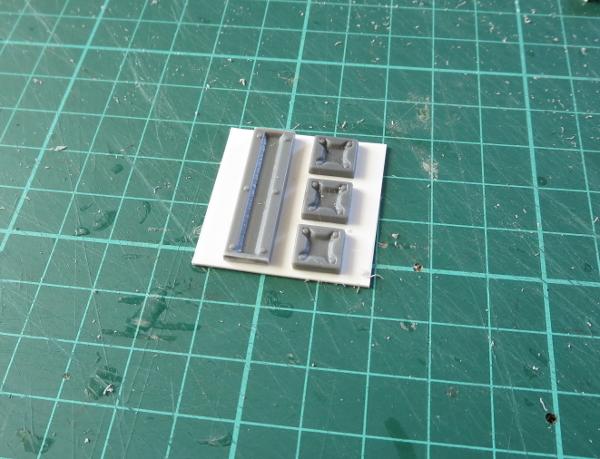
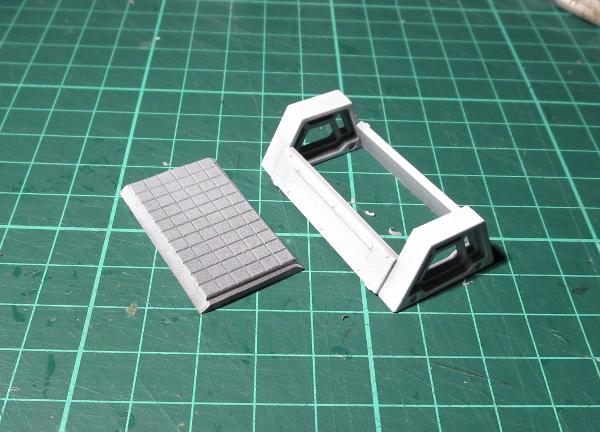
First step was to pretty up the opening at the bottom. I took a garage door from the terrain sprue, and found that it would fit into the existing arch with some cutting for the top corners, and something to fill in the top of the arch as it was higher than the door frame. So I marked out the door frame against the front wall of the tower, and also marked the scrap piece that was cut from the arch to leave an arc that would fit in above the door.

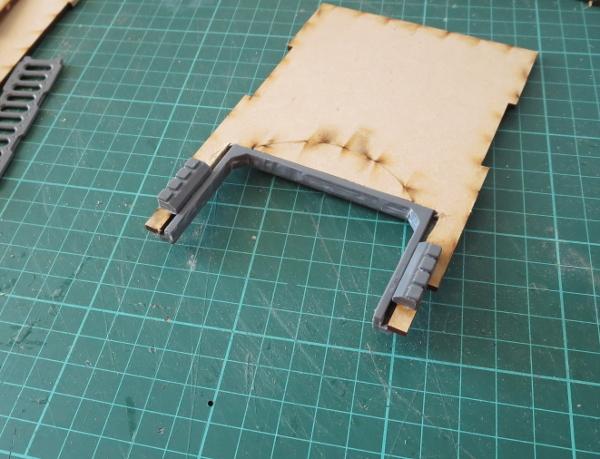
I then used a razor saw and exacto knife to cut the door out of the door frame, and glued the frame and the MDF arc in place in the archway.
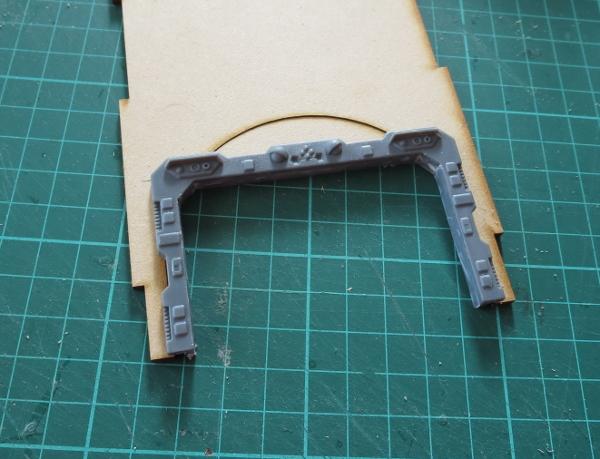
With a dry fit of the tower, I discovered that the dice were sometimes getting stuck behind the sides of the door frame, as the plastic addition made the opening for the dice narrower than was originally intended. I fixed this by taking a lintel piece from the terrain sprue, cutting it in half, and gluing the two pieces on either side of the doorway, creating a bevel to funnel the dice out the door.
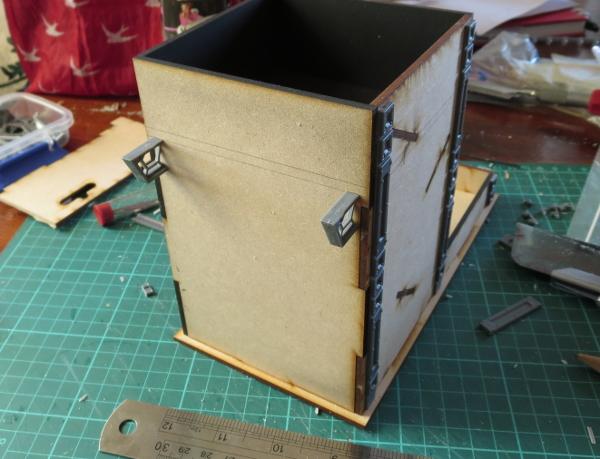
One of the less pleasant things about dice towers is that they can be rather loud and echoey when the dice are working their way through. I fixed this by taking some craft foam and cutting it to the size of the ledges, and then gluing it on top.

At this point, I also sprayed the interior of the tower black to match the foam. This would also make it relatively unobtrusive on the table.

I assembled the walls of the tower, and started adding detail to the outside. I took a piece of scrap MDF, and cut it to serve as a balcony. I used the top halves of a bunch of energy fence posts and some plastic rod to make handrails. (You can find other ideas for handrails in my catwalk article here!)

To support the balcony, I cut the sides off two trapezoid windows, and glued them in place on the back wall of the tower.

Finally, two ladders and some cut down corner reinforcing pieces made an extending ladder that could be hung from the balcony, fire-escape-style.

To add a little extra detail to the front of the building, I made a large Epirian Foundation symbol using pieces from a reinforcing strut from the terrain sprue.
With the addition of a few more bits on the sides to hide the ends of the interior ledges, and a sign board made from the cutaway garage door to disguise the filled-in archway, the tower was ready for painting. To avoid getting spray on the interior, I filled in the top and the doorway with some cardboard and a piece of foamcore.
Painting was a quick and easy spray with a grey primer, and then a quick downwards spray with some white to leave the grey in the recesses and shadowed areas.
The metal parts were painted with P3 Pig Iron and then washed with Army Painter Strong Tone, and the white parts given some weathering with a sponge. (You can find a handy sponge weathering tutorial here!)

Once the wash was dry, everything was dirtied up a little with a drybrush of Vallejo Beasty Brown.

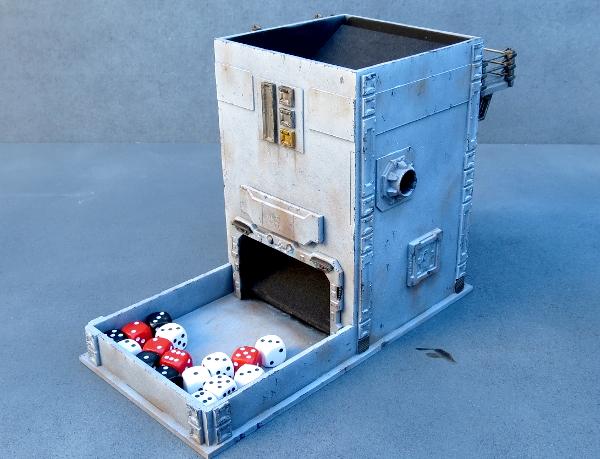
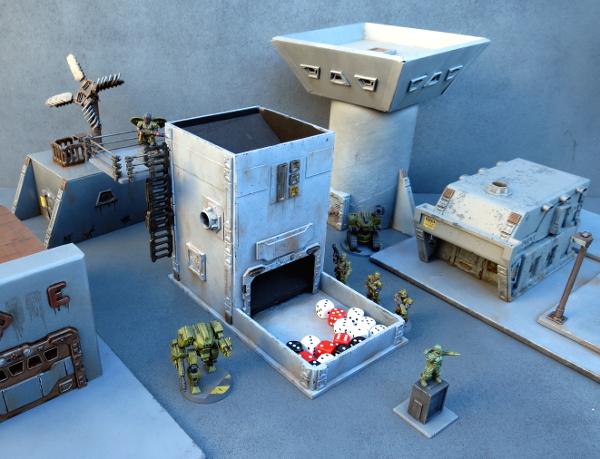
A little detail work here and there, and the tower was ready for the table.
Feeling inspired? You can pick up the Maelstrom'd Edge terrain sprue, along with the rest of the model range, from the webstore here. As always, we would love to see your creations on the Comm Guild Facebook page!
For other Maelstrom's Edge modeling articles, including tutorials and walkthroughs of a wide range of different building and miniature projects, check out the article roundup here.
Epirian Sentinel Bot Conversion Tutorial & Unit Card
Posted on Monday Apr 09, 2018 at 05:00pm in Tutorials
- by Iain Wilson
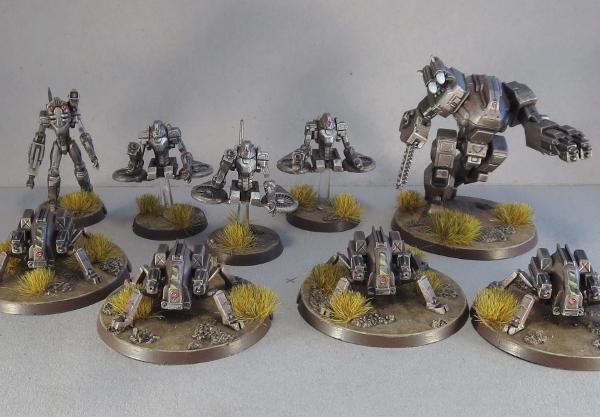
The Epirian faction in Maelstrom's Edge includes a number of fantastic robot options, and with some careful planning it's even possible to field an all-robot force. I went for an almost all-robot force with my starter force, including a lone Journeyman to lead them. I thought it might be fun to add some robot 'not-contractors' to the army for some extra firepower, and so turned to a conversion that I put together for a spotlight on the Scarecrow kit some time ago, which I dubbed a Sentinel bot.
The Sentinel uses parts from the Scarecrow, Drone and Contractor kits.
From the Scarecrow:
- Head
- Torso
- Left Arm
- Left Shoulder
- Right Shoulder
- Fuel Tanks
- Chemtech Sprayer
- Base
From the Drone kit:
- Turbines
- Turbine-mount side pieces
- Flight Stem
From the Contractor kit:
- Maglock Assault Rifle
Start by gluing the two Drone side pieces together and attaching the turbines, as below. There is a small ridge of plastic on the inside faces of the side pieces that needs to be shaved or filed down so that they sit flat against each other. A couple of pieces of spare sprue serve nicely to hold the turbines in place while the glue sets.

Take the Scarecrow torso and cut through it just below the top of the hips.
The torso then glues neatly into the middle cavity created by the two side pieces.
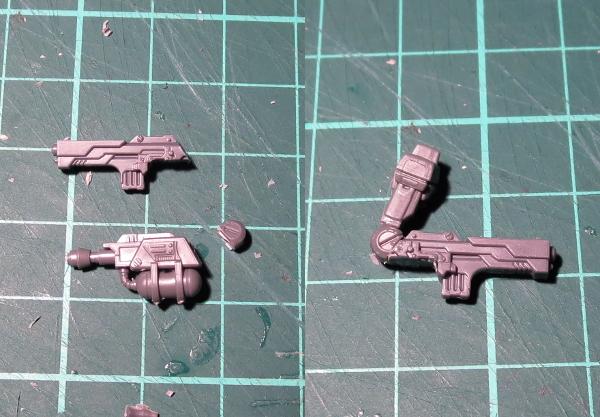
The left arm is assembled as normal. For the right, cut the pistol grip off the maglock rifle, and also cut the back of the rifle at an angle matching the ridge along the top, as shown below. The take the chemtech sprayer and cut the elbow joint off the back. This is glued onto the back of the maglock rifle, and then the weapon be glued to the upper arm.
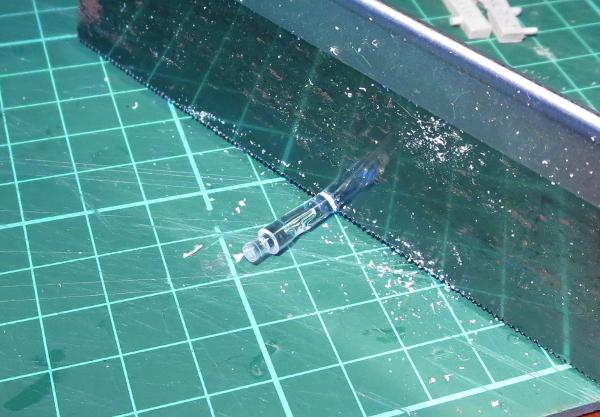
To keep the unit with a similar silhouette to the contractors they are replacing, take the flight stem and cut it a little above halfway up.
This is then glued to the middle of the base. You will need to drill a corresponding hole in the bottom of the turbine assembly for the peg on the top of the flight stem.
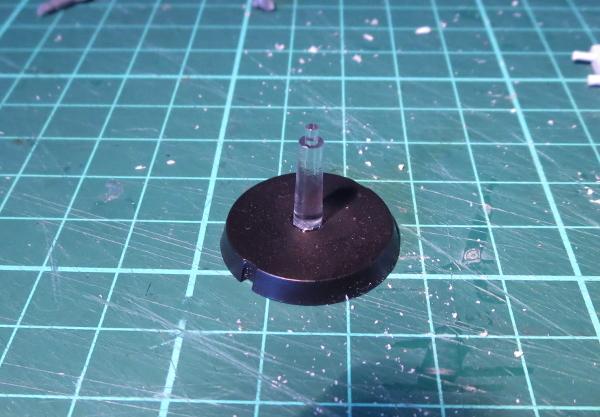
With head, tanks and arms glued in place, the bot can be glued onto the flight stem (or left separate if you're planning on spraying a basecoat, or just if you're a messy painter!) ready for paint.

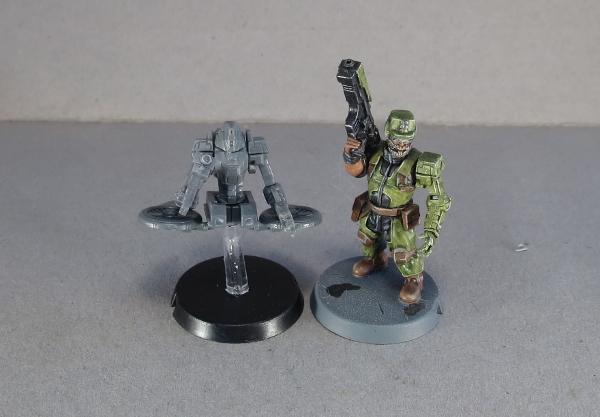
Scale shot with a Contractor:
Painted up, the Sentinels are ready to take to the field. I have added a command unit to one model to create a unit leader, and equipped the third with the auxilliary grenade launcher version of the Maglock Rifle.
You can find an (unofficial) rules card for fielding Sentinel units in the Force Builder section of the Maelstrom's Edge website here. Alternatively, you could just field them as Contractors.
To pick up kits you'll need to create your own Sentinel unit, visit the Maelstrom's Edge webstore here.
We love to see what people are doing with their models, so be sure to also visit the Comm Guild Facebook page!
For other Maelstrom's Edge modeling articles, including tutorials and walkthroughs of a wide range of different building and miniature projects, check out the article roundup here.
Modeling Spotlight: The Broken Marsayan Hypnotist
Posted on Monday Apr 02, 2018 at 05:00pm in Tutorials
- by Iain Wilson
This month sees the release of a new type of unit to Maelstrom's Edge, with the addition of the Marsayan Hypnotist to the Broken faction. Rather than a unit in his own right, the Hypnotist is fielded as an upgrade to other units - an idea that will be carried across to other factions later to help mix things up a little. While he doesn't have any weapons or ability to directly hurt enemy units, the Hypnotist uses his inate abilities to interfere with enemy attacks directed towards his unit. Here, we have a look at some modeling options for this great resin model.
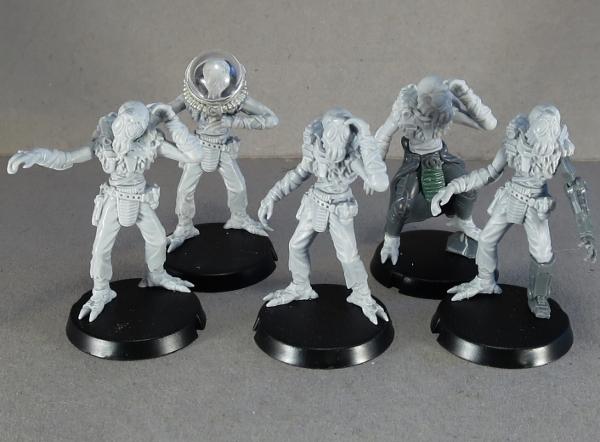
The Marsayan Hypnotist is a two-piece resin model, and comes with a 25mm base. If you haven't worked with resin models before, you might want to check out the handy guide here.
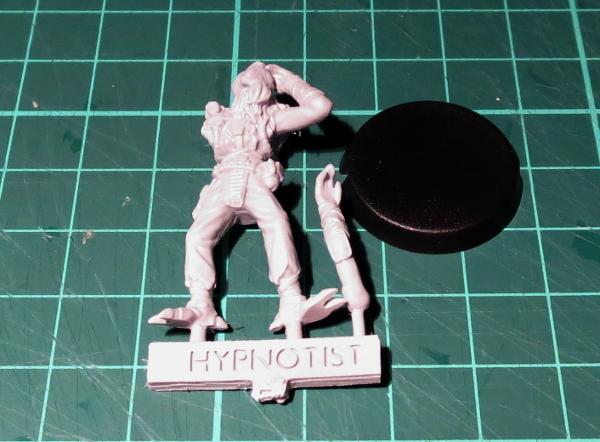
Assembly is simple - cut the model from the frame, glue his feet to the base with superglue or a fast-setting epoxy (I use superglue with an all-plastic primer, for some extra grip without messing about with plastic.
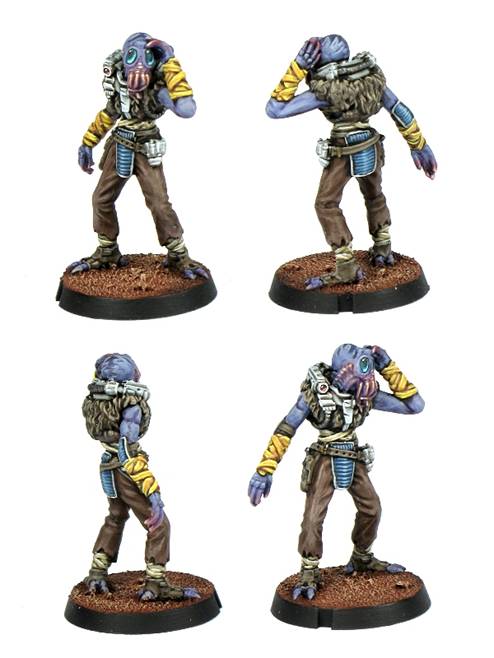
The assembled model is a little taller than a human, but slightly more slender.
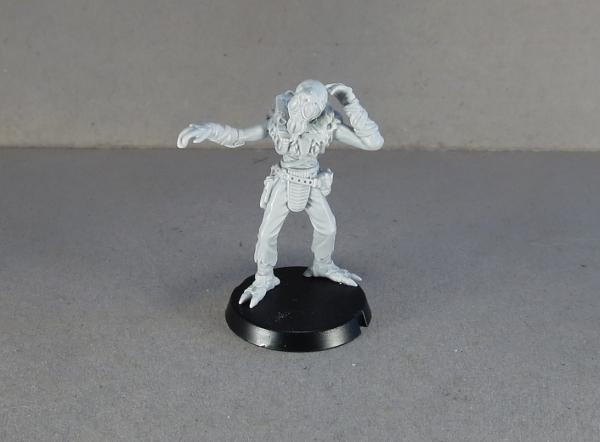
Due to the nature of the Broken as scavengers and refugees, it can be fun to mix up the models a bit by using components from other kits. Here, I replaced the Hypnotist's legs with the legs from a Karist Kaddar Nova.
For something slightly more ambitious, on this one I carefully cut through the resin where the fingertips touch the model's head, and then cut through the neck. The neck was trimmed away and replaced with a new one sculpted from 'Green Stuff' sculpting putty, and the head reattached facing to the right instead of the left. I also cut the left hand off at the wrist and reattached it at a slightly different angle, so that the fingertips still touch the head.
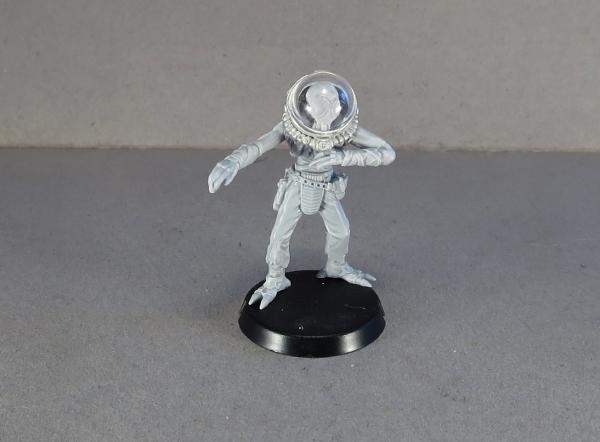
Some worlds are less comfortable for some species than others. On this model, I cut through teh left arm at the shoulder and rotated it downwards to cross the model's chest. I also removed the head and repositioned it slightly, flattened off the top of the shoulders, and added a domed helmet from Bombshell Miniatures.
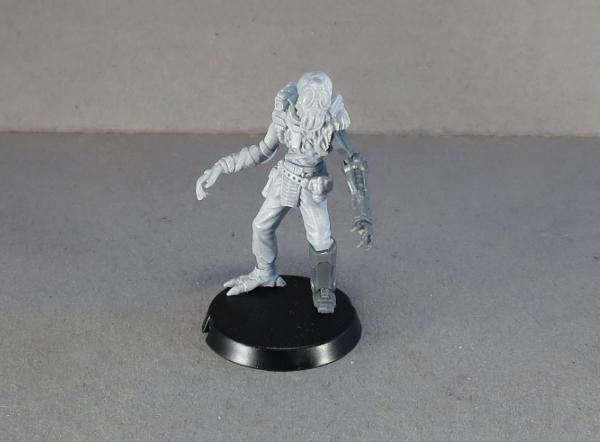
Finally, bionic limbs are a common feature amongst the Broken. While these have no specific in-game effect, they're a great way to add some character to your models. Here, I have replaced the Hypnotist's lower leg and left arm with parts taken from an Epirian Scarecrow bot.
What have you done with your Hypnotists? We would love to see your creations on the Comm Guild Facebook page!
To pick up the Marsayan Hypnotist, or any of the rest of the Maelstrom's Edge model range, visit the webstore here.
For other Maelstrom's Edge modeling articles, including tutorials and walkthroughs of a wide range of different building and miniature projects, check out the article roundup here.
New Broken alien - The Marsayan Hypnotist is available now!
Posted on Saturday Mar 31, 2018 at 04:58am in The Broken
The Marsayan Hypnotist is the next resin release for the Broken faction in Maelstrom's Edge. The first 'Add-On' unit type available for the Broken, the Marsayan Hypnotist can be added to different Broken squads to help protect them from enemy fire, as detailed on the model's profile card in the online unit card section of the Maelstrom's Edge website.
Marsays are not naturally gifted fighters, nor are they a particularly good shot. With their long limbs, clumsy gait and large bulbous eyes, Marsays don't seem a threat. Disguised behind those eyes, however, is their remarkable ability to influence the mind of others. This is a slumbering ability that most Marsay cannot consciously steer, only presenting itself when the Marsay is angry or fearful. There are some, however, who can exercise this power at will, giving them frightening control over those around them. At a distance, a Marsay can subtly suggest to the enemy to perhaps choose a different target to fire at. Up close, they can create much more intense hallucinations or make an opponent become violently ill.
There are rumours that a great Marsayan empire existed, comprising dozens of worlds, stretched across multiple systems. Driven by the most influential telepaths, the Marsayan Empire was thought to be deeply unequal and aggressive towards other cultures. Neighbouring human worlds, either threatened or jealous of the Marsayan abilities, banded together to attack, and most of the Empire was exterminated. The surviving Marsays fled their home worlds and learned to hide amongst human populations. All official records of the Marsayan civilization were wiped out by the arrival of the Maelstrom. Today, Marsays are mostly black market merchants by trade. Common sights in bazaars across the Arm, they are respected for their business acumen and the quality of their wares. Marsayan Ranja is an especially popular liqueur. Equally well known, however, is the Marsayan Swindle. Many an unsuspecting buyer at a Marsay market stall has suddenly felt a little nauseous and returned home with a purchase they can't quite explain.
Marsays still hold a deep fear of being imprisoned or killed for their gifts, and deny or downplay their telepathic potency. This fear of human government drives them to hide amongst the shadows of society, and even with the approach of the Maelstrom few are willing to risk being caught influencing their way onto an evacuation ship. Marsays are naturally drawn to Broken Freeports, where humans and xenos peacefully intermingle away from the sight of authoritarian government. Marsays often join Broken fighting forces to procure plundered goods they can later trade on the black market, and it is on the battlefield that their hidden talent for manipulation is often revealed. Marsayan hypnotists are valued on Broken patrols, as they can silently neutralize threats and do not care for even the thickest armour. Whilst these slight, frail creatures are not physically imposing, when they delve into the minds of their enemies, they can make the most hardened warrior flee in terror.
Pick up your Marsayan Hypnotist from the Maelstrom's Edge webstore here!
Painting Tutorial: Sponge Weathering
Posted on Sunday Mar 25, 2018 at 05:00pm in Tutorials
- by Iain Wilson
We can wind up spending a lot of time painting miniatures for our games, so it can often be tempting when it comes time to paint terrain to just slap on a quick coat of spray and call the job a good'un. There are a number of quick and easy ways to add a little more detail (and subsequent awesomeness) to your terrain, though, and the difference it makes on the visual impact during your games is well worth making that little bit of extra effort. With that in mind, I would like to share a simple sponge method for adding chips and weathering to your building paintwork.
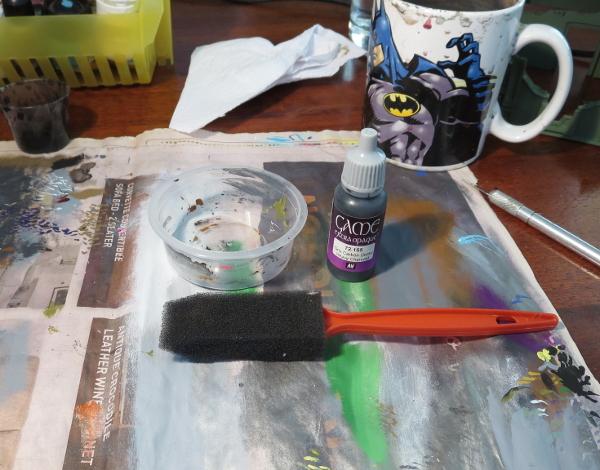
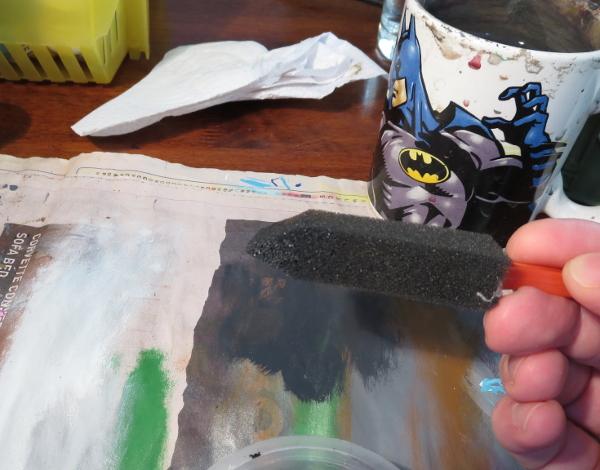
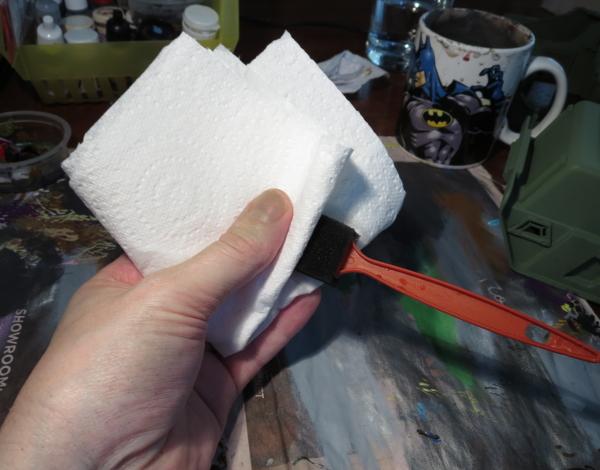
You will need a craft sponge - something fairly soft and fine-weave. I like to use a painting sponge like the one pictured below, as the pointed tip helps to get into difficult corners where necessary. You will also need something to put some paint in or on, some newspaper or paper towel, and (obviously) some paint. This method looks best when applied as dark chipping over a lighter shade of paint. I tend to use Vallejo Heavy Charcoal as a bit of a catch-all. It's darker than most of the colours I use on my buildings, and is indeterminate enough to cover for cement or aged metal. I avoid metallic paints for this sort of weathering, as they can look a little weird unless they catch the light just right. If you want some metalic touches, you can always use a dark grey and then highlight the bigger patches of chipping with a little metal colour.
The weathering is applied once you have the basic colour and any higlighting done on your building, and the process is really simple - Drop out some paint onto whatever palette you are using and dip the tip of your sponge in the paint.
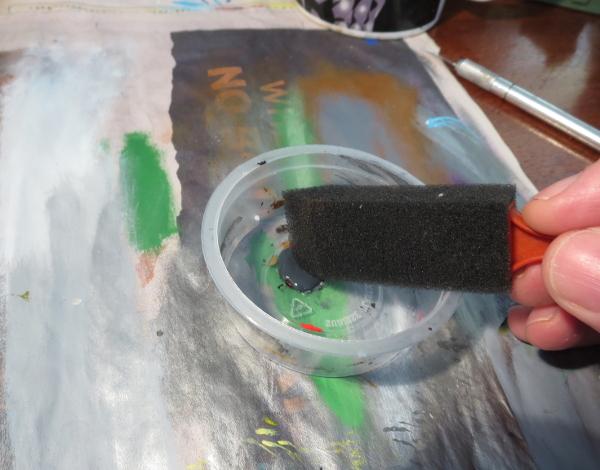
Rub the sponge on the paper to remove any excess paint. You want the sponge to be wet, but not have any gloopy patches of paint. If in doubt, press the sponge against a clean section of the paper and check the result - you're aiming for small specks of colour, not big blobs.
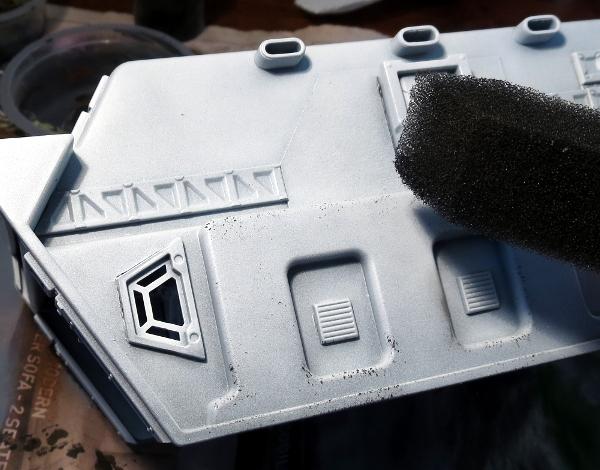
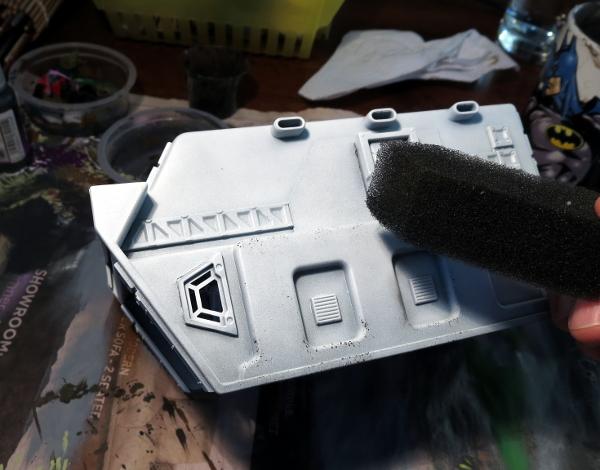
Press the sponge onto your terrain, using a straight up and down motion. You want to dab the paint on, not brush it. Experiment with turning the sponge different ways and using different amounts of pressure to vary the way the chipping is applied, reapplying paint to the sponge as necessary. Apply heavier weathering to places on the terrain that would naturally get knocked or abraded more, like protruding corners of walls or the edges of doors and windows.
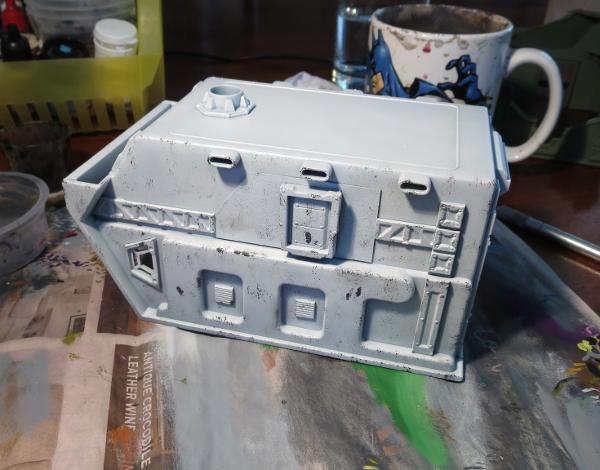
Keep going until you have worked over the whole building.
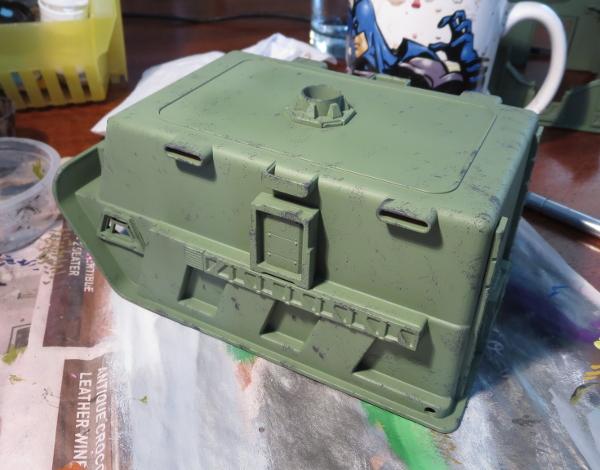
Here's the same thing on a green building.
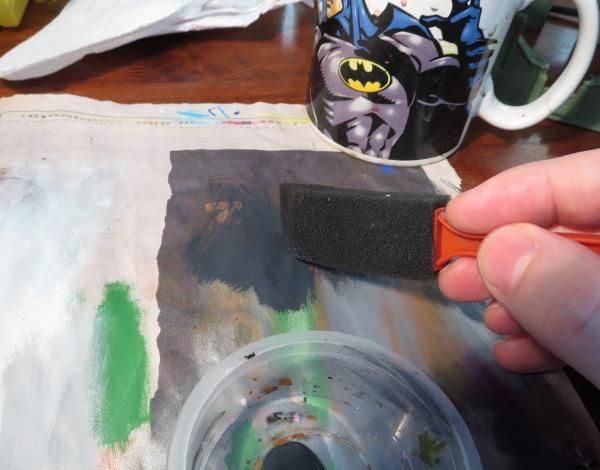
If the sponge starts to get tacky with drying paint, you can wash it out, squeeze out as much water as you can, and then squeeze it between a couple of sheets of paper towel to get it as dry as possible before going back to the paint.
Once you're happy with your chipping, you can add other details or weathering as required. A strategic drybrush of brown in high-traffic areas, or just here and there for a bit of added grime, can go a long way to complete the weathered look.
Here's some finished examples of the technique in action:
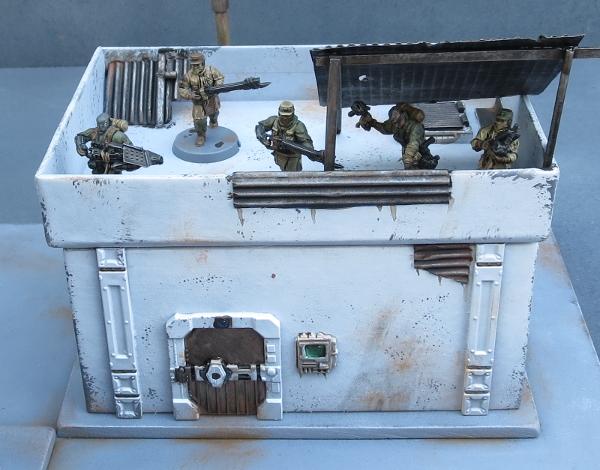
Broken Settlement building (Tutorial)
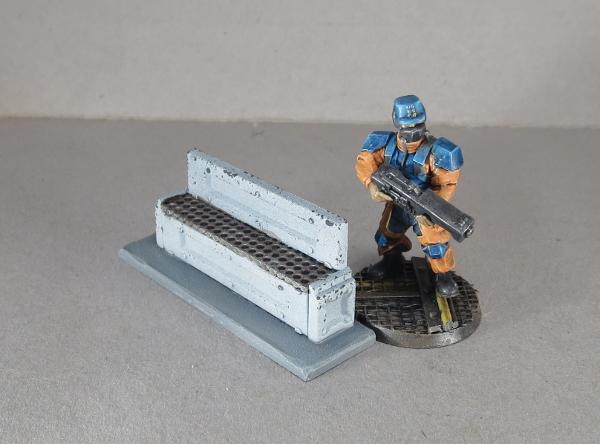
Park Bench (Tutorial)
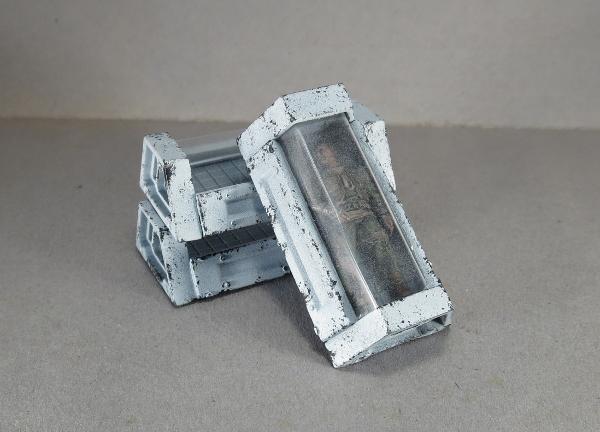
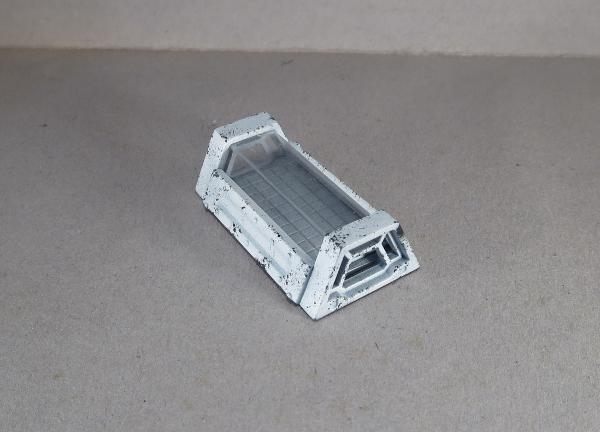
Sleeper Caskets (Tutorial)
Hab Dome (Tutorial)

You can find the Maelstrom's Edge terrain sprue along with the rest of the game range in the webstore here. As always, we would love to see your creations on the Comm Guild Facebook page!
For other Maelstrom's Edge modeling articles, including tutorials and walkthroughs of a wide range of different building and miniature projects, check out the article roundup here.
Terrain Tutorial: Scatter Terrain 2 - Urban Details
Posted on Monday Mar 19, 2018 at 05:00pm in Tutorials
- by Iain Wilson
Cities are more than just a collection of buildings. There are a whole host of other little details, many of which we don't even notice because we're so used to them being there, that fill in that urban sprawl. Streetlights, hedges, park benches, statues, gardens, all go towards making a city look lived in and give it character. And yet these things are so often overlooked when we put together gaming terrain. So many urban tables are just a random collection of buildings in various levels of disrepair, which may look good, but are missing those crucial details that make them look right.
I've covered how to make some of the above mentioned details in previous articles, but this week I thought I would run through a few more, using components from the Maelstrom's Edge terrain sprue, and a few assorted odds and ends.

To start things rolling - Park Benches
The bulk of the bench is made up using the long segments from three support struts, and two of the short segments. Use a sharp hobby knife to cut through the struts on either end of the long, middle sections, and cut away the two short segments leaving the rivet strip on one side.

Two of the long strips and the two short segments make up the base of the bench. Glue these together as below using plastic cement.

For the seat, I have used a piece of embroidery mesh (which you should be able to find at a craft store or haberdashery), although you could choose to use plasticard or cardboard instead. I cut the mesh to fit over the top of the bench base, fitting inside the river strips on the tops of either end.

The mesh was glued in place using an 'all-plastics' glue, or a superglue with a plastic primer - just using plain superglue can work, but because the mesh is a rather rubbery plastic it sometimes doesn't hold the glue well without the extra help. On top of the mesh, I glued the third strut section, level with one long edge of the base.
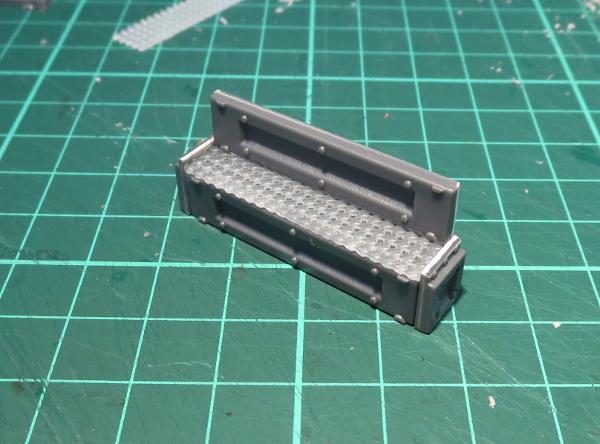
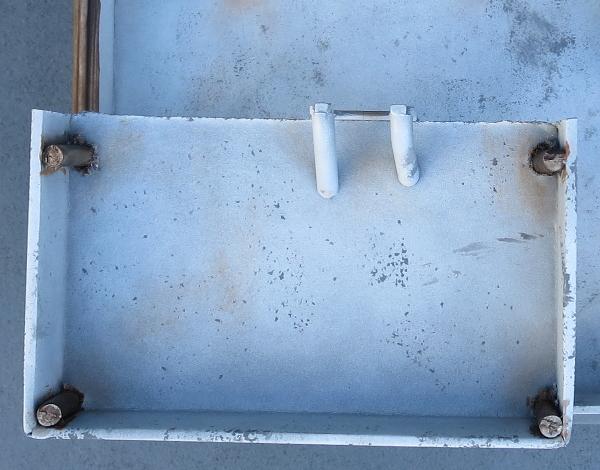
While this comes out just about spot-on for size compared to a 28mm miniature, terrain features often look a little undersized due to the visual discrepancy created by the model's base making it look taller than it actually is. To help mitigate that, I glue a rectangle of 2mm plasticard under the bench to lift it off the ground a bit, which creates a similar illusion of extra height without actually having to make the bench over-sized.

Add a little paint, and the bench is ready to go on the table.
Next up - Let's inject a little art into the scene!
In my first scatter terrain article, I made an orb that I pictured as some sort of holgraphic map tank. I borrowed the same design to make a sculpture using an old rubber ball that I dug up out of the back yard.
The base for the bauble is simply the large pipe fitting from the terrain sprue, glued on top of the square hatch.


On top of that, you can stick a marble, as with my original orb, or any other round-ish thing that strikes your fancy -
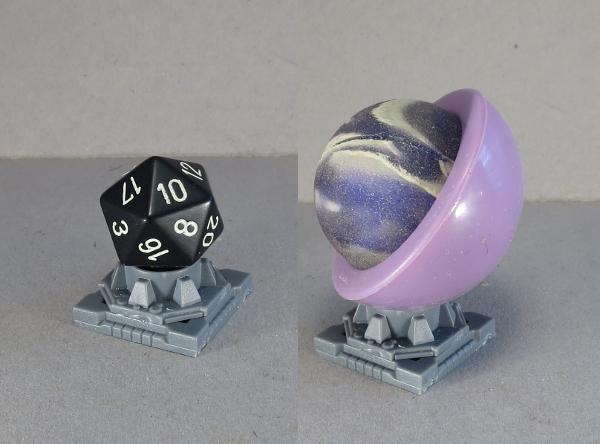
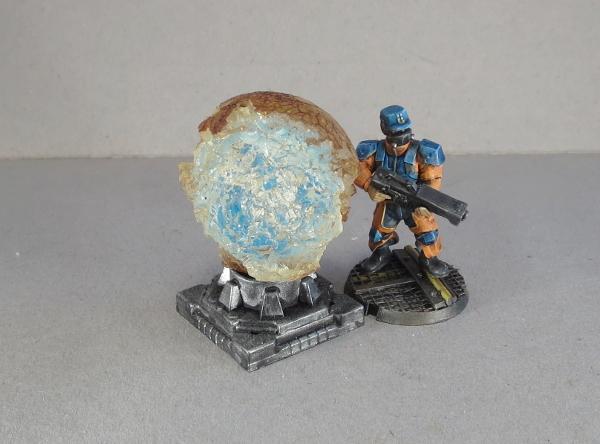
In this case, though, as mentioned, I used a battered old rubber ball. The outside of the ball when I found it was cracked and dirty, and chipped away over much of the ball, leaving a semi-transparent, crystaline shape with a dark crust around it and a blue glow in the middle when the light hits it just right. It was too interesting a shape to not do something with it, and so I promptly glued it onto the pipe fitting base with some all-plastics glue.
Moving right along - let's add some greenery!
If you paint a lot, sooner or later you wind up with empty paint bottles. I found myself looking at my collection of empty dropper bottles and thinking that the lids were just asking to be turned into something. So I took a lid, washed it out, and cut a small pipe fitting from the terrain sprue.

The tip of the lid turned out to be exactly the same diameter as the outside of the hole in the pipe fitting (ie: just a bit bigger than I wanted it to be!) so I scored a line around the top about 1.5mm from the end, and used a hobby knife and a file to narrow down the end to that line.


I used an all-plastics glue to glue the reduced lid tip into the pipe fitting. As with the embroidery mesh used on the park bench, superglue alone isn't likely to bond as well with the lid, so the all plastic glue or a primered superglue is a better option.

I filled the inside of the lid with some 'green stuff' putty, and added a fern made from the leaves of a really dodgy-looking palm tree that came with a set of dinosaur toys bought for my daughter (It's ok, she said I could have it). A quick lick of paint, and the planter is ready for action.

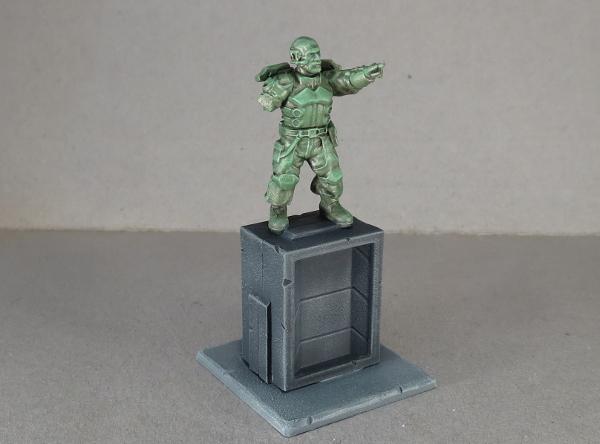
Finally, what sort of city doesn't have statues scattered around to remind people to feel all embiggened?
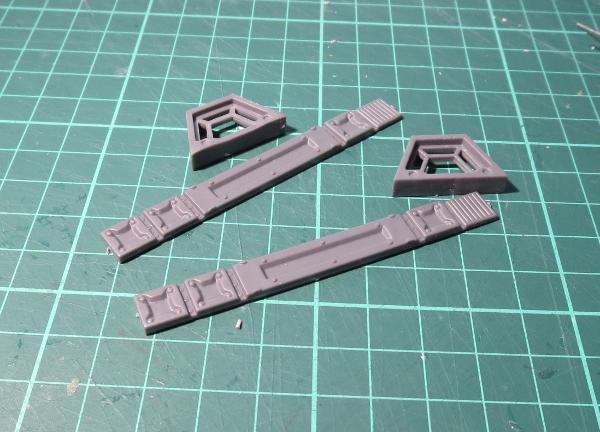
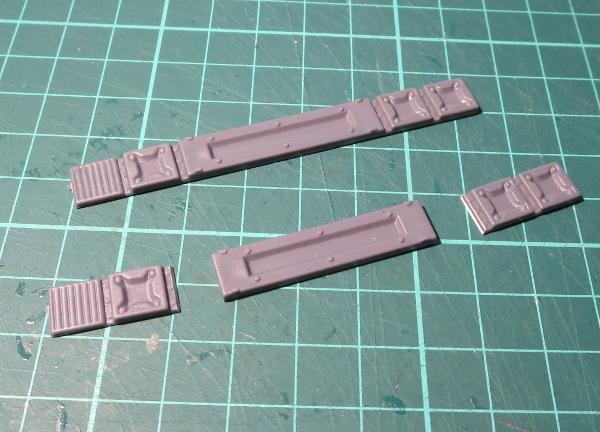
For a quick and easy statue plinth, I took two shutter windows from the terrain sprue, trimmed off the two protruding parts of the frame on the ends and the rivets on the front surface.
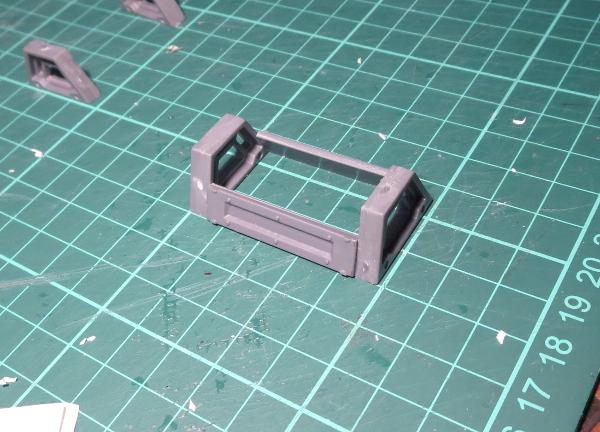
The two windows were then glued together face-to-face, using plastic cement.

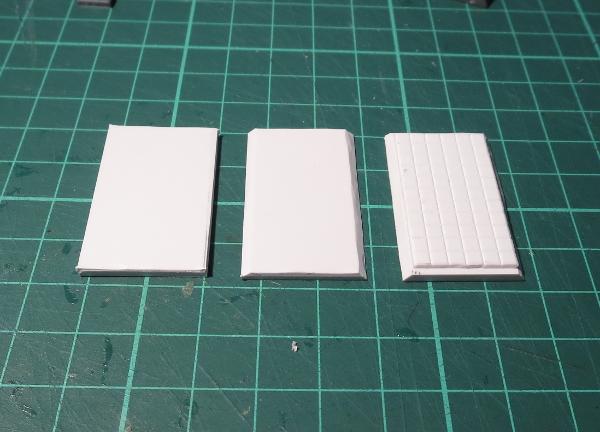
I added a statue assembled from some leftover parts scavenged from the Epirian Bot Handler and Broken Rabble sprues, and a base of 2mm plasticard for stability.

Some paint and weathering, and he was looking suitably statuesque, ready to inspire the city's defenders or enrage the rampaging invaders.
All of the above can be easily modified to suit your own table. You can use the individual pieces as scatter terrain, or glue them to building bases to add extra detail without having loose little terrain bits floating around. Be sure to also check out my first scatter terrain article, and also my tutorials on hedges and street lights

Want to share your terrain collection? We would love to see your creations on the Comm Guild Facebook page!
To pick up the Maelstrom's Edge terrain sprue, or any of the rest of the Maelstrom's Edge model range, visit the webstore here.
For other Maelstrom's Edge modeling articles, including tutorials and walkthroughs of a wide range of different building and miniature projects, check out the article roundup here.
Modeling Spotlight: Epirian Light Carrier Drone
Posted on Monday Mar 12, 2018 at 05:00pm in Tutorials
- by Iain Wilson
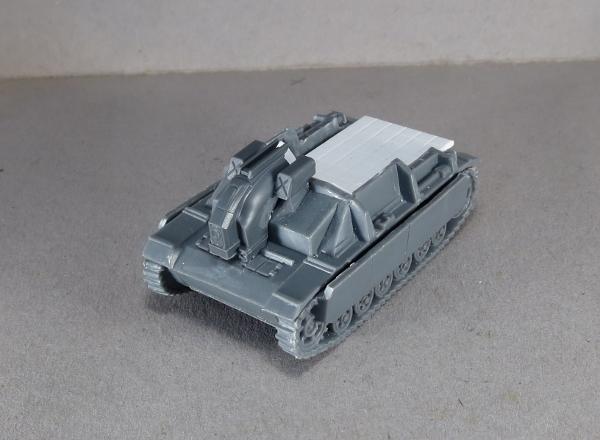
A few weeks ago, I published a spotlight article on the Epirian Drone, showing a few different ways the kit can be assembled or converted. One of the conversions shown was a Light Carrier Drone, made up from a drone chassis and the hull of a 15mm plastic tank from Flames of War, that I think came out of an Adepticon swag bag. This week, I'm going to run through how it was made, using the tank (I think it's some kind of Stug, but I'm no tank expert and so it didn't really matter beyond looking perfect for what I wanted to do) and the chassis piece from an Epirian Drone.
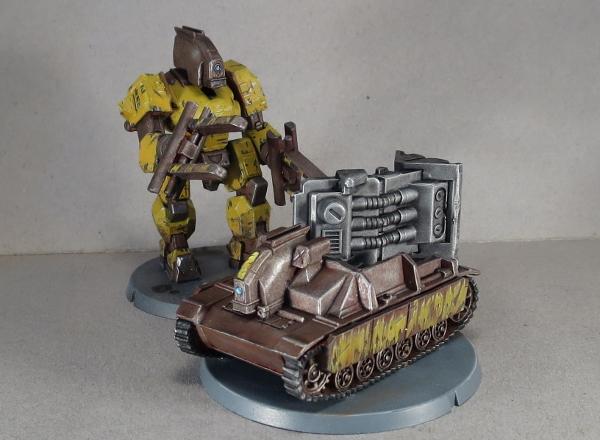
Like the bipedal 'Mule' cargo drone shown above (for which you can find an assembly article here) there are no rules for using this drone in the game - it will most likely just be used to add some flavour to the table. But I find that sometimes venturing off the beaten track and building something different just for the fun of it can really help to keep the creative juices churning over.
SO, I started by grabbing the main assembly parts of the tank - top and bottom of the hull, and the two track pieces.
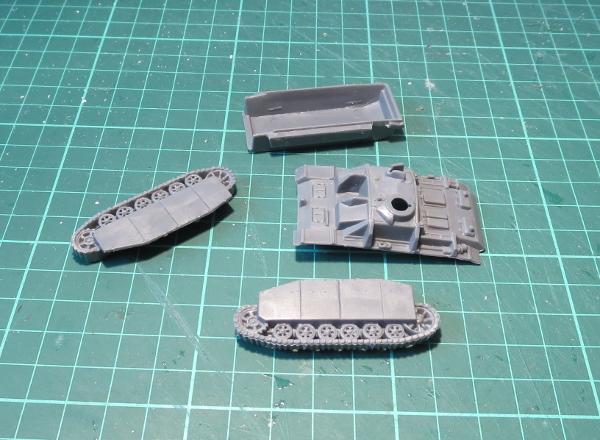
I used a razor saw to cut most of the top of the hull away, leaving just the gun mount and the front armour.
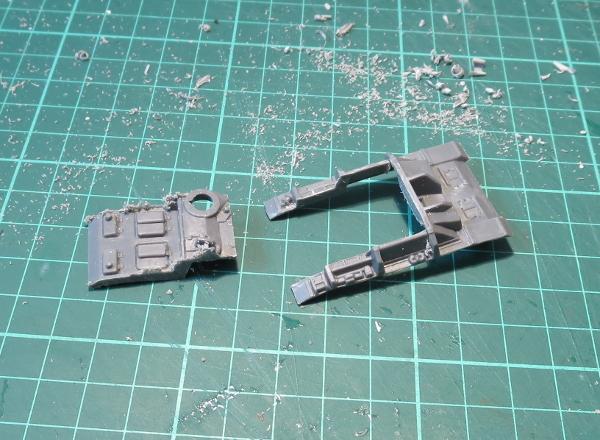
The tracks had some armour plating that extended up over the sides of the tank. I wanted these to be a little more low-profile, so I sawed them off level with the track guards.
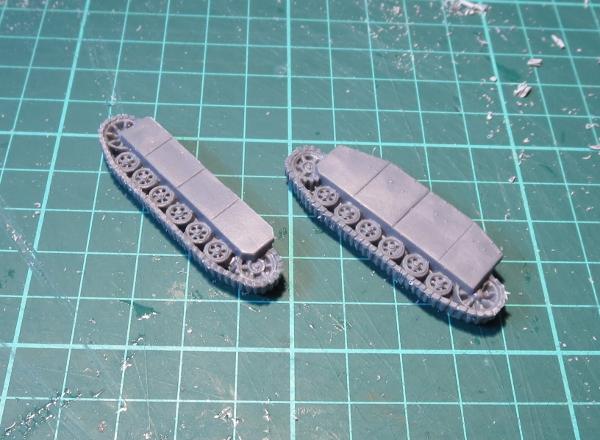
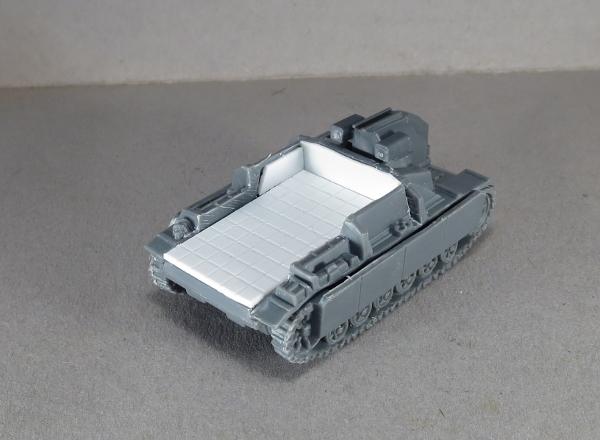
Then I assembled the hull and tracks as per normal, just with a newly-formed great, gaping hole in the rear.
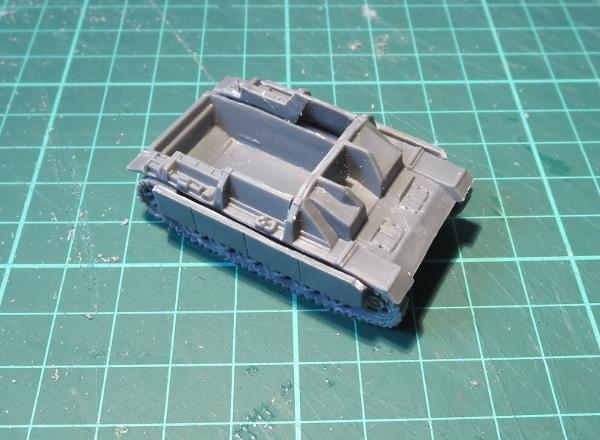
With a slight bevel added to the underside, the drone chassis slotted nicely into the gun mount.
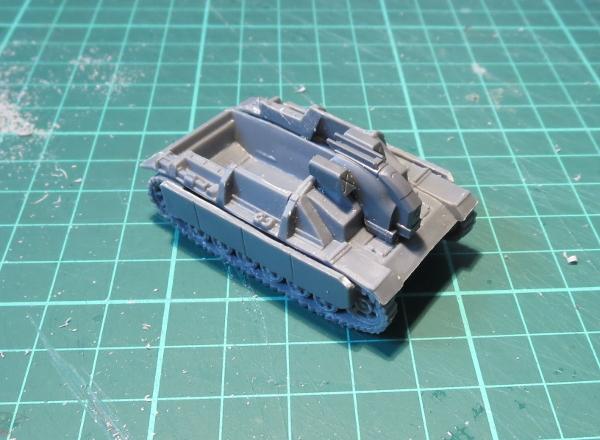
Finally, I filled in the back with some plasticard to create a cargo deck.
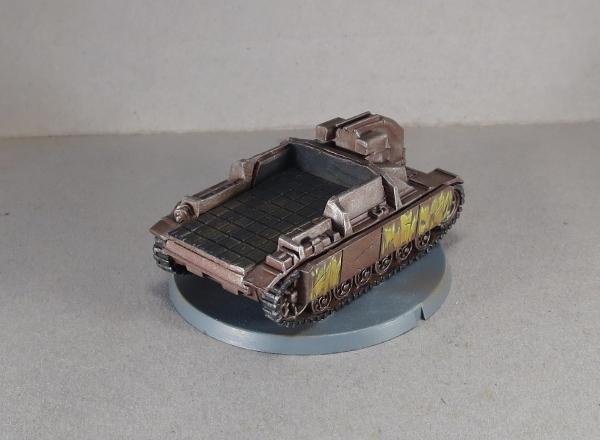
To paint it up, I turned once more to the technique shown in my weathered metal tutorial. I kept the palette fairly limited, to emphasise the bare-bones industrial nature of this machine, and made the yellow panels on the sides worn and battered to show a history of hard use.

What have you done with your Drones? We would love to see your creations on the Comm Guild Facebook page!
To pick up the Drone kit, or any of the rest of the Maelstrom's Edge model range, visit the webstore here.
For other Maelstrom's Edge modeling articles, including tutorials and walkthroughs of a wide range of different building and miniature projects, check out the article roundup here.
Tags: conversion drone epirian modeling robot spotlight tutorial walkthrough
Terrain Tutorial: Sleeper Caskets
Posted on Monday Mar 05, 2018 at 05:00pm in Tutorials
- by Iain Wilson
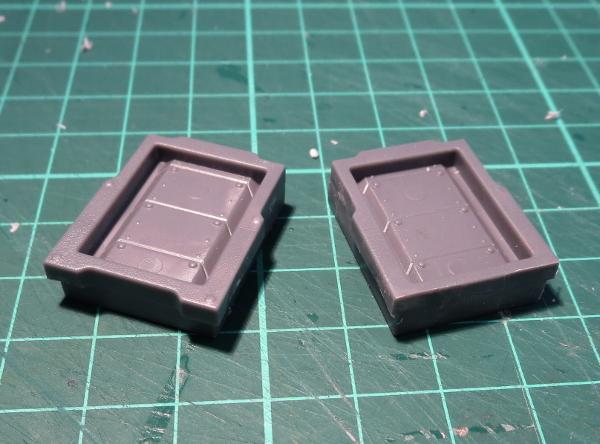
As entire planetary populations attempt to flee the destructive advance of the Maelstrom, many ships pressed into service as evacuation vehicles that not equipped with the facilities to carry large numbers of living, breathing passengers any distance. The obvious answer, where such technology is available, is to put at least some of the passengers into hibernation in sleeper caskets. This solution is not without its risks, however, as poorly maintained and over-used caskets may fail in transit, causing the interned to either wake up early or not at all. And, of course, in systems where the demand is high, the casket can easily wind up being worth more than the poor soul inside, resulting in unscrupulous captains selling off full caskets to equally morally-questionable Edge-dwellers. These new owners will either use the caskets themselves or sell them on at an even higher mark-up, sometimes back to the former occupant.
I hit on the idea of making sleeper caskets from the Maelstrom's Edge terrain sprue a while back, for use as scatter terrain or as part of a larger terrain project, and I was keen to give it a go. This relatively easy build uses a few components from the terrain sprue, some plasticard, and some clear plastic. Read on to find out how it's done.
To start, take the two trapezoid windows and two reinforcing struts from the Maelstrom's Edge terrain sprue.
You only need the long middle section of the strut, so use clippers or a hobby knife to cut through the rivet sections on either side.
Using plastic cement, glue the ends of the strut section to the trapezoid window frames as below. The inside surface strut should be flush with the inside edge of frame, so that the 'glass' top will sit neatly inside.
While the glue is setting, cut a rectangle of 2mm plasticard to fit inside the bottom. Bevel off the long edges so that they sit neatly against the inside surface of the struts. You can also add a layer of textured plasticard on top to provide a little surface detail to the inside of the casket.
If you're intending to use sprays or an airbrush to paint the casket, now is a good time to stop and do that. If you're brush-painting and think your hands are steady enough to not get paint over the 'glass' then you can easily leave painting until the end, although it may still be easier to do it now, particularly if you want to paint the inside - I've just left mine grey to provide some contrast against the white exterior.
When you're ready to proceed, take some transparent plasticard or other thin, clear plastic (blister pack plastic would probably work fairly well) and cut a 30mm wide rectangle that is just a fraction longer than the strut pieces. You want just enough overlap to glue (half to 1mm on either end) - if you make it too long, you'll have trouble getting it into the casket.
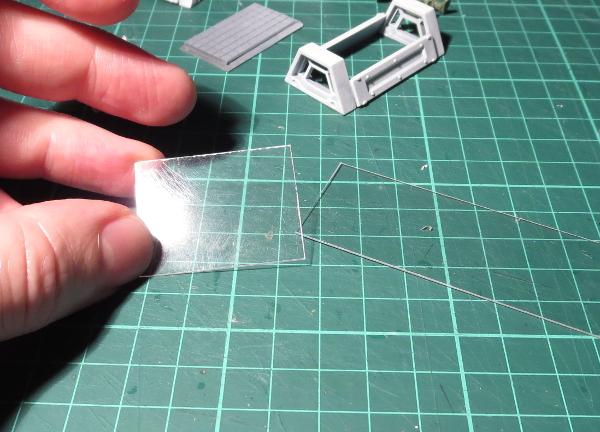
Use a ruler or other straight edge to fold two 10mm strips lengthwise down the plasticard, leaving another 10mm in the middle.

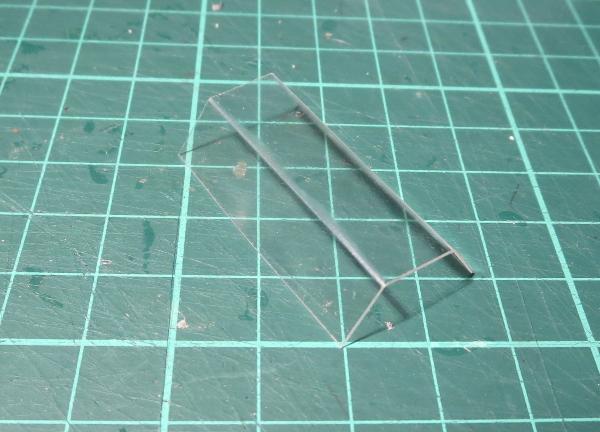
You can also cut pieces of plasticard to fit inside the trapezoid windows, to close in the ends of the casket. If you're not too finicky about details, you can leave this step out - the missing glass won't be too noticeable on the ends.
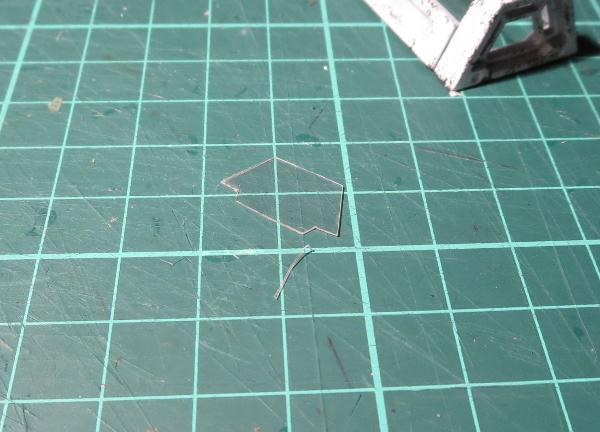
From there, wiggle the top glass into the casket (it may take some squeezing and a curse or two to go in) and glue it into either end. Add any final painting detail, and glue in the bottom.
Note - as an alternative to the above, back during your initial assembly you can just glue the struts to one of the windows and glue that assembly down to the back plate, and then glue the other window in place once the 'glass' is in.
To add a little extra detail to your casket, plastic models can be easily repositioned to fit inside the casket. The 'glass' can also be given a very light frosting of white spray, for a frozen look.
You can use stacks of caskets as line-of-sight blocking scatter terrain...

...although individual caskets will also make handy objective markers.

Of course, now that I've made up a bunch of caskets, at some point I need to make whatever might have been carrying them... Stay tuned!
To make your own sleeper caskets, you can pick up the terrain sprue along with the rest of the Maelstrom's Edge model range from the webstore here. As always, be sure to share your creations on the Comm Guild Facebook page!
For other Maelstrom's Edge modeling articles, including tutorials and walkthroughs of a wide range of different building and miniature projects, check out the article roundup here.
Tags: modeling terrain terrainsprue tutorial
Magnetizing Karist Heavy Weapon troopers
Posted on Wednesday Feb 28, 2018 at 05:00pm in Tutorials
Originally posted on Dakkadakka by Sgt.Oddball.
Hey all,
When you buy Karist Heavy Weapon troopers, you get two guys a pack, with a selection of 3 weapons. I want to be able to use all the weapon types, but I dón't want to paint three guys just so I can use any of the three weapon types (my chosen way of painting Karists is slow...). Magnets are the answer. Luckily, these guys are quite simple to magnetize. Here's how:

What you get in a pack. I love these sculpts and the model quality is fantastic. Very crisp.

Long thin resin bits can end up bent.

This is easy and quick to fix: dip in hot water, straighten, dip in cold water.

All the bits for one guy, without the ammo I forgot at this point.
I drilled a 3mm hole in the torso. The sculpt is such that you know exactly where to drill. If you go too deep you may end up making a hole on the other end where the head goes. You won't see this with the head in place.

In the hole goes a 3x2mm magnet. Try to match the amount which the magnet sticks out to the amount the original resin stuck out. If you want to use the left arm that holds the gun, it's critical that the magnet doesn't stick out too much, or you won't be able to line up the gun with the left arm.

Then put a magnet in the gun arm in the same way. The sculpt shows you where to drill. Don't drill too deep or you'll go out the shoulder guard. Also, if you lay the arm down like this and then press down hard with your drill, you could deform the shoulder guard a little.

As with the torso, you want the magnet to stick out as much as the resin did, or else your left arm won't line up. It's not just the amount by which the magnet sticks out, but also the angle. It's better to have the magnet in a little too deep: it'll still catch and your alignment will work. Of course, if you just use the left arm that holds the ammo, alignment isn't a problem. Easiest way to get it right is to have the left arm glued in place and then dry-fit.

The other guns get the same treatment. Beware of polarity ;)

Here's the missing ammo, which I glued to his belt. Also, you can see the torso and arm line up nicely on the rear.

Front alignment also works out with the left arm in place.
Ravager gun works too.
As does the grenade launcher.
Four guys with interchangeable weapons.
Once I paint these, they'll show up in my 'painted stuff' topic on Dakka :)
Tags: assembly heavy karist modeling trooper tutorial walkthrough
Modeling Spotlight: Assembling the Broken Sig Jammer
Posted on Monday Feb 26, 2018 at 05:00pm in Tutorials
- by Iain Wilson
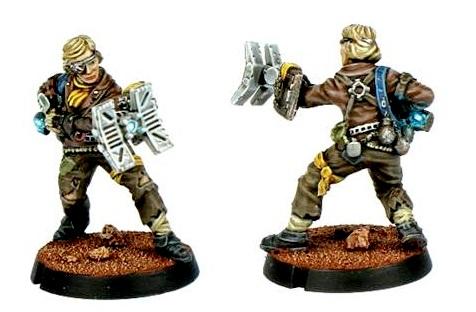
The Broken Sig Jammer adds some elite tech skill to the Broken faction, taking to the field with Tech Disruptor and Targeting Scrambler in hand to make life awkward for oppressors and invaders alike. This week, we're having a closer look at this fantastic resin model.

The ramshackle fleets of the Broken don't possess extensive R&D departments or mass production facilities, but what they lack in investment, they make up for in unregulated ingenuity and daring invention. The Broken is a haven for technological savants and rebellious hackers, rulebreakers ostracised and hunted by a society scared of their technological prowess. Whether driven to the Broken by the Maelstrom or the authorities, these maverick inventors are encouraged to experiment and tinker. These 'Jammers' soon thrive among the Broken ranks, using their skills to break into computer networks, disrupt signals, and generally set technology against their users. It is a rare mercurial talent to be able to invent the kind of disruptive equipment the Jammers carry, and sending a Jammer Savant deep into enemy territory is not a viable strategy. Instead, Broken leadership encourages anyone with a natural aptitude for technology to become an apprentice, or 'Sig Jammer'. In peacetime, these neophytes are a mixture of servant and apprentice, taking care of a Savant's every need, or searching for the particular parts needed to complete the Savant's latest technological masterpiece.
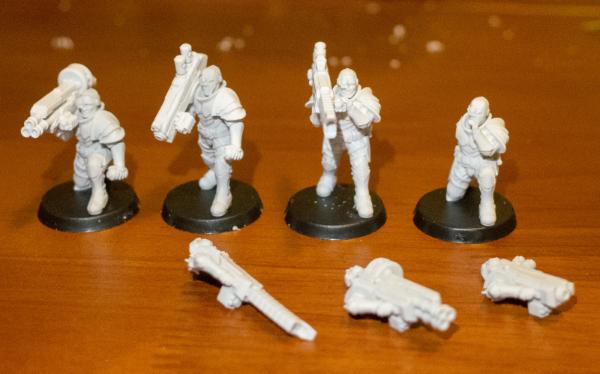
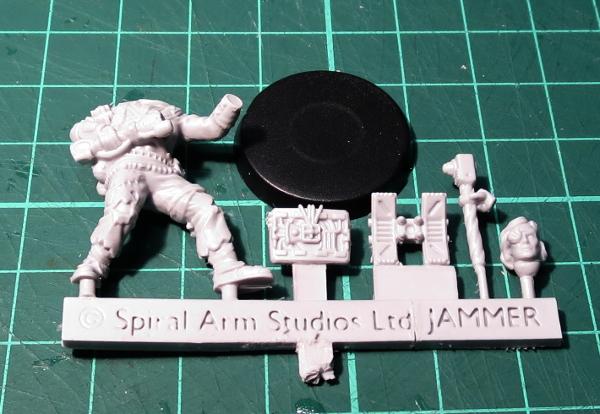
The Sig Jammer model comes in 5 parts - body, head, Targeting Scrambler and the shaft and emitter for the Tech Disruptor.
Assembly is nice and easy, although if you haven't built resin models before you might want to check out my handy guide to working with resin.
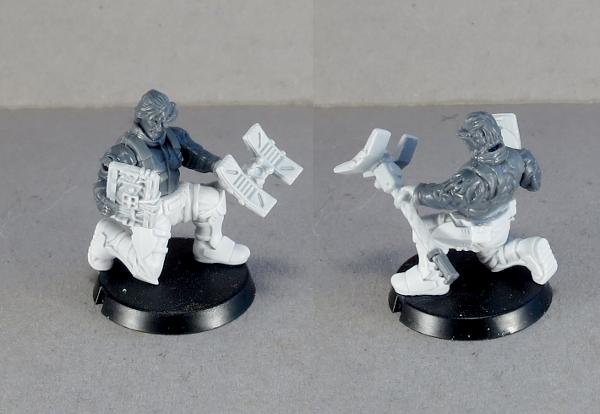
The emitter piece for the Tech Disruptor glues neatly on the end of the shaft with a locator socket to seat it firmly in place. The bottom end of the shaft then glues into the haft, and the left hand joins to the extended arm. It's worth dry-fitting the disruptor before you try to glue it in place, just in case the arm isn't sitting quite right - if the disruptor doesn't fit neatly in place, check out the "Nothing to get bent out of shape about..." section in the article linked above.

The Targeting Scrambler is designed to glue onto the model's left forearm, but goes quite neatly on either shoulder, on the model's leg, or even on the back.

Finally, the head sockets into the torso, with the ball joint allowing for a wide range of movement.

The head is compatible with the rest of the Broken range, so you can easily mix up your Jammers a little by using any of the plastic heads from the Broken Infantry Pack.

You can vary the posing a little with the addition of some other parts of the Broken infantry sprue as well. The model below has the Scrambler attached to the haft of the Distruptor, and an aerial-style Disruptor made using part of an EMP harpoon and a left hand from the infantry sprue.

In keeping with the scavenging nature of the Broken, you can also mix-and-match parts from the other factions. The below model has legs from a Karist Heavy Weapon trooper and the torso from an Epirian Contractor, with arms and head from the Broken Infantry Pack.
With a little creative trimming and chopping, the Jammer model also makes a great fire support team member. Here, I have used the front half of a Longbeam Rifle in place of the Disruptor.
Do you have a Sig Jammer model to show off? Need help with assembly, painting or gaming? Pop along to the Comm Guild Facebook page and share your work!
To pick up the Sig Jammer or any of the rest of the Maelstrom's Edge model range, visit the webstore here.
For other Maelstrom's Edge modeling articles, including tutorials and walkthroughs of a wide range of different building and miniature projects, check out the article roundup here.
