Maelstrom's Edge V2 Beta Rules released!
Posted on Monday Dec 20, 2021 at 06:00pm in Gaming
If you’re a big fan of the v1 rules, then you’ll be pleased to know that the core pillars that comprise Maelstrom’s Edge are not only still there, but have been strengthened. It’s still an alternating activation, squad-based “skirmish” game (aka focused on small squads of 1-6 models) that features 6-sided dice (D6), multi-tiered mission objectives, a suppression mechanic, the ability to bring back destroyed units as reinforcements and a regenerating command point system that can be used for a variety of tactical functions.
If, on the other hand, you’re someone that liked the overall concept of the original Maelstrom’s Edge rules, but you thought that the rules were a little too fiddly, then we also have great news for you! The v2 rules have been totally re-written and highly streamlined: they are a good 30% shorter than the v1 rules as a result. While the v2 rules are undeniably simpler, they’ve also gotten more complex where it counts: giving you tons of new tactical decisions to make with your units during the game. On top of that, the dice rolling “engine” now feels really fresh: each round of shooting keeps both players involved rolling dice and utilizes a “dice flip” mechanic that adds an element of bad luck protection right into the core of the game.
Let’s run through some highlights of the major v2 changes:
SIMPLIFIED UNIT ACTIONS
The largest change in v2 is how unit actions work. The activation test is gone and a unit can now perform up to 3 actions, selected from: movement actions (Move, Dash, Charge), status actions (Aim, On the Move, Take Cover) and shooting actions (Fire, Suppressive Fire, CQ Fighting). While there are some additional caveats to this system (a unit can perform a maximum of only 1 movement and 1 shooting action per activation, for example), we’ve found during playtesting that by splitting the action rules into these smaller “bite-sized” chunks, it makes the whole system much easier to remember. In addition, decoupling movement, shooting and status rules from each other now gives players several new combinations of what to do with their units when they activate them.
SUPPRESSION THAT MATTERS
In v2, suppression is both much simplified and also a whole heck of a lot more deadly. Instead of utilizing tons of suppression tokens, each unit only has 6 suppression levels (which can be conveniently tracked with a D6 next to the unit). Not only does suppression still degrade a unit’s shooting and their ability to benefit from cover, but each time a unit already at max suppression is called upon to raise their suppression level again, one model in the unit instead suffers an injury (which is fatal for most standard infantry in the game). This means it is now entirely possible to ”suppress” an enemy unit to death, representing them fleeing from the battlefield due to the hail of firepower coming their way. This makes the new Suppressive Fire action (which trades-in a shooting unit’s ability to cause damage for a boosted ability to cause suppression) a deadly tool in certain situations.
A NEW DICE ENGINE
The new dice rolling engine in v2 is quite unique, but still based exclusively on 6-sided dice that most players prefer. It is both simple enough to quickly understand, yet nuanced enough to offer: built-in bad luck protection, having both players involved with each round of shooting and tactical player choice within the dice rolling process. Most importantly, when units shoot at each other, the amount of damage they cause now just feels right.
So how does the new system work? As a firing player, all you have to do is look to equal or beat the target’s Evasion characteristic (EVS) with your D6 rolls. For example, if the target has an EVS 4 (the standard EVS of most infantry units), you’d need results of 4-6 to successfully hit them. In addition, as the firing player you get to influence these results by making a number of “dice flips” (changing the result of rolls in your favor) up to the Skill characteristic (SKL) of your firing unit. For example, if your firing unit was SKL 3, you could add +3 to a single roll, +1 to 3 different rolls, or anywhere else in between. Where things really get interesting is that results of ‘1’ and ‘6’ are “critical” results. A “critical hit” (a hit roll result of ‘6’) provides that shot with extra lethality. But it also takes 2 dice flips to change a non-critical result into a critical result (a ‘5’ result into a ‘6’). This means sometimes you have to decide whether using 2 dice flips to change a single ‘5’ result into a critical hit will be more beneficial than just using those same dice flips to score two more standard hits.
And of course, once the firing player has determined how many hits they’ve scored on the target, the defending player gets to make an armor roll against each hit, looking to equal or exceed the Penetration characteristic (PEN) of the firing weapon. Similarly, the defending player gets to influence the results of these rolls with a number of dice flips equal to the Armor characteristic (AV) of their models.
FEWER SPECIAL RULES
With v2, we’ve realized that adding back a few more characteristics to the model/weapon profile means a big reduction in the amount of special abilities in the game. Plus, the abilities we have kept have been greatly simplified, all with the end goal of making each unit’s full rules (including all the text for their unit and weapon abilities) fit onto just a single page.
Here’s a quick rundown of the “new” model & weapon characteristics in v2:
- The model profile has lost its Mass characteristic (MAS), but has gained the Close Quarters Attacks characteristic (CQA) instead, rectifying the biggest point of negative feedback we got about the v1 rules: the much maligned ‘formula’ that was necessary to determine how many melee shots a model was able to make.
- The weapon profile has gained a Suppression characteristic (SUP), which is utilized when the unit makes a Suppressive Fire action.
- The weapon profile has gained a Weapon Type characteristic (TYPE), which helps set apart the archetypal weapon rules (like “AoE”, “Heavy” or “Short Ranged”) from true weapon special abilities.

MORE LETHALITY
One goal of the v2 rules has been to improve the level of lethality in the game. Allowing massive amounts of suppression to inflict damage to a unit was a good first step, but the real key to this change has been the removal of the Mass characteristic (MAS) from the model profile. Now, each point of damage a model suffers just reduces their Fortitude (FOR) characteristic by 1 (and when a model reaches 0 FOR, it is a casualty). The vast majority of standard infantry models only have FOR 1, which means that any hit which gets through their armor will cause a casualty. While this doesn’t suddenly mean that models are now dying in droves in v2, we can safely say that you will notice and appreciate the increase in lethality in the game. You’ll definitely want to start using the reinforcement rules more often to bring back your destroyed units!
QUALITY OF LIFE IMPROVEMENTS
The v2 rules are chock full of little improvements that make the game feel way better overall. Here’s a taste of them:
- Command points no longer need to be allocated to command models. They just stay in your command point pool until you decide to use them.
- More command models have powerful abilities that cost command points to use, giving you further options for what to use your command points on (besides the mainstays of bringing back reinforcements and lowering suppression on your units). But don’t worry, we haven’t gone overboard and given every unit a Command Point based ability, these are still quite special.
- When moving your units, you now only have to bother measuring and moving the unit’s squad leader. The rest of the models are just placed in coherency (within 3” of the squad leader) after their squad leader has finished being moved. This dramatically speeds up the process of moving units.
- The v1 rules deliberately syphoned almost every non-damage effect down to just generating additional suppression, which made special abilities feel, well, not so special. With v2, we’ve expanded the range of what special abilities can do (and we’ll eventually be releasing a set of plastic tokens to help facilitate this). Be prepared to be able to set units on fire, slow them down, freeze them and confuse them, just to name a few options.
- To promote unit movement, defensive fire in v2 has been reduced to just protecting a unit from being charged or shot by a hit and run attack. This means units equipped with Short Ranged weaponry can finally shine, being able to run up to enemy units and blast them at point blank range without fear of being decimated first.
- The way mission objectives generate victory points (VPs) has been simplified, making it much easier to calculate how many VPs you’ve earned at the end of each turn. In addition, the margin you need to be ahead of your opponent to end the game immediately has been widened for all missions, now requiring a +5 VP margin. This gives a little more breathing room for close games to go the distance while still allowing for blowouts to end without one player having to bite the bullet and concede.
- There are now 18 types of mission objectives (up from 12) and 6 different deployment maps (up from 2). There are also now 12 competitive missions and 6 narrative missions included with the core rulebook (up from 6 & 0 respectively). All this means there is now a whole lot more mission variety in v2!
- There is a fun new objective marker placement rule forcing you to place objective markers in the opposing half of the table (and your opponent is bound by the same rule). This helps create tense, interesting games where both sides are fighting over objective markers clustered near the centerline of the table, as opposed to one player getting lucky and having one random objective marker near their deployment zone granting them an easy victory.
IN CONCLUSION
As you can see, the new rules for Maelstrom’s Edge are chock full of improvements...and none of what we’ve presented above even covers the massive rules re-work we’ve done for every single unit in the game. Their rules are both far more streamlined but also laser-focused on allowing them to perform exactly how they’re supposed to. It’s been an extremely long time coming, but we can’t wait for you to try out the new rules and let us know what you think!
The new rulebook will be coming along (hopefully!) in the first half of 2022, but you can get a headstart on the V2 ruleset by downloading a Beta version of the rules here. The Beta rules documents contains all of the rules for playing the game, but keep in mind that these are just 'preview' documents - some rules may be revised based on feedback, and the final layout including background material for the factions and the Maelstrom's Edge universe, artwork and other 'flavor' material is missing.
If you have any thoughts on the new rules, you can pop on over to the Comm Guild Facebook group, or start up a thread in the Maelstrom's Edge section on the Dakka Dakka forums. We welcome any feedback, and would love to hear how everyone's forces stack up in the new rules!
Maelstrom's Edge Battlescribe Data File Update
Posted on Wednesday Oct 13, 2021 at 06:00pm in Gaming
If you're not familiar with Battlescribe, it's an application for building army lists, used for a wide range of different miniatures games. You download the data files for the games you play, and then use those files to create rosters which can be saved and printed. Battlescribe validates your lists and provides profiles and rules summaries for the units you have selected. You can download the Battlescribe app at https://battlescribe.net, and once installed use the 'Manage Data' button to select the Maelstrom's Edge data repository.
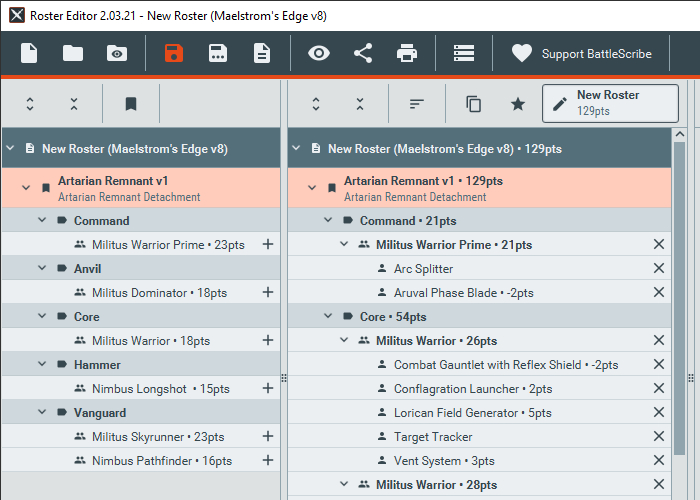
This new update for the Maelstrom's Edge data repository (v.5.0.0) adds the Artarian Remnant faction, and brings the other factions all up to date with all currently available units.
If you're just getting started with Maelstrom's Edge, you can pick up the rulebook in PDF form for free from the Maelstrom's Edge website here, or pick up the print version in the Battle for Zycanthus starter set, available along with the rest of the Maelstrom's Edge range from the webstore here! Free shipping applies to qualifying orders - check your cart for details.
If you have any questions on Maelstrom's Edge gameplay or anything else about the game, background or miniatures range, feel free to pop in to the Comm Guild Facebook group here.
Tags: battlescribe gaming rules
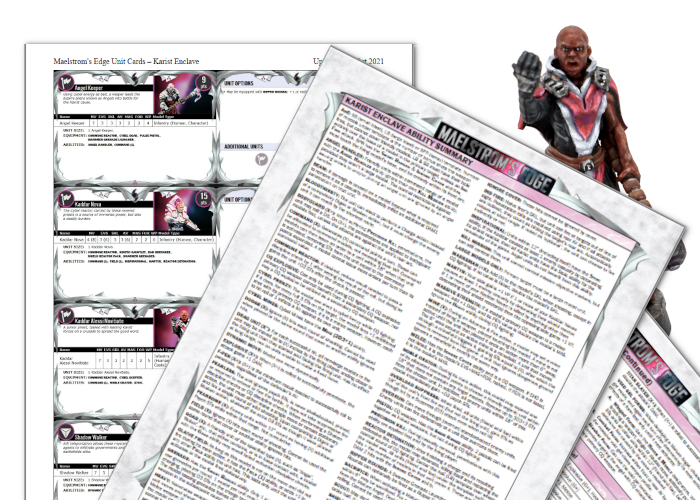
Updated Karist Summary and Cards
Posted on Wednesday Oct 06, 2021 at 06:00pm in Gaming
And so, now that the Kaddar Alessi Novitiate is out in the wild, we have updated the Karist faction summary and the printable unit cards! You can find the new files in the Rules section of the Maelstrom's Edge website here.
Pick up the Alessi Novitiate along with the rest of the Maelstrom's Edge range from the webstore here! Free shipping applies to qualifying orders - check your cart for details.
If you have any questions on the new rules, or any other aspect of Maelstrom's Edge gameplay, feel free to pop in to the Comm Guild Facebook group here.
Game Primer: Suppression
Posted on Wednesday Sept 29, 2021 at 06:00pm in Gaming
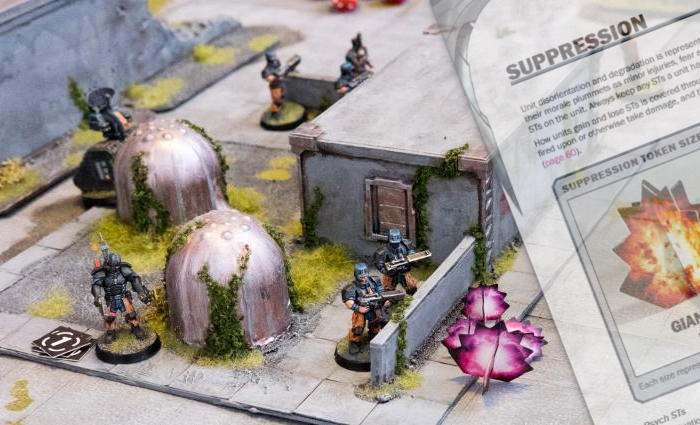
The level of Suppression a unit is suffering from is represented in game via suppression tokens, or STs. The more STs a unit accrues, the more their morale plummets as minor injuries, fear and confusion take their toll. Every enemy attack can increase Suppression, even if no damage is inflicted - Units gain STs whenever they are fired upon or take damage by other means, and they remove STs each turn when they finish performing their main action.
When STs on a unit amount to triple its unit discipline or more, it is considered shell-shocked and suffers severe penalties for being in such a state, such as automatically failing discipline checks or being unable to capture mission objectives.
Discipline Checks
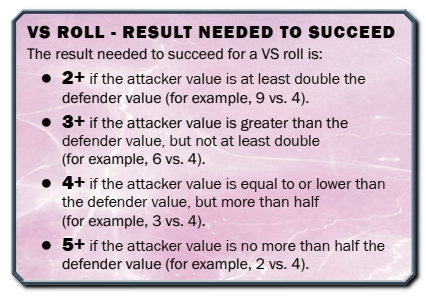 There are many different situations wherein a unit is called upon to test its discipline against the amount of suppression it has accrued. This is a discipline check, and is a single VS roll using the following criteria:
- The unit’s discipline value (the squad leader’s WP characteristic).
- The current number of STs on the unit.
Find out more in the Maelstrom's Edge rulebook - you can download a PDF version for free from the Maelstrom's Edge website here, or pick up the print version in the Battle for Zycanthus starter set, available along with the rest of the Maelstrom's Edge range from the webstore here! Free shipping applies to qualifying orders - check your cart for details.
If you have any questions on suppression, or any other aspect of Maelstrom's Edge gameplay, feel free to pop in to the Comm Guild Facebook group here.
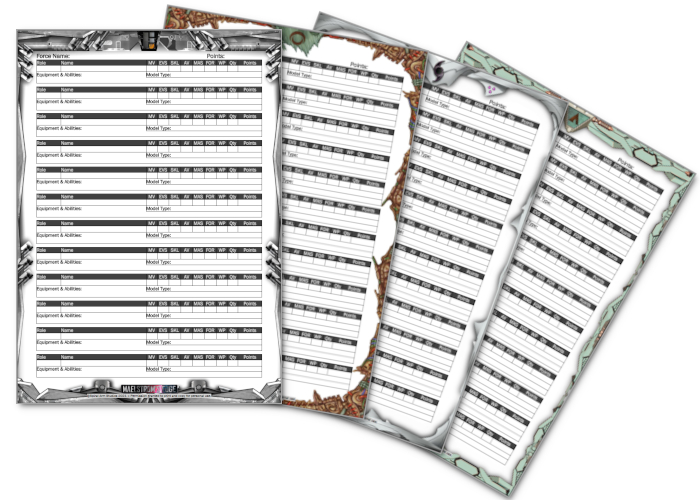
New Printable Force Roster Sheets!
Posted on Wednesday Sept 22, 2021 at 06:00pm in Gaming
Each roster page includes a number of entry sections that you can fill in with the matching information from the unit cards. This, combined with the printable summary sheets for each faction, will give you all of the information you need close to hand without needing to shuffle through multiple cards to find the right one mid-game.
There are sheets for each of the existing factions. You can find them in the Summary Downloads section of the Maelstrom's Edge website here - Just print off as many as you need!
If you need some inspiration for putting a force together, remember that you can also find sample force lists for the Broken, Karists and Eirian Foundation on the website here - Some sample lists for the Remnant will be added soon!
Get your force together by grabbing the Battle for Zycanthus starter set, or any of the rest of the Maelstrom's Edge range, from the webstore here! Free shipping applies to qualifying orders - check your cart for details.
If you have any questions on force selection, or any other aspect of Maelstrom's Edge gameplay, feel free to pop in to the Comm Guild Facebook group here.
Karist anti-grav vehicle rules!
Posted on Wednesday Sept 08, 2021 at 06:00pm in Gaming
Along with the trial transport rules we released for players to try out a while back, we shared some 'unofficial' rules cards for several transport vehicles. This included a Karist Raptor, converted from a Beyond the Gates of Antares vehicle with some added Karist parts. The Raptor has now received a small update to its card, tweaking its rules a little, and also now has an escort vehicle to accompany it on the battlefield - The Scorpio.
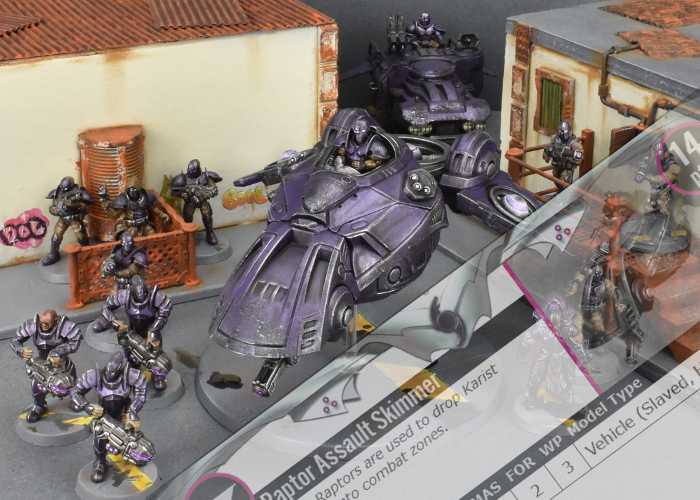
The Scorpio pictured below is built from a Warhammer 40,000 Genestealer Cult vehicle with some Karist parts and a little plasticard added. You can see how it was built here, and can also find the Raptor walkthrough here. You can find the rules cards for them in the 'Unofficial Cards - All Factions' document that you can download from the rules section of the Maelstrom's Edge website here.
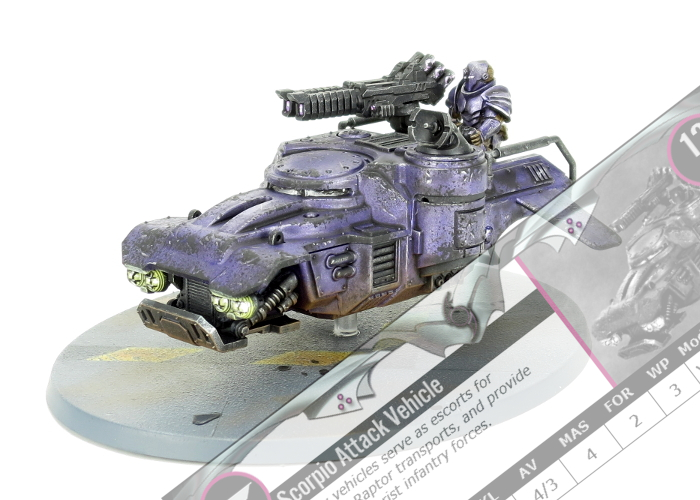
These are 'unofficial' cards, which is a label we put on units created from conversions and/or third-party models. As such, you should check with your opponent before using them, to make sure they're ok with it and to give them a chance to familiarise themselves with the rules. It also means that, while we have provided the above conversion ideas, you should also feel free to use any other suitable vehicle models that you may have to hand.
Battle for your ascension by grabbing a Karist force from the Maelstrom's Edge webstore here! Free shipping applies to qualifying orders - check your cart for details.
If you have any questions about using vehicles in Maelstrom's Edge, or any other aspect of Maelstrom's Edge gameplay, feel free to pop in to the Comm Guild Facebook group here.
Game Primer: Assembling a Force
Posted on Wednesday Aug 11, 2021 at 06:00pm in Gaming
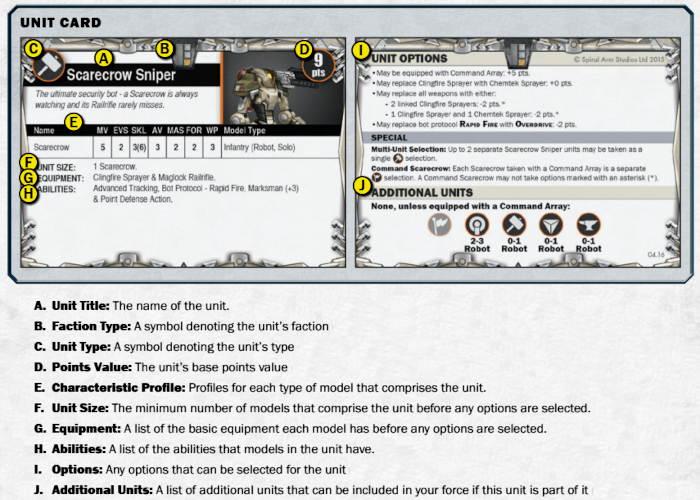
Each unit available to a force has a Unit card, which includes the unit's composition, equipment and special rules. These cards also contain all the information you need to select your force for a game, like the unit's points cost and unit type.
Games are typically played using a points limit that is agreed upon between both sides before forces are selected. You are always free to field a force whose point total is less than or equal to the agreed upon limit, but never one that exceeds it, not even by a single point! If you’re unsure about what points limit to use for your games, the following guidelines can help you decide. However, you should also feel free to experiment playing games with both higher or lower points limits than those suggested:
120 Points: This is a good limit if playing a game just using the contents of a single Battle for Zycanthus box set. This size game will typically last around 90 minutes to 2 hours once both players are familiar with the rules.
150 Points: This is the suggested points limit for Maelstrom’s Edge games to provide players with ample decisions when selecting their forces, while not taking too long to complete. This size game will typically last around 2-3 hours once both players are familiar with the rules.
Any units included in a force must be noted on a force roster, detailing the point total of each unit chosen and including any options selected for that unit.
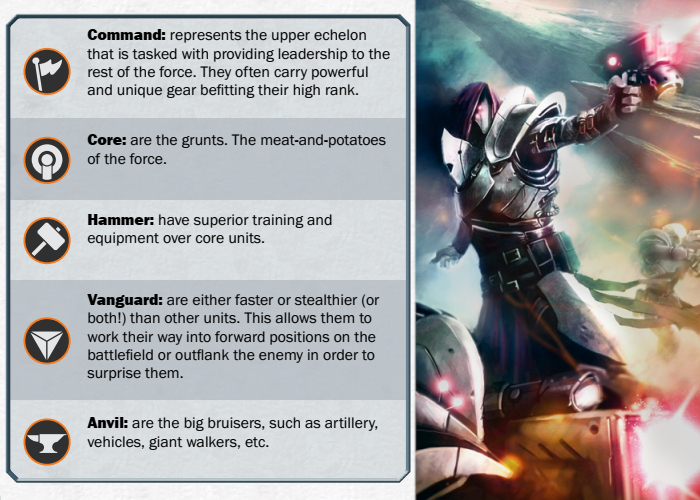
Your force is selected as one or more detachments, led by a Command model. Some units types are optional while others are mandatory, with a minimum number of those units you must select. For example, most commanders require you to take at least one Core unit selection in your force, while also allowing you the choice of a number of Vanguard, Hammer or Anvil units. Once you have satisfied any mandatory unit requirements, you can select other units up to the maximum allowed by that commander (or to the points limit for the game) or take another commander for a new detachment, following the same selection process.

A 150 point Karist Force
To get you started, we've created some sample rosters for different forces, which can be found on the website here!
Get your force together by grabbing the Battle for Zycanthus starter set, or any of the rest of the Maelstrom's Edge range, from the webstore here! Free shipping applies to qualifying orders - check your cart for details.
If you have any questions on force selection, or any other aspect of Maelstrom's Edge gameplay, feel free to pop in to the Comm Guild Facebook group here.
Game Primer: Updated Base Rules
Posted on Wednesday Aug 04, 2021 at 06:00pm in Gaming

The Maelstrom’s Edge rulebook includes various guidelines for customising your models without inadvertently breaking the rules by changing how that model functions on the tabletop, and a part of that covers appropriate basing. Originally, these rules only had to deal with four different bases (including the hex-shaped flying bases), but with that number expanded out to nine, we wanted to allow players some freedom for creative modelling without forcing anyone to rebase existing models. As such, the text from the ‘Custom Basing’ section on page 132 of the Maelstrom’s Edge rulebook should be replaced with the following:
CUSTOM BASING
Models are normally mounted on the base specified for them as part of their model kit.
Conversions will sometimes result in a model not fitting on the correct base. Some players also like to use larger, impressively-detailed bases to make their character models and other significant units stand out on the table. While using a different sized base has an impact on how the model functions on the table, particularly for things like movement and unit coherency, so long as the change is not too extreme this has minimal practical effect on the game. As such models may be mounted on a base one size smaller or larger than specified in their instructions. In units of more than one model, all models with the same original base size must be mounted on the same alternate size.
You can use custom bases, or bases from another manufacturer, but these must have appropriate arc markings modeled or painted on, and fit within the same size range as above. For example, if a model would normally have a 32mm base, then any alternate base would need to be within 28-36mm in diameter. If the alternate base has modeled elements on it that significantly raise the height of the model compared to a standard base, then this qualifies as the model being converted as detailed above.
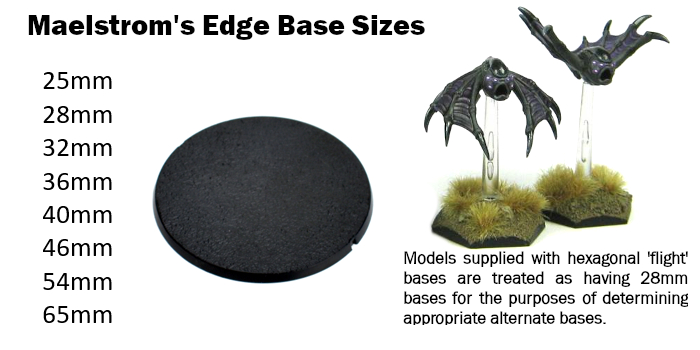
As we update the build instructions for our kits, these will include the relevant base size for each model. In some cases the default base size for a model may change – for example, the Remnant Nimbus is being updated to use a new 40mm base instead of the original 46mm, although the kit will come with both for the moment – and in these cases both the original and the updated base size can be considered valid. We don’t want anyone to feel like they need to pull apart their carefully finished models to update them!
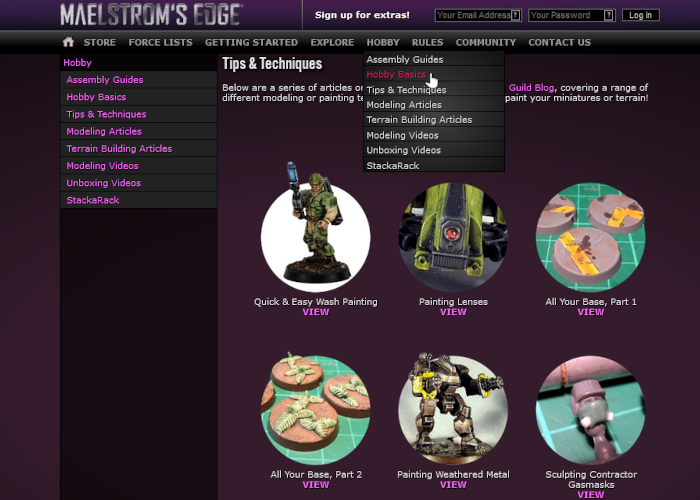
While you're playing with bases, check out the Hobby Basics and the Tips & Techniques pages in the Hobby section of the Maelstrom's Edge website for some tips and tutorials covering different basing methods. Find them here!
Get your game on by ordering the Battle for Zycanthus set, along with the rest of the Maelstrom's Edge range, from the webstore here! Free shipping applies to qualifying orders - check your cart for details.
If you have any questions on bases, model building, or any other aspect of Maelstrom's Edge gameplay, feel free to pop in to the Comm Guild Facebook group here.
Game Primer: Narrative Missions
Posted on Thursday Jul 29, 2021 at 01:18am in Gaming
To create more of a level playing field, competitive missions require players to pick their forces without knowing what their mission will be and whether their force will end up being the attacker or defender. In truth, however, a force is almost always hand-picked and deployed to complete a specific mission. Narrative missions represent the perfect opportunity to recreate this dynamic more accurately, and in keeping with this idea, players select their forces [i]after[/i] choosing the mission, rather than before. This can be done to allow each player to select their own ideal force, or can be a co-operative exercise with players agreeing on the sort of forces that would be appropriate for the mission. The mission itself would usually be chosen by the players, although there's always the option to make it a random selection if you are not too attached to playing any specific type of battle.
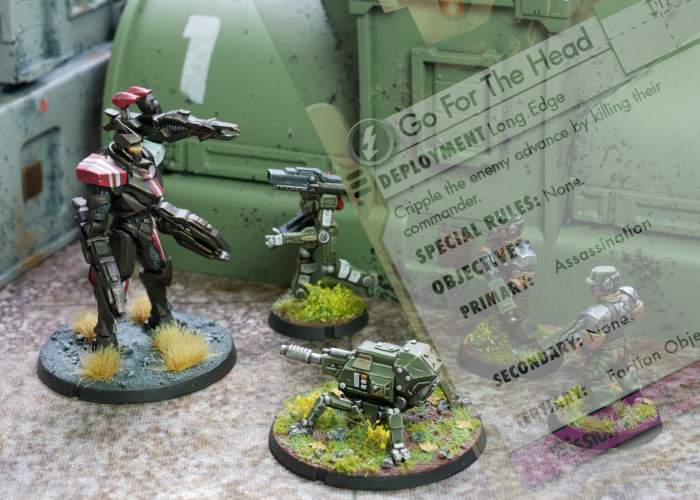
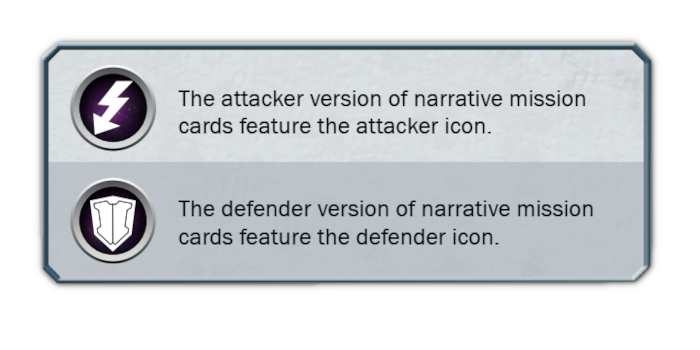
The Narrative mission cards are mostly the same as for Competitive missions, except that there are two cards for each mission - an Attacker card and a Defender card. The mission objectives listed on each card apply only to the player with that card. So one player's Primary Objective may be to assassinate the enemy commander, while the other player has to capture objectives around the board. There may or may not be Secondary missions in play, and the player's Faction objective will also always apply as a Tertiary objective.
Because Narrative missions often use non-standard deployment, the cards also include a diagram showing the shape and position of the deployment zone for each player. As with Competitive missions, the players roll off to see who chooses deployment zones with the winner choosing an appropriate zone and their opponent taking the corresponding zone from their card to suit. For example, if the deployment zone is 'Long Edge' for both players, the winner of the roll would choose either of the long board edges and their opponent would take the other.
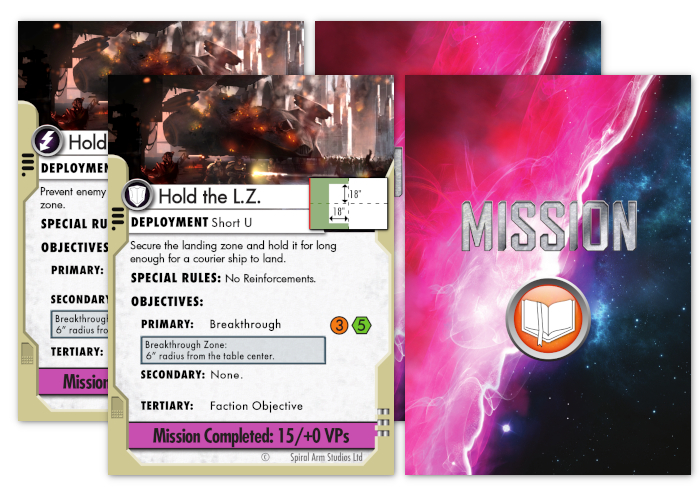
As with Competitive Missions, there may be mission special rules that apply. These may restrict Reserves or Reinforcements, or impose other restrictions or bonuses on the force. In Narrative missions, however, these only apply to the player if they appear on their card. So one player may have the 'No Reserves' rule preventing them from keeping units off the table at the start of the game, while the other player may be free to reserve units if they wish.
Narrative missions excel for use in campaigns: where the result of one game has some bearing on which mission is used for the following game. There are a near infinite number of ways to implement a campaign system, though, and so while we intend to produce various campaigns for you to use in the future, players should feel free to let their imagination run wild coming up with custom campaign missions and different ways to link their games together.
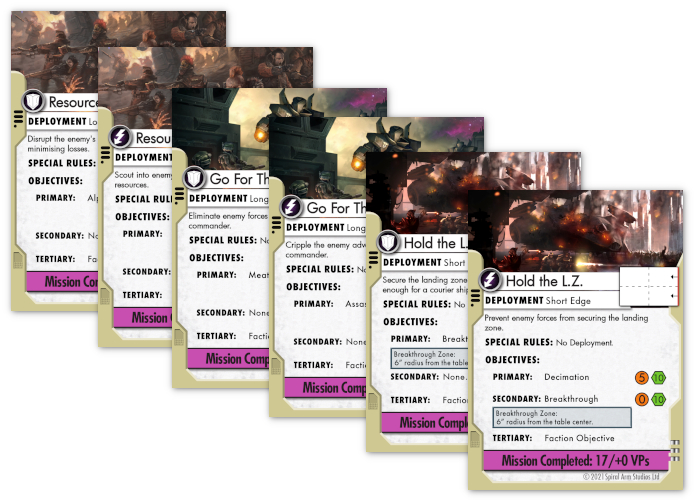
To get started with your Narrative journey, we've created three Narrative missions - "Hold the L.Z.", "Go For The Head" and "Resource Grab" - which you can download now from the 'Rules' section of the Maelstrom's Edge website here. Just download the PDF, print and cut out the cards, and you're good to go. We will release new narrative cards periodically, to give you something new to wage war over.
Note that you will also need the Objective and Faction Objective cards, which can also be downloaded in PDF form. The Objective cards are also included in the Battle for Zycanthus starter set.
Get your tactical hat on and order the Battle for Zycanthus set, along with the rest of the Maelstrom's Edge range, from the webstore here! Free shipping applies to qualifying orders - check your cart for details.
If you have any questions on Narrative Missions, or any other aspect of Maelstrom's Edge gameplay, feel free to pop in to the Comm Guild Facebook group here.
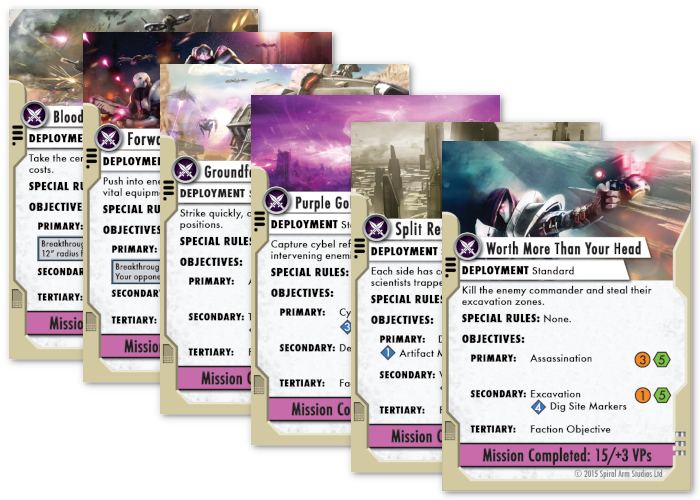
Game Primer: Missions & Objectives
Posted on Monday Jul 12, 2021 at 06:00pm in Gaming
The Maelstrom's Edge rules allow for two different mission types - 'Narrative' missions, where each player has their own objectives that support the narrative of the game, and 'Competive' missions which aim to provide a balanced competition through both players having the same objectives. The mission cards that come with the Battle for Zycanthus set (also available for download on the website here) are the latter type.
Each Maelstrom’s Edge mission features several objective types, giving players multiple paths towards victory. Victory Points (VPs) are tabulated at the end of each turn, and if you can manage to reach the total needed to complete the mission while also outpacing your opponent by a wide enough margin, then the game immediately ends with you as the victor! This makes accomplishing mission objectives as efficiently as possible of paramount importance to the game.
Missions are chosen at the start of the game, before deployment, by shuffling together the mission cards and drawing one at random. Each mission card contains a number of pieces of important information, including a list of any mission special rules that apply, and the objectives that players need to achieve in order to gain Victory Points. For easy reference, the objectives are all each printed on reference cards, although these can also be found in the Maelstrom's Edge Rulebook.
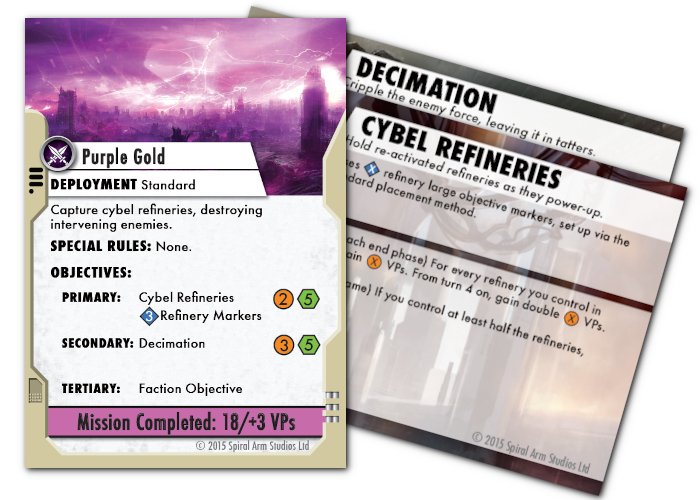
Objectives may call for players to destroy or control objective markers scattered around the board, eliminate specific enemy models, capture territory, and so on, with each objective granting Victory Points each turn, at the end of the game, and/or when specific conditions are met. For example, when playing the 'Purple Gold' mission, players gain 2 VPs in turns 1-3 for each refinery objective marker under their control, increasing to 4VPs each from turn 4 onwards. Then at the end of the game, an additional 5 VPs are awarded to the player who controls at least half of the refinery markers.
Purple Gold also has Decimation as a secondary objective, which grants VPs based on how much of the enemy force you have managed to destroy. Players should always be mindful of both Primary and Secondary objectives, as reaching the mission's VP cap with a sufficient 'margin of victory' immediately ends the game! For Purple Gold, this means scoring a total of at least 15 VPs, while also having scored at least 3 more VPs than your opponent. If neither player reaches the required VP goal earlier, standard games of Maelstrom's Edge last for 5 turns. At the end of Turn 5, VPs from any objectives with 'end of game' conditions are applied, and the player with the highest final VP total is the winner - so long as they have a sufficient margin of victory. If neither player manages this, then the game is considered a hard fought draw!
To add a little individuality to the missions, each of the game's different factions also has one or more 'Faction Objectives' which provide a tertiary path to collect VPs. These faction objectives provide themed VPs tailored to that specific force, with some being available to any force made up of that faction, and others being specific to forces that contain certain sub-faction units. For example, any Karist Enclave force can utilise the Secret Cache objective, while a force that includes an Angel Keeper may choose to use the First Contact objective card instead.
Faction objectives usually provide a limited number of VPs, and also grant a special bonus to the force until those limited VPs have been tapped out. The Karist Secret Cache, for example, allows a Karist player with a unit close enough to the cache objective marker to utilise the 'Cache Resupply' rule to re-roll any failed rolls to hit, or to gain an additional VP at the end of the turn. Once they have received 3 VPs from the cache, the objective marker is removed and Cache Resupply can no longer be used.
While all of that can seem a little complicated at first, in practice it creates a layered game experience where achieving a solid victory relies on making best use of the forces at hand, rather than just how quickly you can eliminate enemy units.
It's worth noting in closing that the above all relates specifically to 'Competitive' mission types. We'll explore the differences that Narrative play can bring to the game in a future article.
Get your tactical hat on and order the Battle for Zycanthus set, along with the rest of the Maelstrom's Edge range, from the webstore here! Free shipping applies to qualifying orders - check your cart for details.
If you have any questions on Missions, or any other aspect of Maelstrom's Edge gameplay, feel free to pop in to the Comm Guild Facebook group here.
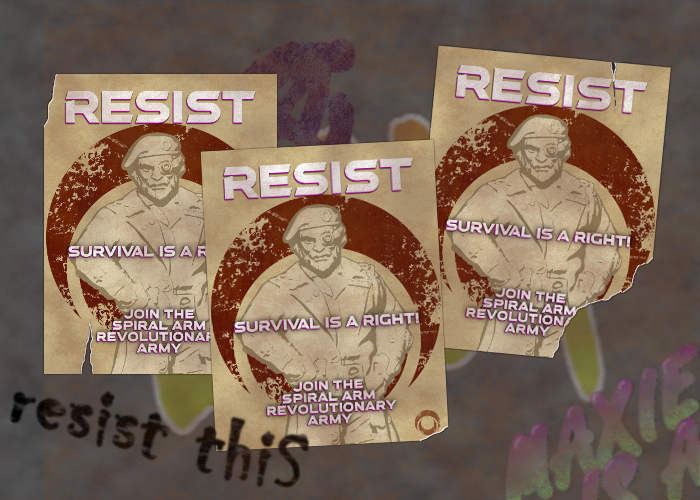
New Broken Faction Objective and Summary Update
Posted on Tuesday Jul 06, 2021 at 06:00pm in Gaming
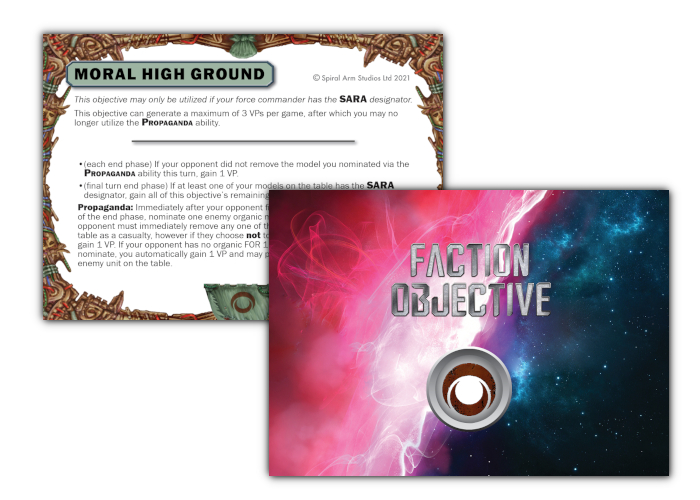
Along with their military might, SARA forces are deft at using propaganda to demoralise and destabilise enemy forces. This is represented through the Propaganda rule allowing a SARA player to force their opponent to sacrifice a model each turn.
Propaganda
Immediately after your opponent finishes their ‘Destroy Units’ portion of the end phase, nominate one enemy organic model on the table with FOR 1. Your opponent must immediately remove any one of their organic, FOR 1 models from the table as a casualty, however if they choose not to remove the model you nominated, gain 1 VP. If your opponent has no organic FOR 1 models on the table for you to nominate, you automatically gain 1 VP and may place +D3 psych STs on any one enemy unit on the table.
The Moral High Ground card has been added to both the Mission & Objective card pack and Faction Objective card pack, which can be found in the Card Downloads section of the Maelstrom's Edge website here!
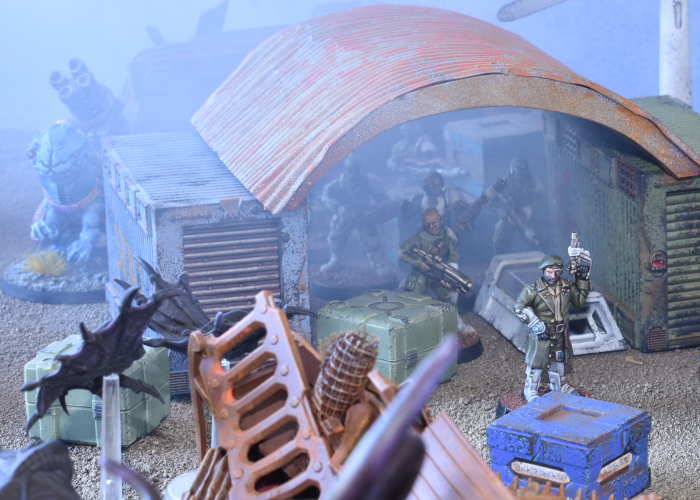
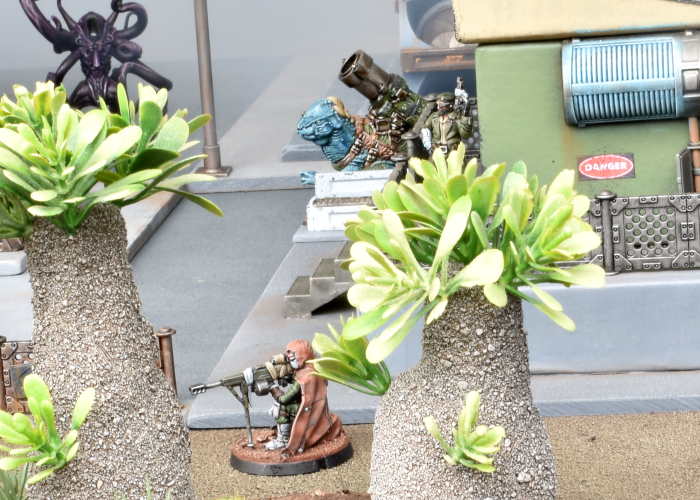
The unit cards for the Revolutionary Captain and the Broken Sniper also both introduced some new special rules and equipment. These have now been added to the Broken Summary, which you can find in the Faction Summary Sheets section here.
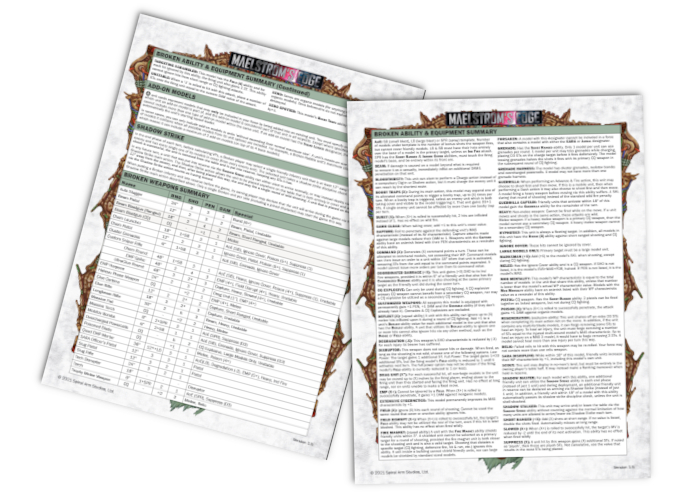
If you still need the unit cards for these two models, they can also be found in the Card Downloads section, in the Broken Unit Cards PDF.
Build your army of revolutionary doom by picking up these fantastic new models from the Maelstrom's Edge webstore now! Free shipping applies to qualifying orders - check your cart for details.
What is SARA?
Posted on Monday May 31, 2021 at 06:00pm in Gaming
Tales of SARA have filtered throughout the spiral arm, so similar to the Jackals, there is a constant stream of people moving towards the Maelstrom’s Edge looking to join their cause. However, while SARA sees the Forsaken as potential allies and a pool for recruitment, they are vehemently opposed to Jackals, who they see as poisoning the otherwise good name of the Broken. SARA cells will often go out of their way to attack a Jackal stronghold when they discover its location.
With their well-equipped, fast-moving fleets, SARA does wage some military campaigns at worlds right at the Edge, mainly by attacking external forces that have laid siege to a planet so as to exploit its resources before the Maelstrom arrives. But even when they’re successful in these types of campaigns, the number of people they can actually rescue is often quite small, basically just those who can fit onto the ships they manage to liberate during the fighting. As a result, SARA instead prefers to target worlds that are still a few generations away from being threatened by the Maelstrom, but are downplaying the danger to their populace and secretly shuttling away the rich and powerful. These types of worlds almost always have secret cells of SARA already in operation, funded by secret donors who see SARA as either a philanthropic cause or just a way to guarantee their own escape from the Maelstrom. These cells seek to weaken local government and ferret out hidden Karist Enclave cells. Bolstered by reinforcements from out-system, SARA groups will spread their infiltration throughout the society to fuel full scale revolts. It isn’t entirely unknown for SARA to completely topple a government this way, and turn the planet’s full scale production towards producing ships to save as many people as possible.
SARA is very much a paramilitary organization and more often than not, the founders of a cell start as lower echelon military units on a dying world who realize their government is not going to save them. They spend years organizing rebellions, training civilians to fight, struggling to get as many people off-planet as possible. As SARA contains a higher percentage of military-trained individuals, it tends to be much more regimented and organized than most Broken forces, and has better discipline and morale. When the time comes for open conflict, SARA cells are organised into brigades, each led by a Revolutionary Colonel. Each brigade is comprised of a varying number of companies depending on the number of SARA units available, each led by a Revolutionary Captain. When SARA manages to rescue souls from a dying world or from ships that have no place to go, able-bodied adults are offered a place in a SARA company for a certain period of time - usually 5 to 10 years, depending on the particular cell. After their service time is up, they are free to leave and try to find their own way in the galaxy, though many choose to remain with the fleet. In this way, SARA fleets are constantly provided with a stream of new recruits.
While from outside SARA is commonly seen as a single entity, there is no true central leadership and each brigade acts autonomously. Some degree of communication between fleets does exist, through cells utilising fast courier vessels or infiltrating Comm Guild facilities and piggybacking support requests or warnings onto authorised Guild messages. This allows SARA fleets to converge when a larger response is required than each can handle alone, or to avoid systems where the danger from the Maelstrom’s unpredictable advance is too great to risk their valuable resources. Sharing similar goals does not always guarantee co-operation though, as fleet commanders may disagree on the value of specific objectives or the best allocation of resources, occasionally even leading to conflict between different SARA brigades.
SO... why are we telling you all this?
Next week sees the release of our new, plastic SARA commander model, which will open up new options for your Broken forces in Maelstrom's Edge. We will also have a showcase article to follow the commander, with a SARA force being put together by Iain - stay tuned!

Put together your own ill-equipped rabble of doom by picking up the plastic Broken infantry sprues, along with the rest of the Maelstrom's Edge range from the webstore here.
Then pop on over to the Comm Guild Facebook group to show us what you're working on!
For other building ideas, modeling tutorials, army spotlights and conversion walkthroughs, check out the Hobby section of the Maelstrom's Edge website here.
Unofficial Faction Rules - Trogyl Scouts
Posted on Monday Nov 30, 2020 at 05:00pm in Gaming
A few weeks ago, I shared a conversion article featuring some homebrew alien Trogyl Scouts, kitbashed from Wargames Atlantic Einherjar and Maelstrom's Edge Broken parts (find it here). While this was a fairly simple conversion, I was so happy with the results that it seemed a shame to leave them cooling their heels in the display case. So, I've worked up a rules card for them, adding them into a new (unofficial) 'Mercenary' faction!

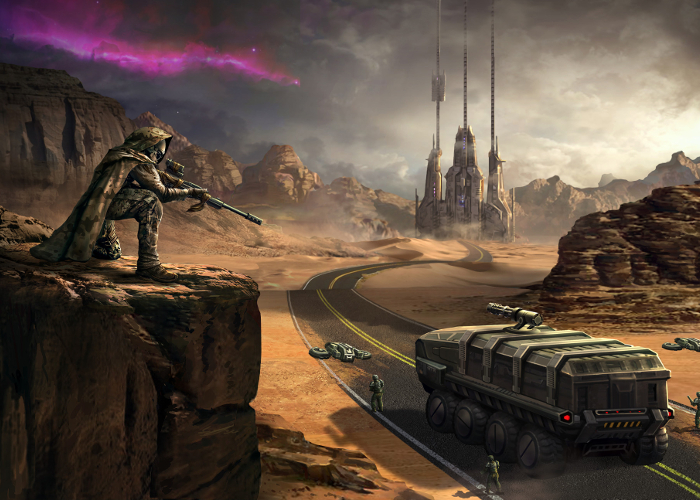
Trogyl Scouts infiltrating a Karist encampment.
Mercenaries are an idea that I've been wanting to explore for a while now. As I've conceived them, rather than being a standalone faction in their own right, the Mercenary faction will allow the addition of less mainstream units that can be taken in a detachment drawn from another faction, although you will have to use up double the normal unit slots for the privilege. Need some more heavy firepower for your Broken force? Want something sneaky to back up you Epirians? Call in the mercs!
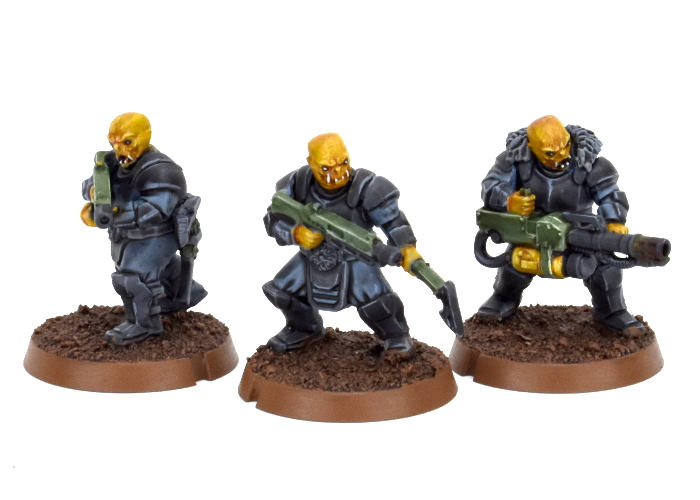
Trogyl Scouts.
The Trogyl are capable fighters, although lightly armed compared to some of the heavy hitters of the Edge. WIth their beam blastguns and ritual axes, they utilise their Scout ability to get in close to the enemy, while their Stealth rule allows them to make better use of available cover than most other troops. If a more long-ranged solution is called for, their blastguns can be swapped out for assault rifles or sniper rifles, and the unit also has the option to take a single heavier weapon, choosing from a grenade launcher, massive torch or plasma cannon.
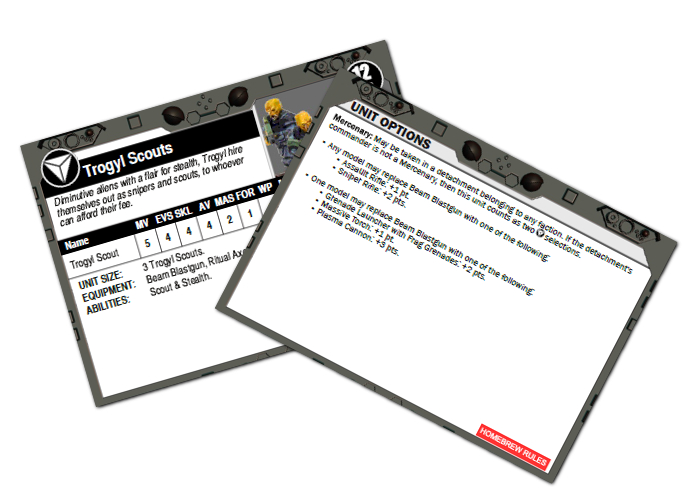
Trogyl Scouts rules card.
The unofficial rules card for the Trogyl can be downloaded here. The download also includes a summary card with the weapon and special rules that apply to the unit. This will be expanded out into a full summary page when other mercenary units join the fray, but for now that seemed excessive.
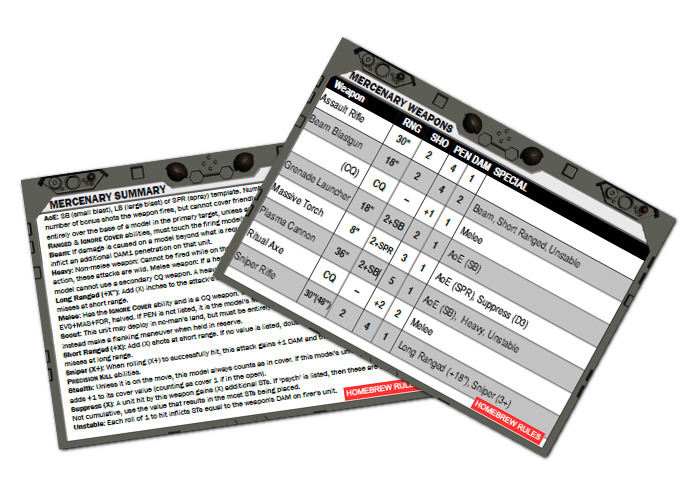
Trogyl Scouts Summary.
While your Trogyl are getting sneaky with it, you can share your battle reports, army building, or any feedback on these rules in the Comm Guild Facebook group!
If you're just getting started, or looking to expand your force, you can pick up the entire Maelstrom's Edge model range from the webstore here.
Happy Gaming!
More Updated Summaries!
Posted on Monday Oct 12, 2020 at 05:00pm in Gaming
Continuing on with our rules updates on the Maelstrom's Edge website! Last week we updated the faction summaries for the Broken and Epirians, covering all of the new units and options that have been added since the previous iteration of the summaries. This week the Karists were similarly brought in line, and we've also added a new summary covering the rules and weapons used by the various 'unofficial' units. This covers the gear and rules used by the likes of Epirian Wardens, Broken Gnolti Longhorns and Karist Reapers, which can be built with some conversion work.
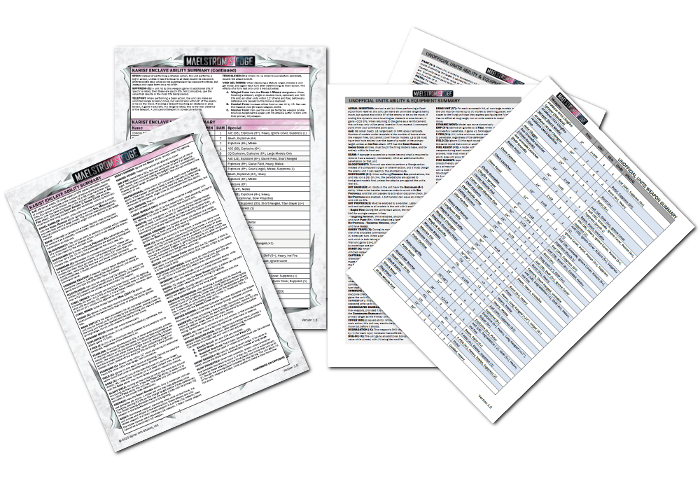
You can find the updated summaries along with downloadable versions of the unit cards in the rules section of the Maelstrom's Edge website here! And if you're looking for the conversion articles for the various 'unofficial' units, you'll find them in the 'Modeling Articles' area of the Hobby section here.
If you have any questions on the rules, or building your models for Maelstrom's Edge, feel free to pop in to the Comm Guild Facebook Group!
Updated Faction Rules Summaries
Posted on Monday Oct 05, 2020 at 05:00pm in Gaming
Because flicking through books looking up rules cuts into valuable gaming time, (and nobody wants that!) the Maelstrom's Edge website has downloadable Faction Summaries that include all of the special rules and weapons profiles for each faction. Since the last iteration of the Epirian and Broken summaries were created, however, we've released quite a few new units and options for both of those factions. Well, good news! These summaries have now been fully updated to cover everything currently available for both factions.
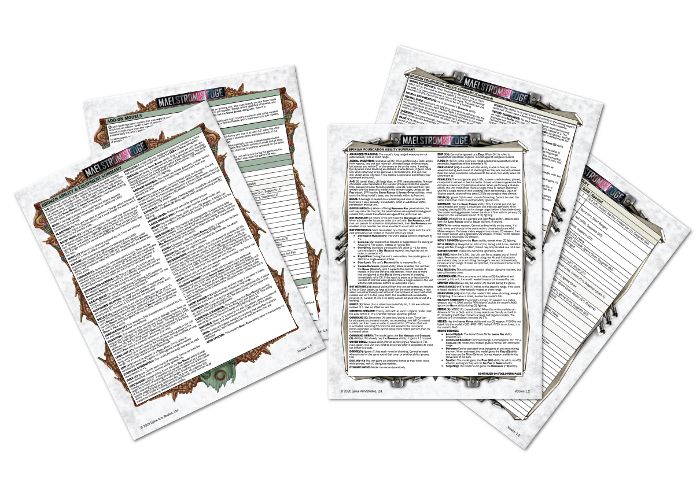
You can find the updated summaries in the rules section of the Maelstrom's Edge website here!
