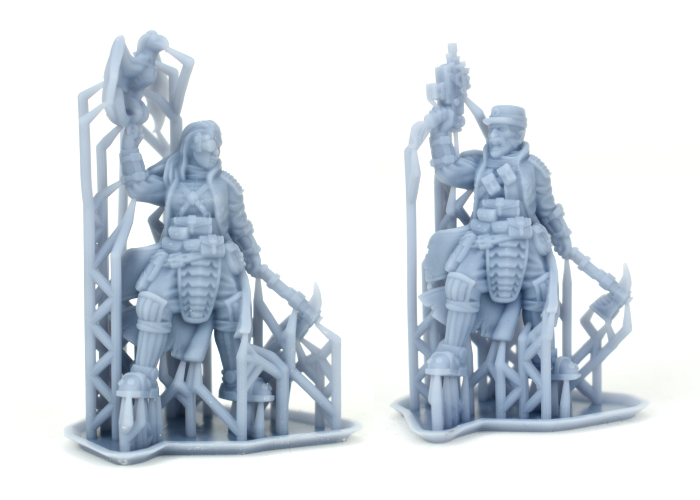
New Karist STL Release - The Angel Hellblaster!
Posted on Wednesday Nov 01, 2023 at 05:00pm in Models
Karist forces advance behind a unit of Hellblasters.
This digital model pack contains STL files for both supported and unsupported versions of the Hellblaster in two different poses.
Angel Hellblaster Render
You can find the rules for using Angel Hellblasters in your Karist force in the downloads section of the Maelstrom's Edge website here.
Start building your army of eldritch alien doom by grabbing your Hellblasters from the webstore here!
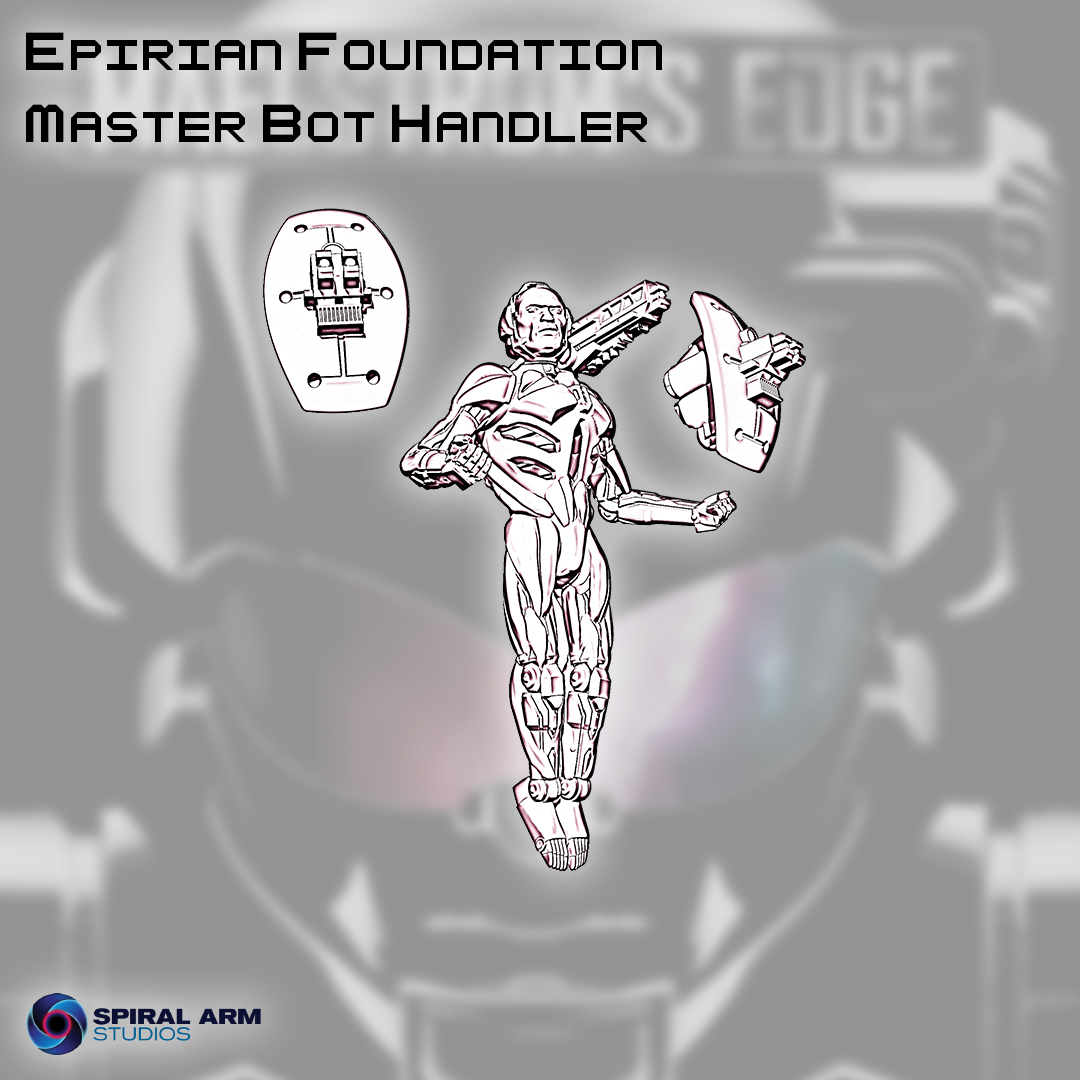
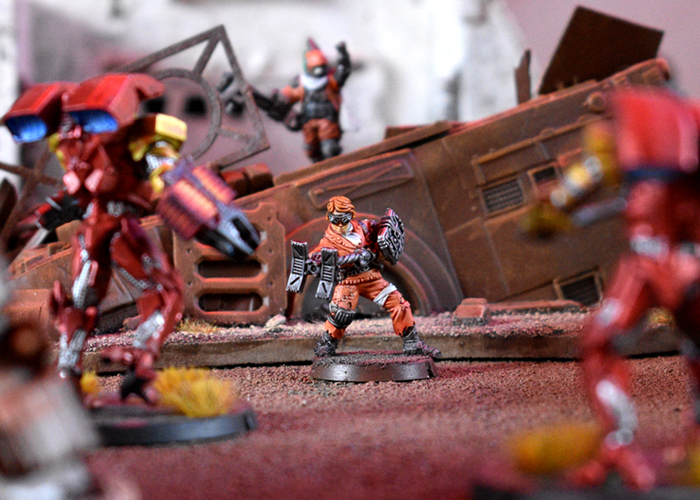
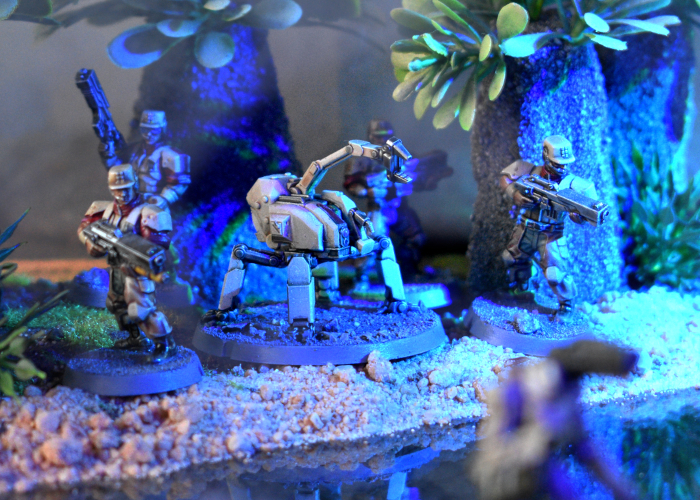
Sneaky Spotlight: The Epirian Master Bot Handler
Posted on Wednesday Oct 25, 2023 at 09:46pm in The Epirian Foundation
Click for larger image
Exceptionally wealthy Master Handlers are often accompanied by Defender Drones, armed with high intensity lasers and packed with proprietary technology not made available to anyone outside of the Foundation elite. Defenders hover noiselessly around their Handler emitting a cascading protective energy field, a visible reminder of the wealth and power of the Foundation.
Stay tuned for more sneak peeks! In the meantime, try out the V2 Beta rules by grabbing the PDFs from the Trial Rules section of the Maelstrom's Edge website here, and grab your models from the Maelstrom's Edge webstore here! Free shipping applies to qualifying orders - check your cart for details.
You can also find a series of articles looking at different aspects of the V2 game here.
If you have any questions on the V2 rules, the model range, or any other aspect of the Maelstrom's Edge game, feel free to pop in to the Comm Guild Facebook group here.
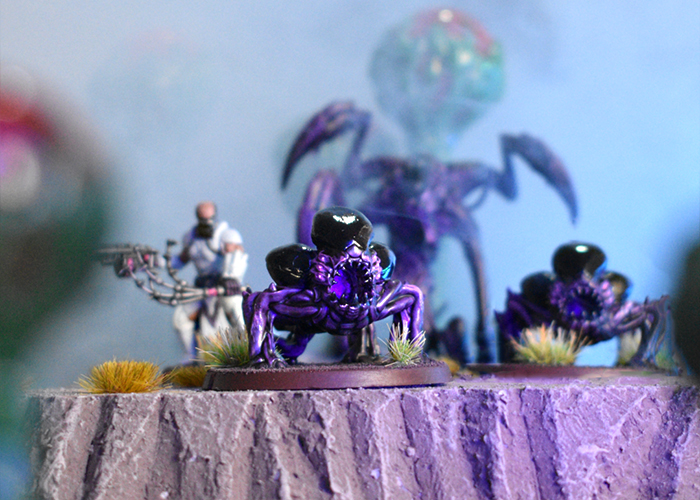
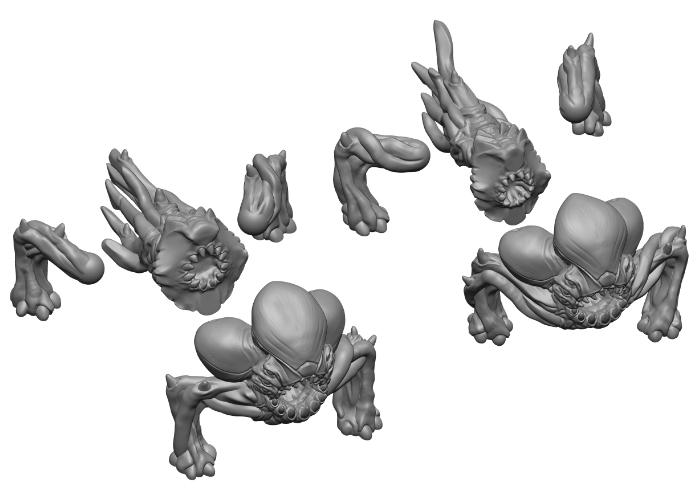
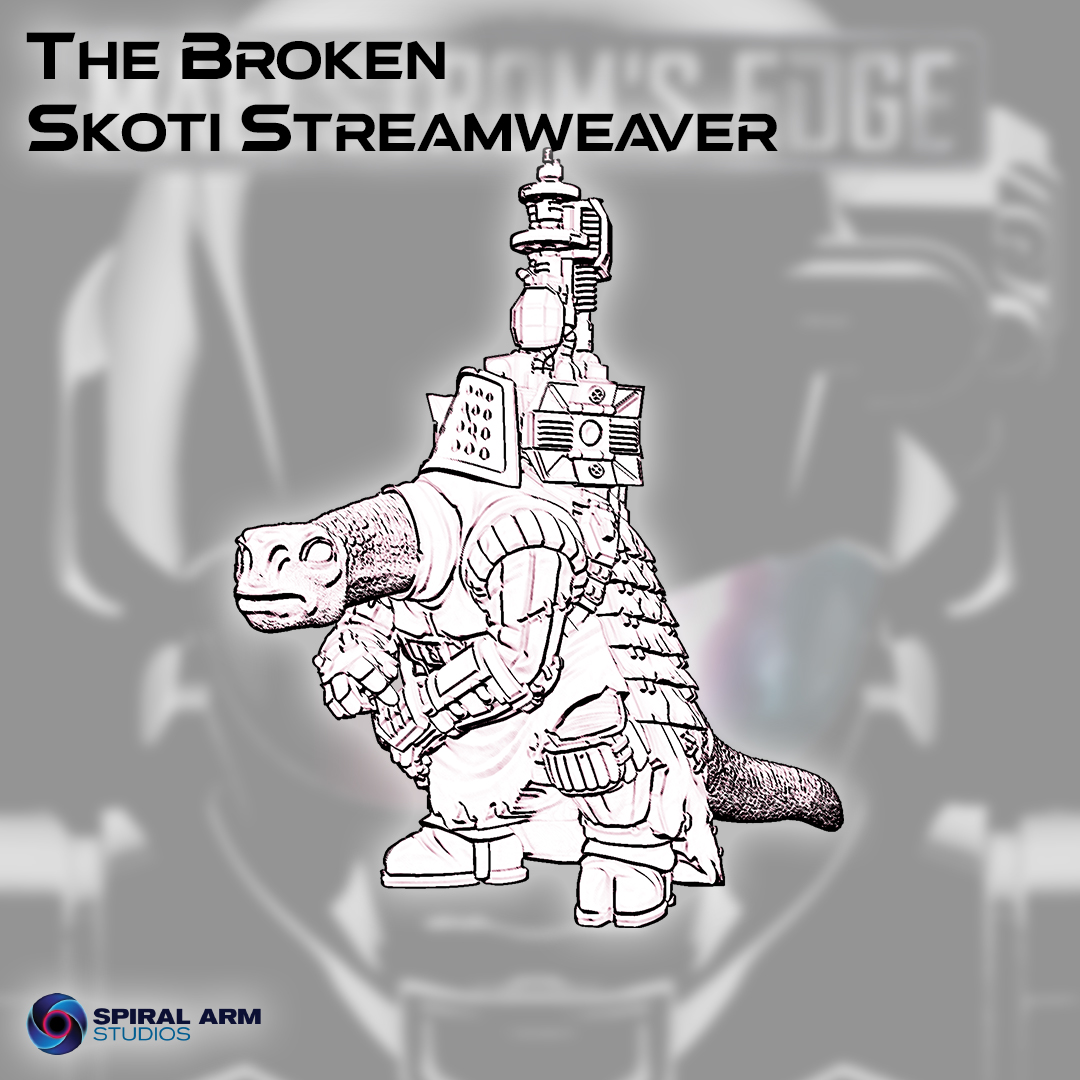
Sneaky Spotlight: The Skoti Streamweaver
Posted on Monday Oct 16, 2023 at 05:00pm in The Broken
We're kicking things off this week with an addition to the Broken line-up: The Skoti Streamweaver!
Click for larger image
A fascinating and little understood species, Skoti are slow moving herbivores who evolved an innate defensive ability to teleport, which they call a “stream” in their tongue. Similar in function to an Angel’s ability to “rift”, Skoti are generally only able to trigger their stream involuntarily in order to escape danger. This ability is made possible through a unique, massive brain structure composed of multiple nodes stretched along their prehensile necks. Broken weaponsmiths devised a way to boost this ability into something more predictable and useful. The complex machinery on the Skoti's back both provides them with additional energy and helps them with their spatial calculations, allowing their streams to span further distances and stay open long enough to allow friendly units to travel through them. In addition, a Skoti is able to utilize their stream like a weapon, creating an opening above an enemy unit and dropping nearby debris onto them, or in some cases even teleporting the enemy against their will!
Stay tuned for more sneak peeks! In the meantime, try out the V2 Beta rules by grabbing the PDFs from the Trial Rules section of the Maelstrom's Edge website here, and grab your models from the Maelstrom's Edge webstore here! Free shipping applies to qualifying orders - check your cart for details.
You can also find a series of articles looking at different aspects of the V2 game here.
If you have any questions on the V2 rules, the model range, or any other aspect of the Maelstrom's Edge game, feel free to pop in to the Comm Guild Facebook group here.
New Broken Release - Sig Jammer STL for 3D printing!
Posted on Friday Oct 06, 2023 at 05:00pm in The Broken
A Sig Jammer draws the ire of a Remnant Holista.
This digital model pack contains STL files for both supported and unsupported versions of the Sig Jammer, with two poses and two head variants.

Sig Jammer Render
You can find the rules for using Sig Jammers in your Broken force in the downloads section of the Maelstrom's Edge website here.
Start building your army of tech-wizardy doom by grabbing your Sig Jammer from the webstore here!
Tags: stl
Model Spotlight: Kaddar Alessi Novitiate
Posted on Monday Sept 25, 2023 at 09:34pm in The Karist Enclave
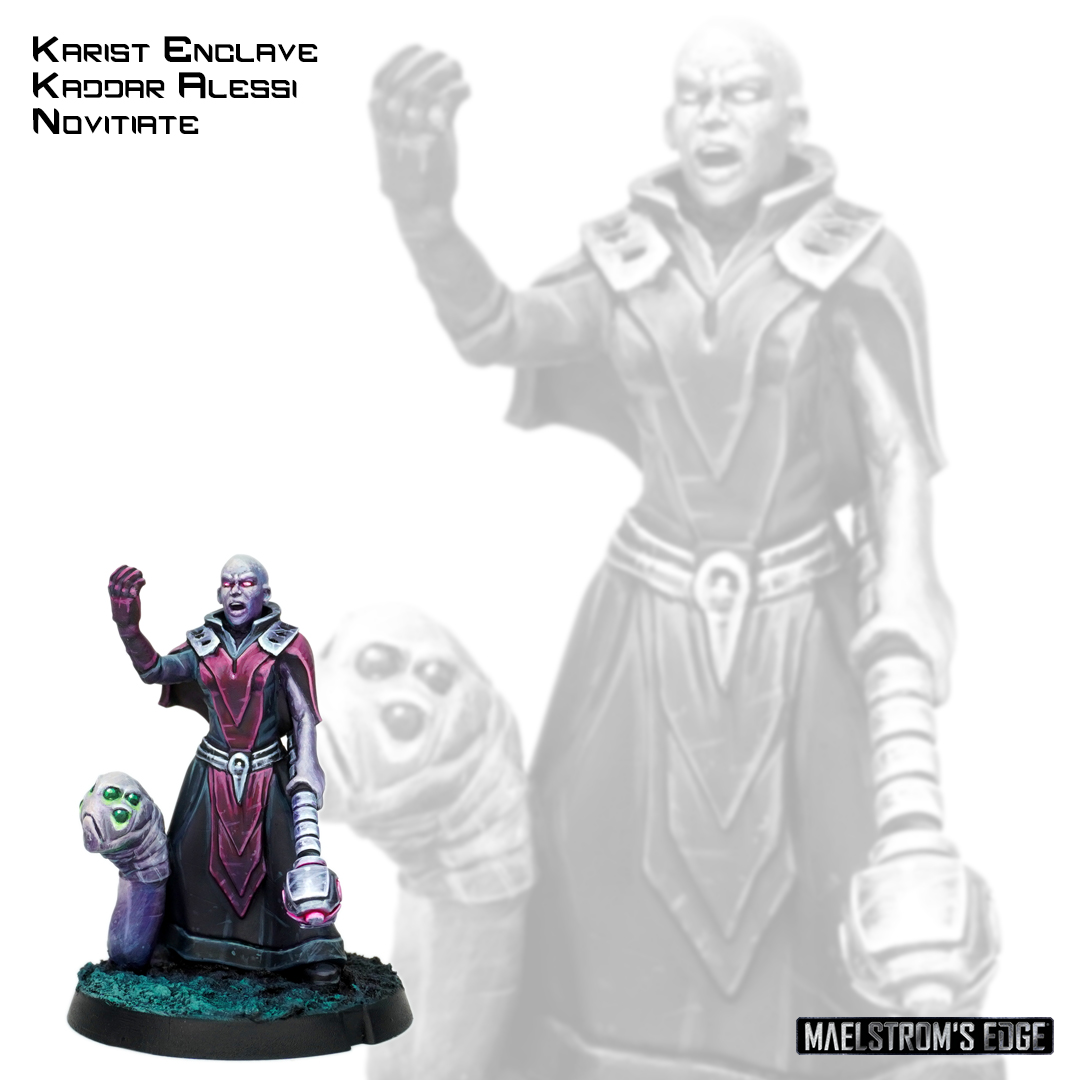
Click for larger image
Model sculpted by Dave Whitaker, painted by Angel Giraldez.
Find it in the Maelstrom's Edge webstore here!
Updated Beta Faction Lists released!
Posted on Wednesday Sept 20, 2023 at 05:00pm in Gaming
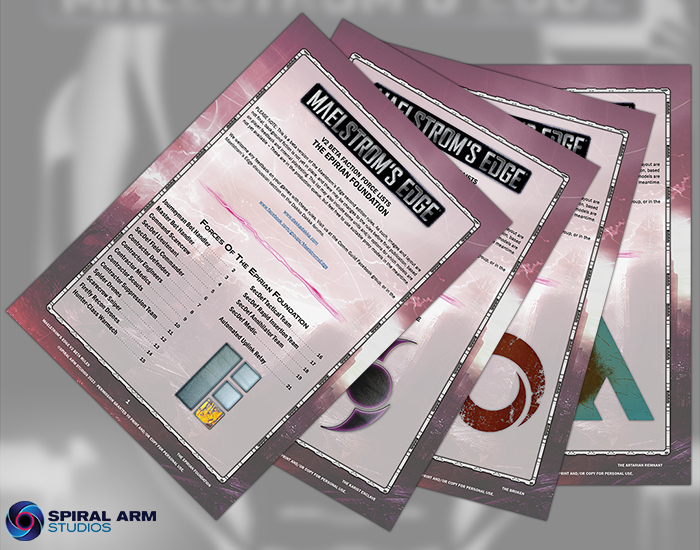
The updated Beta Faction Rules Documents
These documents are considerably further along in the design process than the original Beta release, and incorporate a number of updates based on player feedback and our own internal playtesting. The biggest changes are:
- Cosmetic and format updates - This version is much prettier than the bare-bones first Beta release, and we have tweaked the layout of the unit pages slightly for better legibility. Also included is a spread at the end of the document showing the different weapons and equipment options available to each faction.
- New units - There are a number of new units included, for models we currently have in the production queue. We have included them in this release so players can get a better feel for how the factions will look overall, particularly in the case of the Remnant where the small number of starting units was a little limiting. Feel free to convert or proxy as appropriate if you want to try out these new units in the meantime.
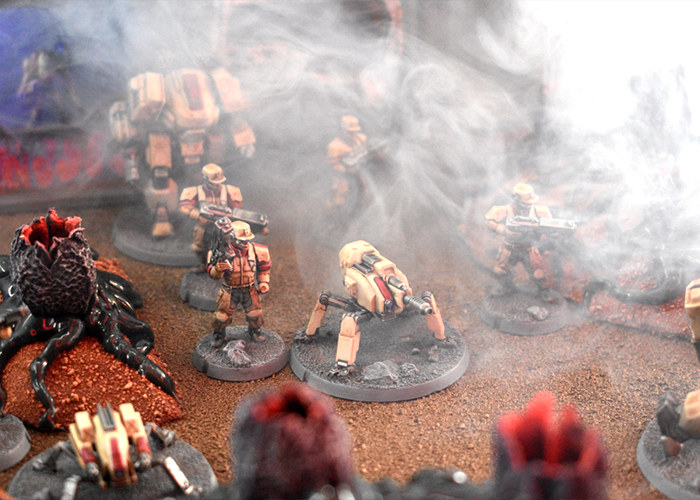
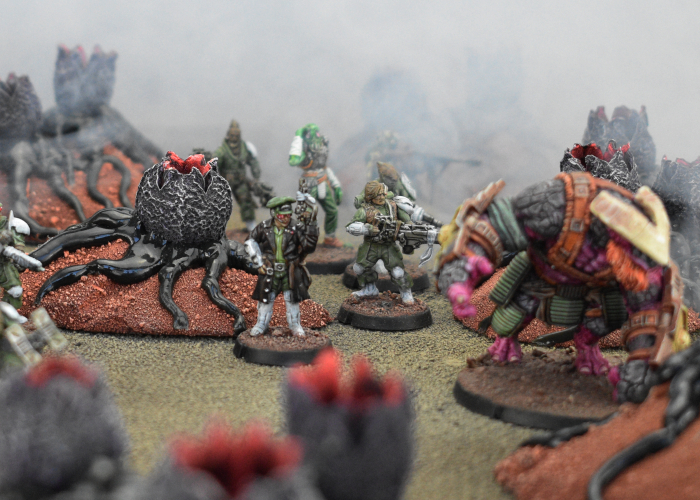
- Remnant Rebalancing - Artarian Remnant forces proved to be a little underpowered, and struggled against the other factions with their much larger model count. As a result, we have made some changes across the faction, reducing unit costs and boosting the power of their weaponry. To go along with this, while we haven't updated the main rulebook Beta document, in the final V2 rules Large model units will count as 2 units for the purposes of calculated mission objectives. This makes it a little easier for low-model-count Remnant forces to score from objectives, while also making them more valuable targets for an enemy with a Kill objective.
A Remnant Fire Team faces off against an Epirian Foundation force.
Smaller changes to unit rules include:
- The 'Human' and 'Xenos' designators have been removed, replaced with the 'Organic', 'Inorganic' and new 'Armored' designators.
- The 'Kill Mission' and 'Support Mission' abilities did the same thing, so have been rolled into a new 'Mission Specialist' ability.
- 'Mission Specialist' added to the Broken Gnolti and Pa'ku. They had the 'Kill Mission' ability through being Behemoths in V1, but this was missed from the initial Beta release.
- Karist Minnow's 'Cybel Frenzy' has been updated.
- The 'Slowed' and 'Frozen' abilities have been updated.
- Broken Sniper 'Glue round' has been renamed to 'Tether round'.
- Broken Sniper 'Shadow Strike' ability has been replaced with a new 'Shadow Stalker' ability.
- Broken 'Shadow Strike' ability has been updated to remove the wild fire requirement on the turn a unit arrives on the table.
- Broken Pa'ku Artillery's 'Coordinated Barrage' ability has been updated.
- Journeyman Bot Handler's 'Push the Machines' ability has been revised to only work on units composed entirely of Bots. The prevents it from being used on Spider Drone units with an Apprentice Handler, but also removes a potential exploit where multiple Journeymen attached to Bot units could endlessly reactivate each other.
- SecDef Tactical and Annihilator teams have extra weapon options
- Hakoyu Grand Master and Mature Angel melee weapons corrected from PEN+2 to PEN5.
Try out the revised rules by grabbing the PDFs from the Trial Rules section of the Maelstrom's Edge website here, and grab your models from the Maelstrom's Edge webstore here! Free shipping applies to qualifying orders - check your cart for details.
You can also find a series of articles looking at different aspects of the V2 game here.
If you have any questions on the V2 rules, the model range, or any other aspect of the Maelstrom's Edge game, feel free to pop in to the Comm Guild Facebook group here.
Tags: v2
Droning on in support - New Epirian Digital Model!
Posted on Monday Sept 04, 2023 at 08:55pm in Models
A Contractor Engineer unit advances cautiously along a waterline.
This kit is comprised of a Support Drone chassis, and optional parts to equip it to join any of three different Contractor unit types. The Recon Package is the standard gear for support drones utilised by Contractor Scout units. Contractor Engineers make use of tool-equipped drones to effect repairs on other damaged bots, while medical drones in Contractor Medic units patch up the force's less hardy human elements. The digital model pack contains STL files for both supported and unsupported versions of the Support Drone, with multiple equipment options. The model has been slightly updated from the original resin release, featuring taller legs to boost the overall size of the drone.
Support Drone Render
You can find the rules for all of these Epirian unit in the downloads section of the Maelstrom's Edge website here.
Start building your army of shooty robotic doom by grabbing your Support Drone from the webstore here!
New Epirian STL release - Contractor Drone!
Posted on Monday Aug 07, 2023 at 05:00pm in Models
A Contractor Defender unit holds the line.
This digital model pack contains STL files for both supported and unsupported versions of the Contractor Drone, with multiple equipment options. The model has been slightly updated from the original resin release, with taller legs and the addition of the linked Strike Missile option. A 3D printed resin version will also be added to the webstore in the near future.
Contractor Drone Render
These drones are added to Contractor Defender or Contractor Scout units. You can find the rules for these units in the downloads section of the Maelstrom's Edge website here.
Start building your army of shooty robotic doom by grabbing your Contractor Drone from the webstore here!
New STL Release for the Broken - Forsaken Tech Chieftain
Posted on Monday Jul 10, 2023 at 05:00pm in Models
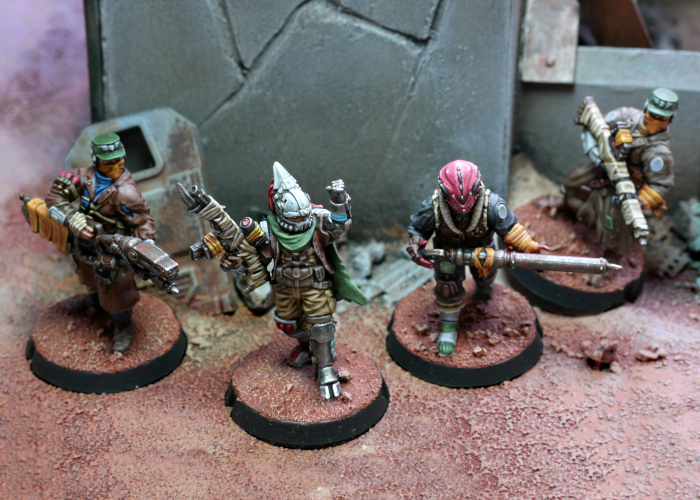
A Chieftain leading a Rabble unit into battle.
This digital pack includes both supported and unsupported files of a male and female version of the Tech Chieftain, and with options for two different customised weapons: a beam blastgun or a slug rifle.
3D printed examples, printed on an Anycubic Mono 4K using Elegoo ABS-like resin at 35μm using Lychee slicer.
Printing results will vary depending on your printer, resin and settings.
You can find the rules for fielding these models in the downloads section of the Maelstrom's Edge website here.
Start building your strike force of cybernetic doom by grabbing some Broken models from the Maelstrom's Edge webstore here!
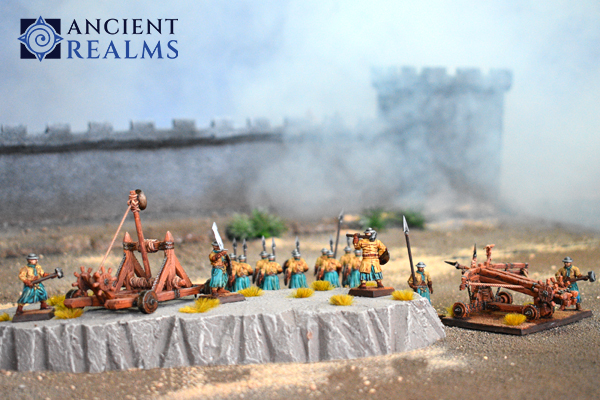
The Ancient Realms Siege Engine Kickstarter is now live!
Posted on Monday Jun 19, 2023 at 04:02pm in Ancient Realms
You can find it here!
New Kickstarter Campaign inbound - Siege Engines!
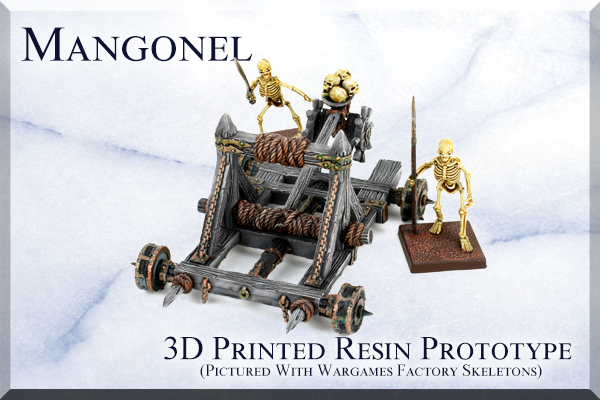
Posted on Friday Jun 16, 2023 at 05:00pm in Ancient Realms
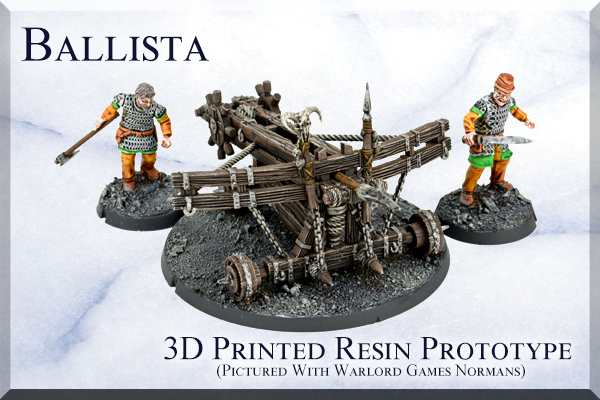
The campaign is launching with two kits available as rewards - the ballista and mangonel. These are supplied without crew or bases, so you can add your own to fit them into whichever game system you choose. Stretch goals will unlock a covered battering ram and trebuchet as add-ons.
The campaign is due to launch on Monday the 19th of June, and will run for two weeks. Visit the pre-launch page here and click the 'Notify me on launch' button to receive an automatic reminder when the project goes live!
Tags: kickstarter
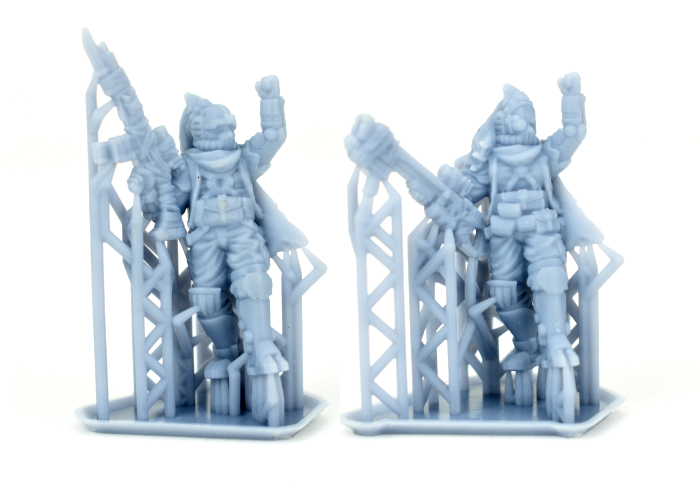
New STL Release - Broken Forsaken Chieftain
Posted on Monday May 29, 2023 at 05:00pm in Models

The appearance of a Chieftain varies wildly based upon the culture of their original planet and also the Freeport that they currently call home. They tend to have slightly nicer clothing and equipment than standard rabble, and many Chieftains see it as their duty to show that an individual can still rise up through the ranks of the Broken while carrying themselves with dignity and class. When a powerful enemy combatant is felled in battle, a Chieftain will confiscate something of value from them, whether it be a chunk of armor or an heirloom weapon. These purloined treasures are worn into future battles by the Chieftain, both as a reminder of the victory, and a symbol of their great leadership.
Originally released in resin, the Chieftain now available to purchase in STL form for 3D printing, from the Maelstrom's Edge store here!
The included model variants.
This digital pack includes both supported and unsupported files of a male and female version of the Forsaken Chieftain, and with options for a poisoned blade or trophy melee weapon in the left hand and a slug pistol or xenos spotter for the right hand.
3D printed examples, printed on an Anycubic Mono 4K using Elegoo ABS-like resin at 35μm using Lychee slicer.
Printing results will vary depending on your printer, resin and settings.
You can find the rules for fielding these models in the downloads section of the Maelstrom's Edge website here.
Start building your strike force of sneaky doom by grabbing some Broken models from the Maelstrom's Edge webstore here!
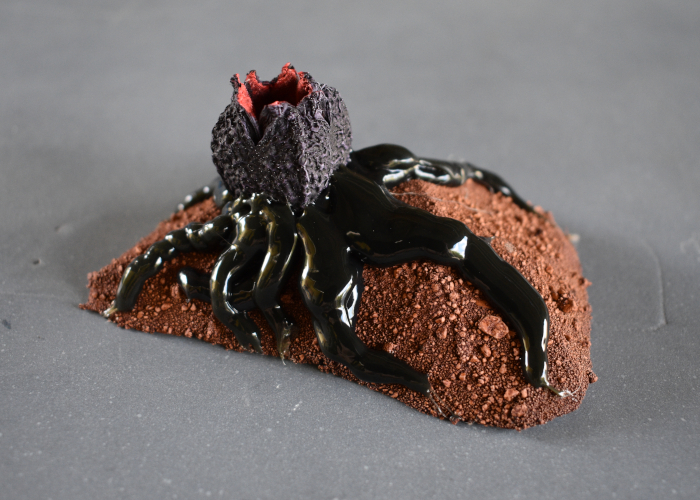
Terrain Tutorial: Alien Plants from Seedpods and Hot Glue!
Posted on Saturday May 06, 2023 at 05:00pm in Tutorials
 - by Iain Wilson
Anyone who scratchbuilds terrain knows that the best part of the process is finding new things to turn into terrain! I recently wound up with a whole box full of black hot glue sticks, and had been looking for a good project to use some of them up. Then my wife came home with a bag of seed pods she had collected from a tree she saw somewhere, and an idea was born. Read on to see how these alien ... er... plants? Yes, that'll do... came to life!
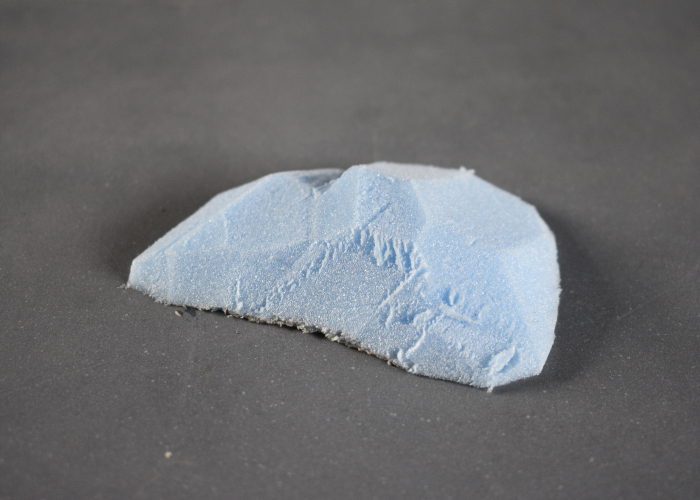
I started out with some blue insulation foam. If you haven't used this stuff before, it's a very firm expanded polystyrene sheet that some people use for insulating walls or somesuch boring thing, and sensible people use for making terrain as it's more solid and durable, and easy to work with than the more common white foam sheet.
Using a sharp knife, I cut the foam sheet into a low, hilly shape. You can use a hobby knife for this, although I used an old kitchen knife. (Don't use your good knives, as cutting foam will dull the blade!)
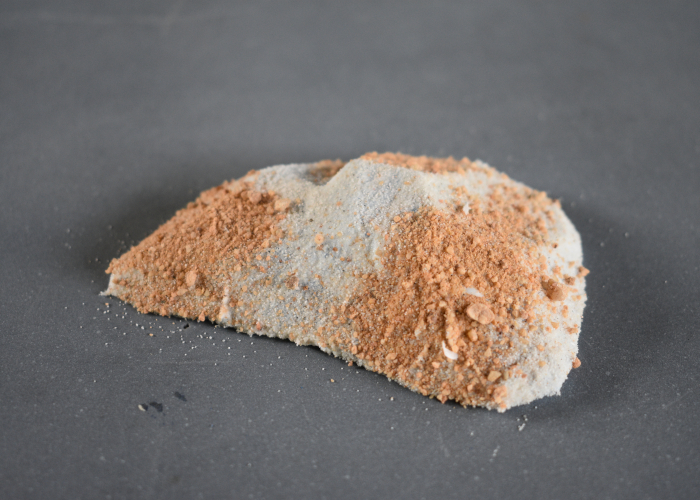
After painting a generous coat of PVA glue over the foam, I sprinkled on a couple of different types of sand, to create some varying texture over the whole thing.
Once the PVA had time to dry, I used a blob of hot glue to stick a seedpod in place. (For multiple pieces, making the base pieces different sizes and using different numbers of seedpods on each will help avoid them all looking too similar on the table!)
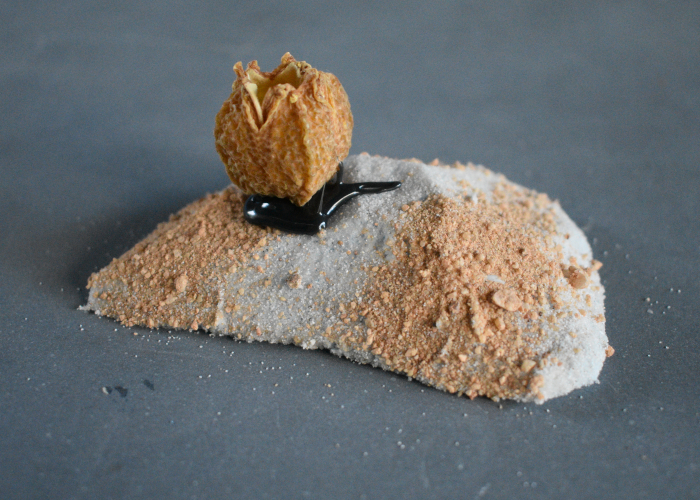
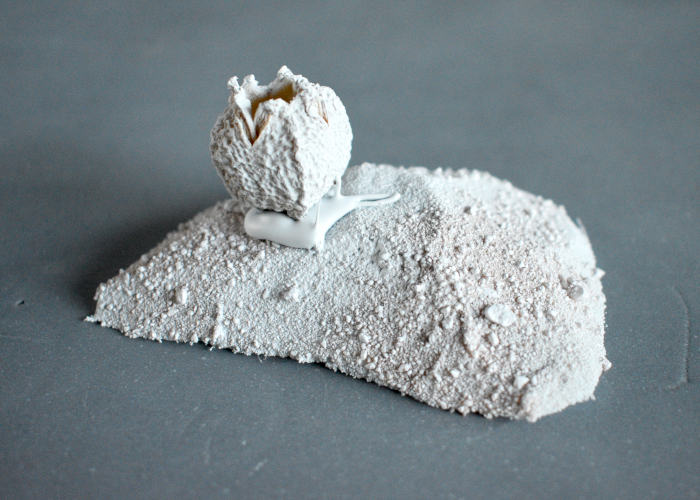
At this point, as I wasn't intending to paint over the hot glue parts of the plants, it was time to get some paint on, starting with a spray of matte white.
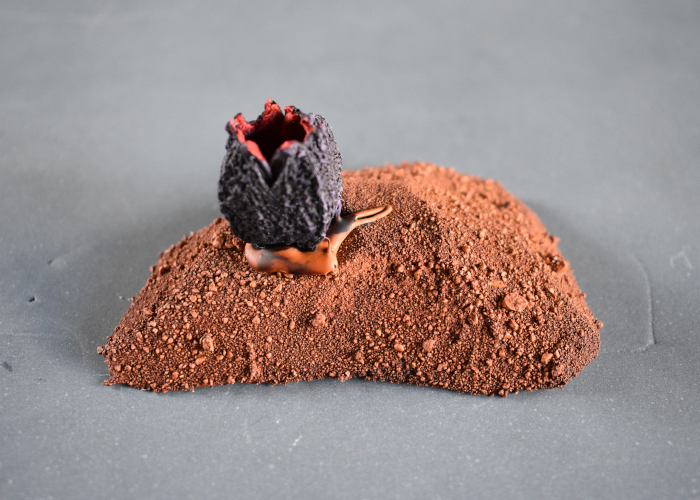
I then added some colour using Army Painter Speedpaints - Blood Red on the inside of the pod, Hive Dweller Purple on the outside, and a generous coat of Hardened Leather over the sand. A coat of matte sealer can also be a good idea here, to make sure that the seedpod is not exposed to the air so it will be preserved.
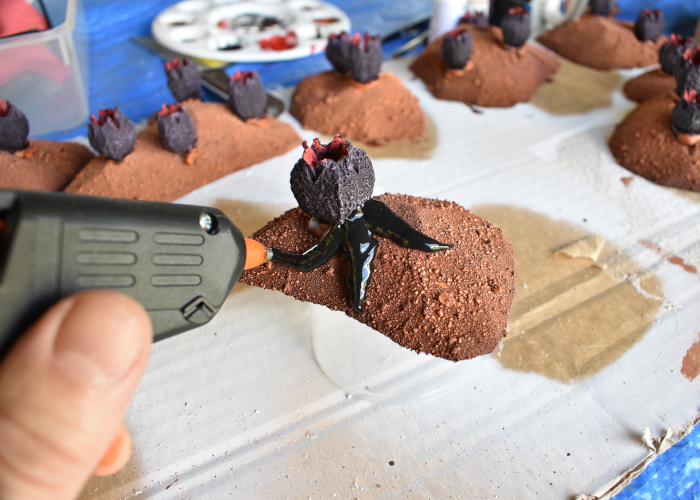
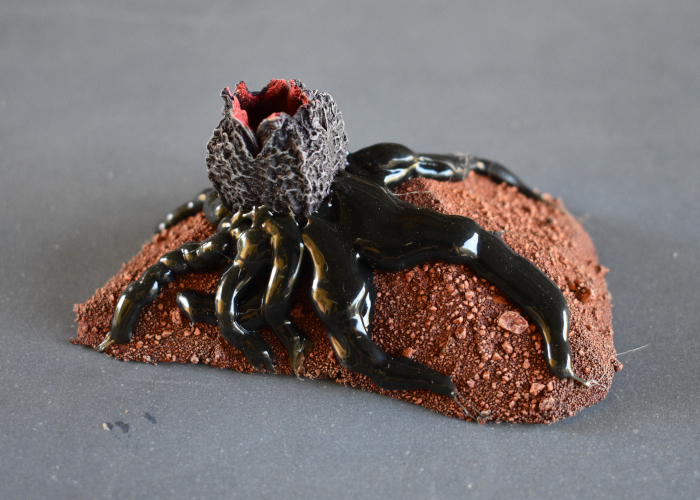
After giving the paint plenty of time to dry, it was time to go to town with the glue. Using a hot glue gun, I placed tentacle-like trails of glue outward from the seedpod, working around the pod to completely enclose the bottom of it.
A couple of tips here:
- Allowing a minute for the previous tentacle to cool before doing the next one helps to avoid them sinking into each other. If you're working on a piece with multiple pods, then doing one at a time on each pod is a handy way to go.
- Depending on how good your glue gun is, it may build up more heat (making the glue runnier) the longer it is on. This can make it harder to keep good, defined tentacle shapes, so taking a break and turning the gun off for a while can help if you're having trouble making good shapes. Although just working faster can also help, as the glue stays firmer if it is not sitting in the gun for as lone - by varying the speed you push the glue through, you can make the tentacles gloopier looking or more defined, to suit your preference.
The tentacles all in place:
(A couple of these are a little gloopier than I wanted, due to me taking a bit longer to place them while I was trying to get pics of the process, but they'll look fine in the overall terrain patch!)
To finish up, I added a light drybrush of Game Color Bonewhite over the exposed sand areas, and a mix of the Bonewhite and White over the outside of the seedpod to pick up some of the texture.
A gaggle of pod pieces all ready for the table:
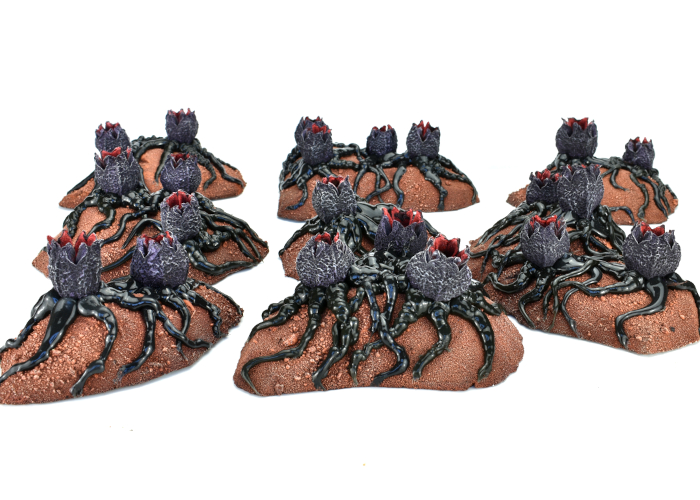
You could easily vary this to suit your own table by using different coloured glue sticks, and obviously you'll get very different results depending on the type of seedpods you use!
Once you have your vast plain of sinister biological doom, head on over to the Maelstrom's Edge webstore here, to pick up an army to run around in it!
What are you working on? We would love to see your models and terrain in the Comm Guild Facebook group!
For other building ideas, modeling tutorials, army spotlights and conversion walkthroughs, check out the Hobby section of the Maelstrom's Edge website here. And while you're there, grab a copy of the Maelstrom's Edge V2 Beta rules!
Epirian Foundation Colours - Maelstrom's Edge V2 Rulebook Preview
Posted on Wednesday Apr 19, 2023 at 06:00am in The Epirian Foundation
The Epirian Foundation‘s robotics and terraforming technologies transformed much of the Spiral Arm. The Foundation took barren, lifeless worlds and made them habitable, exploiting the resources of rocks they couldn’t turn into homes. The Foundation itself was formed as a loose coalition of independent franchises, each specialising in their own unique technologies. This guide shows just some of the many different franchise uniforms. You are of course free to come up with your own colour schemes, whether for a home-made franchise of your own, or as an alternate uniform for an existing franchise - while militia units within a franchise generally all use the same equipment, variations can occur on worlds where specific supply or environmental considerations force them to rely on local alternatives.
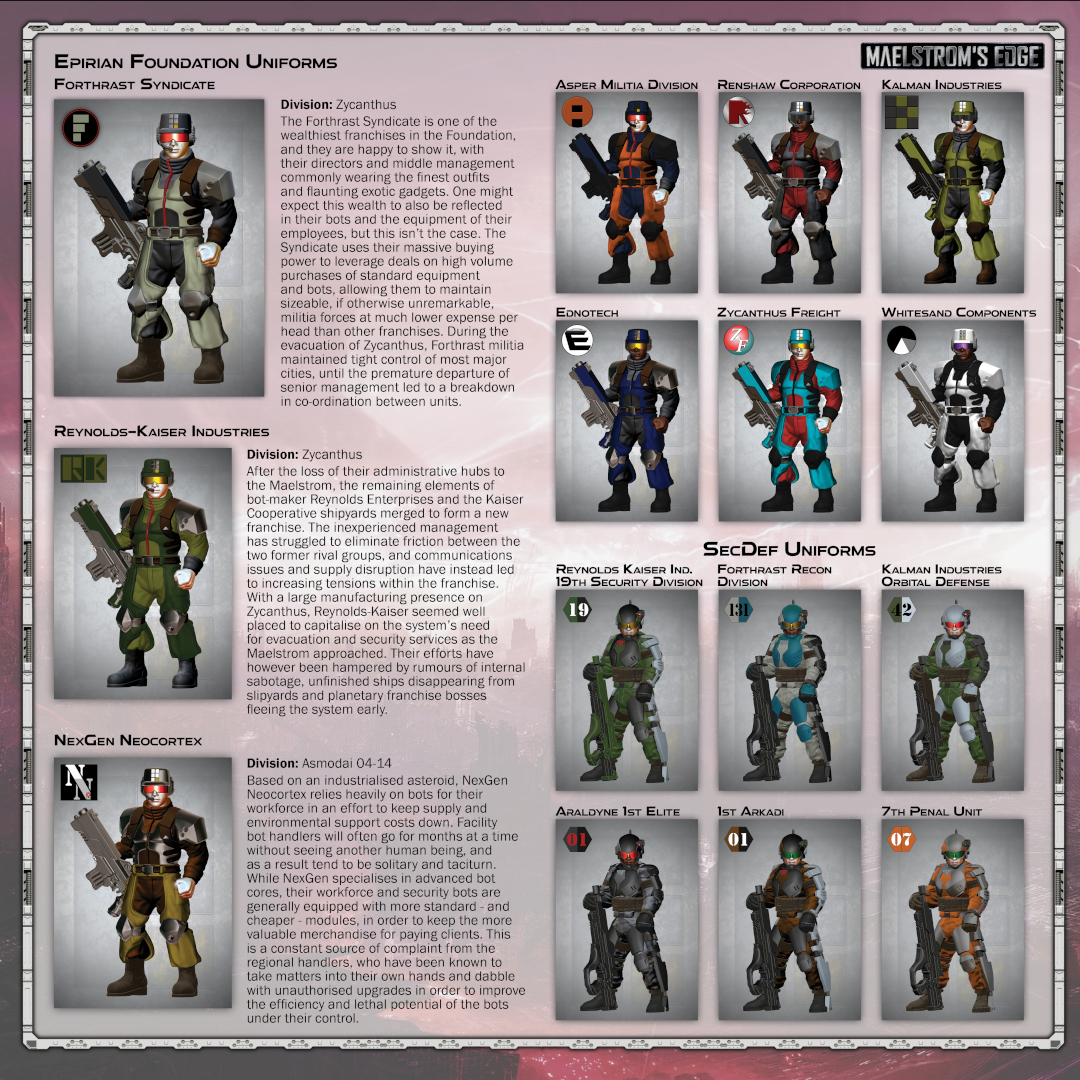
(Click the image for a larger version!)
To get started on your own army of corporate doom, pick up the Epirian models, or any of the rest of the range from the webstore here.
What are you working on? We would love to see your models and terrain in the Comm Guild Facebook group!
Remember to also grab a copy of the Maelstrom's Edge V2 Beta rules so you can get into the action!
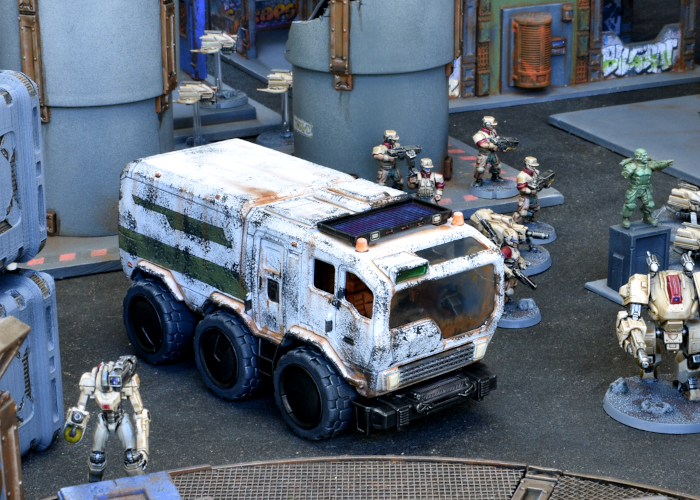
Modeling Spotlight: 'Lightyear' Hyperspeed Truck Repaint!
Posted on Thursday Mar 16, 2023 at 05:00pm in Models
- by Iain Wilson
The 'Lightyear' movie from Pixar was accompanied by a 'Hyperspeed' range of rather cool vehicle and ship toys. While the 1" figures are too small to be useful, some of the vehicles actually wind up looking just about perfect alongside gaming miniatures. The truck, in particular, was just too good to not put on the table. So after grabbing some on special from a local department store, I pulled one apart and painted it up, to see how it would look!
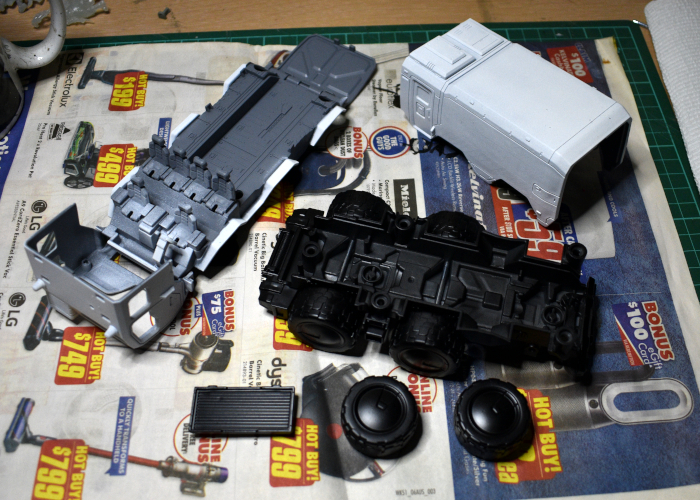
The truck is reasonably well detailed, and so to get the best results I decided to take it apart rather than trying to paint the fully assembled model. This turned out to be more difficult than expected, as two of the screws holding the back of the truck together are hidden behind the rear wheels, and the axles have textured ends that don't just pull out of the wheels - I wound up having to cut them and make a new rear axle. If I do any more of these, I'll probably just go the easy route and paint them assembled.
The truck in question before any modification:

I sprayed the chassis and wheels with Army Painter Matte Black, and the rest of the truck with Uniform Grey and then a zenithal spray of Matte White, so the grey stayed in the creases.
I didn't sand the vehicle before painting, as I was feeling lazy. The paint stuck fine to the plastic, although the printing on the sides of the truck back is slightly raised, which left a noticable shape under the paint. So I decided to just use that existing shape as a template for my own coloured decoration.
I kept the painting fairly simple, painting the seats with Army Painter Hardened Leather Speedpaint, and drybrushing the chassis with Citadel Boltgun Metal. The tyres were painted with Army Painter Uniform Grey, and then the chassis and wheels given a coat of Speedpaint Gravelord Grey. I wanted the truck to look a bit used, so after reassembling everything I weathered the white with some Vallejo Heavy Charcoal applied with a sponge, and drybrushed on some Vallejo Beasty Brown in the crevasses. The various lights were picked out with white and then various appropriate Speedpaints.
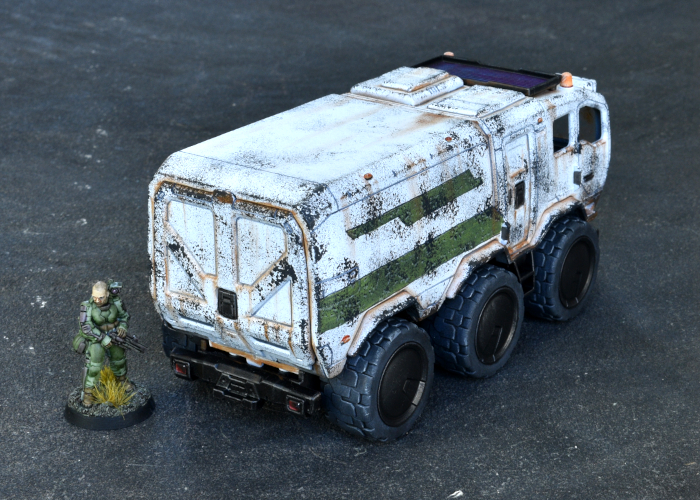
The finished truck, with the original for comparison:
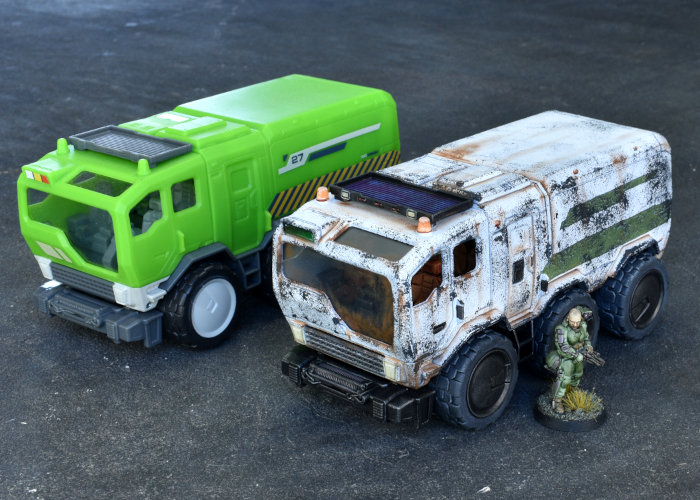
I'm calling it the 'ParSec 12 Medium Transport'. You'll get there in a ParSec!
Once you've built your own fleet of cargo-carrying doom, head to the Maelstrom's Edge webstore here, to pick up some miniatures to attack it with!
We would love to see your models and terrain in the Comm Guild Facebook group. Pop in over there and share what you're working on!
For other building ideas, modeling tutorials, army spotlights and conversion walkthroughs, check out the Hobby section of the Maelstrom's Edge website here. And while you're there, grab a copy of the Maelstrom's Edge V2 Beta rules!
