Unofficial Faction Rules - Imperial Marines.
Posted on Monday Sept 21, 2020 at 05:00pm in Gaming
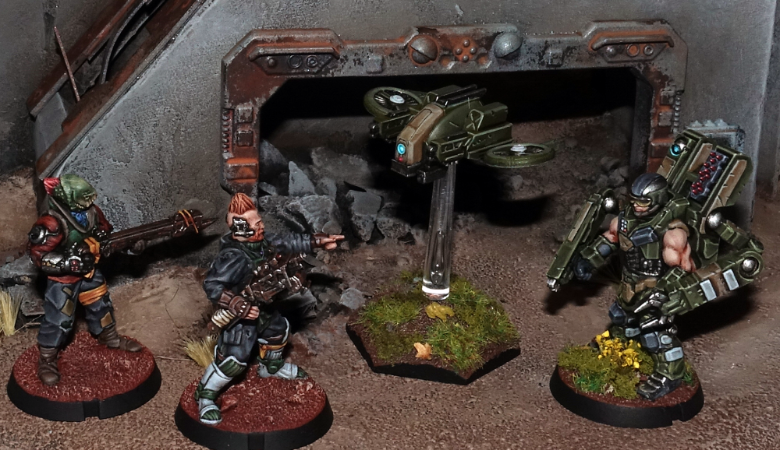
When you've been dabbling in miniature wargames for a while, miniatures have a way of accruing, particularly if you collect multiple games systems. And that's fine, since it means more miniatures for the cabinet. It can be nice, however, to get a bit more mileage out of the collection by using those miniatures in different systems from time to time. With that in mind, this week I'm breaking out some old miniatures and fleshing out an extra faction for Maelstrom's Edge at the same time, with a finished (for now) version of my unofficial Imperial Marine rules!

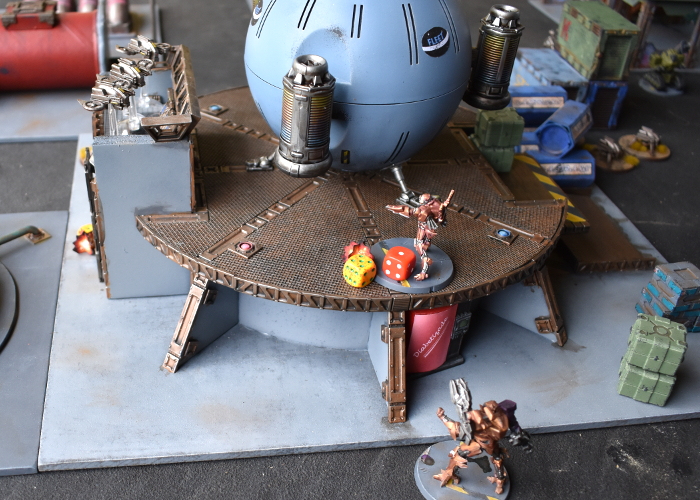
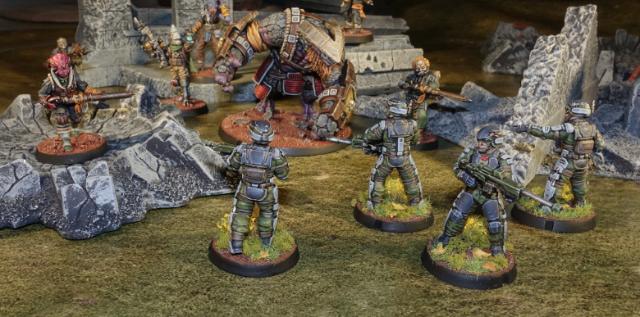
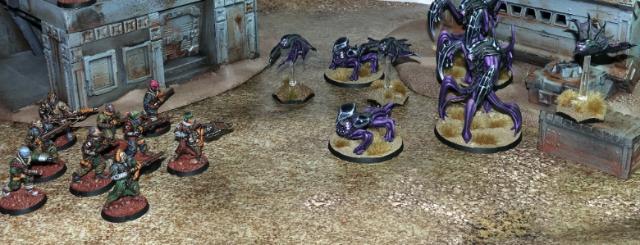
Epirians face off against an Imperial Marine force comprised of Anvil Industry Exo-Lords and an old Havok Battle Form from Bluebird Toys.
I published a very rough, WIP version of these rules some time ago, but finally found the time to flesh them out, adding some more unit and gear options to cover a wider range of models. While it doesn't include every available model option out there, this should let you field a reasonably varied force comprised of any suitably power-armoured models from any of the various manufacturers out there.

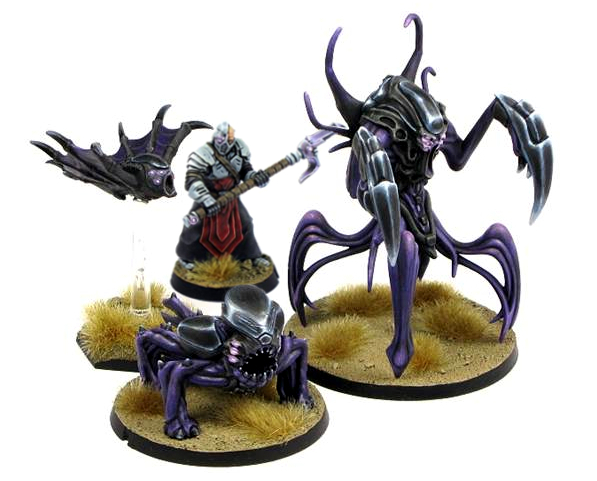
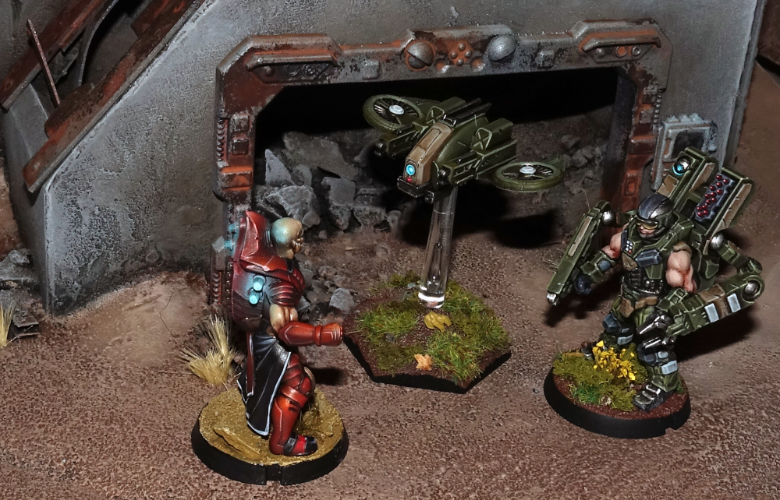
Karist troopers watch as a Mature Angel wades into an Imperial Marine force built from Games Workshop Space Marines.
The rules you'll need to build an Imperial Marine force are split into two downloads. The first compiles all of the current unit cards, while the second has the Faction Summary, listing the faction objective, weapons and applicable special rules for the Imperial Marine faction.
Imperial Marine Unit Cards - Download here
Imperial Marine Faction Summary - Download here
You can also find these in the Rules section of the Maelstrom's Edge website. Note that these rules are intended as just a fun way to use some of your non-Maelstrom's Edge models in your games. The Imperial Marine faction is not a 'canon' part of the Maelstrom's Edge background, nor are the rules an official part of the game, so you should only use them with your opponent's consent.
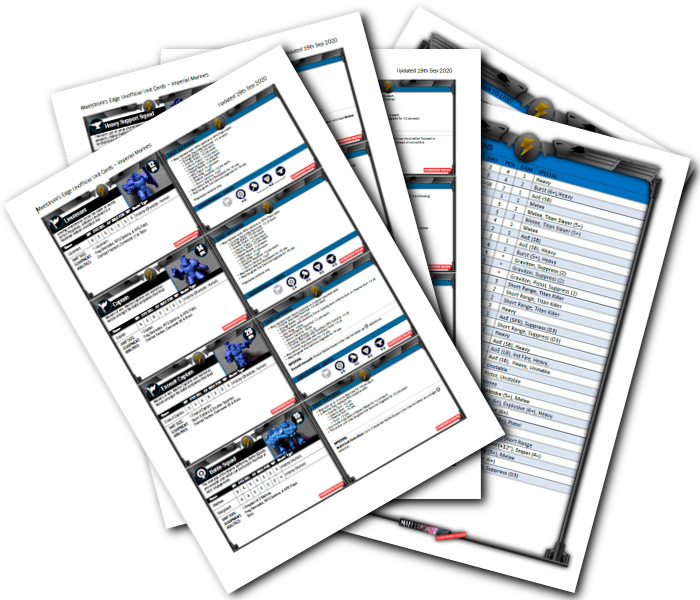
Imperial Marine rules.
In time, there will be additions to come for this faction, with some more unit options, maybe a vehicle or two, and some more Faction Objectives and commander options to flesh out different sub-factions. In the meantime, though, feel free to bust out some marines and give these rules a go!
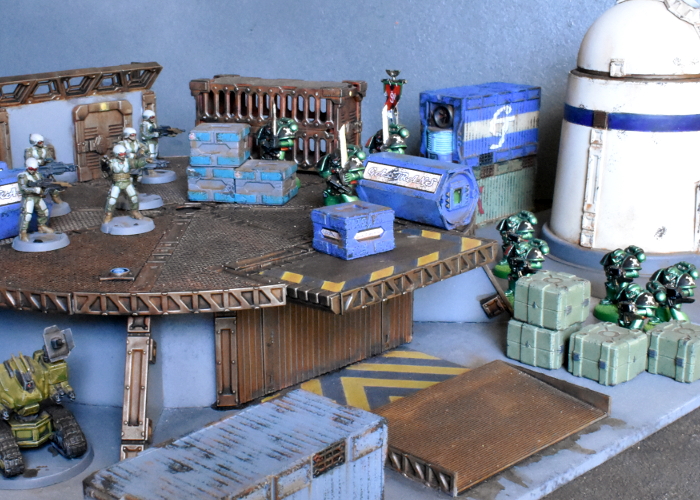
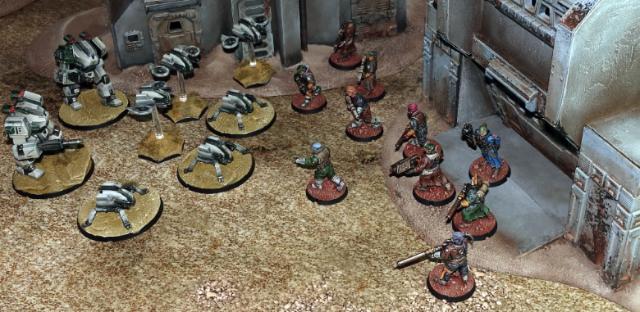
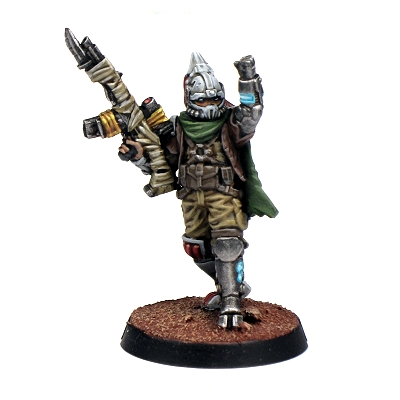
Epirian SecDef defend a landing platform against an Imperial Marine strike team. Marine miniatures taken from the long out of production Space Crusade game from Milton Bradley.
While you're gaming, you can share your battle reports, army building, or any feedback on these rules in the Comm Guild Facebook group!
And, of course, to put together some opponents for your Marine force, you can pick up the entire Maelstrom's Edge model range from the webstore here.
Non-Maelstrom's Edge miniatures used in this article are © their respective manufacturers, and are used without permission.
Battle Report: Remnant vs Epirian Foundation
Posted on Friday Sept 04, 2020 at 05:00pm in Gaming
This week, I took a small break from gluing things to other things. Slopping paint around is fun and all, but the whole point of putting these models together is, of course, to play games with them! So for a slight change of pace this week, here's a 150 point battle report featuring an Epirian Foundation force squaring off against the an Artarian Remnant fire team!
Click here to read it!
New Faction Objective Cards for the Artarian Remnant!
Posted on Tuesday Dec 10, 2019 at 05:00pm in Gaming
In keeping with the individual nature of Remnant fire teams, we've given you three different faction objectives to choose from!
When Remnant Champions go to war, their exploits are followed avidly back in their fleets by crowds of Artarians, all rooting for their favourite fire teams and champions. Crowd favour can be fickle, depending on successes or failure on the field, but the attention of the masses can provide a boost to a battling champion.
If you choose Favour of the Crowd as your faction objective, you can represent this attention through an extra command point bestowed upon the first suit you activate each turn. As champions can use command points to boost their suit systems through the Overcharge rule, this can come in very handy when a suit needs that little bit extra.
The attention of the crowds doesn't just convey approval (or lack of) to the fighting champions, but can also focus the fire team's efforts against particular enemy units at whim. The Great Hunt faction objective represents this by allowing you to nominate an enemy unit as your current Hunt target each turn. Successfully destroying this target will grant you VPs and additional command points. Even if you don't destroy your Hunt targets, though, nominating a unit as such can be a handy way of forcing your opponent to keep that unit away from the main action to avoid giving away VPs, allowing you to steer the battle where you want it to go!
Finally, the Epic Hero faction objective lets you take to the field with an accomplished hero of the Artarian Remnant. This hero's exploits have earned him fame and fortune amongst his own people, and the enmity of the enemies of the Remnant.
The Epic Hero gains you additional VPs for every enemy unit they destroy, but at the risk of also giving away a VP to your opponent if your hero is brought down!
To try these out for yourself, you can download the cards now from the Card Downloads section of the Maelstrom's Edge website. We would love to hear how they work out for you in your games, so be sure to pop over to the Comm Guild Facebook Group and share your war stories!
You can pick up the plastic Militus battlesuit model, used to create various suit variants for your Remnant fire teams, from the Maelstrom's Edge webstore here!
Trial Transport Rules - Downloadable PDF
Posted on Monday Oct 28, 2019 at 05:00pm in Gaming
From time to time, we'll be offering a chance to test out new ideas in development. These trial rules will potentially change during development, but will give you an idea of where they're going, and let you try out something new.
You can now download some trial rules for fielding vehicles that can transport infantry units around the battlefield. A version of these rules will be included in the next edition of the Maelstrom's Edge rules, but this version, tailored to fit into the V1 ruleset, lets you kick some tyres a little earlier.
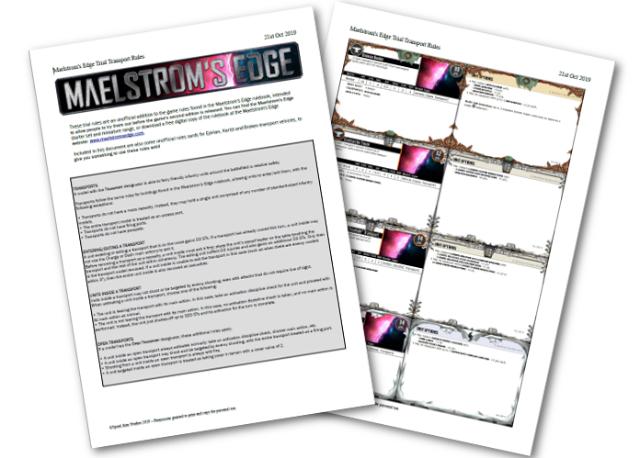
Also included in the download are some unofficial rules cards for Epirian, Karist and Broken transport vehicles, to give you something to test these rules with. Conversions to build some of these have been featured in previous Comm Guild modeling articles, and you can use these as inspiration for your own vehicles, or feel free to use whichever other appropriate vehicles you like.
You can download the trial transport rules from the Maelstrom's Edge website here.
We would love feedback on the rules, or to see your transport vehicle builds. Pop on in to the Comm Guild Facebook Group!
Printable Mission & Objective cards now online!
Posted on Monday Sept 09, 2019 at 05:00pm in Gaming
This PDF document includes all of the core Missions and Objectives, and all of the exclusive Faction Objectives for the Epirian, Karist and Broken factions. Watch this space for an update with Faction Objectives for the Artarian Remnant very soon!
Rules for the Artarian Remnant are now online!
Posted on Tuesday Jul 30, 2019 at 05:00pm in Gaming
This month, the forces of the Artarian Remnant assemble to storm the battlefields of the Edge, with the release of rules cards for the Militus battlesuit!
With a wide array of different gear and weapons available to them, the Militus is the most widespread of the suit types in use by Remnant champions. The suit classes that can be built straight from the plastic Militus kit are represented on five rules cards - two different command options, and three different troop options, which you can now find in the Remnant section of the online Force List.
Faction Abilities
All Militus suit types have the 'Aerial Insertion' rule, to represent the fire team deploying from orbit. What makes them truly special compared to other armies, though, is the 'Crowd Favorites' rule. Combat is an extreme sport for Lorican Champions, and fire teams broadcast their exploits back to adoring fans on the vast ships of the Remnant Fleets, who in turn convey their support to their chosen Champions in the form of Favor.
While Remnant forces receive Command Points each turn for any Command models in play, they also gain an additional point for every 3 Lorican Champions currently on the table. This represents the Champions being boosted by the support of the watching crowds back in the fleet. These Command Points can then be used by the Champions to Overcharge their suits, allowing them to move faster, buff their weapons, or improve their defensive abilities, at the expense of generating heat. Heat is represented by additional Suppression, and can be dispersed through the use of Venting systems.
Militus Warrior
The most common Militus class is the Warrior. A Core choice in a Remnant detachment, the Militus Warrior wields powerful ranged or melee weapons on its arms. It can be equipped with a field generator backpack, and also has access to a third, shoulder-mounted weapon or an assortment of support equipment.
Note: We will be releasing a resin upgrade pack which will include all of the support equipment options, but we have included these options on the cards for now to let you try them out!
Militus Warrior Prime
Experienced Lorican champions may eventually wind up commanding fire teams in combat, and bear the rank of 'Prime' to show their status. The Warrior Prime's 'Counterattack' ability gives his units a boost when retaliating against enemy fire.
Militus Skyrunner
The Skyrunner eschews the protection of a field generator, or the extra firepower of a shoulder mounted weapon in favour of the mobility boost provided by a Lorican Boostpack. While more limited in options than other Militus classes, the Skyrunner serves as a handy Vanguard option for capturing territory and getting the drop on slower enemy units.
A Skyrunner Prime retains the mobility of their class, and can use their enhanced view of the battlefield to better co-ordinate the movement of their units with the 'Mobile Strike' ability.
Militus Dominator
A more specialised class like the Skyrunner, the Dominator trades in support options in favour of overwhelming firepower. While they lack the ability to take the heavier weaponry available to larger Brutus class suits, Dominators opt for twin ranged weapons on their shoulders to maximise their ability to rain punishing fire on their opponents.
So, What's Next?
Well, as we mentioned, there will be a resin upgrade pack coming, with an array of different support options and some special parts to customise your Primes.
Of course, the Militus isn't the only weapon in the Remnant arsenal, and many Lorican Champions take to the field in the heavier Brutus or super-light Nimbus suits. Both of these will be added to the force with resin models later this year.
In the meantime, though, the multiple variants of Militus suit give you plenty of options for building different forces and taking on the less-well-equipped and considerably squishier factions opposing them on the Maelstrom's Edge!
The Militus kit is available now, along with the rest of the Maelstrom's Edge model range in the webstore here.
You can see the unit cards in the online Force Listing section here, and you can also find a downloadable, printable version in the 'Rules' section of the website here!
Happy Gaming!
Maelstrom's Edge V2 Rules - Help, I'm being suppressed!
Posted on Thursday Jun 13, 2019 at 03:27am in Gaming
In V2, suppression will have a much bigger impact on how your units perform on the table (more on that later!). As a side effect of that, being able to suppress enemy units becomes much more useful. We have allowed players to capitalise on this by intruducing a 'Suppression' (SUP) stat to the weapon profile.
You will now be able to choose between two different types of shooting attacks. You can fire normally, which applies suppression to the target unit if it is hit and/or damaged similarly to how it works in V1. Alternatively, you can choose to use 'Suppressive Fire', which doesn't cause direct damage like normal shooting, but allows you to roll against the weapon's SUP stat and increase the target's suppression for each successful roll. This represents your unit spraying the enemy with fire to force their heads down, rather than taking carefully aimed shots.
This gives you some tactical choices when you are electing to shoot with a unit, and also means that units armed with low powered weapons aren't necessarily completely useless against tougher opponents - you might not have much chance of wounding them with regular shooting, but you can potentially still use suppressive fire to soften them up for other units, and if their suppression goes high enough they start taking automatic damage!
If you want to know more, you can join in on the discussion of the new rules, and download a copy of the current draft rules for V2, in the development thread on the DakkaDakka forums here. You can also post any feedback in the Comm Guild Facebook group here.
If you haven't tried Maelstrom's Edge yet, and don't want to wait for V2, you can download the PDF version of the current Maelstrom's Edge rulebook from the website here!
Maelstrom's Edge V2 Rules - Getting up close and personal!
Posted on Thursday May 16, 2019 at 01:11am in Gaming
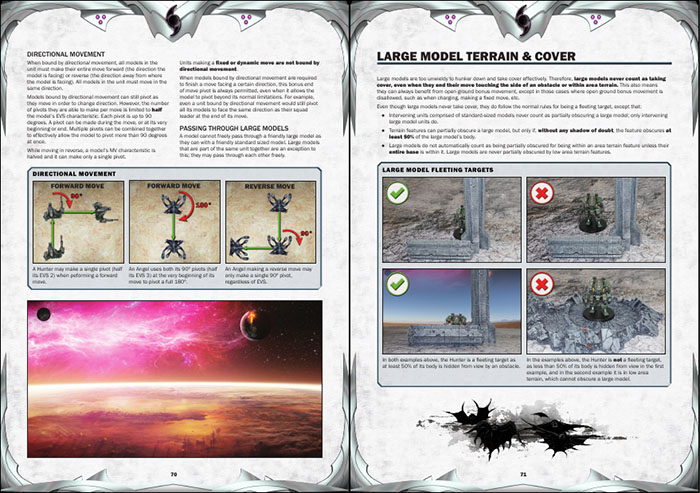
In the current Maelstrom's Edge rules, unless you have a melee weapon with a specified SHO value, the number of dice you roll for Close Quarters attacks is determined by a neat little formula that uses the model's EVS, MAS and FOR stats. While this provides some nice granularity, and allows for a large model's CQ ability to be reduced as it takes damage, it's also a little awkward to calculate on the fly. As a result, it's the one thing in the V1 rules that, going by player feedback, is almost universally disliked by players. We've taken that feedback on board for V2, and will be changing model statlines to include a shiny, new Close Quarters Attacks (CQA) characteristic!
This entirely replaces the current formula - No more algebra in the middle of the game, you just look at the CQA stat, and roll that many dice! This does mean that large models no longer lose shots as they are wounded, but this will be accounted for elsewhere, with their ability to use multiple weapons being affected instead.
You can join in on the discussion of the new rules, and download a copy of the current draft rules for V2, in the development thread on the DakkaDakka forums here. You can also post any feedback in the Comm Guild Facebook group here.
If you haven't tried Maelstrom's Edge yet, and don't want to wait for V2, you can download the PDF version of the current Maelstrom's Edge rulebook from the website here!
Battle Report - Karists vs Epirians
Posted on Wednesday May 01, 2019 at 05:00pm in Gaming
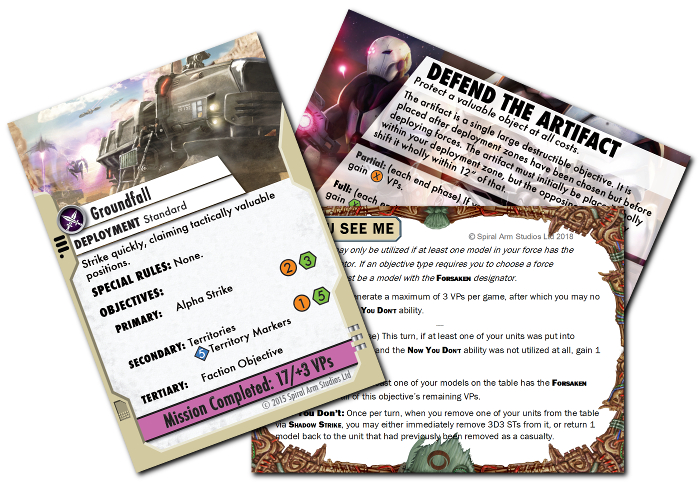
Tempest Elites with Ravager Vulcan pulse cannons and a Coriolis launcher deployed in rough terrain
No one saw them coming: the warriors in their smooth armoured plating, accompanied by the beautiful yet horrible Angels. They took the abandoned and dilapidated production facility at Argos, killing the few patrolling Contractors without mercy. A hastily assembled Epirian contingent, including a powerful Hunter Warmech and a squad of elite SecDef, arrived on the scene the next day to root out the zealot strike force. These Maelstrom-worshipping crackpots were about to pay dearly for their boldness.
This game sees an Epirian force commanded by Iain take to the field against a Karist incursion led by Jon. The mission is Groundfall, which has the Alpha Strike and Territories objectives. Points are gained by destroying enemy units and by capturing the 5 territory markers scattered across the board. Deployment was determined to be in opposing L-shapes: Karist bottom right, Epirian top left. The Karists have easy access to 3 of the 5 territory markers. Uphill battle for the Epirian side?
The Epirian commander wastes no time: Firefly drones zoom up the compound to take stock of the situation and drive out the Karist vanguard. Immediately they spot the biggest threat in the Karist force: a mature Angel. The huge beast seems all but immune to their laser attacks, however.
The Firefly Drones fly up the field but only manage to suppress the Mature Angel.
Elite Karist Tempests respond immediately, heavily damaging the Hunter Warmech with their Ravager Vulcan Pulse Cannons. The Angel also responds to the Epirian attack, taking cover whilst destroying two of the Firefly Drones with her tentacles.
The Hunter takes heavy damage from the Tempests.
Realising the Karist resistance was much stronger than anticipated and finding himself in a bit of a pickle from the get go, the Journeyman projects his mind into the Hunter's damaged shell and returns fire at the Angel in her position of cover. The shooting is ineffective, and the Angel remains unperturbed.
Pondering...
With his toughest asset is compromised, the handler quickly switches to one of his Scarecrow Snipers. The lone bot looses a precision round from its Railrifle into the Angel, hitting the mark this time and visibly hurting the creature.
The Angel finally takes damage from the Scarecrow. Their low-shot sniper weapons can literally be hit or miss, but they have huge damage potential.
The Karist Kaddar Nova, witnessing the opening rounds of the engagement, chooses to maintain the momentum and attempt to finish this quickly, dashing out from his position on his own and taking down another Firefly. His troopers nearby follow suit and down another of the now completely hammered squad of Fireflies. His Angel, meanwhile, takes another Railrifle round from a second sniper robot in the distance, and is now badly hurt. The Karist troops need to act fast, as more bots are fast approaching their position and laying down fire on the juvenile angels on the other flank.
The Karist commander exposes himself, but downs a Firefly, and the nearby troopers destroyed another one. In the Groundfall mission, getting the first kill of the turn is worth a lot of points.
The last Firefly crashes and burns after more Karist troopers lay down a hail of suppressive fire, giving the Enclave the first kill.
Troopers finish off the fireflies, giving the Karists the crucial first kill.
The Foundation commander, witnessing how the Karists are holding a strong firm and his own forces struggling to get in a dominating position, carefully moves up his remaining force through the compound. The contractors launch a few grenade shells into the Karist line to suppress their fire and buy their robotic comrades some time.
Contractors returning fire at the Karist troopers.
Meanwhile, an enigmatic Shadow Walker rifts into hiding near the Epirian flank, with an eye to neutralising the sniper threat. The Angel Keeper assigned to the contingent of Angels in the force has his Juvenile beasts rain down cybel energy on the advancing Drone force, keeping all eyes off the sinister agent stalking up the flank.
The Spider Drones equipped with flakk guns are too far from the action to contribute, and the Angel Hellblasters aim to keep it that way by suppressing them.
The SecDef sergeant, watching the assault unfold on his transport's screen, sighs deeply as his opinion of robotic forces is once again confirmed. Deciding he needs to show how it's done and he'd better do it now, he signalls for his squad to drop right into the Karist position. Landing with guns blazing, he is pleased to see the nearby Karist Troopers turn their heads in surprise and duck down.
SecDef troopers drop behind enemy lines.
Out of nowhere, though, appears a flock of dark fluttering creatures: Angel minnows on the hunt. They frenziedly fire their cybel pulses at the SecDef landing zone. Even though the SecDef had taken up a safe position in cover, they lose one soldier to this alien assault from above.
The Minnows move towards and target the SecDef squad that just dropped behind both trooper squads.
The larger Angel, severely weakened by the merciless sniper fire, seems to lose form and suddenly disappears from the fight just as the Hunter's guns ready for another salvo at this most dangerous foe. Moments later the Hunter explodes in a cloud of shrapnel as the Tempest Elites continue their barrage.
End of the first turn: Jon elects to remove his dangerously wounded Mature Angel in order to deny the Epirians an easy first kill in the coming turn. The Karists hold 3 out of 5 territory objectives, whilst the Epirians have the other two. Iain, having left his damaged hunter on the table, immediately regrets this as the Tempests destroy it in the first action of the second turn and score those valuable first kill points again.
The SecDef realise something needs to happen now. Ignoring the smaller Angels spewing death onto their position, they take aim and down two Karist Troopers, hoping to break the Karist line from the rear.
The SecDef are in position to damage various Karist squads, taking advantage of their assault from the rear, but they are in turn dangerously surrounded.
The Journeyman Handler, taking the SecDef's cue, coordinates the fire of his Scarecrow Sniper with the SecDef squad, catching the Karist Troopers in a crossfire that wipes them out. The tables seem to be turning.
The Scarecrow again shows its potential as it wipes out the remains of a Karist squad.
Ignoring the little Angels would prove a costly mistake, however, as they now came down on the SecDef position. Despite killing several of the flying beasts, the SecDef lose two more soldiers to the pulsing cybel energy, leaving the Sergeant alone to escape the Angel threat and run for cover.
The SecDef sergeant flees from the angry Minnows. Aerial insertion is a powerful ability, but dropping in the middle of the enemy lines comes with certain risks...
The larger Angel Hellblaster also takes a heavy toll as another cybel salvo immolates all of the approaching Spider Drones. The Kaddar Nova, sensing victory and eager to lead by example, dashes forward, emerging from the Karist lines to personally end this heretic assault.
The powerful blasts from the juvenile Angels reduce the Spider Drone squad to just their handler.
Seeing the Karist leader run out and resolved to capitalize on the hole punched in the Karist line by the SecDef's assault, the Journeyman Handler links again to one of the Scarecrow Snipers, dangerously overloading its circuits, in a desperate attempt to deal the deciding blow to the enemy. A precision shot hits the Kaddar Nova square in the chest, ending the priest's heroic ambitions immediately. Surely this would break those crazy zealots! Meanwhile, the contractors move up to secure their end of the compound and open up on the Angel Hellblasters, with little effect.
Hellblasters with their Angel Keeper in their position of cover, guarding one of the objectives.
The Shadow Walker rifts up the field once more, cursing the Kaddar Nova's poor timing, but intending to take down the Sniper bots that were wreaking such havoc on his compatriots. His pistol shots glance off the nearest bot, however, as its position is well protected.
Registering this new close-ranged treat, the nearby bots all respond: the flakk guns on the Relay drone opening up and the Sniper bot quickly taking a shot at the advancing enemy agent. The nimble Shadow Walker, however, manages to dodge unscathed through the hail of incoming fire.
Suddenly the terrifying shape of the Mature Angel reappears at the edge of the compound, immediately bearing down on the lone SecDef sergeant. The veteran soldier stands no chance against this alien monster and quickly falls to its slashing attack.
By voluntarily removing the badly damaged Angel earlier in the game, Jon ensured he would have a strong reinforcement to bring on later. She can now come back to finish off another unit, grabbing the Karists enough points to finish the game.
Realising his situation, the Journeyman Handler orders his force to retreat into cover and await further reinforcements. The Karist force remains in control of the compound, for now.
Epilogue: Iain's decision to keep his Spider drones back to hold objectives rather than sending them after Karist targets, combined with essentially sacrificing his Firefly unit by sending them out into the open unsupported allowed Jon to make the most of the mission with his more aggressive Karist units. While the Scarecrows did their best to even up the playing field, the rapid casualties inflicted on the Epirian force allowed Jon to very quickly rack up enough VPs for a turn 2 victory.
Tags: battlereport epirian karist
Download the Maelstrom's Edge Rulebook for free!
Posted on Wednesday Apr 24, 2019 at 05:00pm in Gaming
 With work underway for a revised 'Version 2' of the Maelstrom's Edge rules, the current rulebook is now being offered for free download in PDF form! You can download it from here.
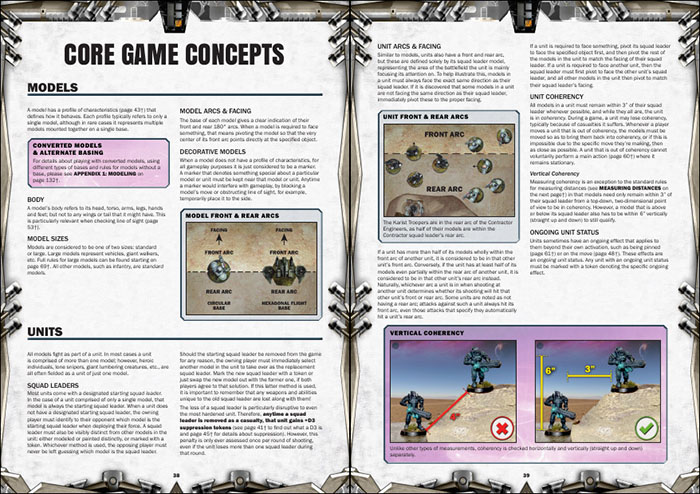
The Maelstrom's Edge Digital Rulebook is a 144 page PDF document containing the background lore of the Maelstrom's Edge universe and the rules for the game, with scores of photographs and diagrams. The document has a complete bookmark structure and clickable links in both the index and in-text references, so you can quickly navigate your way through the rules. The contents of the digital rulebook are identical to those in the printed rulebook found in the box set.
The Maelstrom's Edge Rulebook features the following content:
- The Universe of Maelstrom's Edge
- The Factions
- Game Overview
- Core Game Concepts
- Characteristics, Versus Rolls & Suppression
- Movement & Terrain
- Shooting & Cover
- Unit Activation & Actions
- Charge Action
- Model Type
- Large Models
- Weapon & Unit Abilities
- Buildings
- Playing a Game
- Mission Objectives
- Selecting Your Force
- Narrative Missions
- Forces of the Epirian Foundation
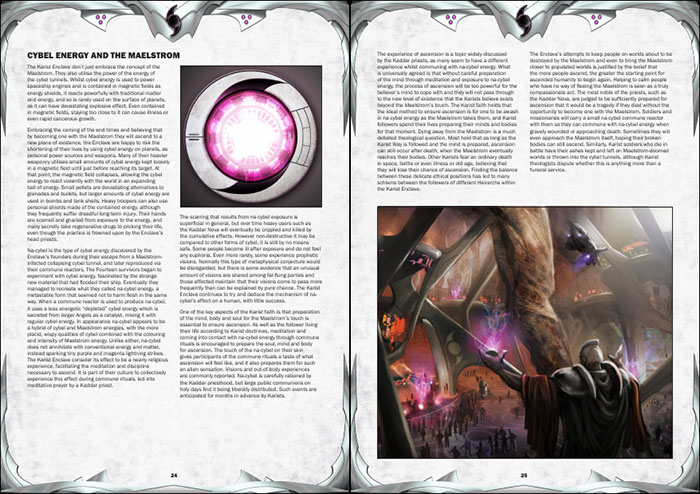
- Forces of the Karist Enclave
- Appendices
- Rules Finder
Download it here.
Website Update - Printable Unit Cards!
Posted on Thursday Nov 15, 2018 at 07:08pm in Gaming
The Maelstrom's Edge website has an online unit card viewer (which you can find here), allowing you to see the stats, options and special rules for each uit in the game.
As part of our ongoing upgrade to the website, we have now also added printable PDF card compilations for each faction. You can find these in the Rules section, along with the summary sheets, samples force rosters and gameplay tutorials!
Sample Force Rosters for the Broken
Posted on Wednesday Oct 10, 2018 at 06:00pm in Gaming
When the Battle For Zycanthus boxed set was released, we published some sample force rosters for the Karist and Epirian factions based on the models in the set, to help give new players an idea of what a Maelstrom's Edge force could look like. Since then, we have released a stack of new models and introduced a third faction, the Broken, to the game, so it seemed like a good idea to add some new force rosters to the sample collection. Below, you'll find three different sample force rosters for the Broken, and a breakdown of which models you would need to put them together.
LIST #1 - ALL-PLASTIC 120 POINTS
(a standard 'small' game, using just the plastic Broken Infantry Pack models)
Detachment #1 (of 2)
| TYPE | UNIT | UPGRADE | POINTS |
| [Command] | Forsaken Chieftain (8) | x2 Beam Pistols (+0) | 8 pts |
| [Core] | Broken Rabble (5) | x1 extra Broken Rabble (+1) | |
| x1 Chem Launcher (+1) | |||
| x1 EMP Harpoon (+1) | 8 pts | ||
| [Core] | Broken Rabble (5) | x2 extra Broken Rabble (+2) | |
| x1 Chem Launcher (+1) | |||
| x1 Glue Rifle (+1) | 9 pts | ||
| [Core] | Broken Rabble (5) | x2 extra Broken Rabble (+1) | |
| x1 Auto Slugger (+1) | |||
| x1 Longbeam Rifle (+1) | 9 pts | ||
| [Hammer] | Rabble Assault (8) | x2 extra Broken Rabble (+4) | |
| x3 EMP Harpoon (+0) | 12 pts | ||
| [Hammer] | Rabble Assault (8) | x2 extra Broken Rabble (+4) | |
| x3 Massive Torch (+3) | |||
| x2 replace Beam Blastgun with Chem Pistol & Slug Pistol (-2) | |||
| Boss replaces Beam Blastgun with Chem Pistol & Grenade Harness (-1) | 12 pts | ||
| [Anvil] | Rabble Fire Support (5) | x2 extra Broken Rabble (+2) | |
| x3 Longbeam Rifle (+6) | 13 pts | ||
| [Anvil] | Rabble Fire Support (5) | x2 extra Broken Rabble (+2) | |
| x3 Longbeam Rifle (+6) | 13 pts | ||
| DETACHMENT #1 TOTAL | 84 pts |
Detachment #2 (of 2)
| TYPE | UNIT | UPGRADE | POINTS |
| [Command] | Forsaken Chieftain (8) | replace Slug Rifle with Beam Blastgun (+1) | 9 pts |
| [Core] | Broken Rabble (5) | x1 extra Broken Rabble (+1) | |
| x1 Chem Launcher (+1) | |||
| x1 EMP Harpoon (+1) | |||
| Boss replaces Slug Rifle with Chem Pistol & Grenade Harness (+0) | 8 pts | ||
| [Core] | Broken Rabble (5) | x2 extra Broken Rabble (+2) | |
| x1 Emp Harpoon (+1) | |||
| x1 Glue Rifle (+1) | |||
| Boss replaces Slug Rifle with Grenade Harness & Slug Pistol (+0) | 9 pts | ||
| [Anvil] | Rabble Fire Support (5) | x2 extra Broken Rabble (+2) | |
| x3 Auto Slugger (+3) | 10 pts | ||
| DETACHMENT #2 TOTAL | 36 pts | ||
| GRAND TOTAL | 120 pts |
Models needed:
- Broken Infantry Pack x10.
The two Chieftains for this list are built from the plastic set, which is why there are two Rabble units that only have 5 in the unit.
LIST #2 - 120 POINTS
(a standard 'small' game, using a mix of plastic and resin Broken models)
Detachment #1 (of 2)
| TYPE | UNIT | UPGRADE | POINTS |
| [Command] | Forsaken Chieftain (8) | x1 Beam Pistol (+0) | |
| x1 Trophy Melee Weapon (+1) | |||
| Xeno Spotter (+1) | |||
| Customized Weapons (+2) | 12 pts | ||
| [Core] | Broken Rabble (5) | x2 extra Broken Rabble (+2) | |
| x1 Chem Launcher (+1) | |||
| x1 Glue Rifle (+1) | 9 pts | ||
| [Core] | Broken Rabble (5) | x2 extra Broken Rabble (+2) | |
| x1 Auto Slugger (+1) | |||
| x1 Longbeam Rifle (+1) | 9 pts | ||
| [Hammer] | Rabble Assault (8) | x1 Marsayan Hypnotist (+2) | |
| x3 Massive Torch (+3) | 13 pts | ||
| [Hammer] | Rabble Assault (8) | x1 extra Broken Rabble (+2) | |
| x1 Hakoyu Grand Master (+4) | |||
| x3 EMP Harpoon (+0) | 14 pts | ||
| [Vanguard] | x2 Sig Jammer (12) | 12 pts | |
| [Anvil] | Gnolti (10) | 10 pts | |
| [Anvil] | Rabble Fire Support (5) | x1 extra Broken Rabble (+1) | |
| x3 Longbeam Rifle (+6) | 12 pts | ||
| DETACHMENT #1 TOTAL | 91 pts |
Detachment #2 (of 2)
| TYPE | UNIT | UPGRADE | POINTS |
| [Command] | Forsaken Chieftain (8) | Customized Weapons (+2) | |
| Extensive Cybernetics (+2) | 12 pts | ||
| [Core] | Broken Rabble (5) | x2 extra Broken Rabble (+2) | |
| x1 Chem Launcher (+1) | |||
| x1 EMP Harpoon (+1) | |||
| Boss replaces Slug Rifle with Chem Pistol & Grenade Harness (+0) | 9 pts | ||
| [Anvil] | Rabble Fire Support (5) | x3 Auto Slugger (+3) | 8 pts |
| DETACHMENT #2 TOTAL | 29 pts | ||
| GRAND TOTAL | 120 pts |
Models needed:
- Broken Infantry Pack x6
- Forsaken Chieftain x1
- Forsaken Tech Chieftain x1
- Sig Jammer x2
- Marsayan Hypnotist x1
- Hakoyu Grand Master x1
- Gnolti x1
LIST #3 - 120 POINTS, SINGLE DETACHMENT
(a mix of plastic and resin models, optimized to fit into a single detachment)
| TYPE | UNIT | UPGRADE | POINTS |
| [Command] | Forsaken Chieftain (8) | x1 Trophy Melee Weapon (+1) | |
| Xeno Spotter (+1) | |||
| Customized Weapons (+2) | |||
| Extensive Cybernetics (+2) | 15 pts | ||
| [Core] | Broken Rabble (5) | x2 extra Broken Rabble (+2) | |
| x1 Auto Slugger (+1) | |||
| x1 Longbeam Rifle (+1) | 9 pts | ||
| [Core] | Broken Rabble (5) | x2 extra Broken Rabble (+2) | |
| x1 Chem Launcher (+1) | |||
| x1 EMP Harpoon (+1) | 9 pts | ||
| [Hammer] | Rabble Assault (8) | x2 Hakoyu Grand Master (+8) | |
| x3 Torch (+0) | 16 pts | ||
| [Hammer] | Rabble Assault (8) | x2 Hakoyu Grand Master (+8) | |
| x3 Massive Torch (+3) | 19 pts | ||
| [Vanguard] | x2 Sig Jammer (12) | 12 pts | |
| [Anvil] | x2 Gnolti (10) | 20 pts | |
| [Anvil] | Rabble Fire Support (5) | x2 extra Broken Rabble (+2) | |
| x3 Longbeam Rifle (+6) | 13 pts | ||
| TOTAL | 112 pts |
Models needed:
- Broken Infantry Pack x5 (you'll have a couple of models spare)
- Forsaken Chieftain x1
- Sig Jammer x2
- Hakoyu Grand Master x4
- Gnolti x2
Note that for the above list, you could get to 119 points by dropping the Rabble Fire Support and including another two Gnolti instead!
Hopefully the above force rosters will give you some idea of how to plan your force. If you're looking for the force rosters for the Karist and Epirian factions, you can find them on the Maelstrom's Edge website here.
To assemble your own force, you can pick up the above models, and the rest of the Maelstrom's Edge model range, from the webstore here.
Happy Gaming!
New Karist Faction Objective Card: First Contact
Posted on Wednesday Oct 03, 2018 at 06:00pm in Gaming
Although the existence of the xenos species called Angels was not completely unknown to the inhabitants of the spiral arm, only a handful of academics and long-standing spacefarers truly knew of them before the Karists began using Angels for their military and propaganda purposes. To everyone else, they were always simply a myth or legend bragged about by starship captains who had spent too many years traversing the void.
Karists tout that these creatures are emissaries of of the Maelstrom, with their priests having helped coined the name 'Angels' to describe them. When Karist priests attempt to sway the populace of a world to their cause, they often mention Angels, or even utilize a live Angel as a demonstration. For how can creatures so powerful and strange, they argue, serve the will of the Karists if their cause were not just and true?
The First Contact faction objective represents a number of new avenues for our game. It is the first of several planned new faction objectives tied to particular models, helping to create different types of themed forces you can choose to utilize within the overarching umbrella of the existing forces. To this end, your force must include an Angel Keeper for you to be able to use the First Contact faction objetive.
First Contact
This objective may only be utilized if your force contains an Angel Keeper. If an objective type requires you to choose a force commander, it must be an Angel Keeper.
This objective can generate a maximum of 3 VPs per game, after which your units no longer benefit from the IrratIonal Fear ability.
Partial: (conditional) Each time a non-fearless enemy unit fails any type of discipline check (even an automatic failure) while affected by the Fearsome ability of your Angel units, gain 1 VP.
Full: N/A
Irrational Fear: Friendly models with the angel designator gain the Fearsome (1) ability, or add +1 to their existing Fearsome ability.
You can download a printable version of this card here.
The existing basic faction objectives ('Secret Cache' for the Karists, 'Now You See Me' for the Broken and 'Automated Uplink Relay' for the Epirians) all work roughly the same way: they provide your forces an optional bonus, which you can choose to forgo each turn to instead gain +1 victory point. First Contact, on the other hand, provides your force with an automatic bonus: namely improving your Angel's 'Fearsome' ability, and successfully utilizing that bonus is what scores you the objective's victory points. Even better, this is the first faction objective where it is possible to earn the maximum 3 victory points in a single turn, even theoretically in the first turn of the game, which would definitely put your opponent on their back foot right out of the gate!
But that raises the obvious question: how can First Contact possibly be balanced compared to the existing two faction objectives? The answer is that the other two objectives provide you with better situational control. When you need a victory point, you can generate one, but when you need the bonus provided by the objective, you can utilize that instead. With First Contact, once you've generated your 3 victory points from it, the bonus provided by it ends and you're stuck the rest of the game without it, even if you would have preferred to keep the bonus around longer in lieu of gaining all 3 victory points.
We would love for you to try out some games with both the Angel Keeper and First Contact rules and let us know what you think about them. If you've got any feedback (with or without playing any games with the rules), please feel free to provide it either by replying to this article directly, or on our Comm-Guild Facebook group or in the Maelstrom's Edge forum on Dakka Dakka.
You can flesh out your shape-shifting alien force by picking up an Angel Keeper and any of the different types of angels from the Maelstrom's Edge webstore here!
Tags: faction gaming karist objectives rules
Tactics: Broken Forsaken Chieftains
Posted on Thursday Aug 02, 2018 at 04:42am in Gaming
With the release of our second Broken Chieftain model, we've also updated its unit card in our online Force Builder rules here, finally unveiling the full suite of equipment options that Broken Chieftains have available to them. This article will look to update your Chieftain knowledge, focusing on their two new upgrade options: Customized Weapons and Enhanced Cybernetics.
CUSTOMIZED WEAPONS
Though Broken Weaponsmiths work tirelessly to keep the weapons of their fighting force repaired and functioning properly, they are also constantly prodded by their Chieftain to find new avenues for how Broken weaponry can be made ever more deadly. In other words, Weaponsmiths, and Broken society in general, are obsessed with making their guns as powerful as possible, regardless of how dangerous this makes them to the wielder. While Broken weapons can never match the accuracy or reliability of the more sophisticated enemy factions they face, the Broken instead rely on a near endless supply of desperate bodies clamoring to get their hands on a customized weapon, even when it is prone to lethal malfunctions.
Anytime Broken forces manage to steal, capture or purchase weapons off the black market, a portion of these are tithed to their Chieftain, who turns them over to their Weaponsmith in the name of 'weapons development'. The disassembling, tinkering, and soldering in a Weaponsmith's shop often continues days at a time. No method used to improve a weapon is off the table: overcharged powerpacks, larger caliber ammunition, oversized magazines, fusing multiple weapons together, etc. If it can be dreamed of, a Weaponsmith has attempted it. The more powerful the conversion, the more rare and coveted the weapon is amongst the Broken, and the more likely it will find its way into the hands of a high-ranking individual like a Chieftain, who views it both as a potent weapon and also as a way of reinforcing their status over those they command.
Rules-wise, customized weapons are an upgrade for a Chieftain that cost 2 points, and gives them the following benefits:
---
Customized Weapons
All weapons this model is equipped with permanently gain +1 PEN, +1 DAM and the Unstable ability (if they don’t already have it). Grenades & CQ Explosives are excluded.
---
As this upgrade affects any weapon a Chieftain takes (excluding grenades & CQ Explosives, of course), it gives you tremendous versatility towards deciding how you want to improve your Chieftain's shooting. For example, with weapons that provide a lot of shots but are only DAM 1, like a Slug Rifle or Chem Pistol, the Customized Weapon upgrade suddenly turns them into DAM 2 weapons. This means that every successful penetration is going to kill a standard MAS 2 infantry model outright, making these weapons now capable of mowing down enemy rank and file models. On the other hand, weapons that are already DAM 2, like a Beam Pistol or Beam Blastgun, now become DAM 3, allowing the Chieftain to become a big game hunter and seriously wound large models like Hunter Warmechs or Mature Angels. This upgrade also benefits any melee weapons the Chieftain may take, such as a Trophy Melee Weapon, Poisoned Blade and even the melee profile of the Beam Blastgun, turning the Chieftain into a formidable foe at close quarters.
Of course, the negative aspect of using customized weapons is that the weapon also gains the Unstable ability, which means that any '1's the Chieftain rolls to hit end up putting suppression tokens onto his unit equal to the DAM of the attack. While this can certainly be annoying when it happens, it is generally a small price to pay to seriously upgrade the offensive capabilities of your Chieftain.
EXTENSIVE CYBERNETICS
While many Broken soldiers eventually have some part of their anatomy replaced with cyerbnetics (usually due to injuries they've suffered on the battlefield), some Chieftains choose to go a step beyond and command their Weaponsmith to give them extensive cybernetic limb and/or organ replacements as a means to improve their strength and durability. This is represented by the Extensive Cybernetics upgrade, which cost 2 points:
---
Extensive Cybernetics
This model permanently improves its MAS characteristic by +1.
---
Boosting a model's MAS by +1 provides both defensive and offensive benefits. The most obvious improvement is that a MAS 3 model requires doesn't suffer an injury until at least 3 points of damage are allocated to it. For example, when a Chieftain leads a Broken Rabble squad, whenever there are only two DAM 1 penetrations remaining to be allocated (a frequent occurrence), you can now elect to put them onto the MAS 3 Chieftain, which means instead of losing a Rabble model, the unit will suffer no permanent damage! In other words, having a MAS 3 Chieftain not only means that model is more durable, but any unit the Chieftain joins effectively becomes more durable as well.
On the offensive side, a model's MAS characteristic is utilized in close quarters fighting with a melee weapon, both to determine how many shots the melee weapon makes, but also to figure out the PEN characteristic of that weapon. A MAS 3 Chieftain gets to make 5 attacks with a melee weapon (instead of the 4 it makes when it is MAS 2) and all those attacks are made with +1 PEN. For example, a Chieftain with Extensive Cybernetics and a Trophy Melee Weapon gets to attack 5 times in close quarters fighting, with each of those shots being a quite powerful PEN 5 and DAM 2. Even crazier, if the model also has taken the Customized Weapons upgrade, they combo together and those five shots are instead PEN 6 & DAM 3! That's enough potential damage to make any foe quake at the thought of facing a Chieftain in CQ fighting.
With these new upgrade options available, a Chieftain is easily the most customizable command model currently in the game. You can go with a super-cheap 7 point Chieftain that just has a couple of pistols, which allows you to fit more Broken units into your force, or alternatively you can take every upgrade and have a 13 point beast that has all kinds of tactical capabilities...the choice is ultimately yours!
Ready to try out your own cybernetic Chieftain? You can pick up the new resin Chieftain models along with the rest of the Maelstrom's Edge model range, from the webstore here.
If you have any rules queries, tactics suggestions, or modeling progress to share, you can join in on the Comm Guild Facebook Group page here.
Tactics: Equipping the Epirian Master Bot Handler
Posted on Saturday May 12, 2018 at 09:30pm in Gaming
EQUIPPING A MASTER BOT HANDLER
A Master Bot Handler is one of the most powerful figures in the Foundation, able to command legions of robotic minions and carry a vast array of weaponry that common soldiers can only dream of. However, this dizzying amount of options can also make deciding exactly how to equip your own Master Handler a bit daunting. Have no fear though! Once you finish with this article, you’ll have all the insider information of what Master Handlers are capable of and know how you’ll want to equip yours.
TACTICAL ROLES OF A MASTER HANDLER
There are three main roles you can equip your Master Handler to fulfill:
- Bot Commander.
- Gun Heavy.
- Support/Melee.
BOT COMMANDER
No matter how you choose to equip your Master Handler, you’ll want to be aware that, above all else, they are a force multiplier for Foundation robotic units. So if you’re looking to field a force that has a preponderance of Contractor or SecDef (coming soon!) units, then you might want to instead just stick with taking regular Journeyman Bot Handlers as the Command Model for your detachments.
With a Master Handler, while you pay a premium in points to take them, you get a heck of a lot of value by way of improving all the robotic units in your force. With his Neural Interface, a Master Handler effectively has the Command (3) ability, which means he’s able to issue orders to up to 3 friendly units within 18” per turn. Anytime a Bot Handler (of any level) issues an order to a Bot unit, that unit gets to enable its Bot Protocols for the turn, which makes them perform much better: Hunter Warmechs get to move and shoot more effectively, Scarecrows get to fire more shots, Firefly Drones dodge incoming fire better and Spider Drones make better use of cover they’re hiding in. If you’re looking to make the absolute most out of this ability to buff nearby robotic units in this way, then there are a few options for the Master Handler that are pretty much mandatory:
Neural Nodes - Master Handlers are able to take up to 2 Neural Nodes. Each one allows them to issue an order to 1 more unit then they normally would be able to. A Master Handler has a WP of 5, which means, especially later in the game when you have a lot of Command Points available, you can put 5 Command Points onto the Master Handler and with the help of a couple Neural Nodes, be able to issue orders to 5 nearby robotic units (thereby enabling Bot Protocols on all of them).
Command Booster Micro Drone - Being able to issue orders to 5 nearby bot units is great, but with a command range of only 18”, you’ll have to keep all those units pretty well clustered around your Master Handler, which is less than ideal. However, Master Handlers are able to take a Command Booster Micro Drone, which increases their command range up to 24”. If you’re looking to make your Master Handler into a true bot commander, then taking a Command Booster allows you to keep your Master Handler back out of harms way while still issuing orders to your bot units that need them.
Firefly Defender Drones - In order to get the most out of your Master Handler as a bot commander you’ll want to keep them roughly in the center of your force, within command range of as many of your bot units as possible. Unfortunately, a Master Handler's prickly superior attitude prevents them from joining friendly units, so to keep your Master Handler safe, a great tactic can be to keep him hidden behind a big obstacle or piece of area terrain so that the enemy can't even spot him. However, a canny opponent might try to counter this by outflanking that terrain in order to get some wide open shots on your Handler. While the Master Handler’s impressive MAS 3 can protect him from a small amount of enemy fire, if the opponent does get a decent-sized unit with open shots on your Master Handler, you're probably going to lose the linchpin of your entire force, and along with it, the game. Therefore taking 1-2 Firefly Defender Drones can be a solid idea to help protect your Handler. As long as you enable their Bot Protocols, Firefly Defender Drones grant their unit (including the Master Handler) the Dodge ability equal to the number of Defender Drones in the unit (so 2 Defender Drones means the unit gets the Dodge (2) ability).
Cheap Weapons - As your goal will be to keep your bot commander Master Handler hidden from the enemy behind terrain, it doesn't make sense to spend extra points on weapons that will probably never be used. As such, sticking with the 0 point weapons (like a Flakk Gun and/or Repair Claw) is the smart choice for a Master Handler acting as a bot commander.
Master of Machines faction objective - Finally, if you want to get the absolute most out of your Master Handler as a bot commander, then taking the Master of Machines as your faction objective is pretty much a must, as it potentially allows you to enable Bot Protocols on a 6th friendly bot unit, and better yet, one that’s beyond your Master Handler’s command range:
MASTER OF MACHINES This objective may only be utilized if your force contains a Master Bot Handler. If utilized, a Master Bot Handler is automatically your force commander for any objective type that requires one. This objective type can generate a maximum of 3 VPs per game, after which you may no longer utilize the Bot Mastery ability. ----- Partial: (each end phase) If at least one of your Master Bot Handlers is on the table and the Bot Mastery ability was not utilized that turn, gain 1 VP. Full: (end of game) If at least one of your Master Bot Handlers is still on the table, gain all of this objective’s remaining VPs. Bot Mastery: Once per turn, you may automatically enable one of your unit’s bot protocols when that unit is activated (regardless of whether its activation discipline check is successfully passed). You must have at least one Master Bot Handler on the table to utilize this ability.
SAMPLE ‘BOT COMMANDER’ MASTER HANDLER
- Master Bot Handler - 16 pts.
- 1 Firefly Defender Drone - 3 pts.
- 2 Neural Nodes - 2 pts.
- 2 Flakk Guns - 0 pts.
- Command Booster Micro Drone - 3 pts.
- TOTAL - 24 pts.
GUN HEAVY
The next major role a Master Handler can fill is one of straight-up shooty death to the enemy. The Master Handler’s powerful exo-skeleton allows them to carry more and heavier guns than any other Foundation infantry model released to date. That means when equipped properly, a Master Handler’s unit can be one the most devastating shooting units in your arsenal. But be warned, this is also the most expensive configuration for a Master Handler.
Fire Assist - One very important limitation to be aware of is that, while Master Handlers have the Fire Assist (+1) ability, this only allows them to fire a maximum of 2 weapons during each round of shooting. That means the only reason you’d want to equip your Master Handler with more than 2 weapons is to give you the tactical flexibility to choose the best 2 weapons to fire in any given situation.
Cluster Missile Pods - If you’re looking to get maximum firepower out of your Master Handler, then taking 2 linked Cluster Missile Pods is definitely the way to go. Linked weapons add +1 to the number of shots the weapon normally is able to fire (and also only count as a single weapon being fired). So if you can manage to find a target where you're able to cover 3 models with the Cluster Missile Pod's AoE template, then you’re looking at getting to fire 5 shots, plus any 6’s you manage to roll count as 2 hits instead of 1!
Arm-mounted Weapons- For a gun heavy Master Handler, you really can’t go wrong with any of the arm-mounted ranged weapon options. However, you do want to pick weapons whose range and weapon profile are a good match to be fired alongside the linked Cluster Missile Pods. The Cutter Light Machine Gun is the obvious choice. A Flakk Gun can be a great choice for your second arm-mounted weapon because it is 0 points and is useful to fire instead of the Cutter when your Master Handler happens to find themselves in an up close and personal situation with the enemy. The Drone Class Laser System (DCLS) is a fine choice to take instead of a Cutter if you desire, providing your Handler with the absolute maximum number of shots possible (albeit with a PEN of only 1), that pair nicely with the shooting of the Firefly Defender Drones that are part of the unit.
Firefly Defender Drones - While Defender Drones are great at keeping the Master Handler protected from enemy fire, they are also all equipped with a DCLS as well, which means when you take a full squad of 4 of them and combine their firepower with that of the Master Handler, you can obliterate almost any enemy light infantry unit right off the table, regardless of whether they’re in cover or not!
Aerial Drone Strike - One thing that should never be forgotten is that the Master Handler also has an Aerial Drone Strike: a one-time use, incredibly powerful area effect weapon. Best of all, using an Aerial Drone Strike just counts as firing a single weapon, which means the Master Handler can fire the Aerial Drone Strike and also fire another weapon at the same time (including his linked Cluster Missile Pods, for example), and all of this gets combined with the shooting of his Defender Drones as well!
Aerial Uplink & Targeting Micro Drones - There are two great Micro Drone options for your gun heavy Master Handler. The Aerial Uplink Drone allows the Master Handler to fire his Aerial Drone Strike two times during the game, instead of just once, which is great for obvious reasons. An even better fit is the Targeting Drone. This gives the Master Handler and all of his Defender Drones +3 SKL when shooting (except during close quarters fighting), which unsurprisingly ups the deadliness of their combined firepower to near obscene levels.
SAMPLE ‘GUN HEAVY’ MASTER HANDLER
- Master Bot Handler - 16 pts.
- 4 Firefly Defender Drones - 12 pts.
- 2 linked Cluster Missile Pods - 4 pts.
- 1 Cutter Light Machine Gun & 1 Flakk Gun - 1 pt.
- Targeting Micro Drone - 2 pts.
- TOTAL - 35 pts.
SUPPORT/MELEE
While the bot commander and gun heavy roles for the Master Handler are fairly straightforward and easy to define, you can also mix and match different aspects of these roles a bit to create something unique for your Master Handler. In addition, the inclusion of a Repair Claw allows a Master Handler to perform yet another role: that of helping to remove suppression from nearby bot units.
Repair Claw - Giving your Master Handler a Repair Claw can be a great choice, not only because it is 0 points, but also because it gives the Handler the Bot Repairs (2D3) ability. This means that whenever the Handler finishes an Advance & Fire or Dash action within 6” of another friendly bot unit, he can remove 2D3 suppression tokens (STs) from them, turning him into an excellent support unit (Note that you cannot use this ability on the Bot Handler’s own unit though). Considering that you'll be keeping your Handler near your bot units to help enable their Bot Protocols, you will often find him within range to perform these types of repairs. You can also consider giving your Handler 2 Repair Claws. While this doesn’t allow him to remove any additional STs from friendly units, it does turn him into quite the close quarters (CQ) powerhouse. Since the Handler is able to fire 2 weapons per round of shooting (which includes CQ fighting), this allows him to use both of his Repair Claws to their full effect. That’s a total of 8, PEN 4 shots during CQ fighting (on top of any shots generated by his Defender Drones) which ain’t too shabby! Be warned that the Master Handler is a pretty slow mover so it can be a bit tough to get him into CQ fighting, but once there, he’ll certainly be able to cause some significant damage.
Firefly Defender Drones - Whether you’re running your Master Handler next to your bot units to remove STs from them, or trying to charge into CQ fighting, either way you’ll definitely need to protect your Handler with at least 2, it not the max of 4 Defender Drones to dissuade the enemy from picking him off and to soak up the inevitable defensive fire he takes from the enemy.
Flakk Gun - If you’re taking 1 repair claw on your support Handler, then the obvious weapon to pair with that is the Flakk Gun, which excels at short range shooting. Since a support/melee Handler will often find himself near the enemy (when removing STs from your bot units and/or running around trying to get into CQ fighting) having a powerful short ranged weapon is a great choice.
Aerial Uplink & Defense Micro Drones - While there isn’t one Micro Drone choice that really excels for a Master Handler in a support role, the Aerial Uplink Drone is a solid pick. Because you likely won’t have the great firepower of a gun heavy build, being able to unleash an Aerial Drone Strike twice during the game can be quite useful. On the other hand, the Defense Drone is perfect for the Handler that is trying to get into CQ fighting. Sure it's a one-use item, but it’s 0 points, and for the turn it's used the Handler gets the Field (2) ability (great for when his Defender Drones have been destroyed) and makes him an absolute melee monster. Plus, because the Handler can fire 2 weapons, he’s able to use the Defender Drones melee profile as well as one Repair Claw in CQ fighting!
SAMPLE ‘SUPPORT’ MASTER HANDLER
- Master Bot Handler - 16 pts.
- 2 Firefly Defender Drones - 6 pts.
- 1 Cluster Missile Pod & 1 Neural Node - 4 pts.
- 1 Flakk Gun & 1 Repair Claw - 0 pts.
- Aerial Uplink Micro Drone - 2 pts.
- TOTAL - 28 pts.
SAMPLE ‘MELEE’ MASTER HANDLER
- Master Bot Handler - 16 pts.
- 4 Firefly Defender Drones - 12 pts.
- 2 Neural Nodes - 2 pts.
- 2 Repair Claws - 0 pts.
- Defense Micro Drone - 0 pts.
- TOTAL - 30 pts.
How will you use your Master Handlers? To share your tactics or modeling ideas, or to discuss the loadouts described above or any other aspect of the Maelstrom's Edge game, visit the Comm Guild Facebook page.
You can find the Epirian Master Bot Handler, along with the rest of the Maelstrom's Edge model range, in the webstore here!
