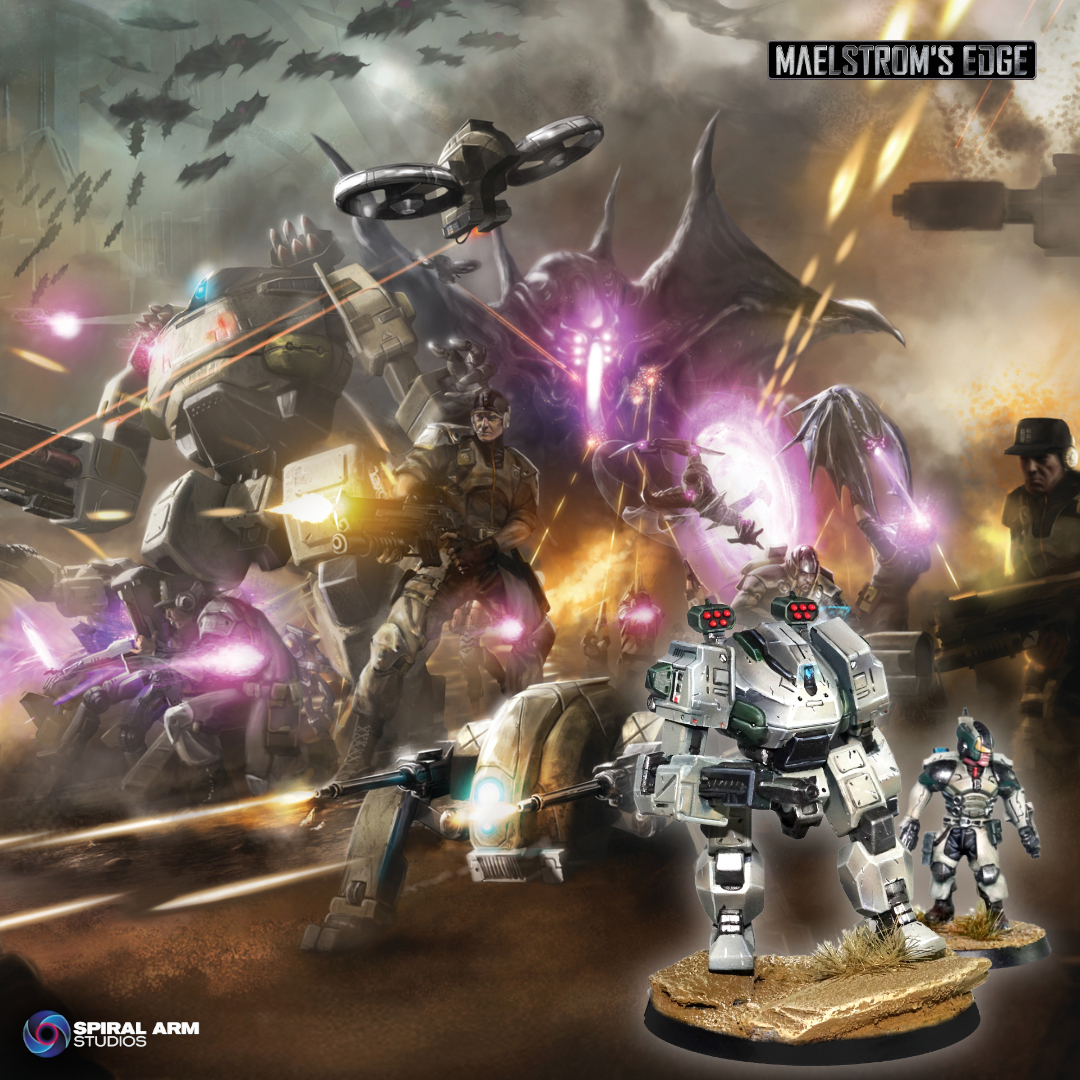
Faction Focus - The Epirian Foundation
Posted on Monday Sept 22, 2025 at 05:00pm in The Epirian Foundation
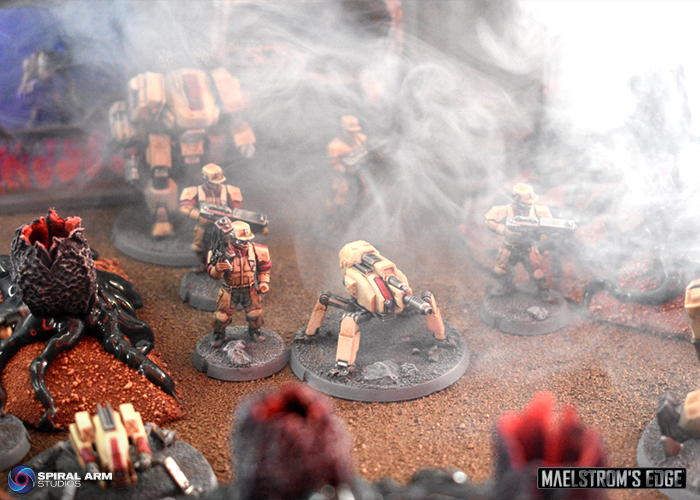
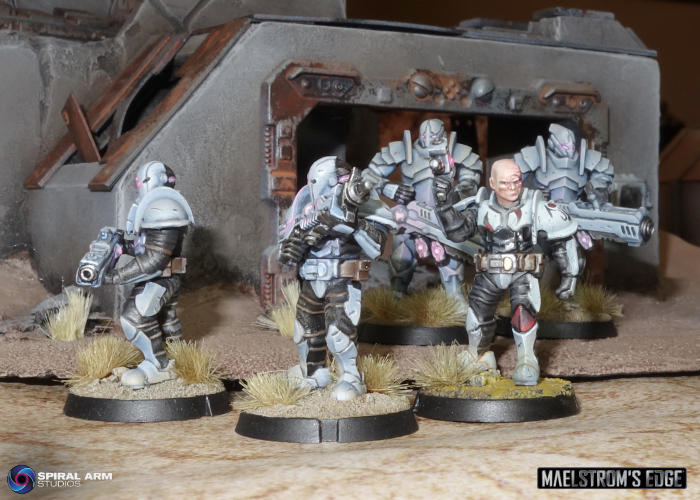
In battle, the Foundation’s greatest strength comes from their advanced robotics technology, boosted via neural links to trained Handlers. Fast, scouting Firefly drones and battle lines of Spider Drones are backed up by heavier-armed Scarecrows and Hunter Warmechs. Alongside this army of artificial combatants are human Contractors, employees of the Foundation who function as mechanics, workers and militia, depending on the situation, while the elite forces of SecDef can be called in when the situation calls for more experienced troops.
Neural linking was developed as a means to increase and expand a robot’s actions and capabilities with creativity and intuition. Bot Handlers, through a neural web embedded in their helmets and years of rigorous training, can channel a portion of their awareness into properly configured bots. This process is referred to as projection. The Bot Handler gains a degree of control over the bot, be it a drone, a mech or a starship. This may be as simple as overriding a set of responses to allow for an unpredictable deviation from programming to surprise an enemy, or, in some cases if the Handler is expert enough, direct piloting of one or even several robotic constructs.
The weapons used by the Foundation tend to reflect the rugged nature of the terraforming outposts. Energy and plasma weapons are deemed risky endeavors, requiring too much maintenance and yielding unpredictable results. Epirian robots and soldiers tend to be outfitted with hard-bullet weapons, as well as computer controlled missiles and the occasional converted industrial tool – mining lasers, blasting explosives, railguns and the brute force of robotic drills and saws.
Before the Maelstrom, SecDef acted as the enforcement arm of the overarching Foundation corporate structure — A hand-picked selection of the most decorated Epirian soldiers, acting outside the purview of any one franchise. With their need for independence and operational security, SecDef traditionally eschew the use of robots, to avoid the potential for a franchise to subvert their operations with back door code or production issues.
With the splintering of the Foundation, many SecDef units have come under more direct control of various individual franchises or multi-system Epirian hubs attempting to reestablish central leadership. Billed by their corporate owners as the ultimate in precision combat, SecDef are hired out to wealthy companies and individuals across the galaxy, serving as military escorts, bodyguards, or even leading attacks on rival corporations or hostile alien worlds.
SecDef’s preferred weaponry and equipment is traditionally manufactured by Araldyne, one of the last great Epirian weapon franchises. Their weapons are both more advanced and significantly more expensive than those produced by the rest of the Foundation, prioritizing sleek design and optimized technologies over the cheaper, mass-produced products used by lesser troops.

On the table, the Epirian Foundation's main strength is in the synergy between bots and their handlers. Bot Protocol abilities allow a handler to spend command points to boost the effectiveness of their charges, making them move faster, increasing their rate of fire, or improving their ability to make use of available cover. Combining these with careful choice of activation order allows a canny commander to get extra usage out of their bots - reactivating a unit for a second attack, or using multiple bot units to back each other up - speedy Fireflies Painting a target with their lasers for follow-up by Hunter Warmechs with their Guided Strike missiles, for example.
SecDef Field Commanders carry almost as much firepower in their armored exosuits as a Hunter Warmech, and grant their forces the ability to hold objectives even with enemy units nearby. SecDef infantry can capitalize on this, using Aerial Insertion to drop directly onto their objective and Cover Drill to let them dig into available cover while holding off enemies with their advanced Araldyne weaponry, while boostpack-equipped Rapid Insertion Teams can jump rapidly across the battlefield providing supporting fire where it is most needed.
Find out more about the Epirian Foundation on the Maelstrom's Edge website here.
The Maelstrom's Edge V2 rulebook is now available! Grab your copy from the Maelstrom's Edge webstore now!

If you have any thoughts on the new rules, pop on over to the Comm Guild Facebook group, or start up a thread in the Maelstrom's Edge section on the Dakka Dakka forums. We welcome any feedback, and would love to hear how everyone's forces stack up in the new rules!
Colors of the Kaigus Pact
Posted on Friday Sept 19, 2025 at 05:00pm in The Kaigus Pact

Click for larger image
The Kaigus Pact will be coming to the Maelstrom's Edge webstore soon with a range of new plastic kits. Stay tuned for news!
Maelstrom's Edge V2 - So, what's changed?
Posted on Thursday Sept 18, 2025 at 05:00pm in Gaming
If you’re a big fan of the V1 rules, then you’ll be pleased to know that the core pillars that comprise Maelstrom’s Edge are not only still there, but have been strengthened. It’s still an alternating activation, squad-based “skirmish” game (aka focused on small squads of 1-6 models) that features 6-sided dice (D6), multi-tiered mission objectives, a suppression mechanic, the ability to bring back destroyed units as reinforcements and a regenerating command point system that can be used for a variety of tactical functions.
If, on the other hand, you’re someone that liked the overall concept of the original Maelstrom’s Edge rules, but you thought that the rules were a little too fiddly, then we also have great news for you! The v2 rules have been totally re-written and highly streamlined: they are a good 30% shorter than the V1 rules as a result. While the V2 rules are undeniably simpler, they’ve also gotten more complex where it counts: giving you tons of new tactical decisions to make with your units during the game. On top of that, the dice rolling “engine” now feels really fresh: each round of shooting keeps both players involved rolling dice and utilizes a “dice flip” mechanic that adds an element of bad luck protection right into the core of the game.
Below, we'll run through some highlights of the major v2 changes. (If you're a player of the V2 Beta rules, and just want to know what's changed in the final rulebook version, skip to the end of the article. Or, you know, read it anyway - we worked hard on it!)
SIMPLIFIED UNIT ACTIONS
The largest change in V2 is how unit actions work. The activation test is gone and a unit can now perform up to 3 actions, selected from: movement actions (Move, Dash, Charge), status actions (Aim, On the Move, Take Cover) and shooting actions (Fire, Suppressive Fire, CQ Fighting). While there are some additional caveats to this system (a unit can perform a maximum of only 1 movement and 1 shooting action per activation, for example), we’ve found during playtesting that by splitting the action rules into these smaller “bite-sized” chunks, it makes the whole system much easier to remember. In addition, decoupling movement, shooting and status rules from each other now gives players several new combinations of what to do with their units when they activate them. You can find out more on how this all works in our Unit Activation article here.
SUPPRESSION THAT MATTERS
In V2, suppression is both much simplified and also a whole heck of a lot more deadly. Instead of utilizing tons of suppression tokens, each unit only has 6 suppression levels (which can be conveniently tracked with a D6 next to the unit). Not only does suppression still degrade a unit’s shooting and their ability to benefit from cover, but each time a unit already at max suppression is called upon to raise their suppression level again, one model in the unit instead suffers an injury (which is fatal for most standard infantry in the game). This means it is now entirely possible to ”suppress” an enemy unit to death, representing them fleeing from the battlefield due to the hail of firepower coming their way. This makes the new Suppressive Fire action (which trades-in a shooting unit’s ability to cause damage for a boosted ability to cause suppression) a deadly tool in certain situations. Find out more int he Suppression article here.
A NEW DICE ENGINE
The new dice rolling engine in v2 is quite unique, but still based exclusively on 6-sided dice that most players prefer. It is both simple enough to quickly understand, yet nuanced enough to offer: built-in bad luck protection, having both players involved with each round of shooting and tactical player choice within the dice rolling process. Most importantly, when units shoot at each other, the amount of damage they cause now just feels right.
So how does the new system work? As a firing player, all you have to do is look to equal or beat the target’s Evasion characteristic (EVS) with your D6 rolls. For example, if the target has an EVS 4 (the standard EVS of most infantry units), you’d need results of 4-6 to successfully hit them. In addition, as the firing player you get to influence these results by making a number of “dice flips” (changing the result of rolls in your favor) up to the Skill characteristic (SKL) of your firing unit. For example, if your firing unit was SKL 3, you could add +3 to a single roll, +1 to 3 different rolls, or anywhere else in between. Where things really get interesting is that results of ‘1’ and ‘6’ are “critical” results. A “critical hit” (a hit roll result of ‘6’) provides that shot with extra lethality. But it also takes 2 dice flips to change a non-critical result into a critical result (a ‘5’ result into a ‘6’). This means sometimes you have to decide whether using 2 dice flips to change a single ‘5’ result into a critical hit will be more beneficial than just using those same dice flips to score two more standard hits.
And of course, once the firing player has determined how many hits they’ve scored on the target, the defending player gets to make an armor roll against each hit, looking to equal or exceed the Penetration characteristic (PEN) of the firing weapon. Similarly, the defending player gets to influence the results of these rolls with a number of dice flips equal to the Armor characteristic (AV) of their models. Find out more in our Shooting Modes article here
FEWER SPECIAL RULES
With V2, we’ve realized that adding back a few more characteristics to the model/weapon profile means a big reduction in the amount of special abilities in the game. Plus, the abilities we have kept have been greatly simplified, all with the end goal of making each unit’s full rules (including all the text for their unit and weapon abilities) fit onto just a single page.
Here’s a quick rundown of the “new” model & weapon characteristics in V2:
- The model profile has lost its Mass characteristic (MAS), but has gained the Close Quarters Attacks characteristic (CQA) instead, rectifying the biggest point of negative feedback we got about the V1 rules: the much maligned ‘formula’ that was necessary to determine how many melee shots a model was able to make.
- The weapon profile has gained a Suppression characteristic (SUP), which is utilized when the unit makes a Suppressive Fire action.
- The weapon profile has gained a Weapon Type characteristic (TYPE), which helps set apart the archetypal weapon rules (like “AoE”, “Heavy” or “Short Ranged”) from true weapon special abilities.
MORE LETHALITY
One goal of the V2 rules has been to improve the level of lethality in the game. Allowing massive amounts of suppression to inflict damage to a unit was a good first step, but the real key to this change has been the removal of the Mass characteristic (MAS) from the model profile. Now, each point of damage a model suffers just reduces their Fortitude (FOR) characteristic by 1 (and when a model reaches 0 FOR, it is a casualty). The vast majority of standard infantry models only have FOR 1, which means that any hit which gets through their armor will cause a casualty. While this doesn’t suddenly mean that models are now dying in droves in V2, we can safely say that you will notice and appreciate the increase in lethality in the game. You’ll definitely want to start using the reinforcement rules more often to bring back your destroyed units!
QUALITY OF LIFE IMPROVEMENTS
The V2 rules are chock full of little improvements that make the game feel way better overall. Here’s a taste of them:
- Command points no longer need to be allocated to command models. They just stay in your command point pool until you decide to use them.
- More command models have powerful abilities that cost command points to use, giving you further options for what to use your command points on (besides the mainstays of bringing back reinforcements and lowering suppression on your units). But don’t worry, we haven’t gone overboard and given every unit a Command Point based ability, these are still quite special.
- When moving your units, you now only have to bother measuring and moving the unit’s squad leader. The rest of the models are just placed in coherency (within 3" of the squad leader) after their squad leader has finished being moved. This dramatically speeds up the process of moving units.
- The V1 rules deliberately syphoned almost every non-damage effect down to just generating additional suppression, which made special abilities feel, well, not so special. With V2, we’ve expanded the range of what special abilities can do. You can now set units on fire, slow them down, freeze them and confuse them, just to name a few options.
- To promote unit movement, defensive fire in V2 has been reduced to just protecting a unit from being charged or shot by a hit and run attack. This means units equipped with Short Ranged weaponry can finally shine, being able to run up to enemy units and blast them at point blank range without fear of being decimated first.
- The way mission objectives generate victory points (VPs) has been simplified, making it much easier to calculate how many VPs you’ve earned at the end of each turn. In addition, the margin you need to be ahead of your opponent to end the game immediately has been widened for all missions, now requiring a +5 VP margin. This gives a little more breathing room for close games to go the distance while still allowing for blowouts to end without one player having to bite the bullet and concede.
- There are now 18 types of mission objectives (up from 12) and 6 different deployment maps (up from 2). There are also now 12 competitive missions and 6 narrative missions included with the core rulebook (up from 6 & 0 respectively). All this means there is now a whole lot more mission variety in V2! (More information here!)
- There is a fun new objective marker placement rule forcing you to place objective markers in the opposing half of the table (and your opponent is bound by the same rule). This helps create tense, interesting games where both sides are fighting over objective markers clustered near the centerline of the table, as opposed to one player getting lucky and having one random objective marker near their deployment zone granting them an easy victory.
As you can see, the new rules for Maelstrom’s Edge are chock full of improvements...and none of what we’ve presented above even covers the massive rules re-work we’ve done for every single unit in the game. Their rules are both far more streamlined but also laser-focused on allowing them to perform exactly how they’re supposed to. It’s been an extremely long time coming, but we can’t wait for you to try out the new rules and let us know what you think!
Before we go we need to mention the V2 Beta rules, which were available for download on the website while we were working on the print rulebook. If you played the Beta, you probably want to know what has changed in the final version, so you don't have to spend a bunch of time searching for differences in the book. There were two different version of the Beta released. Beta 2.0 was very nearly the finished rulebook. There were a few minor formatting and wording tweaks that don't affect gameplay, and the Epirian Contractor Suppression team had some weapon options added in that were left out by mistake.
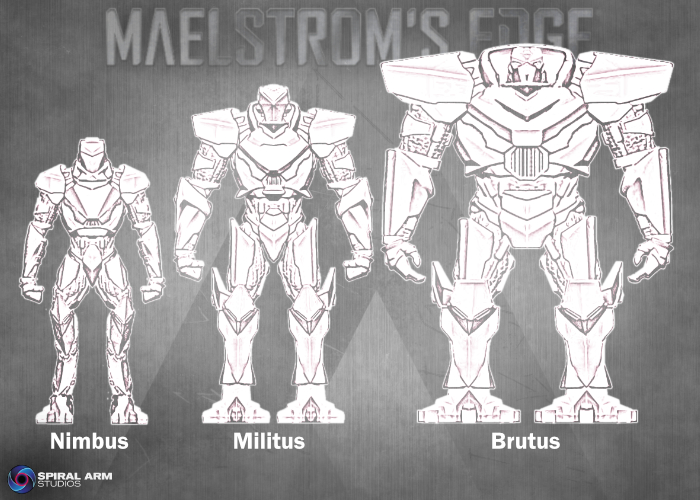
There are some more significant differences from the Beta 1.0, so if you only played that version of the Beta, you might want to spend some time going back over the rulebook. There were quite a lot of sections reworded for better clarity. Artarian Remnant units received a bunch of point drops, increased SHO stats on some weapons and some revisions on various abilities and Faction Objectives. Some units for upcoming models in the production queue were added for most factions - The Brutus for the Remnant, Epirian Master Handlers, and Broken Bikers and Skoti Streamweavers. A few Broken units also received some additional gear options (also in the production queue!). Overall gameplay remains the same, but a lot of little details changed to make things clearer or work better based on early player feedback.
The Maelstrom's Edge V2 rulebook is now available! Grab your copy from the Maelstrom's Edge webstore now!
If you have any thoughts on the new rules, pop on over to the Comm Guild Facebook group, or start up a thread in the Maelstrom's Edge section on the Dakka Dakka forums. We welcome any feedback, and would love to hear how everyone's forces stack up in the new rules!
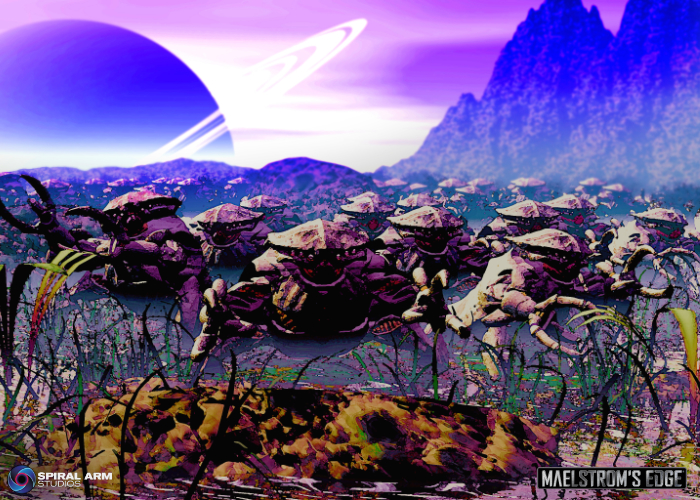
Faction Focus - The Kaigus Pact.
Posted on Wednesday Sept 17, 2025 at 05:00pm in The Kaigus Pact
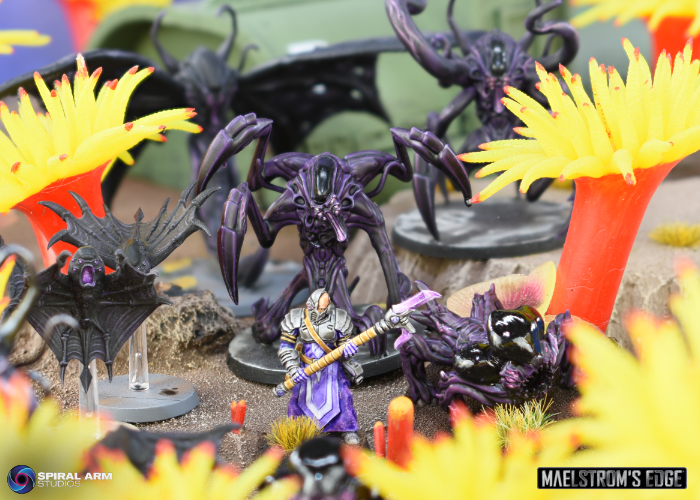
The relative lack of raw materials in deep space and the prowess of the Kaigus in manipulating biotechnology inevitably led to their weapons and technology all using biological processes. Traditional bullets and more technological weapons like lasers are eschewed for rifles that have bio-engineered ligaments for throwing projectiles, poisonous gases and darts, gels that expand and suffocate or strangle their target and other exotic oddities. Microscopic organisms known as namites are controlled by Biologis adepts, able to consume, process and regurgitate organic matter. Operating en masse, these namites can decompose an object and spit it back out as something entirely new within moments. With training, Kaigus are able to control these swarms telepathically, coordinating the namites to construct physical matter to their design. The Biologis continually develop and catalogue a number of “thrall species”, created relatively easily using namites and designed to fulfill important roles within Kaigus society. The genetic blueprints for thrall species include a predisposition to follow telepathic commands and an innate knowledge of the vocation they have been created to fulfill.
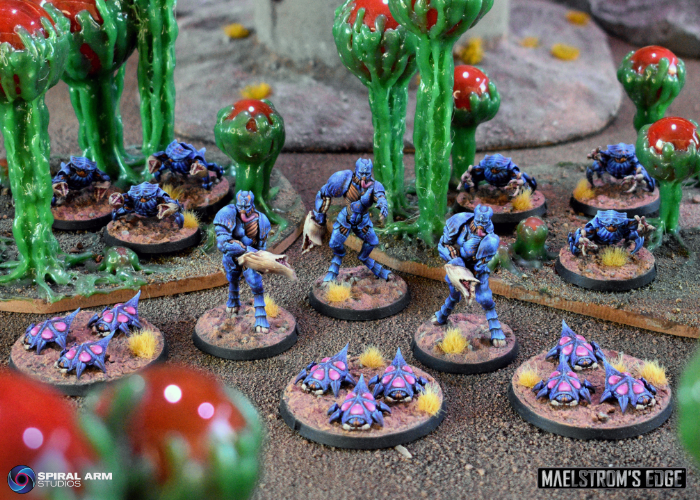
On the table, the Kaigus Pact work quite differently to other factions. Forces are composed of a mix of Kaigus and Thrall species, designed to fill different combat roles. Heavier weaponry is carried by the Kaigus troops, while Tamakin act as lightly armed harassment troops, or melee-equipped close combat units. Explosive or vapor-emitting Krii skitter around the enemies' feet while massively armored Orakan use their carapace as a shield for their progenitors.
Most notably, Biologis and other Kaigus units are able to spawn thrall units directly onto the battlefield. The Hypergenesis ability allows Kaigus Pact commanders to skip the normal reinforcement bidding process. Instead, specific models can spend a fixed number of command points to spawn a thrall unit within 9". Through judicious use of command points, a shrewd commander can get their forces directly into the action when and where they are most needed, overwhelming the opposition with waves of thralls.
We'll be revealing more about the Kaigus Pact and releasing their first models over the coming weeks. Stay tuned!
The Maelstrom's Edge V2 rulebook is now available! Grab your copy from the Maelstrom's Edge webstore now!
Maelstrom's Edge V2 is here!
Posted on Monday Sept 15, 2025 at 05:00pm in Gaming
Do you have what it takes not just to endure, but to thrive in the turbulent universe of the Maelstrom’s Edge?
Battles On The Edge
Maelstrom’s Edge is a squad-based 28mm tabletop wargame for two opposing sides that brings to life the frantic skirmishes and tense battles of the Edge.Manageable Forces
Easy to collect, paint and play: most forces are around 30 to 40 models for standard sized games, with units composed of 1 to 6 models.Alternating Activation
Each turn, you alternate activating units with your opponent. This reduces downtime and ensures you remain part of the action at all times.Innovative Dice Mechanics
Never get bored rolling dice again! A unique ‘dice flip’ mechanic helps mitigate bad luck and adds an extra layer of control to your tactical decisions.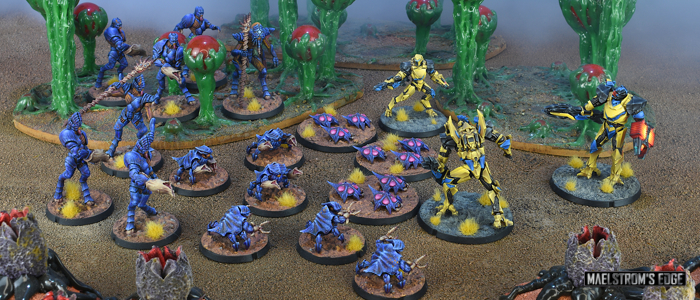
Suppression
Wounding the enemy isn’t your only avenue to success. Suppression can also be used to make enemy units less effective and eventually destroy them.Command Abilities
Command Points generated each turn allow you to lower suppression, trigger special abilities and even bring back destroyed units as fresh reinforcements.Positioning Matters
If you outflank an enemy unit, they’re in trouble as their protection from armor and cover is reduced.Real-Time Scoring
At the end of each turn you accumulate victory points for achieving mission objectives. Outpace your foe by a wide enough margin and you can end the game immediately!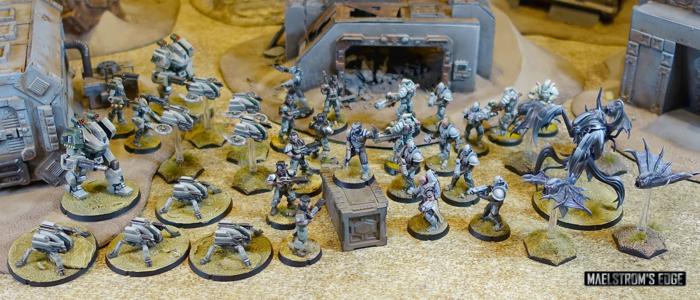
Choose Your Allegiance
Along with fiction detailing the state of the galaxy on the Maelstrom’s Edge, this book contains full rules for the five factions in our ever expanding miniatures range:- Epirian Foundation: Corporate security forces equipped with a wide array of powerful robotic drones and warmechs.
- Karist Enclave: Secretive zealots who worship the Maelstrom and have enslaved a race of mysterious alien Angels to do their bidding.
- Artarian Remnant: Elite exosuit-clad gladiators launching raids from their vast world ships.
- The Broken: Refugees, revolutionaries, mercenaries and aliens displaced by the Maelstrom and fighting for their survival.
- Kaigus Pact: An all-new faction for V2! Post-human masters of bioengineering overwhelming foes with hordes of scuttling creatures.
Get the rules now!
The new V2 rulebook is available in the Maelstrom's Edge webstore now. You can also check out the V2 Rules Downloads section for PDF rules downloads (a PDF version of the rulebook will be coming soon!), and the V2 Rules Articles section for some insights into the Maelstrom's Edge rules. The website also includes a handy Force Builder which allows you to easily build and save your force lists!
Stay Tuned for more!
Bring Me The Head... Epirian vs Karist V2 Battle Report
Posted on Friday Sept 12, 2025 at 05:00pm in Gaming
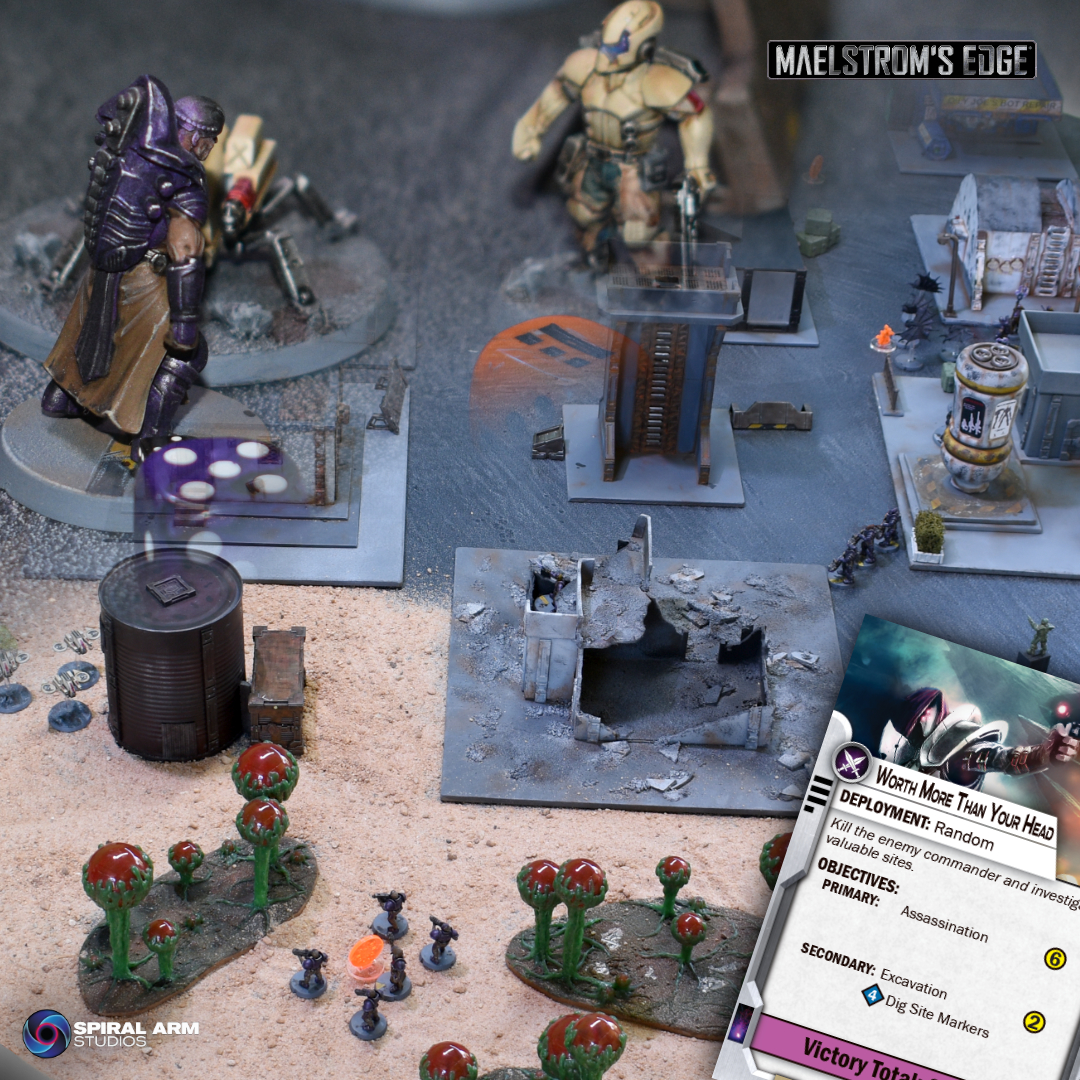
A new Maelstrom's Edge V2 battle report, featuring 120 points of Karists taking on Epirians in a Worth More Than Your Head mission! Check it out here!
Faction Focus - The Broken
Posted on Thursday Sept 11, 2025 at 05:00pm in The Broken
Broken is a term used to unify all such desperate people across the Edge. Their motivations and methods vary wildly - from fervent revolutionaries to callous pirates to the few who have stared into the maw of the Maelstrom only to come away unhinged. Abandoned by their governments, rejected by the systems to which they flee for succor, the Broken must scrape, claw and fight just to see each new day.
The vast majority of Broken consider themselves Forsaken, a catchall name for those who feel that the rest of the Sagittarius Arm has given up on them. Their Freeports are self-declared independent states, and will happily negotiate pacts and trade deals with any entity willing to recognize their autonomy and bargain fairly with them.
As the Maelstrom approaches a planet, the complete breakdown of their society feels to a certain type of individual like the constraints of morality have finally been lifted. Should they escape their doomed world, these Broken souls become Jackals: bloodthirsty murderers who take no prisoners and attack the vulnerable because it brings them pleasure. Eschewing fixed bases, Jackal fleets are a scourge across the Edge, constantly on the prowl for easy targets to enrich themselves.
The rarest Broken faction, secret Spiral Arm Revolutionary Army companies have formed all across the Edge, and continually recruit new members with the mantra that if the common man doesn’t band together to save themselves, then no one will. SARA attracts many former members of planetary militaries, with whole regiments sometimes deserting their posts when they find they have been abandoned by the official evacuation effort. As a result, SARA is more organized and better disciplined than other Broken forces, with a more effective supply chain.

There are a huge number of different alien species found on worlds throughout the human-dominated regions of the Sagittarius Arm. For many, though, their size, customs, diet, or environmental needs make them difficult to accommodate on evacuation ships, and so they are considered expendable and given the lowest priority in the queue. Effectively abandoned by the Foundation, these species find refuge amongst the ranks of the Broken - the massive, scaled Gnolti, the squat, slow-moving Pa’ku, the nervous, lumbering Skoti, or the lanky, radiation-resistant Kasmenai, to name just a few. Other aliens are less numerous, but still useful and welcomed - Ichthyoid Uldagane with their pressurized immersion suits, serpentine Wiioun making themselves at home in waste reclamation tanks, or Pajah Windspeakers, occasionally found tinkering with the engines of raiding vehicles to give an extra boost of speed to a mechanized force.

On the table, Broken forces will generally outnumber other factions, being comprised primarily of poorly trained but numerous troops. These rabble hordes are supplemented by various specialists providing technological boosts or various Xenos species with exotic abilities or brute strength. Sig Jammers and Marsayan Hypnotists interfere with an enemy's communications or targeting systems. Massive Gnolti provide a living shield for their smaller compatriots, until they get in close enough to use their massive fists to devastating effect. Snipers and Pa'ku harass enemy units with hi-tech disruptive or explosive ammunition, while Skoti use their innate teleportation to move Broken troops swiftly around the battlefield.
While their troops are less durable than most of their enemies, the Broken make up for it with their numbers and their ability to move unpredictably around the battlefield. Many Broken units benefit from the Mob Mentality ability, which grants them a bonus to their Willpower based on the size of the unit - taking the mantra of strength in numbers very literally. The Broken also have a unique edge in their deployment, with Shadow Strike allowing Broken units in terrain to leave the table, emerging from a different terrain feature in a later turn.
Find out more about the elusive Broken on the Maelstrom's Edge website here.
The Maelstrom's Edge V2 rulebook is available to order from the 15th of September. Watch this space for more news!
Let us know your thoughts on the Comm Guild Facebook group!
Maelstrom's Edge V2 - Missions & Objectives
Posted on Wednesday Sept 10, 2025 at 05:00pm in Gaming
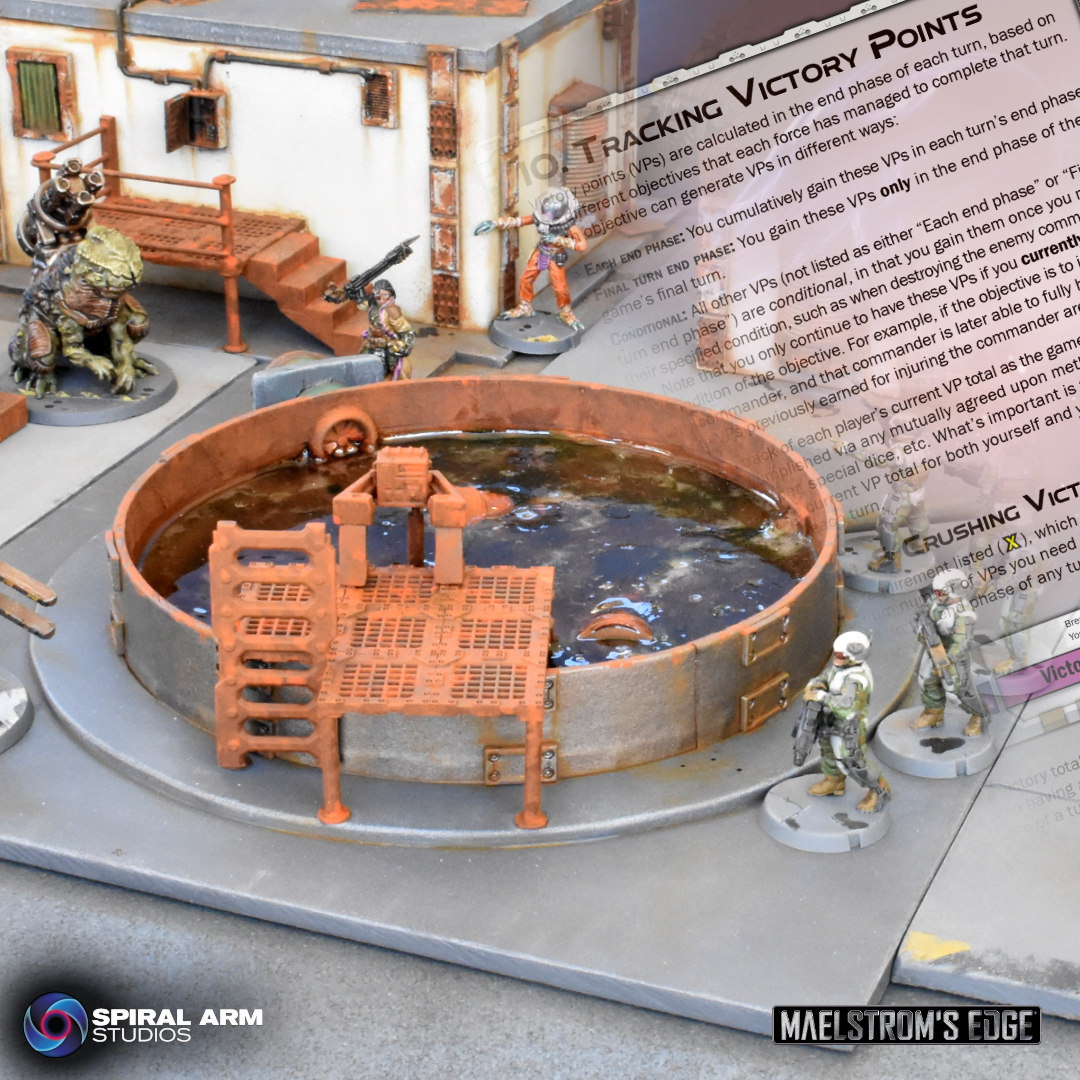
Missions in Maelstrom's Edge V2 have a tiered objective system. Each mission has both a Primary and Secondary objective, both of which award victory points for different battlefield achievements. A 'standard' game draws from a pool of Competitive missions, which assign both players the same objectives and victory point score to win that game. Narrative missions are used to create battles following a set story, with each player having their own objectives and win score. Otherwise, though, the missions all use the same easy to follow structure.
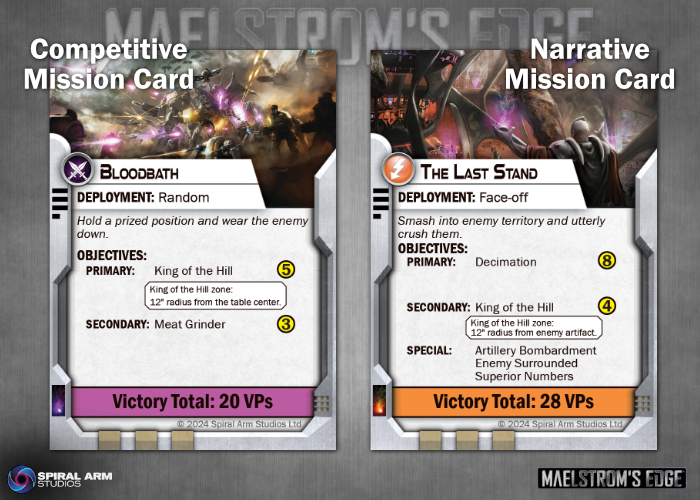
The different Objectives award victory points at different times - the end of each turn, the end of the final turn, and/or upon achieving a specific trigger like wounding an enemy commander. There are a number of different types of objectives: Kill objectives require you to damage specific enemy units, Zone objectives are areas of the battlefield that you need to hold, Control objectives reward you for holding and protecting specific points around the battlefield, and Target objectives are valuable assets that need to be captured or destroyed.
Each army in Maelstrom's Edge also has their own faction-specific objective. Players have the choice, therefore, to focus on all of these objectives at once, or to aim for those that are easier to achieve while holding off the enemy from theirs. Going all-in on your objectives can help you to score a quick victory, or can leave your forces over-extended and vulnerable to a more cautiously deployed enemy. But finding yourself with an objective that doesn't suit your army doesn't have to be game-ending, as you can choose to focus on the objectives that have a better chance of success.
In order to reduce repetition, the V2 rulebook includes 12 Competitive missions, enough to avoid constantly finding yourself playing out the same game.
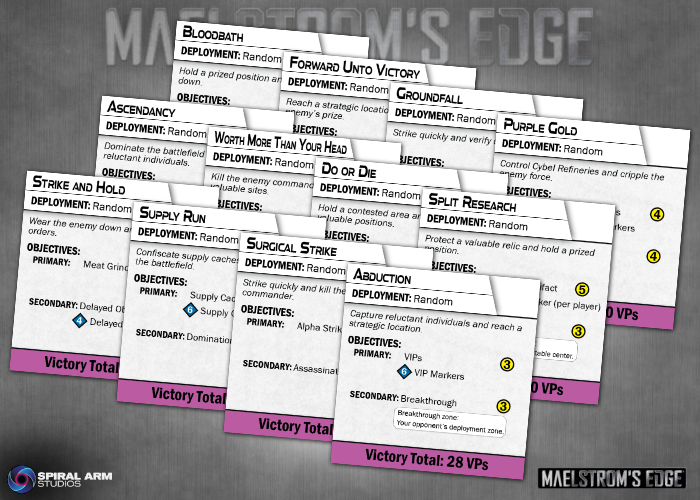
Also included in the book are 3 Narrative missions. We'll be releasing campaign packs with sets of missions for playing out battles following an ongoing storyline. You can also use these cards as inspiration for creating your own narrative missions and campaigns.
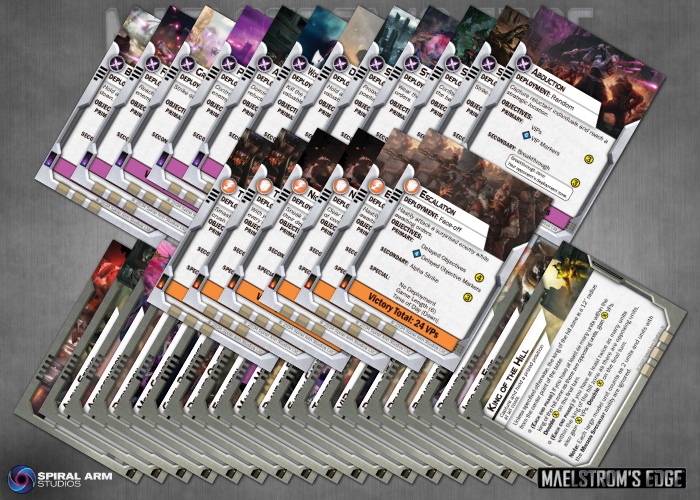
All of the current mission cards are included in the back of the rulebook to cut out or print. We also have a PDF download on the Maelstrom's Edge website (here) that includes the mission cards and a set of objective cards for easy reference as well, so you don't have to refer back to the book mid-game to check your mission parameters. These will also be available through a Print-on-Demand service in the near future.
The Maelstrom's Edge V2 rulebook is now available! Grab your copy from the Maelstrom's Edge webstore now!
If you have any thoughts on the new rules, pop on over to the Comm Guild Facebook group, or start up a thread in the Maelstrom's Edge section on the Dakka Dakka forums. We welcome any feedback, and would love to hear how everyone's forces stack up in the new rules!
Faction Focus - The Artarian Remnant
Posted on Tuesday Sept 09, 2025 at 05:00pm in The Remnant

Artarian society is very class based, ruled over by a select group of rich and noble families. The limited population of the Remnant Fleets and the unwillingness of the noble families to risk their own lives mean that they prefer to wage war on a smaller scale. As such, in place of a military, the Remnant relies on small teams of elite Champions, clad in technologically advanced Lorican Combat Suits.
A Lorican Combat Suit grants a House Champion the fighting prowess of many soldiers. Armored with plating adapted from the materials used on Remnant ship hulls, these suits are void capable and waterproof, and can be fitted with a wide range of customized gear to suit the Champion’s needs. Trackers, protective field generators, boostpacks and other, more specialized tools enhance the Champion's already impressive fighting prowess to make each battlesuit the equivalent of an entire squad of regular soldiers.
On the table, Remnant Fire Teams are small - usually only around half a dozen models - but they pack a massive punch. Their high FOR means they can soak up a lot of damage, while laying waste to the enemy units around them with their devastating weapons systems. Due to their low model count, however, Fire Teams can struggle with objective based missions, and a wise commander is wary of spreading his forces too thin. An isolated Champion, even in the heaviest suits, can be brought down by concentrated enemy firepower.
The biggest advantage that Remnant battlesuits have over other troops is their Overcharge ability. Champions have the option to boost selectively boost their power feeds, increasing the strength of their weapons or defensive abilities, or increasing their movement. This comes at the expense of heat dispersal - too much heat build up interferes with critical systems and causes malfunctions, represented on the table through additional suppression. To stop the heat build up from getting too catastrophic, a Champion can instead forgo shooting for a turn in order to vent their excess heat. This drops their suppression by two levels, enough to get a critical suit back into the battle.
Find out more about the Artarian Remnant on the Maelstrom's Edge website here.
The Maelstrom's Edge V2 rulebook is available to order from the 15th of September. Watch this space for more news!
Let us know your thoughts on the Comm Guild Facebook group!
Maelstrom's Edge V2: Building a Force
Posted on Monday Sept 08, 2025 at 05:00pm in Gaming
In the V2 rulebook*, each unit available to a force has a Unit Page, which includes the unit's composition, equipment and special rules. This page also contain all the information you need to select your force for a game, like the unit's points cost and unit type.
*The unit pages from the rulebook are also available in a free PDF download on the Maelstrom's Edge website, which will also include any future units as they are released.
Games are typically played using a points limit that is agreed upon between both sides before forces are selected. You are always free to field a force whose point total is less than or equal to the agreed upon limit, but never one that exceeds it, not even by a single point! Any units included in a force must be noted on a force roster, detailing the point total of each unit chosen and including any options selected for that unit.
If you’re unsure about what points limit to use for your games, the following guidelines can help you decide. However, you should also feel free to experiment playing games with both higher or lower points limits than those suggested:
90 Points: This is a small, quick game that will typically last around 90 minutes to 2 hours once both players are familiar with the rules.
120 Points: This is the suggested points limit to provide players with ample decisions when selecting their forces, while not taking too long to complete. This size game will typically last around 2-3 hours.
(For those coming from the first edition of the Maelstrom's Edge rules, these suggested limits are lower than they were for V1, as many unit costs have been decreased in the new rules. The size of the forces for a 120 point V2 game will in most cases be fairly close to what it was for the 150 point standard in V1.)
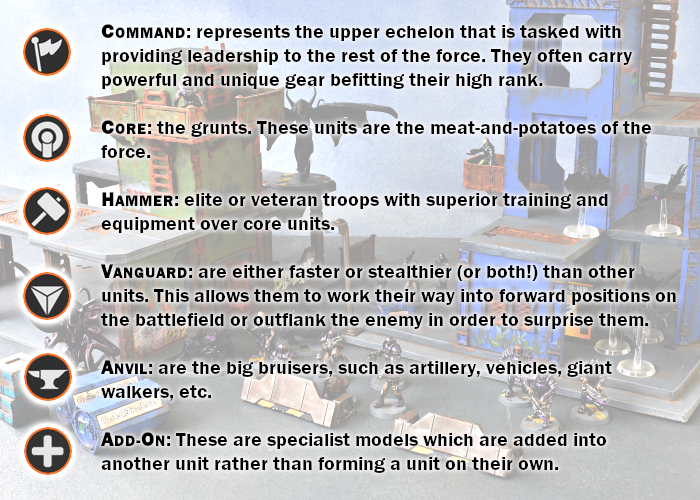
Your force is selected as one or more detachments, led by a Command model. Some units types are optional while others are mandatory, with a minimum number of those units you must select. For example, most commanders require you to take at least one Core unit selection in your force, while also allowing you the choice of a number of Vanguard, Hammer or Anvil units. Once you have satisfied any mandatory unit requirements, you can select other units up to the maximum allowed by that commander (or to the points limit for the game) or take another commander for a new detachment, following the same selection process.

A 120 point Epirian Force
To get you started, we've created some sample rosters for different forces, which can be found here!
The Maelstrom's Edge V2 rulebook is now available! Grab your copy from the Maelstrom's Edge webstore now!
If you have any thoughts on the new rules, pop on over to the Comm Guild Facebook group, or start up a thread in the Maelstrom's Edge section on the Dakka Dakka forums. We welcome any feedback, and would love to hear how everyone's forces stack up in the new rules!
Maelstrom's Edge V2 - Sample Force Lists
Posted on Monday Sept 08, 2025 at 10:29am in Gaming
For this article, we're just looking at force composition, to compare force sizes with V1. We'll go into more detail on tactics and rules changes elsewhere.
For the quick and dirty summary - most of the changes for force composition aren't huge. Forces are still built in the same manner as in V1, with a force made up of one or more detachments, each with a Command model that allows you to make a limited number of unit selections from each of the different unit types - Core, Vanguard, Anvil and Hammer. Equipment selection also mostly works the same, although some options have been removed or changed slightly to fit the new game rules.
The biggest change is in the overall game points size - in V1, the 'standard' game (the size game that we felt made for the best game experience) was 150 points, while in V2 this has been brought down to 120 points. Some tweaking of the individual unit costs across most factions, however, means that the actual size of the forces on the table potentially won't change a lot.
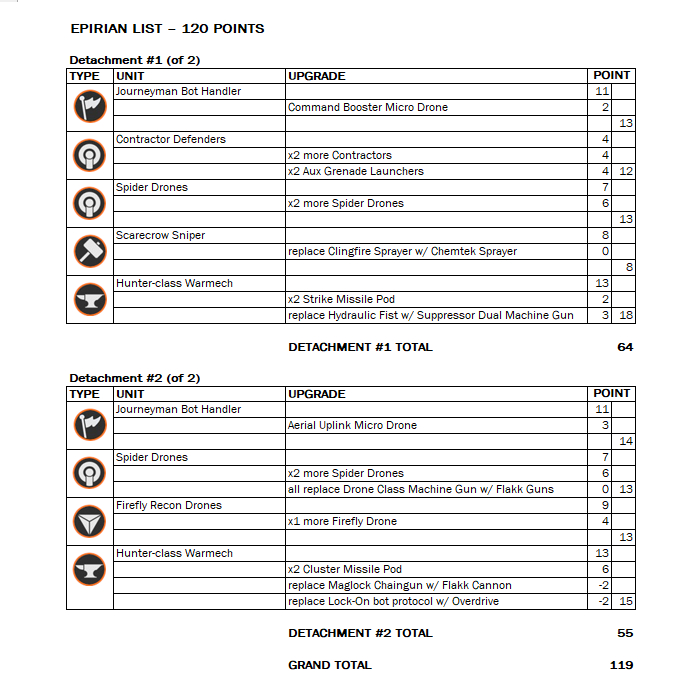
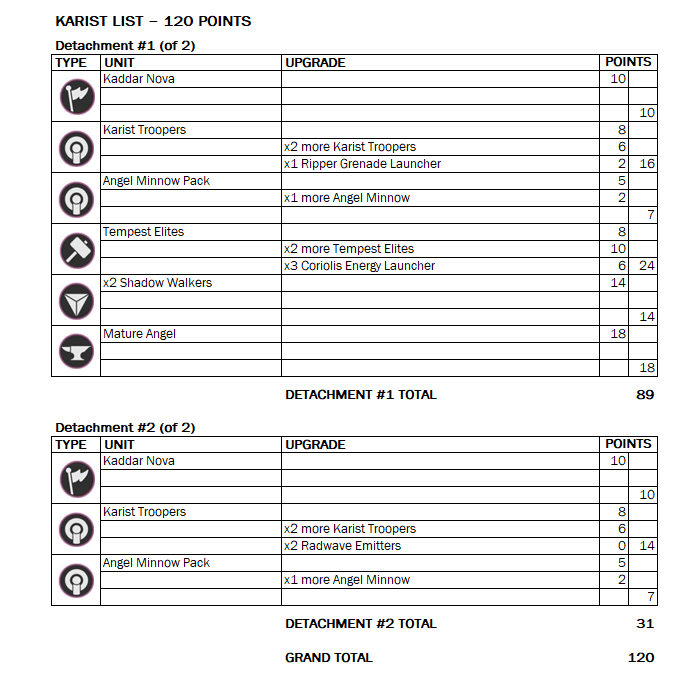
Both of these lists are based on the 150 point V1 lists currently shown in the Rules section of the Maelstrom's Edge website, built from the original plastic models available to these factions. For the Epirians, removing a unit of Fireflies and swapping out the 1st Detachment Hunter's Cluster Missile Pod for a Strike Missile brings the force in at 119 points. The Karists received some more substantial points drops. Their force list gains two more Coriolis launchers on the Tempest Elites, and switches out the second Kaddar Nova for an Angel Keeper, and the second unit of Minnows for some Hellblasters to bring the 150 point V1 list to the 120 point V2.
To balance out their power level a little against the other factions, the Broken didn't receive quite as many points deductions and so their forces may wind up a little smaller in model count for V2. The below list is based on the 120 point V1 'all plastic' Broken list, assembled using just plastic Broken Infantry kits. It needed only a few minor equipment tweaks to fit neatly into the new 120 point limit.
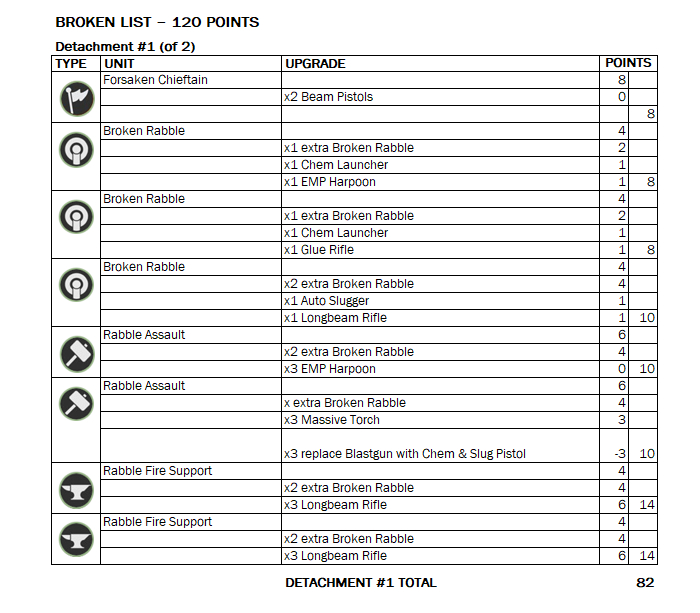
To show how some of the more specialized Broken models can fit in, below is a revised version of that list that switches out some of the rabble for other unit options.
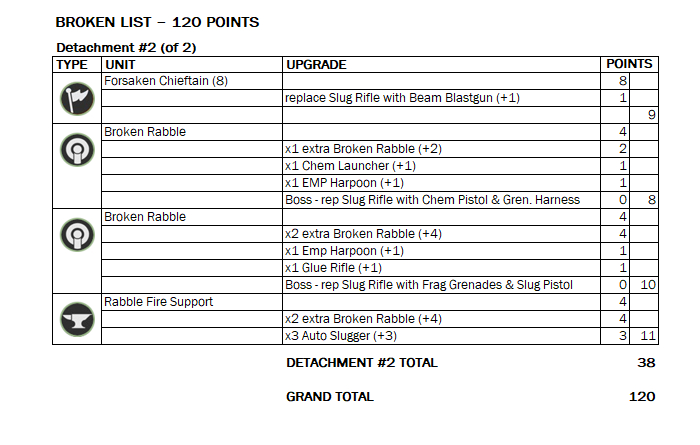
Their points changes mean that Broken forces remain significantly 'hordey' while not needing to collect quite as many models to put together a standard force.
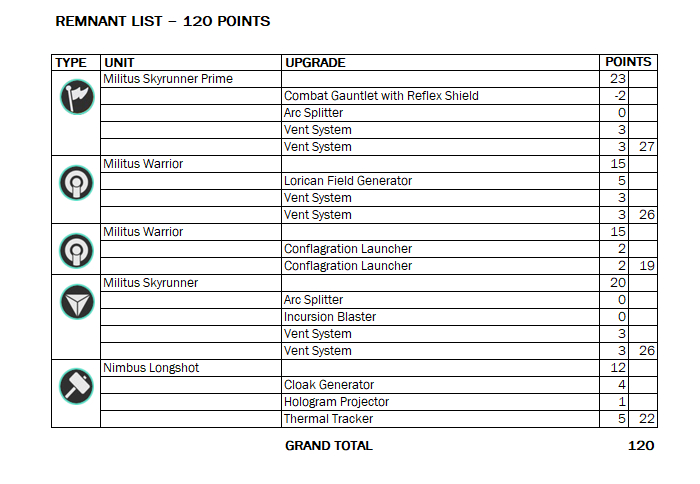
Finally the Remnant, who came in a little later in the piece, and just needed a little rebalancing. The below 120 point list has had some revision from the original V2 Beta release, as we had some feedback from players who found that the Remnant struggled against the other factions on the table. This has given Remnant forces a bit of a boost from their V1 lists as well, which can potentially give you an additional model in your fire team.
The Maelstrom's Edge V2 rulebook is now available! Grab your copy from the Maelstrom's Edge webstore now!
If you have any thoughts on the new rules, pop on over to the Comm Guild Facebook group, or start up a thread in the Maelstrom's Edge section on the Dakka Dakka forums. We welcome any feedback, and would love to hear how everyone's forces stack up in the new rules!
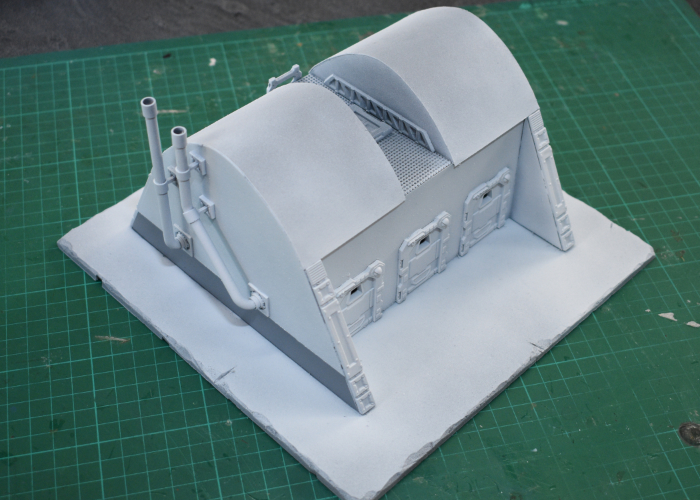
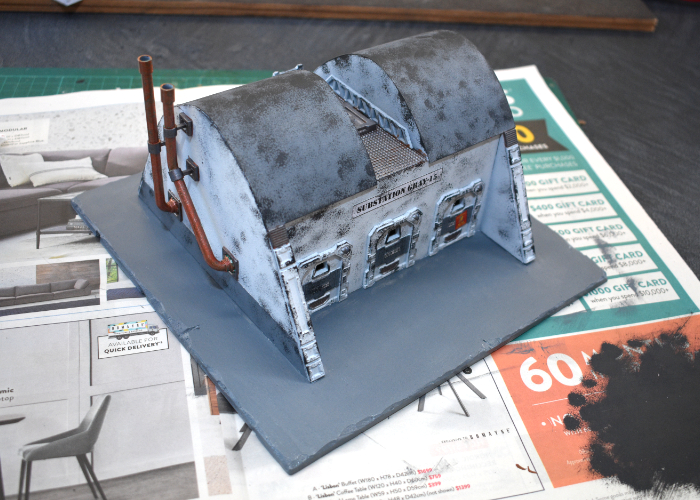
Terrain Spotlight: Drone Substation Quick-paint.
Posted on Friday Sept 05, 2025 at 05:00pm in Tutorials
 - by Iain Wilson
I was rummaging through some storage boxes the other day and came across a building that I had assembled a very long time ago and never got around to finishing. And since it has once again been a little while since I played with terrain, that seemed like as good a reason as any to take some time to get some paint on it!
The building in question was built from foamcore, thin card, and bits from the first Maelstrom's Edge terrain detail sprue, and was made to be somewhat ambiguous as I hadn't decided when I built it what it was actually going to be. For some reason, I had (badly) sprayed it with a slightly watery pale green paint. I obviously had a plan for this when I did it, but I couldn't for the life of me remember what it might have been.
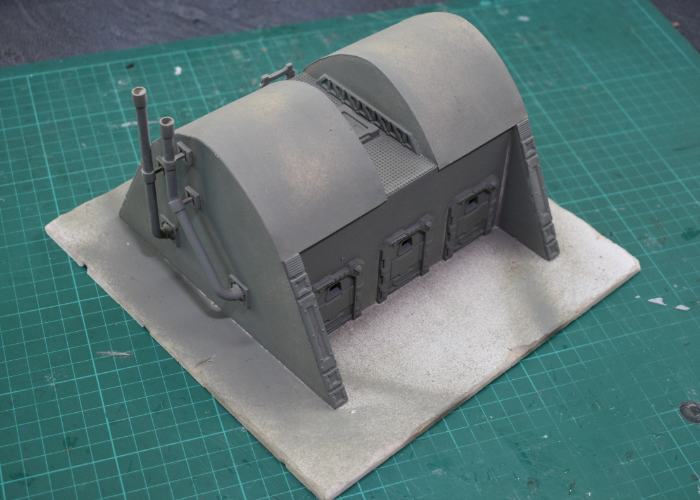
The first step, obviously, was to do something about that dodgy basecoat, so I gave the whole building a good spray with some Army Painter Uniform Grey.
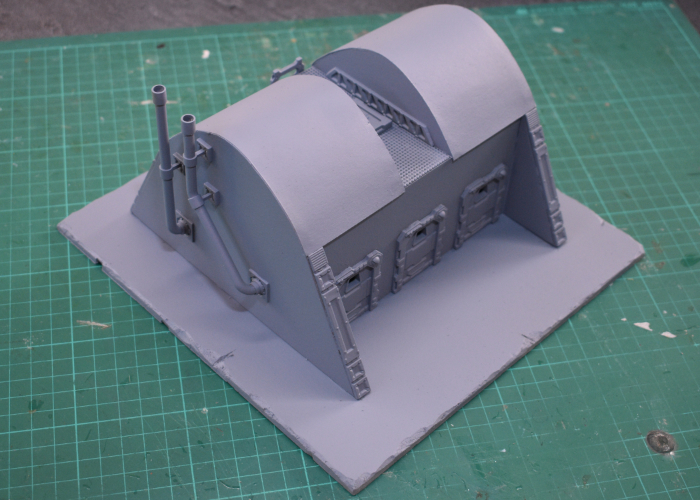
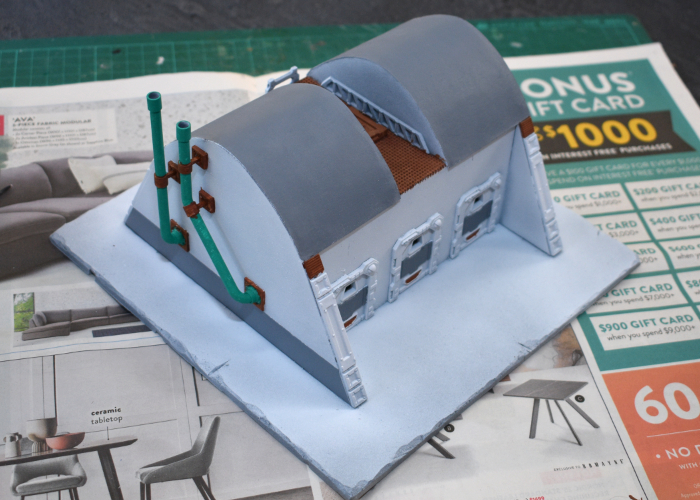
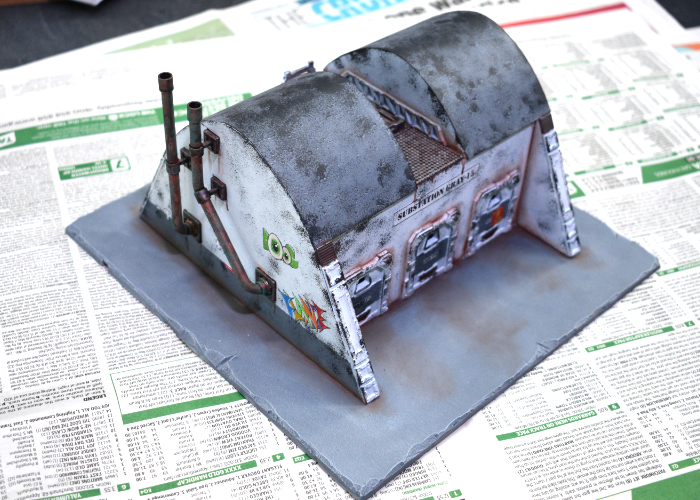
I wanted the building to be white (ish) but solid white buildings are a little boring. So to give it some detail, I broke out some masking tape and masked a strip along the bottom of each end wall before spraying with a coat of white. This was somewhat risky, as my masking tape has been sitting in my toolbox for about 15 years, and doesn't look quite right... There was a certain air of 'will it come off again?' in this operation. Luckily, though, it came off just fine.
Now it was time to start painting the things that weren't going to be white. I gave the chimney pipes (made from cut off pieces of sprue and plastic tubing) a coat of VMC Emerald, and the other bare metal areas a layer of Beasty Brown. The roof and armour strips on the doors received a coat of uniform grey to match the side walls. I could have done this with masking, but that seemed too fiddly given the state of my masking tape, and these areas were easy enough to paint over neatly.
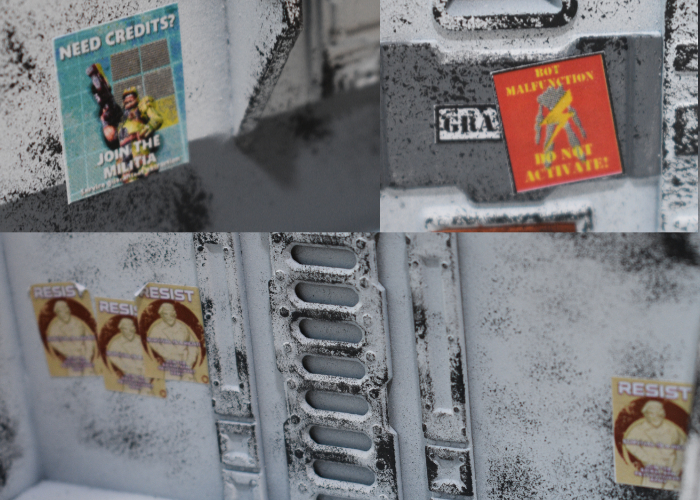
I wanted some signs here and there that looked like they had been there a while, so these needed to go on before any weathering. I printed off some appropriate signage, and glued them in place with some PVA glue.

Then it was time for aforementioned weathering. I broke out a sponge and some Game Color Heavy Charcoal, and went to work, concentrating most heavily on edges and top surfaces. This is the first part of the process where I usually start wondering if I've ruined it, but it usually comes together as it goes along...
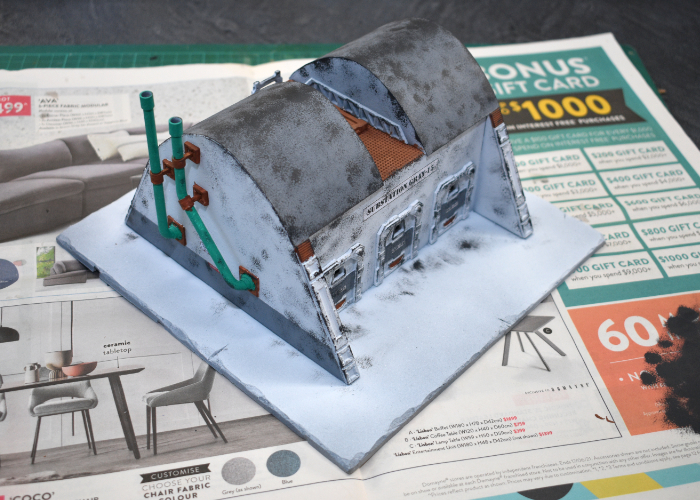
With the initial weathering in place, I added some additional signage.
Then on with the detailing. The chimneys were painted with some old Citadel Copper, and the rest of the metal with a coat of Speedpaint Broadsword Silver. I also painted the base with a coat of Vallejo Neutral Grey.
On sponged areas that aren't white, I like to go over and add some highlights on the larger chip marks. This isn't essential, but does help to give it some more texture and looks better at table height.

Then it was time for final detailing and weathering. I gave all of the exposed metal a coat of Army Painter Mid Brown ink, added some graffiti, and then got stuck into my favourite part - drybrushing on some dirt! I used Beasty Brown, working it into all of the creases and raised surfaces, and added some streaking here and there where it seemed appropriate.
And with dirt in place, the building was ready for the table!
(Click for bigger pics!)
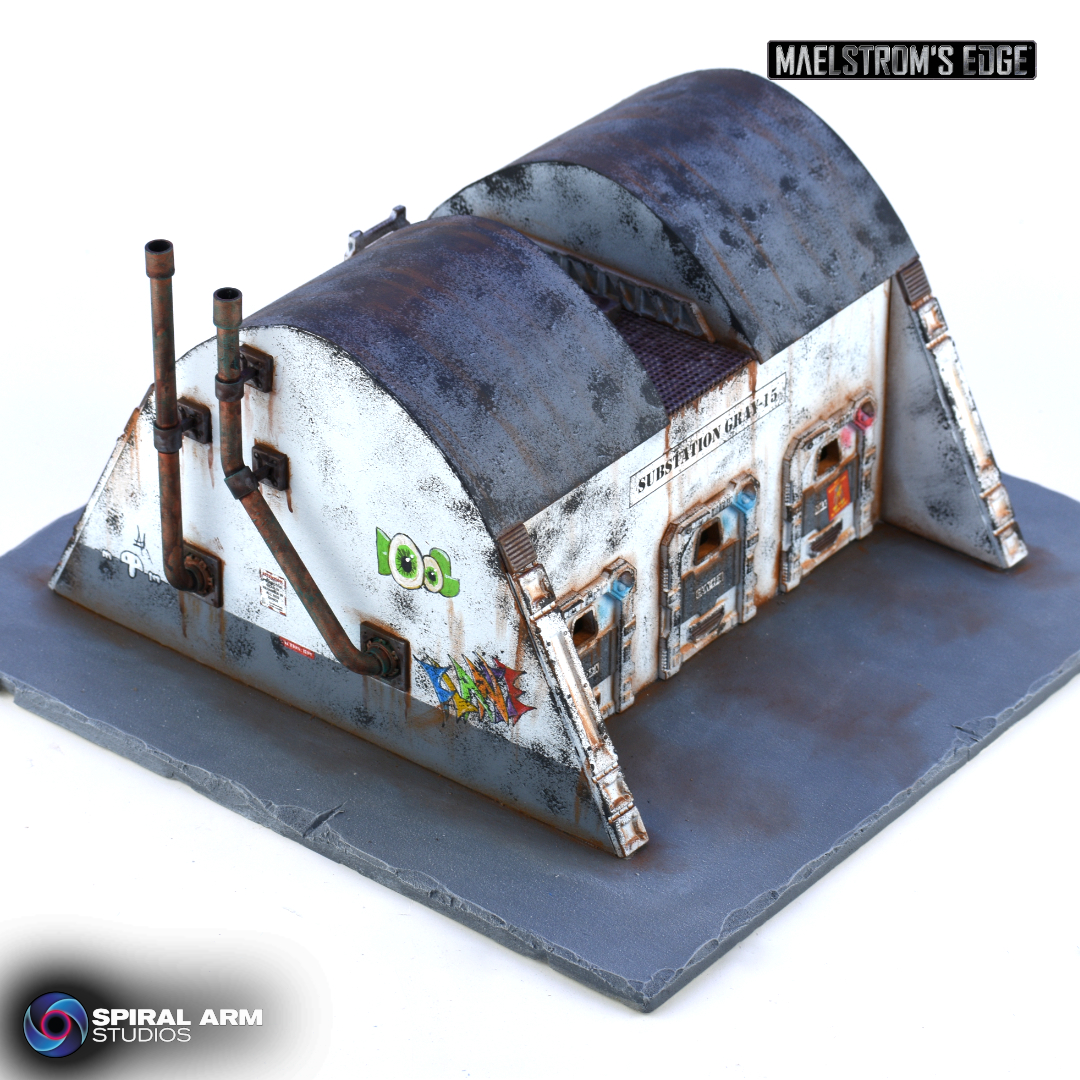
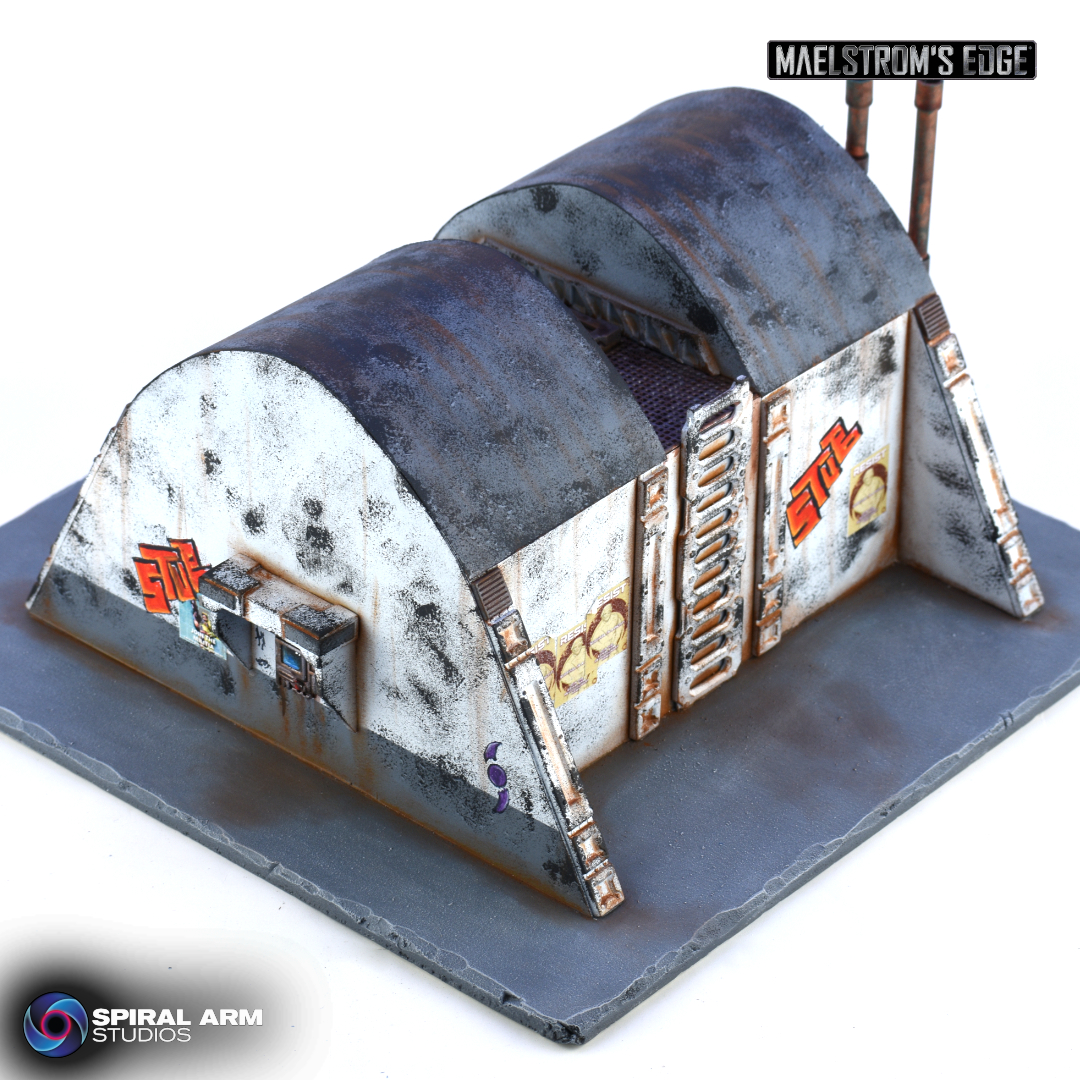
To build your own building of maintenance-neglected doom, grab the Maelstrom's Edge terrain sprues from the webstore here!
What are you working on? We would love to see your models and terrain in the Comm Guild Facebook group!
For other building ideas, modeling tutorials, army spotlights and conversion walkthroughs, check out the Hobby section of the Maelstrom's Edge website here. And while you're there, grab a copy of the Maelstrom's Edge V2 Beta rules!
Tags: modeling painting terrain terrainsprue
Maelstrom's Edge V2 - Suppression
Posted on Thursday Sept 04, 2025 at 05:00pm in Gaming
In Maelstrom's Edge V2, a unit’s suppression level starts at level 0, and can be raised to a maximum of 6. Various in-game effects cause a unit's suppression level to increase, but the most common is enemy units shooting at them - being hit by incoming fire will raise the unit's suppression level by one point, and if the unit suffers any casualties from that attack their suppression level goes up an additional point. Many units also have abilities that will either raise an enemy units' suppression level, or will raise their own suppression level in exchange for some benefit - Artarian Remnant battlesuits, for example, have an Overcharge ability that allows them to perform extra actions while building up waste heat in their systems, represented as an increase in their suppression level.
In V1, suppression was marked with cardboard 'blast' tokens, as there was no specific upper limit to how many a unit could wind up carrying around. In V2, with the change to 6 suppression levels, the easiest way to keep track is with dice - you just have to make sure you can tell your suppression dice apart from the dice you're rolling for attacks! For some other alternatives, Iain put together an article a while back showing some different suppression marker ideas, which you can find here.
While a unit is suppressed, their ability to function effectively on the battlefield is degraded. The unit's SKL (Skill, used for making attacks) is reduced by -1 for each suppression level it currently has, and if this lowers their SKL far enough they also start to reduce the number of shots they can make. The suppressed unit's ability to make use of available cover is also impacted, with the value of their cover reduced by -1 for each suppression level, meaning it will block fewer incoming shots. Units can attempt to 'shake off' a level of suppression at the end of their activation by testing against their WP (Willpower). Alternatively, if they are in cover and did not shoot during their activation they can instead 'regroup' to lower their suppression back down to 0.
A wise commander should always keep their units' suppression under control. Along with the reduction in their shooting and cover, once they reach the maximum level (6), things get worse! Anytime a unit which is at suppression level 6 is required to further raise its suppression level, a model in the unit instead suffers an automatic injury. So even if you have a tough time inflicting direct damage on an enemy, you can eventually whittle them down if you can throw enough bullets at them! To assist in this, attacking units can opt for a Suppressive Fire action instead of regular shooting. Suppressive Fire represents your troops hosing an area with firepower rather precise, well-aimed attacks. It doesn't cause any direct damage but has the potential to raise the target's suppression level much faster than regular shooting, although some weapons are better at suppressive fire than others.
The Maelstrom's Edge V2 rulebook is now available! Grab your copy from the Maelstrom's Edge webstore now!
If you have any thoughts on the new rules, pop on over to the Comm Guild Facebook group, or start up a thread in the Maelstrom's Edge section on the Dakka Dakka forums. We welcome any feedback, and would love to hear how everyone's forces stack up in the new rules!
Faction Focus - The Karist Enclave
Posted on Wednesday Sept 03, 2025 at 05:00pm in The Karist Enclave
The Enclave’s roots trace back to an event soon after the Capital Worlds were lost to the Maelstrom. A small passenger liner, the Kariman’s Breath, was caught on the very fringe of the Maelstrom’s shock wave as it entered a cybel tunnel. While most of the crew and passengers on board died, fourteen men and women emerged from their brush with annihilation having shared a glimpse of a completely different state of being. In the belief that it was possible for the Maelstrom transfer the consciousness of a deserving soul to another plane, these 14 went on to create an organisation that eventually grew into the Karist Enclave of today.
Believing their teachings too important to keep to themselves, the Enclave sent forth missionaries to help others on the Maelstrom's Edge to find ascension.
The masked troops of the Enclave’s military are the enforcers of the message of communal ascension. Clad in plate armor and wielding powerful weaponry charged with radiant cybel energy, Karist troops cut a distinctive profile on the battlefield. From the newest troopers, their specialised assault and support squads, to elite Praetorians and Tempests, Karist troops are tough, adaptable and utterly dedicated to their cause.
In Maelstrom's Edge games, Karist troops form a solid battle line, taking advantage of their heavy armor as they advance into range for their high powered weaponry. Their Commune Reactors allow them to temporarily lower their suppression level, allowing a canny commander to make the most of their devastating firepower.
Dwelling in the depths of interstellar space, the eerie alien life-forms known colloquially as Angels were rarely seen before the coming of the Maelstrom. Adopted by the Enclave as a physical representation of the Maelstrom's devine energy, Angels are found in many Karist forces under the care of specially trained and equipped priests known as Angel Keepers. Minnows, infant form of the fearsome creature, swarm the battlefield in winged packs. Juvenile Hellblasters lob packets of concentrated cybel energy into enemy lines. More mature adult angels, massive in stature, loom above their smaller kin, their void gel forms adopting different configurations at the behest of their keepers - giant wings to soar above the enemy lines, ripping claws or entangling tentacles to harass and mangle opposing troops.
On the table, Angels fill a number of specialised roles. Minnows are fast-moving harassment troops, good for dislodging enemies from an objective. Hellblasters are living cannon, while mature Angels are nigh-unstoppable killing machines, morphing to the most useful shape for the job at hand.
Find out more about the secretive Karist Enclave on the Maelstrom's Edge website here.
The Maelstrom's Edge V2 rulebook is available to order from the 15th of September. Watch this space for more news!
Let us know your thoughts on the Comm Guild Facebook group!
Maelstrom's Edge V2 - Unit Activation
Posted on Tuesday Sept 02, 2025 at 05:00pm in Gaming
When a unit activates it can choose up to three actions from Movement, Status and Shooting categories. Some of these were already present in the V1 rules, but were a little more spread out and more difficult to keep track of. By consolidating and classifying the various actions, it's easier for players to remember what they can and can't do in a turn.
Movement actions dictate how fast the unit moves.
MOVEMENT ACTIONS
- MOVE: The unit moves up to its MV characteristic in inches.
- DASH: The unit moves up to double its MV characteristic in inches, but at the cost of degrading the accuracy of any shooting action it performs.
- CHARGE: The unit moves up to double its MV characteristic in inches, but must move into contact with an enemy unit, who then gets to perform Defensive Fire against the charging unit.
Status actions allow you to focus a unit towards specific goals.
STATUS ACTIONS
- ON THE MOVE: A unit on the move immediately gets to make bonus movement. In addition, a unit that is on the move is both less accurate when shooting and harder to hit when being fired upon.
- TAKE COVER: A unit taking cover gains protection from the terrain it is touching when the enemy shoots at it, and even gets a small amount of protection if it is in open ground. A unit which is taking cover cannot also be on the move, and vice versa.
- AIM: A unit that aims is more accurate when shooting during its activation.
Finally, Shooting actions cover the different options for attacking other units.
SHOOTING ACTIONS
- FIRE: The unit fires a standard round of shooting, which can cause both damage and suppression on the target.
- SUPPRESSIVE FIRE: A special round of shooting, which utilizes a weapon’s Suppression characteristic. No damage can be inflicted, but more suppression can be caused than with a standard round of shooting.
- CQ FIGHTING: A special attack against enemies in base contact with the firing unit, using melee weapons or pistols.
By selecting actions from each category in turn, a unit steps through its activation. For example, a unit can Move, then Take Aim in order to gain a boost to their shooting attacks, and then Fire on an enemy target.
While a unit can only select a single action each from Movement or Shooting, multiple Status actions can be combined so long as you stay within the maximum of three actions in total. So you could, for example, have a unit Take Cover and Aim, and then Fire upon enemy units from their more protected position.
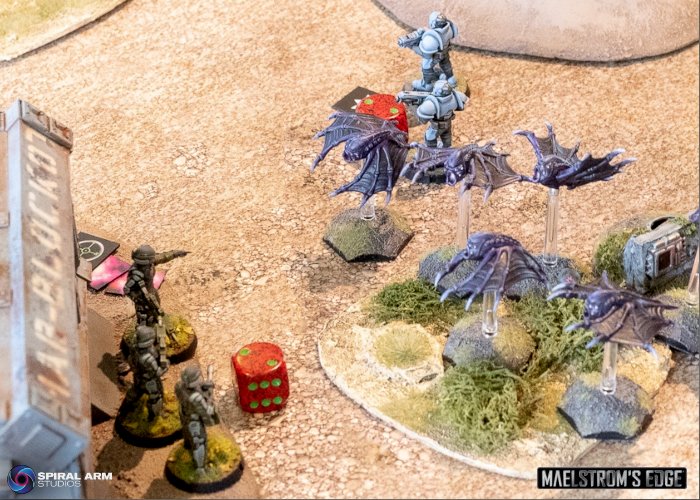
To show how this all works, here's an Epirian SecDef Field Commander facing off against an Artarian Remnant Pathfinder. In the midst of battle, they have just caught sight of each other through the ...err ... trees? and shenanigans ensue.
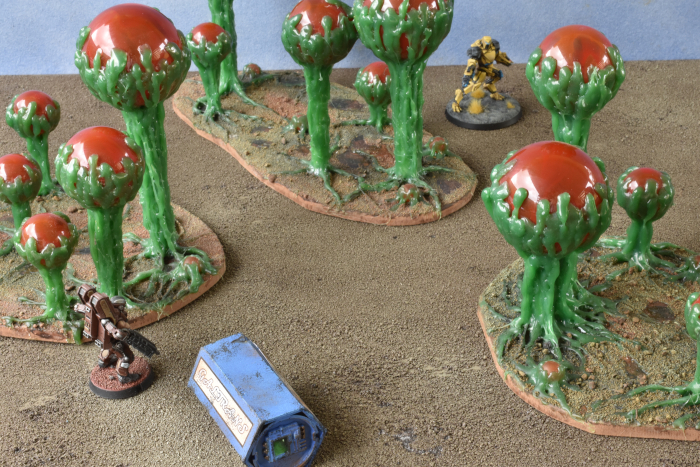
The Remnant player has Priority (meaning they activate a unit first this turn) and chooses to use a Move action to advance the Pathfinder through the trees to bring the Field Commander into short range (6"). They then use their Status action to Aim, applying a +2 bonus to the Pathfinder's SKL (Skill) stat.

The Pathfinder's arc splitter has SHO 4, which means it normally rolls four dice to shoot, and as an SR (short ranged) weapon it receives an additional shot for being within 6" of the target. Rolling five dice, the Remnant player needs to equal or beat the Field Commander's EVS of 4. They roll two 1s, two 2s and a 4.
The Pathfinder has SKL 4, with the +2 from aiming increasing it to 6. This allows the Remnant player to adjust the rolls by up to 6 points in total. They flip the 2s up to 4s, but don't have enough points remaining to get either of the 1s up to a 4, so these remains missed shots.
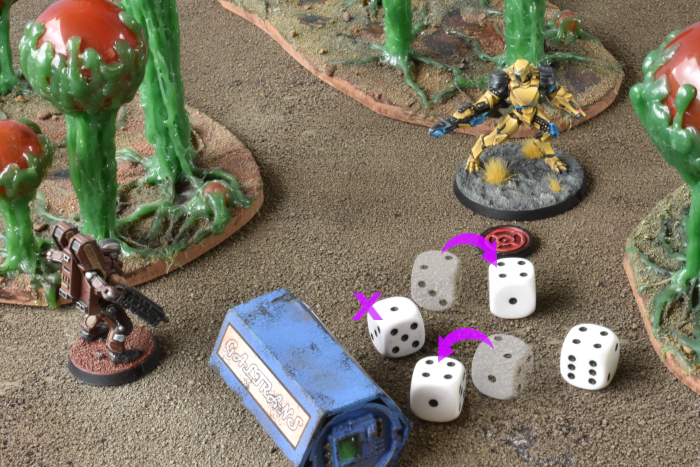
The Epirian player now needs to roll to see if their armor blocks the three successful hits. They need to equal or beat the PEN (penetration) of the arc splitter, which is 3. Rolling three dice, they roll a 2, a 3 and a 4. The Field Commander's AV (Armor Value) of 4 allows them to flip the failing 2 up to a successful roll, which means all three shots are blocked.
While the Field Commander doesn't take any damage, being hit by enemy fire raises his Suppression Level, putting him on Level 1 (Marked in the picture below with the orange die).
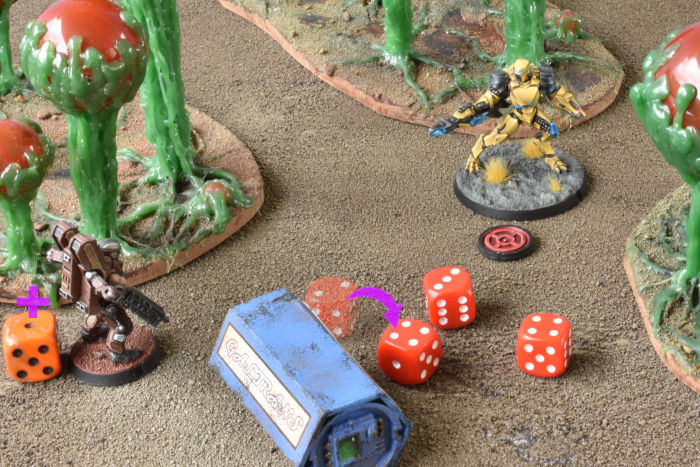
It's now the Epirian player's turn to activate a unit. They use a Move action to shuffle the Field Commander over behind the shipping crate, and a Take Cover action, which will give him some extra defense against any further enemy shooting until he activates next.
Regular models can normally only fire a single weapon per activation, but the Field Commander's Advanced Machine Assistance ability allows him to cut loose with all of his weapons at once. His two LM14 machine guns each have SHO 3, while his cluster missile launcher is an area of effect weapon, so has SHO 2 against the single model enemy unit. Grabbing two black dice for the missiles and six white dice for the machine guns, the Epirian player rolls five 2s, two 5s and a 6, needing to equal or exceed the Pathfinder's EVS of 4 to hit. The Field Commander has SKL 4 but is on Suppression Level 1, reducing his SKL by 1 point. The Epirian player chooses to use the remaining SKL 3 to flip the 3 and one of the 2s up to 4s.
Both Epirian weapons have the same PEN 4, but the 6 is a Critical Hit, requiring a roll of 6 to block. Rolling the dice from the successful hits, the Remnant player gets a 2, a 3, a 4 and a 5, and a 2 on the Critical hit. They use the Pathfinder's AV 4 to flip the regular 2 and the 3 up to 4s, but don't have enough points left to block the Critical Hit.
This means the Pathfinder suffers a single injury, which would be enough to kill a lesser warrior. Remnant Champions are made of tougher stuff though, capable of shrugging off significant damage, and even the comparatively light armored Pathfinder has a FOR (fortitude) of 5, meaning it needs to suffer 5 injuries to be removed as a casualty. It does however raise its Suppression Level by 2 (1 for the successful hits, and another because it suffered an injury).
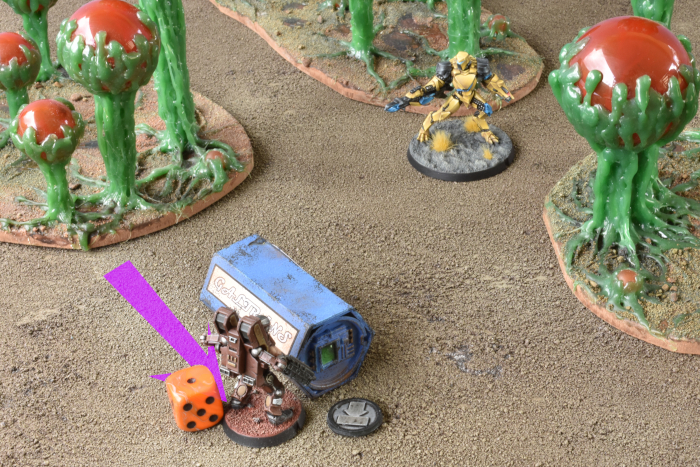
The final step in a model's activation is Recovery, allowing them to attempt to Shake Off suppression. The Epirian player rolls a D6, scoring a 4. This beats the Field Commander's WP of 3+, and so their suppression level is lowered by 1, back to 0. Play would then continue on to the next unit, if there is one, otherwise the players would move on to the next turn.
The Maelstrom's Edge V2 rulebook is now available! Grab your copy from the Maelstrom's Edge webstore now!
If you have any thoughts on the new rules, pop on over to the Comm Guild Facebook group, or start up a thread in the Maelstrom's Edge section on the Dakka Dakka forums. We welcome any feedback, and would love to hear how everyone's forces stack up in the new rules!
