Karist Reaper Cadre - Card Correction
Posted on Tuesday May 16, 2017 at 10:43am in Tutorials
 - by Iain Wilson
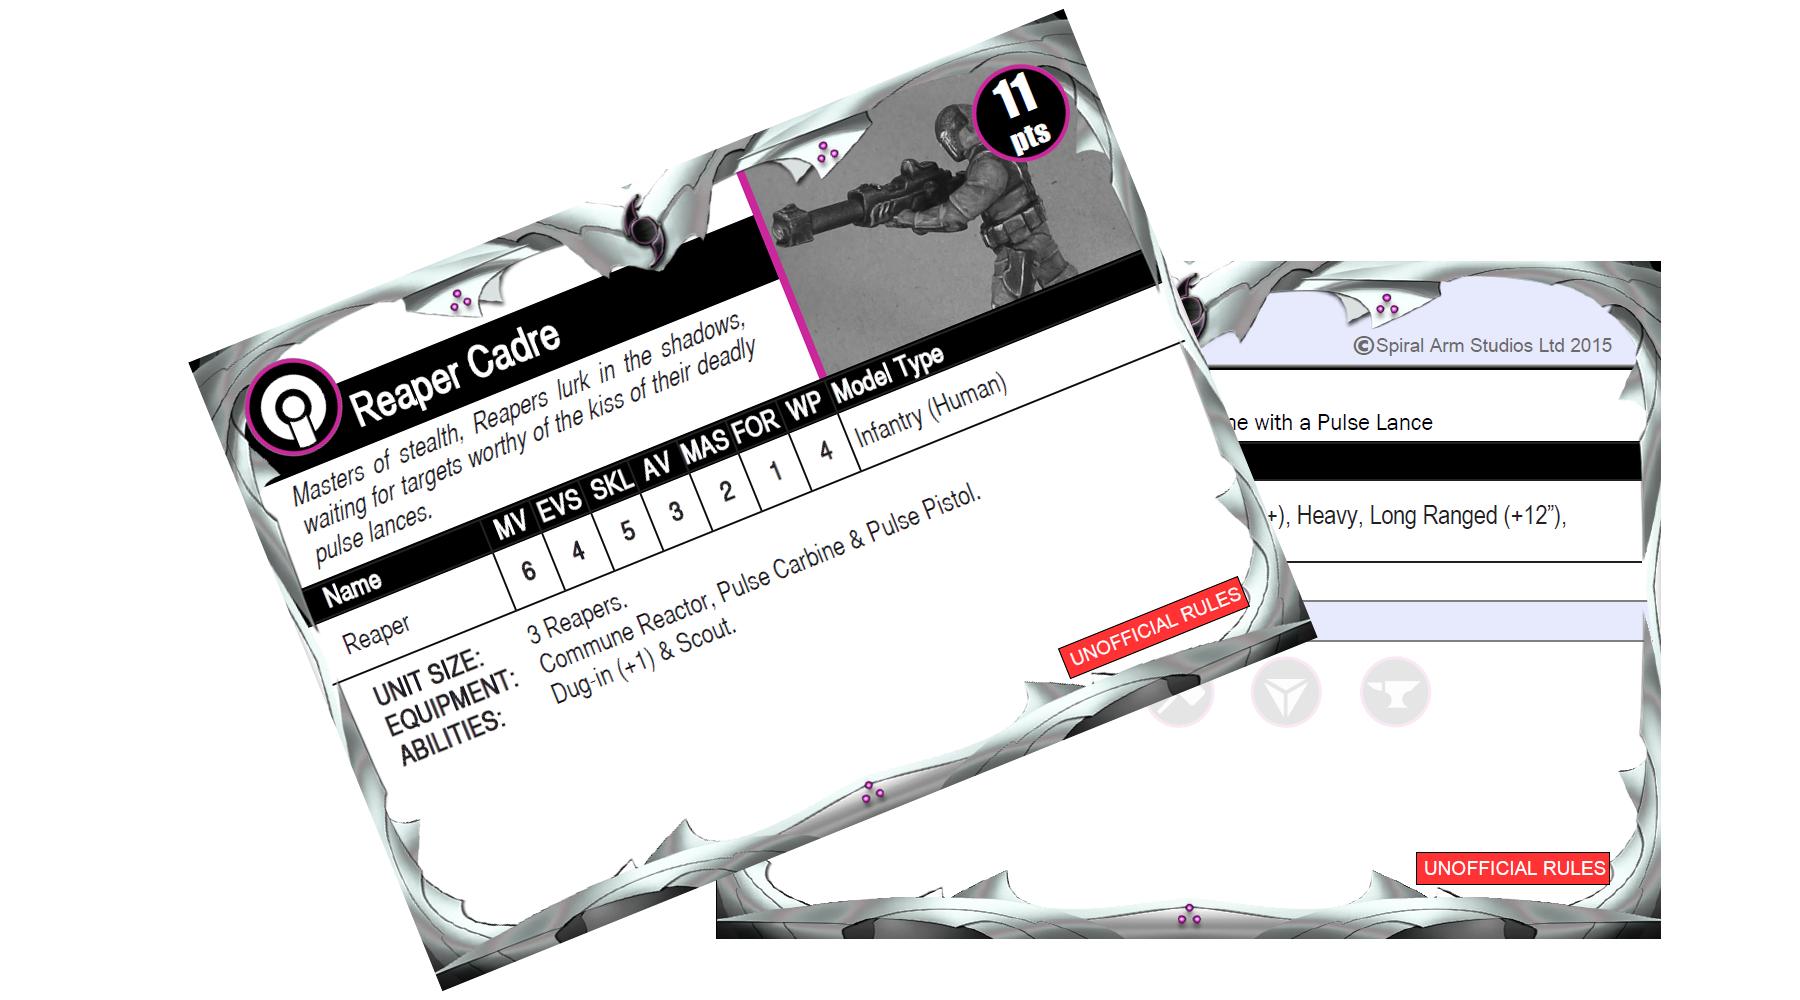
It would appear that the unit card for the Karist Reaper Cadre in this week's article contained a couple of errors that needed to be corrected - The card incorrectly listed the unit as Core instead of Vanguard, and (sadly) the Pulse Lances weren't supposed to be free!
An updated version of the card has now been uploaded, and can be found here.
Those responsible for the error (me) have been severely castigated by, uh, me... and have promised to not do it again.
Karist Reaper Cadre Conversion Tutorial & Unit Card
Posted on Monday May 15, 2017 at 05:00pm in Tutorials
- by Iain Wilson
Following on from the conversion article and rules card for the Epirian Scorpion Drone a little while ago, it seemed fitting to show the Karists a little love as well. Sneaky, sneaky love, in the form of the Karist Reaper Cadre. Armed with a sniper variant of the Karist Pulse Carbine, Reapers arrive in advance of the main force and are tasked with removing problematic opponents before the regular troopers have to deal with them.
Here, you'll find instructions for building the Reapers' fearsome Pulse Lance, and unofficial rules for running this unit in your games.

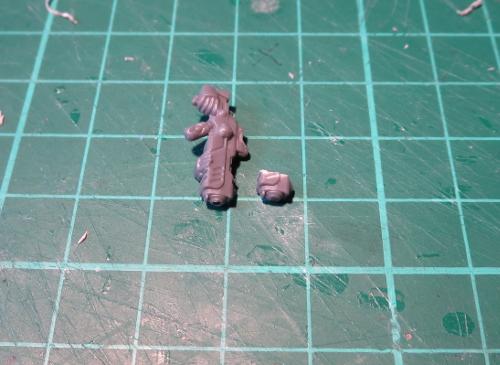
I've based the Reapers on the Karist Trooper, with the shoulder pads left off and the collar trimmed down to represent their lighter armour.
The unit comes with Pulse Carbines by default, but up to two models can be upgraded to have Pulse Lances. To build each lance, you will need two Pulse Carbines. You will also need some 1mm plastic rod (plastruct or similar) and some 2.5mm plastic tube.
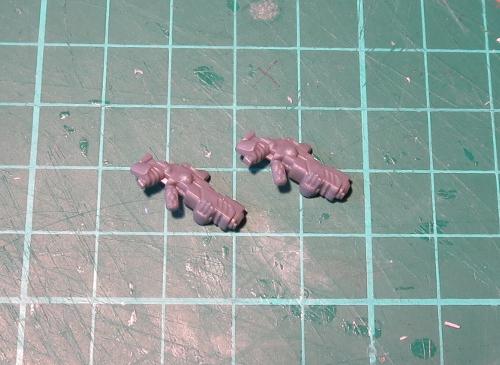
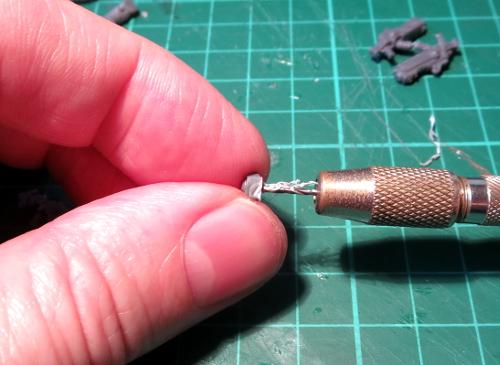
Start by cleaning off any mould lines, and then you will need to drill a 1mm hole into the barrel of one of the pulse carbines. Use a sharp knife to prick a guide hole into the centre of the barrel, and then drill in 3-5mm with a 1mm drill bit.
Then use a sharp knife or a file to remove the barrel completely, so the front of the weapon is flat. You do this after drilling, as it's easier to find the right position for the drill while the barrel is still there.
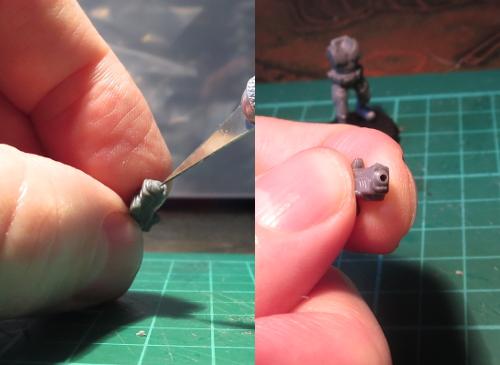
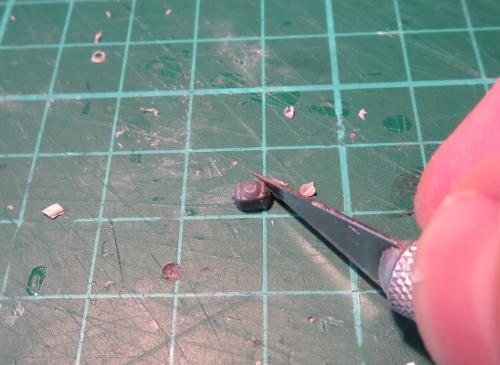
Take the other carbine and cut the front end off just behind the front sight, where there is a groove running across the top of the weapon.
Drill a 1mm hole into the back of this piece, in line with the centre of the barrel. If you drill out your pulse weapon barrels, you can just drill all the way through.
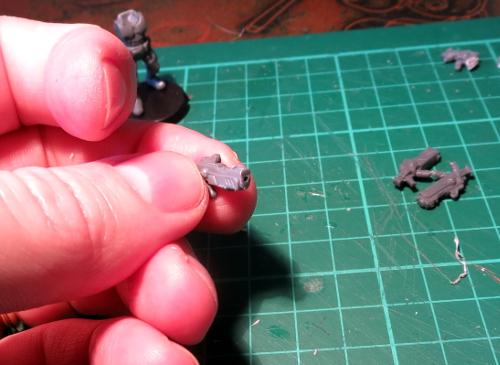
Trim off the leftover pieces of stock around the bottom and sides.
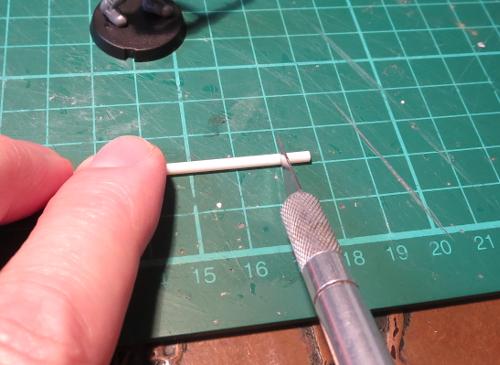
Cut a piece of the 2.5mm tubing around 7mm long - the exact length isn't important, so long as you're consistent with it on all of your lances. There are specialist tools out there for cutting plastic rod and tubing square, but here's the quick and easy method: Grab a cutting mat with a grid pattern on it. Lay the plastic tube along on of the grid lines. Line up where you want to cut with one of the perpendicular lines, and sit the knife blade on top, also lined up with the grid. Now, gently press down with the knife as you use your other hand to roll the tube forwards across the mat. Don't stress if the knife doesn't go through in one go, just roll the tube backwards and forwards a couple of times if necessary without lifting up the knife off the tube. The rolling motion causes the blade to scribe a neat ring around the tube, and when the knife makes it through to the centre your cut piece will pop off with a nice, square end.
Cut a piece of the 1mm rod that is 3-4mm or so longer than your piece of tube. Glue this into the barrel hole you drilled in the first carbine.
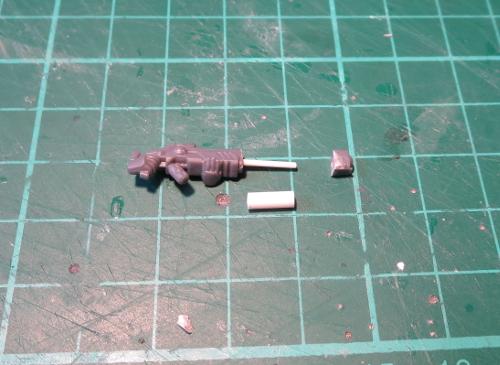
Check for length before gluing the rest in place - Slide the tubing over the 1mm rod, and then dry-fit the 2nd rifle barrel to make sure that it sits flush against the end of the tube. If necessary, either drill out the hole a little more or trim down the end of the rod so that everything sits snug, and then glue it all on place.

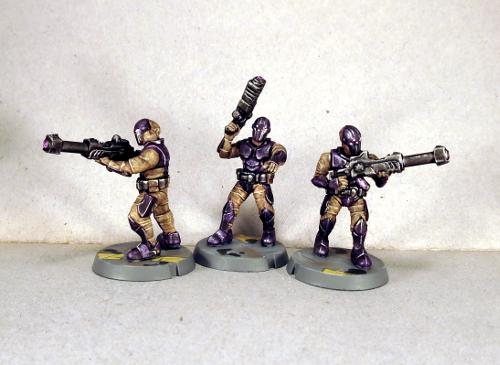
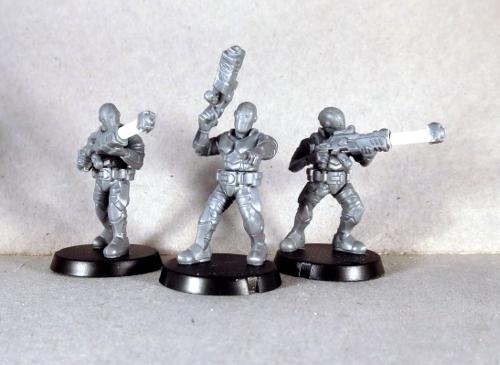
The finished unit, ready for painting:
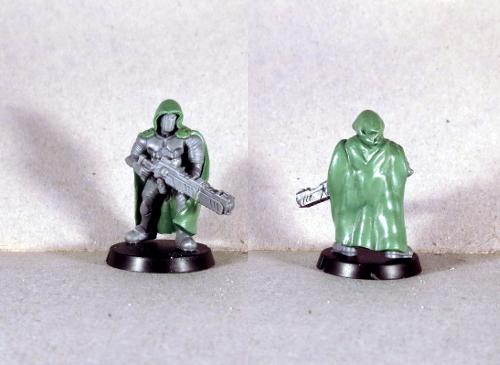
For an alternate take, I built the below version with a sculpted cloak and with a lance that uses one Pulse Carbine from the Trooper sprue, and a front half of a carbine from the Faction Expansion Sprue - that version of the carbine doesn't have hands modeled on, so is easier to use for this. This is a little less fiddly than the plastic tube version above, but doesn't stand out quite as much from the carbine.
If you would like to use the Reaper Cadre in your own games, you can download an unofficial rules card here, and you can pick up the Karist Trooper kit needed to build it from the Maelstrom's Edge webstore here
As always, feel free to share your creations on the Comm Guild Facebook page!
For other Maelstrom's Edge modeling articles, including tutorials and walkthroughs of a wide range of different building and miniature projects, check out the article roundup here.
Tags: conversion karists modeling rules tutorial
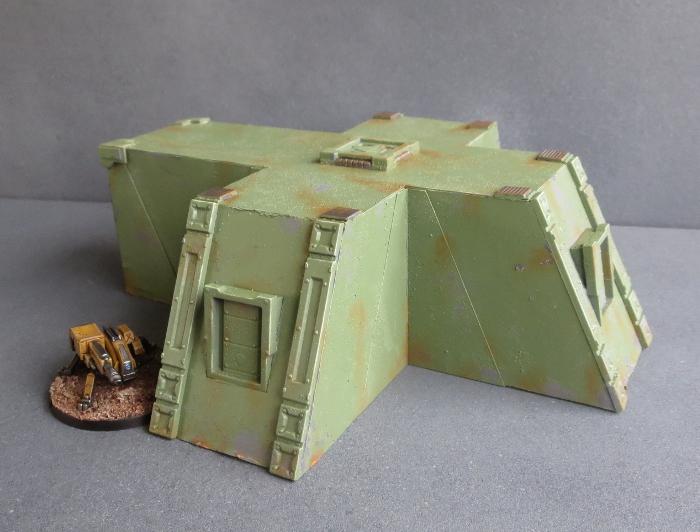
Terrain Template and Tutorial - Bunker
Posted on Monday May 08, 2017 at 05:00pm in Tutorials
- by Iain Wilson
A couple of weeks ago, I shared a template for building a small minehead structure from foamcore, cardboard and the Maelstrom's Edge terrain sprue. For something a little larger and more impressive-looking, I have put together a new template for a bunker. This builds on the basic design of the minehead to keep some design consistency on the table.

 You will need some 5mm or 6mm foamcore (either will work, although the roof piece will overhang the sides slightly with the thinner foamcore), some thin cardboard - around .5mm thick, PVA glue, and the Maelstrom's Edge terrain sprue. A sharp pencil, a steel ruler and a sharp craft knife will get you by for tools.
You will also need the building template, which can be downloaded from here: Bunker.pdf
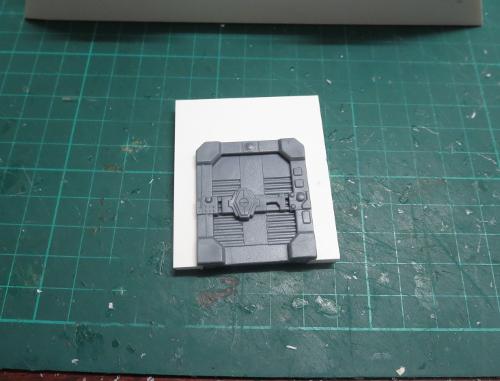
From the terrain sprue, the following components are used: one of the small doors (either will do), three shutter windows*, two corner braces, the square hatch, and six of the long support struts.
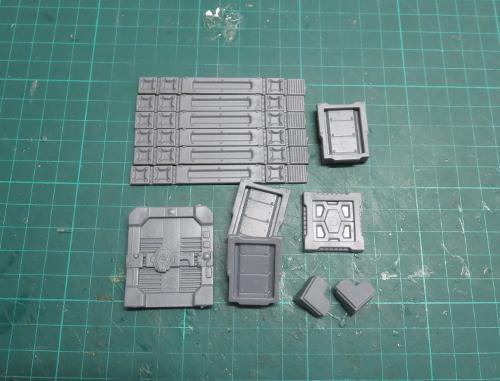
*There are only two shutter windows on a sprue, so you'll need to grab one of the windows from a second sprue. Alternatively, you can build the bunker without the rear window in order to stick to just a single sprue.
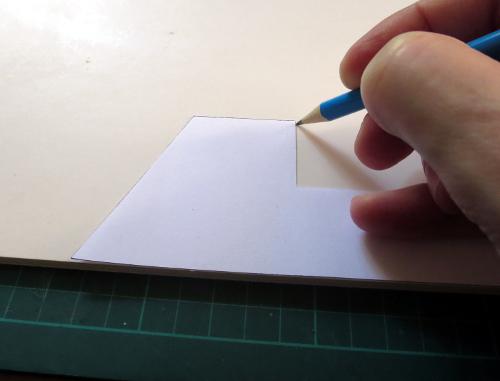
Print out the building template, and cut out the panels using steel ruler and knife.

You can then lay the panels on top of the foamcore and card (the parts are labelled for which material they need) and draw around them with the pencil to transfer the outlines. The solid lines on the parts show where you need to cut.
You need multiples of some parts - the quantity required of each is listed on the part. Some parts also say '(flip)' after the quantity. For these, trace the panel once and then flip it over to trace the second. When cutting foamcore with a knife, the back of the piece can wind up a little rougher than the front, so flipping the template makes sure that you have two 'clean' surfaces for the outside of the building.
Once you have traced all of the parts onto the appropriate material, use the ruler and knife to cut them all out. If you have never cut foamcore before, don't try to cut through in one go. Lay the ruler along the line you want to cut, and then make several passes with the knife, working deeper as you go and being careful to keep the knife blade vertical so you don't wind up with a bevelled edge. If you're building the single-sprue version mentioned above, don't cut the rectangle out of the middle of one of the end wall pieces.
The end wall pieces lean inwards, so need to be bevelled at the bottom. Use a knife to cut an angled strip out of the back of the bottom of each of the wall parts.

There is a protrusion on the bottom of the shutter window that needs to be removed. Trim off with a knife or file it down on each of the windows so that the bottoms of the windows are flat. You can then glue the windows into the end walls. They sit angled out at the top, as below. The outer edge of the window frame sits flush with the wall at the bottom, while the back edge of the window should sit against the outside edge of the hole at the top.

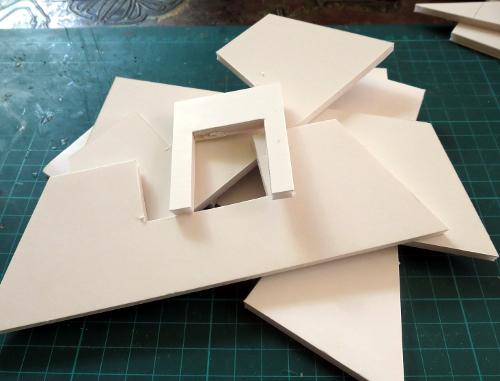
Take the two side wall pieces and two of the end walls and glue then together. The end walls sit inside the side walls, as shown below:
Glue the door into the door section.
Then take the door section, the third end wall and the two main walls and glue them together. The end wall sits inside the main wall sections, while the door goes across the other end, outside the main wall as below:
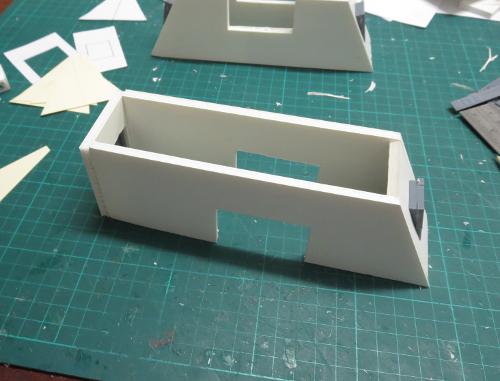
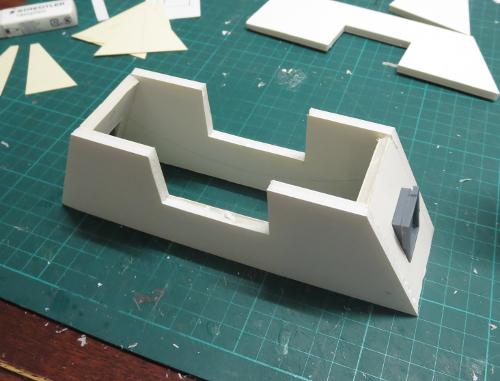
The two sections then slot together, and can be glued in place to form a t-shape.

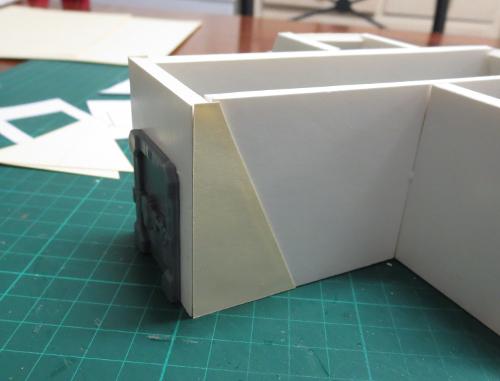
Glue on the side panels. These sit flush with the front of the door panel, to cover over the cut edge of the foamcore and to reinforce the joint.
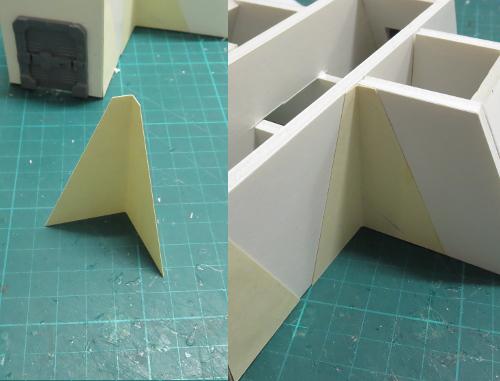
Fold the corner panels along the middle fold line, so that they form a 90-degree angle. These can then be glued in place into each of the inner corners of the 't'. You can use superglue for this step to speed things up a little, as there is no exposed foam to worry about. This helps to give the structure some rigidity while the PVA glue sets, and also covers over any messiness or gaps where the walls join.
The roof can now be glued in place.
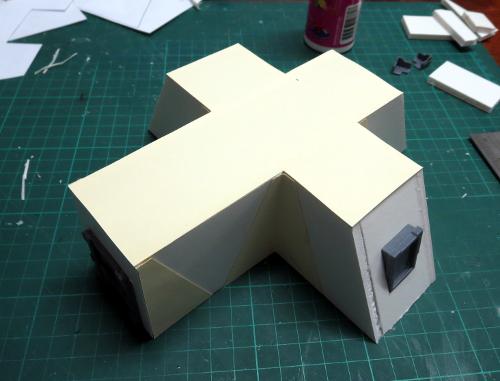
Glue the two corner braces in place on the roof corners above the door.

Take the support struts and cut off the vent and rivet strip from the end with a knife.
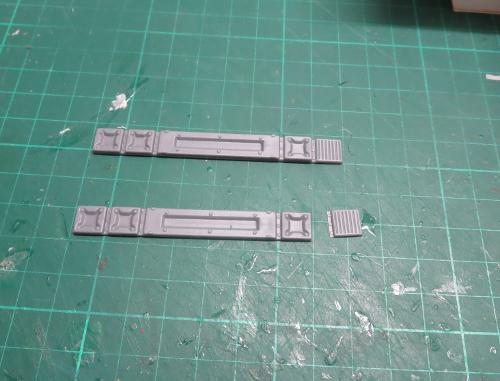
These are then glued onto the end walls, covering over the cut ends of the foamcore. The vent piece goes on the roof, with the rivet strip butting up against the top of the support strut.

Finally, glue the square hatch onto the roof, in the middle of the 't', and your bunker is complete.

Let the glue set, and it's ready for painting.

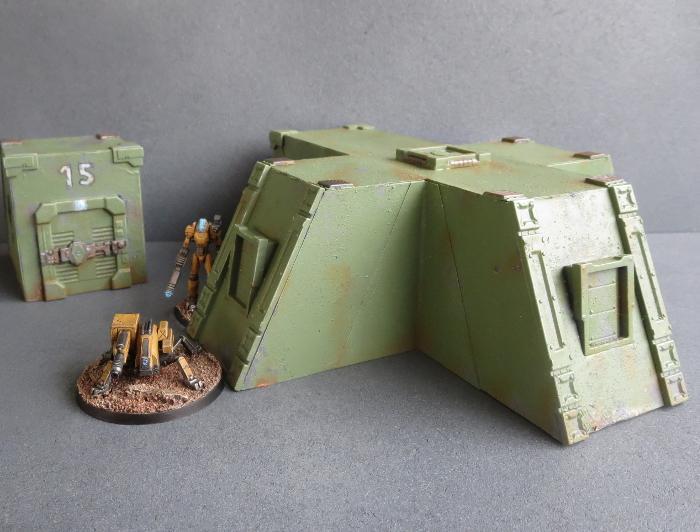
For variation, you could replace the door section with another angled end wall, leaving access through the roof or underground, for more of a fortified pillbox. Or you could stack the small minehead building on top, making a balcony above the door section for troops to stand on.
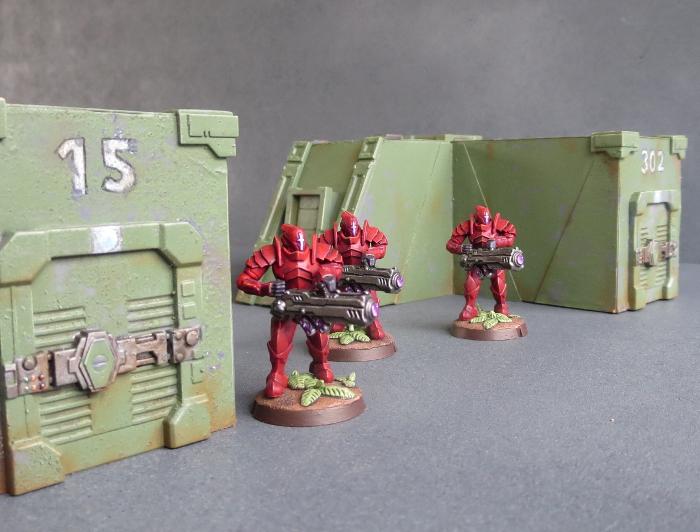
If you want to try it for yourself, you can grab the template from here and the Maelstrom's Edge terrain sprue from the webstore here. I'd love to see what others can come up with to do with the design, so as always please feel free to share your creations on the Comm Guild Facebook page!
For other Maelstrom's Edge modeling articles, including tutorials and walkthroughs of a wide range of different building and miniature projects, check out the article roundup here.
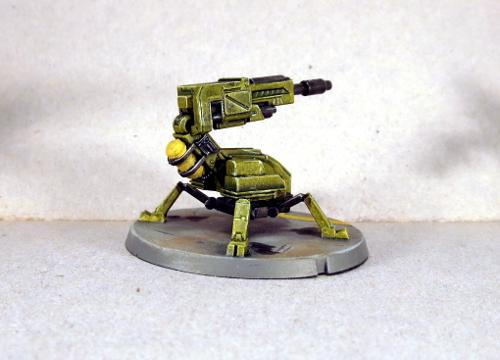
Epirian Scorpion Drone Conversion Tutorial and Unit Card
Posted on Monday May 01, 2017 at 05:00pm in Tutorials
- by Iain Wilson
The humble Epirian Drone is a robot of many guises. It was designed as a modular core unit that could have an array of different weapons or motive devices in order to create specialised roles as required. So far in the game we have two of these variants: the Spider and the Firefly. I've had a lot of fun, however, thinking about ways to modify the kit to create other variants, and of the potential things that bored or desperate engineers on frontier worlds might come up with to make their drones fit new roles.
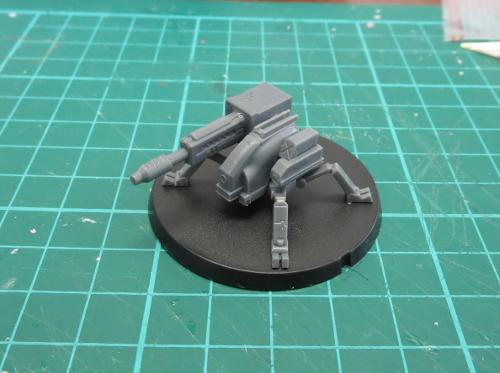
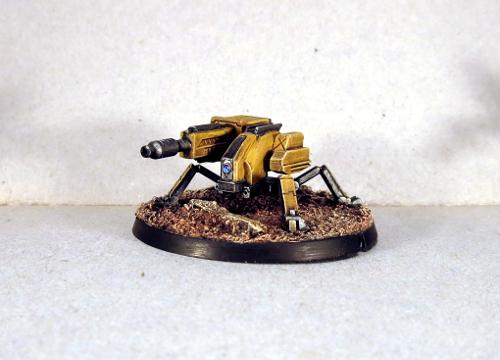
This week, I'm presenting one of the variants that I created: the Scorpion Drone.
Armed with a hefty maglock chaingun, the Scorpion fills a heavy support role when there are no Hunters around to do the job.
This is a fairly simple conversion, using most of a Drone (legs, chassis, left-side nacelle, rear plate, base) and a chaingun and left-side magazine unit from a Hunter - You could use the right side, but I've used the left as it is a leftover part if you build the Hunter with his hydraulic fist.
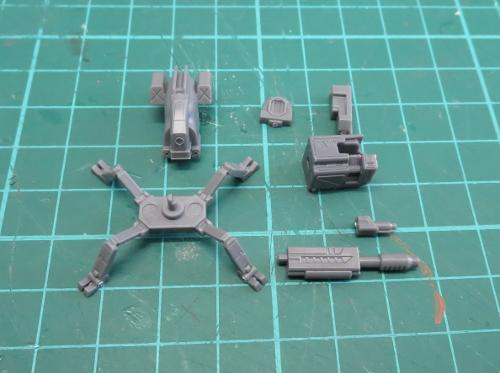
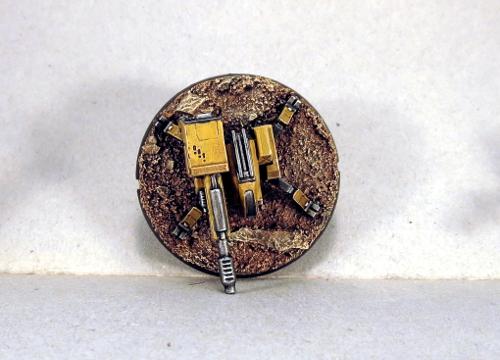
Using a sharp knife, cut the rectangular pod off the right side of the drone chassis.
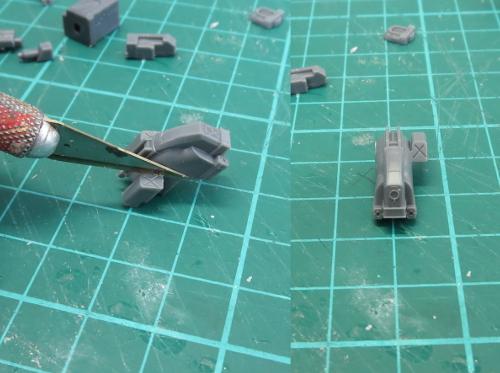
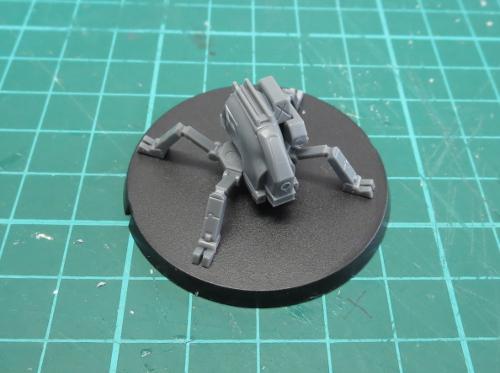
Assemble the drone parts as normal.
Assemble the chaingun with the magazine unit upside-down. This helps to conceal the elbow joint cavity, and means that the side glued to the drone chassis is the side with no detail on it.
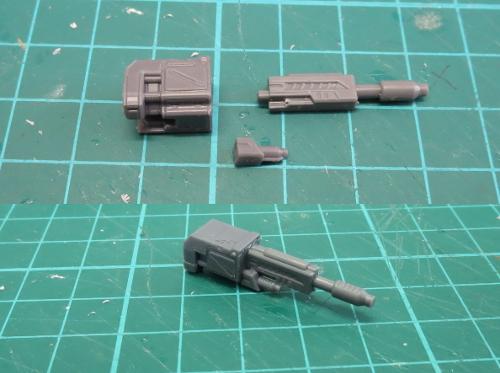
Glue the chaingun onto the chassis. It should sit with the rear of the magazine unit a couple of millimetres back from the rear of the drone, and the top of the magazine unit more-or-less level with the top of the rails on the chassis. The ejection port will line up with the rear left knee.
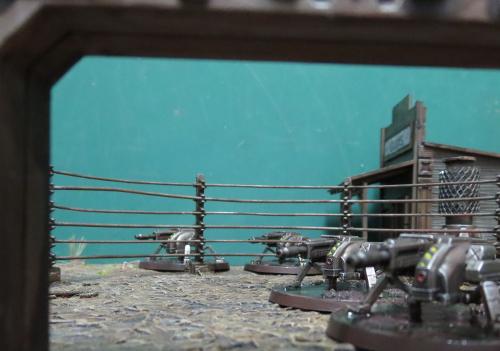
And that's it - job's done!
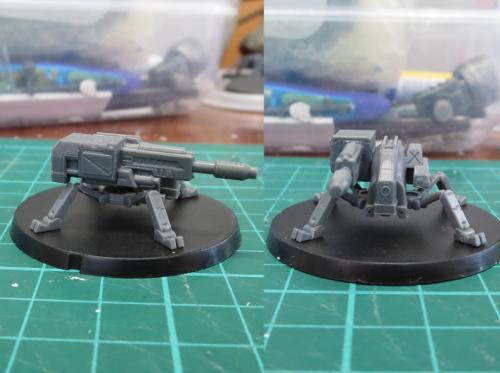
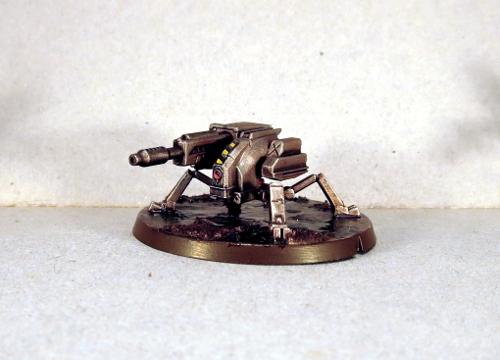
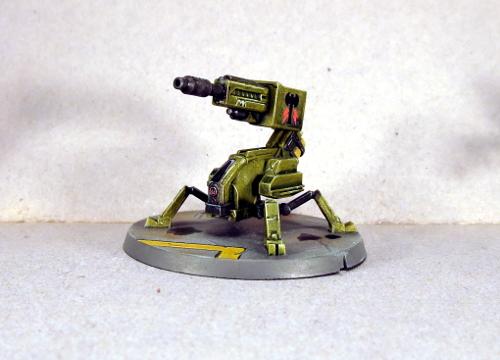
A couple of painted shots of the Scorpion in all its over-sized-weaponish glory:
This was actually the second version of the Scorpion that I came up with. The first looked like this:
This version uses the chemtek sprayer from the Scarecrow kit to create more of a scorpion's tail for the weapon.
I decided to go with the second variant partly to make it an easier conversion, and partly because I thought the weapon mounted on the side looked a little more in keeping with the Maelstrom's Edge aesthetic. The tail is fun, but a little impractical.
If you would like to use the Scorpion in your own games, you can download an unofficial rules card here, and you can pick up the Drone and Hunter kits needed to build it from the Maelstrom's Edge webstore here

As always, feel free to share your creations on the Comm Guild Facebook page!
For other Maelstrom's Edge modeling articles, including tutorials and walkthroughs of a wide range of different building and miniature projects, check out the article roundup here.
Tags: conversion drone epirian rules tutorial
