Entries tagged [conversion]
Modeling Spotlight: The Broken Marsayan Hypnotist
Posted on Monday Apr 02, 2018 at 05:00pm in Tutorials
- by Iain Wilson
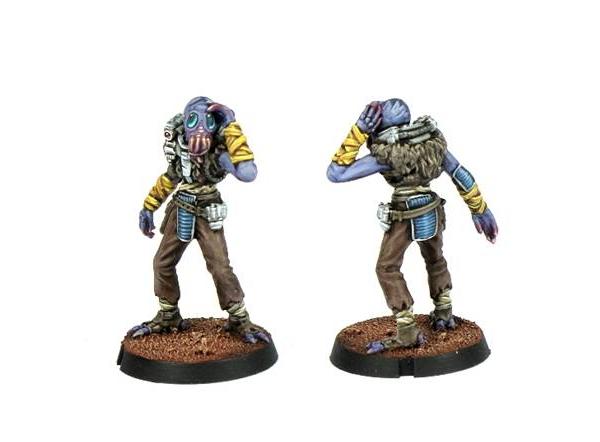
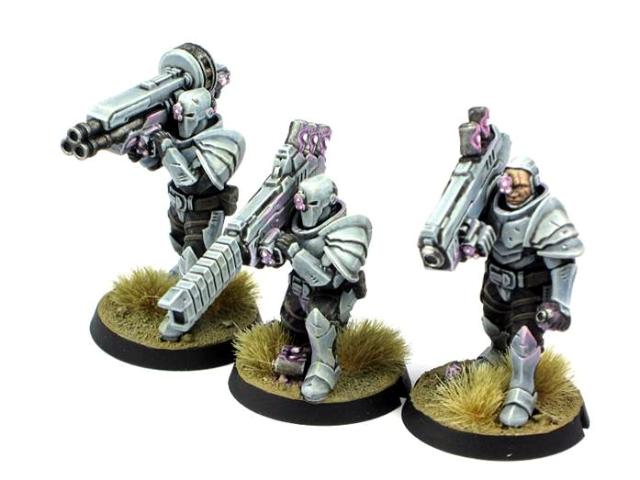
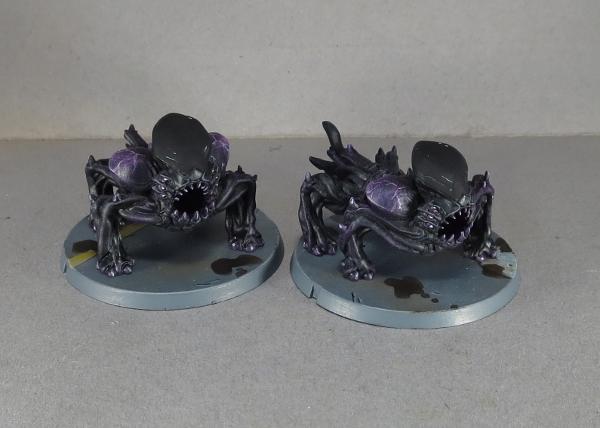
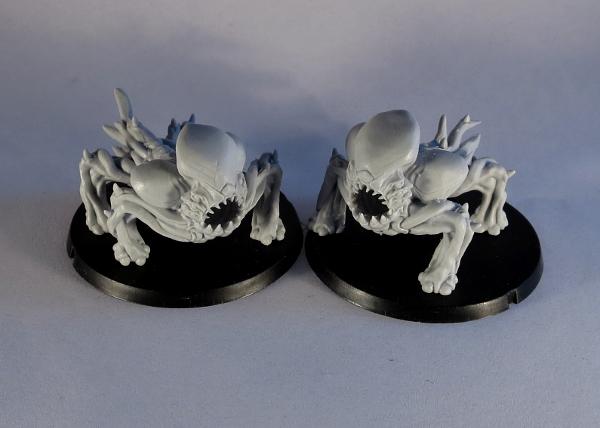
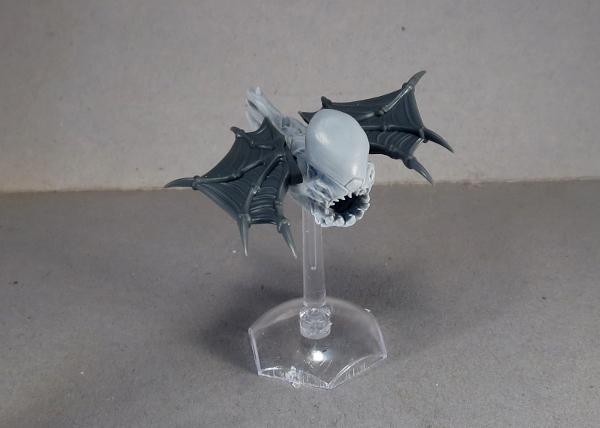
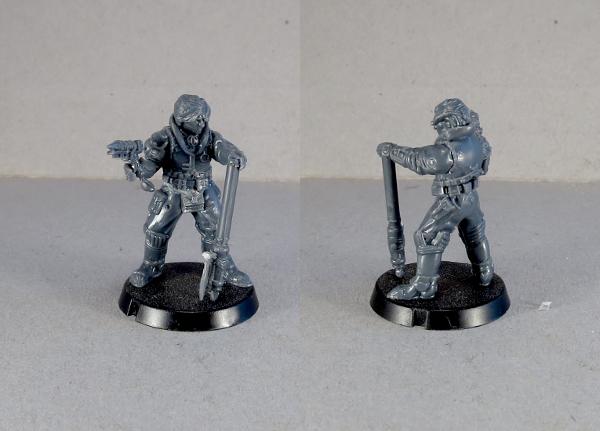
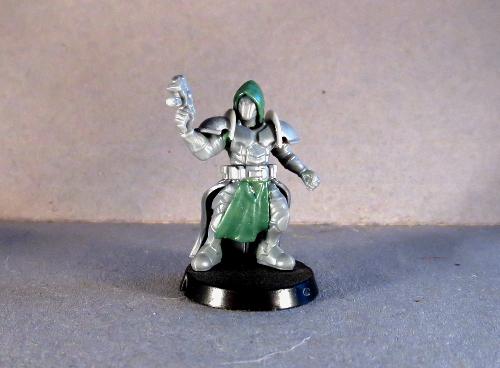
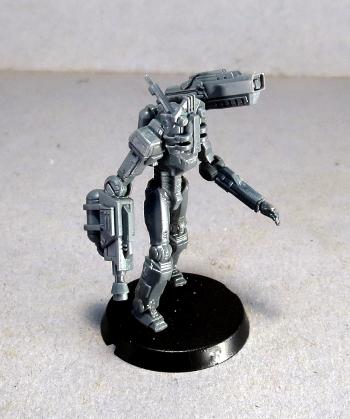
This month sees the release of a new type of unit to Maelstrom's Edge, with the addition of the Marsayan Hypnotist to the Broken faction. Rather than a unit in his own right, the Hypnotist is fielded as an upgrade to other units - an idea that will be carried across to other factions later to help mix things up a little. While he doesn't have any weapons or ability to directly hurt enemy units, the Hypnotist uses his inate abilities to interfere with enemy attacks directed towards his unit. Here, we have a look at some modeling options for this great resin model.
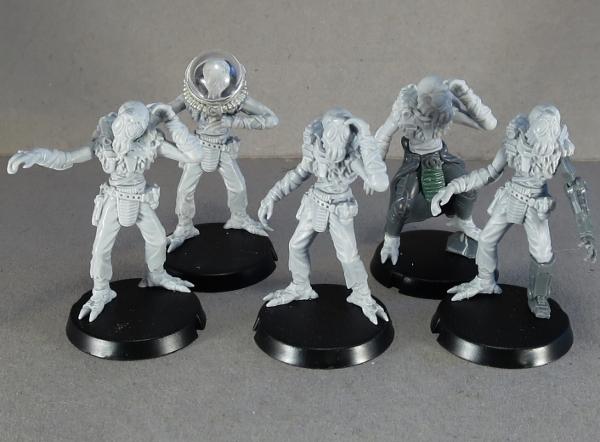
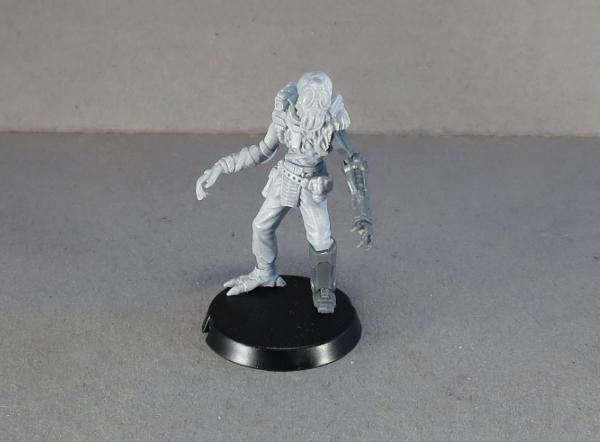
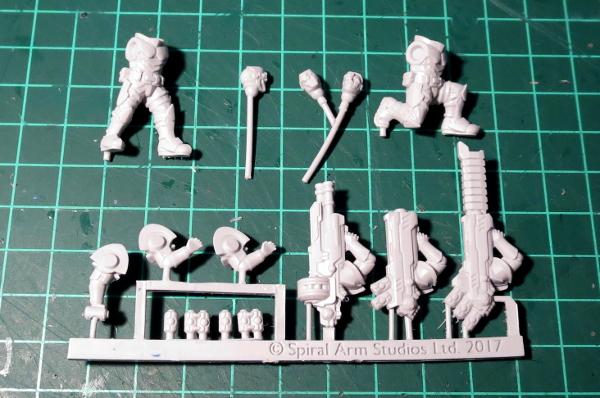
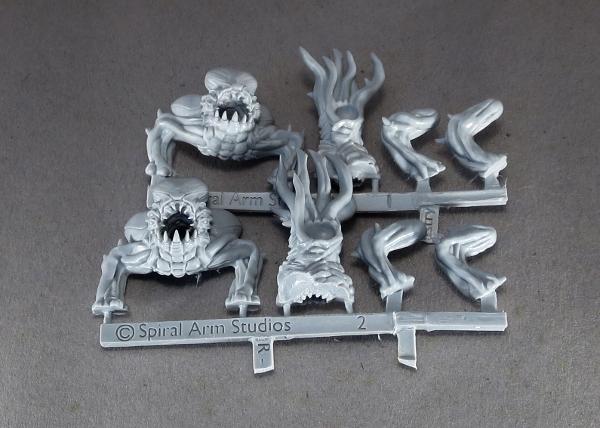
The Marsayan Hypnotist is a two-piece resin model, and comes with a 25mm base. If you haven't worked with resin models before, you might want to check out the handy guide here.
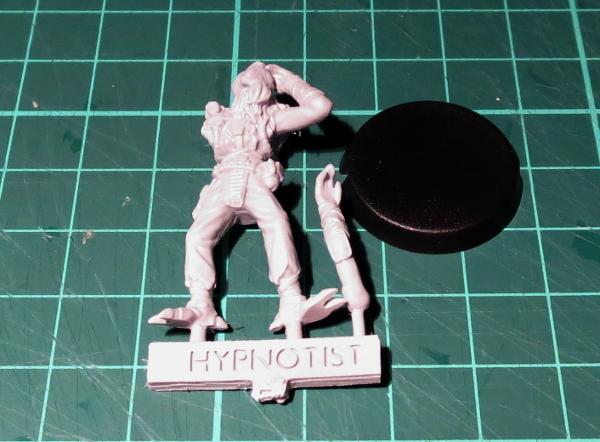
Assembly is simple - cut the model from the frame, glue his feet to the base with superglue or a fast-setting epoxy (I use superglue with an all-plastic primer, for some extra grip without messing about with plastic.
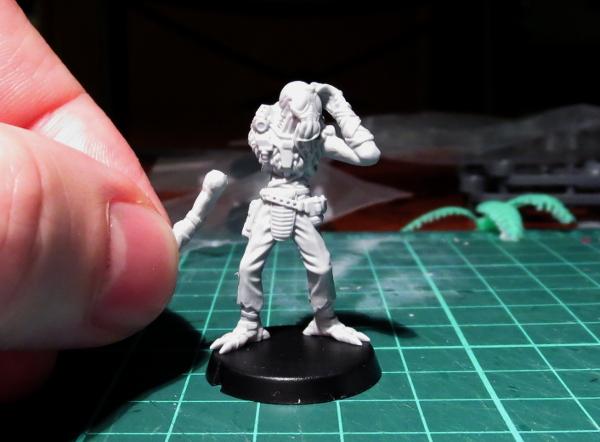
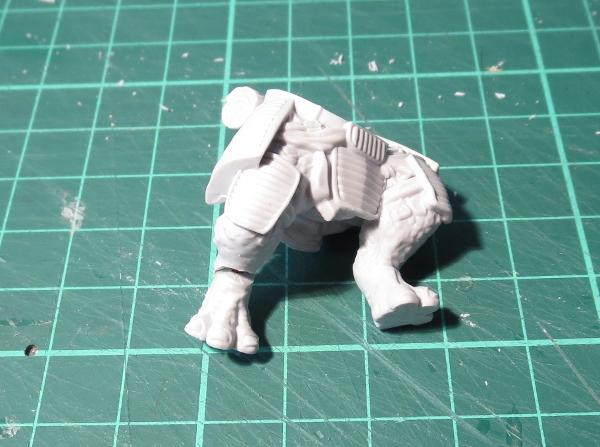
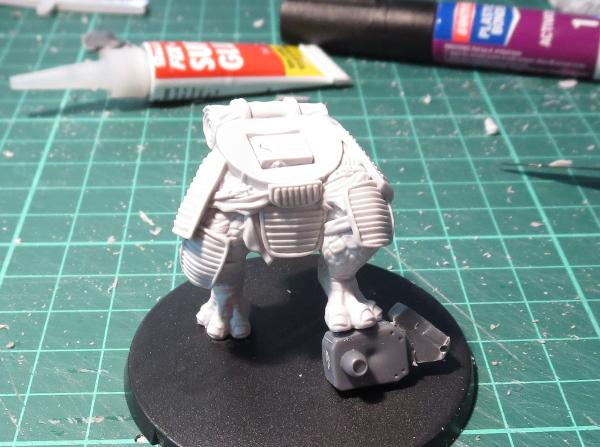
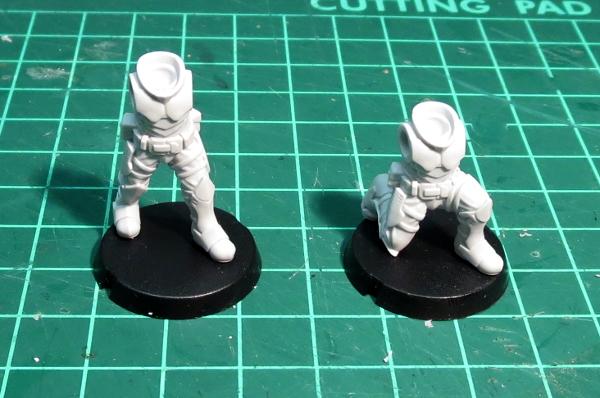
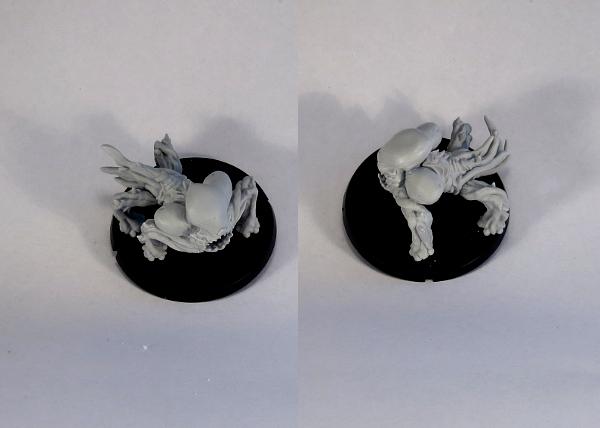
The assembled model is a little taller than a human, but slightly more slender.
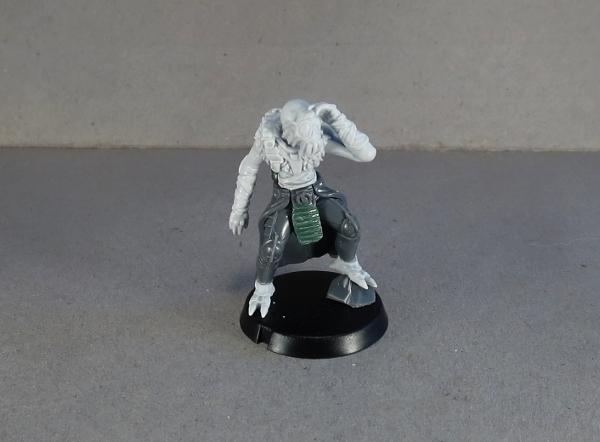
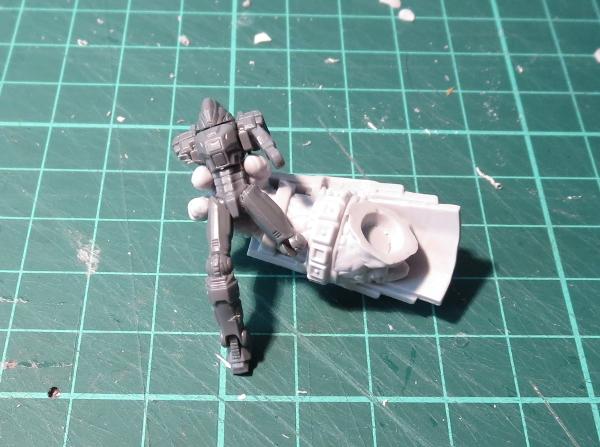
Due to the nature of the Broken as scavengers and refugees, it can be fun to mix up the models a bit by using components from other kits. Here, I replaced the Hypnotist's legs with the legs from a Karist Kaddar Nova.
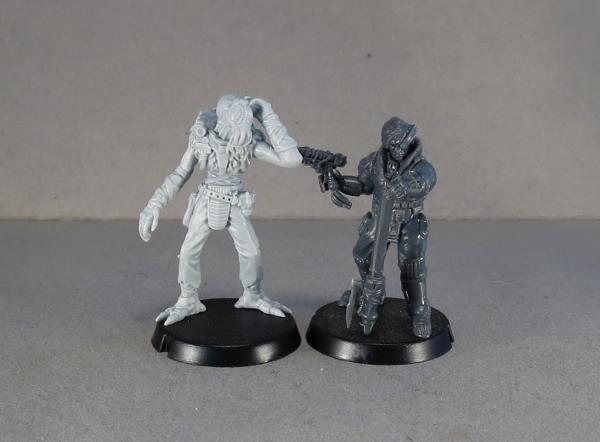
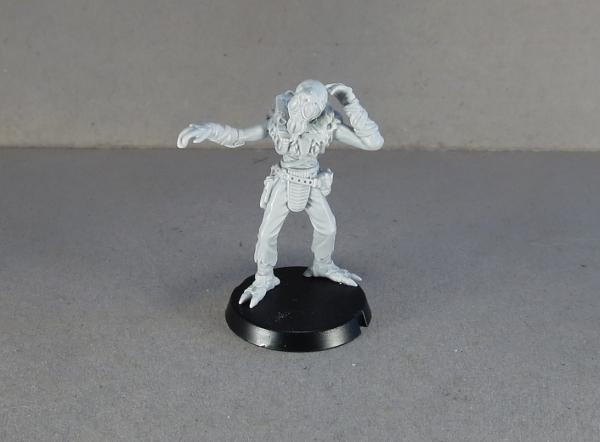
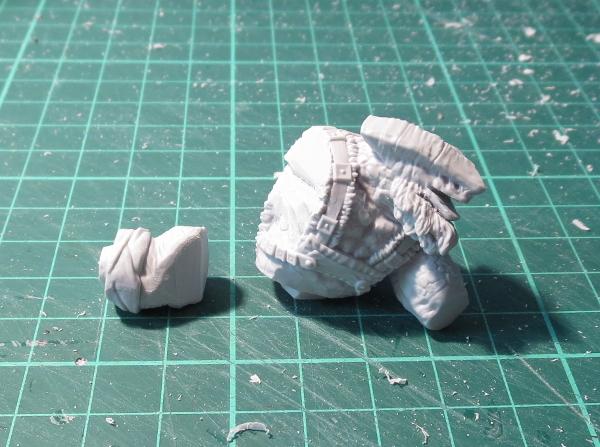
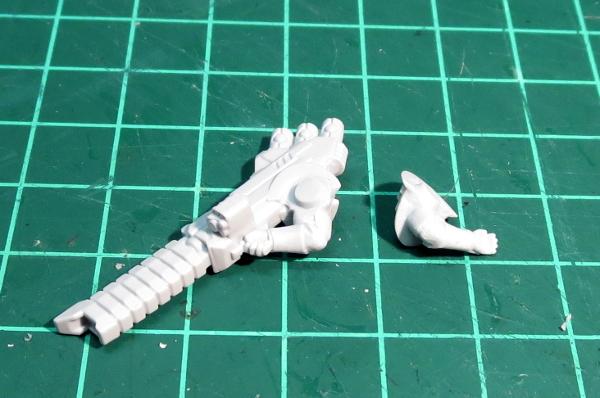
For something slightly more ambitious, on this one I carefully cut through the resin where the fingertips touch the model's head, and then cut through the neck. The neck was trimmed away and replaced with a new one sculpted from 'Green Stuff' sculpting putty, and the head reattached facing to the right instead of the left. I also cut the left hand off at the wrist and reattached it at a slightly different angle, so that the fingertips still touch the head.
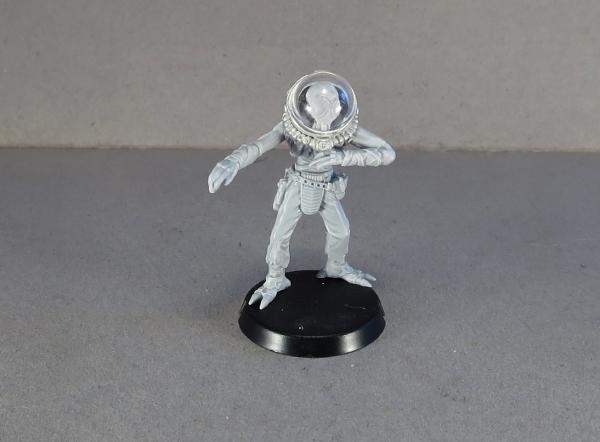
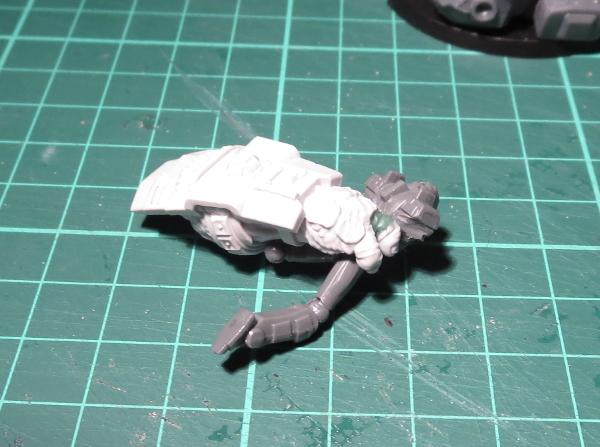
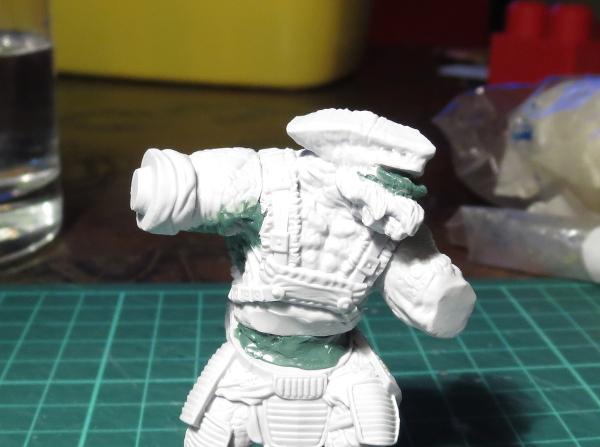
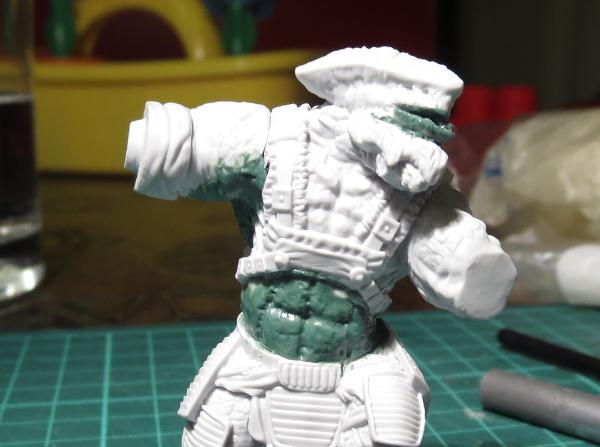
Some worlds are less comfortable for some species than others. On this model, I cut through teh left arm at the shoulder and rotated it downwards to cross the model's chest. I also removed the head and repositioned it slightly, flattened off the top of the shoulders, and added a domed helmet from Bombshell Miniatures.
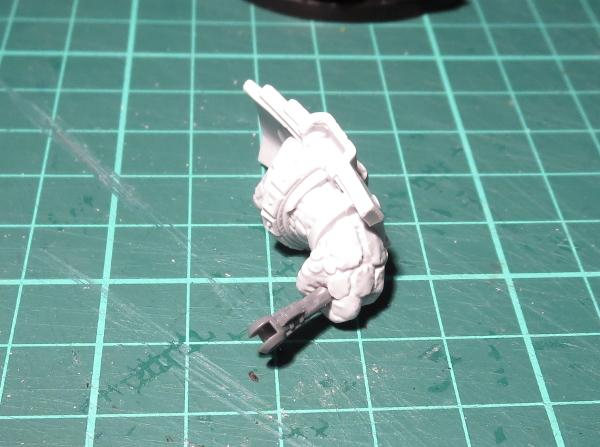
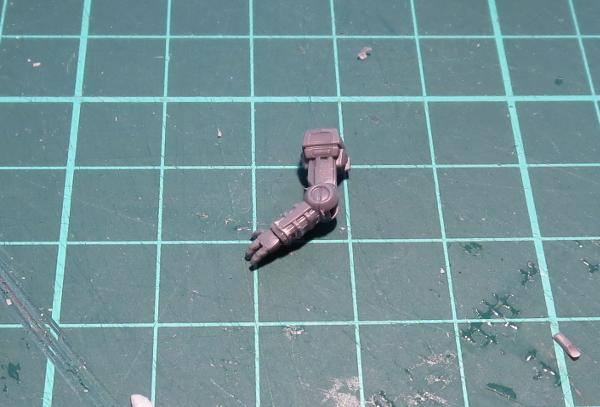
Finally, bionic limbs are a common feature amongst the Broken. While these have no specific in-game effect, they're a great way to add some character to your models. Here, I have replaced the Hypnotist's lower leg and left arm with parts taken from an Epirian Scarecrow bot.
What have you done with your Hypnotists? We would love to see your creations on the Comm Guild Facebook page!
To pick up the Marsayan Hypnotist, or any of the rest of the Maelstrom's Edge model range, visit the webstore here.
For other Maelstrom's Edge modeling articles, including tutorials and walkthroughs of a wide range of different building and miniature projects, check out the article roundup here.
Terrain Tutorial: Scatter Terrain 2 - Urban Details
Posted on Monday Mar 19, 2018 at 05:00pm in Tutorials
- by Iain Wilson
Cities are more than just a collection of buildings. There are a whole host of other little details, many of which we don't even notice because we're so used to them being there, that fill in that urban sprawl. Streetlights, hedges, park benches, statues, gardens, all go towards making a city look lived in and give it character. And yet these things are so often overlooked when we put together gaming terrain. So many urban tables are just a random collection of buildings in various levels of disrepair, which may look good, but are missing those crucial details that make them look right.
I've covered how to make some of the above mentioned details in previous articles, but this week I thought I would run through a few more, using components from the Maelstrom's Edge terrain sprue, and a few assorted odds and ends.

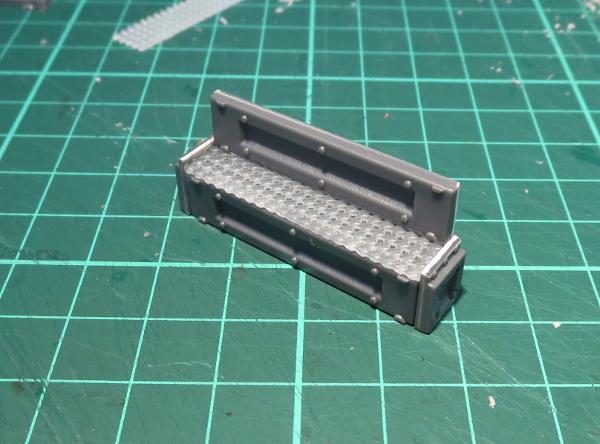
To start things rolling - Park Benches
The bulk of the bench is made up using the long segments from three support struts, and two of the short segments. Use a sharp hobby knife to cut through the struts on either end of the long, middle sections, and cut away the two short segments leaving the rivet strip on one side.

Two of the long strips and the two short segments make up the base of the bench. Glue these together as below using plastic cement.

For the seat, I have used a piece of embroidery mesh (which you should be able to find at a craft store or haberdashery), although you could choose to use plasticard or cardboard instead. I cut the mesh to fit over the top of the bench base, fitting inside the river strips on the tops of either end.

The mesh was glued in place using an 'all-plastics' glue, or a superglue with a plastic primer - just using plain superglue can work, but because the mesh is a rather rubbery plastic it sometimes doesn't hold the glue well without the extra help. On top of the mesh, I glued the third strut section, level with one long edge of the base.
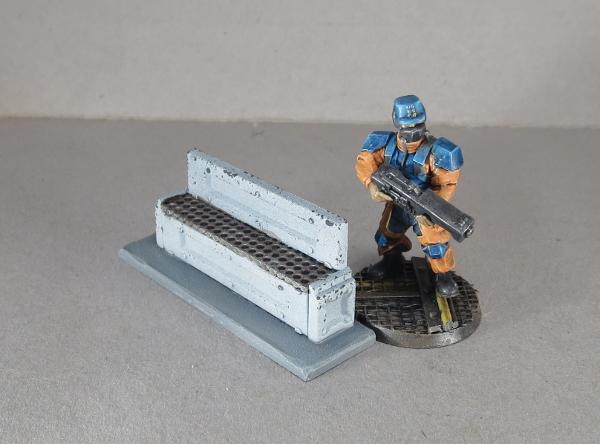
While this comes out just about spot-on for size compared to a 28mm miniature, terrain features often look a little undersized due to the visual discrepancy created by the model's base making it look taller than it actually is. To help mitigate that, I glue a rectangle of 2mm plasticard under the bench to lift it off the ground a bit, which creates a similar illusion of extra height without actually having to make the bench over-sized.

Add a little paint, and the bench is ready to go on the table.
Next up - Let's inject a little art into the scene!
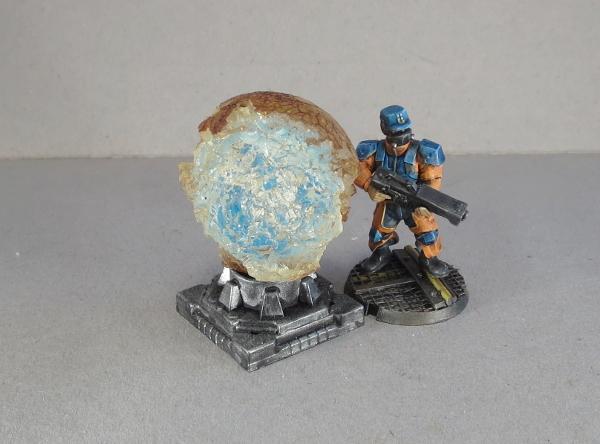
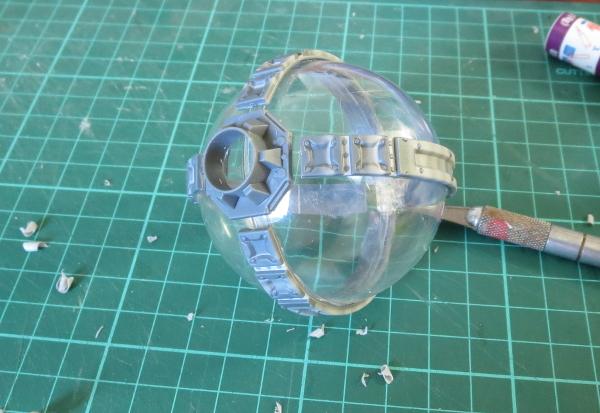
In my first scatter terrain article, I made an orb that I pictured as some sort of holgraphic map tank. I borrowed the same design to make a sculpture using an old rubber ball that I dug up out of the back yard.
The base for the bauble is simply the large pipe fitting from the terrain sprue, glued on top of the square hatch.


On top of that, you can stick a marble, as with my original orb, or any other round-ish thing that strikes your fancy -
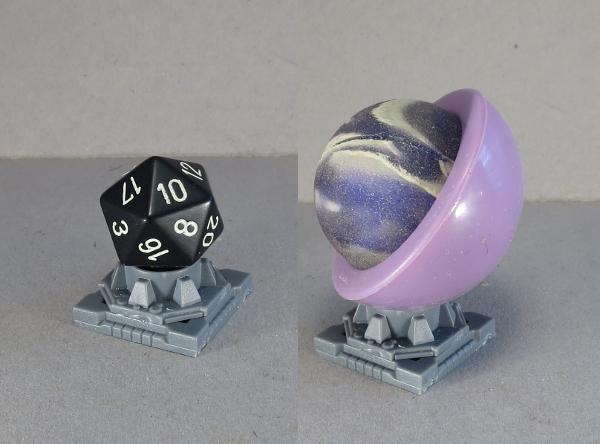
In this case, though, as mentioned, I used a battered old rubber ball. The outside of the ball when I found it was cracked and dirty, and chipped away over much of the ball, leaving a semi-transparent, crystaline shape with a dark crust around it and a blue glow in the middle when the light hits it just right. It was too interesting a shape to not do something with it, and so I promptly glued it onto the pipe fitting base with some all-plastics glue.
Moving right along - let's add some greenery!
If you paint a lot, sooner or later you wind up with empty paint bottles. I found myself looking at my collection of empty dropper bottles and thinking that the lids were just asking to be turned into something. So I took a lid, washed it out, and cut a small pipe fitting from the terrain sprue.

The tip of the lid turned out to be exactly the same diameter as the outside of the hole in the pipe fitting (ie: just a bit bigger than I wanted it to be!) so I scored a line around the top about 1.5mm from the end, and used a hobby knife and a file to narrow down the end to that line.


I used an all-plastics glue to glue the reduced lid tip into the pipe fitting. As with the embroidery mesh used on the park bench, superglue alone isn't likely to bond as well with the lid, so the all plastic glue or a primered superglue is a better option.

I filled the inside of the lid with some 'green stuff' putty, and added a fern made from the leaves of a really dodgy-looking palm tree that came with a set of dinosaur toys bought for my daughter (It's ok, she said I could have it). A quick lick of paint, and the planter is ready for action.

Finally, what sort of city doesn't have statues scattered around to remind people to feel all embiggened?
For a quick and easy statue plinth, I took two shutter windows from the terrain sprue, trimmed off the two protruding parts of the frame on the ends and the rivets on the front surface.
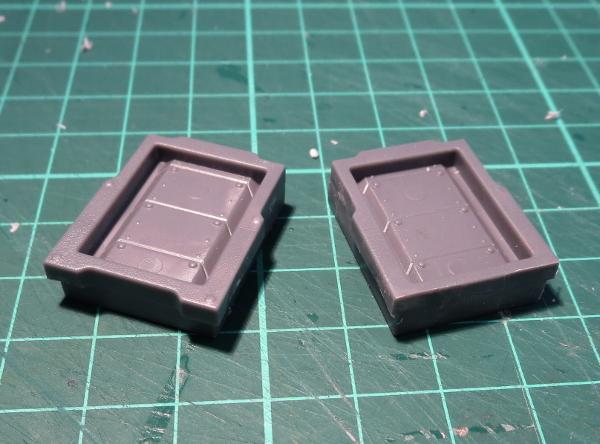
The two windows were then glued together face-to-face, using plastic cement.

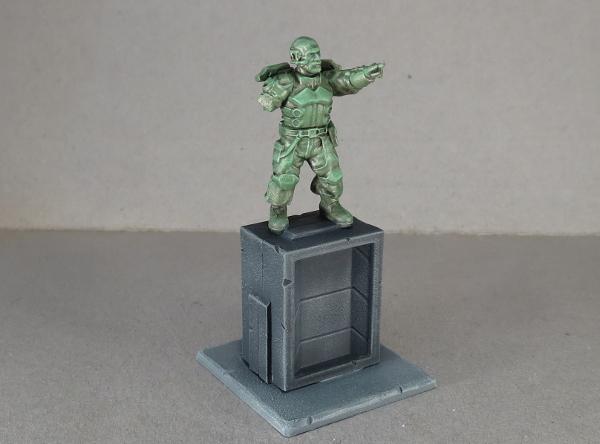
I added a statue assembled from some leftover parts scavenged from the Epirian Bot Handler and Broken Rabble sprues, and a base of 2mm plasticard for stability.

Some paint and weathering, and he was looking suitably statuesque, ready to inspire the city's defenders or enrage the rampaging invaders.
All of the above can be easily modified to suit your own table. You can use the individual pieces as scatter terrain, or glue them to building bases to add extra detail without having loose little terrain bits floating around. Be sure to also check out my first scatter terrain article, and also my tutorials on hedges and street lights

Want to share your terrain collection? We would love to see your creations on the Comm Guild Facebook page!
To pick up the Maelstrom's Edge terrain sprue, or any of the rest of the Maelstrom's Edge model range, visit the webstore here.
For other Maelstrom's Edge modeling articles, including tutorials and walkthroughs of a wide range of different building and miniature projects, check out the article roundup here.
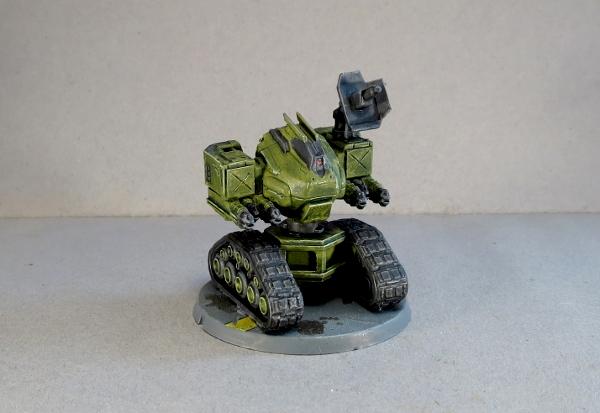
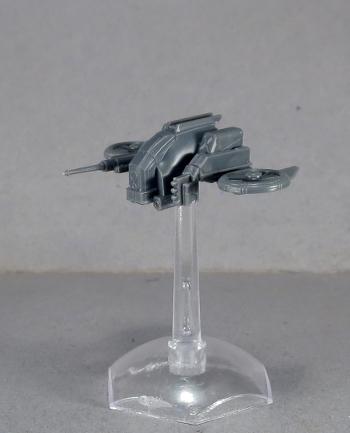
Modeling Spotlight: Epirian Light Carrier Drone
Posted on Monday Mar 12, 2018 at 05:00pm in Tutorials
- by Iain Wilson
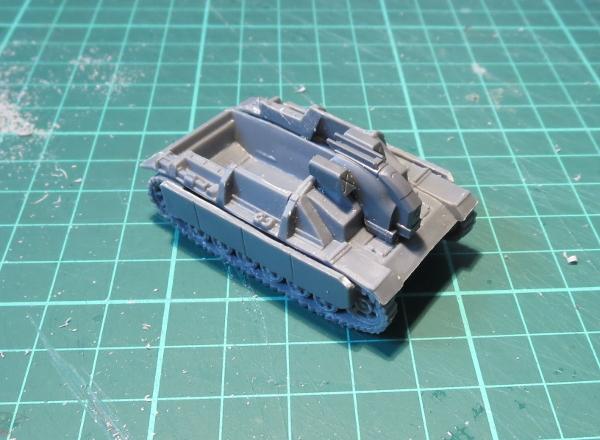
A few weeks ago, I published a spotlight article on the Epirian Drone, showing a few different ways the kit can be assembled or converted. One of the conversions shown was a Light Carrier Drone, made up from a drone chassis and the hull of a 15mm plastic tank from Flames of War, that I think came out of an Adepticon swag bag. This week, I'm going to run through how it was made, using the tank (I think it's some kind of Stug, but I'm no tank expert and so it didn't really matter beyond looking perfect for what I wanted to do) and the chassis piece from an Epirian Drone.
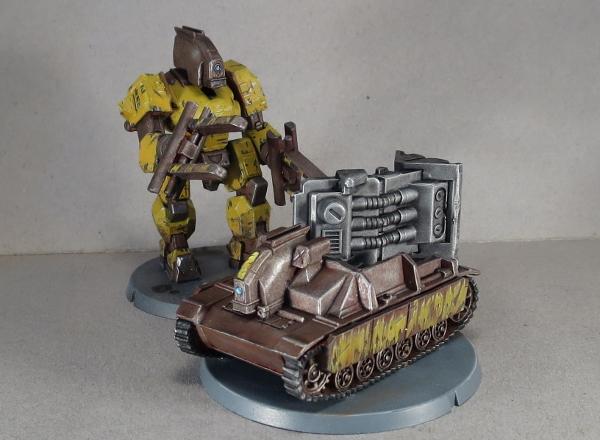
Like the bipedal 'Mule' cargo drone shown above (for which you can find an assembly article here) there are no rules for using this drone in the game - it will most likely just be used to add some flavour to the table. But I find that sometimes venturing off the beaten track and building something different just for the fun of it can really help to keep the creative juices churning over.
SO, I started by grabbing the main assembly parts of the tank - top and bottom of the hull, and the two track pieces.
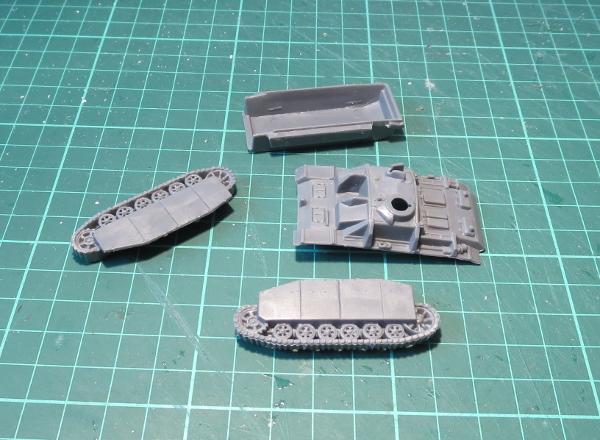
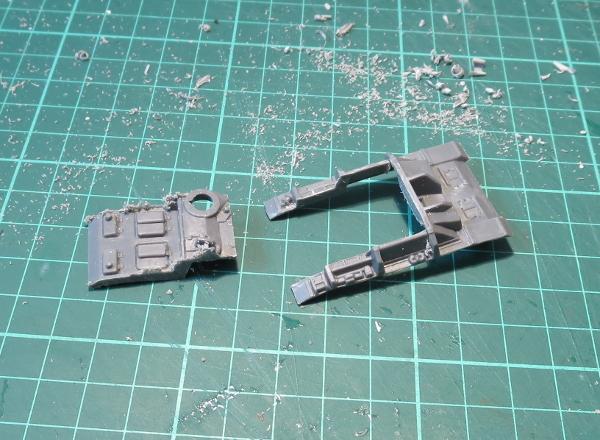
I used a razor saw to cut most of the top of the hull away, leaving just the gun mount and the front armour.
The tracks had some armour plating that extended up over the sides of the tank. I wanted these to be a little more low-profile, so I sawed them off level with the track guards.
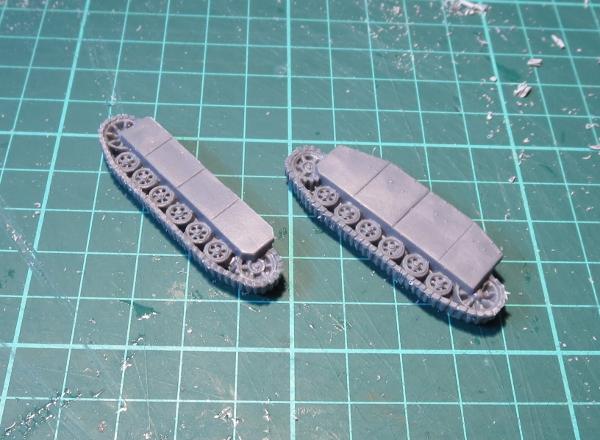
Then I assembled the hull and tracks as per normal, just with a newly-formed great, gaping hole in the rear.
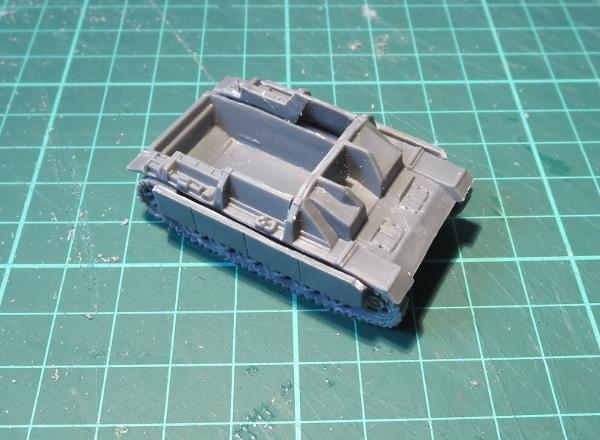
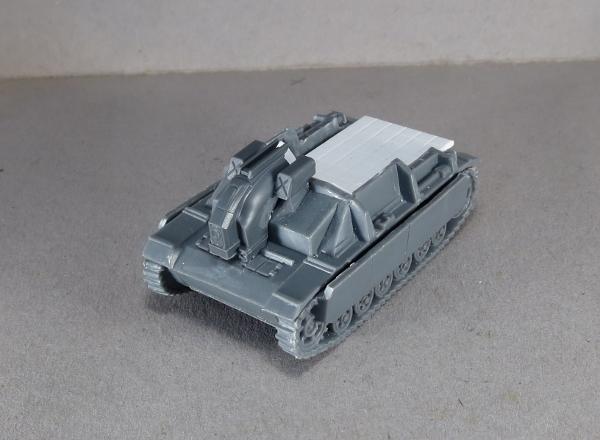
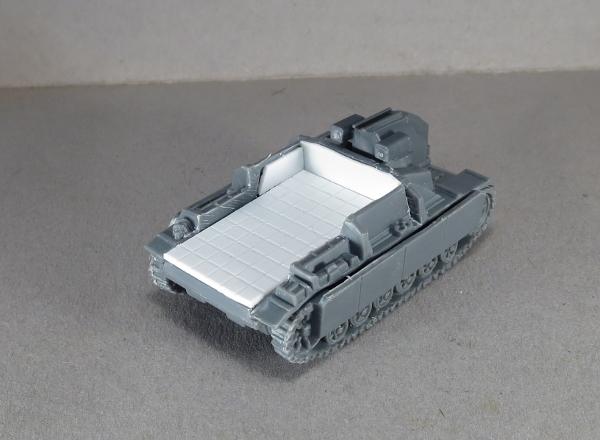
With a slight bevel added to the underside, the drone chassis slotted nicely into the gun mount.
Finally, I filled in the back with some plasticard to create a cargo deck.
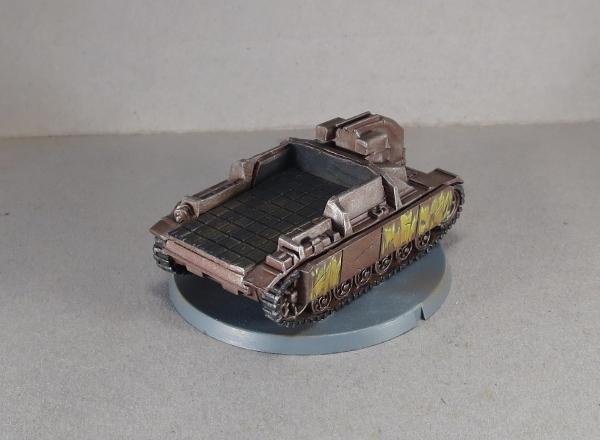
To paint it up, I turned once more to the technique shown in my weathered metal tutorial. I kept the palette fairly limited, to emphasise the bare-bones industrial nature of this machine, and made the yellow panels on the sides worn and battered to show a history of hard use.

What have you done with your Drones? We would love to see your creations on the Comm Guild Facebook page!
To pick up the Drone kit, or any of the rest of the Maelstrom's Edge model range, visit the webstore here.
For other Maelstrom's Edge modeling articles, including tutorials and walkthroughs of a wide range of different building and miniature projects, check out the article roundup here.
Tags: conversion drone epirian modeling robot spotlight tutorial walkthrough
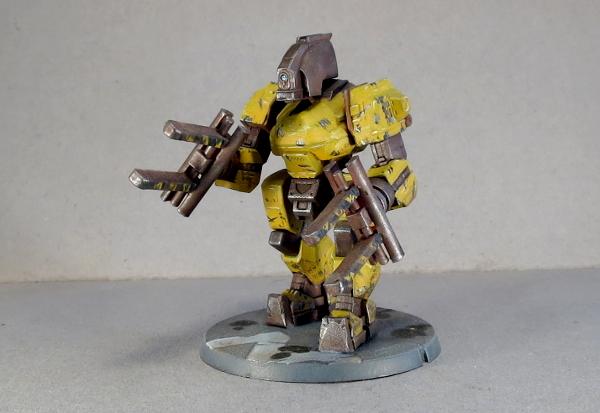
Modeling Spotlight: Converted Broken Gnolti
Posted on Tuesday Jan 30, 2018 at 07:06am in Tutorials
- by Iain Wilson
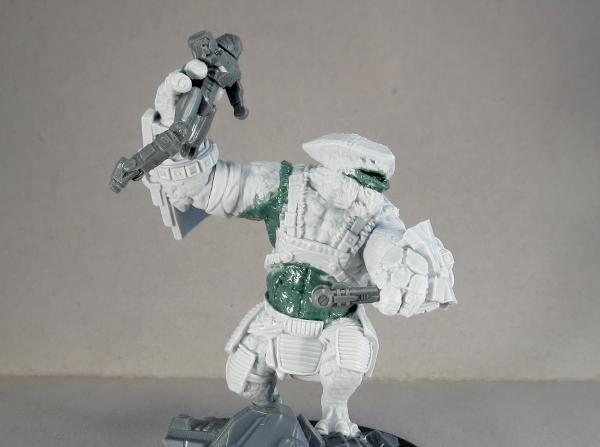
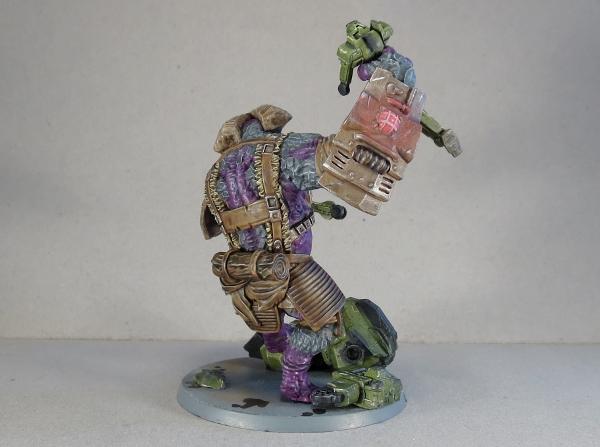
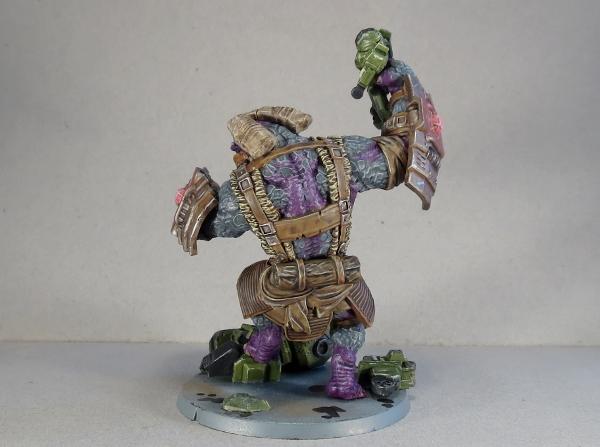
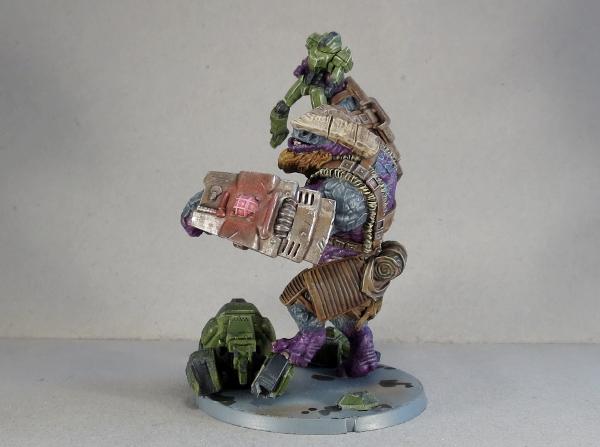
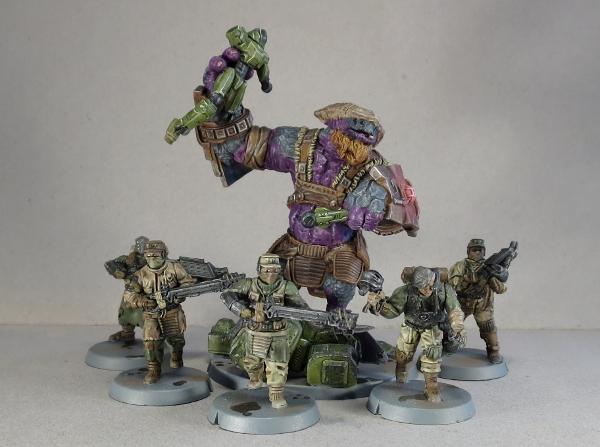
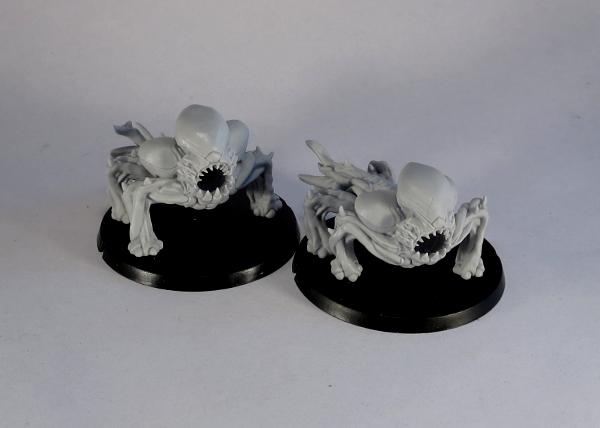
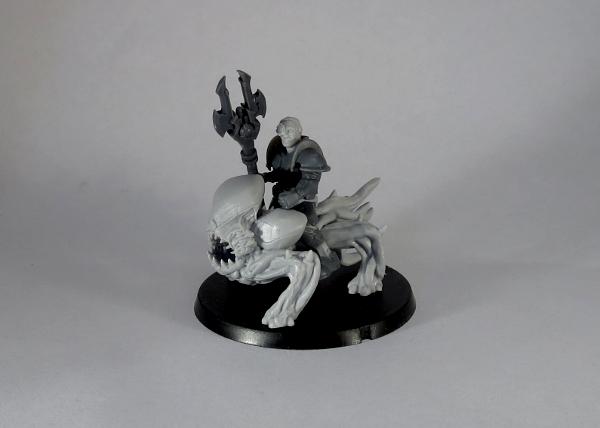
This week saw the arrival of the biggest model yet for Maelstrom's Edge: The Gnolti!
A gigantic chunk of brawn and armoured hide, the Gnolti is slow to anger, but unstoppable when roused. So as impressive as the model is, I decided I wanted to build one that showed a Gnolti really letting it all out. This was the end result:

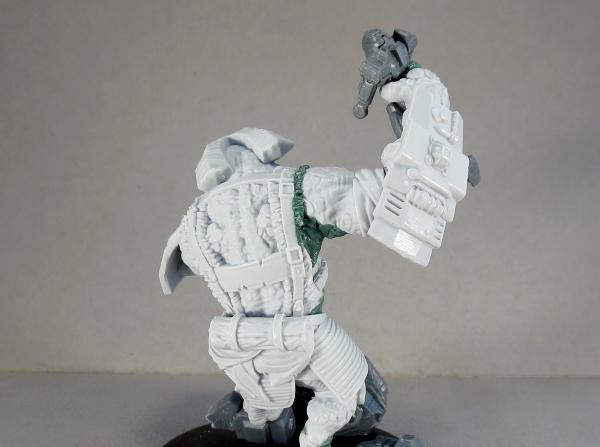
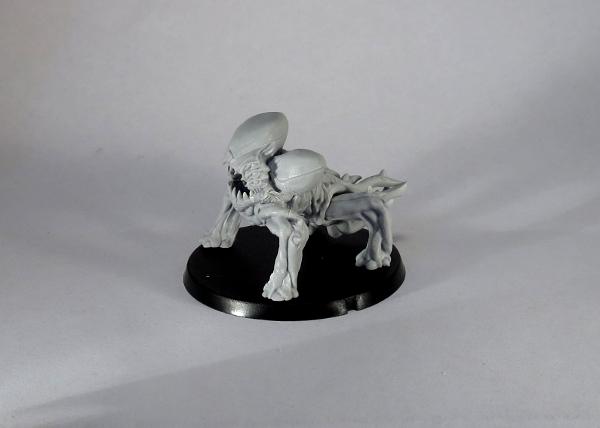
The Gnolti is a multi-part resin kit, with a little posability in the forearms due to the circular connections. One of his hands is open, and this seemed like it was just asking to be holding something breakable. So, I sliced off the forefinger so that I could close in his grip a little, and reattached it with some green stuff, and gave him a little friend to play with, courtesy of the Epirian Scarecrow kit.

The left hand is in a closed fist, and is designed to sit knuckles-down on the base. I reshaped the flattened bottom surface of the fingers to make them more rounded, and then pinned the scarecrow's left forearm into the Gnolti's grip.
To create a more upright stance, I ran the legs under some hot water and carefully bent the lower right leg out and back. Apparently, I wasn't careful enough, as I managed to snap it off through the shin, but with a little drilling and pinning, I wound up with legs positioned how I wanted them.
Adding a Hunter mech's leg for the Gnolti to stand on, I glued the legs in place on the base, and added a piece of sprue to fill in the slot for the torso's locator peg.
Taking the torso piece, I used a razor saw to slice off the right arm at the shoulder, cutting out a wedge on the top so that it could be reattached in a more raised position. I also cut a thin wedge out from his chin at the top of his beard, and then added a cut between his lips so that I could bend his lower lip down into a mouth-open position.
The torso was then glued in place, with the sprue in the waist-hole allowing the torso to sit upright.

The lower lip was padded out with some green stuff to repair the minor damage from sawing it open. I also filled in the cavity in his waist, and started added detail back in under the right arm.
Another layer of green stuff gave him some abdominal muscles, a tongue, and a single flat tusk in his lower jaw.
Finally, the forearms were glued on, and a last run of green stuff added to replace the fur trim on his right shoulder strap.
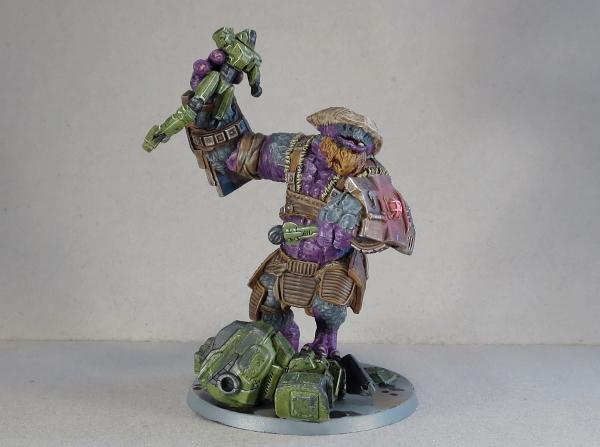
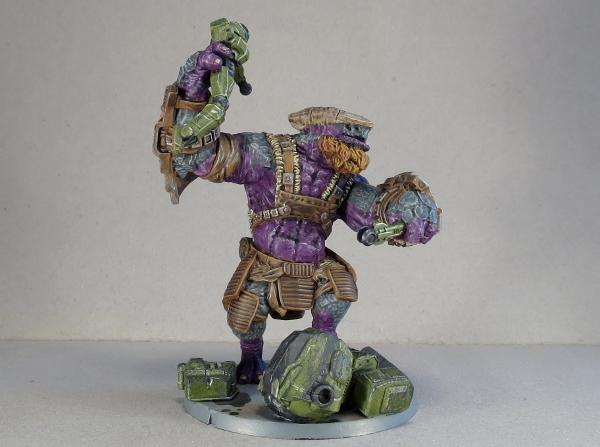
With that, it was time to paint!
I went with a colour scheme that was reminiscent of that used on the studio model shown here, but with slightly more muted colours to fit in with my quick, wash-painted Broken colour scheme.
Ready for action!
To pick up your own wee beasty of broken doom, or any of the rest of the Maelstrom's Edge model range, visit the webstore here. As always, be sure to show off your work on the Comm Guild Facebook page!
For other Maelstrom's Edge modeling articles, including tutorials and walkthroughs of a wide range of different building and miniature projects, check out the article roundup here.
Tags: broken conversion gnolti model modeling spotlight tutorial walkthrough
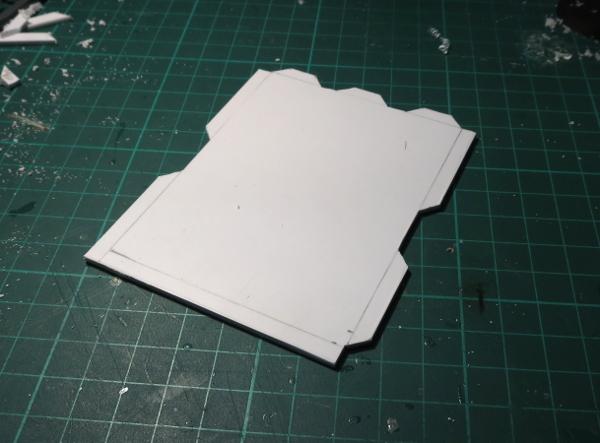
Modeling Spotlight: Epirian Victory Point Tracker
Posted on Tuesday Jan 23, 2018 at 11:19am in General
- by Iain Wilson
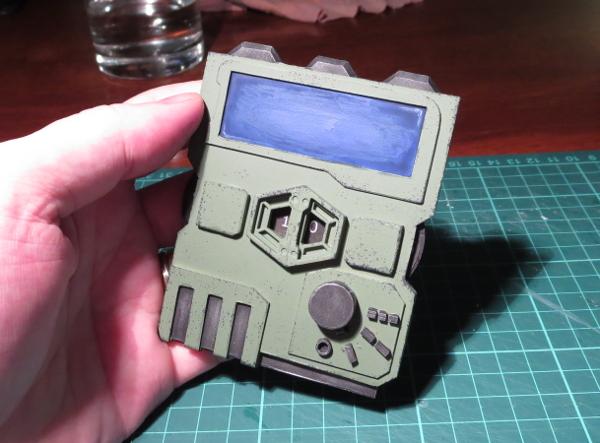
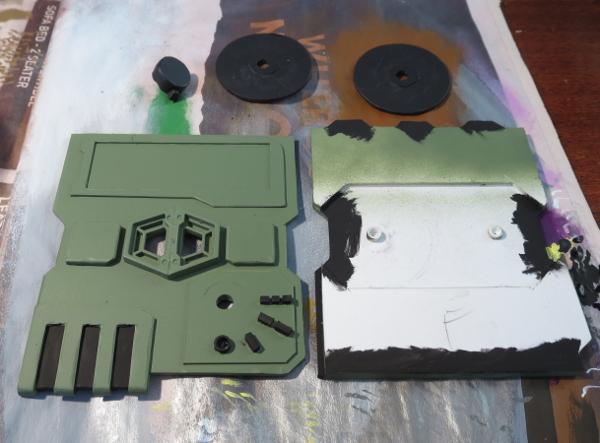
Victory. The elusive mistress that haunts our gaming hours. How do we capture her? Well, in Maelstrom's Edge, we do it by counting up Victory Points, and hopefully winding up with more of them than our opponents. The Battle for Zycanthus box includes Victory Point trackers along with the plethora of tokens and markers found within, but I decided that I wanted something with a little more spectacle, and so I built myself a VP tracker for my Epirian force.
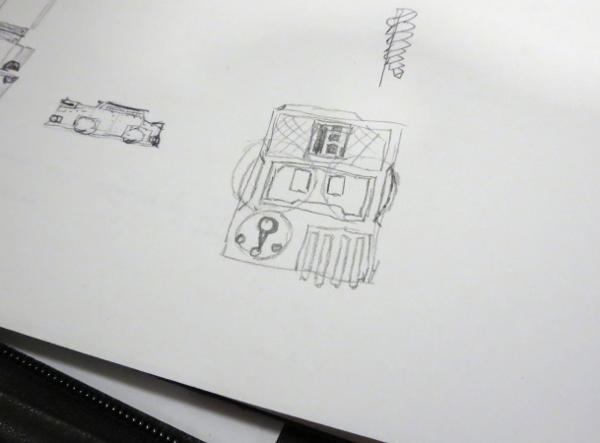
This all started with a rough concept sketch, to get an idea of how things should fit together.
I then made a quick mockup in cardboard, as a sort of proof of concept, and to get a better feel for the size it needed to be.
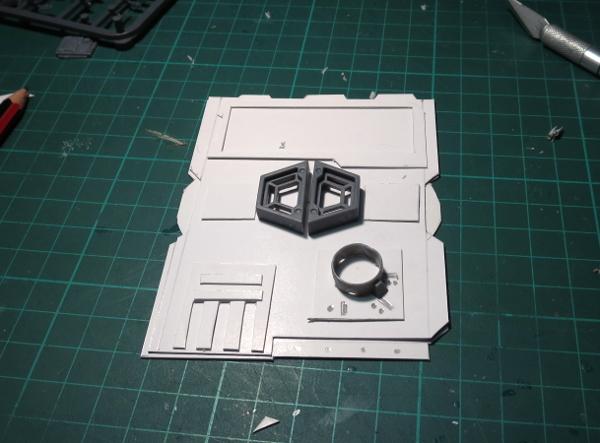
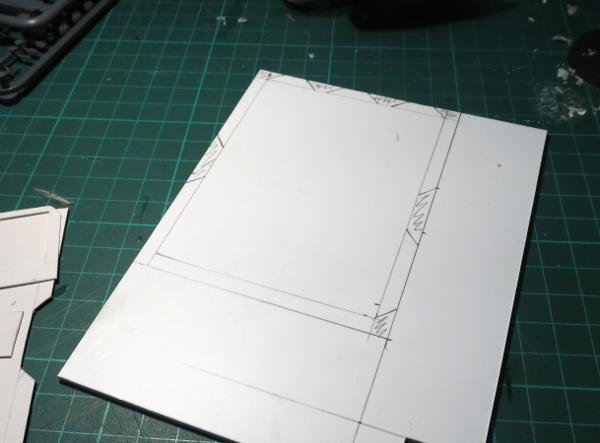
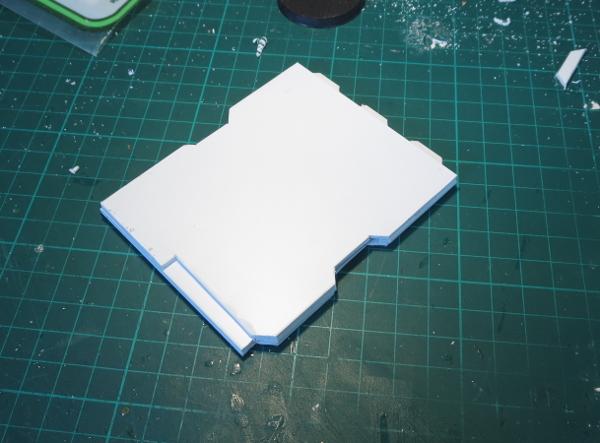
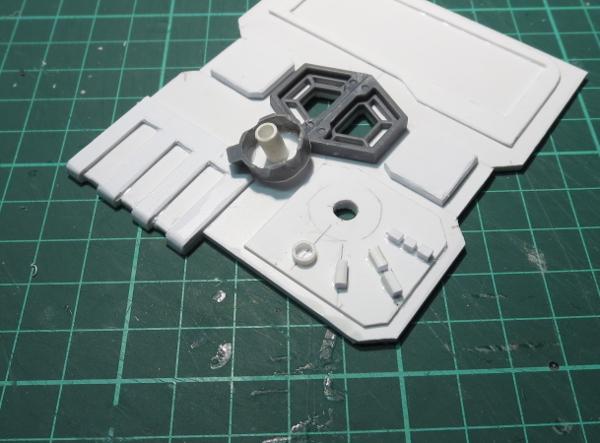
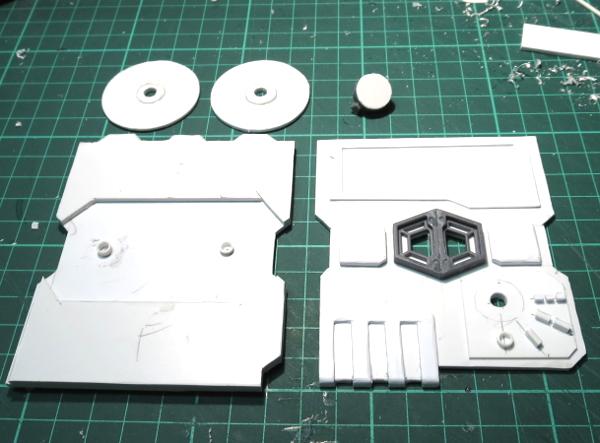
The main body of the tracker is made from layers of 2mm thick plasticard. Each layer was marked out in pencil and then cut out and the edges smoothed down.

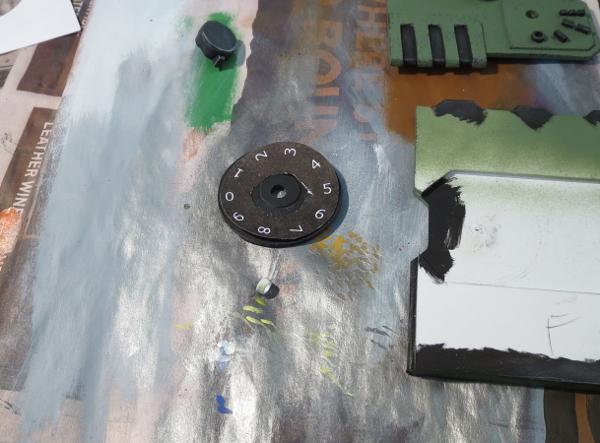
To show the current VP total, there are two dials with the numbers 0-9 marked around the edge. These are cut from thinner plasticard, with a spacer added on the top surface so that the face with the numbers on it doesn't rub against the inside of the tracker's front.
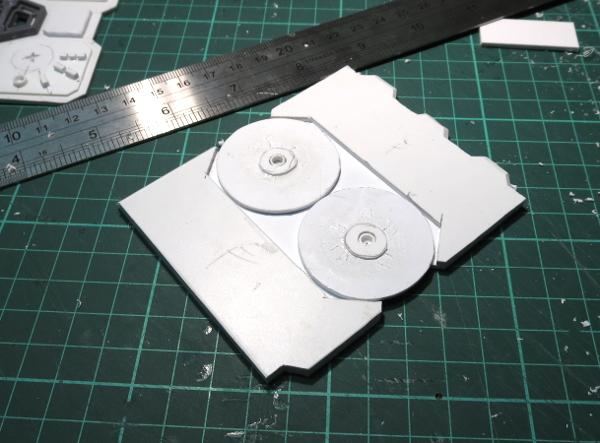
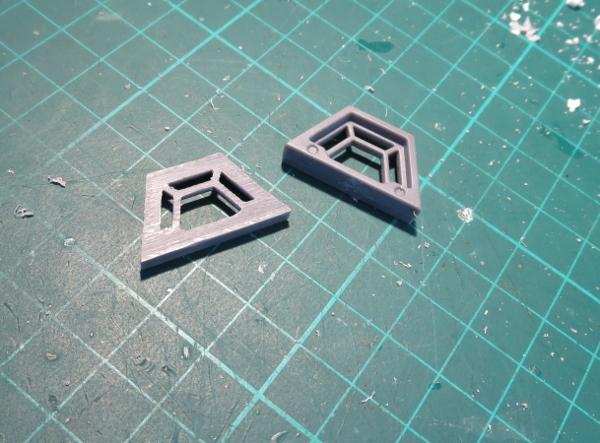
The windows for the VP display are made from a couple of trapezoid windows from the Maelstrom's Edge terrain sprue. I used a razor saw to slice through the windows just behind the interior bracing, to make them a little thinner and so that the bracing would sit flush against the front plate of the tracker.
From there, I cut a couple of trapezoid holes in the front plate to match up to the large openings in the windows, and then added a bunch of detail with various pieces of plasticard.
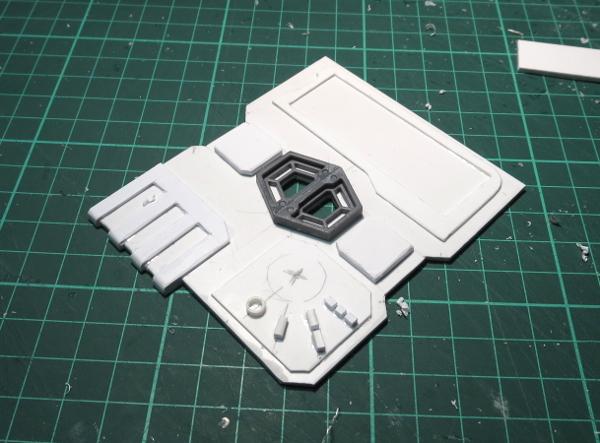
In the bottom corner, I added a rotary switch for tracking how many times the special faction objective has been tapped.
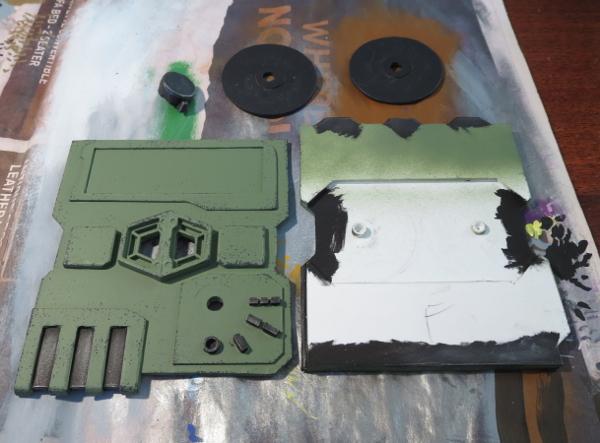
With detailing complete, it was time to paint!
I basecoated the tracker with Army Painter Army Green spray, and used some flat black spray on the VP dials and the rotary switch.
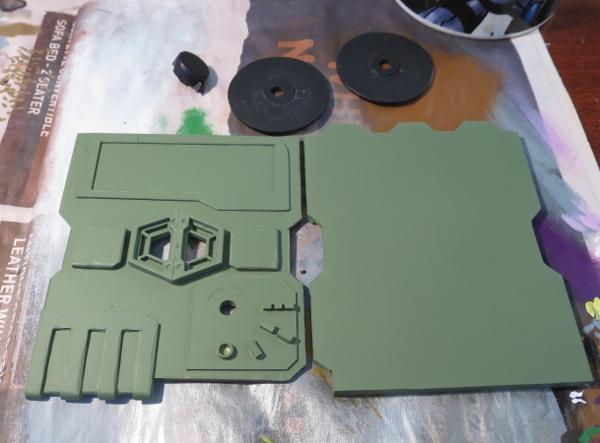
I wanted some metal detail on the tracker to break up the colour a little, so re-basecoated some appropriate spots with some black. I also added a little black inside the side openings for the dials, just to avoid having the white plastic showing through when it was assembled.
The metal parts then received a drybrush of P3 Pig Iron, and some weathering added with Vallejo Heavy Charcoal applied lightly with a sponge.

The numbers for the VP dials were drawn up on black circles in Gimp and then printed out, cut to shape and glued onto the plastic dials.
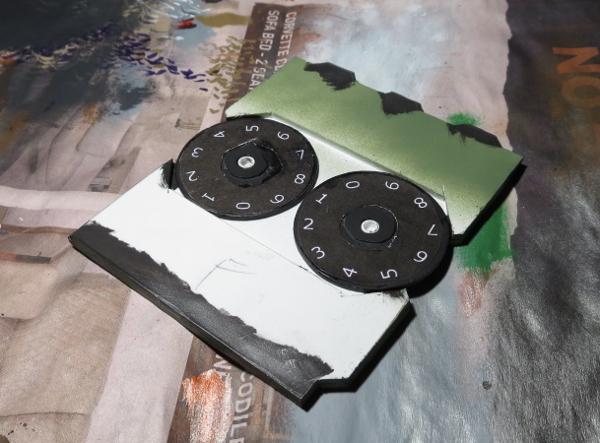
Finally, the front plate was glued in place, and the screen painted with some Ultramarine Blue and shaded with Army Painter Blue Tone.
My plan is to make up some smaller versions of the mission cards to sit in the screen cavity.
And then, of course, the next step will be to make some similarly themed trackers for my Karists and Broken!
Have you built anything unusual for your Maelstrom's Edge games? We would love to see your creations on the Comm Guild Facebook page!
You can find the entire Maelstrom's Edge range in the webstore here.
For other Maelstrom's Edge modeling articles, including tutorials and walkthroughs of a wide range of different building and miniature projects, check out the article roundup here.
Tags: conversion epirian gaming modeling scratchbuilding spotlight tutorial walkthrough
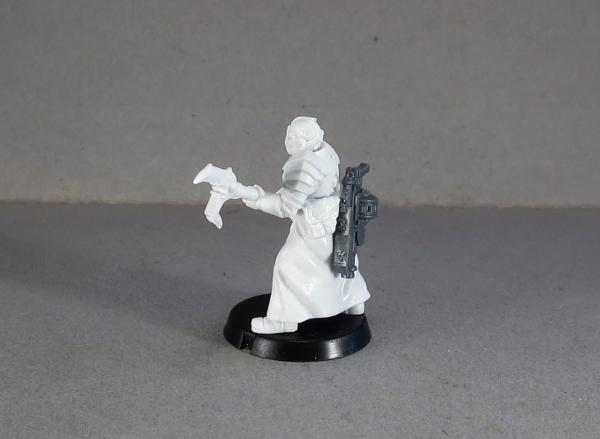
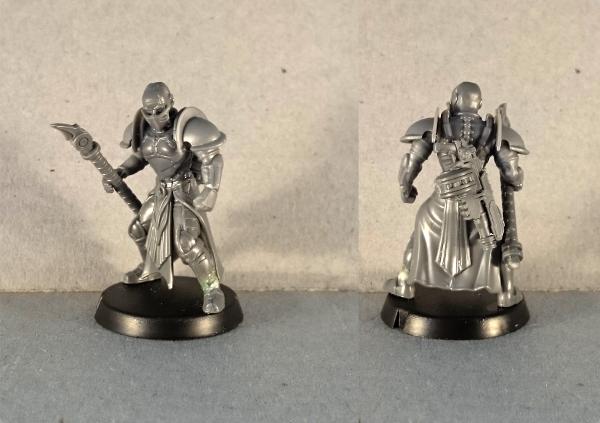
Modeling Spotlight: Karist Angel Keepers
Posted on Sunday Jan 07, 2018 at 05:00pm in Tutorials
- by Iain Wilson
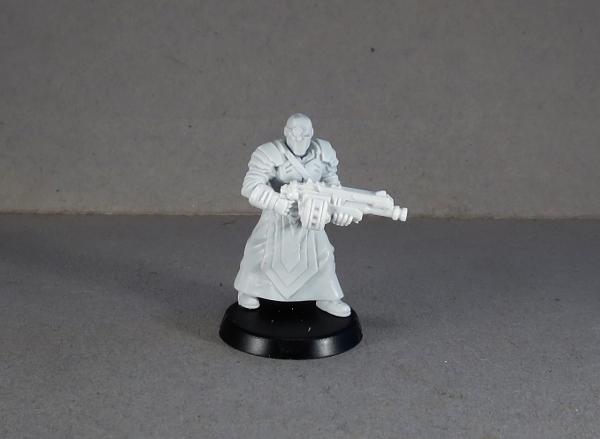
The Karist Angel Keeper has added his goad-wielding distinctiveness to the Karist Enclave model collection, and so this seemed a good opportunity to grab a few and have at them with the exacto knife and superglue.

An addition to the new resin range for Maelstrom's Edge, the Angel Keeper comes supplied with his angel goad and grenade launcher.

Assembly is really simple: Glue feet to base, glue head to neck, glue hands to arms. The goad also has a separate piece for the blade end, which sockets onto a convenient pointy end on the shaft.

The more eagle-eyed rules watchers may have noticed that both weapons are held in hand, but the Keeper actually comes with both by default. This allowed for players to choose which would be held in hand while still keeping the parts count down for practical purposes, and rules-wise isn't an issue since we can assume that all default gear exists whether it is specifically shown or not. If, like me, you do prefer to have all of your models' gear modeled, this isn't a difficult task.
If you have modeled your Keeper with goad in hand, just grab a spare grenade launcher from the Faction Expansion Sprue and glue it onto his back beside his pouch.
If you prefer to have the grenade launcher at the ready, you can use a piece of 1.6 mm diameter plastic rod to replace the shaft. Here, I've also removed the detail piece from the bottom, to be reattached onto the new shaft.


You can also use a shaft from the Cybel Glaive on the Faction Expansion Sprue.

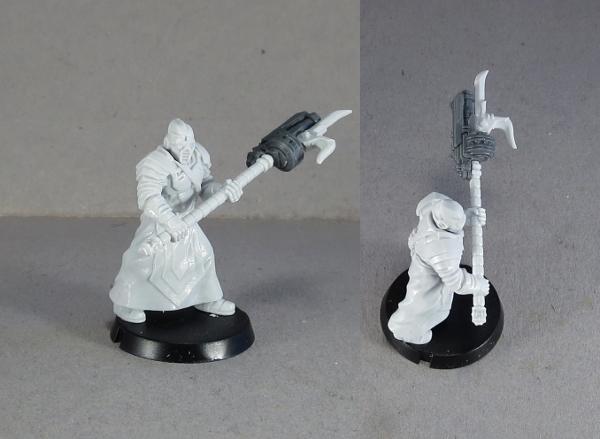
OK, but what if you want both weapons in hand, you say?
Luckily, resin cuts really easily, so the easy option here is to carefully remove the left hand from the stock of the grenade launcher - just trim it down to a flat surface and file it smooth if necessary.
For the goad, cut through the shaft either side of the right hand, and then reattach the bottom of the shaft to the top.


For a slightly more complex (but more hardcore!) alternative, why not combine the two weapons into one?
Take a grenade launcher from the Faction Expansion sprue, cut off the pistol grip and trim down the stock so that it is level with the bottom of the ring around the muzzle.
Trim down the back side of the goad blade so that it is flat, and cut a small, flat inset into the end of the goad shaft where the blade normally attaches.

Then glue the back end of the grenade launcher to the goad shaft, and the goad blade to the stock of the grenade launcher.
The Keeper's head has the same ball joint neck as most of the rest of the Karist range, so you can easily swap in different heads to either customise your Keeper a little, or use the model as a specialist in a Karist Trooper or Praetorian unit. The below model has a head from a Karist Heavy Trooper.
You can also create unit champions by swapping out or modifying the weapons. Below, I've filed down the shoulder pads and added Karist Trooper pads over the top, and used a head and cybel blades from the Faction Expansion sprue to create a Praetorian Tetrarch.

What have you done with your Angel Keepers? We would love to see your creations on the Comm Guild Facebook page!
To pick up the Angel Keeper, or any of the rest of the Maelstrom's Edge model range, visit the webstore here.
For other Maelstrom's Edge modeling articles, including tutorials and walkthroughs of a wide range of different building and miniature projects, check out the article roundup here
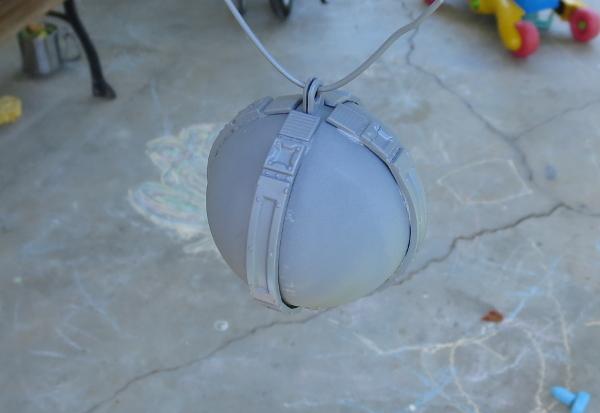
Spotlight: Maelstrom's Edge Terrain Sprue Tree Decorations!
Posted on Monday Dec 25, 2017 at 12:00am in Tutorials
- by Iain Wilson
With Christmas upon us, I wanted to add a bit of a holiday theme to this week's article, and so the only sensible option was to take the Maelstrom's Edge terrain sprue and build Christmas decorations from it!

Around this time of year you can usually find various DIY bauble kits that have plastic baubles that you can stick photos or other momentos inside, or that you can paint or otherwise decorate. This particular one I think came with some rubber stamps inside for making Christmas cards and the like.
I took four of the long reinforcing struts from the terrain sprue and gently bent them into a curve over a metal tube.

These were then glued around the bauble with all-plastic glue. I used a UHU glue that turned out to be not great for gluing these struts onto flat surfaces as it contracts when it dries, which bends the struts and pops them right off the surface they're glued onto. That very property makes it a perfect glue for attaching the struts to a curved surface, though, as it will make them fit more tightly to the bauble.
The struts don't run all the way down to the bottom of the bauble, so I took the large pipe fitting from the sprue, and used a hobby knife to carve the bottom surface out to make it concave.
This was then glued onto the bottom of the bauble.
Time to paint! A quick spray of grey primer:
Season lightly with some crushed rocksalt:
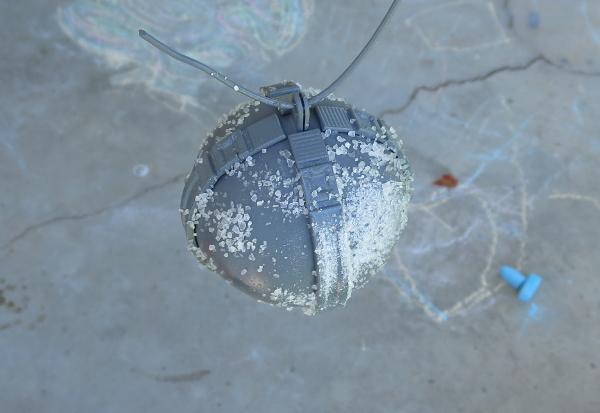
Spray with Army Painter Dragon Red:
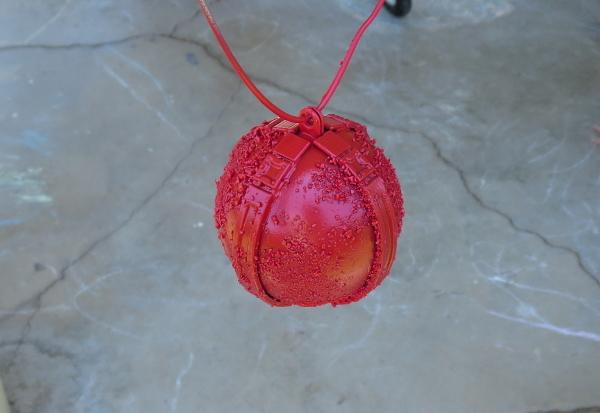
Once the spray was dry, I scrubbed away the salt under running water:
The detail pieces were then painted with P3 Pig Iron:
I followed this up with a generous coat of my old favourite, Army Painter Strong Tone ink.
After sitting overnight for the ink to dry, a quick drybrush of Pig Iron and a little silver, and up it goes on the tree!
To build your own collection of mechanical... er... decorativeness, you can pick up the Maelstrom's Edge terrain kit along with the rest of the Maelstrom's Edge model range from the webstore here. As always, we would love to see your creations on the Comm Guild Facebook page!
Here's wishing everyone a safe and happy holiday season!
For other Maelstrom's Edge modeling articles, including tutorials and walkthroughs of a wide range of different building and miniature projects, check out the article roundup here.
Tags: conversion modeling spotlight terrain terrainsprue walkthrough
Modeling Tutorial - Scarecrow-arm Bionics
Posted on Monday Dec 18, 2017 at 05:00pm in Tutorials
- by Iain Wilson
Amongst the veterans of the savage and bloody conflicts that rage along the Maelstrom's Edge, bionic limbs are commonplace. Many (at least those who can afford it) choose high-tech limb augmetics that are practically indistinguishable from the original. The less fortunate, or perhaps just the less vain, often wind up with more obvious mechanical assistance. You can find various examples of this amongst the plastic broken models, but here I'm going to share an easy bionic arm made from the left arm of an Epirian Scarecrow bot.
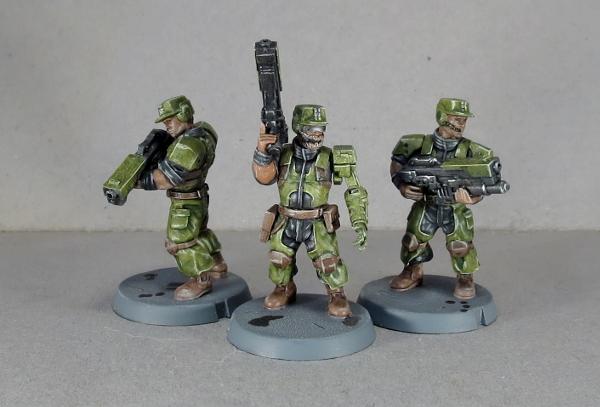
The arm comes in two pieces. Start by trimming or filing off any mould lines.
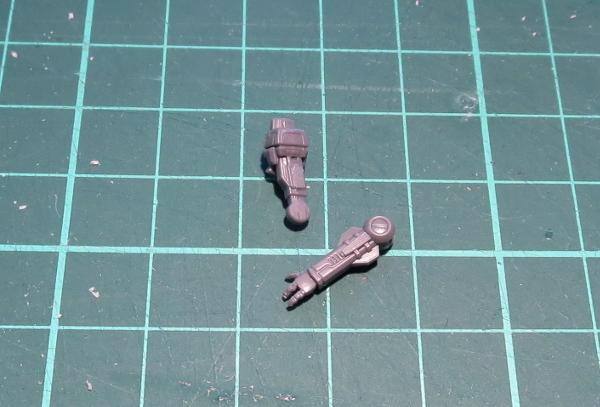
Take the upper arm piece and remove the round lug from the inside of the shoulder and the flange from the top of the shoulder with a sharp knife or razor saw, and cut off the arm just above the elbow pivot and just below the reinforcing struts.
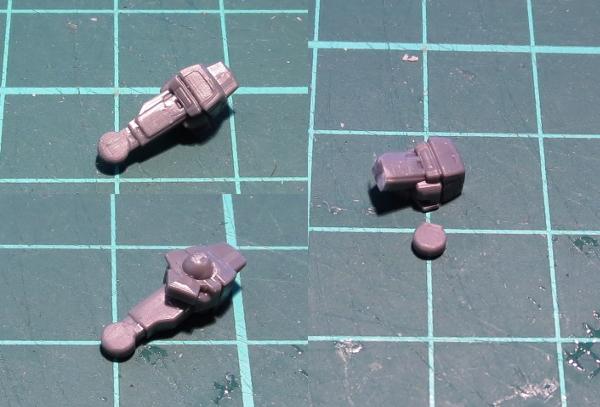
On the lower arm piece, cut the hand off just above the wrist, and the forearm just below the reinforcing struts, and then also remove the struts - leaving them on makes the forearm a little too bulky.
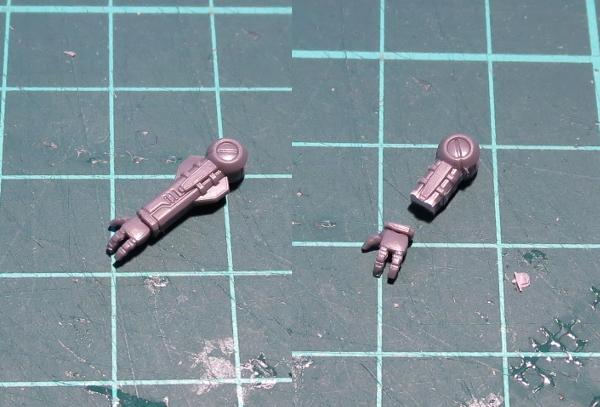
Assemble the arm by gluing the hand back onto the truncated lower arm, the elbow pivot onto the upper arm, and then gluing the elbow joint together.
Glue onto your model of choice, and you're ready to paint and send them off to battle!
To rebuild your own warriors into an augmented force of renewed usefulness, you can pick up the Scarecrow bot along with the rest of the Maelstrom's Edge model range from the webstore here. As always, we would love to see your creations on the Comm Guild Facebook page!
For other Maelstrom's Edge modeling articles, including tutorials and walkthroughs of a wide range of different building and miniature projects, check out the article roundup here.
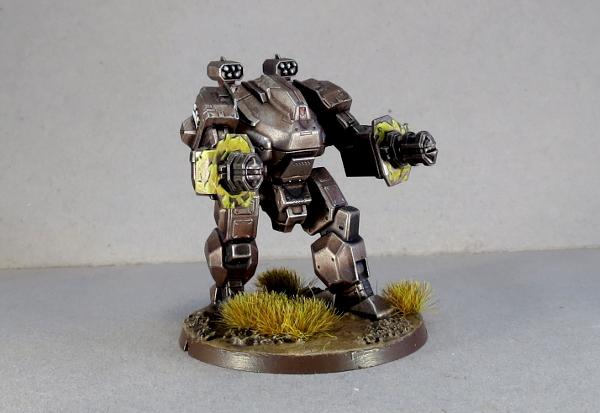
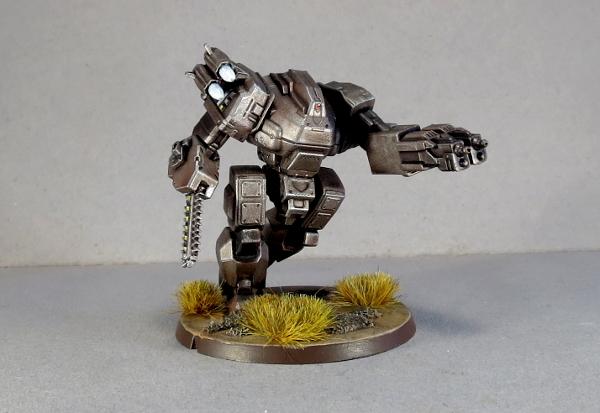
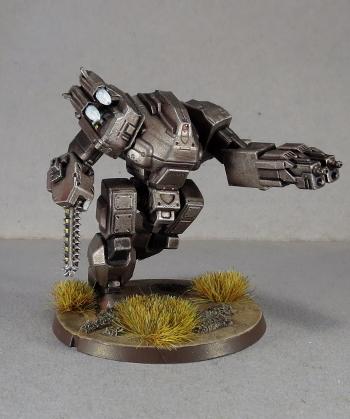
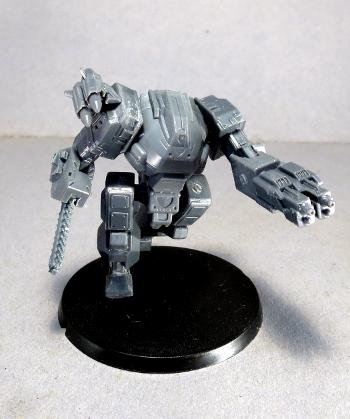
Model Spotlight: Epirian Hunter Warmech
Posted on Monday Dec 11, 2017 at 05:00pm in Models
- by Iain Wilson
For this week's article, I thought it might be fun to pause and take a closer look back at one of the models from the initial Maelstrom's Edge release - the Epirian Hunter Warmech!
Designed through an arcane mix of clever sculpting, sliding-core moulding and witch-craft, the Hunter kit is beautifully detailed while going together with surprisingly few parts. Arms and legs are solid parts, removing the need for unsightly seams, while boasting articulated shoulders, elbows, ankles and hips to give enough poseability to keep things interesting.
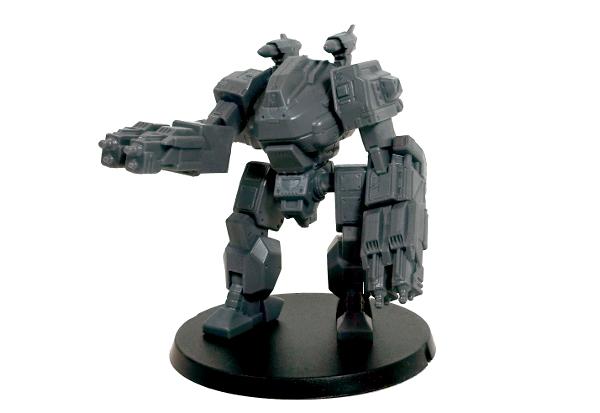
Towering above mere human soldiers, the Hunter is the second-largest model currently on the Maelstrom's Edge battlefield, beaten in size only by the Karist Angel (for now!)
The kit comes with a nice array of weapons - a maglock chain gun, a flakk cannon, two suppressor twin machine guns, two each of the different rocket pods, and a hydraulic fist.
Being plastic, 'borrowing' a second weapon from another kit and modifying it to go on the opposite arm is a breeze. Below, the shield for the flakk cannon has been flipped over to go on the right arm, with the top and bottom beveled parts reshaped slightly to keep the symmetry between the left and right.
The rocket pods are designed to mount behind the head, but it's too much fun to not play around with them and find other places to fit them!
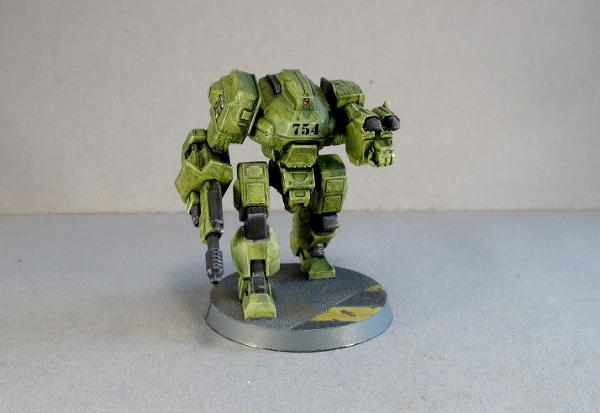
The legs have a slight bend in the knee, which allows for a surprising range of motion combined with the pivoting ankle joints. For a little more speed, the knee joint can be sliced through and reattached into more of a running pose.

If pounding away with a big, metal fist isn't your thing, the hydraulic fist can be easily replaced with a chainsaw blade or other suitably brutal melee weapon of your choosing. The Hunter below has a chainsaw taken from a Games Workshop plastic kit for some extra rippy fun.
If converting is more your thing, let your imagination run wild! Below is an Epirian Uplink Drone, built from a Hunter torso, some bits from the Spider drone kit, and some tracks from a Counterblast robot model. You can see how it was built in the article here.
Venturing a little further off the beaten track, this 'Mule' cargo drone was built from a Hunter chassis with a head made from a Spider drone and some lifter hands scratch-built from plasticard. You can check it out in the build article here.
If big guns are more your thing, then the 'Silverback' fire support mech is going to be right up your alley. This was built from a reposed Hunter with hands made from drone parts and sprue, a drone chassis head, and a gun taken from a Games Workshop Tau kit. To find out how to build your own, check out the article here.

To build your own robot army of mechanical Doom, you can pick up the Hunter kit, along with the rest of the Maelstrom's Edge model range, from the webstore here. As always, we would love to see your creations on the Comm Guild Facebook page!
For other Maelstrom's Edge modeling articles, including tutorials and walkthroughs of a wide range of different building and miniature projects, check out the article roundup here.hun
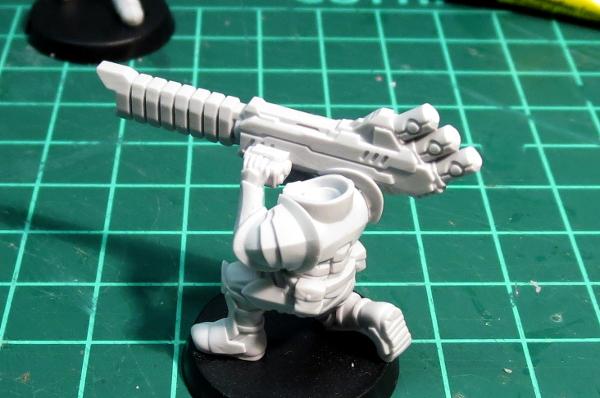
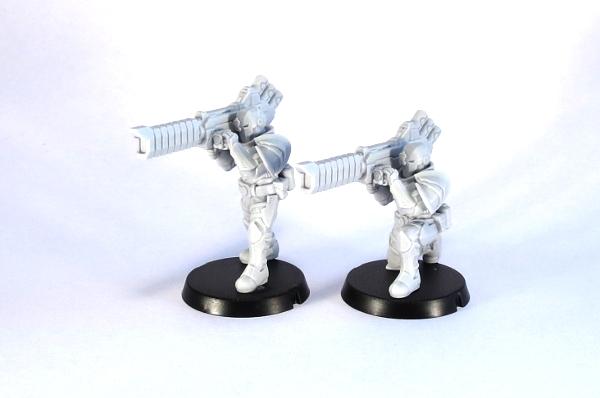
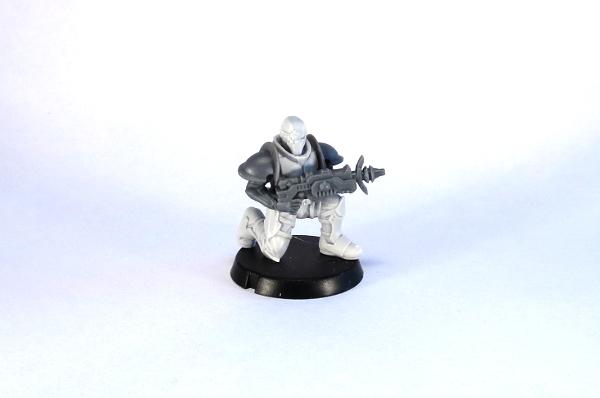
Modeling Spotlight: Assembling Karist Heavy Troopers
Posted on Monday Dec 04, 2017 at 05:00pm in Tutorials
- by Iain Wilson
This week saw the release of the next Maelstrom's Edge resin set into the wild, with the addition of heavy weapon troopers to the Karist Enclave lineup. Here, we're having a quick look at how to assemble these great new models!
The Karist heavy troopers come in a pack of two troopers, with three heavy weapons between them. They also include 3 optional heads - two with helmets and one open-face, an extra left arm with a spare cybel cannister, and a bunch of extra cybel cannisters to attach to their belts.
As always with resin models, it's a good idea to give them a quick wash in warm, soapy water to clear off any residual mould release, as this can affect paint adhesion. If any of the parts are a little bent, this is also the time to drop them in some hot water and then reshape them - although the casts I received of these models were all beautiful and straight, with extremely minimal mould lines, so very little clean-up work involved.
The two bodies are all one piece, and so once the frame lugs are trimmed off the bottom of the feet, can be glued straight onto your base. Because these are resin rather than polystyrene like the regular plastic kits, use a good quality superglue or fast-setting epoxy glue, rather than plastic cement.
The arms have nice, sturdy locator pins that fit snugly into the sockets in the shoulders.
Dry-fit them first to get a feel for how they sit, and then I find the easiest way to ensure the arms fit together nicely is to put a drop of glue into each shoulder socket, a small drop on the left palm, and then sit everything into place and make any minor adjustment quickly before the glue grabs. You can glue one arm at a time if you prefer, but it can be trickier to get a perfect fit that way, depending on the angle of the arms.
Finally, glue the heads in place, and you're ready for paint!
You can add a Quintarch to the unit using a regular Karist trooper, or you can add parts from the Trooper sprue and/or Faction Expansion Sprue to another heavy trooper body to keep with the heavier armour look for the whole unit.
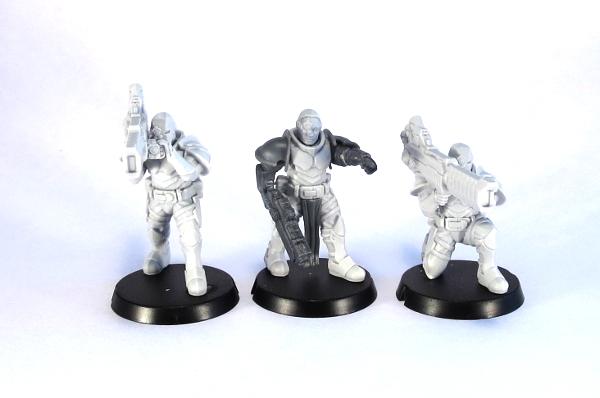
You could also use weapons and arms from the Trooper sprue on the heavy trooper bodies to make special weapon troopers for your regular Karist units.
And for a final bit of fun, I made some conversions a while back of some Tempest Elites with shoulder-mounted weapons (from the Spotlight article here). That conversion becomes even easier with the pulse cannon and cannister arm from the heavy trooper set!

To build your own army of Maelstrom-worshipping, explody Doom, you can pick up the Karist Heavy Trooper set, along with the rest of the Maelstrom's Edge model range, from the webstore here. As always, we would love to see your creations on the Comm Guild Facebook page!
For other Maelstrom's Edge modeling articles, including tutorials and walkthroughs of a wide range of different building and miniature projects, check out the article roundup here.
Tags: conversion converting heavy karist modeling trooper tutorial walkthrough
Modeling Spotlight: The Angel Hellblaster (or 'Fun with Resin!')
Posted on Monday Nov 13, 2017 at 05:00pm in Tutorials
- by Iain Wilson
The Karist Hellblaster is the first of a range of resin models for Maelstrom's Edge, to help flesh out the factions with some more fun and freaky options. This week, I'm having a look at some modeling options with this great little kit.
The Hellblaster comes in a pack of two variants, with slightly different posing and tail tentacles.
Assembly is really easy - It's always a good idea to wash resin models in warm, soapy water before assembly, to clean off any mould release residue (this may affect paint adhesion, otherwise), then cut off the sprue and trim off any mould lines, glue the head piece to the front of the torso, and the rear legs into their sockets. There's a little posability in the rear legs, as the sockets allow for some movement.
If you want to branch out a little from stock poses, one of the really fun aspects of resin models is that they can be easily reshaped. Drop the part you want to reshape into some hot water for a minute or so. When the part has had time to warm through, fish it out and quickly bend it into the shape you want. Then pop it into some cold water to set it in that shape.
Obligitary safety warning: It's always a good idea to avoid breathing in fumes from heated resin or plastic, so boil your miniatures somewhere with good ventilation. And use an appropriate tool (tweezers, long-nose pliers, etc) to fish the resin pieces out of the hot water and handle hot parts with care.
Using this method, you can add a bit of a bend to the Hellblaster's torso, to give it more of a sinuous, in-motion appearance.

You can also reposition legs and tentacles to suit. It helps that angels don't have a fixed skeletal structure - tentacles are fairly forgiving when it comes to finding appropriate poses!
Note that as an alternative to the hot water technique above, you can achieve a similar result using a hair dryer to heat smaller parts. As above, through, handle with care to avoid damage to both the parts and yourself.
With a little more work, you can carefuly cut through in between the cheek sacs and the tops of the forelimbs, to allow for more movement. In the below example, I have stretched the legs out to raise the head and shoulders up higher, and added a slight forwards arch to the angel's back.
Painted up in an appropriate colour scheme, the Hellblaster fits in nicely with the Mature Angels and Minnows to add a bit more variation to an angel force.
But where to from here?
There's no reason to stop with basic reposing! Angels love nothing more than experimenting with different forms, and while the Hellblaster is a form forced on them by Karist Keepers, it also makes a good base for some different angel types, like the (very work-in-progress) examples below:
Snake-angel, converted using the front of a Hellblaster, the wings from a Minnow and a wire armature covered in 'green stuff' putty.
The snake body will be smoothed out with another layer of putty, and some exterior tentacles added for some detail.
Shrike-angel, converted using a Hellblaster body with the forelimbs and energy sacs cut off, and the wings from a Minnow.
The body of the Hellblaster is considerably bigger than a Minnow's, so this guy has a much smaller wing to body ratio, but I think it's still close enough to work, particularly given angels fly using gravitic manipulation and the wings are largely just for show anyway. As with the snake, this model still needs some putty work to join the wings properly to the torso and fill in the flat spots where the legs and sacs were removed. I may also trim down the crest a little, to something more closely resembling the head of the Minnow.
Or, for something completely different, how about angel cavalry?
(Ok, this one's stretching the background a little - chances are that anyone trying to ride an angel wouldn't be riding it for very long... But it was too fun an idea to not have a play with it!)
To build your own shape-changing army of alien doom, you can pick up the Hellblaster along with the rest of the Maelstrom's Edge range from the webstore here. As always, feel free to share your creations on the Comm Guild Facebook page!
For other Maelstrom's Edge modeling articles, including tutorials and walkthroughs of a wide range of different building and miniature projects, check out the article roundup here.
Tags: angel conversion converting hellblaster modeling spotlight tutorial walkthrough
Modeling Spotlight: Easy Broken Rabble Conversions
Posted on Monday Oct 23, 2017 at 05:00pm in Tutorials
- by Iain Wilson
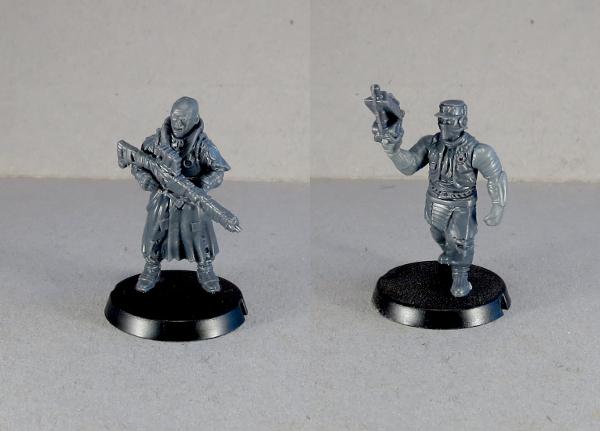
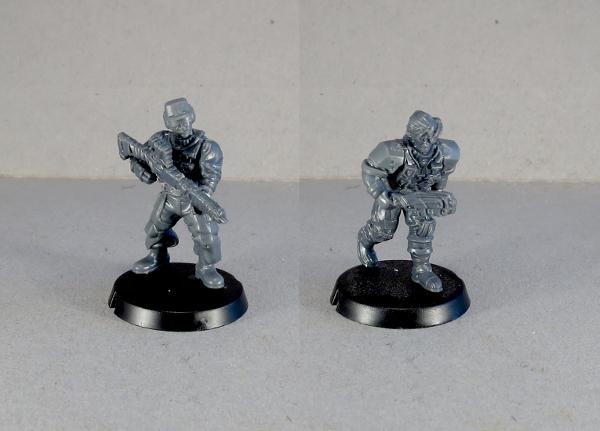
The new, plastic Broken Infantry kit has been out for a few weeks now, and I've been having a ball exploring the modeling options available from these sprues. With build articles now up showing how to put together your Chieftains, Rabble squads (which also serves for the Fire Support unit) and Assault units, it seemed like a good time to look at some easy ways to customise your Broken models a little.
Let's kick things off with guns. Broken have a lot of different weapons, and they're all cobbled together from whatever parts they can scrounge. You can accentuate this a little by swapping grips between the different weapons. Below I have swapped the Chem Pistol grip out in favour or the firing grip from a Beam Blastgun, given a Slug Pistol the pistol grip from a Beam Pistol, and replaced the curved handle on the Chem Launcher with the back half of a Slug Rifle.
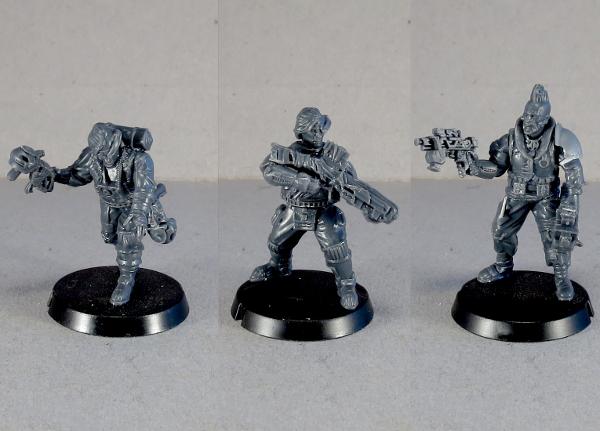
With Broken forces being made up of refugees from all walks of life, and equipped with whatever gear they can beg, borrow or steal, the other Maelstrom's Edge plastic kits are a great resource for personalising your forces. A trimmed down Karist Trooper shoulder pad is a great way to single out your unit Bosses from their otherwise equally-scruffy charges.
Karist Trooper and Epirian Contractor arms and heads can also be used to add some extra variety when scattered through with the Broken parts. The necks may be a little tight on some of the Broken torsos, but you can shave them down with a sharp hobby knife or a modeling file to make them fit.
The model on the left below also has Contractor legs. The Broken torsos and legs have multiple belts and straps, but the thicker belt on the Contractor leg pieces can make this look a little strange and results in the model being very tall, so in this case I have removed the belt from the bottom of the torso with a sharp knife before attaching to the legs.
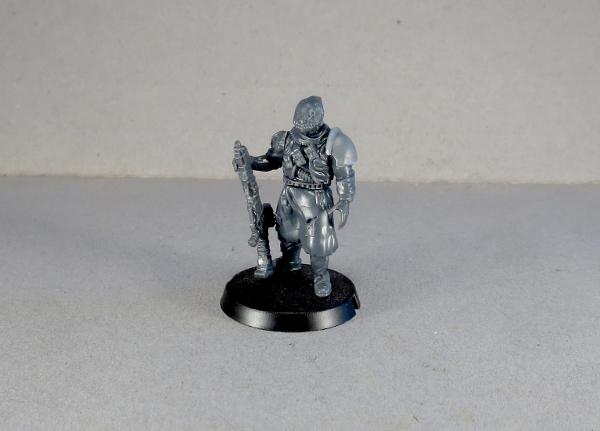
To venture a little out of the box, the below Chieftain model has been given a melee weapon (just for show) made from a cut-down EMP Harpoon with a blade from a knife taken from the Faction Expansion Sprue.
A gunslinger Chieftain can be made using the pistol arms from the Epirian Bot Handler sprue. You can cut the pistols off just above the tops of the hands and attach Broken weapons instead, but in this case I liked the look of the Epirian pistols so left them there, where they will probably sub as Slug Pistols for now. I also added a long coat and lifted the collar with 'green stuff' putty.
Last, but not least, the more speed-happy Broken may want a better way across the battlefield than walking like everyone else, and what better way to travel than a custom-made skyboard?
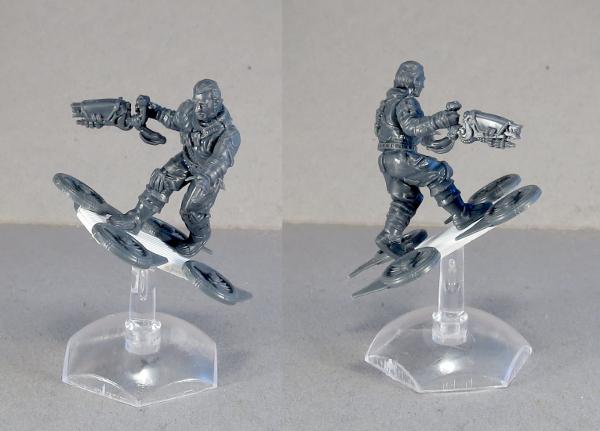
The board was made from a strip of plasticard, with some leftover turbines from Epirian Firefly Drones added onto the sides. Obviously, there are no rules for these, but the idea was too much fun to not put it together, so I'm planning to put together a unit of these guys and work up some homebrew rules for them. Watch this space!
To get to work on your own Rabble horde, you can find the Broken Infanty kit in single, double or triple packs in the Maelstrom's Edge webstore here, along with the rest of the Maelstrom's Edge plastic model range. As always, feel free to share your creations on the Comm Guild Facebook page!
For other Maelstrom's Edge modeling articles, including tutorials and walkthroughs of a wide range of different building and miniature projects, check out the article roundup here.
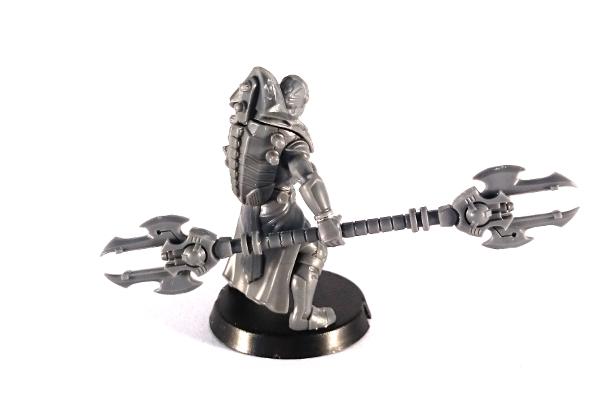
Conversion Spotlight: Kaddar Militant
Posted on Monday Sept 04, 2017 at 05:00pm in Models
- by Iain Wilson
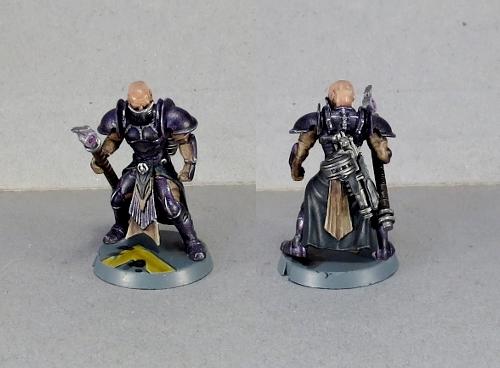
The range of plastic miniatures available for Maelstrom's Edge covers all of the units and options currently available in the game. There's a lot of fun to be had by taking those miniatures and exploring other options beyond the current limits of the game, whether to field with home-brew rules or just for one-off display pieces to flex the creative muscles. This week, we're looking at a model from the latter category, built just for fun, because it never hurts to have a bigger stick.
When the Faction Expansion Sprue was released, I took one look at the awesome cybel glaive on the sprue and couldn't resist the urge to create a double-ended version by sticking the head of one glaive onto the bottom end of the shaft of a second. The resultant, admittedly slightly over-the-top, marvel of blades and energy emitters needed a suitably awe-inspiring model to carry it, so I turned to the ever-imposing Kaddar Nova kit.

The head is taken from the Karist Trooper kit, with the front sanded down smooth.
Painting started out with a basecoat of Army Painter Dragon Red. From there, I built up shadows using thin, multiple layers of Army Painter Purple Tone, before higlighting the edges with white and then a final wash of Army Painter Red Tone over the top to mesh everything together.
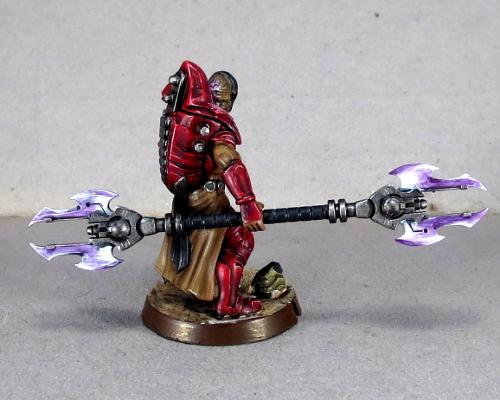
The cloth parts were painted with Vallejo Heavy Brown, and then shaded with layers of Army Painter Strong Tone. Similarly, the black parts were painted with Vallejo Heavy Grey, highlighted with some Vallejo Neutral Grey and then shaded with Army Painter Dark Tone.
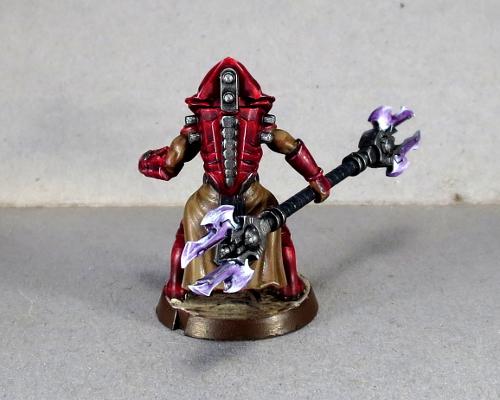
Metal parts started with some more Heavy Grey, and then a coat of P3 Pig Iron, and finally a wash with Dark Tone to give it some depth. Finally, the glaive blades were painted white and then worked up to the purple with layers of Purple Tone. The panel behind his head was given some purple light with a layer of Citadel Warlock Purple, drybrushed with a little Citadel Tentacle Pink and then a final drybrush of white.
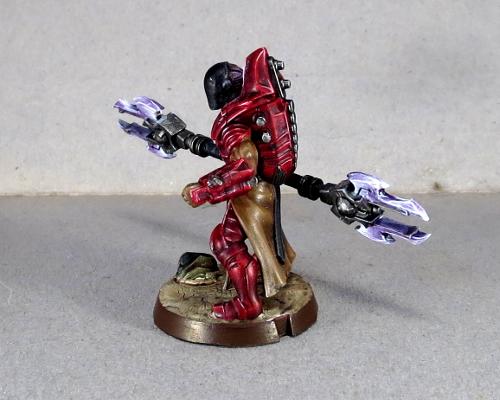
The end result is a spiky, sinister-looking character who will probably wind up spawning yet another Karist force in my collection. I'm thinking of this guy as a 'Kaddar Militant' - a subsect of the Kaddar Priest class, who lean a little more towards brutal subjugation to get their way than is the norm for Karist forces. Stay tuned - there may well wind up being a rules card at some point in the not too distant future, tweaking the standard Kaddar Nova rules to allow for the double-ended Glaive and some revision to the normal unit selection matrix.
If this has inspired you to get creative with some plastic, you can pick up the Maelstrom's Edge terrain sprue from the webstore here. As always, feel free to share your creations on the Comm Guild Facebook page!
For other Maelstrom's Edge modeling articles, including tutorials and walkthroughs of a wide range of different building and miniature projects, check out the article roundup here.
Tags: conversion kaddar karist modeling painting
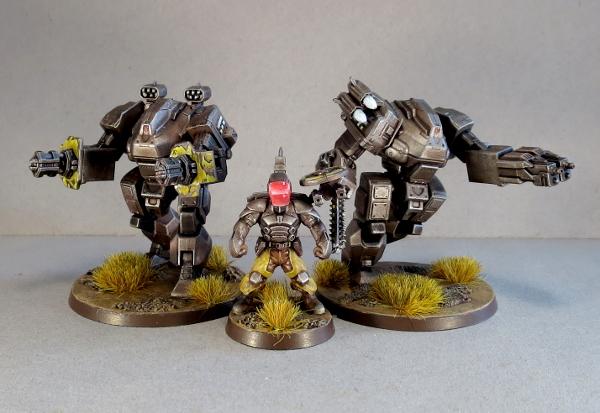
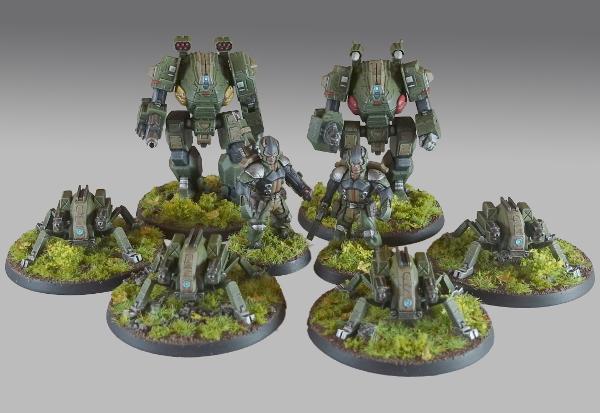
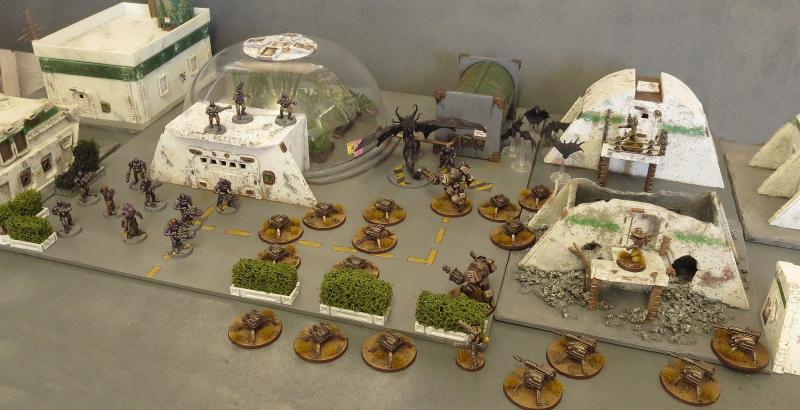
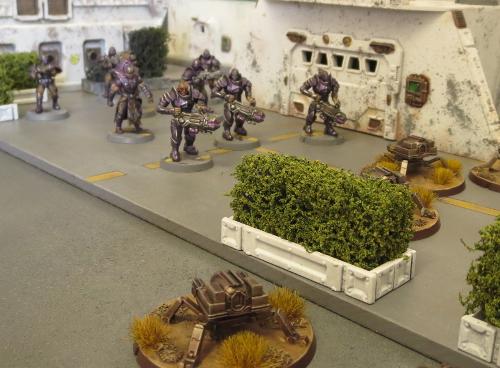
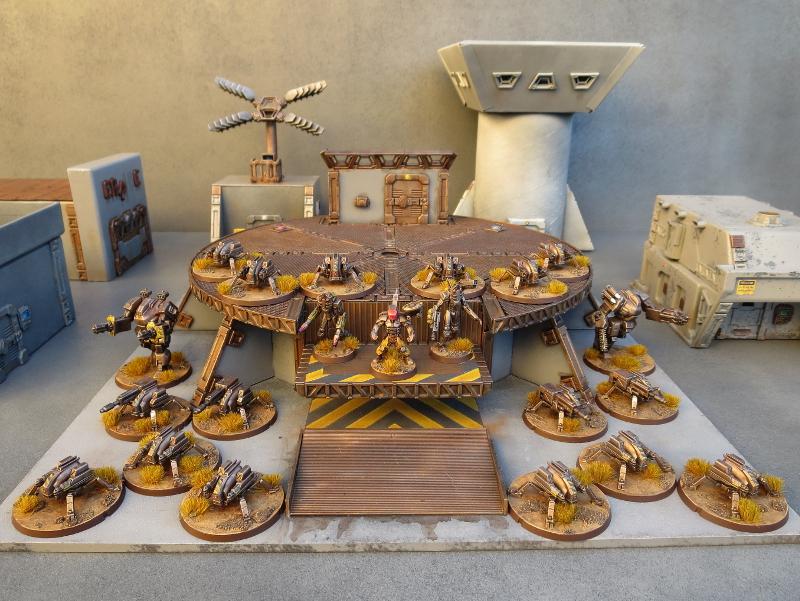
Army Spotlight - Karist Strike Force
Posted on Monday Aug 28, 2017 at 12:00am in Models
- by Iain Wilson
A little while ago I shared an Epirian bot army that I had been assembling, which you can find here if you missed it the first time. It didn't seem like the done thing to let all of those blasphemous machines hog the limelight, and so this week it's time for the pure and wholesome forces of the Karist Enclave to shine.
I wanted a Karist leader with a bit of presence - the sort of no-nonsense character who would stride about the battlefield secure in the rightness of his cause and confidence in his inevitable victory. So I took the Kaddar Nova kit and modified the legs slightly to give him a walking pose.
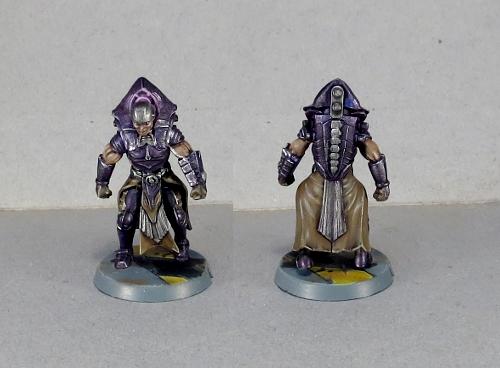
The conversion involved cutting some plastic away from the groin where the two leg pieces join, to bring the legs in for a more upright pose. One leg was angled slightly back by rotating at the waist joint, and the ankles were carefully twisted to straighten them out. The end result is a walking but slightly bow-legged pose, which helps to show the weight that the Nova is carrying around with that backpack!
The painting on this force is quite simple, as I wanted something quick and easy that I could expand on later as I add more models to the roster. The purple is an old Citadel metallic purple washed with Army Painter Dark Tone. The brown cloth sections painted with Vallejo Heavy Brown and washed with Army Painter Strong Tone form a nice contrast to the purple, and the weapons are painted in a no-nonsense metal scheme using P3 Pig Iron washed with Dark Tone.
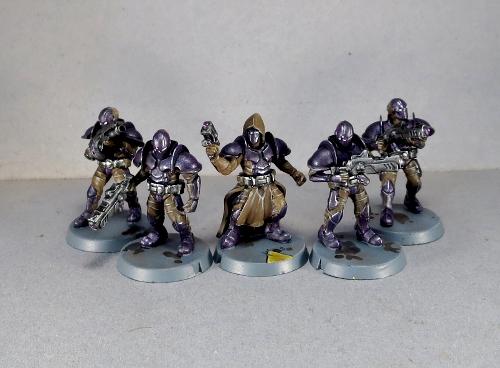
While I was aiming for a fairly small, elite force this time around, I still needed a unit of Troopers to fill in the required Core slot. I decided to go for a 5-man unit, to help them stand out from the more compact specialist units I was going to include and to give help them last a little longer once they get in range of all those Epirian guns.
The Quintarch for this unit was based loosely on an early piece of Maelstrom's Edge artwork, with robes made from a leftover Kaddar Nova robe and some green stuff putty.
A unit of Tempest Elites provide some fire support, with their fearsome Hellstorm Energy Mortars.
For some extra firepower where it counts, I included a Reaper Cadre. This is a homebrew unit that I put together for an article a while back. They're basically elite troopers armed with a long rifle version of the Pulse Carbine. You can find the conversion article and a rules card here.
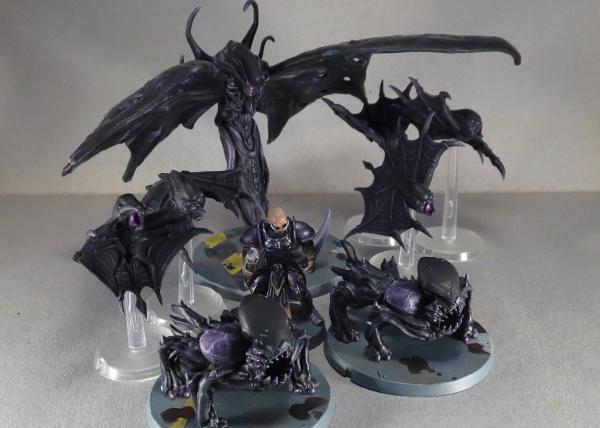
I obviously needed to include some angel units, and to keep them in line I also took along an Angel Keeper. He forms the HQ option for a second detachment.
The Keeper is a playtest unit offered up some time ago for those who wanted some extra angel-related shenanigans in their forces. The model is a conversion using parts from a few different kits, as there is no official model (yet!) for it - you can find the conversion tutorial and rules card here.
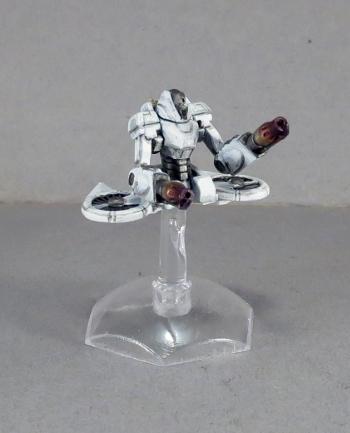
In the Keeper's charge are a unit of Minnows. These were converted to add some extra motion to their poses, by mixing up the pairing of the wing parts and filling in any resultant gaps with a little green stuff.
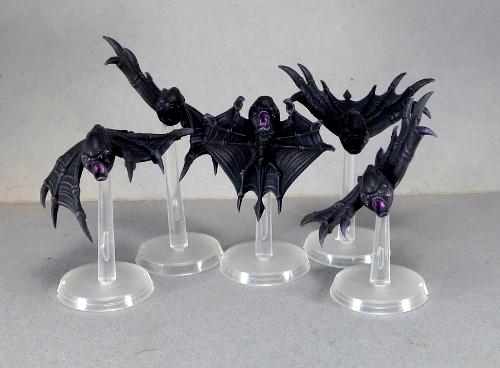
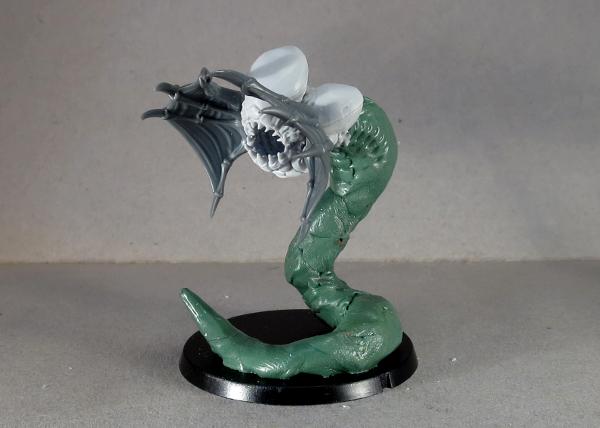
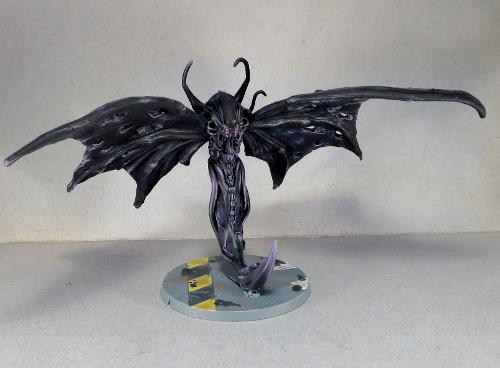
The Minnows' big brother rounds out the second detachment for now. I put together a model of a Mature Angel in its flight form a while ago, and so he had to go into this force. This model was built using the body from the Mature Angel kit, a tail made from green stuff and some wings from a demon model from the Reaper Bones range. You can find a walkthrough of the conversion here
The force all together:
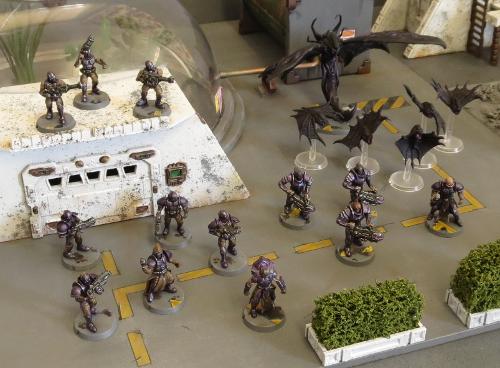
This leaves me with a roster that looks something like this:
Detachment 1
Command: Kaddar Nova - 15 points
Core: Karist Troopers
- Ripper Grenade Launcher - 18 points
Hammer: Tempest Elites
- Hellstorm Energy Mortars - 25 points
Vanguard: Reaper Cadre
- 2 Pulse Lances - 15 points
Detachment 2
Command: Angel Keeper
- Ripper Grenades - 10 points
Core: Angel Minnow Pack - 10 points
Anvil: Mature Angel - 23 points
Total - 116 points.
If you would like to put together your own Karist strike force, you can pick up the various Maelstrom's Edge kits from the webstore here. As always, feel free to share your creations on the Comm Guild Facebook page!
For other Maelstrom's Edge modeling articles, including tutorials and walkthroughs of a wide range of different building and miniature projects, check out the article roundup here.
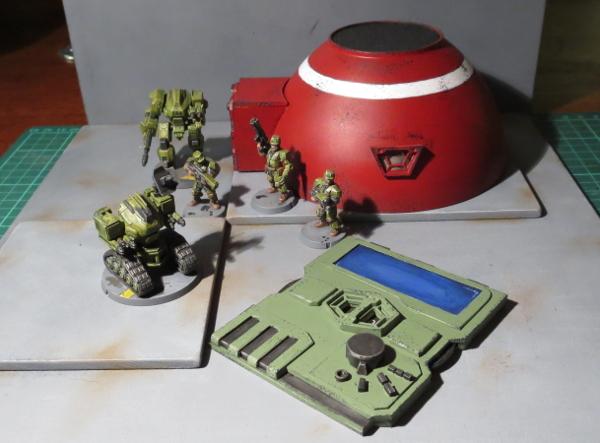
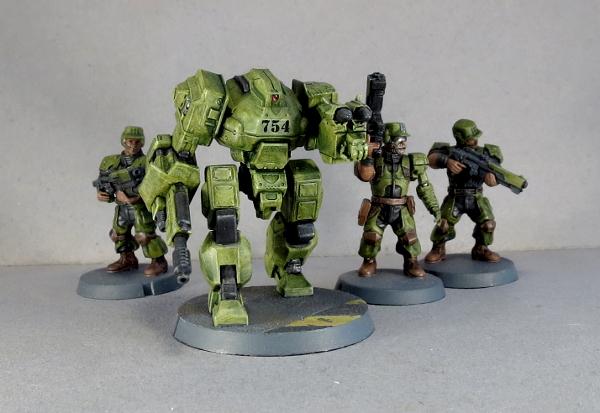
Army Spotlight - Epirian Bot Army, Detachment Two
Posted on Monday Jul 24, 2017 at 05:00pm in Models
- by Iain Wilson
Last week, I shared part 1 of an Epirian Bot army that I've been putting together, which you can find here. This week, I'm fleshing it out with a second detachment, to bring the force up to the 120 point mark, suitable for small games.
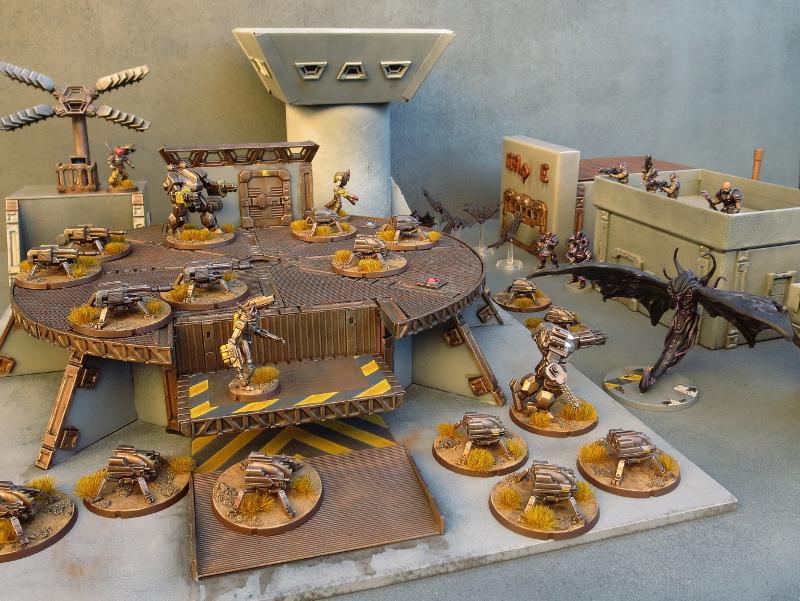
Unsurprisingly in a bot-themed force, the second detachment is comprosed of a whole bunch of extra robots!
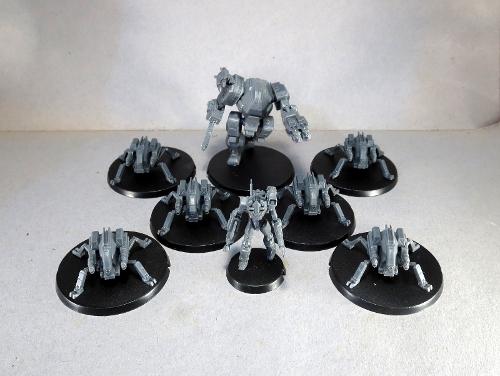
To keep with the bot theme, I wanted the second Command unit to be a Scarecrow rather than another Bot Handler.
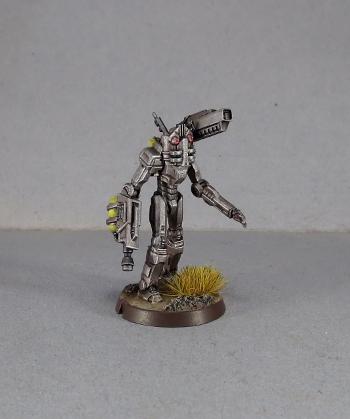
Scarecrows are shifted to a Command slot if you give them a Command Array. That's slightly problematic, since I've been using the Command Array part to put masks on my Scarecrows. I got around this by taking one of the aerials that had been cut off the array and gluing it onto the side of the Scarecrow's head, behind the mask.
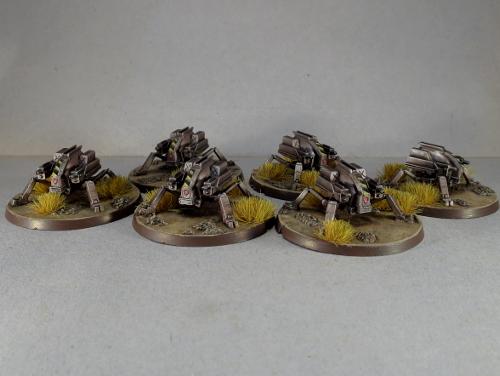
The Scarecrow commander is required to take at least two Core units, so I needed another two units of Spider drones. This time around, I went with Flakk Guns instead of the Cutters, for a bit of close-range supporting fire.
To round out the detachment, I selected another Hunter for my force.
I had built this bot a while back, just to find out how the Hunter would look with a chainsaw in place of the Hydraulic Fist. The saw blade is taken from a Games Workshop Space Wolf kit. Rules-wise, it will still count as the fist.
The bases on this detachment were a slight change from last week. I hadn't been entirely happy with the bases on the first detachment, and so I changed to a slightly darker colouring (Vallejo Heavy Brown, washed with Army Painter Strong Tone and then drybrushed with P3 Jack Bone) and added some grass tufts for a little extra pop. To keep things consistent, this obviously meant going back and redoing the bases on the first detachment as well...
And so, the full force combined:
2nd Detachment:
Command: Scarecrow Sniper
- Command Array - 14 points
Core: Spider Drones
- Flakk Guns, replace Apprentice Bot Handler - 8 points
Core: Spider Drones
- Flakk Guns, replace Apprentice Bot Handler - 8 points
Anvil: Hunter-class Warmech
- Suppressor Dual Machine Gun, 2 Strike Missile Pods, Overdrive - 10 points
Total - 40 points.
Combined with Detachment 1: 120 points.
So, what's next for this force?
The obvious choice is to add some Fireflies, and I'll definitely be doing that as soon as I can. I'm also playing with some more homebrew rules, to create a spotter drone that would work in concert with heavy weapon-equipped robot units, possibly by being able to allocate a Command point to a friendly heavy unit within a certain radius that shares LOS to a selected target.
I also built a prototype for a Scarecrow spotlight article a while back, of a Scarecrow that replaces its legs with turbines from the Firefly kit. This was equipped with twin Clingfire sprayers, but I'm thinking that a unit of these equipped with twin Maglock Assault Rifles might be a fun option for encouraging enemy units to keep their heads down.
I'm picturing these guys as being able to move freely over obstacles, but being fairly slow moving and not particularly robust, due to the delicate balance required to keep such unwieldy creations airborne.
Stay tuned - I'll post another update on this force when I get these finished off!
If all of these robots are leaving you feeling inspired, you can pick up the full range of Maelstrom's Edge models from the webstore here. As always, feel free to share your creations on the Comm Guild Facebook page!
For other Maelstrom's Edge modeling articles, including tutorials and walkthroughs of a wide range of different building and miniature projects, check out the article roundup here.
Tags: bots conversion epirian modeling painting