Entries tagged [conversion]
Terrain Spotlight: Giftbox Garage
Posted on Monday Jul 03, 2017 at 05:00pm in Models
- by Iain Wilson
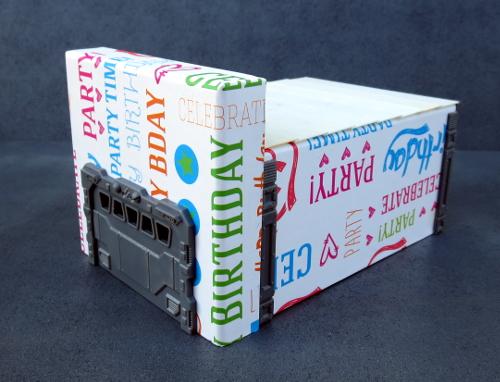
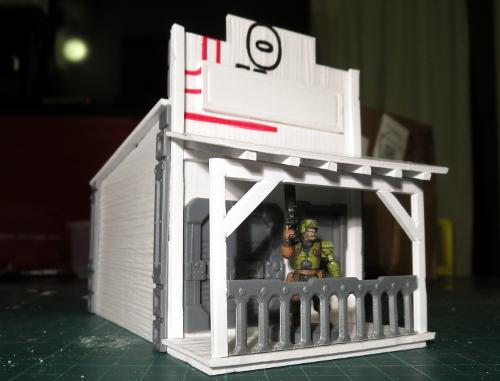
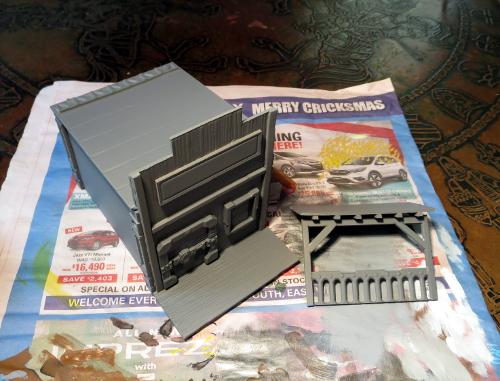
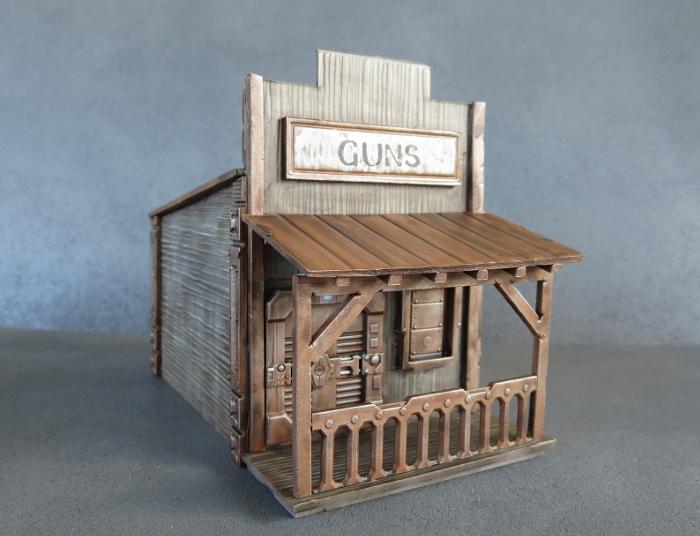
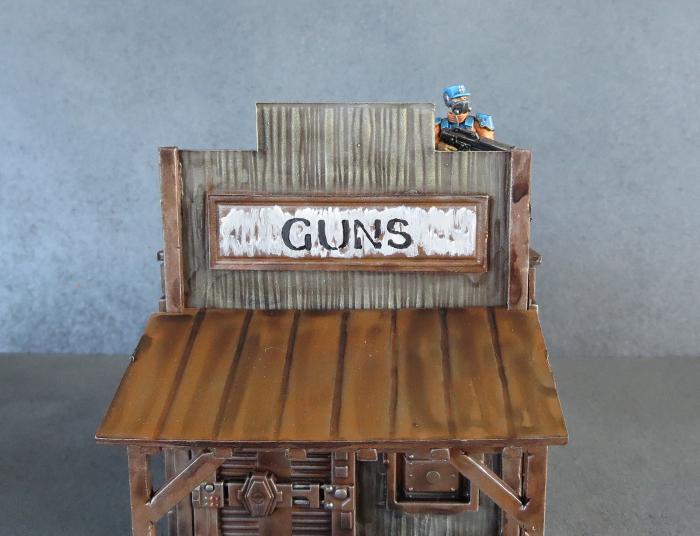
A while back, I shared a scifi western-themed building constructed from a Plast Craft Games plastic kit and the Maelstrom's Edge terrain sprue. This week, I wanted to have another try at that vaguely-western, raise-facade, scifi styling, but with more of a mass-produced, cheap colony building sort of vibe. Something a little more urban, but with a nod back to the frontier. This is what I came up with:
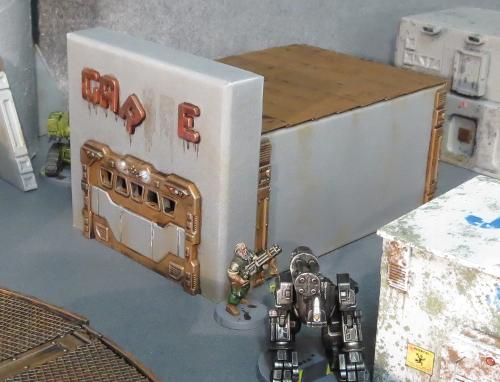
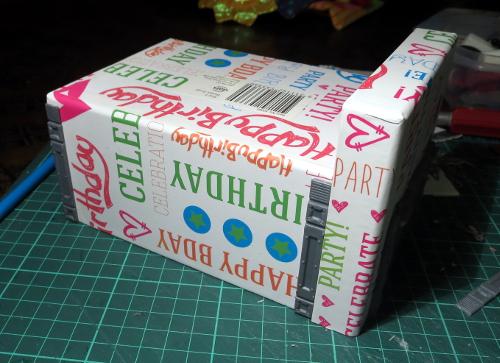
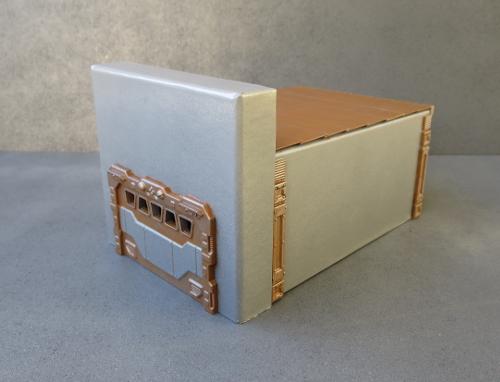
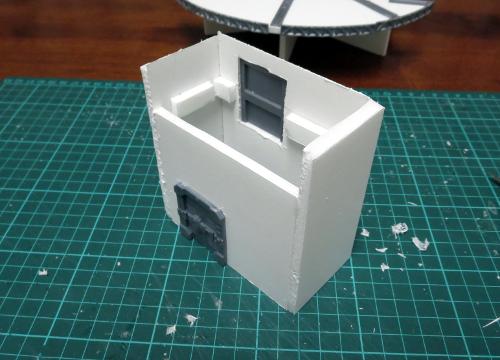
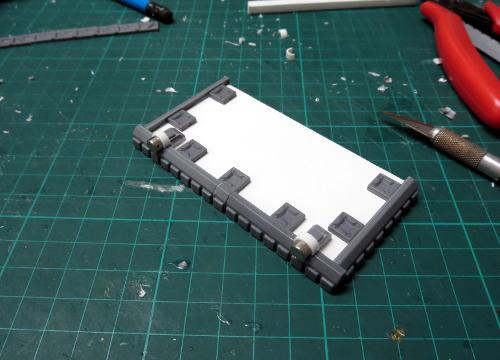
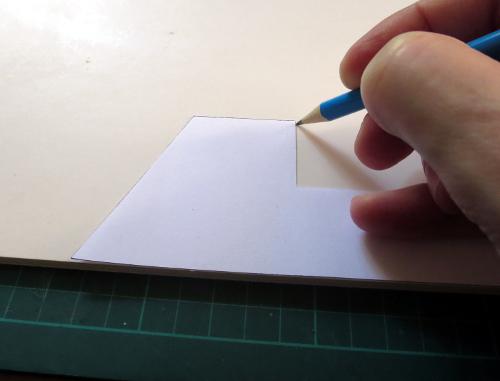
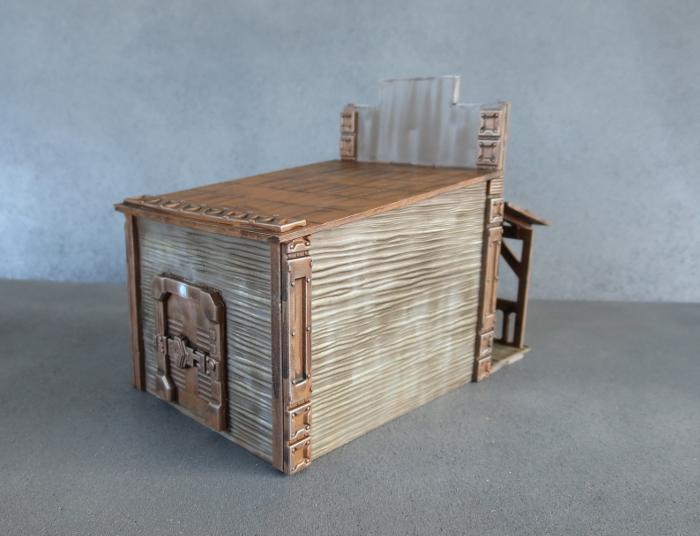
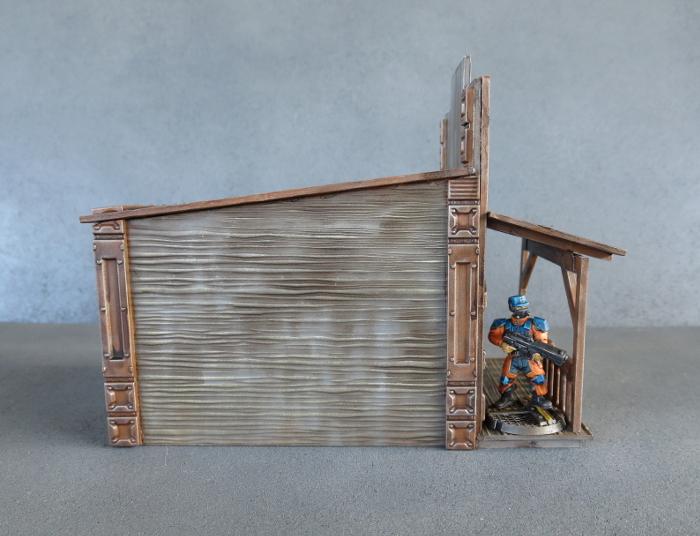
This is built from one of my favourite bases - the good old cardboard giftbox.
You can pick these up from just about anywhere that sells giftwares or from many craft shops, and they're generally fairly inexpensive. Craft shops will also often have raw cardboard versions without the printing on the outside, which does have the bonus of looking slightly less hideous while you're putting it together, but can have a rougher surface texture.
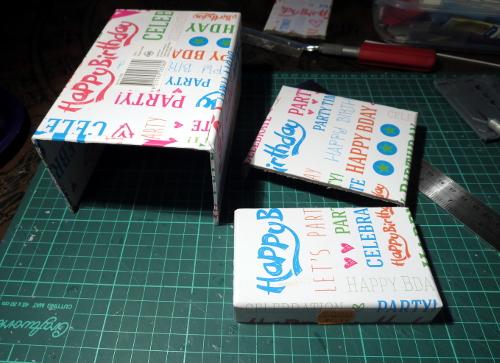
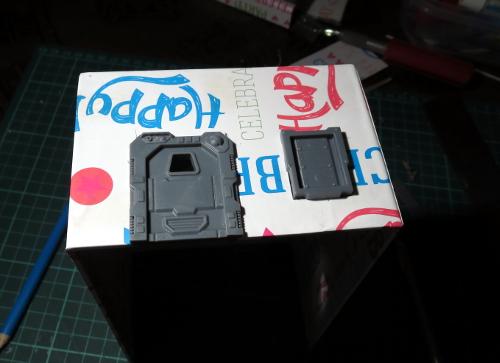
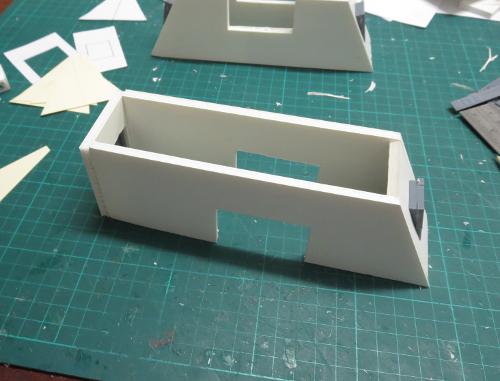
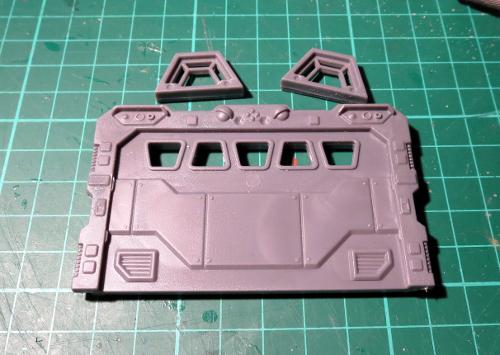
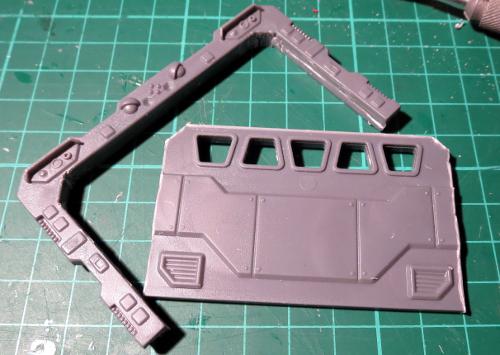
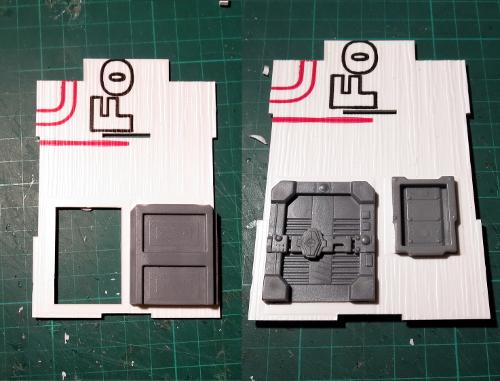
For my previous giftbox buildings, I used the lid upside down on top to form a walled-in roof area. This time, I used the lid for the facade. So the first step was to cut the lid to the height that I wanted the front of the building. I also cut away the end wall of the box, so that the hole for the front door only needed to go through the facade - The door inset is deeper than the width of the card, so would I otherwise have needed to cut a second door hole in the end of the box and hope that they lined up properly.
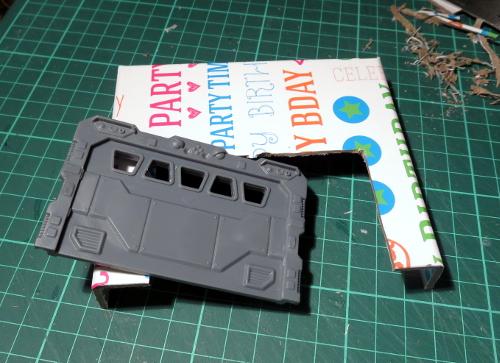
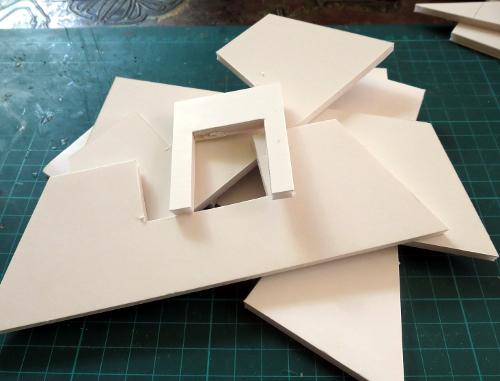
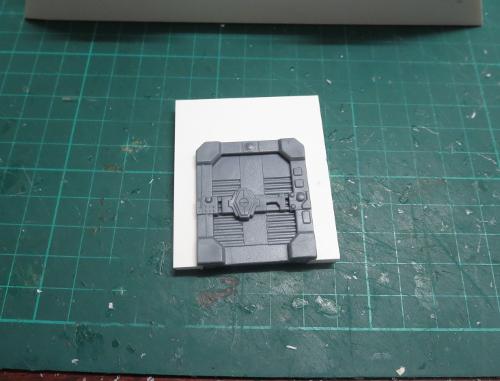
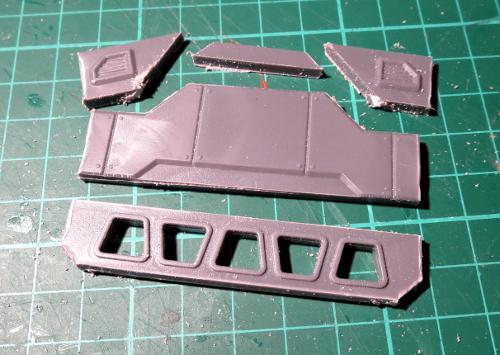
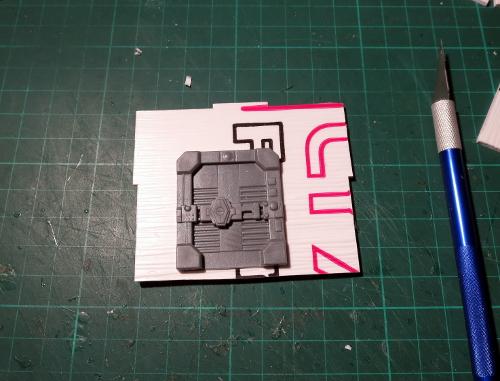
Speaking of a door hole: I took the garage door from the terrain sprue, sat it in place against the facade, and traced around the back of it before cutting out the resultant rectangle. The garage door was then glued in place.
The same process was used on the intact end of the box to add a small door and shutter window from the terrain sprue.
The facade was then glued in place.

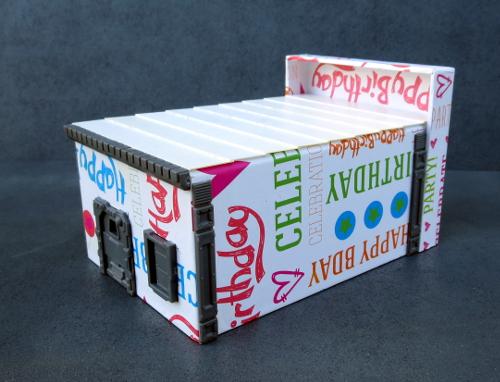
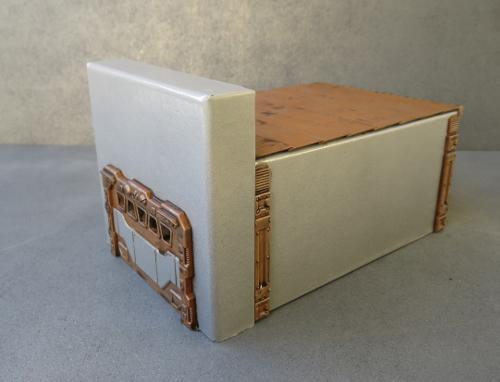
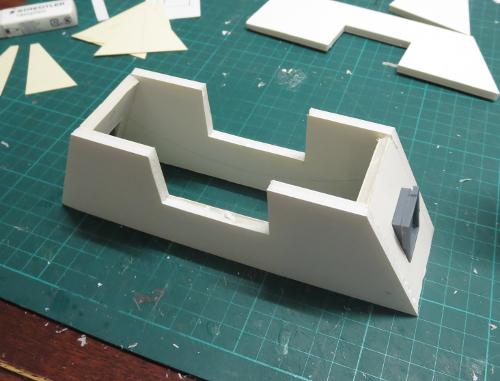
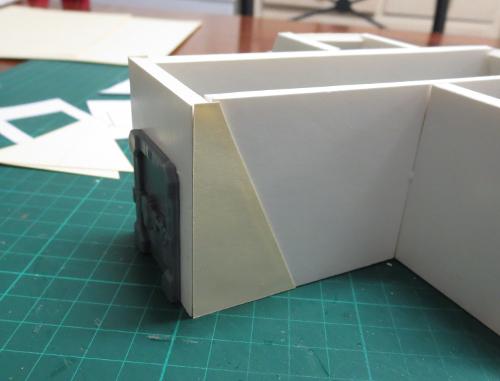
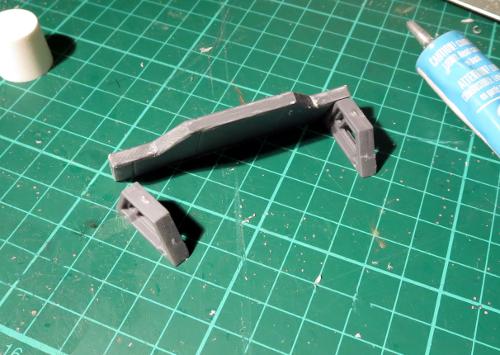
I glued a couple of support struts onto either side of the building, for a little texture.
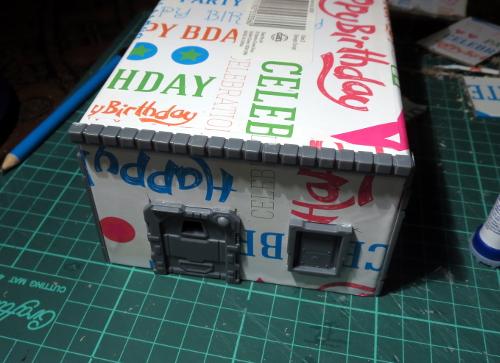
A row of lintel pieces from the terrain sprue were glued onto the top edge of the back wall.
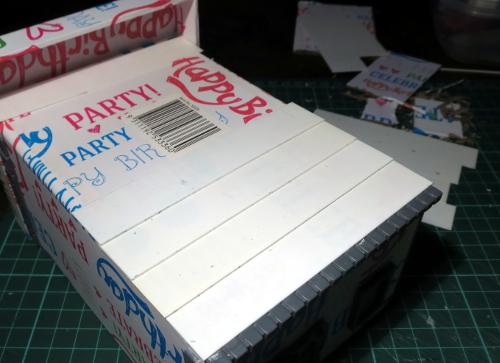
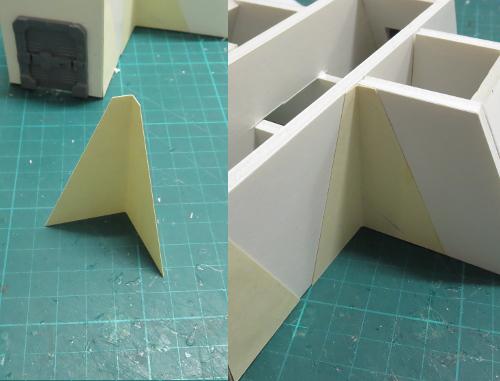
I then layered strips of plasticard along the roof, working up towards the front of the building.
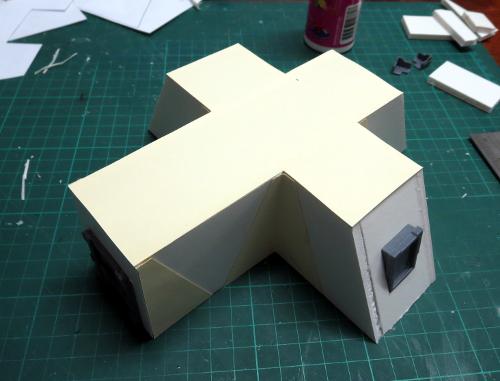
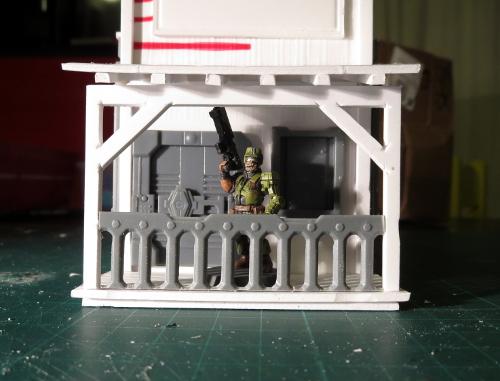
The final building, ready for painting:
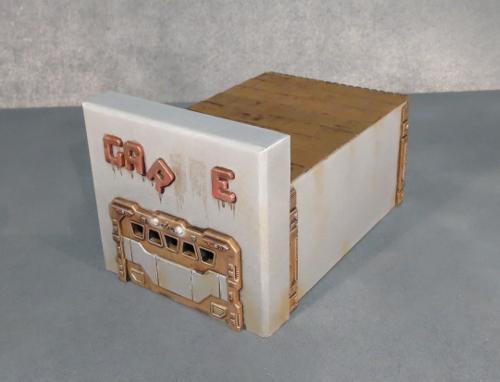
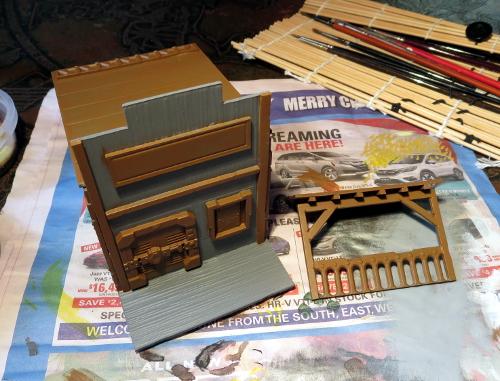
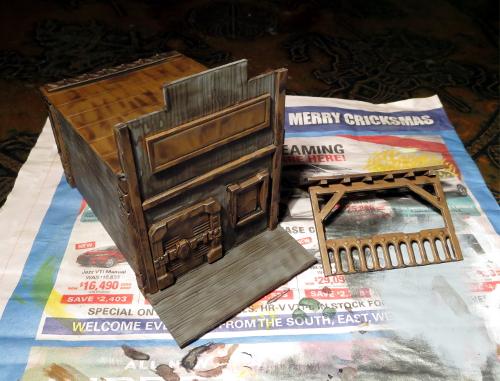
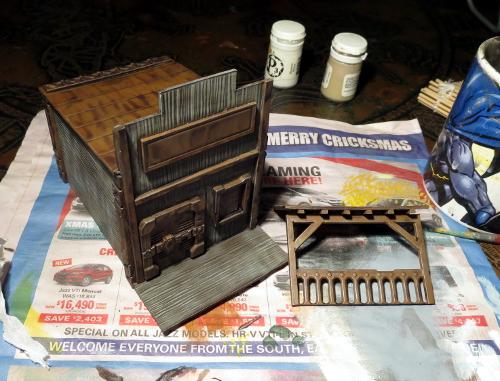
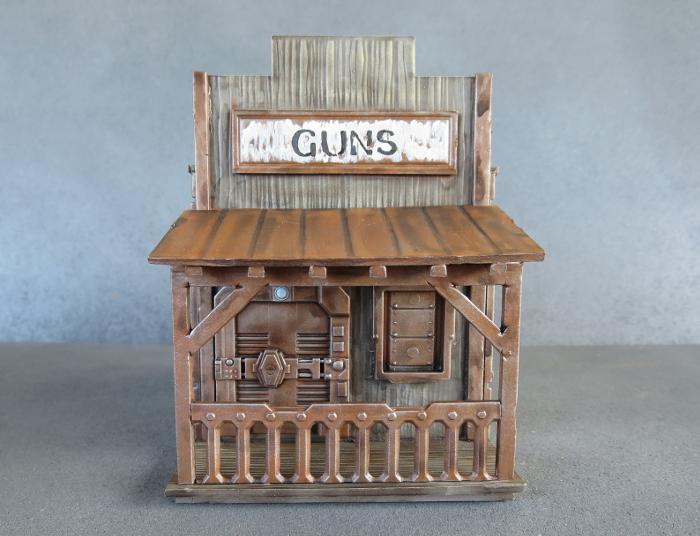
Quick and easy paintjob, that will be quite familiar for anyone who has been following these articles. I started with a black spray undercoat, to give a solid layer to cover over the printing.
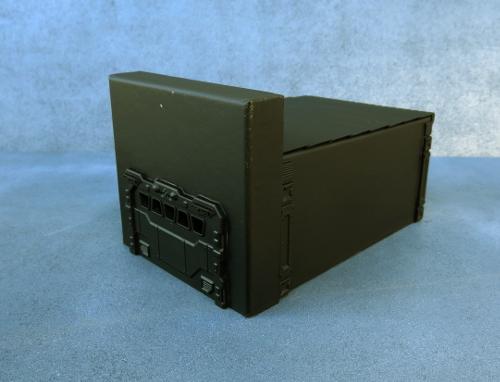
This was followed by a spray of flat grey, and while this was still wet I oversprayed this from above with a lighter grey to add a little bit of a natural highlight.

The metal parts were then picked out with Vallejo Beasty Brown.
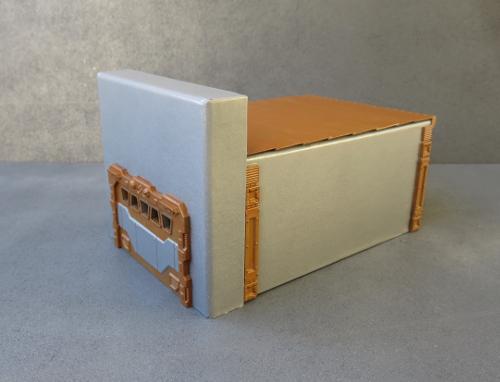
Then a drybrush of P3 Pig Iron.
Then a wash of the most useful paint on the planet: Army Painter Strong Tone.
A final drybrush of silver over the metal bits and some detail work, and the newest addition to the table is ready to go.
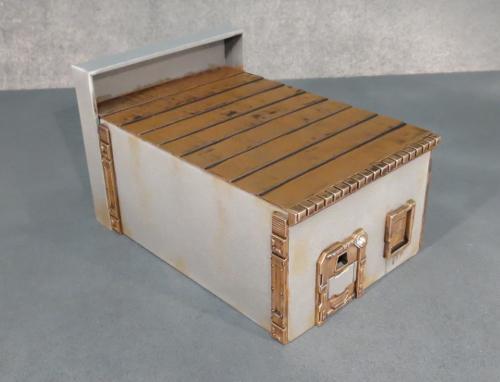
This design can be very easily tailored to different buildings through using different sized boxes and choosing different sprue components. If you would like to build your own, you can pick up the Maelstrom's Edge terrain sprue from the webstore here. As always, feel free to share your creations on the Comm Guild Facebook page!
For other Maelstrom's Edge modeling articles, including tutorials and walkthroughs of a wide range of different building and miniature projects, check out the article roundup here.
Tags: buildings conversion modeling spotlight terrain terrainsprue tutorial walkthrough
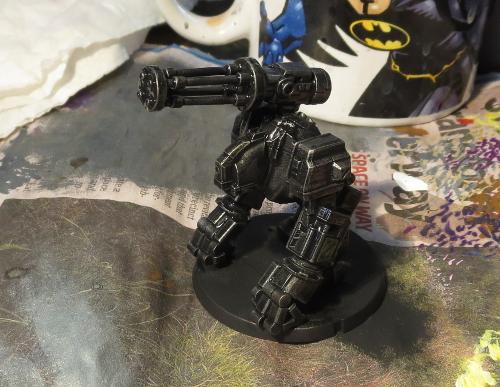
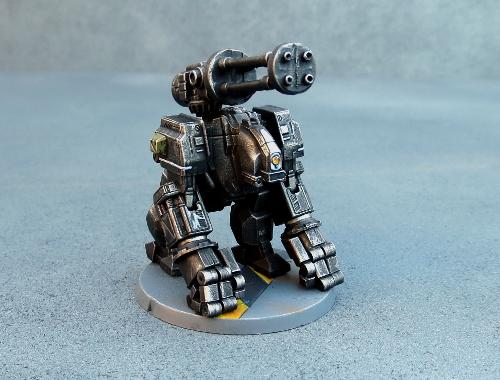
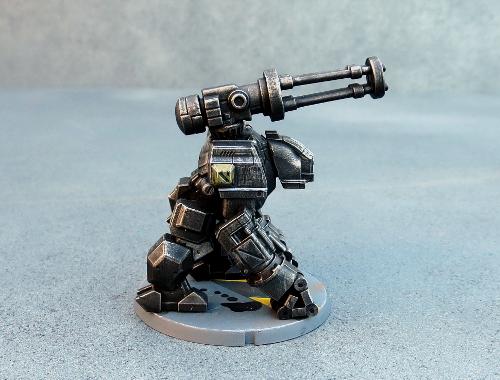
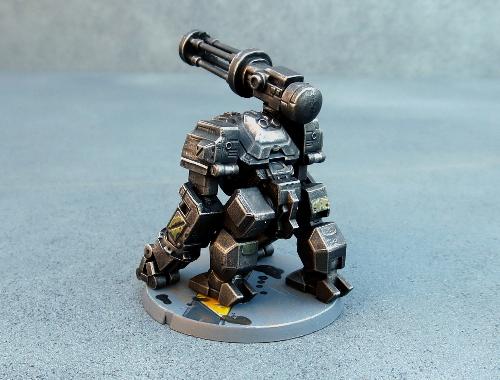
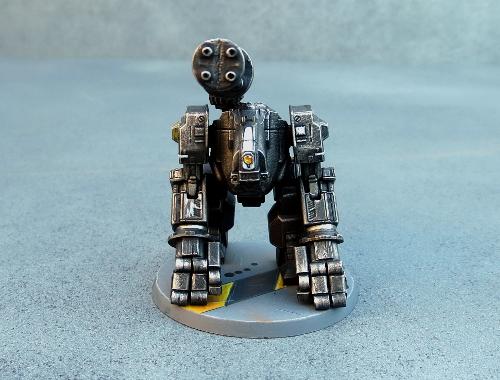
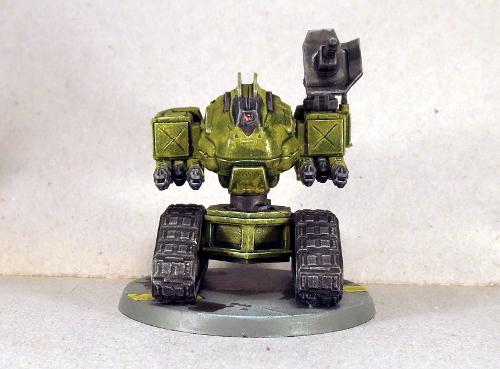
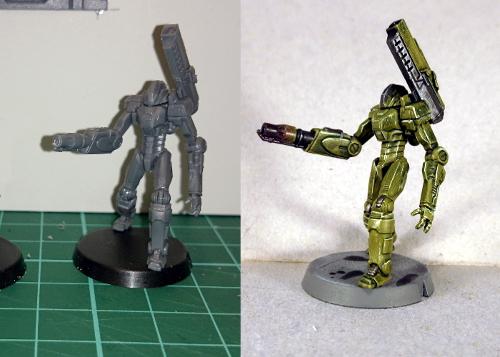
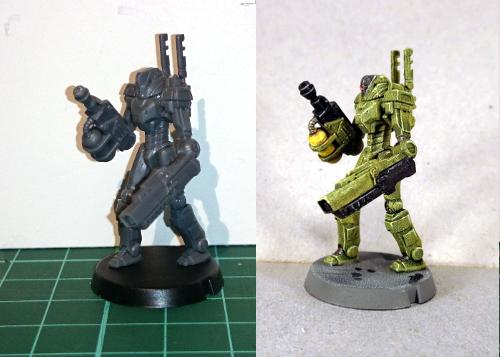
Conversion Spotlight: "Silverback" Mercenary Fire Support Mech
Posted on Monday Jun 26, 2017 at 05:00pm in Models
- by Iain Wilson
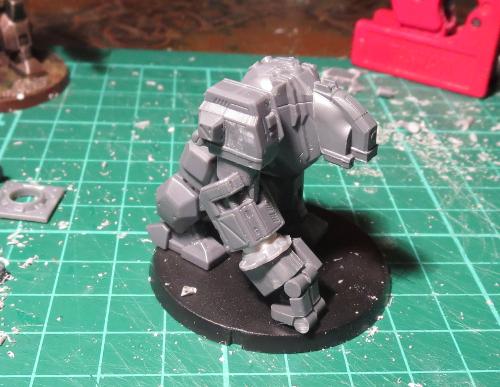
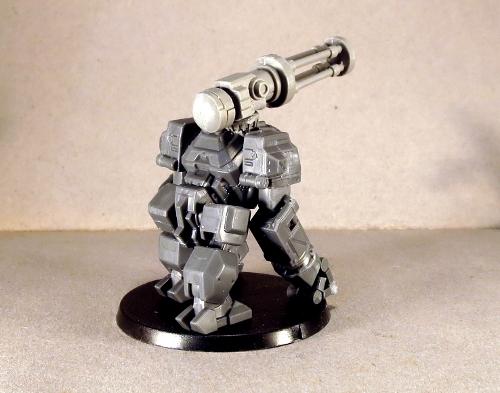
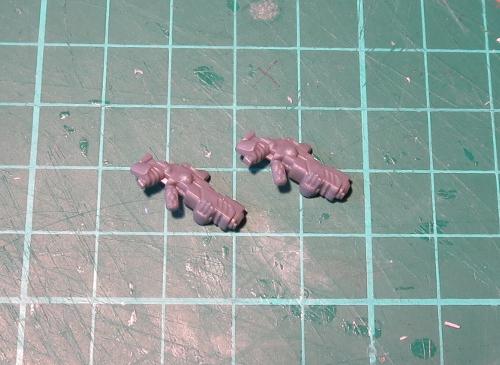
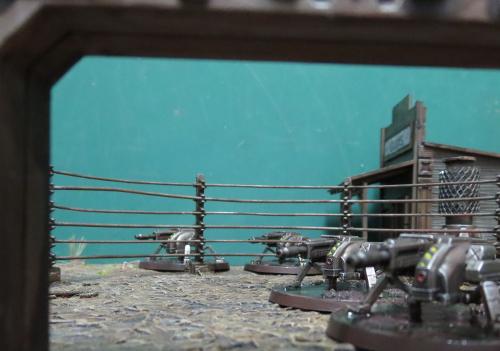
A variation on the Hunter War Mech chassis, the Silverback was an attempt by Epirian engineers to develop a mobile platform for heavy support weapons. Trading in speed for stability, initial deployments showed promising results, however over time the mech's ponderous movement began to be perceived as a liability. When this was compounded by some odd personality quirks that tended to develop in the experimental twinned bot cores used to give the Silverback increased tactical capability, the model was slowly phased out by Epirian forces. Some were sold to planetary security forces, while others found their way onto the black market, where they became a favourite of mercenaries who favoured a more blunt approach to martial engagement.
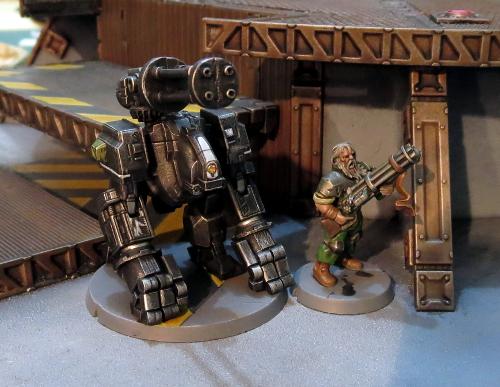
A mercenary bot handler and his Silverback charge.
The Epirian Hunter is a fantastic kit which presents some fun modeling possibilities straight out of the box. Sometimes, though, it's fun to do something a little more extreme, and it's from this that the Silverback was born. This wasn't made with any rules in mind, just something fun to build... although now of course I have some ideas percolating around for mercenary units, so this may be something I come back to in a future article.
To give the Silverback more gorilla-like proportions, I cut down the tops of the thighs level with the top of the protruding panel on the side. This also required slicing off the locating pin and reattaching it lower down. I also added a bit more of a bend to the left leg by slicing carefully through the top of the knee joint, cutting out a small wedge, and regluing the leg at the new angle.
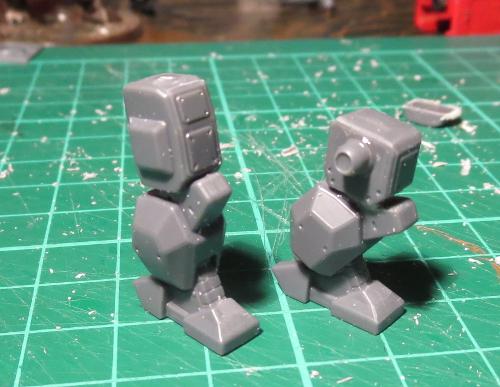
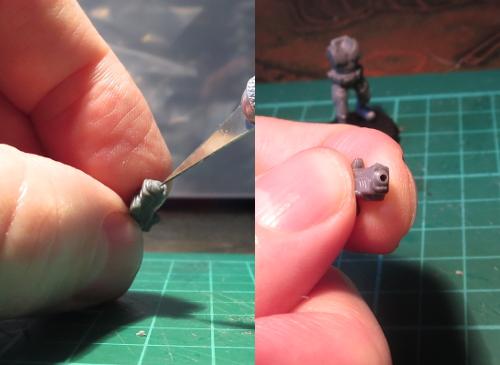
With the torso angled forwards, the top of the existing 'head' serves admirably as a neck. To add a new head, I used a razor saw to slice a drone chassis in half.
The front piece was then glued in place on the torso.

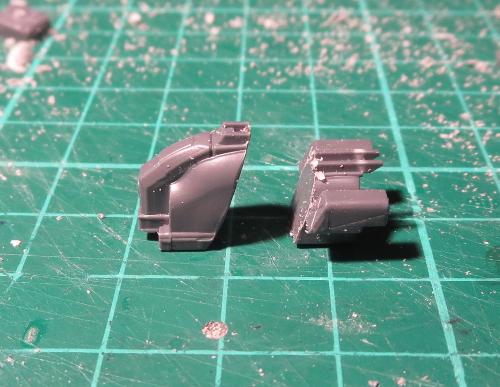
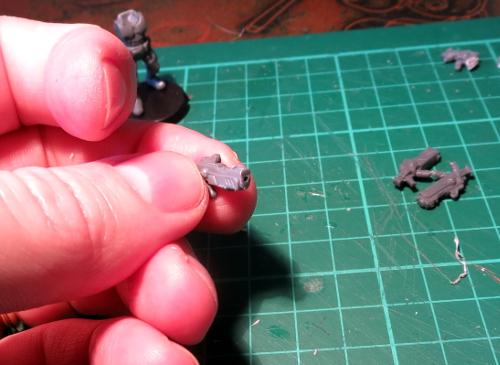
I wanted the arms a little straighter than is allowed by the hunter's elbow arrangement. So I trimmed away the back of the forearm piece, allowing more movement in the joint.
I then took some small pipe fittings from the Maelstrom's Edge terrain sprue and trimmed the square border off.
A small piece of plastic tube was then slipped into the fitting, and this glued in place against the 'hand' end of the forearm.
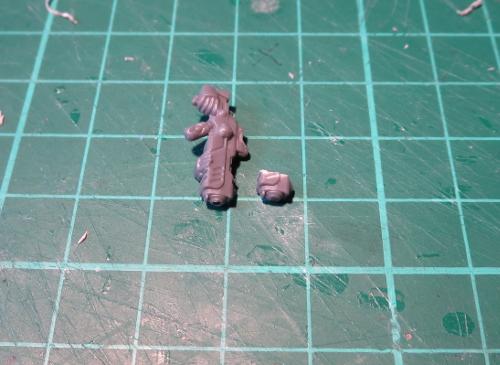
The hands were constructed from the back half of the drone chassis and small pieces cut from the drone's sprue (recycling for the win!).
With everything glued together, the arm was glued in place.
I initially only had two joints on each finger, but it just didn't look quite right, so I added an extra joint when I built the second arm, and then went back and did the same to the first one.
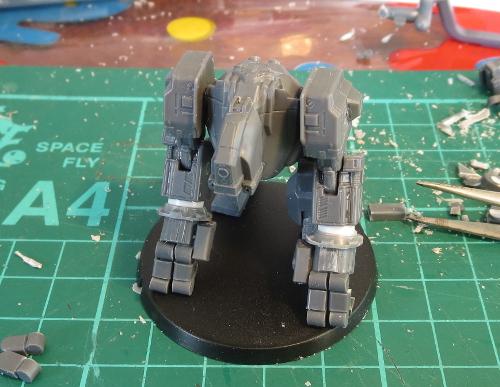
Another couple of small sprue pieces formed the ends of the thumbs, and I added a weapon purloined from a Games Workshop Tau battlesuit kit.
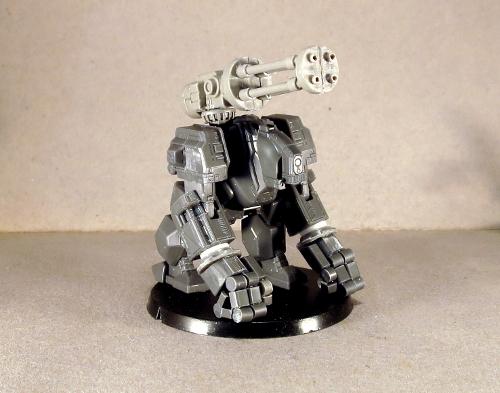
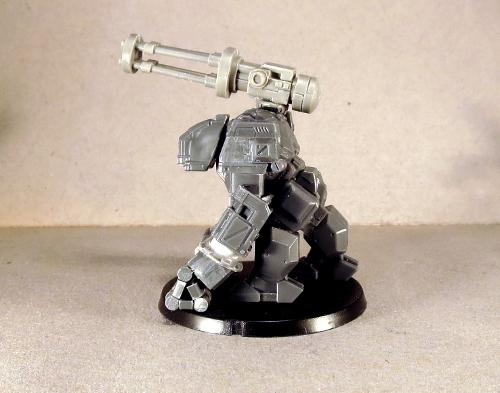
I wanted a dark, slightly sinister paintjob to emphasise the brutish nature of the mech, so started with a black undercoat.
Over this I did a heavy drybrush of P3 Pig Iron.
Then I washed the whole thing with a generous coat of Army Painter Dark Tone.
Once the wash dried, I lightly drybrushed all over with some more Pig Iron, and then did the detail work. A few panels here and there are picked out in different colours to give it a bit more of a ramshackle appearance, in keeping with its mercenary nature. It's not an award-winning paint-job, but is a nice, quick method for getting a table-ready model.

Feeling the urge to hack up a Hunter or two of your own? You can pick up the Hunter, Drone or terrain sprue from the Maelstrom's Edge webstore here. As always, feel free to share your creations on the Comm Guild Facebook page!
For other Maelstrom's Edge modeling articles, including tutorials and walkthroughs of a wide range of different building and miniature projects, check out the article roundup here.
Tags: conversion hunter modeling painting
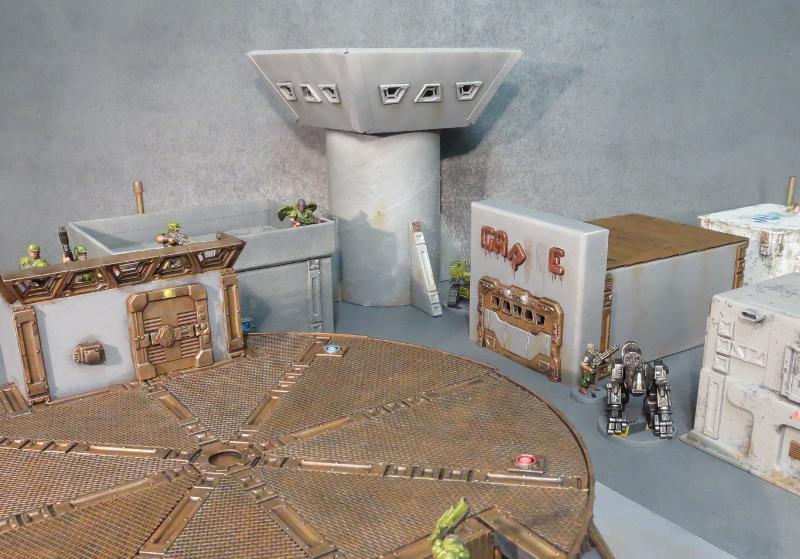
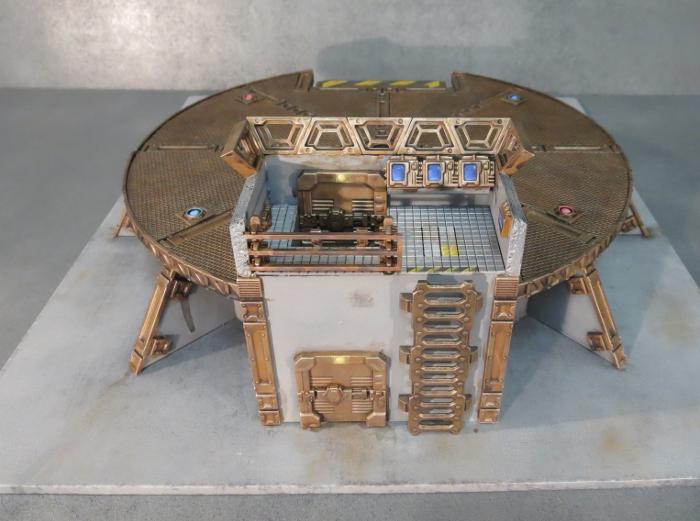
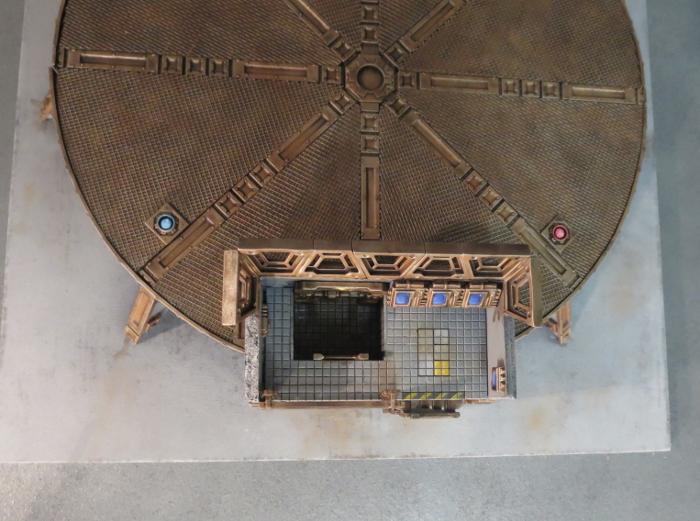
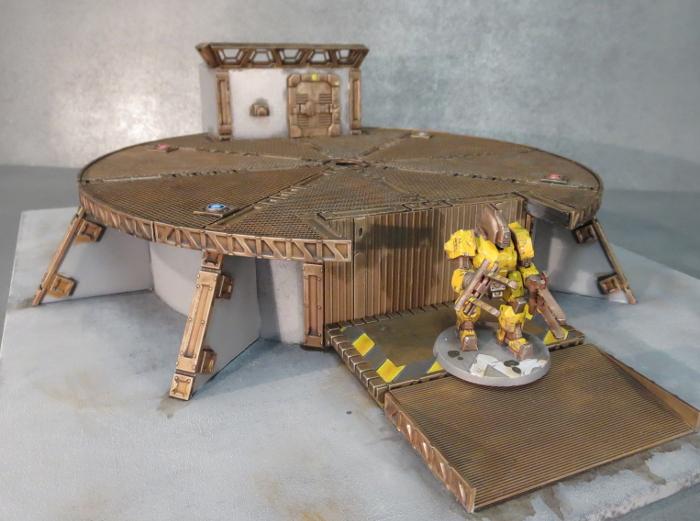
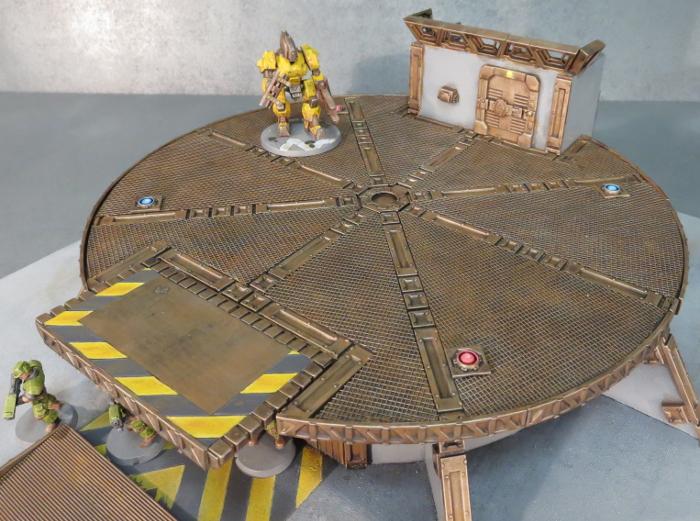
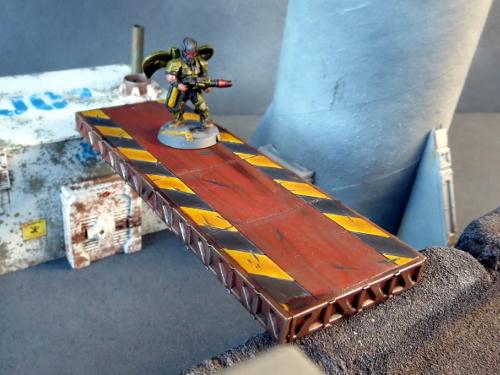
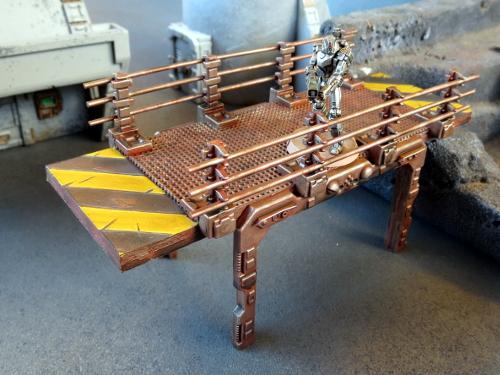
Terrain Spotlight: Landing Pad
Posted on Monday Jun 19, 2017 at 05:00pm in Models
- by Iain Wilson
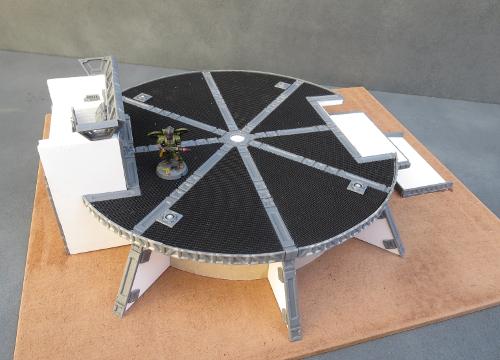
Terrain is a bit of a passion of mine. It can make such a difference to your games having a table full of nice-looking terrain pieces, and this is helped along with the addition of a shiny, impressive centre piece to dominate the battlefield.
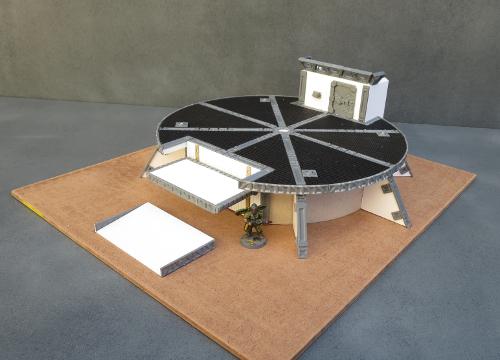
With that in mind, I set to work this week to build a landing pad for my table. Landing pads look great visually, can be easily tailored from game to game with the addition of some crates, landing craft or other small terrain features on top and make for nice line of sight blockers in the middle of the table.
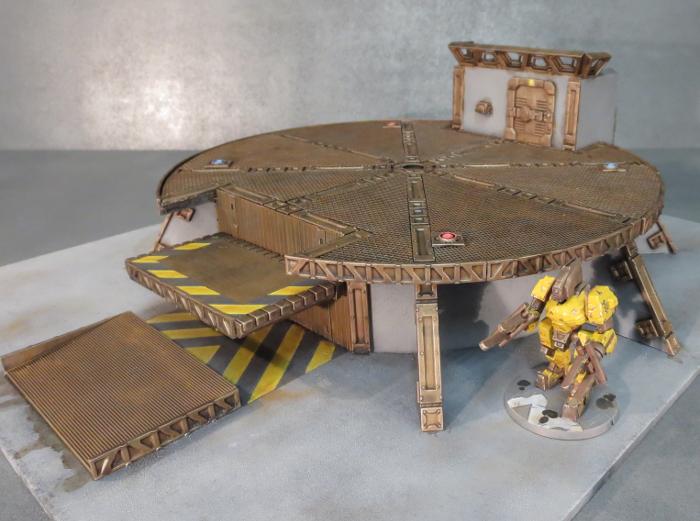
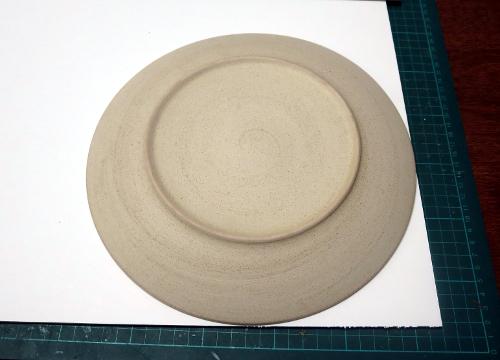
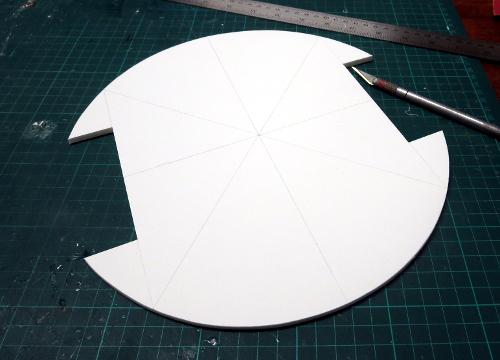
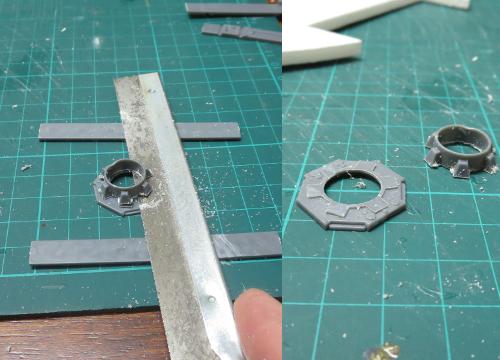
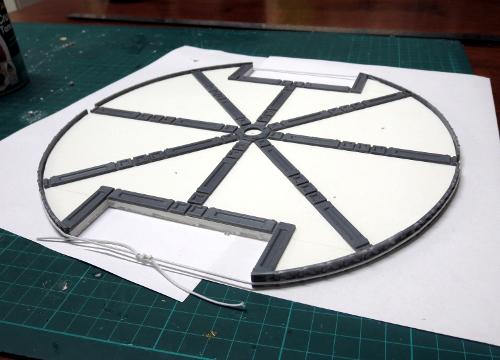
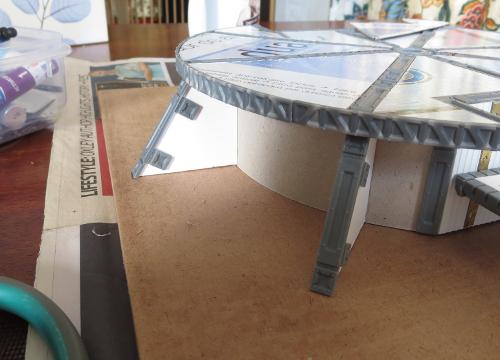
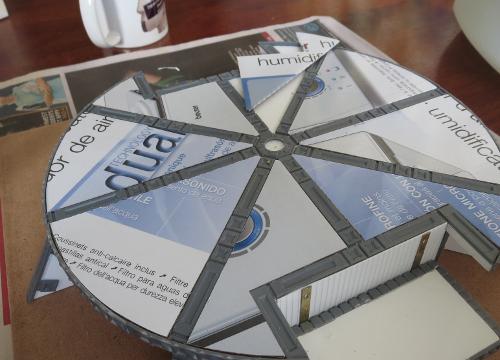
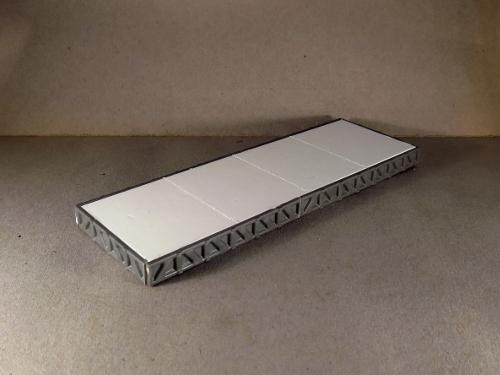
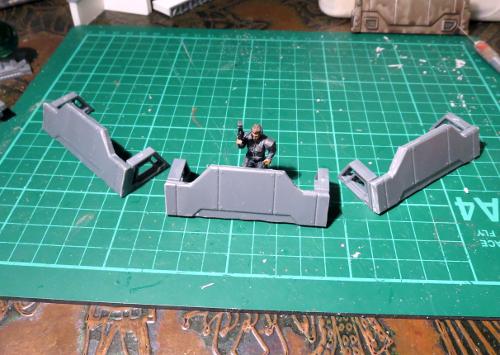
I started out, as so many of my projects do, with a few Maelstrom's Edge terrain sprues and a sheet of 5mm foamcore. A dinner plate served as a handy template for the pad itself.
After tracing around the plate, I drew in an inset rectangle on opposing sides, to break up the circular shape a little in order to make the pad a little more visually interesting. The the shape was cut out with a hobby knife, and some guide lines drawn on for some detailing.
A round detail in the centre of the pad was created from the large pipe fitting, cut down to match the thickness of the support struts. I used a couple of spare struts as height gauges for a razor saw to cut through the pipe fitting sideways.
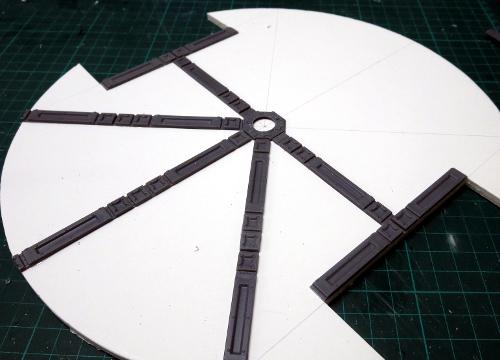
I then laid support struts out along the guide lines, cutting them to length so that they extended to the edges of the pad.
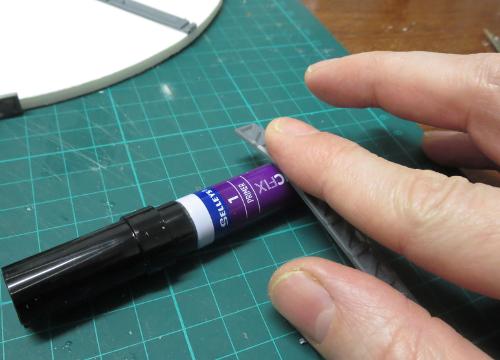
For some detail around the edge of the pad, I took some more support struts and rolled them carefully over a glue primer tube to give them a curve.
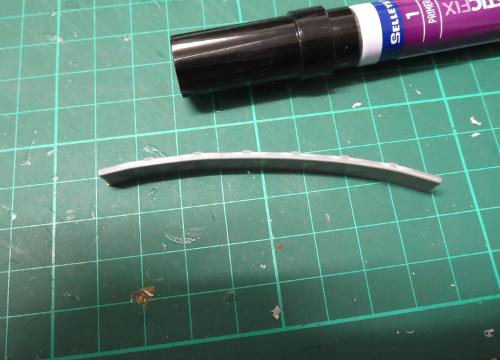
These were then glued around the edges of the pad, and held in place with some hat elastic until the glue set.
A landing pad on the ground is functional enough, but not much good for blocking line of sight, and certainly won't impress the neighbours. So I made a formwork from some more foamcore to go under the pad. In between each of the formwork supports, I spaced some off-cuts of foamcore to serve as guides for the outer wall.

The outer wall was made from thick card, which was bent around the outside of a coffee mug.
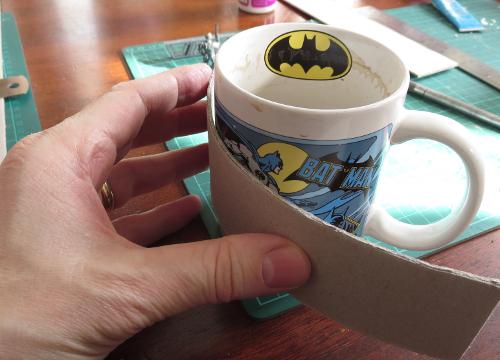
This was then glued in place around the outside of the support formwork, with the help of a few cardboard tabs to reinforce the joints.

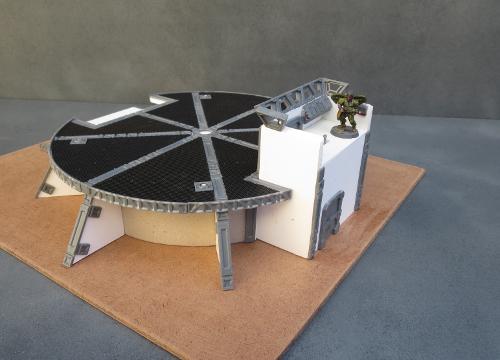
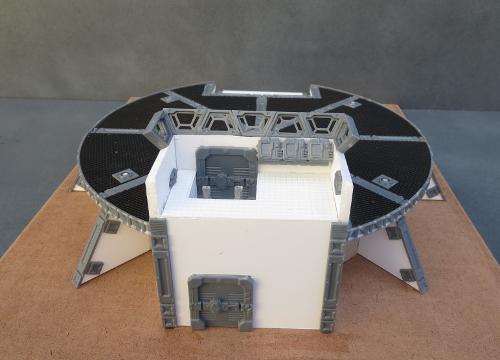
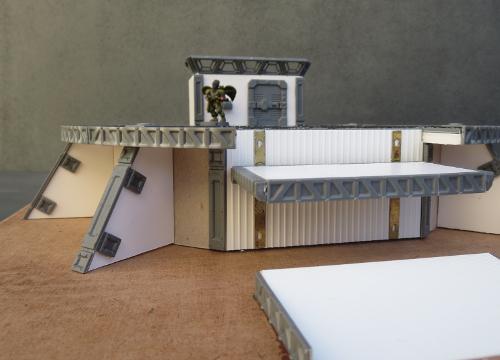
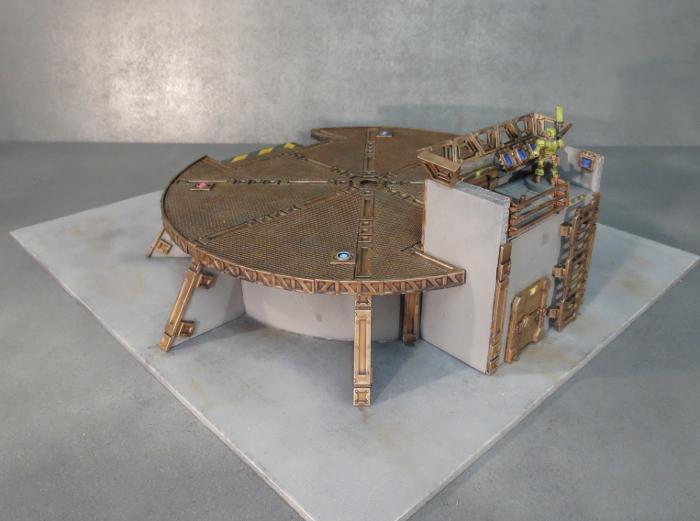
A little more foamcore and some doors from the terrain sprue created the bare bones of a control tower.
This will have multiple access points, through the lower door, a second door off the pad surface, and a ladder from the ground to the control platform. The ladder can be just glued directly to the wall, but this never looks quite right to me, as it would make climbing it a little problematic unless you cut recesses in behind it. In this case, I decided to space it out from the wall instead, using some off-cuts from the terrain sprue lintel piece.
Because the inside of the upper door can be seen from the control platform, I used a second door on the inside wall. Two doors back to back are a little thick for 5mm foamcore walls, so I trimmed the inner door's back down flush so it would fit in neatly.
The floor of the platform was made from some tile-pattern plasticard, with a recess created for the inner door - this would have a short ladder up to the main platform.
I also made some computer terminals using some computer panels and lintels.
Opposite the control tower will be a lift. I wanted this to be functional, just for a little fun. So I made a wall section from some textured plasticard and glued on a couple of picture hooks that I had flattened out with some pliers and a hammer.
The lift platform was made from a rectangle of foamcore with detailing around the edges provided by some lintels and a support strut. On the bottom of one of the long sides I affixed some nice, strong, rare earth magnets. These allow the lift platform to be attached anywhere along the flattened picture hooks, and are strong enough to hold it up even with models standing on it.
The base of the platform still needed some more detail, so I made some buttresses to going around the perimeter. These are just a wedge of foamcore and some pieces cut from support struts. Normally I layer a piece of 5mm and a piece of 3mm foamcore to match the width of the support strut, but this time I decided to go for something a little more visually striking and just used a piece of 5mm foamcore with extra reinforcing pieces added on either side.

These buttresses were then glued around the base of the platform, lining up with the support struts on the platform top.
The top of the platform needed some more detail, and so I cut some wedges of card to slot in between the support struts.
These were sprayed black, and then painted with a coat of PVA glue and pressed onto some plastic flyscreen. I used a sharp hobby knife to cut around the edges.
(Spraying them black before gluing the flyscreen on makes painting a little easier, as it can be tricky to cover all of the tiny little nooks and crannies in the flyscreen)
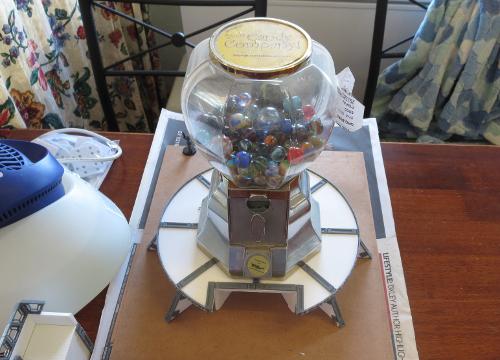
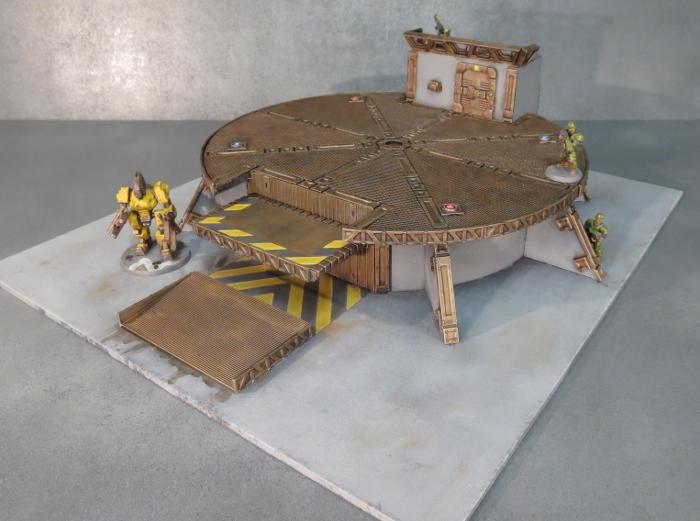
While the glue was setting on the flyscreen, I took the time to glue the landing pad down onto a base board of masonite. A handy, nearby gumball dispenser filled with marbles served as a weight to help the glue bond everything nice and tight.
When everything was set, I glued the flyscreened wedges into place on the platform, and added some landing lights made from small pipe fittings and offcuts of sprue.

With the control tower then glued in place and a row of trapezoid windows added for controller protection, a ramp up to the lift built on the other side of the pad, and a few other little details here and there, construction was complete.
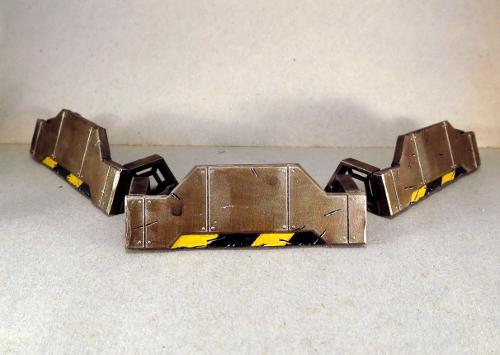
Painting was kept fairly simple: I basecoated with black spray, and then added a coat of grey for the base and walls. The metal parts were then painted using my weathered metal method shown here. Add in the details (including the obligatory hazard striping) and the job's done!
For other Maelstrom's Edge modeling articles, including tutorials and walkthroughs of a wide range of different building and miniature projects, check out the article roundup here.
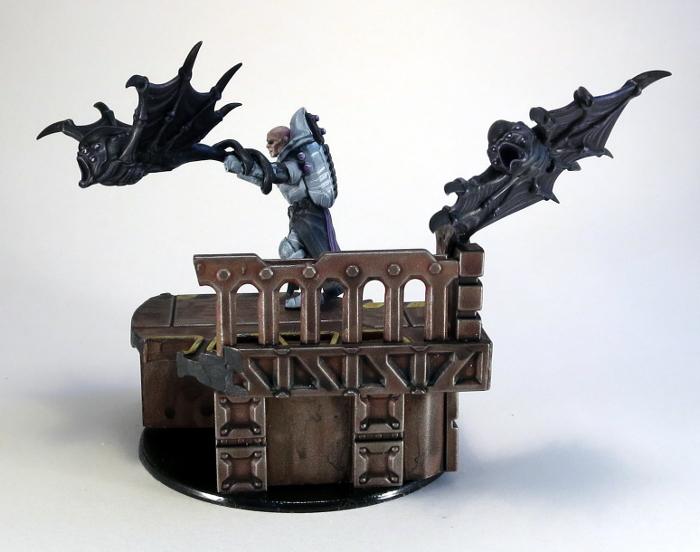
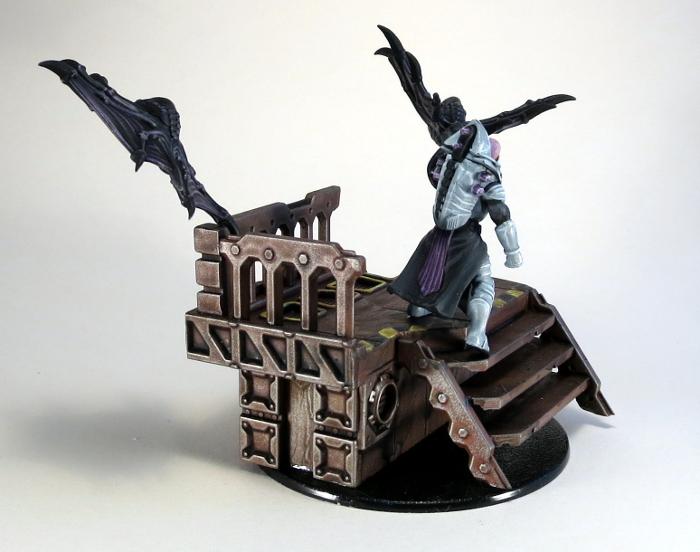
Conversion Spotlight - Kaddar Nova Mini-Diorama
Posted on Monday Jun 12, 2017 at 05:00pm in Models
- by Iain Wilson
Sometimes it's nice to take a break from putting together armies and just paint something for fun. There's nothing better than taking some plastic and doing something new and shiny with it for getting some creative juices going, and it's a great way to explore the rich background of the game.
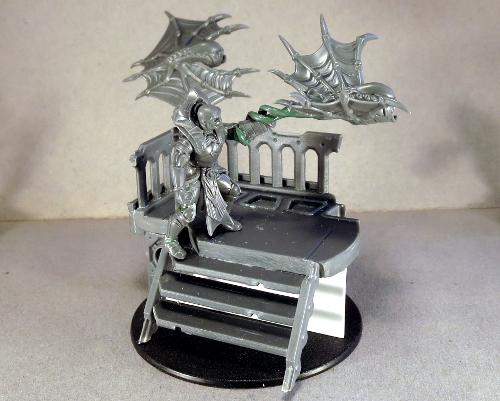
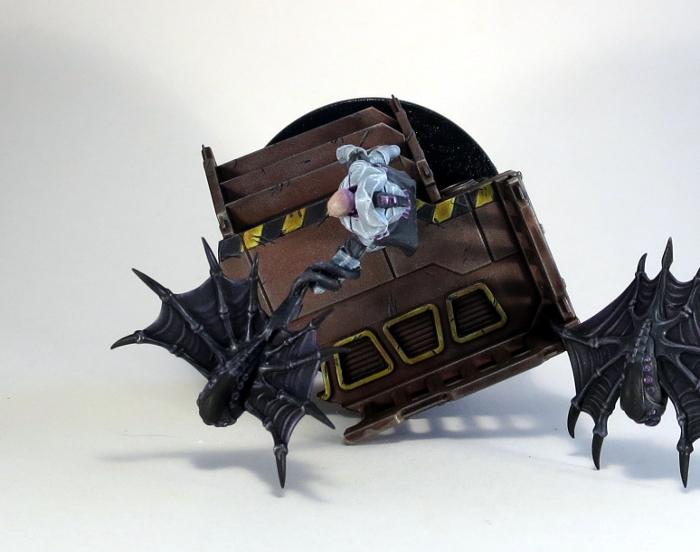
When I first got my hands on the plastic Kaddar Nova kit, I had an image of him standing in some imposing fashion unleashing a minnow like a trained hunting bird. I built the bare bones of this little diorama some time ago, but only just found the time to get it finished off and painted.
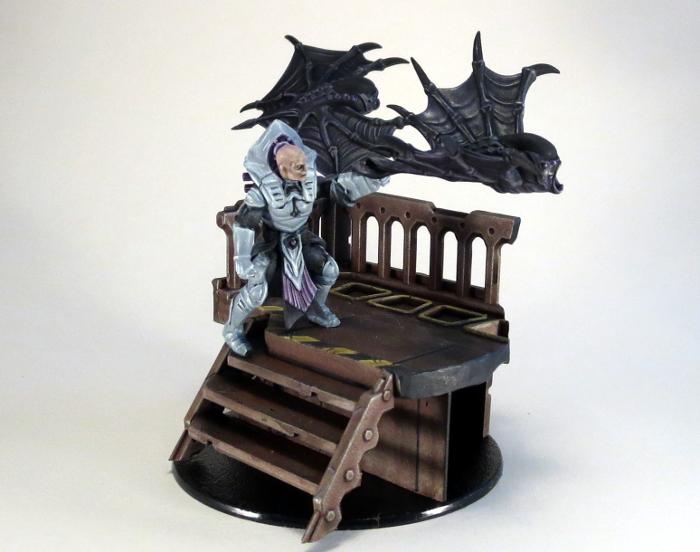
This piece was assembled from 3 different kits. The balcony was assembled almost entirely from components from the Maelstrom's Edge terrain sprue, with a little plasticard to fill in around the sides. The balcony floor is cut from a garage door, with the windows filled in with the gratings from the support struts cut into a trapezoid shape. The railing is made from a ladder, with one side trimmed off. The trimmed off side served for the sides of the staircase, with the stairs themselves made from lengths of support strut glued in detail-side down.
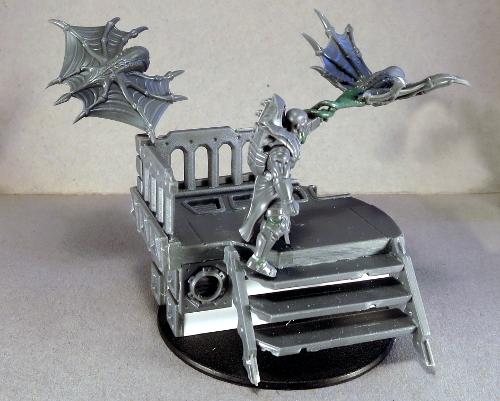
The Kaddar Nova is largely stock, although there was some small alteration of the legs (narrowing the groin area to bring his legs closer together and bending out the right foot so that his toe-tip would touch the lower stair).
Likewise, the Minnows are assembled as normal, with the one launching off the Nova's hand losing his original tail and a new one made with a length of wire and some green stuff. The wire is glued into a small hole drilled in the Nova's forearm, which is covered up by the putty.
When painting something unusual, I like to try pushing my boundaries a little as a change from the repetitiveness of painting gaming forces. For this piece, I decided to go for a nice, bright, white armour, as I generally tend towards darker colour schemes. The trick with white, oddly enough, is to not make it white. Most white things aren't actually white to look at. Shadows add layers of grey, and reflections add other shades to the mix. (This goes for black, as well!) I wasn't about to try painting reflective armour this time around, but I did use Vallejo Light Grey blended into the white to shade the armour. The end result is possibly a little more grey than white, but I'm still pretty happy with how it turned out.
The Minnows were painted using a slight variation of the scheme I used for my winged Mature Angel a couple of weeks back. They were undercoated black, and then drybrushed with dark grey (Vallejo Heavy Charcoal, in this case) and then with purple (some old Citadel Warlock Purple and Tentacle Pink mixed together). This was then washed with some Army Painter Dark Tone to smooth out the drybrushing.
The balcony was painted using the weathered metal recipe shown in the article here, with the addition of some scratches, hazard stripes and yellow detail around the window/vents to break up the expanse of rusty metal a little.
The end result is a simple little scene that I think is nicely evocative of the Maelstrom's Edge setting. If you want to try something similar, you can pick up the components used here from the Maelstrom's Edge webstore. As always, feel free to share your creations on the Comm Guild Facebook page!
For other Maelstrom's Edge modeling articles, including tutorials and walkthroughs of a wide range of different building and miniature projects, check out the article roundup here.
Tags: conversion diorama kaddar karist modeling nova painting
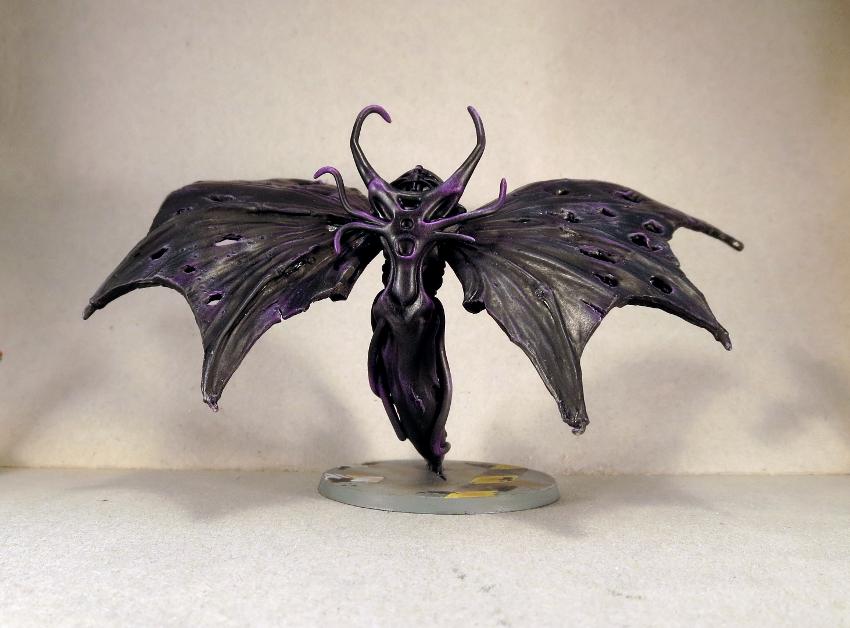
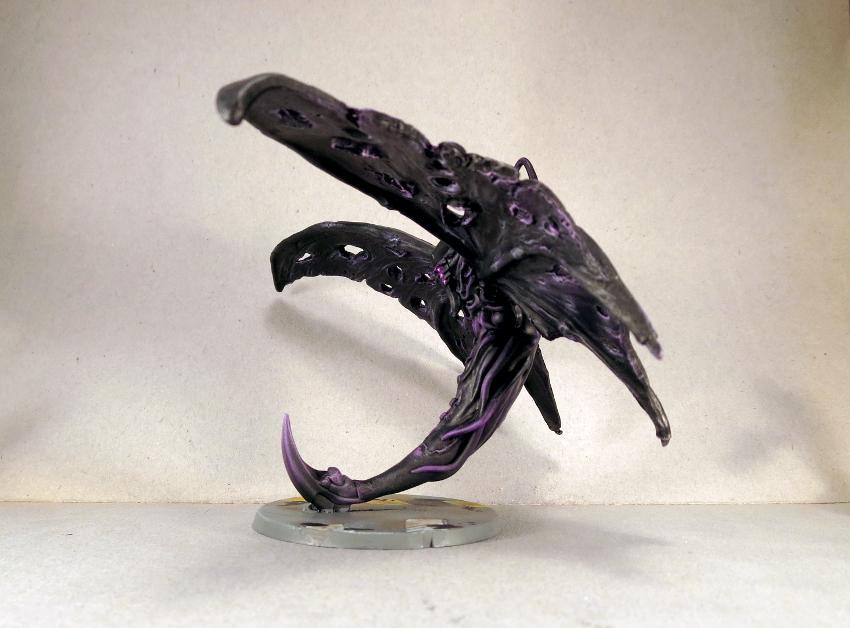
Modeling Spotlight: Winged Angel
Posted on Monday May 29, 2017 at 05:00pm in Models
 - by Iain Wilson
‘Nobody knows what the hell they’re even made of, never mind what they’re thinking.’
- - Gladius Belaru, survivor of the Angel attack on Morningstar Station, Thusia system
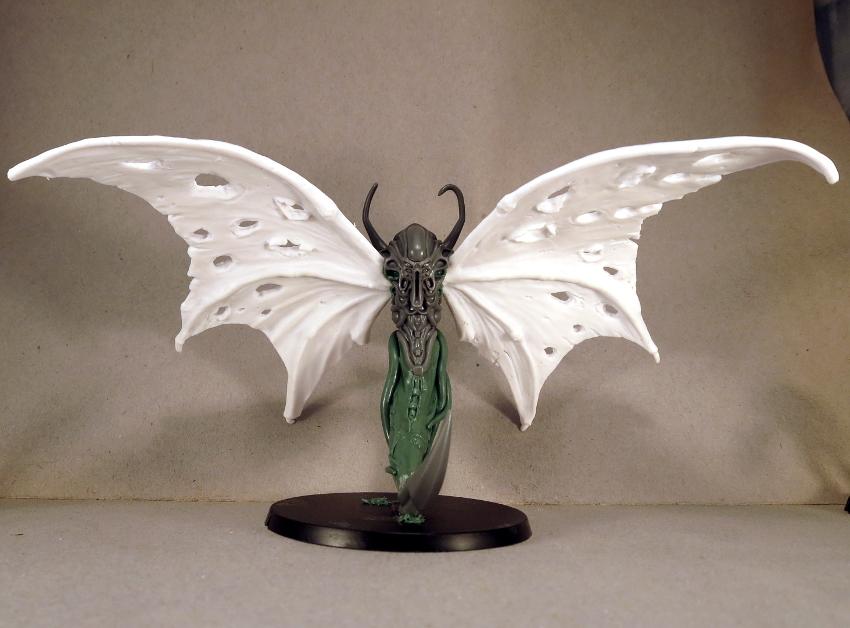
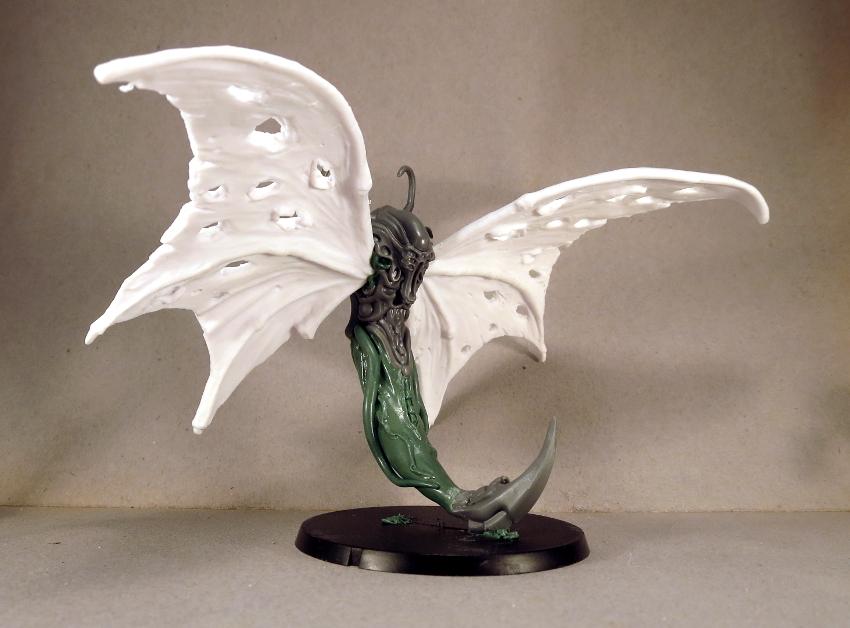
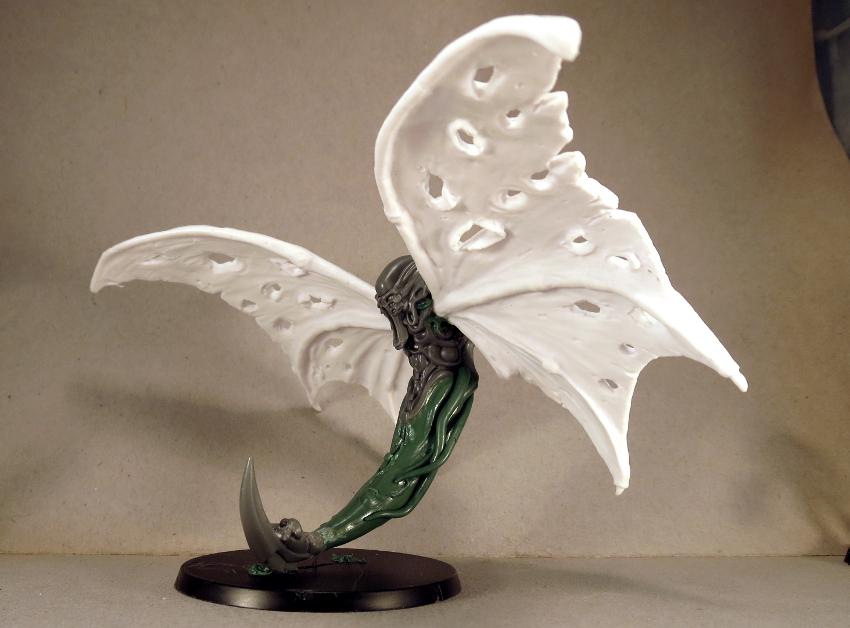
The fully mature Angel is a truly terrifying creature to encounter in the flesh, and their otherworldly scream is a harbinger of nightmares across the Spiral Arm. Dwarfing even the tallest of humans, the Angel is a tapering mass of writhing tentacles, gelatinous membranes, and bristled claws, smelling of sulphur and ozone.
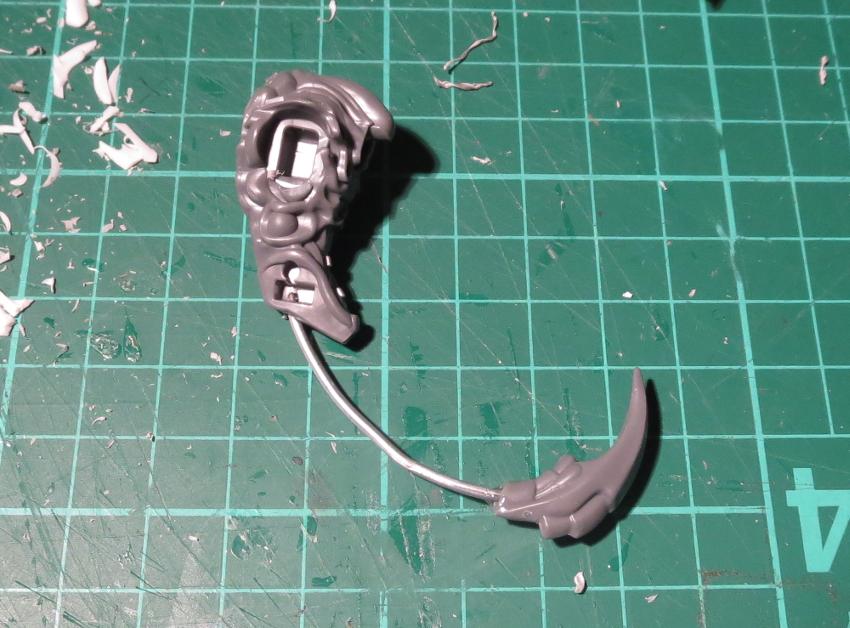
The plastic Mature Angel kit allows players to build angels in their combat form, which is one of the three common forms favoured by these bizarre creatures. While there is no particular need to model the angel's other forms, where would we be if we just went around assembling kits to spec? So this week, I'm building a Mature Angel in its flying form.
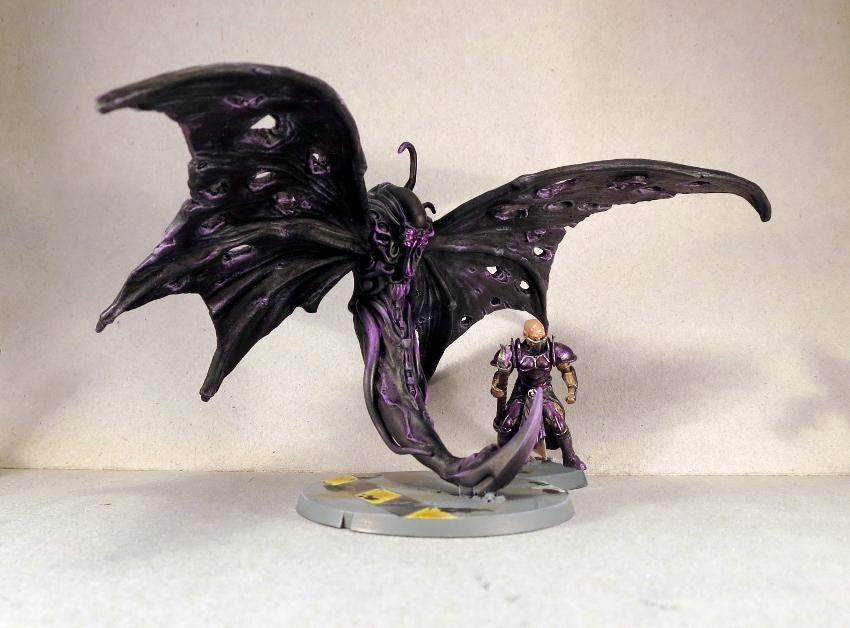
I started out with a length of wire glued into a hole drilled up into the bottom of the angel's torso. This was curved around to the front, with a spike cut from one of the angel's claws glued onto the other end.
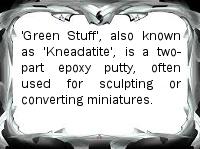 Over the wire, I sculpted a tail from 'green stuff' putty, and added some tentacles down the side to make it a little more visually striking and to help represent the angel's fluid nature.
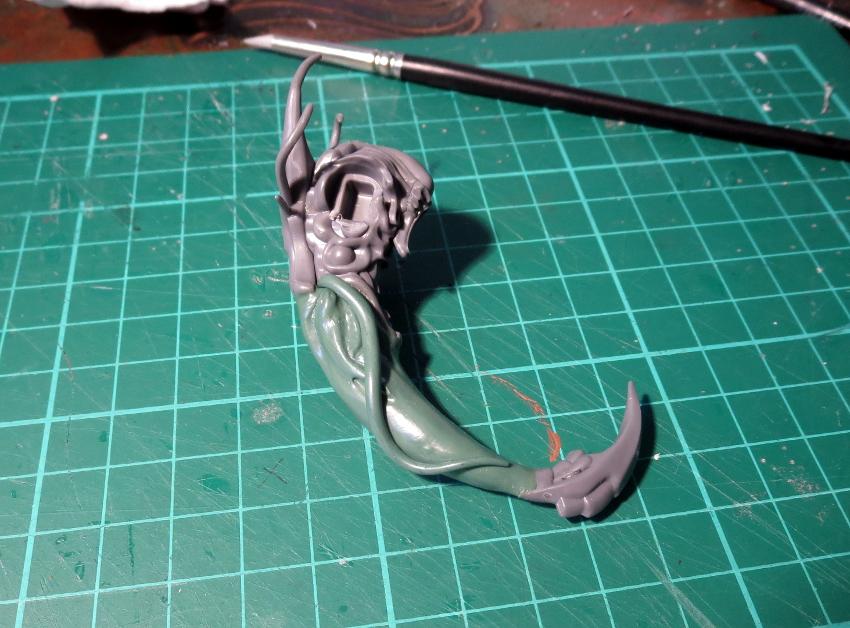
Wings can be sculpted over a similar wire armature, but to save a little time and effort here, I decided to purloin some from another model instead. The donor was a fire demon from Reaper's Bones range.
I cut the wings at the elbows, trimmed off the 'fingers' and glued the wings in place in the angel's arm sockets. A little more green stuff filled in the gaps.

Painting - I kept the colour-scheme fairly simple, as angels are basically just black. Visually, just going with plain black isn't very interesting, though, so I tried to represent the angel's internal cybel energy by adding some purple highlights wherever seemed appropriate. The eyes and mouth were similarly painted purple, but highlighted up closer to white, to help them to stand out.
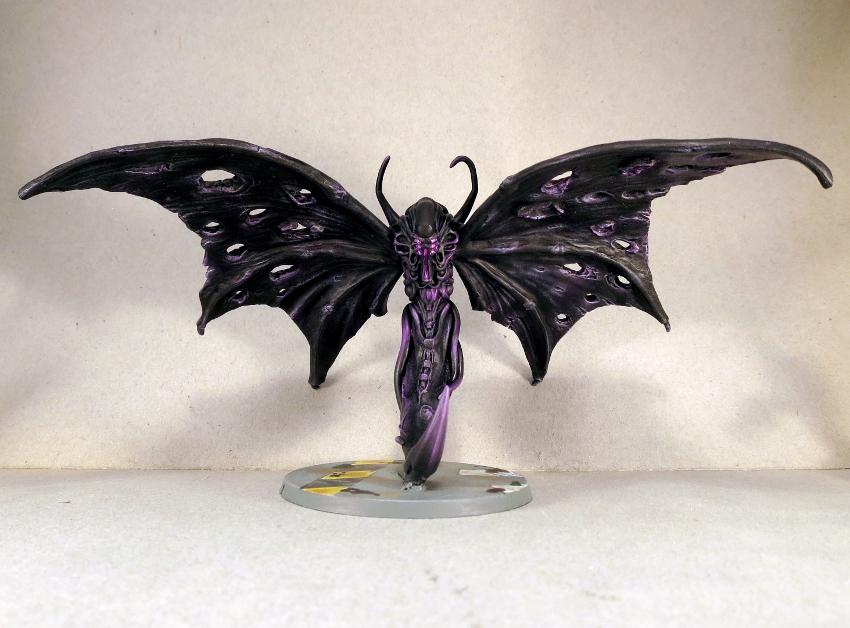

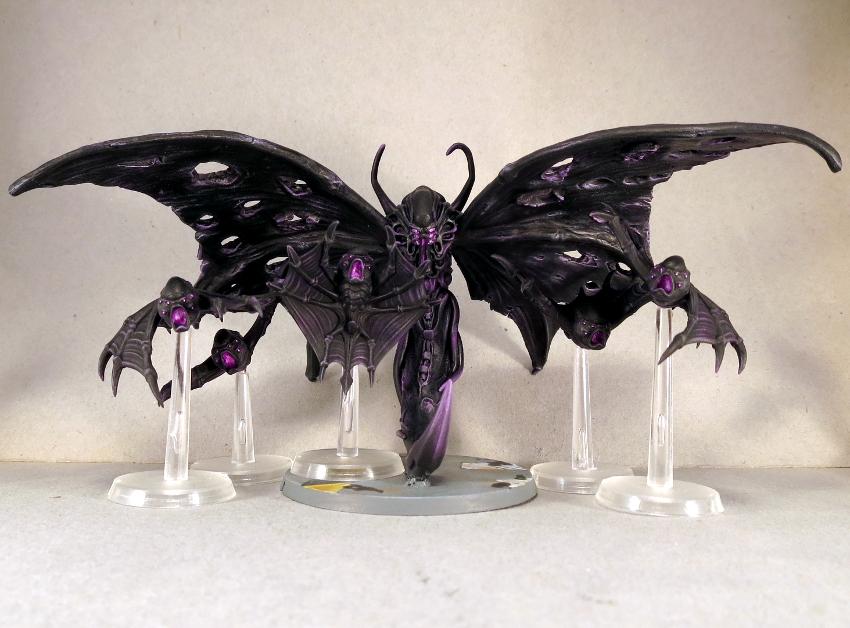
'Family' shot, with some minnows for company:
If you would like to build your own hideous flying spectre of doom, you can pick up the Mature Angel kit from the Maelstrom's Edge webstore here. As always, feel free to share your creations on the Comm Guild Facebook page!
For other Maelstrom's Edge modeling articles, including tutorials and walkthroughs of a wide range of different building and miniature projects, check out the article roundup here.
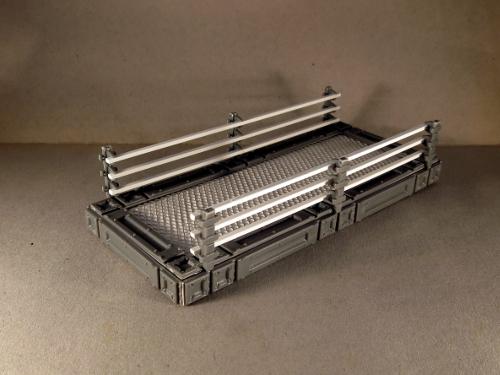
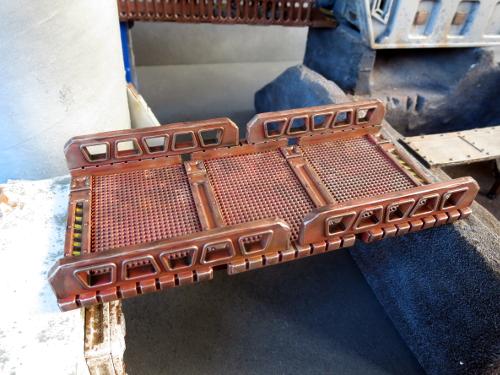
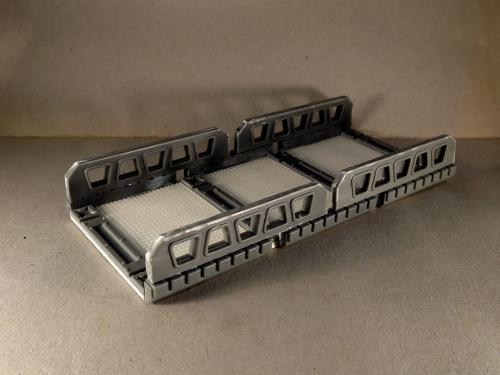
Terrain Spotlight: Catwalks
Posted on Monday May 22, 2017 at 05:00pm in Models
- by Iain Wilson
As the Maelstrom creeps inexorably across the galaxy bringing Armageddon to world after world, many wars are fought in the shadow of once great cities. Where once were towering beacons of hope, the shining pinnacle of human endeavour, now lies ruin - seething hives of scum and villainy where only the strong survive.
For those inclined to less flowery prose: I thought it might be fun to explore what could be done to create multi-level terrain using the Maelstrom's Edge terrain sprue, for games set within the gloomy nether regions of gigantic cities on those worlds where everything has just gone a little bit wrong. Within these cities would be various tall structures linked by ladders and catwalks - essential if you want to get around without having to leap onto the roof of a passing taxi!
So this week, I'll be presenting a few ideas for different ways to construct catwalks to link your buildings together. Starting with the bare bones, Evil-Overlord-thinks-minions-don't-deserve-handrails version:
This is simply a strip of 5mm foamcore cut to an appropriate length, with some panel lines scored across at intervals with a razor saw (you could do the same with a hobby knife, but the saw helps to keep a consistent width and depth). The edges are covered up with reinforcing struts from the Maelstrom's Edge terrain sprue.
For the slightly more OH&S-conscious city builder, here's example 2:
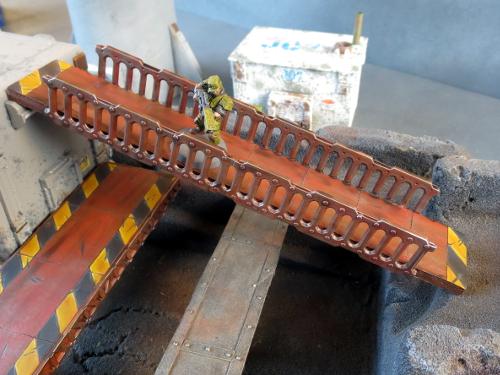
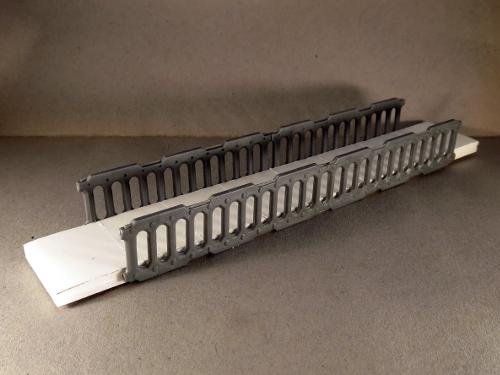
This is another strip of 5mm foamcore, but this time I've used ladders from the terrain sprue glued sideways along the edges to create handrails.
This catwalk is also a little narrower than the first. Varying the width of your catwalks allows for some visual variety, and also mixes up how the catwalk will function in-game, by changing what can fit on it, and whether or not troops will be able to easily block off enemy advances along it.
For something with a little more texture, example 3:
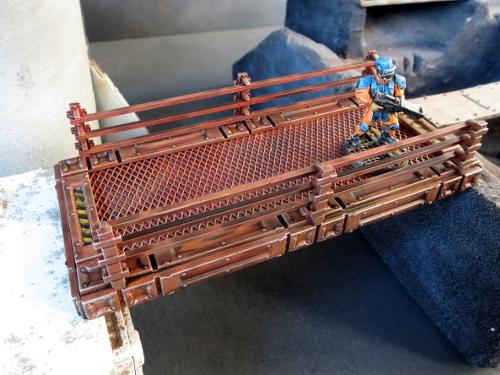
This one starts with another strip of foamcore, but this time I have glued a sheet of aluminium mesh to the top. Support struts from the terrain sprue are cut to size and glued around the perimeter of the top to hold the mesh down and cover the cut edges, and more support struts run around the outside edge of the foamcore to pretty things up.
The handrails are made using the top halves of half a dozen energy fence poles, with the railings cut from lengths of 1.5mm x 2mm plastic rod.
For a break from foamcore, the base of the catwalk can be made from plasticard or sturdy cardboard:
This catwalk uses 1.2mm plasticard, with some embroidery mesh cut to size and glued on top to add some texture, interspersed with support struts from the terrain sprue. The handrails are made from lintel pieces from the terrain sprue topped with leftover window strips cut from doors I used a few weeks back for barriers in my scatter terrain article.
And finally, the freestanding version:
Back to the foamcore for this one, with the embroidery mesh once again providing some detail on the top. The handrails use the bottom halves of the fence posts used for the 3rd catwalk, with railings made from 1.6mm round plastic rod. The legs are door frames that were also left over from the scatter terrain article.
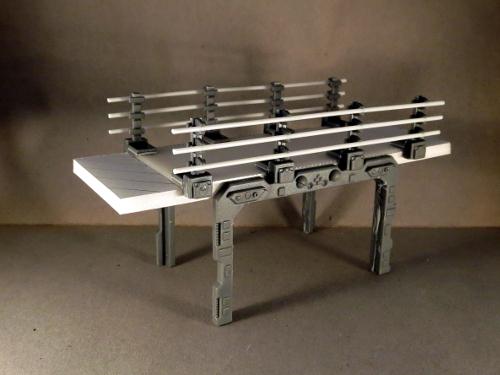
These are obviously just scratching the surface. You can easily mix up these designs by changing the dimensions or detailing. Replacing the foamcore with sturdy mesh gives you a more open, industrial style. You could even build some junction pieces and lay out catwalks on the table for a space corridor bug-fight!
Where to from here? One of my next projects will be to create some matching buildings to hang these off, based around modular bulkheads like this:
If you're feeling inspired and need more catwalks in your life, you can pick up the Maelstrom's Edge terrain sprue from the webstore here. As always, feel free to share your creations on the Comm Guild Facebook page!
For other Maelstrom's Edge modeling articles, including tutorials and walkthroughs of a wide range of different building and miniature projects, check out the article roundup here.
Tags: buildings conversion modeling spotlight terrain terrainsprue walkthrough
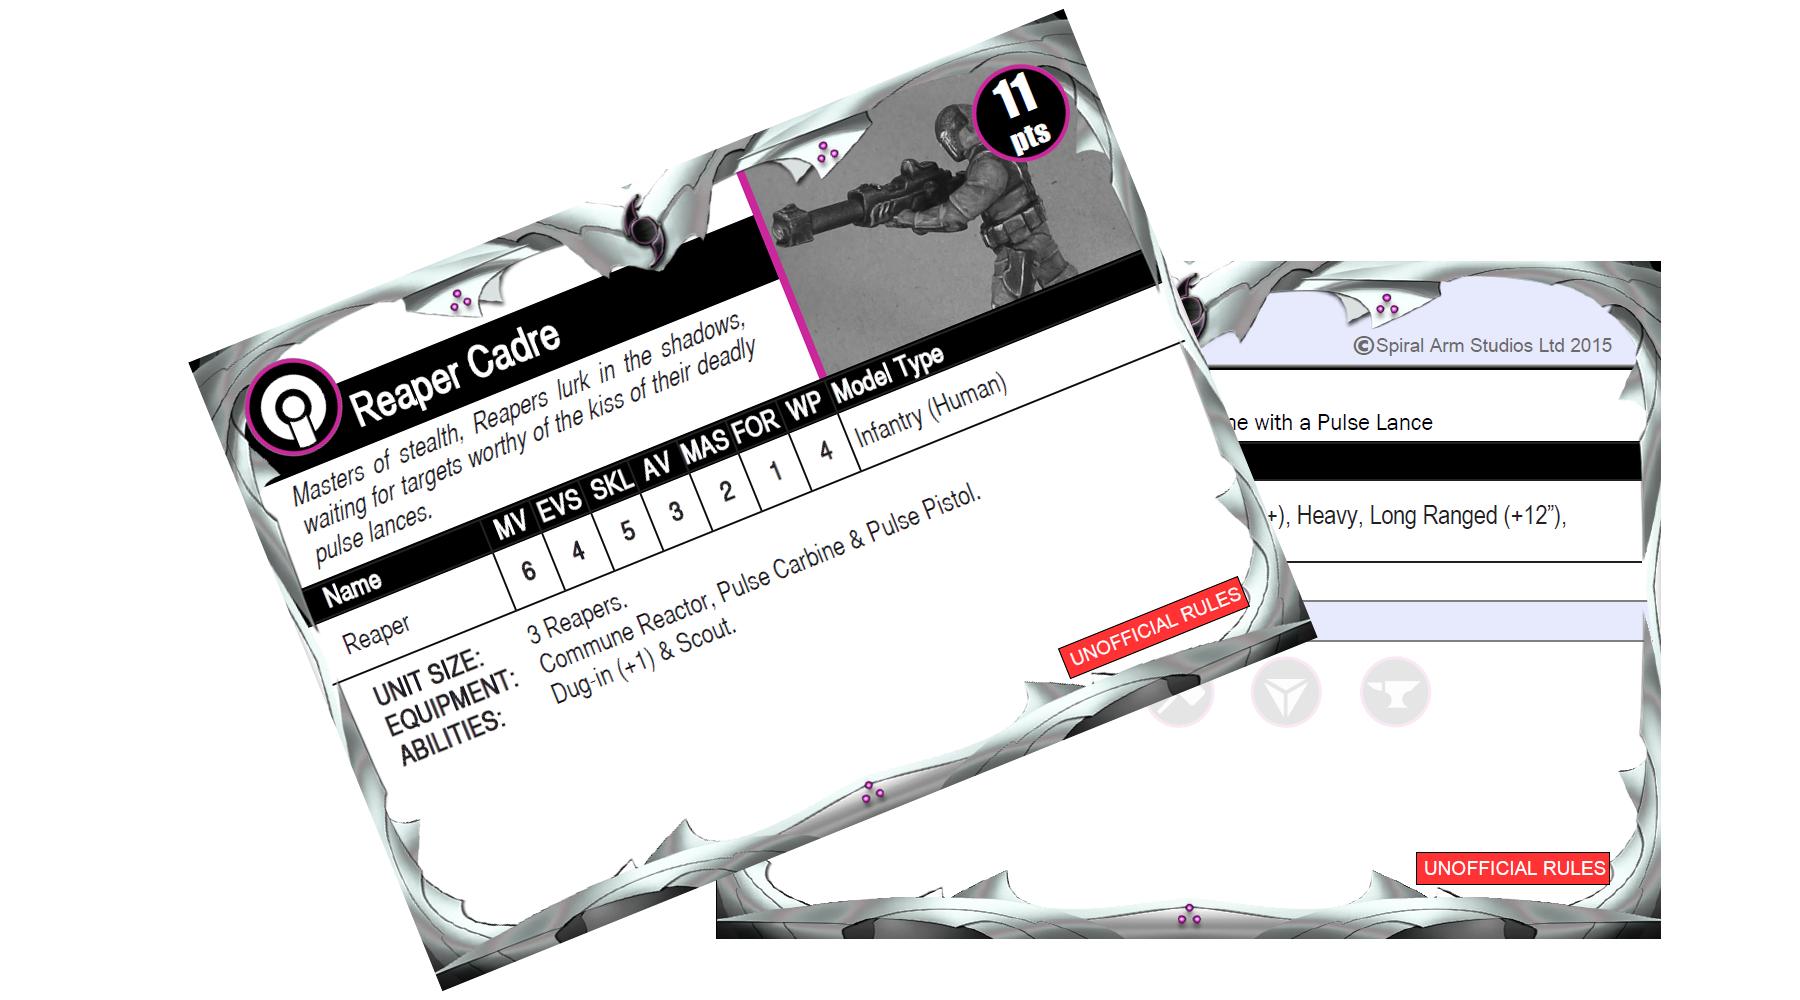
Karist Reaper Cadre Conversion Tutorial & Unit Card
Posted on Monday May 15, 2017 at 05:00pm in Tutorials
- by Iain Wilson
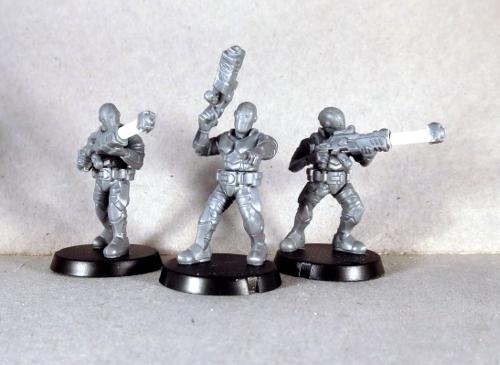
Following on from the conversion article and rules card for the Epirian Scorpion Drone a little while ago, it seemed fitting to show the Karists a little love as well. Sneaky, sneaky love, in the form of the Karist Reaper Cadre. Armed with a sniper variant of the Karist Pulse Carbine, Reapers arrive in advance of the main force and are tasked with removing problematic opponents before the regular troopers have to deal with them.
Here, you'll find instructions for building the Reapers' fearsome Pulse Lance, and unofficial rules for running this unit in your games.

I've based the Reapers on the Karist Trooper, with the shoulder pads left off and the collar trimmed down to represent their lighter armour.
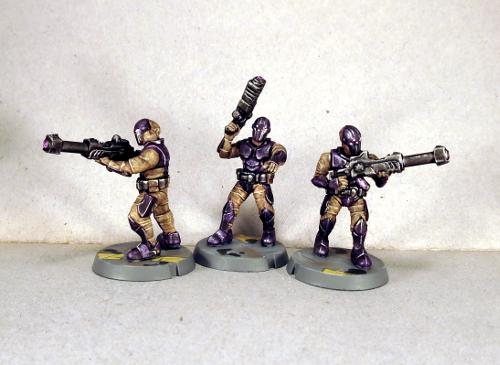
The unit comes with Pulse Carbines by default, but up to two models can be upgraded to have Pulse Lances. To build each lance, you will need two Pulse Carbines. You will also need some 1mm plastic rod (plastruct or similar) and some 2.5mm plastic tube.
Start by cleaning off any mould lines, and then you will need to drill a 1mm hole into the barrel of one of the pulse carbines. Use a sharp knife to prick a guide hole into the centre of the barrel, and then drill in 3-5mm with a 1mm drill bit.
Then use a sharp knife or a file to remove the barrel completely, so the front of the weapon is flat. You do this after drilling, as it's easier to find the right position for the drill while the barrel is still there.
Take the other carbine and cut the front end off just behind the front sight, where there is a groove running across the top of the weapon.
Drill a 1mm hole into the back of this piece, in line with the centre of the barrel. If you drill out your pulse weapon barrels, you can just drill all the way through.
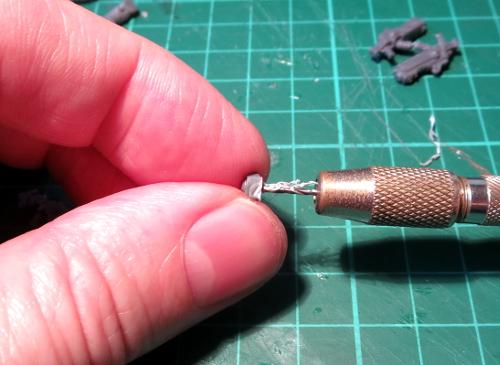
Trim off the leftover pieces of stock around the bottom and sides.
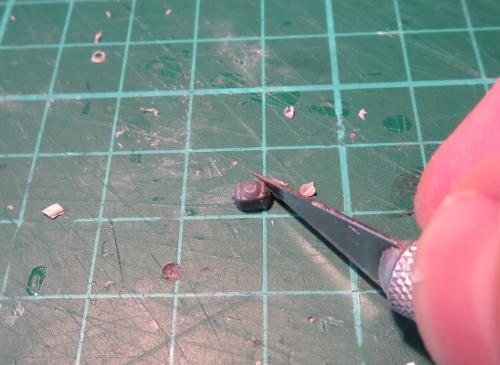
Cut a piece of the 2.5mm tubing around 7mm long - the exact length isn't important, so long as you're consistent with it on all of your lances. There are specialist tools out there for cutting plastic rod and tubing square, but here's the quick and easy method: Grab a cutting mat with a grid pattern on it. Lay the plastic tube along on of the grid lines. Line up where you want to cut with one of the perpendicular lines, and sit the knife blade on top, also lined up with the grid. Now, gently press down with the knife as you use your other hand to roll the tube forwards across the mat. Don't stress if the knife doesn't go through in one go, just roll the tube backwards and forwards a couple of times if necessary without lifting up the knife off the tube. The rolling motion causes the blade to scribe a neat ring around the tube, and when the knife makes it through to the centre your cut piece will pop off with a nice, square end.
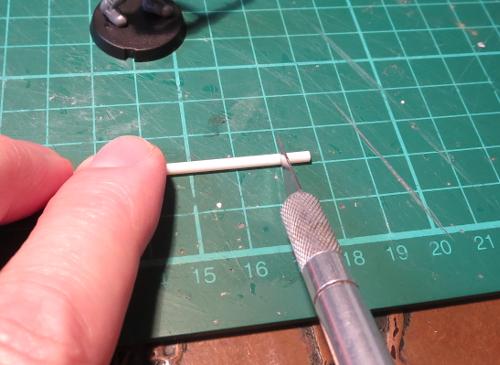
Cut a piece of the 1mm rod that is 3-4mm or so longer than your piece of tube. Glue this into the barrel hole you drilled in the first carbine.
Check for length before gluing the rest in place - Slide the tubing over the 1mm rod, and then dry-fit the 2nd rifle barrel to make sure that it sits flush against the end of the tube. If necessary, either drill out the hole a little more or trim down the end of the rod so that everything sits snug, and then glue it all on place.

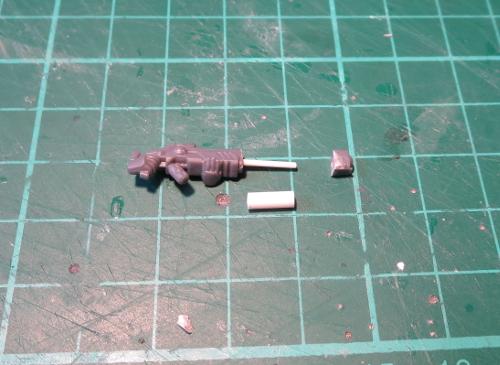
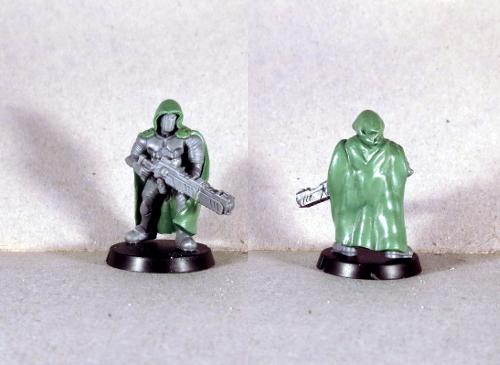
The finished unit, ready for painting:
For an alternate take, I built the below version with a sculpted cloak and with a lance that uses one Pulse Carbine from the Trooper sprue, and a front half of a carbine from the Faction Expansion Sprue - that version of the carbine doesn't have hands modeled on, so is easier to use for this. This is a little less fiddly than the plastic tube version above, but doesn't stand out quite as much from the carbine.
If you would like to use the Reaper Cadre in your own games, you can download an unofficial rules card here, and you can pick up the Karist Trooper kit needed to build it from the Maelstrom's Edge webstore here
As always, feel free to share your creations on the Comm Guild Facebook page!
For other Maelstrom's Edge modeling articles, including tutorials and walkthroughs of a wide range of different building and miniature projects, check out the article roundup here.
Tags: conversion karists modeling rules tutorial
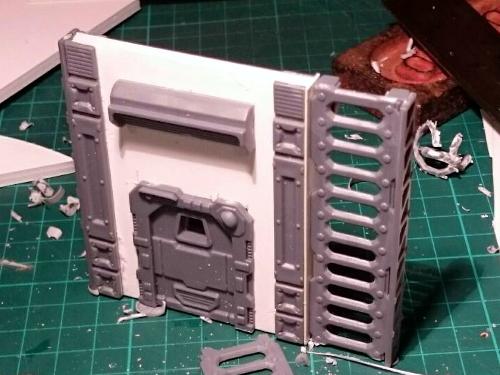
Terrain Template and Tutorial - Bunker
Posted on Monday May 08, 2017 at 05:00pm in Tutorials
- by Iain Wilson
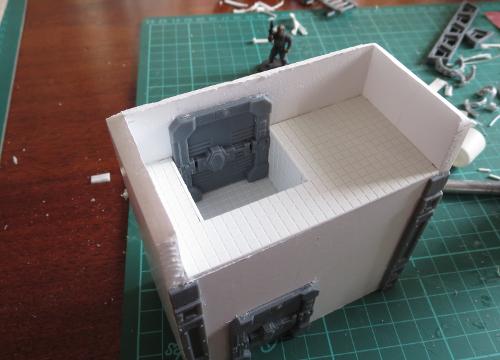
A couple of weeks ago, I shared a template for building a small minehead structure from foamcore, cardboard and the Maelstrom's Edge terrain sprue. For something a little larger and more impressive-looking, I have put together a new template for a bunker. This builds on the basic design of the minehead to keep some design consistency on the table.

 You will need some 5mm or 6mm foamcore (either will work, although the roof piece will overhang the sides slightly with the thinner foamcore), some thin cardboard - around .5mm thick, PVA glue, and the Maelstrom's Edge terrain sprue. A sharp pencil, a steel ruler and a sharp craft knife will get you by for tools.
You will also need the building template, which can be downloaded from here: Bunker.pdf
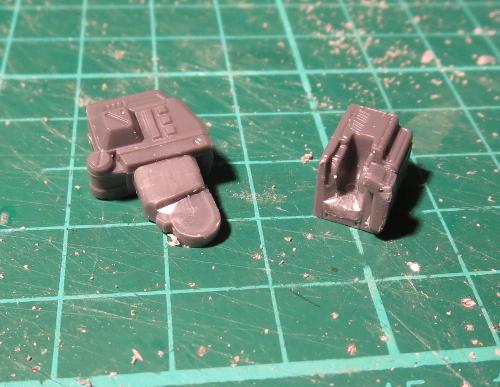
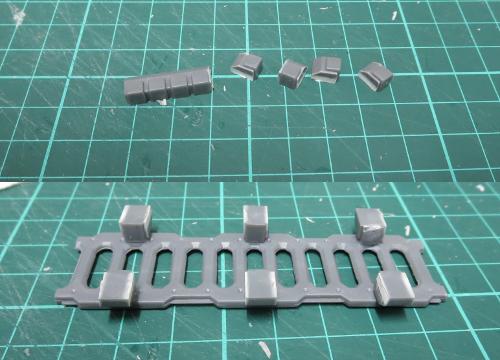
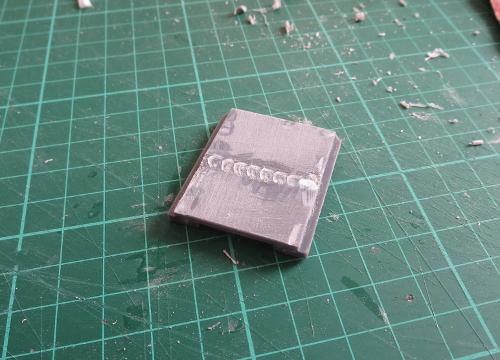
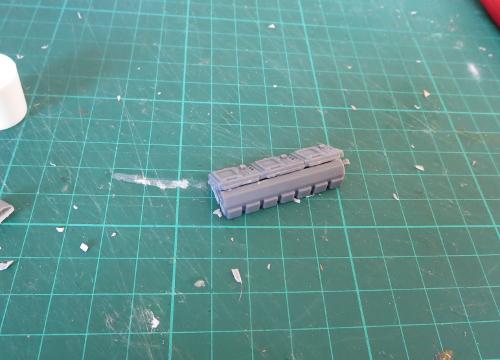
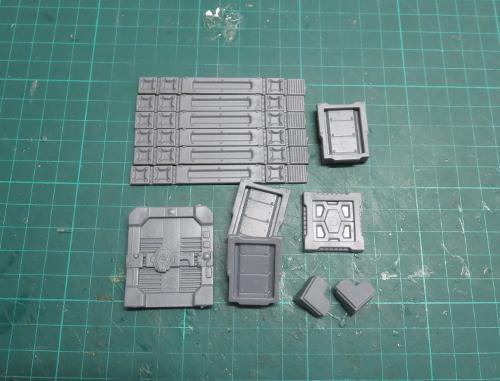
From the terrain sprue, the following components are used: one of the small doors (either will do), three shutter windows*, two corner braces, the square hatch, and six of the long support struts.
*There are only two shutter windows on a sprue, so you'll need to grab one of the windows from a second sprue. Alternatively, you can build the bunker without the rear window in order to stick to just a single sprue.
Print out the building template, and cut out the panels using steel ruler and knife.

You can then lay the panels on top of the foamcore and card (the parts are labelled for which material they need) and draw around them with the pencil to transfer the outlines. The solid lines on the parts show where you need to cut.
You need multiples of some parts - the quantity required of each is listed on the part. Some parts also say '(flip)' after the quantity. For these, trace the panel once and then flip it over to trace the second. When cutting foamcore with a knife, the back of the piece can wind up a little rougher than the front, so flipping the template makes sure that you have two 'clean' surfaces for the outside of the building.
Once you have traced all of the parts onto the appropriate material, use the ruler and knife to cut them all out. If you have never cut foamcore before, don't try to cut through in one go. Lay the ruler along the line you want to cut, and then make several passes with the knife, working deeper as you go and being careful to keep the knife blade vertical so you don't wind up with a bevelled edge. If you're building the single-sprue version mentioned above, don't cut the rectangle out of the middle of one of the end wall pieces.
The end wall pieces lean inwards, so need to be bevelled at the bottom. Use a knife to cut an angled strip out of the back of the bottom of each of the wall parts.

There is a protrusion on the bottom of the shutter window that needs to be removed. Trim off with a knife or file it down on each of the windows so that the bottoms of the windows are flat. You can then glue the windows into the end walls. They sit angled out at the top, as below. The outer edge of the window frame sits flush with the wall at the bottom, while the back edge of the window should sit against the outside edge of the hole at the top.

Take the two side wall pieces and two of the end walls and glue then together. The end walls sit inside the side walls, as shown below:
Glue the door into the door section.
Then take the door section, the third end wall and the two main walls and glue them together. The end wall sits inside the main wall sections, while the door goes across the other end, outside the main wall as below:
The two sections then slot together, and can be glued in place to form a t-shape.

Glue on the side panels. These sit flush with the front of the door panel, to cover over the cut edge of the foamcore and to reinforce the joint.
Fold the corner panels along the middle fold line, so that they form a 90-degree angle. These can then be glued in place into each of the inner corners of the 't'. You can use superglue for this step to speed things up a little, as there is no exposed foam to worry about. This helps to give the structure some rigidity while the PVA glue sets, and also covers over any messiness or gaps where the walls join.
The roof can now be glued in place.
Glue the two corner braces in place on the roof corners above the door.

Take the support struts and cut off the vent and rivet strip from the end with a knife.
These are then glued onto the end walls, covering over the cut ends of the foamcore. The vent piece goes on the roof, with the rivet strip butting up against the top of the support strut.

Finally, glue the square hatch onto the roof, in the middle of the 't', and your bunker is complete.

Let the glue set, and it's ready for painting.

For variation, you could replace the door section with another angled end wall, leaving access through the roof or underground, for more of a fortified pillbox. Or you could stack the small minehead building on top, making a balcony above the door section for troops to stand on.
If you want to try it for yourself, you can grab the template from here and the Maelstrom's Edge terrain sprue from the webstore here. I'd love to see what others can come up with to do with the design, so as always please feel free to share your creations on the Comm Guild Facebook page!
For other Maelstrom's Edge modeling articles, including tutorials and walkthroughs of a wide range of different building and miniature projects, check out the article roundup here.
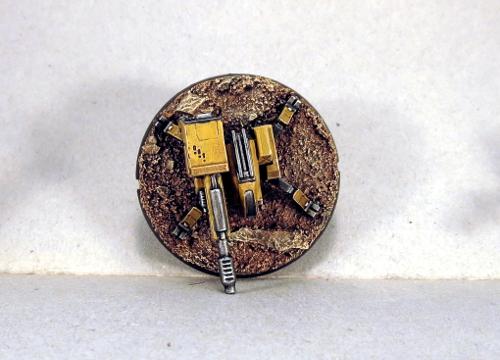
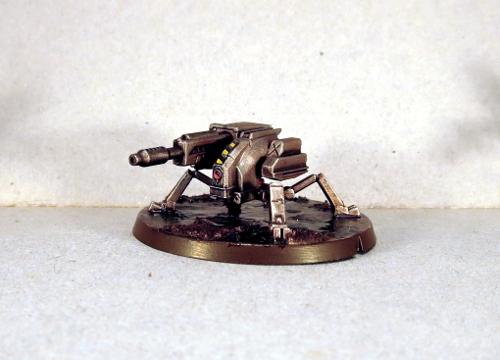
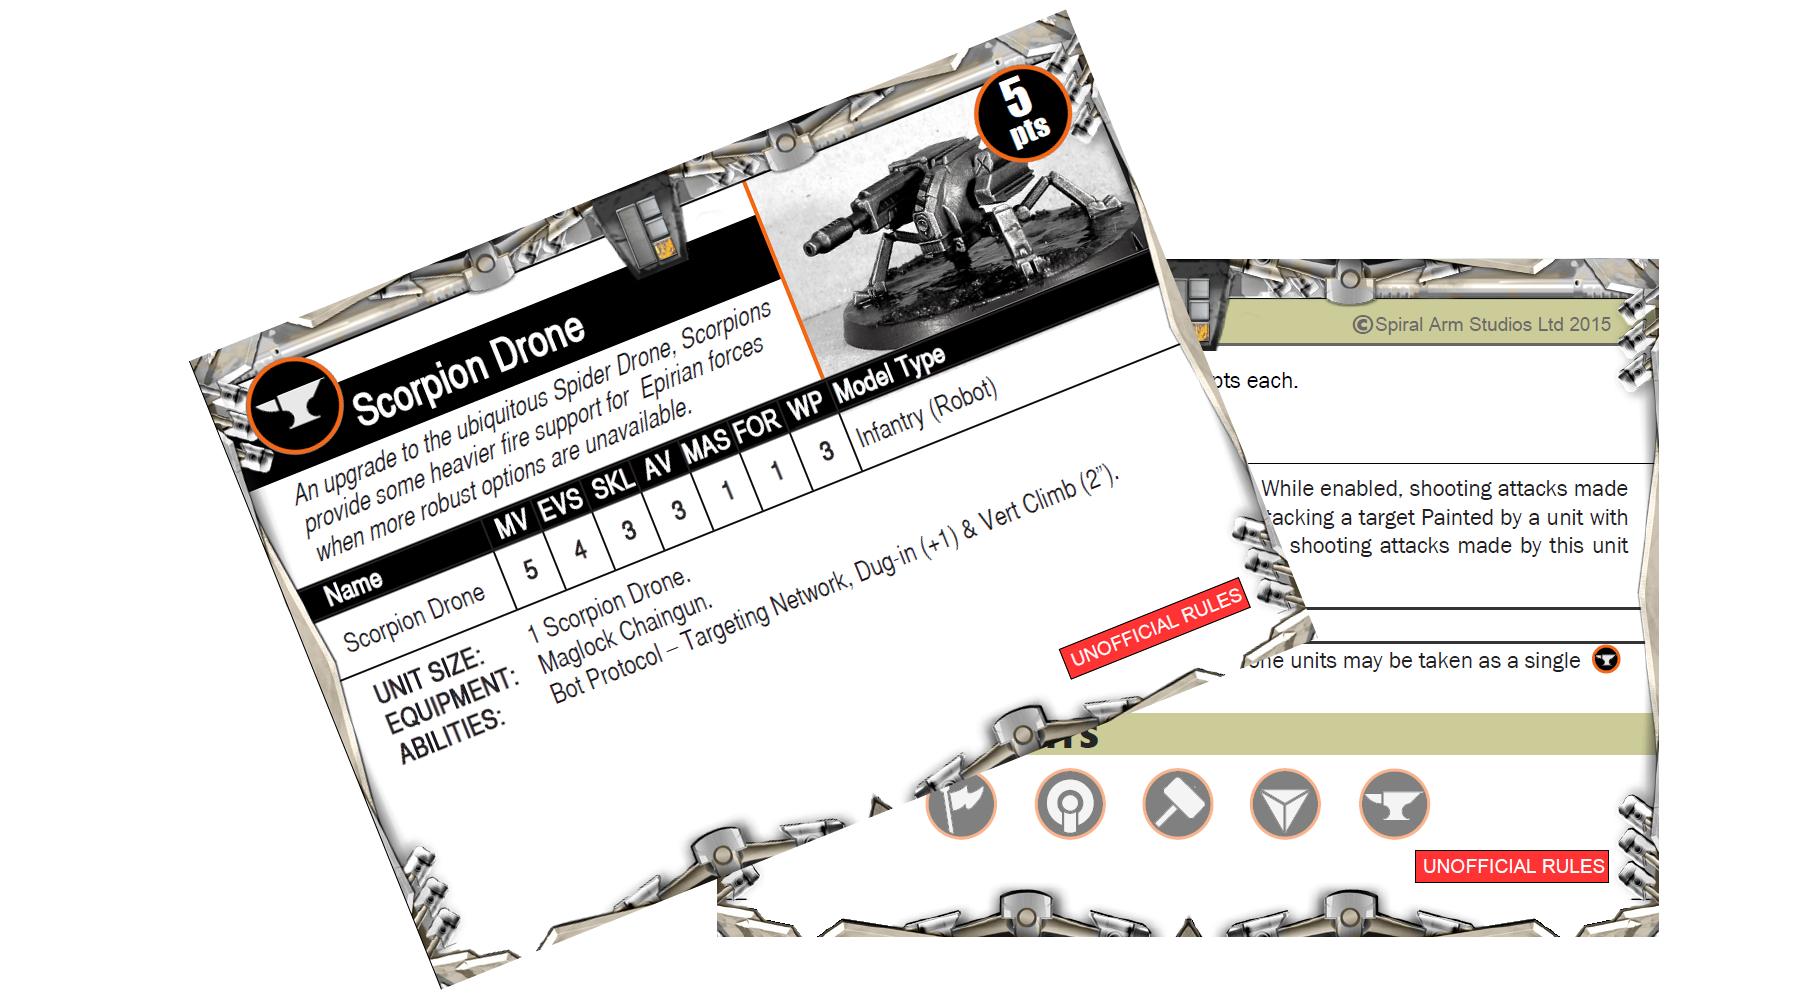
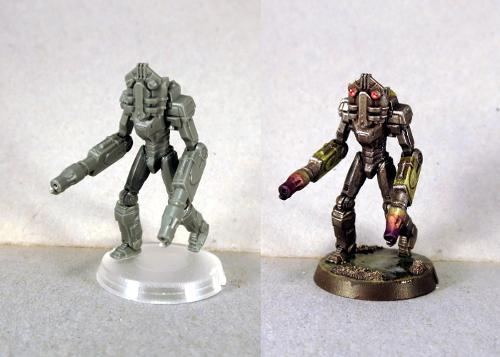
Epirian Scorpion Drone Conversion Tutorial and Unit Card
Posted on Monday May 01, 2017 at 05:00pm in Tutorials
- by Iain Wilson
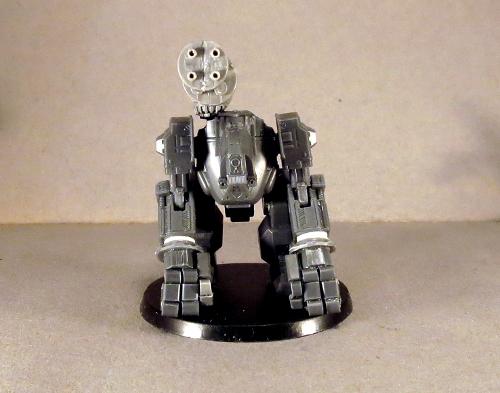
The humble Epirian Drone is a robot of many guises. It was designed as a modular core unit that could have an array of different weapons or motive devices in order to create specialised roles as required. So far in the game we have two of these variants: the Spider and the Firefly. I've had a lot of fun, however, thinking about ways to modify the kit to create other variants, and of the potential things that bored or desperate engineers on frontier worlds might come up with to make their drones fit new roles.
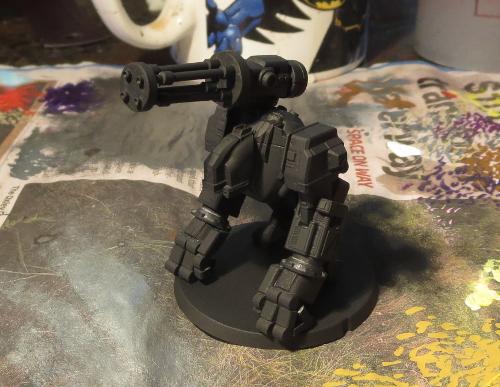
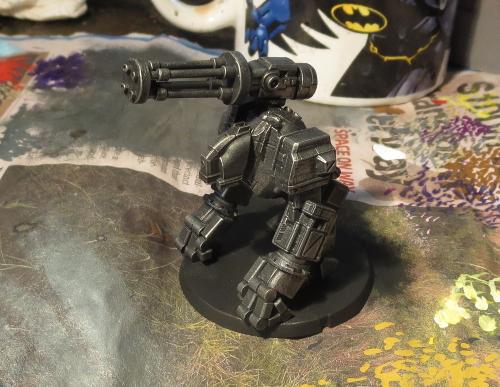
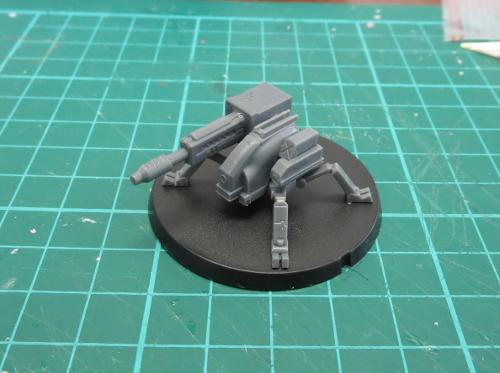
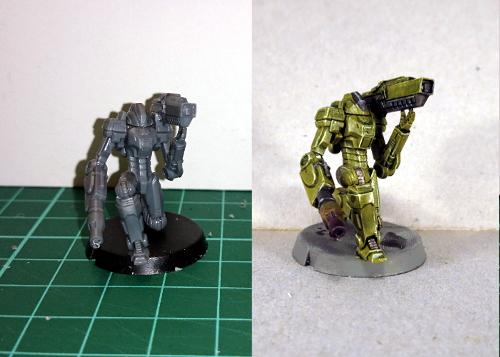
This week, I'm presenting one of the variants that I created: the Scorpion Drone.
Armed with a hefty maglock chaingun, the Scorpion fills a heavy support role when there are no Hunters around to do the job.
This is a fairly simple conversion, using most of a Drone (legs, chassis, left-side nacelle, rear plate, base) and a chaingun and left-side magazine unit from a Hunter - You could use the right side, but I've used the left as it is a leftover part if you build the Hunter with his hydraulic fist.
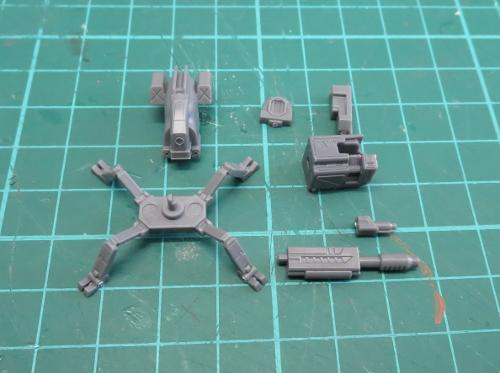
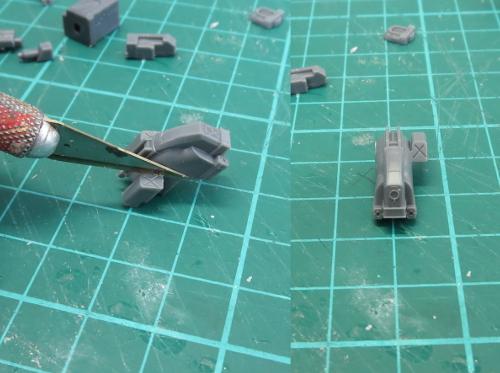
Using a sharp knife, cut the rectangular pod off the right side of the drone chassis.
Assemble the drone parts as normal.
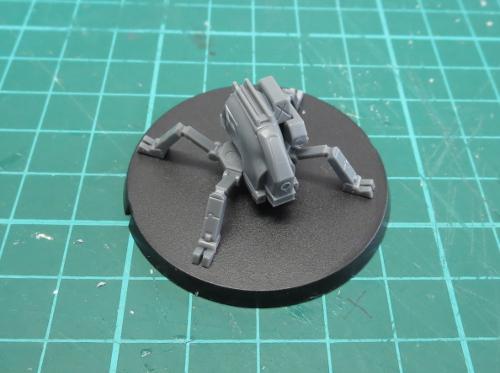
Assemble the chaingun with the magazine unit upside-down. This helps to conceal the elbow joint cavity, and means that the side glued to the drone chassis is the side with no detail on it.
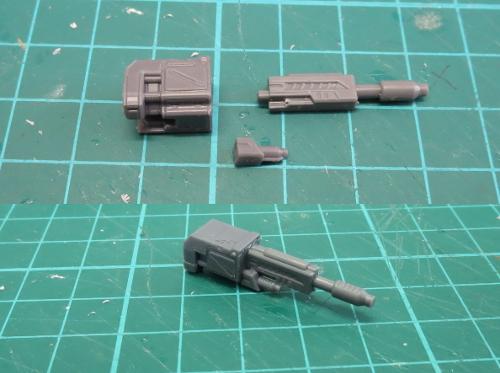
Glue the chaingun onto the chassis. It should sit with the rear of the magazine unit a couple of millimetres back from the rear of the drone, and the top of the magazine unit more-or-less level with the top of the rails on the chassis. The ejection port will line up with the rear left knee.
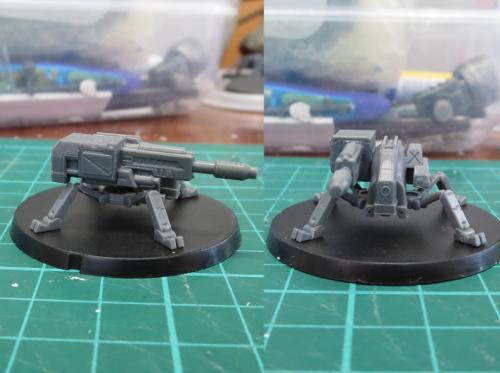
And that's it - job's done!
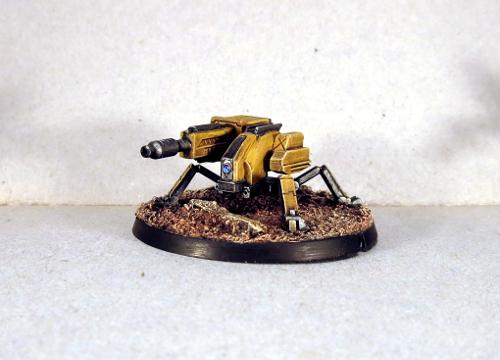
A couple of painted shots of the Scorpion in all its over-sized-weaponish glory:
This was actually the second version of the Scorpion that I came up with. The first looked like this:
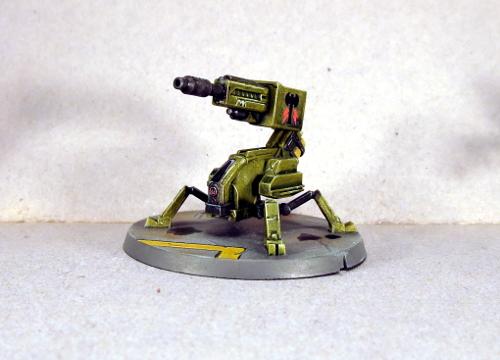
This version uses the chemtek sprayer from the Scarecrow kit to create more of a scorpion's tail for the weapon.
I decided to go with the second variant partly to make it an easier conversion, and partly because I thought the weapon mounted on the side looked a little more in keeping with the Maelstrom's Edge aesthetic. The tail is fun, but a little impractical.
If you would like to use the Scorpion in your own games, you can download an unofficial rules card here, and you can pick up the Drone and Hunter kits needed to build it from the Maelstrom's Edge webstore here
As always, feel free to share your creations on the Comm Guild Facebook page!
For other Maelstrom's Edge modeling articles, including tutorials and walkthroughs of a wide range of different building and miniature projects, check out the article roundup here.
Tags: conversion drone epirian rules tutorial
Tutorial and Spotlight Article Roundup
Posted on Monday Apr 17, 2017 at 05:00pm in Tutorials
The full list of articles is getting a little unwieldy for a single page, so rather than keep updating an increasingly confusing list here, you can find the full collection of articles broken down by sections in the Hobby area of the Maelstrom's Edge website here!
If you've seen anything here that has lit that modeling flame, you can pick up the various plastic kits currently available in the Maelstrom's Edge range from the webstore here.
Maelstrom's Edge also has a Facebook group, known as 'the Comm Guild', where you can post any questions you have about the rules, the models, or upcoming releases, or share your modeling projects. The group can be found here. We love to see what people are working on, so whether you're a modeling veteran or a complete newcomer to the world of miniature wargaming, feel free to join in.
And in the meantime, stay tuned for the plethora of modeling content that we have still coming down the pipeline!
Tags: buildings conversion models painting terrainsprue tutorial
Terrain Tutorial: Scatter Terrain
Posted on Monday Apr 03, 2017 at 05:00pm in Tutorials
- by Iain Wilson
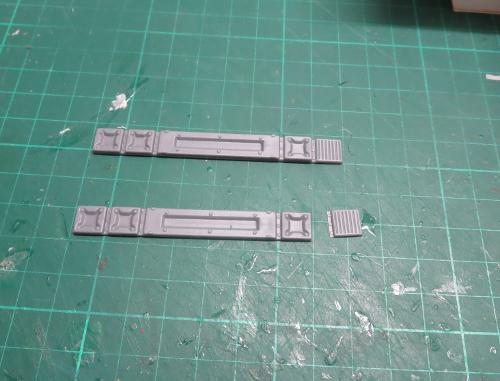
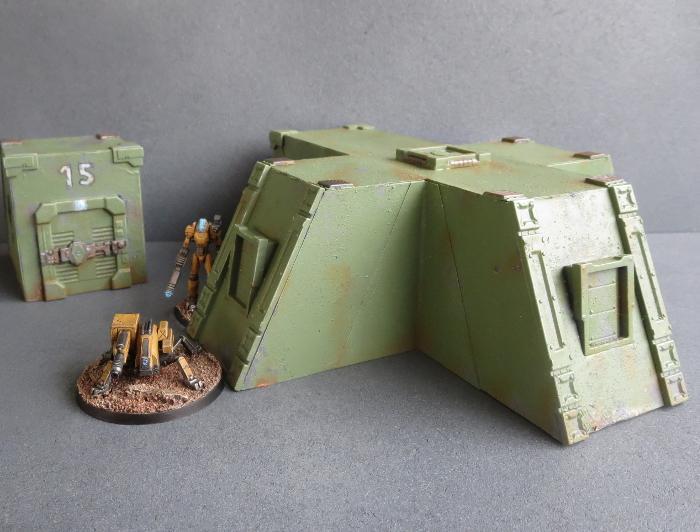
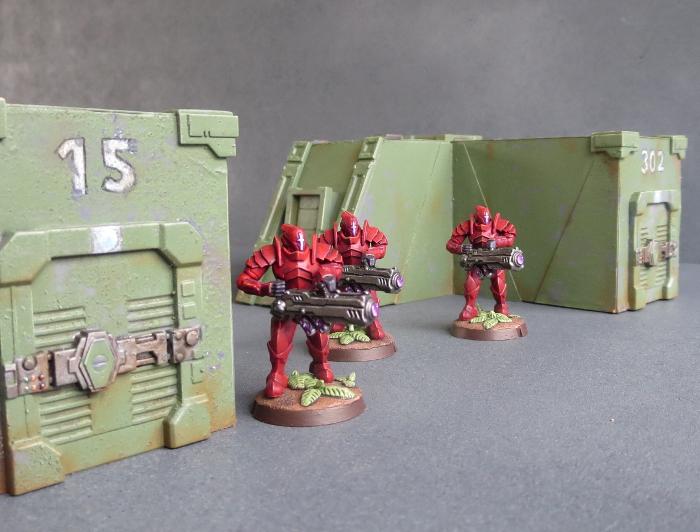
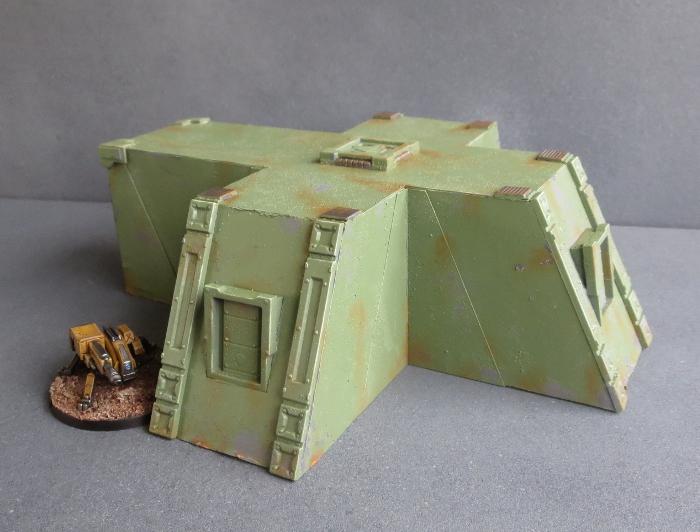
The Maelstrom's Edge terrain sprue is a fantastic resource for detailing scifi buildings made from all sorts of things - You can find a bunch of different ideas and tutorials here. The terrain sprue components are also handy though for making smaller detail pieces to scatter around your gaming tables for a little extra cover. I have previously shared a tutorial for building small shipping containers from a couple of doors, some ladders and a little foamcore (you can find that tutorial here), and this week I thought I would run through a few more small scatter terrain ideas.
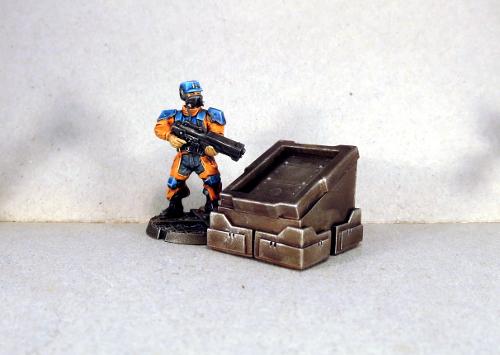
First up: Barricades
For this, you'll need one garage door, and two trapezoid windows.
Start by removing the door from the door frame. You can do this with a jeweller's saw or razor saw, or by running around the inside of the frame with a sharp hobby knife from both sides until the door pops out.
This gives you an open door frame that you can use on a building or ruin, and a handy detailed panel that can be cut up as below:
Throw the off-cuts into your bits box (they'll come in handy for a ruin or scrapheap down the track, and the strip of small windows is a nifty bit of detail for a building or other wall feature) and glue the trapezoid windows to the back of the lower section of the door.
Once the glue has set, you have some barriers just perfect for huddling behind and feeling all suppressed.
I've painted these up fairly plain, so that they will fit with whatever sort of table I throw them on. You can easily paint them to match your buildings, or paint on mis-matched panels for more of a ramshackle look.
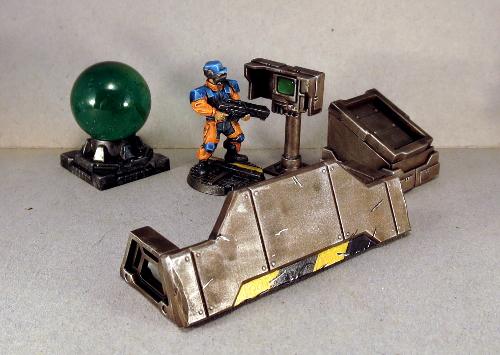
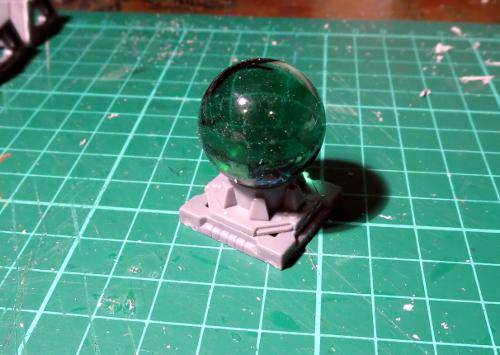
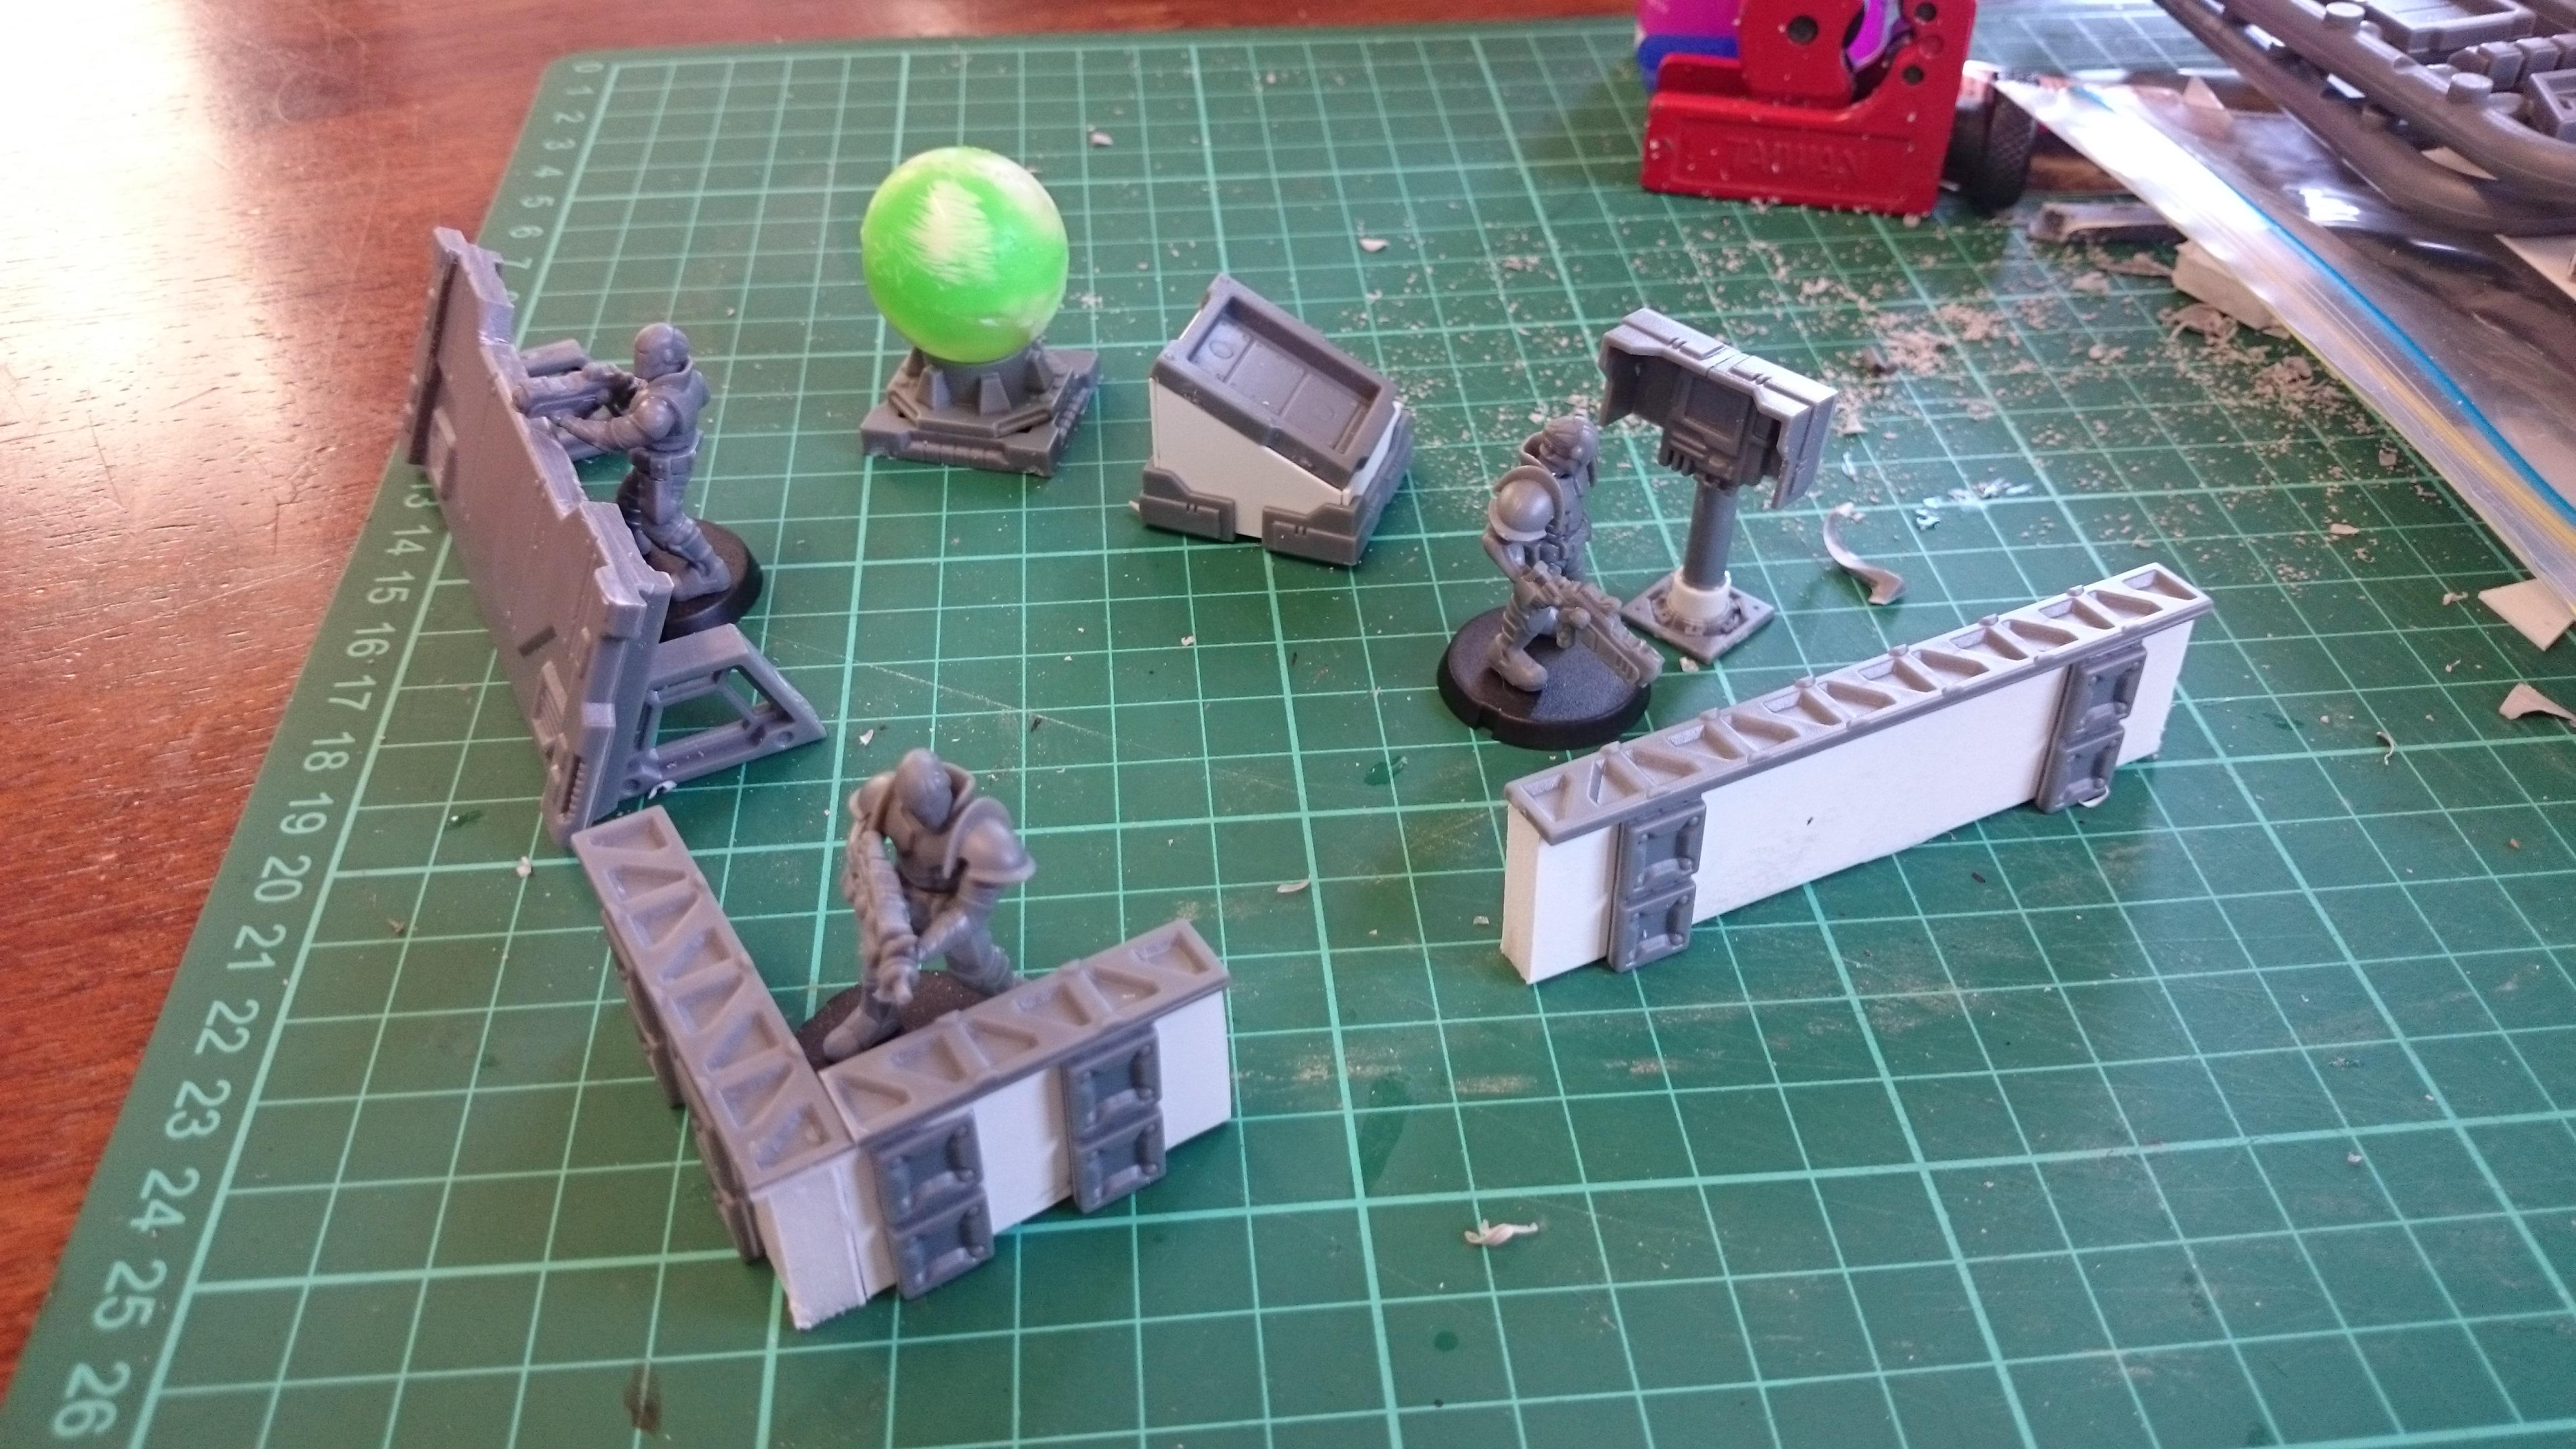
Next: The Orb!

I picture this device as a 3d map tank, so the ball on top would represent either a hologram or a glass ball with a projection inside.
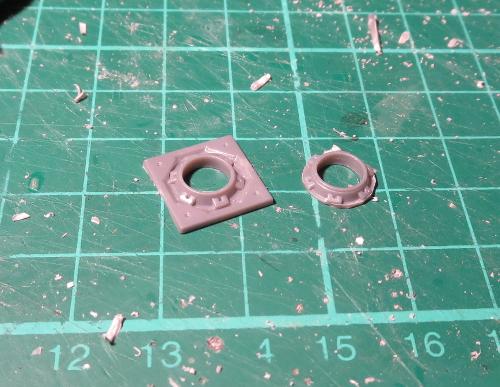
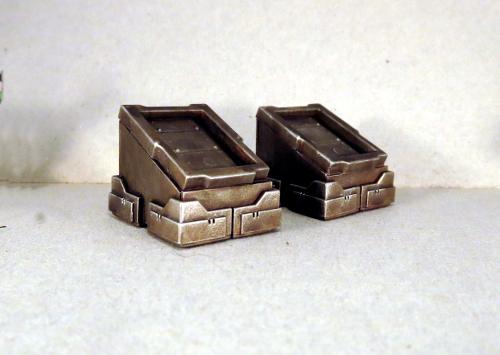
You will need a square hatch, a large pipe fitting, and a suitable-size marble (the one I've used is around 25mm (1") diameter).
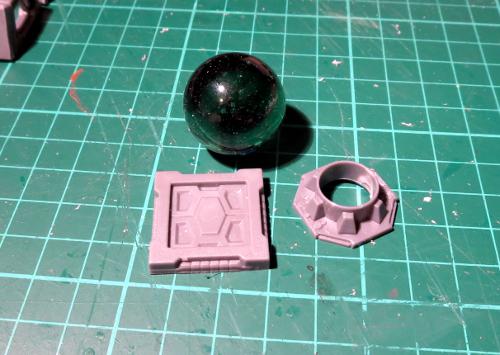
No cutting required on this one - Simply glue the pipe fitting to the top of the square hatch, and put the marble on top. If you hold off on gluing the marble in place until you have painted the base unit, you won't need to worry about cleaning stray paint splatters off the glass.
You could also paint the marble, or use a ball bearing or small plastic ball, to make it into a planetary globe sculpture or some other artistic installation.

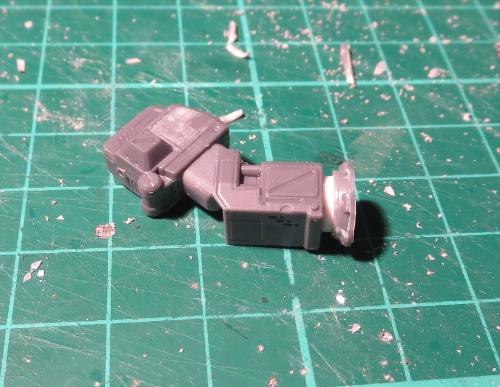
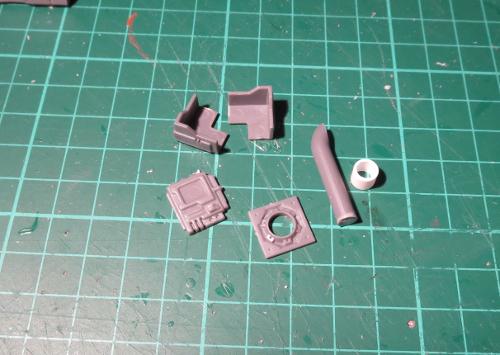
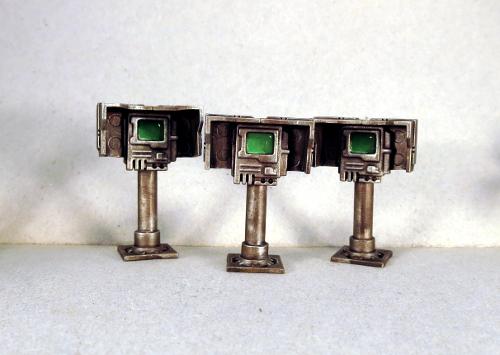
Next: Public Comm Unit
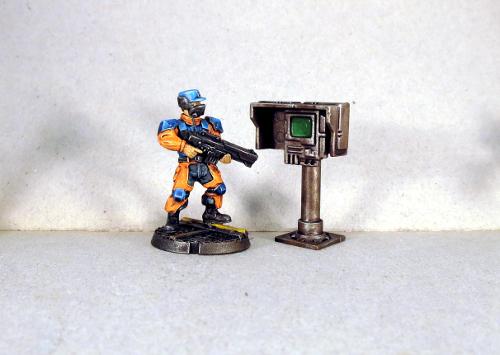
The little computer screen on the terrain sprue shows up all over the place on my terrain pieces. I picture it as a generic, multi-purpose unit that can be configured to display whatever information or controls are required for any given application. In this case, as a public access comm unit or data terminal.
To build this, you need the small pipe fitting, two corner braces, a computer screen, and a 5mm-long piece of 6mm (1/4") plastic tube. You also need a piece of sprue from the terrain sprue - The sprue has a thicker half and a thinner half. From the thinner sprue, cut a piece around 25mm (1") from a corner, with the corner cut off flush with the length of the sprue piece. The end result is a length of plastic rod with a rounded end that has one flat face, as pictured below.
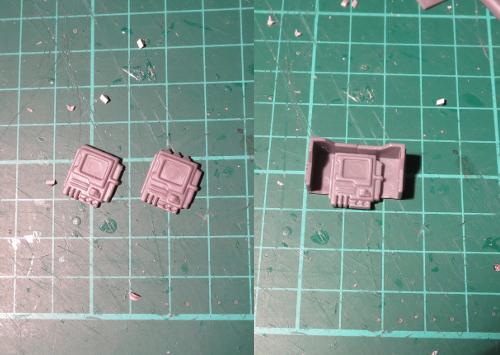
Take the screen and cut off the wedge-shaped protuberances running along the top. Then glue the corner braces together and the screen into the middle, inside the corners and butting up against the top, so that the corner braces form a shade around the screen.
Then glue the plastic tube into the pipe fitting, and the sprue piece inside that, with the rounded end at the top. Make sure the flat face is parallel to one of the edge of the pipe fitting. Then glue the back of the screen to the flat face of the sprue piece.
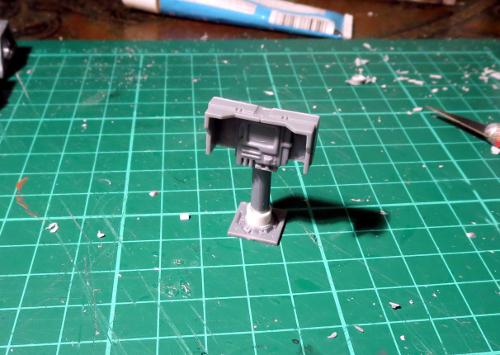
Once painted up, these can be glued onto your terrain pieces for a little extra detail. They also stand quite well on their own, or you could glue them to a base for a little extra stability, and then they can be scattered around as needed - they would make handy objective markers.
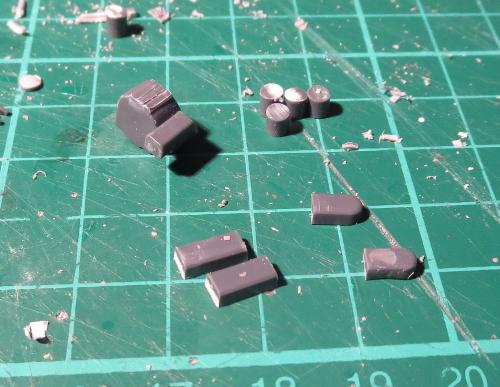
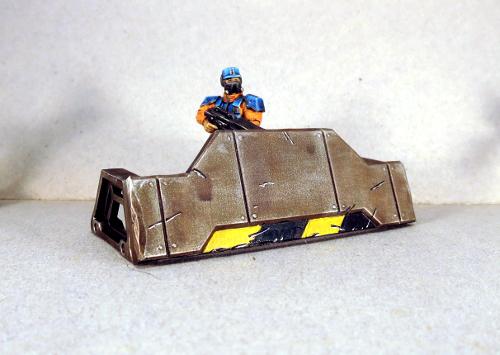
And finally: Thermal Vents
No self-respecting, quasi-military terraforming base is complete without some sort of underground installation. The problem with underground installations, though, is that they need some sort of ventilation shaft, otherwise nobody has any way to sneak in!
To build some suitable clandestine access, (or just some nice, blocky, solid cover for your solo models, depending on your point of view and the specific game objectives at hand) you will need a shutter window, four corner braces and some thin plasticard - I've used .5mm sheet here.
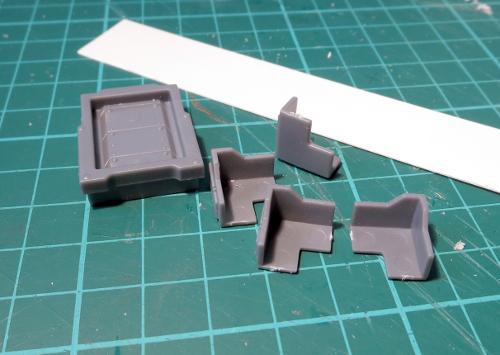
Take the shutter window and on the rear frame, cut or file down the top edge at around a 45-degree angle, as below, leaving the raised frame at the front intact.
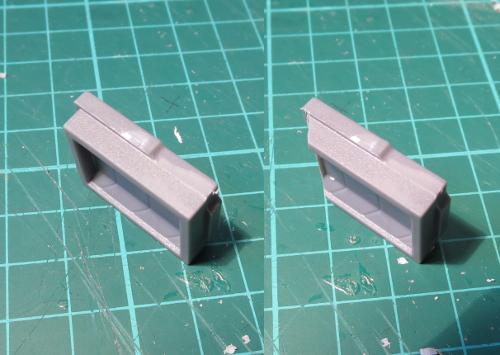
Cut sections of plastcard to run around the window frame. The measurements I've used are below:
Rear section - 21mm wide x 20mm tall
Front section - 21mm wide x 9mm tall
Sides - 23mm wide x 20mm/9mm, to match the front and rear sections.
If you're using thicker or thinner plasticard, you will need to tweak the width of the front and rear sections by a matching amount. You can also change the angle of the window frame by making the side pieces longer or shorter.

Check your plasticard sections for fit, and then glue them in place around the window frame.

The corner braces are then glued around the base.

As with the barricades back at the start, you can paint these up to match whatever buildings you have, or put them in more generic colours to scatter around multiple tables.
That's the lot for this week - although it's just scratching the surface of what you can do with the terrain sprue components. If you like what you have seen here and want to try building some scatter pieces of your own, you can pick up the terrain sprue in a pack of two from the Maelstrom's Edge webstore here.
We love seeing what people create with the sprues, so as always, please feel free to share your work on the Comm Guild Facebook page!
Terrain Spotlight: Welcome to Hamilton!
Posted on Monday Mar 27, 2017 at 05:00pm in Models
- by Iain Wilson
The frontier world listed in the Epirian Foundation directory as PG-4215 [designation pending] is a barely-habitable planet on the outer fringe of populated space. At the time the Maelstrom approached the system, PG-4215 possessed a single official settlement, known as 'Research & Terraforming Implementation Facility Alpha' by the Foundation and as 'Hamilton' by those unfortunate enough to have been posted there.
With PG-4215's few small, equatorial landmasses being hot, dry, and generally unpleasant, Hamilton's small population very early on had committed themselves to paving over and urbanising as much of it as possible.
Oblivious to impending conflict, an Epirian cargo drone shunts shipping containers for unloading.
Hamilton is the first table setup that I've finished off so far for my own Maelstrom's Edge games. I've used it somewhat as a test-bed for trying out different ideas, with the end result being a bit of a hodge-podge of styles.
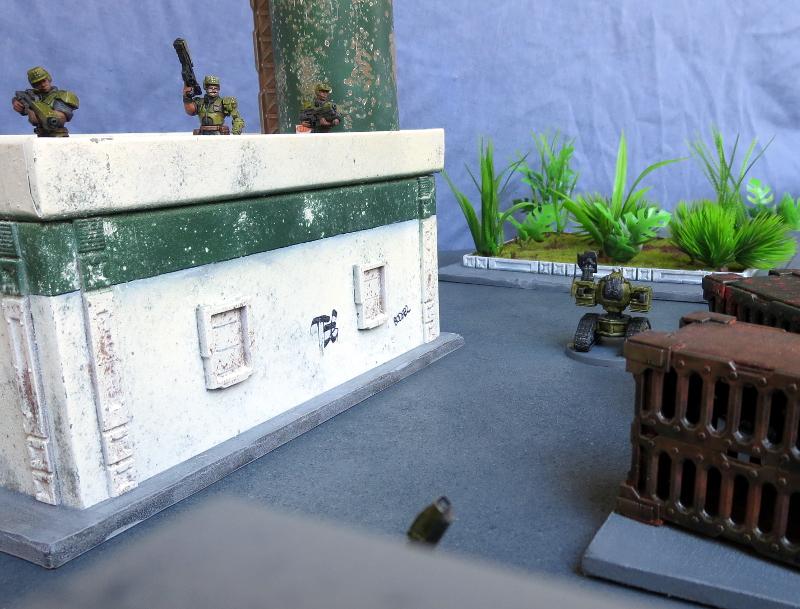
Taking up position on the roof of the refectory, the squad watches an automated uplink relay trundle down the laneway.
Buildings have been constructed from a range of different materials, with the components from the Maelstrom's Edge terrain sprue helping to tie it all together into a more-or-less coherent whole. The building above is made from a cardboard giftbox with the lid flipped upside down.
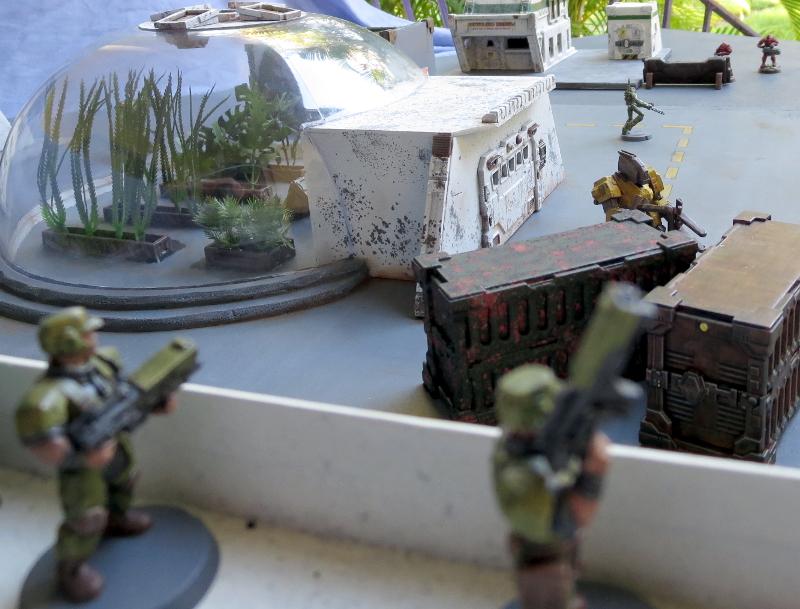
In the distance, past the plantation dome, a squad of heavy armoured Karists approaches, weapons at the ready.
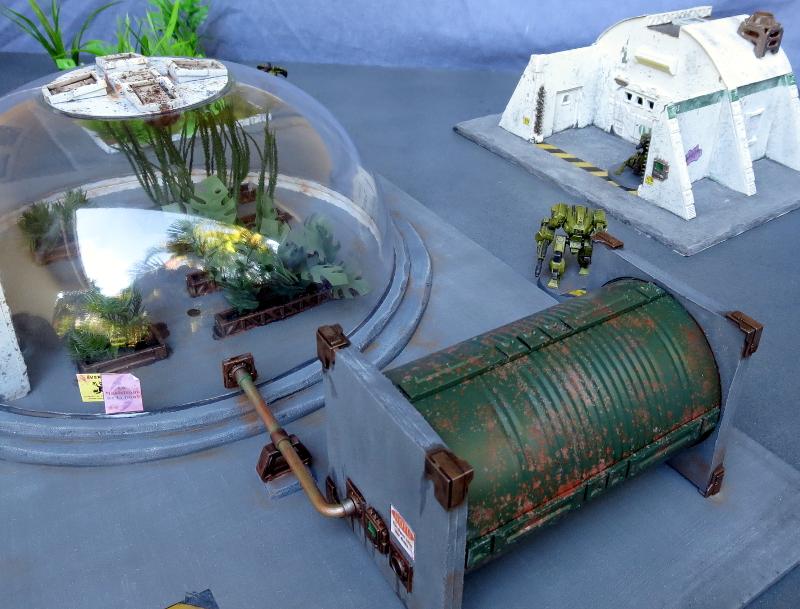
The plantation dome was constructed from a plastic salad bowl, with foamcore used for the enclosed area at the front. You can see how this was put together in the walkthrough here.
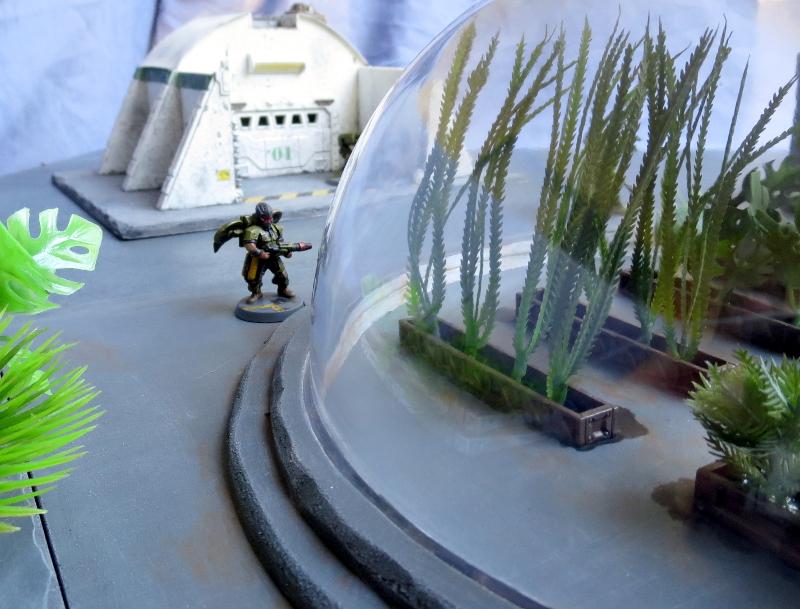
A Warden conducts a routine maintenance check on the exterior of the planation dome.
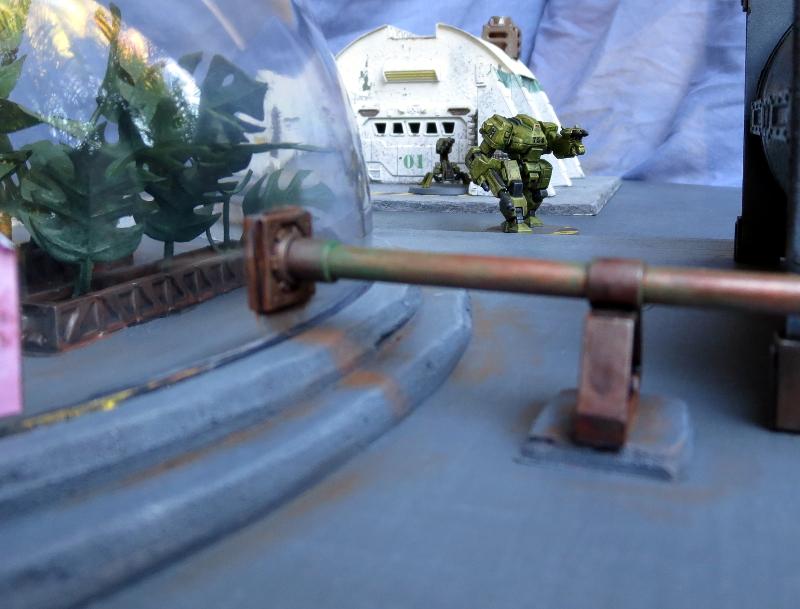
Trimmed-down and repainted aquarium plants were used for the plantation beds inside the dome. In the background is one of my first foamcore constructions.
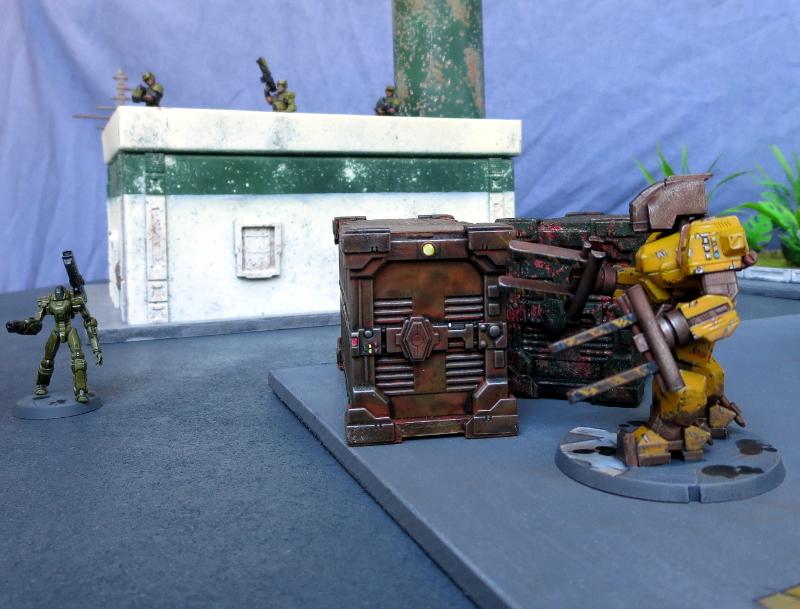
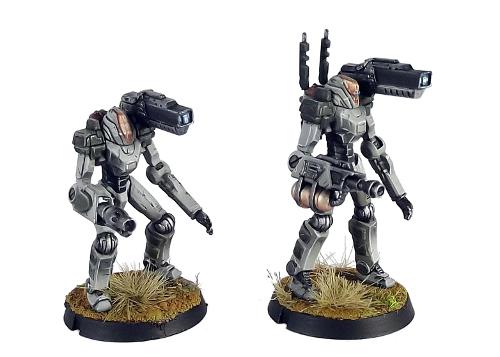
A Hunter warmech on patrol.
Cover is extremely important in Maelstrom's Edge, so wherever possible I have tried to include protruding elements for models to potentially hide behind, as can be seen in the buttressing on the building behind the Hunter.
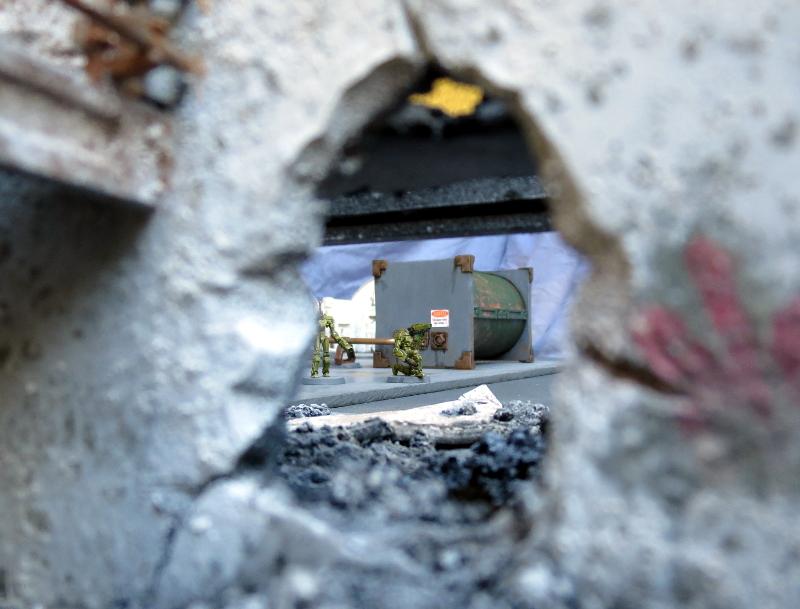
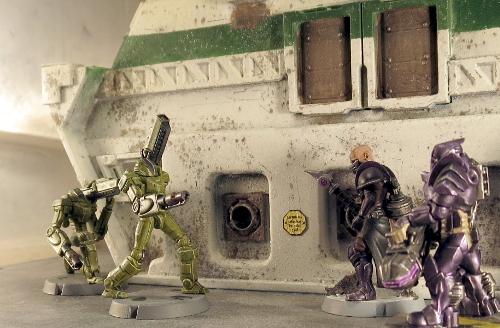
A Scorpion drone lurks in the courtyard, awaiting instructions from its Handler.
Of course, some details aren't particularly useful for cover, and are just there to look pretty.
On the other side of town, a Hunter on loan from the Swamp Research Team surveys the laneway.
Painting has mostly been kept fairly simple, with the buildings all painted white with some salt weathering to make them look like they've been exposed to the elements on an unfriendly world. I wanted a unified colour scheme to help tie the disparate buildings together, so they would look like the town was cobbled together from various sources, but would still look like it was purpose built for a single organisation.
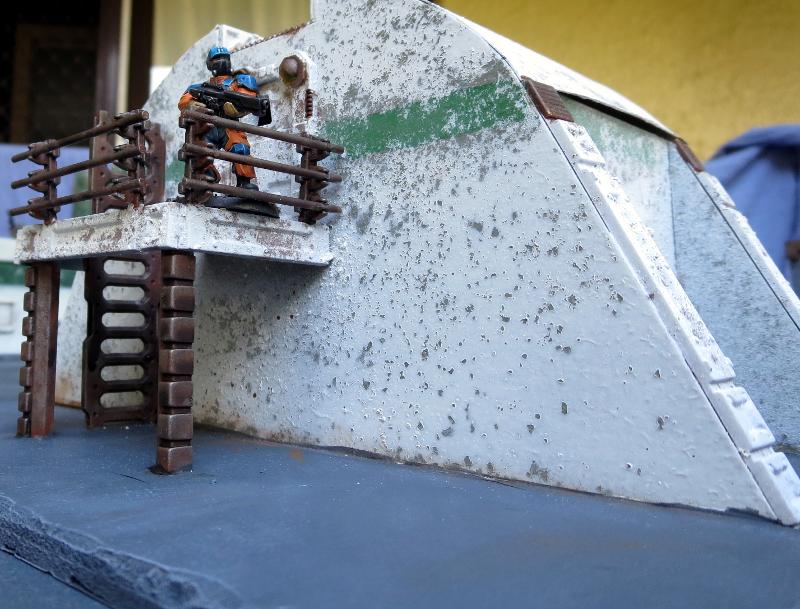
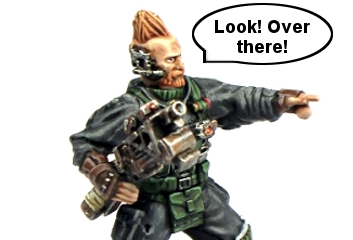
Lieutenant Bob takes up position on the balcony.
Variations on a basic design can help create a 'kit-home' look, with some different buildings that all clearly belong together. The above building was constructed using a similar template to the first foamcore structure, but with the courtyard removed and a balcony added. You can see the construction of this building in a short video here.
The Karists advance.
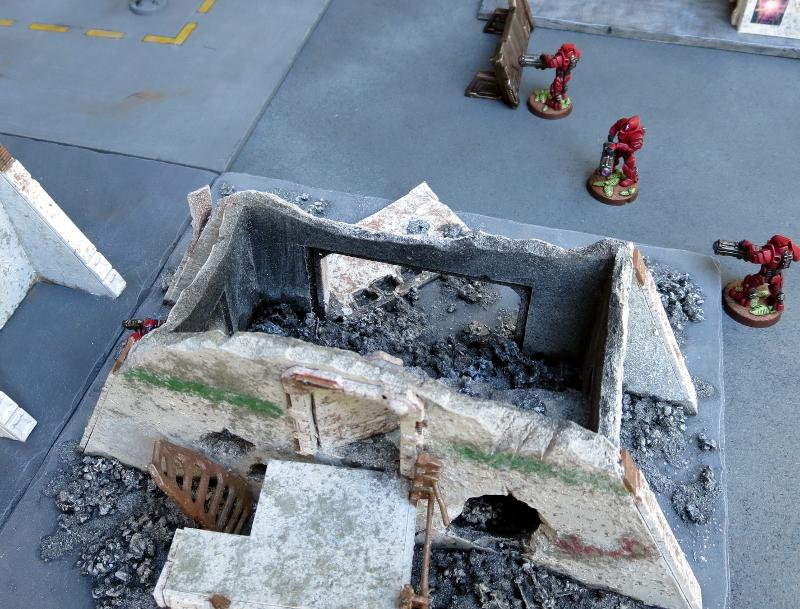
If you're aiming for an urban-themed board, it's a good idea to add in some area terrain elements rather than just having a table filled with solid buildings, as this mixes things up a bit for movement and cover. The same template used for Lieutenant Bob's balcony building was used to create a ruin, just by cutting off the roof, bashing things up a bit and adding some rubble on the base.
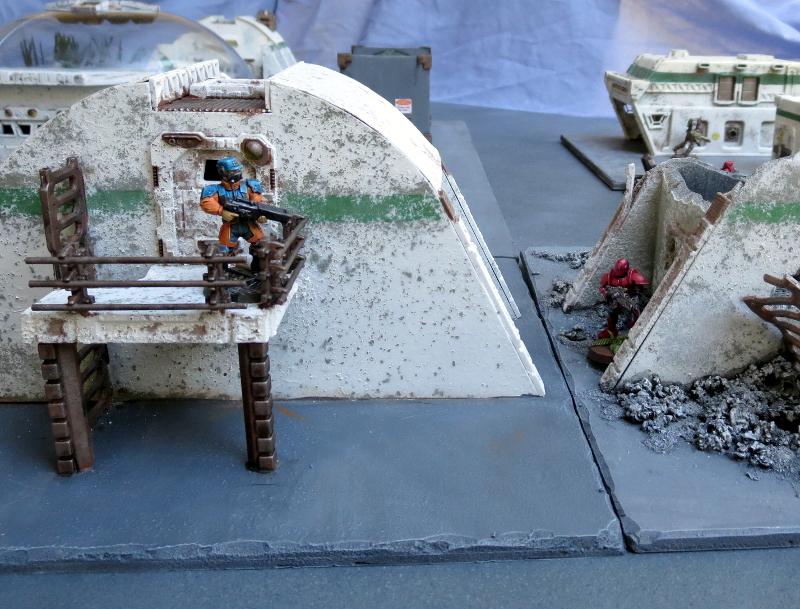
A lone Karist trooper lurks between the buildings.
In the background above you can see another building made from a plastic storage tray. Check out the build video here.
Scarecrows move to intercept the intruders.
Playing on a themed table is a great way to bring your games to life, as it helps to create the illusion of an actual battlefield, rather than just having a random assortment of different terrain.
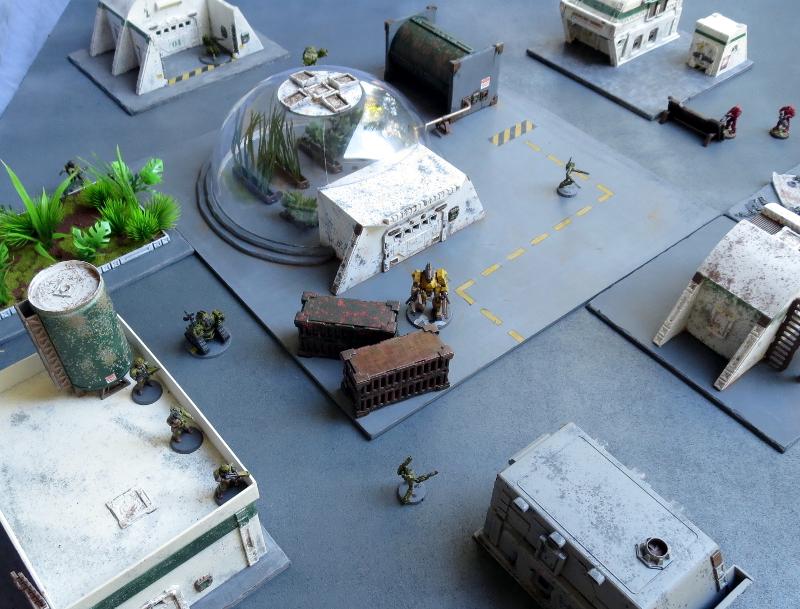
Despite imminent conflict, Bob can't resist trying out his new camera drone...
Still to do: I have several more buildings still on the workbench for this board, including a bot storage building and some more small multi-purpose buildings. I'd also like to add some sort of water-treatment pond. This will help to expand out from 4'x4' to a more rounded 4'x6', which is better for standard games. It would also benefit from the addition of more scatter terrain to break up the firelanes a little, which will be my next terrain project:
All of the decorative elements on the buildings shown here are from the Maelstrom's Edge terrain sprue. You can find this in a handy two-pack in the Maelstrom's Edge online store here. You can share your terrain creations on the Comm Guild Facebook page!
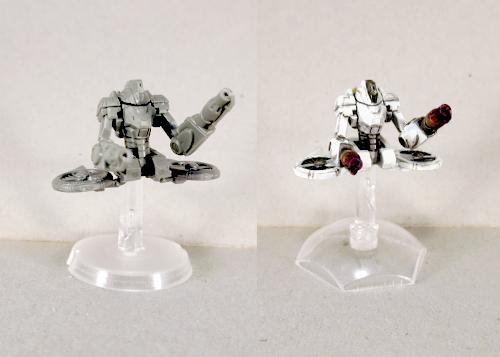
Conversion Spotlight: Epirian Automated Uplink Relay
Posted on Monday Mar 20, 2017 at 05:00pm in Models
- by Iain Wilson
The dependence on robotic units and information warfare means that the Epirian Foundation relies on
electronic communication to function as an effective fighting force. When pursuing conflicts outside of its zone of control, the Foundation uses portable uplinks that link to orbital satellites and airborne recon, providing battlefield intelligence about enemy positions and weaknesses and allowing Bot Handlers to remotely interface with Epirian drones on the ground.
The Maelstrom's Edge rules include an automated uplink relay as a faction-specific objective for the Epirian forces. The uplink itself is represented with a cardboard standee, as it represents a physical object that moves around the board, but I thought it might be nice to have an actual model to represent it. And so, I came up with this:
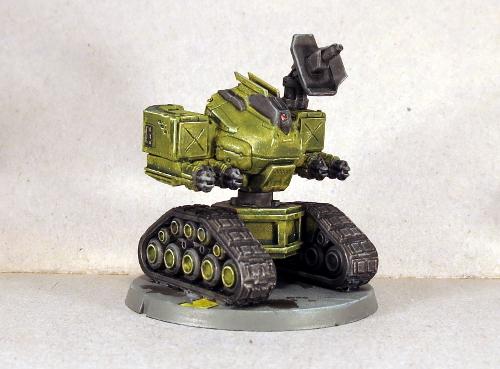
 My kitbash differs a bit from the artwork on the card - the artwork was done while the game was still in its early design stages, before the models were finalised. As a result, the drone chassis that forms the basis of the upper body of the uplink is really too small for the job. The card version also wound up with only a single gun, while the finished version of the uplink, ruleswise, is supposed to have two flakk batteries.
So after initially looking at various ideas using a drone chassis, I went with a Hunter torso instead.
The track unit was purloined from a Counterblast Mekkus Defender robot. Quick and easy to assemble - just two track units and a central hub to which they both attach.

I then took a Hunter torso and cut it off at the waist joint.
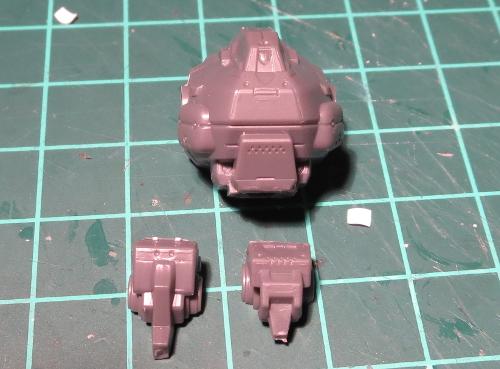
A new waist joint was constructed from plastic tubing, to slot neatly into the waiting cavity in the top of the track unit's central hub.

The flakk batteries were constructed from the flakk guns on the drone sprue. I took the two weapon mount parts and joined them together, glued a flakk gun onto each mount and added a third flakk gun, slightly shaved down on either side, inset between the other two. These were then attached to the forearm magazine piece from the hunter to create something reminiscent of the boxy 'shoulders' of the drone chassis from the original uplink artwork.
One of the big, obvious details in the artwork is the big satellite dish mounted on the uplink's left shoulder. I didn't have anything suitably rounded to hand, but in a flash of inspiration grabbed the flakk cannon from the Hunter sprue and chopped through the exposed parts of the cannon barrels. The shield section was then attached at a jaunty angle to the muzzle end of the cannon, and an antenna made from the coaxial barrel from the Hunter's chaingun.

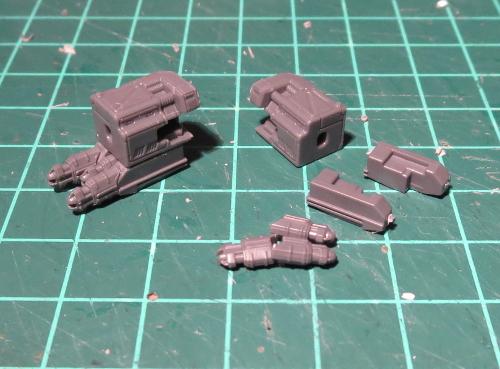
The shoulder sockets were trimmed at an angle so that the weapon arms would sit horizontal. The weapon arms were then glued in place, and the satellite dish and an auxiliary antenna made from the 'spare' weapon on the drone sprue attached to the left shoulder. I also added a square of plasticard to the front of each shoulder to cover over the original weapon attachment sockets. These have an 'X' shape scribed into them to once again tie back to the drone shoulder design. As a final nod to the drone chassis (although this is a detail on the final drone model that is absent from the uplink illustration) I added a pair of rails running along the top of the head, cut from thin plasticard.


I decided to paint this one up to match my original Epirian colour scheme, using Vallejo Yellow Green with a wash of Army Painter Green Tone, and the metal parts painted Vallejo Basalt Grey with a couple of coats of Army Painter Dark Tone.
The tracks were given a light drybrush with Citadel Boltgun Metal (aka Leadbelcher) and then another wash, this time with Army Painter Strong Tone.
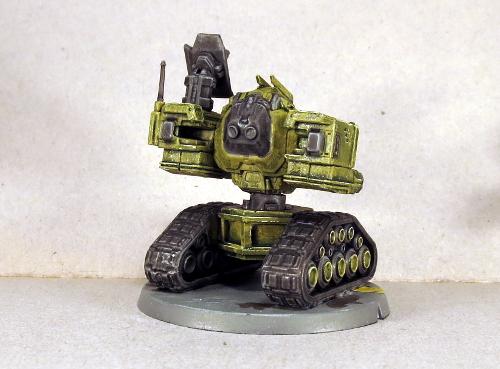
The base was urban-ised with a basecoat of Vallejo Neutral Grey and a drybrush of Vallejo Light Grey. Some oil stains splotched on with Army Painter Strong Tone, some chipping, and some yellow line markings complete the scene.
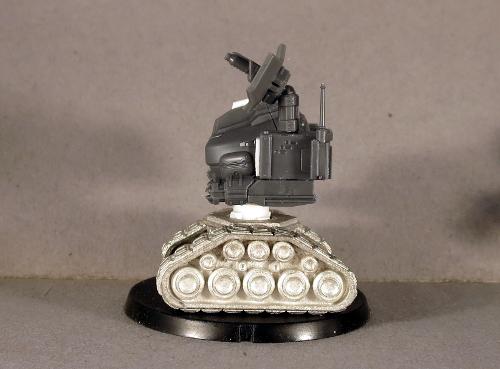
And so there it is: One Automated Uplink Relay. Size-wise, it comes in as a perfect match height=wise for the card version. A little more sideways bulk, but that suits it with the size of the base anyway.
It's not a perfect match for the artwork, but I think it's close enough to be recognisable for what it's supposed to be, and is a really easy conversion.
If you would like to have a go at this yourself, you'll need the track unit from Counterblast (or something else like it - there are a fair few options out there for small, tracked weapon units), and a Maelstrom's Edge Hunter (which will also give you the base for the uplink) and two Drone sprues - You'll have enough parts left over to still build complete drones from those sprues with the other weapon options. You can find the Maelstrom's Edge sprues in the online store here.
Be sure to share your version of the completed uplink relay on the Comm Guild Facebook page!
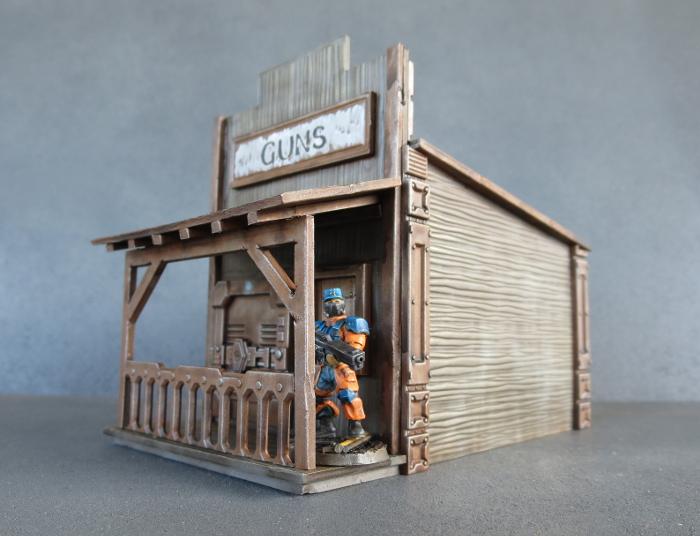
Terrain Walkthrough: Western-themed SciFi Building
Posted on Monday Mar 13, 2017 at 05:00pm in Models
- by Iain Wilson
A few weeks back, I built an Epirian Stockyard, just to get an idea of how some more rustic styling would fit into the Maelstrom's Edge universe. So it was with a fairly large amount of delight that I stumbled this week upon some fantastic, inexpensive, western-styled building kits from a company called Plast Craft Games. These are made from die-cut PVC sheets, and make a perfect base for customisation - in this case, with the addition of some parts from the Maelstrom's Edge Terrain Sprue to make a scifi frontier-town building.
The original kit comes as a single PVC sheet, with the cut panels attached with a few lugs. The PVC is soft enough to cut easily, and while there was some warping of some of the panels (I'm assuming from the pressure of the cutting process) they bend back into shape readily enough. The fact that the woodgrain shown in the store pics of the kit was actually embossed onto the parts was a nice surprise - I had been assuming that was just painted detail.
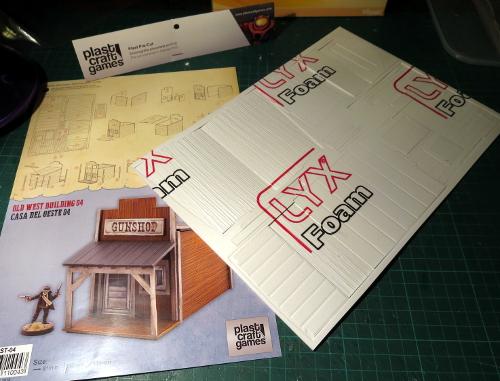
So, the first step was to remove all of the panels from the sheet and clean off the attachment lugs. I was a little surprised to find printing on the outer facings of the building pieces - as I inadvertently discovered three-quarters of the way through assembly, this is actually a sheet of protective film that peels off, once you know about it... It's not mentioned in the mostly-pictorial assembly instructions.
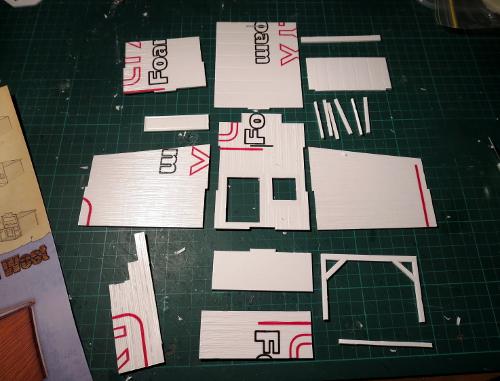
The opening for the door on the front wall turned out to be exactly the right height for the terrain sprue door, although I had to widen it a little. This was the work of a moment with a steel ruler and an exacto knife, and then I did the same for the window, which needed to be widened just a fraction and lengthened a bit. These parts could then be glued in with superglue.
The back wall of the building doesn't have any openings, but I decided to add a second door for in-game versatility. This was done by tracing around the door frame and cutting out a hole for it with the exacto knife and ruler again.
From there, the rest of the building could be assembled. There are some timber braces that run vertically up the edges of each all to disguise the panel joins. I left these on the front and back wall, but flipped them over to hide the woodgrain so that they could be painted as metal to match the terrain sprue parts. Then I added the terrain sprue reinforcing pieces on the side walls and roof, and added a railing to the front porch using a trimmed-down ladder.
(The porch roof and rails are still unglued at this point, to make painting the front of the building easier.)
Time to paint!
I started with a spray of grey undercoat all over.
Parts that I wanted to be metal were then given a coat of Vallejo Beasty Brown.
This was followed with a light drybrush of Citadel Boltgun Metal (Leadbelcher, for the newcomers)

Then the whole building was given a generous wash with Army Painter Strong Tone.
Once dry, the wash was cleaned up a little in a few places where it hadn't covered quite right, and then the wood areas were drybrushed with P3 Jack Bone, with some white mixed in for some lighter areas - this was intended to give the wood an uneven, weathered appearance. The metal parts were also given a light drybrush with the Boltgun Metal again.
At that point, all that was left was to paint up the lights on top of the doors (Citadel Ice Blue with a drybrush of white) and the green-orange-red lights on the door lock panels, give the moving parts of the door locks a coat of Boltgun Metal to make them stand out from the rest of the weathered metal parts, and to paint the sign on the front wall.

So while Lieutenant Bob there takes up his sniping position on the roof, and I go off to make up a town's-worth of these and track down some models for the Serenity crew, we mosey off into the sunset once more.
If you're feeling a similar urge to misbehave, you can find the Plast Craft Games range in various hobby stores and through their own webstore and you can pick up the Maelstrom's Edge terrain sprue 2-pack from the Maelstrom's Edge webstore here.
As always, we'd love to see what you come up with, so feel free to share your creations on the Comm Guild Facebook page!
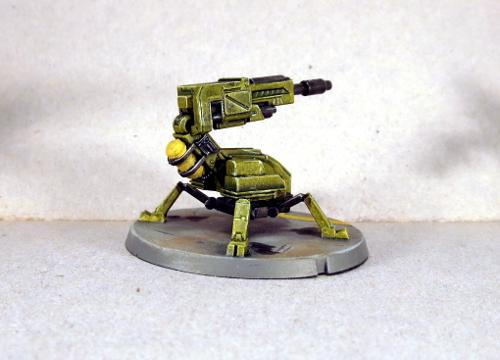
Spotlight: Epirian Scarecrow
Posted on Monday Feb 13, 2017 at 05:00pm in Models
- by Iain Wilson
Scarecrows are a mainstay of Foundation design, originally created to protect the wide-open swathes of agricultural assets on newly terraformed worlds, but since reimagined into a deadly military asset. Here, we take a look at the scarecrow kit, and some of the various ways that you can hack it up and get all creative on its shiny, robot posterior.
The Scarecrow sprue builds the regular Scarecrow, and also includes a variant head and command unit for the model's back to upgrade to the Scarecrow command variant, which lets you take an entire army of assorted Epirian robots.
Studio Scarecrow Models
This kit was designed specifically to allow as much poseability as possible, with joints at the elbows, knees and ankles.

This allows you to assemble the Scarecrow into anything from a stationary pose, to walking, running, or even kneeling down (for that extra sniper-y feeling!)
This model had some slight trimming done on the left elbow joint to allow it to bend a little further than normal, but the legs are completely unmodified
The maglock railrifle that makes up the Scarecrow's long-range firepower is designed to sit horizontally on the top of the shoulder pad. Thanks to the flat planes of the shoulder pad, however, it's easy to raise the railrifle up into a 'standby' position by simply gluing it onto the back of the pad instead of the top.
Alternatively, you can substitute the railrifle for the left forearm by cutting the elbow joint off the forearm and gluing it onto the back end of the railrifle.
For a slightly more complicated variant, the below model has the railrifle substituted in for the right arm weapon. The right shoulder was trimmed up slightly to allow the shoulder pad to swing around a little further than normal, the right elbow bent in slightly, and the left wrist sliced through and the hand rotated to support the rifle. The chemtech sprayer is on standby on the robot's back, where I would assume some handy mechanism allows him to swap out the two weapons as required.

A variant of the Scarecrow bot swaps out the railrifle in favour of two linked clingfire sprayers. Each sprue only comes with one of each weapon, so you'll need to steal the second from another Scarecrow sprue, but the weapons are designed to fit onto either arm.
This variant is also useable as a Subjugator bot, an assault mech used by Epirian Suppression squads. While there's no particular need to do anything to make a Subjugator visually different to a regular Scarecrow, why let that stop you?
The below model (which I'm calling a 'tiki-bot') is a stock standard Scarecrow with the command unit trimmed up a little and glued over the face.
If you prefer your crowd control to be more mobile, you can remove the legs entirely and replace them with a handy flight unit, made from scavenged turbines from a Firefly drone (which you'll have left over if you went with Spider drones instead).
For a slightly less out-of-the-box option, you can use a grenade launcher from the Bot Handler sprue and a force rod from the Faction Expansion sprue to make a closer-quarters version of the Subjugator.

And finally, the up-close-and-personal variant, made by swapping out the arms for legs taken from a second kit (this gives the shoulders a slightly wider range of movement) and adding some chainsaw blades taken from a Games Workshop Space Marine kit.
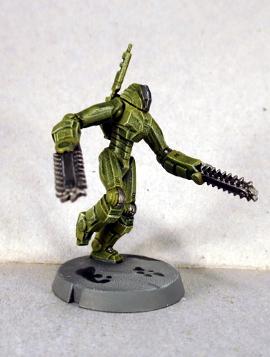
There are no rules for these last two options - I just thought they would be fun to build. I'd love to see what people come up with for them, though!
If you're feeling the urge to create some killer robots of your own, you can pick up the Scarecrow in a pack of two from the Maelstrom's Edge webstore here. And as always, feel free to share your creations on the Comm Guild Facebook page!
Tags: conversion epirian scarecrow