Search Results for 'buildings'
Entries found for "buildings": 75Showing 41 - 50 of total 75 search results
Terrain Spotlight: Sci-Fi Temple
Posted on Monday Jun 18, 2018 at 03:05pm in Tutorials
- by Iain Wilson
This week, I'm showcasing another terrain build, but for a change of pace I thought it would be fun to build something in a more unusual style.
I've been eyeing off the Japanese building range from Plast Craft Games for some time, and in particular a three-level temple that was just screaming to be turned into a table centrepiece. So I grabbed the temple from one of my regular go-to online stores, broke out some Maelstrom's Edge terrain sprues, and set to work!
The Plast Craft Games buildings are flat-packed, assemble-yourself-style constructs in a similar vein to the various MDF offerings out there, except that instead of MDF they're made from sheets of die-cut, foamed PVC. This material is somewhere in between styrofoam and plasticard in density, and is nice and easy to work with and surprisingly sturdy once assembled.
My plan was to not get too crazy with modifying the building, as I love the general design of it. It just needed some sci-fi-ing up to fit on my table. So with that in mind, I discarded the resin screen doors that come with the kit in favour of the single doors from the Maelstrom's Edge terrain sprue. The existing doorways on the temple were exactly the right height for the plastic doorframe, but a little wider, so I filled in the gaps on either side with strips of scrap sheet cut to size. Other than that, the bottom level was assembled as per the instructions.
Similar treatment was given to the second level, although this level only has doors in two walls instead of all four.
The top level has a smaller doorway in a single wall. Rather than cut out the door hole to fit another full-sized doorframe in there, I filled in the doorway with some leftover sheet bits and glued on the square hatch from the terrain sprue. I also replaced the spire on the roof peak with another square hatch.
The railings that came with the temple were a little low, and a little low-tech for my liking, so I replaced them with ladders from the terrain sprue. This required some fudging to make it work, as I discovered when I started gathering ladders that I had run out. Luckily, I was able to cobble together a few discarded cut sections to fill the last of the railing on the second level. It's a little rough if you look too closely, but I can always pass it off as a rushed repair job (those lowest-bid contractors at work!).
I wanted to do the bulk of the painting before adding the roof sections, as I figured that would be easier than trying to work around them. So the building was given a basecoat with black spray, and then a top-down spray with grey, leaving the black in the lower recesses for natural shading.
I then picked out all the metal parts with Citadel Leadbelcher, before giving them a wash with Army Painter Dark Tone.
The balcony levels were painted with Vallejo Neutral Grey and drybrushed with Vallejo Light Grey, and the wall panels were basecoated with Vallejo Heavy Brown and drybrushed with P3 Jack Bone. At which point, it was time to add the roof sections.
I'm not sure if it was my slightly rushed assembly, or a flaw in the temple kit, but I found that the roof sections for the two lower levels were actually too short to reach the corner beams. Luckily, I had some corrugated cardboard that matched the card used for the roof almost exactly. Cut to size and with tile-grooves added by 'scoring' across the corrugations lightly with a sculpting tool, they were a close enough match to hold up to all but the closest scrutiny.
My improvised roof sections were painted black before gluing in place, and then all of the roof pieces were drybrushed with Leadbelcher and washed with Dark Tone. Finally, I picked out the lights above the doors with a drybrush of Citadel Ultramarine Blue, Ice Blue and then white, and added a masonite base sprayed with grey and white for a quick concrete effect. If I have time later, I may go back and replace this with a tiled slab to pretty things up some more.
The finished building:
To pick up the Maelstrom's Edge terrain sprue, or any of the rest of the Maelstrom's Edge model range, visit the webstore here.
For other Maelstrom's Edge modeling articles, including tutorials and walkthroughs of a wide range of different building and miniature projects, check out the article roundup here, or for help or advice, or just to share your work, feel free to visit the Comm Guild Facebook page!
Tags: buildings modeling spotlight terrain terrainsprue walkthrough
Terrain Spotlight: Cardboard Gift Box Ruin
Posted on Monday Jun 11, 2018 at 05:00pm in Tutorials
- by Iain Wilson
If you've been following my hobby articles for any length of time, you may have noticed that I'm rather fond of using cardboard gift boxes to make buildings (If you're new here, you can see examples here, here, or here). But while intact buildings are all well and good, a balanced battlefield should include a mix of line of sight blocking terrain and area terrain, and so this week I'm breaking out the old gift boxes and the Maelstrom's Edge terrain sprue for some good, old-fashioned ruins.
The structure for this build comes from two cardboard gift boxes, bought from a local discount store.
The lids were flipped over to create a walled roof, and I removed a corner of the smaller box with a sharp hobby knife so that it nestled in neatly against the larger box.
I used a door and a shutter window from the terrain sprue to mark out positions for doors and windows, by sitting them in place and tracing around them with a pencil.
Then I used the hobby knife to cut the door and window holes out, and marked out a rough plan for the building damage - the line around the building shows where the walls would be cut down, leaving more raised areas on corners, where the structure would be stronger.
The hobby knife was put to use again, as I cut along the ruin line all the way around the building.
Once done, the cardboard structure went together like this:
As a handy side-effect, the pieces removed from the tops of the walls can be saved and used to create other ruins later...
Because the ruin line wound up around the bottom of all of the window frames, I just left them bare. For the doorways, though, I chopped the door panel out from the surrounding doorframe, and cut the frame into shorter pieces to match the height of the ruined walls.
The doorframe pieces were then glued in place, and I also added some support struts on the corners of the walls, also suitably cut down to height and with the cut ends messed up a little with some clippers to simulate explosive damage. With these all in place, I glued the whole building structure to a base board of masonite.
If you're just after a quick and easy ruin, this is the point where you can call the job a good'un and go and slap some paint onto it. For some extra detailing, though, I chose to glue some chopped up card from the gift boxes and some leftovers from the cut terrain sprue bits around the building, and then using a generous amount of PVA glue added some gravel and sand.
After leaving the glue to dry, it was time for paint!
I started with a basecoat of grey spray, and then a light spray with white around the walls and the bigger rubble patches.
The exposed sections of the baseboard and the building floors was then re-based in Vallejo Neutral Grey, and then drybrushed with Vallejo Light Grey.
Everything was then dirtied up with some Neutral Grey sponge-weathering and spots of drybrushed Vallejo Beasty Brown.
I added a couple of extra details for colour - the number on the roof railing by dabbing through a number stencil with a large brush and some red paint, and a little graffiti on the back wall painted with yellow and some blue ink straight over the grey wall to give it a faded appearance.
The final step was a quick blast of black spray into the interior of the building to create some contrast.
And that's it - one ruin, ready for the table!
If you're keen to try this for yourself, you can pick up the giftboxes from gift stores all over the place, or online with a quick Google search, and the Maelstrom's Edge terrain sprue along with the rest of the Maelstrom's Edge model range from the webstore here.
For other Maelstrom's Edge modeling articles, including tutorials and walkthroughs of a wide range of different building and miniature projects, check out the article roundup here, or for help or advice, or just to share your work, feel free to visit the Comm Guild Facebook page!
Tags: building modeling spotlight terrain terrainsprue tutorial walkthrough
Terrain Spotlight: Knights of Dice Desert Residence meets the Maelstrom's Edge Terrain Sprue!
Posted on Monday May 28, 2018 at 05:00pm in Tutorials
- by Iain Wilson
A few weeks ago, I showcased a dice tower made from a Knights of Dice MDF blank and some bits from the Maelstrom's Edge terrain sprue. This week, I'm giving a similar treatment to a desert building from the KoD 'Tabula Rasa' range.
The Tabula Rasa terrain range is specifically designed to be fairly basic, both as a cost-effective way of filling your table and to serve as a base for people to add their own detail... which obviously makes these buildings a perfect match for the Maelstrom's Edge terrain sprue!
The building I've started with is the 'Desert Residence 1', which when assembled straight out of the pack looks something like this:
Before gluing the building together, there were a few modifications to make. To begins with, the doorways are a little small for the Maelstrom's Edge doors to fit in. So I sat the door over the doorway, traced around it with a pencil and then carefully cut the resultant enlarged doorway out with a sharp exacto knife. MDF cuts fairly easily, so this isn't too onerous, but if you would rather avoid it you could alternatively build a boxwork around the door, as I did on my watch tower) and just glue it over the existing doorway.
There are two differently-sized windows scattered around the building. The larger of them, like the doorways, is a little small for the shuttered windows from the terrain sprue, so I repeated the door process, using the top corner of the window hole to line up the plastic part, and then tracing and cutting a larger hole. Again, if you would prefer to avoid cutting MDF, the shutter windows work quite well just glued straight to the wall.
For the smaller window holes, I covered over two of them using the cast-off MDF pieces from the larger windows, and to this I attached part of the energy fence pylon from the terrain sprue to make some sort of mechanical gubbin (I have to admit, it looks a little like a high-tech toilet cystern to me).
For the third small window, I took the large pipe fitting from the terrain sprue, and glued a small circle of plastic mesh into the back of it. This was then glued over the window hole to make a covered vent.
As a nice little touch, all of the Knights of Dice kits come with a little crowbar-sort-of-thing in the top corner of the MDF sheet, which can be used for prying parts out for assembly, or pulling removable roofs off. With a little bit of trimming up, they also serve quite well as upright bars for attaching ladders. I trimmed the ladder from the terrain sprue off so that it was short enough to work on either of the two building sections - the hooks on the top allow it to be hung from any free stretch of roof railing without needing to glue it in place.
With the leftover piece of ladder and a couple of MDF cast-offs, I made a smaller access ladder to hang between the roof sections.
The final touch was to add some support strut sections from the terrain sprue to cover over the joint holes where the roof supports attach to the walls. I could also have removed the other joint gaps by filling with some filling plaster or putty and sanding it down smooth, but I actually like the wall joints for creating a pre-fabricated slab-assembly look.
With some paint and weathering, the final building winds up looking like this:
Some Karist troopers, taking up station:
To tech up some buildings of your own, you can pick up the Maelstrom's Edge terrain sprue, or any of the rest of the Maelstrom's Edge model range, from the webstore here. As always, be sure to share to see your creations, or pop in with any hobby questions to the Comm Guild Facebook page!
For other Maelstrom's Edge modeling articles, including tutorials and walkthroughs of a wide range of different building and miniature projects, check out the article roundup here.
Tags: building modeling spotlight terrain terrainsprue tutorial walkthrough
Painting Tutorial: Sponge Weathering
Posted on Sunday Mar 25, 2018 at 05:00pm in Tutorials
- by Iain Wilson
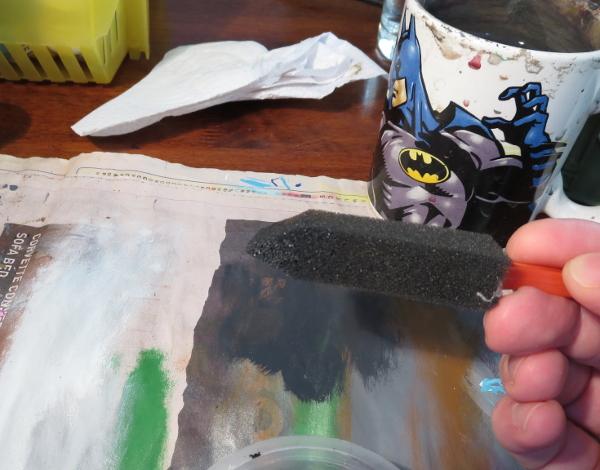
We can wind up spending a lot of time painting miniatures for our games, so it can often be tempting when it comes time to paint terrain to just slap on a quick coat of spray and call the job a good'un. There are a number of quick and easy ways to add a little more detail (and subsequent awesomeness) to your terrain, though, and the difference it makes on the visual impact during your games is well worth making that little bit of extra effort. With that in mind, I would like to share a simple sponge method for adding chips and weathering to your building paintwork.
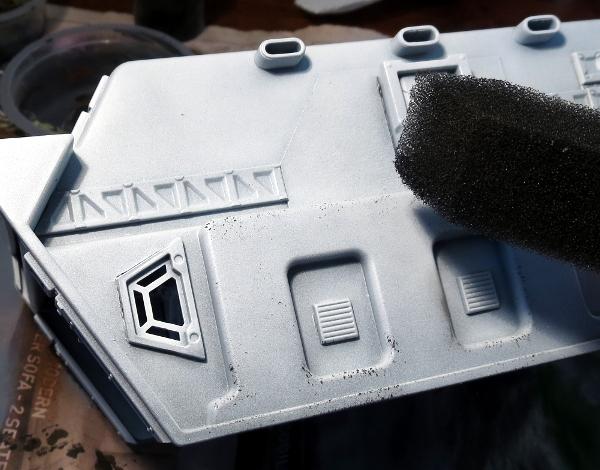
You will need a craft sponge - something fairly soft and fine-weave. I like to use a painting sponge like the one pictured below, as the pointed tip helps to get into difficult corners where necessary. You will also need something to put some paint in or on, some newspaper or paper towel, and (obviously) some paint. This method looks best when applied as dark chipping over a lighter shade of paint. I tend to use Vallejo Heavy Charcoal as a bit of a catch-all. It's darker than most of the colours I use on my buildings, and is indeterminate enough to cover for cement or aged metal. I avoid metallic paints for this sort of weathering, as they can look a little weird unless they catch the light just right. If you want some metalic touches, you can always use a dark grey and then highlight the bigger patches of chipping with a little metal colour.
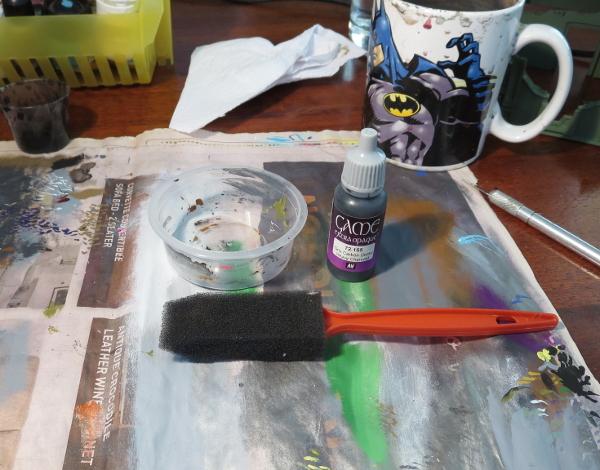
The weathering is applied once you have the basic colour and any higlighting done on your building, and the process is really simple - Drop out some paint onto whatever palette you are using and dip the tip of your sponge in the paint.
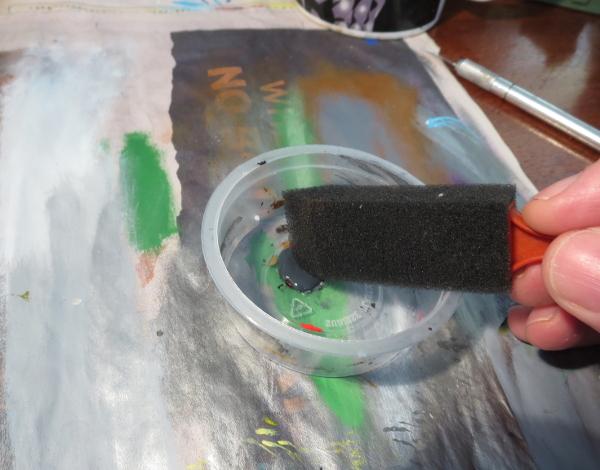
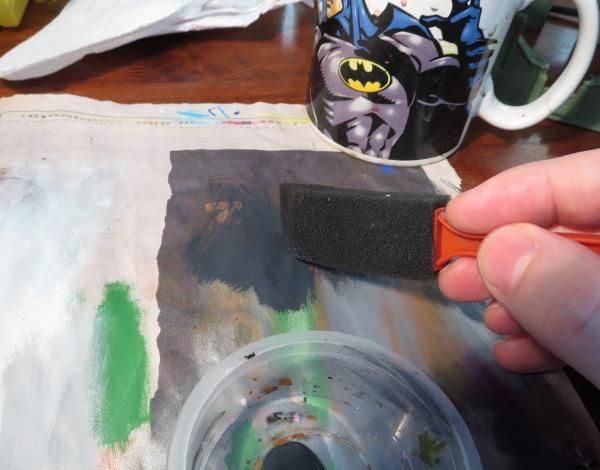
Rub the sponge on the paper to remove any excess paint. You want the sponge to be wet, but not have any gloopy patches of paint. If in doubt, press the sponge against a clean section of the paper and check the result - you're aiming for small specks of colour, not big blobs.
Press the sponge onto your terrain, using a straight up and down motion. You want to dab the paint on, not brush it. Experiment with turning the sponge different ways and using different amounts of pressure to vary the way the chipping is applied, reapplying paint to the sponge as necessary. Apply heavier weathering to places on the terrain that would naturally get knocked or abraded more, like protruding corners of walls or the edges of doors and windows.
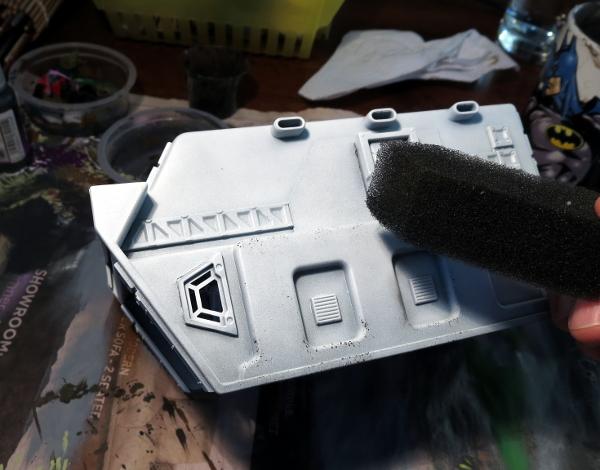
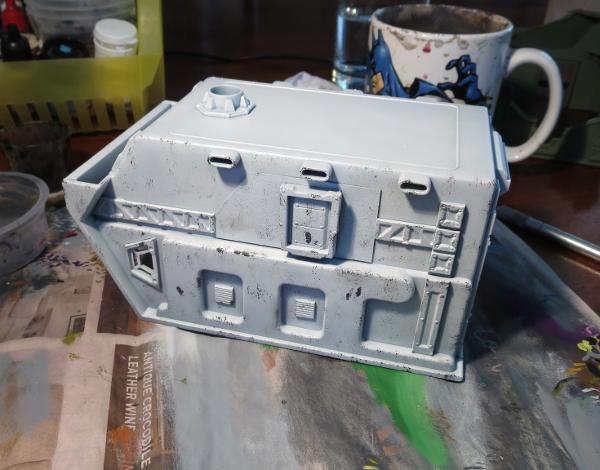
Keep going until you have worked over the whole building.
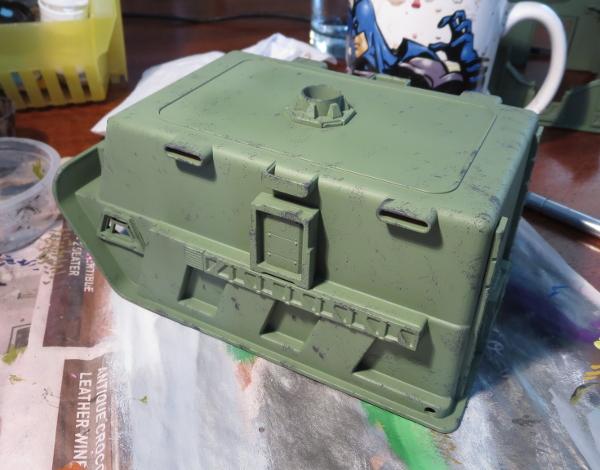
Here's the same thing on a green building.
If the sponge starts to get tacky with drying paint, you can wash it out, squeeze out as much water as you can, and then squeeze it between a couple of sheets of paper towel to get it as dry as possible before going back to the paint.
Once you're happy with your chipping, you can add other details or weathering as required. A strategic drybrush of brown in high-traffic areas, or just here and there for a bit of added grime, can go a long way to complete the weathered look.
Here's some finished examples of the technique in action:
Broken Settlement building (Tutorial)
Park Bench (Tutorial)
Sleeper Caskets (Tutorial)
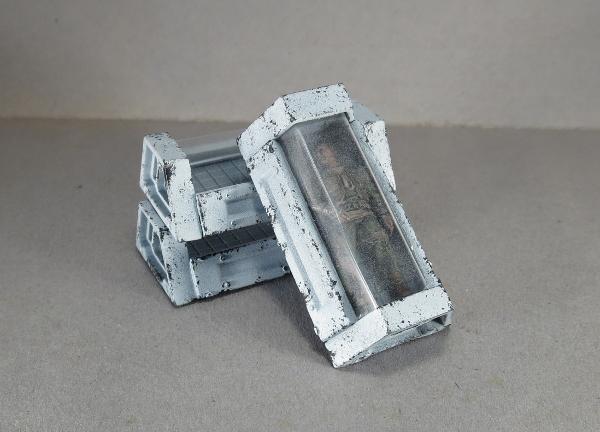
Hab Dome (Tutorial)

You can find the Maelstrom's Edge terrain sprue along with the rest of the game range in the webstore here. As always, we would love to see your creations on the Comm Guild Facebook page!
For other Maelstrom's Edge modeling articles, including tutorials and walkthroughs of a wide range of different building and miniature projects, check out the article roundup here.
Terrain Tutorial: Scatter Terrain 2 - Urban Details
Posted on Monday Mar 19, 2018 at 05:00pm in Tutorials
- by Iain Wilson
Cities are more than just a collection of buildings. There are a whole host of other little details, many of which we don't even notice because we're so used to them being there, that fill in that urban sprawl. Streetlights, hedges, park benches, statues, gardens, all go towards making a city look lived in and give it character. And yet these things are so often overlooked when we put together gaming terrain. So many urban tables are just a random collection of buildings in various levels of disrepair, which may look good, but are missing those crucial details that make them look right.
I've covered how to make some of the above mentioned details in previous articles, but this week I thought I would run through a few more, using components from the Maelstrom's Edge terrain sprue, and a few assorted odds and ends.

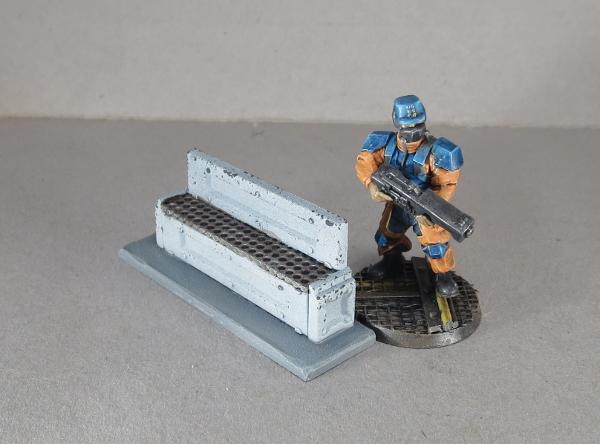
To start things rolling - Park Benches
The bulk of the bench is made up using the long segments from three support struts, and two of the short segments. Use a sharp hobby knife to cut through the struts on either end of the long, middle sections, and cut away the two short segments leaving the rivet strip on one side.

Two of the long strips and the two short segments make up the base of the bench. Glue these together as below using plastic cement.

For the seat, I have used a piece of embroidery mesh (which you should be able to find at a craft store or haberdashery), although you could choose to use plasticard or cardboard instead. I cut the mesh to fit over the top of the bench base, fitting inside the river strips on the tops of either end.

The mesh was glued in place using an 'all-plastics' glue, or a superglue with a plastic primer - just using plain superglue can work, but because the mesh is a rather rubbery plastic it sometimes doesn't hold the glue well without the extra help. On top of the mesh, I glued the third strut section, level with one long edge of the base.
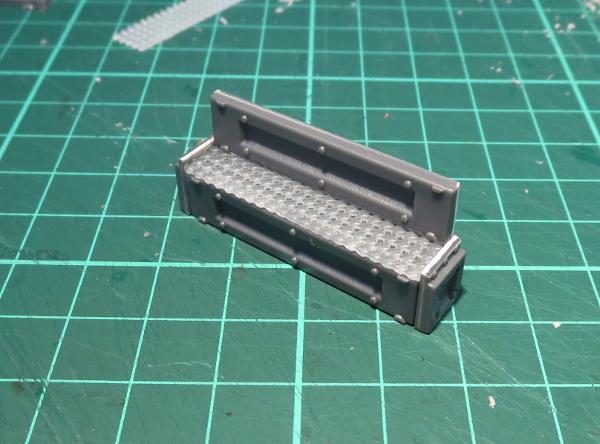
While this comes out just about spot-on for size compared to a 28mm miniature, terrain features often look a little undersized due to the visual discrepancy created by the model's base making it look taller than it actually is. To help mitigate that, I glue a rectangle of 2mm plasticard under the bench to lift it off the ground a bit, which creates a similar illusion of extra height without actually having to make the bench over-sized.

Add a little paint, and the bench is ready to go on the table.
Next up - Let's inject a little art into the scene!
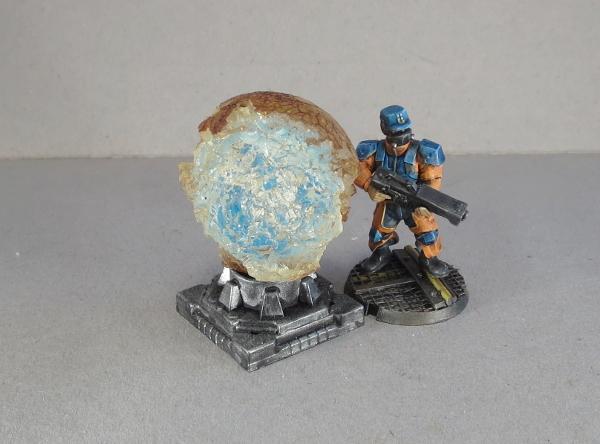
In my first scatter terrain article, I made an orb that I pictured as some sort of holgraphic map tank. I borrowed the same design to make a sculpture using an old rubber ball that I dug up out of the back yard.
The base for the bauble is simply the large pipe fitting from the terrain sprue, glued on top of the square hatch.


On top of that, you can stick a marble, as with my original orb, or any other round-ish thing that strikes your fancy -
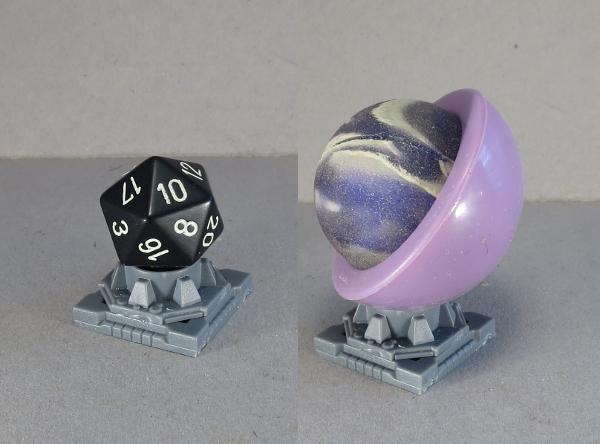
In this case, though, as mentioned, I used a battered old rubber ball. The outside of the ball when I found it was cracked and dirty, and chipped away over much of the ball, leaving a semi-transparent, crystaline shape with a dark crust around it and a blue glow in the middle when the light hits it just right. It was too interesting a shape to not do something with it, and so I promptly glued it onto the pipe fitting base with some all-plastics glue.
Moving right along - let's add some greenery!
If you paint a lot, sooner or later you wind up with empty paint bottles. I found myself looking at my collection of empty dropper bottles and thinking that the lids were just asking to be turned into something. So I took a lid, washed it out, and cut a small pipe fitting from the terrain sprue.

The tip of the lid turned out to be exactly the same diameter as the outside of the hole in the pipe fitting (ie: just a bit bigger than I wanted it to be!) so I scored a line around the top about 1.5mm from the end, and used a hobby knife and a file to narrow down the end to that line.


I used an all-plastics glue to glue the reduced lid tip into the pipe fitting. As with the embroidery mesh used on the park bench, superglue alone isn't likely to bond as well with the lid, so the all plastic glue or a primered superglue is a better option.

I filled the inside of the lid with some 'green stuff' putty, and added a fern made from the leaves of a really dodgy-looking palm tree that came with a set of dinosaur toys bought for my daughter (It's ok, she said I could have it). A quick lick of paint, and the planter is ready for action.

Finally, what sort of city doesn't have statues scattered around to remind people to feel all embiggened?
For a quick and easy statue plinth, I took two shutter windows from the terrain sprue, trimmed off the two protruding parts of the frame on the ends and the rivets on the front surface.
The two windows were then glued together face-to-face, using plastic cement.

I added a statue assembled from some leftover parts scavenged from the Epirian Bot Handler and Broken Rabble sprues, and a base of 2mm plasticard for stability.

Some paint and weathering, and he was looking suitably statuesque, ready to inspire the city's defenders or enrage the rampaging invaders.
All of the above can be easily modified to suit your own table. You can use the individual pieces as scatter terrain, or glue them to building bases to add extra detail without having loose little terrain bits floating around. Be sure to also check out my first scatter terrain article, and also my tutorials on hedges and street lights

Want to share your terrain collection? We would love to see your creations on the Comm Guild Facebook page!
To pick up the Maelstrom's Edge terrain sprue, or any of the rest of the Maelstrom's Edge model range, visit the webstore here.
For other Maelstrom's Edge modeling articles, including tutorials and walkthroughs of a wide range of different building and miniature projects, check out the article roundup here.
Model Spotlight: Epirian Drones
Posted on Monday Feb 19, 2018 at 05:00pm in Models
- by Iain Wilson
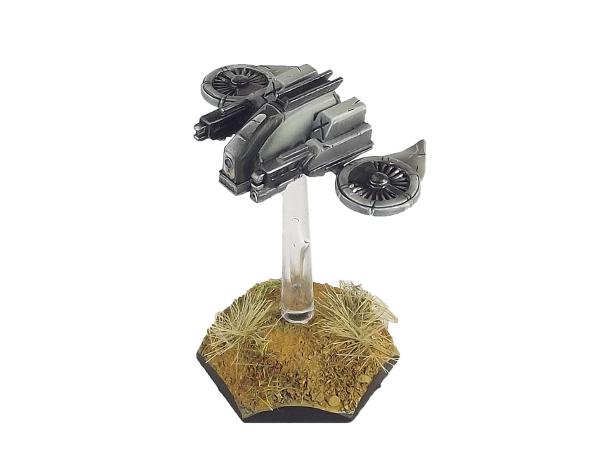
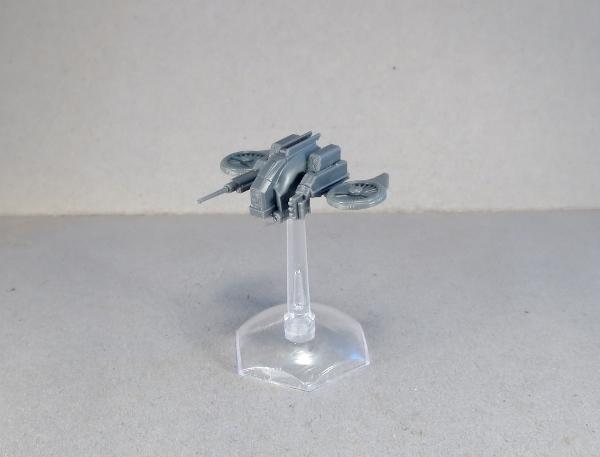
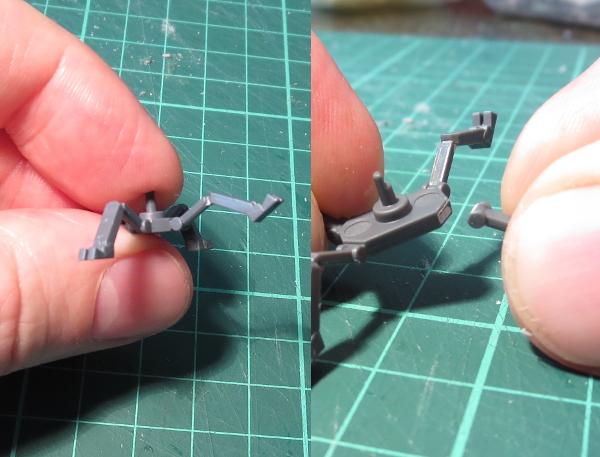
Drones - the ubiquitous workhorse of the Epirian Foundation. Built around a standardised chassis that can be bolted onto a wide array of different locotion and weapon options, the humble drone can be found all over Foundation-settled worlds performing a wide range of tasks. Particularly valued by Contractor military units, the Drone's various weaponised configurations are found at the forefront of any engagement harrassing enemy units and getting into those hard to reach places. Here, we'll take a closer look at the options available on the plastic Drone sprue.
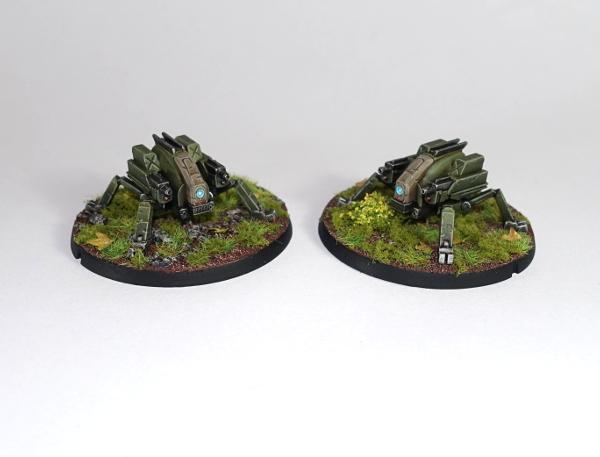
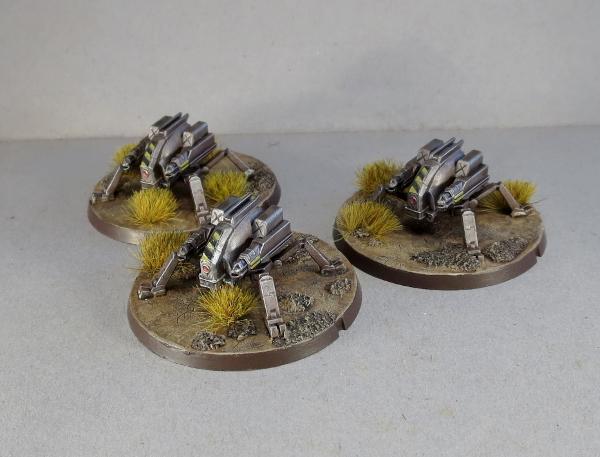
The Drone kit comes with parts to build either of two variants: the flying Firefly drone, or the agile, ground-hugging Spider drone.
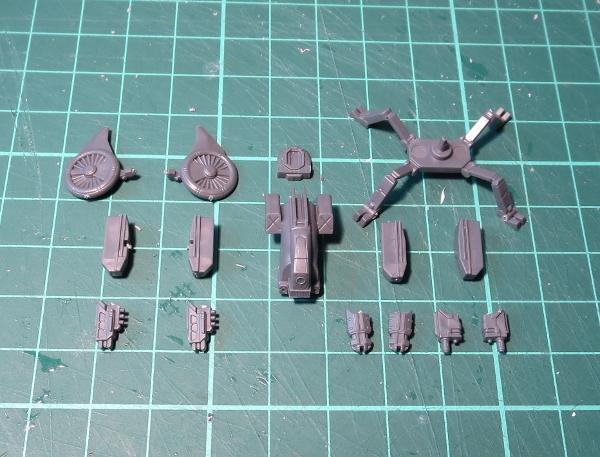
The Firefly is the fastest drone in the Foundation's arsenal, and the lightest armed. Held in the air by two dorsally mounted rotors, the Firefly is capable of vertical takeoff and landing (VTOL) and can travel up to 150 km/hr. Its primary purpose is as a forward scout, using its advanced sensor and communications suite to send information back about enemy positions. Its armour and weaponry is minimal and the Firefly can be easily taken out by even small arms fire - providing the shooter can hit its rapidly-moving frame. The Firefly is equipped with a Drone Class Laser System.
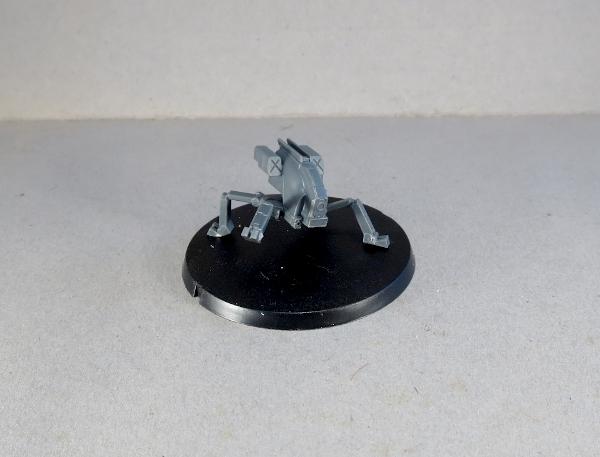
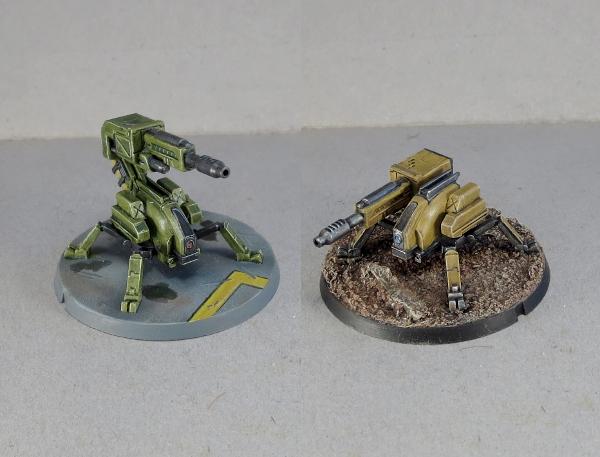
Slower than some of its drone counterparts but fitted with heavier weaponry, the Spider Drone is a popular choice for automated defences inside buildings where a Scarecrow's range is limited. Originally designed to operate within the rough terrain of mining tunnels, the Spider moves on multiple armoured legs, allowing it to keep its balance on the most unsteady of terrain.
The steadiness of its body allows more powerful guns with higher recoil to be added, and most combat Spider variants forgo the sensor suite used in Firefly, Rover and Stalker drones to accommodate more ammunition and heavier armour. Spiders can be equipped with Cutter Light Machine Guns or Flakk Guns.
Because the sprue was developed before the rules were finalised, there wound up being a couple of extra parts on the sprue that were originally intended to be another weapon option, but which also serve nicely as antenae for identifying 'leader' models, or for converting your own different drone classes, like this Sensor Drone:
If you would like your drones to look a little more mobile, the thin legs of the Spider lend themselves well to conversions. You can easily repose them by either carefully bending at the joints, or by slicing through the joint and reattaching at a different angle.
For those wanting the Drones to pack a bit of punch on the battlefield, you could try out the reasonably simple Scorpion Drone conversion detailed here, which takes the Spider Drone and equips it with a Maglock Chaingun from the Hunter Mech kit.
Getting a little more adventurous with the converting, I like to think that the Drone chassis would find its way into all sorts of different applications where having some robotic assist might make a task easier or more efficient. Like this Light Carrier Drone, converted from a Drone chassis and a Battlefront 15mm plastic tank kit, with a little plasticard.
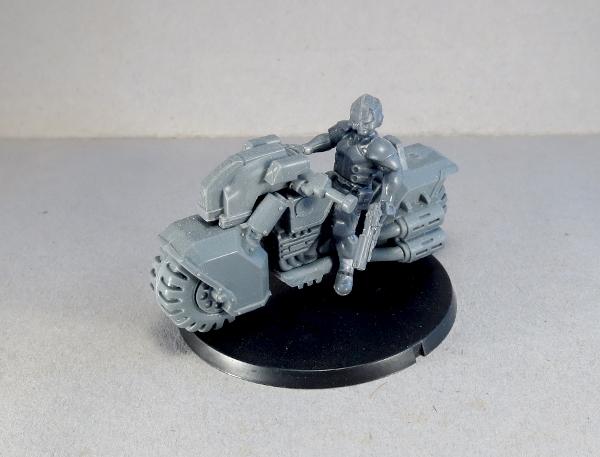
Or this (work-in-progress) Journeyman Patrol Bike, converted from a Games Workshop bike and an Epirian Bot Handler, with the Drone chassis up front for steer assist and targeting.
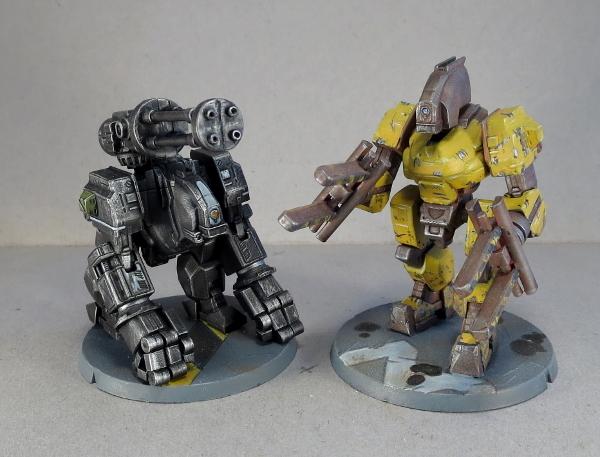
You can also use the Drone chassis as a head for larger bot constructs, like these 'Silverback' and 'Mule' Hunter Mech conversions.
All of that can, of course, leave you with a bunch of leftover flight turbines, which can be used to build a jump pack-equipped Epirian Warden, or some floating 'Sentinel' Drones, using the turbines and the top of a Scarecrow - tutorial coming soon for that one!
What have you done with your Drones? We would love to see your creations on the Comm Guild Facebook page!
To pick up the Drone kit, or any of the rest of the Maelstrom's Edge model range, visit the webstore here.
For other Maelstrom's Edge modeling articles, including tutorials and walkthroughs of a wide range of different building and miniature projects, check out the article roundup here.
Terrain Tutorial: The Foam Ball Cactus!
Posted on Monday Feb 12, 2018 at 05:00pm in Tutorials
- by Iain Wilson
You may have noticed by now that I make a lot of buildings. Sometimes, though, it's nice to get away from the urban sprawl, and venture out into the untamed countryside where enemy troops may wind up being less scary than the native flora and fauna.
If you were gaming back in the '90s, you might be familiar with some of the scratch-built terrain that was featured in White Dwarf magazine back then. One of my favourites, and a staple on many a scifi gaming table back then, was the foam ball and toothpick-spine cactus. It was a little goofy, but also really easy to make and looked rather effective on the table in place of all those mass-produced train set trees. So I thought it might be fun to revisit the idea, and see what I could do to modernise it a little and maybe remove some of the danger of taking out an eyeball while checking line of sight. And so I came up with this:
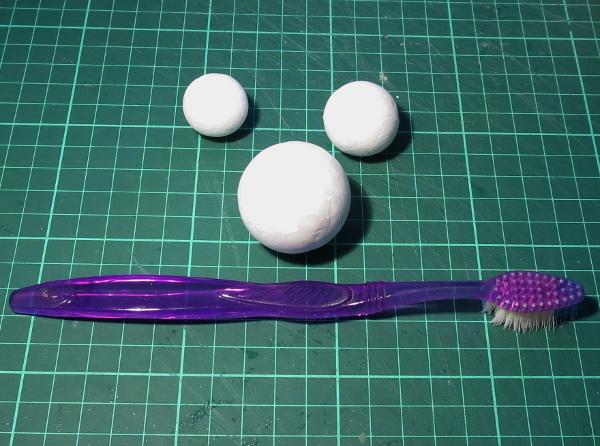
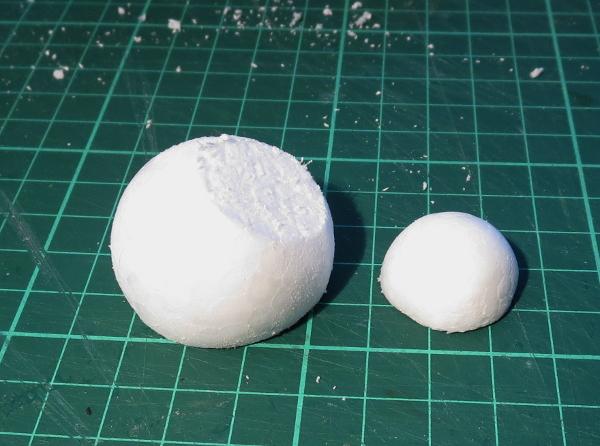
Staying true to the original, I found a bunch of different sized expanded polystyrene balls at a local discount store. To replace the old-school toothpick spines, I dug out an old toothbrush.
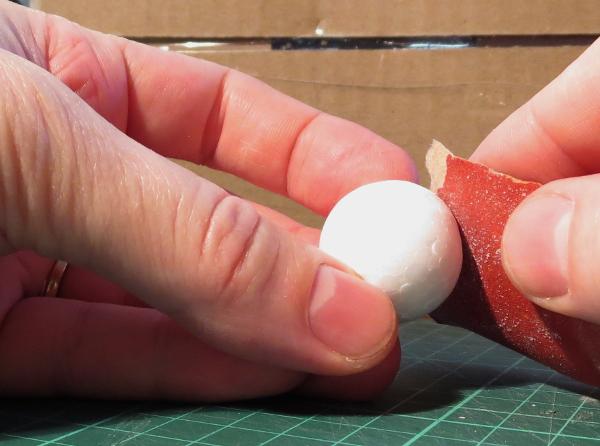
The first step is to give the foam balls a little touch-up with some fine sandpaper. This removes the mould line around the middle of the ball, and roughs up the outer surface a little to help the paint stick.
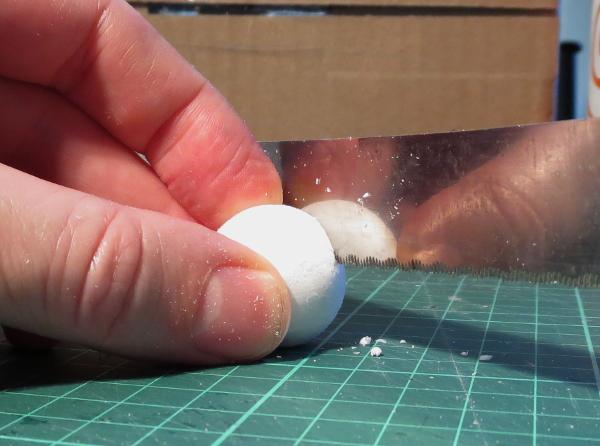
To make the ball easier to stick down to a base board, use a fine-tooth breadknife or other sharp knife to cut a slice off, making a flat surface for the bottom of the cactus.
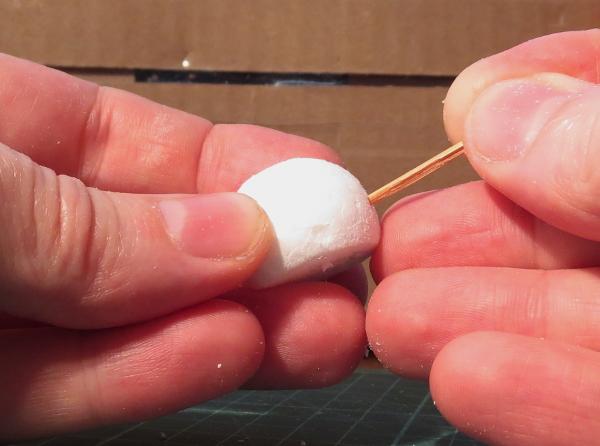
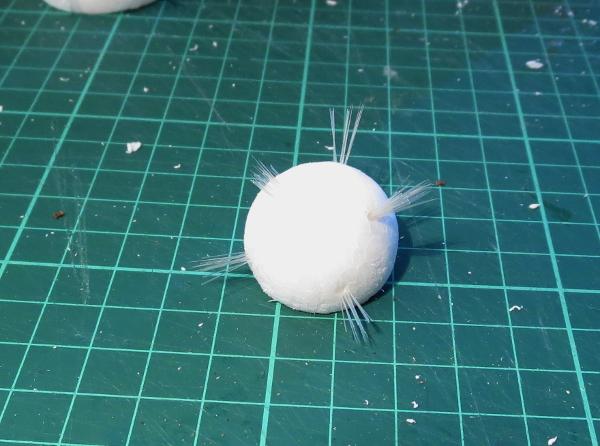
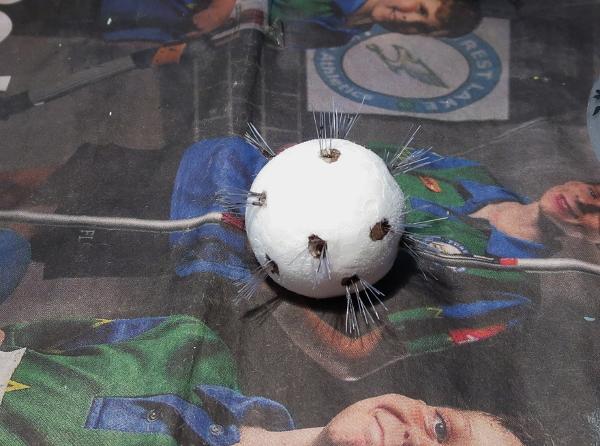
Next we need to pike some holes in the ball to add the spines. Serendipitously, I used a toothpick, but anything pointy will do the job. Make the holes at least 5mm deep, although it doesn't hurt if they go in further. They're spaced around the ball in rough layers, without being too neat about it - slightly haphazard spacing adds to the organic look.
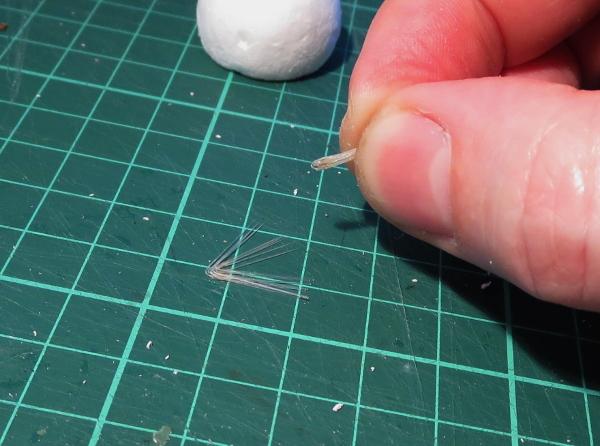
Toothbrush time! Take your toothbrush and, using a pair of pointy pliers, rip out a bunch of bristles. Try to hold them together - they tend to scatter if you're not careful when you let go.
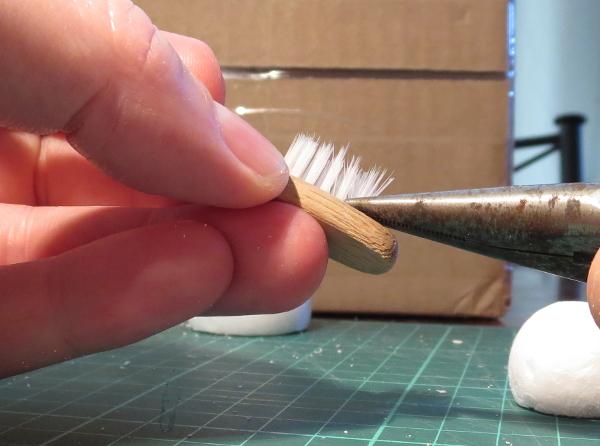
Depending on how many bristles are in a clump, you might want to split the clump into halves or thirds, or use the whole thing as a single clump of spines. It's entirely up to the look you want.
In most toothbrushes, there is a small piece of metal in the fold at the base of the bristles that anchors them into the brush. Tease this out and discard it, and then separate the bristles into the size clump you want, being careful to put the extras down so that they stay together for later.
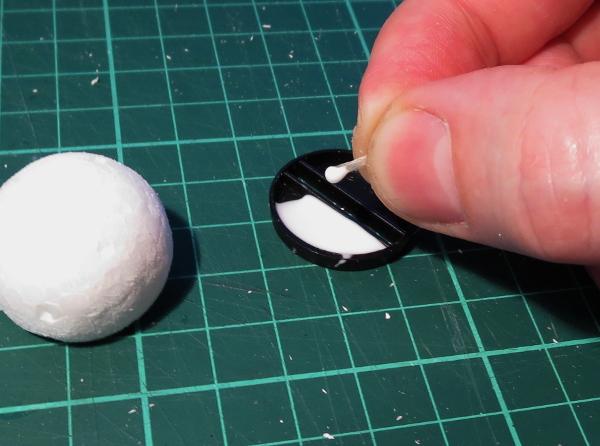
Dip the base of the bristle clump in some PVA glue, and then insert it into one of the holes in the foam ball. Mine have about half of the bristle inside the ball, to give them a good anchor and to stop them from splaying out too much.
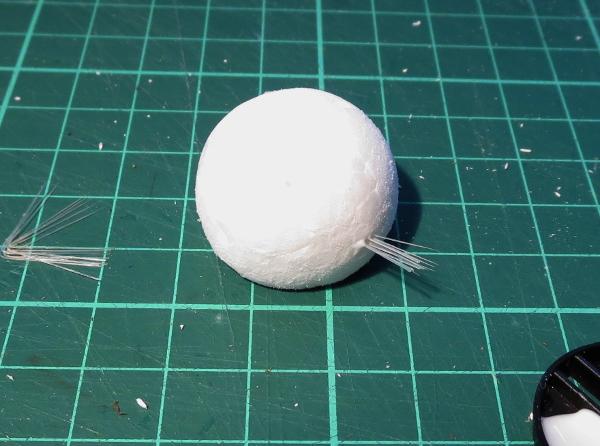
Repeat until you have all of the holes filled with bristles.
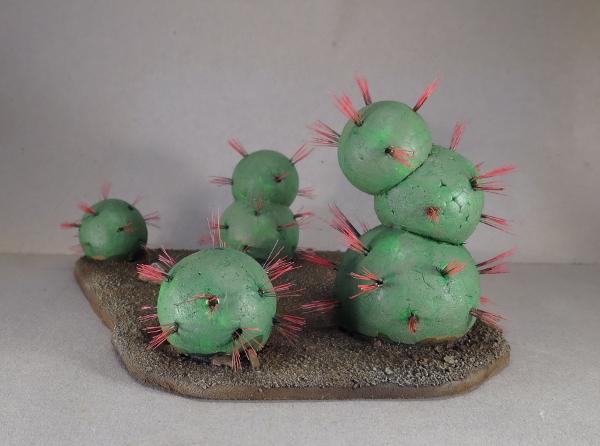
For an older cactus, you can add extra nodules by slicing off a section on the top of the first ball and gluing the flat bottom of another ball into place on top. Reinforce with a toothpick glued in the middle, if you want a little extra strength. When that's set, poke in the holes and add bristles as above.
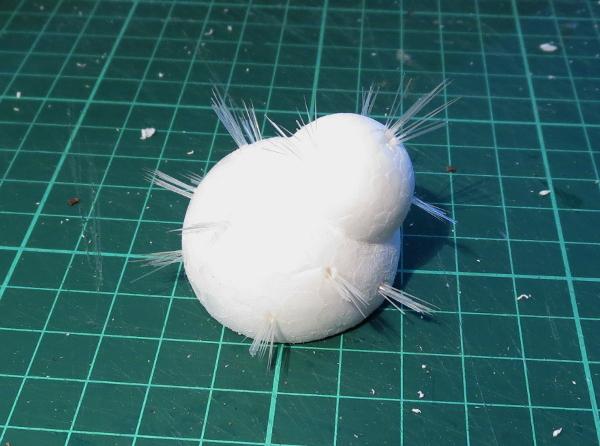
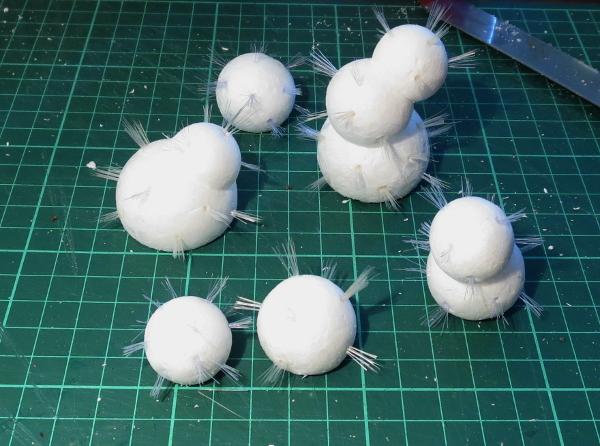
Mixing in some different configurations and different sized balls will help create a nice, varied look on the terrain piece.
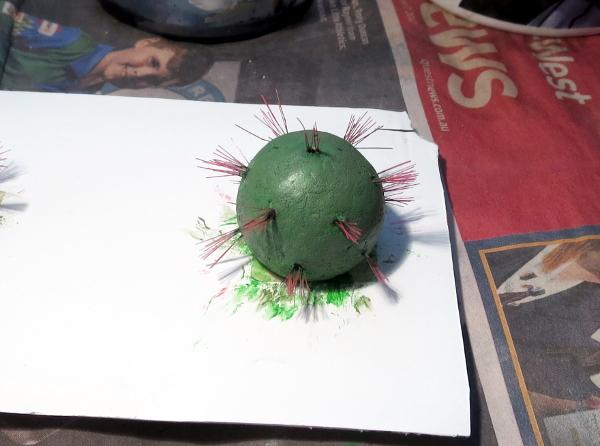
To paint, first work around the holes with a pointy brush and a dab of brown wash or thinned brown or green paint to mask the white interior of the holes. (If you're more forward-thinking than me, you could alternatively do this before you glue the bristles in, which might be a bit easier!)
Then paint the rest. I've gone for standard green cacti, with red spines for some contrasting colour, but for alien flora you could obviously use whatever colours you please.
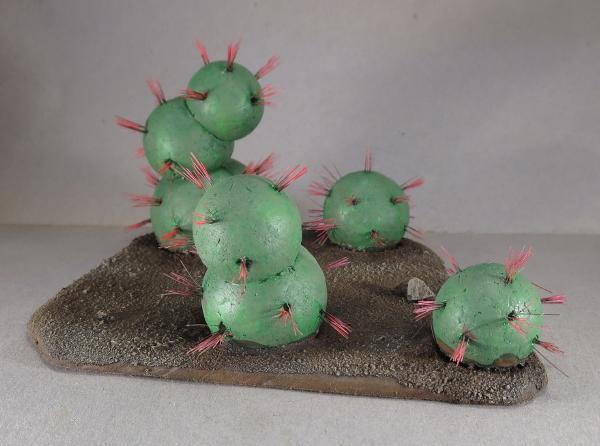
From there, glue your painted cacti onto a base board, and your cactus grove is ready for the table!
Do you have ideas for your own alien area terrain? We'd love to see them! Come along and share on the Comm Guild Facebook page.
For other Maelstrom's Edge modeling articles, including tutorials and walkthroughs of a wide range of different building and miniature projects, check out the article roundup here, and you can find the Maelstrom's Edge model range and boxed game in the webstore here.
Tags: scratchbuilding terrain tutorial
2017 - The year in review for Maelstrom's Edge
Posted on Monday Jan 01, 2018 at 05:00pm in General
2017 has drawn to a close, and it has been a fantastic year for Maelstrom's Edge. Here's our year in review:
This year saw the release of the long-awaited third faction for Maelstrom's Edge: The Broken!
The Broken Infantry Pack consists of 4 sprues loaded with bits, that allow you to build Broken fighters from any of three 4 different unit types. And this is just scraping the surface of what we have planned for the Broken - 2018 will see plenty of new releases to fill out their roster, with additional troop types and a slew of new and fantastic alien species.
Also on the release front, we launched a supplemental range of resin models, starting with the Karist Angel Hellblaster.
While plastic models are great for all sorts of reasons, they have a rather long development leadtime, which slows down releases. Adding resin models allows us to get new things out more regularly, and also lets us develop models that wouldn't necessarily be practical or economical in plastic. So the aim going forward will be to have the core range remain in plastic, supplemented with resin models which will allow us to have a new release out every month.
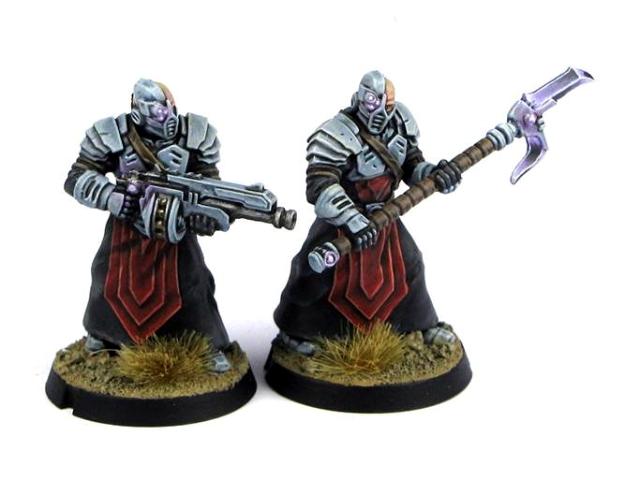
The Hellblaster was followed up with Karist Heavy Weapon troopers, and this month saw the addition of an official model for the Karist Angel Keeper (which previously had a playtest rules card but required some conversion to build a model). It's not all Karist love, though - Epirians and Broken will be seeing some releases very soon!
On the fiction front, 2017 saw the release of Tales From the Edge: Escalation. This is our second compilation of short stories, and features work by some great names in science fiction, including Alastair Reynolds, Aliette de Bodard and Liz Williams!
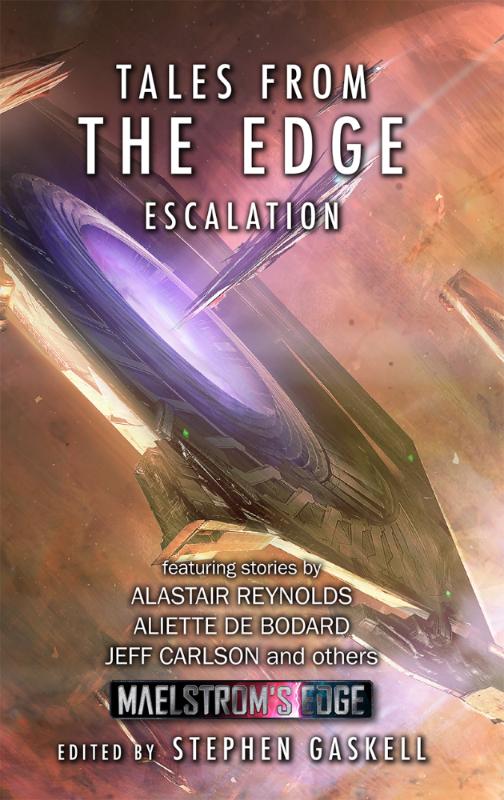
Escalation is available in print through the Maelstrom's Edge webstore, or as a eBook through Amazon.
To go along with the book release, we took a bit of a look at what went into creating the fiction for Maelstrom's Edge with a series of articles here: Crafting Tales from the Edge, Developing Stories for Maelstrom's Edge, and The Maelstrom's Edge Fiction Creative Process, by Tomas L. Martin.
For the modelers, this year continued our regular article releases, with tutorials and spotlight articles covering a huge range of different hobby topics. We showed you how to build a model to represent the Epirian faction objective:
We went to town with the terrain sprue, with tutorials on shipping containers, buildings made from plastic storage trays and drainage channel, and some ideas for scatter terrain, blast craters, hedges, streetlights and 'blanket' door coverings made from bandages. We also shared templates for making a small minehead building and a larger bunker.
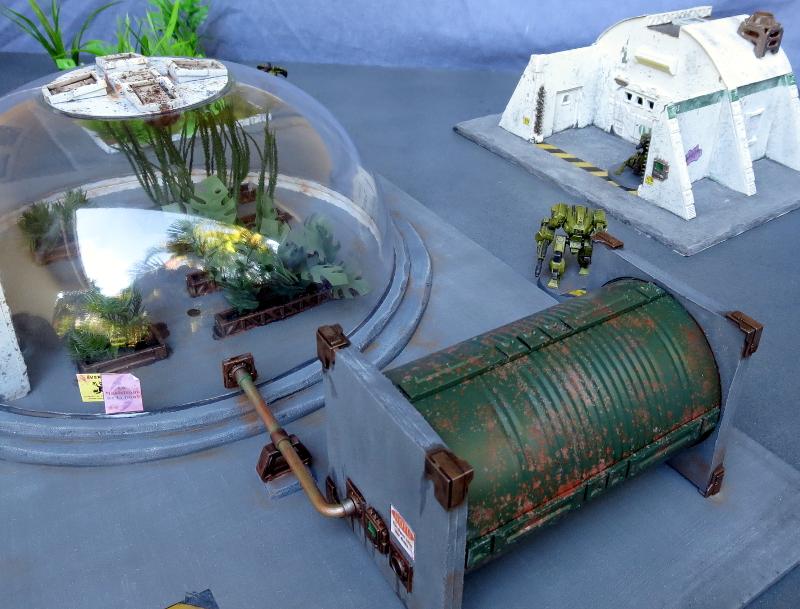
We also showcased a huge array of different terrain projects, including a plantation dome and a massive landing pad piece.
The models weren't forgotten, with tutorials on sculpting your own gas masks for your Epirian contractors, painting weathered-looking metal and heat stress on weapon barrels, a run-down on a quick-painting method for Broken Rabble units, and a guide to making bionic arms for your contractors from Scarecrow arms.
We also offered conversion tutorials and homebrew rules cards for a couple of new units types: The sneaky, sniping Reaper Cadre for the Karists, and the heavy-weapon-toting Scorpion Drone for the Epirians.
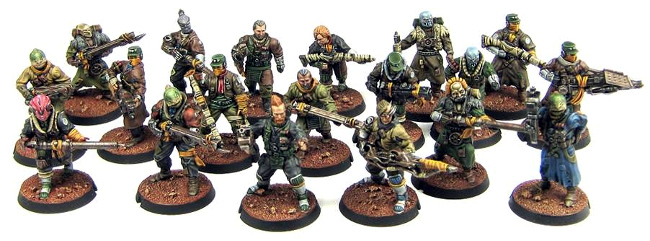
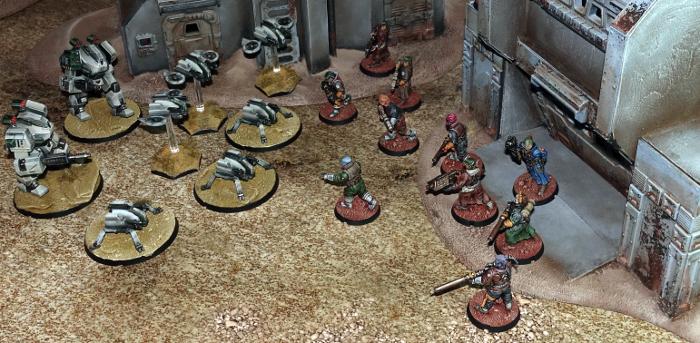
Along the way, we showcased a bunch of different modeling projects, including some small Epirian and Karist forces, some variant Epirian bot ideas, and a winged Angel conversion, amongst many others.
Gaming was also covered, with another fantastic battle report from DakkaDakka's Sgt Oddball - a Karist vs Epirian 'introductory' mission entitled 'The Final Act.
We also published a series of articles alongside the Broken release, taking a close look at their rules and how they fit into the game. You can find these here: Part 1, Part 2, Part 3 and Part 4.
So, what's next?
We have a slew of projects currently in development, and 2018 will see us continue with a new release each month to flesh out the three existing factions. This will include a couple of new plastic kits for the Epirians, and something a little bit... let's say 'heftier' for the Broken. Design work is also well underway for the next faction, which will bring some fun toys to the table for battle suit enthusiasts!
Stay tuned to the Comm Guild blog or the Maelstrom's Edge Facebook page for updates!
You can find all of our miniatures, the terrain sprue, and our fiction on the Maelstrom's Edge webstore here. For all of our modeling articles to date, including tutorials and walkthroughs of a wide range of different building and miniature projects, check out the article roundup here. And as always, feel free to join in the discussion in the Comm Guild Facebook Group here!
Tags: news
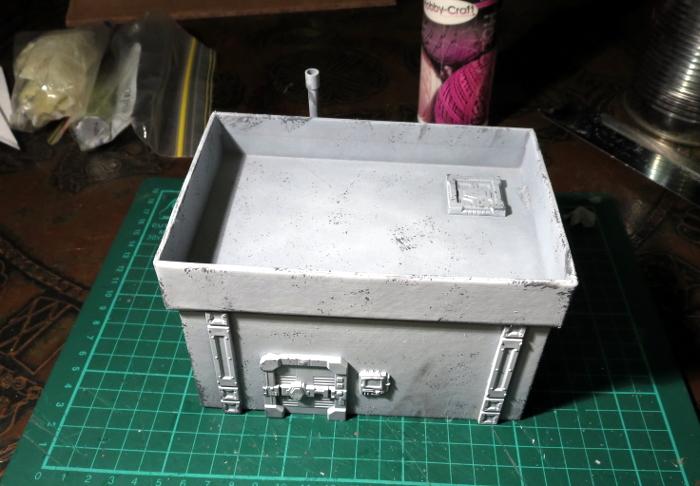
Terrain Tutorial: Blanket Door Coverings
Posted on Monday Nov 27, 2017 at 05:00pm in Tutorials
- by Iain Wilson
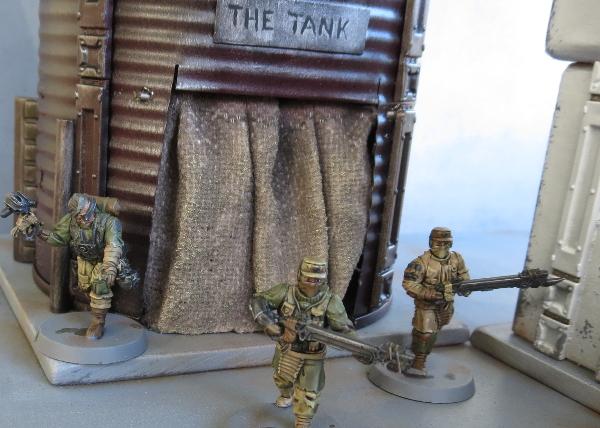
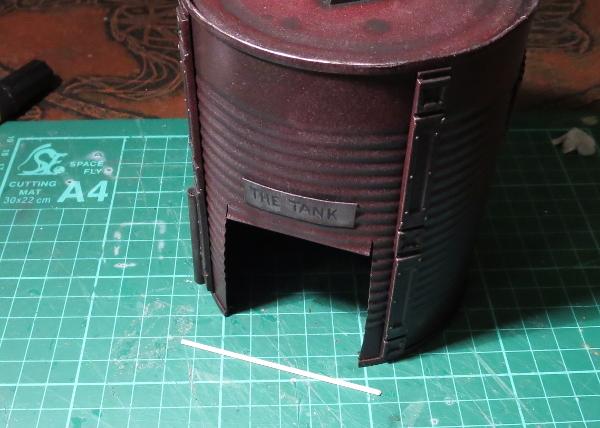
Last week I put together the second part of my Broken settlement, with some buildings made from a cardboard gift box and an old fruit tin. The fruit tin still needed a door covering, and I wanted something that looked sufficiently rough and ready. I decided to go with an old blanket to serve as a makeshift door, which wound up looking like this:
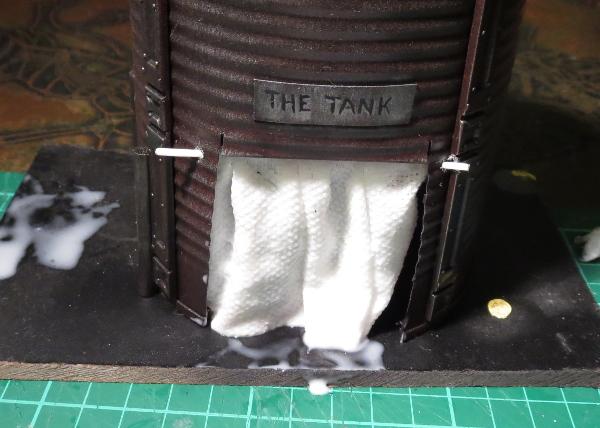
To start with, I took a length of plastic rod and cut it to run across the doorway with a little overhang on either side. This would eventually sit in place at the top of the doorframe, poked through a couple of holes drilled into the tin on either side.
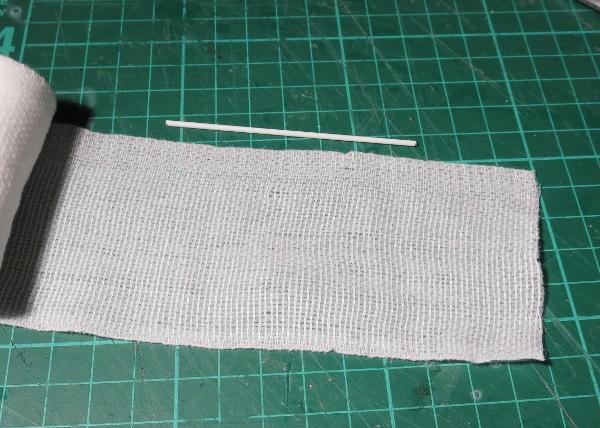
I then grabbed some crepe bandage and cut a piece a little longer than the rod, to allow it to bunch up. Bunched curtains look more interested than a flat sheet, unless you want to paint a design on, in which case a flatter surface is going to be easier to deal with.
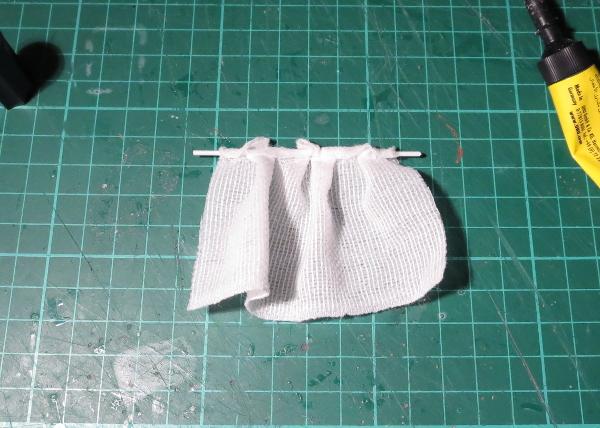
Next I glued the bandage over the rod with some superglue, bunching it up so that the ends of the rod were sticking out, and folded over the rod far enough so that the bottom of the blanket would just touch the ground when hung in place.
Now comes the messy part - I mixed up some PVA glue with a little water. The exact amount of water is going to depend on how runny your PVA glue is, but you're aiming for around the consistency of pouring cream.
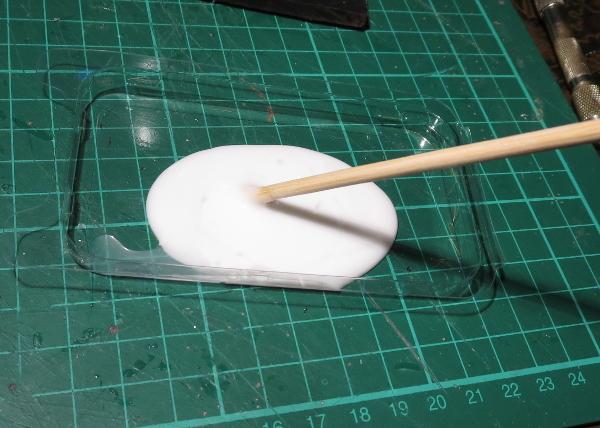
Then I dropped the bandage blanket in the glue and let it soak right in. When the glue dries, it will stiffen up the cloth, so you want it good and soaked through. If the glue is too thick, it doesn't soak in as well and you wind up with some parts of the blanket that are still soft and floppy, and others a goopy mess.
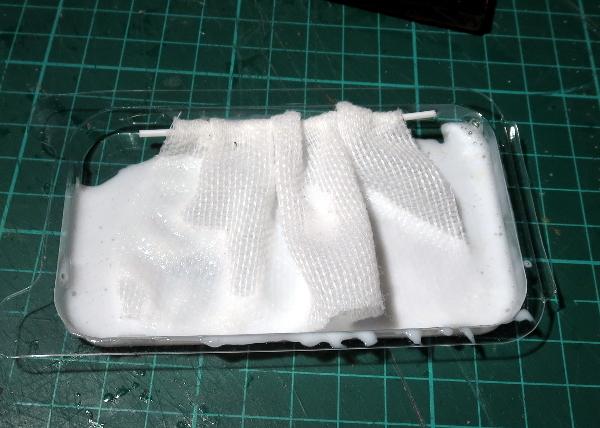
Once the bandage was nice and gluey, I hung it in place and arranged the folds to look as natural as possible, and then left it sit for two days to give it plenty of time to dry. Once dry, it will be stiff, but still slightly flexible. If it's too soft and doesn't hold its shape, you can stiffen it up a little more by painting on some additional glue, but try not to put it on too thick and fill up the weave of the fabric. If you have a brush-on superglue, you could also paint some of that onto the back of the blanket if it is accessible, but again, be sparing so you don't soak it into the weave and destroy the blanket look.
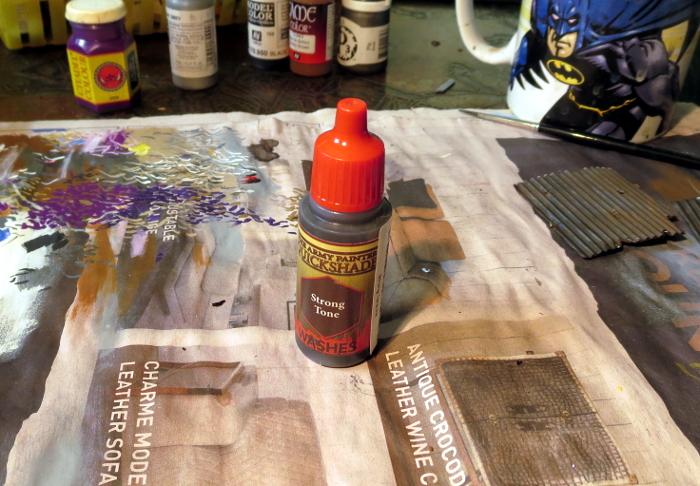
When the glue is properly dried, it's time to paint. I started out with a layer of Army Painter Strong Tone, but you could use whatever colour fits your terrain. If you use a wash or ink, make sure you give it plenty of time to dry, as the watery paint can cause the PVA glue to soften up again.
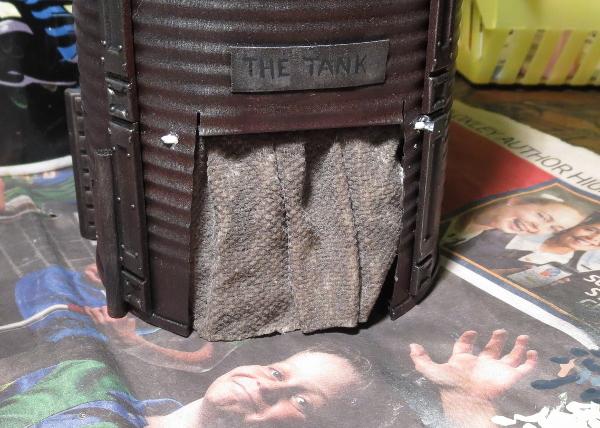
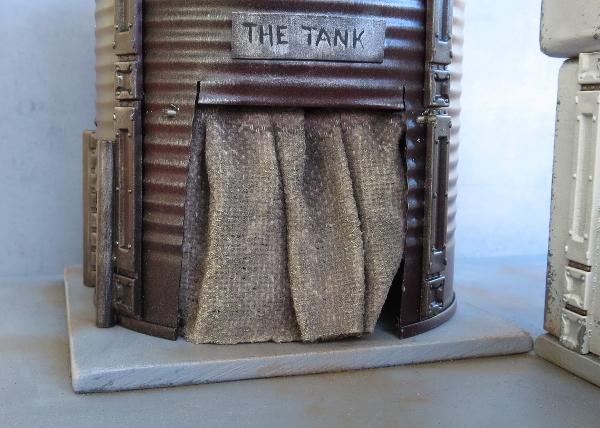
Once the wash was dry, I carefully drybrushed with some bone and white to highlight the raised parts of the blanket, and added a little more wash into the deeper creases for some extra shading.

And that's a job done!
You can also use a similar technique to hang blanket coverings over windows. On this one, the blanket is tacked onto the outside of the window frame. To attach the soaked bandage to the window, I added a drop of superglue to the top corners, let that set, and then carefully teased the wet blanket into the shape I wanted it:
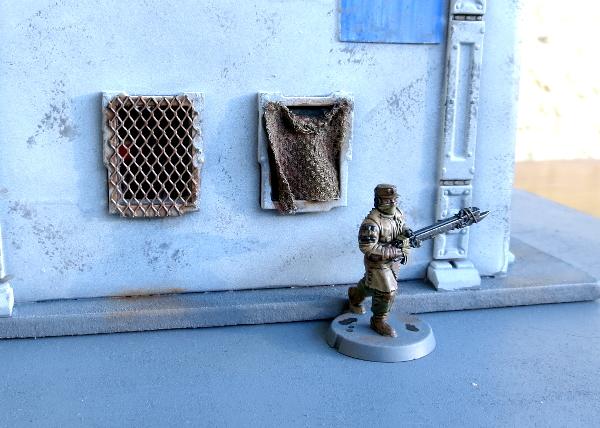
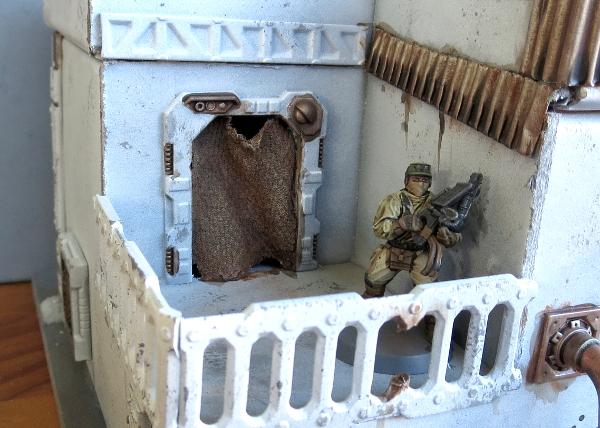
The same was done here to hang a blanket inside this door frame. This is a door piece off the Maelstrom's Edge terrain sprue with the door cut out of the frame. The blanket is superglued in place at the top corners and down the sides of the door frame and then shaped and left to dry.
On my next terrain project, I'll also be using this to add some canvas roof coverings to a building that's seen better days... Stay tuned!
To build your own stellar refugee settlement, you can pick up the Maelstrom's Edge terrain sprue along with the rest of the Maelstrom's Edge miniature range from the webstore here. As always, feel free to share your creations on the Comm Guild Facebook page!
For other Maelstrom's Edge modeling articles, including tutorials and walkthroughs of a wide range of different building and miniature projects, check out the article roundup here.
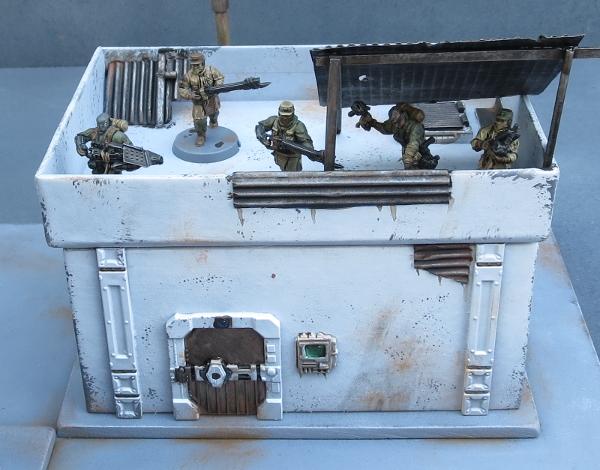
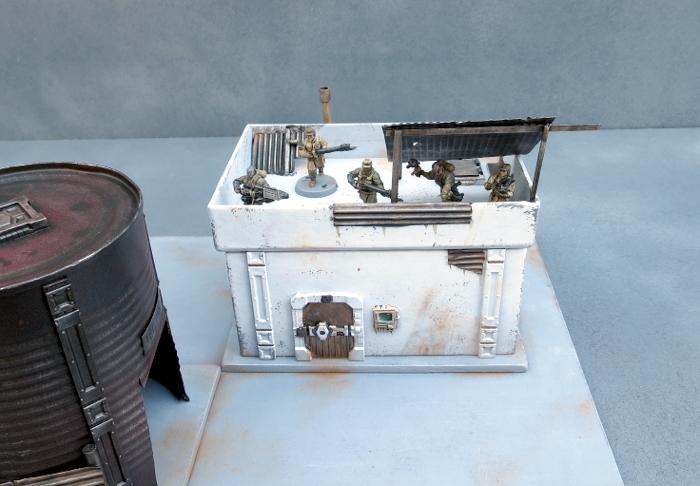
Terrain Spotlight: Broken Settlement, part 2
Posted on Monday Nov 20, 2017 at 05:00pm in Tutorials
- by Iain Wilson
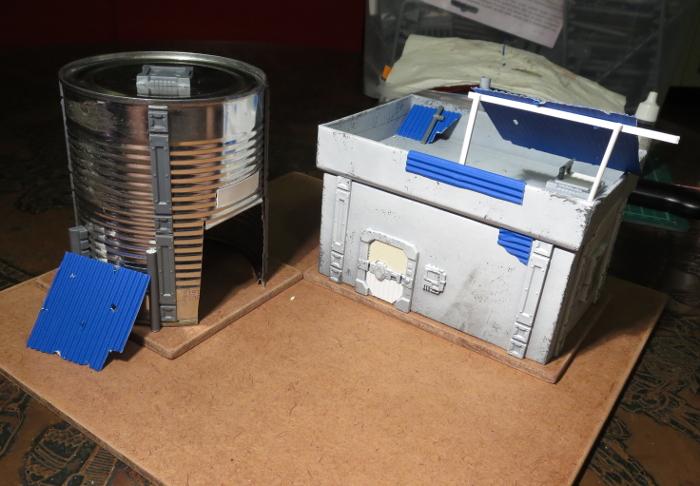
This week, I'm continuing on with the construction of the Broken settlement that I started a few weeks back, which you can find round about here, by adding in another 'renovated' building and a converted water tank shelter.
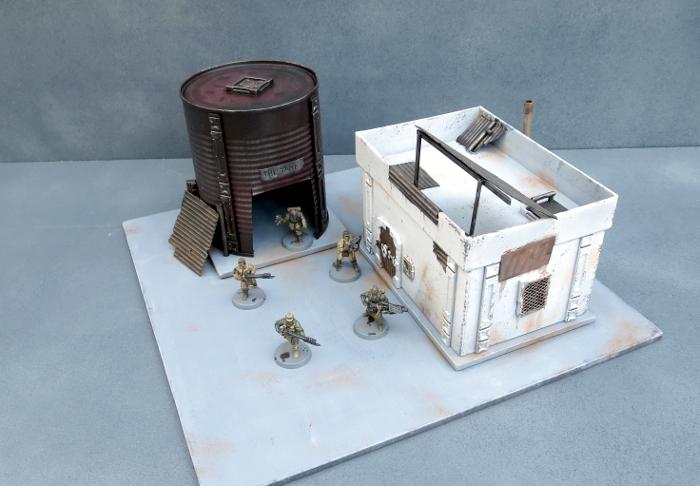
I fast-forwarded a little on construction by grabbing a small building that I made some time ago for a video showing how to make a building from a cardboard gift box and the Maelstrom's Edge terrain sprue (which you can find on Youtube here). This was partly painted as a test run for the sponge-weathering that I used on the first building for this settlement.
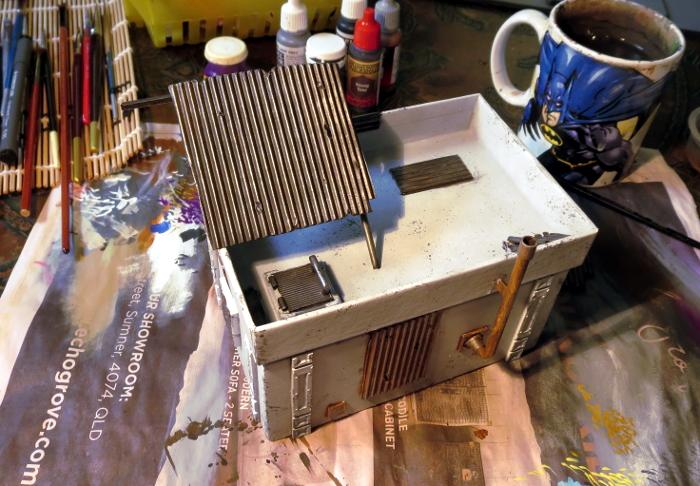
Clearly, this building was still far too pretty looking to fit into a Broken settlement, so I added a bunch of patch-plating using plasticard and corrugated cardboard, and added some mesh over the windows on the sides. I also built a framework on the roof to create a makeshift shelter or sentry point.

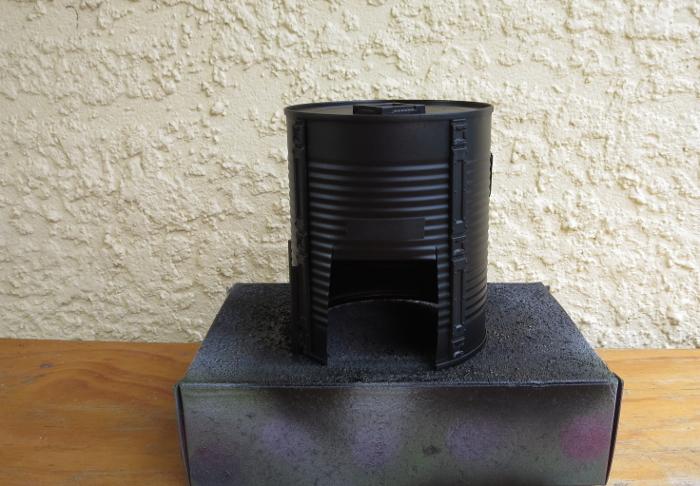
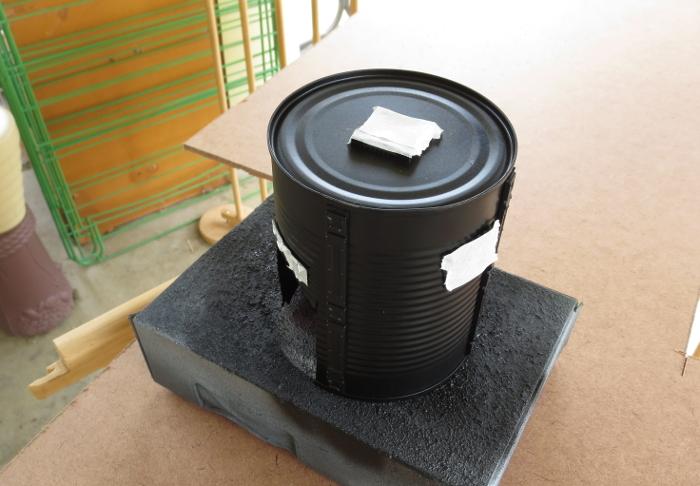
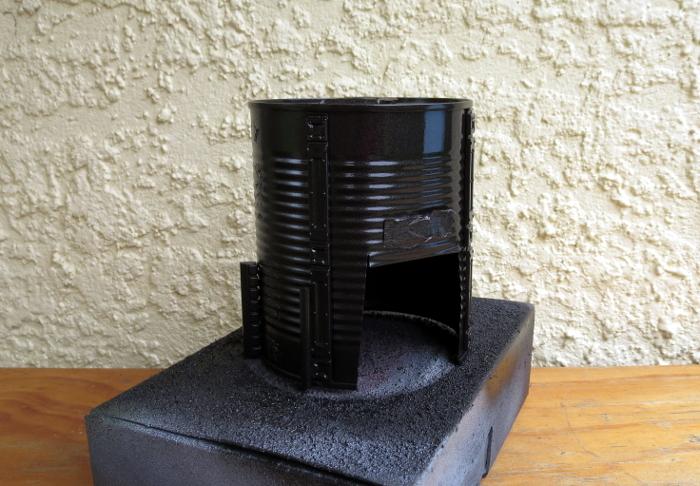
The companion building for the gift box one is made from an old fruit tin. This received a good wash and had the label removed, and then I cut a squarish hole in the side to serve as a doorway.
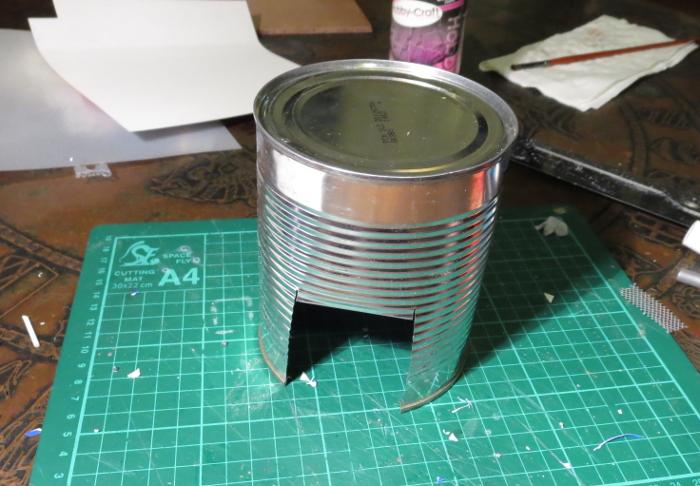
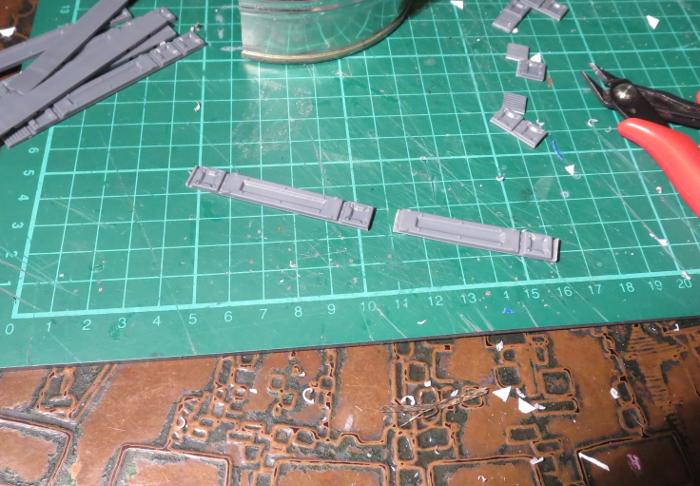
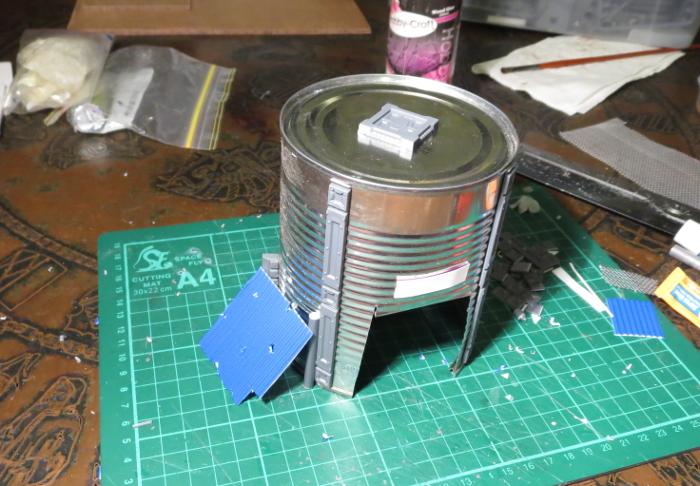
I cut a bunch of reinforcing struts from the terrain sprue to fit neatly down the sides of the tin.
With the addition of some patches, a hatch on the roof and a lean-to on the side, the old tank was ready for painting.
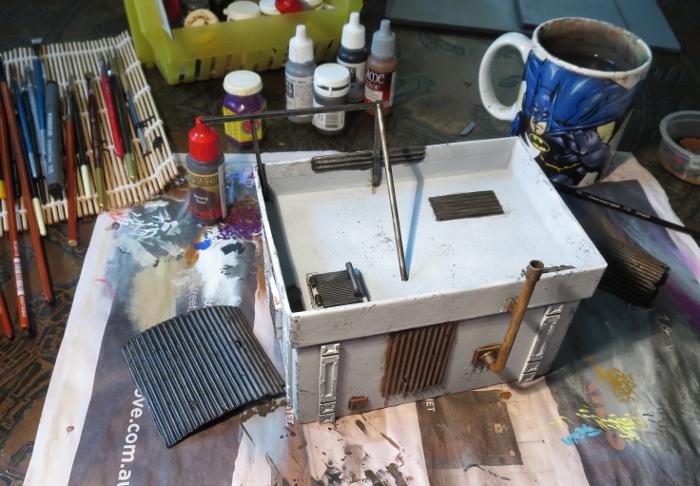
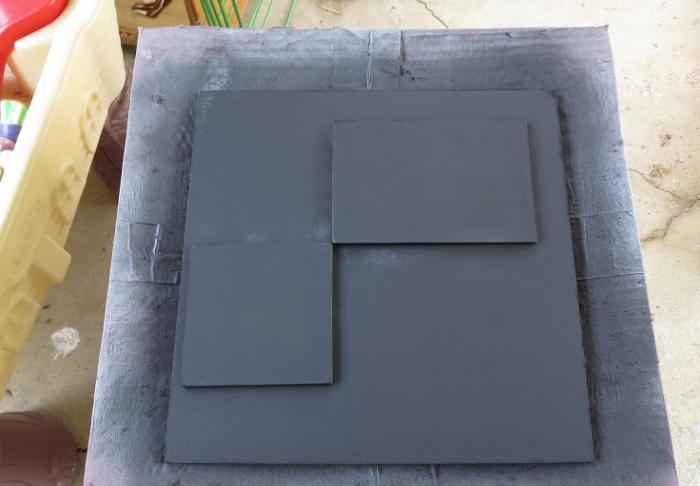
To sit the buildings on, I cut a 12" square of masonite, with a couple of smaller pieces glued on top - a rectangle for the gift box building and a square for the tank. These were cut to size and then sanded around the edges to smooth down the burrs. I then gave the top surface a light sand to break up the shine and give it some texture for drybrushing later, and then glued the building foundation pads on with PVA glue.
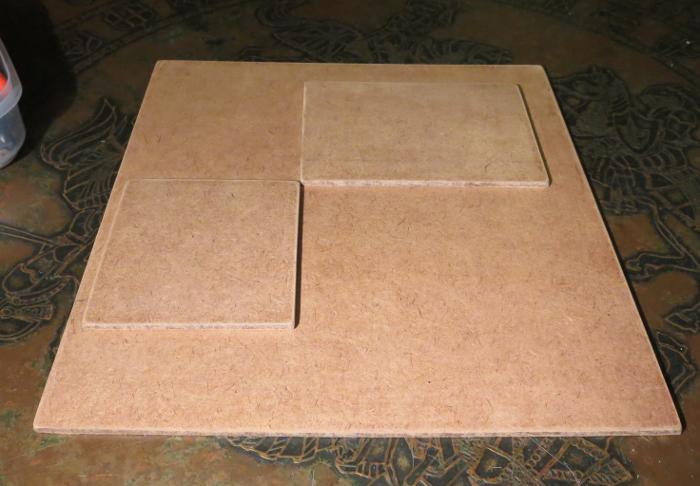
Everything in place, ready for painting:
Because the gift box building was already mostly painted, I could skip straight to the detail work. To check how the main bit was done, check out the first article linked back up at the start of this one.
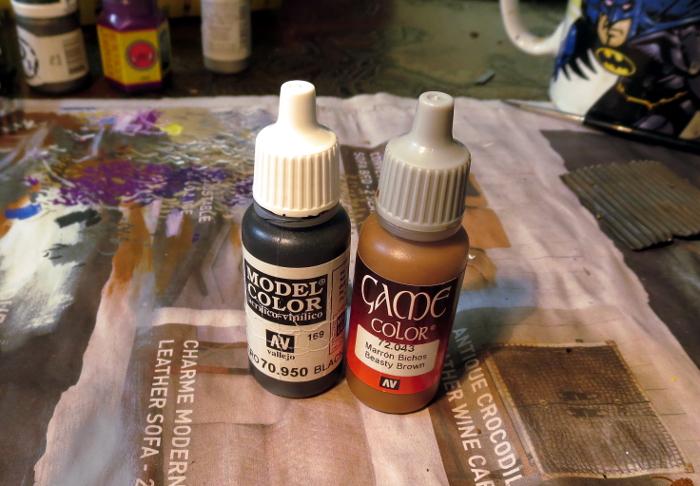
The various metal patches were given a coat of a rough mix of Vallejo Beasty Brown and black.
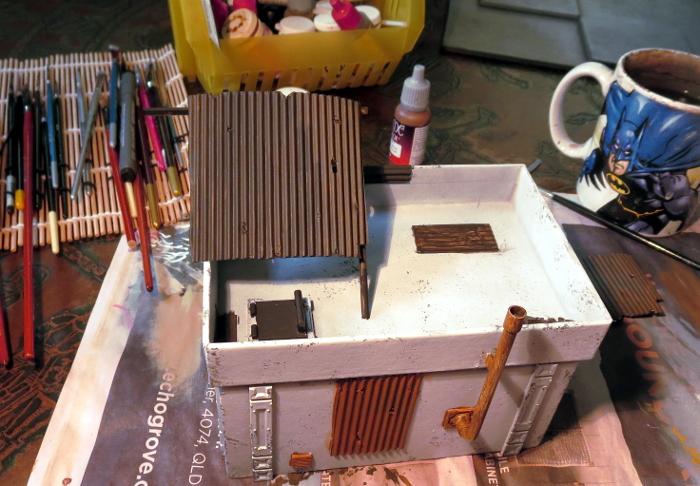
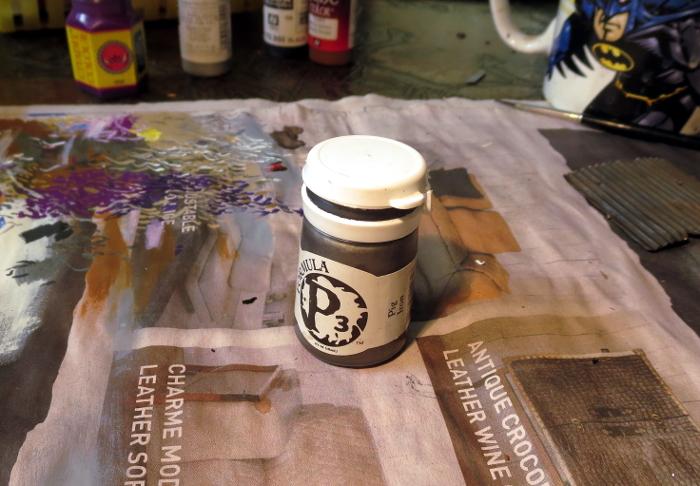
Over this went a light drybrush of P3 Pig Iron.
This was followed by a generous coat of Army Painter Strong Tone.
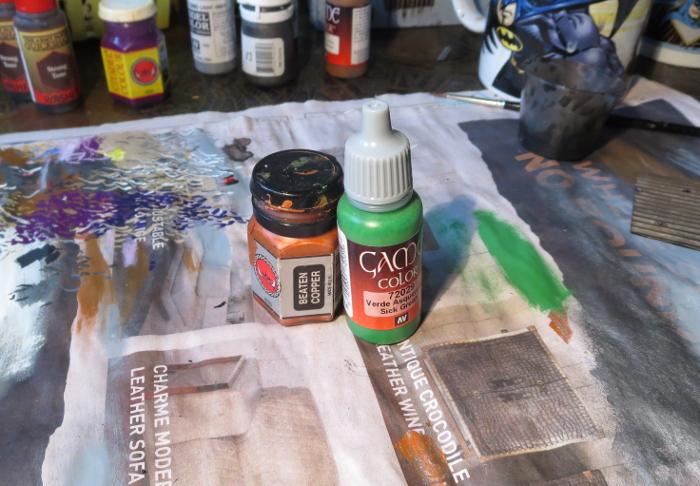
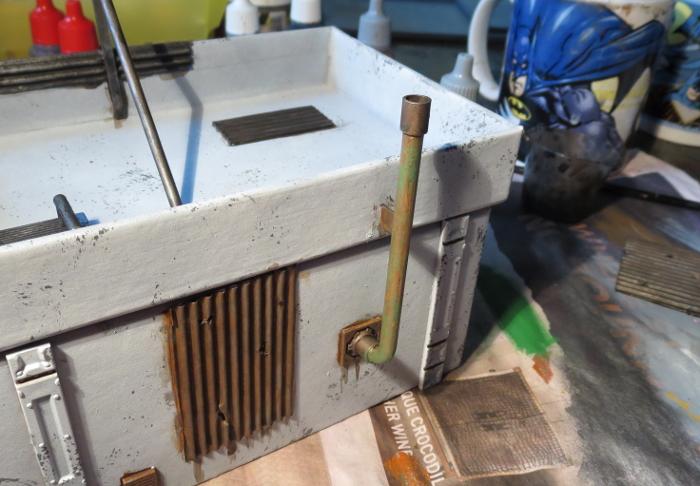
The pipe on the back wall was painted with a coat of Citadel Beaten Copper, and then given a light drybrush of Vallejo Sick Green.
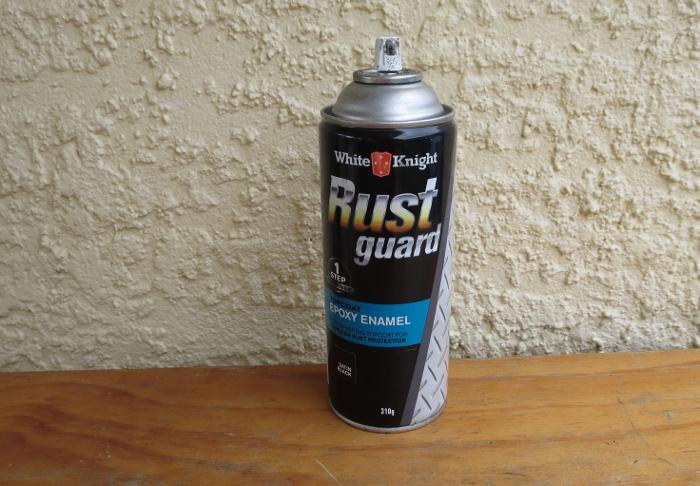
Meanwhile, the tank was given a spray inside and out with black Rustguard, to prevent it from rusting through the paint down the track.
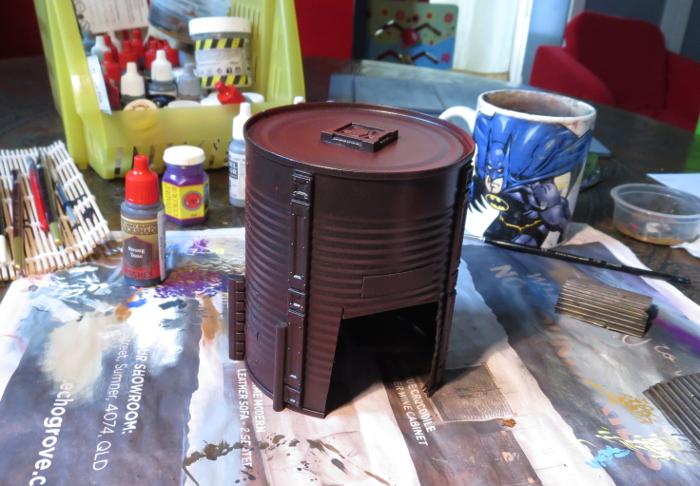
I then masked off the detail parts of the tank building with some masking tape.
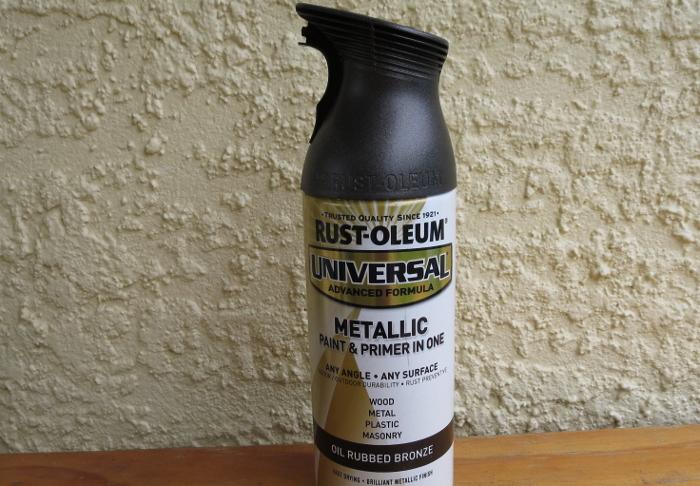
The came a coat of Rust-oleum Oil Washed Bronze. This is a rust-preventing primer like the black, so could have actually gone straight over the bare tin without the layer of black, but I wanted to make sure it was good and dark. The black base helps this without having to spray the bronze on too heavy, as it gets a bit goopy and rough.
When the bronze was dry, I sprayed lightly over the top surface of the tank with some Army Painter Dragon Red, and then flipped the tank upside down and sprayed lightly around it so that the red caught in the undersides of the tin's corrugations without coating the whole thing in red.
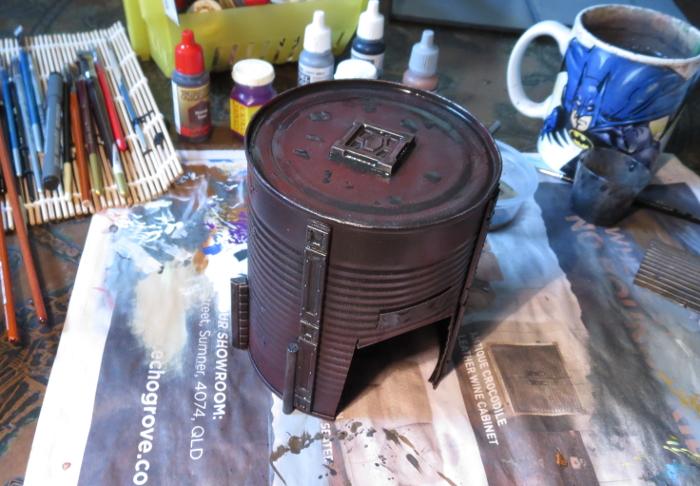
I then drybrushed the whole thing lightly with Pig Iron, going a little heavier on the detail parts to make them stand out a little from the darker tank. The detail parts were then washed with some Strong Tone, and a few puddles of Strong Tone scattered around on the top surface.
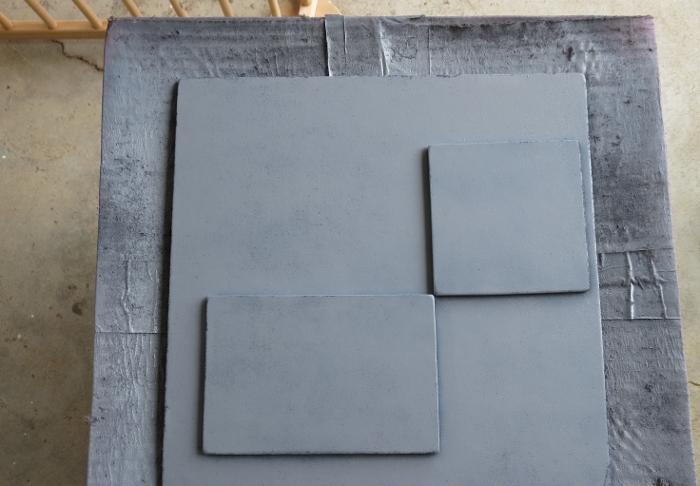
While all of this was going on, I undercoated the based board with some flat black, and then gave it a coat of a flat medium grey. I deliberately use a range of different greys to basecoat my 'concrete' terrain bases, to help reduce the uniformity of the vast expanse of concrete on the table. If you look around in a city that has a lot of concrete structures, the colours vary considerably depending on the age of the concrete and the specific mix used, so it creates a better sense of realism on the gaming table if you carry this across in your painting.
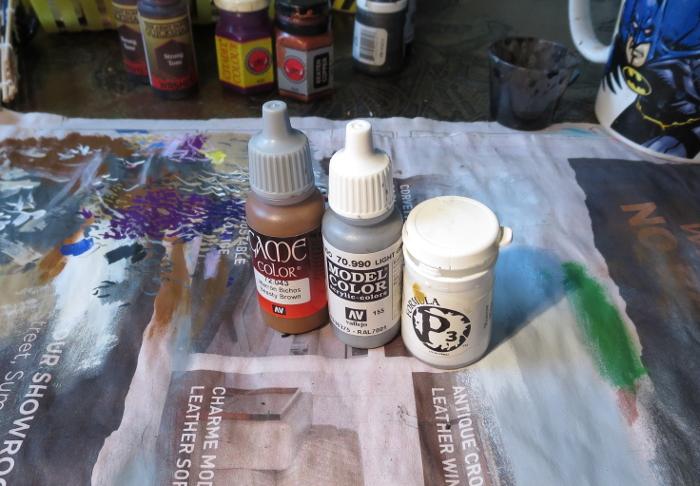
To finish off the base, it was given a drybrush of Vallejo Light Grey mixed roughly with white, and then some patches of worn grime were added with a light drybrush of Beasty Brown, on both the base and the gift box building.
With the addition of a couple of final details (some lettering above the tank's doorway, the light above the door and the comm panel screen), this little building cluster is about done for now.
The tank still needs a blanket door covering, which I'll be going through in an upcoming tutorial, and I will go back over all of the buildings in the settlement to add some more characterful detailing once I have some more of the bulking out done, but it's at a point where it's not going to look out of place on the table as-is.

So what's next?
Aside from the door covering for the tank, I'll be moving on to another building section that will have some challenges in the roofing department and some sort of interesting detail in the courtyard.
Stay tuned for more!
To build your own stellar refugee settlement, you can pick up the Maelstrom's Edge terrain sprue from the webstore here. As always, feel free to share your creations on the Comm Guild Facebook page!
For other Maelstrom's Edge modeling articles, including tutorials and walkthroughs of a wide range of different building and miniature projects, check out the article roundup here.
Tags: broken buildings modeling models spotlight terrain terrainsprue walkthrough