Entries tagged [broken]
Model Spotlight: Revolutionary Captain!
Posted on Tuesday Jun 15, 2021 at 11:41pm in Tutorials
With the release of the Revolutionary Captain ushering the SARA subfaction into Maelstrom's Edge games, a range of new tactical options opens up for the Broken. I'll be sharing my fledgling SARA force in an upcoming army, but to kick things off I thought it would be fun to have a look at some modeling options for the fantastic Revolutionary Captain model!
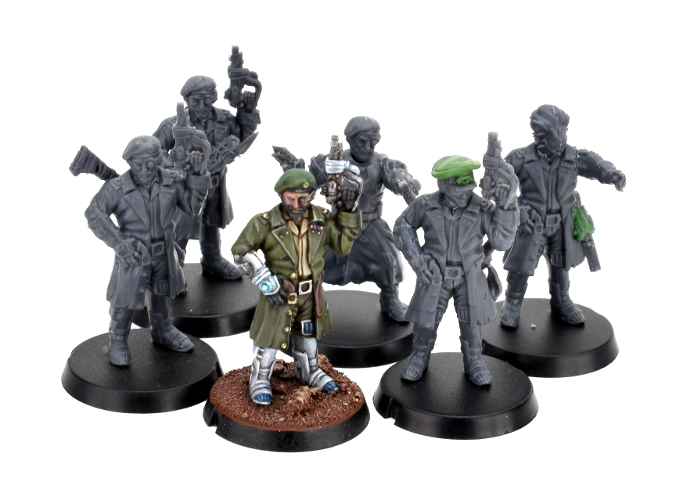
The Revolutionary Captain is a multipart, plastic model. He's not as modular as most of the Maelstrom's Edge model range, as the sculpt was in this case aiming for a specific character look. Being plastic, however, it's still relatively easy to give the model a more customised look if you feel so inclined, and I'll explore some different ideas for that below.
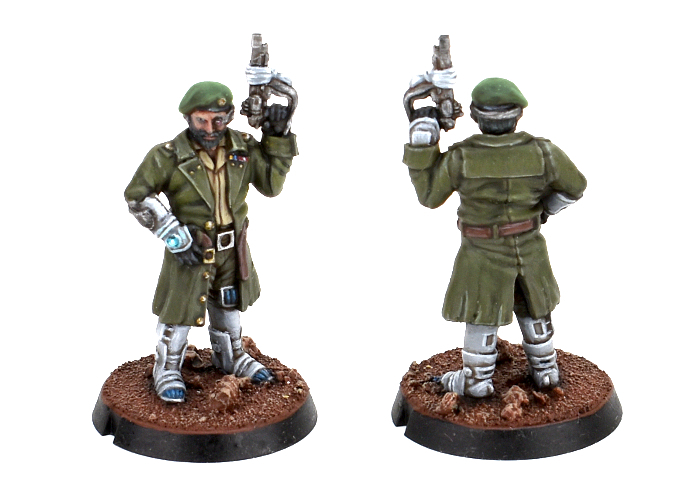
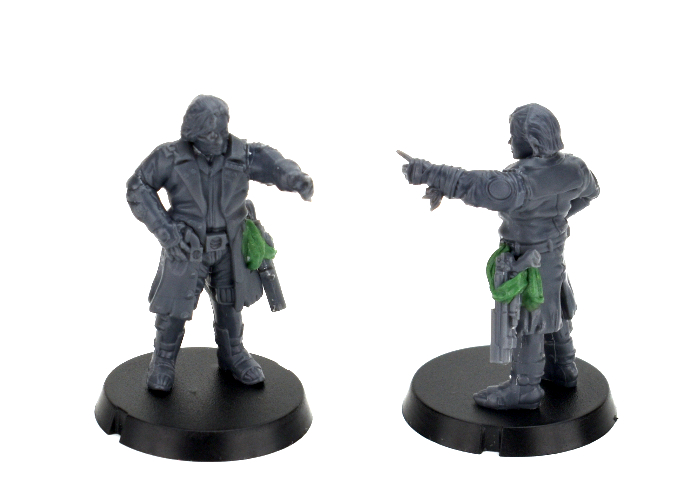
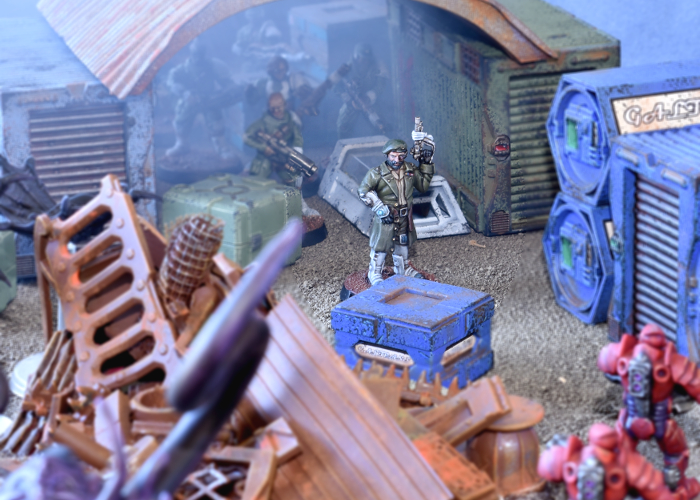
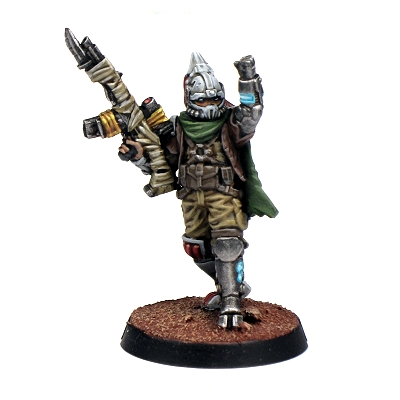
The studio model, painted by Winterdyne.
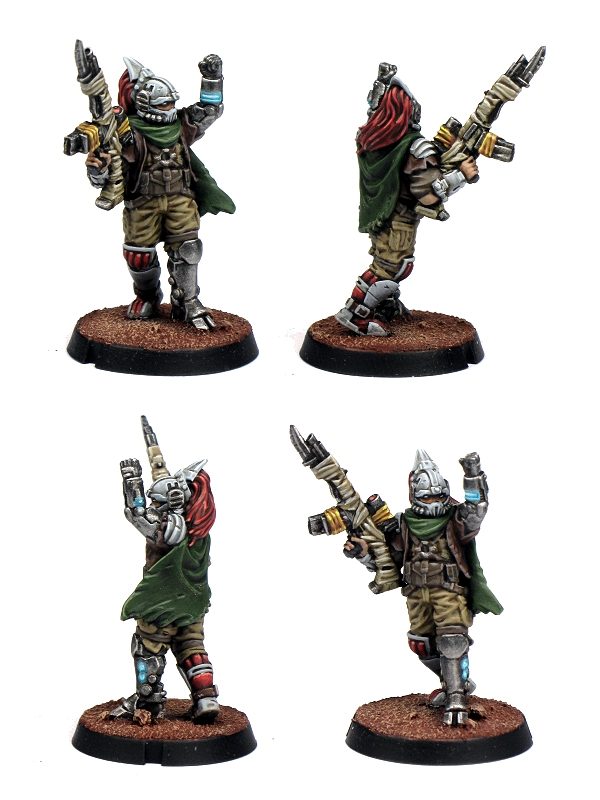
Built straight off the sprue, the Revolutionary Captain is equipped with his SARA Officer's Pistol. His rules card, which can be found here, gives him the option to take one of a number of different secondary weapons, which can mostly be sourced from the Broken Rabble kit. To equip a Beam Blastgun or Slug Rifle, the easy option is to just stick the weapon on his back. You could model a rifle strap from modeling putty, or just assume the weapon is held in place with a magnetic lock built into the back of his coat.
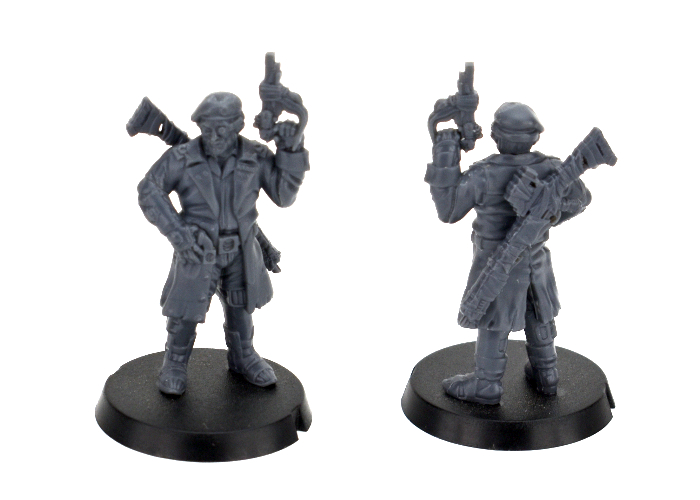
To take a more hands-on approach, for this version I sliced off his right hand, and used a forearm snipped from a Rabble sprue arm to hold the blastgun. As it still sits against his waist, there's no need to try to resculpt the coat belt where the hand was removed, as you can't see it anyway.
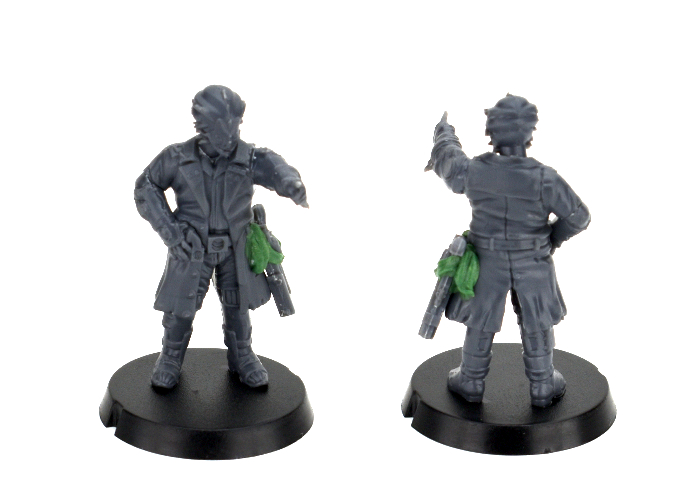
Of course, everyone knows that battlefield commanders spend a good amount of their time pointing at things. If your commander isn't either pointing at something, or standing with one foot on something, people might not even recognise them! By slicing off the Revolutionary Captain's left arm at the coat's shoulder seam, I was able to glue a pointing arm from the Rabble sprue in its place. I also replaced the head with a regular Rabble head by drilling out the neck a little with a 2mm drill bit, and glued a maglock pistol from the Epirian Contractor kit onto her hip with some strapping made from 'Green Stuff' putty to replace the officer's pistol. The putty isn't strictly necessary - you could easily just glue any of the Captain's pistol options to the belt, but the addition of the putty strap does make it look a little nicer on the model.
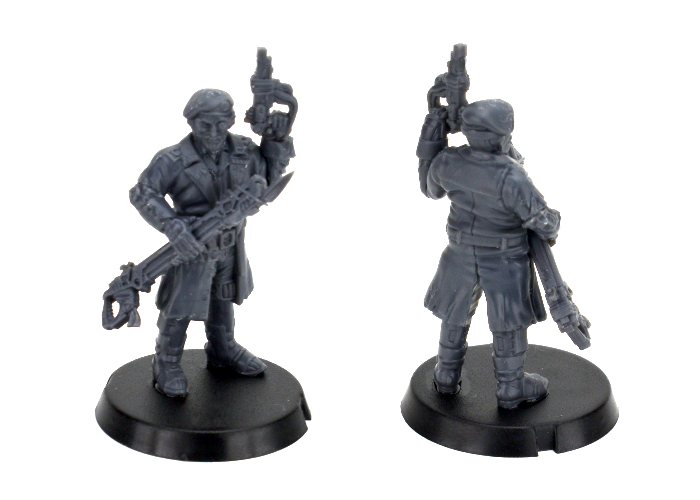
Of course, there's no reason for only humans to be revolting! With the neck drilled out as above, you can use any of the alien heads from the weapons sprue in the Rabble kit to create a xeno force commander.
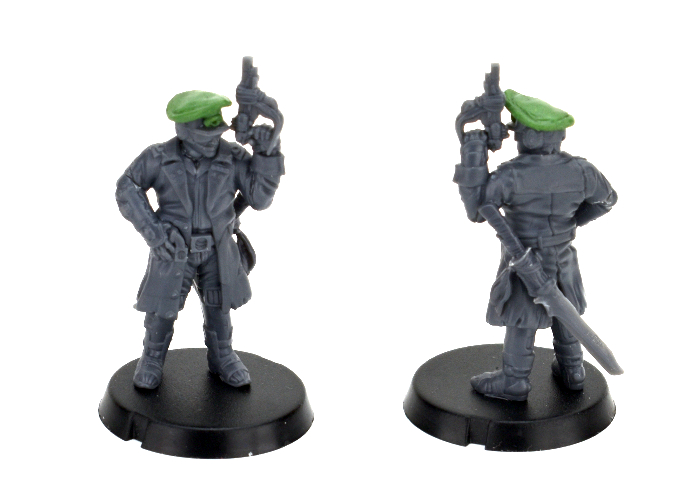
While we're replacing heads, some Captains like a nice, sensible cap in place of a beret, so for this one I used an Epirian Contractor head (mostly for the sunglasses!) and built the cap up into an officer's hat using Green Stuff. I also added a melee weapon on his belt using part of a Karist sword from the Faction Expansion Sprue and bits from a couple of weapons on the Rabble sprue. This could easily represent either the Poisoned Blade or Trophy Melee Weapon. For a slightly easier option, you could just use the Karist sword or knife from the Faction Expansion sprue. The resin Forsaken Chieftain also comes with both of these melee options, so if you have that model you could use whichever one you didn't use on her for the Revolutionary Captain.
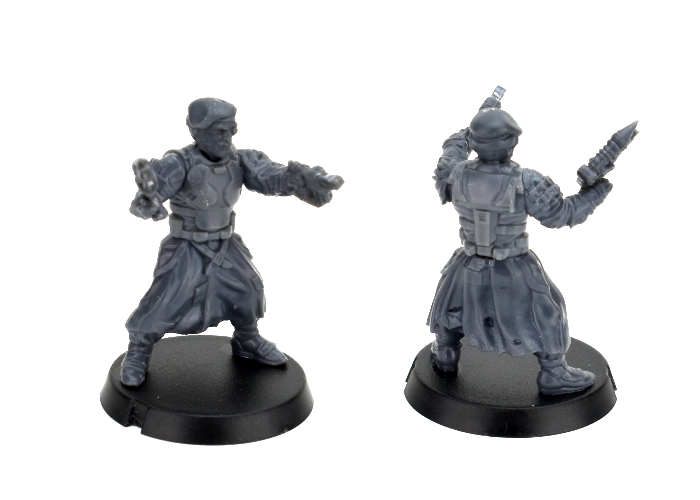
Of course, if you're hacking up your Revolutionary Captain model to replace heads and weapons, this leaves you with some useful parts to build another Captain to lead a second Detachment! For the below model, I used some parts from the Rabble kit (legs, arms and beam pistol), the left hand and head from the Revolutionary Captain, and a torso from the Epirian SecDef kit just to help him to stand out a little more from the Broken horde.
To build your own army of revolutionary doom, you can pick up the Revolutionary Captain along with the rest of the Maelstrom's Edge range from the webstore here.
What are you working on? We would love to see your models and terrain in the Comm Guild Facebook group!
For other building ideas, modeling tutorials, army spotlights and conversion walkthroughs, check out the Hobby section of the Maelstrom's Edge website here.
Tags: broken conversion model modeling sara spotlight tutorials
New model release: The SARA Revolutionary Captain!
Posted on Tuesday Jun 08, 2021 at 06:00pm in The Broken
Revolutionary Captains lead companies of SARA troops on the battlefield. While SARA companies are comprised mostly of the same sorts of units as you would find in Forsaken or Jackal forces, their more military-focused structure results in better discipline and tactics on the battlefield.

On the table, the Revolutionary Captain's military experience grants your Broken force some new abilities. The SARA Discipline rule grants units in the Captain's command radius a boost to their WP. These units are also granted the new Guerilla rule, which allows a unit taking an Advance & Fire action to shoot before moving, allowing your units to to attack enemy positions and then fade away into cover.
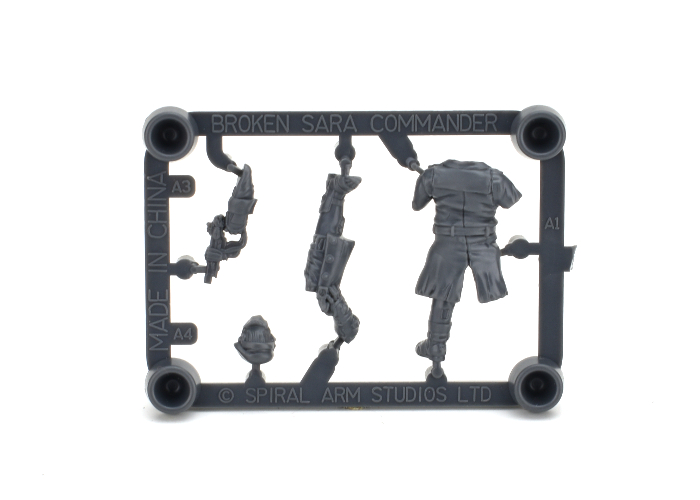
The first of a series of smaller plastic kits that we are releasing, the Revolutionary Captain kit is a single sprue with a multipart, monopose model and is supplied with a 25mm base.
Grab your Revolutionary Captain from the Maelstrom's Edge webstore now!
Painting Spotlight: Helmeted Marsayan Hypnotist
Posted on Thursday Apr 02, 2020 at 05:00pm in Tutorials
Marsayan Hypnotists stand out amongst the forces of the Broken, with their gangly limbs and tentacled face. For this week's model, I decided to accentuate the alien-ness of the Marsayan a little more by adding a hazardous environment helmet from Bombshell Miniatures' Counterblast range. This model was actually put together a while back for a Spotlight article on the Marsayan, but this week I decided the time had come to get some paint on it!
There was a little conversion work involved in getting the helmet onto the model. I repositioned the arms and head, and shaved down the tops of the shoulders to provide a reasonably close fit for the bottom of the helmet ring.
I started out the painting by spraying the model with Army Painter Necrotic Flesh.
Over the clothing, I painted a layer of Citadel Gryph-Hound Orange Contrast. I also painted the wrappings and straps with Army Painter Mid Brown ink, and the fur and helmet ring with Army Painter Dark Tone.
For the skin, I added a layer of Army Painter Blue Tone over the Necrotic Flesh. I also painted the armour pads and eyes with Citadel Liche Purple, the helmet ring with Army Painter Ash Grey, and the fur and air tubes with Vallejo Heavy Charcoal.
I added a highlight to the orange with some Vallejo Light Orange mixed with white. I used some more white to highlight the helmet ring and bindings, and to apply a very light drybrush to the tubes and fur. Using some Army Painter Warlock Purple and white, I painted in the mouth tentacles and added a highlight to the purple armour sections. For the metal device on his hip and the cannister on his back, I painted on a coat of P3 Pig Iron, and then a wash of Dark Tone. Finally, I used some black and white to add shading and highlights to the eyes.
To finish up, I painted the base using the same urban scheme as the rest of my Broken force, and then glued the helmet in place.
What have you done with your Broken? We would love to see them on the Comm Guild Facebook page!
You can pick up the Marsayan Hypnotist, along with the rest of the Maelstrom's Edge model range from the webstore here.
For other Maelstrom's Edge modeling articles, including tutorials and walkthroughs of a wide range of different building and miniature projects, check out the Hobby section of the Maelstrom's Edge website here.
Painting Tutorial: Painting a Pa'ku using (almost) only Army Painter Quickshades!
Posted on Monday May 13, 2019 at 05:00pm in Tutorials
A beautifully painted army that someone has slaved over for more hours than is healthy can be a truly wonderful thing to behold. Sometimes, though, we just want to get some models on the table as quickly as possible. Way back when I first started writing these articles, I shared a tutorial on painting with washes, as it's a really simple technique for speed painting. (Don't look at it, the pictures are horrible and I really need to redo them...)
I thought I would revisit it this week, with a step-by-step walkthrough painting a Broken Pa'Ku (almost) entirely with Army Painter Quickshade washes.
A quick note before starting: Army Painter have two different product ranges under their 'Quickshade' banner. The first are dips, which come in a tin and are used precisely as the name implies - you essentially paint the model in basic colours, drop it in the dip, shake or wipe off the excess dip, and call the job a good 'un. These are good for quickly adding shading to a bunch of models, but can result in a rather muted overall effect due to everything being shaded the same colour. The second product is what we're using here. These are washes, sold in dropper bottles. Washes are thinner than regular acrylic paint, and are usually painted on over lighter colours, where they settle into the creases and darken everything up. Instead of doing that, I'm painting directly over a flat white spray undercoat.
My previous Pa'ku was painted green, so I decided to change it up a little and go blue this time. The first step, then, is to paint a generous coat of Blue Tone all over the Pa'ku's skin. Because the wash is quite watery, this isn't a precise operation. You're unlikely to win awards with models painted using this technique, as regardless of how careful you are, a little bit of wash running into places it doesn't belong as more or less unavoidable. If it gets too messy, you can wait until the first layer dries and then touch up the rest of the model with some white paint before proceeding.
Next up, I painted the straps and bindings with a coat of Mid Brown.
I wanted the large bumps on his back to contrast with the blue skin, so used Flesh Wash. Over the white, this created a light, weathered-bone sort of colour. This needed to go on quite heavily, and required a couple of touchups after it dried, as the flesh tone is very light. In hindsight, Soft Tone might have worked better.
For some brighter colour, I painted the armour pads with Purple Tone.
That left the gun and other metal parts, and the fur around his back pad. I painted these with Dark Tone. For the metal, I was aiming for a dark grey/black tone rather than a true metallic. If you want more of a metal tone, then painting the metal parts with Gun Metal before washing would have done the trick. Instead, I opted for a couple of coats of Dark Tone, with the below picture showing the first coat.
To finish up, I applied the second coat of Dark Tone to the metal parts, and ran a coat of Strong Tone over the fur to help differentiate it slightly from the metal. I also decided that the brown was paler than I wanted, so gave it a second coat of Mid Brown. The Quickshades lend themselves well to this sort of layering - they're heavily pigmented, but over the white the effect is light enough that you can get subtle colour effects with light coats, and a more vibrant colour with a heavy coat, or layer extra coats (or different coloured washes) over the top for a darker finish.
I also went over the targeter lens with some Red Tone, and added a little Dark Tone into the other three eyes, following up with a small dot of regular white paint (hence the 'almost' disclaimer!) in the center of each eye and the targeter when the washes dried.
The base was painted with Army Green, washed with Strong Tone, and then drybrushed with Ash Grey.
The end result is a fairly basic colour scheme - If I was so inclined, I could go back over and tidy up a few small areas of splash-over from the wash, and add a few extra details here and there like the cabling on the gun.
If you're looking for quick and easy, though, it's a really handy technique to play around with, and can easily be adapted to other colour schemes using different wash shades.
If you're keen to paint up your own big, blue, artillery frog, you can pick up the resin Pa'ku kit, along with the rest of the Maelstrom's Edge model range in the webstore here.
As always, feel free to pop along and share your creations, or ask any Maelstrom's Edge- or hobby-related questions on the Comm Guild Facebook page!
For other Maelstrom's Edge modeling articles, including tutorials and walkthroughs of a wide range of different building and miniature projects, check out the Hobby section of the Maelstrom's Edge website here.
Tags: broken pa'ku painting tutorial walkthrough
Painting Spotlight: Broken Forsaken Chieftain
Posted on Monday Mar 04, 2019 at 05:00pm in Tutorials
- by Iain Wilson
Time to get some paint on!
Despite building a bunch of Forsaken Chieftains for a conversion article a while back (This one!), I hadn't had a chance to get any of them painted up yet, so my Broken force has been languishing without a properly-attired leader for all this time. This week I decided to remedy this situation!
The model painted here was one of the resin conversions featured in the article linked above, with the normal Xeno Spotter and melee weapon replaced with bionic arms holding a Beam Blastgun and a grenade.
My broken troops were painted with a very quick 'base colours and a wash of brown ink' affair, which was shown in the article way back here. As a force's leader is a bit of a centrepiece, I wanted a paintjob that was going to look like it fitted in with the troops, but was a little more polished. I started out by spraying the model with Army Painter Army Green, as I had with the troops.
I then picked out the base colours, leaving the army green on the pants and shirt, and painting straps, pouches, boots and armour pads with Vallejo Heavy Brown and Beasty Brown, the coat with P3 Jack Bone, her face with Citadel Tallarn Flesh, and everything else with Vallejo Heavy Charcoal.
The next step was to add some highlights. I used Coat D'Arms Putrid Green to highlight the creases in the shirt and pants, and followed up with some touches of Jack Bone on the darker brown areas and face, and P3 Morrow White on the coat and lighter brown parts.
The green was then shaded with a wash of Army Painter Green Tone, and the brown areas and face with Army Painter Strong Tone. While that was drying, I added some white highlights to the hair, and painted the metal areas - the weapon was just given a light drybrush with P3 Pig Iron, and the other metal areas given a flat coat of the same.
Next up, the metal parts were given a highlight with Army Painter Shining Silver. I also painted the edge detail on the coat with some old Citadel Tentacle Pink, and shaded the coat with multiple light coats of Army Painter Soft Tone painted into the creases and concealed areas.
I then gave the metal parts a wash of Army Painter Dark Tone, and shaded the coat edge detail with some light coats of Army Painter Purple Tone.
That just left some final detail work - The eye was painted white and a black dot added in the middle. The bionic eye was painted with Vallejo Red and Army Painter Pure Red, with a highlight of white. For the yellow on the grenade, I started with a coat of Citadel Iyanden Yellow, a top layer of P3 Cygnus Yellow, some shading underneath with Soft Tone and a highlight of yellow with a little white mixed in. The straps on the gun were painted with Heavy Brown and given a wash of Strong Tone, as were the cross-straps on the back of the coat. Also on the back of the coat, I picked out the studs with Heavy Charcoal and added a highlight with Shining Silver.
And, finally, the base was painted with the same urban scheme that I've been using for several of my Maelstrom's Edge forces - you can find a how-to here.
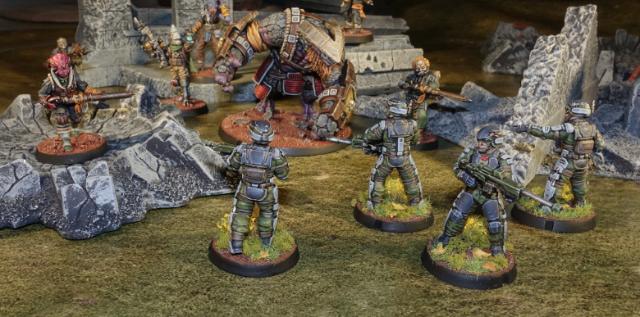
The finished model, leading a Broken force into battle!
Keen to try putting together your own Broken force? You can find the resin Chieftain model and plastic Broken Infantry used here, along with the rest of the Maelstrom's Edge model range in the webstore here.
As always, feel free to pop along and share your work, or ask any Maelstrom's Edge- or hobby-related questions on the Comm Guild Facebook page!
For other Maelstrom's Edge modeling articles, including tutorials and walkthroughs of a wide range of different building and miniature projects, check out the Hobby section of the Maelstrom's Edge website here.
Conversion Spotlight: Jet Pa'ku!
Posted on Monday Jan 07, 2019 at 06:00pm in Tutorials
- by Iain Wilson
Pa'ku are generally regarded as slow, deliberate creatures, rarely rushing into action and often waiting on the sidelines of a battle pondering the best course of action before deigning to lend their (once they get going) formidable skills to the fray. While playing with the resin model, though, I happened upon a conversion idea that was just too much fun to not do it - and so the Jet Pa'ku was born!
I originally put this guy together for a spotlight article on the Pa'ku model when it was released (which you can see here), and in his unpainted state he looked like this:
The conversion used most of one Pa'ku model, the main part of the gun from a second, two auto sluggers taken from the Broken Infantry sprue, and the bottom of an energy fence piece from the Maelstrom's Edge terrain sprue.
I had to make some changes to his pose, so repositioned his arms by soaking them for a minute in boiling water, bending them into the shape I wanted, and then dropping them in some ice water to 'set' them in that shape. To fit the hands onto the guns, I trimmed away some of the webbing between the fingers, widened the trigger space by cutting away a small piece at the back of the gun, and gently bent the fingers around the grips. I also cut a wedge out of the front of his neck with a razor saw, and bent the head forwards using the same hot/cold water treatment. The minor gap that was left behind was filled in with a little 'green stuff' putty.
The Pa'ku's feet are very flat on the bottoms, to attach to the base. That just wouldn't do here, so I used the above hot/cold water treatment to add a bit of a curl to the toes, and then sculpted some detail onto the bottom of the feet with more green stuff.
For the jetpack, I used the main sections of two quad mortars. I trimmed the fittings up so that they would attach sideways to the Pa'ku's backpack, added a turbine from the Epirian Firefly Drone on the front where the weapon barrels normally go, and filled in the gap in between the two new jets with the energy fence base, some green stuff, and a small piece of plasticard over the top to neaten it up.
With everything else assembled, the final detail was to add the smoke trails from the jetpack. For rigidity, I cut a couple of pieces of plastic sprue to the right length and glued them bases for ease of working. Then I covered these in a mix of shredded cardboard (made from small pieces of cardboard box run through a spice grinder) and PVA glue. This was a bit experimental, but looked the part once done, so I crossed my fingers and just hoped it would work out right when it was painted.
Speaking of which, painting started out with a basecoat of Army Painter Army Green spray.
I drybrushed over the skin with Coat D'Arms Putrid Green, and went over all of the metal and leather parts with Vallejo Beasty Brown. The leather straps then got a coat of Vallejo Heavy Brown.
I drybrushed the metal areas with P3 Pig Iron, and then washed the metal and leather parts with Army Painter Strong Tone. I also went over the skin with a generous coat of Army Painter Military Shader wash, and when this was dry, picked out the fur around the backpack, the weapons, claws, targeter and the smoke trail with Vallejo Heavy Charcoal.
Since making the smoke trail clearly wasn't getting experimental enough, I had also decided to try painting a flame effect into the smoke. I did this by picking out sunken areas near the jet nozzles with white, then painting in some yellow and red, leaving the brighter yellow deeper in and fading out to red closer to the surface. Then I drybrushed over the top with more Heavy Charcoal, and highlighted with Vallejo Light Grey and some white.
The weapons, claws, fur and targeter were given a light drybrush with Vallejo Neutral Grey and then a wash of Army Painter Dark Tone. I also added some Dark Tone patches on the jetpack to break up the metal tone a little, and painted the bumps on his back with some old Citadel Tentacle Pink, washed with a couple of coats of Army Painter Red Tone.
This just left some finishing touches - I gave the weapons a highlight with a very light drybrush of Pig Iron, picked up the cloth bindings with the old Citadel Liche Purple with a Tentacle Pink highlight, added some highlights and scratches to the metal bits with Army Painter Shining Silver, painted in the eyes with Citadel Iyanden Darksun, and finally popped some Army Painter Pure Red onto the targeter lens with a white highlight spot.
And there he is! There are no game rules for this monstrosity; it was purely an exercise in conversion for the sake of it. Sometimes it's fun to take a break from assembling game-ready forces to just build something cool!
To add a Pa'ku (or a Jet Pa'ku!) to your own Broken force, you can pick him up along with the rest of the Maelstrom's Edge model range from the webstore here.
As always, feel free to pop along and share your work, or ask any Maelstrom's Edge- or hobby-related questions on the Comm Guild Facebook page!
For other Maelstrom's Edge modeling articles, including tutorials and walkthroughs of a wide range of different building and miniature projects, check out the article roundup here.
Tags: broken conversion modeling spotlight
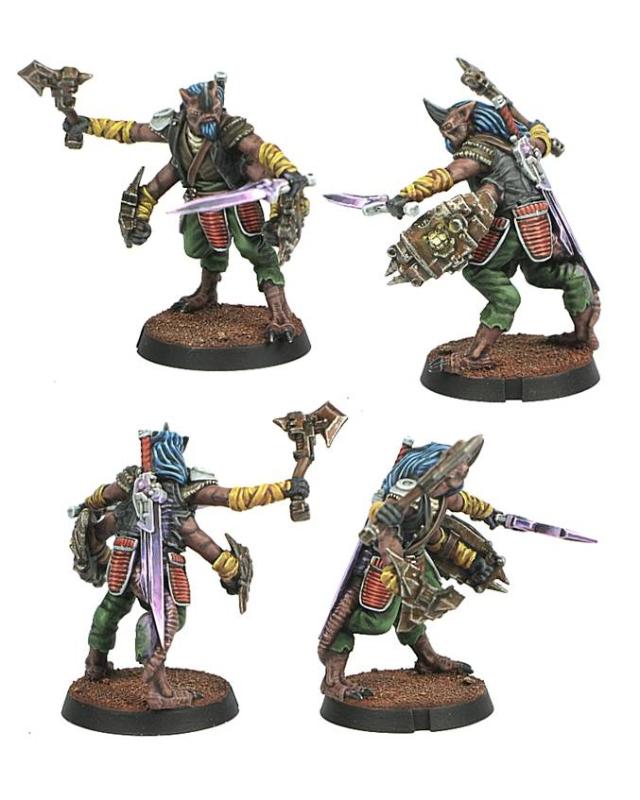
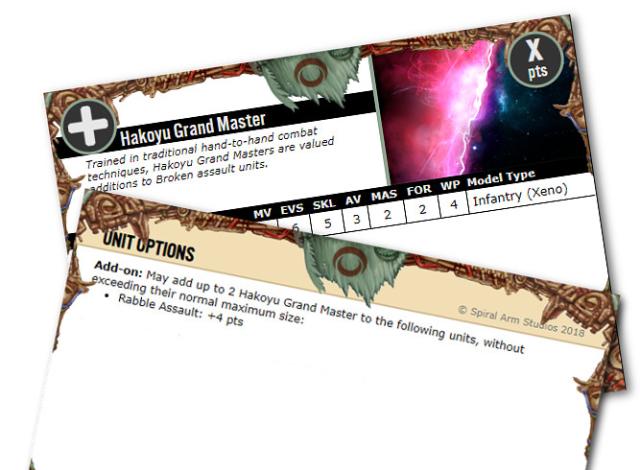
Modeling Spotlight: Hakoyu Grand Masters
Posted on Monday Dec 17, 2018 at 06:00pm in Tutorials
- by Iain Wilson
Hakoyu Grand Masters are masters of close quarters fighting, lending the experience of decades of training in combat skills and their exquisitely-crafted energy weapons to the Broken Federation's cause. This week, I'm taking a closer look at the model for this fearsome melee veteran.
The Hakoyu Grand Master is a multi-part resin model, with the body cast in one piece and all four arms joining at the elbows. Two of the forearms are equipped with the Hakoyu's shields, while the other two hold the Phase Weapons - a sword and an axe.
The elbow joint is a ball-and-socket affair, which allows for a decent range of posing, and also allows you to choose where to put each forearm.
Of course, that also means that you can mix and match arms between models - for the below model, I swapped out the shields in favour of doubling up the weapons. The second axe and sword were switched to the opposite side simply by slicking them off just above the hand and switching them, gluing each weapon onto the hand the other had been removed from.
Phase weapons take many forms, at the preference of the individual Grand Master. For this model, I replaced the sword and axe with a double-ended polearm - presumably this Grand Master would be skilled enough with this weapon for it to have the same effect as fighting with two separate blades! The hands were swapped out with plastic hands from the Broken Infantry sprue - as the Hakoyu only has three fingers, I resculpted the fingers on the left hand with a little 'green stuff' putty. The right hand is bionic, so I left it as is - ill-fitting bionics would be just one of the difficulties faced by alien races amongst the often poorly-equipped Broken.
Life on the Edge is hard, and emergency surgery and appropriate bionics are not always available when needed. It would be expected that this might take a toll on veteran Grand Masters, who spend so much of their time in the thick of the fighting. This Grand Master has at some point lost two of his hands, and rather than replacing them with bionics has had his Phase blades strapped directly to his wrists. I also put this model into a slightly more crouched pose, but cutting through the lower knee joint, bending the legs and then filling in the remaining gap with some putty.
Finally, while known primarily for their fearsome skills in melee, I would expect some Grand Masters to take pride in mastering all aspect of warfare. This Grand Master has eschewed the usual Phase weapons (aside from the one still strapped to his back - you can't turn away completely from tradition, after all!) in favour of a long rifle converted from two slug rifles from the Broken Infantry sprue. The forearm (another bionic) is also taken from the Infantry sprue. I also doubled up the larger of the two shields, but cutting the small shield off the right forearm, and the arm off the large shield, and then gluing them together.
What have you done with your Grand Master? Feel free to pop along and share your work, or ask any Maelstrom's Edge- or hobby-related questions on the Comm Guild Facebook page!
You can pick up the Hakoyu Grand Master along with the rest of the Maelstrom's Edge model range from the webstore here.
For other Maelstrom's Edge modeling articles, including tutorials and walkthroughs of a wide range of different building and miniature projects, check out the article roundup here.
Tags: broken conversion converting hakoyu modeling spotlight tutorial
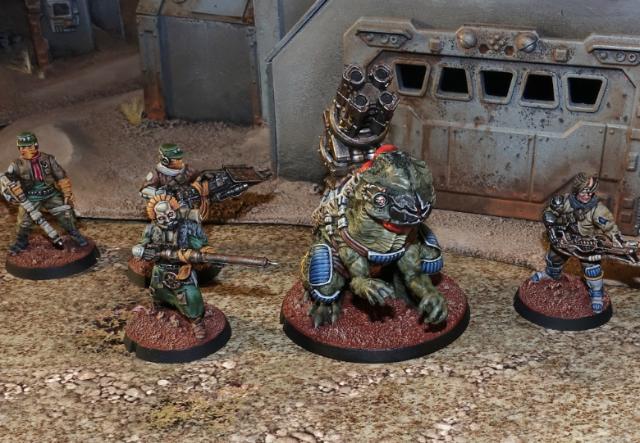
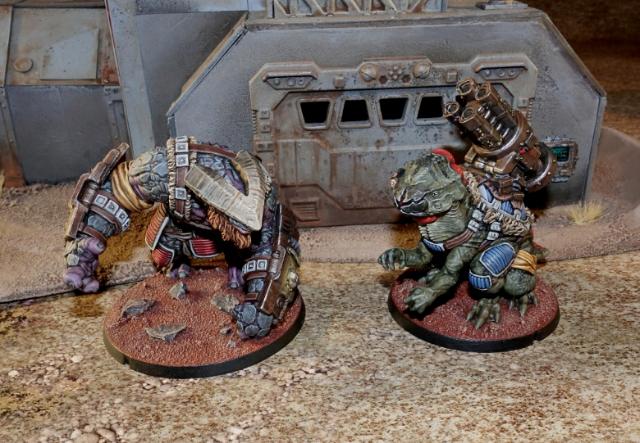
Modeling Spotlight: Pa'ku Artillery
Posted on Monday Nov 26, 2018 at 06:00pm in Tutorials
- by Iain Wilson
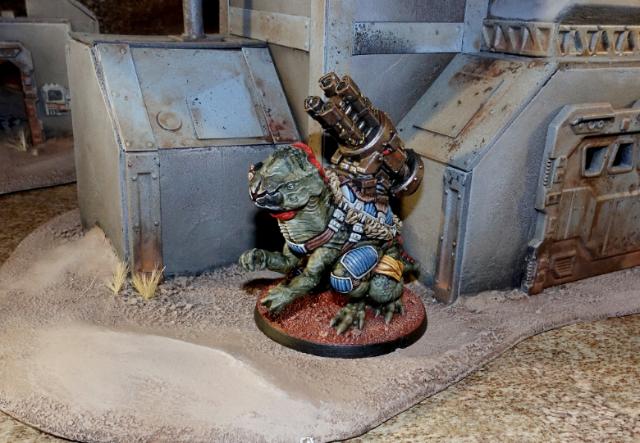
This past month saw the release of the Pa'ku for the Broken faction, taking to the field with their gigantic Quad EMP Cannon strapped to their rather large backs. This is another brilliant model in a slowly growing collection of characterful alien creatures for the faction, and so in my usual style, I figured it would be fun to take a hobby knife to it and see what happened!
The fantastic studio model below shows the Pa'ku in all his warty glory. He's big, he's ugly, but nobody's going to tell him that so long as he has that gigantic quad cannon pointed in their general direction!
The Pa'ku is a resin model, and comes in 6 pieces, along with a 45mm base. The arms are on ball joints that allow for a bit of posing movement, and the cannon barrels have a round locator piece, so can be swivelled around to whatever orientation you prefer.
The immediate, obvious conversion opportunity is to replace the quad cannon with a larger-bore, single cannon. On the below model, I added a ring of plastic tube over the rear tube assembly, and replaced the barrel section with a new, larger, single barrel made from layered plastic tubing, with some plastic rod struts on the sides to give it a little extra detail.
As an extra bonus, you can also put him on the table with the unofficial rules card in the Force List section of the Maelstrom's Edge website here. You could easily leave off the side detailing and just use a single piece of 10mm tubing for a less detailed but much easier conversion, or use a different gun entirely for other heavy weapon variants.
Venturing a little further outside the box, the slow moving, steady Pa'ku seemed like an ideal candidate for ferrying around notable Broken characters who prefer not to dirty their own boots any more than necessary. With that in mind, I took a Pa'ku and assembled it without the gun, and then added a platform onto the back with a little plasticard, and added a rider built from the Broken Infantry sprue. The handrail is cut from a ladder from the Maelstrom's Edge terrain sprue, and the sheath of extra harpoons is a piece of plastic tube filled with offcuts of 1mm rod, attached with a rivet piece from the previously-hacked-up ladder.
Of course, it's possible that not all Pa'ku are as slow and deliberate in their actions as the species is renowned for. What happens to those more headstrong, battle-hungry Pa'ku? I'd like to think they turn out something like this:
The jetpack was made from the main section of two quad guns, with help from a little putty, Epirian drone parts and plasticard. The head was repositioned by cutting and bending the neck, and the forearms twisted in hot water and guns added from the Broken Infantry sprue. I'll be sharing a more detailed build of this one in an upcoming article, once I get some paint on him!
To add some giant-cannon-goodness to your own Broken force, you can pick up the Pa'ku along with the rest of the Maelstrom's Edge model range from the webstore here.
As always, feel free to pop along and share your work, or ask any Maelstrom's Edge- or hobby-related questions on the Comm Guild Facebook page!
For other Maelstrom's Edge modeling articles, including tutorials and walkthroughs of a wide range of different building and miniature projects, check out the article roundup here.
Conversion Spotlight & Rules: Gnolti Berserker!
Posted on Monday Nov 12, 2018 at 06:00pm in Tutorials
- by Iain Wilson
Big, burly, slow to anger but nigh on unstoppable when they get rolling, the Gnolti is an impressive sight on the table, and is one of my favourite models. A while back, I got to thinking about the different ways that the ongoing battles around the Maelstrom's Edge would affect these massive, generally peaceful aliens, and started exploring this with my 'Longhorn' conversion. At the other end of the scale from the implacable veteran, I thought it would be an interesting contrast to have a much younger Gnolti who handles the constant call to arms in a much more direct fashion - and so the Gnolti Berserker was born:
As with my previous Gnolti conversions, this was built from the standard Gnolti model.
I wanted to give him a charging pose, as this guy was definitely not the 'sit back and take a breather' type of fighter! So I started by cutting the left leg off with a razor saw, and then reattaching it with the leg pivoted to the rear.
In place of the Gnolti's normal field generating bucklers, I thought it would be fun to give the berserker an array of scavenged blades to fight with. Using a sharp exacto knife, I cut off the existing detail from the shields, added some cracks and dents, and glued on some blades cut from the resin casting tab that the parts came on. (Waste not, want not!) As the left hand's fingers are slightly flattened on the bottom where they normally sit on the base, I also reshaped these by carefully rounding them off with the knife and adding in some knuckle lines.
For my Longhorn, I had gone with the idea that the Gnolti's horns would grow as they age. Running that idea backwards, a younger Gnolti would therefore need shorter horns. I figured that reducing his beard would also be fitting, and so I cut away the back couple of sections of the horns, removed all of his beard, and also sliced open the mouth with a razor saw and, holding it under some hot water, carefully bent it open.
I used 'Green Stuff' putty to replace the missing detail around his neck where the horns and beard were originally, resculpted a smaller beard and added a layer over the lower lip to reshape it.
Similarly, I filled in the gap created by re-posing the leg, and also removed the blanket roll from the Gnolti's back just to create a little visual difference from the others, and sculpted in new draped cloth in its place.
Finally, I glued on the arms and did a little final gap-filling where the reposing of the arms caused them to not fit flush at the elbow joints.
Painting was largely the same as my original Gnolti conversion, although I used a very slightly darker grey on the scales and made his beard a brighter orange.
Conversions are only part of the fun, of course - What about getting the models on the table? You can find unofficial rules cards for the Gnolti Longhorn and Gnolti Berserker in the Force List section of the Maelstrom's Edge website here, or download a printable version in the 'Unofficial Cards' PDF compilation here.
If you want to give them a try but aren't as confident in your converting, you can very easily use the standard Gnolti model as a fill-in - for the Berserker, paint him without the light on the shields and maybe make him a bit dirtier, and for the Longhorn just glue on an appropriate gun in the right hand, and you're good to go!
Family Shot!
To put together your own mountain of xenos rage, you can pick up the Gnolti kit along with the rest of the Maelstrom's Edge model range from the webstore here.
As always, feel free to pop along and share your work, or ask any Maelstrom's Edge- or hobby-related questions on the Comm Guild Facebook page!
For other Maelstrom's Edge modeling articles, including tutorials and walkthroughs of a wide range of different building and miniature projects, check out the article roundup here.
New Broken unit release: Pa'ku Artillery
Posted on Wednesday Oct 31, 2018 at 05:00pm in The Broken
This month sees the release of a new support unit for the Broken: Pa'ku Artillery, available now from the webstore here!
Behind the implacable visage of the Pa'ku resides a powerful, if often misunderstood intellect. Extremely logical creatures, when the Pa'ku are convinced a certain course of action will do more good than wrong, they will take lives without scruples if that is what it takes. Pa'ku artillery has been known to mercilessly bombard hospitals or civilian refugee groups when they have concluded that this was the most logical course of action. They do not make any decision lightly nor do they act carelessly. In fact, the Pa'ku sometimes drive their commanders crazy as they sit pondering the pros and cons of a proposed course of action and all the alternatives, and where the situation is particularly complex have been known to gather for private war councils with their own kind before they will consider responding to a call to arms. Despite their reputation for ruthlessness, when Pa'ku take lives it is because they believe there is no viable alternative. This does not however mean they are saints - all of a Pa'ku's deliberations are still ultimately guided by self-interest and a desire to survive the chaos of the Edge.

Despite their peculiarities, Pa'ku are especially desirable to the Broken. Their solid physiques make them extremely suited to carrying heavy loads, including the biggest artillery the Broken manage to cobble together. At close range, the Pa'ku can extend their very long tongue with enough force to cave in a man's skull. Pa'ku only speak to other species when necessary, and their language is difficult for most races to translate or speak. Combined with their large size, this generally results in them being overlooked by evacuation efforts, and so as with the even larger Gnolti, joining the Broken is often the only reasonable chance for a Pa'ku to escape the edge and find a new home.
Pa'ku are often found in the support lines of Broken forces with giant cannon and other esoteric weapons strapped to their broad shoulders. Linked with electronic targeting systems, these weapons can be slaved together to unleash devastating barrages of firepower onto enemy lines. Their favoured weapon is a multi-barrelled EMP mortar, which carpets the battlefield with explosive energy packets that can fry electronic systems and incinerate softer targets. You can find the rules for the Pa'ku Artillery unit in the Force Builder section of the Maelstrom's Edge website here.
This high detail, multi-part resin kit contains one Pa'ku armed with a Quad EMP Mortar, and is available now from the webstore here!
Sample Force Rosters for the Broken
Posted on Wednesday Oct 10, 2018 at 06:00pm in Gaming
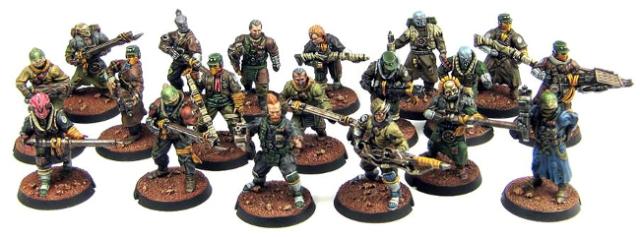
When the Battle For Zycanthus boxed set was released, we published some sample force rosters for the Karist and Epirian factions based on the models in the set, to help give new players an idea of what a Maelstrom's Edge force could look like. Since then, we have released a stack of new models and introduced a third faction, the Broken, to the game, so it seemed like a good idea to add some new force rosters to the sample collection. Below, you'll find three different sample force rosters for the Broken, and a breakdown of which models you would need to put them together.
LIST #1 - ALL-PLASTIC 120 POINTS
(a standard 'small' game, using just the plastic Broken Infantry Pack models)
Detachment #1 (of 2)
| TYPE | UNIT | UPGRADE | POINTS |
| [Command] | Forsaken Chieftain (8) | x2 Beam Pistols (+0) | 8 pts |
| [Core] | Broken Rabble (5) | x1 extra Broken Rabble (+1) | |
| x1 Chem Launcher (+1) | |||
| x1 EMP Harpoon (+1) | 8 pts | ||
| [Core] | Broken Rabble (5) | x2 extra Broken Rabble (+2) | |
| x1 Chem Launcher (+1) | |||
| x1 Glue Rifle (+1) | 9 pts | ||
| [Core] | Broken Rabble (5) | x2 extra Broken Rabble (+1) | |
| x1 Auto Slugger (+1) | |||
| x1 Longbeam Rifle (+1) | 9 pts | ||
| [Hammer] | Rabble Assault (8) | x2 extra Broken Rabble (+4) | |
| x3 EMP Harpoon (+0) | 12 pts | ||
| [Hammer] | Rabble Assault (8) | x2 extra Broken Rabble (+4) | |
| x3 Massive Torch (+3) | |||
| x2 replace Beam Blastgun with Chem Pistol & Slug Pistol (-2) | |||
| Boss replaces Beam Blastgun with Chem Pistol & Grenade Harness (-1) | 12 pts | ||
| [Anvil] | Rabble Fire Support (5) | x2 extra Broken Rabble (+2) | |
| x3 Longbeam Rifle (+6) | 13 pts | ||
| [Anvil] | Rabble Fire Support (5) | x2 extra Broken Rabble (+2) | |
| x3 Longbeam Rifle (+6) | 13 pts | ||
| DETACHMENT #1 TOTAL | 84 pts |
Detachment #2 (of 2)
| TYPE | UNIT | UPGRADE | POINTS |
| [Command] | Forsaken Chieftain (8) | replace Slug Rifle with Beam Blastgun (+1) | 9 pts |
| [Core] | Broken Rabble (5) | x1 extra Broken Rabble (+1) | |
| x1 Chem Launcher (+1) | |||
| x1 EMP Harpoon (+1) | |||
| Boss replaces Slug Rifle with Chem Pistol & Grenade Harness (+0) | 8 pts | ||
| [Core] | Broken Rabble (5) | x2 extra Broken Rabble (+2) | |
| x1 Emp Harpoon (+1) | |||
| x1 Glue Rifle (+1) | |||
| Boss replaces Slug Rifle with Grenade Harness & Slug Pistol (+0) | 9 pts | ||
| [Anvil] | Rabble Fire Support (5) | x2 extra Broken Rabble (+2) | |
| x3 Auto Slugger (+3) | 10 pts | ||
| DETACHMENT #2 TOTAL | 36 pts | ||
| GRAND TOTAL | 120 pts |
Models needed:
- Broken Infantry Pack x10.
The two Chieftains for this list are built from the plastic set, which is why there are two Rabble units that only have 5 in the unit.
LIST #2 - 120 POINTS
(a standard 'small' game, using a mix of plastic and resin Broken models)
Detachment #1 (of 2)
| TYPE | UNIT | UPGRADE | POINTS |
| [Command] | Forsaken Chieftain (8) | x1 Beam Pistol (+0) | |
| x1 Trophy Melee Weapon (+1) | |||
| Xeno Spotter (+1) | |||
| Customized Weapons (+2) | 12 pts | ||
| [Core] | Broken Rabble (5) | x2 extra Broken Rabble (+2) | |
| x1 Chem Launcher (+1) | |||
| x1 Glue Rifle (+1) | 9 pts | ||
| [Core] | Broken Rabble (5) | x2 extra Broken Rabble (+2) | |
| x1 Auto Slugger (+1) | |||
| x1 Longbeam Rifle (+1) | 9 pts | ||
| [Hammer] | Rabble Assault (8) | x1 Marsayan Hypnotist (+2) | |
| x3 Massive Torch (+3) | 13 pts | ||
| [Hammer] | Rabble Assault (8) | x1 extra Broken Rabble (+2) | |
| x1 Hakoyu Grand Master (+4) | |||
| x3 EMP Harpoon (+0) | 14 pts | ||
| [Vanguard] | x2 Sig Jammer (12) | 12 pts | |
| [Anvil] | Gnolti (10) | 10 pts | |
| [Anvil] | Rabble Fire Support (5) | x1 extra Broken Rabble (+1) | |
| x3 Longbeam Rifle (+6) | 12 pts | ||
| DETACHMENT #1 TOTAL | 91 pts |
Detachment #2 (of 2)
| TYPE | UNIT | UPGRADE | POINTS |
| [Command] | Forsaken Chieftain (8) | Customized Weapons (+2) | |
| Extensive Cybernetics (+2) | 12 pts | ||
| [Core] | Broken Rabble (5) | x2 extra Broken Rabble (+2) | |
| x1 Chem Launcher (+1) | |||
| x1 EMP Harpoon (+1) | |||
| Boss replaces Slug Rifle with Chem Pistol & Grenade Harness (+0) | 9 pts | ||
| [Anvil] | Rabble Fire Support (5) | x3 Auto Slugger (+3) | 8 pts |
| DETACHMENT #2 TOTAL | 29 pts | ||
| GRAND TOTAL | 120 pts |
Models needed:
- Broken Infantry Pack x6
- Forsaken Chieftain x1
- Forsaken Tech Chieftain x1
- Sig Jammer x2
- Marsayan Hypnotist x1
- Hakoyu Grand Master x1
- Gnolti x1
LIST #3 - 120 POINTS, SINGLE DETACHMENT
(a mix of plastic and resin models, optimized to fit into a single detachment)
| TYPE | UNIT | UPGRADE | POINTS |
| [Command] | Forsaken Chieftain (8) | x1 Trophy Melee Weapon (+1) | |
| Xeno Spotter (+1) | |||
| Customized Weapons (+2) | |||
| Extensive Cybernetics (+2) | 15 pts | ||
| [Core] | Broken Rabble (5) | x2 extra Broken Rabble (+2) | |
| x1 Auto Slugger (+1) | |||
| x1 Longbeam Rifle (+1) | 9 pts | ||
| [Core] | Broken Rabble (5) | x2 extra Broken Rabble (+2) | |
| x1 Chem Launcher (+1) | |||
| x1 EMP Harpoon (+1) | 9 pts | ||
| [Hammer] | Rabble Assault (8) | x2 Hakoyu Grand Master (+8) | |
| x3 Torch (+0) | 16 pts | ||
| [Hammer] | Rabble Assault (8) | x2 Hakoyu Grand Master (+8) | |
| x3 Massive Torch (+3) | 19 pts | ||
| [Vanguard] | x2 Sig Jammer (12) | 12 pts | |
| [Anvil] | x2 Gnolti (10) | 20 pts | |
| [Anvil] | Rabble Fire Support (5) | x2 extra Broken Rabble (+2) | |
| x3 Longbeam Rifle (+6) | 13 pts | ||
| TOTAL | 112 pts |
Models needed:
- Broken Infantry Pack x5 (you'll have a couple of models spare)
- Forsaken Chieftain x1
- Sig Jammer x2
- Hakoyu Grand Master x4
- Gnolti x2
Note that for the above list, you could get to 119 points by dropping the Rabble Fire Support and including another two Gnolti instead!
Hopefully the above force rosters will give you some idea of how to plan your force. If you're looking for the force rosters for the Karist and Epirian factions, you can find them on the Maelstrom's Edge website here.
To assemble your own force, you can pick up the above models, and the rest of the Maelstrom's Edge model range, from the webstore here.
Happy Gaming!
New resin release for the Broken: The Hakoyu Grand Master!
Posted on Friday Sept 28, 2018 at 06:00pm in The Broken
![]()
The Broken receive a bit of a boost to their melee capabilities this month, with the release of the resin Hakoyu Grand Master - available now from the Maelstrom's Edge webstore!.
The Hakoyu Grand Master is an optional add-on for Broken Assault units. Equipped with powerful close combat weapons and defensive shields, he can help to defend the unit from incoming close quarter attacks while also possessing the fighting prowess to stand toe-to-toe with a Karist Shadow Walker!
With four arms and a horn-like protrusion from their foreheads, Hakoyu can seem menacing at first glance, especially as most have trained for decades in various martial arts and tend to carry at least one large melee weapon with them at all times, despite the fact that they are quite passive by nature. When a Hakoyu does feel forced to fight, their lightning quick reflexes and zealous training means they can usually end the contest before their opponent even knows what has happened.
The Hakoyu hail from the remote Yedo system. Their society is governed by a strict code of honour that can be difficult for non-Hakoyu to decipher. They believe the needs of the group are paramount, with the desires and wants of any individual considered trivial. This means Hakoyu prefer to live their lives in their home system, which makes them one of the more rare alien species in the Spiral Arm, with most humans never encountering a Hakoyu in their lifetime. All is not perfect on Yedo however, as the Hakoyu have been locked in a centuries-old war with their neighboring species, the Cera, over territorial rites and a perceived slight to the Hakoyu peoples' honor that cannot forgive. The war has steadily sapped the resources of Yedo, with the Cera using their technological advantages to blockade Yedo from receiving much needed relief supplies for its civilians. This dire situation has forced increasing numbers of Hakoyu to flee Yedo in an attempt to earn a living selling their services throughout the spiral arm, usually as a bodyguard or enforcer, even though such work is in direct conflict with their morale code and likely means they would not be welcomed back to Yedo should they ever wish to return.
When the Maelstrom threatens a world, misplaced distrust in Hakoyu sell-swords means they're often discarded at the last second by their former employers and denied a place on escape craft, leaving them ripe to join the ranks of the Broken. The Broken offer the Hakoyu a way out and a collective where most everyone is an outcast to some extent, in which many Hakoyu have found a second home even as they long to someday find their way back to Yedo. The Broken, on their part, value the Hakoyu's fighting skills and their unselfish character. The most sought after Hakoyu are their pinnacle warriors: a Grand Master, as they tend to give any squad the upper hand in any close quarter fighting. The calm demeanor of a Grand Master under fire is enough to convince their Broken squad mates to charge into the teeth of enemy fire rather than to run away. Grand Masters wield deadly Hakoyu phase weaponry, a technology first seen on Yedo and whose methods of construction are a closely guarded secret. These weapons pass effortlessly through energy fields and can cause electronic circuitry to explode upon contact, both highly sought after abilities in the Hakoyu's fight against the Cera. Hakoyu are also renown for their exquisite skill with forearm deflectors, and Grand Masters in particular are able to use these to prevent an opponent from ever striking them, no matter what type of deadly melee weapon they might face.
The Hakoyu Grand Master is available now - You can find it in the Maelstrom's Edge webstore here!
The unit card will be up in the Force Builder section of the Maelstrom's Edge website in the next couple of days - but here's a sneak peek!
Conversion Spotlight and Rules: Broken Skyboarders
Posted on Monday Sept 03, 2018 at 06:00pm in The Broken
- by Iain Wilson
Back when the plastic Broken Infantry kit was released, I cobbled together a conversion of a broken warrior riding a hovering skateboard-type affair, which featured in my 'Easy Broken Rabble Conversions' article. At the time, it was just something made for a little fun, but I found myself thinking that this would make for a cool unit option for the Broken, and so decided to sit down and write up some rules for them. Below you''ll find some ideas for building your own skyboarders using asorted components and some plasticard, and a link to the (unofficial) rules card to use them in your own Maelstrom's Edge games!
The primary consideration when putting together any sort of vehicles for the Broken is that they rely on scavenging and trading for whatever they can get, for the most part. As a result, there is very little uniformity in clothing and equipment, and I really wanted to carry this across to the skyboard unit. This meant coming up with three different designs for the three models in the unit, although you could just as easily stick with a single design and custimise them with additional bits and pieces stuck on, or simply with individualised paint schemes on the boards.
The first board is the one I build for the original article. I didn't take any in-progress pics of this at the time, but it's a fairly basic constructions - I glued two rectangles of textured plasticard together for the board itself, and then took four turbines (two left and two right) from Epirian Firefly drones, cut away the mounting pins and glued them onto the sides of the board. The rider was assembled from standard broken parts, posed to look like he is balancing on the board, which didn't actually require any converting.
My second board was also based on Firefly turbines, but this time I used two of them with the mounting pegs and trailing wings removed with a sharp hobby knife, as below:
I measured out the board on a piece of 2mm plasticard, allowing space for the turbines at either end with room for the rider to stand in between them. Then I drilled out holes the size of the turbines using a spade bit - a 10mm bit was very slightly too small, but was all I had. A little sanding after drilling the hole pushed it out to the right size.
I cut the board shape out, sanded down the edges, and glued the turbines in place in the holes. I also added a 'motor' piece using the heat shield cut from a torch (flamethrower) and a trimmed down overcharged powercell, but found on the Broken Infantry sprue.
For the final board, I made use of a part of a pipe fitting piece I had left over from the Maelstrom's Edge terrain sprue, from a building project a while back. I had cut through the pipe fitting to make it shorter, which left a nice circular piece that looked just perfect for a turbine surround. I cut a matching hole in a piece of 2mm plasticard using a 12mm spade bit, and then cut the plasticard to the shape I wanted.
I made the turbine fan itself out of a circle of 1mm plasticard, and added a circle of mesh to go over the top side of the hole, and a strut to hold the fan, using an injection point cut from an old model sprue. With all of this glued in place, I finished up with another overcharged powercell added for some sort of nod towards functionality.
After building riders for the two new boards, again just using components from the Broken Infantry sprue with minimal modification, I drilled holes in the bottoms of the boards to attach flight stems at suitably jaunty angles. With some paint thrown on, the skyboarder unit wound up looking like this:
Obviously, this is only a starting point - you can let your imagination out for a run and come up with different skyboard designs using whatever components you have on hand. The sky's the limit! (Sorry...)
As promised back at the start, I write up a rules card to include these guys as a Vanguard option in your Broken force. You can find this in the Force Builder section of the Maelstrom's Edge website here.
To build your own Skyboarders, you can pick up the Broken Infantry kit along with the rest of the Maelstrom's Edge model range from the webstore here.
As always, feel free to pop along and share your work, or ask any Maelstrom's Edge- or hobby-related questions on the Comm Guild Facebook page!
For other Maelstrom's Edge modeling articles, including tutorials and walkthroughs of a wide range of different building and miniature projects, check out the article roundup here.
Modeling Spotlight: Converting Broken Chieftains
Posted on Monday Aug 06, 2018 at 06:00pm in Models
- by Iain Wilson
This week we released the second of our resin Forsaken Chieftain models for the Broken faction. These two models allow Chieftains to take a few extra options that weren't available from the plastic kit, and are a wonderfully characterful pair of models. However, since I find it physically painful* to assemble models the way they were intended to be built, I thought I would take this opportunity to slice a few of them into pieces and see what interesting conversion possibilities they opened up.
*May not be an actual medical condition, but why take the chance?
Built straight out of the package, the two models each come with a pair of weapon options. The 'regular' chieftain has a xeno spotter perched on his/her (it's deliberately ambiguous) raised right hand, and also has a two separate left forearms, one with a poisoned blade and the other with a trophy melee weapon. The 'tech' chieftain has two separate right arms, with a custom beam blastgun and a custom slug rifle.
You can easily double-up your command options by using the leftover weapons on plastic Broken Rabble bodies. On the below models, I equipped one with the leftover slug rifle by slicing off the locator peg and gluing it on in place of a regular plastic arm. The other has the leftover trophy weapon in place of the plastic forearm, which just requires cutting the lower arm off just below the elbow and gluing the weapon arm piece in its place.
Parts can also be mix-and-matched onto the resin Chieftain models to switch around the available options a little. On the below tech Chieftain model, I left off the resin right arm and equipped him with a plastic arm and beam pistol from the Rabble sprue, and cut off his left arm at the elbow and attached a trophy weapon from the other Chieftain model.
On the regular Chieftain below, I replaced the right forearm with a plastic one, and added a regular blastgun from the Rabble weapon sprue. I also cut off a plastic left forearm and added a grenade.
For a more action-posed Chieftain, I cut the legs off this one at the waist, using a razor saw. Then I glued on a pair of running legs from the Rabble sprue, added a slightly modified slug pistol hanging off the belt, and glued the xeno spotter on tilted just a little bit forwards.
Since I now had a pair of leftover Chieftain legs, I did the obvious thing and glued them to a Karist heavy weapon trooper torso I had left over from a previous conversion. This Chieftain has the right arm with custom beam blastgun from the tech Chieftain, and a left arm and alien head from the Rabble sprue.
Mixing things up a little more, I added a xeno spotter and trophy weapon to a Broken Sig Jammer body, to create a less ostentatious Chieftain model. A head and left hand from the Rabble sprue finished the conversion off nicely.
And finally, a Chieftain equipped with a trophy weapon from a more civilised age, which is apparently less clumsy and random than a blaster. The laser sword is made from an overcharged powercell from the Rabble sprue, with a cut-down blade stolen from a Star Wars figurine. I also cut the left arm off, carefully cutting around the cape so that a plastic arm would fit in neatly underneath it. This Chieftain will no doubt take to the battlefield and display his displeasure at the lack of faith shown by his underlings...
Hopefully, that's inspired you to have some fun with your own Chieftains. You can pick up the resin Chieftain models, the plastic Broken Rabble sprues, or any of the rest of the Maelstrom's Edge model range, from the webstore here.
As always, feel free to pop along and share your work, or ask any Maelstrom's Edge- or hobby-related questions on the Comm Guild Facebook page!
For other Maelstrom's Edge modeling articles, including tutorials and walkthroughs of a wide range of different building and miniature projects, check out the article roundup here.
Tags: broken chieftains conversion modeling models spotlight
New Forsaken Tech Chieftain now available!
Posted on Thursday Aug 02, 2018 at 05:05am in The Broken
The Forsaken are commonly dismissed as simple, degenerate pirates, but the truth is that they usually attack only out of necessity. Piracy is many times the only way their community can survive a hostile galaxy: stealing food, fuel, ammunition and anything else of value they can get their hands on. The Forsaken rarely send out their forces en masse, knowing that a single crushing defeat could mean the end of their entire tribe's existence. Instead, they strike in small patrols, typically led by a Chieftain.
Though a Chieftain is granted his or her position of authority by The Assembly, they must first earn the respect of their fellow Forsaken to even be nominated. A Chieftain must be equal parts fighter, diplomat and cunning tactician. Knowing that their forces can never win a stand-up fight against a prepared opponent, a Chieftain leads his warriors to strike unseen from the shadows, quickly fading away before the enemy can root them out and respond in kind. Many an opposing force has underestimated the ingenuity of a Broken force led by a Chieftain, only realizing too late their folly, as improvised booby traps decimate their defensive positions and Broken secretly approach from their rear.
The appearance of a Chieftain can vary wildly both based upon the culture of their original homeworld, but also from that of the Broken Freeport they are now a part of. Chieftains tend to have slightly nicer clothing and equipment than standard Broken rabble, and many see it as almost their duty to show that even amongst the ranks of the Broken, an individual can still rise up and carry themselves with dignity and class. When the Broken do manage to defeat an enemy officer with particularly fancy clothing or an heirloom weapon, a Chieftain will confiscate these valuable items. A Chieftain wears these purloined treasures into battle, as both a reminder of their past victory, and to display their status as an iconic Broken leader.
This high detail monopose resin model comes with two different weapon options for the right hand - a customised slug rifle or a customised beam blastgun, and is available now from the webstore here! You can also find the updated rules for this model in the Force Builder section here.