Entries tagged [karist]
Conversion Spotlight: Karist Raptor Assault Skimmer Kitbash
Posted on Thursday Oct 24, 2019 at 05:00pm in Tutorials
This week, I'm continuing on my quest to add transport vehicles to all of my Maelstrom's Edge forces, with the probably exception of the Remnant (who really don't need them!). A while back, I shared a kitbashed Karist anti-grav buggy converted from a Games Workshop Genestealer Cult vehicle. This week, I'm revisiting the Karist Enclave to build them a transport vehicle from a Beyond the Gates of Antares skimmer.
The kit that I used was a Freeborn Solar Command Skimmer. This is a hybrid kit with metal and resin bits that go onto a basic plastic skimmer chassis. I went with this variant rather than the basic version because the resin add-ons make the cabin space look a little more practical for carrying troops.
The general styling of the vehicle was pretty much exactly what I wanted, and matches up quite well with the Genestealer buggy aesthetically, so I didn't actually make a lot of changes. I needed to swap out the crew for Karists, and chose to just replace the pilot and putty over the gunner's seat with 'green stuff' putty. The pilot was built using the top half of a plastic Karist trooper, with a head from the resin Karist heavy weapon trooper set.
The main weapons would also be replaced, but I kept the metal launchers for the sides of the cabin, as they'll do well enough to represent Karist grenade launchers.
The main gun on the Antares skimmer is fixed in place in the middle of the nose. I decided that something with a little more free movement was called for, so grabbed a sentry turret from the new Maelstrom's Edge terrain sprue and added a Ravager Pulse Cannon nabbed from the Tempest Elite kit.
The gun turret fit in nicely underneath the front of the skimmer, and with everything else glued in place it wound up looking like this:
I kept the original flight base on there for painting, but then switched it to a spare Games Workshop vehicle base that I had laying around, attaching the skimmer to it with one of the drone flight stems from the Antares kit.
Painting followed the same scheme as my Karist Strike Force, and the later anti-grav vehicle, after which it looked like this:
Stay tuned next week for some trial Transport Vehicle rules, and (unofficial) rules cards for this assault skimmer as well as some Epirian and Broken transport vehicles!
To build your own Raptor, you can pick up the Freeborn Skimmer from Warlord Games, and the new Maelstrom's Edge terrain sprue and other Maelstrom's Edge kits from the Maelstrom's Edge webstore.
As always, feel free to share your models and terrain, or ask any Maelstrom's Edge- or hobby-related questions on the Comm Guild Facebook page!
For other Maelstrom's Edge modeling articles, including tutorials and walkthroughs of a wide range of different building and miniature projects, check out the Hobby section of the Maelstrom's Edge website here.
Battle Report - Karists vs Epirians
Posted on Wednesday May 01, 2019 at 05:00pm in Gaming
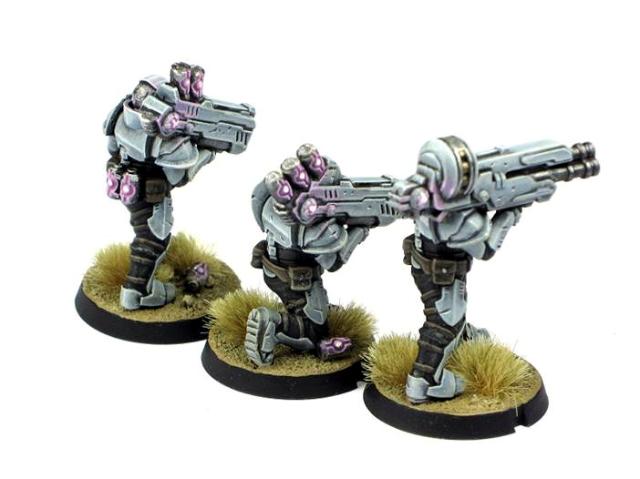
Tempest Elites with Ravager Vulcan pulse cannons and a Coriolis launcher deployed in rough terrain
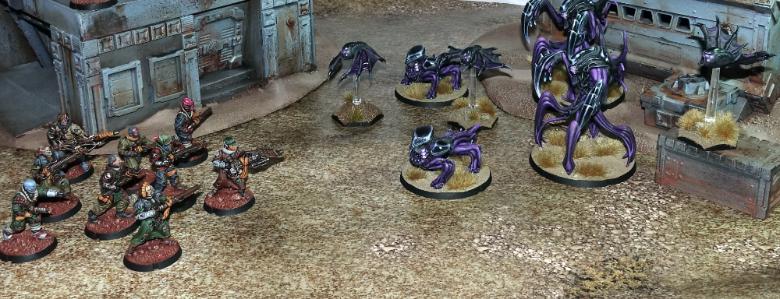
No one saw them coming: the warriors in their smooth armoured plating, accompanied by the beautiful yet horrible Angels. They took the abandoned and dilapidated production facility at Argos, killing the few patrolling Contractors without mercy. A hastily assembled Epirian contingent, including a powerful Hunter Warmech and a squad of elite SecDef, arrived on the scene the next day to root out the zealot strike force. These Maelstrom-worshipping crackpots were about to pay dearly for their boldness.
This game sees an Epirian force commanded by Iain take to the field against a Karist incursion led by Jon. The mission is Groundfall, which has the Alpha Strike and Territories objectives. Points are gained by destroying enemy units and by capturing the 5 territory markers scattered across the board. Deployment was determined to be in opposing L-shapes: Karist bottom right, Epirian top left. The Karists have easy access to 3 of the 5 territory markers. Uphill battle for the Epirian side?
The Epirian commander wastes no time: Firefly drones zoom up the compound to take stock of the situation and drive out the Karist vanguard. Immediately they spot the biggest threat in the Karist force: a mature Angel. The huge beast seems all but immune to their laser attacks, however.
The Firefly Drones fly up the field but only manage to suppress the Mature Angel.
Elite Karist Tempests respond immediately, heavily damaging the Hunter Warmech with their Ravager Vulcan Pulse Cannons. The Angel also responds to the Epirian attack, taking cover whilst destroying two of the Firefly Drones with her tentacles.
The Hunter takes heavy damage from the Tempests.
Realising the Karist resistance was much stronger than anticipated and finding himself in a bit of a pickle from the get go, the Journeyman projects his mind into the Hunter's damaged shell and returns fire at the Angel in her position of cover. The shooting is ineffective, and the Angel remains unperturbed.
Pondering...
With his toughest asset is compromised, the handler quickly switches to one of his Scarecrow Snipers. The lone bot looses a precision round from its Railrifle into the Angel, hitting the mark this time and visibly hurting the creature.
The Angel finally takes damage from the Scarecrow. Their low-shot sniper weapons can literally be hit or miss, but they have huge damage potential.
The Karist Kaddar Nova, witnessing the opening rounds of the engagement, chooses to maintain the momentum and attempt to finish this quickly, dashing out from his position on his own and taking down another Firefly. His troopers nearby follow suit and down another of the now completely hammered squad of Fireflies. His Angel, meanwhile, takes another Railrifle round from a second sniper robot in the distance, and is now badly hurt. The Karist troops need to act fast, as more bots are fast approaching their position and laying down fire on the juvenile angels on the other flank.
The Karist commander exposes himself, but downs a Firefly, and the nearby troopers destroyed another one. In the Groundfall mission, getting the first kill of the turn is worth a lot of points.
The last Firefly crashes and burns after more Karist troopers lay down a hail of suppressive fire, giving the Enclave the first kill.
Troopers finish off the fireflies, giving the Karists the crucial first kill.
The Foundation commander, witnessing how the Karists are holding a strong firm and his own forces struggling to get in a dominating position, carefully moves up his remaining force through the compound. The contractors launch a few grenade shells into the Karist line to suppress their fire and buy their robotic comrades some time.
Contractors returning fire at the Karist troopers.
Meanwhile, an enigmatic Shadow Walker rifts into hiding near the Epirian flank, with an eye to neutralising the sniper threat. The Angel Keeper assigned to the contingent of Angels in the force has his Juvenile beasts rain down cybel energy on the advancing Drone force, keeping all eyes off the sinister agent stalking up the flank.
The Spider Drones equipped with flakk guns are too far from the action to contribute, and the Angel Hellblasters aim to keep it that way by suppressing them.
The SecDef sergeant, watching the assault unfold on his transport's screen, sighs deeply as his opinion of robotic forces is once again confirmed. Deciding he needs to show how it's done and he'd better do it now, he signalls for his squad to drop right into the Karist position. Landing with guns blazing, he is pleased to see the nearby Karist Troopers turn their heads in surprise and duck down.
SecDef troopers drop behind enemy lines.
Out of nowhere, though, appears a flock of dark fluttering creatures: Angel minnows on the hunt. They frenziedly fire their cybel pulses at the SecDef landing zone. Even though the SecDef had taken up a safe position in cover, they lose one soldier to this alien assault from above.
The Minnows move towards and target the SecDef squad that just dropped behind both trooper squads.
The larger Angel, severely weakened by the merciless sniper fire, seems to lose form and suddenly disappears from the fight just as the Hunter's guns ready for another salvo at this most dangerous foe. Moments later the Hunter explodes in a cloud of shrapnel as the Tempest Elites continue their barrage.
End of the first turn: Jon elects to remove his dangerously wounded Mature Angel in order to deny the Epirians an easy first kill in the coming turn. The Karists hold 3 out of 5 territory objectives, whilst the Epirians have the other two. Iain, having left his damaged hunter on the table, immediately regrets this as the Tempests destroy it in the first action of the second turn and score those valuable first kill points again.
The SecDef realise something needs to happen now. Ignoring the smaller Angels spewing death onto their position, they take aim and down two Karist Troopers, hoping to break the Karist line from the rear.
The SecDef are in position to damage various Karist squads, taking advantage of their assault from the rear, but they are in turn dangerously surrounded.
The Journeyman Handler, taking the SecDef's cue, coordinates the fire of his Scarecrow Sniper with the SecDef squad, catching the Karist Troopers in a crossfire that wipes them out. The tables seem to be turning.
The Scarecrow again shows its potential as it wipes out the remains of a Karist squad.
Ignoring the little Angels would prove a costly mistake, however, as they now came down on the SecDef position. Despite killing several of the flying beasts, the SecDef lose two more soldiers to the pulsing cybel energy, leaving the Sergeant alone to escape the Angel threat and run for cover.
The SecDef sergeant flees from the angry Minnows. Aerial insertion is a powerful ability, but dropping in the middle of the enemy lines comes with certain risks...
The larger Angel Hellblaster also takes a heavy toll as another cybel salvo immolates all of the approaching Spider Drones. The Kaddar Nova, sensing victory and eager to lead by example, dashes forward, emerging from the Karist lines to personally end this heretic assault.
The powerful blasts from the juvenile Angels reduce the Spider Drone squad to just their handler.
Seeing the Karist leader run out and resolved to capitalize on the hole punched in the Karist line by the SecDef's assault, the Journeyman Handler links again to one of the Scarecrow Snipers, dangerously overloading its circuits, in a desperate attempt to deal the deciding blow to the enemy. A precision shot hits the Kaddar Nova square in the chest, ending the priest's heroic ambitions immediately. Surely this would break those crazy zealots! Meanwhile, the contractors move up to secure their end of the compound and open up on the Angel Hellblasters, with little effect.
Hellblasters with their Angel Keeper in their position of cover, guarding one of the objectives.
The Shadow Walker rifts up the field once more, cursing the Kaddar Nova's poor timing, but intending to take down the Sniper bots that were wreaking such havoc on his compatriots. His pistol shots glance off the nearest bot, however, as its position is well protected.
Registering this new close-ranged treat, the nearby bots all respond: the flakk guns on the Relay drone opening up and the Sniper bot quickly taking a shot at the advancing enemy agent. The nimble Shadow Walker, however, manages to dodge unscathed through the hail of incoming fire.
Suddenly the terrifying shape of the Mature Angel reappears at the edge of the compound, immediately bearing down on the lone SecDef sergeant. The veteran soldier stands no chance against this alien monster and quickly falls to its slashing attack.
By voluntarily removing the badly damaged Angel earlier in the game, Jon ensured he would have a strong reinforcement to bring on later. She can now come back to finish off another unit, grabbing the Karists enough points to finish the game.
Realising his situation, the Journeyman Handler orders his force to retreat into cover and await further reinforcements. The Karist force remains in control of the compound, for now.
Epilogue: Iain's decision to keep his Spider drones back to hold objectives rather than sending them after Karist targets, combined with essentially sacrificing his Firefly unit by sending them out into the open unsupported allowed Jon to make the most of the mission with his more aggressive Karist units. While the Scarecrows did their best to even up the playing field, the rapid casualties inflicted on the Epirian force allowed Jon to very quickly rack up enough VPs for a turn 2 victory.
Tags: battlereport epirian karist
Conversion Spotlight: Karist Anti-Grav Buggy!
Posted on Monday Apr 29, 2019 at 05:00pm in Tutorials
A short while back, I showed off an Epirian Contractor truck that I put together using a Games Workshop Ork truck with all of the Ork bits removed. It seemed only fair to give the Karists some similar vehicular love, and so I found myself once more purloining the parking lots of the 41st Millenium, this time making off with an Achilles Ridgerunner. The moment I saw this buggy, I thought it would make a fantastic anti-grav vehicle, which was right up the Karist Enclave's alley. And so I set to for some serious wheel-removal action!
There was surprisingly little conversion actually required to make this work - I was intending for a fairly high-tech take on anti-grav, with all of the 'workings' would be internal. This helps to preserve the lines of the vehicle, and eliminates the need to build parts specifically to represent the techy stuff. So for the most part, the buggy was just built as standard. I chose the radar dish that comes in the kit instead of the open cupola, because I liked the look of it.
With the wheels being left off, I also needed to remove the axles, so these parts were all either left off, or trimmed away as necessary.
To conceal the gaps where the front axles should have been, I added a piece of thin plasticard in the wheel arch on either side, and then glued the shock absorbers running down to connect the chassis to the front armour plate. This was just intended to create a little detail, rather than having just the flat plasticard.
On the rear, I covered over where the differential piece should have gone with a couple of vents cut from the support struts on the Maelstrom's Edge terrain sprue.
Obviously, an anti-grav vehicle needs to hover, but I didn't want it sitting too high and also wanted a nice, sturdy joint for the flight stem. To this end, I drilled a hole in the bottom of the buggy, allowing the flight stem to fit snugly through, and glued a short length of plastic tube to the inside of the buggy's top section, for the flight stem peg to slot into.
To attach the stem to the base, I just drilled an appropriately-sized hole a little aft of centre, and called the job a good 'un. The stem would be glued in once everything was painted.
The original weapons needed to be replaced with Karist versions. I left off the smaller weapons that attach either side of the cab, but for the main gun, I cut the attachment joint out of the missile launcher's lower plate and glued it to a pair of Cybel Lances taken from the Karist Heavy Trooper set, with the firer's arms removed.
For the gunner himself, I used the kneeling Heavy Trooper, with a right arm purloined from the plastic Karist Trooper sprue and a hand from the Faction Expansion sprue.
From there, it was just a matter of gluing the rest of the buggy shell together. With the assymetrical cabin, it wound up looking a bit lopsided without the wheels, so I added a small pair of stabiliser wings on the rear, cut from 1.5mm plasticard.
With some paint on, the buggy was ready to fly!
If you're feeling the need for speed, feel free to pop along and share your vehicular creations, or ask any Maelstrom's Edge- or hobby-related questions on the Comm Guild Facebook page!
You can find the Karist range, along with the rest of the Maelstrom's Edge model range in the webstore here.
For other Maelstrom's Edge modeling articles, including tutorials and walkthroughs of a wide range of different building and miniature projects, check out the Hobby section of the Maelstrom's Edge website here.
Sculpting Tutorial: Quick and Easy Hoods
Posted on Monday Jan 28, 2019 at 05:00pm in Tutorials
- by Iain Wilson
It's been a while since I sculpted anything, so this seems like as good a time as any to throw in a quick and easy sculpting tutorial!
Hoods are a nice way of adding that extra sinister touch to your sneaky cultists, and they're actually really easy to make. There are a few different potential ways to go about it, but here I'll run through the way I've found results in the least amount of swearing.
What you will need:
- Some putty - I'm using 'Green Stuff (Kneadatite), but any fine-grain two-part epoxy (ProCreate, or the finer-grade Milliput, for example) will do the job.
- Sculpting tools - I use silicon colour shapers for most of my sculpting, with the bulk of the heavy lifting being done by a flat, square ended tool and a rounded pointy one.
- Baking Paper - not essential, but handy to use as a work surface to stop the putty sticking to the table.
- And obviously, a miniature to put the hood on...
Start by mixing a ball of putty around about the size of the model's head.
Pop the putty ball on top of the model's head, and then use your fingers to flatten the ball down either side.
Use a tool to finish smoothing down the sides, rolling or pulling the putty right down to the model's neck.
Pull the putty from either side to the middle at the back of the head, to close up the gap, then use a round tool to roll up along the resultant seam to smooth it out. This should leave a pointy peak at the top rear of the hood.
Carrying on with the rounded tool, roll along the top of the hood and down the sides to smooth out any remaining fingerprints, lumps or creases that shouldn't be there.
Use the flat tool to shape the front of the hood. You can work the tool in under the putty around the face to pull it outwards, and then smooth along the outside to remove any creases and pull the edge forwards.
Use the point of the rounded tool to poke into the putty at either side of the neck, to make it look like the hood flares out a little and then folds back in under at the collar.
Finally, use the rounded tool, or the edge of the flat tool, to create some creases wherever they look natural - I like to add some shape around the back, where the weight of the pointy rear of the hood would cause the fabric to sag a little.
And that's pretty much it - you can continue to work the putty to fine-tune the shape as necessary, and then let it set before painting!
A couple more examples.
If all of that was a little hard to follow, here's a run through in video form!
If that's all got you inspired to get some hoody action happening in your own cult forces, You can pick up a coven of alien-worshipping Karists, along with the rest of the Maelstrom's Edge range from the webstore here.
As always, feel free to pop along and share your work, or ask any Maelstrom's Edge- or hobby-related questions on the Comm Guild Facebook page!
For other Maelstrom's Edge modeling articles, including tutorials and walkthroughs of a wide range of different building and miniature projects, check out the article roundup here.
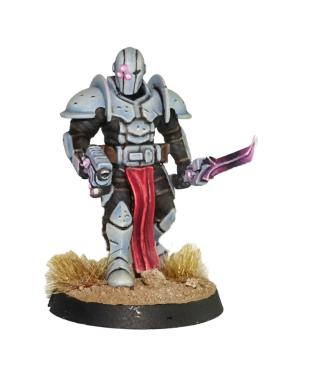
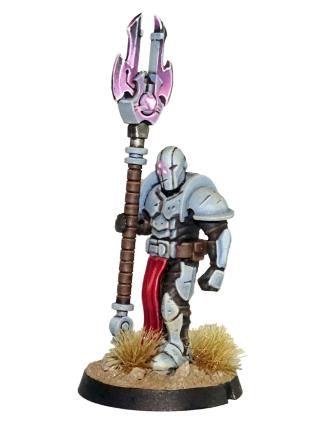
Modeling Spotlight: Karist Kaddar Nova
Posted on Monday Oct 22, 2018 at 06:00pm in Models
- by Iain Wilson
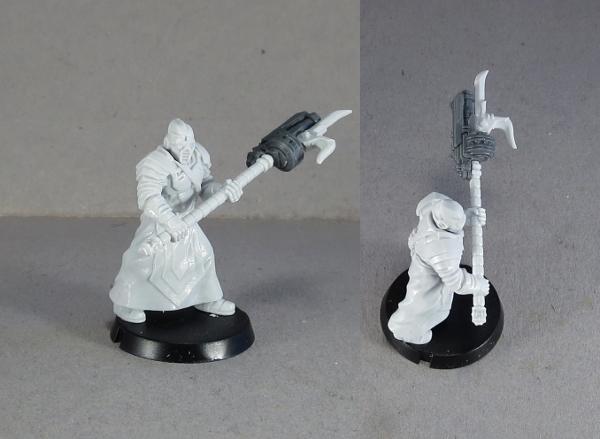
This week, I'm having a play around with another of the original models released with the Battle for Zycanthus boxed set: The Kaddar Nova!
The Kaddar Nova is a member of the Karist Enclave priesthood, but they are often granted operational control on the battlefield due to their experience and the reverence paid to them by members of the Enclave. Equipped with an incredibly powerful cybel reactor that serves as both a power source and a weapon, the Kaddar Nova is a distinctive figure. Their bodies are enlarged and twisted by their constant exposure to cybel energy, and their ravaged faces cut a stark contrast to their powerful frames.
As the leader and figurehead of the Karist forces, the Kaddar Nova needed a suitably impressive model kit, and so the sprue comes with a nice array of parts to build them. But as always, of course, the sprue is only the starting point, and below I'll go through some quick and easy ways to further customise this fearsome individual.
Building your Kaddar Nova straight off the sprue lets you choose from three different sets of legs, two different arms for each side, two different heads, and an optional crown piece for the more formal-dressing Kaddar.
The indents in the crown mimic the extra eyes of the alien Angels that often accompany Karist forces. You can use this to make a more mysterious Kaddar Nova by taking the head with the scull-cap, trimming his nose down flat and gluing the crown piece on upside down over his face, so that the upper rim sits just below his eyes.
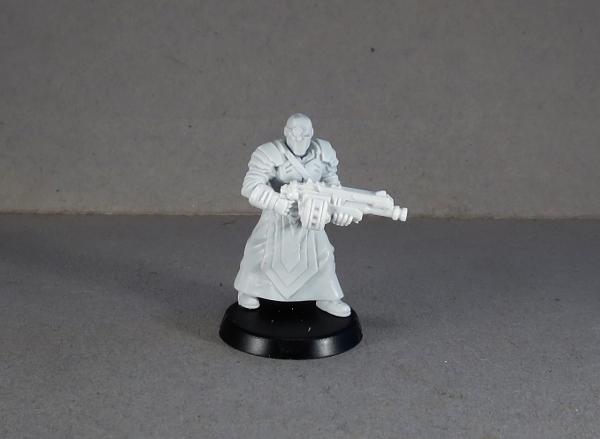
Headswaps are another easy way to mix things up on your models. The necks on the original Karist sets weren't all interchangeable (something that we've corrected in later Maelstrom's Edge models) but thanks to them being plastic that's easily fixed with a little cutting or filing. On the below model, I have used a head from the Tempest Elite set, with the helmet crust removed as it would hit up against the cybel reactor.
A more inscrutable look can be achieved using a Karist Trooper helmet with the neck trimmed down to fit, and the eye lenses sanded down to produce a blank faceplate. The staff on this model is a modified Cybel Glaive from the Faction Expansion sprue.
An advancing pose can be created with some careful cutting - trim a wedge out of the groin area where the legs join, so that they can be attached in a less spread position, and glue them so that one leg is to the rear slightly. Once the glue has set, cut or file the waist down flat and assemble the rest of the model - his robes largely hide the joint, but you can use a little modeling putty to fill any resulting gaps.
Alternatively, you can look for legs from elsewhere in the range. Trooper legs are too small, as they're not cybel-enhanced like the more elite Karist warriors, but by cutting through the waist of a Tempest Elite model with a razor saw, you can replace the Kaddar Nova's robed legs with walking, armoured legs instead.
Shadow Walker legs also work, although they're a fraction shorter. This Kaddar Nova is obviously just not quite as cybel-swollen as his compatriots yet.
The Kaddar Nova is only one aspect of the Kaddar priesthood, and others will be fleshed out eventually. In the meantime, though, it's fun to see where mashing bits together can lead you... The below model is a combination of Kaddar Nova and Shadow Walker parts, with some small tentacles taken from a couple of Mature Angel kits. I call him a 'Kaddar Noctis'.
Hopefully, this has given you some inspiration for your own Kaddar Nova builds! To get started, you can pick up the Kaddar Nova along with the rest of the Maelstrom's Edge model range from the webstore here.
As always, feel free to pop along and share your work, or ask any Maelstrom's Edge- or hobby-related questions on the Comm Guild Facebook page!
For other Maelstrom's Edge modeling articles, including tutorials and walkthroughs of a wide range of different building and miniature projects, check out the article roundup here.
Tags: conversion kaddar karist modeling nova spotlight tutorial
Painting Tutorial: Energy Blades
Posted on Monday Oct 08, 2018 at 06:00pm in Tutorials
- by Iain Wilson
The Maelstrom's Edge Faction Expansion Sprue introduced a couple of cybel-powered edged weapons - the Cybel Blade and Cybel Glaive - to the Karist faction. These weapons give the Karist troops a wonderful, savage look and add even more nasty, close-quarters options to their units.
Painting these sorts of weapons is a great opportunity to add some eye-catching detail to your force, so I thought it might be useful to offer some suggestions on different ways to do so, to suit varying levels of painting prowess. There's no right or wrong way - you can feel free to use whatever technique suits your style, but the below ideas might give you a starting point if you're unsure of how to go about it.
For each of the below methods, paint up the rest of the weapon however suits your force's colours, and then go to town on your blade!
The Silver Wash Method
An easy one to kick things off. Start with a silver blade. Apply a wash of purple ink (I've used Army Painter Purple Tone). Let it dry, and you're done!
The White Wash Method
Similar to the above, except that you start with a white blade. Apply a wash of purple ink, and let it dry.
To lift it just a little, you can then use a fine detail brush and a little white paint to highlight the raised edges.
The Drybrush Method
Start with a silver or gunmetal blade. Apply purple ink to the back half of the blade, and let it dry.
Blend the purple into the metal by lightly drybrushing with the same metal colour that you used on the blade. This will also pick out the raised edges.
The Crystal Method
Start with a white blade. Using a fine detail brush, apply light coats of purple ink which each successive coat covering slightly less of the blade so that you build up a gradient of purple fading gradually to white . You don't want the ink to pool - the lighter you apply each coat, the better the end result will be.
Work with the shape of the blade - you want the brightest (whitest) part of the blade on the curved part of the edge, so the purple builds up from that point towards the tip and the back end of the blade. On the top half of the blade this is reversed, so the darkest purple is on the inside of the curve, fading out to white on the ends. Once you've built up your colour to the level you want it, highlight the raised edges with a little white.
And that's it - 4 different techniques for some very different results. You can vary these up some more by using different colours - I've gone with purple as that's the 'canon' colouring for cybel energy, but if you're using a different colour throughout your force (or looking to apply these techniques for a different miniature altogether) then you can easily substitute any colour ink.
If you're feeling inspired, you can pick up the Expansion Sprue from the Maelstrom's Edge online store here, and make sure you share your efforts on the Comm Guild Facebook page (https://www.facebook.com/groups/MaelstromsEdge)!
For other Maelstrom's Edge modeling articles, including tutorials and walkthroughs of a wide range of different building and miniature projects, check out the article roundup here.
New Karist Faction Objective Card: First Contact
Posted on Wednesday Oct 03, 2018 at 06:00pm in Gaming
Although the existence of the xenos species called Angels was not completely unknown to the inhabitants of the spiral arm, only a handful of academics and long-standing spacefarers truly knew of them before the Karists began using Angels for their military and propaganda purposes. To everyone else, they were always simply a myth or legend bragged about by starship captains who had spent too many years traversing the void.
Karists tout that these creatures are emissaries of of the Maelstrom, with their priests having helped coined the name 'Angels' to describe them. When Karist priests attempt to sway the populace of a world to their cause, they often mention Angels, or even utilize a live Angel as a demonstration. For how can creatures so powerful and strange, they argue, serve the will of the Karists if their cause were not just and true?
The First Contact faction objective represents a number of new avenues for our game. It is the first of several planned new faction objectives tied to particular models, helping to create different types of themed forces you can choose to utilize within the overarching umbrella of the existing forces. To this end, your force must include an Angel Keeper for you to be able to use the First Contact faction objetive.
First Contact
This objective may only be utilized if your force contains an Angel Keeper. If an objective type requires you to choose a force commander, it must be an Angel Keeper.
This objective can generate a maximum of 3 VPs per game, after which your units no longer benefit from the IrratIonal Fear ability.
Partial: (conditional) Each time a non-fearless enemy unit fails any type of discipline check (even an automatic failure) while affected by the Fearsome ability of your Angel units, gain 1 VP.
Full: N/A
Irrational Fear: Friendly models with the angel designator gain the Fearsome (1) ability, or add +1 to their existing Fearsome ability.
You can download a printable version of this card here.
The existing basic faction objectives ('Secret Cache' for the Karists, 'Now You See Me' for the Broken and 'Automated Uplink Relay' for the Epirians) all work roughly the same way: they provide your forces an optional bonus, which you can choose to forgo each turn to instead gain +1 victory point. First Contact, on the other hand, provides your force with an automatic bonus: namely improving your Angel's 'Fearsome' ability, and successfully utilizing that bonus is what scores you the objective's victory points. Even better, this is the first faction objective where it is possible to earn the maximum 3 victory points in a single turn, even theoretically in the first turn of the game, which would definitely put your opponent on their back foot right out of the gate!
But that raises the obvious question: how can First Contact possibly be balanced compared to the existing two faction objectives? The answer is that the other two objectives provide you with better situational control. When you need a victory point, you can generate one, but when you need the bonus provided by the objective, you can utilize that instead. With First Contact, once you've generated your 3 victory points from it, the bonus provided by it ends and you're stuck the rest of the game without it, even if you would have preferred to keep the bonus around longer in lieu of gaining all 3 victory points.

We would love for you to try out some games with both the Angel Keeper and First Contact rules and let us know what you think about them. If you've got any feedback (with or without playing any games with the rules), please feel free to provide it either by replying to this article directly, or on our Comm-Guild Facebook group or in the Maelstrom's Edge forum on Dakka Dakka.
You can flesh out your shape-shifting alien force by picking up an Angel Keeper and any of the different types of angels from the Maelstrom's Edge webstore here!
Tags: faction gaming karist objectives rules
Modeling Spotlight: Karist Shadow Walkers
Posted on Monday Aug 20, 2018 at 06:00pm in Tutorials
- by Iain Wilson
I'm taking a little break from new releases this week to have a look back at another of the original release units - The Karist Shadow Walker!
The Shadow Walker sprue contains two different torsos (twisted in different directions from the front) and two of each arm in different poses. This allows you to create two very different, dynamically posed models from those parts. You can find the general assembly guide on the Maelstrom's Edge website here.
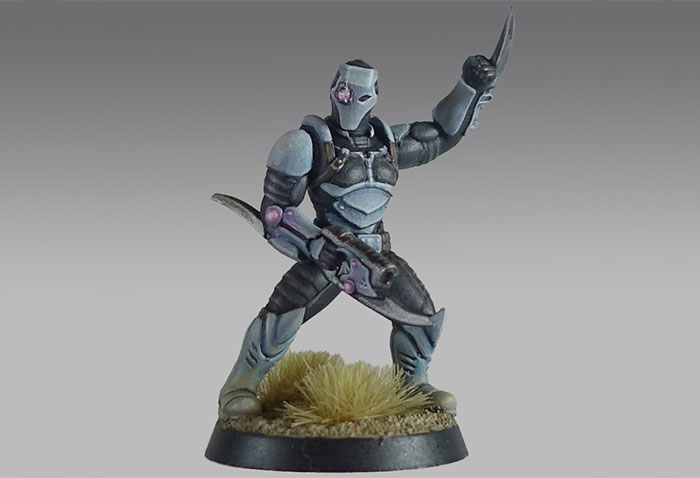
Somewhere along the design process, the sprue went from being intended to create a single model to including parts for two full models with the lack of only a second head. Luckily, several other Karist kits come with extra heads, so it's not too difficult to purloin a leftover in order to build that second Walker. The right hand model below uses the bare head from the Karist Trooper sprue, and there's another bare head available on the Faction Expansion Sprue.
Alternatively, the resin Karist Heavy Weapons set comes with two troopers and three heads - two helmeted, and one bare. The helmeted heads are very similar in style to the Shadow Walker's, with a couple of extra eye lenses. The model below has also been reposed slightly, with the right arm extended and filled with 'green stuff' putty, and the right shin repositioned so that his front foot matches his line of fire.
While we're reposing our models, it is really easy to add a little more motion to the pose by cutting off the bent leg just below the knee and reattaching it at a sharper angle and off the ground, to create a 'lunging' pose. The below Shadow Walker has clearly just Rifted in and is charging into the action:
Borrowing parts from different kits does, of course, work both ways. The Karist Praetorians below were given Shadow Walker legs to help them stand out a little from regular troopers and to create a more dynamic pose than is possible from the Trooper legs. The added loincloths are from the Faction Expansion sprue.
As I was working through these models, I found myself wondering what it would look like if Shadow Walkers had their own specialised mini-factions. From there, I wound up with the 'Shadow Dancer', carrying a regular cybel blade on place of the usual Shadow Walker's wrist-mounted version, and with an added prehensile, mechanical topknot which, I expect, would whip around as the Dancer flips and whirls about his opponents, and shoot out toxic darts or hallucinogenic gas from the emitter on its tip. The cybel blade was taken from the faction expansion sprue, and the topknot made from a piece of guitar string and the muzzle from a Karist radwave emitter.
By contrast, the 'Shadow Stalker' eschews close range combat where possible, opting instead to carry out his work from afar with his nox rifle. This model has an assault rifle arm taken from the new Broken Forsaken Tech Chieftain model with the bayonet and muzzle removed and a silencer made from a length of plastic tube attached. The head is the bare head option from the Karist Heavy Weapons pack.
I don't have a name for this next one yet (feel free to leave suggestions in the comments!) but how about a Shadow Walker sect that has found an alternative to teleporting? Using arcane science to fuse Angel DNA to the human form, this Shadow Walker variant is equipped with void-gel wings!
Of course, if you're going to have bizarre sub-sects of the Karist Walker breed, it wouldn't be too surprising to have a clandestine offshoot of the regular Kaddar priesthood overseeing them. And so the Kaddar Noctis was born - like the flying Walker above, this model fuses Human and Angel DNA, with the traditional Shadow Walker cybel blade replaced with an Angel's void-gel tentacles. The legs and torso are from the Kaddar Nova sprue, with most of the Cybel reactor removed and replaced with a modified cybel glaive head from the Faction Expansion sprue. Arms and head are from the Shadow Walker sprue, with the small tentacle parts taken from a pair of Mature Angel models.
To add some sneaky, pointed 'negotiation' to your own Karist Force, you can pick up the Shadow Walker along with the rest of the Maelstrom's Edge model range from the webstore here.
As always, feel free to pop along and share your work, or ask any Maelstrom's Edge- or hobby-related questions on the Comm Guild Facebook page!
For other Maelstrom's Edge modeling articles, including tutorials and walkthroughs of a wide range of different building and miniature projects, check out the article roundup here.
Tags: conversion converting karist modeling models spotlight
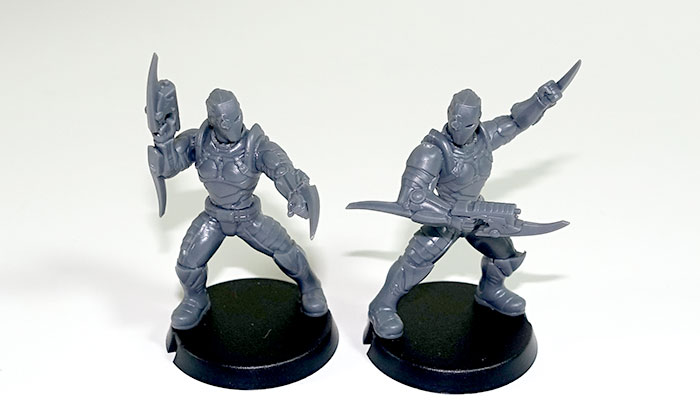
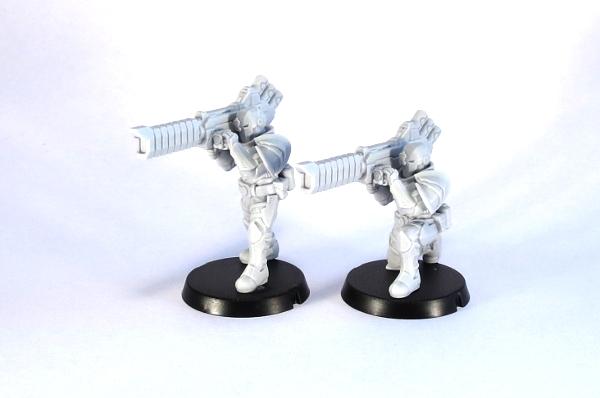
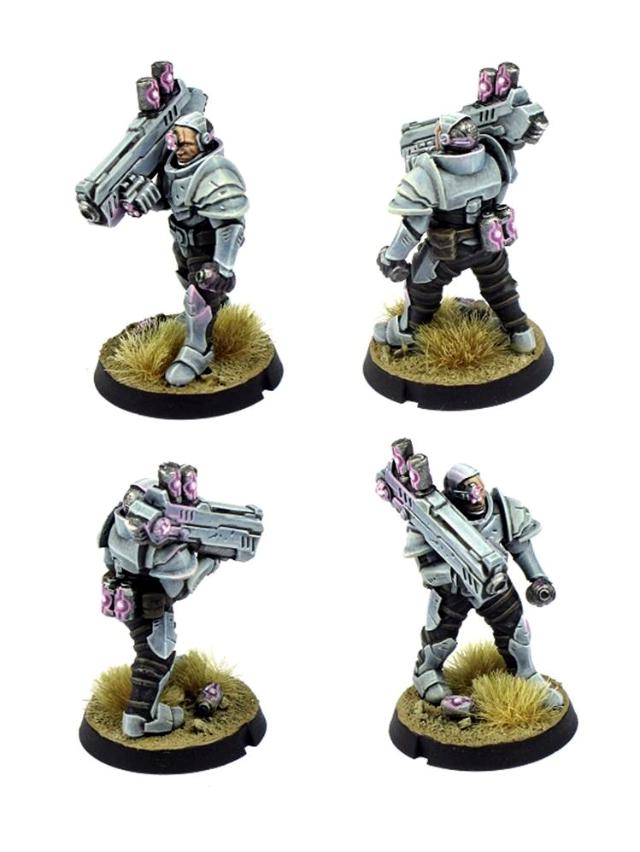
Magnetizing Karist Heavy Weapon troopers
Posted on Wednesday Feb 28, 2018 at 05:00pm in Tutorials
Originally posted on Dakkadakka by Sgt.Oddball.
Hey all,
When you buy Karist Heavy Weapon troopers, you get two guys a pack, with a selection of 3 weapons. I want to be able to use all the weapon types, but I dón't want to paint three guys just so I can use any of the three weapon types (my chosen way of painting Karists is slow...). Magnets are the answer. Luckily, these guys are quite simple to magnetize. Here's how:

What you get in a pack. I love these sculpts and the model quality is fantastic. Very crisp.

Long thin resin bits can end up bent.

This is easy and quick to fix: dip in hot water, straighten, dip in cold water.

All the bits for one guy, without the ammo I forgot at this point.
I drilled a 3mm hole in the torso. The sculpt is such that you know exactly where to drill. If you go too deep you may end up making a hole on the other end where the head goes. You won't see this with the head in place.

In the hole goes a 3x2mm magnet. Try to match the amount which the magnet sticks out to the amount the original resin stuck out. If you want to use the left arm that holds the gun, it's critical that the magnet doesn't stick out too much, or you won't be able to line up the gun with the left arm.

Then put a magnet in the gun arm in the same way. The sculpt shows you where to drill. Don't drill too deep or you'll go out the shoulder guard. Also, if you lay the arm down like this and then press down hard with your drill, you could deform the shoulder guard a little.

As with the torso, you want the magnet to stick out as much as the resin did, or else your left arm won't line up. It's not just the amount by which the magnet sticks out, but also the angle. It's better to have the magnet in a little too deep: it'll still catch and your alignment will work. Of course, if you just use the left arm that holds the ammo, alignment isn't a problem. Easiest way to get it right is to have the left arm glued in place and then dry-fit.

The other guns get the same treatment. Beware of polarity ;)

Here's the missing ammo, which I glued to his belt. Also, you can see the torso and arm line up nicely on the rear.

Front alignment also works out with the left arm in place.
Ravager gun works too.
As does the grenade launcher.
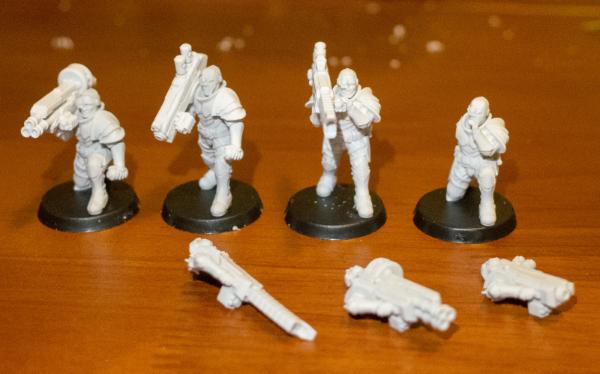
Four guys with interchangeable weapons.
Once I paint these, they'll show up in my 'painted stuff' topic on Dakka :)
Tags: assembly heavy karist modeling trooper tutorial walkthrough
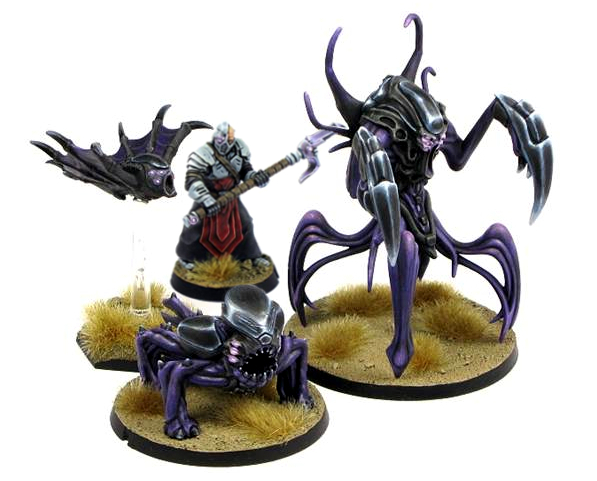
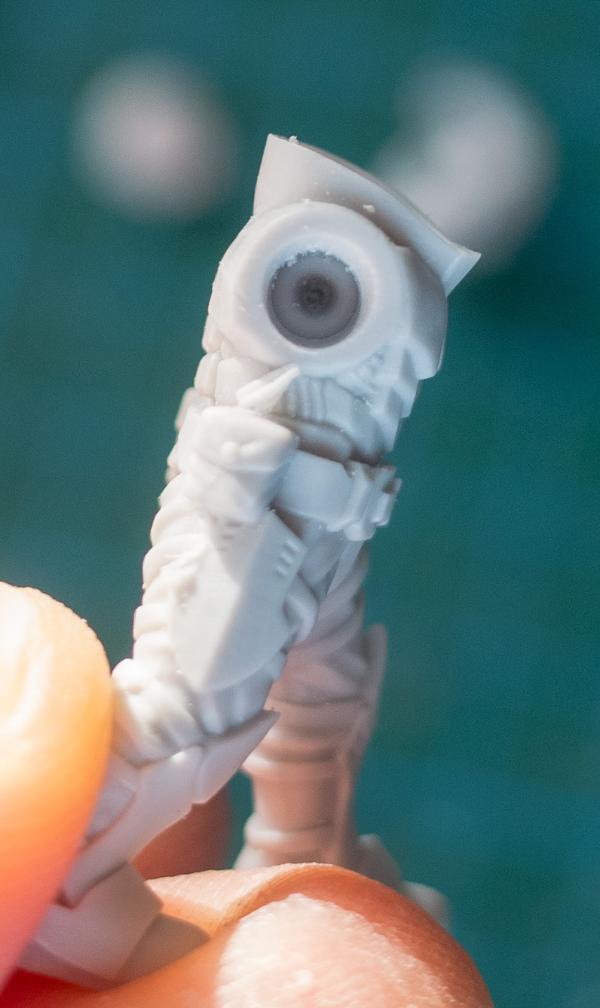
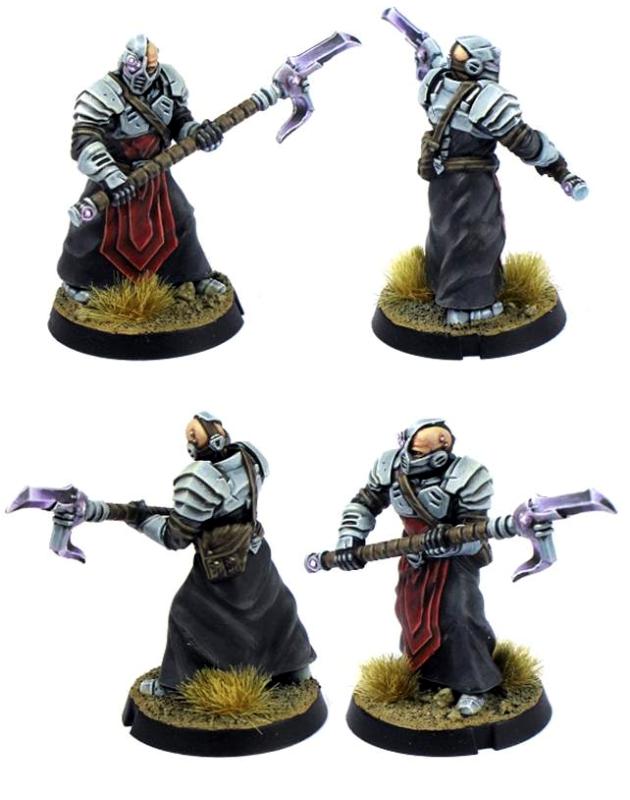
Modeling Spotlight: Karist Angel Keepers
Posted on Sunday Jan 07, 2018 at 05:00pm in Tutorials
- by Iain Wilson
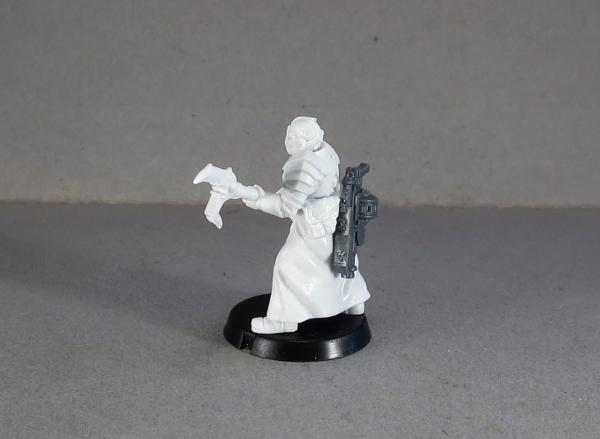
The Karist Angel Keeper has added his goad-wielding distinctiveness to the Karist Enclave model collection, and so this seemed a good opportunity to grab a few and have at them with the exacto knife and superglue.

An addition to the new resin range for Maelstrom's Edge, the Angel Keeper comes supplied with his angel goad and grenade launcher.

Assembly is really simple: Glue feet to base, glue head to neck, glue hands to arms. The goad also has a separate piece for the blade end, which sockets onto a convenient pointy end on the shaft.

The more eagle-eyed rules watchers may have noticed that both weapons are held in hand, but the Keeper actually comes with both by default. This allowed for players to choose which would be held in hand while still keeping the parts count down for practical purposes, and rules-wise isn't an issue since we can assume that all default gear exists whether it is specifically shown or not. If, like me, you do prefer to have all of your models' gear modeled, this isn't a difficult task.
If you have modeled your Keeper with goad in hand, just grab a spare grenade launcher from the Faction Expansion Sprue and glue it onto his back beside his pouch.
If you prefer to have the grenade launcher at the ready, you can use a piece of 1.6 mm diameter plastic rod to replace the shaft. Here, I've also removed the detail piece from the bottom, to be reattached onto the new shaft.


You can also use a shaft from the Cybel Glaive on the Faction Expansion Sprue.

OK, but what if you want both weapons in hand, you say?
Luckily, resin cuts really easily, so the easy option here is to carefully remove the left hand from the stock of the grenade launcher - just trim it down to a flat surface and file it smooth if necessary.
For the goad, cut through the shaft either side of the right hand, and then reattach the bottom of the shaft to the top.


For a slightly more complex (but more hardcore!) alternative, why not combine the two weapons into one?
Take a grenade launcher from the Faction Expansion sprue, cut off the pistol grip and trim down the stock so that it is level with the bottom of the ring around the muzzle.
Trim down the back side of the goad blade so that it is flat, and cut a small, flat inset into the end of the goad shaft where the blade normally attaches.

Then glue the back end of the grenade launcher to the goad shaft, and the goad blade to the stock of the grenade launcher.
The Keeper's head has the same ball joint neck as most of the rest of the Karist range, so you can easily swap in different heads to either customise your Keeper a little, or use the model as a specialist in a Karist Trooper or Praetorian unit. The below model has a head from a Karist Heavy Trooper.
You can also create unit champions by swapping out or modifying the weapons. Below, I've filed down the shoulder pads and added Karist Trooper pads over the top, and used a head and cybel blades from the Faction Expansion sprue to create a Praetorian Tetrarch.

What have you done with your Angel Keepers? We would love to see your creations on the Comm Guild Facebook page!
To pick up the Angel Keeper, or any of the rest of the Maelstrom's Edge model range, visit the webstore here.
For other Maelstrom's Edge modeling articles, including tutorials and walkthroughs of a wide range of different building and miniature projects, check out the article roundup here
The Karist Angel Keeper - Available Now
Posted on Friday Dec 29, 2017 at 12:00pm in Models
Spiral Arm Studios are proud to present our latest release in our continuing one release per month cycle - The Karist Keeper.
This high quality resin kit contains one Karist Angel Keeper model with two weapon options and a 25mm base. The cybel Goad can be assembled in a variety of angles for added dynamism. This Command model enables an all-Angel Karist army to be fielded, creating a very visually distinct force.
Angel Keepers are a strange, isolated offshoot within the Karist Priesthood. For hundreds of years, the Keepers of the Karist Enclave have enslaved the alien creatures known as Angels, keeping them docile using regimented doses of cybel energy. The Keepers experiment on their captives, using different forms of cybel energy and electromagnetically charged cages to shape the Angels, encouraging them to grow new limbs or shapes to match the Enclave's requirements. While all Karists are secretive, Keepers take this mantra to another level. Keeper Initiates hand-picked from amongst the ranks of Novitiate priests secretly study sacred texts from venerated Keepers on both the Karist faith and the complexities of caring for the Angel creatures. Some Initiates drop out when they witness the trapping of Angel Minnows with tainted cybel energy. But those who persevere with their training find Angels to be magnificent, transcendent beings, and pledge their lives to the cause. Junior Keepers undertake a vow of silence, abandoning common human pursuits to focus solely on the miraculous Angels. Keepers study Angels for many years, learning to train and even speak to them in a rudimentary, computer-assisted, language. Those that graduate to the full rank of Angel Keeper undergo surgery to replace their vocal cords with a cybernetic enhancement, effectively allowing them to 'speak' the language of the Angels.
Keepers are the least public of the Kaddar sect, having little to do with local populations, but fulfilling the critical role of Angel harvesting and training. On the battlefield, Keepers are tasked with marshalling Angel units to attack the enemy, an often tricky prospect. As the Angels feel the effects of mass and gravity far stronger than their other senses, Keepers can lead Angels around using the pulsed gravitic generator attached to their voicebox. The combination of sound and gravitic waves is irresistible to smaller Angels, but headstrong Mature Angels often ignore these orders if more tempting prey is available. Therefore, Keepers also utilise grenade launchers equipped with Swarmer rounds to douse enemy units with Na-Cybel. Not only do enemy units become incapacitated through temporary euphoria, but the Na-Cybel also draws the attention of any Angels nearby. When a Keeper and an Angel are in harmony, the consequences for their enemies can be devastating.
Weapon and model rules are available at the Karist online unit cards section of the Maelstrom's Edge website.
The Karist Keeper is available for purchase right now at the Maelstrom's Edge store.
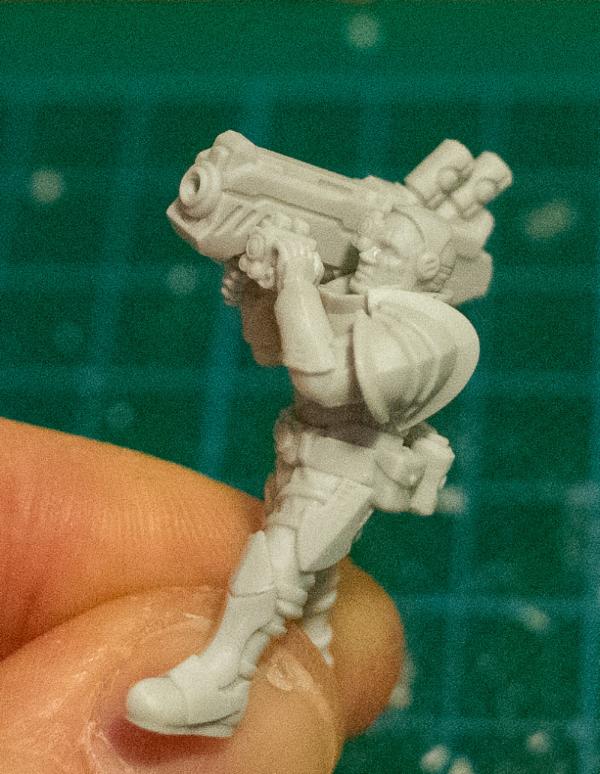
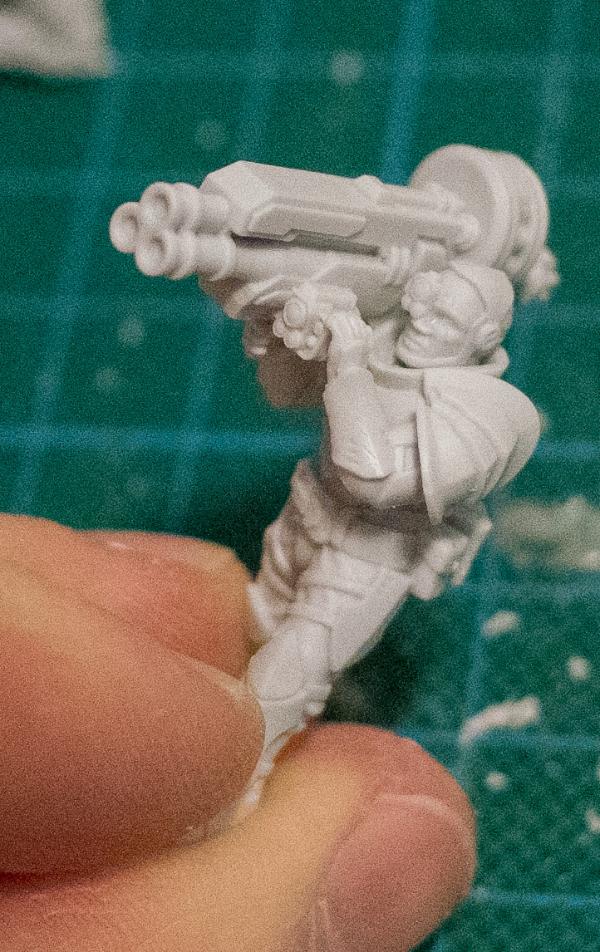
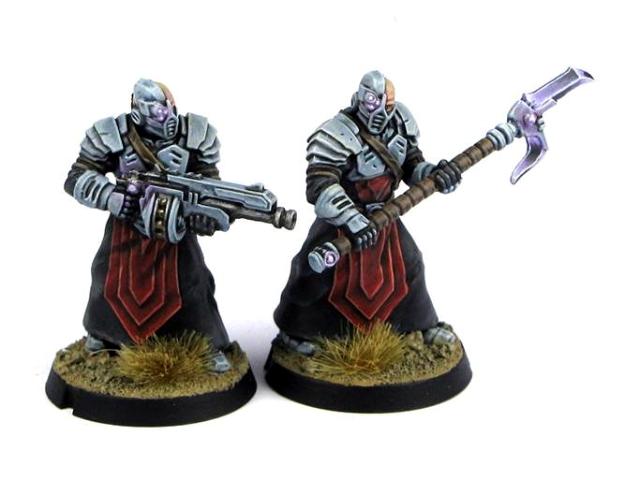
Modeling Spotlight: Assembling Karist Heavy Troopers
Posted on Monday Dec 04, 2017 at 05:00pm in Tutorials
- by Iain Wilson
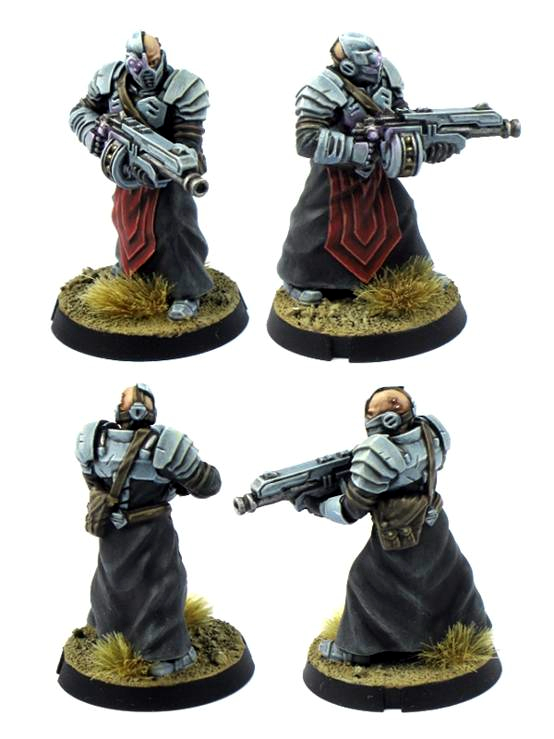
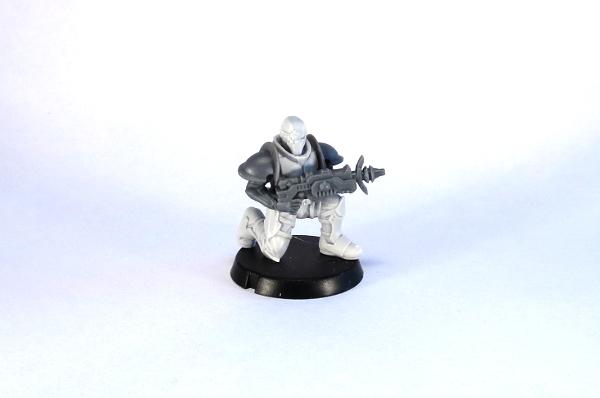
This week saw the release of the next Maelstrom's Edge resin set into the wild, with the addition of heavy weapon troopers to the Karist Enclave lineup. Here, we're having a quick look at how to assemble these great new models!
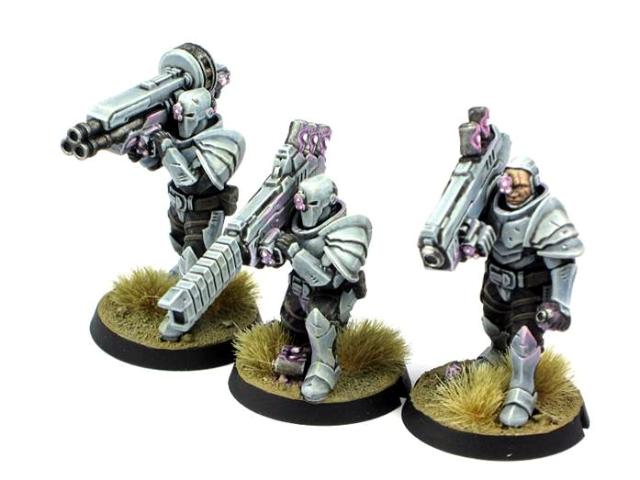
The Karist heavy troopers come in a pack of two troopers, with three heavy weapons between them. They also include 3 optional heads - two with helmets and one open-face, an extra left arm with a spare cybel cannister, and a bunch of extra cybel cannisters to attach to their belts.
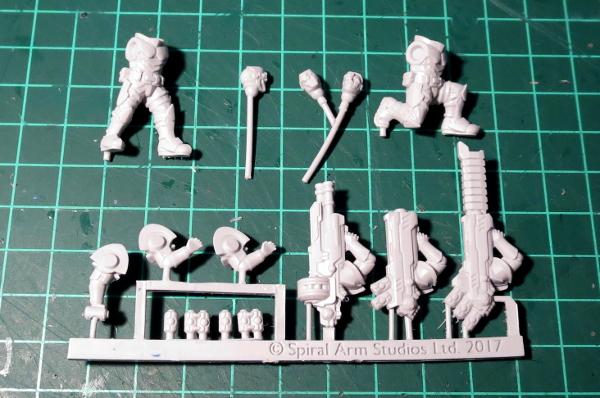
As always with resin models, it's a good idea to give them a quick wash in warm, soapy water to clear off any residual mould release, as this can affect paint adhesion. If any of the parts are a little bent, this is also the time to drop them in some hot water and then reshape them - although the casts I received of these models were all beautiful and straight, with extremely minimal mould lines, so very little clean-up work involved.
The two bodies are all one piece, and so once the frame lugs are trimmed off the bottom of the feet, can be glued straight onto your base. Because these are resin rather than polystyrene like the regular plastic kits, use a good quality superglue or fast-setting epoxy glue, rather than plastic cement.
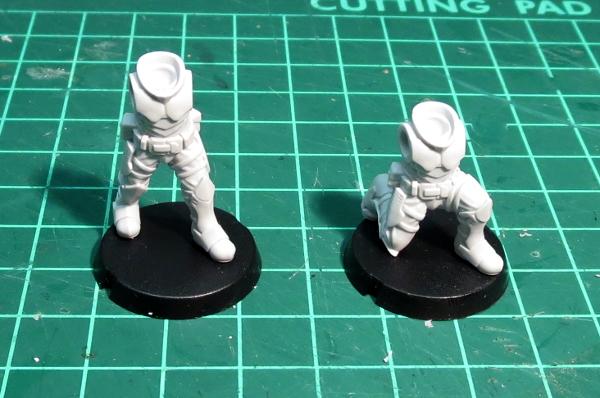
The arms have nice, sturdy locator pins that fit snugly into the sockets in the shoulders.
Dry-fit them first to get a feel for how they sit, and then I find the easiest way to ensure the arms fit together nicely is to put a drop of glue into each shoulder socket, a small drop on the left palm, and then sit everything into place and make any minor adjustment quickly before the glue grabs. You can glue one arm at a time if you prefer, but it can be trickier to get a perfect fit that way, depending on the angle of the arms.
Finally, glue the heads in place, and you're ready for paint!
You can add a Quintarch to the unit using a regular Karist trooper, or you can add parts from the Trooper sprue and/or Faction Expansion Sprue to another heavy trooper body to keep with the heavier armour look for the whole unit.
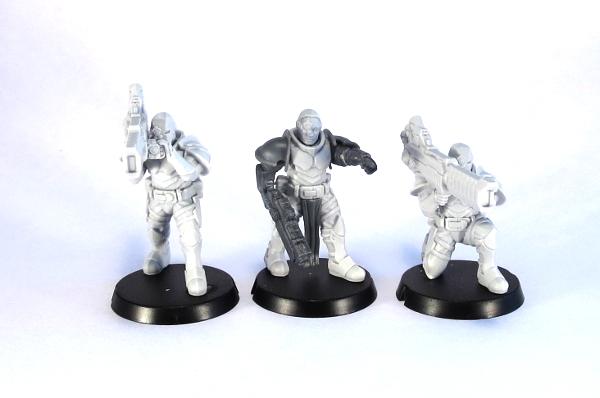
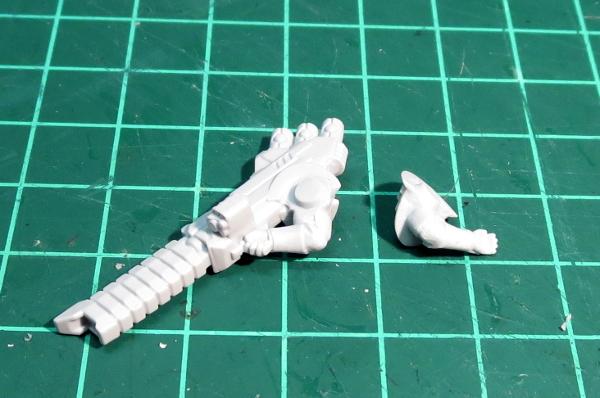
You could also use weapons and arms from the Trooper sprue on the heavy trooper bodies to make special weapon troopers for your regular Karist units.
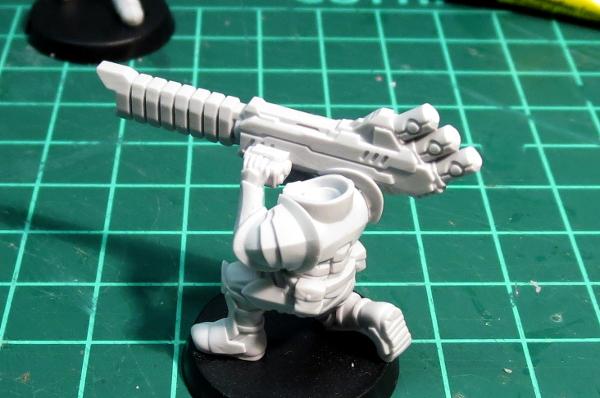
And for a final bit of fun, I made some conversions a while back of some Tempest Elites with shoulder-mounted weapons (from the Spotlight article here). That conversion becomes even easier with the pulse cannon and cannister arm from the heavy trooper set!

To build your own army of Maelstrom-worshipping, explody Doom, you can pick up the Karist Heavy Trooper set, along with the rest of the Maelstrom's Edge model range, from the webstore here. As always, we would love to see your creations on the Comm Guild Facebook page!
For other Maelstrom's Edge modeling articles, including tutorials and walkthroughs of a wide range of different building and miniature projects, check out the article roundup here.
Tags: conversion converting heavy karist modeling trooper tutorial walkthrough
Karist Heavy Weapons - Available Now
Posted on Thursday Nov 30, 2017 at 10:00am in The Karist Enclave
Spiral Arm Studios are proud to present our latest release in our continuing one release per month cycle - Karist Heavy Weapons.
These weapons are resin, with slightly up-armoured Karist troopers carrying and operating them. One of the weapons can now be added to your basic Karist Trooper squads for +1 to +2 points, or you can build an entirely new Anvil unit with two heavy weapons - the Karist Trooper Heavy Squad.
Weapon and unit rules are available on the Karist online unit cards section of the Maelstrom's Edge website.
The models are available for purchase right now at the Maelstrom's Edge store.
You'll also notice that the kit comes with a Karist trooper head which has the mask removed, revealing the human underneath.
The above model is also demonstrating the alternate arm option, holding a cybel ammo cannister. Parts are broadly interchangeable with the rest of the Karist range, opening up further options and conversion possibilities!
Tags: heavyweapons karist models resin
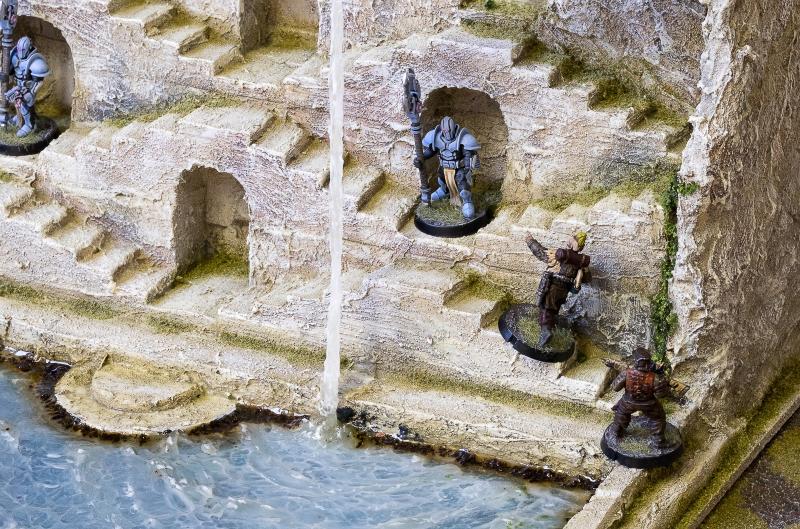
Building a Karist temple: how not to
Posted on Saturday Nov 25, 2017 at 05:33pm in Tutorials
Originally posted on Dakkadakka by Sgt.Oddball.
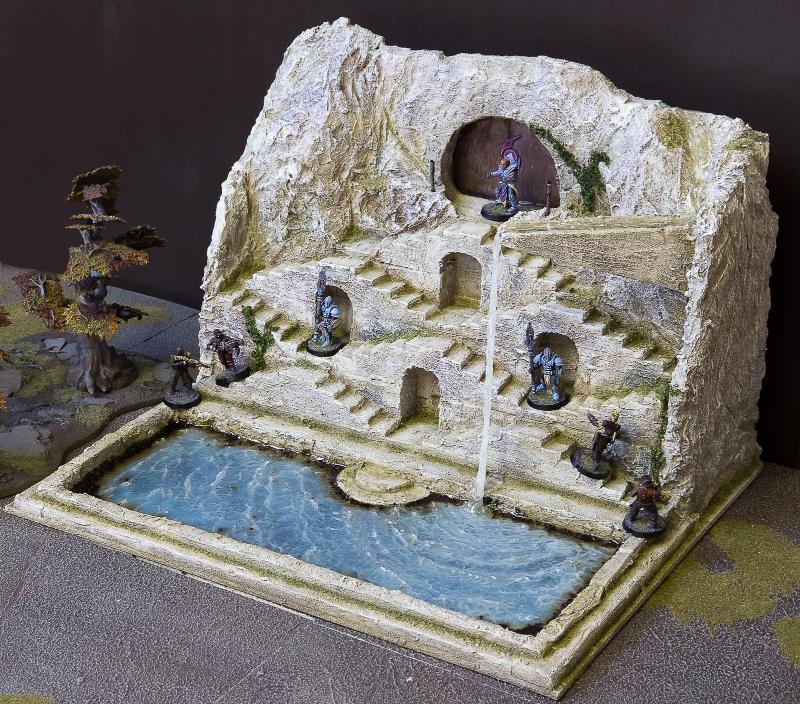
What follows is a brief overview of how I built this Karist temple, inspired by the stepwells seen most commonly in India. A couple mostly water-related things did not work out at first, so here’s how to avoid those things.
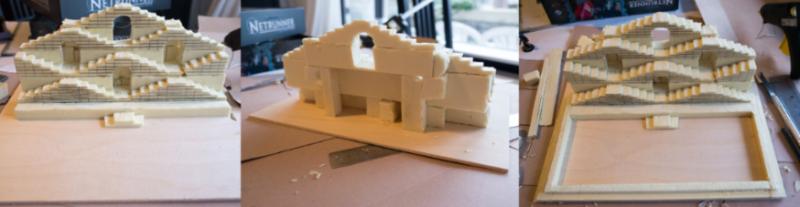
1. I took the lid from one of those boxes they put wine bottles in, measured things, and glued my foam stairs to the lid. The steps are sized to accommodate normal 25mm based dudes without them tipping over. At the back: I just used scraps of foam to hold everything up. I then used foam again to make the basin.
2. I then stacked bits of foam to create the rock around the stairs and the temple entrance.
3. With fingers, a hobby knife, a serrated knife and a hot soldering iron I shaped the foam to look like rock.

4. I then undercoated the whole thing with white textured wall paint. Next, I used a hobby paint mixture to make everything rocky a yellow-sandish colour. The inside of the basin was painted a bright blue. The rock was then washed in diluted brown paint and the water area highlighted with progressively lighter shades of blue-green (lighter towards edges). The rock was highlighted with probably the base colour again and then adding in a sandy colour and white. I also used various coloured washes (reds, greens, browns) to give the rock colour some variation. All highlighting is simple drybrushing/overbrushing. In the last picture, I’ve poured Woodland Scenics E-Z water in the basin and in the water source on top, which is a resin you melt before pouring. This is the first thing you should not do. This stuff was just not suitable for this purpose. It shrunk and cracked as it cured and had a yellowish tint.
5. It’s not at all easy to remove E-Z water once it’s set, especially if you want to keep the surrounding terrain in one piece. Getting rid of it involved trying all sorts of methods, eventually a chisel was most effective. I then tried a more familiar (to me) product, which is Woodland Scenics Realistic water. This is awesome stuff and gave me a very nice pool. For the water drop and a little ripple effect I used Woodland Scenics Water effects, which is also nice.
Then I did the second thing you should not do. I figured I could add some white to the water by mixing white paint into the Water effects stuff and applying it where appropriate. However, Water effects itself is white until it cures, hence I couldn’t see how much the white paint coloured the Water effects. Of course, I didn’t bother to test my batch (all this water stuff takes forever to cure and I have no patience). Turns out I used too much white paint and all my water now looked ridiculous (basically like that picture of the uncured Water effects). The thing is, it’s impossible to get rid of. I think I tried painting over the whole thing? Not sure. Anyway, in the end I decided it was time to once again dig out the whole basin.
This time was worse, as the Realistic water isn’t as easily chiselled as the E-Z Water. It stays a little soft. After much perseverance I got everything out, but I destroyed some of the paint job and actual foam bits around the basin. I had to redo all that and also build new steps into the water (round steps this time). Now that I knew what not to do, again using Realistic water and Water effects got me the desired result (still room for improvement, but I’ll leave that for another project).
6. The final steps were making temple doors with the Karist logo out of plasticard, and detailing. The Maelstrom's Edge terrain sprue supplied a control panel. The doors were painted brown, then bronze, then drybrushed pewter and silver. The logo got various purple paints, washes and highlights. I used green weathering powder to colour the rock a bit in the crevices and then sprinkled on fine blended green turf for some moss, and the dried contents of some teabags around the edges of the basin to represent fallen leaves and such muck accumulating there. This muck, of, course, didn’t appear wet so I added a final coat of Realistic water (this is the white sheen you see in the last image). The colour from the tea bled a bit more than I’d like, so this is probably another thing I’d find a better procedure for next time. To finish up I glued some coarser, darker green turf to the rock to represent vines, washed that with a brown wash and then highlighted with an olive colour. I then broke a skewer in two and wrapped the ends in narrow masking tape to make two torches and planted these near the entrance, painted brown and metallic.
And that’s basically it! Apart from messing around with the water a lot (this cost me so much time, it ain’t funny), it’s a fairly simple project.
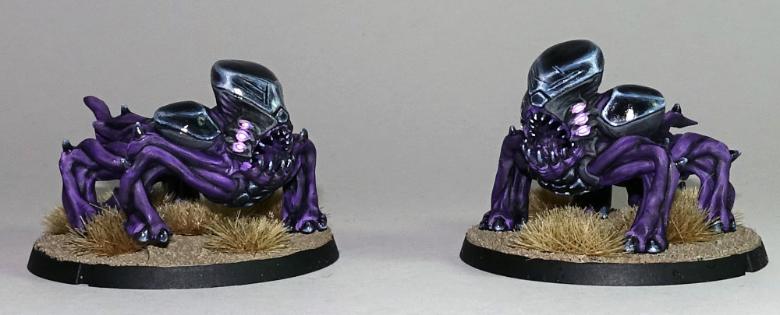
The Karist Angel Hellblaster - Available Now!
Posted on Tuesday Oct 31, 2017 at 03:00pm in Models
We at Spiral Arm Studios are proud to announce the immediate release of the Karist Angel Hellblaster unit. A valuable addition to any Karist force and our first ever resin model! It seems fitting to release a monstrous creature on Halloween!
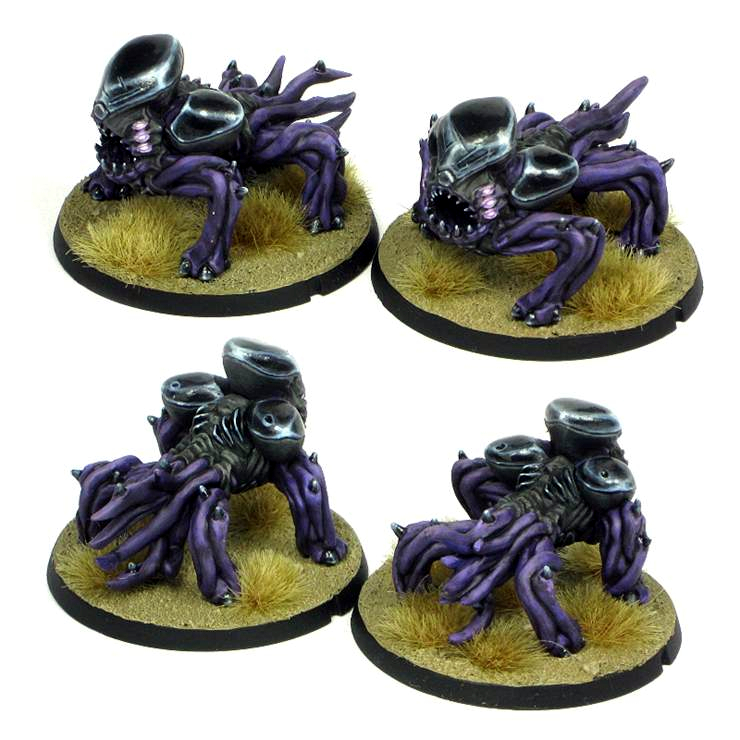
The Angel Hellblaster is a juvenile form of an Angel. Larger than a minnow but smaller than a mature Angel, juvenile angels can take many forms, but Karist Keepers try to goad certain Minnows into a Hellblaster form for the many tactical advantages the Hellblaster type offers.
First and foremost, the Cybel Blast ability sets these guys apart from the rest of the Karist forces. Using a powerful template blast, they can really hold their own.
Cybel Blast: Range 24", SHO 2+SB, PEN 4, DAM 1, Special: AoE (SB), Explosive (6+).
The full Angel Hellblaster profile and force builder elements can be found on the Force Lists section of the Maelstrom's Edge website.
Two distinct models are available in a single pack:
The Hellblaster sits on a 44mm base, the same as the Epirian Spider Drones and Hunter Warmechs. Here's what the Angel range looks like now:
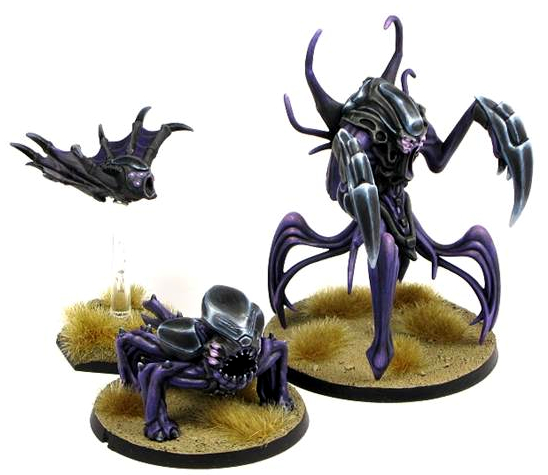
If you have wanted to build an all-Angel army, we are just one model away from it being completely viable, and the Angel Hellblaster will be the Hammer of your force.
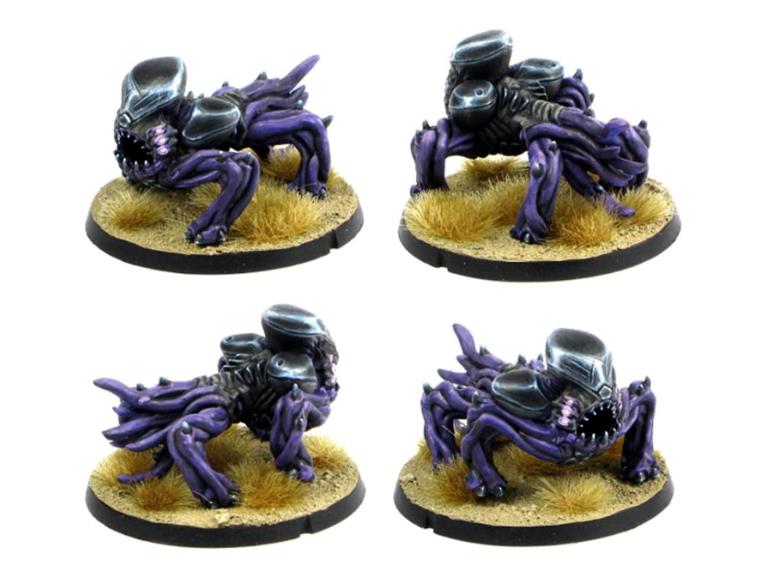
The Angel Hellblaster is available now in the Maelstrom's Edge webstore.
Tags: angel hellblaster karist model resin