Entries tagged [terrainsprue]
Terrain Spotlight: Yoghurt Tub Observatory
Posted on Monday Dec 03, 2018 at 06:00pm in Tutorials
- by Iain Wilson
A side effect of building a lot of scratch-built terrain is that you sooner or later find yourself eyeing off all of your rubbish, trying to decide whether to throw it out or put it in the 'terrain fodder' box. This week's article comes from seeing an empty yoghurt tub sitting upside-down on the sink and thinking 'Hmm... I could totally do something with that!'
With the addition of half of a plastic Christmas bauble, and some bits and pieces from the terrain sprue, I built an observatory:
This all started, as I said above, with a 700g yoghurt tub. I was undecided at first as to just what to do with it, but when I went fossicking around in my potential terrain bits collection, I came across half of a plastic bauble that my wife bought a couple of years ago with Christmas stamps or somesuch thing in it. It looked a perfect size to combine with the tub, and so an idea was born.
I decided to keep this one fairly light on extra detail, for a clean, functional-in-a-sciency-sort-of-way building. The first thing to do was add a door, so I grabbed one from the Maelstrom's Edge terrain sprue, traced around it on the side of the tub and then cut out the doorway rectangle carefully with a sharp hobby knife. After checking the fit and making some slight adjustments with the knife, the door was glued in place with an 'all plastics' glue (a two-part superglue that includes a 'primer' to help the glue grab to plastics that can otherwise be problematic for a strong glue bond).
I added three support struts spaced around the building, just gluing them in place where I wanted them.
For the dome, I took some more support struts and separated the small square sections with attached rivet strips by cutting through the strut with the knife. I gave these a slight curve by bending them carefully over the handle of the hobby knife. On the bauble, I drew a guideline through the middle and then glued the strut sections and a large pipe fitting along the line.
I then glued the bauble in place on top of the yoghurt tub, and added two more support strut pieces halfway around each side, to help reinforce the glue bond, as the edges of the bauble are fairly thin.
Finally, I cut an 8" square of masonite, and glued the tub in the middle of it. I also added a couple of steps cut from an off-cut of foamed PVA, and a little strip of plasticard to cover over the doorstep, where my doorway cut had been a little untidy.
A couple of coats of spray and a little detail work later, and the new observatory looked like this:
A quick tip on painting clear containers - it can be a really good idea, particularly if you are using lighter colours, to spray the inside of the container black or grey before gluing it in place and painting the outside. This helps to make the end result more opaque, as the painted building can otherwise go a slightly translucent or look a little glowy if there is a strong light behind it. It also helps keep the building looking good if the paint gets scratched on the outside.
To build your own yoghurt tub science building, you can pick up the Maelstrom's Edge terrain sprue along with the rest of the Maelstrom's Edge model range from the webstore here.
As always, feel free to pop along and share your work, or ask any Maelstrom's Edge- or hobby-related questions on the Comm Guild Facebook page!
For other Maelstrom's Edge modeling articles, including tutorials and walkthroughs of a wide range of different building and miniature projects, check out the article roundup here.
Terrain Tutorial: Flight Base Shipping Crates
Posted on Monday Nov 19, 2018 at 05:00pm in Tutorials
- by Iain Wilson
This week's modeling article came about more or less by accident! I have a bunch of flight bases left over from the Epirian Drone kit, as it comes with both 45mm bases for Spider Drones, and flight bases for Firefly Drones. I discovered when sorting out some bases in a mixed box of bits that the 25mm round bases fit quite neatly inside the bottom of the flight base, creating a pretty neat little detail effect, and I thought: I need to do something with that!
And so I did - multi-purpose shipping crates:
This is a really quick and easy build. You'll need two flight base bottom pieces, two 25mm bases, some thin cardboard (I'm using part of a manilla folder here, but cereal packet or similar thin card or even some thin plasticard would do just fine) and a computer terminal from the Maelstrom's Edge terrain sprue. That last bit is optional, as the crates will still look perfectly functional without it, but it does help to finish it off and give it that definite sci-fi stamp!
First, cut the cardboard into a strip - the width of the cardboard is the length of the crate. I've gone with 50mm long crates, as that seemed like a good size, but you could make them longer or shorter (or even do a mix of sizes) if you choose. Mark out six 15mm increments along the strip and lightly score with a sharp hobby knife, and cut the cardboard off about 5 or 6mm past the last one. Cut the corners of that last, shorter increment off at 45 degrees, as below:
Fold along each score line to create a hexagonal tube.
Apply superglue to the inside of one end of the tube, and wrap it around one of the flight bases, with the base bottom facing out, so that the end of the tube lines up flush with the bottom of the base.
Repeat for the other end, and this time also glue the short tab on the end of the cardboard inside the corresponding edge of the tube.
Glue a 25mm base, bottom facing out, inside each of the flight bases. The arc markers on the 25mm base line up with two corners of the flight base. If you're not using Maelstrom's Edge bases for this, it still works, you just won't have the extra bit of detail from the arc markers. Some bases also have branding stamps on the bottom - you could use these the other way around, for a slightly different look.
Finally, glue the computer terminal in one end.
Add some paint, and your cargo crates are ready for the table!
Printing out some shipping company names and gluing them on the sides is a great way to add some extra detail and make them look authentic!
To build your own shipping crates, you can pick up the Maelstrom's Edge terrain sprue (and 25mm bases!) along with the rest of the Maelstrom's Edge model range from the webstore here.
As always, feel free to pop along and share your work, or ask any Maelstrom's Edge- or hobby-related questions on the Comm Guild Facebook page!
For other Maelstrom's Edge modeling articles, including tutorials and walkthroughs of a wide range of different building and miniature projects, check out the article roundup here.
Terrain Spotlight: Generator Made From Bubblegum Tape Dispensers!
Posted on Monday Nov 05, 2018 at 06:00pm in Tutorials
- by Iain Wilson
One of the most enjoyable aspects of terrain building for me is to find everyday things that, with a little bit of tinkering, suddenly turn into something that looks at home on the battlefield. This has resulted in me spending more time than is healthy wandering through hardware stores and discount shops looking for new fodder for the workbench - it's often a little surprising where that perfect next project piece will show up.
This week's build is based on an idea that I have come across in several different incarnations online, and thought it looked too cool to not try it out. So after a quick trip to the local grocery store, I found myself building a generator out of bubblegum tape dispensers!
I picked up two packs of grape-flavoured Hubba Bubba. Obviously, the flavour doesn't make any difference to the build, but if you're buying bubblegum anyway, is there any logical reason to buy any flavour other than grape?
The first step was to remove the bubblegum from the packs, and remove the labels. The labels mostly peeled off easily, but needed a little cleanup with some Tea Tree Oil to remove the sticky residue - If you don't have access to Tea Tree Oil, use whatever local equivalent you have for cleaning sticky residue off things.
Then I may have got momentarily distracted...
One side of the pack has an internal ridge running down each long side of the opening, and a pair of tongues that close over into the other half. These needed to be removed, which I did with a sharp exacto knife. They're made from a fairly soft plastic, so cut easily.
This left four almost-identical, semi-circular pieces.
To join the segments together, I took four 25mm bases and cut them in half with a razor saw. The arc markers on the Maelstrom's Edge bases serve as a handy guide for this, but if you are using different bases then some measuring and marking would be involved here.
I cut a piece of masonite to an appropriate size for a base, and then a smaller piece of foamed PVC for the generator to sit on. I could have used another piece of masonite here, but figured the plastic gum dispenser would glue better to the PVC. On the PVC, I marked out where the dispenser pieces would sit, and added a 25mm-wide centre strip to serve as a guide for gluing the base pieces on.
Then, I sat each dispenser piece in turn onto the marks and glued the base sections in position on both sides using an all-plastics glue.
(The 'all-plastics' glue that I use is a 2-part system that has a tube of superglue and a 'primer' pen. You prime the contact points on both parts to be glued before applying the glue, and it creates a super-fast and extremely strong bond with just about any type of plastic).
It was around about this time that I noticed that there were small recycling symbols embossed on two of the dispenser pieces, so I carefully shaved these off with the exacto knife and lightly sanded down the surface. Then I moved on to the ends. Due to the dispenser having that tongue that I cut off back at the start, one side was left with a flat plate, while the other had a hole where the tongue originally slotted in. I took the cut piece of tongue and glued it into this gap.
Then I took eight support struts from the Maelstrom's Edge terrain sprue, and cut off the vent sections on their ends. These were glued in pairs into the dispenser opening.
The four sections of dispenser were then glued down onto the base, with the 25mm base sections on each touching the matching section on the next.
I felt that the generator needed a control panel, so quickly threw one together using a console and two trapezoid windows from the terrain sprue, with a square of foamed PVC as a base.
With that glued in place onto the masonite base, the generator was ready for some paint!
I painted it up using my normal weathered metal technique (which you can find in the tutorial here).
To build your own generator, you should be able to find the bubblegum tape just about anywhere that sells bubblegum, and can pick up the Maelstrom's Edge terrain sprue along with the rest of the Maelstrom's Edge model range from the webstore here.
As always, feel free to pop along and share your work, or ask any Maelstrom's Edge- or hobby-related questions on the Comm Guild Facebook page!
For other Maelstrom's Edge modeling articles, including tutorials and walkthroughs of a wide range of different building and miniature projects, check out the article roundup here.
Tags: buildings conversion spotlight terrain terrainsprue tutorial
Terrain Spotlight: Abandoned Outpost
Posted on Monday Oct 29, 2018 at 06:00pm in Tutorials
- by Iain Wilson
As anyone who has been following these modeling articles may have noticed, I have all sorts of trouble looking at store-bought kits and not immediately coming up with various ways to hack them up and glue them back together again, and this week's article is no exception. There are a plethora of outstanding MDF building kits out in the market these days, which can be great options for inexpensive, easy to build terrain. Thanks to how easy it is to cut and glue, they can also form a great base for modification. I recently put together a basic desert building from Knights of Dice's Tabula Rasa range, with some extra detailing courtesy of the Maelstrom's Edge terrain sprue (If you missed it, you can find the article here), and this week, I'm taking a stab at a second building from this range. Intact buildings are just so pre-galaxy-spanning-apocalypse, however, so I'm taking the knife to this one and creating a small abandoned outpost:
The first step was to plan out exactly how I was going to destroy the building, so I popped the parts off their sheets and fitted the basic structure together with no glue. Then I took a pencil and drew a rough line around the outside where I wanted the walls to be damaged.
I cut the walls using a sharp exacto knife, by scoring through on the outside following the pencil line relatively closely, then scoring a roughly corresponding line on the inside of the wall piece (this wasn't an exact match, just eye-balled to be close enough) and then snapping the piece in two. The edge was then cleaned up using the knife to remove any fluffy or protruding parts.
When all of the cuts were completed, it was time to add some detail. The Tabula Rasa kits are deliberately plain, both to keep the cost down and to provide a generic structure for detail pieces to be added, and so they're a perfect base for the Maelstrom's Edge terrain sprue!
I took a door piece and used a razor saw to cut the door out of the frame, and broke the frame into several pieces. Some scarring was also added with the knife.
I widened both the exterior and interior doorways to match the terrain sprue door pieces. The door frame pieces were glued in place on the exterior doorway, and I added a second doorframe with the door also removed but the frame left intact into the inner doorway. Support struts cut to length were glued over the corner joints on the walls to hide them, and add a little more visual interest to the otherwise fairly plain, boxy building. On the first Tabula Rasa building I added detail over the window holes as well, but for this ruin it didn't seem necessary.
The courtyard has a low MDF wall that runs around it, but I wanted something a little more flashy, so I took a couple of ladders from the terrain sprue and cut off one side with a razor saw.
These were then cut to length and glue in place around the edges of the courtyard, after gluing the scrap pieces back into the locator holes for the original wall to fill them in.
To help turn this into an old, long-abandoned ruin that the jungle had started to reclaim, I built up some patches on the floor with air-drying clay.
I pressed a few castoffs pieces of MDF into the clay, and glued the distressed door down on the courtyard floor. Over this, I painted a thick layer of PVA glue and sprinkled on a generous layer of a gravel, sand and railway ballast mix that I like to use for building rubble as it has a lot of different textures in there.
When the PVA glue had dried, I tipped off the excess gravel mix, and then it was time to paint. I didn't have a brown spray to hand, so I undercoated with some flat black and, while it was still wet, followed up with a light coat of Army Painter Dragon Red.
Over this went a coat of a light cream colour, and then a highlight spray of white from above.
I went back over anything that I wanted to look like exposed metal and re-undercoated with Vallejo Beasty Brown, before drybrushing with P3 Pig Iron. The few bits of the original floor still peeking through the rubble were painted with Vallejo Basalt Grey and drybrushed with Vallejo Light Grey.
With that out of the way, I went to town with washes!
I gave the whole building a generous coat of Army Painter Strong Tone. The walls were painted with a medium-sized flat brush, using vertical strokes to create a streaky effect and allowing the wash to pool and run where it felt like it. When that first wash had dried, I went back over it, picking out small areas with extra dollops of Strong Tone and also adding some patches of Green Tone and Military Shader to give them a greenish, mossy tint.
Time to add some shrubbery!
I took a bunch of assorted fake plants. Most of these are cheap aquarium plants, although I also used a bunch of plastic greenery taken from a mat I found at a local hardware store for creating fake vertical gardens. It looks rubbish as an actual plant feature, but is a perfect resource for my purposes here.
Fake plants, particularly the cheaper kind, tend to be rather brightly coloured and slightly glossy, which just wouldn't do. I got around this by giving the plants a light spray with Army Painter Army Green - not enough to completely cover over the original colour, but enough to dull down the colour and shine. To add some extra colour differentiation, I very lightly misted the tips of some of the plants with white. The painted plants were then glued in place wherever seemed appropriate, but poking a hole through the rubble and into the underlying clay, applying some superglue to the plant stem and pushing it into the hole. I also cut some leaves off a few plants and glued them around on the ground.
The final step was to paint the fallen leaves with varying amounts of brown, and then a quick wash of Strong Tone. At this point, the ruin looked something like this:
To get all apocalyptic on your own building creations, you can pick up the Maelstrom's Edge terrain sprue along with the rest of the Maelstrom's Edge model range from the webstore here.
As always, feel free to pop along and share your work, or ask any Maelstrom's Edge- or hobby-related questions on the Comm Guild Facebook page!
For other Maelstrom's Edge modeling articles, including tutorials and walkthroughs of a wide range of different building and miniature projects, check out the article roundup here.
Tags: conversion modeling painting spotlight terrain terrainsprue tutorial walkthrough
Terrain Tutorial: Hack the Terrain Sprue!
Posted on Monday Oct 15, 2018 at 06:00pm in Tutorials
- by Iain Wilson
The Maelstrom's Edge Terrain Sprue contains a slew of assorted plastic bits and pieces that can be used to pretty up your home-made scifi terrain, including a bunch of essential elements like doors, windows and pipe fittings. This week, I'd like to share a few tips and tricks for squeezing a little extra versatility out of the terrain sprue and adding some extra touches of detail to your buildings.
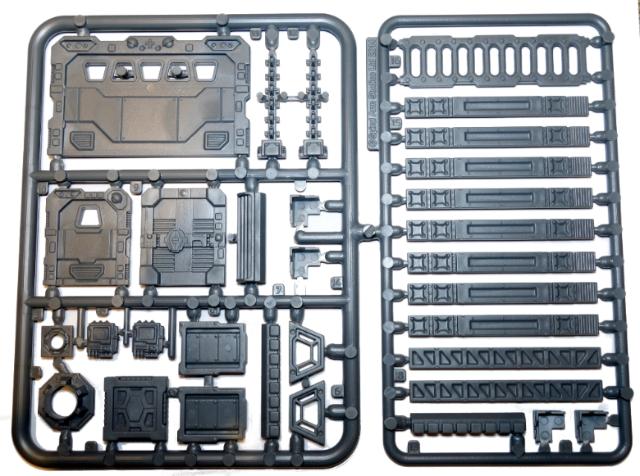
The terrain sprue in all its glory! While it's loaded with all sorts of interesting bits that can be clipped off and glued on to your buildings as-is, a little careful cutting and some extra materials will go a long way towards adding that extra detailing that helps to finish things off just right.
Handrails
An easy one to start with! The ladder from the sprue can be used for making railings for balconies or walkways, by cutting off one side along the red line shown below, with a razor saw or exacto knife. The lintel piece, cut down to length, is perfect for filling in the corners:
Alternatively, you can just glue the intact ladder sideways onto the outer edge of your walkway or platform, like this:
Ventilation Ducts
The large pipe fitting can be used for creating ventilation ducts with the addition of a fan blade made from plasticard or thin cardboard. Use the fitting itself as a template for the fan, by holding it upside-down against your plasticard or cardboard and drawing around the inside with a sharp pencil:
(In case you're wondering, you use the fitting upside-down for this because it flares out at the bottom. So if you draw around with the fitting right-way-up, your fan is going to wind up too wide to fit in)
Next, you can flip the fitting up the right way, and use the buttresses as a guide to make six marks around the circle:
The join the marks across the circle, and along each of the resultant radial lines make another mark 2mm out from the centre.
Then cut out the circle, and cut inwards along each radial line up to the inner marks. Dry-fit it inside the pipe fitting to make sure it goes in, and sand around the edge if necessary so that it goes in easily - you don't want a tight fit, as it will deform slightly in the next step.
Now gently twist each of the segments around the circle to create a fan shape. If you're using plasticard, go gently here to avoid snapping it - cardboard is a little more forgiving at this step. Obviously, you also need to make sure that you twist each segment the same way, otherwise your fan is going to run into some operational issues.
Your fan blade can now be glued in place inside the pipe fitting by applying a small amount of superglue around the edge and pushing it into place.
Once it's been glued into place on your building and painted, you ventilation duct can look something like this:
You can also create a more compact version using the smaller pipe fitting and a rotor assembly from an Epirian Firefly Drone. Simply trim off the mounting strut and fin from the rotor piece to make it circular, and glue it to the back of the pipe fitting, as below:
You'll need to cut a small hole in whatever surface you're mounting this on for the rotor assembly to sit in, so that the pipe fitting can sit flush.
Chimney Pipes
I always try to look out for ways to make use of all of the leftover sprue that builds up from all of those plastic projects. The round sprue used on this terrain set is particularly useful with just a little help from some plastic tubing. Take the small pipe fitting, an 'L'-shaped piece of the thinner side of the terrain sprue, a square cut from the bottom of one of the support struts, and a couple of short pieces of 7mm (1/4") plastic tubing (Plastruct, Woodland Scenics or the like).
The 7mm tubing fits nice and snugly into the small pipe fitting. In a happy coincidence, the thinner section of the terrain sprue fits just as neatly into the 7mm tubing. If you remove any extraneous casting gates and mouldlines from the sprue piece and fit it all together, you can do this:
This can be then glued in place wherever seems appropriate, and can be easily reconfigured to match your terrain using different combinations of sprue sections and/or extra bits of tubing or support strut sections.
Trouble-free Doors
Some people have been using various plastic containers, storage trays or home guttering sections in conjunction with the terrain sprue to create some interesting buildings for their MEdge tables. One of the big problems with some of these options, though, is that the doors need to be inset into the walls, and cutting some plastics easily and cleanly in order to do so can be problematic. So I came up with this solution:
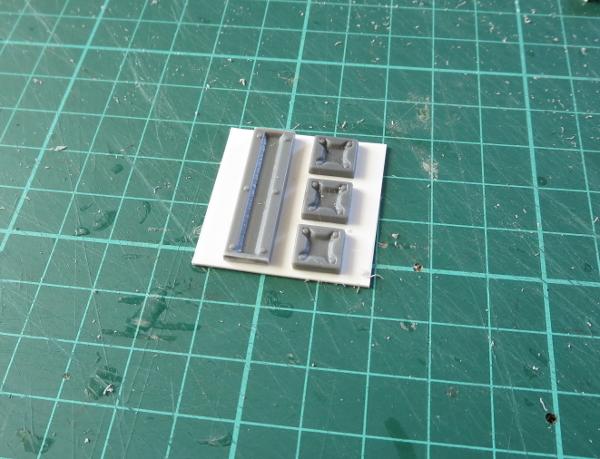
Take a door, and three support struts.
Trim off the support struts along the red lines in the below diagram, keeping just the middle pieces. Note that the top piece in the below picture is slightly different to the other two, which have a rivet strip left on one end:
The glue them in place around the back of the door frame. The strut piece from the top of the diagram goes along the top, and the other two (which, unless something's gone horribly wrong, will be identical) go down either side with the rivet strip at the top.
This can then be glued in place on the wall of whatever you're using to make your building, with no cutting of the wall required.
These are just a few ideas that I've found useful when constructing terrain. One of the great things about a product like this is the more-or-less limitless possibilities opened up through the ease of working with plastic components and the open-ended nature of the construction allowed by it. It's always great to see people take the sprue and find new and unexpected ways to use the components on it. So why not give it a go? You can pick up the Maelstrom's Edge terrain sprue along with the rest of the Maelstrom's Edge model range from the webstore here.
As always, feel free to pop along and share your work, or ask any Maelstrom's Edge- or hobby-related questions on the Comm Guild Facebook page!
For other Maelstrom's Edge modeling articles, including tutorials and walkthroughs of a wide range of different building and miniature projects, check out the article roundup here.
Tags: buildings converting modeling terrain terrainsprue tutorial
Terrain Tutorial: Salt Weathering
Posted on Monday Oct 01, 2018 at 06:00pm in Tutorials
- by Iain Wilson
The Maelstrom's Edge Terrain Sprue lets you quickly and easily build some awesome-looking terrain to play your games around and over. Finishing that terrain off with a stand-out paintjob is sure to make your games look even better!
A while back, I shared a tutorial on sponge weathering, which is a great way to quickly and easily add chipping effects to your paintjob. This time around, I'm looking at salt weathering, which is a little more involved than doing it with a sponge, but gives a much more detailed and realistic effect.
While it may look daunting at first, the most complicated part of the salt weathering process is actually just planning out what colours to use. The paint goes on in 2 or more layers, depending on how involved you want your weathering to be. For this tutorial, I'm going to just use a base layer which will become the 'weathered' part, and a top layer which provides the core colour for the building.
What you'll need.
- A building to paint
- Salt. You can use ordinary tablesalt, or rocksalt, or anything in between. The coarseness of the salt changes how your weathering will appear, so some experimenting can be required to find the effect that you like most. I use a coarse rocksalt that I grind up finely with a mortar and pestle. This gives the grains a less consistent size than just using table salt, which I think enhances the overall effect.
- Hairspray. The cheaper, the better. It doesn't need to hold your fabulous 'do for the whole party, just keep some salt in place while you spray it.
- A small, stiff brush. An old toothbrush is ideal.
- Spray paint. You can use an airbrush for this technique if you have one, but if you don't then spraycans will do just fine - that's all I use.
First step - Apply the basecoat. This is the layer that will show through as your weathering. If you're after a chipped cement wall look, then a dark grey is appropriate. You can use a metallic colour if you want a painted metal feature, or a rusty brown for more weathered metal. If you want multiple effects over the building, then you can mix-and-match as required. If you're worried about the basecoat scratching off, which can be a problem with some plastic or metal materials, then also apply a generous coat of gloss sealer at this point.
For my building, I'm going for cement walls with rusty metal details, so I've sprayed the whole building grey, and then gone over the parts that will be metal with brown for the rust.
The next step is to apply the salt. Working one facing at a time, spray on a generous (but not dripping!) coat of hairspray, and then sprinkle on the salt where you want your weathering to appear. For the most realistic effect, concentrate on areas that would be most likely to see wear and tear - exposed corners, raised edges and the like.
Note - You can use water for this step instead of hairspray, using a spray bottle or a paintbrush to apply the water where you want the salt to go. This can be a little more precise, but requires much more careful handling as the water doesn't bond quite as strongly to larger grains of salt and takes longer to dry than the hairspray.
When you're done, your building will look something like this:
Once the hairspray has dried, you can apply your next coat of colour - I'm using a flat white. Keep this coat light, as too much paint will make it harder to remove the salt. Set aside for the paint to dry.
Now comes the fun part!
Using your brush, gently scrub off the salt. If your building is made from water-proof materials, you can hold it under some running water while you scrub. If you have used something cardboard, foamcore or similar, dip your brush in some water and keep it wet while trying not to soak the building too much as you scrub instead.
As the salt comes away, your base layer is exposed in a lovely chipped pattern.
Let it dry before applying any final detailing. Any leftover salt residue will dry as a white powder on your paint, so can need a little bit of cleanup with a damp cloth. At this point, I like to apply a coat of matte sealer to keep everything pretty while I do any detail work to the building, to avoid damaging the paint with the extra handling. This also helps to avoid any leftover salt absorbing moisture from the air later on, which can damage paper, card or foamcore components.
You can apply multiple layers of colour by repeating the above steps, either over the whole building to show different paint layers or more detail on corroded metal, or by masking off part of the building to apply specific detailing. Here, I'm adding a building ID to the top and front by taping a stencil in place.
Salt is applied over the stencil, followed by a spray of the new colour. Once you remove the stencil and scrub away the salt, you're left with detailing that looks as weathered as the rest of the building.
Once you have applied as many layers of weathering as you feel it needs, all that remains is to apply your final detailing
And that's essentially it. You can vary the amount of weathering by using more or less salt, and can create all sorts of nifty effects through layering and careful use of colours. A good idea if you're not sure of what will work is to google images of derelict buildings or machinery and use those for inspiration.
Why not give it a go? You can pick up the Maelstrom's Edge terrain sprue along with the rest of the Maelstrom's Edge model range from the webstore here.
As always, feel free to pop along and share your work, or ask any Maelstrom's Edge- or hobby-related questions on the Comm Guild Facebook page!
For other Maelstrom's Edge modeling articles, including tutorials and walkthroughs of a wide range of different building and miniature projects, check out the article roundup here.
Tags: painting terrain terrainsprue tutorial
Terrain Spotlight: Building made from foamed PVC and the Maelstrom's Edge Terrain Sprue
Posted on Monday Sept 24, 2018 at 06:00pm in Tutorials
- by Iain Wilson
I've showcased a couple of customised Plast Craft Games buildings in the past - a scifi-d up pagoda, and a similarly modified western building. These kits are made out of a foamed PVC board which was really fantastic to work with, so I decided to track down some similar board to have a crack at putting together some of my own designs with it, with the below result:
Slightly unusually for my projects, I started this one by sketching out a plan to see how everything would fit together. This was partly due to my desire to take advantage of the flexibility of the PVC by adding a curved front wall to the building, so I wanted to make sure that I had my dimensions correct before I started cutting.
Once I was confident that I had it all worked out, I pencilled up the various panels that made up the building onto the sheet of PVC, and then used a steel ruler and hobby knife to cut it all out. The foamed PVC cuts really easily with a knife, and also sands well. It feels almost like something halfway between cardboard and foamcore*, without the inherent frailties, like the risk of damage from moisture or spraypaint.
*For the uninitiated, Foamcore, also sometimes called Foam Board, is a material made up of a thin sheet of expanded polystyrene sandwiched between layers of paper or thin card, and is a common building material for wargaming terrain and scale building construction.
Once everything was cut out, I did a quick dry-fit to check that everything slotted in where it should.
The curved panel on the front was made by cutting the piece to the right size and then laying it over an old baby formula tin while heating it with a hair dryer. This achieved the desired curve, but I suspect the hair dryer was a little too hot for the material as it caused it to swell on some of the cut edges. Next time around, I'll try just immersing it in hot water for a minute instead.
The door and windows are taken from the Maelstrom's Edge terrain sprue. I cut the holes in the wall panels for those by sitting them in place, drawing around them with a pencil, and then cutting the resultant rectangles out with a hobby knife.
I wanted a walled roof area for troops to take cover on, so marked down 20mm inside each wall and glued in some strips of leftover PVC to act as support.
The walls, door and windows were all glued into place, and the roof dropped into place with a little more glue. I used superglue for assembly - this grabs really well, and quite quickly, on the foamed PVC.
As the last step before painting, I took support struts from the terrain sprue and glued them over the exposed joints on the walls.
That left me with the building itself assembled, and a few details to add on once the walls were painted. For some added sturdiness, I glued the building down to a square of 5mm masonite.
To kick off the painting, I sprayed with red right around the top of the walls.
I then applied a line of masking tape over the red paint, just below the tops of the walls. I lined this up with one of the panels on the support struts, to make it look neater.
The whole building received a coat of a nice, sandy brown colour.
This was followed up with a spray of white from above, leaving the sandy brown in the crevasses and undersides of the detail.
(And yes, it does feel a little absurd to take a white building, and apply three different coats of paint just to wind up with a white building again!)
Once the spray was dry, I peeled off the masking tape, and painted the base and the roof with Vallejo Basalt Grey.
Everything was weathered with a sponge and some Vallejo Heavy Charcoal (for a how-to on sponge weathering, check out the article here!), and the base and roof were drybrushed with Vallejo Light Grey and a little white.
I dirtied everything up with a generous drybrush here and there with Vallejo Beasty Brown.
The lower edges of the weathering on the red strips was highlighted with a little Citadel Tentacle Pink and Army Painter Pure Red, and I blacklined some of the deeper detail lines on the terrain sprue components. The 'puddle' stains were added with Army Painter Strong Tone and Dark Tone, by dripping small drops onto the board and leaving it to dry.
For the finishing steps, I added a fan on one wall using the large pipe fitting from the terrain sprue some plasticard, built a small pipe coming out of the back wall using some more terrain sprue pipe fittings, a couple of short pieces of plastic tube and a piece of sprue cut from the terrain sprue, and hung a ladder on the back wall. To add handrails to the top of the ladder, I trimmed away the top rung, and cut a couple of pieces of sprue that looked about right, added a ninety-degree bend with by bending carefully with pliers, and then gluing it all in place. The ladder was painted using my normal weathered metal technique.
The end result looks like this:
You can pick up the Maelstrom's Edge terrain sprue along with the rest of the Maelstrom's Edge model range from the webstore here.
As always, feel free to pop along and share your work, or ask any Maelstrom's Edge- or hobby-related questions on the Comm Guild Facebook page!
For other Maelstrom's Edge modeling articles, including tutorials and walkthroughs of a wide range of different building and miniature projects, check out the article roundup here.
Tags: buildings modeling spotlight terrain terrainsprue walkthrough
Terrain Spotlight: 'Honest' Pete's Trading Post
Posted on Monday Sept 10, 2018 at 06:00pm in Tutorials
- by Iain Wilson
A few weeks ago, I picked up a couple of packs of scifi shipping containers from a company called 'Laser Cut Card'. They produce a range of different vehicles and building kits that are laser cut out of stiff cardboard, which are much cheaper and easier to work with than the more common MDF kits, and are surprisingly sturdy when assembled. I built four of the six containers I received as normal shipping containers, but then couldn't resist doing something a little different for the fifth one. And so for this week's modeling spotlight, I'm running through the construction of 'Honest' Pete's Trading Post!
The shipping containers come flat-packed in a set of three, with some pictorial building instructions on the back of the package insert, but assembly is essentially to roll a sheet of pre-scored card into an octagonal tube and then glue other bits onto the outside of it. I assembled mine with superglue, although you could use wood glue if you wanted to allow a little more working time to make sure you have everything lined up.
Obviously this wasn't going to be a particularly large shop, so the idea was to have a servery-style counter and awning rather than have customers go inside. So I began by cutting one of the large sections off the main body piece of the container, and then gluing the ends on to the result sideless tube.
A shop needs somewhere to put their merchandise, so I threw together a set of shelves from thin plasticard, to run along the back wall of the container. An angled bottom on the uprights allowed the shelves to sit flush against the container side.
Next up I cut another couple of strips of plasticard to create a counter, about a third of the height of the space in the container wall, and glued this in place.
For the finishing touches, I cut some 'concrete' stands for the container out of 5mm foamcore. These serve to lift the container up very slightly to allow a little extra head-clearance for the awning, and make the structure look more stable. The exposed foam center was sealed with a generous coat of PVA glue so that it wouldn't dissolve when hit with spray paint.
I added some corner reinforcing to the bottom of the front edge of the awning piece using some scrap card pieces, and built some corner support posts using the small pipe fitting from the Maelstrom's Edge terrain sprue, some plastic tube and a couple of lengths of plastic cut from the sides of the terrain sprue itself.
Finally, I took a large pipe fitting from the terrain sprue and added a fan cut from a piece of thin plasticard. I trimmed the edges of the pipe fitting away so that it would fit neatly over the circular detail on the roof of the container.
At this point, the trading post was looking like this:
With an MDF base added, and some paint on:
The sign on the awning was a last-minute addition. I was originally going to have the trading post sign on the front of the counter, but realised that this wouldn't be hugely visible on the gaming table, so built a quick rooftop sign from some more scraps of card. I also added a mesh grill above the counter after painting inside the container, to make the interior of the store less accessible.
The container was sprayed with black and then Army Painter Army Green, before being sponge-weathered with Vallejo Heavy Charcoal and dirt weathering drybrushed into the creases with Vallejo Beasty Brown. The text for the signs was created in Gimp, printed, and glued on prior to weathering so that it would match the rest of the container.
I added grafitti on the back and sides of the container to give it a little character and to make sure that all the interesting bits weren't on the front.
The grafitti was sketched in with a black fineliner pen, and then painted in whatever colours seemed appropriate.
The roof was left plain, with just the weathering to break up the green.
As an extra little detail, I printed up a shipping carton and some bottle labels using Gimp, adapting the fronts I made for my Vending Machine templates a few weeks back (article here). The shipping carton was cut and folded, and then weathered with a little Army Painter Soft Tone, while the bottle labels were glued to some bottle bombs taken from the Broken Infantry weapons sprue with their rag wicks cut off.
And with that, 'Honest' Pete's is ready for the table!
You can pick up the Maelstrom's Edge terrain sprue along with the rest of the Maelstrom's Edge model range from the webstore here.
As always, feel free to pop along and share your work, or ask any Maelstrom's Edge- or hobby-related questions on the Comm Guild Facebook page!
For other Maelstrom's Edge modeling articles, including tutorials and walkthroughs of a wide range of different building and miniature projects, check out the article roundup here.
Tags: buildings conversion modeling painting spotlight terrain terrainsprue tutorial walkthrough
Terrain Spotlight: PVC Pipe and PC Fan Cooling Towers
Posted on Monday Aug 27, 2018 at 06:00pm in Tutorials
- by Iain Wilson
On one of my periodic rambles through the plumbing department at the local hardware store (because how else would I spend my weekends?) I came across some pipe fittings that I thought would be just perfect for some different line-of-sight-blocking terrain to break up the sea of square buildings on my urban table setup. With the addition of a couple of old computer fans and a few components from the Maelstrom's Edge terrain sprue, I had a trio of cooling towers ready for the table.
The part that I used for the main body of the tower is a 'round socket downpipe' intended for rain guttering on a house.
As the downpipe is made of PVC, and is quite shiny, I started out by giving it a light sand with some fine grade sandpaper. This provided a better surface for glue and paint to adhere to, and also allowed me to remove the embossed manufacturer logo on the side.
Cooling towers tend to be largely featureless constructions of plain concrete, but that's a bit boring for a gaming table. So I grabbed four reinforcing struts from the Maelstrom's Edge terrain sprue, and chopped off the two square sections from the end, so that the remaining length would fit neatly onto the wider portion of the downpipe. Then I glued the pieces on using an 'all plastics' superglue, which is a two-part superglue that has the normal glue plus a 'primer' that goes on first to help strengthen the bond. For a more flush fit, I could have sanded down the side of the downpipe where the strut pieces would sit to form a flat strip on the curved surface, but the struts are narrow enough that the gaps that result from gluing them straight to the curved side aren't really noticeable, so I didn't bother.
To add some detail to the inside of the tower, I dug out an old computer fan from my box of assorted 'probably use this for terrain one day'
On the inside of the downpipe, there is a ridge where the thinner and thicker sections meet. I cut a piece of 2mm thick plasticard to fit neatly onto that ridge, providing a platform for the fan to sit on. I glued the plastic strip in place, but left the fan unglued for now, to make painting easier.
Painting went through a process that is probably familiar to anyone who has been following these articles. I started by undercoating with flat black spray.
Next I sprayed with a medium grey, and to add some texture to the flat surface added a light spray of light grey while the first coat was still wet. This creates a nice, dappled, concrete-like effect. As I only had gloss grey sprays on hand, once the grey was dry I gave the tower a generous coat of Testors spray lacquer. This both kills the gloss and protects the paint from scratching off the PVC as easily.
Next, I gave the strut pieces a coat of Vallejo Beasty Brown...
...followed by a quick drybrush of P3 Pig Iron...
...and finally a wash of Army Painter Strong Tone. While all of this was going on, I also cut a square of Masonite for a base, sprayed it grey, drybrushed with light grey and white, and added some hazard stripes that I created in Gimp and printed out. These were glued in place with PVA glue, and then weathered with a sponge and some medium grey (you can find a tutorial on sponge weathering here).
The fan was sprayed with some Rustoleum Aged Brass, and then given a light drybrush with Pig Iron, before being glued in place inside the tower.
The tower was glued onto the base - I lightly sanded the bottom of the downpipe to remove any spray paint, and then used the 'all plastic' superglue again. Finally, some weathering was added with a large drybrush and some more Beasty Brown.
I had bought three downpipes, but found that I only had two computer fans that matched. Rather than use a mismatching fan in the third tower, I decided to make one battle-damaged by cutting away a chunk of one side. I left a part of the fan platform to provide a place for a model to stand, and glued the pieces of the tower side inside and underneath the platform to give it some support. Obviously the tower was hit with some sort of implosion device, or a cleanup crew sorting out the damaged tower just threw all of the rubble inside to get it out of the way until the tower could be replaced.
The three towers together, ready for gaming:
To build your own cooling tower, you can pick up the Maelstrom's Edge terrain sprue, or any of the rest of the Maelstrom's Edge model range, from the webstore here.
As always, feel free to pop along and share your work, or ask any Maelstrom's Edge- or hobby-related questions on the Comm Guild Facebook page!
For other Maelstrom's Edge modeling articles, including tutorials and walkthroughs of a wide range of different building and miniature projects, check out the article roundup here.
Terrain Tutorial & Templates: Vending Machines
Posted on Monday Aug 13, 2018 at 06:00pm in Tutorials
- by Iain Wilson
Someone on the Maelstrom's Edge Facebook Group page this week was looking for templates for making vending machines. While I have put together a bit of a range of assorted scatter terrain, this was something that I hadn't got around to yet, and so this seemed like a perfect excuse to have a look into it. As a result, I wound up spending a chunk of this week playing around with some cardboard and foamcore, and sketching up some panel designs in Gimp, with the end result below:
I have put together two different designs, which you can download from the Maelstrom's Edge website here. The first is a basic, square box design, while the second is a slightly more complicated build with a rounded front. The download also includes a sheet of assorted fronts for both types of machine. My original fronts were all somewhat tongue-in-cheek, because I like to amuse myself by inserting random bits of dubious humour into my gaming tables. As I realise that this isn't to everyone's taste though, I have also included a set of less silly, generic fronts. Of course, you could also just make your own, using mine as a template.
I recommend printing the templates directly onto thin card - I used some old manilla folders cut to A4 size, which is light enough to go through most inkjet printers but solid enough when assembled to survive on the gaming table. Alternatively, you could print on paper and then glue the templates to thin card and assemble from there.
The page with the fronts on can be printed on paper, although I recommend using a good quality printer paper as glue can bleed through and affect the colours on cheaper, thinner paper.
ASSEMBLY
The square machine is extremely easy to assembly. Just cut along all of the solid lines with a sharp hobby knife, and score lightly along the dotted lines without cutting all of the way through. Then fold along the dotted lines and glue the tabs inside the resultant box. Superglue is fine for this if you are confident of getting everything lined up right, or you can use PVA glue to give yourself a little more working time. The small rectangle piece is glued inside the front, over the rectangular dispenser hole.
Then glue the tabs on the bottom of the vending machine onto a piece of MDF or masonite, cut just a little larger than the bottom of the machine - I used some 3mm MDF left over from a building kit, cut to 35mm x 30mm. This helps to give the machine some weight, to help it stay put on the gaming table.
It's a good idea to paint the machine at this point, and then glue on the front after cutting out the white rectangle. Then grab a control panel from the Maelstrom's Edge terrain sprue, trim off the thin strips on the sides as below, and then glue in place above the dispensing slot - it's up to you whether you paint the panel before or after gluing it in place.
The end result will look something like this:
For the rounded front machine, you will need a little foamcore or MDF, to form the top and bottom of the machine. This avoids trying to form a curved cardboard surface using a series of little tabs to hold everything together on the curve - that's fiddly and never looks quite right.
As with the square machine, cut out the template by cutting along the solid lines, scoring lightly on the dotted lines, and then folding. There is one dotted line that folds the opposite way to the others - this line is grey instead of black. To get this line to fold in the right place, place a ruler along the line and push from the other side to crease the card up along the ruler's edge. As with the square version, there is a small rectangle that glues inside the dispensing slot.
The separate base template is used as a tracing guide to mark out your foamcore or MDF. You will need to mark out two of these for each machine, and then cut them out.
Once you have cut out the base pieces, fold the machine around them without any glue to check the fit, and trim up or recut them as necessary to get a snug fit. Then glue in the bottom piece as pictured below. Note: If you are using foamcore, you can't use superglue on the exposed foam edges. Use PVA glue instead. It's fine to use superglue to glue the bottom flaps to the paper bottom of the foamcore, though.
Then glue the top piece in flush with the top edge of the machine's sides, as below. As before, use PVA glue here as you're gluing to the foam.
You can then add a wood base and control panel as for the square machine above, paint, and then add a front panel onto the curved face of the machine. The end result will look something like this:
If you would like to have a go at building your own vending machines, the templates are here, and you can pick up the Maelstrom's Edge terrain sprue or any of the rest of the Maelstrom's Edge model range, from the webstore here.
As always, feel free to pop along and share your work, or ask any Maelstrom's Edge- or hobby-related questions on the Comm Guild Facebook page!
For other Maelstrom's Edge modeling articles, including tutorials and walkthroughs of a wide range of different building and miniature projects, check out the article roundup here.
Tags: terrain terrainsprue tutorial
Terrain Spotlight: Cardboard Tube Storage Tank
Posted on Monday Jul 30, 2018 at 05:00pm in Tutorials
- by Iain Wilson
It's been a few weeks since I built any terrain and I'm starting to feel withdrawal symptoms, so this week I have busted out the foamcore and terrain sprues, raided the recycling bin, and built a quick little storage tank for my newly assembled elite Epirian SecDef units to hide behind.
The main body of the tank is made from a small Pringles can. This of course requires you to remove the Pringles from said can, which my wife was happy to take care of for me. If you don't know anyone willing to make this sacrifice for you, you could use any other appropriately-sized tube. For the tank on my plantation dome, I used a metal tin. You could also use soft drink cans, cardboard postal tubes, or even roll your own out of cardboard or plastic sheet.
I used foamcore for the end supports. For the uninitiated, foamcore (also sometimes called foamboard) is a craft board that is comprised of a thin sheet of expanded polystyrene foam sandwiched between two sheets of stiff paper or thin card. Because it's lightweight but fairly strong, it's a fantastic material for building terrain.
I marked out the shapes that I wanted on the foamcore with a pencil, and then cut them out using a sharp hobby knife and a steel ruler.
As I wanted a worn concrete look for the ends, I used the hobby knife to roughly shave away the edges along the top and sides, and then used fine sandpaper to smooth the cut edges of the paper down.
For the access port on the top of the tank, I took the square hatch and corner reinforcing from the Maelstrom's Edge terrain sprue and cut a piece of plasticard sheet to an appropriate size to fit them all on it with a little room to spare for visual effect.
I then cut four strips to run around the outside of the top plate. To replicate the curve of the tank for the two strips that would run across it, I positioned the bottom of the Pringles can on the plasticard lined up with the bottom corners of the strip and traced around it with a pencil, and then cut along the resultant arc with my hobby knife. Because the bottom aluminium strip on the can is slightly larger in diameter than the actual can, this doesn't create a perfect fit, but it gets it close enough that you can sit it in place to see where it needs a little shaving with the knife to sit flush.
The strips were glued in place with plastic cement, and when that was set I flipped the construction over and glued the terrain sprue components in place as well.
To add a little detail to the outsides of the tank ends, I cut some sections off the long support struts on the terrain sprue, and also assembled a little computer terminal by trimming down the comm panel and cutting a piece off the end of the lintel piece.
One end got two of the support strut pieces, and the other end another two strut pieces, the computer terminal and a small pipe fitting, all glued in place with superglue.
I then glued the foamcore pieces onto the ends of the tube with superglue. One end of the tube is rolled cardboard, which glues just fine to the foamcore. For the tube's aliminium end, I gave the superglue a little extra help with a primer from an 'all plastics' two-part superglue.
A little more superglue was used to stick the access port in place on top.
The final step before painting was to paint the exposed foam on the foamcore sections with PVA glue. This protects the foam when the base coat is sprayed on, as most spraypaints will partially eat the foam. If you're painting with a brush, or with a specific foam-friendly spray, this step is unnecessary.
I basecoated the whole tank with a Rustoleum quick-drying grey primer to get a consistent base for painting over, and then hit the tank itself with a spray of Army Painter Dragon Red.
I could have saved some repainting here by masking off the ends to avoid overspray from the red, but it didn't really seem worth the bother. I just used a large, flat brush to add another coat of grey (in this case Vallejo Neutral Grey) over the end pieces, added some weathering to the red using a sponge and some Vallejo Heavy Charcoal (you can find my tutorial on sponge weathering here) and added a layer of Vallejo Beasty Brown over the terrain sprue components.
To create a nice concrete look, I drybrushed over the end pieces with Vallejo Light Grey, and then added a highlight with a lighter drybrush of P3 Morrow White. The brown components received a heavy drybrush of Citadel Boltgun Metal (now called 'Leadbelcher', but I'm still working through a lot of old paint!)
Next up, I gave all of the metal parts a generous wash of Army Painter Strong Tone, and put it aside to dry.
While the wash was doing its thing, I cut an 8"x8" square of masonite, sprayed it with a coat of grey primer, and drybrushed with the Light Grey and some white. I also marked out a square in front of where the pipe fitting would sit on the end of the tank, and painted in some hazard stripes. (If you are interesed, you can find a tutorial on painting hazard stripes here.) Then I glued the tank in place using some superglue on the bottoms of the end pieces (this was fine as I had included the underside edges when I painted the exposed foam with PVA glue. Don't put superglue directly onto expanded polystyene - it doesn't end well) and added some patches of drybrushed Beasty Brown to dirty everything up. Which left the tank looking like this:
To build your own storage tank, you can pick up the Maelstrom's Edge terrain sprue, or any of the rest of the Maelstrom's Edge model range, from the webstore here.
As always, feel free to pop along and share your work, or ask any Maelstrom's Edge- or hobby-related questions on the Comm Guild Facebook page!
For other Maelstrom's Edge modeling articles, including tutorials and walkthroughs of a wide range of different building and miniature projects, check out the article roundup here.
Tags: buildings modeling painting spotlight terrain terrainsprue walkthrough
Terrain Spotlight: Sci-Fi Temple
Posted on Monday Jun 18, 2018 at 03:05pm in Tutorials
- by Iain Wilson
This week, I'm showcasing another terrain build, but for a change of pace I thought it would be fun to build something in a more unusual style.
I've been eyeing off the Japanese building range from Plast Craft Games for some time, and in particular a three-level temple that was just screaming to be turned into a table centrepiece. So I grabbed the temple from one of my regular go-to online stores, broke out some Maelstrom's Edge terrain sprues, and set to work!
The Plast Craft Games buildings are flat-packed, assemble-yourself-style constructs in a similar vein to the various MDF offerings out there, except that instead of MDF they're made from sheets of die-cut, foamed PVC. This material is somewhere in between styrofoam and plasticard in density, and is nice and easy to work with and surprisingly sturdy once assembled.
My plan was to not get too crazy with modifying the building, as I love the general design of it. It just needed some sci-fi-ing up to fit on my table. So with that in mind, I discarded the resin screen doors that come with the kit in favour of the single doors from the Maelstrom's Edge terrain sprue. The existing doorways on the temple were exactly the right height for the plastic doorframe, but a little wider, so I filled in the gaps on either side with strips of scrap sheet cut to size. Other than that, the bottom level was assembled as per the instructions.
Similar treatment was given to the second level, although this level only has doors in two walls instead of all four.
The top level has a smaller doorway in a single wall. Rather than cut out the door hole to fit another full-sized doorframe in there, I filled in the doorway with some leftover sheet bits and glued on the square hatch from the terrain sprue. I also replaced the spire on the roof peak with another square hatch.
The railings that came with the temple were a little low, and a little low-tech for my liking, so I replaced them with ladders from the terrain sprue. This required some fudging to make it work, as I discovered when I started gathering ladders that I had run out. Luckily, I was able to cobble together a few discarded cut sections to fill the last of the railing on the second level. It's a little rough if you look too closely, but I can always pass it off as a rushed repair job (those lowest-bid contractors at work!).
I wanted to do the bulk of the painting before adding the roof sections, as I figured that would be easier than trying to work around them. So the building was given a basecoat with black spray, and then a top-down spray with grey, leaving the black in the lower recesses for natural shading.
I then picked out all the metal parts with Citadel Leadbelcher, before giving them a wash with Army Painter Dark Tone.
The balcony levels were painted with Vallejo Neutral Grey and drybrushed with Vallejo Light Grey, and the wall panels were basecoated with Vallejo Heavy Brown and drybrushed with P3 Jack Bone. At which point, it was time to add the roof sections.
I'm not sure if it was my slightly rushed assembly, or a flaw in the temple kit, but I found that the roof sections for the two lower levels were actually too short to reach the corner beams. Luckily, I had some corrugated cardboard that matched the card used for the roof almost exactly. Cut to size and with tile-grooves added by 'scoring' across the corrugations lightly with a sculpting tool, they were a close enough match to hold up to all but the closest scrutiny.
My improvised roof sections were painted black before gluing in place, and then all of the roof pieces were drybrushed with Leadbelcher and washed with Dark Tone. Finally, I picked out the lights above the doors with a drybrush of Citadel Ultramarine Blue, Ice Blue and then white, and added a masonite base sprayed with grey and white for a quick concrete effect. If I have time later, I may go back and replace this with a tiled slab to pretty things up some more.
The finished building:
To pick up the Maelstrom's Edge terrain sprue, or any of the rest of the Maelstrom's Edge model range, visit the webstore here.
For other Maelstrom's Edge modeling articles, including tutorials and walkthroughs of a wide range of different building and miniature projects, check out the article roundup here, or for help or advice, or just to share your work, feel free to visit the Comm Guild Facebook page!
Tags: buildings modeling spotlight terrain terrainsprue walkthrough
Terrain Spotlight: Cardboard Gift Box Ruin
Posted on Monday Jun 11, 2018 at 05:00pm in Tutorials
- by Iain Wilson
If you've been following my hobby articles for any length of time, you may have noticed that I'm rather fond of using cardboard gift boxes to make buildings (If you're new here, you can see examples here, here, or here). But while intact buildings are all well and good, a balanced battlefield should include a mix of line of sight blocking terrain and area terrain, and so this week I'm breaking out the old gift boxes and the Maelstrom's Edge terrain sprue for some good, old-fashioned ruins.
The structure for this build comes from two cardboard gift boxes, bought from a local discount store.
The lids were flipped over to create a walled roof, and I removed a corner of the smaller box with a sharp hobby knife so that it nestled in neatly against the larger box.
I used a door and a shutter window from the terrain sprue to mark out positions for doors and windows, by sitting them in place and tracing around them with a pencil.
Then I used the hobby knife to cut the door and window holes out, and marked out a rough plan for the building damage - the line around the building shows where the walls would be cut down, leaving more raised areas on corners, where the structure would be stronger.
The hobby knife was put to use again, as I cut along the ruin line all the way around the building.
Once done, the cardboard structure went together like this:
As a handy side-effect, the pieces removed from the tops of the walls can be saved and used to create other ruins later...
Because the ruin line wound up around the bottom of all of the window frames, I just left them bare. For the doorways, though, I chopped the door panel out from the surrounding doorframe, and cut the frame into shorter pieces to match the height of the ruined walls.
The doorframe pieces were then glued in place, and I also added some support struts on the corners of the walls, also suitably cut down to height and with the cut ends messed up a little with some clippers to simulate explosive damage. With these all in place, I glued the whole building structure to a base board of masonite.
If you're just after a quick and easy ruin, this is the point where you can call the job a good'un and go and slap some paint onto it. For some extra detailing, though, I chose to glue some chopped up card from the gift boxes and some leftovers from the cut terrain sprue bits around the building, and then using a generous amount of PVA glue added some gravel and sand.
After leaving the glue to dry, it was time for paint!
I started with a basecoat of grey spray, and then a light spray with white around the walls and the bigger rubble patches.
The exposed sections of the baseboard and the building floors was then re-based in Vallejo Neutral Grey, and then drybrushed with Vallejo Light Grey.
Everything was then dirtied up with some Neutral Grey sponge-weathering and spots of drybrushed Vallejo Beasty Brown.
I added a couple of extra details for colour - the number on the roof railing by dabbing through a number stencil with a large brush and some red paint, and a little graffiti on the back wall painted with yellow and some blue ink straight over the grey wall to give it a faded appearance.
The final step was a quick blast of black spray into the interior of the building to create some contrast.
And that's it - one ruin, ready for the table!
If you're keen to try this for yourself, you can pick up the giftboxes from gift stores all over the place, or online with a quick Google search, and the Maelstrom's Edge terrain sprue along with the rest of the Maelstrom's Edge model range from the webstore here.
For other Maelstrom's Edge modeling articles, including tutorials and walkthroughs of a wide range of different building and miniature projects, check out the article roundup here, or for help or advice, or just to share your work, feel free to visit the Comm Guild Facebook page!
Tags: building modeling spotlight terrain terrainsprue tutorial walkthrough
Terrain Spotlight: Knights of Dice Desert Residence meets the Maelstrom's Edge Terrain Sprue!
Posted on Monday May 28, 2018 at 05:00pm in Tutorials
- by Iain Wilson
A few weeks ago, I showcased a dice tower made from a Knights of Dice MDF blank and some bits from the Maelstrom's Edge terrain sprue. This week, I'm giving a similar treatment to a desert building from the KoD 'Tabula Rasa' range.
The Tabula Rasa terrain range is specifically designed to be fairly basic, both as a cost-effective way of filling your table and to serve as a base for people to add their own detail... which obviously makes these buildings a perfect match for the Maelstrom's Edge terrain sprue!
The building I've started with is the 'Desert Residence 1', which when assembled straight out of the pack looks something like this:
Before gluing the building together, there were a few modifications to make. To begins with, the doorways are a little small for the Maelstrom's Edge doors to fit in. So I sat the door over the doorway, traced around it with a pencil and then carefully cut the resultant enlarged doorway out with a sharp exacto knife. MDF cuts fairly easily, so this isn't too onerous, but if you would rather avoid it you could alternatively build a boxwork around the door, as I did on my watch tower) and just glue it over the existing doorway.
There are two differently-sized windows scattered around the building. The larger of them, like the doorways, is a little small for the shuttered windows from the terrain sprue, so I repeated the door process, using the top corner of the window hole to line up the plastic part, and then tracing and cutting a larger hole. Again, if you would prefer to avoid cutting MDF, the shutter windows work quite well just glued straight to the wall.
For the smaller window holes, I covered over two of them using the cast-off MDF pieces from the larger windows, and to this I attached part of the energy fence pylon from the terrain sprue to make some sort of mechanical gubbin (I have to admit, it looks a little like a high-tech toilet cystern to me).
For the third small window, I took the large pipe fitting from the terrain sprue, and glued a small circle of plastic mesh into the back of it. This was then glued over the window hole to make a covered vent.
As a nice little touch, all of the Knights of Dice kits come with a little crowbar-sort-of-thing in the top corner of the MDF sheet, which can be used for prying parts out for assembly, or pulling removable roofs off. With a little bit of trimming up, they also serve quite well as upright bars for attaching ladders. I trimmed the ladder from the terrain sprue off so that it was short enough to work on either of the two building sections - the hooks on the top allow it to be hung from any free stretch of roof railing without needing to glue it in place.
With the leftover piece of ladder and a couple of MDF cast-offs, I made a smaller access ladder to hang between the roof sections.
The final touch was to add some support strut sections from the terrain sprue to cover over the joint holes where the roof supports attach to the walls. I could also have removed the other joint gaps by filling with some filling plaster or putty and sanding it down smooth, but I actually like the wall joints for creating a pre-fabricated slab-assembly look.
With some paint and weathering, the final building winds up looking like this:
Some Karist troopers, taking up station:
To tech up some buildings of your own, you can pick up the Maelstrom's Edge terrain sprue, or any of the rest of the Maelstrom's Edge model range, from the webstore here. As always, be sure to share to see your creations, or pop in with any hobby questions to the Comm Guild Facebook page!
For other Maelstrom's Edge modeling articles, including tutorials and walkthroughs of a wide range of different building and miniature projects, check out the article roundup here.
Tags: building modeling spotlight terrain terrainsprue tutorial walkthrough
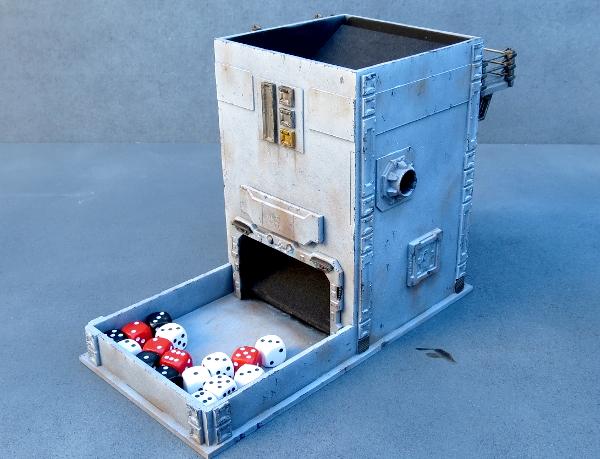
Terrain Spotlight: Epirian-themed Dice Tower
Posted on Monday Apr 16, 2018 at 05:00pm in Tutorials
- by Iain Wilson
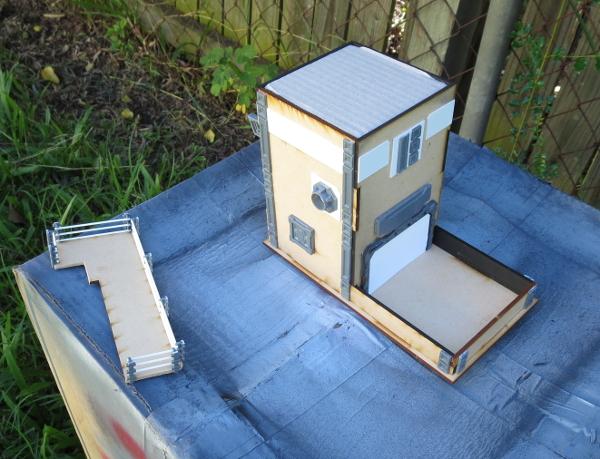
There's nothing worse than throwing a bucketload of dice on the table and having a stray ricochet take out that carefully-painted model sitting perched on the edge of a piece of terrain, or having to launch an expedition under the table when the dice decide to go on an adventure. There are a few common solutions to this problem - dice trays, rolling on another table, never painting anything, ever - but this week, I decided to build a dice tower from a Knights of Dice blank and some bits from the Maelstrom's Edge terrain sprue.

For the uninitiated, a dice tower is a box or tube that has some angled ledges inside. Instead of flinging your dice all over the table like some sort of uncultured barbarian, you drop them into the top of the tower where they roll down from ledge to ledge, eventually rolling out into the tray at the base of the tower where their predilection for wanton destruction is safely contained.
The KoD tower that I used as a base for the build is a plain, laser-cut MDF affair, that when assembled as standard looks like this:
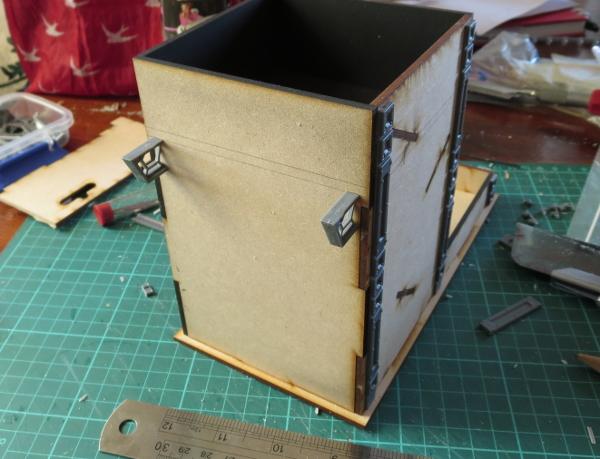
I wanted something that would look like it belonged on the table, and so dug out some terrain sprues and tools, and went to work.
First step was to pretty up the opening at the bottom. I took a garage door from the terrain sprue, and found that it would fit into the existing arch with some cutting for the top corners, and something to fill in the top of the arch as it was higher than the door frame. So I marked out the door frame against the front wall of the tower, and also marked the scrap piece that was cut from the arch to leave an arc that would fit in above the door.

I then used a razor saw and exacto knife to cut the door out of the door frame, and glued the frame and the MDF arc in place in the archway.
With a dry fit of the tower, I discovered that the dice were sometimes getting stuck behind the sides of the door frame, as the plastic addition made the opening for the dice narrower than was originally intended. I fixed this by taking a lintel piece from the terrain sprue, cutting it in half, and gluing the two pieces on either side of the doorway, creating a bevel to funnel the dice out the door.
One of the less pleasant things about dice towers is that they can be rather loud and echoey when the dice are working their way through. I fixed this by taking some craft foam and cutting it to the size of the ledges, and then gluing it on top.

At this point, I also sprayed the interior of the tower black to match the foam. This would also make it relatively unobtrusive on the table.

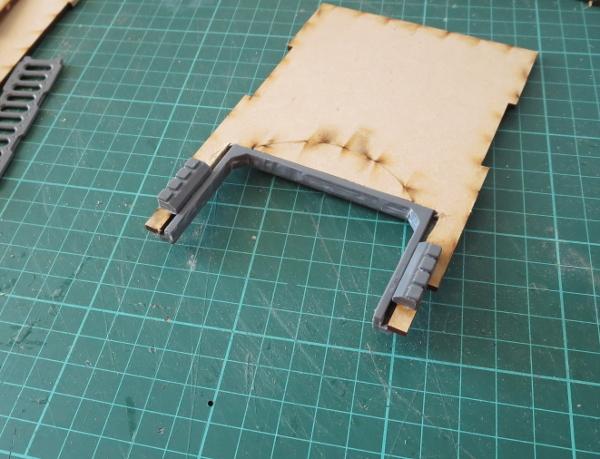
I assembled the walls of the tower, and started adding detail to the outside. I took a piece of scrap MDF, and cut it to serve as a balcony. I used the top halves of a bunch of energy fence posts and some plastic rod to make handrails. (You can find other ideas for handrails in my catwalk article here!)

To support the balcony, I cut the sides off two trapezoid windows, and glued them in place on the back wall of the tower.

Finally, two ladders and some cut down corner reinforcing pieces made an extending ladder that could be hung from the balcony, fire-escape-style.

To add a little extra detail to the front of the building, I made a large Epirian Foundation symbol using pieces from a reinforcing strut from the terrain sprue.
With the addition of a few more bits on the sides to hide the ends of the interior ledges, and a sign board made from the cutaway garage door to disguise the filled-in archway, the tower was ready for painting. To avoid getting spray on the interior, I filled in the top and the doorway with some cardboard and a piece of foamcore.
Painting was a quick and easy spray with a grey primer, and then a quick downwards spray with some white to leave the grey in the recesses and shadowed areas.
The metal parts were painted with P3 Pig Iron and then washed with Army Painter Strong Tone, and the white parts given some weathering with a sponge. (You can find a handy sponge weathering tutorial here!)

Once the wash was dry, everything was dirtied up a little with a drybrush of Vallejo Beasty Brown.

A little detail work here and there, and the tower was ready for the table.
Feeling inspired? You can pick up the Maelstrom'd Edge terrain sprue, along with the rest of the model range, from the webstore here. As always, we would love to see your creations on the Comm Guild Facebook page!
For other Maelstrom's Edge modeling articles, including tutorials and walkthroughs of a wide range of different building and miniature projects, check out the article roundup here.