Entries tagged [models]
Assembly Guide - Broken Forsaken Chieftains & Unit Bosses
Posted on Monday Oct 16, 2017 at 05:00pm in Tutorials
Assembling Broken Forsaken Chieftains & Unit Bosses

Note: The bulk of this article is the same as for the Broken Rabble Assembly Guide and the Broken Rabble Assault Unit Guide, as the only real difference between the different units model-wise is the choice of weapons. So if you have already worked through those, this guide will look rather familiar and you may want to just skip down to the part with the weapons.
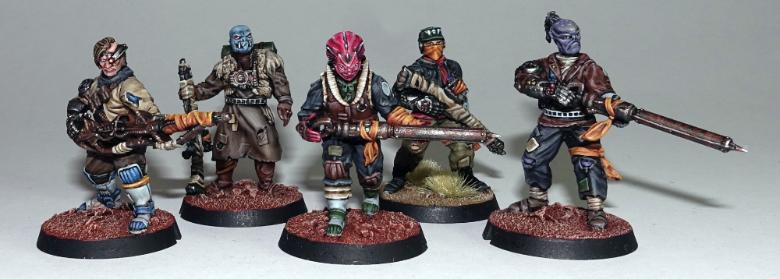
This guide will cover assembling Forsaken Chieftain and Boss models with the various pistol options from the infantry sprue. The two-handed weapon options are all covered in the Rabble and Rabble Assault unit articles linked above. You can also use this guide for assembling standard Assault Unit models with pistols.
General Notes
Polystyrene cement - only use superglue if you want to go insane! All of our models are designed to be assembled with polystyrene cement as it gives some time to re-pose while gluing, fuses the models together and prevents brittle joins like other glues do. Make sure you have polystyrene cement in your toolkit before you begin!
We want you to experiment! We've broken our models up into lots of parts and given a fair few spare parts so that you can push yourself out of your comfort zone, learn new skills and create some really unique models. We've tried to price things so that it won't break the bank if you make a mistake, so please cut stuff up and have some fun. Start simple with a slice here and a re-pose there, and watch your confidence and skills increase until you are a master modeler!
Basing - Always make sure you glue your model to its base with an eye on the arc markers on the sides of the base. The arc marker indents should be at the halfway point between the front and back of the model to show the front and back halves of the model when gaming. See the Maelstrom's Edge rulebook for more detailed notes on this.
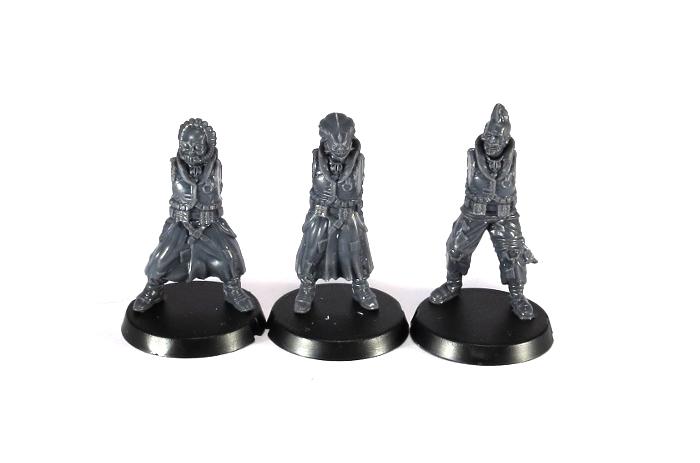
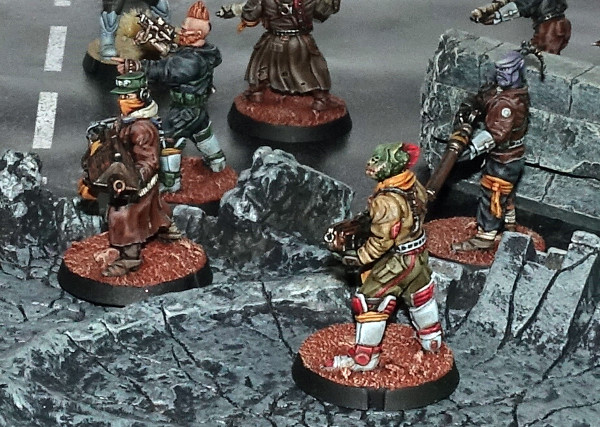
Dry fit before gluing! - There are lots of pose options possible, but that means there is also the freedom to screw up and make some bad poses! Sticking the parts together and seeing how things look will usually lead to a model that is fairly static and repetitive. You should consider knee, hip, torso, and arm positions when gluing and ensure that you have a pose in mind before you start gluing things together. If in doubt or insecure about your talents in the posing area, we recommend you try to copy the poses from some of our studio models found here in the gallery.
Broken Forsaken Chieftain & Unit Boss Assembly Notes
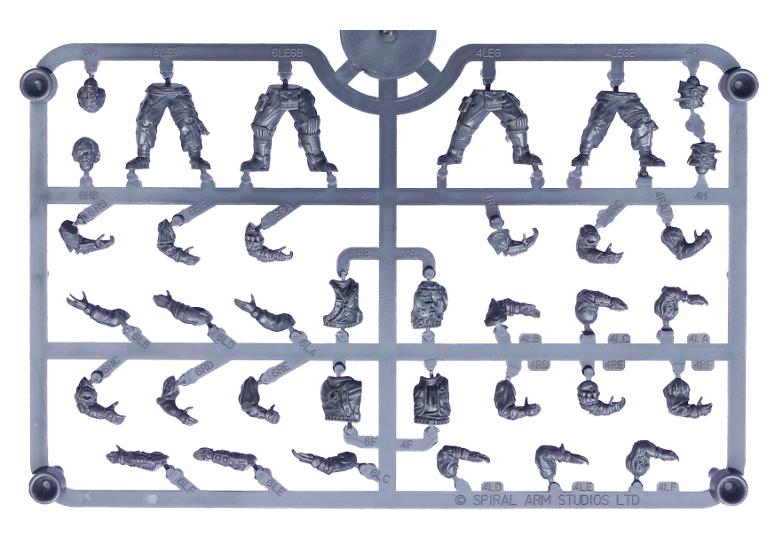
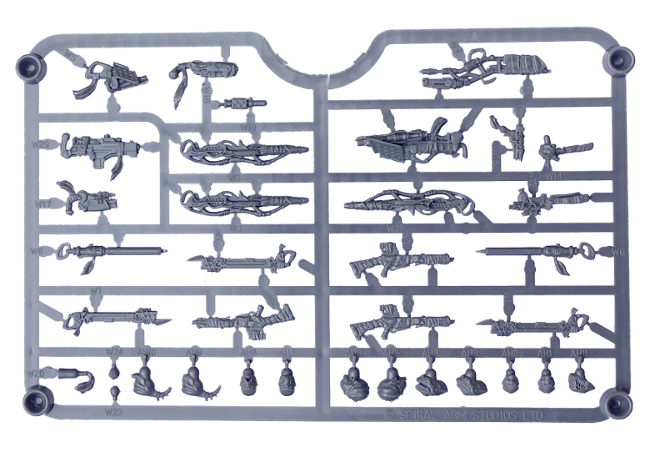
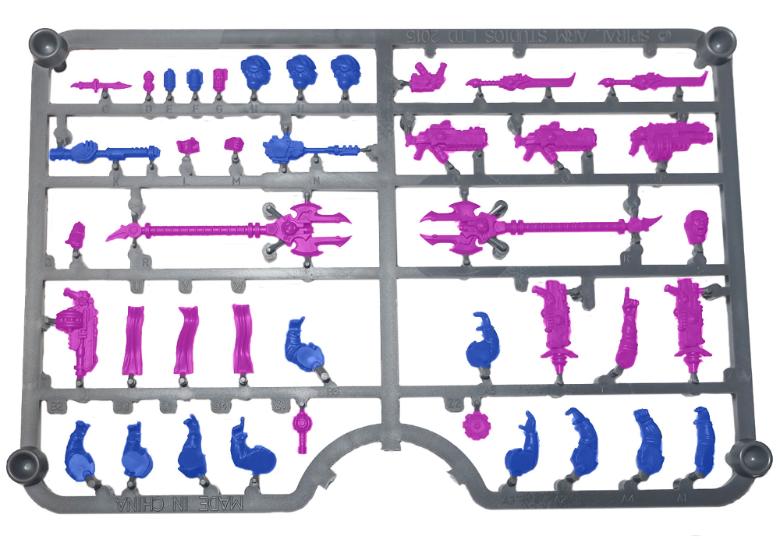
Six Broken models can be made from one set of the Broken Infantry sprues:
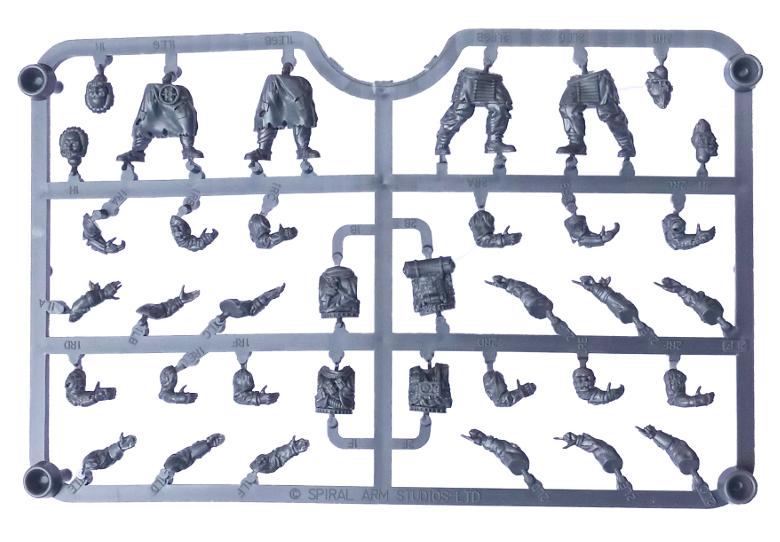
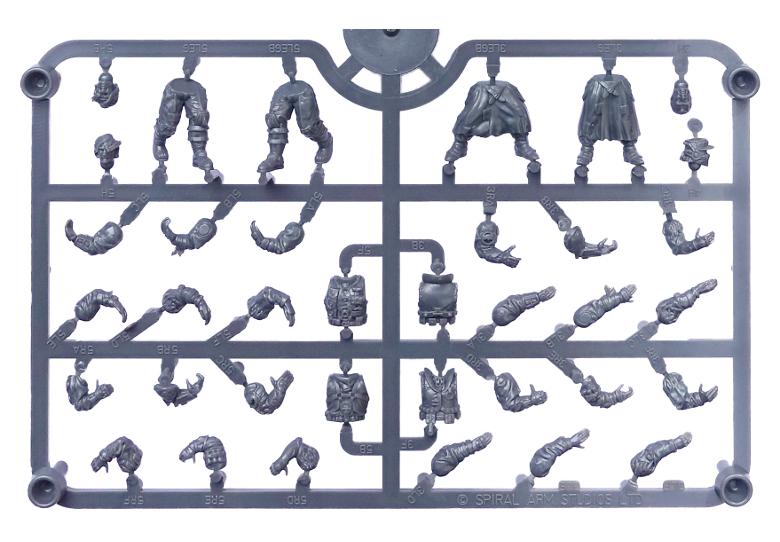
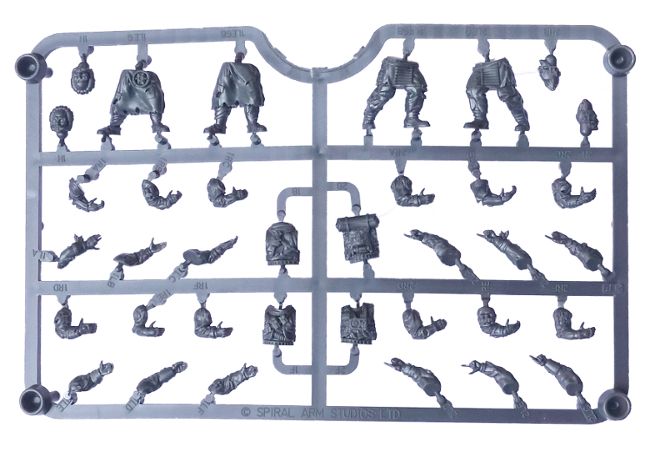
Assembly is fairly straightforward, with everything fitting together where you would expect. There are six different torsos, each with a unique front and back.
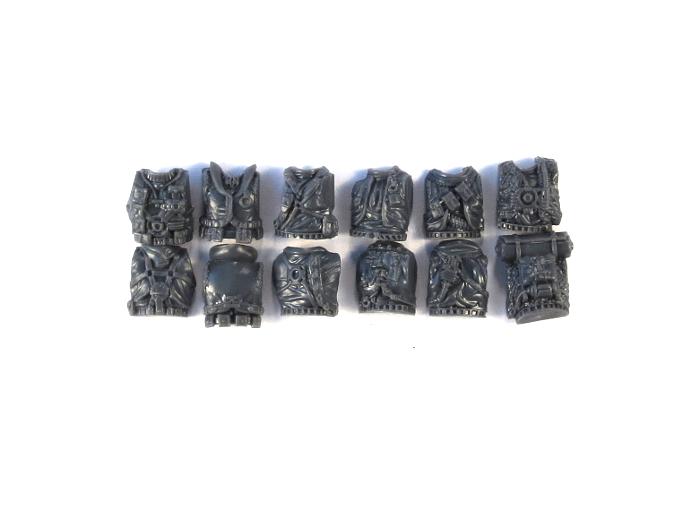
You can save yourself some aggravation if you keep the matching parts together when you cut them off the sprue. If they do get mixed up it will help that the fittings are different on each pair, so each front and back will only go together with its correct partner.
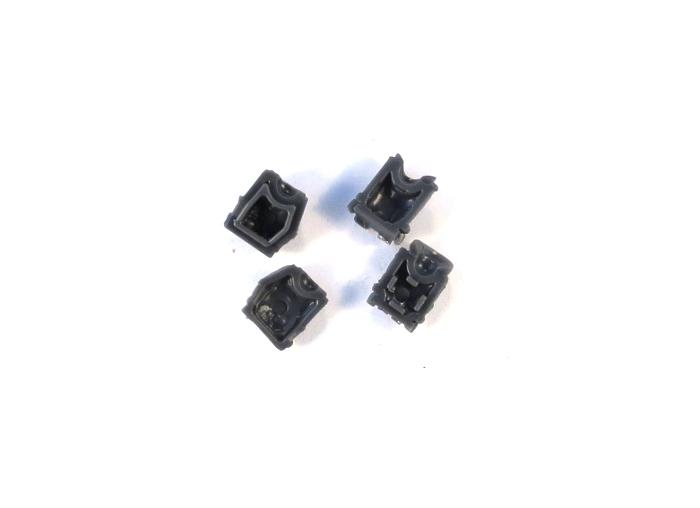
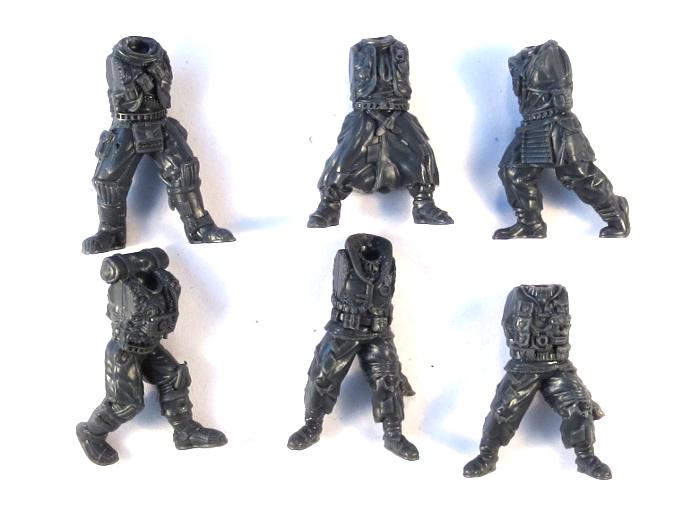
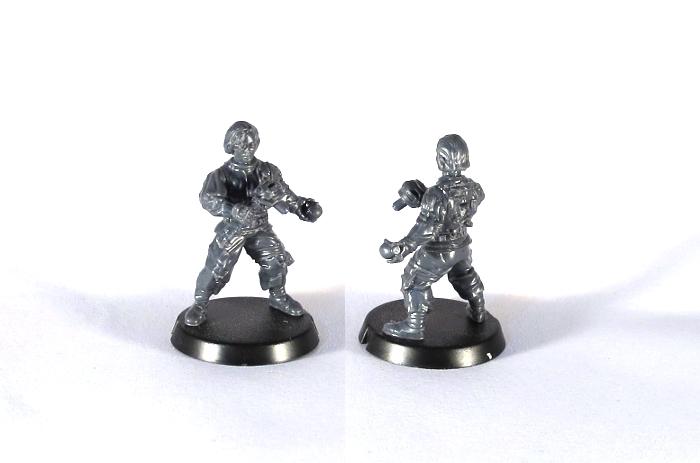
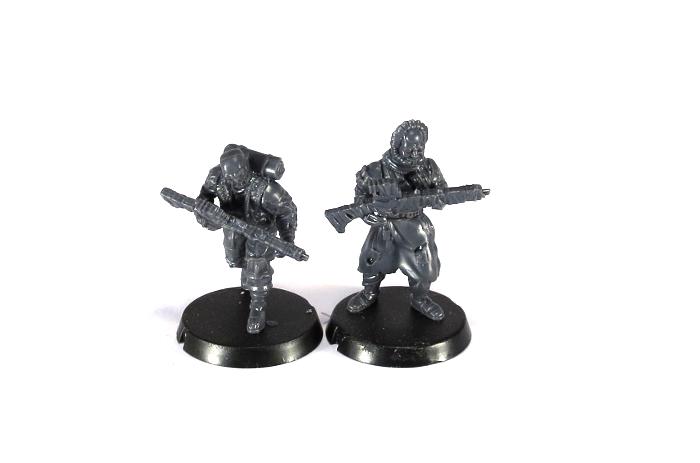
The twelve different sets of legs give you a whole slew of options for posing, as with one exception any of the torsos will work with any of the legs. The exception is torso 3 (parts 3B and 3F) which has pouches hanging from the belt. This torso fits with the legs labelled 3LEG and 6LEG, and slightly less flush with 3LEGB, although the pouches hide any slight gap you wind up with on that last set. You can also make this torso fit with some of the other legs if you trim up the bottom of some of the pouches a little.
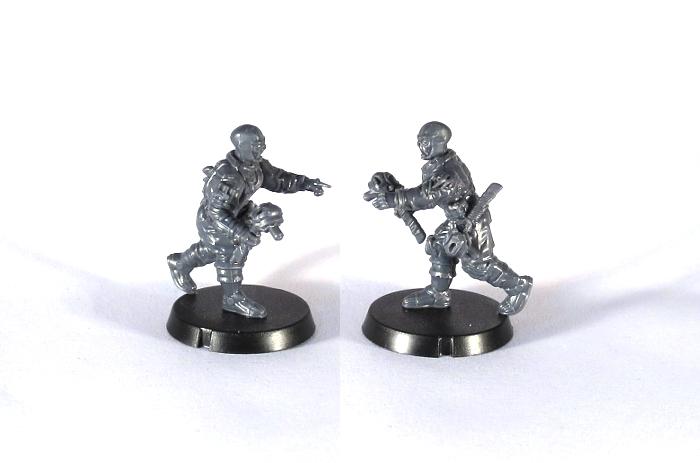
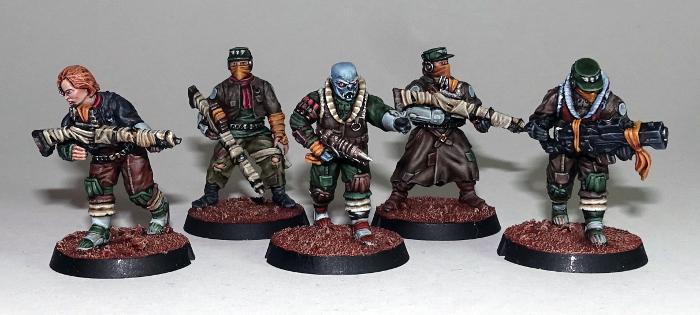
With the torsos glued in place, you might notice that there is a reasonable amount of height variation between the models, which makes for a much more ragtag look to the unit than the usual identically-sized military units.
As with the torso/leg pairing, most of the huge range of heads on the sprues will work with any of the torsos. Torso 2 (2B and 2F) has a rolled cloak across the shoulders and torso 3 (3B and 3F) has a high collar, both of which may get in the way for heads 3H, 4H, 6H, 6HB and AH11.
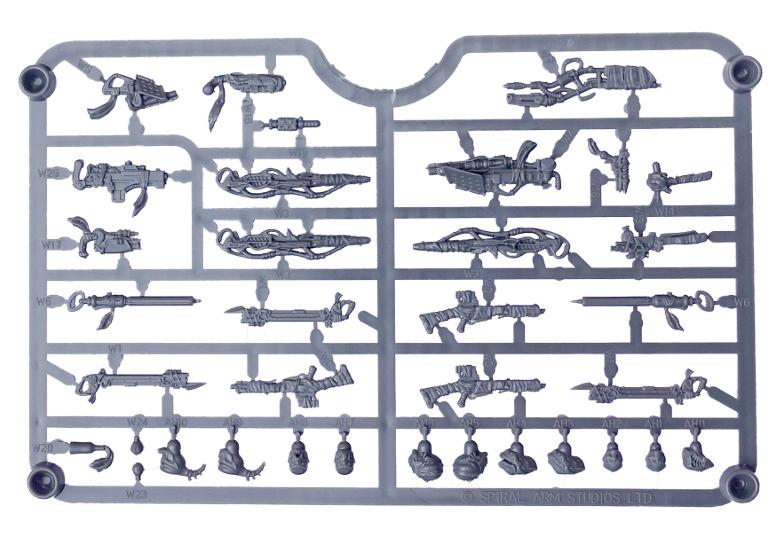
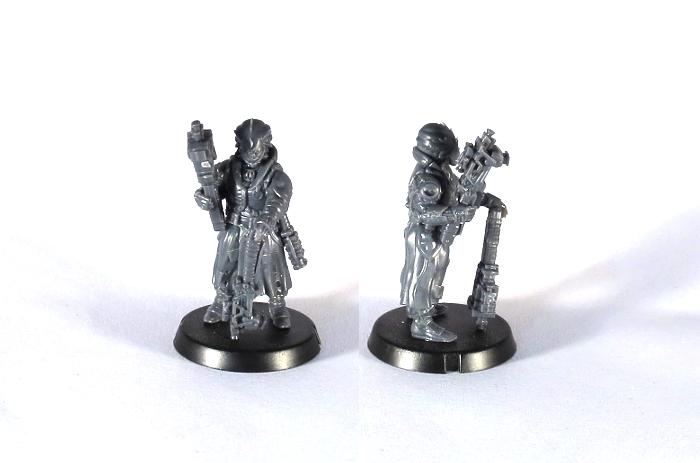
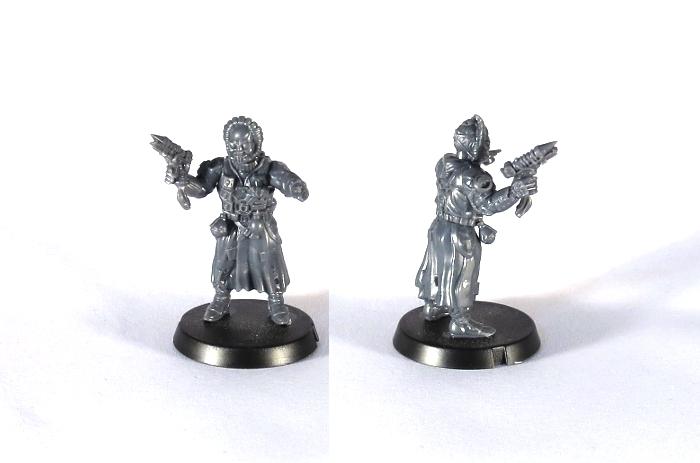
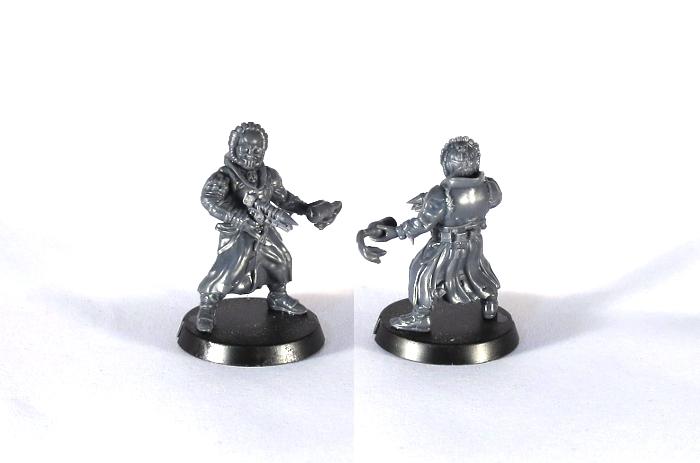
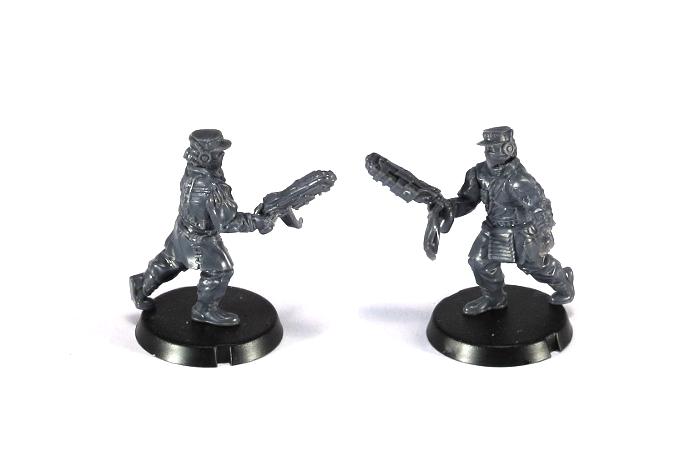
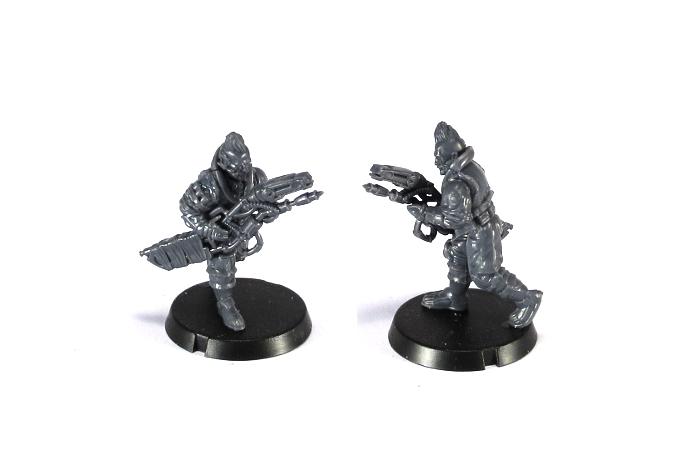
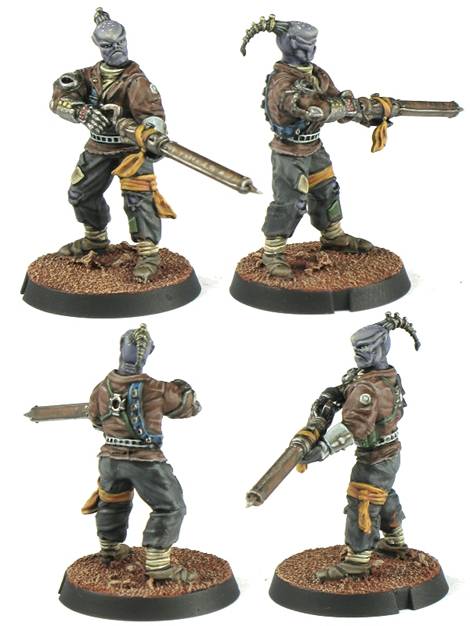
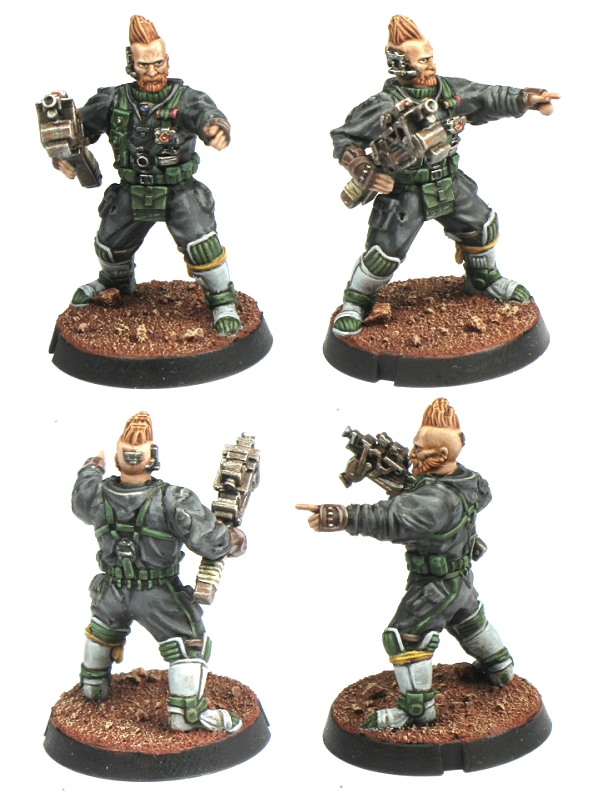
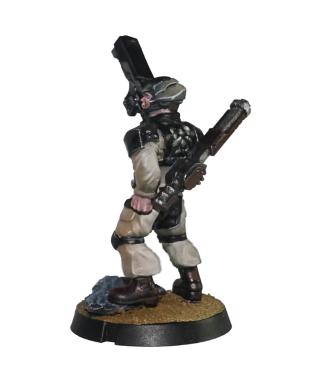
With the massive range of arms available to choose from, a little experimenting may be required to get just the look you want. Because of the different grips and sizes of the various weapons, some weapon hands have a more open grip and others are more closed, so this needs to be kept in mind when fitting them onto your models. Models with two pistols can have the second pistol hanging from their belt or backpack, or in a resting pose using one of the various open hands. Open left hands can also be used to hold grenades.
The Slug Pistol needs a fairly open grip, as it has a fairly chunky handle on it. It works best with arms 1RC, 3RA, 4RC, 5RB, and 6RC.
You can also create a resting pose with it using one of the open left hands and balancing the pistol on the model's hip.
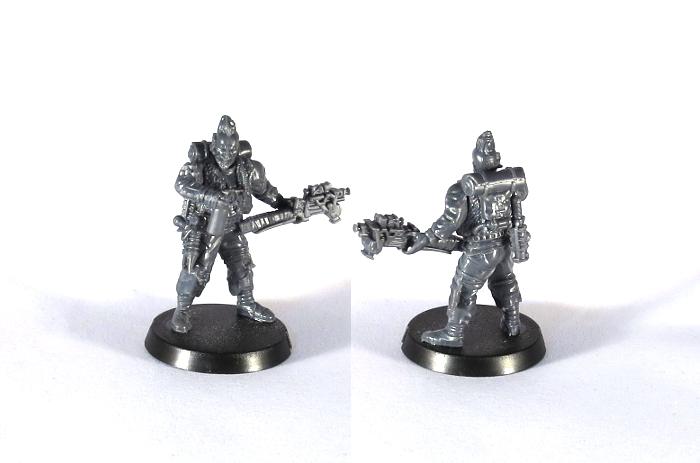
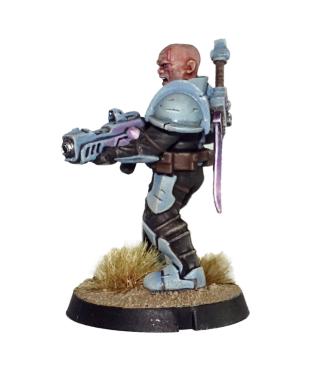
The Chem Pistol works with a more closed right hand, as the handgrip is a little thinner than on the slug pistol.
The Beam Pistol also works best with a more closed right hand, but work best with hands 3RA, 4RE, 5RB, 6RA or 6RE.
For some more ideas for building your Broken models or to share your own creations, head on over to the Comm Guild Facebook page.
You can pick up the Broken Infantry Pack, and the rest of the Maelstrom's Edge miniature range, from the webstore here.
For other Maelstrom's Edge modeling articles, including tutorials and walkthroughs of a wide range of different building and miniature projects, check out the article roundup here.
Tags: boss broken chieftain forsaken modeling models tutorial
Assembly Guide - Broken Rabble
Posted on Monday Oct 02, 2017 at 05:00pm in Tutorials
Assembling Broken Rabble Units
General Notes
Polystyrene cement - only use superglue if you want to go insane! All of our models are designed to be assembled with polystyrene cement as it gives some time to re-pose while gluing, fuses the models together and prevents brittle joins like other glues do. Make sure you have polystyrene cement in your toolkit before you begin!
We want you to experiment! We've broken our models up into lots of parts and given a fair few spare parts so that you can push yourself out of your comfort zone, learn new skills and create some really unique models. We've tried to price things so that it won't break the bank if you make a mistake, so please cut stuff up and have some fun. Start simple with a slice here and a re-pose there, and watch your confidence and skills increase until you are a master modeler!
Basing - Always make sure you glue your model to its base with an eye on the arc markers on the sides of the base. The arc marker indents should be at the halfway point between the front and back of the model to show the front and back halves of the model when gaming. See the Maelstrom's Edge rulebook for more detailed notes on this.
Dry fit before gluing! - There are lots of pose options possible, but that means there is also the freedom to screw up and make some bad poses! Sticking the parts together and seeing how things look will usually lead to a model that is fairly static and repetitive. You should consider knee, hip, torso, and arm positions when gluing and ensure that you have a pose in mind before you start gluing things together. If in doubt or insecure about your talents in the posing area, we recommend you try to copy the poses from some of our studio models found here in the gallery.
Broken Rabble Assembly Notes
Six Broken models can be made from one set of the Broken Infantry sprues:
Assembly is fairly straightforward, with everything fitting together where you would expect. There are six different torsos, each with a unique front and back.
You can save yourself some aggravation if you keep the matching parts together when you cut them off the sprue. If they do get mixed up it will help that the fittings are different on each pair, so each front and back will only go together with its correct partner.
The twelve different sets of legs give you a whole slew of options for posing, as with one exception any of the torsos will work with any of the legs. The exception is torso 3 (parts 3B and 3F) which has pouches hanging from the belt. This torso fits with the legs labelled 3LEG and 6LEG, and slightly less flush with 3LEGB, although the pouches hide any slight gap you wind up with on that last set. You can also make this torso fit with some of the other legs if you trim up the bottom of some of the pouches a little.
With the torsos glued in place, you might notice that there is a reasonable amount of height variation between the models, which makes for a much more ragtag look to the unit than the usual identically-sized military units.
As with the torso/leg pairing, most of the huge range of heads on the sprues will work with any of the torsos. Torso 2 (2B and 2F) has a rolled cloak across the shoulders and torso 3 (3B and 3F) has a high collar, both of which may get in the way for heads 3H, 4H, 6H, 6HB and AH11.
With the massive range of arms available to choose from, a little experimenting may be required to get just the look you want. Because of the different grips and sizes of the various weapons, some weapon hands have a more open grip and others are more closed, so this needs to be kept in mind when fitting them onto your models. In some cases the 'matching' left arm will work, but for some weapon/arm combinations you may want to tack the right arm and weapon together and then find a left arm that fits best.
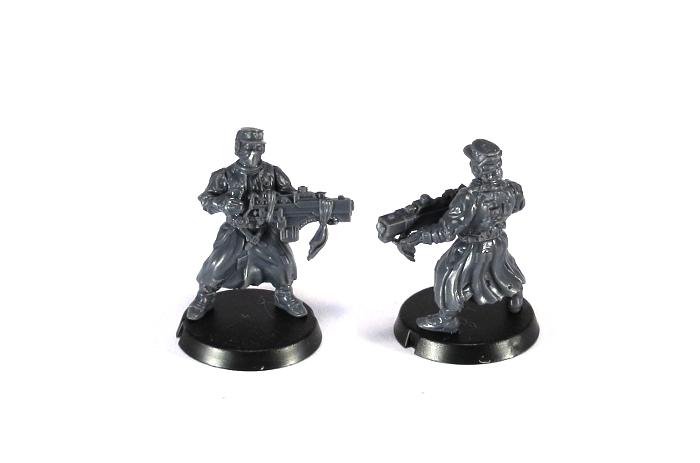
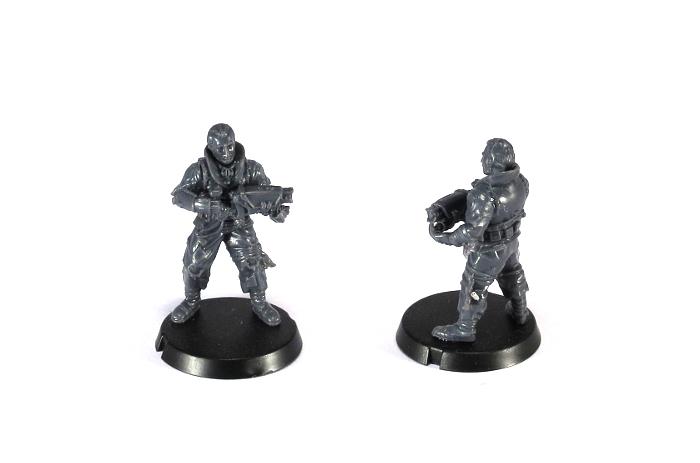
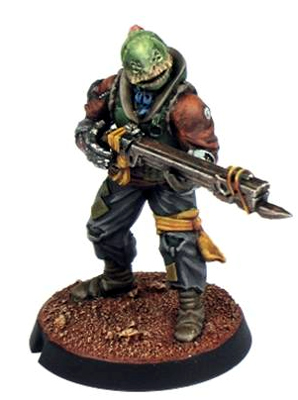
The Slug Rifle is the basic weapon of Broken Rabble units. It works best with a more open right hand, as does the Chem Launcher.
The Auto Slugger and Glue Carbine also work with a more open right hand, but work best with hands 1RC, 3RA, 4RC, 5RB or 6RC.
The Longbeam Rifle and EMP Harpoon can use a more closed hand to latch onto their rear grips, or you can use an open hand for a more relaxed grip.
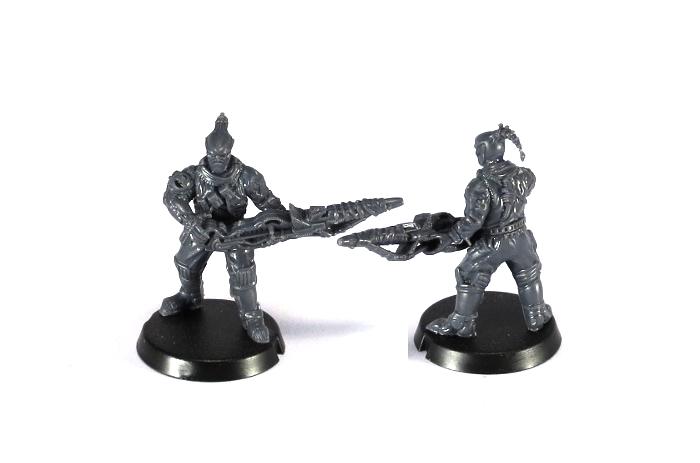

Likewise, the Glue Rifle can potentially work with either grip style. It's such an unusually-shaped weapon, and can work held a few different ways, so have a play with it and see what you like best!
For some more ideas for building your Broken models or to share your own creations, head on over to the Comm Guild Facebook page.
You can pick up the Broken Infantry Pack, and the rest of the Maelstrom's Edge miniature range, from the webstore here.
For other Maelstrom's Edge modeling articles, including tutorials and walkthroughs of a wide range of different building and miniature projects, check out the article roundup here.
The Broken - Plastic Ragtag Civilian Models Now Available!
Posted on Friday Sept 29, 2017 at 12:00pm in The Broken
We are proud to announce that the third Maelstrom's Edge faction has now launched, with a range of plastic models. We present to you... The Broken!
From the factories and the slums, the mining complexes and the farms of the galaxy come the Broken, a growing movement of citizenry angered by the lack of opportunity to escape the Maelstrom. They are a diverse mix of workers, aliens, and rogues left on doomed worlds by the ruling parties.
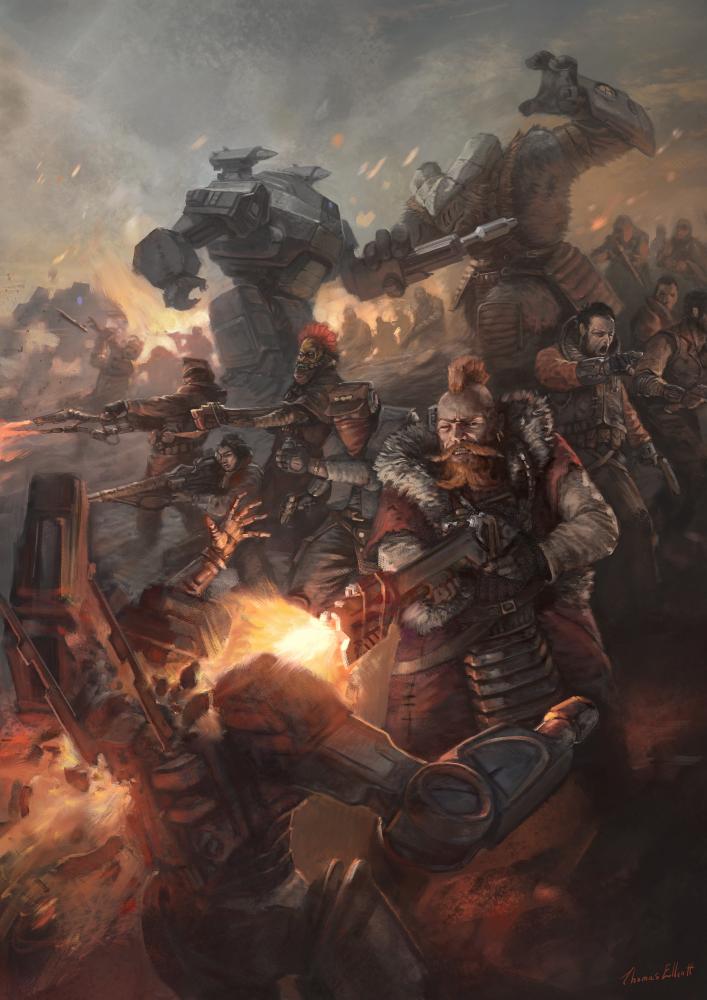
These survivors take matters into their own hands after being left behind. They pool their resources and knowledge in a communal effort to escape the Edge. Derelict ships are repaired. Affluent people’s ships are stolen. Government ships are commandeered. Any ship available is pressed into service for the Broken. They are a group unlike any ever seen in the galaxy. Fear, hate, anger, need fused them, these abandoned people, into an unstoppable force with one goal - escape the Edge. The Broken is a term used to unify all such desperate people across the Edge. Their motivation, methods, and sanity vary wildly from fervent revolutionaries to callous pirates to the few who have stared into the maw of the Maelstrom only to come away unhinged.
The Broken are available for purchase now at the Maelstrom's Edge webstore. You can also check out the unit cards and faction rules at our brand new online force listing section.
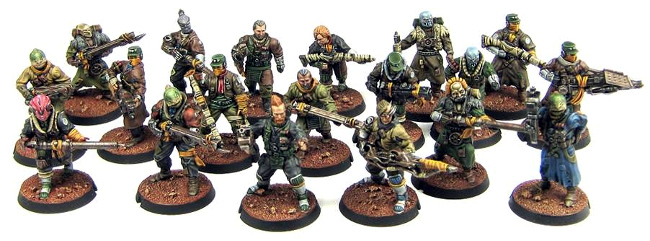
Half a dozen models can be built from a single set of sprues, with enough options for all of your sci-fi civilian modeling desires to be fulfilled. Suitable as proxy models, conversion fodder, and part swaps for other ranges, there are plenty of uses beyond Maelstrom's Edge, so those spare parts you have left over when building a Broken force will have plenty of uses.
The kit is extremely versatile, with every arm, torso, legs and head a distinct part and combination. No hands are built in to the weapons so they are easily switchable with other models, and the entire kit is almost fully parts compatible with our Karist and Epirian lines, allowing for rogue Karist and Epirian forces to represented, as well as converts and captured equipment.
The kit also has unprecedented diversity for a plastic sci-fi civilian range, featuring plenty of female heads and gender agnostic heads, as well as large mixture of alien heads with variant poses to ensure you can build a force themed around a specific alien type if you so desire.
Keep your eyes on this website for assembly instructions and more articles featuring The Broken in the near future.
We are also pleased to report that this release kicks off the start of our increased release schedule, with a release planned every month. Make sure you follow us on facebook to see all of our releases as they are revealed!
The Broken Infantry Sprues
Posted on Tuesday Sept 26, 2017 at 09:00am in Models
Only 4 days until the first models from our new faction - The Broken - are available for purchase!
We'll be sharing more information each day until release, starting with the most important of all - detailed pictures of the sprues!
A common question we've had so far is just how many sprues are needed for each unit to be built? Additionally, how many sprues will be needed for a full force of Broken?
As you can see above, six models can be made with a huge array of options from each set of sprues. Units will be made up of 4-6 models each, with 1 HQ model as well, so a single set of sprues can make up a full squad of 6, with most options. Three sets of sprues will be enough to make full squads of all three unit types. Going with two 6 man squads and one 5 man squad will also allow an HQ model to be built, giving a full complement. The Broken are made up of inexperienced and easily available forces so have a very low points cost compared to some of our factions, so while 3 squads will cover all basic options, if you want to build a full force (100-150 points), you'll be doing some careful list building first!
Previewing the Broken
Posted on Wednesday Aug 30, 2017 at 06:27pm in The Broken
As the release of The Broken gathers speed, it is time to share some more photos of the upcoming models with you. All of these can be built using our plastic kit. The kit will allow three different units or an HQ model to be assembled from it, so the 4 sprues that make up the kit will be a solid foundation of any Broken force.
Keep your eyes on the comm guild blog, our facebook page, or make sure your email address is registered at http://www.maelstromsedge.com to be notified when the Broken go on sale in Sep 2017.
Terrain Spotlight: Comm Tower
Posted on Monday Jun 05, 2017 at 05:00pm in Models
- by Iain Wilson
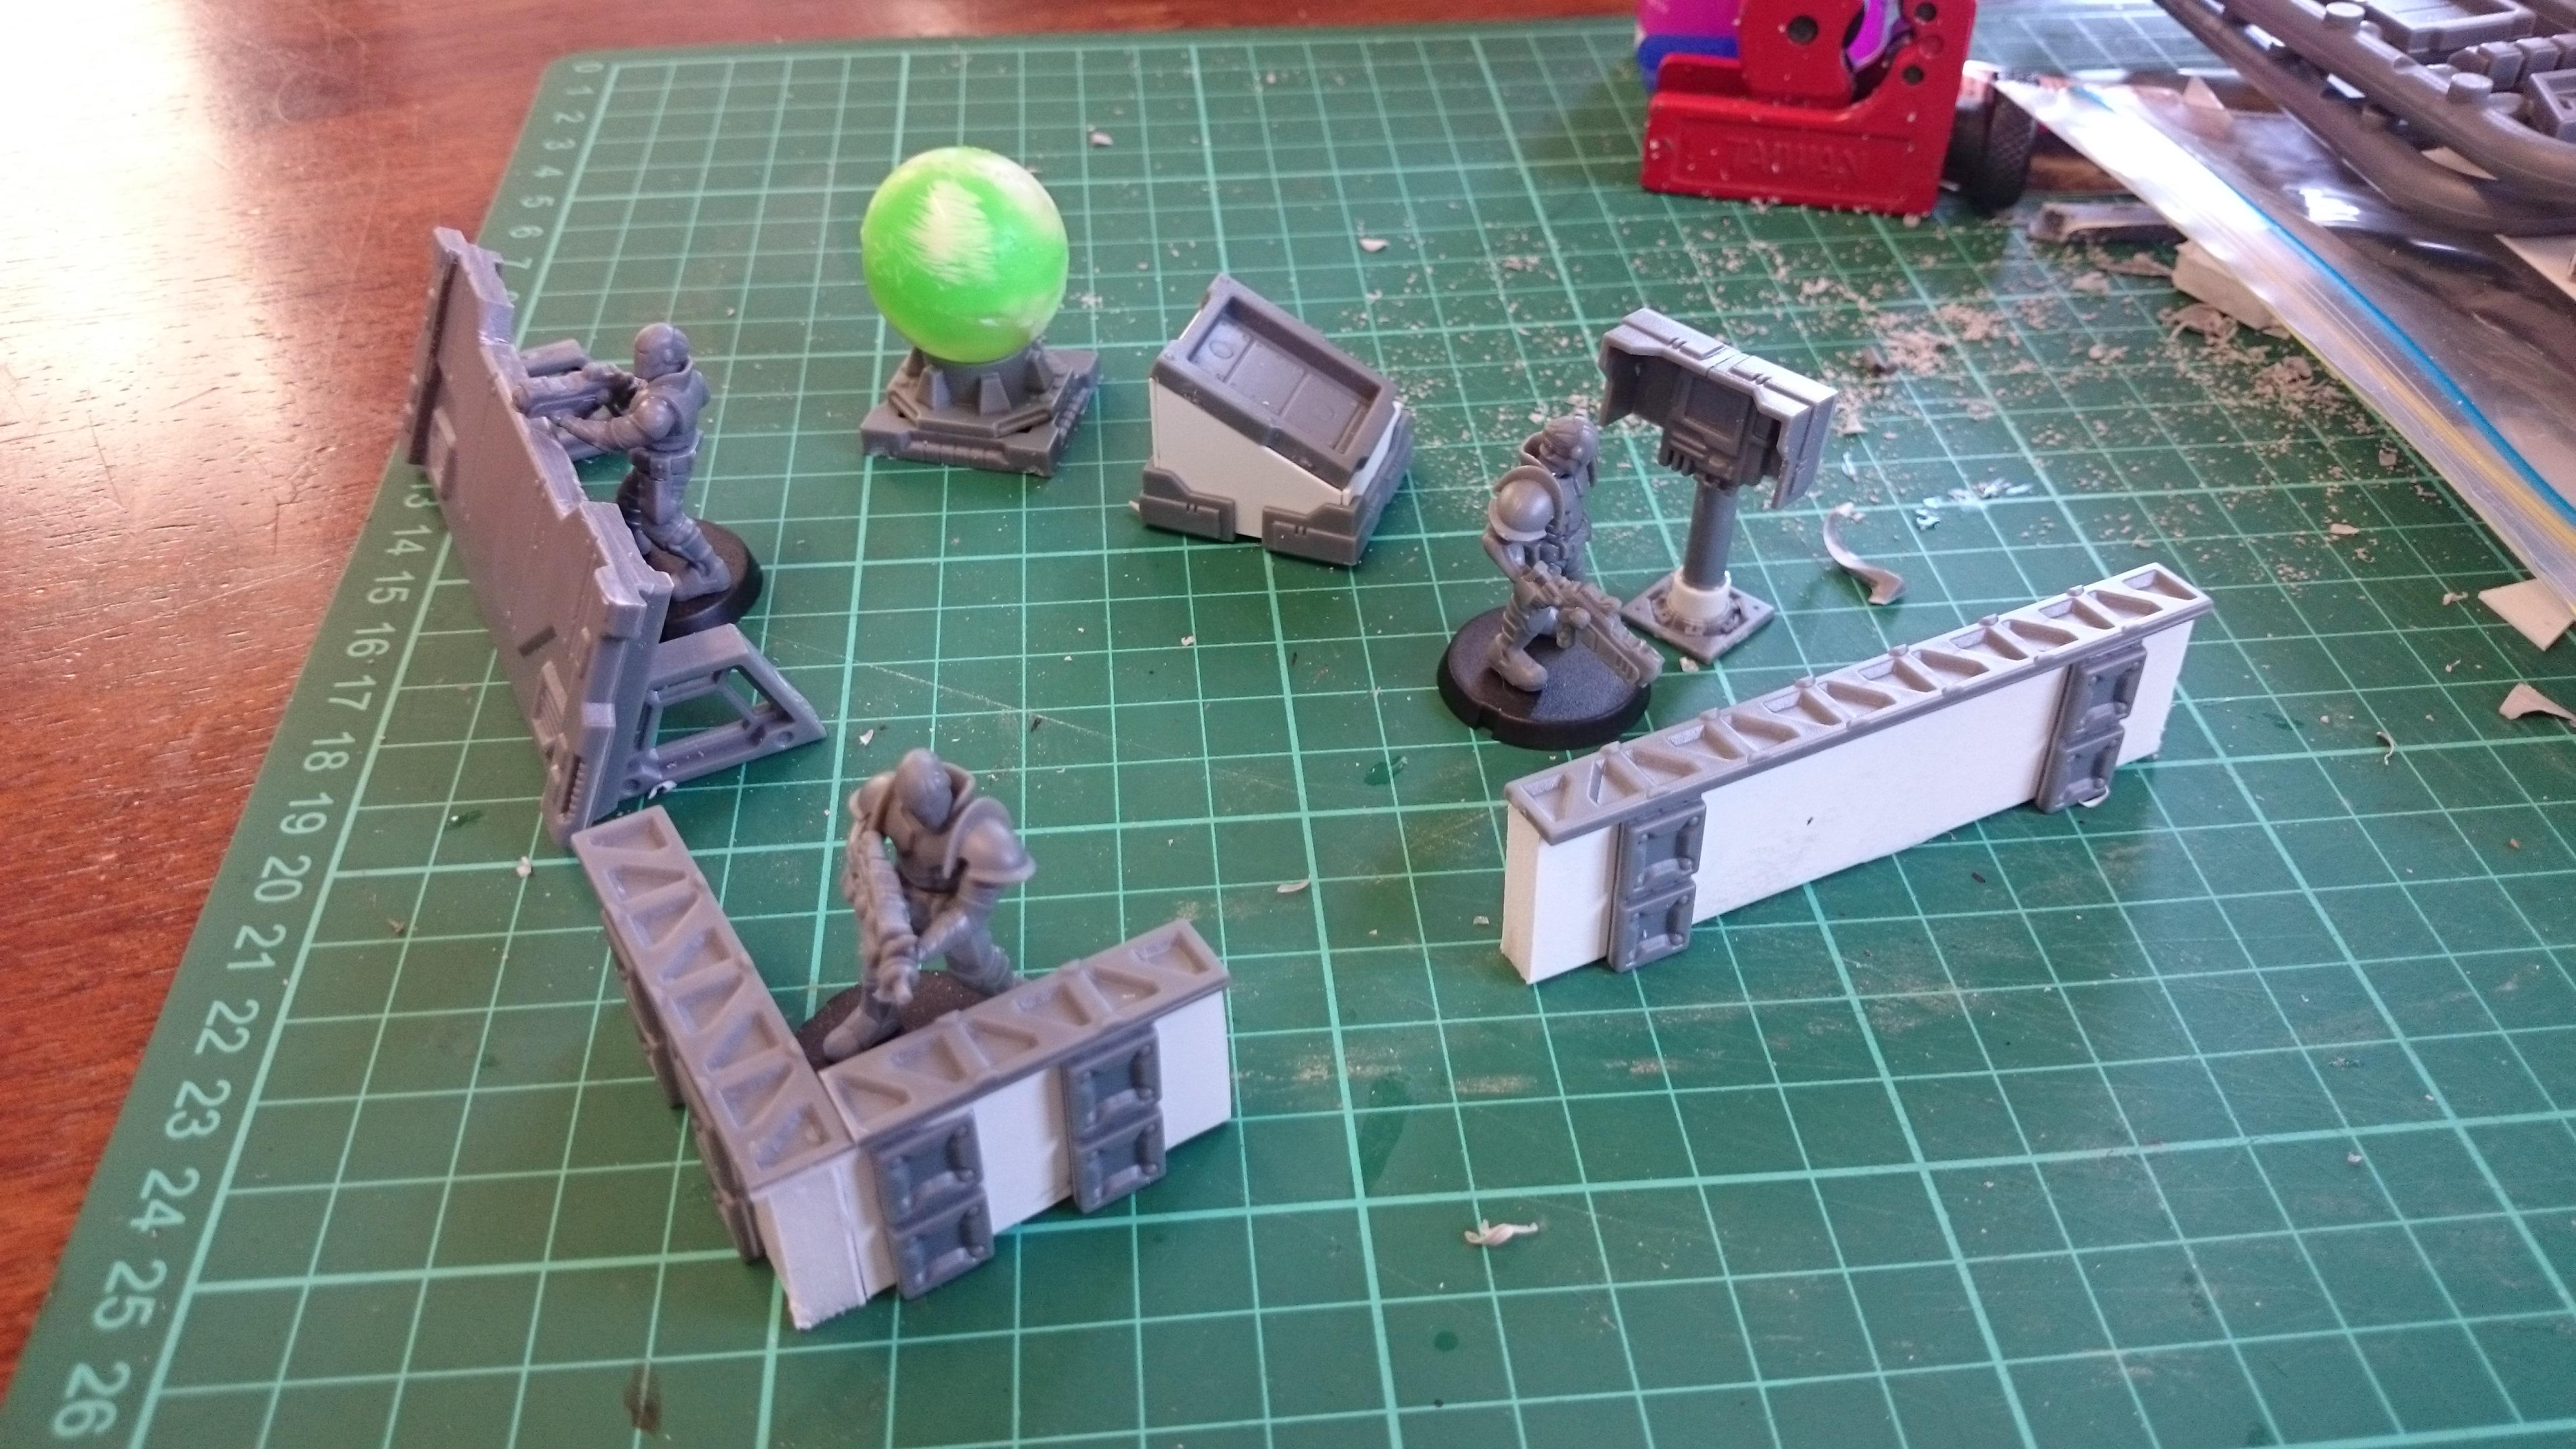
One of the things I really enjoy about working with the Maelstrom's Edge terrain sprue is that with a little imagination and a sharp knife, there are so many potential uses for most of the parts. I think I've used the ladders, energy fences and pipe fittings far more as other things than I have for their original purposes.
This week's build is no exception, as I had a bit of a brain-flash as I was looking at the energy fence posts and decided to build a communications array!
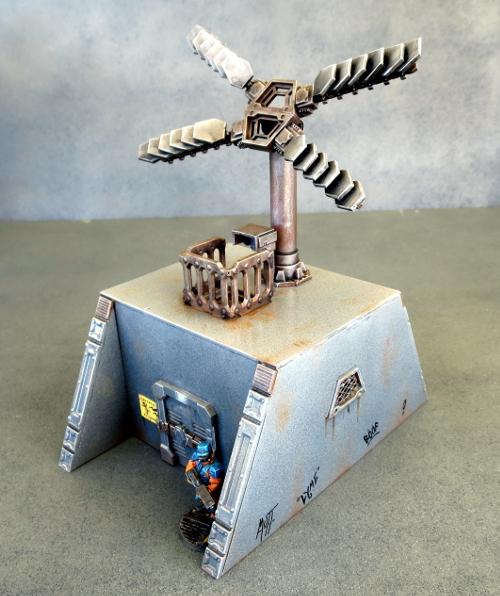
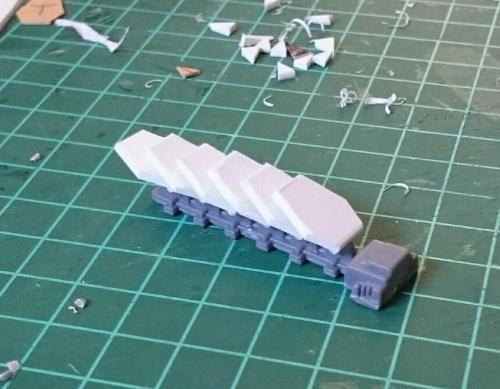
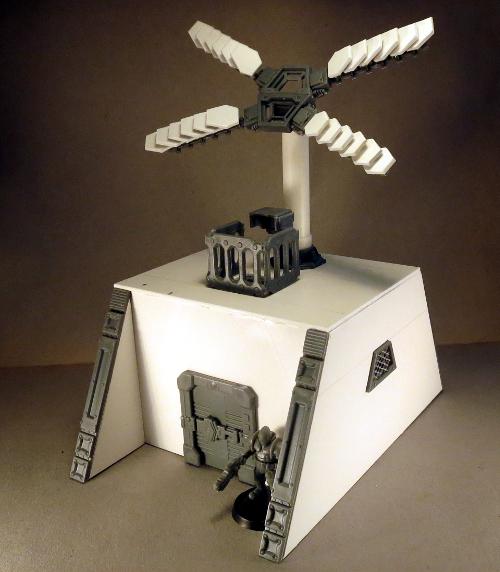
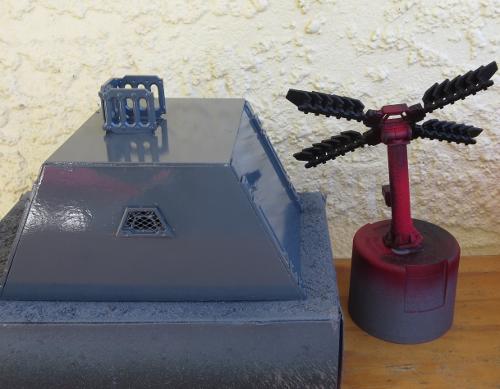
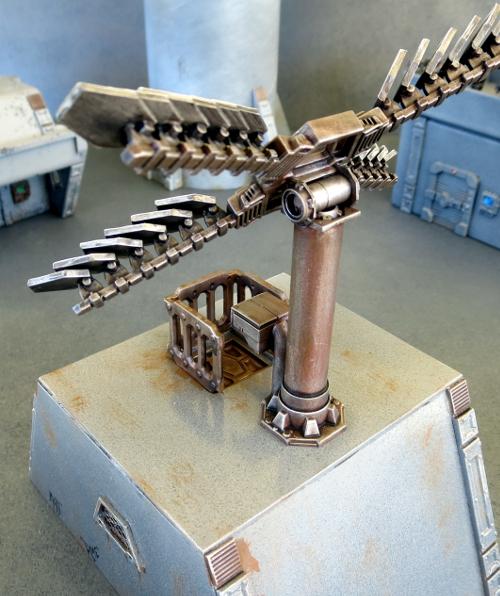
The main focus of this terrain piece is, of course, the cross-shaped array on the roof. The transceiver panels on this array are each built from a fence post and a series of hexagonal shapes cut from a sheet of plasticard. I cut a few test panels from cardboard to get the size and shape right, and then used one of those cardboard testers as a template to mark out the plasticard.
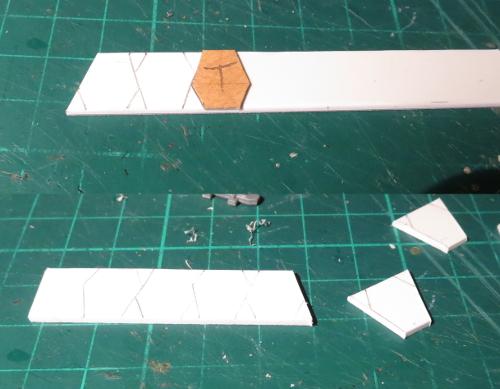
Once cut and cleaned up, the panels had a small length of plastic rod glued to the back, and then glued in place onto the fence post.
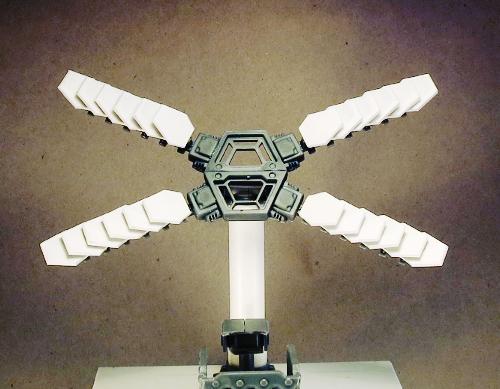
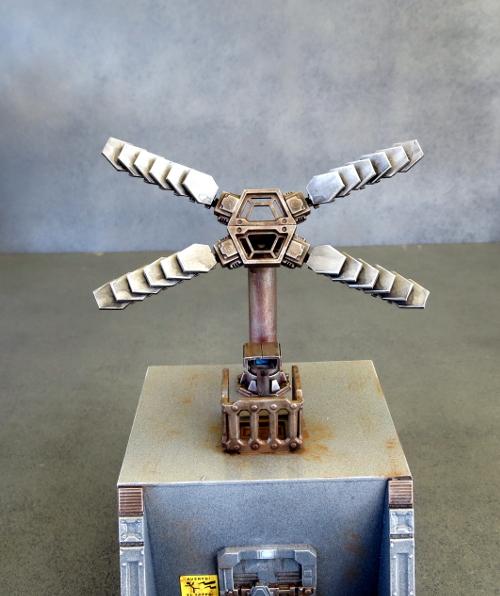
The four resultant transceiver arms were glued onto a pair of trapezoid windows to form the array. I sat this on a post made from plastic tubing and some pipe fittings, with a control panel mounted on the front for servicing and fine-tuning - because as any sci-fi buff would tell you, intergalactic regulations require any piece of important equipment to have a control interface positioned somewhere accessible from outside, but exposed to enemy shooting.
The array obviously needed something to stand on, so I made a basic building frame out of foamcore.
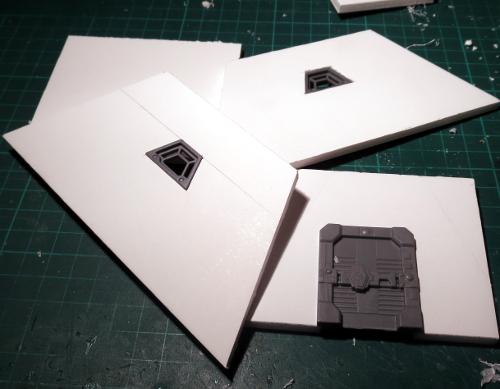
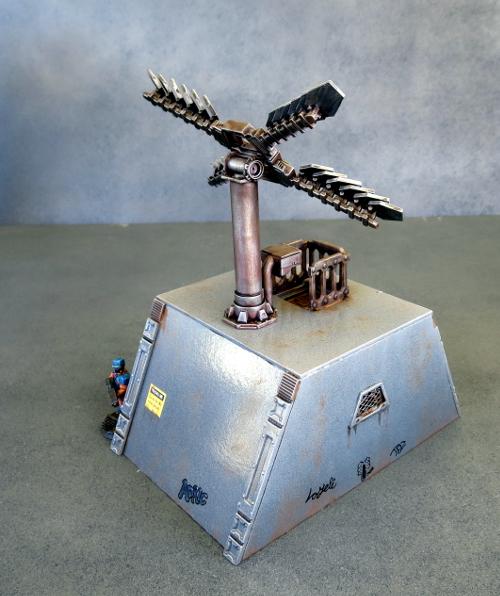
I set a hatch into the roof, and surrounded this with a railing made from a cut-up ladder - because while the control panel needs to be exposed, the Epirian Foundation still (on paper, at least) follows strict OH&S standards.
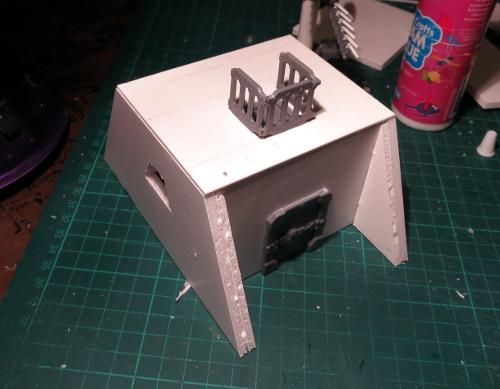
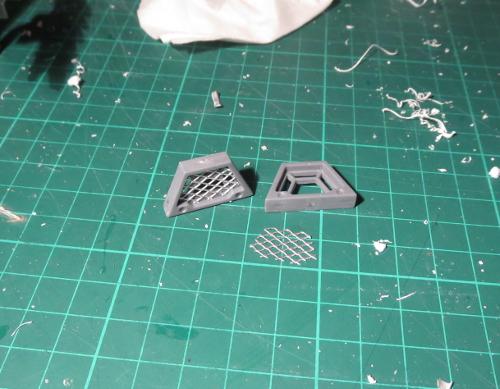
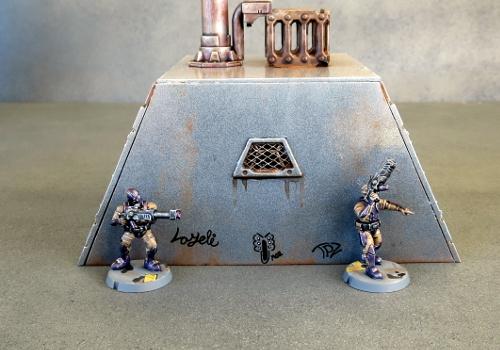
I wanted to use trapezoid windows in the sides of the building, to tie back to the shapes in the array, but they needed to look different to the array centre to reduce the number of people looking at the building and asking why it had windows on its aerial. So I cut some pieces of aluminium mesh to fit snugly inside the window frames.
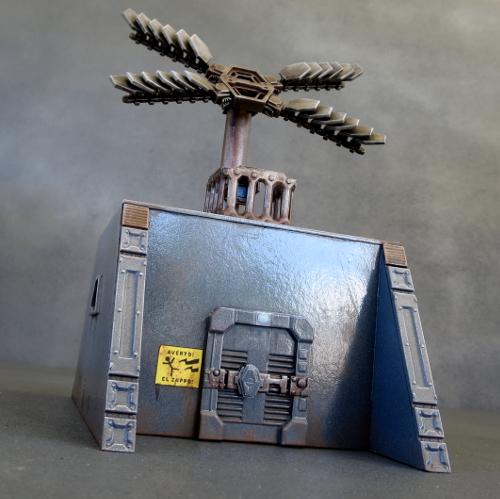
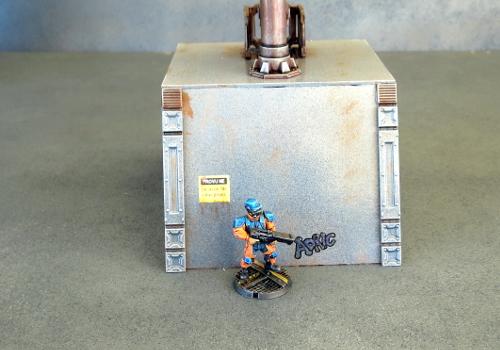
With everything glued in place, the comm building looks like this:

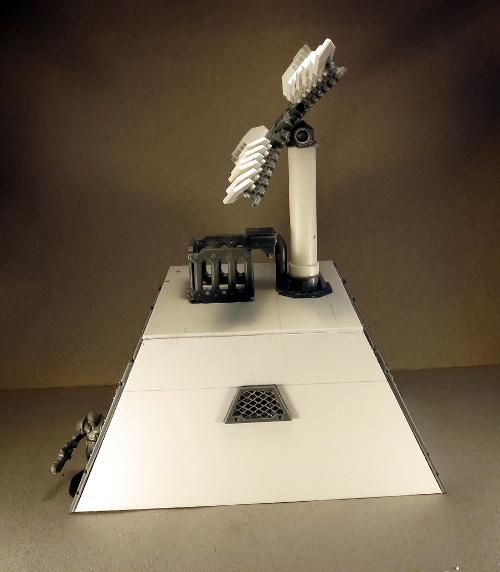
I kept the painting on this one a fairly simple grey, to match some other terrain from previous articles. The building section was sprayed with a medium grey undercoat, and the array sprayed red on the less important parts and black on the transceiver plates and 'moving' parts.
The building then had a light spray with a lighter grey, pitched from above so that the darker grey would stay in the indentations and form some natural shadows. The array and the metal parts on the building were painted using the weathered metal recipe from the article here. Then I finished up with weathering added with drybrushed brown, the door light and control panel screen painted in blue, and then added a couple of printed signs and some fineliner graffiti on the side and back walls.
A cheery, grey city in progress...
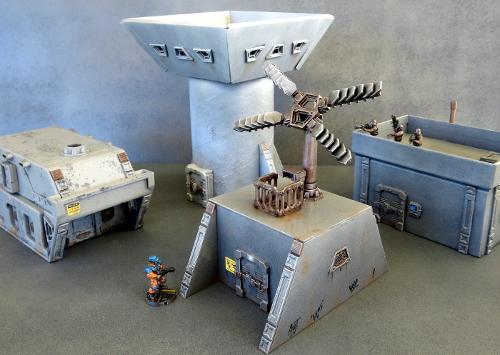
If you would like to build your own communications array, you can pick up the Maelstrom's Edge terrain sprue from the webstore here. As always, feel free to share your creations on the Comm Guild Facebook page!
For other Maelstrom's Edge modeling articles, including tutorials and walkthroughs of a wide range of different building and miniature projects, check out the article roundup here.
Tags: buildings modeling models spotlight terrain terrainsprue walkthrough
Tutorial and Spotlight Article Roundup
Posted on Monday Apr 17, 2017 at 05:00pm in Tutorials
The full list of articles is getting a little unwieldy for a single page, so rather than keep updating an increasingly confusing list here, you can find the full collection of articles broken down by sections in the Hobby area of the Maelstrom's Edge website here!
If you've seen anything here that has lit that modeling flame, you can pick up the various plastic kits currently available in the Maelstrom's Edge range from the webstore here.
Maelstrom's Edge also has a Facebook group, known as 'the Comm Guild', where you can post any questions you have about the rules, the models, or upcoming releases, or share your modeling projects. The group can be found here. We love to see what people are working on, so whether you're a modeling veteran or a complete newcomer to the world of miniature wargaming, feel free to join in.
And in the meantime, stay tuned for the plethora of modeling content that we have still coming down the pipeline!
Tags: buildings conversion models painting terrainsprue tutorial
Terrain Spotlight: Welcome to Hamilton!
Posted on Monday Mar 27, 2017 at 05:00pm in Models
 - by Iain Wilson
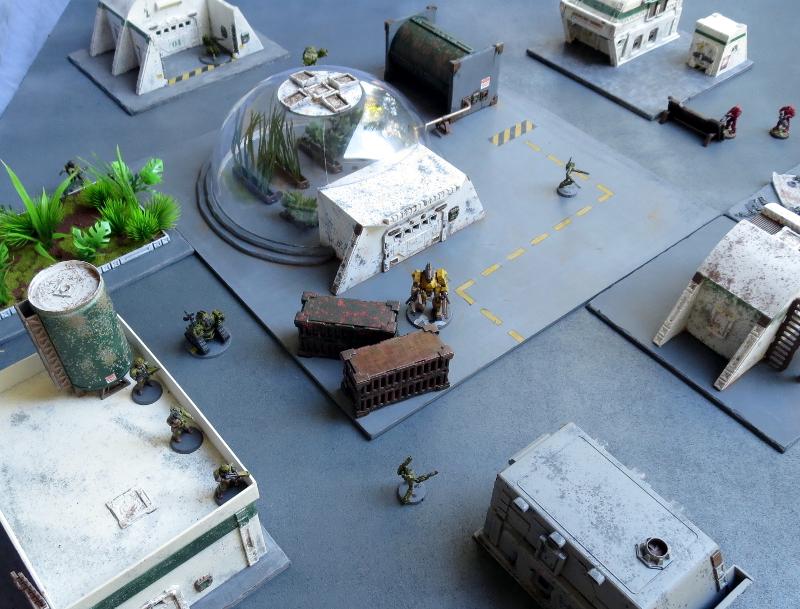
The frontier world listed in the Epirian Foundation directory as PG-4215 [designation pending] is a barely-habitable planet on the outer fringe of populated space. At the time the Maelstrom approached the system, PG-4215 possessed a single official settlement, known as 'Research & Terraforming Implementation Facility Alpha' by the Foundation and as 'Hamilton' by those unfortunate enough to have been posted there.
With PG-4215's few small, equatorial landmasses being hot, dry, and generally unpleasant, Hamilton's small population very early on had committed themselves to paving over and urbanising as much of it as possible.
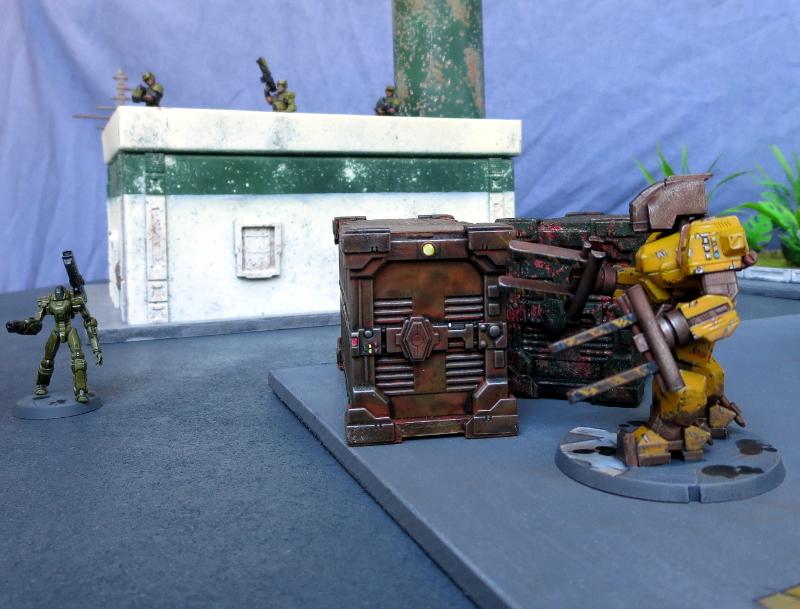
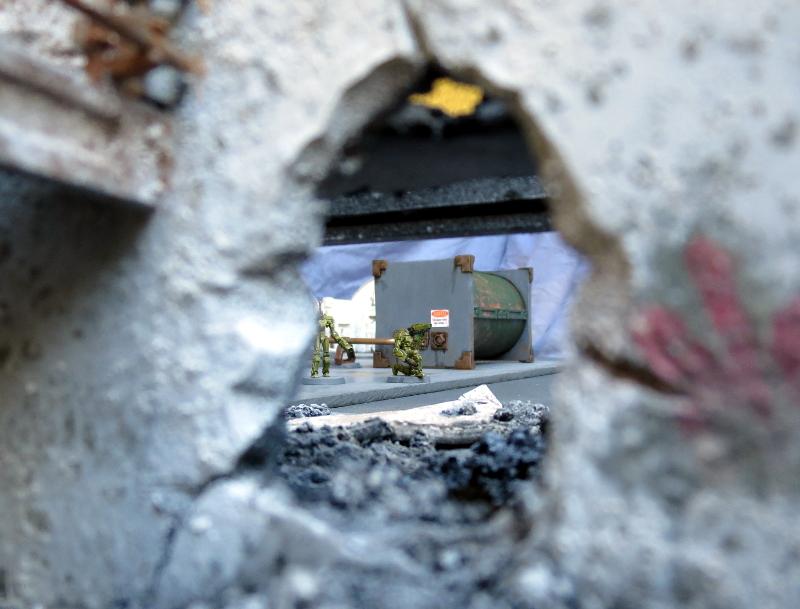
Oblivious to impending conflict, an Epirian cargo drone shunts shipping containers for unloading.
Hamilton is the first table setup that I've finished off so far for my own Maelstrom's Edge games. I've used it somewhat as a test-bed for trying out different ideas, with the end result being a bit of a hodge-podge of styles.
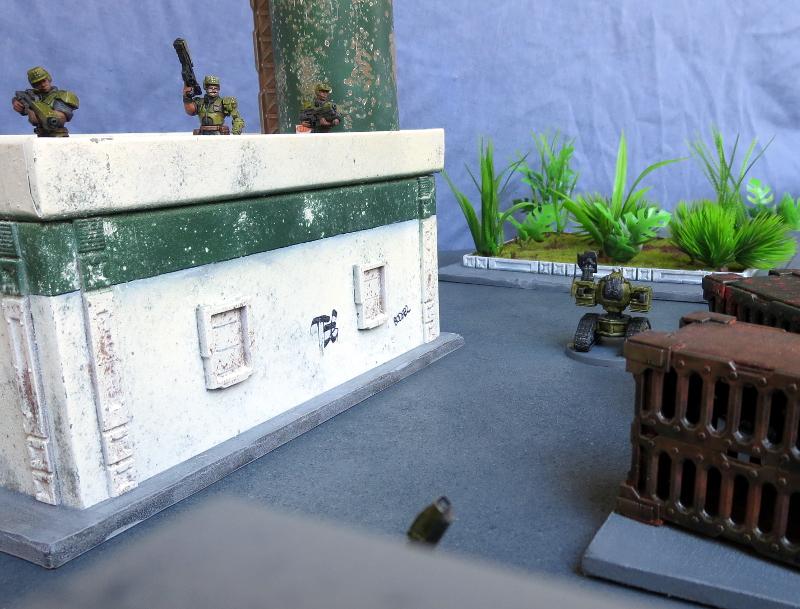
Taking up position on the roof of the refectory, the squad watches an automated uplink relay trundle down the laneway.
Buildings have been constructed from a range of different materials, with the components from the Maelstrom's Edge terrain sprue helping to tie it all together into a more-or-less coherent whole. The building above is made from a cardboard giftbox with the lid flipped upside down.
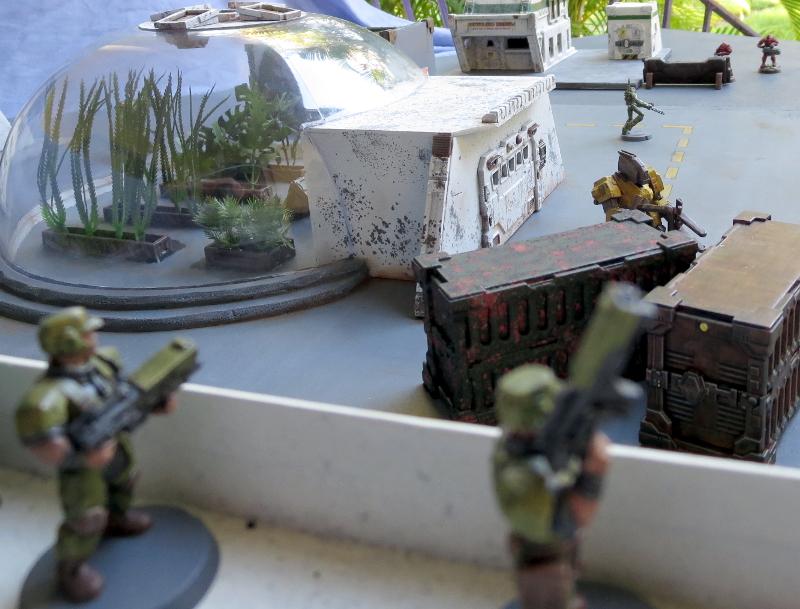
In the distance, past the plantation dome, a squad of heavy armoured Karists approaches, weapons at the ready.
The plantation dome was constructed from a plastic salad bowl, with foamcore used for the enclosed area at the front. You can see how this was put together in the walkthrough here.
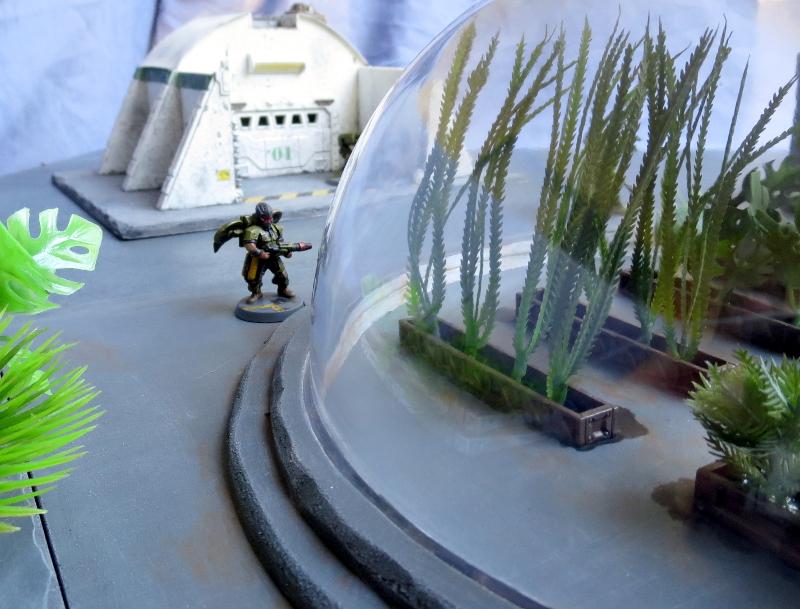
A Warden conducts a routine maintenance check on the exterior of the planation dome.
Trimmed-down and repainted aquarium plants were used for the plantation beds inside the dome. In the background is one of my first foamcore constructions.
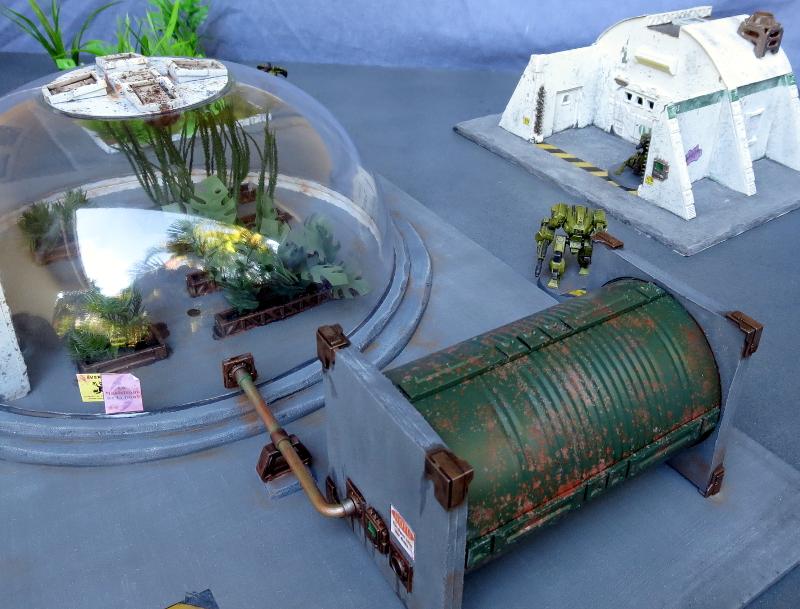
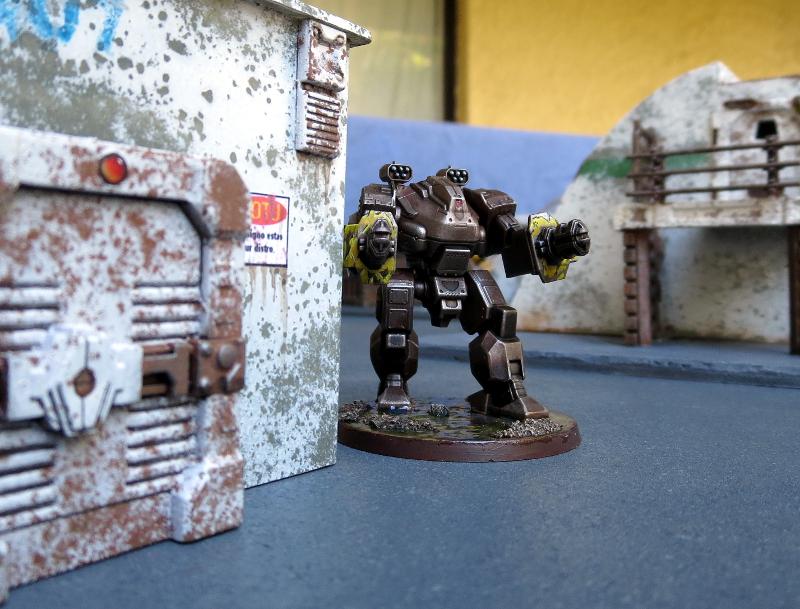
A Hunter warmech on patrol.
Cover is extremely important in Maelstrom's Edge, so wherever possible I have tried to include protruding elements for models to potentially hide behind, as can be seen in the buttressing on the building behind the Hunter.
A Scorpion drone lurks in the courtyard, awaiting instructions from its Handler.
Of course, some details aren't particularly useful for cover, and are just there to look pretty.
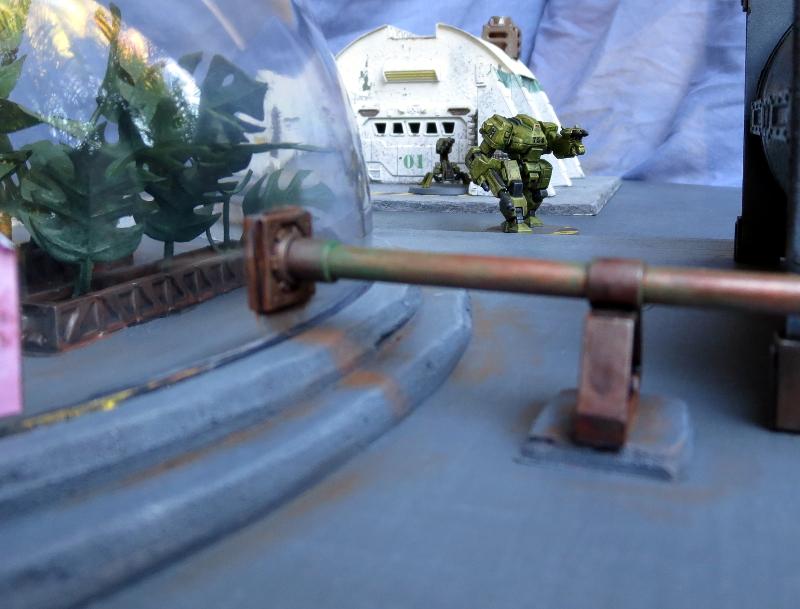
On the other side of town, a Hunter on loan from the Swamp Research Team surveys the laneway.
Painting has mostly been kept fairly simple, with the buildings all painted white with some salt weathering to make them look like they've been exposed to the elements on an unfriendly world. I wanted a unified colour scheme to help tie the disparate buildings together, so they would look like the town was cobbled together from various sources, but would still look like it was purpose built for a single organisation.
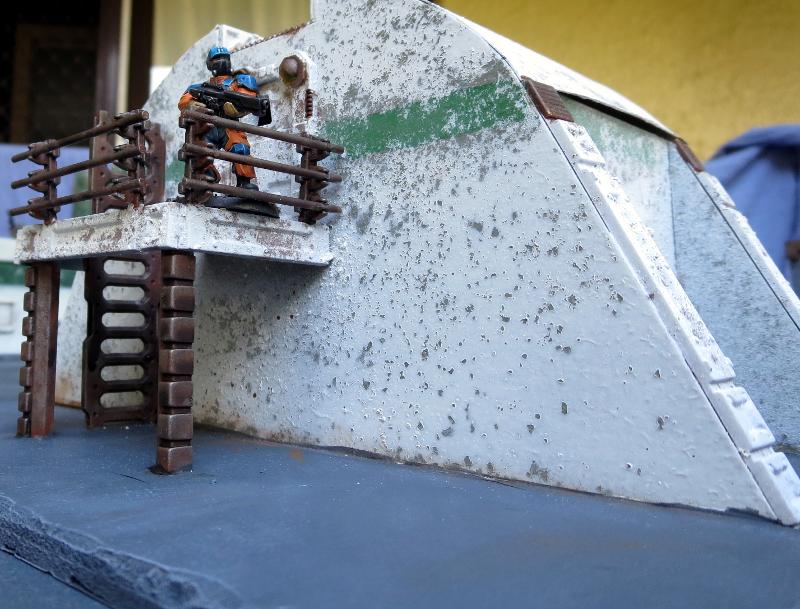
Lieutenant Bob takes up position on the balcony.
Variations on a basic design can help create a 'kit-home' look, with some different buildings that all clearly belong together. The above building was constructed using a similar template to the first foamcore structure, but with the courtyard removed and a balcony added. You can see the construction of this building in a short video here.
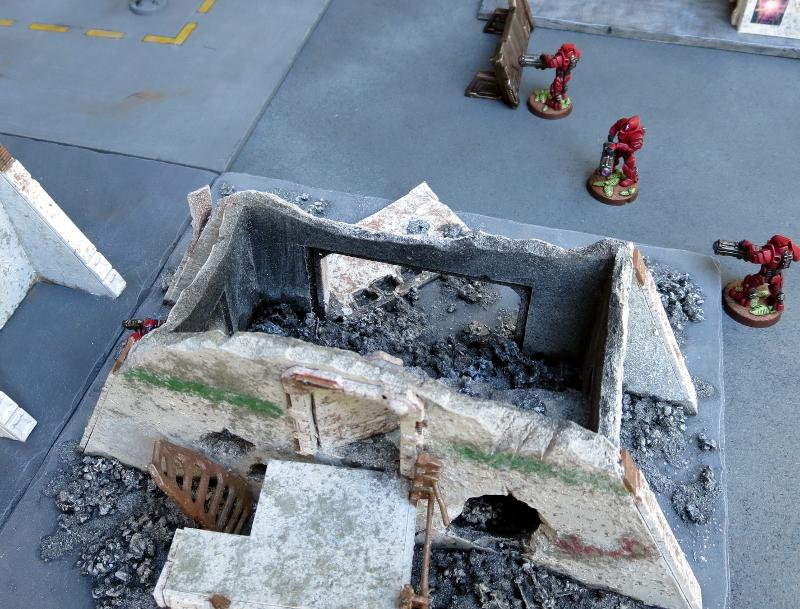
The Karists advance.
If you're aiming for an urban-themed board, it's a good idea to add in some area terrain elements rather than just having a table filled with solid buildings, as this mixes things up a bit for movement and cover. The same template used for Lieutenant Bob's balcony building was used to create a ruin, just by cutting off the roof, bashing things up a bit and adding some rubble on the base.
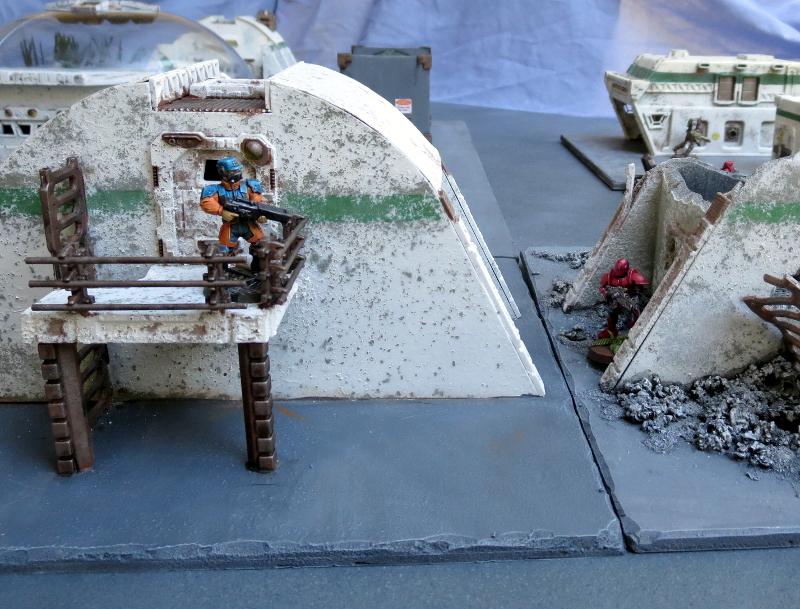
A lone Karist trooper lurks between the buildings.
In the background above you can see another building made from a plastic storage tray. Check out the build video here.
Scarecrows move to intercept the intruders.
Playing on a themed table is a great way to bring your games to life, as it helps to create the illusion of an actual battlefield, rather than just having a random assortment of different terrain.
Despite imminent conflict, Bob can't resist trying out his new camera drone...
Still to do: I have several more buildings still on the workbench for this board, including a bot storage building and some more small multi-purpose buildings. I'd also like to add some sort of water-treatment pond. This will help to expand out from 4'x4' to a more rounded 4'x6', which is better for standard games. It would also benefit from the addition of more scatter terrain to break up the firelanes a little, which will be my next terrain project:
All of the decorative elements on the buildings shown here are from the Maelstrom's Edge terrain sprue. You can find this in a handy two-pack in the Maelstrom's Edge online store here. You can share your terrain creations on the Comm Guild Facebook page!
Friday Photo - Muted Epirian Contractors
Posted on Friday Sept 30, 2016 at 05:00pm in The Epirian Foundation
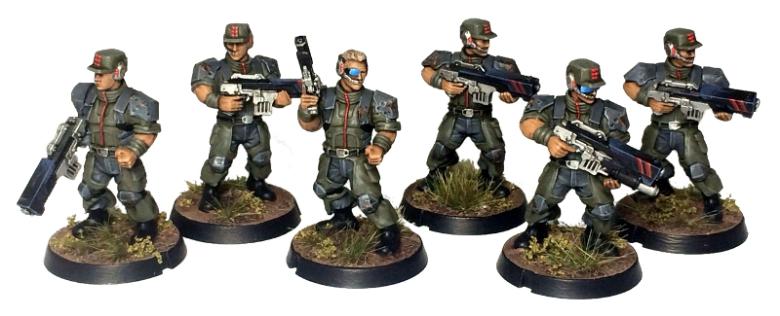
Most of our Epirian colour schemes use metallic plating on the shoulderpads, but to many people, the 'blocky' effect is a bit too much. This one from Golem painting, went with a much more muted colour scheme to great effect. We've got an entire army painted up in these colours and will share more pictures of them here on fridays.
Tags: contractors epirian models painted
Spotlight: Epirian Spider Drones
Posted on Monday Aug 29, 2016 at 05:00pm in The Epirian Foundation
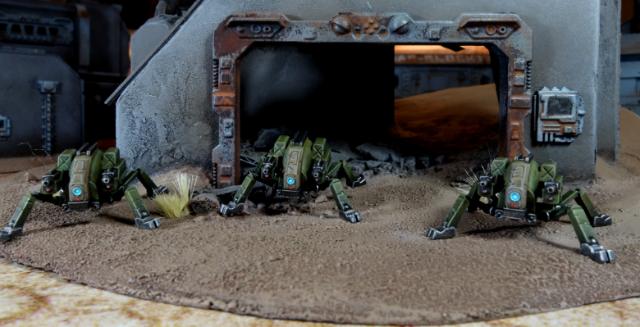
One of our most widely loved models, the Epirian Spider drones are fun little robots that are equipped with either a cutter light machine gun or a flakk gun.
Design
The origin of the design of these drones started with a desire for an 'animal sized' drone. We played around with a bunch of different options, with a crab-type robot being an early front runner. Debate amongst the team deemed it much more appropriate for the Epirians to have an all terrain drone that could fit in small spaces to help from a terraforming perspective. That role and specification evolved in to the spider drone.
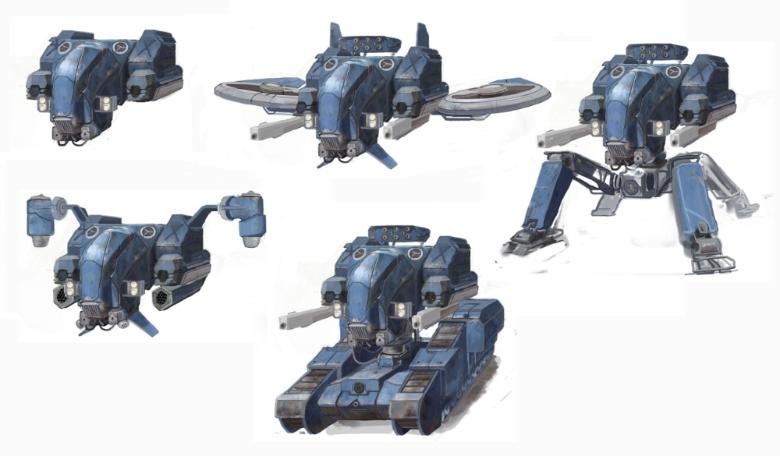
Early Concepts
We always wanted to create a common drone core that could be extended into different means of locomotion. Below, we share one of our early drone development concept images:
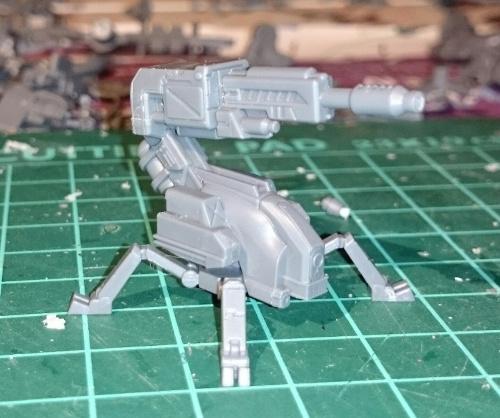
Conversions
The drones also convert very easily due to being a versatile plastic kit. We've seen a few variants - the 'grasshopper' drone which has both legs and turbines, and the 'scorpion' variant, pictured below:
You can check out more on the Spider Drones, as well as being able to order them, at the Maelstrom's Edge web site.
Tags: drones epirian models spiderdrones spotlight
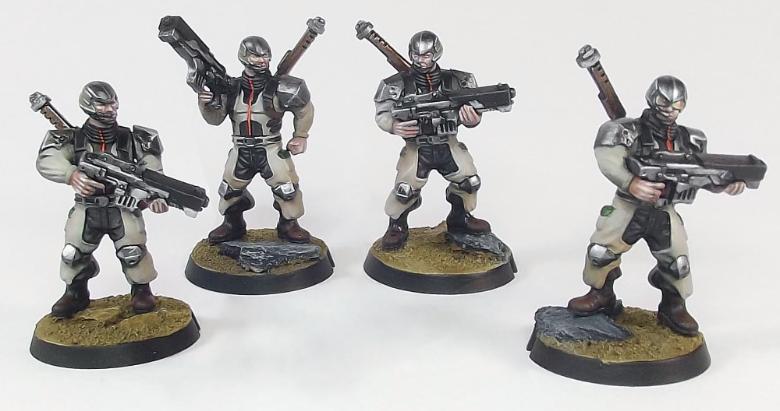
Friday Photo - Karist Troopers in a Red and White Colourscheme
Posted on Friday Aug 26, 2016 at 05:00pm in The Karist Enclave
Our friday posts here at the comm guild are photos of a model in a colour scheme that we might not have shared before (or much at least), an interesting conversion or whatever takes our fancy!
Today's inaugural post are these Karist troopers in a striking red and white colourscheme.
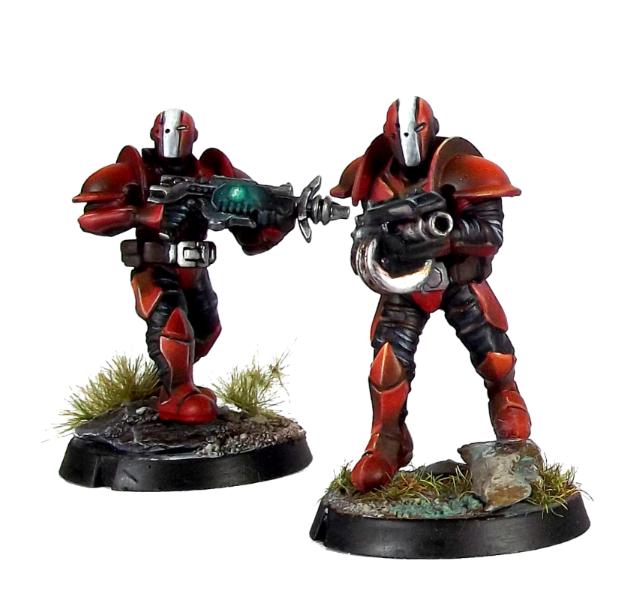
These troopers were painted by lil'legend studios, and are a colour scheme of their own invention. Red works so well on Karists, but changing the cybel glow on the weapon to that greenish-blue colour really makes them pop nicely. We actually have a full force of Karists painted up in these colours and will be sharing more photos of them over the coming months.
The Expansion Sprue in more Detail
Posted on Saturday Aug 20, 2016 at 05:00pm in Models
Wrapping up this week's expansion sprue content, we thought we'd list the sprues you need to make each unit.
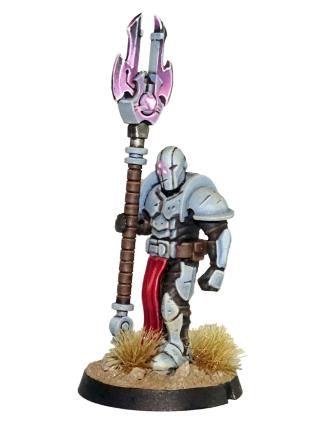
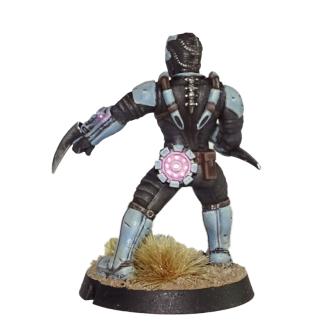
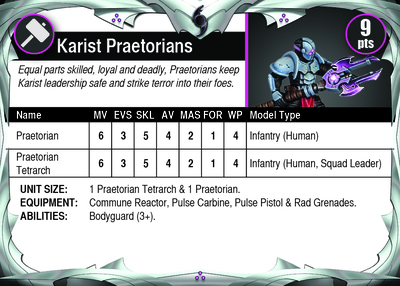
Karist Praetorians
Minimum requirements: 1x Karist Trooper Sprue, 1x Faction Expansion Sprue
Maximum requirements: 2x Karist Trooper Sprue, 3x Faction Expansion Sprue (the max 2 cybel glaives are on a single sprue, but for a larger size unit you'll need more loin cloths and, if so desired, 5 cybel blades)
Epirian Contractor Suppression Team
Minimum requirements: 1x Epirian Contractor Sprue, 1x Faction Expansion Sprue
Maximum requirements: 2x Epirian Contractor Sprue, 5x Faction Expansion Sprue (if you want the max 5 shock batons/mauls), 2x Epirian Scarecrow Sprue
Cybel Mine Equipped Shadow Walker

Minimum requirements: 1x Karist Shadow Walker Sprue, 1x Faction Expansion Sprue
Recommended requirements: 1x Karist Shadow Walker Sprue, 2x Faction Expansion Sprue (to also make a mine on a base token to represent mine deployment)
Customised Karist Troopers / Karist Assault Troopers
Recommended: 2x Karist Trooper Sprue, 1x Faction Expansion Sprue (for the variety of extra parts and poses)
Maximum requirements: 2x Karist Trooper Sprue, 3x Faction Expansion Sprue (for the max 5 cybel blades)
Remember, the faction expansion sprue is only discounted for 2 more days, so head over to the Maelstrom's Edge webstore and pick them up now if you have been waiting :)
Tags: epirian expansionsprue karist models
New Karist and Epirian Models!
Posted on Monday Aug 15, 2016 at 10:26pm in Models
It is with great pleasure that we can now offer the Faction Expansion Sprue for sale at the Maelstrom's Edge webstore.
The faction expansion sprue is needed to build the following new units:
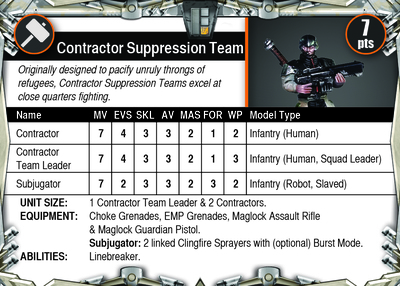
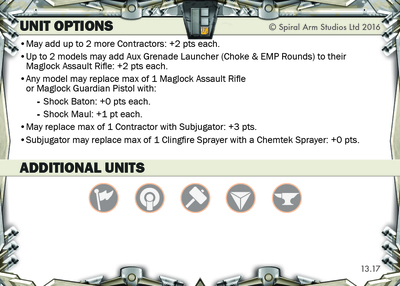
Epirian Contractor Suppression Teams
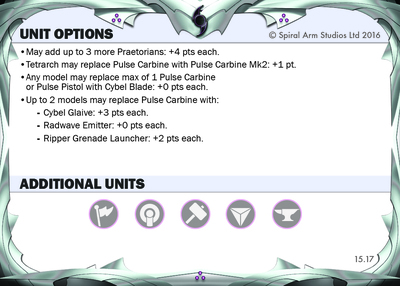
Karist Praetorians

and it adds new options for:
Karist Shadow Walkers (cybel mine)
Epirian Contractors (shock battons, as well as helmet and covered arm options)
Karist Troopers (cybel blades, new head)

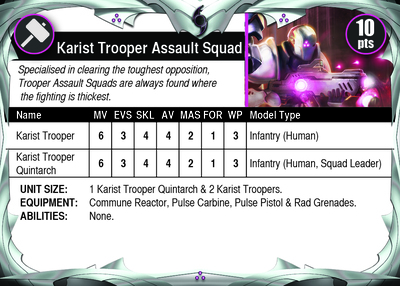
as well as Karist Trooper Assault Squads (cybel blades and extra weapons).
The faction expansion sprue contains the following components (in no particular order):
1x small knife (faction independent but generally more appropriate for Karists)
1x EMP grenade
1x Choke grenade
1x Cybel Charge
1x Rad Grenade
1x Swarmer Grenade
3x different Epirian helmeted heads (usable on contractors and contractor suppression teams)
1x Karist pistol without attached hand
2x Karist cybel blades
1x Epirian shock baton
3x Karist new hand poses (grip, hold, clench)
1x Epirian shock mace
2x Karist pulse carbines without attached hands
2x Karist grenade launchers without attached hands
2x Karist radwave emitters without attached hands
5x Epirian clothed left arms
5x Epirian clothed right arms
1x Cybel mine
1x Karist shouting bald head
1x Karist trooper pointing arm
3x Karist praetorian loincloths (keyed to leg poses on the Karist Trooper sprue)
2x Karist cybel glaives
As part of our launch promotion, the sprue is being sold at a discounted rate until the 22nd Aug. Right now it is just £2.33 / $3.33 per sprue for a limited time, and sold in packs of 3. On the 22nd the price will go up to the normal price, increasing by £1/$1 per sprue.
We'll be revealing more of the new unit options over the next few days. For now, here's an early look at the new unit cards for the Praetorians, Assault Squads and Contractor Suppression Teams:

Thanks for reading! For now and the immediate future, the expansion sprues are only available through the Maelstrom's Edge webstore, so feel free to head over and take a look.
Tags: epirian expansionsprue karist models
What Have Spiral Arm Studios Been Up To?
Posted on Monday Aug 15, 2016 at 12:10am in General
As many of you may have noticed, we've been a little bit quiet in terms of public content since we attended Salute 2016. A good chunk of the core team at Spiral Arm Studios was commissioned to work on some very interesting things in a business to business deal with a third party. While we would normally have refused so that we could keep strong focus on building Maelstrom's Edge, the bribery was simply too convincing, with the compensation enough to fully fund Maelstrom's Edge development at a greater pace through to the end of 2020, so we've suddenly got even more stuff in the pipeline! Gearing up for that extra production took a bit of time, but things are well under way now, and we'll be sharing a bit more of our in development work as time goes on so that everyone can see what they have to look forward to.
In addition to the above, JP, the guy who was working hard to build our community channels, got poached by another games company, and since this happened while our focus was elsewhere on the b2b stuff we did not have the capacity to immediately drop someone else into his place. He was doing a great job and had a lot of smart initiatives in place, and from his work we've now got a wider communication infrastructure in place (centred around this blog) ensuring that we can keep feeding out news and content on a regular basis, bringing in a wide range of content writers to keep things fresh and interesting. As always, we are very happy to share community generated content as well, and we'll be releasing some tools and information to help people dip their toes even further into the Maelstrom's Edge universe over the coming months.
We are celebrating the launch of this blog with the release of our next set of models. This coming week sees the release of the Maelstrom's Edge expansion sprue, as detailed a couple of months ago. This sprue is packed with parts to allow you to build Epirian Contractor Suppression Teams, Karist Praetorians equipped with Cybel Glaives, Cybel Mine equipped Shadow Walkers, Karist Trooper Assault Squads, and loads of new detailing elements like new arm poses, grenades, and more. Here's a sneak preview of the contents of the sprue, broken down by faction (Pink=Karist, Blue=Epirian):
Over this week and next, we'll be releasing loads of new content to support the expansion sprue. Including but not limited to, new unit cards (in digital form), new faction summary sheets, free army books for the Karists and Epirians detailing the new units and weaponry available to each, and plenty of new model photos.
The expansion sprue will go sale tomorrow - Aug 15th in an unspecified timezone, on the Maelstrom's Edge web store. For one week, we'll be offering it at a discounted price as a thank you to all of our loyal supporters, so make sure you grab your discounted sprue before the 22nd Aug! We'll then be bringing out bundles of sprues to allow individual units to be purchased with all necessary parts (The Epirian Contractor Suppression Team for instance needs an Epirian Contractor Sprue, 2-3 expansion sprues and 1-2 Scarecrow sprues!)
Exciting times for sure, and we thank you for being a part of it :)
Tags: epirian expansionsprue karist models