Entries tagged [modeling]
Modeling Spotlight: Karist Shadow Walkers
Posted on Monday Aug 20, 2018 at 06:00pm in Tutorials
- by Iain Wilson
I'm taking a little break from new releases this week to have a look back at another of the original release units - The Karist Shadow Walker!
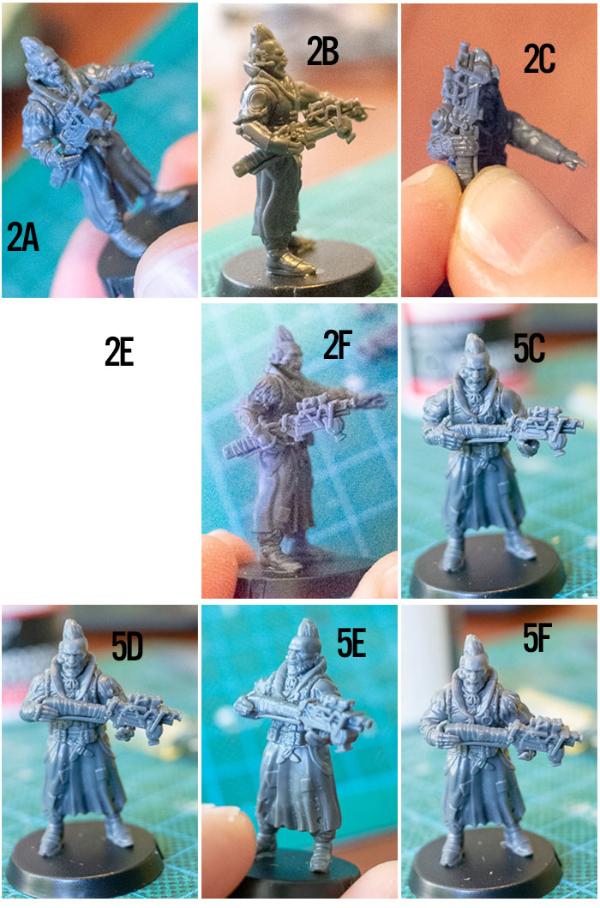
The Shadow Walker sprue contains two different torsos (twisted in different directions from the front) and two of each arm in different poses. This allows you to create two very different, dynamically posed models from those parts. You can find the general assembly guide on the Maelstrom's Edge website here.
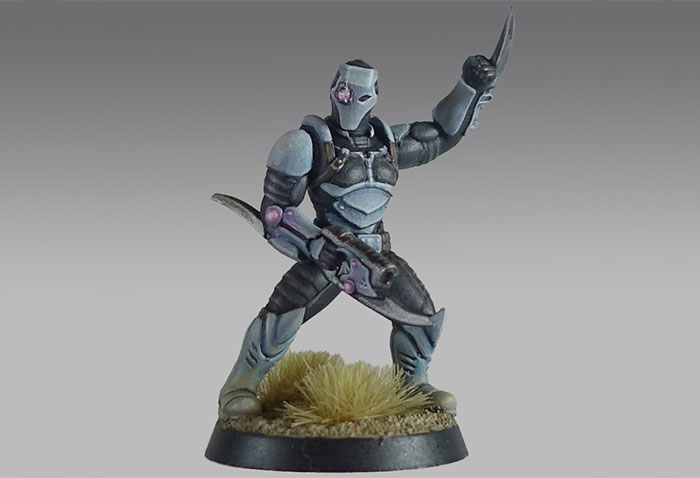
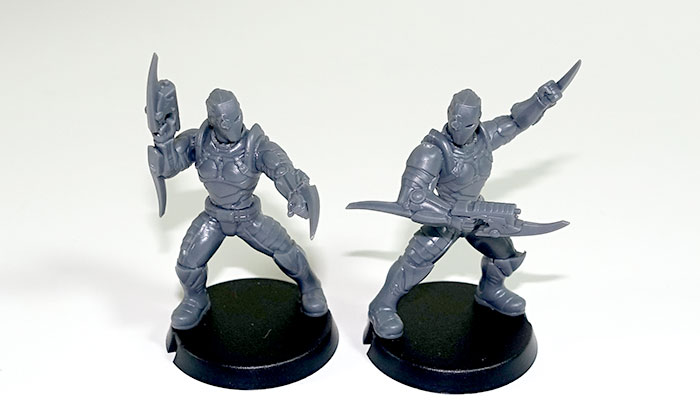
Somewhere along the design process, the sprue went from being intended to create a single model to including parts for two full models with the lack of only a second head. Luckily, several other Karist kits come with extra heads, so it's not too difficult to purloin a leftover in order to build that second Walker. The right hand model below uses the bare head from the Karist Trooper sprue, and there's another bare head available on the Faction Expansion Sprue.
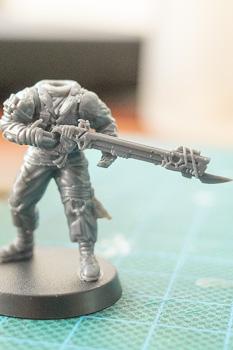
Alternatively, the resin Karist Heavy Weapons set comes with two troopers and three heads - two helmeted, and one bare. The helmeted heads are very similar in style to the Shadow Walker's, with a couple of extra eye lenses. The model below has also been reposed slightly, with the right arm extended and filled with 'green stuff' putty, and the right shin repositioned so that his front foot matches his line of fire.
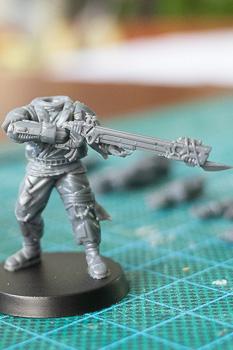
While we're reposing our models, it is really easy to add a little more motion to the pose by cutting off the bent leg just below the knee and reattaching it at a sharper angle and off the ground, to create a 'lunging' pose. The below Shadow Walker has clearly just Rifted in and is charging into the action:
Borrowing parts from different kits does, of course, work both ways. The Karist Praetorians below were given Shadow Walker legs to help them stand out a little from regular troopers and to create a more dynamic pose than is possible from the Trooper legs. The added loincloths are from the Faction Expansion sprue.
As I was working through these models, I found myself wondering what it would look like if Shadow Walkers had their own specialised mini-factions. From there, I wound up with the 'Shadow Dancer', carrying a regular cybel blade on place of the usual Shadow Walker's wrist-mounted version, and with an added prehensile, mechanical topknot which, I expect, would whip around as the Dancer flips and whirls about his opponents, and shoot out toxic darts or hallucinogenic gas from the emitter on its tip. The cybel blade was taken from the faction expansion sprue, and the topknot made from a piece of guitar string and the muzzle from a Karist radwave emitter.
By contrast, the 'Shadow Stalker' eschews close range combat where possible, opting instead to carry out his work from afar with his nox rifle. This model has an assault rifle arm taken from the new Broken Forsaken Tech Chieftain model with the bayonet and muzzle removed and a silencer made from a length of plastic tube attached. The head is the bare head option from the Karist Heavy Weapons pack.
I don't have a name for this next one yet (feel free to leave suggestions in the comments!) but how about a Shadow Walker sect that has found an alternative to teleporting? Using arcane science to fuse Angel DNA to the human form, this Shadow Walker variant is equipped with void-gel wings!
Of course, if you're going to have bizarre sub-sects of the Karist Walker breed, it wouldn't be too surprising to have a clandestine offshoot of the regular Kaddar priesthood overseeing them. And so the Kaddar Noctis was born - like the flying Walker above, this model fuses Human and Angel DNA, with the traditional Shadow Walker cybel blade replaced with an Angel's void-gel tentacles. The legs and torso are from the Kaddar Nova sprue, with most of the Cybel reactor removed and replaced with a modified cybel glaive head from the Faction Expansion sprue. Arms and head are from the Shadow Walker sprue, with the small tentacle parts taken from a pair of Mature Angel models.
To add some sneaky, pointed 'negotiation' to your own Karist Force, you can pick up the Shadow Walker along with the rest of the Maelstrom's Edge model range from the webstore here.
As always, feel free to pop along and share your work, or ask any Maelstrom's Edge- or hobby-related questions on the Comm Guild Facebook page!
For other Maelstrom's Edge modeling articles, including tutorials and walkthroughs of a wide range of different building and miniature projects, check out the article roundup here.
Tags: conversion converting karist modeling models spotlight
Modeling Spotlight: Converting Broken Chieftains
Posted on Monday Aug 06, 2018 at 06:00pm in Models
- by Iain Wilson
This week we released the second of our resin Forsaken Chieftain models for the Broken faction. These two models allow Chieftains to take a few extra options that weren't available from the plastic kit, and are a wonderfully characterful pair of models. However, since I find it physically painful* to assemble models the way they were intended to be built, I thought I would take this opportunity to slice a few of them into pieces and see what interesting conversion possibilities they opened up.
*May not be an actual medical condition, but why take the chance?
Built straight out of the package, the two models each come with a pair of weapon options. The 'regular' chieftain has a xeno spotter perched on his/her (it's deliberately ambiguous) raised right hand, and also has a two separate left forearms, one with a poisoned blade and the other with a trophy melee weapon. The 'tech' chieftain has two separate right arms, with a custom beam blastgun and a custom slug rifle.
You can easily double-up your command options by using the leftover weapons on plastic Broken Rabble bodies. On the below models, I equipped one with the leftover slug rifle by slicing off the locator peg and gluing it on in place of a regular plastic arm. The other has the leftover trophy weapon in place of the plastic forearm, which just requires cutting the lower arm off just below the elbow and gluing the weapon arm piece in its place.
Parts can also be mix-and-matched onto the resin Chieftain models to switch around the available options a little. On the below tech Chieftain model, I left off the resin right arm and equipped him with a plastic arm and beam pistol from the Rabble sprue, and cut off his left arm at the elbow and attached a trophy weapon from the other Chieftain model.
On the regular Chieftain below, I replaced the right forearm with a plastic one, and added a regular blastgun from the Rabble weapon sprue. I also cut off a plastic left forearm and added a grenade.
For a more action-posed Chieftain, I cut the legs off this one at the waist, using a razor saw. Then I glued on a pair of running legs from the Rabble sprue, added a slightly modified slug pistol hanging off the belt, and glued the xeno spotter on tilted just a little bit forwards.
Since I now had a pair of leftover Chieftain legs, I did the obvious thing and glued them to a Karist heavy weapon trooper torso I had left over from a previous conversion. This Chieftain has the right arm with custom beam blastgun from the tech Chieftain, and a left arm and alien head from the Rabble sprue.
Mixing things up a little more, I added a xeno spotter and trophy weapon to a Broken Sig Jammer body, to create a less ostentatious Chieftain model. A head and left hand from the Rabble sprue finished the conversion off nicely.
And finally, a Chieftain equipped with a trophy weapon from a more civilised age, which is apparently less clumsy and random than a blaster. The laser sword is made from an overcharged powercell from the Rabble sprue, with a cut-down blade stolen from a Star Wars figurine. I also cut the left arm off, carefully cutting around the cape so that a plastic arm would fit in neatly underneath it. This Chieftain will no doubt take to the battlefield and display his displeasure at the lack of faith shown by his underlings...
Hopefully, that's inspired you to have some fun with your own Chieftains. You can pick up the resin Chieftain models, the plastic Broken Rabble sprues, or any of the rest of the Maelstrom's Edge model range, from the webstore here.
As always, feel free to pop along and share your work, or ask any Maelstrom's Edge- or hobby-related questions on the Comm Guild Facebook page!
For other Maelstrom's Edge modeling articles, including tutorials and walkthroughs of a wide range of different building and miniature projects, check out the article roundup here.
Tags: broken chieftains conversion modeling models spotlight
Terrain Spotlight: Cardboard Tube Storage Tank
Posted on Monday Jul 30, 2018 at 05:00pm in Tutorials
- by Iain Wilson
It's been a few weeks since I built any terrain and I'm starting to feel withdrawal symptoms, so this week I have busted out the foamcore and terrain sprues, raided the recycling bin, and built a quick little storage tank for my newly assembled elite Epirian SecDef units to hide behind.
The main body of the tank is made from a small Pringles can. This of course requires you to remove the Pringles from said can, which my wife was happy to take care of for me. If you don't know anyone willing to make this sacrifice for you, you could use any other appropriately-sized tube. For the tank on my plantation dome, I used a metal tin. You could also use soft drink cans, cardboard postal tubes, or even roll your own out of cardboard or plastic sheet.
I used foamcore for the end supports. For the uninitiated, foamcore (also sometimes called foamboard) is a craft board that is comprised of a thin sheet of expanded polystyrene foam sandwiched between two sheets of stiff paper or thin card. Because it's lightweight but fairly strong, it's a fantastic material for building terrain.
I marked out the shapes that I wanted on the foamcore with a pencil, and then cut them out using a sharp hobby knife and a steel ruler.
As I wanted a worn concrete look for the ends, I used the hobby knife to roughly shave away the edges along the top and sides, and then used fine sandpaper to smooth the cut edges of the paper down.
For the access port on the top of the tank, I took the square hatch and corner reinforcing from the Maelstrom's Edge terrain sprue and cut a piece of plasticard sheet to an appropriate size to fit them all on it with a little room to spare for visual effect.
I then cut four strips to run around the outside of the top plate. To replicate the curve of the tank for the two strips that would run across it, I positioned the bottom of the Pringles can on the plasticard lined up with the bottom corners of the strip and traced around it with a pencil, and then cut along the resultant arc with my hobby knife. Because the bottom aluminium strip on the can is slightly larger in diameter than the actual can, this doesn't create a perfect fit, but it gets it close enough that you can sit it in place to see where it needs a little shaving with the knife to sit flush.
The strips were glued in place with plastic cement, and when that was set I flipped the construction over and glued the terrain sprue components in place as well.
To add a little detail to the outsides of the tank ends, I cut some sections off the long support struts on the terrain sprue, and also assembled a little computer terminal by trimming down the comm panel and cutting a piece off the end of the lintel piece.
One end got two of the support strut pieces, and the other end another two strut pieces, the computer terminal and a small pipe fitting, all glued in place with superglue.
I then glued the foamcore pieces onto the ends of the tube with superglue. One end of the tube is rolled cardboard, which glues just fine to the foamcore. For the tube's aliminium end, I gave the superglue a little extra help with a primer from an 'all plastics' two-part superglue.
A little more superglue was used to stick the access port in place on top.
The final step before painting was to paint the exposed foam on the foamcore sections with PVA glue. This protects the foam when the base coat is sprayed on, as most spraypaints will partially eat the foam. If you're painting with a brush, or with a specific foam-friendly spray, this step is unnecessary.
I basecoated the whole tank with a Rustoleum quick-drying grey primer to get a consistent base for painting over, and then hit the tank itself with a spray of Army Painter Dragon Red.
I could have saved some repainting here by masking off the ends to avoid overspray from the red, but it didn't really seem worth the bother. I just used a large, flat brush to add another coat of grey (in this case Vallejo Neutral Grey) over the end pieces, added some weathering to the red using a sponge and some Vallejo Heavy Charcoal (you can find my tutorial on sponge weathering here) and added a layer of Vallejo Beasty Brown over the terrain sprue components.
To create a nice concrete look, I drybrushed over the end pieces with Vallejo Light Grey, and then added a highlight with a lighter drybrush of P3 Morrow White. The brown components received a heavy drybrush of Citadel Boltgun Metal (now called 'Leadbelcher', but I'm still working through a lot of old paint!)
Next up, I gave all of the metal parts a generous wash of Army Painter Strong Tone, and put it aside to dry.
While the wash was doing its thing, I cut an 8"x8" square of masonite, sprayed it with a coat of grey primer, and drybrushed with the Light Grey and some white. I also marked out a square in front of where the pipe fitting would sit on the end of the tank, and painted in some hazard stripes. (If you are interesed, you can find a tutorial on painting hazard stripes here.) Then I glued the tank in place using some superglue on the bottoms of the end pieces (this was fine as I had included the underside edges when I painted the exposed foam with PVA glue. Don't put superglue directly onto expanded polystyene - it doesn't end well) and added some patches of drybrushed Beasty Brown to dirty everything up. Which left the tank looking like this:
To build your own storage tank, you can pick up the Maelstrom's Edge terrain sprue, or any of the rest of the Maelstrom's Edge model range, from the webstore here.
As always, feel free to pop along and share your work, or ask any Maelstrom's Edge- or hobby-related questions on the Comm Guild Facebook page!
For other Maelstrom's Edge modeling articles, including tutorials and walkthroughs of a wide range of different building and miniature projects, check out the article roundup here.
Tags: buildings modeling painting spotlight terrain terrainsprue walkthrough
Modeling Spotlight: 120-point Epirian SecDef Force
Posted on Monday Jul 16, 2018 at 05:00pm in Models
- by Iain Wilson
With this week's article, I'm continuing the SecDef love because, well, they're awesome!
As nice as it is to include some elite supertroops in amongst the Epirian bots and contractors, I thought it would be fun to build an entire SecDef force. Obviously, with only a single Hammer option currently in the official rules, this required a bit of creativity, but two mocked-up new unit cards and a bunch of sprues later, my first 120 points were assembled and ready for painting.
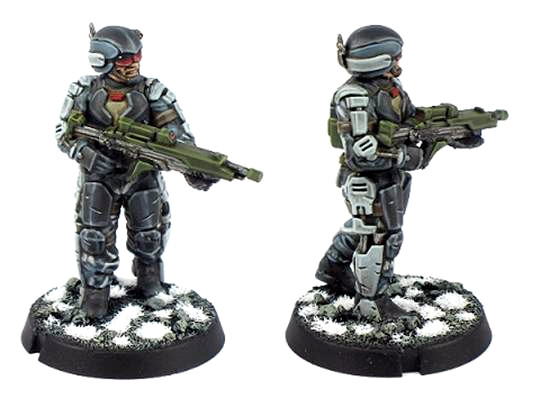
To build even a bare-bones force within the army selection rules for Maelstrom's Edge, a Command unit is required. While there will no-doubt be a SecDef officer option released down the track, I'm far too impatient to wait for that, so I ran up an unofficial unit card for a lower-level officer, a Lieutenant, to command smaller SecDef strike forces. The aim was to create a commander on about the same level as the Journeyman Bot Handler, and one that could be built from existing parts with minimal conversion required. So I took a bare bones SecDef trooper built from the sprue, on the assumption that SecDef field officers would likely look little different to their troops, and just swapped his rifle for a pair of pistols taken from the Contractor sprue.
To allow for a viable force, the Lieutenant has the 'SecDef Commander' rule, which allows him to take up to two SecDef Tactical Teams as Core choices instead of in their usual Hammer slots. In the interests of fielding as many big guns as possible (because the SecDef heavy weapons look cool) I choose to give each of the Core teams two LM14 Machine Guns, and added two extra warm bodies to each to bring them up to full strength.
The models throughout the force are assembled largely straight off the sprue with minimal conversion. I switched around some of the leg pairs (as explained in last week's Modeling Spotlight) and changed around the left hands on the unit Sergeants to add some variety to their poses without having them all holding their rifles twp-handed like their troops, to help them stand out a little.
With the two available Core options filled, I decided to include a sniper unit in the Hammer slot (because why wouldn't you?). To keep them extra sneaky and to stay within my chosen 120 points, I went with the base unit of three, and gave the two troopers each a sniper rifle.
There was clearly not enough firepower on the table here yet, which called for some Chainguns! Rather than fill up my last remaining Hammer slot for the detachment, I made use of the Tactical Team rule that causes teams equipped with two CG100 Chainguns to become Anvil selections, and built up two five-man units accordingly.
To round out the detachment, I liked the idea of a SecDef force having access to a light vehicle that would serve as an advance scout, and potentially as a beacon to guide in teams arriving by Aerial Insertion. After some searching online, I found the Heron Light Battlewalker, a resin kit from Hexy-Shop. This is a small walker with an enclosed cockpit but a detailed interior, which allowed me to cut away the roof and part of the sides to create an open cockpit.
I replaced the Heron's original weapons with a pair of CG100 Chainguns glued together side-by-side, and added a driver by cutting up a pair of SecDef legs, re-assembling them in place in the seat and then filling in the resulting gaps with 'green stuff' putty.
There were no controls in the Heron's cockpit other than a screen down between the driver's feet, so I added a control loom made from a leftover resin piece and the pistol grip from a SecDef assault rifle. I also added some roll bars on the sides of the cockpit (these pieces normally go on the platform on the rear of the Heron), but these are only sticky-tacked in place so I can take them off for painting - this should make it easier to get into the nooks and crannies in the cockpit.
The final touch was to shorten the legs slightly, as the Heron turned out to be a bit taller than I had expected and wanted it to be. This was done by cutting out the lowest section of the legs and reattaching the legs to the ankle ball-joint.
All up, with an 11-point Lieutenant and 12-point walker, the above force comes in at 119 points - perfect for getting started, and ready to be taken as a detachment in a larger Epirian force or fleshed out later if and when more SecDef units are added to the roster. If you would like to build something similar, you can find the unit cards for the Lieutenant and the walker in the Force Builder section of the Maelstrom's Edge website here.
Next week - Painting!
To start assembling your own SecDef force, you can pick up the Secdef sprue, or any of the rest of the Maelstrom's Edge model range, from the webstore here.
As always, feel free to pop along and share your work, or ask any Maelstrom's Edge- or hobby-related questions on the Comm Guild Facebook page!
For other Maelstrom's Edge modeling articles, including tutorials and walkthroughs of a wide range of different building and miniature projects, check out the article roundup here.
Modeling Spotlight: Epirian Secdef
Posted on Monday Jul 09, 2018 at 05:00pm in Tutorials
- by Iain Wilson
Last week saw the release of the awesome new plastic Secdef to bolster the Epirian battleline with some elite military muscle. If you missed it, you can see the release article here: https://www.facebook.com/maelstromsedge/posts/2244261785589396, and you can also find an assembly guide here: http://www.thecommguild.com/roller/thecommguild/entry/assembly-guide-epirian-secdef.
This week, I'd like to go through some quick and easy modeling ideas to tweak your models. Novice modelers, fear not - nothing here requires extensive conversion experience or special tools!
To (ahem) kick things off, you may have noticed in the assembly guide that the sprue comes with 3 sets of legs - one in a walking pose, and two slightly different standing poses.
The left and right legs from each pair have matching locator pins to help them go together neatly, and these are different sizes for each pair to help you keep them sorted during assembly. You can easily mix-and-match the pairs to create some variation in the posing, though - the smaller pins will fit into the larger locator slots, and for pairings where the locator pins don't fit in you can just cut them off with a sharp hobby knife and glue the hips together without them.
One of the ongoing design goals for the Maelstrom's Edge range has been for the various kits to be compatible wherever possible to enable parts swaps. This is particularly useful for increasing the pool of available heads for any unit, and the open-hand design that has been adopted for weapon arms likewise adds extra options for switching gear around. On the below models, some slightly more hi-tech than usual Contractors have been made by using Contractor heads and weapons on the Secdef bodies.
You can also use heads from the Broken Infantry sprue to add unhelmeted human heads or aliens to your Secdef's ranks.
For an enclosed helmet option, you can use a spare head from the Epirian Bot Handler sprue.
The left arm on the above model has also been modified, removing the pointing hand at the wrist and replacing it with one of the open-palm left hands that normally hold the Secdef heavy guns. The heavy weapon arms are also useful for putting on Sergeants to show tactical hand signals.
Secdef troopers are equipped with a G20 pistol along with their assault rifles, although this isn't included on the sprue. As with other pistol and grenade options that come as standard on various units, there's no specific need, rules-wise, to show these. If you do want to show the pistol, though, the G20 is a variant of the standard Epirian Guardian pistol, so you can use the pistols included on the Contractor sprue to represent them, as has been done on the 'Lieutenant' model below.
(Lieutenants aren't an official unit option currently, although a HQ unit for the Secdef is in the pipeline. I'll be working up an unofficial rules card for this guy to go in the Online Force Builder for those who might want to try out an all-Secdef force.)
Finally for this week - While the designs are slightly different, the strength-boosting exoskeleton makes Secdef legs similar enough to the legs of the Master Bot Handler that you can make a walking Master Handler by simply swapping in the Secdef legs for the normal Master Handler legs, as below. I couldn't resist also taking the opportunity to replace this Master Handler's usual weapons with a modified pair of CG100 Chainguns taken from the Secdef sprue.
What have you done with your Secdef troopers? We would love to see your creations on the Comm Guild Facebook page!
To pick up the Secdef sprue, or any of the rest of the Maelstrom's Edge model range, visit the webstore here.
For other Maelstrom's Edge modeling articles, including tutorials and walkthroughs of a wide range of different building and miniature projects, check out the article roundup here.
Tags: conversion epirian modeling secdef spotlight
Assembly Guide - Epirian Secdef
Posted on Wednesday Jul 04, 2018 at 05:00pm in Tutorials
We are very proud to announce the immediate availability of our latest plastics - the Epirian SecDef. These guys have exo-augmented armour, allowing them to be a much more powerful and effective fighting force than their contractor allies.
Available now at https://www.maelstromsedge.com/store/41/3x%20Epirian%20Secdef%20Infantry, along with details of their history and background.
Below, you can find instructions for assembling these great new models!
Assembling Epirian Secdef
General Notes
Polystyrene cement - only use superglue if you want to go insane! All of our models are designed to be assembled with polystyrene cement as it gives some time to re-pose while gluing, fuses the models together and prevents brittle joins like other glues do. Make sure you have polystyrene cement in your toolkit before you begin!
We want you to experiment! We've broken our models up into lots of parts and given a fair few spare parts so that you can push yourself out of your comfort zone, learn new skills and create some really unique models. We've tried to price things so that it won't break the bank if you make a mistake, so please cut stuff up and have some fun. Start simple with a slice here and a re-pose there, and watch your confidence and skills increase until you are a master modeler!
Basing - Always make sure you glue your model to its base with an eye on the arc markers on the sides of the base. The arc marker indents should be at the halfway point between the front and back of the model to show the front and back halves of the model when gaming. See the Maelstrom's Edge rulebook for more detailed notes on this.
Dry fit before gluing! - There are lots of pose options possible, but that means there is also the freedom to screw up and make some bad poses! Sticking the parts together and seeing how things look will usually lead to a model that is fairly static and repetitive. You should consider knee, hip, torso, and arm positions when gluing and ensure that you have a pose in mind before you start gluing things together. If in doubt or insecure about your talents in the posing area, we recommend you try to copy the poses from some of our studio models found here in the gallery.
Epirian Secdef Assembly Notes
Three Secdef models can be made from one sprue. The sprue includes the following weapons: 2 x AR60 Assault Rifle, 1 x SR40 Sniper Rifle, 1 x CG100 Chaingun and 1 x LM14 Machine Gun.
Legs have three different poses and are paired, left and right, with differently-sized locator pins to keep them straight. Leg 5 goes with leg 7, 8 with 4 and 6 with 9.
The three torsos have two different designs (two with chest pouches and a backpack, one without), but the chestplate is identical for each, and any of the three torsos fit with any of the legs.
There are five 'sets' of arms, including two that have right hands with fingers together, and three with the fingers more splayed and the trigger finger separate. The closed-finger version works best for the Machine Gun or Chaingun, while the more open fingers work best for the Assault Rifles or Sniper Rifle. These are more-or-less matched with the extended left arms for the rifles and the left arms with more bent elbows for the heavier weapons. The pointing left arm obviously works with whichever right arm you choose, although there is one rifle arm that has the weapon held out to the side rather than across the body.
There are two small parts labelled as part 24 on the sprue. These are optional, and can be glued in between the belt and the heavier weapons as a support strut.
Finally, the three heads all fit with either of the two torso variants.
For some more ideas for building your Secdef models or to share your own creations, head on over to the Comm Guild Facebook page.
You can pick up the Secdef sprue, and the rest of the Maelstrom's Edge miniature range, from the webstore here.
For other Maelstrom's Edge modeling articles, including tutorials and walkthroughs of a wide range of different building and miniature projects, check out the article roundup here.
Terrain Spotlight: Sci-Fi Temple
Posted on Monday Jun 18, 2018 at 03:05pm in Tutorials
- by Iain Wilson
This week, I'm showcasing another terrain build, but for a change of pace I thought it would be fun to build something in a more unusual style.
I've been eyeing off the Japanese building range from Plast Craft Games for some time, and in particular a three-level temple that was just screaming to be turned into a table centrepiece. So I grabbed the temple from one of my regular go-to online stores, broke out some Maelstrom's Edge terrain sprues, and set to work!
The Plast Craft Games buildings are flat-packed, assemble-yourself-style constructs in a similar vein to the various MDF offerings out there, except that instead of MDF they're made from sheets of die-cut, foamed PVC. This material is somewhere in between styrofoam and plasticard in density, and is nice and easy to work with and surprisingly sturdy once assembled.
My plan was to not get too crazy with modifying the building, as I love the general design of it. It just needed some sci-fi-ing up to fit on my table. So with that in mind, I discarded the resin screen doors that come with the kit in favour of the single doors from the Maelstrom's Edge terrain sprue. The existing doorways on the temple were exactly the right height for the plastic doorframe, but a little wider, so I filled in the gaps on either side with strips of scrap sheet cut to size. Other than that, the bottom level was assembled as per the instructions.
Similar treatment was given to the second level, although this level only has doors in two walls instead of all four.
The top level has a smaller doorway in a single wall. Rather than cut out the door hole to fit another full-sized doorframe in there, I filled in the doorway with some leftover sheet bits and glued on the square hatch from the terrain sprue. I also replaced the spire on the roof peak with another square hatch.
The railings that came with the temple were a little low, and a little low-tech for my liking, so I replaced them with ladders from the terrain sprue. This required some fudging to make it work, as I discovered when I started gathering ladders that I had run out. Luckily, I was able to cobble together a few discarded cut sections to fill the last of the railing on the second level. It's a little rough if you look too closely, but I can always pass it off as a rushed repair job (those lowest-bid contractors at work!).
I wanted to do the bulk of the painting before adding the roof sections, as I figured that would be easier than trying to work around them. So the building was given a basecoat with black spray, and then a top-down spray with grey, leaving the black in the lower recesses for natural shading.
I then picked out all the metal parts with Citadel Leadbelcher, before giving them a wash with Army Painter Dark Tone.
The balcony levels were painted with Vallejo Neutral Grey and drybrushed with Vallejo Light Grey, and the wall panels were basecoated with Vallejo Heavy Brown and drybrushed with P3 Jack Bone. At which point, it was time to add the roof sections.
I'm not sure if it was my slightly rushed assembly, or a flaw in the temple kit, but I found that the roof sections for the two lower levels were actually too short to reach the corner beams. Luckily, I had some corrugated cardboard that matched the card used for the roof almost exactly. Cut to size and with tile-grooves added by 'scoring' across the corrugations lightly with a sculpting tool, they were a close enough match to hold up to all but the closest scrutiny.
My improvised roof sections were painted black before gluing in place, and then all of the roof pieces were drybrushed with Leadbelcher and washed with Dark Tone. Finally, I picked out the lights above the doors with a drybrush of Citadel Ultramarine Blue, Ice Blue and then white, and added a masonite base sprayed with grey and white for a quick concrete effect. If I have time later, I may go back and replace this with a tiled slab to pretty things up some more.
The finished building:
To pick up the Maelstrom's Edge terrain sprue, or any of the rest of the Maelstrom's Edge model range, visit the webstore here.
For other Maelstrom's Edge modeling articles, including tutorials and walkthroughs of a wide range of different building and miniature projects, check out the article roundup here, or for help or advice, or just to share your work, feel free to visit the Comm Guild Facebook page!
Tags: buildings modeling spotlight terrain terrainsprue walkthrough
Terrain Spotlight: Cardboard Gift Box Ruin
Posted on Monday Jun 11, 2018 at 05:00pm in Tutorials
- by Iain Wilson
If you've been following my hobby articles for any length of time, you may have noticed that I'm rather fond of using cardboard gift boxes to make buildings (If you're new here, you can see examples here, here, or here). But while intact buildings are all well and good, a balanced battlefield should include a mix of line of sight blocking terrain and area terrain, and so this week I'm breaking out the old gift boxes and the Maelstrom's Edge terrain sprue for some good, old-fashioned ruins.
The structure for this build comes from two cardboard gift boxes, bought from a local discount store.
The lids were flipped over to create a walled roof, and I removed a corner of the smaller box with a sharp hobby knife so that it nestled in neatly against the larger box.
I used a door and a shutter window from the terrain sprue to mark out positions for doors and windows, by sitting them in place and tracing around them with a pencil.
Then I used the hobby knife to cut the door and window holes out, and marked out a rough plan for the building damage - the line around the building shows where the walls would be cut down, leaving more raised areas on corners, where the structure would be stronger.
The hobby knife was put to use again, as I cut along the ruin line all the way around the building.
Once done, the cardboard structure went together like this:
As a handy side-effect, the pieces removed from the tops of the walls can be saved and used to create other ruins later...
Because the ruin line wound up around the bottom of all of the window frames, I just left them bare. For the doorways, though, I chopped the door panel out from the surrounding doorframe, and cut the frame into shorter pieces to match the height of the ruined walls.
The doorframe pieces were then glued in place, and I also added some support struts on the corners of the walls, also suitably cut down to height and with the cut ends messed up a little with some clippers to simulate explosive damage. With these all in place, I glued the whole building structure to a base board of masonite.
If you're just after a quick and easy ruin, this is the point where you can call the job a good'un and go and slap some paint onto it. For some extra detailing, though, I chose to glue some chopped up card from the gift boxes and some leftovers from the cut terrain sprue bits around the building, and then using a generous amount of PVA glue added some gravel and sand.
After leaving the glue to dry, it was time for paint!
I started with a basecoat of grey spray, and then a light spray with white around the walls and the bigger rubble patches.
The exposed sections of the baseboard and the building floors was then re-based in Vallejo Neutral Grey, and then drybrushed with Vallejo Light Grey.
Everything was then dirtied up with some Neutral Grey sponge-weathering and spots of drybrushed Vallejo Beasty Brown.
I added a couple of extra details for colour - the number on the roof railing by dabbing through a number stencil with a large brush and some red paint, and a little graffiti on the back wall painted with yellow and some blue ink straight over the grey wall to give it a faded appearance.
The final step was a quick blast of black spray into the interior of the building to create some contrast.
And that's it - one ruin, ready for the table!
If you're keen to try this for yourself, you can pick up the giftboxes from gift stores all over the place, or online with a quick Google search, and the Maelstrom's Edge terrain sprue along with the rest of the Maelstrom's Edge model range from the webstore here.
For other Maelstrom's Edge modeling articles, including tutorials and walkthroughs of a wide range of different building and miniature projects, check out the article roundup here, or for help or advice, or just to share your work, feel free to visit the Comm Guild Facebook page!
Tags: building modeling spotlight terrain terrainsprue tutorial walkthrough
Modeling Spotlight: Converted Gnolti Longhorn
Posted on Monday Jun 04, 2018 at 05:00pm in Tutorials
- by Iain Wilson
Slow to anger, but difficult to put down once roused, Gnolti form an implacable, craggy backbone of the Broken forces. As awesome as a regular Gnotli is, I thought it might be interesting to explore the different ways that being forced into warfare might affect different Gnolti. I thought it might be likely that younger, more headstrong Gnolti would be more ready to turn to anger, while older, experienced veterans would be more prone to careful consideration and strategy. With the seeds planted, I grabbed some putty and a few extra bits and pieces, and the Gnolti Longhorn was born!
Obviously, the core of this model is the fantastic, resin Gnolti model.
To make him stand out a little, I wanted some suitably scavenged-looking armour, although this would be more for decoration than anything, given the Gnolti's craggy hide. So I grabbed the front half of an Epirian Hunter Mech torso and removed the lower section.
With some battle damage and careful trimming added with a hobby knife, the torso front fit nicely on over the right shoulder.
To create the eponymous 'longhorns', I drilled into the ends of the horns, and glued in some curled lengths of steel wire.
I reshaped the locator pin on the bottom of the torso a little so that I could twist the torso slightly to the side. Then I heated the right leg in hot water and bent back slightly, allowing the legs to be posed on a low piece of rubble.
The Longhorn was going to lack the shield generators worn by regular Gnolti, but removing the forearm shields completely would have required considerable resculpting of the arms, so instead I removed all of the tech details and added a bunch of battle damage, turning them into ordinary, garden variety bracers.
To allow the left arm to be angled closer in to the torso to rest it on the left knee, I hollowed out the elbow joint with a hobby knife, and slightly reshaped the elbow end of the upper arm.
At this point, it was time to break out the putty. The horns received an initial bulking-out layer.
Once this was set, I added additional putty and smoothed it into the horn shape, and then added striations to match the existing horn sections using a silicon clay shaper.
Rather than worrying too much about getting the horns identical lengths, I made one shorter and squared off the end, to make it look like it had been broken off.
The right hand needed repositioning to hold the gun properly, so I sliced through the wrist with a razor saw, and reattached it at a better angle. The gun itself was borrowed from a Mantic Veer-min Nightmare, with some grips added from plastic tube. I'm picturing this as a Chem Cannon, but haven't fully settled on rules yet.
After final assembly and some minor gap-filling here and there, the Longhorn looked something like this:
Painting was very similar to my previous Gnolti conversion, although I went for a slightly more stark highlight on the scales and a white/grey beard to help convey his veteran status.
The skin is Citadel Liche Purple, drybrushed with P3 Jack Bone and then washed with Army Painter Purple Tone. Scales were painted with Vallejo Neutral Grey, washed with Army Painter Dark Tone and then given a careful drybrush of white.
The harness, cloth and leather armour plates were painted with various shades of brown and washed with Army Painter Strong Tone, and the metal armour was painted with Vallejo Beasty Brown, drybrushed with P3 Pig Iron, washed with Strong Tone and then given a drybrush of Army Painter silver. The darker tone on the weapon was from a black basecoat, a heavy drybrush of Pig Iron and then two coats of Dark Tone.
With basing in my standard Urban theme, Grampa Gnolti was ready for the table.
The other end of the spectrum is, of course, the young, impetuous (relatively speaking) Gnolti. Stay tuned!
What have you done with your Gnolti? We would love to see your creations on the Comm Guild Facebook page!
To pick up the Gnolti kit, or any of the rest of the Maelstrom's Edge model range, visit the webstore here.
For other Maelstrom's Edge modeling articles, including tutorials and walkthroughs of a wide range of different building and miniature projects, check out the article roundup here.
Tags: broken conversion gnolti modeling spotlight tutorial walkthrough
Broken infantry sprue: which arms fit which weapons?
Posted on Wednesday May 30, 2018 at 05:00pm in Tutorials
Originally posted on Dakkadakka by Sgt.Oddball.
Hi all,
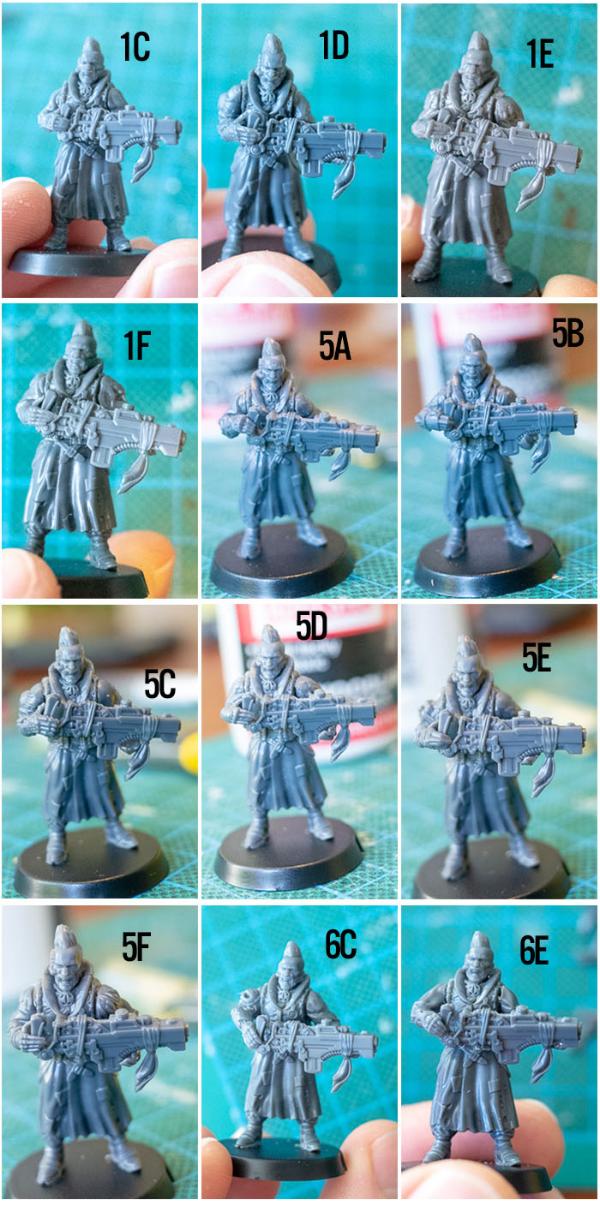
The Broken Infantry sprues have a total of 13 different weapons (not counting grenades) and 36 different pairs of arms. I thought it would be convenient to know which arms fit which weapons.
Scientific testing was set up:
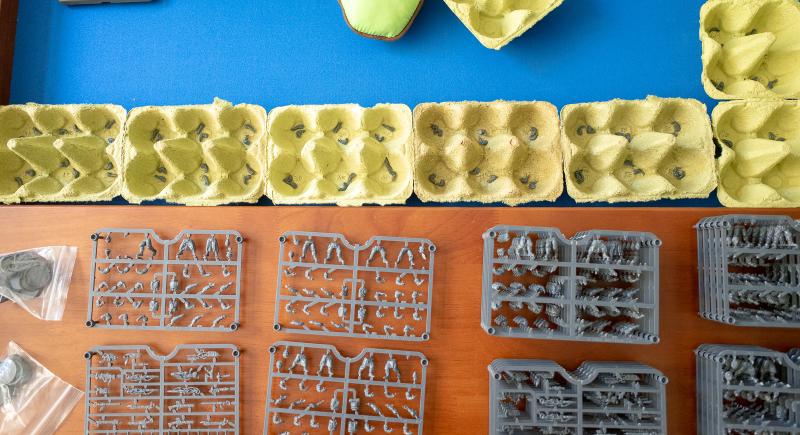
Egg crates full of arms.
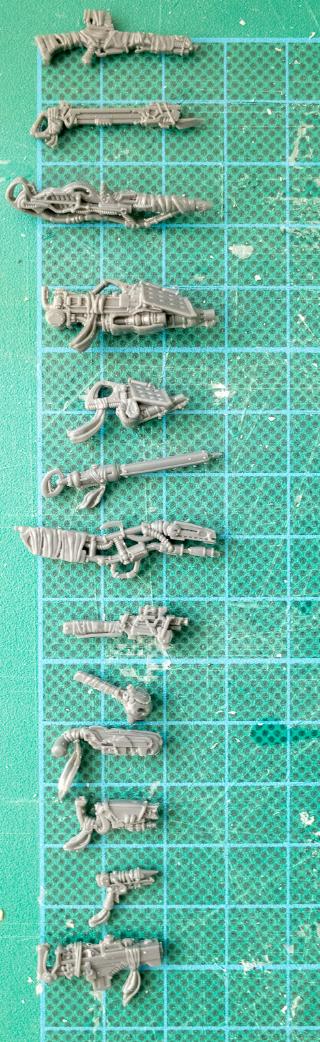
Weapons to be tested (from top to bottom, name/part: slug rifle/w0, beam blastgun/w1, longbeam rifle/w3, massive torch/w4, torch/w5, EMP Harpoon/w6, Glue Rifle/w7, Slug Pistol/w13, Chem Pistol/w14, Chem Launcher/w16, Glue Carbine/w17, Beam Pistol/w18, Auto Slugger/w29.
Before relaying the results, a disclaimer:
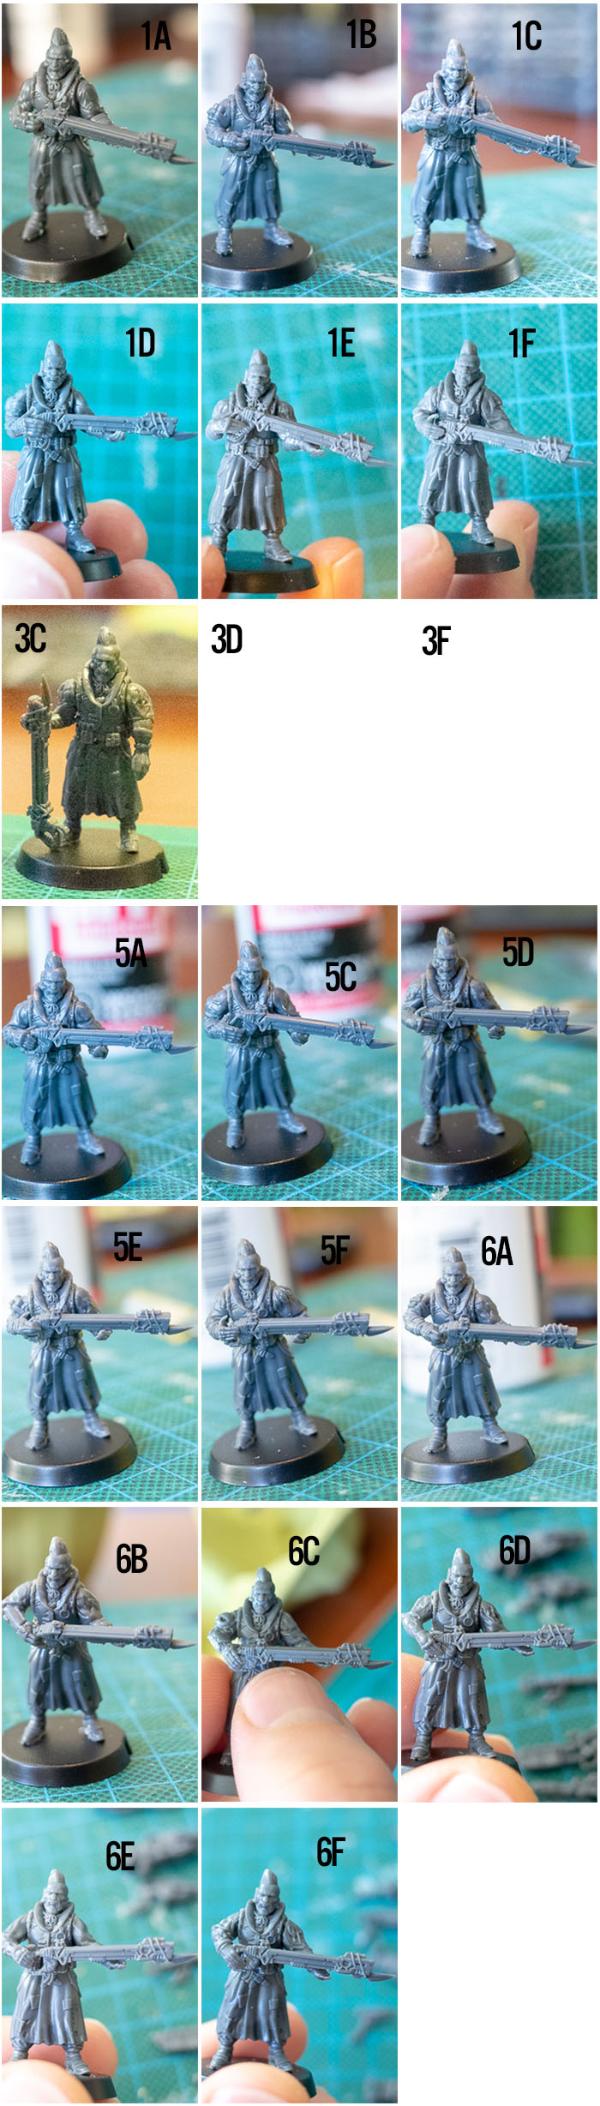
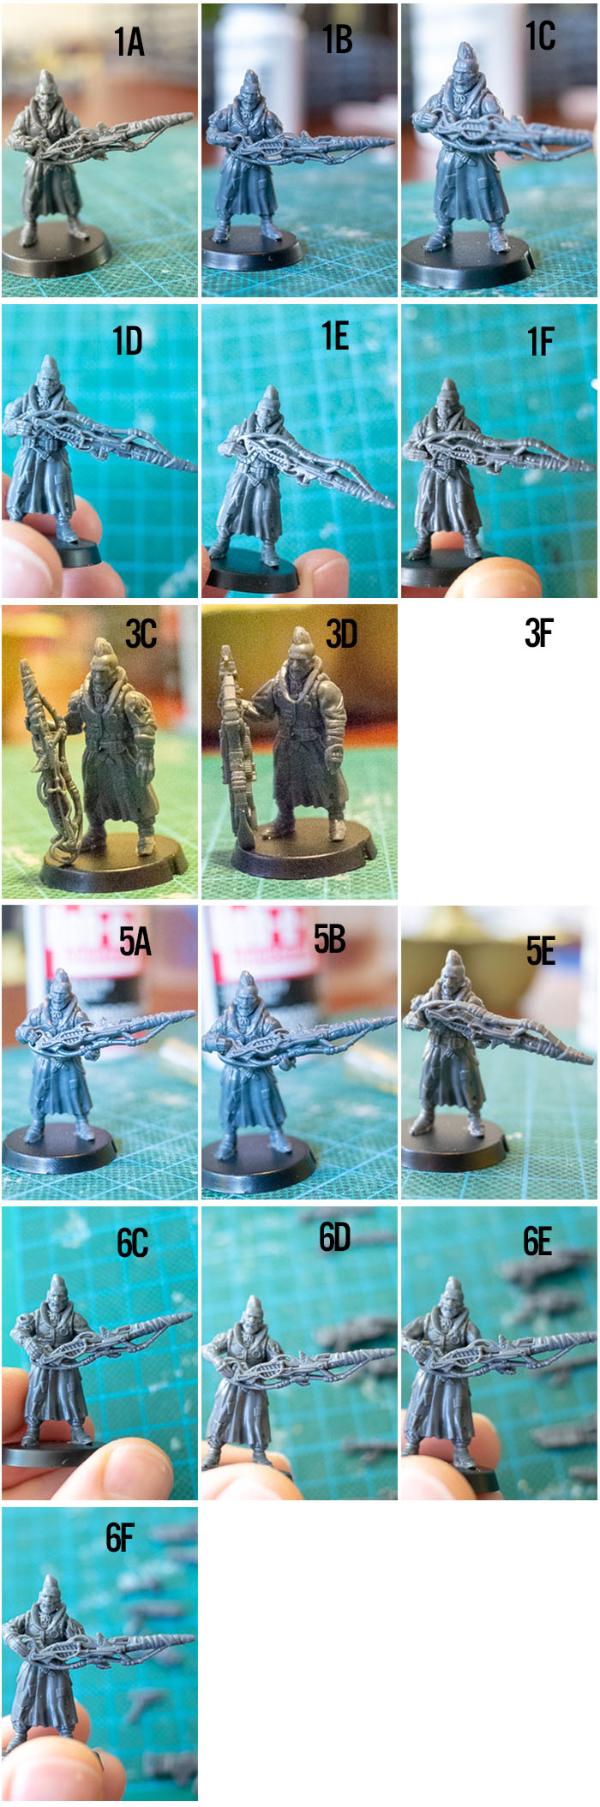
- I only used the one torso/leg combination (legs 3 and torso 3). I think the pairings will work for most torso/leg combinations, but see a little addendum at the end on torso number 6 which is definitely different. I also stuck to the arms as paired on the sprue (didn't mix and match left and right).
- I stuck the arms to the torso with tacky glue and dry-fitted the weapons. Hence, stuff will fit a little nicer when you actually glue it properly. Also, I couldn't take pictures of some combos for lacking three hands.
- It's a rough guide: not all the fits shown are ideal, I might have missed one that kinda fits as well, and of course if you're a little creative and/or do a tiny bit of converting, more fits are possible.
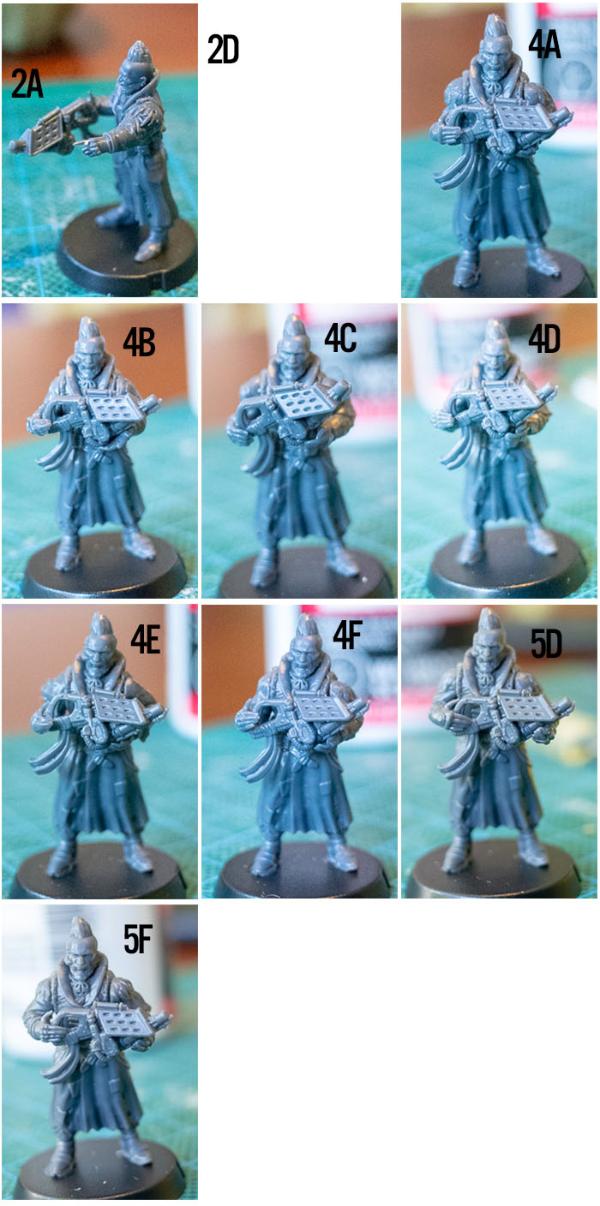
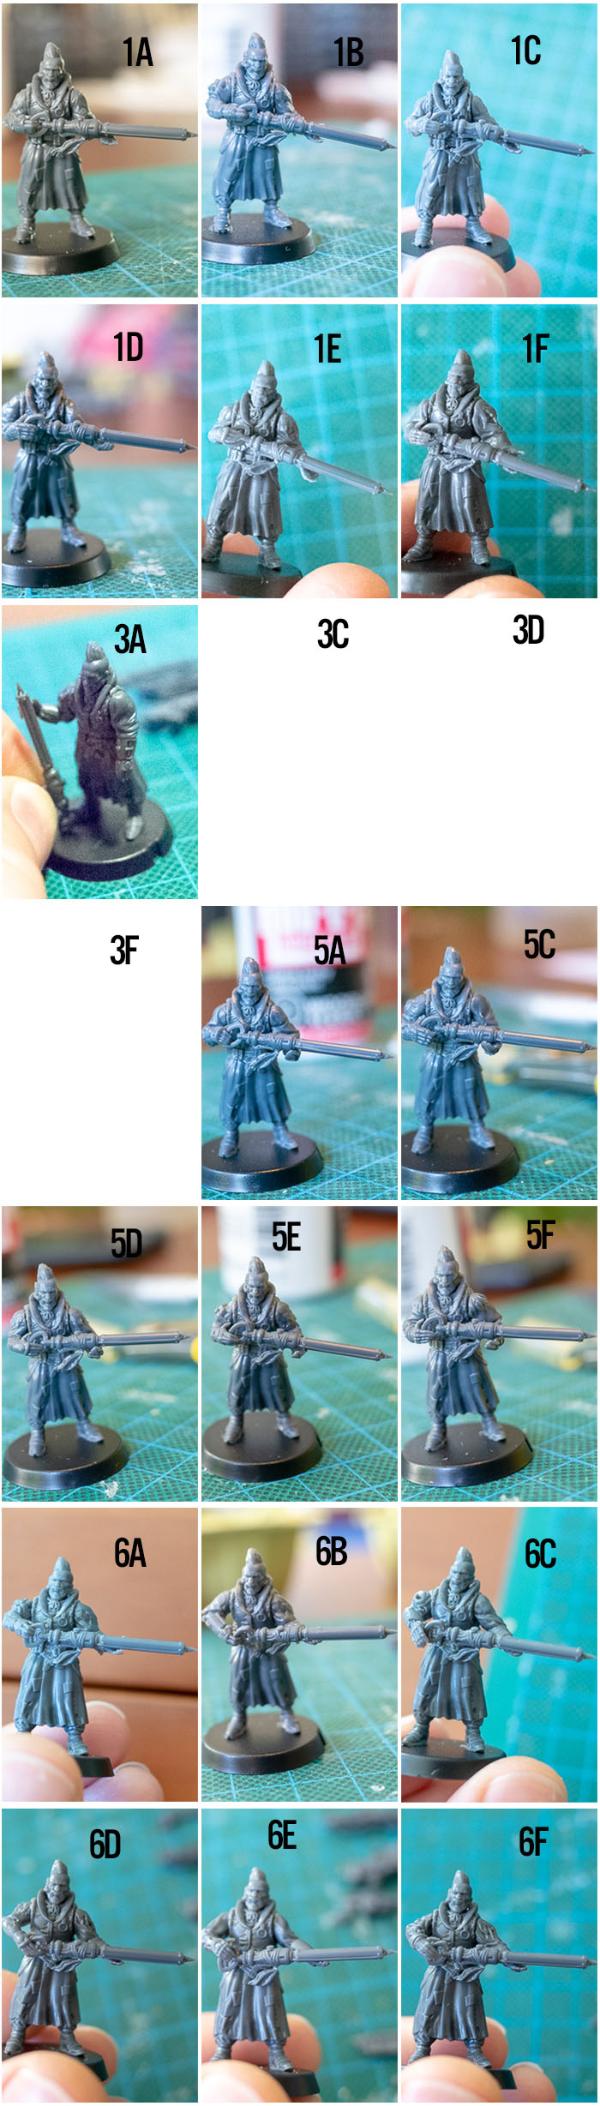
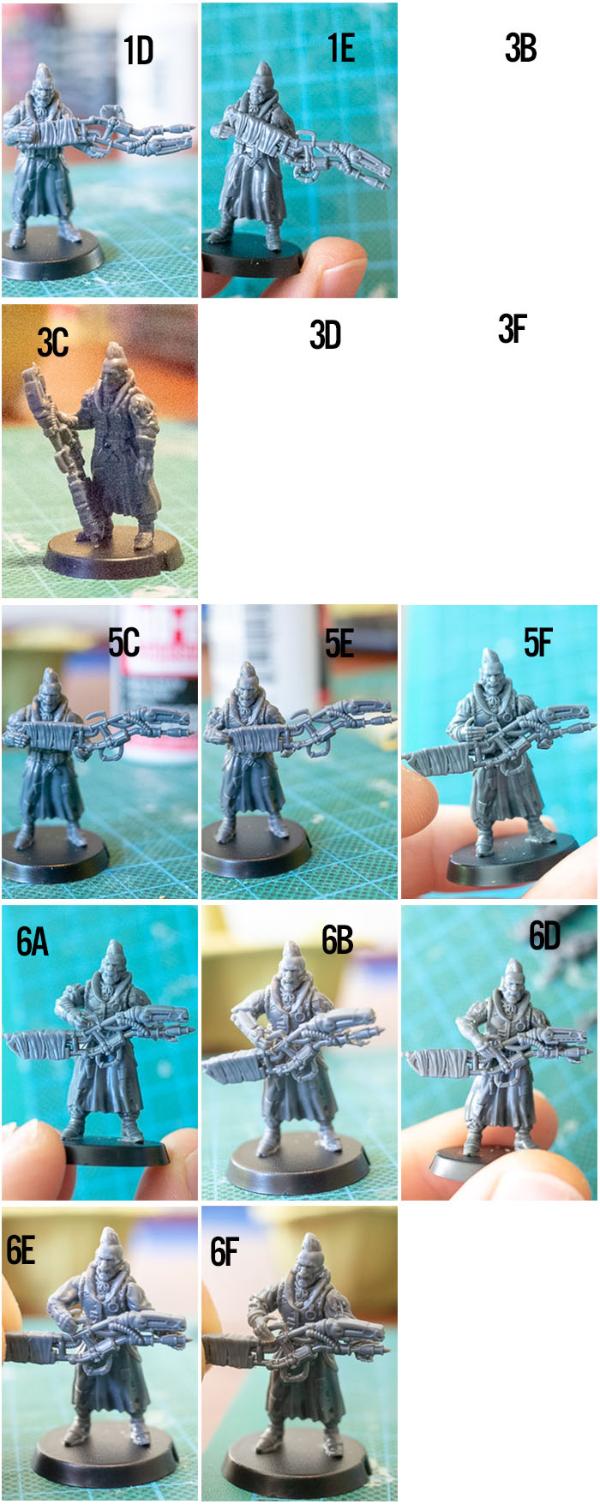
Then, finally, with the Broken sprues it's useful to know that all the '1' arms create a similar hold, all the '2' arms create a similar hold, etc. The numbers for the arms in no way match specifically with the torsos that are on the same sprue, that's totally unrelated. Generally the 1 arms are good for the Slug Rifle, Beam Blastgun, Longbeam Rifle (but 5 is better), Massive Torch and EMP Harpoon. The 2 arms are good for pistols. The 3 arms are good for having your gun resting on the ground. 3E will do a dual pistol. The 4 arms are good for the Torch and Glue Carbine. The 5 arms are good for the Auto Slugger and Longbeam Rifle. The 6 arms are good for the Glue Rifle, Slug Rifle, Beam Blastgun and EMP Harpoon.
So, results:
Slug Rifle works with: 1A, 1C, 1D, 1E, 1F, 2D, 3C, 3D, 3F, 4D, 5A, 5E, 6A, 6B, 6C, 6D, 6E, 6F.
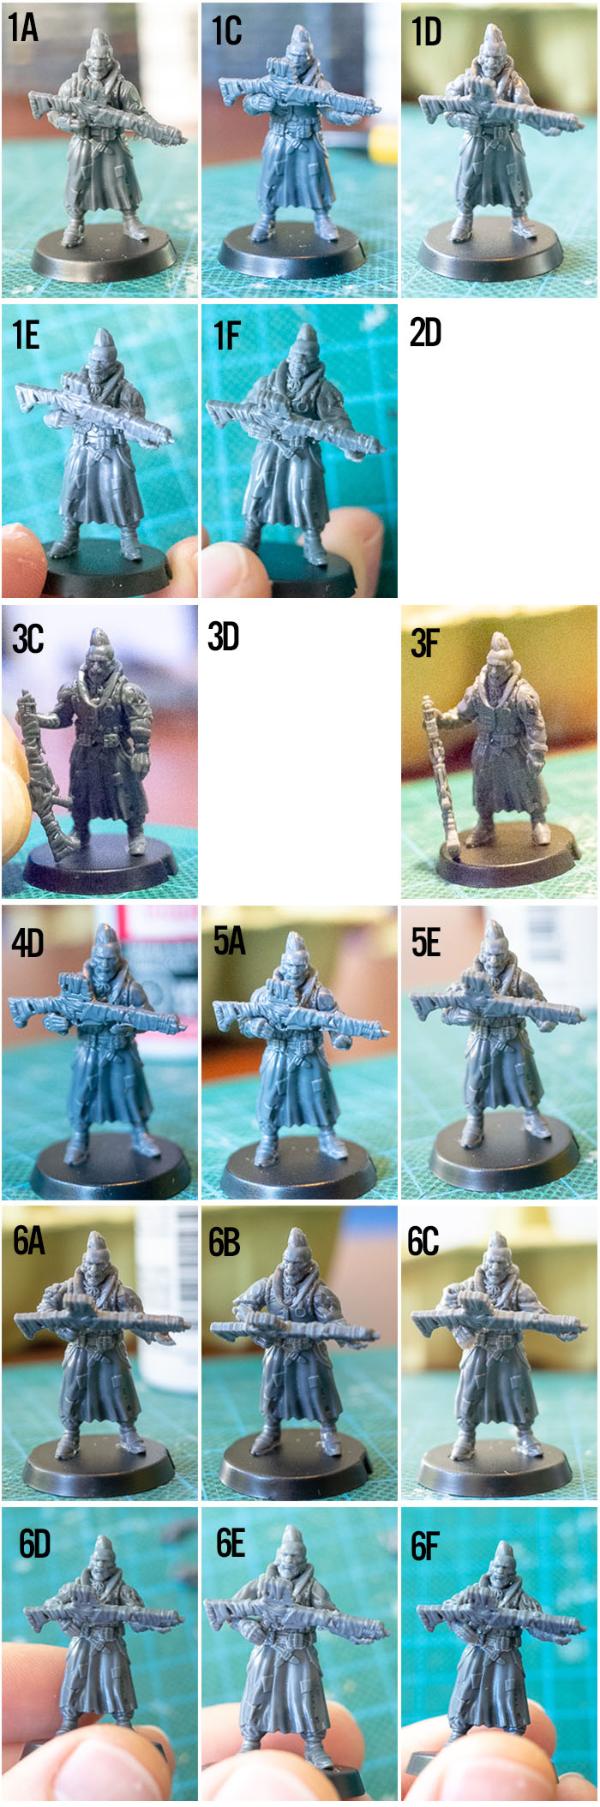
Beam Blastgun works with: 1A, 1B, 1C, 1D, 1E, 1F, 3C, 3D, 3F, 5A, 5C, 5D, 5E, 5F, 6A, 6B, 6C, 6D, 6E, 6F.
Longbeam Rifle works with: 1A, 1B, 1C, 1D, 1E, 1F, 3C, 3D, 3F, 5A, 5B, 5E, 6C, 6D, 6E, 6F.
Massive Torch works with: 1A, 1B, 1C, 1D, 1E, 1F, 5E, 6A.
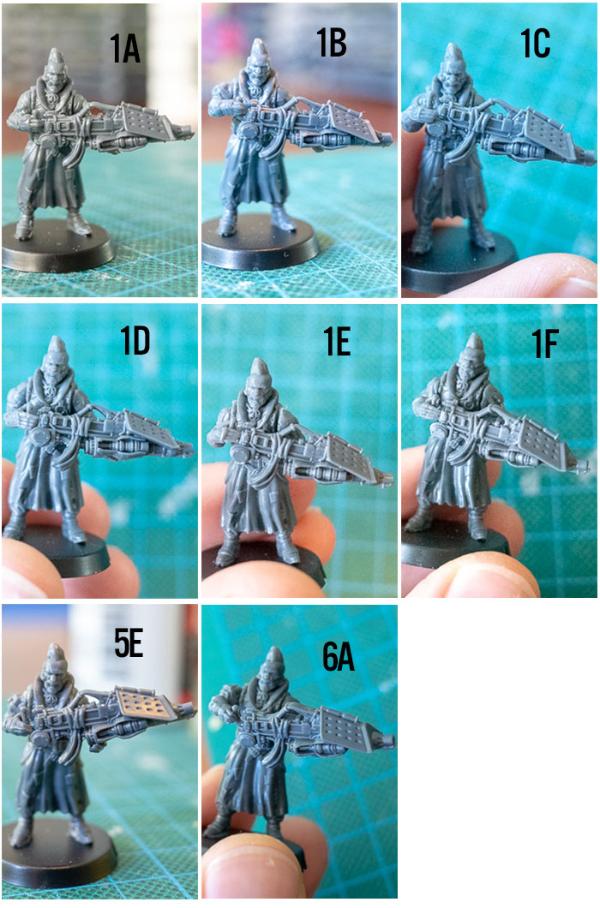
Torch works with: 2AS, 2D, 4A, 4B, 4C, 4D, 4E, 4F, 5D, 5F.
EMP Harpoon works with: 1A, 1B, 1C, 1D, 1E, 1F, 3A, 3C, 3D, 3F, 5A, 5C, 5D, 5E, 5F, 6A, 6B, 6C, 6D, 6E, 6F.
Glue Rifle is a bit odd as there's several ways one might hold it. I have my preference but just showed them all. Note that the gun is upside down in one of the pics. I think this might be because I dropped it and then redid the photo without noticing I held the gun wrong, which would mean this combo should work the right way up, but I'm not sure ;). Works with: 1D, 1E, 3B, 3C, 3D, 3F, 5C, 5E, 5F, 6A, 6B, 6D, 6E, 6F.
Slug Pistol works with: 2A, 2B, 2C, 2E, 2F, 5C, 5D, 5E, 5F.
Chem Pistol works with: 2A, 2B, 2E, 2F, 3E.

Chem Launcher works with: 1D, 1E, 2F, 5A, 5D, 5E.

Glue Carbine works with: 2A, 2C, 2E, 2F, 4A, 4B, 4C, 4D, 4E, 4F, 5D, 5F.
Beam Pistol works with: 1A, 1E, 2A, 2C, 2D, 3E.
Auto Slugger works with: 1C, 1D, 1E, 1F, 5A, 5B, 5C, 5D, 5E, 5F, 6C, 6E.
Small addendum regarding torso number 6, which I think is the only one that makes a serious difference for the arms:
In general, torso 6 points the hands closer together. This makes arms 3 and 4 almost useless, but gives a lot of options for the torch and glue carbine as those shorter guns now take advantage of the many arms that usually accommodate longer guns. It's surprisingly hard to find any arm combination to actually fit the basic Slug Rifle, so beware of that. I did slightly less extensive research on this torso (no pics of every combo), but here's my results:
Slug Rifle: 6C, 6F.
Beam Blastgun: 1A, 1B, 1C, 1D, 1F, 5D, 5E, 6A, 6B, 6C, 6D, 6E, 6F.
Longbeam Rifle: 1A, 1B, 1C, 1D, 6A, 6C, 6D, 6F.
Massive Torch: 1A, 1B, 1D, 1E, 6A.
Torch: 1A, 1B, 1D, 1E, 1B, 2D, 2E, 2F, 5B, 5D, 5E.
EMP Harpoon: 1A, 1B, 1C, 1D, 1E, 1F, 6A, 6B, 6D, 6E, 6F.
Glue Rifle: 5E, 6A, 6C, 6D, 6F.
Slug Pistol: 2A, 2B, 2C, 2D, 2E, 2F.
Chem Pistol: 1A, 2A, 2B, 2C, 2D, 2E, 2F, 3E.
Chem Launcher: 2B, 2D, 2E, 5E, 6C, 6D, 6E, 6F.
Glue Carbine: 1C, 1D, 2B, 2C, 2D, 2E, 2F, 5A, 5B, 5D, 5E, 5F.
Beam Pistol: 2A, 2B, 2C, 2D, 2E, 2F, 3E.
Auto Slugger: 1C, 1D, 1E, 1F, 6C, 6F.
General pose of the 1 arms:
General pose of the 2 arms:
3 arms are basically useless with this torso (unless you do a little bit of converting), but you can still do double pistols:
4 arms aren't much use for weapons, but might work if you want to model somebody gesturing whilst talking ;)
General pose of the 5 arms:
General pose of the 6 arms:
Tags: broken modeling tutorial walkthrough
Terrain Spotlight: Knights of Dice Desert Residence meets the Maelstrom's Edge Terrain Sprue!
Posted on Monday May 28, 2018 at 05:00pm in Tutorials
- by Iain Wilson
A few weeks ago, I showcased a dice tower made from a Knights of Dice MDF blank and some bits from the Maelstrom's Edge terrain sprue. This week, I'm giving a similar treatment to a desert building from the KoD 'Tabula Rasa' range.
The Tabula Rasa terrain range is specifically designed to be fairly basic, both as a cost-effective way of filling your table and to serve as a base for people to add their own detail... which obviously makes these buildings a perfect match for the Maelstrom's Edge terrain sprue!
The building I've started with is the 'Desert Residence 1', which when assembled straight out of the pack looks something like this:
Before gluing the building together, there were a few modifications to make. To begins with, the doorways are a little small for the Maelstrom's Edge doors to fit in. So I sat the door over the doorway, traced around it with a pencil and then carefully cut the resultant enlarged doorway out with a sharp exacto knife. MDF cuts fairly easily, so this isn't too onerous, but if you would rather avoid it you could alternatively build a boxwork around the door, as I did on my watch tower) and just glue it over the existing doorway.
There are two differently-sized windows scattered around the building. The larger of them, like the doorways, is a little small for the shuttered windows from the terrain sprue, so I repeated the door process, using the top corner of the window hole to line up the plastic part, and then tracing and cutting a larger hole. Again, if you would prefer to avoid cutting MDF, the shutter windows work quite well just glued straight to the wall.
For the smaller window holes, I covered over two of them using the cast-off MDF pieces from the larger windows, and to this I attached part of the energy fence pylon from the terrain sprue to make some sort of mechanical gubbin (I have to admit, it looks a little like a high-tech toilet cystern to me).
For the third small window, I took the large pipe fitting from the terrain sprue, and glued a small circle of plastic mesh into the back of it. This was then glued over the window hole to make a covered vent.
As a nice little touch, all of the Knights of Dice kits come with a little crowbar-sort-of-thing in the top corner of the MDF sheet, which can be used for prying parts out for assembly, or pulling removable roofs off. With a little bit of trimming up, they also serve quite well as upright bars for attaching ladders. I trimmed the ladder from the terrain sprue off so that it was short enough to work on either of the two building sections - the hooks on the top allow it to be hung from any free stretch of roof railing without needing to glue it in place.
With the leftover piece of ladder and a couple of MDF cast-offs, I made a smaller access ladder to hang between the roof sections.
The final touch was to add some support strut sections from the terrain sprue to cover over the joint holes where the roof supports attach to the walls. I could also have removed the other joint gaps by filling with some filling plaster or putty and sanding it down smooth, but I actually like the wall joints for creating a pre-fabricated slab-assembly look.
With some paint and weathering, the final building winds up looking like this:
Some Karist troopers, taking up station:
To tech up some buildings of your own, you can pick up the Maelstrom's Edge terrain sprue, or any of the rest of the Maelstrom's Edge model range, from the webstore here. As always, be sure to share to see your creations, or pop in with any hobby questions to the Comm Guild Facebook page!
For other Maelstrom's Edge modeling articles, including tutorials and walkthroughs of a wide range of different building and miniature projects, check out the article roundup here.
Tags: building modeling spotlight terrain terrainsprue tutorial walkthrough
Painting Tutorial - Konstantin Moor, Veteran Bot Handler
Posted on Monday May 21, 2018 at 05:00pm in Tutorials
- by Iain Wilson
Last week, I ran through a conversion tutorial for a veteran Master Bot Handler who I'm calling Konstantin Moor, a nasty, multi-weaponed individual built, along with his faithful drone companions, from the new Epirian Master Bot Handler kit (If you missed last week's article, you can find it here).
Well, now it's time to get some paint on him!
Before I start, a quick note on paints: I tend to use paints from a few different ranges, as I collect whichever paints I like rather than sticking to a single brand. If you're looking to match any of the paints I use, you might find this Paint Compatibility Chart somewhat handy!
I'm painting Konstantin for gaming rather than display, so this is a fairly quick and easy paintjob, with nothing too complicated or fancy going on. I started out by basecoating all three models with Army Painter Army Green spray.
Next, I painted armour sections and the drone chassis with Vallejo Yellow Green, and metal sections with Vallejo Heavy Charcoal. I also gave Konstantin some Vallejo Neutral Grey pants, and a base layer of skin using Citadel Scorched Brown.
Once that was done, I went over the yellow green with a light wash of Army Painter Green Tone, and the metal, grey and skin with Army Painter Dark Tone.
When the washes had dried, I went back over the green sections with a fine brush and a little more green wash, applying very thin layers onto downward-facing surfaces to give them a little more shading. Then I applied a light highlight to raised edges using Coat D'Arms Putrid Green. The metal areas were given a similar highlight with P3 Pig Iron, and I used Vallejo Light Grey on Konstantin's pants. For his skin, I highlighted by lightly drybrushing with Citadel Tallarn Flesh.
Finally, the models were all transplanted to fresh bases, painted up in my urban scheme. I added some light grey onto Konstantin's eyebrows, and painted the lenses on his Neural Nodes with Army Painter Pure Red before giving them a spot of white in the centre. For the laser tips and the shield generator on the firefly drone (Cassio), I painted on a layer of Citadel Ultramarine Blue before drybrushing with Citadel Ice Blue and finishing with white. A few other details, like the red eye lenses on the drones (Pure Red, shaded with the red mixed with a little black and then a highlight spot of white), the Epirian badge on Konstantin's chest (Pig Iron, with a spot of P3 Cygnus Yellow), and picking out the missile tips on the spider drone (Iago), and the trio were ready for the table!
Group shot:
Stay tuned for an unofficial rules card to use Konstantin in your own games, coming later this week to the Force Listing section of the Maelstrom's Edge website!
What have you done with your Master Bot Handlers? We would love to see your creations on the Comm Guild Facebook page!
To pick up this or any of the rest of the Maelstrom's Edge model range, visit the webstore here.
For other Maelstrom's Edge modeling articles, including tutorials and walkthroughs of a wide range of different building and miniature projects, check out the article roundup here.
Modeling Tutorial - Konstantin Moor, Veteran Bot Handler
Posted on Monday May 14, 2018 at 05:00pm in Tutorials
- by Iain Wilson
I've been having an awful lot of fun playing with the new Epirian Master Bot Handler kit (as evidenced in the Modeling Spotlight article from last week. Amongst all of the other conversion ideas that popped up when I started looking at the sprue, I had one that I thought warranted a conversion article all of its own. And so, let me present Konstantin Moor, Veteran Bot Handler, along with his companion drones: Iago and Cassio!
The main things that set Konstantin apart from his brethren are the additional pair of weapon arms, and the independent movement of the weapon arms, as opposed to the normal direct control rig that links to the forearm. To replicate this build, you will need two Epirian Master Bot Handler sprues and the Faction Expansion Sprue. You will also need a Drone sprue to build Iago and Cassio.
I built the body as normal, using the bent legs and the matching torso. In place of the normal helmeted head, I used the bare head from the Faction Expansion Sprue, although there would be nothing stopping you from just using the normal head if you prefer the armoured look. Note that the head from the expansion sprue is designed to go with the Karist Trooper torso, and so has a slightly thicker neck than the various Epirian and Broken heads. As a result, the neck needed a little shaving down with a hobby knife before being glued in place.
The arms were largely left alone, with the only modification required being to chop off the mounting peg for the weapons.
Now for the fun part. I took the backpack, and underneath the existing weapon arm socket, I smoothed down the corner of the pack and drilled a small guide hole with the tip of my hobby knife. Then I found a drill bit that matched the diameter of the arm socket (11/64", although a 4mm bit would do the job for the metric-inclined) and drilled out a new arm socket. I did this with the drill bit held in my fingers and twirling it - you could use a dremel or similar rotary tool, but plastic is soft so there's not really any need when the drill bit is large enough to grip it securely with your fingers, and this helps to reduce the risk of accidentally over-drilling the hole by drilling too fast.
Next up I assembled the two sets of weapon arms and glued them with a bit more than a 90 degree bend in the elbow.
These were glued in place on the backpack, and the backpack and arms glued onto the body. I also glued the Neural Nodes in place on the backpack weapon ports.
Time for some weapons!
Konstantin is armed with two linked sets of Drone Class Laser Systems. Without these being joined to the forearms, I wanted to change how they mounted onto the weapon arms a little, to give them a more open range of movement. Using a hobby knife, I cut through the rear half of the mounting ring off the back of the weapons. The cutoff piece was also cut in half.
The weapons were then glued onto the ends of the weapon arms, pointing directly forwards with the remaining half of the mounting ring socketing over the ball joint. I attached one half of the cutoff ring section on the outside, to reinforce the joint a little.
After one final tweak (repositioning the right arm to be extended forwards instead of down) Konstantin was assembled and ready for paint!
Moving on - Iago!
Iago was assembled as a concept for the Master Handler modeling spotlight article, and I liked the idea too much to not get him onto the table. To put him together, I used a Spider Drone and a Master Handler backpack with Cluster Missile pods.
The bottom protrusions were sliced off the backpack with a razor saw, and the back of the drone chassis was similarly cut down flat.
I then glued the backpack onto the back of the drone chassis. The chassis sidepods needs shortening a little - I cut them down so that they butted up flush against the backpack.
With the addition of a set of Spider Drone legs, Iago was all set.
And finally: Cassio!
Cassio is based on a Firefly Drone, with the normal laser system replaced with an energy field projector. To create the projector, I used a flakk gun from the drone sprue, cut as below, and the muzzle of a radwave emitter and a cybel mine from the Faction Expansion sprue.
I assembled the drone as normal (sans weapons) and then glued the projector in place underneath, using the cut-down flakk gun as the mount, gluing the cybel mine to the front of the gun, and then the reversed radwave emitter muzzle to the front of the mine.
With turbines glued on and a flight base added, Cassio was ready for action.
The unit all assembled:
Next: painting and rules card - Click here!
What have you done with your Master Bot Handlers? We would love to see your creations on the Comm Guild Facebook page!
To pick up this or any of the rest of the Maelstrom's Edge model range, visit the webstore here.
For other Maelstrom's Edge modeling articles, including tutorials and walkthroughs of a wide range of different building and miniature projects, check out the article roundup here.
Modeling Spotlight: The Epirian Master Bot Handler
Posted on Monday May 07, 2018 at 05:00pm in Models
- by Iain Wilson
The Epirian Master Bot Handler is the latest plastic kit to be added to the Maelstrom's Edge range. Striding about the battlefield in his powered exoskeleton, he has the ability to lay down impressive amounts of firepower from a wide array of weapons, or finely co-ordinate his forces through networked neural nodes. Here, we'll have a look at some of the modeling options available with this fantastic model.
Built straight off the sprue, the Master Handler has multiple weapon options available - Repair Claws, Cutter Light Machine Guns, Drone Class Laser Systems and Flakk Guns can all be chosen for the arm mounted weapons in any combination, and the rectangular sockets on his backpack allow you to place Cluster Missile pods for even more punch, or Neural Nodes for throwing command points around with wild abandon.
You can find the Assembly Guide for the Master Handler here.
The Master Handler also brings some other impressive 'guns' to the table, with sleeveless and rather buff arms. If you prefer a more covered look on your models, the arms can be fairly easily replaced with the armoured arms from the regular Bot Handler kit. For the below model, on the sides of the torso I removed the protruding arc of plastic that sits just above the Master Handler's shoulders, and added a small locator pin made from a piece of plastic rod to the backs of the regular Handler's forearms. The arms were glued on to the torso with the tops of the shoulder pads sitting about where the original locator arc was, and the weapons slotted onto the locator pins on the arms as they do with the normal Master Handler arms.
The sprue comes with two sets of legs, one in an upright stance and the other in a knees-bent, braced stance. To mix up the posing a little, you can cut through the groin with a razor saw or sharp hobby knife and switch legs between the two sets to create a stance with one straight leg and one slightly bent. You might need a little gap filling with putty if the cut leaves the waist with a gap. On the below model, I have also extended the right arm out by cutting the top of the shoulder off square, gluing it to the torso and filling in the armpit with some 'green stuff' putty. The left arm has also been slightly repositioned below the elbow, and I have used a head from the Epirian Contractor sprue in place of the Master Handler's helmet.
The leftover legs from the above model were used below, with a similar reposing of the right arm as well.
I thought it might be handy to have a repair claw that was independent of the Handler's arms, so cut down one side of a backpack and drilled out a socket to attach one of the weapon support arms. I used two repair claws clamped over the ball joint on the end of the support arm to create a beefier, four-fingered repair claw. I also took the two Neural Nodes and cut them in half so that they would both fit on the other side of the backpack, and used a helmet from the regular Bot Handler sprue.
The neck joint on the Master Handler torso is compatible with any of the different plastic Epirian heads, and also works with most of the heads from the Broken Infantry pack, which is handy if you want to create an alien Handler for your force. For the below model, I aso left the weapon support arms off entirely, and built the Drone Class Laser System directly into the backpack by trimming off the backs of the weapons at an angle to match the backpack panels.
Because the Master Handler comes with two sets of legs and torsos, you're going to wind up with some spare parts. It seemed a shame to waste these, so I used a leftover helmet from the regular Handler sprue, and some Clingfire Sprayers and a command module from the Epirian Scarecrow kit to create a twin-flamethrower-equipped model that I'm calling an 'Eradicator'. The fuel hoses on the backs of the weapons are made from guitar string.
I thought it might also be fun to add some of that shiny, missile-pod goodness to a drone unit, and so I took a Master Handler backpack, trimmed off the bottom and stuck it onto the back end of a Spider Drone. I don't have a name for this friendly little fellow yet... I think I'll have to revisit that in a later article!
What have you done with your Master Bot Handlers? We would love to see your creations on the Comm Guild Facebook page!
To pick up this or any of the rest of the Maelstrom's Edge model range, visit the webstore here.
For other Maelstrom's Edge modeling articles, including tutorials and walkthroughs of a wide range of different building and miniature projects, check out the article roundup here.
Tags: conversion epirian handler model modeling
Assembly Guide - Epirian Master Bot Handler
Posted on Monday Apr 30, 2018 at 11:00pm in Tutorials
Assembling the Epirian Master Bot Handler
General Notes
Polystyrene cement - only use superglue if you want to go insane! All of our models are designed to be assembled with polystyrene cement as it gives some time to re-pose while gluing, fuses the models together and prevents brittle joins like other glues do. Make sure you have polystyrene cement in your toolkit before you begin.
We want you to experiment! We've broken our models up into lots of parts and given a fair few spare parts so that you can push yourself out of your comfort zone, learn new skills and create some really unique models. We've tried to price things so that it won't break the bank if you make a mistake, so please cut stuff up and have some fun. Start simple with a slice here and a re-pose there, and watch your confidence and skills increase until you are a master modeler!
Basing - Always make sure you glue your model to its base with an eye on the arc markers on the sides of the base. The arc marker indents should be at the halfway point between the front and back of the model to show the front and back halves of the model when gaming. See the Maelstrom's Edge rulebook for more detailed notes on this.
Dry fit before gluing! - There are lots of pose options possible, but that means there is also the freedom to screw up and make some bad poses! Sticking the parts together and seeing how things look will usually lead to a model that is fairly static and repetitive. You should consider the parts available and ensure that you have a pose in mind before you start gluing things together. If in doubt or insecure about your talents in the posing area, we recommend you try to copy the poses from some of our studio models found here in the gallery.
Master Bot Handler Assembly Notes
The sprue comes with parts to assemble one model, with two different body options, two each of four different arm weapons and two each of the backpack equipment options:
You can find the rules and options for the Master Bot Handler's equipment in the Force Builder section of the Maelstrom's Edge website. It's worth noting that rules-wise, if you go all out on ranged weapons you'll wind up with one more weapon than the Master can actually fire in a turn, so while that can be handy for versatility if you have the points available, it's worth considering how you will use him on the table before you start gluing bits on!
The body options provide two different poses, with the torso paired with the legs to create a crouched, braced-for-firing pose, or a more upright stance. Torso parts 1 & 2 go with legs part 5, and torso parts 3 & 4 go with legs part 6, although the torsos do fit on either pair of legs if you want to play around with the posing.
The neural nodes (part 16) cluster missiles (part 17) fit into the rectangular recesses on the top of the backpack, and can be paired or taken as one of each.
Note: Due to a well-intentioned but mistaken last minute change by the sculptor before the sprue went for tooling, the neural nodes and cluster missiles have differently-sized locator bars on their backs that slot into matching recesses on the backpack. As the bar on the neural node is slightly longer than that on the cluster missile pod, this means that if you want to use a dual-node configuration (or just want to put a single neural node on the left instead of the right) you need to trim off the ends of the bar to allow it to fit into the missile pod's slot.
Backpack, head and arms can be glued in place to set up the basic posing.
Assembling the weapon arms all in one go is a little fiddly, so it's best to glue your chosen weapons onto the arms first. The sprue comes with the following weapons:
- 2 x Repair Claw (part 10)
- 2 x Cutter Machine Gun (parts 13 & 14)
- 2 x Drone Class Laser System (parts 19 & 20)
- 2 x Flakk Gun (parts 11 & 12)
The support arms for the weapons are made up of parts 21 and 22, and two of part 18.
The flat disc on part 18 slots into the middle of the two matching discs on parts 21/22. If the fit is a little too snug, you can file or shave down the sides of the disc a little. Don't get too carried away, or you'll make it fit too loosely.
The two parts joined at whatever angle fits the posing of the arms and weapons. The best bet is to glue the join with a touch of plastic glue and then dry fit the support arm against the model to get the right angle on the joint, ensuring that the larger ball fits neatly into the recess on the backpack, and the smaller ball sits into the outside of the ring on the weapon. Once you're happy with the angle of the joint, glue the ends in place.
From there, your model is ready for painting!
For modeling help, to discuss how best to use the Master Bot Handler in your games, or to share your models, head on over to the Comm Guild Facebook page.
You can pick up the Master Bot Handler, his accompanying Firefly Drones, and the rest of the Maelstrom's Edge miniature range, from the webstore here.
For other Maelstrom's Edge modeling articles, including tutorials and walkthroughs of a wide range of different building and miniature projects, check out the article roundup here.