Entries tagged [epirian]
Force Spotlight: Quick Painted Epirians!
Posted on Tuesday Apr 12, 2022 at 05:00pm in The Epirian Foundation
 - by Iain Wilson
A few weeks back, we published some sample force lists for the V2 Maelstrom's Edge rules. These got me a little inspired to put together a new force for myself, and so I dove into the unbuilt model pile and put together 120 points based on the Epirian sample list.
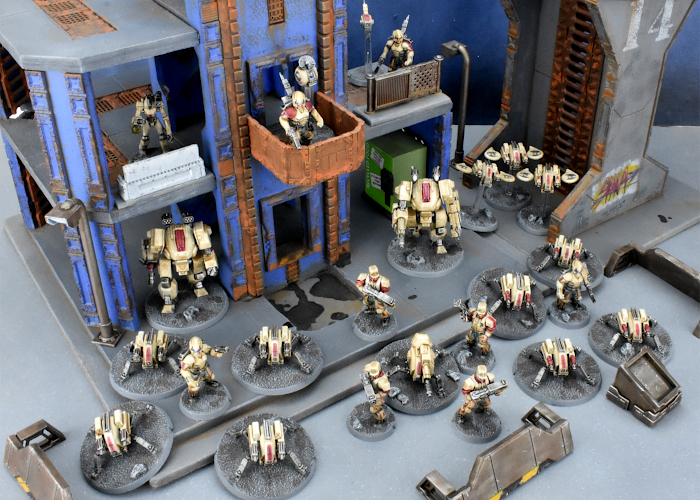
The force roster is almost identical to the sample list. I found myself short by one Firefly drone, so I dropped those to a unit of three, and gave the Contractor Defenders a Chaingun drone and one of the Journeymen a second Dominator pistol to make up the difference.
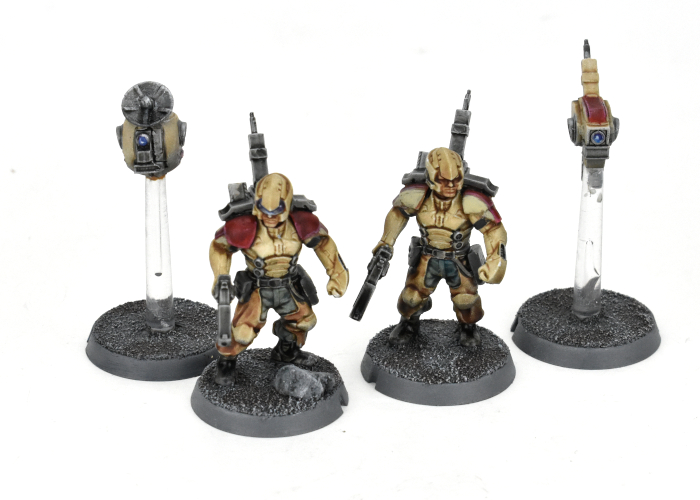
Journeyman Bot Handlers with micro drones (the drones are 3D printed test models - the finished models will be coming in plastic soon!)
I wanted a colour scheme that was quick and easy to paint, and also visually distinct from my existing forces. Starting out with a basecoat of Army Painter Uniform Grey spray, I then added a 'zenithal' highlight by spraying down from above the models with white spray. Over that, I applied a wash of Army Painter Soft Tone. Metal parts were picked out with AK Gunmetal and then washed with Army Painter Dark Tone - two coats for the weapons.
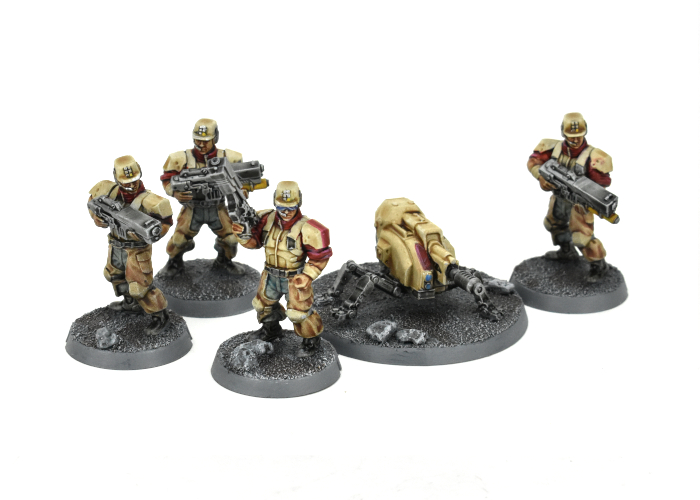
Contractor Defenders.
The pants on the Contractors were painted with a layer of Army Painter Blue Tone to give them a denim look, while the chaps were given a coat of Army Painter Mid Brown wash. I painted the skin with a coat of Army Painter Flesh Wash, and then as it still looked a bit pale added a layer of Mid Brown as well.
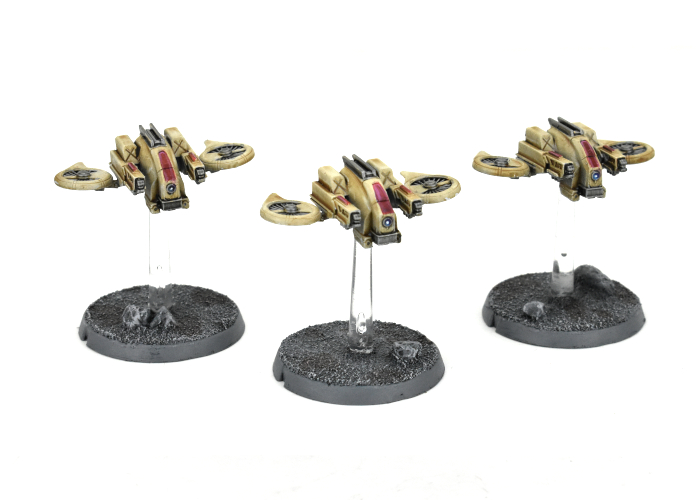
Firefly Drones.
For the red details, I painted on a coat of Citadel Blood Angels Red Contrast. This didn't look quite the right tone with the sandy coloured armour, so I added a layer of Army Painter Purple Tone over the top, before highlighting with Army Painter Pixie Pink.
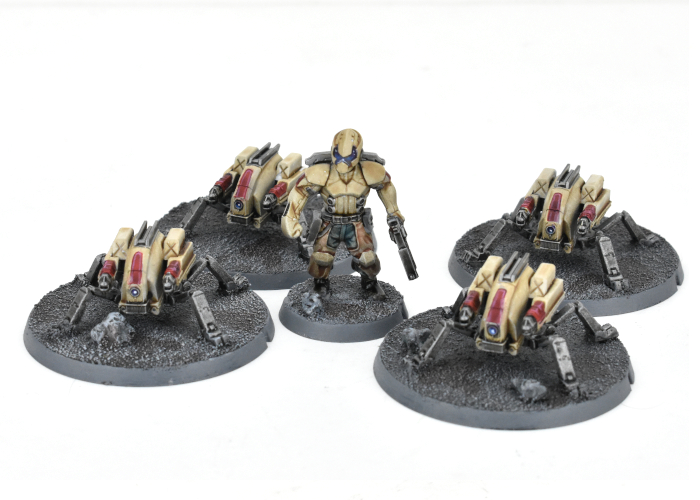
Spider Drones with flakk guns.
I had found with my previous Epirian Bot Force that the weapons on Spider Drones can be a little hard to differentiate from across the table, so I made sure I painted them differently, leaving the machine guns bare metal and adding a red casing on the flakk guns.
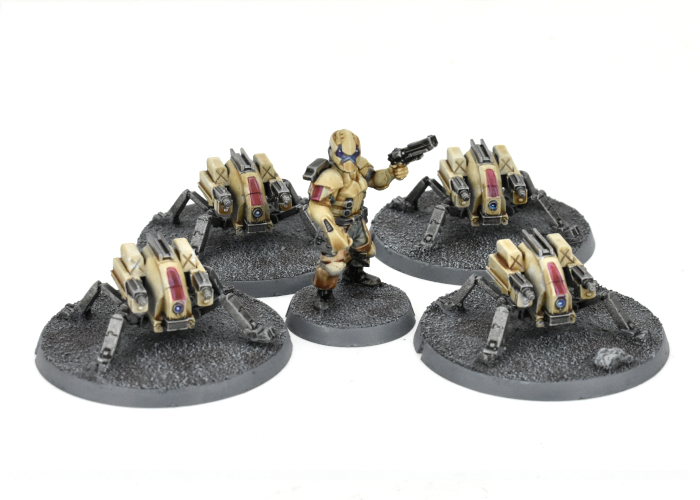
Spider Drones with machine guns.
I used Army Painter Ultramarine Blue for lenses and sensors, shading with Purple Tone and highlighting with Army Painter Gorgon Hide.
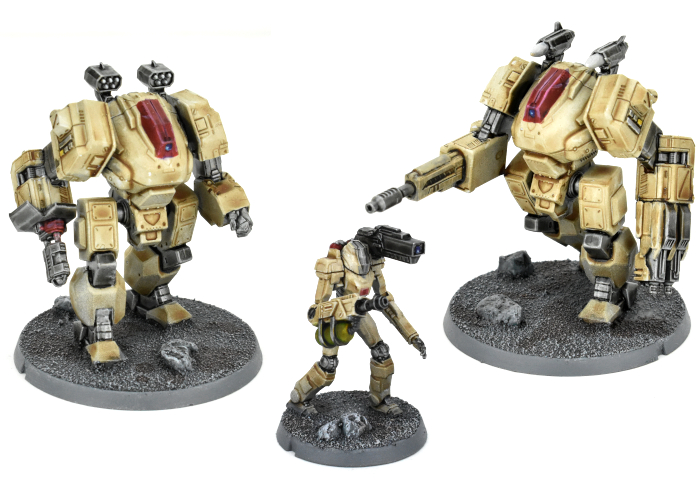
Hunter mechs and Scarecrow bot.
To finish up, after gluing on some fine sand and a few pebbles for detail, I painted the bases with Uniform Grey, washed over the top with Army Painter Dark Tone, and then drybrushed with Vallejo Light Grey and White before adding some splotches of Mid Brown here and there to break up all of that grey.
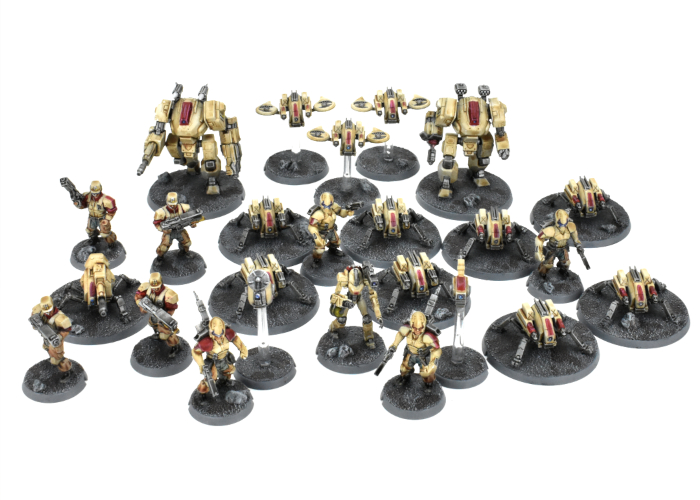
The full force deployed.
Get started on your own V2 force by heading over to the Maelstrom's Edge webstore!
While you're there, you can download the V2 rules from the Trial Rules section of the Maelstrom's Edge website here. The Beta rules documents contain all of the rules for playing V2 games, but keep in mind that these are just 'preview' documents - some rules may be revised based on feedback, and the final layout including background material for the factions and the Maelstrom's Edge universe, artwork and other 'flavor' material is missing.
If you have any thoughts on the new rules, pop on over to the Comm Guild Facebook group, or start up a thread in the Maelstrom's Edge section on the Dakka Dakka forums. We welcome any feedback, and would love to hear how everyone's forces stack up in the new rules!
Converting a Robot Stargrave Crew
Posted on Monday Sept 13, 2021 at 09:52pm in Tutorials
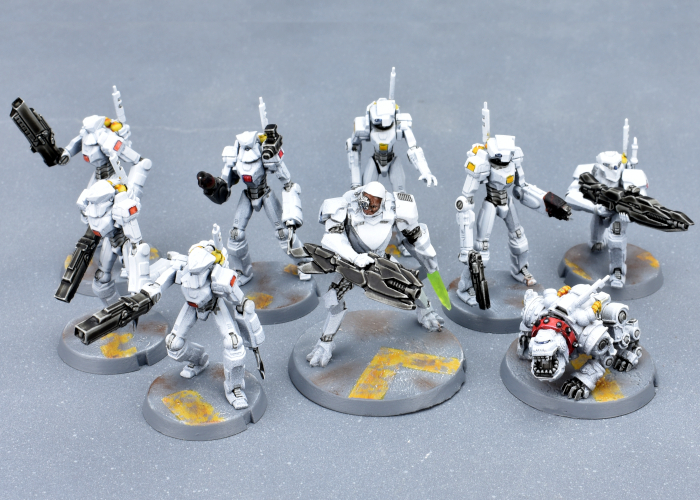
When Stargrave arrived on the gaming scene, bringing the popular Frostgrave rules into a sci-fi setting, it sparked all sorts of interesting ideas amongst gamers for building crews. While there is an official model range for the game, it also encourages players to use whatever miniatures they like, which is a perfect excuse to break out some models and get creative! I was particularly interested in the rule allowing any crew members to be robots, and set to work building up a crew using (mostly) the Maelstrom's Edge Epirian Scarecrow plastic kit!
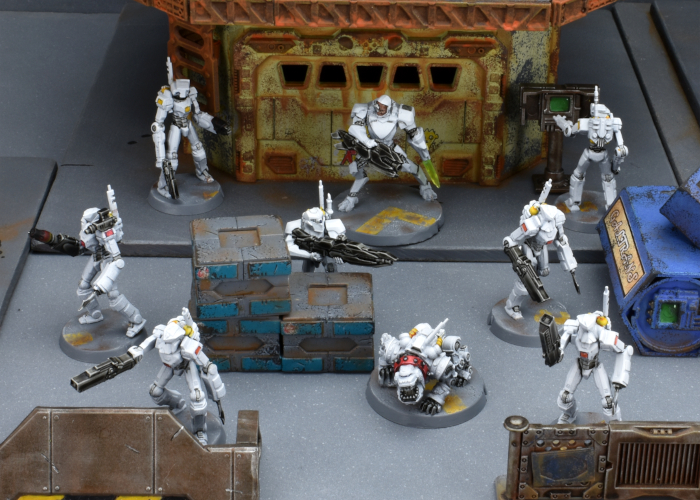
The bulk of the crew was made up of very slightly converted Scarecrows with different heads taken from the Remnant Militus battlesuit kit to denote different 'classes' of robot. Thanks to how wonderfully poseable the Scarecrow kit is, it's really easy to get a range of different looking models out of it! I also used a resin robo-dog from Artel W for a guard dog, added a (still to be painted) space dwarf from Victoria Miniatures as a first mate, and a converted Remnant Nimbus battlesuit for the Captain.
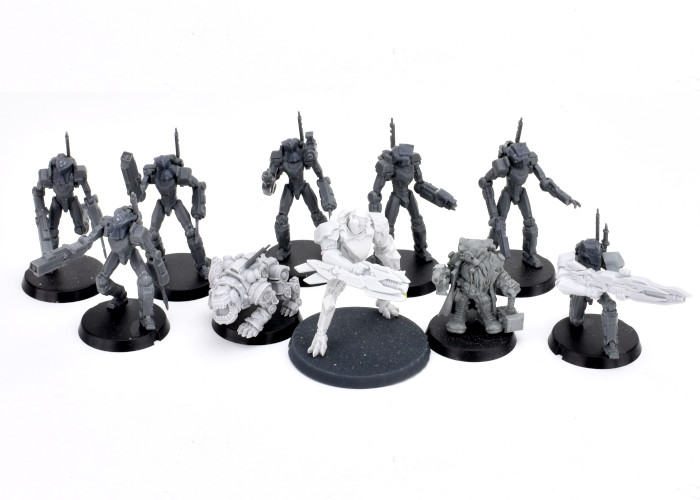
I wanted an easy paint scheme that I could get done quickly, and used Army Painter paints for the bulk of it. I started with a base coat of Uniform Grey spray, followed by a top-down (or 'zenithal') spray of white, so that the grey would stay visible in the creases and underneath surfaces to provide some shading. I then went over the joints and other exposed metal parts with a coat of Dark Tone, and gave the weapons three generous coats of the same. The final details were done with Citadel Contrast - Iyanden Yellow for the tanks on the robot's backs and Leviadon Blue highlighted with Army Painter Ice Storm and white for the eye lenses. The different classes of robot also received some shaded panels to tell them apart - yellow for techs, orange for soldiers and red for specialists.
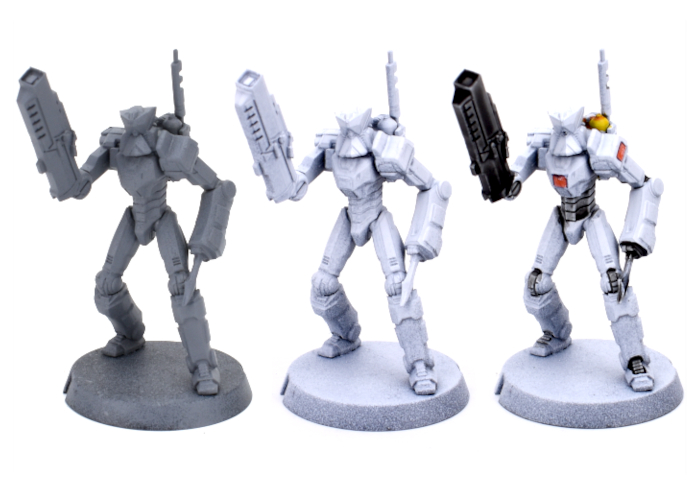
I'm still deciding how to paint up the first mate, and how closely he will mimic the colour scheme, but here's the rest of the the crew all assembled:
Captain and Guard Dog:
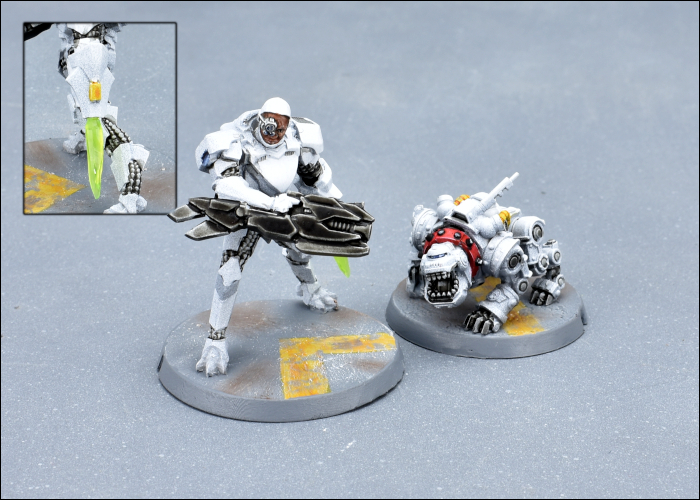
The Captain was built from a Nimbus battlesuit with the head taken from the Karist Heavy Weapons kit. The energy blade is part of a trimmed down lightsaber from a Star Wars figure, left over from an old project. He represents a cyborg in combat armour.
Tech crew - Hacker and Chiseler:
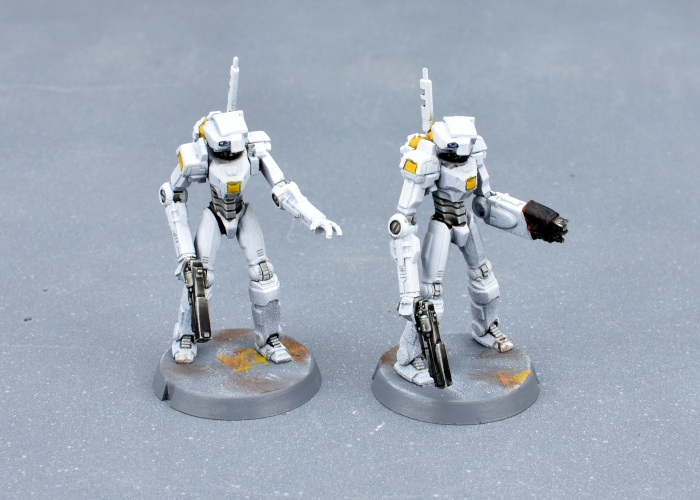
Chiselers are normally equipped with lockpicks. I decided to go a more direct route and gave him a cutting torch using part of a weapon from the Broken Rabble kit.
Troopers
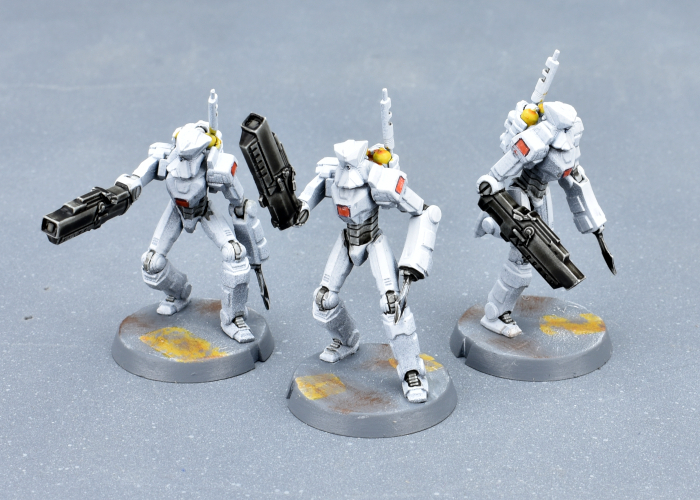
I gave the troopers bulkier left arms to house their combat knives using spare Scarecrow shin pieces. The knives are taken from the Faction Expansion Sprue.
Specialists - Burner and Sniper:
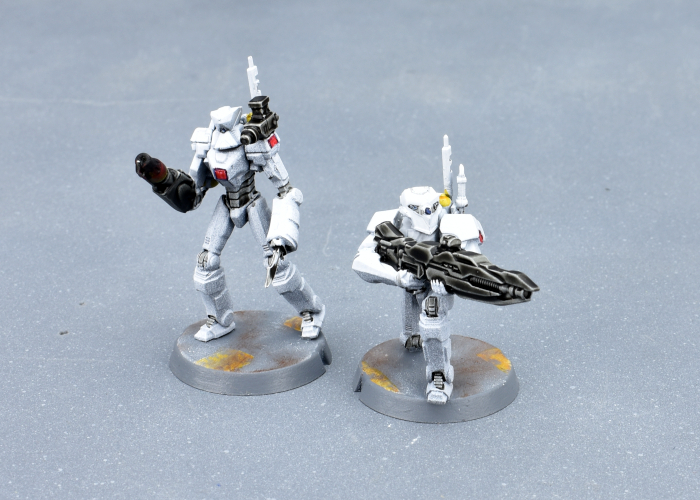
The Burner has a pistol and knife as well as the flamethrower, so I gave him the same knife arm as the regular troopers and mounted a mini grenade launcher taken from the Epirian Handler kit to his shoulder to represent the pistol. The sniper has a different head to the regular troopers, and his sniper rifle was a handy way to make use of the second set of arms that come with the Captain's Nimbus suit.
Time to get that mate painted up and send these bots out on into the black!
To build your own robot crew of clanking doom, you can pick up the Scarecrow kit along with the rest of the Maelstrom's Edge range from the webstore here.
What are you working on? We would love to see your models and terrain in the Comm Guild Facebook group!
For other building ideas, modeling tutorials, army spotlights and conversion walkthroughs, check out the Hobby section of the Maelstrom's Edge website here.
Tags: conversion epirian robot scarecrow spotlight stargrave
Model Spotlight: SecDef Lieutenant
Posted on Monday May 10, 2021 at 05:00pm in Models
You can find this fantastic resin miniature in the Maelstrom's Edge webstore here.
Conversion Spotlight: Automated Uplink Relay, MkII
Posted on Monday Mar 08, 2021 at 05:00pm in Tutorials
When pursuing conflicts outside of its zone of control, the Epirian Foundation makes use of portable uplink drones that link to orbital satelites and airborne recon to provide battlefield intelligence and allow Bot Handlers to remotely interface with Epirian assets on the ground. The Battle for Zycanthus box includes a cardboard marker for the Automated Uplink Relay, but for those wanting a more 'solid' version, I shared a kitbash idea some time ago using parts from various Epirian plastic kits and metal tracks from a Bombshell Miniatures model. The arrival of the PDC Gun Carriage gave me an idea for an alternative, all-plastic version!
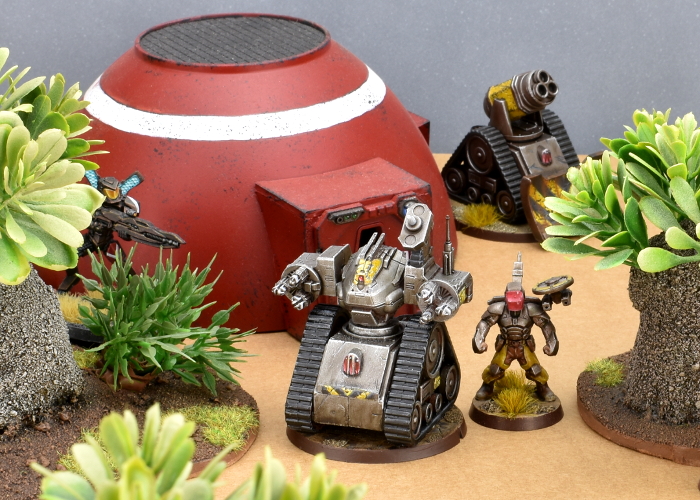
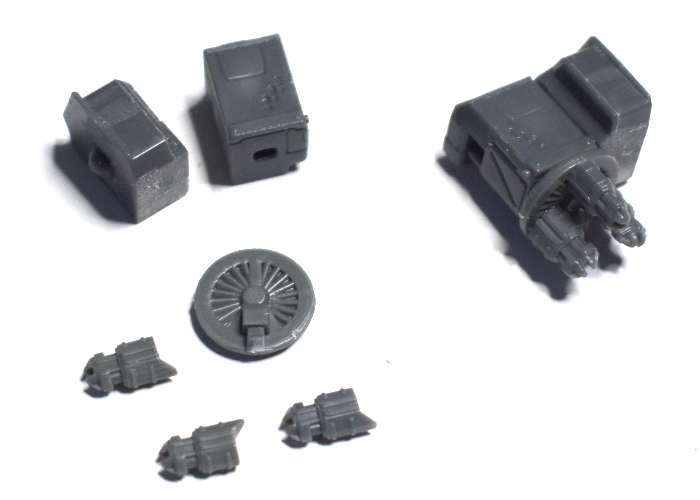
I made a few changes to the drone design this time around, with the most obvious one being the tracks. I built the track unit from the gun carriage as normal, although I trimmed off the lugs on the front that hold the dozer blade.
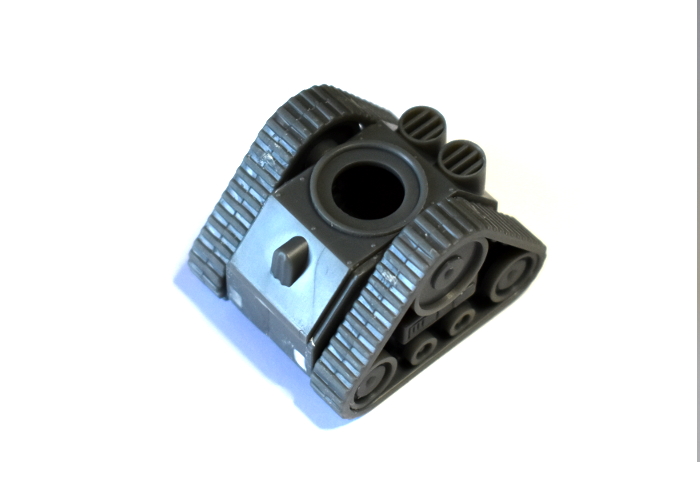
As with the original version, I used the body of an Epirian Hunter war mech, cutting apart at the waist with a razor saw.
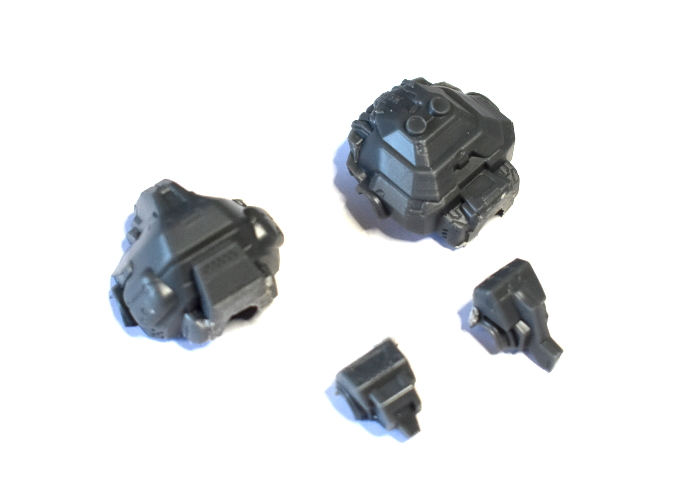
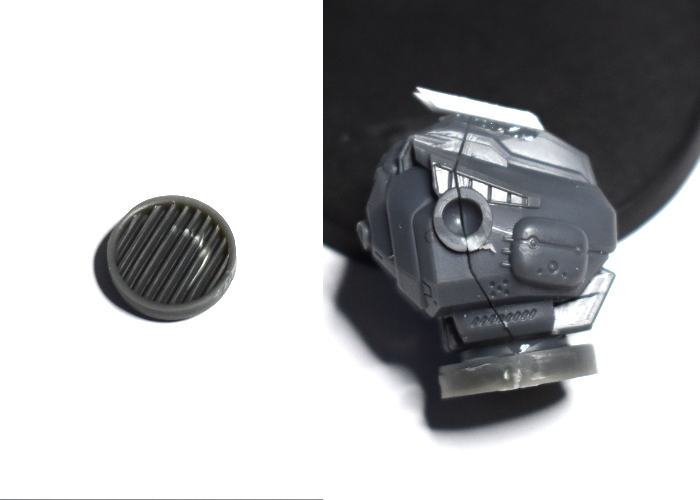
I gave the waist a rotating cuff by gluing on the round grill piece from the gun carriage, and added vanes on the head trimmed from a piece of thin plasticard.
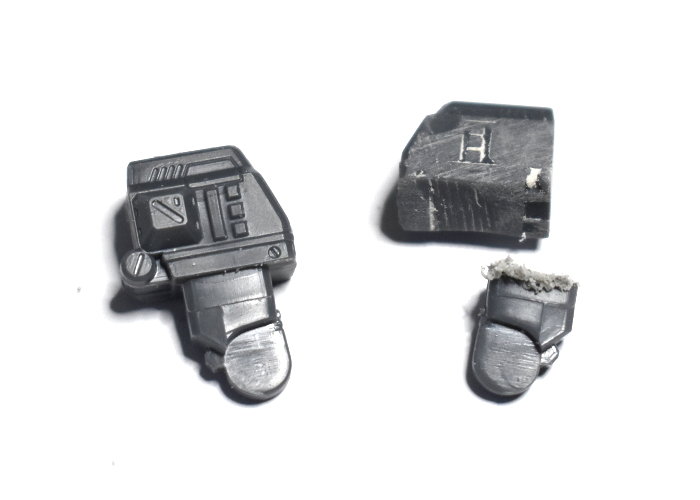
For the arms, I used the shoulders from the Hunter, with the upper arms trimmed off. I needed to glue a new piece for the weapon assembly onto the outer surface of the shoulder, so I sanded this down flat.
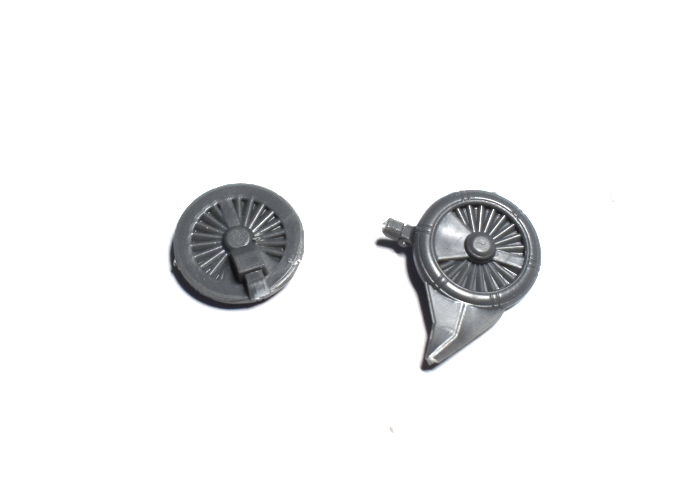
To make rotating cylinders for the tri-barreled Flakk Defense Battery, I used a couple of turbines leftover from the Epirian Spider/Firefly Drone kit. Because the kit makes either drone variant, if you have built any spiders, you'll have some of these laying around. I trimmed off the attachment peg and the wing.
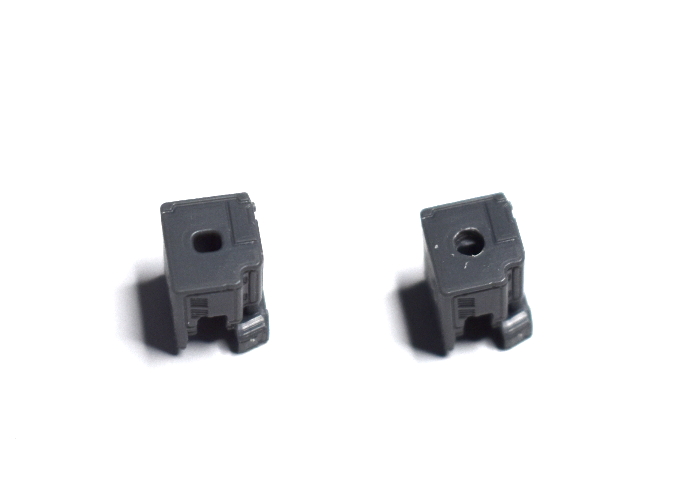
I used the Hunter's weapon casing forearms for the bulk of the flakk weapon casing, drilling out the attachment hole a little larger to accommodate the central hub on the drone turbine.
From there, I glued the weapon casings onto the outside of the shoulders, and the turbines onto the front of the casings. The barrells of the flakk weapon came from the drone kit, with the rear surface trimmed down flat and glued to the front of the turbine.
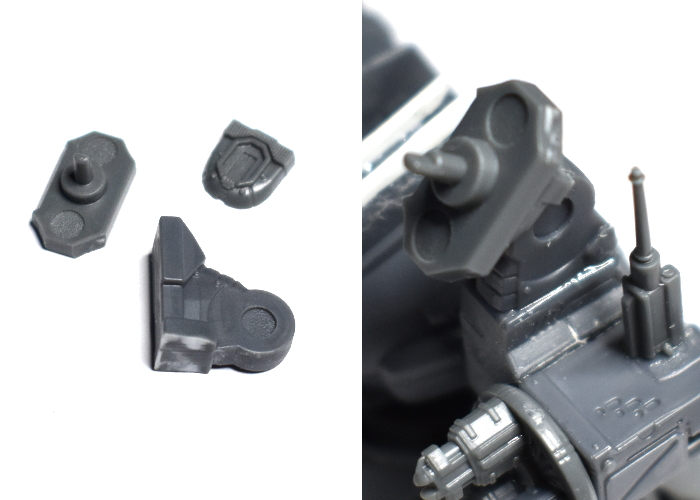
The last thing the Uplink Relay needed was the communications array. I used the 'spare' piece from the drone kit as a fixed arial, glued onto the top of the weapon casing on the left arm. I also assembled a signal dish using a trimmed Hunter foot and the back chassis piece from the drone kit. For the dish itself, I used the leg piece from the drone kit, with the legs themselves removed at the 'hip' pivot.
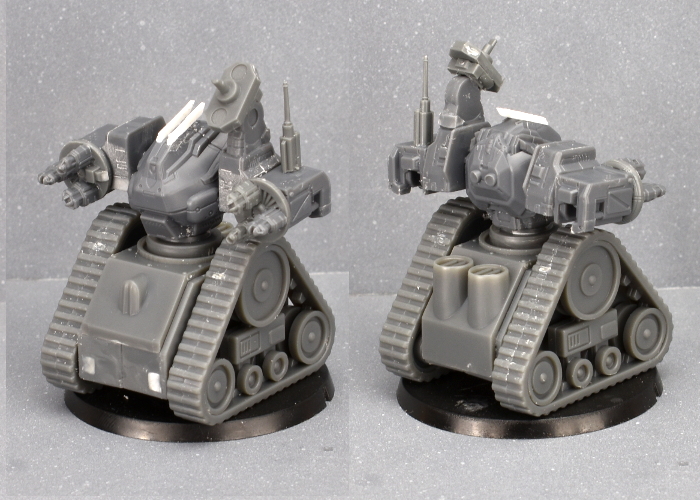
The assembled Automated Uplink Relay, ready for paint:
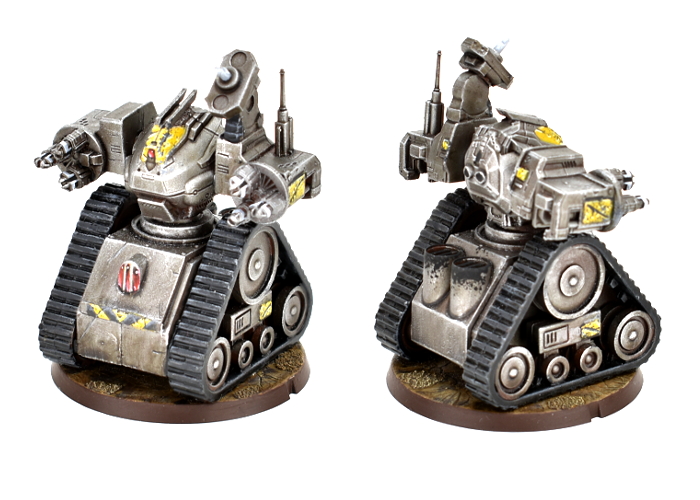
And the finished Relay, ready for the table:
Put together your own Automated Relay of Uplinky doom by picking up the plastic Hunter, Drone and Gun Carriage kits, along with the rest of the Maelstrom's Edge range from the webstore here.
Then pop on over to the Comm Guild Facebook group to show us what you're working on!
For a host of building ideas, modeling tutorials, army spotlights and conversion walkthroughs, check out the Hobby section of the Maelstrom's Edge website here.
Tags: conversion epirian kitbash modeling spotlight tutorial
Kitbash Spotlight: Greatcoat Contractors
Posted on Monday Dec 14, 2020 at 05:00pm in Tutorials
I'm continuing my stroll through the Wargames Atlantic model range. So far, I've made some short, alien scouts using Einherjar and heads from the Broken infantry sprue, and greatcoat-wearing Karist Troopers by combining Les Grognards and Karist parts. This week, I gave some Epirian Contractors the cold weather treatment, using the Raumjager Infantry box.
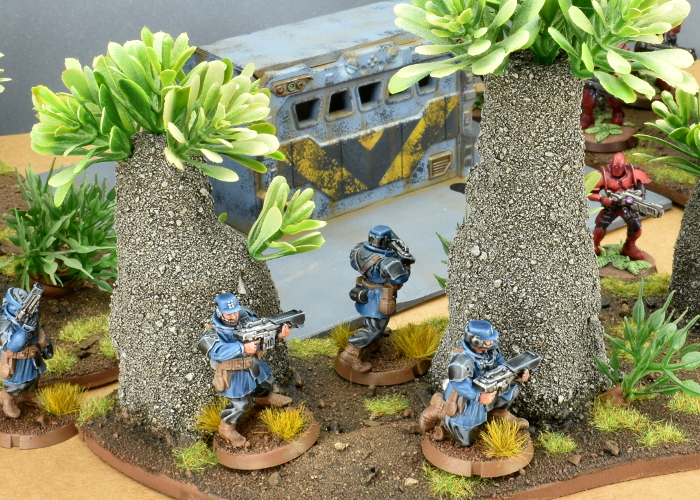
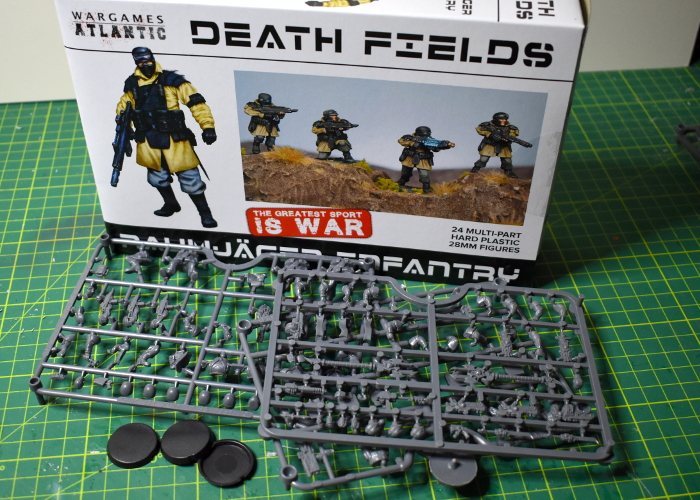
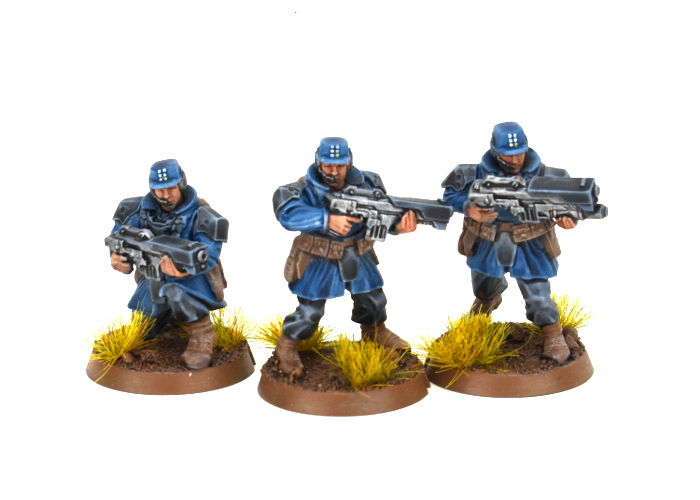
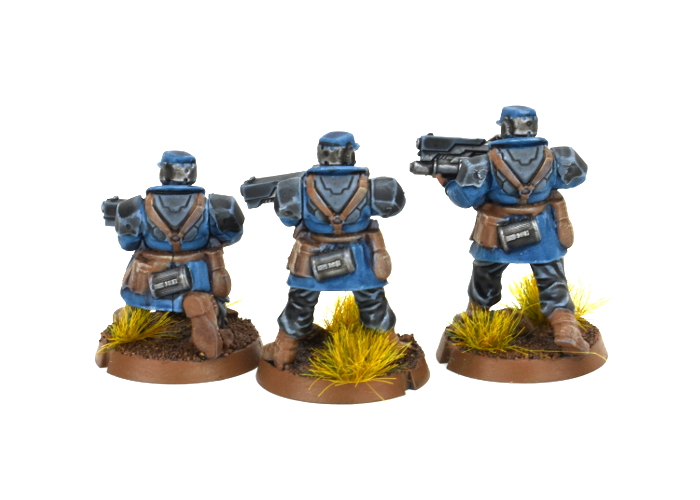
As with all of Wargames Atlantics' kits, the Raumjager are multipart, plastic models. To build my greatcoat Contractors, I used Raumjager bodies, and heads and weapons from the Epirian Contractor kit. The Contractors have rolled up sleeves, which didn't seem ideal with long coats, so I used the sleeved versions from the Faction Expansion Sprue instead.
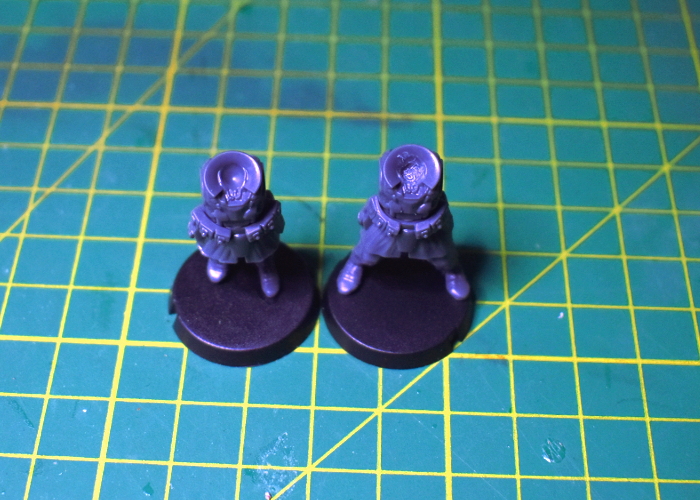
As with the previous kitbashes, the one difficulty is with the Wargames Atlantic models having shorter neck attachments than the Maelstrom's Edge models. This is easily fixed by drilling out the neck slightly with a 2mm drill bit.
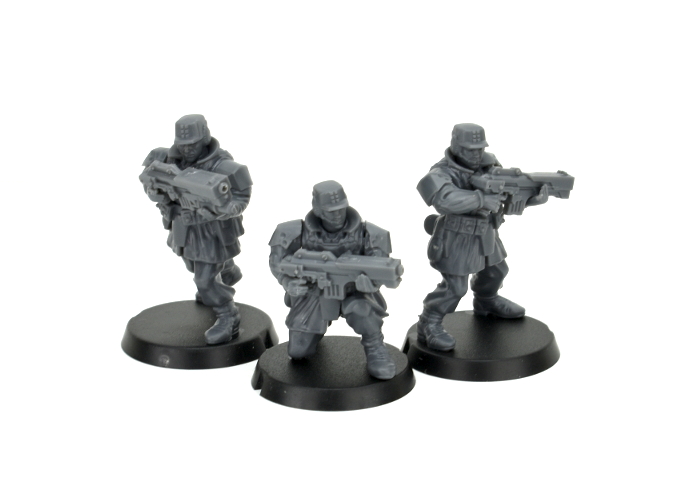
The Raumjager torsos are slightly wider than the Epirians but are close enough that everything still fits in place once arms and weapons are glued on.
I painted these using Army Painter paints, starting out with a base coat of Wolf Gray spray. I picked out the face and hands with Barbarian Flesh and metal parts with Plate Mail Metal. I added a layer of Dark Tone over the weapons, pants and armour, and Blue Tone over the coats and hats. I also went over the skin and leather parts with Mid Brown but, while this worked ok over the skin, didn't tint the leather parts as well as I wanted. So after this dried, I went back over it with Leather Brown. Finally, I highlighted the leather and skin with Skeleton Bone, and picked out the Epirian badge on the hats with white and yellow.
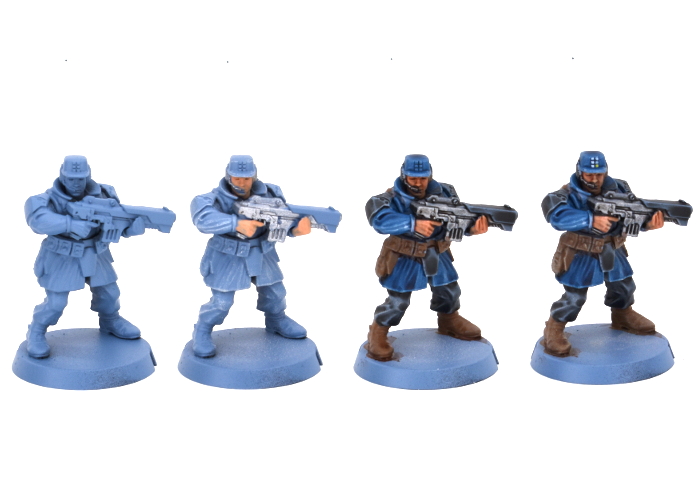
With basing done, the unit was ready for the table.
To lead them into battle, I also threw together a Bot Handler, using another Raumjager body and arms, head and uplink bar from the Epirian Handler kit.
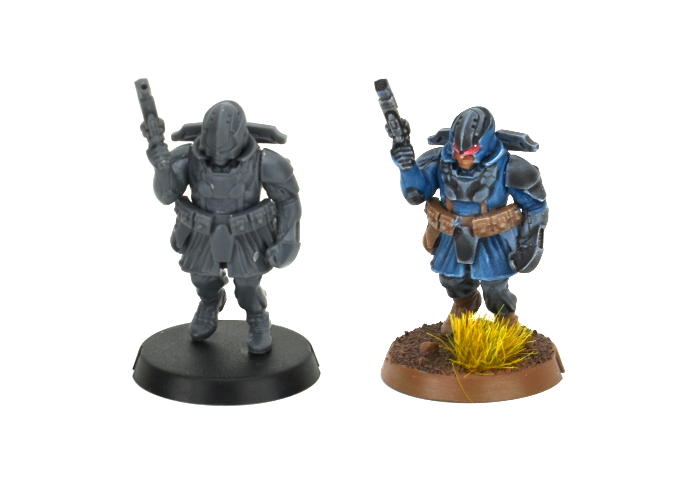
Put together your own Epirian force of fashionably warm doom by picking up the plastic Contractor kit, along with the rest of the Maelstrom's Edge range from the webstore here.
Then pop on over to the Comm Guild Facebook group to show us what you're working on!
For other building ideas, modeling tutorials, army spotlights and conversion walkthroughs, check out the Hobby section of the Maelstrom's Edge website here.
Tags: contractors conversion epirian kitbash modeling spotlight
Quick and Easy Painting with Washes, redux!
Posted on Thursday May 14, 2020 at 05:00pm in Tutorials
Not everyone has the time to spend paintstakingly blending, shading and detailing their models. Sometimes, you just want to get them on the table quickly, so I thought it might be useful to explore some options for fast and painless army painting.
My guinea pigs for this article are some Epirian Suppression Team models, painted exclusively with washes! This is a really easy technique to get to grips with, and while it won't get you an award-winning work of art, it does give you perfectly serviceable-looking models that look great on the table.
For those unfamiliar with them, washes are thin paints designed to sink into the model's crevices whilst leaving less colour on the raised detail (Also sometimes called 'inks' - Not to be confused with 'glazes' which are translucent paints that tint the surface they're painted onto evenly). So while it's a little less precise than blended highlighting or 'juicing' (applying super-thin coats of increasingly dark colour to build up shadow or colour transition), we can use washes over a pale base colour to highlight and shade a model all in one fell swoop. There are a wide range of different washes or inks available, but for this article I'm using Army Painter Quickshades.
I start by giving the model a base coat of white.
Now I'm going to start applying washes to build up the colours I want, leaving the model to fully dry between each. On this model, I've started with a coat of Soft Tone over everything except for the weapons. This is pale enough that other colours will go ok over the top - if you're using darker tones, it's best to try to keep them strictly on the areas where you want them, otherwise you'll need to touch up your basecoat to cover up the overspill before painting each part of the model. Apply a generous coat of wash and leave it to thoroughly dry before moving on to the next step.
Next, I've gone over the armour and chaps with Green Tone, and picked out the boots, belt, kneepads and weapons with Dark Tone. If the colour is lighter than you would like, you can let it dry and then add another coat, as I did with the Dark Tone - this isn't a particularly strong wash, so several coats were needed to get the weapons as dark as I wanted them. You can speed this process up by painting parts that you want to be really 'black' with a medium grey colour before using the wash, but for this article I just stuck with the wash by itself.
I left the tip and front facing of the Shock Baton free of the black wash, as once the black wash dried I applied a coat of Blue Tone to those, which gives a nice energy-glow effect over the white. I also went over the exposed skin areas with Flesh Tone. At this point, I also stuck some sand to the base with PVA glue, washing it with a coat of Strong Tone once the glue dried. Then, to finish up, a quick coat of black around the base edge - you could skip this step by masking off the base edge with tape before painting and then just peeling the tape off at the end.
You can vary the look of the washes by using different base coats. The model below was painted using the exact same process as above, but over a bone basecoat instead of the white.
If you prefer a little more detail, you can go over the washed model with regular paint, picking out features like eyes, belt buckles and the like, and of course you can use different wash colours to suit your preferred colour scheme.
Why not give it a go? As always, feel free to share efforts, or ask any Maelstrom's Edge- or hobby-related questions on the Comm Guild Facebook page!
You can pick up the Epirian Suppression Team, along with the rest of the Maelstrom's Edge model range from the webstore here.
For other Maelstrom's Edge modeling articles, including tutorials and walkthroughs of a wide range of different building and miniature projects, check out the Hobby section of the Maelstrom's Edge website here.
Tags: epirian painting tutorial walkthrough washes
Modeling Spotlight: Epirian Aurochs Automated Transport Kitbash
Posted on Thursday Apr 23, 2020 at 05:00pm in Tutorials
Time to build something!
This week, I had a tinker with the Mule, from Mantic's Warpath game. I love the styling of this vehicle, and thought it would fit nicely into an Epirian force for Maelstrom's Edge with just a few minor tweaks. This was the end result:
The front end of the Mule is rather evocative of the torso of the Epirian Hunter Mech. This inspired me to turn the mule in to a bot-driven vehicle, rather than just another standard transport vehicle. My thinking is that this would be a general purpose vehicle, under the control of a bot handler, which could be used a cargo or troop transport, routine patrols or crowd control tasks.
To carry across the visual link to the Hunter, I took a Hunter torso and cut away the head piece from the top. On the Mule cab, I trimmed the hatch off the roof, and glued the Hunter head in place on the front of the roof.
The Mule comes with two different weapons, that slot into a socket on the back edge of the roof. I took one of these, sliced it off just in front of the mount, and attached a clingfire sprayer from the Epirian Scarecrow kit.
To give some potential variety, I took the second weapon, cut off the barrel and glued on the barrel from the Hunter's chaingun. The rest of the Mule was assembled as normal. I considered filling in or covering the windows and windscreen, but they're actually not super-well defined in the rather soft plastic used for this kit, so I figured with everything painted up they would just look like recessed detail panels.
Well, almost as normal. Just before painting, I decided to also add some cluster missiles. These were taken from the Hunter kit as well, with the mounting pegs cut off, and glued directly to the sides of the cab.
The assembled vehicle before painting:
To paint, I used the weathered metal process from my tutorial here.
And with final details in place, the Epirian 'Aurochs' automated transport vehicle is ready to go!
You can pick up the various Epirian robots, along with the rest of the Maelstrom's Edge model range from the webstore here.
What are you working on? We would love to see what your models and terrain in the Comm Guild Facebook group!
For other Maelstrom's Edge modeling articles, including tutorials and walkthroughs of a wide range of different building and miniature projects, check out the Hobby section of the Maelstrom's Edge website here.
Modeling Spotlight: Biker Bot Handler Conversion
Posted on Thursday Mar 26, 2020 at 05:00pm in Tutorials
Some time ago, I put together a biker conversion for a Bot Handler Spotlight article, which has been sitting in the cabinet ever since, staring at me accusingly when I walk past. Unable to take the abuse any longer, I decided the time had come to get some paint on him, and this was the result:
The model was put together from an Epirian Bot Handler, the chassis from an Epirian Drone, and most of a Citadel Space Marine bike from Warhammer 40000. I carved out the inside of the handler's legs and bent them outwards to fit around the bike seat.
To paint, I started out with a basecoat of Army Painter Wolf Grey spray.
I then blocked in the main colours - P3 Pig Iron for the metal parts, Vallejo Stormy Blue for the bike panels and Handler's uniform, and Vallejo Heavy Charcoal for everything else.
Next, I painted a generous layer of Army Painter Dark Tone over the top of everything, and put it aside to dry.
For final detailing, I highlighted the blue using a mix of Army Painter Ultramarine Blue and white. Over the black, I added a highlight of Vallejo Light Grey, and Army Painter Shining Silver finished off the metal parts. To brighten things up a little, I added some gold using Coat D'Arms Bright Gold washed with Army Painter Medium Brown. For the face, I painted on a coat of Army Painter Barbarian Flesh with some more MEdium Brown, and finally added the red parts with Army Painter Pure Red, shaded with black and highlighted with white.
And that's one biker bot handler, ready to cruise the backroads of the Edge!
You can pick up the Epirian Bot Handler, along with the rest of the Maelstrom's Edge model range from the webstore here.
As always, feel free to share your models and terrain, or ask any Maelstrom's Edge- or hobby-related questions on the Comm Guild Facebook page!
For other Maelstrom's Edge modeling articles, including tutorials and walkthroughs of a wide range of different building and miniature projects, check out the Hobby section of the Maelstrom's Edge website here.
Tags: conversion epirian modeling painting spotlight walkthough
Conversion Spotlight: Epirian Pathfinders
Posted on Thursday Nov 14, 2019 at 05:00pm in Tutorials
I received a grab bag of all sorts of awesome resin parts from Victoria Miniatures this week, so decided it was time to take a break from terrain building and have a bit of a tinker with some infantry. I had thought a while back that Epirian Contractors were just crying out for shotguns, and so with some handy resin additions, I created a new unit of scouty Contractors, which I'm calling 'Pathfinders'.
There's very little converting required here - I just assembled the Contractors without arms. Although I couldn't resist a little bit of cutting things up, so I gave the squad leader a cap on his belt, by cutting off the top of a spare Contractor head.
Victoria's resin cloaks are designed to slot over the shoulders, and fit snugly around the Contractors' collars. These were glued in place with superglue. The shotgun arms needed just a little trimming at the shoulders to fit neatly, as the Victoria Miniatures torsos are slightly narrower than those of the Contractors.
Painting was a quick and easy 'paint in base colours and then give it a wash' job. It's not the prettiest, but it gets a unit on the table quickly. The green areas were painted with Army Painter Army Green, and Vallejo Yellow Green, and washed with Army Painter Military Shader. The metal parts were base coated with Vallejo Heavy Charcoal, given a light drybrush of P3 Pig Iron and washed with Dark Tone. For the shirt, I used Army Painter Barbarian Flesh, Vallejo Heavy Brown for the leather parts, and Coat D'Arms Bone for the shirt. These were washed with Army Painter Strong Tone - This is a fairly heavy contrast with the bone, so creates a bit of a dirty, muddy look. If you are looking for a softer shading effect, you could use Mid Brown or Soft Tone instead of the Strong Tone.
To finish things up, I highlighted the green areas with Coat D'Arms Putrid Green, gave the skin, shirt and leather a highlight of bone, and painted the eyeshades with Heavy Brown, P3 Cygnus Yellow and some white highlights. The bases were basecoated with AK Red Brown Leather and washed with Army Painter Mid Brown.
To build your own Pathfinder unit, you can pick up the plastic Contractor kit, along with the rest of the Maelstrom's Edge range, from the Maelstrom's Edge webstore.
As always, feel free to share your models and terrain, or ask any Maelstrom's Edge- or hobby-related questions on the Comm Guild Facebook page!
For other Maelstrom's Edge modeling articles, including tutorials and walkthroughs of a wide range of different building and miniature projects, check out the Hobby section of the Maelstrom's Edge website here.
Tags: contractor conversion epirian modeling spotlight walkthrough
Conversion Spotlight: Epirian Hornet Drone
Posted on Thursday Oct 10, 2019 at 05:00pm in Tutorials
One of the best parts of this hobby, for me, is when you find yourself looking at some bits and get a little flash of inspiration on how to turn them into something completely different to what they were intended to be. I had one of those moments this week, while cutting some parts off the new Maelstrom's Edge terrain sprue, when on impulse I put a couple of the fan pieces together back-to-back. One thing led to another, and the Epirian Hornet Drone was born!
This is actually a really simple conversion, using parts from the Epirian Hunter Warmech, and four fans from the new terrain sprue.
The first step is to take the Hunter torso and use a sharp hobby knife or razor saw to cut through the waist joint.
With the two halves of the remaining torso glued together, there's a large hole in the bottom, into which a flight stem fits quite neatly. Fill the front half of the hole with green stuff or similar putty.
The Hunter's Cutter machine guns are in two pieces, one of which has a wide flap that covers the underside of the weapon once assembled. Don't use that one. Take the other halves of the two cutters, and glue them to the underside of the Hunter torso. They sit in quite neatly, nestled in under the bulge of the chestplate.
Next, take the four fans from the terrain sprue and glue them together in pairs, lining up the fan blades, to make a pair of turbines.
Glue the turbines onto the Hunter's shoulder sockets.
One drone, ready for painting!
With some paint on, it winds up looking something like this:
You can pick up both the Hunter kit and the new terrain sprue, along with the rest of the Maelstrom's Edge range, from the Maelstrom's Edge webstore.
As always, feel free to share your models and terrain, or ask any Maelstrom's Edge- or hobby-related questions on the Comm Guild Facebook page!
For other Maelstrom's Edge modeling articles, including tutorials and walkthroughs of a wide range of different building and miniature projects, check out the Hobby section of the Maelstrom's Edge website here.
Tags: conversion epirian hunter modeling spotlight terrain terrainsprue tutorial
Painting Tutorial: Quick-Painting a SecDef Lieutenant
Posted on Monday Jun 17, 2019 at 05:00pm in Tutorials
I've been playing around with speed painting a lot lately (so much to paint, so little time!) and have been having a lot of fun experimenting with inks to achieve quick and easy shaded, table-top level results. This week I decided to see what I could do with some Army Painter Quickshades and the new SecDef Lieutenant model.
To start out, I basecoated the model with a flat, cream coloured spray.
I then gave everything except his head a coat of Military Shader.
Once that first layer of ink had dried, I went over the armour plates with a second coat of Military Shader, and boots, pouches and gloves with two generous coats of Mid Brown. On the pistol and the exo-skeleton on the arms and legs, I used Purple Tone, which over the green resulted in a nice, slightly bluish-tinged grey.
I decided that there wasn't quite enough contrast on the plates and exo-skeleton, so went over them with a coat of Dark Tone.
For his head, I painted on a generous coat of Flesh Wash.
To finish up, I painted in his eyes with fine, white horizontal lines, and small dots of black in the middle. For his beard and some characterful head-stubble, I added a thin coat of Dark Tone. I also went over the lens in the targeter and the helmet lenses with white, then a layer of Red Tone, and then a highlight dot of white. Finally, I added some fine gravel to the base, and painted it with Army Green, a coat of Strong Tone, and then a light drybrush of Ash Grey, with a couple of grass tufts added for colour.
To take the paint job that little bit further, he could use a light edge highlight on the armour plates and exoskeleton, but for a quick, rough and ready job he's all set for the tabletop.
To start your own SecDef muster, you can pick up the SecDef Lieutenant, along with the rest of the Maelstrom's Edge model range in the webstore here.
As always, feel free to pop along and share your creations, or ask any Maelstrom's Edge- or hobby-related questions on the Comm Guild Facebook page!
For other Maelstrom's Edge modeling articles, including tutorials and walkthroughs of a wide range of different building and miniature projects, check out the Hobby section of the Maelstrom's Edge website here.
Modeling Spotlight: Epirian SecDef Lieutenant
Posted on Monday Jun 10, 2019 at 05:00pm in Tutorials
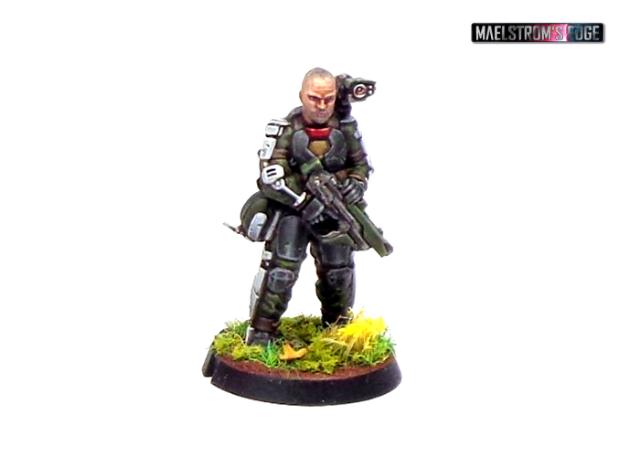
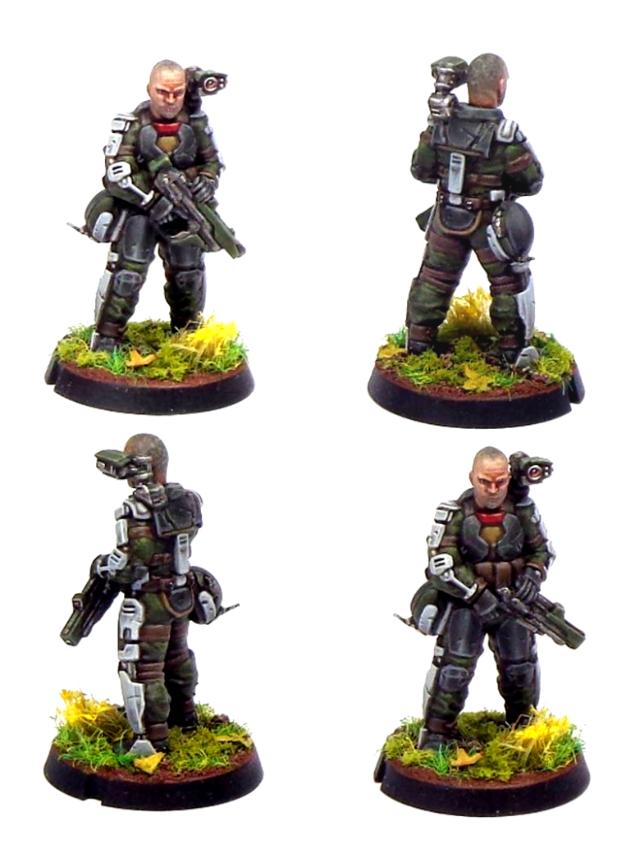
The Epirian SecDef received a boost right in the Command slot last month with the release of a resin Lieutenant model. This fleshes the SecDef out into a fieldable Epirian sub-faction in their own right, as you can now build a detachment solely from SecDef units. This week, I'm taking a closer look at this fantastic model, and some of the modeling options available to it.
The SecDef Lieutenant comes in five pieces (ok, six, if you count the base!) - body, head, targeter, and two different hand options equipped with maglock pistol or carbine.
The head and targeter both have ball joints for full movement range, so you can position the targeter lined up with whichever way the Lieutenant is facing.
The head is also compatible with the SecDef plastics, so you can use a regular helmeted head for a slightly more safety-conscious leader. On the below model, I've used a regular SecDef Tactical head, and also clipped the helmet off his belt and glued on a plastic pouch from the Epirian Handler sprue to cover over the clipped detail.
You can also easily swap in alternate heads from elsewhere in the range. Here's a commander with a little more facial hair, for example, with a head lifted from the Broken Infantry sprue.
Carefully sawing through the waist with a razor saw allows you to swap in alternate legs to switch up the posing. Here, I've used a set of legs removed from a SecDef Boostpack Infantry model, and also given him a capped head from the Epirian Contractor sprue.
Of course, the compatible heads work both ways, so you can also swap in the Lieutenant's venerable pate for a regular SecDef Sergeant.
To get some of your own super-soldier action happening, you can pick up the SecDef Lieutenant, along with the rest of the Maelstrom's Edge model range in the webstore here.
As always, feel free to pop along and share your creations, or ask any Maelstrom's Edge- or hobby-related questions on the Comm Guild Facebook page!
For other Maelstrom's Edge modeling articles, including tutorials and walkthroughs of a wide range of different building and miniature projects, check out the Hobby section of the Maelstrom's Edge website here.
Tags: conversion epirian modeling secdef spotlight
New resin release: Epirian SecDef Lieutenant
Posted on Friday May 24, 2019 at 05:00pm in The Epirian Foundation

Anyone underestimating a SecDef lieutenant is about to pay dearly for his mistake. Promoted from amongst the most capable veteran sergeants, SecDef lieutenants are level-headed combat experts on both a tactical and strategic level with extensive financial and material resources to hand. Often taking on the most difficult (and therefore highest paying) missions with their platoons, the aim of most lieutenants is to accrue enough backpay to purchase a field commander commission, and the heavy combat rig that goes with that position.
While technically tasked with safeguarding the same corporate goals as every other Epirian division, issues can arise when SecDef units are forced to cooperate with Bot Handler commanders in the field. Their philosophy, character and approach are almost diametrically opposed to that of the average Handler. The SecDef's innate distaste for bots results in them having little faith in the abilities of their robotic allies, having seen them fail once too many in their long careers where they believe proper SecDef infantry would have got the job done. Nevertheless, they are professional enough to let the deadly Hunter Warmechs profit from their shoulder-mounted target designator. Many a foe has perished under a hail of strike missiles shortly after a SecDef lieutenant is inserted into enemy lines, quickly identifying and painting the largest threat.
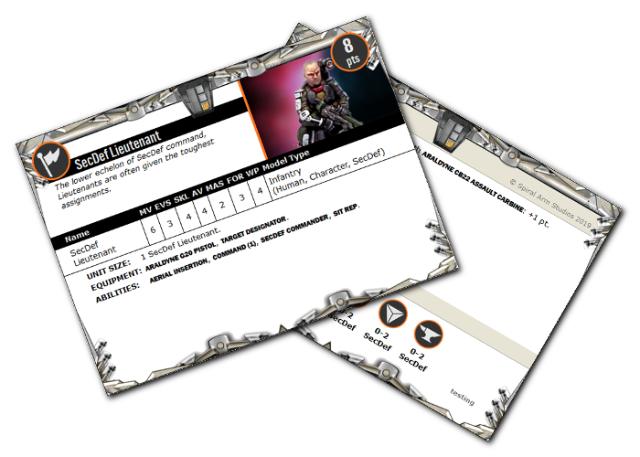
SecDef Lieutenant Rules Card
Battle Report - Karists vs Epirians
Posted on Wednesday May 01, 2019 at 05:00pm in Gaming
Tempest Elites with Ravager Vulcan pulse cannons and a Coriolis launcher deployed in rough terrain
No one saw them coming: the warriors in their smooth armoured plating, accompanied by the beautiful yet horrible Angels. They took the abandoned and dilapidated production facility at Argos, killing the few patrolling Contractors without mercy. A hastily assembled Epirian contingent, including a powerful Hunter Warmech and a squad of elite SecDef, arrived on the scene the next day to root out the zealot strike force. These Maelstrom-worshipping crackpots were about to pay dearly for their boldness.
This game sees an Epirian force commanded by Iain take to the field against a Karist incursion led by Jon. The mission is Groundfall, which has the Alpha Strike and Territories objectives. Points are gained by destroying enemy units and by capturing the 5 territory markers scattered across the board. Deployment was determined to be in opposing L-shapes: Karist bottom right, Epirian top left. The Karists have easy access to 3 of the 5 territory markers. Uphill battle for the Epirian side?
The Epirian commander wastes no time: Firefly drones zoom up the compound to take stock of the situation and drive out the Karist vanguard. Immediately they spot the biggest threat in the Karist force: a mature Angel. The huge beast seems all but immune to their laser attacks, however.
The Firefly Drones fly up the field but only manage to suppress the Mature Angel.
Elite Karist Tempests respond immediately, heavily damaging the Hunter Warmech with their Ravager Vulcan Pulse Cannons. The Angel also responds to the Epirian attack, taking cover whilst destroying two of the Firefly Drones with her tentacles.
The Hunter takes heavy damage from the Tempests.
Realising the Karist resistance was much stronger than anticipated and finding himself in a bit of a pickle from the get go, the Journeyman projects his mind into the Hunter's damaged shell and returns fire at the Angel in her position of cover. The shooting is ineffective, and the Angel remains unperturbed.
Pondering...
With his toughest asset is compromised, the handler quickly switches to one of his Scarecrow Snipers. The lone bot looses a precision round from its Railrifle into the Angel, hitting the mark this time and visibly hurting the creature.
The Angel finally takes damage from the Scarecrow. Their low-shot sniper weapons can literally be hit or miss, but they have huge damage potential.
The Karist Kaddar Nova, witnessing the opening rounds of the engagement, chooses to maintain the momentum and attempt to finish this quickly, dashing out from his position on his own and taking down another Firefly. His troopers nearby follow suit and down another of the now completely hammered squad of Fireflies. His Angel, meanwhile, takes another Railrifle round from a second sniper robot in the distance, and is now badly hurt. The Karist troops need to act fast, as more bots are fast approaching their position and laying down fire on the juvenile angels on the other flank.
The Karist commander exposes himself, but downs a Firefly, and the nearby troopers destroyed another one. In the Groundfall mission, getting the first kill of the turn is worth a lot of points.
The last Firefly crashes and burns after more Karist troopers lay down a hail of suppressive fire, giving the Enclave the first kill.
Troopers finish off the fireflies, giving the Karists the crucial first kill.
The Foundation commander, witnessing how the Karists are holding a strong firm and his own forces struggling to get in a dominating position, carefully moves up his remaining force through the compound. The contractors launch a few grenade shells into the Karist line to suppress their fire and buy their robotic comrades some time.
Contractors returning fire at the Karist troopers.
Meanwhile, an enigmatic Shadow Walker rifts into hiding near the Epirian flank, with an eye to neutralising the sniper threat. The Angel Keeper assigned to the contingent of Angels in the force has his Juvenile beasts rain down cybel energy on the advancing Drone force, keeping all eyes off the sinister agent stalking up the flank.
The Spider Drones equipped with flakk guns are too far from the action to contribute, and the Angel Hellblasters aim to keep it that way by suppressing them.
The SecDef sergeant, watching the assault unfold on his transport's screen, sighs deeply as his opinion of robotic forces is once again confirmed. Deciding he needs to show how it's done and he'd better do it now, he signalls for his squad to drop right into the Karist position. Landing with guns blazing, he is pleased to see the nearby Karist Troopers turn their heads in surprise and duck down.
SecDef troopers drop behind enemy lines.
Out of nowhere, though, appears a flock of dark fluttering creatures: Angel minnows on the hunt. They frenziedly fire their cybel pulses at the SecDef landing zone. Even though the SecDef had taken up a safe position in cover, they lose one soldier to this alien assault from above.
The Minnows move towards and target the SecDef squad that just dropped behind both trooper squads.
The larger Angel, severely weakened by the merciless sniper fire, seems to lose form and suddenly disappears from the fight just as the Hunter's guns ready for another salvo at this most dangerous foe. Moments later the Hunter explodes in a cloud of shrapnel as the Tempest Elites continue their barrage.
End of the first turn: Jon elects to remove his dangerously wounded Mature Angel in order to deny the Epirians an easy first kill in the coming turn. The Karists hold 3 out of 5 territory objectives, whilst the Epirians have the other two. Iain, having left his damaged hunter on the table, immediately regrets this as the Tempests destroy it in the first action of the second turn and score those valuable first kill points again.
The SecDef realise something needs to happen now. Ignoring the smaller Angels spewing death onto their position, they take aim and down two Karist Troopers, hoping to break the Karist line from the rear.
The SecDef are in position to damage various Karist squads, taking advantage of their assault from the rear, but they are in turn dangerously surrounded.
The Journeyman Handler, taking the SecDef's cue, coordinates the fire of his Scarecrow Sniper with the SecDef squad, catching the Karist Troopers in a crossfire that wipes them out. The tables seem to be turning.
The Scarecrow again shows its potential as it wipes out the remains of a Karist squad.
Ignoring the little Angels would prove a costly mistake, however, as they now came down on the SecDef position. Despite killing several of the flying beasts, the SecDef lose two more soldiers to the pulsing cybel energy, leaving the Sergeant alone to escape the Angel threat and run for cover.
The SecDef sergeant flees from the angry Minnows. Aerial insertion is a powerful ability, but dropping in the middle of the enemy lines comes with certain risks...
The larger Angel Hellblaster also takes a heavy toll as another cybel salvo immolates all of the approaching Spider Drones. The Kaddar Nova, sensing victory and eager to lead by example, dashes forward, emerging from the Karist lines to personally end this heretic assault.
The powerful blasts from the juvenile Angels reduce the Spider Drone squad to just their handler.
Seeing the Karist leader run out and resolved to capitalize on the hole punched in the Karist line by the SecDef's assault, the Journeyman Handler links again to one of the Scarecrow Snipers, dangerously overloading its circuits, in a desperate attempt to deal the deciding blow to the enemy. A precision shot hits the Kaddar Nova square in the chest, ending the priest's heroic ambitions immediately. Surely this would break those crazy zealots! Meanwhile, the contractors move up to secure their end of the compound and open up on the Angel Hellblasters, with little effect.
Hellblasters with their Angel Keeper in their position of cover, guarding one of the objectives.
The Shadow Walker rifts up the field once more, cursing the Kaddar Nova's poor timing, but intending to take down the Sniper bots that were wreaking such havoc on his compatriots. His pistol shots glance off the nearest bot, however, as its position is well protected.
Registering this new close-ranged treat, the nearby bots all respond: the flakk guns on the Relay drone opening up and the Sniper bot quickly taking a shot at the advancing enemy agent. The nimble Shadow Walker, however, manages to dodge unscathed through the hail of incoming fire.
Suddenly the terrifying shape of the Mature Angel reappears at the edge of the compound, immediately bearing down on the lone SecDef sergeant. The veteran soldier stands no chance against this alien monster and quickly falls to its slashing attack.
By voluntarily removing the badly damaged Angel earlier in the game, Jon ensured he would have a strong reinforcement to bring on later. She can now come back to finish off another unit, grabbing the Karists enough points to finish the game.
Realising his situation, the Journeyman Handler orders his force to retreat into cover and await further reinforcements. The Karist force remains in control of the compound, for now.
Epilogue: Iain's decision to keep his Spider drones back to hold objectives rather than sending them after Karist targets, combined with essentially sacrificing his Firefly unit by sending them out into the open unsupported allowed Jon to make the most of the mission with his more aggressive Karist units. While the Scarecrows did their best to even up the playing field, the rapid casualties inflicted on the Epirian force allowed Jon to very quickly rack up enough VPs for a turn 2 victory.
Tags: battlereport epirian karist
